what to notice when looking at bibliographic record · polaris cataloging handouts 1 what to notice...
TRANSCRIPT
Polaris Cataloging Handouts
1
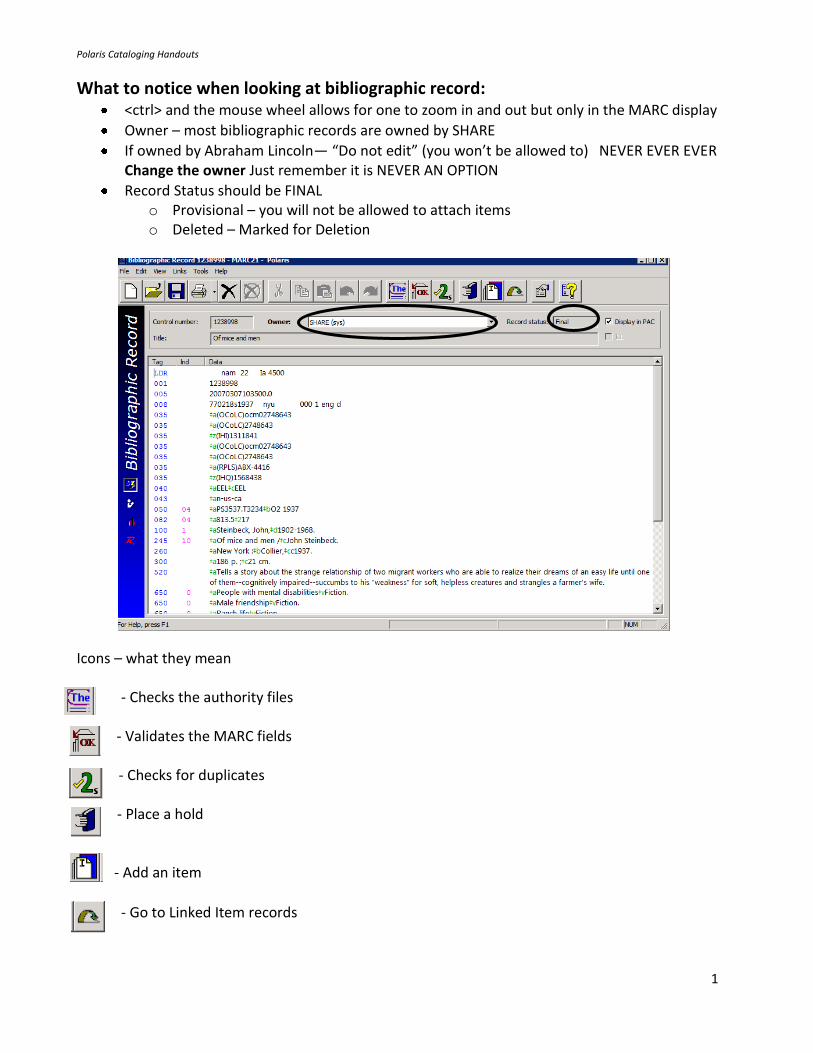
What to notice when looking at bibliographic record: <ctrl> and the mouse wheel allows for one to zoom in and out but only in the MARC display
Owner – most bibliographic records are owned by SHARE
If owned by Abraham Lincoln— “Do not edit” (you won’t be allowed to) NEVER EVER EVER Change the owner Just remember it is NEVER AN OPTION
Record Status should be FINAL o Provisional – you will not be allowed to attach items o Deleted – Marked for Deletion
Icons – what they mean
- Checks the authority files
- Validates the MARC fields - Checks for duplicates - Place a hold - Add an item
- Go to Linked Item records
Polaris Cataloging Handouts
2
Editing in Polaris is very simple Insert a MARC tag – be on line and press <Enter>
Type in tag numbers, two indicators – tricky part is the delimiter – 1st one is assumed
<Ctrl> Q to insert delimiter
To delete – much the same as in Word processing, highlight and <delete>
Make note of display tag at bottom that describes the MARC tag
Diacritics (ALT D)
SAVE File (Keep on Saving)
ZMARC and Authority Files – will explain more as we learn more. Hasn’t worked properly for
training. :-(
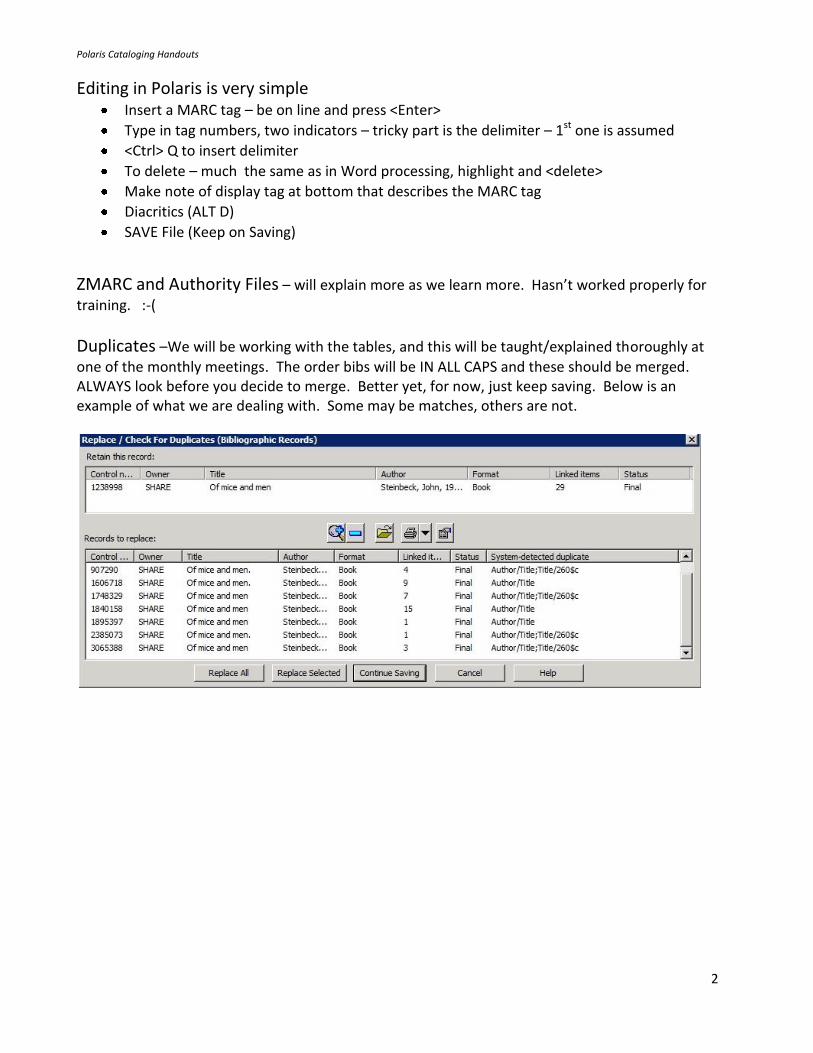
Duplicates –We will be working with the tables, and this will be taught/explained thoroughly at
one of the monthly meetings. The order bibs will be IN ALL CAPS and these should be merged. ALWAYS look before you decide to merge. Better yet, for now, just keep saving. Below is an example of what we are dealing with. Some may be matches, others are not.
Polaris Cataloging Handouts
3
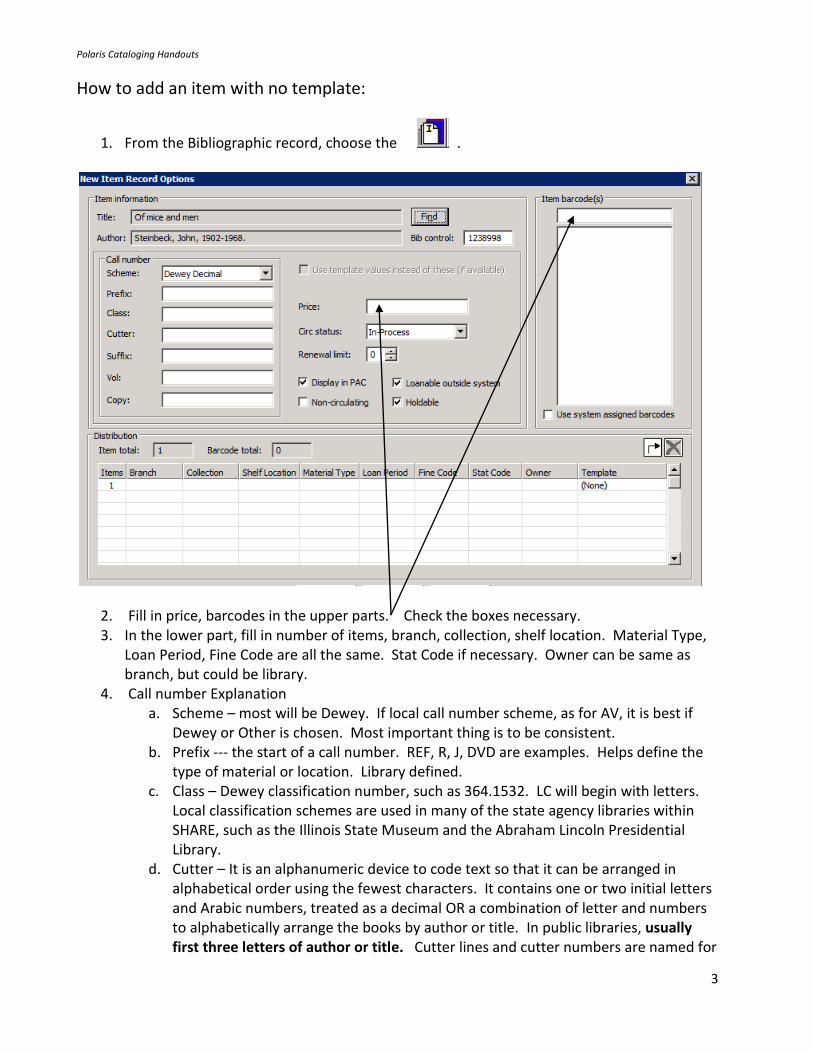
How to add an item with no template:
1. From the Bibliographic record, choose the .
2. Fill in price, barcodes in the upper parts. Check the boxes necessary. 3. In the lower part, fill in number of items, branch, collection, shelf location. Material Type,
Loan Period, Fine Code are all the same. Stat Code if necessary. Owner can be same as branch, but could be library.
4. Call number Explanation a. Scheme – most will be Dewey. If local call number scheme, as for AV, it is best if
Dewey or Other is chosen. Most important thing is to be consistent. b. Prefix --- the start of a call number. REF, R, J, DVD are examples. Helps define the
type of material or location. Library defined. c. Class – Dewey classification number, such as 364.1532. LC will begin with letters.
Local classification schemes are used in many of the state agency libraries within SHARE, such as the Illinois State Museum and the Abraham Lincoln Presidential Library.
d. Cutter – It is an alphanumeric device to code text so that it can be arranged in alphabetical order using the fewest characters. It contains one or two initial letters and Arabic numbers, treated as a decimal OR a combination of letter and numbers to alphabetically arrange the books by author or title. In public libraries, usually first three letters of author or title. Cutter lines and cutter numbers are named for
Polaris Cataloging Handouts
4
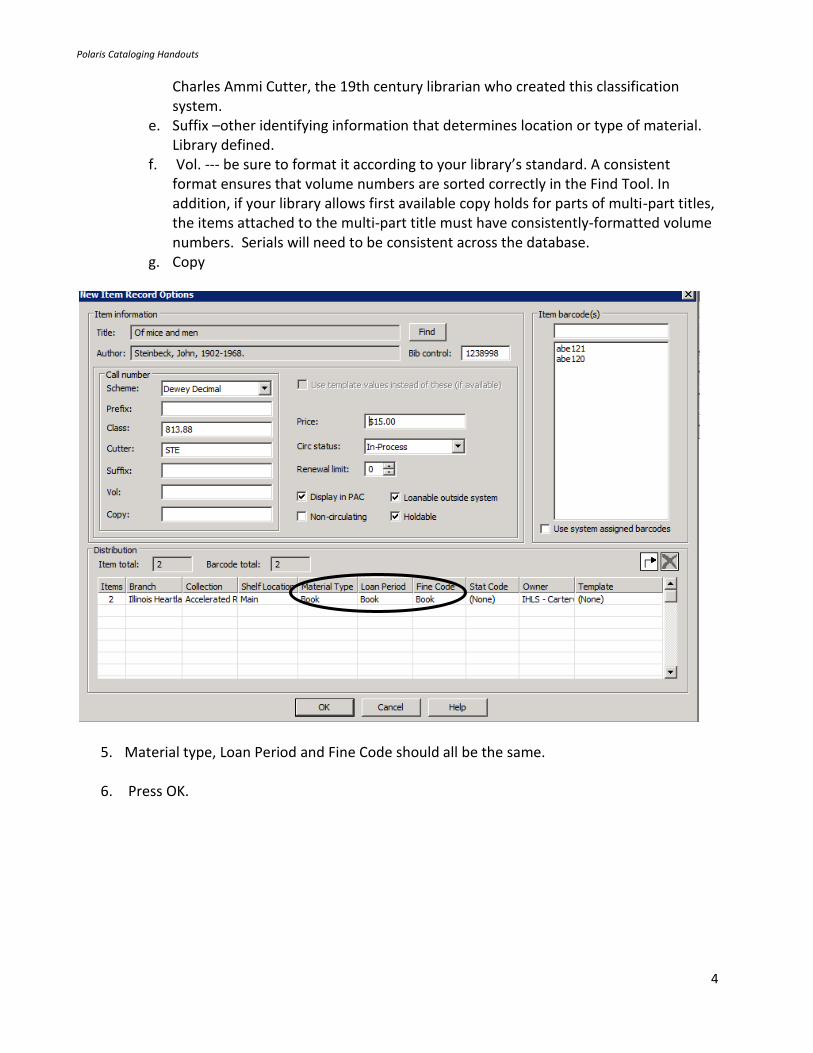
Charles Ammi Cutter, the 19th century librarian who created this classification system.
e. Suffix –other identifying information that determines location or type of material. Library defined.
f. Vol. --- be sure to format it according to your library’s standard. A consistent format ensures that volume numbers are sorted correctly in the Find Tool. In addition, if your library allows first available copy holds for parts of multi-part titles, the items attached to the multi-part title must have consistently-formatted volume numbers. Serials will need to be consistent across the database.
g. Copy
5. Material type, Loan Period and Fine Code should all be the same.
6. Press OK.
Polaris Cataloging Handouts
5
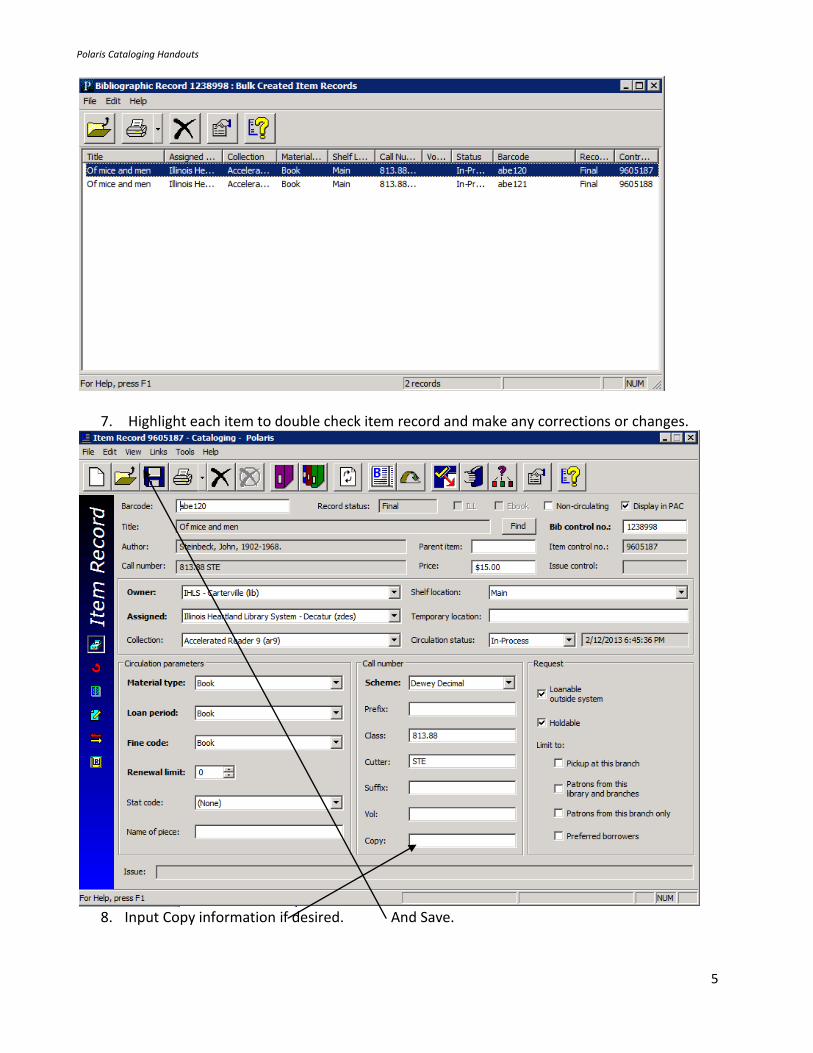
7. Highlight each item to double check item record and make any corrections or changes.
8. Input Copy information if desired. And Save.
Polaris Cataloging Handouts
6
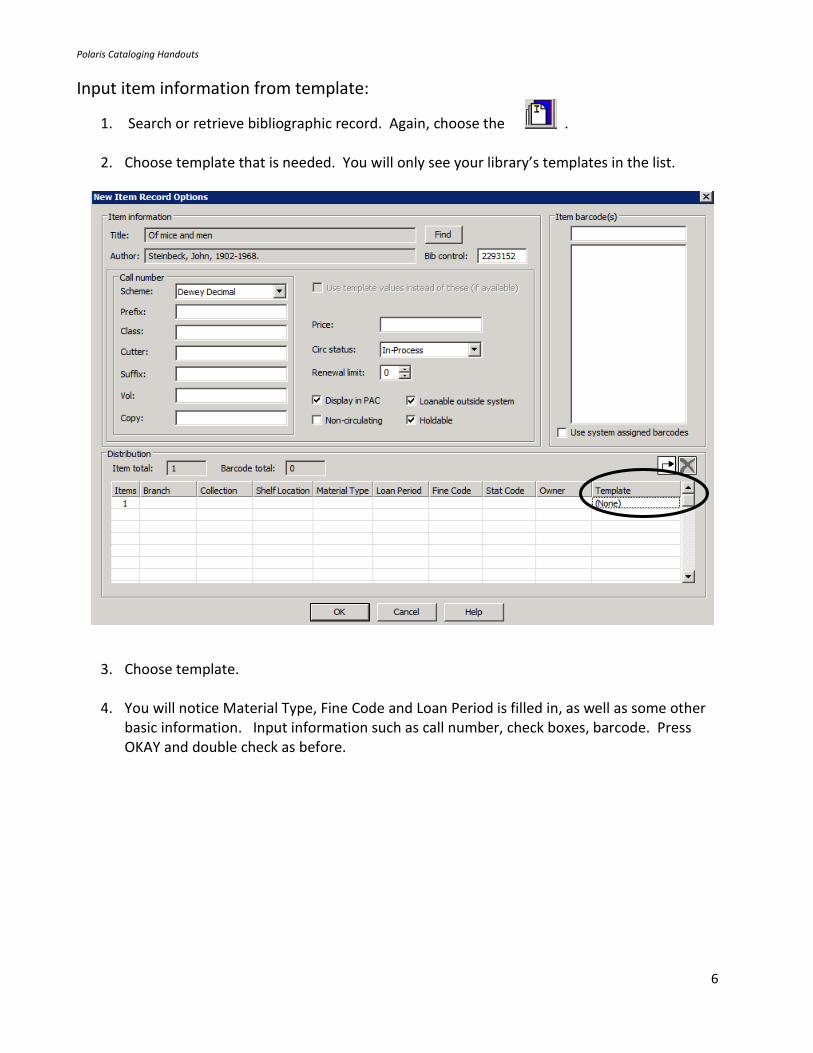
Input item information from template:
1. Search or retrieve bibliographic record. Again, choose the .
2. Choose template that is needed. You will only see your library’s templates in the list.
3. Choose template.
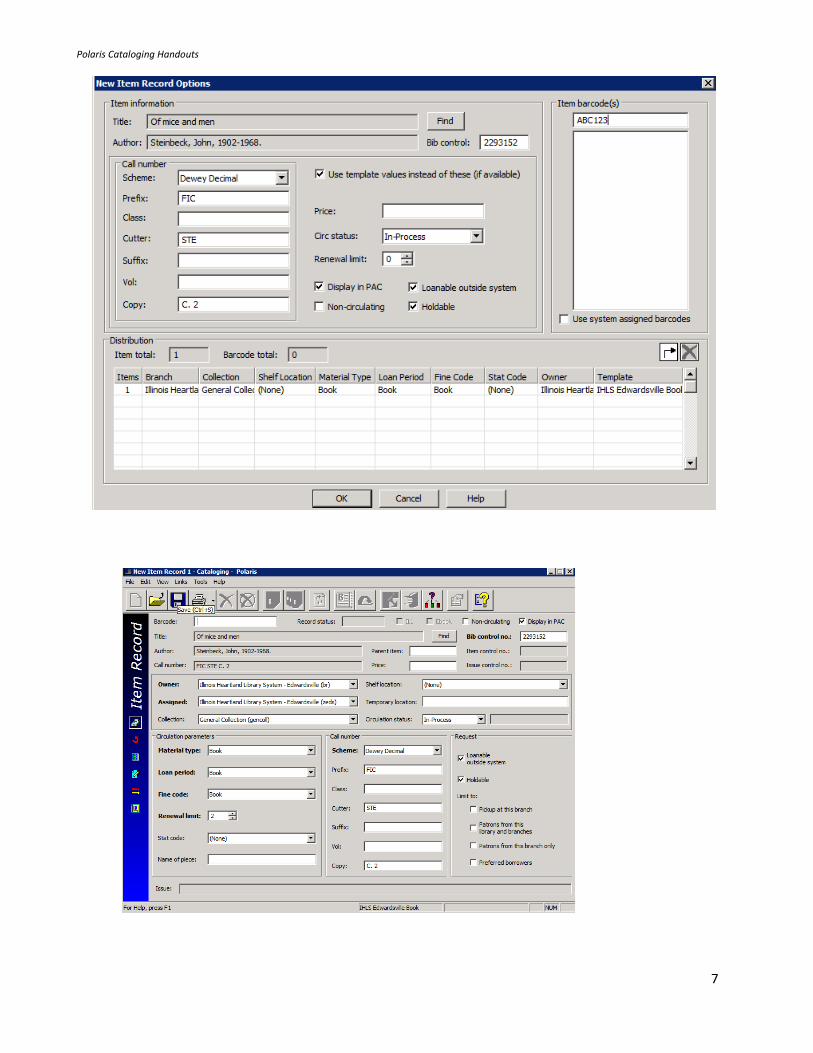
4. You will notice Material Type, Fine Code and Loan Period is filled in, as well as some other
basic information. Input information such as call number, check boxes, barcode. Press OKAY and double check as before.
Polaris Cataloging Handouts
7
Polaris Cataloging Handouts
8
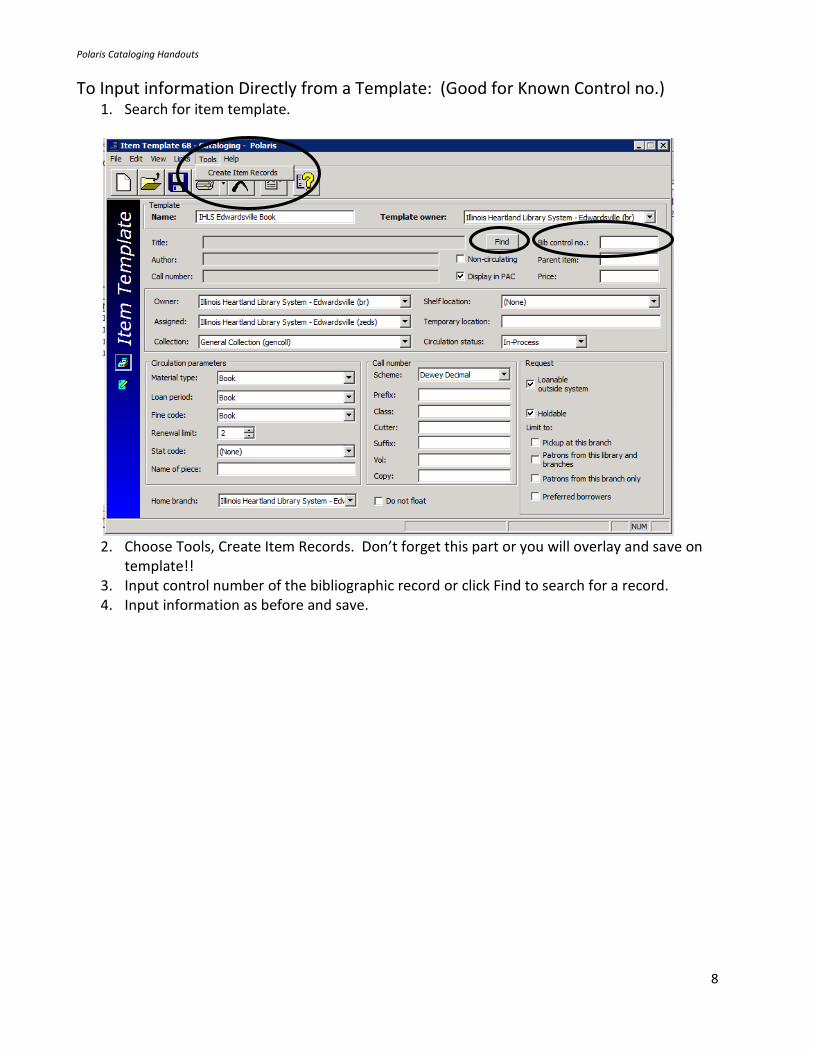
To Input information Directly from a Template: (Good for Known Control no.) 1. Search for item template.
2. Choose Tools, Create Item Records. Don’t forget this part or you will overlay and save on
template!! 3. Input control number of the bibliographic record or click Find to search for a record. 4. Input information as before and save.
Polaris Cataloging Handouts
9
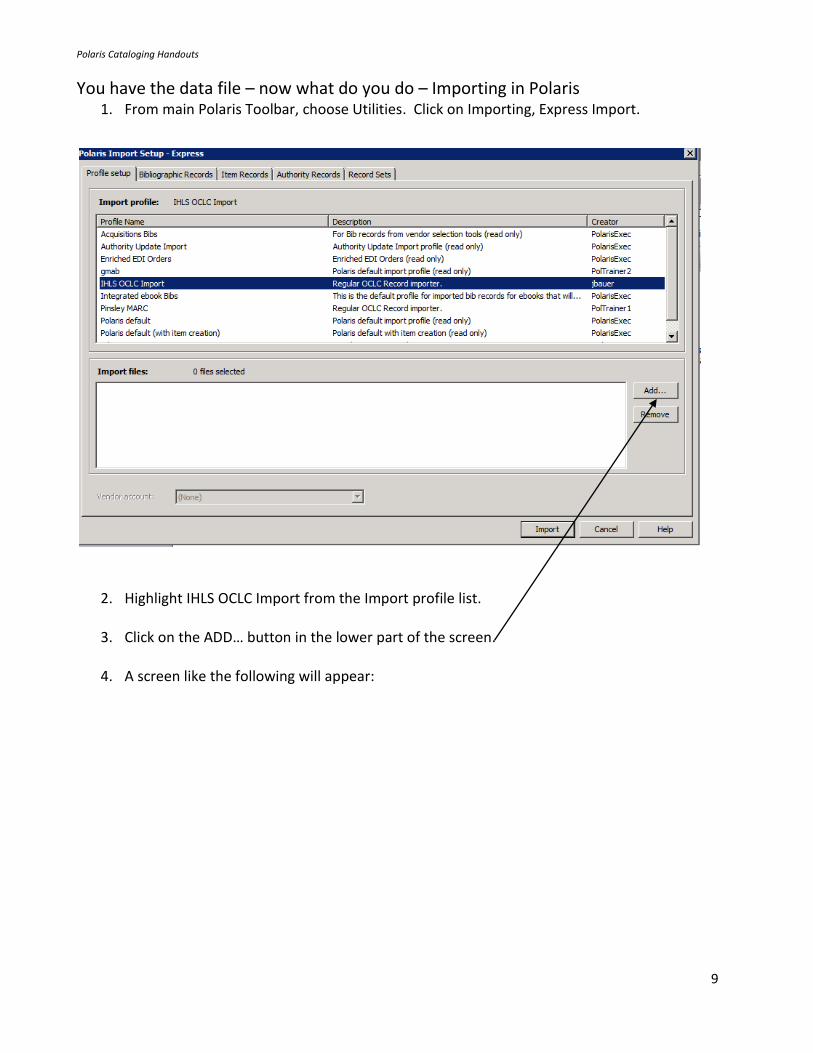
You have the data file – now what do you do – Importing in Polaris 1. From main Polaris Toolbar, choose Utilities. Click on Importing, Express Import.
2. Highlight IHLS OCLC Import from the Import profile list.
3. Click on the ADD… button in the lower part of the screen.
4. A screen like the following will appear:
Polaris Cataloging Handouts
10
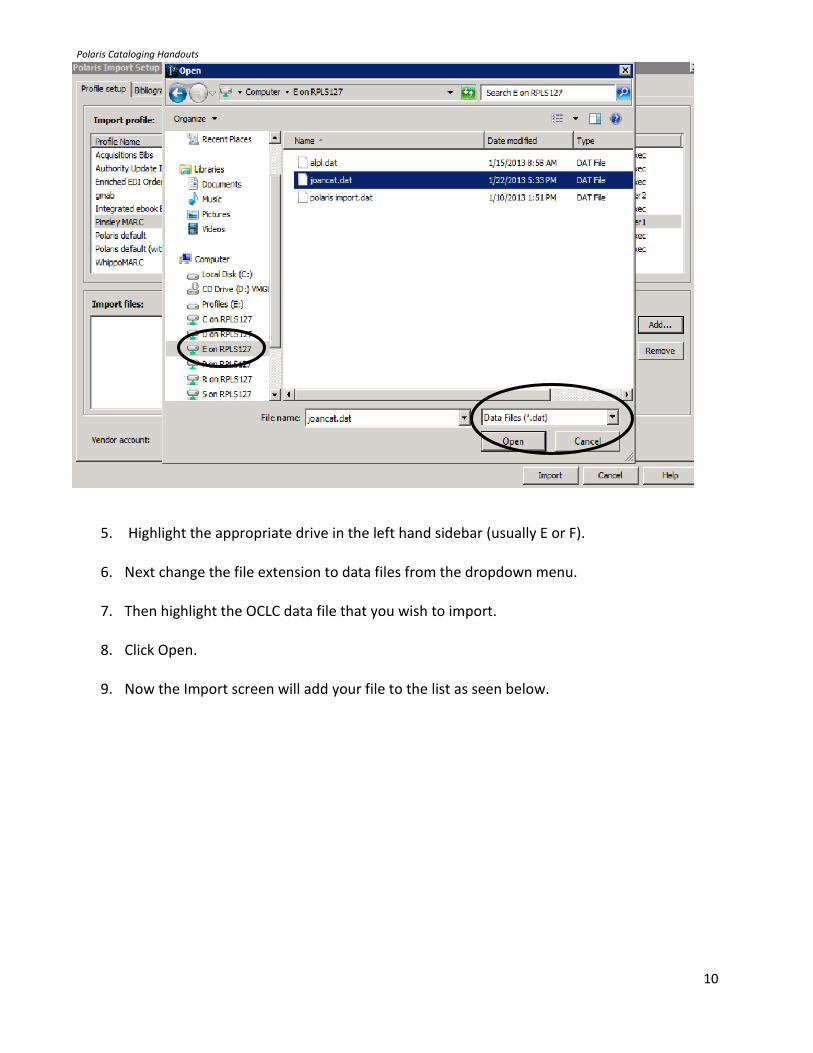
5. Highlight the appropriate drive in the left hand sidebar (usually E or F). 6. Next change the file extension to data files from the dropdown menu.
7. Then highlight the OCLC data file that you wish to import.
8. Click Open.
9. Now the Import screen will add your file to the list as seen below.
Polaris Cataloging Handouts
11
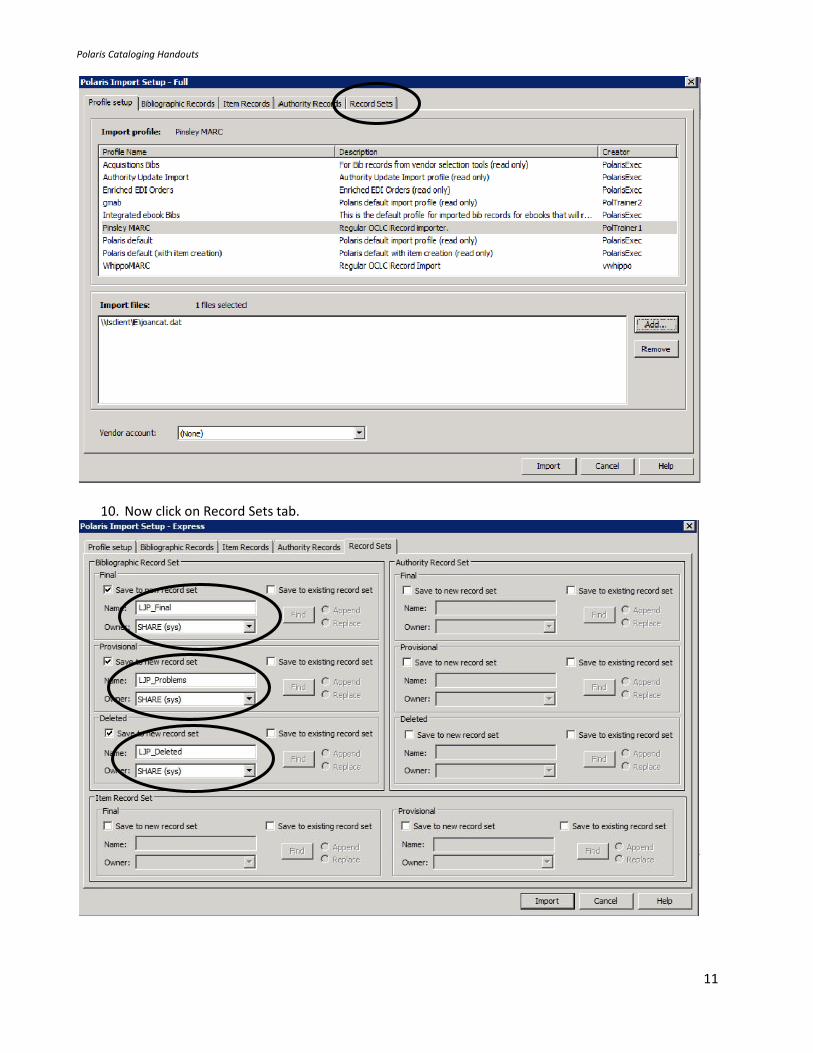
10. Now click on Record Sets tab.
Polaris Cataloging Handouts
12
11. Rename all three record sets to your initials, and you as owner. For example: JCB_Final, JCB_Problems, and JCB_Deleted would be the names for the record sets; owner would be jbauer. Please note, one can reuse the same record set by clicking the Save to existing record set and either Append or Replace.
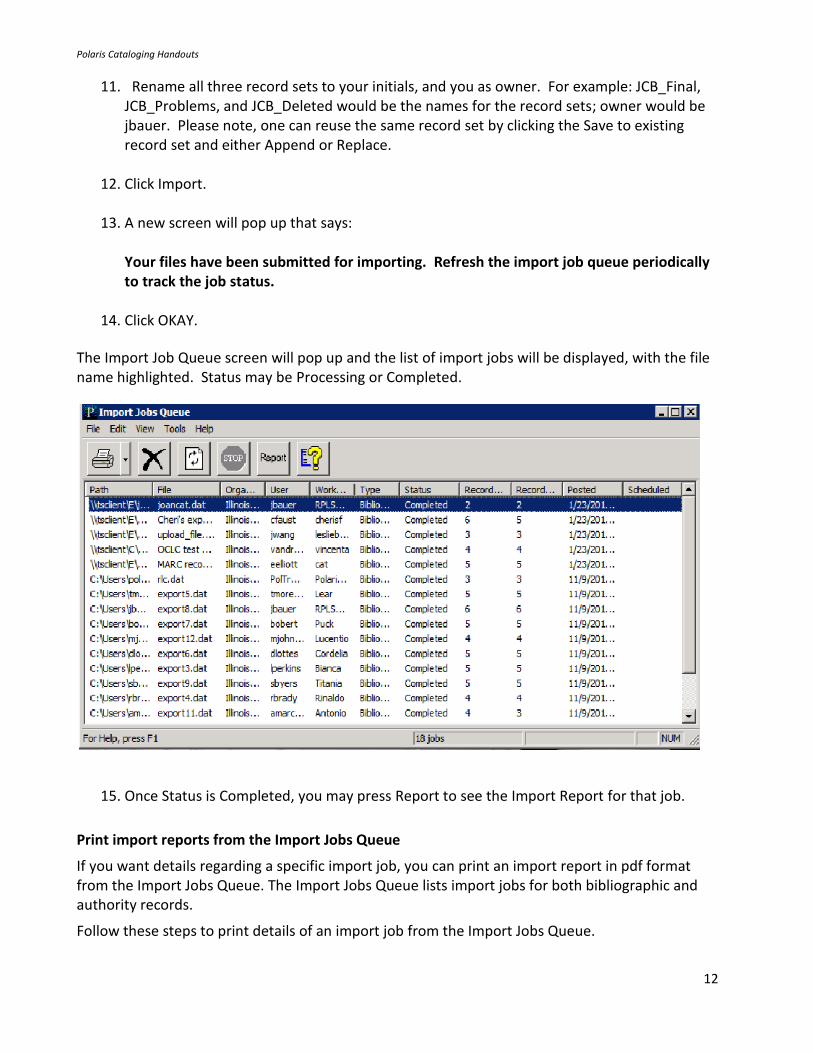
12. Click Import.
13. A new screen will pop up that says:
Your files have been submitted for importing. Refresh the import job queue periodically to track the job status.
14. Click OKAY.
The Import Job Queue screen will pop up and the list of import jobs will be displayed, with the file name highlighted. Status may be Processing or Completed.
15. Once Status is Completed, you may press Report to see the Import Report for that job.
Print import reports from the Import Jobs Queue
If you want details regarding a specific import job, you can print an import report in pdf format from the Import Jobs Queue. The Import Jobs Queue lists import jobs for both bibliographic and authority records.
Follow these steps to print details of an import job from the Import Jobs Queue.
Polaris Cataloging Handouts
13
1. Select Utilities, Importing, Import Jobs Queue.
The Import Jobs Queue dialog box displays the details for each import job.
2. Double-click the import job you want to print. Or, select the import job and click the Report button, or right-click and select Print Report.
3. Select File, Print from the menu.
The Import Report pdf appears in the preview window.
4. Select File, Print to print the report displayed in the preview window.
Tip: Import reports are not saved to the local computer. To save a copy of the report, open the report from the Import Jobs Queue, select File, Save As, and type a file name and path.
The record set provides the bib control number for attaching the item. Depending on your workflow and who attaches the barcode from here, you can go to the Final catalog record set, which contains all of your new bibs, highlight each bib, and attach items as shown in previous pages. If someone else attaches, provide the control number.
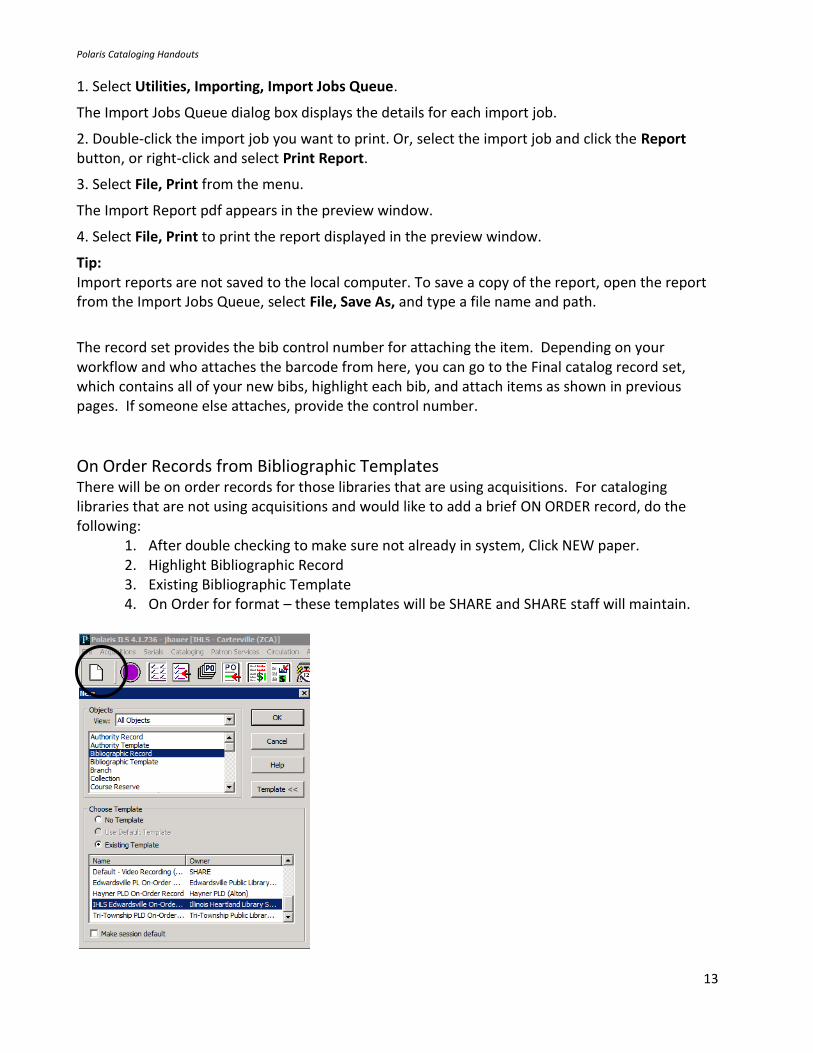
On Order Records from Bibliographic Templates There will be on order records for those libraries that are using acquisitions. For cataloging libraries that are not using acquisitions and would like to add a brief ON ORDER record, do the following:
1. After double checking to make sure not already in system, Click NEW paper. 2. Highlight Bibliographic Record 3. Existing Bibliographic Template 4. On Order for format – these templates will be SHARE and SHARE staff will maintain.
Polaris Cataloging Handouts
14
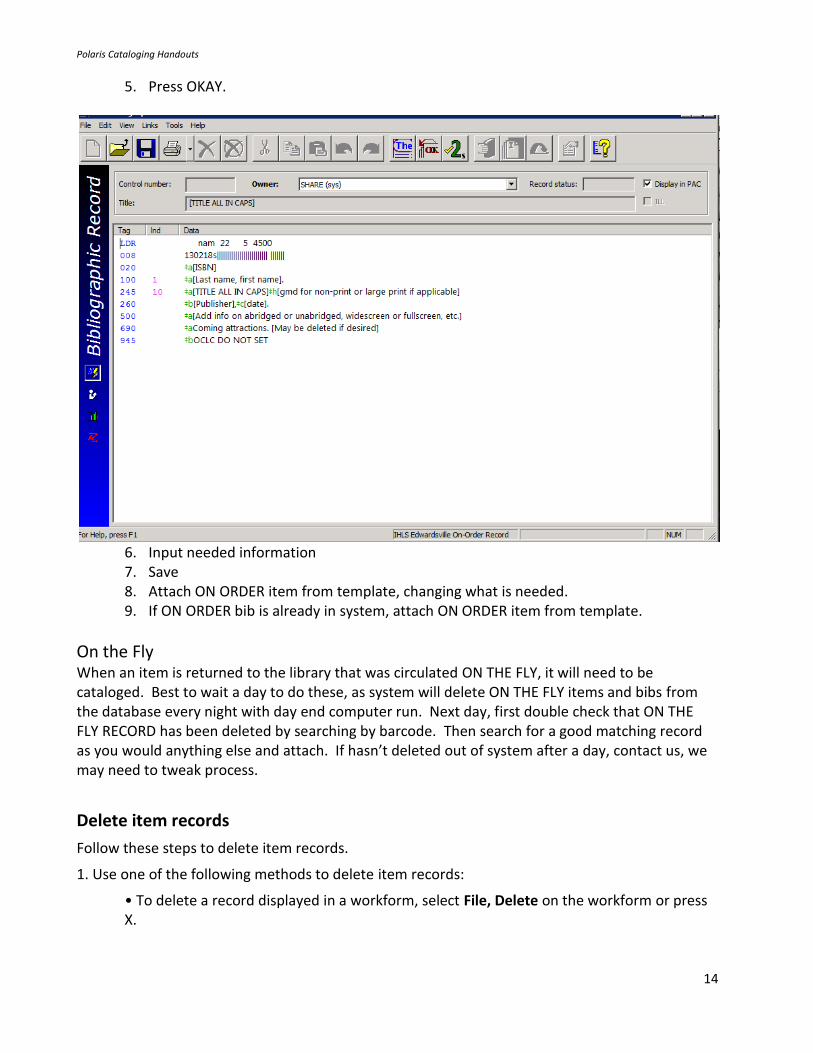
5. Press OKAY.
6. Input needed information 7. Save 8. Attach ON ORDER item from template, changing what is needed. 9. If ON ORDER bib is already in system, attach ON ORDER item from template.
On the Fly
When an item is returned to the library that was circulated ON THE FLY, it will need to be cataloged. Best to wait a day to do these, as system will delete ON THE FLY items and bibs from the database every night with day end computer run. Next day, first double check that ON THE FLY RECORD has been deleted by searching by barcode. Then search for a good matching record as you would anything else and attach. If hasn’t deleted out of system after a day, contact us, we may need to tweak process.
Delete item records
Follow these steps to delete item records.
1. Use one of the following methods to delete item records:
• To delete a record displayed in a workform, select File, Delete on the workform or press X.
Polaris Cataloging Handouts
15
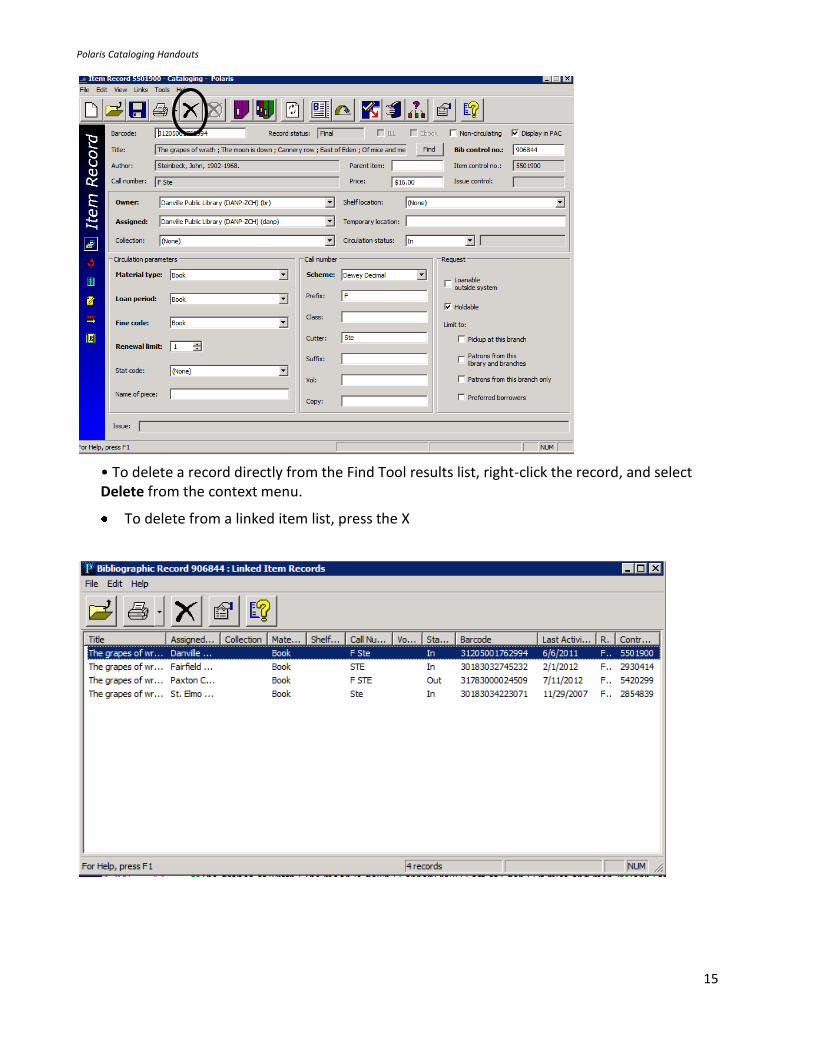
• To delete a record directly from the Find Tool results list, right-click the record, and select Delete from the context menu.
To delete from a linked item list, press the X
Polaris Cataloging Handouts
16
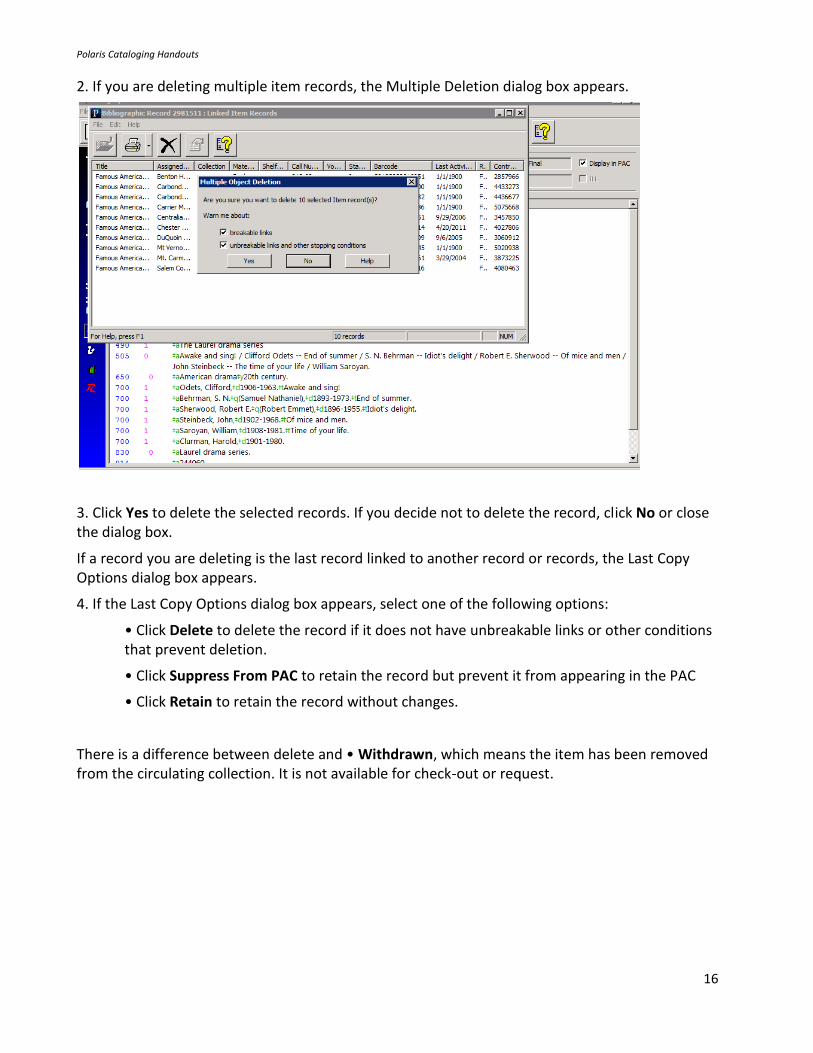
2. If you are deleting multiple item records, the Multiple Deletion dialog box appears.
3. Click Yes to delete the selected records. If you decide not to delete the record, click No or close the dialog box.
If a record you are deleting is the last record linked to another record or records, the Last Copy Options dialog box appears.
4. If the Last Copy Options dialog box appears, select one of the following options:
• Click Delete to delete the record if it does not have unbreakable links or other conditions that prevent deletion.
• Click Suppress From PAC to retain the record but prevent it from appearing in the PAC
• Click Retain to retain the record without changes.
There is a difference between delete and • Withdrawn, which means the item has been removed from the circulating collection. It is not available for check-out or request.
Polaris Cataloging Handouts
17
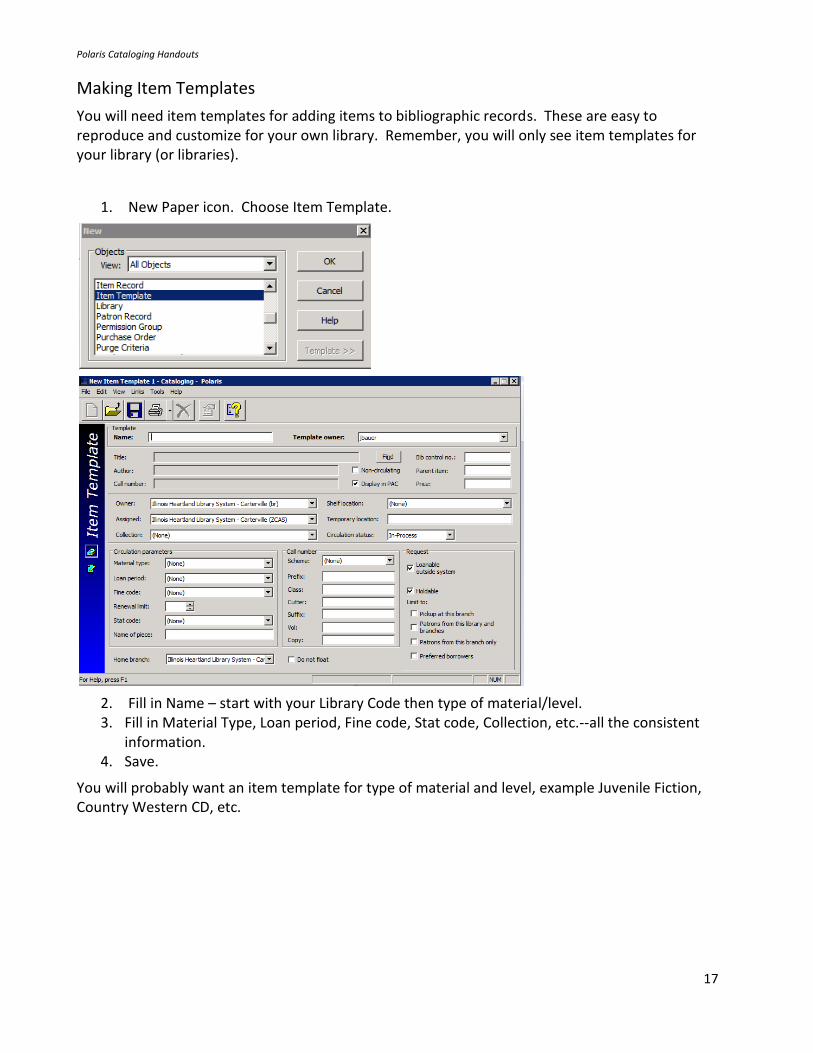
Making Item Templates
You will need item templates for adding items to bibliographic records. These are easy to reproduce and customize for your own library. Remember, you will only see item templates for your library (or libraries).
1. New Paper icon. Choose Item Template.
2. Fill in Name – start with your Library Code then type of material/level. 3. Fill in Material Type, Loan period, Fine code, Stat code, Collection, etc.--all the consistent
information. 4. Save.
You will probably want an item template for type of material and level, example Juvenile Fiction, Country Western CD, etc.
Polaris Cataloging Handouts
18
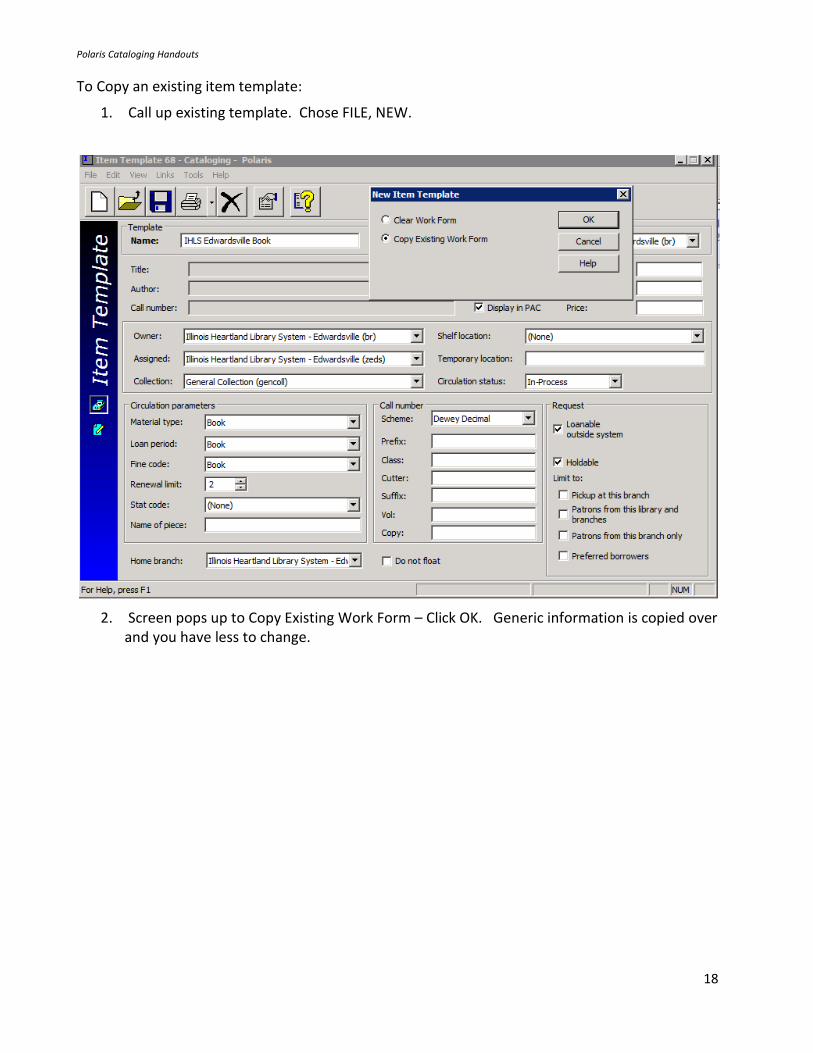
To Copy an existing item template:
1. Call up existing template. Chose FILE, NEW.
2. Screen pops up to Copy Existing Work Form – Click OK. Generic information is copied over and you have less to change.
Polaris Cataloging Handouts
19
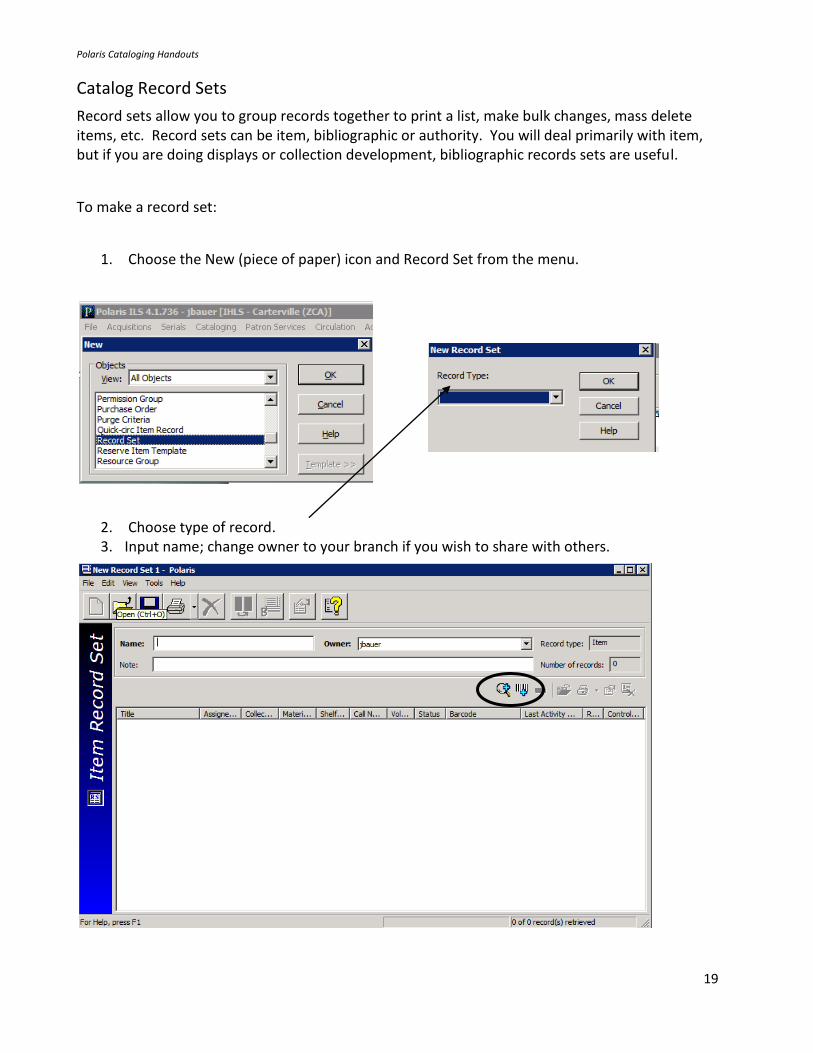
Catalog Record Sets
Record sets allow you to group records together to print a list, make bulk changes, mass delete items, etc. Record sets can be item, bibliographic or authority. You will deal primarily with item, but if you are doing displays or collection development, bibliographic records sets are useful.
To make a record set:
1. Choose the New (piece of paper) icon and Record Set from the menu.
2. Choose type of record. 3. Input name; change owner to your branch if you wish to share with others.

Polaris Cataloging Handouts
20
4. From the Cool Bar, choose the Add by Barcode or Add by Find. If by barcode, scan in your items. If by find, look up the items you need by doing a search.
5. Highlight the desired barcodes, right click and select. Record set is populated and now you can save.
As with everything in Polaris, there are at least 3 ways to do everything. Making record sets are not exception. Find the way that works the best for you.
Item Record sets and bulk change
Bulk change item records
You can gather items for bulk change in a record set, and then bulk change them. Or, you can bulk change items by selecting them in a linked list box from a bibliographic record
1. Select the item records to change, and open the Bulk Change dialog box using one of the following methods:
Tip:You can create an item record set from a bibliographic record set by clicking on the Bibliographic Record Set workform. The item record set will contain all the items linked to the bibliographic records in the record set.

Polaris Cataloging Handouts
21
a) If the items are in a record set, open the record set, and select Tools, Bulk Change, press CTRL+B.
b) If the items you want to change are not in a record set, access the item linked list box by one of the following methods:
• Select Links, Item records from the workform menu on the Bibliographic Record, Purchase Order, or Purchase Order Line Item workform.
• Select a purchase order line item from the Purchase Order workform, Line Items view, or from the Find Tool results list, right-click and select Links, Item Records from the context menu.
• Select a segment in the Purchase Order Line Item workform, right-click and select Links, Item records from the context menu.
Then, select the items to bulk change in the item list box, right-click and select Ad hoc Bulk Change.
The Bulk Change dialog box appears.
Polaris Cataloging Handouts
22
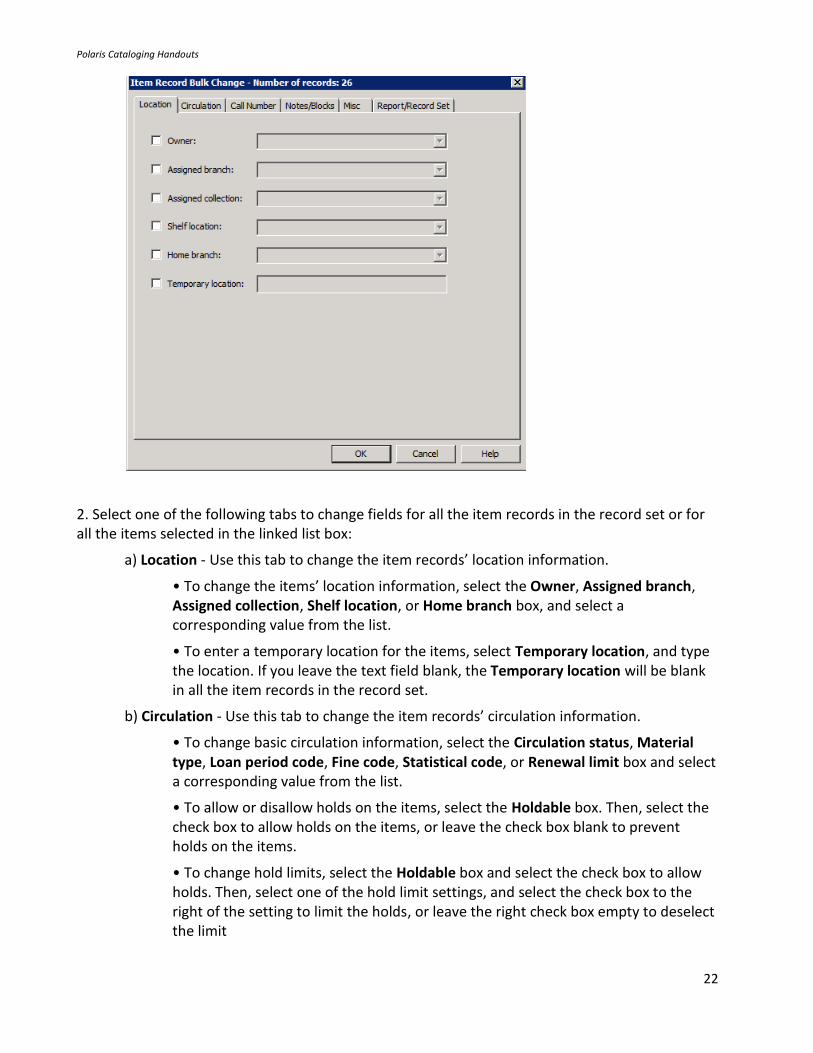
2. Select one of the following tabs to change fields for all the item records in the record set or for all the items selected in the linked list box:
a) Location - Use this tab to change the item records’ location information.
• To change the items’ location information, select the Owner, Assigned branch, Assigned collection, Shelf location, or Home branch box, and select a corresponding value from the list.
• To enter a temporary location for the items, select Temporary location, and type the location. If you leave the text field blank, the Temporary location will be blank in all the item records in the record set.
b) Circulation - Use this tab to change the item records’ circulation information.
• To change basic circulation information, select the Circulation status, Material type, Loan period code, Fine code, Statistical code, or Renewal limit box and select a corresponding value from the list.
• To allow or disallow holds on the items, select the Holdable box. Then, select the check box to allow holds on the items, or leave the check box blank to prevent holds on the items.
• To change hold limits, select the Holdable box and select the check box to allow holds. Then, select one of the hold limit settings, and select the check box to the right of the setting to limit the holds, or leave the right check box empty to deselect the limit
Polaris Cataloging Handouts
23
Example: To allow all items in the record set to be held and then picked up at any library, select the Holdable check box, select Pickup at this branch, but leave the check box to the right empty. This will clear the Pickup at this branch setting for all items in the record set that have this limit setting selected.
• To change the Non circulating setting for all item records, select the Non circulating box, and either select the check box to the right or leave it blank. If you select the check box, all the items in the record set will not circulate. If you leave the check box blank, all the items will have the Non circulating check box unchecked, allowing them to circulate.
c) Call Number - Use this tab to change the item records’ call number information, or to assign call numbers to the item records.
d) Notes/Blocks - Use this tab to change the item records’ notes and blocks.
• To change the notes information for all item records in the record set, select Public note, Non-public note, or Physical condition, and type the text in the box to the right of the note you selected. Then, select Replace to replace any existing notes with the note you typed, Prepend to add the notes to the beginning of any existing notes, or Append to add the notes to the end of any existing notes.
• To change a library-assigned block, select the Library assigned check box, and select a value from the list box to the right.
• To change a free-text block, select the Free text block check box, and type the text for the free-text block you want to add. Then, select Replace to replace the text for any free-text blocks, Prepend to add the text to the beginning of any existing free-text blocks, or Append to add the text to the end of any existing free-text blocks.
e) Misc - Use this tab to change miscellaneous information on the item records, or to assign barcodes to items that do not have a barcode.
• To change the Display in PAC setting for all item records in the record set, select the Display in PAC box, and select the check box to the right, or leave it blank. If you select the check box, all the item records will have the Display in PAC setting checked, which means they will all display in the PAC. If you leave the check box blank, all the item records will have the Display in PAC setting unchecked, which means none of the items will display in the PAC.
• To change the funding source for all the item records in the record set, select Funding source, and type a value. If you leave the text field blank, the Funding source field will be blank in all items in the record set.
• To change the price of all the items, select Price and type the price. If you leave the text field blank, the Price field will be blank in all the items in the record set.
3. Click Report/Record Set tab to specify the bulk change report and error record set.
a) If you want to change the default report name, type the location and file name, or click Browse to locate the file. The default report name
Polaris Cataloging Handouts
24
The report also shows errors for items that could not be bulk changed either due to their status or lack of permissions.
b) To create a record set of the items for which the changes could not be made, select the box under Error Record Set, type a name for the record set in the Name box and select an owner in the Owner box.
Note: An error record set is not required. However, specifying an error record set makes it easier to locate the item records that have errors. If no errors are found, no error record set is created.
4. Click OK or press Enter to start the bulk change process.
The Summary of Changes message box displays the following details:
• The number of item records to be changed
• The name and owner of the record set that contains the item records being changed
• The error record set name and owner, if the error record set is requested
• The path and file name specified for the bulk change report
• A summary of all the fields to be changed and their new values
Tip: To return to the Item Record Bulk Change dialog box to change any of your settings, click Cancel.
5. Click Continue.
The bulk change process applies the changes to the item records. A message informs you when the bulk change process is finished and indicates if there were errors.
6. Click OK to close the message box.
After the bulk change process, the list display is updated as follows depending on whether changed the items from a record set or from a list:
• Record set - The record set workform is refreshed and sorted by the default sort order. You can re-sort the list in barcode order.
• Item list using Ad hoc Bulk Change - The list view is refreshed immediately after the Ad hoc Bulk Change, and you can see the results of the bulk change to fields that display in the list view. If the bib control number was changed, the new title displays in the list view.