white paper - how to print using letterhead, preprinted or...
TRANSCRIPT

How to Print Using Letterhead
Copyright 2010 RICOH Americas Corporation. All rights reserved. Page 1 of 53
Visit our Knowledgebase at: http://tsrc.ricoh-usa.com/ref/faq.asp
07/26/2010
Technical Information:
How to Print Using Letterhead, Preprinted or Prepunched Paper
White Paper
Document Version 1.0

How to Print Using Letterhead
Page 2 of 53
Notice:
THIS DOCUMENT MAY NOT BE REPRODUCED OR DISTRIBUTED IN WHOLE OR IN PART, FOR ANY PURPOSE OR IN ANY FASHION WITHOUT THE PRIOR WRITTEN CONSENT OF RICOH COMPANY LIMITED. RICOH COMPANY LIMITED RETAINS THE SOLE DISCRETION TO GRANT OR DENY CONSENT TO ANY PERSON OR PARTY.
Copyright © 2009 by Ricoh Company Ltd.
All product names, domain names or product illustrations, including desktop images, used in this document are trademarks, registered trademarks or the property of their respective companies. They are used throughout this book in an informational or editorial fashion only. Ricoh Company, Ltd. does not grant or intend to grant hereby any right to such trademarks or property to any third parties. The use of any trade name or web site is not intended to convey endorsement or any other affiliation with Ricoh products. The content of this document, and the appearance, features and specifications of Ricoh products are subject to change from time to time without notice. While care has been taken to ensure the accuracy of this information, Ricoh makes no representation or warranties about the accuracy, completeness or adequacy of the information contained herein, and shall not be liable for any errors or omissions in these materials. The only warranties for Ricoh products and services are as set forth in the express warranty statements accompanying them. Nothing herein shall be construed as constituting an additional warranty. Ricoh does not provide legal, accounting or auditing advice, or represent or warrant that our products or services will ensure that you are in compliance with any law. Customer is responsible for making the final selection of solution and technical architectures, and for ensuring its own compliance with various laws such as the Gramm-Leach-Bliley Act, the Sarbanes-Oxley Act and the Health Insurance Portability and Accountability Act (HIPAA).
Version history:
Version Issue Date Revised item
1.0 July 23, 2008 Initial release
NOTE: Throughout this document you may see references such as 04A (2004 Autumn) or 05S (2005 Spring). You will only see an A (Autumn) or S (Spring) attached to the last two digits of a year. These two seasons reflect the time period the machines were manufactured.

How to Print Using Letterhead
Page 3 of 53
INDEX
1. Introduction.....................................................................................................................4
2. Target Readers...............................................................................................................4
3. Target Models.................................................................................................................4
4. Overview ........................................................................................................................7
5. Loading Letterhead Paper in Source Trays ....................................................................8
5-1 Introduction....................................................................................................................8
5-1-1 Face Up/Down ........................................................................................................8
5-1-2 0 Degree Rotation ...................................................................................................8
5-2 Type A Devices...........................................................................................................9
5-3 Type B Devices ........................................................................................................ 11
5-3-1 Simplex Letterhead Tray (example) ......................................................................13
5-3-2 Duplex Letterhead Tray (example) ........................................................................15
5-3-3 Notes for Small Printers ........................................................................................16
6. Letterhead Setting........................................................................................................18
6-1 Settings ....................................................................................................................18
6-2 Letterhead Mode ......................................................................................................20
6-2-1 Printing All Pages of a Duplex Job Through the Duplex Unit.................................20
6-2-2 6-2-2 Adjusting Image Rotation and Finishing Functions ......................................21
7. Case Studies ................................................................................................................25
7-1 Case 1: Using a Type-B Device for Simplex Letterhead Printing..............................25
7-2 Case 2: Using a Type-B Device for Duplex-Only Printing.........................................31
7-3 Case 3: Using a Type B Device for Both Simplex and Duplex Letterhead Printing ..37
7-3-1 Selecting Letterhead in the driver:.........................................................................41
7-4 Case 4: Using a Small Printer for Simplex Letterhead Printing ................................44
7-5 Case 5: Using a Type A Device for Two Different Letterheads .................................48
8. Appendix ......................................................................................................................52
8-1 A Limitation Affecting Type-B 04A Models ................................................................52

How to Print Using Letterhead
Page 4 of 53
1. Introduction
This document describes printing using letterhead paper, or any paper type requiring printing on a specific side with a specific rotation. Not all printers will produce the same results. Often the use of letterhead paper with a certain device is accomplished through trial and error. This document is an attempt to shed some light on the reasons for the different results between models and help readers properly configure letterhead printing without requiring a lengthy procedure of trial and error. Note that although this document will focus on printing on letterhead paper, the contents can be applied to the following three paper types:
• Letterhead paper
• Pre-printed paper
• Pre-punched paper This document will give a basic description of letterhead printing and the specifications of GW devices. This document should make it evident that numerous factors need to be considered in order to meet some customers' requirements. Some requirements can be met using standard specifications but some can not. For advanced solutions to letterhead printing, another Technical Information document will be created.
2. Target Readers
This document is intended for the support staff of Ricoh family group companies and their subsidiaries.
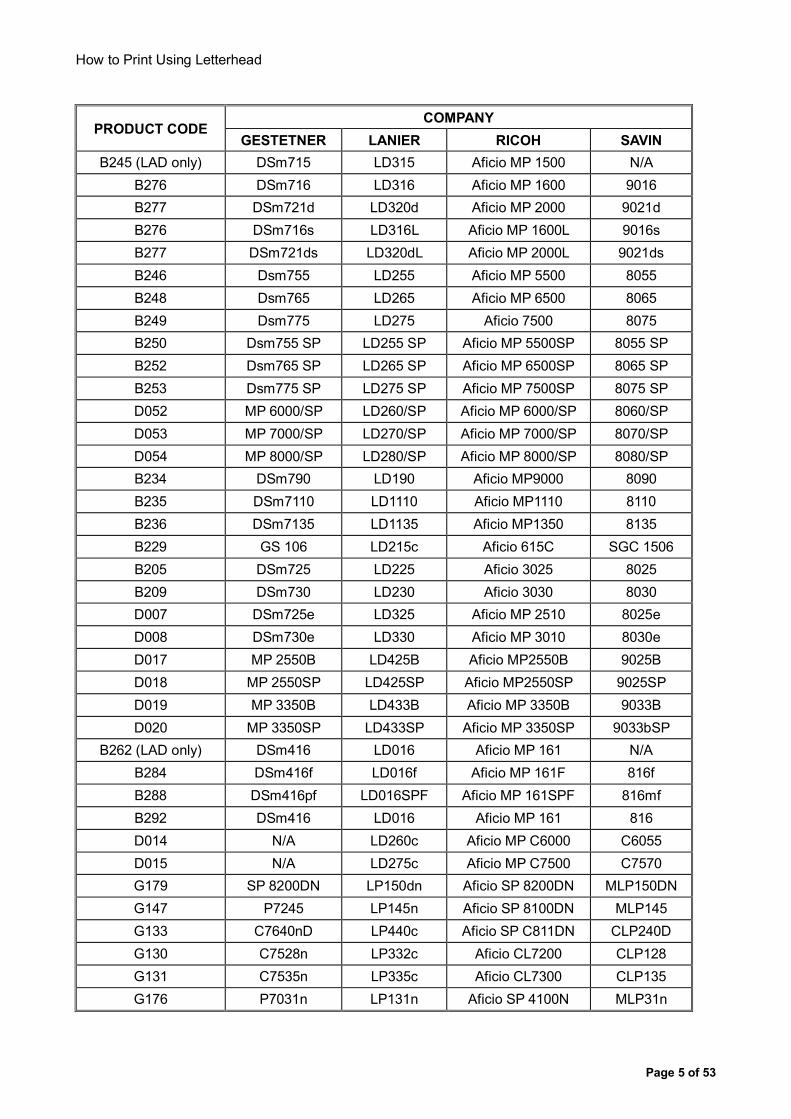
3. Target Models
This document applies to 04A or later GW MFPs and LPs. Note that 04A models have a limitation. It will be explained in the Appendix of this document.
COMPANY PRODUCT CODE
GESTETNER LANIER RICOH SAVIN
B291 DSm735eg ----- Aficio MP 3500g 8035eg
B295 DSm745eg ----- Aficio MP 4500g 8045eg
B296 DSm735e LD335 Aficio MP 3500 8035e
B297 DSm745e LD345 Aficio MP 4500 8045e
D009 MP 4000B LD040B Aficio MP 4000B 9040b
D011 MP 4000 LD040 Aficio MP 4000 9040
D012 MP 5000B LD050B Aficio MP 5000B 9050b
D013 MP 5000 LD050 Aficio MP 5000 9050
B264 DSm735 LD235 Aficio 3035 8035
B265 DSm745 LD245 Aficio 3045 8045
B222 DSc535 LD435c Aficio MP C3500 C3535
B224 DSc545 LD445c Aficio MP C4500 C4540
B230 DSc525 LD425c Aficio MP C2500/ / C2525
B237 DSc530 LD430c Aficio MP C3000 C3030
D042 DSc520 LD420c Aficio MP C2000 C2020
How to Print Using Letterhead
Page 5 of 53
COMPANY PRODUCT CODE
GESTETNER LANIER RICOH SAVIN
B245 (LAD only) DSm715 LD315 Aficio MP 1500 N/A
B276 DSm716 LD316 Aficio MP 1600 9016
B277 DSm721d LD320d Aficio MP 2000 9021d
B276 DSm716s LD316L Aficio MP 1600L 9016s
B277 DSm721ds LD320dL Aficio MP 2000L 9021ds
B246 Dsm755 LD255 Aficio MP 5500 8055
B248 Dsm765 LD265 Aficio MP 6500 8065
B249 Dsm775 LD275 Aficio 7500 8075
B250 Dsm755 SP LD255 SP Aficio MP 5500SP 8055 SP
B252 Dsm765 SP LD265 SP Aficio MP 6500SP 8065 SP
B253 Dsm775 SP LD275 SP Aficio MP 7500SP 8075 SP
D052 MP 6000/SP LD260/SP Aficio MP 6000/SP 8060/SP
D053 MP 7000/SP LD270/SP Aficio MP 7000/SP 8070/SP
D054 MP 8000/SP LD280/SP Aficio MP 8000/SP 8080/SP
B234 DSm790 LD190 Aficio MP9000 8090
B235 DSm7110 LD1110 Aficio MP1110 8110
B236 DSm7135 LD1135 Aficio MP1350 8135
B229 GS 106 LD215c Aficio 615C SGC 1506
B205 DSm725 LD225 Aficio 3025 8025
B209 DSm730 LD230 Aficio 3030 8030
D007 DSm725e LD325 Aficio MP 2510 8025e
D008 DSm730e LD330 Aficio MP 3010 8030e
D017 MP 2550B LD425B Aficio MP2550B 9025B
D018 MP 2550SP LD425SP Aficio MP2550SP 9025SP
D019 MP 3350B LD433B Aficio MP 3350B 9033B
D020 MP 3350SP LD433SP Aficio MP 3350SP 9033bSP
B262 (LAD only) DSm416 LD016 Aficio MP 161 N/A
B284 DSm416f LD016f Aficio MP 161F 816f
B288 DSm416pf LD016SPF Aficio MP 161SPF 816mf
B292 DSm416 LD016 Aficio MP 161 816
D014 N/A LD260c Aficio MP C6000 C6055
D015 N/A LD275c Aficio MP C7500 C7570
G179 SP 8200DN LP150dn Aficio SP 8200DN MLP150DN
G147 P7245 LP145n Aficio SP 8100DN MLP145
G133 C7640nD LP440c Aficio SP C811DN CLP240D
G130 C7528n LP332c Aficio CL7200 CLP128
G131 C7535n LP335c Aficio CL7300 CLP135
G176 P7031n LP131n Aficio SP 4100N MLP31n

How to Print Using Letterhead
Page 6 of 53
COMPANY PRODUCT CODE
GESTETNER LANIER RICOH SAVIN
G177 P7035n LP136n Aficio SP 4110N MLP36n
G176L P7031nL LP131nL Aficio SP 4100NL MLP31nL
G126 P7575 LP175hdn Aficio AP900 MLP75n
G148 P7675 LP275hdn Aficio SP 9100DN MLP175n
G179 SP 8200DN LP150dn Aficio SP 8200DN MLP150DN
G133 C7640nD LP440c Aficio SP C811DN CLP240D
G139 C7521n LP222cn Aficio CL3500N CLP22
G112 P7527 LP128 Aficio AP410 MLP28
G113 P7527n LP128n Aficio AP410N MLP28n
G116 P7535n LP135n Aficio AP610N MLP35n
G104 C7425dn LP126cn Aficio CL4000DN CLP26DN
G160 C7526dn LP226cn Aficio SP C410DN CLP27DN
G161 C7531dn LP231cn Aficio SP C411DN CLP31DN
G158 N/A SP C400DN Aficio SP C400DN SP C400DN
G190 SP C420DN LP331cn Aficio SP C420DN CLP131DN
B202 DSc428 LD328c Aficio 3228C C2824
B178 DSc435 LD335c Aficio 3235C C3528
B180 DSc445 LD345c Aficio 3245C C4535
B156 DSc424 LD124c Aficio 3224C C2410
M001 SP 4210N LP37N Aficio SP 4210N MLP37N
D010 DSm625 LD125 Aficio MP 2500 7025

How to Print Using Letterhead
Page 7 of 53
4. Overview
Letterheads are usually only pre-printed on one side of page. They have a specific readable orientation. When printing using letterhead paper, the following needs to be considered:
• Print images on the letterhead side of the page.
• Print so the orientation of images matches the orientation of the letterhead.
Examples of letterhead paper and successful/unsuccessful printouts: To print successfully using letterhead paper, the three things listed below must be considered. The aim of this document is to describe them: 1. How to load letterhead paper in source trays. This will depend on the device as well as the tray.
Section 5 (face up/down and rotation) will provide instructions for loading. 2. Enable/disable the Letterhead Setting as required. Letterhead setting functions will be described in
Section 6. 3. Configure the source tray to fit the purpose. Paper type, disabling duplex, and Tray Selection Order
will be utilized for configuration. Section 7 shows some case studies.
Hello!
Hello!
Hello!
Printed on the back side
Successful printouts
Rotation is incorrect
Figure 1
Hello!
Examples of letterhead paper
Staple position is incorrect
OK
NG
NG
NG
How to Print Using Letterhead
Page 8 of 53
5. Loading Letterhead Paper in Source Trays
5-1 Introduction
Printing on letterhead requires that the letterhead paper be loaded in source trays in a specific way. The correct way will depend on the tray and on the machine type (machine types will be described later in this section). There are 2 things to consider:
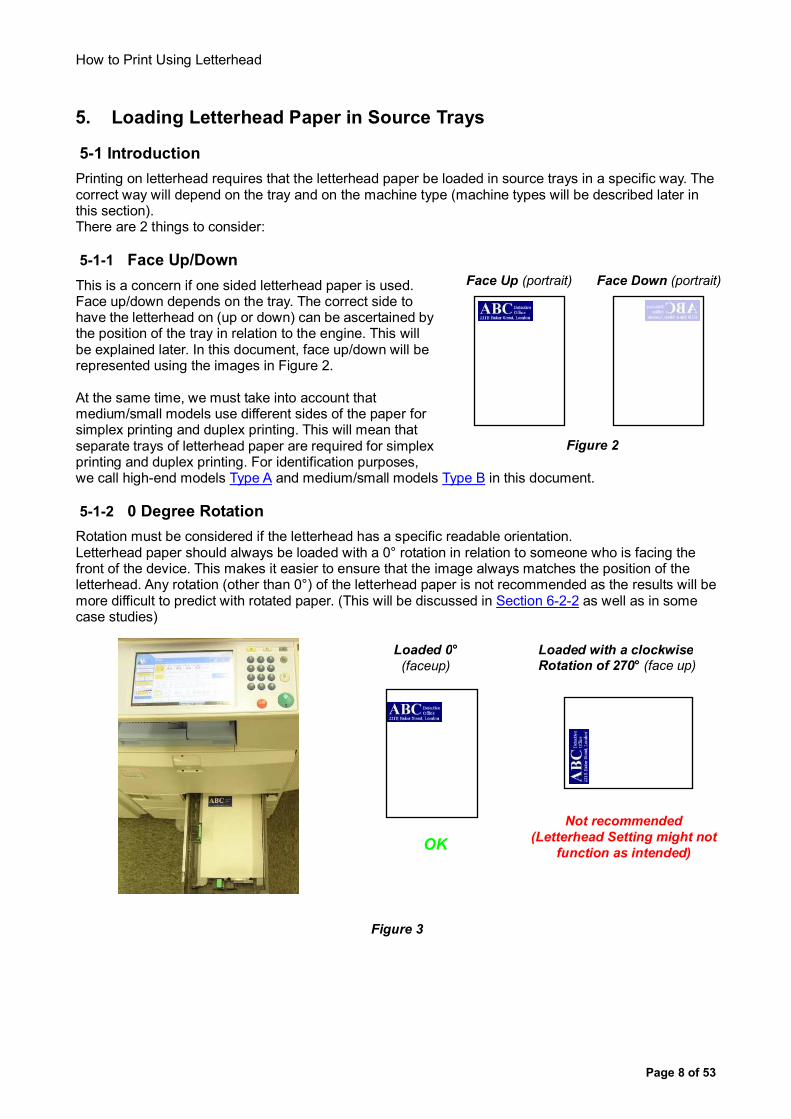
5-1-1 Face Up/Down
This is a concern if one sided letterhead paper is used. Face up/down depends on the tray. The correct side to have the letterhead on (up or down) can be ascertained by the position of the tray in relation to the engine. This will be explained later. In this document, face up/down will be represented using the images in Figure 2. At the same time, we must take into account that medium/small models use different sides of the paper for simplex printing and duplex printing. This will mean that separate trays of letterhead paper are required for simplex printing and duplex printing. For identification purposes, we call high-end models Type A and medium/small models Type B in this document.
5-1-2 0 Degree Rotation
Rotation must be considered if the letterhead has a specific readable orientation. Letterhead paper should always be loaded with a 0° rotation in relation to someone who is facing the front of the device. This makes it easier to ensure that the image always matches the position of the letterhead. Any rotation (other than 0°) of the letterhead paper is not recommended as the results will be more difficult to predict with rotated paper. (This will be discussed in Section 6-2-2 as well as in some case studies)
Face Up (portrait)
Face Down (portrait)
Figure 2
Loaded 0°
(faceup)
Loaded with a clockwise Rotation of 270° (face up)
OK
Not recommended
(Letterhead Setting might not
function as intended)
Figure 3

How to Print Using Letterhead
Page 9 of 53
5-2 Type A Devices
Gestetner Lanier Savin Ricoh
DSm790/7110/7135 LD190/1110/1135 8090/8110/8135 MP9000/1100/1350
DSm651/651sp LD151/151sp 4051/4051sp 2051/2051sp
DSm660/661sp LD160/160sp 4060/4060sp 2060/2060sp
DSm675/675sp LD175/175sp 4075/4075sp 2075/2075sp
DSm755/755sp LD255/255sp 8055/8055sp MP5500/5500sp
DSm765/765sp LD265/265sp 8065/8065sp MP6500/6500sp
DSm775/775sp LD275/275sp 8075/8075sp MP7500/7500sp
P7675 LP275hdn MLP175n SP9100dn
DSc460/CS555 LD160c/LC155 C6045/SDC555 3260/5560
MPC6000/7500 LD260c/275c C6055/7570 MPC6000/7500
Pro906EX/ Pro1106EX/ Pro 1356EX
Pro906EX/ Pro1106EX/ Pro 1356EX
Pro906EX/ Pro1106EX/ Pro 1356EX
Pro906EX/ Pro1106EX/ Pro 1356EX
Pro 907/ Pro 1107/ Pro 1357
Pro 907/ Pro 1107/ Pro 1357
Pro 907/ Pro 1107/ Pro 1357
Pro 907/ Pro 1107/ Pro 1357
Pro907EX/ Pro1107EX/ Pro 1357EX
Pro907EX/ Pro1107EX/ Pro 1357EX
Pro907EX/ Pro1107EX/ Pro 1357EX
Pro907EX/ Pro1107EX/ Pro 1357EX
MP6000 MP6000SP MP7000
MP7000SP MP8000
MP8000SP
LD260 LD260sp LD270 LD270sp LD280 LD280sp
8060 8060sp 8070 8070sp 8080 8080sp
MP6000 MP6000SP MP7000
MP7000SP MP8000
MP8000SP
Type A devices (mostly high end models) have an Internal Inverter/Duplex Unit which will flip pages when necessary, and is capable of using a letterhead tray for both simplex and duplex printing.

How to Print Using Letterhead
Page 10 of 53
Trays: Using a tray that is directly below the engine such as Tray 1 or Tray 2, letterhead paper should be loaded face-DOWN. Using a tray located to the right of the engine such as bypass or LCT, letterhead paper should be loaded face-UP.
Trays below the engine:
Trays on the right side of the engine:
Face DOWN & 0°
Portrait paper
Landscape paper
Portrait paper
Landscape paper
Printing Drum
Inverter/Duplex Unit
Figure 4
Face UP & 0°
Feed direction
Feed direction
Simplex printing
● ●
●
●
●
● ● ●
● ● ● ●
● ● ●
Drum
●
●
● ● ●
Drum
Front side
Front side
Duplex printing Back side
Paper path and feed directions
(DSm755/LD255/8055/MP5500)

How to Print Using Letterhead
Page 11 of 53
5-3 Type B Devices
Gestetner Lanier Savin Ricoh
DSm735/735e LD235/245 8035/8035e 3035/3045
DSm745/745e LD335/345 80458045e MP3500/4500
P7245 LP145n MLP145 SP8100dn
MP4000/4000b LD040/040b 9040/9040b MP4000/4000b
MP5000/5000b LD050/050b 9050/9050b MP5000/5000b
SP8200dn LP150dn MLP150dn SP8200dn
DSc535/545 LD435c/445c C3535c4540 MPC3500/3500spf
MPC4500/4500spf
C7640nD/7640nD-T1 LP440c/440cDT1 CLP240D/240D-T1
SPC811DN/811DN-T1 SPC811DN-T2 APC811DN-DL
C7521 LP222cn CLP22 CL3500n
DSc520/525/530 LD420c/425c/430c C2020/2525/3030 MPC2000/2500/3000
P7528/7528n LP128/128n MLP28/28n AP410/410n
C7425dn LP126cn CLP26dn CL4000dn
C7526dn/7531dn LP226cn/231cn CLP27dn/31dn SPC410dn/411dn
CSPC420dn LP331cn CLP131cn SPC420dn
DSc428/435/445 LD328c/335c/345c C2824/3528/4535 3228C/3235C/3245C
C7528n/7535n LP332c/335c CLP128/135 CL7200/7300
P7535n LP135n MLP35n AP610n
DSm715 LD315 9016/9016s MP1500
DSm716/716s LD316/316L 9021d/9021ds MP1600/1600L
DSm721d/721ds LD320d/320Ld MP2000/2000L
GS106 LD215c SGC1506 615C
DSm625 LD125 7025 MP2500
DSm725/730 LD225/230 8025/8030 3025/3030
DSm725e/730e LD325/330 8025e/8030e MP2510/3010
MP2550/2550B LD425/425B 9025/9025b MP2550/2550b
MP3350/3350B LD433/433B 9033/9033b MP3350/3350b
P7031/7035n LP131/136n MLP31/36n SP4100/4110n
DSc424 LD124c C2410 3224C
DSM416 DSM416f DSM416pf
LD016 LD016f LD016spf
816 816f 816mf
AFICIO MP 161 MP 161f MP161spf
MP 171 MP 171F
MP 171SPF
LD117 LD117F
LD117SPF
917 917F
917SPF
Aficio MP 171 Aficio MP 171F
Aficio MP 171SPF
C8140ND C8150ND
LP540C LP550C
CLP340D CLP350D
SP C820DN/SP C821DN

How to Print Using Letterhead
Page 12 of 53
Gestetner Lanier Savin Ricoh
MP C2030 MPC2050 MP C2530 MP C2550
LD520CL LD520C LD525CL LD525C
C9020L C9020 C9025L
AFICIO MP C2030 MPC205 MP C2530 MP C2550
MP C2800 MP C3300
LD528C LD533C
C2828 C3333
Aficio MP C2800 C3300
MP C4000 MP C5000
LD540C LD550C
C4040 C5050
Aficio MP C4000 C5000
Type B devices are typically medium to low end models. In order to use letterhead paper in a Type B
device, separate source trays might have to be configured for simplex and duplex printing. When you print duplex pages, Type B devices print the back side before printing the front side. This is necessary because an external duplex unit is used. The side effect of this is that the front side of a duplex page is not the same as the front side of a simplex page. In such cases separate simplex and duplex trays might need to be configured for letterhead paper. In this document, we will refer to them as "Simplex letterhead tray" and "Duplex letterhead tray". Following is the paper path of models DSm735e, LD335, 8035e or MP3500.
Print back side first
Figure 5
Page 3 Page 4
Page 1 Page 2
Print front side
next
● ● ●
●
●
●
●
●
● ● ● ●
● ● ● ●
Page 3
Page 1
Page 2
● ● ● ●
● ● ● ●
Front side
Front side Simplex printing and paper side
Duplex printing and paper side
Paper path and feed directions
Duplex unit
Drum Drum
Printing Drum
Trays below the engine
Trays on the right side of the engine

How to Print Using Letterhead
Page 13 of 53
5-3-1 Simplex Letterhead Tray (example)
Gestetner Lanier Savin Ricoh
DSm735/745 LD235/245 8035/8045 3035/3045
DSm735e/745e LD335/345 8035e/8045e MP3500/4500
P7245 LP145n MLP145 SP8100dn
MP4000/4000B LD040/040B 9040/9040B MP4000/4000B
MP5000/5000B LD050/050B 9050/9050B MP5000/5000B
SP8200dn LP150dn MLP150dn SP8200dn
DSc535/545 LD435c/445c C3535/C4540
MPC3500/3500spf MPC4500/4500spf
C7640nd 7640nd-T1
LP440c 440cDT1
CLP240d 240d-T1
SPC811dn SPC811dn T1 SPC811dn T2 SPC811dn DL
DSc520/525/530 LD420c/425c/430c C2020/2525/3030 MPC2000/2500/3500
DSm715 LD315 9016/9016s MP1500
DSm716/716s LD316/316L 9021d/9021ds MP1600/1600L
DSm721d/721ds LD320d/320Ld MP2000/2000L
GS106 LD215c SGC1506 615c
DSm625 LD125 7025 MP2500
DSm725/730 LD225/230 8025/8030 3025/3030
DSm725e/730e LD325/330 8025e/8030e MP2510/3010
MP2550/2550B LD425/425B 9025/9025B MP2550/2550B
MP3350/3350B LD433/433B 9033/9033B MP3350/3350B
DS416/416f/416pf LD016/016f/016spf 816/816f/816mf MP161/161f/161spf
DSc424 LD124c C2410 3224C
MP 171, MP 171F, MP 171SPF
LD117, LD117F, LD117SPF
917, 917F, 917SPF Aficio MP 171, Aficio MP 171F Aficio MP
171SPF
C8140ND/C8150ND LP540C/LP550C CLP340D/CLP350D SP C820DN/SP C821DN
MP C2030 MPC2050 MP C2530 MP C2550
LD520CL LD520C LD525CL LD525C
C9020L C9020 C9025L
AFICIO MP C2030 MPC2050 MP C2530 MP C2550
MP C2800/MP C3300 LD528C/LD533C C2828/C3333 Aficio MP C2800/C3300
MP C4000/MP C5000 LD540C/LD550C C4040/C5050 Aficio MP C4000/C5000

How to Print Using Letterhead
Page 14 of 53
Trays: Using a tray that is directly below the engine such as Tray 1 or Tray 2, letterhead paper should be loaded face-UP. Using a tray located to the right of the engine such as bypass or LCT, letterhead paper should be loaded face-DOWN.
Portrait paper
Landscape paper
Portrait paper
Landscape paper
Figure 6
Trays below the engine:
Trays on the right side of the engine:
Face UP & 0°
Face DOWN & 0°
Feed
direction Feed
direction
How to Print Using Letterhead
Page 15 of 53
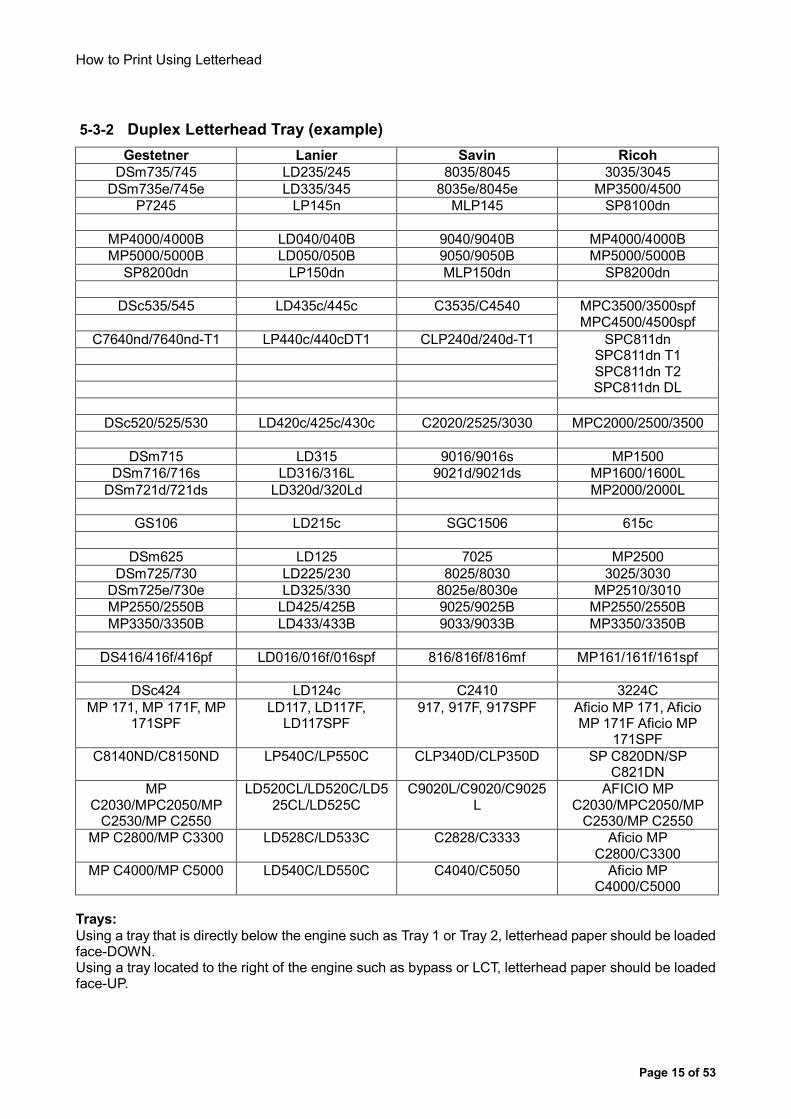
5-3-2 Duplex Letterhead Tray (example)
Gestetner Lanier Savin Ricoh
DSm735/745 LD235/245 8035/8045 3035/3045
DSm735e/745e LD335/345 8035e/8045e MP3500/4500
P7245 LP145n MLP145 SP8100dn
MP4000/4000B LD040/040B 9040/9040B MP4000/4000B
MP5000/5000B LD050/050B 9050/9050B MP5000/5000B
SP8200dn LP150dn MLP150dn SP8200dn
DSc535/545 LD435c/445c C3535/C4540
MPC3500/3500spf MPC4500/4500spf
C7640nd/7640nd-T1 LP440c/440cDT1 CLP240d/240d-T1
SPC811dn SPC811dn T1 SPC811dn T2 SPC811dn DL
DSc520/525/530 LD420c/425c/430c C2020/2525/3030 MPC2000/2500/3500
DSm715 LD315 9016/9016s MP1500
DSm716/716s LD316/316L 9021d/9021ds MP1600/1600L
DSm721d/721ds LD320d/320Ld MP2000/2000L
GS106 LD215c SGC1506 615c
DSm625 LD125 7025 MP2500
DSm725/730 LD225/230 8025/8030 3025/3030
DSm725e/730e LD325/330 8025e/8030e MP2510/3010
MP2550/2550B LD425/425B 9025/9025B MP2550/2550B
MP3350/3350B LD433/433B 9033/9033B MP3350/3350B
DS416/416f/416pf LD016/016f/016spf 816/816f/816mf MP161/161f/161spf
DSc424 LD124c C2410 3224C
MP 171, MP 171F, MP 171SPF
LD117, LD117F, LD117SPF
917, 917F, 917SPF Aficio MP 171, Aficio MP 171F Aficio MP
171SPF
C8140ND/C8150ND LP540C/LP550C CLP340D/CLP350D SP C820DN/SP C821DN
MP C2030/MPC2050/MP C2530/MP C2550
LD520CL/LD520C/LD525CL/LD525C
C9020L/C9020/C9025L
AFICIO MP C2030/MPC2050/MP C2530/MP C2550
MP C2800/MP C3300 LD528C/LD533C C2828/C3333 Aficio MP C2800/C3300
MP C4000/MP C5000 LD540C/LD550C C4040/C5050 Aficio MP C4000/C5000
Trays:
Using a tray that is directly below the engine such as Tray 1 or Tray 2, letterhead paper should be loaded face-DOWN. Using a tray located to the right of the engine such as bypass or LCT, letterhead paper should be loaded face-UP.

How to Print Using Letterhead
Page 16 of 53
5-3-3 Notes for Small Printers
We will not fully explore the results of letterhead printing with small printers in this document. Please see the notes below:
• Small printers have basically the same mechanism as Type B devices. "Simplex letterhead tray" and "Duplex letterhead tray" must be separately configured.
• The description in this section 5-3 can also be applied to small printers. However, the view point of the illustrations is on the left side of the device.
• Paper path depends on the model. See the illustrations below.
• A4/Letter paper can only be fed in the SEF direction in many small printers.
Printing Drum
Optional Duplex Unit
(User Interface side) (Back side)
A small printer that outputs toward the front (P7031,
LP131, MLP31 or SP4100)
Portrait paper
Landscape paper
Portrait paper
Landscape paper
Figure 7
Trays below the engine:
Trays on the right side of the engine:
Face DOWN & 0°
Face UP & 0°
Feed direction
Feed direction

How to Print Using Letterhead
Page 17 of 53
A small printer that outputs towards the back (C7526dn,
LP226c, CLP27dn or SPC410dn)
Image transfer
(a color printer)
Duplex Unit
(User Interface side) (Back side)
Figure 8
The view point of the paper path should be from the left side of small printers
Many small printers can
accommodate A4/Letter paper only in SEF.

How to Print Using Letterhead
Page 18 of 53
6. Letterhead Setting
6-1 Settings
Letterhead Setting is a set of functions. Once Letterhead Setting is applied, the device will run in "Letterhead Mode", which will be described in section 6-2. Letterhead Setting can be configured from either of the following locations:
• (WIM) Configuration > Printer Basic Settings > Letterhead Setting
• (Operation panel) Printer Features > System > Letterhead Setting Settings:
• Off: Letterhead mode is not applied to any jobs. (default)
• Auto Detect: Letterhead mode is applied when one of the following paper types is assigned as the first page of a job:
- Letterhead
- Preprinted
- Prepunched
• On (Always): Letterhead mode is applied to all jobs.
Figure 9
IIII IMPORTANT:
1. Enabling Letterhead Setting is not always necessary when printing using letterhead paper. The necessity depends on the case. After reading this section, please also read the next section (Section 7).
2. Enabling Letterhead Setting might cause the duplex unit to wear out earlier. This is explained in Section 6-2-1.

How to Print Using Letterhead
Page 19 of 53
NOTE: Benefits and Disadvantages of "Auto Detect" and "On Always)"
If "Auto Detect" is selected, users must assign a paper type (Letterhead, Pre-printed or Pre-punched) to each print job that requires letterhead mode. Source trays must be assigned paper types. "Auto Detect" is useful when devices are used for both letterhead printing and normal printing. It also helps prevent mistakes such as printing a normal job on letterhead paper. Below is an example of using Auto Detect with a Type A device. Trays 3 and 4 are both configured to contain letterhead paper. Jobs with normal paper types will be sent to trays 1 or 2 and letterhead mode will not be used. Jobs with the letterhead paper type will be sent to tray 3 or 4 and letterhead mode will be used. If "On (Always)" is selected, users do not have to assign a paper type to jobs or trays.
"Plain/Recycled" can be used for letterhead jobs. "Plain" can be used for source trays. Paper types of source trays must not be changed if Plain/Recycled is used in print jobs (a paper mismatch error will occur). The device prints in letterhead mode all the time. Selecting "On (Always)" would be suitable in cases where a device is used only for letterhead printing. Below is an example of using "On (Always)" (a type A device). "Plain" (=No display) is assigned to all the trays as paper type. Printing will be performed in letterhead mode.
Normal mode
Letterhead mode
Figure 10
Normal mode
(Locked tray)
Letterhead mode
Figure 11
(Locked tray)

How to Print Using Letterhead
Page 20 of 53
6-2 Letterhead Mode
6-2-1 Printing All Pages of a Duplex Job Through the Duplex Unit
(This feature is only implemented in Type B devices) If Letterhead Setting is enabled in a type B device, all pages of a duplex job go through the duplex path. Imagine the following situation:
• Type B device
• A tray is assigned Letterhead for the paper type
• Letterhead paper is loaded face down for duplex printing Without Letterhead Mode: Odd numbered pages (1, 3, 5, etc.) are correctly printed on the letterhead side. However, the last page of odd paged jobs (including single page duplex jobs), will be printed on the backside of the letterhead. The reason for this is that the device will consider the page simplex. Therefore, the paper in the "duplex letterhead tray" will go through the simplex path. With Letterhead Mode: All pages will go through the duplex path and the pages will be printed correctly.
NOTE: This might cause the duplex unit to wear out earlier. As more pages are going through the duplex unit without being counted as duplex, the duplex counter is likely to be lower at the duplex unit’s end-of-life than if Letterhead Mode were not used.
These files can be used to confirm the effectiveness of the setting:
letterhead_4pA4P.doc
page123_3pA4P.doc
Letterhead Setting disabled (default)
p1 p2 p3 (blank)
Letterhead Setting enabled
p1 p2 p3 (blank)
Figure 12

How to Print Using Letterhead
Page 21 of 53
Usage: 1. Open "letterhead_4pA4P.doc" and print it (a color printer is preferred). This will produce four sheets of
one-sided letterhead paper (A4/portrait). Or you can use your own letterhead or pre-printed sheets.
2. Using a type-B MFP or LP, load four sheets of letterhead in a LEF tray. Confirm the tray is available for duplex printing.
3. Turn Letterhead Setting=Off in the device.
4. Open "page123_3pA4P.doc". The document will consist of three A4/portrait pages. (This simulates an odd paged document)
5. Open the Print dialog from "page123_3pA4P.doc" and select the device.
6. Open Printing Preferences and select:
• Portrait
• Duplex=Open to Left
• A4
• The tray that letterhead is loaded in 7. Print.
8. The last page will be printed on the backside of the letterhead.
9. Set Letterhead Setting=Auto Detect.
10. Print again.
11. The last page will be successfully printed on the letterhead side.
6-2-2 6-2-2 Adjusting Image Rotation and Finishing Functions
(This feature is implemented in both Type A and Type B devices) If Letterhead Setting is enabled, the device will rotate images to match the letterhead:
• If the source tray contains SEF paper, the device will print images to match a landscape letterhead.
• If the source tray contains LEF paper, the device will print images to match the orientation of portrait letterhead.
This result might be (or might not be) different from the result of disabling Letterhead Setting. The actual result of a mixed orientation document is determined by too many factors to explore in this document. Some of these factors include:
• Order of the mixed orientation pages
• Simplex/Duplex
• Open to left/Open to top when duplex

How to Print Using Letterhead
Page 22 of 53
Example (NOTE: The test files are embedded on the previous page):
A simplex mixed-orientation job that starts with portrait then changes to landscape is printed on landscape/SEF letterhead paper. If Letterhead Setting is disabled, landscape pages will be printed upside down on the letterhead paper. If Letterhead Setting is enabled, rotation of the image will be adjusted and landscape pages will be printed successfully.
NOTE: Note that finishing functions might be cancelled in letterhead mode. This happens in cases that the image rotation makes the correct positioning of finishing’s (staples, punches), impossible. Letterhead Setting gives priority to the rotation of pages and cancels the finishing functions if necessary. The following functions might be cancelled:
• Staple
• Punch
• Z-fold
• Ring booklet
• Perfect booklet
A simplex mixed-orientation job
Landscape pages
Portrait pages
Portrait pages
Landscape pages
Letterhead Setting disabled (default) Letterhead Setting enabled
Figure 13

How to Print Using Letterhead
Page 23 of 53
Example: A two page, portrait, A4, simplex job with a top left staple is to be printed on letterhead paper. The paper is positioned in the SEF direction. If Letterhead Setting is disabled, the images will be rotated 270° and stapled. If Letterhead Setting is enabled, the images will be rotated 90° and the stapling will be cancelled.
Technical note: This image rotation feature of Letterhead Setting is the reason why we recommend 0° rotation when loading letterhead paper in source trays, as described in Section 5-1. Letterhead Setting assumes that portrait letterhead is loaded in LEF trays and landscape letterhead paper is loaded in SEF trays. The reason for this assumption is that otherwise, it will be very hard to predict results. So Letterhead Setting is very situation specific. In some cases it is needed (or not needed) whether printing on letterhead or not. Instead of describing these complexities in full detail, we have created some common case studies to aide understanding. The case studies in the next section will discuss why the Letterhead Setting should be enabled or disabled in a particular case. These files can be used to confirm the effectiveness of the setting:
letterhead_8pA4L.doc
Hello_2pA4PL.doc
Hello_2pA4PP.doc
Figure 14
Letterhead setting disabled (default)
Letterhead setting enabled
Staple
The top of the page
has been rotated
and the finisher
cannot staple here

How to Print Using Letterhead
Page 24 of 53
Usage: 1. Open "letterhead_8pA4L.doc" and print it (a color printer is preferred). This will produce eight sheets of
one-sided letterhead paper (A4/landscape). Or you can use your own letterhead or pre-printed sheets.
2. Using a type B MFP or LP with stapler, load the eight sheets of letterhead in a SEF tray.
Mixed Orientation Test: 3. Turn Letterhead Setting=Off in the device.
4. Open "Hello_2pA4PL.doc". The document will consist of one A4/portrait page and one A4/landscape page. (This simulates a mixed orientation document)
5. Open the Print dialog from "Hello_2pA4PL.doc" and select the device.
6. Open Printing Preferences and select:
• Portrait
• Simplex
• A4
• The tray that letterhead is loaded 7. Print.
8. Page 2 will be printed upside down in relation to the letterhead.
9. Turn Letterhead Setting="On (Always)" in the device.
10. Print again.
11. Page 2 will be successfully printed.
Finishing Options Test: 12. Turn Letterhead Setting=Off in the device.
13. Open "Hello_2pA4PP.doc". The document will consist of 2 A4/portrait pages.
14. Open the Print dialog from "Hello_2pA4PP.doc" and select the device.
15. Open Printing Preferences and select:
• Portrait
• Simplex
• Staple Top Left
• A4
• The tray that letterhead is loaded 16. Print.
17. The document will be stapled.
18. Turn Letterhead Setting="On (Always)" in the device.
19. Print again.
20. The document will not be stapled. The rotation will be different from the result in 17.
How to Print Using Letterhead
Page 25 of 53
7. Case Studies
Reminder Each case study in this section can be altered as needed to create simple setup guides to match customer environments. In such a case, please remember that:
• "Situation/requirements" should be modified to match the actual environment.
• "Technical notes" should be limited to necessary parts only or completely deleted, depending on who the re-created guides are distributed to.
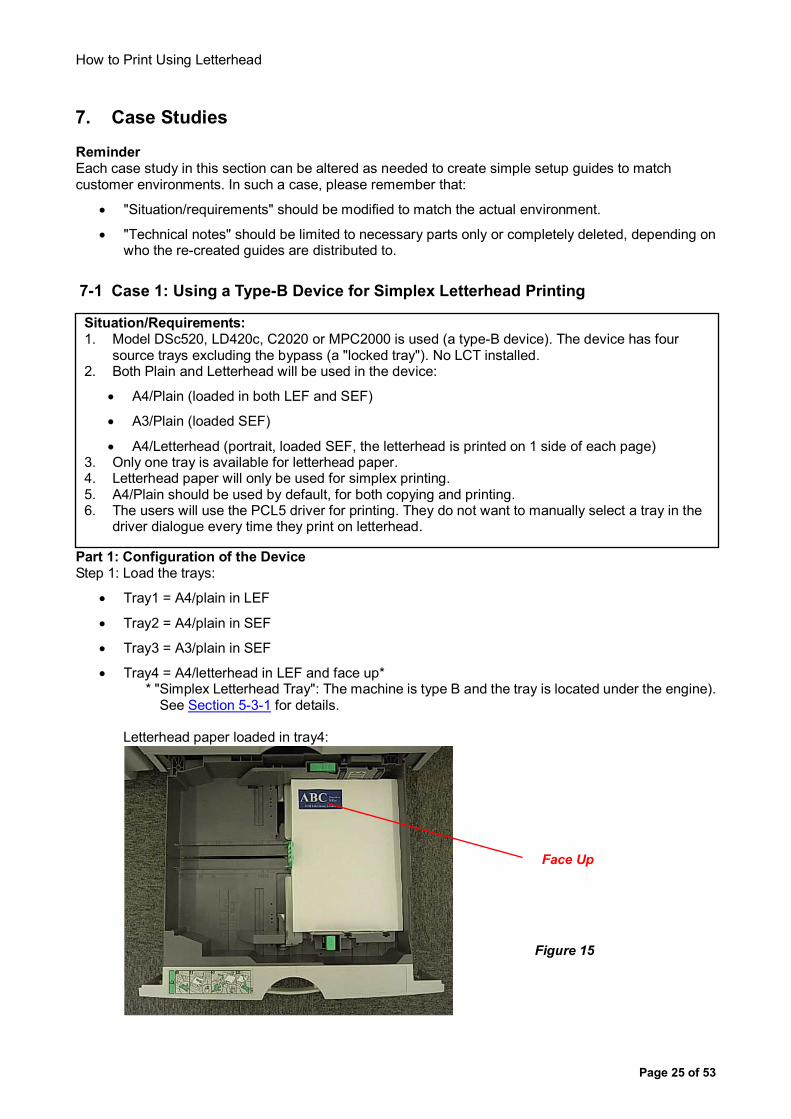
7-1 Case 1: Using a Type-B Device for Simplex Letterhead Printing
Part 1: Configuration of the Device Step 1: Load the trays:
• Tray1 = A4/plain in LEF
• Tray2 = A4/plain in SEF
• Tray3 = A3/plain in SEF
• Tray4 = A4/letterhead in LEF and face up* * "Simplex Letterhead Tray": The machine is type B and the tray is located under the engine). See Section 5-3-1 for details.
Letterhead paper loaded in tray4:
Situation/Requirements: 1. Model DSc520, LD420c, C2020 or MPC2000 is used (a type-B device). The device has four
source trays excluding the bypass (a "locked tray"). No LCT installed. 2. Both Plain and Letterhead will be used in the device:
• A4/Plain (loaded in both LEF and SEF)
• A3/Plain (loaded SEF)
• A4/Letterhead (portrait, loaded SEF, the letterhead is printed on 1 side of each page) 3. Only one tray is available for letterhead paper. 4. Letterhead paper will only be used for simplex printing. 5. A4/Plain should be used by default, for both copying and printing. 6. The users will use the PCL5 driver for printing. They do not want to manually select a tray in the
driver dialogue every time they print on letterhead.
Face Up
Figure 15

How to Print Using Letterhead
Page 26 of 53
Step 2: Configure the Paper Tray Priority of Both the Copier and Printer to Tray1 or Tray2. Step 3: Configure the Tray Paper Size settings of the paper loaded in the trays. (Not all models have the Auto Detect function) Step 4: Configure Paper Type settings for each tray:
• Tray1-3
Paper Type = Plain (="No Display" on the operation panel)
Duplex = "2 Sided Copy" (Both Simplex/Duplex available)
Apply Auto Paper Select = Yes (Auto-selectable)
Tray4 Paper Type = Letterhead Duplex = "1 Sided Copy" (Only Simplex available) Apply Auto Paper Select = Yes (Auto-selectable)
Paper Type settings. Note that the settings will affect both printing and copying:
Figure 16
Figure 17

How to Print Using Letterhead
Page 27 of 53
Paper Type Settings for Tray4: Step 5: Letterhead Setting > "Off": The Printer screen should look like the one shown below.
Figure 19
Plain paper is loaded
Letterhead is loaded for simplex
Figure 20
All trays work in Normal mode
Figure 18

How to Print Using Letterhead
Page 28 of 53
Part 2: Configuring Driver Settings (PCL5 driver is used as an example)
• To print on plain paper, select :
� Input Tray = Auto Tray Select (default) � Paper Type = Plain & Recycled (default)
• To print on letterhead, select : � Input Tray = Auto Tray Select (default) � Paper Type = Letterhead � Duplex = Off (default)
NOTE: This means that in many cases the only thing the user needs to do is choose a paper type (Letterhead or Plain).
Selecting Letterhead Paper:
Figure 21

How to Print Using Letterhead
Page 29 of 53
Part 3: The Result Using PCL5 Driver 1. If A4/Letterhead/simplex is assigned in a job, tray4 will be used. The job will be printed successfully on the
letterhead side. (requirement 6 of this case)
2. If by mistake A4/Letterhead/duplex is assigned in a job, the device will display the paper mismatch.
(requirement 4 of this case)
3. If no paper type is specified for a copy or print, A4/Plain will be used from Tray1 or 2. (requirement five of
this case)
Figure 22
Paper type does not match
A locked tray Paper size does not match
A4/Letterhead/simplex jobs will use tray4
Figure 23
Paper type does not match
A locked tray Paper size
does not match
A4/Letterhead/duplex jobs cannot use any tray.
Error prompt
Duplex prohibited
Figure 24
Paper type does not match
A locked tray Paper size does not match
A4/plain jobs will use tray1-2

How to Print Using Letterhead
Page 30 of 53
Technical Notes: 4. If a type A device is used, one tray can be used for both simplex/duplex printing.
5. In LPs, duplex can be disabled on a per tray basis as of 06A models.
6. As letterhead is loaded only in one feed direction (in this case LEF), some finishing functions will not be available. In this case, staple "2 at Top" for example.
7. Letterhead Setting was not selected in this case for two reasons:
• The last page of an odd paged job issue (Section 6-2-1) does not occur in simplex printing.
• The rotation issue (Section 6-2-2) is not likely to occur. At least it does not occur if a portrait document includes landscape pages.
These files can be used to confirm the effectiveness of the settings in this case study.
letterhead_4pA4P.doc
Hello_2pA4PL.doc
Usage: 1. Open "letterhead_4pA4P.doc" and print it (a color printer is preferred). This will produce four sheets of
one-sided letterhead paper (A4/portrait). Or you can use your own letterhead or pre-printed sheets.
2. Load four4 sheets of letterhead paper in a tray of a type B MFP (one with the finisher is preferred) as instructed in this case study ("Simplex letterhead tray").
3. Configure the device as instructed in this case study.
4. Turn Letterhead Setting=Off.
5. Open "Hello_2pA4PL.doc". The document will consist of one portrait page and one landscape page. This simulates a portrait job that includes landscape pages.
6. Open the Print dialog and select the printer.
7. Open Printing Preferences and select:
• A4
• Portrait
• 1 page per sheet
• Duplex=Off
• (If available) Staple=2 at Left 8. Print.
9. The document will be printed (and stapled) successfully (Letterhead Setting=Off).
10. Turn Letterhead Setting=Auto Detect.
11. Repeat 5-8.
12. The document will be printed (and stapled) successfully (Letterhead Setting=Auto Detect).

How to Print Using Letterhead
Page 31 of 53
7-2 Case 2: Using a Type-B Device for Duplex-Only Printing
Part 1: Configuration of the device
Step 1: Load the trays:
• Tray1 = A4/plain in LEF
• Tray2 = A4/plain in SEF
• Tray3 = A3/plain in SEF
• Tray4 = A4/letterhead in LEF and face down* * "Duplex Letterhead Tray": The machine is type B and the tray is located under the engine. See Section 5-3-1 for details.
Letterhead loaded in tray4:
Situation/Requirements: 1. For paper saving purposes, the customer requires duplex for all print jobs.
2. Model DSc520, LD420c, C2020 or MPC2000 is used (a type-B device). The device has four source trays excluding the bypass (a "locked tray"). No LCT installed.
3. Both Plain and Letterhead will be used in the device:
• A4/Plain (loaded in both LEF and SEF)
• A3/Plain (loaded in SEF)
• A4/Letterhead (portrait, loaded in LEF, the letterhead is printed on one side of each page) 4. Only one tray is available for letterhead paper.
5. Letterhead jobs (and all other jobs) will only be duplex.
6. A4/Plain should be used by default, for both copying and printing.
7. The users will use the PCL5 driver for printing. They do not want to manually select a tray in the driver dialogue every time they print on letterhead.
Face Down
Figure 25

How to Print Using Letterhead
Page 32 of 53
Step 2: Configure Paper Tray Priority of both Copier and Printer to Tray1 or Tray2. Note: The setting is necessary to use A4/Plain as default in copying. Step 3: Configure Tray Paper Size settings the same as loaded paper. (This step depends on the model. Auto Detect is available in DSc520, LD420c, C2020 or MPC2000) Step 4: Configure Paper Type settings for each tray:
• Tray1-3 � Paper Type = Plain (="No Display" on the operation panel) � Duplex = "2 Sided Copy" (Both Simplex/Duplex available) � Apply Auto Paper Select = Yes (Auto-selectable)
• Tray4 � Paper Type = Letterhead � Duplex = "2 Sided Copy" (Both Simplex/Duplex available) � Apply Auto Paper Select = Yes (Auto-selectable)
Paper Type settings. Note that the settings will be applied not only to printing but also to copying:
Figure 26
Figure 27

How to Print Using Letterhead
Page 33 of 53
Paper Type Settings for Tray4: Step 5: Letterhead Setting > "Auto Detect": The Printer screen should look like the one shown below.
Figure 28
Figure 29
Plain paper is loaded Letterhead is loaded for duplex
Figure 30
Normal mode
Letterhead mode
Normal mode

How to Print Using Letterhead
Page 34 of 53
Part 2: Configuring Driver Settings (PCL5 driver is used as an example)
• To print on plain paper, select : � Input Tray = Auto Tray Select (default) � Paper Type = Plain & Recycled (default) � Duplex = On (default as per the customer’s requirement)
• To print on letterhead, select : � Input Tray = Auto Tray Select (default) � Paper Type = Letterhead � Duplex = On (must be default)
NOTE: This means that in many cases the only thing the user needs to do is choose a paper type (Letterhead or Plain).
Selecting Letterhead in the driver:
Figure 31

How to Print Using Letterhead
Page 35 of 53
Part 3: The Result Using PCL 5 Driver 13. If A4/Letterhead/duplex is assigned in a job, tray4 will be used. The job will be printed successfully.
14. If by mistake A4/Letterhead/simplex is assigned in a job, all pages will be printed on the backside of the
letterhead.
15. If no paper type is specified for a copy or print, A4/Plain will be used from Tray1 or 2. (requirement six of
this case)
Figure 32
Paper type does not match A locked tray
Paper size does not match
A4/Letterhead/duplex jobs will use tray4
Figure 34
Paper type
does not match
A locked tray Paper size does not match
A4/plain jobs will use tray1-2
Figure 33
Paper type does not match
A locked tray Paper size does not match
A4/Letterhead/simplex jobs will also use tray4.

How to Print Using Letterhead
Page 36 of 53
Technical Notes: 1. If a type A device is used, one tray can be used for both simplex/duplex printing.
2. If letterhead is loaded only in one feed direction (in this case LEF), some finishing functions will not be available. In this case, staple "2 at Top" for example.
3. Letterhead Setting was enabled in this case because the last page of an odd paged job issue (Section 6-2-1) will occur without the setting. (The rotation issue (Section 6-2-2) is not likely to occur)
These files can be used to confirm the effectiveness of the settings in this case study.
letterhead_4pA4P.doc
Hello_3pA4PPP.doc
Hello_3pA4PPL.doc
Usage: 1. Open "letterhead_4pA4P.doc" and print it (a color printer is preferred). This will produce four sheets of
one-sided letterhead paper (A4/portrait). Or you can use your own letterhead or pre-printed sheets.
2. Load four sheets of letterhead paper in a tray of a type B MFP (one with the finisher is preferred) as instructed in this case study ("Simplex letterhead tray").
3. Configure the device as instructed in this case study.
4. Turn Letterhead Setting=Off.
5. Open "Hello_3pA4PPP.doc". The document will consist of three portrait pages.
6. Open the Print dialog and select the printer.
7. Open Printing Preferences and select:
• A4
• Portrait
• One page per sheet
• Duplex=Open to Left
• (If available) Staple=2 at Left 8. Print.
9. The last page of the document is printed on the backside of the last page. (Letterhead Setting = Off).
10. Turn Letterhead Setting=Auto Detect.
11. Repeat 5-8.
12. The document is printed (and stapled) successfully (Letterhead Setting=Auto Detect).
NOTE: To examine the rotation issue, try these steps again using "Hello_3pA4PPL". The document consists of two A4/portrait pages and one A4/landscape page.

How to Print Using Letterhead
Page 37 of 53
7-3 Case 3: Using a Type B Device for Both Simplex and Duplex Letterhead Printing
Introduction: We can configure the device so users can use Auto Tray Select for both simplex and duplex.
NOTE: The following configuration requires two source trays available for one type of letterhead paper.
Part 1: Configuration of the Device Step 1: Load paper in the trays as follows:
NOTE: DSm735e, LD335, 8035e or MP3500 requires the dial in each tray to be set to apply paper size and feed direction.
• Tray1 = A4/Plain in SEF (Dial = A4/SEF)
• Tray2 = A4/Plain in LEF (Dial = A4/LEF)
• Tray3 = A4/Letterhead in LEF and face-up* (Dial = A4/LEF)
• "Simplex Letterhead Tray": The machine is type B and the tray is located under the engine). See Section 5-3-1 for details.
Situation/Requirements: 1. Model DSm735e, LD335, 8035e or MP3500 is used (a type B device). The device has four
source trays excluding the bypass (a "locked tray"). No LCT. 2. Both Plain and Letterhead paper will be used in the device:
• A4/Plain (in both LEF and SEF)
• A4/Letterhead (portrait, loaded SEF, the letterhead is printed on one side of each page) 3. Letterhead paper will be used for both simplex and duplex printing. 4. A4/Plain should be used by default, for both copying and printing. 5. The users will use the PCL5 driver for printing. They do not want to manually select a tray in the
driver dialogue every time they print on letterhead.
Face Up
Figure 35

How to Print Using Letterhead
Page 38 of 53
• �Tray4 = A4/Letterhead in LEF and face-down* (Dial = A4/LEF) * "Duplex Letterhead Tray": The machine is type B and the tray is located under the engine). See Section 5-3-2 for details.
Step 2: Configure Paper Tray Priority of both Copier and Printer to Tray1.
By correctly configuring the Paper Tray Priority, the trays will be selected with the order of priority shown on the right:
Default order (A-C4.5): 1. Priority Tray (LEF, SEF) 2. Tray1 (LEF) 3. Tray2 (LEF) 4. LCT 5. Tray3 (LEF) 6. Tray4 (LEF) 7. Tray1 (SEF) 8. Tray2 (SEF) 9. Tray3 (SEF) 10. Tray 4 (SEF)
The configured order: 1. Tray1 (LEF, SEF) 2. Tray2 (LEF) 3. Tray3 (LEF) 4. Tray4 (LEF) 5. Tray2 (SEF) 6. Tray3 (SEF) 7. Tray4 (SEF) Note: The device we are using doesn’t have an LCT.
Face Down
Figure 36
Figure 37

How to Print Using Letterhead
Page 39 of 53
Step 3: Configure Paper Type settings:
• Tray1 and Tray2 � Paper Type = Plain (="No display" on the operation panel) � Duplex = 2 Sided Copy (Both Simplex and Duplex available) � Apply Auto Paper Select = Yes (Auto-selectable)
• Tray3 � Paper Type = Letterhead � Duplex = 1 Sided Copy (Only Simplex available) � Apply Auto Paper Select = Yes (Auto-selectable)
Tray3 Paper Type settings:
• Tray4 � Paper Type = Letterhead � Duplex = 2 Sided Copy (Both Simplex/Duplex available) � Apply Auto Paper Select = Yes (Auto-selectable)
Tray4 Paper Type settings:
Figure 38
Figure 39

How to Print Using Letterhead
Page 40 of 53
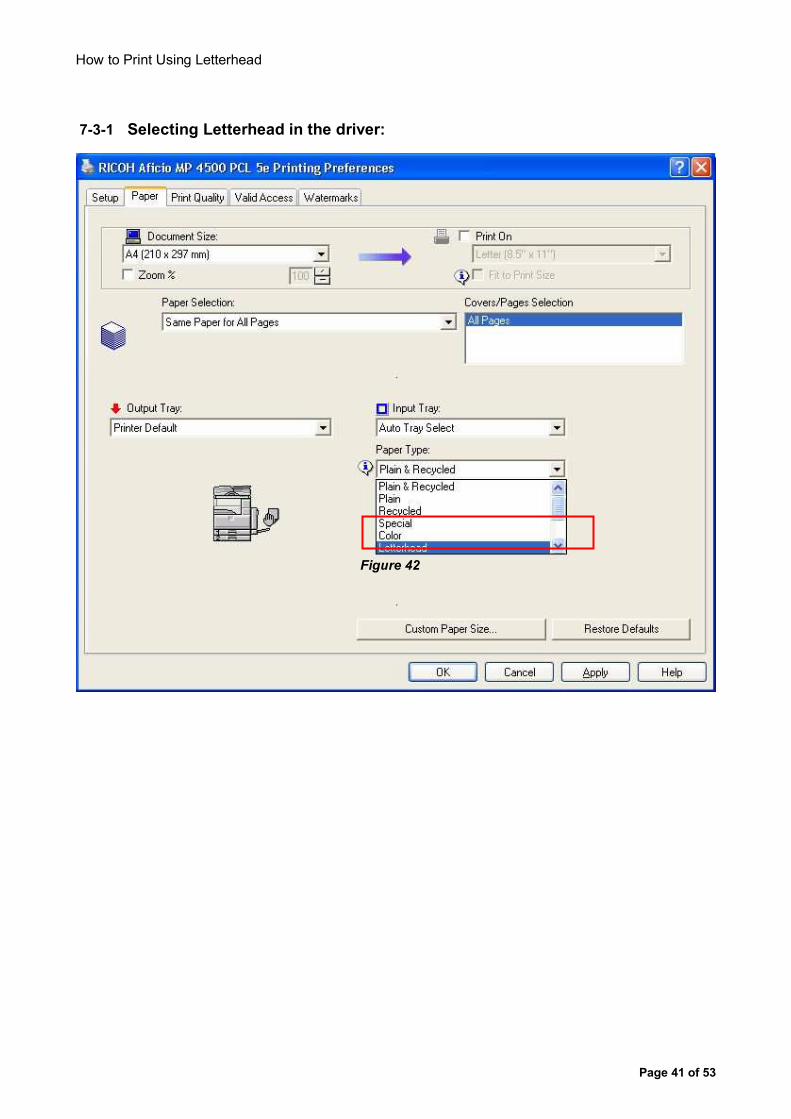
Step 4: Turn Letterhead Setting = "Off". The Printer screen should look like the one shown below. Part 2: Configuring Driver Settings When Printing (PCL5 driver is used as an example)
• To print on plain paper, select : �Input Tray = Auto Tray Select (default) �Paper Type = Plain & Recycled (default)
• To print on letterhead in simplex, select: �Input Tray = Auto Tray Select (default) �Paper Type = Letterhead �Duplex = Off
• To print on letterhead in duplex, select: �Input Tray = Auto Tray Select (default) �Paper Type = Letterhead �Duplex = Open to Left
NOTE: This means that in many cases the only thing the user needs to do is choose a paper type (Letterhead or Plain).
Figure 41
Letterhead is loaded for duplex Plain paper is loaded
Letterhead is loaded for simplex
All trays work in Normal mode
Figure 40
How to Print Using Letterhead
Page 41 of 53
7-3-1 Selecting Letterhead in the driver:
Figure 42

How to Print Using Letterhead
Page 42 of 53
Part 3: The Result Using PCL5 Driver 1. If A4/Letterhead/simplex is assigned in a job, tray3 will be used (unless paper runs out) because tray3 has
higher priority than tray4. The job will be printed successfully on the letterhead side. In addition, simplex pages of a duplex job (the last page of an odd-page job or a one page duplex job) will also be printed successfully using tray3.
2. If A4/Letterhead/duplex is assigned in a job, duplex pages will be printed successfully from tray 4 on the
letterhead side.
3. If no paper type is specified for a copy or print, A4/Plain will be used from Tray1 or 2. (requirement four of
this case)
Figure 44
Duplex pages in A4/Letterhead/duplex jobs will use tray4
Paper type
does not match A locked tray
Duplex prohibited
Paper type does not match
A locked tray
A4/plain jobs will use tray1
Figure 45
Figure 43
A4/Letterhead/simplex jobs will use tray3
Paper type does not match
A locked tray
Simplex pages in A4/Letterhead/duplex jobs
will also use tray3

How to Print Using Letterhead
Page 43 of 53
Limitation:
If the "simplex letterhead tray" runs out of paper, the "duplex letterhead tray" will be used for simplex printing and images will be printed on the backside of the letterhead. Technical Notes: 1. If a type A device is used, one tray can be used for both simplex and duplex printing.
2. In LPs, duplex can be disabled on a per tray basis as of 06A models.
3. As letterhead is loaded only in one feed direction (in this case LEF), some finishing functions will not be available. In this case, staple "2 at Top" for example.
4. In fact, the Priority Tray can be any tray except tray 4 in this case. All that is required is that tray 3 have a higher priority than tray 4.
5. Letterhead Setting was not selected in this case for two reasons:
• The last page of an odd paged job issue (Section 6-2-1) does not occur in simplex printing.
• The rotation issue (Section 6-2-2) is not likely to occur. At least it does not occur if a portrait document includes landscape pages.
NOTE: If the Letterhead Setting is enabled, duplex jobs will also be successfully printed. In such a case, the device will print the last page of an odd-paged job or a one page duplex job by using letterhead in tray4 and making it go through the duplex path.
These files can be used to confirm the effectiveness of the settings in this case study.
letterhead_5pA4P.doc
Hello_3pA4PPP.doc
Hello_3pA4PPL.doc
Usage: 1. Open "letterhead_5pA4P.doc" and print it (a color printer is preferred). This will produce five sheets of
one-sided letterhead paper (A4/portrait). Or you can use your own letterhead or pre-printed sheets.
2. Using a type B MFP (one with a finisher is preferred), load four sheets of letterhead for simplex letterhead printing.
3. Select another lower priority tray for duplex printing in the same MFP and load one sheet of letterhead as instructed in this case study.
4. Configure the Tray Paper Settings of the trays as instructed in this case study.
5. Turn Letterhead Setting=Off.
6. Open "Hello_3pA4PPP.doc". The document will consist of three A4/portrait pages. (This simulates an odd paged document)
7. Open the Print dialog from "Hello_3pA4PPP.doc" and select PCL5 driver for the printer.
8. Open Printing Preferences and select:
• A4
• Portrait
• One page per sheet
• Duplex=Off
• (If available) Staple=2 at Left

How to Print Using Letterhead
Page 44 of 53
9. Print.
10. The three pages are successfully printed (and stapled) as simplex using letterhead in tray3.
11. Open Printing Preferences again and this time select:
• A4
• Portrait
• One page per sheet
• Duplex=Open to Left
• (If available) Staple=2 at Left 12. Print.
13. The first two pages are printed as duplex using letterhead in tray4, and then the last one page is printed as simplex using letterhead in tray3. The job will be successfully printed (and stapled).
NOTE: Steps 6-12 can be repeated with Letterhead Setting=Auto Detect.
NOTE: The rotation issue can be examined using "Hello_3pA4PPL". The document consists of two A4/portrait pages and one A4/landscape page.
7-4 Case 4: Using a Small Printer for Simplex Letterhead Printing
Introduction: Although it is not recommended, in general, to load letterhead in a rotated position (see Section 5-1), this is the only way to use A4 or Letter size letterhead in small printers. The conditions in this case study are the same as Case 1 (Letterhead paper will only be used for simplex printing). So disable Letterhead Setting. Part 1: Configuration of the Device
Step 1: Turn Letterhead Setting=Off via WIM or the operation panel.
Situation / Requirements: 1. Model P7031, LP131, MLP31 or SP4100 (a type B small printer) is used. The device has two source
trays: Tray1 and Bypass. Bypass is auto-selectable.
2. Both Plain and Letterhead will be used in the device. Following paper will be used:
• A4/Plain
• A4/Letterhead (portrait; letterhead is printed on one side)
3. Letterhead will only be used for simplex.
4. The model can contain A4 paper only in SEF. Portrait letterhead must be rotated in source trays.
Figure 46

How to Print Using Letterhead
Page 45 of 53
Step 2: Configure the tray paper setting of tray1 to A4/SEF. For P7031, LP131, MLP31 or SP4100, this is done using the dial. Step 3: Try loading letterhead in the following four ways and printing a one page simplex job to see if the image is successfully printed:
Figure 47
Face UP 270°
Face DOWN 270°
Face UP 90°
Face DOWN 90°
This will work fine in this case: - Model P7031, LP131, MLP31 or SP4100 - Letterhead Setting=Off - A simplex job
Figure 48

How to Print Using Letterhead
Page 46 of 53
The result will depend on the device and the settings. In this case, simplex jobs will be printed successfully when letterhead is loaded in face down and rotated 90°. These files can be used to confirm the effectiveness of the settings in this case study. Step 4: Load letterhead paper in tray1 (using the desired position as discovered in Step 3). Step 5: Configure Paper Type settings for each tray:
• Tray1 � Paper Type = Letterhead � Apply Auto Paper Select = On � Apply Duplex = Off
• Bypass (Note: Not a locked tray in P7031, LP131, MLP31 or SP4100) � Paper Size = A4 Portrait � Paper Type = Plain � Apply Auto Paper Select = On � Apply Duplex =On
Face DOWN 90°
Figure 49
Hello_1pA4P.doc letterhead_4pA4P.doc

How to Print Using Letterhead
Page 47 of 53
Part 2: Configuration of the Driver Settings
• To print on letterhead, select : � Input Tray = Auto Tray Select (default) � Paper Type = Letterhead � Duplex = Off
• To print on plain, select : � Input Tray = Auto Tray Select (default) � Paper Type = Plain/Recycled (default)
Part 3: The Result Using PCL5 Driver 1. If A4/Letterhead/simplex is assigned in a job, tray1 will be used. The job will be successfully printed on
letterhead.
2. If A4/Letterhead/duplex is assigned in a job by mistake, a mismatch error will be displayed.
3. If A4/Plain is assigned in a job, the bypass tray will be used.
Figure 50

How to Print Using Letterhead
Page 48 of 53
7-5 Case 5: Using a Type A Device for Two Different Letterheads
Introduction:
As described in Section 6-1, Letterhead Setting is applied to three paper types, Letterhead, Pre-printed and Pre-punched. In this case, "Letterhead" will be used for Letterhead-A and "Pre-printed" will be used for Letterhead-B. Part 1: Configurations of the device Step 1: Load the trays:
• Tray1 = A4/Plain in LEF
• Tray2 = A4/Plain in SEF
• Tray3 = Letterhead-A in LEF and face-down* *The machine is type A and the tray is located under the engine.
• LCT = Letterhead-B in LEF and face-up** **The machine is type A and the tray is on the right side of the engine. See Section 5-2 for details.
Situation/requirements: 1. Model P7675, LP275hdn, MLP175n or SP9100dn are used (a type A device). The device has four
source trays including LCT. There is no bypass tray.
2. Plain paper and two different letterheads (Letterhead-A and Letterhead-B) will be used in the device:
• A4/Plain (in both LEF and SEF)
• Letterhead-A (A4, portrait, letterhead is printed on one side)
• Letterhead-B (A4, portrait, letterhead is printed on one side) 3. Letterhead paper will be used for both simplex and duplex printing.
4. A4/Plain paper should be used by default.
5. The users will use the PCL5 driver for printing. The do not want to manually select a tray in the driver dialogue every time they print on letterhead.
Tray3 LCT
Figure 51

How to Print Using Letterhead
Page 49 of 53
These files can be used to confirm the effectiveness of the settings in this case study.
letterheadA_2pA4P.doc
letterheadB_2pA4P.doc
Step 2: Configure Paper Tray Priority to Tray1. Step 3: Configure Tray Paper Size settings to match the loaded paper. This procedure for this depends on the model. Auto Detect is available in MT-P2. Step 4: Configure Paper Type settings for each tray:
• Tray1 and Tray2 � Paper Type = Plain � Apply Auto Paper Select = Yes (Auto-selectable)
• Tray3 � Paper Type = Letterhead � Apply Auto Paper Select = Yes (Auto-selectable)
• LCT � Paper Type = Preprinted � Apply Auto Paper Select = Yes (Auto-selectable)
Figure 53
Figure 52

How to Print Using Letterhead
Page 50 of 53
Step 5: Letterhead Setting > Off Step 6: Duplex > Long Edge Bind
NOTE: As for LPs, duplex can be disabled on a per tray basis as of 06A models. P7675, L275hdn, MLP175n or SP9100dn is 06S. Therefore, duplex cannot be disabled for specific trays.
Part 2: Configuring Driver Settings (PCL5 driver is used as an example)
• To print on plain paper, select : � Input Tray = Auto Tray Select (default) � Paper Type = Plain & Recycled (default)
• To print on Letterhead-A, select : � Input Tray = Auto Tray Select (default) � Paper Type = Letterhead
• To print on Letterhead-B, select : � Input Tray = Auto Tray Select (default) � Paper Type = Preprinted
NOTE: This means that in many cases the only thing the user needs to do is choose a paper type (Letterhead, Preprinted or Plain)
Part 3: Result
1. If A4/Plain is assigned in a job, Tray1 or 2 will be used. 2. If A4/Letterhead is assigned in a job, Letterhead–A in Tray 3 will be used (both for simplex and
duplex jobs). 3. If A4/Preprinted is assigned in a job, Letterhead-B in LCT will be used (both for simplex and duplex).
Figure 54
Figure 55

How to Print Using Letterhead
Page 51 of 53
Technical Note:
1. The Letterhead Setting was not selected in this case for two reasons:
• The issue in which the last page of an odd paged is printed on the wrong side of the letterhead (Section 6-2-1) does not occur using a type-A device.
• The rotation issue (Section 6-2-2) is not likely to occur. At least it does not occur if a portrait document includes landscape pages.
2. In fact there is no necessity of using Preprinted or Prepunched as an alternative paper type to
Letterhead. Letterhead Setting is not selected in this case so any paper type other than Plain can be used.

How to Print Using Letterhead
Page 52 of 53
8. Appendix
8-1 A Limitation Affecting Type-B 04A Models
Gestetner Lanier Savin Ricoh
C7521 LP222cn CLP22 CL3500n
P7528/7528n LP128/128n MLP28/28n AP410/410n
C7425dn LP126cn CLP26dn CL4000dn
DSC428/435/445 LD328c/335c/345c C2824/3528/4535 3228C/3235C/3245C
P7535n LP135n MLP35n AP610n
DSc424 LD124c C2410 3224C
Type B 04A models have a limitation. Letterhead Setting cannot be applied to a one page duplex job. The image will be printed on the backside of the letterhead page and the job will be counted as two pages.
p1 (Blank)
Figure 56
