white pine weevil traps - department of entomology...
TRANSCRIPT

Revised: March 11, 2005
White Pine Weevil Detection Traps Sandy Gardosik and Rayanne Lehman, PA Department of Agriculture
These instructions are for modifying and deploying the Tedders traps (Fig. 1) now sold by Great Lakes IPM (1-800 235-0285). Great Lakes advertises these traps as the pyramid trunk trap for detection of plum curculio and pecan weevil. The catalog # is IPM-500. Currently (2005) the cost is $14.95 per trap. To order just the top assembly ask for the boll weevil top assembly catalog #IPM-1006T for $1.75.
Fig. 1 Tedders trap (note bottom of vane chewed by animal) ◦ ◦ ◦ ◦
Fig. 2 Dimensions for prep Adapting the Trap Top As supplied, the plastic and screen top has no means of remaininthe time of year we are using the traps, windy conditions frequen
.
22 in.
24 in.
24in
A
Building the Trap Base The trap base must be prepared if only the trap top is purchased or if the base has deteriorated with usage. Two triangles are needed for each trap and the dimensions are included in the diagram below (Fig. 2). They can be constructed from any material that would hold up outdoors for 1-2 months. Choose a material that does not have a smooth surface. A rougher surface will allow the weevils to crawl to the top of the trap. The base is intended to resemble a tree (to the weevils) so the material must be dark in color – dark brown, dark green, or black. Paint with sand added would also provide a good gripping surface for the weevils. When cutting out the triangles, a slot 24 inches long should be cut in the top of one triangle, which will be vane “A”. A similar slot 24 inches long must be cut in the bottom of the other triangle, vane “B”.
After the triangles are cut, holes must be drilled in the top of vane “A” (solid top, slotted bottom) to attach the bait. In addition, holes must be cut in the bottom of each vane, near the exterior angles. These holes will be used to stake the trap in place in the plantation.
48 in
1 ⅝ in
◦
aration of trap bottom.
g secure on the base. In tly blow the tops from th
1 ⅝ in
◦
Pennsylvania, at e base. To keep
22 in.
B

Revised: March 11, 2005
the top secure, we have added short pieces of plastic J-channel, available at a building supply store, to the inside of the top. The J-channel fits down over the corner of one vane of the base and stabilizes the top enough to prevent it from falling or blowing off.
Fig. 3 Inside of trap top with J-channel added
Fig. 4 Trap top in place.
The 1 to 1 ½ inch pieces of J-channel should be attached to the inside of the screen funnel (Fig. 3). We embedded the J-channel in silicone caulking applied on the inside of the funnel. The J-channel could be applied to the screen but the plastic rib on the outside of the funnel adds additional backing to the J-channel. Position the two pieces of J-channel to be opposite each other on the inside of the funnel. Assembly of Trap Step 1. Assemble the trap base by sliding the triangle with the slotted bottom over the top of the triangle with the slotted top. The slots should line up, allowing the top triangle to slide far enough down on the bottom triangle so that their base and top are even. When assembled properly, the base will stand freely with four “vanes”. Step 2. Place trap in row and stake down, using wire and the holes drilled in each vane of the base. Do not use string or twine since small animals will chew this and may destroy the base in the process (Fig. 1). Step 3. Using fine gauge wire, attach the two small bottles to the base utilizing the small holes drilled in the top of one of the vanes. The bottles should lie flat against the angle created by the vanes and should have their tops as close as possible to the top of the base. Fill one bottle with 95% ethyl alcohol (available in stores selling wine and spirits); fill the other vial with gum turpentine. It is not necessary to place the caps on the bottles. Step 4. Fit the trap top over the base, covering the tops of the bottles containing the alcohol and turpentine. Slide the J-channel on the inside of the trap top over the top corner of the vane with the solid top (slotted bottom). Push the entire trap top downward
gently until it feels secure (Fig. 4). Step 5. Place the large plastic vial over the screen funnel and turn to screw into place (Fig. 5). This is where the weevils will be trapped (Fig. 6) after crawling up the vane and entering through the small opening in the screen. To remove weevils, and other insects and spiders, remove the entire trap top (funnel and large plastic container) and invert to unscrew the large vial.
Fig. 5 Attaching large plastic vial over
screen funnel.
Revised: March 11, 2005
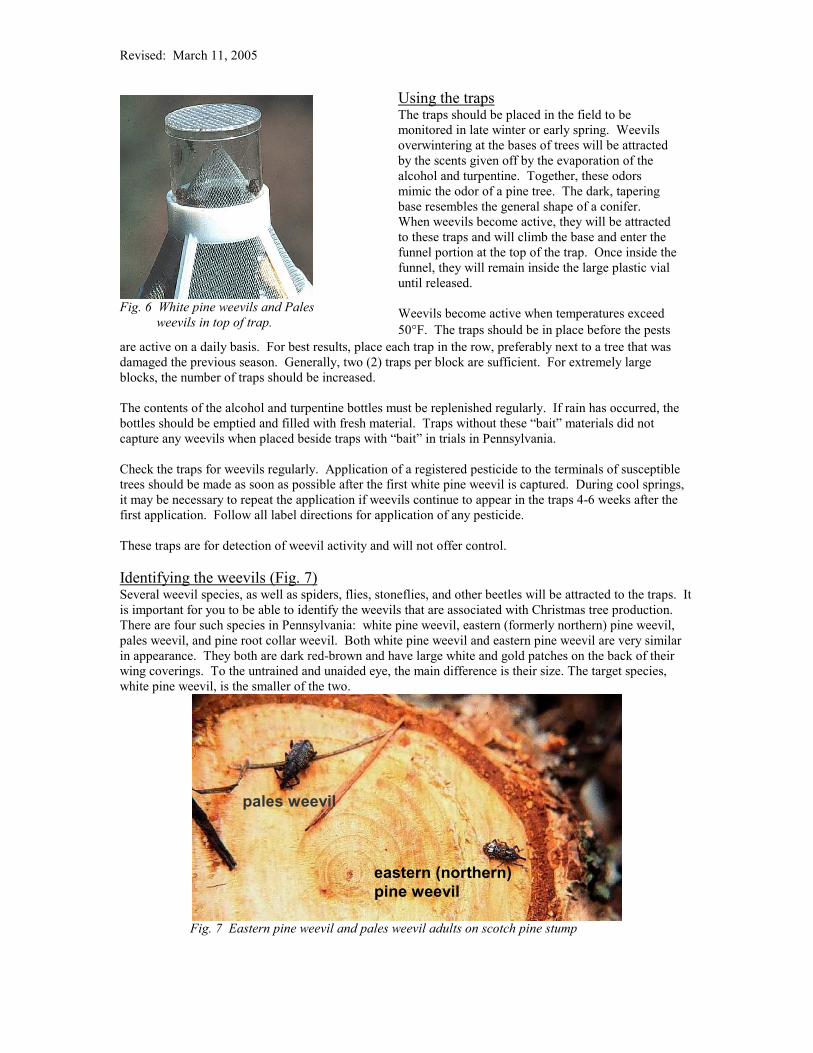
Fig. 6 White pine weevils and Pales weevils in top of trap.
are active on a daily basis. For best results, place each trap in the row, preferably next to a tree that was damaged the previous season. Generally, two (2) traps per block are sufficient. For extremely large blocks, the number of traps should be increased. The contents of the alcohol and turpentine bottles must be replenished regularly. If rain has occurred, the bottles should be emptied and filled with fresh material. Traps without these “bait” materials did not capture any weevils when placed beside traps with “bait” in trials in Pennsylvania. Check the traps for weevils regularly. Application of a registered pesticide to the terminals of susceptible trees should be made as soon as possible after the first white pine weevil is captured. During cool springs, it may be necessary to repeat the application if weevils continue to appear in the traps 4-6 weeks after the first application. Follow all label directions for application of any pesticide. These traps are for detection of weevil activity and will not offer control. Identifying the weevils (Fig. 7) Several weevil species, as well as spiders, flies, stoneflies, and other beetles will be attracted to the traps. It is important for you to be able to identify the weevils that are associated with Christmas tree production. There are four such species in Pennsylvania: white pine weevil, eastern (formerly northern) pine weevil, pales weevil, and pine root collar weevil. Both white pine weevil and eastern pine weevil are very similar in appearance. They both are dark red-brown and have large white and gold patches on the back of their wing coverings. To the untrained and unaided eye, the main difference is their size. The target species, white pine weevil, is the smaller of the two.
Fig. 7 Eastern pine weevil and pales weevil adults on scotch pine stump
Using the traps The traps should be placed in the field to be monitored in late winter or early spring. Weevils overwintering at the bases of trees will be attracted by the scents given off by the evaporation of the alcohol and turpentine. Together, these odors mimic the odor of a pine tree. The dark, tapering base resembles the general shape of a conifer. When weevils become active, they will be attracted to these traps and will climb the base and enter the funnel portion at the top of the trap. Once inside the funnel, they will remain inside the large plastic vial until released. Weevils become active when temperatures exceed 50°F. The traps should be in place before the pests
pales weevil
eastern (northern) pine weevil

Revised: March 11, 2005
Pales weevil and pine root collar weevil will also be attracted to the traps. They can easily be separated from the previous two species by size and color but are difficult to separate from each other. These weevils are larger and dark brown to almost black with small white patches on the top of their wing coverings. Pine root collar weevil is the larger of these two species. References Lehman, R.D. 1993. White pine weevil, Pissodes strobi (Peck). Reg. Hort. Ent. Circ. 154. 3 pp. Tedders, W. L. and B. W. Wood. 1994. A new technique for monitoring pecan weevil emergence
(Coleoptera:Curculionidae). J. Entomol. Sci. 29: 18-30.