wide format variable information with xerox freeflow...
TRANSCRIPT
Xerox® Wide Format
IJP 2000
Xerox® Wide Format Variable Information with Xerox® FreeFlow® Design Express Solution Guide
®
2
Table of Contents
Creating Large Format Signage .......................................................................................................................... 3
Quick Print Instructions .......................................................................................................................................... 4
The Productivity Pack .............................................................................................................................................. 5
Wide Format Signage Application Description ............................................................................................. 6
Variable Data Needs a Data File ........................................................................................................................ 7
How the Application Was Built ............................................................................................................................ 9
Exporting Your Wide Format Signage Application ...................................................................................20
3
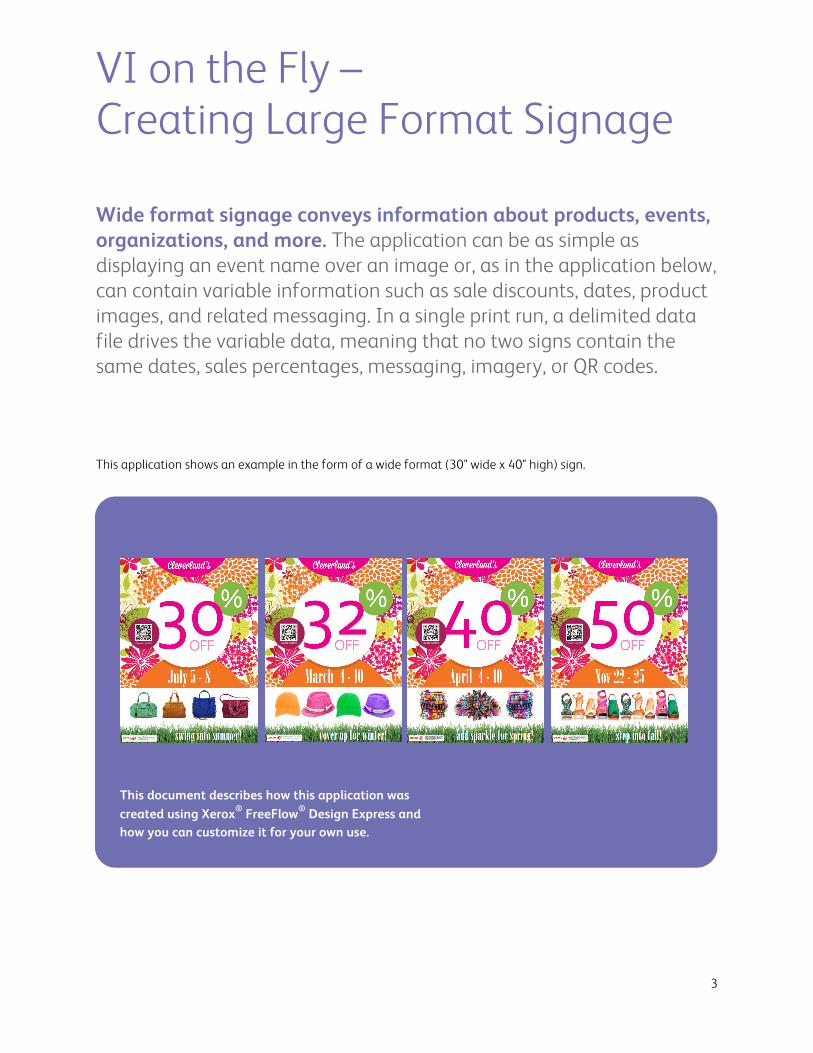
VI on the Fly – Creating Large Format Signage
Wide format signage conveys information about products, events, organizations, and more. The application can be as simple as displaying an event name over an image or, as in the application below, can contain variable information such as sale discounts, dates, product images, and related messaging. In a single print run, a delimited data file drives the variable data, meaning that no two signs contain the same dates, sales percentages, messaging, imagery, or QR codes.
This application shows an example in the form of a wide format (30" wide x 40" high) sign.
This document describes how this application was created using Xerox® FreeFlow® Design Express and how you can customize it for your own use.
4
Quick Print Instructions To print the application as is to the Xerox® Wide Format IJP 2000, follow the quick print instructions below.
The PDF file for this application is included in the productivity pack and can be printed to the IJP 2000. It contains fliers with dimensions of 30" wide by 40" high (providing you don’t scale or alter proportions with your print driver.) To modify the application, refer to the “How the Application Was Built” section of this document on page 9. To print the application: Simply submit the Otohime_VI_Retail_Cleverlands.pdf file to the Xerox® Wide Format IJP 2000.
5
The Productivity Pack
This productivity pack includes a compressed file that contains all the assets necessary to edit and print this application – VIontheflyWideFormatRSign.zip. Keep in mind that the Xerox® Wide Format IJP 2000 printer must be configured to print 30" by 40" PDF applications in order to output this job correctly.
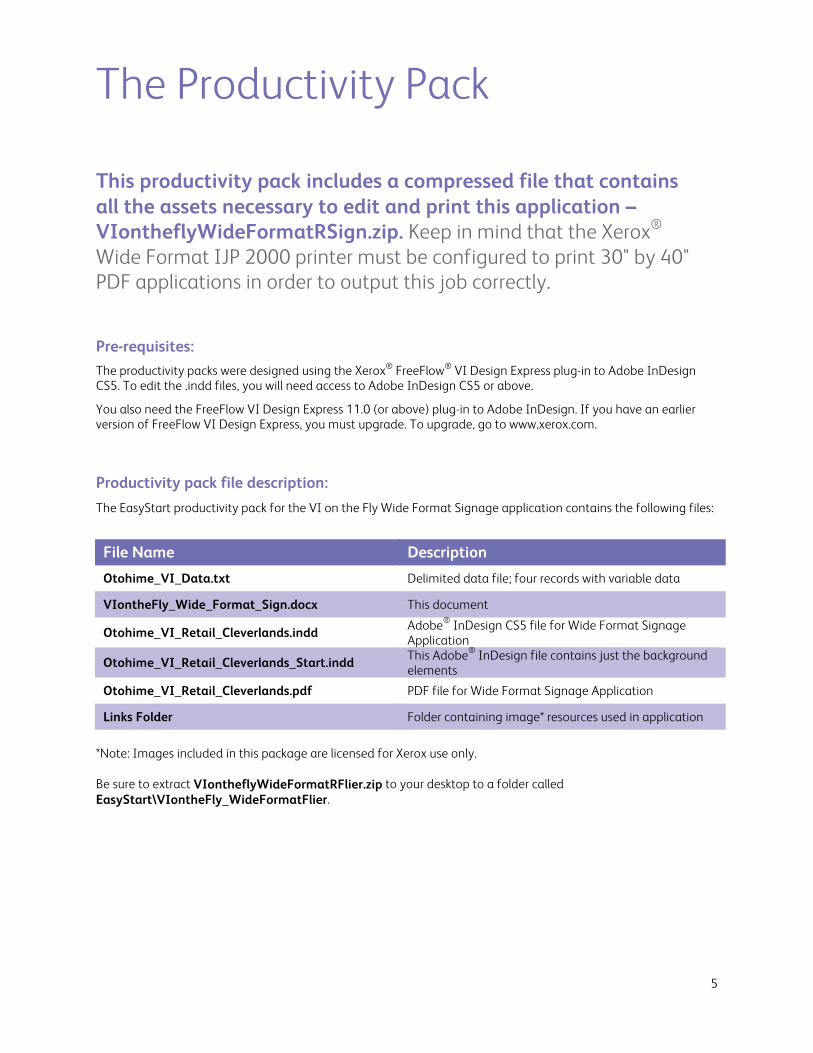
Pre-requisites: The productivity packs were designed using the Xerox® FreeFlow® VI Design Express plug-in to Adobe InDesign CS5. To edit the .indd files, you will need access to Adobe InDesign CS5 or above. You also need the FreeFlow VI Design Express 11.0 (or above) plug-in to Adobe InDesign. If you have an earlier version of FreeFlow VI Design Express, you must upgrade. To upgrade, go to www.xerox.com. Productivity pack file description: The EasyStart productivity pack for the VI on the Fly Wide Format Signage application contains the following files:
File Name Description Otohime_VI_Data.txt Delimited data file; four records with variable data
VIontheFly_Wide_Format_Sign.docx This document
Otohime_VI_Retail_Cleverlands.indd Adobe® InDesign CS5 file for Wide Format Signage Application
Otohime_VI_Retail_Cleverlands_Start.indd This Adobe® InDesign file contains just the background elements
Otohime_VI_Retail_Cleverlands.pdf PDF file for Wide Format Signage Application
Links Folder Folder containing image* resources used in application
*Note: Images included in this package are licensed for Xerox use only.
Be sure to extract VIontheflyWideFormatRFlier.zip to your desktop to a folder called EasyStart\VIontheFly_WideFormatFlier.
6
Wide Format Signage Application Description
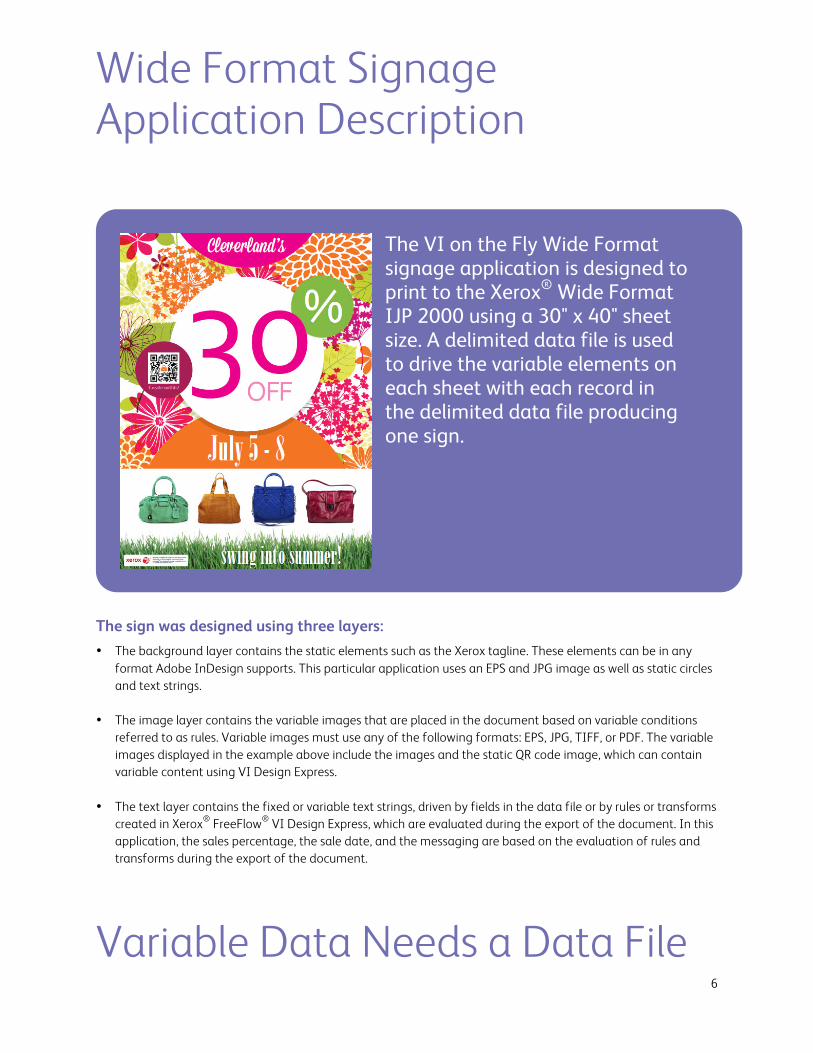
The VI on the Fly Wide Format signage application is designed to print to the Xerox® Wide Format IJP 2000 using a 30" x 40" sheet size. A delimited data file is used to drive the variable elements on each sheet with each record in the delimited data file producing one sign.
The sign was designed using three layers: • The background layer contains the static elements such as the Xerox tagline. These elements can be in any
format Adobe InDesign supports. This particular application uses an EPS and JPG image as well as static circles and text strings.
• The image layer contains the variable images that are placed in the document based on variable conditions referred to as rules. Variable images must use any of the following formats: EPS, JPG, TIFF, or PDF. The variable images displayed in the example above include the images and the static QR code image, which can contain variable content using VI Design Express.
• The text layer contains the fixed or variable text strings, driven by fields in the data file or by rules or transforms created in Xerox® FreeFlow® VI Design Express, which are evaluated during the export of the document. In this application, the sales percentage, the sale date, and the messaging are based on the evaluation of rules and transforms during the export of the document.
Variable Data Needs a Data File
7
What would a variable data application be without a data file? The productivity pack includes a demonstration data file called Otohime_VI_Data.txt. Xerox® FreeFlow® VI Design Express supports most types of delimited data formats, including CVS, DAT, and TXT files. (XML support will be introduced in the FreeFlow VI Design Express 12.0 release in 4th Qtr 2013).
FreeFlow VI Design Express cannot extract or query database files to build a delimited data file; you must do your own database query to produce a flat data file, which can be in any standard format using any standard delimiter character.
During the design of the application, it is suggested that you extract a sample data file of between 5 and 30 records that should be able to exercise all the variable and conditional logic you want to apply to your application. This smaller data file avoids slowing down the design tool, as it has to process through each record when changes are made. When you are ready to create the production output, select the VI Design PDF Export option. During the export phase, you can point to a larger production data file or continue to use the sample data file. If you select a larger production data file, the field names and the order of those field names must match the sample data file used for the design. This application uses a text file generated using a text editor. As discussed above, you can use other delimited data formats. Below is a sample of the first few records from the Otohime_VI_Data.txt data file used in the Wide Format Signage application.
Note: When generating your own delimited file for future applications, it is always best to use field names that mix upper -and lower-case characters. Avoid using one- or two-character field names. Use the underscore character instead of a space character. While those rules apply to naming, data contained in the fields are not restricted by these rules.
8
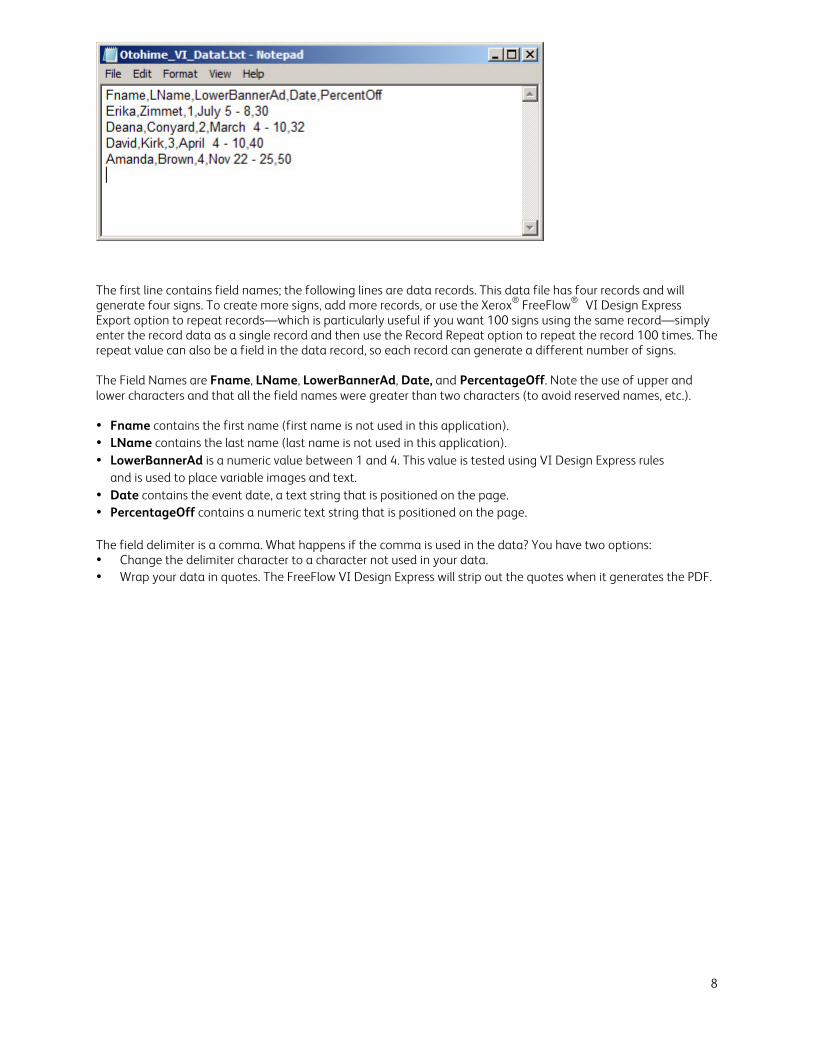
The first line contains field names; the following lines are data records. This data file has four records and will generate four signs. To create more signs, add more records, or use the Xerox® FreeFlow® VI Design Express Export option to repeat records—which is particularly useful if you want 100 signs using the same record—simply enter the record data as a single record and then use the Record Repeat option to repeat the record 100 times. The repeat value can also be a field in the data record, so each record can generate a different number of signs. The Field Names are Fname, LName, LowerBannerAd, Date, and PercentageOff. Note the use of upper and lower characters and that all the field names were greater than two characters (to avoid reserved names, etc.). • Fname contains the first name (first name is not used in this application). • LName contains the last name (last name is not used in this application). • LowerBannerAd is a numeric value between 1 and 4. This value is tested using VI Design Express rules
and is used to place variable images and text. • Date contains the event date, a text string that is positioned on the page. • PercentageOff contains a numeric text string that is positioned on the page. The field delimiter is a comma. What happens if the comma is used in the data? You have two options: • Change the delimiter character to a character not used in your data. • Wrap your data in quotes. The FreeFlow VI Design Express will strip out the quotes when it generates the PDF.
9
How the Application Was Built This section will help you use this productivity pack as a guide to printing the wide format signs. You can modify the signs for your own use, or you can use the concepts and principles to design your own. For more extensive training on Xerox® FreeFlow® VI Design Express, refer to the FreeFlow VI Design Express User Guide, which contains a hands-on exercise in the Hints and Tips chapter that will provide a basic overview of how the software works. It is recommended that you review that chapter. For the Xerox® Wide Format IJP 2000 device, you would use the FreeFlow VI Design Express PDF as the Export option to generate a PDF. Before you start building any application, you should draw or list the elements that will make up the application, noting which elements are static and which elements are variable. You need to consider: • What data is needed to drive the application? • How will the data be used? • What conditional logic will you apply to your design?
For example, consider the field LowerBannerAd. This could contain the variable lower banner ad image, such as bags_27x7.jpg. But by making this a numeric value, this field can drive several conditional logic tests that will place the lower banner image and drive the marketing message for that item. A design decision was made to use QR codes with images related to the products. These QR codes (with the www.xerox.com URL) were created offline and are called in as images. FreeFlow VI Design Express can generate its own QR codes but cannot insert images into them. Follow these steps: 1. Once you understand how the application goes together, the next task is to generate the artwork and the
sample data file.
2. Once that activity has been completed, open Adobe InDesign. 3. The application is designed to print to a 30" x 40" sheet. Use the InDesign Page Setup menu to define
the sheet.
4. This application uses a static background. Anyone familiar with Adobe InDesign can use the available tools and artwork to create the background. To save time, open the Otohime_VI_Retail_Cleverlands_Start.indd file. This has all the background elements in a layer called Background.
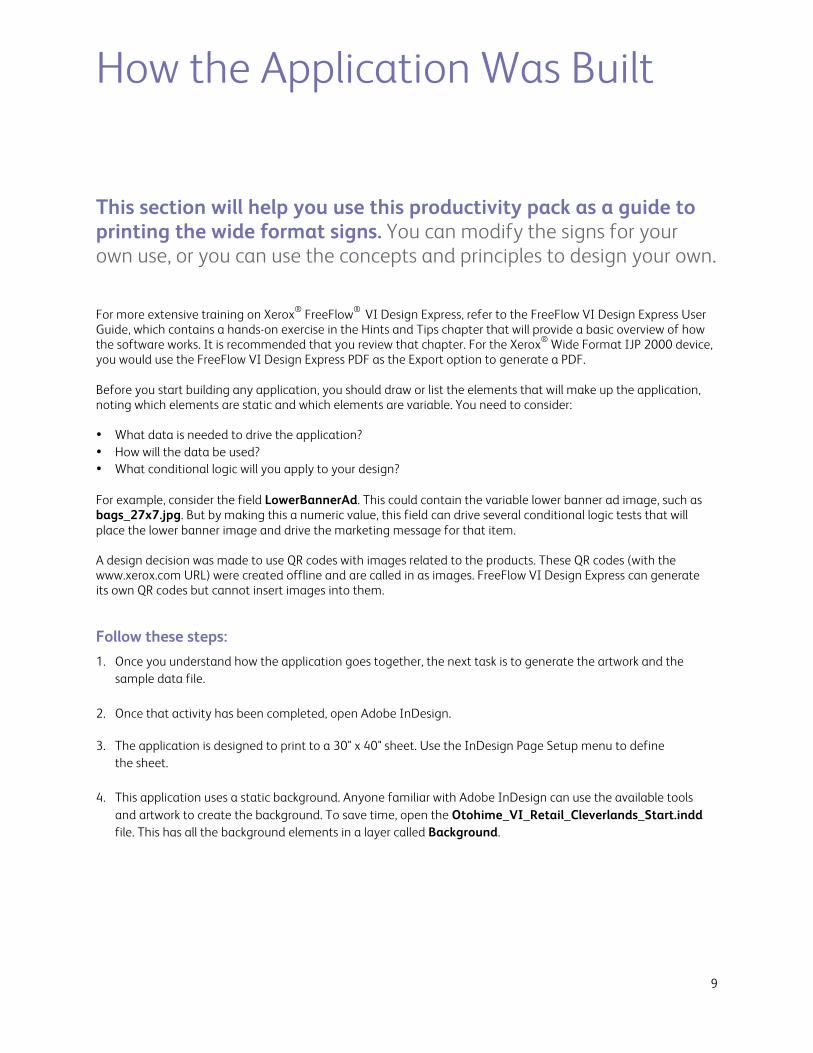
10
The background of the application is shown below. 5. Open the Xerox® FreeFlow® VI Design Express plug-in. The FreeFlow VI Design Express plug-in is used to place
variable elements on the page and create any conditional logic rules that may be required.
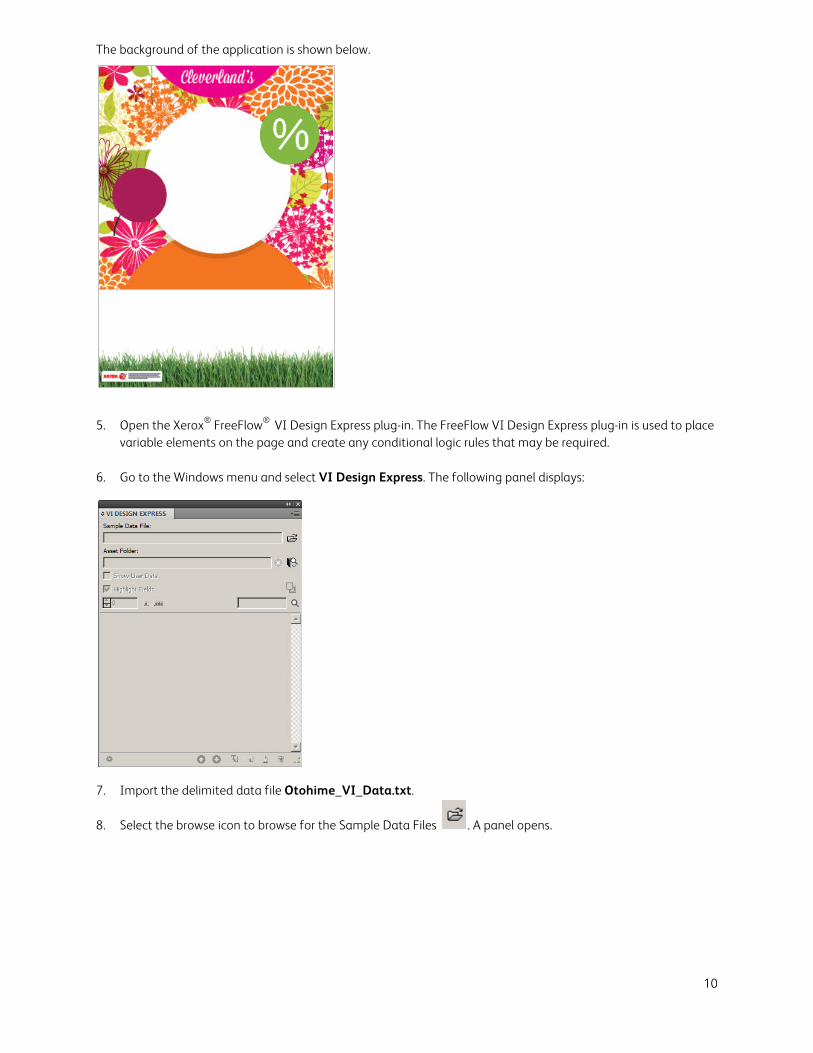
6. Go to the Windows menu and select VI Design Express. The following panel displays:
7. Import the delimited data file Otohime_VI_Data.txt.
8. Select the browse icon to browse for the Sample Data Files . A panel opens.
11
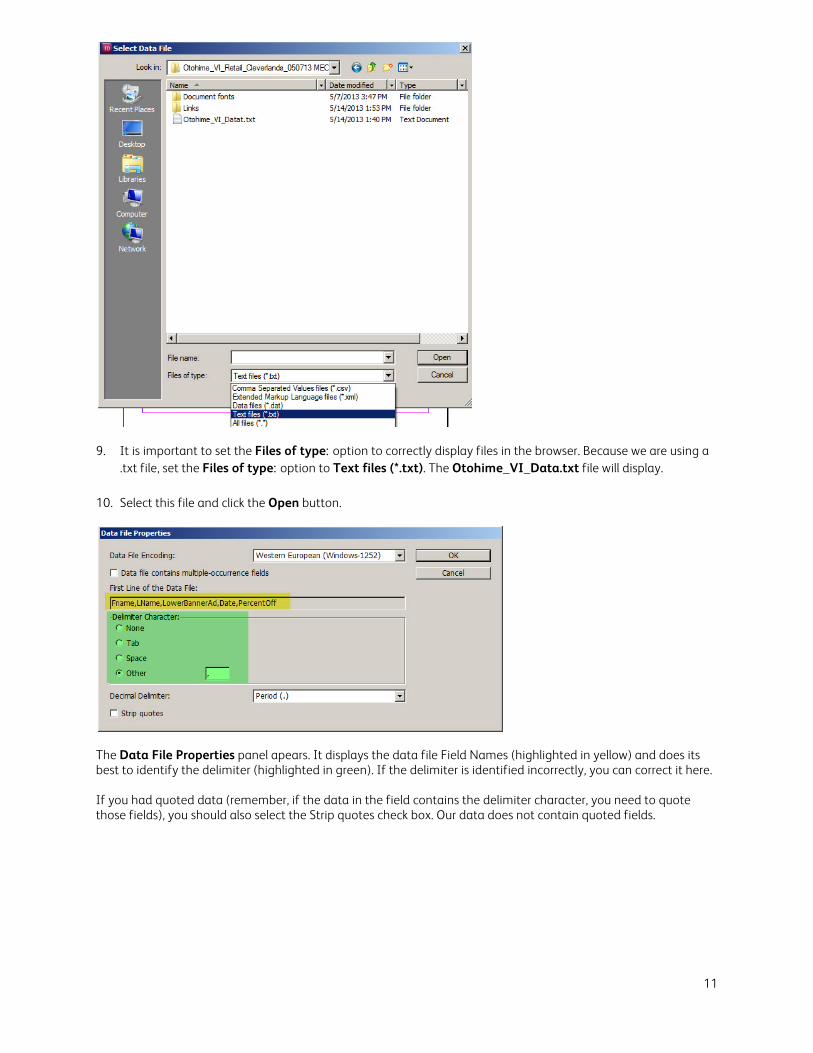
9. It is important to set the Files of type: option to correctly display files in the browser. Because we are using a
.txt file, set the Files of type: option to Text files (*.txt). The Otohime_VI_Data.txt file will display.
10. Select this file and click the Open button.
The Data File Properties panel apears. It displays the data file Field Names (highlighted in yellow) and does its best to identify the delimiter (highlighted in green). If the delimiter is identified incorrectly, you can correct it here. If you had quoted data (remember, if the data in the field contains the delimiter character, you need to quote those fields), you should also select the Strip quotes check box. Our data does not contain quoted fields.
12
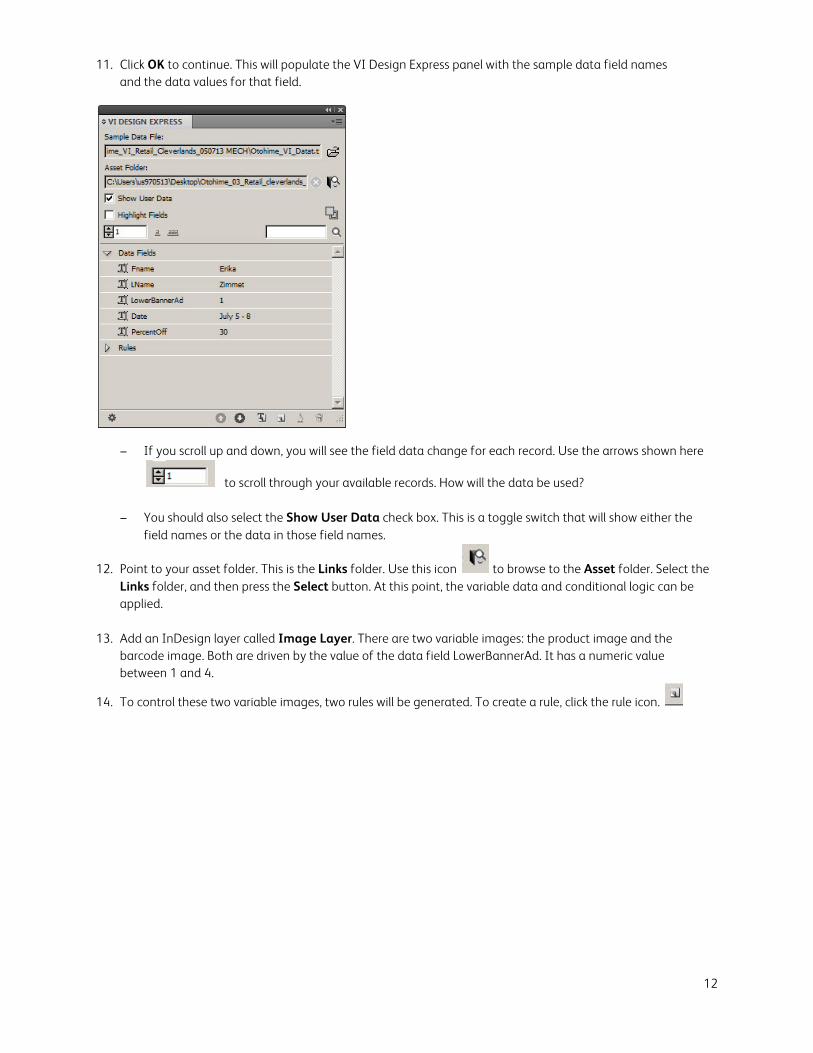
11. Click OK to continue. This will populate the VI Design Express panel with the sample data field names
and the data values for that field.
− If you scroll up and down, you will see the field data change for each record. Use the arrows shown here
to scroll through your available records. How will the data be used?
− You should also select the Show User Data check box. This is a toggle switch that will show either the field names or the data in those field names.
12. Point to your asset folder. This is the Links folder. Use this icon to browse to the Asset folder. Select the Links folder, and then press the Select button. At this point, the variable data and conditional logic can be applied.
13. Add an InDesign layer called Image Layer. There are two variable images: the product image and the barcode image. Both are driven by the value of the data field LowerBannerAd. It has a numeric value between 1 and 4.
14. To control these two variable images, two rules will be generated. To create a rule, click the rule icon.
13
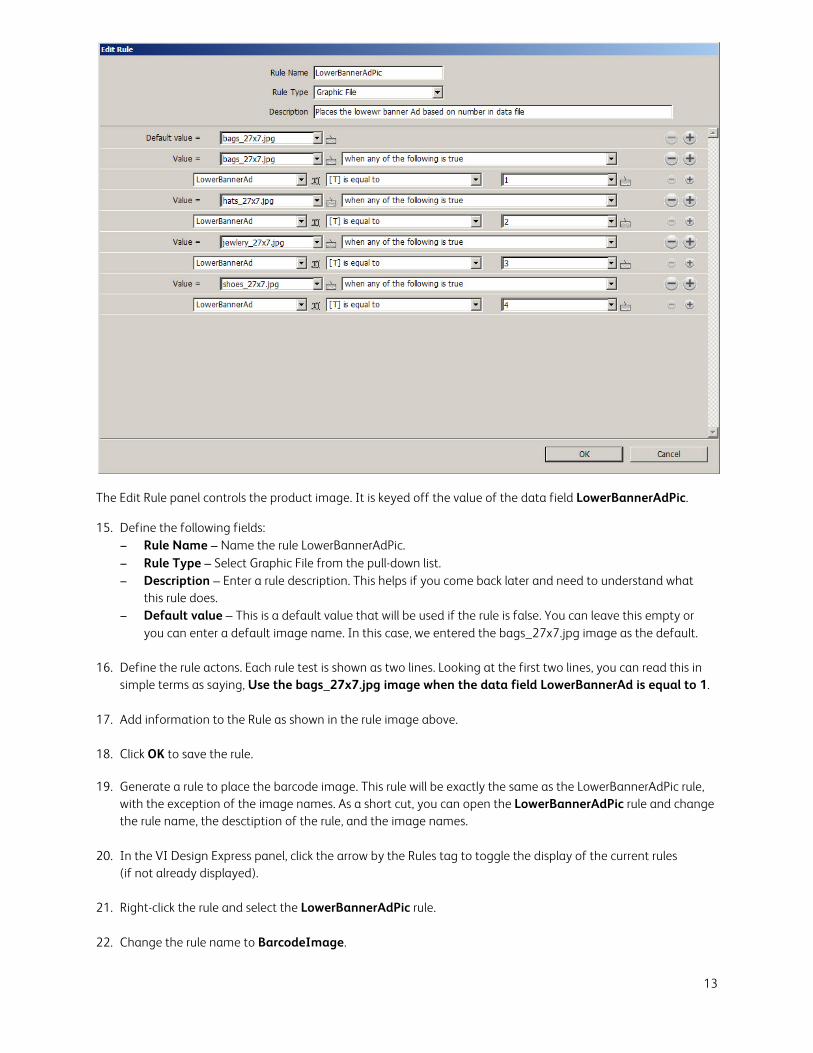
The Edit Rule panel controls the product image. It is keyed off the value of the data field LowerBannerAdPic. 15. Define the following fields:
− Rule Name – Name the rule LowerBannerAdPic. − Rule Type – Select Graphic File from the pull-down list. − Description – Enter a rule description. This helps if you come back later and need to understand what
this rule does. − Default value – This is a default value that will be used if the rule is false. You can leave this empty or
you can enter a default image name. In this case, we entered the bags_27x7.jpg image as the default.
16. Define the rule actons. Each rule test is shown as two lines. Looking at the first two lines, you can read this in simple terms as saying, Use the bags_27x7.jpg image when the data field LowerBannerAd is equal to 1.
17. Add information to the Rule as shown in the rule image above.
18. Click OK to save the rule. 19. Generate a rule to place the barcode image. This rule will be exactly the same as the LowerBannerAdPic rule,
with the exception of the image names. As a short cut, you can open the LowerBannerAdPic rule and change the rule name, the desctiption of the rule, and the image names.
20. In the VI Design Express panel, click the arrow by the Rules tag to toggle the display of the current rules
(if not already displayed).
21. Right-click the rule and select the LowerBannerAdPic rule.
22. Change the rule name to BarcodeImage.
14
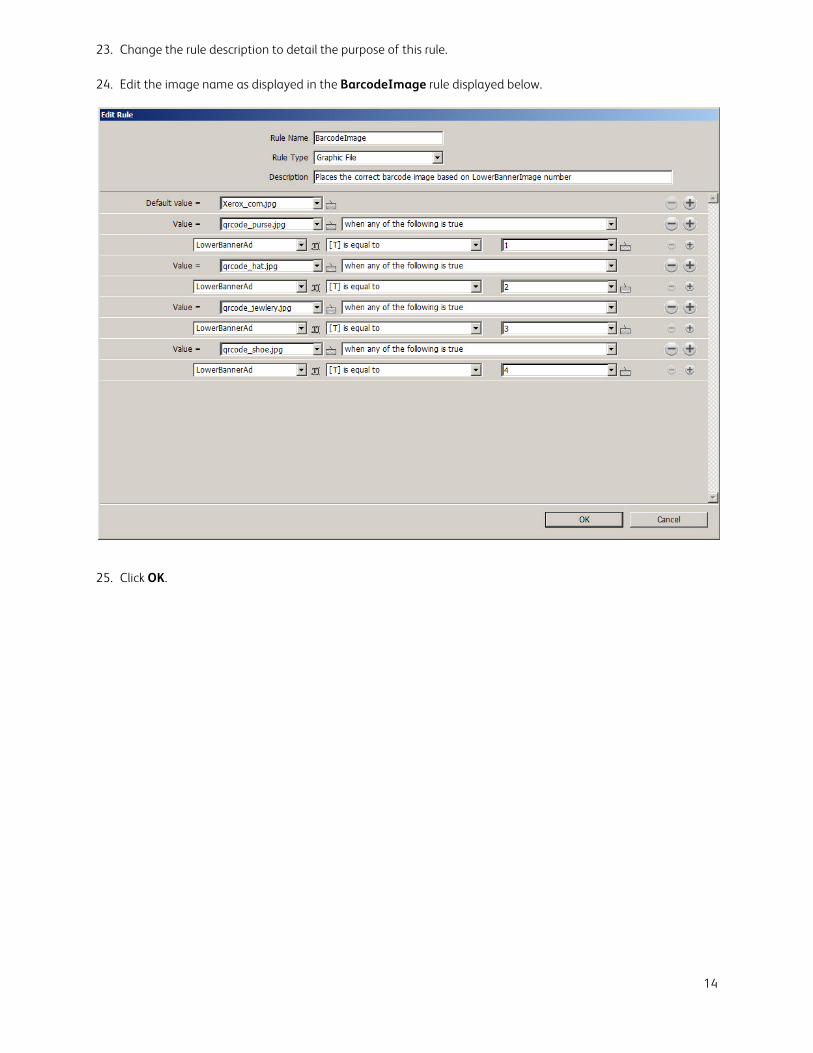
23. Change the rule description to detail the purpose of this rule.
24. Edit the image name as displayed in the BarcodeImage rule displayed below.
25. Click OK.

15
The next step is to use these two rules to place the images. 26. Making sure you are working in the Image Layer, select the Rectangle Frame tool and draw a graphic frame
27" by 7".
27. With that graphic frame as the active frame, right-click and select Insert Object: LowerBannerAdPic. This will insert the image from the rule into that frame.
28. Use the up/down arrow bars to scroll through the four records in the data file. As you scroll from record
to record, the image will change.
29. Draw a 3.5" by 3.5" graphic frame in the middle of the purple circle for the barcode image.
30. With that graphic frame as the active frame, right-click and select Insert Object: BarcodeImage. This will insert the image from the rule into that frame.
31. Use the up/down arrow bars to scroll through the four records in the data file. As you scroll from record
to record, the image will change. 32. Save your application. If it asks for a file name, call it CleverlandsSign.
16
Next, it’s time to address the variable text. 33. Create a new layer and name it Text Layer Working.
34. To place the PercentageOff value, create a text frame 17" by 17" in the center of the white circle.
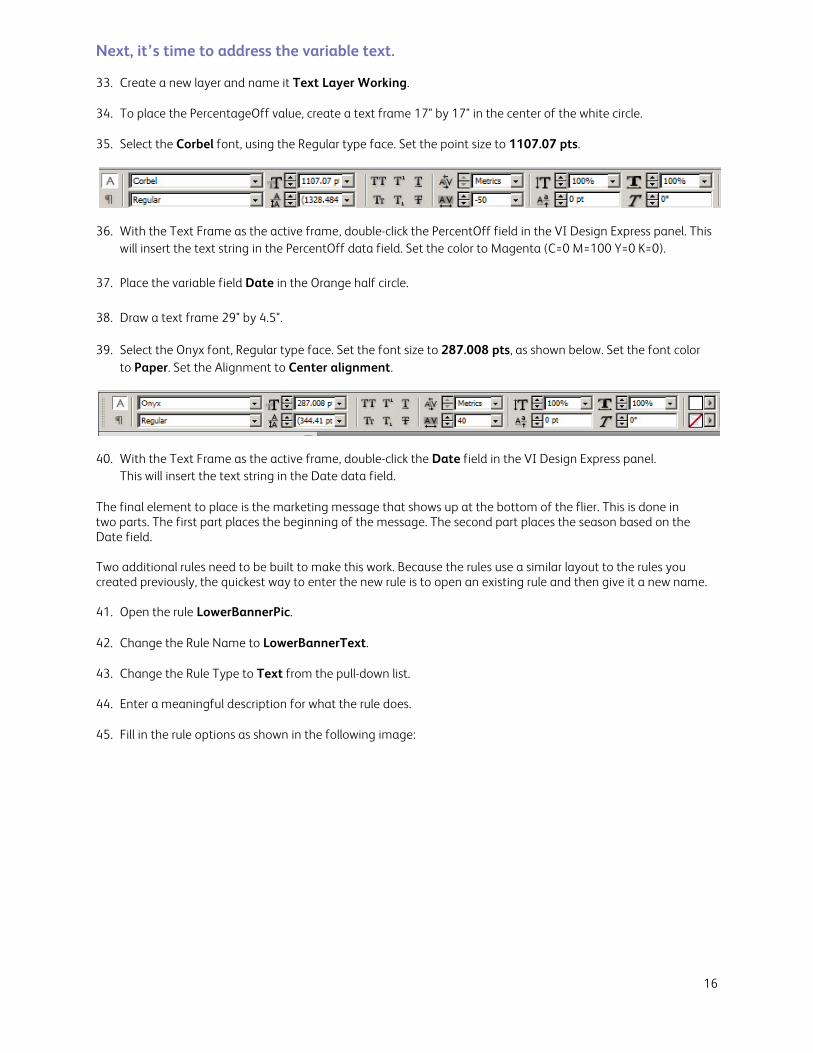
35. Select the Corbel font, using the Regular type face. Set the point size to 1107.07 pts.
36. With the Text Frame as the active frame, double-click the PercentOff field in the VI Design Express panel. This
will insert the text string in the PercentOff data field. Set the color to Magenta (C=0 M=100 Y=0 K=0).
37. Place the variable field Date in the Orange half circle.
38. Draw a text frame 29" by 4.5". 39. Select the Onyx font, Regular type face. Set the font size to 287.008 pts, as shown below. Set the font color
to Paper. Set the Alignment to Center alignment.
40. With the Text Frame as the active frame, double-click the Date field in the VI Design Express panel.
This will insert the text string in the Date data field.
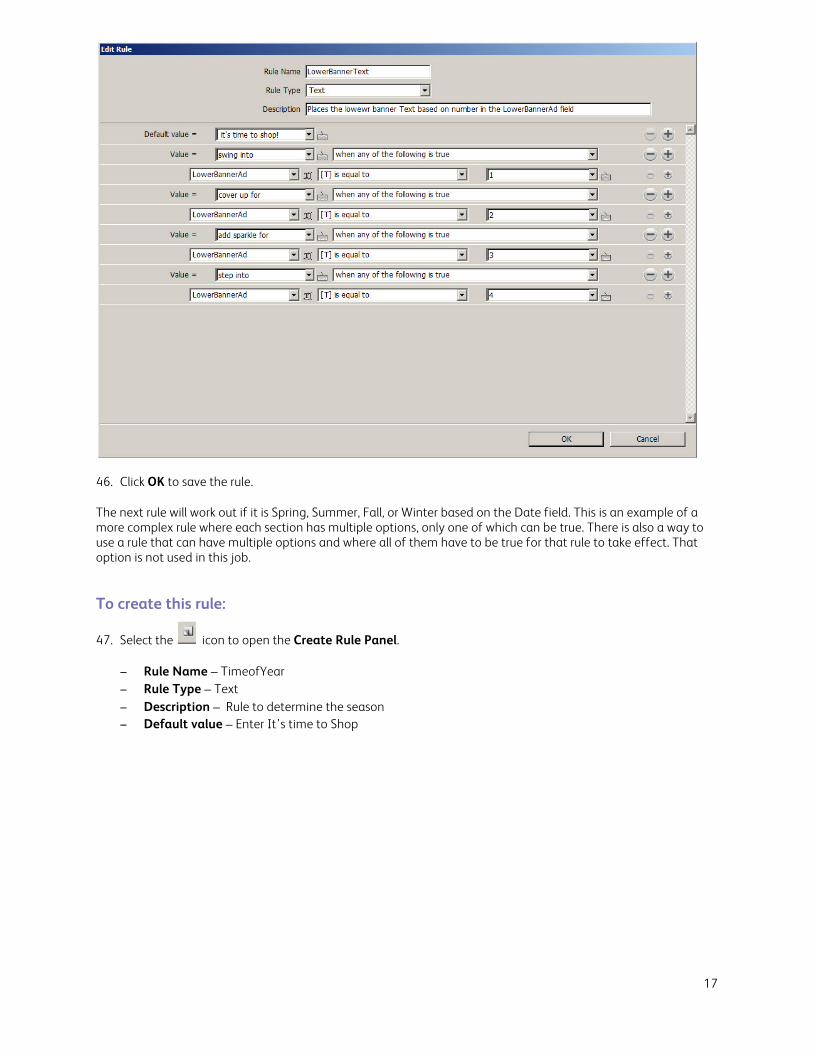
The final element to place is the marketing message that shows up at the bottom of the flier. This is done in two parts. The first part places the beginning of the message. The second part places the season based on the Date field. Two additional rules need to be built to make this work. Because the rules use a similar layout to the rules you created previously, the quickest way to enter the new rule is to open an existing rule and then give it a new name. 41. Open the rule LowerBannerPic.
42. Change the Rule Name to LowerBannerText.
43. Change the Rule Type to Text from the pull-down list.
44. Enter a meaningful description for what the rule does.
45. Fill in the rule options as shown in the following image:
17
46. Click OK to save the rule.
The next rule will work out if it is Spring, Summer, Fall, or Winter based on the Date field. This is an example of a more complex rule where each section has multiple options, only one of which can be true. There is also a way to use a rule that can have multiple options and where all of them have to be true for that rule to take effect. That option is not used in this job. To create this rule:
47. Select the icon to open the Create Rule Panel.
− Rule Name – TimeofYear − Rule Type – Text − Description – Rule to determine the season − Default value – Enter It’s time to Shop
18
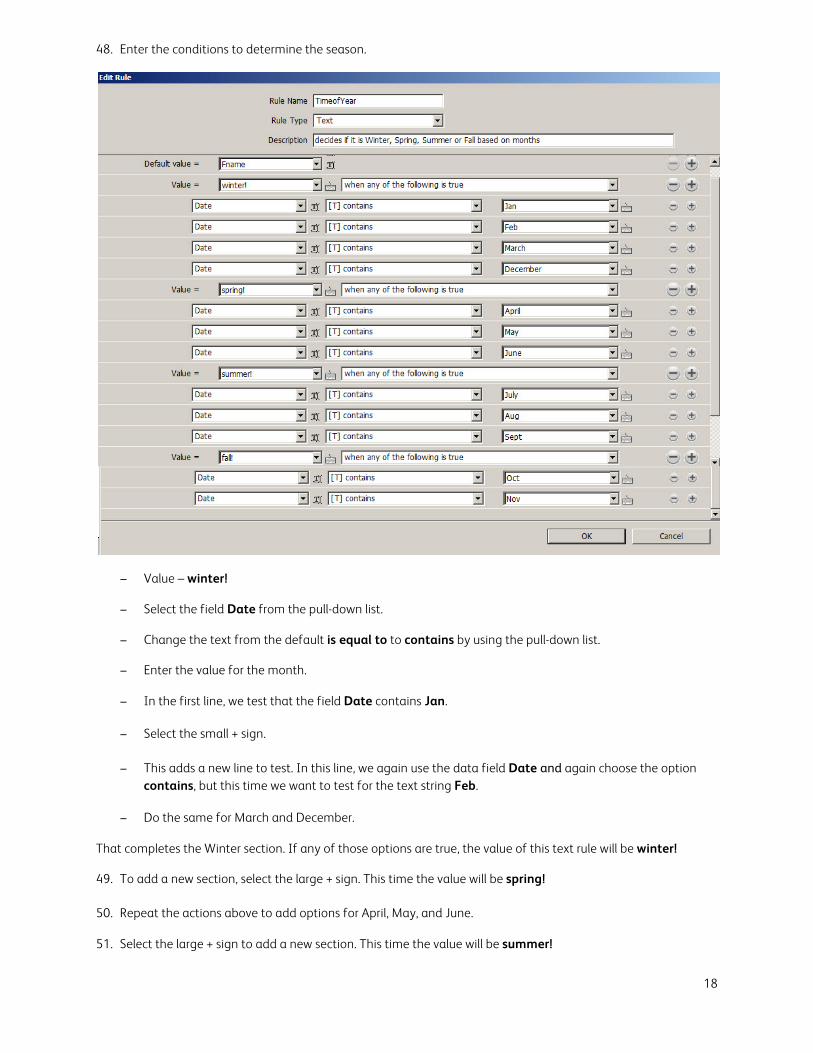
48. Enter the conditions to determine the season.
− Value – winter!
− Select the field Date from the pull-down list.
− Change the text from the default is equal to to contains by using the pull-down list.
− Enter the value for the month.
− In the first line, we test that the field Date contains Jan.
− Select the small + sign.
− This adds a new line to test. In this line, we again use the data field Date and again choose the option contains, but this time we want to test for the text string Feb.
− Do the same for March and December.
That completes the Winter section. If any of those options are true, the value of this text rule will be winter! 49. To add a new section, select the large + sign. This time the value will be spring!
50. Repeat the actions above to add options for April, May, and June.
51. Select the large + sign to add a new section. This time the value will be summer!
19
52. Repeat the actions above to add options for July, Aug, and Sept. You may need to use the scroll bar to continue.
53. Select the large + sign to add a new section. This time the value will be fall!
54. Repeat the actions above to add options for Oct and Nov.
55. Click OK to save the rule.
56. To place the text, create a text frame approximately 3" high and extending from the right of the Xerox tag line to 1 ½ from the right edge of the application.
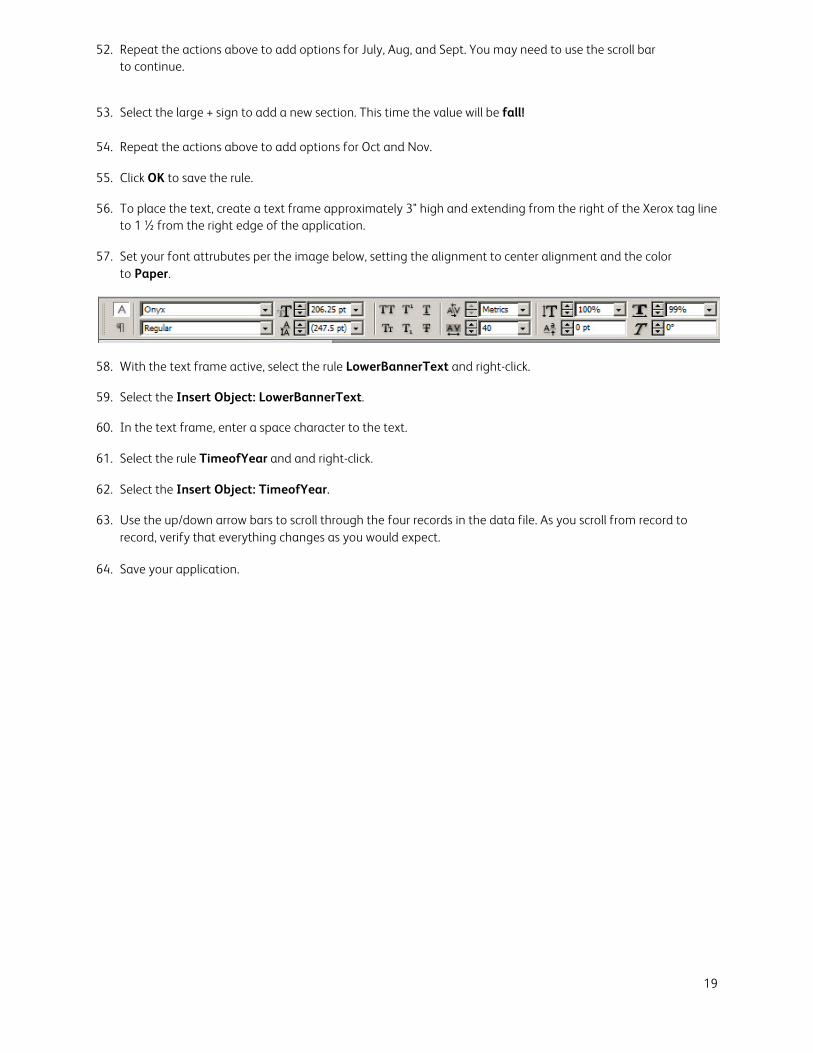
57. Set your font attrubutes per the image below, setting the alignment to center alignment and the color to Paper.
58. With the text frame active, select the rule LowerBannerText and right-click.
59. Select the Insert Object: LowerBannerText.
60. In the text frame, enter a space character to the text.
61. Select the rule TimeofYear and and right-click.
62. Select the Insert Object: TimeofYear.
63. Use the up/down arrow bars to scroll through the four records in the data file. As you scroll from record to record, verify that everything changes as you would expect.
64. Save your application.
20
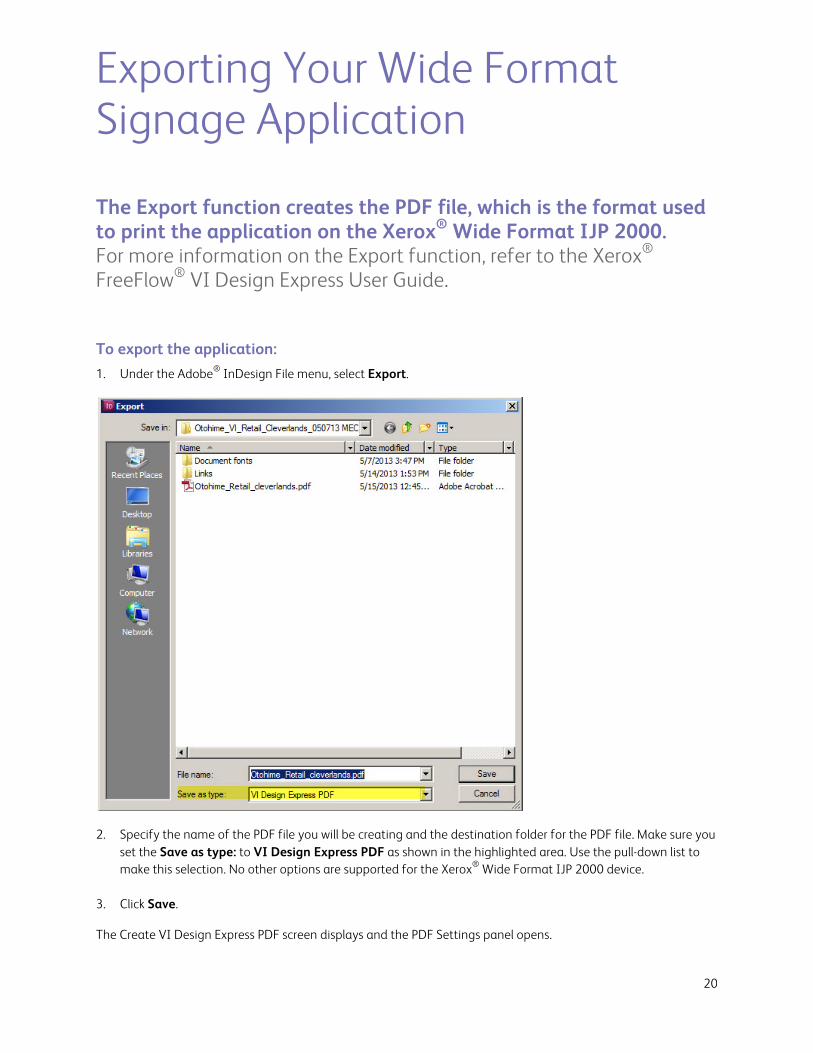
Exporting Your Wide Format Signage Application The Export function creates the PDF file, which is the format used to print the application on the Xerox® Wide Format IJP 2000. For more information on the Export function, refer to the Xerox® FreeFlow® VI Design Express User Guide. To export the application: 1. Under the Adobe® InDesign File menu, select Export.
2. Specify the name of the PDF file you will be creating and the destination folder for the PDF file. Make sure you
set the Save as type: to VI Design Express PDF as shown in the highlighted area. Use the pull-down list to make this selection. No other options are supported for the Xerox® Wide Format IJP 2000 device.
3. Click Save.
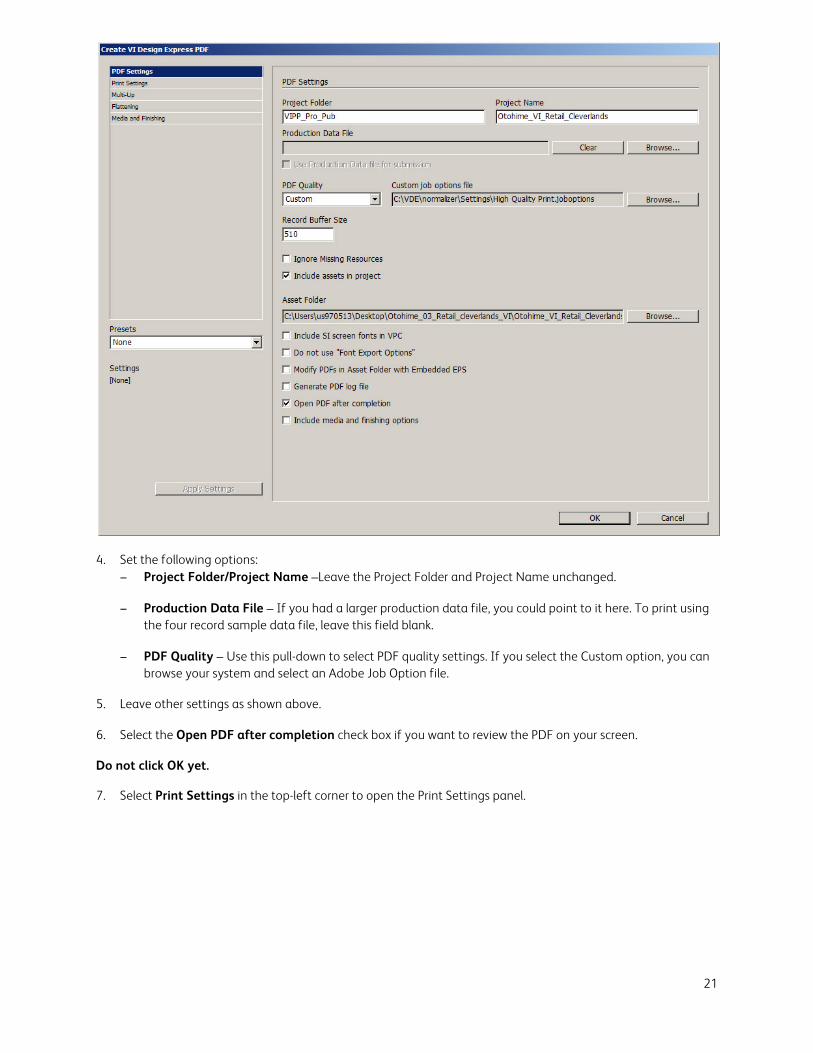
The Create VI Design Express PDF screen displays and the PDF Settings panel opens.
21
4. Set the following options:
− Project Folder/Project Name –Leave the Project Folder and Project Name unchanged.
− Production Data File – If you had a larger production data file, you could point to it here. To print using the four record sample data file, leave this field blank.
− PDF Quality – Use this pull-down to select PDF quality settings. If you select the Custom option, you can browse your system and select an Adobe Job Option file.
5. Leave other settings as shown above.
6. Select the Open PDF after completion check box if you want to review the PDF on your screen.
Do not click OK yet.
7. Select Print Settings in the top-left corner to open the Print Settings panel.
22
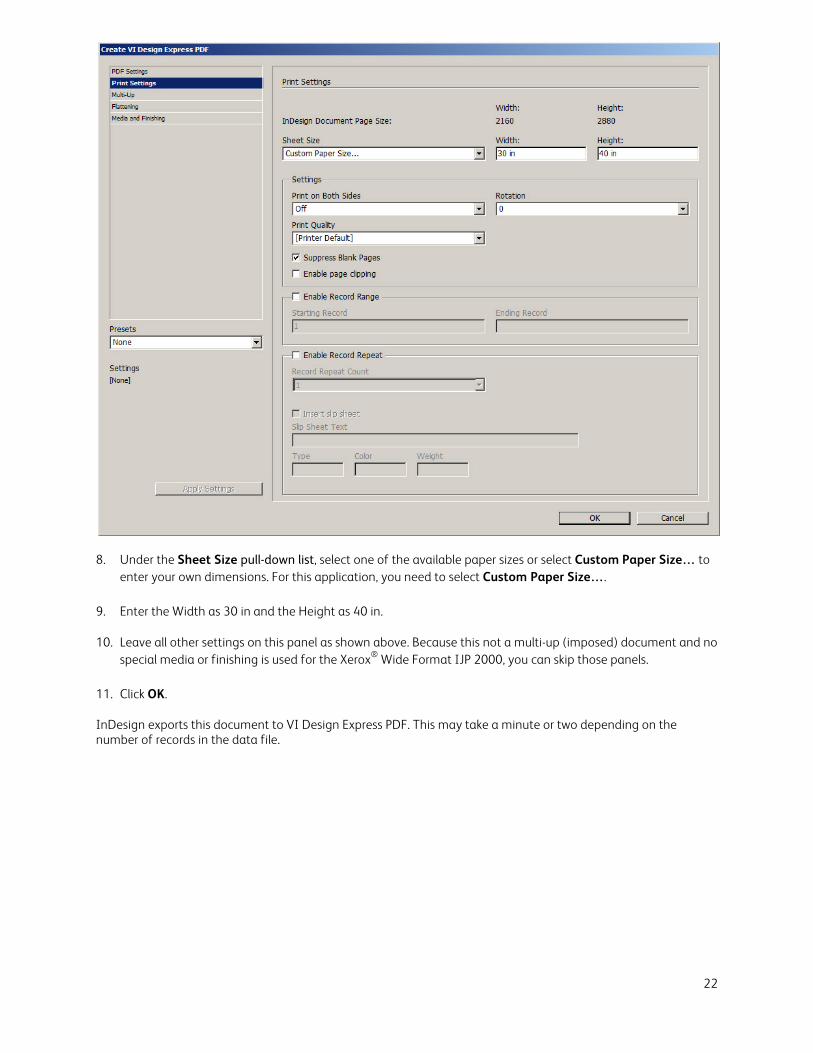
8. Under the Sheet Size pull-down list, select one of the available paper sizes or select Custom Paper Size… to
enter your own dimensions. For this application, you need to select Custom Paper Size….
9. Enter the Width as 30 in and the Height as 40 in.
10. Leave all other settings on this panel as shown above. Because this not a multi-up (imposed) document and no special media or finishing is used for the Xerox® Wide Format IJP 2000, you can skip those panels.
11. Click OK.
InDesign exports this document to VI Design Express PDF. This may take a minute or two depending on the number of records in the data file.
23
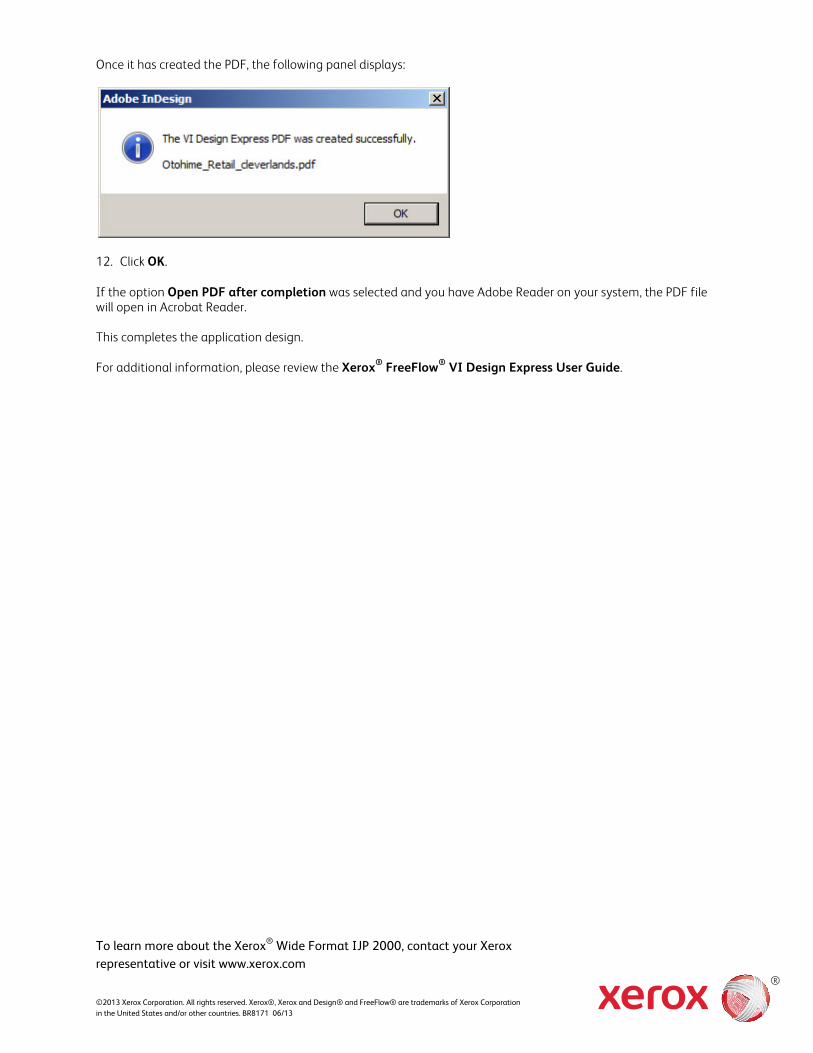
Once it has created the PDF, the following panel displays:
12. Click OK.
If the option Open PDF after completion was selected and you have Adobe Reader on your system, the PDF file will open in Acrobat Reader. This completes the application design. For additional information, please review the Xerox® FreeFlow® VI Design Express User Guide.
To learn more about the Xerox® Wide Format IJP 2000, contact your Xerox representative or visit www.xerox.com
©2013 Xerox Corporation. All rights reserved. Xerox®, Xerox and Design® and FreeFlow® are trademarks of Xerox Corporation in the United States and/or other countries. BR8171 06/13
®