wiley.mysql.your.visual.blueprint.to.open.source.database.management.2003 p30download.com
TRANSCRIPT

MySQL™
TM
®
From
&
Your visual blueprint™ to open source database management
by Michael Moncur
1516922 FM.F 9/26/02 11:30 AM Page i

Published byWiley Publishing, Inc.909 Third AvenueNew York, NY 10022Published simultaneously in Canada
Copyright © 2003 Wiley Publishing, Inc., Indianapolis, Indiana
Certain designs and text Copyright © 1992-2003 maranGraphics, Inc., used withmaranGraphics' permission.
maranGraphics, Inc.5755 Coopers AvenueMississauga, Ontario, CanadaL4Z 1R9
No part of this publication may be reproduced, stored in a retrieval system ortransmitted in any form or by any means, electronic, mechanical, photocopying,recording, scanning or otherwise, except as permitted under Sections 107 or 108 ofthe 1976 United States Copyright Act, without either the prior written permissionof the Publisher, or authorization through payment of the appropriate per-copy feeto the Copyright Clearance Center, 222 Rosewood Drive, Danvers, MA 01923,(978) 750-8400, fax (978) 750-4744. Requests to the Publisher for permissionshould be addressed to the Legal Department, Wiley Publishing, Inc., 10475Crosspoint Blvd., Indianapolis, IN 46256, (317) 572-3447, fax (317) 572-4447,E-mail: [email protected].
Library of Congress Control Number: 2002110260
ISBN: 0-7645-1692-2
Manufactured in the United States of America
10 9 8 7 6 5 4 3 2 1
1V/SR/RQ/QS/IN
Trademark Acknowledgments
Wiley, the Wiley Publishing logo, Visual, the Visual logo,Simplified, Master VISUALLY, Teach Yourself VISUALLY, VisualBlueprint, In an Instant, Read Less – Learn More and relatedtrade dress are trademarks or registered trademarks of WileyPublishing, Inc. in the United States and other countries andmay not be used without written permission. The maranGraphicslogo is a trademark or registered trademark of maranGraphics,Inc. MySQL is a trademark or registered trademark of MySQL ABCompany. All other trademarks are the property of theirrespective owners. Wiley Publishing, Inc. and maranGraphics,Inc. are not associated with any product or vendor mentioned inthis book.
LIMIT OF LIABILITY/DISCLAIMER OF WARRANTY: WHILE THEPUBLISHER AND AUTHOR HAVE USED THEIR BEST EFFORTS INPREPARING THIS BOOK, THEY MAKE NO REPRESENTATIONS ORWARRANTIES WITH RESPECT TO THE ACCURACY OR COMPLETENESSOF THE CONTENTS OF THIS BOOK AND SPECIFICALLY DISCLAIM ANYIMPLIED WARRANTIES OF MERCHANTABILITY OR FITNESS FOR APARTICULAR PURPOSE. NO WARRANTY MAY BE CREATED OR EXTENDEDBY SALES REPRESENTATIVES OR WRITTEN SALES MATERIALS. THEADVICE AND STRATEGIES CONTAINED HEREIN MAY NOT BE SUITABLEFOR YOUR SITUATION. YOU SHOULD CONSULT WITH A PROFESSIONALWHERE APPROPRIATE. NEITHER THE PUBLISHER NOR AUTHOR SHALLBE LIABLE FOR ANY LOSS OF PROFIT OR ANY OTHER COMMERCIALDAMAGES, INCLUDING BUT NOT LIMITED TO SPECIAL, INCIDENTAL,CONSEQUENTIAL, OR OTHER DAMAGES.
Permissions
FOR PURPOSES OF ILLUSTRATING THE CONCEPTSAND TECHNIQUES DESCRIBED IN THIS BOOK, THEAUTHOR HAS CREATED VARIOUS NAMES, COMPANYNAMES, MAILING, E-MAIL AND INTERNETADDRESSES, PHONE AND FAX NUMBERS AND SIMILARINFORMATION, ALL OF WHICH ARE FICTITIOUS. ANYRESEMBLANCE OF THESE FICTITIOUS NAMES,ADDRESSES, PHONE AND FAX NUMBERS AND SIMILARINFORMATION TO ANY ACTUAL PERSON, COMPANYAND/OR ORGANIZATION IS UNINTENTIONAL ANDPURELY COINCIDENTAL.
Important Numbers
For U.S. corporate orders, please call maranGraphics at800-469-6616 or fax 905-890-9434.
For general information on our other products and servicesor to obtain technical support, please contact our CustomerCare Department within the U.S. at 800-762-2974, outsidethe U.S. at 317-572-3993, or fax 317-572-4002.
maranGraphics
Certain text and illustrations by maranGraphics, Inc., usedwith maranGraphics' permission.
MySQLTM: Your visual blueprintTM to open source database management
U.S. Trade Sales
Contact Wileyat (800) 762-2974or fax (317) 572-4002.
U.S. Corporate Sales
Contact maranGraphicsat (800) 469-6616 orfax (905) 890-9434.
is a trademark of Wiley Publishing, Inc.
Was it a monument? A temple? Perhaps the giant Pyramid of Kukulkán,called El Castillo by Spanish visitors to the ancient Mayan city ofChichén-Itzá, was both, and more. Built with mathematical precision, itdominates the city from every direction, and is among the mostrecognized ancient landmarks. Explore the mysteries of Chichén-Itzá inFrommer's Cancún, Cozumel and the Yucatán, available wherever booksare sold or at www.frommers.com.
1516922 FM.F 9/26/02 11:30 AM Page ii

MySQLTM
Your visual blueprintTM to open source database management
1516922 FM.F 9/26/02 11:30 AM Page iii

At maranGraphics, we believe in producing greatcomputer books — one book at a time.
maranGraphics has been producing high-technologyproducts for over 25 years, which enables us to offer thecomputer book community a unique communicationprocess.
Our computer books use an integrated communicationprocess, which is very different from the approach usedin other computer books. Each spread is, in essence, aflow chart — the text and screen shots are totallyincorporated into the layout of the spread. Introductorytext and helpful tips complete the learning experience.
maranGraphics' approach encourages the left and rightsides of the brain to work together — resulting in fasterorientation and greater memory retention.
Above all, we are very proud of the handcrafted natureof our books. Our carefully-chosen writers are expertsin their fields, and spend countless hours researchingand organizing the content for each topic. Our artists
rebuild every screen shot to provide the best claritypossible, making our screen shots the most precise andeasiest to read in the industry. We strive for perfection,and believe that the time spent handcrafting eachelement results in the best computer books moneycan buy.
Thank you for purchasing this book. We hope youenjoy it!
Sincerely,
Robert Maran
maranGraphics is a family-run business located near Toronto, Canada.
1516922 FM.F 9/26/02 11:30 AM Page iv

Wiley Technology Publishing Group: Richard Swadley, Vice President and Executive Group Publisher; Bob Ipsen, Vice President and Executive Publisher; Barry Pruett, Vice President and Publisher; Joseph Wikert, Vice President and Publisher; Mary Bednarek, Editorial Director; Mary C. Corder, Editorial Director; Andy Cummings, Editorial Director.
Wiley Production for Branded Press: Debbie Stailey, Production Director
Acquisitions, Editorial, and Media Development
Project EditorSarah Hellert
Acquisitions EditorJen Dorsey
Product Development SupervisorLindsay Sandman
Copy EditorJill Mazurczyk
Technical EditorScott Hofmann
Editorial ManagerRev Mengle
Permissions EditorCarmen Krikorian
Media Development SpecialistMegan Decraene ManufacturingAllan ConleyLinda Cook
Paul GilchristJennifer Guynn
Production
Book DesignmaranGraphics®
Production CoordinatorNancee Reeves
LayoutBeth Brooks
Melanie DesJardinsCarrie Foster
LeAndra JohnsonKristin McMullan
Heather PopeErin Zeltner
Screen ArtistsJill A. Proll
Cover IllustrationDavid E. Gregory
ProofreaderLaura L. BowmanQuality Control
John BitterDave Faust
John GreenoughAngel Perez
Dwight RamseyIndexer
Liz CunninghamSpecial Help
Cricket A. Krengel
CREDITS
ACKNOWLEDGMENTS
1516922 FM.F 9/26/02 11:30 AM Page v

Michael Moncur is the author of many books on system administration and Web development topics.He has recently written books about JavaScript and DHTML. He works as an independent networkconsultant and Web programmer.
Michael also manages and maintains several popular Web sites. His oldest and most popular site, TheQuotations Page, has been online since 1994. Most of the site's content is stored in a MySQL database,and presented using PHP. Michael lives with his wife, Laura, in a suburb of Salt Lake City, Utah.
I am continually amazed at how complicated it is to write and publish a computer book. Fortunately, agreat deal of this complexity was handled smoothly by the team at Wiley. This began with Jen Dorsey,the acquisitions editor, who was instrumental in getting the project started and keeping it runningsmoothly. The project editor, Sarah Hellert, communicated with me constantly, managed every detail ofthe production, and helped me figure out the intricacies of the visual format I have grown to love.
The copy editor, Jill Mazurczyk, saved me from many embarrassing errors and kept the style consistent.The technical editor, Scott Hofmann, painstakingly tested all of the examples, helped me avoid technicalerrors, and made some valuable suggestions about content and coverage. Thanks are also due to themany people in the graphics and production departments who handled the final details.
I'd also like to thank Neil Salkind at Studio B, for his help in getting this project lined up and keeping itgoing, and David and Sherry Rogelberg, Jessica Richards, and the rest of the team at Studio B. Finally,thanks to my wife, Laura, and the rest of my friends and family.
ABOUT THE AUTHOR
AUTHOR'S ACKNOWLEDGMENTS
1516922 FM.F 9/26/02 11:30 AM Page vi

Dedicated to my wife, Laura, my parents, and everyone else
who sees less of me while I'm busy writing.
1516922 FM.F 9/26/02 11:30 AM Page vii

viii
HOW TO USE THIS BOOK . . . . . . . . . . . . . . . . . . . . . . . . . . . . . . . . . . . . . .XIV
1) INTRODUCING MYSQLUnderstanding MySQL ........................................................................................................2MySQL Terminology ............................................................................................................4Other Database Systems ....................................................................................................5Structured Query Language (SQL) ....................................................................................6Download MySQL ..............................................................................................................8Install MySQL under Linux from a Package ....................................................................10Install MySQL under UNIX from Source ........................................................................12Install MySQL under Windows ........................................................................................14Start the MySQL Server ....................................................................................................16Test the MySQL Installation ..............................................................................................17Using the MySQL Monitor ................................................................................................18View the Server Status ......................................................................................................20Try an SQL Query ..............................................................................................................21Configure a MySQL User ..................................................................................................22Specify a Multiple-Line Query ........................................................................................24Edit a Long Command ......................................................................................................26Configure MySQLGUI ......................................................................................................28
2) MANAGE DATABASES AND TABLESDesign a Database ............................................................................................................30Create and Drop Databases ............................................................................................32Create a Database ..............................................................................................................33Show Available Databases ................................................................................................34Select a Database ..............................................................................................................35Create and Drop Tables ....................................................................................................36Create a Simple Table ........................................................................................................38Show Table Information ....................................................................................................40Numeric Column Types ....................................................................................................42Text and Date Column Types ............................................................................................44Using Text Columns ..........................................................................................................46Using Sets and Enumerations ..........................................................................................48Create an Indexed Table ..................................................................................................50Delete Tables and Databases ............................................................................................52
TABLE OF CONTENTS
1516922 FM.F 9/26/02 11:30 AM Page viii

3) MODIFY TABLESUsing ALTER TABLE Queries ..............................................................................................54Add a Column to a Table ..................................................................................................56Add an Index ......................................................................................................................58Add a Primary Key or Unique Index ................................................................................60Add a Timestamp Column ................................................................................................62Add an Auto-Increment Column ....................................................................................64Rename a Column ............................................................................................................66Change a Column Type ....................................................................................................68Delete a Column ................................................................................................................70Delete an Index or Primary Key ......................................................................................72Rename a Table ..................................................................................................................74Change a Table Type ..........................................................................................................75
4) ADD AND DELETE DATAUsing INSERT and DELETE Queries ..................................................................................76Add a Row to a Table ........................................................................................................78Specify Columns for a New Row ....................................................................................80Specify Insert Priority ........................................................................................................81Using Auto-Increment Columns ......................................................................................82Using Timestamp Columns ..............................................................................................84Replace an Existing Row ....................................................................................................86Insert Rows from Another Table ......................................................................................88Delete a Specific Row ......................................................................................................90Delete All Table Rows ........................................................................................................92Limit the Number of Deleted Rows ................................................................................93Delete Data by Date ..........................................................................................................94
5) UPDATE DATA IN TABLESUsing UPDATE Queries ......................................................................................................96Modify a Single Row ..........................................................................................................98Modify Multiple Rows ....................................................................................................100Update All Table Rows ....................................................................................................102
ix
BOOK TITLE:Your visual blueprint forthest
of the book title
MYSQL:Your visual blueprint to opensource database management
1516922 FM.F 9/26/02 11:30 AM Page ix

x
Limit the Number of Rows to Update ..........................................................................103Update Multiple Columns ..............................................................................................104Update Depending on Column Values ..........................................................................106Increment a Column Value ............................................................................................108
6) USING SELECT QUERIESUsing SELECT Queries ....................................................................................................110Display Data with SELECT ..............................................................................................112Using the WHERE Clause ................................................................................................114Specify Multiple WHERE Conditions ............................................................................116Using the LIMIT Clause ..................................................................................................118Sort Data with the ORDER BY Clause ..........................................................................120Using the GROUP BY Clause ..........................................................................................122Using Multiple Clauses with SELECT ............................................................................123Count Database Rows ....................................................................................................124Calculate Totals and Averages ........................................................................................126Display Data from Multiple Tables ................................................................................128Using JOIN Options ........................................................................................................130Display Data with MySQLGUI ........................................................................................132
7) USING MYSQL FUNCTIONSMath Functions ................................................................................................................134Using Math Functions ......................................................................................................136Compare Numeric Values ..............................................................................................138Understanding String Functions ....................................................................................140Compare String Values ....................................................................................................142Using String Functions ....................................................................................................144Work with Substrings ......................................................................................................146Understanding Date and Time Functions ....................................................................148Work with Dates and Times ..........................................................................................150Display Formatted Dates ................................................................................................152Add and Subtract Dates and Times ..............................................................................153Miscellaneous Functions ................................................................................................154
TABLE OF CONTENTS
1516922 FM.F 9/26/02 11:30 AM Page x

8) IMPORT AND EXPORT DATAImport and Export Tools ................................................................................................156Export to a Text File with SELECT ..................................................................................158Format an Import File ......................................................................................................160Import from a Text File ....................................................................................................162Export Data from a Spreadsheet ....................................................................................164Export Data from Microsoft Access ..............................................................................166Back up Data from a Table ..............................................................................................168Restore a Backup File ......................................................................................................169Manage Automated Backups ..........................................................................................170Back up Table Structure ..................................................................................................172Create a Copy of a Table ................................................................................................173
9) MANAGE THE MYSQL SERVERMySQL Administration Tools ..........................................................................................174Check Server Status ........................................................................................................176Check the MySQL Server Version ..................................................................................177Start and Stop the MySQL Server under UNIX ............................................................178Start and Stop the MySQL Server Under Windows ....................................................180View and Manage Running Processes ..........................................................................182Using WinMySQLadmin ..................................................................................................184Manage MySQL with MySQLGUI ..................................................................................186
10) OPTIMIZE AND TROUBLESHOOT MYSQLOptimize MySQL ............................................................................................................188Check a Table for Errors ..................................................................................................190Optimize and Repair Tables ............................................................................................192MySQL Configuration Options ......................................................................................194Display Server Performance Information ......................................................................196Edit the Configuration File in UNIX ..............................................................................198Edit the Configuration File in Windows ........................................................................199
xi
MYSQL:Your visual blueprint to opensource database management
1516922 FM.F 9/26/02 11:30 AM Page xi

xii
TABLE OF CONTENTS
View MySQL Log Files ....................................................................................................200Improve Performance with Indexes ..............................................................................202Manage Table Locking ....................................................................................................204
11) CONFIGURE MYSQL SECURITYThe Importance of Security ............................................................................................206MySQL Security Basics ....................................................................................................207Grant Privileges to Users ................................................................................................208Modify User Passwords ..................................................................................................210View a User's Privileges ..................................................................................................212View Security Tables ........................................................................................................214Control Network Access ................................................................................................216Advanced MySQL Security ............................................................................................217
12) USING MYSQL WITH PHPIntroducing PHP ..............................................................................................................218Test the PHP Installation ................................................................................................220Install and Test phpMyAdmin ........................................................................................222Manage Data with phpMyAdmin ..................................................................................224Manage the MySQL Server with phpMyAdmin ............................................................226Connect to a MySQL Server ..........................................................................................228Display Query Results ....................................................................................................230Store Query Results as Objects ......................................................................................232Insert a Record from PHP ..............................................................................................234Delete Records Using PHP ..............................................................................................236Create a Form to Add Records ......................................................................................238Create a Database Search Form ....................................................................................240
13) USING MYSQL WITH PERLIntroducing Perl ................................................................................................................242Install Perl under UNIX ....................................................................................................244Install Perl under Windows ............................................................................................246
1516922 FM.F 9/26/02 11:30 AM Page xii

xiii
MYSQL:Your visual blueprint to opensource database management
Install the Perl DBI ..........................................................................................................248Install the MySQL DBD ..................................................................................................249Connect to a MySQL Server ..........................................................................................250Display Query Results ....................................................................................................252Insert a Record from Perl ................................................................................................254Delete Records Using Perl ..............................................................................................255Work with Web Forms ....................................................................................................256
APPENDIX AGlossary..............................................................................................................................258
APPENDIX BCreate and Delete Tables and Databases ......................................................................260Modify Tables with ALTER TABLE ..................................................................................262Add and Delete Data ......................................................................................................263Modify Existing Data with UPDATE ................................................................................264Retrieve Data with SELECT ............................................................................................265Display Status Information ............................................................................................266Administrative Commands ..............................................................................................267Command-Line Utilities ..................................................................................................268
APPENDIX CWhat's on the CD-ROM ..................................................................................................270Using the E-Version of this Book ....................................................................................272Wiley Publishing Inc. End User License Agreement ......................................................274GNU General Public License ..........................................................................................276
INDEX . . . . . . . . . . . . . . . . . . . . . . . . . . . . . . . . . . . . . . . . . . . . . . . . . . . . . . . . . . . . . . . .280
1516922 FM.F 9/26/02 11:30 AM Page xiii

xiv
HOW TO USE THIS BOOK
MySQL: Your visual blueprint to open source databasemanagement uses simple, straightforward examples toteach you how to create powerful and dynamic programs.To get the most out of this book, you should read eachchapter in order, from beginning to end. Each chapterintroduces new ideas and builds on the knowledgelearned in previous chapters. When you become familiarwith MySQL: Your visual blueprint to open source databasemanagement, you can use this book as an informativedesktop reference.
Who This Book Is ForIf you are interested in creating databases, applications,and data-driven Web sites using MySQL, MySQL: Yourvisual blueprint to open source database management isthe book for you.This book introduces you to the SQL language thatforms the foundation of MySQL as well as the specificcommands, utilities, and features unique to MySQL. Italso covers the use of MySQL with the popular PHP andPerl languages for creating dynamic, database-backed Webpages.Although this book requires no prior experience withdatabases or SQL, a basic familiarity with either Windowsor UNIX servers is an asset.
What You Need to Use This BookTo perform the tasks in this book, you need a computer torun the MySQL server. This can be either a machinerunning Windows 98, ME, NT, 2000, or XP; or a machinerunning a UNIX-based operating system such as Linux.The MySQL server software is available at no charge, andinstalling it on your system is detailed in Chapter 1.
The Conventions in This BookA number of typographic and layout styles have been usedthroughout MySQL: Your visual blueprint to open sourcedatabase management to distinguish different types ofinformation.
Courier Font
Indicates the use of MySQL commands, command-lineutilities, HTML tags and attributes, and commands in PHPor Perl.
Bold Indicates information that you must type.
Italics Indicates a new term.
An Apply It section usually contains a segment of codethat takes the lesson you just learned one step further.Apply It sections offer inside information and pointers thatyou can use to enhance the functionality of your code.
An Extra section provides additional information about thetask you just accomplished. Extra sections often containinteresting tips and useful tricks to make working withMySQL easier and more efficient.Please note that the majority of the tasks in this book areperformed using the MySQL monitor. Chapter 1 explainshow to start the MySQL monitor. The tasks in later chaptersassume that the reader knows how to start the monitor oranother MySQL client.
1516922 FM.F 9/26/02 11:30 AM Page xiv

xv
The Organization of this BookMySQL: Your visual blueprint to open source databasemanagement contains 13 chapters and three appendices. The first chapter, "Introducing MySQL," introduces thebasics of MySQL and describes the components of aMySQL system. It shows you how to install MySQL's clientand server software and to start client software, such asthe MySQL monitor. Chapter 2, "Manage Databases and Tables," introducesyou to the MySQL commands for creating and deletingdatabases and tables. It describes the column typessupported in MySQL tables and shows you how tocreate tables using them.Chapter 3, "Modify Tables," introduces the MySQLcommands for modifying tables and demonstrates variouschanges you can make to existing tables, as well as indexesand table options.Chapter 4, "Add and Delete Data," introduces thecommands you can use in MySQL to add data to tablesand delete existing data. You are also shown how to usesome special column types in MySQL tables.Chapter 5, "Update Data in Tables," describes the MySQLcommands for modifying data in existing tables. Tasksdemonstrate a variety of common procedures for updatingthe data in a table.Chapter 6, "Using SELECT Queries," explains how you canuse SELECT commands to retrieve data from MySQL tablesin a variety of ways. It begins with basic queries andproceeds to advanced options, such as multiple-tablequeries.Chapter 7, "Using MySQL Functions," introduces you tothe functions included with MySQL. You can use thesewith any MySQL command to process numeric and textdata and to test conditions.Chapter 8, "Import and Export Data," describes how to useMySQL commands to export data to text files and importdata into a MySQL table. It also explains how to exportdata to MySQL from applications like Microsoft Access andExcel.
Chapter 9, "Manage the MySQL Server," describes thecommands you can use to start and stop the server, andcheck version information and server status. It alsointroduces Windows-based utilities that provide a friendlyadministration interface.Chapter 10, "Optimize and Troubleshoot MySQL," showsyou how to optimize tables, check for errors and repairdamaged tables, and check on and improve theperformance of a MySQL server.Chapter 11, "Configure MySQL Security," describesMySQL's security features and shows how you can usethem to configure users, control privileges, and managepasswords.Chapter 12, "Using MySQL with PHP," describes how youcan use the PHP language with MySQL to create database-driven Web sites and other applications.Chapter 13, "Using MySQL with Perl," shows how you canuse the Perl language to connect to MySQL databases andcreate dynamic Web sites and applications.Appendix A is a glossary of common MySQL and databaseterms, which you'll find useful as you work your waythrough this book.Appendix B is a reference with detailed information aboutthe most important MySQL commands and utilities.Appendix C includes detailed information about theCD-ROM included with this book.
What's on the CD-ROMThe CD-ROM included in this book contains SQL files youcan use to create the example tables used throughout thisbook. It also includes several open-source softwareapplications, including MySQL itself. Finally, the PHP andPerl code used in Chapters 12 and 13 is included in itsentirety. An e-version of the book and all the URLsmentioned in the book are also available on the disc.
MYSQL:Your visual blueprint to opensource database management
1516922 FM.F 9/26/02 11:30 AM Page xv

Whenever you need to store large amounts of data,whether for a corporate accounting system or alarge Web site, a database provides many
advantages. A database system allows you to store and workwith many types of data, and a database server handlesmany of the data management tasks in an efficient way.
UNDERSTANDING MYSQL
MySQL
2
MySQL is a relational database management system, orRDBMS. This type of system stores one or moredatabases, each of which can contain tables of data ofvarious types. Here is a simple example of a table withnames and addresses:
This table includes three rows, or individual entries. Eachone stores a person's name and address information.Each item of information, such as an address or name, iscalled a column, also known as a field.
DATABASE BASICS
Relational Databases
While it is quite useful to store data in simple tables likethis, the strength of a relational database system is thatyou can link data between multiple tables. For example,you may have a separate table of names and phonenumbers:
NAME PHONE
Henry J. Tillman 713-555-2395
John Smith 212-555-9344
Amy Johnson 312-555-2904
Because this table uses the same names as the addresstable, you can easily find the address and phonenumber for a name by connecting information in thetwo tables. By looking at several different tables, thedatabase server can manage complex systems of dataeasily.
Client-Server Systems
MySQL, like most RDBMS systems, is a client-serversystem. In this type of system, a server manages theactual data storage. One or more clients can connect tothe server, send it data or request data, and obtain theirresults from the server.
Client-server systems are powerful because the servercan focus on data management without worrying aboutthe user interface or other issues. Different types ofclients or multiple clients can connect to the serversimultaneously.
The MySQL client sends a request, or query, to theserver. This may be a request for a certain record orgroup of records from a database, a request to add datato the database, or any of several other types ofrequests. The server receives the query and sends aresult back to the client.
NAME ADDRESS CITY STATE
Henry J. Tillman 321 Elm St. Sacramento CA
John Smith 122 Oak St. New York City NY
Amy Johnson 333 Poplar Lane Chicago IL
516922 Ch01.F 9/26/02 11:31 AM Page 2

INTRODUCING MYSQL 1
3
Hardware
The MySQL server runs on many different types ofhardware. PC systems running Linux or 32-bit Windowsare the most common hardware used. The hardwarerequired for the server depends on how busy the serverwill be with client requests.
Server Software
The MySQL server software is available from MySQLAB. You can find their Web page at www.mysql.com/.The MySQL server is available free of charge for non-commercial use under the open source Gnu PublicLicense (GPL). You can download the software andinstall it on a Windows, Linux, or other machine.
Client Software
A simple MySQL client, the MySQL monitor, is includedwith the server software. You can also use any clientthat knows the correct protocols to communicate withthe server. Another such client, MySQLGUI, is describedlater in this chapter.
Programming Languages
In addition to the existing MySQL clients, you can useprogramming languages such as PHP and Perl to createapplications that can communicate with a MySQLserver. This allows you to create custom client softwarefor virtually any purpose.
HOW MYSQL WORKS
Simple Web Sites
A basic Web site uses simple, flat HTML (hypertextmarkup language) files and has no need for a database.While this is sufficient for a simple home page, if yoursite needs to display large amounts of data, the numberof HTML files quickly becomes difficult to manage.
Web Languages
PHP is a popular language for use with MySQL. It uses afriendly syntax, has powerful features, and has supportfor all of MySQL's functions built in. Creating MySQLapplications using PHP is simple, and is described inChapter 12.
Perl is another popular Web language, and one of theoldest languages used on the Web. While its syntax is a bitmore difficult to master, Perl is a powerful language. LikePHP, it supports all of the MySQL client functions. You canlearn more about using Perl with MySQL in Chapter 13.
Database-Backed Web Sites
When you use a database to manage a Web site, all ofthe data is divided into convenient pieces and stored onthe MySQL server. You can then use a language such asPerl or PHP to dynamically build the HTML pages forthe site based on the data from the server.
This has several advantages over a simple Web site: first,the data is stored in a central location and is easy toback up, restore, or move to a different server. Second,the data can be dynamically assembled as needed —rather than static pages, you can easily create searchengines and other interactive features. Third, ratherthan editing HTML files when you need to update thesite, you can use a simple MySQL client to enter ormodify data from a friendly interface.
Most importantly, a database allows you to separate thecontent of the site from the format it is displayed in. Whenyou want to change the look of the site, you can makesome simple changes to the program that displays thedata, and the look of thousands of pages can be changed.
MYSQL AND THE WEB
MySQL consists of client components and servercomponents. The basic components of MySQL aredescribed in the sections below.
MySQL's most popular use is as a back-end system for Web sites. This is largelydue to the fact that most of the systems that run the popular Apache Webserver can also run the MySQL server. MySQL is also included with many Linuxdistributions, and can be installed as an option during the installation of Linux.
516922 Ch01.F 9/26/02 11:31 AM Page 3

Databases in general, and MySQL in particular, use afew terms you may be unfamiliar with. Thefollowing is an overview of some of the MySQL
terms you will encounter throughout this book.
MYSQL TERMINOLOGY
MySQL
MySQL Server
The MySQL server is a software service that runs on acomputer, typically a UNIX or Windows machine. TheMySQL server accepts requests from clients and sendsresults back to them.
MySQL Client
A MySQL client is an application that sends requests toa MySQL server and works with the resulting data. Asimple command-line client comes with the MySQLserver software. Applications written in Web languagessuch as PHP and Perl can act as customized MySQLclients.
Database
A database is a file structure for organizing data, andconsists of one or more tables. The MySQL server canstore any number of databases, and clients can workwith them concurrently.
Table
A table is a unit of data storage within a database. Eachdatabase can contain one or more tables. Tables aredefined with a set number and type of columns, andcan contain any number of rows.
Column (or Field)
The columns, or fields, define the types of data storedin a database table. For example, a table that stores amailing list may include columns called Name, Address,City, and State. A table can have one or more columns.Each column is defined with the type of data it willstore — for example, a number, a string of text, or adate.
Row (or Record)
Each entry in the database is a row, and each row includesa data item for each column. For example, in a mailing listtable, each combination of name and address would formone row of the table. Rows can be added, removed, ormodified at any time. When clients request data, it isreturned in rows. Rows are also known as records.
Primary Key
In order to access a single record in a database table, theserver needs a unique identifier for each row. The primarykey is a column chosen to be this unique identifier. Forexample, the name would be an appropriate primary keyfor an address database. Each table can have one primarykey consisting of one or more columns.
Index
The database server stores extra information about thevalues used in the primary key field in an index. Thisallows for faster searching by this field. You can alsospecify that other fields in a table be indexed if theywill be searched on frequently. These indexes areknown as secondary keys.
Query
Each request that a MySQL client sends to a server iscalled a query. Queries use SQL, or Structured QueryLanguage. A query can request one or more rows ofdata, or request that an action be performed — forexample, adding a new row or deleting an existing row.
SQL
SQL, or Structured Query Language, is the language usedin MySQL queries. SQL is a standardized language thatuses commands to perform various functions on thedatabase server. Examples of SQL commands includeINSERT to add a row to a table and SELECT to find oneor more rows within a table.
4
516922 Ch01.F 9/26/02 11:31 AM Page 4

5
While this book focuses on MySQL, it is actually justone of several database management systems,also known as DBMS, that you may find useful.
Many of these systems use similar languages and can beused interchangeably, and you can choose whichever serverfits the needs of your application.
MySQL is neither the simplest nor the most sophisticated ofdatabase systems. The following are some of the otherpopular systems, ranging from simpler than MySQL to farmore sophisticated.
OTHER DATABASE SYSTEMS
INTRODUCING MYSQL 1
Flat File Database
The most basic of databases does not use a DBMS at all.Applications can simply store data in one or more files.This is the traditional approach used by many simpleapplications such as spreadsheets. Languages such asPerl have features that allow you to use DBMS-likefeatures to manage simple files. The advantage of thisapproach is that it can run on many platforms and doesnot require a database server, but it offers few of theadvantages of a true database management system.
Microsoft Access
Microsoft Access is by far the most popular desktopdatabase software and is available as part of theMicrosoft Office suite. Access uses an internal DBMSthat stores data in local files, and the ability to share filesbetween networked computers is limited. Nevertheless,it is useful for simple applications and has a friendly userinterface. Access can also work as a client for MicrosoftSQL Server, and includes tools to simplify the migrationof Access databases to SQL Server.
mSQL
Mini SQL from Hughes Technologies, known morepopularly as mSQL, is another popular choice as theback end of Web sites. Similar to MySQL in languageand functionality, mSQL's advantages are also similar tothose of MySQL: Its server software is lightweight, canrun on machines with limited resources, and issupported by many programming languages. mSQL is acommercial product, but free copies are available foreducational users and nonprofit organizations.
PostgreSQL
PostgreSQL is another popular DBMS and an alternativeto MySQL. It is free and open source software.PostgreSQL supports some features of the SQLlanguage beyond what MySQL supports, and offersfeatures like transaction support that may make it abetter choice for high-end applications. PostgreSQL canbe run on most Linux and UNIX systems.
Microsoft SQL Server
While Access is a simple desktop database, MicrosoftSQL Server is a full-featured client-server DBMS. Theserver software runs exclusively on Windows NT, 2000,and XP systems. The advantages of SQL Server includeits wide support in Windows-based applications and itsreliability, which has led to its use by manycorporations, banks, and even stock exchanges.
Oracle
Oracle is a high-end DBMS popular for use in corporatedatabases and in larger and more critical Web sites. Itsupports transactions and other features for highreliability, availability, and speed. Its server softwareruns under UNIX or Windows systems. Visit Oracle'sWeb site at www.oracle.com for more information.
DB2
IBM's DB2 is a DBMS with a long history in mainframecomputing. The latest version, DB2 Universal Database,runs under AIX, Windows, and most UNIX systems. It isanother popular choice for banks and other corporationswith critical data storage needs, and includes featuresthat make it work well with Web standards such as Javaand XML.
516922 Ch01.F 9/26/02 11:31 AM Page 5

SQL (Structured Query Language) was first developedby IBM and is now a standard maintained by theANSI, or American National Standards Institute. Most
current DBMS systems follow the SQL standard to somedegree. MySQL's query language is based on this standard.
The following is an overview of some of the most importantcommands in MySQL. You can use these commands fromany MySQL client, such as the MySQL Monitor introducedlater in this chapter. Each of these commands is explained indetail with examples in later chapters.
STRUCTURED QUERY LANGUAGE (SQL)MySQL
6
The CREATE DATABASE command creates the filestructure for a new database and assigns it thename you specify. This command does not by itselfstore any data, but you must create a databasebefore you can use it.
Example:CREATE DATABASE testdb;
CREATE DATABASE
The DROP DATABASE command deletes an existingdatabase. Do not expect a friendly warning whenusing this command: The database is deletedimmediately, without confirmation, including alltables and rows. Use this command with extremecaution.
Example:DROP DATABASE testdb;
DROP DATABASE
The USE command selects a database for use byother commands. The database you specify withUSE must already exist. The commands that workwith tables and rows of data will only work if youhave selected a database using this command.
Example:USE testdb;
USE
The SHOW DATABASES command displays a list ofthe databases that have been created on theMySQL server. The SHOW command can also beused to display tables for a database and othercategories of information.
Example:SHOW DATABASES;
SHOW DATABASES
The CREATE TABLE command creates a tablewithin the currently selected database. To create atable, you specify the fields (columns) it will containand a field type for each one. The CREATE TABLEcommand can optionally include information aboutthe keys and indexes available in the table. Thiscommand often requires multiple lines.
Example:CREATE TABLE address (
name CHAR(100),
address CHAR(120),
phone CHAR(10) );
CREATE TABLE
The DROP TABLE command deletes a table fromthe currently selected database. All of the datastored in the table is permanently deleted and, aswith the DROP DATABASE command, this happensinstantly and without confirmation. Use thiscommand with caution.
Example:DROP TABLE address;
DROP TABLE
516922 Ch01.F 9/26/02 11:31 AM Page 6

INTRODUCING MYSQL 1
7
The SHOW TABLES command displays a list oftables available in the currently selected database.You can use this command when you are unsure ofthe exact name of a table within the database.
Example:SHOW TABLES;
SHOW TABLES
The INSERT command inserts a new row of datainto an existing table within the currently selecteddatabase. You can specify a list of fields in theINSERT command along with values for each field.The INSERT command is described in detail inChapter 4.
Example:INSERT INTO address(name, address, phone)
VALUES ('John Smith','321 Elm Street','804-555-1234');
INSERT
The UPDATE command alters one or more existingrows of data within a table. The WHERE keywordcan be used with this command to specify one ormore rows to alter. The command specifies newvalues for one or more of the fields within eachrow. These values can be based on existing fields orconstant values specified within the command.
If you do not specify a WHERE clause, this commandwill update all of the rows in the table. While youwill sometimes want to update all of the rows,using UPDATE without a WHERE clause can causeloss of data if you are not careful. Update queriesare described in detail in Chapter 5.
Example:UPDATE address SET phone = '801-555-1234'
WHERE name = 'John Smith';
UPDATE
The DELETE command deletes one or more rowsof data within an existing table. The WHERE clauseshould be used to specify the rows that will bedeleted. Use this command with care: If you omitthe WHERE clause, all rows of data within the tableare deleted. See Chapter 4 for further informationabout the DELETE command.
Example:DELETE FROM address WHERE name = 'John Smith';
DELETE
The SELECT command retrieves one or more rowsfrom a database. You can specify the columns to bereturned or use the wildcard * to return values forall columns in the order they appear in the tabledefinition. You can use a WHERE clause to specifyone or more conditions that rows must match inorder to be returned. If you do not use a WHEREclause, the specified columns from all of the rows inthe database are returned.
Example:SELECT name, address, phone FROM address
WHERE name like '%Smith';
SELECT
516922 Ch01.F 9/26/02 11:31 AM Page 7

⁄ From your Web browser, go to this URL: www.mysql.com/.
■ The MySQL Web page is displayed.
¤ Click the Downloads link.
■ The Downloads page is displayed.
‹ Click the link for MySQL 3.23.
Note: If a newer version has been released, you can download the latest version instead.
Before you can use MySQL, you need a workingMySQL server. If you do not already have access toone, you can download the MySQL software from
the MySQL Web site, www.mysql.com/, and install it on acomputer running UNIX, Windows, or another supportedoperating system. MySQL is freely available for non-commercial use.
To access the downloadable files, click the Download linkfrom the MySQL Web site and then click the link for theversion of MySQL to install. At this writing, the currentstable release is MySQL 3.23. Under this site's Downloadpage, several different versions of MySQL are available. Theversion you should download depends on your operatingsystem. For Windows, the choice is simple — a ZIP file isavailable with everything you need for installation.
The download for Red Hat Linux and other versions thatsupport RPM packages is also simple. MySQL is dividedinto several packages for its different components: serversoftware, client software, shared libraries, developmentfiles, and benchmarking utilities. You can install these usingthe rpm command.
If you have a different version of Linux or UNIX, the nextalternative is to download the binary distribution. These arestored as tar.gz files, one for each of the five components.The installation process for these is slightly more complex,but easier than installing from source code.
Binary packages are available for Linux running underIntel (PC) systems, DEC Alpha, IA64, Sun Sparc, and S/390.Additional binary versions are available for other operatingsystems. If one is not available for your operating system, youcan download the source code and compile and install it.
DOWNLOAD MYSQL
MySQL
8
DOWNLOAD MYSQL
516922 Ch01.F 9/26/02 11:31 AM Page 8

■ The download page for the current version is displayed.
› Scroll down to the Windows Downloads section and click the Download link.
Note: For other operating systems, download the appropriate files instead.
■ A list of download locations is displayed.
ˇ Choose a download location near you and click the HTTP or FTP link.
■ You will be prompted for a location to save the downloaded file.
INTRODUCING MYSQL 1Along with Windows and Linux, binary versions of the MySQL server areavailable for Solaris, FreeBSD, MacOS X, HP-UX, AIX, SCO, SGI Irix, DECOSF, and BSDi UNIX. The tip in the next section describes the process ofinstalling these binary distributions.
MySQL is actually available in multiple versions. The basic version, MySQL3.23, should work for most purposes. The additional versions includeMySQL-Max, which is the same version but includes support for additionaltypes of tables and transactions.
Transactions are a feature used in mission-critical database systems, such asthose at financial institutions. These systems allow you to begin atransaction, perform updates to the database, and then end the transaction.The server keeps track of the changes made during the transaction, allowingthe server to roll back the entire transaction if it was not completed. Thisensures that the database is not corrupted by partial transactions.
MySQL 4.0 is also under development at this writing. This release increasesthe speed of the MySQL server and clients and supports additional SQLstatements.
Currently, unless you need the new features of MySQL-Max or MySQL 4.0,MySQL 3.23 is the safest choice.
9
516922 Ch01.F 9/26/02 11:31 AM Page 9

⁄ From the Linux command prompt, type rpm -i MySQL-version.i386.rpm, replacing version with the version number of the downloaded package, and press Enter.
Note: You should be logged on as the root user to install MySQL.
■ The software is installed. This may take several minutes to complete.
Note: The package manager automatically starts the MySQL server after the installation of this package.
¤ Type rpm -i MySQL-client-version.i386.rpm, replacing version with the version number, and press Enter.
‹ Type rpm -i MySQL-shared-version.i386.rpm, replacing version with the version number, and press Enter.
Note: You can stop here for a minimal installation of MySQL, or continue to install the other packages.
If you are using Linux, there is a good chance you caninstall MySQL from the package files in RPM format.This format was developed by Red Hat Linux, but is now
supported by several other systems. Using packages is thesimplest way to install the MySQL server. MySQL isdistributed in several packages with different components.
The first package, MySQL-version-i386.rpm, containsthe MySQL server software, and the second, MySQL-client-version-i386.rpm, contains the MySQLmonitor and other client software. The third package,MySQL-shared-version.i386.rpm, contains sharedfiles needed by the MySQL client software.
Two additional packages are available but not required:MySQL-bench-version.i386.rpm containsbenchmarking and testing utilities, and MySQL-devel-version.i386.rpm contains development libraries andheader files.
In most cases, installing all five packages is a good idea.If you have a limited amount of space, you can leave outthe benchmarking package. You can also leave out thedevelopment files if you will not be using MySQL withprogramming languages such as Perl.
As with other MySQL distributions, you can download thepackage files from the Download section of the MySQLWeb page at www.mysql.com/. Download all five of theRPM files, or only the files you will be installing, beforebeginning the installation process.
You install RPM packages using the package manager utility,rpm. This allows you to install complex software like MySQLwith a minimum of user interaction. The disadvantage of thisapproach is that the software will be installed in the defaultlocation and with the default compilation settings. If yourequire different installation settings, you can install MySQLfrom the source packages, as described in the next task.
INSTALL MYSQL UNDER LINUX FROM A PACKAGE
MySQL
10
INSTALL MYSQL UNDER LINUX FROM A PACKAGE
516922 Ch01.F 9/26/02 11:31 AM Page 10

› Type rpm -i MySQL-bench-version.i386.rpm, replacing version with the version number, and press Enter.
■ The benchmark files are now installed.
ˇ Type rpm -i MySQL-devel-version.i386.rpm, replacing version with the version number, and press Enter.
■ The development files are now installed. This completes the MySQL installation.
INTRODUCING MYSQL 1If your particular operating system does not support RPM files, there is an alternative toinstalling from source code. Pre-compiled binaries for a variety of operating systems areavailable from the Download section at www.mysql.com. These are archived in the tar(tape archive) format and compressed with gzip, and typically have an extension of .tar.gz.
Binary files have the advantage of being much easier to install. The potentialdisadvantages are that you cannot customize the way MySQL is compiled, and that binarypackages are available only for some operating systems and may not be as up to date asthe source code version.
After you have downloaded the correct binary distribution for your operating system andhardware, you can use the following sequence of commands to install MySQL. Thisexample assumes that you have the .tar.gz file stored in the /usr/local directory.
Example:cd /usr/local
tar zxfv mysql-version-OS.tar.gz
ln -s mysql-version-OS mysql
cd mysql
scripts/mysql_install_db
This example stores the MySQL files in the /usr/local/mysql directory. The MySQL serveris not yet running; you can start it by running /usr/local/mysql/bin/safe_ mysqldor following the instructions in the section "Start the MySQL Server," later in this chapter.
11
516922 Ch01.F 9/26/02 11:31 AM Page 11

⁄ From the UNIX command prompt, type cd /usr/local/src to switch to the source directory, and press Enter.
¤ Type tar zxfv mysql-version.tar.gz, replacing version with the correct version number, and press Enter.
■ The source files are uncompressed into a new directory.
‹ Type cd mysql-version, replacing version with the correct version number, and press Enter.
› Type ./configure --prefix=/usr/local/mysql and press Enter.
■ MySQL is configured for your operating system and hardware.
Note: You may need additional configure options to compile MySQL. See the Extra section.
If you need to change MySQL's installation location orother options, or if there is no binary distribution ofMySQL for your operating system or hardware, you
can download the MySQL source code and install it fromsource. This process is mostly automated and is not muchmore difficult than installing a binary version.
The source code is distributed in a .tar.gz archive, andyou can download it from the Download section of theMySQL Web page at www.mysql.com/. Before you beginthe process of installing from source, copy this archive toyour server at your choice of location. The instructionsin this section assume your source archive is in the/usr/local/src directory.
Note that while Windows source code is also available,these instructions are for Linux and other UNIX-like systems.Compiling from source code in Windows is a more complexprocess — in most cases, the easiest thing to do is to use
the regular Windows installation files. The only reason toinstall from source is if there is no easier way to get MySQLrunning in your particular environment.
To install MySQL from source, first unpack the archive ofsource files. Next, use the configure program within thedistribution to set up the correct options for your operatingsystem. After this completes, use the make command tocompile the source code, and the make installcommand to install the files.
This procedure compiles and installs all of the filesyou need to run the MySQL server, the client software,benchmarking and testing utilities, and to connect withprogramming languages such as Perl. The installationdoes not start the MySQL server; you will need to start itfollowing the instructions presented in the section "Startthe MySQL Server," later in this chapter.
INSTALL MYSQL UNDER UNIX FROM SOURCE
MySQL
12
INSTALL MYSQL UNDER UNIX FROM SOURCE
516922 Ch01.F 9/26/02 11:31 AM Page 12

ˇ Type make and press Enter.
■ The MySQL files are now compiled. This may take several minutes. Watch for any compilation errors.
Á Type make install and press Enter.
■ The compiled MySQL program files are now installed.
Note: You need to be logged on as the root user on most systems to complete this last step.
INTRODUCING MYSQL 1
The configure script actually has a wide variety of options. If you have trouble compilingMySQL or need to change installation locations or other settings, you will need to use one ormore of these options. You can type configure --help from the source distributiondirectory to view a list of these options. The table below shows some of the most useful optionsfor configure:
OPTION PURPOSE
--help Display complete option list
--without-server Install the MySQL client only, no server
--prefix=path Use path as the installation directory
--with-charset=CHAR Use CHAR instead of the standard (US English) character set
If you are installing MySQL from an operating system that supports RPM packages but still wantto compile from source, you can use the source RPM distribution. Use this command to build abinary RPM from the source; you can then install the binary RPM in the normal way.
Example:rpm --rebuild MySQL-version.src.rpm
13
516922 Ch01.F 9/26/02 11:31 AM Page 13

⁄ A Welcome dialog box is displayed. Click Next to continue with the installation.
■ The release notes for this version of MySQL are displayed.
¤ Click Next to continue.
While Linux is the most common platform forMySQL, a Windows version is also available. Youcan install the MySQL server under any 32-bit
version of Windows. Windows 2000, Windows XP, and theolder Windows NT are the best platforms for the MySQLserver because they are true multitasking systems and canrun MySQL as a service.
The Windows version of MySQL requires that you havethe TCP/IP protocol installed. This is installed by default onWindows 98, 2000, and XP. If you currently do not have thisprotocol installed, you can add it from the Network controlpanel. You will also need to upgrade to the latest Winsockdrivers if you are running an early version of Windows 95.
One limitation of the MySQL server on some versions ofWindows is that the FAT file system does not allow fileslarger than 4GB, and thus the tables in your databases will
be limited to this size. If you need to use larger tables, youcan use the NTFS file system under Windows NT, 2000, orXP to overcome this limitation.
You can download the Windows version of MySQLfrom the Download section of the MySQL Web site atwww.mysql.com/. Before installing MySQL, you need toexpand the contents of the ZIP file into a folder. Be sureno other programs are running while you perform theinstallation.
After the ZIP file is expanded, you can run the installationprogram, setup.exe, to begin the installation. Theinstallation provides three options: Typical, which installsthe standard client and server files; Compact, which installsonly the minimum files needed to run the server; andCustom, which allows you to choose which components toinstall.
INSTALL MYSQL UNDER WINDOWS
MySQL
14
INSTALL MYSQL UNDER WINDOWS
516922 Ch01.F 9/26/02 11:31 AM Page 14

■ The Choose Destination Location dialog box is displayed.
‹ Click Next to continue and install the components into the c:\mysql directory.
■ Click Browse if you need to choose a different directory.
■ The Setup Type dialog box is displayed.
› Choose Typical for a standard installation and click Next.
■ Choose Custom if you want to select the components to install.
■ The MySQL server and client software is now installed. This may take a moment to complete.
INTRODUCING MYSQL 1The installation process places all of the files for MySQL in the c:\mysqldirectory by default. Within this directory, the following subdirectories areavailable:
DIRECTORY PURPOSE
c:\mysql\bin The server and client EXE files
c:\mysql\data The database data storage area
c:\mysql\Docs The MySQL documentation in HTML format
c:\mysql\bench Benchmarking and testing utilities
Within the mysql\bin directory, two utilities unique to the Windows version areincluded. The first, winmysqladmin.exe, is a graphical utility that allows youto create users and passwords, edit MySQL server settings, and monitor theMySQL server's status.
The second utility, MySqlManager.exe, allows you to monitor one or moreservers and to browse the data structure of the databases stored on the servers.
The configuration settings for the MySQL server are stored in the my.ini file,which the server looks for in c:\mysql by default. You can create this file usinga text editor or the editor built into the winmysqladmin.exe utility.
15
516922 Ch01.F 9/26/02 11:31 AM Page 15

MySQL
STARTING MYSQL UNDER WINDOWS
⁄ From a DOS prompt, type c:\mysql\bin\mysqld-max and press Enter.
■ The server starts in the background and returns you to the DOS prompt. It may take a moment to initialize.
Note: If you used a directory other than c:\mysql when installing, substitute the correct directory.
STARTING MYSQL UNDER LINUX
⁄ From the command prompt, type cd /usr/local/mysql to change to the directory where MySQL is installed.
Note: If you installed MySQL into a different directory, substitute its name here.
¤ Type bin/safe_mysqld & and press Enter.
■ The MySQL server starts in the background.
16
START THE MYSQL SERVER
After you have installed the MySQL Server software,you can start the server. The server software is adaemon, a program that runs in the background and
usually does not have a window or output of its own. Theprocess of starting the MySQL server depends on youroperating system.
Under Windows, the simplest way to start the server is torun the c:\mysql\bin\mysqld-max program from aDOS prompt. You can also use the winmysqladmin utilityto set up the MySQL server to run as a service and startautomatically when the computer is booted.
Under Linux or UNIX, you can start the server by executingthe safe_mysqld program in the bin directory under theMySQL installation directory. You should log on using a userspecifically created to run the MySQL server before startingMySQL. Depending on the installation method you used, auser account may have been created automatically.
The Linux installation of MySQL includes a script,mysql.server, in the share/mysql directory. This scriptcan be used to start or stop the server. The following arethe start and stop commands:
mysql.server startmysql.server stop
You can use this script to automatically start the MySQLserver. How to do this depends on the operating systemyou are using. In most versions of Linux, you can add thecommand to start the server to the /etc/rc.d/rc.local fileto start MySQL when Linux starts.
If you are using the MySQL server for experimentationrather than for a production server, you can simply type/bin/safe_mysqld & from the command prompt. The &character indicates that the program will be run in thebackground. See Chapter 9 for more details about startingand stopping the MySQL server.
START THE MYSQL SERVER
516922 Ch01.F 9/26/02 11:31 AM Page 16

⁄ From the Linux command prompt, type cd /usr/local/ mysql to switch to the MySQL installation directory.
Note: In Windows, switch to the c:\mysql directory.
¤ Type bin/mysqladmin status and press Enter.
Note: In Windows, type c:\mysql\bin\mysqladmin status.
■ The server's current status is displayed.
Note: If an Uptime value is not displayed, the server is either not running or you are not communicating with it.
‹ Type bin/mysqladmin variables to display the variable values.
Note: In Windows, type c:\mysql\bin\mysqladmin variables.
■ The values are displayed.
17
After you have installed the MySQL server, you shouldtest it to be sure it is running correctly. Because theMySQL server software runs in the background and
does not provide any obvious evidence that it is running,you will need to use the utilities included with MySQL tocommunicate with the server and check on it.
The mysqladmin program in the bin directory of theinstallation can perform a wide variety of administrationtasks, most of which will be introduced in Chapter 9. Tocheck whether the server is running correctly, you can usetwo simple options, mysqladmin status andmysqladmin variables.
The status command in mysqladmin displays a summaryof the server's current status, including the amount of timeit has been running. Its output under Linux typically lookssomething like this example:
Uptime: 2938036 Threads: 3 Questions: 35941287
Slow queries: 5 Opens: 60462 Flush tables: 1Open tables: 53 Queries per second avg: 12.233
You can also display this information using the MySQLmonitor utility. You will learn how to do this in the nextsection.
The variables command displays the values of a numberof MySQL settings. The variables themselves are notimportant for this test — if you see a list of variables at all,then mysqladmin has successfully communicated with theMySQL server, and you are ready to begin using the serverto work with data.
The mysqladmin command works identically in Windowsand Linux. In both systems, it is located in the bin directoryunder the directory where you installed MySQL. The stepsbelow are shown using Linux; notes are included where theWindows version differs.
TEST THE MYSQL INSTALLATION
TEST THE MYSQL INSTALLATION
INTRODUCING MYSQL 1
516922 Ch01.F 9/26/02 11:31 AM Page 17

⁄ From the UNIX or DOS command prompt, type mysql to start the monitor.
Note: You may need to add a username, password, and host name to this command, depending on your server.
■ The MySQL Monitor displays a welcome message.
¤ Type HELP at the monitor prompt to display a list of commands.
The MySQL Monitor is a command-line interface toMySQL and was installed when you installed theMySQL server. You can use the monitor to experiment
with SQL commands, and you will use it throughout thisbook to work with MySQL databases.
MySQL uses a client-server architecture: the server interactswith one or more client applications, either on the samemachine or different machines. The server deals with theactual data for the database, and the client makes requestsand receives data from the server. The MySQL Monitor is asimple client for the MySQL server.
To start the monitor, use the mysql command from youroperating system's command prompt. By default, themonitor will try to connect to a server on the localcomputer, using the current user's username and nopassword. If you need to access a server on a differentcomputer or using a specific username or password, youwill need to specify one or more options to the mysqlcommand.
The options you will commonly use include -uUSERNAMEto specify a username, -pPASSWORD to specify a password,and -hHOST to specify an address for the MySQL server.
When you are in the MySQL Monitor, the commands youcan use include monitor commands and SQL queries. Theresults of your command or query are shown on themonitor screen.
You can type monitor commands, such as EXIT and HELP,directly. SQL queries can be long and can extend acrossmultiple lines, so the monitor requires that you end eachquery with a semicolon (;). If you type a query and pressEnter without including the semicolon, you are promptedfor another line to add to the command.
USING THE MYSQL MONITOR
MySQL
18
USING THE MYSQL MONITOR
516922 Ch01.F 9/26/02 11:31 AM Page 18

■ A list of available commands is displayed.
‹ You can use SQL statements from the monitor. For example, type SHOW DATABASES; and press Enter.
■ A list of available databases is displayed.
› To exit the MySQL Monitor, type EXIT and press Enter.
■ You are returned to the UNIX or Windows environment.
INTRODUCING MYSQL 1If an error message is displayed when you try to start the monitor, besure you have correctly specified the username, password, and hostname for the MySQL server. The following table lists some of the mostuseful options for the mysql command:
COMMAND DESCRIPTION
-? Display a complete list of options
-D Select a database to use
-h Specify the host (server name or IP address)
-p Specify the password to access the server
-P Specify the TCP/IP port number for the server
-u Specify a username for the server
-V Display the server version number
If your MySQL server is on the local machine, and you have created ausername and password to access it, you only need to specify theusername and password to start the MySQL Monitor.
Example:mysql –uFRED -pPASSWORD
While monitor commands and SQL queries are typically shown inuppercase, such as EXIT and SHOW DATABASES, the commands arenot case-sensitive, and you can type them in lowercase if you prefer.
19
516922 Ch01.F 9/26/02 11:31 AM Page 19
MySQL
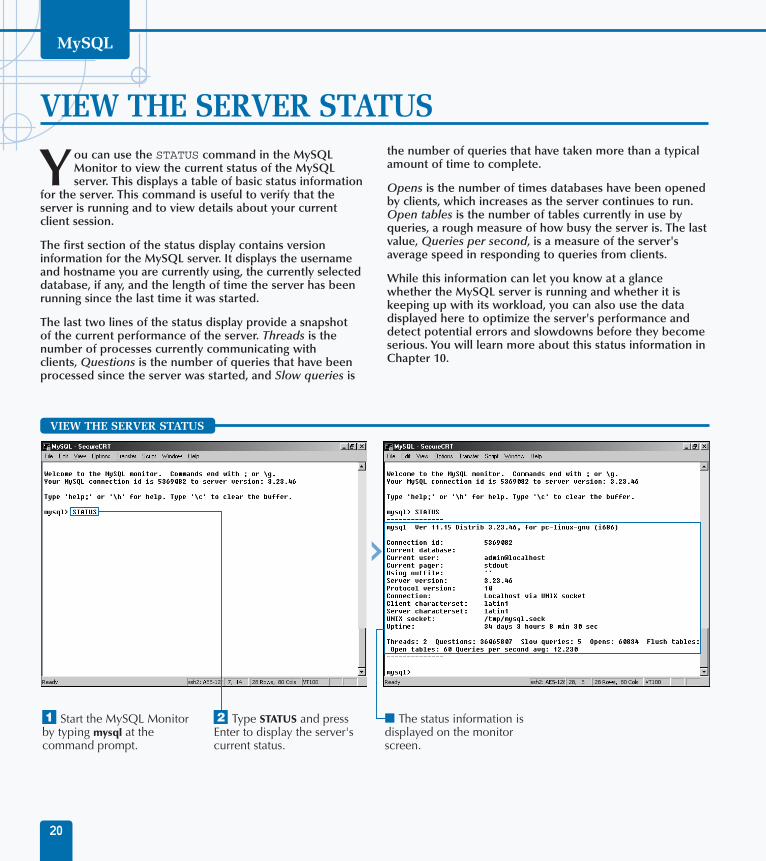
⁄ Start the MySQL Monitor by typing mysql at the command prompt.
¤ Type STATUS and press Enter to display the server's current status.
■ The status information is displayed on the monitor screen.
20
VIEW THE SERVER STATUS
You can use the STATUS command in the MySQLMonitor to view the current status of the MySQLserver. This displays a table of basic status information
for the server. This command is useful to verify that theserver is running and to view details about your currentclient session.
The first section of the status display contains versioninformation for the MySQL server. It displays the usernameand hostname you are currently using, the currently selecteddatabase, if any, and the length of time the server has beenrunning since the last time it was started.
The last two lines of the status display provide a snapshotof the current performance of the server. Threads is thenumber of processes currently communicating withclients, Questions is the number of queries that have beenprocessed since the server was started, and Slow queries is
the number of queries that have taken more than a typicalamount of time to complete.
Opens is the number of times databases have been openedby clients, which increases as the server continues to run.Open tables is the number of tables currently in use byqueries, a rough measure of how busy the server is. The lastvalue, Queries per second, is a measure of the server'saverage speed in responding to queries from clients.
While this information can let you know at a glancewhether the MySQL server is running and whether it iskeeping up with its workload, you can also use the datadisplayed here to optimize the server's performance anddetect potential errors and slowdowns before they becomeserious. You will learn more about this status information inChapter 10.
VIEW THE SERVER STATUS
516922 Ch01.F 9/26/02 11:31 AM Page 20

⁄ From the MySQL Monitor, type create database testdb; and press Enter.
■ A message is displayed indicating that the database was created successfully.
Note: If the message Query OK was not displayed, the server may not be running, or you may not have the correct permissions to create a database. See Chapter 10 for troubleshooting tips.
21
While you can use the MySQL Monitor to viewstatus and other information about the server,you will find it most useful for testing MySQL
queries and for using queries to work with data indatabases.
A MySQL query begins with an SQL command, such asCREATE, INSERT, or SELECT. The remainder of the queryspecifies the parameters of the command. You must endeach MySQL query with the ; (semicolon) character.
You can use a MySQL query at any time from the MySQLMonitor prompt. Some query commands, such as SELECTand INSERT, require that you first specify a database usingthe USE command. This command is explained in Chapter 2.
When you enter a query into the MySQL monitor, it isexecuted immediately by the MySQL server. The monitordisplays the results of your query. For queries such as
SELECT, it will display the data you requested. For queriesthat affect the database, such as DELETE and INSERT, it willdisplay a message informing you how many rows wereaffected by the query.
While the MySQL monitor is a great way to test MySQLqueries and perform simple tasks, it is not the mostefficient interface for complex database management. Ifyou need to use a large number of queries, you can do sousing a database client such as phpMyAdmin, introducedin Chapter 12. You can also write your own programs in alanguage such as PHP or Perl to work with the data in yourdatabase.
In this example, you will enter a simple query at the MySQLMonitor prompt to create a database. The database youcreate here, testdb, will be used in subsequent examples, sokeep it available on the server.
TRY AN SQL QUERY
INTRODUCING MYSQL 1
TRY AN SQL QUERY
516922 Ch01.F 9/26/02 11:31 AM Page 21

⁄ From the MySQL monitor, type USE testdb; and press Enter.
■ This selects the database.
Note: Be sure you have started the MySQL monitor using the root user.
¤ Type GRANT ALL ON testdb.* TO testuser and press Enter.
‹ Type IDENTIFIED BY 'testpw'; and press Enter.
■ This creates the testuser account.
Note: Choose your own password rather than using the one shown here.
MySQL has its own access control systemusing usernames and passwords. To workwith data on a MySQL server, you will need a
valid MySQL username and password. MySQL usernamesare completely separate from UNIX or Windows usernames.
When you install MySQL, it creates the root user bydefault. This user has access to all databases on the server,and can create and manage additional users. You shouldnot use the root user to work with the MySQL serverunless absolutely necessary. Instead, use a username andpassword that has been given access to the database youare working with.
You will use the testdb database for examples throughoutthis book. Rather than use the root user for these tests, youcan create a username specifically for this purpose. Tocreate the user, you will need to be connected to theMySQL monitor as the root user. Use the followingcommand to create the new user:
GRANT ALL ON testdb.* TO testuserIDENTIFIED BY 'testpw';
This GRANT command creates a new user, testuser, andgrants the user access to all tables in the testdb database.The IDENTIFIED BY section specifies a password for theuser. You should choose your own password rather thanusing the value given here.
After you have created the testuser username, you can use itto access the MySQL monitor. The following command startsthe MySQL monitor with this username. You may need tospecify a hostname or other options, as described in thesection "Using the MySQL Monitor," earlier in this chapter.
mysql -utestuser -ptestpw
MySQL security is a complex topic. You can create anynumber of users with different levels of access to databases,tables, and even specific columns. See Chapter 11 for moreinformation about MySQL security.
CONFIGURE A MYSQL USER
MySQL
22
CONFIGURE A MYSQL USER
516922 Ch01.F 9/26/02 11:31 AM Page 22

Note: The following command is only needed if you will be running the MySQL monitor from the same machine as the MySQL server.
› Type GRANT ALL ON testdb.* TO testuser@localhost and press Enter.
ˇ Type IDENTIFIED BY 'testpw'; and press Enter.
■ This creates an account for use from the local host.
Á Type EXIT to exit the MySQL monitor.
■ You are returned to the command prompt.
‡ Type mysql -utestuser -ptestpw to start the MySQL monitor.
■ You are now connected to MySQL as the new user.
Note: Use the same password you specified when creating the user.
INTRODUCING MYSQL 1
When MySQL is installed, the root user has adefault password of mysql. Because this iscommon knowledge, you should change thepassword for the root user as soon as possible tosecure the server. To change the password, startthe MySQL monitor as the root user and use thefollowing command.
Example:
set password = password('newpass');
Replace newpass with the password of yourchoice, and be sure to choose a password that isnot easy for others to guess. See Chapter 11 fordetailed information about changing passwordsfor MySQL users.
Because you will be using the testdb databasethroughout this book, you may find it useful tomake the MySQL monitor automatically use thetestuser user by default. This can easily be done onUNIX systems. Create a file in your home directorywith the filename .my.cnf and add the followinglines to the file:
Example:[client]
user=testuser
password=testpw
23
516922 Ch01.F 9/26/02 11:31 AM Page 23

⁄ From the MySQL monitor, type USE testdb; and press Enter.
■ The test database is now selected.
¤ Type CREATE TABLE address ( and press Enter.
‹ Type name CHAR(100) NOT NULL, and press Enter.
› Type address CHAR(120), and press Enter.
While simple SQL queries fit on a single line, somequery commands require several lines. You canenter a multiple-line query in the MySQL
monitor by pressing Enter after each section of a command.
Because you must use the semicolon character at the end ofa query, the MySQL monitor does not act on the query untilyou end a line with a semicolon. You can enter any numberof lines, in order, and use a semicolon at the end of the lastline to indicate the end of the query.
After you have entered a line, you can press the up-arrowkey to return to that line and edit it further. Press Enter againto continue to the next line. The MySQL monitor alsosupports a special command, \c (clear). If you type \c as thefirst characters in a line, the monitor clears the command youhave entered so far, and you can start a new command onthe next line. This is useful if you have made a mistake.
As an example of using a multiple-line query, you can trythe CREATE TABLE command below:
CREATE TABLE address (
name CHAR(100) NOT NULL,
address CHAR(120),
city CHAR(50),
state CHAR(2) );
This example will use the testdb database you createdearlier in this chapter. If you have not already created thetestdb database, you can create it before beginning usingthis command:
CREATE DATABASE testdb;
SPECIFY A MULTIPLE-LINE QUERY
MySQL
24
SPECIFY A MULTIPLE-LINE QUERY
516922 Ch01.F 9/26/02 11:31 AM Page 24

■ The command you have entered so far is displayed.
ˇ Type city CHAR(50), and press Enter.
Á Type state CHAR(2) ); and press Enter.
■ The command is now complete and the table is created.
‡ Type SHOW TABLES; and press Enter.
■ The monitor displays the list of tables, including your new table.
INTRODUCING MYSQL 1
Along with \c to clear the command, the MySQL monitor supports a numberof other commands. Most of the commands have a short version beginningwith the backslash character as well as a single-word version. The followingtable summarizes some of the most useful commands.
SHORT LONG DESCRIPTION
\c CLEAR Clears the current command
\e EDIT Edits the command in a text editor
\g GO Executes the current command
\G EGO Executes the current command and displays avertical result
\h HELP Displays a list of commands and their descriptions
\p PRINT Displays the current command
\P PAGER Specifies a program to use to create paged output
\q EXIT Exits the MySQL monitor
\r CONNECT Attempts to reconnect to the server
\s STATUS Displays MySQL status information
\u USE Selects the database for subsequent commands
\ SOURCE Executes MySQL commands from a specified file
25
516922 Ch01.F 9/26/02 11:31 AM Page 25

⁄ From the MySQL monitor, type USE testdb; and press Enter.
■ This selects the database.
¤ From the MySQL monitor, type CREATE TABLE test ( and press Enter.
‹ Type \e to edit the command so far.
■ The editor opens and displays the command you have entered so far.
› In the editor, type field1 CHAR (100), and press Enter.
ˇ Type field2 CHAR(50) ); and press Enter.
While it allows you to split a long query intomultiple lines, the MySQL monitor interface isunforgiving — if you made an error on the first
line, you cannot correct it without entering the entirecommand again. Fortunately, the MySQL monitor providesan alternative.
You can use the \e command at the beginning of any line toedit the current command. This opens a text editor andallows you to use it to edit (or enter) the command. Whenyou are finished, you save the command and exit the editor,and the full command is stored in the MySQL monitor buffer.
You can use \e as the first line in a command to enter theentire command in the editor and avoid using the regularMySQL monitor interface. You can also enter the \ecommand at any time, and the command you have enteredso far will be transferred to the editor.
This feature is not included in the Windows version of theMySQL monitor. In the Linux version, it uses the text editoryou have defined using the $EDITOR environmentalvariable. To set this variable, use a command like this fromthe command prompt:
export EDITOR=pico
This command may vary depending on your shell andoperating system. This example uses pico, a simple editorincluded with most versions of Linux. You can use theeditor of your choice instead.
When you finish editing, be sure to use the editor's Savecommand to save the file. If you do not save the file, thecommand will be lost. After you have edited a command,you will be returned to the MySQL monitor. You can thenuse the \g (go) command to execute the command.
EDIT A LONG COMMAND
MySQL
26
EDIT A LONG COMMAND
516922 Ch01.F 9/26/02 11:31 AM Page 26

Á Press Ctrl-X and then Y to save the file and exit the editor.
Note: This command will vary depending on your editor.
■ You are returned to the MySQL monitor.
‡ Type \g and press Enter.
■ The monitor executes the query and displays the result.
° Type SHOW TABLES; and press Enter.
■ The list of tables in the database is displayed, including the new table.
INTRODUCING MYSQL 1
The Windows version of the MySQL monitor does not support the\e command. There are several alternative ways to deal with longMySQL commands if you are using a Windows system. The first isto type the command in a text editor, such as Notepad, select it, anduse the Copy command to copy it to the clipboard, and then pasteit into the MySQL monitor window.
Another alternative is to use the MySQLGUI utility, a graphicalinterface to MySQL, described in the next section. This utilityincludes a text box that you can use to enter a command of anylength, and then submit it to the server. It also saves the most recentqueries you have performed and allows you to easily repeat them.
The Windows version of the MySQL monitor can be used toconnect to a MySQL server running on a UNIX system, and theUNIX version can connect to a Windows-based server. While thereare slight differences in the client programs, they use the sameprotocols to communicate with the MySQL server.
27
516922 Ch01.F 9/26/02 11:31 AM Page 27

■ When you start MySQLGUI, you are prompted for a password. The root user is used by default.
⁄ Enter the password and click OK.
■ The main MySQLGUI window is displayed.
¤ Click the Options button to configure MySQLGUI.
The MySQL monitor is only one of the clients you canuse with a MySQL server. You can use MySQLGUI, agraphical MySQL client, as an alternative interface to
MySQL. This utility can do most of the same things as theMySQL monitor.
MySQLGUI was developed by the developers of MySQL,and is available from the Downloads section of the MySQLWeb page at www.mysql.com/. Binary versions of this utilityare available for Windows and Linux systems.
For Windows systems, MySQLGUI is distributed as a ZIP file.You will need to use a program such as WinZip to extractthe files from the archive. WinZip is available from thefollowing URL: www.winzip.com/.
To install MySQLGUI, simply copy the files from the ZIParchive to a directory on your computer. You can use itfrom any machine that can reach your MySQL server across
the network; it does not have to be installed on the samemachine as the MySQL server software.
After you have installed the files, open the directory anddouble-click the mysqlgui.exe file. MySQLGUI promptsyou for a password for the root user. After you specify thisonce, you can click the Options button to specify a differentusername for future sessions.
The MySQLGUI utility is also available for Linux and severalother systems, and the source code is available. See theMySQL Web site for complete instructions for installing orcompiling MySQLGUI on your system.
MySQLGUI allows you to send queries to the MySQL server,display the server status, and perform other tasks. SeeChapter 6 for information about using MySQLGUI toperform a query, and see Chapter 9 for information aboutserver management using MySQLGUI.
CONFIGURE MYSQLGUI
MySQL
28
CONFIGURE MYSQLGUI
516922 Ch01.F 9/26/02 11:31 AM Page 28

■ The MySQL client options dialog box is displayed. It is divided into several pages; the Server page is selected by default.
‹ On the Server page, specify the host name for the MySQL server.
› Specify a default database to connect to when MySQLGUI starts.
ˇ Click the Client tab to switch to the next page.
■ The Client configuration page is displayed.
Á Enter a username for the MySQL server.
‡ Click Save to save the settings you have specified.
■ You are returned to the main MySQLGUI window.
INTRODUCING MYSQL 1
After you have configured MySQLGUI, you can use it to work withthe MySQL server. The main window includes a drop-down menuthat allows you to select a database to work with, similar to the USEcommand in the MySQL monitor. There is also an indicator that isgreen in color if you have a valid connection to the MySQL server.
The main part of the window is divided into two sections. The toparea allows you to specify a MySQL query with one or more lines.You can edit the query as needed. Do not use a semicolon to endqueries you enter into MySQLGUI. When the query is finished, clickthe Execute query button to send it to the MySQL server. MySQLGUIopens a new window to display the results of the query.
The bottom portion of the window displays a list of your mostrecent queries for the selected database. You can click an entry inthis list to copy the query to the top window, and use the Executequery button to send the query to the MySQL server again.
To exit MySQLGUI, click the Exit button on the toolbar or close itswindow. The list of recent queries is saved and displayed again thenext time you run the utility.
29
516922 Ch01.F 9/26/02 11:31 AM Page 29

MySQL
30
DATABASE DESIGN BASICS
30
Creating a database and one or more tables is easy.The complex part of the process is designing thedatabase: determining the data you need to store,
how it should be divided into tables and fields, and the typeof tables to use.
DESIGN A DATABASE
MySQL
Plan Tables
The first step in designing the database is to list all ofthe data you need to store and decide how it can bedivided into tables. Often separate tables are morepractical than one large table, but avoid duplicatinginformation between tables. If you will be usingapplications to work with the tables, plan accordinglyso that each application only needs to access aminimum number of tables.
Plan Columns
After deciding on a list of tables to include in thedatabase, list the fields, or columns, to include in eachtable and the type of data to be stored in each column.You can add columns at a later time, but your list ofcolumns should be as complete as possible when youcreate the tables. Keep the list of columns short and tothe point; do not include unnecessary data, duplicatesof data available in another table, or fields that can becalculated from existing fields.
Keys and Indexes
Each table will need a primary key: a unique index thatyou can use to single out any record, or row, from thetable. Along with the primary key, you may want tocreate additional indexes, also known as secondarykeys, to make it easier for the server to find data withincolumns that are frequently searched.
Relationships
Often you will need to consider the relationshipbetween two tables. For example, you may have anaddress book table and a phone list table. Each wouldinclude a name field, and you could relate databetween the two tables using this field. To ensure thattable relationships can be taken advantage of, be sureany fields that can be used to link tables are the sametype and are set up as keys to the tables.
Security
Some data requires more security than other data. Youmay need a more secure type of table to store certaindata, and you may want to separate the non-critical dataand the critical data. In addition to security, your designshould take reliability into account. You may need touse multiple database servers to make data reliablyavailable, and use regular backups to keep the data safe.
Plan for the Future
Along with your current needs, you should take anyplans for the future into account when designing thedatabase. If you will be adding additional tables at alater time, plan the current tables to use similarcolumns and make relationships between tables easier.
One important way of preparing for future changes is touse a standard naming convention for the columns inyour tables. If two tables have a column that stores thesame data, be sure they both use the same columnname and store the data in the same format.
The process of database design includes choosing tables,the columns that will make up the tables, and the keys,indexes, and relationships among tables.
516922 Ch02.F 9/26/02 11:32 AM Page 30

31
MyISAM
MyISAM is the default MySQL table type. This type oftable is based on the ISAM, or Indexed SequentialAccess Method, standard. The main disadvantage ofMyISAM tables is that they are not transaction safe.Transactions are used with critical data storage, such asthat used by financial institutions, to ensure that onlycomplete transactions are recorded in the database.Incomplete transactions can be rolled back to preventcorruption of the data.
Because using transactions is not necessary for mostWeb database applications or for many non-criticalbusiness uses, MyISAM tables are useful. If you create atable on the MySQL server without specifying a tabletype, the MyISAM type is used by default.
ISAM
ISAM is the standard table type that MyISAM tables arebased on. Because MyISAM tables are smaller and moreefficient, use of ISAM tables is discouraged by theMySQL developers, and this type may not be supportedby future versions of MySQL. You should use it only ifyou need compatibility with data already in the ISAMformat.
Heap
Heap tables are specialized. They use a hashed index,which uses a mathematical formula to quickly find thelocation of data for a key. Heap tables are stored inRAM rather than on disk. This makes a Heap tableextremely fast, but not reliable for permanent storage.Heap tables are a perfect choice when you need tocreate a temporary table.
BDB
BDB, short for Berkeley DB, is a new table typesupported by MySQL 3.23.34 and later. This table type isnot supported by default when you install MySQLunless you use the MySQL-Max distribution. You cancompile the regular MySQL distribution to optionallyinclude support for BDB tables.
The main advantage of BDB tables is that they supporttransactions. You can begin a transaction, submit data,and use the COMMIT command to commit the data tothe database. If the application is interrupted before thedata is complete, you can use the ROLLBACK commandto remove the partial transaction and keep the databasestable. BDB is also designed for high performance whenworking with large amounts of data and manyconcurrent users.
BDB is developed by Sleepycat Software. You can findout more about this database system at the developer'sWeb site, www.sleepycat.com.
InnoDB
InnoDB is an industrial-strength database system that issupported by MySQL 3.23.34a and later. Like BDB,InnoDB is not supported by default; you need tocompile MySQL with InnoDB support or use theMySQL-Max distribution.
Like DBD, InnoDB supports transactions, committing,and rollbacks. InnoDB provides greater performancethan basic MyISAM tables, especially when you areworking with large amounts of data. You can find outmore about InnoDB at www.innodb.com.
MYSQL TABLE TYPES
MANAGE DATABASES AND TABLES 2
MySQL supports a variety of different table types. Eachdatabase on a MySQL server can contain tables of any ofthese types. While the default type is sufficient for mostpurposes, you should be familiar with the different typesavailable and know when there may be a moreappropriate choice.
You can choose the table type to use with the TYPEkeyword within a CREATE TABLE query in MySQL. Youcan convert a table to a different type later if needed.
516922 Ch02.F 9/26/02 11:32 AM Page 31

Databases are the largest unit of data on a MySQLserver. Each MySQL server can store any number ofdatabases. Each table of data is stored in one of
these databases.
CREATE AND DROP DATABASES
Database Internals
When you create a database, the MySQL server creates adirectory on the server's file system. When you installMySQL, you can choose the location for these directories.Within each database's directory, the MySQL servercreates files for each of the tables you create in thedatabase.
Existing Databases
If you attempt to create a database using CREATEDATABASE, but a database with the name you specifyalready exists on the server, an error message isreturned. To avoid this error, you can use the IF NOTEXISTS keywords with the CREATE command. If this isspecified and the database already exists, no error isreturned, no new database is created, and the existingdatabase is unchanged.
Example:CREATE DATABASE IF NOT EXISTS newdb;
USING CREATE DATABASE
Show Database Contents
Because the DROP DATABASE command is drastic, useit carefully. One way to be sure you are deleting thecorrect database is to use the SHOW TABLES commandto display a list of tables in the database. Be sure noneof the tables listed contains important data.
The SHOW TABLE STATUS command displays a moredetailed list of tables, including the number of rowsstored in each table. Use this command to be sure youare going to delete the right tables.
Example:SHOW TABLES FROM newdb;
SHOW TABLE STATUS FROM newdb;
Data Security and Backups
Because DROP DATABASE and other commands cancause drastic and immediate loss of data if not usedcarefully, it is always a good idea to maintain backups ofimportant data and to make a backup before using theDROP command. Chapter 8 explains how to back updata on the MySQL server.
USING DROP DATABASE
MySQL
32
You can create a new database with the CREATEDATABASE command in MySQL. To use this command,simply specify a name for the new database.
Example:CREATE DATABASE newdb;
The DROP DATABASE command in SQL allows you todelete an existing database. This command immediatelydeletes the database. You are not asked to confirm thisaction. All tables within the database and the data theycontain are deleted.
Normally, using DROP DATABASE will return an error if thedatabase does not exist. You can avoid this error by addingthe phrase IF EXISTS to the DROP DATABASE query.
Example:DROP DATABASE newdb;
516922 Ch02.F 9/26/02 11:32 AM Page 32

⁄ From the command prompt, type mysql and press Enter to start the MySQL monitor.
Note: You may need to specify a username and password when starting the monitor. See Chapter 1 for details.
¤ From the MySQL monitor, type CREATE DATABASE newdb; and press Enter.
■ The server creates the database.
‹ Type SHOW DATABASES; and press Enter.
■ The complete list of databases on the server is displayed, including your new database.
33
Before you can store data in tables within a MySQLdatabase, you must first create the database. You cando this using the CREATE DATABASE command in
SQL. The basic form of this command simply specifies adatabase name:
CREATE DATABASE newdb;
When you create a database, no tables or data are stored inthe database. The MySQL server stores each database as adirectory on the server. When you create a new database, adirectory is created to store its tables. When you latercreate one or more tables, they are stored as files withinthis directory.
If you attempt to create the newdb database and a databasewith that name already exists, an error message is displayed.To avoid this error, you can specify IF NOT EXISTS. This
tells the server to create the database only if it does notexist, and no error is returned:
CREATE DATABASE IF NOT EXISTS newdb;
Because the database name is used as a directory nameon the server, you can use any valid name as a directory onyour system. Two characters that are explicitly disallowed indatabase names are period (.) and slash (/). On mostsystems, safe characters to use in directory names includeletters, numbers, and the underscore (_). Spaces are notallowed in names in some systems.
The opposite of CREATE DATABASE is the DROPDATABASE command. This command deletes the directorystructure for a database, including all tables. Because it doesnot warn you that data will be lost, DROP DATABASEshould be used carefully.
CREATE A DATABASE
CREATE A DATABASE
MANAGE DATABASES AND TABLES 2
516922 Ch02.F 9/26/02 11:32 AM Page 33

⁄ From the MySQL monitor, type SHOW DATABASES; and press Enter.
■ The complete list of databases on the server is displayed.
Note: Depending on the databases you have created, your list will vary from the results shown here.
¤ Type SHOW DATABASES LIKE '%test%'; and press Enter.
■ All databases containing the word 'test' are displayed. If you created the testdb database in Chapter 1, it will be listed here.
You can use the SHOW DATABASES command fromwithin the MySQL monitor to list all of the databasesavailable on the server. The basic command is simple:
SHOW DATABASES;
You can also use the LIKE keyword to show only databaseswhose names match a pattern. The following shows a list ofall databases that begin with the letter t:
SHOW DATABASES LIKE 't%';
The LIKE clause supports wildcard characters. These areuseful when you are unsure of the exact name of thedatabase you are looking for, or when you need to list all ofthe databases that match a certain keyword. The firstwildcard, underscore (_), matches any character. Thiscommand would list the testdb database and any othersthat contain testd followed by one letter:
SHOW DATABASES LIKE 'testd_';
The second wildcard is the percent (%) character. Thismatches any string of characters, or no characters. Thefollowing command would list the testdb database alongwith any other with a name containing 'test':
SHOW DATABASES LIKE '%test%';
Because this command includes wildcards at the beginningand end of the database name, it looks for the characterstest at any location. This example would match databasesnamed testdata, datatest, or newtest23.
Rather than using the MySQL monitor, you can also use themysqlshow utility, which is included with the MySQLserver, to list the databases. Use mysqlshow with noparameters to list all of the databases on the server. You canalso specify a database name to display the tables includedin the database. The following mysqlshow commanddisplays the tables within the testdb database:
mysqlshow testdb
SHOW AVAILABLE DATABASES
MySQL
34
SHOW AVAILABLE DATABASES
516922 Ch02.F 9/26/02 11:32 AM Page 34

⁄ From the MySQL monitor, type USE testdb; and press Enter.
■ The database is selected.
Note: This command will only work if you have created the testdb database. Follow the instructions in Chapter 1 if you need to create it.
¤ Type SHOW TABLES; and press Enter.
■ The list of tables in the current database is displayed.
35
Later in this chapter you will work with tables. Beforeyou can work with the tables in a database, you mustfirst select the database. You can do this with the USE
command. To use this command, type USE followed by thedatabase name and a semicolon to end the statement. Forexample, the following command selects the testdbdatabase:
USE testdb;
After you have selected a database with the USE command,it is used as the default database for any queries you make.If you refer to a table in a subsequent query, the MySQLserver looks for that table in the database you previouslyselected.
In order to select a database, you must be logged in to theMySQL server using the MySQL monitor, or another client,
and the username you have specified must have permissionto access the database you select. You can use the SHOWDATABASES command, described in the previous section,to determine a database name to select.
As an alternative to the USE command, you can also specifya database name and table name when you perform aquery that involves a table. You do this by separating thedatabase name from the table name using a period. Forexample, testdb.address refers to the address table withinthe testdb database.
After you have selected a database with the USE command,you can use commands like CREATE TABLE or SELECT towork with the current database. This database remains asthe default until you specify another database with USE oruntil you exit from the MySQL monitor or other MySQLclient.
SELECT A DATABASE
SELECT A DATABASE
MANAGE DATABASES AND TABLES 2
516922 Ch02.F 9/26/02 11:32 AM Page 35

CREATE AND DROP TABLESMySQL
After creating a database on the MySQL server, youcan create one or more tables to store data. Eachdatabase can contain any number of tables.
Specify Columns
The list of columns, or fields, for the table is included inparentheses in the CREATE TABLE command. Columntypes such as CHAR and DECIMAL can have parametersin parentheses; include these within the column list.Commas separate the column names.
Example:CREATE TABLE test (
Column1 INTEGER,
Column2 CHAR(50) );
Specify Column Attributes
You can specify one or more optional attributes for acolumn after its column type. For example, the NULL orNOT NULL attribute indicates whether the column canstore NULL values. NULL is a special value that indicatesthat nothing has been stored in the column.
The DEFAULT attribute specifies a default value for acolumn. For columns that allow NULL values, NULL isthe default; otherwise the default is zero for numericcolumns and a blank value for text columns. If youspecify a value for the DEFAULT attribute it overridesthis default.
Example:CREATE TABLE test2 (
Column1 CHAR(10) NOT NULL,
Column2 INT DEFAULT 10 );
Create a Unique Index or Primary Key
You can use the keyword UNIQUE to create a uniqueindex, also known as a key. A unique index is similar toa standard index, but each row’s value for the indexedcolumn must be unique.
As with INDEX, you can specify an optional name forthe index and one or more columns to be indexed.When you index more than one column, only thecombination of values of the columns needs to beunique. A table can have any number of unique indexes.
A primary key is similar to a unique index, but eachtable can have only one primary key. Additionally, theprimary key must have the NOT NULL attribute. Theprimary key is used to uniquely identify each row of thetable.
You can assign the primary key using the PRIMARY KEYkeywords, similar to INDEX. Alternately, you can specifythe PRIMARY KEY attribute for one of the columns.
Example:CREATE TABLE phonelist (
name VARCHAR(20) NOT NULL,
phone VARCHAR(12),
UNIQUE phoneindex (phone),
PRIMARY KEY (name) );
Create Indexes
When you index a table, the server stores a list of valuesand pointers into the database to make it easier tosearch for values in the indexed columns. You cancreate a simple index with the INDEX keyword. You canspecify an optional name for the index and one or morecolumns to index in parentheses.
Example:CREATE TABLE clients (
name VARCHAR(20),
city VARCHAR(30),
INDEX index1 (name,city) );
36
CREATE TABLES
You can use the CREATE TABLE command to create a table. Aswith the CREATE DATABASE command, this command normallyreturns an error if the table already exists. If you use the optionalkeywords IF NOT EXISTS, this error is suppressed.
516922 Ch02.F 9/26/02 11:32 AM Page 36

Specify Table Type
You can include the TYPE keyword within the CREATETABLE command to specify one of MySQL’s supportedtable types. The basic table types include ISAM,MyISAM, and Heap. Depending on your installation of
the MySQL server, other table types may be available.MyISAM tables are used by default.
Example:CREATE TABLE test (
field1 INT ) TYPE = ISAM;
Table Options
You can also specify one or more options when creating a table.These are summarized in the following table.
OPTION PURPOSE
AUTO_INCREMENT Specify the next value for an AUTO_INCREMENTcolumn.
AVG_ROW_LENGTH An estimate of the row length when variable-length columns are used.
CHECKSUM Specify 1 to create checksums, which slowsdown the server but prevents some errors.
COMMENT An optional description of the table, up to 60characters long.
MAX_ROWS The maximum number of rows you will store inthe table.
MIN_ROWS The minimum number of rows you will store inthe table.
To specify an option, include it at the end of the columnspecifications for the table followed by an = sign and its value.Separate multiple options with spaces. Use quotation marks aroundtext options such as COMMENT. Note that table types, such as ISAM,should not be quoted.
Example:CREATE TABLE students (
name VARCHAR(100) )
COMMENT=’student names’;
MANAGE DATABASES AND TABLES 2
Using Temporary Tables
You can optionally specify the TEMPORARYkeyword to create a temporary table. Thetable will be automatically deleted whenyou close your connection with the server.Temporary tables are guaranteed to beunique; if you create a temporary tablewith the same name as an existing table, itis assigned a unique name and is visibleonly to your current connection. Becauseof this, temporary tables are not shown inthe list when you use the SHOW TABLEScommand.
Example:CREATE TEMPORARY TABLE temptable (
Name CHAR(50),
Address CHAR(200) );
Copy Fields from Another Table
You can optionally use the SELECTkeyword when you create a table to copyone or more columns from an existingtable. MySQL will automatically createfields in the new table that match thefields of the existing table.
Example:CREATE TABLE phone2
SELECT name, phone from phonelist;
CREATE TABLES (CONTINUED)
You can use the DROP TABLE command in MySQL todelete an existing table. This immediately deletes thetable, whether it currently contains any data or not.Because it deletes without confirmation, use thiscommand with caution.
The DROP TABLE command will return an error if thetable you attempt to delete does not exist. You can
avoid this error by adding the IF EXISTS phrase to theDROP TABLE command.
Example:DROP TABLE temptable;
DELETE TABLES
37
516922 Ch02.F 9/26/02 11:32 AM Page 37
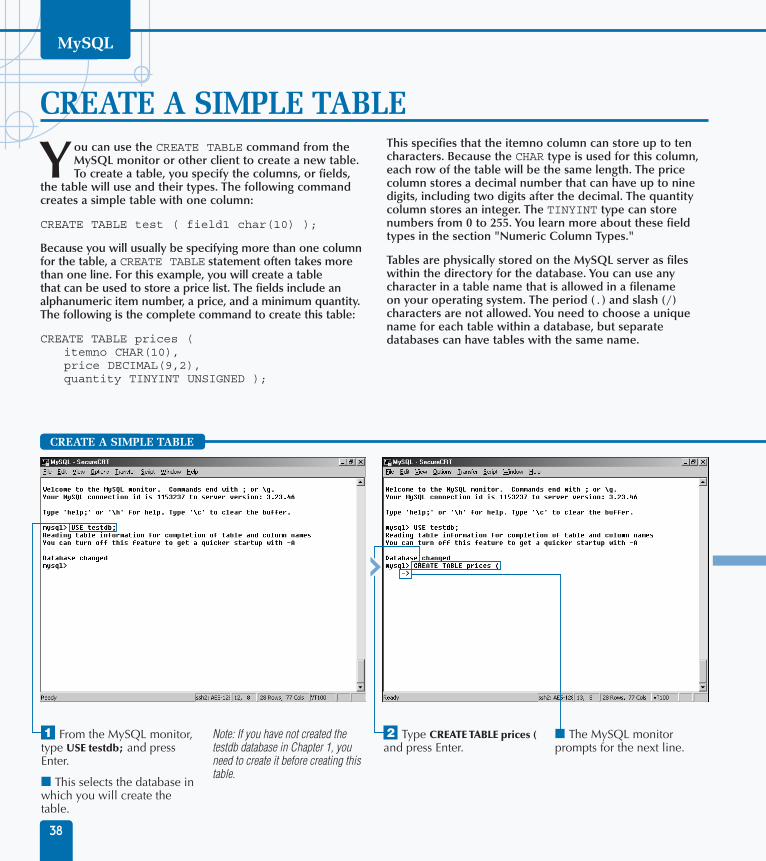
38
FIG HEAD
⁄ From the MySQL monitor, type USE testdb; and press Enter.
■ This selects the database in which you will create the table.
Note: If you have not created the testdb database in Chapter 1, you need to create it before creating this table.
¤ Type CREATE TABLE prices ( and press Enter.
■ The MySQL monitor prompts for the next line.
You can use the CREATE TABLE command from theMySQL monitor or other client to create a new table.To create a table, you specify the columns, or fields,
the table will use and their types. The following commandcreates a simple table with one column:
CREATE TABLE test ( field1 char(10) );
Because you will usually be specifying more than one columnfor the table, a CREATE TABLE statement often takes morethan one line. For this example, you will create a tablethat can be used to store a price list. The fields include analphanumeric item number, a price, and a minimum quantity.The following is the complete command to create this table:
CREATE TABLE prices (itemno CHAR(10),price DECIMAL(9,2),quantity TINYINT UNSIGNED );
This specifies that the itemno column can store up to tencharacters. Because the CHAR type is used for this column,each row of the table will be the same length. The pricecolumn stores a decimal number that can have up to ninedigits, including two digits after the decimal. The quantitycolumn stores an integer. The TINYINT type can storenumbers from 0 to 255. You learn more about these fieldtypes in the section "Numeric Column Types."
Tables are physically stored on the MySQL server as fileswithin the directory for the database. You can use anycharacter in a table name that is allowed in a filenameon your operating system. The period (.) and slash (/)characters are not allowed. You need to choose a uniquename for each table within a database, but separatedatabases can have tables with the same name.
CREATE A SIMPLE TABLE
38
CREATE A SIMPLE TABLE
MySQL
516922 Ch02.F 9/26/02 11:32 AM Page 38

‹ Type itemno CHAR(10), and press Enter.
› Type price DECIMAL(9,2), and press Enter.
■ You have now specified two fields for the table.
ˇ Type quantity TINYINT UNSIGNED ); and press Enter.
■ You have specified the last field, and the closing ) character ends the command. The table is now created.
As another example, you can create a table for an employee list. This table willinclude columns for the employee's first and last names, salary, date hired, anddepartment number. The following is the CREATE TABLE command for this table:
Example:CREATE TABLE employee (
FirstName VARCHAR(50),
LastName VARCHAR(50),
Salary DECIMAL(8,2),
HireDate DATE,
Department INT );
This command uses the VARCHAR type for the FirstName and LastName fields.Because this type is used, each row of the table will have a variable length. Thiscan conserve space if the full size of the columns is not always used.
The Salary field stores decimal numbers with up to eight digits including twodigits after the decimal point. The HireDate field is a DATE field. The Departmentfield is an integer. These column types are described in detail later in this chapter,starting with the section "Numeric Column Types."
Because this is a long command, you may find it useful to use the \e command inthe MySQL monitor, as described in Chapter 1. This allows you to use a text editorto enter the complete command.
39
MANAGE DATABASES AND TABLES 2
516922 Ch02.F 9/26/02 11:32 AM Page 39

⁄ From the MySQL monitor, type USE testdb; and press Enter.
■ The database is selected.
Note: This example requires the testdb database and the address table. Create these using the instructions in Chapter 1 or on the CD-ROM.
¤ Type SHOW TABLES; and press Enter.
■ The list of tables for the database is displayed.
‹ Type SHOW TABLES LIKE 'a%'; and press Enter.
■ Only tables beginning with the letter A are displayed.
› Type SHOW TABLE STATUS; and press Enter.
You can use several SHOW commands from a MySQLclient to find out information about the tables in thecurrent database. The first command, SHOW TABLES,
lists all of the tables in the currently selected database.
You can optionally use the LIKE keyword to show onlytables matching a string. Like the SHOW DATABASEScommand, you can use the wildcard _ for one characterand % for any number of characters. The following examplelists all tables that have names beginning with the letter A:
SHOW TABLES LIKE 'a%';
The SHOW TABLE STATUS command also displaysinformation about the tables in the current database. Ratherthan simply listing the tables, this command displays specificinformation about each table: its name, type, row format,number of rows, average length of rows, the times the tablewas created and last updated, and other details. As withSHOW TABLES, you can use the LIKE keyword to displayonly selected tables.
The SHOW COLUMNS command lists the columns for a tablewith detailed information about each. To use this command,you specify a table name with the FROM keyword:
SHOW COLUMNS FROM address;
You can also use the LIKE keyword with SHOW COLUMNS.In this case, LIKE allows you to display only the columnnames that match the string you specify. You can usewildcards to specify a partial column name. The followingcommand lists any columns of the address table that beginwith the letter n:
SHOW COLUMNS FROM address LIKE 'n%';
A final command is SHOW INDEX. This command displaysinformation about the indexes and keys used with the tableyou specify with the FROM keyword. Here is a simpleexample of this command:
SHOW INDEX FROM address;
SHOW TABLE INFORMATION
MySQL
40
SHOW TABLE INFORMATION
516922 Ch02.F 9/26/02 11:32 AM Page 40

■ A list of detailed information for each table in the database is displayed.
ˇ Type SHOW COLUMNS FROM address; and press Enter.
■ A list of detailed information for each column in the address table is displayed.
MANAGE DATABASES AND TABLES
The SHOW TABLE STATUS command includes a list of details for each table in the database. Here is an explanation of the fields in this list:
ITEM DESCRIPTION
Name The table name
Type The table type, typically MyISAM
Row_format Whether the rows are fixed or variable length
Rows Total number of rows
Avg_row_length Average row length
Data_length Total length of the table's data file
Max_data_length Maximum size of the data file
Index_length Length of the table's index file
Data_free Amount of unused space in the table
Auto_increment Next value for an autoincrement column
Create_time The time the table was created
Update_time The time the table was last modified
Check_time The time the table was last checked for errors
Create_options The options used when creating the table
Comment An optional comment specified when the table was created
41
2
516922 Ch02.F 9/26/02 11:32 AM Page 41

Some of the most important data you can store in adatabase is in the form of numbers: monetary figures,quantities, sequence numbers, and so on. MySQL
includes a variety of standard column types for the storageof numeric values.
NUMERIC COLUMN TYPES
MySQL
42
INTEGER
An INTEGER column stores an integer — a roundnumber with no decimal portion. An INTEGER columncan store values from –2,147,483,648 to 2,147,483,647.You can optionally specify the UNSIGNED attribute forintegers, which doubles the range of positive numbersallowed and disallows negative numbers.
The numeric range of a column type depends on thenumber of bytes MySQL uses to store the column'sdata. Bytes are a basic unit of memory or disk storage.Each byte consists of eight binary digits, or bits, and canstore 256 unique values. Multiple bytes allowexponentially larger numbers. MySQL uses four bytesfor each row of an INTEGER column.
You can optionally specify a display length for anINTEGER column in parentheses. This length will beused to pad small values with spaces. If you specify theZEROFILL attribute, zeroes are used instead of spaces.For example, a column with a length of 3 and ZEROFILLwill return a value of 7 as 007. You can use INT as ashorter form of INTEGER.
Example:CREATE TABLE inventory (
item INTEGER,
quantity INTEGER(3) ZEROFILL );
TINYINT
The TINYINT column type is a smaller version ofINTEGER. This type stores each value using a singlebyte, so it is limited to –128 to 127. If you specify theUNSIGNED keyword, values can range from 0 to 255. Aswith INT, you can specify a display size in parentheses.
SMALLINT
SMALLINT is another version of INTEGER. This typestores each value using two bytes, so the range ofvalues is –32,768 to 32,767. The UNSIGNED range is 0 to65,535. As with INT, you can specify a display size inparentheses.
MEDIUMINT
MEDIUMINT is another version of INTEGER. This typestores each value using three bytes, so the range ofvalues is –8,388,608 to 8,388,607. The unsigned range is0 to 16,777,216. As with INT, you can specify a displaysize in parentheses.
BIGINT
The largest integer column type is BIGINT. This type issimilar to INTEGER, but stores each of its values usingeight bytes. This allows numbers an order of magnitudelarger than INTEGER can store. As with INT, you canspecify a display size in parentheses.
In general, be sure to use whichever type is closest tothe range of numbers you need to store in the columnwithout going over. Using larger types than you need isan unnecessary waste of space.
Example:CREATE TABLE numbers (
Smallnum TINYINT(3),
bignum BIGINT(20) UNSIGNED );
DETAILS OF NUMERIC TYPES
When choosing a numeric column type, you shouldconsider the type of numbers you need to store: integers,numbers with a fixed decimal as used in currency, or
floating-point numbers with longer decimal values. Yourchoice of type also depends on the maximum value thecolumn can store.
516922 Ch02.F 9/26/02 11:32 AM Page 42

FLOAT
The FLOAT type allows you to store floating-pointnumbers. The MySQL server normally uses four bytes tostore these numbers, and the precision depends on thesize of the numbers. You can store numbers as large as39 digits long in a FLOAT column. As with integer types,you can specify UNSIGNED to double the range andlimit values to positive numbers.
You can specify two parameters in parentheses whendefining a FLOAT column: the first is the number of bitsused to store the number, up to 53. When you use anumber of bits larger than 24, MySQL uses eight bytesto store the values. The second parameter is thenumber of digits that should follow the decimal point.Both parameters are optional.
Example:CREATE TABLE stats (
distance FLOAT,
velocity FLOAT(24,4) );
REAL or DOUBLE
You can use REAL columns to store an eight-bytefloating-point number with a larger range than FLOAT.The types DOUBLE and DOUBLE PRECISION areequivalent to REAL. Unlike FLOAT, you cannot specifythe precision when you create a column.
DECIMAL
DECIMAL columns are used to store numbers with afixed decimal position. When you create a DECIMALcolumn, you specify two values in parentheses: the totalnumber of digits, and the number of digits after thedecimal point.
Unlike floating-point numbers, DECIMAL values arestored as text: the number 39,400, for example, wouldbe stored in five bytes of text, one for each digit. Thesevalues are not rounded, so you can expect them to beaccurate.
DETAILS OF NUMERIC TYPES (CONTINUED)
UNSIGNED
You can specify the UNSIGNED attribute for anynumeric column. This allows only positive numbers tobe stored in the column and doubles the largestnumber you can store.
ZEROFILL
If you specify a display width for an integer column, youcan also specify the optional ZEROFILL attribute. Thisuses zeroes rather than spaces to pad the values thatare smaller than the width you have specified.
Auto-Increment Columns
You can optionally use the AUTO_INCREMENT attributewith an integer column. MySQL automatically uses anew value for this column each time a row is added,starting with one. If you insert a value of zero or a nullvalue into this column, the next number in thesequence is used.
Using Null Values
You can specify NULL or NOT NULL for numericcolumns. If specified, the column can contain null values,and the null value is used as the default unless you specifya different default. The null value is not the same as zero,but means "no value." NULL is the default.
COLUMN ATTRIBUTES
MANAGE DATABASES AND TABLES 2
43
DEFAULT
If you specify the DEFAULT keyword in a columndefinition, you can set a default value. This value will beused whenever a row is added and a value for thecolumn is not explicitly set. The default is zero fornumeric columns if you do not specify a default.
Example:CREATE TABLE stock (
item INTEGER UNSIGNED,
price DECIMAL(5,2),
quantity INTEGER(3) DEFAULT 1);
All of the numeric column types can have one or moreoptional attributes. These specify how the column storesnumbers, how the numbers retrieved from the column
will be displayed, and the default value for the columnfor new rows.
516922 Ch02.F 9/26/02 11:32 AM Page 43

While data is often in the form of numbers, MySQLalso includes a variety of column types for storingnon-numeric data. This includes text columns that
store a length of text, also known as a string, and severalcolumn types devoted to the storage of dates and times.
TEXT AND DATE COLUMN TYPES
MySQL
44
CHAR
CHAR is the basic text column type. ACHAR column can store up to 255characters of text. You can specify thenumber of characters allowed inparentheses. CHAR columns have a fixedlength; if you define a column as CHAR(50), 50 bytes are required to store anyentry in the column, even if the actualvalue is shorter than 50 characters.
VARCHAR
A VARCHAR column can also store up to255 characters of text, and you canspecify the maximum length of values inparentheses. Unlike CHAR, VARCHARcolumns have a variable length. Shortervalues will use less space in the tablethan longer values. The disadvantage ofvariable-length columns is that they areharder for the MySQL server to workwith, and consequently slower.
You must use fixed or variable lengthconsistently in all of the columns of atable. If you use one VARCHAR column,all CHAR columns will be converted toVARCHAR because the table's rows willhave variable lengths.
TEXT
A TEXT column allows you to store a larger amount of text. You do notneed to specify a maximum length, and each item can range from zeroto 65,535 characters in length. Because TEXT columns have a variablelength, longer values will use more space.
Along with the basic TEXT column type, MySQL allows severalvariations with different sizes. TINYTEXT columns can store up to 255characters, similar to VARCHAR. MEDIUMTEXT columns can store up to16MB of text. LONGTEXT columns can store up to 4GB of text. Inpractice, MEDIUMTEXT and LONGTEXT columns will be limited tosmaller values because MySQL clients and servers limit the size ofcommunication packets.
Example:CREATE TABLE applicants (
firstname VARCHAR(50),
lastname VARCHAR(50),
resume TEXT);
BLOB
BLOB column types are fundamentally the same as TEXT, but can storebinary data. You can use these columns to store images, data files, oranything that is not simple text. BLOB is shorthand for Binary LargeObject. The basic BLOB column type can store up to 65,535 bytes of data.
As with TEXT, a number of variations on BLOB have different sizelimitations. TINYBLOB columns can store up to 255 bytes,MEDIUMBLOB columns can store up to 16MB, and LONGBLOB columnscan store up to 4GB.
TEXT COLUMN TYPES
When choosing a text column type, you should considerthe amount of text you need to store, whether fixed orvariable-length columns are appropriate, and whethercertain values are used repeatedly.
516922 Ch02.F 9/26/02 11:32 AM Page 44

MANAGE DATABASES AND TABLES
45
ENUM
You can use an ENUM, or enumerated, column when youneed to use a set number of text values as possiblevalues in the column. For example, you could define anENUM column for an address table to store a contacttype: personal, business, or other.
ContactTypeENUM("personal","business","other")
You specify the allowable values when you create thetable. When you add a row, it can assign either anempty string or one of the values you specify. MySQLstores these values as a number, starting with zero forthe first possible value.
SET
The SET column type is similar to ENUM, but each rowcan contain one or more of the string values youspecified when creating the table. If you defined acontact type column as a SET, it could containcombinations of values, such as personal and business.
ContactTypeSET("personal","business","other")
TEXT COLUMN TYPES (CONTINUED)
DATETIME
You can use a DATETIME column to store a date andtime. This stores the year, month, day of month, hours,minutes, and seconds. You can set it using a string like"2005-10-22 06:30:00" or using the numeric equivalent,20051022063000.
DATE
A DATE column is similar to DATETIME, but stores onlya year, month, and day of month. The dates in DATE andDATETIME columns can range from January 1st, 1000 toDecember 31, 9999.
TIME
A TIME column is similar to DATETIME, but stores onlythe time of day in hours, minutes, and seconds.
YEAR
The YEAR column type simply stores a year. Its valuescan range from 1900 to 2155.
TIMESTAMP
A TIMESTAMP column is a special type that stores adate and time, similar to DATETIME, but can beupdated automatically. The first TIMESTAMP column ina table is automatically updated to the current date andtime whenever you insert or modify a row, unless youexplicitly set the TIMESTAMP column to another value.You can also force any TIMESTAMP column to update tothe current time by storing zero or NULL in the column.
TIMESTAMP columns can store any date and time fromthe beginning of 1970 to the end of 2037, with a differentunique value for each second. You can specify a displaywidth up to 14 characters when you create the table. Thisdoes not affect the values the column can store.
Example:CREATE TABLE names (
Name VARCHAR(30),
LastUpdate TIMESTAMP(14) );
DATE COLUMN TYPES
2
Dates are another type of data you can store in a MySQLtable. MySQL includes column types that can store a dateand time, a simple date, or a timestamp that can beupdated automatically.
516922 Ch02.F 9/26/02 11:32 AM Page 45

⁄ From the MySQL monitor, type USE testdb; and press Enter.
■ The database is now selected.
Note: See Chapter 1 to create the testdb database.
¤ Next, type CREATE TABLE links ( and press Enter.
■ The MySQL monitor prompts for the next line.
‹ Type title VARCHAR(100), and press Enter.
Note: Do not forget the comma after each line except the last one.
MySQL's various types of text columns are usefulwhenever you need to store non-numeric data.For example, you can create a table to store links
to Web sites. The links table includes text columns for thetitle of a Web page, the URL, and a description.
When choosing which text column type to use, the firstfactor you should consider is the length of the text that willbe stored in the column. For the links table, a title willrarely be more than 100 characters, so CHAR(100) orVARCHAR (100) will work for the title column. URLs arealmost always under 255 characters, so CHAR(255) orVARCHAR (255) is ideal.
A description may be longer than 255 characters, the limitof the CHAR and VARCHAR types, so a TEXT column isneeded. You do not need to specify the length of TEXTcolumns. The limit for this type is 65,535 characters, butsmaller descriptions will save space in the table.
The second factor to consider is whether to use fixed-lengthcolumns with CHAR or variable-length columns with
VARCHAR. If you use any variable-length columns, the table'srows will be variable length. This may save disk space, butfixed-length rows are faster for the server to index or search.
All of the columns of a table should be consistently fixed orvariable length. If you specify a combination of fixed andvariable-length columns in a CREATE TABLE statement,MySQL will automatically convert any CHAR columns toVARCHAR, and the table will have variable-length rows.
In this example, because the TEXT column used for thedescription has a variable length, you must use VARCHARfor the other text fields. Here is the complete CREATETABLE command for the links table:
CREATE TABLE links (title VARCHAR(100),url VARCHAR(255),description TEXT );
USING TEXT COLUMNS
MySQL
46
USING TEXT COLUMNS
516922 Ch02.F 9/26/02 11:32 AM Page 46

■ The MySQL monitor prompts for another line.
› Type url VARCHAR(255), and press Enter.
ˇ Type description TEXT ); and press Enter.
Note: If you want to add additional fields, include them before the closing parenthesis.
■ The table is now created.
Á To verify that the command worked, type SHOW COLUMNS FROM links; and press Enter.
■ The columns you created for this table are displayed.
If you are not sure what length to use for a CHAR or VARCHAR column,specify a value large enough to store a typical value. You can alwayschange the length later. You can also change VARCHAR columns toTEXT columns without losing data. This is explained in Chapter 3.
The MySQL server may automatically change the type of some of yourcolumns if there is a conflict between them. In particular, if you usefixed-length CHAR columns and at least one variable-length VARCHARor TEXT column, the entire row must be variable length, so your CHARcolumns are converted to VARCHAR.
In addition, the server automatically changes VARCHAR columns witha length of one to three characters to CHAR columns, because it is notpractical to use variable length when the column is this small.
While it is important to choose the correct column types when youcreate a table, after you have created it, you can work with VARCHARand CHAR columns in exactly the same ways. TEXT columns also workin most of the same ways, except that you cannot use the entire bodyof a TEXT field as an index.
47
MANAGE DATABASES AND TABLES 2
516922 Ch02.F 9/26/02 11:32 AM Page 47

⁄ From the MySQL monitor, type USE testdb; and press Enter.
■ The database is now selected.
Note: If you did not create the testdb database in Chapter 1, you need to create it first.
¤ Type CREATE TABLE music ( and press Enter.
■ This starts the table definition.
■ The MySQL monitor prompts for the next line.
‹ Type title VARCHAR(100), and press Enter.
Sets and enumerations are different from normal textcolumns in that they are limited to a specific list ofvalues. You can use these columns whenever you
need to assign categories to the items in a table. Forexample, suppose you were using a database table tocatalog music recordings. You could use a SET column tostore the category of music that each recording contains:
category SET("rock", "pop", "blues","country", "dance")
The one potential disadvantage of a SET column is thateach item can have only one value. Anything that fits morethan one category could only be listed in one. This is whereENUM columns are useful.
With an ENUM column, each item can be assigned anynumber of values from the list you specify when you create
the table. You can look at an ENUM column as a list of flags,each of which can be assigned or not assigned to an item.In the music catalog example, an ENUM column would beideal to store the media the music is available on:
media ENUM("CD","DVD","LP","Cassette")
Although you could use separate columns to achieve thesame effect, ENUM columns are convenient because theycan be assigned values as a single unit. They are also storedon the server in a highly efficient way, using only one bit peritem, and are thus especially useful when you are storingmany rows of data in a table.
Because ENUM and SET columns can have a large numberof possible values, you may need to split the columnspecification into two or more lines when you create thetable.
USING SETS AND ENUMERATIONS
MySQL
48
USING SETS AND ENUMERATIONS
516922 Ch02.F 9/26/02 11:32 AM Page 48

› Type category SET("rock", "pop", and press Enter.
ˇ Type "blues", "country", "dance"), and press Enter.
■ These two lines define a SET column.
Á Type media ENUM("CD","DVD", and press Enter.
‡ Type "LP","Cassette") ); and press Enter.
■ This completes the definition for the ENUM column and the CREATE TABLE command. The table is now created.
The values for an ENUM column are actually stored as integers. A valueof 1 represents the first possible value, 2 represents the secondpossible value, and so on. ENUM columns can have a maximum of65,535 total values available. ENUM values use one byte of storage ifthere are less than 256 possible values and two bytes if there are 256or more.
The values for a SET column are stored using individual bits. Thismeans that one byte, or eight bits, of storage is required for everyeight members of the set. A SET column can have a maximum of 64members, which requires eight bytes of storage.
You can change the definition for a SET or ENUM column using theALTER TABLE query in MySQL, described in Chapter 3. However,changing the definition does not change the values stored for existingdata. If you add a value at the beginning of the list, the numeric valuesfor the entire list will change. You can safely add values at the end ofthe list, but the best strategy is to determine the possible values inadvance and include them when you first create the table.
49
MANAGE DATABASES AND TABLES 2
516922 Ch02.F 9/26/02 11:32 AM Page 49

⁄ From the MySQL monitor, type USE testdb; and press Enter.
■ This selects the testdb database.
¤ Type CREATE TABLE MailList ( and press Enter.
■ The MySQL monitor prompts for the next line.
‹ Type name VARCHAR(80) PRIMARY KEY, and press Enter.
■ This defines the name field as the primary key.
Along with the various columns the table will contain,you can specify a primary key and one or moreindexed columns. In general, you will want to have at
least a primary key for any table. If there is no primary key,there may be no way to uniquely identify a single record.This makes it impossible to edit or delete a single rowwithout affecting other rows in the table.
For the primary key, you should choose a column that willhave a unique value for each row of the table. For example,for a table that stores a list of names and mailing addresses,the name field is usually a good primary key, assuming thatthe list is small enough that duplicate names is not aconcern.
You can define the primary key by including the keywordsPRIMARY KEY with one of the column definitions when youcreate the table, or with a separate PRIMARY KEY definitionthat specifies a column for the key in parentheses. In thiscase, you can also use multiple fields as a primary key.
The following CREATE TABLE query creates a MailList tablewith columns for the name, address, city, state, and postalcode. The name column is defined as the primary key.
CREATE TABLE MailList (name VARCHAR(80) PRIMARY KEY,address VARCHAR(120),city VARCHAR(50),state VARCHAR(2),postal VARCHAR(5) );
CREATE AN INDEXED TABLE
MySQL
50
CREATE AN INDEXED TABLE
516922 Ch02.F 9/26/02 11:32 AM Page 50

› Type address VARCHAR(120), and press Enter.
ˇ Type city VARCHAR(50), and press Enter.
Á Type state VARCHAR(2), and press Enter.
‡ Type postal VARCHAR(5) ); and press Enter.
■ This completes the query, and the table is created.
° Type SHOW COLUMNS FROM MailList; and press Enter.
■ The columns for the table you created are displayed.
Along with the primary key, one or moreadditional indexes are often useful. You shouldonly define an index on an additional column ifyou frequently need to search for values in thatcolumn. You can add an index with the INDEXkeyword, and optionally specify the UNIQUEkeyword to require a unique value for each row.
The following example shows an expandedmailing list table with an index on the postal codefield. In this case, the UNIQUE keyword is not usedbecause multiple records can have the same code.
Example:CREATE TABLE MailList2 (
name VARCHAR(80) PRIMARY KEY,
address VARCHAR(120),
city VARCHAR(50),
state VARCHAR(2),
postal VARCHAR(5),
INDEX (postal) );
51
MANAGE DATABASES AND TABLES 2
516922 Ch02.F 9/26/02 11:32 AM Page 51

⁄ From the MySQL monitor, type USE testdb; and press Enter.
■ This selects the database.
Note: This task uses the prices table created earlier in this chapter.
¤ Type DROP TABLE prices; and press Enter.
■ The table is deleted.
‹ Type SHOW TABLES; and press Enter.
■ Verify that the deleted table is not listed.
If you no longer have any use for a table, you can deleteit using the DROP TABLE command. This commandimmediately deletes the table, including all data. You
can specify more than one table to drop with DROP TABLE,separated by commas. The following command deletesthe prices table:
DROP TABLE prices;
When you attempt to drop a table that does not exist,MySQL returns an error. You can optionally specify the IFEXISTS keywords to prevent the error. The followingexample deletes the test1 table only if it exists:
DROP TABLE IF EXISTS test1;
If you want to delete an entire database, you can use theDROP DATABASE command. This command deletes theentire database including all tables and data. As with DROPTABLE, you can use the IF EXISTS keyword to prevent anerror if the database does not exist. The followingcommand deletes a database called newdb:
DROP DATABASE newdb;
The DROP command does not prompt you for confirmation,whether you are deleting a table or an entire database.After you have issued the DROP command, there is noway to recover the data unless you have a backup copy.Be sure that you have a backup before you use the DROPcommand.
In order to drop a database or table, the MySQL usernameyou are using must have the correct privileges. Only theroot user is allowed to delete databases by default.See Chapter 11 for more information about MySQLsecurity.
In this example you delete the prices table and the newdbdatabase, which you created in the sections "Create aDatabase" and "Create a Simple Table," earlier in thischapter. Be sure you specify the names correctly to avoiddeleting the wrong data.
DELETE TABLES AND DATABASES
MySQL
52
DELETE A TABLE
516922 Ch02.F 9/26/02 11:32 AM Page 52

The DROP TABLE command deletes the disk files that MySQL uses tostore a table's data. There are typically three separate files for eachtable. The DROP DATABASE command deletes the files for each tablein the database and additionally deletes the directory for the database.If non-MySQL files are also in this directory, it may prevent thedirectory from being entirely deleted.
Because the DROP command is drastic, be sure you have a backup ofall data before deleting a table or database. You will learn more aboutbacking up MySQL databases in Chapter 8.
If you are unsure whether to delete a table, you can use the SHOWCOLUMNS command to display the columns of the table.
Example:SHOW COLUMNS FROM tablename;
You can also use a SELECT query to display the data in the table beforedeleting it. The following command displays all of the rows of a table.
Example:SELECT * FROM tablename;
53
DELETE A DATABASE
⁄ From the MySQL monitor, type DROP DATABASE newdb; and press Enter.
■ The database is deleted. ¤ Type SHOW DATABASES; and press Enter.
■ The list of databases is displayed. Verify that the database has been deleted.
MANAGE DATABASES AND TABLES 2
516922 Ch02.F 9/26/02 11:32 AM Page 53

When you create a table with the CREATE TABLEcommand in MySQL, you specify the columndefinitions and other options. If you later decide
to change any aspect of the table's definition, you can do so
using the ALTER TABLE command. This command allowsyou to change column names, column types, and otheraspects of a table's definition.
USING ALTER TABLE QUERIES
MySQL
54
Basic ALTER TABLE Syntax
You can make any number of changes with a singleALTER TABLE command. You can use a variety ofcommands within ALTER TABLE to add columns,remove columns, and make other changes. If you usemultiple keywords to make changes, separate themwith commas.
Example:ALTER TABLE address
ADD COLUMN lastvisit DATE,
DROP COLUMN postal;
ADD COLUMN
Use the ADD COLUMN command to add a column to thetable. Specify the new column name, the column type,and any attributes. You can use the same syntax as youuse when creating a table, as described in Chapter 2.
You can optionally specify the keyword FIRST afterADD COLUMN to add the column at the beginning of thetable, or the AFTER keyword and a column name toadd it after an existing column. If you do not specifyeither of these, the column is added at the end of thetable.
DROP COLUMN
The DROP COLUMN command enables you to delete anexisting table column. Use this command with caution,because it deletes all of the data stored in that columnin existing table rows without asking for confirmation.To use DROP COLUMN, simply specify the column name.
CHANGE
The CHANGE command changes the definition of anexisting column. To use this command, specify the oldcolumn name followed by the new name, the columntype, and any options such as DEFAULT or NULL.Specify the old name twice if you are not renaming thecolumn.
The MySQL server attempts to convert any existing datain the column to the new column type. However, insome cases, such as when you change the length of aVARCHAR column to a smaller amount, the data in thecolumn will be truncated and cannot be restored.
Example:ALTER TABLE address
CHANGE name name CHAR(120) NOT NULL;
MODIFY
The MODIFY command changes the definition for acolumn without changing its name. To use this command,specify the column name, the new column type, and anyoptions. As with CHANGE, the data is converted whereverpossible to the new format.
Example:ALTER TABLE address
MODIFY name CHAR(120) NOT NULL;
516922 Ch03.F 9/26/02 11:32 AM Page 54

MODIFY TABLES 3
55
ADD INDEX
Use the ADD INDEX command to add an index to thetable for an existing column. To use this command,specify an optional index name followed by thecolumn or columns to index in parentheses. If youuse ADD UNIQUE instead of ADD INDEX, a uniqueindex is created. Before adding a unique index, besure the existing rows of the table have uniquevalues for the column or columns you plan to index.
Example:ALTER TABLE address
ADD INDEX postindex (postal);
DROP INDEX
The DROP INDEX command deletes an existing index.To use this command, specify the index name. The indexname is the column name by default, or the name youspecified when creating the index.
Example:ALTER TABLE address
DROP INDEX postindex;
ADD PRIMARY KEY
The ADD PRIMARY KEY command adds a primary key.This can only be used if the table does not have anexisting primary key. To use this command, specifyone or more columns to act as the primary key. Eachexisting row of the table must have a unique value forthe column or columns specified. The column youspecify must also have the NOT NULL attribute. Youcan alter the column to add this attribute if necessary,as described earlier in this section.
Example:ALTER TABLE address
ADD PRIMARY KEY (name, address);
DROP PRIMARY KEY
The DROP PRIMARY KEY command removes anexisting primary key. This only removes the indexinginformation, not the column or columns that act as thekey. This command does not require any parameters.
Example:ALTER TABLE address
DROP PRIMARY KEY;
RENAME
The RENAME command renames an existing table. Touse this command, specify the existing table name andthe new name. You can use RENAME TO as a synonymfor RENAME.
Example:ALTER TABLE temp
RENAME TO temp2;
Table Options
You can change table options using an ALTER TABLEcommand. These options include TYPE, the table type,COMMENT, the optional comment field, and otheroptions. The complete list of options is in Chapter 2.To change options, specify each option followed by anequal sign and the new value.
Example:ALTER TABLE temp
TYPE=Heap,
COMMENT="I changed the table type.";
ORDER BY
The ORDER BY command sorts the existing data in atable by the value of a specified column. While you canretrieve the rows of the table in any order, this commandis useful to make the order permanent when the table israrely changed and usually retrieved in a particular order.
Example:ALTER TABLE address
ORDER BY name;
516922 Ch03.F 9/26/02 11:32 AM Page 55

Note: This example uses the testdb database and the address table. If you have not created these, follow the instructions in Chapter 1 or on the CD-ROM.
⁄ From the MySQL monitor, type USE testdb; and press Enter.
■ The database is now selected.
¤ Type SHOW COLUMNS FROM address; and press Enter.
■ The current list of columns is displayed.
If you have created a few tables in MySQL, you learnedthat there are many decisions to be made — thecolumns to include, their types, and other aspects of the
table. Fortunately, you can change most of these after thetable is created with the ALTER TABLE command.
You can use ALTER TABLE ADD COLUMN to add a columnto an existing table. The basic query syntax specifies thetable, the name of the new column, and its column type:
ALTER TABLE address ADD COLUMN country VARCHAR(10);
You can optionally specify where the new column shouldbe added. Either specify the keyword FIRST to insert thenew column as the first column in the table's definition, orspecify the AFTER keyword followed by the name of anexisting column. The following example adds a countrycolumn to the address table after the existing state column:
ALTER TABLE address ADD COLUMNcountry VARCHAR(10) AFTER state;
When you add a column, you can specify the sameattributes that you use when creating a table, as describedin Chapter 2. You can specify the column's type and displaywidth, select a default value for the column, and specifywhether null values are allowed.
You cannot specify values for the data in the table's rowsfor the new column. The default value of the column will beused for all rows of the table until you change the data.
Be sure the new column's name does not conflict withother columns in the table. The column must also becompatible with the existing columns: In particular, if thereare existing variable-length text columns, such as VARCHARor TEXT, you cannot add a fixed-length CHAR column.
ADD A COLUMN TO A TABLE
MySQL
56
ADD A COLUMN TO A TABLE
516922 Ch03.F 9/26/02 11:32 AM Page 56

‹ Type ALTER TABLE address ADD COLUMN and press Enter.
■ The MySQL monitor prompts for the next line.
› Type country VARCHAR(10) AFTER state; and press Enter.
■ The column is now added to the table.
ˇ Type SHOW COLUMNS FROM address; and press Enter.
■ The list of columns is displayed, including the new country column.
MODIFY TABLES 3You can add multiple columns within the same ALTER TABLEcommand by separating them with commas and enclosingthe entire list of new columns in parentheses. For example, thefollowing command adds three new columns to the address table:
Example:ALTER TABLE address ADD COLUMN (
country VARCHAR(10),
unit VARCHAR(5),
notes TEXT );
The parentheses shown in this example are not necessary unlessyou are adding more than one column. When you use this formof the command to add multiple columns, the columns are alwaysadded at the end of the table; you cannot use the AFTER orFIRST keywords to control the position of the new columns.You can combine the ADD COLUMN option with other ALTERQUERY commands, described later in this chapter. To includemultiple commands, separate them with commas.
Although it makes the ALTER TABLE query easier to read, theword COLUMN is actually optional. If you use ADD by itself, MySQLassumes you are adding one or more columns.
57
516922 Ch03.F 9/26/02 11:32 AM Page 57

Note: This example uses the testdb database and the address table. The instructions for creating these are in Chapter 1 and on the CD-ROM.
⁄ Type USE testdb; and press Enter.
■ The database is now selected.
¤ Type ALTER TABLE address ADD INDEX and press Enter.
■ The MySQL monitor prompts for the next line.
‹ Type stateindex (state); and press Enter.
■ The index is now created.
› Type SHOW COLUMNS FROM address; and press Enter.
■ The list of columns is displayed. The value NULL in the Key field shows the new index on the state column.
As you work with a table in MySQL, you may find thatan index on an additional field would improveperformance. You can use the ALTER TABLE
command to add an index to an existing table. To add anindex, you specify the ADD INDEX keywords, an optionalname for the index, and the existing column or columns tobe indexed.
For example, the following ALTER TABLE query adds anindex called stateindex to the address table, as an index forthe existing state column:
ALTER TABLE address ADD INDEX stateindex (state);
Because the ADD INDEX command adds a simple indexrather than a primary key, it is unaffected by existingindexes in the table's definition. When you use thiscommand to add an index, the MySQL server immediatelybegins scanning the table and building the index file.
You can optionally specify more than one column for theindex, separated by commas. In this case, the index will be
based on the combination of values in all of the columnsyou list. This example adds an index that uses both thestate and country columns:
ALTER TABLE address ADD INDEX location (state,country);
If you are adding a column to the table with ADD COLUMN,you can use ADD INDEX within the same ALTER TABLEcommand to add an index based on the new column, aslong as you specify the index after the column definition:
ALTER TABLE address ADD COLUMN custnum INT UNSIGNED,ADD INDEX (custnum);
Keep in mind that adding an index does not always improveperformance. In fact, extra indexes on fields that are notfrequently used for searching can slow down access to thetable. See Chapter 10 for information on determiningwhether an added index will be beneficial.
ADD AN INDEX
MySQL
58
ADD AN INDEX
516922 Ch03.F 9/26/02 11:32 AM Page 58

MODIFY TABLES
MySQL version 3.22 and later supports an alternate command foradding indexes to tables. You can use the CREATE INDEX commandto add a regular index, a unique index, or a full-text index to anexisting column.
To add a simple index with CREATE INDEX, specify a name for thenew index, the ON keyword, and the table name. This should befollowed by one or more column names in parentheses. The followingcommand adds an index on the state column of the address table:CREATE INDEX stateindex ON address (state);
You can optionally specify the keyword UNIQUE after CREATE to makethe new index a unique index, or FULLTEXT to make it a full-textindex. Full-text indexes index the entire text of a VARCHAR or TEXTcolumn. If you add a regular index on a TEXT column, you mustspecify the length of the column to index in parentheses. This exampleadds an index on only the first ten characters of the name column:CREATE INDEX first10 ON address (name(10));
Functionally, CREATE INDEX is equivalent to the ADD INDEX andADD UNIQUE commands with ALTER TABLE, described in thissection and the next section. You cannot add a primary key usingCREATE INDEX.
59
Note: This example uses the testdb database and the address table. The instructions for creating these are in Chapter 1 and on the CD-ROM.
⁄ From the MySQL Monitor, type USE testdb; and press Enter.
■ This selects the database.
¤ Type ALTER TABLE address and press Enter.
‹ Type ADD COLUMN custnum INT UNSIGNED, and press Enter.
› Type ADD INDEX (custnum); and press Enter.
■ This adds the custnum column and creates an index on that column.
ADD A NEW INDEXED COLUMN
3
516922 Ch03.F 9/26/02 11:32 AM Page 59
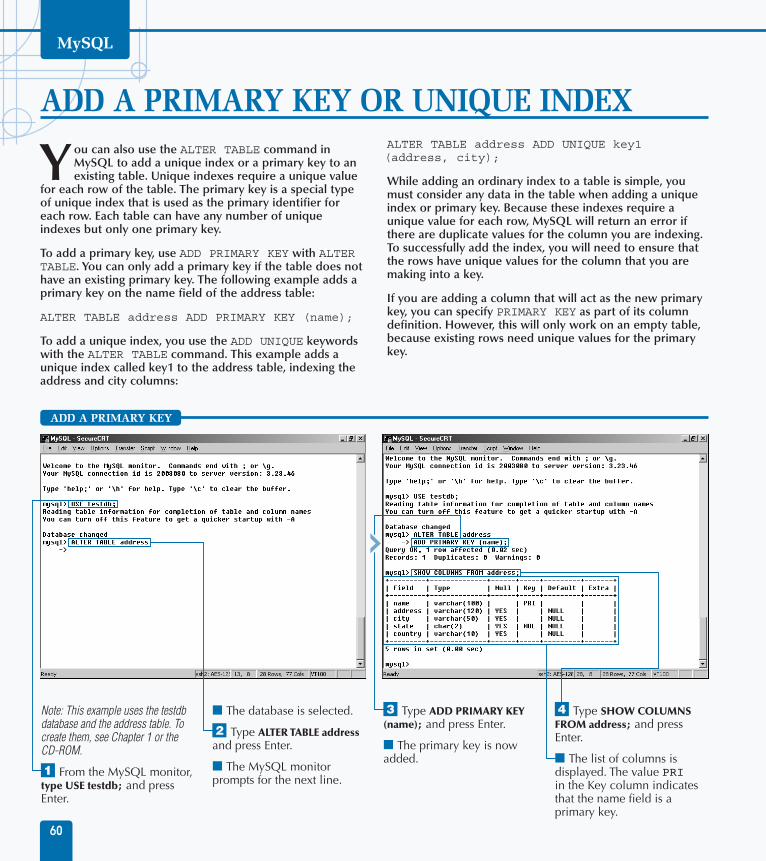
MySQL
Note: This example uses the testdb database and the address table. To create them, see Chapter 1 or the CD-ROM.
⁄ From the MySQL monitor, type USE testdb; and press Enter.
■ The database is selected.
¤ Type ALTER TABLE address and press Enter.
■ The MySQL monitor prompts for the next line.
‹ Type ADD PRIMARY KEY (name); and press Enter.
■ The primary key is now added.
› Type SHOW COLUMNS FROM address; and press Enter.
■ The list of columns is displayed. The value PRI in the Key column indicates that the name field is a primary key.
60
ADD A PRIMARY KEY OR UNIQUE INDEX
You can also use the ALTER TABLE command inMySQL to add a unique index or a primary key to anexisting table. Unique indexes require a unique value
for each row of the table. The primary key is a special typeof unique index that is used as the primary identifier foreach row. Each table can have any number of uniqueindexes but only one primary key.
To add a primary key, use ADD PRIMARY KEY with ALTERTABLE. You can only add a primary key if the table does nothave an existing primary key. The following example adds aprimary key on the name field of the address table:
ALTER TABLE address ADD PRIMARY KEY (name);
To add a unique index, you use the ADD UNIQUE keywordswith the ALTER TABLE command. This example adds aunique index called key1 to the address table, indexing theaddress and city columns:
ALTER TABLE address ADD UNIQUE key1 (address, city);
While adding an ordinary index to a table is simple, youmust consider any data in the table when adding a uniqueindex or primary key. Because these indexes require aunique value for each row, MySQL will return an error ifthere are duplicate values for the column you are indexing.To successfully add the index, you will need to ensure thatthe rows have unique values for the column that you aremaking into a key.
If you are adding a column that will act as the new primarykey, you can specify PRIMARY KEY as part of its columndefinition. However, this will only work on an empty table,because existing rows need unique values for the primarykey.
ADD A PRIMARY KEY
516922 Ch03.F 9/26/02 11:32 AM Page 60

Note: This example uses the testdb database and the address table. To create them, see Chapter 1 or the CD-ROM.
⁄ From the MySQL monitor, type USE testdb; and press Enter.
■ This selects the database.
¤ Type ALTER TABLE address and press Enter.
‹ Type ADD UNIQUE key1 (address, city); and press Enter.
■ The unique index is now added on the address and city columns.
61
MODIFY TABLES 3
ADD A UNIQUE INDEX
While you can add any type of index or primary key to a table usingALTER TABLE, you can also define them when the table is createdwith the CREATE TABLE command. This is often the better way toadd an index, because it ensures that you define the index before anyrows are added to the table, and eliminates problems with non-unique rows.
For example, the following CREATE TABLE statement creates anaddressindex table. This is identical to the address table, but has theprimary key on the name field and the unique index on the addressfield already defined.
Example:CREATE TABLE addressindex (
name VARCHAR(100) PRIMARY KEY,
address VARCHAR(120),
city VARCHAR(50),
state CHAR(2),
UNIQUE key1 (address) );
This example uses the PRIMARY KEY keyword with the namecolumn to define the primary key. It uses the UNIQUE keyword in thelast line to define a unique index named key1 on the address column.
516922 Ch03.F 9/26/02 11:32 AM Page 61

Note: This example uses the testdb database and the address table. See Chapter 1 or the CD-ROM to create them.
⁄ From the MySQL monitor, type USE testdb; and press Enter.
■ The database is now selected.
¤ Type ALTER TABLE address and press Enter.
■ The MySQL monitor prompts for the next line.
Timestamp columns are useful for keeping track ofwhen a row of the table has been updated. Each timeyou modify or insert a row, the first timestamp
column in the table's definition is automatically set to thecurrent date and time.
As with other column types, you can add a timestampcolumn to an existing table using the ALTER TABLEcommand in MySQL. For example, the following commandadds a timestamp column called updatetime with a displaywidth of 14 characters to the address table:
ALTER TABLE address ADD COLUMN updatetime TIMESTAMP(14);
When you add a new timestamp column to an existingtable, it is filled with the default value for each existing row.
Because the default value for the first timestamp column isthe current date and time, all rows will be set to the currentdate and time when you add the column.
If you add a second timestamp column to a table, it is notupdated automatically. The default value for the secondtimestamp column will be zero. You can set this column tothe current time and date manually when you add a row.
You can use a timestamp column as an index or primarykey. However, if data already exists in the table, you cannotmake a new timestamp column the primary key when youadd it to the table, because all of the rows will have thecurrent date and time as the value and the rows will benon-unique. You must assign unique values before adding aunique index.
ADD A TIMESTAMP COLUMN
MySQL
62
ADD A TIMESTAMP COLUMN
516922 Ch03.F 9/26/02 11:32 AM Page 62

‹ Type ADD COLUMN updatetime TIMESTAMP(14); and press Enter.
■ The timestamp column is now added to the table.
› Type SHOW COLUMNS FROM address; and press Enter.
■ The list of columns is displayed, including the column you added.
MODIFY TABLES 3
63
DISPLAY WIDTH FORMAT
14 YYYYMMDDHHMMSS
12 YYMMDDHHMMSS
10 YYMMDDHHMM
8 YYYYMMDD
6 YYMMDD
Because MySQL stores years as four digits, you should alwaysspecify all four digits of the year when assigning a value to atimestamp or date field. If you only specify two digits, MySQLassumes that values from 70 to 99 are in the 1900's, and valuesfrom 0 to 69 are in the 2000's.
A timestamp column's display width can be up to 14 digits. When14 digits are used, the column displays the year, month, date,hour, minute, and second values. For example, aTIMESTAMP(14) column set to January 3rd, 2005 at midnightwould return the value 20050103000000.
Smaller values for the display width display only a partial date, asshown in the table below. The display width does not affect theactual value. Timestamps always store a value down to the second.
516922 Ch03.F 9/26/02 11:32 AM Page 63

Note: This example uses the testdb database and the links table. The instructions to create them are in Chapter 1 and on the CD-ROM.
⁄ From the MySQL monitor, type USE testdb; and press Enter.
■ The database is now selected.
¤ Type ALTER TABLE links ADD COLUMN and press Enter.
■ The MySQL monitor prompts for the next line.
‹ Type num INTEGER UNSIGNED NOT NULL and press Enter.
While some tables have an obvious choice for aprimary key, such as a name column, some tableshave no value that is guaranteed to be unique for
each row. In this case, you can use an auto-incrementcolumn as a key. When you specify the AUTO_INCREMENTattribute for a column, each row you add is automaticallyassigned a new unique value for that column.
As with other column types, you can use ALTER TABLEto add an auto-increment column to an existing table. Forexample, this command adds a new auto-increment columncalled num to the links table:
ALTER TABLE links ADD COLUMN num INTEGER UNSIGNED NOT NULL AUTO_INCREMENT PRIMARY KEY;
Any column you use as an auto-increment column musthave the NOT NULL attribute. If you insert a NULL value
into an auto-increment column, the next sequence numberfor the field is inserted instead. Auto-increment columnsshould also have the UNSIGNED attribute because negativenumbers can cause conflicts.
You can use any of MySQL's integer types for an auto-increment column. However, be sure to use a type that canstore a wide enough range of values to account for themaximum amount of rows you will be adding to the table.You can change the column type later if you need a largerrange, as explained in the section "Change a Column Type,"later in this chapter.
Auto-increment columns are ideal for use as primary keysor unique indexes, and in fact MySQL requires that anyauto-increment column be defined as a unique index. Youcan use only one auto-increment column per table.
ADD AN AUTO-INCREMENT COLUMN
MySQL
64
ADD AN AUTO-INCREMENT COLUMN
516922 Ch03.F 9/26/02 11:32 AM Page 64

› Type AUTO_INCREMENT PRIMARY KEY; and press Enter.
■ The new column is added to the table.
ˇ Type SHOW COLUMNS FROM links; and press Enter.
■ The list of columns is displayed, including the new auto-increment column.
MODIFY TABLES 3When you add an auto-increment column to a table withexisting data, the rows of the table are assigned values forthe column automatically, counting up from one. Thisallows you to use a new auto-increment column as aprimary key or unique index, because the values areguaranteed to be unique.
When you delete a row from a table with an auto-increment column, the sequence number on that row isusually not re-used. Thus, you should not assume thatevery number in a certain range will be used for one ofthe rows of the table — the only thing you areguaranteed is that every row has a unique value for theauto-increment column. If you delete all of the rows ofthe table, the auto-increment numbers start over at one.
You can specify the first number to be used whenassigning values to an auto-increment column when youcreate the table with the AUTO_INCREMENT parameter.You can also use this when adding a new auto-incrementcolumn to a table.
When you insert a new row in an auto-incrementcolumn, it is assigned the number after the largestnumber used by a current row of the table.
65
516922 Ch03.F 9/26/02 11:32 AM Page 65

Note: This example uses the testdb database and the links table. See Chapter 1 or the CD-ROM for information on creating them.
⁄ From the MySQL monitor, type USE testdb; and press Enter.
■ The database is now selected.
¤ Type DESCRIBE links; and press Enter.
■ This displays the current column list for the links table.
You can use the ALTER TABLE command in MySQLto change the name of an existing column. To changea column's name, use the CHANGE keyword. For
example, this command changes the name of the urlcolumn in the links table to link:
ALTER TABLE links CHANGE url link VARCHAR(255);
To use CHANGE with ALTER TABLE, you specify the currentname of the column, followed by the new name, thecolumn's type, and any attributes such as DEFAULT orUNSIGNED. If you do not want to change the type of thecolumn, specify the same information you used whencreating the column.
If you are unsure of the column's current type andattributes, you can use the SHOW COLUMNS command tofind out the details of the column, and repeat them with anew name. The rules for the new column name are the
same as when creating a table, but you cannot use a namethat is already used in the table.
Keep in mind that when you rename a column, anyapplications that refer to the column by name will need tobe modified to use the new name. You will also need torefer to the new name in any further references to thecolumn.
In MySQL 4.0 and later, you can use the optional keywordFIRST after the column definition to move the column tothe beginning of the column list for the table, or the AFTERkeyword followed by a column name to move the columnto a new position after the specified column. Changing theorder of columns does not affect existing data orapplications.
If you specify a different column type or attributes with theCHANGE keyword, the column's definition will be modified.This is explained in the next section.
RENAME A COLUMN
MySQL
66
RENAME A COLUMN
516922 Ch03.F 9/26/02 11:32 AM Page 66

‹ Type ALTER TABLE links and press Enter.
■ The MySQL monitor prompts for the next line.
› Type CHANGE url link VARCHAR(255); and press Enter.
■ MySQL now changes the name of the column.
ˇ Type DESCRIBE links; and press Enter.
■ This displays the column list again. Note that the new name is now listed for the link column.
MODIFY TABLES 3If you change the column order using ALTER TABLE, it may create potentialproblems with applications that were built to work with the table. For example,suppose an application used the following command to add a record to a table:
Example:INSERT INTO links
VALUES("Netscape",
"http://www.netscape.com/",
"Netscape Corp.");
This command adds a row to the table, specifying values for each of the threecolumns. While this command will work with the current version of the linkstable, it does not specify the columns for the insert and thus relies on thecurrent column order. If you have changed the column order using theCHANGE or ADD COLUMN features of ALTER TABLE, the INSERT commandwill fail, or worse, may insert incorrect data into the table.
Applications that retrieve data without using column names can run into thesame problem. While the best practice is to specify column names in allqueries, you can avoid these potential issues if you avoid changing the orderof table columns.
If your applications do use column names, of course, a renamed columncould cause an error. Keep both of these issues in mind any time you modifya working table.
See Chapter 4 for more information about the INSERT command in MySQL.
67
516922 Ch03.F 9/26/02 11:32 AM Page 67

Note: This example uses the testdb database and the links table. See Chapter 1 or the CD-ROM if you have not created them.
⁄ From the MySQL monitor, type USE testdb; and press Enter.
■ The database is now selected.
¤ Type ALTER TABLE links and press Enter.
■ The MySQL monitor prompts for the next line.
‹ Type CHANGE description description VARCHAR(200); and press Enter.
■ The column's type is now changed.
While it is important to choose each column's typeand attributes carefully when creating a table,you can change a column's type using ALTER
TABLE. The basic syntax for this is similar to renaming atable, using the CHANGE keyword. For example, thefollowing command changes the description field in thelinks table to a VARCHAR(200) column:
ALTER TABLE links CHANGEdescription description VARCHAR(200);
To avoid renaming the table when using CHANGE, specifythe same name for the old and new names. You can alsospecify any attributes of the column you want to changewith the CHANGE keyword. For example, you can specify theNULL or NOT NULL attributes or specify a default valueusing the DEFAULT keyword. Include these items after thecolumn definition.
You can alternately use the MODIFY keyword, which allowschanging a column type but not renaming it. The MODIFY
keyword is supported only in MySQL 3.22 and later. Thefollowing example makes another change to the descriptioncolumn using MODIFY:
ALTER TABLE links MODIFY description VARCHAR(150);
When you change a column's type, MySQL makes an effortto preserve the data in existing rows as much as possibleand convert it to the new type. If you change a table's typeto a type that stores less data — for example, changing aTEXT column to a VARCHAR column — the values will betruncated to fit in the new size. Changing the column's typeback to its original type will not restore the data.
As when creating a table or adding a column, the MySQLserver may not allow some changes. If the table currentlyhas one or more variable-length fields, you cannot change acolumn's type to a fixed-length CHAR field. Conversely, ifthe existing fields are fixed-length, you cannot change oneto a variable-length field unless you make the same changeto all columns.
CHANGE A COLUMN TYPE
MySQL
68
CHANGE A COLUMN TYPE
516922 Ch03.F 9/26/02 11:32 AM Page 68
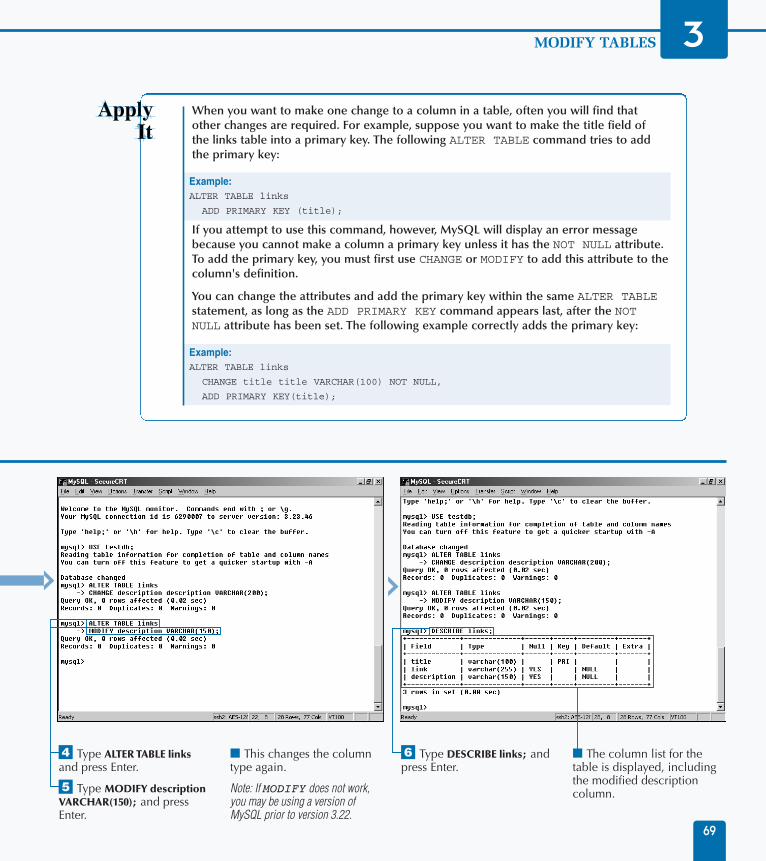
› Type ALTER TABLE links and press Enter.
ˇ Type MODIFY description VARCHAR(150); and press Enter.
■ This changes the column type again.
Note: If MODIFY does not work, you may be using a version of MySQL prior to version 3.22.
Á Type DESCRIBE links; and press Enter.
■ The column list for the table is displayed, including the modified description column.
MODIFY TABLES 3
69
When you want to make one change to a column in a table, often you will find that other changes are required. For example, suppose you want to make the title field of the links table into a primary key. The following ALTER TABLE command tries to addthe primary key:
Example:ALTER TABLE links
ADD PRIMARY KEY (title);
If you attempt to use this command, however, MySQL will display an error messagebecause you cannot make a column a primary key unless it has the NOT NULL attribute.To add the primary key, you must first use CHANGE or MODIFY to add this attribute to thecolumn's definition.
You can change the attributes and add the primary key within the same ALTER TABLEstatement, as long as the ADD PRIMARY KEY command appears last, after the NOTNULL attribute has been set. The following example correctly adds the primary key:
Example:ALTER TABLE links
CHANGE title title VARCHAR(100) NOT NULL,
ADD PRIMARY KEY(title);
516922 Ch03.F 9/26/02 11:32 AM Page 69

Note: This example uses the address table in the testdb database, created in Chapter 1. The country column was added in the section “Add a Column to a Table,” earlier in this chapter.
⁄ From the MySQL monitor, type USE testdb; and press Enter.
■ The database is now selected.
¤ Type ALTER TABLE address and press Enter.
■ The MySQL monitor prompts for the next line.
‹ Type DROP COLUMN country; and press Enter.
■ The column is now deleted from the table.
If you no longer need a column in a table, you can useALTER TABLE with the DROP COLUMN keywords todelete the column from the table. For example, the
following command deletes the country column from theaddress table:
ALTER TABLE address DROP COLUMN country;
This command removes the column from the tabledefinition, and removes any data stored in the columnin the existing rows of the table. As with other DROPcommands, there is no warning or confirmation beforethe data is lost, so be sure you do not inadvertently deletea column that contains important data.
The word COLUMN is optional. You can simply use DROP andthe column name to drop a column. You can combine DROPwith other ALTER TABLE commands within the same
query by separating the commands with commas. Forexample, this command drops the country column and addsa test column:
ALTER TABLE address DROP COLUMN country,ADD COLUMN test INTEGER(5);
If you drop a column that is used as an index or a primarykey on the table, the indexing information is also deleted.If the index is based on multiple columns, it is not deleteduntil all of the columns associated with the index have beendropped from the table.
If you attempt to drop a column and the table only has onecolumn, MySQL will return an error because a table musthave at least one column. You can delete the table entirelyusing the DROP TABLE command, explained in Chapter 2.
DELETE A COLUMN
MySQL
70
DELETE A COLUMN
516922 Ch03.F 9/26/02 11:32 AM Page 70

› Type ALTER TABLE address and press Enter.
ˇ Type DROP COLUMN custnum; and press Enter.
■ This deletes another column.
Note: The country and custnum columns were added earlier in this chapter.
Á Type SHOW COLUMNS FROM address; and press Enter.
■ The list of columns is displayed, without the dropped column.
MODIFY TABLES 3
71
When you use most variations of the ALTERTABLE command, the MySQL server actuallyperforms the alterations in several steps. It firstcreates a new table with a copy of the existingtable's data. Next, the changes you specified inyour query are made to the new table. Finally,the original table is deleted and the new one isrenamed to the old name.
Clients are able to read data from the tableduring the alteration process, but no datacan be written to the table until the process iscompleted. Because alterations may take a whileon large tables and consume a large amount ofthe server's CPU and memory resources, it is bestto alter tables while few clients are using them.
Because ALTER TABLE copies the table, you canuse it to sort a table's data. To do this, use theORDER BY keywords:
Example:ALTER TABLE address ORDER BY name;
While you usually do not need to manually sort atable in this way, it can improve performance with alarge table that will not be modified frequently. Thesorting process can take a long time on a largetable.
516922 Ch03.F 9/26/02 11:32 AM Page 71

Note: These examples use the address table in the testdb database. The indexes and primary key were added earlier in this chapter.
⁄ From the MySQL monitor, type USE testdb; and press Enter.
■ The database is now selected.
¤ Type SHOW INDEX FROM address; and press Enter.
■ The list of indexes is displayed.
‹ Type ALTER TABLE address DROP INDEX stateindex; and press Enter.
■ The index is deleted.
› Type ALTER TABLE address DROP INDEX key1; and press Enter.
■ This deletes the unique index.
You can remove an index or a primary key from atable with the ALTER TABLE command. This may beuseful if you are adding a new key, or if you no longer
require an index — if you do not frequently search on acolumn, having an index on the column may decreaserather than increase the MySQL server's speed.
To remove an index or a unique index, use the DROPINDEX keywords and specify the name of the index todelete. While the index name, by default, is the same as thecolumn name it indexes, you may have specified a differentname for the index when it was created. For example, thefollowing command removes the stateindex index youadded earlier in this chapter from the address table:
ALTER TABLE address DROP INDEX stateindex;
Because this command requires the index name rather thanthe column name, you can use the SHOW INDEX commandto determine the name of the index if you are not sure. If
you did not specify an index name when the index wascreated, it will have the same name as the column itindexes. The following command lists the indexes for theaddress table:
SHOW INDEX FROM address;
When you drop an index, only the indexing information isdeleted. No data in any column is affected, and you can re-create the index using another ALTER TABLE commandat any time.
You can also delete a primary key using ALTER TABLE. Todo this, use the DROP PRIMARY KEY keywords. Becausethere can be only one primary key, an index name is notrequired. This command removes the primary key from theaddress table:
ALTER TABLE address DROP PRIMARY KEY;
DELETE AN INDEX OR PRIMARY KEY
MySQL
72
DELETE AN INDEX
516922 Ch03.F 9/26/02 11:32 AM Page 72

Note: The testdb database should already be selected.
⁄ Type ALTER TABLE address DROP PRIMARY KEY; and press Enter.
■ The primary key is removed.
¤ Type SHOW INDEX FROM address; and press Enter.
■ Because the index and primary key have been removed, the list is now empty.
MODIFY TABLES 3
73
DELETE A PRIMARY KEY
If you are removing an index or primary key, you often need to add anew index or primary key. You can perform both of these actions witha single ALTER TABLE command. The following example removesthe index and primary key from the address table and then adds anew auto-increment column and sets it as the new primary key.
Example:ALTER TABLE address
DROP INDEX stateindex,
DROP PRIMARY KEY,
ADD COLUMN num INT UNSIGNED AUTO_INCREMENT,
ADD PRIMARY KEY (num);
When you use multiple operations with ALTER TABLE, they areperformed in order. This example will only work if the existingprimary key is dropped before the last line of the command wherethe new one is added.
You can combine any of the available clauses for ALTER TABLEin this way. However, it is often more practical to use separatestatements. If you make the changes in separate statements, youcan check the table and verify that the operation worked beforecontinuing with further changes.
516922 Ch03.F 9/26/02 11:32 AM Page 73

Note: The instructions for creating the MailList table are in Chapter 2 and on the CD-ROM.
⁄ From the MySQL monitor, type USE testdb; and press Enter.
■ The database is now selected.
¤ Type ALTER TABLE MailList and press Enter.
■ The MySQL monitor prompts for the next line.
‹ Type RENAME TO mail; and press Enter.
■ The table is now renamed.
You can use the ALTER TABLE command in MySQLto rename an existing table. To rename a table,specify the old name and the new name with the
RENAME TO keywords. For example, the followingcommand renames the MailList table to simply mail:
ALTER TABLE MailList RENAME TO mail;
When choosing a new name for the table, follow the samerules you follow when you create a table. Be sure that thenew table name does not conflict with an existing table inthe same database.
Renaming a table is virtually instantaneous. Once the tablehas been renamed, you need to use the new namewhenever you refer to it, and any applications that use thetable should be updated to use the new name.
Unlike other ALTER TABLE queries, the MySQL serverdoes not create a temporary copy of the table whenrenaming a table. Instead, the data files for the table in thefile system are simply renamed. This is much faster thancopying the table, and is unaffected by the amount of datastored in the table.
MySQL 3.23 and later also support the RENAME TABLEcommand for the same purpose. The following examplerenames the MailList table to mail using RENAME TABLE:
RENAME TABLE MailList TO mail;
There is no difference in the way a table is renamed usingRENAME TABLE or ALTER TABLE, so you can use thecommand of your choice if your MySQL server supportsboth. If you are unsure which version of MySQL you areusing, simply use ALTER TABLE.
RENAME A TABLE
74
RENAME A TABLE
MySQL
516922 Ch03.F 9/26/02 11:32 AM Page 74

Note: This example uses the testdb database. Instructions for creating it are in Chapter 1 and on the CD-ROM.
⁄ Type USE testdb; and press Enter.
■ The database is now selected.
¤ Type CREATE TABLE temp ( and press Enter.
‹ Type field1 VARCHAR(5), field2 INT ); and press Enter.
■ This creates the temp table as a default MyISAM table.
› Type ALTER TABLE temp TYPE=Heap; and press Enter.
■ The table is converted to a Heap table.
ˇ Type SHOW TABLE STATUS; and press Enter.
■ The list of tables and details is displayed, verifying that the table type has changed.
75
You can use ALTER TABLE to change the optionsused when the table was created, including the tabletype. If you do not specify a type when a table is
created, MySQL uses the default type, MyISAM.
Along with MyISAM, MySQL supports several alternate tabletypes. These include ISAM, the older format used to supportlegacy data; Heap tables, which are stored in memory anduse a hashed index; and BDB and InnoDB tables, high-performance types that support transactions for increasedreliability. Chapter 2 explains these table types in more detail.
To change a table type, use ALTER TABLE with the TYPE=option. You do not need to know the original table type todo this. For example, the following command changes thetype of a table called temp to Heap:
ALTER TABLE temp TYPE=Heap;
You can change a table's type to any of the types supportedby your particular MySQL server installation. Keep in mind
that the BDB and InnoDB table types are only supported ifyou have installed the MySQL-Max package or explicitlyincluded them when compiling MySQL from source.
You can also use ALTER TABLE with other table options.Table options allow you to specify various settings for thetable, such as MAX_ROWS and MIN_ROWS to define theexpected maximum and minimum numbers of rows,AUTO_INCREMENT to set the next value to be used in anauto-increment column, and COMMENT to specify acomment or description of the table. The various tableoptions are listed in Chapter 2.
You can change table options with ALTER TABLE using thesame keywords you use when creating a table. For example,you can use the COMMENT keyword to add a comment to atable, replacing any comment specified when the table wascreated:
ALTER TABLE temp COMMENT="This is the newcomment.";
CHANGE A TABLE TYPE
CHANGE A TABLE TYPE
MODIFY TABLES 3
516922 Ch03.F 9/26/02 11:32 AM Page 75

MySQL
76
After you create a database and one or more tables tostore data, you can use the INSERT and REPLACEcommands in MySQL to add rows of data to the
table. After a table contains data, you can use the DELETEcommand to delete a row, a group of rows, or the entiretable.
USING INSERT AND DELETE QUERIES
MySQL
Specify Column Names
You can optionally specify one or more column namesand provide values for those columns only. If you donot specify column names, you must provide values forall columns in the correct order.
Example:INSERT INTO address (name, state)
VALUES ("Jane Doe", "CA");
Using LOW_PRIORITY
You can optionally specify the LOW_PRIORITY keywordwith INSERT. If this is specified, MySQL will wait untilno clients are reading from the table before insertingthe record. This prevents other clients from beingdelayed when the table is locked. The MySQL clientwaits until the INSERT has completed before returning.
Using DELAYED
The DELAYED option is similar to LOW_PRIORITY.When you specify this keyword, the MySQL clientreturns immediately, but the server holds the row andinserts it when no clients are reading from the table.
Copy Data Between Tables
You can use SELECT with INSERT to select one ormore columns of data in one or more rows of anexisting table to copy to the destination table. TheSELECT clause can specify column names and the tableto take data from. You can also use an optional WHEREclause to specify one or more conditions that each rowmust match in order to be copied.
Example:INSERT INTO mail (name, address)
SELECT name, address FROM address;
ADD DATA WITH INSERT
The REPLACE command is identical to INSERTwith the exception that if you add a row thatduplicates the value of an existing row in a uniqueindex or primary key column, the existing row isdeleted and replaced with the new row.
Example:REPLACE INTO mail (name, address)
VALUES ("John Doe", "33 Birch Street");
REPLACE DATA WITH REPLACE
76
The INSERT command in MySQL adds one or morerecords to an existing table. To insert data, use INSERTINTO tablename and specify the values for eachcolumn of the table. The keyword INTO is optional.
Example:INSERT INTO address
VALUES ("John Smith", "321 Elm Street",
"Chicago", "IL", 0
516922 Ch04.F 9/26/02 11:33 AM Page 76

7777
Using the WHERE Clause
You can add the WHERE clause to a DELETE query toselect a single row or group of rows to be deleted.WHERE can be followed by a condition that matches a value in any of the fields of the table.
MySQL displays the number of deleted rows after aDELETE query when the WHERE clause is completed.This is the only way to determine whether rows weresuccessfully deleted. MySQL does not display an errormessage if the WHERE clause matches no rows.
Using LIMIT
You can optionally use the LIMIT clause with a DELETEquery to limit the number of rows to be deleted. Thisserves two purposes: first, if you are unsure how manyrows will be matched by a WHERE clause, using a LIMITclause will ensure that a large number of rows cannotbe deleted by mistake.
Second, it limits the amount of time a table is lockedduring the DELETE process. You can minimize theslowdown caused by a DELETE query by using a LIMITclause and repeating the DELETE command until all ofthe desired rows have been deleted.
Example:DELETE FROM address
WHERE state = "CA" LIMIT 10;
Using ORDER BY
In MySQL 4.0 and later, you can use the ORDER BYclause along with LIMIT in a DELETE query. This allowsyou to control not only how many rows are deleted, butwhich rows are chosen. Rows are deleted in alphabeticalor numeric order based on the value of the column youselect.
You can optionally follow the ORDER BY clause withthe keyword ASC to delete rows in ascending order,the default, or DESC to delete in descending order.
Example:DELETE FROM address
ORDER BY name ASC LIMIT 10;
Using TRUNCATE
The TRUNCATE query is identical to DELETE except thatit does not allow a WHERE clause. It deletes all of thetable's records without confirmation. When you deleteall rows using TRUNCATE or DELETE, MySQL actuallydeletes the entire table and then creates a new, emptytable. This improves speed, but there is no way todetermine the number of rows that were deleted by the query.
Example:TRUNCATE TABLE address;
DELETE DATA FROM TABLES
ADD AND DELETE DATA 4
You can use the DELETE command in MySQL to deleteone or more rows of data from a table. The simplestversion of a DELETE query deletes all of the rows from atable. Be cautious because this command erases theentire table.
Example:DELETE FROM address;
516922 Ch04.F 9/26/02 11:33 AM Page 77

Note: This example uses the address table in the testdb database. See Chapter 1 or the CD-ROM to create them if necessary.
⁄ From the MySQL monitor, type USE testdb; and press Enter.
■ The database is now selected.
¤ Type INSERT INTO address and press Enter.
■ The MySQL monitor prompts for the next line.
‹ Type VALUES ("John Smith", "321 Elm Street", and press Enter.
■ The MySQL monitor prompts for the next line.
After you create a table in a MySQL database, you can begin adding data to the table. The primary wayto add rows of data to a table is with the INSERT
query. To add a row, you specify the values for all of therow's columns:
INSERT INTO addressVALUES ("John Smith", "321 Elm Street","Chicago", "IL", 0);
Within the VALUES section of the INSERT query, youspecify a value for each of the columns of the table. Valuesfor text fields should be enclosed within single or doublequotes. Values for numeric fields can simply be included as a number. The entire list of values should be enclosedwithin parentheses.
With this form of the INSERT query, you need to specifythe values for each of the fields in the order they are
defined in the table's definition. If you are unsure of theorder, you can use one of these two equivalent commandsto list the fields:
DESCRIBE tablename;SHOW COLUMNS FROM tablename;
As with other SQL queries that work with tables, youshould first use the USE command to select the databasethat contains the table you will be working with. You caninsert one row into the table with each INSERT query.
You can add data with INSERT from the MySQL monitor'scommand line or from an application that works withMySQL. One common solution for data entry is to use a Web form linked to a program written in PHP, Perl, oranother language to validate and insert the data.
ADD A ROW TO A TABLE
MySQL
78
ADD A ROW TO A TABLE
516922 Ch04.F 9/26/02 11:33 AM Page 78

› Type "Chicago", "IL", 0); and press Enter.
■ This completes the INSERT query. The row is added to the table.
ˇ Type SELECT * FROM address; and press Enter.
■ This SELECT query displays the contents of the table. Verify that the new row was added.
ADD AND DELETE DATA 4
79
As another example of the INSERT query in MySQL, you can add a row of data to the employee tableyou created in Chapter 2. The fields of this table are defined with the following CREATE TABLE query:
Example:CREATE TABLE employee (
FirstName CHAR(50),
LastName CHAR(50),
Salary DECIMAL(8,2),
HireDate DATE,
Department INT );
To add a row to this table, you can specify values for the fields in the same order they were specifiedwhen the table was created. When using this type of INSERT command, be sure to specify a value forevery column of the table.
Example:INSERT INTO employee VALUES (
"Sue", "Johnson", "30000",
"2002/05/11", 21);
516922 Ch04.F 9/26/02 11:33 AM Page 79

Note: This example uses the address table in the testdb database.
⁄ From the MySQL monitor, type USE testdb; and press Enter.
■ The database is now selected.
¤ Type INSERT INTO ADDRESS and press Enter.
■ The MySQL monitor prompts for the next line.
‹ Type (name, address) and press Enter.
■ You are prompted for the next line.
› Type VALUES ("John Doe", "1445 West 10th Ave."); and press Enter.
■ This completes the INSERT query. The row is added to the table.
In a table with a large number of fields, you may find itcumbersome to specify values for each of the columnsin order. Fortunately, you can use an alternate INSERT
query syntax to insert a row and specify values forwhichever columns you choose, in the order you specify.
To insert a row and specify the columns to add, list thecolumn names in parentheses before the list of values. Forexample, this query inserts a row into the address table andspecifies values for the name and address columns only:
INSERT INTO address(name, address)VALUES ("John Doe", "1445 West 10th Ave.");
In this form of the INSERT query, you need to use thecorrect column names to match the table's definition, butyou do not need to specify values for all columns or in any
particular order. The row added to the table will contain the columns and values you specified. It will also includedefault values for any columns your INSERT query did notinclude.
This type of INSERT query has the advantage of beingsimpler when you are not specifying values for all fields.Another advantage is that if you later change the definitionof the table and add columns or change the column order,the same INSERT query will still work as long as thecolumns you include in the query have not changed.
If you specify a column name that is not defined in the table,MySQL will return an Unknown column error message. Ifyou are unsure of the exact column names, use DESCRIBEtablename to display a list.
SPECIFY COLUMNS FOR A NEW ROW
MySQL
80
SPECIFY COLUMNS FOR A NEW ROW
516922 Ch04.F 9/26/02 11:33 AM Page 80

Note: This example uses the address table in the testdb database.
⁄ From the MySQL monitor, type USE testdb; and press Enter.
■ The database is now selected.
¤ Type INSERT LOW_PRIORITY INTO address and press Enter.
■ The MySQL monitor prompts for the next line.
‹ Type VALUES ("Jane Smith", "321 Elm Street", and press Enter.
■ You are prompted for the next line.
› Type "Chicago", "IL", 0); and press Enter.
■ This completes the INSERT query. The client waits until the table is free before inserting the data.
SPECIFY INSERT PRIORITY
81
With some MySQL table types, an INSERT querythat adds data to the table will lock the table, andthe table cannot be read by other clients during
the processing of INSERT. You can optionally specify theLOW_PRIORITY keyword in an INSERT query to allowclients to continue to read the table:
INSERT LOW_PRIORITY INTO addressVALUES ("Jane Smith", "321 Elm Street","Chicago", "IL", 0);
When you specify LOW_PRIORITY, your client waits untilno clients are reading from the table before inserting therow. In a busy table, this may take some time.
A similar option is provided with the DELAYED keyword.When you specify DELAYED, your client returns immediatelyas if the insert were successful. The server then holds therequest until no clients are reading from the table, and then
inserts the row. This provides a faster alternative, butthere is no immediate way to confirm that the insert wassuccessful.
INSERT DELAYED INTO address (name, address)VALUES("Susan Jones", "112 West 5th");
The LOW_PRIORITY and DELAYED options perform similarfunctions and cannot both be used in the same INSERTquery. By default, neither option is enabled.
With MySQL's default MyISAM table type, LOW_PRIORITYand DELAYED are usually unnecessary because this tabletype supports concurrent inserts: You can insert a row whileother clients are reading data from the table. These optionsare mostly useful for tables using the older ISAM format.Because an INSERT operation is usually fast on a table withfew users, these options are unnecessary in this case andmay slow down the process of inserting rows.
SPECIFY INSERT PRIORITY
ADD AND DELETE DATA 4
516922 Ch04.F 9/26/02 11:33 AM Page 81

Note: This example uses the links table in the testdb database. See the Extra section if you have not created this table.
⁄ From the MySQL monitor, type USE testdb; and press Enter.
■ The database is now selected.
¤ Type INSERT INTO links (title, link, num) and press Enter.
■ The MySQL monitor prompts for the next line.
‹ Type VALUES ("Yahoo", "http://www.yahoo.com/", NULL); and press Enter.
■ This completes the INSERT query. The row is added to the table.
As another usage of INSERT queries, you can useINSERT to work with a table that includes an auto-increment column. Auto-increment columns
are integer columns created with the AUTO_INCREMENTattribute. They are automatically filled with a uniquenumeric value when you create a row.
To insert a row in a table with an auto-increment column,simply use a zero or NULL as the value for that column. Forexample, this INSERT query adds a row to the links tableyou created in Chapter 2. It includes values for the title andlink fields as well as the auto-increment num field.
INSERT INTO links (title, link, num) VALUES ("Yahoo", "http://www.yahoo.com/", NULL);
Because NULL is specified as the value for the num column,a new value is stored in the column. The MySQL server keepstrack of the largest number used in the column so far, andadds one to that number to create the value for a new row.
Because the default value for an auto-increment column isthe next numeric value, you can also specify no value for thecolumn. It will still be assigned a unique value.
If you specify an integer value greater than zero for the auto-increment column, this value will be used instead of thenext value in order. However, because an auto-incrementcolumn must be defined as a unique index or primary key,the INSERT query does not work if you specify a value thatalready exists in the table. If the INSERT is successful, thevalue you specified is used as the new starting point for theautomatic numbering.
USING AUTO-INCREMENT COLUMNS
MySQL
82
USING AUTO-INCREMENT COLUMNS
516922 Ch04.F 9/26/02 11:33 AM Page 82

› Type INSERT INTO links (title, link) and press Enter.
■ You are prompted for the next line.
ˇ Type VALUES ("Microsoft", "http://www.microsoft.com/"); and press Enter.
■ This completes another INSERT query. A row is added to the table.
Note: Although no value was specified for the num column this time, it is still filled with the next auto-increment value.
Á Type SELECT * FROM links; and press Enter.
■ This displays the data in the links table, including the two rows you added.
ADD AND DELETE DATA 4The links table was created in Chapter 2, and the num field wasadded in Chapter 3. If you have not created this table, you canuse the following MySQL command to create it now, including the auto-increment num field.
Example:CREATE TABLE links (
title VARCHAR(100),
url VARCHAR(255),
description TEXT,
num INT AUTO_INCREMENT PRIMARY KEY);
You can find out the next value for a table's auto-increment columnwith the SHOW TABLE STATUS command in the MySQL monitor.This command lists all of the tables in the current database andvarious details about each table. The auto-increment column liststhe next auto-increment value for each table.
While sequential numbers are used for the auto-increment columnwhen you add rows to the table, the values of all of the existingrows are not necessarily continuous. If you delete rows, MySQLdoes not re-use the auto-increment values from the deleted rows.Thus, do not assume that the next auto-increment value indicatesthe number of existing rows.
83
516922 Ch04.F 9/26/02 11:33 AM Page 83

Note: This example uses the address table in the testdb database. See Chapter 1 or the CD-ROM to create them.
⁄ From the MySQL monitor, type USE testdb; and press Enter.
■ The database is now selected.
¤ Type INSERT INTO address (name, updatetime) and press Enter.
■ You are prompted for the next line.
‹ Type VALUES ("Albert Einstein", NULL); and press Enter.
■ This completes the INSERT query. The row is added to the table.
Timestamp columns store a date and time to the exactsecond. If a table includes a timestamp column, it willusually be updated with the current time and date
when you add a row using INSERT. Only the first timestampcolumn in a table is automatically updated.
To add a row and ensure that the timestamp column isupdated, specify the NULL value for the timestamp column.This example inserts a row into the address table andupdates the timestamp in the updatetime column:
INSERT INTO address (name, updatetime)VALUES ("Albert Einstein", NULL);
The NULL value updates the timestamp column with thecurrent date and time. Unlike auto-increment columns, youcannot use zero to force an update. Timestamp columnscan actually contain a zero value, so use NULL when youwant to update the timestamp.
Because the first timestamp column is updated by default,you do not need to specify a value at all. The followingexample will also add a row to the address table andupdate the timestamp:
INSERT INTO address (name, address)VALUES ("Mae West", "333 Cedar St.");
If you are updating a timestamp column other than the firstone in a table, you must explicitly set it to NULL to store thecurrent date and time. If for some reason you want to use adifferent value in a timestamp, you can override it byspecifying a date and time value:
INSERT INTO address (name, updatetime)VALUES ("Mark Twain", "20050510123000");
As with other columns that store dates and times, the valueyou assign to a timestamp column should include the year,month, date, hours, minutes, and seconds values in order.You can also specify a date without a time, and zero valueswill be used for the time portion of the timestamp.
USING TIMESTAMP COLUMNS
MySQL
84
USING TIMESTAMP COLUMNS
516922 Ch04.F 9/26/02 11:33 AM Page 84

› Type INSERT INTO address (name, address) and press Enter.
■ You are prompted for the next line.
ˇ Type VALUES ("Mae West", "333 Cedar St."); and press Enter.
■ This completes the INSERT query to add a second row to the table.
Á Type SELECT * FROM address; and press Enter.
■ This displays all of the table's rows, including the two you added.
Note: Both rows should show the date and time when you typed the INSERT commands in the timestamp field.
ADD AND DELETE DATA 4
85
The UPDATE query in MySQL, discussed further in Chapter 5, updatesone or more rows of a table with new information. When you update a row, MySQL automatically sets the first timestamp column of the rowto the current date and time, even if you did not specify a value for thatcolumn. For example, this command updates a row with a new address:
Example:UPDATE address
SET address="123 Oak Street"
WHERE name = "Albert Einstein";
When this command is executed, the updatetime field for that row willbe set to the current date and time. While this is usually a useful feature,there are times when you will want to update a row without changingthe timestamp column. To do this, you can specify that the columnshould keep its old value by specifying the column name as the value.
Example:UPDATE address
SET address="123 Oak Street",
updatetime=updatetime
WHERE name = "Albert Einstein";
As with new table rows, if you want to update a timestamp column thatis not the first one in the table, you need to explicitly assign the NULLvalue to the column.
516922 Ch04.F 9/26/02 11:33 AM Page 85

Note: This example uses the mail table in the testdb database. If you have not created this table, see the instructions in the Extra section.
⁄ From the MySQL monitor, type USE testdb; and press Enter.
■ This selects the database.
¤ Type INSERT INTO mail (name, address, city) and press Enter.
■ You are prompted for the next line.
‹ Type VALUES ("Samuel Johnson", "19 East 5th", "New York"); and press Enter.
■ This completes the INSERT query. The row is added to the table.
Along with INSERT, MySQL also includes a REPLACEcommand. Like INSERT, REPLACE adds a new rowto a table. The difference is that when you add a row
with INSERT that has the same value as an existing row fora unique index or primary key column, an error is returned.If you add a row with REPLACE, it replaces the existing row.If there is no existing row, REPLACE works just like INSERT.
For example, the following query adds a new row to themail table using REPLACE:
REPLACE INTO mail (name, address)VALUES ("Samuel Johnson", "3394 Willow Ave.");
In this example, the name field is the table's primary key. Ifthe table has an existing row with the same name specified
here, the existing row will be deleted before the new row isadded.
Do not be tempted to use REPLACE when you want toupdate information in a row. While the command above willreplace the old record with the new one, it does not specifyvalues for all of the table's columns. Any existing data in theunspecified columns will be lost, because the old row isdeleted entirely before the new one is inserted. You can usethe UPDATE command, discussed in Chapter 5, to updateone or more columns of a row without erasing existing data.
When you execute a REPLACE query using the MySQLmonitor, it displays the number of rows affected by thequery. This number will be one if the new row did notreplace an existing row, or two if the old row was deletedand the new row was added.
REPLACE AN EXISTING ROW
MySQL
86
REPLACE AN EXISTING ROW
516922 Ch04.F 9/26/02 11:33 AM Page 86

› Type REPLACE INTO mail (name, address) and press Enter.
ˇ Type VALUES ("Samuel Johnson", "3394 Willow Ave."); and press Enter.
■ This completes the REPLACE query.
Note: Because the row you added with REPLACE has the same name as the previous one, it replaces the other row you added.
Á Type SELECT * FROM mail; and press Enter.
■ The rows of the table are displayed. Because the row was replaced, only one row is present.
ADD AND DELETE DATA 4
87
The mail table was created in Chapter 2 and modified inChapter 3. If you have not created this table and its primarykey, you can simply use this CREATE TABLE statement tocreate the table:
Example:CREATE TABLE mail (
name VARCHAR(80) PRIMARY KEY,
address VARCHAR(120),
city VARCHAR(50),
state CHAR(2),
postal VARCHAR(5) );
This command creates the mail table and specifies its fivecolumns. The name column is defined as the primary key.Because the primary key always requires unique values, theREPLACE command will replace any existing row with thesame value in the name field as the row you are adding.
If you use REPLACE on a table that does not include aprimary key or unique index, no rows are ever replacedbecause the table allows duplicate values for any of itscolumns. In this case, the REPLACE command is equivalentto INSERT.
516922 Ch04.F 9/26/02 11:33 AM Page 87

Note: This example uses the mail and address tables in the testdb database.
⁄ From the MySQL monitor, type USE testdb; and press Enter.
■ The database is now selected.
¤ Type INSERT INTO mail (name, address) and press Enter.
■ The MySQL monitor prompts for the next line.
Often, the data you want to add to a table is alreadylisted in another table. You can use the SELECTkeyword with INSERT to copy one or more rows
from one table to another. For example, the following querycopies data from the address table to the mail table:
INSERT INTO mail (name, address)SELECT name, address FROM address;
In this example, all of the rows of the address table arecopied. The name and address fields are copied to theircorresponding fields for each row. In this case the fieldnames are the same, but any fields can be used. If the fieldnames for two tables are the same, you can use a wildcardto copy all of the fields:
INSERT INTO mail SELECT * FROM address;
With this syntax, all of the columns will be copied if there is a column with the same name in the destination table. Ifa column does not exist in the destination table, the othercolumns are still copied and a warning message is displayed.
If the source and destination tables have a column ofdifferent types, MySQL will convert the data whereverpossible. Some column values may be truncated when you copy them to a column with a smaller field length.
If any of the selected rows in the source table have thesame value for a primary key or unique index as an existingrow in the destination table, MySQL will return an error.You can specify the IGNORE option to ignore this error andcontinue copying. In this case, only the rows that are notpresent in the destination table are copied.
INSERT ROWS FROM ANOTHER TABLE
MySQL
88
INSERT ROWS FROM ANOTHER TABLE
516922 Ch04.F 9/26/02 11:33 AM Page 88

‹ Type SELECT name, address FROM address; and press Enter.
■ This completes the INSERT query. All of the rows of the address table are copied to the mail table.
› Type SELECT * FROM mail; and press Enter.
■ The rows of the mail table are displayed.
Note: Because the postal field does not exist in the address table, the default value was used for this column in the rows that were copied.
ADD AND DELETE DATA 4You can use a SELECT query without INSERT to display one or more rows ofdata from a table. The simplest SELECT statement displays all of the columnsand rows of a table:
Example:SELECT * FROM tablename;
If you specify one or more column names instead of the wildcard (*)character, only the values of those columns will be displayed for each row. Thefollowing query displays a list of names and addresses from the address table:
Example:SELECT name, address
FROM address;
You can add the WHERE clause to single out one or more rows from the table.For example, this query displays all of the rows of the address table with thevalue 'CA' in the state field:
Example:SELECT * FROM address WHERE state = "CA";
Many other options are available for SELECT to control the rows displayed,their order, and other aspects. The SELECT statement and the WHERE clauseare described in detail in Chapter 6.
89
516922 Ch04.F 9/26/02 11:33 AM Page 89

Note: This example uses the address table in the testdb database.
⁄ From the MySQL monitor, type USE testdb; and press Enter.
■ The database is now selected.
¤ Type DELETE FROM address and press Enter.
■ The MySQL monitor prompts for the next line.
‹ Type WHERE name = "John Smith"; and press Enter.
■ This completes the DELETE query and the row is deleted.
Note: This row was added to the table earlier in this chapter. No records will be deleted if this row is not present in the table.
If you need to remove one or more rows of data from a table, you can use a DELETE query in MySQL. Thefollowing is a simple DELETE query:
DELETE FROM address WHERE name="John Smith";
To use DELETE, you specify the table to delete rows from.You can use the WHERE clause to specify one or more recordsto delete. To delete a single row, be sure the condition youspecify in the WHERE clause applies to only one row — thisis always the case if you use a primary key or unique indexas the column to check.
Be careful not to use a WHERE clause that matches morerows than expected, because all of the matching rows willbe lost. If you omit the WHERE clause entirely, all of therows of the table are deleted without confirmation.
You can specify the LOW_PRIORITY option with DELETEto minimize the operation's impact on other users. If this is specified, the MySQL server will wait until no clients arereading from the table before deleting the rows, and yourclient will not return until the rows have been successfullydeleted.
To delete more than one row, specify a WHERE conditionthat matches several rows. For example, the followingDELETE query deletes all rows from the address tablewhere the state column has the value of 'CA':
DELETE FROM addressWHERE state = "CA";
You can use a second DELETE option, QUICK, to speed updeletion. When the QUICK option is specified, the serverdoes not update index files when it deletes the rows. If youare deleting a large number of records, this will speed upthe operation.
DELETE A SPECIFIC ROW
MySQL
90
DELETE A SPECIFIC ROW
516922 Ch04.F 9/26/02 11:33 AM Page 90

› Type DELETE FROM address and press Enter.
■ You are prompted for the next line.
ˇ Type WHERE state = "CA"; and press Enter.
■ This deletes any records with ’CA’ in the state field.
Á Type SELECT * FROM address; and press Enter.
■ This displays the contents of the table. Verify that the record was deleted.
ADD AND DELETE DATA 4When you delete a row in MySQL's standard MyISAM table format, therow is not actually removed from the table at all. Instead, MySQL storesa list of the records that have been marked as deleted, and these recordsare ignored in queries. When you later insert a row, MySQL finds thefirst deleted record in the list and replaces it with the new row.
The advantage of this system is that DELETE and INSERT operationsare fast, and in a table where records are frequently added andremoved, the table remains efficient. However, when you delete a largenumber of records, the space they used remains in the table and usesdisk space.
To reclaim the space used by deleted records, you can use theOPTIMIZE TABLE command in the MySQL monitor. For example, thiscommand optimizes the address table:
Example:OPTIMIZE TABLE address;
This command compresses the table and permanently removes thedeleted records. Keep in mind that this may take a while on a largetable, and the table is unavailable to other users during the optimizationprocess.
The OPTIMIZE TABLE command and similar commands for managingMySQL tables are described in Chapter 10.
91
516922 Ch04.F 9/26/02 11:33 AM Page 91

MySQL
Note: This example uses the testdb database and the mail table. You added records to this table earlier in this chapter.
⁄ From the MySQL monitor, type USE testdb; and press Enter.
■ The database is now selected.
¤ Type SELECT * FROM address; and press Enter.
■ This displays the existing rows of the table.
‹ Type DELETE FROM address; and press Enter.
■ All rows of the table are deleted.
› Type SELECT * FROM address; and press Enter.
■ No rows are displayed because the table is empty.
92
DELETE ALL TABLE ROWS
If you use a DELETE query without the WHERE clause,all rows of the table will be deleted. For example, thiscommand deletes all of the rows in the address table:
DELETE FROM address;
This command immediately deletes all of the rows of thetable. Because it is easy to delete an entire table by simplyleaving out the WHERE clause, be careful when usingDELETE queries, and be sure you have a backup of criticaltable data before using DELETE.
When you use DELETE to delete all rows, the MySQL serverdoes not individually delete each row. Instead, it deletes theoriginal table and creates a new, empty table with the samename and specifications. The advantage of this approach isthat it is much faster.
Because deleting all rows is optimized this way, MySQL willusually not return the number of rows that were deletedwhen you delete all rows. Instead, it will report that zero
rows were affected. If you need to count the number ofdeleted rows, you can add a WHERE clause that alwaysmatches. This slows down the DELETE process, but thedeleted rows are counted. The following example uses aWHERE clause that compares two numbers. This will matchall rows and ensure that the correct number of deletedrows is displayed.
DELETE FROM addressWHERE 1 > 0;
The TRUNCATE command works the same way as DELETEbut does not accept a WHERE clause and always deletes allrows. The following command deletes all rows from theaddress table:
TRUNCATE TABLE address;
When you use DELETE or TRUNCATE, the MySQL serverwill wait until no clients are reading or writing to the tablebefore deleting the records.
DELETE ALL TABLE ROWS
516922 Ch04.F 9/26/02 11:33 AM Page 92

Note: This example uses the mail table in the testdb database.
⁄ From the MySQL monitor, type USE testdb; and press Enter.
■ The database is now selected.
¤ Type DELETE FROM mail LIMIT 1; and press Enter.
■ One record is deleted from the table.
‹ Type SELECT * FROM mail; and press Enter.
■ The contents of the remaining rows of the table are displayed.
93
When you use DELETE without a WHERE clause, allof the records will be deleted. Even when you usea WHERE clause, more rows may match the clause
than you expected. To minimize the damage by overreachingDELETE queries, you can add the LIMIT clause. The follow-ing command deletes only one row from the mail table:
DELETE FROM mail LIMIT 1;
When you use the LIMIT clause, the MySQL server ensuresthat only the number of rows you specified will be deleted.This has two advantages: first, it prevents you from deletingmore rows than expected. Second, when you intend todelete a large number of rows, you can use the LIMITclause to delete a portion of the rows at a time, and repeatthe command until all of the rows are deleted. This allows
you to minimize the slowdown for other clients caused bydeleting the records.
In MySQL 4.0 and later, you can also use the ORDER BYclause to control the order in which rows will be deleted.This only makes sense when you use it with LIMIT. UsingORDER BY allows you to delete the oldest row in the tableor order by a different field. For example, this commanddeletes the five oldest rows from the address table:
DELETE FROM addressORDER BY updatetime LIMIT 5;
You can use any field in the ORDER BY clause. You can alsooptionally follow it with the keyword ASC for an ascendingsort, the default, or DESC for a descending sort.
LIMIT THE NUMBER OF DELETED ROWS
ADD AND DELETE DATA 4
LIMIT THE NUMBER OF DELETED ROWS
516922 Ch04.F 9/26/02 11:33 AM Page 93

Note: This example uses the address table and the testdb database. You can create these using the instructions in Chapter 1 or on the CD-ROM.
⁄ From the MySQL monitor, type USE testdb; and press Enter.
■ The database is now selected.
¤ Type DELETE FROM address and press Enter.
■ You are prompted for the next line.
When you include a timestamp field in a table, it isautomatically updated with the current date andtime when each row is added to the table. If you
are using a table to store data that becomes less useful as it gets older, you can use a timestamp field with a DELETEquery to delete all of the rows that were created or updatedbefore a certain date.
For example, the address table has a timestamp columncalled updatetime. You can use a WHERE clause with aDELETE query to delete older data from the table. Thefollowing example deletes all rows that were created orupdated before January 1st, 2001:
DELETE FROM addressWHERE updatetime < 20010101000000;
The WHERE clause in this command compares the updatetimecolumn with the numeric date value for January 1st, 2001.Any value less than this number indicates that the row hasnot been updated since that date and can thus be deleted.
This type of DELETE command is especially useful withtables that are used to log events. For example, you may beusing a table to log an entry for each user that visits a Webpage. On a busy site, this table will quickly become largeand unwieldy. You can use a DELETE query regularly todelete all of the rows that are older than you need.
If you use this technique, be sure that the timestamp field is being updated whenever you insert or update a row. Thisis only done automatically with the first timestamp columnfor each table. With other timestamp columns, you need toexplicitly assign the NULL value to update the timestamp, asdescribed earlier in this chapter.
DELETE DATA BY DATE
MySQL
94
DELETE DATA BY DATE
516922 Ch04.F 9/26/02 11:33 AM Page 94

‹ Type WHERE updatetime < 20010101000000; and press Enter.
■ This completes the query. Rows older than the specified date are deleted.
Note: You may need to specify a different date for rows to be affected.
› Type SELECT name, updatetime FROM address; and press Enter.
■ The remaining rows of the table are displayed.
ADD AND DELETE DATA 4In some cases, you may need to delete the older rows from a table to make room,but avoid losing the data in those rows entirely. You can use an INSERT and SELECTstatement, as described in the section "Insert Rows from Another Table," earlier inthis chapter, to copy the older rows to a separate table before deleting them.
The following CREATE TABLE statement creates an archive table that includes thesame fields as the address table:
Example:CREATE TABLE archive (
name VARCHAR(100),
address VARCHAR(120),
city VARCHAR(50),
state CHAR(2),
updatetime TIMESTAMP );
Using this table, you can use an INSERT query with the SELECT clause to copy theolder data, and then delete the older data.
Example:INSERT INTO archive SELECT * FROM address
WHERE updatetime < 20010101000000;
DELETE FROM address
WHERE updatetime < 20010101000000
95
516922 Ch04.F 9/26/02 11:33 AM Page 95

While INSERT allows you to add a new row to atable, the UPDATE query provides another usefulfunction. Using UPDATE, you can make changes
to one or more rows of the table. The UPDATE query canchange the value of one column or several, and can workwith existing column values for each row.
USING UPDATE QUERIES
MySQL
96
The WHERE Clause
If you want to update a single row or group of rows,you can specify a WHERE clause with one or moreconditions that test the columns of each row. Only therows that match the WHERE clause will be modified inthe UPDATE query.
The syntax of the WHERE clause is identical to that usedwith DELETE and SELECT queries.
Example:UPDATE address SET state="NY"
WHERE city = "New York City";
Update a Limited Number of Rows
You can optionally specify the LIMIT keyword and anumber to limit the number of rows the MySQL serverwill modify in an UPDATE query. You cannot specify theorder of the update, so this feature does not controlwhich rows will be updated. It is useful for limiting thepotential damage done by an incorrect query.
Example:UPDATE address SET city="Chicago" LIMIT 5;
Specify Update Priority
You can optionally specify the LOW_PRIORITY keywordwith an UPDATE query. If this keyword is specified, theMySQL server waits until no clients are reading fromthe table before performing the update. This canminimize the slowdown experienced by other users of the table, but increases the time spent performingthe update.
Example:UPDATE LOW_PRIORITY address
SET city="New Orleans";
USING UPDATE
The basic UPDATE query updates all of the rows of thetable. You can use the SET keyword to specify a columnname and its new value. When MySQL executes theUPDATE query, it returns the number of rows thatwere affected by the update.
Note that unlike ALTER TABLE or CREATE TABLE, anUPDATE query does not use the TABLE keyword. UsingTABLE with UPDATE will cause a syntax error.
Example:UPDATE address SET city = "New York City";
516922 Ch05.F 9/26/02 11:34 AM Page 96

UPDATE DATA IN TABLES 5
97
Update Key Values
If you use an UPDATE query to modify the value of a column that is defined as a primary key or uniqueindex, MySQL will return an error if any of the updatedrows would duplicate the value of an existing row forthe key. When this happens, the update is aborted.
If you specify the IGNORE keyword within the UPDATEquery, any duplicate keys are skipped. The update is notaborted, and the update is performed for all rows thatdo not create a duplicate key value.
Example:UPDATE IGNORE address
SET city="Santa Fe";
Update Multiple Columns
You can specify more than one column to update afterthe SET keyword within an UPDATE query. Separate thecolumn and value pairs with commas.
The MySQL server executes the UPDATE query from leftto right. If you assign two different values to a column,the last one in the query is the value used.
Example:UPDATE address
SET city = "Santa Fe", state = "NM"
WHERE name="John Smith";
Using Current Values
You can use the current value of any column in anUPDATE query. You can assign the value to anothercolumn or use it within a function or calculation toreach a value.
Because MySQL interprets the UPDATE query from leftto right, if you change the value of a column and use itin an assignment, the order of the statements controlswhether the new value or the old value is used.
Example:UPDATE address
SET city = state;
Using MySQL Functions
You can use MySQL functions to calculate a valueassigned in an UPDATE query. MySQL includes a widevariety of functions, such as UPPER to return theuppercase equivalent of a text value or ROUND to rounda numeric value. You can also use arithmetic operations,such as + (add), – (subtract), * (multiply), and / (divide). The functions and operators supported by MySQL are explained in detail in Chapter 7.
Example:UPDATE address
SET name = UPPER(name);
Update Timestamp Columns
Timestamp columns are a special case in MySQL.When your UPDATE query updates a row in a table that contains a timestamp column, the column isautomatically updated with the current date and time,whether it was included in the UPDATE query or not.
While automatic updates of timestamps are usually auseful practice, you may need to preserve the existing
value of the timestamp column. You can do this byexplicitly assigning the column to its existing value alongwith the other assignments within the UPDATE query.
Example:UPDATE address
SET name = UPPER(name),
updatetime = updatetime;
ADVANCED UPDATE QUERIES
Along with basic updates, you can perform morecomplex operations with an UPDATE query. You canupdate multiple rows and multiple columns, and you cancalculate values based on existing data.
516922 Ch05.F 9/26/02 11:34 AM Page 97

Note: This example uses the mail table in the testdb database. If you have not created this database or added data to it, follow the instructions in the Extra section.
⁄ From the MySQL monitor, type USE testdb; and press Enter.
■ The database is now selected.
¤ Type UPDATE mail SET city="Salt Lake City" and press Enter.
■ The MySQL monitor prompts you for the next line of the query.
Often, you will need to modify the data in a row of a MySQL database table. While you can delete therow and insert a replacement, it is often easier to
update the row in place. You can use the UPDATE query inMySQL to modify the values of one or more columns in oneor more rows of data.
For a basic UPDATE query, you simply specify the table nameto update and use the SET keyword to name one or morecolumns to modify and their new values. For example, thisquery sets the city column to a new value in the mail table:
UPDATE mail SET city="Salt Lake City";
As with other MySQL queries, UPDATE will affect all of thetable's rows unless you specify otherwise — so unless all of
the members of the database are really in the same city, theabove query would change more records than you intendedand potentially cause the loss of data. Thus, like DELETEand DROP, use this command with caution.
To specify one or more rows to modify, you add the WHEREclause to the UPDATE query. For example, this query limitsthe update to a single row of the mail table:
UPDATE mail SET city="Salt Lake City"WHERE name="John Smith";
Because the name column is a primary key and must have a unique value for each row, this ensures that only a singlerow is updated. If you specify a WHERE clause that matchesmore than one row, any rows that match will be changed.
MODIFY A SINGLE ROW
MySQL
98
MODIFY A SINGLE ROW
516922 Ch05.F 9/26/02 11:34 AM Page 98

‹ Type WHERE name="John Smith"; and press Enter.
■ This completes the query. MySQL displays the number of rows that were updated.
› Type SELECT * FROM mail; and press Enter.
■ The contents of the table are displayed. You can verify that the address was changed.
UPDATE DATA IN TABLES 5If you have not created the mail table or added records toit, you can use the following MySQL queries to preparethe table for this example:
Example:CREATE TABLE mail (
name VARCHAR(80) PRIMARY KEY,
address VARCHAR(120),
city VARCHAR(50),
state CHAR(2),
postal VARCHAR(5) );
INSERT INTO mail (name, address, city)
VALUES ("John Smith", "321 Elm Street", "Chicago");
INSERT INTO MAIL (name, address, city)
VALUES ("John Jones", "1141 Oak Lane", "Kalamazoo");
INSERT INTO MAIL (name, address, city)
VALUES ("Jane Smith", "321 Elm Street", "Chicago");
The CREATE TABLE query creates the mail table anddefines its fields. The name field is the primary key. TheINSERT queries create three example rows within thenew table.
99
516922 Ch05.F 9/26/02 11:34 AM Page 99

Note: This example uses the mail table in the testdb database. If you have not created this table, see the instructions in the Extra section of "Modify a Single Row," earlier in this chapter.
⁄ From the MySQL monitor, type USE testdb; and press Enter.
■ The database is now selected.
¤ Type UPDATE mail SET city="Unknown" and press Enter.
■ The MySQL monitor prompts you for the next line.
If you specify a WHERE clause that matches more thanone row in an UPDATE query, all of the matching rowswill be modified. This is useful when you need to make
a global change to a group of rows in a table.
For example, the following query updates the mail table. Itlooks for a NULL value in the city column and assigns thevalue "Unknown" to the column instead.
UPDATE mail SET city="Unknown"WHERE city IS NULL;
Note that you cannot use the standard = sign to check for aNULL value, because the NULL value really means that thevalue is not defined at all. Instead, MySQL provides the ISNULL keywords, which allow you to test for a NULL value.
You can use any column name in the WHERE clause. You can also use the AND and OR keywords to combine multipleWHERE conditions. These keywords are explained in detailin Chapter 6. The following query checks for a NULL valueor a blank value and updates either one:
UPDATE mail SET city="Unknown"WHERE city IS NULL OR city = "";
After you perform an UPDATE query that affects one or morerows, MySQL displays the number of rows that were affected.If no rows were affected, it does not mean your query wasincorrect, just that no rows matched the WHERE clause.
Because an UPDATE query that affects a large number ofrows can take a long time, you can use the LOW_PRIORITYoption with UPDATE. If this option is specified, the MySQLserver will wait until no clients are accessing the tablebefore performing the update. This reduces the impact ofthe query on other users, but will increase the length oftime the update takes when the table is busy.
For example, the following query uses the LOW_PRIORITYkeyword and updates the city column as in the previousexample:
UPDATE LOW_PRIORITY mail SET city="Unknown"WHERE city IS NULL;
MODIFY MULTIPLE ROWS
MySQL
100
MODIFY MULTIPLE ROWS
516922 Ch05.F 9/26/02 11:34 AM Page 100

‹ Type WHERE city IS NULL; and press Enter.
■ This completes the UPDATE query and the table is updated. The number of updated records is displayed.
› Type SELECT * FROM mail; and press Enter.
■ The contents of the table are displayed. You can verify that the update was performed correctly.
UPDATE DATA IN TABLES 5
When you specify an UPDATE query with a WHERE clausethat can affect multiple rows, there is a potential for errorsif one of the columns you are updating is a primary key orunique index. If the UPDATE query changes one of thesecolumns to a value that duplicates an existing row's value,the query will abort because there cannot be duplicatevalues for a key.
If you add the IGNORE option to your UPDATE query,instead of aborting when a duplicate key is created, theMySQL server will instead skip that row and continue withthe remaining rows to be updated. When the query iscompleted, the status report will display a number ofwarnings if one or more duplicate keys have been skipped.
Example:UPDATE IGNORE mail SET name="John Smith"
WHERE name LIKE '%Smith%';
This example looks for names that contain "Smith" andattempts to change them. Any duplicate keys will beignored, and a warning message will be displayed.
101
516922 Ch05.F 9/26/02 11:34 AM Page 101

MySQL
Note: This example uses the mail table in the testdb database. If you have not created this table, see the instructions in the Extra section of "Modify a Single Row," earlier in this chapter.
⁄ From the MySQL monitor, type USE testdb; and press Enter.
■ The database is now selected.
¤ Type UPDATE mail and press Enter.
■ You are prompted for the next line.
‹ Type SET address=UPPER(address); and press Enter.
■ This completes the query, and the update is performed.
› Type SELECT * FROM mail; and press Enter.
■ The contents of the table are displayed. All words in the address fields are now uppercase.
102
UPDATE ALL TABLE ROWS
If you omit the WHERE clause from an UPDATE query, itwill affect all of the rows of the table. For example, thisquery sets the address field of the mail table to a single
value for all rows:
UPDATE mail SET address="32 South E Street";
In a simple example like this, the UPDATE query replaces all values for the column with the new value. This causesthe loss of some unique data and is only useful in rarecases. For example, you may find it useful if you are addinga new field to the table or deciding on a new purpose foran existing field, and want to start with a default value forall rows.
An UPDATE query without the WHERE clause becomes moreuseful when you combine it with one or more MySQLfunctions. For example, the UPPER function changes all of the letters of a text string to uppercase. You can use thisfunction to change the data in a column to all uppercase:
UPDATE mailSET address=UPPER(address);
Rather than setting every address field to the same value,this version of the query performs a useful purpose. It runseach address through the UPPER function to convert it touppercase and stores the new value in the address field.This technique is useful for making a formatting change to a field throughout a table's rows. You will learn more aboutUPPER and other MySQL functions in Chapter 7.
UPDATE ALL TABLE ROWS
516922 Ch05.F 9/26/02 11:34 AM Page 102

Note: This example uses the mail table in the testdb database. If you have not created this table, see the instructions in the Extra section of "Modify a Single Row," earlier in this chapter.
⁄ From the MySQL monitor, type USE testdb; and press Enter.
■ The database is now selected.
¤ Type UPDATE mail and press Enter.
■ You are prompted for the next line of the query.
‹ Type SET postal="33422" LIMIT 3; and press Enter.
■ The server now performs the UPDATE query. Because you specified the LIMIT clause, only three rows of the table are changed.
› Type SELECT * FROM mail; and press Enter.
■ The contents of the table are displayed. Note that three rows have been changed.
103
You can add the LIMIT clause to an UPDATE query to limit the number of rows that can be updated.For example, this query updates only three rows:
UPDATE mail SET postal="33422" LIMIT 3;
Although this example does not include a WHERE clause tocontrol the rows to be updated, the LIMIT clause specifiesthat only a maximum of three rows will be updated. Youcannot specify the order of the UPDATE query, so you cannotcontrol which rows will be updated.
The LIMIT clause is useful for two purposes. First, you canuse it as a safeguard either with or without the WHERE clauseto prevent an incorrect query from damaging data. If yourWHERE clause unexpectedly matches more records than you
expected, this can prevent the loss of too much existing data.The following example uses LIMIT with a WHERE clause:
UPDATE mail SET postal="33422"WHERE postal IS NULL LIMIT 1;
The second use for the LIMIT clause is to minimize theslowdown of the MySQL server. If you are performing acomplicated UPDATE query on a large table, it can slowdown the table for other clients, and may take minutes or even hours depending on the size of the table and thespeed of the server.
If you specify a number in the LIMIT clause, you canperform only part of the update and test the server'sresponse or repeat the same query later to update morerows of the table.
LIMIT THE NUMBER OF ROWS TO UPDATE
UPDATE DATA IN TABLES 5
LIMIT THE NUMBER OF ROWS TO UPDATE
516922 Ch05.F 9/26/02 11:34 AM Page 103

Note: This example uses the mail table in the testdb database. If you have not created this table, see the instructions in the Extra section of "Modify a Single Row," earlier in this chapter.
⁄ From the MySQL monitor, type USE testdb; and press Enter.
■ The database is now selected.
¤ Type UPDATE mail and press Enter.
■ The MySQL monitor prompts you for the next line of the query.
‹ Type SET address="", city="", state="" and press Enter.
■ You are prompted for the next line.
You can use multiple assignment statements after theSET keyword within an UPDATE query to updatemultiple columns for each row being updated. To
update multiple columns, simply separate the assignmentswith a comma.
For example, suppose you are working with the mailing listin the mail table again. For any listing that does not have avalue in the postal code column, you want to change theaddress, city, and state columns to blanks. You can do thiswith the following UPDATE query:
UPDATE mailSET address="", city=", state=""WHERE postal IS NULL;
This example includes three assignments after the SETkeyword, assigning blank values to the address, city, and
state columns. The WHERE clause looks for any row that has a NULL value in the postal column.
When you specify multiple assignments, the MySQL serverevaluates them from left to right for each row. While thismakes no difference in the example above, it can affectsome queries. For example, if you assign two differentvalues to the same column in the UPDATE query, the oneyou specify last will be the final value of the column.
Because a query like this can cause data loss, be carefulwhen entering it and verify the syntax before you executethe query. For example, if you inadvertently added asemicolon at the end of the second line of this query, itwould execute immediately without the WHERE clause,erasing the address, city, and state of all rows in the entiretable.
UPDATE MULTIPLE COLUMNS
MySQL
104
UPDATE MULTIPLE COLUMNS
516922 Ch05.F 9/26/02 11:34 AM Page 104

› Type WHERE postal IS NULL; and press Enter.
■ This completes the query. The rows are now updated.
ˇ Type SELECT * FROM mail; and press Enter.
■ This displays the contents of the table. Verify that the correct columns were updated.
UPDATE DATA IN TABLES 5
105
In the real world, the example here may update fewer rows thannecessary. Some rows may have a valid postal code but may bemissing a value in the address, city, or state columns, any of whichwould result in an invalid address. You can extend the query to checkfor NULL values in any of these columns and assign blank values.
Example:UPDATE mail
SET address="", city="",
state="", postal=""
WHERE postal IS NULL
OR address IS NULL
OR city IS NULL
OR state IS NULL;
This example looks for NULL values in the postal, address, city, or statefields by using the OR keyword. If any of them are null, all of the fieldsare replaced with blank values.
The OR keyword is used to combine multiple conditions in a WHEREclause so that rows that match any of the conditions will be updated.You can also use the AND keyword to combine conditions. When youuse AND, only rows that match all of the conditions are updated.
516922 Ch05.F 9/26/02 11:34 AM Page 105

Note: This example uses the mail table in the testdb database. If you have not created this table, see the instructions in the Extra section of "Modify a Single Row," earlier in this chapter.
⁄ From the MySQL monitor, type USE testdb; and press Enter.
■ The database is now selected.
¤ Type ALTER TABLE mail ADD COLUMN ( and press Enter.
■ You are prompted for the next line.
‹ Type address2 VARCHAR(120), city2 VARCHAR(50), and press Enter.
› Type state2 CHAR(2), postal2 VARCHAR(5) ); and press Enter.
■ This completes the ALTER TABLE query. The new fields are added to the table.
You can use the value of any existing column of thetable within an UPDATE query. This allows you toupdate one column based on the value of one or
more other columns.
For example, suppose you were to add columns for a secondaddress to the mail table. Using an UPDATE query, you couldcopy the current address columns for each row to use asthe default value of each of the second address columns.The following ALTER TABLE query adds the new columnsto the table:
ALTER TABLE mail ADD COLUMN(address2 VARCHAR(120), city2 VARCHAR(50),state2 CHAR(2), postal2 VARCHAR(5) );
After the new columns have been added to the table, youcan use an UPDATE query to copy the corresponding fieldsfrom the first address to the second:
UPDATE mail SET address2=address,city2=city, state2=state, postal2=postal;
This query uses the existing values in the address, city, state,and postal columns as the values of the new address columns.Because no WHERE clause is specified, this query affects allof the rows of the table. You can also use a WHERE clause toupdate only certain rows. The following example updatesonly rows where the state field has the value 'CA':
UPDATE mail SET address2=address,city2=city, state2=state, postal2=postalWHERE state='CA';
You can use any of the existing values from the table'scolumns in this way in an UPDATE query. You can also use avariety of MySQL functions to modify or combine the valuesof one or more columns to form the value of a column. SeeChapter 7 for a detailed explanation of the many availableMySQL functions.
UPDATE DEPENDING ON COLUMN VALUES
MySQL
106
UPDATE DEPENDING ON COLUMN VALUES
516922 Ch05.F 9/26/02 11:34 AM Page 106

ˇ Type UPDATE mail SET address2=address, and press Enter.
■ You are prompted for the next line.
Á Type city2=city, state2=state, postal2=postal; and press Enter.
■ This completes the UPDATE query. All of the rows of the table are updated.
‡ Type SELECT name, address, address2 FROM mail; and press Enter.
■ The values of the columns you specified are displayed for all rows. Verify that the address values were copied.
UPDATE DATA IN TABLES 5If you are working with a table that has a timestamp column, this columnis automatically updated with the current date and time in each rowmodified by any UPDATE query. If you want to update a row and preservethe current value of the timestamp column, you must explicitly set thecolumn to its original value.
For example, if you were to add a second address to the address table andperform a similar update, you may want to avoid updating the timestampin the updatetime column. The following query accomplishes this:
Example:UPDATE address SET address2=address,
city2=city, state2=state,
updatetime=updatetime;
While setting a column to its own value normally has no effect, in atimestamp column this prevents the MySQL server from automaticallyupdating the field. You can also set the timestamp column explicitly to adifferent value. For example, the following UPDATE query sets all rows toa specified updatetime value:
Example:UPDATE address SET address2=address,
city2=city, state2=state,
updatetime="20030101120000";
107
516922 Ch05.F 9/26/02 11:34 AM Page 107

Note: This example uses the testdb database and creates a new table.
⁄ From the MySQL monitor, type USE testdb; and press Enter.
■ The database is now selected.
¤ Type CREATE TABLE exams (name VARCHAR(80), and press Enter.
‹ Type numtests INT, totalscore INT, avgscore TINYINT); and press Enter.
■ The table is created.
› Type INSERT INTO exams (name, numtests, totalscore) and press Enter.
■ You are prompted for the next line.
ˇ Type VALUES ("Sam", 5, 350), and press Enter.
Á Type ("Ted",3, 220),("Sue",6, 510); and press Enter.
■ This completes the INSERT query and adds three sample rows to the table.
Often, you will find it useful to update a column'svalue based on its existing value. The simplestexample of this is to increment a numeric column's
value. This is easy to do in an UPDATE query by referring tothe column's current value.
For example, suppose you created a table to store examstatistics for students. The following CREATE TABLE querycreates this simple table:
CREATE TABLE exams (name VARCHAR(80), numtests INT, totalscore INT, avgscoreTINYINT);
This creates a table called exams with four columns: namefor the student name, numtests for the number of tests thestudent has taken, totalscore for the total of all test scores,and avgscore for an average.
When a new test is administered to students, you may wantto increment the numtests column for all of the rows in thedatabase. You can use a simple UPDATE query toaccomplish this:
UPDATE examsSET numtests = numtests + 1;
This query adds one to the current value of the numtestscolumn for each row and stores the resulting value in thatrow's numtests column, replacing the original value. The neteffect is to increment the numtests column for every student.
As with other UPDATE queries, you could optionally add aWHERE clause. Specifying a WHERE clause may be useful toincrement the number of tests for only a single student orgroup of students. You can use a wide variety of arithmeticoperations on MySQL column values; these are listed inChapter 7.
INCREMENT A COLUMN VALUE
MySQL
108
INCREMENT A COLUMN VALUE
516922 Ch05.F 9/26/02 11:34 AM Page 108

‡ Type UPDATE exams and press Enter.
■ You are prompted for the next line.
° Type SET numtests = numtests + 1; and press Enter.
■ This completes the UPDATE query. The column is incremented in all rows.
· Type SELECT * FROM exams; and press Enter.
■ The contents of the table are displayed. The number of tests has been incremented for each row.
UPDATE DATA IN TABLES 5
109
You can use math in UPDATE statements to do more than simply incrementcolumns. For example, you could use an UPDATE query to automatically set theavgscore column for each student to be an average calculated by dividingtotalscore by numtests.
Example:UPDATE exams
SET avgscore = totalscore / numtests;
This example uses the / (division) operator to calculate the average. Because thereis no WHERE clause, this operation will be performed on all rows of the table.
Because UPDATE can modify multiple columns at once, you could combine thisexample with the previous example to increment the number of tests andcalculate the average at the same time.
Example:UPDATE exams
SET numtests = numtests + 1,
avgscore = totalscore / numtests;
Because MySQL processes the UPDATE query from left to right, the numtestscolumn will be incremented for each row first, after which the new value will beused in the calculation of the average.
516922 Ch05.F 9/26/02 11:34 AM Page 109

S ELECT is one of the most powerful MySQL querycommands, and one you will use frequently. A SELECTquery returns one or more rows from one or more
tables. You can use SELECT from the MySQL monitor todisplay data or from an application to retrieve data.
USING SELECT QUERIES
MySQL
110
The SELECT query has a specificsyntax. The various clauses andkeywords are optional, but must bespecified in this order. Many of theclauses require that you specify atable with FROM.
SELECT columns or expressions
FROM table or tables WHERE conditions
GROUP BY columns ORDER BY columns
LIMIT number;
BASIC SELECT SYNTAX
The LIMIT clause allows you to limit thenumber of rows the SELECT query can return.If you specify a single number with LIMIT,only that number of rows will be returned. Thisclause can be combined with a WHERE clauseto display a limited number of rows that matchthe condition.
If you specify two numbers in the LIMITclause, the first is the number of the first resultrow to be returned. Rows are numberedstarting with zero. The second number is thelimit. You can use this to display pages of datafrom a query.
Example:SELECT * FROM address LIMIT 10;
THE LIMIT CLAUSE
If you specify more than one table name in the FROMclause, the SELECT query will return data from multipletables. This is known as a JOIN query, and requires aWHERE clause to match a column from each table withcorresponding items in other tables.
You can also use the JOIN keyword to combine tables.When you use INNER JOIN or simply specify multipletables, only rows that match between tables are displayed.When you use LEFT JOIN, all of the rows in the left tableare displayed. If no corresponding values exist for theright table, NULL values are returned.
Example:SELECT * FROM address, mail
WHERE address.name = mail.name;
USING JOIN TO COMBINE TABLES
Specify Columns
You can specify one or more column names in the SELECT query. The columnsyou specify will be displayed for each row returned by the query. You can usecommas to separate multiple columns or use * to return all columns.
Example:SELECT name, city FROM address;
Specify Tables
You use the FROM keyword in SELECT to specify one or more tables fromwhich to retrieve rows. In most cases, a single table name is used.
516922 Ch06.F 9/26/02 11:35 AM Page 110

USING SELECT QUERIES 6
111
The ORDER BY clause specifies one or morecolumns by which to sort the results of the SELECTquery. You can specify a single column name ormultiple columns separated by commas. You canoptionally specify the keyword ASC (ascending) orDESC (descending) for each column. An ascendingsort is the default.
Example:SELECT * FROM address ORDER BY name;
THE ORDER BY CLAUSE
The GROUP BY clause is similar to ORDERBY, but all of the rows for each value of thegroup column are combined into a singlerow. You can use functions such as COUNTto perform calculations on the combineddata.
Example:SELECT state, COUNT(*) FROM addressGROUP BY state;
THE GROUP BY CLAUSE
Compare Numeric Values
MySQL includes a number of comparison operators youcan use with numeric values:
OPERATOR DESCRIPTION
= Is equal to
> Is greater than
< Is less than
>= Is greater than or equal to
<= Is less than or equal to
<> or != Is not equal to
Work with NULL Values
The following comparison operators work with NULLvalues in columns:
OPERATOR DESCRIPTION
IS NULL Is the NULL value
IS NOT NULL Is not the NULL value
<=> Is equal to (allows NULL values)
Compare Text Strings
You can compare text values using the standard equal,greater-than, and less-than operators. Additionally, youcan use LIKE or NOT LIKE to compare text strings.These operators allow the wildcard values % for anycharacters or no characters, and _ for one character.
Combine Conditions
You can use the AND keyword to combine twoconditions in a WHERE clause. Only the rows that matchboth conditions will be returned. The OR keyword alsocombines conditions. In this case, any row that matchesone condition or the other is returned. The NOTkeyword negates one or more conditions.
You can use AND, OR, and NOT to combine any numberof conditions for a WHERE clause. You can useparentheses to indicate the conditions that should beevaluated first.
Example:SELECT * FROM address
WHERE (state="CA" OR state="AZ")
AND name LIKE "%Smith%";
THE WHERE CLAUSE
You can use the WHERE clause to select only the rowsthat match a condition. You can use any of MySQL'savailable functions and comparison operators to form aWHERE condition.
Example:SELECT * FROM address
WHERE name LIKE "%Smith%";
516922 Ch06.F 9/26/02 11:35 AM Page 111

Note: This example uses the testdb database and the mail table. See Chapter 5 or the CD-ROM for instructions to create this table.
⁄ From the MySQL monitor, type USE testdb; and press Enter.
■ You are prompted for the next line.
¤ Type SELECT * FROM mail; and press Enter.
■ All columns and rows of the table are displayed.
The SELECT query is one of the most powerful optionsavailable in MySQL. Using SELECT, you can displaydata from a table or retrieve data into an application.
A basic SELECT query specifies the fields to displayfollowed by the FROM keyword and the table to draw themfrom:
SELECT name, address FROM mail;
This example displays all of the rows of the mail table. Foreach row, the name and address columns are displayed. Thecolumns for each row are displayed in the order youspecified in the SELECT statement. You can also use awildcard character (*) to select all of the table's columns:
SELECT * FROM mail;
This example displays all of the rows of the table. Eachrow includes the value of all columns. The columns aredisplayed in the order they were defined when the tablewas created.
You can also use SELECT without the FROM keyword totest MySQL functions and expressions. When you do notspecify a table to select data from, MySQL will evaluate theexpression in the SELECT statement and display the result.For example, this query displays the sum of severalnumbers:
SELECT 3 + 12 + 33;
When you include the FROM keyword to specify a table,you can also combine the table's fields into functions andexpressions. For example, this SELECT query displays thename and address of each row in the mail table, convertingall text to uppercase:
SELECT UPPER(name), UPPER(address) FROMmail;
DISPLAY DATA WITH SELECT
MySQL
112
DISPLAY DATA WITH SELECT
516922 Ch06.F 9/26/02 11:35 AM Page 112

‹ Type SELECT name FROM mail; and press Enter.
■ Only the name column is displayed.
› Type SELECT city, address, name FROM mail; and press Enter.
■ The city, address, and name columns are displayed in order.
USING SELECT QUERIES 6
113
Sometimes, when you perform a function or calculation on oneor more fields of a table in a SELECT query, you want to view theresult as well as the original fields. You can do this by assigning aname, or alias, to the calculated value. For example, the followingquery displays the name field followed by its uppercase equivalent:
Example:SELECT name, UPPER(name) AS name2 FROM mail;
The AS keyword is used to indicate an alias name for the calculatedvalue. This name is displayed in the results when you use a queryfrom the MySQL monitor. When you are using MySQL with alanguage such as PHP or Perl, the alias is available to your programas well as the columns you name directly in the SELECT query.
As another example, the CONCAT function in MySQL combinesmultiple text values into a single string. This example returns thename and an addr alias that combines the address, city, and statecolumns.
Example:SELECT name, CONCAT(address, "/", city, "/", state) AS addr
FROM mail;
516922 Ch06.F 9/26/02 11:35 AM Page 113

Note: This example uses the mail table in the testdb database. See Chapter 5 or the CD-ROM if you need to create this table.
⁄ From the MySQL monitor, type USE testdb; and press Enter.
■ The database is now selected.
¤ Type SELECT * FROM mail; and press Enter.
■ All rows of the table are displayed.
‹ Type SELECT * FROM mail and press Enter.
■ You are prompted for the next line of the query.
› Type WHERE name = "John Smith"; and press Enter.
■ The row that matches the WHERE clause is displayed.
By default, when you use a SELECT query, all of therows of the table are returned. You can add a WHEREclause to your SELECT queries to select one or more
specific rows. You can select rows by performingcomparisons with one or more of the table's fields. Thefollowing is a simple example of a SELECT query with aWHERE clause:
SELECT * FROM mailWHERE name = "John Smith";
This example looks for a specific value within the namefield of the mail table and displays the rows that match.Because the name field is the primary key in this case, onlyone row will be displayed.
MySQL uses case-insensitive matching with text fields.Aside from differences in case, the = operator will onlymatch if the name is exactly as specified. You can also useother operators, such as less than (<) and greater than (>).Numbers are compared numerically, and text values are
compared alphabetically. If the values you are comparingare different types, MySQL converts them to a compatibletype if possible.
With text fields, you can use the LIKE keyword to findpartial matches. LIKE allows you to use wildcard characters.The first wildcard, _, matches a single character. Thefollowing example finds "John Smith", "John Smitt", or aname with any other final character:
SELECT * FROM mailWHERE name = "John Smit_";
The other wildcard, %, can represent any number ofcharacters or no characters. You can use this at thebeginning and ending of a word to find the word anywherein the column. The example below will find the name "JohnSmith" as well as any other name containing "Smith":
SELECT * FROM mailWHERE name LIKE "%Smith%";
USING THE WHERE CLAUSE
MySQL
114
USING THE WHERE CLAUSE
516922 Ch06.F 9/26/02 11:35 AM Page 114

ˇ Type SELECT * FROM mail and press Enter.
■ You are prompted for the next line.
Á Type WHERE name LIKE "%Smith%"; and press Enter.
■ The rows that match the WHERE clause are displayed.
‡ Type SELECT name, address FROM mail and press Enter.
■ You are prompted for the next line.
° Type WHERE postal > 10000; and press Enter.
■ The rows that match the WHERE clause are displayed.
Note: The fields you use in the WHERE clause do not have to be returned by the SELECT query.
USING SELECT QUERIES 6
115
MySQL supports a variety of operators for comparing numeric ortext values. The table below lists each operator and its purpose.
OPERATOR DESCRIPTION
= Is equal to
> Is greater than
< Is less than
>= Is greater than or equal to
<= Is less than or equal to
<> or != Is not equal to
IS NULL Is the NULL value
IS NOT NULL Is not the NULL value
<=> Is equal to (allows NULL values)
LIKE Match text strings with wildcards
NOT LIKE Text strings do not match
516922 Ch06.F 9/26/02 11:35 AM Page 115

Note: This example uses the mail table in the testdb database. See Chapter 5 or the CD-ROM if you need to create this table.
⁄ From the MySQL monitor, type USE testdb; and press Enter.
■ The database is now selected.
¤ Type SELECT * FROM mail WHERE and press Enter.
■ You are prompted for the next line.
‹ Type name LIKE "%Smith%" OR name LIKE "%Jones%"; and press Enter.
■ This completes the query. Rows that match either condition are displayed.
Often, in a large database, specifying a singlecondition would still return a huge number ofrows. You can combine several conditions in a
WHERE clause to make your search more specific. Thelogical operators AND, OR, and NOT are used to combineconditions.
The OR operator allows you to make a search more general.The following example displays records from the mail tablethat contain the names Smith or West:
SELECT * FROM mail WHEREname LIKE "%Smith%" OR name LIKE "%West%";
The AND operator allows you to make a search morespecific. The following example displays only the recordswith a name column containing "Smith" and a value of"CA" in the state column:
SELECT * FROM mail WHEREname LIKE "%Smith%" AND state = "CA";
If you have not used AND and OR with computer languagesbefore, they may be confusing. Remember that using ORwill allow more rows to match the query, and using AND willallow less rows to match.
Finally, the NOT operator inverts a condition. If you use NOTLIKE or != (not equal), rows that do not match thecondition are returned. You can use NOT to make anyexisting condition into its opposite.
You can combine any number of conditions with AND, OR,and NOT to create complex conditions. When you use ANDand OR together, often the meaning is ambiguous. You canenclose conditions in parentheses to ensure that they areconsidered first, before combining the result with the otherconditions.
SPECIFY MULTIPLE WHERE CONDITIONS
MySQL
116
SPECIFY MULTIPLE WHERE CONDITIONS
516922 Ch06.F 9/26/02 11:35 AM Page 116

› Type SELECT * FROM mail WHERE and press Enter.
■ You are prompted for the next line.
ˇ Type name LIKE "%Smith%" AND state = "CA"; and press Enter.
■ This completes the query. Only the rows that match both conditions are displayed.
Á Type SELECT * FROM mail WHERE and press Enter.
■ You are prompted for the second line.
‡ Type name LIKE "%John%" AND and press Enter.
■ You are prompted for the third line.
° Type (state = "CA" OR state = "AZ"); and press Enter.
■ This completes the query. Only the rows that match the first condition and either of the second or third are displayed.
USING SELECT QUERIES 6
117
You can create very complex WHERE conditions using AND, OR, NOT,and parentheses to combine multiple conditions. For example, hereis a complex query using the mail table:
Example:SELECT * FROM mail WHERE
(name LIKE "%Smith%" OR name LIKE "%Jones%")
AND NOT (state = "UT" or state = "AZ");
This query will return all of the rows that have a name columncontaining either "Smith" or "Jones", except for those with valuesof "UT" or "AZ" in the state column.
These operators can even be useful when working with a singlefield:
Example:SELECT * FROM mail WHERE
name LIKE "%Smith%"
AND name NOT LIKE "%John%";
This example returns all rows that contain "Smith" in the namecolumn, except for those that contain "John".
516922 Ch06.F 9/26/02 11:35 AM Page 117
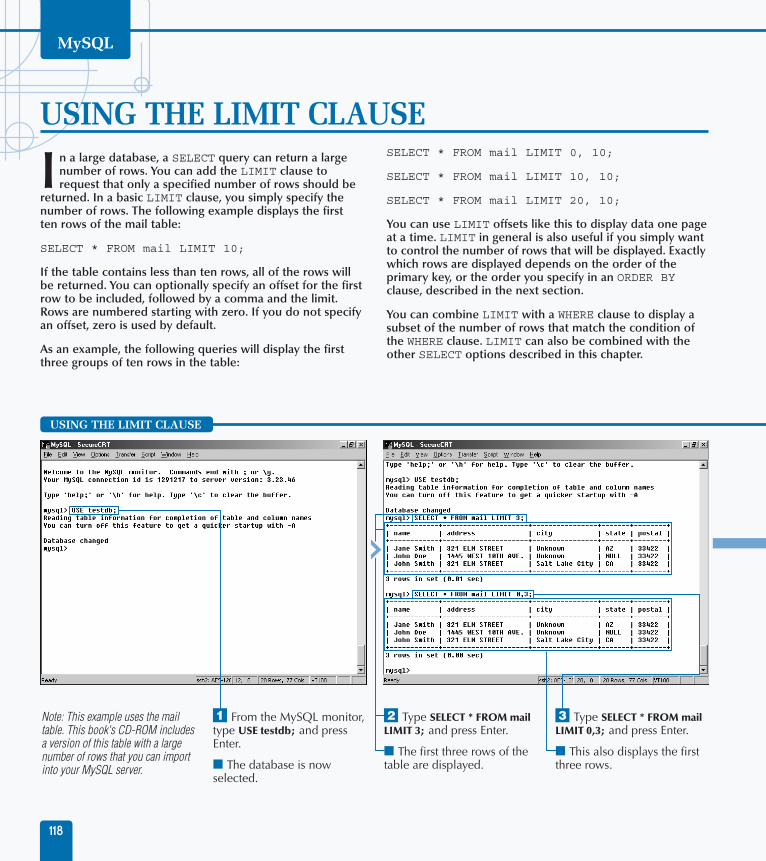
Note: This example uses the mail table. This book's CD-ROM includes a version of this table with a large number of rows that you can import into your MySQL server.
⁄ From the MySQL monitor, type USE testdb; and press Enter.
■ The database is now selected.
¤ Type SELECT * FROM mail LIMIT 3; and press Enter.
■ The first three rows of the table are displayed.
‹ Type SELECT * FROM mail LIMIT 0,3; and press Enter.
■ This also displays the first three rows.
In a large database, a SELECT query can return a largenumber of rows. You can add the LIMIT clause torequest that only a specified number of rows should be
returned. In a basic LIMIT clause, you simply specify thenumber of rows. The following example displays the firstten rows of the mail table:
SELECT * FROM mail LIMIT 10;
If the table contains less than ten rows, all of the rows willbe returned. You can optionally specify an offset for the firstrow to be included, followed by a comma and the limit.Rows are numbered starting with zero. If you do not specifyan offset, zero is used by default.
As an example, the following queries will display the firstthree groups of ten rows in the table:
SELECT * FROM mail LIMIT 0, 10;
SELECT * FROM mail LIMIT 10, 10;
SELECT * FROM mail LIMIT 20, 10;
You can use LIMIT offsets like this to display data one pageat a time. LIMIT in general is also useful if you simply wantto control the number of rows that will be displayed. Exactlywhich rows are displayed depends on the order of theprimary key, or the order you specify in an ORDER BYclause, described in the next section.
You can combine LIMIT with a WHERE clause to display asubset of the number of rows that match the condition ofthe WHERE clause. LIMIT can also be combined with theother SELECT options described in this chapter.
USING THE LIMIT CLAUSE
MySQL
118
USING THE LIMIT CLAUSE
516922 Ch06.F 9/26/02 11:35 AM Page 118

› Type SELECT * FROM mail LIMIT 3,3; and press Enter.
■ The second group of three rows is displayed.
ˇ Type SELECT * FROM mail LIMIT 6,3; and press Enter.
■ The third group of three rows is displayed.
Á Type SELECT * FROM mail WHERE name LIKE "%Smith%" and press Enter.
■ You are prompted for the next line.
‡ Type LIMIT 1; and press Enter.
■ Only the first record matching the WHERE clause is displayed.
USING SELECT QUERIES 6
119
You can use LIMIT to display data in pages. To do this,you use the same maximum value and a different offsetfor each query. If you know the number of the page youwant to display and the number of rows per page, you cancalculate the offset using this formula:offset = (page –1) * rows
In this formula, page is the page number, starting withpage 1, and rows is the number of rows per page. You canuse this formula within a Web application in a languagesuch as Perl or PHP to easily display one page of data at atime.
When you are displaying paged data, the rows returnedfor each page may not always be consistent. This canhappen if rows are added to or deleted from the databasebetween your SELECT queries. The pages will also beinconsistent if you use a different ORDER BY clause insubsequent SELECT queries.
516922 Ch06.F 9/26/02 11:35 AM Page 119

Note: This example uses the quotes table. See the Extra section for details.
⁄ From the MySQL monitor, type USE testdb; and press Enter.
¤ Type SELECT * FROM quotes; and press Enter.
■ The rows of the table are displayed in the default order.
One of the most powerful features of a databasemanagement system like MySQL is the ability tosort large amounts of data by different fields. You
can use the ORDER BY clause in a SELECT statement tocontrol the order of the rows returned.
For example, suppose you defined a table to store famousquotations. This table would include text fields for thequotation, named quotes, and the author, named author,and an auto-increment column called num to act as aprimary key. You could use a simple ORDER BY clause tolist the quotations sorted by the author's name:
SELECT * FROM quotes ORDER BY author;
You can optionally follow an ORDER BY column with thekeyword DESC for descending order, or ASC, the default, forascending.
If you specify more than one column name in the ORDERBY clause, the table will first be sorted by the first column,
and then the second column, and so on. The followingexample would return a list of quotations sorted by authorand then by the num field:
SELECT * FROM quotes ORDER BY author, num;
The second column to sort by will only be effective if thereare multiple rows for some values of the author column. Ifall of the values in this column are unique, the othercolumns in ORDER BY have no effect.
If you specify one or more columns with SELECT, you canuse numbers as shorthand in ORDER BY to refer to thecolumns being selected. This example orders by the authorcolumn:
SELECT quote, author FROM quotes ORDER BY 2;
SORT DATA WITH THE ORDER BY CLAUSE
MySQL
120
SORT DATA WITH THE ORDER BY CLAUSE
516922 Ch06.F 9/26/02 11:35 AM Page 120

‹ Type SELECT * FROM quotes ORDER BY author; and press Enter.
■ The rows are displayed ordered by the author column.
› Type SELECT * FROM quotes ORDER BY quote; and press Enter.
■ The rows are now ordered by the quote column.
USING SELECT QUERIES 6
Rather than a column name or list of columns,you can also use a MySQL function in the ORDERBY clause. This allows you to customize the orderin a number of ways. For example, the RANDfunction is useful for displaying results in randomorder.
Example:SELECT * FROM quotes
ORDER BY RAND();
When you use ORDER BY RAND(), MySQLautomatically retrieves the row for your query inrandom order. While the order is random, eachrow will still only be returned once. If you usethis clause with a WHERE clause, the rows thatmatch the WHERE condition will be returned inrandom order.
You can create the quotes table for this example byimporting it from the SQL file on the CD-ROM orwith the following CREATE TABLE query. Theversion on the CD-ROM includes a number ofexample rows to work with.
Example:CREATE TABLE quotes (
quote VARCHAR(100),
author VARCHAR(50),
num INT(11) AUTO_INCREMENT PRIMARY KEY);
121
516922 Ch06.F 9/26/02 11:35 AM Page 121

Note: This example uses the quotes table in the testdb database. See the CD-ROM for an importable SQL file to create this table.
⁄ From the MySQL monitor, type USE testdb; and press Enter.
■ The database is now selected.
¤ Type SELECT author FROM quotes GROUP BY author; and press Enter.
■ A list of unique author names in the table is displayed.
‹ Type SELECT quote, author FROM quotes GROUP BY author; and press Enter.
■ One row for each unique author name is displayed.
Sometimes you want to look at groups of rows ratherthan single rows to extract data. You can use theGROUP BY clause in a SELECT query to combine all
of the rows for a particular value into a single row. Forexample, this query displays a list of author names from thequotes table:
SELECT author FROM quotes GROUP BY author;
The GROUP BY clause is similar to ORDER BY, but it onlyreturns a single row for each unique value of the groupingfield. In this case, because you are displaying only theauthor field, it will display a list of authors. Even if the sameauthor name is included in several rows of the database, itwill be listed only once in the query with GROUP BY.
If you include fields in the SELECT query that you are notgrouping by, only a single value will be displayed even
though many rows have been grouped together. Thefollowing query will display a single quotation for eachauthor, regardless of how many times the author appears inthe database:
SELECT quote, author FROM quotes GROUP BY author;
You can optionally use an ORDER BY clause after theGROUP BY clause. This will control the order in which therows are pulled from the database before they are groupedtogether as specified in the GROUP BY clause.
While GROUP BY in its simple form is useful for listing theunique values of a column in a MySQL table, you canactually gather statistics on each group using several MySQLfunctions. These are described later in this chapter, in thesection "Calculate Totals and Averages."
USING THE GROUP BY CLAUSE
MySQL
122
USING THE GROUP BY CLAUSE
516922 Ch06.F 9/26/02 11:35 AM Page 122

Note: This example uses the quotes table in the testdb database. See the CD-ROM for information on importing this table onto your server.
⁄ From the MySQL monitor, type USE testdb; and press Enter.
■ The database is now selected.
¤ Type SELECT * FROM quotes WHERE author LIKE "%Franklin%" and press Enter.
■ You are prompted for the next line.
‹ Type ORDER BY num LIMIT 2; and press Enter.
■ The query is now complete, and the results are displayed.
123
You can make a SELECT query as simple or ascomplex as necessary. The simplest version ofSELECT is used to test a function or calculation, and
does not even require a table name. This example multipliestwo numbers and displays the result:
SELECT 17 * 34;
In a more complex SELECT query, you must use the variousclauses in the correct order, or MySQL will return an error.The following is the basic syntax and order for a SELECTquery in MySQL:
SELECT columns or expressionsFROM table or tables WHERE conditionsGROUP BY columns ORDER BY columnsLIMIT number;
The WHERE, GROUP BY, ORDER BY, or LIMIT clauses areoptional. Whichever ones you do include must be specifiedin the order shown. If you include any of these clauses, youmust also include the FROM keyword to specify a table. For
example, the following query includes WHERE, ORDER BY,and LIMIT clauses:
SELECT * FROM quotes WHERE author LIKE"%Franklin%"
ORDER BY num LIMIT 2;
Several of the clauses in a SELECT statement allow multipleitems. The FROM TABLE clause can list multiple tables —this is described in the section "Display Data from MultipleTables," later in this chapter. You can use AND and OR tocombine WHERE conditions, as described earlier in thischapter. The ORDER BY and GROUP BY clauses can includea list of column names, separated by commas.
Because a SELECT query that uses several complex clausescan be quite long, it is difficult to enter it into the MySQLmonitor without an error. You can use the \e (edit) optionin the MySQL monitor to edit the query in a text editor andthen execute it with the \g (go) option. These options aredescribed in detail in Chapter 1.
USING MULTIPLE CLAUSES WITH SELECT
USING MULTIPLE CLAUSES WITH SELECT
USING SELECT QUERIES 6
516922 Ch06.F 9/26/02 11:35 AM Page 123

Note: This example uses the quotes table in the testdb database. This table is included on the CD-ROM.
⁄ From the MySQL monitor, type USE testdb; and press Enter.
■ The database is now selected.
¤ Type SELECT COUNT(*) FROM quotes; and press Enter.
■ The count of all rows in the table is displayed.
The SELECT queries you have used so far return all ofthe data that matches the WHERE criteria. Rather thanthe rows themselves, you can use SELECT to obtain a
count of the rows in a table or the rows that match acondition. This is especially useful in applications that useMySQL, because the database server can return a count tothe application rather than requiring your application tocount all of the rows it receives.
To count the number of rows in a table, you use the COUNTfunction. This function accepts a column name as aparameter or the wildcard *. The following query displays acount of all of the rows in the quotes table:
SELECT COUNT(*) FROM quotes;
If you specify a column name rather than the wildcard, onlythe rows that have a non-NULL value for that column willbe counted. The following query counts the rows that havea non-NULL value in the author column:
SELECT COUNT(author) FROM quotes;
If you specify a WHERE clause with COUNT, MySQL countsthe rows that match the WHERE condition. The followingquery returns a count of the number of rows that have aspecific value in the author column:
SELECT COUNT(*) FROM quotesWHERE author="Mark Twain";
Because the COUNT function returns a single-row result withthe count, you cannot retrieve a count and a regular columnvalue using the same SELECT query. You can, however,count values for multiple columns. The following exampledisplays a count of rows that have a non-NULL value in thequote column, followed by a count of non-NULL values inthe author column:
SELECT COUNT(quote), COUNT(author) FROM quotes;
If you are not interested in the values of a particular columnand only want a count of rows, always use COUNT(*). TheMySQL server can count the rows faster if a column is notspecified, because it does not have to examine values ineach row it counts.
COUNT DATABASE ROWS
MySQL
124
COUNT DATABASE ROWS
516922 Ch06.F 9/26/02 11:35 AM Page 124

‹ Type SELECT COUNT(*) FROM quotes and press Enter.
■ You are prompted for the next line.
› Type WHERE author="Mark Twain"; and press Enter.
■ The count of rows that match the specified author column value is displayed.
ˇ Type SELECT COUNT(author) FROM quotes; and press Enter.
■ A count of rows that have non-NULL values in the author column is displayed.
USING SELECT QUERIES 6
125
You can use the DISTINCT keyword with COUNT to count the unique valuesof a column. For example, the following query counts the number of uniquevalues for the author column in the quotes table. If the same value isincluded in the column for several different rows, it is only counted once.
Example:SELECT COUNT(DISTINCT author) FROM quotes;
When using DISTINCT, you can list multiple columns. In this case, thecount will be the number of rows that have a unique combination of valuesin the two columns. The following query counts unique combinations ofvalues in the author and quote columns:
Example:SELECT COUNT(DISTINCT author, quote) FROM quotes;
You can also use DISTINCT in a regular SELECT query to display the list ofunique values. The result is similar to using the GROUP BY clause. Thefollowing example displays a list of unique values of the author column inthe quotes table:
Example:SELECT DISTINCT author FROM quotes;
If you specify any columns with DISTINCT that are primary keys or uniqueindexes, the result is the same as if you had not used DISTINCT, becausethese columns have a unique value for each row of the table.
516922 Ch06.F 9/26/02 11:35 AM Page 125

Note: This example uses the testdb database and creates a new table called scores.
⁄ Type USE testdb; and press Enter.
■ The database is now selected.
¤ Type CREATE TABLE scores (name VARCHAR(50), and press Enter.
■ You are prompted for the next line.
‹ Type score INT UNSIGNED); and press Enter.
■ This creates the scores table.
› Type INSERT INTO scores (name, score) VALUES and press Enter.
ˇ Type ("Tom",75), ("Tom",85), ("Tom",88), and press Enter.
Á Type ("Sue",89), ("Sue",90), ("Sue",74), and press Enter.
‡ Type ("John",54), ("John",65); and press Enter.
■ This inserts some sample data into the table.
While the COUNT function is useful for counting theentire contents of a table, it becomes even moreuseful when you use it with the GROUP BY clause.
You can use this combination to display detailed statisticsabout a table's contents. For example, the following querydisplays a list of author names from the quotes table, andfor each one, a count of the number of rows it appears in:
SELECT author, COUNT(*) FROM quotesGROUP BY author;
Along with COUNT, MySQL includes several other functionsthat you can use to display statistics on grouped data from atable. The AVG function calculates the average of the valuesfor a column in a group. The MIN function determines thesmallest of a set of values, and MAX determines the largestvalue of a group.
For example, suppose you create a table to store studentnames and test scores. The scores table includes two simple
columns — name and score. After a number of rows arestored in this table, you can use this query to display theaverage, minimum, and maximum scores for each student:
SELECT name, AVG(score), MIN(score), MAX(score) FROM scores GROUP BY name;
You can also use the AVG, MIN, and MAX functions withoutGROUP BY to calculate statistics on the entire table. Otherfunctions available include SUM for the sum of values and STDfor the standard deviation. The following example displays theaverage score and total score for the entire scores table:
SELECT AVG(score), SUM(score)FROM scores;
Because the SELECT query returns a single-row result forthe entire table when you use these functions, you cannotretrieve column values using the same SELECT query.
CALCULATE TOTALS AND AVERAGES
MySQL
126
CALCULATE TOTALS AND AVERAGES
516922 Ch06.F 9/26/02 11:35 AM Page 126

° Type SELECT name, COUNT(*) FROM scores and press Enter.
· Type GROUP BY name; and press Enter.
■ The number of scores for each student is displayed.
‚ Type SELECT name, AVG(score), and press Enter.
— Type MIN(score), MAX(score) and press Enter.
± Type FROM scores GROUP BY name; and press Enter.
■ The name, average, minimum score, and maximum score are displayed for each student.
USING SELECT QUERIES 6
127
When you use GROUP BY, you can select any number ofcolumns as well as functions such as COUNT and AVG thataggregate the data from the grouped rows. When you arenot using GROUP BY, and you use a function like COUNT orAVG, you cannot select any normal column values in thesame query. The following table describes the availablefunctions in MySQL for use with GROUP BY clauses.
This example uses a simple new table,scores. The CREATE TABLE commandfor this table only needs to specify twocolumns.
Example:CREATE TABLE scores (
name VARCHAR(50),
score INT UNSIGNED);
Although this is a very basic table, youcan achieve impressive results by storingmultiple scores for each name and usingthe various MySQL grouping functions.
FUNCTION DESCRIPTION
COUNT Number of rows
AVG Average value
SUM Total value
MIN Minimum value
MAX Maximum value
STD Standard deviation
BIT_OR Bitwise OR
BIT_AND Bitwise AND
516922 Ch06.F 9/26/02 11:35 AM Page 127

Note: This example uses the quotes table, which you can import from the CD-ROM, and creates a new authors table.
⁄ From the MySQL monitor, type USE testdb; and press Enter to select the database.
¤ Type CREATE TABLE authors (author VARCHAR(50), and press Enter.
‹ Type born INT, died INT); and press Enter.
■ This creates the authors table.
› Type INSERT INTO authors (author, born, died) VALUES and press Enter.
ˇ Type ("Mark Twain", 1835, 1910), and press Enter.
Á Type ("G. B. Shaw", 1856, 1950), and press Enter.
‡ Type ("W. Shakespeare", 1564,1616); and press Enter.
■ This inserts three rows into the authors table.
MySQL is known as a relational database system,and one of the most important features of arelational database is the ability to work with
relationships between different tables. You can use SELECTto retrieve related data from multiple tables.
For example, the quotes table stores quotations and theircorresponding authors. If you had a separate table, namedauthors, that stored birth and death dates for a list of authors,you could combine the two in a single SELECT query:
SELECT * FROM quotes, authors WHERE quotes.author = authors.author;
This query combines, or joins, data from the two tables.Each row in the result includes a combination of thecolumns from the quotes table and the columns of theauthors table. A row is returned for each row that matchesbetween the tables.
The WHERE clause is required when working with multipletables. The first WHERE condition should identify the
relationship between the two tables. In the example above,the WHERE condition indicates that rows should be matchedwhen the author columns from both tables are equal.
To refer to columns when working with multiple tables, youmust specify the table name for each column. Separate thetable and column names with a period. The column youmatch between the tables does not have to be included inthe results. The following SELECT query displays only thequote field from the quotes table and the correspondingborn field from the authors table:
SELECT quotes.quote, authors.born FROM quotes, authorsWHERE quotes.author = authors.author;
Although the columns that match across the two tablesin this example are both named author, the names do notneed to be similar. However, they should contain the sametype of data, such as a number or a string of text. MySQLwill attempt to compare the columns even if they havedifferent formats, but the results may not be consistent.
DISPLAY DATA FROM MULTIPLE TABLES
MySQL
128
DISPLAY DATA FROM MULTIPLE TABLES
516922 Ch06.F 9/26/02 11:35 AM Page 128

° Type SELECT * FROM authors; and press Enter.
■ The contents of the authors table are displayed.
· Type SELECT quotes.quote, quotes.author, and press Enter.
‚ Type authors.born, authors.died and press Enter.
— Type FROM quotes, authors and press Enter.
± Type WHERE quotes.author = authors.author; and press Enter.
■ The rows that match both tables are shown as if they were a single table.
USING SELECT QUERIES 6
129
You can use aliases to assign shorter names to the tables in a SELECTquery. This is especially useful when you are retrieving data from multipletables, because you must refer to a table name with each column name.To use an alias, include the AS keyword and the alias name after a tablename. For example, the following query displays data from the quotesand authors tables using aliases:
Example:SELECT * FROM quotes AS q, authors AS a
WHERE q.author = a.author;
This statement assigns the aliases q and a to the two tables. This techniqueis most useful when you are working with tables with long names. Evenwhen the tables have short names, aliases can be useful if you areretrieving several column values using SELECT, as in the next example.
Example:SELECT q.quote, q.author, a.born, a.died
FROM quotes AS q, authors AS aWHERE q.author = a.author;
When you define an alias in this manner, you can refer to columnsthroughout the query using either the alias name or the full column name.
516922 Ch06.F 9/26/02 11:35 AM Page 129

Note: This example uses the testdb database and the quotes and authors tables. See the CD-ROM if you have not yet created one of these.
⁄ From the MySQL monitor, type USE testdb; and press Enter.
■ The database is now selected.
¤ Type SELECT * FROM quotes INNER JOIN authors and press Enter.
‹ Type ON quotes.author = authors.author; and press Enter.
■ This displays matching rows from both tables.
In database terminology, a query that returns data frommultiple tables is called a join. MySQL includes a JOINkeyword that you can use as an alternate syntax for
combining data from tables. In addition, you can usevarious keywords with JOIN to request differentcombinations of data from the tables.
The basic type of join uses the INNER JOIN keyword. Thisis also the type used when you simply specify multiple tablenames with commas, as in the previous section. In an innerjoin, the only rows returned will be those that contain amatching, non-NULL value in both tables. The followingexample uses the quotes and authors tables with an innerjoin:
SELECT * FROM quotes INNER JOIN authorsON quotes.author = authors.author;
The ON keyword is used to specify the condition that linksthe two tables. In this example, if an author entry in thequotes table does not have a corresponding listing in theauthors table, the row is not included in the result. Similarly,
if an entry in the authors table is not used in any rows ofthe quotes table, it is not included in the result.
If you use the NATURAL JOIN keywords, MySQLautomatically joins the tables on any column names thatmatch between the tables. Because the author column hasthe same name in both tables, the following query returnsthe same results as the previous one:
SELECT * FROM quotes NATURAL JOIN authors;
You can use the LEFT JOIN keywords to combine tablesdifferently. In a left join, all of the rows of the first (left)table you specify are included in the result, whether or notthere is a corresponding row in the second table. Thefollowing query displays every row of the quotes table, andincludes information from the authors table when available.Otherwise, it includes NULL values for the fields of theauthor table.
SELECT * FROM quotes LEFT JOIN authorsON quotes.author = authors.author;
USING JOIN OPTIONS
MySQL
130
USING JOIN OPTIONS
516922 Ch06.F 9/26/02 11:35 AM Page 130

› Type SELECT * FROM quotes and press Enter.
ˇ Type NATURAL JOIN authors; and press Enter.
■ This also displays matching rows from both tables.
Á Type SELECT * FROM quotes LEFT JOIN authors and press Enter.
‡ Type ON quotes.author = authors.author; and press Enter.
■ This query displays all rows from the quotes table, regardless of whether the author was found in the authors table.
USING SELECT QUERIES 6
131
You can use the NATURAL LEFT JOIN keywords to return the same result as LEFTJOIN, except that MySQL automatically matches identically-named columns betweenthe two tables. The following query lists all rows of the quotes table and includes thecorresponding information, if any, from the authors table:
Example:SELECT * FROM quotes NATURAL LEFT JOIN authors;
Another variation, RIGHT JOIN, is similar to LEFT JOIN but includes all of the rows ofthe second (right) table rather than the first. The following query lists all of the quotationsfor all of the authors listed in the authors table. If an author is not listed in the quotestable, a single row is returned with NULL values for the fields of the quotes table.
Example:SELECT * FROM quotes RIGHT JOIN authors
ON quotes.author = authors.author;
The conditions you specify using the ON keyword will be used to match rows betweenthe tables. If you want to include only certain rows, you can add a WHERE clause. Thefollowing example uses RIGHT JOIN to list all of the rows of the quotes table for eachauthor in the authors table, but only includes the rows for a single author:
Example:SELECT * FROM quotes RIGHT JOIN authors
ON quotes.author = authors.author
WHERE authors.author="Mark Twain";
516922 Ch06.F 9/26/02 11:35 AM Page 131
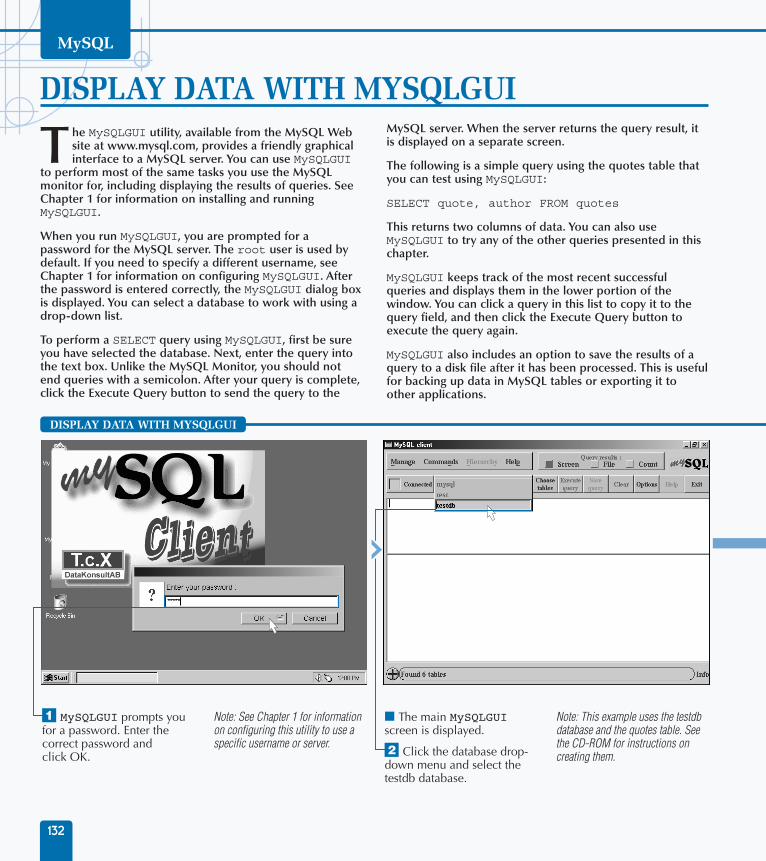
⁄ MySQLGUI prompts you for a password. Enter the correct password and click OK.
Note: See Chapter 1 for information on configuring this utility to use a specific username or server.
■ The main MySQLGUI screen is displayed.
¤ Click the database drop-down menu and select the testdb database.
Note: This example uses the testdb database and the quotes table. See the CD-ROM for instructions on creating them.
The MySQLGUI utility, available from the MySQL Website at www.mysql.com, provides a friendly graphicalinterface to a MySQL server. You can use MySQLGUI
to perform most of the same tasks you use the MySQLmonitor for, including displaying the results of queries. SeeChapter 1 for information on installing and runningMySQLGUI.
When you run MySQLGUI, you are prompted for apassword for the MySQL server. The root user is used bydefault. If you need to specify a different username, seeChapter 1 for information on configuring MySQLGUI. Afterthe password is entered correctly, the MySQLGUI dialog boxis displayed. You can select a database to work with using adrop-down list.
To perform a SELECT query using MySQLGUI, first be sureyou have selected the database. Next, enter the query intothe text box. Unlike the MySQL Monitor, you should notend queries with a semicolon. After your query is complete,click the Execute Query button to send the query to the
MySQL server. When the server returns the query result, itis displayed on a separate screen.
The following is a simple query using the quotes table thatyou can test using MySQLGUI:
SELECT quote, author FROM quotes
This returns two columns of data. You can also useMySQLGUI to try any of the other queries presented in thischapter.
MySQLGUI keeps track of the most recent successfulqueries and displays them in the lower portion of thewindow. You can click a query in this list to copy it to thequery field, and then click the Execute Query button toexecute the query again.
MySQLGUI also includes an option to save the results of aquery to a disk file after it has been processed. This is usefulfor backing up data in MySQL tables or exporting it toother applications.
DISPLAY DATA WITH MYSQLGUI
MySQL
132
DISPLAY DATA WITH MYSQLGUI
516922 Ch06.F 9/26/02 11:35 AM Page 132
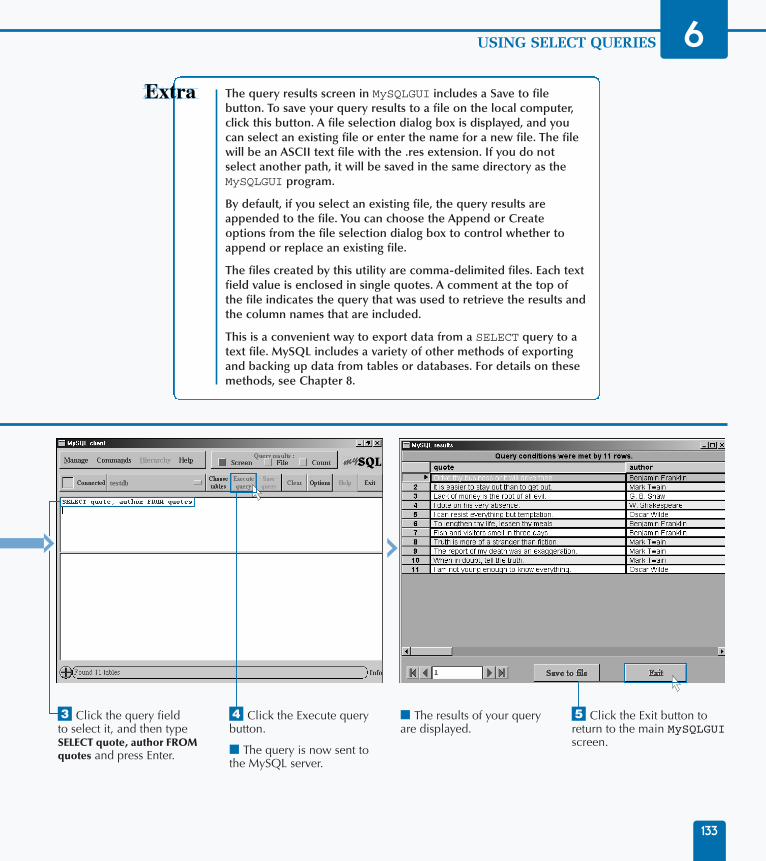
‹ Click the query field to select it, and then type SELECT quote, author FROM quotes and press Enter.
› Click the Execute query button.
■ The query is now sent to the MySQL server.
■ The results of your query are displayed.
ˇ Click the Exit button to return to the main MySQLGUI screen.
USING SELECT QUERIES 6
133
The query results screen in MySQLGUI includes a Save to filebutton. To save your query results to a file on the local computer,click this button. A file selection dialog box is displayed, and youcan select an existing file or enter the name for a new file. The filewill be an ASCII text file with the .res extension. If you do notselect another path, it will be saved in the same directory as theMySQLGUI program.
By default, if you select an existing file, the query results areappended to the file. You can choose the Append or Createoptions from the file selection dialog box to control whether toappend or replace an existing file.
The files created by this utility are comma-delimited files. Each textfield value is enclosed in single quotes. A comment at the top ofthe file indicates the query that was used to retrieve the results andthe column names that are included.
This is a convenient way to export data from a SELECT query to atext file. MySQL includes a variety of other methods of exportingand backing up data from tables or databases. For details on thesemethods, see Chapter 8.
516922 Ch06.F 9/26/02 11:35 AM Page 133

MySQL includes a wide variety of functions andoperators for working with numeric values. All ofthese functions will work with integer values, such
as INTEGER or TINYINT columns, or decimal values, suchas FLOAT or DOUBLE columns.
MATH FUNCTIONS
MySQL
134
Arithmetic Operators
MySQL supports the standard arithmetic operators foradding, subtracting, multiplication, and division. Theseare described in the table below.
OPERATOR DESCRIPTION EXAMPLE
+ Addition a + 3
- Subtraction a - 1
* Multiplication a * 2
/ Division a / 2
% Modulo (remainder) a % 2
The modulo (%) operator returns the remainder for adivision operation. For example, the result of a % 2 isthe remainder when the value of a is divided by 2.
Random Numbers
The RAND function returns a random floating-pointnumber between zero and one. You can optionallyspecify a seed, or starting point for the calculation, forthe random number generator. Any time you obtainrandom numbers using the same seed, the samenumbers will be returned. The following exampledisplays a random number:
SELECT RAND();
You can also use RAND() within an ORDER BY clause tomake a SELECT statement return the records in randomorder. The following query displays the rows of thequotes table in random order:
SELECT * FROM quotes ORDER BY RAND();
Positive and Negative Numbers
MySQL can work with negative numbers. You canspecify a negative number with a hyphen, as in -3. Youcan also use a hyphen to convert a value into itsopposite with the - operator. For example, this querywould convert the score value to a negative number ifpositive, and to a positive number if negative:
SELECT - score FROM table;
You can use the ABS (absolute value) function toconvert a number to its positive form: the absolutevalue of 31 is 31, and the absolute value of –5 is 5. Thisexample returns the absolute value of the scorecolumn:
SELECT ABS(score) FROM table;
The SIGN function is used to determine the sign of avalue. It returns 1 for positive numbers, –1 for negativenumbers, or zero for zero. This example returns the signof the score column:
SELECT SIGN(score) FROM table;
Comparison Functions
Two MySQL functions allow you to compare a list ofnumbers. The LEAST function accepts two or morearguments and returns the smallest value from the list.The GREATEST function is similar, but returns thelargest value from the list. The following statementswould both return the number 17:
SELECT LEAST(97, 17, 22, 43, 23);
SELECT GREATEST(2, 3, 17, 9, 4);
516922 Ch07.F 9/26/02 11:50 AM Page 134

USING MYSQL FUNCTIONS 7
135
Round Numbers
MySQL includes a variety of functions for roundingdecimal numbers to integers. The FLOOR functionrounds a number down to the nearest integer. Thefollowing example returns a rounded version of acolumn called average using FLOOR:
SELECT FLOOR(average) FROM table;
The CEILING function is similar, but rounds up insteadof down: 3.1, 3.6, and 3.9 would all be rounded to 4.The ROUND function is more intelligent, rounding to thenearest integer: 3.1 to 3.49 would be rounded down to3, and 3.5 to 3.9 would be rounded up to 4.
You can optionally specify the number of decimalplaces for the rounded number. If you do not specifythis value, ROUND rounds the number to the nearestinteger. The following example displays a roundedversion of the average column with two decimal places:
SELECT ROUND(average,2) FROM table;
The TRUNCATE function is similar to ROUND, but simplyremoves the decimal digits beyond the specifiednumber of places. This is similar to FLOOR, but notlimited to integers. The following example usesTRUNCATE to return the average column’s value withonly one decimal place:
SELECT TRUNCATE(average,1) FROM table;
Exponential Functions
The POWER function returns a number raised to thepower you specify. You can abbreviate this function asPOW. The following statement displays the value of 2raised to the 7th power:
SELECT POWER(2,7);
The SQRT function returns the square root of a numberyou specify. The following SELECT statement displaysthe square root of 36:
SELECT SQRT(36);
Logarithmic Functions
MySQL includes several functions for working withlogarithms. The EXP function returns the value of e (thelogarithmic constant, approximately 2.71) raised to thepower you specify. The following SELECT statementdisplays the value of e raised to the 7th power:
SELECT EXP(7);
The LOG function returns the natural logarithm (base elogarithm) of the number you specify. The followingSELECT statement displays the natural logarithm of 20:
SELECT LOG(20);
Finally, the LOG10 function returns the base-10logarithm of the number you specify. The followingSELECT statement displays the base-10 logarithm of 20:
SELECT LOG10(20);
Geometry and Trigonomety Functions
MySQL includes a wide variety of functions useful forgeometry and trigonometry. The following table liststhese functions and their uses:
FUNCTION DESCRIPTION
PI The value of PI (approximately 3.14)
SIN Returns the sine of the argument
COS Returns the cosine of the argument
TAN Returns the tangent of the argument
ATAN Returns the arc tangent of the argument
ASIN Returns the arc sine of the argument
ACOS Returns the arc cosine of the argument
COT Returns the cotangent of the result
DEGREES Converts from radians to degrees
RADIANS Converts from degrees to radians
516922 Ch07.F 9/26/02 11:50 AM Page 135

Note: This example uses the testdb database and the quotes and scores tables. These are available on the CD-ROM.
⁄ From the MySQL monitor, type USE testdb; and press Enter.
■ The database is now selected.
¤ Type SELECT 17 * 3 + 2; and press Enter.
■ MySQL computes and displays the result.
‹ Type SELECT ROUND(17/3, 2); and press Enter.
■ This displays a result rounded to two decimal places.
MySQL includes a wide variety of mathematicalfunctions and operators. You can test any of thesefunctions with a simple SELECT statement. For
example, this statement displays the result of a mathematicalexpression:
SELECT 17 * 3 + 2;
You can combine any number of mathematical operators andfunctions to produce a result. The following example displaysthe value of 17 divided by 3, rounded to two decimal places:
SELECT ROUND(17/3, 2);
These functions can also be used within a SELECTstatement that works with a table. The following statementdisplays the rows of the scores table. For each row, itdisplays the name column, the score column, and the valueof 10 times the score column:
SELECT name, score, 10*scoreFROM scores;
You can use any MySQL column name or names in anexpression like this, along with numeric constants and theresults of MySQL functions. This allows you to calculate aresult on the fly rather than storing unnecessary data in thetable.
Some functions can also be used within the ORDER BYclause of a SELECT statement. For example, the followingquery displays five rows of the quotes table in randomorder, using the RAND function:
SELECT * FROM quotesORDER BY RAND() LIMIT 5;
You can also use column names, operators, and MySQLfunctions in the ORDER BY clause. This allows you tomodify a column’s value or combine the values of twocolumns, and use the result to order the table.
USING MATH FUNCTIONS
MySQL
136
USING MATH FUNCTIONS
516922 Ch07.F 9/26/02 11:50 AM Page 136

› Type SELECT name, score, 10*score and press Enter.
■ You are prompted for the next line.
ˇ Type FROM scores; and press Enter.
■ This displays the table's rows, including a computed value.
Á Type SELECT * FROM quotes and press Enter.
‡ Type ORDER BY RAND() LIMIT 5; and press Enter.
■ This displays five random rows from the table.
USING MYSQL FUNCTIONS 7
137
The following example of a SELECT statement using MySQL’smathematical operators was included in this section:
Example:SELECT 17 * 3 + 2;
If you work out this expression using a calculator, you will find there aretwo different results, depending on the order you evaluate the operators.If you first multiply 17 by 3, and then add 2, the result is 53. If you firstadd 3 and 2, and then multiply by 17, the result is 85. MySQL, like othercomputer languages, solves this dilemma by using a standard set of rulesfor operator precedence.
In MySQL’s rules of precedence, multiplication and division are alwaysevaluated before addition and subtraction, so either 2 + 17 * 3 or 17 * 3 +2 would return the answer 53. You can also use parentheses to enforceyour own rules of precedence. The following example performs theaddition before the multiplication:
Example:SELECT 17 * (3 + 2);
516922 Ch07.F 9/26/02 11:50 AM Page 137

⁄ From the MySQL monitor, type SELECT 17 > 33; and press Enter.
■ The result is zero, meaning false.
¤ Type SELECT 33 <= 34; and press Enter.
■ The result is 1, meaning true.
‹ Type SELECT GREATEST(27, 2, 33, 31, 55, 10); and press Enter.
■ The largest number from the list is displayed.
› Type SELECT LEAST(27, 2, 33, 31, 55, 10); and press Enter.
■ The smallest number from the list is displayed.
Along with the standard arithmetic operators, MySQLincludes a variety of functions that you can use tocompare numeric values. The most basic of these is
the = operator, which indicates whether two values areequal. MySQL also includes < (less than) and > (greaterthan) operators. The following simple SELECT statementindicates whether one number is greater than another:
SELECT 17 > 33;
If you use a comparison operator in a SELECT statementlike this, it is evaluated to one if true and zero if false. Thus,because 17 is less than 33, this statement will display a zeroresult.
You can also use <= (less than or equal) and >= (greaterthan or equal) in comparisons. The <> or != operatorsmean not equal, and return the opposite of the valuereturned by the = operator.
You can use MySQL’s comparison operators anywhere anumber is expected. The most common use for them is ina WHERE clause to return records that match one or morecriteria. This SELECT statement uses a numeric comparisonin a WHERE clause:
SELECT * FROM scoresWHERE score > 80;
MySQL also includes the GREATEST function, whichaccepts two or more values and returns the greatest valuefrom the list. The LEAST function is similar but returnsthe lowest value. These provide an easy way to compareseveral constants or column values at once. The followingstatement displays the largest value from a list:
SELECT GREATEST(27, 2, 33, 31, 55, 10);
COMPARE NUMERIC VALUES
MySQL
138
COMPARE NUMERIC VALUES
516922 Ch07.F 9/26/02 11:50 AM Page 138

Note: These examples use the scores table and the testdb database. These are included on the CD-ROM.
ˇ Type USE testdb; and press Enter.
Á Type SELECT * FROM scores and press Enter.
‡ Type WHERE score > 80; and press Enter.
■ Rows with a matching column are displayed.
° Type SELECT name, score, and press Enter.
· Type score > 80 FROM scores; and press Enter.
■ The third column indicates whether the score column's value is over 80.
USING MYSQL FUNCTIONS 7
139
MySQL allows you to compare text values using many of the same operators andfunctions that work with numeric values. Strings of text are compared in alphabeticalorder, with strings that would be ordered earlier treated as lesser, and strings thatwould be ordered later treated as greater. The following query indicates whether onestring is greater than another:
SELECT "abalone" > "xylophone";
You can also use the GREATEST and LEAST functions to work with text. The followingexample displays the string that occurs last in alphabetical order from the specifiedlist:
SELECT GREATEST("abalone", "xylophone", "breeze", "garden");
While functions such as GREATEST and LEAST work with either numeric or textvalues, most of MySQL’s functions for working with numeric values do not apply totext strings. If you use a function such as ABS or SQRT with a string value, MySQL willfirst convert the string to a number if it contains a numeric value. Otherwise, a value ofzero is used.
516922 Ch07.F 9/26/02 11:50 AM Page 139

MySQL includes many functions for working withstrings, or text values. You can use these functionswith quoted strings or with the values of text
columns such as CHAR, VARCHAR, and TEXT columns.
UNDERSTANDING STRING FUNCTIONSMySQL
140
CONCAT
The CONCAT function accepts two or more string valuesas arguments and returns a string that combines, orconcatenates, the strings into a single string. You canspecify numeric values as arguments, and they will beconverted automatically into strings.
CONCAT_WS
The CONCAT_WS, or concatenate with separator,function is similar to CONCAT. This function accepts aseparator string as the first argument, and uses this as aseparator between each of the combined strings.
LENGTH
The LENGTH function returns the length of a stringvalue, or the number of characters it contains. MySQLincludes two alternate functions, CHAR_LENGTH andCHARACTER_LENGTH, that serve the same purpose.
BASIC STRING FUNCTIONS
LEFT
The LEFT function accepts a string as its first parameterand a number as the second parameter. It returns thespecified number of characters from the beginning ofthe string. The example displays the first five charactersof a string.
Example:SELECT LEFT("abcdefghij",5);
RIGHT
The RIGHT function is similar to LEFT, but returns aspecified number of characters starting at the end of astring. The example displays the last five characters of astring.
Example:SELECT RIGHT("qrstuvwxyz",5);
MID and SUBSTRING
The MID or SUBSTRING function accepts threearguments: a string value, a position to start from, and alength. It returns the specified number of charactersbeginning at the specified position. If you omit the lastargument, the substring continues to the end of thestring. The example displays five characters starting atthe third position.
Example:SELECT MID("abcdefghijk", 3, 5);
WORK WITH SUBSTRINGS
The functions in this section perform simple but usefulfunctions, such as combining the values of strings.
MySQL also includes several functions that allow you towork with substrings, or portions of string values.
516922 Ch07.F 9/26/02 11:50 AM Page 140

USING MYSQL FUNCTIONS 7
LTRIM
The LTRIM function removes any spaces from thebeginning of a string and returns the result. This is usefulfor removing unnecessary spaces from user input.
RTRIM
The RTRIM function removes any spaces from the end ofa string and returns the result.
TRIM
The TRIM function is a generalized version of LTRIM andRTRIM. If you use TRIM with only a string as an argument,it trims any spaces from the beginning and end of the stringand returns the result. You can also specify the keywordsLEADING, TRAILING, or BOTH to indicate which ends ofthe string should be trimmed, and an optional character toremove instead of a space. The example removes anyperiods from the beginning or end of the string.
Example:SELECT TRIM(BOTH "." FROM "...abcdef...");
WORKING WITH SPACES
LOCATE
The LOCATE function searches for a substringwithin a larger string. It returns the position ofthe substring as an integer, or zero if thesubstring was not found. To use LOCATE,specify the substring followed by the largerstring. You can optionally specify an index as athird argument. If this is specified, LOCATEbegins the search at the position you specify.
Example:SELECT LOCATE("def", "abcdefghi");
INSTR
The INSTR function is similar to LOCATE, butwith the arguments in reverse order. To searchfor a substring using INSTR, specify the largestring and then the substring.
Example:SELECT INSTR("abcdefghi", "def");
REPLACE
The REPLACE function finds occurrences ofa substring within a larger string and replacesthem with the string you specify. To useREPLACE, specify the string, the substring tosearch for, and then the replacement string.The example replaces the string "xx" with "def".
Example:SELECT REPLACE("abcxxghijkl", "xx", "def");
INSERT
The INSERT function replaces a substring witha specified string. To use INSERT, you specifythe string to work with, the position to startreplacing, the number of characters to replace,and a replacement string. The examplereplaces two characters, starting at the fourthposition, with the new string "def".
Example:SELECT INSERT("abcxxghijkl", 4, 2, "def");
SEARCH AND REPLACE
MySQL includes several functions that allow youto search for a substring within a larger string, orto insert or replace portions of a string value.
MySQL includes a number of functions that convertstrings in one fashion or another.
FUNCTION DESCRIPTION
UPPER(string) Converts all letters in a string touppercase
LOWER(string) Converts all letters in a string tolowercase
REPEAT Repeats a string the (string, num) specified number of times
SPACE(num) Returns a string containing thespecified number of spaces
REVERSE Reverses the order of the characters string) in a string
ASCII(string) Returns the ASCII code value for thefirst character in a string
CHAR(num) Returns a string converted from thespecified ASCII codes
CONVERSION FUNCTIONS
141
MySQL includes a variety of functions that allow you towork with space characters, such as removing extra spacesfrom a string.
516922 Ch07.F 9/26/02 11:50 AM Page 141

⁄ From the MySQL monitor, type SELECT "apple" = "orange"; and press Enter.
■ The result is zero, because the strings are not equal.
Note: The remaining examples use the scores table in the testdb database, available on the CD-ROM.
¤ Type USE testdb; and press Enter.
‹ Type SELECT * FROM scores and press Enter.
› Type WHERE name="Tom"; and press Enter.
■ The matching rows are displayed.
MySQL allows you to compare string values as easilyas numbers. The basic string comparison uses the = operator. This SELECT statement indicates
whether two strings are equal:
SELECT "apple" = "orange";
String comparisons can be used anywhere MySQL expectsa value, but are most useful within WHERE clauses. Thefollowing SELECT query displays data from a table using astring comparison:
SELECT * FROM scores WHERE name="Tom";
For a more sophisticated string comparison, you can usethe STRCMP function. This function returns a value of 0 ifthe two strings you specify are equal, –1 if the first string issmaller than the second when compared alphabetically, and1 if the second string is smaller. For example, the followingSELECT statement will display all of the names that startwith a letter before N from the scores table:
SELECT * FROM scoresWHERE STRCMP(name,"N") = -1;
You can also use the LIKE operator to compare strings, asdescribed in Chapter 6. This is similar to the = operator, butallows the use of the wildcard characters % (zero or morecharacters) and _ (one character). The NOT LIKE operatoris the opposite of LIKE, and returns a value of 1 if thestrings do not match.
MySQL also includes an operator, REGEXP or RLIKE,which is similar to LIKE but supports a standard regularexpression syntax instead of simple wildcards. For example,the following SELECT query uses a regular expression tofind names beginning with "T" and at least three letterslong:
SELECT * FROM scores WHERE name REGEXP "T.{2}";
COMPARE STRING VALUES
MySQL
142
COMPARE STRING VALUES
516922 Ch07.F 9/26/02 11:50 AM Page 142

ˇ Type SELECT * FROM scores and press Enter.
Á Type WHERE STRCMP(name,"N") = -1; and press Enter.
■ Rows with a name lower than "N" in alphabetical order are displayed.
‡ Type SELECT * FROM scores and press Enter.
° Type WHERE name LIKE "T%"; and press Enter.
■ All rows with names beginning with "T" are displayed.
USING MYSQL FUNCTIONS 7
143
The syntax used in MySQL’s RLIKE and REGEXP operatorsfollows the extended POSIX regular expression standard.The following table lists some of the special characterssupported in MySQL regular expressions.
CHARACTER DESCRIPTION
. Matches any character
[abc] Matches any of the characters in brackets
^ Anchors the match to the beginning of the string
$ Anchors the match to the end of the string
| Matches the previous characters or the following ones
* Repeats the previous character zero or more times
+ Repeats the previous character one or more times
? Repeats the previous character zero or one times
{3} Matches the previous character exactly 3 times
{2,5} Matches the previous character between 2 and 5 times
516922 Ch07.F 9/26/02 11:50 AM Page 143

Note: This example uses the scores and quotes tables in the testdb database, available on the CD-ROM.
⁄ From the MySQL monitor, type USE testdb; and press Enter.
■ The database is now selected.
¤ Type SELECT CONCAT(name, " ", score) and press Enter.
■ You are prompted for the next line.
‹ Type FROM scores; and press Enter.
■ The calculated value is displayed for each row of the table.
You can use MySQL’s string functions to work withdata from a table in a SELECT statement. One reasonyou may want to use functions is to convert the data
from the table columns into a more useful format. Forexample, you could use the CONCAT function to combinetwo fields into a single string:
SELECT CONCAT(name, " ", score)FROM scores;
As another example, you can use the UPPER function toconvert a column to uppercase before displaying its value.The following query displays the quote and author fields ofthe quotes table in uppercase form:
SELECT UPPER(quote), UPPER(author) FROM quotes;
MySQL functions are also useful in the WHERE clause of aSELECT statement. While this is most often used with
comparison functions, you can also convert a column’svalue before comparing it with a known value.
The UPDATE query in MySQL is often used with oneor more functions. For example, the REPLACE functionreplaces part of a string with another string. You canuse this function with UPDATE to replace a string in allof a table’s rows. For example, this query changes anyoccurrence of "G." to "George" within the author fieldof the quotes table:
UPDATE quotes SET author = REPLACE(author, "G.", "George");
You can use any combination of column values from thetable, constants, and MySQL functions and operatorswithin an UPDATE query. You can also use a WHERE clause,if desired, to make sure that the update affects only therows you want to update.
USING STRING FUNCTIONS
MySQL
144
USING STRING FUNCTIONS
516922 Ch07.F 9/26/02 11:50 AM Page 144

› Type SELECT UPPER(quote), UPPER(author) and press Enter.
ˇ Type FROM quotes; and press Enter.
■ The uppercase values are displayed for each row.
Á Type UPDATE quotes SET and press Enter.
‡ Type author = REPLACE(author, "G.", "George"); and press Enter.
■ The replacement is performed on all matching rows.
° Type SELECT * FROM quotes; and press Enter.
■ The updated contents of the table are displayed.
USING MYSQL FUNCTIONS 7
145
When you use a MySQL function or other calculation within aSELECT query to return a value, you can optionally assign an aliasto the calculated value. This is useful to give a shorthand name tothe result. More importantly, if you are retrieving the data from thequery using a program, using an alias allows the program to accessthe calculated value.
To assign an alias, you use the AS keyword and assign a name, whichshould follow the same rules as a valid column name. For example,this query concatenates the name and score fields from the scorestable and returns the result as the alias nscore, along with thenormal column values.
Example:SELECT name, score,
CONCAT(name, " ", score) AS nscore
FROM scores;
You can use any number of aliases and calculated fields within aSELECT query. This allows you to avoid calculations outside ofthe MySQL server.
516922 Ch07.F 9/26/02 11:50 AM Page 145

Note: This example uses the quotes table in the testdb database. If you have not created them, see the CD-ROM for instructions.
⁄ From the MySQL monitor, type USE testdb; and press Enter.
■ The database is now selected.
¤ Type SELECT author, LEFT(quote, 10) and press Enter.
‹ Type FROM quotes; and press Enter.
■ This displays the author column and the first ten characters of the quote column for each row.
MySQL includes a number of functions that allowyou to divide a text string into smaller pieces, orsubstrings. You can use these functions when you
need to extract a portion of a text column’s value.
The first substring function, LEFT, returns the number ofcharacters you specify starting at the beginning of thestring. For example, the following query uses this functionto display the first ten characters of the quote field for eachrow of the quotes table:
SELECT author, LEFT(quote,10)FROM quotes;
The RIGHT function is similar, but returns the specifiednumber of characters starting at the end of the string. Thefollowing example displays the last ten characters of thequote column for each row of the quotes table:
SELECT author, RIGHT(quote, 10)FROM quotes;
The third substring function is MID. You can use thisfunction to find a number of characters anywhere in a textvalue. The first numeric parameter is the starting position,and the second is the number of characters. The startingposition can range from one to the length of the string. Thefollowing example returns ten characters from the quotecolumn, starting with the fifth character:
SELECT author, MID(quote, 5, 10)FROM quotes;
MySQL also includes a SUBSTRING function that is identicalto MID. You can use the two interchangeably. If you do notspecify the number of characters to return, these functionsreturn the substring that starts at the specified index andends at the end of the string. The following query displaysthe portion of the quote column’s value from the fifthcharacter to the end:
SELECT author, SUBSTRING(quote, 5) FROM quotes;
WORK WITH SUBSTRINGS
MySQL
146
WORK WITH SUBSTRINGS
516922 Ch07.F 9/26/02 11:50 AM Page 146

› Type SELECT author, RIGHT(quote, 10) and press Enter.
ˇ Type FROM quotes; and press Enter.
■ This displays the author column and the last ten characters of the quote column for each row.
Á Type SELECT author, MID(quote, 5, 10) and press Enter.
‡ Type FROM quotes; and press Enter.
■ This displays the author column and ten characters of the quote column, starting at the fifth character.
USING MYSQL FUNCTIONS 7
147
MySQL also includes functions that allow you to search a string for aparticular substring. The first of these, LOCATE, searches a text valuefor a string you specify. If the string is found within the larger string, itreturns a number indicating the character position where it starts. Ifthe string is not found, LOCATE returns zero. The following querysearches the values of the quote column in the quotes table for thestring "every" and displays the results:
Example:SELECT LOCATE("every", quote)
FROM quotes;
The LOCATE function also accepts a third optional parameter. If youspecify a number after the two strings, MySQL will only search for thesubstring starting with the character index you specify. This is usefulwhen you want to find the second or third occurrence of a string.
MySQL also supports the INSTR function for compatibility withother database systems. This function is similar to LOCATE, but theparameters are in the opposite order: you first specify the largerstring, and then the substring to search for. Unlike LOCATE, INSTRdoes not support a starting position for the search.
516922 Ch07.F 9/26/02 11:50 AM Page 147

MySQL allows you to store a date or date/timecombination in several column types, includingDATE, TIME, DATETIME, and TIMESTAMP.
MySQL also includes a number of functions that allow youto work with dates and times and convert them intodifferent formats.
UNDERSTANDING DATE AND TIME FUNCTIONS
MySQL
148
If you need to know the current date within a MySQLquery, you can use the NOW function. This functionreturns the current date and time. If you use thisfunction as a string value, it will return a string withthe year, month, date, hour, minute, and second withpunctuation in between. If you use the result as anumeric value, it will contain no punctuation.
The NOW function does not require any parameters. TheSYSDATE and CURRENT_TIMESTAMP functions aresynonyms for NOW.
The CURRENT_DATE function returns the current dateonly. This function can be abbreviated CURDATE. TheCURRENT_TIME and CURTIME functions are similar butreturn only the hours, minutes, and seconds values forthe current time.
GET THE CURRENT DATE
WORK WITH DATE COMPONENTS
MySQL includes a variety offunctions for extractingcomponents, such as the day of theweek or the week of the year, froma date value. The following tabledescribes these functions.
The HOUR, MINUTE, and SECONDfunctions work only with valuesthat include a time, such asTIMESTAMP or TIME columns. Theother functions work only withvalues that include a date.
FUNCTION DESCRIPTION
DAYOFWEEK Numeric day of week (1-7 for Sunday-Saturday)
WEEKDAY Numeric day of week (0-6 for Monday-Sunday)
DAYNAME Name of day of week
DAYOFMONTH Day of month (1-31)
DAYOFYEAR Day of year (1-366)
MONTH Numeric month (1-12)
MONTHNAME Name of month
QUARTER Numeric quarter (1-4)
WEEK Week of year (0-53)
YEAR Numeric year (4 digits)
YEARWEEK Year and week number (6 digits)
HOUR Hour of day (0-23)
MINUTE Minute of hour (0-59)
SECOND Second (0-59)
516922 Ch07.F 9/26/02 11:50 AM Page 148

USING MYSQL FUNCTIONS 7
149
The DATE_ADD function adds an interval to adate value. To use this function, you specify thedate to work with as an expression or columnname, the keyword INTERVAL, a numberspecifying the amount of time to add, and akeyword indicating the type of interval. The basicintervals are SECOND, MINUTE, HOUR, DAY,MONTH, and YEAR.
The DATE_SUB function is similar, but subtractsthe specified interval from the date. You can useADDDATE and SUBDATE as synonyms forDATE_ADD and DATE_SUB. The example belowsubtracts two months from a date in theupdatetime column.
Example:SELECT DATE_SUB(updatetime, INTERVAL 2MONTH) FROM address;
In addition to the basic intervals, you can use various keywordsto specify multiple parts of a date, such as a year and month.The table below lists these keywords with an example of thesyntax for each one.
KEYWORD DESCRIPTION EXAMPLE
MINUTE_SECOND Minutes and seconds "03:22"
HOUR_MINUTE Hours and minutes "12:03"
HOUR_SECOND Hours, minutes, and "12:03:22"seconds
DAY_HOUR Days and hours "2 12"
YEAR_MONTH Years and months "2-1"
DAY_MINUTE Days, hours, and minutes "2 12:03"
DAY_SECOND Days, hours, minutes, "2 12:03:22"and seconds
ADD AND SUBTRACT
The DATE_FORMAT function allows you to display a datewith the format you specify. The first parameter shouldbe a date value, and the second is a string with one ormore codes for components of the date and time. Thefollowing codes display components of the date.
DATE_FORMAT FUNCTIONS
CODE MEANING
%d Day of month (01, 02, 03, and so on)
%e Day of month (1, 2, 3, and so on)
%D Day of month (1st, 2nd, 3rd, and so on)
%m Numeric month (01, 02, 03, and so on)
%c Numeric month (1, 2, 3, and so on)
%M Month name
%W Name of day of week
%a Name of day of week (abbreviated)
%Y Year (4 digits)
%y Year (2 digits)
The following codes can be used within theDATE_FORMAT function to display the componentsof the time. An additional function, TIME_FORMAT,is similar to DATE_FORMAT but only allows thefollowing codes.
TIME_FORMAT FUNCTIONS
CODE MEANING
%H Hour (24 hours, 2 digits)
%k Hour (24 hours, 1-2 digits)
%h Hour (12 hours, 2 digits)
%i Minute (2 digits)
%S Second (2 digits)
%p AM or PM
%T Complete 24-hour time
%t Complete 12-hour time with AM or PM
FORMAT DATES
516922 Ch07.F 9/26/02 11:50 AM Page 149

Note: This example uses the address table in the testdb database. You can import this table from the CD-ROM.
⁄ From the MySQL monitor, type USE testdb; and press Enter.
■ The database is now selected.
¤ Type INSERT INTO address (name, updatetime) and press Enter.
‹ Type VALUES ("John Smith", "1998-12-22 10:05:00"); and press Enter.
■ This adds a record with a specified date.
› Type INSERT INTO address (name) VALUES ("Jane Doe"); and press Enter.
■ This record is assigned the current date and time.
You can use MySQL’s date and time functions on datesyou specify within a query, or dates and times storedin DATE, TIME, DATETIME, or TIMESTAMP columns.
If you specify a date, you can use one of two formats: anumber that combines the year, month, date, hour, minute,and second values, or a string with punctuation. Thefollowing two dates are equivalent:
2004-12-31 12:33:00
20041231123300
For TIME columns or functions that require only a time,you can simply specify the hours, minutes, and seconds as anumber or string. Similarly, you can specify the year, month,and date for DATE columns or functions that work with dates.
For example, the address table defined earlier in this bookhas a TIMESTAMP column called updatetime. You can use
the MONTH and YEAR functions, which extract thecorresponding components from a date, to displayonly the month and year for each row’s TIMESTAMP:
SELECT MONTH(updatetime), YEAR(updatetime)FROM address;
When you use functions like this and are returning the datato an application, you may find it useful to use the ASkeyword to assign an alias to the evaluated values.
You can compare dates using the = operator, as withother data types. You can also use functions like YEARwithin a WHERE clause to compare just part of the date.The following SELECT query displays all of the rows withan updatetime column with the year 2002:
SELECT * FROM address WHERE YEAR(updatetime) = 2002;
WORK WITH DATES AND TIMES
MySQL
150
WORK WITH DATES AND TIMES
516922 Ch07.F 9/26/02 11:50 AM Page 150

ˇ Type SELECT name, MONTH(updatetime), YEAR(updatetime) and press Enter.
Á Type FROM address; and press Enter.
■ The month and year for all rows are displayed.
‡ Type SELECT * FROM address and press Enter.
° Type WHERE YEAR(updatetime) = 1998; and press Enter.
■ Rows that match the specified year are displayed.
USING MYSQL FUNCTIONS 7
MySQL includes several functions for converting date values to different formats.The following functions convert MySQL date and time values:
FUNCTION DESCRIPTION
TO_DAYS Converts to number of days since year zero
UNIX_TIMESTAMP Converts to a UNIX timestamp (number of seconds since 1/1/1970)
TIME_TO_SEC Converts a time value to a number of seconds
Conversely, the following functions convert from various formats back to aMySQL date or time value:
FUNCTION DESCRIPTION
FROM_DAYS Converts from number of days since year zero
FROM_UNIXTIME Converts from UNIX timestamp
SEC_TO_TIME Converts number of seconds to time (hours, minutes, seconds)
If you need to convert a date to a format not listed here, you can use theindividual functions such as MONTH, DATE, and YEAR, or the DATE_FORMATfunction, described in the next section.
151
516922 Ch07.F 9/26/02 11:50 AM Page 151

MySQL
Note: This example uses the address table in the testdb database, available on the CD-ROM.
⁄ From the MySQL monitor, type USE testdb; and press Enter.
■ The database is now selected.
¤ Type SELECT name, DATE_FORMAT(updatetime, "%M %D, %Y") and press Enter.
‹ Type FROM address; and press Enter.
■ The rows of the table are listed with formatted dates.
› Type SELECT DATE_FORMAT(NOW(), "The date is %m/%d/%Y"); and press Enter.
■ The current date is displayed in the specified format.
ˇ Type SELECT TIME_FORMAT(NOW(), "%h:%i:%s"); and press Enter.
■ The current time is displayed in the specified format.
152
DISPLAY FORMATTED DATES
Often, you will need to display a date in a specificformat. You can use the DATE_FORMAT functionto do this in MySQL. This function is particularly
useful to format a date before displaying it or returning itto an application.
To use DATE_FORMAT, you specify the date value, which canbe a specified date or a column name, and a format stringwith one or more codes for date and time components. Thefollowing example displays the rows of the address tablewith a date such as "February 20th, 2004":
SELECT name, DATE_FORMAT(updatetime, "%M %D, %Y")FROM address;
As with other calculated values, you can use the AS keywordto assign an alias to the formatted date. This is particularlyuseful if you are passing the date to an application.
The format string you use with DATE_FORMAT can containpunctuation and text to accompany the date. Any text that isnot a code beginning with the % symbol is passed through tothe output. The following example obtains the current dateusing the NOW function and formats it with a text message:
SELECT DATE_FORMAT(NOW(), "The date is%m/%d/%Y.");
If you are only working with the time for a date value, youcan use the TIME_FORMAT function. This function is similarto DATE_FORMAT, but accepts only the codes that representthe components of the time. The following exampledisplays the current time using this function:
SELECT TIME_FORMAT(NOW(), "%h:%i:%s");
The codes you can use with the DATE_FORMAT andTIME_FORMAT functions are listed in the section "Understanding Date and Time Functions," earlier inthis chapter.
DISPLAY FORMATTED DATES
516922 Ch07.F 9/26/02 11:50 AM Page 152

ADD AND SUBTRACT DATES AND TIMES
Note: This example uses the address table in the testdb database, available on the CD-ROM.
⁄ From the MySQL monitor, type SELECT DATE_ADD(NOW(), INTERVAL 3 MONTH); and press Enter.
■ This displays the current date plus three months.
¤ Type SELECT NOW() + INTERVAL 2 YEAR; and press Enter.
■ This adds two years to the current date.
‹ Type USE testdb; and press Enter.
› Type SELECT * FROM address WHERE and press Enter.
ˇ Type updatetime > (NOW() – INTERVAL 30 DAY); and press Enter.
■ All rows updated within the last 30 days are displayed.
153
You can use the MySQL functions DATE_ADD andDATE_SUB to add and subtract values from a date.This is useful when you need to calculate a future
or past date, and is also useful when testing date values.
To add an interval to a date value, use DATE_ADD andspecify the date, the keyword INTERVAL, the number toadd, and the unit for the number, such as MONTH or DAY. Forexample, the following SELECT statement displays the datethree months from the current date:
SELECT DATE_ADD(NOW(), INTERVAL 3 MONTH);
In MySQL version 3.23 and later, you can use the + and -operators as shorthand for DATE_ADD and DATE_SUB. Touse these, simply specify the same INTERVAL keyword andunit type. The following example adds two years to thecurrent date and displays the result:
SELECT NOW() + INTERVAL 2 YEAR;
While you can use date addition and subtraction to modifyexisting date values, they can also be useful in a WHEREclause. For example, the following SELECT query displaysthe rows from the address table where the updatetimecolumn has a value within the last 30 days:
SELECT * FROM address WHERE updatetime > (NOW() - INTERVAL 30 DAY);
This example subtracts an interval of 30 days from the NOWfunction to obtain the date 30 days ago and then testswhether the updatetime column’s value is after that date.
Be sure to use singular values such as DAY, MONTH, andYEAR in the INTERVAL clause. Plural values, such asYEARS, will result in an error.
USING MYSQL FUNCTIONS 7
ADD AND SUBTRACT DATES AND TIMES
516922 Ch07.F 9/26/02 11:50 AM Page 153

Along with the functions described earlier in thischapter, MySQL includes a variety of other functions.These include functions to display information about
the MySQL server, current user, and session; functions toencode and decode strings in various ways; and functionsfor working with binary numbers.
MISCELLANEOUS FUNCTIONS
MySQL
154
DATABASE
The DATABASE function does not require any arguments.It returns the name of the currently selected database.Usually this is the database you selected with the USEstatement.
Example:SELECT DATABASE();
USER
The USER function displays the name of the currentMySQL username. If you are using the MySQL monitor,this is the user you specified on the command line.The returned value includes the username and thehostname the user is connecting from, separated bythe @ symbol. The SYSTEM_USER and SESSION_USERfunctions are synonyms for USER.
Example:SELECT USER();
VERSION
The VERSION function returns the MySQL server’ssoftware version number as a string. This function doesnot require any arguments.
Example:SELECT VERSION();
CONNECTION_ID
The CONNECTION_ID function returns the currentconnection ID. This is a number assigned when theclient connects to the MySQL server and will be aunique number for each current client session.
Example:SELECT CONNECTION_ID();
LAST_INSERT_ID
The LAST_INSERT_ID function returns the last valueassigned to a column with the AUTO_INCREMENTattribute when a row was added using the INSERTstatement within the current client session. If you haveadded a row to a table that includes an auto-incrementcolumn, you can use this function to obtain a uniqueidentifier for the new row.
Example:SELECT LAST_INSERT_ID();
MYSQL INFORMATION FUNCTIONS
The functions described here return information about thecurrent database, the current user, and the MySQL serveritself. These are particularly useful from within anapplication.
516922 Ch07.F 9/26/02 11:50 AM Page 154

USING MYSQL FUNCTIONS 7
PASSWORD
The PASSWORD function accepts a string andencrypts it. This function is used by MySQLitself to encrypt passwords for users. Forsecurity reasons, after you have an encryptedvalue, there is no way to calculate theoriginal password; to check user passwords,MySQL encrypts the value entered by theuser and compares it with the encryptedpassword stored in the database.
Example:SELECT PASSWORD("zephyr");
ENCRYPT
The ENCRYPT function accepts a string asan argument and encrypts it. This functionis available only on UNIX servers, as it usesthe standard UNIX function crypt(). Aswith the PASSWORD function, this is a one-way encryption and cannot be reversed.
Depending on the operating system, theENCRYPT function may work with only thefirst eight characters of the string. This isdue to the fact that the underlying UNIXfunction is intended for encrypting shortpasswords.
Example:SELECT ENCRYPT("zephyr");
ENCRYPTION FUNCTIONS
MySQL includes several operators and functions thatyou can use to work with individual bits of binary data.These include logical AND and OR functions that workon the individual bits (binary digits) of a number andother operations. The following table describes thebinary operators available in MySQL.
Along with these operations, MySQL includes a function,BIT_COUNT, which returns the number of bits used tostore a number. This is useful for checking whether anumber will fit in a particular numeric column type.
OPERATOR DESCRIPTION
| Logical bitwise OR
& Logical bitwise AND
<< Shift the bits of a number one space to the left
> Shift the bits of a number one space to the right
~ Convert all 1 bits to 0 and all 0 bits to 1
BINARY (BIT) OPERATORS
155
MySQL includes a variety of functions that can encode ordecode strings. These are useful when working withpasswords and other sensitive information in a database.
ENCODE
The ENCODE function encodes a string using another string as apassword. It uses the letters in the password to determine how toalter the original string. Unlike PASSWORD and ENCRYPT, theencoding is reversible.
The result of the ENCODE function is a binary string with the samelength as the original string. Because it may contain nontextcharacters, this value cannot be stored in a text column, such as CHARor TEXT. You can store it in a binary column type such as BLOB.
Example:SELECT ENCODE("Hello there", "zephyr");
DECODE
The DECODE function accepts a string encoded with the ENCODEfunction and a password. It decodes the string using the password.If the password is the same one used when encoding the string, thisshould restore the original value of the string.
MD5
The MD5 function calculates an MD5 checksum for a string. Achecksum is a value calculated from a string value using a formula.MD5 is a standard developed by RSA Data Security. It uses a complexformula to create an alphanumeric checksum based on the originalstring value. The checksum cannot be used to recreate the originalstring, but it can be compared with another string’s checksum todetermine whether the strings match.
Example:SELECT MD5("Hello there");
516922 Ch07.F 9/26/02 11:50 AM Page 155

MySQL includes a variety of tools for importing andexporting data. These are useful for transferringdata to and from other database systems,
spreadsheets, and other applications, and to back up andrestore data in MySQL tables.
IMPORT AND EXPORT TOOLS
MySQL
156
Export with SELECT
The INTO OUTFILE option can be used with anySELECT query to create a text file with the resultingrow data. Each row of the table is written as a row inthe text file. By default, the fields within each line areseparated by tab characters. The file is saved on theMySQL server. The default location is the directorywhere the MySQL database itself is stored.
Example:SELECT name, address, city
INTO OUTFILE "mail.txt"
FROM mail;
Text File Formats
The SELECT INTO OUTFILE and LOAD DATA INFILEcommands support several options to control thestructure of the output file. You can specify these optionsafter the table name and before any list of column nameswith LOAD DATA, or after the name of the output filewith SELECT INTO OUTFILE. The table below showsthe available options.
The ENCLOSED BY option can also be used asOPTIONALLY ENCLOSED BY. If this is specified, textvalues are enclosed in the character, but numeric fieldsare not enclosed.
KEYWORDS DESCRIPTION DEFAULT
FIELDS Separates fields \t (tab)TERMINATED BY
FIELDS Encloses each field noneENCLOSED BY
FIELDS Prefixes special ESCAPED BY characters \ (backslash)
LINES TERMINATED BY Ends each line \n (newline)
Import with LOAD DATA
You can use the LOAD DATA INFILE command inMySQL to read a text file into a database table. Thiscommand can be used to import a text file created by theSELECT INTO OUTFILE command, or a file you haveexported from another application. To use this command,use LOAD DATA INFILE and the filename to import.Specify the table to import to with the INTO TABLEkeywords, and specify a list of column names if needed.
If you do not specify a list of column names, MySQLwill expect all columns to appear in the file in the sameorder they are defined in the table's structure.
You can specify the LOW_PRIORITY keyword after LOADDATA to wait until no clients are reading from the tablebefore importing the data. The CONCURRENT option canbe used to allow clients to read data while the import isin progress. The LOCAL option allows you to specify afile on the client machine instead of the MySQL server.
If a row in the text file contains the same value for aunique or key field as an existing row of the table, anerror will occur, and the import operation will beaborted. You can optionally specify the REPLACEkeyword after the filename to replace the existing rowswith the rows from the text file, avoiding this error.Alternately, specify the IGNORE keyword to skip anyduplicate rows and continue the import.
Example:LOAD DATA INFILE 'address.txt'
INTO TABLE address (name, address, city);
516922 Ch08.F 9/26/02 11:37 AM Page 156

IMPORT AND EXPORT DATA 8
157
Back Up Data with mysqldump
The mysqldump utility dumps the contents of a table oran entire database to the screen, and you can redirectits output to a file. This command does not create a textfile suitable for use with the LOAD DATA command.Instead, it creates a file of SQL commands, such asCREATE TABLE and INSERT, to re-create the table.
Because it can be used to re-create a table or an entiredatabase easily, mysqldump's output files are idealbackups for the MySQL server. You can use a utility likecron under UNIX or the Task Scheduler under Windowsto schedule mysqldump to create regular daily backups.
To use mysqldump, specify a database and a list oftables on the command line. If you do not specifytables, the entire database is included in the dump.This utility also includes a number of options; some ofthe most useful are described in the table.
Example:mysqldump -uuser -ppassword testdb address>backup.sql
OPTION DESCRIPTION
-A or --all- Includes all databases on databases the server
-C or --compress Attempts to compress data sentfrom the server to the client
-B or --databases Backs up multiple databases listedafter this option
--help Displays a complete list of options
-f or --force Ignores MySQL errors during the dump
-h or --host Specifies the hostname for theMySQL server
-u or --user Specifies the MySQL username
-p or --password Specifies the password for theMySQL username
-t or --no-create- Writes data only, no table info structure
-d or --no-data Writes table structure only, nodata
-w or --where Adds a WHERE clause to selectspecific rows
Restore a Backup File
The backup file created by mysqldump contains MySQLcommands. You can restore the data by executing thosecommands. You can do this with the mysql commandor with the SOURCE command within the MySQLmonitor.
Example:mysql -uuser -ppassword –Dtestdb <backup.sql
Copy Data Between Tables
You can use several methods to copy data betweentables. One of the simplest is to create a table with thesame structure as the existing table, and then use theSELECT option with an INSERT query to copy the datafrom the old table to the new table.
Another method of copying a table is to create abackup of the table using mysqldump, and then editthe file to use a different table name or rename theoriginal table on the database server. You can thenrestore the backup file to create the new table.
Example:INSERT INTO address2 SELECT * FROM address;
516922 Ch08.F 9/26/02 11:37 AM Page 157

Note: This example uses the mail table in the testdb database, available on the CD-ROM.
⁄ From the MySQL monitor, type USE testdb; and press Enter.
■ The database is now selected.
¤ Type SELECT name, address, city and press Enter.
‹ Type FROM mail; and press Enter.
■ This displays the data that will be exported to the text file.
The SELECT query in MySQL includes an INTOOUTFILE option to save the results of the SELECTquery to a file. You can use this to create a text file
containing row and column values from a table. To use thisoption, specify INTO OUTFILE and the name of the fileafter the column names and before the FROM clause.
The following example saves all of the rows of the mailtable into a text file:
SELECT name, address, cityINTO OUTFILE "mail.txt"FROM mail;
The INTO OUTFILE option saves a file on the MySQLserver, and the MySQL username you are using must havethe correct permissions to be able to create a file. If you donot have access to write a file on the server or to read thefile after it has been created, you can use client-side utilities
to create a similar file. These include the mysqldump utility,described in the section "Back Up Data from a Table," laterin this chapter.
When you use this option, the created file is a simpletext file, with one row per database row. The fields areseparated with tab characters by default. You can usevarious options with the FIELDS and ROWS keywords tomodify the format of the output file. These options areexplained in the Extra section.
You can use INTO OUTFILE with any combination ofSELECT query options. You can specify column names toexport, use a WHERE clause to choose rows from the table,and use a LIMIT clause to limit the number of rows. Youcan test the SELECT query without the INTO OUTFILEclause and make sure the right data is displayed beforecreating the output file.
EXPORT TO A TEXT FILE WITH SELECT
158
EXPORT TO A TEXT FILE WITH SELECT
MySQL
516922 Ch08.F 9/26/02 11:37 AM Page 158

› Type SELECT name, address, city and press Enter.
ˇ Type INTO OUTFILE "mail.txt" and press Enter.
Á Type FROM mail; and press Enter.
■ The text file is now created.
Note: By default, the file will be created in the directory where the current database's MySQL data is stored.
The INTO OUTFILE option allows several optional keywords to modify the format of theoutput file. These are divided into FIELDS and LINES options. The FIELDS keyword can befollowed by one or more of the following options:
KEYWORDS DESCRIPTION DEFAULT
TERMINATED BY Character used to separate fields \t (tab)
ENCLOSED BY Character surrounding each field none
ESCAPED BY Character used to escape special characters \ (backslash)
The ESCAPED BY character is used to prefix special characters, such as commas orquotation marks, within the column data. The ESCAPED BY character itself is representedby a doubled character, such as \\ for a backslash.
The LINES keyword can include a single option, LINES TERMINATED BY. This specifiesthe character that ends each line in the output file. The default is \n, the newline character.
You can specify OPTIONALLY ENCLOSED BY instead of ENCLOSED BY. In this case, MySQLwill only enclose strings with the character. Numeric fields will not be enclosed.
To use the FIELDS or LINES options, specify them after the export filename in the SELECTINTO OUTFILE query. If you specify multiple options, separate them with commas.
159
IMPORT AND EXPORT DATA 8
516922 Ch08.F 9/26/02 11:37 AM Page 159

Note: This example uses Notepad under Windows, but any text editor can be used.
⁄ From the text editor, start a new text file.
■ You can also open an existing file containing data and edit it into the correct format.
¤ Type a row of data into the editor. Press the Tab key to separate fields of data.
Note: This example uses name, address, and city fields.
‹ After you complete a row, press Enter to continue to the next row.
MySQL allows you to import data into a table from atext file. This is useful when you need to transferdata from another application into MySQL. Before
you attempt to import a file, be sure it is formatted correctly.
To create an import file compatible with MySQL, startwith a simple text file. You can create a text file in an editoror export one from an application. Be sure to use a texteditor that saves as raw text. Common text editors includeNotepad under Windows, and emacs, vi, and pico underUNIX. You can also use a word processor to create the fileif you save it as a simple text file.
The file should include one line for each row of data to beadded to the table. Each line should end with a newlinecharacter. The columns of data should be in the same orderon each row. The particular order is not important as longas it is consistent.
Separate the columns with a tab character if possible. If not,consistently use another character, such as a comma, andMySQL can still recognize the file. The file will be easiest toimport if the fields are not enclosed within quotation marksor other characters. If your application insists on quotationmarks, you will need to specify a FIELDS ENCLOSED BYoption when you import the data into MySQL.
Your text file should include only data for the table. Thereshould not be any headers, column names, or otherextraneous text at the beginning or end of the file. Thefile should not include any blank lines. If a column's valueis blank, you can include a blank field in the file as long asyou still include the correct number of tabs or separatorcharacters.
FORMAT AN IMPORT FILE
MySQL
160
FORMAT AN IMPORT FILE
516922 Ch08.F 9/26/02 11:37 AM Page 160

› Continue typing rows until all of the desired data is included in the file.
Note: You will often start with a file saved from an application, rather than typing the data manually.
ˇ Click File ➪ Save As from the menu.
Á Specify a filename for the text file and click the Save button.
■ The text file is now saved.
Note: The save option will vary depending on the editor you are using.
If you want to include special characters in the text file, you need to prefixthem with an escape character. The default escape character is a backslash(\). The following are some typical character sequences that you can use tospecify special characters:
SEQUENCE CHARACTER
\t Tab
\n Newline
\\ Backslash
\" Quotation marks
\' Apostrophe
\N Null value (must be the entire column value)
You can use the ESCAPED BY clause when you import the file to specify acharacter other than the backslash. If you will be using quotation marks toenclose the fields and specifying them in an ENCLOSED BY clause, youmust also escape any quotation marks that appear within a field's value.
161
IMPORT AND EXPORT DATA 8
516922 Ch08.F 9/26/02 11:37 AM Page 161

Note: This example uses the address table in the testdb database. It also requires the mail.txt file you created in the previous section.
⁄ From the MySQL monitor, type USE testdb; and press Enter.
■ The database is now selected.
¤ Type DELETE FROM address; and press Enter.
■ This deletes the current contents of the table.
‹ Type SELECT * FROM address; and press Enter.
■ Verify that the table is currently empty.
The LOAD DATA command in MySQL allows you toimport a text file into a MySQL table. You can use thiscommand to import a text file you created with a
SELECT INTO OUTFILE command, or a file you createdyourself or exported from another application.
The following is a simple example of a LOAD DATAstatement. This loads the file mail.txt into the address tableand looks for values for the name, address, and citycolumns.
LOAD DATA INFILE "mail.txt"INTO TABLE address (name, address, city);
The LOAD DATA statement supports several options. First, ifyou specify the LOW_PRIORITY keyword before INFILE,MySQL waits until no clients are reading from the tablebefore importing the data. If you specify CONCURRENTinstead, other clients are allowed to read data from thetable while the LOAD DATA operation is working.
You specify the column names after INTO TABLE inparentheses, in the same order they appear in the importfile. If you do not specify column names, MySQL will expectthe file to contain values for every column in the table'sdefinition, in the same order as they are defined in the table.
By default, MySQL expects column values to be separatedwith tab characters and lines to end with a newlinecharacter. You can change this behavior with the FIELDSTERMINATED BY and LINES TERMINATED BY options.You can also specify ENCLOSED BY and ESCAPED BYoptions, described in the section "Import and Export Tools"earlier in this chapter, if your file is not in the default format.Specify any of these options after the table name andbefore the list of columns.
If the text file contains an entry that would conflict with anexisting table row, the import stops with an error. You canspecify the IGNORE option to prevent this error and skipconflicting rows, or specify REPLACE and the data in thetext file will override any conflicting data in the table.
IMPORT FROM A TEXT FILE
MySQL
162
IMPORT FROM A TEXT FILE
516922 Ch08.F 9/26/02 11:37 AM Page 162

› Type LOAD DATA INFILE "mail.txt" and press Enter.
Note: You may need to specify a path. If the file is not on the MySQL server, see the Extra section.
ˇ Type INTO TABLE address (name, address, city); and press Enter.
■ The data is now imported from the file. MySQL displays the number of rows imported.
Á Type SELECT name, address, city FROM address; and press Enter.
■ The file now contains the imported data.
By default, the LOAD DATA statement looks for a file on theMySQL server. You can use the LOCAL option to load a file fromthe client machine instead. To use this option, specify LOCALimmediately after LOAD DATA.
Example:LOAD DATA LOCAL INFILE "mail.txt"
INTO TABLE address (name, address, city);
If you use the LOCAL option, the default location for the file willbe the current directory on the client machine. You can optionallyspecify a full path to the file. Because this option transfers the fileacross the network from the client to the server, it takes longerthan LOAD DATA without LOCAL. If you have access, you may findit faster to upload the file to the server and then use LOAD DATA.
If you have a text file on a different machine than the MySQLserver or client, you can upload it to the client or server machineusing FTP or a similar application. When you use FTP betweenWindows and UNIX hosts, text files are automatically convertedfrom Windows-style line breaks to UNIX style. This may preventerrors when importing the file in MySQL.
163
IMPORT AND EXPORT DATA 8
516922 Ch08.F 9/26/02 11:37 AM Page 163

Note: This example creates a file containing name, address, and city fields, suitable for import into the mail or address tables described earlier in this book.
⁄ From Microsoft Excel, type the data you want to export or load an existing spreadsheet file.
Note: Be sure only rows of valid data for export are included in the spreadsheet.
¤ Click File ➪ Save As from the menu.
Save As...
164
EXPORT DATA FROM A SPREADSHEET
MySQL
Because MySQL allows you to import a simple text file,you can move data into a MySQL table from anyapplication that can export to a text file. One
common application is a spreadsheet, such as MicrosoftExcel. Because spreadsheets store data in columns androws, their format can easily be adapted to a MySQL table.
When exporting data from any application, the ideal formatis a text file with tabs separating columns and one line perrow. This is the MySQL default format for the LOAD DATAstatement. If this option is not available, columns separatedby commas or other characters will work.
When you save a file in Excel, one of the available file typesis Text (tab delimited). This format matches MySQL's defaultsettings and makes it easy to export data for use with aMySQL table. If you are using a different spreadsheet, look
for a similar option. If a character other than a tab is used toseparate fields, note it so you can specify it in the FIELDSSEPARATED BY clause of the LOAD DATA statement later.
Before exporting data, be sure your data is organized intoa single worksheet with a consistent number of columnson each row. Remove any rows that contain headerinformation, captions, or comments. Only rows of datashould be included.
If you do not yet have a MySQL table prepared for the data,create it based on the fields in the spreadsheet. If youdefine the columns of the table in the same order as theyare used in the spreadsheet, you will not need to specifycolumn names in the LOAD DATA statement when youimport the file into MySQL.
EXPORT DATA FROM A SPREADSHEET
516922 Ch08.F 9/26/02 11:37 AM Page 164

‹ In the Save as Type drop-down field, select Text (Tab delimited).
› Specify a filename for the exported file.
■ In this example, the data is saved to the excel.txt file.
ˇ Click the Save button.
Á Excel may show a warning that some data cannot be saved into a text file. Click Yes to save the file.
■ You are returned to the main Excel window. The data has now been exported and you can import the text file into MySQL.
You can also import a text file you created with the SELECTINTO OUTFILE option in MySQL into a spreadsheet. MicrosoftExcel, in particular, works well with files created in MySQL'sdefault tab-delimited format.
To import a text file, select Open from the File menu andchoose the file. After you click the Open button, Excel runs theText Import Wizard to prompt you for information about thetext file you will be importing. The first dialog box displayedby the wizard prompts you to choose between Delimited andFixed width fields and to choose a starting row for the import.Data is imported starting with the first row by default.
The next dialog box prompts you for more detailed information.You can choose the delimiter character and the character thatencloses fields. If you exported the file using MySQL's defaultsettings, choose Tab as the delimiter and none as the enclosingcharacter.
The final dialog box displayed by the wizard allows you tochoose a format, such as numeric values or text, for each ofthe imported fields. This formats the spreadsheet cells afterthe import is completed.
165
IMPORT AND EXPORT DATA 8
516922 Ch08.F 9/26/02 11:37 AM Page 165

⁄ From Access, open the table that you want to export.
¤ Click File ➪ Export from the menu.
‹ Choose a filename for the exported file.
Note: In this example, the filename is Table1.txt.
› Select Text Files as the file type to export.
ˇ Click the Save All button.
Export...
David Jones
Microsoft Access is the most popular desktopdatabase application, and it is often used to storebusiness data. Access includes a sophisticated
Export option that can export a file in several differentformats. You can use this feature to create a text file thatyou can import into a MySQL table using the LOAD DATAstatement.
To export data from Access, open the table you wantto export and select Export from the File menu. Select afilename and select Text Files as the file type. After youclick the Save button, the Export Text Wizard prompts youfor several options to control the formatting of the text file.You can select comma, tab, or another character to separatefields, and choose whether to enclose data in quotationmarks or another character.
If you select the Tab delimited option from the wizard andselect none for the Text Qualifier option rather than a
quotation mark, the file will be created in the defaultformat for the LOAD DATA command in MySQL.
Like a MySQL database, an Access database can contain anynumber of tables. If you need to transfer multiple tables ofdata to MySQL, you must export each table separately to atext file.
To prepare a table for export, be sure it contains only rowsof data you want to include in the MySQL table. The tableshould not include any comments or field names in the firstrows, as this would result in invalid data being exported.
You can use a similar process to export data from mostother database applications. If an application does not letyou choose the characters to enclose and separate fields,you can use the FIELDS SEPARATED BY and ENCLOSEDBY options in the LOAD DATA statement to make MySQLwork with the format of the file.
EXPORT DATA FROM MICROSOFT ACCESS
MySQL
166
EXPORT DATA FROM MICROSOFT ACCESS
516922 Ch08.F 9/26/02 11:37 AM Page 166

Á From the Export Text Wizard, select the Delimited option.
‡ Click Next to continue. ° Select Tab as the delimiting character.
· Select none as the Text Qualifier option.
‚ Click Next.
— Click Finish to save the file.
■ You can now import the resulting text file into MySQL.
IMPORT AND EXPORT DATA 8
167
You can also import a text file you created with the SELECTINTO OUTFILE option in MySQL into Microsoft Access. Toimport a text file, select Get External Data, and then Import fromthe File menu. From the file selection dialog box, select Text Filesas the file type. Select the text file to import and click OK.
Access now starts the Import Text Wizard to prompt you forinformation about the text file. In the first dialog box, choosebetween Delimited and Fixed width fields. Choose Delimited formost MySQL export files. You can also choose a starting row forthe import.
Click Next to display the next dialog box. Choose the characterthat delimits the fields, typically Tab for MySQL files. You can alsochoose Text Qualifier if your text file encloses fields in quotationmarks. Click Next to continue.
In the next dialog box, choose whether to add the data to a newtable or an existing table in the current database. Click Next todisplay another dialog box, which prompts you for the name anddata type of each field. The next dialog box lets you choose afield to act as primary key. Finally, enter a table name and clickFinish to complete the import.
516922 Ch08.F 9/26/02 11:37 AM Page 167

Note: This example uses the testdb database and the mail and address tables.
⁄ From the command line, type mysqldump testdb mail and press Enter.
■ This dumps the contents of the mail table to the screen.
Note: You may need to specify the username and password with the -u and -p options.
Note: Under Windows, you may need to specify the full path to the command, for example, c:\mysql\bin\mysqldump.
¤ Type mysqldump testdb mail address >tables.txt and press Enter.
■ This backs up both tables to the tables.txt file.
‹ Type mysqldump testdb >db.txt and press Enter.
■ This backs up the entire database to the db.txt file.
Note: You may need to specify the username and password with the -u and -p options.
168
BACK UP DATA FROM A TABLE
While you can export data to a text file usingSELECT and the INTO OUTFILE option, thisprocess creates a simple text file. MySQL includes
a separate utility, mysqldump, that you can use from thecommand line to back up a database to a text file. Theoutput file includes SQL statements and can be used torebuild the database or tables.
To use mysqldump, specify a database name and one ormore table names. The following example dumps the mailand address tables from the testdb database:
mysqldump testdb mail address
If you do not specify table names, mysqldump will dumpthe entire database. You can also back up more than onedatabase by specifying the -B option and a list of databases.In this case, you cannot specify particular table names. Thefollowing example backs up the db1 and db2 databases:
mysqldump -B db1 db2
The mysqldump utility always includes all of the columnsof each table. You can specify the format of the text outputusing several options: --fields-terminated-by,--fields-enclosed-by, --fields escaped by,and --lines-terminated-by. These are the same as theoptions for the LOAD DATA command, described earlier inthis chapter.
This utility supports the same -u and -p options as themysql command. You will usually need to use theseoptions to specify a username with access to the tables youare dumping and the correct password.
The mysqldump utility does not create a text file by itself —it normally dumps the text to the standard output at theshell prompt. You can use the > operator from thecommand line to save the output to a file instead.
BACK UP DATA FROM A TABLE
MySQL
516922 Ch08.F 9/26/02 11:37 AM Page 168

Note: This example requires the tables.txt file created in the previous section. You will delete the existing tables and restore them from the file.
⁄ From the MySQL monitor, type USE testdb; and press Enter.
■ The database is now selected.
¤ Type DROP TABLE address; and press Enter.
‹ Type DROP TABLE mail; and press Enter.
■ Both tables are now deleted.
› Type SOURCE tables.txt; and press Enter.
■ The database is re-created using the instructions in the text file.
ˇ Type SELECT name, address FROM address; and press Enter.
■ This displays the contents of the restored table.
169
When you have created a backup text file usingmysqldump, you can use it to re-create thedatabase or tables that were backed up. The text
file includes SQL statements, such as CREATE TABLE andINSERT, to rebuild the backed up databases or tables. Touse the file, you can simply route it through the mysqlcommand to process the SQL statements.
The following example uses the mysql command to restorethe database backed up in the db.txt file:
mysql testdb <db.txt
You can also use the SOURCE command within the MySQLmonitor. This command reads SQL commands from a textfile you specify.
As with the standard mysql command, you can use the -uoption to specify a username and the -p option to specify apassword. The username you specify must have permission
to create the database or table you are restoring. You mayalso need to use the -h option to specify a host name.
If you are restoring a database or table that has beencorrupted or updated incorrectly, you should first use theDROP TABLE or DROP DATABASE commands to delete anyexisting data.
The file created by mysqldump is a standard text file. Ifyou need to modify the SQL statements in the file beforeimporting, you can use any text editor. If you have a backupfile for an entire database and need to restore a singletable, you can use a text editor to move the statements forthat table to a different file.
Along with restoring a database that has been lost orcorrupted, you can use the backup file to import thedatabase and tables onto a different MySQL server. Thisis an efficient way to move data between servers.
RESTORE A BACKUP FILE
RESTORE A BACKUP FILE
IMPORT AND EXPORT DATA 8
516922 Ch08.F 9/26/02 11:37 AM Page 169
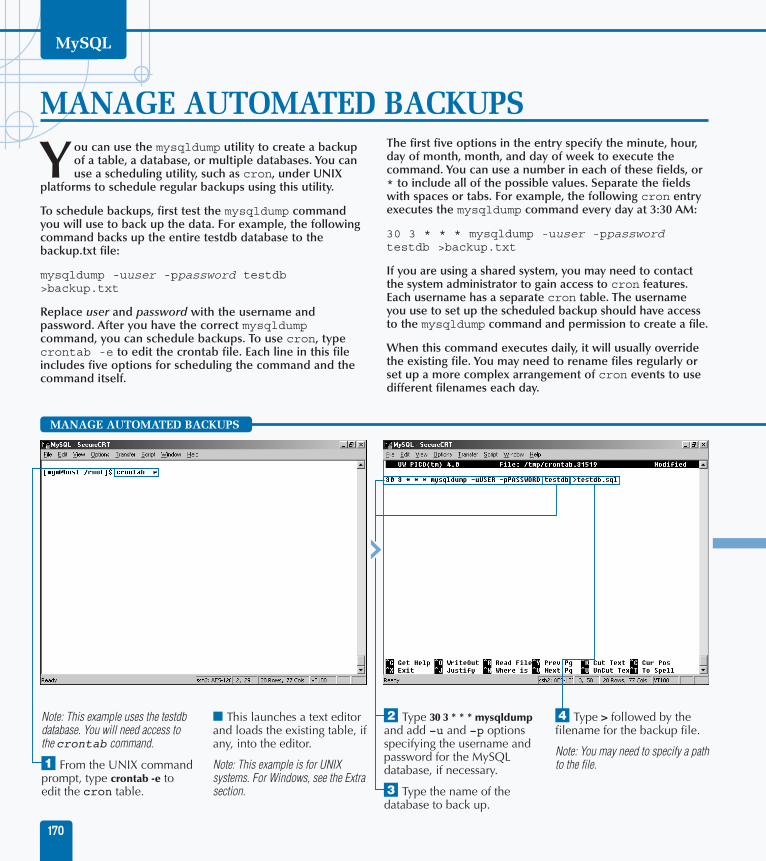
Note: This example uses the testdb database. You will need access to the crontab command.
⁄ From the UNIX command prompt, type crontab -e to edit the cron table.
■ This launches a text editor and loads the existing table, if any, into the editor.
Note: This example is for UNIX systems. For Windows, see the Extra section.
¤ Type 30 3 * * * mysqldump and add -u and -p options specifying the username and password for the MySQL database, if necessary.
‹ Type the name of the database to back up.
› Type > followed by the filename for the backup file.
Note: You may need to specify a path to the file.
You can use the mysqldump utility to create a backupof a table, a database, or multiple databases. You canuse a scheduling utility, such as cron, under UNIX
platforms to schedule regular backups using this utility.
To schedule backups, first test the mysqldump commandyou will use to back up the data. For example, the followingcommand backs up the entire testdb database to thebackup.txt file:
mysqldump -uuser -ppassword testdb>backup.txt
Replace user and password with the username andpassword. After you have the correct mysqldumpcommand, you can schedule backups. To use cron, typecrontab -e to edit the crontab file. Each line in this fileincludes five options for scheduling the command and thecommand itself.
The first five options in the entry specify the minute, hour,day of month, month, and day of week to execute thecommand. You can use a number in each of these fields, or* to include all of the possible values. Separate the fieldswith spaces or tabs. For example, the following cron entryexecutes the mysqldump command every day at 3:30 AM:
30 3 * * * mysqldump -uuser -ppasswordtestdb >backup.txt
If you are using a shared system, you may need to contactthe system administrator to gain access to cron features.Each username has a separate cron table. The usernameyou use to set up the scheduled backup should have accessto the mysqldump command and permission to create a file.
When this command executes daily, it will usually overridethe existing file. You may need to rename files regularly orset up a more complex arrangement of cron events to usedifferent filenames each day.
MANAGE AUTOMATED BACKUPS
MySQL
170
MANAGE AUTOMATED BACKUPS
516922 Ch08.F 9/26/02 11:37 AM Page 170

ˇ Press Enter to complete the cron table entry.
Á Press Ctrl-X and then Y to save the file and exit the editor.
Note: These keystrokes are for pico, an editor available on most systems. Use the correct keystrokes for your particular editor.
‡ Type crontab -l and press Enter.
■ This displays the cron table. Verify that your new entry is included.
IMPORT AND EXPORT DATA 8
You can also use mysqldump to make backups on a Windows-basedMySQL server. Under Windows, the utility is mysqldump.exe in thec:\mysql\bin directory. Its options are the same as the UNIX version,and the Windows command prompt also supports the > operator toredirect the output of a command to a file.
To automate backups, you can use the at command from the commandline under Windows NT, Windows 2000, or Windows XP. Type at /? atthe command line to display a list of options for this program.
You can also use the Task Scheduler included with most versions ofWindows to schedule a backup. To use Task Scheduler, select ScheduledTasks from the Control Panel. Double-click the Add Scheduled Taskentry to add a new task. A wizard prompts you for information aboutthe program that should be run and the schedule it should follow.
As an alternative, you can use any standard Windows backup programto back up the MySQL data to tape or to a disk archive. The data isstored in the c:\mysql\data directory. Each database has a subdirectoryunder data where its data is stored. One backup utility, ntbackup.exe,is included with Windows NT and Windows 2000.
171
516922 Ch08.F 9/26/02 11:37 AM Page 171

Note: This example uses the address table in the testdb database.
⁄ From the command prompt, type mysqldump.
■ If necessary, type -uuser –ppassword, replacing user and password with the correct options for your server.
Note: In Windows, you may need to specify the full path, for example, c:\mysql\bin\mysqldump.
¤ Type -d testdb address >address.txt and press Enter.
■ The structure of the table is saved to the file you specified.
‹ Type cat address.txt and press Enter.
■ This displays the contents of the file you have created.
Note: Under Windows systems, use the command more instead of cat.
172
BACK UP TABLE STRUCTURE
The mysqldump utility includes an option, -d or --no-create-db, that dumps the structure ofthe table but not the data. You can use this option
to create an empty table with the same structure as theexisting table. This is useful if you need to store similardata in a different table. You can also use the resultingSQL statements as a starting point to create a differenttable.
For example, the following mysqldump command dumpsonly the structure of the address table in the testdbdatabase to the table.txt file:
mysqldump -uuser -ppassword -d testdbaddress >address.txt
After you have dumped the structure of the table to a file,you can edit the file in a text editor to change the name ofthe table and any other options within the CREATE TABLE
statements. You can then import the file using the mysqlcommand. For example, the following command imports thetable structure saved to address.txt in the testdb database:
mysql -uuser -ppassword testdb <address.txt
You can also use the source command within the MySQLmonitor to import the saved table structure. If you attemptto import the file without changing the name of the tablefirst, MySQL will display an error message because the tablealready exists.
Conversely, you can use the -t option with mysqldump todump the data from the table, but not its structure — theresulting file will include the INSERT statements for thedata of the table, but not the CREATE TABLE statement.This option is useful if you want to merge the data in thetable into a different table rather than creating a new table.
BACK UP TABLE STRUCTURE
MySQL
516922 Ch08.F 9/26/02 11:37 AM Page 172

Note: This example uses the address table in the testdb database.
⁄ From the MySQL monitor, type USE testdb; and press Enter.
¤ Type DESCRIBE address; and press Enter.
■ The structure of the table is displayed.
‹ Type CREATE TABLE address2 ( and press Enter.
› Type name VARCHAR(100), address VARCHAR(120), city VARCHAR(50), and press Enter.
ˇ Type state CHAR(2), updatetime TIMESTAMP ); and press Enter.
■ The new table is created.
Á Type INSERT INTO address2 SELECT * FROM address; and press Enter.
■ The data is now copied to the second table.
173
If you need to copy a table's structure or data to adifferent table, you can use several different methods.One simple way to copy a table is to first create the
new table with the same structure, and then use an INSERTquery with the SELECT option to copy the data from onetable to the other.
For example, to copy the address table, you would first typeDESCRIBE address; to view the structure of the table.Next, use a CREATE TABLE query using the same columntypes and other information to create the new table. Afterthe table is created, you can use a single INSERT query tocopy all of the rows of the table to the new table. Thefollowing query copies all of the data in the address tableto the address2 table:
INSERT INTO address2 SELECT * FROM address;
This form of the INSERT command uses a standard SELECTstatement to select the data to copy. You can optionallyspecify a list of columns to copy, and include a WHERE clauseto select only certain rows to be copied into the new table.
An alternate method of copying the table may be easier forcomplex tables. Use mysqldump -d to create a backup ofthe table's structure, as described in the previous section.Next, edit the resulting file and change the table name in theCREATE TABLE command to the name of the new table.Use mysql to read the file and create the new table, andthen use an INSERT query like the above to copy the data.
CREATE A COPY OF A TABLE
CREATE A COPY OF A TABLE
IMPORT AND EXPORT DATA 8
516922 Ch08.F 9/26/02 11:37 AM Page 173

After you have installed a MySQL server, it runscontinuously and requires little intervention.However, you may need to start and stop the server
and perform other administrative tasks from time to time.MySQL includes a variety of tools for this purpose.
MYSQL ADMINISTRATION TOOLSMySQL
174
The mysqladmin Utility
The mysqladmin utility runs from a client machine andis installed with the MySQL client software. This utilitysupports a number of different commands for managingthe MySQL server. To use this utility, type mysqladminfollowed by the command name. You may also need tospecify the -u and -p options with a valid usernameand password. The table below shows some of the mostuseful mysqladmin commands.
COMMAND DESCRIPTION
create Create a database
drop Drop a database
ping Check whether the server is running
status Display basic status information
extended-status Display a detailed status report
processlist Show a list of the current MySQLserver processes
kill Stop one or more server processes
variables List MySQL variables and theirvalues
version Display the MySQL server versionnumber
shutdown Shut down the MySQL server
password Change the password for thecurrent MySQL user
Examples:mysqladmin create newdatabase
mysqladmin ping
mysqladmin shutdown
Start and Stop MySQL (UNIX)
On a UNIX system, you typically start the MySQL serverwith the mysqld or safe_mysqld programs. mysqldis the server program itself, and safe_mysqld is awrapper that determines the correct settings and startsmysqld. These programs are stored in the MySQLbinaries directory, typically /usr/local/mysql/bin.
To stop the MySQL server, you can use themysqladmin shutdown command. This sends a signalto the server to shut it down.
Start and Stop MySQL (Windows)
On a Windows system, you can also use mysqld tostart the server and mysqladmin shutdown to shut itdown. These commands are typically located in theC:\mysql\bin directory and can be run from thecommand prompt.
On Windows NT, 2000, and XP systems, you can alsouse the operating system's service managementfeatures to start and stop the server. MySQL is listed onthe Services control panel, and you can start or stop itor configure it to start automatically when the systemstarts. You can also use the NET START and NET STOPcommands to start and stop the server.
Example:NET START mysql
NET STOP mysql
BASIC MYSQL ADMINISTRATION
All installations of the MySQL server and client includesome basic command-line administration tools. Themysqladmin utility handles many of the administrationtasks.
516922 Ch09.F 9/26/02 12:00 PM Page 174

MANAGE THE MYSQL SERVER 9
Environment
The Environment tab displays the host name, username, operating system, IP address, and the amount ofRAM available on the server machine. If you click theExtended Server Status button, detailed statistics for theserver are displayed. These are the same values shownin the mysqladmin status command.
Start Check
WinMySQLadmin performs a basic check when it startsto determine whether the server is running correctly.The Start Check tab displays the results of this checkand any error messages that were reported.
Server
The Server tab displays a list of MySQL server statusvariables and their values. These provide a detailedsnapshot of the server's current performance. Thesevalues are the same as those listed by the mysqladminextended-status command and are described inChapter 11.
my.ini Setup
The Windows version of MySQL uses a file called my.inito determine various settings for the server. The my.iniSetup tab in WinMySQLadmin displays the currentcontents of the my.ini file and allows you to edit theoptions and save any changes you have made. Be surenot to change values in this file unless you are surewhat they will affect. The settings available in this fileare described in Chapter 11.
Err File
The MySQL server maintains a log file that includes anyerrors encountered by the server as well as basic statusmessages created when the server starts up or shutsdown. The Err File tab displays the contents of this log file.
Variables
The Variables tab displays a list of MySQL variables andtheir values. These are the same settings available in themy.ini file. Rather than show the contents of this file,this tab displays the server's current variable settings.This is the same information shown in the mysqladminvariables command.
Process
The Process tab displays a list of currently runningthreads, or processes, on the MySQL server. Each entryincludes a process ID number, the username and host,the database in use, the command the thread isrunning, the thread's current status, and the amount oftime it has spent processing. This list is the sameproduced by the mysqladmin processlistcommand.
You can right-click a process and select Kill to stop theprocess. This feature is also available from themysqladmin kill command.
Databases
The Databases tab displays a current list of databaseson the server. If you select a database from the list, thelist of tables in the database is displayed. If you select atable from the list, detailed information about itsavailable columns and indexes is displayed. The right-click menu allows you to create and drop databases.
Report
The Report tab creates and displays a detailed report ofthe MySQL server's configuration and status, includingthe information in several of the prior tabs. You canprint the report or save it to a file.
THE WINMYSQLADMIN UTILITY
175
The Windows installation of MySQL includes a utilitycalled WinMySQLadmin. This utility allows you to displayinformation about the server and perform many of thesame functions as the mysqladmin utility. Torun WinMySQLadmin, start the c:\mysql\bin\winmysqladmin.exe program.
When you start WinMySQLadmin, it briefly displays itswindow and then hides itself. It adds an icon resemblinga traffic light to the system tray. To show theWinMySQLadmin window, right-click the tray icon and
select the Show Me option. The right-click menu alsoincludes an option to start or stop the MySQL server.
Although this utility provides a graphical interfaceto many MySQL settings, you can also use the command-line mysqladmin utility under Windows.
The WinMySQLadmin window is divided into a number oftabbed sections. Select each tab to display the associatedpage. The pages available are described below.
516922 Ch09.F 9/26/02 12:00 PM Page 175

MySQL
⁄ From the command line, type mysqladmin ping and press Enter.
Note: You may need to specify the -u and -p options with the correct username and password values for your server.
■ The message indicates whether the server is responding.
Note: Under Windows, you may need to include the path with the command, for example, c:\mysql\bin\ mysqladmin.exe.
¤ Type mysqladmin status and press Enter.
Note: You may need to specify a username and password.
■ A more detailed status report is displayed.
176
CHECK SERVER STATUS
If you or other users of the system are having troubleaccessing the MySQL server, the first step is todetermine whether the MySQL server is running at
all. One simple way to check this is with the mysqladminutility. This utility includes a variety of different options forworking with the MySQL server and is installed as part ofthe MySQL client package.
To test the server, first try the ping option withinmysqladmin. This option communicates with the serverand displays a simple message indicating whether it isresponding. The following is a simple example:
mysqladmin ping -uuser -ppassword
This command tests the default server on the local host.It displays the message "mysqld is alive" if the serverresponds. If there is no response from the server, it displaysan error message that may help you resolve the problem.
As with other mysql client commands, you can specify the-h (host) option if necessary to refer to a different MySQLserver. For a complete list of mysqladmin options, typemysqladmin with no options.
Sometimes, although the MySQL server is running, it maynot be responding quickly or correctly. You can find out abit more about the server's condition with the mysqladminstatus command. This displays the amount of time theserver has been running, the number of active threads, thenumber of queries since the server started, and otherinformation.
You can use the information displayed by the statusoption, and the more detailed extended-status optionfrom mysqladmin, to determine the server's currentperformance and learn how performance can be improved.See Chapter 10 for details about optimizing the MySQLserver.
CHECK SERVER STATUS
516922 Ch09.F 9/26/02 12:00 PM Page 176

CHECK THE MYSQL SERVER VERSION
⁄ From the command prompt, type mysqladmin version and press Enter.
Note: You may need to specify the -u and -p options with the correct username and password values for your server.
■ The server's version information is displayed.
Note: Under Windows, you may need to specify the path with the command, for example, c:\mysql\bin\ mysqladmin.exe.
¤ Type mysql to start the MySQL monitor.
Note: You may need to specify a username and password.
■ Notice the version information displayed before the prompt.
‹ Type exit and press Enter.
■ This exits the MySQL monitor.
177
The mysqladmin utility also includes an option todisplay version information for the MySQL server. Youcan use this option to determine whether your server
supports certain features or requires an upgrade. To checkthe server version, use the version command withmysqladmin, as shown in this example:
mysqladmin version -uuser -ppassword
This command displays the server version number, theprotocol in use, and the amount of time the server has beenrunning. It also displays information about threads, queries,and other statistics, similar to the output of the statuscommand. The following is an example of how the serverversion information appears. This may vary depending onyour specific system.
Server version 3.23.46Protocol version 10
Connection Localhost via UNIX socketUNIX socket /tmp/mysql.sockUptime: 17 min 24 sec
As with other mysqladmin commands, you must specify acorrect username and password with the -u and -poptions. You can also specify a hostname with the -hoption and a socket file with the -S option, if necessary.
At this writing, the latest version of MySQL 3 is version 3.23.MySQL 4.0 is also available, although it is currently in alphatesting. Visit www.mysql.com to find out information aboutthe current version and to download files for a new versionif necessary.
When you start the MySQL monitor with the mysqlcommand, a brief message is displayed indicating theversion number of the server and the current connection.
MANAGE THE MYSQL SERVER 9
CHECK THE MYSQL SERVER VERSION
516922 Ch09.F 9/26/02 12:00 PM Page 177

⁄ From the UNIX command prompt, type cd followed by the directory where the MySQL server is installed, typically /usr/local/mysql.
¤ Type bin/safe_mysqld & and press Enter.
■ This starts the MySQL server.
‹ Type mysqladmin ping and press Enter.
■ This indicates that the server is now running.
Note: If necessary, add the -u and -p options with the correct username and password.
If the MySQL server is not currently running, you canrestart it. You may also need to stop and restart theserver if you have changed its configuration, or if it is
not responding. On UNIX systems, you can start the MySQLserver using the safe_mysqld command, which starts themysqld server program.
The mysqld and safe_mysqld programs are located inthe bin directory under the MySQL installation directory.On most systems, this directory is /usr/local/mysql/bin or/usr/local/bin. The exact directory depends on how theMySQL server was installed. The following example startsthe MySQL server:
/usr/local/bin/safe_mysqld &
The & character indicates that the program should run inthe background on most systems. After you have started theserver, you can use mysqladmin ping or mysqladminstatus to verify that it is running.
To shut down the MySQL server, use the mysqladminshutdown command. The following command shuts downthe MySQL server on the local host:
mysqladmin shutdown -uuser -ppassword
To use the shutdown command, the username you specifymust have the correct permissions to shut down the server.On a default installation, only the root user can do this. SeeChapter 11 for information on configuring MySQL usersand passwords.
When you use the shutdown command, the server isimmediately shut down. It does not complete any pendingqueries. While the server is down, clients who attempt toconnect to it will receive an error message.
See Chapter 1 for information about setting up the MySQLserver to start automatically when the system boots underUNIX and Windows systems.
START AND STOP THE MYSQL SERVER UNDER UNIX
MySQL
178
START THE MYSQL SERVER
516922 Ch09.F 9/26/02 12:00 PM Page 178

STOP THE MYSQL SERVER
⁄ From the UNIX command prompt, type mysqladmin shutdown and press Enter.
■ This immediately shuts down the MySQL server.
Note: If necessary, add the -u and -p options with the correct username and password.
¤ Type mysqladmin ping and press Enter. Add your username and password if needed.
■ This indicates that the server is no longer running.
Note: If other users require the MySQL server, be sure to restart it after you are finished.
MANAGE THE MYSQL SERVER 9
If you encounter an error when starting the MySQL server, there area number of potential causes. The first item to check is whether theMySQL server is currently running — you cannot run two copies ofthe MySQL server at the same time unless you have customized theport and socket settings. Type mysqladmin ping to check whetherthe server is already running. You can also type ps on a UNIX systemto list running processes and check whether mysqld is included.
If the server fails to start, you may find some useful information aboutthe error that occurred in the MySQL log files. These files are locatedin the MySQL data directory, typically /usr/local/var or /usr/local/mysql/data on UNIX systems. The files are hostname.log andhostname.err, with your server host name in place of hostname.
If an error message is displayed indicating that the TCP/IP port orsocket is already in use, either MySQL is already running, or someother service is using the port you have selected for MySQL.
You need to have the correct permissions to start the MySQL server. Ifit did not start correctly, log in as root and attempt to start the MySQLserver again.
179
516922 Ch09.F 9/26/02 12:00 PM Page 179

⁄ From the command prompt, type NET START mysql and press Enter.
■ This starts the MySQL server.
Note: Under Windows 95, 98, and Me, type the path to mysqld.exe instead.
¤ Type NET STOP mysql and press Enter.
■ This shuts down the MySQL server.
Note: Under Windows 95, 98, and Me, type mysqladmin shutdown instead.
If you are running the MySQL server on a Windowssystem, you can start and stop the server in a number ofdifferent ways. Under Windows 95, 98, and Me, you can
use the mysqld command from the command prompt tostart the server. This is typically located in the C:\mysql\bindirectory. The following command starts the MySQL serveron a typical system:
C:\mysql\bin\mysqld
You can shut down the MySQL server from the commandprompt using the mysqladmin utility, located at C:\mysql\bin\mysqladmin.exe. The following exampleshuts down the MySQL server on the local machine:
C:\mysql\bin\mysqladmin shutdown –u root –ppassword
On Windows NT, 2000, and XP systems, MySQL is usuallyset up to run as a service, and you can use the standardWindows methods to control it. The first of these is theServices control panel, located under Administrative Tools
in Windows 2000. Find MySQL in the list of services and usethe toolbar buttons to start or stop the service. You can alsouse the Services control panel to set up MySQL to runautomatically when the system starts.
An alternative way to control the MySQL service onWindows NT, 2000, and XP is to use the NET commandfrom the command prompt. To start the MySQL server, usethe NET START command. The following command startsthe server:
NET START mysql
To shut down the MySQL server, use the NET STOPcommand at the command prompt. The followingcommand shuts down the MySQL server:
NET STOP mysql
You can also use the mysqladmin utility to shut downMySQL when it is run as a service. Choose the mostconvenient method for your particular system.
START AND STOP THE MYSQLSERVER UNDER WINDOWS
MySQL
180
START AND STOP MYSQL FROM THE COMMAND PROMPT
516922 Ch09.F 9/26/02 12:00 PM Page 180

START AND STOP MYSQL FROM THE SERVICES CONTROL PANEL
Note: These instructions are for Windows NT, 2000, and XP.
⁄ Start the Services control panel from the Control Panel or Administrative Tools window.
■ The display indicates the MySQL server's current status.
¤ Double-click the MySQL entry.
■ The MySql Properties dialog box is displayed.
‹ To start or stop the MySQL server, use the Start and Stop buttons.
› You can set the Startup type option to Automatic, Manual, or Disabled. Use Automatic to start MySQL when the computer starts.
MySql Started Manual LocalSystem
MANAGE THE MYSQL SERVER 9
If you are unable to start the MySQL server under Windows, be sure yoursystem has the necessary components installed. In particular, MySQLrequires the TCP/IP protocol, which you can install using the Networkcontrol panel. MySQL also requires that your system support theWinsock 2 standard. This is included in Windows 98 and later; you mayneed to install an update from Microsoft for Windows 95 systems.
On Windows NT, 2000, and XP systems, most users do not havepermission to start and stop services by default. If you are unable tostart MySQL, log on as Administrator and try again. Although Windowsuses the Administrator account, the default administrative user underMySQL is root, as on UNIX systems.
You cannot shut down the MySQL server using the Task Manager. If youattempt to shut down the MySQL server in this way, it may lock up yoursystem or fail to shut down. Use the mysqladmin utility or one of theservice control methods described in this section instead.
If the MySQL server does not start correctly, check the error log forinformation. This log is stored at c:\mysql\data using the filenamemysql.err by default. The WinMySQLadmin utility, described in thesection "Using WinMySQLadmin," later in this chapter, also includesan option to view the log file.
181
516922 Ch09.F 9/26/02 12:00 PM Page 181

VIEW RUNNING PROCESSES
Note: This example assumes that the MySQL server is currently running on the local machine.
⁄ From the command prompt, type mysqladmin processlist and press Enter.
Note: You may need to add -u and -p options to specify a valid username and password.
■ The list of processes is displayed.
You can use the mysqladmin utility with theprocesslist command to display a list of theprocesses currently running on the MySQL server.
This list includes all of the queries currently running forclients as well as commands entered from the MySQLmonitor. The following is an example of the processlistcommand:
mysqladmin processlist -uuser -ppassword
For each process currently running, this command lists itsprocess ID number, the MySQL user ID that started it, thehost the client connected from, the database used by thequery, the command issued to the server, the amount oftime the query has been in progress, the current status ofthe process, and the query or command that started theprocess.
Occasionally, a database query will take an excessiveamount of time, slowing down the server, or an error will
cause a process to lock up and stop responding. When thishappens, you can use mysqladmin processlist todisplay the list of processes and find the problematic one.You can then stop the process.
To stop a process, use the kill command with mysqladmin.To use this command, specify one or more process IDnumbers. They will be immediately stopped, notcompleting their queries. The MySQL server will continueto run and process other requests. For example, thefollowing command kills a process with the ID number3037:
mysqladmin kill 3037
If you stop a process that is currently writing data to a table,it may leave partial or corrupt data in the table. Because ofthis, you should use the kill command only when you arecertain the process will not complete on its own.
VIEW AND MANAGE RUNNING PROCESSES
MySQL
182
VIEW AND MANAGE RUNNING PROCESSES
516922 Ch09.F 9/26/02 12:00 PM Page 182

KILL A PROCESS
⁄ From the command prompt, type mysqladmin processlist and press Enter.
■ The list of processes is displayed.
¤ Type mysqladmin kill followed by the number of the process to kill.
■ The process is immediately stopped.
‹ Type mysqladmin processlist and press Enter.
■ The list of processes is displayed again. Note that the killed process is no longer listed.
MANAGE THE MYSQL SERVER 9
The MySQL server can have a number of processes, also knownas threads, running concurrently. The number of threads that canrun at the same time depends on the operating system and on theconfiguration of the MySQL server. Chapter 10 explains how you canconfigure the server for a maximum number of concurrent threads.
The status of threads in the process list may indicate Query if a queryis in process or Sleep if the thread is currently inactive. The serverkeeps a number of threads in an inactive state so that it can use themfor queries rather than starting a new thread each time.
You can use the ps command in most UNIX systems to display a list ofprocesses currently running on the server and their ID numbers. Whilethis will show all of the MySQL threads currently in use, the processnumbers used by MySQL are not the same as the system's IDnumbers.
You can also kill MySQL threads using the operating system's commands.However, using the mysqladmin utility to kill threads has less chanceof corrupting data, and is easier because you can use the processlistcommand to determine the correct thread to kill.
183
516922 Ch09.F 9/26/02 12:01 PM Page 183

Note: Type c:\mysql\bin\winmysqladmin from the command prompt to start the utility. Right-click the tray icon and select Show Me to display the utility.
⁄ From WinMySQLadmin's Environment tab, click the Extended Server Status button.
■ This displays a detailed set of statistics for the MySQL server.
¤ Click the my.ini Setup tab at the top of the WinMySQLadmin dialog box.
■ This displays the contents of the initialization file, which you can edit if needed.
C:/mysql
The Windows version of the MySQL server includesthe WinMySQLadmin utility. This is a graphical utilitythat allows you to manage settings and display
statistics for the MySQL server from within Windows. Torun this tool, start the winmysqladmin.exe program inthe C:\mysql\bin directory.
When WinMySQLadmin is first run, it shows briefly andthen hides itself. It remains resident, and an icon appears inthe system tray. Right-click the icon and select the Show Meoption to view the utility.
The WinMySQLadmin display is divided into a numberof tabbed sections. The first, Environment, includesinformation about the computer MySQL is running onand a number of statistics for the server. These are the samevalues available from the mysqladmin status command.
The Start Check tab runs some tests to verify that the serveris running correctly. The Server tab displays a list of statisticsfor the MySQL server. The my.ini Setup tab allows you toedit the my.ini file, which stores default settings for theserver. The Err File tab displays the server error log. TheVariables tab displays a list of MySQL variables and theircurrent settings; these are explained in detail in Chapter 11.
The Process tab in WinMySQLadmin shows a list ofprocesses and their ID numbers, similar to the output of themysqladmin processlist command. You can right-clickan entry in the list and select Kill Process to stop a process.
The Databases tab allows you to view information aboutthe databases stored on the server, the tables within adatabase, and the columns of each table. This is similar tothe SHOW DATABASES and SHOW TABLES commands fromthe MySQL monitor. The right-click menu includes optionsto create or drop databases and to refresh the current list.
USING WINMYSQLADMIN
MySQL
184
USING WINMYSQLADMIN
516922 Ch09.F 9/26/02 12:01 PM Page 184

‹ Click the Process tab at the top of the dialog box.
■ This displays a current process list for the server.
› Click the Databases tab at the top of the dialog box.
■ The list of databases on the server is displayed.
ˇ Select a database and a table by clicking their names.
■ The columns and index information for the table are displayed.
address
address
name
MANAGE THE MYSQL SERVER 9The final tab of the WinMySQLadmin utility, Report, allowsyou to display a detailed report about the MySQL server.After you select the Report tab, click the Create the Reportbutton to create the report.
The report includes information about the current installationof MySQL, how it was compiled, and the system it is runningon. It also lists the contents of the my.ini file, the currentstatus of the server as displayed in the Server tab, the list ofvariables as shown in the Variables tab, and the error log aslisted in the Err File tab.
The report is displayed in a text window within theWinMySQLadmin interface. You can use the Print button toprint a copy of the report or use the Save As button to save itas a text file. This tab also includes Cut, Copy, Paste, Delete,and Select All buttons that you can use to edit the report orcopy it to another program.
All of the information in the WinMySQLadmin utility is alsoavailable from the command line using the MySQL monitorand the mysqladmin utility. You can use whichever tools youare most comfortable with to manage the server.
185
516922 Ch09.F 9/26/02 12:01 PM Page 185

Note: See Chapter 1 for information on installing and starting MySQLGUI.
⁄ From the MySQLGUI menu, click Commands, Administration, and then Administrator Panel.
■ The administration panel is displayed.
¤ Click the Show variables button to display the variable list.
The MySQLGUI utility provides another interface tothe MySQL server, and includes a variety of usefuladministration functions. While most of these are also
available from command-line utilities, MySQLGUI provides auser-friendly graphic interface. This utility provides some ofthe same features as WinMySQLadmin, described in theprevious section, but is also available for non-Windowsoperating systems. See Chapter 1 for information onobtaining and installing MySQLGUI.
To manage the MySQL server using MySQLGUI, selectCommands, Tables, and then Administration from themenu. The Administrator Panel option provides a centralmethod of accessing various management functions. Someof these functions are also available directly from theAdministration menu.
The Administrator Panel displays a summary of the server'sstatus, similar to the output of the mysqladmin statuscommand, and displays the current time from the MySQLserver. The panel also includes buttons for administrative
functions. These include Ping to check on the server,Refresh to refresh the status display, and Shutdown toshut down the server.
The Show variables button displays MySQL's currentvariable settings. The Display status button displays acomplete status report, similar to the output of themysqladmin extended-status command. The Showprocesses button displays a list of current MySQL threads,similar to the mysqladmin processlist command.
The Flush tables button closes all open tables. The Flushhosts button clears the host cache. The Flush logs buttoncloses and re-opens the log files. See Chapter 10 for moreinformation about log files. The Flush status commandclears the status variables.
In addition to these options, MySQLGUIs administrationpanel includes options to create and drop databases, andto change passwords and grant privileges to users. SeeChapter 11 for more information about securing MySQLby setting up users and passwords.
MANAGE MYSQL WITH MYSQLGUI
MySQL
186
MANAGE MYSQL WITH MYSQLGUI
516922 Ch09.F 9/26/02 12:01 PM Page 186

■ The variable list is displayed.
‹ Click the Exit button to return to the administration panel.
› Click the Display status button to display detailed server status.
■ The status information is displayed in a new window.
ˇ Click Exit to return to the administration panel.
MANAGE THE MYSQL SERVER 9You may have noticed that there is often more than one way to achieve thesame result. For example, if you want to display a list of MySQL variables andtheir current values, you can use several commands: show variables fromthe MySQL monitor, mysqladmin variables from the command prompt,the Variables tab in WinMySQLadmin, or the Show variables button inMySQLGUI.
Each of these methods of MySQL administration has its advantages anddisadvantages. The MySQL monitor and the mysqladmin utility are availableon all operating systems and provide a consistent interface, while theMySQLGUI and WinMySQLadmin utilities provide a graphical interface witheasy access to common options. You can use whichever commands areavailable to you, and whichever you find the most comfortable to work with.
In addition to the administrative features discussed here, you can useMySQLGUI to send queries to the MySQL server and display the results. Unlikethe command-line MySQL monitor, MySQLGUI includes options to save queryresults to a file after you view them, and saves a list of the most recent queriesfor easy access.
While MySQLGUI looks simple, keep in mind that it is every bit as powerful asthe command-line utilities. You can use it to delete an entire database or shutdown the MySQL server. Be sure to select commands carefully.
187
516922 Ch09.F 9/26/02 12:01 PM Page 187

While MySQL will work remarkably well using thedefault settings, you can change a variety offactors to improve performance. Some of the
most important factors that affect MySQL serverperformance include the speed of the server hardware, thedesign of tables, and the performance of particular queries.
OPTIMIZE MYSQL
MySQL
Disk Access
Disk access is usually the largest bottleneck affecting aMySQL server. Because tables are stored on disk,virtually every MySQL operation involves disk access.MySQL will benefit from a fast disk drive. Additionally,you may want to consider using a separate drive forMySQL data so that other server functions do not slowdown MySQL.
Processor Speed
While not as important as disk speed, the processor, orCPU, of the MySQL server comes into play whenworking with data that has been read from disk: A fasterprocessor will handle MySQL queries faster. It is alsobeneficial to analyze the other applications on theserver. If a Web server or other software is using theCPU intensively, MySQL would benefit from a fasterprocessor or a dedicated MySQL server machine.
Memory
A busy MySQL server requires a large amount ofmemory. This is used to store data temporarily while itis sent to clients, and for temporary tables. Adding
memory will often improve performance, especially ifthe disk drives and CPU are already reasonably fast.
OPTIMIZE THE MYSQL SERVER
Using Fixed-Length Rows
When a table is frequently changed, MySQL performsbetter using fixed-length rows. To use fixed-length rowson a table, avoid using variable-length column typessuch as VARCHAR, TEXT, and BLOB. The disadvantage offixed-length rows is that all rows take the same amountof space. Variable-length rows will make more efficientuse of disk space if there is a large amount of variationin the sizes of data items.
Reduce Data Size
The less data MySQL has to work with, the faster it willbe. Use the smallest column sizes possible for your dataand eliminate unnecessary columns to improve theMySQL server's performance working with a table.
OPTIMIZE TABLE DESIGN
188
One aspect of MySQL that is relatively easy to optimize isthe speed of the machine running the MySQL server.Upgrading disks, memory, or processor, or switching to afaster machine can dramatically improve performance.
The design of a table can also affect performance. Byconsidering performance when you design and create atable under MySQL, you can ensure that queries on thetable can be quickly handled by the server.
516922 Ch10.F 9/26/02 11:38 AM Page 188

OPTIMIZE AND TROUBLESHOOT MYSQL 10
189
Using EXPLAIN
You can use the EXPLAIN command with a SELECTquery to display information about how MySQL willhandle the query. When you use EXPLAIN, the MySQLserver does not actually process the SELECT query.Instead, it displays a chart of information about the query.
The information displayed by EXPLAIN includes thetables the query will use, the keys it can use to quicklyfind records, the number of rows the query will return,and any extra explanation the server can offer about thequery.
The Extra column will indicate whether a file sort isnecessary to process an ORDER BY clause. It will alsoindicate whether a temporary table will be needed tohandle a GROUP BY clause. If either of these is present,it indicates a major bottleneck for the query. You maybe able to eliminate the problem by adding an index orchanging the query.
Example:EXPLAIN SELECT * FROM quotes;
Improve Queries
After you have isolated a slow query, you can trychanging its syntax. Eliminate any unnecessary ORDERBY clauses, as they can slow down the query. AddWHERE clauses to target specific records whereverpossible, and use the LIMIT clause to limit the numberof records returned. See Chapter 6 for details about thesyntax of these SELECT query clauses.
Add Indexes
If you frequently search for values in a particularcolumn, you may be able to improve performance byadding an index on that column. You can use the ALTERTABLE command to add an index at any time. This isexplained further in "Improve Performance withIndexes," later in this chapter.
Lock Tables
MySQL normally handles table locking automatically. Youmay be able to improve the performance of a complexquery or series of queries by locking the table first. Youcan use the LOCK TABLES and UNLOCK TABLEScommands to control table locking. This is described in"Manage Table Locking," later in this chapter.
OPTIMIZE SLOW QUERIES
Multiple Tables and Relationships
Performance problems multiply when you are workingwith multiple tables. Because JOIN queries that retrievedata from multiple tables tend to be slow, do not dividedata into more tables than necessary.
When you do use multiple tables that have arelationship, be sure the columns that form therelationship are the same type, length, and preferablyhave the same name. This will ensure that the MySQLserver can perform a JOIN query efficiently.
Sort Table Data
You can use the ORDER BY keywords with an ALTERTABLE command to sort the data in the table. This canimprove performance when the contents of the tableare often read in the same order, and are not changedfrequently.
Example:ALTER TABLE address ORDER BY name;
OPTIMIZE TABLE DESIGN (CONTINUED)
Often, a particular query that is used frequently can slowdown the MySQL server. By optimizing a query's syntax,you can often improve its performance.
The MySQL server keeps track of the number of slowqueries, or queries that took more than a certain lengthof time, since the server started. You can display thisvalue using the SHOW STATUS command in the MySQL
monitor or the mysqladmin status command at thecommand prompt.
The MySQL server can optionally maintain a slow querylog, which keeps a record of each slow query. This isparticularly useful for determining which queries areslowing down the server. This log file is described indetail in "View MySQL Log Files," later in this chapter.
516922 Ch10.F 9/26/02 11:38 AM Page 189

⁄ From the command prompt, type cd /usr/local/ mysql/data/testdb and press Enter.
■ This switches to the directory where the testdb database is stored.
Note: On Windows systems, the directory is usually c:\mysql\data\testdb.
¤ Type myisamchk quotes and press Enter.
■ This checks the table for errors and displays a report.
Note: To check a different table, replace quotes with the name of the table.
MySQL includes a utility called myisamchk thatallows you to check tables for errors and repair anyerrors that occur. You can use this utility as a
regular check to watch for errors, or when you suspect aproblem with a table. This utility is for the default MyISAMtable type. An older utility, isamchk, works for ISAM tables.
To check a table for errors, start in the directory where thedatabase files are stored, typically /usr/local/mysql/data/database_name. Type myisamchk followed by one or moretable names. The check will be performed immediately, andmay take several minutes on a large table. No clients canaccess the table while myisamchk is running, andmyisamchk only works if no clients have a lock on thetable. The following example checks the quotes table:
cd /usr/local/mysql/data/testdbmyisamchk quotes
The myisamchk utility displays a series of status messagesduring the table check. If any of these indicate an errorin the table, you can attempt to repair the table. Use themyisamchk -r option to attempt to repair a corrupt table.The following example repairs the quotes table:
myisamchk -r quotes
If an error message is displayed, and myisamchk is unableto repair the table using this option, you can try the -ooption. This performs a slower recovery process that maywork when the standard process fails.
Unlike other MySQL utilities, the myisamchk utility doesnot require a MySQL username and password. It worksdirectly with database files. For this reason, in the defaultinstallation, your UNIX username must have root access torun myisamchk. On Windows systems, this utility isavailable as c:\mysql\bin\myisamchk.exe.
CHECK A TABLE FOR ERRORS
MySQL
190
CHECK A TABLE FOR ERRORS
516922 Ch10.F 9/26/02 11:38 AM Page 190

‹ Type myisamchk -m quotes and press Enter.
■ This performs a more detailed (medium) check on the table.
› Type myisamchk -r quotes and press Enter.
■ This attempts to recover the table data.
OPTIMIZE AND TROUBLESHOOT MYSQL 10The myisamchk utility includes a number of additional options to controlthe check and repair process. Type myisamchk --help for a complete listof options. The following table describes some of the most useful options:
OPTION DESCRIPTION
-c Check (default if no options are specified)
-e Extended check — slow but more thorough
-m Medium check — faster than extended
-F Fast check — only checks improperly closed tables
-C Checks only tables changed since the last check
-i Displays information about the table while checking
-f Automatically repairs the table if any errors are detected
-T Does not mark table as checked
-r Recover — attempts to repair table and recover data
-o Safe recover — uses slower recovery method
-q Quick recover — checks index files only
-v Verbose — displays detailed information
-V Displays the myisamchk version number
-w Wait — waits until no clients are locking table before checking
191
516922 Ch10.F 9/26/02 11:38 AM Page 191

Note: This example uses the quotes table in the testdb database, but it would work with any table.
⁄ From the MySQL monitor, type USE testdb; and press Enter.
■ The database is now selected.
¤ Type OPTIMIZE TABLE quotes; and press Enter.
■ The table is scanned and optimized, and a report is displayed.
When you delete rows from a MySQL table, theyare not actually deleted. Instead, MySQL marksthe rows as deleted and re-uses the space later
when rows are inserted. If you have deleted a large numberof rows from a table, you should optimize the table to reclaimthe space. Optimizing is also necessary when a table withvariable-length rows has been changed many times.
To optimize a table, use the OPTIMIZE TABLE commandwithin the MySQL monitor. To use this command, specifythe table name. The following example optimizes thequotes table:
OPTIMIZE TABLE quotes;
Along with reclaiming space from deleted rows, theOPTIMIZE TABLE command also repairs minor errorsin table rows, sorts the index files, and updates the table'sstatistics. You can use this command as often as you desirewithout damaging a table. However, the table is locked andcannot be used by clients during the optimization process.
From time to time, you may run into a situation where aMySQL table becomes corrupted. This usually happenswhen a power outage or hardware failure causes the serverto go down unexpectedly while a table is being updated. Inmost cases, you can easily repair the table. You can use themyisamchk utility discussed earlier or the REPAIR TABLEcommand to repair a damaged table.
To use REPAIR TABLE, specify the table name. You canalso specify the optional keyword QUICK for a quick repairor EXTENDED for an extended repair. If the regular repairdoes not work, the extended option may. The followingcommand repairs the quotes table:
REPAIR TABLE quotes;
OPTIMIZE AND REPAIR TABLES
MySQL
192
OPTIMIZE AND REPAIR TABLES
516922 Ch10.F 9/26/02 11:38 AM Page 192

‹ Type REPAIR TABLE quotes; and press Enter.
■ This attempts to repair any errors in the table.
› Type SELECT * FROM quotes; and press Enter.
■ This displays the contents of the table. Verify that the table rows are undamaged.
OPTIMIZE AND TROUBLESHOOT MYSQL 10
Along with OPTIMIZE TABLE and REPAIR TABLE, MySQL includes a CHECKTABLE command. This command is equivalent to the myisamchk utility, but runsfrom the MySQL monitor or another client. To use CHECK TABLE, specify one ormore table names. The following example checks the quotes table for errors:
Example:CHECK TABLE quotes;
You can also use several optional keywords with CHECK TABLE after the tablename. These are described in the table below.
KEYWORD DESCRIPTION
QUICK Quick check — does not scan all table rows
FAST Fast check — only checks improperly closed tables
CHANGED Checks only tables that have changed since the last check
MEDIUM Medium check — checks each table row (default)
EXTENDED Extended check — comprehensive but slow on large tables
193
516922 Ch10.F 9/26/02 11:38 AM Page 193

The MySQL server is a complex system, and includes anumber of parameters you can use to tune theserver's performance. You can modify these values by
editing configuration files or with command-line options.
Each configuration file is divided into sections for differentMySQL components. For example, the line [mysqld]begins the section for the server, and [client] begins thesection for clients. Within each section, each line can includean option from the program's command-line options or theset-variable command to set a system variable.
MYSQL CONFIGURATION OPTIONS
MySQL
194
The Global Configuration File
The global configuration file is read first. On UNIXsystems, this file is /etc/my.cnf. On Windows systems,the two global files are supported: my.ini in theWindows system directory, and my.cnf in the rootdirectory, typically C:\.
The User Configuration File
On UNIX systems, each user can have their ownconfiguration file, .my.cnf, in their home directory. Youcan use this file to set values for each user, typically forMySQL client utilities.
The Server Configuration File
The server configuration file affects a particular copy ofthe MySQL server software, and is only needed whenmultiple servers are installed on the same machine. Thisfile also has the filename my.cnf. On UNIX systems, it isstored in the data directory under the MySQLinstallation, typically /usr/local/mysql/data. OnWindows systems, the file is usually underC:\mysql\data\. The values you specify in the serverconfiguration file override the values in the global file.
CONFIGURATION FILES
The [client] section in the configuration file includesoptions that affect all of the MySQL client programs,including the MySQL monitor, mysql, the mysqladminutility, myisamchk, and other client tools. This sectionis particularly useful in a .my.cnf file in a user's homedirectory. For example, the following file excerpt setsthe password option for MySQL clients. If you includethis in the .my.cnf file in your home directory, you donot need to specify a password when using MySQLclient programs.
[client]password=mypassword
The table below lists several options that may also beuseful in the [client] section for a particular user.
VALUE DESCRIPTION
host=name Specifies a MySQL server to connect to
user=name Username for the MySQL server,if different from UNIX username
password=value Password for the MySQL server
database=value Default database to select
CLIENT OPTIONS
MySQL supports a variety of configuration files. Each cancontain the same commands and settings, but the orderin which they are read determines which files canoverride others.
516922 Ch10.F 9/26/02 11:38 AM Page 194

OPTIMIZE AND TROUBLESHOOT MYSQL 10
VARIABLE DESCRIPTION
back_log Maximum number of client requests waiting for threads
concurrent_inserts Specifies ON to allow INSERT operations while clients are reading data
connect_timeout Number of seconds the server waits for a connection before timing out
delayed_insert_limit Number of rows of an INSERT DELAYED query to process at a time
delayed_insert_timeout Time the server waits for additional INSERT DELAYED items
delayed_queue_size Number of INSERT DELAYED rows to store
flush_time Closes all tables after the specified number of seconds
interactive_timeout Number of seconds of idle time before disconnecting interactive clients
join_buffer_size Buffer size for full joins (queries from multiple tables)
key_buffer_size Buffer size for index values
long_query_time Amount of seconds before a query is considered slow
max_allowed_packet Maximum size of a single packet of data
max_connections Maximum number of simultaneous client connections allowed
max_connect_errors Number of allowed errors before blocking connections from a host
max_delayed_threads Maximum number of threads used for INSERT DELAYED queries
max_join_size Maximum number of rows for JOIN queries
max_sort_length The number of bytes of each BLOB or TEXT value to use when sorting
max_user_connections Maximum number of connections for each username
net_buffer_length Default size for the communication buffer
net_read_timeout Number of seconds to wait before aborting when reading data
net_write_timeout Number of seconds to wait before aborting when writing data
thread_cache_size Number of threads kept standing by for use by clients
wait_timeout Number of seconds of idle time before disconnecting a client
SYSTEM VARIABLES
Set Variables
You can set MySQL system variables byincluding them in the [mysqld] sectionof a configuration file, using the set-variable command. The followingexample sets themax_allowed_packet variable:
[mysqld]set-variable max_allowed_packet=1M
You can also set variables using the --set-variable option whenmysqld is started.
Display Current Values
You can display the current values of all of the system variables using theSHOW VARIABLES command from the MySQL monitor or themysqladmin variables command at the UNIX or Windowscommand prompt. This is useful if you are unsure whether theconfiguration files are being read correctly, and is the first thing youshould do if a variable change has not produced the effect you expected.
You can also use the LIKE operator with SHOW VARIABLES to show asection of the list. The following example shows the values of allvariables that include the characters "max" in their names:
SHOW VARIABLES LIKE '%max%';
195
MySQL includes a number of system variables thatcontrol the behavior of the server. While these variableshave sensible default values, setting them to optimal
values for your system can dramatically improve theserver's performance. The table below describes keysystem variables for optimizing performance.
516922 Ch10.F 9/26/02 11:38 AM Page 195

⁄ From the MySQL monitor, type SHOW STATUS; and press Enter.
■ The current values of the status variables are displayed.
¤ Type SHOW STATUS LIKE '%Opened%'; and press Enter.
■ The variables that match the string you specified are displayed.
To optimize the performance of a MySQL server,the first step is to determine how it is currentlyperforming. MySQL keeps a number of running
status variables that you can examine to get a snapshot ofthe server's current performance. This will let you knowhow much traffic the server is handling, as well as earlyindications of performance problems.
To display the status variables, you can use the SHOWSTATUS command in the MySQL monitor or themysqladmin extended-status command at thecommand prompt. The output of either command is a tableof variables and their values. You can use the LIKE operatorwith SHOW STATUS to show only certain values.
Most of the variables count the number of times somethinghas happened since the server started. For example, theOpened_tables value is the number of table that havebeen opened, and the Questions value is the number ofqueries the server has received. The Uptime value gives
you the number of seconds the server has been running, soyou can use this and the various variables to get an idea ofhow the server performs over time.
The Threads_connected value indicates how many clientconnections are currently open to the server, and theMax_used_connections value is the largest number ofclients that are simultaneously connected. You can usethese values to determine whether the server is busy andwhether the max_concurrent_users system variableneeds to be increased.
Slow_queries is another value you should watchcarefully. This is the number of queries that have takenmore than the expected amount of time. The time for aslow query is set using the long_query_time systemvariable. If many slow queries are being counted, thismeans the server is running slower than expected, orsome particular queries in use are slowing down the server.
DISPLAY SERVER PERFORMANCEINFORMATION
MySQL
196
DISPLAY SERVER PERFORMANCE INFORMATION
516922 Ch10.F 9/26/02 11:38 AM Page 196

‹ Type USE testdb; and press Enter.
■ This selects a database.
› Type CREATE TABLE newtable ( and press Enter.
■ You are prompted for the next line.
ˇ Type field1 INT); and press Enter.
■ This creates a new table.
Á Type SHOW STATUS LIKE '%Opened%'; and press Enter.
■ Notice that the number of opened tables has increased.
OPTIMIZE AND TROUBLESHOOT MYSQL 10
197
The list of values returned by SHOW STATUS is quite long,but certain values are important to watch. The table belowdescribes some of the most important status variables.
VARIABLE DESCRIPTION
Aborted_clients Number of client connections not closed properly
Aborted_connects Number of failed connections to the server
Bytes_received Total bytes of data received from clients
Bytes_sent Total bytes of data sent to clients
Connections Number of times clients have connected to the server
Open_tables Number of tables currently in use
Open_files Number of files currently in use
Opened_tables Number of tables opened since the server started
Questions Total number of queries received from clients
Slow_queries Number of queries that have taken longer than a maximum amount of time
Threads_cached Number of threads standing by for clients
Threads_created Number of threads created since the server started
Threads_running Current number of active threads
Uptime Number of seconds since the server started
516922 Ch10.F 9/26/02 11:38 AM Page 197

⁄ From the command prompt, type pico /etc/my.cnf and press Enter.
■ This loads the configuration file into the editor.
Note: You may need to use a different editor name on your system.
¤ From the editor, make the desired changes to the configuration file.
‹ When you are finished, press Ctrl-X and then Y.
■ This saves the file and exits the editor.
Note: The command to save and exit may be different depending on the editor you are using.
If you decide to change some of the MySQL options toimprove the performance of the server, you can edit theconfiguration file to make the changes. As discussed
earlier in this chapter, there may be several configurationfiles on a UNIX system. The main configuration file isusually /etc/my.cnf.
To edit the configuration file, load it into a text editor suchas pico, vi, or emacs. One or more of these editors isincluded with most UNIX and Linux systems. Depending onyour MySQL installation, the file may not yet exist. You cancreate it using the text editor. On most systems, only theroot user can edit files in the /etc directory. The followingexample loads the /etc/my.cnf file into the pico editor:
pico /etc/my.cnf
When adding commands to the configuration file, the beststrategy is to make one change at a time and test the server
with the modified value before making other changes.This is especially important on a busy production server;changing variables incorrectly can reduce performance oreven cripple the server.
After you make changes to the configuration file, save it andexit the editor. MySQL does not read the new configurationautomatically. You will need to shut down the server usingthe mysqladmin shutdown command and restart it toread the modified configuration information. Chapter 9includes information on stopping and restarting the MySQLserver.
After you have changed system variable values in theconfiguration file, you can use the SHOW VARIABLEScommand from the MySQL monitor or the mysqladminvariables command from the command prompt to verifythat the changes were read and implemented by the server.
EDIT THE CONFIGURATION FILE IN UNIX
MySQL
198
EDIT THE CONFIGURATION FILE IN UNIX
516922 Ch10.F 9/26/02 11:38 AM Page 198

Note: Select Run from the Start menu to display the Run dialog box.
⁄ From the Run dialog box, type C:\mysql\bin\ winmysqladmin and press Enter.
■ This starts the WinMySQLadmin utility.
¤ Within MySQLadmin, click the my.ini Setup tab.
‹ Make the desired changes to the file.
› Click the Save Modification button to save the changes you have made.
199
The Windows version of MySQL supports three differentconfiguration files. The first has the filename my.ini.This file is stored in the Windows system directory,
typically C:\windows\system or C:\winnt\system32. You canalso use a global options file with the filename my.cnf in theC:\ root directory, and a server options file called my.cnf inthe C:\mysql\data directory.
When the MySQL server starts in Windows, it reads themy.ini file first, followed by the my.cnf file in the rootdirectory, and finally the my.cnf file in the data directory.Values in a later file can override those set in an earlier file.
There are two ways to edit the configuration file inWindows. The first is to load the file into any text editor. TheNotepad accessory included with Windows will work fine.Use the following command from the command prompt orthe Run dialog box to edit the my.cnf file in Notepad:
notepad c:\mysql\my.cnf
The second method is to use the WinMySQLadmin utility,introduced in Chapter 9. This utility provides a graphicaloverview of the MySQL server's configuration, and themy.ini Setup tab allows you to create a configuration fileusing default values or edit the existing file.
By default, none of the MySQL configuration files exist afteryou install the MySQL server. You can create them using atext editor or the WinMySQLadmin utility. After you havecreated or modified a configuration file, you need to restartthe server. See Chapter 9 for instructions to restart theserver.
After you have changed system variable values in aconfiguration file, you can verify that the changes were readby using the SHOW VARIABLES command from the MySQLmonitor, or the mysqladmin variables command fromthe command prompt.
EDIT THE CONFIGURATION FILE IN WINDOWS
OPTIMIZE AND TROUBLESHOOT MYSQL 10
EDIT THE CONFIGURATION FILE IN WINDOWS
516922 Ch10.F 9/26/02 11:38 AM Page 199

⁄ From the command prompt, type cd /usr/local/ mysql/data and press Enter.
■ This switches to the location where logs are stored.
Note: The location may vary depending on your installation. Under Windows, the location is usually c:\mysql\data.
¤ To view the error log, type cat hostname.err, replacing hostname with the name of your server, and press Enter.
■ The contents of the error log are displayed.
Note: Under Windows, type more hostname.err instead.
Note: If the log is large, you can use the tail command to view only the most recent entries on UNIX systems.
MySQL supports a number of different log files. Youcan use these to analyze the performance of theserver and to detect errors and potential problems
when they occur. The log files are standard text files storedin the same directory as the database files, typically /usr/local/mysql/data.
The only log file created by default is the error log. This logsall errors encountered by the server and each time theserver is started or stopped. The error log is named withthe hostname of the server and the .err extension underUNIX, and is stored at c:\mysql\data\mysql.err on Windowssystems.
MySQL can optionally create a general query log, whichlogs each query sent to the server. This log file is createdif you specify the -l or --log option when you start themysqld server. Unless you specify a different name in the
command line, the filename for this log is the hostname ofthe server, and the extension .log is added.
If you specify the --log-update option when you startmysqld, an update log is created. This is similar to thequery log, but includes only queries that have resultedin updates to a table. You can use the update log toreconstruct a table from a backup, using the loggedqueries to make any changes that were not backed up.
The final available log is the slow query log. This isa log of all queries that have exceeded the definedlong_query_time value. This log is very useful indetermining which queries are taking a large amount oftime and potentially slowing down the server. To turn onthe slow query log, use the --log-slow-queries optionon the command line.
VIEW MYSQL LOG FILES
MySQL
200
VIEW MYSQL LOG FILES
516922 Ch10.F 9/26/02 11:38 AM Page 200

‹ To view the query log, type cat hostname.log, replacing hostname with the server name, and press Enter.
■ The contents of the log are displayed.
Note: Under Windows, use the command more hostname.log instead.
Note: Depending on your configuration, the query log may not be created by default.
› To view the slow query log, type cat hostname-slow.log, replacing hostname with the server name, and press Enter.
■ The contents of the log are displayed.
Note: Under Windows, use the command more hostname-slow.log instead.
Note: The slow query log is not created by default; you must explicitly enable it.
OPTIMIZE AND TROUBLESHOOT MYSQL 10
201
Newer versions of MySQL support a binary update log. This issimilar to the update log, but stored in a binary rather than textformat for greater efficiency. To use the binary log, specify the --log-bin option on the command line to mysqld. MySQLincludes a utility, mysqlbinlog, to convert the binary log to atext format.
You can maintain the MySQL log files at any time by renamingor deleting them. After you have done this, use the mysqladminflush-logs command to restart logging. When you do this,the update log is automatically recreated with a new sequencenumber; you can then move the old log to a backup location ordelete it. The binary log is also rotated automatically. If you wantto regularly rotate the query log or slow query log, you need todo so manually.
The FLUSH LOGS command within the MySQL monitor alsorefreshes the logs and rotates the update logs. The Redhat Linuxversion of the MySQL server includes a mysql-log-rotatescript that rotates the logs. This is set up automatically if youinstall the RPM version of the MySQL server.
516922 Ch10.F 9/26/02 11:38 AM Page 201

Note: This example uses the quotes table in the testdb database. You can import this table from the CD-ROM.
⁄ From the MySQL monitor, type USE testdb; and press Enter.
■ This selects the database.
¤ Type ALTER TABLE quotes and press Enter.
■ You are prompted for the next line.
‹ Type ADD INDEX authorind (author); and press Enter.
■ This adds an index to the table.
AMySQL table can have one or more indexesassociated with it. While at least one unique indexis usually used as a primary key to uniquely identify
each row of the table, you can add additional indexes,unique or not, to improve performance.
The MySQL status values shown by the SHOW STATUScommand or the mysqladmin extended-statuscommand can help you determine whether an indexwould improve performance. In particular, a high value forthe Handler_read_key counter indicates that records areoften being read by key and that indexing is working well.
The Handler_read_rnd_next value, on the other hand,indicates that sequential reads are being used often ratherthan direct access by key. This may mean that you areusing inefficient queries, or that an additional index wouldimprove performance. If you add an index, be sure to test
the performance of your queries afterward and remove theindex if it has not improved performance.
To add an index, use the ALTER TABLE query with theADD_INDEX keyword. Specify the index name, if desired,followed by a list of columns to index in parentheses. Forexample, the following query adds an index on the authorfield of the quotes table:
ALTER TABLE quotesADD INDEX authorind (author);
The process of adding a unique index is similar, but usesthe ADD UNIQUE keyword instead of ADD INDEX. To usea unique index, the column must have unique values foreach row. However, if you specify multiple columns for theunique index, only the combination of the column valuesneeds to be unique.
IMPROVE PERFORMANCE WITH INDEXES
MySQL
202
IMPROVE PERFORMANCE WITH INDEXES
516922 Ch10.F 9/26/02 11:38 AM Page 202

› Type SHOW STATUS LIKE '%Handler%'; and press Enter.
■ The list displayed includes values that may help you determine whether an index will improve performance.
ˇ Type ALTER TABLE quotes and press Enter.
■ You are prompted for the next line.
Á Type DROP INDEX authorind; and press Enter.
■ This removes the added index.
OPTIMIZE AND TROUBLESHOOT MYSQL 10
203
Sometimes an index does not improve performance.In particular, if you are not frequently searching forparticular values of a column, indexing that column isnot likely to help. In a table with few rows, often verylittle indexing is needed for optimal performance.
If an index is slowing down performance or is not animprovement, you can remove it from the table. Toremove an index, use DROP INDEX with the ALTERTABLE command. The following command removesthe index named authorind from the quotes table:
Example:ALTER TABLE quotes DROP INDEX authorind;
When you use DROP INDEX, only the extra data storedin index files is deleted; no rows of the table are modifiedor deleted. However, if the index was a unique index orprimary key, it may be the only way to refer to a singlerow of the table. In this case, removing the index canreduce the usefulness of the table.
516922 Ch10.F 9/26/02 11:38 AM Page 203
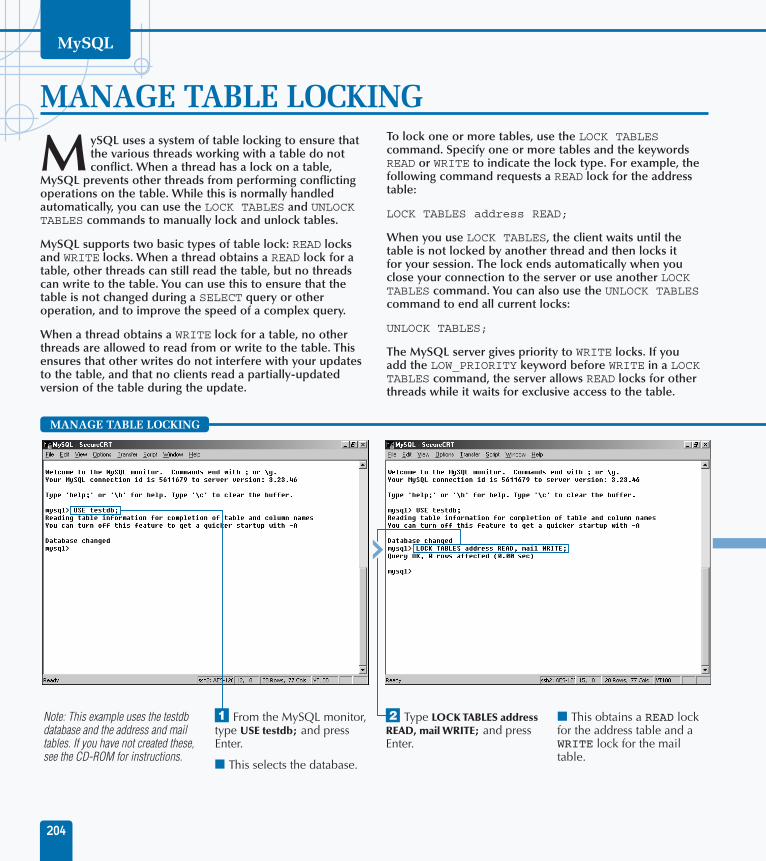
Note: This example uses the testdb database and the address and mail tables. If you have not created these, see the CD-ROM for instructions.
⁄ From the MySQL monitor, type USE testdb; and press Enter.
■ This selects the database.
¤ Type LOCK TABLES address READ, mail WRITE; and press Enter.
■ This obtains a READ lock for the address table and a WRITE lock for the mail table.
MySQL uses a system of table locking to ensure thatthe various threads working with a table do notconflict. When a thread has a lock on a table,
MySQL prevents other threads from performing conflictingoperations on the table. While this is normally handledautomatically, you can use the LOCK TABLES and UNLOCKTABLES commands to manually lock and unlock tables.
MySQL supports two basic types of table lock: READ locksand WRITE locks. When a thread obtains a READ lock for atable, other threads can still read the table, but no threadscan write to the table. You can use this to ensure that thetable is not changed during a SELECT query or otheroperation, and to improve the speed of a complex query.
When a thread obtains a WRITE lock for a table, no otherthreads are allowed to read from or write to the table. Thisensures that other writes do not interfere with your updatesto the table, and that no clients read a partially-updatedversion of the table during the update.
To lock one or more tables, use the LOCK TABLEScommand. Specify one or more tables and the keywordsREAD or WRITE to indicate the lock type. For example, thefollowing command requests a READ lock for the addresstable:
LOCK TABLES address READ;
When you use LOCK TABLES, the client waits until thetable is not locked by another thread and then locks itfor your session. The lock ends automatically when youclose your connection to the server or use another LOCKTABLES command. You can also use the UNLOCK TABLEScommand to end all current locks:
UNLOCK TABLES;
The MySQL server gives priority to WRITE locks. If youadd the LOW_PRIORITY keyword before WRITE in a LOCKTABLES command, the server allows READ locks for otherthreads while it waits for exclusive access to the table.
MANAGE TABLE LOCKING
MySQL
204
MANAGE TABLE LOCKING
516922 Ch10.F 9/26/02 11:38 AM Page 204

‹ Type INSERT INTO mail (name, address) and press Enter.
› Type SELECT name, address FROM address; and press Enter.
■ This copies data between the tables. On a busy system, it would execute faster because of the table locking.
ˇ Type UNLOCK TABLES; and press Enter.
■ This releases the locks on both tables.
OPTIMIZE AND TROUBLESHOOT MYSQL 10
205
There are two basic reasons to manually lock tables. The first is to ensurethat a complex operation is not interfered with by other threads. This isnot necessary with basic UPDATE queries, because MySQL uses lockingautomatically. You may need to use it when you are performing a series ofUPDATE queries and do not want the table to be changed in between.
When you use a READ lock, you ensure that the table cannot be changedduring a SELECT query. This allows the SELECT query to obtain an accuratesnapshot of the current table data. If you keep the READ lock in place, youcan be sure that multiple SELECT queries will be working with exactly thesame data.
The second reason to lock tables is to improve performance. A complexSELECT query can run faster when no other clients can access the table, soa READ lock will improve performance. A complex UPDATE query will runmuch faster with a WRITE lock, giving it exclusive access to the table.
In general, you should only use table locking when you are sure you need itfor data integrity, or when you have experienced performance problemswithout locking. Using locking unnecessarily can create performanceproblems for other clients.
516922 Ch10.F 9/26/02 11:38 AM Page 205

Security is a growing concern among systemadministrators. Any system that stores data critical to acompany or organization is vulnerable to security risks. A
MySQL database may store thousands of tables of crucial dataand can be a major vulnerability if it is not properly secured.
THE IMPORTANCE OF SECURITYMySQL
206
Database Security
Because databases are often used to store importantdata, MySQL does not rely on the security abilities ofthe underlying operating system. Instead, it includes itsown security system. This allows you to control accessto each database, each table, and even specific columnswithin a table individually.
Users should be given access only to the data they needto work with directly, and should be given the minimumamount of access to be able to do their jobs. MySQLincludes a number of commands that allow you to createusers and assign them specific privileges, or abilities.
System Security
Because the MySQL data files for each database arestored in the file system of the underlying operatingsystem, a secure operating system is also important fora secure database server. Be sure that no users excepttrusted administrators have the ability to directly accessthe MySQL data files. Anyone who can access these filesdirectly can completely circumvent MySQL's securitysystem.
Physical Security
When you are planning the security of a database server,be sure not to forget the server hardware itself. Despitethe most sophisticated security and encryption inMySQL and the operating system, the data is still storedon a hard disk and is vulnerable if there is physicalaccess to the server machine. Client machines shouldalso be kept physically secure if they have the ability toconnect without specifying a password each time.
Network Security
Because a MySQL server is often accessed across a localor wide-area network, the security of the network is alsoimportant. Malicious users can scan network traffic andview data or passwords as they are transmitted betweendatabase clients and servers.
To prevent potential network security issues, MySQLencrypts passwords before sending them acrossthe network. You can also use data compression betweenMySQL clients and servers, which prevents data frombeing sent as readable text.
The best network security is provided by a good firewallor proxy server. Because the MySQL server usually doesnot need to be accessed from everywhere in the world,you can keep it behind the firewall and allowconnections only from trusted systems.
Password Guidelines
MySQL relies on passwords for security. While thisprovides a basic level of security in authenticating users,this system is only as secure as the passwords chosen.To keep the MySQL server secure, be sure to have a setof guidelines in place for assigning passwords.
You should never create users without passwords.Passwords should be as long as possible. MySQL allowspasswords up to at least eight characters, depending onthe operating system. Avoid passwords that containnames, words that appear in the dictionary, or commonabbreviations, as they can be easily guessed.
Security Risks
While most people imagine data security as a battleagainst crackers and malicious vandals, the reality is thatmost security threats come from inside the company.Well-meaning users who have more access than they
should have can accidentally delete or invalidate entireMySQL tables with a single command, and disgruntledemployees are an even greater risk. For this reason,avoid giving users more than the minimum privilegesthey require.
516922 Ch11.F 9/26/02 11:39 AM Page 206

MYSQL SECURITY BASICS
MySQL includes a sophisticated security system. Youcan use MySQL commands to create users andgrant them privileges for a database or table.
CONFIGURE MYSQL SECURITY 11
207
The Grant Tables
Internally, the MySQL server stores its usernames,passwords, and privileges in several tables within themysql database. This database is created when youinstall the MySQL server. The user table within thisdatabase stores a row for each user and a number offields that define the basic privileges granted to the user.
The other tables in the mysql database include the hosttable, which stores privileges specific to particularhostnames, and the db table, which stores privilegesgranted to users for a specific database. The tables_privtable stores privileges granted for specific table names,and the columns_priv table stores privileges granted foronly specific columns of a table.
Default Users
When you install the MySQL server, the root user iscreated by default. This user is granted all privileges for alldatabases and tables, and can create additional users. Theroot user does not have a password by default, and this isa major security hole. Be sure to change the root passwordbefore allowing users to access the MySQL server.
The installation also creates an anonymous user, whichallows users on the local host to connect withoutspecifying a username and password. This user isrestricted to a database named test or with a namebeginning with test_, so this does not represent aserious security risk.
The Authentication Process
When you attempt to connect to a MySQL server, theclient encrypts your password and sends a requestincluding the username you specified to the server. Theserver checks whether the username is listed in the usertable and whether the password matches the encryptedpassword stored in that table. If they match, you areallowed to connect.
After this initial authentication, the MySQL clientauthenticates each command the client sends to theserver, and checks the user, db, and other tables todetermine whether the username has the rightprivileges for the command being issued.
Security Commands
MySQL includes three basic commands for workingwith security. The first, GRANT, grants one or moreprivileges to a user for a database or table. If the userdoes not already exist, it is created.
The REVOKE command removes one or more privilegesfrom a username. It can leave a user without privileges,but does not delete users from the user table.
The SHOW GRANTS command displays the privilegesgranted to a particular user. These are displayed asGRANT statements and can be used to recreate orduplicate the user's privileges.
MySQL Users and Privileges
You must specify a username when you use MySQLclient programs, such as mysql or mysqladmin. If youare the administrator of the MySQL server, you cancreate usernames and control the privileges, orpermissions, of each user.
You use the GRANT command in MySQL to grant one ormore privileges to a user. If the username you specifydoes not exist, it is created. The REVOKE command isthe opposite. This command removes one or moreprivileges from a user.
A user in MySQL is actually the combination of ausername and hostname. If a username is set up with aspecific host, the user can only connect from that host.Users can also be configured to allow multiple hosts orall hosts.
The privileges you can grant to a user include most ofthe different things that can be done with SQL queries,including SELECT, INSERT, and DELETE. The completelist of privileges is included later in this chapter.
516922 Ch11.F 9/26/02 11:39 AM Page 207

Note: This example uses the testdb database and the quotes table, which you can import from the CD-ROM.
⁄ From the MySQL monitor, type USE testdb; and press Enter.
■ The database is now selected.
¤ Type GRANT ALL ON testdb.* and press Enter.
■ You are prompted for the next line.
‹ Type TO nancy IDENTIFIED BY 'thepass'; and press Enter.
■ The user is now created. This user has all privileges for the entire database.
MySQL uses its own system of usernames andpasswords, unrelated to the underlying operatingsystem. You can use the GRANT command from
MySQL to create a username and assign one or moreprivileges to the user. You can assign privileges for alldatabases, a single database, a table, or even a single column.
The basic syntax of the GRANT command specifies aprivilege type, a table or database name, a username, anda password. The username can be an existing MySQL user.If it is a new user, the user is added. The following GRANTcommand grants all privileges to the user nancy for thetestdb database:
GRANT ALL ON testdb.* TO nancy IDENTIFIED BY 'thepass';
Usernames on MySQL can be a simple name like theabove, or a combination of a username, the @ symbol,and hostname. If you specify a hostname, the user canonly access MySQL from that host. If you do not specifya hostname, the username will work from any host. Youcan use the wildcard character, %, as the hostname toexplicitly indicate that the user can connect from any host.
You can specify a database name with the * symbol, meaningall tables under that database, a table name under thecurrent database selected with the USE command, or thewildcard *.*, meaning all databases on the server. You canoptionally specify a list of columns in parentheses beforethe ON keyword, and the user will have the privileges youspecify for only those columns.
The IDENTIFIED BY clause in the GRANT statement allowsyou to specify a password for the user. The password will beencrypted and stored in the MySQL user table. If the userhas already been created with a previous GRANT statement,you do not need to use the IDENTIFIED BY clause again.
In order to grant privileges to a user, you must be logged inas a user with those privileges and the ability to grant. If youspecify WITH GRANT OPTION at the end of the GRANTcommand, the user will have the ability to grant anyprivileges they have to other users.
The REVOKE command allows you to revoke one or moreprivileges from a user. To use this command, specify REVOKE,the privilege type or ALL, the ON keyword, the table ordatabase name, the FROM keyword, and the username.
GRANT PRIVILEGES TO USERS
MySQL
208
GRANT PRIVILEGES TO USERS
516922 Ch11.F 9/26/02 11:39 AM Page 208

› Type GRANT ALL ON quotes and press Enter.
ˇ Type TO fred IDENTIFIED BY 'other'; and press Enter.
■ This creates another user. This one has access to the quotes table only.
Á Type REVOKE DELETE, DROP ON quotes and press Enter.
‡ Type FROM fred; and press Enter.
■ This removes the DELETE and DROP privileges, leaving the user with the remaining privileges.
CONFIGURE MYSQL SECURITY 11Most of the examples here use the ALL keyword as the privilegetype. This keyword assigns all available privileges. You can alsoassign the specific privileges listed in the table below.
PRIVILEGE ALLOWS
ALTER Use ALTER TABLE command
CREATE Use CREATE TABLE command
DELETE Use DELETE command
DROP Use DROP TABLE command
FILE Use SELECT INTO OUTFILE and LOAD DATA INFILE
INDEX Use CREATE INDEX or DROP INDEX
INSERT Use INSERT command
LOCK TABLES Use LOCK TABLES command
PROCESS Use SHOW PROCESSLIST and mysqladmin processlist
RELOAD Use the FLUSH command
SELECT Use SELECT queries
SHOW DATABASES Show all databases
SHUTDOWN Shut down the server with mysqladmin shutdown
SUPER Various administrative privileges including mysqladmin kill
UPDATE Use UPDATE queries
209
516922 Ch11.F 9/26/02 11:39 AM Page 209

Note: This example uses the users you created in the previous section. You must be connected to MySQL as the root user or another user that can grant privileges.
⁄ From the MySQL monitor, type SET PASSWORD FOR and press Enter.
¤ Type fred = PASSWORD('newpass'); and press Enter.
■ This sets the user's password.
‹ Type SET PASSWORD = PASSWORD('newpass'); and press Enter.
■ This sets the password for the current user.
Note: If you change your password, be sure not to use the default value given here, and be sure to remember the password you have chosen.
After you have created a user and granted privilegeswith GRANT, you can change the user's passwordusing the SET PASSWORD command within the
MySQL monitor. For example, the following commandchanges the password for the user fred:
SET PASSWORD FOR fred = PASSWORD('newpass');
MySQL stores passwords in an encrypted form. When youchange a password with the SET PASSWORD command,you must use the PASSWORD function to encrypt the newpassword. MySQL expects the new password to be inencrypted form.
In order to change a user's password, you must either belogged in as that user or as a user with the GRANT OPTIONprivilege. This allows you to change the password for anyuser. You can also assign passwords by using theIDENTIFIED BY clause when creating users or addingprivileges using the GRANT command, as explained in theprevious section.
You can also change a user's password using themysqladmin password command at the commandprompt. In this case, you do not need to use the PASSWORDfunction. For example, the following command changes thepassword for the current user:
mysqladmin password 'newpass'
If you specify the -u option with mysqladmin, you can setthe password for the specified user. However, this optionrequires the user's current password. If you need to set apassword and do not know the user's current password, usethe SET PASSWORD command.
When MySQL is first installed, the root user may be set upwith no password or a default password. To secure theMySQL server, you should immediately change thepassword for this user using SET PASSWORD ormysqladmin password.
MODIFY USER PASSWORDS
MySQL
210
MODIFY USER PASSWORDS
516922 Ch11.F 9/26/02 11:39 AM Page 210

› Type SET PASSWORD FOR and press Enter.
ˇ Type nancy = PASSWORD('pass2'); and press Enter.
■ This sets another user's password.
Á Type SELECT PASSWORD('newpass'); and press Enter.
■ This demonstrates the PASSWORD function and displays an encrypted result.
CONFIGURE MYSQL SECURITY 11MySQL uses its own system of usernames and passwords. Usernamesin MySQL are limited to a length of 16 characters. There is no limit topassword length in MySQL, but some systems limit the length to eightcharacters. While the username and password can be the same as aUNIX or Windows user account, they are separate and do not need tobe the same.
When you choose a password, be sure to make it difficult to guess. Namesand words that appear in the dictionary are bad choices for passwords.The ideal choice is a combination of random letters mixed with numbers,although truly random passwords are not easy for users to remember.
Because MySQL stores passwords encrypted using the PASSWORDfunction, knowing the encrypted password for a user is as good asknowing the real password. Do not allow users to view the grant tables,described later in this chapter, as the encrypted passwords would bedisplayed.
When users specify a password on the command line to mysql or otherclient programs, other users may be able to see the password in thesystem's process list. A better strategy is to store the password in a .my.cnffile in each user's home directory. This file is explained in Chapter 10.
211
516922 Ch11.F 9/26/02 11:39 AM Page 211

Note: The users referred to in this example were created in the section “Grant Privileges to Users.”
⁄ From the MySQL monitor, type SHOW GRANTS FOR nancy; and press Enter.
■ The privileges for the user are displayed.
Note: You must be connected to MySQL as the root user or another user that can grant privileges to use this command.
¤ Type SHOW GRANTS FOR fred; and press Enter.
■ This user's privileges are displayed.
You can use the VIEW GRANTS command from theMySQL monitor to find out what privileges have beengranted to a particular user. This is useful if you need
to check what abilities have been given to a user. Forexample, the following statement displays the privilegesgranted to the user fred:
SHOW GRANTS FOR fred;
The results for SHOW GRANTS are presented in the formof one or more GRANT statements. You can copy thesestatements and use them to restore the user's privilegesin the event of data loss, or use them to create anotheruser with the same privileges. The password in the GRANTstatement is shown in encrypted form.
In some cases a user is configured in MySQL but does nothave any privileges. This can happen if you create a usermanually in the users table, or if you have revoked all of a
user's privileges. In this case, when you use SHOW GRANTS,the results show a GRANT USAGE statement. USAGE is aspecial privilege meaning "no privileges." In other words,the user can connect to the MySQL server but cannotaccess any databases or tables.
When using SHOW GRANTS, remember that MySQL storesusers as a combination of username and hostname. If ausername is configured with a specific host, you mustspecify the hostname to view their privileges. If you havecreated the user ted@localhost, for example, no privilegeswill be shown if you use this command:
SHOW GRANTS FOR ted;
Because no hostname is specified, this command looks fora user with access from all hosts, and no user is found. Toshow the privileges for the correct user, specify thehostname with the @ symbol.
VIEW A USER'S PRIVILEGES
MySQL
212
VIEW A USER'S PRIVILEGES
516922 Ch11.F 9/26/02 11:39 AM Page 212

‹ Type REVOKE ALL ON testdb.quotes FROM fred; and press Enter.
■ This revokes all of the user's privileges.
› Type SHOW GRANTS FOR fred; and press Enter.
■ The user's privileges now include only the USAGE privilege, which allows access but no privileges.
CONFIGURE MYSQL SECURITY 11
In order to use SHOW GRANTS, your username must have theGRANT OPTION in its list of privileges. When you displaythe privileges for a user, the encrypted password is shown inthe GRANT statements, and this could be used to gain accessto the user's resources.
When you change a user's privileges using GRANT or REVOKE,the changes take effect immediately and are shown insubsequent SHOW GRANTS commands. The privileges arechecked both when a user attempts to connect to the MySQLserver and when they issue each command after connecting.
You cannot use wildcards with SHOW GRANTS to display theprivileges of multiple users. To display a list of users or quicklyview privileges for multiple users, you can access the grant tablesdirectly, as described in the next section.
The GRANT statements shown when you use SHOW GRANTS area summary of the user's privileges. While they can be used torecreate the user's privileges, they are not necessarily the samecommands you used to assign the privileges and create the user.
213
516922 Ch11.F 9/26/02 11:39 AM Page 213

⁄ From the MySQL monitor, type USE mysql; and press Enter.
■ The database is now selected.
Note: Usually you must be logged in as the root user to access this database.
¤ Type SELECT * FROM user and press Enter.
‹ Type WHERE User = "fred"; and press Enter.
■ The user's entry in the user table is displayed.
MySQL stores the users and privileges you assign in aset of tables under the mysql database, which wascreated when you installed the server. You can view
these tables directly to find out detailed information abouta user or to view the complete lists of users and privileges.
The mysql database is accessible only to the root userby default. Because this database contains usernames,passwords, and privileges for all users, access to iteffectively allows you to view or modify any user'sprivileges on the server.
The user table within the mysql database stores the list ofusernames and their basic privileges. This table is used bythe MySQL server to determine whether to allow accesswhen a user attempts to connect. Various columns of thistable store values of "Y" or "N" to indicate whether aprivilege is granted. You can use the following command toview the complete list of users:
SELECT * FROM user;
Because the output of this command includes encryptedpasswords, be sure not to let anyone other than anadministrator view the list.
The db table stores a row for each user that has privilegesfor a specific database on the server. For each row, theusername, hostname, and database name are stored alongwith flags indicating various privileges specific to thedatabase for that user.
The host table stores information for specific hostnames,and is used when a user is given access from multiple hosts.The tables_priv and columns_priv tables are used to storeany privileges that have been granted to users specific to atable or one or more columns of a table.
VIEW SECURITY TABLES
MySQL
214
VIEW SECURITY TABLES
516922 Ch11.F 9/26/02 11:39 AM Page 214

› Type DESCRIBE user; and press Enter.
■ This displays a summary of the columns of the user table.
ˇ Type DESCRIBE db; and press Enter.
■ This displays the columns of the db table.
CONFIGURE MYSQL SECURITY 11
You can manipulate the tables in the mysql database directly. Forexample, you can use the following UPDATE query to change a user'spassword rather than using the SET PASSWORD command.
Example:UPDATE user SET Password=PASSWORD('newpass')
WHERE user='fred';
You can also use INSERT queries to add users or DELETE queries todelete users from the user table. You can also modify the other tables toadd or remove privileges. While this is rarely necessary, it gives you morecomplete access to the various settings stored in the tables and may bemore practical than using GRANT and REVOKE in some cases.
When you have made changes to users or other tables in the mysqldatabase, they are not automatically reloaded by the server. You canuse the command FLUSH PRIVILEGES from the MySQL monitor, ormysqladmin flush-privileges from the command prompt, to forcethe tables to be reloaded. They will also be reloaded if you restart theMySQL server.
While modifying these tables directly is powerful, it can also be dangerous:You could easily delete the root username, for example, and lose rootaccess to the server. Use these tables with caution, or use the GRANT andREVOKE commands instead. Also, be sure that you do not give any otherusers access to view or modify the tables in the mysql database.
215
516922 Ch11.F 9/26/02 11:39 AM Page 215

MySQL
Note: This example uses the testdb database. You must be connected to MySQL as the root user or another user that can grant privileges.
⁄ From the MySQL monitor, type GRANT ALL ON testdb.* TO henry@localhost and press Enter.
¤ Type IDENTIFIED BY 'password'; and press Enter.
■ This creates a user that can access MySQL from the local host only.
Note: For security, choose your own password rather than using the one given here.
‹ Type GRANT ALL ON testdb.* TO [email protected] and press Enter.
› Type IDENTIFIED BY 'password'; and press Enter.
■ This creates a user that can connect to MySQL from the example.com host only.
Note: For security, choose a different password.
216
CONTROL NETWORK ACCESS
When you created users on the MySQL server earlierin this chapter, you did not specify a hostname inthe GRANT command. This allows the user to
connect to the MySQL server from any host on thenetwork. While this is often what you need, when a userwill only be connecting from the local host or a specifichost, you can give them access only from certain hosts. Thisgreatly reduces the possibility of the user account beingused maliciously across the network.
To specify the hostname a user can connect from, use the@ symbol to combine the user name and hostname. Forexample, the following GRANT command creates a username,henry, that can be used to connect only from the machinerunning MySQL server:
GRANT ALL ON testdb.* TO henry@localhost IDENTIFIED BY 'password';
MySQL allows multiple users with the same name in theuser table, as long as their hostnames are different. For thisreason, limiting the user to the local host will only work if
you have not previously granted privileges to the sameusername without specifying a hostname. If you have donethis, use REVOKE to remove the privileges for the originaluser before adding a user with a specified hostname.
You can specify a hostname or IP address that the user canconnect from instead of using localhost. For example,the following GRANT command creates a username, sue,that can connect only from a host called example.com:
GRANT ALL ON testdb.* TO [email protected] BY 'password';
If you need to allow access for a user from more thanone host, simply repeat the GRANT command for eachhostname. You can use the wildcard character % in thehostname to allow a set of host names or IP addresses.When you do this, you must enclose the username andhostname in quotation marks:
GRANT ALL ON testdb.* TO'user1'@'192.168.%';
CONTROL NETWORK ACCESS
516922 Ch11.F 9/26/02 11:39 AM Page 216

ADVANCED MYSQL SECURITY
MySQL includesa number ofmore advanced
security options. Youcan use various startupoptions when you startthe MySQL server tocontrol specific aspectsof security. You canalso use the secureSSL protocol whenconnecting clients toa MySQL server.
CONFIGURE MYSQL SECURITY 11
--local-infile
This option should be followed by the = symbol anda value of zero or one. If the value is zero, the LOADDATA LOCAL INFILE command is not permitted. Thiscommand may be a security risk because it allows fileson the local system to be read and sent to the MySQLserver. See Chapter 8 for details on using the LOADDATA command.
Example:mysqld –local-infile=0
--safe-show-database
Normally, any MySQL user can use the SHOW DATABASEScommand to display a complete list of databases on theserver. If you use the --safe-show-database option,users are only shown the databases for which they havebeen granted one or more privileges.
--safe-user-create
If this option is included, users are not allowed to useGRANT to create a new user unless they have beenexplicitly granted the INSERT privilege for the usertable in the mysql database. Users who have theGRANT OPTION privilege can still grant any privilegesthey have to any existing user.
USING STARTUP OPTIONS
217
The program that handles the MySQL server, mysqld,includes a variety of startup options. This section describesseveral options that you can use to manage the security ofthe MySQL server. To use these options, add one or moreof them to the command line when you start the MySQLserver. See Chapter 1 for information on starting the server.
--skip-show-database
If this option is used, the SHOW DATABASES commandis not allowed at all, except for users who have beenexplicitly given the SHOW DATABASES privilege.
--skip-grant-tables
If this option is specified, the grant tables are not used atall — in other words, MySQL is running with no securityat all. You should never use this option unless you havea special situation that requires MySQL security to beturned off.
One use for this command is for recovering access to theserver when you have accidentally changed or deletedthe root user. You can start the server with the --skip-grant-tables option, use GRANT to restore the rootuser, and then restart the server to turn security back on.
--skip-name-resolve
If this option is used, MySQL will not use DNS (domainname system) to convert hostnames to IP addresses.This effectively means that you cannot use a hostnamewhen granting privileges to users, and you mustexplicitly use an IP address instead. This can increasesecurity if your DNS server is not secure.
--skip-networking
If this option is specified, MySQL does not allowTCP/IP connections to the server across the network.Connections can only use UNIX sockets, which meansthat the local host is usually the only machine that canconnect. This option will increase security if you do notrequire access to the server from other machines.
When you connect to a MySQL server using a client, the traffic between the two is notencrypted. This means that a machine on the network may be able to scan network trafficand discover passwords or data being transferred to and from the MySQL server.
To prevent this type of network vulnerability, MySQL supports the SSL (Secure SocketsLibrary) protocol, the same system used by Web servers to provide encrypted access toclients. Setting up SSL on MySQL requires re-compiling the server, if it was not initially setup with this option. For details on using SSL with MySQL, see the MySQL documentationat www.mysql.com.
SSL AND MYSQL
516922 Ch11.F 9/26/02 11:39 AM Page 217

PHP is one of the most popular Web scripting languages,and one of the most popular languages for creatingapplications to work with MySQL. PHP is a scripting
language that is interpreted by Web servers. In particular, thepopular open source Apache server can support PHP as amodule, which allows for efficient execution of scripts.
This is only a brief introduction to PHP. PHP is a project ofthe Apache Software Foundation, and you can find outmore or download software from the PHP Web site:www.php.net.
MySQL
INTRODUCING PHP
MySQL
218
PHP and HTML
To use PHP, you embed a script within an HTMLdocument and save the document with the .php or.php3 extension. The Web server looks for PHP scriptsin files with these extensions and interprets thembefore sending the document to the Web browser.Thus, the browser does not have access to the PHPscript — only to the output of the script and thesurrounding HTML.
You begin and end a PHP script with the <?php and ?>tags. Anything between these two tags is interpreted asPHP rather than HTML. Anything outside these tagsshould be valid HTML.
Create Output
PHP supports a number of commands. One basicexample is the echo command, which sends output tothe Web browser as part of the HTML document. Eachstatement within the PHP script should end with asemicolon. The following example displays a messageusing PHP:
<?phpecho "This is a test.";?>
Using Variables
PHP supports variables, containers that can storenumbers, text strings, or other data. PHP variables do notneed to be defined before you use them, and they canstore any type of data. The following example assigns astring value and a numeric value to two variables:
<?php$num=39;$string="This is a test.";?>
PHP also supports arrays, or variables with indexes. Anarray is basically a number of variables with a commonname. The indexes for an array can be either numbersor string values. The following example assigns a valueto an array element:
<?php$array[1]="number one";?>
PHP variables can be included in string values. This isuseful when you need to combine a variable's valuewith some text. The following example displays thevalue of the $num variable within a string:
<?phpecho "The number is $num.";?>
PHP and MySQL
PHP includes support for MySQL with a number offunctions, described throughout this chapter. Theseallow you to connect to a MySQL server, submit a queryto the server and retrieve the results, and perform otherMySQL tasks. Virtually anything you can do with theMySQL monitor can also be done from a PHP script.
516922 Ch12.F 9/26/02 11:40 AM Page 218

USING MYSQL WITH PHP 12
219
Using Functions
You can combine several statements into a group with afunction in PHP. To define a function, you use thefunction keyword and surround the statements withbraces. The following example defines a function calledprint_bold:
<?phpfunction print_bold($text) {
echo "<b>$text</b>";}?>
The values in parentheses are the arguments, orparameters, of the function. To call a function, youspecify its name and the arguments in parentheses. Thefollowing statement calls the print_bold function:
print_bold("This is a test.");
Functions can also return a value using the returnkeyword. When you call such a function, you can storeits result in a variable.
Loops
PHP supports loops to perform a statement or a blockof statements multiple times. The while statementdefines a simple type of loop that repeats as long as acondition is true. The following is an example of awhile loop:
while ($num < 30) {$num = $num + 1;echo "The number is $num.";
}
PHP also supports for loops. This type of loop startswith a for statement specifying a beginning value, acondition, and an increment expression for a variable.The following for loop is equivalent to the previouswhile example:
for ($num=0; $num<30; $num = $num + 1) {
echo "The number is $num.";}
Operators
PHP supports a number of standard operators forworking with numbers and strings. You can use these inany expression to work with constants or variables. Theoperators available in PHP are similar to those ofMySQL. The following table summarizes some of thebasic PHP operators:
OPERATOR MEANING
+ Addition
- Subtraction
* Multiplication
/ Division
% Modulo (remainder)
. Concatenation (combines strings)
Conditional Statements
You can use the if statement in PHP to perform one ormore statements conditionally. This statement uses aconditional expression followed by a single PHPstatement, or a block of statements enclosed in braces.For example, this if statement displays a message if the$num variable has a value greater than 30:
if ($num > 30) echo "It's bigger than30.";
The condition in an if statement can use one or moreconditional operators. These are similar to theconditional operators in MySQL, and are summarized inthe table below.
OPERATOR MEANING
== Is equal to
!= Is not equal to
> Is greater than
< Is less than
>= Is greater than or equal to
<= Is less than or equal to
&& Logical AND
|| Logical OR
516922 Ch12.F 9/26/02 11:40 AM Page 219

⁄ From the UNIX command prompt, type pico test.php and press Enter.
■ This opens a text file for editing.
Note: Use the appropriate command to open a file on your system. On Windows, you can use Notepad to create the file. With earlier versions of PHP, you will need to use the .php3 extension.
¤ Type <?php to begin the test PHP script and press Enter.
‹ Type the phpinfo(); command to display PHP information, and press Enter.
If you are running your own Web server and are notalready running PHP, you can install PHP on the server.Depending on your system, this can be a simple or
complicated process. Most Linux distributions include PHP,so you may not need to do anything.
If you are using a shared hosting provider, there is a goodchance it supports PHP. In particular, most installations usingthe Apache Web server are set up to run PHP. Consult yourhost's instructions to find out how to use PHP on the server.
To test whether your server already supports PHP, create afile with a .php extension and include the following text inthe file:
<?phpphpinfo();
?>
The phpinfo command displays a detailed list ofinformation about the current PHP installation. If thisinformation is displayed when you load the .php file you
created into a Web browser, then PHP is installed. Next,check the Configure Command entry for the with-mysqloption. If this is present, your PHP installation is set up towork with MySQL.
If PHP does not work or is not configured to work withMySQL, you may need to install PHP. If you are runningLinux, first check with the vendor of your Linux distributionto see if they have a prepackaged binary version of PHPavailable. This provides an easy way to install PHP. If abinary version is not available, you will need to install PHPfrom source code.
You can download the PHP source code from the PHPWeb site at www.php.net. This site also provides detailedinstructions for installing PHP on a wide variety of systems.The download will be in the form of a .tar.gz archive. Youcan use the tar zxf command to expand the files fromthe archive. After the files are extracted, you will need touse a configure command to choose how PHP will beconfigured, and then compile PHP following the instructions.
TEST THE PHP INSTALLATION
MySQL
220
TEST THE PHP INSTALLATION
516922 Ch12.F 9/26/02 11:40 AM Page 220

› Type ?> to end the PHP script.
ˇ Press Ctrl-X and then Y to save the file and exit the editor.
Note: Use the appropriate command for the editor you are using.
Á Type the URL for the test file into a Web browser.
■ If the PHP information is displayed, PHP is working on your server.
For Windows servers, a binary version of PHP is available fromthe PHP Web site at www.php.net. PHP for Windows is availablein two packages: one as a .zip archive, and a second as an .exefile that automatically begins the installation. Both packagesinclude built-in support for MySQL, so you do not need tochange the configuration to support MySQL.
If you are using Microsoft's IIS (Internet Information Server)or PWS (Personal Web Server), included with some versions ofWindows, the .exe version of the PHP binary will automaticallyconfigure your server to work with PHP.
If you are using the Apache Web server under Windows,download the .zip version of the PHP package. This includeseverything you need to support PHP as an Apache module. Atthis writing, this feature only works reliably with PHP 1.x, anddoes not yet support the new PHP 2.x versions.
The www.php.net site includes links to external sites where youcan find binary versions of PHP for Mac OS X, Novell NetWare,and a variety of other systems.
221
USING MYSQL WITH PHP 12
516922 Ch12.F 9/26/02 11:40 AM Page 221

⁄ Type cd followed by the name of a directory on your Web server and press Enter.
Note: This assumes you have downloaded the phpMyAdmin installation file to the same directory.
¤ Type tar zxf filename, replacing filename with the name of the .tar.gz file, and press Enter.
■ The files are extracted into a new directory.
‹ Type cd phpmyadmin-version, replacing version with the version you downloaded, and press Enter.
› Type pico config.inc.php and press Enter.
Note: Use the appropriate editor command on your system. The file may end in .php3, depending on the version you downloaded.
P hpMyAdmin is a free, open source applicationthat gives you a user-friendly interface to a MySQLdatabase or an entire MySQL server. While this
program is written in PHP and requires PHP, you can useit to manage your databases and tables even if you do notknow how to program in PHP. This utility allows you tocreate databases and tables, browse through data, andperform most MySQL queries from a Web interface.
To use phpMyAdmin, you must first download and installit. Because it is written in PHP, it should work on mostWeb servers that support PHP. You can download thephpMyAdmin installation files from the project's Webpage at www.phpmyadmin.net.
The installation files are available in two formats, with thePHP or PHP3 extension. You can use whichever version will
best work on your server. In most cases, the version withPHP extensions will work best. Downloads are available invarious archive formats, including .tar.gz, typically used onUNIX systems, and .zip, usually used under Windows.
To install phpMyAdmin, you can simply install the files fromthe archive in a directory on your Web server. After the filesare in place, you will need to edit the config.inc.php file andspecify a username, password, and hostname for theMySQL server.
After you install phpMyAdmin, you can use it to performmost of the same functions as the MySQL monitor fromany Web browser. This is very useful for beginners toMySQL and even for experienced users who want a moreconvenient interface to the database.
INSTALL AND TEST PHPMYADMIN
MySQL
222
INSTALL AND TEST PHPMYADMIN
516922 Ch12.F 9/26/02 11:40 AM Page 222

ˇ From the editor, specify the URL where you have installed phpMyAdmin.
Á Specify the username to access the MySQL server.
‡ Specify the password for the MySQL user.
° Specify the hostname of the MySQL server.
· Press Ctrl-X and then Y to save the file and exit the editor.
‚ Type the URL where you installed phpMyAdmin into a Web browser.
■ You can now access the databases and tables permitted for the username you specified.
Note: See the security notes in the Extra section.
Note: You may want to create a user specifically for running phpMyAdmin. See Chapter 11 for details.
You can use phpMyAdmin to perform virtually any task on the MySQLserver, including dangerous tasks like dropping a database or running aDELETE query. Because you have specified a MySQL username andpassword in phpMyAdmin's configuration, anyone who can access theWeb page can access the database.
Because of this, you should secure the directory where you haveinstalled phpMyAdmin in some way. Most Web servers allow you tocreate an .htaccess file that requires a username and password. Youcan secure the page in this way, or place it on a private Web server ora secure directory you have already configured.
In addition to securing the Web location where phpMyAdmin is installed,you should also use a username and password in the configuration filethat allow only a minimum of access. You can create a special user inMySQL that has access to only a certain database, and this way otherdatabases are inaccessible from the phpMyAdmin utility.
See Chapter 11 for information on creating users in MySQL and assigningprivileges. The phpMyAdmin Web page at www.phpmyadmin.net/ hasmore information on security and authentication.
223
USING MYSQL WITH PHP 12
516922 Ch12.F 9/26/02 11:40 AM Page 223
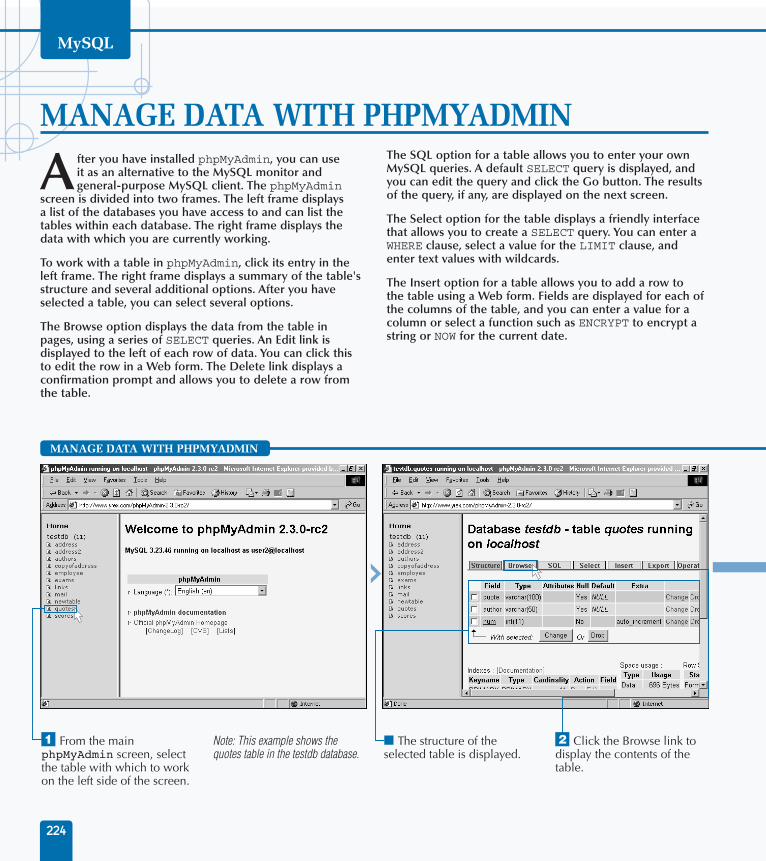
⁄ From the main phpMyAdmin screen, select the table with which to work on the left side of the screen.
Note: This example shows the quotes table in the testdb database.
■ The structure of the selected table is displayed.
¤ Click the Browse link to display the contents of the table.
After you have installed phpMyAdmin, you can useit as an alternative to the MySQL monitor andgeneral-purpose MySQL client. The phpMyAdmin
screen is divided into two frames. The left frame displaysa list of the databases you have access to and can list thetables within each database. The right frame displays thedata with which you are currently working.
To work with a table in phpMyAdmin, click its entry in theleft frame. The right frame displays a summary of the table'sstructure and several additional options. After you haveselected a table, you can select several options.
The Browse option displays the data from the table inpages, using a series of SELECT queries. An Edit link isdisplayed to the left of each row of data. You can click thisto edit the row in a Web form. The Delete link displays aconfirmation prompt and allows you to delete a row fromthe table.
The SQL option for a table allows you to enter your ownMySQL queries. A default SELECT query is displayed, andyou can edit the query and click the Go button. The resultsof the query, if any, are displayed on the next screen.
The Select option for the table displays a friendly interfacethat allows you to create a SELECT query. You can enter aWHERE clause, select a value for the LIMIT clause, andenter text values with wildcards.
The Insert option for a table allows you to add a row tothe table using a Web form. Fields are displayed for each ofthe columns of the table, and you can enter a value for acolumn or select a function such as ENCRYPT to encrypt astring or NOW for the current date.
MANAGE DATA WITH PHPMYADMIN
MySQL
224
MANAGE DATA WITH PHPMYADMIN
516922 Ch12.F 9/26/02 11:40 AM Page 224
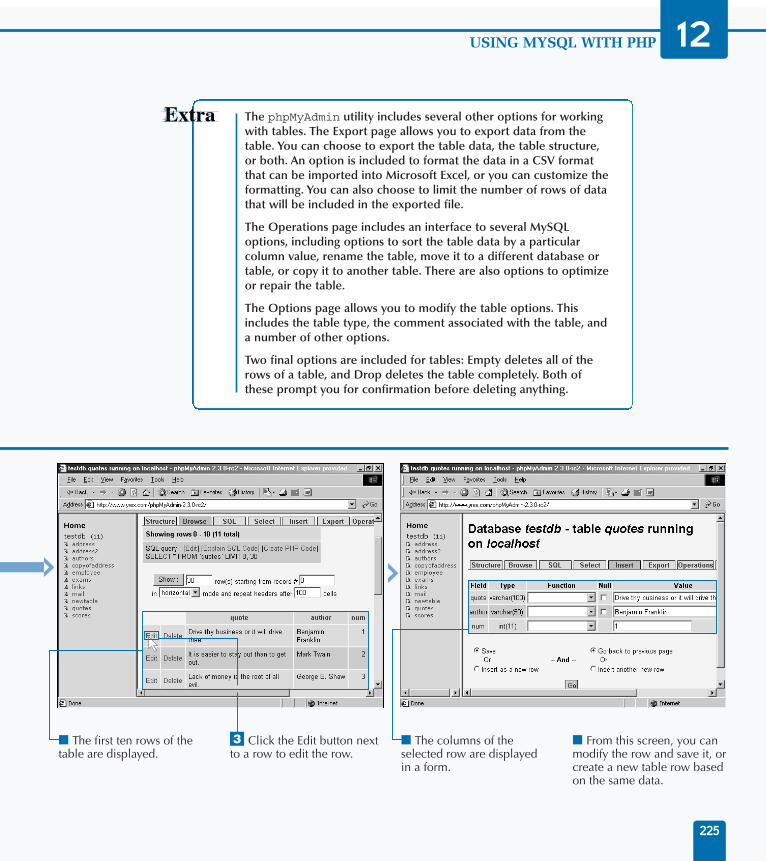
■ The first ten rows of the table are displayed.
‹ Click the Edit button next to a row to edit the row.
■ The columns of the selected row are displayed in a form.
■ From this screen, you can modify the row and save it, or create a new table row based on the same data.
The phpMyAdmin utility includes several other options for workingwith tables. The Export page allows you to export data from thetable. You can choose to export the table data, the table structure,or both. An option is included to format the data in a CSV formatthat can be imported into Microsoft Excel, or you can customize theformatting. You can also choose to limit the number of rows of datathat will be included in the exported file.
The Operations page includes an interface to several MySQLoptions, including options to sort the table data by a particularcolumn value, rename the table, move it to a different database ortable, or copy it to another table. There are also options to optimizeor repair the table.
The Options page allows you to modify the table options. Thisincludes the table type, the comment associated with the table, anda number of other options.
Two final options are included for tables: Empty deletes all of therows of a table, and Drop deletes the table completely. Both ofthese prompt you for confirmation before deleting anything.
225
USING MYSQL WITH PHP 12
516922 Ch12.F 9/26/02 11:40 AM Page 225
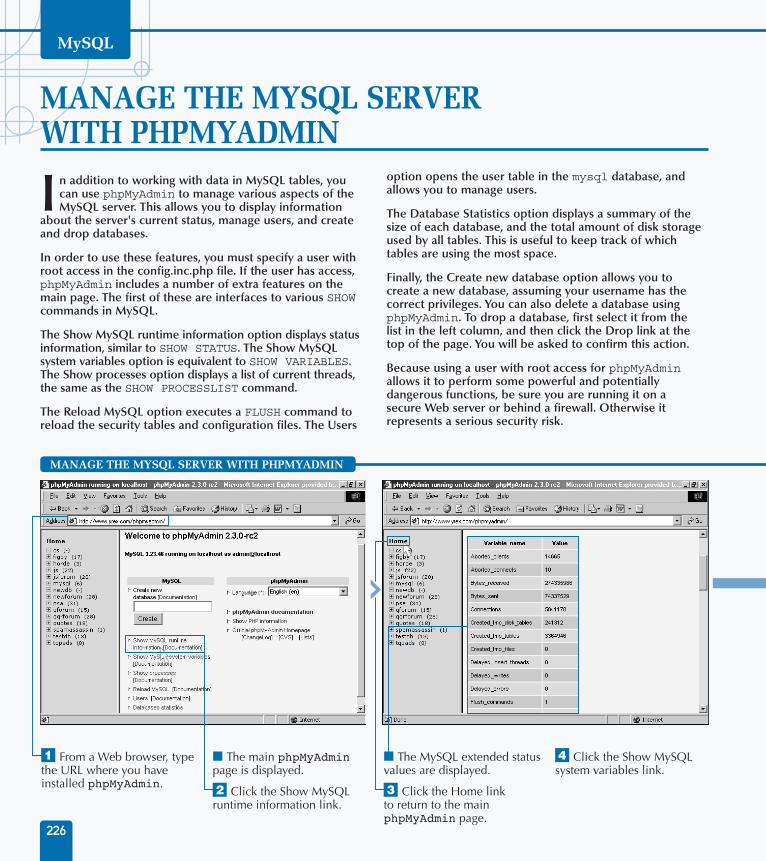
⁄ From a Web browser, type the URL where you have installed phpMyAdmin.
■ The main phpMyAdmin page is displayed.
¤ Click the Show MySQL runtime information link.
■ The MySQL extended status values are displayed.
‹ Click the Home link to return to the main phpMyAdmin page.
› Click the Show MySQL system variables link.
In addition to working with data in MySQL tables, youcan use phpMyAdmin to manage various aspects of theMySQL server. This allows you to display information
about the server's current status, manage users, and createand drop databases.
In order to use these features, you must specify a user withroot access in the config.inc.php file. If the user has access,phpMyAdmin includes a number of extra features on themain page. The first of these are interfaces to various SHOWcommands in MySQL.
The Show MySQL runtime information option displays statusinformation, similar to SHOW STATUS. The Show MySQLsystem variables option is equivalent to SHOW VARIABLES.The Show processes option displays a list of current threads,the same as the SHOW PROCESSLIST command.
The Reload MySQL option executes a FLUSH command toreload the security tables and configuration files. The Users
option opens the user table in the mysql database, andallows you to manage users.
The Database Statistics option displays a summary of thesize of each database, and the total amount of disk storageused by all tables. This is useful to keep track of whichtables are using the most space.
Finally, the Create new database option allows you tocreate a new database, assuming your username has thecorrect privileges. You can also delete a database usingphpMyAdmin. To drop a database, first select it from thelist in the left column, and then click the Drop link at thetop of the page. You will be asked to confirm this action.
Because using a user with root access for phpMyAdminallows it to perform some powerful and potentiallydangerous functions, be sure you are running it on asecure Web server or behind a firewall. Otherwise itrepresents a serious security risk.
MANAGE THE MYSQL SERVERWITH PHPMYADMIN
MySQL
226
MANAGE THE MYSQL SERVER WITH PHPMYADMIN
516922 Ch12.F 9/26/02 11:40 AM Page 226

■ The System variables and their values are displayed.
ˇ Click the Home link to return to the main phpMyAdmin page.
Á Click the Show processes link.
■ The MySQL server's current process list is displayed.
‡ Click the Home link to return to the main phpMyAdmin page.
When you select the Users option, the user table in the mysqldatabase is opened, and the list of current users is displayed. The Editlink next to each username allows you to change the user's hostnameand assign privileges. The Delete link deletes a user. The Grants linkdisplays the current list of privileges granted to a user, and allows youto delete or modify the privileges.
The Users page also includes a form that allows you to create a newuser. You can specify the hostname the user is allowed to connectfrom, a password, and the privileges the user should be assigned fora particular database.
You can also open the mysql database directly in phpMyAdmin towork with the various security tables. Keep in mind that this featureis potentially dangerous; if you mistakenly delete the root user, forexample, you can lose access to the server. See Chapter 11 for moreinformation about managing MySQL security.
For details on using phpMyAdmin to manage a MySQL server, see theofficial documentation. The complete phpMyAdmin documentation isusually installed when you set up this utility. To access your local copyof the documentation, follow the phpMyAdmin documentation linkon the main page.
227
USING MYSQL WITH PHP 12
516922 Ch12.F 9/26/02 11:40 AM Page 227

⁄ Type <?php to start the PHP script.
Note: You will usually want to include basic HTML tags, as shown here.
¤ Type mysql_connect( to begin the command.
Before you can use any MySQL functions in PHP, youmust first open a connection to the MySQL server.You can do this using the mysql_connect function.
To use this function, specify a hostname, username, andpassword for the MySQL server:
$link=mysql_connect("localhost", "testuser","testpw");
This command opens a connection to the MySQL serverand returns a link identifier that can be used to performoperations on the server. In this example, the identifier isstored in the $link variable. If the connection to the serveris not opened successfully, the boolean value false isreturned, and an error message is displayed.
If you do not specify one or more of the parameters for themysql_connect command, PHP assumes default values. Itattempts to use localhost as the server hostname, the
username the Web server uses for PHP, and no password. Ifthese values do not work on your MySQL server, an errorwill be returned unless you specify a valid hostname,username, and password.
After you have opened a connection to the MySQL server,you can use the connection throughout the PHP script. Ifyou only have a single connection to a single server open,you can use it without needing the link identifier.
The connection to the MySQL server stays open until yourPHP script ends, or until you explicitly close the connection.To close a connection, use the mysql_close commandand specify the link identifier returned when you openedthe connection. This command closes the link opened bythe previous example:
mysql_close($link);
CONNECT TO A MYSQL SERVER
MySQL
228
CONNECT TO A MYSQL SERVER
516922 Ch12.F 9/26/02 11:40 AM Page 228

‹ Add the hostname, username, and password for your MySQL server.
Note: See Chapter 11 for information on creating a username and password.
› If desired, add a variable to store the link identifier returned by mysql_connect.
ˇ End the command with a closing parenthesis and a semicolon, and press Enter.
Á Type ?> to end the script.
Note: Add any commands to work with the server before this tag.
■ This completes the PHP script to connect to MySQL.
MySQL also supports persistent connections. This is a special type ofconnection that stays open even after the PHP script ends. If the sameuser attempts to connect to the server a second time, PHP finds theexisting connection and returns its identifier rather than returning anew connection.
To use persistent connections, use mysql_pconnect() to open theconnection. The arguments for this function are the same as for thestandard mysql_connect()function. You cannot close a persistentconnection manually; instead, the server will keep the connectionopen until MySQL's wait_timeout period expires. See Chapter 10for information on setting this timeout value on a MySQL server.
Example:$link=mysql_pconnect("localhost", "testuser", "testpw");
// Add statements that use the database server here
Persistent connections can be more efficient in an application wherethe same user will make many queries on different PHP scripts. In asimple application, they are less efficient because connections are leftopen and not used further, and MySQL may run out of connectionsfor future clients.
Persistent connections only work if PHP is running as a module on anApache Web server. They are not currently supported when PHP isrun as a CGI program or on other Web servers.
229
USING MYSQL WITH PHP 12
516922 Ch12.F 9/26/02 11:40 AM Page 229

Note: Start with a basic HTML document.
⁄ Type <?php and ?> to begin and end the PHP script.
¤ Type mysql_connect to begin the statement that connects to the database, and add the details for the server, username, and password.
‹ Type mysql_select_db followed by the database name to select the database for future queries.
› Type mysql_query to begin the function that sends the query to the MySQL server, and add the query and a variable to store the result identifier.
After you have connected to the MySQL server from aPHP script, you can run one or more MySQL queries.Often, you will want to send a SELECT query to the
server and display the resulting data. PHP includes anumber of ways to receive data from the SQL server.
As with the MySQL monitor, before you can make a query,you must select a database. To do this, use the mysql_select_db function. To use this function, specify thedatabase name as a string:
mysql_select_db("testdb");
After you have selected a database, you can send an SQLquery to the server using the mysql_query function. Touse this function, specify the query as a string. The followingexample sends a simple SELECT query to the server:
$result=mysql_query("SELECT quote, authorFROM quotes");
If the query is successful, the mysql_query functionreturns a result identifier. In this example, the $resultvariable stores the result identifier. You can use thisidentifier later in the script to display the query results.
While the result identifier indicates that the query wassuccessful, this only means that MySQL understood thequery — it does not mean there are definitely one or morerows of data in the result. If the query is unsuccessful, themysql_query function returns a FALSE value instead.Some queries, such as INSERT and DELETE, do not returndata from the server. In this case, mysql_query simplyreturns TRUE if the query was successful.
To display query results, you can use the mysql_fetch_rowfunction. This function accepts a result identifier, and returnsthe next row of the result as an array. The array includes all ofthe columns of the result in order. You can repeat thefunction to retrieve all of the result rows. The followingexample uses a while loop to retrieve all of the rows:
while(list($quote, $author) =mysql_fetch_row($result)) {
echo "<p>$quote --$author</p>"; }
This example retrieves each row into the $quote and$author variables. These are used with an echo statementto display each row as an HTML paragraph. The listfunction allows the array returned by mysql_fetch_rowto be stored in two regular variables instead of an array, andis a convenient way to handle simple queries.
DISPLAY QUERY RESULTSMySQL
230
DISPLAY QUERY RESULTS
516922 Ch12.F 9/26/02 11:40 AM Page 230

ˇ Type while to begin the loop, and add the mysql_fetch_row statement. Include braces to enclose the loop.
Á Type echo to begin the statement that displays each row. Add the string to display and a closing bracket to end the loop.
‡ Load your PHP document into a Web browser.
■ The rows of data are displayed within the HTML document.
Note: This example uses the quotes table in the testdb database. You can import this table from the CD-ROM.
USING MYSQL WITH PHP
You can optionally specify a link identifier from mysql_connect asa second parameter to the mysql_select_db and mysql_queryfunctions. However, these and most other MySQL functions in PHPdefault to using the last connection you opened, so this is usually notnecessary.
You can use the mysql_db_query function to avoid selecting adatabase first. This function is similar to mysql_query, but accepts adatabase name as its first parameter.
To use this script or any PHP script you create, you must first save theedited file, and then upload it to your Web server that supports PHP.If you are using PHP version 3, save the file with the .php3 extension.For PHP version 4, save the file with the .php extension.
After the file is saved, you will need to upload it to the correctdirectory of the Web server. You can do this using the same programyou use to upload HTML documents. Typically this is done using theFTP protocol.
After the file is uploaded to the server, you can use a Web browser todisplay the result. PHP does not require a particular browser becauseit creates HTML output. PHP pages display just like HTML pages.
231
12
516922 Ch12.F 9/26/02 11:40 AM Page 231

Note: Start with a basic HTML document.
⁄ Type <?php and ?> to begin and end the PHP script.
¤ Type mysql_connect followed by the correct user, password, and hostname to connect to the database.
‹ Type mysql_select_db followed by the database name to select the database for future queries.
› Type $result = mysql_query to begin the function that sends the query to the MySQL server, and add the query in quotation marks.
Note: This example uses the quotes table in the testdb database. You can import this table from the CD-ROM.
When you use the mysql_fetch_row function toretrieve rows from a query, you must specify thecolumn names in the query and retrieve them in
the same order. If you are trying to use a query that returnsall columns of a table, and are unsure of the order thecolumns will be returned in, you can use mysql_fetch_object instead.
For example, suppose you have made the following queryto the MySQL server. This query retrieves all columns andall rows from the quotes table.
$result=mysql_query("SELECT * FROM quotes");
To retrieve the data, you can use mysql_fetch_object.This returns an object whose properties are the columnvalues for the row. Thus, you can refer directly to theMySQL column names rather than assigning your ownvariable names to each column. The following while loopuses the mysql_fetch_object function to retrieve anddisplay each row:
while($row = mysql_fetch_object($result)) {echo "<p>$row->quote --$row->author</p>";
}
In this example, the $row variable stores each row. You canuse the -> operator to refer to each MySQL column nameas a property of the object. Thus, you can refer to the quotecolumn as $row->quote and the author column as $row->author. Because the MySQL query specified the wildcard* rather than specific column names, all columns of thetable are available from the object.
You can use whichever function you are most comfortablewith to return data from a MySQL query. The data returnedis the same; only the method you use to access it changes.PHP includes several other fetch commands that returnthe results in different formats, such as mysql_fetch_assocto store the data in an associative array. This type of arrayuses column names to index the results rather than numericindexes.
STORE QUERY RESULTS AS OBJECTS
MySQL
232
STORE QUERY RESULTS AS OBJECTS
516922 Ch12.F 9/26/02 11:40 AM Page 232

ˇ Type while to begin the loop that iterates through the rows of data. Add the statement to retrieve a row and an opening brace to begin the loop.
Á Type echo followed by a string using the $row object to display the row. Add the closing brace to end the loop.
‡ Load your PHP document into a Web browser.
■ The rows of data are displayed within the HTML document.
If you are running into MySQL errors while attempting to use a database fromPHP, it is useful to display the results within your PHP script. The followingPHP script adds if statements to check whether each MySQL commandsucceeded. It displays an appropriate error message if any command fails.
Example:<?php
$link = mysql_connect("localhost", "testuser", "testpw");
if (!$link) echo "Failed to connect to MySQL server!";
$status=mysql_select_db("testdb");
if (!$status) echo "Failed to select database!";
$result=mysql_query("SELECT * FROM quotes");
if (!$result) echo "The MySQL query failed!";
while($row = mysql_fetch_object($result)) {
echo "<p>$row->quote --$row->author</p>"; }
?>
This example checks the results of the mysql_connect, mysql_select_db,mysql_query, and mysql_fetch_object commands. All of these return aFALSE value if they fail. The one condition that these do not account for is ifthe query succeeds but returns a zero-row result. If this happens, the whileloop will end immediately without displaying any data.
233
USING MYSQL WITH PHP 12
516922 Ch12.F 9/26/02 11:40 AM Page 233

Note: Start with a basic HTML document.
⁄ Type <?php and ?> to begin and end the PHP script.
¤ Type mysql_connect followed by the username, host, and password to connect to the MySQL server.
‹ Type mysql_select_db followed by the database name to select the database.
Note: This example uses the testdb database and the scores table. You can import this table from the CD-ROM.
› Type $query= followed by the MySQL query in quotation marks.
ˇ Type $success = mysql_query ($query); to create the statement that sends the query to the server.
You can use the mysql_query command in PHP tosend an INSERT query to the MySQL server. Whenyou do this, a result identifier is not returned because
an INSERT query does not return any data from the MySQLserver. Instead, the result returned from mysql_query is asimple true or false value that indicates whether thequery was successful.
For example, the following PHP statements add a record tothe scores table and display a message indicating success orfailure:
$query="INSERT INTO scores (name, score)VALUES ('Fred', 92)";$success = mysql_query($query);if ($success) echo "The INSERT query wassuccessful.";
else echo "Error: INSERT query failed.";
This example stores the query in the $query variable, andthen uses the mysql_query function to send the query to
the MySQL server. The result of the query is stored in the$success variable. The if statement checks this variableand displays a success message, and the else statementdisplays an error message if the insert was unsuccessful.Unlike SELECT queries, an INSERT query does not return aresult identifier. The result stored in the $success variablewill be a simple TRUE or FALSE value.
As with other MySQL queries, you must first connect to theMySQL server using the mysql_connect function, andthen select a database with mysql_select_db beforeattempting to insert a row. You must be connected using aMySQL username that has the INSERT privilege for thetable you are using in the INSERT command.
Because double quotation marks are used to define the$query string, you cannot use double quotes inside thequery. You can substitute single quotation marks within thequery. Only values to be stored in text columns need to bequoted. You can use a PHP variable within the INSERTquery by including its name in the $query string.
INSERT A RECORD FROM PHP
MySQL
234
INSERT A RECORD FROM PHP
516922 Ch12.F 9/26/02 11:40 AM Page 234

Á Type if to begin the statement that checks whether the query succeeded, followed by echo and the success message in quotation marks.
‡ Type else to begin the statement that checks for an error, and type echo followed by the error message.
° Load the PHP document into a Web browser.
■ The displayed message indicates whether the INSERT query was successful.
If a table includes an auto-increment column, it will automatically be updated with a newunique value each time you insert a record. After you have inserted a row into a table fromPHP, you can use the mysql_insert_id function to find out what number was assigned tothe auto-increment field in the INSERT query.
This technique is useful because you now have a value that you can use to find the insertedrow in a subsequent query. Without this feature, you would have to use a separate query tofind the newest row, and even that may find a row inserted by a different user.
For example, the following PHP code inserts a row into the quotes table and then displaysthe ID assigned to the auto-increment field.
Example:$link=mysql_connect("localhost", "testuser", "testpw");
mysql_select_db("testdb");
$query = "INSERT INTO quotes (quote, author) VALUES ";
$query .= "('Union gives strength.', 'Aesop')";
$success = mysql_query($query);
if ($success) {
echo "The INSERT query was successful.";
echo "The record number is: " + mysql_insert_id();
} else echo "Error: INSERT query failed.";
You can optionally specify a link identifier from mysql_connect with the mysql_insert_idfunction. If you do not use an identifier, the most recent connection used is assumed.
235
USING MYSQL WITH PHP 12
516922 Ch12.F 9/26/02 11:40 AM Page 235

Note: Start with a basic HTML document.
Note: This example uses the scores table in the testdb database.
⁄ Type <?php and ?> to begin and end the PHP script.
¤ Type mysql_connect followed by the username, password, and hostname to connect to the MySQL server.
‹ Type mysql_select_db followed by the database name to select the database.
› Type $query= followed by the DELETE query.
ˇ Type $success=mysql_ query($query); to send the query to the server.
You can also use PHP to send a DELETE query to theMySQL server. As with an INSERT query, when youuse the mysql_query function with a DELETE
query, a simple true or false result is returned thatindicates whether the delete was successful.
To delete one or more rows of a table, you usually will needto specify a WHERE clause. Without this clause, all records ofthe table would be deleted. The following PHP statementssend a DELETE query to the MySQL server:
$query="DELETE FROM scores WHERE name ='fred'";$success=mysql_query($query);if ($success) echo "The DELETE query wassuccessful.";
else echo "Error: DELETE query failed.";
These statements store the query in the $query variableand send it to the MySQL server using the mysql_queryfunction. The if statement displays a message if theDELETE query succeeded, and the else statement displaysa message if the query failed.
Note that a failed query is not the same as a nonmatchingWHERE clause. If the WHERE clause does not match anyrecords, the mysql_query function will still succeed. Thequery will only fail if the server cannot be reached, or ifthere is a syntax error in the query.
You can find out how many rows were affected by theDELETE query with the mysql_affected_rows function.This function returns the number of rows affected by themost recent DELETE, INSERT, or UPDATE query. You canuse this to determine how many rows the WHERE clausematched.
DELETE RECORDS USING PHP
MySQL
236
DELETE RECORDS USING PHP
516922 Ch12.F 9/26/02 11:40 AM Page 236

Á Type if ($success) to check whether the query is successful, and type echo followed by a success message.
‡ Type else echo followed by the message to display if the query fails.
° Load the PHP document into a Web browser.
■ The message indicates whether the query was successful.
You can also use the mysql_query function in PHP to send an UPDATE query to the MySQL serverto modify one or more rows of a table. As with an INSERT or DELETE query, the result of an UPDATEquery is a TRUE or FALSE value indicating whether the query was successful. You can use themysql_affected_rows function to determine how many rows were affected by the UPDATE query.
The following example updates the quotes table. It uses the MySQL function UPPER to convert thequote field of each row to uppercase, and then displays the number of affected rows.
Example:<?php
mysql_connect("localhost", "testuser", "testpw");
mysql_select_db("testdb");
$query="UPDATE quotes SET quote = UPPER(quote)";
$result = mysql_query($query);
$numrows = mysql_affected_rows();
if ($result) echo "Rows updated: $numrows";
else echo "Error: UPDATE query failed.";
?>
As with other MySQL queries, the mysql_query function will return a TRUE value indicatingsuccess even if no rows were modified by the query. This can happen if you have used a WHEREclause that did not match any rows of the table. Your script can check the mysql_affected_rowsfunction to make sure the correct number of rows has been updated.
237
USING MYSQL WITH PHP 12
516922 Ch12.F 9/26/02 11:40 AM Page 237

Note: Start with a basic HTML document.
Note: This example uses the quotes table in the testdb database.
⁄ Type <form> and </form> to define the HTML form.
¤ Type <input> to define the form fields.
‹ Type <?php and ?> to begin and end the PHP script.
› Type if ($add) to begin a statement that checks whether the form has already been submitted.
ˇ Type mysql_connect followed by the username, password, and hostname to connect to the MySQL server.
Á Type mysql_select_db followed by the database name to select the database.
One of the strengths of PHP is its ability to workdirectly in an HTML document. You can createan HTML form and use a PHP script in the same
document to write the data entered into the form to aMySQL database. As an example, you can create an HTMLform and PHP script that allow you to add a row to thequotes table.
The <form> tag in HTML starts an HTML form. You can usethe action attribute of the <form> tag to specify the CGIor PHP program that handles the results of the form. In thecase of PHP, you can specify the same file that contains theform itself. The following HTML defines a form that calls theadd.php script:
<form method="get" action="add.php">Quote: <input type="text" name="quote"><br>Author: <input type="text"name="author"><br><input type="submit" name="add"value="Submit"></form>
After you have defined the form, you can create the PHPscript to handle the form results. PHP automatically storesthe form values as variables. In this case, the $quote and$author variables store the entered data. You can makethese variables part of an INSERT query and send it to theMySQL server with the mysql_query function. Thefollowing PHP code adds a record from the form:
if ($add) {mysql_connect("localhost", "testuser",
"testpw");mysql_select_db("testdb");
$query="INSERT INTO quotes(quote, author)";$query.=" VALUES( '$quote','$author')"; $result=mysql_query($query);
if ($result) echo "<b>Added one rowsuccessfully.</b>";}
The if statement checks the $add variable, which is setwhen the Submit button has been clicked. The rest of thescript creates a query and sends it to the MySQL server.
CREATE A FORM TO ADD RECORDS
MySQL
238
CREATE A FORM TO ADD RECORDS
516922 Ch12.F 9/26/02 11:40 AM Page 238

‡ Type $query= followed by the beginning of the MySQL query.
° Type $query.= followed by the conclusion of the MySQL query.
· Type $result=mysql_ query($query); to send the query to the MySQL server.
‚ Type if ($result) to check the result, and type echo followed by a message to display if the query was successful.
— Load the PHP document into a Web browser.
■ The HTML form is displayed.
± Enter some data and click the Submit button.
■ The form is displayed again, and a message indicates that the INSERT query was successful.
The form in this example uses the <form> HTML tag to begin aform. Within the <form> and </form> tags, you can use variousHTML tags to define form elements for different input types. Thisexample uses two different input types.
The <input type="text"> tag defines a text input field. Thename attribute assigns a name to the field. This name is used asthe PHP variable name to store the data entered into the field.
The <input type="submit"> tag is also used in this example.This tag defines a Submit button. When you click this button, theform data is submitted to the script specified in the actionattribute of the <form> tag. This tag has a name attribute to namethe button, and a value attribute to define the text displayed onthe button.
The Submit button in this example has the name add and the value"Submit". As with other form fields, this name is used as a PHPvariable name when you submit the form to a PHP script. The ifstatement within the PHP script checks for the $add variable to seewhether the form has already been submitted.
239
USING MYSQL WITH PHP 12
516922 Ch12.F 9/26/02 11:40 AM Page 239

Note: Start with a basic HTML document.
Note: This example uses the quotes table in the testdb database. You can import this table from the CD-ROM.
⁄ Type <form> and </form> to define the HTML form.
¤ Type <input> to define the form fields.
‹ Type <?php and ?> to begin and end the PHP script.
› Type if ($submit) to begin the statement that checks whether the Submit button has been clicked.
ˇ Type echo followed by text to display at the beginning of the search results.
Á Type mysql_connect followed by the username, password, and hostname to connect to the MySQL server.
‡ Type mysql_select_db ("testdb"); to select the database.
Another common application of PHP is to create asearch engine for a database. You can use an HTMLform and a short PHP script to search a table. The
PHP script runs a SELECT query using the value enteredinto the form and displays the results.
As an example, you can create a form to search the quotestable. The following HTML tags define the form:
<form method="get" action="search.php">Search for: <input type="text"name="search"><input type="submit" name="submit"value="Search"></form>
This defines a form that sends data to search.php, thefilename of the current page. There is one text field namedsearch to specify a search term, and a Submit button namedsubmit. The PHP script can check for the submit button,and if it has been clicked, display the results of a search.The following section of PHP handles the search:
if ($submit) {echo "Searching for: <b>$search</b><br>";mysql_connect("localhost", "testuser",
"testpw");mysql_select_db("testdb");$query="SELECT * FROM quotes WHERE quote
LIKE '%$search%' ";$result=mysql_query($query);while ($row = mysql_fetch_object($result)) {echo "Found: $row->quote --$row->author<br>";
}}
This code creates a SELECT query, placing the $searchvalue from the form into a WHERE clause. It then usesmysql_query to submit the query to MySQL, and a whileloop with the mysql_fetch_object function to displaythe results.
CREATE A DATABASE SEARCH FORM
MySQL
240
CREATE A DATABASE SEARCH FORM
516922 Ch12.F 9/26/02 11:40 AM Page 240

° Type $query= followed by the SELECT query.
· Type $result=mysql_query ($query); to send the query to the MySQL server.
‚ Type while followed by the statement to fetch a row from the result.
— Type echo to begin the statement that displays the search results.
± Load the PHP document into a Web browser.
¡ Enter a search term and click the Search button.
■ The results of the search are displayed.
You can use a separate SELECT query using the COUNT(*) keyword to count the number of resultsthat will be returned from the query. This is useful in a large table, because displaying all of the rowsand counting them would be slow. It is also useful if your script needs to display data in multiplepages. You can use the count to determine a LIMIT clause to use for each page of data.
The following PHP code could be added to the example to display a count before the search results.
Example:$q="SELECT COUNT(*) FROM quotes AS c WHERE quote LIKE '%$search%' ";
$cr=mysql_query($q);
$r = mysql_fetch_object($cr);
echo "Number of quotes found: $r->c";
This example uses the $q variable to store the count query, and the $cr variable for the result of thequery. It retrieves a row of the result using mysql_fetch_object into the $r variable. Only a singlerow is returned, and the $r->c field is the number of records found.
PHP also includes the mysql_num_rows function. This function accepts a result identifier as aparameter, and returns the number of rows in the result. You can use this to find out how many rowsa SELECT query returned without using COUNT. However, this technique is very inefficient becauseit requires the MySQL server to process the entire SELECT. It is better to use COUNT unless you willbe retrieving all of the rows from the SELECT query.
241
USING MYSQL WITH PHP 12
516922 Ch12.F 9/26/02 11:40 AM Page 241

Perl, originally an acronym for Practical Extraction andReport Language, is a sophisticated and powerfullanguage included on most UNIX systems. Perl is one
of the most popular languages for use with dynamic Webpages, and includes everything you need to create powerfulapplications that connect with MySQL databases.
This is only a brief introduction to Perl. For completedocumentation as well as downloadable versions of Perl andother packages, visit the Perl web page: www.perl.com/.
INTRODUCING PERLMySQL
242
The Perl Interpreter
After Perl is installed, the Perl interpreter, perl, isavailable. This program reads Perl scripts and outputs theirresults. The Perl interpreter is included on many Linux andUNIX systems and can be installed on Windows.
Perl can also be handled by the mod_perl module ofthe Apache Web server. This allows Perl scripts to behandled efficiently by the Web server itself.
Basic Syntax
Perl files usually begin with a shell header that tells thesystem where the Perl interpreter is located. Thefollowing is a typical example:
#!/usr/local/bin/perl
After this line, the script can contain one or more Perlstatements. Each statement ends with a semicolon.
Create Output
The print command is the most common way tocreate output in Perl. You can follow this command withan expression in quotation marks. Perl also includes avariety of other quoting methods to allow you toefficiently specify text to be printed.
Example:print "This is a test.";
Using Variables
Like most languages, Perl supports variables, orcontainers that can store a value such as a number or textstring. Perl variables begin with the $ symbol, as in $textand $score. You do not need to declare variables beforeusing them, and a variable can store any type of data.
Perl variables can be included in a text string if it usesdouble quotes. Strings defined with single quotes are notevaluated for variables. The following example defines avariable called $text and then prints it with a message:
Example:$text = "Hello there.";
print "Here is the text: $text";
Using Arrays
An array is a special type of variable that can storemultiple values, indexed with numbers or text strings.Perl uses @ followed by the variable name to refer to anarray as a whole, and $ followed by the name and anindex in square brackets to refer to an element of thearray. The following example assigns values to twoelements of the score array:
Example:$score[0]=59;
$score[1]=95;
Operators
Perl supports a number of standard operators. You canuse these within any Perl statement to work withnumbers or strings. Some of the most commonoperators are described in the table.
OPERATOR MEANING
+ Addition
- Subtraction
* Multiplication
/ Division
% Modulo (remainder)
. Concatenation (combines strings)
516922 Ch13.F 9/26/02 11:40 AM Page 242

243
USING MYSQL WITH PERL 13
Regular Expressions
One of Perl's most powerful features is the ability towork with regular expressions. These are patternsconsisting of text and special characters to searchstrings of text. The following are some of the mostuseful special characters within regular expressions:
CHARACTER DESCRIPTION
. Matches any character
^ Matches the beginning of a string
$ Matches the end of a string
* Repeats the previous character zero ormore times
+ Repeats the previous character one ormore times
? Repeats the previous expression zero orone time
You can search using a regular expression with the =~operator. The following example searches the $textstring for the text search followed by any number ofcharacters:
$text =~ /search.*/;
Loops
Perl supports loops, or blocks of statements that can berepeated a number of times. The simplest of these is thewhile loop, which checks a condition and repeats theblock of statements as long as the condition is true.
Example:while ($num < 30) {
$num = $num + 1;
print "The number is $num.";
}
Packages
One of Perl's most powerful features is the ability toadd packages, or modules, that support additionalfunctions. For example, a package is available to workwith databases such as MySQL. To use a package in aPerl script, add the use statement and the packagename at the beginning of the script.
Example:use DBI;
Perl and MySQL
The DBI package adds numerous functions to Perl forworking with databases, tables, queries, and results. Theprocess of installing this package is explained in "Installthe Perl DBI," later in this chapter. Using the functionsprovided by this package, you can do anything from Perlthat you can do from the MySQL monitor or other clients.
Conditional Statements
You can use the if statement in Perl to perform one ormore statements conditionally. This statement uses aconditional expression followed by a block of Perlstatements enclosed in braces. For example, this ifstatement displays a message if the $num variable has avalue greater than 30:
if ($num > 30) {print "It's bigger than30.";}
The condition in an if statement can use a variety ofconditional operators. The table describes some of themost common conditional operators.
OPERATOR MEANING
== Is equal to (numeric)
eq Is equal to (string)
!= Is not equal to (numeric)
ne Is not equal to (string)
> Is greater than (numeric)
< Is less than (numeric)
>= Is greater than or equal to
<= Is less than or equal to
&& Logical AND
|| Logical OR
516922 Ch13.F 9/26/02 11:40 AM Page 243

⁄ From the UNIX command prompt, type cd followed by a directory name where the source code will be stored and press Enter.
¤ Type wget followed by the URL for the source distribution and press Enter.
■ The file is now downloaded.
‹ Type tar zxf stable.tar.gz and press Enter to extract the Perl source files into their own directory.
› Type cd perl-version and press Enter, replacing version with the current Perl version.
ˇ Type rm -f config.sh Policy.sh and press Enter to remove unneeded files.
Á Type sh Configure -de and press Enter.
■ The Configure program scans your system.
Perl is included with most Linux distributions. If youare using an operating system that does not includePerl, or need to upgrade to the latest version, it is
easy to install from source code. Binary distributions arealso available for most systems. To test whether Perl isalready installed on your system, try the followingcommand at the command prompt:
perl -v
This command displays version information for the currentPerl installation, if any. If the command fails, either Perl isnot installed or your path is not configured correctly for theperl command.
To install or upgrade Perl, download the latest sourcedistribution. This is available from the Perl Web page atwww.perl.com/. The download is in the form of acompressed .tar.gz archive.
After you have expanded the files from this archive, run theConfigure script. This is an automated script that tests
various aspects of your system configuration and sets upoptions to compile the source code. After the Configurescript is finished, you can use the following commands tocompile and install the Perl distribution:
makemake testmake install
You can also install Perl from a binary RPM package undermany Linux distributions, and a wide variety of otherpackages are available. See the Downloads section atwww.perl.com for details. To install Perl on a Windowssystem, see the section "Install Perl under Windows," laterin this chapter.
Perl can be expanded with modules that add supportfor additional features, including the MySQL modulesdescribed later in this chapter. Most of these are availablefrom CPAN, the Comprehensive Perl Archive Network,along with a great deal of documentation for Perl. You canreach CPAN at this URL: www.perl.com/CPAN/index.html.
INSTALL PERL UNDER UNIXMySQL
244
INSTALL PERL UNDER UNIX
516922 Ch13.F 9/26/02 11:40 AM Page 244

‡ After Configure finishes, type make and press Enter.
■ This compiles the source code. This may take several minutes.
° Type make test and press Enter.
■ This tests the Perl binaries before installing them.
· Type make install and press Enter.
■ The Perl files are now installed.
Perl is included with many Linux distributions, and binary packagesare available for others. Most of these are available in a packageformat such as RPM, which can be installed using a simple command,and do not require you to configure or compile Perl yourself.
After you have installed the Perl interpreter, you can use Perl scriptson the Web using the CGI interface with most Web servers. If youare using the Apache Web server, you can also install the mod_perlmodule. This module allows you to use Apache modules written inPerl, and also interprets Perl scripts directly within the Web server,while making more efficient use of system resources. This module isavailable from the following URL: http://perl.apache.org/.
The Apache Web server software itself is included with many Linuxdistributions. You will need this or another Web server to use Perlfor Web applications. Apache is open source software and isavailable from the Apache Software Foundation at the followingURL: www.apache.org/.
Perl can connect to many database systems, including MySQL,with installable modules. The process of installing these modulesfor MySQL support on most systems is explained in "Install the PerlDBI" and "Install the MySQL DBD," later in this chapter.
245
USING MYSQL WITH PERL 13
516922 Ch13.F 9/26/02 11:40 AM Page 245

⁄ After you start the installer, a Welcome message is displayed. Click the Next button to begin the installation.
■ The license agreement is displayed.
¤ Accept the license agreement and click Next to continue.
If you are using MySQL on a Windows-based server,Perl is also available in a Windows distribution. The mostpopular Windows version of Perl is ActivePerl, developed
by ActiveState. The distribution for ActivePerl is availablefrom the following URL: www.activestate.com/ActivePerl/.
ActivePerl requires approximately 55MB of free disk space.It also requires Internet Explorer 5.0 or later and ServicePack 5 or later for Windows NT 4.0 systems. It should installon most Windows 2000 and Windows XP systems withoutadditional software. The other system requirements arelisted on the download page.
ActivePerl is distributed as an .msi file. This is a formatused by Microsoft's Windows Installer utility. The installer isincluded with Windows 2000 and Windows XP. For Windows95, 98, or ME systems, you can download the installer fromMicrosoft and install it before installing ActivePerl. Apackage that uses an alternate installer is also available.
After you have downloaded ActivePerl, double-click the.msi file to begin the installation. The Setup Wizard firstdisplays an introductory screen, and then displays theActivePerl license agreement. After you accept thelicense agreement and click Next, you can choose whichcomponents to install and the location for the installed files.
The final screen of the Setup Wizard asks whether to addPerl to your PATH setting and whether to associate .pl fileswith the Perl interpreter. Click Next from this screen, andthen click Install to complete the installation.
After the installation is complete, switch to the new PERLdirectory from a command prompt window. Within thisdirectory you will find an example Perl script, example.pl.Type perl example.pl to test this script. If it displays abrief Hello message and no error messages, ActivePerl isworking on your system.
INSTALL PERL UNDER WINDOWS
MySQL
246
INSTALL PERL UNDER WINDOWS
516922 Ch13.F 9/26/02 11:40 AM Page 246

■ The next screen allows you to choose components and the install location.
‹ Make any changes desired and click Next to continue.
■ The final options screen is displayed.
› Click Next, and then click Install on the following screen to complete the installation.
ActivePerl
ActivePerl includes optional modules to work withMicrosoft's IIS Web server, included with Windows 2000Server and Windows XP Server. You can choose to installthese modules within the Setup Wizard when you areinstalling ActivePerl. For more information about IIS, seeMicrosoft's Web site: www.microsoft.com/iis/.
The Apache Web server is also available for Windowssystems. If you do not have a Web server already, Apacheis a good choice and is available at no charge. The 32-bitWindows version of Apache is provided as an .msi file forMicrosoft's Windows Installer utility and as an .exe filethat includes the Window Installer. You can downloadApache for Windows from the Apache SoftwareFoundation's Web site: www.apache.org/.
Apache 2.0, the most recent stable release, is tested andreliable on Windows systems, and a good alternative toMicrosoft's IIS for many users. As with the UNIX versionof Apache, you can install the mod_perl module todirectly support Perl scripts from within the Web server.
To use MySQL with ActivePerl, you will need to install theDBD and DBI modules for MySQL support. The process ofinstalling these modules is described later in this chapter.
247
USING MYSQL WITH PERL 13
516922 Ch13.F 9/26/02 11:40 AM Page 247

MySQL
⁄ Type cd followed by the directory name where the .tar.gz file was downloaded and press Enter.
¤ Type tar zxf followed by the name of the downloaded file and press Enter.
■ The files are expanded into a new directory.
‹ Type cd followed by the new directory name and press Enter.
› Type perl Makefile.PL and press Enter.
ˇ Type make and press Enter.
■ This compiles the files.
Á Type make test and press Enter.
■ The compiled files are now tested.
‡ Type make install and press Enter.
■ The DBI files are now installed.
248
INSTALL THE PERL DBI
The DBI package for Perl supports a number ofdifferent database systems. Because it uses the samesyntax for all database servers, you can use it to write
portable Perl applications that work with any supporteddatabase server. Along with the DBI, you will need to installa separate database driver, or DBD, for each database serveryour applications will be working with.
The DBI for Perl is available from the MySQL Web page,www.mysql.com/, in the Downloads section. For UNIXsystems, this is distributed as a .tar.gz archive. You canexpand this archive and use the following commands tocompile and install the DBI:
perl Makefile.PLmakemake testmake install
The first command sets up the compilation options for yoursystem. The make command compiles the programs for theDBI. The make test command runs some tests to make sure
the files work correctly, and make install installs the DBIin your Perl libraries. If the final command does not displayany error messages, the DBI should work on your server.
If you run into trouble with installation, there is somedocumentation on the Perl DBI within the MySQLdocumentation, available from the MySQL Web site. Afterthe installation, you will need to install the DBD for MySQL.
Under Windows systems, you can use the Perl PackageManager (PPM) included with ActiveState's Perl distributionto automatically install the DBI. To use this, start thec:\perl\bin\ppm.pl program from a command promptwindow, and then type the following command:
install DBI
MySQL also provides a downloadable Perl distribution forWindows that includes the DBI and DBD modules requiredfor your scripts to connect to a MySQL server. See theDownloads page at the MySQL Web site for a link to thisdistribution.
INSTALL THE PERL DBI
516922 Ch13.F 9/26/02 11:40 AM Page 248

⁄ Type cd followed by the directory name where the .tar.gz file was downloaded and press Enter.
¤ Type tar zxf followed by the name of the downloaded file and press Enter to expand the files into a new directory.
‹ Type cd followed by the new directory name and press Enter.
› Type perl Makefile.PL and press Enter.
ˇ Type 1 to choose MySQL support and press Enter.
■ The Perl files are configured for your system.
Á Type make and press Enter.
■ This compiles the files.
‡ Type make test and press Enter.
■ The compiled files are now tested.
° Type make install and press Enter.
■ The DBD files are now installed.
249
The DBI package cannot access a MySQL database, orany database, by itself. It requires a DBD, or databasedriver, module for each database server. The MySQL
DBD actually supports both MySQL servers and mSQLservers in the same module. You can download the DBDfrom the Downloads section of the MySQL Web page,www.mysql.com/.
The DBD distribution file is in the .tar.gz format and usuallyhas a filename such as Msql-Mysql-modules-1.2216.tar.gz.After you have downloaded this file, you use the samesequence of commands used for the DBI module to installthe package:
perl Makefile.PLmakemake testmake install
The make test command runs some tests on thecompiled files, and the make install command installs
the files on your system. If these commands do not displayany error messages, the DBD is successfully installed. If yourun into trouble with the installation, consult thedocumentation at the MySQL Web site.
After the DBI and DBD modules are installed, you canbegin to use Perl scripts to connect to a MySQL server andmake queries. If you are writing a Perl application that willuse MySQL, you need to include a use command at thebeginning of the script to load the DBI package. A separatecommand for the DBD module is not required. Thefollowing command loads the DBI package in Perl:
use DBI;
After this module is loaded, you can use the variousmethods, or built-in functions, to work with MySQL.For example, the DBI->connect method connects to aMySQL server, as described in the next section. Completedocumentation for the various DBI functions is includedas part of the MySQL documentation, available from theMySQL Web site at www.mysql.com/.
INSTALL THE MYSQL DBD
INSTALL THE MYSQL DBD
USING MYSQL WITH PERL 13
516922 Ch13.F 9/26/02 11:40 AM Page 249

⁄ Open Notepad or another text editor to create the Perl script.
¤ Type #!/usr/bin/perl to begin the Perl script.
Note: Specify the correct path for Perl on your system.
‹ Type use DBI; to load the DBI package.
› Type print to begin the command to output the CGI header, and add the Content-type header.
ˇ Type print to begin the commands that begin and end the HTML document, and add the appropriate HTML tags.
Note: See the Extra section for further information about CGI.
After you have loaded the DBI package within a Perlscript, you can use the methods built into the DBI toaccess MySQL. To connect to a MySQL server, you
use the DBI->connect method. To use this method, firstcreate a single string that includes the database type,mysql, the database name, and the hostname. For example,use DBI:mysql:testdb:localhost to connect to thetestdb database on the local host.
To connect to the database, specify the string you created,the username for the MySQL server, and the password. Ifyou do not specify a username or password, the DBI usesthe default values defined by the DBI_USER and DBI_PASSenvironmental variables. The following example connects tothe server at the local host and selects the testdb database:
use DBI;
$dbh = DBI->connect( "DBI:mysql:testdb:localhost","testuser", "testpw");
The connect method returns a database handle object,here stored in the $dbh variable. You can use the methodsof this object to send queries to the MySQL server andretrieve the results. If the connection to the MySQL serveris unsuccessful, the connect method returns a false valueinstead. You can test this variable to determine whether theconnection was successful. The following if statementchecks the database handler and prints a message if theconnection was successful:
if ($dbh) {print "Connected to MySQLsuccessfully.";}
else {print "Error: can't connect toMySQL.";}
When you are finished using the connection to MySQL, youcan use the disconnect method to end the connection.You use this method with the database handle. Thefollowing example disconnects from the MySQL server:
$dbh->disconnect;
CONNECT TO A MYSQL SERVER
MySQL
250
CONNECT TO A MYSQL SERVER
516922 Ch13.F 9/26/02 11:40 AM Page 250

Á Type $dbh = DBI->connect followed by the database name, hostname, username, and password to connect to the MySQL server.
Note: Be sure to specify the correct hostname, username, and password for your server.
‡ Type if and else to begin the statements that indicate whether the connection was successful, and add the print commands.
° Load the Perl document into a Web browser.
■ The displayed message indicates whether the connection was made.
Note: You will need to upload the Perl file to a Web server before you can use it.
251
USING MYSQL WITH PERL 13
When you use a Perl script as a CGI script on a Web server, youneed to send the output in HTML as it will be interpreted bythe Web browser. Before any output, your Perl script shouldfirst send a Content-type header to indicate that the rest ofthe page is interpreted as HTML. The following section of theexample code uses a print statement to send this header andthen prints the basic tags to begin the HTML document:
Example:print "Content-type:text/html\n\n";
print "<html><head><title>Connecting to MySQL";
print "</title></head><body>";
When you send output within a CGI program, be sure to useHTML tags to format it correctly. For example, you cannot enda line using the standard \n code, as it will be ignored by thebrowser. You can send a line break tag, <br>, or format the textinto paragraphs using <p> and </p> tags instead.
516922 Ch13.F 9/26/02 11:40 AM Page 251

Note: Open the Perl script in a text editor.
⁄ Type the Perl header and use DBI; to load the DBI package.
¤ Type print to begin the statements that send a CGI header and start and end the HTML document, and add the header and HTML tags.
‹ Type $dbh = DBI->connect and add the correct database name, hostname, username, and password to connect to the MySQL server.
Note: Be sure to use the correct hostname, username, and password for your system.
› Type $query = followed by the MySQL query to store the query in a variable.
After you have made a connection to a MySQL serverfrom a Perl script, you can send a MySQL query tothe server. One way to do this is to use the prepare
method of the database handler. This accepts a query as aparameter, and prepares a statement handler object toexecute the query. The query is not yet sent to the server.The following example prepares a query:
$query = "SELECT quote, author FROM quotes";
$sth = $dbh->prepare($query);
This method returns a statement handler object, stored inthe $sth variable here. After you have prepared the query,you can use the execute method on the statement handlerto send the query to the MySQL server. The followingexample executes the query in the $sth object:
$result = $sth->execute;
This executes queries that do not return a result, such asINSERT or DELETE, immediately. For a SELECT query,the query is started. You can then use one of the fetchmethods to retrieve each row of the result. One suchmethod is fetchrow_array, which fetches a row from theMySQL server and stores its fields in an array. The followingexample uses a while loop to print each row of the queryresult:
while(@row = $sth->fetchrow_array) {print "<p>$row[0] —$row[1]</p>"; }
The columns of the result are returned in order, startingwith zero. Thus, in this example, $row[0] represents thequote column, and $row[1] represents the author column.The print statement prints each row, formatted as anHTML paragraph.
DISPLAY QUERY RESULTS
MySQL
252
DISPLAY QUERY RESULTS
516922 Ch13.F 9/26/02 11:40 AM Page 252

ˇ Type $sth = $dbh->prepare($query); to prepare the query.
Á Type $result = $sth->execute; to start the query.
‡ Type while to begin the loop that retrieves and displays each row of the result, and add the fetchrow_array method to retrieve a row from the table.
° Type print followed by the text that will be displayed with each row, including the variable values.
Note: Save the document and upload it to a Web server.
· Load the Perl document into a Web browser.
■ The results of the query are displayed.
USING MYSQL WITH PERL 13
253
The DBI includes a number of different fetch methods, and you can use any of themto retrieve the results of a SELECT query. For example, the fetchrow_hashrefreturns each row as a reference to a hash table containing each column name and itscorresponding value. This is not as efficient as the fetchrow_array method, butallows you to refer to result columns by their MySQL column name rather than bynumber.
For example, the following Perl code sends a SELECT query to the MySQL server, andthen uses a while loop with the fetchrow_hashref method to display the resultsof the SELECT query.
Example:use DBI;
$dbh = DBI->connect("DBI:mysql:testdb:localhost",
"testuser", "testpw");
$query = "SELECT quote, author FROM quotes";
$sth = $dbh->prepare($query);
$result = $sth->execute;
while($hash = $sth->fetchrow_hashref) {
print "<p>$hash->{quote} --$hash->{author}</p>"; }
516922 Ch13.F 9/26/02 11:40 AM Page 253

⁄ Type the Perl header and use DBI; to load the DBI package.
¤ Type print followed by the CGI header.
‹ Type print followed by the HTML tags to format the output.
› Type $dbh = DBI->connect followed by the database name, hostname, username, and password to connect to the MySQL server.
ˇ Type $query = followed by the MySQL query.
Á Type $rows = $dbh->do($query); to execute the query.
‡ Type if and else and add the statements to print the result.
° Load the Perl document into a Web browser.
■ The displayed message indicates that the record was successfully inserted.
You can use Perl to perform an INSERT query on theMySQL server to add a record to a table. Because anINSERT query is simple and does not return a result,
you do not need to use the prepare method. Instead, youcan use the do method of the database handler. Thisfunction accepts a MySQL query and executes itimmediately.
As with other DBI methods, you must first use the connectmethod to open a connection to a MySQL server and selecta database. To use the do method, specify the databasehandler that was returned by the connect method andspecify a MySQL query. The following statements store anINSERT query in the $query variable and use the domethod to execute the query:
$query = "INSERT INTO scores (name, score)VALUES ('Fred', 92)";
$rows = $dbh->do($query);
The do method returns the number of rows affected by thequery. Because a single record should have been added bythe INSERT query, the $rows variable will be nonzero ifthe insert succeeded. You can use an if statement to checkthe number of rows and print a message indicating whetherthe row was successfully inserted:
if ($rows > 0) {print "Inserted recordsuccessfully.";}
else {print "Error: INSERT query failed.";}
Because the do method does not return a statementhandler, you cannot use it to process a SELECT query.However, it works well for queries that return the numberof rows affected rather than returning rows of data, such asINSERT, UPDATE, and DELETE.
INSERT A RECORD FROM PERLMySQL
254
INSERT A RECORD FROM PERL
516922 Ch13.F 9/26/02 11:40 AM Page 254

⁄ Type the Perl header and use DBI; to load the DBI package.
¤ Type print followed by the CGI header.
‹ Type print followed by the HTML tags to format the document.
› Type $dbh = DBI->connect followed by the correct database name, hostname, username, and password to connect to the MySQL server.
ˇ Type $query= followed by the MySQL query.
Á Type $rows = $dbh->do($query); to execute the query.
‡ Type if and else followed by the statements to print the result.
° Load the Perl document into a Web browser.
■ The displayed message indicates that the DELETE query was successful.
255
You can also use Perl to send a DELETE query to theMySQL server to delete one or more records. As withthe INSERT query, you can use the do method to
execute the query and return the number of rows that weredeleted.
To delete one or more rows of a table, create a DELETEquery that includes a WHERE clause. The WHERE clause willdetermine the rows to be deleted. Without this clause, theentire contents of the table would be deleted. The followingstatements store a DELETE query in the $query variableand execute the query using the do method:
$query = "DELETE FROM scores WHERE name ='fred'";
$rows = $dbh->do($query);
As with the INSERT query, you can check the returnedresult in the $rows variable to determine that the rows
were deleted successfully. The following statements checkthe result and display a message:
if ($rows > 0) {print "Deleted recordsuccessfully.";}
else {print "Error: DELETE query failed.";}
Note that a failed query is not the same as a query that didnot match any rows. If the query was invalid or caused aMySQL error, the do method returns zero. If the querysimply matches no rows, it returns the special value "0E0".Perl treats this value as true, but numerically it is evaluatedto zero. If you use an if statement like the following, it willprint a success message if the query succeeded, regardlessof whether it affected any rows:
if ($rows) {print "DELETE query wassuccessful.";}
DELETE RECORDS USING PERLUSING MYSQL WITH PERL 13
DELETE RECORDS USING PERL
516922 Ch13.F 9/26/02 11:40 AM Page 255

⁄ Type the Perl header and use DBI; to load the DBI package.
¤ Type print followed by the CGI header.
‹ Type print followed by the HTML tags to format the output.
› Type print <<EOF; followed by the HTML tags for the search form.
ˇ Type if to begin the statement that detects when the form is submitted.
Á Type $dbh = DBI->connect followed by the database name, hostname, username, and password to connect to the MySQL server.
You can use Perl to send the results of an HTML formto a MySQL query. For example, you can create asearch form to search the quotes table. To output the
form, you can use a special Perl syntax that allows you toinclude several rows of content to output. The followingPerl code displays the form:
print <<EOF;
<form method="get" action="search.pl">
Search for: <input type="text"name="search">
<input type="submit" name="submit"value="Search">
</form>
EOF
The print << syntax means that everything starting on thenext line and ending with the text EOF should be output.This allows you to include HTML directly within the Perlscript. When the user clicks the Search button, the formdata is sent to the Perl script in the QUERY_STRINGenvironmental variable. The following if statementchecks this variable:
if ($ENV{'QUERY_STRING'} =~ /search=(.*)&/){
This statement uses a regular expression to look for thefield name search in the query string. It uses the (.*)expression to capture the value of the search field. Perlstores this value in the $1 variable, and it can then be usedto create a MySQL query.
After you have created the MySQL query in the $queryvariable, you can use the prepare method to prepare thequery and the execute method to send it to the server.
WORK WITH WEB FORMS
MySQL
256
WORK WITH WEB FORMS
516922 Ch13.F 9/26/02 11:40 AM Page 256

‡ Type $query= followed by the MySQL query.
° Type $sth = $dbh->prepare($query); to prepare the query.
· Type $result = $sth->execute; to execute the query.
‚ Type print to begin the statement that prints a heading for the search results.
— Type while to begin the loop that displays each row of the search results.
± Load the Perl document into a Web browser.
¡ Type a search term and click the Search button.
■ The results of the search are displayed below the form.
USING MYSQL WITH PERL 13
257
You can simplify the use of HTML forms and their results using CGI.pm, apopular Perl package. You can download this package and view itsdocumentation at this URL: http://stein.cshl.org/WWW/CGI/.
The following example shows the search form example rewritten to usethis package.
Example:use DBI;
use CGI qw(:standard);
print header, start_html("Search Form"), start_form, "Search for: ",
textfield('search'), submit, end_form;
if (param()) {
$s=param('search');
print "<p>Searching for: <b>$search</b></p>";
$dbh = DBI->connect("DBI:mysql:testdb", "testuser", "testpw");
$query = "SELECT quote,author FROM quotes WHERE QUOTE LIKE '%$s%' ";
$sth = $dbh->prepare($query);
$result = $sth->execute;
while(@row = $sth->fetchrow_array) {
print "<p>$row[0] --$row[1]</p>"; }
}
print end_html;
516922 Ch13.F 9/26/02 11:40 AM Page 257

ALTERTo modify the definition of a database table. MySQL supports theALTER TABLE command for this purpose.
BITThe smallest unit of storage in computer memory. A bit can storean on or off value and represents the numbers zero or one.
BYTEThe standard unit of storage in computer memory. A byte iscomprised of 8 bits, and can represent numbers from 0 to 255.Multiple bytes can be combined to store larger numbers.
CLIENTAn application or interface that accesses an application on a server,such as a MySQL database server. The MySQL monitor is acommand-line client for MySQL.
COLUMNAn item of data that can be stored in a database table. Each columnstores a specific type of data, and stores one value for each row ofdata. Columns are sometimes known as fields.
CONDITIONAn expression that can be evaluated to a true or false value.Conditions can be used in a WHERE clause to select rows of datafrom a table.
DATABASEA combination of one or more tables stored in a single directory. AMySQL server can store any number of databases.
DATABASE MANAGEMENT SYSTEM (DBMS)A software application that stores data in files and organizes it intocolumns, rows, and tables. MySQL is a database management system.
DEFAULTThe value that is stored in a column when no value is explicitlyassigned. If you do not specify a default value for a table column,MySQL uses zero or the NULL value, depending on the column type.
DROPTo delete a column, table, or database. This action is accomplishedwith MySQL commands such as DROP TABLE and DROPDATABASE.
FIELDSee column.
FLOATING POINTA type of numeric data that can be stored in a database. Floatingpoint numbers support fractional values and exponents, and canhave any number of decimal places. MySQL data types such asFLOAT and DOUBLE support floating point numbers.
GRANTTo allow a user one or more privileges for a database or table.MySQL privileges are assigned with the GRANT command.
HEAPA type of MySQL table that stores data in RAM memory rather thanon disk, most often used for temporary tables.
INDEXA file that stores pointers to rows in a table for a particular columnor columns. An index can be assigned to any column in a MySQLtable. Indexed columns are known as keys.
INDEXED SEQUENTIAL ACCESSMETHOD (ISAM)A method for storing data in files that can be accessed sequentiallyas well as through one or more indexes, or keys. MySQL supportsISAM as a table type. The default table type, MyISAM, is animproved version of this system.
INSERTTo add one or more rows to an existing table in a database. MySQLsupports the INSERT command for this purpose.
INTEGERA number with no decimal portion. MySQL includes severalcolumn types devoted to storing integers, such as INT andTINYINT.
JOINTo retrieve data from two or more tables using a relationshipdefined by two or more columns that match between the tables.This is accomplished with the SELECT command in MySQL, eitherspecifying multiple tables or using the JOIN keyword explicitly.
KEYA column in a database table that has been indexed. Values for akey column can be used to quickly access a row of data withouthaving to search sequentially through the table.
APPENDIX
258258
GLOSSARY
6516922 AppA.F 9/26/02 11:41 AM Page 258

GLOSSARY AMYSQLA database management system (DBMS) that runs on UNIX,Windows, and a variety of other systems. MySQL supports the SQLquery language.
MYSQL MONITORA command-line interface, or client, for MySQL. This utility allowsyou to enter MySQL queries. It sends each query to a MySQLserver and displays the results. The mysql command starts themonitor on most systems.
MYSQL SERVERA computer running the MySQL server software. This softwaretakes requests, or queries, from clients, and acts on them tomanage one or more databases.
NULLA special value meaning that no value has been explicitly assignedto a column. In MySQL, a column with the NULL attribute isallowed to store NULL values.
PERLAn open source language widely used for text processing and Webprogramming. Perl modules are available for use with MySQLdatabases.
PHPAn open source server-side language that runs on Web servers andintegrates with HTML files. PHP includes features for working withMySQL databases.
PRIMARY KEYA column that contains a unique value for each row of a table, andcan be used to refer to a single row.
PRIVILEGEAn action that a user or group is allowed to perform on a table ordatabase, such as creating a table or deleting records. MySQL’ssecurity system allows combinations of privileges to be assigned tousers to control access.
QUERYA command in the SQL language to request data or performanother action on a database server. Queries are sent from theclient to the server, and the server returns the results.
RECORDSee row.
REVOKETo take away one or more access privileges from a user in MySQL’ssecurity system. The REVOKE command in MySQL is used for thispurpose.
ROWAn element of a database table. A table can store any number ofrows. Each row contains a value for each of the table’s definedcolumns. Rows are sometimes known as records.
SECURE SOCKETS LAYER (SSL)A standard for secure, encrypted communication between clientsand servers. SSL is used for secure Web services and is alsosupported by MySQL clients and servers.
SELECTA type of SQL query that uses the SELECT command to requestone or more rows of data from a table to be returned to the client.SELECT supports a variety of clauses to control the amount andtype of data returned.
SERVERA hardware or software service that accepts requests from clientsand acts on them. The MySQL software acts as a database server.
STRINGA text value that can be stored in a database column. MySQLincludes a number of column types and functions for working withstrings.
STRUCTURED QUERY LANGUAGE (SQL)A standardized language for retrieving data from database tables,inserting data, creating and modifying tables, and performing otherdatabase management functions. MySQL’s query language is basedon the SQL standard.
TABLEThe basic element of data storage in a MySQL database. Each tableis defined to store one or more columns, each assigned a specifictype of data. The table can store a number of rows, each of whichincludes a value for each defined column.
TIMESTAMPA numeric value that represents a specific date and time, oftenused for time logging of events. MySQL includes a TIMESTAMPcolumn type to store these values. Timestamp columns areautomatically updated with the current date and time when a rowis added or modified.
UNIQUE INDEXA type of index that requires a unique value in each row of thetable for the column or columns being indexed. A primary key is aspecial type of unique index.
UPDATETo modify one or more existing rows of a table. MySQL supportsUPDATE queries for this purpose.
259259
6516922 AppA.F 9/26/02 11:41 AM Page 259

MySQL includes CREATE and DROP commands forcreating and deleting databases and tables. Thesecommands are described in the following sections.
CREATE AND DELETE TABLES AND DATABASES
COLUMN DATA POSSIBLE TYPE DESCRIPTION OPTIONS
INT or Integer UNSIGNED, ZEROFILLINTEGER
TINYINT Integer (0-255) UNSIGNED, ZEROFILL
SMALLINT Integer UNSIGNED, ZEROFILL
MEDIUMINT Integer UNSIGNED, ZEROFILL
BIGINT Integer UNSIGNED, ZEROFILL
REAL Floating-point UNSIGNED, ZEROFILL
DOUBLE Floating-point UNSIGNED, ZEROFILL
FLOAT Floating-point UNSIGNED, ZEROFILL
DECIMAL Decimal UNSIGNED, ZEROFILL
CHAR Text (fixed) BINARY
VARCHAR Text (variable) BINARY
TEXT Text (variable)
TINYTEXT Text (variable)
COLUMN DATA POSSIBLE TYPE DESCRIPTION OPTIONS
MEDIUMTEXT Text (variable)
LONGTEXT Text (variable)
BLOB Binary (variable)
TINYBLOB Binary (variable)
MEDIUMBLOB Binary (variable)
LONGBLOB Binary (variable)
ENUM Enumerated data (single)
SET Enumerated data (multiple)
DATE Date
TIME Time
DATETIME Date and Time
TIMESTAMP Date and Time (automatic)
Specify Columns
The CREATE TABLE command requires that you specifyone or more columns for the new table. To define acolumn, specify a column name, column type, and anyoptions. Separate the column definitions with commasand enclose the entire column list in parentheses.
Along with the specific column options listed in thetable, all columns can have the NULL or NOT NULLattributes. This indicates whether the column can storea NULL value. You can also specify DEFAULT followedby a default value for the column, and AUTO_INCREMENTto create an auto-increment column.
Indexes and Keys
You can include the PRIMARY KEY keyword within aCREATE TABLE command to specify a primary key.Specify one or more column names for the primary key
in parentheses. Specify the INDEX keyword to create anindex on one or more columns, or UNIQUE for a uniqueindex. Specify an index name followed by one or morecolumn names in parentheses.
CREATE TABLE
This command creates a new table within the currentdatabase. To use this command, specify the table name,one or more column definitions, and any table options.You can also specify the IF NOT EXISTS keywordsbefore the table name to suppress an error message ifthe specified table already exists.
Example:CREATE TABLE inventory (
itemno INTEGER UNSIGNED NOT NULL PRIMARY KEY,
description VARCHAR(200),
price DECIMAL (9,2),
count TINYINT ) TYPE=ISAM;
260
APPENDIX
6516922 AppB.F 9/26/02 11:41 AM Page 260

MYSQL COMMAND REFERENCE B
This command creates a new database. This is afast operation as the database does not yet containany data. You can optionally specify the IF NOTEXISTS keywords before the database name tosuppress an error message if the database alreadyexists.
Example:CREATE DATABASE newdb;
CREATE DATABASE
This command deletes an existing database,including all tables and all of the data they contain.This command does not prompt you forconfirmation, so use it with caution. You canoptionally specify the IF EXISTS keywords beforethe database name to suppress an error message ifthe specified database does not exist.
Example:DROP DATABASE newdb;
DROP DATABASE
TYPE
Specify the column type. The default type, MyISAM, isadequate for most purposes. Alternate types includeBDB, InnoDB, Heap, ISAM, and MERGE.
AUTO_INCREMENT
Use this option to specify the next index number for anauto-increment column. The column values will start atone if this option is not specified.
AVG_ROW_LENGTH
For tables with variable-length rows, specify anapproximate row length. This helps MySQL to optimizedata storage.
CHECKSUM
If this option is set to one, MySQL maintains achecksum value for each row. This makes it easier todetect errors, but decreases performance.
COMMENT
Specify an optional comment in quotation marks as adescription of the table. The comment can be up to 60characters in length.
MAX_ROWS
Specify the maximum number of rows the table willstore.
MIN_ROWS
Specify the approximate minimum number of rows thetable will store.
ROW_FORMAT
Specify DYNAMIC or FIXED to determine whether thetable will use fixed or variable-length rows.
TABLE OPTIONS
At the end of the CREATE TABLE command, you can specify one ormore table options. To use options, specify the option name followedby an equal sign and its value. Separate multiple options with commas.
You can optionally specify aSELECT statement at the end ofthe CREATE TABLE command.This retrieves column names froman existing table and createscorresponding columns in thenew table.
COPY FROM ANOTHER TABLE
261
This command deletes an existing table. This command does notprompt you for confirmation and should be used with caution. Youcan optionally specify the IF EXISTS keywords before the tablename to suppress an error message if the table does not exist.
Example:DROP TABLE IF EXISTS inventory;
DROP TABLE
6516922 AppB.F 9/26/02 11:41 AM Page 261

The ALTER TABLE command in MySQL modifies thedefinition of an existing table. To use ALTER TABLE,specify one or more of the following commands. You
can separate multiple commands with commas.
MODIFY TABLES WITH ALTER TABLE
ADD COLUMN
This command adds a column to an existing table. Youcan specify a list of multiple columns, separated bycommas and enclosed in parentheses.
Example:ALTER TABLE address ADD COLUMN newcol INT;
ADD INDEX and ADD UNIQUE
The ADD INDEX command adds an index to the table.Specify a name for the index followed by one or morecolumn names to index in parentheses. Use ADDUNIQUE to add a unique index.
Example:ALTER TABLE address ADD INDEX newindex (name,address);
ADD PRIMARY KEY
This command adds a primary key to an existing table.It can only be used if the table does not already have adefined primary key. Specify the column or columns forthe primary key in parentheses.
Example:ALTER TABLE address ADD PRIMARY KEY (name);
CHANGE COLUMN
This command changes the definition of an existingcolumn and can also rename the column. To use thiscommand, specify the current column name, the newname, and the new definition of the column. MySQLwill attempt to convert existing data to the new format.
Example:ALTER TABLE address CHANGE COLUMN name nameVARCHAR(50);
ORDER BY
This command sorts the existing data in the table by thecolumn name you specify.
MODIFY COLUMN
This command changes the definition of an existingcolumn. Specify the column name followed by the newcolumn definition.
Example:ALTER TABLE address MODIFY COLUMN nameVARCHAR(100);
DROP COLUMN
This command deletes a specified column from anexisting table. This deletes all data currently stored inthe column
Example:ALTER TABLE address DROP COLUMN newcol;
DROP INDEX
This command deletes an index or unique index. Specifythe index name. This command does not delete any data.
DROP PRIMARY KEY
This command deletes the table's primary key, if one isdefined. You do not need to specify a column name.This command does not delete any existing data.
RENAME TO
This command renames the table. Specify RENAME TOfollowed by the new table name. The TO keyword isoptional.
Example:ALTER TABLE address RENAME TO mailings;
Using Table Options
You can specify table options, such as TYPE for thetable type or COMMENT for a comment about the table,within the ALTER TABLE command.
Example:ALTER TABLE address TYPE=ISAM;
APPENDIX
262
6516922 AppB.F 9/26/02 11:41 AM Page 262

263
MySQL includes the INSERT command to add oneor more rows to a table and the DELETEcommand to delete one or more rows. These are
described in the following sections.
ADD AND DELETE DATAMYSQL COMMAND REFERENCE B
This command adds a row, or multiple rows, to anexisting table. To use INSERT, specify the tablename, column names, and values.
Example:INSERT INTO address (name, address)
VALUES ("John Smith", "181 West 7th");
Insert Options
If you specify the LOW_PRIORITY option beforethe INTO keyword in an INSERT command, MySQLdoes not add the data until no other clients areusing the table. The DELAYED keyword is similar,but the data is held on the server for later insertionand the client does not wait for the operation tocomplete.
Specify the IGNORE keyword to ignore any conflictswith existing data and continue without insertingthat row.
INTO
The INTO keyword is followed by the name of thetable to add data into. You can optionally specify alist of column names in parentheses.
VALUES
The VALUES keyword is followed by the values foreach column of the new row. If you specified a listof columns, specify the values in the same order. Ifyou did not specify a list of columns, a value mustbe specified for each column in the table'sdefinition.
SELECT
You can optionally specify a SELECT statement atthe end of the INSERT command. This retrievesdata from one or more columns of an existing tableand copies it to the specified table.
INSERT
The DELETE command deletes one or more rowsof a table. This command does not prompt you forconfirmation; use it with caution. To use thiscommand to delete all of a table's data, specify theFROM keyword and the table name.
Example:DELETE FROM address;
Delete Options
You can specify one of two optional keywords afterthe DELETE command and before the FROMkeyword. If the LOW_PRIORITY keyword isspecified, MySQL waits until no other clients areusing the table before deleting data. If the QUICKoption is specified, indexes are not updated duringthe delete, which may speed up the process.
WHERE
Specify a WHERE clause and one or more conditionsto choose one or more rows to be deleted. If thisclause is not included, all rows of the table will bedeleted.
Example:DELETE FROM address WHERE name="John Smith";
ORDER BY
In MySQL 4.0 and later, you can optionally specifythe ORDER BY keyword followed by a list ofcolumn names to delete rows in a specified order.
LIMIT
Specify a number after the LIMIT keyword to limitthe number of rows that can be deleted
Example:DELETE FROM address WHERE name > "A" LIMIT 10;
DELETE
6516922 AppB.F 9/26/02 11:41 AM Page 263

The UPDATE command in MySQL makes changes toexisting rows of a table. To use this command, specifythe table name followed by the SET keyword and one
or more pairs of column names and values.
Example:UPDATE address
SET name="John Smith"
WHERE name="J. Smith";
MODIFY EXISTING DATA WITH UPDATE
264
UPDATE Options
You can specify two optional keywords with theUPDATE query. If you specify the LOW_PRIORITYkeyword, the MySQL server waits until no other clientsare using the table before updating the data.
Example:UPDATE LOW_PRIORITY address
SET name = UPPER(name);
The UPDATE command can make a change that resultsin a conflict between two rows in a primary key orunique index column. If this will occur, MySQL displaysan error message and stops the update. If you specifythe IGNORE keyword, MySQL skips any conflicting rowsand continues the update.
WHERE
Specify the WHERE clause with one or more conditionsto control which rows of the table will be updated. Ifthis clause is not specified, all rows of the table areupdated.
Example:UPDATE address
SET address="830 West Terrace"
WHERE name = "John Smith";
LIMIT
If you specify the LIMIT keyword followed by anumber, only the specified maximum number of rowscan be updated.
Example:UPDATE address
SET name = UPPER(name) LIMIT 10;
Multiple Updates
If you include more than one column name and valueafter the SET keyword, all of the columns are updatedat once. This allows for complex updates in a singlecommand. This can also be combined with the WHEREor LIMIT clauses as needed.
Example:UPDATE address
SET address="392 East 10th",
city = "Salt Lake City", state="UT"
WHERE name = "Jane Smith";
APPENDIX
6516922 AppB.F 9/26/02 11:41 AM Page 264

RETRIEVE DATA WITH SELECT
265
The SELECT command returns the values of thecolumns you specify for one or more rows of atable in a MySQL database. This command
supports a variety of options.
MYSQL COMMAND REFERENCE B
Basic SELECT Syntax
Specify one or more column names after the SELECTcommand, separated by commas. You can also specifythe wildcard character * to return values for all columnsin the order defined when the table was created.
Example:SELECT name, address, city, state
FROM address;
WHERE
Specify the WHERE keyword followed by one or moreconditions to choose one or more rows from the table.If this clause is omitted, all rows are returned. Thisclause should be specified immediately after the tablename.
Example:SELECT * FROM address
WHERE name = "John Smith";
ORDER BY
The ORDER BY clause determines the order of the rowsreturned from a SELECT query. Specify one or morecolumn names, separated by commas. For each column,you can specify the ASC (ascending) or DESC(descending) keywords. ASC is the default. You can alsoorder by a MySQL function or formula. The RAND()function is useful for returning rows in random order.
Example:SELECT * FROM address
ORDER BY state ASC, city ASC;
GROUP BY
If you specify the GROUP BY clause, MySQL groups thereturned rows into single rows for each value of thespecified columns. As with ORDER BY, separate thecolumn names with commas and optionally use the ASCor DESC keywords.
Example:SELECT * FROM address
GROUP BY city;
LIMIT
Specify the LIMIT keyword followed by a number toreturn, at maximum, the specified number of rows. Youcan optionally specify two numbers, separated bycommas, in the LIMIT clause. In this case, the firstnumber is the first row of the result to return and thesecond is the maximum number of rows.
Example:SELECT * FROM address LIMIT 10;
Multiple Tables
You can specify two or more table names separatedby commas. This joins data from multiple tables, andrequires a WHERE condition that matches rows betweenthe tables. Specify the table name for each columnname, with a period separating table and column names.
Example:SELECT quotes.quote, quotes.author,
authors.born, authors.died
FROM quotes, authors
WHERE quotes.author = authors.author;
6516922 AppB.F 9/26/02 11:41 AM Page 265

MySQL includes a variety of SHOW commands that displayinformation about databases, tables, and the serveritself. These are described in the following sections.
DISPLAY STATUS INFORMATION
SHOW DATABASES
This command lists all of the databases on the currentserver. Depending on security settings, it may only listthe databases you have access to.
Example:SHOW DATABASES;
SHOW TABLES
This command lists all of the tables stored in the currentdatabase. You can also specify the FROM keyword and adatabase name to list the tables in another database.
SHOW OPEN TABLES
This command is similar to SHOW TABLES, but only liststhe tables that are currently in use or have a cachedconnection. Information about the number of users isdisplayed.
SHOW COLUMNS
This command displays a detailed list of columns for atable. Specify the FROM keyword followed by a tablename. DESCRIBE is equivalent to SHOW COLUMNS FROM.
Example:SHOW COLUMNS FROM address;
SHOW TABLE STATUS
This command displays a detailed list of information foreach table in the current database, including the tabletype, row format, and table options.
SHOW CREATE TABLE
This command displays a CREATE TABLE command tocreate the table specified. This is useful if you need torecreate the table in another database or on anotherserver.
Example:SHOW CREATE TABLE address;
SHOW INDEX
This command lists the indexes or keys defined for thetable you specify with the FROM keyword. The detailedinformation listed for each index includes the columnsto which it applies.
Example:SHOW INDEX FROM address;
SHOW STATUS
This command displays a detailed list of statusinformation for the MySQL server. This information isuseful for determining the server's current use andoptimizing performance.
SHOW VARIABLES
This command lists all of the MySQL system variables.These are usually defined in the configuration file or onthe command line when the MySQL server is started.This listing is useful for checking the server'sconfiguration.
SHOW PROCESSLIST
This command displays a list of processes, or threads,currently running on the MySQL server. The resultsinclude the username, hostname, current command,and an ID number for each process.
Example:SHOW PROCESSLIST;
SHOW GRANTS
The SHOW GRANTS command displays the privilegesgranted to a MySQL user. Specify the FOR keywordfollowed by the username.
Example:SHOW GRANTS FOR testuser;
APPENDIX
266
6516922 AppB.F 9/26/02 11:41 AM Page 266

ADMINISTRATIVE COMMANDS
MySQL includes a variety of administrativecommands for managing tables, processes, users,and various server components.
MYSQL COMMAND REFERENCE B
OPTIMIZE TABLE
The OPTIMIZE TABLE command sorts a table's indexfiles and reclaims any space used by deleted rows. Touse this command, specify the table name.
Example:OPTIMIZE TABLE address;
CHECK TABLE
The CHECK TABLE command checks a table for errors.Specify a table name and optionally one or more of thekeywords QUICK, FAST, CHANGED, MEDIUM, or EXTENDED.
Example:CHECK TABLE address;
REPAIR TABLE
The REPAIR TABLE command attempts to repair adamaged table. You can optionally specify the keywordsQUICK for a fast scan or EXTENDED for a more thoroughscan.
ANALYZE TABLE
The ANALYZE TABLE command analyzes a table'scontent and configures its keys for use in future queries.To use this command, specify the table name.
FLUSH HOSTS
The FLUSH HOSTS command clears the host cachetables MySQL uses to manage access by users fromremote hosts. This allows access by users who werepreviously blocked due to connection errors.
FLUSH LOGS
This command closes and reopens the MySQL log files.It is useful if you have changed logging settings or if youare backing up or deleting old data in the log files.
FLUSH PRIVILEGES
This command reloads the MySQL grant tables, used tocontrol access by users. This is useful if you have madechanges to the tables manually.
FLUSH QUERY CACHE
This command arranges MySQL's cache of queries inmemory to conserve memory. Use the command RESETQUERY CACHE to clear this cache completely.
FLUSH TABLES
This command closes and reopens all MySQL tables,and clears the query cache.
FLUSH STATUS
This command resets most of the status variables thatare shown with the SHOW STATUS command. Thesevariables are also cleared each time you start theMySQL server.
KILL
This command stops a thread on the MySQL server.Specify the process ID number, available from theoutput of SHOW PROCESSLIST.
Example:KILL 3931;
GRANT
The GRANT command grants one or more privileges to auser of the MySQL server. If the user does not alreadyexist, it is created. Specify the privileges to grant, thedatabase and table names, the TO keyword followed bythe username, and the IDENTIFIED BY keywordsfollowed by a password.
Example:GRANT ALL ON testdb.quotes
TO fred IDENTIFIED BY 'password';
REVOKE
The REVOKE command takes away one or more privilegesfrom a user of the MySQL server. Specify the privileges torevoke, the FROM keyword, and the username.
Example:REVOKE ALL ON testdb.quotes FROM fred;
267
6516922 AppB.F 9/26/02 11:41 AM Page 267

MySQL includes a number of utilities that can beused from the command prompt on a UNIX orWindows system. These are described in the
following sections.
COMMAND-LINE UTILITIES
This command starts the MySQL monitor, acommand-line interface that enables you toenter MySQL commands and view theirresults.
COMMAND DESCRIPTION
-? Display a complete list ofoptions
-D Select a database to use
-h Specify the host (server nameor IP address)
-p Specify the password toaccess the server
-P Specify the TCP/IP portnumber for the server
-u Specify a username for theserver
-V Display server version number
After you are in the MySQL monitor, you can type any MySQLcommand. The monitor also supports a number of specialcommands:
COMMAND DESCRIPTION
\c Clears the current command
\e Edits the command in a text editor
\g Executes the current command
\G Executes the current command and displays avertical result
\h Displays a list of commands and their descriptions
\p Displays the current command
\q Exits the MySQL monitor
\r Attempts to reconnect to the server
\s Displays MySQL status information
\ Executes MySQL commands from a specified file
MYSQL
APPENDIX
The mysqladmin utility runs from a client machine and supportsa number of different commands for managing the MySQL server.Type mysqladmin followed by the command name.
Example:mysqladmin extended-status
MYSQLADMIN
COMMAND DESCRIPTION
create Create a database
drop Drop a database
ping Check whether the server isrunning
status Display basic status information
extended-status Display a detailed status report
processlist Show a list of the current MySQLserver processes
COMMAND DESCRIPTION
kill Stop one or more server processes
variables List MySQL variables and theirvalues
version Display the MySQL server versionnumber
shutdown Shut down the MySQL server
password Change the password for thecurrent MySQL user
268
6516922 AppB.F 9/26/02 11:41 AM Page 268

MYSQL COMMAND REFERENCE B
269
OPTION DESCRIPTION
-A or --all-databases Includes all databases onthe server
-C or --compress Attempts to compress data
-B or --databases Backs up multiple databases
—help Displays a complete list ofoptions
-f or --force Ignores MySQL errors
To use mysqldump, specify a database and a list oftables on the command line. If you do not specifytables, the entire database is included in the dump.
OPTION DESCRIPTION
-h or --host Specifies the server hostnamefor the MySQL server
-u or --user Specifies the MySQLusername
-p or --password Specifies the password
-t or --no-create-info Writes data only, no tablestructure
Example:mysqldump -uuser -ppassword testdb address>backup.sql
MYSQLDUMP
The mysqldump utility dumps the contents of a table or an entiredatabase to the screen, and you can redirect its output to a file. Thiscommand creates a file of SQL commands to re-create the table.
The myisamchk utility checks MyISAM tablesfor errors and optionally attempts to repair anyproblems found. This utility works directly onthe MySQL data files, and should be used whilethe server is not running or no users areaccessing the tables being checked.
Example:myisamchk –r /var/mysql/data/testdb/address
The following table describes some of the mostuseful command-line options for themyisamchk utility.
OPTION DESCRIPTION
-e Extended check: slow but more thorough
-m Medium check: faster than extended
-F Fast check: only checks improperly closed tables
-C Checks only tables changed since the last check
-i Displays information about the table while checking
-f Automatically repairs the table if any errors are detected
-r Recover: attempts to repair table and recover data
-o Safe recover: uses a slower and safer recovery method
-q Quick recover: checks index files only
-w Waits until no clients are locking the table before checking
MYISAMCHK
6516922 AppB.F 9/26/02 11:41 AM Page 269

WHAT'S ON THE CD-ROM
270
APPENDIX
The CD-ROM included in this book contains manyuseful files and programs. Before installing any of theprograms on the disc, make sure that you do not
already have a newer version of the program alreadyinstalled on your computer. For information on installing
different versions of the same program, contact theprogram's manufacturer. For the latest and greatestinformation, please refer to the ReadMe file located at theroot level of the CD-ROM.
SYSTEM REQUIREMENTS To use the contents of the CD-ROM, your computer musthave the following hardware and software:
• A PC with a Pentium or faster processor
• Microsoft Windows 95, 98, ME, NT, 2000, or XP; or Linuxor UNIX. MySQL can also be compiled on other systems,such as Mac OSX.
• At least 128MB of physical RAM installed on yourcomputer
• A double-speed (8x) or faster CD-ROM drive
• A monitor capable of displaying at least 256 colors orgrayscale
• A network card
AUTHOR'S SOURCE CODE These files include SQL files you can use to create theexample tables used throughout the book as well as thesample PHP and Perl code from Chapters 12 and 13. Youcan browse the files directly from the CD-ROM, or you cancopy them to your hard drive and use them as the basis foryour own projects. To find the files on the CD-ROM, openthe \Samples folder on the CD-ROM drive.
To import an SQL file, use the MySQL monitor from thecommand line and specify the database:
mysql testdb <file.sql
You must create the testdb database, as described inChapter 1, before importing any files. Chapter 1 alsoincludes more information about the MySQL monitor.See Chapter 8 for more information about importing andexporting files.
ACROBAT VERSION The CD-ROM contains an e-version of this book that youcan view and search using Adobe Acrobat Reader. You canalso use the hyperlinks provided in the text to access all theWeb pages and Internet references in the book. You cannotprint the pages or copy text from the Acrobat files. TheCD-ROM includes a freeware version of Adobe AcrobatReader.
INSTALLING AND USING THE SOFTWARE For your convenience, the software titles appearing on theCD-ROM are listed alphabetically.
Acrobat ReaderFor Windows 95/98/NT/2000 and Linux. Freeware.
Adobe Acrobat Reader allows you to view the onlineversion of this book. For more information on using AcrobatReader, see the section "Using the E-Version of this Book" inthis appendix. For more information about Acrobat Readerand Adobe Systems, see www.adobe.com.
ApacheFor Windows and UNIX. Open source.
Apache is a Web server from the Apache SoftwareFoundation. It is used throughout the world on a largenumber of Web sites. It supports PHP and Perl as modulesand integrates well with MySQL.
You can download the latest version of Apache as well asview information, such as troubleshooting tips and FAQs, atthe www.apache.org Web site.
6516922 AppC.F 9/26/02 11:41 AM Page 270

WHAT'S ON THE CD-ROM C
271
MySQLFor Windows and UNIX. GNU version.
MySQL is a fast and reliable database management system.It includes powerful features that allow you to add, access,and process information stored in databases. The latestversion of MySQL also features full-text searching andindexing capabilities.
MySQL is free for non-commercial use. For moreinformation about MySQL or to download server orclient software, visit the www.mysql.com Web site.
PerlFor Windows and UNIX. Open source.
Perl is a powerful scripting language with features thatmake it ideal for text processing and as a language fordynamic Web pages. Perl is a popular language for creatingdatabase applications and database-driven Web sites withMySQL.
Perl is open source software. For more information aboutPerl or to download source code or binary distributions,visit the www.perl.org Web site.
Perl DBI and DBD: MySQLFor Windows and UNIX. GNU version.
The DBI is a programmatic interface that allows the Perllanguage to connect to a variety of database managementsystems, including MySQL. It supports DBDs, or databasedrivers, for each database system. The MySQL DBD is alsoincluded on the CD-ROM.
The DBI and the MySQL DBD are open source software.For more information on the DBI or to download the latestversion, visit the Web site at http://dbi.perl.org.
PHPFor Windows and UNIX. Open source.
PHP is a powerful server-side scripting language thatintegrates with HTML. You must have PHP installed on yourWeb server in order to create and view PHP Web pages.
PHP is free, open source software. For more informationabout PHP or to download the latest version, visit thewww.php.net Web site.
phpMyAdminFor Windows and UNIX. GNU version.
phpMyAdmin administers the MySQL database managementsystem on the Web. It allows you to create and editdatabases and tables, execute SQL statements, andadminister multiple databases and servers.
TROUBLESHOOTINGThe programs on the CD-ROM should work on computerswith the minimum of system requirements. However, someprograms may not work properly.
The two most likely problems for the programs not workingproperly include not having enough memory (RAM) for theprograms you want to use, or having other programs runningthat affect the installation or running of a program. If youreceive error messages such as Not enough memory orSetup cannot continue, try one or more of the methodsbelow and then try using the software again:
• Turn off any anti-virus software
• Close all running programs
• In Windows, close the CD-ROM interface and rundemos or installations directly from Windows Explorer
• Have your local computer store add more RAM to yourcomputer
If you still have trouble installing the items from theCD-ROM, call the Wiley Customer Service phone number:800-762-2974 (outside the U.S.: 317-572-3994). You can alsocontact Wiley Customer Service by e-mail [email protected].
6516922 AppC.F 9/26/02 11:41 AM Page 271

FLIP THROUGH PAGES
⁄ Click one of these options to flip through the pages of a section.
First page
Previous page
Next page
Last page
ZOOM IN
⁄ Click to magnify an area of the page.
¤ Click the area of the page you want to magnify.
■ Click one of these options to display the page at 100% magnification ( ) or to fit the entire page inside the window ( ).
You can view MySQL: Your visual blueprint to opensource database management on your screen usingthe CD-ROM included at the back of this book. The
CD-ROM allows you to search the contents of each chapterof the book for a specific word or phrase. The CD-ROMalso provides a convenient way of keeping the book handywhile traveling.
You must install Adobe Acrobat Reader on your computerbefore you can view the book on the CD-ROM. TheCD-ROM includes this program for your convenience.Acrobat Reader allows you to view Portable DocumentFormat (PDF) files, which can display books and magazineson your screen exactly as they appear in printed form.
Acrobat Reader is a popular and useful program. There aremany files available on the Web that are designed to beviewed using Acrobat Reader. Look for files with the .pdfextension. For more information about Acrobat Reader,visit the Web site at www.adobe.com/products/acrobat/reader.html.
To view the contents of the book using Acrobat Reader,display the main menu on the CD-ROM. Click the eBooklink, select the section of the book you want to view, andthen click Install.
USING THE E-VERSION OF THIS BOOK
272
FIG HEAD
APPENDIX
USING THE E-VERSION OF THIS BOOK
6516922 AppC.F 9/26/02 11:41 AM Page 272

To install Acrobat Reader, insert the CD-ROMinto a drive. In the screen that appears, clickSoftware. Click Acrobat Reader and then followthe instructions on your screen to install theprogram.
You can make searching the book moreconvenient by copying the PDF files to yourcomputer. To do this, display the contents of theCD-ROM and then copy the Book folder from theCD-ROM to your hard drive. This allows you toeasily access the contents of the book at any time.
When you search for text, the text that AcrobatReader highlights may be difficult to read. To makehighlighted text easier to read, turn off the fontsmoothing capabilities of Acrobat Reader. In theAcrobat Reader window, click Edit ➪ Preferences.Click Display at the left side of the Preferencesdialog box. In the Smoothing area, click SmoothText ( changes to ), and then click OK.
273
WHAT'S ON THE CD-ROM C
FIND TEXT
⁄ Click to search for text in the section.
■ The Find dialog box appears.
¤ Type the text you want to find.
‹ Click Find to start the search.
■ The first instance of the text is highlighted.
› Click Find Again to find the next instance of the text.
database
6516922 AppC.F 9/26/02 11:41 AM Page 273

274
WILEY PUBLISHING, INC.END-USER LICENSE AGREEMENTREAD THIS. You should carefully read these terms andconditions before opening the software packet(s) includedwith MySQL: Your visual blueprint to open source databasemanagement ("Book"). This is a license agreement("Agreement") between you and Wiley Publishing, Inc.("WPI"). By opening the accompanying software packet(s),you acknowledge that you have read and accept thefollowing terms and conditions. If you do not agree and donot want to be bound by such terms and conditions,promptly return the Book and the unopened softwarepacket(s) to the place you obtained them for a full refund.
1. License Grant.
WPI grants to you (either an individual or entity) anonexclusive license to use one copy of the enclosedsoftware program(s) (collectively, the "Software") solely foryour own personal or business purposes on a singlecomputer (whether a standard computer or a workstationcomponent of a multi-user network). The Software is in useon a computer when it is loaded into temporary memory(RAM) or installed into permanent memory (hard disk,CD-ROM, or other storage device). WPI reserves all rightsnot expressly granted herein.
2. Ownership.
WPI is the owner of all right, title, and interest, includingcopyright, in and to the compilation of the Softwarerecorded on the disk(s) or CD-ROM "Software Media."Copyright to the individual programs recorded on theSoftware Media is owned by the author or other authorizedcopyright owner of each program. Ownership of theSoftware and all proprietary rights relating thereto remainwith WPI and its licensers.
3. Restrictions On Use and Transfer.
(a) You may only (i) make one copy of the Software forbackup or archival purposes, or (ii) transfer the Software toa single hard disk, provided that you keep the original for
backup or archival purposes. You may not (i) rent or leasethe Software, (ii) copy or reproduce the Software through aLAN or other network system or through any computersubscriber system or bulletin-board system, or (iii) modify,adapt, or create derivative works based on the Software.
(b) You may not reverse engineer, decompile, ordisassemble the Software. You may transfer the Softwareand user documentation on a permanent basis, providedthat the transferee agrees to accept the terms andconditions of this Agreement and you retain no copies. Ifthe Software is an update or has been updated, any transfermust include the most recent update and all prior versions.
4. Restrictions on Use of Individual Programs.
You must follow the individual requirements andrestrictions detailed for each individual program inAppendix C of this Book. These limitations are alsocontained in the individual license agreements recorded onthe Software Media. These limitations may include arequirement that after using the program for a specifiedperiod of time, the user must pay a registration fee ordiscontinue use. By opening the Software packet(s), you willbe agreeing to abide by the licenses and restrictions forthese individual programs that are detailed in Appendix Cand on the Software Media. None of the material on thisSoftware Media or listed in this Book may ever beredistributed, in original or modified form, for commercialpurposes.
5. Limited Warranty.
(a) WPI warrants that the Software and Software Mediaare free from defects in materials and workmanship undernormal use for a period of sixty (60) days from the date ofpurchase of this Book. If WPI receives notification withinthe warranty period of defects in materials or workmanship,WPI will replace the defective Software Media.
APPENDIX
6516922 AppC.F 9/26/02 11:41 AM Page 274

WHAT'S ON THE CD-ROM C
275
(b) WPI AND THE AUTHOR OF THE BOOK DISCLAIMALL OTHER WARRANTIES, EXPRESS OR IMPLIED,INCLUDING WITHOUT LIMITATION IMPLIEDWARRANTIES OF MERCHANTABILITY AND FITNESS FORA PARTICULAR PURPOSE, WITH RESPECT TO THESOFTWARE, THE PROGRAMS, THE SOURCE CODECONTAINED THEREIN, AND/OR THE TECHNIQUESDESCRIBED IN THIS BOOK. WPI DOES NOT WARRANTTHAT THE FUNCTIONS CONTAINED IN THE SOFTWAREWILL MEET YOUR REQUIREMENTS OR THAT THEOPERATION OF THE SOFTWARE WILL BE ERROR FREE.
(c) This limited warranty gives you specific legal rights, andyou may have other rights that vary from jurisdiction tojurisdiction.
6. Remedies.
(a) WPI's entire liability and your exclusive remedy fordefects in materials and workmanship shall be limited toreplacement of the Software Media, which may be returnedto WPI with a copy of your receipt at the following address:Software Media Fulfillment Department, Attn.: MySQL: Yourvisual blueprint to open source database management,Wiley Publishing, Inc., 10475 Crosspoint Blvd., Indianapolis,IN 46256, or call 1-800-762-2974. Please allow four to sixweeks for delivery. This Limited Warranty is void if failure ofthe Software Media has resulted from accident, abuse, ormisapplication. Any replacement Software Media will bewarranted for the remainder of the original warranty periodor thirty (30) days, whichever is longer.
(b) In no event shall WPI or the author be liable for anydamages whatsoever (including without limitation damagesfor loss of business profits, business interruption, loss ofbusiness information, or any other pecuniary loss) arisingfrom the use of or inability to use the Book or the Software,even if WPI has been advised of the possibility of suchdamages.
(c) Because some jurisdictions do not allow the exclusionor limitation of liability for consequential or incidentaldamages, the above limitation or exclusion may not applyto you.
7. U.S. Government Restricted Rights.
Use, duplication, or disclosure of the Software for or onbehalf of the United States of America, its agencies and/orinstrumentalities "U.S. Government" is subject torestrictions as stated in paragraph (c)(1)(ii) of the Rights inTechnical Data and Computer Software clause of DFARS252.227-7013, or subparagraphs (c) (1) and (2) of theCommercial Computer Software - Restricted Rights clauseat FAR 52.227-19, and in similar clauses in the NASA FARsupplement, as applicable.
8. General.
This Agreement constitutes the entire understanding of theparties and revokes and supersedes all prior agreements,oral or written, between them and may not be modified oramended except in a writing signed by both parties heretothat specifically refers to this Agreement. This Agreementshall take precedence over any other documents that maybe in conflict herewith. If any one or more provisionscontained in this Agreement are held by any court ortribunal to be invalid, illegal, or otherwise unenforceable,each and every other provision shall remain in full force andeffect.
6516922 AppC.F 9/26/02 11:41 AM Page 275

GNU GENERAL PUBLIC LICENSEVersion 2, June 1991
Copyright © 1989, 1991 Free Software Foundation, Inc.
59 Temple Place - Suite 330, Boston, MA 02111-1307, USA
Everyone is permitted to copy and distribute verbatimcopies of this license document, but changing it is notallowed.
PREAMBLEThe licenses for most software are designed to take awayyour freedom to share and change it. By contrast, the GNUGeneral Public License is intended to guarantee yourfreedom to share and change free software—to make surethe software is free for all its users. This General PublicLicense applies to most of the Free Software Foundation'ssoftware and to any other program whose authors committo using it. (Some other Free Software Foundation softwareis covered by the GNU Library General Public Licenseinstead.) You can apply it to your programs, too.
When we speak of free software, we are referring tofreedom, not price. Our General Public Licenses aredesigned to make sure that you have the freedom todistribute copies of free software (and charge for thisservice if you wish), that you receive source code or can getit if you want it, that you can change the software or usepieces of it in new free programs; and that you know youcan do these things.
To protect your rights, we need to make restrictions thatforbid anyone to deny you these rights or to ask you tosurrender the rights. These restrictions translate to certainresponsibilities for you if you distribute copies of thesoftware, or if you modify it.
For example, if you distribute copies of such a program,whether gratis or for a fee, you must give the recipients allthe rights that you have. You must make sure that they, too,receive or can get the source code. And you must showthem these terms so they know their rights.
We protect your rights with two steps: (1) copyright thesoftware, and (2) offer you this license which gives you legalpermission to copy, distribute and/or modify the software.
Also, for each author's protection and ours, we want tomake certain that everyone understands that there is nowarranty for this free software. If the software is modifiedby someone else and passed on, we want its recipients to
know that what they have is not the original, so that anyproblems introduced by others will not reflect on theoriginal authors' reputations.
Finally, any free program is threatened constantly bysoftware patents. We wish to avoid the danger thatredistributors of a free program will individually obtainpatent licenses, in effect making the program proprietary.To prevent this, we have made it clear that any patent mustbe licensed for everyone's free use or not licensed at all.
The precise terms and conditions for copying, distribution,and modification follow.
TERMS AND CONDITIONS FOR COPYING,DISTRIBUTION AND MODIFICATION0. This License applies to any program or other work
which contains a notice placed by the copyright holdersaying it may be distributed under the terms of thisGeneral Public License. The "Program", below, refers toany such program or work, and a "work based on theProgram" means either the Program or any derivativework under copyright law: that is to say, a workcontaining the Program or a portion of it, eitherverbatim or with modifications and/or translated intoanother language. (Hereinafter, translation is includedwithout limitation in the term "modification".) Eachlicensee is addressed as "you".
Activities other than copying, distribution andmodification are not covered by this License; they areoutside its scope. The act of running the Program is notrestricted, and the output from the Program is coveredonly if its contents constitute a work based on theProgram (independent of having been made by runningthe Program). Whether that is true depends on what theProgram does.
1. You may copy and distribute verbatim copies of theProgram's source code as you receive it, in anymedium, provided that you conspicuously andappropriately publish on each copy an appropriatecopyright notice and disclaimer of warranty; keepintact all the notices that refer to this License and tothe absence of any warranty; and give any otherrecipients of the Program a copy of this License alongwith the Program.
You may charge a fee for the physical act of transferringa copy, and you may at your option offer warrantyprotection in exchange for a fee.
276
APPENDIX
6516922 AppC.F 9/26/02 11:41 AM Page 276

277
2. You may modify your copy or copies of the Program orany portion of it, thus forming a work based on theProgram, and copy and distribute such modifications orwork under the terms of Section 1 above, provided thatyou also meet all of these conditions:
a) You must cause the modified files to carryprominent notices stating that you changed the filesand the date of any change.
b) You must cause any work that you distribute orpublish, that in whole or in part contains or isderived from the Program or any part thereof, to belicensed as a whole at no charge to all third partiesunder the terms of this License.
c) If the modified program normally reads commandsinteractively when run, you must cause it, whenstarted running for such interactive use in the mostordinary way, to print or display an announcementincluding an appropriate copyright notice and anotice that there is no warranty (or else, saying thatyou provide a warranty) and that users mayredistribute the program under these conditions,and telling the user how to view a copy of thisLicense. (Exception: if the Program itself isinteractive but does not normally print such anannouncement, your work based on the Program isnot required to print an announcement.)
These requirements apply to the modified work as awhole. If identifiable sections of that work are notderived from the Program, and can be reasonablyconsidered independent and separate works inthemselves, then this License, and its terms, do notapply to those sections when you distribute them asseparate works. But when you distribute the samesections as part of a whole which is a work based onthe Program, the distribution of the whole must beon the terms of this License, whose permissions forother licensees extend to the entire whole, and thusto each and every part regardless of who wrote it.
Thus, it is not the intent of this section to claimrights or contest your rights to work written entirelyby you; rather, the intent is to exercise the right tocontrol the distribution of derivative or collectiveworks based on the Program.
In addition, mere aggregation of another work notbased on the Program with the Program (or with awork based on the Program) on a volume of a
storage or distribution medium does not bring theother work under the scope of this License.
3. You may copy and distribute the Program (or a workbased on it, under Section 2) in object code orexecutable form under the terms of Sections 1 and 2above provided that you also do one of the following:
a) Accompany it with the complete correspondingmachine-readable source code, which must bedistributed under the terms of Sections 1 and 2above on a medium customarily used for softwareinterchange; or,
b) Accompany it with a written offer, valid for at leastthree years, to give any third party, for a charge nomore than your cost of physically performing sourcedistribution, a complete machine-readable copy ofthe corresponding source code, to be distributedunder the terms of Sections 1 and 2 above on amedium customarily used for software interchange;or,
c) Accompany it with the information you received asto the offer to distribute corresponding source code.(This alternative is allowed only for noncommercialdistribution and only if you received the program inobject code or executable form with such an offer,in accord with Subsection b above.)
The source code for a work means the preferredform of the work for making modifications to it. Foran executable work, complete source code meansall the source code for all modules it contains, plusany associated interface definition files, plus thescripts used to control compilation and installationof the executable. However, as a special exception,the source code distributed need not includeanything that is normally distributed (in eithersource or binary form) with the major components(compiler, kernel, and so on) of the operating systemon which the executable runs, unless thatcomponent itself accompanies the executable.
If distribution of executable or object code is madeby offering access to copy from a designated place,then offering equivalent access to copy the sourcecode from the same place counts as distribution ofthe source code, even though third parties are notcompelled to copy the source along with the objectcode.
WHAT'S ON THE CD-ROM C
6516922 AppC.F 9/26/02 11:41 AM Page 277

4. You may not copy, modify, sublicense, or distribute theProgram except as expressly provided under thisLicense. Any attempt otherwise to copy, modify,sublicense or distribute the Program is void, and willautomatically terminate your rights under this License.However, parties who have received copies, or rights,from you under this License will not have their licensesterminated so long as such parties remain in fullcompliance.
5. You are not required to accept this License, since youhave not signed it. However, nothing else grants youpermission to modify or distribute the Program or itsderivative works. These actions are prohibited by law ifyou do not accept this License. Therefore, by modifyingor distributing the Program (or any work based on theProgram), you indicate your acceptance of this Licenseto do so, and all its terms and conditions for copying,distributing or modifying the Program or works basedon it.
6. Each time you redistribute the Program (or any workbased on the Program), the recipient automaticallyreceives a license from the original licensor to copy,distribute or modify the Program subject to these termsand conditions. You may not impose any furtherrestrictions on the recipients' exercise of the rightsgranted herein. You are not responsible for enforcingcompliance by third parties to this License.
7. If, as a consequence of a court judgment or allegationof patent infringement or for any other reason (notlimited to patent issues), conditions are imposed onyou (whether by court order, agreement or otherwise)that contradict the conditions of this License, they donot excuse you from the conditions of this License. Ifyou cannot distribute so as to satisfy simultaneouslyyour obligations under this License and any otherpertinent obligations, then as a consequence you maynot distribute the Program at all. For example, if apatent license would not permit royalty-freeredistribution of the Program by all those who receivecopies directly or indirectly through you, then the onlyway you could satisfy both it and this License would beto refrain entirely from distribution of the Program.
If any portion of this section is held invalid orunenforceable under any particular circumstance, thebalance of the section is intended to apply and thesection as a whole is intended to apply in othercircumstances.
It is not the purpose of this section to induce you toinfringe any patents or other property right claims or tocontest validity of any such claims; this section has thesole purpose of protecting the integrity of the freesoftware distribution system, which is implemented bypublic license practices. Many people have madegenerous contributions to the wide range of softwaredistributed through that system in reliance onconsistent application of that system; it is up to theauthor/donor to decide if he or she is willing todistribute software through any other system and alicensee cannot impose that choice.
This section is intended to make thoroughly clear whatis believed to be a consequence of the rest of thisLicense.
8. If the distribution and/or use of the Program isrestricted in certain countries either by patents or bycopyrighted interfaces, the original copyright holderwho places the Program under this License may add anexplicit geographical distribution limitation excludingthose countries, so that distribution is permitted only inor among countries not thus excluded. In such case,this License incorporates the limitation as if written inthe body of this License.
9. The Free Software Foundation may publish revisedand/or new versions of the General Public License fromtime to time. Such new versions will be similar in spiritto the present version, but may differ in detail toaddress new problems or concerns.
Each version is given a distinguishing version number. Ifthe Program specifies a version number of this Licensewhich applies to it and "any later version", you have theoption of following the terms and conditions either ofthat version or of any later version published by theFree Software Foundation. If the Program does notspecify a version number of this License, you maychoose any version ever published by the FreeSoftware Foundation.
10. If you wish to incorporate parts of the Program intoother free programs whose distribution conditions aredifferent, write to the author to ask for permission. Forsoftware which is copyrighted by the Free SoftwareFoundation, write to the Free Software Foundation; wesometimes make exceptions for this. Our decision willbe guided by the two goals of preserving the free statusof all derivatives of our free software and of promotingthe sharing and reuse of software generally.
278
APPENDIX
6516922 AppC.F 9/26/02 11:41 AM Page 278

279
NO WARRANTY11. BECAUSE THE PROGRAM IS LICENSED FREE OF
CHARGE, THERE IS NO WARRANTY FOR THEPROGRAM, TO THE EXTENT PERMITTED BYAPPLICABLE LAW. EXCEPT WHEN OTHERWISE STATEDIN WRITING THE COPYRIGHT HOLDERS AND/OROTHER PARTIES PROVIDE THE PROGRAM "AS IS"WITHOUT WARRANTY OF ANY KIND, EITHEREXPRESSED OR IMPLIED, INCLUDING, BUT NOTLIMITED TO, THE IMPLIED WARRANTIES OFMERCHANTABILITY AND FITNESS FOR A PARTICULARPURPOSE. THE ENTIRE RISK AS TO THE QUALITY ANDPERFORMANCE OF THE PROGRAM IS WITH YOU.SHOULD THE PROGRAM PROVE DEFECTIVE, YOUASSUME THE COST OF ALL NECESSARY SERVICING,REPAIR OR CORRECTION.
12. IN NO EVENT UNLESS REQUIRED BY APPLICABLE LAWOR AGREED TO IN WRITING WILL ANY COPYRIGHTHOLDER, OR ANY OTHER PARTY WHO MAY MODIFYAND/OR REDISTRIBUTE THE PROGRAM ASPERMITTED ABOVE, BE LIABLE TO YOU FORDAMAGES, INCLUDING ANY GENERAL, SPECIAL,INCIDENTAL OR CONSEQUENTIAL DAMAGESARISING OUT OF THE USE OR INABILITY TO USE THEPROGRAM (INCLUDING BUT NOT LIMITED TO LOSSOF DATA OR DATA BEING RENDERED INACCURATEOR LOSSES SUSTAINED BY YOU OR THIRD PARTIESOR A FAILURE OF THE PROGRAM TO OPERATE WITHANY OTHER PROGRAMS), EVEN IF SUCH HOLDER OROTHER PARTY HAS BEEN ADVISED OF THEPOSSIBILITY OF SUCH DAMAGES.
END OF TERMS AND CONDITIONS
WHAT'S ON THE CD-ROM C
6516922 AppC.F 9/26/02 11:41 AM Page 279

280
INDEX
Symbols& (ampersand), 16' (apostrophe), 161* (asterisk), 7, 89, 124, 208, 243@ (at symbol), 154, 208, 212, 216, 242\ (backslash), 156, 159, 161^ (caret), 243, (comma), 57, 111, 159$ (dollar sign), 243" (double quotes), 161, 242= (equal sign), 37/ (forward slash), 33, 38() (parentheses), 36, 42, 44, 57% (percent sign), 34, 40, 114, 142, 152, 208. (period), 33, 35, 38, 243+ (plus sign), 243? (question mark), 243; (semicolon), 18, 24, 29, 35' (single quote), 242[] (square brackets), 242_ (underscore), 33, 34, 40, 114, 142
Aaborted_clients variable, 197aborted_connects variable, 197ABS function, 134, 139Access (Microsoft), 5, 166–167ACOS function, 135action attribute, 239ActivePerl, 246–247ActiveState, 246, 248ADD COLUMN command, 54ADD INDEX command, 55, 58–61ADD PRIMARY KEY command, 55, 69ADD UNIQUE clause, 202ADDATE (DATE_ADD) function, 149addition (+) operator, 134, 219, 242administration tools, 174–175Administrator accounts, 181, 214AFTER keyword, 56, 57, 66AIX, 5, 9aliases
assign, 145described, 113retrieve data from multiple
tables with, 129
ALL keyword, 208, 209ALTER privilege, 209ALTER TABLE command
add columns with, 56–57, 62, 64–65, 106add indexes with, 58–60, 202add primary keys with, 60–61change column types with, 68–69delete columns with, 70–71delete indexes with, 72–73described, 54–55improve performance with, 189multiple operations with, 73rename columns with, 66–67rename tables with, 74security and, 209syntax of, 54TYPE= option, 75
American Standard Code for InformationInterchange. See ASCII text files
ampersand (&), 16AND keyword, 105, 111AND operator, 116–117ANSI (American National Standards
Institute), 6Apache Web server. See also servers
compatibility of, with MySQL, 3Perl and, 242, 245, 247PHP and, 218, 220–221, 229
apostrophe ('), 161arithmetic operators, 134, 219, 242arrays, 218, 242AS keyword, 113, 129, 145ASC keyword, 77, 93, 111ASCII (American Standard Code for
Information Interchange) text files, 133, 141. See also text files
ASCII function, 141ASIN function, 135asterisk (*), 7, 89, 124, 208, 243at symbol (@), 154, 208, 212, 216, 242ATAN function, 135authentication, 207auto-increment columns. See alsoAUTO_INCREMENT attribute; columnsadd, 64–65described, 43, 82–83integers and, 64PHP and, 235
primary keys and, 64sequential numbers for, 83
AUTO_INCREMENT attribute, 37, 43,64–65, 75, 82–83. See alsoauto-increment columns
averages, calculate, 109, 126–127AVG function, 126–127AVG_ROW_LENGTH option, 37, 41
Bback_log variable, 195backslash (\), 156, 159, 161backup(s)
automated, 170–171DROP DATABASE command and, 32DROP TABLE command and, 52importance of, 30mysqldump utility and, 157, 168–169restore files from, 157, 169table structure, 172, 173
BDB (Berkeley DB) tables, 31, 75bench directory, 15benchmark utilities, 10, 11, 15BIGINT column type, 42bin directory, 15, 17, 184binary log files, 201. See also log filesbinary operators, 155binary versions
of MySQL, 8–9, 11, 13of PHP, 220–221
BIT_AND (bitwise AND) function, 127BIT_COUNT function, 155BIT_OR (bitwise OR) function, 127BLOB (Binary Large Object)
column type, 44, 188<br> tag, 251bytes
described, 42, 258SET columns and, 49
bytes_received variable, 197bytes_sent variable, 197
Ccaret (^), 243case-sensitivity, of commands, 19CEILING function, 135central processing units. See CPUs
6516922 Index.F 9/26/02 11:41 AM Page 280

281
MYSQL:Your visual blueprint to opensource database management
CGI (Common Gateway Interface), 229,245, 251, 256
CGI.pm, 256CHANGE command, 54, 66–68CHAR column type, 36, 38–39, 44,
46–47, 56CHAR function, 141CHAR_LENGTH function, 140CHARACTER_LENGTH function, 140CHECK TABLE command, 193CHECKSUM option, 37checksums, 37, 155CLEAR command, 24, 25client(s)
configuration options and, 28–29, 194described, 258security and, 206-server systems, 2, 18software for, 3
column(s). See also auto-incrementcolumns; fieldsadd, 54, 56–57, 62, 64–65, 106attributes of, 36, 43copy, 37default values for, 43delete, 54, 70described, 2, 4, 258fixed-length, 44, 56increment values of, 108–109modify, 54names, 56, 66–67, 76plan, 30specify, 36, 80, 110, 111types
described, 42–43change, 68–69table design and, 188
update, 97, 104–109variable-length, 37, 44, 46, 188width, 43, 63
combine conditions, 111comma (,), 57, 111, 159comma-delimited files, 133command(s). See also specific commands
case-sensitivity of, 19clear, 24–25described, 4, 6display list of, 18, 19, 25edit, 25, 26–27
execute, 25, 26–27save changes to, 26
COMMENT keyword, 75comments, 75COMMIT command, 31Common Gateway Interface. See CGI comparison
functions, 134operators, 111, 138–139
compile process, 10, 12–13Comprehensive Perl Archive Network.
See CPAN CONCAT function, 113, 140, 144CONCAT_WS function, 140concatenation (.) operator, 219, 242CONCURRENT option, 156, 162concurrent_inserts variable, 195conditional statements, 219, 243.
See also conditionsconditions. See also conditional
statementsdescribed, 258select multiple, 116–117
configuration files, 194–195, 198–199configure command, 220configure program, 12–13CONNECT command, 25connect method, 250, 254connect_timeout variable, 195CONNECTION_ID function, 154connections variable, 197content, format and, separation of, 3conversion functions, 141copy
columns, 37data between tables, 157table structure, 173
COS function, 135COT function, 135COUNT function, 124, 126–127CPAN (Comprehensive Perl
Archive Network), 244CPUs (central processing units), 71, 188CREATE command, 21, 174CREATE DATABASE command,
6, 21, 32–33CREATE INDEX command, 59
CREATE TABLE commandcreate archive tables with, 95described, 6, 36–39indexed tables and, 50, 61INSERT command and, 79multiple-line queries and, 24security and, 209text columns and, 46TYPE keyword and, 31
cron utility, 170CURDATE function, 148CURTIME function, 148
Ddaemon, 16data
column types, 44–45critical and non-critical,
separation of, 30export, 156–158, 164–167import, 156–157, 160–161, 167size, reduce, 188sort, 55, 93, 111, 120–121, 189
data directory, 15database(s). See also DBMSs (database
management systems)count rows in, 124–125create, 6, 21, 30–33delete, 6, 32, 52–53described, 2–4, 258design basics, 30–31driver modules (DBD), 247, 248, 249lists of available, 6, 19, 34security for, 206select, 6, 25, 35size information, 226view current, 20, 175
DATABASE function, 154Databases tab, 184date(s). See also times
add/subtract, 149, 153column types, 45components, 148delete data by, 94–95display, 152format, 149, 151functions, 148–149get current, 148work with, 150–152
6516922 Index.F 9/26/02 11:41 AM Page 281

282
INDEX
DATE function, 148–149DATE_ADD function, 149, 153DATE_FORMAT function, 149, 152DATE_SUB function, 149, 153DATETIME function, 148–149DATETYPE column type, 45DAY_HOUR keyword, 149DAY_MINUTE keyword, 149DAYNAME function, 148DAYOFMONTH function, 148DAYOFWEEK function, 148DAYOFYEAR function, 148DAY_SECOND keyword, 149DB2 (IBM), 5DBD (database driver) modules, 247,
248, 249DBI modules, 247, 248–249, 253–254DBMSs (database management systems).
See also databasesdescribed, 5, 258relational (RDBMSs), 2–3specific types of, 5
DEC Alpha, 8DEC OSF, 9DECIMAL column type, 36, 39, 43DECODE function, 155DEFAULT attribute, 36DEFAULT keyword, 43, 66, 68DEGREES function, 135DELAYED keyword, 81delayed_insert_limit variable, 195delayed_insert_timeout variable, 195delayed_queue_size variable, 195DELETE command
delete data by date with, 94–95delete rows with, 90–92described, 7, 76–77Perl and, 252, 255PHP and, 236–237query syntax and, 21security and, 209
DESC keyword, 77, 93, 111development libraries, 10directories
delete, 53MySQL installation and, 12, 13, 14, 15source, 12switch to/from, 12
disconnect method, 250disk access, 188DISTINCT keyword, 125division (/) operator, 109, 134, 219, 242DNS (domain name system), 217do method, 254, 255Docs directory, 15dollar sign ($), 243DOS (Disk Operating System)
prompt, 16, 18DOUBLE column type, 43DOUBLE PRECISION column type, 43double quotes ("), 161, 242download
CGI.pm, 256MySQL, 8–9, 12, 14MySQLGUI, 28packages, 11, 221Perl, 243, 248RPM files, 10server software, 3
drivers. See DBD (database driver)modules
DROP COLUMN command, 54, 70–71drop command, 174DROP DATABASE command, 6, 32, 52–53DROP INDEX command, 55, 72–73, 203DROP PRIMARY KEY command, 55, 72–73DROP TABLE command, 6, 37, 52–53, 209
Eecho command, 218EDIT command, 25, 26–27, 39EGO command, 25else statement, 236emacs, 160, 198ENCLOSED BY clause, 159, 161–162ENCODE function, 155ENCRYPT function, 155, 224encryption, 155, 207, 224ENUM column type, 45, 48–49enumerations, 48–49Environment tab, 175equal sign (=), 37equal to (=) operator, 111, 115,
138, 219, 243 .err file extension, 200
Err File tab, 175, 184, 185error(s)
check tables for, 190–191checksums and, 37CREATE DATABASE command
and, 32, 33DROP TABLE command and, 37, 52ignore, 88import process and, 163indexes and, 60log files, 181, 184, 185, 200–201MySQL monitor and, 19MySQL server and, 179PHP and, 233renamed columns and, 67repair, 190–191"unknown column," 80
escape characters, 161ESCAPED BY clause, 159, 161–162Excel (Microsoft), 164–165, 225execute method, 252, 256EXISTS keyword, 32EXIT command, 18, 25EXP function, 135EXPLAIN command, 189exponential functions, 135export data, 156–158, 164–167EXTENDED keyword, 192, 193extended-status command, 174, 175,
176, 196eXtensible Markup Language. See XML
FFAST keyword, 193FAT (File Allocation Table) system, 14fetchrow_array method, 253fetchrow_hashref method, 253fields. See also columns
copy, 37create, 37described, 2, 4enclose, 156, 160separate, 156text, 46, 114
FIELDS ENCLOSED BY option, 156, 160FIELDS ESCAPED BY option, 156FIELDS keyword, 156, 158–159
6516922 Index.F 9/26/02 11:41 AM Page 282

283
MYSQL:Your visual blueprint to opensource database management
FIELDS option, 159FIELDS SEPARATED BY option, 164FIELDS TERMINATED BY option,
156, 162file(s)
execute commands from specified, 25extensions, 11, 200, 218, 222, 231systems, 14
File Transfer Protocol, 9, 163. See FTP firewalls, 226FIRST keyword, 54, 56, 57, 66fixed-length columns, 44, 56flat file databases, 5FLOAT column type, 43FLOOR function, 135FLUSH command, 209FLUSH LOGS command, 201FLUSH PRIVILEGES command, 215flush_time variable, 195for loops, 219. See also loopsform(s)
create, 238–241database search, 240–241Perl and, 256–257Web, 256–257
<form> tag, 238–239forward slash (/), 33, 38FreeBSD, 9FROM clause, 158FROM keyword, 40, 112, 208FROM_DAYS function, 151FROM_UNIXTIME function, 151FTP (File Transfer Protocol), 9, 163FULLTEXT keyword, 59
Ggeometry functions, 135GO command, 25, 26–27, 123GRANT command, 23, 207–209, 216greater than (>) operator, 111,
114–115, 138, 168, 171, 219, 243greater than or equal to (>=)
operator, 111, 115, 139, 219, 243GREATEST function, 134, 139–140GROUP BY clause, 111, 122, 126–127, 189gzip utility, 11
Hhardware requirements, 3hashed indexes, 31header files, 10heap tables, 31, 75HELP command, 18, 25hostnames
convert, to IP addresses, 217MySQLGUI and, 29PHP and, 228security and, 207specify, 19, 22, 29, 216view current, 20
HOUR function, 148HOUR_MINUTE keyword, 149HOUR_SECOND keyword, 149HP-UX, 9.htaccess file, 223HTML (HyperText Markup Language)<form> tag, 238–239links, to MySQL download pages, 9MySQL documentation and, 15<p> tag, 251PHP and, 218, 231, 238–239Web forms and, 256–257
IIA64 systems, 8IBM (International Business Machines), 6IDENTIFIED BY clause, 22, 23, 208IF EXISTS clause, 32, 37, 52IF keyword, 32IF NOT EXISTS clause, 32, 33, 36if statements
Perl and, 243, 255, 256PHP and, 219, 233, 234, 236, 238
IGNORE keyword, 88, 97, 101, 156IIS (Internet Information Server), 221, 247import data, 156–157, 160–161, 167Import Text Wizard, 167INDEX keyword, 36, 37indexes. See also ISAM (Indexed
Sequential Access Method) tablesadd, 55, 58–59, 189, 202create, 36, 50–51delete, 55, 72–73, 203
described, 4, 30, 258disadvantages of, 203full-text, 59improve performance with, 202–203names of, 36, 55PHP and, 218primary key, 60–61unique, 36, 59–61, 64, 72–73, 259
INNER JOIN clause, 110, 130–131InnoDB tables, 31, 75InnoDB Web site, 31INSERT command
add data with, 76add rows with, 78–79copy data between tables with, 157copy older data with, 95copy table structures with, 173described, 7Perl and, 252, 254PHP and, 234–236, 238query syntax and, 21security and, 209specify columns for rows with, 80specify INSERT priority for, 81
installationcompact, 14custom, 14, 15file systems and, 32minimal, 10MySQL, 8–9, 10, 12–15, 17, 32MySQLGUI, 28Perl, 248phpMyAdmin, 222–223from source code, 12–13test, 17typical, 14, 15
INSTR function, 141, 147INTEGER column type, 42integers
auto-increment columns and, 64described, 42, 258ENUM columns and, 49
Intel, 8interactive_timeout variable, 195INTERVAL keyword, 149, 153INTO keyword, 76INTO OUTFILE option, 156, 158–159, 168
6516922 Index.F 9/26/02 11:41 AM Page 283

284
INDEX
IP (Internet Protocol) addresses,19, 216, 217
Is equal to (=) operator, 111, 115,138, 219, 243
Is greater than (>) operator, 111,114–115, 138, 168, 171, 219, 243
Is greater than or equal to(>=) operator, 111, 115, 139, 219, 243
Is less than (<) operator, 111,114–115, 138, 219, 243
Is less than or equal to (<=)operator, 111, 115, 138, 142, 150
Is not equal to (!=) operator, 111,115–116, 139, 219, 243
IS NOT NULL operator, 111, 115IS NULL operator, 111, 115ISAM (Indexed Sequential Access
Method) tablescheck, for errors, 190–191described, 31, 75, 258INSERT priority settings, 81quotation marks and, 37
JJava, 5JOIN command, 110, 130–131, 189join_buffer_size variable, 195joins, 110, 130–131, 189, 258
Kkey_buffer_size variable, 195keys, described, 30, 258.
See also primary keyskill command, 174, 175, 182
LLAST_INSERT_ID function, 154LEAST function, 134, 138–139LEFT function, 140, 146LEFT JOIN clause, 110, 131less than (<) operator, 111,
114–115, 138, 219, 243LIKE clause, 34, 40LIKE keyword, 34, 40, 111, 114LIKE operator, 114–115, 142, 195LIMIT clause, 93, 103, 110, 77,
118–119, 189LIMIT keyword, 96
line(s)breaks, 163go to specific, 24navigate between, 24
LINES option, 159LINES TERMINATED BY option,
156, 159, 162Linux. See also Red Hat Linux
distributions, inclusion of MySQL with, 3edit commands under, 26–27install MySQL under, 8, 10–11install server software on, 3log files and, 201MySQLGUI and, 28Perl and, 243, 245PHP and, 220PostgreSQL, 5start MySQL server under, 16text editors, 198
LOAD DATA command, 157, 162–164, 166LOAD DATA INFILE command, 156local directory, 11LOCAL option, 156, 163LOCATE function, 141, 147LOCK TABLES command, 189, 204–205.log file extension, 200log files, 181, 184, 185, 200–201LOG function, 135logarithmic functions, 135logical AND (&&) operator, 219, 243logical bitwise AND (&)
operator, 155logical bitwise OR (|) operator, 155logical OR (||) operator, 219, 243long_query_time variable, 195, 196, 200LONGBLOB column type, 44LONGTEXT column type, 44loops
described, 219for, 219while, 230, 233, 240, 243, 253
LOW_PRIORITY keyword, 76, 81, 100,156, 162
LOW_PRIORITY option, 90, 100, 156, 162LOWER function, 141LTRIM function, 141
MMacintosh, 9, 221mainframe computers, 5make command, 12, 248make install command, 12, 248, 249make test command, 248, 249math functions, 134–137MAX function, 126–127max_allowed_packet variable, 195max_concurrent_users variable, 196max_connect_errors variable, 195max_connections variable, 195max_deployed_threads variable, 195max_join_size variable, 195MAX_ROWS option, 37, 75max_sort_length variable, 195max_user_connections variable,
195, 196MD5 checksums, 155MD5 function, 155MEDIUM keyword, 193MEDIUMBLOB column type, 44MEDIUMINT column type, 42MEDIUMTEXT column type, 44memory, 31, 42, 71, 75, 188Microsoft Access, 5, 166–167Microsoft Excel, 164–165, 225Microsoft Internet Information
Server (IIS), 221, 247Microsoft SQL Server, 5Microsoft Windows. See Windows
(Microsoft)MID function, 140, 146MIN function, 126–127Mini SQL. See mSQL (Hugh
Technologies)MIN_ROWS option, 37, 75MINUTE function, 148MINUTE_SECOND keyword, 149mod_perl module, 242, 245, 247MODIFY command, 54, 68MODIFY keyword, 68modulo (%) operator, 134, 219, 242MONTH function, 148, 150MONTHNAME function, 148mSQL (Hugh Technologies), 5multiple-line queries, 24–27
6516922 Index.F 9/26/02 11:41 AM Page 284

285
MYSQL:Your visual blueprint to opensource database management
multiplication (*) operator, 134,219, 242
multitasking systems, 14my.cnf, 23, 194, 199my.ini, 15, 175, 184–185, 194, 199my.ini Setup tab, 175, 184, 199MyISAM tables, 31, 36, 75, 81, 92, 190–191myisamchk, 190–194MySQL client, 4, 6. See also clientsmysql command, 18–19, 157, 177mysql directory, 15, 16MySQL monitor
backups and, 169classification of, as a client, 3, 18clear commands with, 24configuration options and, 194described, 6, 18–21, 259edit commands with, 25, 26–27exit, 19, 25start, 18, 19test queries with, 21use commands from, 6view server status with, 20
MySQL server. See also serversauto-increment columns and, 82backups and, 157, 171column types and, 43configuration options, 15, 194–195connect to, 27, 228–229, 250–251delete actions and, 90, 92, 93described, 4, 259IGNORE option and, 101installation and, 12MySQLGUI and, 132, 186–187optimize, 188–189passwords and, 194performance information, 196–197PHP and, 218, 226–227reports, 175, 185startup, 16–17, 174, 178–181, 217status information, 20, 175–176, 195, 226stop, 16–17, 174, 178–181table types and, 75text columns and, 47troubleshoot, 188–189TRUNCATE option and, 92UPDATE command and, 96, 107usernames, 194version information, 20, 177
MySQL Web site, 3, 8, 11–12, 14, 132, 248mysqladmin
configuration options and, 194described, 174display processes with, 182–183display variables with, 17, 195–196extended-status command, 202flush-privileges command, 215kill processes with, 175, 182, 183password command, 210ping command, 179processlist command, 174, 182–184security and, 209shutdown command, 174, 178, 180, 209start/stop MySQL server with, 181–182status command, 17, 175, 176, 184test MySQL installation with, 17version command, 177
mysql_affected_rows function,236–237
MySQL-bench-version-i386.rpm, 10MySQL-client-version-i386.rpm, 10mysql_close command, 228mysql_connect function, 228, 231,
233, 234, 235mysqld command, 174, 178, 180MySQL-devel-version.i386.rpm, 10mysqld-max, 16mysqldump, 157, 168–172mysql.err, 181mysql_fetch_assoc function, 232mysql_fetch_object function,
232, 233, 240, 241mysql_fetch_row function, 230, 232MySQLGUI
classification of, as a client, 3configure, 28–29described, 27display data with, 132–133edit queries with, 29exit, 29manage MySQL server with, 186–187query syntax and, 29send queries with, 187start, 28
mysql_insert_id function, 235MySQLManager.exe, 15MySQL-MAX package, 9, 31, 75
mysql_num_rows function, 241mysql_pconnect function, 229mysql_query function, 230, 231,
233–234, 236–237, 240mysql_select_db function, 230, 231,
233, 234mysql.server script, 16mysqlshow utility, 34MySQL-version-i386.rpm, 10
NNATURAL JOIN clause, 130–131NATURAL LEFT JOIN clause, 131NET START command, 174, 180NET STOP command, 174, 180net_buffer_length variable, 195net_read_timeout variable, 195NetWare (Novell), 221Network control panel, 14network security, 206, 216net_write_timeout variable, 195newline (\n) character, 156, 161not equal to (<>) operator, 111,
115, 139NOT keyword, 32, 111NOT LIKE keyword, 111NOT LIKE operator, 114–116, 142NOT NULL attribute, 36, 37, 43, 55, 64NOT operator, 116–117Notepad, 27, 160, 199Novell NetWare, 221NOW function, 148, 152ntbackup.exe, 171NTFS (New Technology File System), 14NULL attribute, 36, 43, 45, 68, 69.
See also null valuesnull values. See also NULL attribute
described, 259special characters for, 161timestamp columns and, 84, 85
numeric column types, 42–43numeric comparisons, 111, 138–139
Oobjects, store query results as, 232–233Office (Microsoft). See Microsoft Access;
Microsoft ExcelON keyword, 59, 131, 208
6516922 Index.F 9/26/02 11:41 AM Page 285

286
INDEX
open tables status indicator, 20opened_tables variable, 197open_files variable, 197open_tables variable, 197opens status indicator, 20operator(s). See also specific operators
arithmetic, 134, 219, 242binary, 155comparison, 111, 138–139PHP and, 219precedence, 137
OPTIMIZE TABLE command, 192–193OR keyword, 105, 111OR operator, 116–117Oracle, 5ORDER BY clause
described, 35, 77, 111eliminate, 189EXPLAIN command and, 189LIMIT clause and, 118–119sort data with, 120–121
P<p> tag, 251packages, 8, 10–11, 13, 201, 244–245paged output, specify programs to use, 25PAGER command, 25parentheses ( ), 36, 42, 44, 57password(s). See also security
authentication of, 207backups and, 157configuration options and, 194encryption of, 155, 207guidelines for, 206, 211modify, 23, 174, 210–211, 215MySQL monitor and, 18, 19, 22–23MySQL server and, 132MySQLGUI and, 28PHP and, 223, 228root user, 23, 207specify, 18, 19, 22, 23, 211
password command, 174PASSWORD function, 155, 211percent sign (%), 34, 40period (.), 33, 35, 38, 243Perl
connect to MySQL server with, 250–251customize MySQL clients with, 4
DBD (database driver) modules,247, 248, 249
DBI modules, 247, 248–249, 253, 254delete records with, 255described, 3, 242–243, 259display query results with, 252–253flat-file databases and, 5insert records with, 254install, 243–248interpreter, 242LIMIT clause and, 119MySQL installation and, 10, 12operators, 242SELECT command and, 113Web forms and, 256–257
persistent connections, 229PHP
add records with, 238–239delete records with, 236–237described, 3–4, 218–219, 259display query results with, 230–231forms and, 238–241HTML and, 218insert records from, 234–235installation, 220–221LIMIT clause and, 119SELECT command and, 113store query results as objects with,
232–233Web site, 220, 221
.php file extension, 218, 222, 231
.php3 file extension, 218, 222, 231phpinfo command, 220phpMyAdmin, 222–227physical security, 206. See also securityPI function, 135pico text editor, 26–27, 160, 198ping command, 174, 176, 179plus sign (+), 243POSIX regular expression standard, 143PostgreSQL, 5POWER function, 135PPM (Perl Package Manager), 248prepare method, 252, 256primary keys
add, 55auto-increment columns and, 64create, 37
define, 50–51delete, 55, 72–73described, 4, 30, 37, 259indexes and, 4, 60–61update, 97
PRINT command, 25print statement, 251, 252print_bold function, 219priority settings, 76, 81, 100, 156, 162privileges. See also security
described, 207, 259grant, 207, 208–209PHP and, 234remove, 216storage of, in security tables, 214–215view, 212–213
Process tab, 175, 184processes. See also threads
described, 183kill, 182, 183view/manage, 182–183
processlist command, 174, 182–184processors, 71, 188programming languages, described, 3.
See also specific languagesps command, 183
QQUARTER function, 148queries. See also specific commands
client-server systems and, 2described, 2, 4, 259edit long, 26–27multiple-line, 24–27per second measure, 20slow, 20, 197specify, 24–25syntax for, 18, 21, 24, 29, 189
question mark (?), 243questions variable, 197QUICK keyword, 192, 193QUICK option, 90, 192, 193
RRADIANS function, 135RAM (random-access memory).
See memory
6516922 Index.F 9/26/02 11:41 AM Page 286

287
MYSQL:Your visual blueprint to opensource database management
RAND function, 121, 134random numbers, described, 134RDBMS (relational database management
systems), 2–3. See also DBMSs(database management systems)
READ locks, 204–205REAL column type, 43record(s). See also rows
delete, 236–237, 255described, 4insert, 234–235, 238–239, 254
Red Hat Linux. See also Linuxinstall MySQL on, 8log files and, 201RPM format, 8, 10
REGEXP operator, 142regular expressions, 142–143, 243relational databases, described, 2–3relationships, described, 30release notes, 14Reload MySQL option, 226remainder (%) operator, 134, 219, 242RENAME command, 55RENAME TABLE command, 74, 192–193REPEAT function, 141REPLACE command, 76REPLACE function, 141, 144REPLACE keyword, 156Report tab, 175, 185reports
create, 175edit, 185print, 185
return keyword, 219REVERSE function, 141REVOKE command, 207, 208RIGHT function, 140, 146RIGHT JOIN clause, 131RLIKE operator, 142, 143ROLLBACK command, 31root users. See also usernames; users
create, 22DROP TABLE command and, 52installation and, 13, 22MySQL server and, 132passwords for, 23, 207
ROUND function, 97, 135
round numbers, 135row(s). See also records
auto-increment columns and, 65combine, into a single row, 122copy, 88count, 124–125delete, 7, 65, 90–91, 192, 236–237described, 4, 259fixed-length, 188insert, 7, 78–79, 82, 88–89limit the number of, 37, 110modify, 98–101numbers for, 118replace existing, 86–87retrieve, 7specify columns for, 80update, 7, 86, 96–97, 102–103variable-length, 188
ROWS keyword, 158rpm command, 8, 10RMP packages, 8, 10–11, 13, 201, 244–245RSA Data Security, 155RTRIM function, 141
Ssafe_mysqld command, 16, 174, 178search and replace functions, 141SECOND function, 148secondary keys, described, 30. See also
keys; primary keysSEC_TO_TIME function, 151Secure Sockets Layer. See SSL (Secure
Sockets Layer)security. See also passwords
advanced, 217checksums and, 155encryption, 155, 207, 224firewalls, 226importance of, 206network access control, 206, 216overview of, 30, 207–217PHP and, 226privileges and, 207, 208–209,
212–216, 234, 259risks, 206tables, 214–215
seeds, specify, 134SELECT clause, 76, 95
SELECT commandcount rows with, 124–125described, 7, 110–111display data with, 112–113export data with, 158–159GROUP BY clause and, 122INSERT command and, 88–89INTO OUTFILE option, 156, 159,
162, 165, 167LIMIT clause and, 110, 118–119math functions and, 136–137multiple clauses used with, 123MySQLGUI and, 132Perl and, 253PHP and, 224, 230–231, 240, 241query syntax and, 21retrieve data from multiple tables
with, 128–129security and, 209sort data with, 120–121strings and, 142, 144–145table locks and, 205USE command and, 21
SELECT keyword, 37semicolon (;), 18, 24, 29, 35server(s). See also Apache Web server;
MySQL serverdescribed, 3, 259list all databases on, 34programming languages and, 3reconnection attempts, 25software for, 3, 16–17status information, 17storage of tables on, 38use of multiple, to insure data
availability, 30version information, 19
Server tab, 185Services control panel, 174, 180SESSION_USER function, 154SET column type, 45, 48–49SET keyword, 96, 98SET PASSWORD command, 210–211, 215sets, described, 48–49Setup Wizard, 246, 247setup.exe, 14set-variable command, 194, 195SGI Irix, 9
6516922 Index.F 9/26/02 11:41 AM Page 287

288
INDEX
SHOW COLUMNS command, 40, 52, 53SHOW COLUMNS FROM command, 41SHOW command, 6SHOW DATABASES command, 6, 19,
34–35, 217SHOW GRANTS command, 207, 212–213SHOW INDEX command, 72SHOW STATUS command, 196, 197SHOW TABLE STATUS command, 32, 40,
41SHOW TABLES command, 7, 25, 27, 32,
37, 40SHOW VARIABLES command, 195, 198shutdown command, 174, 178SIN function, 135single quote ('), 242Sleepycat Software, 31slow queries, 20, 197slow_queries variable, 197SMALLINT column type, 42Solaris, 9sort data, 55, 93, 111, 120–121, 189SOURCE command, 25, 157, 169, 172space characters, 141SPACE function, 141special characters. See also specific
charactersin MySQL regular expressions, 143in text files, 161
spreadsheets, export data from, 164–165SQL (Structured Query Language).
See also queriesdescribed, 4, 6–7, 259development of, by IBM, 6
SQL Server (Microsoft), 5square brackets ([]), 242src directory, 12SSL (Secure Sockets Layer), 217, 259startup options, 217STATUS command, 17, 20, 25, 174, 175, 176status information, 20, 25, 174–176,
195–196, 226STD function, 127S/390 systems, 8STRCMP function, 142string(s)
combine text values into, 113comparisons, 111, 142–143encryption of, 224
functions, 140–141, 144–145mysqladmin and, 259numeric comparisons and, 139Perl and, 242search for, 147sub-, 140, 146–147view tables which match, 40
SUBDATE function, 149Submit button, 240SUBSTRING function, 140, 146substrings, 140, 146–147. See also stringssubtraction (-) operator, 134, 219, 242SUM function, 126–127Sun Sparc systems, 8SYSDATE function, 148SYSTEM_USER function, 154
Ttab characters, 156, 161, 165tab-delimited format, 165table(s). See also columns; rows; specific
typesadd columns to, 56–57add rows to, 78–79check, for errors, 190–191combine, 110copy data between, 76, 157copy fields from, 37corrupt, 190–191create, 6, 36–39delete, 6, 37, 52–53delete data from, 77delete rows from, 90–92described, 4, 259design, 188display, 27display data from multiple, 128–129drop, 36–37information, view, 40–41joins, 110, 130–131, 189, 258lock/unlock, 189, 204–205name/rename, 38, 55, 74optimize/repair, 188, 192–193plan, 30specify options for, 37structure of, 172, 173temporary, 31, 37
types of, 31, 36, 75update rows in, 102–103
TABLE keyword, 96TAN function, 135.tar.gz file extension, 11Task Manager, 181Task Scheduler, 157, 171TCP/IP (Transmission Control
Protocol/Internet Protocol), 14,19,179, 181, 217
TEMPORARY keyword, 37temporary tables. See also tables
described, 37heap tables used as, 31
TERMINATE BY clause, 159terminology, overview of, 4test
MySQL installation, 17phpMyAdmin, 222–223utilities, 10, 15
text. See also TEXT column type;text fileseditors, 26–27, 160, 198–199fields, 46, 114strings, compare, 111values, combine, into strings, 113
TEXT column typeadd, 56create, 46–47described, 44–45indexes and, 59length of, 46table design and, 188
text file(s). See also log files; textASCII, 133, 141create, 160–161import/export, 156, 158–163, 165–167formats, 156, 160–161
Text Import Wizard, 165thread_cache_size variable, 195threads. See also processes
caches for, 195described, 20, 175display, 175run, 197
threads_cached variable, 197threads_created variable, 197threads_running variable, 197
6516922 Index.F 9/26/02 11:41 AM Page 288

289
MYSQL:Your visual blueprint to opensource database management
time. See also datesadd/subtract, 153convert, 151formats, 149–152functions, 148–149
TIME column type, 45TIME function, 148–149TIME_FORMAT function, 149, 152TIMESTAMP columns
add, 62–63described, 45, 62, 84–85update, 94, 97, 107
TIMESTAMP function, 148–150TIME_TO_SEC function, 151TINYBLOB column type, 44TINYINT column type, 38, 39, 42TINYTEXT column type, 44TO_DAYS function, 151totals, calculate, 126–127transactions
BDB tables and, 31described, 9, 31InnoDB tables and, 31MyISAM tables and, 31
Transmission Control Protocol/InternetProtocol. See TCP/IP
trigonometry functions, 135TRIM function, 141TRUNCATE command, 92TRUNCATE function, 135TRUNCATE keyword, 77TYPE keyword, 31, 36TYPE= option, 75
Uunderscore (_), 33, 34, 40, 114, 142unique indexes, 36, 59–61, 64, 72–73, 259UNIQUE keyword, 36, 59, 61UNISIGNED keyword, 42UNIX
backups and, 157, 170configuration files, 194, 198DB2 and, 5display current values for
variables with, 195install MySQL under, 8, 9, 12–13install Perl under, 243–244log files, 200
myisamchk and, 190MySQL server and, 4, 27,178–179Oracle and, 5Perl and, 242PostgreSQL, 5ps command, 183security and, 217sockets, 217start MySQL monitor under, 18text files and, 160, 163usernames and, 22, 23, 194
UNIX_TIMESTAMP function, 151Unknown column error, 80UNLOCK TABLES command, 189, 204–205UNSIGNED attribute, 42, 43, 64, 66update. See also UPDATE command
columns, 97, 104–109rows, 7, 86, 96–97, 102–103
UPDATE commanddescribed, 96–97increment column values with, 108–109modify rows with, 98–103PHP and, 237priority settings, 96, 100security and, 209, 215table locks and, 205timestamp columns and, 85update columns with, 104–109use math with, 109WHERE clause and, 7
UPPER function, 97, 102, 141, 237USE command
described, 6, 25, 35INSERT query and, 78query syntax and, 21
USER function, 154username(s). See also users
character restrictions on, 211configuration options and, 194DROP TABLE command and, 52MySQL monitor and, 18, 19phpMyAdmin and, 223privileges and, 212specify, 18, 19, 207view current, 20
users. See also root users; usernamesconfigure, 22–23storage of, in security tables, 214–215
VVARCHAR columns
add, 56, 57change definition of, 54described, 44indexes and, 50, 51, 59table design and, 188
variable(s). See also specific variablesdisplay, 175, 186–187, 195–197Perl and, 242PHP and, 218
variable-length columns, 37, 44, 46, 188variables command, 17, 174, 175, 198Variables tab, 175, 185version command, 174, 177VERSION function, 154vi (text editor), 160, 198VIEW GRANTS command, 212–213
Wwait_timeout variable, 195, 229WEEK function, 148WEEKDAY function, 148WHERE clause
combine conditions in, 111, 116–117DELETE command and, 7described, 76, 77, 114–115division operator and, 109improve performance with, 189joins and, 110, 131LIMIT clause and, 118–119ORDER BY clause and, 121Perl and, 255PHP and, 236row updates and, 102SELECT command and, 7, 110,
111, 114, 128select rows with, 89specify rows with, 90, 92–94,
98, 100–101string comparisons and, 142UPDATE command and, 7, 96, 98,
100–107, 108, 109
6516922 Index.F 9/26/02 11:41 AM Page 289

290
INDEX
WHERE keyword, 7while loops, 230, 233, 240, 243, 253wildcard characters
asterisk (*), 7, 89, 124, 208, 243count rows with, 124–125dollar sign ($), 243percent sign (%), 34, 40, 114,
142, 152, 208PHP and, 224question mark (?), 243security and, 208underscore (_), 33, 34, 40, 114, 142WHERE clause and, 114–115
Windows (Microsoft)administration utilities, 175backups and, 157, 171configuration files, 194, 199DB2 and, 5display current values for
variables with, 195
EDIT command and, 26–27install MySQL under, 8, 12, 14–15install Perl under, 246–247install server software on, 3, 4log files, 200myisamchk and, 190MySQLGUI and, 28Oracle and, 5PHP for, 221service management features, 174, 180start MySQL server under, 16, 174,
180–181-style line breaks, 163text files and, 163usernames, 22
WinMySQLadmin, 15, 16, 175, 181,184–185, 199
Winsock standard, 14, 181WinZIP, 28WRITE locks, 204–205
XXML (eXtensible Markup Language), 5
YYEAR column type, 45YEAR function, 148, 150YEAR_MONTH keyword, 149YEARWEEK function, 148
ZZEROFILL attribute, 42, 43.zip files, 8, 14, 28, 221, 222
6516922 Index.F 9/26/02 11:41 AM Page 290