windows 10: familiar, and better than ever · windows 10: familiar, and better than ever ......
TRANSCRIPT

Windows 10: Familiar, and better than everYour advanced guide to the best of both worlds—Windows 10
Familiar, and better than ever
Windows 10 is the best combination of the Windows you already know, plus lots of great improvements you’ll love having. Technologies like InstantGo, which lets you boot up and resume quickly. Everything runs fast and smooth. And Windows 10 devices now have Battery Saver to automatically conserve power—so you can work longer and play harder. For total confidence, Windows 10 helps you stay up to date on the latest and greatest features and has more built-in security protections than ever to help keep your system safe.

Familiar, and better than ever Guide contentsThe purpose of this guide is to introduce you to the key features in Windows 10, and give you tips and tricks on how to get started using those features. You’ll find information on the following topics:
A few feature highlights• Start menu• How to search• Using tiles• Task view• Virtual desktops• Windows behavior in
modern applications• Charms functionality
in modern applications• Snap enhancements• Quick Access tools
Cortana• What can Cortana do?• Cortana’s Notebook
Microsoft Edge• The Hub• Web Notes• Reading List
Setting things up• Set up your email
and calendar• Change your account picture• Protect your PC
Using Microsoft Office 365 with Windows 10• Access your email• Use Office 365
on mobile devices • Use Office 365 with
OneDrive for Business to work with files anywhere
• Log on to Office 365• Create a file• Share a file• Synchronize a file
Personalization and settings• A new look• Personalize your
lock screen• Get started with themes• Change your desktop
background and colors
Apps and the action center
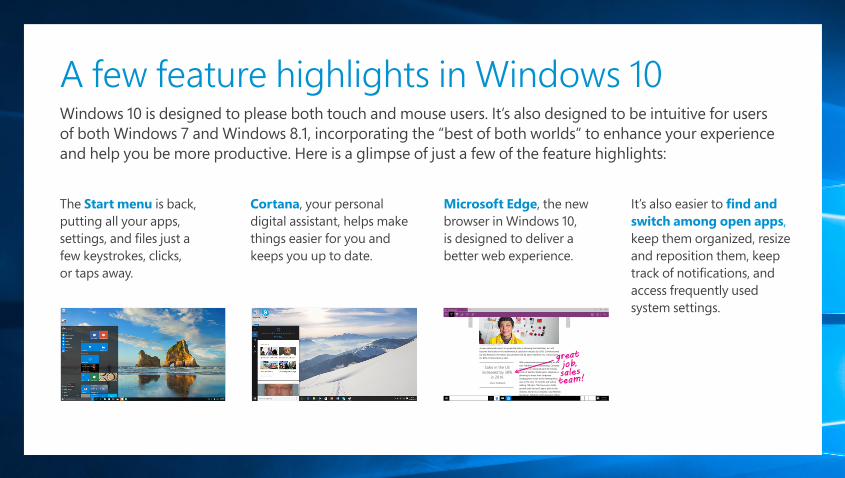
A few feature highlights in Windows 10Windows 10 is designed to please both touch and mouse users. It’s also designed to be intuitive for users of both Windows 7 and Windows 8.1, incorporating the “best of both worlds” to enhance your experience and help you be more productive. Here is a glimpse of just a few of the feature highlights:
The Start menu is back, putting all your apps, settings, and files just a few keystrokes, clicks, or taps away.
Cortana, your personal digital assistant, helps make things easier for you and keeps you up to date.
Microsoft Edge, the new browser in Windows 10, is designed to deliver a better web experience.
It’s also easier to find and switch among open apps, keep them organized, resize and reposition them, keep track of notifications, and access frequently used system settings.
The future is looking bright for Fabrikam, Inc.
A new nationwide report on projected sales is showing that Fabrikam, Inc. will become the leader in the mathematical calculator industry by 2018. Commissioned by Trey Research, the report also predicts that by 2022, Fabrikam, Inc. will account for 80% of total industry sales.
With educational technology sales on the rise, Fabrikam, Inc. is expanding. Currently located in an industrial park 30 minutes south of Seattle, Washington. Fabrikam is planning to move their corporate headquarters closer to the metropolitan area in the next 12 months and will be adding 150 jobs. “We have seen stable growth over the last 5 years, both in the industry and at our company,” says Matilda Goodman, Fabrikam chief executive officer. The company has signed multiple contracts
Sales in the US increased by 38%
in 2014.- Source: Trey Research
2:30 PM7/7/2015Ask me anything
Exit
Trey Research
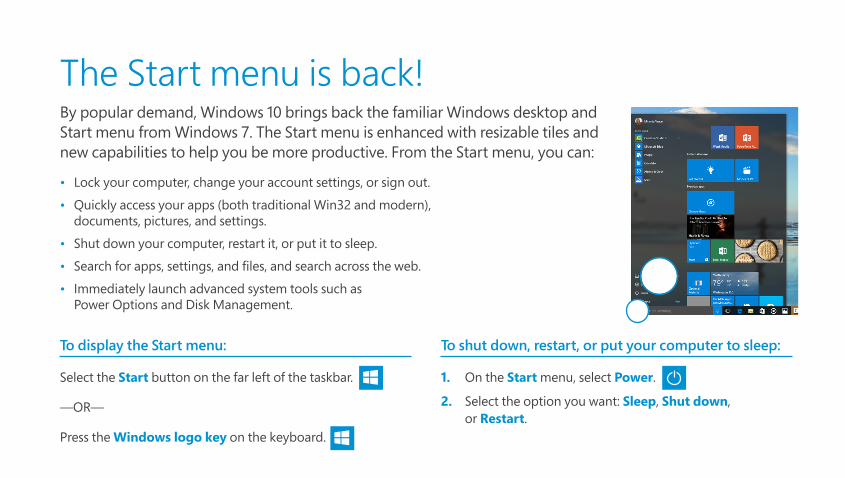
The Start menu is back!By popular demand, Windows 10 brings back the familiar Windows desktop and Start menu from Windows 7. The Start menu is enhanced with resizable tiles and new capabilities to help you be more productive. From the Start menu, you can:
• Lock your computer, change your account settings, or sign out.
• Quickly access your apps (both traditional Win32 and modern), documents, pictures, and settings.
• Shut down your computer, restart it, or put it to sleep.
• Search for apps, settings, and files, and search across the web.
• Immediately launch advanced system tools such as Power Options and Disk Management.
To display the Start menu:
Select the Start button on the far left of the taskbar.
—OR—
Press the Windows logo key on the keyboard.
To shut down, restart, or put your computer to sleep:
1. On the Start menu, select Power.
2. Select the option you want: Sleep, Shut down, or Restart.
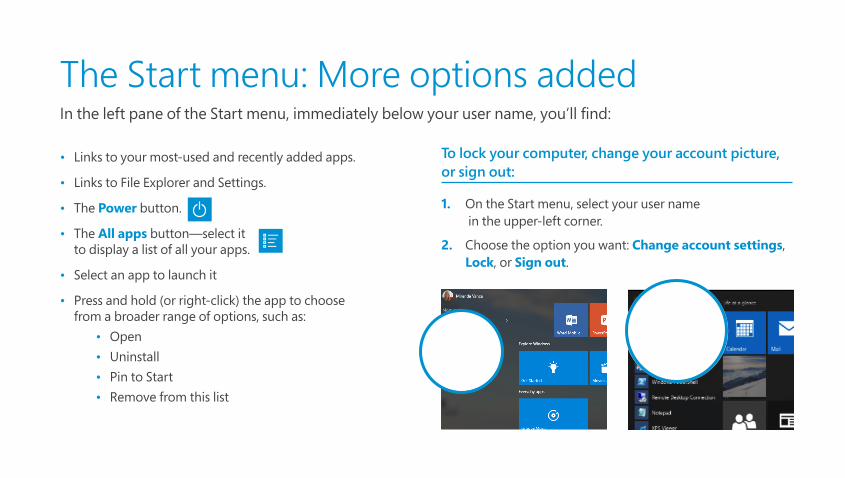
The Start menu: More options addedIn the left pane of the Start menu, immediately below your user name, you’ll find:
• Links to your most-used and recently added apps.
• Links to File Explorer and Settings.
• The Power button.
• The All apps button—select it to display a list of all your apps.
• Select an app to launch it
• Press and hold (or right-click) the app to choose from a broader range of options, such as:
• Open• Uninstall• Pin to Start• Remove from this list
To lock your computer, change your account picture, or sign out:
1. On the Start menu, select your user name in the upper-left corner.
2. Choose the option you want: Change account settings, Lock, or Sign out.
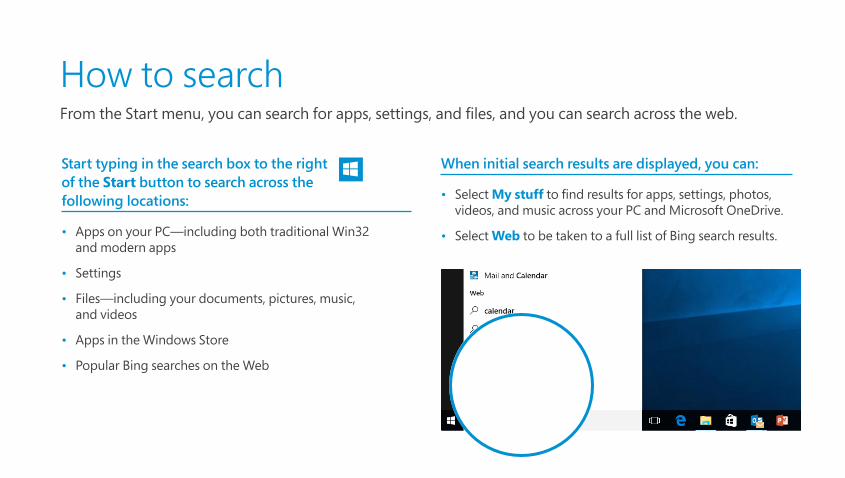
When initial search results are displayed, you can:
• Select My stuff to find results for apps, settings, photos, videos, and music across your PC and Microsoft OneDrive.
• Select Web to be taken to a full list of Bing search results.
How to searchFrom the Start menu, you can search for apps, settings, and files, and you can search across the web.
Start typing in the search box to the right of the Start button to search across the following locations:
• Apps on your PC—including both traditional Win32 and modern apps
• Settings
• Files—including your documents, pictures, music, and videos
• Apps in the Windows Store
• Popular Bing searches on the Web
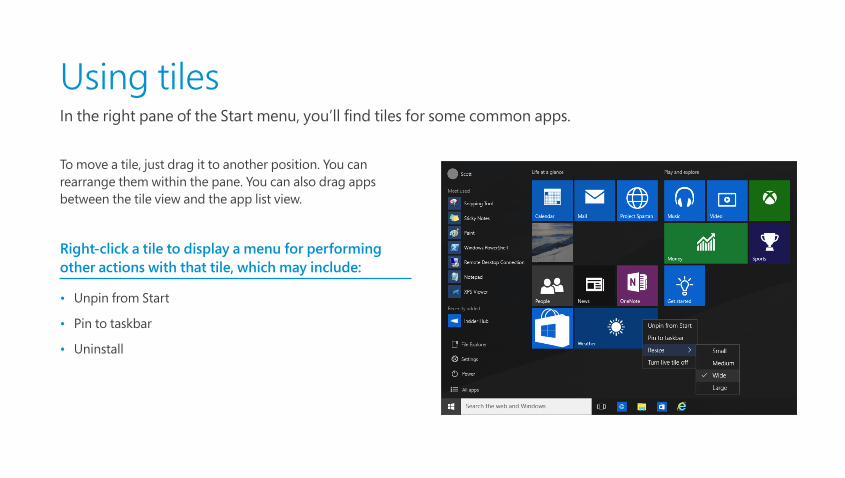
Using tilesIn the right pane of the Start menu, you’ll find tiles for some common apps.
To move a tile, just drag it to another position. You can rearrange them within the pane. You can also drag apps between the tile view and the app list view.
Right-click a tile to display a menu for performing other actions with that tile, which may include:
• Unpin from Start
• Pin to taskbar
• Uninstall
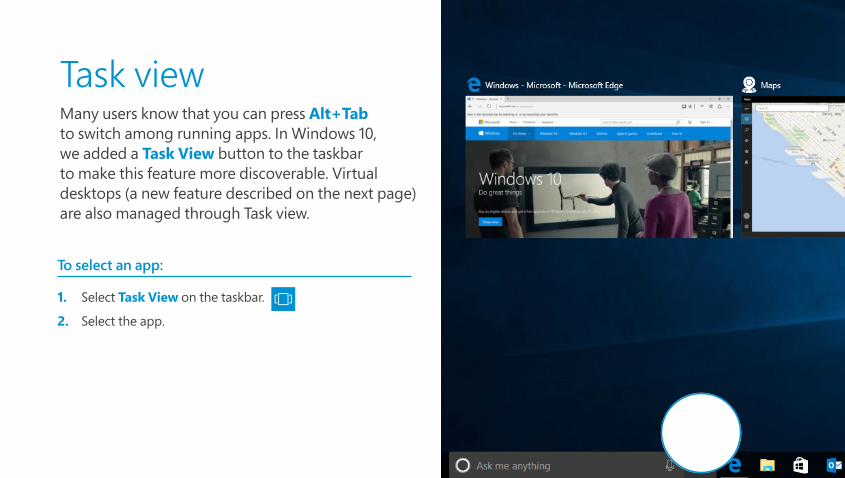
Task viewMany users know that you can press Alt+Tab to switch among running apps. In Windows 10, we added a Task View button to the taskbar to make this feature more discoverable. Virtual desktops (a new feature described on the next page) are also managed through Task view.
To select an app:
1. Select Task View on the taskbar.
2. Select the app.
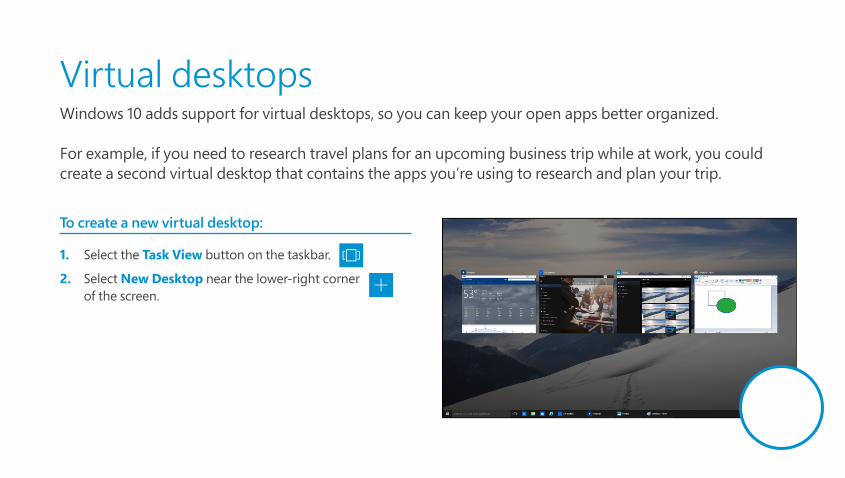
Virtual desktopsWindows 10 adds support for virtual desktops, so you can keep your open apps better organized.
For example, if you need to research travel plans for an upcoming business trip while at work, you could create a second virtual desktop that contains the apps you’re using to research and plan your trip.
To create a new virtual desktop:
1. Select the Task View button on the taskbar.
2. Select New Desktop near the lower-right corner of the screen.
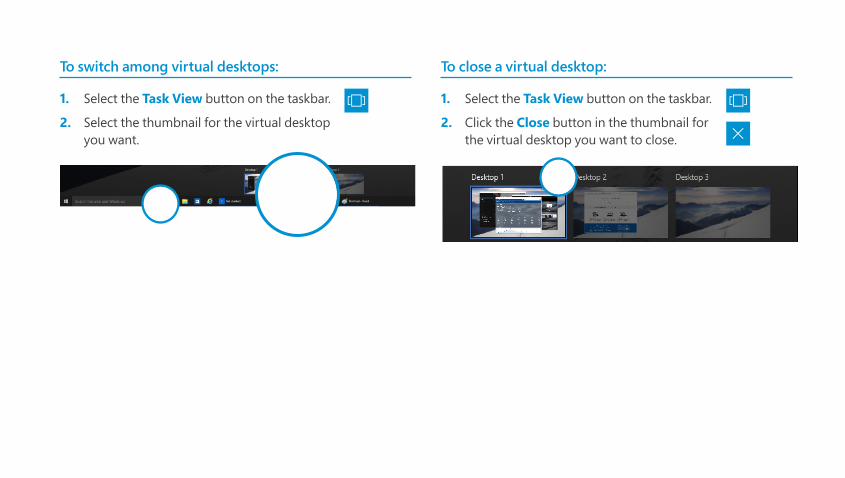
To switch among virtual desktops:
1. Select the Task View button on the taskbar.
2. Select the thumbnail for the virtual desktop you want.
To close a virtual desktop:
1. Select the Task View button on the taskbar.
2. Click the Close button in the thumbnail for the virtual desktop you want to close.
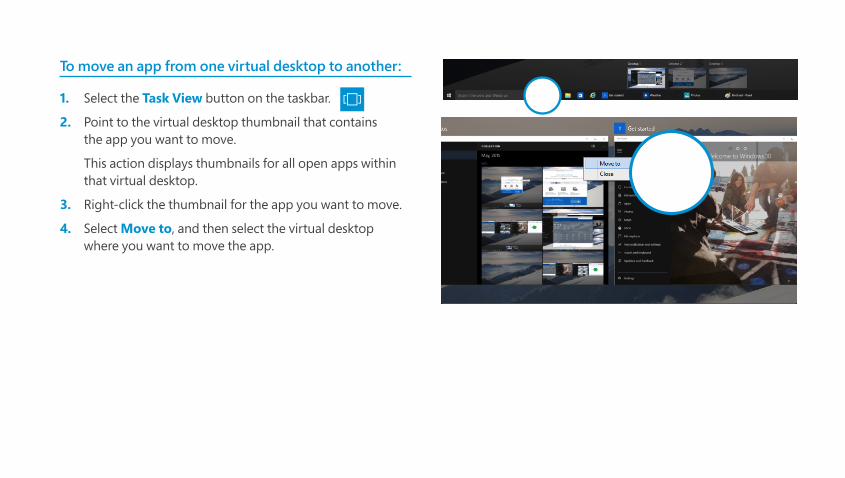
To move an app from one virtual desktop to another:
1. Select the Task View button on the taskbar.
2. Point to the virtual desktop thumbnail that contains the app you want to move.
This action displays thumbnails for all open apps within that virtual desktop.
3. Right-click the thumbnail for the app you want to move.
4. Select Move to, and then select the virtual desktop where you want to move the app.
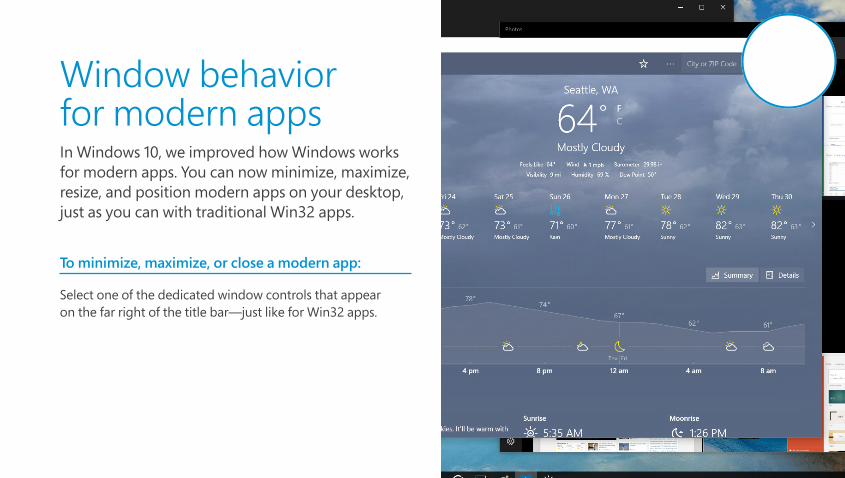
Window behavior for modern appsIn Windows 10, we improved how Windows works for modern apps. You can now minimize, maximize, resize, and position modern apps on your desktop, just as you can with traditional Win32 apps.
To minimize, maximize, or close a modern app:
Select one of the dedicated window controls that appear on the far right of the title bar—just like for Win32 apps.

Charms functionality in modern apps With Windows 10, you no longer need to go all the way to the right side of your screen to access the charms for an application. Now, you can just select the Menu button on the upper left to do things like search, print, or change settings.
The options you see will vary by application.
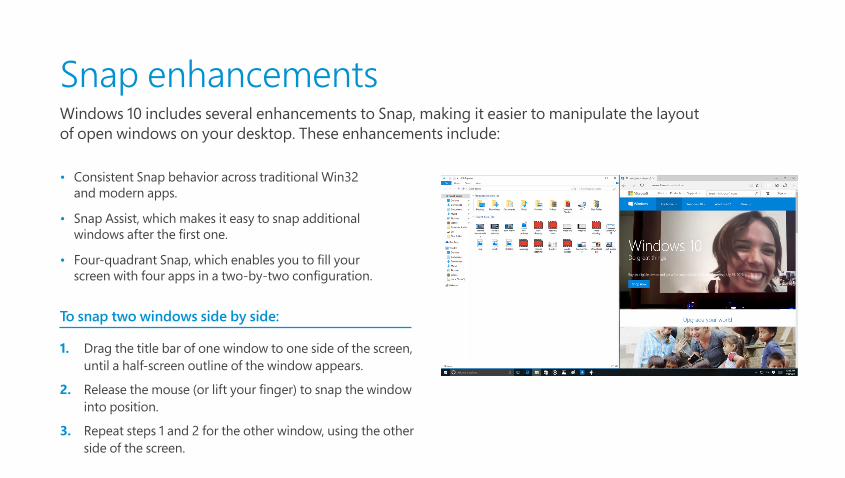
Snap enhancementsWindows 10 includes several enhancements to Snap, making it easier to manipulate the layout of open windows on your desktop. These enhancements include:
• Consistent Snap behavior across traditional Win32 and modern apps.
• Snap Assist, which makes it easy to snap additional windows after the first one.
• Four-quadrant Snap, which enables you to fill your screen with four apps in a two-by-two configuration.
To snap two windows side by side:
1. Drag the title bar of one window to one side of the screen, until a half-screen outline of the window appears.
2. Release the mouse (or lift your finger) to snap the window into position.
3. Repeat steps 1 and 2 for the other window, using the other side of the screen.
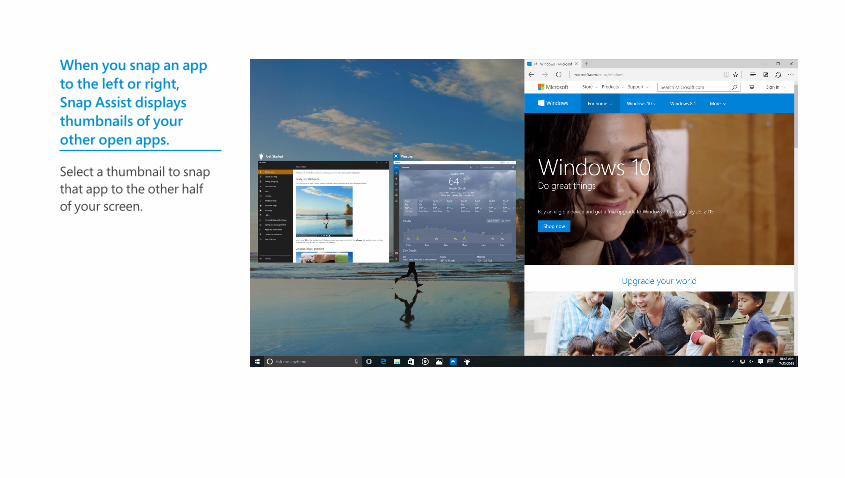
When you snap an app to the left or right, Snap Assist displays thumbnails of your other open apps.
Select a thumbnail to snap that app to the other half of your screen.
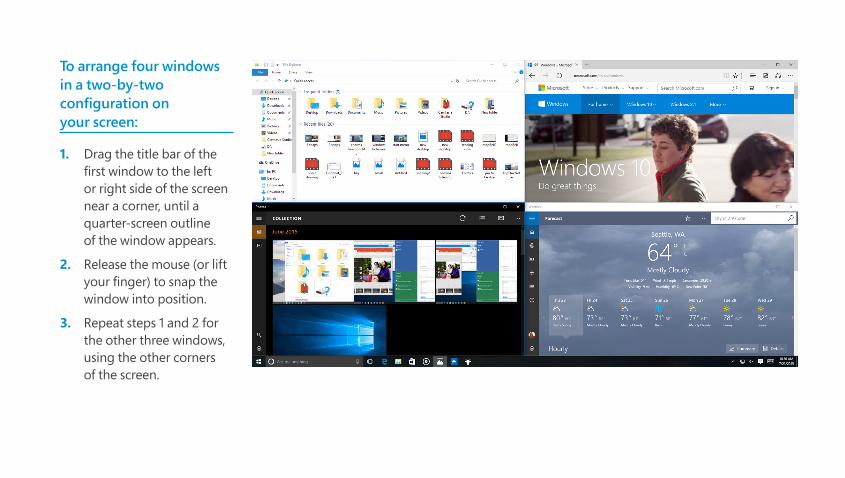
To arrange four windows in a two-by-two configuration on your screen:
1. Drag the title bar of the first window to the left or right side of the screen near a corner, until a quarter-screen outline of the window appears.
2. Release the mouse (or lift your finger) to snap the window into position.
3. Repeat steps 1 and 2 for the other three windows, using the other corners of the screen.
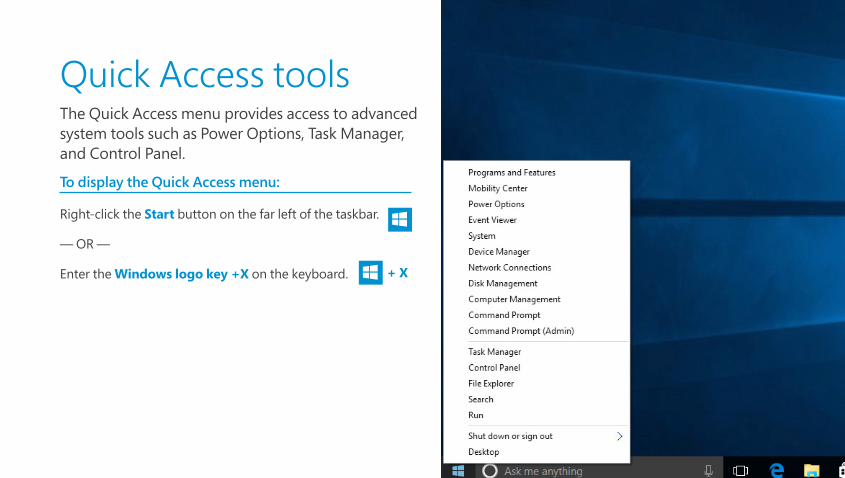
Quick Access toolsThe Quick Access menu provides access to advanced system tools such as Power Options, Task Manager, and Control Panel.
To display the Quick Access menu:
Right-click the Start button on the far left of the taskbar.
— OR —
Enter the Windows logo key +X on the keyboard. + X
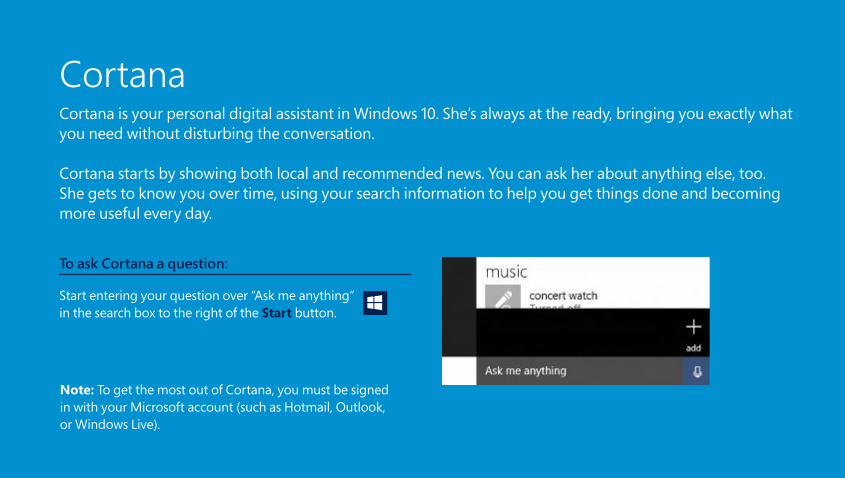
CortanaCortana is your personal digital assistant in Windows 10. She’s always at the ready, bringing you exactly what you need without disturbing the conversation.
Cortana starts by showing both local and recommended news. You can ask her about anything else, too. She gets to know you over time, using your search information to help you get things done and becoming more useful every day.
To ask Cortana a question:
Start entering your question over “Ask me anything” in the search box to the right of the Start button.
Note: To get the most out of Cortana, you must be signed in with your Microsoft account (such as Hotmail, Outlook, or Windows Live).
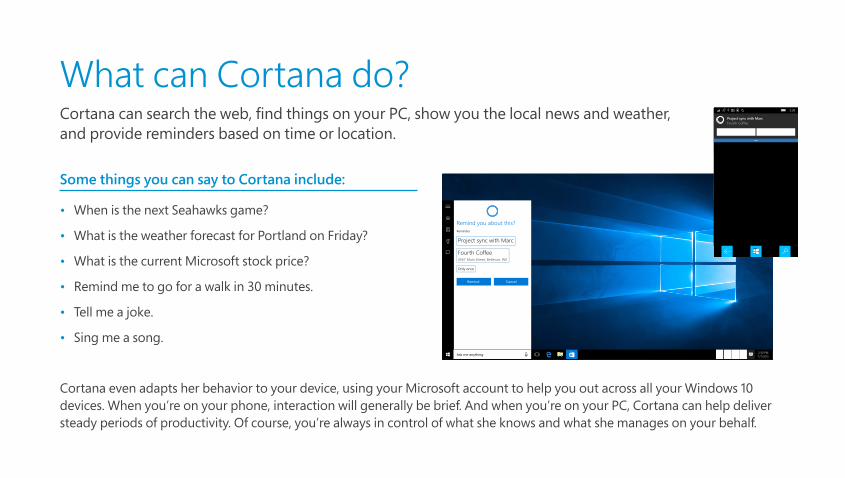
What can Cortana do?Cortana can search the web, find things on your PC, show you the local news and weather, and provide reminders based on time or location.
Cortana even adapts her behavior to your device, using your Microsoft account to help you out across all your Windows 10 devices. When you’re on your phone, interaction will generally be brief. And when you’re on your PC, Cortana can help deliver steady periods of productivity. Of course, you’re always in control of what she knows and what she manages on your behalf.
Some things you can say to Cortana include:
• When is the next Seahawks game?
• What is the weather forecast for Portland on Friday?
• What is the current Microsoft stock price?
• Remind me to go for a walk in 30 minutes.
• Tell me a joke.
• Sing me a song.2:30 PM7/7/2015Ask me anythingAsk me anything
Remind you about this?Reminder
Project sync with Marc
Fourth Coffee4567 Main Street, Bellevue, WA
Only once
CancelRemind
Ask me anything
Cortana
Welcome Erwin!With traffic, it's likely to take you 45minutes to get to your next meeting.
5
10
Outlook Mail
Tuesday 07
Project sync with MarcFourth Coffee3:30 PM
DOW17,068.71▲ +0.32%3:59 PM EDT
Fabrikam Portal
Dynamics
YammerPhotos
Microsoft Edge
1
3Project sync with MarcFourth Coffee
Snooze Dismiss
2∶30
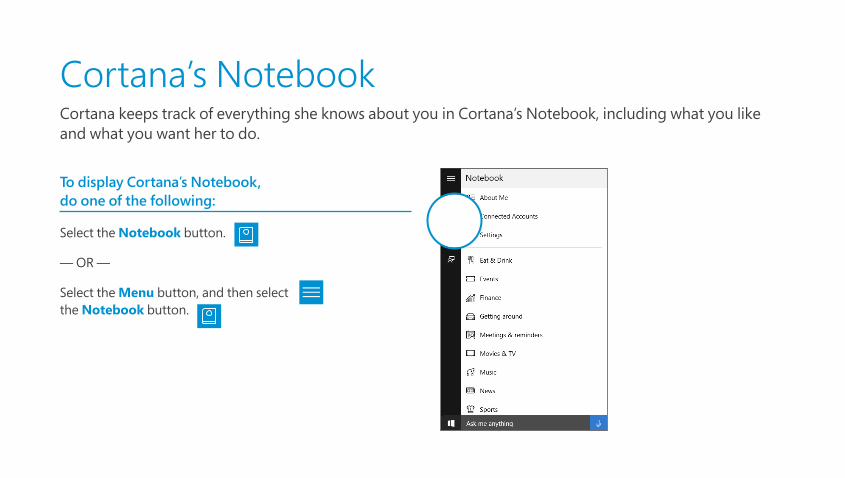
Cortana’s NotebookCortana keeps track of everything she knows about you in Cortana’s Notebook, including what you like and what you want her to do.
To display Cortana’s Notebook, do one of the following:
Select the Notebook button.
— OR —
Select the Menu button, and then select the Notebook button.
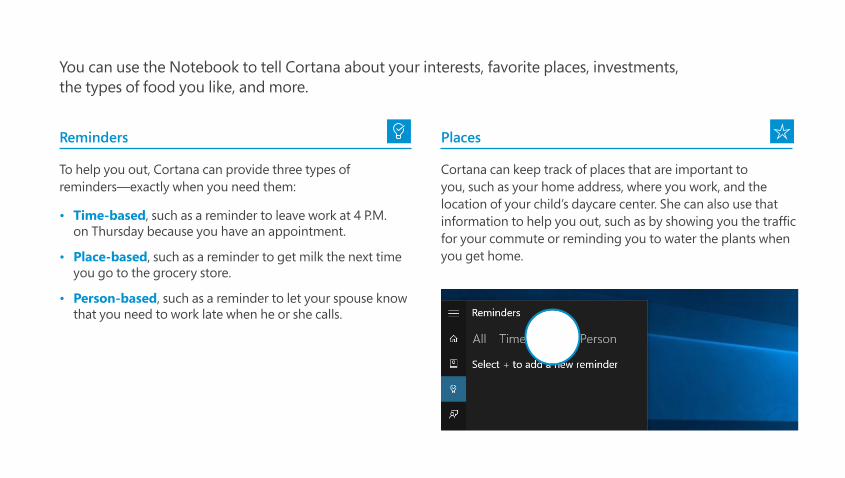
You can use the Notebook to tell Cortana about your interests, favorite places, investments, the types of food you like, and more.
Reminders
To help you out, Cortana can provide three types of reminders—exactly when you need them:
• Time-based, such as a reminder to leave work at 4 P.M. on Thursday because you have an appointment.
• Place-based, such as a reminder to get milk the next time you go to the grocery store.
• Person-based, such as a reminder to let your spouse know that you need to work late when he or she calls.
Places
Cortana can keep track of places that are important to you, such as your home address, where you work, and the location of your child’s daycare center. She can also use that information to help you out, such as by showing you the traffic for your commute or reminding you to water the plants when you get home.
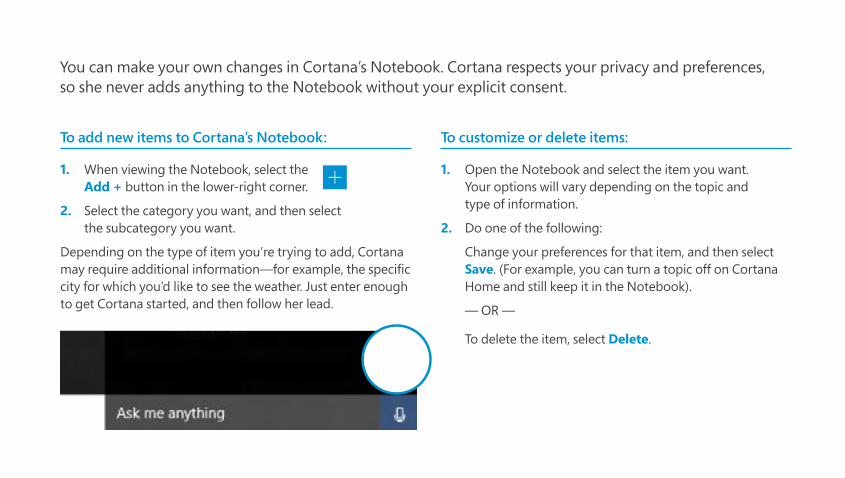
You can make your own changes in Cortana’s Notebook. Cortana respects your privacy and preferences, so she never adds anything to the Notebook without your explicit consent.
To add new items to Cortana’s Notebook:
1. When viewing the Notebook, select the Add + button in the lower-right corner.
2. Select the category you want, and then select the subcategory you want.
Depending on the type of item you’re trying to add, Cortana may require additional information—for example, the specific city for which you’d like to see the weather. Just enter enough to get Cortana started, and then follow her lead.
To customize or delete items:
1. Open the Notebook and select the item you want. Your options will vary depending on the topic and type of information.
2. Do one of the following: Change your preferences for that item, and then select Save. (For example, you can turn a topic off on Cortana Home and still keep it in the Notebook).
— OR —
To delete the item, select Delete.

Introducing Microsoft EdgeMicrosoft Edge, the new browser in Windows 10, is designed to deliver a better web experience. It’s fast, compatible, and built for the modern web—designed to work the way you do and help you get things done through easy sharing, reading, discovery, and more.
When you want to search for something, there’s no need to go to a website.
Enter your search in the address bar, and you’ll get search suggestions and results from the web, your browsing history, and your favorites—right on the spot.
Microsoft Edge uses a new rendering engine to help you get the most out of modern webpages. If a page doesn’t look quite right in Microsoft Edge, just open it with Internet Explorer.
1. Select the More actions button.
2. Select Open with Internet Explorer.
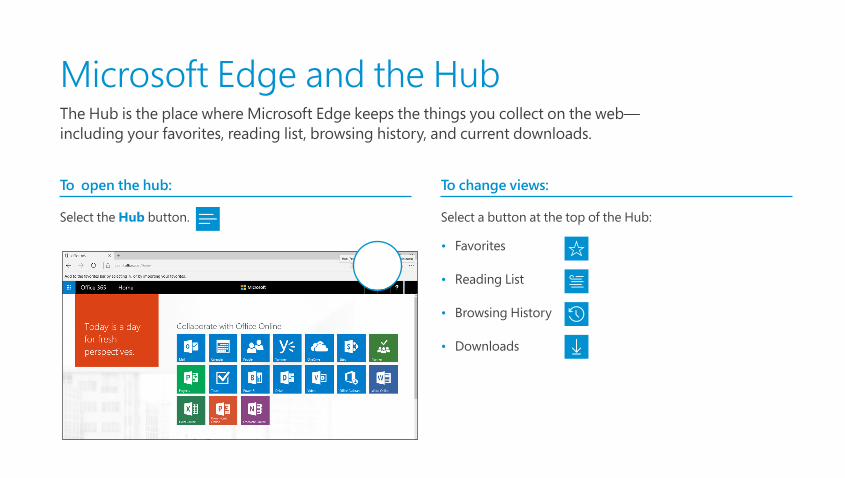
Microsoft Edge and the HubThe Hub is the place where Microsoft Edge keeps the things you collect on the web— including your favorites, reading list, browsing history, and current downloads.
To open the hub:
Select the Hub button.
To change views:
Select a button at the top of the Hub:
• Favorites
• Reading List
• Browsing History
• Downloads

Microsoft Edge and Web NotesMicrosoft Edge is the only browser that lets you take notes, write, doodle, and highlight directly on webpages—and then save your “Web Notes” for later or share them with others. Web Notes are collected on the Hub and can be shared to other programs, such as Microsoft OneNote.
Within Web Notes, you can:
Select Make a Web Note to display the Web Note toolbar, where you can:
• Draw on the page
• Highlight content
• Erase everything you’ve added to the page
• Comment on something
• Clip part of the page
When you finish creating a Web Note, you can:
• Save the Web Note to Favorites or Reading List.
• Share the Web Note via OneNote or to Reading List.
• Exit the Web Note toolbar to close it and return to the normal view.
The future is looking bright for Fabrikam, Inc.
A new nationwide report on projected sales is showing that Fabrikam, Inc. will become the leader in the mathematical calculator industry by 2018. Commissioned by Trey Research, the report also predicts that by 2022, Fabrikam, Inc. will account for 80% of total industry sales.
With educational technology sales on the rise, Fabrikam, Inc. is expanding. Currently located in an industrial park 30 minutes south of Seattle, Washington. Fabrikam is planning to move their corporate headquarters closer to the metropolitan area in the next 12 months and will be adding 150 jobs. “We have seen stable growth over the last 5 years, both in the industry and at our company,” says Matilda Goodman, Fabrikam chief executive officer. The company has signed multiple contracts
Sales in the US increased by 38%
in 2014.- Source: Trey Research
2:30 PM7/7/2015Ask me anything
Exit
Trey Research

Microsoft Edge and Reading ListReading List gives you a place to save content you want to read later.
To save content to Reading List:
• Select the Reading List button > Reading List > Add.
• When you’re ready to read what you’ve saved, go to the Hub button, and then select the Reading List button.
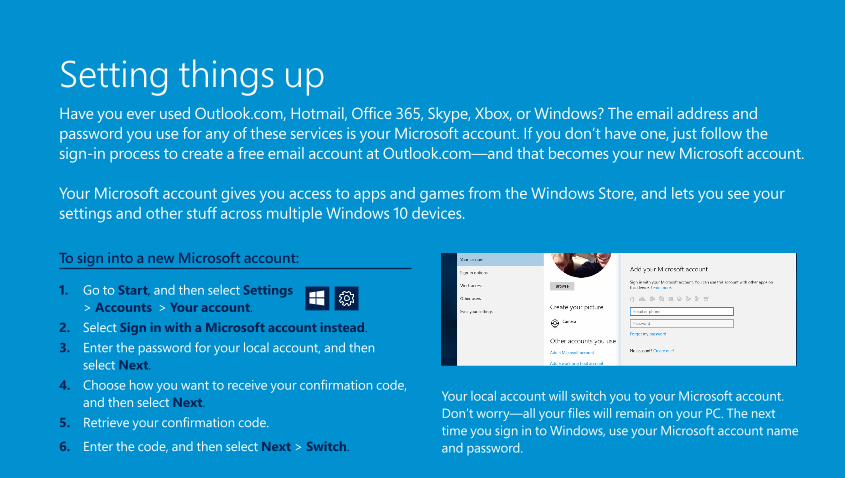
Setting things upHave you ever used Outlook.com, Hotmail, Office 365, Skype, Xbox, or Windows? The email address and password you use for any of these services is your Microsoft account. If you don’t have one, just follow the sign-in process to create a free email account at Outlook.com—and that becomes your new Microsoft account.
Your Microsoft account gives you access to apps and games from the Windows Store, and lets you see your settings and other stuff across multiple Windows 10 devices.
To sign into a new Microsoft account:
1. Go to Start, and then select Settings > Accounts > Your account.
2. Select Sign in with a Microsoft account instead.3. Enter the password for your local account, and then
select Next.4. Choose how you want to receive your confirmation code,
and then select Next.5. Retrieve your confirmation code.
6. Enter the code, and then select Next > Switch.
Your local account will switch you to your Microsoft account. Don’t worry—all your files will remain on your PC. The next time you sign in to Windows, use your Microsoft account name and password.
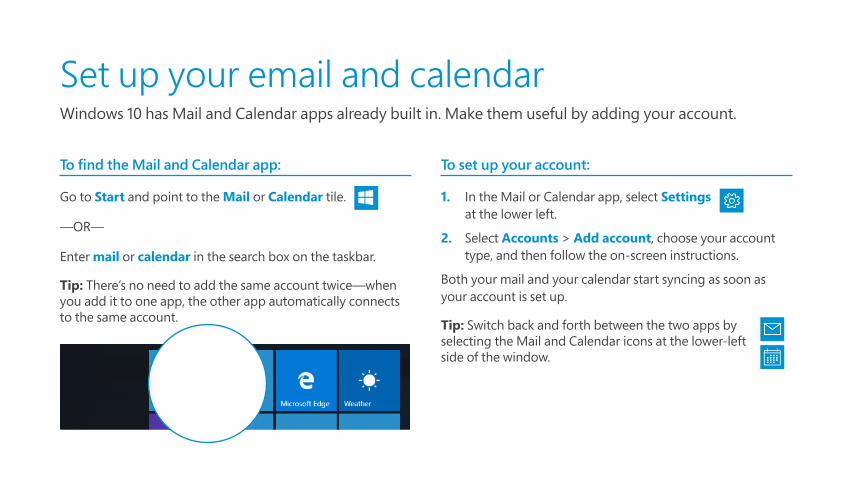
Set up your email and calendarWindows 10 has Mail and Calendar apps already built in. Make them useful by adding your account.
To find the Mail and Calendar app:
Go to Start and point to the Mail or Calendar tile.
—OR—
Enter mail or calendar in the search box on the taskbar.
Tip: There’s no need to add the same account twice—when you add it to one app, the other app automatically connects to the same account.
To set up your account:
1. In the Mail or Calendar app, select Settings at the lower left.
2. Select Accounts > Add account, choose your account type, and then follow the on-screen instructions.
Both your mail and your calendar start syncing as soon as your account is set up.
Tip: Switch back and forth between the two apps by selecting the Mail and Calendar icons at the lower-left side of the window.
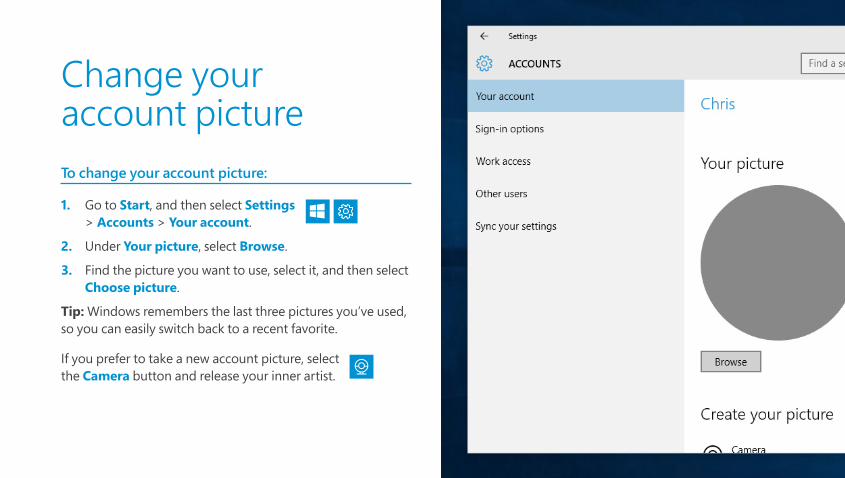
Change your account pictureTo change your account picture:
1. Go to Start, and then select Settings > Accounts > Your account.
2. Under Your picture, select Browse.
3. Find the picture you want to use, select it, and then select Choose picture.
Tip: Windows remembers the last three pictures you’ve used, so you can easily switch back to a recent favorite.
If you prefer to take a new account picture, select the Camera button and release your inner artist.
Protect your PCWindows 10 is safer and more secure, thanks to Windows Defender and Windows Firewall. When you start up Windows 10 for the first time, they are both on and working to protect your PC by scanning for malicious software. There may be situations in which you need to turn off Windows Defender or Windows Firewall temporarily, such as while installing certain applications or software updates. However, be sure to check with your network administrator before doing so.
Windows Defender uses real-time protection to scan everything you download or run on your PC. It turns itself off tif you install another antivirus app.
To turn off Windows Defender temporarily:
1. Go to Start and then select Settings > Update & security > Windows Defender.
2. Turn off Real-time protection.
Windows Firewall filters information coming into your PC from the Internet, blocking potentially harmful programs such as worms.
To turn Windows Firewall on or off:
1. Enter firewall in the search box.
2. Select Windows Firewall > Turn Windows Firewall on or off.
Note: If your PC is connected to a network, you might not be able to change your Windows Firewall settings, because of network policies. Contact your administrator for more information.
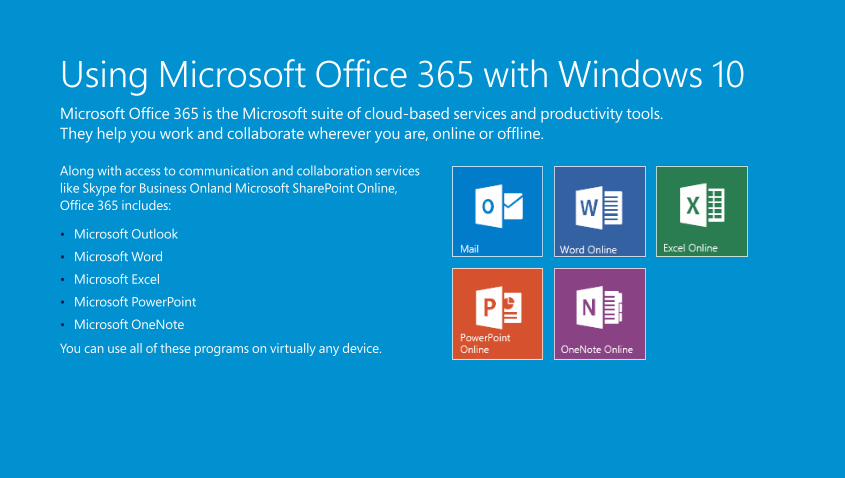
Using Microsoft Office 365 with Windows 10Microsoft Office 365 is the Microsoft suite of cloud-based services and productivity tools. They help you work and collaborate wherever you are, online or offline.
Along with access to communication and collaboration services like Skype for Business Onland Microsoft SharePoint Online, Office 365 includes:
• Microsoft Outlook
• Microsoft Word
• Microsoft Excel
• Microsoft PowerPoint
• Microsoft OneNote
You can use all of these programs on virtually any device.
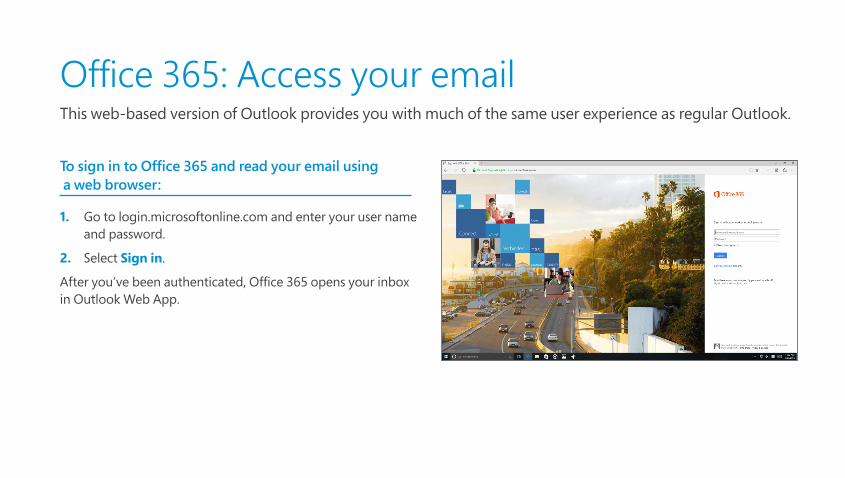
Office 365: Access your emailThis web-based version of Outlook provides you with much of the same user experience as regular Outlook.
To sign in to Office 365 and read your email using a web browser:
1. Go to login.microsoftonline.com and enter your user name and password.
2. Select Sign in.
After you’ve been authenticated, Office 365 opens your inbox in Outlook Web App.

Office 365: On mobile devicesYou can access email, instant messaging, documents, and other Office 365 services from your mobile phone or tablet.
To set up your device:
1. Go to Settings > Office 365 Settings > Software > Phone & tablet.
2. Choose the appropriate supported device type listed under Phone or Tablet.
3. Follow the on-screen instructions to complete any required installation and configuration.

Office 365 and OneDrive for Business: Work with files anywhereMicrosoft OneDrive for Business uses Microsoft Office 365 (SharePoint Online) to safely store your business files in the cloud. You can work on files from virtually any location or computer, and share your work with team members.
OneDrive for Business makes it easy to:
• Store and organize your work files in a secure location in the cloud.
• Share files with your coworkers, so they can review or edit the content much more efficiently than by attaching content to email messages.
• Synchronize files stored in the cloud to your computer or mobile device so that you can access your files offline.

Office 365 and OneDrive for Business: Start by logging on to Office 365To work with files on OneDrive for Business, you first need to log on to Office 365 and create or open OneDrive:
1. On the Office 365 sign-in page, enter your user name and password, and select Sign in.
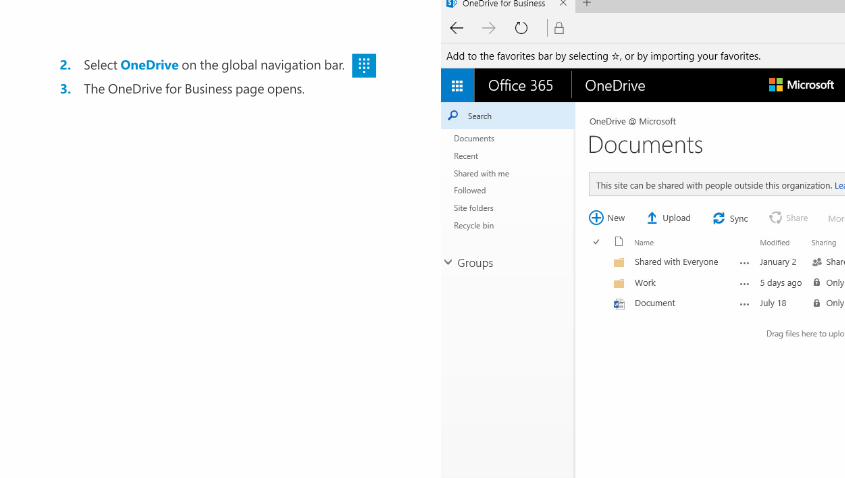
2. Select OneDrive on the global navigation bar.
3. The OneDrive for Business page opens.
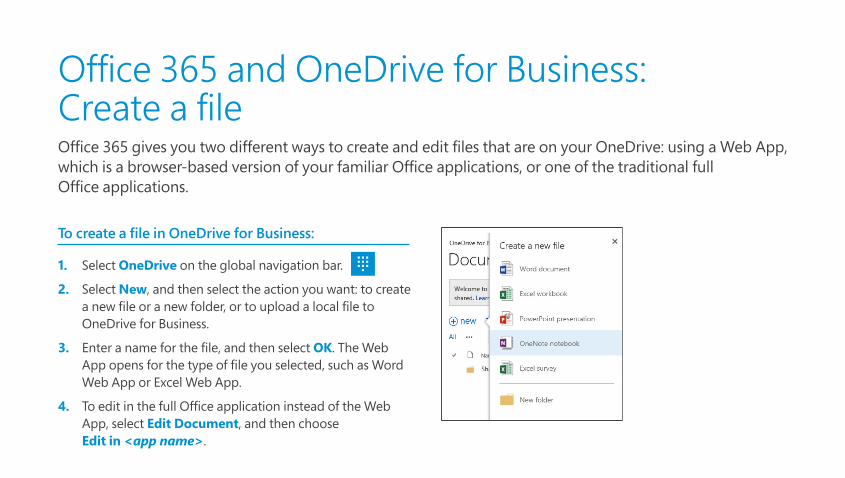
Office 365 and OneDrive for Business: Create a fileOffice 365 gives you two different ways to create and edit files that are on your OneDrive: using a Web App, which is a browser-based version of your familiar Office applications, or one of the traditional full Office applications.
To create a file in OneDrive for Business:
1. Select OneDrive on the global navigation bar.
2. Select New, and then select the action you want: to create a new file or a new folder, or to upload a local file to OneDrive for Business.
3. Enter a name for the file, and then select OK. The Web App opens for the type of file you selected, such as Word Web App or Excel Web App.
4. To edit in the full Office application instead of the Web App, select Edit Document, and then choose Edit in <app name>.
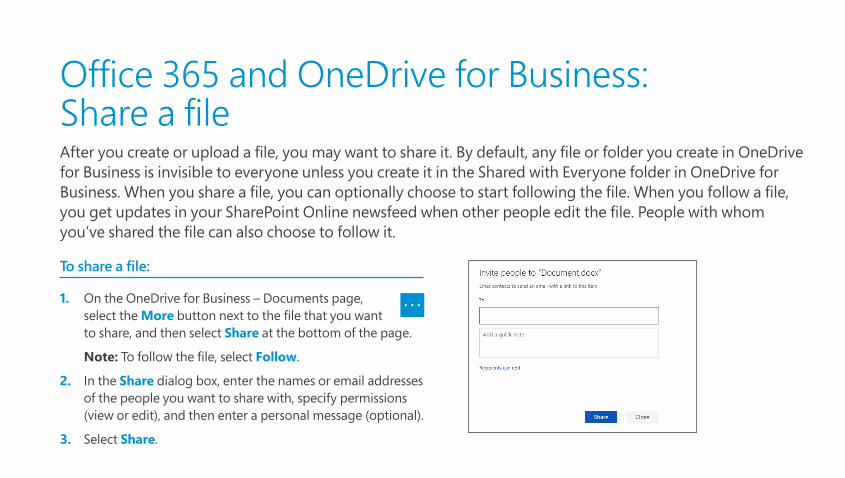
Office 365 and OneDrive for Business: Share a fileAfter you create or upload a file, you may want to share it. By default, any file or folder you create in OneDrive for Business is invisible to everyone unless you create it in the Shared with Everyone folder in OneDrive for Business. When you share a file, you can optionally choose to start following the file. When you follow a file, you get updates in your SharePoint Online newsfeed when other people edit the file. People with whom you’ve shared the file can also choose to follow it.
To share a file:
1. On the OneDrive for Business – Documents page, select the More button next to the file that you want to share, and then select Share at the bottom of the page. Note: To follow the file, select Follow.
2. In the Share dialog box, enter the names or email addresses of the people you want to share with, specify permissions (view or edit), and then enter a personal message (optional).
3. Select Share.
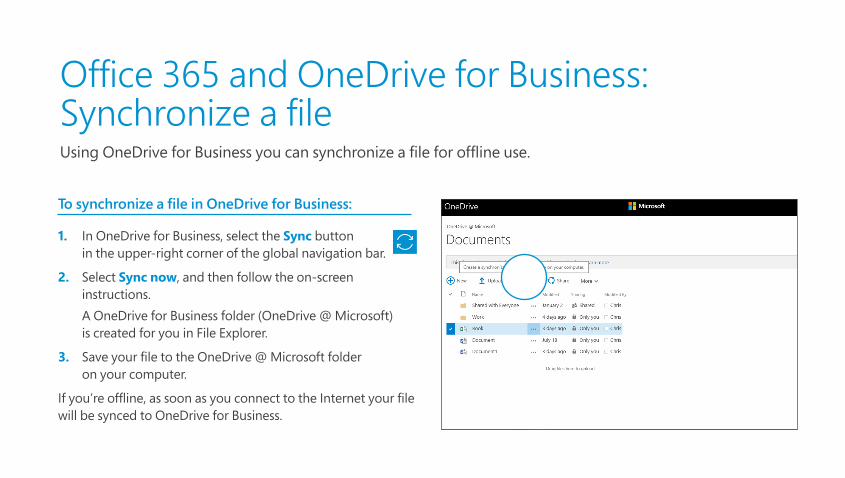
Office 365 and OneDrive for Business: Synchronize a fileUsing OneDrive for Business you can synchronize a file for offline use.
To synchronize a file in OneDrive for Business:
1. In OneDrive for Business, select the Sync button in the upper-right corner of the global navigation bar.
2. Select Sync now, and then follow the on-screen instructions. A OneDrive for Business folder (OneDrive @ Microsoft) is created for you in File Explorer.
3. Save your file to the OneDrive @ Microsoft folder on your computer.
If you’re offline, as soon as you connect to the Internet your file will be synced to OneDrive for Business.
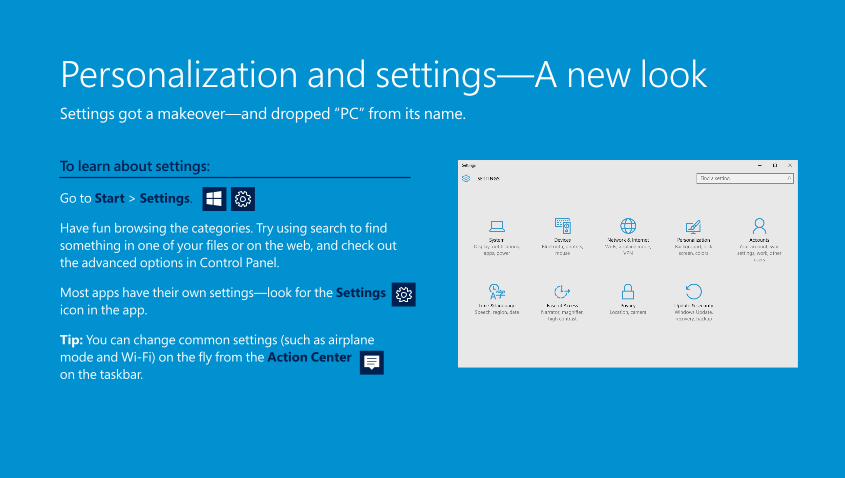
Personalization and settings—A new lookSettings got a makeover—and dropped “PC” from its name.
To learn about settings:
Go to Start > Settings.
Have fun browsing the categories. Try using search to find something in one of your files or on the web, and check out the advanced options in Control Panel.
Most apps have their own settings—look for the Settings icon in the app.
Tip: You can change common settings (such as airplane mode and Wi-Fi) on the fly from the Action Center on the taskbar.
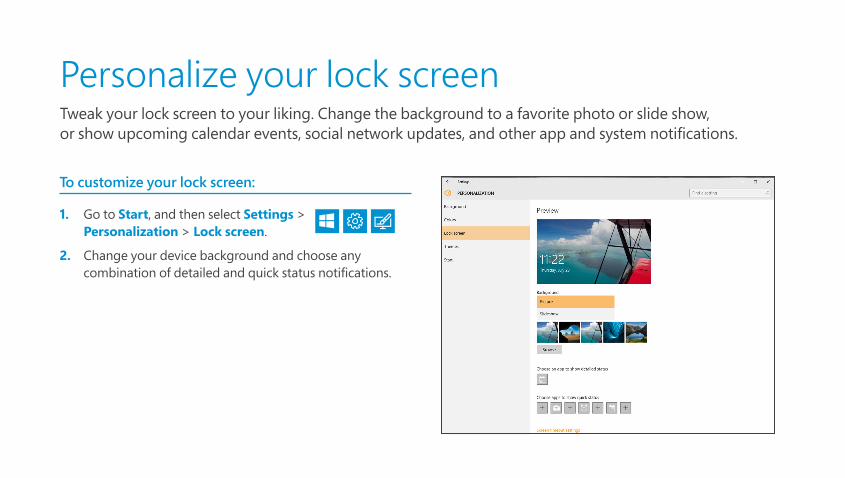
Personalize your lock screenTweak your lock screen to your liking. Change the background to a favorite photo or slide show, or show upcoming calendar events, social network updates, and other app and system notifications.
To customize your lock screen:
1. Go to Start, and then select Settings > Personalization > Lock screen.
2. Change your device background and choose any combination of detailed and quick status notifications.

Get started with themesPersonalize your environment by choosing from among themes featuring cute critters, holiday cheer, and other smile-inducing options.
To get a theme:
1. Go to Start, and then select Settings > Personalization > Themes.
2. Select Theme settings.
3. Choose from one of the default themes, or select Get more themes online.
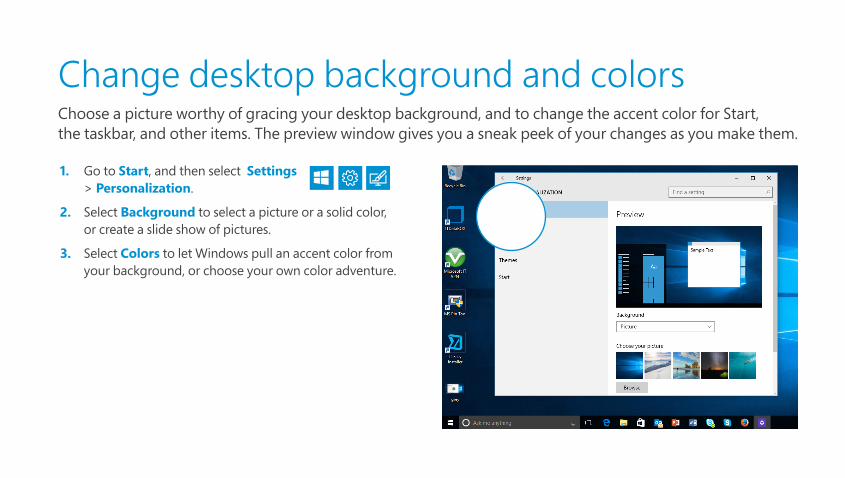
Change desktop background and colorsChoose a picture worthy of gracing your desktop background, and to change the accent color for Start, the taskbar, and other items. The preview window gives you a sneak peek of your changes as you make them.
1. Go to Start, and then select Settings > Personalization.
2. Select Background to select a picture or a solid color, or create a slide show of pictures.
3. Select Colors to let Windows pull an accent color from your background, or choose your own color adventure.
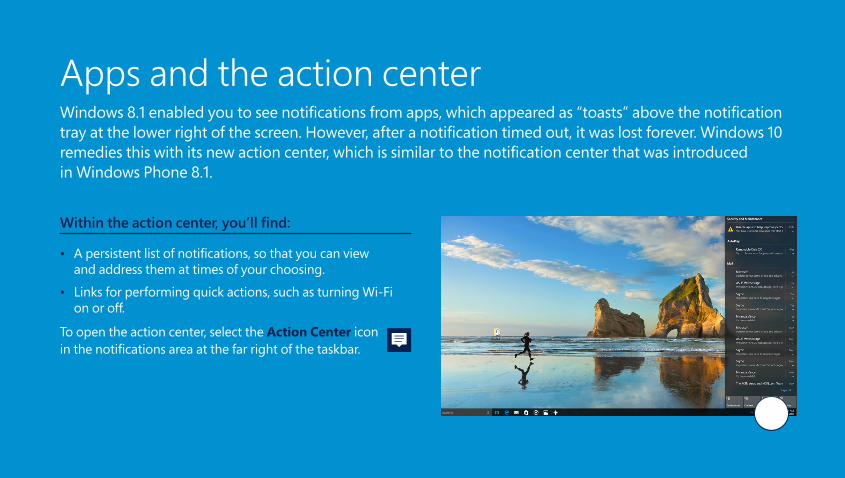
Apps and the action centerWindows 8.1 enabled you to see notifications from apps, which appeared as “toasts” above the notification tray at the lower right of the screen. However, after a notification timed out, it was lost forever. Windows 10 remedies this with its new action center, which is similar to the notification center that was introduced in Windows Phone 8.1.
Within the action center, you’ll find:
• A persistent list of notifications, so that you can view and address them at times of your choosing.
• Links for performing quick actions, such as turning Wi-Fi on or off.
To open the action center, select the Action Center icon in the notifications area at the far right of the taskbar.
We hope this guide has helped you get started enjoying all of the benefits of Windows 10!
Remember—it’s the Windows you already know, only better.