windows 2008 server r2
TRANSCRIPT

ADIT Project IT 401 – Advanced Operating System
Chapter 1 - Introduction
Windows Server 2008 R2 is a server operating system produced by Microsoft. It was
launched on October 22, 2009. According to the Windows Server Team blog, the retail
availability was September 14, 2009. It is built on Windows NT 6.1; the same core operating
system used with the end-user oriented Windows 7. It is the first 64-bit only operating system
release from Microsoft.
Microsoft introduced Windows Server 2008 R2 at the 2008 Professional Developers
Conference as the server variant of Windows 7.
On January 7, 2009, a beta release of Windows Server 2008 R2 was made available to
subscribers of Microsoft's TechNet and MSDN programs, as well as those participating in the
Microsoft Connect program for Windows 7. Two days later, the beta was released to the
public via the Microsoft Download Center.
On April 30, 2009, the release candidate was made available to subscribers of Microsoft's
TechNet and MSDN. On May 5, 2009, the release candidate was made available to the
general public via the Microsoft download center.
According to Windows Server Division WebLog, the following are the dates when Microsoft
Windows Server 2008 R2 has been made available to various distribution channels:
OEMs received Windows Server 2008 R2 RTM in English and all Language Packs on
July 29. The remaining languages were available around August 11.
ISV (Independent software vendor) and IHV (Independent hardware vendor) partners
have been able to download Windows Server 2008 R2 RTM from MSDN starting on
August 14.
IT Professionals with TechNet Subscriptions are able to download Windows Server
2008 R2 RTM in English, French, German, Italian, and Spanish on August 14 and all
remaining languages beginning August 21.
Developers with MSDN Subscriptions have been allowed to download Windows
Server 2008 R2 RTM in English, French, German, Italian, and Spanish on August 14
and all remaining languages starting August 21.
1

ADIT Project IT 401 – Advanced Operating System
Microsoft Partner Program Gold/Certified Members were able to download Windows
Server 2008 R2 RTM through the Microsoft Partner Program (MPP) Portal on August
19.
Volume License (VL) customer with an existing Software Assurance (SA) license
were able to download Windows Server 2008 R2 RTM on August 19 via the Volume
License Service Center (VLSC).
Volume License customers without a Software Assurance (SA) license can purchase
Windows Server 2008 R2 through Volume Licensing on September 1.
Additionally, qualifying students have been able to download Windows Server 2008 R2
RTM Standard Edition from DreamSpark
2

ADIT Project IT 401 – Advanced Operating System
Chapter 2 - Installation of Windows 2008 R2
1. Insert the appropriate Windows Server 2008 installation media into your DVD
drive.
2. Reboot the computer.
3. When prompted for an installation language and other regional options, make your
selection and press Next.
3

ADIT Project IT 401 – Advanced Operating System
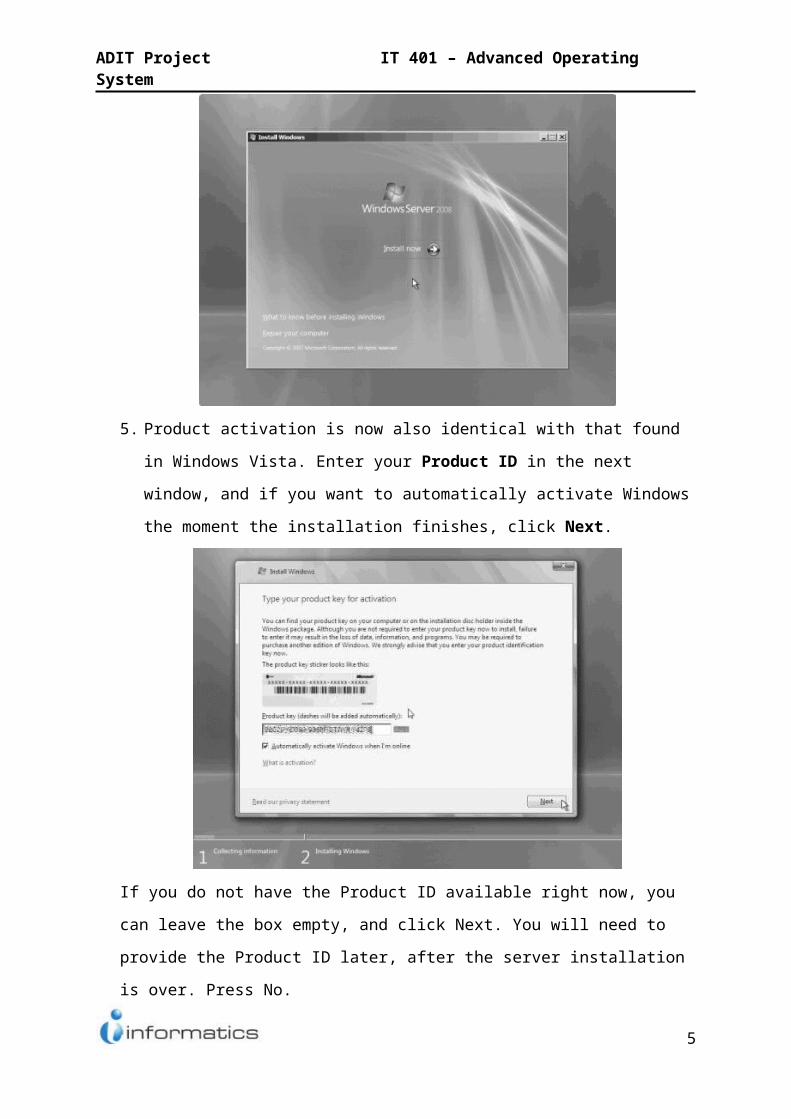
4. Next, press Install Now to begin the installation process.
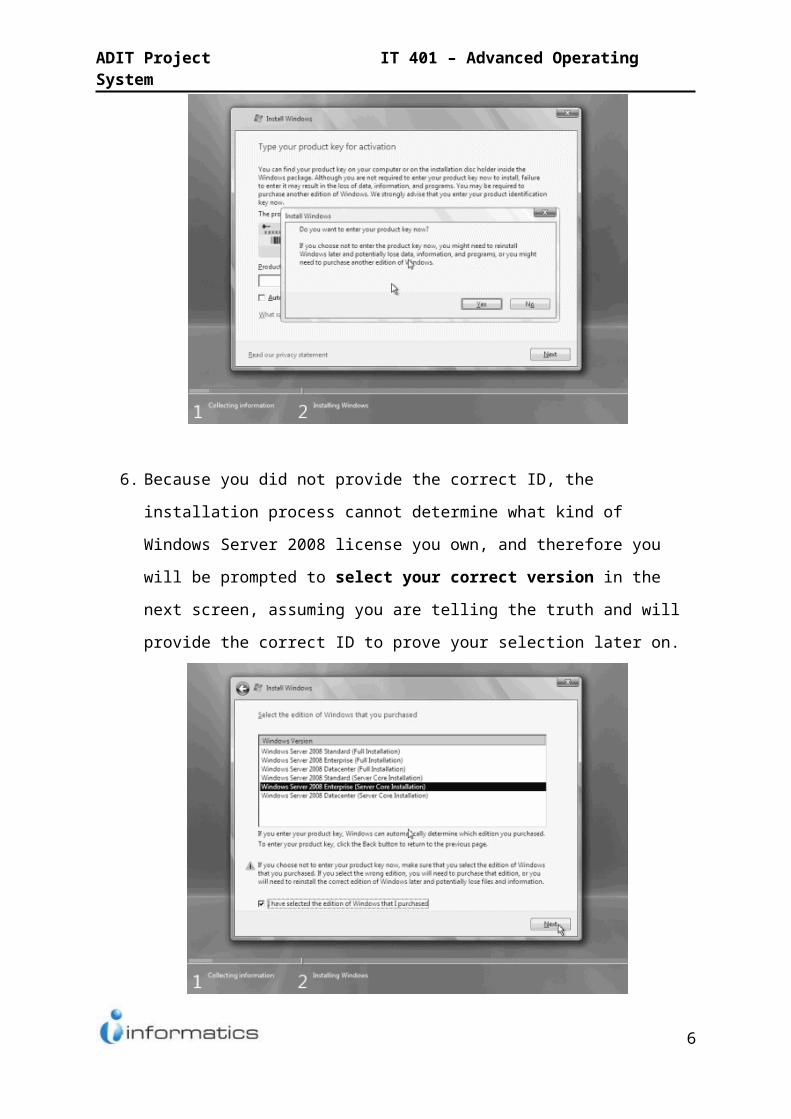
5. Product activation is now also identical with that found in Windows Vista. Enter your
Product ID in the next window, and if you want to automatically activate Windows
the moment the installation finishes, click Next.
If you do not have the Product ID available right now, you can leave the box empty, and
click Next. You will need to provide the Product ID later, after the server installation is
over. Press No.
4
ADIT Project IT 401 – Advanced Operating System
6. Because you did not provide the correct ID, the installation process cannot determine
what kind of Windows Server 2008 license you own, and therefore you will be
prompted to select your correct version in the next screen, assuming you are telling
the truth and will provide the correct ID to prove your selection later on.
5
ADIT Project IT 401 – Advanced Operating System
7. If you did provide the right Product ID, select the Full version of the right Windows
version you're prompted, and click Next.
8. Read and accept the license terms by clicking to select the checkbox and pressing Next.
6

ADIT Project IT 401 – Advanced Operating System
9. In the "Which type of installation do you want?" window, click the only available option – Custom (Advanced).
10. In the "Where do you want to install Windows?", if you're installing the server on a regular IDE hard disk, click to select the first disk, usually Disk 0, and click Next.
If you're installing on a hard disk that's connected to a SCSI controller, click Load Driver and
insert the media provided by the controller's manufacturer.
7

ADIT Project IT 401 – Advanced Operating System
If you're installing in a Virtual Machine environment, make sure you read the "Installing the
Virtual SCSI Controller Driver for Virtual Server 2005 on Windows Server 2008"
If you must, you can also click Drive Options and manually create a partition on the
destination hard disk.
11. The installation now begins, and you can go and have lunch. Copying the setup files
from the DVD to the hard drive only takes about one minute. However, extracting and
uncompressing the files takes a good deal longer. After 20 minutes, the operating
system is installed. The exact time it takes to install server core depends upon your
hardware specifications. Faster disks will perform much faster installs… Windows
Server 2008 takes up approximately 10 GB of hard drive space.
The installation process will reboot your computer, so, if in step #10 you inserted a floppy
disk (either real or virtual), make sure you remove it before going to lunch, as you'll find
the server hanged without the ability to boot (you can bypass this by configuring the
server to boot from a CD/DVD and then from the hard disk in the booting order on the
server's BIOS)
8

ADIT Project IT 401 – Advanced Operating System
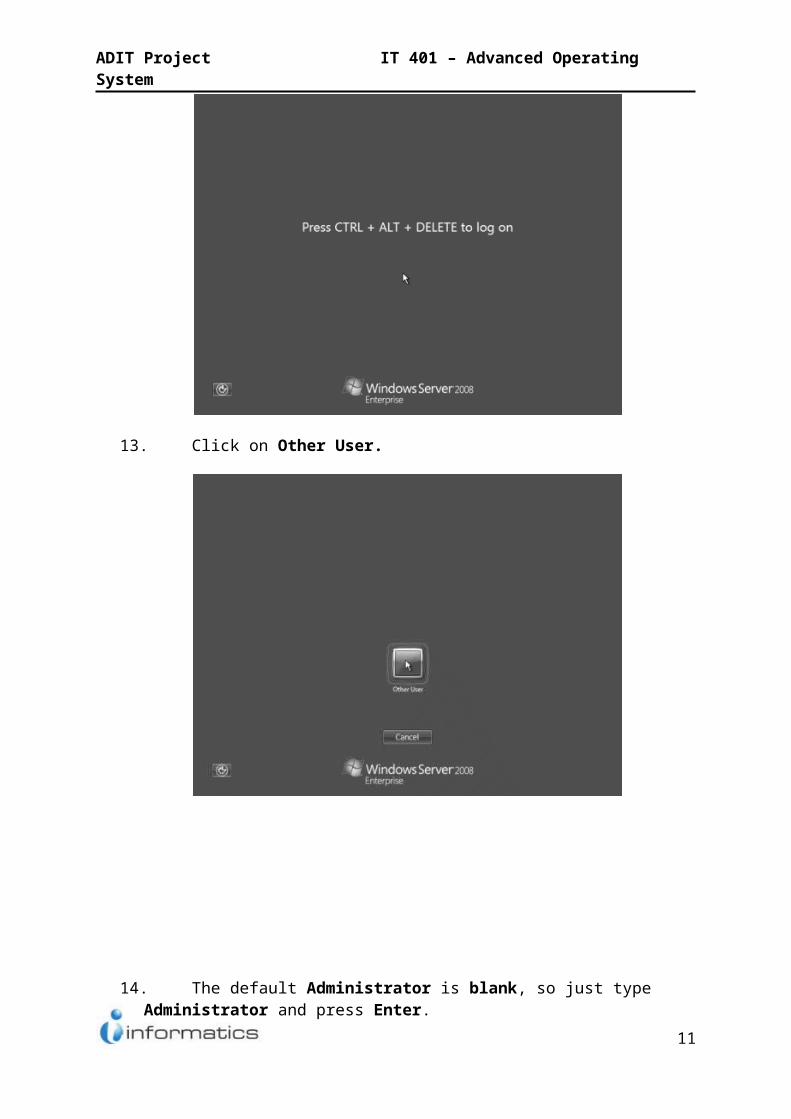
12. Then the server reboots you'll be prompted with the new Windows Server 2008 type of login screen. Press CTRL+ALT+DEL to log in.
13. Click on Other User.
9

ADIT Project IT 401 – Advanced Operating System
14. The default Administrator is blank, so just type Administrator and press Enter.
15. You will be prompted to change the user's password. You have no choice but to press Ok.
10
ADIT Project IT 401 – Advanced Operating System
16. In the password changing dialog box, leave the default password blank (duh, read step #15…), and enter a new, complex, at-least-7-characters-long new password twice. A password like "topsecret" is not valid (it's not complex), but one like "T0pSecreT!" sure is. Make sure you remember it.
17. Someone thought it would be cool to nag you once more, so now you'll be prompted to accept the fact that the password had been changed. Press Ok.
11

ADIT Project IT 401 – Advanced Operating System
18. Finally, the desktop appears and that's it, you're logged on and can begin working.
You will be greeted by an assistant for the initial server configuration, and after
performing some initial configuration tasks, you will be able to start working.
12

ADIT Project IT 401 – Advanced Operating System
Chapter 3 - Planning server hardware
Processor
• Minimum: 1GHz (x86 processor) or 1.4GHz (x64 processor) • Recommended: 2GHz or
faster Note: An Intel Itanium 2 processor is required for Windows Server 2008 for Itanium-
based Systems
Memory
• Minimum: 512MB RAM • Recommended: 2GB RAM or greater • Maximum (32-bit
systems): 4GB (Standard) or 64GB (Enterprise and Datacenter) • Maximum (64-bit systems):
32GB (Standard) or 2TB (Enterprise, Datacenter and Itanium-based Systems)
Available Disk Space
• Minimum: 10GB • Recommended: 40GB or greater Note: Computers with more than 16GB
of RAM will require more disk space for paging, hibernation, and dump files
Drive
DVD-ROM drive
Display and Peripherals
• Super VGA (800 x 600) or higher-resolution monitor • Keyboard • Microsoft Mouse or
compatible pointing device
13

ADIT Project IT 401 – Advanced Operating System
Chapter 4 - Network Compatibility
G Wireless Modem Router - The G Wireless Modem Router is perfect for setting up
a simple wireless network that has the range to easily cover a small office or apartment.
N1 Vision Wireless Router - The N1 Vision wireless router offers an easy way for
you to view your network's broadband speed, computer bandwidth usage, and the status of
your connected devices - all from an easy-to-read display.
USB 2.0 Plus Hub - Add USB ports--subtract cable mess.
Nearly all your gadgets connect to your computer through USB. You can add ports for your
devices with the USB plus Hub and remove desktop cable clutter with our patent-pending,
cable-management feature.
14

ADIT Project IT 401 – Advanced Operating System
Chapter 5 - Active Directory
To run DCPROMO, enter the command in the Run command, or click on the DCPROMO
link from Server Manager > Roles > Active Directory Domain Services.
Depending upon the question if AD-DS was previously installed or not, the Active Directory
Domain Services Installation Wizard will appear immediately or after a short while. Click
Next.
15

ADIT Project IT 401 – Advanced Operating System
In the Operating System Compatibility window, read the provided information and click
Next.
In the Choosing Deployment Configuration window, click on "Create a new domain in a
new forest" and click Next.
16

ADIT Project IT 401 – Advanced Operating System
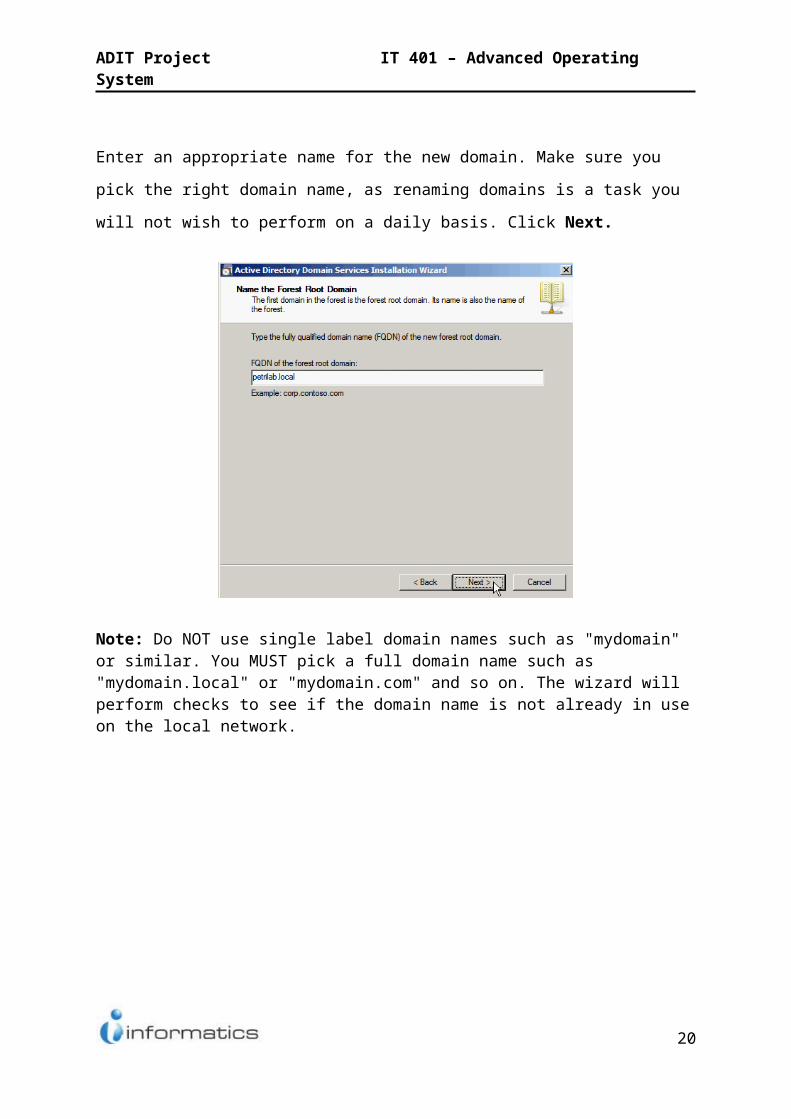
Enter an appropriate name for the new domain. Make sure you pick the right domain name,
as renaming domains is a task you will not wish to perform on a daily basis. Click Next.
Note: Do NOT use single label domain names such as "mydomain" or similar. You MUST pick a full domain name such as "mydomain.local" or "mydomain.com" and so on. The wizard will perform checks to see if the domain name is not already in use on the local network.
17

ADIT Project IT 401 – Advanced Operating System
Pick the right forest function level. Windows 2000 mode is the default, and it allows the
addition of Windows 2000, Windows Server 2003 and Windows Server 2008 Domain
Controllers to the forest you're creating. Read my "Understanding Windows Server 2008
Active Directory Domain and Forest Functional Levels" article for more information on that.
Pick the right domain function level. Windows 2000 Native mode is the default, and it allows
the addition of Windows 2000, Windows Server 2003 and Windows Server 2008 Domain
Controllers to the domain you're creating.
18

ADIT Project IT 401 – Advanced Operating System
The wizard will perform checks to see if DNS is properly configured on the local network. In
this case, no DNS server has been configured, therefore, the wizard will offer to
automatically install DNS on this server.
It's most likely that you'll get a warning telling you that the server has one or more dynamic
IP Addresses. Running IPCONFIG /all will show that this is not the case, because as you
can clearly see, I have given the server a static IP Address. So, where did this come from?
19
ADIT Project IT 401 – Advanced Operating System
The answer is IPv6. I did not manually configure the IPv6 Address, hence the warning. In a
network where IPv6 is not used, you can safely ignore this warning.
You'll probably get a warning about DNS delegation. Since no DNS has been configured yet,
you can ignore the message and click Yes.
20

ADIT Project IT 401 – Advanced Operating System
Next, change the paths for the AD database, log files and SYSVOL folder. For large
deployments, carefully plan your DC configuration to get the maximum performance. When
satisfied, click Next.
21

ADIT Project IT 401 – Advanced Operating System
Enter the password for the Active Directory Recovery Mode. This password must be kept
confidential, and because it stays constant while regular domain user passwords expire (based
upon the password policy configured for the domain, the default is 42 days), it does not. This
password should be complex and at least 7 characters long. I strongly suggest that you do
NOT use the regular administrator's password and that you write it down and securely store
it. Click Next.
In the Summary window review your selections, and if required, save them to an unattend
answer file. When satisfied, click Next.
22

ADIT Project IT 401 – Advanced Operating System
The wizard will begin creating the Active Directory domain, and when finished, you will
need to press Finish and reboot your computer.
23

ADIT Project IT 401 – Advanced Operating System
Chapter 6 - Configuring a Server, Storage, Backup and
Performance
The final step of the Windows Server 2008 R2 installation is setting the password on the
Administrator account.
The default password policy for Windows Server 2008 R2 is to require a minimum of six characters, with at least three of the four categories of characters: lowercase, uppercase, numbers, and non alphanumeric characters. Passwords expire in 42 days, by default. Once a server is joined to a domain, the policies of the domain will apply for domain accounts, but the local security policy will still apply for local accounts.
Once the password is set, you’ll see the Initial Configuration Tasks Wizard.This wizard is also known as the Out of Box Experience (OOBE) and is similar to the one from Windows Server 2008, with the addition of the Activate Windows option. The OOBE is a useful wizard for the initial configuration of a server, providing easy access on a single page to most of the tasks you need to get your server up and running.
24

ADIT Project IT 401 – Advanced Operating System
The Local Security Policy controls password policies for local accounts.
The Initial Configuration Tasks Wizard, or OOBE.
25

ADIT Project IT 401 – Advanced Operating System
Server Manager
The primary graphical interface for server management in Windows Server 2008 R2 is the
Server Manager Console.
The Server Manager console includes integrated management consoles for the roles and
features that are enabled on the server. New in Windows Server 2008 R2 is the ability to run
the Server Manager remotely without having to open a Remote Desktop session to the remote
server.
Also new in the R2 version of Server Manager are Best Practice Analyzers (BPAs) that are
directly integrated into the Server Manager for those roles that have them.
26

ADIT Project IT 401 – Advanced Operating System
Adding Roles, Role Services, and Features
Adding a role, role service, or feature in Windows Server 2008 R2 can be done from
Server Manager, from the Initial Configuration Tasks Wizard, or from Windows PowerShell.
The Server Manager and Initial Configuration Tasks Wizard experience is essentially the
same as it was in Windows Server 2008, but the option to use Windows PowerShell is new.
To use Server Manager to add a role or feature, select Server Manager (<servername>) in the
tree pane and then, from the Action menu, select Add Roles (or Add Features). To add a role
service for an already installed role, highlight that role in the tree pane and, from the Action
menu, select Add Role Service. The Add Role Wizard, Add Role Services Wizard, or
Add Feature Wizard will open. All three wizards are essentially the same.
A new alternative that makes it easier to script and automate the configuration of servers is
Windows Power Shell. Windows Server 2008 R2 has a new Server Manager module that can
be used to add or remove roles, role services, or features. Windows Power Shell session that
sets the execution policy to only require signing for scripts that originate remotely, then
imports the Server Manager module, and finally adds the File Services role, along with the
File Server role service.
27

ADIT Project IT 401 – Advanced Operating System
Managing Server Core
Once Windows PowerShell is installed, and you have remote management and Remote
Desktop enabled, you are in a position to manage the server comfortably using familiar tools.
You’ll need to use Windows PowerShell or the Dism.exe command-line utility to add or
remove roles; role services, and features because you can’t use the remote management tools
or Server Manager to add roles remotely. You can manage a server running Server Core
installation in the following ways:
Locally and remotely using a command prompt By using the Windows command- line
tools at a command prompt; you can manage servers running a Server Core installation.
Remotely using Terminal Server By using another computer running Windows, you can
use the Terminal Server client to connect to a server running a Server Core installation and
manage it remotely. The shell in the Terminal Server session will be the command prompt.
Remotely using Windows Remote Shell By using another computer running Windows
Vista, Windows 7, Windows Server 2008, or Windows Server 2008 R2, you can use
Windows Remote Shell to run command-line tools and scripts on a server running a Server
Core installation.
Locally or remotely using Windows Power Shell By using Windows Power Shell locally
on a computer running a Server Core installation of Windows Server 2008 R2 or remotely
from a computer running Windows Server 2008 R2, you can connect to a server running a
Server Core installation in the same way that you would connect to any computer running
Windows.
Remotely using a Microsoft Management Console (MMC) snap-in By using an MMC
snap-in from a computer running Windows Vista, Windows 7, Windows Server 2008, or
Windows Server 2008 R2, you can connect to a server running Server Core installation in the
same way that you would connect to any computer running Windows.
28

ADIT Project IT 401 – Advanced Operating System
Remotely using Server Manager By using Server Manager from a computer running
Windows Server 2008 R2 you can connect to a server running a Server Core installation of
Windows Server 2008 R2 and manage it.
29

ADIT Project IT 401 – Advanced Operating System
Chapter 7 - Configuring Accounts and Client Connectivity
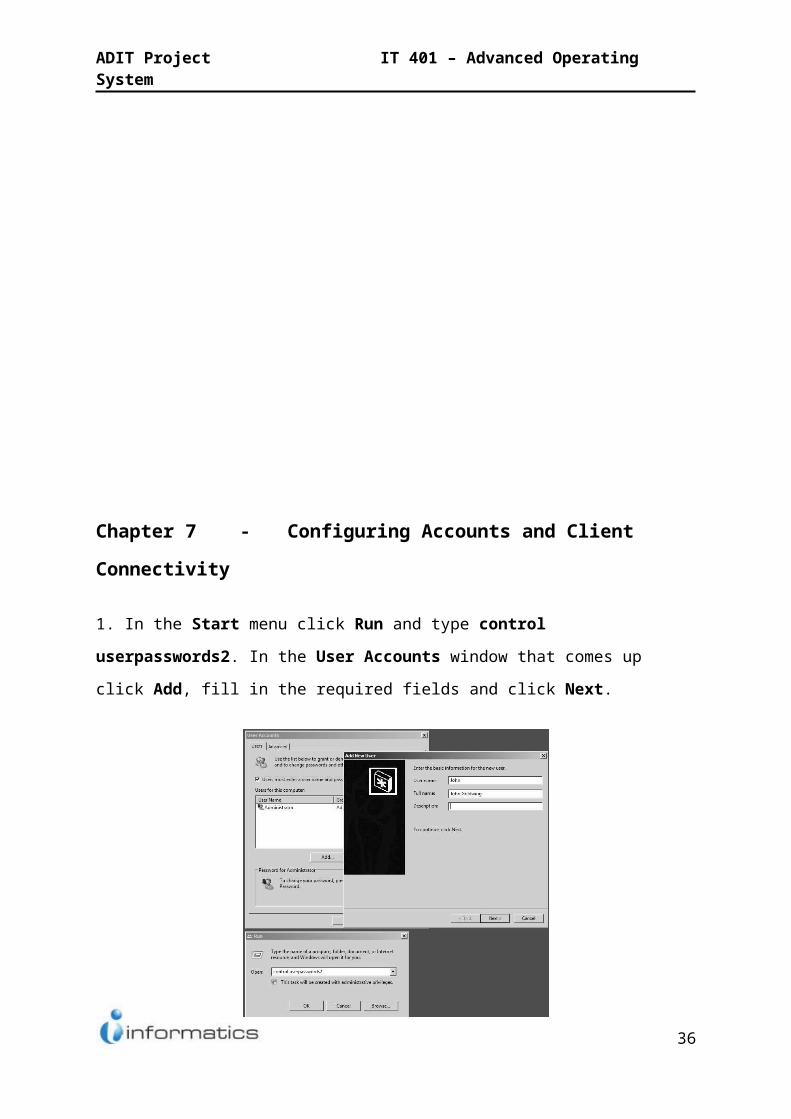
1. In the Start menu click Run and type control userpasswords2. In the User Accounts
window that comes up click Add, fill in the required fields and click Next.
2. Fill in a password twice and click Next. In the next screen select Standard User to create
a limited account to work with (recommended), then click Finish to add the user!
3. If you selected Standard User
as level of access, you have to give
the user permission to
shutdown the PC. To do this click
Run in the menu Start, then type
gpedit.msc and click OK. In the
Local Group Policy Editor that opens, browse to: Computer Configuration -> Windows
Settings -> Security Settings -> Local Policies -> User Rights Assignment. In the right
pane scroll to Shut down the system.
30

ADIT Project IT 401 – Advanced Operating System
4. Double click Shut down the system and click Add User or Group. Now enter the User
name of the user you want to give permission to shut down, then click OK.
31
ADIT Project IT 401 – Advanced Operating System
5. Finally click OK in the Shut down the system Properties window to save the changes you made to the list of users that are allowed to shutdown the computer!
Configuring Groups, Folders and Security
1. Navigate to the Control Panel (Start } Settings } Control Panel) and open the `Administrative Tools'.
2. Open the `Active Directory Users and Computers'. Right click on the root container of the domain and select Properties.
32

ADIT Project IT 401 – Advanced Operating System
3. In the properties dialog, click on the Group Policy tab. Then click on New to create a new
Group Policy Object (GPO) in the root container.
4. Specify the name of the new group policy (for example, "Domain Policy") and then click
on Close.
NOTE: Microsoft recommends that you create a new Group Policy Object rather than editing
the default policy (called `Default Domain Policy'). This makes it much easier to recover
from serious problems with security settings. If the new security settings create problems,
you can temporarily disable the new Group Policy Object until you isolate the settings that
caused the problems.
5. Right click on the root container of your domain and select Properties. This will bring up
again the Domain Properties dialog.
6. Click on the Group Policy tab, and select the new Group Policy Object Link that you have
just created (for example, `Domain Policy').
7. Click on Up to move the new GPO to the top of the list, and then click on Edit to open the Group Policy Object Editor.
33

ADIT Project IT 401 – Advanced Operating System
8. Expand the Computer Configuration node and navigate to Windows Settings } Security Settings } Account Policies } Password Policy folder.
9. From the right pane, double-click on the `Enforce password history' policy. Then select the
`Define this policy setting' option, and set the `Keep password history' value to `24'.
10. Click on the OK button to close the dialog.
34

ADIT Project IT 401 – Advanced Operating System
11. From the right pane, this time double-click on the `Maximum password age' policy. Then
select the `Define this policy setting' option and set the `Password will expire' value to 42
days.
12. Click on OK to close the properties dialog.
13. From the right pane, double-click on the `Minimum password age' policy. Then select the
'Define this policy setting' option and set the `Password can be changed after:' value to `2'.
14. Click on the OK button to close the dialog.
35
ADIT Project IT 401 – Advanced Operating System
15. From the right pane, double-click on the `Minimum password length' policy. Then select
the `Define this policy setting' option and set the value of the `Password must be at least:'
entry field to `8'.
16. Click on the OK button to close the dialog.
17. From the right pane, double-click on the `Password must meet complexity requirements'
policy. Then enable the `Define this policy setting in the template' option, and select
`Enabled'.
18. Click on the OK button to close the dialog.
19. At this stage the password policy settings of the new GPO have been configured. Close
all dialogs and exit the `Active Directory Users and Computers' configuration dialog.
Security
1. Start the Server Manager by clicking the Server Manager icon in the systray, or the
Server Manager shortcut in directly the Start menu or in the menu Administrative Tools
36

ADIT Project IT 401 – Advanced Operating System
2. Scroll down to Security Information within Server Summary and click Configure IE
ESC. In the window that pops up select Off for both Administrators and Users. Save the
changes by clicking OK.
Chapter 8 - Managing the Distributed File System & Software Installation
Term Explanation
37

ADIT Project IT 401 – Advanced Operating System
DFS Namespace
A DFS Namespace is just a central namespace through which users can see a unified view of the shared folders that are included in the DFS.
DFS Namespace Server
This is simply the server that hosts the DFS Namespace.DFS Namespace Root The DFS root is the top level of the DFS namespace. The namespace root and the DFS namespace use the same name.
DFS Folder
A DFS folder is simply a folder that is presented to a client within the DFS namespace, but below the DFS root. A DFS folder can exist on the same server as is hosting the DFS root, but it doesn’t have to. DFS folders commonly represent file system resources located on other servers.
DFS TreeA DFS tree is a reference to the DFS hierarchy. The tree starts with the DFS root, and contains all of the DFS folders that have been defined within the root.
Replication Topology
Windows Server 2008 supports a couple of different types of replication topologies for DFS
servers. Each of these topologies have their good points and their bad points. If you are
having trouble deciding which replication topology is right for your organization, then you
should give serious consideration to using the same DFS replication topology as you're using
for your Active Directory infrastructure.
The Hub and Spoke Topology
One of the most popular replication topologies is the hub and spoke topology, shown in
Figure A. The hub and spoke topology involves placing the initial master in the middle of the
topology. Each replica performs two way replication with the initial master, but does not
replicate with any of the other replicas. This type of topology tends to be very efficient, but
the problem with it is that if the initial master were to fail, then all replication would cease to
function until it came back online.
38

ADIT Project IT 401 – Advanced Operating System
Although Windows Server 2008 improves upon DFS technology, DFS has been around for
quite a while, and I have learned quite a bit over the years about planning for DFS
replication. I'm not talking about the replication topology itself, although that is important.
When I'm talking about are the little things that make the difference between replication
performing well, and DFS running amuck. In this article, I want to wrap up the series by
sharing with you some best practices for DFS replication.
Backup Strategy
Just because the files stored on a DFS tree are being replicated to other servers does not mean
that you don't have to back them up. Having a DFS replicas on other servers helps to protect
the data against a catastrophic hard drive failure, but does nothing to protect against data
corruption. If a file were to become corrupted, the corruption would likely be replicated to
the other targets.
Because the data should be identical on each DFS replica, you can usually get away with only
backing up one of the replicas. But one important thing that you need to keep in mind about
the backup process though, is that it is important that you configure your backup software not
to update the archive bit. The reason for this is that file replication is triggered by a file
version change, or a modified date and time stamp. As such, there is a chance that updating
the archive bit could potentially trigger a mass replication. This doesn't happen in every case
though (or at least as it for me anyway), so you may want to experiment to see if the archive
bit has any effect on your environment.
39

ADIT Project IT 401 – Advanced Operating System
Disk Space
This one may seem obvious, but I have seen cases in which the drive containing the staging
folder is either ridiculously small, or low on space. The drive containing the staging folder
has to have enough free space to accommodate the replication process. After all, it will act as
a temporary repository for replicated data that is being sent or received.
The DFS Root
There are several considerations that you should make when planning your DFS root. I
recommend starting with an empty DFS root so that you can avoid replicating any data at the
root level. The DFS root should only contain folders that are managed by DFS.
I also recommend that you avoid replicating data between DFS namespace root folders. The
reason for this is that in doing so Windows will try to replicate not only the root, but also the
target folders within it. While this may not sound like such a bad thing, keep in mind that the
target folders are already replicating independently of the root in most cases. Setting up
replication at the root level does not provide a level of replication redundancy.
Decide Whether or Not Replication is Appropriate
Although DFS replication can help you distribute the client workload between multiple file
servers, and provides you with a level fault tolerance using DFS replication is not always
desirable. For example, imagine an environment in which users are constantly making
changes to data. In such an environment, every update to a file would change the files
version number, which would trigger DFS replication. If an excessive number of updates are
being made then it could trigger a replication storm.
40

ADIT Project IT 401 – Advanced Operating System
Chapter 9 - Managing Printers
Installing the Print Services Tools
In some ways, Microsoft has taken a minimalist approach when designing Windows Server
2008. Don’t get me wrong though; Windows Server 2008 is even more bloated than
Windows Server 2003 R2. What I’m talking about though is that Windows Server 2008 is
designed so that only the minimum components are initially installed. It is then up to you to
install any additional roles or components that the server is going to need.
This is even true for print management. The Print Services Tools are not installed by default,
so it is up to you to install them. To do so, open Server Manager and select the Features
container. After doing so, click the Add Features link, found in the results pane. When you
do, Windows will launch the Add Features Wizard. The wizard’s initial screen asks you to
select the features that you want to install. Scroll through the list of available features until
you find the Remote Server Administration Tools option.
Some of the Remote Server Administration Tools get installed by default, so you will need to
expand the Remote Services Administration Tools container, and then expand the Role
Administration Tools container found beneath it. Finally, select the Print Services Tools
check box, shown in Figure A, and then click Next, followed by Install and Close.
41

ADIT Project IT 401 – Advanced Operating System
Accessing the Print Services Tools
Now that you have installed the Print Services Tools, you can access the Print Management
console by choosing the Print Management command from the server’s Administrative
Tools menu.
42

ADIT Project IT 401 – Advanced Operating System
Managing Network Printers
Now that I have shown you what the Print Management console looks like, take a look at
Figure C. Notice in the figure that a number of printers (or as Microsoft likes to call them,
print devices) have been defined, and are available through the console. You will also notice
that the All Drives container is also already populated with drivers that correspond to the
various print devices.
At this point, Windows will launch the Printer Migration Wizard. The wizard’s initial screen
will show you the print drivers and print processors that are about to be exported.
43

ADIT Project IT 401 – Advanced Operating System
Click Next, and you will be taken to the screen that’s shown in Figure B. As you can see, you
must tell Windows what to do if one of the printers that’s being imported is the same as a
printer that already exists. You must also tell Windows whether or not you want the new
printers to be listed in the Active Directory. Click Next, and Windows will import the
printers. When the wizard completes, you should see the printers that you have imported
listed beneath the currently selected print server.
44

ADIT Project IT 401 – Advanced Operating System
Deploying Network Printers Through Group Policy Settings
To configure the group policy to deploy network printers, begin by opening the Print
Management console on your Windows Server 2008 print management server. Now,
navigate through the console tree to Print Management | Print Servers | your print server|
Printers. Now, right click on the network printer that you want to deploy, and select the
Deploy With Group Policy command from the resulting shortcut menu.
Next, use the check boxes beneath the GPO Name drop down list to control whether the
printer should be deployed on a computer basis, a user basis, or both. Finally, click the Add
button, and the printer will be added to the list of GPO settings to be deployed. If you want to
include the printer in other group policy objects, you can click the Browse button again, and
pick another group policy object. When you’re done, click OK.
45

ADIT Project IT 401 – Advanced Operating System
Remote Access and VPN’s
Remote Desktop lets users control their desktop computer remotely. It’s a simple concept
that, properly implemented, can have a dramatic impact on your organization’s productivity
so that staff can work from home — even if they don’t have a mobile computer.
Until Microsoft Windows Server 2008 (set for February release), the network connection
itself has been the biggest challenge. Your private network probably uses private Internet
Protocol addresses, which prevent users from connecting directly to their desktop computers
from the Internet. Even if you offered users a virtual private network connection, many
firewalls block VPNs.
To work around these limits, Windows Server 2008 introduces the Terminal Services (TS)
Gateway role, which acts as a proxy server between the Internet and your internal network.
As illustrated, the Remote Desktop client uses encrypted Hypertext Transfer Protocol over
Secure Sockets Layer to communicate with the TS Gateway. Because HTTPS is primarily
used to browse the Web, almost all firewalls allow it. The TS Gateway authenticates the user
(via either a password or a smart card), verifies that the user is authorized to connect to the
destination computer and then uses Remote Desktop Protocol (RDP) to complete the
connection on your private network.
46