windows 7 beginners guide - cdn.csu.edu.au · there are several versions of microsoft windows in...
TRANSCRIPT
Windows 7 Beginners guide
Written by: Education and Training Team
Customer Services Management Division of Information Technology
February 2011 Version 1
Copyright 2011 Charles Sturt University No part of this document may be reproduced, altered or sold without prior written permission of the
Executive Director, Division of Information Technology, Charles Sturt University
Where to Start
There are a number of different ways that you may access the University Network in order to complete your day to day work. These are:
• The computer at your desk (your workstation) • A Macintosh Computer • A Laptop • A Thin Client Session
Thin Client allows you to access a Windows environment remotely from a computer. It enables you to have access to the University Server as well as a wide variety of software that you would otherwise not be able to use unless it was physically loaded onto your computer. You access Thin Client from either your workstation or a Macintosh Computer.
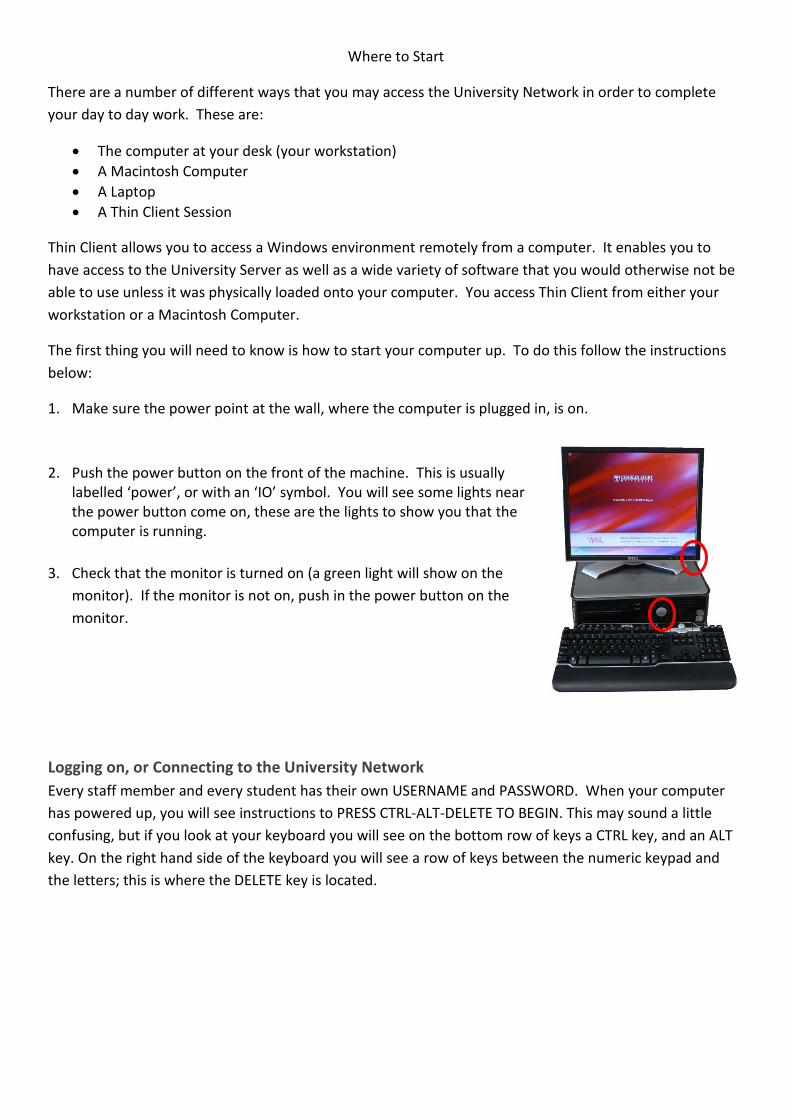
The first thing you will need to know is how to start your computer up. To do this follow the instructions below:
1. Make sure the power point at the wall, where the computer is plugged in, is on. 2. Push the power button on the front of the machine. This is usually
labelled ‘power’, or with an ‘IO’ symbol. You will see some lights near the power button come on, these are the lights to show you that the computer is running.
3. Check that the monitor is turned on (a green light will show on the
monitor). If the monitor is not on, push in the power button on the monitor.
Logging on, or Connecting to the University Network Every staff member and every student has their own USERNAME and PASSWORD. When your computer has powered up, you will see instructions to PRESS CTRL-ALT-DELETE TO BEGIN. This may sound a little confusing, but if you look at your keyboard you will see on the bottom row of keys a CTRL key, and an ALT key. On the right hand side of the keyboard you will see a row of keys between the numeric keypad and the letters; this is where the DELETE key is located.
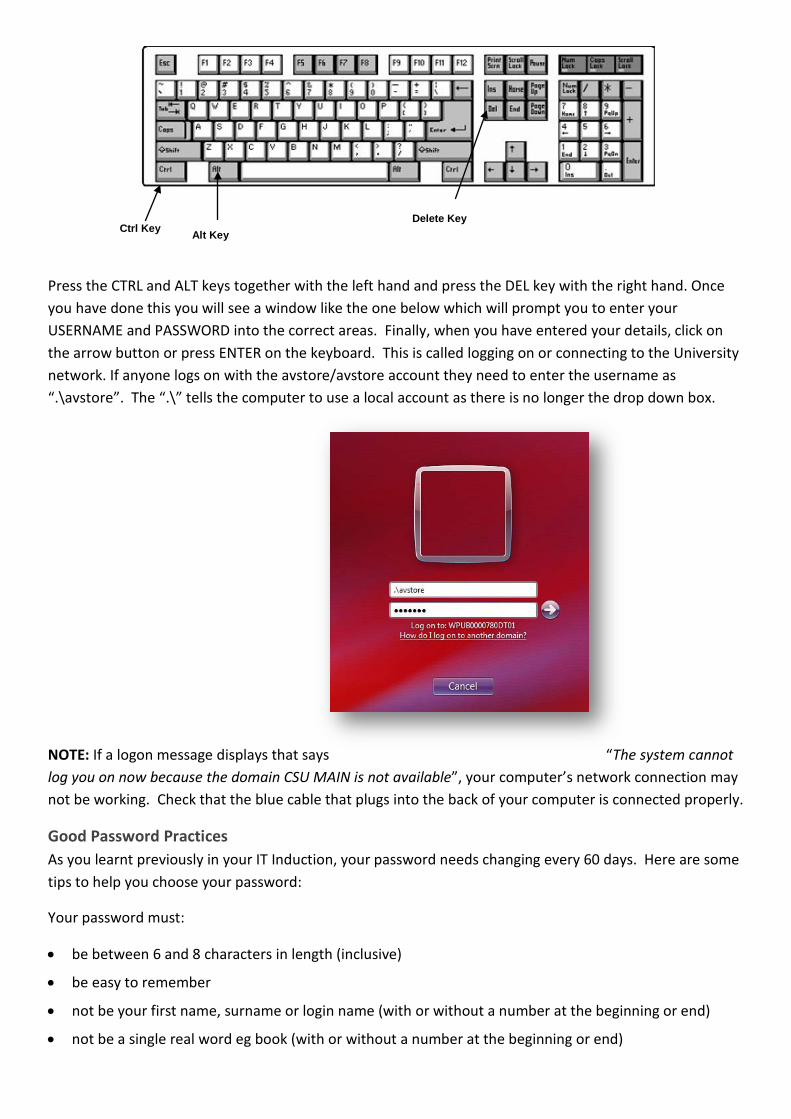
Press the CTRL and ALT keys together with the left hand and press the DEL key with the right hand. Once you have done this you will see a window like the one below which will prompt you to enter your USERNAME and PASSWORD into the correct areas. Finally, when you have entered your details, click on the arrow button or press ENTER on the keyboard. This is called logging on or connecting to the University network. If anyone logs on with the avstore/avstore account they need to enter the username as “.\avstore”. The “.\” tells the computer to use a local account as there is no longer the drop down box.
NOTE: If a logon message displays that says “The system cannot log you on now because the domain CSU MAIN is not available”, your computer’s network connection may not be working. Check that the blue cable that plugs into the back of your computer is connected properly.
Good Password Practices As you learnt previously in your IT Induction, your password needs changing every 60 days. Here are some tips to help you choose your password:
Your password must:
• be between 6 and 8 characters in length (inclusive)
• be easy to remember
• not be your first name, surname or login name (with or without a number at the beginning or end)
• not be a single real word eg book (with or without a number at the beginning or end)
Delete Key Alt Key Ctrl Key
• not be a similar format / theme / trend to your current password
• not be "qwerty" or something similar, as it is amongst a hacker's favourite first attempts.
Think of it as a challenge! You have to keep those nosy hackers out of your files with the best password you can think of - you want to make it simple for you to remember, but exceedingly difficult for them to guess. Hackers tend to use dictionary files to help them, so using real words is not a good idea.
Good Password Examples (don’t use these ones!)
• mrg00fee - 8 characters, no real words, but easy to remember.
• tac0snax - 8 characters, no real words, but easy to remember.
• s0ak&w8 (soakin' wet) - use numbers or special characters instead of letters in words, ("&","!", or "#")
• zcbm0864 - easily remembered keyboard patterns instead of words.
NOTE: Banner users MUST NOT choose a password which contains special characters, or a password which starts with a digit (0-9) as Banner cannot handle them
Privacy Statement and Code of Conduct
The University has a Privacy Statement and a code of conduct called “Policy for the Use of University Computing and Communication Facilities”. Please take time to read through these. The URL (internet address) is:
http://www.csu.edu.au/division/dit/about/privacy.htm
Alternatively go to my.csu and:
1. click on the IT Services quick link at the left of your screen;
2. select IT SERVICES FOR STAFF;
3. select the ABOUT US link in the grey banner under the red logo;
4. select PRIVACY STATEMENT from the links on the left of the ABOUT US home page (this page also has a link to the code of conduct).
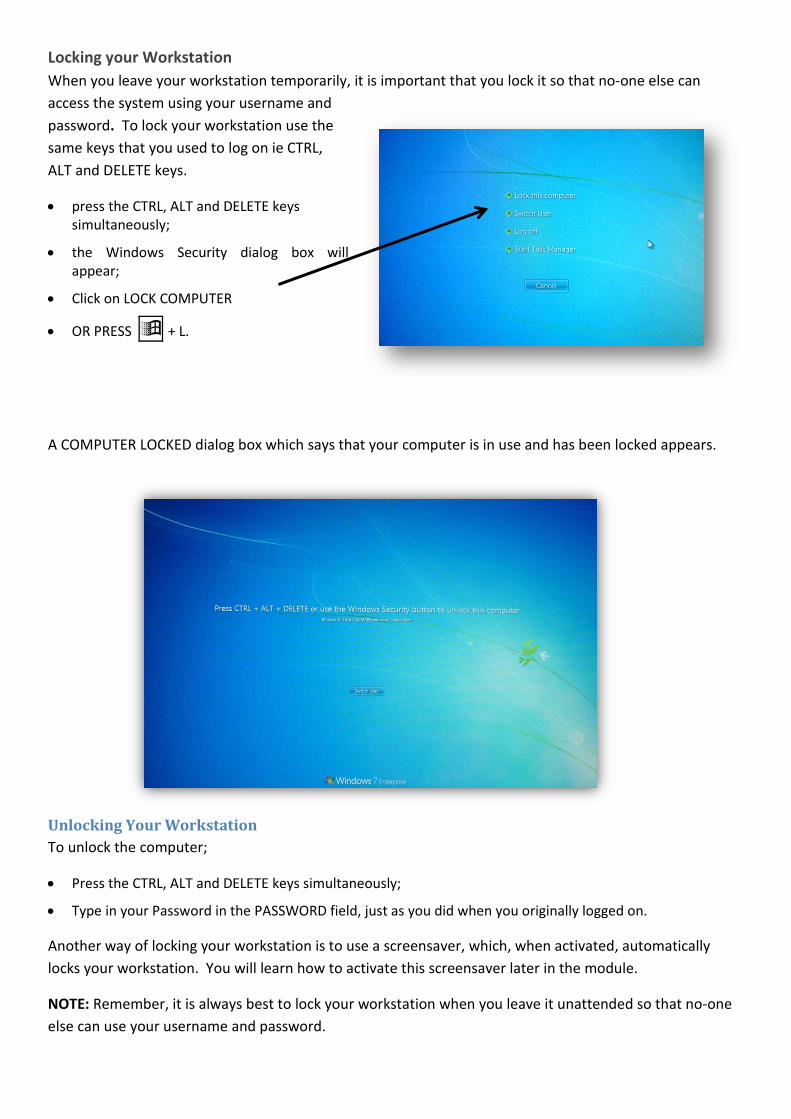
Locking your Workstation When you leave your workstation temporarily, it is important that you lock it so that no-one else can access the system using your username and password. To lock your workstation use the same keys that you used to log on ie CTRL, ALT and DELETE keys.
• press the CTRL, ALT and DELETE keys simultaneously;
• the Windows Security dialog box will appear;
• Click on LOCK COMPUTER
• OR PRESS + L.
A COMPUTER LOCKED dialog box which says that your computer is in use and has been locked appears.
Unlocking Your Workstation To unlock the computer;
• Press the CTRL, ALT and DELETE keys simultaneously;
• Type in your Password in the PASSWORD field, just as you did when you originally logged on.
Another way of locking your workstation is to use a screensaver, which, when activated, automatically locks your workstation. You will learn how to activate this screensaver later in the module.
NOTE: Remember, it is always best to lock your workstation when you leave it unattended so that no-one else can use your username and password.
THE WINDOWS OPERATING SYSTEM Every computer needs an operating system which lets you, literally, operate your computer. There are a few around and Microsoft Windows is just one of them, albeit one of the most popular ones.
Some of the functions the Windows operating system allows you to do are:
• Access applications (programs) on your computer (word processing, games, spread sheets, calculators and so on)
• Load any new programs on to the computer • Manage hardware such as printers, scanners, mice, digital cameras • Manage how files are stored on your computer (File Management, covered later in this module) • Change computer settings such as colour schemes, screensavers, and the resolution of your monitor.
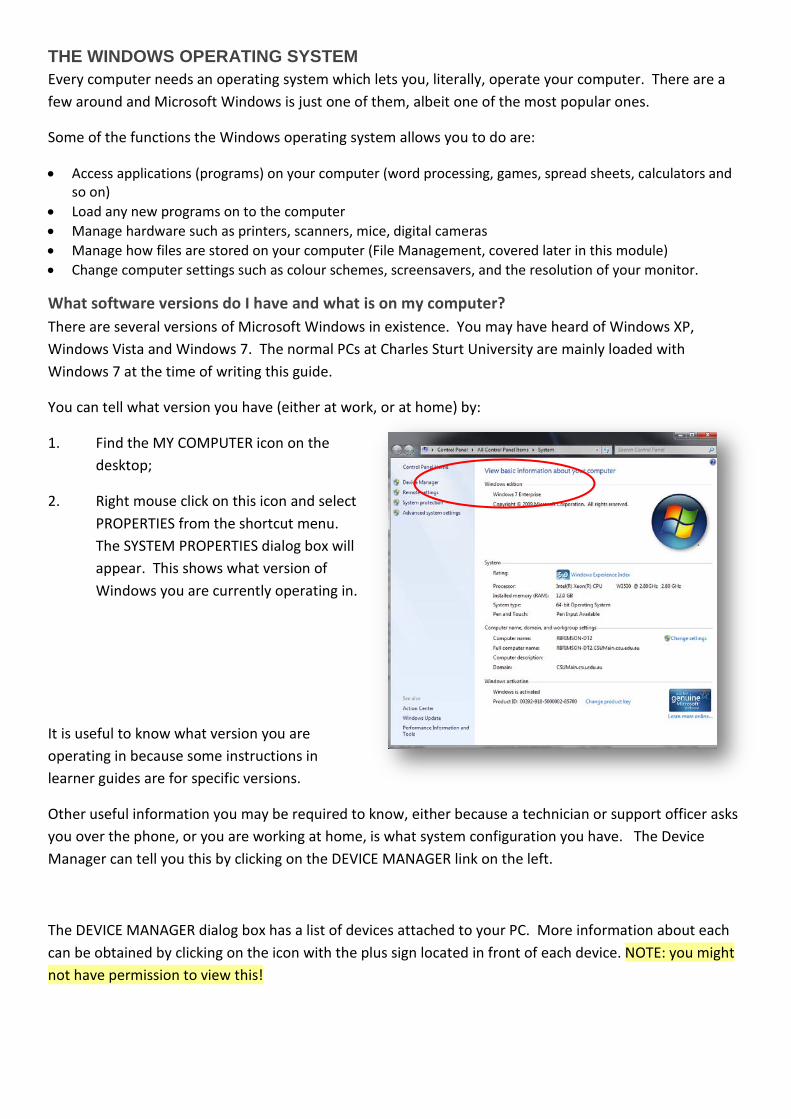
What software versions do I have and what is on my computer? There are several versions of Microsoft Windows in existence. You may have heard of Windows XP, Windows Vista and Windows 7. The normal PCs at Charles Sturt University are mainly loaded with Windows 7 at the time of writing this guide.
You can tell what version you have (either at work, or at home) by:
1. Find the MY COMPUTER icon on the desktop;
2. Right mouse click on this icon and select PROPERTIES from the shortcut menu. The SYSTEM PROPERTIES dialog box will appear. This shows what version of Windows you are currently operating in.
It is useful to know what version you are operating in because some instructions in learner guides are for specific versions.
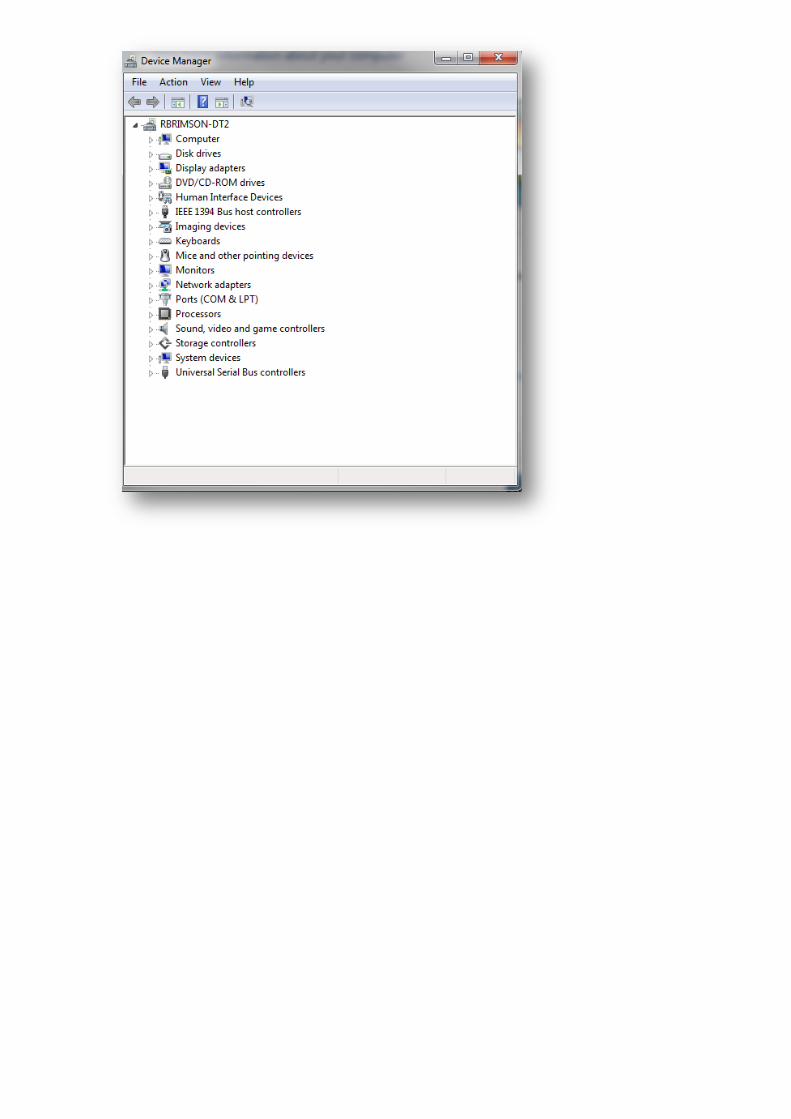
Other useful information you may be required to know, either because a technician or support officer asks you over the phone, or you are working at home, is what system configuration you have. The Device Manager can tell you this by clicking on the DEVICE MANAGER link on the left.
The DEVICE MANAGER dialog box has a list of devices attached to your PC. More information about each can be obtained by clicking on the icon with the plus sign located in front of each device. NOTE: you might not have permission to view this!
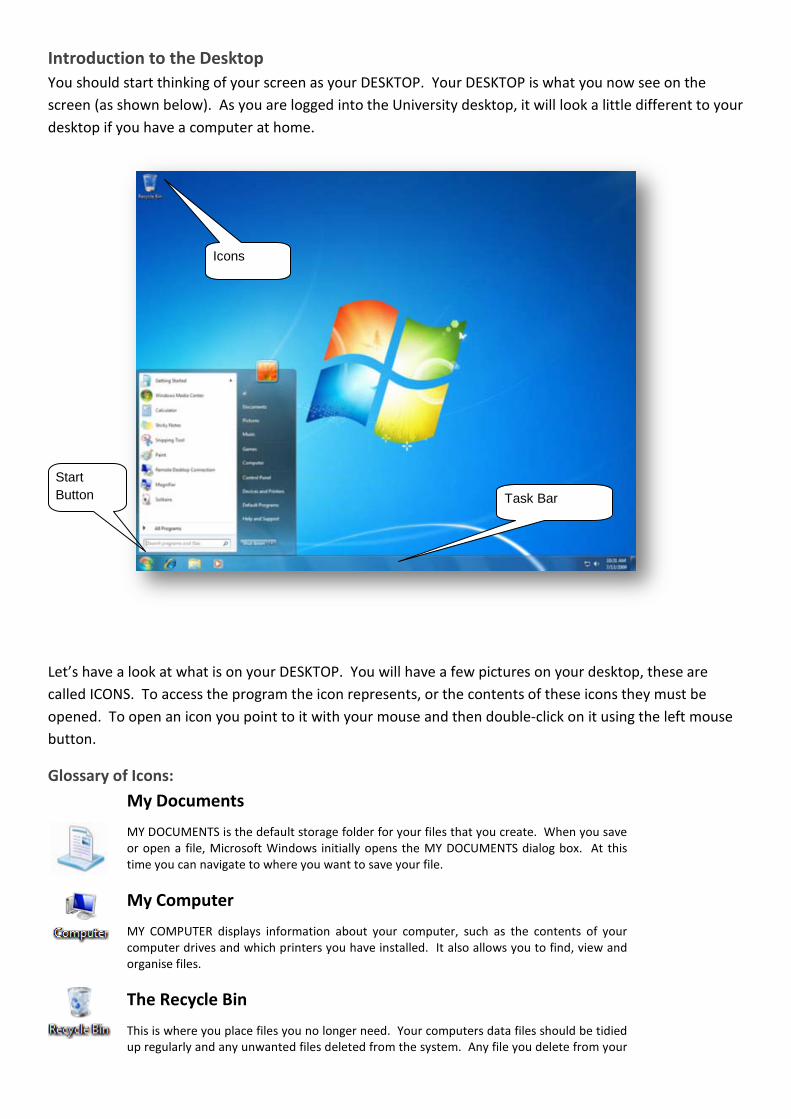
Introduction to the Desktop You should start thinking of your screen as your DESKTOP. Your DESKTOP is what you now see on the screen (as shown below). As you are logged into the University desktop, it will look a little different to your desktop if you have a computer at home.
Let’s have a look at what is on your DESKTOP. You will have a few pictures on your desktop, these are called ICONS. To access the program the icon represents, or the contents of these icons they must be opened. To open an icon you point to it with your mouse and then double-click on it using the left mouse button.
Glossary of Icons: My Documents
MY DOCUMENTS is the default storage folder for your files that you create. When you save or open a file, Microsoft Windows initially opens the MY DOCUMENTS dialog box. At this time you can navigate to where you want to save your file.
My Computer
MY COMPUTER displays information about your computer, such as the contents of your computer drives and which printers you have installed. It also allows you to find, view and organise files.
The Recycle Bin
This is where you place files you no longer need. Your computers data files should be tidied up regularly and any unwanted files deleted from the system. Any file you delete from your
Task Bar
Icons
Start Button
hard drive will be placed first in the RECYCLE BIN. Files you delete from the University Network drives will not go into the recycle bin.
You may decide to leave those files in the RECYCLE BIN if you think you might need to retrieve them later. However, you should empty the recycle bin so it does not fill up. We will look at the recycle bin in more detail later in this module.
Internet Explorer
With INTERNET EXPLORER and an Internet connection, you can search for and view information on the World Wide Web. You can search the Internet for people, businesses, and information about subjects that interest you, download music, copy graphics, stay in touch with or meet new friends, and a host of other activities.
Microsoft Outlook
MICROSOFT OUTLOOK is an e-mail program that lets you exchange mail with friends and colleagues as well as manage appointments through the calendar function.
Microsoft Excel
MICROSOFT EXCEL is a spread sheet application which allows users to enter text and numbers into rows and columns. This data can be manipulated and analysed by using formulas and functions and reporting and charting can be done on the results,
Microsoft PowerPoint
MICROSOFT POWERPOINT is a presentation program. It turns text, numbers and graphics into a presentation which can be shown to an audience in a slideshow, or printed off as handouts.
Microsoft Word
MICROSOFT WORD is a word processing application used for creating documents such as reports, letters, business plans, and more.
My Personal Drive (P)
This is a University network drive where you are able to save any files you create. You will learn more about your P: drive later in this module.
My Shared Drive (S)
This is a University network drive where you are able to save any files you create. You will learn more about your S: drive later in this module.
The Taskbar
The taskbar is the long horizontal bar at the bottom of your screen. Unlike the desktop, which can get obscured by open windows, the taskbar is almost always visible. It has three main sections:
• The Start button , which opens the Start menu. • The middle section, which shows you which programs and files you have open and allows you to
quickly switch between them. • The notification area, which includes a clock and icons (small pictures) that communicate the status
of certain programs and computer settings.
You're likely to use the middle section of the taskbar the most, so let's look at it first.
Keep track of your windows
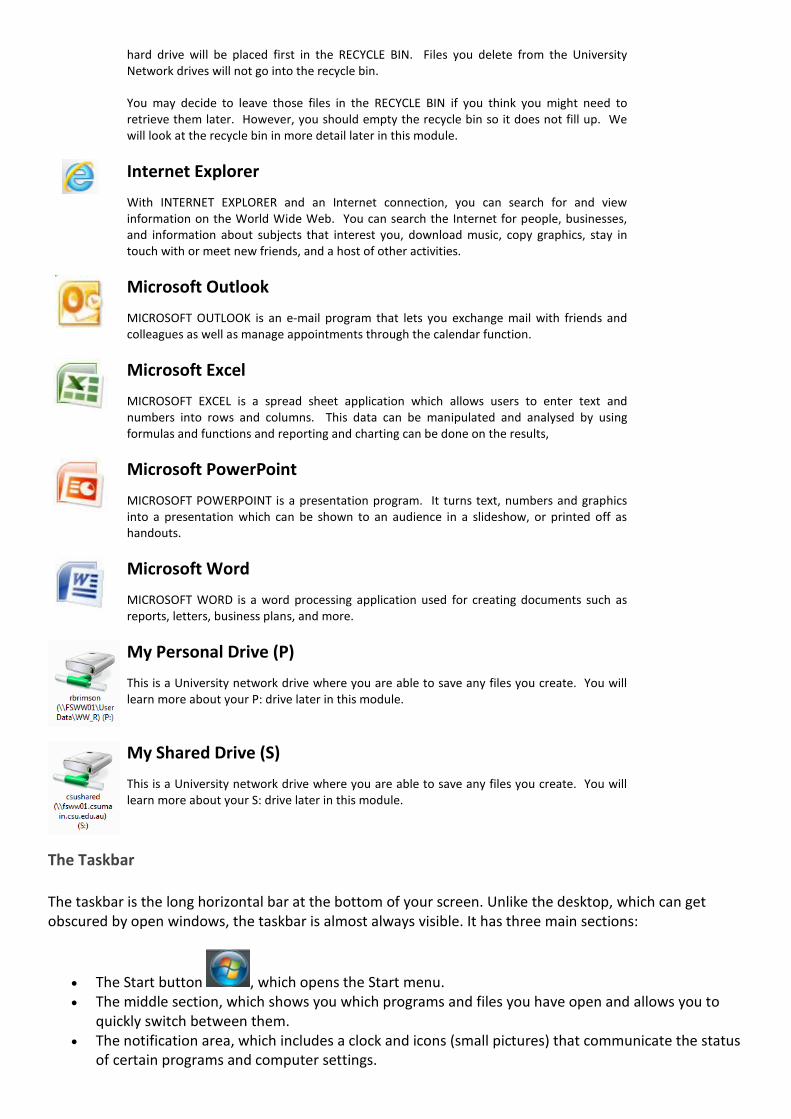
If you open more than one program or file at a time, you can quickly start piling up open windows on your desktop. Because windows often cover each other or take up the whole screen, it's sometimes hard to see what else is underneath or remember what you've already opened.
That's where the taskbar comes in handy. Whenever you open a program, folder, or file, Windows creates a corresponding button on the taskbar. The button shows an icon that represents the open program. In the picture below, two programs are open—Calculator and Minesweeper—and each has its own button on the taskbar.
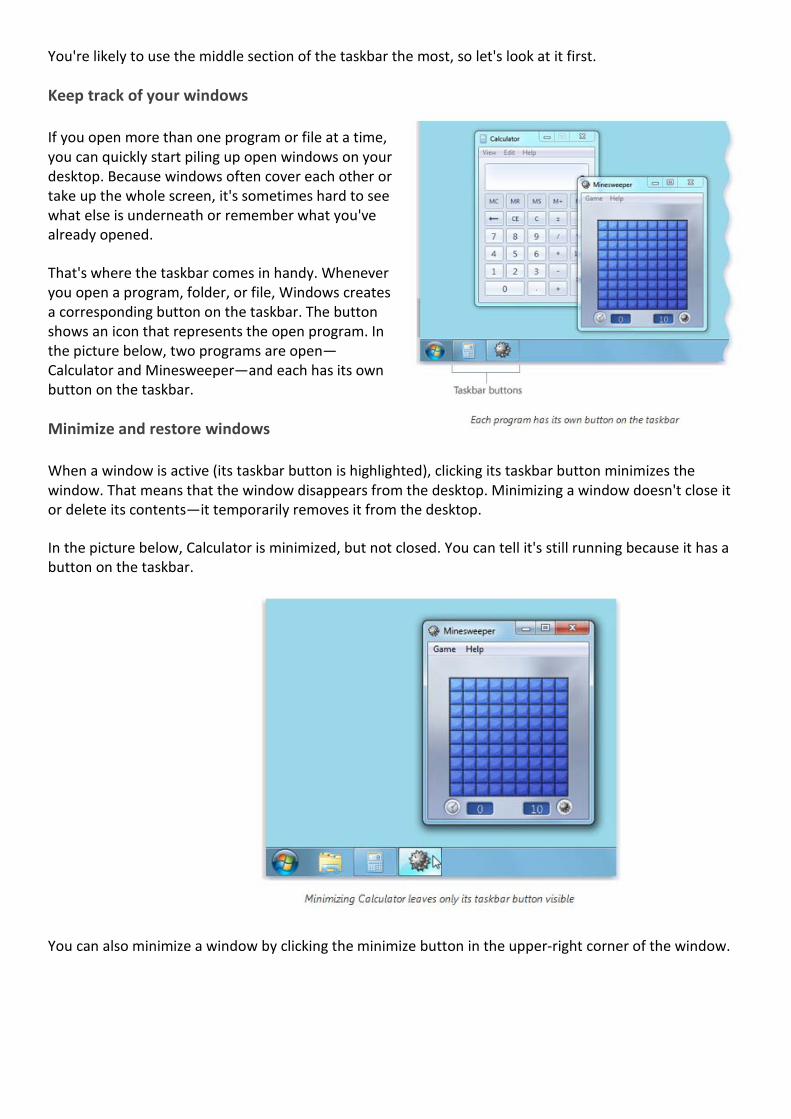
Minimize and restore windows
When a window is active (its taskbar button is highlighted), clicking its taskbar button minimizes the window. That means that the window disappears from the desktop. Minimizing a window doesn't close it or delete its contents—it temporarily removes it from the desktop.
In the picture below, Calculator is minimized, but not closed. You can tell it's still running because it has a button on the taskbar.
You can also minimize a window by clicking the minimize button in the upper-right corner of the window.
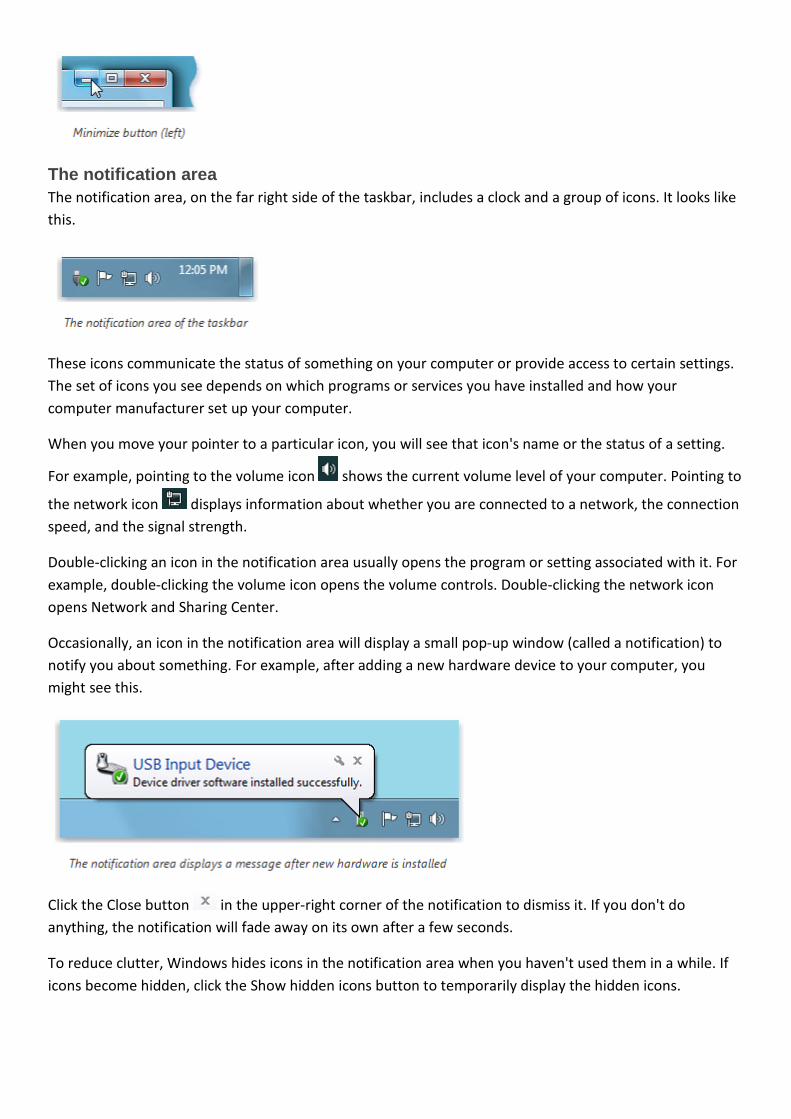
The notification area The notification area, on the far right side of the taskbar, includes a clock and a group of icons. It looks like this.
These icons communicate the status of something on your computer or provide access to certain settings. The set of icons you see depends on which programs or services you have installed and how your computer manufacturer set up your computer.
When you move your pointer to a particular icon, you will see that icon's name or the status of a setting.
For example, pointing to the volume icon shows the current volume level of your computer. Pointing to
the network icon displays information about whether you are connected to a network, the connection speed, and the signal strength.
Double-clicking an icon in the notification area usually opens the program or setting associated with it. For example, double-clicking the volume icon opens the volume controls. Double-clicking the network icon opens Network and Sharing Center.
Occasionally, an icon in the notification area will display a small pop-up window (called a notification) to notify you about something. For example, after adding a new hardware device to your computer, you might see this.
Click the Close button in the upper-right corner of the notification to dismiss it. If you don't do anything, the notification will fade away on its own after a few seconds.
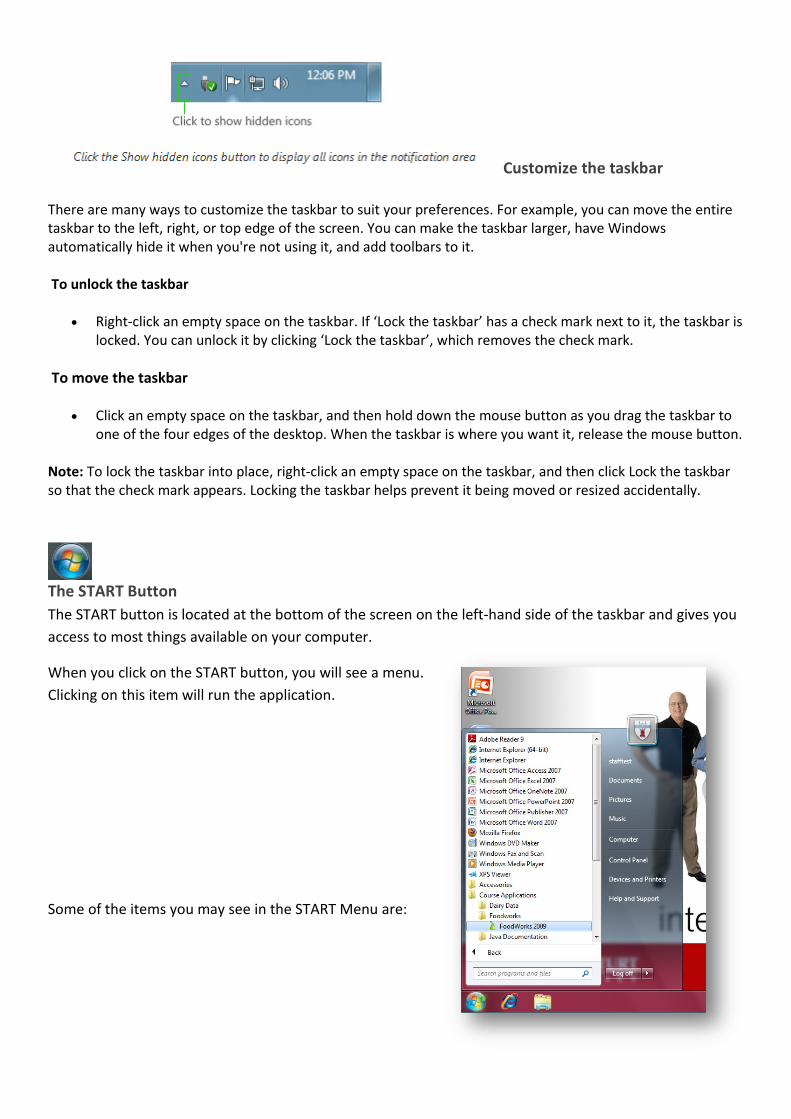
To reduce clutter, Windows hides icons in the notification area when you haven't used them in a while. If icons become hidden, click the Show hidden icons button to temporarily display the hidden icons.
Customize the taskbar
There are many ways to customize the taskbar to suit your preferences. For example, you can move the entire taskbar to the left, right, or top edge of the screen. You can make the taskbar larger, have Windows automatically hide it when you're not using it, and add toolbars to it.
To unlock the taskbar
• Right-click an empty space on the taskbar. If ‘Lock the taskbar’ has a check mark next to it, the taskbar is locked. You can unlock it by clicking ‘Lock the taskbar’, which removes the check mark.
To move the taskbar
• Click an empty space on the taskbar, and then hold down the mouse button as you drag the taskbar to one of the four edges of the desktop. When the taskbar is where you want it, release the mouse button.
Note: To lock the taskbar into place, right-click an empty space on the taskbar, and then click Lock the taskbar so that the check mark appears. Locking the taskbar helps prevent it being moved or resized accidentally.
The START Button The START button is located at the bottom of the screen on the left-hand side of the taskbar and gives you access to most things available on your computer.
When you click on the START button, you will see a menu. Clicking on this item will run the application.
Some of the items you may see in the START Menu are:
Documents: The DOCUMENTS menu links you to your documents.
Pictures: This will link you to your pictures folder
Music: This links you to a folder for storing music
Computer: Clicking this link will show you the drives connected to this computer
Control Panel: Allows you to make changes to the current settings on the computer.
Devices and Printers:
Search programs and files: Allows you to search for files, folders, printers, software applications etc. by entering search criteria
Help and Support: Gives you access to a help facility where you can find out how to do certain things on your computer.
Log Off: Allows you to log off as a User without turning off the computer. This would allow someone else can log on.
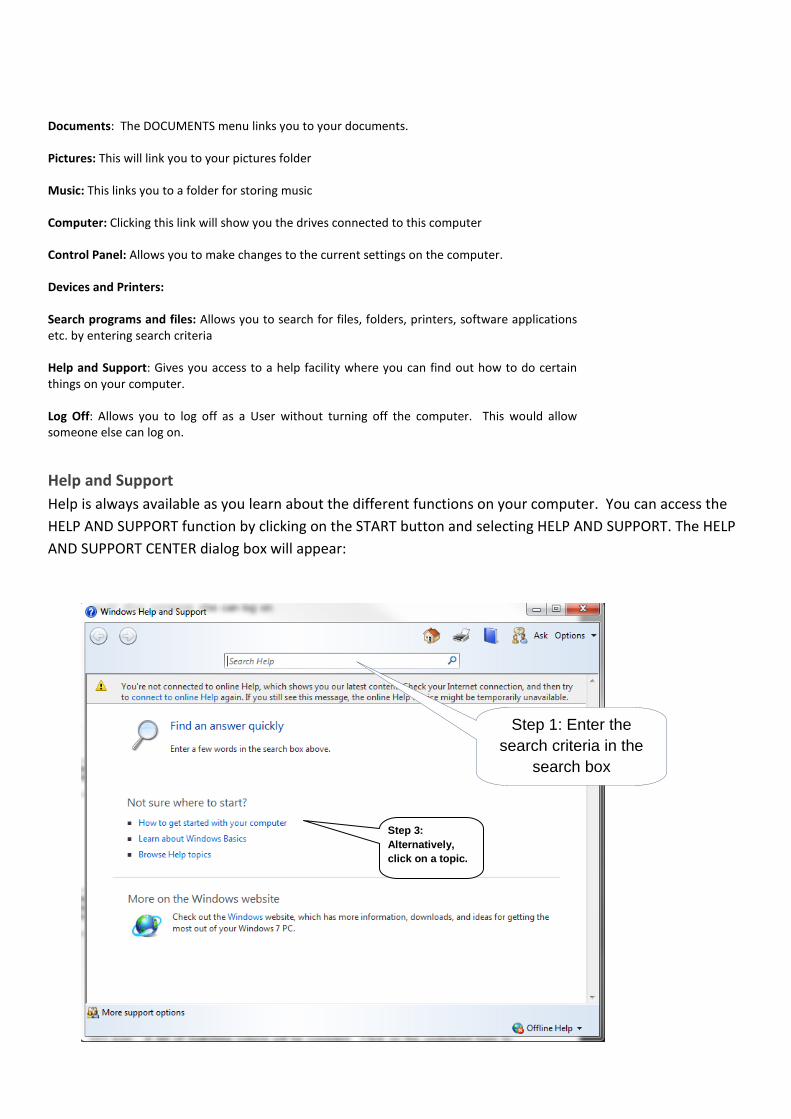
Help and Support Help is always available as you learn about the different functions on your computer. You can access the HELP AND SUPPORT function by clicking on the START button and selecting HELP AND SUPPORT. The HELP AND SUPPORT CENTER dialog box will appear:
Step 1: Type in a keyword(s)
Step 3: Alternatively, click on a topic.
Step 1: Enter the search criteria in the
search box
Find the support you need by either clicking on a topic under the section called NOT SURE WHERE TO START? or type what you are looking for in the SEARCH field and press ENTER. A list of matching criteria will be compiled. Click on the underlined topic to display the full help text.
NOTE: You can also hit F1 on your keyboard at any time to launch the HELP menu. You need to click on the desktop first then press F1
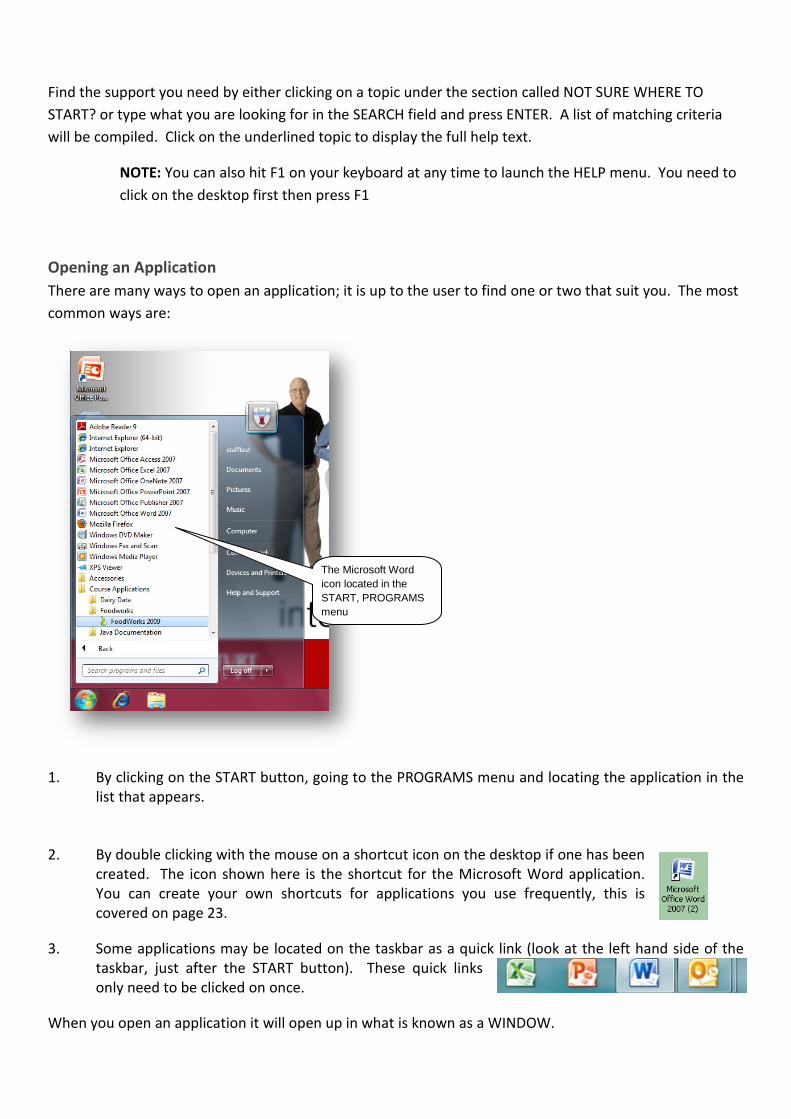
Opening an Application There are many ways to open an application; it is up to the user to find one or two that suit you. The most common ways are:
1. By clicking on the START button, going to the PROGRAMS menu and locating the application in the list that appears.
2. By double clicking with the mouse on a shortcut icon on the desktop if one has been
created. The icon shown here is the shortcut for the Microsoft Word application. You can create your own shortcuts for applications you use frequently, this is covered on page 23.
3. Some applications may be located on the taskbar as a quick link (look at the left hand side of the taskbar, just after the START button). These quick links only need to be clicked on once.
When you open an application it will open up in what is known as a WINDOW.
The Microsoft Word icon located in the START, PROGRAMS menu
Windows
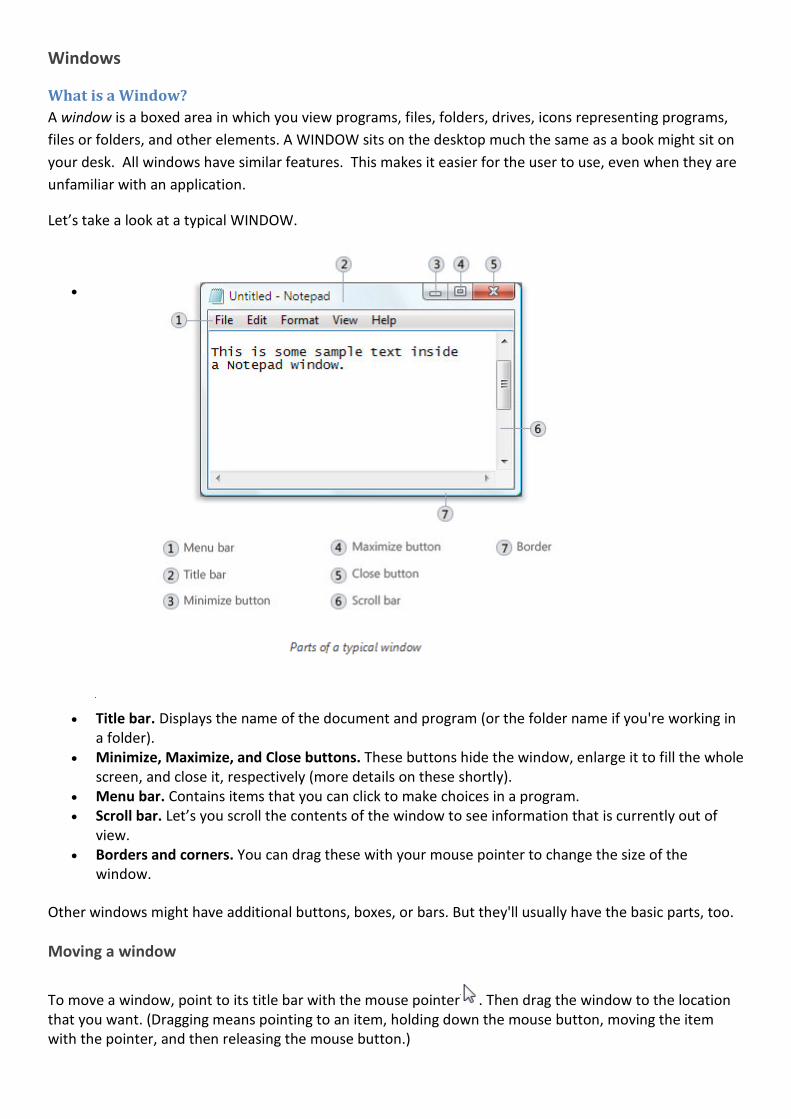
What is a Window? A window is a boxed area in which you view programs, files, folders, drives, icons representing programs, files or folders, and other elements. A WINDOW sits on the desktop much the same as a book might sit on your desk. All windows have similar features. This makes it easier for the user to use, even when they are unfamiliar with an application.
Let’s take a look at a typical WINDOW.
•
• Title bar. Displays the name of the document and program (or the folder name if you're working in a folder).
• Minimize, Maximize, and Close buttons. These buttons hide the window, enlarge it to fill the whole screen, and close it, respectively (more details on these shortly).
• Menu bar. Contains items that you can click to make choices in a program. • Scroll bar. Let’s you scroll the contents of the window to see information that is currently out of
view. • Borders and corners. You can drag these with your mouse pointer to change the size of the
window.
Other windows might have additional buttons, boxes, or bars. But they'll usually have the basic parts, too.
Moving a window
To move a window, point to its title bar with the mouse pointer . Then drag the window to the location that you want. (Dragging means pointing to an item, holding down the mouse button, moving the item with the pointer, and then releasing the mouse button.)
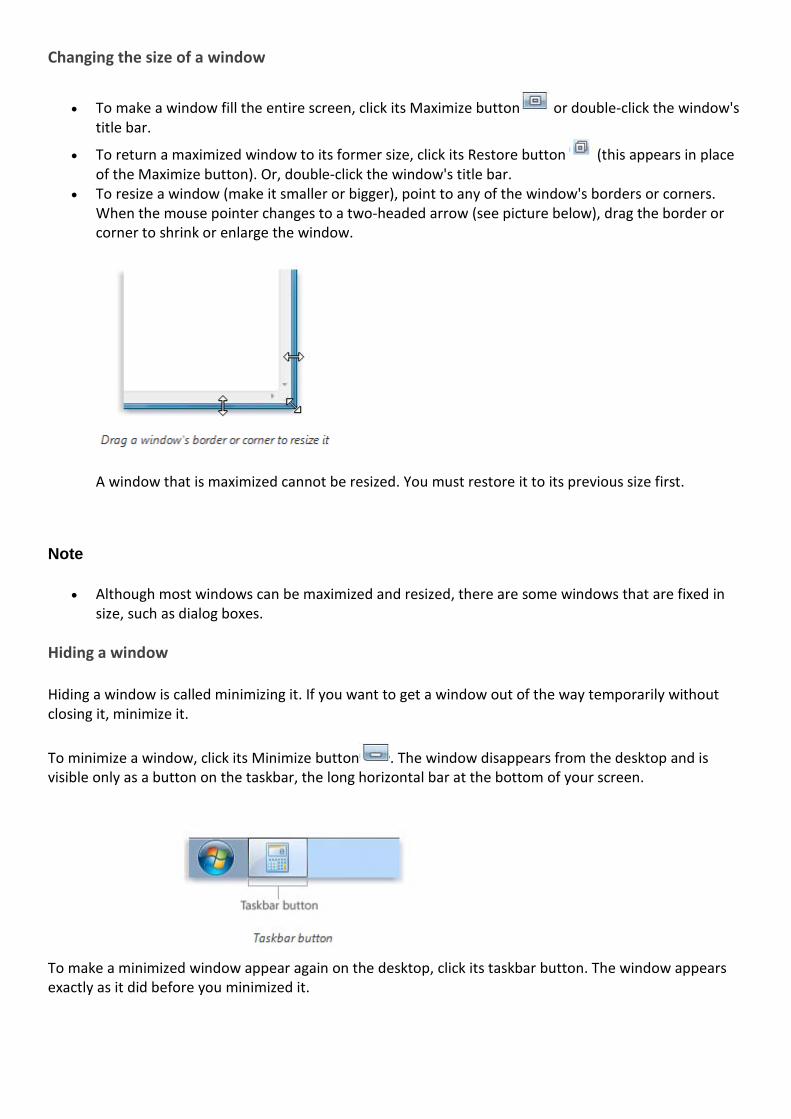
Changing the size of a window
• To make a window fill the entire screen, click its Maximize button or double-click the window's title bar.
• To return a maximized window to its former size, click its Restore button (this appears in place of the Maximize button). Or, double-click the window's title bar.
• To resize a window (make it smaller or bigger), point to any of the window's borders or corners. When the mouse pointer changes to a two-headed arrow (see picture below), drag the border or corner to shrink or enlarge the window.
A window that is maximized cannot be resized. You must restore it to its previous size first.
Note
• Although most windows can be maximized and resized, there are some windows that are fixed in size, such as dialog boxes.
Hiding a window
Hiding a window is called minimizing it. If you want to get a window out of the way temporarily without closing it, minimize it.
To minimize a window, click its Minimize button . The window disappears from the desktop and is visible only as a button on the taskbar, the long horizontal bar at the bottom of your screen.
To make a minimized window appear again on the desktop, click its taskbar button. The window appears exactly as it did before you minimized it.

Closing a window
Closing a window removes it from the desktop and taskbar. If you're done with a program or document
and don't need to return to it right away, close it. To close a window, click its Close button .
Note
• If you close a document without saving any changes you made, a message appears that gives you the option to save your changes.
Switching between windows
If you open more than one program or document, your desktop can quickly become cluttered with windows. Keeping track of which windows you have open isn't always easy, because some windows might partially or completely cover others.
Using the taskbar. The taskbar provides a way to organize all of your windows. Each window has a corresponding button on the taskbar. To switch to another window, just click its taskbar button. The window appears in front of all other windows, becoming the active window—the one you're currently working in.
To easily identify a window, point to its taskbar button. When you point to a taskbar button, you'll see a thumbnail-sized preview of the window, whether the content of the window is a document, a photo, or even a running video. This preview is especially useful if you can't identify a window by its title alone.
Note
• To see thumbnail previews, your computer must support Aero. This might be disabled on CSU computers.
Using Alt+Tab. You can switch to the previous window by pressing Alt+Tab, or cycle through all open windows and the desktop by holding down Alt and repeatedly pressing Tab. Release Alt to show the selected window.
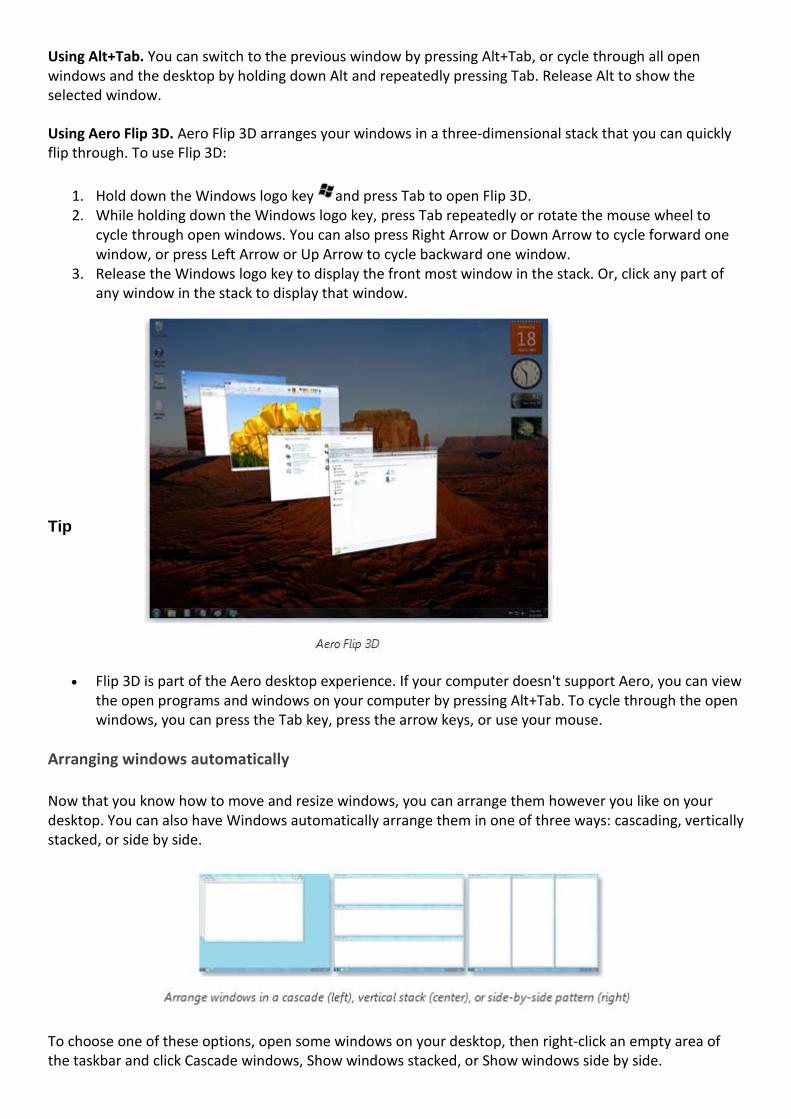
Using Aero Flip 3D. Aero Flip 3D arranges your windows in a three-dimensional stack that you can quickly flip through. To use Flip 3D:
1. Hold down the Windows logo key and press Tab to open Flip 3D. 2. While holding down the Windows logo key, press Tab repeatedly or rotate the mouse wheel to
cycle through open windows. You can also press Right Arrow or Down Arrow to cycle forward one window, or press Left Arrow or Up Arrow to cycle backward one window.
3. Release the Windows logo key to display the front most window in the stack. Or, click any part of any window in the stack to display that window.
Tip
• Flip 3D is part of the Aero desktop experience. If your computer doesn't support Aero, you can view the open programs and windows on your computer by pressing Alt+Tab. To cycle through the open windows, you can press the Tab key, press the arrow keys, or use your mouse.
Arranging windows automatically
Now that you know how to move and resize windows, you can arrange them however you like on your desktop. You can also have Windows automatically arrange them in one of three ways: cascading, vertically stacked, or side by side.
To choose one of these options, open some windows on your desktop, then right-click an empty area of the taskbar and click Cascade windows, Show windows stacked, or Show windows side by side.
Arranging windows using Snap
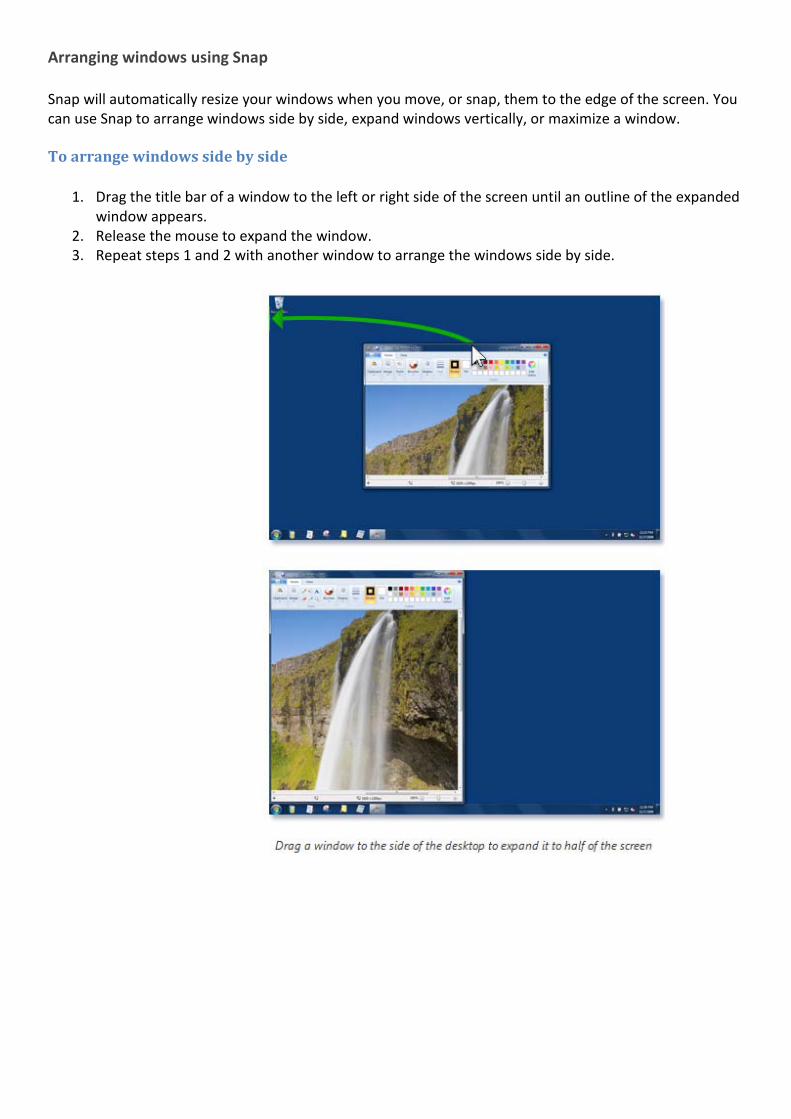
Snap will automatically resize your windows when you move, or snap, them to the edge of the screen. You can use Snap to arrange windows side by side, expand windows vertically, or maximize a window.
To arrange windows side by side
1. Drag the title bar of a window to the left or right side of the screen until an outline of the expanded window appears.
2. Release the mouse to expand the window. 3. Repeat steps 1 and 2 with another window to arrange the windows side by side.
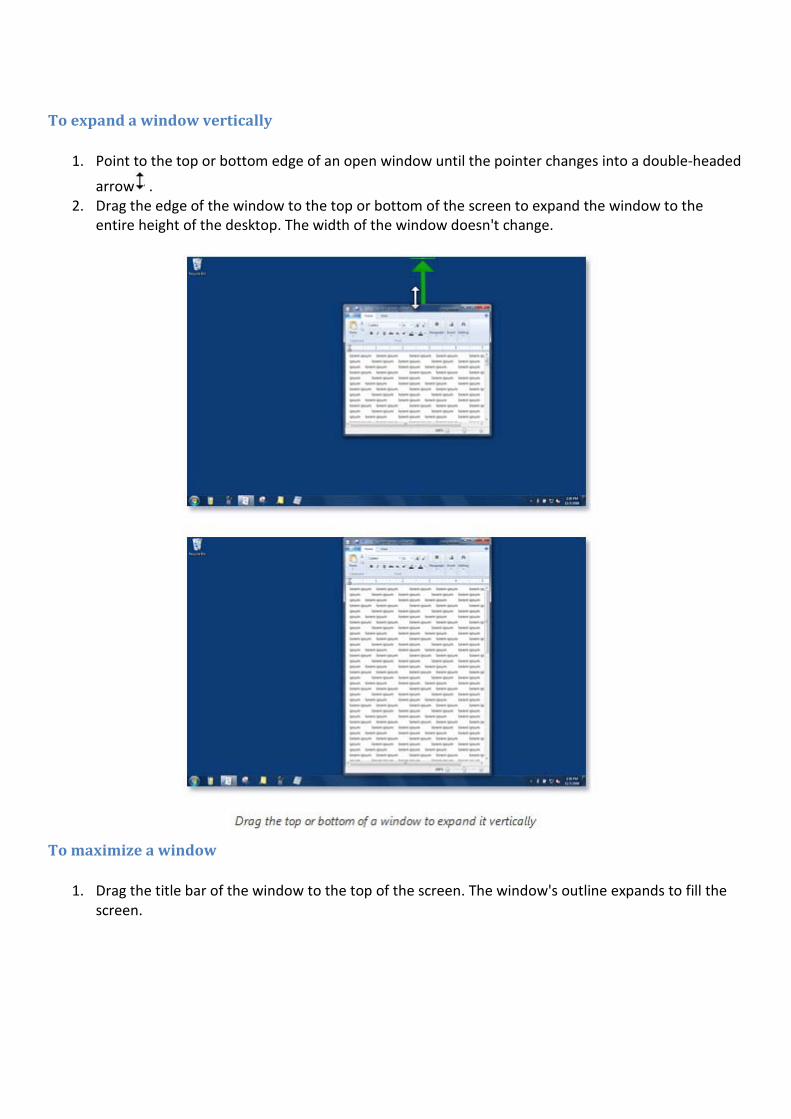
To expand a window vertically
1. Point to the top or bottom edge of an open window until the pointer changes into a double-headed
arrow . 2. Drag the edge of the window to the top or bottom of the screen to expand the window to the
entire height of the desktop. The width of the window doesn't change.
To maximize a window
1. Drag the title bar of the window to the top of the screen. The window's outline expands to fill the screen.

2. Release the window to expand it to fill the entire desktop.
Dialog Boxes DIALOG BOXES are special windows where you are asked to give details and select options. The choices you make are then sent as commands to the software you are using. DIALOG BOXES vary depending on the task requested as well as the application, however they do have several items in common.
The following is an example of a DIALOG BOX.
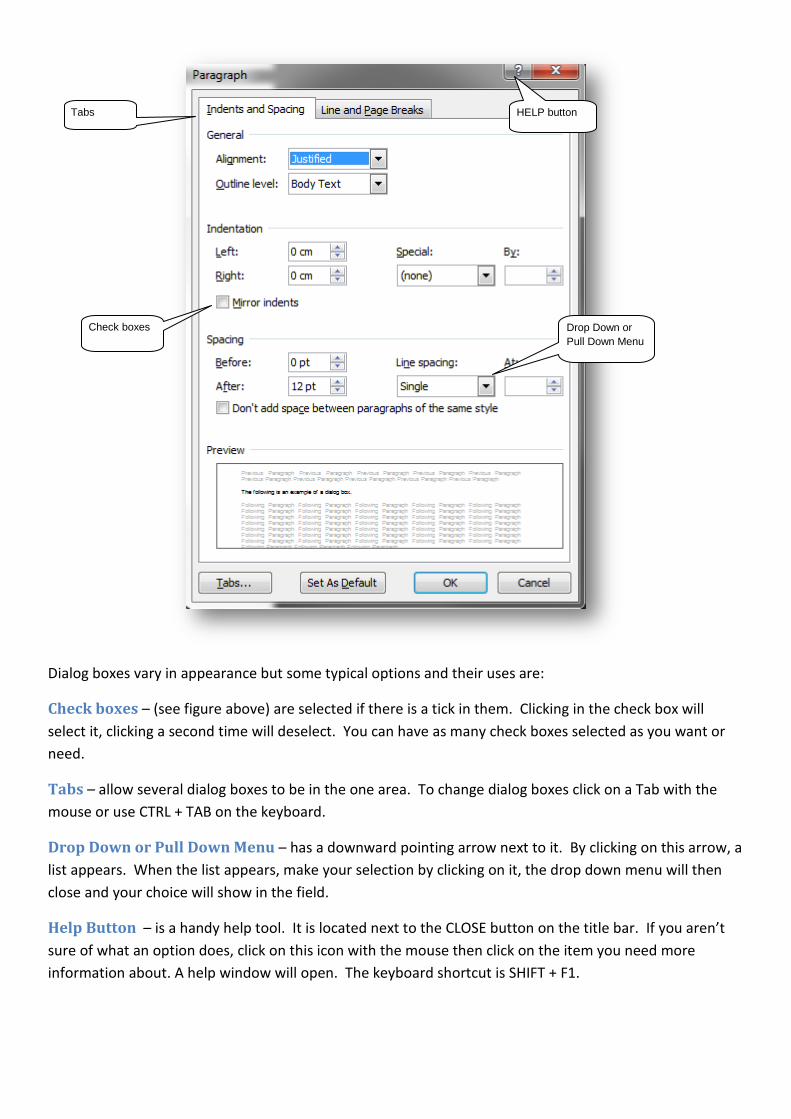
Dialog boxes vary in appearance but some typical options and their uses are:
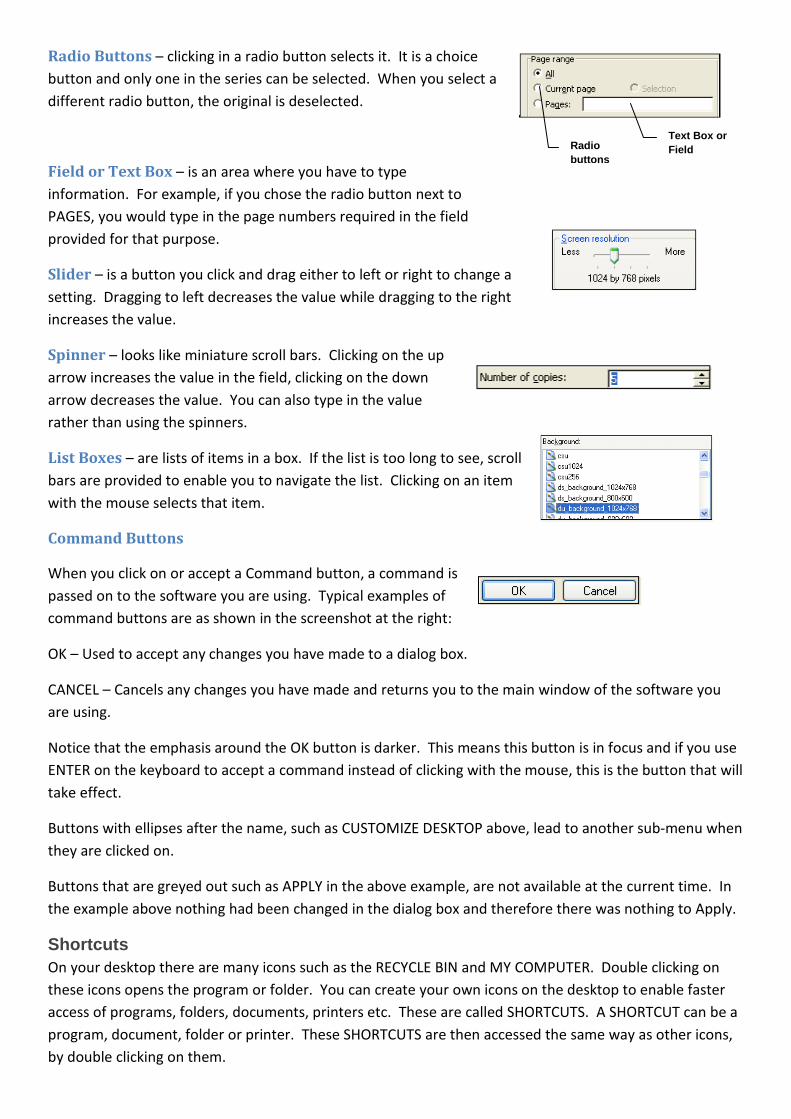
Check boxes – (see figure above) are selected if there is a tick in them. Clicking in the check box will select it, clicking a second time will deselect. You can have as many check boxes selected as you want or need.
Tabs – allow several dialog boxes to be in the one area. To change dialog boxes click on a Tab with the mouse or use CTRL + TAB on the keyboard.
Drop Down or Pull Down Menu – has a downward pointing arrow next to it. By clicking on this arrow, a list appears. When the list appears, make your selection by clicking on it, the drop down menu will then close and your choice will show in the field.
Help Button – is a handy help tool. It is located next to the CLOSE button on the title bar. If you aren’t sure of what an option does, click on this icon with the mouse then click on the item you need more information about. A help window will open. The keyboard shortcut is SHIFT + F1.
Drop Down or Pull Down Menu
HELP button
Tabs
Check boxes
Text Box or Field Radio
buttons
Radio Buttons – clicking in a radio button selects it. It is a choice button and only one in the series can be selected. When you select a different radio button, the original is deselected.
Field or Text Box – is an area where you have to type information. For example, if you chose the radio button next to PAGES, you would type in the page numbers required in the field provided for that purpose.
Slider – is a button you click and drag either to left or right to change a setting. Dragging to left decreases the value while dragging to the right increases the value.
Spinner – looks like miniature scroll bars. Clicking on the up arrow increases the value in the field, clicking on the down arrow decreases the value. You can also type in the value rather than using the spinners.
List Boxes – are lists of items in a box. If the list is too long to see, scroll bars are provided to enable you to navigate the list. Clicking on an item with the mouse selects that item.
Command Buttons
When you click on or accept a Command button, a command is passed on to the software you are using. Typical examples of command buttons are as shown in the screenshot at the right:
OK – Used to accept any changes you have made to a dialog box.
CANCEL – Cancels any changes you have made and returns you to the main window of the software you are using.
Notice that the emphasis around the OK button is darker. This means this button is in focus and if you use ENTER on the keyboard to accept a command instead of clicking with the mouse, this is the button that will take effect.
Buttons with ellipses after the name, such as CUSTOMIZE DESKTOP above, lead to another sub-menu when they are clicked on.
Buttons that are greyed out such as APPLY in the above example, are not available at the current time. In the example above nothing had been changed in the dialog box and therefore there was nothing to Apply.
Shortcuts On your desktop there are many icons such as the RECYCLE BIN and MY COMPUTER. Double clicking on these icons opens the program or folder. You can create your own icons on the desktop to enable faster access of programs, folders, documents, printers etc. These are called SHORTCUTS. A SHORTCUT can be a program, document, folder or printer. These SHORTCUTS are then accessed the same way as other icons, by double clicking on them.
You can tell if an icon is a SHORTCUT or not by its appearance. If it has a little black arrow on the icon, then it is a SHORTCUT. This is important to know because if you delete one of these shortcuts, you will not hurt the original folder, document, program or printer, only the shortcut that gets to it.
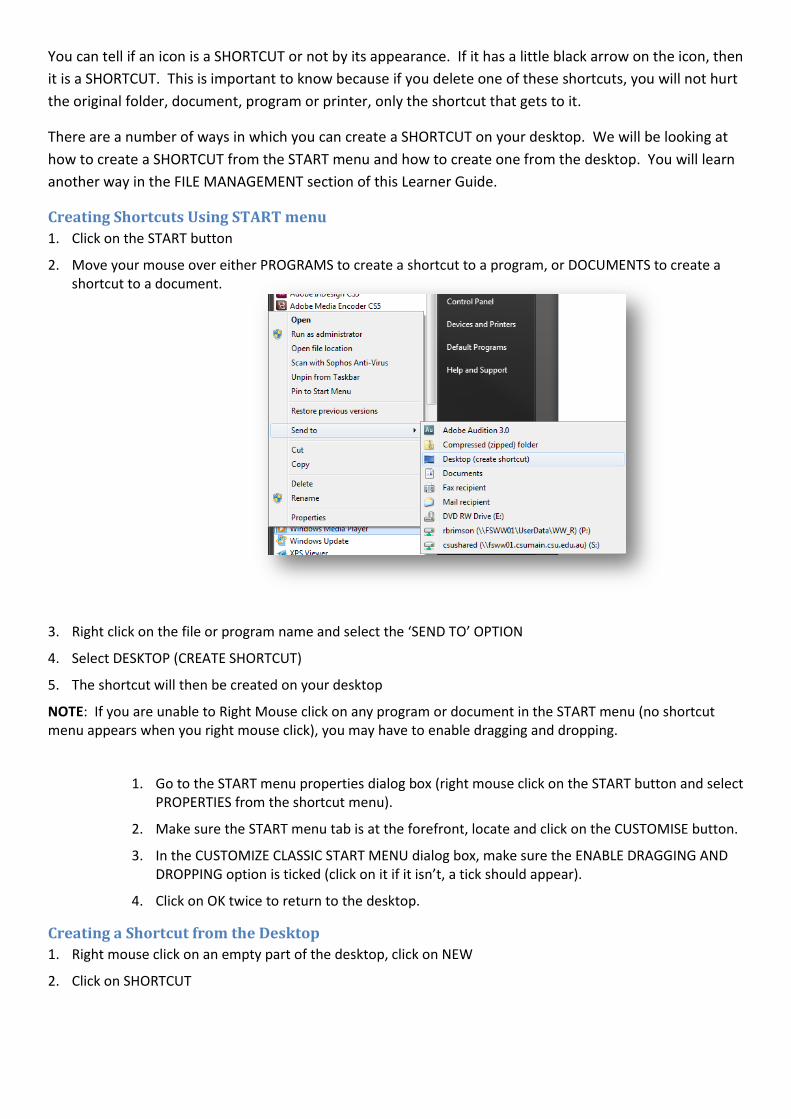
There are a number of ways in which you can create a SHORTCUT on your desktop. We will be looking at how to create a SHORTCUT from the START menu and how to create one from the desktop. You will learn another way in the FILE MANAGEMENT section of this Learner Guide.
Creating Shortcuts Using START menu 1. Click on the START button
2. Move your mouse over either PROGRAMS to create a shortcut to a program, or DOCUMENTS to create a shortcut to a document.
3. Right click on the file or program name and select the ‘SEND TO’ OPTION
4. Select DESKTOP (CREATE SHORTCUT)
5. The shortcut will then be created on your desktop
NOTE: If you are unable to Right Mouse click on any program or document in the START menu (no shortcut menu appears when you right mouse click), you may have to enable dragging and dropping.
1. Go to the START menu properties dialog box (right mouse click on the START button and select PROPERTIES from the shortcut menu).
2. Make sure the START menu tab is at the forefront, locate and click on the CUSTOMISE button.
3. In the CUSTOMIZE CLASSIC START MENU dialog box, make sure the ENABLE DRAGGING AND DROPPING option is ticked (click on it if it isn’t, a tick should appear).
4. Click on OK twice to return to the desktop.
Creating a Shortcut from the Desktop 1. Right mouse click on an empty part of the desktop, click on NEW
2. Click on SHORTCUT
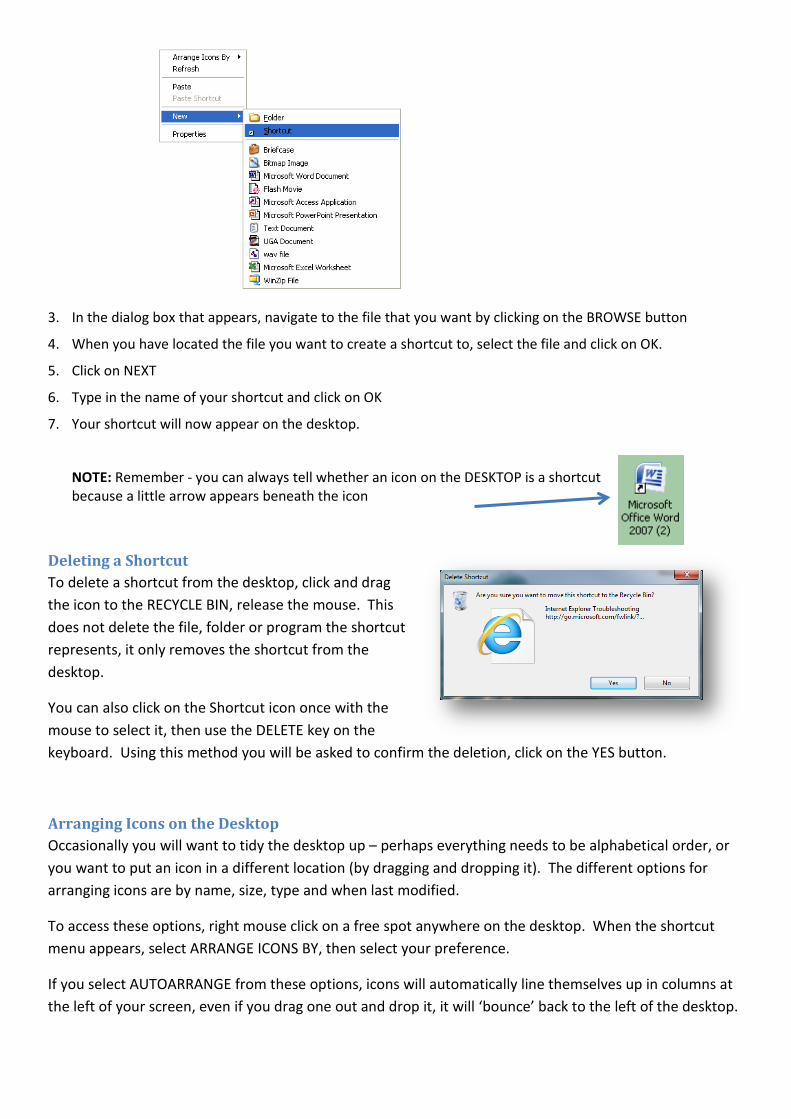
3. In the dialog box that appears, navigate to the file that you want by clicking on the BROWSE button
4. When you have located the file you want to create a shortcut to, select the file and click on OK.
5. Click on NEXT
6. Type in the name of your shortcut and click on OK
7. Your shortcut will now appear on the desktop.
NOTE: Remember - you can always tell whether an icon on the DESKTOP is a shortcut because a little arrow appears beneath the icon
Deleting a Shortcut To delete a shortcut from the desktop, click and drag the icon to the RECYCLE BIN, release the mouse. This does not delete the file, folder or program the shortcut represents, it only removes the shortcut from the desktop.
You can also click on the Shortcut icon once with the mouse to select it, then use the DELETE key on the keyboard. Using this method you will be asked to confirm the deletion, click on the YES button.
Arranging Icons on the Desktop Occasionally you will want to tidy the desktop up – perhaps everything needs to be alphabetical order, or you want to put an icon in a different location (by dragging and dropping it). The different options for arranging icons are by name, size, type and when last modified.
To access these options, right mouse click on a free spot anywhere on the desktop. When the shortcut menu appears, select ARRANGE ICONS BY, then select your preference.
If you select AUTOARRANGE from these options, icons will automatically line themselves up in columns at the left of your screen, even if you drag one out and drop it, it will ‘bounce’ back to the left of the desktop.
Changing the Icon One way of customizing your icons on the desktop is to change the image or graphic used. To do this:
1. right mouse click on the icon then click on PROPERTIES in the shortcut menu;
2. select the CHANGE ICON button (located on the SHORTCUT tab);
3. if an error message comes up saying it can’t find the icon, click on OK to cancel the message;
4. you will now be able to choose from a selection of default icons. When you have selected an icon, click on OK. Click on OK again to close the PROPERTIES dialog box.
Changing the size of the icons Click and hold down the Ctrl key and then use your scroll wheel on your mouse to resize the icons.
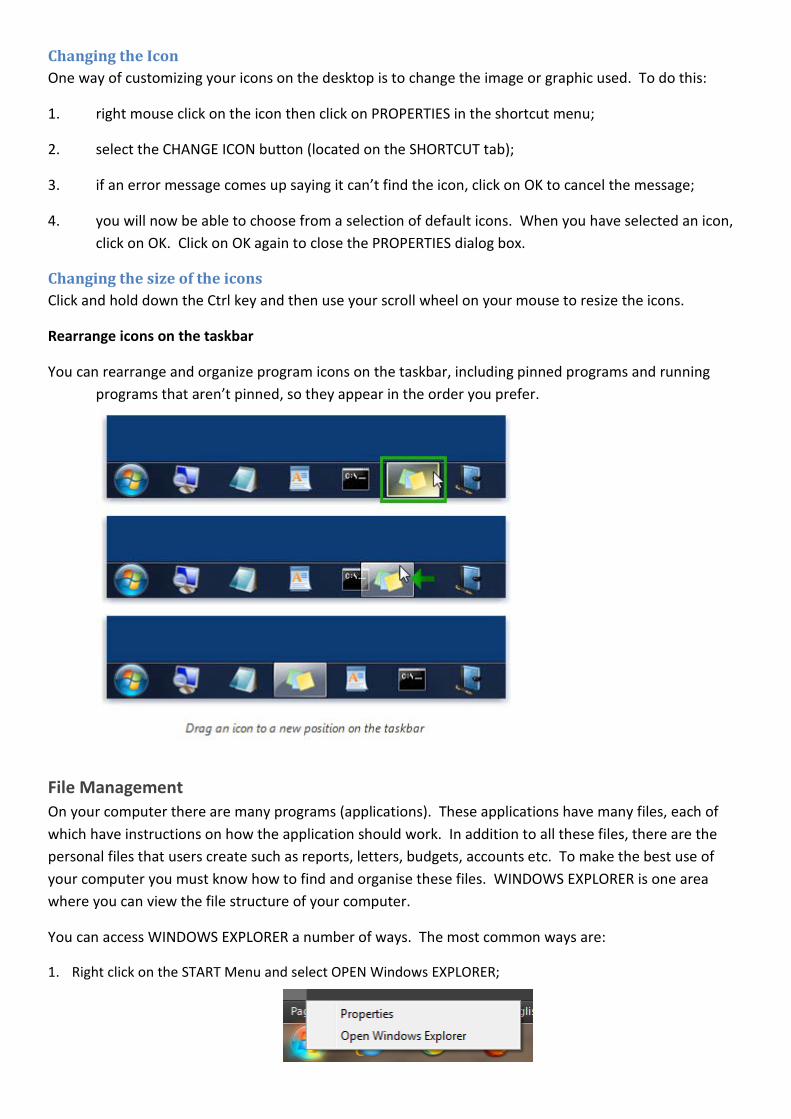
Rearrange icons on the taskbar
You can rearrange and organize program icons on the taskbar, including pinned programs and running programs that aren’t pinned, so they appear in the order you prefer.
File Management On your computer there are many programs (applications). These applications have many files, each of which have instructions on how the application should work. In addition to all these files, there are the personal files that users create such as reports, letters, budgets, accounts etc. To make the best use of your computer you must know how to find and organise these files. WINDOWS EXPLORER is one area where you can view the file structure of your computer.
You can access WINDOWS EXPLORER a number of ways. The most common ways are:
1. Right click on the START Menu and select OPEN Windows EXPLORER;
OR
2. Click on the WINDOWS EXPLORER icon on the TASK BAR;
OR
3. Click on the START button, go to PROGRAMS, ACCESSORIES and select WINDOWS EXPLORER from the list of accessories, (for your convenience, CSU has also set up a Windows Explorer icon at the top of the START menu).
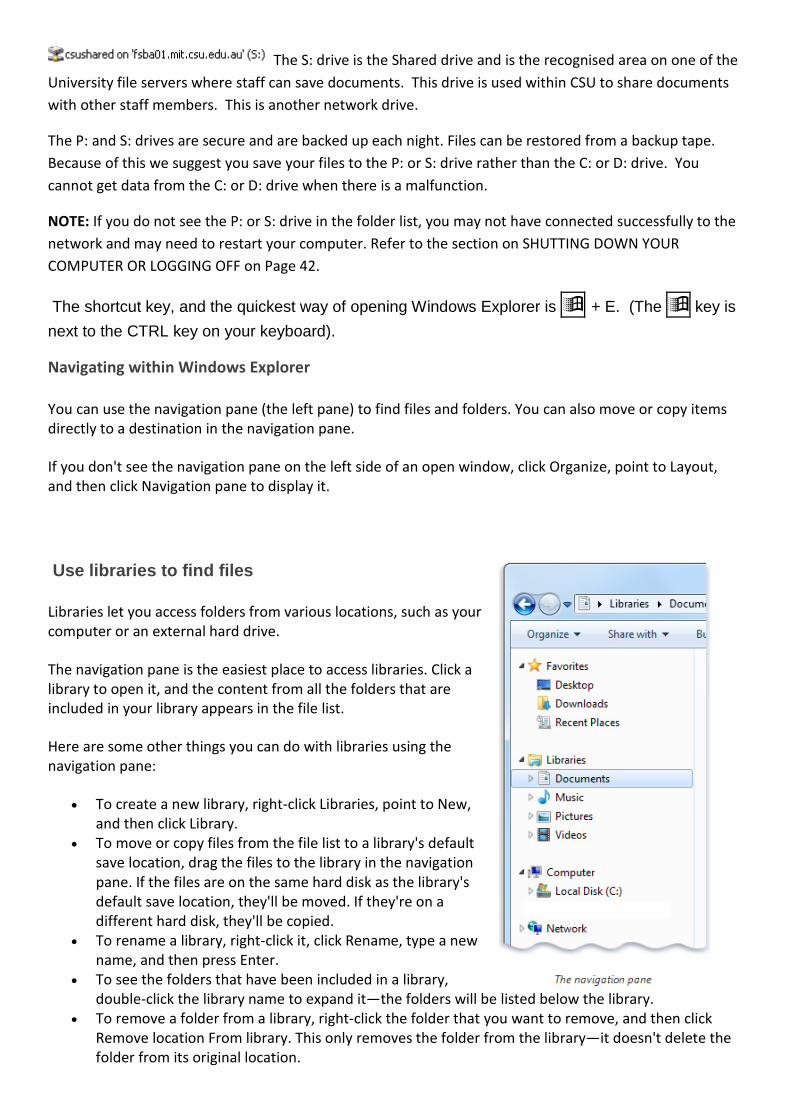
When you open up WINDOWS EXPLORER, you will see the following window:
One of the things WINDOWS EXPLORER will show is the different data storage areas available to save your files. These data storage areas are known as DRIVES. In the FOLDER LIST you will see:
This is known as a hard drive and is inside your computer. This drive is the area where all your program software is installed e.g. Microsoft Word, Excel etc
This is another hard drive in your computer into which you can save data
This is a CD drive where you are able to read CD data disks and listen to audio disks. You cannot save data to this drive without a special CD drive (CD burner).
If you plug in a USB drive (sometimes known as a thumb or flash drive), Windows XP will recognise the addition and automatically give the drive a letter of its own – usually the next available letter that isn’t being used by another drive.
The P: drive is your Personal or Private drive where you can save private and confidential work documents. It is an area that has been put aside on one of the university file servers and cannot be accessed by staff other than yourself. It is easy to determine as it starts with your username e.g. sdixon. This is a network drive.
Navigation pane RIGHT PANE
The S: drive is the Shared drive and is the recognised area on one of the University file servers where staff can save documents. This drive is used within CSU to share documents with other staff members. This is another network drive.
The P: and S: drives are secure and are backed up each night. Files can be restored from a backup tape. Because of this we suggest you save your files to the P: or S: drive rather than the C: or D: drive. You cannot get data from the C: or D: drive when there is a malfunction.
NOTE: If you do not see the P: or S: drive in the folder list, you may not have connected successfully to the network and may need to restart your computer. Refer to the section on SHUTTING DOWN YOUR COMPUTER OR LOGGING OFF on Page 42.
The shortcut key, and the quickest way of opening Windows Explorer is + E. (The key is next to the CTRL key on your keyboard).
Navigating within Windows Explorer
You can use the navigation pane (the left pane) to find files and folders. You can also move or copy items directly to a destination in the navigation pane.
If you don't see the navigation pane on the left side of an open window, click Organize, point to Layout, and then click Navigation pane to display it.
Use libraries to find files
Libraries let you access folders from various locations, such as your computer or an external hard drive.
The navigation pane is the easiest place to access libraries. Click a library to open it, and the content from all the folders that are included in your library appears in the file list.
Here are some other things you can do with libraries using the navigation pane:
• To create a new library, right-click Libraries, point to New, and then click Library.
• To move or copy files from the file list to a library's default save location, drag the files to the library in the navigation pane. If the files are on the same hard disk as the library's default save location, they'll be moved. If they're on a different hard disk, they'll be copied.
• To rename a library, right-click it, click Rename, type a new name, and then press Enter.
• To see the folders that have been included in a library, double-click the library name to expand it—the folders will be listed below the library.
• To remove a folder from a library, right-click the folder that you want to remove, and then click Remove location From library. This only removes the folder from the library—it doesn't delete the folder from its original location.
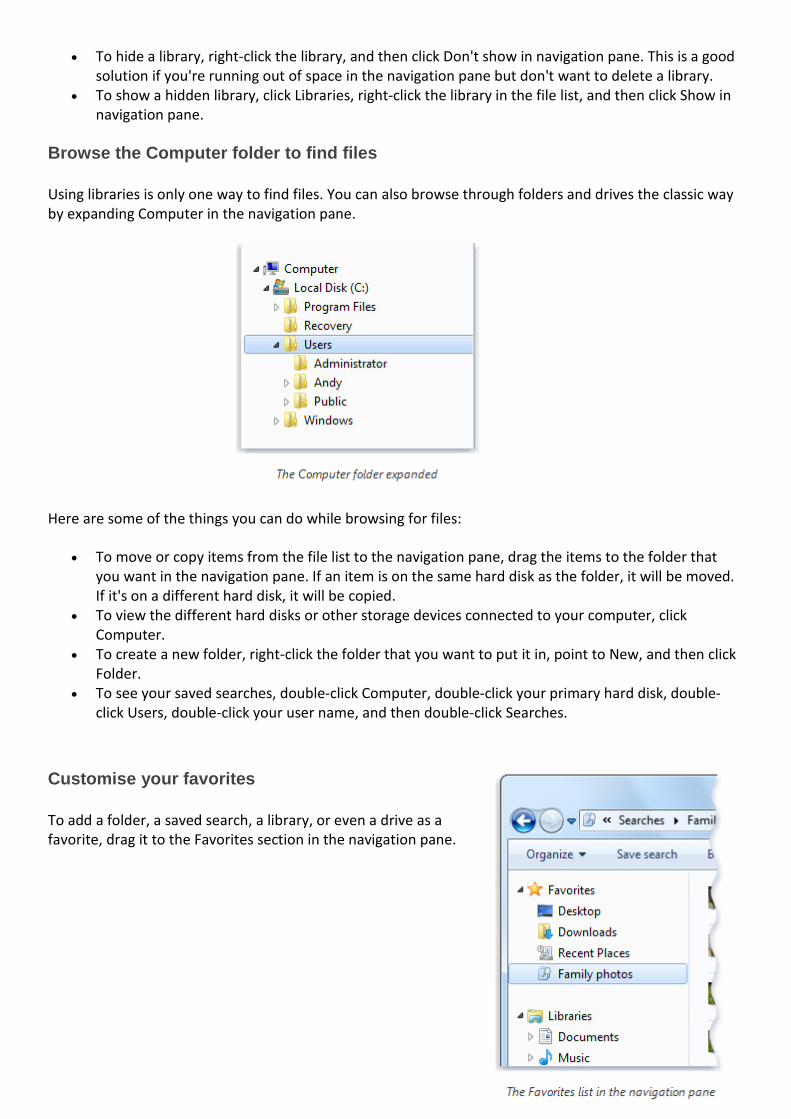
• To hide a library, right-click the library, and then click Don't show in navigation pane. This is a good solution if you're running out of space in the navigation pane but don't want to delete a library.
• To show a hidden library, click Libraries, right-click the library in the file list, and then click Show in navigation pane.
Browse the Computer folder to find files
Using libraries is only one way to find files. You can also browse through folders and drives the classic way by expanding Computer in the navigation pane.
Here are some of the things you can do while browsing for files:
• To move or copy items from the file list to the navigation pane, drag the items to the folder that you want in the navigation pane. If an item is on the same hard disk as the folder, it will be moved. If it's on a different hard disk, it will be copied.
• To view the different hard disks or other storage devices connected to your computer, click Computer.
• To create a new folder, right-click the folder that you want to put it in, point to New, and then click Folder.
• To see your saved searches, double-click Computer, double-click your primary hard disk, double-click Users, double-click your user name, and then double-click Searches.
Customise your favorites
To add a folder, a saved search, a library, or even a drive as a favorite, drag it to the Favorites section in the navigation pane.
Here are some other ways to customize your favorites:
• To change the order of favorites, drag a favorite to a new position in the list. • To restore the default favorites in the navigation pane, right-click Favorites, and then click Restore
Favorite Links. • To view the folder where your favorites are stored, click Favorites in the navigation pane. Favorites
are stored as shortcuts. • To remove a favorite, right-click the favorite, and then click Remove. This removes the favorite from
the navigation pane—it doesn't delete the files or folders that the shortcut points to.
Note
• You can't add files or websites as favorites.
Change navigation pane settings
1. In an open window, click Organize, and then click Folder and search options. 2. In the Folder Options dialog box, click the General tab, and then do one or both of the following:
o To show all the folders on your computer in the navigation pane, including your personal folder, select the Show all folders check box, and then click OK.
o To automatically expand the navigation pane to the folder that's selected in the folder window, select the ‘Automatically expand to current folder check box’, and then click OK.
Change thumbnail size and file details
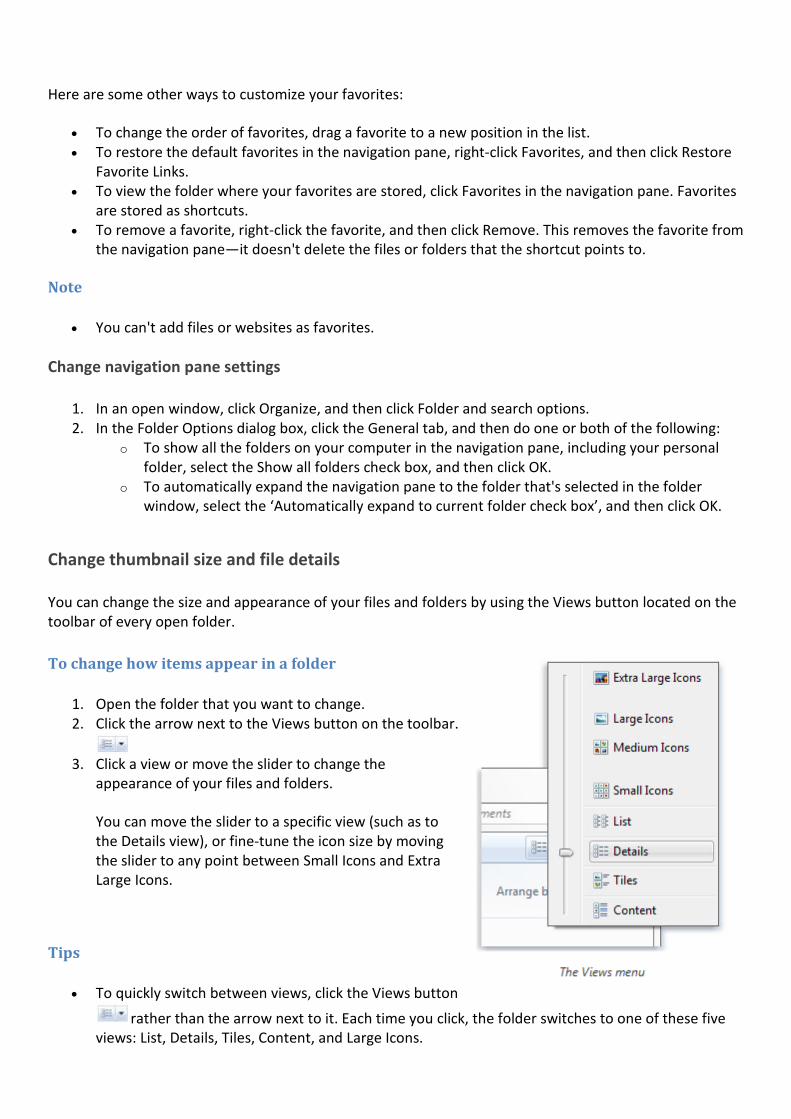
You can change the size and appearance of your files and folders by using the Views button located on the toolbar of every open folder.
To change how items appear in a folder
1. Open the folder that you want to change. 2. Click the arrow next to the Views button on the toolbar.
3. Click a view or move the slider to change the
appearance of your files and folders.
You can move the slider to a specific view (such as to the Details view), or fine-tune the icon size by moving the slider to any point between Small Icons and Extra Large Icons.
Tips
• To quickly switch between views, click the Views button
rather than the arrow next to it. Each time you click, the folder switches to one of these five views: List, Details, Tiles, Content, and Large Icons.
• When using libraries, you can arrange your files and folders in different ways by using the Arrange by list, as well as by using the Views button. When you make a change using the Arrange by list, and then change the view using the Views button, you can go back to the default view by clicking Clear changes in the Arrange by list.
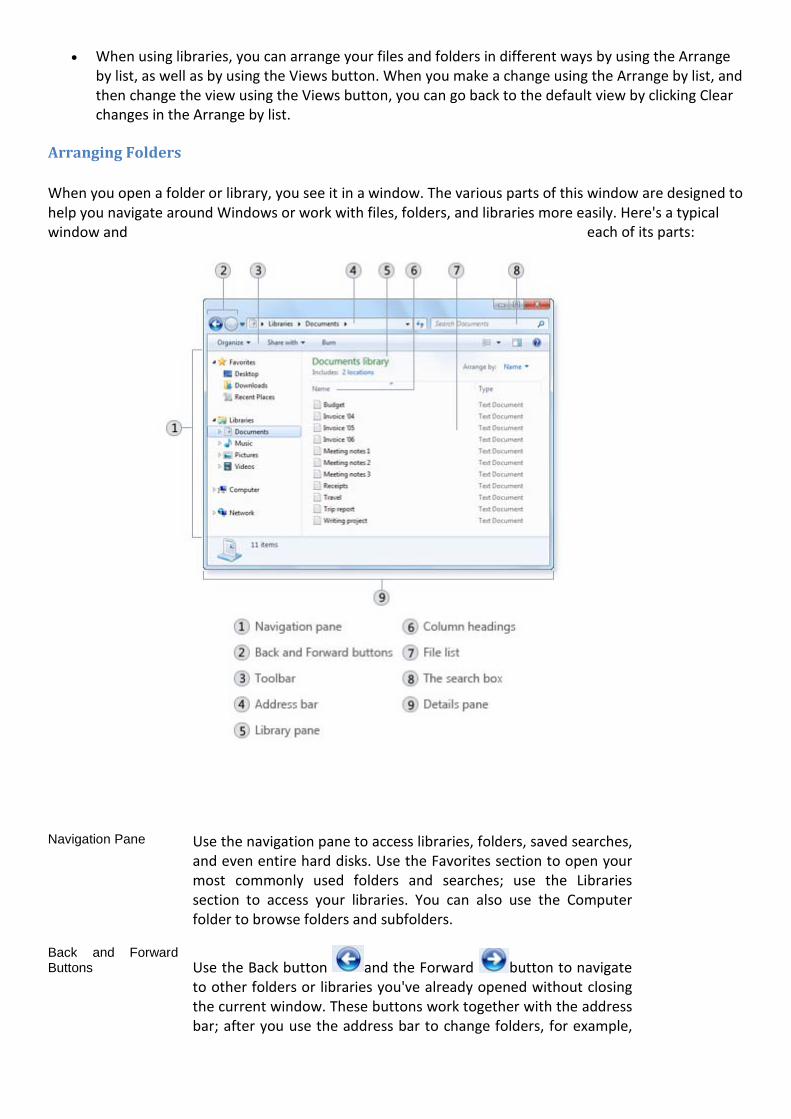
Arranging Folders
When you open a folder or library, you see it in a window. The various parts of this window are designed to help you navigate around Windows or work with files, folders, and libraries more easily. Here's a typical window and each of its parts:
Navigation Pane Use the navigation pane to access libraries, folders, saved searches, and even entire hard disks. Use the Favorites section to open your most commonly used folders and searches; use the Libraries section to access your libraries. You can also use the Computer folder to browse folders and subfolders.
Back and Forward Buttons Use the Back button and the Forward button to navigate
to other folders or libraries you've already opened without closing the current window. These buttons work together with the address bar; after you use the address bar to change folders, for example,
you can use the Back button to return to the previous folder.
Toolbar Use the toolbar to perform common tasks, such as changing the appearance of your files and folders, burning files to a CD, or starting a digital picture slide show. The toolbar's buttons change to show only the tasks that are relevant. For example, if you click a picture file, the toolbar shows different buttons than it would if you clicked a music file.
Address bar Use the address bar to navigate to a different folder or library or to go back to a previous one.
Library pane The library pane appears only when you are in a library (such as the Documents library). Use the library pane to customize the library or to arrange the files by different properties.
Column headings Use the column headings to change how the files in the file list are organized. For example, you can click the left side of a column heading to change the order the files and folders are displayed in, or you can click the right side to filter the files in different ways. (Note that column headings are available only in Details view. To learn how to switch to Details view, see 'Viewing and arranging files and folders' later in this topic.)
File list This is where the contents of the current folder or library are displayed. If you type in the search box to find a file, only the files that match your current view (including files in subfolders) will appear.
The search box Type a word or phrase in the search box to look for an item in the current folder or library. The search begins as soon as you begin typing—so if you type "B," for example, all the files with names starting with the letter B will appear in the file list.
Details pane Use the details pane to see the most common properties associated with the selected file. File properties are information about a file, such as the author, the date you last changed the file, and any descriptive tags you might have added to the file.
Preview pane Use the preview pane to see the contents of most files. If you select an e‑ mail message, text file, or picture, for example, you can see its contents without opening it in a program. If you don't see the preview pane, click the Preview pane button in the toolbar to turn it on.
Selecting Files and Folders Before you move, copy or delete files and folders, they must be selected so that Windows (and the computer) knows which files and folders to work with.
In WINDOWS EXPLORER, you can select multiple files and folders by combining the use of the keyboard with the mouse
Single Selection – point your mouse over the item you want to select and click once. The item will be highlighted (usually blue highlight)
Scattered Selection – hold down the CTRL key and then click on each item you want to select
Block Selection – click on the first item you want to select, hold down the SHIFT key and then click the last item to be included in the selection
Selecting All – To select everything in a folder, use the EDIT MENU, SELECT ALL option, or they keyboard shortcut - CTRL+A
Working with Folders
Accessing Folders and Drives To access your different drives and folders you can either, double click on “My Computer” and then select the relevant drive where your folders reside. Or single click the “Windows Explorer” icon on the task bar
to navigate to your folder.
Creating New Folders All users have been given the ability to create folders in their P: Personal drive, however only the Share Administrators have access to create folders on the S: Shared drive. It is important that you are in the correct drive and folder before you create a new one. When you create a new folder it will be created within the active folder (the folder which is currently open).
The names you give Folders should be descriptive, and not too long. It can include letters and numbers but should not include special characters such as full stops, exclamation marks, asterisks, back or forward
slashes etc). (.!/\*)
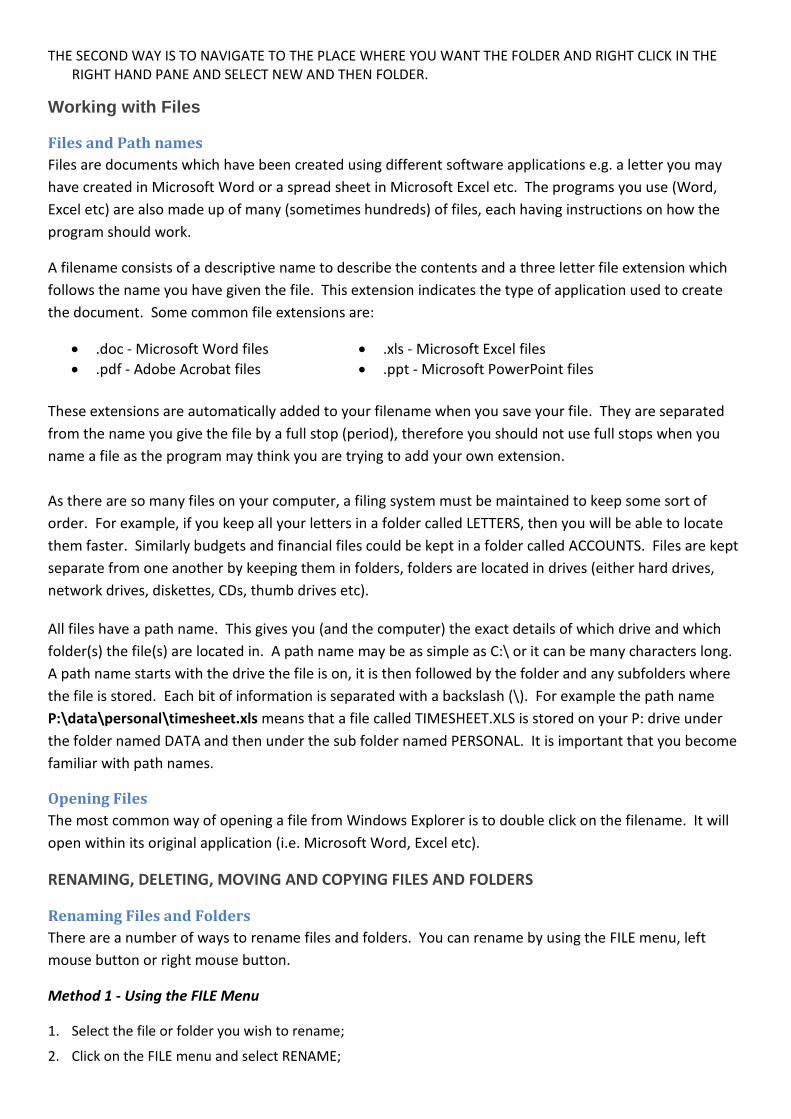
There are two ways in which you can create a new folder:
1. Locate and select the folder on the drive where you want to create a new folder. The folder must be selected before continuing (if you aren’t sure, look at the yellow icon representing a manila folder, this must be open);
2. Click on FILE menu, select NEW, then select FOLDER;
NOTE: If you cannot see the menu bar, click Organize, layout, and select Menu bar.
3. Type in the folder name and press ENTER TO FINALISE (YOU CAN ALSO CLICK AWAY FROM THE NEW FOLDER, OUTSIDE ITS SURROUNDING RECTANGLE TO FINALISE).
OR
1. Locate and select the folder on the drive where you want to create a new folder;
2. Right click the mouse in the RIGHT PANE;
3. Select NEW from the shortcut menu, then click on FOLDER;
4. Type in the folder name and press ENTER OR CLICK AWAY FROM THE SURROUNDING RECTANGLE.
THE SECOND WAY IS TO NAVIGATE TO THE PLACE WHERE YOU WANT THE FOLDER AND RIGHT CLICK IN THE RIGHT HAND PANE AND SELECT NEW AND THEN FOLDER.
Working with Files
Files and Path names Files are documents which have been created using different software applications e.g. a letter you may have created in Microsoft Word or a spread sheet in Microsoft Excel etc. The programs you use (Word, Excel etc) are also made up of many (sometimes hundreds) of files, each having instructions on how the program should work.
A filename consists of a descriptive name to describe the contents and a three letter file extension which follows the name you have given the file. This extension indicates the type of application used to create the document. Some common file extensions are:
• .doc - Microsoft Word files • .xls - Microsoft Excel files • .pdf - Adobe Acrobat files • .ppt - Microsoft PowerPoint files
These extensions are automatically added to your filename when you save your file. They are separated from the name you give the file by a full stop (period), therefore you should not use full stops when you name a file as the program may think you are trying to add your own extension. As there are so many files on your computer, a filing system must be maintained to keep some sort of order. For example, if you keep all your letters in a folder called LETTERS, then you will be able to locate them faster. Similarly budgets and financial files could be kept in a folder called ACCOUNTS. Files are kept separate from one another by keeping them in folders, folders are located in drives (either hard drives, network drives, diskettes, CDs, thumb drives etc).
All files have a path name. This gives you (and the computer) the exact details of which drive and which folder(s) the file(s) are located in. A path name may be as simple as C:\ or it can be many characters long. A path name starts with the drive the file is on, it is then followed by the folder and any subfolders where the file is stored. Each bit of information is separated with a backslash (\). For example the path name P:\data\personal\timesheet.xls means that a file called TIMESHEET.XLS is stored on your P: drive under the folder named DATA and then under the sub folder named PERSONAL. It is important that you become familiar with path names.
Opening Files The most common way of opening a file from Windows Explorer is to double click on the filename. It will open within its original application (i.e. Microsoft Word, Excel etc).
RENAMING, DELETING, MOVING AND COPYING FILES AND FOLDERS
Renaming Files and Folders There are a number of ways to rename files and folders. You can rename by using the FILE menu, left mouse button or right mouse button.
Method 1 - Using the FILE Menu
1. Select the file or folder you wish to rename;
2. Click on the FILE menu and select RENAME;
3. Type in the new name. NOTE: If you are renaming a file you must keep the same file extension (e.g. “.doc”) as it had, or the file will no longer be associated with the program that created it;
4. To FINALISE THE RENAMING OPERATION press ENTER OR CLICK AWAY FROM THE RECTANGLE THAT SURROUNDS THE FILE OR FOLDER NAME.
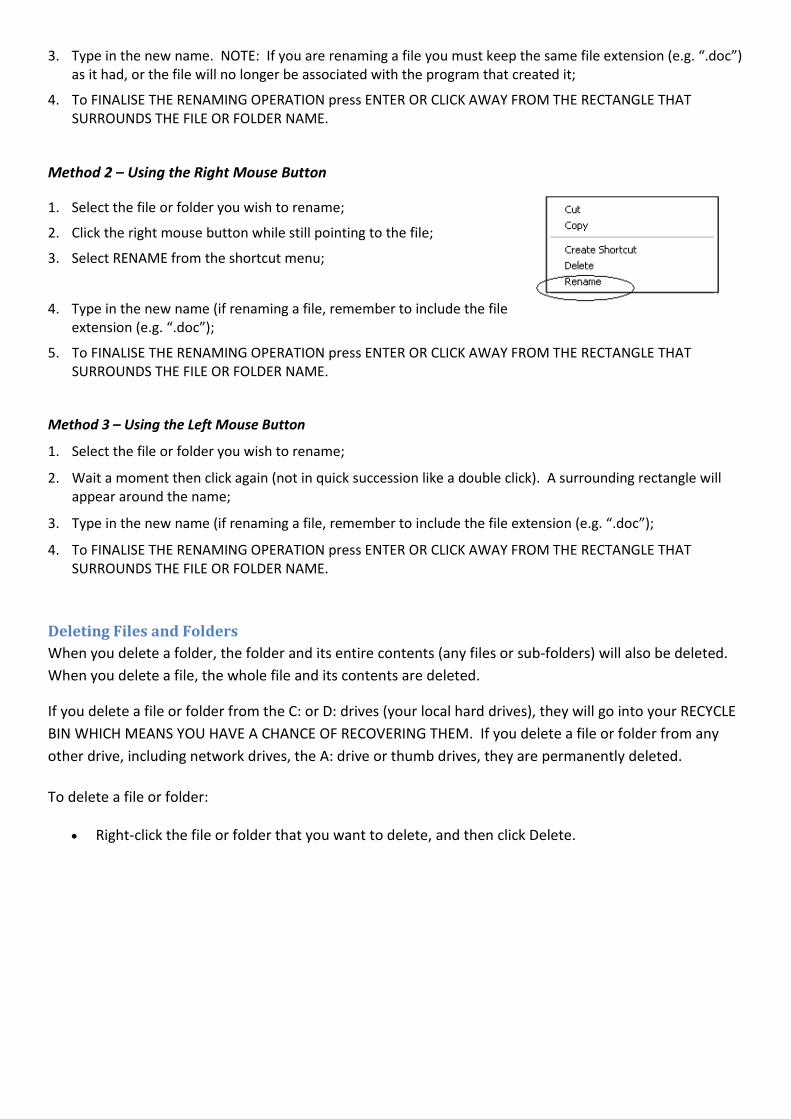
Method 2 – Using the Right Mouse Button
1. Select the file or folder you wish to rename;
2. Click the right mouse button while still pointing to the file;
3. Select RENAME from the shortcut menu;
4. Type in the new name (if renaming a file, remember to include the file extension (e.g. “.doc”);
5. To FINALISE THE RENAMING OPERATION press ENTER OR CLICK AWAY FROM THE RECTANGLE THAT SURROUNDS THE FILE OR FOLDER NAME.
Method 3 – Using the Left Mouse Button
1. Select the file or folder you wish to rename;
2. Wait a moment then click again (not in quick succession like a double click). A surrounding rectangle will appear around the name;
3. Type in the new name (if renaming a file, remember to include the file extension (e.g. “.doc”);
4. To FINALISE THE RENAMING OPERATION press ENTER OR CLICK AWAY FROM THE RECTANGLE THAT SURROUNDS THE FILE OR FOLDER NAME.
Deleting Files and Folders When you delete a folder, the folder and its entire contents (any files or sub-folders) will also be deleted. When you delete a file, the whole file and its contents are deleted.
If you delete a file or folder from the C: or D: drives (your local hard drives), they will go into your RECYCLE BIN WHICH MEANS YOU HAVE A CHANCE OF RECOVERING THEM. If you delete a file or folder from any other drive, including network drives, the A: drive or thumb drives, they are permanently deleted.
To delete a file or folder:
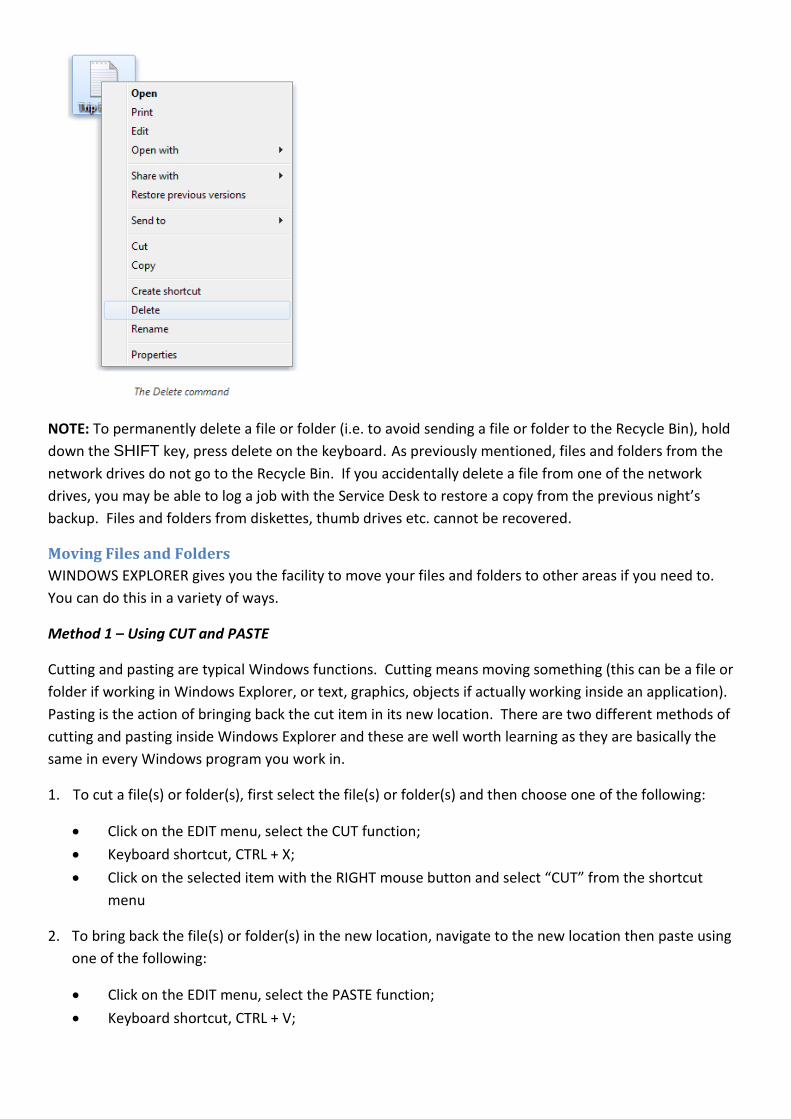
• Right-click the file or folder that you want to delete, and then click Delete.
NOTE: To permanently delete a file or folder (i.e. to avoid sending a file or folder to the Recycle Bin), hold down the SHIFT key, press delete on the keyboard. As previously mentioned, files and folders from the network drives do not go to the Recycle Bin. If you accidentally delete a file from one of the network drives, you may be able to log a job with the Service Desk to restore a copy from the previous night’s backup. Files and folders from diskettes, thumb drives etc. cannot be recovered.
Moving Files and Folders WINDOWS EXPLORER gives you the facility to move your files and folders to other areas if you need to. You can do this in a variety of ways.
Method 1 – Using CUT and PASTE
Cutting and pasting are typical Windows functions. Cutting means moving something (this can be a file or folder if working in Windows Explorer, or text, graphics, objects if actually working inside an application). Pasting is the action of bringing back the cut item in its new location. There are two different methods of cutting and pasting inside Windows Explorer and these are well worth learning as they are basically the same in every Windows program you work in.
1. To cut a file(s) or folder(s), first select the file(s) or folder(s) and then choose one of the following:
• Click on the EDIT menu, select the CUT function;
• Keyboard shortcut, CTRL + X;
• Click on the selected item with the RIGHT mouse button and select “CUT” from the shortcut menu
2. To bring back the file(s) or folder(s) in the new location, navigate to the new location then paste using one of the following:
• Click on the EDIT menu, select the PASTE function;
• Keyboard shortcut, CTRL + V;
• In the position where you want the item to be pasted, click with the RIGHT mouse button and select “PASTE” from the shortcut menu.
Method 2 – Dragging and Dropping
1. In the right pane, select the file(s) or folder(s) you want to move;
2. Manipulate the FOLDER LIST on the left side of the Windows Explorer so that it shows the new location. Make sure you use the scroll bars and the + and – (collapse and expand buttons) to navigate, do not click on the names of the drives or folders as you will change to that drive or folder and lose your selection in the RIGHT pane;
3. Click and drag the selected file(s) or folder(s) from the RIGHT pane, over to the FOLDER LIST on the left. Release the mouse button when the target folder is highlighted (active);
4. Your file(s) or folder(s) will now appear in the new area
Copying Files and Folders AS WELL AS MOVING FILES AND FOLDERS, WINDOWS EXPLORER can copy them, (just be aware you are not allowed to have two files or two folders called the same thing in the same location). There are a variety of ways you can choose to copy files and folders:
Method 1 – Using COPY and PASTE
Like cutting, copying is a typical Windows function. Copying does not damage or remove the selection being copied. To place the copy in a new location is known as pasting (and is done the same way as previously described). There are three different methods of copying in Windows Explorer and, as mentioned previously, these are well worth learning as they are basically the same in every Windows program you work in.
1. To copy file(s) or folder(s), first select the file(s) or folder(s) and then choose one of the following:
• Click on the EDIT menu, select the COPY function;
• Keyboard shortcut, CTRL + C;
• Click on the selected item with the RIGHT mouse button and select “COPY” from the shortcut menu.
2. To place a copy of the file(s) or folder(s) in the new location, navigate to the new location then paste using one of the following:
• Click on the EDIT menu, select the PASTE function;
• Keyboard shortcut, CTRL + V;
• In the position where you want the item to be pasted, click with the RIGHT mouse button and select “PASTE” from the shortcut menu.
Method 2– Dragging and Dropping
1. In the RIGHT pane, select the file(s) or folder(s) you want to copy
2. Manipulate the FOLDER LIST on the left side of the Windows Explorer so that it shows the new location. Make sure you use the scroll bars and the + and – (collapse and expand buttons) to navigate, do not click on the names of the drives or folders as you will change to that drive or folder and lose your selection in the RIGHT pane;
3. Hold down the CTRL key on the keyboard and at the same time, click and drag the selected file(s) and/or folder(s) over to the FOLDER LIST on the left, and drop it where you want to copy the file(s) and/or folder(s) to. Before dropping make sure the target folder is highlighted (active). Also make sure you release the mouse before you release the CTRL key when dropping.
4. Your file(s) and folder(s) will now appear in the new area
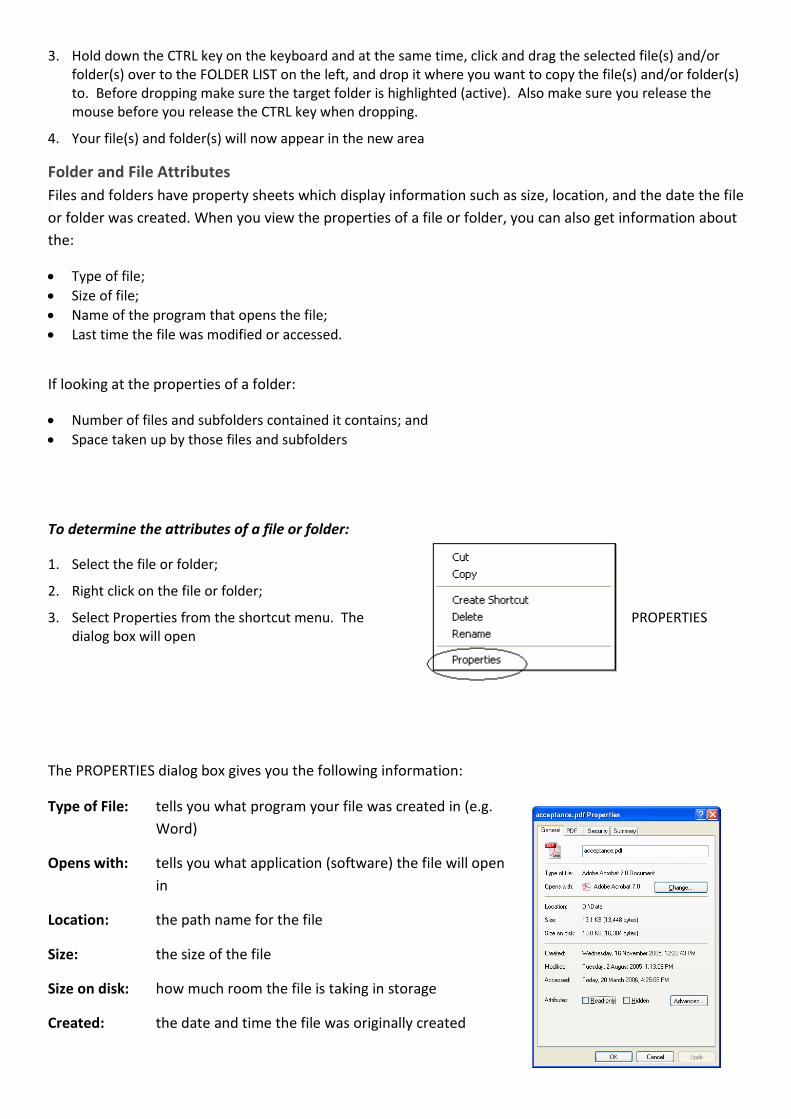
Folder and File Attributes Files and folders have property sheets which display information such as size, location, and the date the file or folder was created. When you view the properties of a file or folder, you can also get information about the:
• Type of file; • Size of file; • Name of the program that opens the file; • Last time the file was modified or accessed.
If looking at the properties of a folder:
• Number of files and subfolders contained it contains; and • Space taken up by those files and subfolders
To determine the attributes of a file or folder:
1. Select the file or folder;
2. Right click on the file or folder;
3. Select Properties from the shortcut menu. The PROPERTIES dialog box will open
The PROPERTIES dialog box gives you the following information:
Type of File: tells you what program your file was created in (e.g. Word)
Opens with: tells you what application (software) the file will open in
Location: the path name for the file
Size: the size of the file
Size on disk: how much room the file is taking in storage
Created: the date and time the file was originally created
Modified: the date and time the file was last modified
Accessed: the date and time the file was last accessed
Hidden: Usually hidden files are program or system files that should not be deleted or changed. Hidden files and folders will appear dimmed within WINDOWS EXPLORER to indicate they are not typical items.
Read Only: A read only file contains information you can read but not change, like a printed book. A read only file on your computer is a file you can open, read or print but not make any changes to.
Other Functions within Windows Explorer
Creating Shortcuts on the Desktop Shortcuts to your most often used folders and files may be created and placed on the Desktop to help automate your work.
1. Select the file or folder that you wish to have as a shortcut on the Desktop;
2. Right click on the file or folder;
3. Select SEND TO from the shortcut menu, then select DESKTOP (CREATE SHORTCUT) FROM THE SUB-MENU;
4. A shortcut for the file or folder will now appear on your desktop and you can open it from the desktop in the same way as any other icon.
Restoring Deleted Files When you delete folders and files from your local hard drives, they are moved to RECYCLE BIN and can be retrieved if desired. The RECYCLE BIN is a storage area used to store deleted files and folders. They will remain there until you empty the RECYCLE BIN. Once you have emptied the Recycle Bin it is not possible to retrieve deleted files.
NOTE: Files and folders deleted from the network drives do not go to the RECYCLE BIN. If you need to restore a file that was on the P: or S: drives, you may be able to have them recovered from the overnight backups. Log a job with the Service Desk with the full details of the file name and location (see Page 6 for Service Desk contact details).
Recover files from the Recycle Bin
1. Open the recycle bin 2. Do one of the following:
o To restore a file, click it, and then, on the toolbar, click Restore this item. o To restore all of the files, make sure that no files are selected, and then, on the toolbar, click
Restore all items.
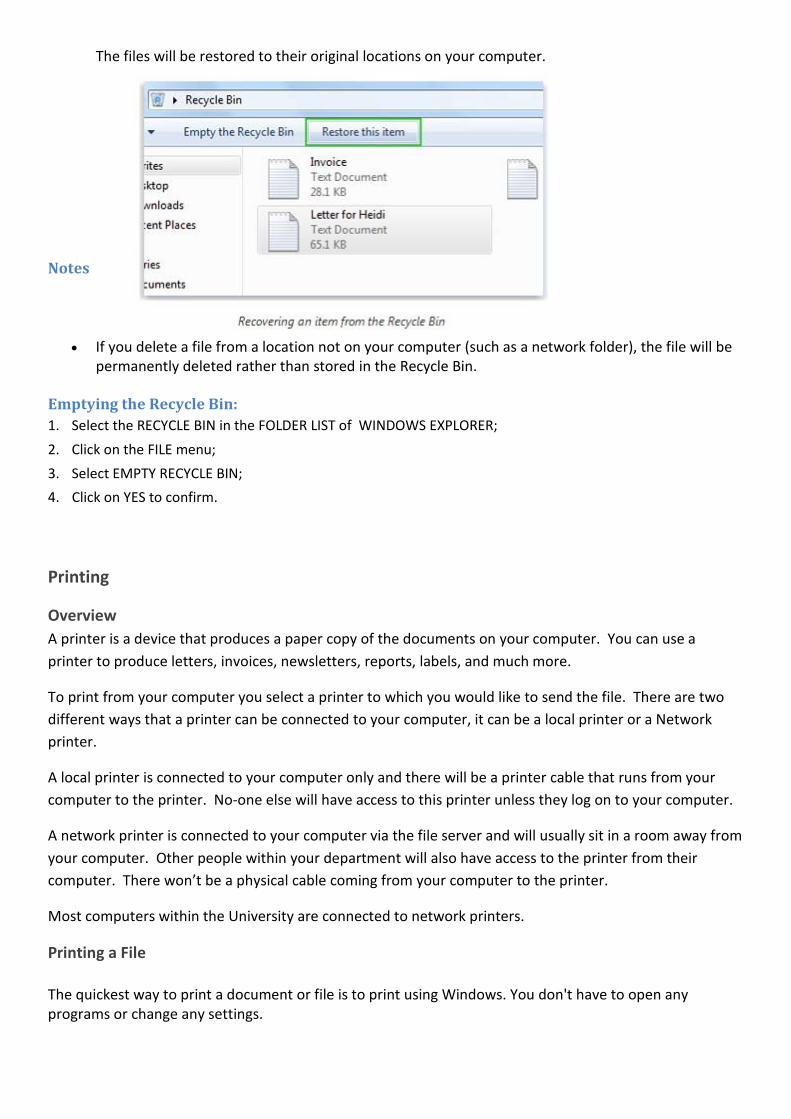
The files will be restored to their original locations on your computer.
Notes
• If you delete a file from a location not on your computer (such as a network folder), the file will be permanently deleted rather than stored in the Recycle Bin.
Emptying the Recycle Bin: 1. Select the RECYCLE BIN in the FOLDER LIST of WINDOWS EXPLORER;
2. Click on the FILE menu;
3. Select EMPTY RECYCLE BIN;
4. Click on YES to confirm.
Printing
Overview A printer is a device that produces a paper copy of the documents on your computer. You can use a printer to produce letters, invoices, newsletters, reports, labels, and much more.
To print from your computer you select a printer to which you would like to send the file. There are two different ways that a printer can be connected to your computer, it can be a local printer or a Network printer.
A local printer is connected to your computer only and there will be a printer cable that runs from your computer to the printer. No-one else will have access to this printer unless they log on to your computer.
A network printer is connected to your computer via the file server and will usually sit in a room away from your computer. Other people within your department will also have access to the printer from their computer. There won’t be a physical cable coming from your computer to the printer.
Most computers within the University are connected to network printers.
Printing a File
The quickest way to print a document or file is to print using Windows. You don't have to open any programs or change any settings.
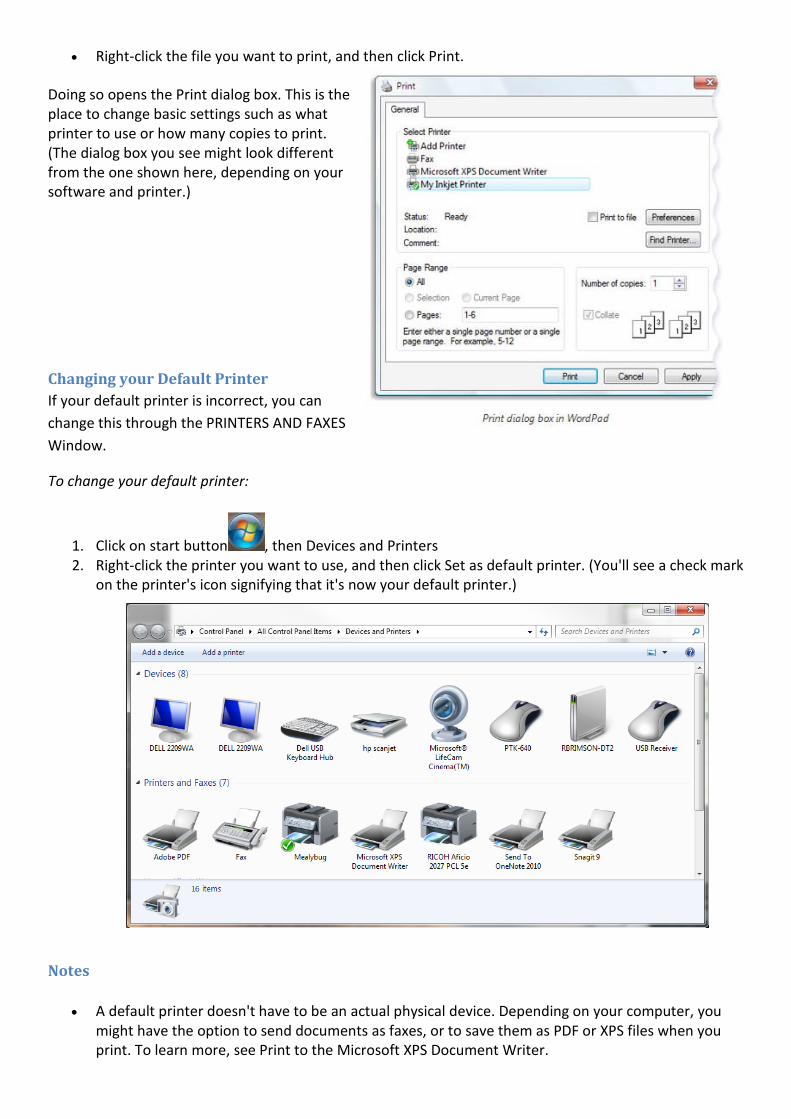
• Right-click the file you want to print, and then click Print.
Doing so opens the Print dialog box. This is the place to change basic settings such as what printer to use or how many copies to print. (The dialog box you see might look different from the one shown here, depending on your software and printer.)
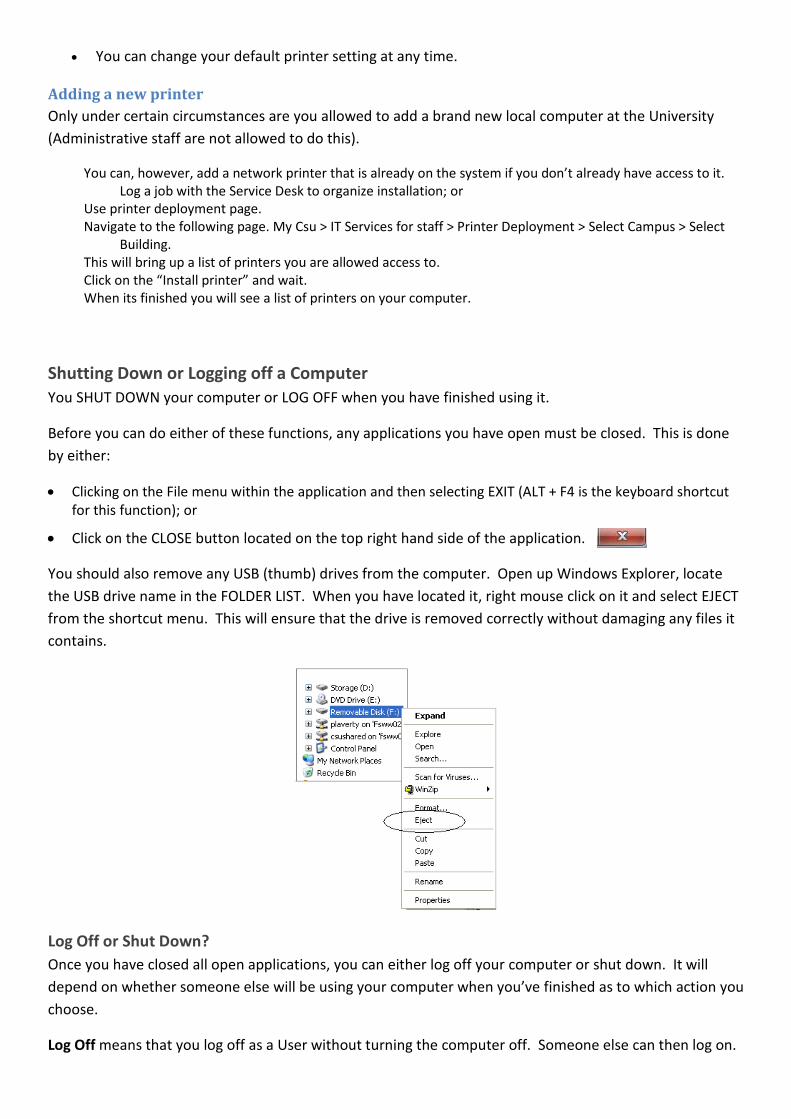
Changing your Default Printer If your default printer is incorrect, you can change this through the PRINTERS AND FAXES Window.
To change your default printer:
1. Click on start button , then Devices and Printers 2. Right-click the printer you want to use, and then click Set as default printer. (You'll see a check mark
on the printer's icon signifying that it's now your default printer.)
Notes
• A default printer doesn't have to be an actual physical device. Depending on your computer, you might have the option to send documents as faxes, or to save them as PDF or XPS files when you print. To learn more, see Print to the Microsoft XPS Document Writer.
• You can change your default printer setting at any time.
Adding a new printer Only under certain circumstances are you allowed to add a brand new local computer at the University (Administrative staff are not allowed to do this).
You can, however, add a network printer that is already on the system if you don’t already have access to it. Log a job with the Service Desk to organize installation; or
Use printer deployment page. Navigate to the following page. My Csu > IT Services for staff > Printer Deployment > Select Campus > Select
Building. This will bring up a list of printers you are allowed access to. Click on the “Install printer” and wait. When its finished you will see a list of printers on your computer.
Shutting Down or Logging off a Computer You SHUT DOWN your computer or LOG OFF when you have finished using it.
Before you can do either of these functions, any applications you have open must be closed. This is done by either:
• Clicking on the File menu within the application and then selecting EXIT (ALT + F4 is the keyboard shortcut for this function); or
• Click on the CLOSE button located on the top right hand side of the application.
You should also remove any USB (thumb) drives from the computer. Open up Windows Explorer, locate the USB drive name in the FOLDER LIST. When you have located it, right mouse click on it and select EJECT from the shortcut menu. This will ensure that the drive is removed correctly without damaging any files it contains.
Log Off or Shut Down? Once you have closed all open applications, you can either log off your computer or shut down. It will depend on whether someone else will be using your computer when you’ve finished as to which action you choose.
Log Off means that you log off as a User without turning the computer off. Someone else can then log on.

Shut Down means that you log off as a User and the computer is turned off at the same time. If you are leaving work for the day and no-one else will be using your computer, you will need to Shut Down your computer as this saves power.
Log Off To log off from your computer:
1. Click on the START button;
2. Select LOG OFF (click the arrow next to Shut down);
3. If you have any open programs then you will be asked to close them down or to let Windows, Force them to shut down. You will lose any un-saved information if you do this.
Shut Down To shut down your computer:
1. Click on the START button
2. Select SHUT DOWN
3. You will then see the SHUT DOWN WINDOWS dialog box
4. If you have any open programs then you will be asked to close them down or to let Windows, Force them to shut down. You will lose any un-saved information if you do this.
Restarting your Computer The RESTART command is occasionally used because:
• you do not have access to the network drives • the Service Desk has asked you to restart your computer
Restarting your computer means that the computer logs you off the system, turns itself off and turns itself back on again so you can re-log on.
To restart your computer:
1. Follow Steps 1 – 3 of the SHUT DOWN instructions
2. Select RESTART from the drop down menu
3. Your computer will log you off, turn itself off and turn itself on again so you can re-log on.