windows server 2012 r2 pocket consultant: essentials...
TRANSCRIPT
ptg25017816
31
CHAP TER 2
Deploying Windows Server 2012 R2
■ Server roles, role services, and features for Windows Server 2012 R2 32
■ Full-server, minimal-interface, and Server Core installations 40
■ Installing Windows Server 2012 R2 44
Servers are the heart of any Windows network . One of your primary responsibili-ties as an administrator is to manage these resources . Windows Server 2012 R2
comes with several integrated management tools . The one you’ll use for handling core system administration tasks is Server Manager . Server Manager provides set-up and configuration options for the local server in addition to options for manag-ing roles, features, and related settings on any remotely manageable server in the enterprise . Tasks you can use Server Manager to perform include the following:
■ Adding servers for remote management ■ Initiating remote connections to servers ■ Configuring the local server ■ Managing installed roles and features ■ Managing volumes and shares on file servers ■ Configuring Network Interface Card (NIC) Teaming ■ Viewing events and alerts ■ Restarting servers
Server Manager is great for general system administration, but you also need a tool that gives you granular control over system environment settings and proper-ties . This is where the System utility comes into the picture . You can use this utility to do the following:
■ Change a computer’s name . ■ Configure application performance, virtual memory, and registry settings. ■ Manage system and user environment variables . ■ Set system startup and recovery options .
From the Library of Todd Schultz
ptg25017816
ChAPTer 2 Deploying Windows Server 2012 R232
Server roles, role services, and features for Windows Server 2012 R2
Windows Server 2012 R2 uses the same configuration architecture as Windows Server 2012. You prepare servers for deployment by installing and configuring the following components:
■ Server roles A server role is a related set of software components that allows a server to perform a specific function for users and other computers on a network . A computer can be dedicated to a single role, such as Active Directory Domain Services (AD DS), or provide multiple roles .
■ Role services A role service is a software component that provides the func-tionality for a server role . Each role can have one or more related role services . Some server roles, such as Domain Name System (DNS) and Dynamic Host Configuration Protocol (DHCP), have a single function, and installing the role installs this function . Other roles, such as Network Policy and Access Services, and Active Directory Certificate Services (AD CS), have multiple role services that you can install . With these server roles, you can choose which role ser-vices to install .
■ Features A feature is a software component that provides additional func-tionality . Features, such as BitLocker Drive Encryption and Windows Server Backup, are installed and removed separately from roles and role services . A computer can have zero or more features installed, depending on its con-figuration.
You configure roles, role services, and features by using Server Manager, a Microsoft Management Console (MMC) . Some roles, role services, and features are dependent on other roles, role services, and features . As you install roles, role services, and features, Server Manager prompts you to install other roles, role services, or features that are required . Similarly, if you try to remove a required component of an installed role, role service, or feature, Server Manager warns that you cannot remove the component unless you also remove dependent roles, role services, or features .
Because adding or removing roles, role services, and features can change hard-ware requirements, you should carefully plan any configuration changes and deter-mine how they affect a server’s overall performance . Although you typically want to combine complementary roles, doing so increases the workload on the server, so you need to optimize the server hardware accordingly . Table 2-1 provides an over-view of the primary roles and the related role services you can deploy on a server running Windows Server 2012 R2 .
From the Library of Todd Schultz
ptg25017816
Deploying Windows Server 2012 R2 ChAPTer 2 33
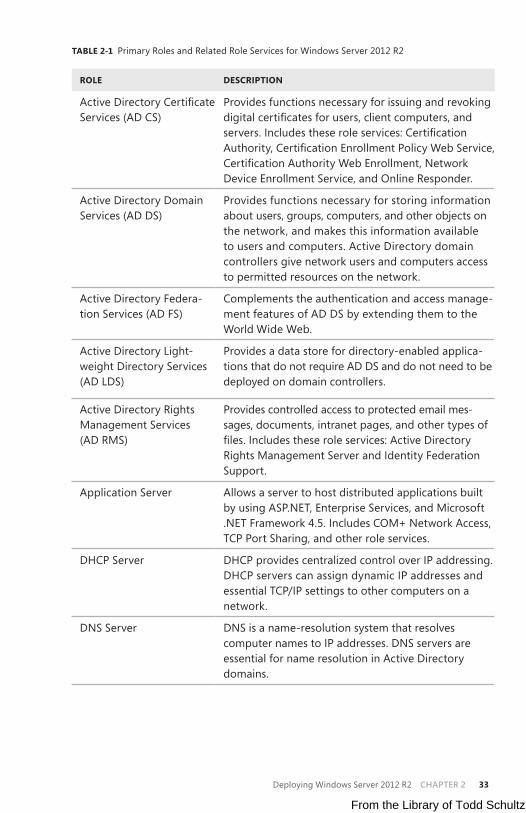
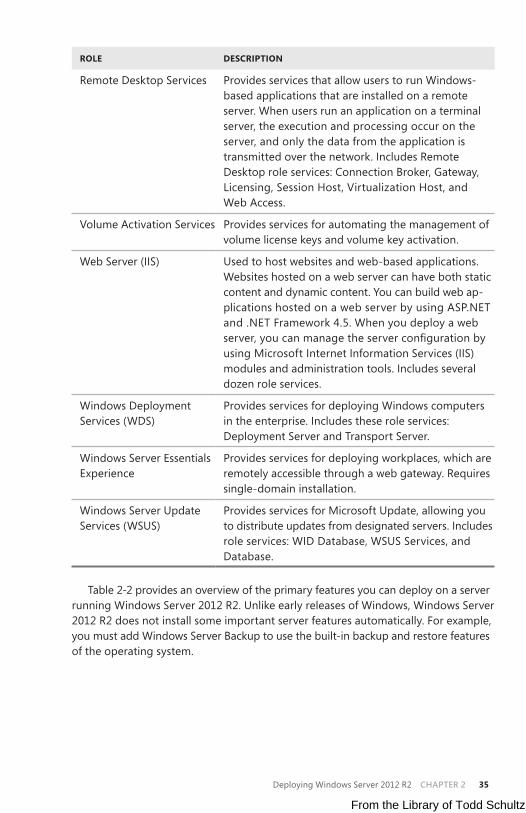
TABLE 2-1 Primary Roles and Related Role Services for Windows Server 2012 R2
ROLE DESCRIPTION
Active Directory Certificate Services (AD CS)
Provides functions necessary for issuing and revoking digital certificates for users, client computers, and servers . Includes these role services: Certification Authority, Certification Enrollment Policy Web Service, Certification Authority Web Enrollment, Network Device Enrollment Service, and Online Responder .
Active Directory Domain Services (AD DS)
Provides functions necessary for storing information about users, groups, computers, and other objects on the network, and makes this information available to users and computers . Active Directory domain controllers give network users and computers access to permitted resources on the network .
Active Directory Federa-tion Services (AD FS)
Complements the authentication and access manage- ment features of AD DS by extending them to the World Wide Web .
Active Directory Light-weight Directory Services (AD LDS)
Provides a data store for directory-enabled applica-tions that do not require AD DS and do not need to be deployed on domain controllers .
Active Directory Rights Management Services (AD RMS)
Provides controlled access to protected email mes-sages, documents, intranet pages, and other types of files. Includes these role services: Active Directory Rights Management Server and Identity Federation Support .
Application Server Allows a server to host distributed applications built by using ASP .NET, Enterprise Services, and Microsoft .NET Framework 4 .5 . Includes COM+ Network Access, TCP Port Sharing, and other role services .
DHCP Server DHCP provides centralized control over IP addressing . DHCP servers can assign dynamic IP addresses and essential TCP/IP settings to other computers on a network .
DNS Server DNS is a name-resolution system that resolves computer names to IP addresses . DNS servers are essential for name resolution in Active Directory domains .
From the Library of Todd Schultz
ptg25017816
ChAPTer 2 Deploying Windows Server 2012 R234
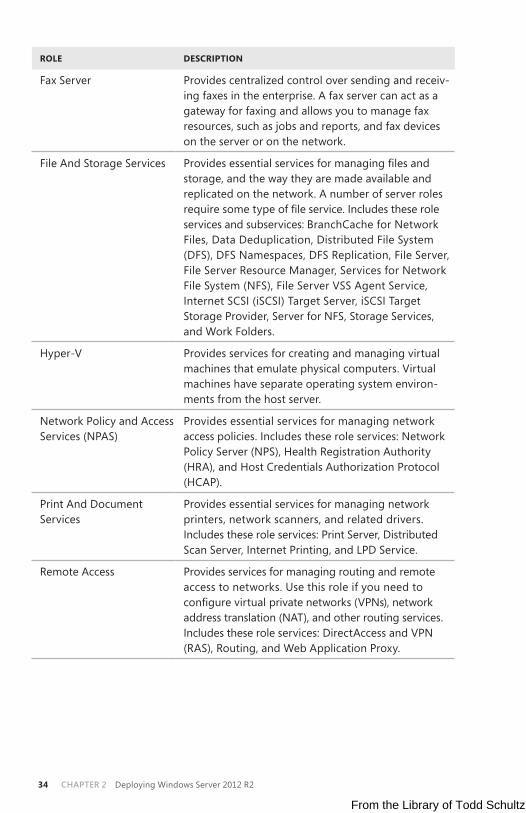
ROLE DESCRIPTION
Fax Server Provides centralized control over sending and receiv - ing faxes in the enterprise . A fax server can act as a gateway for faxing and allows you to manage fax resources, such as jobs and reports, and fax devices on the server or on the network .
File And Storage Services Provides essential services for managing files and storage, and the way they are made available and replicated on the network . A number of server roles require some type of file service. Includes these role services and subservices: BranchCache for Network Files, Data Deduplication, Distributed File System (DFS), DFS Namespaces, DFS Replication, File Server, File Server Resource Manager, Services for Network File System (NFS), File Server VSS Agent Service, Internet SCSI (iSCSI) Target Server, iSCSI Target Storage Provider, Server for NFS, Storage Services, and Work Folders .
Hyper-V Provides services for creating and managing virtual machines that emulate physical computers . Virtual machines have separate operating system environ-ments from the host server .
Network Policy and Access Services (NPAS)
Provides essential services for managing network access policies . Includes these role services: Network Policy Server (NPS), Health Registration Authority (HRA), and Host Credentials Authorization Protocol (HCAP) .
Print And Document Services
Provides essential services for managing network printers, network scanners, and related drivers . Includes these role services: Print Server, Distributed Scan Server, Internet Printing, and LPD Service .
Remote Access Provides services for managing routing and remote access to networks . Use this role if you need to configure virtual private networks (VPNs), network address translation (NAT), and other routing services . Includes these role services: DirectAccess and VPN (RAS), Routing, and Web Application Proxy .
From the Library of Todd Schultz
ptg25017816
Deploying Windows Server 2012 R2 ChAPTer 2 35
ROLE DESCRIPTION
Remote Desktop Services Provides services that allow users to run Windows-based applications that are installed on a remote server . When users run an application on a terminal server, the execution and processing occur on the server, and only the data from the application is transmitted over the network . Includes Remote Desktop role services: Connection Broker, Gateway, Licensing, Session Host, Virtualization Host, and Web Access .
Volume Activation Services Provides services for automating the management of volume license keys and volume key activation .
Web Server (IIS) Used to host websites and web-based applications . Websites hosted on a web server can have both static content and dynamic content . You can build web ap- plications hosted on a web server by using ASP .NET and .NET Framework 4 .5 . When you deploy a web server, you can manage the server configuration by using Microsoft Internet Information Services (IIS) modules and administration tools . Includes several dozen role services .
Windows Deployment Services (WDS)
Provides services for deploying Windows computers in the enterprise . Includes these role services: Deployment Server and Transport Server .
Windows Server Essentials Experience
Provides services for deploying workplaces, which are remotely accessible through a web gateway . Requires single-domain installation .
Windows Server Update Services (WSUS)
Provides services for Microsoft Update, allowing you to distribute updates from designated servers . Includes role services: WID Database, WSUS Services, and Database .
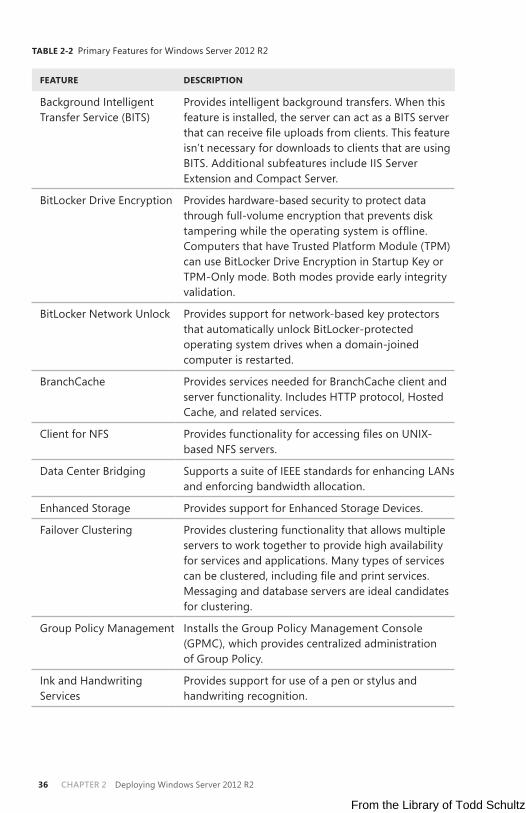
Table 2-2 provides an overview of the primary features you can deploy on a server running Windows Server 2012 R2 . Unlike early releases of Windows, Windows Server 2012 R2 does not install some important server features automatically . For example, you must add Windows Server Backup to use the built-in backup and restore features of the operating system .
From the Library of Todd Schultz
ptg25017816
ChAPTer 2 Deploying Windows Server 2012 R236
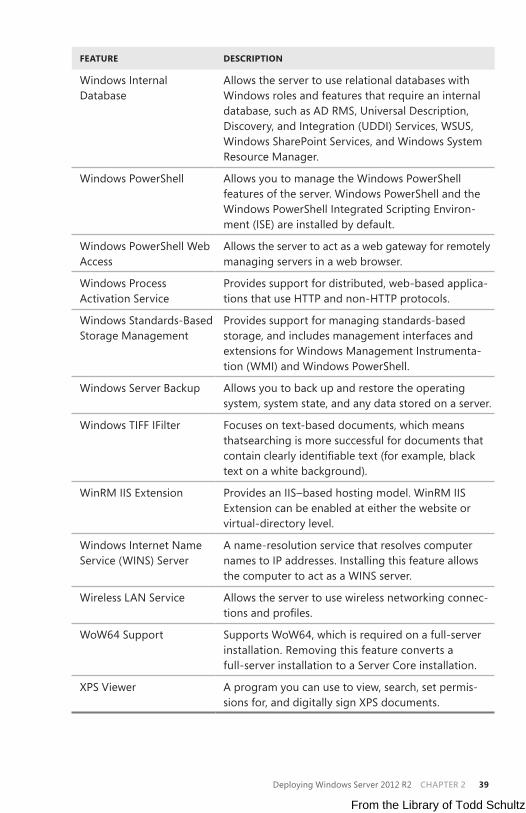
TABLE 2-2 Primary Features for Windows Server 2012 R2
FEATURE DESCRIPTION
Background Intelligent Transfer Service (BITS)
Provides intelligent background transfers . When this feature is installed, the server can act as a BITS server that can receive file uploads from clients. This feature isn’t necessary for downloads to clients that are using BITS . Additional subfeatures include IIS Server Extension and Compact Server .
BitLocker Drive Encryption Provides hardware-based security to protect data through full-volume encryption that prevents disk tampering while the operating system is offline. Computers that have Trusted Platform Module (TPM) can use BitLocker Drive Encryption in Startup Key or TPM-Only mode . Both modes provide early integrity validation .
BitLocker Network Unlock Provides support for network-based key protectors that automatically unlock BitLocker-protected operating system drives when a domain-joined computer is restarted .
BranchCache Provides services needed for BranchCache client and server functionality . Includes HTTP protocol, Hosted Cache, and related services .
Client for NFS Provides functionality for accessing files on UNIX-based NFS servers .
Data Center Bridging Supports a suite of IEEE standards for enhancing LANs and enforcing bandwidth allocation .
Enhanced Storage Provides support for Enhanced Storage Devices .
Failover Clustering Provides clustering functionality that allows multiple servers to work together to provide high availability for services and applications . Many types of services can be clustered, including file and print services. Messaging and database servers are ideal candidates for clustering .
Group Policy Management Installs the Group Policy Management Console (GPMC), which provides centralized administration of Group Policy .
Ink and Handwriting Services
Provides support for use of a pen or stylus and handwriting recognition .
From the Library of Todd Schultz
ptg25017816
Deploying Windows Server 2012 R2 ChAPTer 2 37
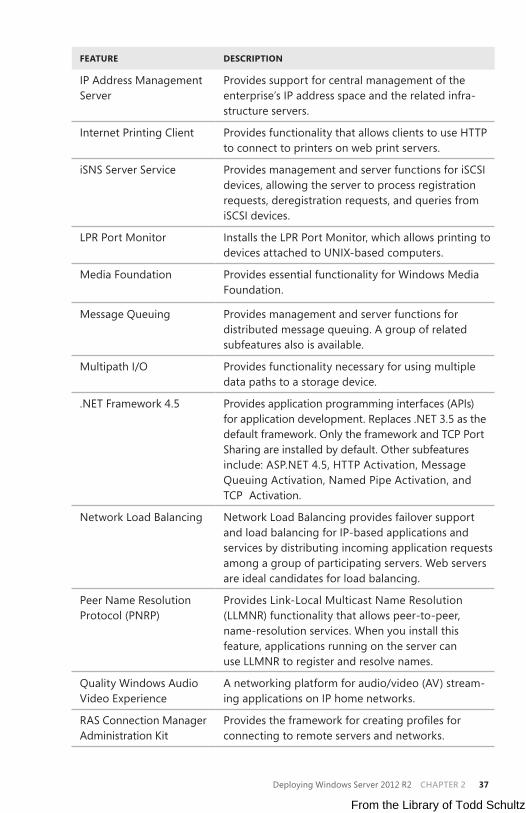
FEATURE DESCRIPTION
IP Address Management Server
Provides support for central management of the enterprise’s IP address space and the related infra-structure servers .
Internet Printing Client Provides functionality that allows clients to use HTTP to connect to printers on web print servers .
iSNS Server Service Provides management and server functions for iSCSI devices, allowing the server to process registration requests, deregistration requests, and queries from iSCSI devices .
LPR Port Monitor Installs the LPR Port Monitor, which allows printing to devices attached to UNIX-based computers .
Media Foundation Provides essential functionality for Windows Media Foundation .
Message Queuing Provides management and server functions for distributed message queuing . A group of related subfeatures also is available .
Multipath I/O Provides functionality necessary for using multiple data paths to a storage device .
.NET Framework 4 .5 Provides application programming interfaces (APIs) for application development . Replaces .NET 3 .5 as the default framework . Only the framework and TCP Port Sharing are installed by default . Other subfeatures include: ASP .NET 4 .5, HTTP Activation, Message Queuing Activation, Named Pipe Activation, and TCP Activation .
Network Load Balancing Network Load Balancing provides failover support and load balancing for IP-based applications and services by distributing incoming application requests among a group of participating servers . Web servers are ideal candidates for load balancing .
Peer Name Resolution Protocol (PNRP)
Provides Link-Local Multicast Name Resolution (LLMNR) functionality that allows peer-to-peer, name-resolution services . When you install this feature, applications running on the server can use LLMNR to register and resolve names .
Quality Windows Audio Video Experience
A networking platform for audio/video (AV) stream-ing applications on IP home networks .
RAS Connection Manager Administration Kit
Provides the framework for creating profiles for connecting to remote servers and networks .
From the Library of Todd Schultz
ptg25017816
ChAPTer 2 Deploying Windows Server 2012 R238
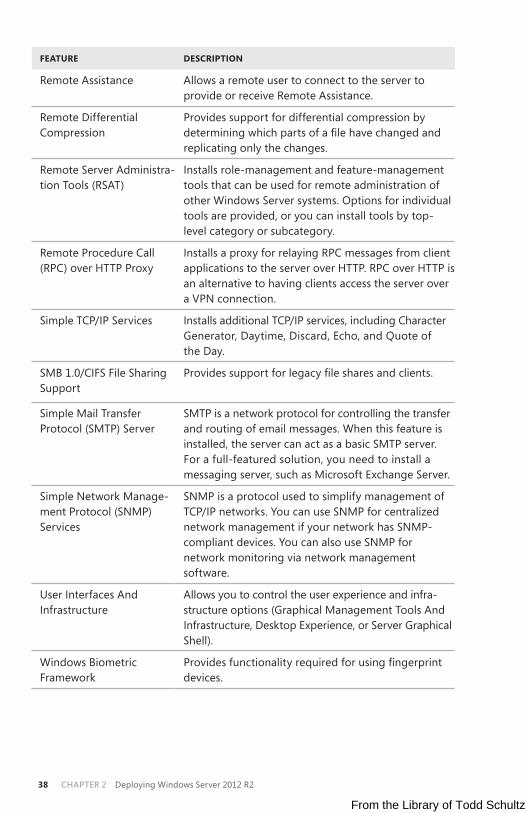
FEATURE DESCRIPTION
Remote Assistance Allows a remote user to connect to the server to provide or receive Remote Assistance .
Remote Differential Compression
Provides support for differential compression by determining which parts of a file have changed and replicating only the changes .
Remote Server Administra-tion Tools (RSAT)
Installs role-management and feature-management tools that can be used for remote administration of other Windows Server systems . Options for individual tools are provided, or you can install tools by top- level category or subcategory .
Remote Procedure Call (RPC) over HTTP Proxy
Installs a proxy for relaying RPC messages from client applications to the server over HTTP . RPC over HTTP is an alternative to having clients access the server over a VPN connection .
Simple TCP/IP Services Installs additional TCP/IP services, including Character Generator, Daytime, Discard, Echo, and Quote of the Day .
SMB 1 .0/CIFS File Sharing Support
Provides support for legacy file shares and clients.
Simple Mail Transfer Protocol (SMTP) Server
SMTP is a network protocol for controlling the transfer and routing of email messages . When this feature is installed, the server can act as a basic SMTP server . For a full-featured solution, you need to install a messaging server, such as Microsoft Exchange Server .
Simple Network Manage-ment Protocol (SNMP) Services
SNMP is a protocol used to simplify management of TCP/IP networks . You can use SNMP for centralized network management if your network has SNMP-compliant devices . You can also use SNMP for network monitoring via network management software .
User Interfaces And Infrastructure
Allows you to control the user experience and infra - structure options (Graphical Management Tools And Infrastructure, Desktop Experience, or Server Graphical Shell) .
Windows Biometric Framework
Provides functionality required for using fingerprint devices .
From the Library of Todd Schultz
ptg25017816
Deploying Windows Server 2012 R2 ChAPTer 2 39
FEATURE DESCRIPTION
Windows Internal Database
Allows the server to use relational databases with Windows roles and features that require an internal database, such as AD RMS, Universal Description, Discovery, and Integration (UDDI) Services, WSUS, Windows SharePoint Services, and Windows System Resource Manager .
Windows PowerShell Allows you to manage the Windows PowerShell features of the server . Windows PowerShell and the Windows PowerShell Integrated Scripting Environ-ment (ISE) are installed by default .
Windows PowerShell Web Access
Allows the server to act as a web gateway for remotely managing servers in a web browser .
Windows Process Activation Service
Provides support for distributed, web-based applica-tions that use HTTP and non-HTTP protocols .
Windows Standards-Based Storage Management
Provides support for managing standards-based storage, and includes management interfaces and extensions for Windows Management Instrumenta-tion (WMI) and Windows PowerShell .
Windows Server Backup Allows you to back up and restore the operating system, system state, and any data stored on a server .
Windows TIFF IFilter Focuses on text-based documents, which means thatsearching is more successful for documents that contain clearly identifiable text (for example, black text on a white background) .
WinRM IIS Extension Provides an IIS–based hosting model . WinRM IIS Extension can be enabled at either the website or virtual-directory level .
Windows Internet Name Service (WINS) Server
A name-resolution service that resolves computer names to IP addresses . Installing this feature allows the computer to act as a WINS server .
Wireless LAN Service Allows the server to use wireless networking connec-tions and profiles.
WoW64 Support Supports WoW64, which is required on a full-server installation . Removing this feature converts a full-server installation to a Server Core installation .
XPS Viewer A program you can use to view, search, set permis-sions for, and digitally sign XPS documents .
From the Library of Todd Schultz
ptg25017816
ChAPTer 2 Deploying Windows Server 2012 R240
NOTE Desktop experience is now a subfeature of the top-level feature called User In-terfaces And Infrastructure. Desktop experience provides Windows desktop function-ality on the server. Windows features added include Windows Media Player, desktop themes, Video for Windows (AVI support), Disk Cleanup, Sync Center, Sound recorder, Character Map, and Snipping Tool. Although these features allow a server to be used like a desktop computer, they can reduce the server’s overall performance.
As an administrator, you might be asked to install or uninstall dynamic-link libraries (DLLs), particularly if you work with IT development teams . The utility you use to work with DLLs is Regsvr32 . This utility is run at the command line .
After you open a Command Prompt window, you install or register a DLL by entering regsvr32 name.dll, as in this example:
regsvr32 mylibs.dll
If necessary, you can uninstall or unregister a DLL by entering regsvr32 /u name.dll, as in this example:
regsvr32 /u mylibs.dll
Windows File Protection prevents the replacement of protected system files. You can replace only DLLs installed by the Windows Server operating system as part of a hotfix, service pack update, Windows update, or Windows upgrade. Windows File Protection is an important part of the Windows Server security architecture .
Full-server, minimal-interface, and Server Core installations
Windows Server 2012 R2 supports full-server, minimal-interface, and Server Core installations . Full-server installations, also referred to as Server With A GUI Installa-tions, have the Graphical Management Tools And Infrastructure and Server Graphi-cal Shell features (which are part of the User And Infrastructure feature) and the WoW64 Support framework installed . Minimal-interface installations, also referred to as Server With Minimal Interface Installations, are full-server installations with the Server Graphical Shell removed . Server Core installations have a limited user inter-face and do not include any of the User Interfaces And Infrastructure features or the WoW64 Support framework .
As discussed in “Changing the installation type” section later in this chapter, the installation type can be changed at any time . With a full-server installation, you have a complete working version of Windows Server 2012 R2 that you can deploy with any permitted combination of roles, role services, and features . With a minimal-interface installation, you also can deploy any permitted combination of roles, role services, and features . However, with a Server Core installation, you have a minimal installation of Windows Server 2012 R2 that supports a limited set of roles and role combinations . The supported roles include AD CS, AD DS, AD LDS, DHCP Server, DNS Server, File Services, Hyper-V, Media Services, Print And Document Services, Routing And Remote Access Server, Streaming Media Services, Web Server (IIS),
From the Library of Todd Schultz
ptg25017816
Deploying Windows Server 2012 R2 ChAPTer 2 41
and Windows Server Update Server . In its current implementation, a Server Core installation is not a platform for running server applications .
Although all three installation types use the same licensing rules and can be managed remotely by using any available and permitted remote-administration technique, full-server, minimal-interface, and Server Core installations are com-pletely different when it comes to local console administration . With a full-server installation, you’re provided with a user interface that includes a full desktop environment for local console management of the server . With a minimal interface, you have only Microsoft Management Consoles, Server Manager, and a subset of Control Panel available for management tasks . Missing from both a minimal-interface installation and a Server Core installation are File Explorer, the taskbar, the notification area, Internet Explorer, a built-in Help system, themes, Metro-style apps, and Windows Media Player .
Navigating Server CoreWith a Server Core installation, you get a user interface that includes a limited desk-top environment for local console management of the server . This minimal interface includes the following:
■ Windows Logon screen for logging on and logging off ■ Notepad (Notepad.exe) for editing files ■ Registry Editor (Regedit .exe) for managing the registry ■ Task Manager (Taskmgr .exe) for managing tasks and starting new tasks ■ Command prompt (Cmd .exe) for administration using the command line ■ Windows PowerShell prompt for administration using Windows PowerShell ■ File Signature Verification tool (Sigverif.exe) for verifying digital signatures of
system files ■ System Information (Msinfo32 .exe) for getting system information ■ Windows Installer (Msiexec .exe) for managing Windows Installer ■ Date And Time control panel (Timedate .cpl) for viewing or setting the date,
time, and time zone ■ Region And Language control panel (Intl .cpl) for viewing or setting regional
and language options, including formats and the keyboard layout ■ Server Configuration utility (Sconfig.exe), which provides a text-based menu
system for managing a server’s configurationWhen you start a server with a Server Core installation, you can use the Windows
Logon screen to log on just as you do with a full-server installation . In a domain, the standard restrictions apply for logging on to servers, and anyone with appropriate user rights and logon permissions can log on to the server . On servers that are not acting as domain controllers and for servers in workgroup environments, you can use the NET USER command to add users, and the NET LOCALGROUP command to add users to local groups for the purposes of logging on locally .
From the Library of Todd Schultz

ptg25017816
ChAPTer 2 Deploying Windows Server 2012 R242
After you log on to a Server Core installation, you have a limited desktop environ-ment with an administrator command prompt . You can use this command prompt for administration of the server . If you accidentally close the command prompt, you can open a new command prompt by following these steps:
1. Press Ctrl+Alt+Delete, and then click Task Manager . 2. In Task Manager, click More Details .3. On the File menu, tap or click Run New Task .4. In the Create New Task dialog box, enter cmd in the Open box, and then
click OK .You can use this technique to open additional Command Prompt windows, too .
Although you can work with Notepad and Regedit by entering notepad.exe or regedit.exe instead of cmd, you can also start Notepad and Regedit directly from a command prompt by entering notepad.exe or regedit.exe as appropriate .
The Server Configuration utility (Sconfig) provides a text-based menu system that makes it easy to do the following:
■ Configure domain or workgroup membership. ■ Change a server’s name . ■ Add a local Administrator account . ■ Configure remote management features. ■ Configure Windows Update settings. ■ Download and install Windows updates . ■ Enable or disable Remote Desktop . ■ Configure network settings for TCP/IP. ■ Configure the date and time. ■ Log off, restart, or shut down .
When you are logged on, you can display the Windows Logon screen at any time by pressing Ctrl+Alt+Delete . In a Server Core installation, the Windows Logon screen has the same options as it does in a full-server installation, allowing you to lock the computer, switch users, log off, change a password, or start Task Manager . At the command prompt, you have all the standard commands and command-line utilities available for managing the server . However, commands, utilities, and programs run only if all of their dependencies are available in the Server Core installation .
Although a Server Core installation supports a limited set of roles and role services, you can install most features . Windows Server 2012 R2 also supports the .NET Framework, Windows PowerShell, and Windows Remote Management (WinRM) . This support allows you to perform local and remote administration by using Windows PowerShell . You also can use a Remote Desktop client to manage a Server Core installation remotely . Some of the common tasks you might want to perform when you are logged on locally are summarized in Table 2-3 .
From the Library of Todd Schultz
ptg25017816
Deploying Windows Server 2012 R2 ChAPTer 2 43
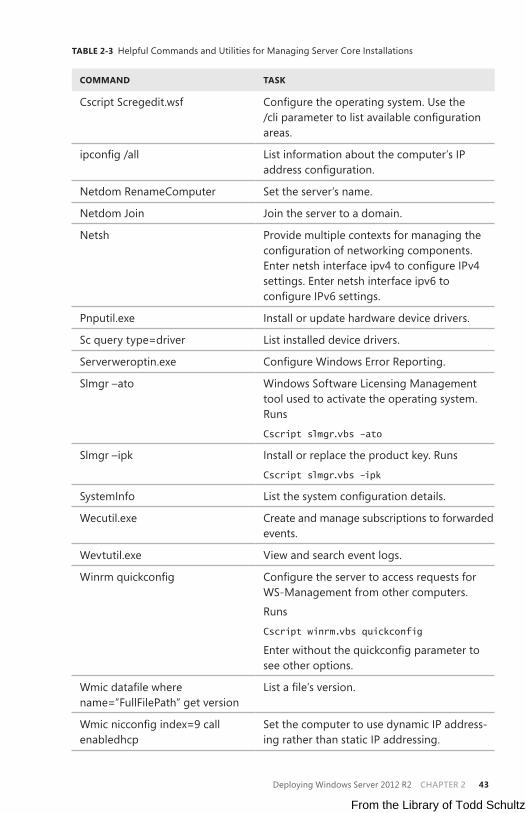
TABLE 2-3 Helpful Commands and Utilities for Managing Server Core Installations
COMMAND TASK
Cscript Scregedit .wsf Configure the operating system. Use the /cli parameter to list available configuration areas .
ipconfig /all List information about the computer’s IP address configuration.
Netdom RenameComputer Set the server’s name .
Netdom Join Join the server to a domain .
Netsh Provide multiple contexts for managing the configuration of networking components. Enter netsh interface ipv4 to configure IPv4 settings . Enter netsh interface ipv6 to configure IPv6 settings.
Pnputil .exe Install or update hardware device drivers .
Sc query type=driver List installed device drivers .
Serverweroptin .exe Configure Windows Error Reporting .
Slmgr –ato Windows Software Licensing Management tool used to activate the operating system . Runs
Cscript slmgr.vbs –ato
Slmgr –ipk Install or replace the product key . Runs
Cscript slmgr.vbs –ipk
SystemInfo List the system configuration details.
Wecutil .exe Create and manage subscriptions to forwarded events .
Wevtutil .exe View and search event logs .
Winrm quickconfig Configure the server to access requests for WS-Management from other computers .
Runs
Cscript winrm.vbs quickconfig
Enter without the quickconfig parameter to see other options .
Wmic datafile where name=”FullFilePath” get version
List a file’s version.
Wmic nicconfig index=9 call enabledhcp
Set the computer to use dynamic IP address-ing rather than static IP addressing .
From the Library of Todd Schultz
ptg25017816
ChAPTer 2 Deploying Windows Server 2012 R244
COMMAND TASK
Wmic nicconfig index=9 call enablestatic(“IPAddress”), (“SubnetMask”)
Set a computer’s static IP address and network mask .
Wmic nicconfig index=9 call setgateways(“GatewayIPAddress”)
Set or change the default gateway .
Wmic product get name /value
List installed Windows Installer (MSI) applications by name .
Wmic product where name=”Name” call uninstall
Uninstall an MSI application .
Wmic qfe list List installed updates and hotfixes.
Wusa .exe PatchName .msu /quiet Apply an update or hotfix to the operating system .
Installing Windows Server 2012 R2
You can install Windows Server 2012 R2 on new hardware or as an upgrade . When you install Windows Server 2012 R2 on a computer with an existing operating sys-tem, you can perform a clean installation or an upgrade . With a clean installation, the Windows Server 2012 R2 Setup program replaces the original operating system on the computer, and all user or application settings are lost . With an upgrade, the Set-up program performs a clean installation of the operating system and then migrates user settings, documents, and applications from the earlier version of Windows .
Windows Server 2012 R2 supports only 64-bit architecture . You can install the operating system only on computers with 64-bit processors . Before you install Windows Server 2012 R2, you should be sure that your computer meets the mini-mum requirements of the edition you plan to use . Microsoft provides both minimum requirements and recommended requirements . If your computer doesn’t meet the minimum requirements, you will not be able to install Windows Server 2012 R2 . If your computer doesn’t meet the recommended requirements, you will experience performance issues .
Windows Server 2012 R2 requires at least 10 gigabytes (GB) of disk space for installation of the base operating system . Microsoft recommends that a computer running Windows Server 2012 R2 have 32 GB or more of available disk space . Ad-ditional disk space is required for paging and dump files and also for the features, roles, and role services you install . For optimal performance, you should have at least 10 percent of free space on a server’s disks at all times .
When you install Windows Server 2012 R2, the Setup program automatically makes recovery options available on your server as an advanced boot option . In addition to a command line for troubleshooting and options for changing the startup
From the Library of Todd Schultz
ptg25017816
Deploying Windows Server 2012 R2 ChAPTer 2 45
behavior, you can use System Image Recovery to perform a full recovery of the computer by using a system image created previously . If other troubleshooting techniques fail to restore the computer and you have a system image for recovery, you can use this feature to restore the computer from the backup image .
Performing a clean installationBefore you start an installation, you need to consider whether you want to manage the computer’s drives and partitions during the setup process . If you want to use the advanced drive setup options that Setup provides for creating and formatting parti-tions, you need to start the computer by using the distribution media . If you don’t start by using the distribution media, these options won’t be available, and you’ll be able to manage disk partitions at a command prompt only by using the DiskPart utility .
You can perform a clean installation of Windows Server 2012 R2 by following these steps:
1. Start the Setup program by using one of the following techniques: ■ For a new installation, turn on the computer with the Windows Server
2012 R2 distribution media in the computer’s disc drive, and then press any key when prompted to start Setup from your media . If you are not prompted to boot from the disc drive, you might need to select advanced boot options and then boot from the media rather than from the hard disk, or you might need to change the computer’s firmware settings to allow starting and loading the operating system from media .
■ For a clean installation over an existing installation, you can boot from the distribution media, or you can start the computer and log on by using an account with administrator privileges . When you insert the Windows Server 2012 R2 distribution media into the computer’s disc drive, Setup should start automatically . If Setup doesn’t start automatically, use File Explorer to access the distribution media, and then double-tap or double-click Setup .exe .
2. If you started the computer by using the distribution media, choose your language, time and currency formats, and keyboard layout when prompted . Only one keyboard layout is available during installation . If your keyboard language and the language edition of Windows Server 2012 R2 you are installing are different, you might see unexpected characters as you type . Be sure that you select the correct keyboard language to avoid this . When you are ready to continue with the installation, tap or click Next .
3. Click Install Now to start the installation . After Setup copies the temporary files to the computer, choose whether to get updates for Setup during the installation . If you started Setup after logging on to an existing installation of Windows, click either Go Online To Install Updates Now or No, Thanks .
From the Library of Todd Schultz
ptg25017816
ChAPTer 2 Deploying Windows Server 2012 R246
4. With volume and enterprise licensed editions of Windows Server 2012 R2, you might not need to provide a product key during installation . With retail editions, however, you need to enter a product key when prompted . Tap or click Next to continue . The Activate Windows When I’m Online check box is selected by default to ensure that you are prompted to activate the operat-ing system the next time you connect to the Internet .
NOTE You must activate Windows Server 2012 r2 after installation. If you don’t activate Windows Server 2012 r2 in the allotted time, you get an error stating “Your activation period has expired” or that you have a “Non-genuine version of Windows Server 2012 r2 installed.” Windows Server 2012 r2 will then run with reduced functionality. You need to activate and validate Windows Server 2012 r2 as necessary to regain full functionality.
5. On the Select The Operating System You Want To Install page, options are provided for full-server and Server Core installations . Make the appropriate selection, and then tap or click Next .
6. The license terms for Windows Server 2012 R2 have changed from previous releases of Windows . After you review the license terms, tap or click I Accept The License Terms, and then tap or click Next .
7. On the Which Type Of Installation Do You Want page, choose the type of installation you want Setup to perform . Because you are performing a clean installation to replace an existing installation or configure a new computer, click Custom Install Windows Only (Advanced) as the installation type . If you started Setup from the boot prompt rather than from Windows itself, the Upgrade option is disabled . To upgrade rather than perform a clean install, you need to restart the computer and boot the currently installed operating system . After you log on, you then need to start the installation .
8. On the Where Do You Want To Install Windows page, select the disk or disk and partition on which you want to install the operating system . There are two versions of the Where Do You Want To Install Windows page, so you need to keep the following in mind:
■ When a computer has a single hard disk with a single partition encompass-ing the whole disk or a single area of unallocated space, the whole disk partition is selected by default, and you can tap or click Next to choose this as the install location and continue . With a disk that is completely unallocated, you might want to create the necessary partition before installing the operating system, as discussed in the “Creating, formatting, deleting, and extending disk partitions during installation” section later in this chapter .
■ When a computer has multiple disks or a single disk with multiple parti-tions, you need to select an existing partition to use for installing the operating system or create a partition . You can create and manage par-titions, as discussed in the “Creating, formatting, deleting, and extending disk partitions during installation” section later in this chapter .
From the Library of Todd Schultz
ptg25017816
Deploying Windows Server 2012 R2 ChAPTer 2 47
■ If a disk has not been initialized for use or if the firmware of the computer does not support starting the operating system from the selected disk, you need to initialize it by creating one or more partitions on the disk . You cannot select or format a hard disk partition that uses FAT or FAT32 or has other incompatible settings . To work around this issue, you might want to convert the partition to NTFS . When working with this page, you can access a command prompt to perform any necessary preinstallation tasks . See the “Creating, formatting, deleting, and extending disk parti-tions during installation” section later in this chapter .
9. If the partition you select contains a previous Windows installation, Setup provides a prompt stating that existing user and application settings will be moved to a folder named Windows .old and that you must copy these set-tings to the new installation to use them . Tap or click OK .
10. Tap or click Next . Setup starts the installation of the operating system . During this procedure, Setup copies the full disk image of Windows Server 2012 R2 to the location you selected and then expands it . Afterward, Setup installs features based on the computer’s configuration and the hardware it detects. This process requires several automatic restarts. When Setup finishes the installation, the operating system will be loaded, and you can perform initial configuration tasks such as setting the administrator password and server name .
REAL WORLD Servers running core installations of Windows Server are configured to use DhCP by default. As long as the server has a network card and a connected network cable, a Server Core installation should be able to connect to your organiza-tion’s DhCP servers and obtain the correct network settings. however, many enterprise data centers do not use or provide DhCP for servers, and assign static IP addresses. You can configure the server by using Sconfig, which provides menu options for configuring domain/workgroup membership, the computer name, remote manage-ment, Windows Update, remote Desktop, network settings, date and time, logoff, restart, and shutdown.
Alternatively, you can configure the server by using individual commands. If you want to use a static IP address, use Netsh to apply the settings you want. After networking is configured correctly, enter Slmgr –ipk to set the product key and Slmgr –ato to activate Windows. Enter timedate.cpl to set the server’s date and time. If you want to enable remote management by using the WS-Management protocol, enter winrm quickconfig.
Next, you’ll probably want to set the name of the computer. To view the default com-puter name, enter echo %computername%. To rename the computer, use Netdom renameComputer with the following syntax: netdom renamecomputer currentname /newname:newname, where currentname is the current name of the computer and newname is the name you want to assign. An example is netdom renamecomputer win-k4m6bnovlhe /newname:server18. You’ll need to restart the computer, and you can do this by entering shutdown /r.
When the computer restarts, you can join it to a domain by using Netdom Join. For the syntax, enter netdom join /?.
From the Library of Todd Schultz
ptg25017816
ChAPTer 2 Deploying Windows Server 2012 R248
Performing an upgrade installationAlthough Windows Server 2012 R2 provides an upgrade option during installation, an upgrade isn’t what you think it is . With an upgrade, Setup performs a clean in-stallation of the operating system and then migrates user settings, documents, and applications from the earlier version of Windows .
During the migration portion of the upgrade, Setup moves folders and files from the previous installation to a folder named Windows .old . As a result, the previous installation will no longer run .
NOTE You cannot perform an upgrade installation of Windows Server 2012 r2 on a computer with a 32-bit operating system, even if the computer has 64-bit processors. You need to migrate the services being provided by the computer to other servers and then perform a clean installation. The Windows Server Migration tools might be able to help you migrate your server. These tools are available on computers running Windows Server 2012 R2.
You can perform an upgrade installation of Windows Server 2012 R2 by follow-ing these steps:
1. Start the computer, and log on by using an account with administrator privi-leges . When you insert the Windows Server 2012 R2 distribution media into the computer’s DVD-ROM drive, Setup should start automatically . If Setup doesn’t start automatically, use File Explorer to access the distribution media and then double-tap or double-click Setup .exe .
2. Because you are starting Setup from the current operating system, you are not prompted to choose your language, time and currency formats, or keyboard layout, and only the current operating system’s keyboard layout is available during installation . If your keyboard language and the language of the edi-tion of Windows Server 2012 R2 you are installing are different, unexpected characters might be displayed as you type .
3. Choose Install Now to start the installation . After Setup copies the temporary files to the computer, choose whether to get updates during the installation. Click either Go Online To Install Updates Now or No, Thanks .
4. With volume-licensed and enterprise-licensed editions of Windows Server 2012 R2, you might not need to provide a product key during installation of the operating system . With retail editions, however, you are prompted to enter a product key . Tap or click Next to continue . The Automatically Activate Windows When I’m Online check box is selected by default to ensure that you are prompted to activate the operating system the next time you con-nect to the Internet .
From the Library of Todd Schultz
ptg25017816
Deploying Windows Server 2012 R2 ChAPTer 2 49
5. On the Select The Operating System You Want To Install page, options are provided for full-server and Server Core installations . Make the appropriate selection, and then tap or click Next .
6. The license terms for Windows Server 2012 R2 have changed from previous releases of Windows . After you review the license terms, tap or click I Accept The License Terms, and then tap or click Next .
7. On the Which Type Of Installation Do You Want page, you need to select the type of installation you want Setup to perform . Because you are performing a clean installation over an existing installation, select Upgrade . If you started Setup from the boot prompt rather than from Windows itself, the Upgrade option is disabled . To upgrade rather than perform a clean install, you need to restart the computer and boot the currently installed operating system . After you log on, you can start the installation .
8. Setup will then start the installation . Because you are upgrading the operat-ing system, you do not need to choose an installation location . During this process, Setup copies the full disk image of Windows Server 2012 R2 to the system disk . Afterward, Setup installs features based on the computer’s con-figuration and the hardware it detects. When Setup finishes the installation, the operating system will be loaded, and you can perform initial configura-tion tasks such as setting the administrator password and server name .
Performing additional administration tasks during installationSometimes you might forget to perform a preinstallation task prior to starting the installation . Rather than restarting the operating system, you can access a command prompt from Setup or use advanced drive options to perform the necessary admin-istrative tasks .
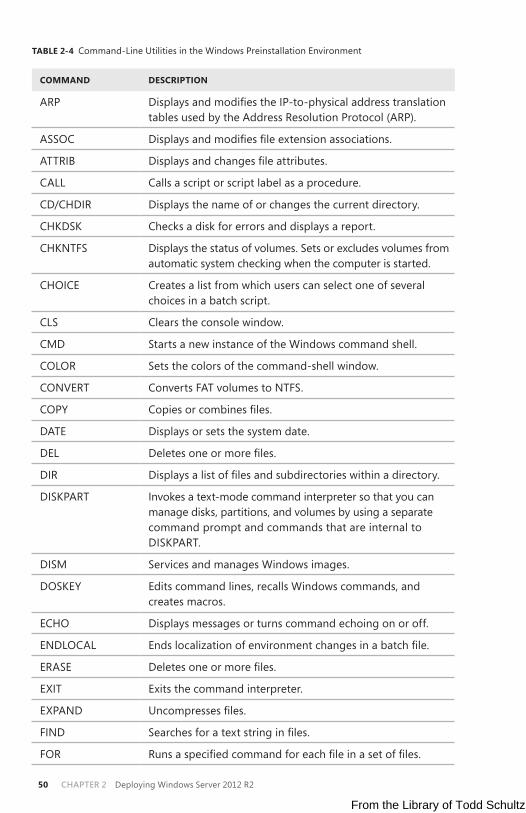
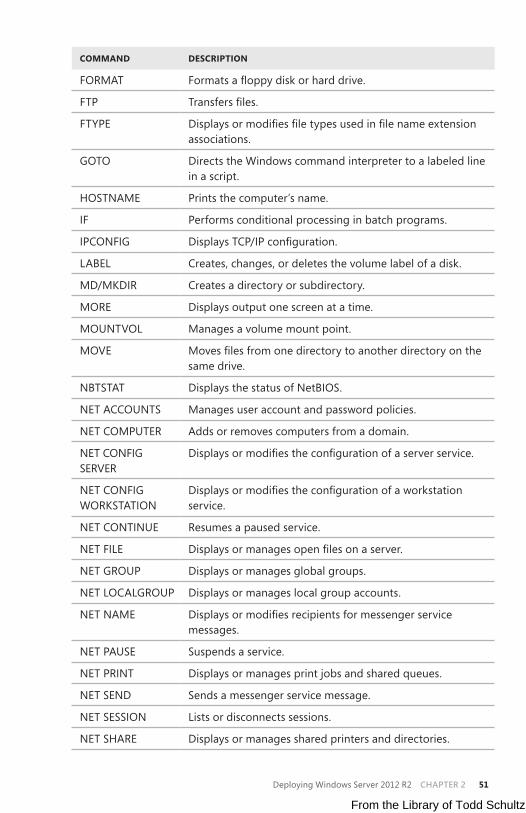
Using the command line during installationWhen you access a command prompt from Setup, you access the Windows Preinstal-lation Environment (Windows PE) used by Setup to install the operating system . During installation, on the Where Do You Want To Install Windows page, you can access a command prompt by pressing Shift+F10 . As Table 2-4 shows, the Windows PE gives you access to many of the same command-line tools that are available in a standard installation of Windows Server 2012 R2 .
From the Library of Todd Schultz
ptg25017816
ChAPTer 2 Deploying Windows Server 2012 R250
TABLE 2-4 Command-Line Utilities in the Windows Preinstallation Environment
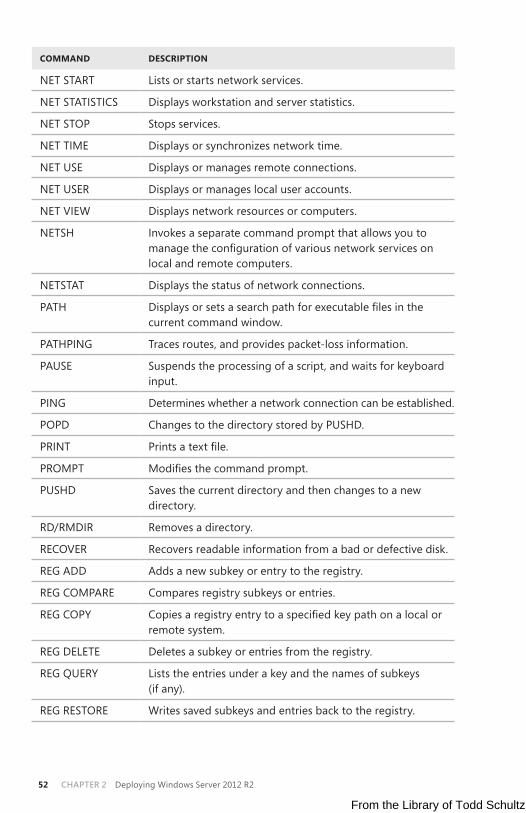
COMMAND DESCRIPTION
ARP Displays and modifies the IP-to-physical address translation tables used by the Address Resolution Protocol (ARP) .
ASSOC Displays and modifies file extension associations.
ATTRIB Displays and changes file attributes.
CALL Calls a script or script label as a procedure .
CD/CHDIR Displays the name of or changes the current directory .
CHKDSK Checks a disk for errors and displays a report .
CHKNTFS Displays the status of volumes . Sets or excludes volumes from automatic system checking when the computer is started .
CHOICE Creates a list from which users can select one of several choices in a batch script .
CLS Clears the console window .
CMD Starts a new instance of the Windows command shell .
COLOR Sets the colors of the command-shell window .
CONVERT Converts FAT volumes to NTFS .
COPY Copies or combines files.
DATE Displays or sets the system date .
DEL Deletes one or more files.
DIR Displays a list of files and subdirectories within a directory.
DISKPART Invokes a text-mode command interpreter so that you can manage disks, partitions, and volumes by using a separate command prompt and commands that are internal to DISKPART .
DISM Services and manages Windows images .
DOSKEY Edits command lines, recalls Windows commands, and creates macros .
ECHO Displays messages or turns command echoing on or off .
ENDLOCAL Ends localization of environment changes in a batch file.
ERASE Deletes one or more files.
EXIT Exits the command interpreter .
EXPAND Uncompresses files.
FIND Searches for a text string in files.
FOR Runs a specified command for each file in a set of files.
From the Library of Todd Schultz
ptg25017816
Deploying Windows Server 2012 R2 ChAPTer 2 51
COMMAND DESCRIPTION
FORMAT Formats a floppy disk or hard drive.
FTP Transfers files.
FTYPE Displays or modifies file types used in file name extension associations .
GOTO Directs the Windows command interpreter to a labeled line in a script .
HOSTNAME Prints the computer’s name .
IF Performs conditional processing in batch programs .
IPCONFIG Displays TCP/IP configuration.
LABEL Creates, changes, or deletes the volume label of a disk .
MD/MKDIR Creates a directory or subdirectory .
MORE Displays output one screen at a time .
MOUNTVOL Manages a volume mount point .
MOVE Moves files from one directory to another directory on the same drive .
NBTSTAT Displays the status of NetBIOS .
NET ACCOUNTS Manages user account and password policies .
NET COMPUTER Adds or removes computers from a domain .
NET CONFIG SERVER
Displays or modifies the configuration of a server service.
NET CONFIG WORKSTATION
Displays or modifies the configuration of a workstation service .
NET CONTINUE Resumes a paused service .
NET FILE Displays or manages open files on a server.
NET GROUP Displays or manages global groups .
NET LOCALGROUP Displays or manages local group accounts .
NET NAME Displays or modifies recipients for messenger service messages .
NET PAUSE Suspends a service .
NET PRINT Displays or manages print jobs and shared queues .
NET SEND Sends a messenger service message .
NET SESSION Lists or disconnects sessions .
NET SHARE Displays or manages shared printers and directories .
From the Library of Todd Schultz
ptg25017816
ChAPTer 2 Deploying Windows Server 2012 R252
COMMAND DESCRIPTION
NET START Lists or starts network services .
NET STATISTICS Displays workstation and server statistics .
NET STOP Stops services .
NET TIME Displays or synchronizes network time .
NET USE Displays or manages remote connections .
NET USER Displays or manages local user accounts .
NET VIEW Displays network resources or computers .
NETSH Invokes a separate command prompt that allows you to manage the configuration of various network services on local and remote computers .
NETSTAT Displays the status of network connections .
PATH Displays or sets a search path for executable files in the current command window .
PATHPING Traces routes, and provides packet-loss information .
PAUSE Suspends the processing of a script, and waits for keyboard input .
PING Determines whether a network connection can be established .
POPD Changes to the directory stored by PUSHD .
PRINT Prints a text file.
PROMPT Modifies the command prompt.
PUSHD Saves the current directory and then changes to a new directory .
RD/RMDIR Removes a directory .
RECOVER Recovers readable information from a bad or defective disk .
REG ADD Adds a new subkey or entry to the registry .
REG COMPARE Compares registry subkeys or entries .
REG COPY Copies a registry entry to a specified key path on a local or remote system .
REG DELETE Deletes a subkey or entries from the registry .
REG QUERY Lists the entries under a key and the names of subkeys (if any) .
REG RESTORE Writes saved subkeys and entries back to the registry .
From the Library of Todd Schultz
ptg25017816
Deploying Windows Server 2012 R2 ChAPTer 2 53
COMMAND DESCRIPTION
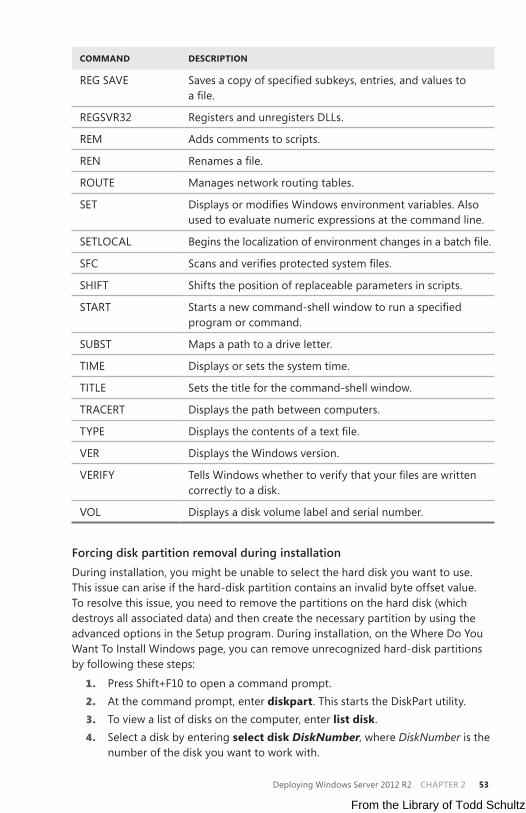
REG SAVE Saves a copy of specified subkeys, entries, and values to a file.
REGSVR32 Registers and unregisters DLLs .
REM Adds comments to scripts .
REN Renames a file.
ROUTE Manages network routing tables .
SET Displays or modifies Windows environment variables. Also used to evaluate numeric expressions at the command line .
SETLOCAL Begins the localization of environment changes in a batch file.
SFC Scans and verifies protected system files.
SHIFT Shifts the position of replaceable parameters in scripts .
START Starts a new command-shell window to run a specified program or command .
SUBST Maps a path to a drive letter .
TIME Displays or sets the system time .
TITLE Sets the title for the command-shell window .
TRACERT Displays the path between computers .
TYPE Displays the contents of a text file.
VER Displays the Windows version .
VERIFY Tells Windows whether to verify that your files are written correctly to a disk .
VOL Displays a disk volume label and serial number .
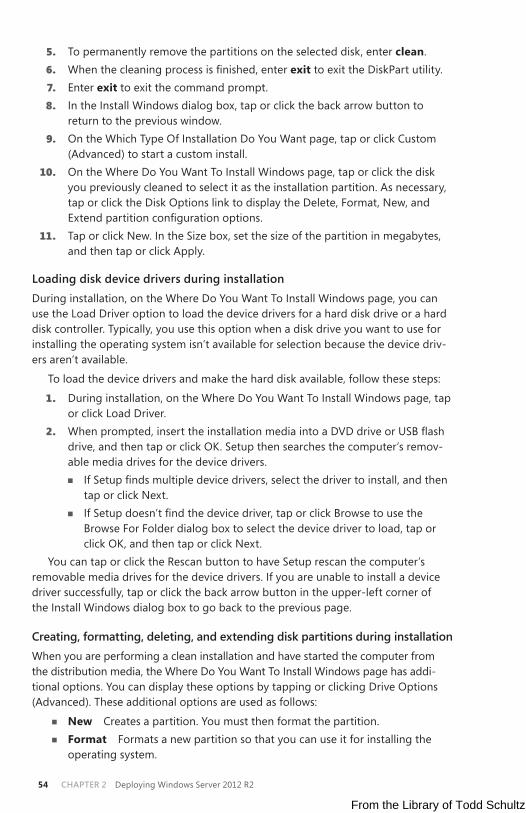
Forcing disk partition removal during installationDuring installation, you might be unable to select the hard disk you want to use . This issue can arise if the hard-disk partition contains an invalid byte offset value . To resolve this issue, you need to remove the partitions on the hard disk (which destroys all associated data) and then create the necessary partition by using the advanced options in the Setup program . During installation, on the Where Do You Want To Install Windows page, you can remove unrecognized hard-disk partitions by following these steps:
1. Press Shift+F10 to open a command prompt . 2. At the command prompt, enter diskpart . This starts the DiskPart utility .3. To view a list of disks on the computer, enter list disk .4. Select a disk by entering select disk DiskNumber, where DiskNumber is the
number of the disk you want to work with .
From the Library of Todd Schultz
ptg25017816
ChAPTer 2 Deploying Windows Server 2012 R254
5. To permanently remove the partitions on the selected disk, enter clean . 6. When the cleaning process is finished, enter exit to exit the DiskPart utility . 7. Enter exit to exit the command prompt . 8. In the Install Windows dialog box, tap or click the back arrow button to
return to the previous window . 9. On the Which Type Of Installation Do You Want page, tap or click Custom
(Advanced) to start a custom install .10. On the Where Do You Want To Install Windows page, tap or click the disk
you previously cleaned to select it as the installation partition . As necessary, tap or click the Disk Options link to display the Delete, Format, New, and Extend partition configuration options.
11. Tap or click New . In the Size box, set the size of the partition in megabytes, and then tap or click Apply .
Loading disk device drivers during installationDuring installation, on the Where Do You Want To Install Windows page, you can use the Load Driver option to load the device drivers for a hard disk drive or a hard disk controller . Typically, you use this option when a disk drive you want to use for installing the operating system isn’t available for selection because the device driv-ers aren’t available .
To load the device drivers and make the hard disk available, follow these steps:
1. During installation, on the Where Do You Want To Install Windows page, tap or click Load Driver .
2. When prompted, insert the installation media into a DVD drive or USB flash drive, and then tap or click OK . Setup then searches the computer’s remov-able media drives for the device drivers .
■ If Setup finds multiple device drivers, select the driver to install, and then tap or click Next .
■ If Setup doesn’t find the device driver, tap or click Browse to use the Browse For Folder dialog box to select the device driver to load, tap or click OK, and then tap or click Next .
You can tap or click the Rescan button to have Setup rescan the computer’s removable media drives for the device drivers . If you are unable to install a device driver successfully, tap or click the back arrow button in the upper-left corner of the Install Windows dialog box to go back to the previous page .
Creating, formatting, deleting, and extending disk partitions during installationWhen you are performing a clean installation and have started the computer from the distribution media, the Where Do You Want To Install Windows page has addi- tional options . You can display these options by tapping or clicking Drive Options (Advanced) . These additional options are used as follows:
■ New Creates a partition . You must then format the partition . ■ Format Formats a new partition so that you can use it for installing the
operating system .
From the Library of Todd Schultz
ptg25017816
Deploying Windows Server 2012 R2 ChAPTer 2 55
■ Delete Deletes a partition that is no longer wanted . ■ Extend Extends a partition to increase its size .
The sections that follow discuss how to use each of these options . If these options aren’t available, you can still work with the computer’s disks . On the Where Do You Want To Install Windows page, press Shift+F10 to open a command prompt . At the command prompt, enter diskpart to start the DiskPart utility .
CreATING DISK PArTITIONS DUrING INSTALLATION
Creating a partition allows you to set the partition’s size . Because you can create new partitions only in areas of unallocated space on a disk, you might need to delete existing partitions to be able to create a partition of the size you want . After you create a partition, you can format the partition so that you can use it to install a file system . If you don’t format a partition, you can still use it for installing the operating system . In this case, Setup formats the partition when you continue installing the operating system .
You can create a new partition by following these steps:
1. During installation, on the Where Do You Want To Install Windows page, tap or click Drive Options (Advanced) to display the advanced options for work-ing with drives .
2. Tap or click the disk on which you want to create the partition, and then tap or click New .
3. In the Size box, set the size of the partition in megabytes, and then tap or click Apply to have Setup create a partition on the selected disk .
After you create a partition, you need to format the partition to continue with the installation .
FOrMATTING DISK PArTITIONS DUrING INSTALLATION
Formatting a partition creates a file system on the partition. When formatting is complete, you have a formatted partition on which you can install the operating system . Keep in mind that formatting a partition destroys all data on the partition . You should format existing partitions (rather than ones you just created) only when you want to remove an existing partition and all its contents so that you can start the installation from a freshly formatted partition .
You can format a partition by following these steps:
1. During installation, on the Where Do You Want To Install Windows page, tap or click Drive Options (Advanced) to display the advanced options for work-ing with drives .
2. Tap or click the partition that you want to format .3. Tap or click Format. When prompted to confirm that you want to format the
partition, tap or click OK . Setup then formats the partition .
From the Library of Todd Schultz
ptg25017816
ChAPTer 2 Deploying Windows Server 2012 R256
DeLeTING DISK PArTITIONS DUrING INSTALLATION
Deleting a partition removes a partition you no longer want or need . When Setup finishes deleting the partition, the disk space previously allocated to the partition becomes unallocated space on the disk . Deleting the partition destroys all data on the partition . Typically, you need to delete a partition only when it is in the wrong format or when you want to combine areas of free space on a disk .
You can delete a partition by following these steps:
1. During installation, on the Where Do You Want To Install Windows page, tap or click Drive Options (Advanced) to display the advanced options for work-ing with drives .
2. Tap or click the partition you want to delete .3. Tap or click Delete. When prompted to confirm that you want to delete the
partition, tap or click OK . Setup then deletes the partition .
eXTeNDING DISK PArTITIONS DUrING INSTALLATION
Windows Server 2012 R2 requires at least 10 GB of disk space for installation, and at least 32 GB of available disk space is recommended . If an existing partition is too small, you won’t be able to use it to install the operating system . To resolve this, you can extend a partition to increase its size by using areas of contiguous, unallocated space on the current disk. You can extend a partition with an existing file system only if it is formatted with NTFS 5 .2 or later . New partitions created in Setup can be extended also, provided that the disk on which you create the partition has unal-located space .
You can extend a partition by following these steps:
1. During installation, on the Where Do You Want To Install Windows page, tap or click Drive Options (Advanced) to display the advanced options for work-ing with drives .
2. Tap or click the partition you want to extend .3. Tap or click Extend . In the Size box, set the size of the partition in megabytes,
and then tap or click Apply to extend the selected partition . 4. When prompted to confirm that you want to extend the partition, tap or
click OK . Setup then extends the partition .
Changing the installation typeUnlike earlier releases of Windows Server, you can change the installation type of any server running Windows Server 2012 R2 . This is possible because a key difference between the installation types relates to whether the installation has the following User Interfaces and Infrastructure features:
■ Graphical Management Tools And Infrastructure ■ Desktop Experience ■ Server Graphical Shell
From the Library of Todd Schultz
ptg25017816
Deploying Windows Server 2012 R2 ChAPTer 2 57
Full-server installations have both the Graphical Management Tools And Infra-structure feature and the Server Graphical Shell feature . They also might have Desk-top Experience . Alternatively, minimal-interface installations have only the Graphical Management Tools And Infrastructure feature and Server Core installations have none of these features .
Knowing that Windows also automatically installs or uninstalls dependent fea-tures, server roles, and management tools to match the installation type, you can convert from one installation type to another simply by adding or removing the appropriate User Interfaces and Infrastructure features .
Converting full-server and minimal-interface installationsTo convert a full-server installation to a minimal-interface installation, you remove the Server Graphical Shell . Although you can use the Remove Roles And Features Wizard to do this, you also can do this at a Windows PowerShell prompt by entering the following command:
uninstall-windowsfeature server-gui-shell -restart
This command instructs Windows Server to uninstall the Server Graphical Shell and restart the server to finalize the removal. If Desktop Experience also is installed, this feature also will be removed .
TIP As a best practice before you run this or any other command that might have far-reaching effects, you should run the command with the –Whatif parameter. This parameter tells Windows PowerShell to confirm exactly what will happen when a com-mand is run.
To convert a minimal-interface installation to a full-server installation, you add the Server Graphical Shell . You can use the Add Roles And Features Wizard to do this, or you can enter the following command at a Windows PowerShell prompt:
install-windowsfeature server-gui-shell -restart
This command instructs Windows Server to install the Server Graphical Shell and restart the server to finalize the installation. If you also want to install the Desktop Experience, you can use this command instead:
install-windowsfeature server-gui-shell, desktop-experience -restart
Converting Server Core installationsTo convert a full-server or minimal-interface installation to a Server Core installation, you remove the user interfaces for Graphical Management Tools And Infrastructure . If you remove the WoW64 Support framework, you also convert the server to a Server Core installation . Although you can use the Remove Roles And Features Wizard to remove the user interfaces, you also can do this at a Windows PowerShell prompt by entering the following command:
uninstall-windowsfeature server-gui-mgmt-infra -restart
From the Library of Todd Schultz
ptg25017816
ChAPTer 2 Deploying Windows Server 2012 R258
This command instructs Windows Server to uninstall the user interfaces for Graphical Management Tools And Infrastructure and restart the server to finalize the removal . Because many dependent roles, role services, and features might be uninstalled along with the user interfaces, run the command with the –Whatif parameter first to get details on what exactly will be uninstalled.
If you installed the server with the user interfaces and converted it to a Server Core installation, you can revert back to a full-server installation with the following command:
install-windowsfeature server-gui-mgmt-infra, server-gui-shell -restart
As long as the binaries for this feature and any dependent features haven’t been removed, the command should succeed . If the binaries were removed, however, or Server Core was the original installation type, you need to specify a source for the required binaries .
You use the –Source parameter to restore required binaries from a Windows Imaging (WIM) format mount point . For example, if your enterprise has a mounted Windows Image for the edition of Windows Server 2012 R2 that you are working with available at the network path \\ImServer18\WinS12EE, you could specify the source as follows:
install-windowsfeature server-gui-mgmt-infra, server-gui-shell -source \\imserver18\wins12ee
Though many large enterprises might have standard images that can be mounted by using network paths, you also can mount the Windows Server 2012 R2 distribu-tion media and then use the Windows\WinSXS folder from the installation image as your source . To do this, follow these steps:
1. Insert the installation disc into the server’s disk drive, and then create a folder to mount the installation image by entering the following command: mkdir c:\mountdir .
2. Locate the index number of the image you want to use by entering the fol-lowing command at an elevated command prompt, where e is the drive des-ignator of the server’s disk drive: dism /get–wiminfo /wimfile:e:\sources \install.wim .
3. Mount the installation image by entering the following command at an elevated prompt, where e is the drive designator of the server’s disk drive, 2 is the index of the image to use, and c:\mountdir is the mount directory: dism /mount–wim /wimfile:e:\sources\install.wim /index:2 /mountdir: c:\mountdir /readonly . Mounting the image might take several minutes .
4. Use Install–WindowsFeature at a Windows PowerShell prompt with the source specified as c:\mountdir\windows\winsxs, as shown in this example:
install-windowsfeature server-gui-mgmt-infra, server-gui-shell -source c:\mountdir\windows\winsxs
From the Library of Todd Schultz