winter wonderland just kisses · just kisses designed by robert kaufman fabrics featuring winter...
TRANSCRIPT
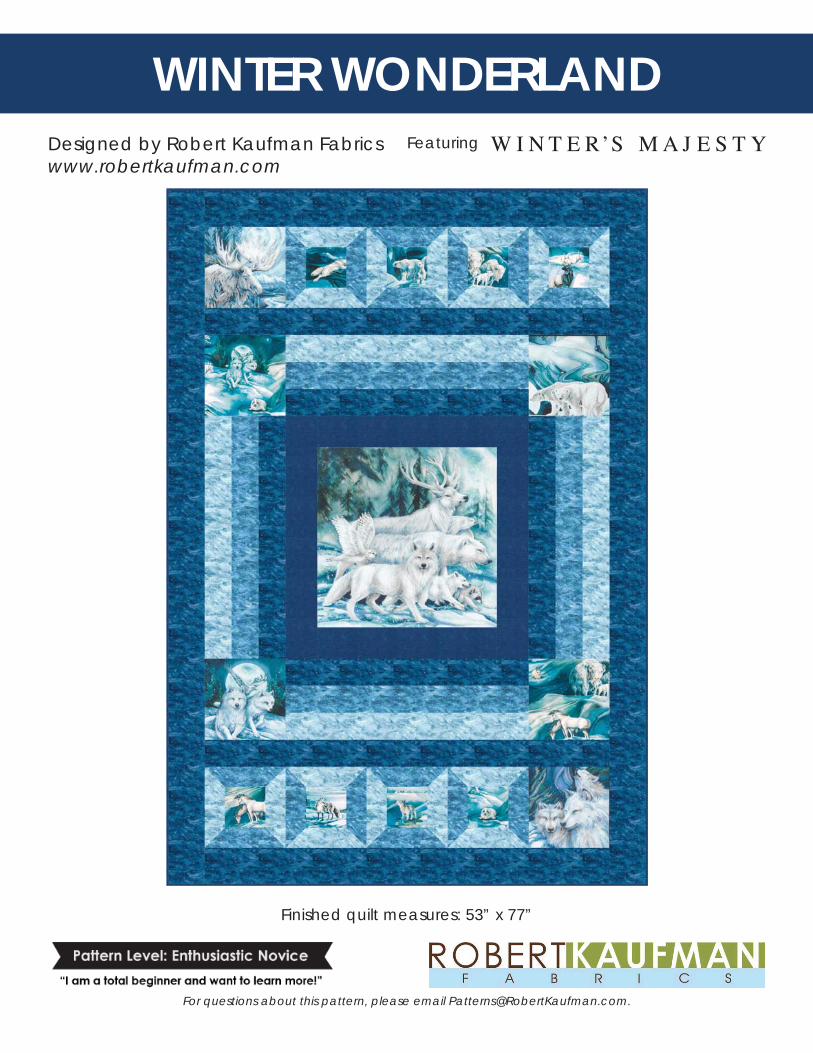
Just KissesDesigned by Robert Kaufman Fabricswww.robertkaufman.com
Featuring
WINTER WONDERLAND
For questions about this pattern, please email [email protected].
Finished quilt measures: 53” x 77”
page 2
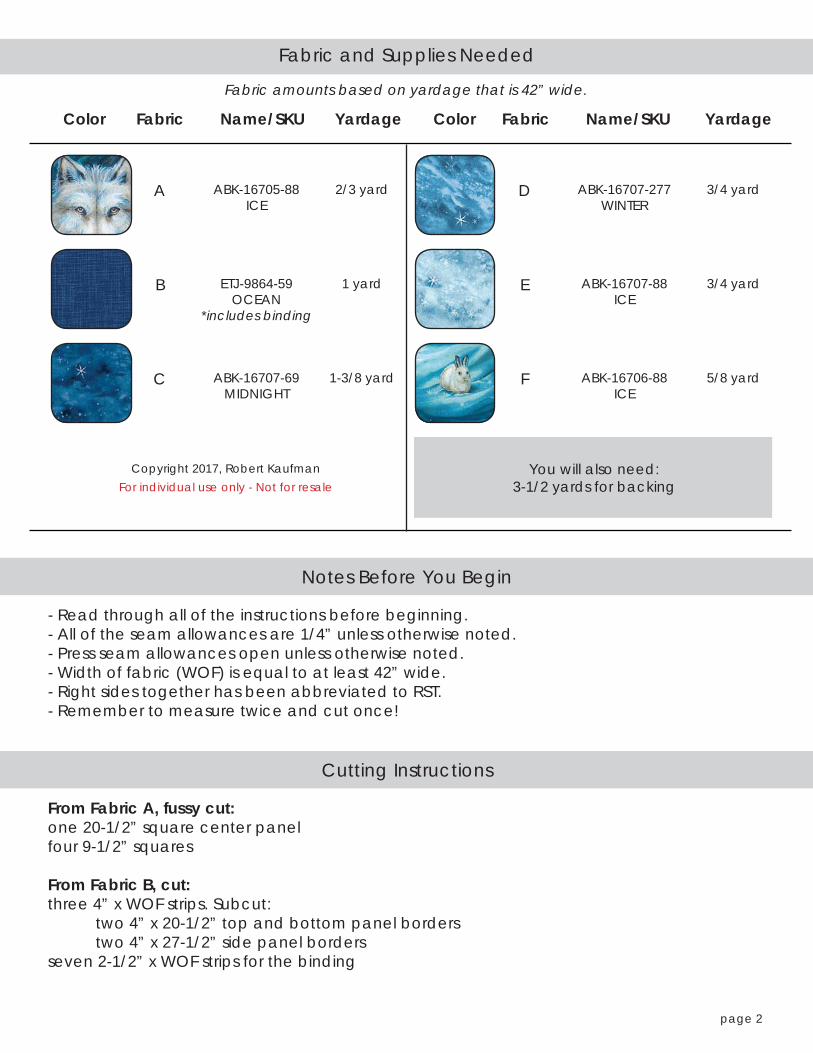
Fabric and Supplies Needed
Color Fabric Name/SKU Yardage
ABK-16707-277 WINTER
ABK-16707-88 ICE
ABK-16706-88 ICE
ABK-16705-88 ICE
ETJ-9864-59 OCEAN
*includes binding
ABK-16707-69 MIDNIGHT
Color Fabric Name/SKU Yardage
Fabric amounts based on yardage that is 42” wide.
A
B
C
D
E
F
2/3 yard
1 yard
1-3/8 yard
3/4 yard
3/4 yard
5/8 yard
Copyright 2017, Robert KaufmanFor individual use only - Not for resale
You will also need:3-1/2 yards for backing
- Read through all of the instructions before beginning.- All of the seam allowances are 1/4” unless otherwise noted.- Press seam allowances open unless otherwise noted. - Width of fabric (WOF) is equal to at least 42” wide.- Right sides together has been abbreviated to RST.- Remember to measure twice and cut once!
From Fabric A, fussy cut:one 20-1/2” square center panelfour 9-1/2” squares
From Fabric B, cut:three 4” x WOF strips. Subcut: two 4” x 20-1/2” top and bottom panel borders two 4” x 27-1/2” side panel bordersseven 2-1/2” x WOF strips for the binding
Notes Before You Begin
Cutting Instructions

page 3
From Fabric C, cut:fi ve 3-1/2” x WOF strips. Sew together, end-to-end, then trim to yield: four 3-1/2” x 27-1/2” strips two 3-1/2” x 45-1/2” stripssix 4-1/2” x WOF strips. Sew together, end-to-end, then trim to yield: two 4-1/2” x 45-1/2” top and bottom borders two 4-1/2” x 77-1/2” side borders
From each of Fabrics D and E, cut:three 3-1/2” x WOF strips. Sew together, end-to-end, then trim to yield: four 3-1/2” x 27-1/2” stripstwo 3” x WOF strips. Subcut: sixteen 3” squares for the HSTsthree 2-1/2” x WOF strips. Subcut: sixteen 2-1/2” x 5-1/2” rectangles
From Fabric F, fussy cut:two 9-1/2” squares showcasing larger images from the printeight 5-1/2” squares showcasing smaller images from the print
Step 1: Pair a 3” Fabric D square with a 3” Fabric E square, RST. Mark a diagonal line on the wrong side of one square. Sew 1/4” away from both sides of the marked line. Cut on the marked line, creating two half-square triangles (HSTs). Press toward the darker fabric. Trim to 2-1/2” square. Repeat to make a total of 32 D/E HSTs.
Assemble the Pieced Block Rows
Step 2: Gather one 5-1/2” Fabric F square, four D/E HSTs, two 2-1/2” x 5-1/2” Fabric D rectangles and two 2-1/2” x 5-1/2” Fabric E rectangles. Arrange in three rows of three, following the Block Assembly Diagram, noting the fabric placement and HST orientation. Sew the pieces together to form the rows, pressing the seams toward the rectangles. Sew the rows together to form the block, pressing the seams open or to one side. Repeat to make eight 9-1/2” square Pieced Blocks. NOTE: four blocks will have Fabric D one the top and bottom and four blocks will have Fabric D on the left and right.

page 4
Step 3: Gather one 9-1/2” Fabric A square and two of each type of pieced block from Step 2. Arrange to form the top pieced row, following the diagram. Sew together, pressing the seams to one side. Repeat to make the second pieced row, noting the slightly different placement and orientation of the blocks in the diagram.
Assemble the Quilt
page 5
Step 4: Sew a 20-1/2” Fabric B panel border to the top and bottom of the Fabric A center panel. Press the seams toward the border. Sew a 27-1/2” Fabric B panel border to the sides of the Fabric A center panel. Press the seams toward the border.
Step 5: Sew a 3-1/2” x 27-1/2” Fabric C and E strip to opposite sides of a 3-1/2” x 27-1/2” Fabric D strip to form one striped border unit. Press the seams to one side. Repeat to make a total of four striped border units.
Step 6: Sew a 9-1/2” Fabric A or F square square to the left and sides of a striped border unit from Step 5, noting the orientation of the blocks in the diagram and the fabric order of the striped unit. This forms the top striped border. Press the seams toward the square. Repeat to make the bottom striped border, noting the slightly different placement and orientation of the blocks in the diagram.
Step 7: Sew the remaining striped border units from Step 5 to the left and right edges of the quilt center, placing the Fabric C edge next to the quilt center. Press the seams toward the quilt center.
Step 8: Sew top and bottom striped border units from Step 6 to the top and bottom edges of the quilt center, placing the Fabric C edge next to the quilt center. Press the seams toward the quilt center.
Step 9: Sew a 3-1/2” x 45-1/2” Fabric C strip to the top and bottom of the quilt center, pressing the seams toward the Fabric C strips.
Step 10: Sew the top pieced row to the top of the quilt, pressing the seam toward the Fabric C strip. Sew the bottom pieced row to the bottom of the quilt, pressing the seam toward the Fabric C strip.
Step 11: Sew a 4-1/2” x 45-1/2” Fabric C strip to the top and bottom of the quilt center, pressing the seams toward the Fabric C strips.
Step 12: Sew a 3-1/2” x 77-1/2” Fabric C strip to the sides of the quilt, pressing the seams toward the Fabric C strips.
Your quilt top is complete! Baste, quilt, bind and enjoy!