wireless access point router - scoop regain access to your router if you forget the administrator...
TRANSCRIPT


Contents
1. Introduction ……………………………...….……………… 3
1.1 Safety instructions …………………………...……………. 3
1.2 Cleaning and care ……….…………………………..……. 4
1.3 Contents of package ……….……………………..………. 4
2. Getting to know your device …...………………...………. 5
3. Resetting the device …………..………………….………. 6
4. Requirements for your PC ……………………….………. 6
5. Getting Started ……………………………….…...………. 7
5.1 Insert (U)SIM card and battery ………………………...… 7
5.2 Connecting the power adaptor ……………………...…… 8
5.3 Installation ………………..………………………….….…. 8
5.3.1 Installing the Wireless Access Point Router ...………..... 8
5.4 Configure your PC …………………………………….…. 11
5.5 Login to WEB Management Page …………………...… 13
6. Configure the router advanced settings ……………….. 15
6.1 Quick settings …………………………….………..…….. 15
6.2 Advance settings …………………………..……….……. 17
7. Call Function ………………………...…………………… 38
8. Troubleshooting ….................................................. .…39
2
1. Introduction Thank you for purchasing the ClearCom WR200. The ClearCom WR200 Wireless Access Router is a convenient and flexible Internet access device which connects wireless or wired networks to the internet using 3G/WCDMA. It can also be used to connect via other methods such as ADSL modems and can be configured to provide automatic fail-over in case of lost connection.
1.1 Safety instructions • Before using the ClearCom WR200, please
read the general instructions below.
• Do not switch this device on when wireless device use is prohibited or when it may cause interference or danger.
• All wireless devices may be susceptible to interference, which could affect performance. To avoid interference problems, do not place the device in the immediate proximity of other electrical equipment such as a microwave ovens or hi-fi systems.
• Switch the device off in restricted areas, such as when close to aircrafts, medical equipment, fuel, chemicals or areas where there is a danger of explosion.
• Only use the supplied accessories and batteries. The use of other accessories may cause damage to the product and will void the guarantee.
• Keep the device out of reach of children. It may contain small parts which could cause injury if used as a toy.
3

1.2 Cleaning and care • Your device is designed for indoor use.
• It is not water-resistant and must not be installed in humid areas such as bathrooms.
• The outer surfaces of the unit can be cleaned with a soft, dry, lint-free cloth. Never use cleaning agents or solvents.
NOTE: This product is guaranteed for a period of 12 calendar months from the date of purchase as indicated on your till slip. Keep your till slip in a safe place as it will be required for guarantee repairs. It is however not guaranteed against damage caused by misuse, riot damage, lightning or power surge damage, damage caused by using the unit for purposes other than which it was intended.
1.3 Contents of package
- Router
- Power Adaptor
- Battery
- Installation Guide
- Antennae
4
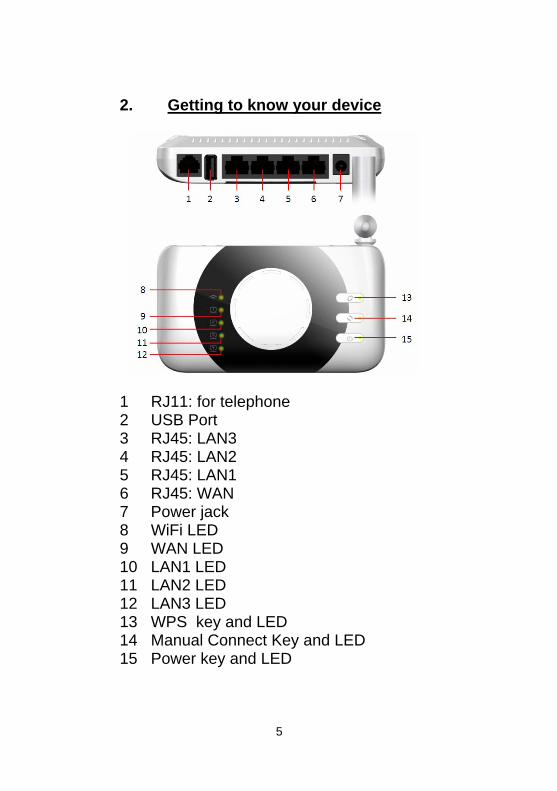
2. Getting to know your device
1 RJ11: for telephone 2 USB Port 3 RJ45: LAN3 4 RJ45: LAN2 5 RJ45: LAN1 6 RJ45: WAN 7 Power jack 8 WiFi LED 9 WAN LED 10 LAN1 LED 11 LAN2 LED 12 LAN3 LED 13 WPS key and LED 14 Manual Connect Key and LED 15 Power key and LED
5

3. Resetting the device If you wish to clear your settings from this router, you can reset it to the factory default settings. You can also regain access to your router if you forget the administrator password or wireless network key by performing a default reset. How to reset Press and hold the reset button underneath the unit for 2 seconds using a suitable tool. 4. Requirements for your PC
1. Wireless LAN Adaptor (if you wish to connect via Wi-Fi)
2. Suitable Operating system (OS) such as Windows ( XP, Vista or 7) equipped with:
TCP/IP Protocol
6

IE 6.0(or above) for web-based configuration (the latest version of other browsers such as Firefox, Google Chrome will also work)
This router also works with most recent releases of MAC OS and Linux (Ubuntu etc) using most recent browser options. 5. Getting Started 5.1 Installing the Wireless Access Router This device has two network access types: 3G Mode and WAN 3G Mode: Uses a SIM card to make a wireless connection to the internet by way of a WCDMA/3G network. WAN: Use an ADSL modem or other Ethernet internet access device to make a wired connection to the internet. What follows is a summary of the configuration for the two methods.
7

1. 3G mode
Steps: (1) Insert the SIM card. (see 5.2) (2) Insert the battery or connect the power adaptor.
(see 5.3 and 5.4) (3) Press and hold the power button for 2 seconds
until the router turns on. (4) Establish a connection to your computer by LAN
port or by WiFi (see 5.5).
8

(5) Access the Web Management Interface (GUI) to configure WAN connection type as 3G mode -This is the default setting. (See section 5.6 and 6)
2. ADSL modem or other Ethernet device mode
9

Steps: (1) Insert the battery or connect the power adaptor.
(see 5.3 and 5.4) (2) Connect the router to an ADSL modem or other
Ethernet device via the WAN port. (3) Switch the router on by pressing and holding the
Power button for 2 seconds. (4) Establish the connection by LAN port or by WiFi
(see 5.5). (5) Access the Web Management Interface (GUI) to
configure the WAN connection as an appropriate connection type such as DHCP. (see section 5.6 and 6)
5.2 Insert SIM card NOTE: Always switch the device off and disconnect the power before removing the battery. This step is applicable only if you are using a 3g/WCDMA network for your internet connection. 1. Remove the back cover and the battery (if already fitted). 2. Insert the SIM card. Ensure that the contact area on the card is facing down and that the beveled corner on the card is facing the beveled corner marking on the holder.
10

5.3 Insert battery 1. Remove the back cover (if already fitted). 2. Align the battery contacts with the battery compartment connectors, and insert the battery. Replace the back cover.
5.4 Connecting the power adaptor 1. Insert the power line cord from the adaptor into the socket at the back of the unit. Plug the power adaptor into a conveniently located power socket.
11

5.5 Configure your PC 1. Wireless connection mode For notebook and any other wireless device, you can use this connection mode if you do not wish to connect using an Ethernet cable. (1) Insure that your WR200 Is turned on. (2) The default network name (SSID) is “your_network”. Using your wireless device’s appropriate connection method, ask it to connect to this access point. An example from a Windows device is shown below.
12

Please make sure that your wireless device is set to the following settings (example from a PC running Windows OS) Click Wireless Network Connections Status-> Properties->Internet Protocol (TCP/IP) ->“Obtain IP address automatically” and “DNS server address automatically”. When connected to the router, you can check the IP address assigned by the DHCP server.
13

Notes: 1. By default, this unit has a unique WPA Key. This
key is found on a label under the router. 2. To browse the internet after connecting, make sure that your SIM (with Internet access enabled) has been properly installed in the SIM slot of the router, or that you have connected to an alternative router via the WAN port. 2. Wired connection mode (1) Connect your PC to the router using the
LAN1~LAN3 ports. Make sure your network settings are correct - your computer must be set to “Obtain IP address automatically” and “DNS server address automatically”.
14

5.6 Login to WEB Management Page 1. Open the web browser and access http://10.0.1.2
The default login user name is admin and the default password is admin
Note: http://10.0.1.2/ is the default LAN IP address. If you modify it at any stage, you will need to enter the routers new IP address here instead.
15

6. Configure your router’s settings 6.1 Quick settings This section shows how to configure the settings that most users need. For more complex configuration see section 6.2 (Advance settings).
• SSID: Click Wireless Settings->Basic The SSID is a unique name for your wireless network. It is must not exceed 32 characters. The default SSID is: your_network. You can change this to a more personal wireless name if you wish.
Note: After any modification, the Wi-Fi connection will automatically disconnect. If you are connecting via Wi-Fi, you will need to reconnect to the new SSID once it appears in your PC’s Wi-Fi AP list.
• Wi-Fi key: Click Wireless Settings->Security Your router is configured by default with a unique Wi-Fi key. Since this key is unique to your router there is no need to change it. You may however wish to change your key to make it easier to remember or to improve
16

your security. If you wish to change the Wi-Fi security type, you can also do so on this page.
Connection Type: Click Internet settings->WAN settings The router is set to access the internet via 3G networks as default connection mode. The predefined APN profile is selected according to your SIM card. Should you require a different setting for some reason, you are able to set up a customized connection .
• Administrator Password: Click Administrator->Management
Administrator Password is used for logging into WEB management page (GUI). It is recommended that you modify your login details for improved security. The default username and password are both “admin”.
17

6.2 Advance settings 1. Internet Settings (1) WAN settings This router supports six WAN connection types: Static (fixed IP), DHCP (Auto configure), PPPoE (ADSL), L2TP, PPTP and 3G.
• Static (fixed IP): When your network provider applies a fixed IP address to you, you can use this connection type. It is also useful when connecting your router to the internet using an ADSL modem that does not have a DHCP server built in.
• DHCP This is useful when connecting to the
internet via the WAN port, through a router that includes a DHCP server.
18
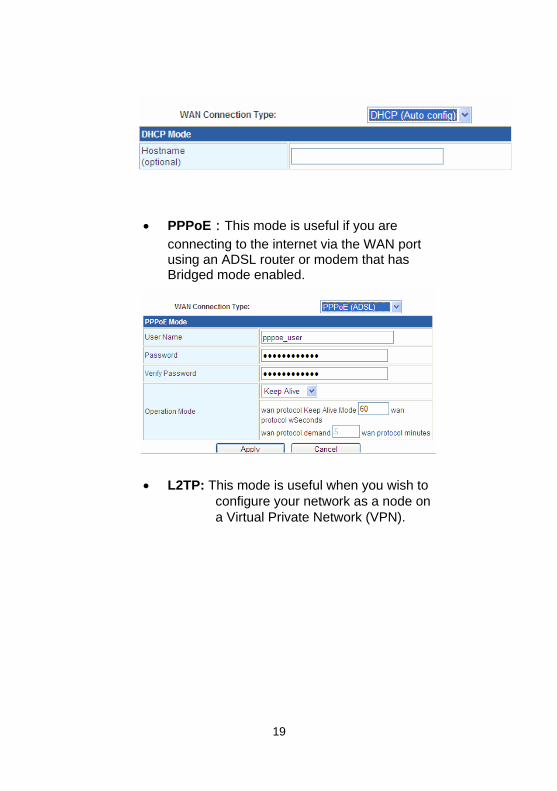
• PPPoE:This mode is useful if you are connecting to the internet via the WAN port using an ADSL router or modem that has Bridged mode enabled.
• L2TP: This mode is useful when you wish to
configure your network as a node on a Virtual Private Network (VPN).
19

• PPTP This mode is useful when you wish to configure your network as a node on a Virtual Private Network (VPN).
• 3G: This mode is used to connect the router
to the Internet using a 3G/WCDMA network. This connection type requires you to insert a SIM card.
20

Account: The default settings for 3G are retrieved from your SIM. If you select this account, the APN, Dial Number, User name, password and Auth need not to be modified unless you specifically require another setting. There settings are normally APN: internet Dial Number: *99# Username /Password are left blank Operation Mode: You can select Automatic or Manual. If you select Automatic, the router will access the Internet automatically at anytime when you power it on. It may take a few minutes for the connection to be established. This can be confirmed by the LED on the Manual Connect key becoming green and beginning to flash. If you select Manual, the internet connection can be established by pressing the Manual Connect key. (2) LAN settings (Local Area Network settings) This page explains about the settings of the LAN ports of your router. IP address & Subnet mask: This is your router’s IP address and the subnet mask for your LAN. LAN 2: Your router can be configured to respond to an alternative IP address using these settings. MAC address: This is your router’s MAC address.
21

DHCP Type: If you select Disable, you will either have to manually configure the IP addresses of connected devices, or use another device to provide DHCP services. If you select Server, your router enables its built-in DHCP Server. It will then assign IP address to clients connecting to the router. The IP addresses are allocated from the pool of available addresses between “Start IP address” and “End IP address”. You can also reserve certain static IP addresses for pre-defined clients using the Statically Assigned fields.
22

(3) DHCP clients list: This table shows the clients which have been assigned IP addresses by the router.
(4) Advanced Routing (Static Routing settings): When the router is connected to more than one network, a static route must be set up between them. The static route is a predetermined path that network information must use to reach a specific host or network. The minimum settings are preconfigured, but you can add routes as needed.
Note: Don't change any of these settings if you do not know exactly what you are doing.
23

(5) QoS (Quality of Service): This page is used to configure Quality of Service (QoS) rules for your router. (6) Link Backup:
Your router can be configured to provide automatic internet connection backup. For instance, if your primary connection to the internet is via an ADSL router that is connected to your routers WAN port, and for some reason ADSL connectivity is lost, this router can be configured to automatically transfer your Internet connection to the 3G/WCDMA connection. Except for the short delay that might be experienced in connecting to the 3G/WCDMA network; the transfer is quite transparent to users. You will first need to configure the settings of both of our chosen connection types (one at a time) in the Internet settings-> WAN section. You will then need to return to this page to configure the failover conditions. Operation mode: In this field you can enable/disable the function, and also select if you want a failed-over link to revert to the primary link as soon as possible, or only once the secondary link fails. Link Priority Setting: You will need to select your two preferred WAN connection options in the drop-down fields. You will then need to assign which is the primary and which is the secondary link. Link Priority Setting: These fields will allow you to select the parameters of when the fail-over will happen. Check Interval Time determines how often the router will check to confirm that the
24

primary link is available. A smaller number of minutes selected will increase the speed at which the router selects the secondary link, but since the check is an active one, it will also increase the amount of Internet data that is used by this process. Check Count is the number of “pings” that are performed each time the check is made. A smaller setting will increases the sensitivity of the fail-over, and may not necessarily be desirable particularly when heavy traffic delays or causes “pings” to not get through. WAN Check Method Define the IP addresses that are checked to determine if the link is up or not. You will need to carefully select an IP address that should always be available to confirm the connection. You could ask your ISP to provide one (which may not count against your data cap if it is “on-network”) or you could use an Internet based service such as the Google DNS server 8.8.8.8 you will need to confirm that your chosen IP responds to a “ping” before using it.
25

2. Wireless settings (1) Basic This page is used to configure the basic Wi-Fi settings.
26

Wi-Fi Enable/Disable: Enable or disable the Wi-Fi access Point. Network Mode: There are 5 modes to select from: 11b/g mixed mode, 11b only mode, 11g only mode, 11b/g/n mixed mode and 11n only mode (2.4G) Note: Don't change the content of this list if you don’t understand what effect your changes will have. Network Name (SSID): This field sets the SSID, or the name by which your WI-Fi AP will be known. Broadcast Network Name (SSID):
Enable: Allows the SSID to be broadcast so that users can detect and attempt to connect to it. Disable: This will prevent the SSID from being broadcast. Users will not be able to see it, but will still be able to connect if they know the correct SSID.
Frequency (Channel): Select the appropriate channel for your network from the list. You can select either a channel number from the list or the auto option. The default channel is channel 6. Note: If you do not understand the implications, please do not change the contents, particularly of the HT Physical Mode section.
27

(2) Advanced Wireless Settings This page is used to configure the advanced settings for WiFi. These settings are best left at the default values unless you fully understand the implications of any changes. (3) Security Settings This page is used to change the encryption settings for your wireless network to prevent unauthorized access. Security Modes: There are many security modes available to you to encrypt your WiFi connection:
• Disable: Your wireless network has no encryption that opens to everyone. (This option is not recommended.)
• OPENWEP: This security mode uses a key to secure your connection.
Default Key: You can select Key1~Key4. WEP Keys You can enter up to 4 different
keys. The key that is used as default will be dependent on your selection under Default Key.
Keys format: a. Hex: enter a key of 10 or 26 characters. b. ASCII: enter a key of 5 or 13 characters.
28

• WPA-PSK, WPA2-PSK and WPAPSKWPA2PSK: These three security modes use a pre-shared key to secure and encrypt your connection.
• WPA-PSK uses the WPA method and is used for older Wi-Fi devices.
• WPA2-PSK uses the WPA2 method and is used for newer devices supporting this mode.
• WPAPSKWPA2PSK needs to be used when you are connecting with various devices some of which support WPA2 and some of which only support WPA. This will allow the access point to retain backwards compatibility while not sacrificing security for never devices.
WPA Algorithms: You can select TKIP, AES or TKIPAES. For modes Pass Phrase: input at least 8 characters. Key Renewal Interval: Set key renewal time, from 0 sec. ~3600 sec.
29

(4) WDS You can open WDS function on this page, there are three modes: Lazy mode, bridge mode, and repeater mode. Note: In order to obtain better compatibility, please use the same type of product for connection.
• Repeater mode:
Phy mode: It provides four modes to select from: CCK, OFDM, HTMIX, and GREENFIELD. Encryp Type: It provides three modes to select from: WEP, SKTP, and AES. AP MAC Address: Input the peer router’s MAC address.
30

Steps: 1. Go to Wireless Settings->Basic, on this page, set
the Network Name (SSID) and Frequency (Channel), must be same as the peer router.
2. Go to Wireless Settings->WDS, set the WDS mode as Repeater Mode, also set the phy mode and encrypType the same as the peer router, and input the peer router’s MAC address.
3. Go to Wireless Settings->Security, set the security mode, must be same as the peer router.
4. After these, press “Apply” make all the settings enable.
Notes: 1. Please do not use the security mode of: WPA-PSK, WPA2-PSK, WPAPSKWPA2PSK, and WPA1WPA2. WDS works best with WEP security mode. 2. Please don’t set all the routers’ WDS mode to repeater mode, at least one router in your WDS network must be set to bridge mode.
31

• Lazy mode
In lazy mode, the router will auto search all nearby routers which use the same SSID, channel, security mode, and phy mode and select the device which has the best signal strength and the most stable wireless link. It will then create a WDS connection with it automatically.
Notes: 1. Please do not use the security mode of: WPA-PSK, WPA2-PSK, WPAPSKWPA2PSK, and WPA1WPA2. WDS works best with WEP security mode. 2. Please don’t set all the routers’ WDS mode to repeater mode, at least one router in your WDS network must be set to bridge mode
32
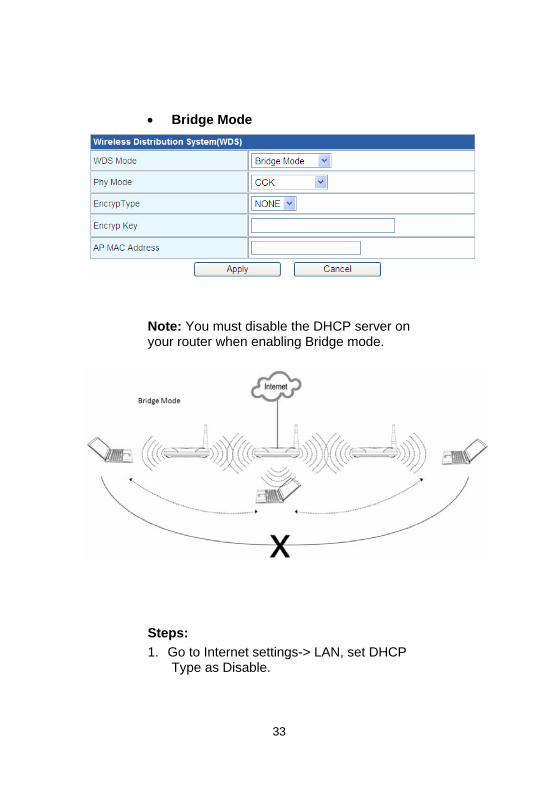
• Bridge Mode
Note: You must disable the DHCP server on your router when enabling Bridge mode.
Steps: 1. Go to Internet settings-> LAN, set DHCP
Type as Disable.
33

2. Go to Wireless Settings->WDS, set the WDS mode as Bridge Mode, also set the phy mode and encrypt Type to the same as the peer router, and input the peer router’s MAC address.
3. Go to Wireless Settings->Security, set the security mode, to the same as the peer router.
4. After this, press “Apply” to enable all settings. (5) WPS You can open WPS the function on this page. This provides a simple method of connecting a wireless device to the routers WIFi connection.
After you enable WPS, you can set the relevant parameter according to your requirements.
• WPS Summary This shows summery of the WPS information, including WPS current status, WPS Auth Mode, and Encryp Type etc. If you select the “Reset OOB” button, The router will restore itself to the default WPS settings.
34

• WPS progress
User can select PIN or PBC protect mode as the connection method WPS. (6) Station List This page is used to monitor stations which associate to this AP. (7) Statistics This page shows the statistic data of Wireless TX and RX. 3. Firewall Note: No changes should be made to Firewall settings without a thorough understanding of the implications.
35

(1) MAC/IP/Port Filtering This page shows the configuration of the filter functions for the firewall. You can configure a filter through MAC address, IP address or Network port number. (2) Port Forwarding (Virtual Server Settings) This page allows the configuration of a virtual server to enable external computers to access services provided on the local network. (3) DMZ This page allows the configuration of the DMZ functions. The DMZ function allows for the forwarding of all otherwise unallocated ports to a particular IP address on you network. This function should be used with care. (4) System Security This page allows the configuration of the system firewall to protect your router from Internet based attacks. (5) Content Filtering This page allows the configuration of URL filter functions. There are a few tools that can be used to restrict internet access to certain websites. 4. 3G modem
The statue page shows the status of 3G modem, including 3G Modem status, SIM Card status and Network information. Under the PIN management tab, you are able to enter you SIM PIN. You are
36

also able to change your PIN as well as configure the SIM to not need a PIN
5. Storage The storage pages are used to configure your router to act as an FTP server. The content for the FTP server must be placed on a USB drive or memory stick and connected to the routers USB interface.
(1) User Admin On this page you can configure users that will be able to access your USB drive via FTP. The default user is admin and the default password is also admin. This admin user will be able to access the root of the USB drive that has been connected. You are able to configure other user accounts for your FTP server, but each user will have limited access by default. For instance, say you created user someuser. During the creation of this user, your router will create a directory “home” in the root of your device. In the “home” directory, it will create “someuser”. The user someuser will have access to /home/someuser only. The admin account will be able to load files for someuser into this folder. Similarly, someotheruser will only be able to access /home/someotheruser. (3) FTP server On this page you can set up access rights to the USB drive, such as allowing for read only access, directory creation etc.
37

6. Administration settings (1) Management settings You can set language, administrator account and password, NTP, and Dynamic DNS on this page.
• Language settings: You can set the system language (currently only supporting English).
• Administrator settings: Used to modify login account and password.
Account: Input the new login account. Password: Input the new login password.
• NTP settings
You can modify router time synchronization NTP host and time zone to correctly synchronize the system time.
38

(2) Upload Firmware You can upload firmware to this router on this page. If any firmware updates are available for this router, you will find them on our website www.telkomphones.co.za Steps: a. Press the “Browse “button to select the correct
firmware image file for the router. b. Press “Apply” to upgrade.
c. After firmware upgrade, the router will reboot automatically. Notes: 1. Please select the correct firmware file; otherwise The router will not function correctly. 2. To avoid damaging your router, please don’t switch
it off until the firmware update is finished.
(3) Setting Management • Export settings
You can save the current system settings by exporting them to a configuration file.
• Import settings You can restore the system settings by importing previously saved configuration files.
• Load factory defaults If you press the “Load Default” button, the system settings will be restored to original default values.
39

Note: After you restore the defaults, the WiFi will disconnect, and you may need to recreate a connection again. (4) Status This page shows the current status of the WiFi router, including System Information, Internet Configurations and local network information. (5) Statistics This page shows the current status of memory, data traffic of WAN and LAN. (6) System log This page shows logs of system. 7. Call Function
Your router can make telephone calls using its SIM card. If you have not already done so, please configure as follows: 1. Insert a SIM card and power on your router. 2. Connect a telephone to the RJ11 (telephone
socket) of your router using a telephone line cord. 3. After a few seconds the “Manual connect LED”
should turn green and you will be able to use the telephone to dial or answer calls. If the “manual Connect LED” does not turn green, then you have either not inserted the SIM correctly or the SIM
40

requires a PIN to operate (see section 4 to assist with configuring your SIM PIN).
Please Note: In order to use the call function on this router, the power supply needs to be connected! The integrated battery is purely to ensure continued data connectivity during power failures.
41

8. Troubleshooting
Problem Solution
Cannot connect to the Routers SSID
1. Make sure the wireless switch on your PC is on and refresh the network list. 2. Make sure your PC is within range of your router. 3. Make sure your router is kept away from Electromagnetic interference. 4. Make sure your router is set to broadcast its SSID. 5. Reboot your router. 6. Reset your router to factory default settings by pressing the reset button found underneath.
Cannot connect to the router
1. Make sure that you are always in range of your router when using WiFi to connect. 2. Make sure you have entered the correct WiFi key. 3. Make sure that your PC is using an IP address that is within the default range – check that you don’t have your IP address statically set on your PC. 4. Check to ensure that your PC’s firewall is not interfering with your internet access.
Cannot log into Web management Page
1. Clear the cookies and caches of your internet browser. 2. Close your internet browser and open it again. 3. Check if your admin username and password have not been changed.
42

43
Cannot browse the Internet
1. Check the 3G LED. It must be green and flashing. 2. Check if your SIM is activated, not expired and has enough airtime. (don’t forget to RICA new SIMs 3. Check if you selected the correct APN name. 4. Check if your router has been assigned a valid IP address
For any service or product information queries relating to this router, please call our Shared Call number 0860 2C HELP (0860 22 43 57) or visit our website on www.telkomphones.co.za