wireless actuator for home automation using arduino wireless en.pdf868mhz wireless actuator for home...
TRANSCRIPT

RADIOCONTROLLI S.r.l.Via Carditello 10 81050 San Tammaro (CE)[email protected]
www.radiocontrolli.com
1
> 500meters
ACTUATOR ( N.8 Switch)
868MHz Wireless actuator for home automation developed using ARDUINO microcontroller, composed by a SEND unit
(ARDUINO Wireless ) and by one or more ACTUATOR units with the possibility to switch from a minimum of 8 up to a maximum
of 80 devices (relays). This wireless control system is designed for the most varied requirements in the field of Home
automation, it can be used to activate all kinds of lighting, as other applications, for example heating / cooling, electric gates,
automatic doors and industrial controls. It’s possible to have a "point to point" configuration (No.1 ARDUINO Wireless unit -
No.1 ACTUATOR unit) or a "point-multipoint" configuration (No. 1 ARDUINO Wireless unit more ACTUATOR units, max 10) up
to the possibility of switching 80 users (relays ).
The SEND unit is composed of Arduino microncontroller + RadioControlli Shield (Shield Radio + Keyboard +display) and from
the software available free on the website www.radiocontrolli.com.
The ACTUATOR units are powered using a normal 5V power supply and can control relays boards (Relay Commercial Board)
or solid-state actuators board (designed and produced by RadioControlli).
It’s a bidirectional system that allows the following operations:
--- Sending a switch command to the Actuator unit, to switch 1 of the 8 relays or a relays combination.
--- For each switch command received, the Actuator unit sends a feedback .
--- It’s possible to know the state of the individual relays of a specific ACTUATOR unit anytime.
--- You can send commands to switch more ACTUATOR units simultaneously (broadcast function).
--- Each ACTUATOR unit periodically sends to its SEND unit reference, a word containing the status of the outputs (wake up timer);
this time by default is set at 30 seconds but it can be changed and even canceled.
--- Each ACTUATOR unit has on-board an temperature sensor, it’s possible, by sending a command, to know the temperature’s value
of the ACTUATOR unit.
Point to point configuration :
868 Mhz 868 Mhz 868 Mhz
Pag.1/17
ARDUINO + RadioControlli shield
R
C
a
d
i
o
o
n
t
r
o
l
l
i
R
C
a
d
i
o
o
n
t
r
o
l
l
i
8
Wireless actuator for home automation using ARDUINO
You can control everything..... anywhere
Rev.2.2

1
Point to point configuration :
RECEIVER 1
1
1
you can control everything... anywhere
RECEIVER “ ” n
RECEIVER 2
868 Mhz
Features :
--- Possibility to control N. 10 ACTUATOR units (up to 80 users/relays).
--- GFSK 19.2Kbps Modulation - Frequency 869.5MHz - Power Output = +20dBm (100mW)
--- Distance: up to 500meters in open field with maximum transmission power (distance between SEND unit and ACTUATOR unit)
--- Possibility to transmit a command to all ACTUATOR units (broadcast) .
--- Possibilty to know the temperatura value for every ACTUATOR units.
8
RADIOCONTROLLI S.r.l.Via Carditello 10 81050 San Tammaro (CE)[email protected]
www.radiocontrolli.comPag.2/17
ARDUINO
Wireless actuator for home automation using ARDUINO
You can control everything..... anywhere
Rev.2.2

SEND RECEIVER
RadioControlliActuator board
Relays commercial board
Power Supplyconnector
Vertical mounting
Mounting with cable
RADIOCONTROLLI S.r.l.Via Carditello 10 81050 San Tammaro (CE)[email protected]
www.radiocontrolli.comPag.3/17
Arduino
Keyboard
Shield
Display
868MHz Antenna
Mechanical support
Wireless actuator for home automation using ARDUINO
You can control everything..... anywhere
Rev.2.2

Output Connector
1
2
3
5
4
6
7
8
9
10
GN
D
5 VOLT
1
2
3
4
5
6
7
8
9
10
11
12
13
26
25
24
23
22
21
20
19
18
17
16
15
14
RC
S1
KS
MT
GN
D
GN
D
3
.3V
OLT
GND
RS
T
GN
D
RESET1
+
3.3
Vo
lt
TR
AN
SC
EIV
ER
1 2 3 4
1
2
3
4
+
5V
OLT
GND
+
3.3
VO
LT
IN OUT GND 1 2 3 4
+3
.3V
OLT
SERIAL PORT
GN
D
RadioControlli ACTUATOR Board
The ACTUATOR unit , are powered by a normal 5V power supply and can control relay boards (Relay Commercial Board)
or solid-state actuators board (designed and produced by RadioControlli).
Each ACTUATOR can manage 8 users / relays.
Each ACTUATOR is supplied from the factory with its own unique and unchangeable ID Address (4byte).
The ACTUATOR unit is equipped with an RS232 serial interface.
IN1
IN2
IN3
IN4
IN5
IN6
IN7
IN8
VC
C
Power Supply 5 Volt
ID ADDRESS
GN
DIN
1IN
2
IN8
VC
C
RS232
RADIOCONTROLLI S.r.l.Via Carditello 10 81050 San Tammaro (CE)[email protected]
www.radiocontrolli.comPag.4/17
Wireless actuator for home automation using ARDUINO
You can control everything..... anywhere
Rev.2.2

The shield below represented is the interface between the wireless ACTUATOR (RECEIVER) and the ARDUINO logic
control.
The management of the ACTUATORS is performed by an application resident on ARDUINO, downloadable from the
website RadioControlli.
The shield is supplied from the factory with its own unique ID Address and unchangeable (4byte) in this case 1E100001.
RADIOCONTROLLI S.r.l.Via Carditello 10 81050 San Tammaro (CE)[email protected]
www.radiocontrolli.compag.1/9
RADIOCONTROLLI S.r.l.Via Carditello 10 81050 San Tammaro (CE)[email protected]
www.radiocontrolli.comPag.5/17
RadioControlli Arduino Shield
Antenna
Arduino connector
RS-232
Display ConnectorDisplay Adjustament
Keyboard Connector
Transceiver RadioControlliRCS1KSMT-868
Arduino connector
Arduino connector
Wireless actuator for home automation using ARDUINO
You can control everything..... anywhere
Rev.2.2
1E100001

RADIOCONTROLLI S.r.l.Via Carditello 10 81050 San Tammaro (CE)[email protected]
www.radiocontrolli.compag.1/9
RADIOCONTROLLI S.r.l.Via Carditello 10 81050 San Tammaro (CE)[email protected]
www.radiocontrolli.comPag.6/17
Keyboard
Shield with 868MHz Antenna
Display
Actuator Unit
5 Volt Power Supply
Relays Commercial board
RadioControlli Evaluation Kit
1) N. 1 ARDUINO Shield equipped with 868MHz Antenna, keyboard and display.2) N. 1 Actuator Unit equipped with 868MHz Antenna3) N.1 5Volt Power Supply for Actuator Unit4) N.1 Relays Commercial Board
1) N.1 ARDUINO Shield equipped with 868MHz Antenna, Keyboard and display.2) N. 2 Actuator Units equipped with 868MHz Antenna3) N. 2 5Volt Power Supply for Actuator Unit4) N. 2 Relays Commercial Board
KIT ARD-1 (Essential)
KIT ARD-2
Wireless actuator for home automation using ARDUINO
You can control everything..... anywhere
Rev.2.2

QUICK GUIDE Evaluation Kit
STEP5 After you load the software, place the dip-switch in ON position (as in the figure above).
RADIOCONTROLLI S.r.l.Via Carditello 10 81050 San Tammaro (CE)[email protected]
www.radiocontrolli.compag.1/9
RADIOCONTROLLI S.r.l.Via Carditello 10 81050 San Tammaro (CE)[email protected]
www.radiocontrolli.comPag.7/17
1E100001
STEP1 denominated website Download the software "ArduinoWireless" by the www.radiocontrolli.com, if you have some compilation problem can you download also the library denominated : keypad.zip. STEP2 , Connect the Shield RadioControlli including keyboard and display to ARDUINO microcontroller. STEP3 Load the software on ARDUINO device making sure that the dip-switch of the shield are positioned to OFF.
STEP4 Set to the desired mode of the display brightness using the following potentiometer.
STEP6 Connect the Actuator unit to the relays board choosing the type of connection desired: - Horizontal mounting - vertical mounting - mounting with a cable
Moreover, power ON the Actuator unit using the power supply 5Volt supplied.
ARDUINO WIRELESSby RADIOCONTROLLI
Wireless actuator for home automation using ARDUINO
You can control everything..... anywhere
Rev.2.2

RADIOCONTROLLI S.r.l.Via Carditello 10 81050 San Tammaro (CE)[email protected]
www.radiocontrolli.compag.1/9
RADIOCONTROLLI S.r.l.Via Carditello 10 81050 San Tammaro (CE)[email protected]
www.radiocontrolli.comPag.8/17
STEP7 After the start-up screen will appear the following screen:
M1 means Menù N.1, the menus of the application are 5 from M1 to M5.
Present 0, it means the system has not saved any Actuator in memory.
M1 Present 0 START
M2 Found 0Search Actuators
Save? y/n1E20000D
STEP8 Press the key A (scrolling menu) until you get to the menu M5:
STEP9 Verify that the concentrator code (in this case 1E100001) corresponds to what is indicated on the label of the ARDUINO shield (see page 5). if the code does not match to perform the insertion by pressing the C key.
Enter the new code, for example 4E100008.
Using the keyboard press the numeric keys and accept them (one at a time) with the button "C".
to insert the alphanumeric codes (for example "E") press the "9" button and advance by pressing the "A" button accept the value by pressing the "C" button.
QUICK GUIDE Evaluation Kit
Wireless actuator for home automation using ARDUINO
You can control everything..... anywhere
Rev.2.2
M5 1E100001 Insert Code
_Modify Code
4E1000084E100008 y/n
press the C key to accept, the following screen appears :

RADIOCONTROLLI S.r.l.Via Carditello 10 81050 San Tammaro (CE)[email protected]
www.radiocontrolli.compag.1/9
RADIOCONTROLLI S.r.l.Via Carditello 10 81050 San Tammaro (CE)[email protected]
www.radiocontrolli.comPag.9/17
After the start-up screen will appear the following screen:
M5 means Menù N.5, the menus of the application are 5 from M1 to M5.
M2 Found 0Search Actuators
M2 Found 0 WAIT Search
Save? y/n1E20000D
STEP10 Press the key A (scrolling menu) until you get to the menu M2:
STEP11 Power ON the actuator supplied, and press the C key (Enter) to activate the "Search Actuators" function.
STEP12 Press the "C" key (yes) to save this actuator in memory.
The system is searching for Actuators in its area of action.
The device has found the actuator N. 1E20000D.
QUICK GUIDE Evaluation Kit
Wireless actuator for home automation using ARDUINO
You can control everything..... anywhere
Rev.2.2
M5 4E100008Insert Code

RADIOCONTROLLI S.r.l.Via Carditello 10 81050 San Tammaro (CE)[email protected]
www.radiocontrolli.compag.1/9
RADIOCONTROLLI S.r.l.Via Carditello 10 81050 San Tammaro (CE)[email protected]
www.radiocontrolli.comPag.10/17
Present 1, it means the system has stored N.1 actuator in memory.
ATT1 = Actuator N.11E20000D = Actuator code00 = word sent by ARDUINO device
M1 Present 1 START
ATT1 1E20000D 00 0 0 0 0 0 0 0 0
STEP13 Using the keys A and B (scrolling menu) go on the menu M1, this time will be presented the following screen:
STEP14 Press the "C" key(START), the following screen appears:
The relays 1 and 5 actuator N.1 1E20000D are ON STATE ---> 1 while the remaining relays are OFF STATE -> 0.
ATT1 1E20000D 11 1 0 0 0 1 0 0 0
STEP15 Pressing keys 1 to 8 will be activated the relays corresponding, for example by pressing buttons 1 and 5:
The relay 1 and 5 of the Actuator N.1 1E20000D are in OFF STATE ---> 0.ATT1 1E20000D 00
0 0 0 0 0 0 0 0
STEP16 Also to perform the deactivation of the relays you must press the corresponding keys, for example by pressing buttons 1 and 5, the situation will be:
QUICK GUIDE Evaluation Kit
Wireless actuator for home automation using ARDUINO
You can control everything..... anywhere
Rev.2.2
RADIOCONTROLLI S.r.l.Via Carditello 10 81050 San Tammaro (CE)[email protected]
www.radiocontrolli.compag.1/9
RADIOCONTROLLI S.r.l.Via Carditello 10 81050 San Tammaro (CE)[email protected]
www.radiocontrolli.comPag.11/17
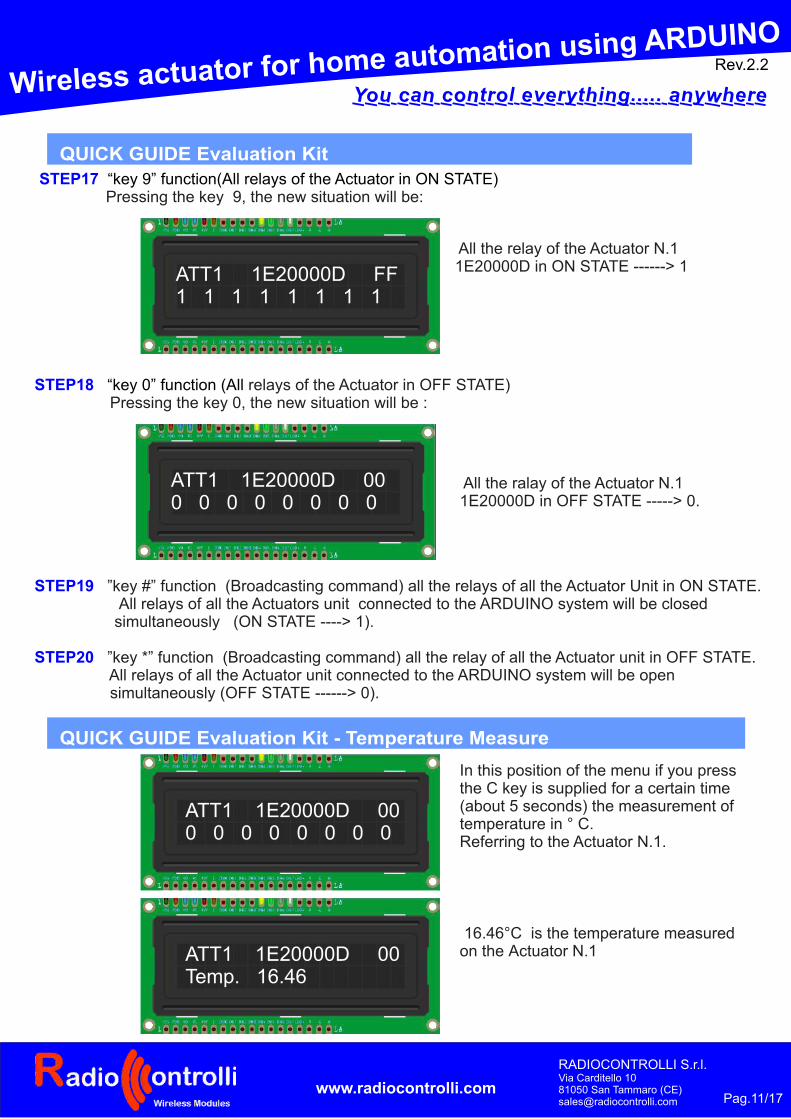
All the relay of the Actuator N.1 1E20000D in ON STATE ------> 1
All the ralay of the Actuator N.1 1E20000D in OFF STATE -----> 0.
ATT1 1E20000D FF1 1 1 1 1 1 1 1
ATT1 1E20000D 00 0 0 0 0 0 0 0 0
ATT1 1E20000D 00 0 0 0 0 0 0 0 0
STEP17 “key 9” function(All relays of the Actuator in ON STATE) Pressing the key 9, the new situation will be:
STEP18 “key 0” function (All relays of the Actuator in OFF STATE) Pressing the key 0, the new situation will be :
ATT1 1E20000D 11 1 0 0 0 1 0 0 0
STEP19 ”key #” function (Broadcasting command) all the relays of all the Actuator Unit in ON STATE. All relays of all the Actuators unit connected to the ARDUINO system will be closed simultaneously (ON STATE ----> 1).
STEP20 ”key *” function (Broadcasting command) all the relay of all the Actuator unit in OFF STATE. All relays of all the Actuator unit connected to the ARDUINO system will be open simultaneously (OFF STATE ------> 0).
ATT1 1E20000D 00 0 0 0 0 0 0 0 0
QUICK GUIDE Evaluation Kit
QUICK GUIDE Evaluation Kit - Temperature Measure
In this position of the menu if you press the C key is supplied for a certain time (about 5 seconds) the measurement of temperature in ° C.Referring to the Actuator N.1.
ATT1 1E20000D 00 Temp. 16.46
16.46°C is the temperature measured on the Actuator N.1
Wireless actuator for home automation using ARDUINO
You can control everything..... anywhere
Rev.2.2
RADIOCONTROLLI S.r.l.Via Carditello 10 81050 San Tammaro (CE)[email protected]
www.radiocontrolli.compag.1/9
RADIOCONTROLLI S.r.l.Via Carditello 10 81050 San Tammaro (CE)[email protected]
www.radiocontrolli.comPag.12/17
Keyboard Functions
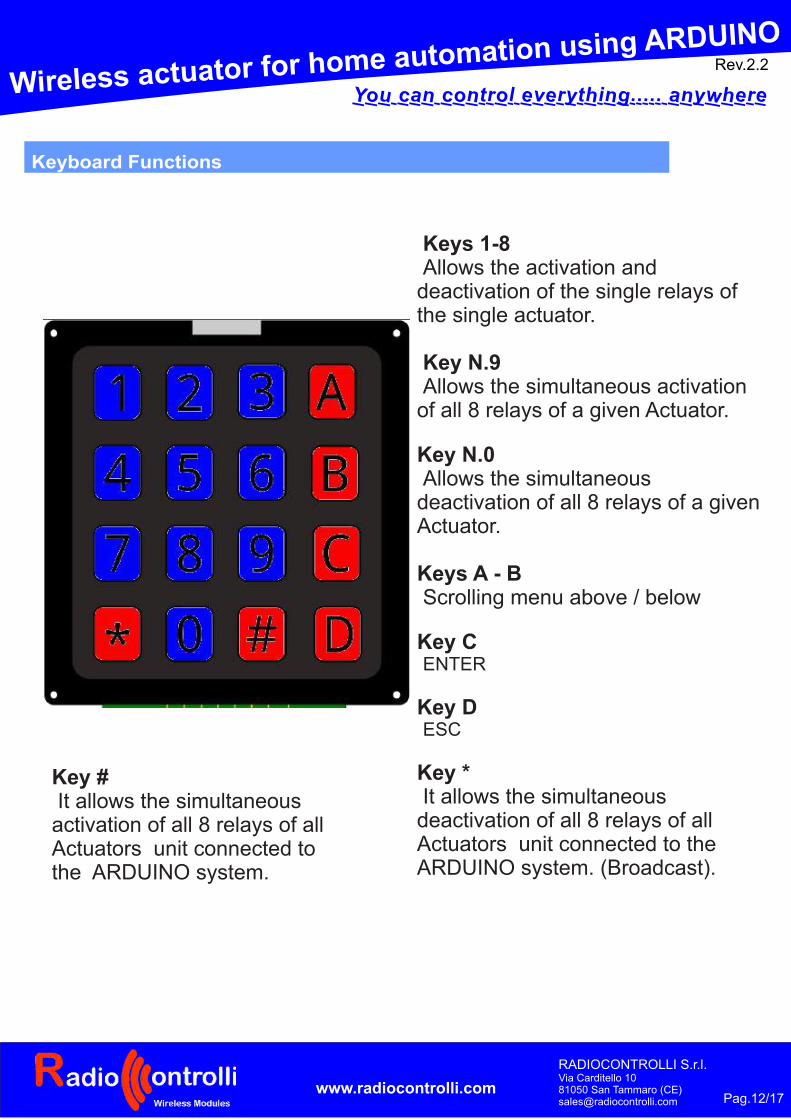
Keys 1-8 Allows the activation and deactivation of the single relays of the single actuator.
Key N.9 Allows the simultaneous activation of all 8 relays of a given Actuator.
Key N.0 Allows the simultaneous deactivation of all 8 relays of a given Actuator.
Keys A - B Scrolling menu above / below
Key C ENTER
Key D ESC
Key * It allows the simultaneous deactivation of all 8 relays of all Actuators unit connected to the ARDUINO system. (Broadcast).
Key # It allows the simultaneous activation of all 8 relays of all Actuators unit connected to the ARDUINO system.
Wireless actuator for home automation using ARDUINO
You can control everything..... anywhere
Rev.2.2

RADIOCONTROLLI S.r.l.Via Carditello 10 81050 San Tammaro (CE)[email protected]
www.radiocontrolli.compag.1/9
RADIOCONTROLLI S.r.l.Via Carditello 10 81050 San Tammaro (CE)[email protected]
www.radiocontrolli.comPag.13/17
RadioControlli
APPLICATION MENU’
Menù M1
Menù M2
PRESENT = 1It means that at this moment the device has stored N.1 Actuator unit.
STARTIn presence of Actuators already stored you can start the program (START) by pressing the C key on the keyboard.
After pressing START you can access to the operating menu.It’s possible :- With the A and B keys move to different Actuators - With the 1-8 keys to change the status of individual relays- With the 0 and 9 keys change the status of all the relays- With the # and * keys send broadcast commands - With the D key exit from this menu
Found = 1Actuator found.
Sear Actuators With this menu option, activatable by pressing the "C" key, you can put the device in search of new actuators.
Store ? Y/n
has been found a new device Actuator, this device is not registered on the network , to register press y (C) or n (D).
WAIT Actuator unit currently being recorded.
M1 Present 1 START
ATT1 1E20000D 000 0 0 0 0 0 0 0
M2 Found 0 Search Actuators
Store ? Y/n1E20000B
M2 Found 0 WAIT
Wireless actuator for home automation using ARDUINO
You can control everything..... anywhere
Rev.2.2
RADIOCONTROLLI S.r.l.Via Carditello 10 81050 San Tammaro (CE)[email protected]
www.radiocontrolli.compag.1/9
RADIOCONTROLLI S.r.l.Via Carditello 10 81050 San Tammaro (CE)[email protected]
www.radiocontrolli.comPag.14/17
RadioControlli
APPLICATION MENU’
Menù M2
Menù M3
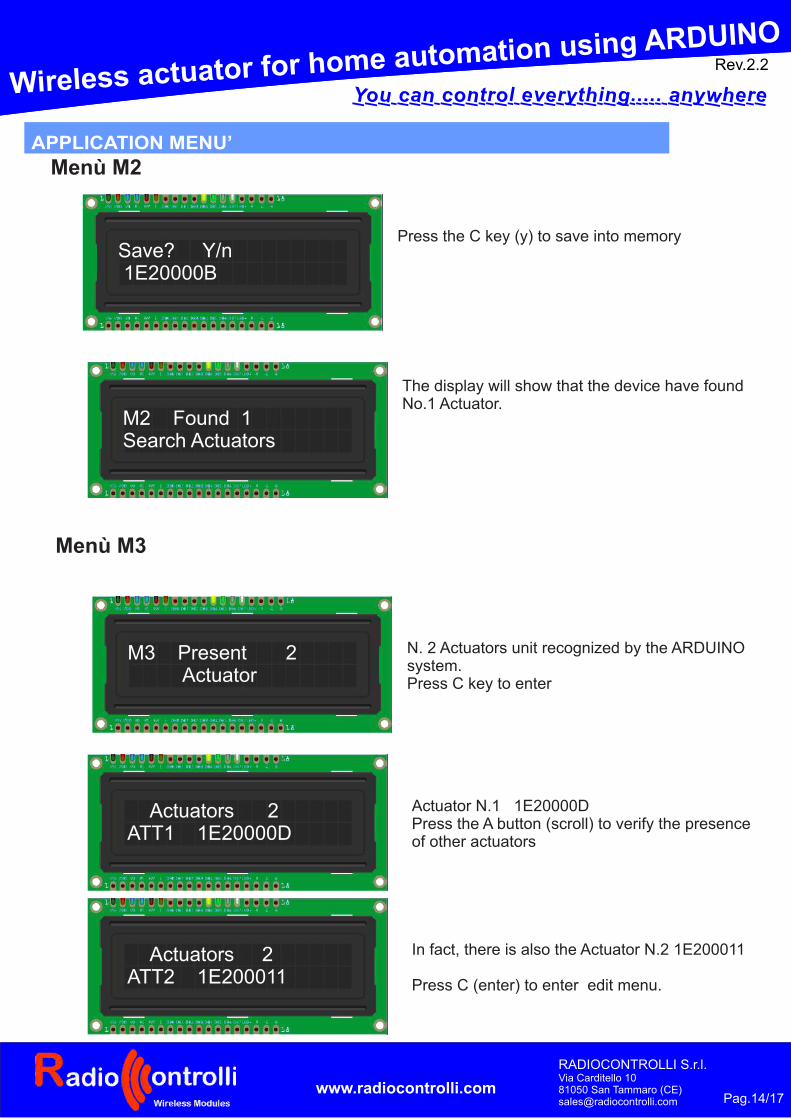
Press the C key (y) to save into memory
The display will show that the device have foundNo.1 Actuator.
N. 2 Actuators unit recognized by the ARDUINO system.Press C key to enter
Actuator N.1 1E20000DPress the A button (scroll) to verify the presence of other actuators
Save? Y/n 1E20000B
M2 Found 1Search Actuators
M3 Present 2 Actuator
Actuators 2 ATT1 1E20000D
Actuators 2 ATT2 1E200011
In fact, there is also the Actuator N.2 1E200011
Press C (enter) to enter edit menu.
Wireless actuator for home automation using ARDUINO
You can control everything..... anywhere
Rev.2.2

RADIOCONTROLLI S.r.l.Via Carditello 10 81050 San Tammaro (CE)[email protected]
www.radiocontrolli.compag.1/9
RADIOCONTROLLI S.r.l.Via Carditello 10 81050 San Tammaro (CE)[email protected]
www.radiocontrolli.comPag.15/17
RadioControlli
APPLICATION MENU’
Menù M3
Edit ActuatorATT2 1E200011
Delete y/nATT2 1E200011
Press C key to delete this actuator.
To cancel this Actuator press the C key (yes) , press D key (no) for not canceling.By pressing the D key returns you to the following menu:
Actuators 2ATT2 1E200011
In this condition by pressing the A or B keys , the actuator can be moved from position
Edit AttuatoreATT2 1E200011
With this menu you can clear the data in EEPROM. To proceed, press C key.
Menù M4
M4 EEPROM DataErase EEPROM
ERASE EEPROM Sure y/n
Confirmation is requested C (y) D (no).
Wireless actuator for home automation using ARDUINO
You can control everything..... anywhere
Rev.2.2

RADIOCONTROLLI S.r.l.Via Carditello 10 81050 San Tammaro (CE)[email protected]
www.radiocontrolli.compag.1/9
RADIOCONTROLLI S.r.l.Via Carditello 10 81050 San Tammaro (CE)[email protected]
www.radiocontrolli.comPag.16/17
RadioControlli
APPLICATION MENU’
Menù M5
M5 00000000Insert Code
Cancella s/nATT2 1E200011
This menu must be used when you want to add other devices Actuators on the evaluation kit RadioControlli.
In this case you must enter the Concentrator/Arduino device code.
Each RadioControlli shield has a serial number, this serila number is transcribed with a label on the transceiver.
In our case (see sheet N.7 of this document) the serial nmber is 1E100001.
Press C key to enter the code
Modify Code
Insert the code 1E100001 Enter a first digit and press C key (enter) every
Wireless actuator for home automation using ARDUINO
You can control everything..... anywhere
Rev.2.2

RADIOCONTROLLI S.r.l.Via Carditello 10 81050 San Tammaro (CE)[email protected]
www.radiocontrolli.compag.1/9
RADIOCONTROLLI S.r.l.Via Carditello 10 81050 San Tammaro (CE)[email protected]
www.radiocontrolli.comPag.17/17
Wireless actuator for home automation using ARDUINO
You can control everything..... anywhere
Rev.2.2
RESET procedure
JUMP
A the fter configuration and the association between the Actuator units and Arduino ( ) to be able use previous chaptersthe same Actuator unit with different Arduino devices it is
: necessary to do the following procedure
1) Power ON the Actuator unit.2) Press and hold down the button RESET will light 1 the LED (orange).3) Press and release the button RESET14) Release (about 3 seconds) the button RESET15) They will start a series of green flashes on LED16) the button During these flashes press and release again RESET1
RESET1 Button
RESET Button