wireless air controls installation manual
TRANSCRIPT
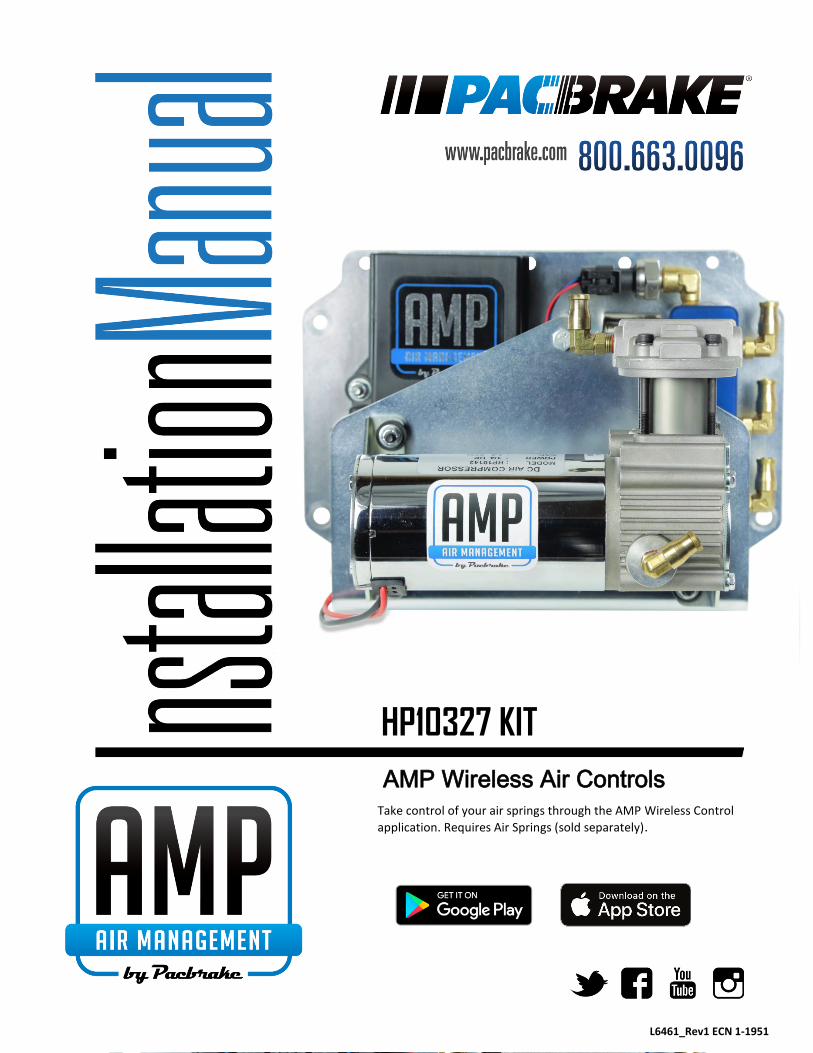
Take control of your air springs through the AMP Wireless Control
application. Requires Air Springs (sold separately).
HP10327 KIT
AMP Wireless Air Controls
L6461_Rev1 ECN 1-1951

HP10327 AMP WIRELESS AIR CONTROLS L6461
2
L6461_Rev1 ECN 1-1951
Kit Contents System Diagram
Wireless Control Board
with Compressor
1
Frame Bracket 2
3/8” U-Bolt 2
3/8” Nyloc Nut 4
3/8” Flat Washer 4
5/16” Hex Head Screw 4
5/16” Nyloc Nut 4
5/16” Flat Washer 8
T-Tap, 16-14 AWG 1
Spade Terminal 1
Fuse Holder 1
Fuse, 10A 1
Heat Shrinkable Splice 1
Ring Terminal
Relay Harness
1
1
1/4” Airline, Black
1/4” Airline, Red
1/4” Airline, Green
6’
15’
15’
Inlet Air Filter 1
Tube Cutter 1
Installation Manual 1
Troubleshooting guide 1
Warranty Card 1
AMP Decal 1
Tools Required Wire Strippers
Terminal Crimper
Heat Gun or Torch
Ratchet and Socket Set
Multi Meter or Test Light
Torque Wrench

HP10327 AMP WIRELESS AIR CONTROLS L6461
3
L6461_Rev1 ECN 1-1951
Thank you and congratulations on the purchase of your AMP Wireless Air Controls kit. Please read the entire installation
manual prior to starting the installation to ensure you can complete the install once started.
1 Control Board Installation
This kit is designed to be installed along the frame
rail of pickup trucks, see Figure 1A.
Check for clearance along the frame rail to ensure
that the kit will not interfere with anything once
installed. Refer to Figure 1C.
Fasten the control board to the two frame brackets
using the supplied 5/16” cap screws, nuts and
washers. Torque the hardware to 17 ft-lbs [23 N.m].
Refer to Figure 1B.
Mount the control board as high as possible on the
frame rail and in the orientation shown in Figure
1C.
Securely install the Control Board Assembly onto
the frame rail of the vehicle using 2 U-bolts, 4 flat
washers, and 4 Nyloc nuts. Refer to Figure 1C.
Check to ensure control board/compressor and
mounting brackets do not pinch or interfere with
vehicle components.
Figure 1B
Figure 1A
Figure 1C

HP10327 AMP WIRELESS AIR CONTROLS L6461
4
L6461_Rev1 ECN 1-1951
2 Harness Installation
Refer to the system diagram on page 2 for the following instructions.
Locate a switched ignition wire at the fuse block in the engine bay
Ensure the ignition is OFF before proceeding
Control Board Harness Route the red/black/white harness from the control board to the engine bay. Extend/trim the harness as
necessary.
Strip the end of the black wire and crimp the supplied ring terminal to it.
Connect the ring terminal to the negative terminal of the battery.
If the negative terminal of the battery is not accessible, an external chassis ground may be used provided it has
clean contact.
Use the blue heat shrinkable splice to connect the fuse holder to the red wire.
Crimp the male spade terminal to the other end of the fuse holder.
Use the blue 16-14 AWG T-tap and crimp it onto a 12VDC switched ignition source, then connect the male
spade terminal to the T-Tap.
The T-tap can be crimped onto a constant 12VDC source – giving the user the ability to control their air springs
without having to power the truck on. The controller consumes approximately 35-80mA in standby mode, which
will slowly discharge the battery.
Compressor Relay Harness
SIGNAL WIRE
TO BATTERY NEGATIVE
T-Tap
12VDC SWITCHED IGNITION WIRE

HP10327 AMP WIRELESS AIR CONTROLS L6461
5
L6461_Rev1 ECN 1-1951
Find a location to mount the relay receptacle within 12” of the positive battery terminal.
Route the red/black wires with plug along the control board harness and connect to the matching plug at the
compressor. Use the supplied zip ties to secure both the compressor and control board harnesses away from
heat sources and moving components.
Connect the ring terminal crimped to two black wires to the negative terminal of the battery.
If the negative terminal of the battery is not accessible, an external chassis ground may be
used provided it has clean contact.
Connect the fuse holder to the positive terminal of the battery.
Locate the white wire on control board harness, trim the heat shrunk end and strip the end.
Connect this white wire with the white signal wire of the relay harness using the pre-installed red heat
shrinkable splice.
3 Plumbing
Refer to the System Diagram on page 2 for the following instructions.
Use supplied tube cutter to cut airline. Using scissors may distort the line and cause the fitting to leak.
Connect the input of the solenoid block to the outlet of the compressor using a section of black airline.
Connect the air intake filter to the inlet of the compressor using a section of black airline. Mount the filter
housing in a clean, dry area sheltered from road spray and debris.
Connect the inlet of the DRIVER side air spring to the LEFT port on the solenoid block using the red airline.
Connect the inlet of the PASSENGER side air spring to the RIGHT port on the solenoid block using the green
airline. Ensure airlines between the control board and air springs are of equal lengths.
Use the supplied zip ties to secure the airlines away from heat sources and moving components

HP10327 AMP WIRELESS AIR CONTROLS L6461
6
L6461_Rev1 ECN 1-1951
4 Application User Guide
Once all installation has been completed, the system is ready to be paired with your mobile device.
4.1 Pairing/Connecting the Controller with an Android Device
Switch vehicle to ignition power or idle engine to power on controller
Turn on Bluetooth and Location services on your device
In system options, open the Bluetooth page
Refresh and search for the controller with name containing “PACBRAKE AMP”
Select the controller for pairing – if successful, the Wireless AMP controller will be added to the list of paired
devices on your mobile device.
Open the AMP Wireless Controls app. The Bluetooth toggle will illuminate to show if your device has successfully
connected to the controller on the AMP Wireless Controls kit.
4.2 Pairing/Connecting to Controller with an iPhone™
Ensure that Bluetooth and Location services are turned on
Open the AMP Wireless Controls app. The Bluetooth toggle will illuminate to show that your device has
successfully connected to the controller on the AMP Wireless Controls kit.
NOTE: If multiple PACBRAKE AMP devices are nearby, a window will display to select a controller for connection.
Download the AMP Wireless Air Controls
app on Google Play, the App Store, or visit
www.pacbrake.com/wireless to
download the latest version.

HP10327 AMP WIRELESS AIR CONTROLS L6461
7
L6461_Rev1 ECN 1-1951
4.3 Air Spring Inflation/Deflation
Press and hold the Inflation or Deflation button to adjust the pressure in the air springs.
Use the Air Spring Selection tab to select which air spring to inflate/deflate.
Pacbrake does not limit the minimum or maximum pressure in your air springs. Inflate your air springs
according to your air spring manufacturer’s guidelines.
4.4 Presets Tab
Use the Presets Tab to save pressure presets.
Press and hold one of the preset buttons to save the current pressure value as a preset. A message on the bottom
of the screen will indicate that the preset has been saved.
Use these presets anytime to quickly adjust to the desired pressure.
4.5 Bluetooth Toggle
The Bluetooth Toggle illuminates when it has successfully connected to the wireless controller.
Tap the Bluetooth toggle to manually connect or disconnect from the controller.
Note: The app automatically connects to the controller on startup.
4.6 Air Spring Selection
Select which air spring to inflate/deflate by tapping on the Left, Both or Right button.
4.7 Pressure Indicator
The Pressure Indicator shows the pressure of each air spring with an accuracy of ± 5% over the entire range.
The presets allow for rapid adjustment to the desired pressure (± 1 PSI)
5 Leak Testing
Inflate both air springs to 90 PSI and wait for the pressure readings on the application to stabilize. Allow this
pressure to remain in the system for a few minutes and ensure that it is not dropping. If the pressure is slowly
decreasing over several minutes, use soapy water on all airline connections to detect any air leaks. Repair as
necessary and retest.
Inflate the air springs to a predetermined value, and on the following day recheck the pressure. If one or both the
air springs have lost pressure, an air leak is present. The leak must be repaired, and then retested until no leaks
exist.
Congratulations! You have completed the installation. Proceed to the following page for warranty information and
operating guidelines.

HP10327 AMP WIRELESS AIR CONTROLS L6461
8
L6461_Rev1 ECN 1-1951
6 Warranty
To be eligible for warranty, owner must submit their warranty card or register online within 30 days of purchase date.
Refer to the attached Warranty Sheet for more information
Operating your vehicle with Pacbrake air suspension
Pacbrake air springs have minimum and maximum pressure requirements. Never operate your vehicle with less than
10 PSI in the air spring and never inflate the air springs over 100 PSI. Staying within the pressure limit will ensure
maximum air spring life. Failure in doing so may void the warranty. Check the air pressure in the air springs daily for
the first couple of days to ensure a leak does not develop. The air springs are designed to maintain the vehicles stock
ride height with a load. Do not use the air springs as a means to lift the vehicle with no load. A rough ride may result.
Servicing your vehicle with Pacbrake air suspension
When lifting the vehicle with a floor jack or hoist on the frame, never allow the air spring to limit the travel of the axle.
Try to always jack the vehicle on the axle. Suspending the axle with the air spring limiting the axle travel will damage
the air spring and void the air spring warranty.
Disclaimer
Driving while distracted can result in a loss of vehicle control that may lead to an accident, severe personal injury, and
death. The driver’s primary responsibility is in the safe and legal operation of a vehicle, and use of any handheld
devices, other equipment, or vehicle systems which take the driver’s eyes, attention and focus away from the safe
operation of a vehicle or which are not permissible by law should never be used during operation of the vehicle.
Legal - Apple, the Apple logo, iPhone, and iPod touch are trademarks of Apple Inc., registered in the U.S. and other
countries. App Store is a service mark of Apple Inc., registered in the U.S. and other countries. - Google Play and the Google Play logo are trademarks of Google LLC - Android is a trademark of Google LLC - The Android robot is reproduced or modified from work created and shared by Google and used according to
terms described in the Creative Commons 3.0 Attribution License.

HP10327 AMP WIRELESS AIR CONTROLS L6461
9
L6461_Rev1 ECN 1-1951
FCC Regulatory Approval
Contains Transmitter Module FCC ID: A8TBM70ABCDEFGH
This equipment has been tested and found to comply with the limits for a Class B digital device, pursuant to part 15 of the FCC Rules.
These limits are designed to provide reasonable protection against harmful interference in a residential installation. This equipment
generates, uses, and can radiate radio frequency energy, and if not installed and used in accordance with the instructions, may cause
harmful interference to radio communications. However, there is no guarantee that interference will not occur in a particular installation.
If this equipment does cause harmful interference to radio or television reception, which can be determined by turning the equipment off
and on, the user is encouraged to try to correct the interference by one or more of the following measures:
• Reorient or relocate the receiving antenna.
• Increase the separation between the equipment and receiver.
• Connect the equipment into an outlet on a circuit different from that to which the receiver is connected.
• Consult the dealer or an experienced radio/TV technician for help.
IC Regulatory Approval
Contains transmitter module IC: 12246A-BM70BLES1F2
This device complies with Industry Canada license-exempt RSS standard(s). Operation is subject to the following two conditions:
(1) This device may not cause interference, and
(2) This device must accept any interference, including interference that may cause undesired operation of the device.
Le présent appareil est conforme aux CNR d'Industrie Canada applicables aux appareils radio exempts de licence. L'exploitation est
autorisée aux deux conditions suivantes:
(1) l'appareil ne doit pas produire de brouillage, et
(2) l'utilisateur de l'appareil doit accepter tout brouillage radioélectrique subi, même si le brouillage est susceptible d'en
compromettre le fonctionnement.
CUSTOMER SERVICE HOURS
MONDAY TO FRIDAY FROM 6:00 AM TO 4:30 PM PST
BUSINESS HOURS OF OPERATION
MONDAY TO FRIDAY FROM 7:30 AM TO 4:00 PM PST
CORPORATE HEADQUARTERS / R&D CENTER
19594 96TH AVENUE
SURREY, BRITISH COLUMBIA