wireless lan connection set-up instructions - honda wireless lan set... · 1. summary - 1 - 1-1...
TRANSCRIPT

Wireless LAN Connection Set-up Instructions
LA990009-2864

1. Summary
- 1 -
1-1 Using a DST-i wireless LAN connectionIn order to establish a wireless network connection, a decision to select either Infrastructure or Adhoc mode will be necessary. DENSO recommends using Infrastructure Mode, however it may require additional equipment (Access Point) if one is not already available. The two types of connection modes are supported as follows:
Infrastructure mode Adhoc modeAllows wireless connection between a PC and the DST-i via an access point.
Allows direct wireless connection between a PC and the DST-i.
See PC Owner’s manual.
These instructions explain how to execute necessary settings on a PC screen to use the DST-i wirelessly, register the DST-i settings, and connect to wireless LAN (local area network) connection.
To establish a wireless LAN connection, the PC must have a proper wireless LAN adapter installed and configured. Refer to your PC/device manual or consult your IT professional.
Access point (wireless LAN router)
See the explanation provided in these guidelines.
Refer to device manual.
See the explanation provided in these guidelines.
See PC Owner’s manual.

- 2 -
Review the DST-i LED Indicators to confirm proper hardware connection:
Infrastructure mode Adhoc modePC connection (wireless LAN connection) indicator
PC connection (wireless LAN connection) indicator
Just after start: Flashing fastSearching for an access point: Flashing fastAfter connecting to an access point: Flashing slow
Just after start: Flashing fastStandby for connection: Flashing slow
To Confirm Active Wireless ModeDST-i Screen
NOTE: On the main screen, the notification icon will identify which mode is actively configured.
Infrastructure modeAfter connecting to an access point
Adhoc modeStandby for connection

- 3 -
1-2 Operating environmentOperating environmentSame as the Honda Diagnostic System (HDS) operating environmentHDS should be installed
Wireless LAN specification supported by the DST-iIEEE802.11b IEEE802.11gIEEE802.11n (2.4GHz bandwidth)
NOTE5GHz IEEE802.11n and IEEE802.11a cannot be used.

- 4 -
1-3 Usage methodWireless LAN connection setup
Setting up DST-i wireless LAN connection on a PC.
The “DST-iWifiSetupWizard” is used to configure the wireless LAN settings on the DST-i through the PC.
CAUTIONThe method to set up the wireless LAN adapter, and the setup method to connect a PC to an access point (wireless LAN router) are not described.
NOTEIn order to establish a PC connection through the wireless LAN, you must first configure the settings on the PC to wireless settings on the DST-i. The following procedure must be set up before you are able to connect through wireless LAN.
Flow of operation:
• Recommended Infrastructure Mode parameters (Network Authentication and Data Encryption)
• Recommended Adhoc Mode parameters (Network Authentication, Data Encryption, and Channel)
• Selecting the connection method (Infrastructure or Adhoc)
Infrastructure Mode setup Adhoc Mode setup
Contact your system administrator for the remaining setup parameters (i.e. SSID, Network Key, IP address, etc.) as these are defined by individual facilities.
Selecting the connection method (Infrastructure or Adhoc)
For the operating method, see “3. Wireless LAN connection setup”.

- 5 -
Vehicle diagnosis by wireless LAN connection
The “DST-iConnectionManager” is used to establish proper connection. The connection status can be checked by viewing the DST-i indicator and the screen display. See the “1-1. About using the DST-i wireless LAN connection” for how to check.
The DST-i can be used wirelessly when a vehicle diagnosis is performed in this condition.
CAUTION• When using the DST-i wirelessly, it is necessary to keep the dashboard (see the following image of the screen)
displayed.
• When connecting the DST-i and a PC with the USB cable, the USB connection is connected.
Flow of operation:
• Searching and selecting the DST-i using the connection manager
• Displaying the dashboard
Searching and selecting the DST-i using the connection manager
Displaying the dashboard
For the operating method, see “4. Vehicle diagnosis by wireless LAN connection”.

- 6 -
DST-i Agent services
Connect the DST-i and a PC either by wireless or USB cable to execute all DST-i Agent functions. There are “DST-i Software Update”, “CM Update History File Retrieving”, “Update of CM Update Calibration File”, etc., as the function.
CAUTIONIt is necessary to keep the dashboard displayed when using the DST-i wirelessly.
There are two ways to run the DST-i Agent service functions:
1. Auto start and run
2. Manually select the function and run
Auto start and run
Manually select the function and run
For the operating method, see “5. DST-i Agent services”.

- 7 -
1. Connect the DST-i and the PC by the USB cable and startup the DST-i. To recognize the DST-i, the Windows device set-up may take up to 45 minutes to install.
2. Connect the USB cable (Type A) to the PC USB port.3. Connect the USB cable (Type B) to the DST-i USB port.
4. Turn the mode switch of the DST-i ON.
CAUTIONWhen first connecting a PC to the DST-i by the USB cable or connecting to a different USB port from previous time, wait until the message of USB driver install appears on the lower right of the PC screen.
5. After the DST-i top screen appears, do not change screens as this may render setup impossible.
CAUTIONThe screen will automatically change and this connection screen is displayed when the DST-i and PC are communicating.
2. DST-i and PC connection

3. Wireless LAN connection setup
- 8 -
Setting up the DST-i wireless LAN connection on a PC.
1. Launch “DST-iWifiSetupWizard” from the Startup menu.
2. Once Setup Wizard has launched, select the setup procedure and click. Select “Wizard Assisted Setup” or “Advanced Mode Setup”.
The following explains what happens when selecting “Wizard Assisted Setup”.

3. Connect the DST-i to the PC by the USB cable.4. Turn the DST-i mode switch to ON.5. After the DST-i top screen appears, click “Next”.
Setup for infrastructure mode1. Select the setup items from the drop down menu. The following settings will depend on existing IT/Company
parameters:
a. SSID
b. Network Key
c. IP Address
d. Subnet Mask2. After setup is complete, click “Save and Next”.
- 9 -

Setup in Adhoc mode1. Select the setup items from the drop down menu. The following Setting will depend on existing IT/Company parameters
a. SSID
b. Network Key
c. Channel2. After setup is complete, click “Save and Next”.
Select the default setting (Infrastructure or Adhoc) and click “Complete”.
- 10 -

The Connection Manager is used to establish proper connection. The connection status can be checked by viewing the DST-i indicator and the screen display. See “1-1. Using a DST-i wireless LAN connection” for how to check.
The DST-i can be used wirelessly when a vehicle diagnosis is performed in this condition.
1. Launch “DST-iConnectionManager” from the Startup menu.
2. The Connection Manager launches and DST-i search starts. Wait until the detected DST-i is displayed.
- 11 -
4. Vehicle diagnosis by wireless LAN

3. After the list of detected DST-i appears, select the DST-i to be connected and click “Connection”.
NOTEWhen connecting to the same DST-i again, it will automatically link after detecting the DST-i by clicking “Set Default”.
NOTE• The DST-i serial number appears in the DST-i List.
• To verify the serial number, check the label affixed to the back of the DST-i.
NOTEIf the DST-i device indicated in the DST-i List is connected to another PC, “Not Available” appears.
- 12 -

4. After connection to the DST-i is complete, a notification appears on the dashboard screen.
CAUTIONIt is necessary to keep the dashboard displayed when using the DST-i wirelessly.
5. Start the HDS.- The DST-i can be used wirelessly when a vehicle diagnosis is performed in this condition.
NOTEWhen closing the connection manager and the dashboard screen, please wait approximately 30 seconds to allow the screen to disappear.
- 13 -
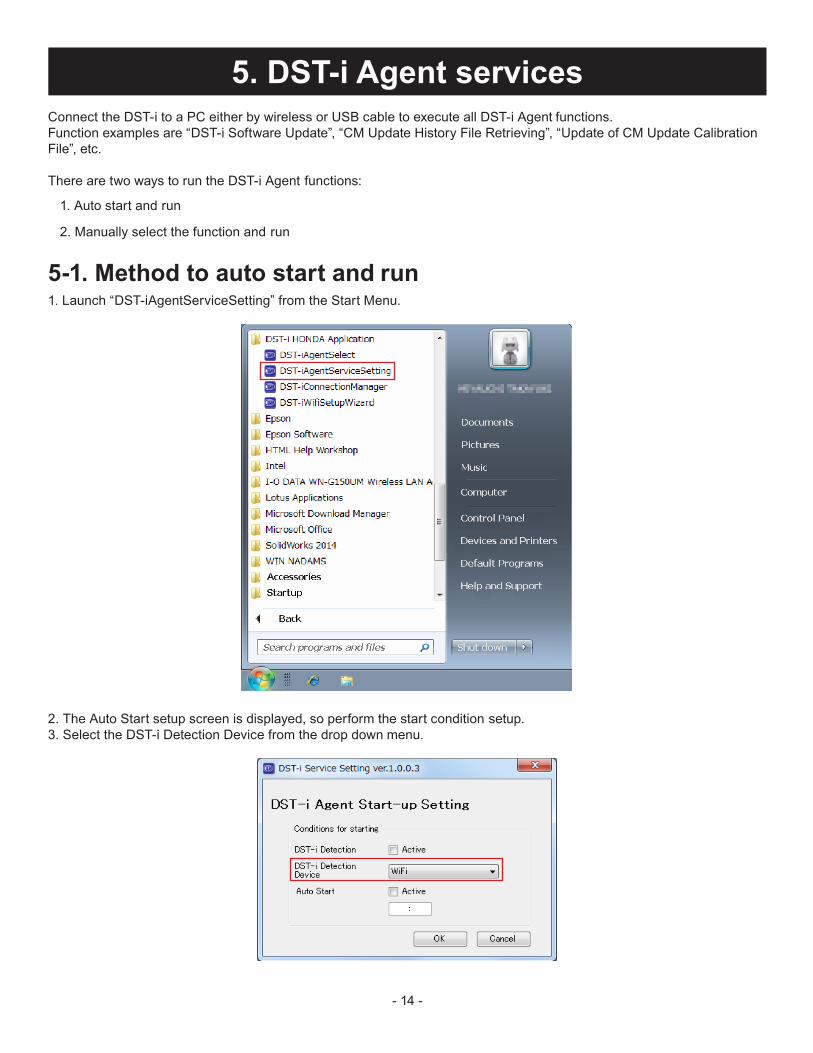
Connect the DST-i to a PC either by wireless or USB cable to execute all DST-i Agent functions.Function examples are “DST-i Software Update”, “CM Update History File Retrieving”, “Update of CM Update Calibration File”, etc.
There are two ways to run the DST-i Agent functions:
1. Auto start and run
2. Manually select the function and run
5-1. Method to auto start and run1. Launch “DST-iAgentServiceSetting” from the Start Menu.
2. The Auto Start setup screen is displayed, so perform the start condition setup.3. Select the DST-i Detection Device from the drop down menu.
5. DST-i Agent services
- 14 -

To immediately auto start after the connection with the DST-i is established1. Click the “Active” box for DST-i Detection and click “OK”.
CAUTIONIt is necessary to keep the dashboard displayed when using the DST-i wirelessly.
2. A confirmation screen appears, click “OK”.
3. A completion screen appears, click “OK”.
4. Once the DST-i is detected and the connection is established, the DST-i Agent service will automatically start and run the program.
- 15 -

To set the time to auto start1. Click the “Active” box for auto start.2. Enter the time to auto start and click “OK”.
CAUTIONIt is necessary to keep the dashboard displayed when using the DST-i wirelessly.
3. When the set time comes, the DST-i Agent service will automatically start and run the program.
NOTEThe program will not run if the DST-i cannot be detected or the connection is not established by the set time.
- 16 -

5-2. Method to manually select the function and run1. Launch “DST-iAgentSelect” from the Start Menu.
2. The manual selection of function to run screen is displayed, allowing you to choose the program selection to run.3. Place a check in the box next to the program you wish to run and click “Run”.
NOTESelecting “Force overwrite” updates all the data and will take time to complete.
- 17 -

4. A confirmation screen appears, click “OK”.
5. Wait until the chosen program completes. - When completing correctly, the program automatically ends and the screen closes.
- 18 -