wireless lan usb adapter 802 - movistar.es · to standard ieee 802.11n/802.11g/ 802.11b, which...
TRANSCRIPT

Wireless USB Adapter Comodidad sin límites.
User manual

Wireless USB Adapter
2
Table of Contents 1. Introduction ................................................................................................................................ 42. The Wireless USB Adapter ......................................................................................................... 6
2.1 Package Content ................................................................................................................ 62.2 Description of the USB Adapter ........................................................................................ 72.3 User Documentation ......................................................................................................... 82.4 Minimum Requirements ................................................................................................... 9
3. Installation CD .......................................................................................................................... 103.1 Installation ....................................................................................................................... 13
4. The Wireless USB Adapter Utility ........................................................................................... 194.1 Running the Wireless USB Adapter Utility ................................................................... 194.2 Automatic configuration ................................................................................................. 22
4.2.1 Network Configuration with applied wireless security ..................................................... 23
4.2.2 Network Configuration with applied wireless security and simple support function for wireless configuration (WPS). .............................................................................................................. 27
4.2.3 Network configuration without applied wireless security ................................................ 40
4.3 Manual configuration ...................................................................................................... 414.3.1 Hidden SSID Networks ......................................................................................................... 46
4.4 Profile Management ........................................................................................................ 484.4.1 Conectar ................................................................................................................................. 50
4.4.2 Borrar ...................................................................................................................................... 50
4.4.3 Editar ....................................................................................................................................... 51
4.4.4 Añadir ..................................................................................................................................... 52
4.5 Information on the connection ...................................................................................... 534.6 Additional Features ......................................................................................................... 55
4.6.1 TCP/IP Configuration ............................................................................................................ 55
4.6.2 Select the Operating System’s in-built Configuration Utility ........................................... 57
5. Windows Wireless network configuration service ................................................................ 595.1 Windows 7 Wireless Network Configuration Service .................................................. 59
5.1.1 Connection to a wireless network ........................................................................................ 59
5.1.2 Connection to a Wireless Router with a hidden SSID ........................................................ 63
5.1.3 Verification of the wireless network status ........................................................................ 70
5.1.4 Change the preferred networks order .................................................................................. 71
5.1.5 Change Advanced Configuration ......................................................................................... 75
5.1.6 Advanced Authentication ..................................................................................................... 78
5.2 Windows Vista Wireless Network Configuration Service ............................................ 885.2.1 Connection to a wireless network ........................................................................................ 88
5.2.2 Connection to a Wireless Router with a hidden SSID ........................................................ 91
5.2.3 Verification of the wireless network status ........................................................................ 95
5.2.4 Change the preferred networks order .................................................................................. 96

Wireless USB Adapter
3
5.2.5 Change Advanced Configuration ......................................................................................... 98
5.2.6 Advanced Authentication ................................................................................................... 100
5.3 Windows XP Wireless Network Configuration Service .................................................. 1075.3.1 Connection to a wireless network ...................................................................................... 107
5.3.2 Connection to a Wireless Router with a hidden SSID ...................................................... 111
5.3.3 Verification of the wireless network status ...................................................................... 114
5.3.4 Change the preferred networks order ................................................................................ 116
5.3.5 Change Advanced Configuration ....................................................................................... 117
5.3.6 Advanced Authentication ................................................................................................... 117
6. Uninstall .................................................................................................................................. 1247. Troubleshooting ..................................................................................................................... 127
7.1 Common problems ......................................................................................................... 1277.1.1 Windows does not recognize the USB adapter after connecting it correctly ................ 128
7.1.2 Link activity LED does not light ......................................................................................... 129
7.1.3 Your USB adapter is currently disabled ............................................................................. 129
7.1.4 Utility’s icon is not on the Windows taskbar .................................................................... 130
7.1.5 The SSID of your network is not in the list of available networks .................................. 131
7.1.6 You can’t connect to the router .......................................................................................... 131
7.1.7 The signal connection level is low or unstable ................................................................. 132
7.1.8 No IP address has been obtained automatically ............................................................. 133
7.1.9 Resource conflict on Windows ........................................................................................... 133
7.1.10 The wireless connection is established but I do not have Internet access ................... 134
7.2 Verification of the status of the USB Wireless Adapter controllers .......................... 1357.2.1 Verification of the status of the controllers in Windows 7 .............................................. 135
7.2.2 Verification of the status of the controllers in Windows Vista ........................................ 138
7.2.3 Verification of the status of the controllers in Windows XP (SP2 or higher) .................. 143
7.3 Verification of radio connection ................................................................................... 1477.3.1 Verification of the radio connection in Windows 7 .......................................................... 148
7.3.2 Verification of the radio connection in Windows Vista .................................................... 149
7.3.3 Verification of the radio connection in Windows XP (SP2 or higher) .............................. 151
8. Informative Letter .................................................................................................................. 1539. Customer Service .................................................................................................................... 15410. Environmental Recycling ...................................................................................................... 15511. Technical specifications ........................................................................................................ 15612. Agreement Declaration .......................................................................................................... 157

Wireless USB Adapter
4
1. Introduction Firstly, we would like to thank you for the trust you have shown in Movistar by purchasing this USB Wireless Adapter. This device forms a part of Movistar’s Broad Band Equipment that will allow you to benefit from the huge advantages of using wireless networks. Read this User Manual carefully. This User Manual is mainly practical and aimed at providing you with a step-to-step guide of how to install, configure and use this USB Wireless Adapter. The USB Wireless Adapter allows you to connect your computer to a wireless network pursuant to standard IEEE 802.11n/802.11g/ 802.11b, which provides you with a wireless connection of up to 300 Mbps. The USB Wireless Adapter is connected to a USB port on the computer. To use it, you have to install the controller and corresponding management utility on your computer. Warning: Due to the existence of several wireless standards, you may find different solutions on the market that may not be compatible with standard IEEE 802.11n and therefore not compatible with Movistar’s ADSL Wireless Equipment.

Wireless USB Adapter
5
Figure 1.1 Home Wireless Network

Wireless USB Adapter
6
2. The Wireless USB Adapter Below is a description of your USB Wireless Adapter, package content and system requirements as well as its features and advantages.
2.1 Package Content
Figure 2.1 Box content Besides, you will also find the warranty card inside the box.
Wireless USB Adapter
7
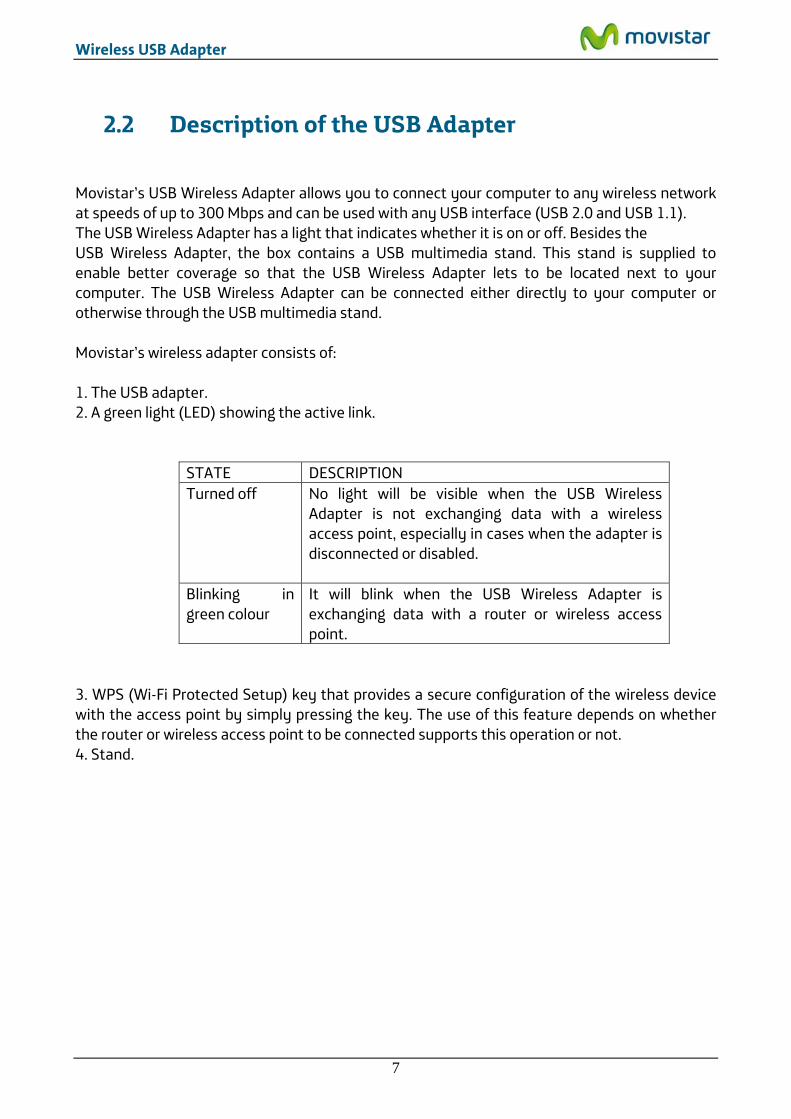
2.2 Description of the USB Adapter Movistar’s USB Wireless Adapter allows you to connect your computer to any wireless network at speeds of up to 300 Mbps and can be used with any USB interface (USB 2.0 and USB 1.1). The USB Wireless Adapter has a light that indicates whether it is on or off. Besides the USB Wireless Adapter, the box contains a USB multimedia stand. This stand is supplied to enable better coverage so that the USB Wireless Adapter lets to be located next to your computer. The USB Wireless Adapter can be connected either directly to your computer or otherwise through the USB multimedia stand. Movistar’s wireless adapter consists of: 1. The USB adapter. 2. A green light (LED) showing the active link.
STATE DESCRIPTION Turned off No light will be visible when the USB Wireless
Adapter is not exchanging data with a wireless access point, especially in cases when the adapter is disconnected or disabled.
Blinking in green colour
It will blink when the USB Wireless Adapter is exchanging data with a router or wireless access point.
3. WPS (Wi-Fi Protected Setup) key that provides a secure configuration of the wireless device with the access point by simply pressing the key. The use of this feature depends on whether the router or wireless access point to be connected supports this operation or not. 4. Stand.

Wireless USB Adapter
8
Figure 2.2 Parts of Movistar’s wireless adapter NOTE: The adapter must be connected to a USB port version 2.0 to achieve the equipment’s best performance. If it is connected to a USB port version 1.1, the equipment will operate correctly but not at its best.
2.3 User Documentation The USB Wireless Adapter is supplied with an Installation Guide. You should read this Guide before starting to install your USB Wireless Adapter. This Advanced Manual adds additional information to the one provided in the Installation Guide. The CD supplied also contains the following documents: - TCP_IP Guideline: This document describes how to prepare your computer for a wireless connection after installing the USB Wireless Adapter. - Wireless Networks Recommendations: You can use this document as a guide to optimise the wireless network created with Movistar’s wireless router, offering guidelines on how to physically locate you at home and on aspects to consider during configuration to keep it stable and secure.
1
2
3
4

Wireless USB Adapter
9
2.4 Minimum Requirements The minimum characteristics required by your computer for Movistar’s USB Wireless Adapter to operate correctly are:
- Desktop computer or laptop with a free USB port (remember that if your port is USB 1.1, the speed of the connection will be lower).
- Windows XP, Vista or Windows 7 operating system. - CD reader. - 50 MB of free disk space for installing the controller and management utility. - A free 1.1 or 2.0 USB port on your computer. - 800x600 video card, 256 colours. - Internet Explorer 5.5. - CPU 300 MHz or higher processor speed.

Wireless USB Adapter
10
3. Installation CD NOTE. The routes indicated throughout the document for direct access, etc. is associated to the classical view of the system in Windows XP and Vista. If you do not have either one, the routes may vary slightly. To change the system view, press the right hand side button (secondary) on the mouse on the task bar. In the menu that appears, select the “Properties” option. On the screen that appears, access the “Start Menu” tab. Then select the view you want to use.
Insert the installation CD accompanying the USB Wireless adapter into the CD-ROM unit on your computer. The screen shown in the next figure will automatically appear. IMPORTANT. In Windows 7 and Vista, a window may appear asking you for confirmation to show next figure In this case, accept. If figure 3.1 does not appear automatically, launch the installation program manually by clicking twice on the “autorun.exe” file located in the root folder of the CD content.

Wireless USB Adapter
11
Figure 3.1 Operation selection
This first window will show two options (to see this menu in English, push on the British flag):
• Install Drivers and Utility: This menu allows you to install both the USB device controller and the utility that you will use to connect your USB wireless adapter.
• See documentation: You can use this option to access the user manual and the quick installation guide in pdf format. By clicking on this option, the following window will appear:

Wireless USB Adapter
12
Figure 3.2 See documentation On this screen, you can select:
• USB Wireless Adapter User Manual. Select this option to open the user manual (this document) in pdf format.
• USB Wireless Adapter Quick Guide. Select this option to open the installation guide in pdf format.
• Wireless Network Recommendations. Select this option to open the Recommendation guide for wireless networks in pdf format.
• TCP/IP Guideline. Select this option to open the TCP/IP protocol Guidelines in pdf format. Also the link Install Acrobat reader (found on the bottom left) is included. This program is required for opening documents in pdf format.

Wireless USB Adapter
13
3.1 Installation
1. Select option: Install Drivers and Utility, in the CD’s start window:
Figure 3.3 Install Drivers and Utility

Wireless USB Adapter
14
2. The installation process will beging and the following screen will appear indicating in
which directory the utility is going to be installed.
Figure 3.4 Installation directory. The default installation directory is ‘C:\Program files\MOVISTAR\ConxWireless’. If you want to change the location where Movistar Wireless USB Adapter utility is to be installed, click on Examinar… Navigate through the directory tree until you reach the new destination folder and press Aceptar.
3. Next, you can enter the name of the programme folder under which the management utility icons will appear. Press Siguiente to begin installation.

Wireless USB Adapter
15
4. After pressing Siguiente the installation of the necessary components will begin and
a progress screen will appear informing you of the status of the installation.
Figure 3.5 Installation process.
5. After finishing the installation process, a screen will appear asking you to connect the adapter to a free USB port on your computer. USB ports are marked with the USB symbol indicated below.
If you wish, you can connect the Wireless USB Adapter to the stand and the stand’s cable to a USB port of your computer.
Wireless USB Adapter
16
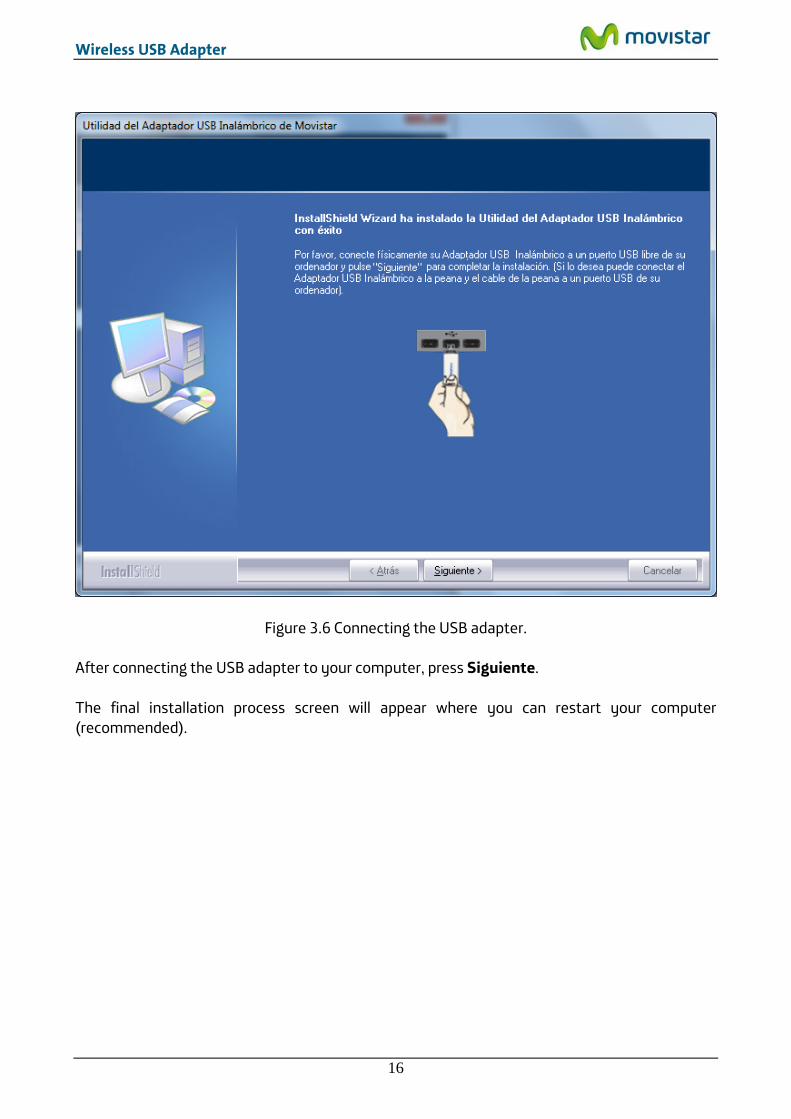
Figure 3.6 Connecting the USB adapter. After connecting the USB adapter to your computer, press Siguiente. The final installation process screen will appear where you can restart your computer (recommended).

Wireless USB Adapter
17
Figure 3.7 End of installation. By pressing Finalizar the installation window will close. If you do not want to restart your computer after concluding the installation, click on ‘No, I will restart my computer later on’, and press Finalizar. After completing these steps, your adapter and the utility will be installed on your computer. The application will run automatically when starting Windows. To find out whether the application has been installed correctly, you should see whether the utility icon is in the notification area of the Windows task bar. See an example below:

Wireless USB Adapter
18
Figure 3.8 Task bar icons

Wireless USB Adapter
19
4. The Wireless USB Adapter Utility
4.1 Running the Wireless USB Adapter Utility Before connecting your Wireless USB Adapter to a wireless network, make sure your wireless router or access point is activated and turned on. Otherwise, follow the manual of your wireless router in order to activate it. You run the Utility by simply using Start->All programs-> Adaptador USB Inalámbrico de Movistar->Utilidad del Adaptador USB Inalámbrico de Movistar.
Figure 4.1 Group of programs

Wireless USB Adapter
20
Or by clicking twice on the corresponding icon on the task bar.
Figure 4.2 Task bar icons IMPORTANT. By running the Windows 7 and Vista Assistant, a window may appear asking you to confirm. In this case, accept. To close the Configuration Assistant at any time, press the red cross on the upper right hand side of the screen. The different statuses of the application are indicated with different icons on the task bar, as shown below:
Figure 4.3 Utility’s status. If you connect the USB network, you will see that the icon on the tool bar changes from ‘Device disconnected physically from your computer or disabled’ as indicated in previous figure, to ‘There is no network connection’. By running the utility, the following figure will appear.

Wireless USB Adapter
21
Figure 4.4 Available networks The application shows the available networks detected by your wireless Adapter. The following information will appear in the “Redes Disponibles” section:
- Nombre de Red. This is the network identifier (SSID) of all networks within the range of the USB wireless adapter.
- Conexión This shows the type of connection you will make to connect to this network. It can be ‘Punto a punto’, indicating that you are going to connect to another device only to transmit data between them, or ‘Red’, indicating that you are going to connect to a network through a wireless access point (AP) or wireless router. This option (“Red”) will be indicated in the “Conexión” field if the network you are going to connect to comes from a Movistar router.
- Canal. This indicates the channel number (contained in standards 802.11b, 802.11g and 802.11n) you are using to transmit information on this network. Next to the channel number are three letters (b, g and n) that tell us what type of technology the related network supports. ‘b’ is the oldest (11 Mbps), then ‘g’ (54 Mbps) and finally ‘n’ (up to 300 Mbps).
- Seguridad. The type of security of the related network is indicated here. Normally, the types of networks listed will range from less to more secure: Not secure, WEP, WPA-PSK and WPA2-PSK.

Wireless USB Adapter
22
- Señal. This indicates your adapter’s coverage percentage. 100% indicates maximum coverage.
- Calidad de la Señal. Similar to Señal, this will tell you the level of coverage in the form of a horizontal bar with colours ranging from red (poor coverage), to yellow (average coverage, sufficient for connecting but surely with a limited speed), and finally green (very good coverage).
4.2 Automatic configuration Before connecting your USB Wireless Adapter to a wireless network: 1. Make sure that your router’s wireless network or access point is active. Check that the wireless network indicator is on. If not, consult the installation guide or equipment manual to activate it. 2. Check whether you have the following parameters of your wireless network: network name (SSID) and encryption key (WPA,WEP, etc.) or WPS operating values (simple wireless configuration method). You may check them on the label on the back of your router or by reviewing the configuration with your router’s corresponding tool (for further information, we recommend reviewing your router or access point user manual). After checking the preliminary points, follow the instructions provided below for configuring the network connection of your Movistar’s wireless USB adapter. On the start window of the Management Utility of your “Available networks” Adapter. If you use a Movistar router with a default configuration, identify both the name of the wireless network (SSID) to which you will be connected and the Security key, which can be found on the sticker on the underside of the device (see figure 4.6 ‘Security parameters’). It is important to know the name of the network identifier (SSID). You can change this to personalise the name of your network and therefore easily identify it from amongst the whole available group. Select the network you want to connect to from the list of wireless networks and press Siguiente (if your network does not appear on the list, press Actualizar to detect networks again).

Wireless USB Adapter
23
Figure 4.5 Available Networks Then, you will be asked in a new window to enter the security values required for establishing the necessary connection. The window that appears may vary depending on the wireless security measures applied and facilities supported. There are 3 possible types of networks: - Networks with an applied wireless security measure (chapter 4.2.1). - Networks with an applied wireless security measure and simple support function for wireless configuration (WPS) (chapter 4.2.2). - Networks without an applied wireless security measure (chapter 4.2.3).
4.2.1 Network Configuration with applied wireless security In this window you should enter the password for connection to the network and the profile name, which will allow you to save the connection options to the wireless network selected. The profile created will save all options required for connection to the network and, if these options change, the rest of the information that did not change will not have to be entered again. You can just edit the profile to modify the parameters that changed (to do this, go to subsection 4.4 ‘Profile Management’). The utility will save the profile and, if there is sufficient

Wireless USB Adapter
24
coverage of the network related to this profile, it will attempt to connect to the latter with the parameters stored there.
Figure 4.6 Security parameters The application automatically generates a profile name obtained from the name of the wireless network (SSID) to which you will connect. If you want, you can personalise profile name (field Nombre de Perfil’). Enter the corresponding security key on the Clave de Seguridad field (if you have changed the default password, enter the new parameter). Before validating the security key entered, you can press Opciones Avanzadas and enter the network parameters (TCP/IP) manually. If you are not sure of what you have to do here, see subsection 4.6.1 TCP/IP Configuration. It is for advanced users. After entering both parameters, press Aplicar to continue (then the security parameter window will close) and wait a few seconds until the connection is established. If the desired wireless network connection is established correctly, the following message will appear indicating that the connection has been successful. To check whether the network connection is correct, see subsection 4.5 ‘Information on the connection’.

Wireless USB Adapter
25
Figure 4.7 Successful connection
If the connection is not established correctly, the following window will appear. Press Aceptar and repeat the configuration.
Figure 4.8 Connection error Once correctly connected to the wireless network, the configuration will be stored on your computer. The utility will automatically connect to this network when you connect the USB wireless Adapter to your computer or start it up.
4.2.1.1 Network Configuration with Advanced Authentication If the network that you have selected has a WPA or WPA2 security (Not to be confused with WPA-PSK or WPA2-PSK) or any other security type that requires advanced authentication parameters (802.1x protocol):
Congratulations, you have configured your Internet connection successfully. Now, you can enjoy your wireless connection!

Wireless USB Adapter
26
Figure 4.9 Network with WPA security Press Siguiente. The next window will appear indicating that you must use the in-built wireless utility of the operating system to configure a connection to this type of networks.
Figure 4.10 Contact the administrator
To use the in-built wireless utility of the operating system, see paragraph 4.6.2 ‘Select the Operating System’s in-built Configuration Utility’. To configure your wireless connection with this type of security, see paragraph 5.1.6 and 5.2.6 (‘Advanced Authentication’) in case you use Windows Vista and XP respectively. There, you will be explained how to configure this connection.

Wireless USB Adapter
27
If you use Windows 2000, consult the network administrator of the network you want to connect. He will inform you about the process you must follow. By default Windows 2000 has no in-built wireless utility to manage wireless connections.
4.2.2 Network Configuration with applied wireless security and simple support function for wireless configuration (WPS).
Wi-Fi Protected setup (WPS) is a technology for wireless networks that can simplify the configuration process without having to configure the connection with the access point or with the security parameters. Its use depends on whether your wireless access point supports such a function. To configure your adapter using the simple wireless configuration method (WPS), you have two options:
- Push Button Configuration or PBC. This is the recommended configuration mode as you just have to press the specific button of your WPS wireless access point and then the corresponding WPS button of your wireless adapter to establish the required connection. Otherwise, a second configuration method can be chosen using the management utility of the wireless adapter.
- PIN Configuration. This is another WPS configuration method. It consists of entering a PIN identifying the device you want to add in the wireless access point or vice versa.
To check that the network you are trying to connect using WPS has enabled this feature, please follow the next steps.
1. On the utility’s Available Networks tab (you will see that your access point supports WPS because the corresponding icon appears in the available network list security column:
. The following figure shows an example of a network with WPS enabled:

Wireless USB Adapter
28
Figure 4.11 Example of a network with WPS enabled
4.2.2.1 WPS configuration using utility button of the USB Wireless Adapter To configure the wireless connection by pressing the button of the utility, follow these instructions:
1. On the following window that asks you whether you want to use WPS to configure your
connection, select the option ‘Sí’ and press Siguiente > to continue.

Wireless USB Adapter
29
Figure 4.12 Selection of WPS option
2. Select the option BOTÓN: Opción de configuración mediante pulsación botón and press Aplicar. The WPS profile creation window will appear (figure 4.27 ‘WPS profile creation’).

Wireless USB Adapter
30
Figure 4.13 Choice of WPS configuration
3. Press the specific button of your wireless access point to activate the WPS registration function (see the wireless access point manual). You have 120 seconds to perform the association, otherwise the adapter will no longer look forward to a device to register.
You can execute the WPS registration in reverse order. Firstly, press the WPS button of your access point, and then click Aplicar in the window of choice WPS configuration. You have 120 seconds to perform the association, otherwise the time window will be disabled and the access point will no longer let a device to register. You can also configure the TCP/IT network parameters of your connection by pressing on Opciones Avanzadas (see subsection 4.6.1 ‘TCP/IP Configuration’). It is for advanced users. Once the configuration using WPS has finished, a profile containing all data required for connection to the previously selected network is created. By default, the utility generates a profile name formed by the words' MOVISTAR_ 'plus the SSID of the network to which it connects. After that, the utility will connect automatically to the network. If the desired wireless network connection is established correctly, the following message will appear indicating that the connection has been successful.

Wireless USB Adapter
31
Figure 4.14 Successful connection
If the connection is not established correctly, or the WPS registry fails, the following window will appear. Press Aceptar and repeat the configuration.
Figure 4.15 Connection error
4.2.2.2 Enrolee PIN Configuration To configure the wireless connection using PIN in enrolee mode, follow these instructions:
1. On the following window that asks you whether you want to use WPS to configure your connection, select the option ‘Sí’ and press Siguiente > to continue.
Congratulations, you have configured your Internet connection successfully. Now, you can enjoy your wireless connection!

Wireless USB Adapter
32
Figure 4.16 Selection of WPS option
2. Select the option ‘PIN: Opción de configuración mediante la introducción de código PIN. Seleccione el modo apropiado’. By default, enrolee mode is selected on the dropdown menu 'Modo Configuración'. A PIN number generated by your adapter will be displayed. If desired, you can change this number by clicking on the button 'Generar PIN'. Copy the PIN from the utility dimmed textbox on the registry option of your wireless access point (see the manual of the wireless access point) and press Aplicar. A WPS profile creation window will appear (figure 4.24 ‘WPS profile creation’).

Wireless USB Adapter
33
Figure 4.17 PIN Enrolee option
3. Then, push on the button Aplicar, your adapter will be registered in your wireless access point. You have 120 seconds to perform the association; otherwise the adapter will no longer seek a device to register.
You can also configure the TCP/IT network parameters of your connection by pressing on Opciones Avanzadas (see subsection 4.6.1 ‘TCP/IP Configuration’). It is for advanced users. Once the configuration using WPS is finished, a profile containing all data required for connection to the previously selected network is created. By default, the utility generates a profile name formed by the words' MOVISTAR_ 'plus the SSID of the network to which it connects. After that, the utility will connect automatically to the network. If the desired wireless network connection is established correctly, the following message will appear indicating that the connection has been successful.

Wireless USB Adapter
34
Figure 4.18 Successful connection
If the connection is not established correctly, or the WPS registry fails, the following window will appear. Press Aceptar and repeat the configuration.
Figure 4.19 Connection error
4.2.2.3 Registrar PIN Configuration To configure the wireless connection using PIN in registrar mode, follow these instructions:
Congratulations, you have configured your Internet connection successfully. Now, you can enjoy your wireless connection!

Wireless USB Adapter
35
1. On the following window that asks you whether you want to use WPS to configure your
connection, select the option ‘Sí’ and press Siguiente > to continue.
Figure 4.20 Selection of WPS option
2. Select the option ‘PIN: Opción de configuración mediante la introducción de código PIN. Seleccione el modo apropiado’. Select on the dropdown menu 'Modo Configuración' the option ‘Registro’. Enter the PIN number generated by your wireless router (see the manual of the access point or wireless router) and press Aplicar. A WPS profile creation window will appear (figure 4.24 ‘WPS profile creation’).

Wireless USB Adapter
36
Figure 4.21 PIN Registrar option
3. Then, run the external registrar mode on your access point or wireless router to activate
the registrar function WPS (see the manual of your wireless access point). You have 120 seconds to perform the association, otherwise the adapter will no longer seek a device to register.
You can also configure the TCP/IT network parameters of your connection by pressing on Opciones Avanzadas (see subsection 4.6.1 ‘TCP/IP Configuration’). It is for advanced users. Once the configuration using WPS is finished, a profile containing all data required for connection to the previously selected network is created. By default, the utility generates a profile name formed by the words' MOVISTAR_’ plus the SSID of the network to which it connects. After that, the utility will connect automatically to the network. If the desired wireless network connection is established correctly, the following message will appear indicating that the connection has been successful.

Wireless USB Adapter
37
Figure 4.22 Successful connection
If the connection is not established correctly, or the WPS registry fails, the following window will appear. Press Aceptar and repeat the configuration.
Figure 4.23 Connection error
4.2.2.4 WPS Configuration using Physical Buttons To configure the wireless connection by pressing the physical button of the adapter, follow these instructions: NOTE. To configure the wireless connection by pressing physical buttons, you need to have
already executed the wireless utility (You must check that the utility icon, , is located on the Windows taskbar). In case it is not already executed, see chapter 4.1 ‘Running the Wireless USB Adapter Utility’.
1. Keep the USB wireless Adapter WPS button pressed for 2 seconds (see figure ‘Parts of Movistar’s wireless adapter’) until the following window appears:
Congratulations, you have configured your Internet connection successfully. Now, you can enjoy your wireless connection!

Wireless USB Adapter
38
Figure 4.24 Creation of a WPS profile
2. Press the specific button of your wireless access point to activate the WPS registration function (see the wireless access point manual). The progress bar will increase as the following figure shows:
Figure 4.25 WPS registration progress You can execute the WPS registration in reverse order. Firstly, press the WPS button of your access point, and then click Aplicar in the window of choice WPS configuration. You have 120 seconds to perform the association, otherwise the time window will be disabled and the access point will no longer let a device to register in. Once the configuration using WPS is finished, a profile containing all data required for connection to the previously selected network is created. By default, the utility generates a profile name formed by the words' MOVISTAR_ 'plus the SSID of the network to which it connects. After that, the utility will connect automatically to the network. If the wireless network connection is established correctly, the following message will appear indicating that the connection has been successful.

Wireless USB Adapter
39
Figure 4.26 Successful connection
If the connection is not established correctly, or the WPS registry fails, the following window will appear. Press ‘Aceptar’ and repeat the configuration.
Figure 4.27 Connection error
Congratulations, you have configured your Internet connection successfully. Now, you can enjoy your wireless connection!
Wireless USB Adapter
40
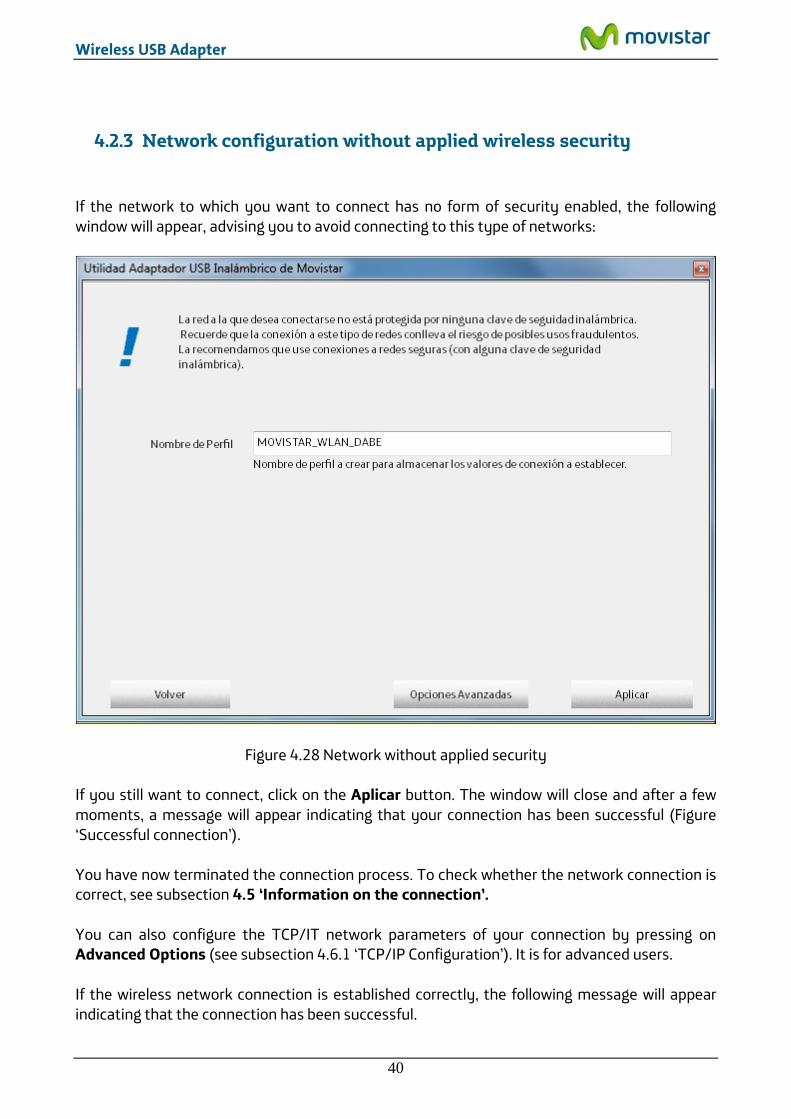
4.2.3 Network configuration without applied wireless security If the network to which you want to connect has no form of security enabled, the following window will appear, advising you to avoid connecting to this type of networks:
Figure 4.28 Network without applied security If you still want to connect, click on the Aplicar button. The window will close and after a few moments, a message will appear indicating that your connection has been successful (Figure ‘Successful connection’). You have now terminated the connection process. To check whether the network connection is correct, see subsection 4.5 ‘Information on the connection’. You can also configure the TCP/IT network parameters of your connection by pressing on Advanced Options (see subsection 4.6.1 ‘TCP/IP Configuration’). It is for advanced users. If the wireless network connection is established correctly, the following message will appear indicating that the connection has been successful.

Wireless USB Adapter
41
Figure 4.29 Successful connection
If the connection is not established correctly, the following window will appear. Press Aceptar and repeat the configuration.
Figure 4.30 Connection error Once correctly connected to the wireless network, the configuration will be stored on your computer. The utility will automatically connect to this network when you connect the USB wireless Adapter to your computer or start it up.
4.3 Manual configuration Before connecting your Wireless USB Adapter to a wireless network: 1. Make sure that your router’s wireless network or access point is active. Check that the wireless network indicator is on. If not, consult the installation guide or the user manual to activate it. 2. Check whether you have the following parameters of your wireless network: network name (SSID) and encryption key (WPA, WEP, etc) or WPS operating values (simple wireless
Congratulations, you have configured your Internet connection successfully. Now, you can enjoy your wireless connection!

Wireless USB Adapter
42
configuration method). For further information, please review your router or access point user manual. After checking the preliminary points, follow the instructions provided below for configuring the network connection of your Movistar wireless adapter. The Movistar utility also allows manual configuration of your wireless access. This configuration is for advanced users or connections to networks without SSID (hidden network name).
1. On the start window of the Management Utility of your “Available networks” Adapter, press the Manual Conf. Button:
Figure 4.31 Available networks
2. Next, you must fill the values required in the fields. These values are explained below To make this type of configuration, you should know all data of the network to which you want to connect. If you do not, you should use the automatic configuration.

Wireless USB Adapter
43
Figure 4.32 Manual Configuration The data requested is the following:
- Nombre Perfil (Profile Name). This is the name with which the Movistar utility saves configuration data (Profile). Similar to the automatic configuration mode, the name is also generated automatically and can be overwritten.
- Nombre Red (Network Name). You will use the dropdown window to choose the
name of the network (SSID) to which you want to connect. If the network to which you want to connect has a hidden SSID, you should know your SSID to be able to connect. The following point explains how to connect with hidden networks.
- Conexión (Connection). This indicates the type of connection to be made. You can
choose between ‘Red’ and ‘Punto a punto’. The first case is intended for connection to a network through a wireless access point (AP) or wireless router. This option (“Red”) should be selected if you configure your Internet access using Movistar’s router.
Select the second case if you want to make connections between two single devices such as computer to computer or laptop to computer and it will only transmit data from one device to another.

Wireless USB Adapter
44
- Autenticación (Authentication). This field must contain the type of authentication
used on the network to which you want to connect. You must choose one of the following types:
• Abierta (Open). No authentication – users do not require an authentication
key. • Compartida (Shared). The key is secret and shared between the device that
wants to connect to the network and the wireless access point. • WPA-PSK (WPA-Pre Shared Key). Based on WPA but not requiring an
authentication server. The key is shared. • WPA2-PSK. Similar to the previous point, this is WPA-PSK migration to an
even more secure system. Similar to WPA-PSK, no authentication server is required. The key is shared.
• WPA-None. This authentication system may only be selected if our connection is ‘Point-to-Point’. It is based on WPA-PSK but applied to point-to-point connections so it is more secure than WEP because the encrypted algorithms are better and more modern.
- Tipo Seguridad (Security Type). This field must contain the type of encryption used in
network communication. You must choose one of the following types:
• None. In this case, no encrypted algorithm will be used and there will be no confidentiality between your computer and the access point.
• WEP (Wired Equivalent Privacy). This is the first encrypted system used on wireless networks. You should use WPA instead of WEP if you have old devices connected as the must b
• TKIP (Temporal Key Integrity Protocol). This is the encrypted algorithm used by WPA. It is the same algorithm as WEP but solves the latter’s vulnerabilities.
• AES (Advanced Encryption Standard). This is the most modern of the encrypted algorithms mentioned. It is normally associated with WPA2 or WPA2-PSK. It is the most recommended if all your devices are compatible with this type of encryption.
- Clave Seguridad (Security Key). Field intended for the key used in the related text
table for connection to the network. - Opciones Avanzadas (Advanced options). This allows you to specify TCP/IP network
values manually. For further details, consult subsection 4.6.1 ‘TCP/IP Configuration’ of this user manual.
3. Once you have entered the required parameters, click Aceptar. Then, in the following
message you will be offered to connect to the profile created. To do so, click Aceptar. Otherwise, click Cancelar. In this case we will have created a connection profile within the Profiles management option that can connect at any time.

Wireless USB Adapter
45
Figure 4.33 Creation of network profile
4. If you clicked Aceptar, the utility will try to connect with the parameters. If those values are correct, it displays the following message indicating that the connection has been established successfully.
Figure 4.34 Successful connection
If the connection is not established correctly, the following window will appear.
Figure 4.35 Connection error Please, verify that you entered the correct security key (remember that it’s case sensitive). Press Aceptar and try again. If the problem remains, reboot your router and your computer and repeat the configuration.
Congratulations, you have configured your Internet connection successfully. Now, you can enjoy your wireless connection!

Wireless USB Adapter
46
Once correctly connected to the wireless network, the configuration will be stored on your computer. The utility will automatically connect to this network whilst you connect the USB wireless Adapter to your computer or start it up.
4.3.1 Hidden SSID Networks
1. To connect to a hidden SSID network, you must first press the Conf Manual button in the initial Management Utility window of your ‘Available Networks’ Adapter (see next figure ‘Available Networks’).
Figure 4.36 Available Networks
2. The manual configuration window will appear. You must complete all fields related to your connection (if you have any doubts, see subsection 4.3 ‘Manual configuration’). But in the ‘Nombre Red’ (Network Name) field (see next figure) you should not select the SSID of the network to which you want to connect as it is hidden and will not appear. You will have to write the exact SSID using your keyboard after previously selecting the field with your mouse.

Wireless USB Adapter
47
Figure 4.37 Hidden SSID
3. Once you have entered the required parameters, click Aceptar. Then, in the following message you will be offered to connect to the profile created. To do so, click Aceptar. Otherwise, click Cancelar. In this case we will have created a connection profile within the Profiles management option that can connect at any time.
Figure 4.38 Creation of network profile
4. If you clicked Aceptar, the utility will verify the parameters entered. If those values are correct, it displays the following message indicating that the connection has been established successfully.

Wireless USB Adapter
48
Figure 4.39 Successful connection
If the connection is not established correctly, the following window will appear.
Figure 4.40 Connection error Please, verify that you entered the correct security key (remember that it’s case sensitive). Press Aceptar and try again. If the problem remains, reboot your router and your computer and repeat the configuration. Once correctly connected to the wireless network, the configuration will be stored on your computer. The utility will automatically connect to this network whilst you connect the USB wireless Adapter to your computer or start it up.
4.4 Profile Management Profiles allow you to connect to different networks, by storing the required data to establish each wireless connection necessary over time. By default, every time the configuration process on a network is completed, a profile containing all data related to the connection will be automatically created. As such, you will not have to repeat the configuration process every time you want to connect to such network.
Congratulations, you have configured your Internet connection successfully. Now, you can enjoy your wireless connection!

Wireless USB Adapter
49
The adapter connects automatically to the network of the latest profile established every time the computer is started. To establish this connection automatically, you must have both coverage and signal of such network. To be able to see, change, add or eliminate a profile from your computer, you must go to the Gestión Perfiles tab in the main utility window. The utility will show this aspect:
Figure 4.41 Profile management If you have several profiles, select the one you want for establishing the connection. If you select any of the available profiles, you will see information related to this profile in the chart on the right hand side. It contains the following information:
- Estado Red. It indicates whether the network related to the profile is available, that is, whether it is present for connection. If your adapter detects a signal level that is sufficient to make the connection to the network related to this profile, then the Estado Red field will show the status ‘DISPONIBLE’, otherwise it will show the ‘NO DISPONIBLE’ status.
- Nombre Red (SSID). Name identifying the network related to such profile. - Conexión. This indicates the type of connection to be made. You can choose between
‘Red’ and ‘Punto a punto’. The first case is intended for connection to a network through a wireless access point (AP) or wireless router. This option (“Red”) should

Wireless USB Adapter
50
be displayed if you have configured your Internet access using Movistar’s router. If the value displayed is 'Punto a punto', the connection is made between only two devices such as computer-laptop or computer-computer, and only transmits data from one device to another.
- Método Seguridad. It shows the type of authentication and encryption of the connection. If you want to know more about the type of Security of the network to which you are connected, see subsection 4.3 ‘Manual configuration’.
The profiles created can be edited, deleted, and may choose to connect to one or other profile. Furthermore, it is possible to create new profiles if you know the connection settings of your network. To delete a connection profile, select it and press the button Borrar. When connecting to a profile or other select it and press the button Conectar. To change the order of the profile, press the arrow keys. Here are the options to edit and create profiles. From the Profile Management tab, you can perform four different actions according to the keys available. To change the order of the profile, press the arrow keys. Here are the options you can execute by pressing the corresponding buttons.
4.4.1 Conectar After configuring your connection and therefore creating a profile, you can choose to connect to your network by simply selecting the desired profile and pressing Conectar. Movistar’s utility will then attempt to connect to the network using the parameters stored in the profile.
4.4.2 Borrar Eliminate the selected profile. If you are connected to the network related to this profile, the following window will appear, indicating that the profile you are trying to eliminate is being used:
Figure 4.42 profile in use

Wireless USB Adapter
51
If you still want to eliminate it, press Aceptar, otherwise close the window to cancel the action.
4.4.3 Editar This allows you to modify the information on the profile. By pressing the key, the manual configuration window will appear containing current profile data already configured.
Figure 4.43 Profile configuration In the paragraph ‘4.3 Configuración manual’, you will be explained all the fields and options that you can configure in this window. Once you have finished editing the profile, press Aceptar to save it, or press Cancelar to cancel the action.

Wireless USB Adapter
52
4.4.4 Añadir
This allows you to create a profile without having to establish a connection on such network. The manual configuration window will appear (figure ‘Manual configuration’) for you to manually enter the connection parameters. Similar to with the previous button, if you require information to create a new profile, go to the ‘Manual Configuration’ subsection.
Figure 4.44 Add profile In the paragraph ‘4.3 Configuración manual’, you will be explained all the fields and options that you can configure in this window. Once you have created the profile settings press Aceptar. Then, the following message is displayed giving you the option to connect to the profile you have just created.

Wireless USB Adapter
53
Figure 4.45 Profile creation Click Aceptar to connect to the profile you just edited or created, otherwise press Cancelar.
4.5 Information on the connection This subsection contains information on your USB wireless adapter and if it is connected to a network, information on the established connection. First of all, look at the icon related to information on the connection:
- If it is bright green and also shows the SSID name of the network to which you wanted to connect than you are correctly connected to the network. In this case you
are connected to ‘WLAN_DABE’. - If it is dark green with no SSID, this will mean that you are not connected to any
network.

Wireless USB Adapter
54
Figure 4.46 Established connection The data shown is the following: Información Conexión Establecida (it shows data related to the wireless connection)
- Nombre Red (SSID). Name identifying the network to which you are connected. - Dirección MAC de la Red. This is the MAC address of the wireless access point
interface to which you are connected. - Velocidad de la Red. This is the maximum connection speed on such network. - Calidad de la Conexión. This indicates the connection’s signal strength. - Señal. This indicates your adapter’s coverage percentage. 100% indicates maximum
coverage.
Información Adaptadro USB Inalámbrico (this shows data related to your adapter and information about your network connection)
- Estado Interfaz Inalámbrico. It shows whether the wireless interface is available for using your USB wireless adapter for connecting to wireless networks. To use the adapter for connection, it must indicate that it is ‘Encendido’ otherwise it will be disabled showing that it is ‘Apagado’. To alter the status, press the Activado/Desactivado button.

Wireless USB Adapter
55
- Dirección MAC. This is the MAC address of your wireless adapter. - Dirección IP. This is the network address assigned to your wireless interface. - Máscara de Subred. This defines the range of network addresses. - Puerta de Enlace. This is the IP address of the routing device (router or access point). - DNS (‘Domain Name Server’). This is the IP address of the server, required for
Internet navigation (name resolution). Usually the address of your access point or router is assigned and it is responsible for supplying the DNS service.
4.6 Additional Features
4.6.1 TCP/IP Configuration Before concluding any of the configuration scenarios mentioned above, you can manually configure the parameters of your Network connection (TCP/IP configuration). If you have any doubts as to what values to enter in your configuration, we advise you not to modify them. If you have to, consult the network administrator. This subsection of configuration allows you to manually assign the network address of your wireless interface as well as the parameters required for configuring it on a LAN network. If you use a Movistar router with a default configuration, you will not have to alter any value shown in this subsection. By clicking on Opciones Avanzadas from any network connection’s configuration scenarios, the following window will appear:

Wireless USB Adapter
56
Figure 4.47 Advanced Options The data requested is the following (Remember: you will not have to modify anything if you connect to a Movistar wireless router):
- Driección IP PC. This is the network address (IP address) assigned to your wireless interface.
- Máscara Subred. This defines the range of network addresses. - IP Puerta de Enlace. This is the IP address of the routing device (router or access
point). - DNS (‘Domain Name Server’). This is the IP address of the server, required for
Internet navigation (name resolution). Usually the address of your access point or router is assigned and it is responsible for supplying the DNS service.
You may only enter this data manually if you select the Usar la siguiente dirección IP option. By default, the Obtener una dirección IP automáticamente option is selected, whereby your computer will obtain the network address automatically through a DHCP server (this entire process is automatic). Nevertheless, if you have to enter values manually, select the Usar la siguiente dirección IP option and enter the values indicated above. You will have to complete all fields for correct operation. You should manually enter the network parameters. For example, when the DHCP

Wireless USB Adapter
57
service of your router is deactivated and your computer is unable to acquire an IP address dynamically, or when the network administrator forces you to use a static IP address (the administrator will supply you with the data you must enter). Finally, press Aceptar to close the window and store the data or press Volver to close the window without saving the changes. You will automatically return to the manual configuration window. You can also find more detailed information in the document ‘PAUTAS_TCPIP.pdf’ that is on the CD supplied. You can open the document in two ways:
- Run the CD menu (see chapter 3, installation CD, where you will find information on how to run the menu), select ‘See Documentation’ and then select ‘TCP/IP protocol guidelines’. Wait a few moments for the TCP/IP protocol Guidelines in pdf format to open.
- Open the CD content (to do this, click on Start-->My PC and then click on the right hand side button of the mouse on the installation disk icon and press Open. A window will appear with the CD content). In the ‘Documentacion’ folder in the root of the CD directory you will find the ‘PAUTAS_TCPIP.pdf’ file. Click twice on the file to open it.
If you are unable to open the file, check whether you have the ‘Adobe Reader’ application installed. To install ‘Adobe Reader’, see subsection 3 ‘Installation CD’.
4.6.2 Select the Operating System’s in-built Configuration Utility Movistar’s utility allows Windows to use its own wireless network configuration service. Windows allows you to configure wireless networks only for XP and Vista and 7 versions. By default, the Movistar’s utility manages the wireless configuration of your USB adapter, although you can choose to use the operating system’s own utility. Depending on the operating system used, the way to configure wireless access through the in-built wireless utility of the operating system (Windows) may vary. Windows Vista and Windows 7 In Windows Vista and Windows 7, you can choose to use either Movistar’s utility or Windows Vista’s in-built utility. For information on how to manage the configuration service of wireless networks in Windows 7, go to subsection 5.1 ‘Windows 7 Wireless Network Configuration Service’ and for Windows Vista, go to subsection 5.2 ‘Windows Vista Wireless Network Configuration Service’.

Wireless USB Adapter
58
Windows XP (SP2 or higher) To make a system manage its wireless interface, click on the right hand button on the Movistar utility icon on the task bar and select the option ‘Usar Utilidad de Configuración propia del sistema operativo’.
Figure 4.48 Use the operating system’s own utility Remember that opting to configure wireless networks using the operating system service disables the possibility of such configuration using Movistar’s Wireless USB Adapter’s personalised Utility. For information about how to manage the configuration service of wireless networks in Windows XP, go to subsection 5.3 ‘Windows XP Wireless Network Configuration Service’. Finally, if you want Movistar’s utility to manage the wireless configuration of your adapter again, click with the right button on the Movistar utility icon on the task bar and select the option ‘Usar Utilidad de Configuración Movistar’.
Figure 4.49 Use Movistar’s utility

Wireless USB Adapter
59
5. Windows Wireless network configuration service
Before connecting your USB Wireless Adapter to a wireless network: 1. Make sure that your router’s wireless network or access point is active. Check that the wireless network indicator is on. If not, consult the installation guide or equipment manual to activate it. 2. Check whether you have the following parameters of your wireless network: the name of the network (SSID) and the encryption key (WPA, WEP, etc) or WPS operating values (simple wireless configuration method). You may check them on the label on the back of your router or by reviewing the configuration with your router’s corresponding tool (for further information, we recommend reviewing your router or access point user manual).
5.1 Windows 7 Wireless Network Configuration Service Si has decidido emplear la utilidad de configuración inalámbrica de Windows 7, aquí se te explica cómo configurar tu conexión inalámbrica.
5.1.1 Connection to a wireless network
To connect to a wireless network, press on the icon on the task bar icon. On the top part of the window you can check the current status of you wireless card:

Wireless USB Adapter
60
Figure 5.1 Available wireless networks
Wireless USB Adapter
61
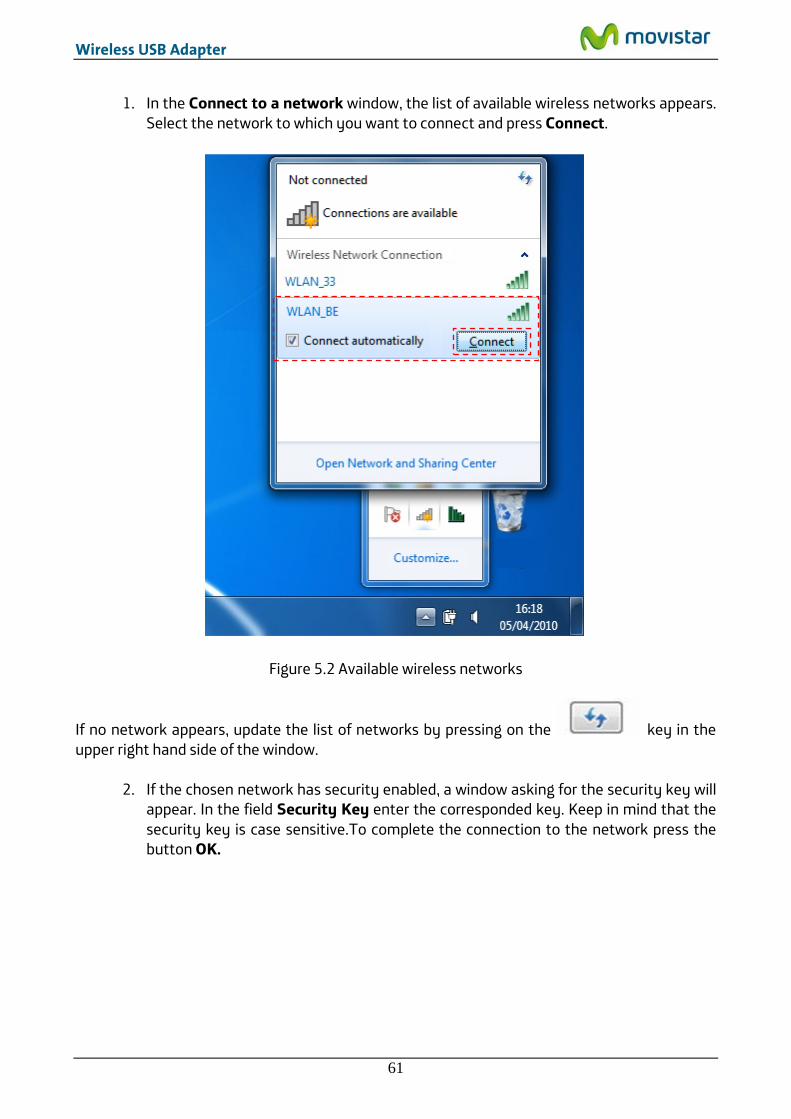
1. In the Connect to a network window, the list of available wireless networks appears. Select the network to which you want to connect and press Connect.
Figure 5.2 Available wireless networks
If no network appears, update the list of networks by pressing on the key in the upper right hand side of the window.
2. If the chosen network has security enabled, a window asking for the security key will appear. In the field Security Key enter the corresponded key. Keep in mind that the security key is case sensitive.To complete the connection to the network press the button OK.

Wireless USB Adapter
62
Figure 5.3 Connect to a network
3. Once the connection has been established, the Word Connected will appear to the right of the network name you chose previously (in the network list of the window Connect to a network), indicating that the connection has been completed successfully.
4. Finally, select the network type of the chosen network. If the wireless network comes
from a Movistar router, select Home network in the next window and then press the button Close.

Wireless USB Adapter
63
Figure 5.4 Connected correctly If you want further information about how to configure your wireless network, consult the following subsections.
5.1.2 Connection to a Wireless Router with a hidden SSID If you want to connect to a wireless router who’s SSID (network name) is hidden, it will not appear on the list of networks. To connect to this type of networks, follow the next steps:

Wireless USB Adapter
64
1. Press on the icon on the task bar and the window Connect to a network will appear. Select the option Open Network and Sharing Center.
Figure 5.5 Open Network and Sharing Center
2. In the window Network and Sharing Center, press on the option Set up a new connection or network.

Wireless USB Adapter
65
Figure 5.6 Network and Sharing Center

Wireless USB Adapter
66
3. In the next window select Manually connect to a wireless network and press Next.
Figure 5.7 Manually connect to a wireless network

Wireless USB Adapter
67
4. Just in case, you have more than one wireless network adapters installed in your
computer, the next window will appear. Select the adapter for which you want to configure the wireless network connection. By default, Windows 7 assigns the name Wireless network connection. Finally, press Next.
Figure 5.8 Choose wireless adapter
5. Enter the parameters. First of all, enter the network’s name, Next, choose the security type, encryption method and enter the security key. Mark the option Connect even if the network is not broadcasting. Press son Next.

Wireless USB Adapter
68
Figure 5.9 Manual connection

Wireless USB Adapter
69
6. The connection process will be completed and a window will appear indicating that
you have created a wireless profile successfully.
Figure 5.10 Profile created successfully
7. Hold one several seconds and check that you have been connected properly to the desired network. In order to verify it in Windows 7, press on the wireless network icon on the task bar and a message will be open as shown in the next figure:

Wireless USB Adapter
70
Figure 5.11 Available networks
Search for the message related to your interface, that the network’s name is correct (WLAN_BE, for example). Also, you should see the message ‘Internet access’ is shown below the network’s name if that network has Internet access available.
5.1.3 Verification of the wireless network status To verify the wireless network status in Windows 7 quickly, select the wireless network icon on the desktop toolbar and a short message will appear like the one in the following figure:

Wireless USB Adapter
71
Figure 5.12 Connected correctly
Search for the message related to your interface. If you have more than one, in the latter you will find:
• The name of the network connection. WLAN_BE, for example. • The current wireless coverage in vertical bar format.
5.1.4 Change the preferred networks order To change the preferred network order and give connection priority to one network over another, press the Open Network and Sharing Centre option on the menu that appears by pressing the connection icon on the Windows 7 toolbar.

Wireless USB Adapter
72
Figure 5.13 Open network and sharing center

Wireless USB Adapter
73
The Network and Sharing Center screen will appear. Press on Manage wireless networks.
Figure 5.14 Network and sharing center

Wireless USB Adapter
74
On the Manage wireless networks screen, select the network whose priority you want to alter on the list.
Figure 5.15 Manage wireless networks

Wireless USB Adapter
75
To give higher priority to a network, press the Move up key. To give lower priority to a network, press the Move down key.
Figure 5.16 Vary connection priority
5.1.5 Change Advanced Configuration To verify the state of the network’s connection in Windows 7:
1. Press on the icon on the task bar and the window Connect to a network will appear.

Wireless USB Adapter
76
Figure 5.17 Wireless network connection status
2. Press using the secondary button of the mouse (right button) on the connected network’s name and select the option Status.
3. Next, Wireless network connection status will appear. Press on Properties button.

Wireless USB Adapter
77
Figure 5.18 Wireless network connection status
The Wireless Network Connection Properties screen will appear, opened by the Networking tab where you can access the advanced configuration of you network adapter. You can configure TCP/IP protocol parameters in particular. For further information, consult the document ‘TCP_IP Verification Guidelines’ in the ‘Documentacion’ folder on the installation CD.

Wireless USB Adapter
78
Figure 5.19 Wireless network connection properties
5.1.6 Advanced Authentication If the network that you wish to connect has a WPA or WPA2 security (Not to be confused with WPA-PSK or WPA2-PSK) or any other security type that requires advanced authentication parameters, please complete the following steps.
1. Press on the icon on the task bar and the window Connect to a network will appear. Select the option Open Network and Sharing Center.

Wireless USB Adapter
79
Figure 5.20 Open network and sharing center
2. In the Network and sharing center window that appears, press on Set up a connection or network.

Wireless USB Adapter
80
Figure 5.21 Network and sharing center

Wireless USB Adapter
81
3. Choose the option Manually connect to a wireless network and press Next.
Figure 5.22 Set up a connection or network

Wireless USB Adapter
82
4. Just in case, you have more than one wireless network adapters installed in your
computer, the next window will appear. Select the adapter for which you want to configure the wireless network connection. By default, Windows 7 assigns the name Wireless network connection. Finally, press Next.
Figure 5.23 Choose wireless connection
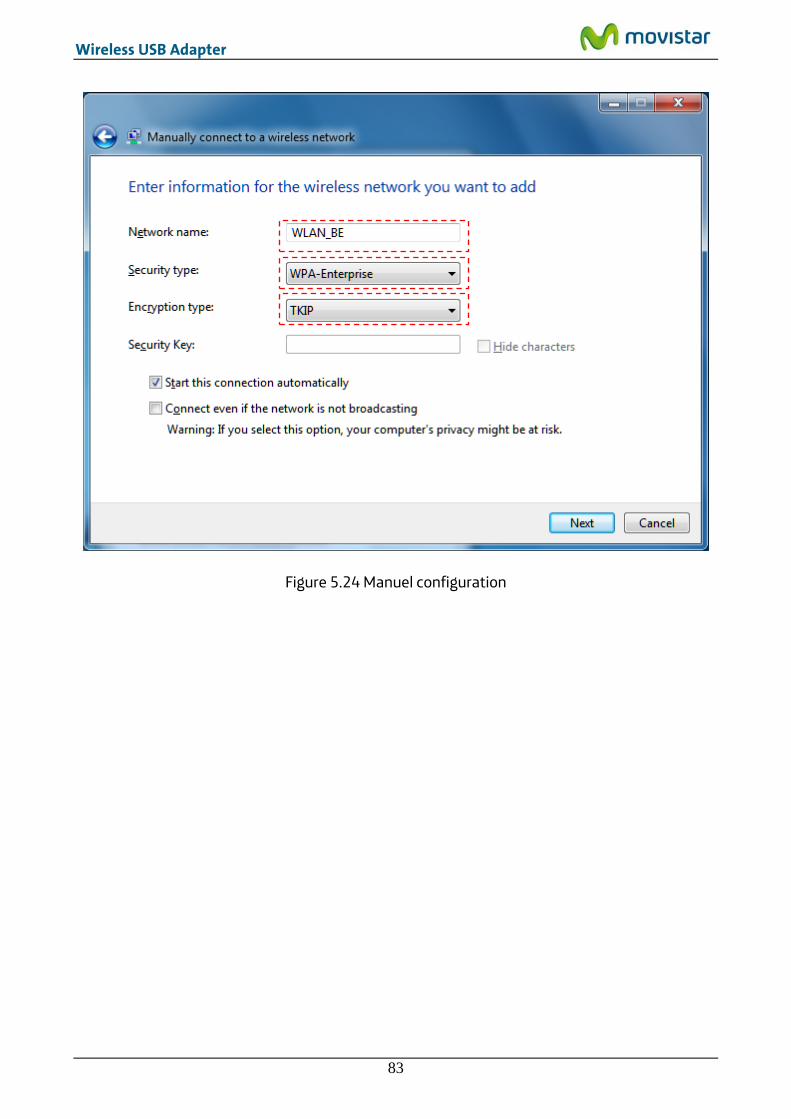
5. Insert the network parameters. First of all, enter the SSID. Then choose the type of authentication protocol and the type of encryption (In the case that the authentication protocol is 802.1x based, you won’t have to enter any password or security key). The remaining security parameters will be entered later. Click Next.
Wireless USB Adapter
83
Figure 5.24 Manuel configuration

Wireless USB Adapter
84
6. The pre-configuration process will be completed and a window indicating that the
network configuration has been saved will be displayed. Now you will be able to enter other advanced security settings. To do this, press on Change connection settings.
Figure 5.25 Adding a network

Wireless USB Adapter
85
7. On the tab Security, you can choose the 802.1x authentication options. To configure
the chosen authentication method press the button Settings…
Figure 5.26 Security settings

Wireless USB Adapter
86
8. Here you can specify if you use digital certificates among other security options.
When finished press OK.
Figure 5.27 PEAP properties

Wireless USB Adapter
87
9. Hold one several seconds and check that you have been connected properly to the
desired network. In order to verify it in Windows 7, press on the wireless network icon on the task bar and a message will be open as shown in the next figure:
Figure 5.28 Connected correctly
Search for the message related to your interface, check that the network’s name is correct (WLAN_BE, for example). Also, you should see the message ‘Internet access’ is shown below the network’s name if that network has Internet access available. For further information contact your local network administrator.

Wireless USB Adapter
88
5.2 Windows Vista Wireless Network Configuration Service
If you have decided to use the Windows Vista wireless configuration utility, you will find how to configure your wireless connection here (to use the operating system’s utility instead of Movistar’s utility, or vice versa, see subsection 4.6.2 ‘Select the Operating System’s own Configuration Utility’).
5.2.1 Connection to a wireless network To connect to a wireless network, open the Connect to a network window by pressing on the task bar icon. This icon shows you the status of the connection through the following details:
Connected to a wireless network:
Not connected to a wireless network:

Wireless USB Adapter
89
1. In the Connect to a network window, the list of available wireless networks appears.
Select the network to which you want to connect and press Connect.
Figure 5.1 Connect to a network
If no network appears, update the list of networks by pressing on the key in the upper right hand side of the window.
2. Click twice on your network SSID and enter the network key if its security is enabled, otherwise you will start an insecure network connection. To complete the network connection, press the Connect Button.

Wireless USB Adapter
90
Figure 5.2 Connect to a network
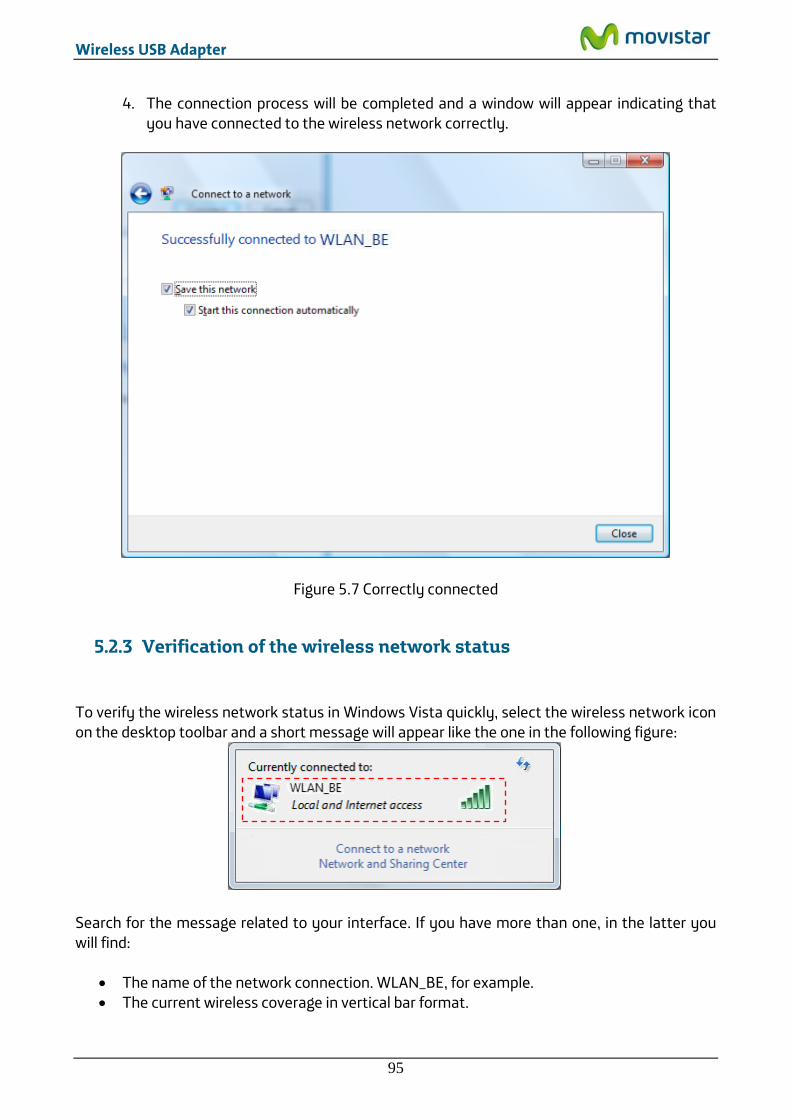
3. The connection process will be completed and a window will appear indicating that you have connected to the wireless network correctly.

Wireless USB Adapter
91
Figure 5.3 Correctly connected If you want further information about how to configure your wireless network, consult the following subsections.
5.2.2 Connection to a Wireless Router with a hidden SSID If you want to connect to a wireless router who’s SSID (network name) is hidden, it will not appear on the list of networks.

Wireless USB Adapter
92
1. Press on the connection icon on the task bar and select Connect to a network. After that, in the window appeared, press Set up a connection or network.
Figure 5.4 Connect to a network

Wireless USB Adapter
93
2. Select the option ‘Manually Connect to a Wireless Network’ and press Next.
Figure 5.5 Network configuration

Wireless USB Adapter
94
3. Insert the network parameters. First of all, enter the network name. Then select the type of security, encryption and security key or password. Select ‘Connect even if the network is not broadcasting’. Press Next.
Figure 5.6 manual connection
Wireless USB Adapter
95
4. The connection process will be completed and a window will appear indicating that you have connected to the wireless network correctly.
Figure 5.7 Correctly connected
5.2.3 Verification of the wireless network status To verify the wireless network status in Windows Vista quickly, select the wireless network icon on the desktop toolbar and a short message will appear like the one in the following figure:
Search for the message related to your interface. If you have more than one, in the latter you will find:
• The name of the network connection. WLAN_BE, for example. • The current wireless coverage in vertical bar format.

Wireless USB Adapter
96
5.2.4 Change the preferred networks order To change the preferred network order and give connection priority to one network over another, press the Network and shared resources centre option on the menu that appears by pressing the connection icon on the Windows Vista toolbar.
The Network and Sharing Center screen will appear. Press on Manage network connections.
Figure 5.8 Network and shared resources centre

Wireless USB Adapter
97
On the Manage wireless networks screen, select the network whose priority you want to alter on the list.
Figure 5.9 Manage wireless networks

Wireless USB Adapter
98
To give greater priority to a network, press the Move up key. To give less priority to a network, press the Move down key.
Figure 5.10 Vary connection priority
5.2.5 Change Advanced Configuration Click on Start->Control panel->Internet & networks->Network and Sharing Centre->See Status to access the ‘Wireless network connection status screen’. On this screen, click on Properties to access the advanced configuration of the network adapter.

Wireless USB Adapter
99
Figure 5.11 Wireless network connection status The Wireless Network Connection Properties screen will appear, opened by the Networking tab where you can access the advanced configuration of you network adapter. You can configure TCP/IP protocol parameters in particular. For further information, consult the document ‘TCP_IP Verification Guidelines’ in the ‘Documentacion’ folder on the installation CD.

Wireless USB Adapter
100
Figure 5.12 Wireless network connection properties
5.2.6 Advanced Authentication If the network that you wish to connect has a WPA or WPA2 security (Not to be confused with WPA-PSK or WPA2-PSK) or any other security type that requires advanced authentication parameters, please complete the following steps.

Wireless USB Adapter
101
1. Press on the connection taskbar icon and select the option Connect to a network. In the appeared window, press on Set up a connection or network.
Figure 5.13 Connecting to a network

Wireless USB Adapter
102
2. Choose the option Manually connect to a wireless network and press Next.
Figure 5.14 Network configuration

Wireless USB Adapter
103
3. Insert the network parameters. First of all, enter the SSID. Then choose the type of authentication protocol and the type of encryption (In the case that the authentication protocol is 802.1x based, you won’t have to enter any password or security key). The remaining security parameters will be entered later. Click Next.
Figure 5.15 Manual configuration

Wireless USB Adapter
104
4. The pre-configuration process will be completed and a window indicating that the
network configuration has been saved will be displayed. Now you will be able to enter other advanced security settings. To do this, press on Change connection settings.
Figure 5.16 Adding a Network

Wireless USB Adapter
105
5. On the tab 'Security', you can choose the 802.1x authentication options.
Figure 5.17 Security settings

Wireless USB Adapter
106
6. Press the button Settings to enter the information related to the authentication
method (EAP) chosen from the previous dropdown menu. Here you can specify if you use digital certificates among other security options. When finished press OK.
Figure 5.18 PEAP Properties

Wireless USB Adapter
107
7. The connection process will be completed and a window will appear indicating that
you have connected to the wireless network correctly.
Figure 5.19 Connection established For further information call the network administrator.
5.3 Windows XP Wireless Network Configuration Service If you have decided to use the Windows XP wireless configuration utility, you will find how to configure your wireless connection here (to use the operating system’s utility instead of Movistar’s utility, or vice versa, see subsection 4.6.2 ‘Select the Operating System’s own Configuration Utility’).
5.3.1 Connection to a wireless network To connect to a wireless network, open the Wireless network connection status window by pressing on the task bar icon (if the icon indicates the ‘Not connected to a wireless network’

Wireless USB Adapter
108
status, you will directly access the window showing wireless networks within range). This icon shows you the status of the connection through the following details:
Connected to a wireless network: Not connected to a wireless network: Limited or no connection: If the wireless network icon does not appear on the task bar, you can open the Wireless network connection status window using Start->Connect to->Wireless network connections.
1. In the General tab, press the View Wireless Networks button.
Figure 5.20 Wireless connection status
2. Lists of available wireless networks appear in this window. If no network appears, update the list of networks by pressing on the Refresh Network List option on the Related Tasks menu on the upper left hand side of the screen.
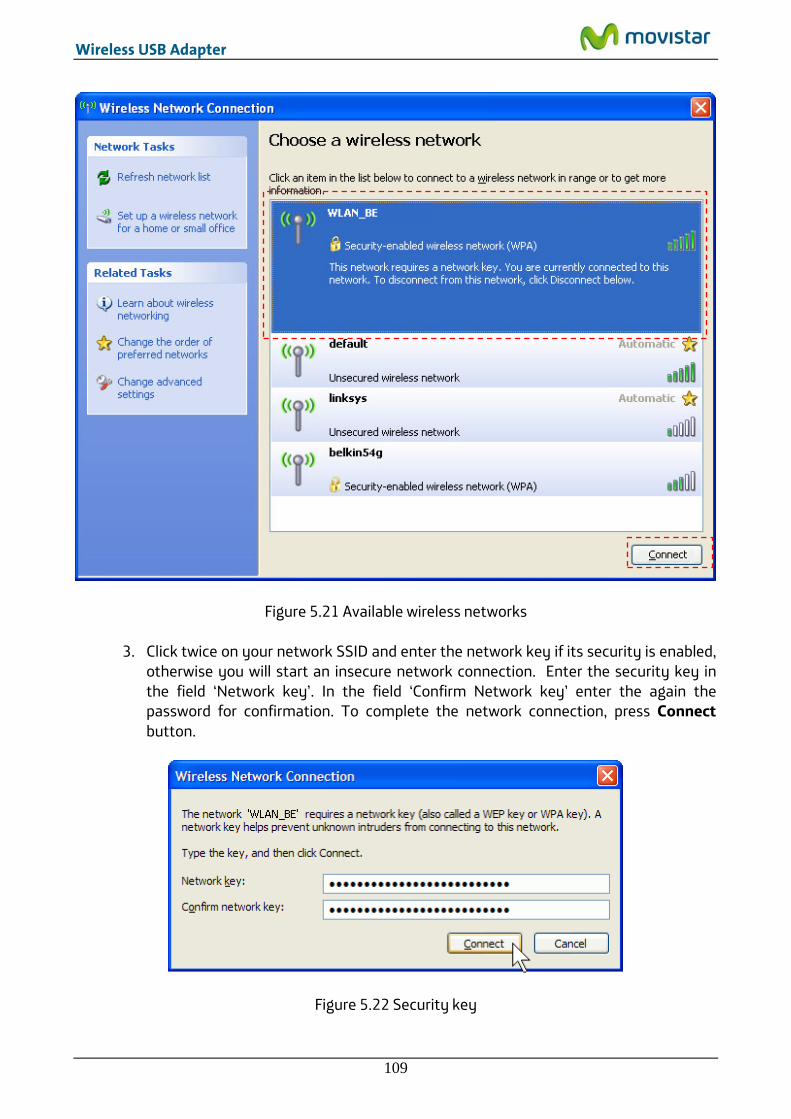
Wireless USB Adapter
109
Figure 5.21 Available wireless networks
3. Click twice on your network SSID and enter the network key if its security is enabled, otherwise you will start an insecure network connection. Enter the security key in the field ‘Network key’. In the field ‘Confirm Network key’ enter the again the password for confirmation. To complete the network connection, press Connect button.
Figure 5.22 Security key

Wireless USB Adapter
110
4. After establishing a wireless network connection, you will see Connected appear
beside your network SSID, indicating that your connection was completed successfully.
Figure 5.23 Connection established correctly If you want further information on how to configure your wireless network, consult the following subsections.

Wireless USB Adapter
111
5.3.2 Connection to a Wireless Router with a hidden SSID
1. If you want to connect to a wireless router whose SSID (network name) is hidden, it
will not appear on the list of networks.
Figure 5.24 Available networks

Wireless USB Adapter
112
2. Press Change the order of preferred networks on the Wireless Network Connection screen. On the Wireless Network Connection Properties window, press Add.
Figure 5.25 Preferred networks

Wireless USB Adapter
113
3. Insert the network parameters. First of all, enter the SSID. Then choose the type of authentication, data encryption and network key. Press OK.
Figure 5.26 Add preferred network

Wireless USB Adapter
114
4. If you press on the icon on the task bar you will see that the connection has been completed.
Figure 5.27 Wireless connection status
5.3.3 Verification of the wireless network status To verify the wireless network status in Windows XP (SP2 or higher), select the wireless network icon on the desktop toolbar and the Wireless Network Connection Status window will appear.

Wireless USB Adapter
115
1. The General tab allows you to verify the quality and activity of the radio link.
Figure 5.28 Wireless connection status

Wireless USB Adapter
116
2. The tab Support allows you to verify the wireless customer’s TCP/IP parameters. It will also indicate whether the TCP/IP parameters were assigned automatically (DHCP) or manually.
Figure 5.29 Network connection status
5.3.4 Change the preferred networks order To change the preferred networks order and give connection priority to one network over another, press Change the order of preferred networks on the Related tasks menu to the left of the Wireless network connection screen. The Wireless network connection properties screen will appear, opened by the Wireless Networks tab, showing a list of preferred networks. To give greater priority to your network, select it on the list and press the Move up key. To give less priority to a network, select it and press the Move down key.

Wireless USB Adapter
117
Figure 5.30 Preferred network priority
5.3.5 Change Advanced Configuration By selecting this option from the Related Tasks menu to the left of the Wireless Network Connection screen, the Wireless Network Connection Properties screen will appear, opened by the General tab, where you can access the advanced configuration of the network adapter. You can configure TCP/IP protocol parameters in particular. For further information, consult the document ‘Pautas Verificación TCP_IP’ in the ‘Documentacion’ folder on the CD.
5.3.6 Advanced Authentication If the network that you wish to connect has a WPA or WPA2 security (Not to be confused with WPA-PSK or WPA2-PSK) or any other security type that requires advanced authentication parameters, please complete the following steps.

Wireless USB Adapter
118
1. Press on Change the order of preferred networks.
Figure 5.31 Available Networks
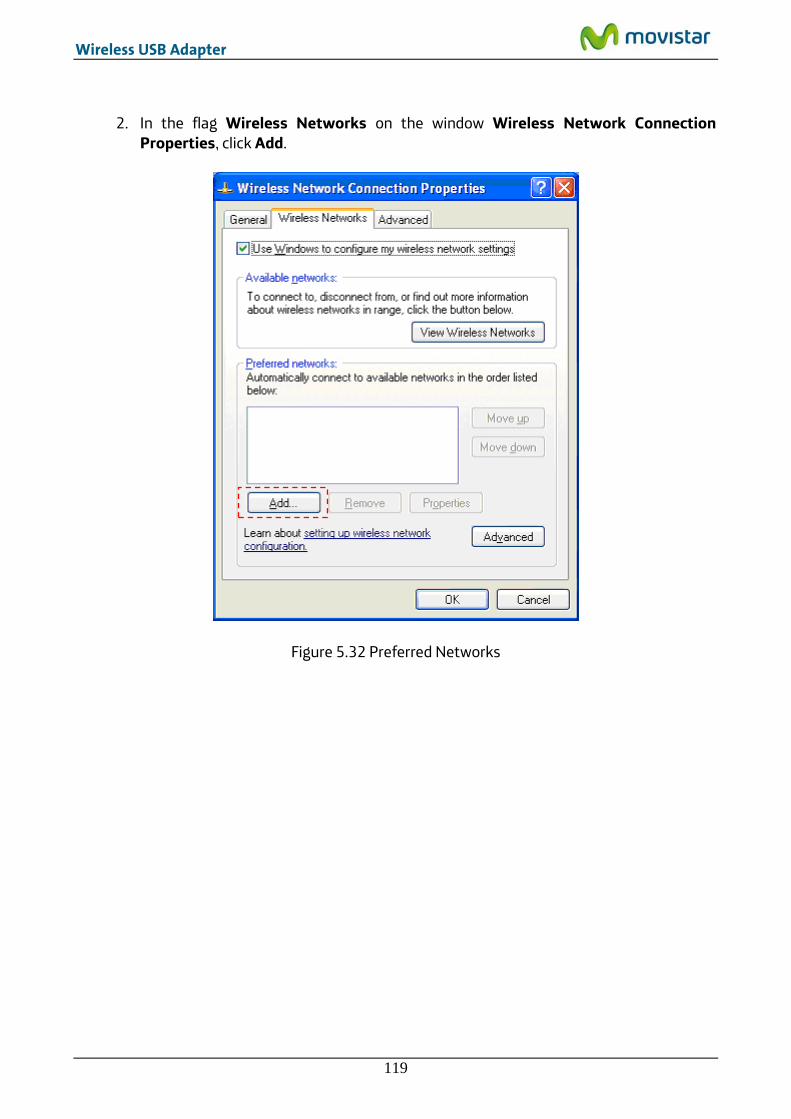
Wireless USB Adapter
119
2. In the flag Wireless Networks on the window Wireless Network Connection
Properties, click Add.
Figure 5.32 Preferred Networks

Wireless USB Adapter
120
3. Insert the network parameters. First of all, enter the SSID. Then choose the type of authentication protocol and the type of encryption (In the case that the authentication protocol is 802.1x based, you won’t have to enter any password or security key).
Figure 5.33 Add Preferred Network

Wireless USB Adapter
121
4. On the tab 'Authentication', you can choose the 802.1x authentication options.
Figure 5.34 Authentication protocol

Wireless USB Adapter
122
5. Press the button Properties to enter the information related to the authentication
method (EAP) chosen from the previous dropdown menu. Here you can specify if you use digital certificates among other security options. When finished press OK.
Figure 5.35 PEAP Properties

Wireless USB Adapter
123
6. If you press on the icon on the task bar you will see that the connection has been established. Otherwise check you have entered the correct security configuration.
Figure 5.36 Wireless connection status For further information call the network administrator.

Wireless USB Adapter
124
6. Uninstall If you wish to remove Movistar’s utility from your computer, do the following:
1. Go to the Windows Task Bar and click on Start->All programs-> Adaptador USB Inalámbrico de Movistar->Desinstalar la Utilidad del Adaptador Inalámbrico de Movistar. The following window will appear:
A screen asking for the execution of the application will appear when running installation process under Windows 7 and Vista. Select Allow to continue the installation.
Figure 6.1 Select removal
2. Click on the button Sí to run the uninstall process. Wait a few moments while removal is in progress. A window containing a progress bar will appear:

Wireless USB Adapter
125
Figure 6.2 Removal progress
3. Finally, press Finalizar to terminate removal. You will now have removed Movistar’s utility and the USB adapter controller from your computer.
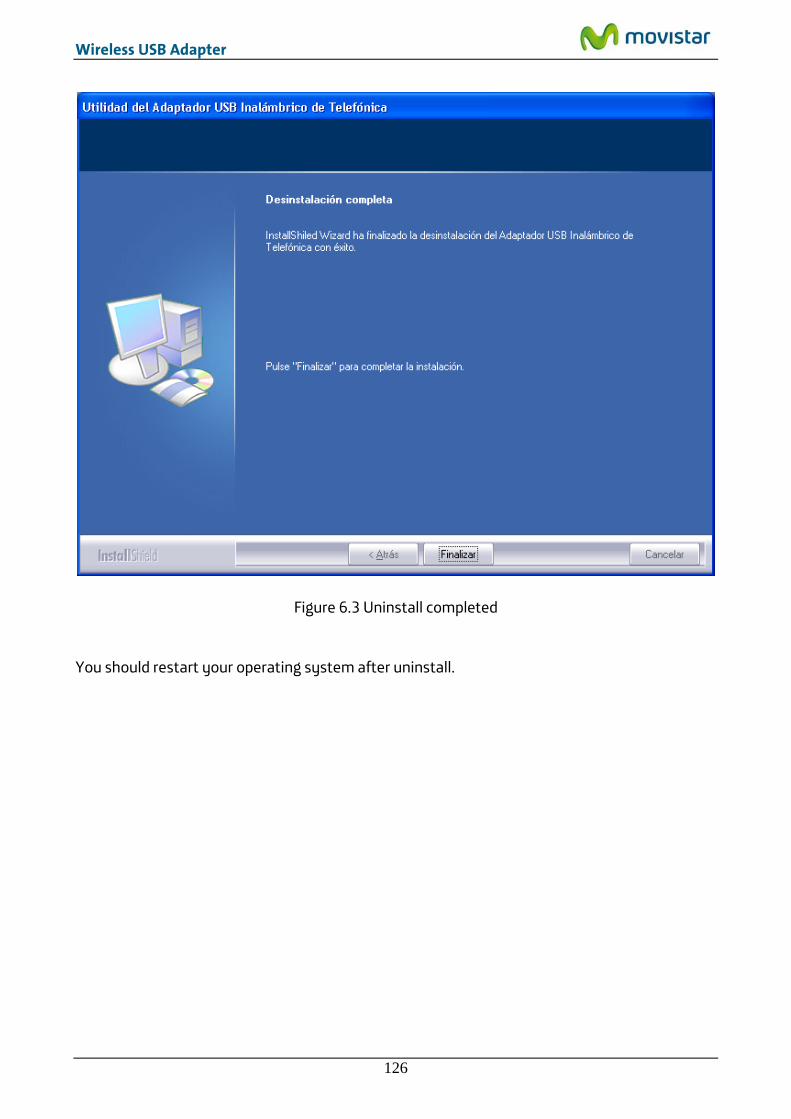
Wireless USB Adapter
126
Figure 6.3 Uninstall completed You should restart your operating system after uninstall.

Wireless USB Adapter
127
7. Troubleshooting
7.1 Common problems If you detect a problem, see the following table. However, if the problem persists, call Technical Support.
PROBLEM CAUSE SOLUTION
Windows does not recognize the USB adapter after connecting it correctly.
• The USB port is damaged. • The adapter is not correctly
installed or connected. • The installation process has
failed.
• Connect the adapter to a different USB port. • Check the adapter is correctly connected and
installed. See paragraph ‘Verification of the status of the USB Wireless Adapter controllers’ in section 7 of the user manual. If the problem persists, restart the computer.
• Uninstall utility and install it again.
Link activity LED does not light.
• Windows has not recognized the adapter correctly.
• Connect the adapter to another USB port. If this does not solve the problem, reinstall the adapter driver.
Your USB adapter is currently disabled.
• The device does not receive electrical power.
• Run the utility, you will get a window telling you to activate the adapter. Press ‘Activar’, and the adapter will be enabled.
Utility’s icon is not on the Windows taskbar
• The utility is not being executed
• To run the utility click Start->All programs->Adaptador USB Inalámbrico de Movistar->Utilidad del Adaptador USB Inalámbrico de Movistar.
The SSID of your network is not in the list of available networks.
• Your USB adapter is currently deactivated.
• Your network has not yet been detected.
• The name (SSID) of your network is hidden.
• The access point is currently disabled
• Take a look at the field ‘Estado Interfaz Inalámbrico’ and check if value ‘Apagado’ appears there. In that case, click on ‘Activar’ button.
• If your network has not been detected, press 'Actualizar ' to refresh the network list.
• If your network is configured with the name (SSID) hidden, see paragraph 4.3.1 'Hidden SSID networks ' in user manual to solve the problem.
• Check that the access point is turned on and enabled
You can’t connect to the router.
• The security key you entered is incorrect.
• The network’s name (SSID) you chose is incorrect.
• TCP/IP configuration is incorrect.
• You don’t have wireless coverage.
• There are interferences on the channel used.
• Check that you have entered the correct security key (note that it is case-sensitive).
• Check that you have chosen the correct network name (SSID), that name must be identical to those written on the router’s sticker, note that it is case-sensitive.
• Check the TCP / IP configuration. This option is recommended only for advanced users. (For further information, consult the document "Pautas Verificación TCP_IP" found in the folder

Wireless USB Adapter
128
called ‘Documentacion’ , inside the CD). • Change the position of the adapter to get a
stronger signal. (For more information, consult the document "Recomendaciones para redes inalámbricas" found in the folder called ‘Documentacion , inside the CD).
• Change the channel used by your access point; try to use a channel that is not being used by other networks.
The signal connection level is low or unstable.
• There are interferences on the channel used.
• The distance between the router and the adapter is too large.
• Change the channel used by your access point; try to use a channel that is not being used by other networks.
• Change the position of the adapter to get a stronger signal. (For more information, consult the document "Recomendaciones para redes inalámbricas" found in the folder called ‘Documentacion , inside the CD).
No IP address has been obtained automatically.
• DHCP server is not enabled in the router.
• The security key is incorrect.
• Access the router and enable the DHCP server option. The router contains a DHCP server to provide a network address automatically (For more information, consult the document "Pautas Verificación TCP_IP" found in the folder called ‘Documentacion’, inside the CD).
• Check that you have entered the correct security key.
Resource conflict on Windows.
• Another device is in conflict with wireless USB adapter.
• Use the properties of the computer to identify the direction of I/O port and IRQ values. Select the alternative configuration for the base address of I/O values or IRQ.
• If a device has been identified to be in conflict with the Wireless USB Adapter, you can modify the I/O direction or IRQ of that device instead of changing the Wireless USB Adapter.
The wireless connection is established but I do not have Internet access.
• TCP/IP configuration is incorrect.
• The router or wireless access point is not correctly configured for internet access.
• Check that TCP / IP configuration of your wireless client is correct. You can use the command "ipconfig" to verify the connection. (For further information, consult the document "Pautas Verificación TCP_IP" found in the folder called ‘Documentacion’, inside the CD).
• Check the settings on your router or wireless access point.
7.1.1 Windows does not recognize the USB adapter after connecting it correctly
Windows will show the message ‘A problem occurred during hardware installation, your new hardware installed may not work correctly’ inside an illustrative globe located on the right part of the windows taskbar. Also, if the utility is currently installed, you will see that the utility icon shows the state ‘Device disconnected physically from your computer or disabled’. Next, you’ll be explained the possible causes and solutions.

Wireless USB Adapter
129
7.1.1.1 The USB port is damaged. SOLUTION: Connect the adapter to a different USB
port. 7.1.1.2 The adapter is not correctly installed or connected. SOLUTION: Check that
the adapter is correctly connected and installed. See paragraph ‘Verification of the status of the USB Wireless Adapter controllers’ in section 7 of the user manual. If the problem persists, restart the computer.
7.1.1.3 The installation process has failed. Maybe the installation was not completed and, therefore, the driver was not installed correctly. SOLUTION: Uninstall utility and install it again, and the driver will be re-installed. If you have just installed the utility, it is desirable for you to restart the computer, because if you don’t do that it may not work properly.
7.1.2 Link activity LED does not light The activity link LED is off after you connect the adapter to a USB port. Before you continue, wait a few seconds to verify that the problem persists and the LED indicator remains off Next, you’ll be explained the possible causes and solutions.
7.1.2.1 Windows has not recognized the adapter correctly. SOLUTION: If Windows does not recognize correctly the installed adapter, check that it’s well connected. Try to connect the adapter to another USB port. If this does not solve the problem, reboot your system. Finally, reinstall the utility.
7.1.3 Your USB adapter is currently disabled The adapter is correctly installed, but for some reason is disabled. Next, you’ll be explained the possible causes and solutions.
7.1.3.1 The device does not receive electrical power. The adapter is not turned up due to the O.S. has configured the adapter in power saving mode. SOLUTION: If your adapter is disabled, this will not be a problem as when the utility is launched, the following window will appear before the wireless network default window, indicating that your adapter is deactivated:
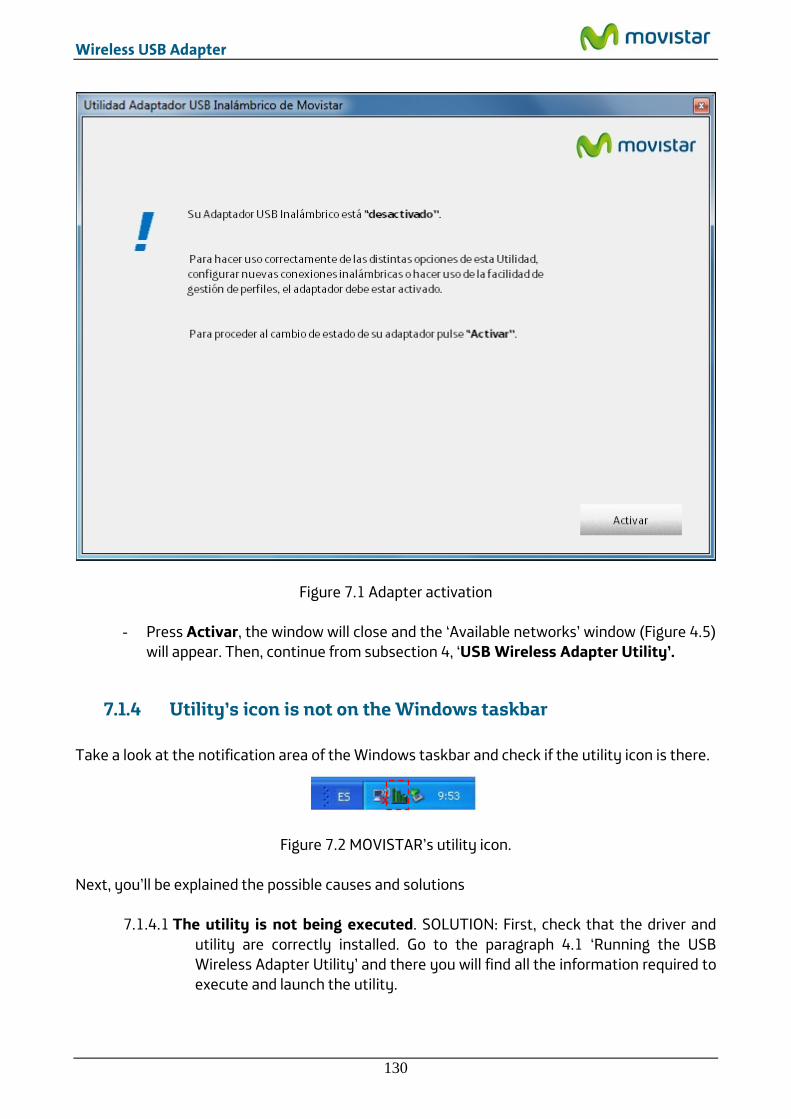
Wireless USB Adapter
130
Figure 7.1 Adapter activation
- Press Activar, the window will close and the ‘Available networks’ window (Figure 4.5) will appear. Then, continue from subsection 4, ‘USB Wireless Adapter Utility’.
7.1.4 Utility’s icon is not on the Windows taskbar Take a look at the notification area of the Windows taskbar and check if the utility icon is there.
Figure 7.2 MOVISTAR’s utility icon. Next, you’ll be explained the possible causes and solutions
7.1.4.1 The utility is not being executed. SOLUTION: First, check that the driver and utility are correctly installed. Go to the paragraph 4.1 ‘Running the USB Wireless Adapter Utility’ and there you will find all the information required to execute and launch the utility.

Wireless USB Adapter
131
7.1.5 The SSID of your network is not in the list of available networks
The network you are looking for does not exist in the ‘Available networks’ list. Next, you’ll be explained the possible causes and solutions
7.1.5.1 Your USB adapter is currently deactivated. Take a look at the field ‘Estado Interfaz Inalámbrico’ and check if value ‘Apagado’ appears there. SOLUTION: In that case, click on ‘Activar’ button.
7.1.5.2 Your network has not yet been detected. The utility has not yet detected any discovery packet from your network. SOLUTION: Wait a few seconds and press 'Actualizar ' to refresh the network list.
7.1.5.3 The name (SSID) of your network is hidden. It is possible that the network you want to connect does not reveal the network name (SSID) in its discovery packets, and so the utility cannot detect the network. Verify that your wireless access point is not is configured with the name (SSID) hidden. In that case, you can only connect to the network either manually or by WPS PBC configuration. SOLUTION: See the paragraph 4.3.1 'Hidden SSID networks' in user manual to solve the problem.
7.1.5.4 The access point is currently disabled. The access point or wireless router has its wireless interface disabled or turned off that allows your adapter to connect to it. SOLUTION: Check that the access point is turned on and has its wireless interface enabled (see the access point user manual).
7.1.6 You can’t connect to the router Once you have chosen the network you want to connect to, a problem occurs and the connection is not established. Next, you’ll be explained the possible causes and solutions
7.1.6.1 The security key you entered is incorrect. You are not using the same type of encryption and the same security key in all network elements. SOLUTION: Check that you have entered the correct security key (note that it is case-sensitive). Remember that if you are using WEP encryption, you will have to select and configure key number 1 in the wireless router configuration menu.
7.1.6.2 The network’s name (SSID) you chose is incorrect. You have tried to connect to an incorrect network and, therefore, the security parameters you entered won’t be valid for that one. SOLUTION: Check that you have chosen the correct network name (SSID), that name must be identical to those written on

Wireless USB Adapter
132
the router’s sticker, note that it is case-sensitive. To do this, select the profile created and check in the section ‘Detalle del Perfil' if the field Nombre Red (SSID) contains the SSID of your network, if not, delete it and connect to your network again (in case of doubt, go to the paragraph 4.4 'Profile Management').
7.1.6.3 TCP/IP configuration is incorrect. SOLUTION: Check the TCP / IP configuration. This option is recommended only for advanced users. (For further information, consult the document "Pautas Verificación TCP_IP" found in the folder called ‘Documentacion’, inside the CD).
7.1.6.4 You don’t have wireless coverage. It is possible that the signal transmitted from the access point or the wireless router is not powerful enough and the transmission contains too many errors to be understood by the adapter. SOLUTION: Change the position of the adapter to get a stronger signal. (For more information, consult the document " Recomendaciones para redes inalámbricas " found in the folder called ‘Documentacion , inside the CD).
7.1.6.5 There are interferences on the channel used. The frequency band (channel) used for transmission and reception suffers a lot of interferences. Maybe there are many networks using the same. SOLUTION: Change the channel used by your access point; try to use a channel that is not being used by other networks. If there are other wireless networks operating in the same area, you should configure subnetworks 4 or 5 channels apart. For example, if a wireless subnetwork is operating on channel 6 and we want to install another wireless network, we must select channel 1, 2, 10 or 11.
7.1.7 The signal connection level is low or unstable You are properly connected but the transfer speed is very slow or you have problems when you send/receive large files or your connection vary between ‘connected’ and ‘disconnected’. Next, you’ll be explained the possible causes and solutions
7.1.7.1 There are interferences on the channel used. The frequency band (channel) used for transmission and reception suffers a lot of interferences. Maybe there are many networks using the same. SOLUTION: Change the channel used by your access point; try to use a channel that is not being used by other networks. If there are other wireless networks operating in the same area, you should configure subnetworks 4 or 5 channels apart. For example, if a wireless subnetwork is operating on channel 6 and we want to install another wireless network, we must select channel 1, 2, 10 or 11.
7.1.7.2 The distance between the router and the adapter is too large. Due to distance and obstacles between the access point and adapter, the signal does not arrive with enough power. SOLUTION: Change the position of the adapter to get a stronger signal. (For more information, consult the document
Wireless USB Adapter
133
"Recomendaciones para redes inalámbricas" found in the folder called ‘Documentacion’, inside the CD).
7.1.8 No IP address has been obtained automatically If the computer has not correctly obtained an IP address, then the connection will show the status 'limited or no connectivity'. This status indicates that Windows has set some default IP/TCP values that certainly will not match with the correct ones. Next, you’ll be explained the possible causes and solutions
7.1.8.1 DHCP server is not enabled in the router. If the router has no DHCP server enabled, then your computer can not acquire a dynamic of all the parameters necessary to make the correct connection to the router. SOLUTION: Access the router and enable the DHCP server option. The router contains a DHCP server to provide a network address automatically (For more information, consult the document "Pautas Verificación TCP_IP" found in the folder called ‘Documentacion’, inside the CD).
7.1.8.2 The security key is incorrect. You are not using the same type of encryption and the same security key in all network elements. SOLUTION: Check that you have entered the correct security key (note that it is case-sensitive). Remember that if you are using WEP encryption, you will have to select and configure key number 1 in the wireless router configuration menu.
7.1.9 Resource conflict on Windows If you have more than one network adapter installed, these drivers may interfere with the wireless USB adapter driver. Next, you’ll be explained the possible causes and solutions
7.1.9.1 Another device is in conflict with wireless USB adapter. You have installed another network device that interferes with your wireless adapter. SOLUTION: Use the properties of the computer to identify the direction of I/O port and IRQ values. Select the alternative configuration for the base address of I/O values or IRQ. If a device has been identified to be in conflict with the Wireless USB Adapter, you can modify the I/O direction or IRQ of that device instead of changing the Wireless USB Adapter.

Wireless USB Adapter
134
7.1.10 The wireless connection is established but I do not have Internet access
The connection to the access point or wireless router has been successfully established, but you do not have Internet access when using your browser. Next, you’ll be explained the possible causes and solutions
7.1.10.1 TCP/IP configuration is incorrect. SOLUTION: Check that TCP / IP configuration of your wireless client is correct. You can use the command "ipconfig" to verify the connection. (For further information, consult the document " Pautas Verificación TCP_IP" found in the folder called ‘Documentacion’, inside the CD)
7.1.10.2 The router or wireless access point is not correctly configured for internet access. SOLUTION: Check and compare the settings on your router or wireless access point with the parameters given by your ISP.
If you cannot solve a problem connecting to the wireless network with the information given in this guide, please contact the network administrator to check you are using the correct configuration.

Wireless USB Adapter
135
7.2 Verification of the status of the USB Wireless Adapter controllers
If you have problems after installing the USB Wireless Adapter, following the steps below to make sure that your equipment is working properly.
7.2.1 Verification of the status of the controllers in Windows 7 In the Windows task bar, select Start. Press with the secondary button of the mouse on the option Computer and select Properties.
Figure 7.3 Start Windows 7

Wireless USB Adapter
136
1. The System window will appear. Select: Device manager.
Figure 7.4 System

Wireless USB Adapter
137
2. In the Device manager window, open the Network Adapters group. Select 802.11n
USB Wireless LAN Card, select Properties using the secondary button on the mouse.
Figure 7.5 Device manager

Wireless USB Adapter
138
3. The 802.11n USB Wireless LAN Card Properties window will appear. In the General tab,
verify the message in the Device status field. It should be: This device is working properly.
Figure 7.6 Adapter properties NOTE: If the above message does not appear in the adapter properties, this means that the installation has not been performed correctly or that the USB Wireless Adapter is not working properly. Remove the device (see subsection 6, ‘Uninstall’) and reinstall it.
7.2.2 Verification of the status of the controllers in Windows Vista
1. In the Windows task bar, select: Start->Control panel

Wireless USB Adapter
139
Figure 7.7 Start Windows Vista
2. The main Control Panel window will appear. Select: Hardware and Sound

Wireless USB Adapter
140
Figure 7.8 Control panel

Wireless USB Adapter
141
3. The Hardware and sound window will appear. Select Device Manager
Figure 7.9 Hardware and Sound

Wireless USB Adapter
142
4. In the Device administrator window, open the Network Adapters group. Select 802.11n USB Wireless LAN Card, select Properties using the secondary button on the mouse.
Figure 7.10 Device administrator
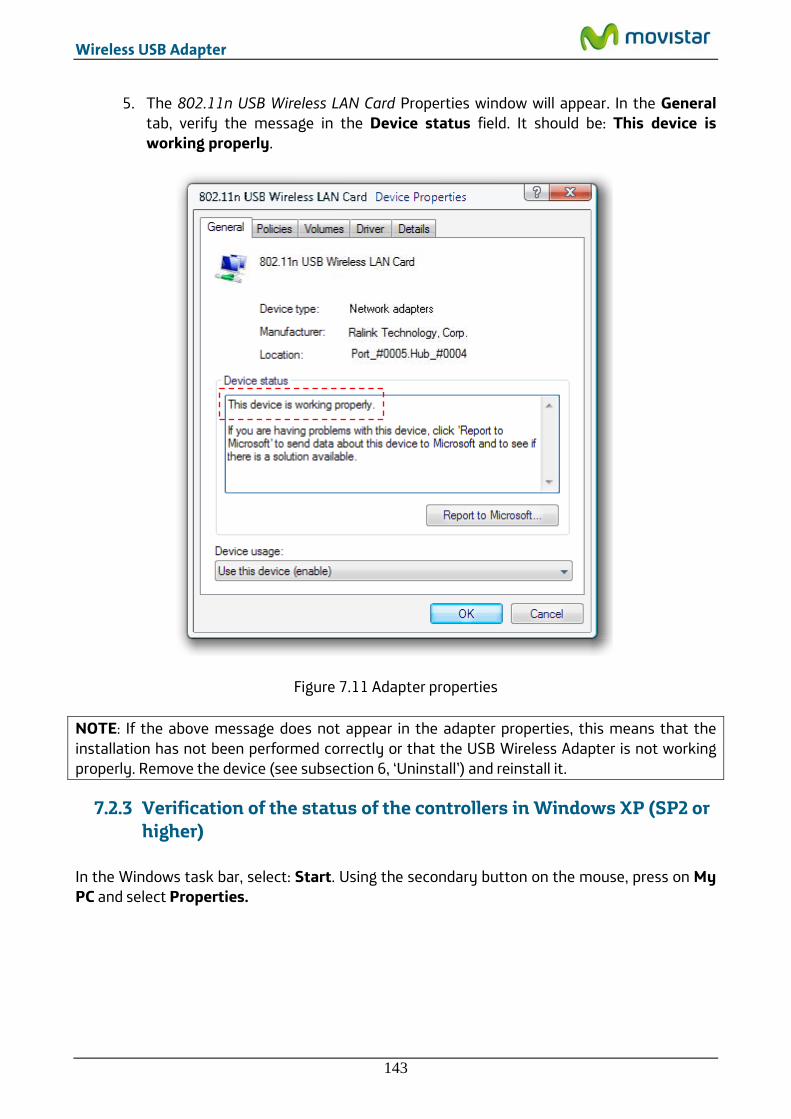
Wireless USB Adapter
143
5. The 802.11n USB Wireless LAN Card Properties window will appear. In the General tab, verify the message in the Device status field. It should be: This device is working properly.
Figure 7.11 Adapter properties NOTE: If the above message does not appear in the adapter properties, this means that the installation has not been performed correctly or that the USB Wireless Adapter is not working properly. Remove the device (see subsection 6, ‘Uninstall’) and reinstall it.
7.2.3 Verification of the status of the controllers in Windows XP (SP2 or higher)
In the Windows task bar, select: Start. Using the secondary button on the mouse, press on My PC and select Properties.

Wireless USB Adapter
144
Figure 7.12 Start Windows XP

Wireless USB Adapter
145
1. The System Properties window will appear.
Figure 7.13 System properties

Wireless USB Adapter
146
2. In the Hardware tab, select Device Manager and open the Network adapters group. Select 802.11n USB Wireless LAN Card, select Properties using the secondary button on the mouse.
Figure 7.14 Device Manager

Wireless USB Adapter
147
3. The 802.11n USB Wireless LAN Card Properties window will appear. In the General tab, verify the message in the Device status field. It should be: This device is working properly.
Figure 7.15 Adapter properties NOTE: If the above message does not appear in the adapter properties, this means that the installation has not been performed correctly or that the USB Wireless Adapter is not working properly. Remove the device (see subsection 6, ‘Uninstall’) and reinstall it.
7.3 Verification of radio connection Make sure that the wireless router is on and that the USB Wireless Adapter is correctly installed on your computer.

Wireless USB Adapter
148
7.3.1 Verification of the radio connection in Windows 7 To verify the state of the network’s connection in Windows 7:
1. Press on the icon on the task bar and the window Connect to a network will appear.
Figura 7.16 Estado de Conexión de red inalámbrica
2. Press using the secondary button of the mouse (right button) on the connected network’s name and select the option Status.
The Wireless network connection status window will appear. Verify the drawing shown in the Signal quality field. The number of green bars indicates the strength of the incoming signal. If the signal strength is poor, consult subsection 7.1 ‘Trouble shooting’ to improve the situation.

Wireless USB Adapter
149
Figura 7.17 Estado de Conexión de red inalámbrica In the SSID field, verify the name of the network to which you are connected. If, in the IPv4 Connectivity field, the phrase ‘No Internet connection’ appears, check to see whether the WEP or WPA-PSK encryption coincides with that of your wireless router.
7.3.2 Verification of the radio connection in Windows Vista Click on Start->Control panel->Internet networks->Network and shared resources centre to access the ‘Network centre and shared resources screen’. Make sure that you are connected to the desired network. Select View status.

Wireless USB Adapter
150
Figure 7.18 Network and shared resources centre The Wireless network connection status window will appear. Verify the drawing shown in the Signal quality field. The number of green bars indicates the strength of the incoming signal. If the signal strength is poor, consult subsection 7.1 ‘Common problems’ to improve the situation.
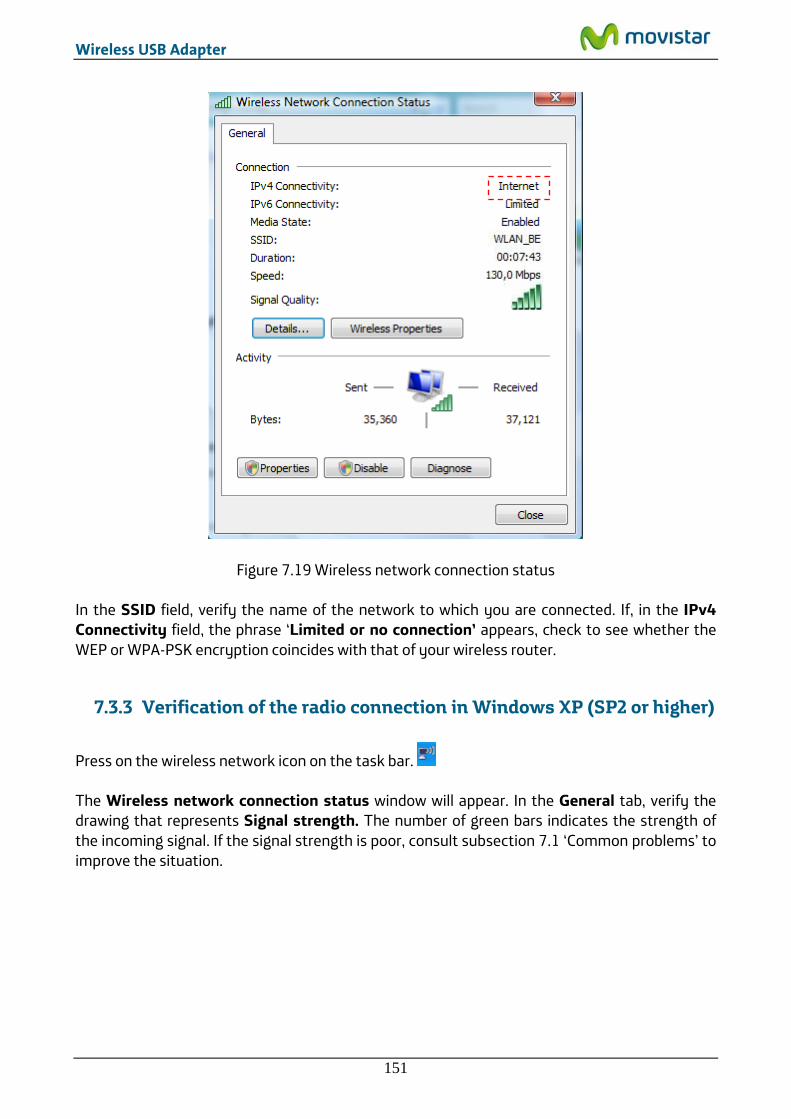
Wireless USB Adapter
151
Figure 7.19 Wireless network connection status In the SSID field, verify the name of the network to which you are connected. If, in the IPv4 Connectivity field, the phrase ‘Limited or no connection’ appears, check to see whether the WEP or WPA-PSK encryption coincides with that of your wireless router.
7.3.3 Verification of the radio connection in Windows XP (SP2 or higher)
Press on the wireless network icon on the task bar. The Wireless network connection status window will appear. In the General tab, verify the drawing that represents Signal strength. The number of green bars indicates the strength of the incoming signal. If the signal strength is poor, consult subsection 7.1 ‘Common problems’ to improve the situation.

Wireless USB Adapter
152
Figure 7.20 Wireless network connection status In the Network field, verify the name of the network (SSID) to which you are connected. If, in the Status field, the phrase ‘Limited or no connection’ appears, check to see whether the WEP or WPA-PSK encryption coincides with that of your wireless router.

Wireless USB Adapter
153
8. Informative Letter
Queremos agradecerte la confianza depositada en Movistar al haber adquirido uno de nuestros equipos; y te informamos que para cualquier aclaración, consulta o reclamación, puedes llamar de forma gratuita a:
Línea de Atención Personal (1004)
Centro de Atención al Cliente Pymes y Profesionales (900 10 10 10)
Centro de Atención de Empresas (900 12 09 00)
Donde serás atendido por nuestros asesores, o si lo prefieres, visita la página comercial de Movistar: www.movistar.es
Para obtener información sobre el servicio postventa, consulta la tarjeta de garantía del equipo.
Por último, indicarte que, para reclamaciones por escrito referidas a esta venta, puedes dirigirte a Telefónica de España S.A.U, Gran Vía 28, 28013 Madrid.

Wireless USB Adapter
154
9. Customer Service Customer service is available by phone and also on the Internet. - Help over the phone If you do not know your Broad Band access parameters, dial 900 50 20 10 from this access and an automatic service will tell you the IP address of your access. - Help on the Internet All information on ADSL can be found in the MOVISTARonline.com All ADSL area: URL: www.movistar.es/adsl - Other addresses of interest: 1. - Documentation and software updates: in this area you can download the latest versions of configuration programmes, software updates for the ADSL router and user documentation; an easy way of benefiting the most from your high speed line. URL: URL:
www.movistar.es/adsl/ayudakit www. movistar.es/adsl/descarga
2. - Tutorials: didactical material for both new and more advanced users. URL: www. movistar.es/adsl/experto TELEFÓNICA’S TECHNICAL ASSISTANCE CENTRES General public: 1004 Soho and Professionals: 900 10 10 10 CUSTOMER SERVICES FOR REPAIRS DURING THE WARRANTY PERIOD Phone: 902 197 115

Wireless USB Adapter
155
10. Environmental Recycling Do not dispose the Wireless USB Adapter with your normal household waste. Ask your local authority about the opportunities available to dispose correctly and avoid damages to the environments. Always comply with the legal regulations regarding this matter. All transgressors will be prosecuted. The cardboard box, plastic packaging and the device can be recycled according to the legal rules in Spain with regards to recycling matters.
The cross symbol over the container that can be found printed on the device means that when the equipment has arrived to the end of its lifespan, it must be transferred to a special collection centre, and its processing must be separated from the household waste.

Wireless USB Adapter
156
11. Technical specifications Standards: IEEE 802.11b/g/ N (Draft II) Connection interface: USB 2.0 (USB 1.1 Compatible) Frequency band: 2.4000 ~ 2.4835GHz (ISM Radio band - industrial, scientific and medical) Transfer rate: 11b: 1/2/5.5/11Mbps
11g: 6/9/12/24/36/48/54Mbps 11n (20MHz): MCS0-15, 32 supporting guard interval (up to 144Mbps) 11n (40MHz): MCS0-15, 32 supporting guard interval (up to 300Mbps)
Security: Supporting WEP 64/128, WPA and WPA encryption It supports Cisco CCX
Type of antenna: 2 internal antennas Controllers: Windows XP/Vista/Windows 7 LEDs: Link/Activity Environmental conditions:
Operating temperature 0 ~ 55 degrees Celsius Relative humidity 10~95% (Without condensation)
Dimensions: 83 x 27 x 10 mm Certifications: FCC, CE

Wireless USB Adapter
157
12. Agreement Declaration
Wireless USB Adapter
158
Descubre más:
/ En el 1004 (desde tu móvil o fijo)
/ En el +34699991004 (desde el extranjero)
/ En www.movistar.es
/ En nuestras tiendas Movistar
Equipo suminstrado por CIF : A-28669844 Número de Registro REI RAEEE : 000577