wms 10.1 tutorial hydraulics and floodplain modeling …wmstutorials-10.1.aquaveo.com/26...
TRANSCRIPT

Page 1 of 15 © Aquaveo 2016
WMS 10.1 Tutorial
Hydraulics and Floodplain Modeling – Managing HEC-RAS Cross Sections Modify cross sections in an HEC-RAS model to use surveyed cross section data
Objectives Build a basic HEC-RAS model from a conceptual schematic of cross sections, river banks, and river
centerlines. Extract the cross sections from background elevation data. Then merge surveyed cross
sections into extracted cross sections using the cross section database management tools in WMS. Export
and run a HEC-RAS model, read the results into WMS, and delineate a floodplain using the HEC-RAS
results.
Prerequisite Tutorials Hydraulics and Floodplain
Modeling – HEC-RAS
Analysis
Required Components Data
Drainage
Map
River
Time 30-60 minutes
v. 10.1

Page 2 of 15 © Aquaveo 2016
1 Introduction ......................................................................................................................... 2 2 Objectives ............................................................................................................................. 2 3 Creating a Conceptual River Model .................................................................................. 3
3.1 Open Centerline and Bank Arcs ................................................................................... 3 3.2 Getting a Background Image ........................................................................................ 3 3.3 Create a local copy of the image .................................................................................. 4 3.4 Open Background Images ............................................................................................ 4 3.5 Define Centerline and Bank Arcs ................................................................................. 4 3.6 Create Materials ........................................................................................................... 5
4 Converting a DEM to a TIN ............................................................................................... 5 4.1 Open a DEM ................................................................................................................ 5 4.2 Convert to a TIN .......................................................................................................... 6
5 Extracting Cross Sections ................................................................................................... 6 6 Merging Cross Sections ...................................................................................................... 7
6.1 Open Channel Cross Section Data ............................................................................... 7 6.2 Create a New Cross Section Database.......................................................................... 7 6.3 Define Channel Cross Sections in the Database ........................................................... 7 6.4 Align Channel Cross Sections with Extracted Cross Sections ..................................... 9
7 Running HEC-RAS ........................................................................................................... 10 7.1 Creating a Schematic and Defining Roughness Values ............................................. 11 7.2 Running HEC-RAS .................................................................................................... 11 7.3 Post-processing .......................................................................................................... 13
8 Floodplain Delineation ...................................................................................................... 13 8.1 Interpolating HEC-RAS Results ................................................................................ 13 8.2 Delineating the Floodplain ......................................................................................... 14
9 Conclusion.......................................................................................................................... 15
1 Introduction
HEC-RAS is a 1-D river model that relies on cross section data along reaches to compute
results. Cross sections can be extracted from a TIN in WMS, but the TIN does not always
define the channel with enough resolution to get an accurate cross section through the
channel. Tools in WMS make it possible to manage cross sections by editing their shape,
defining properties, and merging multiple cross sections together. Surveyed channel cross
section data can be merged with cross sections extracted from a TIN in order to develop
cross sections that accurately depict both the channel and surrounding terrain.
2 Objectives
This exercise will show how to merge cross sections and use the data for input into a
HEC-RAS model by:
Creating a conceptual river model
Converting a DEM to a TIN for background elevation data
Extracting cross sections
Merging cross sections
Running HEC-RAS

WMS Tutorials Hydraulics and Floodplain Modeling – Managing HEC-RAS Cross Sections
Page 3 of 15 © Aquaveo 2016
Delineating the floodplain using HEC-RAS results
3 Creating a Conceptual River Model
A conceptual river model can be created by using GIS data to define the centerline and
bank arcs, material properties, and cross section location and geometry. Background
images are also useful in creating and viewing this GIS data.
3.1 Open Centerline and Bank Arcs
1. Close all instances of WMS
2. Open WMS
3. Switch to the Map module.
4. Select File | Open
5. Locate the xsecs folder in the files for this tutorial. If needed, download the
tutorial files from www.aquaveo.com.
6. Select “river.map” and click Open.
7. Select Display | Display Projection... to set the display projection.
8. Select Global projection then click Set Projection.
9. In the Select Projection dialog, set Projection to “UTM”, Datum to “NAD 27”,
Horizontal Units to “Meters”, and Zone to “12 (114°W - 108°W - Northern
Hemisphere)”.
10. Select OK.
11. Set Vertical Units to “U.S. Survey Feet”
12. Select OK.
13. Select Yes if a message appears telling that the horizontal and vertical units are
inconsistent.
If without an internet connection, skip sections 3.2 and 3.3.
3.2 Getting a Background Image
Using an Internet connection, load a background image (Aerial photo or a topo map) for
the project site. Use any of the Get Data tools in WMS to load images from the internet.
1. Select the arrow next to the Add GIS Data button and select Get Online
Maps from the drop-down menu; this will open the Get Online Maps dialog.
2. Select World Imagery and click OK.
3. WMS will load the background image file. It will take few moments depending
upon the internet connection. Once done, an aerial photo is added to the
background.

WMS Tutorials Hydraulics and Floodplain Modeling – Managing HEC-RAS Cross Sections
Page 4 of 15 © Aquaveo 2016
3.3 Create a local copy of the image
The image just loaded is read in from a server and sometimes it takes a long time to zoom
and pan around. Create a local copy of the image to expedite such navigations.
1. In the Project Explorer, under the “GIS Data” folder, right click the image that
was downloaded and select Export.
2. In the Export Image dialog, select OK to accept the suggested value of resample
magnification.
3. In the Save As dialog, assign a name to the downloading image and the location
where it will be saved. Then click Save.
4. Once the image has been downloaded, remove the bigger online image (the one
that has a little globe on its icon). To do this, right-click on the online image
under the “GIS Data” folder and select Delete.
If able to successfully complete all the steps in sections 3.2 and 3.3, skip section 3.4.
3.4 Open Background Images
If reliable internet connection is not accessible, open images showing the area for
modeling by doing the following:
1. Select File | Open to access the Open dialog.
2. In the Open dialog, select “jordannarrows.jpg” and “midvale.jpg” and click
Open.
3.5 Define Centerline and Bank Arcs
1. Zoom in close enough around a section of the feature arcs to see three distinct
arcs as shown in Figure 1.
Figure 1 Centerline and bank arcs
The middle arc is the centerline arc that defines the thalweg of the river reach and the
outer arcs define the right and left banks.
2. Use the Select Feature Arc tool to select the middle arc.
3. Select Feature Objects | Attributes and choose “Centerline” then select OK.

WMS Tutorials Hydraulics and Floodplain Modeling – Managing HEC-RAS Cross Sections
Page 5 of 15 © Aquaveo 2016
4. In the River Reach Attributes dialog, enter “Jordan River” for the River Name.
5. Enter “Riverton” in the Reach Name.
6. Select OK.
7. Use the Select Feature Arc tool to select both outer arcs. Press the SHIFT
key to select both simultaneously.
8. Select Feature Objects | Attributes and choose “Bank”, then select OK.
3.6 Create Materials
Materials are defined on an Area Property coverage by digitizing polygons representing
different materials using a background image, such as an aerial photograph, or by using
land use data from a shapefile or another source. Each different material that is defined
will be used later to assign roughness values to the cross sections. In this exercise read in
a map file containing material data that has already been digitized.
1. Select File | Open to access the Open dialog.
2. Open “materials.map”.
3. Zoom in around the materials polygons on the “Area Property” coverage.
4. Right-click on the “Area Property” coverage and select Display Options .
5. In the Display Options dialog, select Map Data and toggle Color Fill Polygons
on.
6. Select OK.
7. Select Edit | Materials to open the Materials Data dialog and view the material
types associated with each color.
8. Select Cancel.
4 Converting a DEM to a TIN
Cross section geometry can be extracted from a TIN in WMS. Create a TIN by opening a
DEM and converting it to a TIN. It is also possible to filter redundant DEM points out of
the created TIN.
4.1 Open a DEM
1. Switch to the Terrain Data module.
2. Select File | Open to access the Open dialog.
3. Open “91606647.hdr” in the “91696647” folder.
4. Select OK in the Improting NED GRIDFLOAT File dialog.
5. Select Yes to change projection. This will open the Reproject Object dialog.
6. In the Object Projection section toggle on Global Projection and click Set
Projection button. This will open the Select Projection dialog.

WMS Tutorials Hydraulics and Floodplain Modeling – Managing HEC-RAS Cross Sections
Page 6 of 15 © Aquaveo 2016
7. Ensure “Geographic (Latitude/Longitude)”, and “NAD 83” are selected in the
Projection and Datum drop down boxes.
8. Select OK.
9. Set Vertical units to “Meters”.
10. In the Project Projection section toggle Set on.
11. Click Set Projection.
12. The Select Projection dialog will reappear. Set Projection to “UTM”, Datum to
“NAD 27”, Planar Units to “METERS”, and Zone to “12 (114°W - 108°W –
Northern Hemisphere)”.
13. Select OK.
14. Set the Vertical units to “Meters”.
15. Select OK.
4.2 Convert to a TIN
1. Select DEM | Conversion | DEM → TIN | Filtered.
2. In the DEM Conversion Options dialog, select OK.
3. Right-click on “New Tin” under “Terrain Data” in the Project Explorer and select
Display Options to open the Display Options dialog.
4. On the TIN Data tab, toggle Triangles off and Boundaries on.
5. Select OK.
6. Hide the DEM under the “Terrain Data” by toggling its check box off.
5 Extracting Cross Sections
It is very easy to extract cross section geometry from a TIN in WMS. This is done by
creating arcs that represent the plan view of the cross sections on a 1D-Hyd Cross Section
coverage.
1. Switch to the Map module.
2. Select File | Open to access the Open dialog.
3. Open “xsections.map” in the “xsecs” folder.
4. Hide the materials polygons by toggling “Area Property” coverage in the Project
Explorer off.
5. Hide the background image by toggling it off.
6. Zoom in around the cross section arcs labeled 0 – 4.
7. Select the Contour Options icon, located at the top of the window.
8. The elevation (elev) Contour Options dialog will appear. For the Contour
Interval, select the “Specified Interval” and enter a value of “10.0”.
9. Select OK.

WMS Tutorials Hydraulics and Floodplain Modeling – Managing HEC-RAS Cross Sections
Page 7 of 15 © Aquaveo 2016
The cross section arcs are approximately as wide as the floodplain might be. They end
where there is a sharp break in slope and the terrain gets relatively steep. Wider cross
section arcs are generally not necessary for a HEC-RAS analysis.
10. Make sure the “1D-Hyd Cross Section” coverage is active in the Project
Explorer.
11. In the Model drop-down list at the top of the screen select “River Tools”.
12. Select River Tools | Extract Cross Section.
13. In the Extract Cross Sections dialog, select OK.
14. In the Save dialog, enter “xsec” for the name of the new cross section database
where all of the cross sections will be stored, then click Save.
15. When prompted to extract cross sections from the DEM or the TIN, select the
TIN option.
6 Merging Cross Sections
Any two cross sections can easily be merged in WMS. Create a new cross section
database that stores surveyed channel cross section data and merge it with the cross
sections that were extracted from the TIN. Merging cross sections will create more
accurate cross section geometry data. Cross sections are merged by aligning both cross
sections using reference points such as the thalweg or bank locations and then inserting
points from one cross section into the other.
6.1 Open Channel Cross Section Data
1. Select File | Edit File.
2. In the Open dialog, open “channel.txt”.
3. Select OK to open with Notepad or choose any other text editor or spreadsheet.
4. Leave “channel.txt” open for later use.
6.2 Create a New Cross Section Database
1. In WMS, select River Tools | Manage Cross Sections.
2. In the Manage Cross Sections dialog, choose the New Cross Section Database
button.
3. Enter “channelxsec.idx” for the File name.
4. Select Save.
6.3 Define Channel Cross Sections in the Database
The current cross section database should be “channelxsec.idx” (the one that was just
created).
1. Click on the Edit Cross Section Database button to open the CsDb Management
window.

WMS Tutorials Hydraulics and Floodplain Modeling – Managing HEC-RAS Cross Sections
Page 8 of 15 © Aquaveo 2016
2. Click the New button to add a cross section to the database.
3. Select the Edit button to edit the cross section. This will open the Cross-Section
Attributes dialog.
4. Click the Add button. In the Add Points dialog, enter “7” to add seven points to
the cross section.
5. Select OK.
6. Make sure XY is toggled off.
7. Copy and paste the cross section data for Channel Section 1 from “channel.txt”
(opened in Notepad) into the Cross-Section Attributes Geom Edit tab as shown in
Figure 2. Make sure to paste the data into the first row.
Figure 2 Adding cross section geometry data to the database
8. Select the Point Props tab.
9. Click the Auto Mark button to automatically define thalweg and right/left bank
points. These reference points will be used to align cross sections for merging.
10. Select OK.
11. Repeat steps 2-10 to add the 4 remaining channel cross sections in channel.txt to
the cross section database.
12. Click the Save button.
13. Select OK.
14. Select OK.
15. Close the text file “channel.txt” in Notepad.
16. Select No if asked to save changes.

WMS Tutorials Hydraulics and Floodplain Modeling – Managing HEC-RAS Cross Sections
Page 9 of 15 © Aquaveo 2016
6.4 Align Channel Cross Sections with Extracted Cross Sections
This will allow viewing all of the extracted cross sections and assign the highlighted
geometry to this cross section arc.
1. Use the Select Feature Arc tool to select the cross section arc at the top of
the screen labeled “0”.
2. Select Feature Objects | Attributes.
3. In the River Cross Section Attributes dialog, select Assign Cross Section.
4. The Assign Cross Section Profile dialog will appear. Click the Edit button.
5. The Cross-Section Attributes dialog will reappear. Select the Line Props tab to
view the material properties (roughness values) that will be applied to each cross
section. These can be edited if necessary.
6. Select the Merge tab.
7. Select the Load Insert Cs button.
8. Click on the Data Base Browse button.
9. From the Open dialog, open “channelxsec.idx”.
10. Make sure that the csid number that is highlighted for the channel cross section
matches the csid number of the extracted cross section that is being edited (these
numbers also match the number labels displayed next to each cross section arc on
the screen).
11. Select OK.
12. Choose “Thalweg” for Alignment to align the thalweg (specified as a point
property) of the channel cross section with the thalweg of the extracted cross
section.
13. Enter a value for Step Z (try “5”) and use the Down button to move the channel
cross section vertically.
14. Reduce the Step Z value to “1” and use the Up button to position the cross
section.
15. Keep reducing the Step Z value and using the Up and Down buttons until the
cross sections are aligned correctly.
16. Enter a value for Step D and use the Left and Right buttons if needed to move the
channel cross section horizontally.
17. Select “Insert All” from the Merge drop-down list.
18. Click Apply to insert the channel cross section and permanently change the
extracted cross section data.
19. Select OK and notice the updated extracted cross section geometry.
20. Select OK.
21. Select OK.
22. Repeat this process (steps 1-21) for all of the cross section arcs.

WMS Tutorials Hydraulics and Floodplain Modeling – Managing HEC-RAS Cross Sections
Page 10 of 15 © Aquaveo 2016
A profile of the surveyed cross section geometry will appear in the upper left corner of
the profile view of the extracted cross section geometry as shown in Figure 3.
Figure 3 Merging cross sections
Merge cross sections using the Alignment tools shown in Figure 4. Align cross sections
using reference points (point properties) that are defined on both cross sections such as
left end, left bank, thalweg, right bank, and right end. Enter a value for the Offset and the
cross section will be offset that distance from the alignment point. Specify a distance for
Step Z and use the Up and Down buttons to move the inserted cross section vertically. Do
the same for Step D using the Left and Right buttons to move the cross section
horizontally. The horizontal and vertical scales on the plots are useful for determining the
distances to enter. (Remember that the scales are not equal and so the vertical distances
are magnified).
Figure 4 Alignment tools
The Zoom tool is useful for viewing the alignment of the cross sections close-up once the
channel cross section are located in the general area where it will be inserted.
7 Running HEC-RAS
A schematic will be created using the GIS data defined in WMS and exported to HEC-
RAS. Post-processing options are also available in WMS after running an HEC-RAS
simulation.

WMS Tutorials Hydraulics and Floodplain Modeling – Managing HEC-RAS Cross Sections
Page 11 of 15 © Aquaveo 2016
7.1 Creating a Schematic and Defining Roughness Values
1. Make the “1D-Hyd Centerline” the active coverage in the Project Explorer.
2. Select River Tools | Map → 1D Schematic.
3. Switch to the River module.
4. Select HEC-RAS | Material Properties. The Hecras Material Properties dialgo
will appear.
5. Enter roughness values for Agriculture, Brushland, Bare, River, and Urban as
shown in Figure 5.
Figure 5 Materials roughness values
6. Select OK.
7. Select HEC-RAS | Model Control. The HEC-RAS Model Control dialog will
appear.
8. Select “Materials” under Roughness for use in generating roughness values.
9. Select OK.
7.2 Running HEC-RAS
1. Select HEC-RAS | Export GIS File.
2. The Enter a filename to save an HEC-RAS project file dialog will open. Enter
“hecras.prj” and Save.
3. Select Yes if asked to replace existing file.
This will start HEC-RAS with the geometry file exported from WMS already loaded. The
window will be titled HEC-RAS 4.1.0.
4. Select Options | Unit system (US Customary/SI) in the HEC-RAS window.
5. In the HEC-RAS dialog, select System International (Metric System).
6. Select OK.
7. Select Yes to set the project units to SI (metric).
WMS Tutorials Hydraulics and Floodplain Modeling – Managing HEC-RAS Cross Sections
Page 12 of 15 © Aquaveo 2016
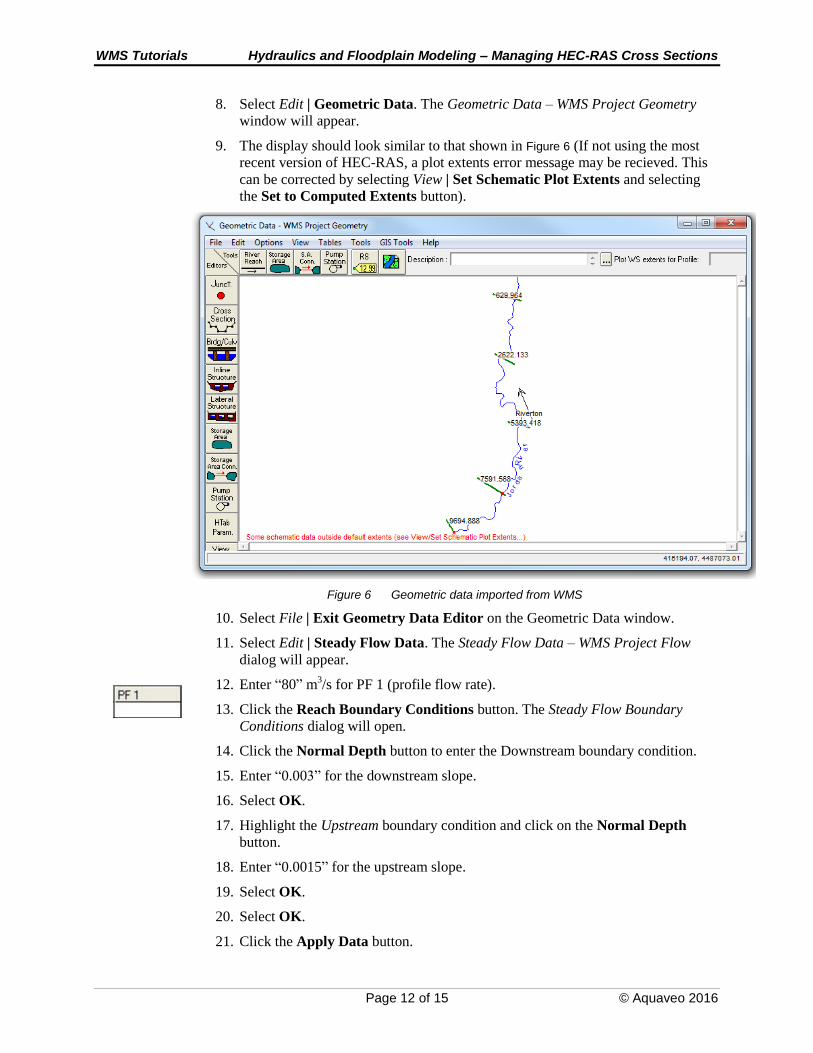
8. Select Edit | Geometric Data. The Geometric Data – WMS Project Geometry
window will appear.
9. The display should look similar to that shown in Figure 6 (If not using the most
recent version of HEC-RAS, a plot extents error message may be recieved. This
can be corrected by selecting View | Set Schematic Plot Extents and selecting
the Set to Computed Extents button).
Figure 6 Geometric data imported from WMS
10. Select File | Exit Geometry Data Editor on the Geometric Data window.
11. Select Edit | Steady Flow Data. The Steady Flow Data – WMS Project Flow
dialog will appear.
12. Enter “80” m3/s for PF 1 (profile flow rate).
13. Click the Reach Boundary Conditions button. The Steady Flow Boundary
Conditions dialog will open.
14. Click the Normal Depth button to enter the Downstream boundary condition.
15. Enter “0.003” for the downstream slope.
16. Select OK.
17. Highlight the Upstream boundary condition and click on the Normal Depth
button.
18. Enter “0.0015” for the upstream slope.
19. Select OK.
20. Select OK.
21. Click the Apply Data button.

WMS Tutorials Hydraulics and Floodplain Modeling – Managing HEC-RAS Cross Sections
Page 13 of 15 © Aquaveo 2016
22. Select File | Exit Flow Data Editor on the Steady Flow Data window.
23. Select Run | Steady Flow Analysis. The Steady Flow Analysis dialog will
appear.
24. Change the Flow Regime to “Mixed”.
25. Click on the Compute button.
26. Select Close to exit the HEC-RAS Finished Computations.
27. Select File | Exit on the Steady Flow Analysis window.
28. Select File | Save Project on the main HEC-RAS window.
29. Close the HEC-RAS 4.1.0 window.
7.3 Post-processing
1. In WMS select HEC-RAS | Read Solution.
2. Use the Select River Reach tool to select the river reach icon displayed on
the schematic.
3. Select HEC-RAS | Plot Solution to view the profile plot generated by HEC-RAS
for the river reach. This will open a Profile Plot window.
4. Use the Select Cross Section tool to select one of the cross section icons
displayed on the schematic.
5. Select HEC-RAS | Plot Solution to view the cross section profile plot generated
by HEC-RAS in a Cross Section window. Click the red X to exit when done
viewing results.
8 Floodplain Delineation
HEC-RAS computes a water surface elevation at each cross section. Interpolate the HEC-
RAS results along the cross section and centerline feature arcs in order to improve the
floodplain delineation. WMS intersects the water surface elevation data with the
background elevation TIN in order to delineate the floodplain.
8.1 Interpolating HEC-RAS Results
1. Select Display | Display Options to open the Display Options dialog.
2. On the River Data tab, toggle River Hydraulic Schematic off.
3. Select OK.
4. Make the “1D-Hyd Cross Section” coverage active in the Project Explorer.
5. Make sure that none of the cross section arcs are selected by clicking somewhere
else on the screen.
6. Select River Tools | Interpolate Water Surface Elevations.
7. The Interpolate Stages dialog will appear. Choose Create a data point “At a
specified spacing”.

WMS Tutorials Hydraulics and Floodplain Modeling – Managing HEC-RAS Cross Sections
Page 14 of 15 © Aquaveo 2016
8. Enter “100” for the Data point spacing.
9. Select OK.
10. Make the “1D-Hyd Centerline” coverage active in the Project Explorer.
11. Select River Tools | Interpolate Water Surface Elevations. The Interpolate
Stages dialog will reappear.
12. Select OK.
8.2 Delineating the Floodplain
1. Switch to the Terrain Data module.
2. Select Flood | Delineate.
3. In the Floodplain Delineation dialog, enter “500” for Max search radius.
4. Enter “2” for Number of stages in a quadrant.
5. Select OK.
6. Select the flood depth dataset, “W.S. Elev-PF 1_fd”, from the “Terrain Data”
folder of the Project Explorer.
7. Select Display | Contour Options . The W.S. Elev-PF 1_fd Contour Options
dialog will open.
8. For Contour Interval select the “Number of Contours” option and enter “25”.
9. For Contour Method select “Color fill” and adjust the Transparency to 55%.
10. Under Data Range, select Specify a range.
Notice that the values of the default range are much smaller than the actual elevation of
the TIN. This is because these values are the flood depth.
11. Deselect the Fill below and Fill above checkboxes.
12. Select OK.
Two data sets were created by delineating the floodplain. “W.S. Elev-PF 1_fd” contains
flood depth values and “W.S. Elev-PF 1_wl” contains water surface elevations.
13. Select “W.S. Elev-PF 1_wl” from the Project Explorer and experiment with
viewing the results, similar to the flood depth. If desired, experiment with
adjusting the transparency and turn the background image on as shown in Figure
7. When specifying the range, notice that the default values are actual TIN
elevations.
WMS Tutorials Hydraulics and Floodplain Modeling – Managing HEC-RAS Cross Sections
Page 15 of 15 © Aquaveo 2016
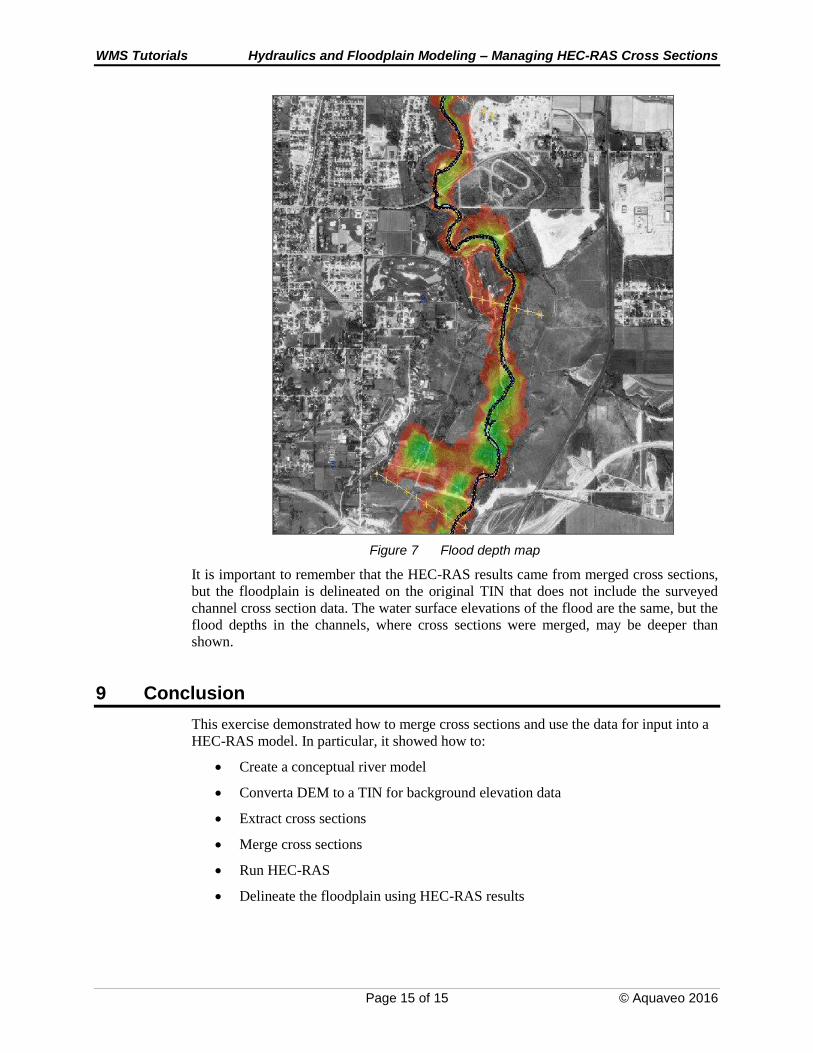
Figure 7 Flood depth map
It is important to remember that the HEC-RAS results came from merged cross sections,
but the floodplain is delineated on the original TIN that does not include the surveyed
channel cross section data. The water surface elevations of the flood are the same, but the
flood depths in the channels, where cross sections were merged, may be deeper than
shown.
9 Conclusion
This exercise demonstrated how to merge cross sections and use the data for input into a
HEC-RAS model. In particular, it showed how to:
Create a conceptual river model
Converta DEM to a TIN for background elevation data
Extract cross sections
Merge cross sections
Run HEC-RAS
Delineate the floodplain using HEC-RAS results