wood firing 2
TRANSCRIPT
www.ceramicartsdaily.org | Copyright © 2011, Ceramic Publications Company | Wood Firing Techniques & Tips | Second Edition | i
plans and instructions for making a wood-fired kiln
and firing with wood
ceramic artsdaily.org
wood kiln firing techniques & tips
| Second Edition |
This special report is brought to you with the support of Larkin Refractory Solutions
www.ceramicartsdaily.org | Copyright © 2011, Ceramic Publications Company | Wood Firing Techniques & Tips | Second Edition | 1
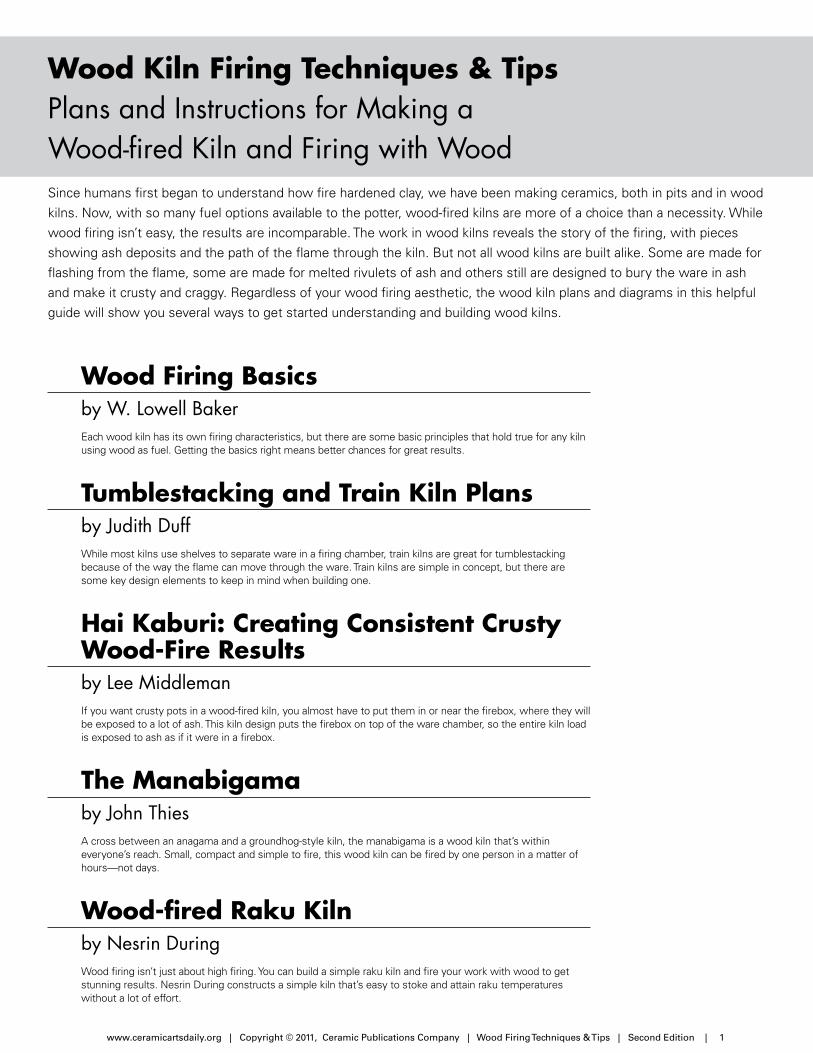
Wood Firing Basicsby W. Lowell BakerEach wood kiln has its own firing characteristics, but there are some basic principles that hold true for any kiln using wood as fuel. Getting the basics right means better chances for great results.
Tumblestacking and Train Kiln Plansby Judith DuffWhile most kilns use shelves to separate ware in a firing chamber, train kilns are great for tumblestacking because of the way the flame can move through the ware. Train kilns are simple in concept, but there are some key design elements to keep in mind when building one.
Hai Kaburi: Creating Consistent Crusty Wood-Fire Resultsby Lee MiddlemanIf you want crusty pots in a wood-fired kiln, you almost have to put them in or near the firebox, where they will be exposed to a lot of ash. This kiln design puts the firebox on top of the ware chamber, so the entire kiln load is exposed to ash as if it were in a firebox.
The Manabigamaby John ThiesA cross between an anagama and a groundhog-style kiln, the manabigama is a wood kiln that’s within everyone’s reach. Small, compact and simple to fire, this wood kiln can be fired by one person in a matter of hours—not days.
Wood-fired Raku Kilnby Nesrin DuringWood firing isn’t just about high firing. You can build a simple raku kiln and fire your work with wood to get stunning results. Nesrin During constructs a simple kiln that’s easy to stoke and attain raku temperatures without a lot of effort.
Wood Kiln Firing Techniques & Tips Plans and Instructions for Making a Wood-fired Kiln and Firing with WoodSince humans first began to understand how fire hardened clay, we have been making ceramics, both in pits and in wood kilns. Now, with so many fuel options available to the potter, wood-fired kilns are more of a choice than a necessity. While wood firing isn’t easy, the results are incomparable. The work in wood kilns reveals the story of the firing, with pieces showing ash deposits and the path of the flame through the kiln. But not all wood kilns are built alike. Some are made for flashing from the flame, some are made for melted rivulets of ash and others still are designed to bury the ware in ash and make it crusty and craggy. Regardless of your wood firing aesthetic, the wood kiln plans and diagrams in this helpful guide will show you several ways to get started understanding and building wood kilns.

www.ceramicartsdaily.org | Copyright © 2011, Ceramic Publications Company | Wood Firing Techniques & Tips | Second Edition | 2
Wood Firing Basicsby W. Lowell Baker
Wood burns in two distinctly different stages. The first, and most obvious, is the burning of gasses produced when wood is heated. Wood begins to gasify at about 500°F. The
second is the burning of the charcoal. This happens, for the most part, after the materials that form the gasses have been driven out of the wood. The coals in your ash pit serve to provide some heat to the kiln and to gasify the freshly stoked wood, mostly through radiant heat energy. As the gasses burn in a wood kiln, they typically produce very long flames. These flames can be easily over 30 feet long. Charcoal produces very hot, but very short, flames. The flame from charcoal is normally less than a few inches long. All of these issues are relevant to building and firing any wood-burning kiln.
One of the demonstrations I take my students through when we begin talking about kiln design is to bring an oxygen-acetylene torch into the classroom. If the torch is ignited with only acetylene (fuel), it produces a very long, very dirty flame. One can quickly pass his or her hand through this flame without any real danger, but it will be covered with black soot. As oxygen is added, the flame shortens and becomes significantly hotter. As the flame shortens with the changing oxygen-fuel ratio, smaller flame tips appear in the center of the flame. This is the place where the flame is the hottest. The more defined the tips are, the hotter the flame. You want this part of the flame in the firing chamber of a kiln, not in the firebox or the flue.
If you have a small kiln and a fuel that develops a long flame, you need to either redesign your kiln to use the length of the flame, or simply shorten the flame to bring the hottest part of the fire back into the chamber where the pots are stacked. As with the acetylene example, the
easiest way to shorten the flame and make it hotter is to add oxygen.
If you have electricity at the kiln site, adding a blower is one of the easiest and most controllable ways of adding oxygen.
A small squirrel-cage fan that will deliver about 100 cubic feet of air per minute will supply all the air you will need to fire a small kiln. You can fabricate a bolt-on connector to attach the pipe to the blower, or duct tape a piece of automotive tail pipe to the blower. You should realize that the end of the metal pipe will be subjected to a great deal of heat and will have to be replaced after a number of firings. Place the pipe in the ash pit of your firebox and adjust the air-input damper to the desired air flow. You will find that the flame around the blow pipe will be very intense. This system will allow you to fire your kiln with a much smaller firebox than would normal-ly be needed in a natural-draft kiln. The smaller firebox will require more frequent stoking, simply because it will not hold as much fuel as a larger box.
Increasing the flue height would be the last choice in a small kiln. If you do this, you must be certain that you have air intake ports and a flue cross section large enough to allow easy circulation of hot gasses. A damper will be essential for control. This will be less responsive than a forced-air system and will vary more due to atmospheric conditions, because it depends on lowered pressure to bring air into the kiln.
So, more air shortens the flame and more air increases the temperature of the coal bed to help gasify your fuel more quickly.
W. Lowell Baker is currently Professor of Art at the University of Ala-bama, and has taught workshops for nearly 40 years.
Each wood kiln has its own characteristics for firing, but there are some basic
principles that hold true for any kiln using wood as a fuel.
www.ceramicartsdaily.org | Copyright © 2011, Ceramic Publications Company | Wood Firing Techniques & Tips | Second Edition | 3
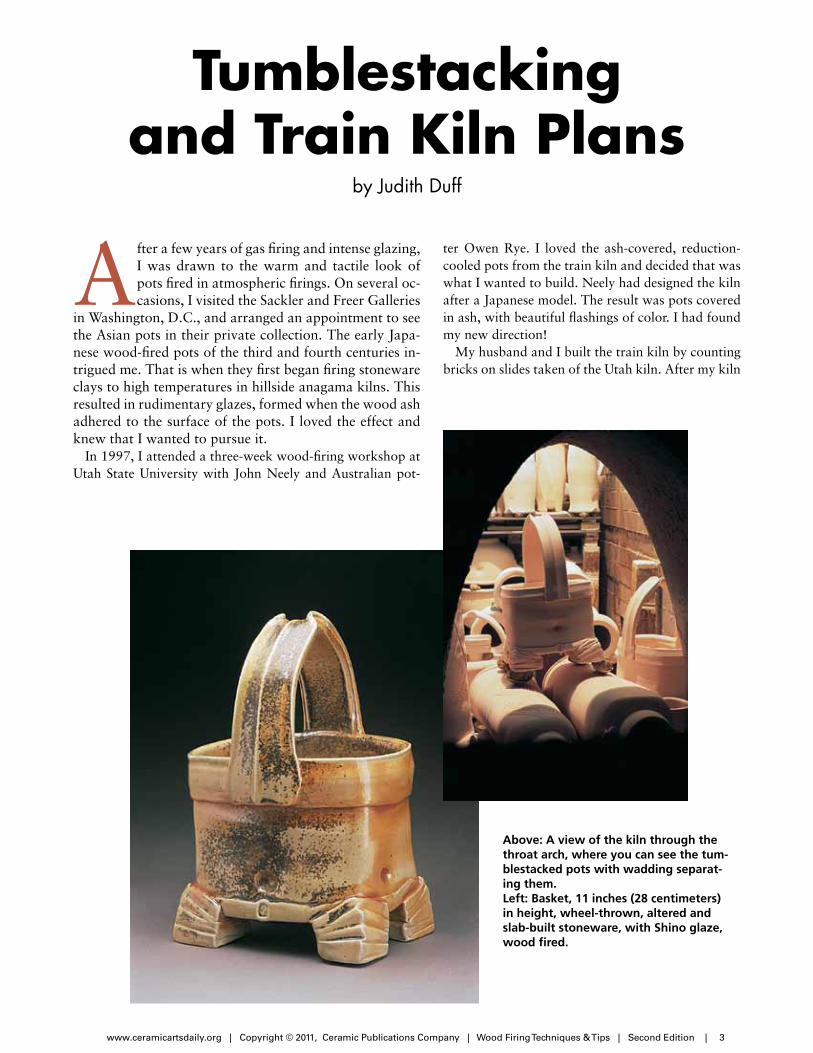
After a few years of gas firing and intense glazing, I was drawn to the warm and tactile look of pots fired in atmospheric firings. On several oc-casions, I visited the Sackler and Freer Galleries
in Washington, D.C., and arranged an appointment to see the Asian pots in their private collection. The early Japa-nese wood-fired pots of the third and fourth centuries in-trigued me. That is when they first began firing stoneware clays to high temperatures in hillside anagama kilns. This resulted in rudimentary glazes, formed when the wood ash adhered to the surface of the pots. I loved the effect and knew that I wanted to pursue it.
In 1997, I attended a three-week wood-firing workshop at Utah State University with John Neely and Australian pot-
ter Owen Rye. I loved the ash-covered, reduction-cooled pots from the train kiln and decided that was what I wanted to build. Neely had designed the kiln after a Japanese model. The result was pots covered in ash, with beautiful flashings of color. I had found my new direction!
My husband and I built the train kiln by counting bricks on slides taken of the Utah kiln. After my kiln
Tumblestacking and Train Kiln Plans
by Judith Duff
Above: A view of the kiln through the throat arch, where you can see the tum-blestacked pots with wadding separat-ing them.Left: Basket, 11 inches (28 centimeters) in height, wheel-thrown, altered and slab-built stoneware, with Shino glaze, wood fired.
www.ceramicartsdaily.org | Copyright © 2011, Ceramic Publications Company | Wood Firing Techniques & Tips | Second Edition | 4
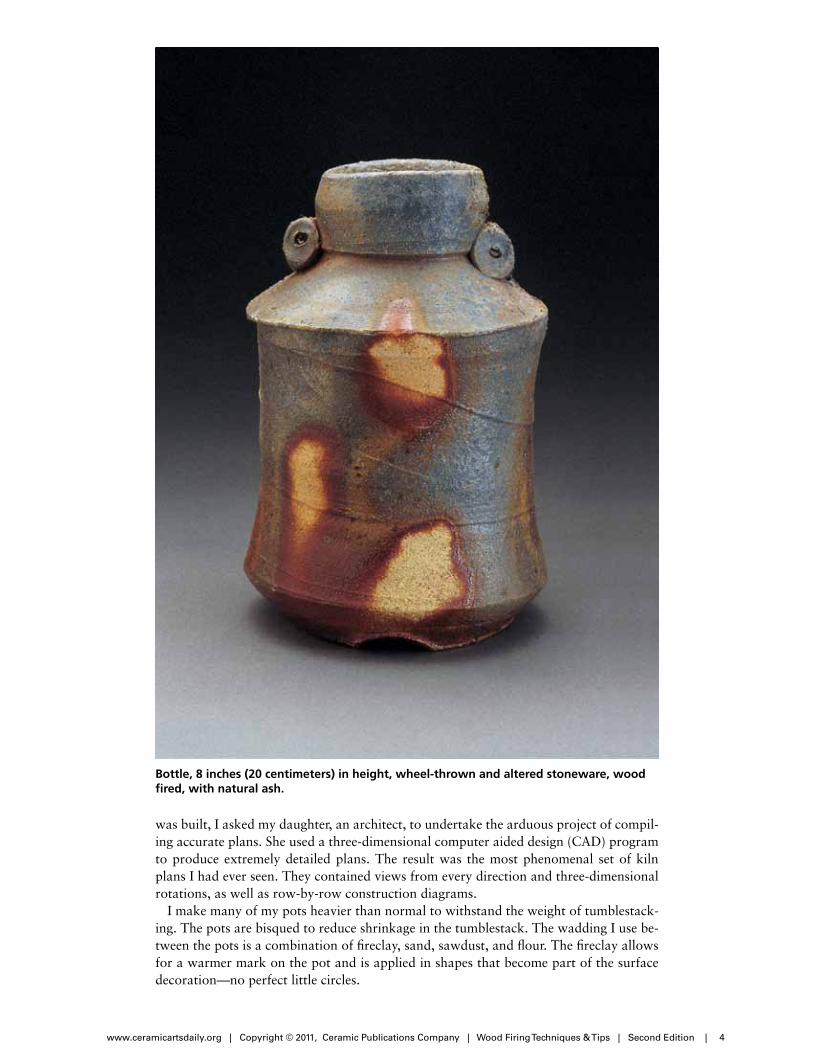
Bottle, 8 inches (20 centimeters) in height, wheel-thrown and altered stoneware, wood fired, with natural ash.
was built, I asked my daughter, an architect, to undertake the arduous project of compil-ing accurate plans. She used a three-dimensional computer aided design (CAD) program to produce extremely detailed plans. The result was the most phenomenal set of kiln plans I had ever seen. They contained views from every direction and three-dimensional rotations, as well as row-by-row construction diagrams.
I make many of my pots heavier than normal to withstand the weight of tumblestack-ing. The pots are bisqued to reduce shrinkage in the tumblestack. The wadding I use be-tween the pots is a combination of fireclay, sand, sawdust, and flour. The fireclay allows for a warmer mark on the pot and is applied in shapes that become part of the surface decoration —no perfect little circles.
www.ceramicartsdaily.org | Copyright © 2011, Ceramic Publications Company | Wood Firing Techniques & Tips | Second Edition | 5
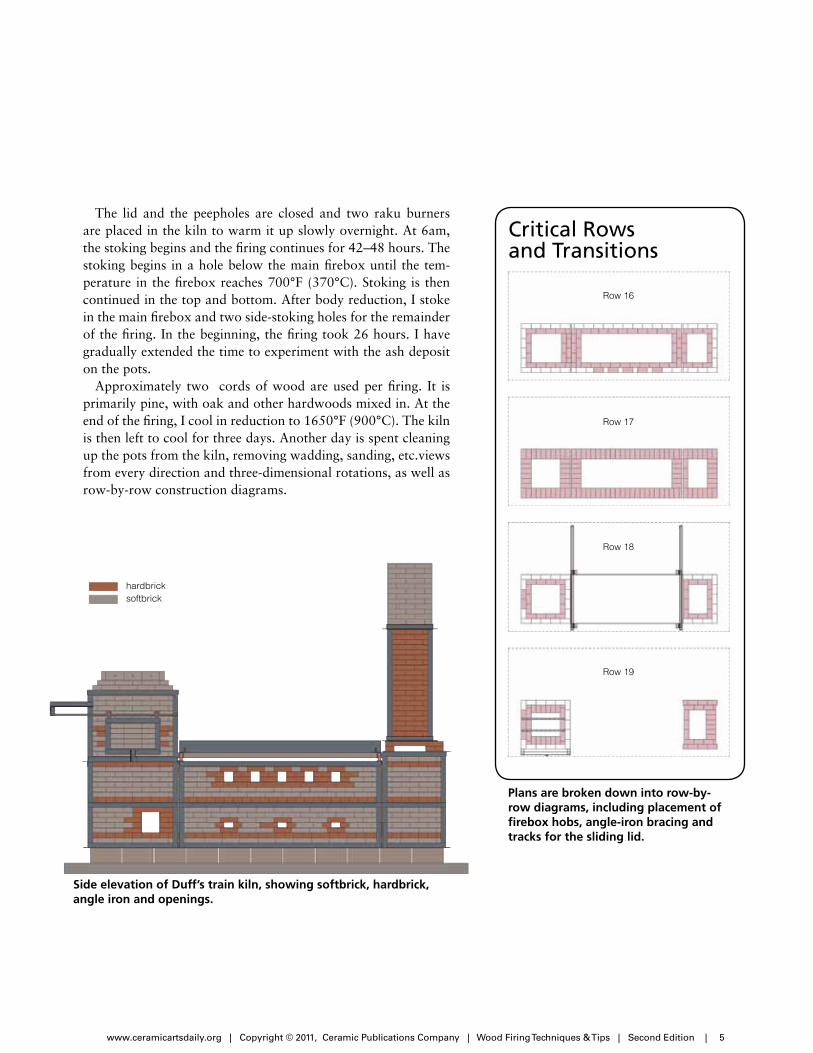
Plans are broken down into row-by-row diagrams, including placement of firebox hobs, angle-iron bracing and tracks for the sliding lid.
Side elevation of Duff’s train kiln, showing softbrick, hardbrick, angle iron and openings.
Row 16
Row 17
Row 18
Row 19
hardbricksoftbrick
Critical Rows and Transitions
The lid and the peepholes are closed and two raku burners are placed in the kiln to warm it up slowly overnight. At 6am, the stoking begins and the firing continues for 42–48 hours. The stoking begins in a hole below the main firebox until the tem-perature in the firebox reaches 700°F (370°C). Stoking is then continued in the top and bottom. After body reduction, I stoke in the main firebox and two side-stoking holes for the remainder of the firing. In the beginning, the firing took 26 hours. I have gradually extended the time to experiment with the ash deposit on the pots.
Approximately two cords of wood are used per firing. It is primarily pine, with oak and other hardwoods mixed in. At the end of the firing, I cool in reduction to 1650°F (900°C). The kiln is then left to cool for three days. Another day is spent cleaning up the pots from the kiln, removing wadding, sanding, etc.views from every direction and three-dimensional rotations, as well as row-by-row construction diagrams.
www.ceramicartsdaily.org | Copyright © 2011, Ceramic Publications Company | Wood Firing Techniques & Tips | Second Edition | 6
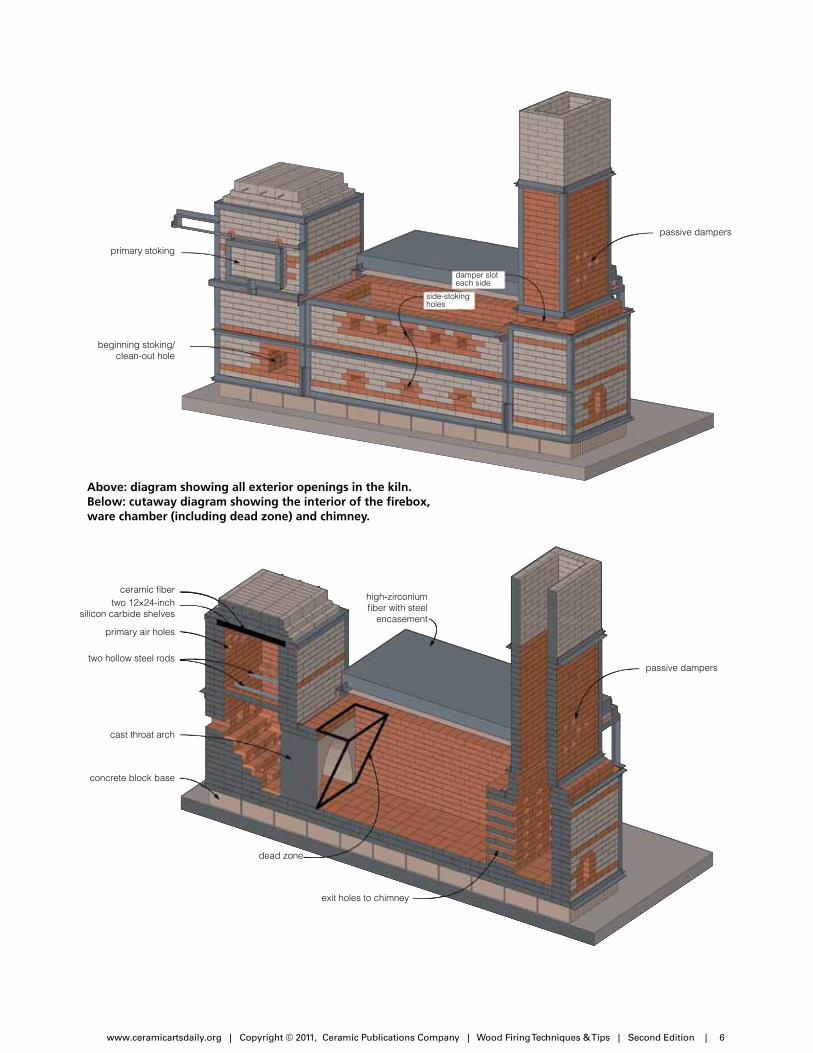
Above: diagram showing all exterior openings in the kiln.Below: cutaway diagram showing the interior of the firebox, ware chamber (including dead zone) and chimney.
primary stoking
beginning stoking/clean-out hole
side-stoking holes
damper slot each side
passive dampers
primary air holes
two 12×24-inch silicon carbide shelves
ceramic fiber
two hollow steel rods
cast throat arch
concrete block base
dead zone
exit holes to chimney
high-zirconium fiber with steel
encasement
passive dampers
www.ceramicartsdaily.org | Copyright © 2011, Ceramic Publications Company | Wood Firing Techniques & Tips | Second Edition | 7
Hai KaburiCreating Consistent Crusty Wood-Fire Results
by Lee Middleman
Matsumiya Ryoji, a master potter living in Aomori prefecture, Japan, has devel-oped a unique wood-fire kiln to consis-tently create ceramic pieces with a very
crusty ash surface. He achieves this by burying the work in four successive layers of ash during the firing.
During his more-than-thirty-year career, Matsumiya has built four-teen kilns and fired them more than 750 times. He currently has two noborigamas, an anagama with two additional chambers, an Olsen
crossfire, an archaeological Sueki, and his new bourry box hai kaburi (ash covering) kiln.
Matsumiya was seeking a way to achieve work similar to the few pieces created in the rebox of his anagama. In
the firebox, only a small area is effective and the work is subject to damage from stoking. The anagama re-
quires eight days of firing; a long time to carefully avoid damaging the ware. On a visit to fellow pot-ter Kusakabe Masakazu in Miharu, Matsumiya studied Kusakabe’s version of the bourry box kiln in which ash drops from an overhead grate in one chamber onto the side of the floor of a second chamber. A few pieces in or near this area developed the appearance Matsumiya sought. The ware must be small to avoid blocking the holes between the chambers.
Thus he decided to design a single-cham-ber kiln in which low side stokeholes are used to heat and maintain temperature while three high stokeholes located in the front are used to place wood on grates over most of the pieces. Because the work gets covered in the embers from above, top stok-ing alone is insufficient to ensure watertight vessels and to maintain the temperature to
melt the ash. So, after the kiln is brought to a temperature of 2282°F (1250°C) by side stok-
ing, long pieces of wood are front stoked (he continues to side stoke to maintain temperature).
The embers created from the front stoking above fall onto the work.Matsumiya has found that using four bundles of
wood creates the best results. A bundle is about 4 feet (1.2 m) in diameter and 6 feet (1.8 m) long, made up of
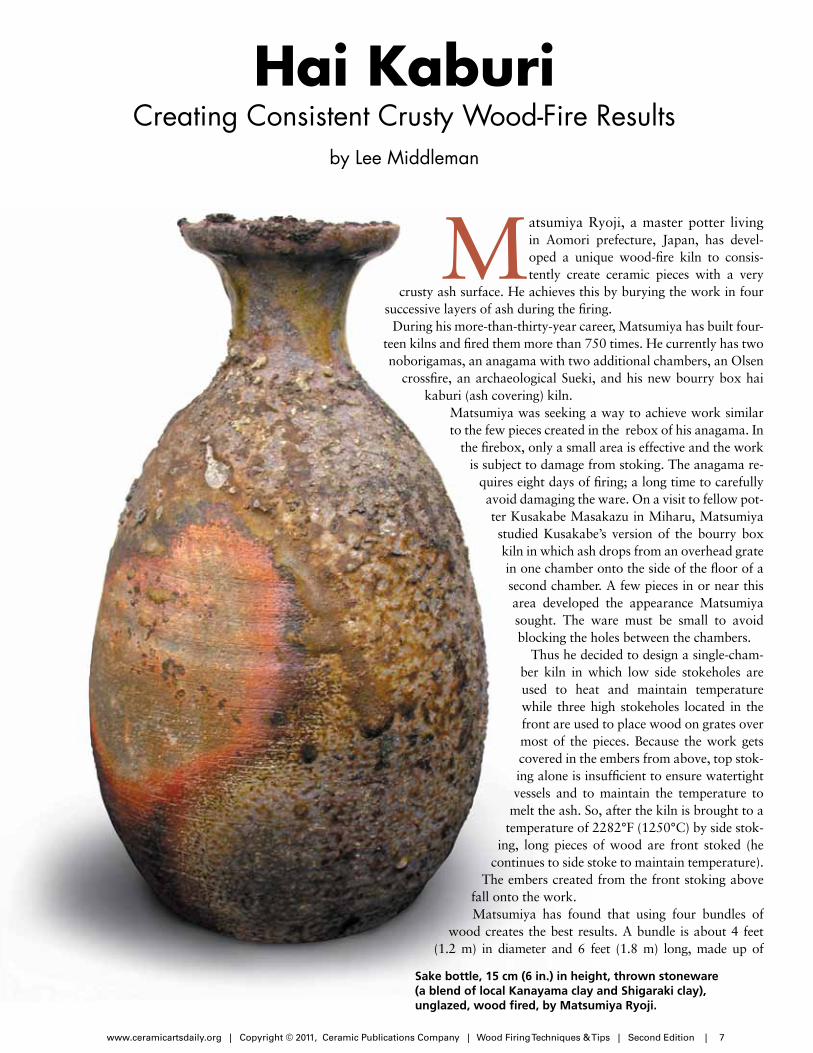
Sake bottle, 15 cm (6 in.) in height, thrown stoneware (a blend of local Kanayama clay and Shigaraki clay), unglazed, wood fired, by Matsumiya Ryoji.
www.ceramicartsdaily.org | Copyright © 2011, Ceramic Publications Company | Wood Firing Techniques & Tips | Second Edition | 8
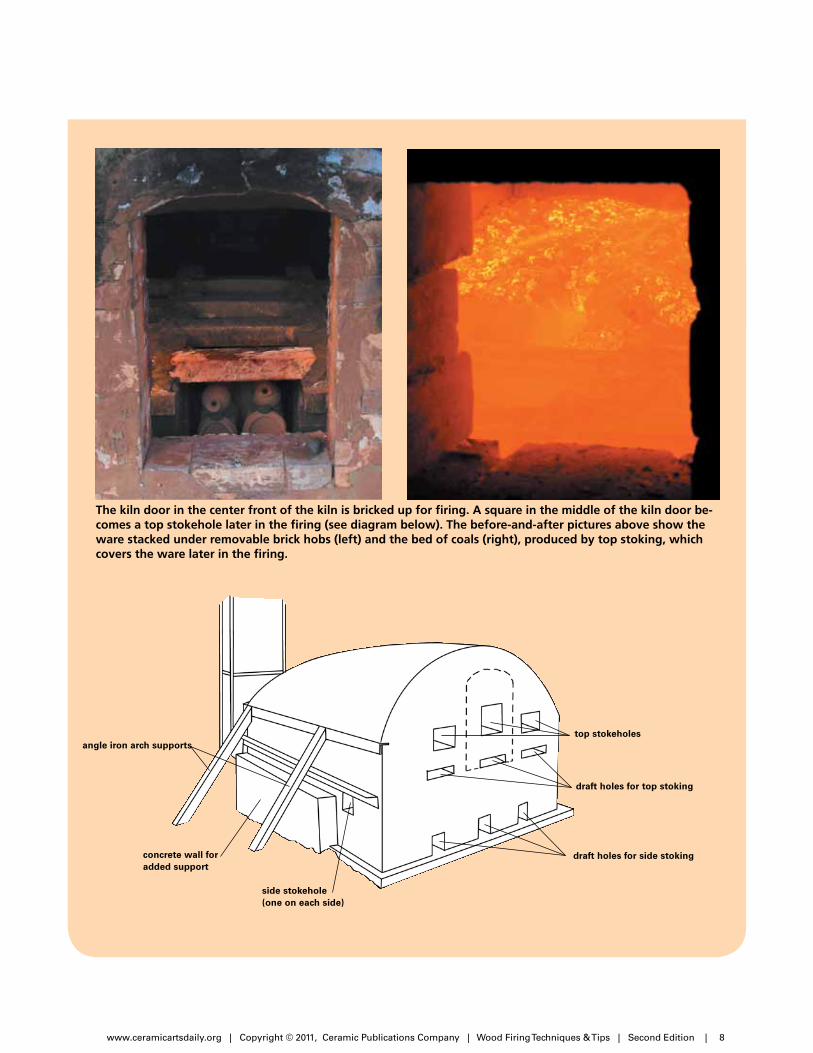
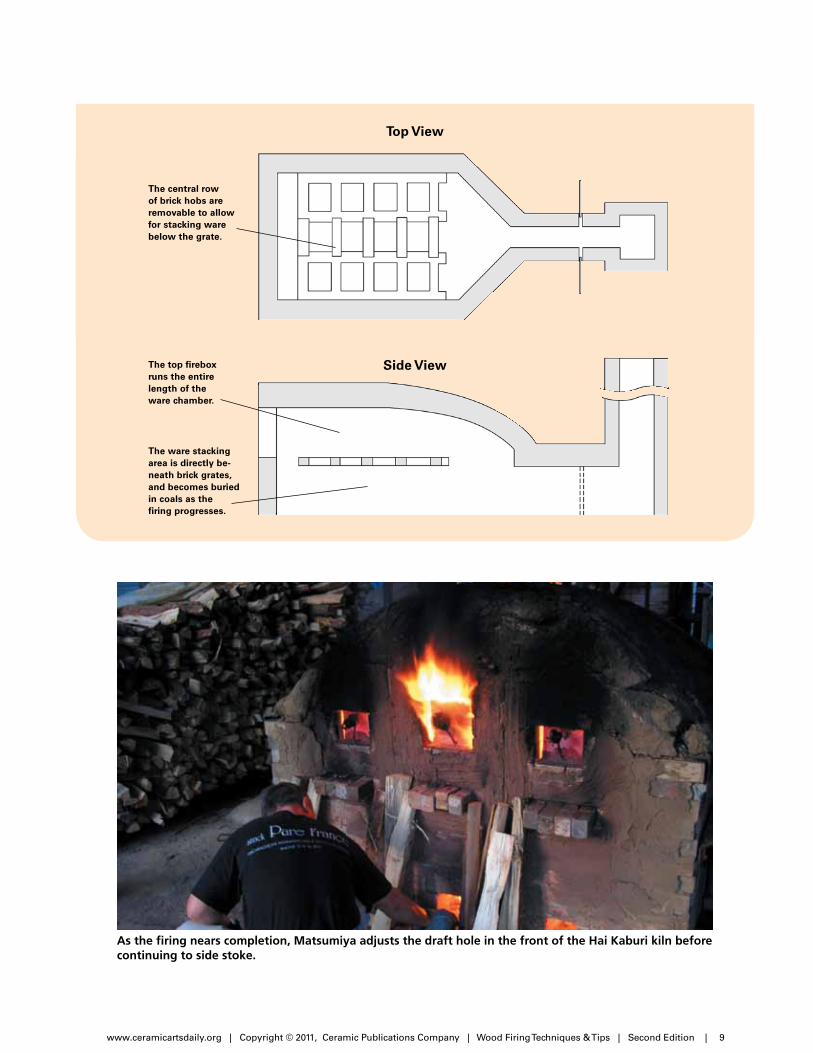
The kiln door in the center front of the kiln is bricked up for firing. A square in the middle of the kiln door be-comes a top stokehole later in the firing (see diagram below). The before-and-after pictures above show the ware stacked under removable brick hobs (left) and the bed of coals (right), produced by top stoking, which covers the ware later in the firing.
top stokeholes
side stokehole(one on each side)
concrete wall for added support
draft holes for top stoking
draft holes for side stoking
angle iron arch supports
www.ceramicartsdaily.org | Copyright © 2011, Ceramic Publications Company | Wood Firing Techniques & Tips | Second Edition | 9
As the firing nears completion, Matsumiya adjusts the draft hole in the front of the Hai Kaburi kiln before continuing to side stoke.
Top View
The central row of brick hobs are removable to allow for stacking ware below the grate.
Side View
The ware stacking area is directly be-neath brick grates, and becomes buried in coals as the firing progresses.
The top firebox runs the entire length of the ware chamber.
www.ceramicartsdaily.org | Copyright © 2011, Ceramic Publications Company | Wood Firing Techniques & Tips | Second Edition | 10
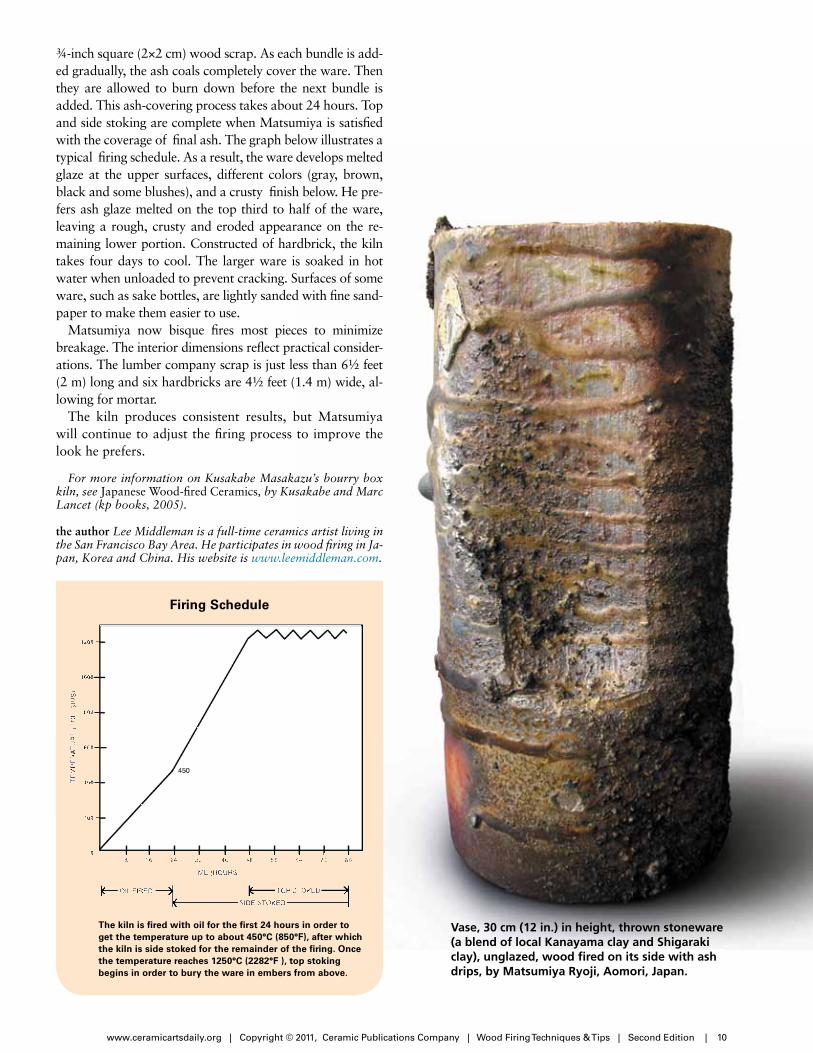
¾-inch square (2×2 cm) wood scrap. As each bundle is add-ed gradually, the ash coals completely cover the ware. Then they are allowed to burn down before the next bundle is added. This ash-covering process takes about 24 hours. Top and side stoking are complete when Matsumiya is satisfied with the coverage of final ash. The graph below illustrates a typical firing schedule. As a result, the ware develops melted glaze at the upper surfaces, different colors (gray, brown, black and some blushes), and a crusty finish below. He pre-fers ash glaze melted on the top third to half of the ware, leaving a rough, crusty and eroded appearance on the re-maining lower portion. Constructed of hardbrick, the kiln takes four days to cool. The larger ware is soaked in hot water when unloaded to prevent cracking. Surfaces of some ware, such as sake bottles, are lightly sanded with fine sand-paper to make them easier to use.
Matsumiya now bisque fires most pieces to minimize breakage. The interior dimensions reflect practical consider-ations. The lumber company scrap is just less than 6½ feet (2 m) long and six hardbricks are 4½ feet (1.4 m) wide, al-lowing for mortar.
The kiln produces consistent results, but Matsumiya will continue to adjust the firing process to improve the look he prefers.
For more information on Kusakabe Masakazu’s bourry box kiln, see Japanese Wood-fired Ceramics, by Kusakabe and Marc Lancet (kp books, 2005).
the author Lee Middleman is a full-time ceramics artist living in the San Francisco Bay Area. He participates in wood firing in Ja-pan, Korea and China. His website is www.leemiddleman.com.
Vase, 30 cm (12 in.) in height, thrown stoneware (a blend of local Kanayama clay and Shigaraki clay), unglazed, wood fired on its side with ash drips, by Matsumiya Ryoji, Aomori, Japan.
Firing Schedule
The kiln is fired with oil for the first 24 hours in order to get the temperature up to about 450°C (850°F), after which the kiln is side stoked for the remainder of the firing. Once the temperature reaches 1250°C (2282°F ), top stoking begins in order to bury the ware in embers from above.
www.ceramicartsdaily.org | Copyright © 2011, Ceramic Publications Company | Wood Firing Techniques & Tips | Second Edition | 11
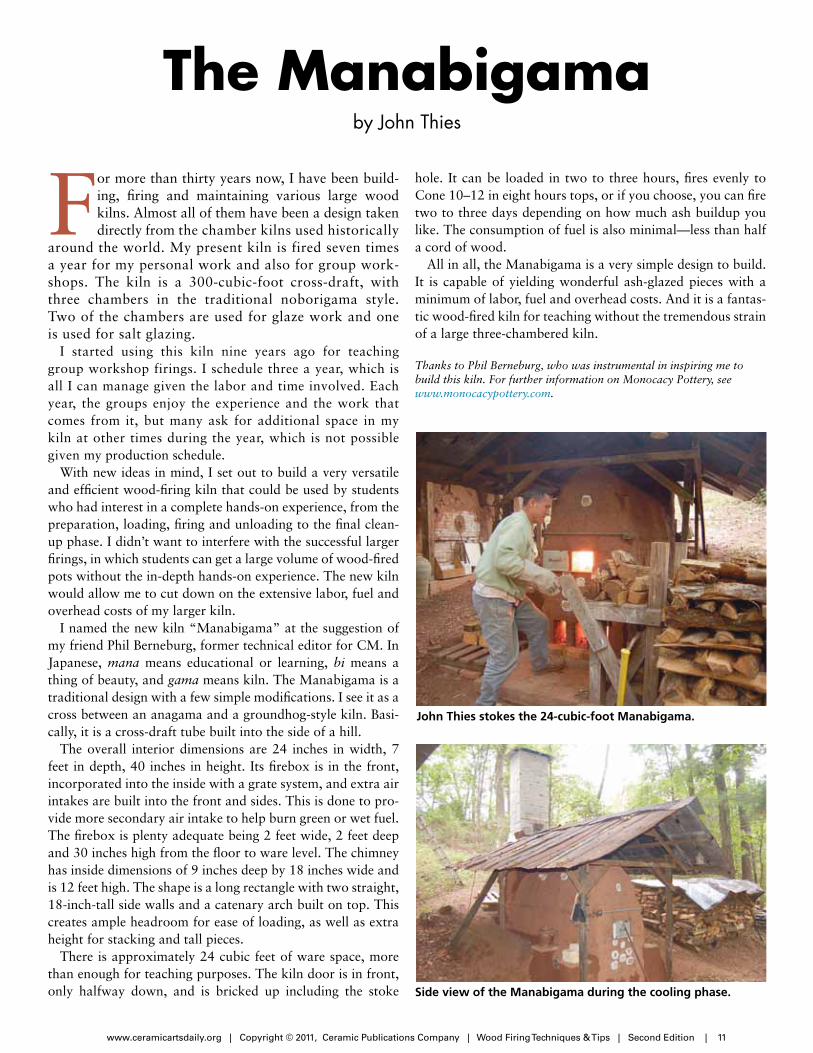
For more than thirty years now, I have been build-ing, firing and maintaining various large wood kilns. Almost all of them have been a design taken directly from the chamber kilns used historically
around the world. My present kiln is fired seven times a year for my personal work and also for group work-shops. The kiln is a 300-cubic-foot cross-draft, with three chambers in the traditional noborigama style. Two of the chambers are used for glaze work and one is used for salt glazing.
I started using this kiln nine years ago for teaching group workshop firings. I schedule three a year, which is all I can manage given the labor and time involved. Each year, the groups enjoy the experience and the work that comes from it, but many ask for additional space in my kiln at other times during the year, which is not possible given my production schedule.
With new ideas in mind, I set out to build a very versatile and efficient wood-firing kiln that could be used by students who had interest in a complete hands-on experience, from the preparation, loading, firing and unloading to the final clean-up phase. I didn’t want to interfere with the successful larger firings, in which students can get a large volume of wood-fired pots without the in-depth hands-on experience. The new kiln would allow me to cut down on the extensive labor, fuel and overhead costs of my larger kiln.
I named the new kiln “Manabigama” at the suggestion of my friend Phil Berneburg, former technical editor for CM. In Japanese, mana means educational or learning, bi means a thing of beauty, and gama means kiln. The Manabigama is a traditional design with a few simple modifications. I see it as a cross between an anagama and a groundhog-style kiln. Basi-cally, it is a cross-draft tube built into the side of a hill.
The overall interior dimensions are 24 inches in width, 7 feet in depth, 40 inches in height. Its firebox is in the front, incorporated into the inside with a grate system, and extra air intakes are built into the front and sides. This is done to pro-vide more secondary air intake to help burn green or wet fuel. The firebox is plenty adequate being 2 feet wide, 2 feet deep and 30 inches high from the floor to ware level. The chimney has inside dimensions of 9 inches deep by 18 inches wide and is 12 feet high. The shape is a long rectangle with two straight, 18-inch-tall side walls and a catenary arch built on top. This creates ample headroom for ease of loading, as well as extra height for stacking and tall pieces.
There is approximately 24 cubic feet of ware space, more than enough for teaching purposes. The kiln door is in front, only halfway down, and is bricked up including the stoke
hole. It can be loaded in two to three hours, fires evenly to Cone 10–12 in eight hours tops, or if you choose, you can fire two to three days depending on how much ash buildup you like. The consumption of fuel is also minimal—less than half a cord of wood.
All in all, the Manabigama is a very simple design to build. It is capable of yielding wonderful ash-glazed pieces with a minimum of labor, fuel and overhead costs. And it is a fantas-tic wood-fired kiln for teaching without the tremendous strain of a large three-chambered kiln.
Thanks to Phil Berneburg, who was instrumental in inspiring me to build this kiln. For further information on Monocacy Pottery, see www.monocacypottery.com.
John Thies stokes the 24-cubic-foot Manabigama.
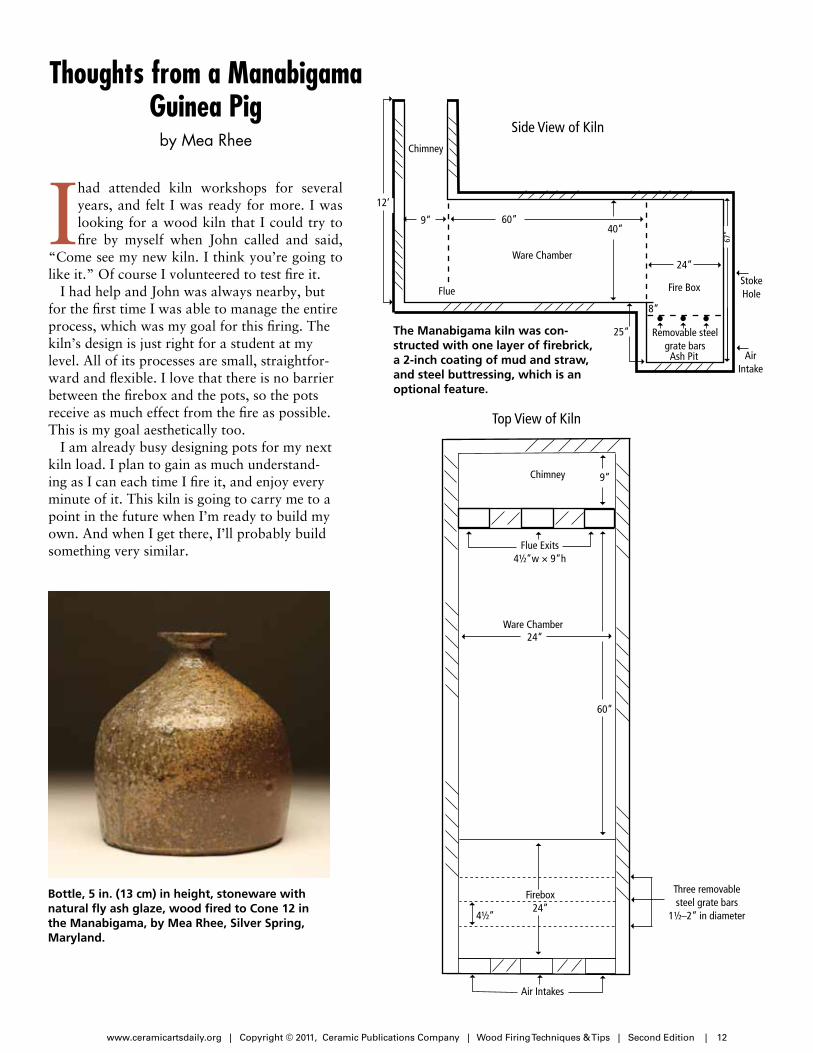
Side view of the Manabigama during the cooling phase.
The Manabigamaby John Thies
www.ceramicartsdaily.org | Copyright © 2011, Ceramic Publications Company | Wood Firing Techniques & Tips | Second Edition | 12
I had attended kiln workshops for several years, and felt I was ready for more. I was looking for a wood kiln that I could try to fire by myself when John called and said,
“Come see my new kiln. I think you’re going to like it.” Of course I volunteered to test fire it.
I had help and John was always nearby, but for the first time I was able to manage the entire process, which was my goal for this firing. The kiln’s design is just right for a student at my level. All of its processes are small, straightfor-ward and flexible. I love that there is no barrier between the firebox and the pots, so the pots receive as much effect from the fire as possible. This is my goal aesthetically too.
I am already busy designing pots for my next kiln load. I plan to gain as much understand-ing as I can each time I fire it, and enjoy every minute of it. This kiln is going to carry me to a point in the future when I’m ready to build my own. And when I get there, I’ll probably build something very similar.
Bottle, 5 in. (13 cm) in height, stoneware with natural fly ash glaze, wood fired to Cone 12 in the Manabigama, by Mea Rhee, Silver Spring, Maryland.
The Manabigama kiln was con-structed with one layer of firebrick, a 2-inch coating of mud and straw, and steel buttressing, which is an optional feature.
Top View of Kiln
Side View of Kiln
Ware Chamber
60”
4
4
Chimney
4
4
9”
Flue
l l l
Removable steel grate bars
4 4 4
Ash Pit
4
4
24”
Fire Box
8”
25”
4
4
4
Stoke Hole
4
40”
4
4
4
67”
Air Intake
4
12’
4
4
444 4
4
4
9”
4
60”
4
4
4
24”
Chimney
Flue Exits4½”w × 9“h
Ware Chamber
4
4
4
Firebox24”
Three removable steel grate bars
1½–2” in diameter
4
4
4½”4
4
Air Intakes
4
4
Thoughts from a Manabigama Guinea Pig
by Mea Rhee
www.ceramicartsdaily.org | Copyright © 2011, Ceramic Publications Company | Wood Firing Techniques & Tips | Second Edition | 13
by Nesrin DuringWood-fired Raku Kiln
This simple, self-built raku kiln is made of stacked bricks and sized to fit what I’m planning to fire. Sometimes I start firing small objects, then add another one or two rows of bricks for the big-
ger objects. These kilns are built wherever I want them to stand, taking into consideration the direction of the wind. The day after I’ve finished firing, I put away the bricks, out of sight under a roof or in a shed to keep them dry until the next firing.
Kiln ConstructionA typical kiln is built from about 50 insulating bricks (IFBs), a square kiln shelf (size depending on what I want to fire), a metal grill for a grate, a piece of sheet metal, and some broken shelf pieces. It takes about 45 minutes to build, and fires to about 1650°F in about 45 to 60 minutes for the first firing; thereafter, every load takes 15 to 20 minutes (one can see the glaze melting, the pots shining in the flames, from the top of the kiln).
To begin, I level the surface with a layer of dirt; it will also protect what is beneath (concrete, for example, can crack with the heat). I look at the direction of the wind
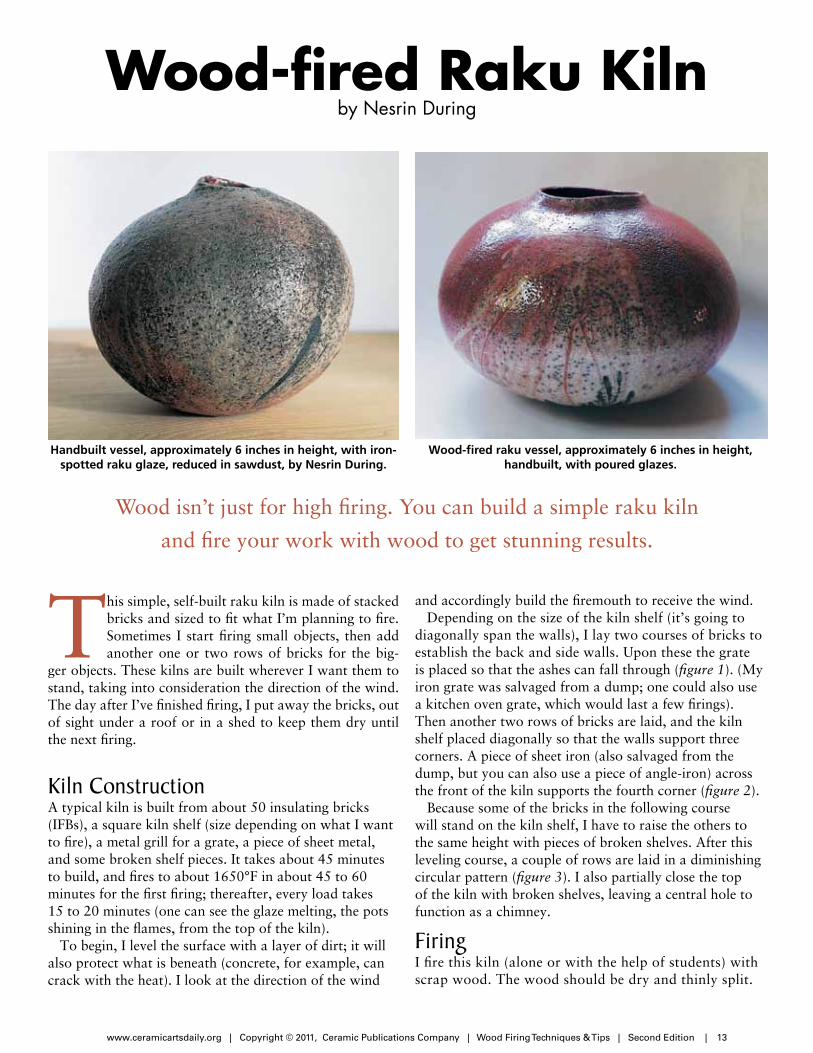
Handbuilt vessel, approximately 6 inches in height, with iron-spotted raku glaze, reduced in sawdust, by Nesrin During.
Wood isn’t just for high firing. You can build a simple raku kiln
and fire your work with wood to get stunning results.
Wood-fired raku vessel, approximately 6 inches in height, handbuilt, with poured glazes.
and accordingly build the firemouth to receive the wind.Depending on the size of the kiln shelf (it’s going to
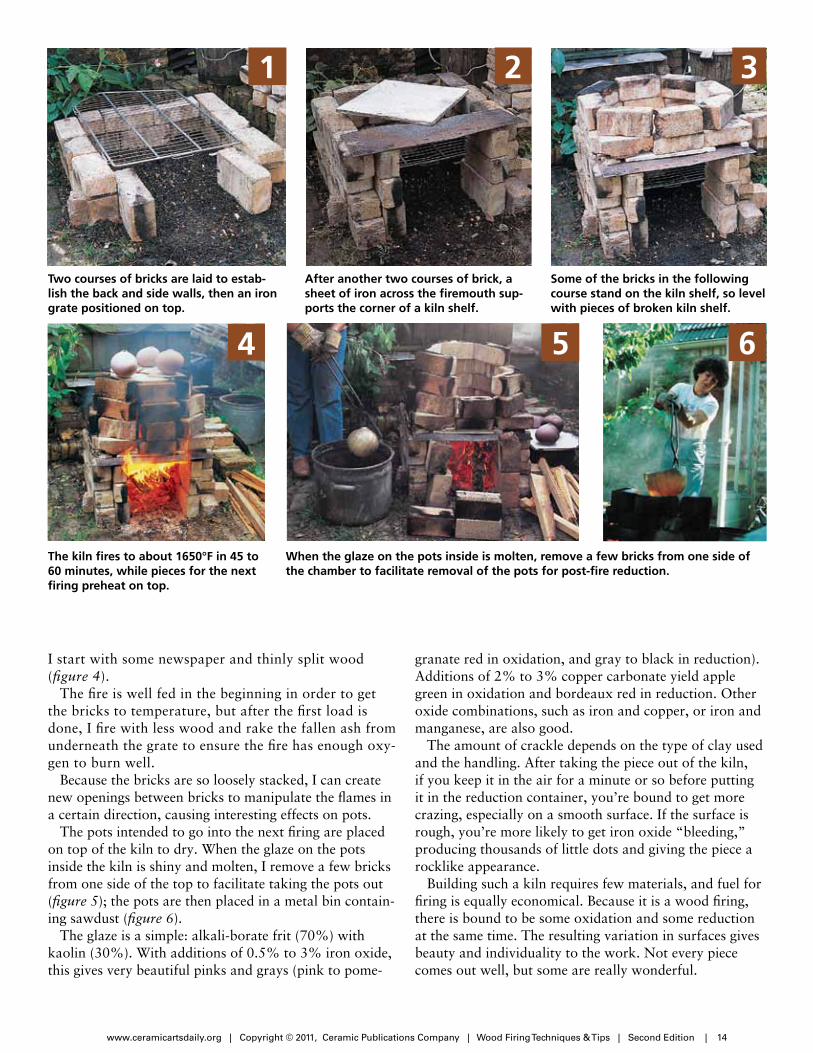
diagonally span the walls), I lay two courses of bricks to establish the back and side walls. Upon these the grate is placed so that the ashes can fall through (figure 1). (My iron grate was salvaged from a dump; one could also use a kitchen oven grate, which would last a few firings). Then another two rows of bricks are laid, and the kiln shelf placed diagonally so that the walls support three corners. A piece of sheet iron (also salvaged from the dump, but you can also use a piece of angle-iron) across the front of the kiln supports the fourth corner (figure 2).
Because some of the bricks in the following course will stand on the kiln shelf, I have to raise the others to the same height with pieces of broken shelves. After this leveling course, a couple of rows are laid in a diminishing circular pattern (figure 3). I also partially close the top of the kiln with broken shelves, leaving a central hole to function as a chimney.
FiringI fire this kiln (alone or with the help of students) with scrap wood. The wood should be dry and thinly split.
www.ceramicartsdaily.org | Copyright © 2011, Ceramic Publications Company | Wood Firing Techniques & Tips | Second Edition | 14
Two courses of bricks are laid to estab-lish the back and side walls, then an iron grate positioned on top.
1
After another two courses of brick, a sheet of iron across the firemouth sup-ports the corner of a kiln shelf.
2
Some of the bricks in the following course stand on the kiln shelf, so level with pieces of broken kiln shelf.
3
The kiln fires to about 1650°F in 45 to 60 minutes, while pieces for the next firing preheat on top.
4
I start with some newspaper and thinly split wood (figure 4).
The fire is well fed in the beginning in order to get the bricks to temperature, but after the first load is done, I fire with less wood and rake the fallen ash from underneath the grate to ensure the fire has enough oxy-gen to burn well.
Because the bricks are so loosely stacked, I can create new openings between bricks to manipulate the flames in a certain direction, causing interesting effects on pots.
The pots intended to go into the next firing are placed on top of the kiln to dry. When the glaze on the pots inside the kiln is shiny and molten, I remove a few bricks from one side of the top to facilitate taking the pots out (figure 5); the pots are then placed in a metal bin contain-ing sawdust (figure 6).
The glaze is a simple: alkali-borate frit (70%) with kaolin (30%). With additions of 0.5% to 3% iron oxide, this gives very beautiful pinks and grays (pink to pome-
granate red in oxidation, and gray to black in reduction). Additions of 2% to 3% copper carbonate yield apple green in oxidation and bordeaux red in reduction. Other oxide combinations, such as iron and copper, or iron and manganese, are also good.
The amount of crackle depends on the type of clay used and the handling. After taking the piece out of the kiln, if you keep it in the air for a minute or so before putting it in the reduction container, you’re bound to get more crazing, especially on a smooth surface. If the surface is rough, you’re more likely to get iron oxide “bleeding,” producing thousands of little dots and giving the piece a rocklike appearance.
Building such a kiln requires few materials, and fuel for firing is equally economical. Because it is a wood firing, there is bound to be some oxidation and some reduction at the same time. The resulting variation in surfaces gives beauty and individuality to the work. Not every piece comes out well, but some are really wonderful.
When the glaze on the pots inside is molten, remove a few bricks from one side of the chamber to facilitate removal of the pots for post-fire reduction.
65
www.ceramicartsdaily.org | Copyright © 2011, Ceramic Publications Company | Wood Firing Techniques & Tips | Second Edition | 15
Lots of Inventory • Lowest Prices
Unpara l le led serv ice & re f ractory des ign ass is tance for over
35 years by the fo lks who t ru ly care about your bus iness
• Firebrick – straights, arches, wedges & ti les
• Insulating firebrick – straights, arches, wedges & ti les
• Ceramic f iber blankets, boards, papers & textiles
• Castables in several insulating & dense compositions
• Mor tars, patches & inexpensive coatings
• Nitride & Fines Bonded Kiln Shelves
• Custom Manabigama Kiln Refrac tor y Package
P.O. Box 716, Lithonia, GA 30058
Phone: 678.336.7090 Fax: 678.336.7094
Email: [email protected]
www.LarkinRefractory.com
Kiln FurnitureGALORE!ALL SIZES AVAILABLE!
REFRACTORY SOLUTIONS
L R
S