woodworking newsletter string inlay made easy vol. … inlay made easy woodworking newsletter vol....
TRANSCRIPT
String Inlay Made EasyWoodworking Newsletter
Vol. 7, Issue 1 - September 2012
1/4 www.leevalley.com
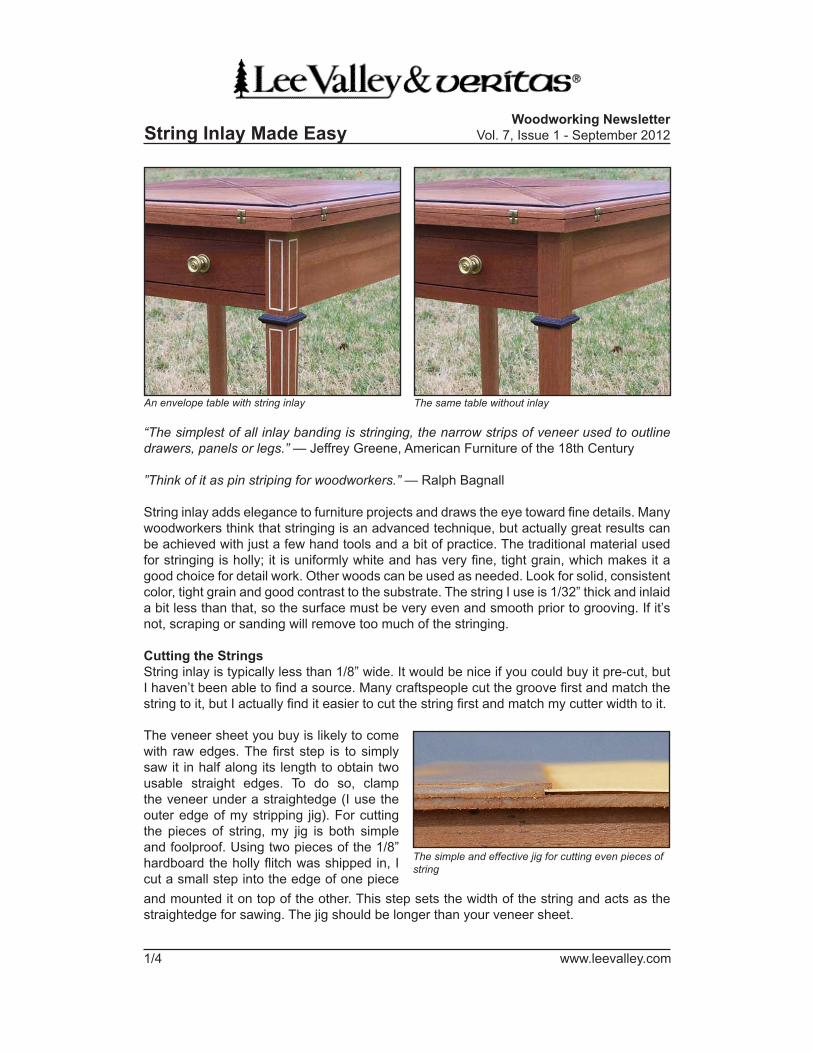
The same table without inlay
“The simplest of all inlay banding is stringing, the narrow strips of veneer used to outline drawers, panels or legs.” — Jeffrey Greene, American Furniture of the 18th Century
”Think of it as pin striping for woodworkers.” — Ralph Bagnall
String inlay adds elegance to furniture projects and draws the eye toward fine details. Many woodworkers think that stringing is an advanced technique, but actually great results can be achieved with just a few hand tools and a bit of practice. The traditional material used for stringing is holly; it is uniformly white and has very fine, tight grain, which makes it a good choice for detail work. Other woods can be used as needed. Look for solid, consistent color, tight grain and good contrast to the substrate. The string I use is 1/32” thick and inlaid a bit less than that, so the surface must be very even and smooth prior to grooving. If it’s not, scraping or sanding will remove too much of the stringing.
Cutting the StringsString inlay is typically less than 1/8” wide. It would be nice if you could buy it pre-cut, but I haven’t been able to find a source. Many craftspeople cut the groove first and match the string to it, but I actually find it easier to cut the string first and match my cutter width to it.
An envelope table with string inlay
The simple and effective jig for cutting even pieces of string
The veneer sheet you buy is likely to come with raw edges. The first step is to simply saw it in half along its length to obtain two usable straight edges. To do so, clamp the veneer under a straightedge (I use the outer edge of my stripping jig). For cutting the pieces of string, my jig is both simple and foolproof. Using two pieces of the 1/8” hardboard the holly flitch was shipped in, I cut a small step into the edge of one pieceand mounted it on top of the other. This step sets the width of the string and acts as the straightedge for sawing. The jig should be longer than your veneer sheet.

String Inlay Made EasyWoodworking Newsletter
Vol. 7, Issue 1 - September 2012
2/4 www.leevalley.com
The veneer can easily be cut using a knife, but the blade tends to follow the wood grain and that can spoil your string pieces. Sawing it using a fine-toothed veneer saw is the best way to create consistent strips. Slip the edge of the sheet under the lip of the jig and use the step as a straightedge. Keep the saw straight and take light strokes, letting the blade do the work; too much force can wrinkle or break the veneer. Saw the ends from the inside out to avoid damaging the veneer. Cutting the string pieces is surprisingly fast once you get a feel for it. For this article, I cut 12 strips in about 20 minutes.
Filing the CutterThe groove for the string can be cut using a beading tool, a scratch stock or even a marking gauge fitted with the proper blade. Whichever tool you use, shop built or store bought, you will need to create a properly sized cutter for your strings.
Commercial beading tools usually come with blank cutters. You can also buy blank cutters to fit antique tools such as the Stanley #66. To shape the cutter, simply file a tooth into it. Since the tooth needs to be only as deep as the string thickness, using a mill file to remove the shoulders from the edge takes just a few minutes. Cut a test groove that’s a bit wide and then carefully file the tooth to final width, testing as you go. The ideal fit is when the string has to be lightly tapped into the groove. The advantage with this system is that your jig will always cut the same sized strings, so the jig and cutter will be a matched pair. The next time you use this size of string, all of the prep work is done.
The cut pieces of stringSawing creates consistent strips
The filed cutter ready for useFiling the cutter to fit the string width

String Inlay Made EasyWoodworking Newsletter
Vol. 7, Issue 1 - September 2012
3/4 www.leevalley.com
Cutting the Grooves Secure the cutter into the tool and set the depth of cut a bit less than the thickness of the string. You want the inlay to be just a bit proud of the surface so that it can be scraped smooth. Set the fence to place the groove where you want it.
Begin cutting the groove using a light scraping cut. Make several passes, letting the cutter do the work. The groove is complete when the edge of the tool rides along the material and the cutter stops removing material. On larger panels, the beading tool can be used to cut all four sides, but it may be prudent to score the edges of the groove first to prevent tear out. For shorter cross cuts, the groove can be cut quickly using a sharp chisel.
Creating the groove for the string
The cutter set in the beading tool
Inlaying the String PiecesApply a very light bead of glue into the groove and lay the string down. Use a mallet and a flat block to tap it into the groove. Don’t be worried that the inlay does not look precise at this stage; the next step will take care of that.
String Inlay Made EasyWoodworking Newsletter
Vol. 7, Issue 1 - September 2012
4/4 www.leevalley.com
Text and photos by Ralph W. Bagnall
Ralph Bagnall is a woodworking consultant and author who has been writing freelance woodworking articles for more than 10 years. He provides physical plant consulting to woodworking companies as well as written and video marketing support for woodworking manufacturers and retailers. http://www.consultingwoodworker.com
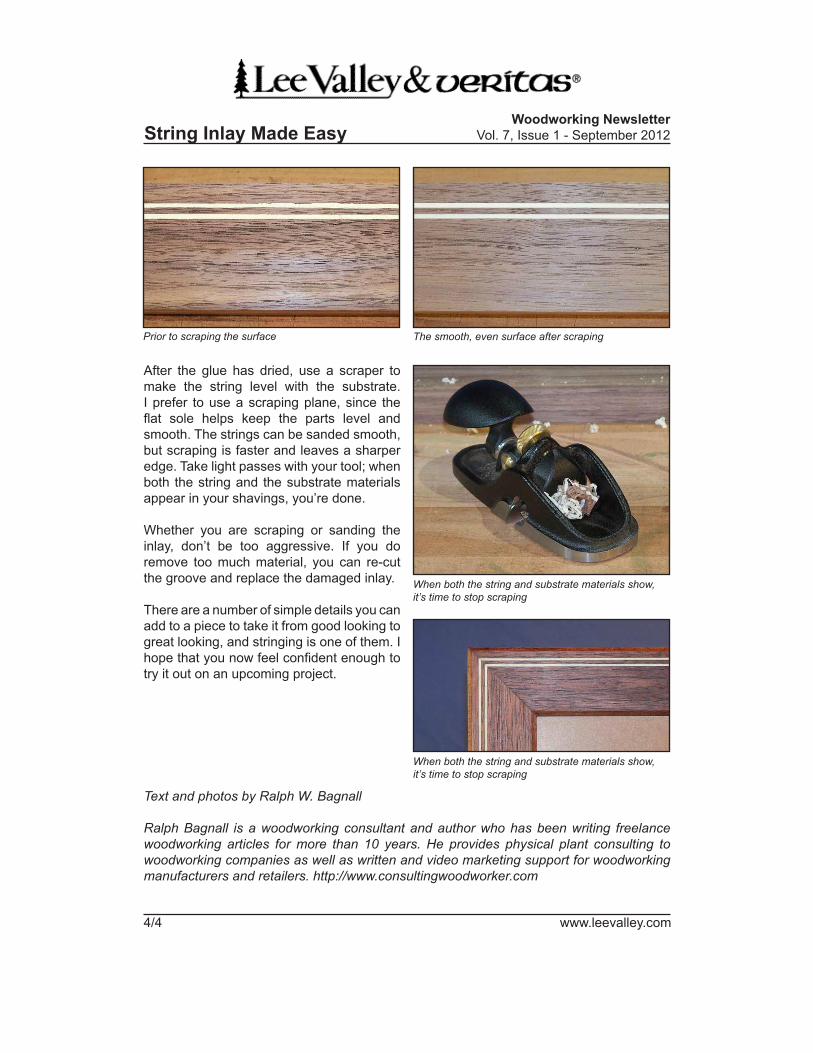
The smooth, even surface after scrapingPrior to scraping the surface
After the glue has dried, use a scraper to make the string level with the substrate. I prefer to use a scraping plane, since the flat sole helps keep the parts level and smooth. The strings can be sanded smooth, but scraping is faster and leaves a sharper edge. Take light passes with your tool; when both the string and the substrate materials appear in your shavings, you’re done.
Whether you are scraping or sanding the inlay, don’t be too aggressive. If you do remove too much material, you can re-cut the groove and replace the damaged inlay.
There are a number of simple details you can add to a piece to take it from good looking to great looking, and stringing is one of them. I hope that you now feel confident enough to try it out on an upcoming project.
When both the string and substrate materials show, it’s time to stop scraping
When both the string and substrate materials show, it’s time to stop scraping