woodworks: intermediate project new england pine blanket chest · 2018-05-14 · building this...
TRANSCRIPT

–1–
Building this charming chest will sharpen woodworking skills in a number of ways. At the same time, it will allow students to build and finish atreasured piece of furniture. Building this chest will pose more of a challenge than a beginner project. Basic construction is simple; there are nounnecessary frills or complex joinery techniques in this project. But re-creating this antique Massachusetts chest will help you to learn and master new skills such as installing hidden dowel hinges and joining boards with biscuits.
Two more reasons for selecting the pine chest for your project:1. The finished project is functional, and can be used as a storage piece for blankets, toys, etc.2. Its clean lines make it a piece of furniture that blends with nearly all home decorating schemes.
A final word: Make certain you carefully read through the entire set of plans and instructions. Study the drawing before picking up a hammer orsaw and discuss any questions you have about the project with your teacher. This will eliminate any chance of aggravation and wasted materials
WOODWORKS: INTERMEDIATE PROJECT
NEW ENGLAND PINE BLANKET CHEST

CONTINUED - WOODWORKS: INTERMEDIATE PROJECT NEW ENGLAND PINE BLANKET CHEST
–2–
TOOLS REQUIRED:
FINISHING PRODUCTS:See Shopping and Cutting Lists
Hand Tools– Pencil– Ruler (zigzag or tape)– Hammer and 1/32” nailset– Hammer, ball-peen– Square, (combination or try)– Phillips screwdriver (medium)– Block plane– Hand Screw– C-type springs
Recommended FinishMinwax® Pre-Stain Wood ConditionerMinwax® Wood Finish™ Colonial MapleMinwax® Fast-Drying Polyurethane
Alternate finish choices (Choose one) Minwax® Pre-Stain Wood ConditionerMinwax® PolyShades® Mission Oak, Satin
MiscellaneousAssortment of clean, lint-free ragsWood glueMinwax® Wood Finish™ BrushesTack clothPermanent black ink markerPaint thinner, if necessaryWater-filled metal container with airtight lid (to dispose of oil-soaked rags)Masking tape
Power Tools– Jointer– Plate joiner with no. 20 biscuits– Sanders: belts, random orbit, pad; withappropriate sanding papers in 80,120,150,200 grits plus, 220 AND 240-grit for pad sander– Saws (radial, band and table)– Electric drill (with screwdriver bit)– Assortment of drill bits– Router, with cutters: 3/4” straight and1/4" rounding-over
MiscellaneousClampsSafety glassesRespirator (for sanding step)MaterialsSee shopping and cutting lists
BEFORE YOU BEGINIf you intend to become a serious woodworker, your goal should be to achieve a high degree of craftsmanship in every project you attempt. Quality workmanship begins and ends with good work habits. Before starting any project, always carefully review the plans. Also, allow time at the end of work sessions to clean up your work area and return tools to their correct locations.
PROCEDUREBecause of the width of the various planks, you will be required to edge-glue narrower boards to obtain the needed widths. Resist the urge to use single, very wide boards because, over time, wide planks are far more likely to cup and warp.
Steps for building the Pine Blanket Chest1. Cut all parts to size (see the cutting list); note that Parts A, B, C and D are initially cut slightly over-length to make edge-joining easier. Using glue and no. 20 biscuits, join the boards to make up six members (front, back, ends, bottom and top): use bar clamps to keep all sections tightly joined while the glue dries. The next day, these parts can be cut to their actual sizes, as shown in the drawing.
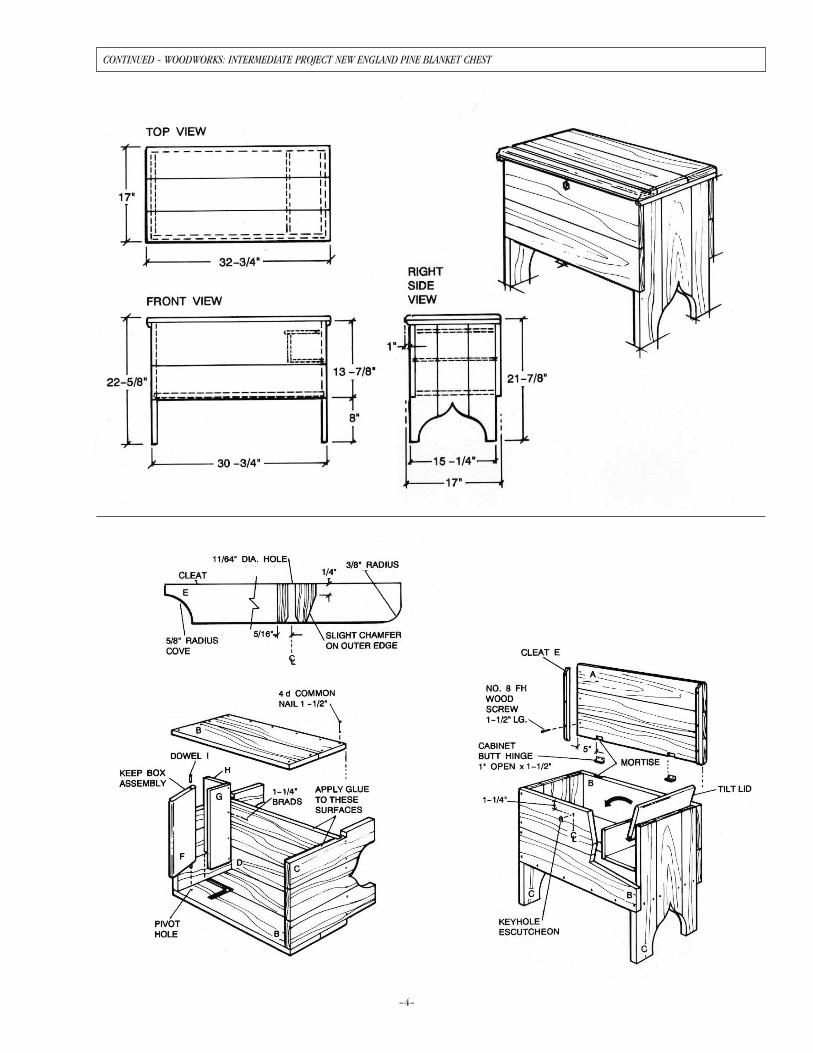
2. Shape the front edge of top A with a cove cutter chucked in the router. Then, replace the cove cutter with a V-groove cutter to rout the shallow V-cut along the front edge as shown. Finally, switch to a 3/8-in. rounding-over bit to shape the ends and back edges of top, A.
3. Lay out the leg shape on 1/4-in. plywood or hardboard and cut it out. Sand the cut edges smooth to remove any irregularities left by the saw blade. Set the pattern aside for use in Step 5.
4. Position the end panels back-edge to back-edge with inside surfaces up. With a framing square, check across leg bottoms to make certain they are perfectly aligned. When they are, apply light pressure with a bar clamp to hold them in place. Then, lay out the location of the dado, which will receive the bottom member, on the interior surfaces. After determining the router shoe offset (i.e.; the distance from cutter edge to shoe edge) with the 3/4-in. straight cutter in its chuck, clamp or tack a straightedge to serve as a guide for ploughing the dado across both boards at one time.
5. Next, tack the two end pieces together, with inside surfaces (the planes with dadoes) abutting. Trace the leg pattern onto the top member. Cut out the notch at front using a band saw or handsaws (rip and crosscut). Then, cut out the leg shape using either a saber or scroll saw.
6. After all chest parts have been cut to shape and size, plane the surfaces to remove any squeezeout where boards are joined. Smooth all boards beginning with 100-grit sandpaper and finish with 120-grit.
7. Cut the parts for the Keep Box to size.
8. Then, position the chest front and back members edge-to-edge (i.e.; the front's right edge should abut the back member’s left edge, with their top edges aligned) so the grooves to receive the Keep Box front and bottom panels can be laid out. Rout grooves 3/8-in. deep using a 1/2-in. straight cutter; make certain you also use tacked-on guides to prevent the router from "walking off' the cutting line when you rout. At this time, also lay out and bore the blind holes, which will receive the lid’s dowel hinges.

–3–
CONTINUED - WOODWORKS: INTERMEDIATE PROJECT NEW ENGLAND PINE BLANKET CHEST
9. Round over the front edge of the Keep Box lid and bore the dowel holes. Glue-in the dowel “hinges.”
10. Final pre-assembly step; shape the cleats as shown, bore the screw pilot and countersink holes and attach cleats to the underside of the top using glue and wood screws, as shown.
Cabinetmaker’s Tip: Notice the shape (cross-section view)of these cleats. You will find it easier to obtain this shape if you chamfer cleats before installing them on the top.
Assembling the Pine Chest11. Fasten the back to the chest bottom and legs using glue and1-1/2 in. common nails. (Nail heads should be set slightly below the surface after the cabinet is fully assembled.)
12. Lay the carcase on its back and install the Keep Box bottom and front into the slots in the carcase back, without glue. If necessary, apply clamp pressure to ensure that these parts are fully seated in their slots. Nail Keep Box front to bottom front using 1-1/4 in. brads.
13. Apply glue to front edges of chest legs and bottom and install front with Keep Box parts positioned in the slots in front member and the lid dowel hinge placed in its respective hole. When all is in place, fasten front to carcase with glue and nails.
14. Stand the chest upright and put the top in place. Then, mark and cut the hinge mortises in both top and back members.
15. Locate the position for the false keyhole at front; bore a small hole, about 1/4-in. deep. Paint the hole interior black or, use a permanent black ink marker.
16. Install hinges and the keyhole escutcheon plate so you can make certain that carcase and top align. Make any necessary adjustments if they do not. When satisfied with the fit, remove the hardware so you can move on to the next step – finishing.
Sanding, Staining & FinishingFinisher’s Tip: If you want your project to closely resemble an antique, you can “distress” the chest to give the appearance of wear or aging. Use an awl to replicate “worm holes” and various tools such as a rough file and ball-peen hammer to make indents and marks.
1. Sand the entire piece using 120-grit abrasive paper. Then, use 150-grit abrasive paper in a pad sander, using with-the-grain sanding strokes. Dust off the piece and wipe it with a tack cloth.
2. Apply Minwax® Pre-Stain Wood Conditioner following directions on the label. Wait 5-10 minutes, then wipe off excess using a clean, lint-free rag. Proceed to the next step within 2 hours.
3. Working on one section of the chest at a time, apply Minwax® Wood Finish™ Stain to the surface using a brush. Allow stain to set 5-15 minutes to achieve desired color, then wipe off excess stain. Allow stain to dry 24 hours.
Finisher’s Tip: Make certain that your last wipe with the cloth is in a with-the-grain direction. This way, the wood grain will visually conceal any stain you might miss during wiping.
4. The next day, apply Minwax® Fast-Drying Polyurethane following can directions. Use a brush intended for use with polyurethane. Allow finish to dry overnight.
5. The next day, sand lightly using 220-grit paper, dust off and wipe with a tack cloth. Apply a second coat of the Polyurethane and set aside to dry overnight.
6. Finally, sand lightly with 240-grit paper, dust, wipe with a tack cloth and apply the third and final coat of Polyurethane. Allow the chest to dry for several days before putting the piece into service.
A Final Cabinetmaker’s Tip: You may need to install the furniture glides on your chest. These are placed, one per foot, to ensure that the chest won’t rock if is placed on a slightly uneven surface (floor or rug). Use nylon glides for use on carpeting; rubber glides on wood surfaces.
FINISHER’S TIPS
• Use scraps of wood to test the stains and finishes you are planning to use. Label the finish used and the type of wood on each test sample chip. Allow all samples to dry thoroughly before making your final finish selection for your project. Save samples for quick reference on future projects.
• Remember to pretreat softwoods (like pine) with Minwax® Pre-Stain Wood Conditioner before staining to help ensure the even absorption of the stain.
• For a clean, sharp finish, all final passes with the brush or cloth should be made in the same direction as the wood grain.
• It is critical that all stains and finishes be allowed to dry thoroughly between coats. Remember that drying times can vary due to humidity and other climactic conditions.
Clean Up• If you have product left over, wipe the can rim so that product inthe rim won't dry out and prevent the lid from forming a tight seal.
• Clean brushes used for oil-based finishes with mineral spirits; for water-cleanup products such as Minwax® Polycrylic® Protective Finish, clean brushes with soap and warm water.
Safe Disposal of Rags & WastePlease be mindful of the safe way to dispose of used rags and other waste. Rags, steel wool and other waste soaked with oil finishes, mineral spirits or the like may spontaneously catch fire if improperly discarded. Place all finishing rags, steel wool and waste immediately after use in a water-filled, metal container. Tightly seal and then dispose of such by-products in accordance with local regulations. Be sure to keep the container out of reach of children.
Misc. Box Materials:Professional strength wood glue; one pair Brainerd Hinges, 1-1/2 x 1-1/4” solid brass, no.7150XG; one keyhole escutcheon plate; 1-1/4” and 1-1/2" finishing nails; six 1-1/4” no. 8 fh screws (for affixing cleats to top); four 7/8” dia., 3-prong nylon furniture glides; 22 no. 20 biscuits; two 1-1/2” pes. 3/8" dowel (for Keep Box hinges); assorted grits (100 through 240) sandpaper.
CONTINUED - WOODWORKS: INTERMEDIATE PROJECT NEW ENGLAND PINE BLANKET CHEST
–4–

CONTINUED - WOODWORKS: INTERMEDIATE PROJECT NEW ENGLAND PINE BLANKET CHEST
–4–

CONTINUED - WOODWORKS: INTERMEDIATE PROJECT NEW ENGLAND PINE BLANKET CHEST
–6–
Item Pcs. Size For Stock Cut From (buy) *see Notes
A 1 3/4” x 17” x 3 3/4” Top Pine 2/6*, 1 x 6”B 1 3/4” x 13 3/4” x 31 3/4” Front and Back Pine 3/6, 1 x 6”C 1 1 1/16” x 15 1/4” x 21 7/8” Legs Pine 2/6, 5/4, x 6”D 1 3/4” x 14 1/2” x 29 3/4” Bottom Pine 1/9, 1 x 6”E 1 5/8” x 7/8” x 17” Top Cleats Pine From Scrap BoxF 1 1/2” x 6 1/4” x 14 7/16” Keep Box Lid Pine 1/2, 1 x 8”**G 1 1/2” x 5” x 14 1/2” Box Front Pine 1/3, 1 x 6” per K.H.H 1 1/2” x 5 1/2” x 14 1/2” Box Bottom Pine G & H
*Notes• The buying column lists the boards using “lumberyard language.” You should know that lumber is purchased using nominal dimen-sions, which differ from the actual dimensions. For example, the listing (nominally) 1/5 1 x 6 indicates one 5-ft- length of 1 x 6. The actual dimension for this board is 3/4 x 5-1/2” by 60 inches long.
• Bring the above materials list to the lumberyard with you when you go to buy the materials.
** Run 3/4” stock through the planer to obtain an exact 1/2” thickness for me Keep Box. If no planer is available, purchase 1/2” nominal stock for the Keep Box. Then, adjust the box’s installation locations accordingly to suit the material's actual dimension of 7/16” thickness.
Product SafetyCAUTION: ALWAYS BE SURE TO READ ALL LABEL INSTRUCTIONS AND PRECAUTIONS BEFORE USING PRODUCT.
DANGER! HARMFUL OR FATAL IF SWALLOWED. SKIN IRRITANT. COMBUSTIBLE. KEEP OUT OF REACH OF CHILDREN.
WARNING! Removal of old paint by sanding, scraping or other means may generate dust or fumes that contain lead. Exposure to lead dust or fumes may cause brain damage or other adverse health effects, especially in children or pregnant women. Controlling exposure to lead or other hazardous substances requires the use of proper protective equipment, such as properly fitted respirator (NIOSH approved) and proper containment and cleanup. For more information, call the National Lead Information Center at 1-800-424-LEAD (in U.S.) or contact your local health authority.
DANGER: Contains mineral spirits. Do not take internally. Avoid contact with skin and eyes. Wear rubber gloves and safety glasses when handling. Do not use or store near heat, sparks, flame or other source of ignition. Close container after each use. Avoid inhalation and use only with adequate ventilation. If using indoors, open all windows and doors to make sure there is fresh air movement. If you experience lightheadedness, dizziness or headaches, increase fresh air movement or leave the area. Reports have associated repeated and prolonged occupational overexposure to solvents with permanent brain and nervous system damage. Intentional misuse by deliberately concentrating and inhaling the contents may be harmful or fatal.
FIRST AID: If swallowed: Do not induce vomiting. Call physician immediately.
FOR SKIN CONTACT: Wash thoroughly with soap and water. If irritation persists, get medical attention.
FOR EYE CONTACT: IMMEDIATELY flush eyes thoroughly with water, then remove any contact lenses. Continue to flush eyes with water for at least 15 minutes. If irritation persists, get medical attention.
IF AFFECTED BY INHALATION: Immediately remove to fresh air. If symptoms persist, call physician.
Created for GW&J and Minwax Company by Harry Wicks Woodworks, Cutchogue NY 11935 ©1999