working with olap cubes - intellicus · olap viewer: a browser based viewer with grid and charting...
TRANSCRIPT
Working with OLAP Cubes
Version: 7.3

2
Copyright © 2015 Intellicus Technologies
This document and its content is copyrighted material of Intellicus Technologies.
The content may not be copied or derived from, through any means, in parts or in whole, without a prior
written permission from Intellicus Technologies. All other product names are believed to be registered
trademarks of the respective companies.
Dated: September 2015
Acknowledgements
Intellicus acknowledges using of third-party libraries to extend support to the functionalities that they
provide.
For details, visit: http://www.intellicus.com/acknowledgements.htm
3
Contents
1 Designing Cube Objects 4
Pre-requisites 4
Intellicus OLAP Glossary 5
2 Preparing Data Source for Cubes 6
3 Cube Designer 7
Editor 7
Query Selector 11
Properties tab 11
Button Palette 16
Build Status 17
4 Miscellaneous 19
Navigating to and editing desired Cube 19
4
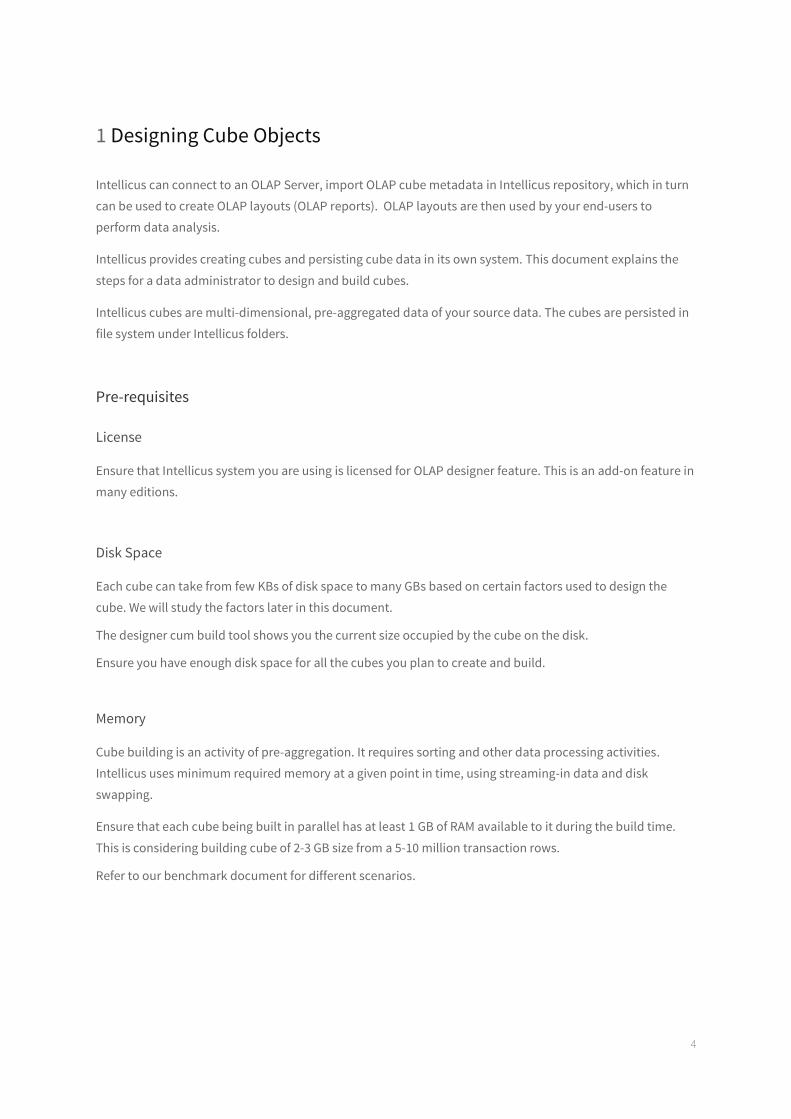
1 Designing Cube Objects
Intellicus can connect to an OLAP Server, import OLAP cube metadata in Intellicus repository, which in turn
can be used to create OLAP layouts (OLAP reports). OLAP layouts are then used by your end-users to
perform data analysis.
Intellicus provides creating cubes and persisting cube data in its own system. This document explains the
steps for a data administrator to design and build cubes.
Intellicus cubes are multi-dimensional, pre-aggregated data of your source data. The cubes are persisted in
file system under Intellicus folders.
Pre-requisites
License
Ensure that Intellicus system you are using is licensed for OLAP designer feature. This is an add-on feature in
many editions.
Disk Space
Each cube can take from few KBs of disk space to many GBs based on certain factors used to design the
cube. We will study the factors later in this document.
The designer cum build tool shows you the current size occupied by the cube on the disk.
Ensure you have enough disk space for all the cubes you plan to create and build.
Memory
Cube building is an activity of pre-aggregation. It requires sorting and other data processing activities.
Intellicus uses minimum required memory at a given point in time, using streaming-in data and disk
swapping.
Ensure that each cube being built in parallel has at least 1 GB of RAM available to it during the build time.
This is considering building cube of 2-3 GB size from a 5-10 million transaction rows.
Refer to our benchmark document for different scenarios.

5
Intellicus OLAP Glossary
Cube Object: Cube Object is definition of cube, which is editable by data administrator. It is not visible to
end user till it is built into a cube with data.
Cube: Cube is a persistent data representation of a cube object. Data administrator builds a cube from Cube
Object. End User can browse a cube on OLAP Viewer or View reports that draws data from a Cube.
OLAP Viewer: A browser based viewer with grid and charting options that helps end user to slice and dice a
cube. OLAP Viewer allows end user to save the slice and dice status for future use.
OLAP Report: A slice and dice status saved by end user on the OLAP Viewer is an OLAP Report.

6
2 Preparing Data Source for Cubes
To Design a cube you will need two types of data.
Fact Data: Transactional data with multiple value fields that need to be pre aggregated. Each of these value
fields is called a Measure. Fact data also has multiple keys on which aggregation needs to be grouped upon.
Dimension Data: Master Data that maps to grouping keys in the fact data.
You can source both these types from Intellicus Query Objects. Intellicus Query Objects can fetch data from
RDBMS or file sources. Refer to Query Objects manual for more details.
You will design Query Objects – one for the fact data that gives transaction records and as many query
objects one for each master.

7
3 Cube Designer
Following are main sections in the cube designer.
1. Editor or design canvas - the central area of the cube designer that diagrammatically represents the
design of the currently opened cube.
2. Query Object Selector – the left pane from where you can drag required Query Objects to design the
cube object
3. Properties tab – the right bottom area where you can edit properties of any selected item on the
editor
4. Button palette – action buttons on the top for CRUD operations and Build
5. Build Status tab – status of the build activity
Figure 1: Cube Designer
Editor
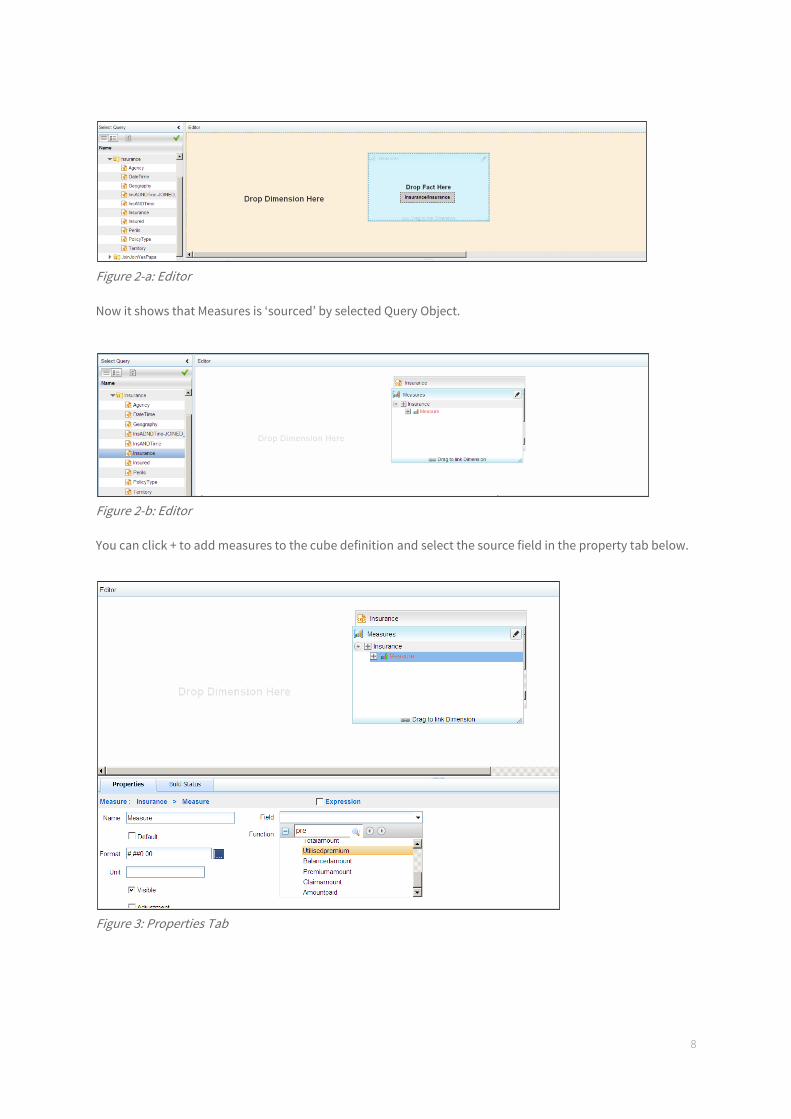
Editor section shows two sub sections
1. A box titled - Measures
2. A canvas area for dropping Dimension on
Drag the transaction Query Object into the measures box.
Button Palette
Editor
Properties tab Query Object Selector
8
Figure 2-a: Editor
Now it shows that Measures is ‘sourced’ by selected Query Object.
Figure 2-b: Editor
You can click + to add measures to the cube definition and select the source field in the property tab below.
Figure 3: Properties Tab
9
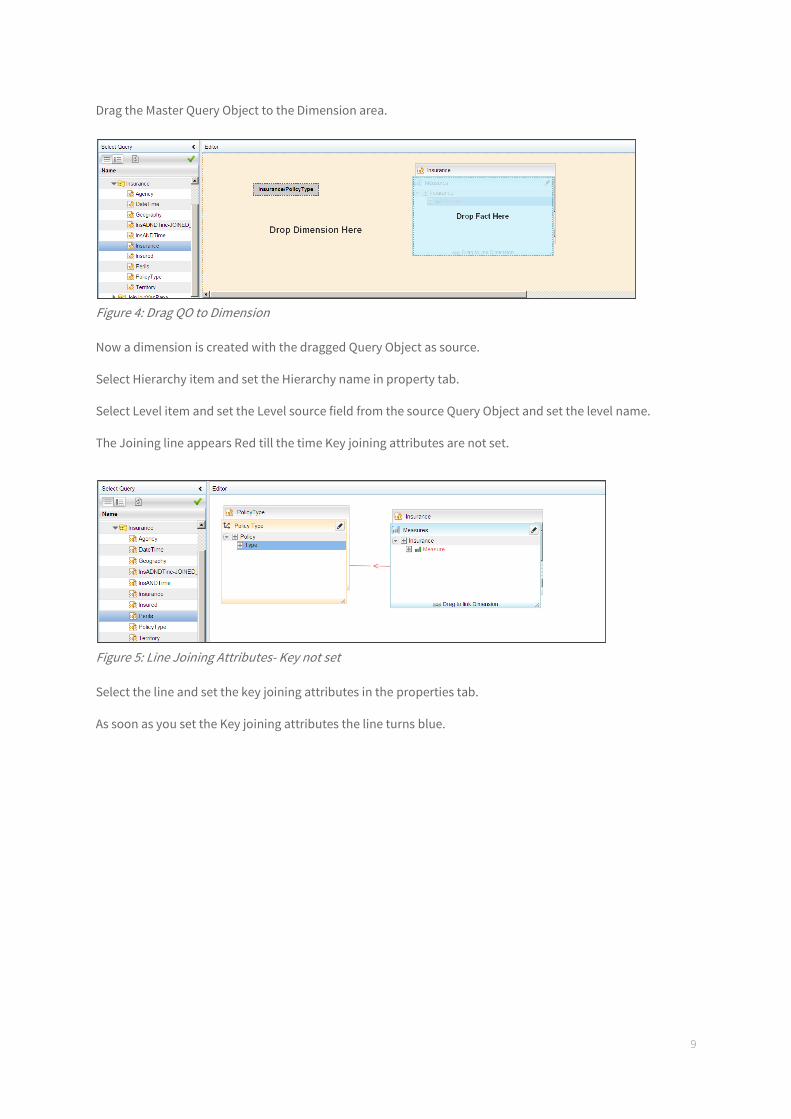
Drag the Master Query Object to the Dimension area.
Figure 4: Drag QO to Dimension
Now a dimension is created with the dragged Query Object as source.
Select Hierarchy item and set the Hierarchy name in property tab.
Select Level item and set the Level source field from the source Query Object and set the level name.
The Joining line appears Red till the time Key joining attributes are not set.
Figure 5: Line Joining Attributes- Key not set
Select the line and set the key joining attributes in the properties tab.
As soon as you set the Key joining attributes the line turns blue.
10
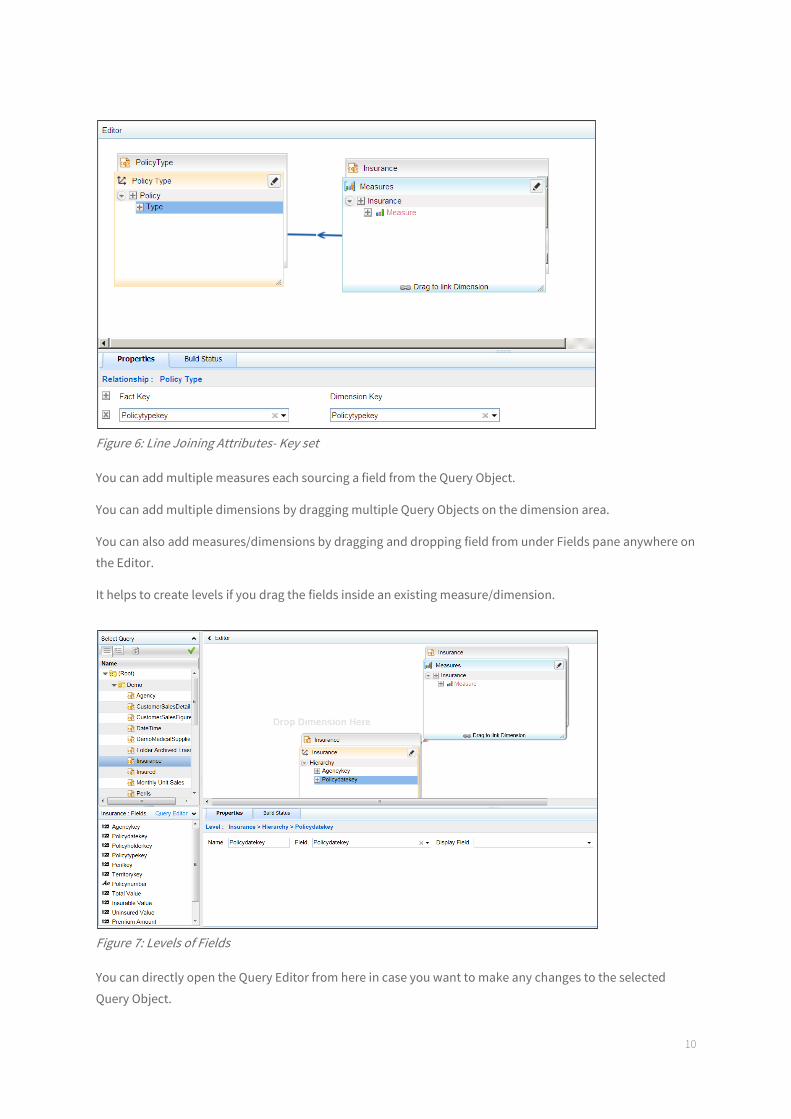
Figure 6: Line Joining Attributes- Key set
You can add multiple measures each sourcing a field from the Query Object.
You can add multiple dimensions by dragging multiple Query Objects on the dimension area.
You can also add measures/dimensions by dragging and dropping field from under Fields pane anywhere on
the Editor.
It helps to create levels if you drag the fields inside an existing measure/dimension.
Figure 7: Levels of Fields
You can directly open the Query Editor from here in case you want to make any changes to the selected
Query Object.
11
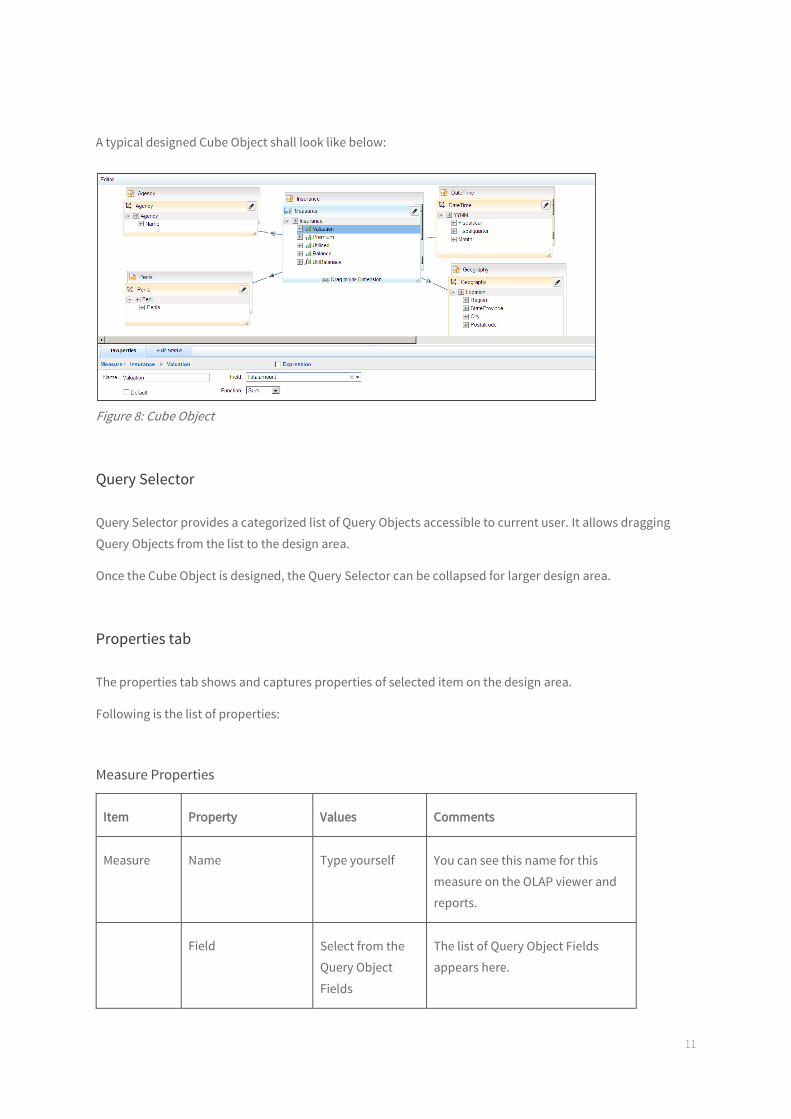
A typical designed Cube Object shall look like below:
Figure 8: Cube Object
Query Selector
Query Selector provides a categorized list of Query Objects accessible to current user. It allows dragging
Query Objects from the list to the design area.
Once the Cube Object is designed, the Query Selector can be collapsed for larger design area.
Properties tab
The properties tab shows and captures properties of selected item on the design area.
Following is the list of properties:
Measure Properties
Item Property Values Comments
Measure Name Type yourself You can see this name for this
measure on the OLAP viewer and
reports.
Field Select from the
Query Object
Fields
The list of Query Object Fields
appears here.
12
Function SUM,
COUNT,
MINIMUM,
MAXIMUM
Select from the list as per need.
Default Yes/No Specifies if this is the default
measure for this cube.
Format Format String
#,##0.00
This format will applied on this
measure on Viewer and reports.
Unit Type yourself Currently used as a suffix for the
measure value. True value will be
used in future when we implement
conversions.
Visible Check/Uncheck Check – You can see this measure
on viewer
Uncheck – You cannot see this
measure. You can only use it to
express another calculated
measure.
Adjustment Check/Uncheck This is a waterfall type chart
related property. If you check this
property, then this measure
becomes a floating bar on a
waterfall type of chart.
Adjustment-Yes
Negative/
Positive
Negative/
Positive
If the adjustment property is
checked, then you will see this
property.
If you set as negative adjustment –
the floating bar will be Red in color
and will be drawn downwards
from previous measure’s top.
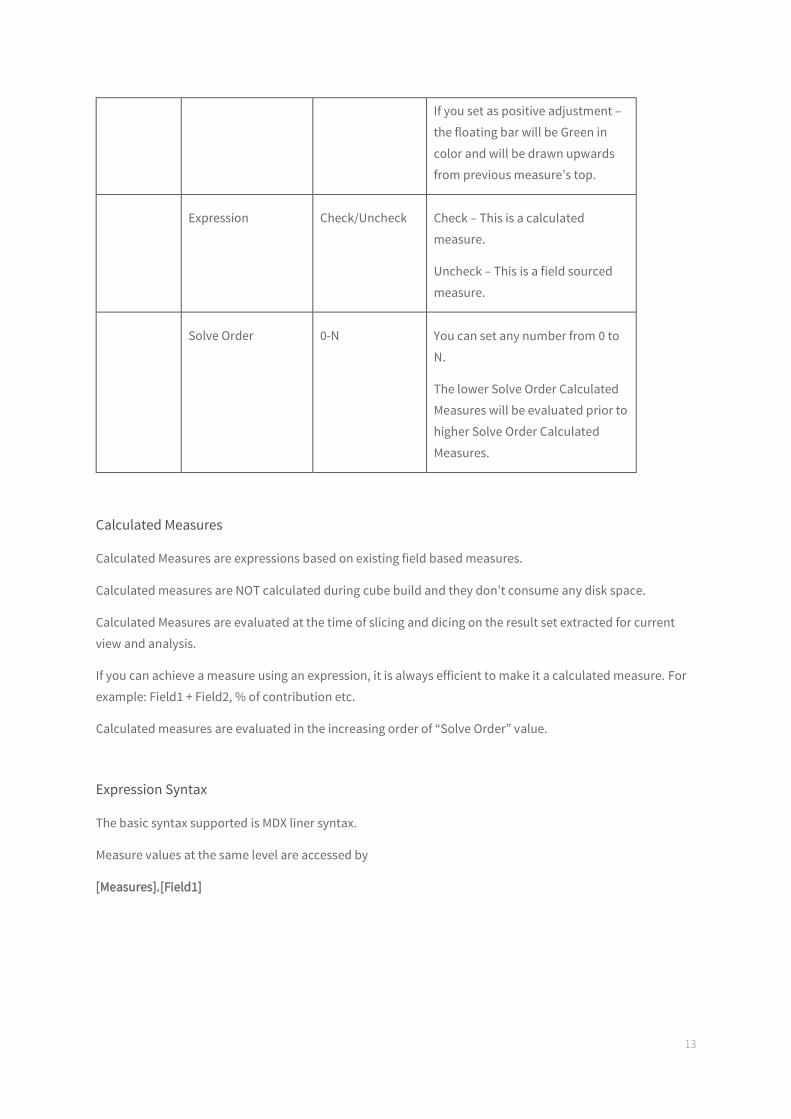
13
If you set as positive adjustment –
the floating bar will be Green in
color and will be drawn upwards
from previous measure’s top.
Expression Check/Uncheck Check – This is a calculated
measure.
Uncheck – This is a field sourced
measure.
Solve Order 0-N You can set any number from 0 to
N.
The lower Solve Order Calculated
Measures will be evaluated prior to
higher Solve Order Calculated
Measures.
Calculated Measures
Calculated Measures are expressions based on existing field based measures.
Calculated measures are NOT calculated during cube build and they don’t consume any disk space.
Calculated Measures are evaluated at the time of slicing and dicing on the result set extracted for current
view and analysis.
If you can achieve a measure using an expression, it is always efficient to make it a calculated measure. For
example: Field1 + Field2, % of contribution etc.
Calculated measures are evaluated in the increasing order of “Solve Order” value.
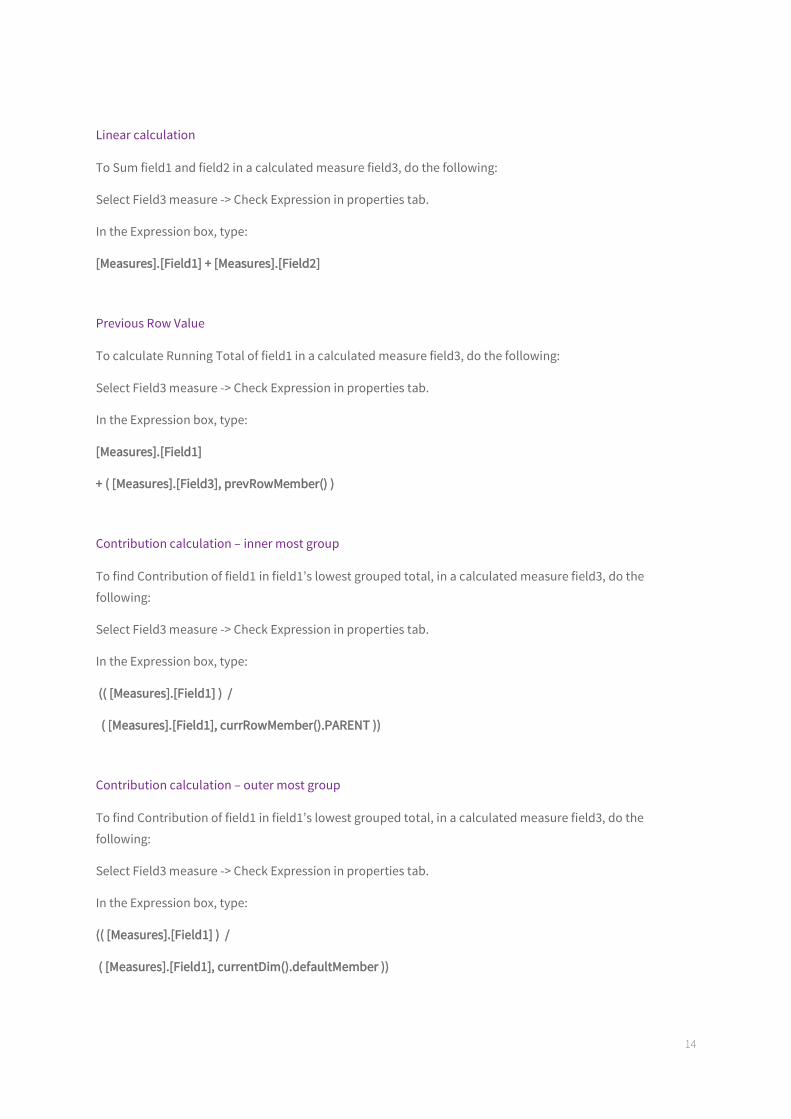
Expression Syntax
The basic syntax supported is MDX liner syntax.
Measure values at the same level are accessed by
[Measures].[Field1]
14
Linear calculation
To Sum field1 and field2 in a calculated measure field3, do the following:
Select Field3 measure -> Check Expression in properties tab.
In the Expression box, type:
[Measures].[Field1] + [Measures].[Field2]
Previous Row Value
To calculate Running Total of field1 in a calculated measure field3, do the following:
Select Field3 measure -> Check Expression in properties tab.
In the Expression box, type:
[Measures].[Field1]
+ ( [Measures].[Field3], prevRowMember() )
Contribution calculation – inner most group
To find Contribution of field1 in field1’s lowest grouped total, in a calculated measure field3, do the
following:
Select Field3 measure -> Check Expression in properties tab.
In the Expression box, type:
(( [Measures].[Field1] ) /
( [Measures].[Field1], currRowMember().PARENT ))
Contribution calculation – outer most group
To find Contribution of field1 in field1’s lowest grouped total, in a calculated measure field3, do the
following:
Select Field3 measure -> Check Expression in properties tab.
In the Expression box, type:
(( [Measures].[Field1] ) /
( [Measures].[Field1], currentDim().defaultMember ))
15
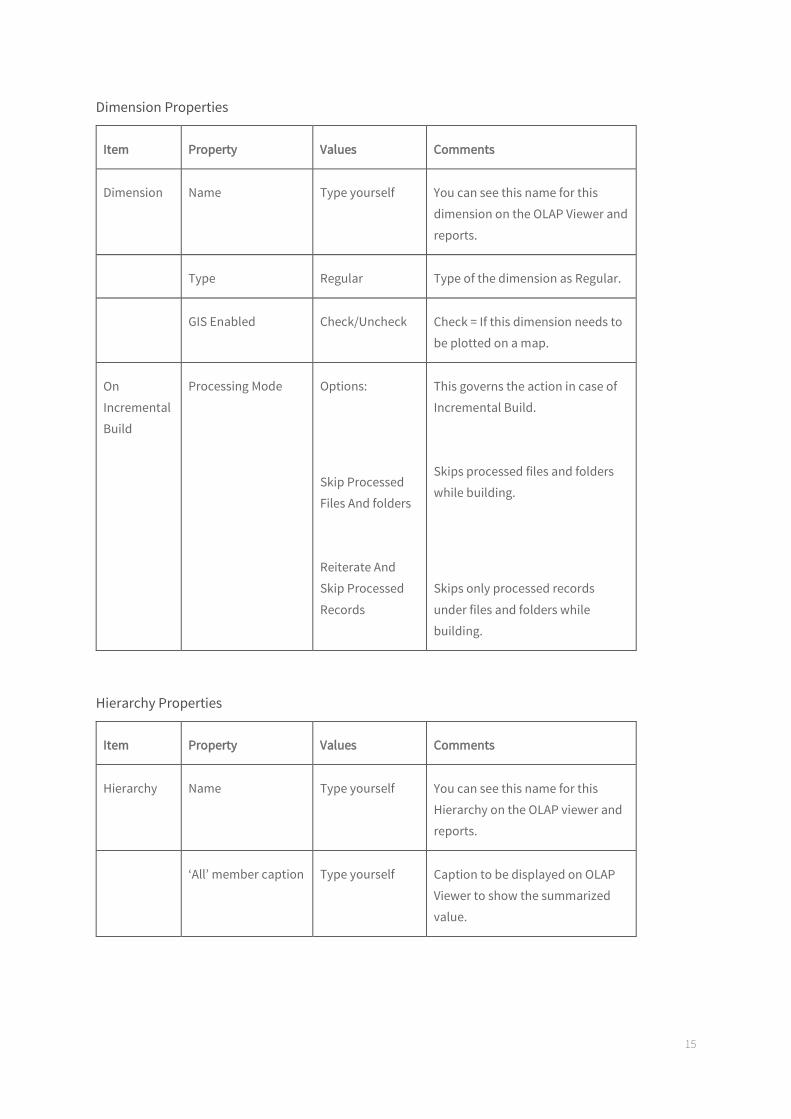
Dimension Properties
Item Property Values Comments
Dimension Name Type yourself You can see this name for this
dimension on the OLAP Viewer and
reports.
Type Regular Type of the dimension as Regular.
GIS Enabled Check/Uncheck Check = If this dimension needs to
be plotted on a map.
On
Incremental
Build
Processing Mode Options:
Skip Processed
Files And folders
Reiterate And
Skip Processed
Records
This governs the action in case of
Incremental Build.
Skips processed files and folders
while building.
Skips only processed records
under files and folders while
building.
Hierarchy Properties
Item Property Values Comments
Hierarchy Name Type yourself You can see this name for this
Hierarchy on the OLAP viewer and
reports.
‘All’ member caption Type yourself Caption to be displayed on OLAP
Viewer to show the summarized
value.
16
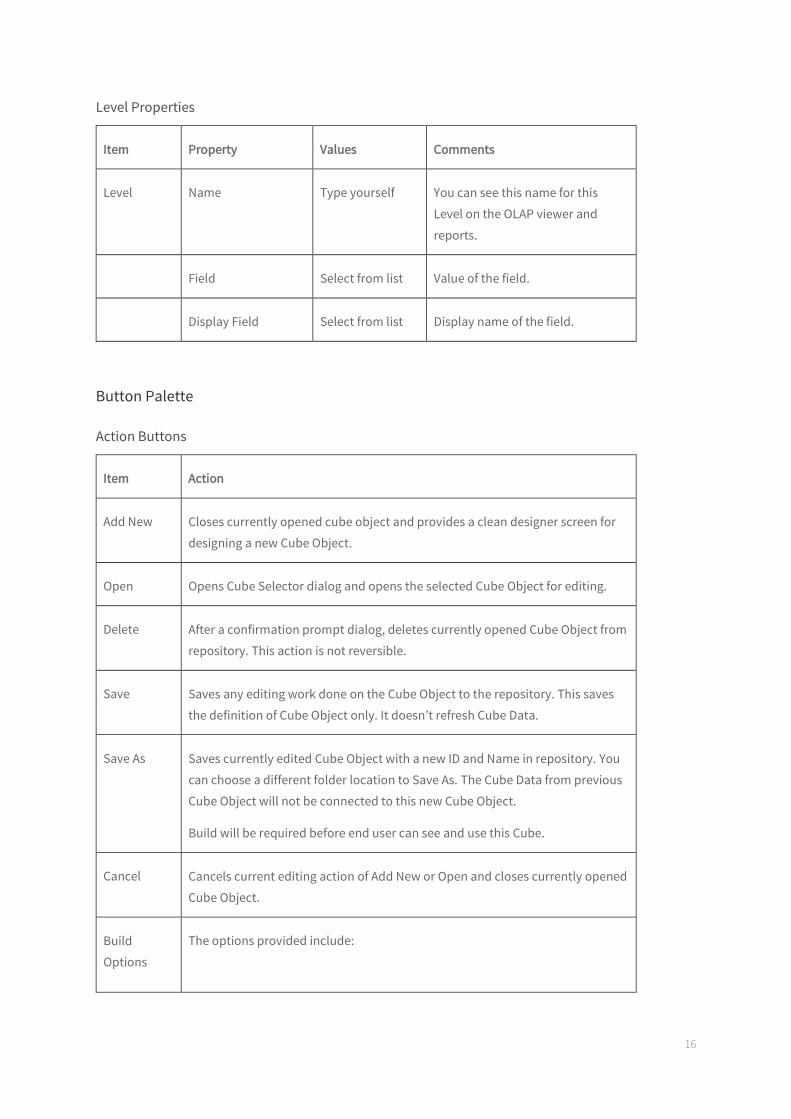
Level Properties
Item Property Values Comments
Level Name Type yourself You can see this name for this
Level on the OLAP viewer and
reports.
Field Select from list Value of the field.
Display Field Select from list Display name of the field.
Button Palette
Action Buttons
Item Action
Add New Closes currently opened cube object and provides a clean designer screen for
designing a new Cube Object.
Open Opens Cube Selector dialog and opens the selected Cube Object for editing.
Delete After a confirmation prompt dialog, deletes currently opened Cube Object from
repository. This action is not reversible.
Save Saves any editing work done on the Cube Object to the repository. This saves
the definition of Cube Object only. It doesn’t refresh Cube Data.
Save As Saves currently edited Cube Object with a new ID and Name in repository. You
can choose a different folder location to Save As. The Cube Data from previous
Cube Object will not be connected to this new Cube Object.
Build will be required before end user can see and use this Cube.
Cancel Cancels current editing action of Add New or Open and closes currently opened
Cube Object.
Build
Options
The options provided include:
17
Full: To be able to schedule a full build on the saved cube either once or in
recurring mode.
Incremental: To be able to schedule a build picking differential data after the
last build was run.
Consolidation: Consolidates previous run builds.
You can also choose to build on Local File System or Hadoop.
Build Now Initiates the Cube Build activity in the background.
Cube build activity is a background activity. You can leave this screen after
initiating the build, leaving the screen doesn’t cancel Build activity.
The Build Status tab shows up when Build starts.
You can initiate Build only once concurrently for a given cube.
If you Open a Cube Object and its Build activity is going on, then you will see a
disabled Build button.
You may need to wait till build is completed or you can Cancel the Build before
you can reinitiate Build activity.
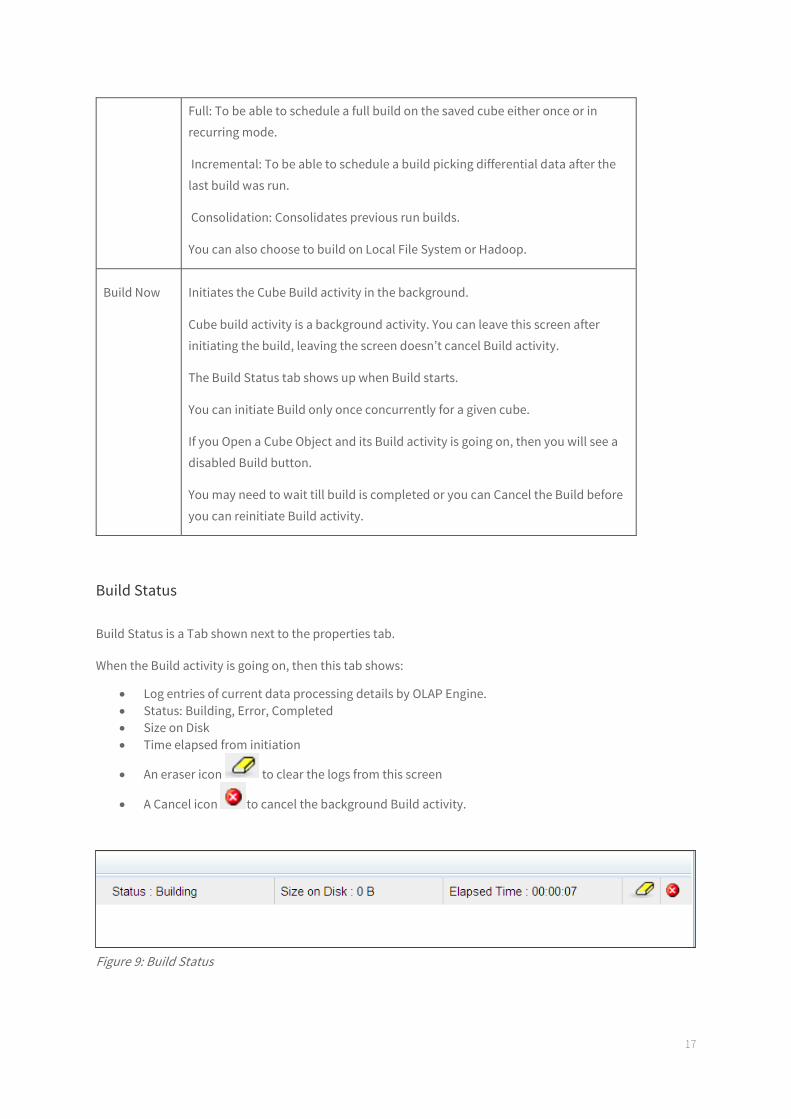
Build Status
Build Status is a Tab shown next to the properties tab.
When the Build activity is going on, then this tab shows:
Log entries of current data processing details by OLAP Engine.
Status: Building, Error, Completed
Size on Disk
Time elapsed from initiation
An eraser icon to clear the logs from this screen
A Cancel icon to cancel the background Build activity.
Figure 9: Build Status

18
When No Build activity is going on, then this tab shows:
Last Build Status
Size on Disk
Time elapsed in building last cube

19
4 Miscellaneous
Navigating to and editing desired Cube
From Repository Explorer select the folder containing the cube object. Select Object Type – Cube Objects.
Select the desired Cube Object. Double click on the Cube Object name or Select Edit Details icon from the
toolbar.
From the Cube Object Designer, click on the Open action button. On the Cube Object selector dialog, select
the folder containing desired cube and click on Open.