writing xml with fme - safe...
TRANSCRIPT
FME® Desktop XML Pathway Training Manual
Writing XML with FME
FME 2013-SP1 Edition
Safe Software Inc. makes no warranty either expressed or implied, including, but not limited to, any implied warranties of merchantability or fitness for a particular purpose regarding these materials, and makes such materials available solely on an “as-is” basis.
In no event shall Safe Software Inc. be liable to anyone for special, collateral, incidental, or consequential damages in connection with or arising out of purchase or use of these materials. The sole and exclusive liability of Safe Software Inc., regardless of the form or action, shall not exceed the purchase price of the materials described herein.
This manual describes the functionality and use of the software at the time of publication. The software described herein, and the descriptions themselves, are subject to change without notice.
Copyright © 1994 – 2013 Safe Software Inc. All rights are reserved.
Revisions Every effort has been made to ensure the accuracy of this document. Safe Software Inc. regrets any errors and omissions that may occur and would appreciate being informed of any errors found. Safe Software Inc. will correct any such errors and omissions in a subsequent version, as feasible. Please contact us at:
Safe Software Inc. Suite 2017, 7445 – 132nd Street Surrey, BC Canada V3W1J8
www.safe.com
Safe Software Inc. assumes no responsibility for any errors in this document or their consequences, and reserves the right to make improvements and changes to this document without notice.
Trademarks FME is a registered trademark of Safe Software Inc.
All brand or product names mentioned herein may be trademarks or registered trademarks of their respective holders and should be noted as such.
Documentation Information Document Name: FME Desktop XML (Writing) Pathway Training Updated: May 2013 FME Version: FME 2013-SP1, Build 13448, WIN32 Operating System: Windows 7 SP-1, 64-bit. Other Applications: Notepad++ v6.3.2, Internet Explorer v10
FME Desktop Writing XML Training Manual
Introduction Page 3
Introduction ....................................................................................................................................... 5 XML Pathway ........................................................................................................................................... 5 FME Version ............................................................................................................................................ 5 Sample Data ............................................................................................................................................ 5
XML Basics ....................................................................................................................................... 6 What is XML?........................................................................................................................................... 6 XML Data Structures ................................................................................................................................ 6
Basic XML/GML Writing ................................................................................................................... 7 Reading XML and GML ........................................................................................................................... 7 Writing XML and GML .............................................................................................................................. 7
Writing with Templates ................................................................................................................... 12 Using Templates .................................................................................................................................... 12 Creating Templates ................................................................................................................................ 19
Writing XML Updates ..................................................................................................................... 26 XMLUpdater Transformer ...................................................................................................................... 26
Writing to Pre-Defined Formats ...................................................................................................... 30 GML ....................................................................................................................................................... 31 GML Profiles .......................................................................................................................................... 31 GML Application Schemas ..................................................................................................................... 31
Session Review .............................................................................................................................. 38 What You Should Have Learned from this Session ............................................................................... 38

FME Desktop Writing XML Training Manual
Page 4 Introduction
FME Desktop Writing XML Training Manual
Introduction Page 5
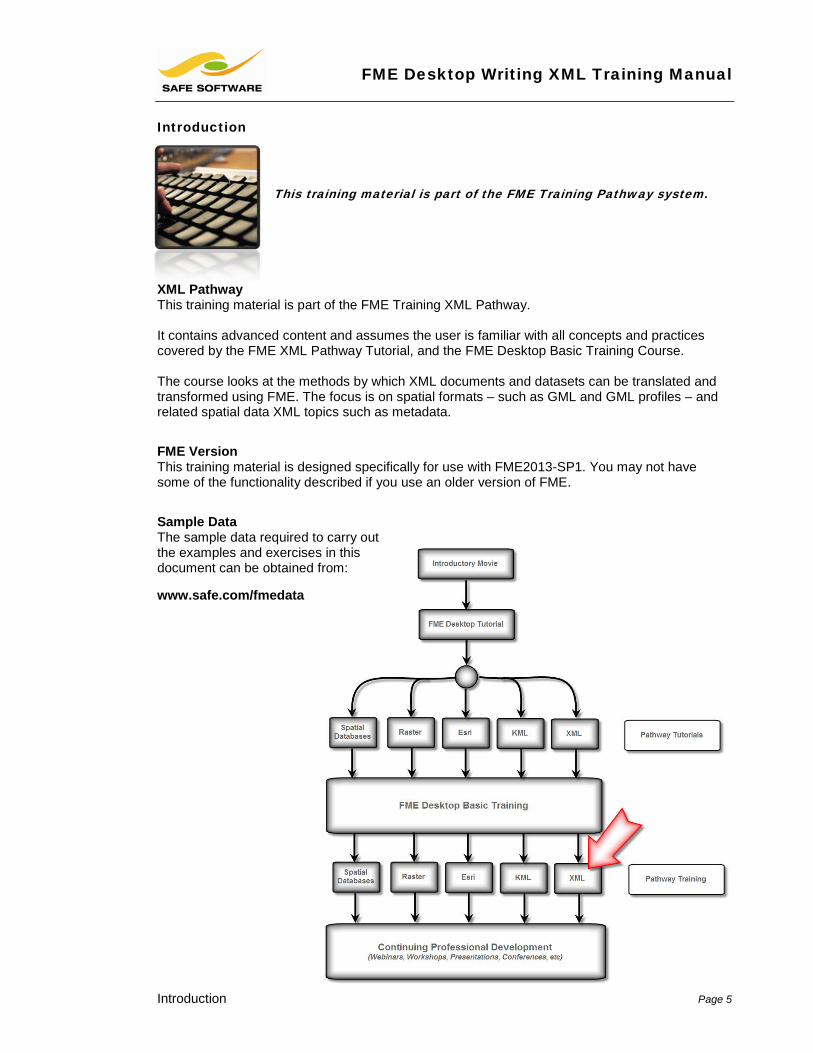
Introduction This training material is part of the FME Training Pathway system.
XML Pathway This training material is part of the FME Training XML Pathway. It contains advanced content and assumes the user is familiar with all concepts and practices covered by the FME XML Pathway Tutorial, and the FME Desktop Basic Training Course. The course looks at the methods by which XML documents and datasets can be translated and transformed using FME. The focus is on spatial formats – such as GML and GML profiles – and related spatial data XML topics such as metadata. FME Version This training material is designed specifically for use with FME2013-SP1. You may not have some of the functionality described if you use an older version of FME. Sample Data The sample data required to carry out the examples and exercises in this document can be obtained from: www.safe.com/fmedata
FME Desktop Writing XML Training Manual
Page 6 XML Basics
XML Basics A review of XML basics
XML is growing as a language for defining spatial formats and metadata. Because it is such a flexible language any number of differing formats can be – and are – based on XML. It’s relatively simple to use because XML documents (datasets) are generally open and self-documenting. What is XML? XML is a markup language. In other words it is used to annotate (mark-up) the contents of a document. In this simple example the data is a simple text string – Joan – and the XML markup is a set of tags that tell us this is the name of an FME user: <FMEUser> <name>Joan</name> </FMEUser> The official specification for XML defines not the names of the tags (how could they possibly know to have an “FMEUser” tag?) but simply how these tags should be structured.
XML Data Structures One challenge to using XML data with GIS (and other spatial archetypes) is that spatial systems are commonly geared to working with relational and “flat” data structures. However, XML documents are object-oriented and often nested to a high degree. Therefore, much of the challenge of handling XML data is in either:
• Reading an XML document and converting it to a GIS relationship-type structure • Converting a GIS relationship-type structure and writing it as an XML document.
Professor Lynn Guistic says…
“Think of the XML specification as defining the grammar of a language, not the words”
Professor Lynn Guistic says…
“Converting a GIS format to XML/GML is – in one way – easier than XML to GIS. That’s because it’s an exercise in restructuring the data to a known schema, not trying to read from an unknown one.“
FME Desktop Writing XML Training Manual
Basic XML/GML Writing Page 7
Basic XML/GML Writing A review of XML basics
Reading XML and GML In reading XML or GML datasets, the easier scenario is reading from a dataset with a known schema or a known application schema. That’s because FME understands the structure of the source data, and has a set of rules defined to transform it. These rules are stored in an FME file called an xfMap. Therefore, a known GML schema can be wrapped up as a pre-defined format to make it easier to read data of that type into FME. The more challenging scenario is when the schema is missing, unknown or not a defined application schema. That type of dataset cannot so easily be turned into a standard FME format, and the user must use various FME functions in order to manually transform the data into a usable GIS structure. Writing XML and GML When writing XML/GML datasets, the opposite case is actually true. It’s relatively simple to create a GML dataset that is not based on a particular GML profile or application schema. That’s because the writer schema is defined within FME – probably as a reflection of the source GIS schema – and all outgoing data will match that schema automatically. The more challenging scenario here is to write data of a known application schema, using a pre-defined format. That’s because there is no automatic match between the incoming GIS data and the outgoing GML data. The user must use FME functionality to map how their GIS data matches up to components of the GML application schema.
FME Desktop Writing XML Training Manual
Page 8 Basic XML/GML Writing
Example 1: Writing Simple GML Datasets
Scenario FME user; City of Interopolis, Planning Department
Data City Parks data (MapInfo TAB format)
Overall Goal Write a GML Dataset
Demonstrates Writing GML data with the GML Writer
Starting Workspace None
Finished Workspace C:\FMEData\Workspaces\PathwayManuals\XMLWriting1a-Complete.fmw C:\FMEData\Workspaces\PathwayManuals\XMLWriting1b-Complete.fmw
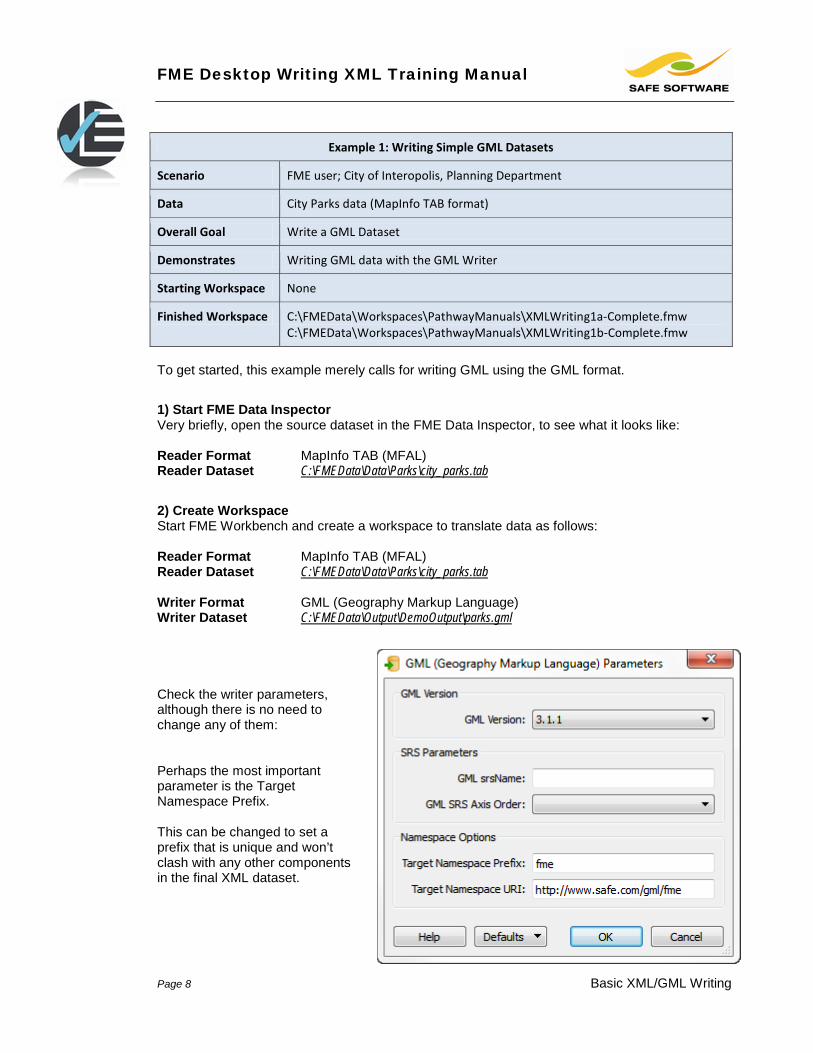
To get started, this example merely calls for writing GML using the GML format. 1) Start FME Data Inspector Very briefly, open the source dataset in the FME Data Inspector, to see what it looks like: Reader Format MapInfo TAB (MFAL) Reader Dataset C:\FMEData\Data\Parks\city_parks.tab 2) Create Workspace Start FME Workbench and create a workspace to translate data as follows: Reader Format MapInfo TAB (MFAL) Reader Dataset C:\FMEData\Data\Parks\city_parks.tab Writer Format GML (Geography Markup Language) Writer Dataset C:\FMEData\Output\DemoOutput\parks.gml Check the writer parameters, although there is no need to change any of them: Perhaps the most important parameter is the Target Namespace Prefix. This can be changed to set a prefix that is unique and won’t clash with any other components in the final XML dataset.
FME Desktop Writing XML Training Manual
Basic XML/GML Writing Page 9
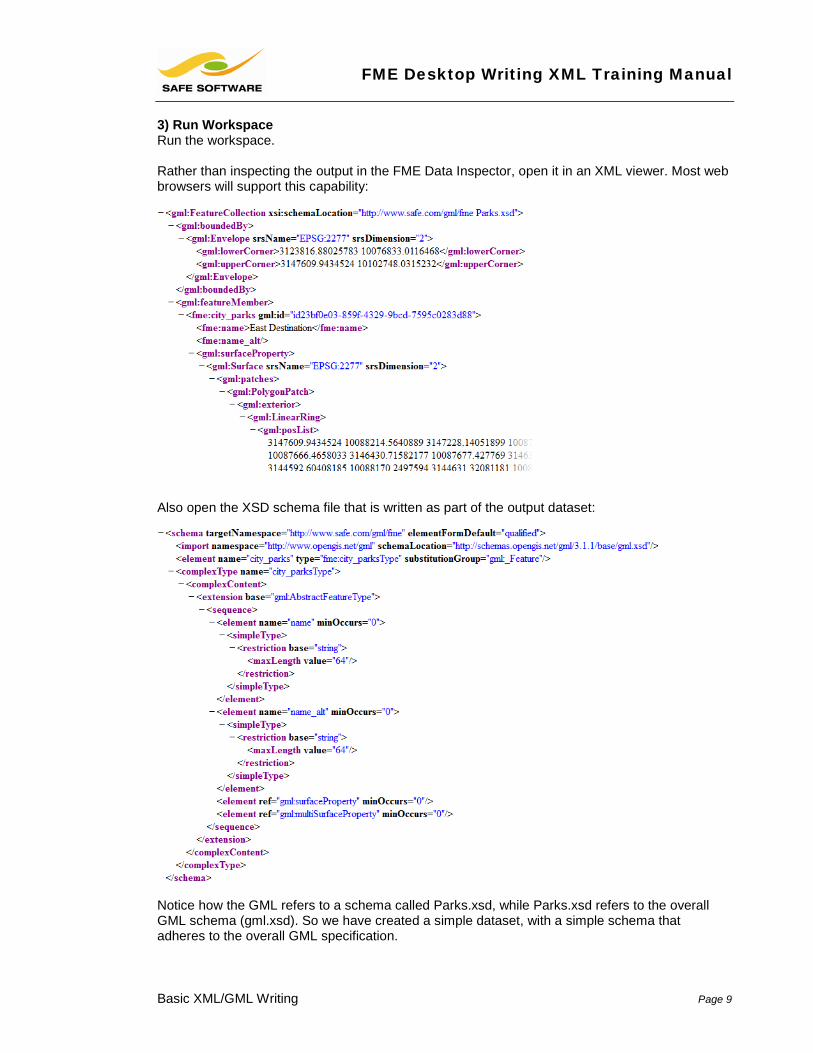
3) Run Workspace Run the workspace. Rather than inspecting the output in the FME Data Inspector, open it in an XML viewer. Most web browsers will support this capability:
Also open the XSD schema file that is written as part of the output dataset:
Notice how the GML refers to a schema called Parks.xsd, while Parks.xsd refers to the overall GML schema (gml.xsd). So we have created a simple dataset, with a simple schema that adheres to the overall GML specification.
FME Desktop Writing XML Training Manual
Page 10 Basic XML/GML Writing
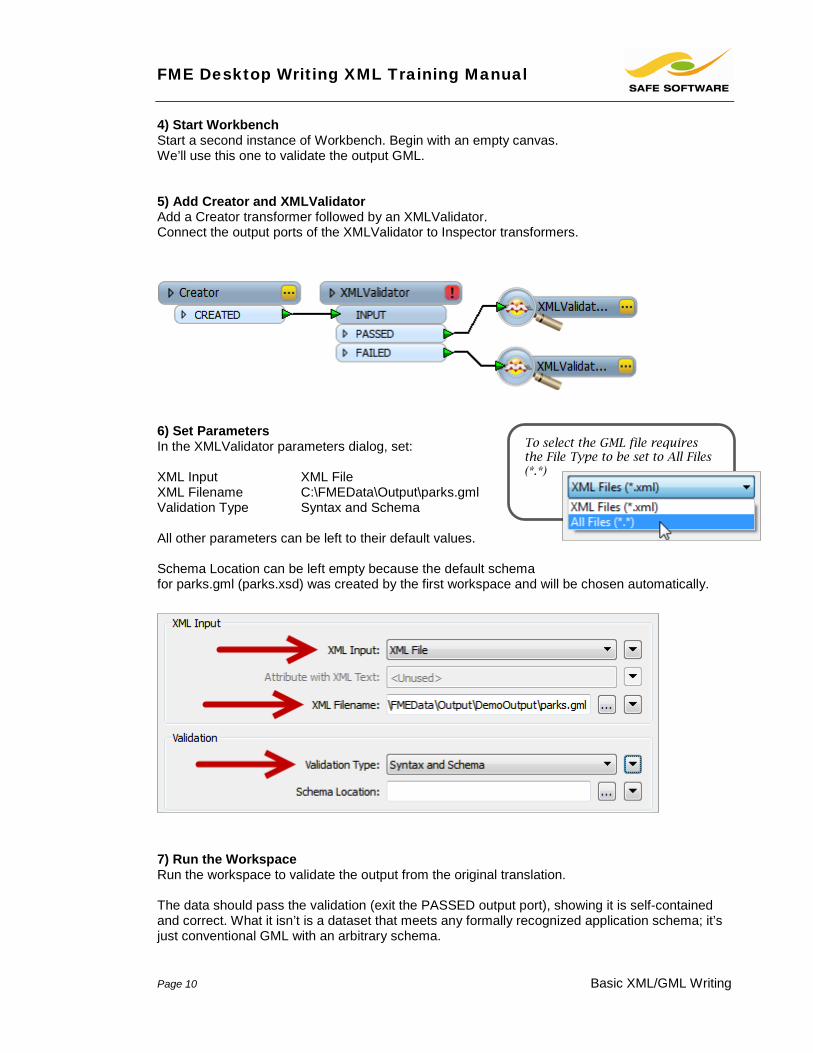
4) Start Workbench Start a second instance of Workbench. Begin with an empty canvas. We’ll use this one to validate the output GML. 5) Add Creator and XMLValidator Add a Creator transformer followed by an XMLValidator. Connect the output ports of the XMLValidator to Inspector transformers.
6) Set Parameters In the XMLValidator parameters dialog, set: XML Input XML File XML Filename C:\FMEData\Output\parks.gml Validation Type Syntax and Schema All other parameters can be left to their default values. Schema Location can be left empty because the default schema for parks.gml (parks.xsd) was created by the first workspace and will be chosen automatically.
7) Run the Workspace Run the workspace to validate the output from the original translation. The data should pass the validation (exit the PASSED output port), showing it is self-contained and correct. What it isn’t is a dataset that meets any formally recognized application schema; it’s just conventional GML with an arbitrary schema.
To select the GML file requires the File Type to be set to All Files (*.*)

FME Desktop Writing XML Training Manual
Basic XML/GML Writing Page 11
8) Re-Create Workspace Now re-create the original workspace that translated the city_parks dataset. However, instead of using the GML writer, use a writer for a GML application schema. You can find some GML application schemas by opening the format gallery and typing GML into the search field:
Run the workspace and see what sort of output you get. It will vary greatly. For example, if you chose the format “BC MoF Electronic Submission Framework – ESF”, then you will get no features in the output GML. That’s because this is a specific application schema for the BC forestry industry. None of the data to be written matches what is required for the schema of this GML format, therefore FME has filtered it out. If you chose the format CityGML, then you will get some output, and the data can be validated. However, a closer look shows the data has been written to a type called “GenericCityObject”. In other words CityGML has a catch-all type for unknown features, or “extensions” to the CityGML specification, but it still doesn’t really mean this is useful CityGML.
Professor Lynn Guistic says…
“The lesson here is that writing data to a known application schema is not as simple as feeding it to a writer of that type. The user is responsible for ensuring that the writer feature types match what is required by the schema. If this does not happen then the results are unpredictable”
FME Desktop Writing XML Training Manual
Page 12 Writing with Templates
Writing with Templates Templates are the best way to create a brand new XML/GML dataset
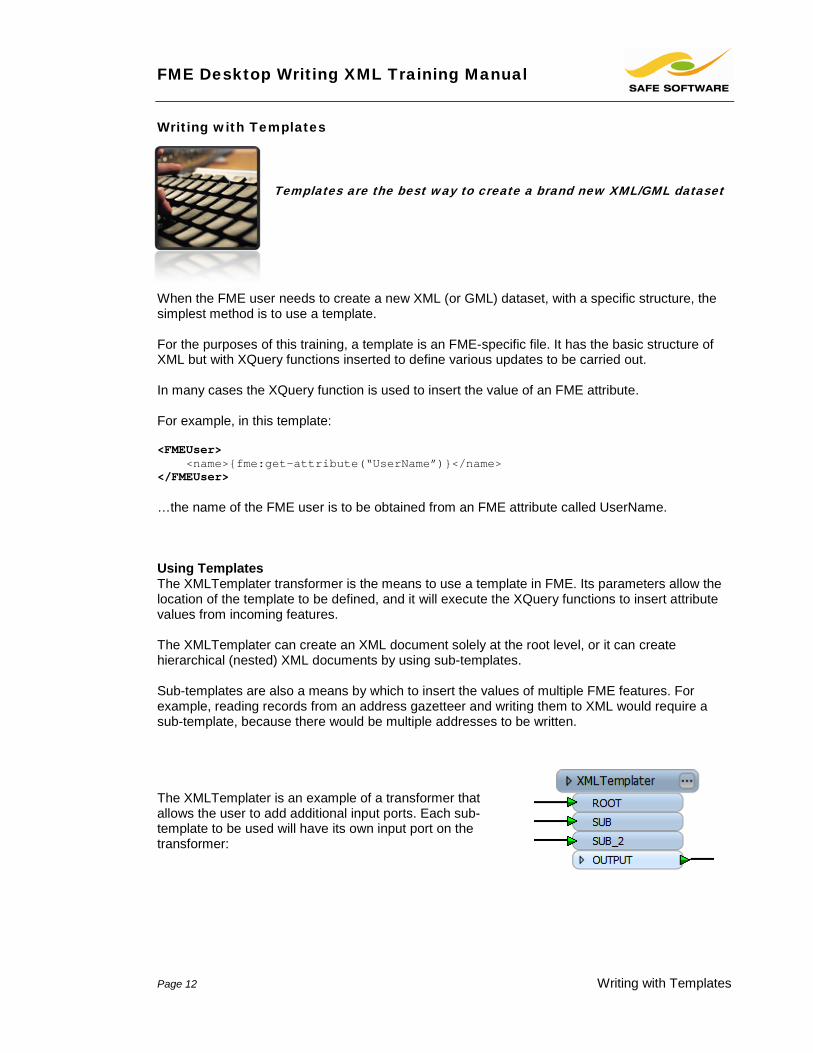
When the FME user needs to create a new XML (or GML) dataset, with a specific structure, the simplest method is to use a template. For the purposes of this training, a template is an FME-specific file. It has the basic structure of XML but with XQuery functions inserted to define various updates to be carried out. In many cases the XQuery function is used to insert the value of an FME attribute. For example, in this template: <FMEUser> <name>{fme:get-attribute(“UserName”)}</name> </FMEUser> …the name of the FME user is to be obtained from an FME attribute called UserName. Using Templates The XMLTemplater transformer is the means to use a template in FME. Its parameters allow the location of the template to be defined, and it will execute the XQuery functions to insert attribute values from incoming features. The XMLTemplater can create an XML document solely at the root level, or it can create hierarchical (nested) XML documents by using sub-templates. Sub-templates are also a means by which to insert the values of multiple FME features. For example, reading records from an address gazetteer and writing them to XML would require a sub-template, because there would be multiple addresses to be written. The XMLTemplater is an example of a transformer that allows the user to add additional input ports. Each sub-template to be used will have its own input port on the transformer:
FME Desktop Writing XML Training Manual
Writing with Templates Page 13
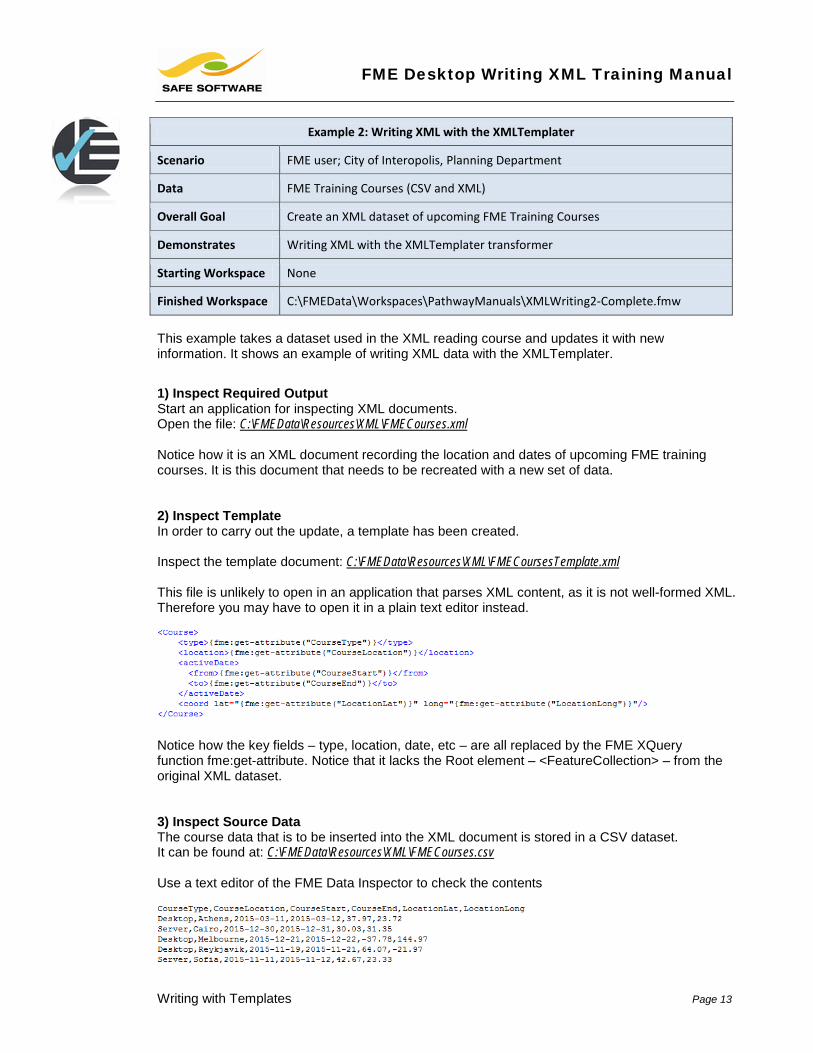
Example 2: Writing XML with the XMLTemplater
Scenario FME user; City of Interopolis, Planning Department
Data FME Training Courses (CSV and XML)
Overall Goal Create an XML dataset of upcoming FME Training Courses
Demonstrates Writing XML with the XMLTemplater transformer
Starting Workspace None
Finished Workspace C:\FMEData\Workspaces\PathwayManuals\XMLWriting2-Complete.fmw
This example takes a dataset used in the XML reading course and updates it with new information. It shows an example of writing XML data with the XMLTemplater. 1) Inspect Required Output Start an application for inspecting XML documents. Open the file: C:\FMEData\Resources\XML\FMECourses.xml Notice how it is an XML document recording the location and dates of upcoming FME training courses. It is this document that needs to be recreated with a new set of data. 2) Inspect Template In order to carry out the update, a template has been created. Inspect the template document: C:\FMEData\Resources\XML\FMECoursesTemplate.xml This file is unlikely to open in an application that parses XML content, as it is not well-formed XML. Therefore you may have to open it in a plain text editor instead.
Notice how the key fields – type, location, date, etc – are all replaced by the FME XQuery function fme:get-attribute. Notice that it lacks the Root element – <FeatureCollection> – from the original XML dataset. 3) Inspect Source Data The course data that is to be inserted into the XML document is stored in a CSV dataset. It can be found at: C:\FMEData\Resources\XML\FMECourses.csv Use a text editor of the FME Data Inspector to check the contents
FME Desktop Writing XML Training Manual
Page 14 Writing with Templates
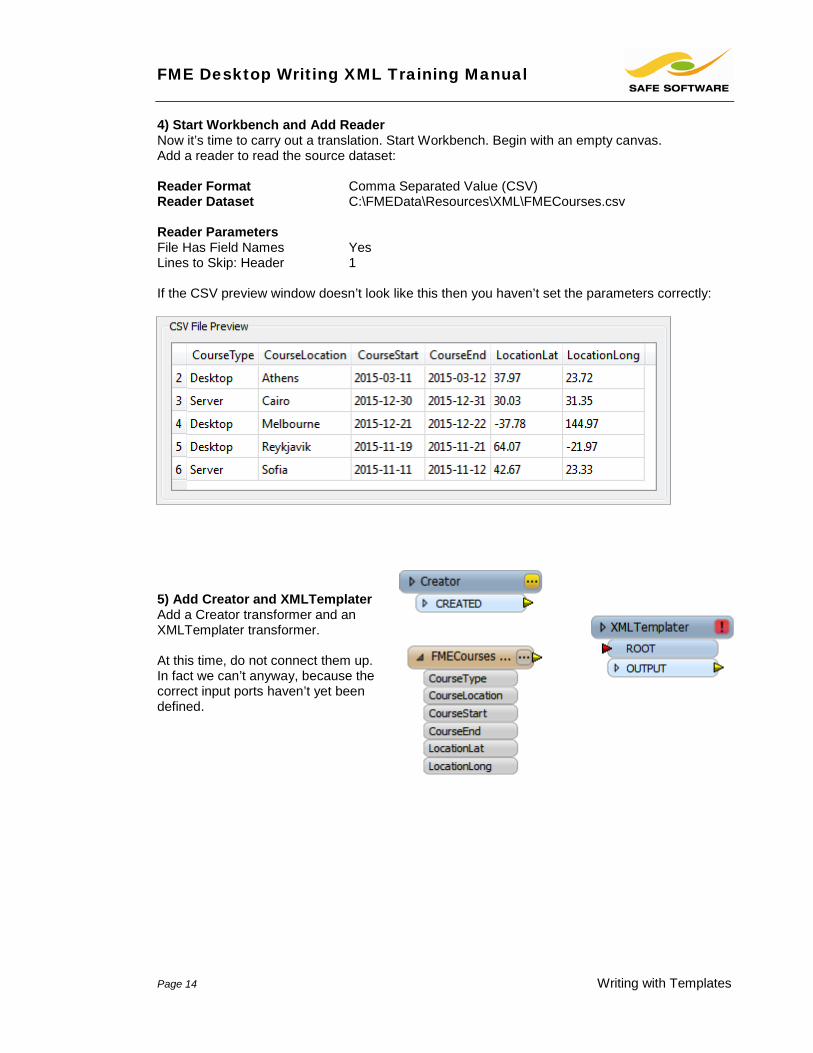
4) Start Workbench and Add Reader Now it’s time to carry out a translation. Start Workbench. Begin with an empty canvas. Add a reader to read the source dataset: Reader Format Comma Separated Value (CSV) Reader Dataset C:\FMEData\Resources\XML\FMECourses.csv Reader Parameters File Has Field Names Yes Lines to Skip: Header 1 If the CSV preview window doesn’t look like this then you haven’t set the parameters correctly:
5) Add Creator and XMLTemplater Add a Creator transformer and an XMLTemplater transformer. At this time, do not connect them up. In fact we can’t anyway, because the correct input ports haven’t yet been defined.
FME Desktop Writing XML Training Manual
Writing with Templates Page 15
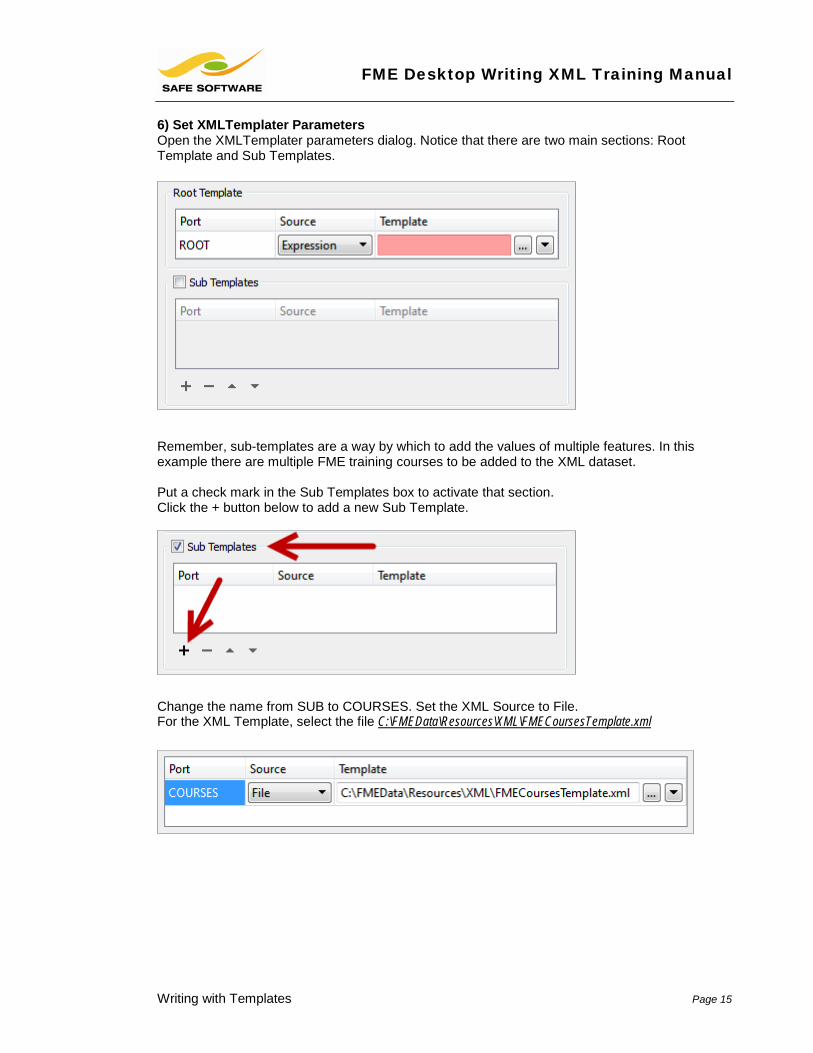
6) Set XMLTemplater Parameters Open the XMLTemplater parameters dialog. Notice that there are two main sections: Root Template and Sub Templates.
Remember, sub-templates are a way by which to add the values of multiple features. In this example there are multiple FME training courses to be added to the XML dataset. Put a check mark in the Sub Templates box to activate that section. Click the + button below to add a new Sub Template.
Change the name from SUB to COURSES. Set the XML Source to File. For the XML Template, select the file C:\FMEData\Resources\XML\FMECoursesTemplate.xml
FME Desktop Writing XML Training Manual
Page 16 Writing with Templates
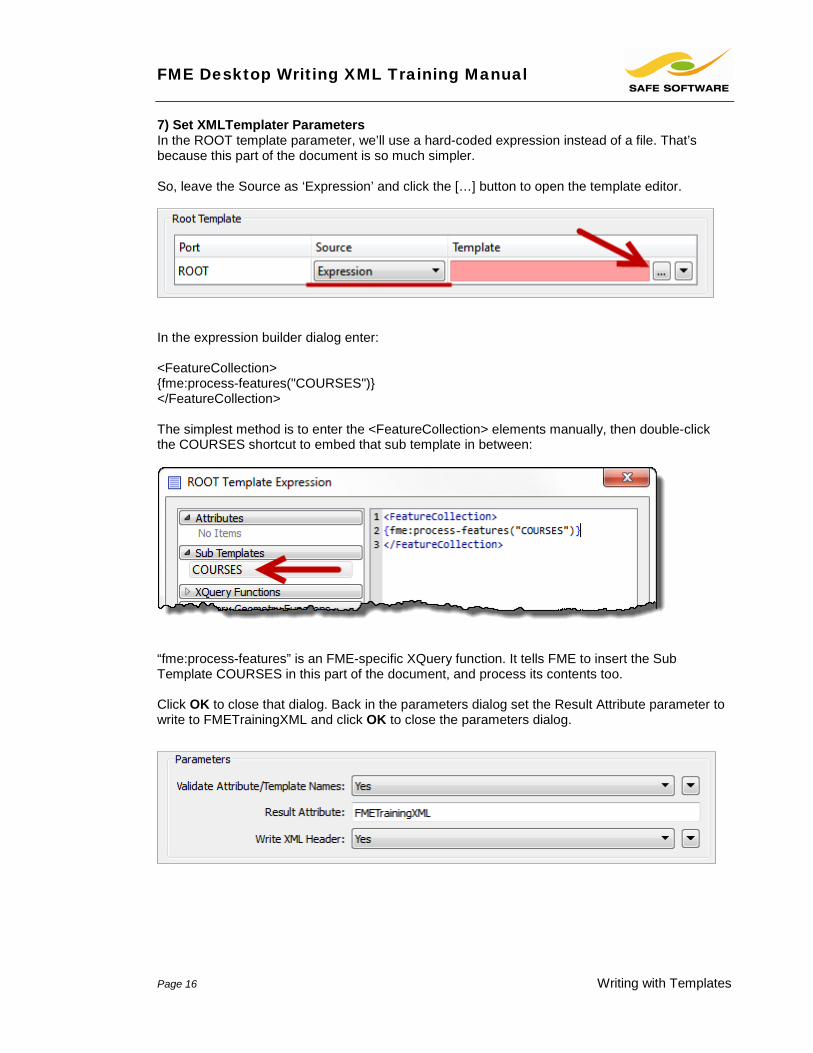
7) Set XMLTemplater Parameters In the ROOT template parameter, we’ll use a hard-coded expression instead of a file. That’s because this part of the document is so much simpler. So, leave the Source as ‘Expression’ and click the […] button to open the template editor.
In the expression builder dialog enter: <FeatureCollection> {fme:process-features("COURSES")} </FeatureCollection> The simplest method is to enter the <FeatureCollection> elements manually, then double-click the COURSES shortcut to embed that sub template in between:
“fme:process-features” is an FME-specific XQuery function. It tells FME to insert the Sub Template COURSES in this part of the document, and process its contents too. Click OK to close that dialog. Back in the parameters dialog set the Result Attribute parameter to write to FMETrainingXML and click OK to close the parameters dialog.
FME Desktop Writing XML Training Manual
Writing with Templates Page 17
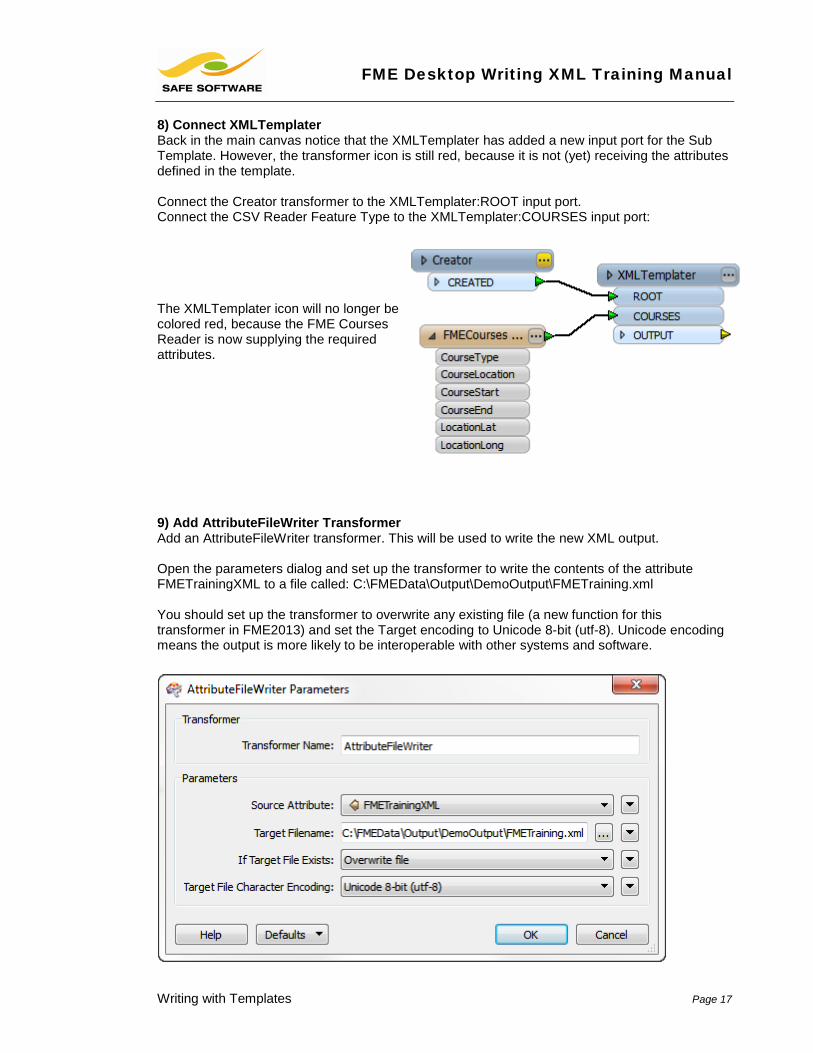
8) Connect XMLTemplater Back in the main canvas notice that the XMLTemplater has added a new input port for the Sub Template. However, the transformer icon is still red, because it is not (yet) receiving the attributes defined in the template. Connect the Creator transformer to the XMLTemplater:ROOT input port. Connect the CSV Reader Feature Type to the XMLTemplater:COURSES input port: The XMLTemplater icon will no longer be colored red, because the FME Courses Reader is now supplying the required attributes. 9) Add AttributeFileWriter Transformer Add an AttributeFileWriter transformer. This will be used to write the new XML output. Open the parameters dialog and set up the transformer to write the contents of the attribute FMETrainingXML to a file called: C:\FMEData\Output\DemoOutput\FMETraining.xml You should set up the transformer to overwrite any existing file (a new function for this transformer in FME2013) and set the Target encoding to Unicode 8-bit (utf-8). Unicode encoding means the output is more likely to be interoperable with other systems and software.
FME Desktop Writing XML Training Manual
Page 18 Writing with Templates
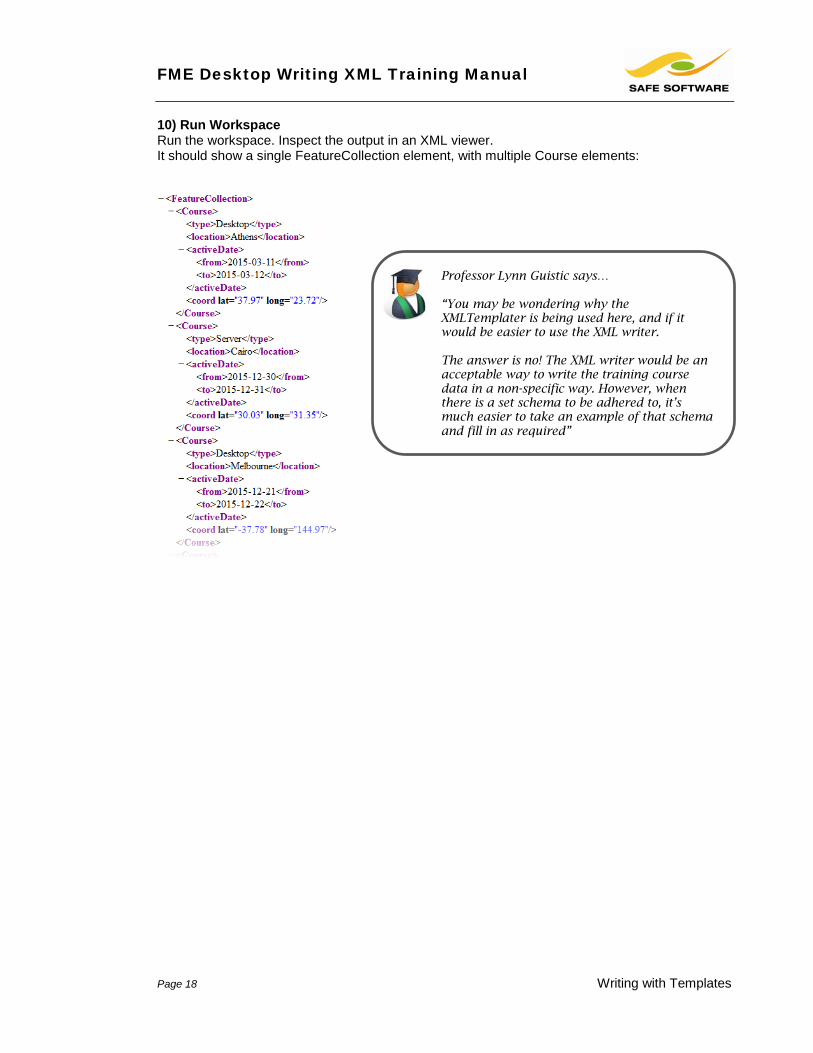
10) Run Workspace Run the workspace. Inspect the output in an XML viewer. It should show a single FeatureCollection element, with multiple Course elements:
Professor Lynn Guistic says…
“You may be wondering why the XMLTemplater is being used here, and if it would be easier to use the XML writer.
The answer is no! The XML writer would be an acceptable way to write the training course data in a non-specific way. However, when there is a set schema to be adhered to, it’s much easier to take an example of that schema and fill in as required”
FME Desktop Writing XML Training Manual
Writing with Templates Page 19
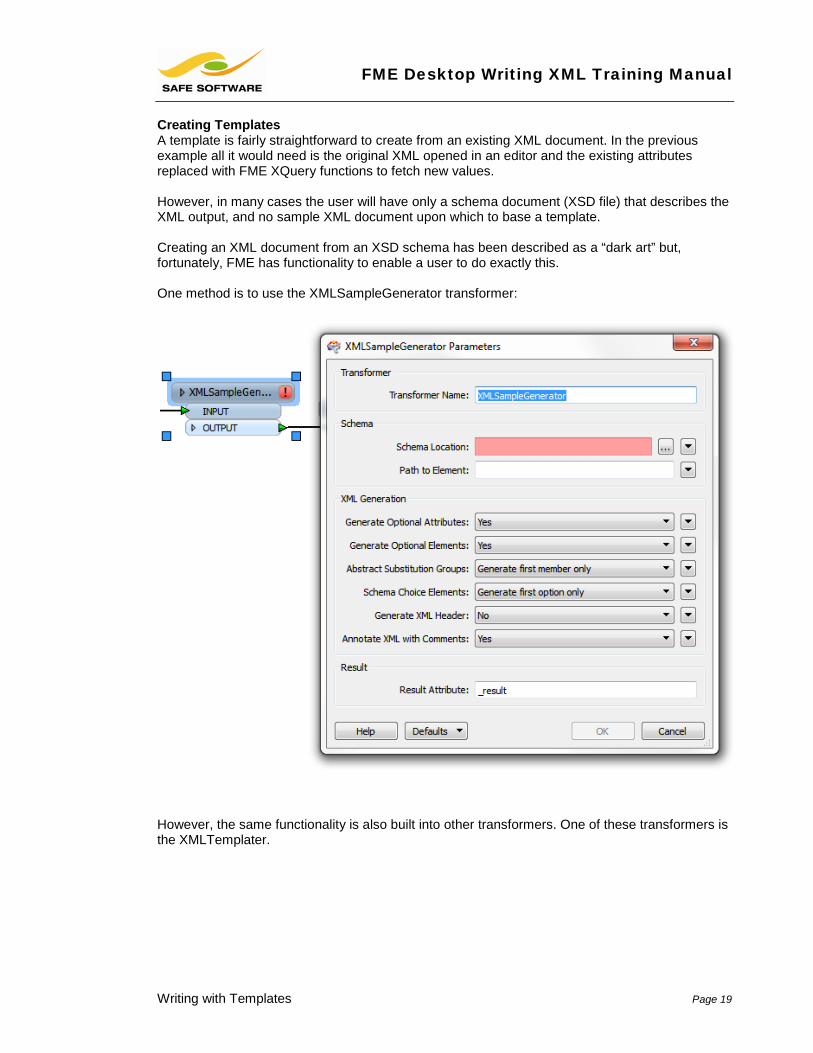
Creating Templates A template is fairly straightforward to create from an existing XML document. In the previous example all it would need is the original XML opened in an editor and the existing attributes replaced with FME XQuery functions to fetch new values. However, in many cases the user will have only a schema document (XSD file) that describes the XML output, and no sample XML document upon which to base a template. Creating an XML document from an XSD schema has been described as a “dark art” but, fortunately, FME has functionality to enable a user to do exactly this. One method is to use the XMLSampleGenerator transformer:
However, the same functionality is also built into other transformers. One of these transformers is the XMLTemplater.
FME Desktop Writing XML Training Manual
Page 20 Writing with Templates
Example 3: Creating Sample XML with the XMLTemplater
Scenario FME user; City of Interopolis, Planning Department
Data FME Training Courses (XML), Metadata Schema (XSD)
Overall Goal Create metadata for the dataset of upcoming FME Training Courses
Demonstrates Writing Sample XML with the XMLTemplater transformer
Starting Workspace None
Finished Workspaces
C:\FMEData\Workspaces\PathwayManuals\XMLWriting3a-Complete.fmw C:\FMEData\Workspaces\PathwayManuals\XMLWriting3b-Complete.fmw C:\FMEData\Workspaces\PathwayManuals\XMLWriting3c-Complete.fmw
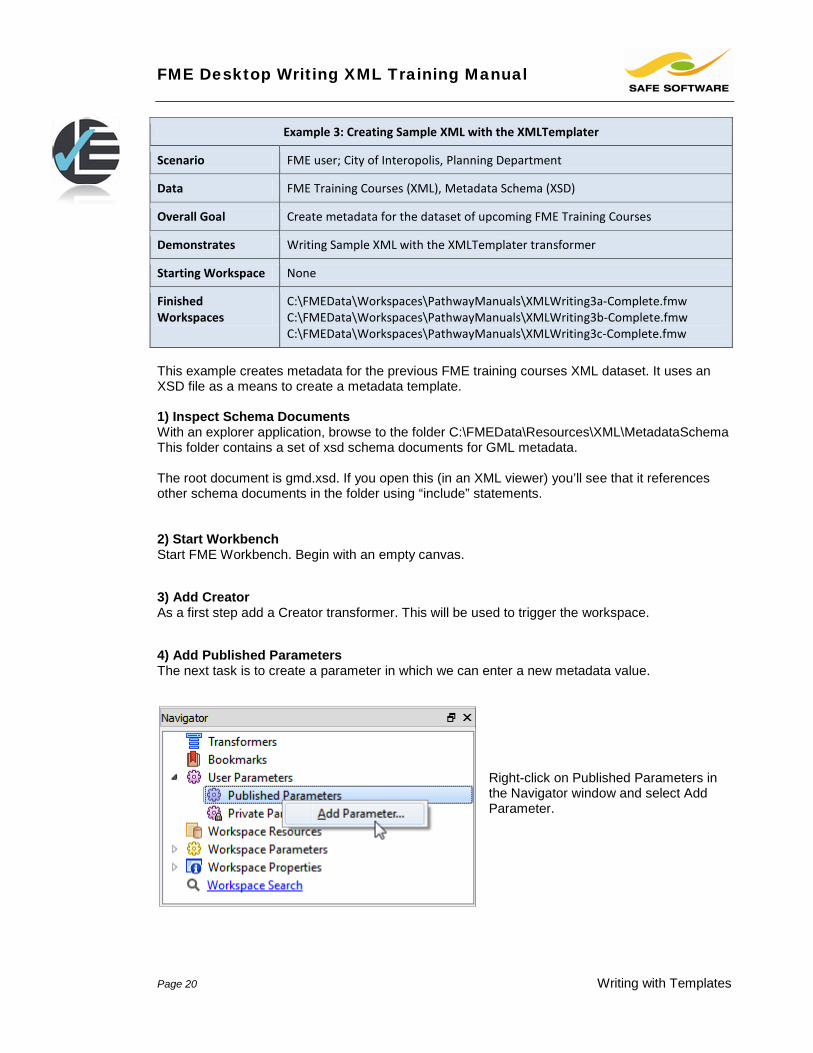
This example creates metadata for the previous FME training courses XML dataset. It uses an XSD file as a means to create a metadata template. 1) Inspect Schema Documents With an explorer application, browse to the folder C:\FMEData\Resources\XML\MetadataSchema This folder contains a set of xsd schema documents for GML metadata. The root document is gmd.xsd. If you open this (in an XML viewer) you’ll see that it references other schema documents in the folder using “include” statements. 2) Start Workbench Start FME Workbench. Begin with an empty canvas. 3) Add Creator As a first step add a Creator transformer. This will be used to trigger the workspace. 4) Add Published Parameters The next task is to create a parameter in which we can enter a new metadata value.
Right-click on Published Parameters in the Navigator window and select Add Parameter.
FME Desktop Writing XML Training Manual
Writing with Templates Page 21
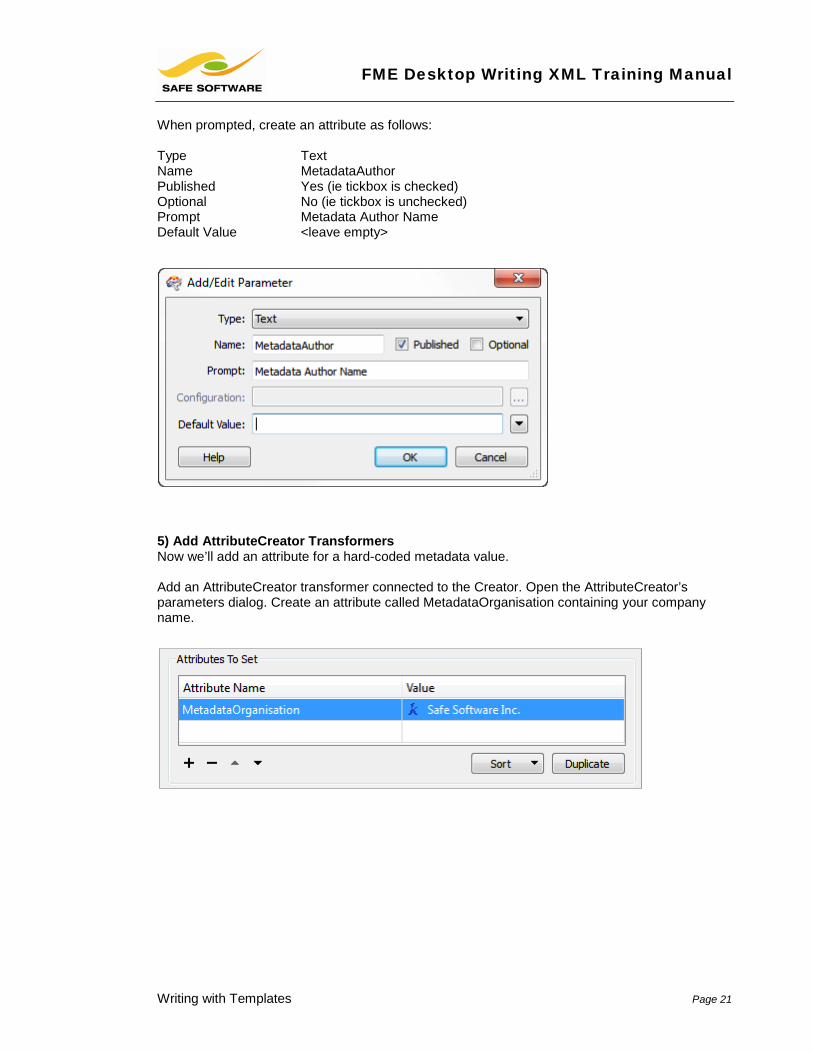
When prompted, create an attribute as follows: Type Text Name MetadataAuthor Published Yes (ie tickbox is checked) Optional No (ie tickbox is unchecked) Prompt Metadata Author Name Default Value <leave empty>
5) Add AttributeCreator Transformers Now we’ll add an attribute for a hard-coded metadata value. Add an AttributeCreator transformer connected to the Creator. Open the AttributeCreator’s parameters dialog. Create an attribute called MetadataOrganisation containing your company name.
FME Desktop Writing XML Training Manual
Page 22 Writing with Templates
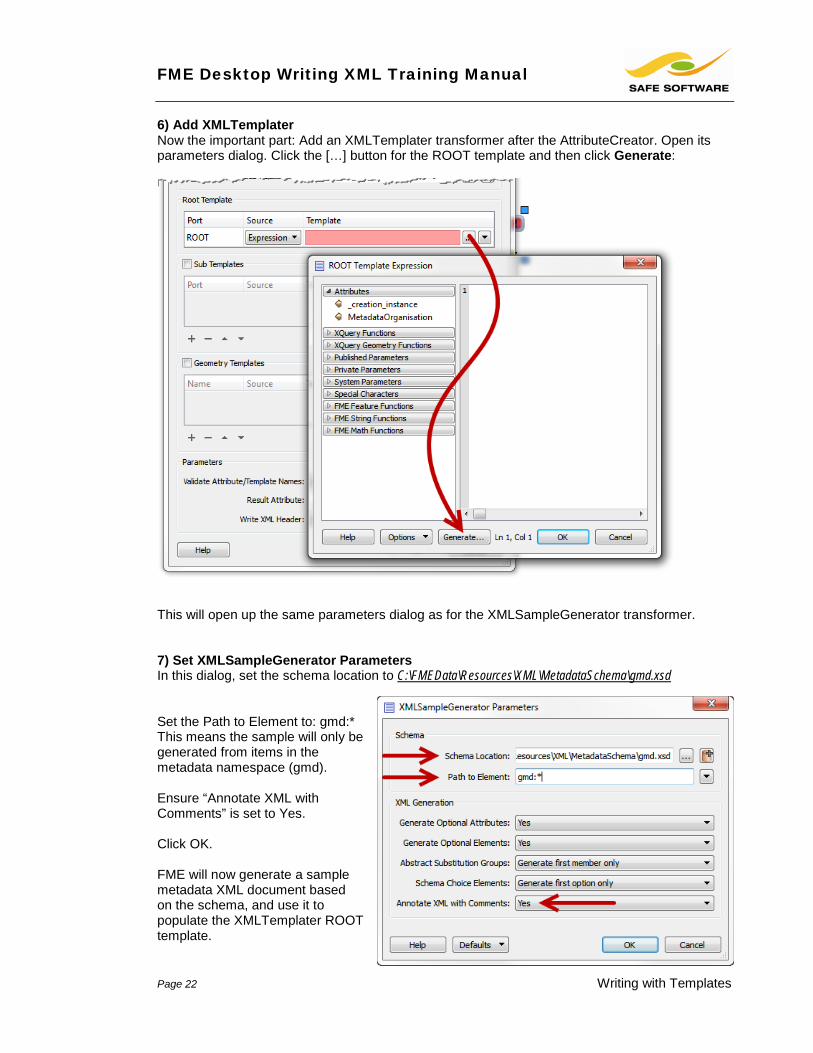
6) Add XMLTemplater Now the important part: Add an XMLTemplater transformer after the AttributeCreator. Open its parameters dialog. Click the […] button for the ROOT template and then click Generate:
This will open up the same parameters dialog as for the XMLSampleGenerator transformer. 7) Set XMLSampleGenerator Parameters In this dialog, set the schema location to C:\FMEData\Resources\XML\MetadataSchema\gmd.xsd Set the Path to Element to: gmd:* This means the sample will only be generated from items in the metadata namespace (gmd). Ensure “Annotate XML with Comments” is set to Yes. Click OK. FME will now generate a sample metadata XML document based on the schema, and use it to populate the XMLTemplater ROOT template.
FME Desktop Writing XML Training Manual
Writing with Templates Page 23
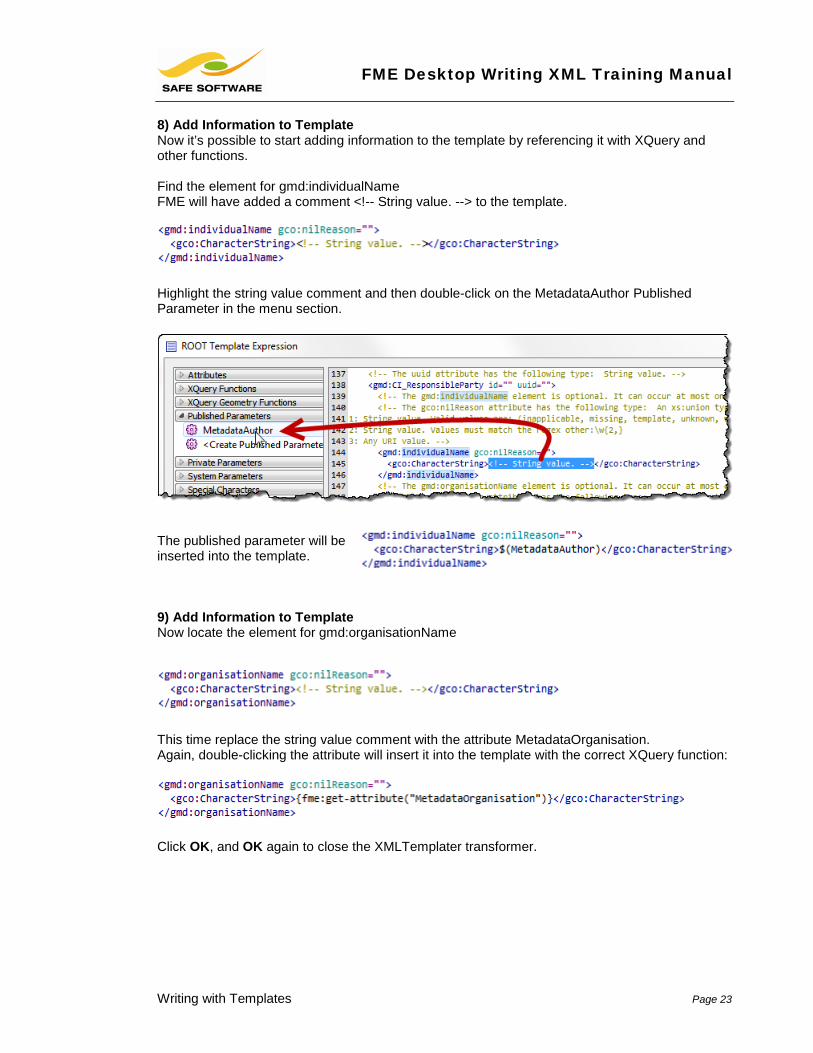
8) Add Information to Template Now it’s possible to start adding information to the template by referencing it with XQuery and other functions. Find the element for gmd:individualName FME will have added a comment <!-- String value. --> to the template.
Highlight the string value comment and then double-click on the MetadataAuthor Published Parameter in the menu section.
The published parameter will be inserted into the template. 9) Add Information to Template Now locate the element for gmd:organisationName
This time replace the string value comment with the attribute MetadataOrganisation. Again, double-clicking the attribute will insert it into the template with the correct XQuery function:
Click OK, and OK again to close the XMLTemplater transformer.
FME Desktop Writing XML Training Manual
Page 24 Writing with Templates
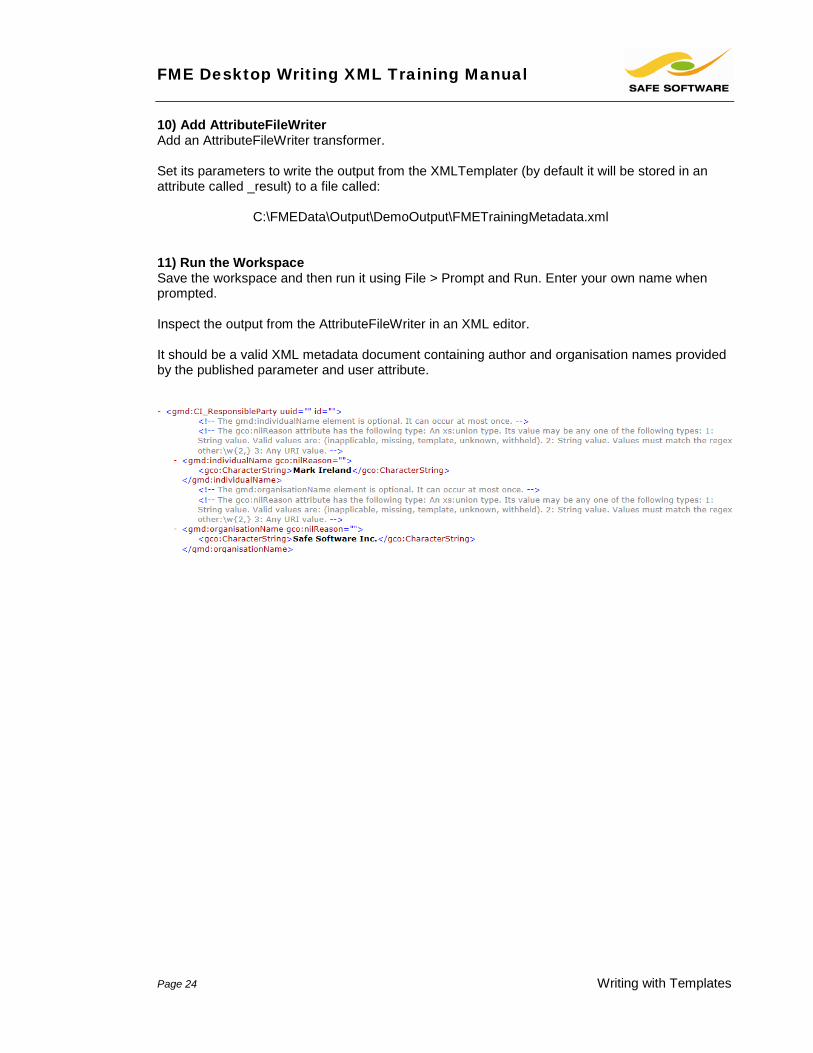
10) Add AttributeFileWriter Add an AttributeFileWriter transformer. Set its parameters to write the output from the XMLTemplater (by default it will be stored in an attribute called _result) to a file called: C:\FMEData\Output\DemoOutput\FMETrainingMetadata.xml 11) Run the Workspace Save the workspace and then run it using File > Prompt and Run. Enter your own name when prompted. Inspect the output from the AttributeFileWriter in an XML editor. It should be a valid XML metadata document containing author and organisation names provided by the published parameter and user attribute.
FME Desktop Writing XML Training Manual
Writing with Templates Page 25
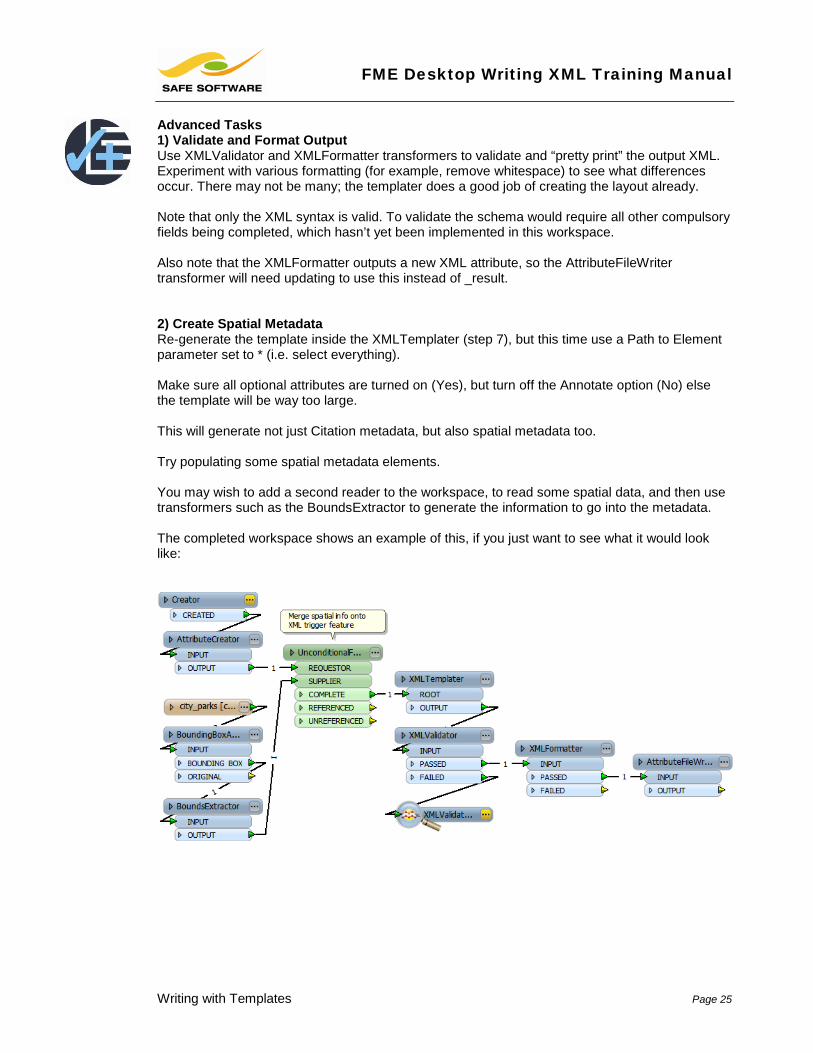
Advanced Tasks 1) Validate and Format Output Use XMLValidator and XMLFormatter transformers to validate and “pretty print” the output XML. Experiment with various formatting (for example, remove whitespace) to see what differences occur. There may not be many; the templater does a good job of creating the layout already. Note that only the XML syntax is valid. To validate the schema would require all other compulsory fields being completed, which hasn’t yet been implemented in this workspace. Also note that the XMLFormatter outputs a new XML attribute, so the AttributeFileWriter transformer will need updating to use this instead of _result. 2) Create Spatial Metadata Re-generate the template inside the XMLTemplater (step 7), but this time use a Path to Element parameter set to * (i.e. select everything). Make sure all optional attributes are turned on (Yes), but turn off the Annotate option (No) else the template will be way too large. This will generate not just Citation metadata, but also spatial metadata too. Try populating some spatial metadata elements. You may wish to add a second reader to the workspace, to read some spatial data, and then use transformers such as the BoundsExtractor to generate the information to go into the metadata. The completed workspace shows an example of this, if you just want to see what it would look like:
FME Desktop Writing XML Training Manual
Page 26 Writing XML Updates
Writing XML Updates XQuery – wrapped up inside the XMLUpdater transformer – is the best way to update an existing XML/GML dataset
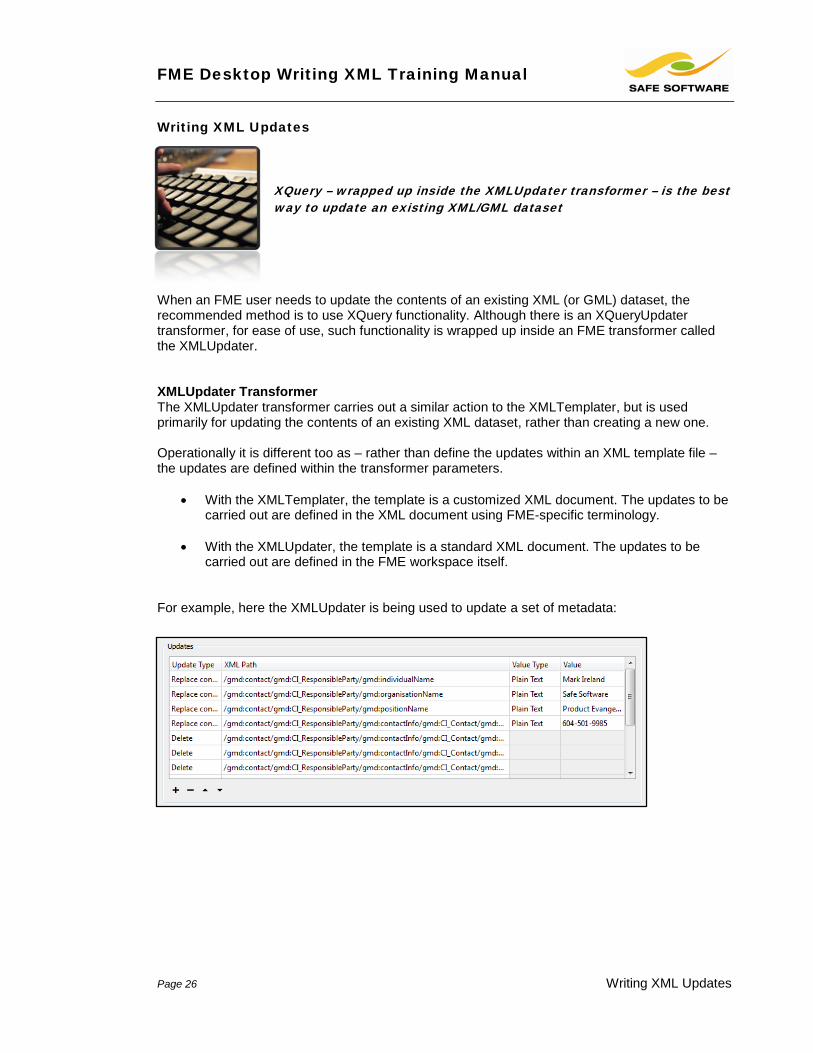
When an FME user needs to update the contents of an existing XML (or GML) dataset, the recommended method is to use XQuery functionality. Although there is an XQueryUpdater transformer, for ease of use, such functionality is wrapped up inside an FME transformer called the XMLUpdater. XMLUpdater Transformer The XMLUpdater transformer carries out a similar action to the XMLTemplater, but is used primarily for updating the contents of an existing XML dataset, rather than creating a new one. Operationally it is different too as – rather than define the updates within an XML template file – the updates are defined within the transformer parameters.
• With the XMLTemplater, the template is a customized XML document. The updates to be carried out are defined in the XML document using FME-specific terminology.
• With the XMLUpdater, the template is a standard XML document. The updates to be
carried out are defined in the FME workspace itself. For example, here the XMLUpdater is being used to update a set of metadata:
FME Desktop Writing XML Training Manual
Writing XML Updates Page 27
Example 4: Writing XML with the XMLUpdater
Scenario FME user; City of Interopolis, Planning Department
Data FME Training Courses (CSV and XML)
Overall Goal Update metadata
Demonstrates Updating XML with the XMLUpdater
Starting Workspace None
Finished Workspace C:\FMEData\Workspaces\PathwayManuals\XMLWriting4-Complete.fmw
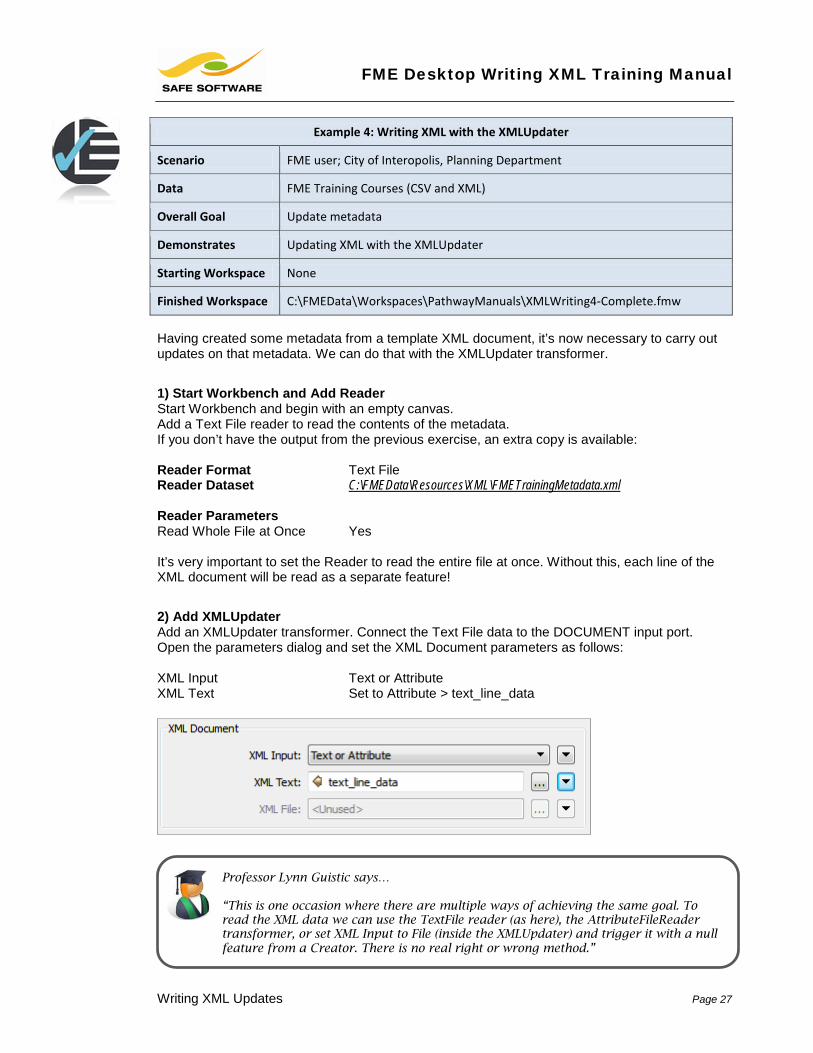
Having created some metadata from a template XML document, it’s now necessary to carry out updates on that metadata. We can do that with the XMLUpdater transformer. 1) Start Workbench and Add Reader Start Workbench and begin with an empty canvas. Add a Text File reader to read the contents of the metadata. If you don’t have the output from the previous exercise, an extra copy is available: Reader Format Text File Reader Dataset C:\FMEData\Resources\XML\FMETrainingMetadata.xml Reader Parameters Read Whole File at Once Yes It’s very important to set the Reader to read the entire file at once. Without this, each line of the XML document will be read as a separate feature! 2) Add XMLUpdater Add an XMLUpdater transformer. Connect the Text File data to the DOCUMENT input port. Open the parameters dialog and set the XML Document parameters as follows: XML Input Text or Attribute XML Text Set to Attribute > text_line_data
Professor Lynn Guistic says…
“This is one occasion where there are multiple ways of achieving the same goal. To read the XML data we can use the TextFile reader (as here), the AttributeFileReader transformer, or set XML Input to File (inside the XMLUpdater) and trigger it with a null feature from a Creator. There is no real right or wrong method.”
FME Desktop Writing XML Training Manual
Page 28 Writing XML Updates
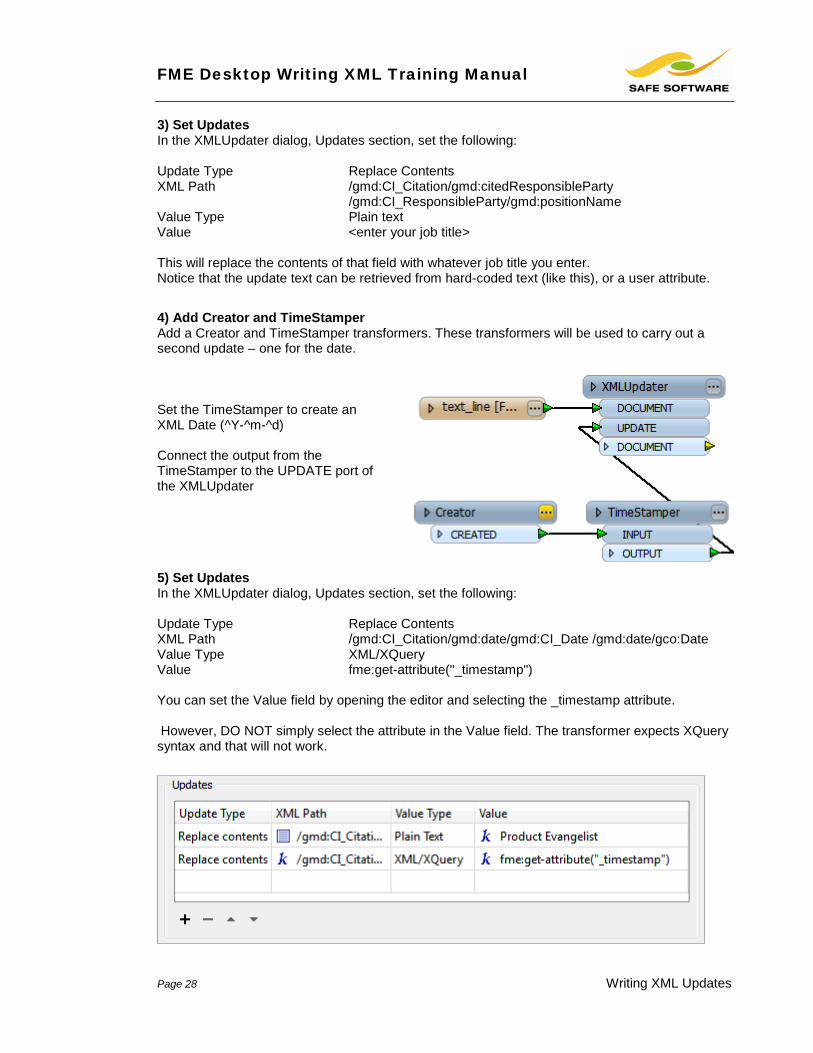
3) Set Updates In the XMLUpdater dialog, Updates section, set the following: Update Type Replace Contents XML Path /gmd:CI_Citation/gmd:citedResponsibleParty
/gmd:CI_ResponsibleParty/gmd:positionName Value Type Plain text Value <enter your job title> This will replace the contents of that field with whatever job title you enter. Notice that the update text can be retrieved from hard-coded text (like this), or a user attribute. 4) Add Creator and TimeStamper Add a Creator and TimeStamper transformers. These transformers will be used to carry out a second update – one for the date. Set the TimeStamper to create an XML Date (^Y-^m-^d) Connect the output from the TimeStamper to the UPDATE port of the XMLUpdater 5) Set Updates In the XMLUpdater dialog, Updates section, set the following: Update Type Replace Contents XML Path /gmd:CI_Citation/gmd:date/gmd:CI_Date /gmd:date/gco:Date Value Type XML/XQuery Value fme:get-attribute("_timestamp") You can set the Value field by opening the editor and selecting the _timestamp attribute. However, DO NOT simply select the attribute in the Value field. The transformer expects XQuery syntax and that will not work.
FME Desktop Writing XML Training Manual
Writing XML Updates Page 29
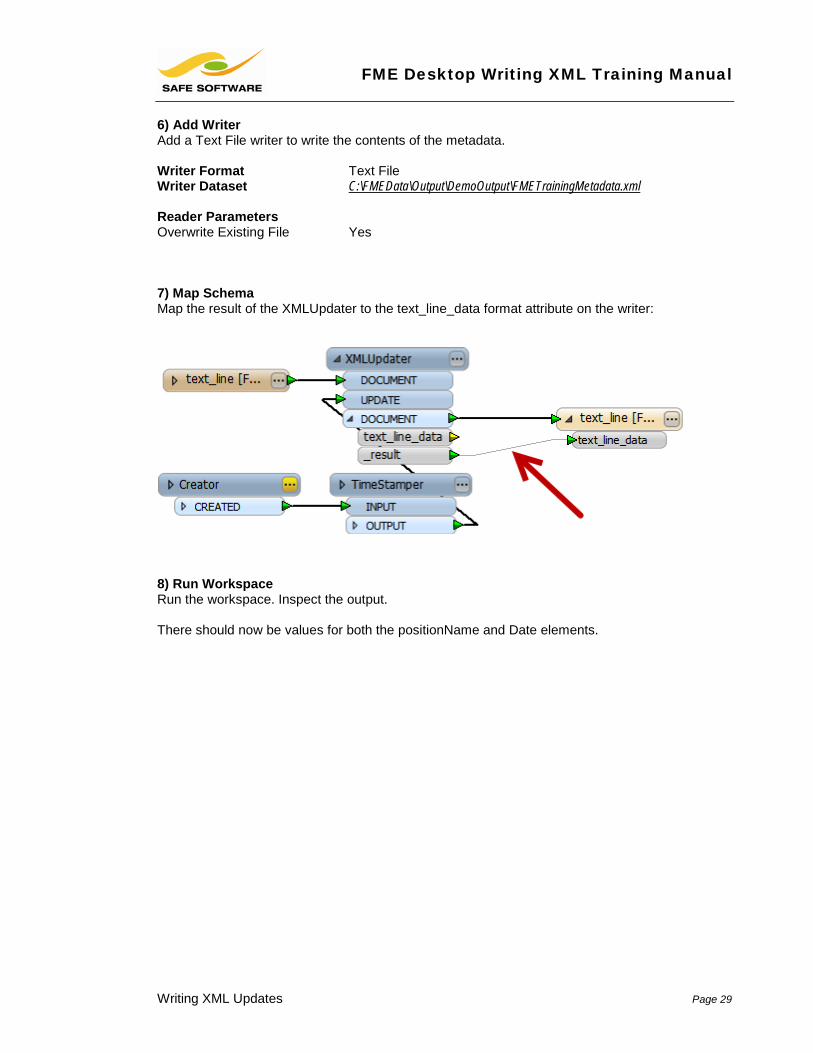
6) Add Writer Add a Text File writer to write the contents of the metadata. Writer Format Text File Writer Dataset C:\FMEData\Output\DemoOutput\FMETrainingMetadata.xml Reader Parameters Overwrite Existing File Yes 7) Map Schema Map the result of the XMLUpdater to the text_line_data format attribute on the writer:
8) Run Workspace Run the workspace. Inspect the output. There should now be values for both the positionName and Date elements.

FME Desktop Writing XML Training Manual
Page 30 Writing to Pre-Defined Formats
Writing to Pre-Defined Formats A review of GML basics
For the most well-known and well-documented formats, FME provides a set of pre-made readers and writers. These work well on the reader side of operations, but are perhaps a little harder to use when writing data. This is because the user needs to know how their source data maps to the elements of a pre-defined schema. FME has no way to automatically write the data because it cannot tell which source Feature Types and attributes are intended to match which XML elements. This applies to both standard GML Application Schema formats such as:
• Aeronautical Information Exchange Model 5 (AIXM 5) • CityGML • Dutch TOP50NL GML • German AAA GML Exchange Format (NAS) • INSPIRE GML
…and also to hybrid “GML” formats like these:
• GeoRSS/RSS Feed • Google Earth KML • GPS eXchange Format (GPX) • OpenStreetMap (OSM) XML • Trimble JobXML
One problem is that these formats all have different specifications and vary greatly in what is required. For example, OpenStreetMap has no schema and allows any attributes (as tags). Other formats allow any Feature Types, while others (such as KML) require specific Feature Types. To understand this subject requires a brief overview of schemas, particularly for GML.
FME Desktop Writing XML Training Manual
Writing to Pre-Defined Formats Page 31
GML The OGC (Open Geospatial Consortium) defines GML as:
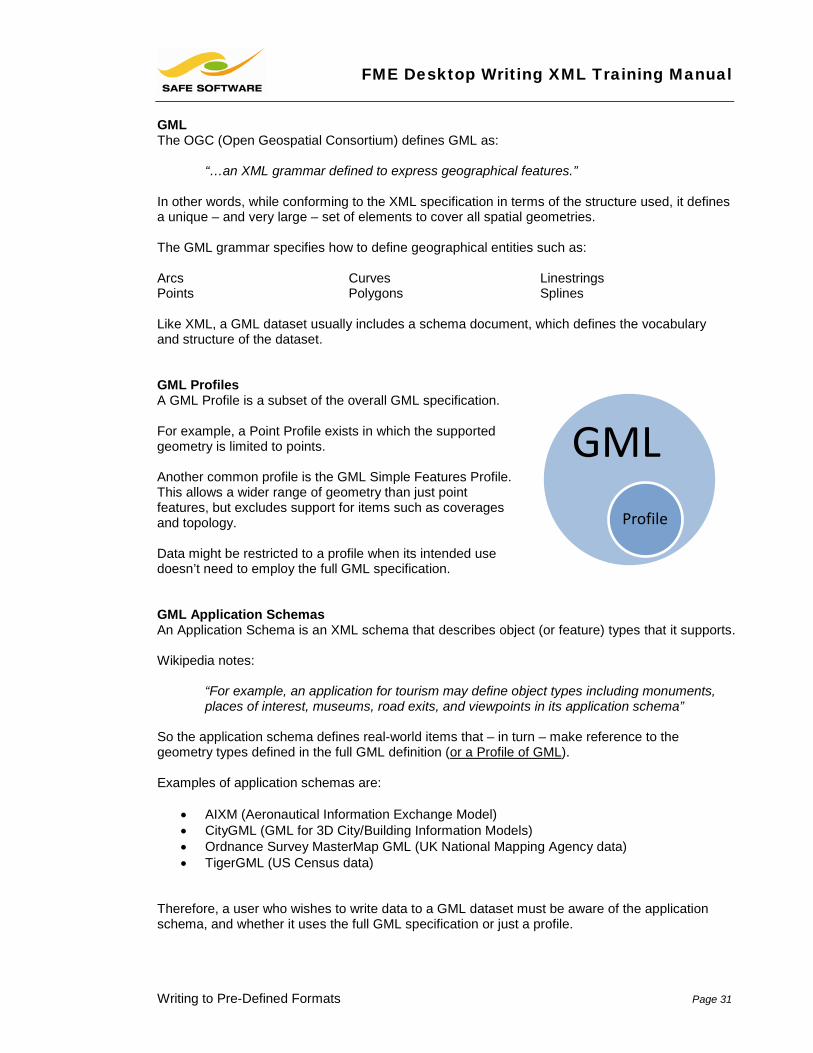
“…an XML grammar defined to express geographical features.” In other words, while conforming to the XML specification in terms of the structure used, it defines a unique – and very large – set of elements to cover all spatial geometries. The GML grammar specifies how to define geographical entities such as: Arcs Curves Linestrings Points Polygons Splines Like XML, a GML dataset usually includes a schema document, which defines the vocabulary and structure of the dataset. GML Profiles A GML Profile is a subset of the overall GML specification. For example, a Point Profile exists in which the supported geometry is limited to points. Another common profile is the GML Simple Features Profile. This allows a wider range of geometry than just point features, but excludes support for items such as coverages and topology. Data might be restricted to a profile when its intended use doesn’t need to employ the full GML specification. GML Application Schemas An Application Schema is an XML schema that describes object (or feature) types that it supports. Wikipedia notes:
“For example, an application for tourism may define object types including monuments, places of interest, museums, road exits, and viewpoints in its application schema”
So the application schema defines real-world items that – in turn – make reference to the geometry types defined in the full GML definition (or a Profile of GML). Examples of application schemas are:
• AIXM (Aeronautical Information Exchange Model) • CityGML (GML for 3D City/Building Information Models) • Ordnance Survey MasterMap GML (UK National Mapping Agency data) • TigerGML (US Census data)
Therefore, a user who wishes to write data to a GML dataset must be aware of the application schema, and whether it uses the full GML specification or just a profile.
GML Profile
FME Desktop Writing XML Training Manual
Page 32 Writing to Pre-Defined Formats
Example 5: Writing GML Datasets
Scenario FME user; City of Interopolis, Planning Department
Data Address Points
Overall Goal Write data to a known GML application schema
Demonstrates Writing to GML formats in FME
Starting Workspace None
Finished Workspace C:\FMEData\Workspaces\PathwayManuals\XMLWriting5a-Complete.fmw C:\FMEData\Workspaces\PathwayManuals\XMLWriting5b-Complete.fmw C:\FMEData\Workspaces\PathwayManuals\XMLWriting5c-Complete.fmw C:\FMEData\Workspaces\PathwayManuals\XMLWriting5d-Complete.fmw
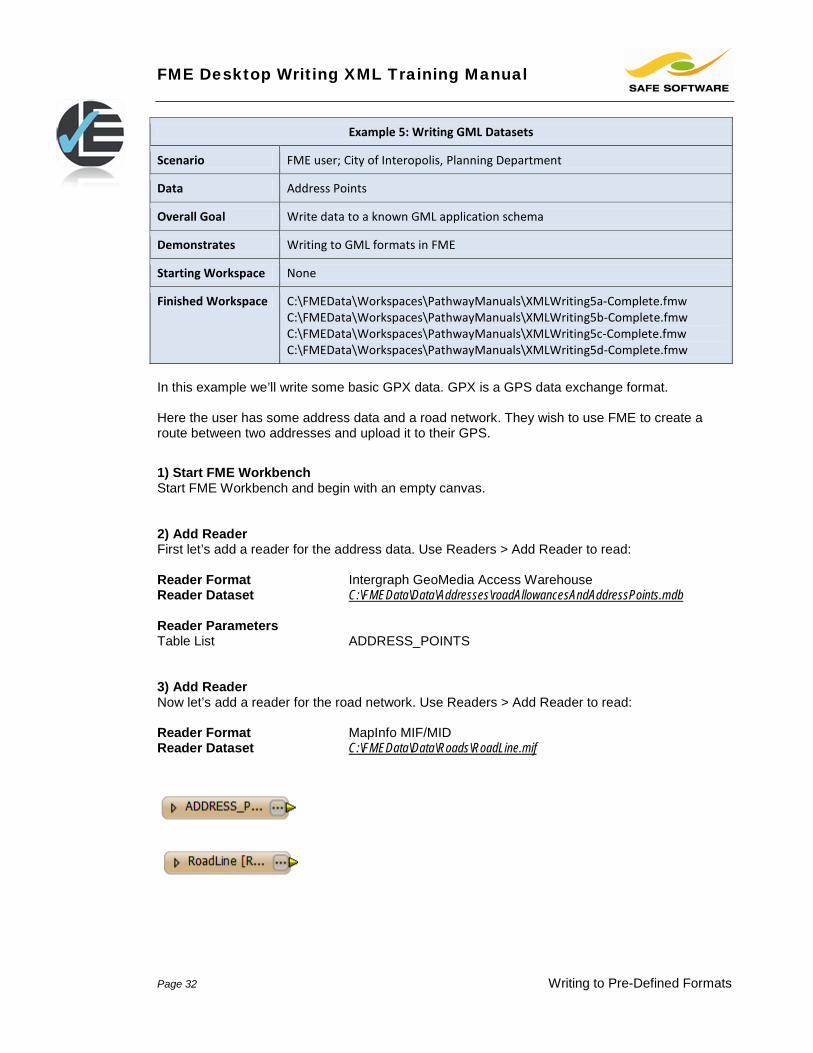
In this example we’ll write some basic GPX data. GPX is a GPS data exchange format. Here the user has some address data and a road network. They wish to use FME to create a route between two addresses and upload it to their GPS. 1) Start FME Workbench Start FME Workbench and begin with an empty canvas. 2) Add Reader First let’s add a reader for the address data. Use Readers > Add Reader to read: Reader Format Intergraph GeoMedia Access Warehouse Reader Dataset C:\FMEData\Data\Addresses\roadAllowancesAndAddressPoints.mdb Reader Parameters Table List ADDRESS_POINTS 3) Add Reader Now let’s add a reader for the road network. Use Readers > Add Reader to read: Reader Format MapInfo MIF/MID Reader Dataset C:\FMEData\Data\Roads\RoadLine.mif
FME Desktop Writing XML Training Manual
Writing to Pre-Defined Formats Page 33
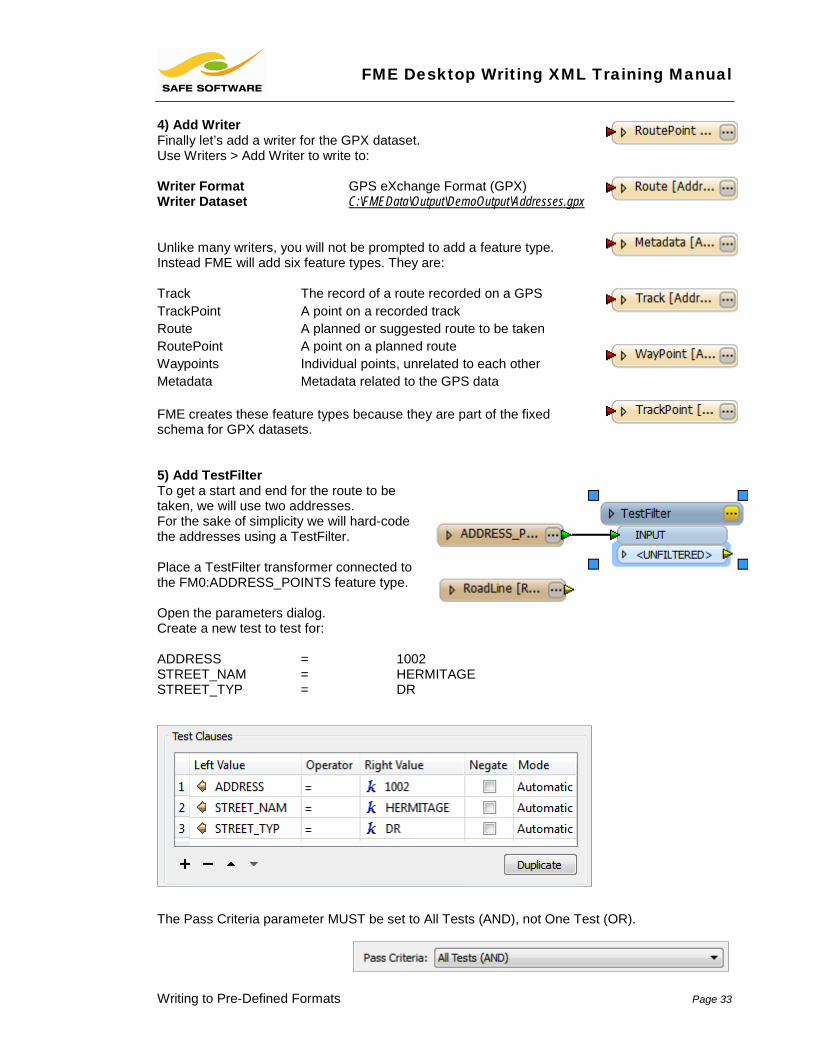
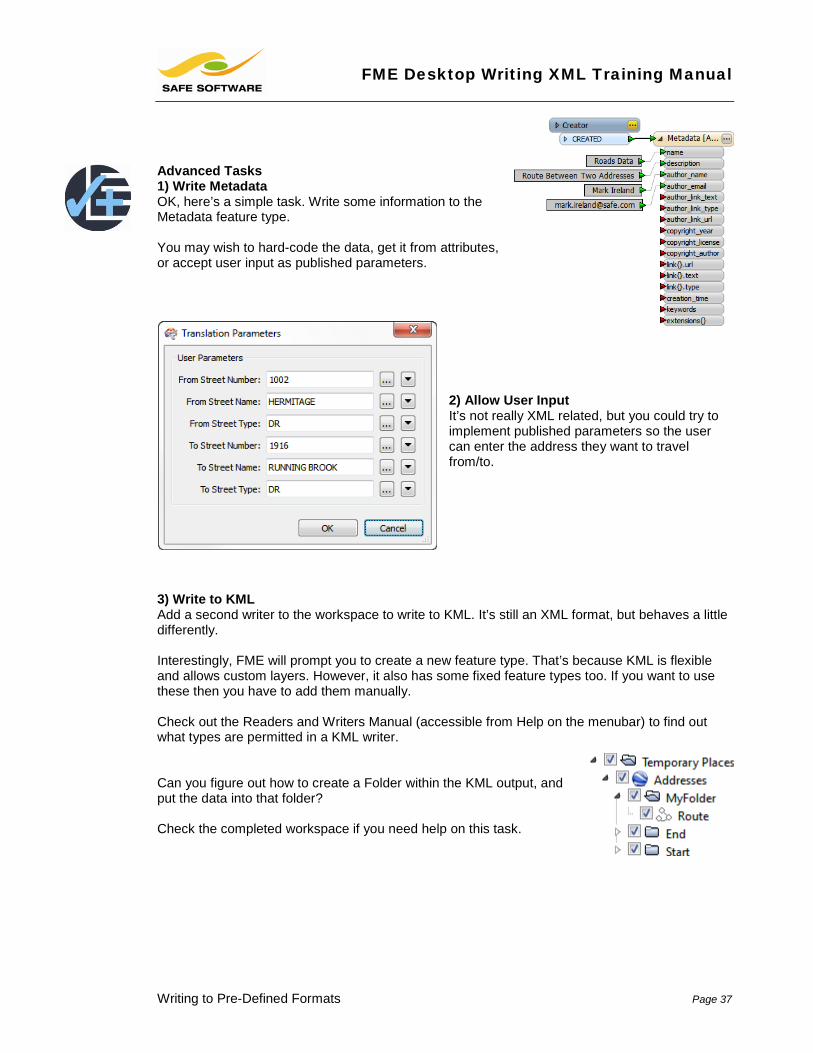
4) Add Writer Finally let’s add a writer for the GPX dataset. Use Writers > Add Writer to write to: Writer Format GPS eXchange Format (GPX) Writer Dataset C:\FMEData\Output\DemoOutput\Addresses.gpx Unlike many writers, you will not be prompted to add a feature type. Instead FME will add six feature types. They are: Track The record of a route recorded on a GPS TrackPoint A point on a recorded track Route A planned or suggested route to be taken RoutePoint A point on a planned route Waypoints Individual points, unrelated to each other Metadata Metadata related to the GPS data FME creates these feature types because they are part of the fixed schema for GPX datasets. 5) Add TestFilter To get a start and end for the route to be taken, we will use two addresses. For the sake of simplicity we will hard-code the addresses using a TestFilter. Place a TestFilter transformer connected to the FM0:ADDRESS_POINTS feature type. Open the parameters dialog. Create a new test to test for: ADDRESS = 1002 STREET_NAM = HERMITAGE STREET_TYP = DR
The Pass Criteria parameter MUST be set to All Tests (AND), not One Test (OR).

FME Desktop Writing XML Training Manual
Page 34 Writing to Pre-Defined Formats
Create a second test (the “Duplicate” button will be useful here) to test for: ADDRESS = 1916 STREET_NAM = RUNNING BROOK STREET_TYP = DR
In the main TestFilter dialog set names for the output ports and click OK to close the transformer:
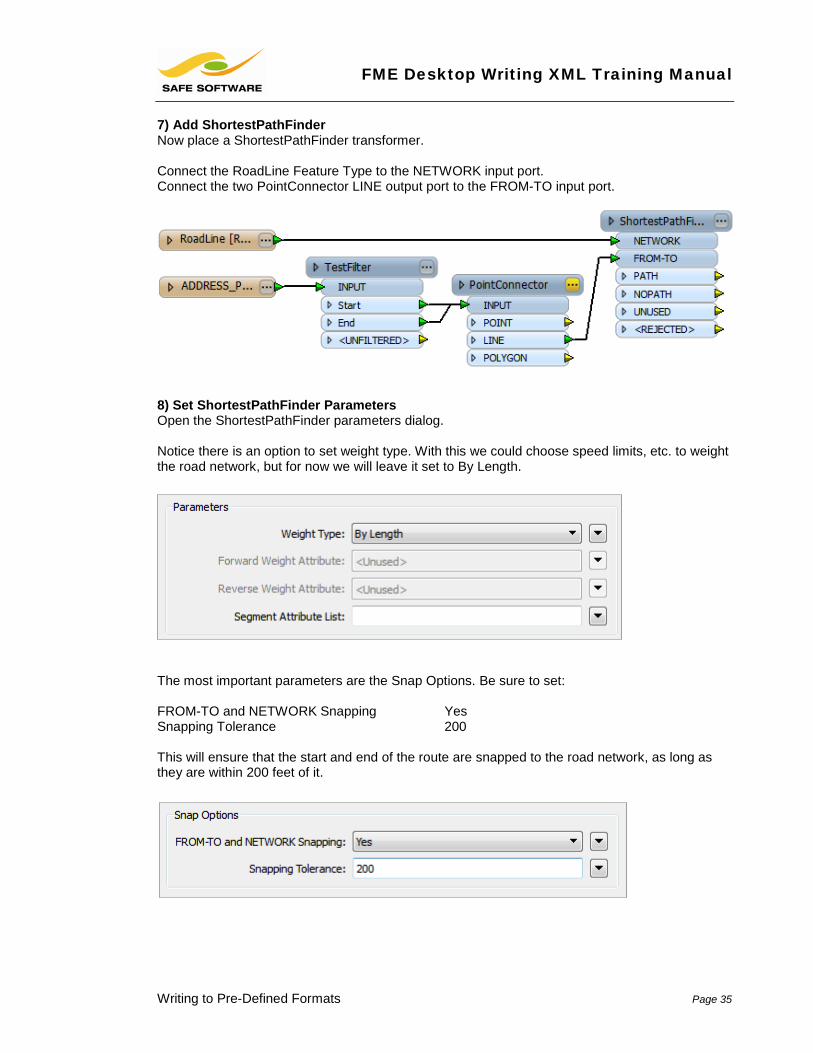
6) Add ShortestPathFinder To find a route we’ll use a ShortestPathFinder transformer. In FME2013 the Start/End point need to be a line feature (rather than points) so firstly place a PointConnector transformer after the TestFilter like so:
FME Desktop Writing XML Training Manual
Writing to Pre-Defined Formats Page 35
7) Add ShortestPathFinder Now place a ShortestPathFinder transformer. Connect the RoadLine Feature Type to the NETWORK input port. Connect the two PointConnector LINE output port to the FROM-TO input port.
8) Set ShortestPathFinder Parameters Open the ShortestPathFinder parameters dialog. Notice there is an option to set weight type. With this we could choose speed limits, etc. to weight the road network, but for now we will leave it set to By Length.
The most important parameters are the Snap Options. Be sure to set: FROM-TO and NETWORK Snapping Yes Snapping Tolerance 200 This will ensure that the start and end of the route are snapped to the road network, as long as they are within 200 feet of it.
FME Desktop Writing XML Training Manual
Page 36 Writing to Pre-Defined Formats
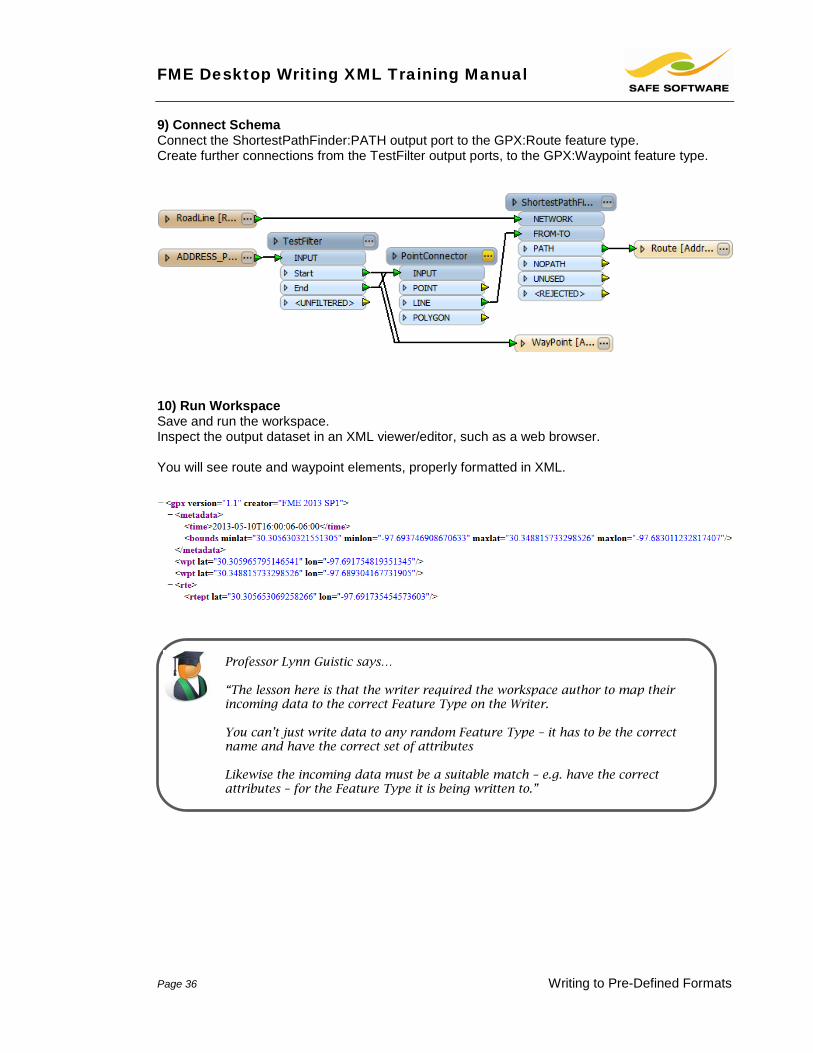
9) Connect Schema Connect the ShortestPathFinder:PATH output port to the GPX:Route feature type. Create further connections from the TestFilter output ports, to the GPX:Waypoint feature type.
10) Run Workspace Save and run the workspace. Inspect the output dataset in an XML viewer/editor, such as a web browser. You will see route and waypoint elements, properly formatted in XML.
Professor Lynn Guistic says…
“The lesson here is that the writer required the workspace author to map their incoming data to the correct Feature Type on the Writer. You can’t just write data to any random Feature Type – it has to be the correct name and have the correct set of attributes Likewise the incoming data must be a suitable match – e.g. have the correct attributes – for the Feature Type it is being written to.”
FME Desktop Writing XML Training Manual
Writing to Pre-Defined Formats Page 37
Advanced Tasks 1) Write Metadata OK, here’s a simple task. Write some information to the Metadata feature type. You may wish to hard-code the data, get it from attributes, or accept user input as published parameters.
2) Allow User Input It’s not really XML related, but you could try to implement published parameters so the user can enter the address they want to travel from/to.
3) Write to KML Add a second writer to the workspace to write to KML. It’s still an XML format, but behaves a little differently. Interestingly, FME will prompt you to create a new feature type. That’s because KML is flexible and allows custom layers. However, it also has some fixed feature types too. If you want to use these then you have to add them manually. Check out the Readers and Writers Manual (accessible from Help on the menubar) to find out what types are permitted in a KML writer. Can you figure out how to create a Folder within the KML output, and put the data into that folder? Check the completed workspace if you need help on this task.
FME Desktop Writing XML Training Manual
Page 38 Session Review
Session Review This session was all about XML data and FME.
What You Should Have Learned from this Session The following are key points to be learned from this session: Theory
• Writing to a known XML schema is significantly harder than reading from it; because the author has to know how to map his source data to the schema elements
• A template is one of the easiest methods to create a new XML document from an
existing GIS datasource
• When a template or sample XML document does not exist, FME provides functionality to convert a schema document (XSD) into a sample XML dataset
• Updating an existing XML document is most easily handled using XQuery. FME wraps
up XQuery functionality inside easy-to-use transformers such as the XMLUpdater
• Fixed XML schemas are represented in FME Workbench by fixed Feature Types. Variable schemas may be represented by both fixed and variable feature types
FME Skills
• The ability to write an XML dataset without a specific application schema
• The ability to write an XML dataset using a pre-defined template
• The ability to create an XML template using an XML schema document
• The ability to update data in an existing XML document using the XMLUpdater
• The ability to write data to an XML dataset with a fixed/known schema