x-16s™ users manual - controlbyweb · x-16s™ users manual introduction power supply than you...
TRANSCRIPT


X-16s™ Users Manual
X-16s User Manual Revisions
Revision Description
1.0 Initial release
1.1 Added further information about entering slope and offset settings
Page 2 Xytronix Research & Design, Inc.

X-16s™ Users Manual Introduction
Section 1: IntroductionThe X-16s™ expansion module is used in conjunction with the X-600M™ controller. The X-16s has eight, 0-5V, analog inputs. The X-16s employs a 24-bit A/D converter and can make both single or differential voltage measurements. A 5.0V reference output can be used to power potentiometers or other resistance sensing sensors. The X-16s is ideal for measuring precision analog voltages in industrial environments. One or more X-16s expansion modules can be connected to a X-600M control module with a ribbon cable. The ribbon cable provides both power and communications.
The X-600M is a multifunction web-enabled industrial I/O controller. It performs control, logic, and monitoring functions similar to that of a Programmable Logic Controller (PLC). However, unlike a PLC, the X-600M is designed for web-based applications from the ground up. No add-on software or hardware is required. The X-600M can be fully configured, programmed and tested using its built-in web server. The web setup pages are intuitive and easy to use and do not require special programming skills.
The X-600M together with the X-16s provide an easy, flexible and reliable way to monitor sensors and devices over a network. The X-16s is suitable for use with pressure sensors, flow meters, current transducers and position sensors – anywhere where precision analog voltage sensing is required.
The X-16s' inputs can be used to trigger email alerts based on a voltage level and can be used to control the relay contacts of other ControlByWeb™ products (such as WebRelay™) that are located at a remote location.
Xytronix Research & Design, Inc. Page 3

Introduction X-16s™ Users Manual
1.1 Features
• Eight analog input channels (can be configured as eight single ended inputs, four differential inputs, or a combination of both
• Full 0 to 5V input range (input range can be scaled by using external resistors)
• 24-bit, ∑∆ ADC
• 10uV resolution
• 4-20mA inputs (using external 250-ohm resistors)
• Removable terminal connectors (included) simplify making wiring connections
• Apply a different slope and offset for each raw voltage reading (via X-600M)
• Built-in web server (via X-600M) provides simple, web based configuration and control
• Custom applications can monitor the X-16s (via X-600M) with simple XML formatted status
• Modbus/TCP protocol (via X-600M) provides interoperability with devices and software from other manufacturers
• Set high/low alarms (via X-600M) for analog inputs which can send out alert emails and control remote ControlByWeb devices.
1.2 The X-16s Connectors & Indicators
Analog Inputs
The X-16s has eight analog inputs. Four analog ground (Agnd) terminals provide convenient connection points for making sensor wiring connections. The X-16s can be setup to input either eight single-ended analog signals, four differential analog signals, or a combination both.
Reference Output
Two 5.0V reference terminals can be used to power resistance sensing sensors such as potentiometers and bridge sensors. The reference output can provide up to 50ma (the two reference terminals are connected together internally). When resistance sensors are excited (powered) from the 5.0V reference output, the measurement will be ratio-metric with the reference. With ratio-metric measurements the absolute voltage (and error) of the reference is removed from the measurement accuracy.
Expansion Bus
The expansion bus allows for a family of expansion modules to be connected directly to the X-600M without the need for an Ethernet switch. The cable can be a daisy chain with multiple connectors. The ribbon cable expansion bus provides both power and communications connections.
Power Supply
The expansion bus can provide up to 1.7 Amps for powering up to 32 expansion modules; however, the maximum number of expansion modules depends on the module type and power source attached to the X-600M.
The X-16s employs modern switch-mode power supply. With this type of power supply the current draw decreases as the voltage increases; therefore, you can add more expansion modules by using a 24-volt
Page 4 Xytronix Research & Design, Inc.
X-16s™ Users Manual Introduction
power supply than you can with a 12-volt power supply. See the X-600M User Manual for more details.
Indicators
The green Power LED indicator is illuminated whenever the module is powered. To identify the module during installation, the X-600M can send a blink command which will cause the power LED to blink for three seconds.
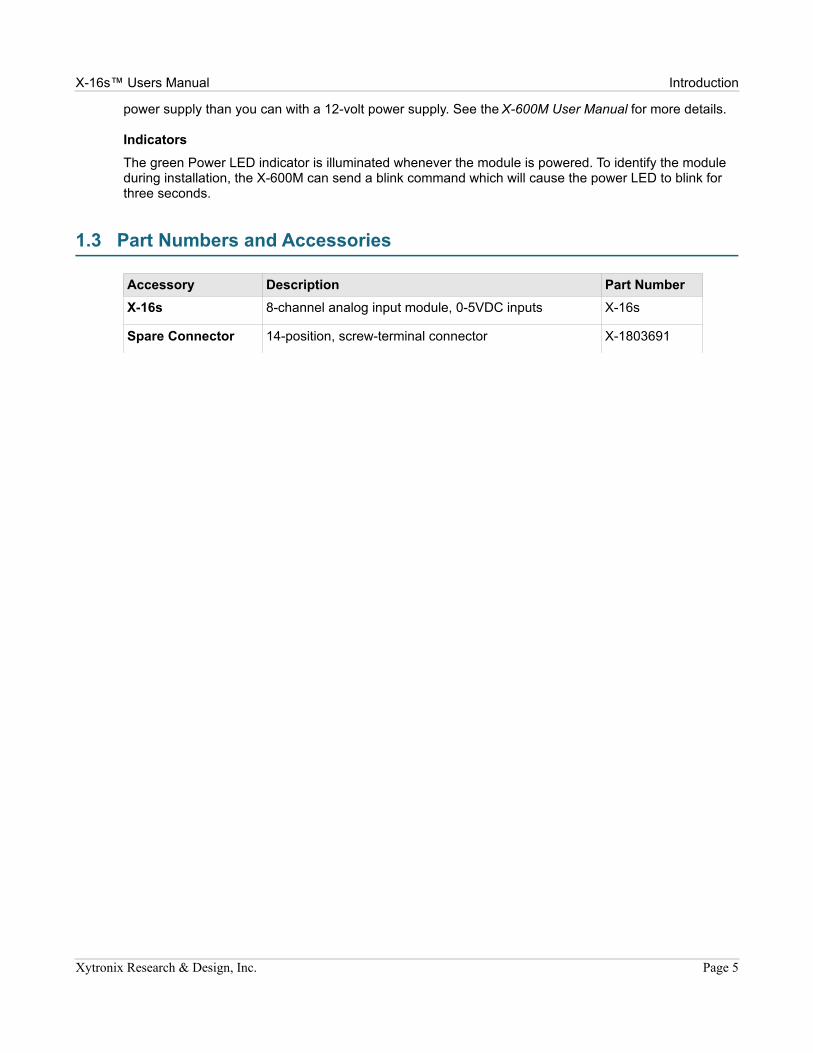
1.3 Part Numbers and Accessories
Accessory Description Part Number
X-16s 8-channel analog input module, 0-5VDC inputs X-16s
Spare Connector 14-position, screw-terminal connector X-1803691
Xytronix Research & Design, Inc. Page 5

Installation and Connections X-16s™ Users Manual
Section 2: Installation and Connections Installation consists of mounting the X-16s and connecting it to an X-600M controller with a 10-conductor ribbon cable. Programming and testing is done by using a web browser to configure the web pages, inputs, and outputs for your specific needs.
2.1 Installation Guidelines
• This unit must be installed by qualified personnel.
• This unit must not be installed in unprotected outdoor locations.
• This unit must not be used for medical, life saving purposes, or for any purpose where its failure could cause serious injury or the loss of life.
• This unit must not be used in any way where its function or failure could cause significant loss or property damage.
2.2 Mounting
X-16s can be mounted to a standard (35mm by 7.55mm) DIN-Rail. Normally expansion modules are mounted to the left side (embossed logo side of the enclosure) of the X-600M controller so that the ribbon cable doesn't cover the power connector. The X-16s should be located in a clean, dry location where it is protected from the elements. Ventilation is recommend for installations where high ambient air temperatures are expected to be high. See Appendix D: Mechanical Information for additional mechanical details.
2.2.1 DIN-Rail Mounting
Attach the X-16s to the DIN-Rail by hooking the top hook on the back of the enclosure to the DIN-Rail and then snap the bottom hook into place. To remove the X-16s from the DIN-Rail, use a flat-head screwdriver. Insert the screw driver into the notch in the release tab and pry against the enclosure to release the bottom hook.
Page 6 Xytronix Research & Design, Inc.

X-16s™ Users Manual Installation and Connections
2.3 Making Connections
CAUTION: Make sure the power is shut off before making connections.
CAUTION: Miswiring or misconfiguration could cause permanent damage to the X-16s, the equipment to which it is connected, or both.
A removable terminal connector is provided for making the power connections. The correct wiring procedure is as follows:
1. Make sure power is turned off.
2. Remove the terminal connector from the X-16s and make wiring connections to the terminals. This technique avoids stressing the internal components while torquing the screws.
3. Reconnect the terminal connector.
4. Apply power.
It is recommended that any load (device to be controlled) not be connected to the expansion modules until after the X-600M has been configured and tested. By doing this, wiring and configuration mistakes will not cause the load device to turn on unexpectedly.
Make certain the wires are properly inserted into to the terminals and that the screws are tight.
Wire Specification:
Use wire rated for 75ºC (min) for connections to the terminal blocks
Connector Specifications:
Type: 14-position, removable, 3.81 mm pitchConnection wire: Use wire rated for 75ºC (min) for connections to the terminal blocksStripping Length: 7mmConnection capacity: 1.5mm2 stranded, 1.5mm2 solidConductor minimum: 30AWG (UL/CUL)Conductor maximum: 14 AWG (UL/CUL)Conductor Type: CopperTightening torque: 0.22 Nm (min), 0.25 Nm (max)
Xytronix Research & Design, Inc. Page 7

Installation and Connections X-16s™ Users Manual
12-Pin Connector Pinout
Terminal Description
+5Vref +5.0V reference output, 50mA maximum
+5Vref +5.0V reference output, internally connected to above
Ain1 Analog Input 1 (0-5V) or Differential Ain1+
Ain2 Analog Input 2 (0-5V) or Differential Ain1-
Agnd Analog Ground
Ain3 Analog Input 3 (0-5V) or Differential Ain3+
Ain4 Analog Input 4 (0-5V) or Differential Ain3-
Agnd Analog Ground
Ain5 Analog Input 5 (0-5V) or Differential Ain5+
Ain6 Analog Input 6 (0-5V) or Differential Ain5-
Agnd Analog Ground
Ain7 Analog Input 7 (0-5V) or Differential Ain7+
Ain8 Analog Input 8 (0-5V) or Differential Ain7-
Agnd Analog Ground
Page 8 Xytronix Research & Design, Inc.

X-16s™ Users Manual Installation and Connections
2.4 Analog Input Connections
The analog inputs must be in the range of 0.0V to 5.0V. Analog sensors that provide an output voltage in the range of 0 to 5 volts can be connected directly to the X-16s module. Voltages outside this range will be clamped internally by the X-16s to 0.0 and 5.0V respectively. The inputs are internally protected with a 1K ohm resistor and a pair of over-voltage steering diodes.
For some applications it may be necessary to add external resistors to scale the input to a value compatible with the X-16s. In the case of a sensor whose output levels are higher than 5 volts, a simple voltage divider can be used to scale down the output. The following diagram shows a voltage divider circuit for a 0-10V sensor. In the example resister values for R1 and R2 are chosen so that Vout will have a 0 to 5 volt range.
Generally, you can choose a 10K Ohm resistor for R2 and then calculate the value of R1 using the following formula.
Vout = Vin * (R2 / (R1 + R2))
To determine the proper resister value to use in the example above, use the maximum output of the sensor (10 VDC) as Vin in the equation, the maximum input value of the X-16s (5 VDC) as Vout, and R2=10K Ohms. Solving for R1 gives R1=10K ohms.
R1=10K, R2=10K
As another example, if the maximum output voltage of the sensor is 15VDC, choose R2=10K. Solving for R1 gives R1=20K ohms.
The input bias current of the X-16s is relatively low, such that the X-16s will work with input circuits with an impedance of up up to 10K ohms with negligible error.
Xytronix Research & Design, Inc. Page 9

Installation and Connections X-16s™ Users Manual
The slope and offset for the voltage divider must calculated and entered into the setup pages of the X-600M. The general term for the Slope is:
Slope = (Y2-Y1)/(X2-X1)
For the 10V input example:
Slope = (10Vin – 0Vin)/(5Vout – 0Vout) = 2V/V
Once the slope is determined, calculate the offset using the Y=mX+b linear equation where b is the offset.
0Vout = 2V/V * 0Vin + Offset
Offset = 0V – (2V/V * 0V) = 0
To configure the X-600 with the new slope and offset values, navigate to the I/O > Analog Input screen. Click the Edit button of the desired analog input channel. Enter the new Slope, Offset and Units values.
Click Update to submit the changes.
Page 10 Xytronix Research & Design, Inc.

X-16s™ Users Manual Installation and Connections
2.4.1 Current Sensors
Some senors generate an output current instead of an output voltage. To use these sensors, a load resistor is connected in the current sensor loop. The load resistor generates a voltage proportional to the sensor current which is in turn sensed by the X-16s. The following diagram shows how to connect a 4 to 20mA sensor to the X-16s.
With a 250-ohm load resistor, a 4 to 20mA sensor will generate a 1.0 to 5.0V output which can be directly connected to the X-16s. A voltage measurement of less than 1.0V indicates the current loop is open or that something is wrong with the sensor. Ensure the resistor wattage is appropriate to handle the power dissipation. A 250-ohm resistor with 20mA flowing thru it will generate 0.1W. The measurement accuracy will be no better than the resistor's accuracy. In general use a 1% or a 0.1% resistor.
When making connections with current sensors it is very important to consider the lead dress. The example above shows the voltage sense connections made with a 4-wire Kelvin connection. This technique uses separate pairs of current-carrying and voltage-sensing wires to make accurate measurements. The goal is to prevent current from flowing in the sense wires and terminals of the X-16s. If current is allowed to flow in the Agnd connections of the X-16s, the current will generate a small offset voltage due to the resistance of the wires and terminals. The offset voltage becomes a source of error. This is especially problematic where the X-16s is used to measure multiple 4-20mA sensors. When connecting more than one 4-20ma sensor consider using a “star” or single point ground topology. If the output current from one sensor changes or affects the measurements of other sensors (crosstalk), you will need to re-consider your connections.
Loop powered current transmitters normally require 7 to 8 Volts across their terminals in order to work properly. With a 250-ohm resistor the load resistor will drop an additional 5-Volts. Allow 2-volts or so for voltage drops across the wiring, especially if the wires are small or long. In this example make certain your loop power source is at least 15-Volts (8+5+2).
Xytronix Research & Design, Inc. Page 11

Installation and Connections X-16s™ Users Manual
2.4.2 Differential Inputs
The differential input mode can be used with sensors that have two analog outputs that are referenced to each other instead of ground. When making differential voltage measurements, the X-16s is programmed to use a pair of inputs (2) to make a single differential measurement. With differential inputs you must make certain both inputs are within the common mode range (0-5V) of the input amplifiers. Normally this means you must provide some sort of input bias. If no input bias is provided, even though the differential voltage is correct the absolute voltages may drift into or beyond the 0-5V power rails of the amplifiers and will produce erratic measurements.
The illustration below shows the connections for a Wheatstone bridge sensor with two output signals. The outputs are connected to Ain1 and Ain2. The X-16s must be programmed for differential mode on “Ain1”. The analog measurement will be made by the voltage difference between the two inputs (Ain1-Ain2). For differential measurements the measurement range is ±5V. For example, if Ain1 is 2.0V and Ain2 is 3.0V, the differential measurement will be -1.0V. Note however, the absolute voltage of both inputs must be in the range of 0-5V for the input amplifiers to work. For example:
Ain1 Ain2 Measurement
+5V 0V +5.0V
0V +5V -5.0V
When the differential input mode is selected for a pair of inputs, the differential data is output on both channels. For the example above, Ain1 = Ain2.
In the illustration below the bridge is excited (driven) by the 5.0V reference output. Notice also that the bridge provides the necessary input bias.
The low input bias and high resolution inputs of the X-16s together with the reference output make the X-16s workable with many bridge sensors without using a preamplifier or other circuitry.
Page 12 Xytronix Research & Design, Inc.

X-16s™ Users Manual Example Applications
Section 3: Example Applications
3.1 Monitor Height, Position, etc. over an IP network
The illustration below shows an example of using the X-16s with a potentiometer position sensor. Potentiometers are in essence a variable resistor with three connections. Typically the +5Vref reference from the X-16s is used to apply power across the potentiometer. The wiper terminal of the potentiometer is connected to any of the eight analog inputs.
Xytronix Research & Design, Inc. Page 13
Example Applications X-16s™ Users Manual
3.2 Monitor Flow, Distance, or Speed with a 4-20mA Sensor
Signal conditioners are available for measuring flow, distance, speed and many other industrial processes. Many popular signal conditioners employ a 4-20mA analog output. With a simple shunt resistor these transducers can be connected directly to the X-16s as described in Section 2.4.1 above. Once the components are properly wired, the X-600M must be configured with the proper Slope and Offset to convert the voltage measurement into engineering units such as CFS (flow), Meters (distance) or Meters per Second (speed). For linear transducers this is normally done with a Y=mX+b equation.
Engineering Value = (Measured Value * Slope) + Offset
The documentation for the sensor must be consulted for the calculations. For example, if the range of a laser rangefinder is 1Meters to 100Meters the transducer will output 4mA at 1M and 20mA at 100M. By default the X-16s makes measurements in units of Volts. To convert this measurement to engineering units the voltage measurement must be processed with a Slope setting. The general term for the Slope is:
Slope = (Y2-Y1)/(X2-X1)
To determine the slope, first determine the minimum and maximum voltage range that will be applied to the X-16s. In this example the transducer will output 4mA at 1M and 20mA at 100M. This can be converted to voltage using Ohms Law V=IR.
Vmin = 4mA * 250 Ohms = 1V
Vmax = 20mA * 250 Ohms = 5V
To calculate the slope:
Slope = (100M – 1M)/(5V – 1V) = 24.75 Meters/Volt
Once the slope is determined, calculate the offset using the Y=mX+b linear equation where b is the offset.
1M = 24.75M/V * 1V + Offset
Offset = 1M – (24.75M/V * 1V) = -23.75M
Configure the X-600M with the new settings as shown in Section 2.4.
Page 14 Xytronix Research & Design, Inc.

X-16s™ Users Manual Example Applications
3.3 Monitor Motor Load Current
The illustration below shows an example of using the X-16s in conjunction with a current transducer to measure the current draw of a motor.
This example uses a current sensor that will measure current up to 20 Amps AC. The sensor produces a linear 0-5VDC output that it can be connected directly to one input of the X-16s analog module. The slope is calculated and entered into the setup pages of the X-600M. The slope calculation is given below:
Slope = (Y2-Y1)/(X2-X1)
Slope = (20Amps – 0 Amps)/(5 VDC – 0 VDC) = 4 Amps/V
Configure the X-600M with the new settings as shown in Section 2.4.
Xytronix Research & Design, Inc. Page 15

Example Applications X-16s™ Users Manual
3.4 Level Alarm at a Remote Location
The illustration below shows an example of using the X-16s to sense water (or other) liquid level and to sound an alarm at a remote location using a WebRelay module. This example is similar to the potentiometer example above except that the X-600M is configured to control a remote device. Each analog input can be configured to send messages to a remote ControlByWeb device when a high or low threshold is reached. In this example the X-600M is configured to send a remote message to sound an alarm when a certain level is exceeded.
Page 16 Xytronix Research & Design, Inc.
X-16s™ Users Manual Example Applications
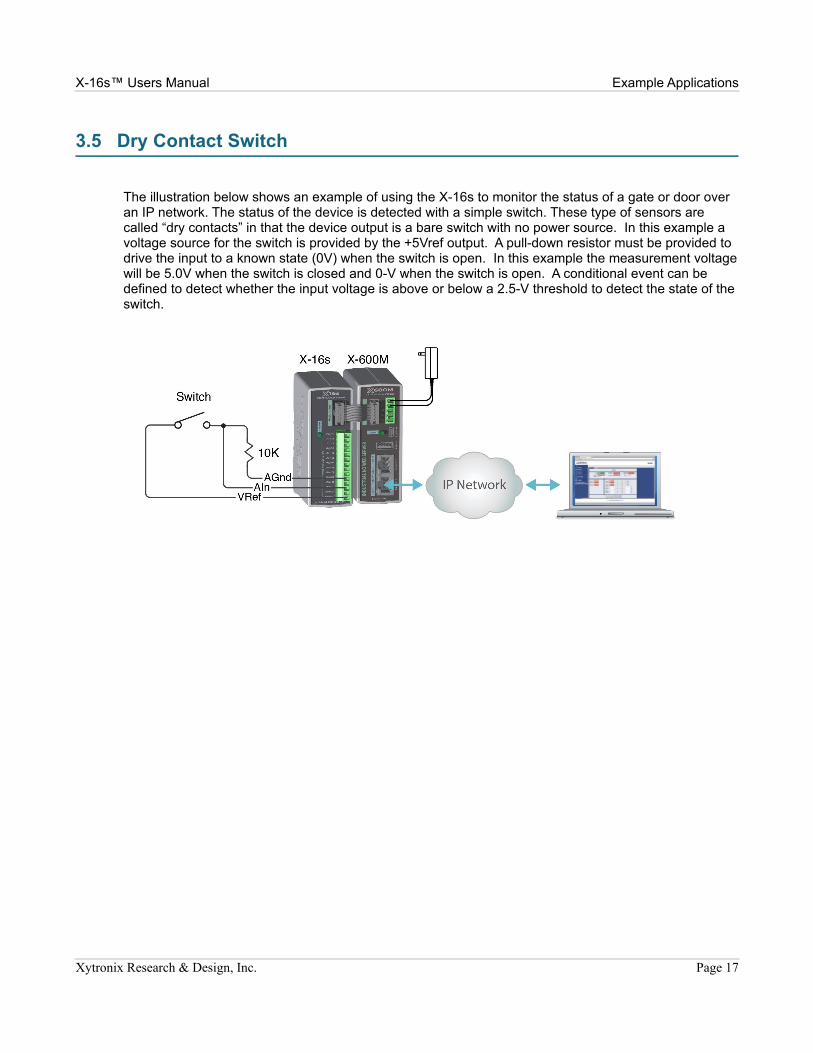
3.5 Dry Contact Switch
The illustration below shows an example of using the X-16s to monitor the status of a gate or door over an IP network. The status of the device is detected with a simple switch. These type of sensors are called “dry contacts” in that the device output is a bare switch with no power source. In this example a voltage source for the switch is provided by the +5Vref output. A pull-down resistor must be provided to drive the input to a known state (0V) when the switch is open. In this example the measurement voltage will be 5.0V when the switch is closed and 0-V when the switch is open. A conditional event can be defined to detect whether the input voltage is above or below a 2.5-V threshold to detect the state of the switch.
Xytronix Research & Design, Inc. Page 17

Configuration and Setup X-16s™ Users Manual
Section 4: Configuration and Setup
4.1 Setup Example
The Quick Start Demo
After making the power and Ethernet connections, the X-600M can automatically scan for the presence of any ControlByWeb™ Ethernet devices (on the same sub-net) and also for any expansion modules connected to the X-600M via the ribbon-cable connector. It also automatically creates a dashboard web page and populates it with all of the resources (components) supported by the Ethernet devices and expansion modules. This makes it easy to start experimenting with the web page's user interface and to try out the relays and sensors.
To quickly add a device do the following:
1. Click on the Devices menu tab to pull up the Devices Overview page. Then click on the Find New Devices button to scan the expansion bus and the local network for ControlByWeb devices and expansion modules.
2. In this example we are going to add an X-16s analog expansion module. Click the Add button for the X-16s.
Page 18 Xytronix Research & Design, Inc.

X-16s™ Users Manual Configuration and Setup
3. In the Select column, click the checkboxes of the I/O components you would like to configure and select the Create Device Widget checkbox (This will display the status of the I/O on the Dashboard).
Click Add Checked I/O to submit these changes.
4. Click Commit Changes - Once clicked, the X-600M begins to monitor the newly added device.
Xytronix Research & Design, Inc. Page 19
Configuration and Setup X-16s™ Users Manual
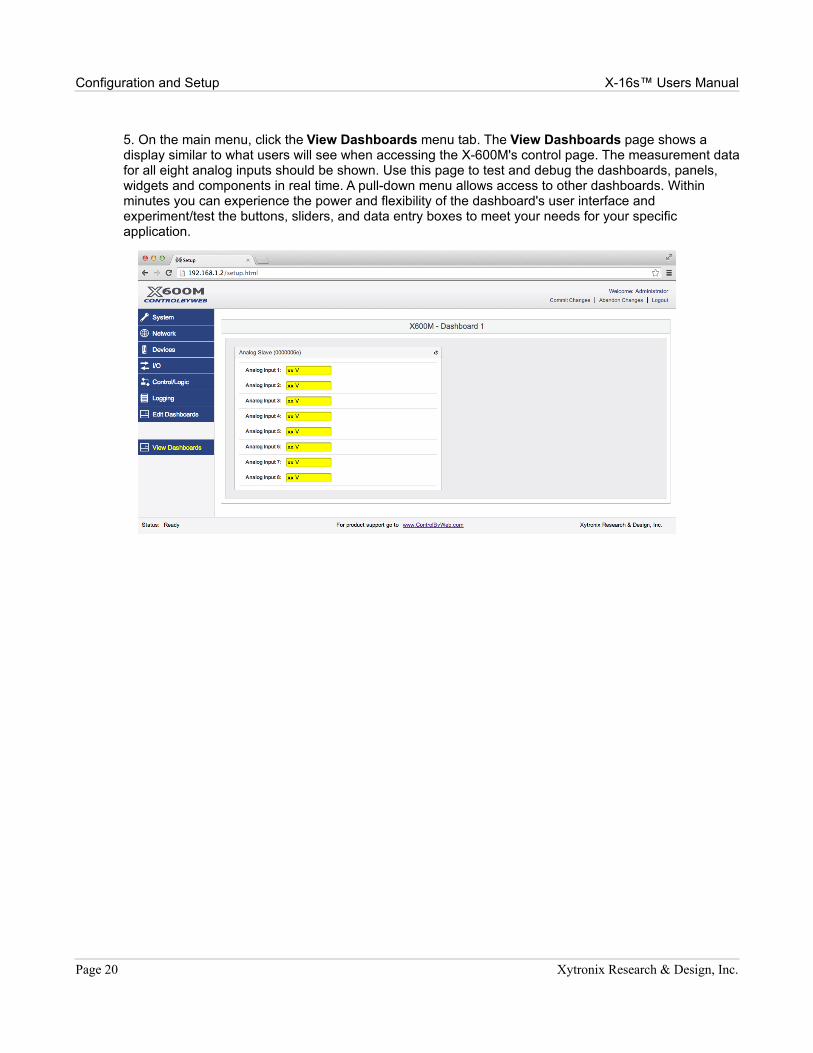
5. On the main menu, click the View Dashboards menu tab. The View Dashboards page shows a display similar to what users will see when accessing the X-600M's control page. The measurement data for all eight analog inputs should be shown. Use this page to test and debug the dashboards, panels, widgets and components in real time. A pull-down menu allows access to other dashboards. Within minutes you can experience the power and flexibility of the dashboard's user interface and experiment/test the buttons, sliders, and data entry boxes to meet your needs for your specific application.
Page 20 Xytronix Research & Design, Inc.

X-16s™ Users Manual Appendix A: Specifications
Appendix A: Specifications
Power Requirements
Input Voltage: 9-28 VDC (power is supplied via the expansion bus cable, 24V recommended)Current: See table below for typical values at 25°C
Power Supply Current
9 VDC 40 mA
12 VDC 30 mA
24 VDC 18 mA
Analog Inputs
Number of Inputs: 8 single-ended, 4-differential, or a combination Input Range: 0 - 5V [(-0.1V (min), 5.1V (max)] all channels Conversion Method: 24-bit, ∑∆ ADC Resolution: 10µV Maximum Inaccuracy: ±0.075% full scale Input Offset Voltage: 10µV Input Bias Current: 350nA Conversion Rate: 7 Hz
Reference Output
Voltage: 5.00V Current: 50mA max Accuracy: 0.04% Temperature Coefficient: 3ppm/°C Max
Connector
Type: 14-position, removable, 3.81 mm pitchConnection wire: Use wire rated for 75ºC (min) for connections to the terminal blocksStripping Length: 7mmConnection capacity: 1.5mm2 stranded, 1.5mm2 solidConductor minimum: 30AWG (UL/CUL)Conductor maximum: 14 AWG (UL/CUL)Conductor Type: CopperTightening torque: 0.22 Nm (min), 0.25 Nm (max)
(Replacement part number, Phoenix Contact 1803691)
Expansion Connector:
Connector: Ribbon cable, 2x5-position, polarized 0.100” pitchCommunications: RS-485
LED Indicators
Green: Power On
Environmental
Indoor use or NEMA-4 protected location
Xytronix Research & Design, Inc. Page 21

Appendix A: Specifications X-16s™ Users Manual
Altitude: up to 2000mOperating Temperature: -40ºC to 65.5ºC (-40ºF to 150ºF)Storage Temperature: -40ºC to 85ºC (-40ºF to 185ºF)Humidity: 5-95%, non-condensing
Mechanical
Size: 1.41 x 3.88 x 3.1 in. (35.7 x 98.5 x 78 mm), (not including connector)Weight: 4.8 oz (136 g)
Electromagnetic Compliance
IEC CISPR 22, CISPR 24FCC 47CFR15 (Class B)EN55024 ITE Immunity (2010)EN55022 Emissions (2010)
Product Safety Compliance
UL 61010-1 (Electrical Equipment for Measurement, Control, and Laboratory Use)
Page 22 Xytronix Research & Design, Inc.

X-16s™ Users Manual Appendix B: Trademark and Copyright Information
Appendix B: Trademark and Copyright InformationThis document is Copyright ©2014 by Xytronix Research & Design, Inc. All rights reserved.
X-600M™, WebRelay™, ControlByWeb™, and Xytronix Research & Design™ are trademarks of Xytronix Research & Design™, Inc. 2005-2014.
All other trademarks are the property of their respective owners.
All parts of this product and design including but not limited to firmware, hardware design, schematics, PCB layout, concept, graphics, users manual, etc., are property of Xytronix Research & Design, Inc. ©2005-2014. X-600M may not be opened, disassembled, copied or reverse-engineered.
No part of this manual may be reproduced or transmitted in any form or by any means, electronic or mechanical, including photocopying or scanning, for any purpose other than the personal use by the purchaser of this product. Xytronix Research & Design, Inc., assumes no responsibility for any errors that may appear in this document.
Whereas reasonable effort has been made to make the information in this document as useful and accurate as possible, Xytronix Research & Design, Inc. assumes no responsibility for the application, usefulness, or completeness of the information contained herein. Under no circumstance will Xytronix Research & Design, Inc. be responsible or liable for any damages or losses including direct, indirect, special, incidental, or consequential damages or losses arising from either the use of any information contained within this manual or the use of any products or services referenced in this manual.
Xytronix Research & Design, Inc. reserves the right to change any product’s features, specifications, documentation, warranties, fee schedules, and conditions at any time and without notice.
Xytronix Research & Design, Inc. Page 23

Appendix C: Warranty X-16s™ Users Manual
Appendix C: WarrantyThis Xytronix Research & Design, Inc. product has a warranty against defects in material and workmanship for a period of one year from the date of shipment. During the warranty period, Xytronix Research & Design, Inc. will, at its option, either repair or replace products that prove to be defective. This warranty is extended to the original purchaser of the equipment only.
For warranty service or repair, the product must be properly packaged, and returned to Xytronix Research & Design, Inc. The purchaser shall prepay all charges for shipping to Xytronix Research & Design, Inc., and Xytronix Research & Design, Inc. will pay the shipping charges to return the product to the purchaser as long as the product is shipped within the United States. If the product is shipped outside of the United States, the purchaser shall pay all shipping charges, duties, and taxes.
Limitation
The foregoing warranty shall not apply to defects or damage resulting from improper use or misuse, unauthorized repair, tampering, modification, improper connection, or operation outside the electrical/environmental specifications for the product. Further, the warranty does not cover Acts of God, such as fire, flood, hurricanes, and tornadoes. This warranty does not cover damage to property, equipment, direct, indirect, consequential, or incidental damage (including damage for loss of business profit, business interruption, loss of data, and the like) arising out of the use or misuse of this product.
UNDER NO CIRCUMSTANCES WILL THE LIABILITY OF XYTRONIX RESEARCH & DESIGN, INC. TO THE PURCHASER OR ANY OTHER PARTY EXCEED THE ORIGINAL PURCHASE PRICE OF THE PRODUCT, REGARDLESS OF THE FORM OF THE CLAIM. No other warranty is expressed or implied. Xytronix Research & Design, Inc. specifically disclaims the implied warranties or merchantability and fitness for a particular purpose. Some jurisdictions may not allow the exclusion of limitation of liability for consequential or incidental damage.
Page 24 Xytronix Research & Design, Inc.

X-16s™ Users Manual Appendix D: FCC Statement
Appendix D: FCC StatementThis device complies with Part 15 of the FCC Rules. Operation is subject to the following two conditions:
- This device may not cause harmful interference.- This device must accept any interference received, including interference that may cause undesired
operation.
Warning
This equipment has been tested and found to comply with the limits for a Class B digital device, pursuant to Part 15 of the FCC Rules. These limits are designed to provide reasonable protection. This equipment generates, uses and can radiate radio frequency energy and, if not installed and used in accordance with the instructions, may cause interference to radio communications. There is no guarantee, however, that interference will not occur in a particular installation. If this equipment does cause harmful interference to radio or television reception, which can be determined by turning the equipment off and on, the user is encouraged to try to correct the interference by one or more of the following measures:
- Reorient or relocate the receiving antenna.- Increase the separation between the equipment and receiver.- Connect the equipment into a relay on a circuit different from where the receiver is connected.- Consult the dealer or an experienced radio/TV technician for help.
Notice
Changes or modification not expressly approved by the party responsible for compliance could void the user’s authority to operate the equipment.
Xytronix Research & Design, Inc. Page 25

Appendix E: Mechanical Dimensions X-16s™ Users Manual
Appendix E: Mechanical Dimensions
Page 26 Xytronix Research & Design, Inc.