xamp-m4 instr manual - xkitz electronics documentation 1 xkitz xamp-m4 audio bi-amplifier,...
TRANSCRIPT

12/7/2016 XKITZ XAMP-M4 1
Audio Bi-Amplifier, 200W/100W, 2-Way Active Crossover
Model XAMP-M4 Assembly and Operator’s Manual Rev 1.1.2
Xkitz.com
Features
• On-board 2-way active crossover drives dual amplifiers for separate woofer and tweeter • Linkwitz-Riley crossover, 4th order, 24dB/Octave roll-off • Uses two LM3886 chips in bridged configuration to produce 200W peak on the bass channel • Uses an LM4766 Chip in bridged configuration to produce 100W peak on the tweeter channel • Crossover frequency configuration components are on a single socketed module - quick and easy to change
the XO frequency by simply snapping in a new module. • Wide range of standard XO frequency modules are offered by Xkitz, any frequency available on request • Baffle Step Compensation, optional, adjustable and configurable to support various baffle sizes • Supports unbalanced signal inputs by default, balanced audio signaling is available as an add-on option.
� Unbalanced signals are connected via standard RCA jacks � Balanced signals are connected via optional 3.5mm TRS jacks. The TRS jacks are wired to be
directly compatible with the new hi-def audio players such as the Pono • Specifications:
� THD: < 0.025% (see graphs on pgs 10-11) � THD+N: < 0.05% � IMD: < 0.09% � Frequency Response Linear from 20Hz – 80KHz � CMRR (balanced input): > 55dB � Input Impedance 20K ohms unbalanced, 40K balanced � Input Overload: 3.8V peak-to-peak � Voltage Gain: Adjustable, Max 27dB � Power Output
• Woofer Channel: Adjustable, max 66W RMS into 8 Ohms, 106W RMS into 4 Ohms • Tweeter Channel: Adjustable , max 36W RMS
� Filter Topology: Linkwitz-Riley, 4th Order, 24dB/octave � Amplifier Type: Class AB � Power supply: Single positive DC rail (no negative supply required) 24V–50V DC
• Applications: • Active Monitors • Speaker Bi-Amp conversions • Bi-Amp’ed Active Speaker System • Portable boom-box • Portable guitar amplifier • Custom speaker systems
• Channels are phase aligned to within a fraction of a degree to minimize distortion around the XO frequency • Separate bass and treble output level adjustments via on-board multi-turn trim-pots • Quiet power ON / power OFF • Low power consumption and no negative supply needed - perfect for portable battery powered amplifiers • This is a mono device, two units are needed for stereo operation • PCB Dimensions: 3.6” x 3.75” x 2” High (91mm x 95mm x 51mm) • This is an intermediate electronic kit containing 130 components, and can be assembled in about 2-3 hours

12/7/2016 XKITZ XAMP-M4 2
Unpacking Your Kit
Carefully unpack and take stock of the components in your kit. The electronic components are packed in 2 bags labeled ‘Bag A’ and ‘Bag B’. See Table 1 for a complete listing of your components.
Assembly Instructions It is very important that you read and understand all of the following instructions before you start your assembly so that you don’t make any mistakes that might be difficult to recover from. The assembly should be done in the order listed in Table 1 or you may have difficulty physically accessing components for soldering.
What you’ll need
� Soldering iron with small or medium tip
� Damp sponge for tip cleaning
� Solder
� Solder wick or solder sucker in case of solder bridging (stranded wire could substitute)
� Small needle nose pliers.
� Small wire cutters
� Small straight screwdriver
� Sharp knife
� Magnifying glass to read the markings on the tiny components
General Assembly Guidelines
� Take your time!! Most mistakes are made when rushing through the assembly. Taking the time to double check every step will pay off with a first-time functional device.
� In cases where it is necessary to re-form the leads on components (such as resistors and diodes), be very careful not to put stress where the lead enters the component itself. The physical attachment of the lead to the component can sometimes be very fragile and the lead may break off if too much force is applied. Reforming the leads can be done by gripping the lead with small needle-nose pliers at the base of the component while bending the lead on the other side of the pliers.
� Use as little heat and solder as necessary to affix the components to the PCB (printed circuit board). Many of the parts in this kit are temperature sensitive. Overheating may damage them.
� Always clean the soldering iron tip on the damp sponge prior to every solder joint. Re-tin whenever the tip gets a little dull. (tinning is the application of fresh solder to the tip of the iron until its shiny, wipe excess on a damp sponge).
� Inspect the solder joints. They should be shiny and smoothly connect the pad to the lead. A dull looking joint may indicate it is ‘cold’, meaning that either the pad or the lead weren’t heated enough to allow reliable connection. This could lead to erratic operation of the device. Re-flow the joint again with the soldering iron, apply equal heat to both the pad and the lead, apply a little more solder if needed to get a good shiny connection.
� When clipping the excess leads of the through-hole parts, don’t try to clip too close to the PCB. Clip just above the solder joint to avoid fracturing the solder joint, which could lead to device failure sometime in the future.
� Carefully inspect each solder joint to make sure you didn’t accidentally form a ‘solder bridge’, or connect two adjacent pads together. Remove solder bridges by using solder wick or a solder sucker. If the bridge is small you may be able to remove it by just reheating the joint and sliding the soldering iron across the bridge. If not, see the next step.
� If you need to remove solder from a hole (or a solder bridge) and you don’t have solder wick or a solder sucker, you can use stripped stranded wire in place of solder wick. Place the stranded wire across the hole and touch the soldering iron to the wire, above the hole. As the wire heats it will melt the solder in the hole, and the melted solder will tend to wick up into the stranded wire. When the wire fills up with solder, move a clean part of the wire over the hole and repeat until the hole is clear of solder.

12/7/2016 XKITZ XAMP-M4 3
Circuit Board Assembly
You're ready to begin assembling your XAMP-M4 circuit board. Assemble the board in the order listed in Table 1. The components for the standard kit (in bags marked ‘Bag A’ and ‘Bag B’) support the default configuration: UNBALANCED signal mode. If you purchased the BALANCED signal mode upgrade, you will have an additional bag labeled ‘Balanced Mode Upgrade’, which contains the components required to configure the XAMP-M4 to support balanced input. Table 2 below has the parts lists and specific instructions for the Balanced mode option. Use the install check boxes on the right side to track your progress. The 'Install Notes' column will alert you to any special instructions (listed below) for each of the components. We recommend reading and understanding all the design notes before you start your assembly. The PCB has large, heavy metal planes, which makes de-soldering components extremely difficult. Soldering a component in the wrong location may be a difficult mistake to recover from.
Table 1. Circuit Board Parts List – Parts Used for All Configuration Options
Pack √
Device Value Marking Qty Reference
Designators Bag Install
Notes Install
√ CIRCUIT BOARD (PCB) REV 1.1 XAMP-M4 1
RESISTOR 1K,1% BRN-BLK-BLK-BRN-BRN 16
R1,R14,R15, R16,R19,R25, R27,R29,R30,R31,R39,R44,R45,R46,R50,R62
A
RESISTOR 10K,1% BRN-BLK-BLK-RED-BRN 10
R4,R7,R10, R12,R34,R37,R41,R43,R49,R51
A
1
RESISTOR 20K,1% RED-BLK-BLK-RED-BRN 6 R2,R11,R17, R32,R42,R47
A 1
RESISTOR 10K,1% BRN-BLK-BLK-RED-BRN 3 R21,R22,R23 A 2 RESISTOR 20K,1% RED-BLK-BLK-RED-BRN 2 R20,R24 A 2
RESISTOR 4.7,1% YEL-VIO-BLK-SLV-BRN 4 R3,R18,R33, R48
A
RESISTOR 10 BRN-BLK-BLK 1 R26 A RESISTOR 15K,1% BRN-GRN-BLK-RED-BRN 1 R28 A RESISTOR 82.5K,1% GRY-RED-GRN-ORA-BRN 2 R6,R36 A RESISTOR 100K,1% BRN-BLK-BLK-ORA-BRN 2 R9,R40 A
RESISTOR 200K,1% RED-BLK-BLK-ORA-BRN 4 R5,R8,R35, R38
A
DIODE 1N5240 1N5240 1 D1 A 3 CAPACITOR 100pF 101 1 C59 A 4
CAPACITOR 10pF 100 4 C4,C10,C11, C14
A 4
CAPACITOR .1uF 104 15
C2,C7,C9,C26,C27,C28,C29,C32,C34,C38,C41,C43,C45,C47,C48
A
4
CAPACITOR .47uF 474 4 C30,C31,C44,C46
A 4
CAPACITOR 10uF 106 6 C12,C13,C18,C21,C35,C36
A 4
CAPACITOR .015uF, 5% 153 (Blue colored ones) 10
C49,C50,C51,C52,C53,C54,C55,C56,C57,C58
A
4
CAPACITOR
BSC Configuration Cap: One of: (See Table 3) .022uF 223 .033uF 333 .047uF 473
1 C42
A
5
SOCKET – 14 PIN 3 U1,U2,U3 A 6 OP AMP IC TL074 TL074 (or OPA4227) 3 U1,U2,U3 A 7 SOCKET – 20 PIN 1 XO MODULE A 8
COMPONENT CARRIER – 20 PIN
1 XO MODULE 8
SPADE TERMINAL 6 SP1,SP3,SP5, SP6,SP7,SP8
A

12/7/2016 XKITZ XAMP-M4 4
TRANSISTOR 2N3904 2N3904 3 Q1,Q2,Q3 A 9 TRIMPOT 10K R10K 3 VR1, VR2,VR3 A 10 ELECTROLYTIC CAPACITOR 10uF 10uF 2 C5,C37 A 11
ELECTROLYTIC CAPACITOR 22uF 22uF 5 C1,C6,C8,C33,C40
A 11
ELECTROLYTIC CAPACITOR 100uF 100uF 2 C25,C39 A 11 VOLTAGE REGULATOR LM317TG LM317TG 1 U4 9 ELECTROLYTIC CAPACITOR 4700uF 4700uF 1 C24 B 11 RCA JACK 1 J2 B 12 AMPLIFIER CHIP LM4766 1 U5 B 13 AMPLIFIER CHIP LM3886 2 U6,U7 B 13 HEAT SINK 3 B 13 4-40 SCREW 3 B 13 4-40 LOCK NUT 3 B 13 NO COMPONENTS GO HERE J3 14
Table 2. Balanced Signal Input Upgrade Parts List
Pack √
Device Value Marking Qty Reference
Designators Bag Install
Notes Install
√ RESISTOR 10K, 0.1% BRN-BLK-BLK-RED-VIO 3 R21,R22,R23 2
RESISTOR 20K, 0.1% RED-BLK-BLK-RED-VIO 2 R20,R24 2
3.5MM TRS JACK 1 J1 12
Circuit Board Component Installation Notes: 1. You will have extra 10K and 20K resistors after this step. These extras will be used in the next step.
2. Install the 1% tolerance 10K and 20K resistors included in the standard kit ONLY if you’re running in UN-BALANCED input signal mode. If you purchased the optional BALANCED mode upgrade, then discard these 1% 10K and 20K resistors, and install the 0.1% tolerance 10K and 20K resistors included in your BALANCED Mode Upgrade packet instead.
3. Diodes are polarized devices; which means they won’t work if installed the wrong way around. A solid bar on one end of the diode marks the cathode. The cathode goes in the square pad hole on the PCB.
4. Be sure to install these caps as close to the PCB as possible, especially C26, C27, C43, and C44, as they must fit underneath the U3 and U6 LM4766 amplifier chips.
5. To configure the Baffle Step Compensation circuit, install the appropriate cap value in C42. There are 3 possible cap values to install for C42, depending on your baffle size. See Table 3 below.
6. Solder the 14 pin sockets into the PCB to hold the op amps. Align the notches on one end of the sockets to the notches shown on the PCB silkscreen.
7. Install the TL074 op amp chips (or the OPA4227 chips if you’ve purchased this upgrade) into the sockets. The op amp chips are polarized devices, installing them backward will permanently damage the devices. Align the notch on one end of the op amp chips to the notches shown on the PCB silkscreen. Be careful not to bend the leads on the op-amp chips when inserting into the sockets.
8. Install the 20 pin socket in the location on the board marked ‘XO MODULE’ (the row of resistors from R57 at the top through R56 at the bottom). Install with the pin 1 notch toward ‘R57’ at the top of the MODULE. Carefully insert the 20-pin component carrier into the 20-pin socket marked ‘XO MODULE’ with the chamfered corner matching that of the PCB pattern. Solder the 10 resistors included in the XO component pack to the component carrier to configure your crossover frequency. Use the parts placement diagram below and the instruction slip in your XO component pack to assemble the Module. The 10 resistors are simply inserted across the component carrier and slipped into the two horizontally adjacent, fork shaped pins. When you’ve double checked they’re all in the correct locations, solder them in place. Cut the excess leads.
9. Install the transistors and voltage regulator with their shapes matching the shapes on the PCB silkscreen.
10. Install the multi-turn trim-pots in the orientation shown on the PCB pattern. 11. The electrolytic capacitors are polarized devices, be sure to install them the right way around. The
positive lead is longer than the negative lead. The positive lead goes in the square pad hole on the PCB. Note that the polarity is also marked on the outer casing of the caps.
12. Install the RCA jack in locations J2 ONLY if running in the stock UN-BALANCED mode. If you purchased the optional BALANCED mode upgrade, then discard the RCA jack and install the 3.5mm

12/7/2016 XKITZ XAMP-M4 5
jack included in your upgrade packet in location J1 instead. Note that the PCB hole patterns for the RCA jack and the 3.5mm jack overlap on the PCB. This is not a problem, since the RCA and 3.5mm are used mutually exclusively.
13. Install amplifier chips. Attach the LM4766 and the LM3886’s to the heat sinks loosely with the screws and nuts. Insert each assembly and solder the chip pins and the heat sink tabs. Tighten the screw to secure the chip to the heat sink.
14. Leave these locations empty. They are not required for this kit.
Figure 1. PCB Parts Placement and Dimensions
0.12"
3.6"
0.1
2"
3.7
5"
Board Height: 2.0"

12/7/2016 XKITZ XAMP-M4 6
Input Signal Configuration – Balanced or Unbalanced (Optional) There are two basic systems used to connect the audio signal on consumer and pro audio equipment; unbalanced lines and balanced lines. Unbalanced lines use one wire for signal and the other for ground. Balanced lines, on the other hand, have two signal wires and a shield ground wire. Unbalanced lines are most common in consumer grade audio, and are generally much more susceptible to audio noise like 50/60Hz hum. Unbalanced lines will also pick up any electro-magnetic noise in the nearby environment (such as computers, cell phones, microwaves, etc.) and adds it to your audio signal, making it audible in your speakers. Unbalanced lines can also lead to ground loops, which are the major source of 50/60Hz hum in your sound system. Ground loops arise whenever there is more than one path from any piece of audio equipment to earth ground. Your equipment will always be grounded through your AC line. Adding another path to ground through your unbalanced audio cable adds a second path to ground, and this can cause audible 50/60Hz hum. Balanced lines are more common in high end consumer and professional audio systems and are much less susceptible to noise. Balanced lines allow you to run very long audio cables without allowing electro-magnetic noise to couple into your signal. They’re also not susceptible to 50/60Hz hum; there is no connection to ground in the audio signal cable, so they can’t create ground loops in your sound system.
For unbalanced signal input, you’ll install the RCA jack in location J2, and leave the J1 location empty.
For balanced signal input, you’ll install the 3.5mm TRS jack in location J1, and leave the J2 location empty.
Figure 2. Balanced Mode signal Input TRS Jack Wiring
Heat Sinking The XAMP-M4 includes heat sinks to remove heat from the amplifier chips. These heat sinks are sufficient for lower power applications. For applications that are expected to run at high power for long periods of time, you will likely want to attach an additional heat sink to augment the existing one.
The stock heat sink is conveniently mounted on one edge of the board, allowing easy attachment of an additional heat sink, or to the interior wall of a metal chassis.

12/7/2016 XKITZ XAMP-M4 7
Customizing Your Active Crossover Frequency
The crossover (XO) frequency is determined by the value of the ten resistors mounted to a 20-pin socketed component carrier called the ‘XO Module’. All 10 resistors are set to the same value. Xkitz offers a wide range of standard XO Module frequencies at this location: https://www.xkitz.com/collections/active-crossovers-and-bi-amplifiers-1/products/xo-module-for-use-with-xover-2-and-xamps Or you can select your own custom XO frequency resistor values with our filter calculator tool at: http://www.xkitzconnect.com/files/Linkwitz-Riley-2Way-Calculator.htm Just enter your desired crossover frequency. Then hit the ‘Calc’ button. It will give you the suggested resistor value for your crossover, and it will show a schematic diagram of the crossover. You may have to round the suggested values to standard available resistor values. High precision (1% or better) resistors are recommended to minimize distortion.
Selecting Your Ideal Crossover Frequency
Consult the specifications of your loudspeakers to select your ideal XO frequency. Every loudspeaker has its own ideal operating frequency range. Woofers, of course, work well in the low frequency range, but as frequency increases their performance deteriorates. Same for tweeters; they operate well at upper frequency ranges and deteriorate as the frequency comes down. Your crossover frequency should be somewhere near the mid-point between points where both the woofer and the tweeter are still solidly within their ideal operating frequency range.
Baffle Step Compensation
The Baffle Step Compensation circuit, or BSC, if you choose to use it, allows you to apply a low pass filter function to the audio signal to compensate for a phenomenon where sounds above a certain frequency (determined by the size of the baffle, or the front of your speaker box) are actually reflected by the front of the speaker enclosure. Sounds that fall below that frequency do not get reflected, but instead wrap around the back of the speaker enclosure. This has the effect of reducing the magnitude of the lower frequencies. Your ear hears the primary waves plus the reflected waves on the highs, but only the primary waves of the lows. The BSC circuit, by applying a low pass filter, will roll off some of the highs to restore the overall sound to a more natural, linear state. Check the web for more detailed description of BSC. The VR3 precision 20-turn trim-pot allows the BSC magnitude to be adjusted. Turning the pot 20 full revolutions counter-clockwise reduces the BSC magnitude to the point of being entirely disabled. Turning it clockwise increases the BSC magnitude to a maximum of 6dB. In other words, it increases the amount of attenuation of the higher frequencies to 6dB below the lower frequencies. This compensates for the theoretical 6dB attenuation of the low frequencies due to the baffle step.
Table 3. Baffle Step Compensation – Recommended C42 Value
Baffle Width (in Inches) Baffle Step Freq. C42 Value
Less than 10" 507Hz 0.022uF
10" - 16" 351Hz 0.033uF
Greater than 16" 240Hz 0.047uF

12/7/2016 XKITZ XAMP-M4 8
Important Note! Differential Speaker Outputs!!! The speaker outputs of the XAMP-M4 are differential. In other words both the (+) and (-) speaker outputs are actively driven by the amplifier chip, and neither is connected to ground. This means that if you measure the voltage of the (+) and (-) speakers outputs, you’ll see that each will be sitting at about ½ of your power supply voltage. This is due to the fact that there is just a single positive power supply, not (+) and (–) supply like most power amplifiers. The XAMP-M4 uses something called a ‘phantom ground’ that is placed half way between the (+) supply voltage and actual ground. But the speaker drivers don’t care about this DC offset, they only care about the differential voltage between the (+) and (-) terminals.
When scoping the speaker outputs, be sure to ground the scope to the power supply ground (NOT the (-) speaker output!), and monitor the speaker (+) and (-) outputs with separate scope channels. You’ll see that the (+) and (-) speaker outputs are 180 degrees out of phase. You’ll also want to put your scope in AC mode, since the baseline quiescent voltage levels of the speaker outputs will be sitting at ½ of your supply voltage.
Initial Power-up and Calibration
Before applying power for the first time, it’s a good idea to make sure the bass, treble and BSC are fully disabled. The trim-pots are high precision, 20 turn pots, so in order to ensure the bass, treble and BSC are fully OFF you need to turn all three trim-pots 20 full revolutions counter-clockwise.
Leave your speaker drivers unconnected for the initial power up. They may be damaged if there is some failure on the board that causes a DC potential to exist on the speaker output terminals. Power up the amplifier and use a voltmeter in DC mode to verify that you see 0V across the woofer (+) and (-) terminals, and same for the tweeter. As already mentioned, it is normal to see a DC potential on these with respect to ground.
There are a number of different methods to calibrate a 2-way active crossover. Below is the method we generally prefer. We like to first set the bass level using a voltmeter or an oscilloscope, then gradually raise the level of the high channel and set the ideal level exclusively by ear or with a spectrum analyzer.
In a stereo system, you’ll want to try and calibrate both L and R at the same time to maintain a close balance of the L and R volume levels.
For steps 1-4, you should disconnect your speakers from the amplifiers because it’ll be very loud.
1. Use a signal generator of some kind to inject a sine wave into the XAMP. Free signal generator apps are widely available for any smart phone or on the PC.
2. Set the level of the signal generator to 0.5V RMS. On a voltmeter set to AC, it will read 0.5V. On an oscilloscope you’ll see a signal with a swing of 1.41V peak-to-peak.
3. Set the frequency of the signal generator to around 50Hz.
4. Set your voltmeter to AC and connect it to the Woofer speaker outputs. Raise the Bass level pot until the output voltage is equal the ‘Volts RMS’ listed in Table 4 below for your power supply voltage and woofer impedance. The table also shows the max woofer channel power you can expect for each setting.
5. Now that you have your bass level set, it’s time to set the crossover Treble levels. Connect your speakers to the speaker output terminals and connect your normal audio signal source to the input and set the volumes to a comfortable listening level. Either use a spectrum analyzer (free smart phone or PC apps are available) or just use your ears to monitor the audio from your speakers. Since the Treble levels are set to zero, the sound will start out dull and lacking in any high frequencies. Slowly raise the Treble level control pot until your treble levels are flat on the spectrum analyzer, or until they sound natural by ear. You may want to adjust the L and R in isolation so that you can make sure both are dialed in perfectly, without the other channel interfering.
6. Now slowly raise the BSC pot(s) until your bass response sounds natural, or the lows below the baffle step frequency look flat on the spectrum analyzer (see table 3).

12/7/2016 XKITZ XAMP-M4 9
Table 4. Max Woofer Output Voltage vs. Power Supply Voltage and Driver Impedance
4 Ohm Woofer 8 Ohm Woofer Power Supply Volts DC Volts RMS RMS Watts* Volts RMS RMS Watts 24V 12.8V 40W 13.7V 23W 26V 13.6V 46W 14.8V 27W 28V 14.9V 55W 16.0V 32W 30V 16.3V 66W 17.8V 39W 32V 17.4V 75W 19.0V 45W 34V 18.2V 82W 20.2V 51W 36V 19.2V 91W 21.4V 57W 38V 20.2V 101W 22.8V 65W >40V 20.7V 106W 23.0V 66W
Power Supply The XAMP-M4 requires only a single positive DC voltage from 24V up to about 50V. The amplifier chips will only operate properly in this voltage range. The higher the voltage, the more audio power it will put out. Higher supply voltage will also put out cleaner audio, even if you’re not running it loud, but it will consume more power. On the XAMP-M4 there is no real advantage to using a supply voltage greater than 40V, as this won’t lead to any higher power output, and will only cause more unnecessary heat for you heat sink to dissipate. Batteries are a good choice for powering the XAMP-M4, they will provide very clean DC voltage. A good selection would be two small 12V lead acid batteries in series. This has the advantage of being rechargeable, and they’re reasonably priced. If you plan to run the amplifier from AC mains voltage, either 110 or 220VAC, consider our Audio Grade 200W DC power supply: the XAPS-200W. It takes in AC from a power transformer and creates very clean, well regulated DC voltage for your amplifier.
Troubleshooting If you’re having trouble with your device, check Table 5 for possible cause and solution.
Table 5. Troubleshooting Guide
Problem Possible Cause Solution No activity - circuit doesn't seem to do anything
Power supply not working, no input signal
• Verify DC voltage input is applied and connected OK • Check line level signal wiring
Power supply
voltage out of the range of 24V-50V
• The amplifier chips will not operate outside of this voltage range
Sounds bad, muffled Woofer/Tweeter swapped
If the woofer and tweeter driver wires get swapped, it will sound very bad, check your wiring.
60Hz audible hum Grounding problems, noise on the DC supply
• Make sure all you’re audio source and amplifier and any other components are solidly grounded to earth ground
• Try driving the amp with a 9V battery, if the hum goes away then there’s noise on your DC power supply.
• Change line-in configuration: balanced or unbalanced

12/7/2016 XKITZ XAMP-M4 10
Figure 3. Woofer, 15dB Gain, 7.8W into 8 Ohms: THD=0.016% THD+N=0.064%
Figure 4. Woofer, 15dB Gain, 7.8W into 8 Ohms: IMD: 0.094% (60Hz/700Hz, 4:1)
Figure 5. Woofer, 15dB Gain, 15.6W into 4 Ohms: THD=0.038% THD+N=0.069%
Figure 6. Woofer, 15dB Gain, 15.6W into 4 Ohms: IMD: 0.18% (60Hz/700Hz, 4:1)
12/7/2016 XKITZ XAMP-M4 11
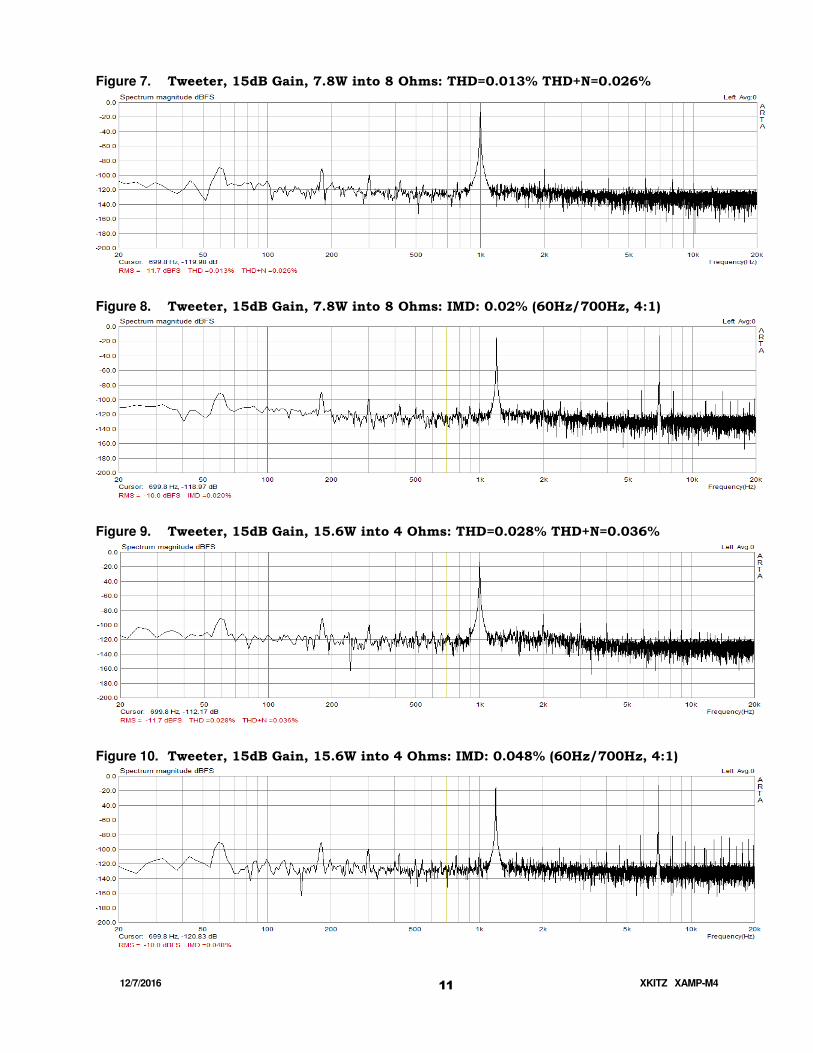
Figure 7. Tweeter, 15dB Gain, 7.8W into 8 Ohms: THD=0.013% THD+N=0.026%
Figure 8. Tweeter, 15dB Gain, 7.8W into 8 Ohms: IMD: 0.02% (60Hz/700Hz, 4:1)
Figure 9. Tweeter, 15dB Gain, 15.6W into 4 Ohms: THD=0.028% THD+N=0.036%
Figure 10. Tweeter, 15dB Gain, 15.6W into 4 Ohms: IMD: 0.048% (60Hz/700Hz, 4:1)

12/7/2016 XKITZ XAMP-M4 12
Figure 11. XAMP-M4 Schematic