xcalibur foundation - thermo fisher scientific · access, excel, microsoft, ... chapter 1...
TRANSCRIPT

Xcalibur
FoundationAdministrator GuideSoftware Version 3.0
XCALI-97520 Revision A May 2013

© 2013 Thermo Fisher Scientific Inc. All rights reserved.
LCquan, Watson LIMS, and Web Access are trademarks, and Thermo Scientific, LCQ, and Xcalibur are registered trademarks of Thermo Fisher Scientific Inc. in the United States.
The following are registered trademarks in the United States and other countries: Access, Excel, Microsoft, and Windows are registered trademarks of Microsoft Corporation. Oracle is a registered trademark of Oracle Corporation and/or its affiliates.
All other trademarks are the property of Thermo Fisher Scientific Inc. and its subsidiaries.
Thermo Fisher Scientific Inc. provides this document to its customers with a product purchase to use in the product operation. This document is copyright protected and any reproduction of the whole or any part of this document is strictly prohibited, except with the written authorization of Thermo Fisher Scientific Inc.
The contents of this document are subject to change without notice. All technical information in this document is for reference purposes only. System configurations and specifications in this document supersede all previous information received by the purchaser.
Thermo Fisher Scientific Inc. makes no representations that this document is complete, accurate or error-free and assumes no responsibility and will not be liable for any errors, omissions, damage or loss that might result from any use of this document, even if the information in the document is followed properly.
This document is not part of any sales contract between Thermo Fisher Scientific Inc. and a purchaser. This document shall in no way govern or modify any Terms and Conditions of Sale, which Terms and Conditions of Sale shall govern all conflicting information between the two documents.
Release history: Revision A, May 2013
Software version: (Thermo) Foundation 3.0 and later, Xcalibur 3.0 and later, LCquan 2.7 SP1 and later, LC Devices 2.8 and later, Q Exactive 2.0 and later, Exactive 1.1 SP4 and later, TSQ 2.3 SP3 and later; TSQ Quantum 2.3 SP3 and later; (Microsoft) Windows 7 Professional SP1 32-bit and Windows 7 Professional 64-bit systems, and Office 2010
For Research Use Only. Not for use in diagnostic procedures.

Thermo Scientific Foundation Administrator Guide iii
C
Preface . . . . . . . . . . . . . . . . . . . . . . . . . . . . . . . . . . . . . . . . . . . . . . . . . . . . . . . . . . . . . viiRelated Documentation . . . . . . . . . . . . . . . . . . . . . . . . . . . . . . . . . . . . . . . . . .viiiSafety and Special Notices . . . . . . . . . . . . . . . . . . . . . . . . . . . . . . . . . . . . . . . .viiiContacting Us . . . . . . . . . . . . . . . . . . . . . . . . . . . . . . . . . . . . . . . . . . . . . . . . . .ix
Chapter 1 Introduction . . . . . . . . . . . . . . . . . . . . . . . . . . . . . . . . . . . . . . . . . . . . . . . . . . . . . . . . . . .1System Security . . . . . . . . . . . . . . . . . . . . . . . . . . . . . . . . . . . . . . . . . . . . . . . . . . 1Configuration Tasks of the Laboratory Manager and IT Professional . . . . . . . . . 2Prerequisites to Configuring the System . . . . . . . . . . . . . . . . . . . . . . . . . . . . . . . 5
How Users Perform Sample Acquisition and Store Data . . . . . . . . . . . . . . . . . 6Secure User Groups . . . . . . . . . . . . . . . . . . . . . . . . . . . . . . . . . . . . . . . . . . . . . 7
Configuring Software Applications . . . . . . . . . . . . . . . . . . . . . . . . . . . . . . . . . . . 8Defining User Requirements . . . . . . . . . . . . . . . . . . . . . . . . . . . . . . . . . . . . . . 8Protecting Records . . . . . . . . . . . . . . . . . . . . . . . . . . . . . . . . . . . . . . . . . . . . . 9Setting Up User Access Controls . . . . . . . . . . . . . . . . . . . . . . . . . . . . . . . . . . . 9
Chapter 2 Using the Database Configuration Manager . . . . . . . . . . . . . . . . . . . . . . . . . . . . . .11Using Microsoft and Oracle Databases . . . . . . . . . . . . . . . . . . . . . . . . . . . . . . . 11Configuring Your Auditing Database . . . . . . . . . . . . . . . . . . . . . . . . . . . . . . . . 12Auditing Database Configuration Manager Parameters . . . . . . . . . . . . . . . . . . . 15
Chapter 3 Establishing Secure File Operations . . . . . . . . . . . . . . . . . . . . . . . . . . . . . . . . . . . . .19Confirming the Properties of Thermo Foundation DatabaseService . . . . . . . . . 20Configuring the Properties of Thermo Foundation SecurityService . . . . . . . . . . 22Configuring Security Settings for Folders and Files . . . . . . . . . . . . . . . . . . . . . . 25
Configuring Security Settings for the Root Folder . . . . . . . . . . . . . . . . . . . . . 26Working with Accounts Set Up by the Foundation Application . . . . . . . . . . 32Configuring Settings for the Security Folder . . . . . . . . . . . . . . . . . . . . . . . . . 40Configuring Security Settings for the Database Registry Key . . . . . . . . . . . . . 42
Specifying the Way Users Log On and Off . . . . . . . . . . . . . . . . . . . . . . . . . . . . 45Turning Off Fast User Switching for Local Workstations . . . . . . . . . . . . . . . 45Setting the Automatic Logoff Feature . . . . . . . . . . . . . . . . . . . . . . . . . . . . . . 48
Removing and Archiving Files . . . . . . . . . . . . . . . . . . . . . . . . . . . . . . . . . . . . . . 49
Contents

Contents
iv Foundation Administrator Guide Thermo Scientific
Chapter 4 Defining Secure User Groups and Permissions . . . . . . . . . . . . . . . . . . . . . . . . . . .51Planning User Groups . . . . . . . . . . . . . . . . . . . . . . . . . . . . . . . . . . . . . . . . . . . . 52Using the Authorization Manager . . . . . . . . . . . . . . . . . . . . . . . . . . . . . . . . . . . 53Setting Up Secure User Groups . . . . . . . . . . . . . . . . . . . . . . . . . . . . . . . . . . . . . 55
Choose Secure Group Dialog Box . . . . . . . . . . . . . . . . . . . . . . . . . . . . . . . . . 55Defining User Groups . . . . . . . . . . . . . . . . . . . . . . . . . . . . . . . . . . . . . . . . . . 56Create Private Group Dialog Box . . . . . . . . . . . . . . . . . . . . . . . . . . . . . . . . . 58Editing User Groups . . . . . . . . . . . . . . . . . . . . . . . . . . . . . . . . . . . . . . . . . . . 58Edit Users In Group Dialog Box . . . . . . . . . . . . . . . . . . . . . . . . . . . . . . . . . . 59
Setting Permissions . . . . . . . . . . . . . . . . . . . . . . . . . . . . . . . . . . . . . . . . . . . . . . 60Changing the Permission Level of a Feature . . . . . . . . . . . . . . . . . . . . . . . . . 61Setting All Permissions . . . . . . . . . . . . . . . . . . . . . . . . . . . . . . . . . . . . . . . . . 65Inheriting Permissions . . . . . . . . . . . . . . . . . . . . . . . . . . . . . . . . . . . . . . . . . . 66Exporting and Importing Permissions . . . . . . . . . . . . . . . . . . . . . . . . . . . . . . 67Defining the List of Secure Folders . . . . . . . . . . . . . . . . . . . . . . . . . . . . . . . . 67Requiring User Comments . . . . . . . . . . . . . . . . . . . . . . . . . . . . . . . . . . . . . . 69Comment List Dialog Box. . . . . . . . . . . . . . . . . . . . . . . . . . . . . . . . . . . . . . . 70New Comment Dialog Box . . . . . . . . . . . . . . . . . . . . . . . . . . . . . . . . . . . . . . 70
Setting Up Secure Reports. . . . . . . . . . . . . . . . . . . . . . . . . . . . . . . . . . . . . . . . . 71About the Secure Reports . . . . . . . . . . . . . . . . . . . . . . . . . . . . . . . . . . . . . . . 71Setting Up a Secure Template Folder . . . . . . . . . . . . . . . . . . . . . . . . . . . . . . 71Configuring Secure Reports. . . . . . . . . . . . . . . . . . . . . . . . . . . . . . . . . . . . . . 72Locking the Workbook After Creating Reports (LCquan only) . . . . . . . . . . . 73
Viewing the Authorization Manager History Log . . . . . . . . . . . . . . . . . . . . . . . 74Working with Security Settings . . . . . . . . . . . . . . . . . . . . . . . . . . . . . . . . . . . . . 75
Printing the Security Settings . . . . . . . . . . . . . . . . . . . . . . . . . . . . . . . . . . . . 75Saving the Security Settings . . . . . . . . . . . . . . . . . . . . . . . . . . . . . . . . . . . . . . 76
Permission Level Settings for an Application . . . . . . . . . . . . . . . . . . . . . . . . . . . 76Authorization Manager Parameters . . . . . . . . . . . . . . . . . . . . . . . . . . . . . . . . . . 81
Chapter 5 Using the CRC Validator. . . . . . . . . . . . . . . . . . . . . . . . . . . . . . . . . . . . . . . . . . . . . . . .95Checking Files with the Foundation CRC Validator . . . . . . . . . . . . . . . . . . . . . 96
Selecting Files Using Database Filters . . . . . . . . . . . . . . . . . . . . . . . . . . . . . . 97Selecting Files Using a Pattern. . . . . . . . . . . . . . . . . . . . . . . . . . . . . . . . . . . 100
CRC Validator Parameters . . . . . . . . . . . . . . . . . . . . . . . . . . . . . . . . . . . . . . . 101

Contents
Thermo Scientific Foundation Administrator Guide v
Chapter 6 Auditing. . . . . . . . . . . . . . . . . . . . . . . . . . . . . . . . . . . . . . . . . . . . . . . . . . . . . . . . . . . . .103Viewing Audit Viewer Databases . . . . . . . . . . . . . . . . . . . . . . . . . . . . . . . . . . . 103
Accessing the Global Auditing Database . . . . . . . . . . . . . . . . . . . . . . . . . . . 104Accessing the Local Database. . . . . . . . . . . . . . . . . . . . . . . . . . . . . . . . . . . . 105
Viewing Audit Viewer Pages . . . . . . . . . . . . . . . . . . . . . . . . . . . . . . . . . . . . . . 106Filtering Audit Viewer Entries . . . . . . . . . . . . . . . . . . . . . . . . . . . . . . . . . . . . . 107Sorting Audit Viewer Entries. . . . . . . . . . . . . . . . . . . . . . . . . . . . . . . . . . . . . . 109Printing Audit Viewer Entries . . . . . . . . . . . . . . . . . . . . . . . . . . . . . . . . . . . . . 110
Printing the Audit Trail for the Global Auditing Database . . . . . . . . . . . . . 110Printing the Audit Trail for an Application Database . . . . . . . . . . . . . . . . . 110
Audit Viewer Parameters . . . . . . . . . . . . . . . . . . . . . . . . . . . . . . . . . . . . . . . . . 112All Page of the Audit Viewer . . . . . . . . . . . . . . . . . . . . . . . . . . . . . . . . . . . . 113History Page of the Audit Viewer . . . . . . . . . . . . . . . . . . . . . . . . . . . . . . . . 113Event Page of the Audit Viewer . . . . . . . . . . . . . . . . . . . . . . . . . . . . . . . . . . 115File Tracking Page of the Audit Viewer . . . . . . . . . . . . . . . . . . . . . . . . . . . . 116Instrument Error Page of the Audit Viewer . . . . . . . . . . . . . . . . . . . . . . . . . 117
Chapter 7 Configuring Instruments. . . . . . . . . . . . . . . . . . . . . . . . . . . . . . . . . . . . . . . . . . . . . . .119Adding Instrument Drivers to the Instrument Configuration . . . . . . . . . . . . . 120Setting Up the Configuration Options for Each Configured Device . . . . . . . . 120
Instrument Configuration Window Parameters. . . . . . . . . . . . . . . . . . . . . . 122Out-of-Date Device Drivers Detected . . . . . . . . . . . . . . . . . . . . . . . . . . . . 124
Chapter 8 Viewing and Saving System Version Information. . . . . . . . . . . . . . . . . . . . . . . . .125
Chapter 9 IT Considerations . . . . . . . . . . . . . . . . . . . . . . . . . . . . . . . . . . . . . . . . . . . . . . . . . . . .127Avoid Antivirus Scanning During Data Acquisition . . . . . . . . . . . . . . . . . . . . 127Do Not Delete the Xcalibur System Account . . . . . . . . . . . . . . . . . . . . . . . . . 128Ensure that a Firewall Exception Exists for the Instrument . . . . . . . . . . . . . . . 128Ensure Your Computer Stays Active . . . . . . . . . . . . . . . . . . . . . . . . . . . . . . . . 129
Appendix A LCquan Folder Structure and Security Features . . . . . . . . . . . . . . . . . . . . . . . . . .131LCquan Folder Structure. . . . . . . . . . . . . . . . . . . . . . . . . . . . . . . . . . . . . . . . . 131Security Features Within LCquan . . . . . . . . . . . . . . . . . . . . . . . . . . . . . . . . . . 132
Appendix B Watson Interface. . . . . . . . . . . . . . . . . . . . . . . . . . . . . . . . . . . . . . . . . . . . . . . . . . . . .135Recommended Settings for Excel Reports . . . . . . . . . . . . . . . . . . . . . . . . . . . . 135
Rounding the Decimal Places . . . . . . . . . . . . . . . . . . . . . . . . . . . . . . . . . . . 135Setting the Excel Features . . . . . . . . . . . . . . . . . . . . . . . . . . . . . . . . . . . . . . 136
About the Watson Digital Interface. . . . . . . . . . . . . . . . . . . . . . . . . . . . . . . . . 138
Index . . . . . . . . . . . . . . . . . . . . . . . . . . . . . . . . . . . . . . . . . . . . . . . . . . . . . . . . . . . . . . .139


Thermo Scientific Foundation Administrator Guide vii
P
Preface
This administrator guide describes how to configure instruments and the Xcalibur™ and LCquan™ applications for security and compliance. The intended audience includes both laboratory administrators and local IT professionals who have administrative privileges for the system.
To suggest changes to documentation or to Help
Complete a brief survey by clicking the button below.Thank you in advance for your help.
Related DocumentationYou can also find the information covered in this user guide in the Help system that comes with the Thermo Foundation™ platform.
The Foundation platform includes Help and the Thermo Foundation Administrator Guide as a PDF file.
To view product manuals
For the Xcalibur data system:
IMPORTANT Some of the instructions in this guide assume an understanding of the security settings for Microsoft™ Windows™ operating system. Thermo Fisher Scientific strongly recommends that you enlist your local IT professional to perform these tasks.
Contents
• Related Documentation
• Safety and Special Notices
• Contacting Us

Preface
viii Foundation Administrator Guide Thermo Scientific
Choose Start > All Programs (or Programs) > Thermo Foundation x.x > Manuals.
For the LCquan application:
Choose Start > All Programs (or Programs) > Thermo Xcalibur x.x > Manuals > LCquan.
Safety and Special NoticesMake sure you follow the precautionary statements presented in this guide. The safety and other special notices appear in boxes.
IMPORTANT Highlights information necessary to prevent damage to software, loss of data, or invalid test results; or might contain information that is critical for optimal performance of the system.
Note Highlights information of general interest.
Tip Highlights helpful information that can make a task easier.

Preface
Thermo Scientific Foundation Administrator Guide ix
Contacting UsThere are several ways to contact Thermo Fisher Scientific for the information you need.
To contact Technical Support
Find software updates and utilities to download at mssupport.thermo.com.
To contact Customer Service for ordering information
To get local contact information for sales or service
Go to www.thermoscientific.com/wps/portal/ts/contactus.
To copy manuals from the Internet
Go to mssupport.thermo.com, agree to the Terms and Conditions, and then click Customer Manuals in the left margin of the window.
To suggest changes to documentation or to Help
• Fill out a reader survey online at www.surveymonkey.com/s/PQM6P62.
• Send an e-mail message to the Technical Publications Editor at [email protected].
Phone 800-532-4752
Fax 561-688-8736
E-mail [email protected]
Knowledge base www.thermokb.com
Phone 800-532-4752
Fax 561-688-8731
E-mail [email protected]
Web site www.thermo.com/ms


Thermo Scientific Foundation Administrator Guide 1
1
Introduction
You can use Thermo Scientific™ applications to develop methods, create or import sequences, acquire, process, and review data, and create reports, all within a secure environment. This chapter provides an overview of security and compliance considerations and describes how to use the Foundation platform, and the Xcalibur and LCquan applications to address them.
System SecurityTo prevent unauthorized access to data, most organizations implement strict security procedures for their computer networks. In this context, unauthorized access means:
• Access by an individual (external or internal to the organization) who has not been granted the authority to use, manipulate, or interact with the system
• Access by using the identity of another individual—for example, by using a colleague’s user name and password
The Xcalibur data system and the LCquan application directly implement some of these controls and rely on the security functions in the Microsoft Windows 7 Professional operating system for other controls:
• The Thermo Foundation SecurityService controls secure file operations.
• The laboratory administrator restricts user software access through Thermo Foundation Authorization Manager (an administrative utility), which relies on Windows user groups. The Authorization Manager does not configure user access to the workstation. However, it can define application roles and feature access for the users.
• Windows security functions handle user authentication.
• Windows security functions maintain electronic record security and, in particular, the NTFS permission rights.
Contents
• System Security
• Configuration Tasks of the Laboratory Manager and IT Professional
• Prerequisites to Configuring the System
• Configuring Software Applications
1 IntroductionConfiguration Tasks of the Laboratory Manager and IT Professional
2 Foundation Administrator Guide Thermo Scientific
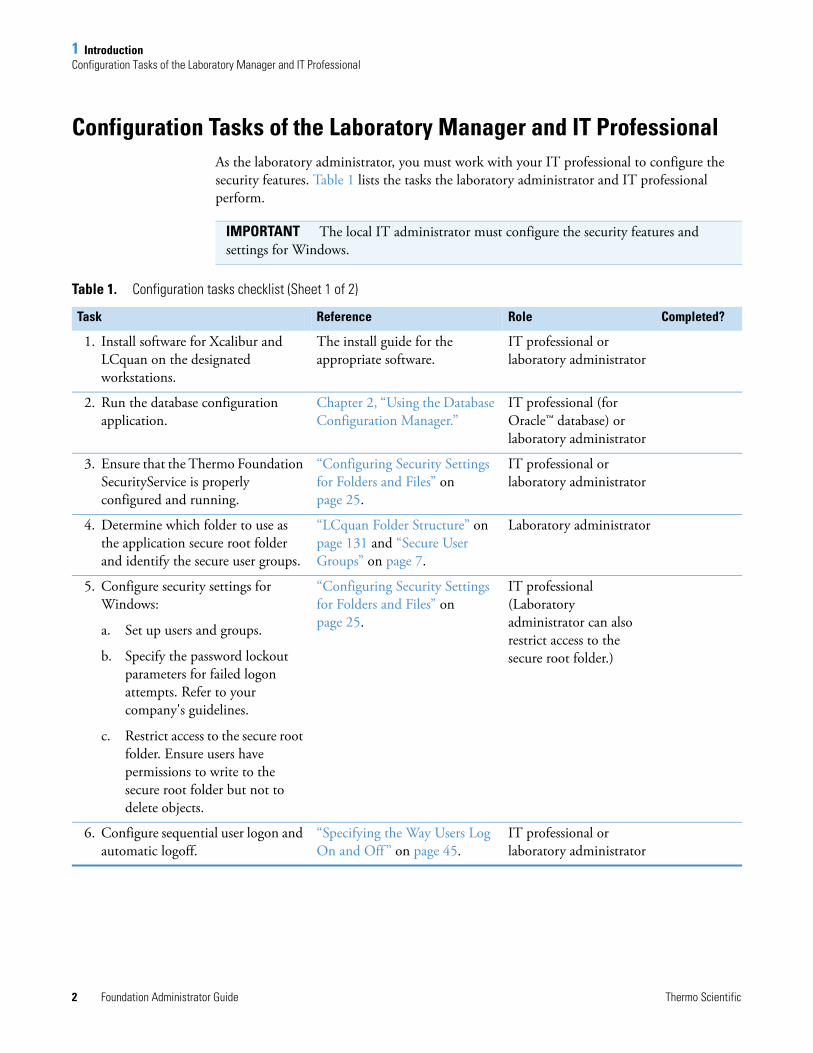
Configuration Tasks of the Laboratory Manager and IT ProfessionalAs the laboratory administrator, you must work with your IT professional to configure the security features. Table 1 lists the tasks the laboratory administrator and IT professional perform.
IMPORTANT The local IT administrator must configure the security features and settings for Windows.
Table 1. Configuration tasks checklist (Sheet 1 of 2)
Task Reference Role Completed?
1. Install software for Xcalibur and LCquan on the designated workstations.
The install guide for the appropriate software.
IT professional or laboratory administrator
2. Run the database configuration application.
Chapter 2, “Using the Database Configuration Manager.”
IT professional (for Oracle™ database) or laboratory administrator
3. Ensure that the Thermo Foundation SecurityService is properly configured and running.
“Configuring Security Settings for Folders and Files” on page 25.
IT professional or laboratory administrator
4. Determine which folder to use as the application secure root folder and identify the secure user groups.
“LCquan Folder Structure” on page 131 and “Secure User Groups” on page 7.
Laboratory administrator
5. Configure security settings for Windows:
a. Set up users and groups.
b. Specify the password lockout parameters for failed logon attempts. Refer to your company's guidelines.
c. Restrict access to the secure root folder. Ensure users have permissions to write to the secure root folder but not to delete objects.
“Configuring Security Settings for Folders and Files” on page 25.
IT professional (Laboratory administrator can also restrict access to the secure root folder.)
6. Configure sequential user logon and automatic logoff.
“Specifying the Way Users Log On and Off” on page 45.
IT professional or laboratory administrator

1 IntroductionConfiguration Tasks of the Laboratory Manager and IT Professional
Thermo Scientific Foundation Administrator Guide 3
7. Configure Authorization Manager settings for applications:
“Using the Authorization Manager” on page 53.
Laboratory administrator
a. Define user groups. “Setting Up Secure User Groups” on page 55.
b. Set permission levels for software features for each user group.
“Setting Permissions” on page 60, and “Setting Folder Permissions for Users and Groups” on page 37
c. If users are permitted to change the secure root folder, define the list of secure folders.
“Defining the List of Secure Folders” on page 67.
d. Specify whether users are required to make comments.
“Viewing the Authorization Manager History Log” on page 74.
e. Save the configuration settings. “Saving the Security Settings” on page 76.
Table 1. Configuration tasks checklist (Sheet 2 of 2)
Task Reference Role Completed?
1 IntroductionConfiguration Tasks of the Laboratory Manager and IT Professional
4 Foundation Administrator Guide Thermo Scientific
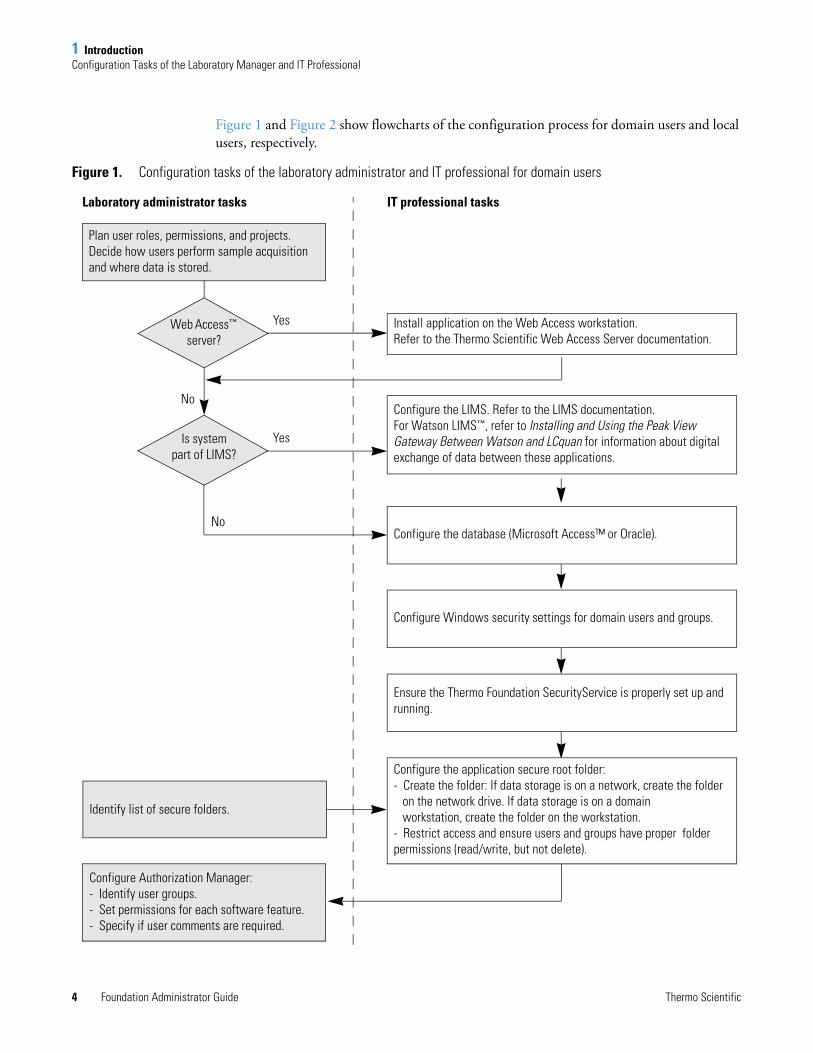
Figure 1 and Figure 2 show flowcharts of the configuration process for domain users and local users, respectively.
Figure 1. Configuration tasks of the laboratory administrator and IT professional for domain users
Web Access™ server?
Plan user roles, permissions, and projects. Decide how users perform sample acquisition and where data is stored.
Configure Authorization Manager: - Identify user groups.- Set permissions for each software feature.- Specify if user comments are required.
Install application on the Web Access workstation. Refer to the Thermo Scientific Web Access Server documentation.
Is system part of LIMS?
Laboratory administrator tasks IT professional tasks
Yes
Yes
No
No
Identify list of secure folders.
Configure the LIMS. Refer to the LIMS documentation. For Watson LIMS™, refer to Installing and Using the Peak View Gateway Between Watson and LCquan for information about digital exchange of data between these applications.
Configure the database (Microsoft Access™ or Oracle).
Configure Windows security settings for domain users and groups.
Ensure the Thermo Foundation SecurityService is properly set up and running.
Configure the application secure root folder:- Create the folder: If data storage is on a network, create the folder
on the network drive. If data storage is on a domain workstation, create the folder on the workstation.
- Restrict access and ensure users and groups have proper folder permissions (read/write, but not delete).
1 IntroductionPrerequisites to Configuring the System
Thermo Scientific Foundation Administrator Guide 5
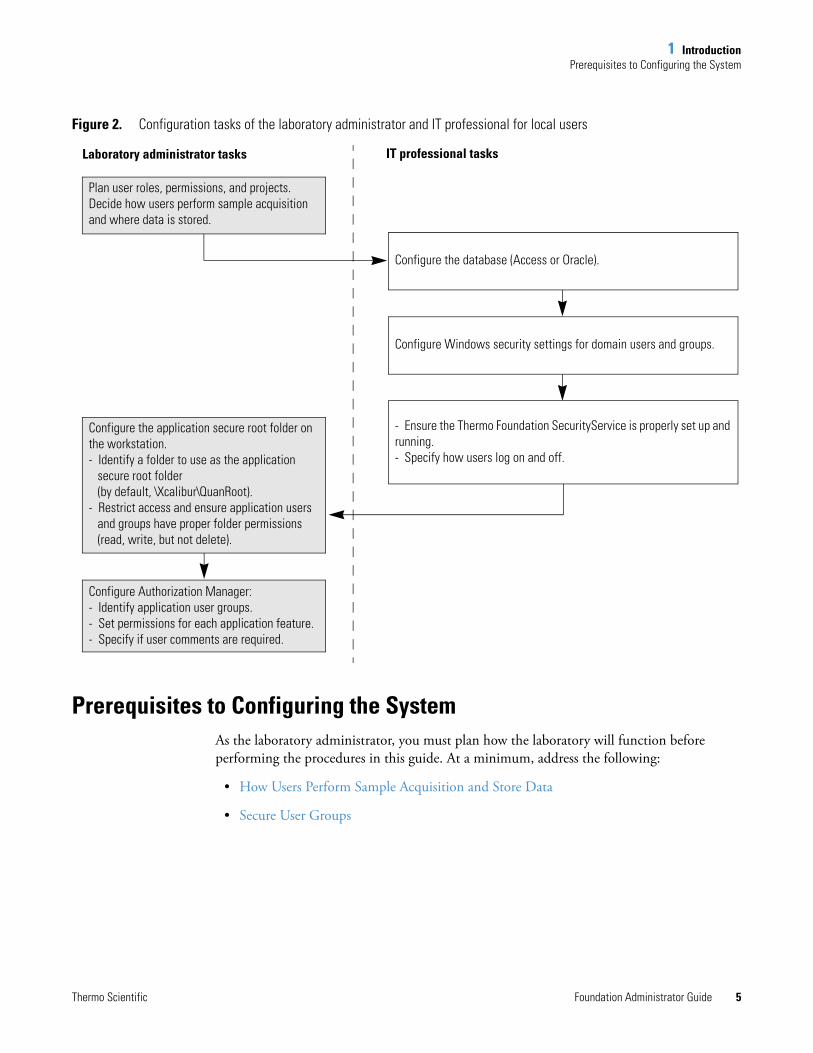
Figure 2. Configuration tasks of the laboratory administrator and IT professional for local users
Prerequisites to Configuring the SystemAs the laboratory administrator, you must plan how the laboratory will function before performing the procedures in this guide. At a minimum, address the following:
• How Users Perform Sample Acquisition and Store Data
• Secure User Groups
Configure the application secure root folder on the workstation.- Identify a folder to use as the application
secure root folder(by default, \Xcalibur\QuanRoot).
- Restrict access and ensure application users and groups have proper folder permissions (read, write, but not delete).
Configure Authorization Manager:- Identify application user groups.- Set permissions for each application feature.- Specify if user comments are required.
Plan user roles, permissions, and projects.Decide how users perform sample acquisition and where data is stored.
Laboratory administrator tasks IT professional tasks
- Ensure the Thermo Foundation SecurityService is properly set up and running.- Specify how users log on and off.
Configure the database (Access or Oracle).
Configure Windows security settings for domain users and groups.
1 IntroductionPrerequisites to Configuring the System
6 Foundation Administrator Guide Thermo Scientific
How Users Perform Sample Acquisition and Store Data
Users can perform sample acquisitions and store the acquired sample data in various places. Refer to your application user guide for supported configurations. These are the most likely mass spectrometer and data storage configurations:
• Local users can store acquired sample data on a standalone workstation.
• Domain users can store acquired sample data on a workstation that is on a network.
• Multiple domain users can store acquired sample data on a network server.
You can integrate application data with a laboratory information management system (LIMS), such as Watson LIMS. If you are using Watson LIMS, refer to Installing and Using the Peak View Gateway Between Watson and LCquan.
Some applications support the Thermo Scientific Web Access Server environment for workstations that are for data review only. Web Access can provide application virtualization to manage configuration and maintenance. You cannot use an instance of the application running on a Web Access server for acquisition. The IT professional is responsible for installing Thermo software on the Web Access server.
Some applications support remote acquisition. During remote acquisition, you can have the application time-stamp raw files created by the Xcalibur application during acquisition and create a time-stamped folder:
• Remotely stored raw files are time-stamped with the submission time.
• Pausing during acquisition does not change the time stamp.
• The time stamp for the raw files folder and the time stamp for the raw files are not necessarily the same.
Or, you can prevent the application from time-stamping the raw files during a remote acquisition by setting the permission from the Expand Tree list if the application permits this activity. Refer to your application user guide for more information.
IMPORTANT An application might be able to overwrite a raw file of the same name if you turn off time-stamping.
1 IntroductionPrerequisites to Configuring the System
Thermo Scientific Foundation Administrator Guide 7
Secure User Groups
Your application requires both the security features of the Windows 7 operating system and the Thermo Foundation Authorization Manager to define the secure user groups and permissions. Typically, the IT professional is responsible for establishing Windows user accounts and user groups (domain groups). The laboratory administrator is responsible for setting up the permission levels in the Authorization Manager and, if necessary, private groups. You can create user groups that are either identified Windows user groups or private user groups that you define. You cannot create a collection of groups that is a combination of these two options.
• Windows user groups
– The IT professional creates and manages domain user accounts and user groups.
– You or the IT professional can create standalone workstation user accounts and user groups.
• Authorization Manager private groups—A group can be either a preexisting Windows user group or a private group that you configure within the Foundation Authorization Manager.
– Networked workstation—A user must be a member of a domain user group before you can view the user name so you can add the user to a private group. If an intended user is not a user on the domain, the IT professional must create a user account for the user.
– Standalone workstation—A user must have a logon account for the workstation before you can add the user to a private group. You or the IT professional must create a user account for each intended user.
As the laboratory administrator, you must define the following before asking your IT professional to configure Windows user groups for domain users or before configuring private groups in the Foundation Authorization Manager:
• Types of user roles, for example, administrator, supervisor, scientist, technician, auditor, or quality assurance
• Individuals assigned to each user role and their projects
• Permissions for a given user role, such as the authority to create methods and acquire data, signature authority, or read-only access to workbooks
For example, a laboratory might have standard operating procedures that prohibit technicians from performing certain operations with the software. But the same laboratory might not have any restrictions on software operations that the scientists can perform. In this case, you must define at least two user groups—one for scientists and one for technicians.
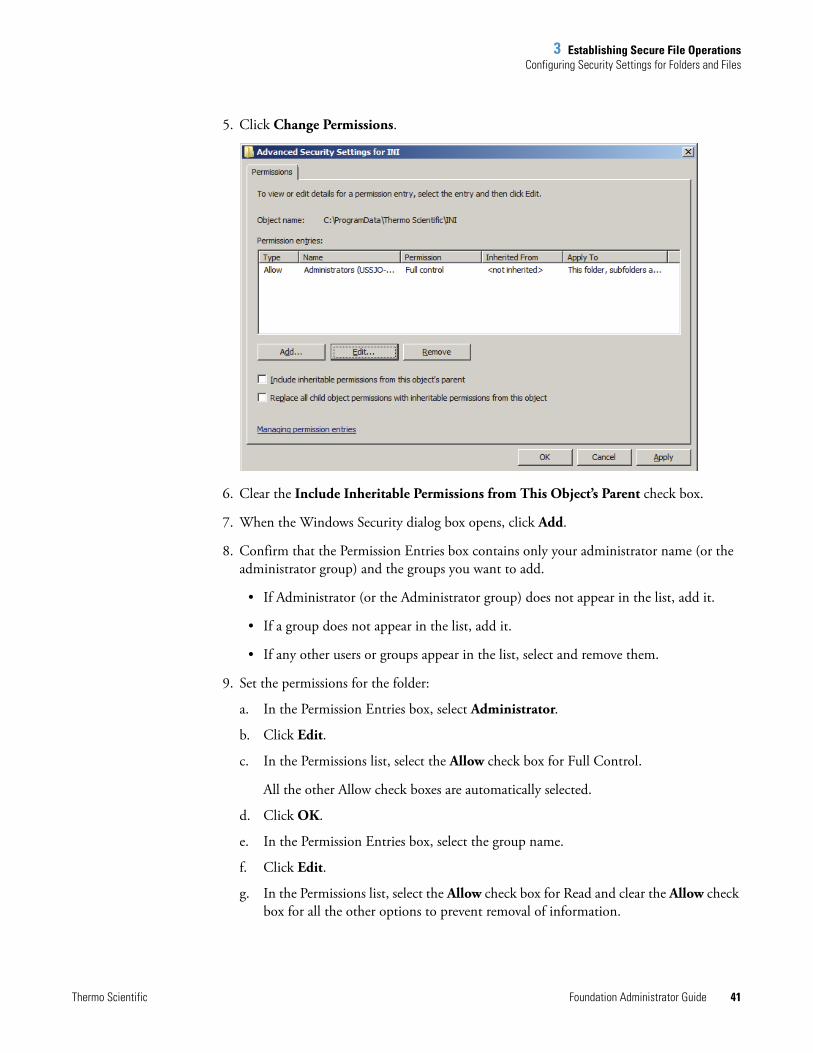
•
IMPORTANT Each Windows user account must be associated with a user ID, a password, and a full description. These items are required for the system to store the auditing information in the designated database.
1 IntroductionConfiguring Software Applications
8 Foundation Administrator Guide Thermo Scientific
Configuring Software ApplicationsThermo Scientific applications are installed as a group, installing the different applications in the correct order to support the interdependencies of the software. The Foundation platform supports the other applications, providing a variety of cross application functionality. The Xcalibur data system is the base application and the LCquan application is a layered application. The LCquan application has better tools and features for operating in a secure environment.
To view and save the version information for your installed software
1. Choose Help > About Application > Version info.
2. Click the application name and version.
3. To save the information, click Save.
The application displays the location of the version file.
To view version information about all installed Thermo Scientific applications, see “Viewing and Saving System Version Information” on page 125.
To fully implement the security features for applications, the laboratory administrator must work with the IT professional to achieve the proper data system configuration. Configuring applications for security and compliance requires three steps:
• Defining User Requirements
• Protecting Records
• Setting Up User Access Controls
Defining User Requirements
To define user requirements, consider all aspects of how the system will be configured and how you want authorized users to use the configured system.
If the system is to be used in an agency-regulated environment, perform a full system validation. Create a formal user requirements document and a system configuration document that address the bullet points below. Create and execute test scripts that address each of the requirements.

1 IntroductionConfiguring Software Applications
Thermo Scientific Foundation Administrator Guide 9
If you do not plan to use the system in a regulated environment, define how the system should be used. This might include the following elements that will help you to conduct the system configuration steps throughout this document:
• Define authorized user groups on the system, categorized by user type, which defines the level of access to the system functionality as well as access to data.
• Create a detailed process workflow showing how each user type uses the system to control instruments and to perform sample acquisition, analysis, and reporting.
• Create a list of all discrete software functionality of the system, organized according to the applications list in the Authorization Manager module.
Protecting Records
To establish secure file operations, as the laboratory administrator, you or an assistant laboratory administrator must restrict access permissions for specific folders and files. Set permissions so that only you or an assistant administrator can delete or alter records. The use of protected folders and files ensures that unauthorized users cannot obscure previous records by using a utility such as Windows Explorer.
Setting Up User Access Controls
To control user access, you must define secure user groups and grant access permissions for each group. You can restrict defined groups of users from performing various functions within the application. This restriction can range from complete prohibition, through several levels of password-required access, to no restrictions. You set user access controls by using Thermo Foundation Authorization Manager.
After you define the security settings for at least one group, the application automatically denies access to user that are not in that group.
IMPORTANT If no secure groups are defined, users have access to all features of the application.


Thermo Scientific Foundation Administrator Guide 11
2
Using the Database Configuration Manager
This chapter describes how to use the Database Configuration Manager to configure your database. The database keeps a record of auditable events and changes made to files that the Xcalibur data system creates and manages. Until you run the Database Configuration Manager, all applications run without auditing.
Using Microsoft and Oracle DatabasesTo store the Foundation Global Audit Trail, you can use either of the following:
• Oracle database on a network workstation or server (remote system)
• Microsoft Access database on a standalone or networked workstation or server
Use the Thermo Foundation Auditing Database Configuration Manager to configure either a Microsoft Access database on your local computer or an Oracle database on a remote computer.
For information about installing and configuring the Oracle Server and Client software, version 11g or later, refer to the Oracle manuals. Consult with your Oracle database administrator and your Thermo Fisher Scientific service representative for advice and instructions about how to install this software for your application.
Contents
• Using Microsoft and Oracle Databases
• Configuring Your Auditing Database
• Auditing Database Configuration Manager Parameters
Note The LCquan application uses a Microsoft Access database to store each LCquan Workbook Audit Trail.
If Watson LIMS is part of the workflow, refer to the Watson documentation for database setup instructions that are specific to Watson LIMS.

2 Using the Database Configuration ManagerConfiguring Your Auditing Database
12 Foundation Administrator Guide Thermo Scientific
To use an Oracle database, make sure that you complete the following tasks:
1. If the site does not have an Oracle server, version 11g or later, install an Oracle database on an accessible remote server. For more information, consult your Oracle database administrator.
2. Install the Oracle client software on your local system. For more information, consult your Oracle database administrator.
3. If you do not know the user name, password, and Oracle Net Service Name of your Oracle database, obtain this information from your Oracle database administrator.
Configuring Your Auditing DatabaseThis topic describes how to use the Auditing Database Configuration Manager to configure your auditing database.
For information about the parameters in the Thermo Foundation Auditing Database Configuration Manager wizard, see “Auditing Database Configuration Manager Parameters” on page 15.
To configure your auditing database
1. From the Windows taskbar, choose Start > Programs (or All Programs) > Thermo Foundation x.x > Database Configuration, where x.x is the version.
IMPORTANT Ensure that no other Xcalibur applications are running at the same time as the Database Configuration Manager. Auditing of Xcalibur applications cannot take place while running the Database Configuration Manager.

2 Using the Database Configuration ManagerConfiguring Your Auditing Database
Thermo Scientific Foundation Administrator Guide 13
The Thermo Foundation Auditing Database Configuration Manager opens.
2. In the Select Database Type area, select the database type:
• If you are using an Access database, select the Microsoft Access option and go to step 4. This option creates a relational database that cannot be accessed or edited in the MS Access application.
• If you are using an Oracle database, select the Oracle on Network Server option and go to step 3.
3. For an Oracle database, specify the Oracle database parameters:
a. In the User Name box, type the database user name.
b. In the Password box, type the database password.
c. In the Oracle Net Service Name list, select the Oracle Net Service Name for your database.
IMPORTANT If you are using Oracle version 11 or later, you might need to contact Technical Support for information about configuring your database. See “Contacting Us” on page ix for contact information.
Note Be sure to use the Oracle user name and password provided by your Oracle database administrator.

2 Using the Database Configuration ManagerConfiguring Your Auditing Database
14 Foundation Administrator Guide Thermo Scientific
4. Click Next.
The Thermo Foundation Database Configuration Manager dialog box opens.
5. Confirm that the settings in the Thermo Foundation Auditing Database Configuration Manager dialog box are correct and click OK.
The next page of the Thermo Foundation Auditing Database Configuration Manager opens.

2 Using the Database Configuration ManagerAuditing Database Configuration Manager Parameters
Thermo Scientific Foundation Administrator Guide 15
6. Select a restart option:
• To automatically restart the computer after you click Finish, select the Restart Computer Now option.
• To manually restart the computer at a later time, select the I Will Restart Later option.
7. Click Finish to save your settings and close the Auditing Database Configuration Manager.
Auditing Database Configuration Manager ParametersUse the Thermo Foundation Auditing Database Configuration Manager to select and configure the auditing database. Follow the instructions in the box at the top of the Auditing Database Configuration Manager wizard. You must restart your computer to make the changes effective.
For more information about setting up your database, see “Configuring Your Auditing Database” on page 12. Not all of the parameters are displayed at every step in the configuration process.
Note The changes made in the Auditing Database Configuration Manager take effect after restarting the computer.
Note If you are using Oracle as the database back end, install at least one relational database on an accessible server and install the Oracle client on the system computer before using the Auditing Database Configuration Manager.
For a brief explanation on how to install an Oracle database, see “Installing an Oracle Database” on page 123.
2 Using the Database Configuration ManagerAuditing Database Configuration Manager Parameters
16 Foundation Administrator Guide Thermo Scientific
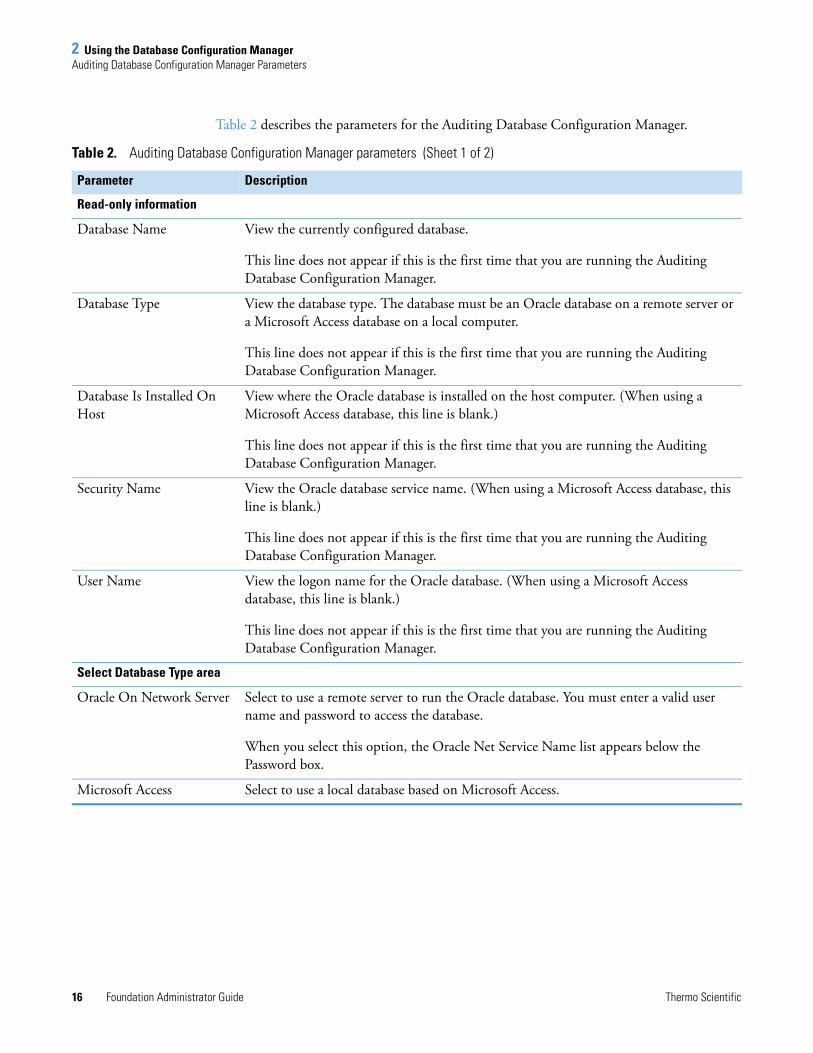
Table 2 describes the parameters for the Auditing Database Configuration Manager.
Table 2. Auditing Database Configuration Manager parameters (Sheet 1 of 2)
Parameter Description
Read-only information
Database Name View the currently configured database.
This line does not appear if this is the first time that you are running the Auditing Database Configuration Manager.
Database Type View the database type. The database must be an Oracle database on a remote server or a Microsoft Access database on a local computer.
This line does not appear if this is the first time that you are running the Auditing Database Configuration Manager.
Database Is Installed On Host
View where the Oracle database is installed on the host computer. (When using a Microsoft Access database, this line is blank.)
This line does not appear if this is the first time that you are running the Auditing Database Configuration Manager.
Security Name View the Oracle database service name. (When using a Microsoft Access database, this line is blank.)
This line does not appear if this is the first time that you are running the Auditing Database Configuration Manager.
User Name View the logon name for the Oracle database. (When using a Microsoft Access database, this line is blank.)
This line does not appear if this is the first time that you are running the Auditing Database Configuration Manager.
Select Database Type area
Oracle On Network Server Select to use a remote server to run the Oracle database. You must enter a valid user name and password to access the database.
When you select this option, the Oracle Net Service Name list appears below the Password box.
Microsoft Access Select to use a local database based on Microsoft Access.

2 Using the Database Configuration ManagerAuditing Database Configuration Manager Parameters
Thermo Scientific Foundation Administrator Guide 17
Additional parameters for the Oracle database selection
User Name View the Oracle database logon name.
(When using a Microsoft Access database, this box is grayed out.)
Password View the Oracle database password.
(When using a Microsoft Access database, this box is grayed out.)
Oracle Net Service Name View the name of the Oracle Net Service that the database administrator set up during the Oracle Client configuration that provides database connection information. All available names appear in the list.
(When using a Microsoft Access database, this list does not appear.)
Final wizard page parameters
Restart Computer Now Restart the computer automatically when you click Finish.
I Will Restart Later End the database configuration without restarting the computer when you click Finish.
You must restart your computer to make the changes effective.
Buttons
Next Move to the second page of the Auditing Database Configuration Manager.
Exit Close the wizard without accepting the new entries.
Cancel Return to the first page of the wizard where you can change the entries.
OK Accept the entries and go to the Auditing Database Configuration Manager.
Finish Close the Auditing Database Configuration Manager.
If you selected the Restart Computer Now option, save and close all other applications before clicking this button.
Table 2. Auditing Database Configuration Manager parameters (Sheet 2 of 2)
Parameter Description


Thermo Scientific Foundation Administrator Guide 19
3
Establishing Secure File Operations
To allow for accurate and ready retrieval of data and preserve previously recorded information from being overwritten by record changes, store all electronic records in protected folders and establish standard operating procedures for precise and systematic record archiving.
Contents
• Confirming the Properties of Thermo Foundation DatabaseService
• Configuring the Properties of Thermo Foundation SecurityService
• Configuring Security Settings for Folders and Files
• Configuring Security Settings for the Database Registry Key
• Specifying the Way Users Log On and Off
• Removing and Archiving Files
3 Establishing Secure File OperationsConfirming the Properties of Thermo Foundation DatabaseService
20 Foundation Administrator Guide Thermo Scientific
Confirming the Properties of Thermo Foundation DatabaseServiceThe authorization and auditing functions of a layered application installed on the Thermo Foundation platform rely on two system services:
• Thermo Foundation SecurityService for user authentication—If certain events require authentication, this service verifies the user names and passwords entered. It installs when you install the Xcalibur data system.
• Thermo Foundation DatabaseService—To access the auditing database and make auditing entries using any Thermo layered application. This service installs when you install the Foundation platform.
Both services automatically start whenever a user restarts a workstation.
Layered applications use the Thermo Foundation DatabaseService to access the auditing database and make auditing entries.
To confirm the properties of Thermo Foundation DatabaseService are set correctly
1. Open the Services window as follows:
a. From the Windows 7 taskbar, choose Start > Control Panel > System and Security > Administrative Tools.
b. Double-click Services.
The Services window opens.
Note For information about Thermo Foundation SecurityService, refer to the Thermo Xcalibur Getting Started Guide.
Tip If you do not see the System and Security category on the Control Panel, select Category in the View By List in the upper right side of the window.
3 Establishing Secure File OperationsConfirming the Properties of Thermo Foundation DatabaseService
Thermo Scientific Foundation Administrator Guide 21
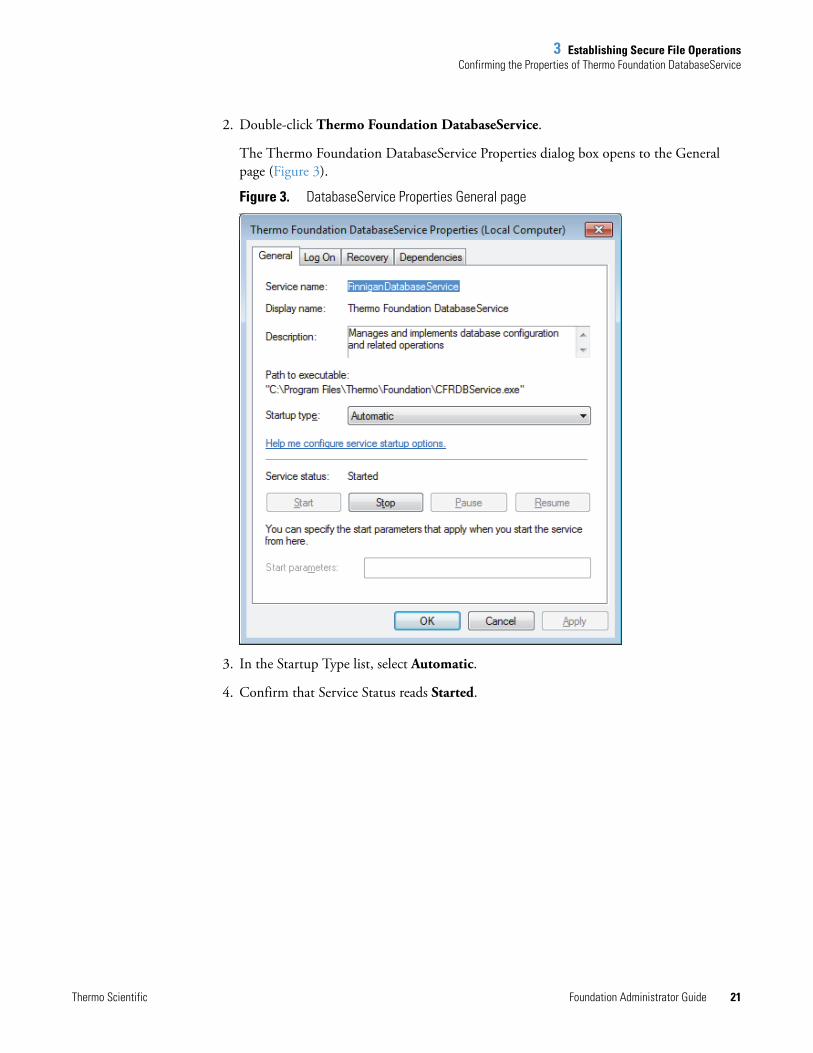
2. Double-click Thermo Foundation DatabaseService.
The Thermo Foundation DatabaseService Properties dialog box opens to the General page (Figure 3).
Figure 3. DatabaseService Properties General page
3. In the Startup Type list, select Automatic.
4. Confirm that Service Status reads Started.

3 Establishing Secure File OperationsConfiguring the Properties of Thermo Foundation SecurityService
22 Foundation Administrator Guide Thermo Scientific
5. Click the Log On tab to display the Log On page (Figure 4).
Figure 4. DatabaseService Properties Log On page
6. Under Log On As, select the Local System Account option.
7. Clear the Allow Service to Interact with Desktop check box.
8. Click OK to close the dialog box.
9. Close the Services window and close the Administrative Tools window.
Configuring the Properties of Thermo Foundation SecurityServiceThe Thermo Foundation SecurityService has two main functions:
• User authentication—If you select authentication for certain events using the Foundation Authorization Manager, the SecurityService verifies user names and passwords whenever they are entered.
• Secure file operations—You can set the SecurityService to take ownership of the data folders and files. This security measure prevents users from deleting data they own.

3 Establishing Secure File OperationsConfiguring the Properties of Thermo Foundation SecurityService
Thermo Scientific Foundation Administrator Guide 23
The SecurityService installs and starts automatically when you install a Thermo layered application. It is configured to start every time you restart the workstation computer.
To configure the properties of the SecurityService
1. Open the Windows Services feature as follows:
a. From the Windows taskbar, choose Start > Control Panel > System and Security > Administrative Tools.
b. Double-click Services.
2. Double-click Thermo Foundation SecurityService.
The Thermo Foundation SecurityService Properties dialog box opens to the General page.
3. Set the Startup Type to Automatic.
4. Make sure that the Service Status reads Started (Figure 5).
Figure 5. SecurityService Properties Log On page
IMPORTANT You must prevent unauthorized users from stopping the SecurityService. If the SecurityService is stopped, the security features in the application do not function properly.
Only the system administrator who installed the application software and the SecurityService, or someone who has administrative rights, can stop the service.
Service status
3 Establishing Secure File OperationsConfiguring the Properties of Thermo Foundation SecurityService
24 Foundation Administrator Guide Thermo Scientific
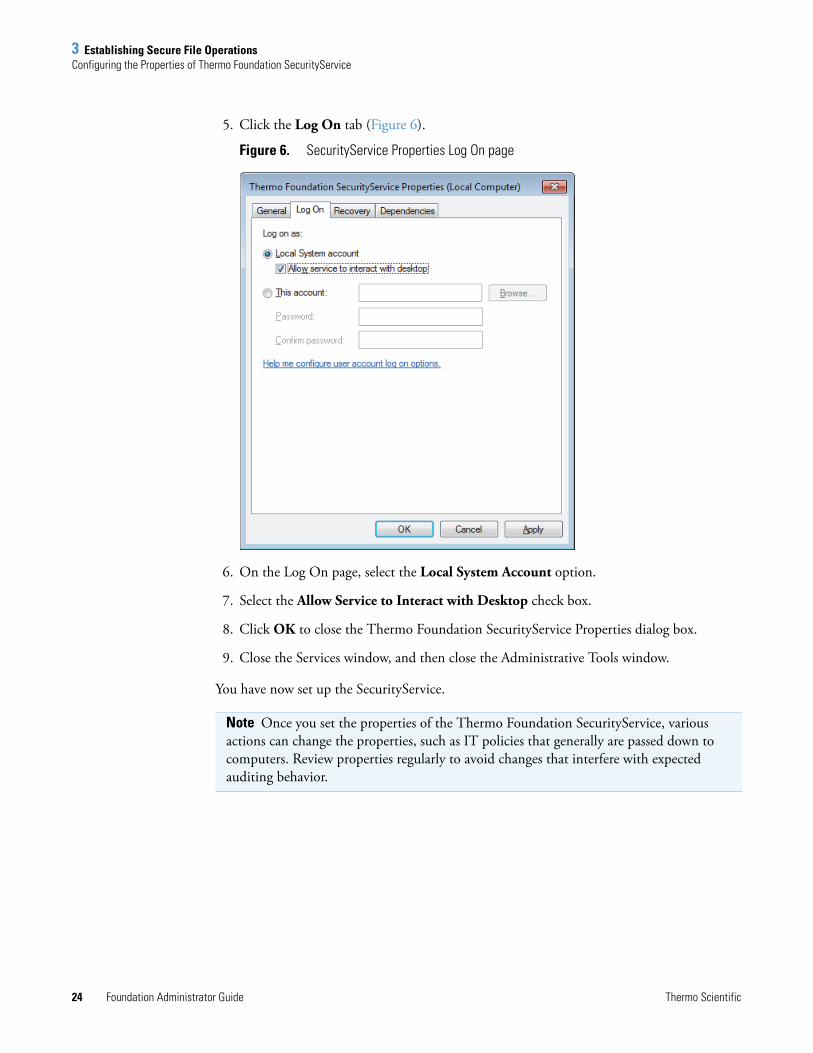
5. Click the Log On tab (Figure 6).
Figure 6. SecurityService Properties Log On page
6. On the Log On page, select the Local System Account option.
7. Select the Allow Service to Interact with Desktop check box.
8. Click OK to close the Thermo Foundation SecurityService Properties dialog box.
9. Close the Services window, and then close the Administrative Tools window.
You have now set up the SecurityService.
Note Once you set the properties of the Thermo Foundation SecurityService, various actions can change the properties, such as IT policies that generally are passed down to computers. Review properties regularly to avoid changes that interfere with expected auditing behavior.
3 Establishing Secure File OperationsConfiguring Security Settings for Folders and Files
Thermo Scientific Foundation Administrator Guide 25
Configuring Security Settings for Folders and FilesTo confirm the security of your data, you must restrict access to the following folders and the files contained within them:
• Foundation folder—Contains the executable (.exe) files, the dynamic library link (.dll) files, the log files, and so on that make up the Foundation platform.
The Foundation folder is located in the following directory for Windows 7 (32 bit):
drive:\Program Files\Thermo\
The Foundation folder is located in the following directory for Windows 7 (64 bit):
drive:\Program Files (x86)\Foundation
• INI folder—Contains the configuration files. Because the Thermo Foundation Authorization Manager reads the controlled feature information from the configuration files, prohibit write or delete access to these files by non-administrators.
The INI folder for the Windows 7 operating systems is located in drive:\ProgramData\Thermo Scientific.
To add an administrative user (or administrative group) to the Security page Group, or to add a specific group or groups to the User Names list and grant the administrator full access to the security folder and read-only access to everyone else, follow these procedures:
1. Configuring Security Settings for the Root Folder
2. Working with Accounts Set Up by the Foundation Platform
3. Adding and Removing Users (for Folders)
4. Setting Folder Permissions for Users and Groups
Note The folder that contains the configuration files is hidden by default in Windows.
To make the INI folder appear, from the Windows 7 taskbar, choose Start > Control Panel > Appearance and Personalization > Folder Options > View > Hidden Files and Folders, and select Show Hidden Files and Folders. If you do not see the Appearance and Personalization category, select Category in the View By list to the right.
Tip When you require more restricted access to folders and files, grant access only to specific user groups. To set up appropriate user groups, see “Using the Authorization Manager” on page 53.
As you follow these procedures, use your specific user group.
3 Establishing Secure File OperationsConfiguring Security Settings for Folders and Files
26 Foundation Administrator Guide Thermo Scientific
Configuring Security Settings for the Root Folder
You must create a root folder or folders for your data and configure the proper security settings for each folder. To do this, use the Security tab of the Properties dialog box to add users and groups and set the permissions for each.
In the procedures that follow, add an administrative user (or administrative group) and a group or groups to the Permission Entries list. Then, grant the administrator full access to the folder and grant limited access to everyone else.
To prepare a root folder, first turn off Use Sharing Wizard in the Folder Options dialog box. You can then create a root folder for storing all your projects.
To turn off the File Sharing Wizard
1. Log on to the system as a user with administrative privileges.
2. From the Windows taskbar, choose Start > All Programs > Accessories >Windows Explorer.
3. Choose Organize > Folder and Search Options, and then click the View tab.
Tip To further restrict access to folders and files, you can grant access to specific user groups only. To do this, first set up appropriate user groups, as described in “Adding and Removing Users (for Folders)” on page 33, and then perform the procedures that follow, using your specific user groups.

3 Establishing Secure File OperationsConfiguring Security Settings for Folders and Files
Thermo Scientific Foundation Administrator Guide 27
4. In the Advanced Settings list, at the bottom, clear the Use Sharing Wizard check box.
5. Click OK to save the change and close the Folder Options dialog box.
To create or locate a folder to use as the root folder for storing all projects
1. Create or use any folder (except the Xcalibur folder).
In this example, the folder is named Study.
For example, you can use the QuanRoot folder (located in the Xcalibur folder) as the root folder for LCquan application projects. This folder is created on your system when you load the LCquan application.
IMPORTANT Do not use the Xcalibur folder as your root folder. If you change the permission settings for this folder, Xcalibur applications will not run correctly. Instead, create a new folder or use another existing folder as your root folder.
Clear this check box.
3 Establishing Secure File OperationsConfiguring Security Settings for Folders and Files
28 Foundation Administrator Guide Thermo Scientific
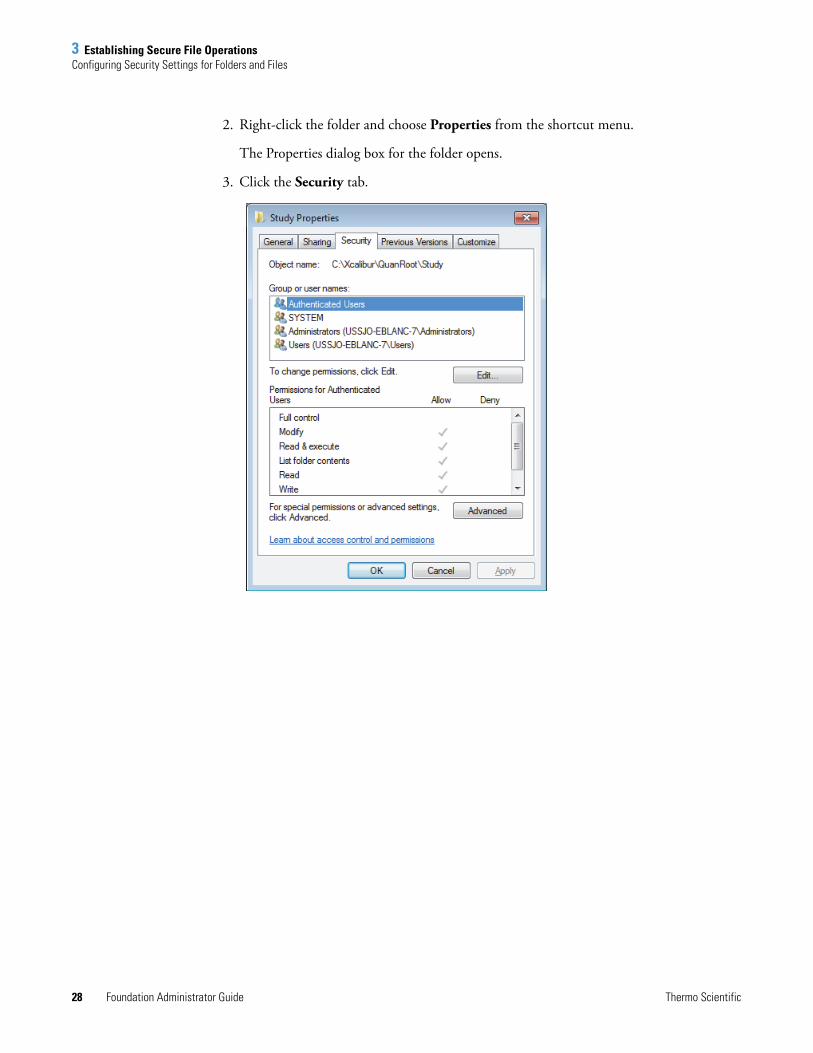
2. Right-click the folder and choose Properties from the shortcut menu.
The Properties dialog box for the folder opens.
3. Click the Security tab.
3 Establishing Secure File OperationsConfiguring Security Settings for Folders and Files
Thermo Scientific Foundation Administrator Guide 29
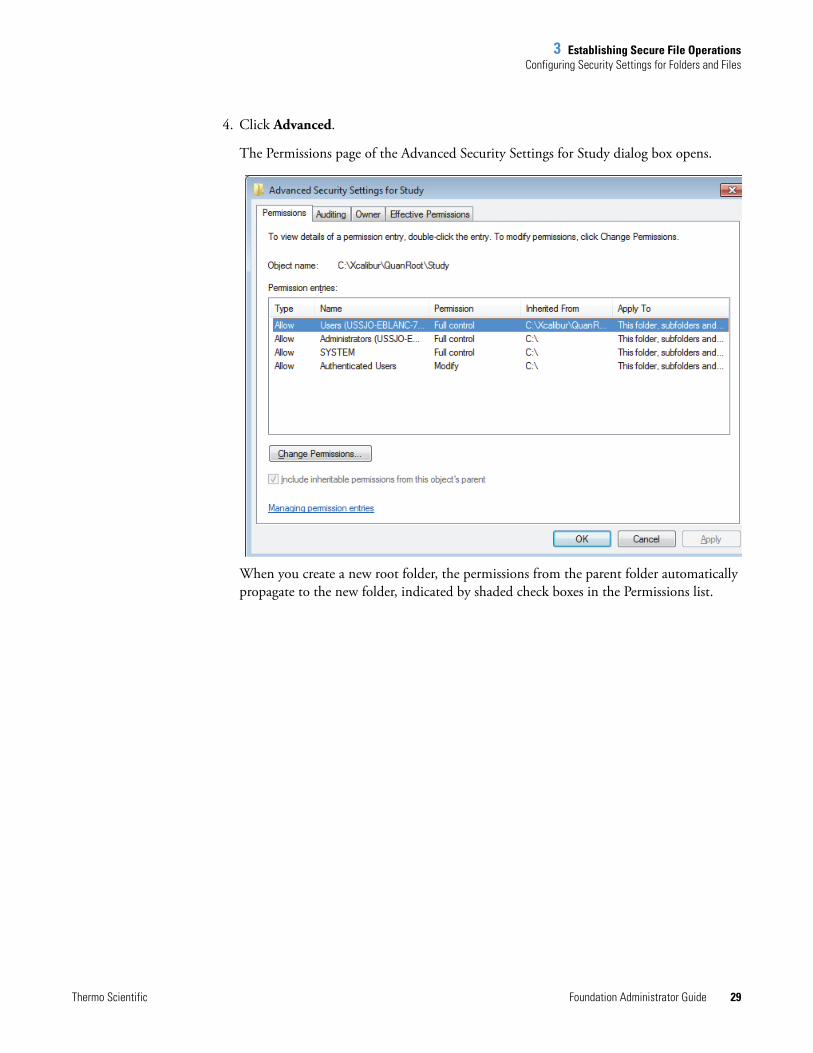
4. Click Advanced.
The Permissions page of the Advanced Security Settings for Study dialog box opens.
When you create a new root folder, the permissions from the parent folder automatically propagate to the new folder, indicated by shaded check boxes in the Permissions list.
3 Establishing Secure File OperationsConfiguring Security Settings for Folders and Files
30 Foundation Administrator Guide Thermo Scientific
In the Advanced Security Settings dialog box, the check box labeled “Include inheritable permissions from this object’s parent” is automatically selected and grayed out. For a root folder, you must change this option.
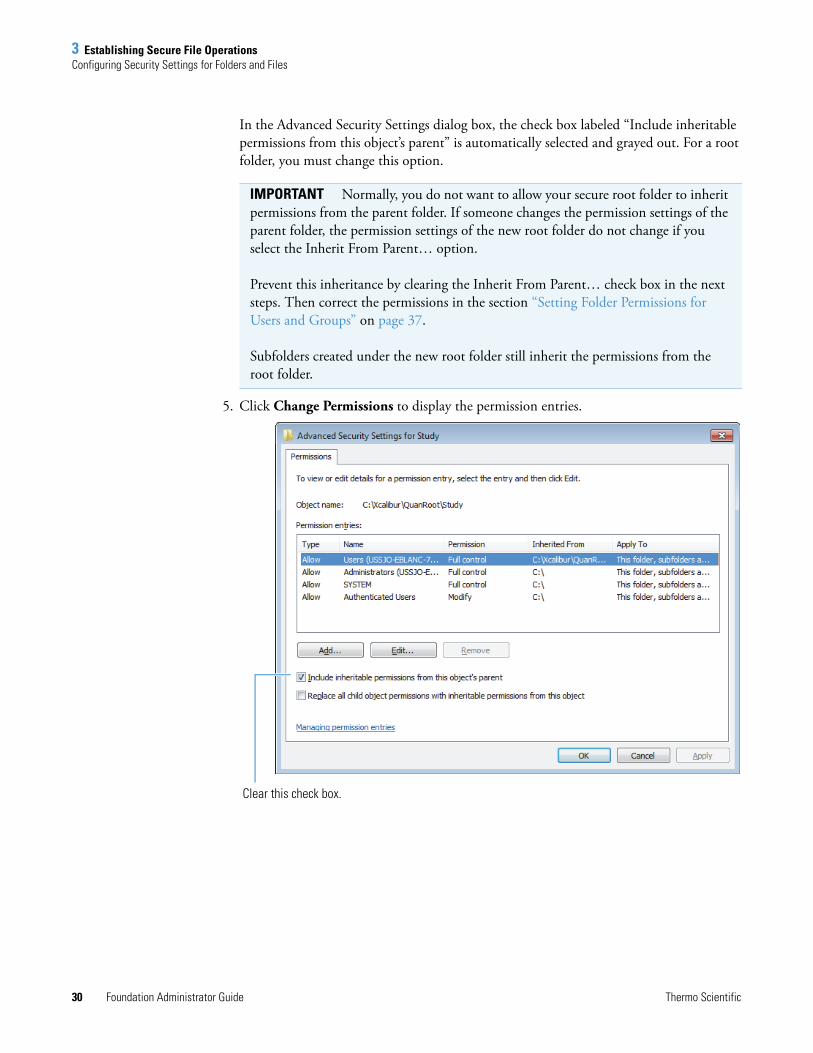
5. Click Change Permissions to display the permission entries.
IMPORTANT Normally, you do not want to allow your secure root folder to inherit permissions from the parent folder. If someone changes the permission settings of the parent folder, the permission settings of the new root folder do not change if you select the Inherit From Parent… option.
Prevent this inheritance by clearing the Inherit From Parent… check box in the next steps. Then correct the permissions in the section “Setting Folder Permissions for Users and Groups” on page 37.
Subfolders created under the new root folder still inherit the permissions from the root folder.
Clear this check box.

3 Establishing Secure File OperationsConfiguring Security Settings for Folders and Files
Thermo Scientific Foundation Administrator Guide 31
6. Clear the Include Inheritable Permissions… check box.
The Windows Security dialog box opens.
7. To copy the inherited permissions to the new folder, click Add.
8. Click OK to close the Advanced Security Settings dialog box.
You will correct the permission settings later.
9. On the Security page of the Properties dialog box, examine the Group or User Names list and notice which groups or users appear in the list.
You want only your selected group or groups and your administrator name (or the name of the administrator group) to appear in this list.
• If either is missing from the list, go to “Adding and Removing Users (for Folders).”
• If both appear in the list, and additional groups or users also appear in the list, go to “Removing Unnecessary Users from Folders” on page 37.
• If both appear in the list, and no additional groups or users appear in the list, go to “Setting Folder Permissions for Users and Groups” on page 37.

3 Establishing Secure File OperationsConfiguring Security Settings for Folders and Files
32 Foundation Administrator Guide Thermo Scientific
Working with Accounts Set Up by the Foundation Platform
To support system security, the Foundation platform sets up these account names:
If you delete these accounts, recover them using these actions:
Xcalibur_System The Foundation platform creates this account with administrative privileges. The account name and password are embedded. The account is not interactive. No one ever logs in to this account except the application itself.
IUSR_localPCname
IWAM_localPCname
Installing IIS creates these two accounts. The expression localPCname in the user account name represents the name of your local computer. All accounts appear to interface with Microsoft IIS 5.0 for either starting out of process accounts, using anonymous access, or running .NET objects.
ASPNET Proteomics Browser also creates two additional accounts upon installation:
ASPNET.postgres (user account)—Might have been installed by a non-Thermo Scientific application. The layered application ProSight PC uses the Microsoft asp.net network framework and creates a user account.
ProtUserBioWorks 3.2 and later—Created by Proteomics Browser upon installation.
Deleted account Action to restore
Xcalibur_System Reinstall the Thermo Foundation software.
IUSR_localPCname,IWAM_localPCname
Reinstall IIS using the instructions in the CD jewel case and the user guide for Bioworks Browser. Apply for the license to be renewed.
ASPNETpostgresProtUser
If installing ProSight PC software causes this file to be installed, then reinstall ProSight PC. If ASPNET was installed by your IT department or another application, then get instructions from your local IT contact.
Reinstall Proteomics Browser using the instructions in the CD jewel case and the user guide for Bioworks Browser.

3 Establishing Secure File OperationsConfiguring Security Settings for Folders and Files
Thermo Scientific Foundation Administrator Guide 33
Adding and Removing Users (for Folders)
Before setting permission levels for a folder or registry key, you might need to modify the Groups or User Names list on the Security page for the folder by adding or removing users.
Adding Users to Folders
Follow these procedures to modify the users list for the INI and Foundation folders.
To add users and groups to a folder
1. Using Windows Explorer, locate the folder of interest: INI or Foundation.
2. Right-click the folder and choose Properties from the shortcut menu.
The Folder Name Properties dialog box opens.
3. If the Security page is unavailable, do the following:
a. Choose Start > Control Panel.
b. Choose Appearance and Personalization > Folder Options.
The Folder Options dialog box opens.
c. Click the View tab.
d. In the Advanced Settings box, clear the Use Sharing Wizard check box, and then click OK to accept the setting and close the Folder Options dialog box.
e. Close the Control Panel.
IMPORTANT Each Windows user account must be associated with a user ID, password, and full description. These items are required for the system to store the auditing information in the designated database.
Note By default, the Foundation and INI folders are in these directories.
• For Windows 7 (32 bit), the Foundation folder is located in the following directory:
drive:\Program Files\Thermo\
• For Windows 7 (64 bit), the Foundation folder is located in the following directory:
drive:\Program Files (x86)\Thermo
• For Windows 7, the INI folder is located in the following directory:
drive:\ProgramData\Thermo Scientific\

3 Establishing Secure File OperationsConfiguring Security Settings for Folders and Files
34 Foundation Administrator Guide Thermo Scientific
4. Click the Security tab to display the Security page..
3 Establishing Secure File OperationsConfiguring Security Settings for Folders and Files
Thermo Scientific Foundation Administrator Guide 35
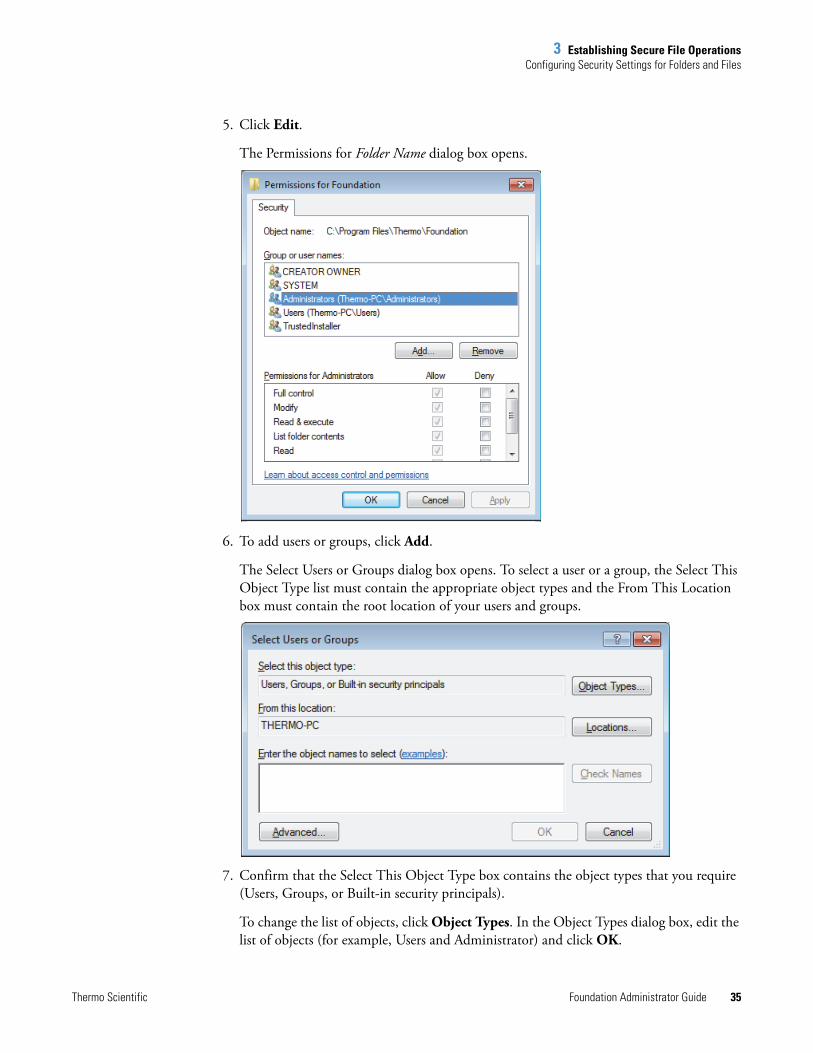
5. Click Edit.
The Permissions for Folder Name dialog box opens.
6. To add users or groups, click Add.
The Select Users or Groups dialog box opens. To select a user or a group, the Select This Object Type list must contain the appropriate object types and the From This Location box must contain the root location of your users and groups.
7. Confirm that the Select This Object Type box contains the object types that you require (Users, Groups, or Built-in security principals).
To change the list of objects, click Object Types. In the Object Types dialog box, edit the list of objects (for example, Users and Administrator) and click OK.

3 Establishing Secure File OperationsConfiguring Security Settings for Folders and Files
36 Foundation Administrator Guide Thermo Scientific
8. Confirm that the From This Location box lists the root location that contains your users and groups.
To change the location, click Locations. In the Locations dialog box, specify a new location and click OK.
9. In the Enter the Object Names to Select box, enter the new users or groups:
• If the name of a specific user group was missing from the Group or User Names list on the Security page, type the name of the group.
• If the user name of the administrator (or the name of the administrator group) was missing from the Group or User Names list on the Security page, type the user name or group name.
10. To verify that the new user or group name is now in the list, do the following:
a. Click Check Names to search for users or groups with the names that you specified in the Enter the Object Names to Select box.
All similar or matching object names that were found appear underlined in the box.
b. Confirm that only the correct object name or names are listed in the box. Then click OK to close the Select Users or Groups dialog box and return to the Permissions for Folder Name dialog box.
11. Examine the Group or User Names list again.
The user groups and the name of the administrator are now available in the list.
• When additional groups or users appear in the Group or User Names list, go to “Removing Unnecessary Users from Folders.”
• If no additional groups or users appear, go to “Setting Folder Permissions for Users and Groups” on page 37.
To remove users or groups from the Group or User Names list
1. If it is not already open, open the Permissions for Folder Name dialog box (see step 1 through step 5 of “To add users and groups to a folder” on page 33).
2. For each user of group that you want to remove, do the following:
a. Select the name of the user or group.
b. Click Remove to remove the selected user or group.
You are now ready to set the permission levels for your users and groups.
Tip To enter multiple object names at the same time, separate the names with a semicolon.
3 Establishing Secure File OperationsConfiguring Security Settings for Folders and Files
Thermo Scientific Foundation Administrator Guide 37
Removing Unnecessary Users from Folders
You must remove unnecessary users or groups from the Group or User Names box on the Security page.
To remove the names of unnecessary users or groups
1. On the Security page of the Properties dialog box, click Edit.
The Permissions dialog box opens.
2. In the Group or User Names box, select the name of the unnecessary user or group and click Remove.
3. Repeat this step to remove any other unnecessary users or groups.
Setting Folder Permissions for Users and Groups
After the correct users and groups are in the Group or User Names list on the Security page of the Folder Name Properties dialog box, set the folder permissions for the users and groups.
To set the permissions for users and groups
1. Open the Security page for the folder (see step 1 of “Adding Users to Folders” on page 33).
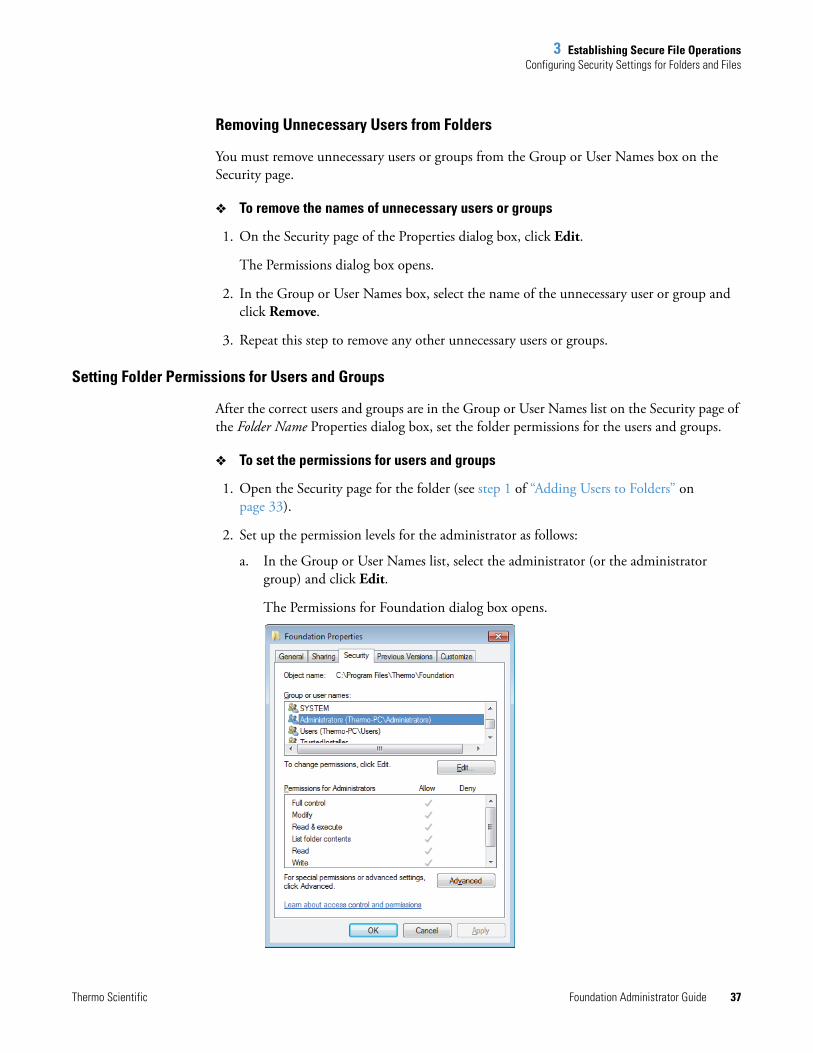
2. Set up the permission levels for the administrator as follows:
a. In the Group or User Names list, select the administrator (or the administrator group) and click Edit.
The Permissions for Foundation dialog box opens.

3 Establishing Secure File OperationsConfiguring Security Settings for Folders and Files
38 Foundation Administrator Guide Thermo Scientific
b. In the Permissions for Folder Name dialog box, select the Allow check box for the Full Control option.
All of the other check boxes in the Allow column are automatically selected.
3. Set up the permissions levels for a group as follows:
a. In the Group or User Names list, select the group name.
b. In the Permissions for the group list, select the Allow check box for the Read action and clear the Allow check box for all other actions in the list.
4. Click OK to close the Permissions for Foundation dialog box and return to the Security page of the Foundation Properties dialog box.
Note Groups or users granted Full Control for a folder can delete files and subfolders within that folder regardless of the permissions protecting the files and subfolders.
Note Setting these permissions confirms that you cannot delete any of the files in the folder using Windows Explorer.

3 Establishing Secure File OperationsConfiguring Security Settings for Folders and Files
Thermo Scientific Foundation Administrator Guide 39
5. To confirm that the inheritance setting is correct, do the following:
a. On the Security page, click Advanced.
The Advanced Security Settings dialog box opens.
b. Click Change Permissions.
The Permissions page opens.

3 Establishing Secure File OperationsConfiguring Security Settings for Folders and Files
40 Foundation Administrator Guide Thermo Scientific
c. Clear the Include Inheritable Permissions from This Object’s Parent check box.
The Windows Security dialog box opens.
d. Click Add and then OK to close the dialog box and return to the Permissions page.
e. Click OK to return to the Security page.
6. Click OK to close the Folder Name Properties dialog box and save the permission assignments.
Configuring Settings for the Security Folder
The procedure for configuring the security folder is similar to that for configuring the root folder. For the security folder, you must give full access rights only to the administrator and give read-only access rights to everyone else.
For additional information about any step, see “Configuring Security Settings for the Root Folder” on page 26.
To configure the Security folder
1. Use Windows Explorer to locate the Security folder.
The folder path is as follows:
C:\ProgramData\Thermo Scientific\INI
2. Right-click the INI folder and choose Properties from the shortcut menu to open the Properties dialog box.
3. Click the Security tab.
4. Click Advanced to open the Advanced Security Settings for INI dialog box for the Security folder.
3 Establishing Secure File OperationsConfiguring Security Settings for Folders and Files
Thermo Scientific Foundation Administrator Guide 41
5. Click Change Permissions.
6. Clear the Include Inheritable Permissions from This Object’s Parent check box.
7. When the Windows Security dialog box opens, click Add.
8. Confirm that the Permission Entries box contains only your administrator name (or the administrator group) and the groups you want to add.
• If Administrator (or the Administrator group) does not appear in the list, add it.
• If a group does not appear in the list, add it.
• If any other users or groups appear in the list, select and remove them.
9. Set the permissions for the folder:
a. In the Permission Entries box, select Administrator.
b. Click Edit.
c. In the Permissions list, select the Allow check box for Full Control.
All the other Allow check boxes are automatically selected.
d. Click OK.
e. In the Permission Entries box, select the group name.
f. Click Edit.
g. In the Permissions list, select the Allow check box for Read and clear the Allow check box for all the other options to prevent removal of information.
3 Establishing Secure File OperationsConfiguring Security Settings for Folders and Files
42 Foundation Administrator Guide Thermo Scientific
h. In the Advanced Security Settings dialog box, confirm that the Inherit From Parent… check box is cleared.
i. Click OK twice to close the Advanced Security Settings dialog box.
10. Click OK to save the permission assignments and close the Properties dialog box.
You have configured the security settings for the Security folder.
Configuring Security Settings for the Database Registry Key
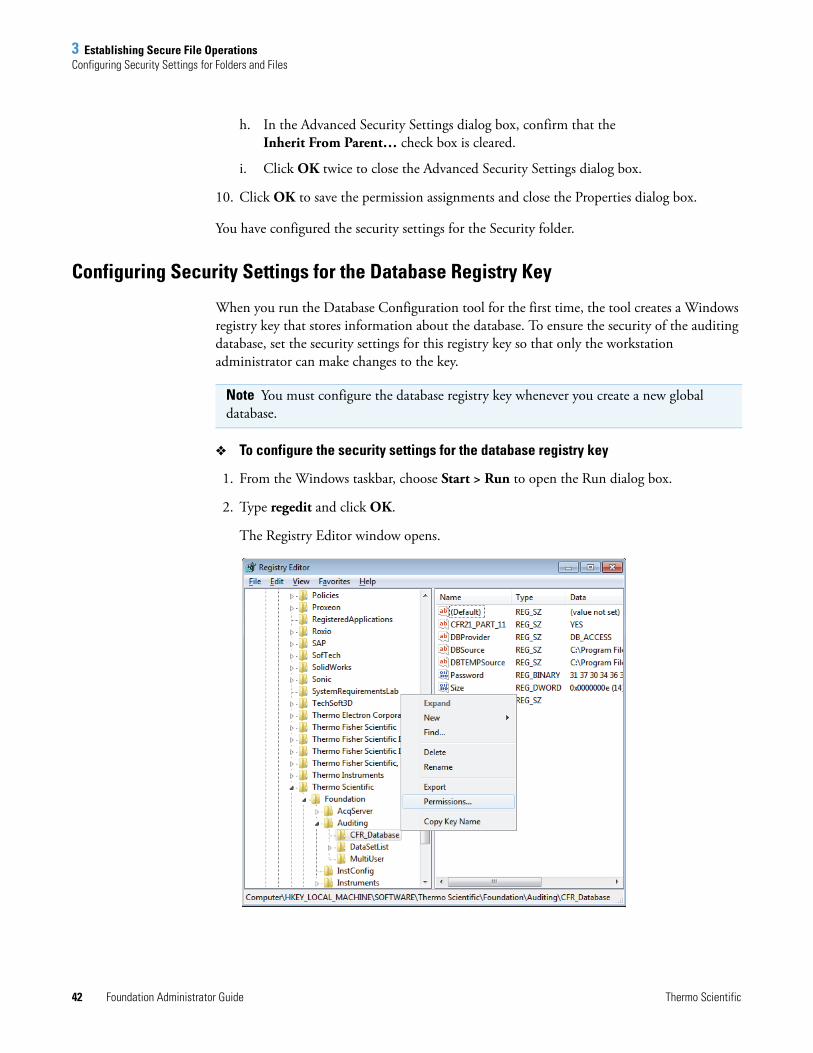
When you run the Database Configuration tool for the first time, the tool creates a Windows registry key that stores information about the database. To ensure the security of the auditing database, set the security settings for this registry key so that only the workstation administrator can make changes to the key.
To configure the security settings for the database registry key
1. From the Windows taskbar, choose Start > Run to open the Run dialog box.
2. Type regedit and click OK.
The Registry Editor window opens.
Note You must configure the database registry key whenever you create a new global database.
3 Establishing Secure File OperationsConfiguring Security Settings for Folders and Files
Thermo Scientific Foundation Administrator Guide 43
3. In the left pane of the Registry Editor dialog box, locate the folder:
Computer\HKEY_LOCAL_MACHINE\SOFTWARE\Thermo Scientific\Foundation\Auditing\CFR_Database
4. Right-click the CFR_Database folder and choose Permissions from the shortcut menu to open the Permissions dialog box for this registry key.
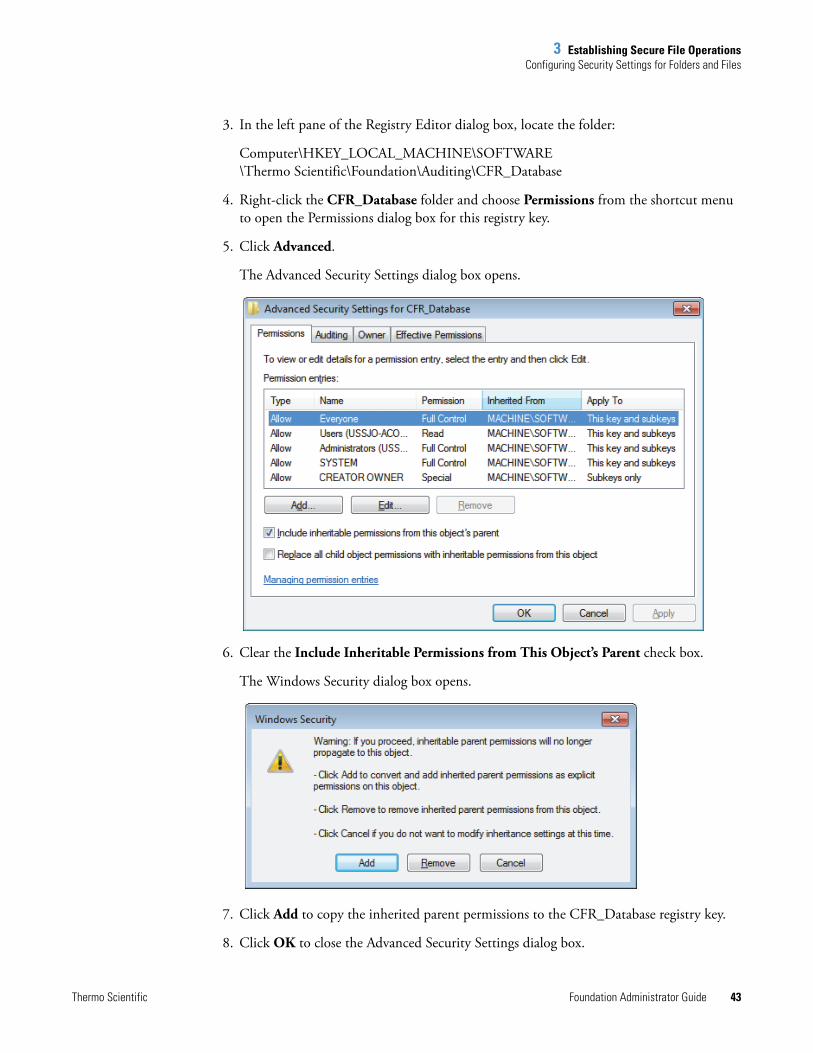
5. Click Advanced.
The Advanced Security Settings dialog box opens.
6. Clear the Include Inheritable Permissions from This Object’s Parent check box.
The Windows Security dialog box opens.
7. Click Add to copy the inherited parent permissions to the CFR_Database registry key.
8. Click OK to close the Advanced Security Settings dialog box.

3 Establishing Secure File OperationsConfiguring Security Settings for Folders and Files
44 Foundation Administrator Guide Thermo Scientific
9. On the Security page of the Permissions dialog box, examine what groups or users appear in the Group_or_User_Names box.
You want only your administrator name (or the administrator group) and your selected group or groups to appear in this box.
• If your administrator name (or the administrator group) does not appear in the box, add it. (See “Adding Users to Folders” on page 33.)
• If the group you want to use does not appear in the box, add it. (See “Adding Users to Folders” on page 33.)
• If other users or groups appear in the box, remove them.(See “Removing Unnecessary Users from Folders” on page 37.)
10. Set the permissions for the registry key:
a. In the Group or User Names box, select your administrator name (or the administrator group).
b. In the Permissions list, select the Allow check box for Full Control.
The Read check box in the Allow column is automatically selected.
c. In the Group or User Names box, select a group name.
d. In the Permissions list, select the Allow check box for Read, and clear the Allow check box for all other actions in the list to prevent removal of information.
11. Click OK.
12. Choose File > Exit to close the Registry Editor.

3 Establishing Secure File OperationsSpecifying the Way Users Log On and Off
Thermo Scientific Foundation Administrator Guide 45
Specifying the Way Users Log On and OffThis section describes the following:
• Turning Off Fast User Switching for Local Workstations
• Setting the Automatic Logoff Feature
• Removing and Archiving Files
Turning Off Fast User Switching for Local Workstations
To maintain secure file operations, turn off Fast User Switching on all computers that provide this option. The Windows 7 operating system provides Fast User Switching on all computers. Check with your IT group to see if they have applied global settings that cause an unexpected response to turning off this feature.
Starting with Windows 7, you can switch between users without actually logging off from the computer. You can turn off this feature, called Fast User Switching, so that the current user must log off before another user logs on.
If you do not turn off Fast User Switching when it is allowed, two users could log on at the same time, which can cause strange behavior when they try to control their mass spectrometer. The acquisition service can only handle one user logged in at a time. Thermo Fisher Scientific recommends that all labs turn off Fast User Switching, regardless of whether secure file operations is important to the user or not.
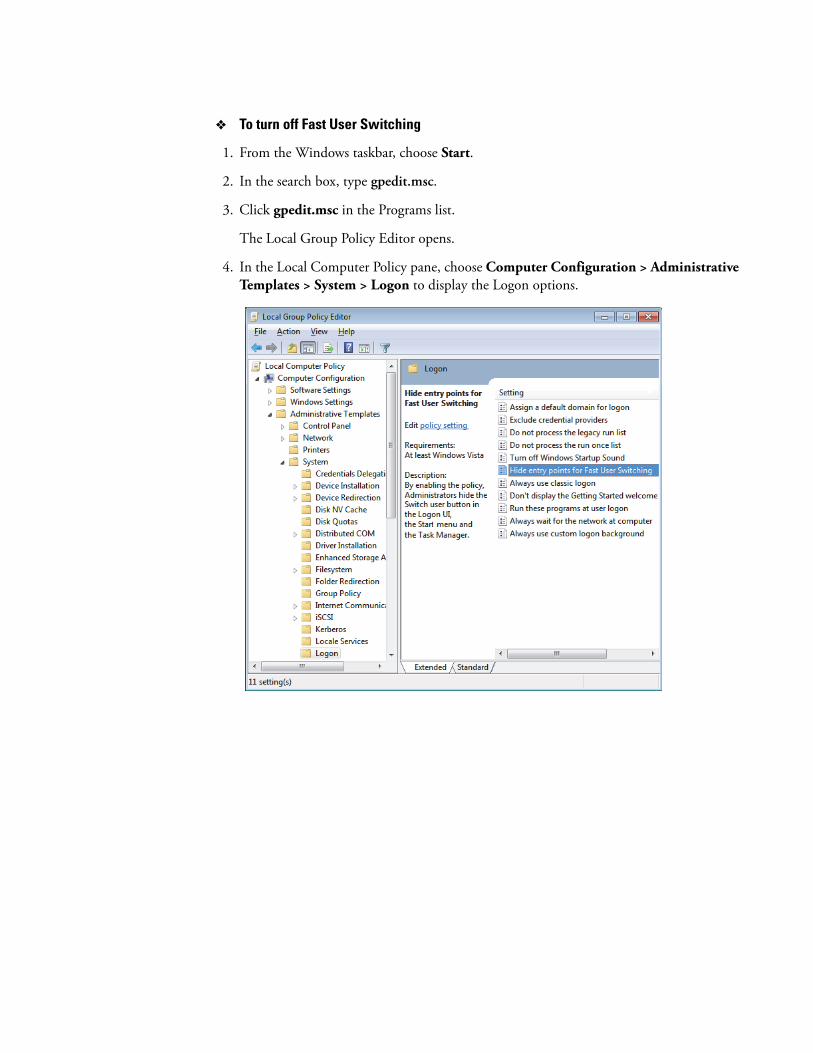
To turn off Fast User Switching
1. From the Windows taskbar, choose Start.
2. In the search box, type gpedit.msc.
3. Click gpedit.msc in the Programs list.
The Local Group Policy Editor opens.
4. In the Local Computer Policy pane, choose Computer Configuration > Administrative Templates > System > Logon to display the Logon options.

3 Establishing Secure File OperationsSpecifying the Way Users Log On and Off
Thermo Scientific Foundation Administrator Guide 47
5. Double-click Hide Entry Points for Fast User Switching.
The Hide Entry Points for Fast User Switching dialog box opens.
6. Select the Enabled option and click OK.
7. Close the User Accounts dialog box and close the Control Panel.
Setting the Automatic Logoff Feature
Use the Automatic Logoff feature to allow a user to log on to a workstation, start data acquisition, and then log off while the system continues to acquire the data. A subsequent user can log on to the workstation, queue acquisition sequences, and process data while the acquisition that the first user started continues.
Automatic logoff cannot occur if a password-protected screen saver precedes it. Automatic logoff can occur if the screen saver is not password-protected, but you are not notified when it occurs.
To turn the automatic logoff feature on or off
1. Choose Start > Programs (or All Programs) > Thermo Foundation x.x > AutoLogoff, where x.x is the version.
The Thermo Foundation Automatic Logoff Setup dialog box opens.
IMPORTANT Thermo Fisher Scientific recommends that you enable automatic logoff to help ensure file integrity and access controls.
By default, Automatic Logoff is turned off.

3 Establishing Secure File OperationsRemoving and Archiving Files
48 Foundation Administrator Guide Thermo Scientific
2. Do one of the following:
• To turn on the feature, select the Enable check box and type a value (1–1000) in the Auto Logoff Time (minutes) box to specify how long the system waits before logging off the current user.
• To turn off the feature, clear the Enable check box.
3. Click OK.
When a user logs out, the computer automatically shuts down any programs that are running. If the Windows screen saver is set to appear on the computer at an earlier time than the Auto Logoff time, the automatic logoff still occurs at the specified time, even though the user cannot see evidence of the logoff because the screen saver is active.
Removing and Archiving FilesFor data security over a long period of time, it is good to have proper procedures in place for data protection—including raw data, processed data, and metadata.
• Backing up data: Backups should be performed daily, nightly, or weekly (however you set up the system) and protect against a data loss due to computer hardware failure or inadvertent deletion. This might also include developing a procedure for restoring corrupted or lost data from a backup to the server.
• Archiving data: An archive permanently stores data in accordance with data retention requirements. The data is typically no longer needed for regular access and can be locked up in a repository.
To archive files, use third-party software designed for this purpose. In addition, to protect the archived data, develop and implement standard operating procedures for archiving files and security procedures to protect the archived data.
• Retrieving data: Retrieving data from an established archive would generally require a formal request through the IT organization.
If you have an archive, develop a procedure for ensuring that retrieved records can be read. Generally, this requires you to convert records to a new format or to keep and maintain the tools for reading the records in their current format.
For the Foundation platform running on the Windows 7 operating system, provide users with the following instruction as part of your standard operating procedure after you turn on AutoLogoff:
Each time you log on, the Windows 7 operating system prompts you for permission to run AutoLogoff in the background. Choose Allow every time.

Thermo Scientific Foundation Administrator Guide 51
4
Defining Secure User Groups and Permissions
To control access to certain features of the Foundation platform, the LCquan application, and the Xcalibur data system, define secure user groups and grant these groups appropriate permission levels. By design, every member of a secure user group holds the same rights and permissions. Use the Foundation Authorization Manager to create new groups and define permission levels. After you define secure user groups and set permission levels, only those users who are in a secure user group can access the application. All others are prohibited access.
For the Authorization Manager, an application is a functional window or tool in the Foundation platform, Xcalibur data system, or the LCquan application. For a list of applications that the Authorization Manager controls, see the Permission Level pane row of Table 10 on page 83.
Follow these procedures to use the Foundation Authorization Manager to configure secure groups and set permissions for controlled features in the application data system.
IMPORTANT Shut down all applications before running the Authorization Manager. Otherwise, if you make changes to permissions for an application when the application is open, the changes might not take effect until you exit and restart the program.
Contents
• Planning User Groups
• Using the Authorization Manager
• Setting Up Secure User Groups
• Setting Permissions
• Setting Up Secure Reports
• Viewing the Authorization Manager History Log
• Working with Security Settings
• Permission Level Settings for an Application
• Authorization Manager Parameters

4 Defining Secure User Groups and PermissionsPlanning User Groups
52 Foundation Administrator Guide Thermo Scientific
Planning User GroupsBefore you begin, decide how many user groups you require or, if more appropriate, how many levels of access to grant to your users. For example, consider a laboratory where both scientists and technicians work. The standard operating procedures for this laboratory state that technicians cannot perform certain operations with the software in contrast to scientists who have no restrictions. In this case, if you are the laboratory administrator, you must create at least two user groups—one for technicians and one for scientists.
There is no limit to the number of user groups defined. For simplicity, if all users are to have the same privileges, define a single user group.
A user group can be either a preexisting Windows domain logon group or a private group:
• The domain administrator must create and manage Windows domain logon groups. For help with domain logon groups, contact your domain administrator.
• The workstation administrator can create and manage private groups. However, before the administrator can add a user to a private group, the user must be a member of a domain group. If an intended user is not a user on the domain, grant a domain account for that person. Contact your domain administrator for help in completing this task.
A single user can belong to more than one user group. If the groups have different permission levels, the most lenient permission level applies to the user.
IMPORTANT As a precaution, define at least one user group. If no user groups are configured in the Authorization Manager, access to controlled features is unrestricted.

4 Defining Secure User Groups and PermissionsUsing the Authorization Manager
Thermo Scientific Foundation Administrator Guide 53
Using the Authorization ManagerWith Thermo Foundation Authorization Manager and the security features of the Windows operating system, define user groups and set permission levels for these groups. The Authorization Manager ensures that only individuals who have some level of responsibility for the records can access them. You must be a local Windows administrator to use the Authorization Manager. To plan your user group definitions before defining them in the application, see Planning User Groups.
To start the Authorization Manager
From the Windows taskbar, choose Start > Programs (or All Programs) > Thermo Foundation x.x > Authorization Manager, where x.x is the version.
From the Windows taskbar, choose Start > All Programs >Thermo Foundation x.x > Authorization Manager.
IMPORTANT To use Windows Active Directory Domain groups with Authorization Manager, you must configure them as Domain Global groups. Because Domain Local groups are not visible to Authorization Manager, you cannot use them.

4 Defining Secure User Groups and PermissionsUsing the Authorization Manager
54 Foundation Administrator Guide Thermo Scientific
The Thermo Foundation Authorization Manager window opens. For information about the parameters in this window, see “Authorization Manager Parameters” on page 81.
Permission Level pane
4 Defining Secure User Groups and PermissionsSetting Up Secure User Groups
Thermo Scientific Foundation Administrator Guide 55
Setting Up Secure User GroupsTo set up the secure user groups in Thermo Foundation Authorization Manager, you can use either preexisting Windows user groups or create your own private groups in the Authorization Manager. You cannot create a collection of groups that is a combination of these two options.
The application places no limit on the number of user groups you can define. For simplicity, if all users are to have the same privileges, you can define a single user group.
Choose Secure Group Dialog Box
Use the Choose Secure Group dialog box to select a secure user group so that you can copy the complete set of permission levels to another group.
IMPORTANT
• You must define secure user groups; otherwise, the system is not secure and all users can access all features of the software.
• A single user can belong to more than one user group. If the groups have different permission levels, the most lenient permission level applies to the user.
Table 3. Choose Secure Group dialog box parameters
Parameter Description
Secure Group View the list of secure user groups. When you select a group and click OK, the complete set of permission levels for the group is copied to the group selected in the Secure Groups box in the Authorization Manager.

4 Defining Secure User Groups and PermissionsSetting Up Secure User Groups
56 Foundation Administrator Guide Thermo Scientific
Defining User Groups
Use the Create Private Group dialog box to create a new private (local) group and to add users to the group. After you create a private group, use the Edit User List of Private Group dialog box to add or remove users from the group.
To select user groups
1. If it is not already open, open the Authorization Manager (see “Using the Authorization Manager” on page 53).
2. Select only one of the Available Groups options to specify the type of user group:
• To use preexisting Windows user groups, select the Domain/Workstation option. Contact your domain administrator to create or change logon groups.
Continue to step 3.
• To use (or create) a local user group, select the Private option. The lab administrator can create private groups (see To define secure private groups).
3. To select the secure domain/workstation logon groups, do the following:
a. Select a group in the Available Groups list and click .
The group appears in the Secure Groups box.
b. When you have selected all of the needed groups, go to “Editing User Groups” on page 58.
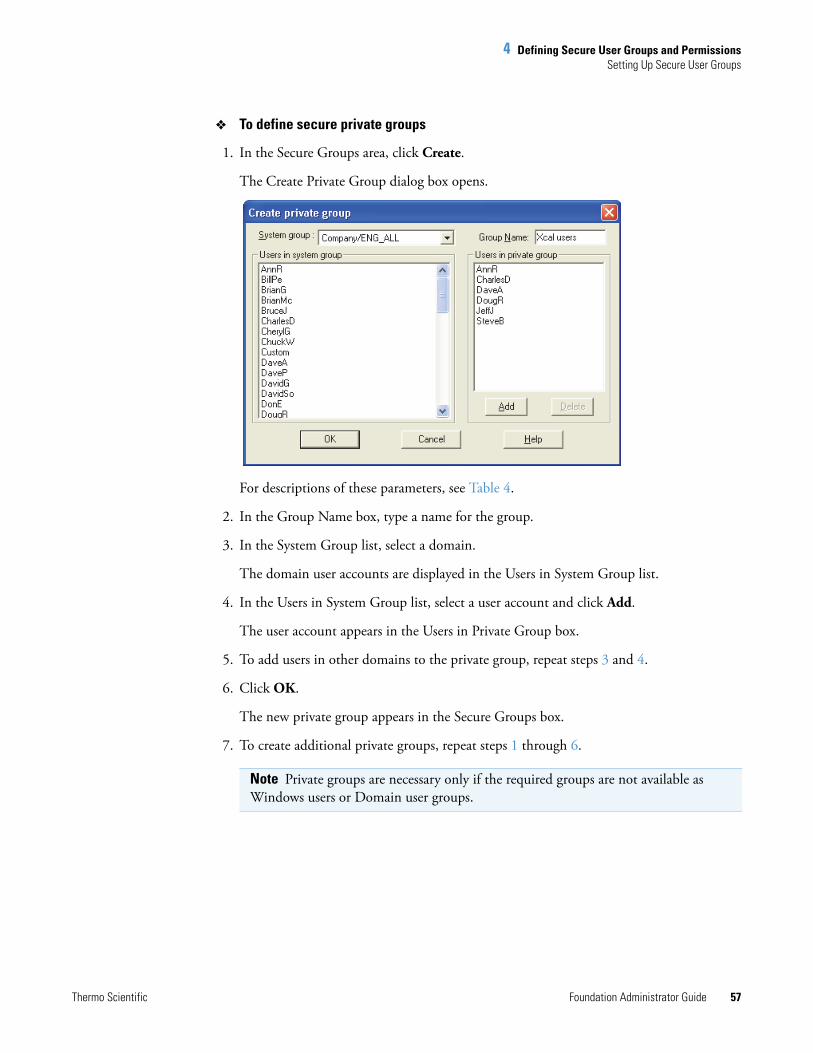
4 Defining Secure User Groups and PermissionsSetting Up Secure User Groups
Thermo Scientific Foundation Administrator Guide 57
To define secure private groups
1. In the Secure Groups area, click Create.
The Create Private Group dialog box opens.
For descriptions of these parameters, see Table 4.
2. In the Group Name box, type a name for the group.
3. In the System Group list, select a domain.
The domain user accounts are displayed in the Users in System Group list.
4. In the Users in System Group list, select a user account and click Add.
The user account appears in the Users in Private Group box.
5. To add users in other domains to the private group, repeat steps 3 and 4.
6. Click OK.
The new private group appears in the Secure Groups box.
7. To create additional private groups, repeat steps 1 through 6.
Note Private groups are necessary only if the required groups are not available as Windows users or Domain user groups.
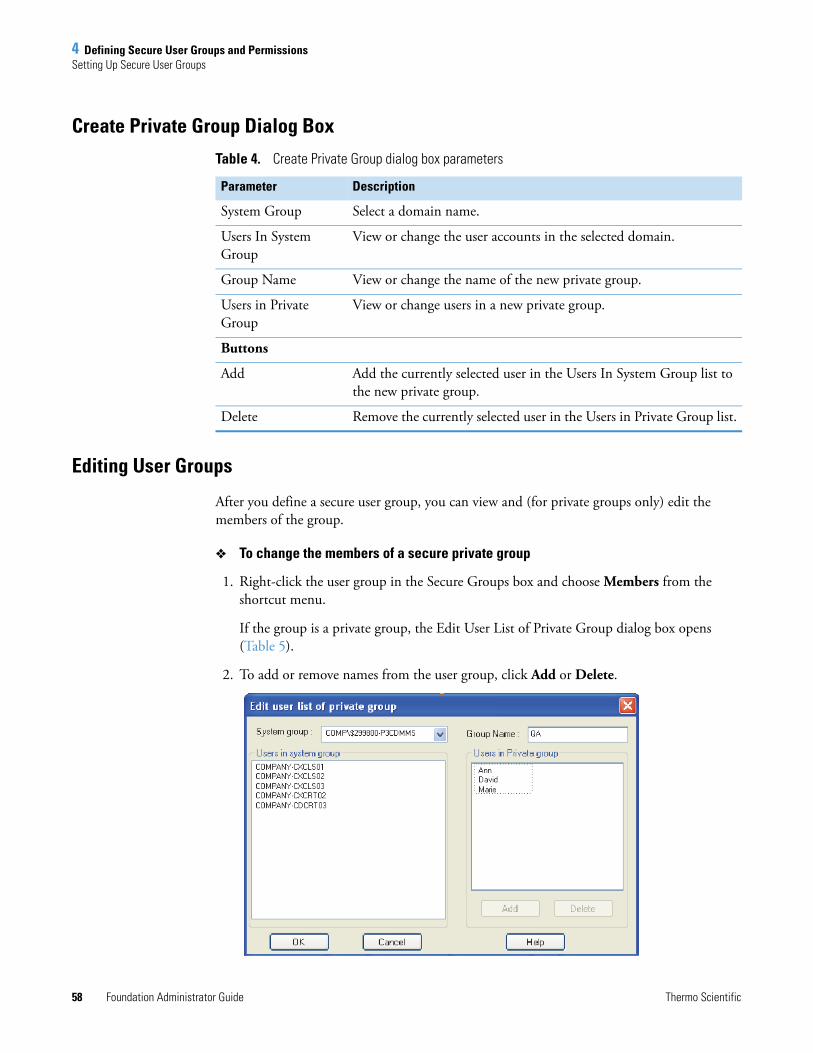
4 Defining Secure User Groups and PermissionsSetting Up Secure User Groups
58 Foundation Administrator Guide Thermo Scientific
Create Private Group Dialog Box
Editing User Groups
After you define a secure user group, you can view and (for private groups only) edit the members of the group.
To change the members of a secure private group
1. Right-click the user group in the Secure Groups box and choose Members from the shortcut menu.
If the group is a private group, the Edit User List of Private Group dialog box opens (Table 5).
2. To add or remove names from the user group, click Add or Delete.
Table 4. Create Private Group dialog box parameters
Parameter Description
System Group Select a domain name.
Users In System Group
View or change the user accounts in the selected domain.
Group Name View or change the name of the new private group.
Users in Private Group
View or change users in a new private group.
Buttons
Add Add the currently selected user in the Users In System Group list to the new private group.
Delete Remove the currently selected user in the Users in Private Group list.

4 Defining Secure User Groups and PermissionsSetting Up Secure User Groups
Thermo Scientific Foundation Administrator Guide 59
3. For each user that you want to remove from the private group, select the user in the Users in Private Group box, and then click Delete.
4. For each user you want to add to the private group, do the following:
a. In the System Group list, select the group that contains the new user.
A list of users in the selected group appears in the Users in System Group box.
b. In the Users in System Group box, select the user you want to add.
c. Click Add.
5. After you finish editing the user list, set the permission levels for each user.
For descriptions of the parameters in the Users in Group dialog box, see Edit Users In Group dialog box parameters.
To view the members of a domain group
Right-click the user group in the Secure Groups box and choose Members from the shortcut menu.
The Modify Users in Group dialog box opens. Because the domain administrator controls membership in these groups, the lists in the Modify Users in Group dialog box are read-only. To make changes to domain/workstation logon groups, see your domain administrator.
To open this dialog box
1. In the Authorization manager window, in the Global Security Features group box, select the Predefined Comments check box.
2. Click Edit.
Edit Users In Group Dialog Box
Use the Edit Users In Group dialog box to make changes to a private group of users. Use the Users in Group dialog box to view but not change the users in a domain or workstation logon group. The lists in this dialog box are read-only. See your domain administrator to make changes to domain or workstation logon groups. When you right-click on a user group, the dialog box for that group appears.
Table 5. Edit Users In Group dialog box parameters
Parameter Description
Users In Group Users who are currently in the domain logon group.
Users Not In Group Users who are not currently in the domain logon group.

4 Defining Secure User Groups and PermissionsSetting Permissions
60 Foundation Administrator Guide Thermo Scientific
Setting PermissionsFor each secure user group, set the permission levels in the Permission Level area for certain features of the CRC Validator and Instrument Configuration applications, the Xcalibur data system, and the LCquan application (if installed).
The following table lists the available permission levels. All new secure user groups, whether domain/workstation groups or private groups, have all features set to Disallowed.
You can set permission levels by doing the following:
• Changing the Permission Level of a Feature
• Setting All Permissions
• Inheriting Permissions
• Exporting and Importing Permissions
• Defining the List of Secure Folders
• Requiring User Comments
Table 6. Permission levels
Permission Level Description
Disallowed Not permitted. You can specify whether the user interface control for the disallowed operation is hidden or grayed out.
Signature List Enter the names and passwords of everyone on the required signature list to perform the authorized action. To approximate an electronic signature, set the Signature List feature to Allowed, Password Required, and Comments Required. Anyone in a group with the Allowed/Password/Comment combination for the given feature must enter both a password and a comment, which is the approximation of an electronic signature.
A user who belongs to more than one group on the required signature list can sign on behalf of each group by entering a user ID and password for each group.
Supervisor Password Enter the supervisor name and password to perform the action. Anyone who has permission to perform the Allowed or Password Required actions can sign as a supervisor.
Password Required The user must enter a password before continuing to perform the authorized action.
Allowed No restrictions.

4 Defining Secure User Groups and PermissionsSetting Permissions
Thermo Scientific Foundation Administrator Guide 61
Changing the Permission Level of a Feature
You can change the permission levels for a secure user group individually for each feature or you can set all the features to the same permission level. Follow this procedure to set up the permission levels for one feature, and then go to “Setting All Permissions” on page 65 if you want to set all features to the same permission level.
If you have already set up the permission levels for one secure user group and you want to set the same permission levels for other secure user groups, go to “Inheriting Permissions” on page 66.
If you have already set up the permissions levels for all your secure user groups and you want to transfer these settings to another workstation, go to “Exporting and Importing Permissions” on page 67.
To change the permission level of a feature
1. If you have not already done so, open the Authorization Manager and create the appropriate secure user groups (see “Defining User Groups” on page 56).
2. In the Authorization Manager, select a user group from the Secure Groups box.
3. Click Expand Tree to show the entire list of controlled features for the application.
4. From the list of controlled features, select the feature whose permission level you want to change.
5. In the controlled features list to the lower left of the Authorization Manager, select the name of the application.
6. To show the entire list of controlled features for the unit, click Expand Tree.
Note You can set permissions only for individual features, not subgroups. After selecting a feature, the Permission Level options are active. If they are unavailable, you might have selected a subgroup, not a feature.
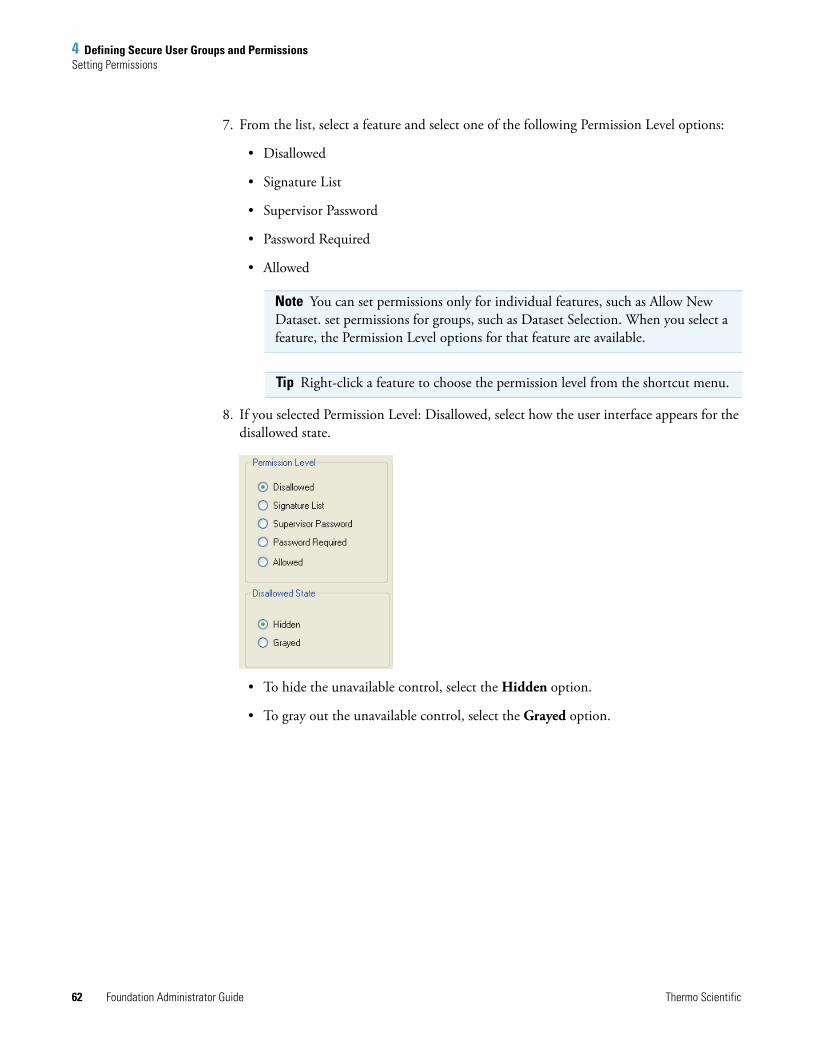
4 Defining Secure User Groups and PermissionsSetting Permissions
62 Foundation Administrator Guide Thermo Scientific
7. From the list, select a feature and select one of the following Permission Level options:
• Disallowed
• Signature List
• Supervisor Password
• Password Required
• Allowed
8. If you selected Permission Level: Disallowed, select how the user interface appears for the disallowed state.
• To hide the unavailable control, select the Hidden option.
• To gray out the unavailable control, select the Grayed option.
Note You can set permissions only for individual features, such as Allow New Dataset. set permissions for groups, such as Dataset Selection. When you select a feature, the Permission Level options for that feature are available.
Tip Right-click a feature to choose the permission level from the shortcut menu.

4 Defining Secure User Groups and PermissionsSetting Permissions
Thermo Scientific Foundation Administrator Guide 63
9. If you set the permission level to Signature List, use the Available Groups area under Signature List Groups to define the signature list groups.
Being a part of the signature list requires that someone from the specified group be present to perform the signing activity that permits the feature to be performed. The signature is specifically for the feature selected.
To approximate an electronic signature, set a name or group to Allowed, Password Required, and Comments Required. For instructions about defining the Comments feature, see “Requiring User Comments” on page 69.
a. In the Available Groups box, select a user group and click the right arrow. The group appears in the Signatures Required box.
b. To add other groups to the Signatures Required list, repeat step a.
c. To require that the current user of the application be placed on the signature list, select the Current User Must Sign check box.
d. To rearrange the order of the groups in the Signatures Required box, select a group and click the Move Group buttons: Up or Down.
Note When a user uses a feature with the Signature List permission level, a series of password dialog boxes appears, one dialog box for each signature (name and password of a member of the designated group).
For instructions about defining the Comments feature, see “Requiring User Comments” on page 69.
The order of the groups in the Available Groups box defines the display order of the password dialog boxes.

4 Defining Secure User Groups and PermissionsSetting Permissions
64 Foundation Administrator Guide Thermo Scientific
10. If you want the users to enter a comment when they perform an action, select the Comments check box in the Other Requirements area.
This option is available for all permission settings except Disallowed. When a user enters a comment, it appears in the audit log for the software.
11. Set the permission levels for any or all remaining features as follows:
• To set the permission level of an individual feature, repeat steps 7 through 10.
• To set the permission levels of the other features in the currently selected application to the same permission level you just set, select the This Application option and click Set To Same.
• If you want to set the permission levels of all the features in all the applications to the same permission level you just set, select the All Applications option and click Set To Same.
The Permission Level setting, the Disallow State setting (if applicable), and the Comments setting are copied to all the other features.
12. To set the permission levels for other user groups in the Secure Groups box, repeat steps 1 through 11.
Note The Authorization Manager retains permission level settings if you move a user group out of the Secure Groups box and into the Available Groups box. If you move the group back into the Secure Groups box, the permission settings remain intact; however, if you delete a user group from the Secure Groups box, all permission settings are lost.

4 Defining Secure User Groups and PermissionsSetting Permissions
Thermo Scientific Foundation Administrator Guide 65
Setting All Permissions
You can set every feature to the same permission level in one of two ways.
To set features to the same permission level
Do one of the following:
• After you set the permission level for one feature, do one of the following:
– To set all of the other features for this application to the same permission level that you just set, select the This application option in the All Features area and click Set To Same.
The Permission Level setting, the Disallowed state setting (if applicable), and the Comment setting are copied to all of the other features for the currently selected application.
– To set all other features for all applications to the permission level that you just set, select the All applications option and click Set To Same.
The software copies the Permission Level setting, the Disallowed state setting (if applicable), and the Comment setting to all other features for all applications.
–or–
• Right-click the user group name in the Secure Groups box, and choose Globally Set To > Permission Level from the shortcut menu.

4 Defining Secure User Groups and PermissionsSetting Permissions
66 Foundation Administrator Guide Thermo Scientific
Inheriting Permissions
You can copy a complete set of permission levels from one secure user group to another secure user group.
To copy permission levels from one secure user group to another secure user group
1. Set up the permissions for a secure user group. For setting up permissions in the LCquan application see “LCquan Folder Structure” on page 131.
2. In the Secure Groups box, select the user group to receive the set of permission levels.
For descriptions of parameters in the Choose Secure Group dialog box, see Table 3 on page 55.
3. Right-click the selected group and choose Inherit From from the shortcut menu to open the Choose Secure Group dialog box and display a list of the secure groups (minus the currently selected group).
4. Select the group whose permission levels you want to copy and click OK.
Both user groups now have the same set of permission levels.
4 Defining Secure User Groups and PermissionsSetting Permissions
Thermo Scientific Foundation Administrator Guide 67
Exporting and Importing Permissions
You can import the permission list that contains the user groups and permissions from another computer. Doing this saves time if you have more than one computer in your lab and you want to allow users access to all computers. Instead of setting up identical user groups on each computer, you can import the permission list from a computer that has the user groups and access permissions that you require.
To export and import the permission list
1. On the system where the correct users and permission levels are set, start the Foundation Authorization Manager.
2. In the Foundation Authorization Manager, click Export.
The button is located at the bottom of the window. The Save As dialog box opens.
3. Save the permission list in the Security folder as a file with an .eperm file extension.
The Windows 7 default location is drive:\ProgramData\Thermo Scientific\.
The default file name is permissions.eperm.
4. Copy the file to the Security folder on the new system.
5. On the new system, start Thermo Foundation Authorization Manager and click Import.
The Open dialog box opens.
6. Select the permission list file (filename.eperm) and click Open.
The user groups and permission levels appear in the Foundation Authorization Manager.
7. Confirm that the user groups and permissions are correct and click OK to save the settings and close Thermo Foundation Authorization Manager.
Defining the List of Secure Folders
Store all electronic records in protected folders. To ensure the application root folder is protected, do not permit users to change the root folder to an unprotected folder.
Note To maintain the security of the permission list, you must export it to a secure location. The Security folder (with proper security settings) on the current computer is an ideal location.
IMPORTANT If you have not configured the security settings to protect your root folders, do so before setting the root folder feature permissions. See Chapter 3, “Establishing Secure File Operations.”

4 Defining Secure User Groups and PermissionsSetting Permissions
68 Foundation Administrator Guide Thermo Scientific
The Foundation Authorization Manager list of controlled features includes the following two features for each application:
• Allow Arbitrary Selection of Root Folder—Allows users to change the root folder to any folder that they choose. You must ensure that the Allow Arbitrary Selection of Root Folder feature is set to Disallowed.
• Allow Change of Root Folder—Allows users to change the root folder to another secure folder. You can set the Allow Change of Root Folder feature to any permission level. If you set the permission level to anything other than Disallowed, you must define a list of secure folders from which the user can select a new root folder.
To define the list of secure folders
1. In the Secure Folders box, click Add.
The Browse For Folder dialog box opens.
2. Select the secure folder that you want to add to the Secure Folders box and click OK to close the dialog box.
The folder appears in the list in the Secure Folders box.
3. Repeat steps 1 and 2 for each folder that you want to add to the Secure Folders box.
After the permission levels and the Secure Folders box have been correctly set up, a user cannot change the root folder to a folder that is not secure. The user must select the new folder from the Secure Folders box from within the application. The secure folders information is saved as part of the configuration in a protected folder. For more information, see “Saving the Security Settings” on page 76.
Tip To display these two features in the Foundation Authorization Manager, double-click the application name in the controlled features list and double-click Root Folder.
IMPORTANT Define secure folders by using fully qualified path names. Use of mapped drive paths might result in network disconnection upon auto-logoff.
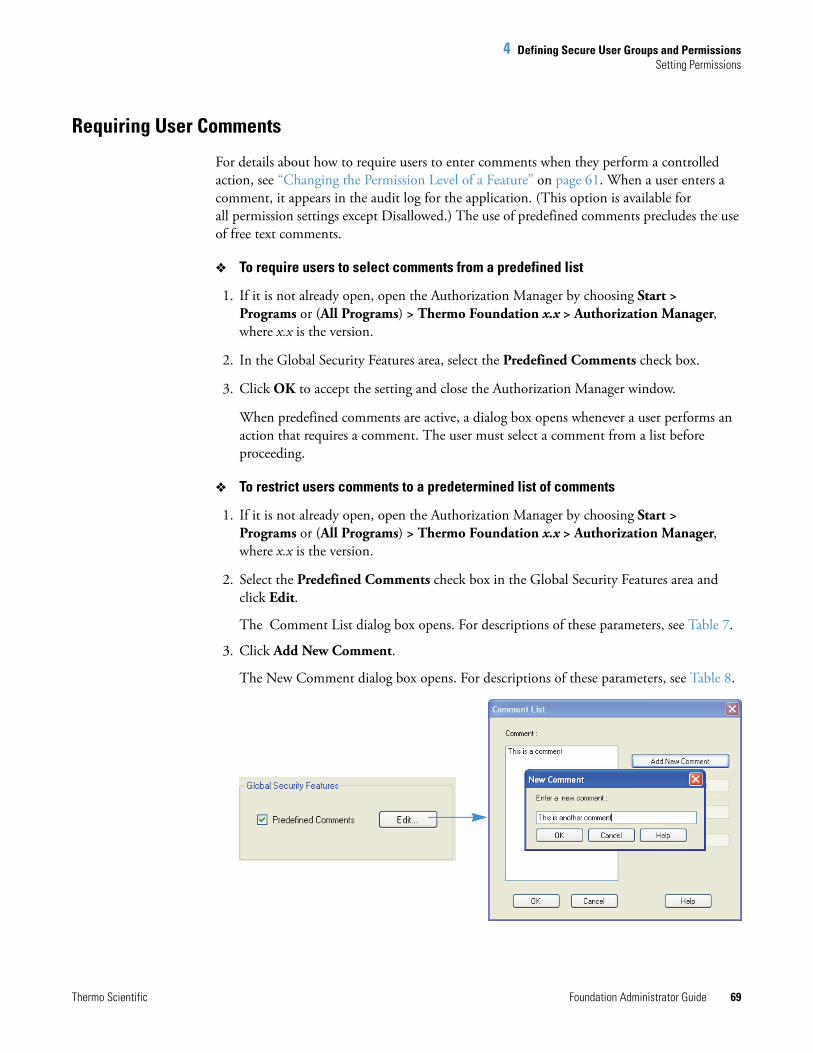
4 Defining Secure User Groups and PermissionsSetting Permissions
Thermo Scientific Foundation Administrator Guide 69
Requiring User Comments
For details about how to require users to enter comments when they perform a controlled action, see “Changing the Permission Level of a Feature” on page 61. When a user enters a comment, it appears in the audit log for the application. (This option is available for all permission settings except Disallowed.) The use of predefined comments precludes the use of free text comments.
To require users to select comments from a predefined list
1. If it is not already open, open the Authorization Manager by choosing Start > Programs or (All Programs) > Thermo Foundation x.x > Authorization Manager, where x.x is the version.
2. In the Global Security Features area, select the Predefined Comments check box.
3. Click OK to accept the setting and close the Authorization Manager window.
When predefined comments are active, a dialog box opens whenever a user performs an action that requires a comment. The user must select a comment from a list before proceeding.
To restrict users comments to a predetermined list of comments
1. If it is not already open, open the Authorization Manager by choosing Start > Programs or (All Programs) > Thermo Foundation x.x > Authorization Manager, where x.x is the version.
2. Select the Predefined Comments check box in the Global Security Features area and click Edit.
The Comment List dialog box opens. For descriptions of these parameters, see Table 7.
3. Click Add New Comment.
The New Comment dialog box opens. For descriptions of these parameters, see Table 8.

4 Defining Secure User Groups and PermissionsSetting Permissions
70 Foundation Administrator Guide Thermo Scientific
4. Enter the comment and click OK.
The new comment appears in the Comment box.
5. Repeat steps 2 and 3 for each new comment that you want to enter.
The Comment box displays the predefined comments in the order that you entered them. To rearrange the order of the comments, click Move Up or Move Down. To delete a comment, select it and click Remove Comment.
6. Make any additional changes to the comment list:
• To delete a comment from the list, select the comment and click Remove Comment.
• To move a comment up or down in the list, select it and click Move Up or Move Down.
7. When you are finished, click OK.
Comment List Dialog Box
Use the Edit Comment List dialog box to define a list of comments that a user must select from to use with features that require a comment.
New Comment Dialog Box
Use the New Comment dialog box to add comments to the list of predefined comments.
Table 7. Edit Comment List dialog box parameters
Parameter Description
Comment View the predefined comments in the order that they appear to the user.
Buttons
Add New Comment Define a new comment.
Remove Comment Delete the currently selected comment in the Comment box.
Move Up Move the selected comment up one position in the Comment box.
Move Down Move the selected comment down one position in the Comment box.
Table 8. New Comment dialog box parameters
Parameter Description
Enter A New Comment Define a new comment to be added to the Comments box.

4 Defining Secure User Groups and PermissionsSetting Up Secure Reports
Thermo Scientific Foundation Administrator Guide 71
Setting Up Secure ReportsYou can limit a user group’s authorization for creating quantitation reports to the secure XReport templates that you specify. After you configure the secure XReport templates feature, the user groups with this permission level can use only the templates from the specified secure templates folder. Users are limited to saving only, and the file format is limited to PDF files. In the Review Reports view, the options to print reports and create new XReport templates are not available.
About the Secure Reports
Users create secure reports when they use the secure XReport templates in the secure templates folder. The secure reports have the following characteristics:
• The only option available for creating a secure report is to save the report as a PDF file. The PDF document properties allow for printing only.
The application changes any other preexisting report formats in the given workbook to PDF and tracks the changes in the Audit Trail.
• A watermark design appears on the background of each page of a secure report.
• A unique serial number appends to the footer of each page:
workbookName_timestamp_n
where n is a counter for the number of reports printed from a workbook.
The serial number increments for each report generated from a given application experiment. If user groups with different security privileges create reports from the same experiment, both the secure and non-secure reports are included in the total count of reports when assigning the serial number.
Setting Up a Secure Template Folder
Secure XReport templates are available in the designated secure templates folder. You can specify only one secure templates folder. Templates that are not in the secure templates folder are not available to the user, even if the templates were previously available in another workbook.
Use the following guidelines when setting up a secure templates folder:
• To prevent users from adding any unapproved templates to the folder, assign read-only access to the folder.
• For a locked workbook, make sure to designate the folder that already contains the templates for the locked workbook.
• Ensure the secure template folder contains only the approved XReport template files (.xrt).

4 Defining Secure User Groups and PermissionsSetting Up Secure Reports
72 Foundation Administrator Guide Thermo Scientific
Configuring Secure Reports
To configure secure reports
1. In the Foundation Authorization Manager, select a user group from the Secure Groups area.
2. In the list of controlled features (lower left side), select the application name and click Expand Tree.
3. In the Quantitative Section, select Secure XReport Template.
4. In the Permission Level area, select Allowed.
For the Secure XReport Template feature, Allowed is the most restrictive setting.
5. In the Secure Template Folder area, click Browse.
6. In the Browse for Folder dialog box, select the folder that contains the secure templates and click OK.

4 Defining Secure User Groups and PermissionsSetting Up Secure Reports
Thermo Scientific Foundation Administrator Guide 73
Locking the Workbook After Creating Reports (LCquan only)
You can have the application automatically lock the workbook (not a copy of the workbook) after you create a report. A locked workbook (and its associated files) is a workbook that cannot be overwritten. You cannot save any changes made to a locked workbook, and you cannot acquire data in a locked workbook. You can create new reports, but the application does not save the report selections. When you open a locked workbook, the application displays [Locked] in the title bar next to the workbook name and in the status bar.
To automatically lock the workbook after you create a report
1. Choose Start > All Programs > Thermo Foundation > Authorization Manager to open the Authorization Manager.
2. In the Authorization Manager, do the following:
a. Select a user group in the Secure Groups box.
b. Click Expand Tree to show the entire list of controlled features for the application.
c. From the list, click the plus sign before the LCquan folder.
d. Click the plus sign before the Quantitate Section folder.
e. Select Automatically Lock Workbook after Creating Reports.
The Permission Level options become available.
f. Select the Allowed option, and click OK.

4 Defining Secure User Groups and PermissionsViewing the Authorization Manager History Log
74 Foundation Administrator Guide Thermo Scientific
Viewing the Authorization Manager History LogThermo Foundation Authorization Manager automatically maintains a history log to record all changes made to the security settings. The log records the following events:
• Creation of a private group
• Addition or deletion of members from a group
• Change in group permissions
• Switch between private and domain/workstation groups
• Manipulation of the signature list
To display the history log
In Thermo Foundation Authorization Manager, click History Log.
The Audit Viewer window opens, showing the history log for the Authorization Manager.
Each entry in the history log contains the time and date, and the user ID and full name. You can sort and filter the entries in the history log by field (for example, you can sort and filter by date and time). You can also print the log.

4 Defining Secure User Groups and PermissionsWorking with Security Settings
Thermo Scientific Foundation Administrator Guide 75
Working with Security SettingsYou can print or save a report of the security settings for each secure user group. The report contains a list of group members, the controlled features information for each application, and the names of any secure folders for each application.
Printing the Security Settings
To print the security settings
1. Open the Thermo Foundation Authorization Manager.
2. In the Secure Groups area, select the secure group and click Print.
The Print dialog box opens.
The report contains a list of the members of the group, the controlled feature information for each application, and the names of any secure folders for each application.

4 Defining Secure User Groups and PermissionsPermission Level Settings for an Application
76 Foundation Administrator Guide Thermo Scientific
Saving the Security Settings
After you have defined your user groups, set the appropriate permission levels, and specified the type of application auditing, click OK to save your settings and exit the Authorization Manager.
The controlled features information is saved in a configuration file in the following folder:
C:\ProgramData\Thermo Scientific\INI
You must properly set the security for this folder to prohibit access by non-administrators. If you have not already done this, go to Chapter 3, “Establishing Secure File Operations.”
Permission Level Settings for an ApplicationThis section discusses the different permission levels and how they interact.
Certain permission level settings override other settings. In addition, some features are unavailable—regardless of their permission level settings—if you have locked specific features in the application.
When using the Oracle Server and Client software, version 11g or later, refer to the Oracle manuals. Consult with your Oracle database administrator and your Thermo Fisher Scientific service representative for advice and instructions about how to set permissions for your application when using this version of the software.
The Permission Level Settings table lists the application features that you can configure in the Foundation Authorization Manager.
Table 9. Permission Level Settings (Sheet 1 of 5)
Application feature Description
Run Application
Operator Use Allowed If you set this feature to Disallowed, the user cannot open the application. As a result, the permission level settings for the other features are irrelevant.
If a user whose permission is set to Disallowed tries to access the system, the application makes an entry in the Global Auditing Database history log.
Root Folder
Allow Change of Root Folder If you enable this feature (set it to Signature List, Supervisor Password, Password Required, or Allowed), define a list of secure folders where the user can select a new root folder.
Allow Arbitrary Selection of Root Folder
If you set this feature to Allowed, the user can select any folder to be the root folder of the workbook.
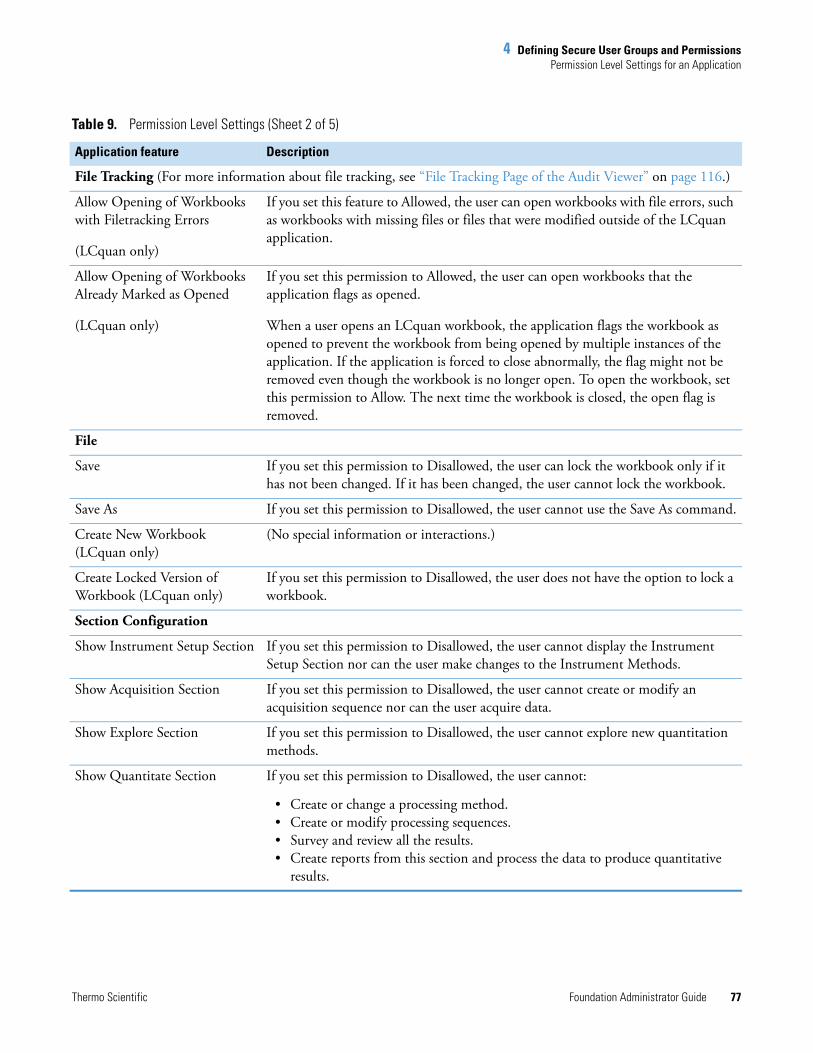
4 Defining Secure User Groups and PermissionsPermission Level Settings for an Application
Thermo Scientific Foundation Administrator Guide 77
File Tracking (For more information about file tracking, see “File Tracking Page of the Audit Viewer” on page 116.)
Allow Opening of Workbooks with Filetracking Errors
(LCquan only)
If you set this feature to Allowed, the user can open workbooks with file errors, such as workbooks with missing files or files that were modified outside of the LCquan application.
Allow Opening of Workbooks Already Marked as Opened
(LCquan only)
If you set this permission to Allowed, the user can open workbooks that the application flags as opened.
When a user opens an LCquan workbook, the application flags the workbook as opened to prevent the workbook from being opened by multiple instances of the application. If the application is forced to close abnormally, the flag might not be removed even though the workbook is no longer open. To open the workbook, set this permission to Allow. The next time the workbook is closed, the open flag is removed.
File
Save If you set this permission to Disallowed, the user can lock the workbook only if it has not been changed. If it has been changed, the user cannot lock the workbook.
Save As If you set this permission to Disallowed, the user cannot use the Save As command.
Create New Workbook (LCquan only)
(No special information or interactions.)
Create Locked Version of Workbook (LCquan only)
If you set this permission to Disallowed, the user does not have the option to lock a workbook.
Section Configuration
Show Instrument Setup Section If you set this permission to Disallowed, the user cannot display the Instrument Setup Section nor can the user make changes to the Instrument Methods.
Show Acquisition Section If you set this permission to Disallowed, the user cannot create or modify an acquisition sequence nor can the user acquire data.
Show Explore Section If you set this permission to Disallowed, the user cannot explore new quantitation methods.
Show Quantitate Section If you set this permission to Disallowed, the user cannot:
• Create or change a processing method.• Create or modify processing sequences.• Survey and review all the results.• Create reports from this section and process the data to produce quantitative
results.
Table 9. Permission Level Settings (Sheet 2 of 5)
Application feature Description

4 Defining Secure User Groups and PermissionsPermission Level Settings for an Application
78 Foundation Administrator Guide Thermo Scientific
Grid Column Settings
Allow Changes to Column setup info
If you set this permission to Disallowed, the user cannot change the number and arrangements of columns in the Results table.
Acquisition Section
Start Acquisition Dialog If you set this permission to Disallowed, the user cannot open the Run Sequence dialog box from the Acquisition view.
Allow Changes to Selected Sample Info in Acquisition Sequence
If you set this permission to Disallowed, the user cannot make changes to the sample information, such as Sample Name, Comment, Study, Client, Laboratory, and so on, in the acquisition sequence.
Allow Changes to Column Labels in Acquisition Sequence
If you set this permission to Disallowed, the user cannot make changes to the column labels in the acquisition sequence.
Prevent Raw File Time-Stamping When Doing Remote Workbook Acquisitions
If you set this permission to Disallowed, the application time-stamps the raw files during a remote acquisition.
Important The application can overwrite raw files of the same name if you turn off time-stamping.
Acquisition Run Dialog
OK Button If you set this permission to Disallowed, the user can view the Run Sequence dialog box but cannot start a data acquisition because the OK button is unavailable in the Run Sequence dialog box.
Explore Section
Allow Import of Peak Lists If you set this permission to Disallowed, the user cannot import a Peak Name List.
Allow Export of Peak Lists If you set this permission to Disallowed, the user cannot export a Peak Name List.
Quantitate Section
Allow Changes to Selected Sample Info in Processing Sequence
If you set this permission to Disallowed, the user cannot make changes to the sample information, such as Sample Name, Comment, Study, Client, Laboratory, and so on, in the processing sequence.
Allow Changes to Column Labels in Processing Sequence
If you set this permission to Disallowed, the user cannot change the column labels in the processing sequence.
Allow Changes to Column Labels in Results
If you set this permission to Disallowed, the user cannot change the column labels on the Survey or Review All pages of the results section.
Prompt User for Comments after Manual Integration
If you set this permission to Allowed, the user must enter a comment before proceeding with a manual integration. Whenever the user performs a manual integration, the Chromatogram Comment dialog box opens and prompts the user for a comment before proceeding.
Table 9. Permission Level Settings (Sheet 3 of 5)
Application feature Description
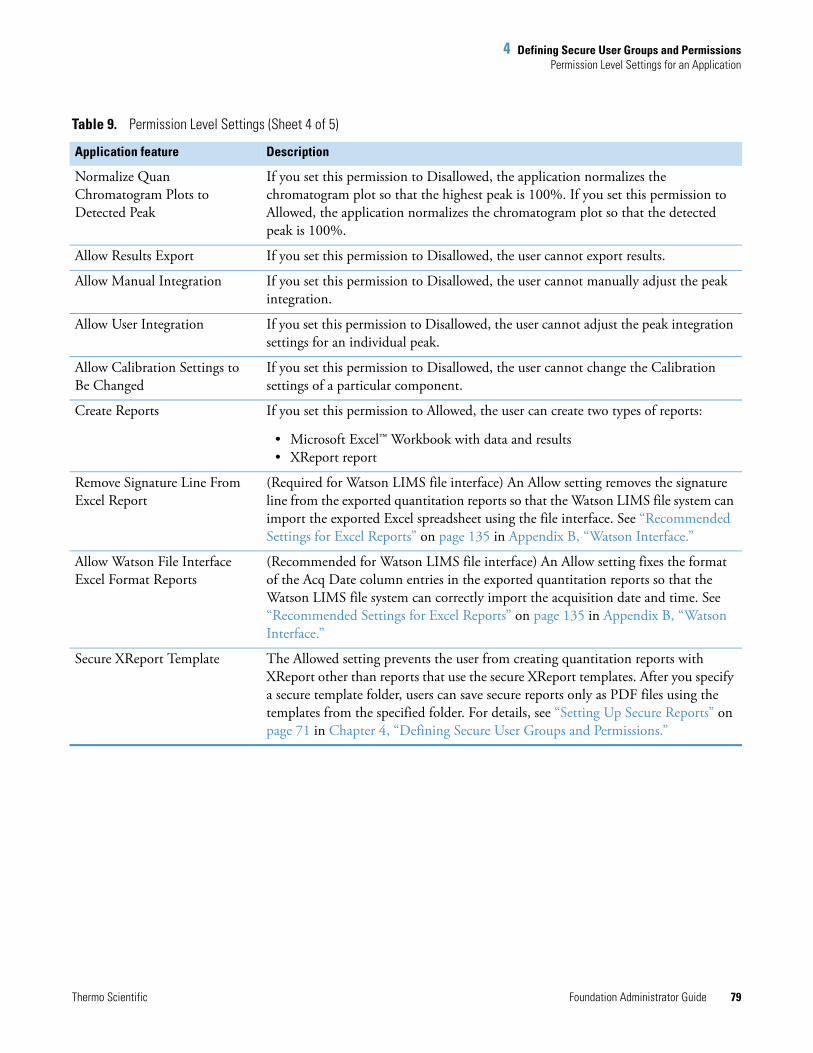
4 Defining Secure User Groups and PermissionsPermission Level Settings for an Application
Thermo Scientific Foundation Administrator Guide 79
Normalize Quan Chromatogram Plots to Detected Peak
If you set this permission to Disallowed, the application normalizes the chromatogram plot so that the highest peak is 100%. If you set this permission to Allowed, the application normalizes the chromatogram plot so that the detected peak is 100%.
Allow Results Export If you set this permission to Disallowed, the user cannot export results.
Allow Manual Integration If you set this permission to Disallowed, the user cannot manually adjust the peak integration.
Allow User Integration If you set this permission to Disallowed, the user cannot adjust the peak integration settings for an individual peak.
Allow Calibration Settings to Be Changed
If you set this permission to Disallowed, the user cannot change the Calibration settings of a particular component.
Create Reports If you set this permission to Allowed, the user can create two types of reports:
• Microsoft Excel™ Workbook with data and results• XReport report
Remove Signature Line From Excel Report
(Required for Watson LIMS file interface) An Allow setting removes the signature line from the exported quantitation reports so that the Watson LIMS file system can import the exported Excel spreadsheet using the file interface. See “Recommended Settings for Excel Reports” on page 135 in Appendix B, “Watson Interface.”
Allow Watson File Interface Excel Format Reports
(Recommended for Watson LIMS file interface) An Allow setting fixes the format of the Acq Date column entries in the exported quantitation reports so that the Watson LIMS file system can correctly import the acquisition date and time. See “Recommended Settings for Excel Reports” on page 135 in Appendix B, “Watson Interface.”
Secure XReport Template The Allowed setting prevents the user from creating quantitation reports with XReport other than reports that use the secure XReport templates. After you specify a secure template folder, users can save secure reports only as PDF files using the templates from the specified folder. For details, see “Setting Up Secure Reports” on page 71 in Chapter 4, “Defining Secure User Groups and Permissions.”
Table 9. Permission Level Settings (Sheet 4 of 5)
Application feature Description
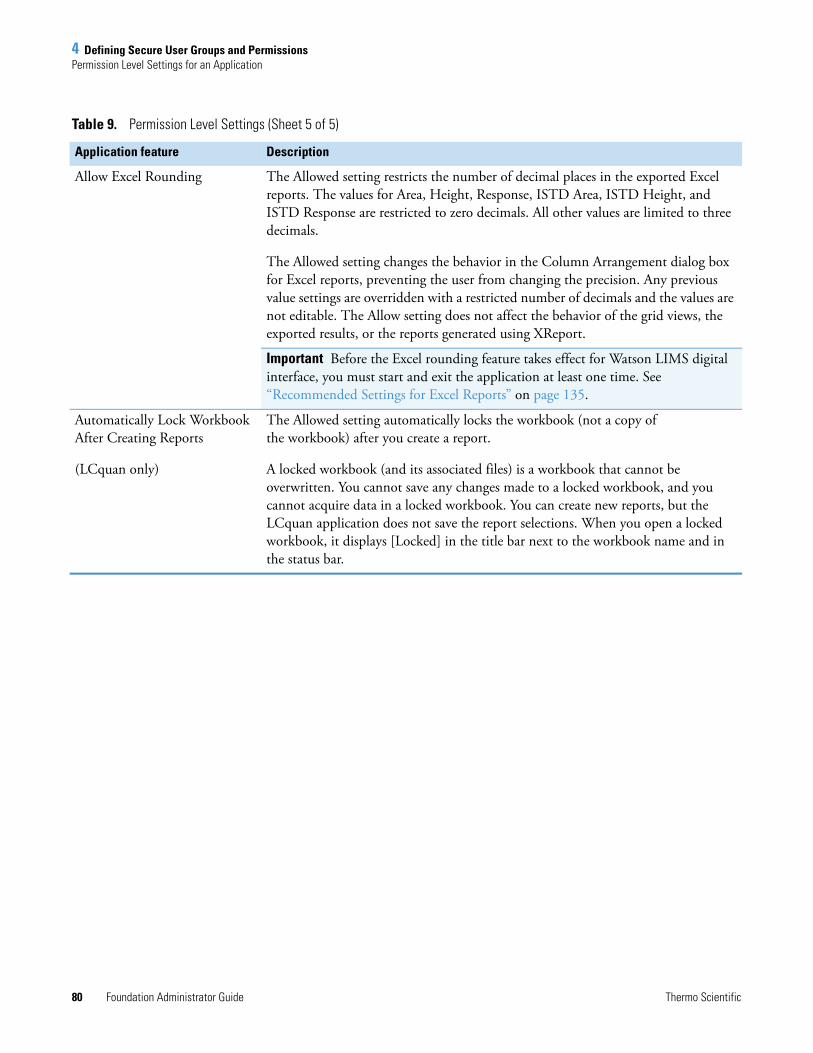
4 Defining Secure User Groups and PermissionsPermission Level Settings for an Application
80 Foundation Administrator Guide Thermo Scientific
Allow Excel Rounding The Allowed setting restricts the number of decimal places in the exported Excel reports. The values for Area, Height, Response, ISTD Area, ISTD Height, and ISTD Response are restricted to zero decimals. All other values are limited to three decimals.
The Allowed setting changes the behavior in the Column Arrangement dialog box for Excel reports, preventing the user from changing the precision. Any previous value settings are overridden with a restricted number of decimals and the values are not editable. The Allow setting does not affect the behavior of the grid views, the exported results, or the reports generated using XReport.
Important Before the Excel rounding feature takes effect for Watson LIMS digital interface, you must start and exit the application at least one time. See “Recommended Settings for Excel Reports” on page 135.
Automatically Lock Workbook After Creating Reports
(LCquan only)
The Allowed setting automatically locks the workbook (not a copy of the workbook) after you create a report.
A locked workbook (and its associated files) is a workbook that cannot be overwritten. You cannot save any changes made to a locked workbook, and you cannot acquire data in a locked workbook. You can create new reports, but the LCquan application does not save the report selections. When you open a locked workbook, it displays [Locked] in the title bar next to the workbook name and in the status bar.
Table 9. Permission Level Settings (Sheet 5 of 5)
Application feature Description

4 Defining Secure User Groups and PermissionsAuthorization Manager Parameters
Thermo Scientific Foundation Administrator Guide 81
Authorization Manager ParametersIn addition to using the security features of your computer operating system, use the Authorization Manager to define user groups and to set permission levels for those groups within Thermo applications and software. Setting permission levels makes sure that only those who are to some degree responsible for electronic records can access the specific applications that generate them. You must be logged on as an administrator to set these permissions.
When using the Oracle Server and Client software, version 11g or later, see “Using Microsoft and Oracle Databases” on page 11.
For more information about using the Authorization Manager to define user groups and set permission levels, see “Setting Up Secure User Groups” on page 55.
These tables describe the parameters in the Authorization Manager window and the features that you can configure from this window:
• Table 10 describes the parameters in the Authorization Manager window.
• Table 11 on page 86 describes the application features that you can configure from the Authorization Manager window.
Table 10. Foundation Authorization Manager parameters (Sheet 1 of 6)
Parameter Description
Available Groups
Domain/Workstation Use preexisting Windows logon groups. Contact your network administrator to create or change logon groups.
Private Use or create a private (local) user group. The administrator of the workstation can create private groups.
Available Groups View the available Windows logon groups (Domain/Workstation option) or private (local) groups (Private option).
To move a group into the Secure Groups box, select the group in the Available Groups list and click >>. To move a group out of the Secure Groups box, select the group in the Secure Groups box and click <<, or double-click the group.
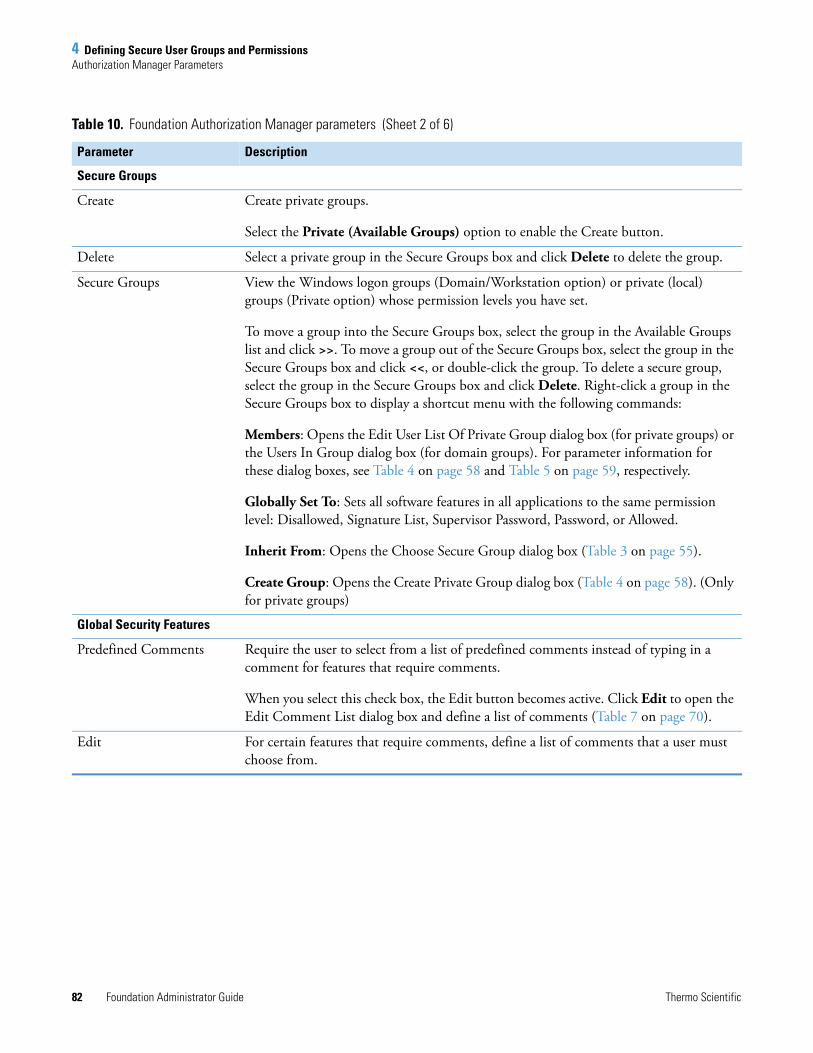
4 Defining Secure User Groups and PermissionsAuthorization Manager Parameters
82 Foundation Administrator Guide Thermo Scientific
Secure Groups
Create Create private groups.
Select the Private (Available Groups) option to enable the Create button.
Delete Select a private group in the Secure Groups box and click Delete to delete the group.
Secure Groups View the Windows logon groups (Domain/Workstation option) or private (local) groups (Private option) whose permission levels you have set.
To move a group into the Secure Groups box, select the group in the Available Groups list and click >>. To move a group out of the Secure Groups box, select the group in the Secure Groups box and click <<, or double-click the group. To delete a secure group, select the group in the Secure Groups box and click Delete. Right-click a group in the Secure Groups box to display a shortcut menu with the following commands:
Members: Opens the Edit User List Of Private Group dialog box (for private groups) or the Users In Group dialog box (for domain groups). For parameter information for these dialog boxes, see Table 4 on page 58 and Table 5 on page 59, respectively.
Globally Set To: Sets all software features in all applications to the same permission level: Disallowed, Signature List, Supervisor Password, Password, or Allowed.
Inherit From: Opens the Choose Secure Group dialog box (Table 3 on page 55).
Create Group: Opens the Create Private Group dialog box (Table 4 on page 58). (Only for private groups)
Global Security Features
Predefined Comments Require the user to select from a list of predefined comments instead of typing in a comment for features that require comments.
When you select this check box, the Edit button becomes active. Click Edit to open the Edit Comment List dialog box and define a list of comments (Table 7 on page 70).
Edit For certain features that require comments, define a list of comments that a user must choose from.
Table 10. Foundation Authorization Manager parameters (Sheet 2 of 6)
Parameter Description
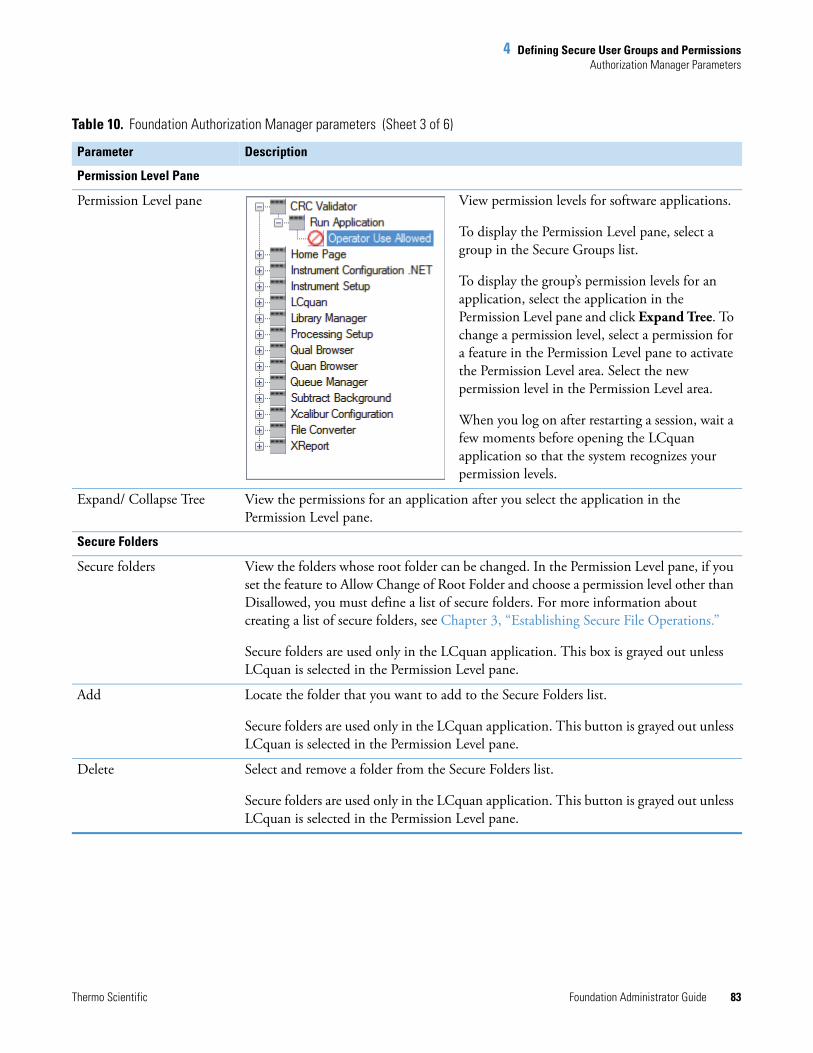
4 Defining Secure User Groups and PermissionsAuthorization Manager Parameters
Thermo Scientific Foundation Administrator Guide 83
Permission Level Pane
Permission Level pane View permission levels for software applications.
To display the Permission Level pane, select a group in the Secure Groups list.
To display the group’s permission levels for an application, select the application in the Permission Level pane and click Expand Tree. To change a permission level, select a permission for a feature in the Permission Level pane to activate the Permission Level area. Select the new permission level in the Permission Level area.
When you log on after restarting a session, wait a few moments before opening the LCquan application so that the system recognizes your permission levels.
Expand/ Collapse Tree View the permissions for an application after you select the application in the Permission Level pane.
Secure Folders
Secure folders View the folders whose root folder can be changed. In the Permission Level pane, if you set the feature to Allow Change of Root Folder and choose a permission level other than Disallowed, you must define a list of secure folders. For more information about creating a list of secure folders, see Chapter 3, “Establishing Secure File Operations.”
Secure folders are used only in the LCquan application. This box is grayed out unless LCquan is selected in the Permission Level pane.
Add Locate the folder that you want to add to the Secure Folders list.
Secure folders are used only in the LCquan application. This button is grayed out unless LCquan is selected in the Permission Level pane.
Delete Select and remove a folder from the Secure Folders list.
Secure folders are used only in the LCquan application. This button is grayed out unless LCquan is selected in the Permission Level pane.
Table 10. Foundation Authorization Manager parameters (Sheet 3 of 6)
Parameter Description

4 Defining Secure User Groups and PermissionsAuthorization Manager Parameters
84 Foundation Administrator Guide Thermo Scientific
Permission Level
Disallowed To refuse access to the feature that you selected, set the permission level of the feature in the Permission Levels pane to Disallowed. By default, all new secure user groups have all features set to Disallowed.
If Disallowed and Allowed are the only options available (all of the other options are grayed out), then these options do not indicate permission levels, but instead indicate configuration settings. Disallowed means that the selection in the Permission Levels pane is not displayed by the application and Allowed means that the selection is displayed.
For example, if you select Xcalibur Configuration | Allow To Access | Dataset List page in the Permission Levels pane, only the Disallowed and Allowed settings are available. If you select Disallowed, the Dataset List page is not displayed in the Xcalibur Configuration dialog box. If you select Allowed, the Dataset List page is displayed in the Xcalibur Configuration dialog box.
Signature List Require that the names and passwords of everyone on the signature list be entered to perform the action that you selected in the Permission Levels pane. When an action with a permission level of Signature List is chosen, a series of password dialog boxes appear, one for each signature (name and password of a member of a designated signature group). The order of the groups shown in the Signature List Groups: Signature Required list defines the order in which the password dialog boxes appear.
Supervisor Password Require that the name and password of the supervisor be entered to perform the action that you selected in the Permission Levels pane. In this context, a supervisor is any person who has permission to do this operation—that is, the person’s permission level for this operation is either Allowed or Password Required.
Password Required Require that the password of the user be entered to perform the action that you selected in the Permission Levels pane.
Allowed No restrictions. Allows the user to perform the action that you selected in the Permission Levels pane without restriction.
If Disallowed and Allowed are the only options available (all of the other options are grayed out), then these options do not indicate permission levels, but instead indicate configuration settings. Disallowed means that the selection in the Permission Levels pane is not displayed by the application and Allowed means that the selection is displayed.
For example, if you select Xcalibur Configuration | Allow To Access | Dataset List page in the Permission Levels pane, only the Disallowed and Allowed settings are available. If you select Disallowed, the Dataset List page is not displayed in the Xcalibur Configuration dialog box. If you select Allowed, the Dataset List page is displayed in the Xcalibur Configuration dialog box.
Table 10. Foundation Authorization Manager parameters (Sheet 4 of 6)
Parameter Description
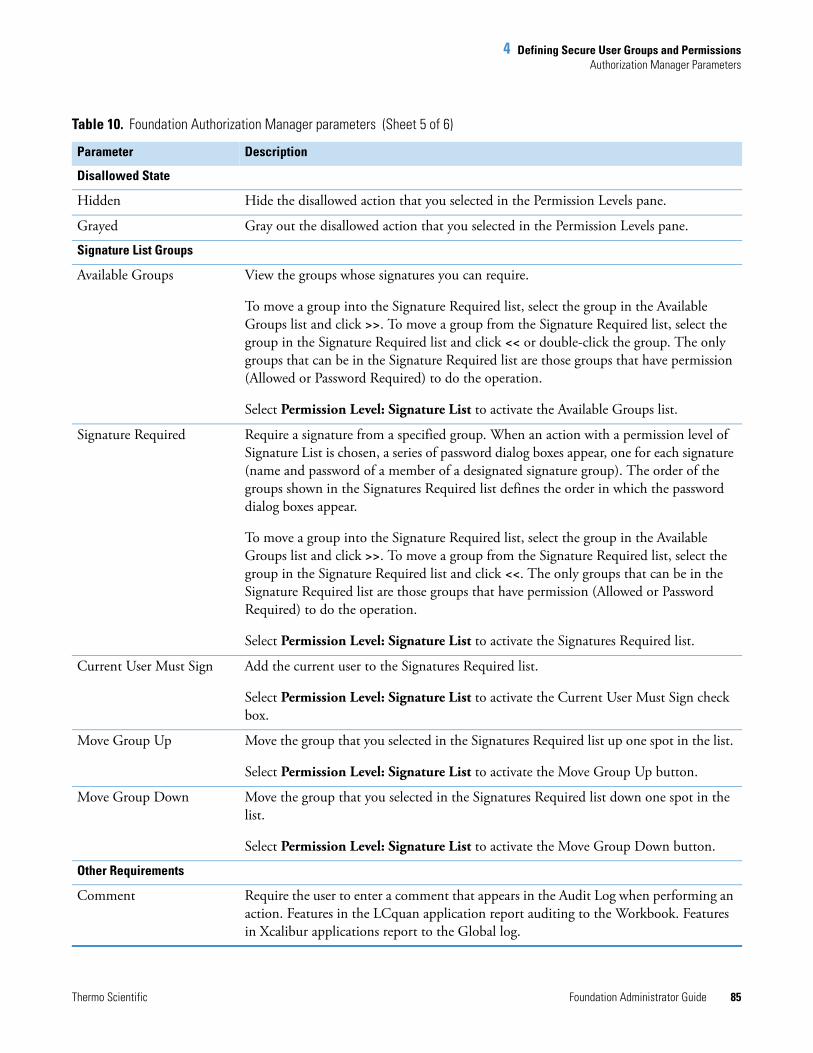
4 Defining Secure User Groups and PermissionsAuthorization Manager Parameters
Thermo Scientific Foundation Administrator Guide 85
Disallowed State
Hidden Hide the disallowed action that you selected in the Permission Levels pane.
Grayed Gray out the disallowed action that you selected in the Permission Levels pane.
Signature List Groups
Available Groups View the groups whose signatures you can require.
To move a group into the Signature Required list, select the group in the Available Groups list and click >>. To move a group from the Signature Required list, select the group in the Signature Required list and click << or double-click the group. The only groups that can be in the Signature Required list are those groups that have permission (Allowed or Password Required) to do the operation.
Select Permission Level: Signature List to activate the Available Groups list.
Signature Required Require a signature from a specified group. When an action with a permission level of Signature List is chosen, a series of password dialog boxes appear, one for each signature (name and password of a member of a designated signature group). The order of the groups shown in the Signatures Required list defines the order in which the password dialog boxes appear.
To move a group into the Signature Required list, select the group in the Available Groups list and click >>. To move a group from the Signature Required list, select the group in the Signature Required list and click <<. The only groups that can be in the Signature Required list are those groups that have permission (Allowed or Password Required) to do the operation.
Select Permission Level: Signature List to activate the Signatures Required list.
Current User Must Sign Add the current user to the Signatures Required list.
Select Permission Level: Signature List to activate the Current User Must Sign check box.
Move Group Up Move the group that you selected in the Signatures Required list up one spot in the list.
Select Permission Level: Signature List to activate the Move Group Up button.
Move Group Down Move the group that you selected in the Signatures Required list down one spot in the list.
Select Permission Level: Signature List to activate the Move Group Down button.
Other Requirements
Comment Require the user to enter a comment that appears in the Audit Log when performing an action. Features in the LCquan application report auditing to the Workbook. Features in Xcalibur applications report to the Global log.
Table 10. Foundation Authorization Manager parameters (Sheet 5 of 6)
Parameter Description
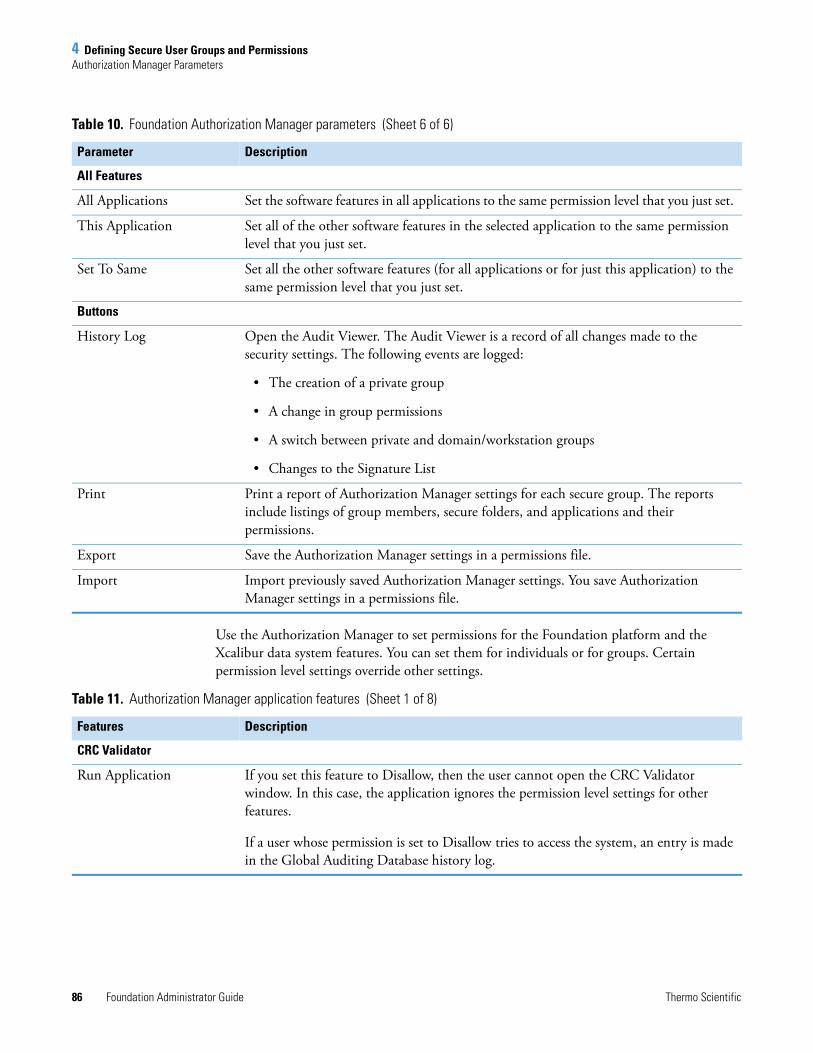
4 Defining Secure User Groups and PermissionsAuthorization Manager Parameters
86 Foundation Administrator Guide Thermo Scientific
Use the Authorization Manager to set permissions for the Foundation platform and the Xcalibur data system features. You can set them for individuals or for groups. Certain permission level settings override other settings.
All Features
All Applications Set the software features in all applications to the same permission level that you just set.
This Application Set all of the other software features in the selected application to the same permission level that you just set.
Set To Same Set all the other software features (for all applications or for just this application) to the same permission level that you just set.
Buttons
History Log Open the Audit Viewer. The Audit Viewer is a record of all changes made to the security settings. The following events are logged:
• The creation of a private group
• A change in group permissions
• A switch between private and domain/workstation groups
• Changes to the Signature List
Print Print a report of Authorization Manager settings for each secure group. The reports include listings of group members, secure folders, and applications and their permissions.
Export Save the Authorization Manager settings in a permissions file.
Import Import previously saved Authorization Manager settings. You save Authorization Manager settings in a permissions file.
Table 10. Foundation Authorization Manager parameters (Sheet 6 of 6)
Parameter Description
Table 11. Authorization Manager application features (Sheet 1 of 8)
Features Description
CRC Validator
Run Application If you set this feature to Disallow, then the user cannot open the CRC Validator window. In this case, the application ignores the permission level settings for other features.
If a user whose permission is set to Disallow tries to access the system, an entry is made in the Global Auditing Database history log.
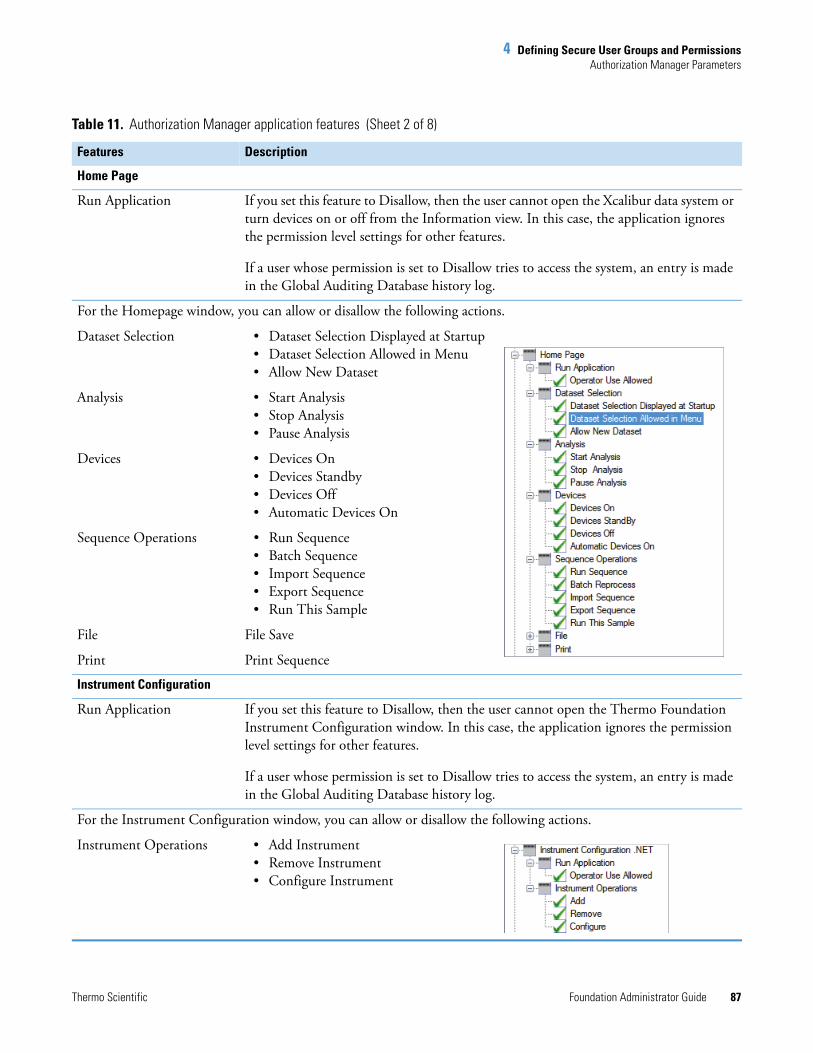
4 Defining Secure User Groups and PermissionsAuthorization Manager Parameters
Thermo Scientific Foundation Administrator Guide 87
Home Page
Run Application If you set this feature to Disallow, then the user cannot open the Xcalibur data system or turn devices on or off from the Information view. In this case, the application ignores the permission level settings for other features.
If a user whose permission is set to Disallow tries to access the system, an entry is made in the Global Auditing Database history log.
For the Homepage window, you can allow or disallow the following actions.
Dataset Selection • Dataset Selection Displayed at Startup• Dataset Selection Allowed in Menu• Allow New Dataset
Analysis • Start Analysis• Stop Analysis• Pause Analysis
Devices • Devices On• Devices Standby• Devices Off• Automatic Devices On
Sequence Operations • Run Sequence• Batch Sequence• Import Sequence• Export Sequence• Run This Sample
File File Save
Print Print Sequence
Instrument Configuration
Run Application If you set this feature to Disallow, then the user cannot open the Thermo Foundation Instrument Configuration window. In this case, the application ignores the permission level settings for other features.
If a user whose permission is set to Disallow tries to access the system, an entry is made in the Global Auditing Database history log.
For the Instrument Configuration window, you can allow or disallow the following actions.
Instrument Operations • Add Instrument• Remove Instrument• Configure Instrument
Table 11. Authorization Manager application features (Sheet 2 of 8)
Features Description

4 Defining Secure User Groups and PermissionsAuthorization Manager Parameters
88 Foundation Administrator Guide Thermo Scientific
Instrument Setup
Run Application If you set this feature to Disallow, then the user cannot open the Instrument Setup window. In this case, the application ignores the permission level settings for other features.
If a user whose permission is set to Disallow tries to access the system, an entry is made in the Global Auditing Database history log.
For the Instrument Setup window, you can allow or disallow access to the following actions.
Dataset Application • Dataset Selection Displayed at Startup• Dataset Selection Allowed in Menu• Allow New Dataset
File File Save
Print Print Instrument Method
LCquan
For information about the LCquan features, see Appendix A, “LCquan Folder Structure and Security Features.”
Table 11. Authorization Manager application features (Sheet 3 of 8)
Features Description
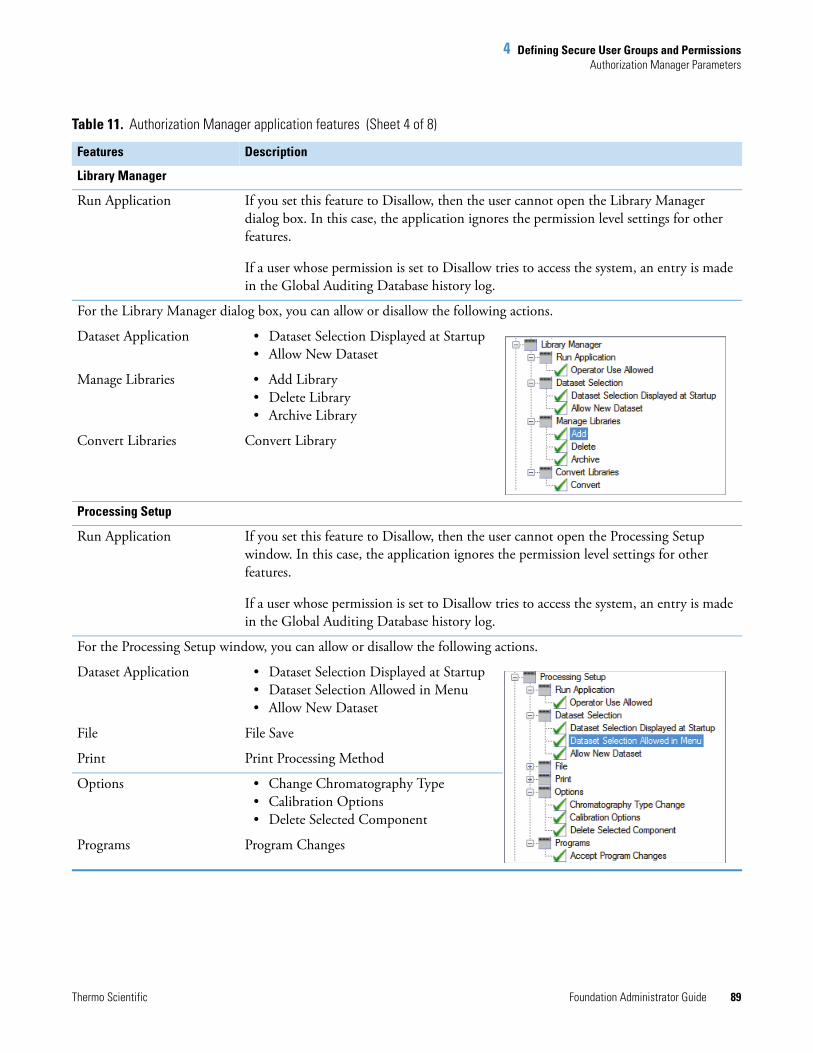
4 Defining Secure User Groups and PermissionsAuthorization Manager Parameters
Thermo Scientific Foundation Administrator Guide 89
Library Manager
Run Application If you set this feature to Disallow, then the user cannot open the Library Manager dialog box. In this case, the application ignores the permission level settings for other features.
If a user whose permission is set to Disallow tries to access the system, an entry is made in the Global Auditing Database history log.
For the Library Manager dialog box, you can allow or disallow the following actions.
Dataset Application • Dataset Selection Displayed at Startup• Allow New Dataset
Manage Libraries • Add Library• Delete Library• Archive Library
Convert Libraries Convert Library
Processing Setup
Run Application If you set this feature to Disallow, then the user cannot open the Processing Setup window. In this case, the application ignores the permission level settings for other features.
If a user whose permission is set to Disallow tries to access the system, an entry is made in the Global Auditing Database history log.
For the Processing Setup window, you can allow or disallow the following actions.
Dataset Application • Dataset Selection Displayed at Startup• Dataset Selection Allowed in Menu• Allow New Dataset
File File Save
Print Print Processing Method
Options • Change Chromatography Type• Calibration Options• Delete Selected Component
Programs Program Changes
Table 11. Authorization Manager application features (Sheet 4 of 8)
Features Description
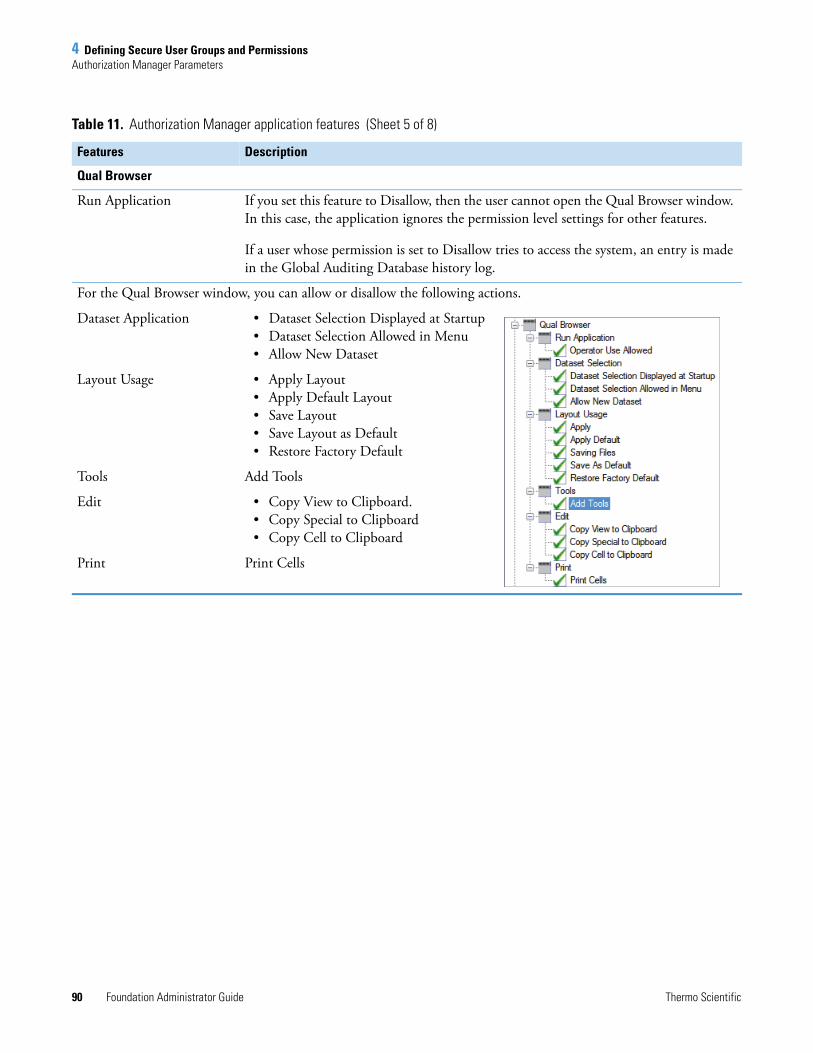
4 Defining Secure User Groups and PermissionsAuthorization Manager Parameters
90 Foundation Administrator Guide Thermo Scientific
Qual Browser
Run Application If you set this feature to Disallow, then the user cannot open the Qual Browser window. In this case, the application ignores the permission level settings for other features.
If a user whose permission is set to Disallow tries to access the system, an entry is made in the Global Auditing Database history log.
For the Qual Browser window, you can allow or disallow the following actions.
Dataset Application • Dataset Selection Displayed at Startup• Dataset Selection Allowed in Menu• Allow New Dataset
Layout Usage • Apply Layout• Apply Default Layout• Save Layout• Save Layout as Default • Restore Factory Default
Tools Add Tools
Edit • Copy View to Clipboard.• Copy Special to Clipboard• Copy Cell to Clipboard
Print Print Cells
Table 11. Authorization Manager application features (Sheet 5 of 8)
Features Description
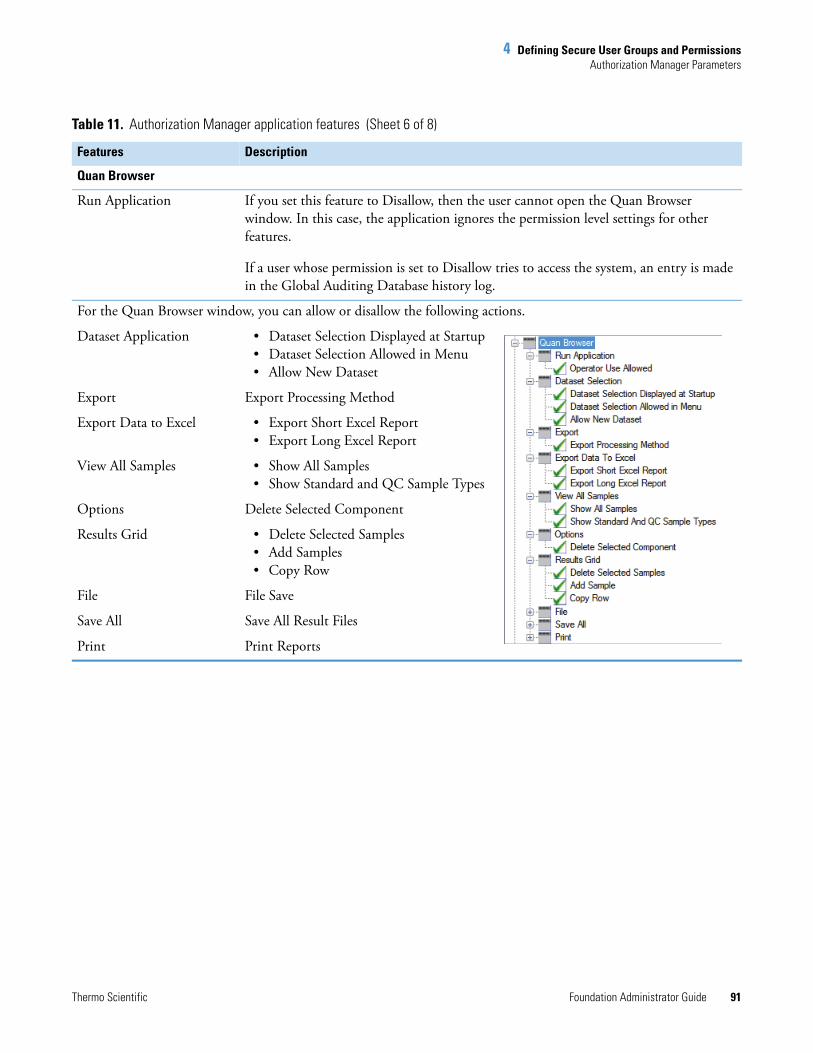
4 Defining Secure User Groups and PermissionsAuthorization Manager Parameters
Thermo Scientific Foundation Administrator Guide 91
Quan Browser
Run Application If you set this feature to Disallow, then the user cannot open the Quan Browser window. In this case, the application ignores the permission level settings for other features.
If a user whose permission is set to Disallow tries to access the system, an entry is made in the Global Auditing Database history log.
For the Quan Browser window, you can allow or disallow the following actions.
Dataset Application • Dataset Selection Displayed at Startup• Dataset Selection Allowed in Menu• Allow New Dataset
Export Export Processing Method
Export Data to Excel • Export Short Excel Report• Export Long Excel Report
View All Samples • Show All Samples• Show Standard and QC Sample Types
Options Delete Selected Component
Results Grid • Delete Selected Samples• Add Samples• Copy Row
File File Save
Save All Save All Result Files
Print Print Reports
Table 11. Authorization Manager application features (Sheet 6 of 8)
Features Description

4 Defining Secure User Groups and PermissionsAuthorization Manager Parameters
92 Foundation Administrator Guide Thermo Scientific
Queue Manager
Run Application If you set this feature to Disallow, then the user cannot submit sequences to the acquisition queue. In this case, the application ignores the permission level settings for other features.
If a user whose permission is set to Disallow tries to access the system, an entry is made in the Global Auditing Database history log.
Selecting the Disallow check box hides access to the following features.
Dataset Application • Dataset Selection Displayed at Startup• Dataset Selection Allowed in Menu• Allow New Dataset
Queue • Pause Queue• Resume Queue• Purge Queue
Analysis Remove From Queue
Subtract Background
Run Application If you set this feature to Disallow, then the user cannot open the software application. In this case, the application ignores the permission level settings for other features.
If a user whose permission is set to Disallow tries to access the system, an entry is made in the Global Auditing Database history log.
Selecting the Disallow check box hides access to the following features.
Dataset Application • Dataset Selection Displayed at Startup• Allow New Dataset
Operation Proceed
Table 11. Authorization Manager application features (Sheet 7 of 8)
Features Description

4 Defining Secure User Groups and PermissionsAuthorization Manager Parameters
Thermo Scientific Foundation Administrator Guide 93
Xcalibur Configuration
Run Application If you set this feature to Disallow, then the user cannot open the software application. In this case, the application ignores the permission level settings for other features.
If a user whose permission is set to Disallow tries to access the system, an entry is made in the Global Auditing Database history log.
Selecting the Disallow check box hides access to the following features:
Customer Info Print User Info
Allow Access to Tabs • Folders• Customer Info• Fonts• Peak Detection• Mass Options• Labeling and Scaling• Intelligent Shutdown• Dataset List
Reset Reset Allowed
File Converter
Run Application If you set this feature to Disallow, then the user cannot open the File Converter application. In this case, the application ignores the permission level settings for other features.
If a user whose permission is set to Disallow tries to open the File Converter application, an entry is made in the Global Auditing Database history log.
Selecting the Disallow check box hides access to the following features.
Dataset Application • Dataset Selection Displayed at Startup• Allow New Dataset
Convert Button Convert Button Check
XReport
Run Application If you set this feature to Disallow, then the user cannot open the Xreport application. In this case, the application ignores the permission level settings for other features.
If a user whose permission is set to Disallow tries to access the system, an entry is made in the Global Auditing Database history log.
Table 11. Authorization Manager application features (Sheet 8 of 8)
Features Description

Thermo Scientific Foundation Administrator Guide 95
5
Using the CRC Validator
The Thermo Foundation CRC Validator compares the cyclic redundancy check (CRC) value stored in the database for a file with the CRC value computed from the file stored on the hard disk. If the stored CRC value and the computed CRC value do not match, the file might have been corrupted or altered from the time when a layered application saved it. This chapter describes how to use the Foundation CRC Validator to check your files.
Contents
• Checking Files with the Foundation CRC Validator
• Selecting Files Using Database Filters
• Selecting Files Using a Pattern
• CRC Validator Parameters
Note Close any open layered applications before running the Foundation CRC Validator.

5 Using the CRC ValidatorChecking Files with the Foundation CRC Validator
96 Foundation Administrator Guide Thermo Scientific
Checking Files with the Foundation CRC Validator To use the Foundation CRC Validator
1. From the Windows taskbar, choose Start > Programs (or All Programs) > Thermo Foundation x.x > CRC Validation, where x.x is the version.
The Foundation CRC Validator window opens. For information about the parameters in this window, see “CRC Validator Parameters” on page 101.
2. In the File Selection area, select a file selection method:
• To select files that match a database filter, see “Selecting Files Using Database Filters” on page 97.
• To select files that match a pattern, see “Selecting Files Using a Pattern” on page 100.
3. To check the selected files, do the following:
a. Click Check.
b. Examine the results displayed in the Check Results area.
The Status column in the file list indicates the status of each file (see Table 12).

5 Using the CRC ValidatorChecking Files with the Foundation CRC Validator
Thermo Scientific Foundation Administrator Guide 97
4. Click Exit to close the CRC Validator window.
Selecting Files Using Database Filters
When you select files using database filters, select files for validation based on information about those files that is stored in the auditing database. For example, select files created by a particular layered application or select files created or modified at certain times.
Create two types of filters: non-date filters and date filters. Non-date filters are based on fields from the auditing database. Use them to select files based on characteristics, such as the application used to create the file or the name of the user who created the file. Use date filters to select files based on the date when they were created or last modified.
Combine multiple non-date filters using the AND and OR operators. The default filter is the most recently selected dataset name.
To select files using a database filter
1. In the File Selection area of the CRC Validator window, select the Files Matching Database Filter option.
Table 12. Status values for CRC Validation
Status Description
CRCs Match The CRC stored in the database matches the CRC just calculated for the file.
CRCs Do Not Match The CRC stored in the database does not match the CRC just calculated for the file. Most likely, the file has been modified since the tracking record was created.
File Not In Database The file was found on the hard disk, but not in the database. It might not be a tracked file.
File Not On Disk The file was found in the database, but not on the hard disk. The file might have been archived or deleted.

5 Using the CRC ValidatorChecking Files with the Foundation CRC Validator
98 Foundation Administrator Guide Thermo Scientific
2. Click Edit Filter.
The Filter Entries dialog box opens. For descriptions of these parameters, see Table 13.
3. For each non-date filter that you want to add, do the following in the Add Non-Date Filter area:
a. In the first list, select AND or OR.
b. In the second list, select the database key to filter on.
c. In the Equals box, type the value for the database key. For example, if you selected Application Name in the second list, you might enter Home Page or Qual Browser in the Equals box.
d. Click Add to add this filter to the list of current filters.
4. For each date filter that you want to add, do the following in the Add Date Filter area:
a. In the From box, enter the starting date and time for the filter.
b. In the To box, enter the ending date and time for the filter.
c. Click Add to add this filter to the list of current filters.
5. To remove unwanted filters from the filter list, click the filter name in the list and click Remove Filter.
6. When you have made all needed changes, click OK to save your changes and close the dialog box.
5 Using the CRC ValidatorChecking Files with the Foundation CRC Validator
Thermo Scientific Foundation Administrator Guide 99
Filter Entries Dialog Box
Use the Filter Entries dialog box to specify how you want to filter the entries in the Audit Viewer or in the CRC Validator. By applying a filter, you can display a subset of the entries in the Audit Viewer or a subset of the entries to be validated in the CRC Validator.
Table 13. Filter Entries dialog box parameters
Parameter Description
Add Non-Date Filter
Operator View or change the operator (AND or OR) used in the filter.
Field View or change the field to filter, for example, Application Name.
Equals String View or change the field value to filter, for example, Authorization Manager.
Add Add the new filter to the Filter Entry box.
Add Date Filter
From Date/Time View or change the earliest date and time for the time/date range for the filter.
To Date/Time View or change the latest date and time for the time/date range for the filter.
Add Add the new filter to the Filter Entry box.
Filter Entry box View or change the filters that an application uses to filter the audit records.
You can click the filters to select them. When a filter is selected, the Remove Filter button becomes active.
Button
Remove Filter Delete the selected filter in the Filter Entry box.
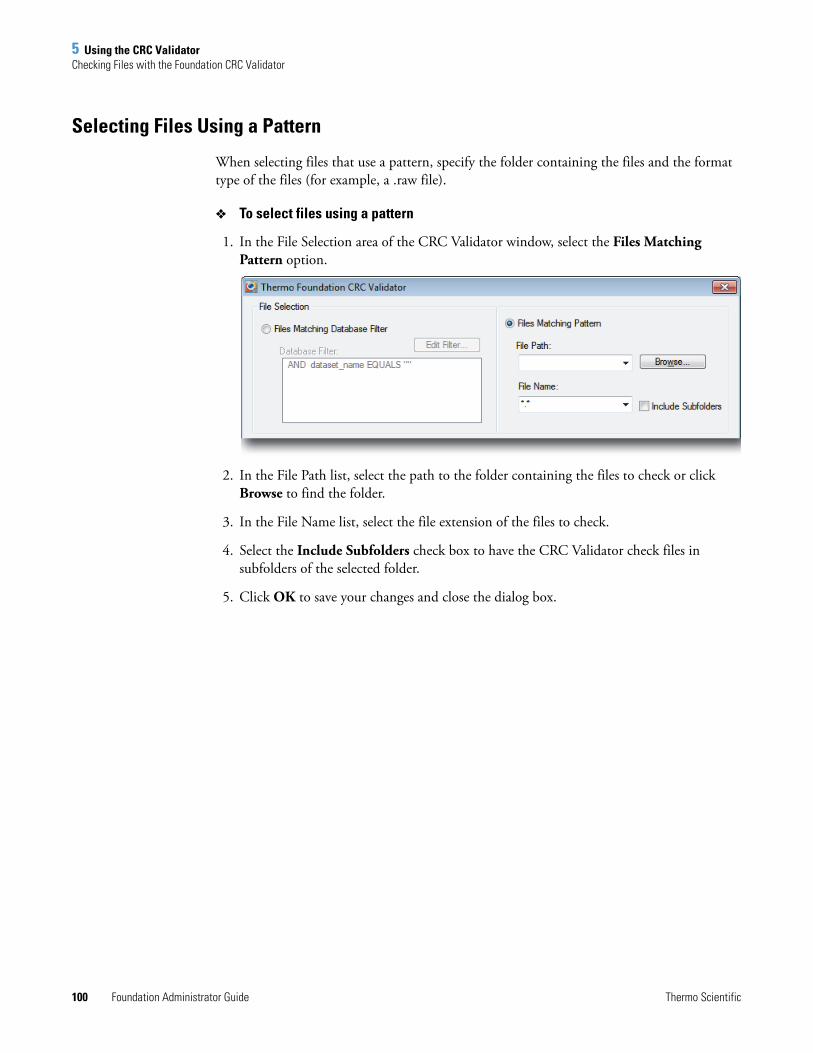
5 Using the CRC ValidatorChecking Files with the Foundation CRC Validator
100 Foundation Administrator Guide Thermo Scientific
Selecting Files Using a Pattern
When selecting files that use a pattern, specify the folder containing the files and the format type of the files (for example, a .raw file).
To select files using a pattern
1. In the File Selection area of the CRC Validator window, select the Files Matching Pattern option.
2. In the File Path list, select the path to the folder containing the files to check or click Browse to find the folder.
3. In the File Name list, select the file extension of the files to check.
4. Select the Include Subfolders check box to have the CRC Validator check files in subfolders of the selected folder.
5. Click OK to save your changes and close the dialog box.
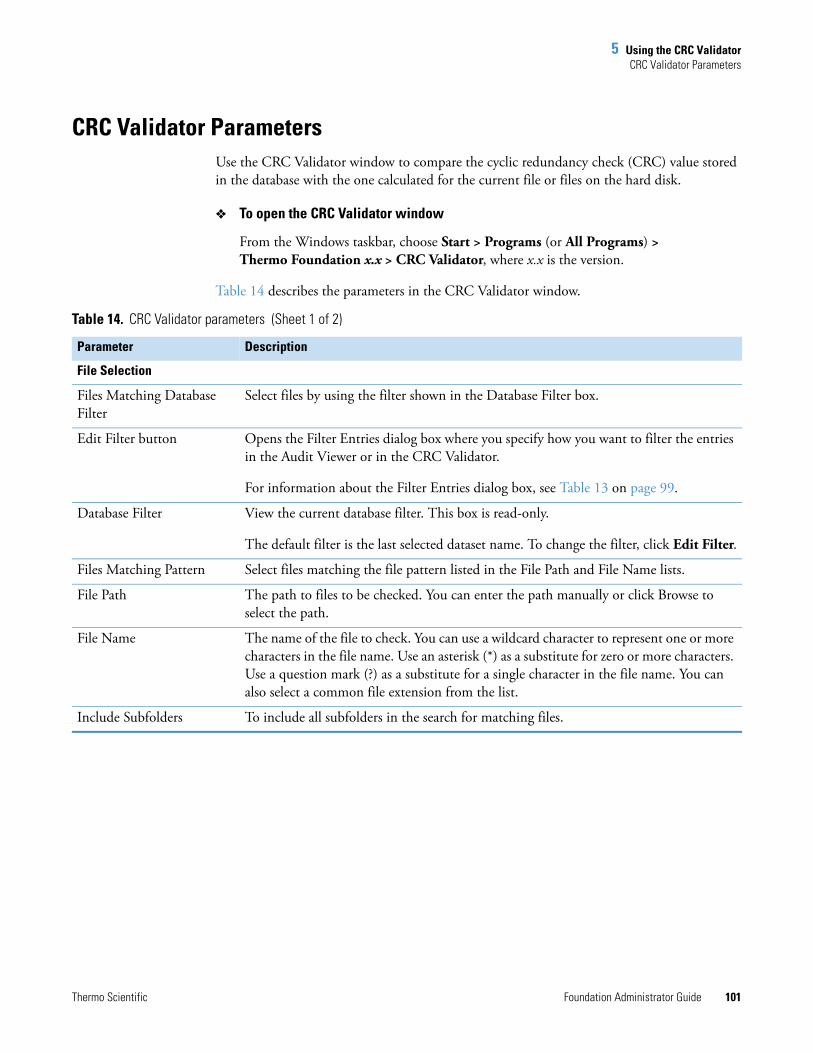
5 Using the CRC ValidatorCRC Validator Parameters
Thermo Scientific Foundation Administrator Guide 101
CRC Validator ParametersUse the CRC Validator window to compare the cyclic redundancy check (CRC) value stored in the database with the one calculated for the current file or files on the hard disk.
To open the CRC Validator window
From the Windows taskbar, choose Start > Programs (or All Programs) > Thermo Foundation x.x > CRC Validator, where x.x is the version.
Table 14 describes the parameters in the CRC Validator window.
Table 14. CRC Validator parameters (Sheet 1 of 2)
Parameter Description
File Selection
Files Matching Database Filter
Select files by using the filter shown in the Database Filter box.
Edit Filter button Opens the Filter Entries dialog box where you specify how you want to filter the entries in the Audit Viewer or in the CRC Validator.
For information about the Filter Entries dialog box, see Table 13 on page 99.
Database Filter View the current database filter. This box is read-only.
The default filter is the last selected dataset name. To change the filter, click Edit Filter.
Files Matching Pattern Select files matching the file pattern listed in the File Path and File Name lists.
File Path The path to files to be checked. You can enter the path manually or click Browse to select the path.
File Name The name of the file to check. You can use a wildcard character to represent one or more characters in the file name. Use an asterisk (*) as a substitute for zero or more characters. Use a question mark (?) as a substitute for a single character in the file name. You can also select a common file extension from the list.
Include Subfolders To include all subfolders in the search for matching files.

5 Using the CRC ValidatorCRC Validator Parameters
102 Foundation Administrator Guide Thermo Scientific
Check Results
View the results of the comparison of the CRC value for each selected file. The table includes the name of the file tested, the status of the check, and the full path to the file.
File Name View the name of the file tested, including the extension.
Status View the status of the check. The status value is one of the following:
CRCs Match: The CRC stored in the database matches the CRC just calculated for the file.
CRCs Do Not Match: The CRC stored in the database does not match the CRC just calculated for the file. Most likely, the file has been modified since the tracking record was created.
File Not In Database: The file was found on the hard disk but was not found in the database. It might not be a tracked file.
File Not On Disk: The file was found in the database but was not found on the hard drive. The file might have been deleted or archived.
Folder Name View the full path to the file.
Files Tested View the total number of files tested.
Not In Database View the number of files that were not found in the database.
Not On Disc View the number of files that are in the database but could not be found on the disk.
CRCs Match View the number of files where the CRC value stored in the database matches the CRC just calculated for the file.
CRCs Differ View the number of files where the CRC value stored in the database does not match the CRC just calculated for the file.
Buttons
Check Start the comparison of the CRC value stored in the database with the one calculated for the specified file or files on the hard disk.
Print Print the CRC validation report. The report contains which filter or file mask was used and the time and date when the report was produced.
Table 14. CRC Validator parameters (Sheet 2 of 2)
Parameter Description
Thermo Scientific Foundation Administrator Guide 103
6
Auditing
This chapter describes how to use the Audit Viewer utility for auditing functions. When you open the Audit Trail from within the Xcalibur data system, you can view the same information that is provided in the Audit Viewer utility; however, you cannot print reports. You can perform these auditing functions:
• Display all auditable events and changes made to files created or managed by various Thermo Scientific applications.
• View a history of what has been done during data acquisition and data processing.
• Get information about all auditable events that have occurred within the application.
Viewing Audit Viewer DatabasesA Foundation, Xcalibur, or LCquan application writes to the Global Auditing database and maintains the application’s local databases. The Global Auditing database stores the application start and stop events. All other application events are stored in the local databases for the application.
Contents
• Viewing Audit Viewer Databases
• Viewing Audit Viewer Pages
• Filtering Audit Viewer Entries
• Sorting Audit Viewer Entries
• Printing Audit Viewer Entries
• Audit Viewer Parameters

6 AuditingViewing Audit Viewer Databases
104 Foundation Administrator Guide Thermo Scientific
You can access either of the following types of databases using Audit Viewer:
• The Global Auditing database keeps a log of auditable events for all the Xcalibur-related data files and applications it recognizes. The Xcalibur-related data files include the raw files that you acquire in the LCquan application.
• The local application database keeps a log of auditable events associated with the current application, including the entries that have not been saved to the database. Each application database also includes a log about the raw files that are acquired as part of the application. For the LCquan application, the audit database is the LCquan Workbook Audit Trail.
To access the databases, follow these procedures:
• Accessing the Global Auditing Database
• Accessing the Local Database
Accessing the Global Auditing Database
The Global Auditing database is a log of auditable events for all the application-related data files and applications that it recognizes. You access the Global Auditing database when you start Audit Viewer from the Windows taskbar.
To start Audit Viewer from the Windows taskbar
Choose Start > Programs (or All Programs) > Thermo Foundation x.x > Audit Viewer, where x.x is the version.
IMPORTANT You must configure the database in the Thermo Foundation Auditing Database Configuration Manager before you can access the Global Auditing database. See “Configuring Your Auditing Database” on page 12.
IMPORTANT Each Windows user account must be associated with a user ID, password, and full description. The system requires these items to store the auditing information in the designated database.

6 AuditingViewing Audit Viewer Databases
Thermo Scientific Foundation Administrator Guide 105
The Audit Viewer window opens. The window title bar shows the location of the database being viewed.
Accessing the Local Database
The local database for an application is a log of auditable events associated with the current view or window (Xcalibur data system) or workbook (LCquan application), including the entries that have not been saved to the database. Each database also includes a log about the raw files that are acquired as part of the Xcalibur study or LCquan workbook.
Each LCquan workbook and each Xcalibur window has its own database. When you start Audit Viewer from a study or workbook, the viewer displays the saved and unsaved entries for the current study or workbook. The unsaved entries are highlighted in yellow in the viewer window.

6 AuditingViewing Audit Viewer Pages
106 Foundation Administrator Guide Thermo Scientific
To access the auditing database for an LCquan workbook or an Xcalibur window or view
1. Open the LCquan workbook or Xcalibur window or view.
2. In the LCquan Workbook window or the Xcalibur view or window, choose File > Audit Trail.
The Audit Viewer window opens and displays the entries for the open study or workbook. Yellow highlights indicate any unsaved entries. In the LCquan application, you can open more than one workbook at a time.
Viewing Audit Viewer PagesThe Audit Viewer window contains the following pages, each with a different function:
• The All page (see “All Page of the Audit Viewer” on page 113) provides a summary of all entries for the current database.
To display the Audit Viewer page associated with an entry on the All page, double-click the entry on the All page.
• The History page (see “History Page of the Audit Viewer” on page 113) provides a chronological listing of all the changes made to method files and result lists.
• The Event page (see “Event Page of the Audit Viewer” on page 115) lists all user-initiated auditable events. All events that are subject to authorization control are auditable.
• The File Tracking page (see “File Tracking Page of the Audit Viewer” on page 116) provides the following type of information:
– Global Auditing database: Lists the changes that are made by any program to the application-created files.
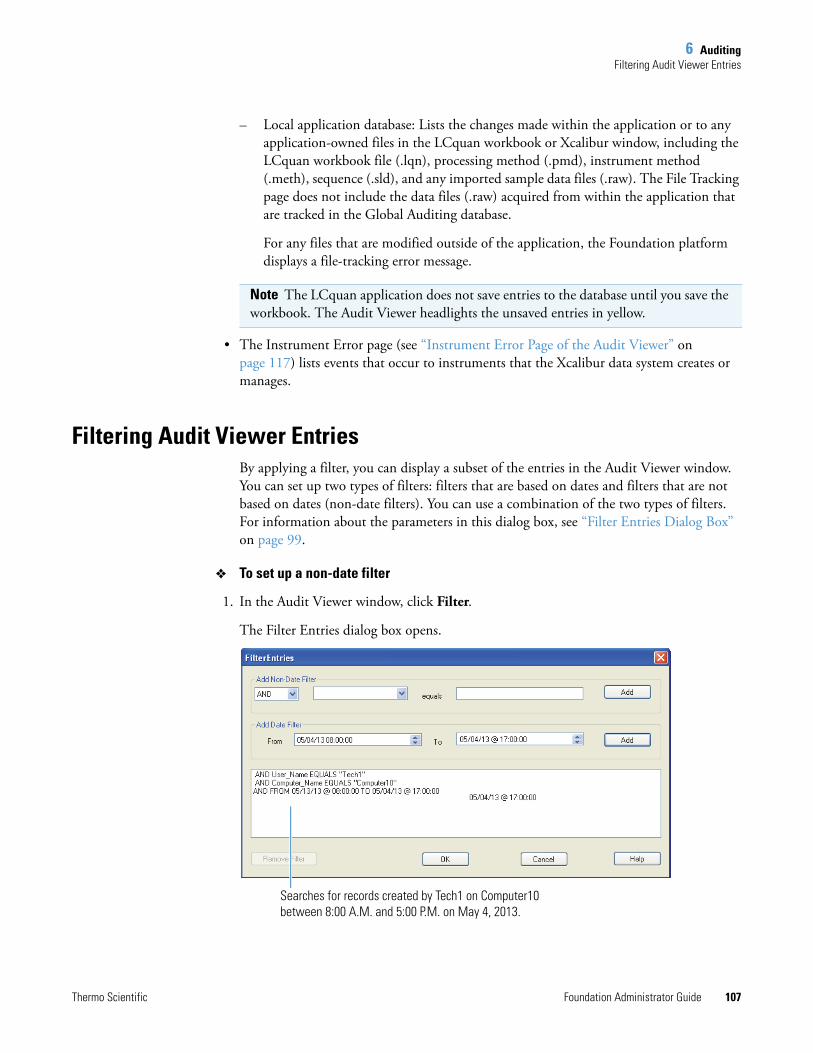
6 AuditingFiltering Audit Viewer Entries
Thermo Scientific Foundation Administrator Guide 107
– Local application database: Lists the changes made within the application or to any application-owned files in the LCquan workbook or Xcalibur window, including the LCquan workbook file (.lqn), processing method (.pmd), instrument method (.meth), sequence (.sld), and any imported sample data files (.raw). The File Tracking page does not include the data files (.raw) acquired from within the application that are tracked in the Global Auditing database.
For any files that are modified outside of the application, the Foundation platform displays a file-tracking error message.
• The Instrument Error page (see “Instrument Error Page of the Audit Viewer” on page 117) lists events that occur to instruments that the Xcalibur data system creates or manages.
Filtering Audit Viewer Entries By applying a filter, you can display a subset of the entries in the Audit Viewer window. You can set up two types of filters: filters that are based on dates and filters that are not based on dates (non-date filters). You can use a combination of the two types of filters. For information about the parameters in this dialog box, see “Filter Entries Dialog Box” on page 99.
To set up a non-date filter
1. In the Audit Viewer window, click Filter.
The Filter Entries dialog box opens.
Note The LCquan application does not save entries to the database until you save the workbook. The Audit Viewer headlights the unsaved entries in yellow.
Searches for records created by Tech1 on Computer10 between 8:00 A.M. and 5:00 P.M. on May 4, 2013.
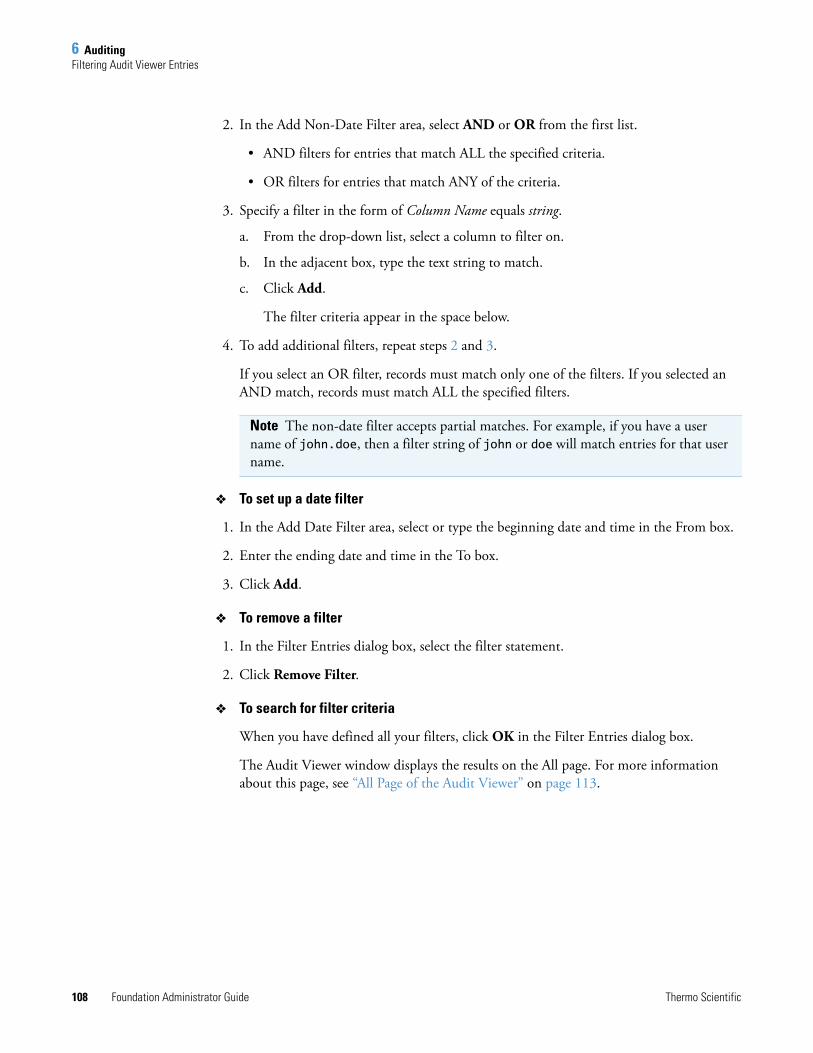
6 AuditingFiltering Audit Viewer Entries
108 Foundation Administrator Guide Thermo Scientific
2. In the Add Non-Date Filter area, select AND or OR from the first list.
• AND filters for entries that match ALL the specified criteria.
• OR filters for entries that match ANY of the criteria.
3. Specify a filter in the form of Column Name equals string.
a. From the drop-down list, select a column to filter on.
b. In the adjacent box, type the text string to match.
c. Click Add.
The filter criteria appear in the space below.
4. To add additional filters, repeat steps 2 and 3.
If you select an OR filter, records must match only one of the filters. If you selected an AND match, records must match ALL the specified filters.
To set up a date filter
1. In the Add Date Filter area, select or type the beginning date and time in the From box.
2. Enter the ending date and time in the To box.
3. Click Add.
To remove a filter
1. In the Filter Entries dialog box, select the filter statement.
2. Click Remove Filter.
To search for filter criteria
When you have defined all your filters, click OK in the Filter Entries dialog box.
The Audit Viewer window displays the results on the All page. For more information about this page, see “All Page of the Audit Viewer” on page 113.
Note The non-date filter accepts partial matches. For example, if you have a user name of john.doe, then a filter string of john or doe will match entries for that user name.

6 AuditingSorting Audit Viewer Entries
Thermo Scientific Foundation Administrator Guide 109
Sorting Audit Viewer Entries You can sort entries by the column headings on each of the Audit Viewer pages. For more information about these pages, see “Viewing Audit Viewer Pages” on page 106.
To sort entries on an Audit Viewer page
1. In the Audit Viewer window, click the tab of the page you want to view.
2. Click Sort.
The Sort Entries dialog box opens.
3. In the 1st Sort Field list, select a column heading and select the Ascending or Descending option.
4. Repeat this step for the 2nd Sort Field and 3rd Sort Field.
5. Click OK.
The Audit Viewer page displays the entries in the specified sort order.
Sort Entries Dialog Box
Use the Sort Entries dialog box to specify how to sort the entries in the Audit Viewer. Each page in the Audit Viewer has a unique set of fields that you can sort.
Table 15. Sort Entries dialog box parameters
Parameter Description
1st Sort Field Specify the first field in the log that is sorted.
2nd Sort Field Specify the second field in the log that is sorted. You cannot specify a second sort field if the first sort field is not already defined.
3rd Sort Field Specify the third field in the log that is sorted. You cannot specify a third sort field if the second sort field is not already defined.
Ascending Sort fields in ascending order.
Descending Sort fields in descending (reverse) order.
6 AuditingPrinting Audit Viewer Entries
110 Foundation Administrator Guide Thermo Scientific
Printing Audit Viewer EntriesThe printing options vary depending on whether you are printing the Audit Trail for the Global Auditing Database or a local database.
• Printing the Audit Trail for the Global Auditing Database
• Printing the Audit Trail for an Application Database
Printing the Audit Trail for the Global Auditing Database
To print the Audit Trail for the Global Auditing database
1. From the Windows taskbar, choose Start > Programs (or All Programs) > Thermo Foundation x.x > Audit Viewer, where x.x is the version.
The Audit Viewer window opens.
2. Click the tab of the page you want to print.
3. Click Print.
The Print Options dialog box opens. For descriptions of these parameters, see Table 16.
4. Select the printing options (see Print Options Dialog Box) and then click OK.
Printing the Audit Trail for an Application Database
You can print the entries from an application database only when you save all displayed records on the specific page of the Audit Viewer window. Use the Print Options dialog box (see Table 16) to choose document properties for printing the log.
To print the Audit Trail for an application database
1. In the application study window, choose File > Audit Trail.
If the Xcalibur or LCquan study already contains saved entries, go to step 2.
If the Xcalibur or LCquan study contains any unsaved entries, the Foundation platform displays a View Audit Trail message prompting you to save the study before continuing.

6 AuditingPrinting Audit Viewer Entries
Thermo Scientific Foundation Administrator Guide 111
In the View Audit Trail dialog box, do one of the following:
• Click Yes to save the study entries.
The Foundation platform logs the automatic save in the Audit Trail and starts Audit Viewer.
• Click No to start Audit Viewer without saving the study.
2. In the Audit Viewer window, click the tab of the page that you want to print.
3. Make sure the displayed page contains only saved entries. Yellow highlights appear on the rows of any unsaved entries.
If you have a mix of saved and unsaved entries, you can do one of the following:
• In the application window, choose File > Save to save the application study. In the Audit Viewer window, click Refresh.
• In the Audit Viewer window, click Filter, and then add filter rules so that only the saved records appear on the page you want to print. See “Filtering Audit Viewer Entries” on page 107 for details.
4. Click Print.
5. In the Print Options dialog box, select printing options, and then click OK.
Print Options Dialog Box
Note If you select the Don't Tell Me About This Again check box, the Foundation platform automatically applies the last requested behavior (Save or Not Save) each time you start Audit Viewer when the application contains unsaved entries. To restore the message, choose Options > Enable Warnings.
Table 16. Print Options dialog box parameters
Parameter Description
Printer Options
Orientation: Portrait Print the log vertically.
Orientation: Landscape
Print the log horizontally.
Font Size: Small Print the log in 8-point font.
Font Size: Medium Print the log in 10-point font.
Font Size: Large Print the log in 12-point font.
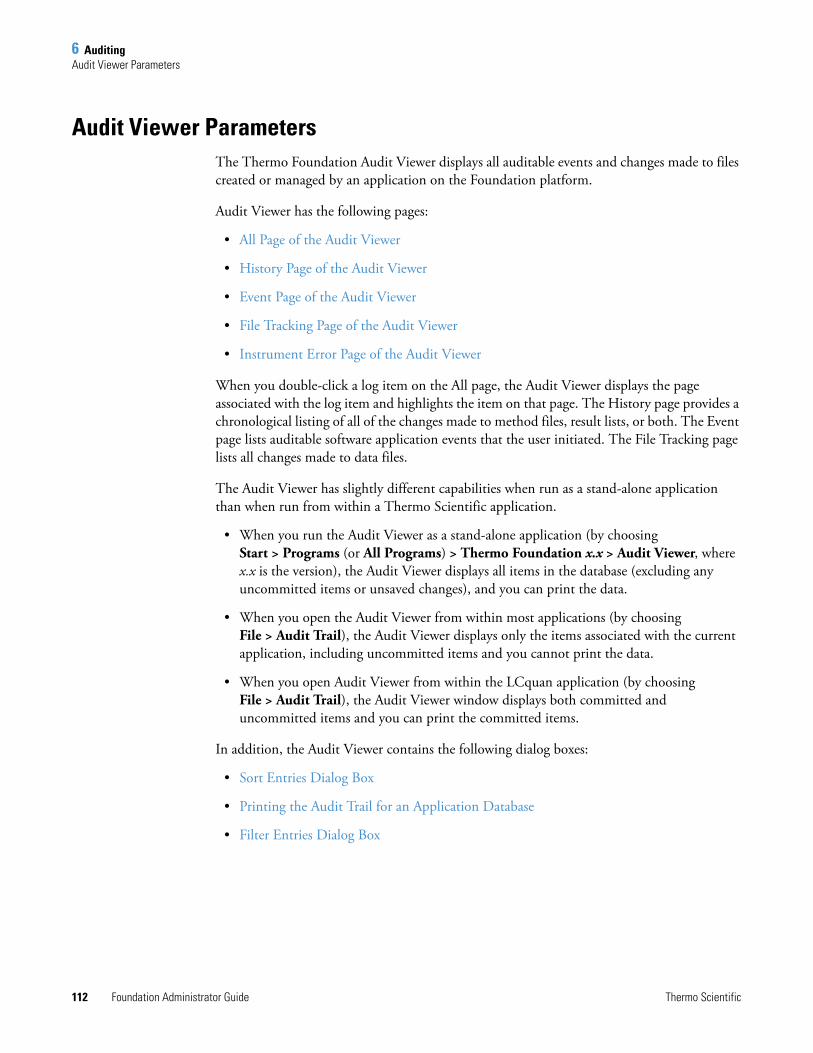
6 AuditingAudit Viewer Parameters
112 Foundation Administrator Guide Thermo Scientific
Audit Viewer ParametersThe Thermo Foundation Audit Viewer displays all auditable events and changes made to files created or managed by an application on the Foundation platform.
Audit Viewer has the following pages:
• All Page of the Audit Viewer
• History Page of the Audit Viewer
• Event Page of the Audit Viewer
• File Tracking Page of the Audit Viewer
• Instrument Error Page of the Audit Viewer
When you double-click a log item on the All page, the Audit Viewer displays the page associated with the log item and highlights the item on that page. The History page provides a chronological listing of all of the changes made to method files, result lists, or both. The Event page lists auditable software application events that the user initiated. The File Tracking page lists all changes made to data files.
The Audit Viewer has slightly different capabilities when run as a stand-alone application than when run from within a Thermo Scientific application.
• When you run the Audit Viewer as a stand-alone application (by choosing Start > Programs (or All Programs) > Thermo Foundation x.x > Audit Viewer, where x.x is the version), the Audit Viewer displays all items in the database (excluding any uncommitted items or unsaved changes), and you can print the data.
• When you open the Audit Viewer from within most applications (by choosing File > Audit Trail), the Audit Viewer displays only the items associated with the current application, including uncommitted items and you cannot print the data.
• When you open Audit Viewer from within the LCquan application (by choosing File > Audit Trail), the Audit Viewer window displays both committed and uncommitted items and you can print the committed items.
In addition, the Audit Viewer contains the following dialog boxes:
• Sort Entries Dialog Box
• Printing the Audit Trail for an Application Database
• Filter Entries Dialog Box
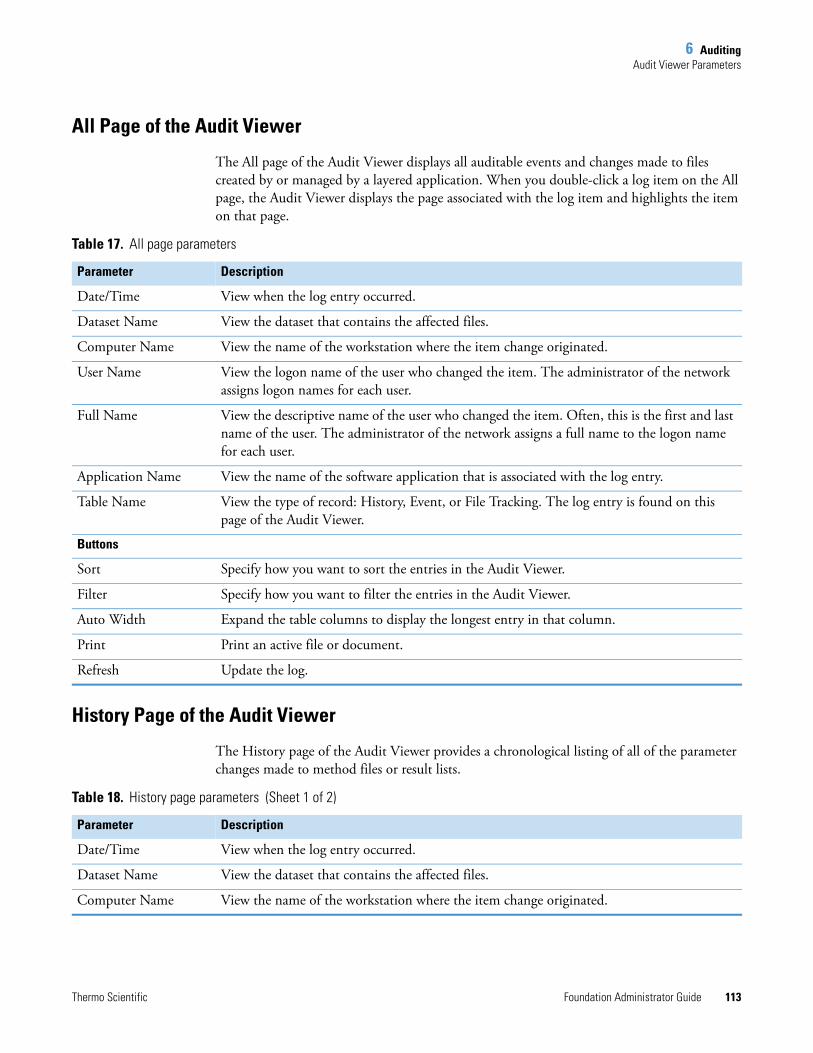
6 AuditingAudit Viewer Parameters
Thermo Scientific Foundation Administrator Guide 113
All Page of the Audit Viewer
The All page of the Audit Viewer displays all auditable events and changes made to files created by or managed by a layered application. When you double-click a log item on the All page, the Audit Viewer displays the page associated with the log item and highlights the item on that page.
History Page of the Audit Viewer
The History page of the Audit Viewer provides a chronological listing of all of the parameter changes made to method files or result lists.
Table 17. All page parameters
Parameter Description
Date/Time View when the log entry occurred.
Dataset Name View the dataset that contains the affected files.
Computer Name View the name of the workstation where the item change originated.
User Name View the logon name of the user who changed the item. The administrator of the network assigns logon names for each user.
Full Name View the descriptive name of the user who changed the item. Often, this is the first and last name of the user. The administrator of the network assigns a full name to the logon name for each user.
Application Name View the name of the software application that is associated with the log entry.
Table Name View the type of record: History, Event, or File Tracking. The log entry is found on this page of the Audit Viewer.
Buttons
Sort Specify how you want to sort the entries in the Audit Viewer.
Filter Specify how you want to filter the entries in the Audit Viewer.
Auto Width Expand the table columns to display the longest entry in that column.
Print Print an active file or document.
Refresh Update the log.
Table 18. History page parameters (Sheet 1 of 2)
Parameter Description
Date/Time View when the log entry occurred.
Dataset Name View the dataset that contains the affected files.
Computer Name View the name of the workstation where the item change originated.

6 AuditingAudit Viewer Parameters
114 Foundation Administrator Guide Thermo Scientific
User Name View the logon name of the user who changed the item that is listed in the Item Changed field. The administrator of the network assigns logon names for each user.
Full Name View the full name of the user who changed the item that is listed in the Item Changed field. Often, this is the first and last name of the user. The administrator of the network assigns a full name to the logon name for each user.
Application Name View the name of the software application that is associated with the log entry.
Filename View the name of the affected file. The file name is not case-sensitive.
Path View the route through the file system to the affected file.
Old Row View the pre-change row number of the item if the change resulted in a change of row number.
New Row View the post-change row number of the item if the change resulted in a change of row number.
Change Type View the type of operation (edit, delete, and so on) that changed the item.
Item Changed View the setting that was changed.
Old Value View the old value of the item that is listed in the Item Changed field (if applicable).
New Value View the new value of the item that is listed in the Item Changed field.
User Data 1 View custom user data, if supported by the application. The user data is unique for each application.
User Data 2 View custom user data, if supported by the application. The user data is unique for each application.
User Data 3 View custom user data, if supported by the application. The user data is unique for each application.
User Data 4 View custom user data, if supported by the application. The user data is unique for each application.
User Data 5 View custom user data, if supported by the application. The user data is unique for each application.
Buttons
Sort Specify how you want to sort the entries in the Audit Viewer.
Filter Specify how you want to filter the entries in the Audit Viewer.
Auto Width Expand the table columns to display the longest entry in that column.
Print Print an active file or document.
Refresh Update the log.
Table 18. History page parameters (Sheet 2 of 2)
Parameter Description

6 AuditingAudit Viewer Parameters
Thermo Scientific Foundation Administrator Guide 115
Event Page of the Audit Viewer
The Event page of the Audit Viewer lists auditable application events that were initiated by the user. Events can include starting a Thermo Scientific application, printing a file from within a Thermo Scientific application, and importing a file from within an application.
Table 19. Event page parameters
Parameter Description
Date/Time View when the event occurred.
Dataset Name View the data set that contains the affected files.
Computer Name View the name of the workstation initiating the event.
User Name View the logon name of the user who initiated the event. The administrator of the network assigns logon names for each user.
Full Name View the descriptive name of the user who initiated the event. Often, this is the first and last name of the user. The administrator of the network assigns a full name to the logon name for each user.
Application Name View the name of the software application that is associated with the event.
Event View what occurred. Typical events include importing and exporting data files, methods, and sequences.
Response View the action taken by the user (if any) in response to the event.
Comment View the comment associated with the event.
Buttons
Sort Specify how you want to sort the entries in the Audit Viewer.
Filter Specify how you want to filter the entries in the Audit Viewer.
Auto Width Expand the table columns to display the longest entry in that column.
Print Print an active file or document.
Refresh Update the log.
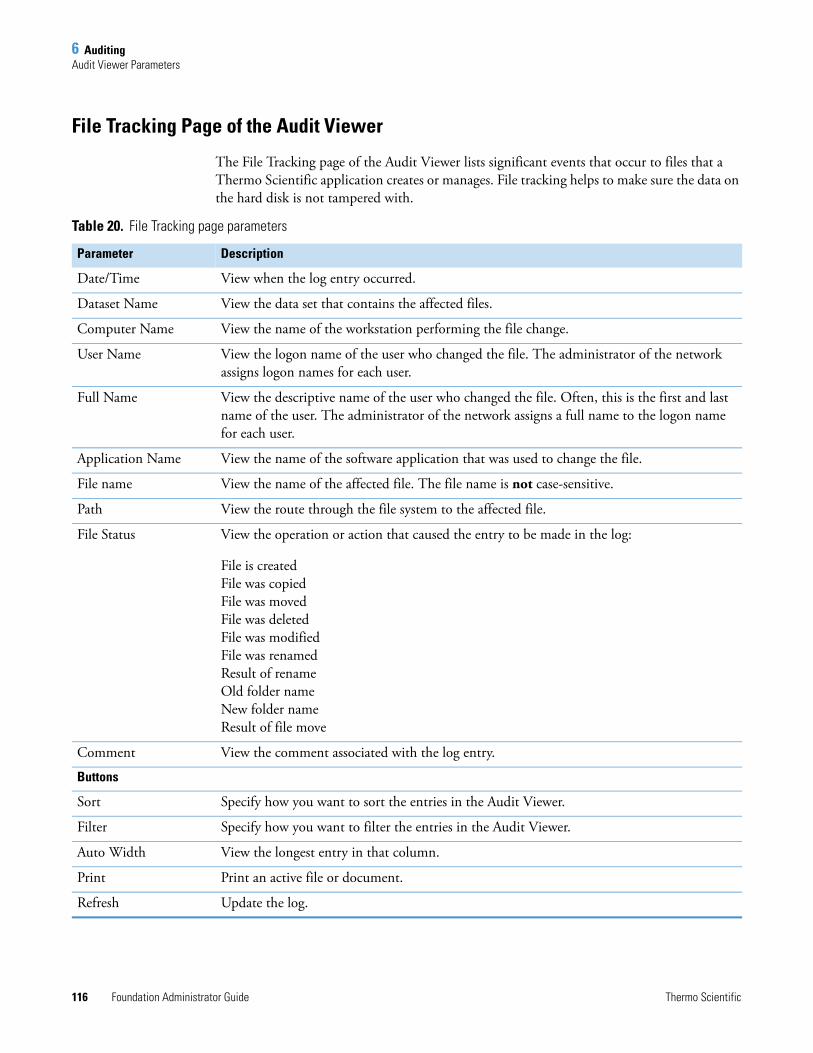
6 AuditingAudit Viewer Parameters
116 Foundation Administrator Guide Thermo Scientific
File Tracking Page of the Audit Viewer
The File Tracking page of the Audit Viewer lists significant events that occur to files that a Thermo Scientific application creates or manages. File tracking helps to make sure the data on the hard disk is not tampered with.
Table 20. File Tracking page parameters
Parameter Description
Date/Time View when the log entry occurred.
Dataset Name View the data set that contains the affected files.
Computer Name View the name of the workstation performing the file change.
User Name View the logon name of the user who changed the file. The administrator of the network assigns logon names for each user.
Full Name View the descriptive name of the user who changed the file. Often, this is the first and last name of the user. The administrator of the network assigns a full name to the logon name for each user.
Application Name View the name of the software application that was used to change the file.
File name View the name of the affected file. The file name is not case-sensitive.
Path View the route through the file system to the affected file.
File Status View the operation or action that caused the entry to be made in the log:
File is createdFile was copiedFile was movedFile was deletedFile was modifiedFile was renamedResult of renameOld folder nameNew folder nameResult of file move
Comment View the comment associated with the log entry.
Buttons
Sort Specify how you want to sort the entries in the Audit Viewer.
Filter Specify how you want to filter the entries in the Audit Viewer.
Auto Width View the longest entry in that column.
Print Print an active file or document.
Refresh Update the log.

6 AuditingAudit Viewer Parameters
Thermo Scientific Foundation Administrator Guide 117
Instrument Error Page of the Audit Viewer
The Instrument Error page of the Audit Viewer lists error codes from instruments.
The Audit Viewer has slightly different capabilities when run as a stand-alone application than when run from within a Thermo Scientific application. When you run the Audit Viewer as a stand-alone application (by choosing Start > All Programs > Thermo Foundation x.x > Audit Viewer, where x.x is the version), you can view and print all items in the database (excluding any uncommitted items or unsaved changes). When you open the Audit Viewer from within an application (by choosing File > Audit Trail), the Audit Viewer window displays only the items associated with the current application, including uncommitted items. However, you cannot print the data.
Table 21. Instrument Error page parameters
Parameter Description
Date/Time View when the log entry occurred.
Computer Name View the name of the workstation performing the change.
User Name View the logon name of the user who made the change that caused the error notification. The administrator of the network assigns logon names for each user.
Full Name View the descriptive name of the user who made the change that caused the error notification. Often, this is the first and last name of the user. The administrator of the network assigns a full name to the logon name for each user.
Application Name View the name of the software application that was used to change the instrument.
Dataset Name View the data set that contains the affected instrument.
Instrument Error Code View the code that the application produced when it received information about the instrument error.
Instrument Error Severity
View the severity error level for the incident.
Instrument Error String
View the instrument error string that was produced.
Device VI State View the status of the device at the time the log event occurred.
Time Offset If an acquisition was in progress when the log event occurred, view the acquisition time. If no acquisition was in progress, this field reads zero.
Buttons
Sort Specify how you want to sort the entries in the Audit Viewer.
Filter Specify how you want to filter the entries in the Audit Viewer.
Auto Width View the longest entry in that column.
Print Print an active file or document.
Refresh Update the log.

Thermo Scientific Foundation Administrator Guide 119
7
Configuring Instruments
This chapter describes how to set up the instrument configuration for your LC/MS or GC/MS system by using the Thermo Foundation Instrument Configuration window.
Contents
• Adding Instrument Drivers to the Instrument Configuration
• Setting Up the Configuration Options for Each Configured Device
7 Configuring InstrumentsAdding Instrument Drivers to the Instrument Configuration
120 Foundation Administrator Guide Thermo Scientific
Adding Instrument Drivers to the Instrument ConfigurationTo control a Thermo Scientific GC/MS or LC/MS system from the Xcalibur or LCquan application, you must first add the devices that make up the system to the list of configured devices for the system.
To add devices to the instrument configuration
1. Choose Start > Programs > Thermo Foundation x.x > Instrument Configuration, where x.x is the version.
The Thermo Foundation Instrument Configuration window opens.
2. To choose the type of hardware devices to add, select a device type in the Device Types list. The selections include the following: All, Autosampler, Gas Chromatograph, Liquid Chromatograph, Mass Spectrometer, Detector, or Other.
Selecting All displays all of the installed device drivers in the Available Devices list.
3. For each device that you want to add to the instrument configuration, in the Available Devices list do the following:
• Select the device icon, and then click Add.
–or–
• Double-click the device icon.
A copy of the device icon appears in the Configured Devices list.
To specify the configuration options for each configured device, go to the next topic, “Setting Up the Configuration Options for Each Configured Device.”
Setting Up the Configuration Options for Each Configured DeviceThe data system does not automatically recognize some of the hardware options for the configured instrument devices. For example, the data system cannot sense the size of the sample loop installed on the autosampler injection valve or the tray type installed in the autosampler tray compartment.
For most Thermo Scientific mass spectrometers, the data system does automatically recognize the ion source.
Note If you do not see the device you want to add, you might need to install the device driver.
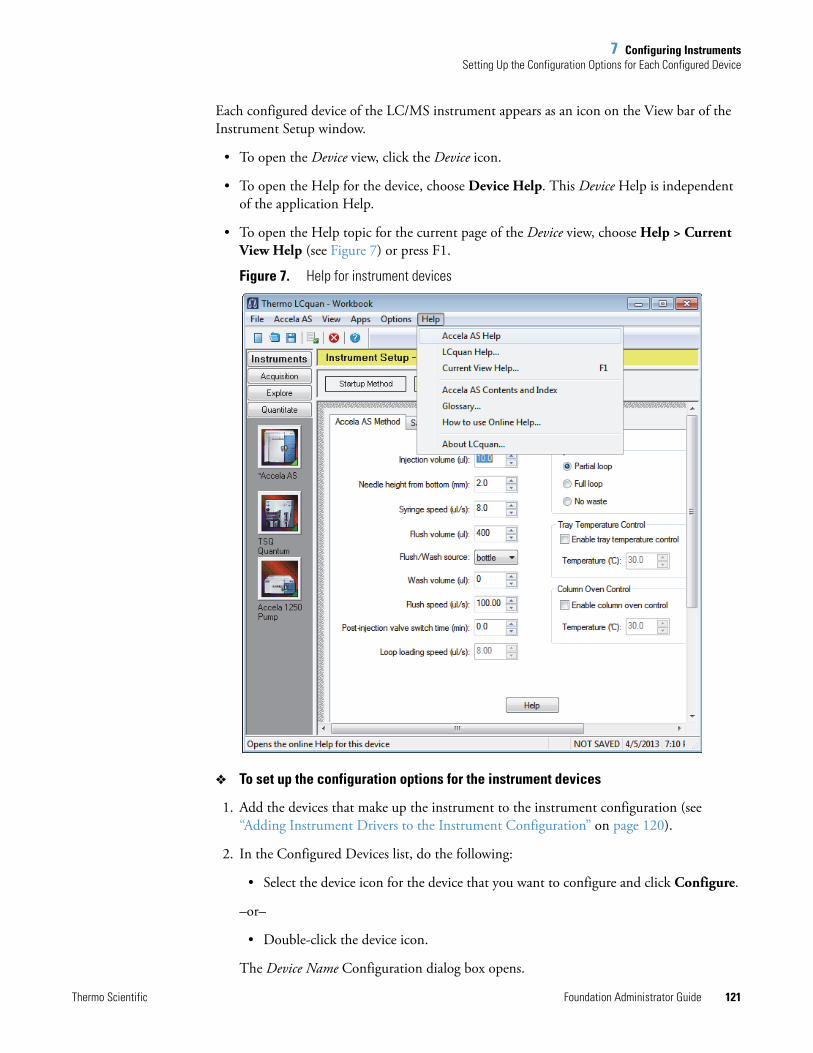
7 Configuring InstrumentsSetting Up the Configuration Options for Each Configured Device
Thermo Scientific Foundation Administrator Guide 121
Each configured device of the LC/MS instrument appears as an icon on the View bar of the Instrument Setup window.
• To open the Device view, click the Device icon.
• To open the Help for the device, choose Device Help. This Device Help is independent of the application Help.
• To open the Help topic for the current page of the Device view, choose Help > Current View Help (see Figure 7) or press F1.
Figure 7. Help for instrument devices
To set up the configuration options for the instrument devices
1. Add the devices that make up the instrument to the instrument configuration (see “Adding Instrument Drivers to the Instrument Configuration” on page 120).
2. In the Configured Devices list, do the following:
• Select the device icon for the device that you want to configure and click Configure.
–or–
• Double-click the device icon.
The Device Name Configuration dialog box opens.
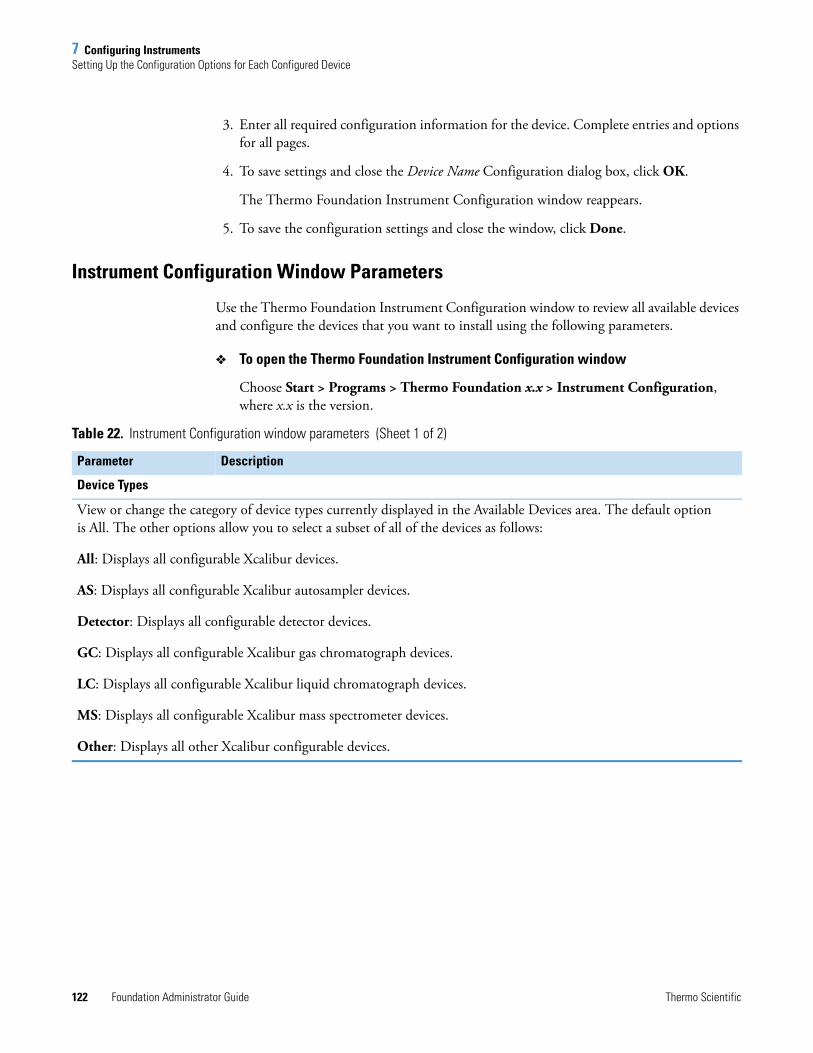
7 Configuring InstrumentsSetting Up the Configuration Options for Each Configured Device
122 Foundation Administrator Guide Thermo Scientific
3. Enter all required configuration information for the device. Complete entries and options for all pages.
4. To save settings and close the Device Name Configuration dialog box, click OK.
The Thermo Foundation Instrument Configuration window reappears.
5. To save the configuration settings and close the window, click Done.
Instrument Configuration Window Parameters
Use the Thermo Foundation Instrument Configuration window to review all available devices and configure the devices that you want to install using the following parameters.
To open the Thermo Foundation Instrument Configuration window
Choose Start > Programs > Thermo Foundation x.x > Instrument Configuration, where x.x is the version.
Table 22. Instrument Configuration window parameters (Sheet 1 of 2)
Parameter Description
Device Types
View or change the category of device types currently displayed in the Available Devices area. The default option is All. The other options allow you to select a subset of all of the devices as follows:
All: Displays all configurable Xcalibur devices.
AS: Displays all configurable Xcalibur autosampler devices.
Detector: Displays all configurable detector devices.
GC: Displays all configurable Xcalibur gas chromatograph devices.
LC: Displays all configurable Xcalibur liquid chromatograph devices.
MS: Displays all configurable Xcalibur mass spectrometer devices.
Other: Displays all other Xcalibur configurable devices.
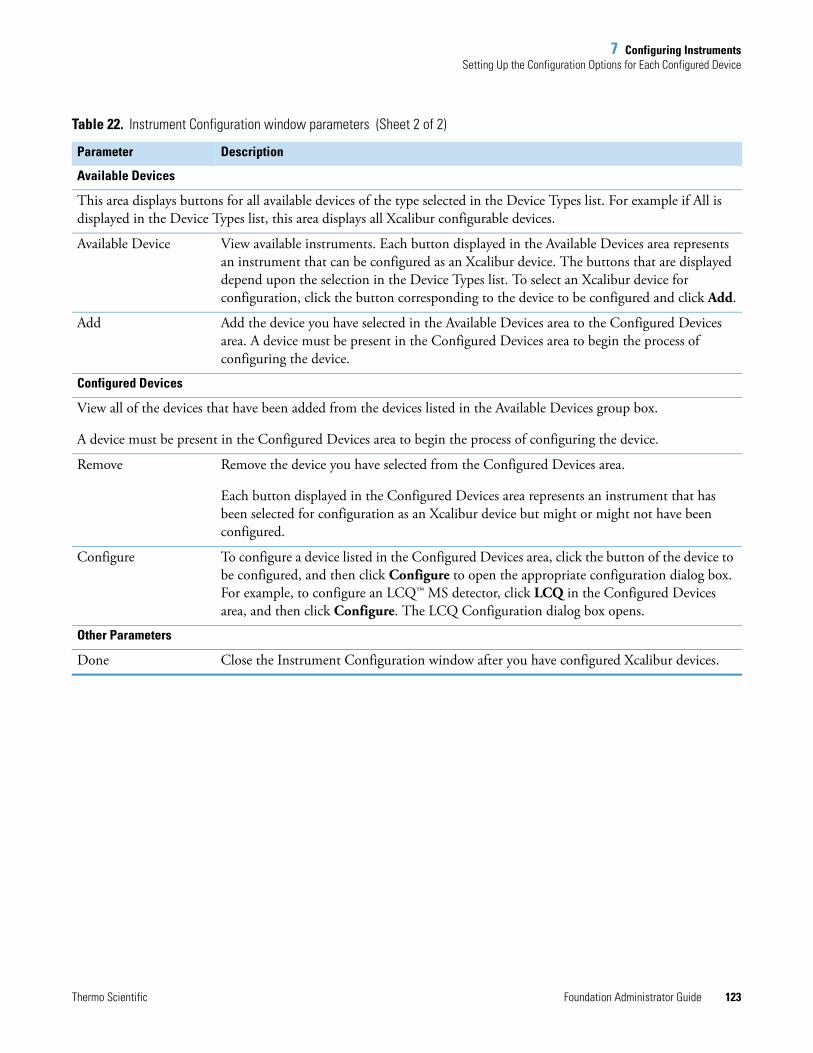
7 Configuring InstrumentsSetting Up the Configuration Options for Each Configured Device
Thermo Scientific Foundation Administrator Guide 123
Available Devices
This area displays buttons for all available devices of the type selected in the Device Types list. For example if All is displayed in the Device Types list, this area displays all Xcalibur configurable devices.
Available Device View available instruments. Each button displayed in the Available Devices area represents an instrument that can be configured as an Xcalibur device. The buttons that are displayed depend upon the selection in the Device Types list. To select an Xcalibur device for configuration, click the button corresponding to the device to be configured and click Add.
Add Add the device you have selected in the Available Devices area to the Configured Devices area. A device must be present in the Configured Devices area to begin the process of configuring the device.
Configured Devices
View all of the devices that have been added from the devices listed in the Available Devices group box.
A device must be present in the Configured Devices area to begin the process of configuring the device.
Remove Remove the device you have selected from the Configured Devices area.
Each button displayed in the Configured Devices area represents an instrument that has been selected for configuration as an Xcalibur device but might or might not have been configured.
Configure To configure a device listed in the Configured Devices area, click the button of the device to be configured, and then click Configure to open the appropriate configuration dialog box. For example, to configure an LCQ™ MS detector, click LCQ in the Configured Devices area, and then click Configure. The LCQ Configuration dialog box opens.
Other Parameters
Done Close the Instrument Configuration window after you have configured Xcalibur devices.
Table 22. Instrument Configuration window parameters (Sheet 2 of 2)
Parameter Description

7 Configuring InstrumentsSetting Up the Configuration Options for Each Configured Device
124 Foundation Administrator Guide Thermo Scientific
Out-of-Date Device Drivers Detected
When you open the Thermo Foundation Instrument Configuration window and one or more of the configured device drivers are not compatible with the installed version of the Foundation platform, the application opens a dialog box that displays the out-of-date drivers it has detected.
If this dialog box appears, install the latest software for the instruments listed.
•
Note Follow the installation instructions provided with the data system and instrument control software DVDs.
Table 23. Out-of-date device drivers detected dialog box parameters
Parameter Description
Instrument View currently installed instruments with out-of-date software.
In Use View the status of the instrument displayed in the Instrument list: In Use (Yes) or Not In Use (blank). In Use devices appear in the Configured Devices area of the Instrument Configuration view.
Version View the current version of the instrument that is displayed in the same row of the Instrument list. Make sure the version to be installed is more recent than the current version.
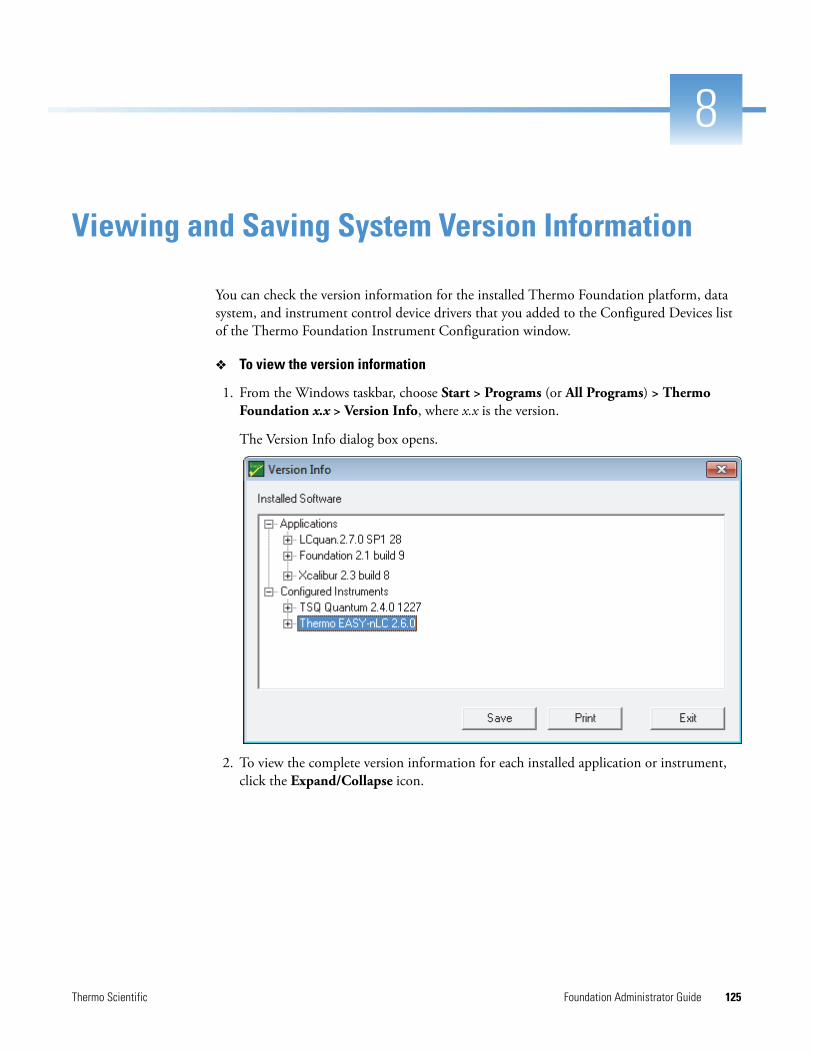
Thermo Scientific Foundation Administrator Guide 125
8
Viewing and Saving System Version Information
You can check the version information for the installed Thermo Foundation platform, data system, and instrument control device drivers that you added to the Configured Devices list of the Thermo Foundation Instrument Configuration window.
To view the version information
1. From the Windows taskbar, choose Start > Programs (or All Programs) > Thermo Foundation x.x > Version Info, where x.x is the version.
The Version Info dialog box opens.
2. To view the complete version information for each installed application or instrument, click the Expand/Collapse icon.
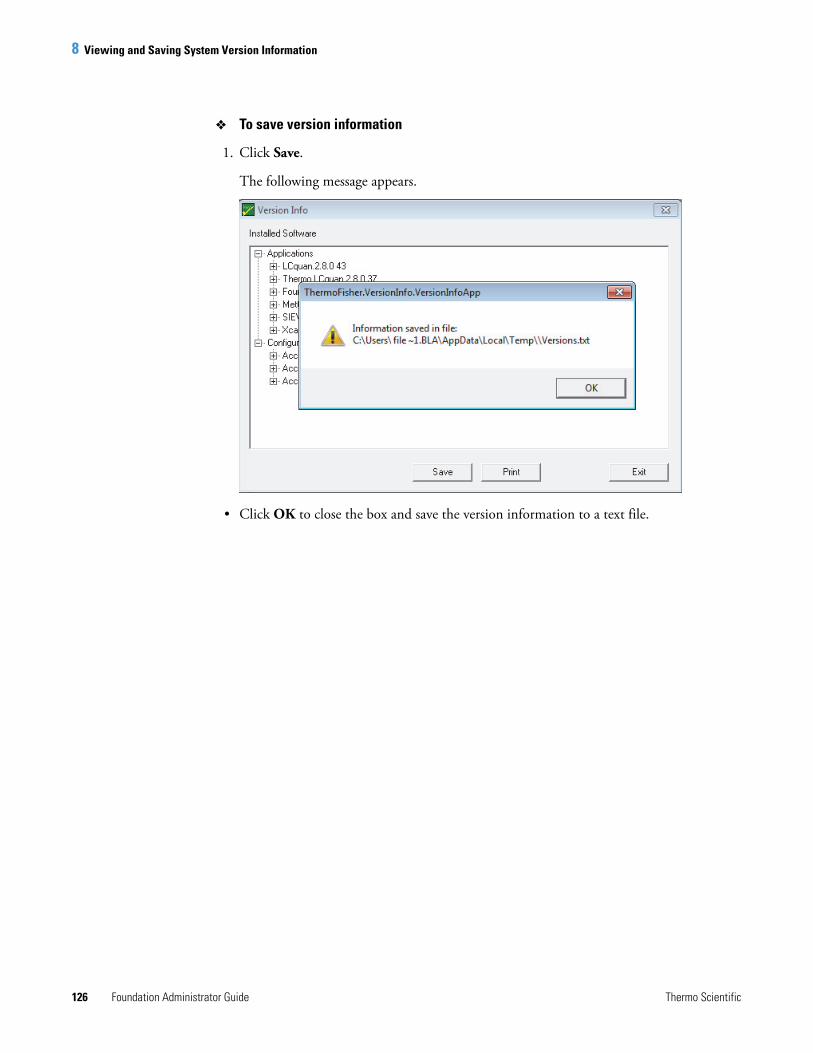
8 Viewing and Saving System Version Information
126 Foundation Administrator Guide Thermo Scientific
To save version information
1. Click Save.
The following message appears.
• Click OK to close the box and save the version information to a text file.

Thermo Scientific Foundation Administrator Guide 127
9
IT Considerations
To ensure that both the Xcalibur and LCquan applications work properly, review these IT issues.
Avoid Antivirus Scanning During Data AcquisitionSchedule utilities that actively scan the hard drive—such as antivirus, defragmenting, and backup utilities—to run at times other than during data acquisition. These utilities can monopolize computer resources, interfere with data acquisition, or cause loss of communication with the instrument.
These directories are typically used during data acquisition:
• C:\Users\user name\AppData\Local\Temp
• C:\Xcalibur\methods or the directory where the instrument method (.meth) and processing method (.pmd) files are stored
• C:\Xcalibur\Quanroot or the directory where raw files (.raw) are stored
• C:\Xcalibur\system\programs\
• C:\Program Files\Thermo\Foundation
Contents
• Avoid Antivirus Scanning During Data Acquisition
• Do Not Delete the Xcalibur System Account
• Ensure that a Firewall Exception Exists for the Instrument
• Ensure Your Computer Stays Active

9 IT ConsiderationsDo Not Delete the Xcalibur System Account
128 Foundation Administrator Guide Thermo Scientific
Do Not Delete the Xcalibur System AccountWith sequential user logon, a user can log on, start an acquisition, and then log out. When the Foundation platform is installed, a user account—Xcalibur System—is created under the Administrators group. This account runs in the background during data acquisition.
To ensure correct system and application functioning, do not
• Change the password
• Change the name
• Delete the account
• Remove it from the Administrator’s group
Ensure that a Firewall Exception Exists for the Instrument Firewall settings must include an exception for the instrument in use. If the firewall exception is not configured, the computer is unable to communicate with the instrument. During installation, instrument software now automatically configures the required exception for the Microsoft Windows firewall.
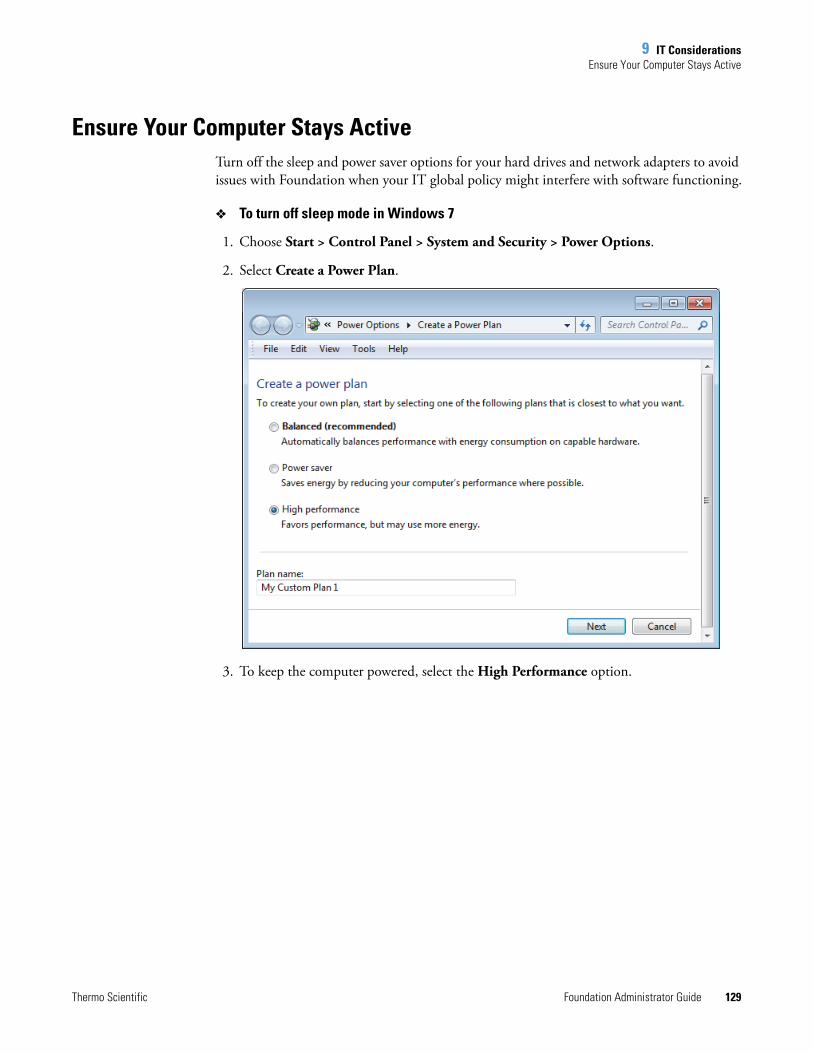
9 IT ConsiderationsEnsure Your Computer Stays Active
Thermo Scientific Foundation Administrator Guide 129
Ensure Your Computer Stays ActiveTurn off the sleep and power saver options for your hard drives and network adapters to avoid issues with Foundation when your IT global policy might interfere with software functioning.
To turn off sleep mode in Windows 7
1. Choose Start > Control Panel > System and Security > Power Options.
2. Select Create a Power Plan.
3. To keep the computer powered, select the High Performance option.
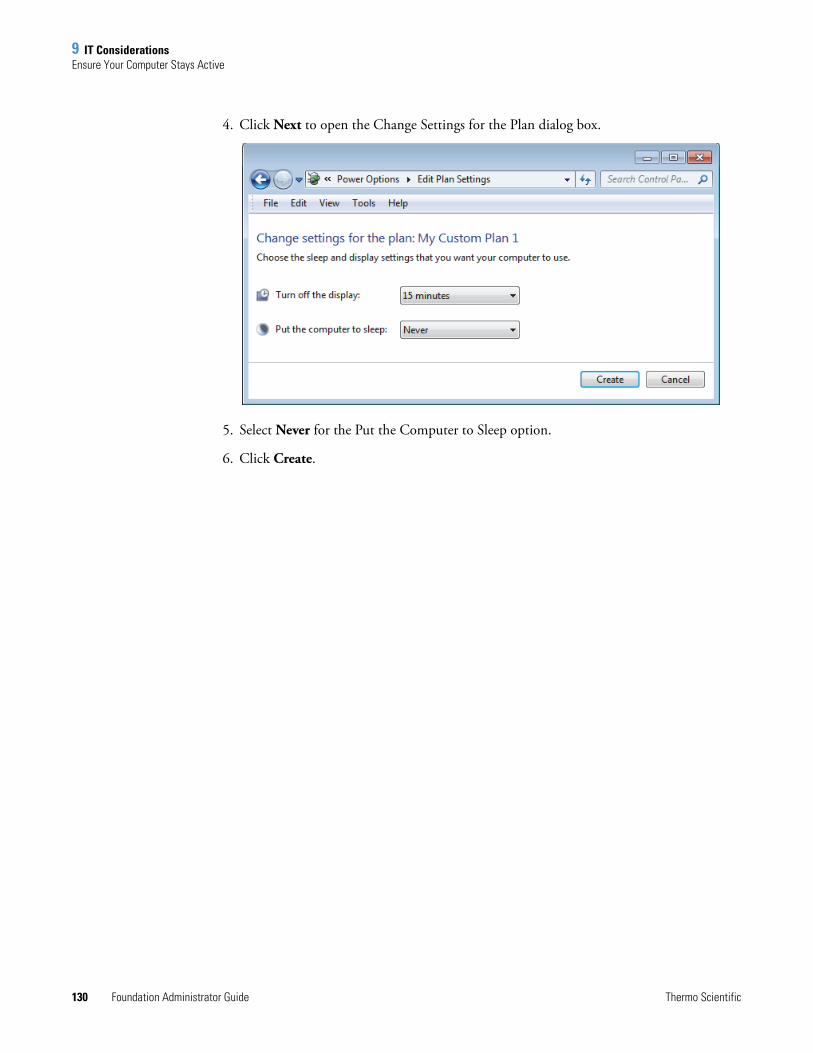
9 IT ConsiderationsEnsure Your Computer Stays Active
130 Foundation Administrator Guide Thermo Scientific
4. Click Next to open the Change Settings for the Plan dialog box.
5. Select Never for the Put the Computer to Sleep option.
6. Click Create.
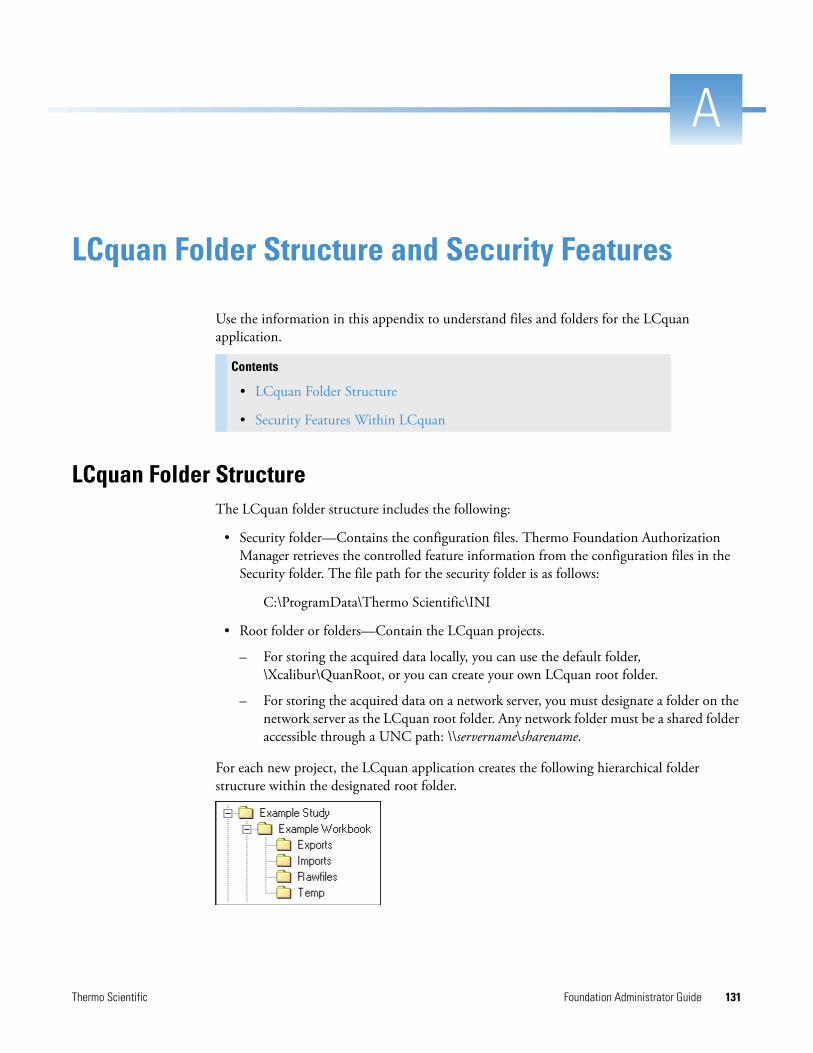
Thermo Scientific Foundation Administrator Guide 131
A
LCquan Folder Structure and Security Features
Use the information in this appendix to understand files and folders for the LCquan application.
LCquan Folder StructureThe LCquan folder structure includes the following:
• Security folder—Contains the configuration files. Thermo Foundation Authorization Manager retrieves the controlled feature information from the configuration files in the Security folder. The file path for the security folder is as follows:
C:\ProgramData\Thermo Scientific\INI
• Root folder or folders—Contain the LCquan projects.
– For storing the acquired data locally, you can use the default folder, \Xcalibur\QuanRoot, or you can create your own LCquan root folder.
– For storing the acquired data on a network server, you must designate a folder on the network server as the LCquan root folder. Any network folder must be a shared folder accessible through a UNC path: \\servername\sharename.
For each new project, the LCquan application creates the following hierarchical folder structure within the designated root folder.
Contents
• LCquan Folder Structure
• Security Features Within LCquan

A LCquan Folder Structure and Security FeaturesSecurity Features Within LCquan
132 Foundation Administrator Guide Thermo Scientific
• Study folder—Top-level folder within the root folder. Each study folder contains one or more workbook folders. The study folder can contain any number of workbook folders, but each workbook must have a unique name.
• Workbook folder—Contains all the information that the LCquan application uses for an individual quantitative analysis project. The workbook folder contains the LCquan file (.lqn), the instrument method file (.meth), and an audit database (.mdb). The workbook folder also contains the following:
– Exports folder—Stores copies of all files that the application exports, such as report files.
– Imports folder—Stores a copy of legacy files that you import into the workbook, such as instrument method files, processing method files, or sequence files.
– Rawfiles folder—Contains acquired data files (.raw) and any imported raw data files.
– Temp folder—Contains temporary files used by the LCquan application.
Security Features Within LCquanAfter the appropriate file protections and user access controls are in place, the LCquan application uses several built-in features to ensure the security of the data.
The application performs Cyclic Redundancy Checks (CRCs) to protect against malicious changes to data files. A CRC can detect file corruption and attempted changes to data files outside the application. The CRC calculates checksums for sets of data, using mathematical formulas, and embeds the value within the file. Each time you open the file, the CRC recalculates the checksums and compares them with the stored values. When you modify or process data within the application, the CRC recalculates and stores new checksums.
In addition, the application includes a file tracking system that maintains a database of the files created in or used by the application. When you open an existing project, the application displays a warning if files within that project have been moved or modified (as determined from the CRC value). The Audit Trail ensures that you can generate all electronic records from the raw data.
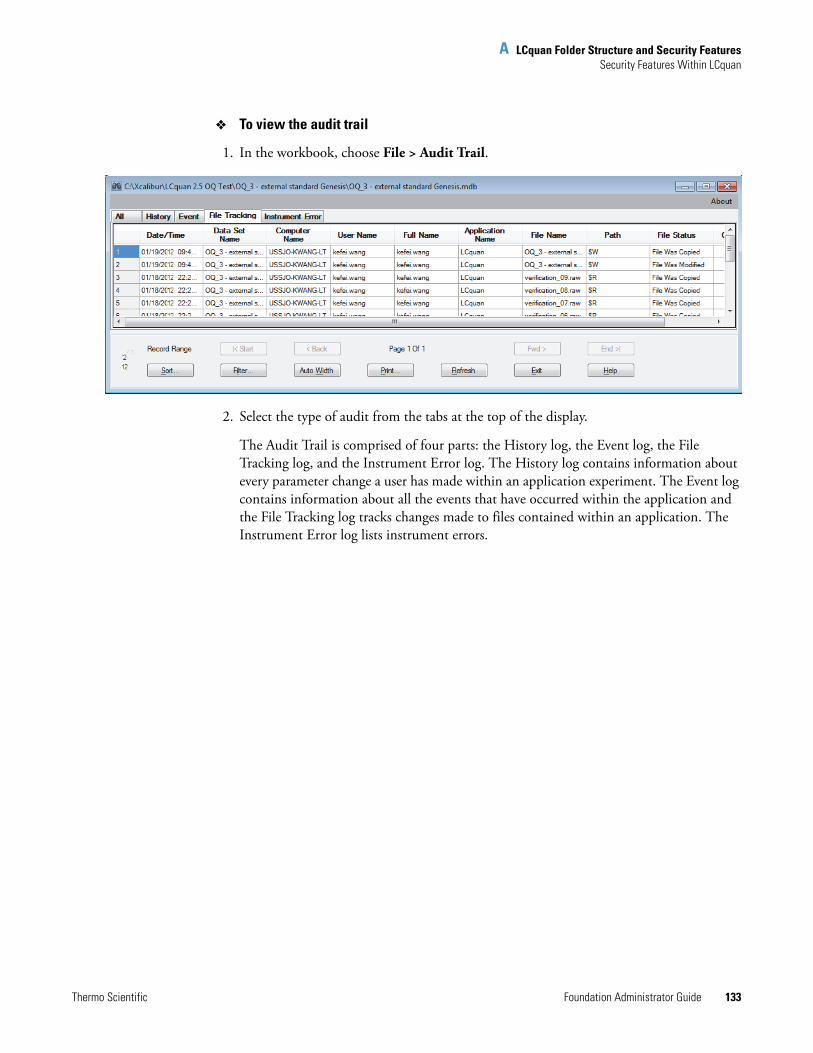
A LCquan Folder Structure and Security FeaturesSecurity Features Within LCquan
Thermo Scientific Foundation Administrator Guide 133
To view the audit trail
1. In the workbook, choose File > Audit Trail.
2. Select the type of audit from the tabs at the top of the display.
The Audit Trail is comprised of four parts: the History log, the Event log, the File Tracking log, and the Instrument Error log. The History log contains information about every parameter change a user has made within an application experiment. The Event log contains information about all the events that have occurred within the application and the File Tracking log tracks changes made to files contained within an application. The Instrument Error log lists instrument errors.


Thermo Scientific Foundation Administrator Guide 135
B
Watson Interface
This appendix describes Thermo Foundation Authorization Manager settings for the Watson file interface.
Recommended Settings for Excel ReportsFor the Watson file interface, set the following features in Thermo Foundation Authorization Manager to ensure that you can correctly import Excel reports from the application:
• Remove Signature Line from Excel Reports—This setting removes the signature line from the exported quantitation reports.
• Allow Watson File Interface Excel Format Reports—This setting corrects the format of the acquisition date and time entries in the exported quantitation reports.
Rounding the Decimal Places
For the Watson digital interface, you can ensure consistency in the number of decimal places displayed in the Excel reports that the application exports. To do this, use the Allow Excel Rounding feature.
If you specify Excel rounding, the exported values are restricted to three decimal places consistently in the Excel reports. However, if you use this feature, the Excel reports do not include a full precision value.
To use the Excel rounding feature, set the permission level to Allowed in the Foundation Authorization Manager (see Setting the Excel Features). Before the Excel rounding feature takes effect for the Watson digital interface, you must start and exit the application.
Note To use the digital gateways, you must install the Xcalibur and LCquan XDK components.
Contents
• Recommended Settings for Excel Reports
• About the Watson Digital Interface

B Watson InterfaceRecommended Settings for Excel Reports
136 Foundation Administrator Guide Thermo Scientific
Setting the Excel Features
To set the Excel features for reports
1. From the Windows taskbar, choose Start > All Programs >Thermo Foundation x.x > Authorization Manager.
Thermo Foundation Authorization Manager opens.
2. In the Secure Groups area, select the group.

B Watson InterfaceRecommended Settings for Excel Reports
Thermo Scientific Foundation Administrator Guide 137
3. In the controlled features list (lower left side), select the application, and click Expand Tree.
The list of controlled features appears.
4. Under Quantitate Section, right-click the feature and choose Allow from the shortcut menu for each of the following:
• Remove signature line from Excel report
• Allow Watson file interface Excel format
• Allow Excel Rounding
A check mark appears next to each allowed feature.
5. Click OK to apply the changes and close the Foundation Authorization Manager.
B Watson InterfaceAbout the Watson Digital Interface
138 Foundation Administrator Guide Thermo Scientific
About the Watson Digital InterfaceThe following fields are exported to the Watson application using the digital interface for each sample/analyte combination:
• Peak area
• Peak height
• Retention time
See “Rounding the Decimal Places” on page 135.
To use the digital interface with Watson 7.2 or later, refer to Installing and Using the Peak View Gateway Between Watson and LCquan for instructions.

Thermo Scientific Foundation Administrator Guide 139
I
Symbols
Aaccess
restricting to folders and files 25unauthorized
definition 1prevention of, overview 9
accessing the auditing database 20acquiring data
remote acquisition 6time-stamping raw files during remote acquisition
always time-stamp 6never time-stamp 6
Acquisition run dialog, setting permissions 78Acquisition section, configuration 77Acquisition section, setting permissions 78adding users 33antivirus scanning 127archiving files 49audit log, requiring comments for 64Audit Trail, definition 132Audit Viewer
filtering entries 107Instrument Error Page 117printing entries 110sorting entries 109starting from Windows desktop 104tabs 106use for auditing 103
auditing databasesaccessing 104configuring 11–14
auditing databases, accessing 104
Authorization Managerhistory log for 74printing security settings in 75saving controlled feature settings in 76
Automatic Logoff featureabout 48password-protected screen saver restriction 48
Cchromatogram peaks
normalizing detected peak to 100% 79normalizing highest peak to 100% 79
comments about actions, requiring 64comments, setting predetermined list 69configuration file 76configuring software applications
checklist 2overview of 8
controlled feature settings, saving 76controlling user access, overview of 9CRC Validator, checking files with 96CRCs
See cyclical redundancy checkscreating private groups 57cyclic redundancy check (CRC)
security 132using 95
Ddata
loss due to auto logoff, prevention of 48time-stamp raw files during remote acquisition
always time-stamp 6never time-stamp 6
database filters, selecting files using 97
Index

140 Foundation Administrator Guide Thermo Scientific
Index: E
database serviceSee Thermo Foundation DatabaseService
databasesGlobal Auditing database, accessing 103workbook database, accessing 103
decimal place rounding 135defining as secure, private groups 57defining user requirements 8definition
private groups 7user groups 7
device drivers, incompatible 124documentation survey ixdomain logon groups
defining as secure 56definition 52
Eevent log 133Event page, Audit Viewer 106Excel
recommended settings 135rounding decimal places in 80
Explore section, configuration 77Explore section, setting permissions 78exporting permissions 67
FFast User Switching feature 45features, setting for LCquan 76–80file tracking log 133File Tracking page, Audit Viewer 106files
configuring security settings for 25permissions, setting 77removing and archiving 49tracking 132
filters, selecting files using 97firewall exception 128folder structure 131folders
configuring security settings for 25permissions
setting for root 26setting for security 40
GGlobal Auditing database 104
Hhistory log
for Authorization Manager 74for software applications 133
History page, Audit Viewer 106
Iimporting permissions 67incompatible device drivers 124inheriting permissions 66Instrument Configuration window 119Instrument Error page, Audit Viewer 107, 117Instrument Setup section
configuration 77setting permissions 77
LLCquan feature permissions 76–80locking the workbook 73locking workbook automatically after creating report 73logging in and out 48
MMicrosoft Access database, configuring 11multi-user logon 48
Nnormalization
of detected chromatogram peak to 100% 79of highest chromatogram peak to 100% 79
OOperator Use Allowed 76Oracle database, configuring 11Out Of Date Instrument Drivers Detected dialog box 124
Ppatterns, using to select files 100peaks
normalizing detected chromatogram peak to 100% 79normalizing highest chromatogram peak to 100% 79
permission level Signature List 63permission levels
about setting 60definition 60exporting and importing 67inheriting 66setting 60

Thermo Scientific Foundation Administrator Guide 141
Index: Q
setting all 65setting all features to same 65settings 76–80
permissions setting for folders and files 37printing security settings 75private groups
creating 57defining as secure 57definition 7, 52editing 58
protecting records, overview of 9
QQuantitate section
configuration 77setting permissions 78
Rraw files
time-stamping during remote acquisitionalways time-stamp 6never time-stamp 6
records, protecting 9registry key, Windows 42remote acquisition
always time-stamp 6prevent time-stamping 6
removing files 49removing users 33reports
lock workbook after creating report 73permissions for creating 79rounding decimal places in Excel 80setting up secure reporting 79
root folderallowing change 76configuring security settings for 26
Ssaving system information 125secure reporting 79security features, within software applications 132security folder
configuration file and 76configuring security settings for 40
security serverSee Thermo Foundation SecurityService
security settingsfolders and files 25printing from Authorization Manager 75
security, system 1SecurityService
See Thermo Foundation SecurityServiceselecting files
using a pattern 100using database filters 97
Set To Same button 65setting permission levels 60signature list definition 63Status values for CRC Validation 97study description 132survey link ixsystem information
displaying 125saving 125
system security 1
TThermo Foundation DatabaseService
confirming properties of 20functions 20
Thermo Foundation DatabaseService Properties dialog boxLog On page 22
Thermo Foundation SecurityServiceconfirming properties of 20functions 22properties of
secure file operations 22user authentication 22
verifying properties of 22Thermo Foundation SecurityService Properties dialog box
Log On page 20time stamps
about 6time-stamping raw files during remote acquisition
always time-stamp 6never time-stamp 6
tracking, files 132
Uunauthorized access
definition 1prevention of, overview 9
user access, controlling 9user authentication 20

142 Foundation Administrator Guide Thermo Scientific
Index: V
user groupsdefinition 7editing 58single user belonging to multiple 55
user groups, Authorization Managerplanning 52single user belonging to multiple 52
user requirements, defining 8
VVersion Info dialog box 125viewing system information 125
WWatson interface, setting features for 135Watson LIMS, Oracle database 11Windows Active Directory Domain groups 53workbooks
already marked as opened 77databases, auditing 104description 132locking 73locking automatically after creating reports 73setting permissions 77
XXcalibur system account 128XReport templates, secure 79