xdc consumer user's guide - texas instruments · xdc includes tools and standards for api...
TRANSCRIPT
XDC Consumer User’s Guide
Literature Number: SPRUEX4July 2007

IMPORTANT NOTICE
Texas Instruments Incorporated and its subsidiaries (TI) reserve the right to make corrections, modifications,enhancements, improvements, and other changes to its products and services at any time and to discontinue anyproduct or service without notice. Customers should obtain the latest relevant information before placing ordersand should verify that such information is current and complete. All products are sold subject to TI's terms andconditions of sale supplied at the time of order acknowledgment.
TI warrants performance of its hardware products to the specifications applicable at the time of sale in accordancewith TI's standard warranty. Testing and other quality control techniques are used to the extent TI deems necessaryto support this warranty. Except where mandated by government requirements, testing of all parameters of eachproduct is not necessarily performed.
TI assumes no liability for applications assistance or customer product design. Customers are responsible fortheir products and applications using TI components. To minimize the risks associated with customer productsand applications, customers should provide adequate design and operating safeguards.
TI does not warrant or represent that any license, either express or implied, is granted under any TI patent right,copyright, mask work right, or other TI intellectual property right relating to any combination, machine, or processin which TI products or services are used. Information published by TI regarding third-party products or servicesdoes not constitute a license from TI to use such products or services or a warranty or endorsement thereof. Useof such information may require a license from a third party under the patents or other intellectual property of thethird party, or a license from TI under the patents or other intellectual property of TI.
Reproduction of information in TI data books or data sheets is permissible only if reproduction is without alterationand is accompanied by all associated warranties, conditions, limitations, and notices. Reproduction of this infor-mation with alteration is an unfair and deceptive business practice. TI is not responsible or liable for such altereddocumentation.
Resale of TI products or services with statements different from or beyond the parameters stated by TI for thatproduct or service voids all express and any implied warranties for the associated TI product or service and is anunfair and deceptive business practice. TI is not responsible or liable for any such statements.
Following are URLs where you can obtain information on other Texas Instruments products and applicationsolutions:
Mailing Address: Texas InstrumentsPost Office Box 655303 Dallas, Texas 75265
Copyright © 2007, Texas Instruments Incorporated
Products ApplicationsAmplifiers amplifier.ti.com Audio www.ti.com/audioData Converters dataconverter.ti.com Automotive www.ti.com/automotiveDSP dsp.ti.com Broadband www.ti.com/broadbandInterface interface.ti.com Digital Control www.ti.com/digitalcontrolLogic logic.ti.com Military www.ti.com/militaryPower Mgmt power.ti.com Optical Networking www.ti.com/opticalnetworkMicrocontrollers microcontroller.ti.com Security www.ti.com/securityLow Power Wireless www.ti.com/lpw Telephony www.ti.com/telephony
Video & Imaging www.ti.com/videoWireless www.ti.com/wireless

iii
This is a draft version printed from file: pref.fm on 7/31/07
Preface
Read This First
About This ManualThe eXpress DSP Components (XDC, pronounced "ex-dee-see") is astandard for providing reusable software components that are optimized forreal-time embedded systems.
This document is a user's guide for consumers of XDC-based packages,including XDC itself.
How to Use this ManualChapter 1 describes XDC and provides a general introduction.
Chapter 2 describes the steps to creating and building applications that useXDC in more detail.
Chapter 3 describes the tools provided with XDC that apply to XDCconsumers.
Chapter 4 describes the XDC runtime packages that apply to XDCconsumers.
Chapter 5 describes the XDC configuration syntax.
Appendix A lists compiler options for various targets.
iv
Notational Conventions
Notational ConventionsThis document uses the following conventions:
Program listings, program examples, and interactive displays are shownin a special typeface. Examples use a bold version of the special typefacefor emphasis.
Here is a sample program listing:
#include <xdc/runtime/System.h>
int main(){ System_printf("Hello World!\n"); return (0); }
Square brackets ( [ and ] ) identify an optional parameter. If you use anoptional parameter, you specify the information within the brackets.Unless the square brackets are in a bold typeface, do not enter thebrackets themselves.
Related Documentation From Texas InstrumentsXDC Release Notes (XDC_INSTALL_DIR/release_notes.html). Includesinformation about software version, upgrades and compatibility, host andtarget device support, validation, and known issues.
XDC Getting Started Guide(XDC_INSTALL_DIR/doc/XDC_Getting_Started_Guide.pdf). Includessteps for installing and validating the installation. Provides a quickintroduction to XDC using a "hello world" application.
"CDOC" reference documentation. Contains full reference informationabout all installed packages and their modules, APIs, XDC configuration,data structures, etc. See Section 1.6.1 for how to use this online system.
XDC Producer User’s Guide (SPRUEX5). Provides information aboutcreating XDC packages.
XDC Documentation List (XDC_INSTALL_DIR/doc/index.html). Provideslinks to several other XDC documents.

Read This First v
Related Documentation
Related DocumentationYou can use the following books to supplement this reference guide:
The C Programming Language (second edition), by Brian W. Kernighanand Dennis M. Ritchie, published by Prentice-Hall, Englewood Cliffs, NewJersey, 1988
Programming in C, Kochan, Steve G., Hayden Book Company
Programming Embedded Systems in C and C++, by Michael Barr, AndyOram (Editor), published by O'Reilly & Associates; ISBN: 1565923545,February 1999
Real-Time Systems, by Jane W. S. Liu, published by Prentice Hall; ISBN:013099651, June 2000
Principles of Concurrent and Distributed Programming (Prentice HallInternational Series in Computer Science), by M. Ben-Ari, published byPrentice Hall; ISBN: 013711821X, May 1990
American National Standard for Information Systems-ProgrammingLanguage C X3.159-1989, American National Standards Institute (ANSIstandard for C); (out of print)
TrademarksThe Texas Instruments logo and Texas Instruments are registeredtrademarks of Texas Instruments. Trademarks of Texas Instruments include:TI, Code Composer, Code Composer Studio, DSP/BIOS, SPOX, TMS320,TMS320C54x, TMS320C55x, TMS320C62x, TMS320C64x, TMS320C67x,TMS320C28x, TMS320C5000, TMS320C6000 and TMS320C2000.
Windows is a registered trademark of Microsoft Corporation.
Linux is a registered trademark of Linus Torvalds.
All other brand or product names are trademarks or registered trademarks oftheir respective companies or organizations.

vi

vii
This is a draft version printed from file: xdcugtoc.fm on 7/31/07
Contents
1 About XDC . . . . . . . . . . . . . . . . . . . . . . . . . . . . . . . . . . . . . . . . . . . . . . . . . . . . . . . . . . . . . . . .1-1This chapter provides an overview of eXpress Dsp Components (XDC).1.1 What is XDC? . . . . . . . . . . . . . . . . . . . . . . . . . . . . . . . . . . . . . . . . . . . . . . . . . . . . . . . . .1-21.2 XDC Terminology . . . . . . . . . . . . . . . . . . . . . . . . . . . . . . . . . . . . . . . . . . . . . . . . . . . . . .1-31.3 How to Use XDC: The Quick Tour . . . . . . . . . . . . . . . . . . . . . . . . . . . . . . . . . . . . . . . . .1-51.4 The Package Path . . . . . . . . . . . . . . . . . . . . . . . . . . . . . . . . . . . . . . . . . . . . . . . . . . . . .1-61.5 Setting Your PATH Definition . . . . . . . . . . . . . . . . . . . . . . . . . . . . . . . . . . . . . . . . . . . . .1-81.6 Getting More Information . . . . . . . . . . . . . . . . . . . . . . . . . . . . . . . . . . . . . . . . . . . . . . . .1-9
2 Basic Steps to Using XDC . . . . . . . . . . . . . . . . . . . . . . . . . . . . . . . . . . . . . . . . . . . . . . . . . . .2-1This chapter provides a more detailed look at the steps to using XDC.2.1 Overview of the Development Steps . . . . . . . . . . . . . . . . . . . . . . . . . . . . . . . . . . . . . . .2-22.2 Configuring the Application. . . . . . . . . . . . . . . . . . . . . . . . . . . . . . . . . . . . . . . . . . . . . . .2-22.3 Writing C Code . . . . . . . . . . . . . . . . . . . . . . . . . . . . . . . . . . . . . . . . . . . . . . . . . . . . . . . .2-72.4 Processing the Configuration . . . . . . . . . . . . . . . . . . . . . . . . . . . . . . . . . . . . . . . . . . . .2-142.5 Compiling and Linking . . . . . . . . . . . . . . . . . . . . . . . . . . . . . . . . . . . . . . . . . . . . . . . . .2-19
3 XDC Tools . . . . . . . . . . . . . . . . . . . . . . . . . . . . . . . . . . . . . . . . . . . . . . . . . . . . . . . . . . . . . . . .3-1This chapter provides command-line syntax and examples for the tools provided with XDC.3.1 Overview of the Tools. . . . . . . . . . . . . . . . . . . . . . . . . . . . . . . . . . . . . . . . . . . . . . . . . . .3-23.2 The cdoc Tool. . . . . . . . . . . . . . . . . . . . . . . . . . . . . . . . . . . . . . . . . . . . . . . . . . . . . . . . .3-33.3 The configuro Tool . . . . . . . . . . . . . . . . . . . . . . . . . . . . . . . . . . . . . . . . . . . . . . . . . . . . .3-53.4 The path Tool . . . . . . . . . . . . . . . . . . . . . . . . . . . . . . . . . . . . . . . . . . . . . . . . . . . . . . . . .3-63.5 The repoman Tool . . . . . . . . . . . . . . . . . . . . . . . . . . . . . . . . . . . . . . . . . . . . . . . . . . . . .3-8
4 XDC Runtime Modules . . . . . . . . . . . . . . . . . . . . . . . . . . . . . . . . . . . . . . . . . . . . . . . . . . . . . .4-1This chapter provides introductory information about the XDC runtime modules.4.1 Overview of the Runtime Modules . . . . . . . . . . . . . . . . . . . . . . . . . . . . . . . . . . . . . . . . .4-24.2 XDC Boot Sequence and Control Points . . . . . . . . . . . . . . . . . . . . . . . . . . . . . . . . . . . .4-24.3 System Module. . . . . . . . . . . . . . . . . . . . . . . . . . . . . . . . . . . . . . . . . . . . . . . . . . . . . . . .4-64.4 Memory Segments and Sections . . . . . . . . . . . . . . . . . . . . . . . . . . . . . . . . . . . . . . . . .4-104.5 Memory Allocation and Heaps . . . . . . . . . . . . . . . . . . . . . . . . . . . . . . . . . . . . . . . . . . .4-134.6 Timestamp Module . . . . . . . . . . . . . . . . . . . . . . . . . . . . . . . . . . . . . . . . . . . . . . . . . . . .4-174.7 Gate Interface and Implementations . . . . . . . . . . . . . . . . . . . . . . . . . . . . . . . . . . . . . .4-194.8 Diagnostics and Logs . . . . . . . . . . . . . . . . . . . . . . . . . . . . . . . . . . . . . . . . . . . . . . . . . .4-214.9 Types Module . . . . . . . . . . . . . . . . . . . . . . . . . . . . . . . . . . . . . . . . . . . . . . . . . . . . . . . .4-33

viii
Contents
5 XDC Configuration . . . . . . . . . . . . . . . . . . . . . . . . . . . . . . . . . . . . . . . . . . . . . . . . . . . . . . . . . 5-1This chapter provides more information about XDC configuration syntax.5.1 More About the XDC Script Language . . . . . . . . . . . . . . . . . . . . . . . . . . . . . . . . . . . . . 5-25.2 More About the xs Command . . . . . . . . . . . . . . . . . . . . . . . . . . . . . . . . . . . . . . . . . . . . 5-55.3 JavaScript Language . . . . . . . . . . . . . . . . . . . . . . . . . . . . . . . . . . . . . . . . . . . . . . . . . 5-135.4 XDC Script Methods . . . . . . . . . . . . . . . . . . . . . . . . . . . . . . . . . . . . . . . . . . . . . . . . . . 5-15
A Target Compiler Options . . . . . . . . . . . . . . . . . . . . . . . . . . . . . . . . . . . . . . . . . . . . . . . . . . . . A-1This appendix lists the compiler options used by default for the various targets you can select.

1-1
Chapter 1
About XDC
This chapter provides an overview of eXpress Dsp Components (XDC).
1.1 What is XDC? . . . . . . . . . . . . . . . . . . . . . . . . . . . . . . . . . . . . . . . . . . . . 1-2
1.2 XDC Terminology . . . . . . . . . . . . . . . . . . . . . . . . . . . . . . . . . . . . . . . . . 1-3
1.3 How to Use XDC: The Quick Tour. . . . . . . . . . . . . . . . . . . . . . . . . . . . 1-5
1.4 The Package Path. . . . . . . . . . . . . . . . . . . . . . . . . . . . . . . . . . . . . . . . . 1-6
1.5 Setting Your PATH Definition . . . . . . . . . . . . . . . . . . . . . . . . . . . . . . . 1-8
1.6 Getting More Information . . . . . . . . . . . . . . . . . . . . . . . . . . . . . . . . . . 1-9
Topic Page

What is XDC?
1-2
1.1 What is XDC?
The eXpress DSP Components (XDC, pronounced "ex-dee-see") is astandard for providing reusable software components, called "packages",that are optimized for real-time embedded systems.
XDC includes tools and standards for API development, static configuration,and packaging. XDC components have hardware-neutral formal interfaces,are configurable offline to optimize memory and performance, and supportcustom automation in the development environment via a scripting language.
The main benefit of XDC is that it standardizes the delivery of target contentand makes it easier for target content to be included in applications.
The users of XDC are divided into developers we call "consumers" and"producers." Consumers integrate target content packages—DSPalgorithms, device drivers, TCP/IP stacks, real-time OSes, and so on—intotheir own applications. Producers create the packages used by consumers.
An XDC "package" is a named collection of files that form a unit of versioning,update, and delivery from a producer to a consumer. Each package isembodied as a specially-named directory (and its contents) within a filesystem. Packages are the focal point for managing content throughout its life-cycle. All packages are built, tested, released, and deployed as a unit.

XDC Terminology
About XDC 1-3
An XDC "repository" is simply a directory that contains packages. The dots inthe name of a package, interface, or module refer to its location within therepository. For example the ti.sysbios.knl.Task module would be located atti/sysbios/knl with respect to a repository directory named in the XDC"package path". The package path is simply a list of repositories containingpackages installed by the user.
This document is intended for use by consumers. However, producers mustalso be familiar with the concepts in this document in order to move beyondit and understand how to create packages. (Also, producers often alsofunction as consumers, for example, to use a third-party RTOS when creatinga TCP/IP stack.) After reading this document, producers should move on tothe XDC Producer User’s Guide (SPRUEX5).
1.2 XDC Terminology
XDC uses a number of terms that you will need to be familiar with:
Packages. These serve as general-purpose containers for modules andinterfaces as well as other software artifacts. Packages are the focal pointfor managing content throughout its life-cycle. All packages are built,tested, released, and deployed as a unit.
Modules. These encapsulate a related set of types and functions. Theyhave both an external specification and a concrete internalimplementation. A module optionally manages a single instance type,which is analogous to a C++ class.

XDC Terminology
1-4
Interfaces. These are effectively "abstract modules". They have aspecification without an implementation. Other modules and interfacescan inherit the specification. An interface defines a collection of relatedtypes, constants, variables, and functions. A single C (and/or asm)header file defines the interface.
Repository. A directory in which one or more packages are installed.Repositories can contain only one version of a package. So, side-by-sideinstallations of two different versions of a package require tworepositories. The user has complete control over the number and namesof repositories.
Package Path. An ordered sequence of repositories that are searchedwhen locating a package's file. Like the PATH environment variable usedto locate commands, the package path is set by the user and allowssource code to reference package files without using absolute paths.Simple adjustments of the package path can be used to quickly switchbetween different versions of one or more packages.
Target content. Software bound into an application program executingon a particular hardware platform.
Meta content. Host-based content that plays an active role in the design-time configuration as well as the run-time analysis of target programs.
Client applications. The application that consumes packages and callsfunctions in interfaces to perform application actions.
How to Use XDC: The Quick Tour
About XDC 1-5
1.3 How to Use XDC: The Quick Tour
Using an XDC package requires the introduction of a configuration step to theconventional compile/link cycle. You can easily add this configuration step toexisting build flows using XDC's "configuro" command-line tool. For moreabout integrating configuration into your build flow, see the XDC GettingStarted Guide (XDC_INSTALL_DIR/doc/XDC_Getting_Started_Guide.pdf).
Follow the steps in the first chapter of the XDC Getting Started Guide to installXDC and test the installation.
Follow the steps in the second chapter of the XDC Getting Started Guide toget a quick introduction to the process of creating applications that use XDC-based content. The main steps in that process are:
1) Configuring the application. See Section 2.2 for more information.
2) Writing C code. See Section 2.3 for more information.
3) Processing the configuration for your target and platform. See Section2.4 for more information.
4) Compiling and linking the application. See Section 2.5 for moreinformation.
The next chapter of this manual (XDC Consumer User’s Guide) goes intomore detail than the XDC Getting Started Guide about each of thesedevelopment steps.

The Package Path
1-6
1.4 The Package Path
XDC packages often need to reference files contained in other packages.Files contained in a package are always found along the "Package Path,"which is simply a semicolon-separated list of package "repositories". Arepository is simply a directory that contains installed packages.
The Package Path is always defined as follows:
XDCPATH;XDC_INSTALL_DIR/packages;^
In this definition, XDCPATH is a semicolon-separated set of repositoriesspecified by the user. The XDC_INSTALL_DIR/packages is the repository ofpackages included with the XDC tools. The "^" denotes the current package'srepository (if there is a current package). For most tools, the current packageis defined as the package named by a package.xdc file in the current workingdirectory. If no such file exists, then any repository name containing the "^"character expands to an empty string "".
Because XDC_INSTALL_DIR/packages is always part of the package path,the XDC tools can automatically find XDC’s own packages. However, if youhave other software that uses XDC packaging (such as DSP/BIOS), youneed to set the XDCPATH environment variable to reference any repositoriescontaining packages you require.
All source files, whether they are part of a package or your application, shouldalways reference files contained in a package by prefixing the file name withthe package's directory name. For example, to include the Task.h header inthe ti.sysbios.knl package, your source files should #include<ti/sysbios/knl/Task.h>.
When compiling your sources, you should add a -I option for each repositorynamed in the Package Path in the same order that they appear in thePackage Path. Following this pattern allows you to easilyadd/remove/override packages without having to update your build system.You can simply install (or remove) a package into one of the repositories, add(or remove) the reference from your sources, and rebuild.
Since virtually all build tools support an option similar to -I, the pattern worksfor linker command files, assembly language files, XDC scripts, andmakefiles.

The Package Path
About XDC 1-7
1.4.1 Managing the XDCPATH Portion of the Package Path
In the Package Path, you control the XDCPATH portion. This prefix is a stringof ';' separated directories that contain packages.
XDCPATH may be specified as an environment variable or on the commandline of any tool that uses the Package Path. See the documentation of theparticular command-line tool to find the appropriate option.
IMPORTANT NOTE: All directories referenced in XDCPATH, whether in anenvironment variable or a command line, must use forward slashes (/) asseparators instead of the Windows-standard backslash (\). For example,use "c:/os;c:/drivers;c:/framework".
Relative paths in XDCPATH reference directories relative to the packagebeing built rather than the directory from which the command was invoked.Thus, a relative path refers to a different repository for each package used.
Note: It is usually a mistake to use a relative path in the XDCPATH prefix.
It is possible, however, to use the '^' character in the XDCPATH definition torefer to the "current package's" repository. So, if you have a repository that isalways in a fixed location relative to all of your package's repositories, it ispossible to create a single XDCPATH setting that works for all your packagesand does not include any absolute paths.
Suppose, for example, that your build system places all prerequisitepackages in an "imports" repository prior to building the packages in a "src"repository and the imports and src repositories are sibling directories in thefile system. The following XDCPATH setting is sufficient to build all packagesin the src repository.
set XDCPATH=^/../imports
Multiple versions of the same package can appear along the Package Path.The Package Path can name multiple repositories that can contain a packagedirectory with the same name. When searching for a package, the firstrepository that contains a directory matching the package's name is used.Thus, even if two packages with the same name appear in the package path,only one will ever be found-the first one in the order specified in the packagepath.
Thus, it is possible to quickly update selected packages by adding an"updates" repository at the front of XDCPATH. If the updates are successful,you can "permanently" remove the old versions; otherwise you can quicklyrevert to the previous versions by simply removing the updates repositoryfrom XDCPATH.

Setting Your PATH Definition
1-8
Here is a Linux command example for setting XDCPATH:
export XDCPATH="/opt/embedded/os;/opt/embedded/drivers"
If you are using Microsoft Windows, see Section 1.5 for how to setenvironment variables.
XDC configuration scripts mention packages by name, not by location. Thismakes scripts portable to new directory locations.
If you do not want to specify a directory using the XDCPATH environmentvariable, you can use the --xdcpath option on the command line for all the xscommand-line tools.
Alternately, you can place the --xdcpath command-line option in a text file,say mysettings.txt, and specify the file on the command line of xs commands.This is useful in makefiles, which can have a dependency on the text file. Thexs command line would reference the file as shown in this example:
xs @mysettings.txt
1.5 Setting Your PATH Definition
XDC does not use the PATH environment variable directly. However, youroperating system or shell does—PATH defines where the operating systemlooks for command line programs. You may want to include the top-level XDCdirectory in your PATH to simplify invoking the XDC command-line tools.
Setting the PATH definition makes it easy to run XDC's xs command, whichis used to run a number of tools. If you do not want to add the XDC directoryto your PATH, you can use one of the following alternate ways of running thexs command:
You can invoke xs from the command line by using the full path<xdc_install_dir>/xs.
You can make an alias to the xs or xs.exe executable.
On Microsoft Windows, the PATH is managed by Windows itself (in Windows2000 and Windows XP) rather than by the autoexec.bat or autoexec.nt filesused in previous versions of Windows.
You can create aliases using the doskey command from the Windowscmd.exe shell as shown in this example:
doskey xdc=<xdc_install_dir>/xs.exe $*
Getting More Information
About XDC 1-9
To change the Windows PATH (and other Windows environment variables),follow these steps:
1) Right-click My Computer and choose Properties.
2) In the System Properties window, choose the Advanced tab.
3) In the Advanced tab, click the Environment Variables button.
4) Highlight the Path variable in the "Systems variables" area and click Edit.
5) Add the directory in which you installed XDC to the end of the currentPath definition. Use a semicolon to separate the locations in the list. Forexample, you might add the following to your existing Path definition:
;c:\xdc_2_95
6) Click OK in the Environment Variables window and OK in the SystemProperties window.
7) Reopen any Command Prompt or MS-DOS windows you want to usewith XDC.
1.6 Getting More Information
You can read the following additional documents to learn more about XDC:
XDC Release Notes (XDC_INSTALL_DIR/release_notes.html). Includesinformation about software version, upgrades and compatibility, host andtarget device support, validation, and known issues.
XDC Getting Started Guide(XDC_INSTALL_DIR/doc/XDC_Getting_Started_Guide.pdf). Includessteps for installing and validating the installation. Provides a quickintroduction to XDC using a "hello world" application.
"CDOC" reference documentation. Contains full reference informationabout all installed packages and their modules, APIs, XDC configuration,data structures, etc. See Section 1.6.1 for how to use this online system.
XDC Producer User’s Guide (SPRUEX5). Provides information aboutcreating XDC packages.
XDC Documentation List (XDC_INSTALL_DIR/doc/index.html). Provideslinks to several other XDC documents.
Getting More Information
1-10
1.6.1 Using the CDOC Reference Help System
To open the CDOC reference help system, you can choose CDOC from theXDC group in the All Programs section of the Windows Start menu.
Alternatively, issue the following command from the command prompt—forexample by opening the Microsoft Windows Start menu and choosing Run.
xs xdc.tools.cdoc.sg
You see the "cdoc" window with a tree view of the XDC packages availableto you. All of these packages provide documentation that can be displayed bythe CDOC viewer.
Click "+" next to a repository to expand its list of packages. Click "+" next to apackage name to see the list of modules it provides. You can further expandthe tree to see a list of the functions provided by a module. Double-click on apackage or module to see its reference information.
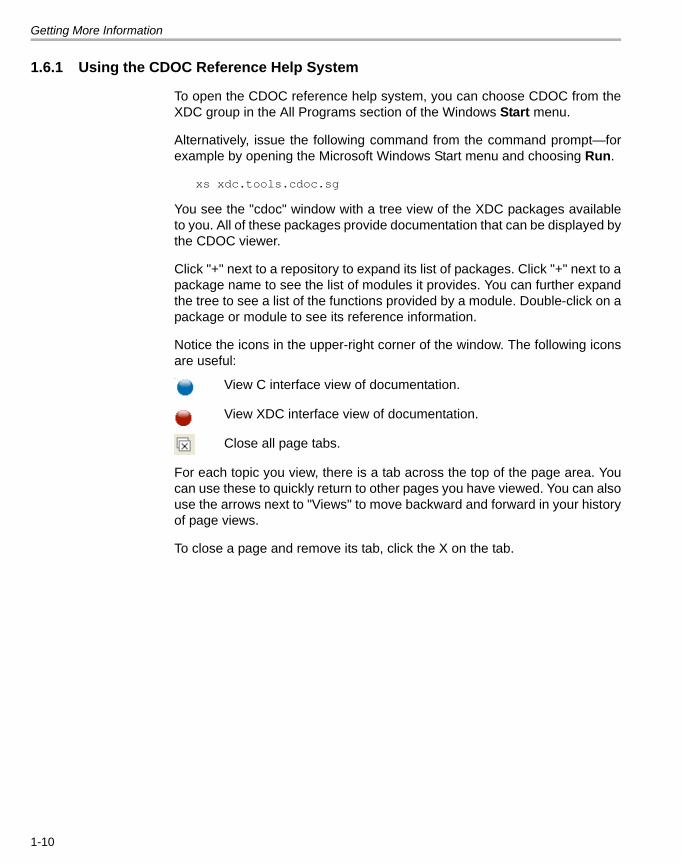
Notice the icons in the upper-right corner of the window. The following iconsare useful:
View C interface view of documentation.
View XDC interface view of documentation.
Close all page tabs.
For each topic you view, there is a tab across the top of the page area. Youcan use these to quickly return to other pages you have viewed. You can alsouse the arrows next to "Views" to move backward and forward in your historyof page views.
To close a page and remove its tab, click the X on the tab.

2-1
Chapter 2
Basic Steps to Using XDC
This chapter provides a more detailed look at the steps to using XDC.
2.1 Overview of the Development Steps . . . . . . . . . . . . . . . . . . . . . . . . . 2-2
2.2 Configuring the Application . . . . . . . . . . . . . . . . . . . . . . . . . . . . . . . . 2-2
2.3 Writing C Code . . . . . . . . . . . . . . . . . . . . . . . . . . . . . . . . . . . . . . . . . . . 2-7
2.4 Processing the Configuration . . . . . . . . . . . . . . . . . . . . . . . . . . . . . . 2-14
2.5 Compiling and Linking. . . . . . . . . . . . . . . . . . . . . . . . . . . . . . . . . . . . 2-19
Topic Page

Overview of the Development Steps
2-2
2.1 Overview of the Development Steps
To expand on the quick tour provided in the XDC Getting Started Guide thischapter expands on each of the steps in the development process.
Creating applications that use XDC-based software packages follows adevelopment cycle that builds on traditional C programming techniques. XDCpackages standardize the delivery of TI and 3rd party software, easing theintegration of such software.
Using an XDC package adds a configuration step to the conventionalcompile/link cycle. The configuration processing is easily added to existingbuild flows. XDC provides a number of tools that simplify the task ofintegrating and using XDC-based packages.
The steps for creating an application that uses XDC-based content are asfollows:
1) Configuring the application. See Section 2.2.
2) Writing C code. See Section 2.3.
3) Processing the configuration for your target and platform. See Section2.4.
4) Compiling and linking the application. See Section 2.5.
As with the standard development cycle, the focus is on writing C code. Theother steps are simple. XDC provides tools to support the additionalconfiguration steps.
2.2 Configuring the Application
An application that uses XDC packages needs a configuration file. This is afile containing script statements that statically configure how the applicationuses XDC packages. Your C program code can do additional dynamicconfiguration, but the XDC configuration defines the starting point.
The XDC configuration serves the following purposes:
Specifies the packages to use and the static objects to create.
Performs integrity checks between specified and dependent packages.
Sets options for modules and objects to change their default behavior.
The configuration file is typically located in the same directory as your mainC code file. It can have any name. The name should not contain spaces, andlowercase names are recommended.
Configuring the Application
Basic Steps to Using XDC 2-3
As you develop applications, the configuration step is one you may revisit asyou add functionality to your C code or tune the functionality of the packagesused by your application for optimal performance.
Use a text editor to create the configuration file, and save the file with anextension of .cfg. For example, your file might be called mycfg.cfg. Whenyou save the file, be sure to save it as plain text (not as a Microsoft Word orother word processor file).
XDC configuration files use JavaScript (EcmaScript) syntax. For moreinformation about configuration syntax, see Chapter 5. For details about thepackages, modules, objects, and properties you can configure, see theCDOC reference help system (see Section 1.6.1).
The following subsections provide an overview of the basic statement typesyou will use for most configurations.
2.2.1 Using a Module
The xdc.useModule command enables an application to use a particularmodule. For example, this command enables use of the xdc.runtime.Systemmodule:
var System = xdc.useModule("xdc.runtime.System");
(The package path allows XDC to find packages, so all you specify is thename of the package within a repository referenced in the package path.)
The generalized syntax is:
var Mod = xdc.useModule("pkg.name.Mod");
Your C code file will also need to identify modules referenced in C code byincluding their header files. For example:
#include <pkg/name/Mod.h>
Notice the similarity in referencing modules between JavaScript and C. Thisis made possible by adding a -I option for each repository in the package pathto the C compiler's command line. A similar technique can be used withassembly language files, linker command files, and even GNU makefiles.

Configuring the Application
2-4
2.2.2 Setting a Module Parameter Value
Your XDC configuration scripts can set properties for modules and forinstances you have created for a module.
The generalized syntax for setting a parameter of a module in an XDCconfiguration script is:
Mod.cfgParam1 = value1;
This example enables the Error module, which handles run-time errors. Itsets the Policy parameter to return errors to the calling function.
var Err = xdc.useModule("xdc.runtime.Error"); Err.Policy = Err.UNWIND;
Warning: We normally would use "Error" as the name of the variable. Butsince JavaScript already has a Error class defined, creating an Errorvariable here would overwrite JavaScript's built-in Error class and preventother parts of the configuration from throwing Error exceptions.
2.2.3 Defining Static Constants
Program.global is a special object that allows you to define global variablesand constants in a configuration script and access these values from C/C++.
Suppose, for example, that your configuration script contains the followingline:
Program.global.MAXCHANNELS = 2;
You can access the MAXCHANNELS parameter from your C/C++ files asfollows:
#include <xdc/cfg/global.h>
void main() { printf("MAXCHANNELS = %d\n", MAXCHANNELS); }
See the xdc.cfg.Program.global topic in the CDOC reference help system(see Section 1.6.1) for information about how to compile sources that usexdc/cfg/global.h.

Configuring the Application
Basic Steps to Using XDC 2-5
2.2.4 Static Object Instance Creation
Each module can manage at most one instance type. For example, supposethe Task module of the ti.sysbios.knl package allows you to create Taskobjects. You can create objects statically (in an XDC configuration file) ordynamically (in C code).
The syntax to create such an object statically is as follows.
var Task = xdc.useModule("ti.sysbios.knl.Task");
Program.global.tsk0 = Task.create("&twoArgsFxn");
The tsk0 name is the name of the object created within the Program.globalnamespace.
The "&twoArgsFxn" is a module-specific argument to the create() method. Inthis case, it specifies an externally defined C function named "twoArgsFxn"that the Task thread should run.
To use tsk0 from your C/C++ code, follow the same pattern used in theprevious section to access MAXCHANNELS. For example:
#include <xdc/cfg/global.h> /* declares tsk0 */#include <ti/sysbios/knl/Task.h> /* declares Task functions */...Task_setPri(tsk0);
These additional examples create instances for other modules:
Program.global.heap0 = HeapBuf.create(heapBufParams);Program.global.swi0 = Swi.create('&swi0Fxn', swiParams);Program.global.clk0 = Clock.create("&clk0Fxn", 5, clkParams);
In general, the create method of any module has zero or more requiredparameters, and the last parameter is a "structure" of instance parametersthat is optionally passed to the create method; if it is not passed (as in theTask example above), module-specific defaults are used. Each module'sonline reference documentation describes these defaults; see Section 1.6.1for more information about how to view a module's reference documentation.

Configuring the Application
2-6
2.2.5 Setting an Instance Parameter Value
You can set the parameters of instances you create. Typically, this is done bysetting parameters in a Params structure that is specific to the module. Then,you pass the Params structure to the create() method for the module(sometimes along with some other arguments). The instance created hasthose parameters.
For example, the following statements enable the xdc.runtime.Memory andti.sysbios.heaps.HeapBuf module. Then, a variable of type Heapbuf.Paramsis declared. This is the Params structure defined by theti.sysbios.heaps.HeapBuf module. Statements fill in the values of theblockSize, numBlocks, and align fields of the structure. Then, a HeapBufinstance is created using those parameters and the heap is assigned to bethe default heap instance for the Memory module.
var Memory = xdc.useModule('xdc.runtime.Memory');var HeapBuf = xdc.useModule('ti.sysbios.heaps.HeapBuf');
/* Create a heap using ti.bios.HeapBuf */var heapBufParams = new HeapBuf.Params();heapBufParams.blockSize = 128;heapBufParams.numBlocks = 100;heapBufParams.align = 8;Program.global.heap0 = HeapBuf.create(heapBufParams);
/* Use heap0 as the default heap */Memory.defaultHeapInstance = Program.global.heap0;
2.2.6 Finding Configuration Options
Configuration parameters are described in a module’s CDOC online help.Look for the “config” keyword in CDOC to find the properties you can set forthe module and instances of the object it describes.
The section with the heading "Module-wide configuration parameters" listsparameters you can set for the entire module. The heading "Per-instanceconfiguration parameters" lists parameters you can set for an instance or inthe create() method for the module.

Writing C Code
Basic Steps to Using XDC 2-7
2.2.7 Property Types
The CDOC online help lists the type of value expected for each configurationparameter. Since JavaScript is an untyped language, variables can refer todifferent types at different points in a script and most types are automaticallyconverted as needed. For example:
var tmp = 1; /* tmp is the numeric variable 1 */tmp = "tmp = " + tmp; /* now tmp is the string "tmp = 1" */
However, all properties of XDC objects are declared with a fixed type and allassignments to these properties are checked at runtime. If an inappropriateassignment is made, a runtime exception is thrown and the script terminatesat the point that the assignment is made. This runtime type checking helpscatch programmer errors. For example, the defaultHeapSize property of thexdc.runtime.Memory module is declared to be an "int". The following scriptterminates on the second assignment to defaultHeapSize with a fatal error:
var Memory = xdc.useModule("xdc.runtime.Memory");Memory.defaultHeapSize = 64 * 1024; /* ok*/Memory.defaultHeapSize = "64K"; /* ERROR! must be an int */
Similarly, do not set a Boolean value to the quoted string "true" or "false".
2.3 Writing C Code
XDC establishes C coding conventions that make it easier to integrate XDC-based content. After you learn these conventions, you will be able to integrateany modules supplied within XDC packages.
2.3.1 Using Modules
A module encapsulates a related set of types and functions. A module isanalogous to a C++ class and can optionally manage a single instance type.
To use a module in C code, you must #include its header file. For example:
#include <xdc/runtime/Memory.h>
Suppose you want to use the printf method supplied by thexdc.runtime.System module. As we saw in Section 2.2.1, first you use thisXDC configuration statement in your application's configuration script:
var System = xdc.useModule("xdc.runtime.System");

Writing C Code
2-8
Then you should add the following statements to your C code:
#include <xdc/runtime/System.h> :System_printf("Hello World!");
Notice that the package name in the #include statement was not used in thename of System's printf method. In fact, all XDC modules provide two namesfor each module identifier: a "short" name without the package name (e.g.,System_printf) and a "long" name that includes the package name (e.g.,xdc_runtime_System_printf). So, the code above could also have beenwritten as follows.
#include <xdc/runtime/System.h> :xdc_runtime_System_printf("Hello World!");
Short names are much easier to read but may conflict with another method'sshort name. For example, the printf method of a hypothetical ti.wlan.Systemmodule. Since conflicts are rare, we use the short names whenever possible.
In the event of a conflict, you can disable the short names for a specificmodule by defining the symbol <modName>__nolocalnames prior toincluding the module's header. For example:
#define xdc_runtime_System__nolocalnames#include <xdc/runtime/System.h>#include <ti/wlan/System.h> :System_printf("Hello world"); /* call ti_wlan_System_printf()*/xdc_runtime_System_printf("Hello World");
The same technique is used to avoid conflicts with the base types defined inxdc/std.h. Suppose, for example, your code defines a Boolean type namedBool that conflicts with the same named type in xdc/std.h. Simply define thesymbol xdc__nolocalnames and all identifiers from xdc/std.h will have the"xdc_" prefix. For example:
#define xdc__nolocalnames#include <xdc/std.h>
typedef unsigned char Bool; /* define a local boolean type */ :xdc_Bool flag1; /* flag1 is an XDC boolean variable */Bool flag2; /* flag2 is a local boolean variable */

Writing C Code
Basic Steps to Using XDC 2-9
As rule, all identifiers in a module's interface have the prefix <pkg>_<Mod>_.Shorter names are defined for all identifiers with just the <Mod>_ prefix. In theevent that a module's short names conflict with other identifiers, you can#define <pkg>_<Mod>__nolocalnames to disable these short names.
Finally, all identifiers with the prefix <pkg>_<Mod>_ are defined in the<pkg/Mod>.h header file.
2.3.2 Naming Conventions
XDC uses a set of naming conventions and suggests that you and third-partyproviders follow these same conventions. The benefits of these conventionsare as follows:
1) Package names can be distinguished from module names. For example,ti.bios.utils is a package, but ti.bios.Utils is a module in the ti.biospackage.
2) Modifiable entities can be distinguished from constants. For example,System.DONE is a constant, but System.maxPasses is a moduleconfiguration parameter.
3) Interfaces can be distinguished from concrete modules. For example,xdc.IPlatform is an interface, but xdc.Platform is a module.
4) Types can be distinguished from variables and functions. For example,Arg and Startup_InitFxn are types, but arg and Startup_firstFxns areparameters or variables.
All identifiers follow these naming conventions:
Package names are all lowercase.
xdc.runtime
Module names begin with an uppercase letter.
xdc.runtime.Memory
Interface names begin with an uppercase "I".
IHeap and IGateProvider
Type names begin with an uppercase letter. The uppercase applies to thefirst letter after any prefix (for example, "Handle" in Task_Handle).
Arg and String /* types */ xdc_String

Writing C Code
2-10
Functions, variables, and parameter names begin with a lowercase letterafter any module prefix. Camel case is used where needed to delimitmulti-word names.
Diags_setMask() /* function */ Log_system /* global variable */
Multiple-word identifiers are separated by uppercase letters, not anunderscore.
Mod_twoWords /* multi-word global variable */
Constants are in all uppercase after the module or package prefix. Ifmultiple words are required, an underscore delimits the words.
Diags_INTERNAL /* constant */ Types_STATIC_POLICY /* two-word constant name */
Structure field names and configuration parameters begin with alowercase letter.
attrs.count /* structure field name */ System_maxAtexitHandlers /* configuration parameter */
2.3.3 Runtime Object Instance Creation
Modules that manage instances provide C functions to create and delete thetype of object managed by that module.
create() function. The function for dynamically creating an instance isnamed <Mod>_create(). The <Mod>_create() function returns a handle to thenew instance or NULL if the function fails. The handle returned by<Mod>_create() is of type <Mod>_Handle. The type of the instance itself is<Mod>_Object.
#include <ti/sysbios/knl/Task.h>#include <xdc/runtime/System.h>#include <xdc/runtime/Error.h> :Error_Block eb;Task_Handle task; :task = Task_create(NULL, &eb);if (task == NULL) { System_abort("task create failed!\n");}

Writing C Code
Basic Steps to Using XDC 2-11
The first argument to a function that deals with an instance for that module isa <Mod>_Handle. (The exception is the delete() function, which takes apointer to a <Mod>_Handle.)
Task_setPri(task, Task_MAXPRI); /* set priority of task thread*/Task_delete(&task); /* delete task object, set task to NULL */
The create() function for a module always take a parameter that is a pointerto a structure of type <Mod>_Params. If you set this parameter to NULL (asin the previous example), the defaults are used for all the object’s parameters.
For all modules with instance creation parameters, you can get the defaultinstance parameter values by calling <Mod>_Params_init(). For example:
HeapMin_Params heapParams; HeapMin_Handle heap;
/* initialize all instance parameters to their defaults */ HeapMin_Params_init(&heapParams);
/* set specific parameters */ heapParams.size = 0x10000;
/* create instance */ heap = HeapMin_create(&heapParams, NULL);
The create() function always takes a last parameter that is a pointer to anError_Block. The Error_Block structure is defined by the xdc.runtime.Errormodule. If this parameter is NULL, errors will cause the application toterminate (via xdc_runtime_System_abort()) without returning to the caller.
delete() function. The function for dynamically deleting an instance is named<Mod>_delete(). This function returns Void, which means it cannot directlyreturn a failure status. If it is successful, it sets the pointer to a <Mod>_Handlethat was passed to it to NULL. This has the benefit of preventing theapplication from inadvertently using the handle variable after the instance hasbeen deleted.
The following example shows the create() and delete() functions for aSemaphore module. In this case, we create a Semaphore instance withdefault parameters and no error block (so any error will abort the application).
Semaphore_Handle sem; /* declare handle to semaphore */
sem = Semaphore_create(NULL, NULL); /* create semaphore */ ... Semaphore_delete(&sem); /* delete semaphore */

Writing C Code
2-12
The following example illustrates how to create a module (Task) instance withparameters other than the defaults.
Task_Handle myTask; /* declare handle to task */ Task_Params params; /* declare task creation attributes */
Task_Params_init(¶ms); /* init task params to defaults */ /* set only attributes of interest */ params.stacksize = 1024 * sizeof (Int); myTask = Task_create(fxn, ¶ms, NULL); /* create task */
2.3.4 XDC Datatypes
XDC defines the following base datatypes for use in C code in xdc/std.h. Youshould use these types in application code that uses XDC modules or isintended to be portable to multiple targets. Most datatypes have names thatare similar to the corresponding C type, but with TitleCase used fordifferentiation and abbreviation of unsigned and long. The underlying sizesmay be different on various targets.
For more information about these types as well as predefined macros thatfacilitate the creation of portable C modules see the CDOC reference help forthe xdc package (see Section 1.6.1).
Table 2–1 XDC Datatypes for C Programs
XDC Type C99 Type Comments
Bits16 uint16_t
Bits32 uint32_t
Bits8 uint8_t Supported only for ’C55x+byte mode and for all ’C6000 and TMS470 targets
Bool unsigned short 1 for true and 0 for false or use TRUE and FALSE
Char char
Double double
Float float
Fxn int (*)() function pointer
IArg intptr_t
Int int
Int16 int_least16_tor int_fast16_t
The target may opt to use either the int_fast or the int_least types for these definitions.

Writing C Code
Basic Steps to Using XDC 2-13
Int32 int_least32_tor int_fast32_t
Int8 int_least8_tor int_fast8_t
LDouble long double
LLong long long May be supported only as long on some targets
Long long
Ptr void* data pointer
Short short
SizeT size_t
String char* null-terminated string
UArg uintptr_t holds arguments to pass to functions
UChar unsigned char
UInt unsigned int
UInt16 uint_least16_t or unint_fast_16_t
The target may opt to use either the uint_fast or the uint_least types.
UInt32 uint_least32_t or unint_fast32_t
UInt8 uint_least8_t or unint_fast_8_t
ULLong unsigned long long May be supported only as unsigned long on some targets
ULong unsigned long
Uns unsigned int
UShort unsigned short
VaList va_list
XDC Type C99 Type Comments

Processing the Configuration
2-14
2.4 Processing the Configuration
In this step, you use the "configuro" tool provided with XDC to process yourapplication's configuration file. Processing the file generates a compiler.optfile to be used when you compile the application and a linker.cmd file to beused when you link the application.
Before a configuration script can be processed, you need to specify the"target" compiler and the hardware "platform" required to run your application.In general terms:
A target identifies a specific compiler and an ISA and runtime modelsupported by the compiler. For example, the TI ’C6000 compiler for the’C64+ ISA running in big-endian mode.
A platform identifies the hardware execution environment as seen byyour application. For example, a DM6446 EVM with 64 MB of DDR2external memory.
XDC uses simple string names to identify targets and platforms.
2.4.1 Choosing a Target
The following target strings are recognized by XDC. See Section A.1 for a listshowing the compiler options generated for various targets.
To see the latest list of targets, open the CDOC online documentation(Section 1.6.1). Select the (XDC) view. You can expand the ti.targets andgnu.targets lists.
Table 2–2 TI Targets
ti.targets.TMS470 ti.targets.C28 ti.targets.C62
ti.targets.TMS470_big_endian ti.targets.C28_large ti.targets.C62_big_endian
ti.targets.MSP430 ti.targets.C55 ti.targets.C64
ti.targets.Arm7 ti.targets.C55_huge ti.targets.C64_big_endian
ti.targets.Arm7_big_endian ti.targets.C55_large ti.targets.C64P
ti.targets.Arm9 ti.targets.C64P_big_endian
ti.targets.Arm9t ti.targets.C67
ti.targets.C67_big_endian
ti.targets.C67P
ti.targets.C67P_big_endian

Processing the Configuration
Basic Steps to Using XDC 2-15
Table 2–3 Non-TI Targets
If your target is not listed, it is possible to create your own target, but you mayneed to contact technical support.
2.4.2 Choosing a Platform
The "platform" is a string that describes the specific board. It specifies aparticular device and memory map on which an application will run, and isused for linking.
Platforms are provided for many common TI development boards.
The full list of platforms available is visible in the CDOC online documentation(see Section 1.6.1) in the list of packages under ti.platforms. Examplesinclude ti.platforms.sim6xxx, ti.platforms.sim64Pxx, ti.platforms.dsk5510,ti.platforms.dsk6416, and ti.platforms.evmDM6437.
If you are developing for a platform that is not listed in the onlinedocumentation, you may be able to use the ti.platforms.generic platform. Formore information about how to define a platform instance using this platformpackage, see the CDOC online documentation for the ti.platforms.genericpackage.
2.4.3 Running Configuro
XDC provides a tool called "configuro" that processes XDC configurationfiles.
Running configuro generates a subdirectory with the same name as yourCFG file (for example, C:/myprojects/hello/mycfg for the mycfg.cfg file). Thissubdirectory is an XDC "package".
gnu.targets.Linux86 Native target for Linux on PC
gnu.targets.Mingw Native target for Windows using Mingw compiler
gnu.targets.MVArm9 Embedded target for Linux on Arm9
gnu.targets.Sparc Native target for Solaris on Sparc workstations
gnu.targets.UCArm9 gcc/uClibc target for Linux on Arm
microsoft.targets.Net32 Microsoft .Net 32-bit native target
microsoft.targets.VC98 Windows 32-bit using Visual C/C++ 6.x compiler.
microsoft.targets.Win32 Windows 32-bit using Visual C/C++ 6,7,8 compilers.

Processing the Configuration
2-16
From a consumer perspective, the important thing about this package is thatit contains files generated from your configuration to be used when compilingand linking your application. These files include compiler.opt andlinker.cmd, along with header files and libraries.
Generate files from the configuration you created using the followingcommand line:
xs xdc.tools.configuro -t <target> -p <platform> -c <compiler_location> mycfg.cfg
For example:
xs xdc.tools.configuro -t ti.targets.C64 -p ti.platforms.sim6xxx -c c:/CCStudio_v3.3/C6000/cgtools mycfg.cfg
The -t option specifies the target.
The -p option specifies the platform.
The -c option specifies the location of the compiler you want to use.
You can view further command-line options for the configuro tool with thiscommand:
xs xdc.tools.configuro --help
compiler.optfile
linker.cmdfile
C compiler linker
mycfg.cfgfile
configuro tool

Processing the Configuration
Basic Steps to Using XDC 2-17
When you run configuro, you see a message similar to the following:
making package.mak (because of package.bld) ...generating interfaces for package mycfg (because ...)configuring mycfg.x64 from package/cfg/mycfg_x64.cfg ...cl64 package/cfg/mycfg_x64.c ...
Re-run configuro on your CFG file whenever you do any of the following:
Change the CFG file
Change the target or platform
Update a package used by your application
The configuro command uses specially generated makefiles to avoid runningany unnecessary steps when you make the changes above. So, if you are notsure whether to run configuro, go ahead and run it; if nothing needs to bedone, configuro quickly detects this and does nothing.
You can integrate the step of running configuro into your makefile or CodeComposer Studio project file as described in the subsections that follow.
For details about using configuro, see Section 3.3 and the CDOC onlinereference for the xdc.tools.configuro package.
2.4.4 Running Configuro from a CCStudio Project
On Windows systems, if you have installed both XDC and Code ComposerStudio, you can use an XDC tab in the Build Options dialog in CodeComposer Studio.
1) First, use the Component Manager (part of CCStudio) to make sure thelatest version of XDC is enabled. To run the Component Manager, useyour Windows Start menu to choose All Programs->TexasInstruments->Code Composer Studio->Component Manager. WithinComponent Manger, expand Target Content (XDC). Then expand yourtarget family. Make sure the version of XDC you want to use has acheckmark. When you close Component Manager, save your changes.

Processing the Configuration
2-18
2) Next, add the CFG file you created to your CCStudio project.
3) Then, open the Project->Build Options dialog and move to the XDCtab:
4) With the Basic category selected, specify the target and platformpackages you want to use. Optionally, you can also specify the -r (buildprofile) and --xp (XDCPATH) command-line options for configuro here.

Compiling and Linking
Basic Steps to Using XDC 2-19
2.5 Compiling and Linking
The particular compile and link syntax you use is compiler-dependent. SeeSection A.1 for details about compiler options for various targets. Additionalexamples are provided with XDC in the examples/configuro directory.
NOTE: The compiler's standard C runtime library must come after thelinker.cmd file in the link order in a makefile or CCStudio project. Forexample, this is an RTS library for TI compilers, libc.a for GCC, andmsvcrt.lib for Microsoft Visual Studio.
2.5.1 Compiling and Linking with CCStudio
Add the compiler.opt file to the project in the Project->Build Options dialog.In the Compiler tab, select the Files category and add mycfg/compiler.opt inthe Options File field.
Add the linker.cmd file to your project using the Add Files to Projectcommand.
If you haven't already added a RTS library to your CCStudio project, use theAdd Files to Project command. For example, your RTS library might be$(CGTOOLS)/lib/rts6400.lib.
2.5.2 Using the Command Line on Windows for TI Targets with CCStudio1) In a command window, run the DosRun.bat file in the CCStudio
installation directory.
2) Compile your application using a command similar to the following, where<mycfg> is the name of your configuration package directory.
cl6x -@<mycfg>/compiler.opt -c hello.c
3) Link your application using a command similar to the following, where<mycfg> is the name of your configuration package directory.
cl6x -q -z -c hello.obj <mycfg>/linker.cmd C:/CCStudio_v3.3/C6000/cgtools/lib/rts6400.lib -o hello.out

Compiling and Linking
2-20
2.5.3 Building with the TI Code Generation Tools from a Makefile
This section and the two sections that follow show how to run the configurotool and use its output with the compilers and linkers for TI, GNU, andMicrosoft. They use the compiler.opt and linker.cmd files generated byconfiguro.
The example makefiles in this section and the following sections all use GNUmake, which is delivered with XDC (XDC_INSTALL_DIR/gmake).
Important Note: In GNU makefiles, always use a tab character to indent,not spaces. Also, all commands should be on a single line. Variabledefinitions that contain spaces (for example, CGTOOLS often does onWindows) must be surrounded by quotes. For more information about thesyntax of makefiles and the operation of GNU make see the online GNUmake manual at http://www.gnu.org/software/make/manual/make.html.
The following example makefile runs the TI Code Generation Tools compilerand linker.
CGTOOLS = C:/CCStudio_v3.3/C6000/cgtools
CC = $(CGTOOLS)/bin/cl6xLNK = $(CGTOOLS)/bin/lnk6xRTS = $(CGTOOLS)/lib/rts6400.lib
CONFIG = mycfgXDCTARGET = ti.targets.C64XDCPLATFORM = ti.platforms.sim6xxx
%/linker.cmd %/compiler.opt : %.cfg xs xdc.tools.configuro -c $(CGTOOLS) -t $(XDCTARGET) -p $(XDCPLATFORM) $<
%.obj : %.c $(CONFIG)/compiler.opt $(CC) -@$(CONFIG)/compiler.opt -c $<
hello.out : hello.obj $(CONFIG)/linker.cmd $(LNK) -o hello.out -c hello.obj $(CONFIG)/linker.cmd $(RTS)

Compiling and Linking
Basic Steps to Using XDC 2-21
2.5.4 Building with Microsoft Visual Studio from a Makefile
The following example makefile runs configuro and uses the compiler.opt andlinker.cmd files generated by configuro in the command lines for the MicrosoftVisual Studio compiler and linker.
CGTOOLS = "C:/Program Files/Microsoft Visual Studio 8"
CC = $(CGTOOLS)/vc/bin/clLNK = $(CGTOOLS)/vc/bin/linkRTS = -nodefaultlib -libpath:$(CGTOOLS)/vc/lib kernel32.lib ms-vcrt.lib
CONFIG = mycfgXDCTARGET = microsoft.targets.Win32
%/linker.cmd %/compiler.opt : %.cfg xs xdc.tools.configuro -c $(CGTOOLS) -t $(XDCTARGET) $<
%.obj : %.c $(CONFIG)/compiler.opt $(CC) @$(CONFIG)/compiler.opt -c $<
hello.exe : hello.obj $(CONFIG)/linker.cmd $(LNK) -out:$@ hello.obj @$(CONFIG)/linker.cmd $(RTS)
No platform specification is needed because the default platform for eachtarget in microsoft.targets is the one required for native execution on an x86PC (host.platforms.PC).
Compiling and Linking
2-22
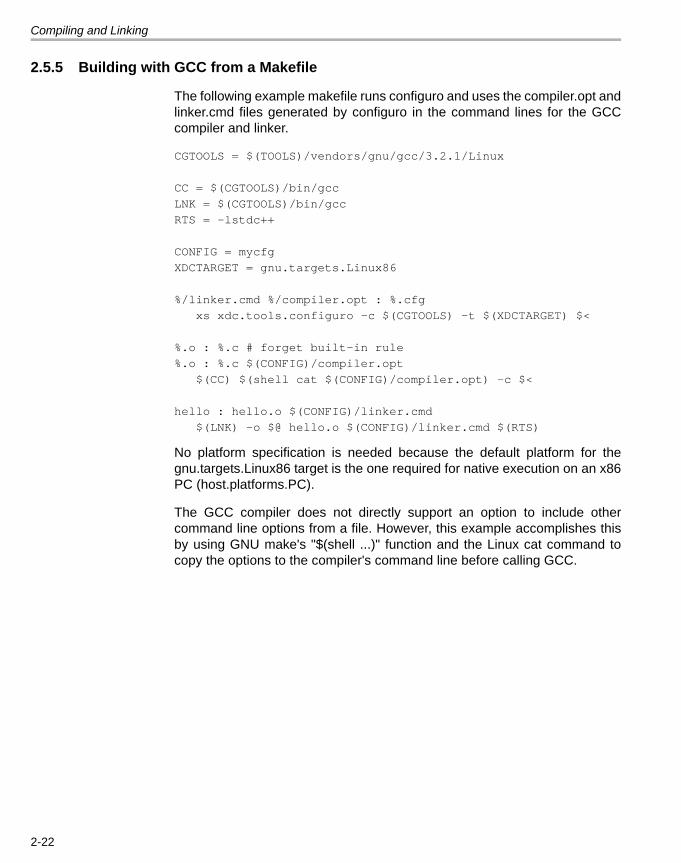
2.5.5 Building with GCC from a Makefile
The following example makefile runs configuro and uses the compiler.opt andlinker.cmd files generated by configuro in the command lines for the GCCcompiler and linker.
CGTOOLS = $(TOOLS)/vendors/gnu/gcc/3.2.1/Linux
CC = $(CGTOOLS)/bin/gccLNK = $(CGTOOLS)/bin/gccRTS = -lstdc++
CONFIG = mycfgXDCTARGET = gnu.targets.Linux86
%/linker.cmd %/compiler.opt : %.cfg xs xdc.tools.configuro -c $(CGTOOLS) -t $(XDCTARGET) $<
%.o : %.c # forget built-in rule%.o : %.c $(CONFIG)/compiler.opt $(CC) $(shell cat $(CONFIG)/compiler.opt) -c $<
hello : hello.o $(CONFIG)/linker.cmd $(LNK) -o $@ hello.o $(CONFIG)/linker.cmd $(RTS)
No platform specification is needed because the default platform for thegnu.targets.Linux86 target is the one required for native execution on an x86PC (host.platforms.PC).
The GCC compiler does not directly support an option to include othercommand line options from a file. However, this example accomplishes thisby using GNU make's "$(shell ...)" function and the Linux cat command tocopy the options to the compiler's command line before calling GCC.

3-1
Chapter 3
XDC Tools
This chapter provides command-line syntax and examples for the toolsprovided with XDC.
3.1 Overview of the Tools . . . . . . . . . . . . . . . . . . . . . . . . . . . . . . . . . . . . . 3-2
3.2 The cdoc Tool . . . . . . . . . . . . . . . . . . . . . . . . . . . . . . . . . . . . . . . . . . . . 3-3
3.3 The configuro Tool. . . . . . . . . . . . . . . . . . . . . . . . . . . . . . . . . . . . . . . . 3-5
3.4 The path Tool . . . . . . . . . . . . . . . . . . . . . . . . . . . . . . . . . . . . . . . . . . . . 3-6
3.5 The repoman Tool . . . . . . . . . . . . . . . . . . . . . . . . . . . . . . . . . . . . . . . . 3-8
Topic Page

Overview of the Tools
3-2
3.1 Overview of the Tools
The following XDC tools are useful when creating applications that use XDC-based content. See the CDOC online documentation for information abouteach of these tools. (See Section 1.6.1 for information about using CDOC.)
Table 3–1 XDC Tools
These tools are run using the xs command. The xs executable runs commandscripts found using the package path. In most cases, these tools include bothcommand-line (textual) output tools and graphical tools. If a graphical versionof a tool exists, its package name is the same as the command-line tool withthe additional suffix ".sg".
Tool Package Description
xdc.tools.cdoc.sg Online documentation viewer for XDC-based packages
xdc.tools.cdoc Command-line based documentation viewer
xdc.tools.configuro Processes an XDC configuration file to generate com-piler.opt and linker.cmd files
xdc.tools.path Displays a list of packages on the XDCPATH
xdc.tools.path.sg Displays a list of packages on the XDCPATH in a graph-ical window
xdc.tools.repoman Command-line based repository manager
xdc.tools.repoman.sg Graphical display repository manager

The cdoc Tool
XDC Tools 3-3
3.2 The cdoc Tool
The cdoc tool displays help information about XDC packages. The interfaceis graphical. This tool is in the xdc.tools.cdoc.sg package.
To open the CDOC reference help system, run the following command fromthe command prompt—for example by opening the Microsoft Windows Startmenu and choosing Run.
xs xdc.tools.cdoc.sg
You see the "cdoc" window with a tree view of the XDC packages availableto you. All of these packages provide documentation that can be displayed bythe CDOC viewer.
Click "+" next to a repository to expand its list of packages. Click "+" next to apackage name to see the list of modules it provides. You can further expandthe tree to see a list of the functions provided by a module. Double-click on apackage or module to see its reference information.
Notice the icons in the upper-right corner of the window. The following iconsare useful:
View C interface view of documentation.
View XDC interface view of documentation.
Close all page tabs.
Many modules have a dual existence—they have configuration parametersthat are used during the configuration process and they have C APIs that arecalled at runtime. Chose the "XDC interface view" to view a module'sconfiguration interface and the "C interface view" for a its C runtime interface.
For each topic you view, there is a tab across the top of the page area. Youcan use these to quickly return to other pages you have viewed. You can alsouse the arrows next to "Views" to move backward and forward in your historyof page views.
To close a page and remove its tab, click the X on the tab.
Optionally, you can specify a repository on the command line. If you do, onlythe packages in that repository are listed. If you do not specify a repository,all packages found using the package path are listed.

The cdoc Tool
3-4
3.2.1 Generating Static Help Documentation
If you prefer to use a web browser to view package Referencedocumentation, you can run a command-line version of the CDOC tool togenerate static HTML files for any collection of packages. After generatingstatic pages, you can leverage popular search tools such as Google Desktopto locate relevant documentation.
Suppose you have packages installed in the repositoriesc:/bios_6_00/packages and c:/codec_engine_1_20/packages. The followingcommand generates configuration documentation for all of these packagesinto the output directory ref_html.
xs xdc.tools.cdoc -l XDC -od:ref_html -PR c:/bios_6_00/packages c:/codec_engine_1_20/packages
For more information see the CDOC documentation of the xdc.tools.cdocpackage.
The configuro Tool
XDC Tools 3-5
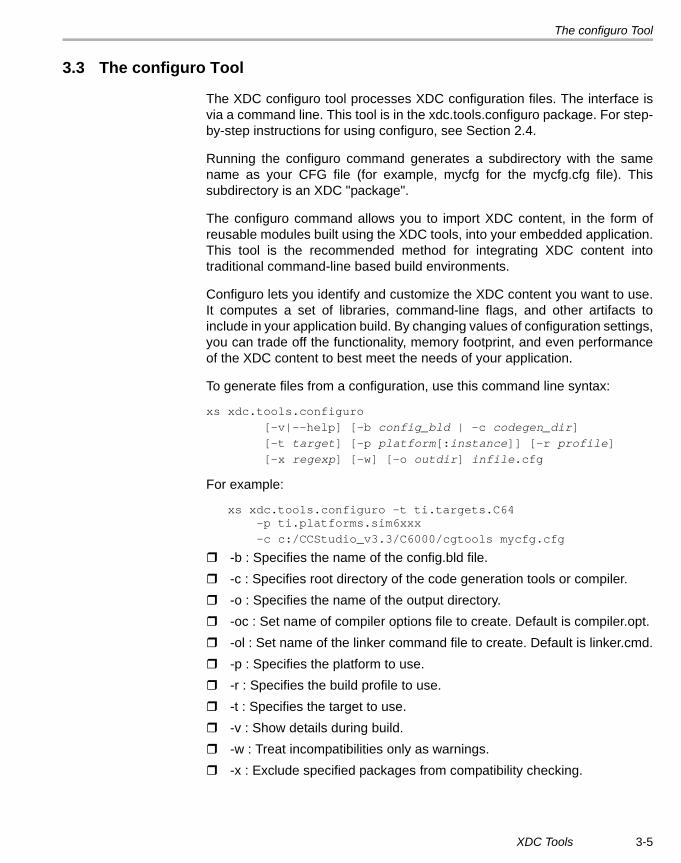
3.3 The configuro Tool
The XDC configuro tool processes XDC configuration files. The interface isvia a command line. This tool is in the xdc.tools.configuro package. For step-by-step instructions for using configuro, see Section 2.4.
Running the configuro command generates a subdirectory with the samename as your CFG file (for example, mycfg for the mycfg.cfg file). Thissubdirectory is an XDC "package".
The configuro command allows you to import XDC content, in the form ofreusable modules built using the XDC tools, into your embedded application.This tool is the recommended method for integrating XDC content intotraditional command-line based build environments.
Configuro lets you identify and customize the XDC content you want to use.It computes a set of libraries, command-line flags, and other artifacts toinclude in your application build. By changing values of configuration settings,you can trade off the functionality, memory footprint, and even performanceof the XDC content to best meet the needs of your application.
To generate files from a configuration, use this command line syntax:
xs xdc.tools.configuro [-v|--help] [-b config_bld | -c codegen_dir] [-t target] [-p platform[:instance]] [-r profile] [-x regexp] [-w] [-o outdir] infile.cfg
For example:
xs xdc.tools.configuro -t ti.targets.C64 -p ti.platforms.sim6xxx -c c:/CCStudio_v3.3/C6000/cgtools mycfg.cfg
-b : Specifies the name of the config.bld file.-c : Specifies root directory of the code generation tools or compiler.-o : Specifies the name of the output directory.-oc : Set name of compiler options file to create. Default is compiler.opt.-ol : Set name of the linker command file to create. Default is linker.cmd.-p : Specifies the platform to use.-r : Specifies the build profile to use.-t : Specifies the target to use.-v : Show details during build.-w : Treat incompatibilities only as warnings.-x : Exclude specified packages from compatibility checking.

The path Tool
3-6
3.4 The path Tool
The path tool displays the packages located along the specified packagepath. Both textual and graphical versions of this tool are provided. The textualtool is xdc.tools.path and the graphical tool is xdc.tools.path.sg.
By default, the path tool displays a list of all packages found in therepositories referenced by the package path.
For example, output for the xdc.tools.cdoc.sg package is similar to this:
Package Name: xdc.tools.cdoc.sgRepository: C:\xdc_2_94_01\packagesRelease Name: xdc_tools_cdoc_sgLabel: defaultCompatibility Key: 1, 0, 0, 62Date: 04/25/2007 19:07
The following command-line options are available:
-n : Display only the names of the packages.
-p : Echo only the current package path.
-d : Display information about the packages in the specified repositoryonly. For example:
xs xdc.tools.path -d C:/CCStudio_v3.3/bios_5_31/packages

The path Tool
XDC Tools 3-7
When you run the xdc.tools.path.sg graphical utility, the window looks similarto the following:
This tool allows you to modify the package path and rescan the repositoriesfor packages. You can also save the list of packages to a file.

The repoman Tool
3-8
3.5 The repoman Tool
The repoman tool creates and manages package repositories. It displaysinformation about archived packages, extracts archived packages, extractsrepositories from bundles and deletes packages from repositories. Bothtextual and graphical versions of this tool are provided. The textual tool isxdc.tools.repoman and the graphical tool is xdc.tools.repoman.sg.
Important Note: The repoman tool, especially its current command-lineoption set, is preliminary and subject to change in a future release. See theonline documentation for the xdc.tools.repoman and xdc.tools.repoman.sgpackages to get the most recent information about this tool.
3.5.1 Command Line Repoman Tool
For the command-line tool, the main options are:
-t : Display package info for an archive directory or tar file.
-n : Display package names only.
-x : Extract packages from an archive directory or tar file.
-d : Delete packages from a repository.
-c : Copy packages to a repository.
-o : Save repository information to a file.
--rrestore : Restore one or more repositories from information in a file.
--rcreate : Create one or more repositories from information in a file.
There are a number of other options that can be used in conjunction withthese options, but one of these options is required on the command line to tellrepoman what action it is supposed to take. This section describes the mainfunctions first and gives the syntax for each. Later, it lists the various extraoptions you can use in combination with the main options.
The -t and -n options display information. The -t option displays the file,release name, label, version, category, buildable, required packages,references, and description. The -n option displays only the name. Thesyntax for these informational functions is:
xs xdc.tools.repoman -t [-v] [-p path ] [ packagename... | packagefile... ]
xs xdc.tools.repoman -n [-v] [-p path ] [ packagename... | packagefile... ]
The repoman Tool
XDC Tools 3-9
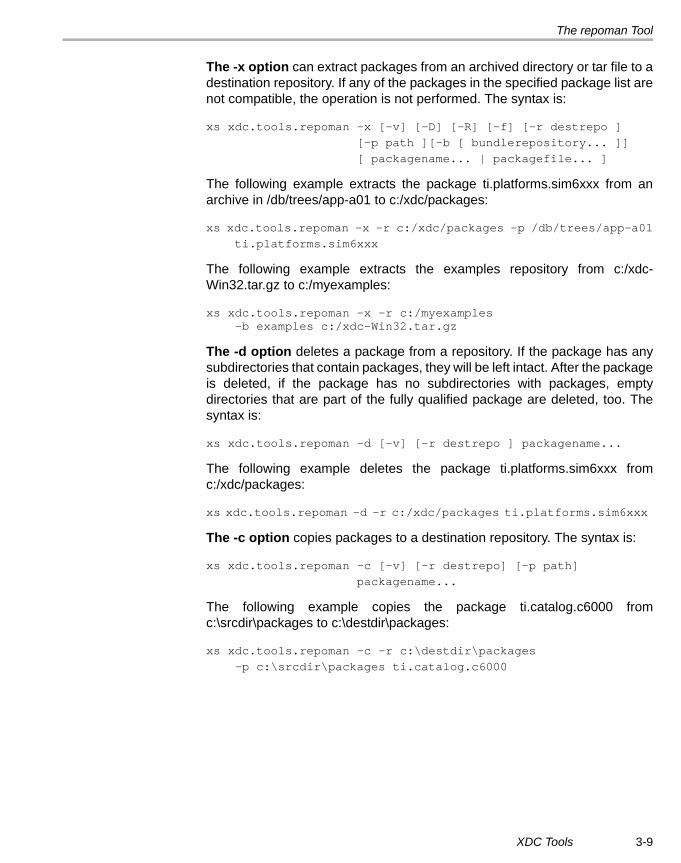
The -x option can extract packages from an archived directory or tar file to adestination repository. If any of the packages in the specified package list arenot compatible, the operation is not performed. The syntax is:
xs xdc.tools.repoman -x [-v] [-D] [-R] [-f] [-r destrepo ] [-p path ][-b [ bundlerepository... ]] [ packagename... | packagefile... ]
The following example extracts the package ti.platforms.sim6xxx from anarchive in /db/trees/app-a01 to c:/xdc/packages:
xs xdc.tools.repoman -x -r c:/xdc/packages -p /db/trees/app-a01 ti.platforms.sim6xxx
The following example extracts the examples repository from c:/xdc-Win32.tar.gz to c:/myexamples:
xs xdc.tools.repoman -x -r c:/myexamples -b examples c:/xdc-Win32.tar.gz
The -d option deletes a package from a repository. If the package has anysubdirectories that contain packages, they will be left intact. After the packageis deleted, if the package has no subdirectories with packages, emptydirectories that are part of the fully qualified package are deleted, too. Thesyntax is:
xs xdc.tools.repoman -d [-v] [-r destrepo ] packagename...
The following example deletes the package ti.platforms.sim6xxx fromc:/xdc/packages:
xs xdc.tools.repoman -d -r c:/xdc/packages ti.platforms.sim6xxx
The -c option copies packages to a destination repository. The syntax is:
xs xdc.tools.repoman -c [-v] [-r destrepo] [-p path] packagename...
The following example copies the package ti.catalog.c6000 fromc:\srcdir\packages to c:\destdir\packages:
xs xdc.tools.repoman -c -r c:\destdir\packages -p c:\srcdir\packages ti.catalog.c6000

The repoman Tool
3-10
The -o option saves repository information to the "outfile" file to be used in asubsequent restore or create operation. The syntax is:
xs xdc.tools.repoman -o outfile [-p searchpath] repository ...
The following example saves package information for repository c:/myrepo tothe c:/myrepo.rmn file. It also saves the c:/pkgarchives;c:/testpkgs searchpath:
xs xdc.tools.repoman -o c:/myrepo.rmn -p "c:/pkgarchives;c:/testpkgs" c:/myrepo
The --rrestore option restores one or more repositories from information inthe "infile" file. The syntax is:xs xdc.tools.repoman --rrestore -i infile [-p searchpath] [infile_repo_indicies]
The following example restores all the packages in c:/myrepo frominformation that was saved to the file c:/myrepo.rmn. It uses the search pathc:/pkgarchives;c:/testpkgs to find and copy the packages. The examplecreates c:/myrepo if it doesn't exist.
xs xdc.tools.repoman -rrestore -i c:/myrepo.rmn -p "c:/pkgarchives;c:/testpkgs"
The --rcreate option creates one or more repositories from information in the"infile" file. The syntax is:
xs xdc.tools.repoman --rcreate -i infile [-p searchpath] [infile_repo_indicies] dest_repo0 ...
The following example creates the new repository c:/mynewrepo frominformation that was saved to the file c:/myrepo.rmn for the repositoryc:/myrepo. It uses the search path c:/pkgarchives;c:/testpkgs to find and copythe packages. When created, c:/mynewrepo will be identical to c:/myrepowhen its package information was saved with the -o option.
xs xdc.tools.repoman -rcreate -i c:/myrepo.rmn -p "c:/pkgarchives;c:/testpkgs" c:/mynewrepo

The repoman Tool
XDC Tools 3-11
3.5.2 Additional Command-Line Options
The other options that can be used on the repoman command line with themain options described in the previous section are as follows:
-b : The repositories to be extracted when -x is used to extractrepositories from a bundle. In this case, the last argument specifies thebundle file to extract from. If omitted, use "packages". Use with: -x.
-D : Also extracts dependent packages. Use with: -x.
-f : Force all packages to be extracted, regardless of incompatibilities.Use with: -x.
-p path : Search the specified directory. If the -p option is omitted, thecurrent directory is searched. Use with: -t, -n, -x, -c.
-r destrepo : Use specified destination repository. If omitted, use therepository for the current package. If there is no current package, use thecurrent working directory. Use with: -x, -d, -c.
-R : Also recursively extracts dependent packages. Use with: -x.
-v : Print informative messages during execution. Use with: all.
packagename : A list of packages to use. If none are specified, allpackages found in the search directory are used. May contain wildcards.For example: ti.platforms.sim6xxx or ti.catalog.c??00 or ti.platforms.*.Use with: all.
A version/key can also be attached to a package name as follows:ti.platforms.c6000[1,0,0,0,313835]. A prefix of the full version/key mayalso be used as follows: ti.platforms.c6000[1,0]. If a package name hasmultiple matches either with or without a version/key specified, the mostrecent is selected.
packagefile : A list of files to use. If none are specified, all packages in thesearch directory are used. May contain wildcards. Use with: -t, -n, -x.

The repoman Tool
3-12
3.5.3 Graphical Repoman Tool
The Repoman graphical tool is used to manage package repositories andcheck the validity of package paths. The left-hand pane displays archivedpackages and packages found in repositories. The right-hand pane showspackages in repositories that are treated as a package path. Package detailscan be viewed by hovering the mouse cursor over the package name, asshown in the following figures.
Duplicate packages are displayed under the package name on a separatebranch, by version and date.
You can populate theAvailable Packagespane by clicking the
button on thepane's toolbar andadding or removingdirectories via thedialog box. Directoriesare first searched forarchived packages. Ifnone are found, theyare then recursively searched for package directories.

The repoman Tool
XDC Tools 3-13
You can copy or extract any package in the Available Packages pane byselecting it and dragging it to the "Package Path" pane and dropping onto arepository in that pane.
To have an archived package's dependencies extracted along with it, right-click on the package and select a dependency level prior to using drag-and-drop. "Immediate Dependencies" extracts all of the package's dependencies."All Dependencies" extracts all of the package's dependencies and theirrecursive dependencies.
The "Package path repositories pane" is initially populated with the contentsof XDCPATH environment variable. You can add additional repositories byclicking the button on the pane's toolbar and specifying a repository in thedialog box that comes up. The dialog box also allows you to create newrepositories (directories). Only repositories created in this manner canhave packages added and deleted.
A common use for this tool is to copy or extract existing packages to create a“working” repository. You might then modify some of the packages or deletesome packages. Then, you can view the “working” repository’s internalcompatibility and its compatibility in relation to other repositories.
Your XDCPATH is not modified by adding or removing repositories usingRepoman. However, you can copy the resulting path to the clipboard andupdate your XDCPATH manually.

The repoman Tool
3-14
You can remove a repository from the path by selecting it and clicking the icon, or by right-clicking on the repository and selecting the "Remove FromPath" menu item.
You can move a repository up or down in the order by right-clicking it andselecting the "Move up" or "Move down" menu item.
To delete a package from a repository, select the package and click the icon, or right-click on the package and select "Delete". All of the packages'files will be deleted.
You can copy the pane’s repository list to the clipboard by clicking the icon.The list is delimited by semicolons and provided in the order they are shownin the pane.
You can check the package path for errors by clicking the icon. If anyerrors or warnings are generated, an error or warning icon isdisplayed next to the repository containing the package that generated theerror and also next to the package. To see a description of the error, hover themouse over the package's icon.
You can save repository information to a file by choosing File->Save from themenu bar. The repository, the name and version of all packages in thePackage Path pane, and the directories used to display packages in theAvailable Packages pane will be saved.

The repoman Tool
XDC Tools 3-15
You can open repository information files that were created with File->Saveby choosing File->Open from the menu bar. Opening a previously saved filedisplays a dialog showing the repositories that package information wassaved for and their state.
If all of the repositories about which information was saved are intact, you canclick Done to see the usual Repoman view. If any of the repositories havebeen modified or deleted, you can start a restore operation for them. You mayspecify a different name for any repository being restored. If the repositorycannot be restored completely to its original state, the operation does notcreate, modify or copy any directories or files. You may repeatedly retry therestore operation with different search paths.

3-16

4-1
Chapter 4
XDC Runtime Modules
This chapter provides introductory information about the XDC runtimemodules.
4.1 Overview of the Runtime Modules . . . . . . . . . . . . . . . . . . . . . . . . . . . 4-2
4.2 XDC Boot Sequence and Control Points . . . . . . . . . . . . . . . . . . . . . . 4-2
4.3 System Module . . . . . . . . . . . . . . . . . . . . . . . . . . . . . . . . . . . . . . . . . . . 4-6
4.4 Memory Segments and Sections . . . . . . . . . . . . . . . . . . . . . . . . . . . 4-10
4.5 Memory Allocation and Heaps . . . . . . . . . . . . . . . . . . . . . . . . . . . . . 4-13
4.6 Timestamp Module. . . . . . . . . . . . . . . . . . . . . . . . . . . . . . . . . . . . . . . 4-17
4.7 Gate Interface and Implementations . . . . . . . . . . . . . . . . . . . . . . . . 4-19
4.8 Diagnostics and Logs . . . . . . . . . . . . . . . . . . . . . . . . . . . . . . . . . . . . 4-21
4.9 Types Module . . . . . . . . . . . . . . . . . . . . . . . . . . . . . . . . . . . . . . . . . . . 4-33
Topic Page

Overview of the Runtime Modules
4-2
4.1 Overview of the Runtime ModulesThe modules and interfaces in the xdc.runtime package form the "core" XDCtarget runtime support library. This package is provided with completesources. It implements basic system services required by virtually allapplications.
4.2 XDC Boot Sequence and Control PointsThis section describes the sequence of events that occurs immediately aftera device is reset until execution reaches the application’s main() function. Italso identifies the specific points during this boot sequence at which user-provided functions ("boot hooks") are called.
All targets follow the same set of boot sequence steps. In outline the target-independent boot sequence steps are:
1) Immediately after CPU reset, perform target-specific CPU initialization.
2) Run user-supplied reset function (see Startup.resetFxn).
3) Perform additional target-specific initialization.
4) Run user-supplied "first functions" (See Startup.firstFxns).
5) Run all module initialization functions.
6) Run user-supplied last functions (See Startup.lastFxns).
7) Run main().
The reset function (in step 2 above) is run as early as possible in the bootsequence. In fact, for some targets it is called before the C environment isfully initialized. So, the execution context of this function is target-specific andmay require that it not use static data, for example.
Although the functions in steps 4-6 are C functions, they are run duringnormal C++ static object initialization. This has two consequences:
Since the C++ standard does not provide a means to control the order ofexecution of static constructors, the initialization of application modulesmay not run before a C++ constructor runs. If you need to use a module(for memory allocation, for example), your constructor must explicitly callStartup_exec() before using any other module in the system. Since theStartup_exec() function is idempotent (multiple calls yield the sameresult), it is safe to call this function more than once. Thus you may call itfrom each C++ constructor that needs a module's services.
If you are using a target that does not support C++, you must explicitlycall Startup_exec() prior to using any module's services. You can simplycall Startup_exec() as the first step in main(), for example.

XDC Boot Sequence and Control Points
XDC Runtime Modules 4-3
4.2.1 Initialize Registers
Execution on TI targets always starts at _c_int00, which is plugged as thereset vector. The boot sequence begins with the initialization of a few criticalregisters, including the system stack pointer. This part of the sequence istarget-specific.
For a detailed view of the initial register setup, the actual boot code isavailable in the XDC installation. On all targets, the relevant portion of theboot code (in terms of the initial register setup) occurs between _c_int00(where execution starts) and the call to the xdc_runtime_Startup_reset()function. Boot code for any other targets should be available in a similarlocation, inside the "rts" folder for that target.
The following sections show what register initialization occurs for each targetand where the actual boot code is located:
’C6000
Clear the IER and IFR.
Set the system stack pointer (B15) to point to the end of the stack section.
Set the global page pointer (B14) to point to the beginning of the .bsssection.
On the ’C6700, also set the floating point registers.
The c6000 boot code is available in:<xdc_install_dir>\packages\ti\targets\rts6000\boot.c
The auto_init() function is defined in autoinit.c in the same directory.
’C2000Set up the stack, initialize any status bits not initialized by the reset, and setthe C28x modes.
The c2000 boot code is available in:<xdc_install_dir>\packages\ti\targets\rts2800\boot_cg.asm
’C470Set user mode, change to 16-bit state, and initialize and align the user modestack.
The c470 boot code is available in:<xdc_install_dir>\packages\ti\targets\boot.asm

XDC Boot Sequence and Control Points
4-4
ARM7Set user mode, change to 16-bit state, and initialize and align the user modestack.
The arm7 boot code is available in:<xdc_install_dir>\packages\ti\targets\arm\rtsarm7\boot.asm
ARM9Set user mode, change to 16-bit state, and initialize and align the user modestack.
ARM7
The arm9 boot code is available in:<xdc_install_dir>\packages\ti\targets\arm\rtsarm9\boot.asm
4.2.2 Perform User Reset Function
The reset function is the first control point in the boot sequence. It occursalmost immediately after the target has been reset. The user-specified resetfunction is called after the initial register initialization, but before even the cinitrecords have been processed. Any code that needs to be executedimmediately after a reset, such as configuring or disabling a watchdog timer,should occur here.
The Startup module has a module-wide configuration parameter called"resetFxn", which specifies the function to run at this point.
Configuration example: The following example XDC configurationstatements demonstrate the Startup module’s use:
var Startup = xdc.useModule('xdc.runtime.Startup');Startup.resetFxn = "&myResetFxn";
Note that the "&" isn’t actually being used as an operator in these statements;it’s just part of a string. Internally, XDC knows to interpret the characters afterthe & as the name of an external user-supplied function.
The resetFxn is called before the cinit records have been processed, so nodata structures or variables have been loaded with their initial values at thispoint.
4.2.3 Process .cinit Records
After the reset function has been called, the C initialization records areprocessed.

XDC Boot Sequence and Control Points
XDC Runtime Modules 4-5
4.2.4 Start Modules
At this point, the boot sequence calls the xdc_runtime_Startup_exec()function. This function then calls all the module startup functions.
The Startup module has two module-wide configuration parameters:"firstFxns" and "lastFxns", which are arrays of user-specified functions to becalled before and after the module startup functions, respectively.
Configuration example: The following example XDC configurationstatements specify functions to be called with the firstFxns and lastFxnsparameters.
var Startup = xdc.useModule('xdc.runtime.Startup');
var len = Startup.firstFxns.length;Startup.firstFxns.length++;Startup.firstFxns[len] = '&myFirst';
var len = Startup.lastFxns.length;Startup.lastFxns.length++;Startup.lastFxns[len] = '&myLast';
Functions added to "firstFxns" typically initialize values needed by modulestartup functions—such as initialization of global data used by modules,which is a function of platform-specific registers. Functions added to the"lastFxns" array might be used by middleware or other modules to performany necessary initialization before main().
4.2.5 Process .pinit Records
After the module startup functions have run, the pinit records are processed.The .pinit table consists of pointers to initialization functions. For C++programs, class constructors of global objects execute during .pinitprocessing.
Note that the module initialization in the previous section may occur in themiddle of .pinit processing. So, C++ constructors that require the services ofa module must explicitly call Startup_exec() prior to using any module.
4.2.6 Main() Function
Finally, execution reaches the main() function.

System Module
4-6
4.3 System Module
The System module provides a façade for two key system level areas:printing and program termination. Since both the printing and terminationprocesses can be very different depending on the product and stage ofdevelopment, you can configure an application to use differentimplementations of the underlying mechanisms while maintaining the samecode base. This is accomplished by setting the System Support Proxy.
4.3.1 System Support Proxy
The Support Proxy modules inherit from xdc.runtime.ISystemSupport. Thisinterface specifies five functions: abort, exit, flush, putch and ready. TheSystem module calls into the configured Support Proxy functions as needed.There are two implementations in the xdc.runtime package:
xdc.runtime.SysStd: Based on the standard C runtime library. SeeSection 4.3.6.
xdc.runtime.SysMin (default): Used for footprint- or performance-constrained applications. See Section 4.3.7.
You set the Support Proxy via the SupportProxy configuration parameter ofthe System module. The following statements set the Support Proxy toxdc.runtime.SysStd:
var System = xdc.useModule('xdc.runtime.System');System.SupportProxy = xdc.useModule('xdc.runtime.SysStd');
If an application wants to minimize the memory footprint, it should use theSysMin module as the Support Proxy by either omitting the lines above orsubstituting SysMin for SysStd above.
4.3.2 System Gate
The System module is a gated module (see Section 4.7). The gateassociated with the System module is a used for two purposes:
Used to manage critical regions within the System Module.
Used by any code to protect its small critical regions via theGate_enterSystem() and Gate_leaveSystem() APIs.
The System Gate must be restrictive enough to insure that critical regionsprotected by System's gate are safe. For example, if these regions can beaccessed by both interrupt service routines (ISRs) and non-ISR code, the

System Module
XDC Runtime Modules 4-7
Gate must disable interrupts on entering and restore interrupts on leaving.The following is example configuration code to set the System Gate to aninstance of the GateHwi module in the ti.sysbios.gates package.
GateHwi = xdc.useModule('ti.sysbios.gates.GateHwi');System.common$.gate = GateHwi.create();
4.3.3 atexit Handling
An atexit function is a function that is called during an exit. The Systemmodule allows you to configure the number of atexit functions that are boundat runtime via the maxAtexitHandlers configuration parameter (default is 8).The following statements set the maximum number of System atexit functionsthat can be added after the application starts running.
var System = xdc.useModule('xdc.runtime.System');System.maxAtexitHandlers = 4;
The System atexit functions have the following typedef:
typedef Void (*AtexitHandler)(Int status);
The System atexit functions are called when a System_exit() is called. Thestatus that is passed into System_exit() is passed into each of the Systematexit functions. The order of the System atexit functions is last in first out(LIFO). The System_atexit() function is used to add a System atexit function.
if (System_atexit(myExitFxn) == FALSE) { /* failed to add myExitFxn atexit function */}
The System atexit functions are independent of the standard C runtime atexitfunctions. During startup, the System module registers the System_rtsExitfunction with the atexit handler. During the execution of the standard Cruntime atexit functions, this function (System_rtsExit) executes all Systematexit functions.
4.3.4 Termination
There are two types of termination functions:
System_exit()
System_abort()
The System_exit() function is intended to be used for a graceful termination.The System_abort() is intended for catastrophic termination. The maindifference is that the atexit functions (both System and standard C runtime)are executed on a System_exit() and not on an System_abort().

System Module
4-8
4.3.4.1 System_exit
When called, the System_exit() function performs the following operations:
1) Calls the standard C runtime exit() function.
2) Via System_rtsExit (the standard C runtime atexit function that Systemregistered):
a) Enters the System gate (see Section 4.3.2).
b) Calls the System atexit functions (see Section 4.3.3).
c) Calls the Support Proxy's exit function (see Section 4.3.1).
If the standard C runtime exit function is called instead of the System_exit(),the exit status passed into exit() is not passed to the System atexit functions.The constant System_STATUS_UNKNOWN (equal to 0xCAFE) is usedinstead.
4.3.4.2 System_abort
When called, the System_abort() function performs the following operations
1) Enters the System gate (see Section 4.3.2)
2) Calls the Support Proxy's abort function (see Section 4.3.1).
3) Calls the standard C runtime abort() function.
The System atexit (or standard C runtime atexit) functions are not executed.
If the standard C runtime abort function is called instead of theSystem_abort(), the first two steps are not performed.
4.3.5 Printing
There are several printing APIs provided by the System module:System_putch(), System_printf(), System_sprintf(), System_vprintf() andSystem_vsprintf(). Although the prototypes for these APIs are same as theirstandard C runtime counterparts, not all standard printf format strings aresupported. The System module manages printf format string parsing, whilethe System Proxy does the actual character output. See SysMin and SysStdfor implementation details.
The System_flush() function calls into the Support Proxy's flush function. SeeSysMin and SysStd for implementation details.
System Module
XDC Runtime Modules 4-9
4.3.6 SysStd Module
The SysStd module inherits the xdc.runtime.ISystemSupport interface and isused to provide the underlying services required by the System module viaSystem's SupportProxy configuration parameter (see Section 4.3.1).
SysStd directly calls the standard C runtime functions. It does not perform anyadditional functionality. The standard C runtime putchar and fflush functionsare used. Both SysStd's abort and exit functions flush the standard output viathe standard C runtime fflush function.
4.3.7 SysMin Module
The SysMin module inherits the xdc.runtime.ISystemSupport interface and isused to provide the underlying services required by the System module viaSystem's SupportProxy configuration parameter (see Section 4.3.1).
SysMin is System’s default Support Proxy; it is intended to be flexible butminimal. When SysMin is the Support Proxy, all output—such asSystem_printf() and System_putch()—goes into an internally managedbuffer. There are several configuration parameters that let you change thefeatures as needed.
bufSize. The size in MAUs of the internal buffer used for output.
sectionName. The section in which the internal buffer should be created.
flushAtExit. If true, the internal buffer is flushed via SysMin_flush()during a System_exit() or System_abort().
If an application wants to minimize the memory footprint, it should use theSysMin module as the Support Proxy. If the application needs minimalprinting capabilities, the bufSize configuration parameter can be set to 0, andflushAtExit can be set to false to even further reduce the footprint.

Memory Segments and Sections
4-10
4.4 Memory Segments and Sections
XDC manages a device's memory by dividing it first into memory segmentsand then into memory sections that lie within those segments.
Memory segments are named ranges of memory with fixed addresses; theygenerally correspond to the different memory units on a device. Memorysegments are configurable in an application's config.bld or configuration file.
Memory sections are smaller allocations of a memory segment, such as the".text" section, which holds code, and the ".far" section, which holds data.Each memory section is placed in a particular memory segment. The defaultmapping of sections to segments is based on two factors. First, the XDCtarget (see Section 2.4.1) defines all the default sections (such as ".text",".const", and ".cinit") and maps them to either "code", "data", or "stack"memory. Then, the XDC platform (see Section 2.4.2) maps "code", "data",and "stack" to actual memory segments.
The target and platform define the default mapping of sections to segments,but these mappings can be overridden by explicitly placing the sections in theclient configuration script using 'Program.sectMap'. For example, to place asection named ".mySection" into the memory segment named "IRAM", theconfiguration script would contain the following line:
Program.sectMap[".mySection"] = "IRAM";
This same line can be used to either relocate an existing section, or to createa new section. In this way, the memory managed by a statically created heapcan be explicitly placed by specifying a section for the heap, and placing thatsection into the desired memory segment using 'Program.sectMap'.
Configuration example: The following XDC configuration example places aheap in memory explicitly by placing its section.
var HeapMin = xdc.useModule('xdc.runtime.HeapMin');
/* Create a HeapMin and place it in new section ".myHeapSect" */var myHeap = HeapMin.create();myHeap.size = 1024;myHeap.sectionName = ".myHeapSect";
/* Place the heap's section in the IRAM segment */Program.sectMap["myHeap.sectionName"] = "IRAM";
The section map can also be used to accomplish more specific placement,including specifying the load and run addresses for the segment. See theCDOC online reference for more details.

Memory Segments and Sections
XDC Runtime Modules 4-11
Configuration example: The following XDC configuration statements placethe .text section in a different load and run segment. They also place the.myHeapSect section at a specific address.
Program.sectMap[".text"] = {loadSegment: "SDRAM", runSegment: "IRAM"};Program.sectMap[".myHeapSect"] = {loadAddress: 0x80000000};
Finally, the current section map can be viewed programmatically in aconfiguration script using the Program.getSectMap() API. This API returnsthe current section map based on the Target and Platform section maps aswell as the Program.sectMap. See the CDOC online reference for details.
Configuration example: The following XDC configuration statements printall of the sections in the section map, as well as any defined properties of thesection.
var sectMapView = Program.getSectMap();
/* For each section in the sectMap */for (var sectName in sectMapView) { print(sectName); var sectSpec = sectMapView[sectName]; /* print the section's defined properties */ for (var p in sectSpec) { if (sectSpec[p] != undefined) { print(" " + p + " = " + sectSpec[p]); } }}

Memory Segments and Sections
4-12
Sample output (printed to command line during configuration)
.text loadSegment = IRAM.myHeapSect loadSegment = IRAM.switch loadSegment = SDRAM.vecs loadSegment = IRAM.args loadSegment = SDRAM.stack loadSegment = SDRAM.sysmem loadSegment = SDRAM.far loadSegment = SDRAM.data loadSegment = SDRAM.cinit loadSegment = SDRAM.bss loadSegment = SDRAM.const loadSegment = SDRAM.pinit loadSegment = SDRAM.cio loadSegment = SDRAM

Memory Allocation and Heaps
XDC Runtime Modules 4-13
4.5 Memory Allocation and Heaps
The xdc.runtime.Memory module provides the interface for all memoryallocations, both static and dynamic. This module is a common interface forall the different IHeap implementations.
The actual memory management is performed by heaps. Heaps are createdvia heap-specific create functions. The heap instances are then used in theMemory module calls. Internally, the Memory module calls the heap’sinterface functions.
Memory_alloc() is used at runtime to dynamically allocate memory.
The Memory module is simply a common interface for all memory operations.The actual memory management is performed by a heap instance, such asHeapMin or HeapStd. All of the Memory APIs take a heap instance as one oftheir parameters. Internally, the Memory module calls into the heap’sinterface functions.
Different heap implementations have different memory managementalgorithms, but all are accessed through xdc.runtime.Memory.
The Memory module supports a default heap, which can be used by passing“NULL” as the IHeap_Handle to the Memory APIs. The default heap can bespecified by configuring Memory.defaultHeapInstance. Otherwise, a defaultheap of type xdc_runtime_HeapStd is created with sizeMemory.defaultHeapSize.
Memory allocations sizes are measured in "Minimum Addressable Units"(MAUs) of memory. The size of an MAU in bits is determined by the target.
4.5.1 Heap Handles
The memory APIs that require a handle to a heap require a handle of typeIHeap_Handle. This requires an explicit cast from the specific Heap handletype to the general IHeap_Handle. You can perform this explicit cast using autility function, which always has the form <specific heap type>_Handle_to_xdc_runtime_IHeap(myHeap);
For example, to convert a HeapStd_Handle to an IHeap_Handle, use thefollowing:
IHeap_Handle iheap = HeapStd_Handle_to_xdc_runtime_IHeap(myHeap);
Of course, you can simply cast the variable myHeap to be an IHeap_Handle.But, by using the utility function above, your code remains type safe. Forexample, if myHeap is ever changed to an incompatible type, the compilercorrectly flags an error, whereas with the cast the compiler silently proceeds.

Memory Allocation and Heaps
4-14
4.5.2 Allocating Memory Dynamically
The Memory_alloc() function allocates memory. Its prototype is as follows:
Ptr Memory_alloc(IHeap_Handle heap, SizeT size, SizeT align, Error.Block* eb)
The "heap" parameter is the heap instance to allocate memory from. The"size" and "align" parameters specify the length of the memory block toallocate and the alignment of the starting address, respectively. The errorblock is used for error reporting.
Run-time example: The following C code example allocates a task stackfrom the default heap. The task stack will have a size of 512 MAUs and noparticular alignment.
Ptr tsk1_stack = Memory_alloc(NULL, 512, 0, NULL);
Run-time example: The following C code example allocates space for astructure from a heap.
extern HeapStd_Handle myHeap;
typedef struct Foo { int bar;} Foo;
Foo *myFoo;IHeap_Handle iheap = HeapStd_Handle_to_xdc_runtime_IHeap(myHeap);myFoo = (Foo *) Memory_alloc(iheap, sizeof(Foo), 0, NULL);myFoo->bar = 10;
The Memory module also supports the standard calloc and valloc APIs, whichinitialize the allocated memory to zero or to a specified value, respectively.
Ptr Memory_calloc (IHeap_Handle heap, SizeT size, SizeT align, Error_Block* eb);Ptr Memory_valloc (IHeap_Handle heap, SizeT size, SizeT align, Char value, Error_Block* eb);

Memory Allocation and Heaps
XDC Runtime Modules 4-15
4.5.3 Freeing Memory
The Memory_free() function frees memory. Its prototype is as follows:
Void Memory_free(IHeap_Handle heap, Ptr block, SizeT size)
Memory can only be freed if the underlying Heap supports it.
A call to Memory_free() takes the handle to the heap instance to free memoryto, a pointer to the block of memory to be freed, and the size of the block thatwas allocated.
By requiring the size of the block to be passed to the Memory_free() method,the underlying memory allocator can manage heaps with no extra space fromthe heap itself. This can be particularly important when managing small on-chip memory regions with large alignment requirements; even one wordtaken from a 32K block of memory wastes significant memory whenallocations must be aligned on 8K boundaries, for example.
Run-time example: The following C code example allocates a block, thenfrees it back to a heap. Foo is a structure, and the doSomething() functionoperates on a block of memory. The "myHeap" handle is for a Heap instance.
Ptr block;extern HeapStd_Handle myHeap;
IHeap_Handle iheap = HeapStd_Handle_to_xdc_runtime_IHeap(myHeap);block = Memory_alloc(iheap, sizeof(Foo), 0, NULL);
doSomething(block);
Memory_free(iheap, block, sizeof(Foo));
4.5.4 The xdc.runtime.HeapMin Implementation
HeapMin is a simple “growth-only” heap, meaning that it does not supportMemory_free(). It is intended as a minimal footprint heap implementation.HeapMin services any size allocation request. Attempting to free memoryback to a HeapMin instance results in an error.
Configuration example: The following XDC configuration example staticallycreates a HeapMem instance named myHeap:
var HeapMin = xdc.useModule('xdc.runtime.HeapMin');
/* Create heap as global variable so it can be used in C code */Program.global.myHeap = HeapMin.create();Program.global.myHeap.size = 1024;

Memory Allocation and Heaps
4-16
Run-time example: The following C code example dynamically creates aHeapMem instance named myHeap:
HeapMin_Params prms;char *buf[1024];HeapMin_Handle myHeap;
HeapMin_Params_init(&prms);prms.size = 1024;prms.buf = (Ptr)buf;myHeap = HeapMin_create(&prms, NULL);
4.5.5 The xdc.runtime.HeapStd Implementation
HeapStd is a wrapper for the "C" standard C runtime malloc() and free()functions. As a consequence, allocating from a HeapStd instance ignores the"align" parameter to Memory_alloc().
Configuration example: The following XDC configuration example staticallycreates a HeapStd heap instance named myHeap:
var HeapStd = xdc.useModule('xdc.runtime.HeapStd');
/* Create heap as global variable so it can be used in C code */Program.global.myHeap = HeapStd.create();Program.global.myHeap.size = 1024;
Run-time example: The following C code example dynamically creates aHeapStd instance named myHeap:
HeapStd_Params prms;HeapStd_Handle myHeap;
HeapStd_Params_init(&prms);prms.size = 1024;myHeap = HeapStd_create(&prms, NULL);

Timestamp Module
XDC Runtime Modules 4-17
4.6 Timestamp Module
The xdc.runtime.Timestamp module, as the name suggests, providestimestamping services. The Timestamp module can be used forbenchmarking code and adding timestamps to Log events (see Section4.8.4).
Timestamp provides two APIs for timestamping: Timestamp_get32() andTimestamp_get64(). Timestamp_get64() is only truly supported on targetsthat have a dedicated 64-bit counter. On other targets, the upper part ofTypes.Timerstamp is simply set to zero.
This module also provides a Timestamp_getFreq() API that returns thefrequency of the timestamp counter in Hz. This API can be used to convertthe numbers returned by Timestamp_get32() and Timestamp_get64() toactual time units (milliseconds).
The Timestamp module has a configuration parameter of typeITimestampProvider. Depending on the Timestamp provider used, theTimestamp counter may be a timer or a 64-bit dedicated counter in the coreor a 32-bit counter that is part of a timer peripheral.
During debugging, you may plug xdc.runtime.Timestamp.SupportProxy withxdc.runtime.TimestampStd, which calls the standard C runtime functionclock(). For example:
var Timestamp = xdc.useModule("xdc.runtime.Timestamp");Timestamp.SupportProxy = xdc.useModule("xdc.runtime.TimestampStd");
There is also an xdc.runtime.TimestampNull module that can be used whentimestamp services are not needed by the application. The TimestampNullmodule always returns a timestamp of ~0. However, other modules likexdc.runtime.LoggerBuf that use xdc.runtime.Timestamp will tag events withthis unchanging timestamp.
Run-time example: This C example calculates a time delta based ontimestamp values:
#include <xdc/runtime/Timestamp.h>
time1 = Timestamp_get32();CallLongFunction();time2 = Timestamp_get32();delta = time2 - time1;

Timestamp Module
4-18
Run-time example: This C example uses Timestamp_getFreq() and prints amessage every second.
#include <xdc/runtime/Types.h>#include <xdc/runtime/Timestamp.h>main (){ ... Types.FreqHz freq; UInt32 start;
Timestamp_getFreq(&freq);
/* works only for timestamps with 32-bit frequencies */ assert(freq.hi == 0);
for (;;) { start = Timestamp_get32(); while ((Timestamp_get32() - start) < freq.lo) { ; /* do nothing */ } System_print("A second has elapsed"); } ...}
Configuration example: This XDC example showing how to plug proxyvar Timestamp = xdc.useModule('xdc.runtime.Timestamp');
Timestamp.SupportProxy = xdc.useModule('xdc.runtime.TimestampStd');

Gate Interface and Implementations
XDC Runtime Modules 4-19
4.7 Gate Interface and Implementations
A "Gate" is a module that implements the IGateProvider interface. Gatesprevent concurrent accesses to critical data structures—that is, datastructures that must be updated atomically to preserve system integrity. Thevarious Gate implementations differ in how they lock the critical regions.
Threads can be preempted by other threads of higher priority, and somesections of code need to be completed by one thread before they can beexecuted by another thread. Code that modifies a linked list is a commonexample of a critical region that needs to be protected by a Gate.
Some modules use Gates internally to protect critical regions of code, suchas modifications to the module state, which are shared across all instancesof the module. A module that does this is referred to as a "Gated Module".Gated modules are marked with the "@Gated" command in their CDOCdocumentation. The documentation for such modules discusses how theGate is used by that module.
Gated modules can be configured to use a specific Gate type, which is setusing the common defaults for that module.
Gates generally work by either disabling some level of preemption such asdisabling task switching or even hardware interrupts, or by acquiring a binarysemaphore prior to any access to the critical data.
Gates have two key APIs: "enter" and "leave". A thread calls Gate_enter() tolock a critical region and prevent other threads from passing that point in thecode. When the thread has finished executing the critical region, it callsGate_leave() to allow other threads to execute that critical region.
All Gate implementations support nesting through the use of a "key". A call toGate_enter() returns a key that must then be passed back to Gate_leave().

Gate Interface and Implementations
4-20
Run-time example: The following C code protects a critical region with aGate. This example uses a module named GateHwi, a Gate implementationthat disables and enables interrupts as its locking mechanism.
UInt gateKey;GateHwi_Handle gateHwi;GateHwi_Params prms;GateHwi_Params_init(&prms);
gateHwi = GateHwi_create(&prms, NULL);
/* Simultaneous operations on a Queue by multiple threads could * corrupt the Queue structure, so modifications to the Queue * are protected with a Gate. */gateKey = GateHwi_enter(gateHwi);Queue_dequeue(myQ);GateHwi_leave(gateHwi, gateKey);
4.7.1 The xdc.runtime.GateNull Implementation
GateNull provides no protection. Calling GateNull_enter() andGateNull_leave() has no effect. For applications without preemptive threadsor when an application never uses a gated module from more than onethread, GateNull is provided so that a gated module may be configured to notuse any real Gate.
4.7.2 Plugging Gates
Gated modules can be configured to use a specific Gate type, which is setusing the common defaults for that module.
Configuration example: The following XDC example creates a Gate.
ModA.common$.gate = MyGate.create();
In addition to gated modules, there is a system-wide "system gate" that canbe used anywhere. The system gate is configured to provide the highest levelof protection available or required by the system. A real-time operatingsystem, for example, would configure the system gate to disable allpreemption down to the hardware level.
The system gate is configured using the common$.gate property of theSystem module:
Var System = xdc.useModule(‘xdc.runtime.System’);System.common$.gate = MyGate.create();

Diagnostics and Logs
XDC Runtime Modules 4-21
4.8 Diagnostics and Logs
XDC provides for diagnostics with a set of modules that operate together toconfigure and implement diagnostics.
These modules can be partitioned into three groups: modules that generateevents, a module that allows precise control over when (or if) various eventsare generated, and modules that manage the output or display of the events.
Assert, Error, and Log provide methods that are added to source code andgenerate events. The Diags module provides both configuration and runtimemethods to selectively enable or disable different type of events on a permodule basis. Finally, LoggerBuf and LoggerSys are simple alternativeimplementations of an event output interface, ILogger. You can provide moresophisticated or platform-specific implementations of ILogger without makingany changes to code that uses Assert, Log, Error, or Diags.
The modules described in this section are
Assert. Add integrity checks to the code. See Section 4.8.1.
Diags. Manage a module's diagnostics mask. See Section 4.8.2.
Error. Raise error events. See Section 4.8.3.
Log. Generate log events in real-time. See Section 4.8.4.
LoggerBuf. A logger using a buffer for log events. See Section 4.8.5.
LoggerSys. A logger using printf for log events. See Section 4.8.6.
Types. Define diagnostics configuration parameters. See Section 4.9.
4.8.1 Assert Module
The Assert module provides configurable diagnostics to the program. Similarto the standard C assert() macro, Assert methods are interspersed with othercode to add diagnostics to a program. Unlike the standard C assert support,the Assert module provides greater flexibility in managing the messagesdisplayed, the message string space overhead, and the runtime handling offailures. In addition, because the Assert methods build atop the Diagsmodule, you can precisely control which asserts remain in the finalapplication, if any.
The Assert module works in conjunction with the Diags module. Assertstatements are added to the code using the Assert_isTrue() function.Execution of the assert statements is controlled by the Diags_ASSERT bit inthe module's diagnostics mask (see Section 4.8.2).

Diagnostics and Logs
4-22
Two types of asserts are supported: public asserts and internal asserts:
Public asserts must have an assert ID and are, by default, controlled bythe Diags.ASSERT bit.
Internal asserts cannot have an assert ID (other than NULL) and areactive only when both the Diags.ASSERT and Diags_INTERNAL bits ofthe module's diagnostics mask are set.
Assert IDs are small integer values that index into a table of assertiondescriptors. These descriptors hold an error message and a diagnosticsmask that is used to enable and disable the assertion at runtime.
You can remap individual public asserts to different bits in the diagnosticsmask, or even disable the asserts altogether. This is done by setting the maskproperty of the assert ID. Setting the mask to 0 disables the assert. In all othercases, the Diags.ASSERT bit is ORed together with the mask to define thecontrolling bits. For example, the module's diagnostics mask must have theDiags.ASSERT bit set and any other bit specified in the mask property of theassert ID in order to activate the assert.
Example 1: The following C code adds an assert to application code that isthat is not in a module. This assert does not have an assert identifier (thesecond argument is NULL); This makes it an internal assert.
/* file.c */#include <xdc/runtime/Assert.h>
Assert_isTrue(count > 0, NULL);
The following XDC configuration statements set both the ASSERT andINTERNAL bits in the diagnostics mask to enable the internal assert createdin the previous C code. Since the C code is not in a module, you must set thebits in the diagnostics mask of the xdc.runtime.Main module. The Mainmodule is used to control all Log and Assert statements that are not part ofthe implementation of a module; for example, top-level application code orany existing sources that simply call the Log or Assert methods.
/* program.cfg */var Assert = xdc.useModule('xdc.runtime.Assert');var Diags = xdc.useModule('xdc.runtime.Diags');var Main = xdc.useModule('xdc.runtime.Main');
Main.common$.diags_ASSERT = Diags.ALWAYS_ON;Main.common$.diags_INTERNAL = Diags.ALWAYS_ON;

Diagnostics and Logs
XDC Runtime Modules 4-23
Example 2: The following example shows how to use and configure anassert ID that is declared by a module. It adds that assert to the application’sC source code, and configures the application to execute the assert.
This is part of the XDC file for the module that declares an Assert Id:
/* Mod.xdc */import xdc.runtime.Assert;import xdc.runtime.Diags;
config Assert.Id A_nonZero = { msg: "A_nonZero: value must be non-zero"};
This is part of the C code for the application:
#include <xdc/runtime/Assert.h>
Assert_isTrue(x != 0, Mod_A_nonZero);
This is part of the XDC configuration file for the application:
var Diags = xdc.useModule('xdc.runtime.Diags');var Mod = xdc.useModule('my.pkg.Mod');Mod.common$.diags_ASSERT = Diags.ALWAYS_ON;
4.8.2 Diags Module
Every XDC module has a "diagnostics mask" that allows clients to enable ordisable diagnostics on a per module basis both at configuration time and atruntime. The Diags module manages a module's diagnostics mask.
You use the Diags module to set and clear bits in a module's diagnosticsmask for the purpose of controlling diagnostics within that module. Each bitcorresponds to a "type" of diagnostic that can be individually enabled ordisabled.
A module's diagnostics mask controls both Assert and Log statements withinthat module. A module's diagnostics mask may also used to conditionallyexecute blocks of code using the Diags_query() runtime function.
A module's diagnostics mask can be set at configuration time or at run-time.The implementation of diagnostics is such that when they are permanentlyturned off at configuration time, an optimizer can completely eliminate thediagnostics code from the program. Similarly, if diagnostics are permanentlyturned on at configuration time, the optimizer can eliminate all run-timeconditional checking and simply invoke the diagnostics code directly. Run-time checking of the diagnostics mask is performed only when thediagnostics are configured to be run-time modifiable.

Diagnostics and Logs
4-24
Each bit of the diagnostics mask is controlled by one of the followingconstants.
These constants can be used from either JavaScript configuration scripts orC code and, therefore, have two "names". For example, to reference theENTRY constant from JavaScript you must use "Diag.ENTRY" whereas fromC your would use "Diags_ENTRY".
The ENTRY and EXIT bits control Log statements at the entry and exit points,respectively, to each function within a module. This is useful for tracking theexecution flow of your program.
The LIFECYCLE bit controls Log statements at the create/construct anddelete/destruct points to each instance object for the module. This is usefulfor tracking the lifecycle of a module instance object.
The ASSERT bit controls Assert statements in a module. There are twoclasses of asserts:
Public asserts, which have an Assert_Id and are documented in themodule's reference pages. These asserts are on by default and aremeant to help developers validate code that invokes a module'sfunctions.
Constant Meaning
ENTRY Function entry
EXIT Function exit
LIFECYCLE Object lifecycle
INTERNAL Internal diagnostics
ASSERT Assert checking
USER1 User defined diagnostics
USER2 User defined diagnostics
USER3 User defined diagnostics
USER4 User defined diagnostics
USER5 User defined diagnostics
USER6 User defined diagnostics
USER7 User defined diagnostics
USER8 User defined diagnostics

Diagnostics and Logs
XDC Runtime Modules 4-25
Internal asserts, which have no Assert_Id. These asserts are off bydefault and are typically used only when developing code. That is, like thestandard C assert() mechanism, these asserts are not part of a deployedapplication.
When a module has the ASSERT bit set (which is set by default) in itsdiagnostics mask, the module executes all of its public assert statements. Toenable internal asserts, you must set both the ASSERT and INTERNAL bits.
The INTERNAL bit is used to classify diagnostic code as being internal. Thatis to say, this class of diagnostics is undocumented and typically not used byclient software.
The USER1-7 bits are available to each module writer to use as they wish.
Configuration example: The following XDC configuration statements set amodule's diagnostics mask in a configuration script. (In this case, the Taskmodule of the ti.sysbios.knl package is used.) In this example, the ENTER bitis turned on and the EXIT bit is turned off. Both bits are configured to be run-time modifiable.
var Diags = xdc.useModule('xdc.runtime.Diags'); var Task = xdc.useModule('ti.sysbios.knl.Task');
Task.common$.diags_ENTER = Diags.RUNTIME_ON; Task.common$.diags_EXIT = Diags.RUNTIME_OFF;
Run-time example: The following C code shows how to disable and re-enable ENTER diagnostics at runtime for the ti.sysbios.knl.Task moduleconfigured in the previous example. The first call to Diag_setMask() enablesentry diagnostics ("+E") for just the ti.sysbios.knl.Task module; any call to anyTask method in the application causes an "entry" Log event to be generated.The second call disables ("-E") the generation of these events. See thexdc.runtime.Diags module's reference documentation for a completedescription of the strings accepted by Diags_setMask().
#include <xdc/runtime/Diags.h> : Diags_setMask("ti.sysbios.knl.Task+E"); : Diags_setMask("ti.sysbios.knl.Task-E");
Configuration example: The following XDC configuration statements turnon asserts in the entire program.
var Diags = xdc.useModule('xdc.runtime.Diags'); var Defaults = xdc.useModule('xdc.runtime.Defaults'); Defaults.diags_ASSERT = Diags.ALWAYS_ON;

Diagnostics and Logs
4-26
Configuration example: The following XDC configuration statements turnon asserts in all of the modules whose name begins with "ti.sysbios." usingthe Diags.setMaskMeta() function. In this case, no change to the applicationcode is necessary to enable these events. It is important to note that, whilethe configuration step must be rerun and the application must be re-linked, noapplication sources need to be recompiled.
var Diags = xdc.useModule('xdc.runtime.Diags');Diags.setMaskMeta("ti.sysbios.%", Diags.ASSERT, Diags.ALWAYS_ON);
4.8.3 Error Module
The xdc.runtime.Error module is the run-time error manager.
This module provides mechanisms for raising, checking, and handling errorsin a program. You can configure it via the Error.policy and Error.raiseHookconfiguration parameters.
Modules may define specific error types and reference these when raising anerror. Each error type has a custom error message and can be parameterizedwith up to NUMARGS arguments. A generic error type is provided for raisingerrors when not in a module.
Use the Error_check() function to determine if an error has been raised. It isimportant to understand that it is the caller's responsibility to check the errorblock after calling a function that takes an error block as an argument.Otherwise, a raised error may go undetected, which could compromise theintegrity of the system. For example:
Task_create(..., &eb); if (Error_check(&eb)) { ...an error has been raised... }
The Error.raiseHook allows a configured function to be invoked when anyerror is raised. This function is passed a pointer to the error's error block andmakes it easy to mange all errors from a common point. For example, you cantrap any error (fatal or not) by simply setting a breakpoint in this function. Youcan use the following functions to extract information from an error block.
Error_getData()
Error_getCode()
Error_getId()
Error_getMsg()
Error_getSite()

Diagnostics and Logs
XDC Runtime Modules 4-27
Example: The following example shows how a module, named ModA,defines a custom error type and shows how this error is raised by the module.The module defines an Id of E_notEven in its module specification file (in thiscase, ModA.xdc). The error's message string takes only one argument. Themodule also defines a mayFail() function that takes an error block. In themodule's C source file, the function checks for the error condition and raisesthe error if needed.
This is part of ModA's XDC specification file for the module:
config xdc.runtime.Error.Id E_notEven = { msg: "expected an even number (%d)" };
Void mayFail(Int x, xdc.runtime.Error.Block *eb);
This is part of the C code for the module:
Void ModA_mayFail(Int x, Error_Block *eb) { if ((x % 2) != 0) { Error_raise(eb, ModA_E_notEven, x, 0); ...add error handling code here... return; } ... }
Run-time Example: The following C code supplies an error block to afunction that requires one and tests the error block to see if the function raisedan error. Note that an error block must be initialized before it can be used andsame error block may be passed to several functions.
#include <xdc/runtime/Error.h> #include <ti/sysbios/knl/Task.h> Error_Block eb; Task_Handle tsk;
Error_init(&eb); tsk = Task_create(..., &eb);
if (Error_check(&eb)) { ...an error has been raised... }

Diagnostics and Logs
4-28
Run-time Example: The following C code shows that you may pass NULL toa function requiring an error block. In this case, if the function raises an error,the program is aborted (via xdc_runtime_System_abort()), thus executioncontrol will never return to the caller.
#include <xdc/runtime/Error.h> #include <ti/sysbios/knl/Task.h>
tsk = Task_create(..., NULL); ...will never get here if an error was raised in Task_create...
Run-time Example: The following C code shows how to write a function thatis not part of a module and that takes an error block and raises the genericerror type provided by the Error module. Note, if the caller passes NULL forthe error block or if the error policy is Error_TERMINATE, then the call toError_raise() will call xdc_runtime_System_abort() and never return.
#include <xdc/runtime/Error.h>
Void myFunc(..., Error_Block *eb) { ... if (...error condition detected...) { String myErrorMsg = "my custom error message"; Error_raise(eb, Error_E_generic, myErrorMsg, 0); ...add error handling code here... return; } }
4.8.4 Log Module
The Log module is used to generate log events in real-time while the targetprogram executes. Log events are routed to a "logger" instance for output orstorage; for example, an instance of xdc.runtime.LoggerBuf orxdc.runtime.LoggerSys.
Log event routing is managed at the module level, where each module canspecify a logger instance. A logger instance can accept log events from manymodules, but a module can route log events to only one logger instance.There can be one or many logger instances in a system. Each logger instancerepresents a separate log. All Log calls that are not in a module are controlledby the module xdc.runtime.Main. The Main module is used to control all Logand Assert statements that are not part of the implementation of a module—for example, top-level application code or any existing sources that simplycall the Log or Assert methods.

Diagnostics and Logs
XDC Runtime Modules 4-29
The generation of a log event is controlled by a module's diagnostics mask.Each log event is associated with a mask. Log events are generated onlywhen a particular bit is set in both the log event mask and the module'sdiagnostics mask. For example, a log event mask with the USER1 bit set isgenerated only when the USER1 bit is also set in the module's diagnosticsmask.
There are two ways to generate log events:
LOG_write(), which is tailored for module writers and takes fulladvantage of the XDC configuration model—for example, the messagestring associated with the Log event need not be part of the finalapplication, significantly reducing the "footprint overhead" of embeddingdiagnostics in deployed systems. The Log_write[0-8]() functions allowsup to 8 values to be passed to the logger. They expect the logger tohandle any formatting. A log event type allows you to specify the type ofevent.
LOG_print(), which is designed for arbitrary C code. The Log_print[0-6]()functions allow up to 6 values to be passed along with a printf-like formatstring to the logger. They handle printf-style formatting.
Both functions are controlled by the module's diagnostics mask. Theirstorage or output is defined by the logger that is assigned to the module thatcalls the Log methods or to the xdc.runtime.Main module if the caller is notpart of a module.
The log function call sites are implemented in such a way that an optimizercan completely eliminate log code from the program if the log function hasbeen permanently disabled at configuration time. If the log functions arepermanently turned on at configuration time, then the optimizer can eliminateall run-time conditional checking and simply invoke the log function directly.Run-time checking is performed only when the log functions are configuredto be run-time modifiable.
The Log module provides log event generation, but in order to store or displaya log event, a logger instance must be created and assigned to the module.This is done in the program configuration script. See Section 4.8.5 or Section4.8.6 for details.
Example 1: The following example defines a log event, uses that log eventin a module, and configures the program to generate the log event. In thisexample, both USER1 and USER2 bits are set in the event mask. This meansthat if either bit is set in the module's diagnostics mask, then the log event willbe generated. Note, in order for the event to be realized, you must also createa logger instance and assign it to the module. See LoggerBuf or LoggerSysfor details.

Diagnostics and Logs
4-30
This is part of the XDC specification file for the Mod module (Mod.xdc):
import xdc.runtime.Diags; import xdc.runtime.Log;
config Log.Event L_someEvent = { mask: Diags.USER1 | Diags.USER2, msg: "my log event message, arg1: 0x%x, arg2: 0x%x" };
This is part of the C code implementation of the Mod module:
#include <xdc/runtime/Log.h> UInt x, y;
Log_write2(Mod_L_someEvent, (IArg)x, (IArg)y);
Finally, the following is an example of how the application might control theLog statements embedded in the Mod module at configuration time. In thiscase, the configuration script arranges for the Log statements within themy.pkg.Mod module (shown above) to always generate events. Withoutthese configuration statements, no Log events would be generated by thismodule. This is part of the XDC configuration file for the application:
var Diags = xdc.useModule('xdc.runtime.Diags'); var Mod = xdc.useModule('my.pkg.Mod'); Mod.common$.diags_USER1 = Diags.ALWAYS_ON;
Example 2: The following XDC configuration statements turn on enter andexit logging at configuration time for a module.
var Diags = xdc.useModule('xdc.runtime.Diags'); var MyMod = xdc.useModule('my.pkg.MyMod');
MyMod.common$.diags_ENTER = Diags.ALWAYS_ON; MyMod.common$.diags_EXIT = Diags.ALWAYS_ON;
Example 3: The following example configures a module to support enter andexit logging, but defers the actual activation and deactivation of the logginguntil run-time. See the Diags_setMask() function for details on specifying thecontrol string.
This is part of the XDC configuration file for the application:
var Diags = xdc.useModule('xdc.runtime.Diags'); var MyMod = xdc.useModule('my.pkg.MyMod');
MyMod.common$.diags_ENTER = Diags.RUNTIME_OFF; MyMod.common$.diags_EXIT = Diags.RUNTIME_OFF;
Diagnostics and Logs
XDC Runtime Modules 4-31
This is part of the C code for the application:
/* turn on enter and exit logging in the module */ Diags_setMask("my.pkg.MyMod+EX");
/* turn off enter and exit logging in the module */ Diags_setMask("my.pkg.MyMod-EX");
4.8.5 LoggerBuf Module
The xdc.runtime.LoggerBuf module provides a logger that stores run-time logevents in a buffer.
This logger captures log events in real-time to a buffer. The log events storedin the buffer are unformatted; the log event formatting is deferred. UseLoggerBuf_flush() to process the log events stored in the buffer and streamthe formatted output to stdout.
The implementation of this logger is fast with minimal stack usage making itappropriate for a real-time application. If this logger is used in a preemptiveenvironment, then an appropriate gate must be assigned to the module. Forexample, if you wish to generate log events from an interrupt context, then agate that disables interrupts must be used.
var LoggerBuf = xdc.useModule('xdc.runtime.LoggerBuf'); LoggerBuf.common$.gate = ...some gate instance...
If the buffer type is circular, the log buffer of size LoggerBuf_numEntriescontains the last numEntries log events. If the bufType is fixed, the log buffercontains the first numEntries log events.

Diagnostics and Logs
4-32
Configuration example: The following XDC configuration statements createa logger instance, assign it as the default logger for all modules, and enableUSER1 logging in all modules of the package my.pkg. See theDiags.setMaskMeta() function in the CDOC system for details on specifyingthe module names.
var LoggerBuf = xdc.useModule('xdc.runtime.LoggerBuf'); LoggerBuf.enableFlush = true;
var LoggerBufParams = new LoggerBuf.Params(); LoggerBufParams.exitFlush = true;
var Defaults = xdc.useModule('xdc.runtime.Defaults'); Defaults.common$.logger = LoggerBuf.create(LoggerBufParams);
var Diags = xdc.useModule('xdc.runtime.Diags'); Diags.setMaskMeta("my.pkg.%", Diags.USER1, Diags.RUNTIME_ON);
4.8.6 LoggerSys Module
The xdc.runtime.LoggerSys module routes events to the System_printf()function.
This logger processes log events as they are generated and routes themthrough the System_printf() function. The final disposition of the log event isdependent on which system provider has been assigned toSystem.SupportProxy.
Note that the log events are processed within the run-time context of theLog_write() or Log_print() function that generated the event. It is important toaccount for the processing overhead and stack usage imposed on the run-time context. The cost of this processing is defined by the implementation ofthe system provider.

Types Module
XDC Runtime Modules 4-33
Configuration example: The following XDC configuration statements createa logger instance, assign it as the default logger for all modules, and enableUSER1 logging in all modules of the package my.pkg. SeeDiags.setMaskMeta for details on specifying the module names.
var LoggerSys = xdc.useModule('xdc.runtime.LoggerSys'); var LoggerSysParams = new LoggerSys.Params();
var Defaults = xdc.useModule('xdc.runtime.Defaults'); Defaults.common$.logger = LoggerSys.create(LoggerSysParams);
var Diags = xdc.useModule('xdc.runtime.Diags'); Diags.setMaskMeta("my.pkg.%", Diags.USER1, Diags.RUNTIME_ON);
4.9 Types Module
The xdc.runtime.Types module defines basic constants and types usedthroughout the xdc.runtime package and, in some cases, to every XDCmodule.
The Common$ structure defined by the Types module is available for (orcommon to) all XDC modules. Every field of the Common$ structure is aconfiguration parameter that may be set within a configuration script for anyXDC module (not just the xdc.runtime modules). The fields of this structureare typically read by the modules in the xdc.runtime package at configurationtime to control the generation of data structures that are embedded in theapplication and referenced by these modules at runtime.
Every XDC module has a configuration parameter named "common$" that isof type Common$. This allows the user of any module to control the module'sdiagnostics, where its instances are allocated, how they are allocated, and(for gated modules) what gate it should use to protect critical sections.
Configuration example: The following configuration script specifies that theinstance objects managed by the Task module in the ti.sysbios.knl packageshould be placed in the ".fast" memory section and that only ENTRYdiagnostics should be available at runtime.
var Task = xdc.useModule('ti.sysbios.knl.Task");Task.common$.instanceSection = ".fast";Task.common$.diags_ENTRY = Diags.RUNTIME_OFF
Note that by setting Task.common$.diags_ENTRY to Diags.RUNTIME_OFFwe are both enabling ENTRY events and specifying that they are initiallydisabled; they must be explicitly enable at runtime. See Section 4.8 foradditional information.
Types Module
4-34
The Common$ structure is defined as follows:
metaonly struct Common$ { Diags.Mode diags_ASSERT ; Diags.Mode diags_ENTRY ; Diags.Mode diags_EXIT ; Diags.Mode diags_INTERNAL ; Diags.Mode diags_LIFECYCLE ; Diags.Mode diags_USER1 ; Diags.Mode diags_USER2 ; Diags.Mode diags_USER3 ; Diags.Mode diags_USER4 ; Diags.Mode diags_USER5 ; Diags.Mode diags_USER6 ; Diags.Mode diags_USER7 ; Diags.Mode diags_USER8 ; IGateProvider.Handle gate ; Ptr gateParams ; IHeap.Handle instanceHeap ; String instanceSection ; ILogger.Handle logger ; CreatePolicy memoryPolicy ; Bool namedInstance ; Bool namedModule ; }
The following fields in the Common$ structure are used by the Diags and Logmodules:
Field Description
diags_ASSERT The Diags.ASSERT bit of a module's diagnostics mask.
diags_ENTRY The Diags.ENTRY bit of a module's diagnostics mask. (default=Diags.ALWAYS_OFF)
diags_EXIT The Diags.EXIT bit of a module's diagnostics mask. (default=Diags.ALWAYS_OFF)
diags_INTERNAL The Diags.INTERNAL bit of a module's diagnostics mask. (default=Diags.ALWAYS_OFF)
diags_LIFECYCLE The Diags.LIFECYCLE bit of a module's diagnostics mask. (default=Diags.ALWAYS_OFF)
diags_USER1 The Diags.USER1 bit of a module's diagnostics mask. (default=Diags.ALWAYS_OFF)

Types Module
XDC Runtime Modules 4-35
diags_USER2 The Diags.USER2 bit of a module's diagnostics mask. (default=Diags.ALWAYS_OFF)
diags_USER3 The Diags.USER3 bit of a module's diagnostics mask. (default=Diags.ALWAYS_OFF)
diags_USER4 The Diags.USER4 bit of a module's diagnostics mask. (default=Diags.ALWAYS_OFF)
diags_USER5 The Diags.USER5 bit of a module's diagnostics mask. (default=Diags.ALWAYS_OFF)
diags_USER6 The Diags.USER6 bit of a module's diagnostics mask. (default=Diags.ALWAYS_OFF)
diags_USER7 The Diags.USER7 bit of a module's diagnostics mask. (default=Diags.ALWAYS_OFF)
diags_USER8 The Diags.USER8 bit of a module's diagnostics mask. (default=Diags.ALWAYS_OFF)
logger The handle of the logger instance used by the module. All log events gen-erated by the module are routed to this logger instance. See LoggerBuf and LoggerSys for two examples of logger instances provided by the xdc.runtime package.
namedInstance If set to true, each instance object is given an additional field to hold a string name that is used when displaying information about an instance. Setting this to true increases the size of the module's instance objects by a single word but improves the usability of tools that display instance objects. (default=FALSE)
namedModule If set to true, this module's string name is retained on the target so that it can be displayed as part of Log and Error events. Setting this to false saves data space in the application at the expense of readability of Log and error messages associated with this module. (default=TRUE)
Field Description

Types Module
4-36
The following fields in the Common$ structure are used by the Memorymodule:
The following fields in the Common$ structure are used by the Gate module:
Field Description
instanceSection Identifies the section in which instances created by this module should be placed.
instanceHeap Identifies the heap from which this module should allocate memory.
memoryPolicy Specifies whether this module should allow static object creation only (STATIC_POLICY), dynamic object creation but not deletion (CREATE_POLICY), or both dynamic object creation and deletion (DELETE_POLICY).
Field Description
gate A handle to the Gate implementation to be used by this module.
gateParams Gate parameters for use by this module.

5-1
Chapter 5
XDC Configuration
This chapter provides more information about XDC configuration syntax.
5.1 More About the XDC Script Language . . . . . . . . . . . . . . . . . . . . . . . . 5-2
5.2 More About the xs Command . . . . . . . . . . . . . . . . . . . . . . . . . . . . . . . 5-5
5.3 JavaScript Language . . . . . . . . . . . . . . . . . . . . . . . . . . . . . . . . . . . . . 5-13
5.4 XDC Script Methods. . . . . . . . . . . . . . . . . . . . . . . . . . . . . . . . . . . . . . 5-15
Topic Page

More About the XDC Script Language
5-2
5.1 More About the XDC Script Language
XDC scripts use a general-purpose programming language based upon theECMA-262 Edition 3 standard—popularly known as JavaScript 1.5.
The xs command runs a JavaScript interpreter based on the Mozilla Rhinopackage. See the Rhino documentation to learn more about the particularfeatures of this implementation of JavaScript. In particular, look for materialon LiveConnect, which enables JavaScript programs to transparently invokeJava APIs. This powerful feature provides a mechanism to tap into the vastamount of functionality in the Java ecosystem.
5.1.1 Benefits of Static Configuration
XDC supports both static and dynamic creation of objects. Creating objectsat run-time (dynamic) is easier, but extra code is required to support theobject creation and deletion. Design-time configuration (static) provides thefollowing benefits over run-time configuration:
Improves run-time performance by reducing the time your programspends performing system setup.
Can reduce program size by eliminating run-time code required todynamically create and configure objects. For typical modules, functionsto create and delete objects make up 50% of the code in the module.
Optimizes internal data structures.
Detects errors earlier by validating properties before compilation.
Automatically sets a variety of properties that are dependent on otherproperties. This helps ensure that your configuration is valid.
5.1.2 Language Overview
JavaScript syntax, operators, and flow-control statements are similar to thosein the C language. C programmers can easily read JavaScript. It includes if,else, switch, break, for, while, do, and return statements.
JavaScript is a loosely-typed language. Variables in JavaScript are moreflexible than variables in C or Java. Variables do not need to be explicitlydeclared, and the same variable can store different data types at differenttimes. These types are number, string, Boolean value, array, object, function(which is actually an object itself), and null. Operators automatically convertvalues between data types as necessary.

More About the XDC Script Language
XDC Configuration 5-3
Variables can be local to a function or global to the entire JavaScriptenvironment. Variable and object names may not contain spaces orpunctuation other than "_" or "$". In addition, variable and object names caninclude numbers but must not begin with a number.
JavaScript does not have pointers and does not deal with memoryaddresses.
5.1.3 Common Misconceptions About JavaScript
If you've used JavaScript before, you have probably added scripts to a webpage. It's important to clear up misconceptions some programmers may haveabout JavaScript when used outside the context of web pages:
JavaScript is a general-purpose, cross-platform programming language.While it was developed for use in web browsers, it has a number offeatures that make it useful for application configuration. It is easy to learnand use, the syntax is similar to C, it is object-oriented, and it is widelydocumented.
JavaScript is standardized. The language is also called ECMAScript, andthe ECMA-262 standard defines the language (seehttp://www.ecma.ch/ecma1/STAND/ECMA-262.HTM). The basic syntaxand semantics of the language are stable and standardized.
When you use JavaScript in a web page, the objects you use are definedby the Document Object Model (DOM). These objects include window,document, form, and image. The DOM is not part of the JavaScriptstandard; nor is the DOM part of XDC.
Other object models can be defined for use with JavaScript. Instead ofthe DOM, XDC provides its own objects via modules contained bypackages.
JavaScript is not a part of Java. These are two different languages thathave similar names for historical marketing reasons. However, XDCscripts can call Java functions to provide file services. JavaScript itselfdoes not provide file services for security reasons on web browsers.
XDC runs JavaScript only on the host PC or Linux machine. JavaScriptcode is never run on the target DSP.

More About the XDC Script Language
5-4
5.1.4 JavaScript and Java References
This document does not provide details on the syntax of the JavaScriptlanguage or on the Java packages that can be used. For referenceinformation, we recommend the following sources:
JavaScript, The Definitive Guide, 3rd Edition, David Flanagan; O’Reilly1998
ECMA-262 standard: http://www.ecma-international.org/publications/standards/Ecma-262.htm
Core JavaScript 1.5 Reference:http://developer.mozilla.org/en/docs/Core_JavaScript_1.5_Reference
Rhino JavaScript interpreter: http://www.mozilla.org/rhino
Java 2 SDK: http://java.sun.com/j2se/1.3/docs
java.io package: http://java.sun.com/j2se/1.3/docs/api/java/io/package-summary.html
More About the xs Command
XDC Configuration 5-5
5.2 More About the xs Command
Chapter 3 describes a number of XDC tools that you can run using the xscommand. For example:
xs xdc.tools.cdoc.sg
The xs command is actually more than a central command for runningvarious tools. It is actually a program that executes XDC scripts. The toolsdescribed in Chapter 3 are implemented as XDC scripts.
Since the xs command is an XDC script execution program, you can also useit to test XDC scripts or script commands. The xs command accepts thefollowing command syntaxes:
xs [options] xdc-package [script-args ...]Script code is part of an XDC package (default: no option required)Section 5.2.1
xs [options] -c xdc-capsule [script-args ...]Script code is contained in an XDC capsule. Section 5.2.2
xs [options] -f xs-script-file [script-args ...]Script file is located anywhere on the filesystem. Section 5.2.3
xs [options] -m xdc-module [script-args ...]Script code is part of an XDC module. Section 5.2.4
xs [options] -iSpecify a script interactively. Section 5.2.5
xs [options] -gDebug a script with a graphical tool. Section 5.2.6
The basic model for using the xs command is to specify a script to executealong with optional arguments to be passed to the script. The variationsshown here are due to how the “script” is located by xs.
Important: Running a script in one of these modes is different from runningit with the configuro utility. When a configuration script is run, it is run in acontext (called an "object model" or "domain") in which the global object"Program" is initialized based on the user-specified target and platformparameters. Several distinct domains are defined by XDC; each defines atop-level object that provides a context for the execution of scripts.Currently, there is a "cfg" configuration domain, a "bld" build domain, and a"rov" runtime domain.
The options you can use on the command line beyond the basic -c, -f, -m, -i,and -g mode-selection options are described in Section 5.2.7.

More About the xs Command
5-6
5.2.1 Running a Script Defined by a Package
An XDC package that contains a main() method in a module named Main canbe invoked directly as shown below.
xs sample.stuff world
The package is "sample.stuff" and is located along the XDCPATH packagepath. The script must be contained in the file Main.xs. The argument "world"is sent to the main() function. Note that this is equivalent to using the followinginvocation using the -m module option:
xs –m sample.stuff.Main world
If none of the options -m, -f, or -c is specified, the argument given to xs after[options] is assumed to be a package name. This package must have amodule named Main that defines a main() function.
Arguments are passed as function parameters to the main() function that isrequired in the script file.
5.2.2 Running a Script Defined by a Capsule
An XDC capsule is simply a file that contains an XDC script that can beloaded and used via the xdc.loadCapsule() method. The capsule thatcontains a main() method can be run using xs by specifying the capsule withthe –c option. For example:
xs –c sample/stuff/hello.xs world
In this example, the script hello.xs is contained in a package calledsample.stuff and is located along the package path. Note that instead of usingthe package name directly, the “.” separator is replaced with a forward slash“/” (on both Linux and Windows).
There are no requirements on the naming of the script file (different fileextensions can be used) or the actual location of the file within a package(subdirectories can be used).
Arguments are passed as a single string array parameter to the main()function that is required in the script file. Each argument passed on the xscommand line is a separate string in the array passed to main().

More About the xs Command
XDC Configuration 5-7
5.2.3 Running a Script Defined by a File
As with the previous examples, the following command runs the code in thefile hello.xs contained in the sample.stuff package.
xs –f sample/stuff/hello.xs world
For example, if hello.cfg contains the line, the text “hello world” is echoed tothe standard output of the command shell:
print("hello " + arguments[0]);
The only difference between the capsule and the file techniques is that acapsule defines a main() function that is run, whereas a file runs when it isloaded. The capsule is a better way to encapsulate scripts because thecapsule can be loaded from other scripts that need finer control over whenthe script is run.
In both the file and capsule techniques, it is possible to supply an absolutepath to the capsule or file on the xs command line. In this case, the packagepath is not used.
The -f option specifies that the next argument is the name of a script toexecute. Any remaining arguments are passed to the script.
If you start a script using the -f option, arguments supplied on the commandline can be retrieved using the standard JavaScript “arguments” array. This isan array-like object containing the arguments passed to the function, indexedbeginning at 0. The “length” property of the object can be used to determinethe number of arguments actually passed. This is true even for scripts that donot have a function defined, but rather just begin execution with the first linein the file.
5.2.4 Running a Script Defined by a Module
A meta-only module that contains a method named "main" can be run usingxs by specifying the module with the –m option. For example:
xs –m sample.stuff.Hello world
The package in this example is sample.stuff and is located along the packagepath. The module Hello must contain a "main" function, which must bespecified in the corresponding Hello.xdc and implemented in the Hello.xs file.
The -m option specifies that the next argument is the name of a module, andthat the main function of that module should be run. Any remaining argumentson the command line are passed to the script.
Arguments are passed as a single string array parameter to the main()function that is required in the script file.

More About the xs Command
5-8
5.2.5 Running an Interactive JavaScript Session
If you use the -i option on the command line, you enter the interactiveJavaScript shell, which executes statements you type at the js> prompt. Thismode echoes the results of print statements and expressions to your terminalwindow. This can be useful for testing XDC script statements.
Thus, the following command starts the XDC script interpreter and issues aprompt for an interactive statement.
xs –i
Once you enter interactive mode, you can run a script from the interactiveshell using the built-in xdc.includeFile() method. For example:
% xs -i js> xdc.includeFile("xdc/services/io/File.xs")
The results of this statement are similar to those if you executed the scriptfrom the command line.
Note: Be aware that running a script in interactive mode is different fromrunning it with the configuro utility, because when a configuration script isrun, it is run in a context in which the global object Program is initializedbased on the user-specified target and platform parameters.
Any statements in the included file that are not contained within a function runwhen the file is included. Functions in the included file become available forexecution by other statements.
After script execution ends, you are still in the JavaScript shell and are freeto execute any methods or use any variables defined by the script.
Alternatively, instead of including a script, you can type commands directly.For each line or group of lines that constitutes a complete expression,complete statement, or complete statement block, the debugging shelldisplays the result on the next line. For example, a portion of a debuggingsession might look like the following:
% xs -i js> textvar = "hello world"; js> print(textvar);
To exit from the interactive shell, type quit. The quit command cannot beexecuted in a XDC script; it is only available in the interactive shell. Thekeywords quit and exit are reserved for future use in XDC scripts.

More About the xs Command
XDC Configuration 5-9
5.2.6 The Rhino Script Debugger
You can use the Rhino GUI debugger to test a script. Rhino is an open-sourceimplementation of JavaScript. It is written entirely in Java(http://www.mozilla.org/rhino).
The command-line syntax for the GUI debugger is the same as for the rest ofthe xs command line, except that you add the -g option:
xs -g[=i] myscript.cfg
In the Rhino environment, you can use File->Run to run a script file. Outputfrom the print() statement is displayed in the JavaScript Console window. Youcan Step Into and Step Over script functions. This debugger also allows youto watch variables, evaluate arbitrary expressions, and view the currentcontext for the "this" variable and local variables.
Figure 5–1 Rhino GUI Debugger Window

More About the xs Command
5-10
Here are some important hints for using the Rhino debugger:
The Debug menu contains three check boxes: Break on Exception,Break on Function Enter, and Break on Function Return. If the -g optionis used on the xs command line, Break on Exception and Break onFunction Enter are enabled within the debugger. Only Break onException is enabled if you use the -g=i option.
When Break on Exception is enabled, non-fatal errors are displayed inexception dialog boxes as they occur.
Use Windows->Tile or Windows->Cascade to open windows for themain script, all its included files, and internal XDC script files.
Break on Function Enter and Break on Function Return cause thedebugger to stop at entry and exit of each JavaScript function. You maywant to deselect these options if you just want to run to a specificbreakpoint you have set.
You can set a breakpoint by clicking in the gray column next to the linenumber of the script. You can only set breakpoints on lines that containexecutable statements.
Choose Windows->Console to open the Console window, whichreceives standard out and standard error.
We recommend that you set a breakpoint at the last statement in yourscript file to see any displayed messages in the Console window beforethe debugger finishes running the script.
The Rhino debugger allows you to browse and view XDC script objects,however the list is not always clear or complete. You can add print()statements to the script. The results of print() statements are displayed inthe Console window.
5.2.7 Further Command-Line Options
In addition to the basic -c, -f, -m, -i, and -g mode-selection options for the xscommand, you can use a number of additional options and command-linesyntaxes. These are:
The --xdcpath option to specify the package path. Section 5.2.7.1
The -D option to specify environment variables. Section 5.2.7.2
Passing arguments to a script. Section 5.2.7.3
@ to take options and arguments from a file. Section 5.2.7.4

More About the xs Command
XDC Configuration 5-11
5.2.7.1 Specifying the Package Path
Normally, you specify the list of locations where XDC should search forpackages using the XDCPATH environment variable.
Alternatively, you can specify these locations using the --xdcpath option of thexs command.
All subdirectories in the locations referenced are searched for packages.
For example, the following command adds auto-generated documentation foryour own packages to the beginning of the CDOC online help display.
xs --xdcpath=c:/mypackages xdc.tools.cdoc.sg
If you want to specify more than one directory with the --xdcpath option, usesemicolons to separate the items in the list.
If you use a UNIX-like shell, you will have to quote the semicolons to preventthe shell from interpreting these characters as command separators. Forexample:
xs --xdcpath="/usr/home/me/packages;/tools/packages" ...
5.2.7.2 Setting Environment Variables
It can be useful to set, what is in effect, a “global” variable whose value isspecified on the command line when running an XDC script. This can be doneusing the –D option to xs. Your script can then retrieve that value from theglobal “environment” object in the script being run without having to save andparse the command line arguments array. The environment is a table indexedby the name of the environment variable.
For example, this command makes an environment variable called "mode"available to the script. Your script would then need to handle this variableappropriately:
xs -Dmode=debug xdc.tools.configuro <options> mycfg.cfg
Note that these global values are not the same as the command shell’senvironment variables.
As another example, the following command sets an environment variablecalled “junk” to the value “car”.
xs –Djunk=car –f envvar.xs
The environment could be accessed by the script and printed as shownbelow:
print("Env var: " + environment["junk"]);

More About the xs Command
5-12
This example shows how to set and retrieve an environment variable. Thisapproach works for any of the methods for finding and running a script fromthe xs command line.
5.2.7.3 Passing Arguments
If you start a script using the -f option, arguments supplied on the commandline can be retrieved using the standard JavaScript “arguments” array. This isan array-like object containing the arguments passed to the function, indexedbeginning at 0. The “length” property of the object can be used to determinethe number of arguments actually passed. This is true even for scripts that donot have a function defined, but rather just begin execution with the first linein the file. For example:
for (var i = 0; i < arguments.length; i++ ) { print("argument " + i + " = " + arguments[i]);}
If you start a script using the default method, -c, or -m, arguments are passedas function parameters to the main() function that is required in the script file.For example,
function main(args) { for (var i = 0; i < args.length; i++ ) { print("argument " + i + " = " + args[i]); }}
5.2.7.4 Taking Options and Arguments from a File
The @ option enables you to reuse common command-line options andarguments by saving them in a file. This option reads the specified file andinclude its contents as arguments to xs.
One common scenario is specifying a user-specific portion of the XDCpackage path. If several repositories (directories containing packages) arebeing used, the argument to the --xdcpath option can get quite long andtedious to re-enter each time you use the xs command.
Alternately, you can create a file that specifies arguments, one argument perline. Suppose, for example, you create a file named opts-file that contains thefollowing lines:
--xdcpath dir-path1;dir-path2;dir-path3

JavaScript Language
XDC Configuration 5-13
Then, run the xs command as follows:
xs @opts-file ...
As a result, the xs command effectively is invoked as follows:
xs --xdcpath "dir-path1;dir-path2;dir-path3" ...
In general, each line of the file supplied with the @ option is added to theargument list of the xs command. The process is recursive so that if there isa line with an @ option, that file is opened and each line is added to theargument list, and so on.
5.3 JavaScript Language
XDC scripts contain statements in the JavaScript language. Thesestatements are executed to perform design-time application configuration.
This document does not provide details on the syntax of the JavaScriptlanguage. However, several concepts are important when using JavaScriptfor XDC configuration. This section provides an overview of such concepts.Also see Section 5.1.4 for JavaScript reference sources.
5.3.1 Object and Property Naming and Referencing
JavaScript is object-oriented. The object model is separate from theJavaScript language, but object handling syntax is part of the language.Modules are treated as object classes in XDC scripts. Certain modules canhave instances created.
Modules have properties to define their characteristics. Such properties areactually variables local to the object. You access properties using the dot (.)notation. For example, use xdc.runtime.Memory.defaultHeapSize torefer to the defaultHeapSize property of the Memory module in thexdc.runtime package.

JavaScript Language
5-14
5.3.2 Error Handling and Exceptions
The exit status from an XDC script is 0 (success) unless a script specified onthe command line could not be run (for example, because the file was notfound or results in errors). If the script runs and results in errors, the exit statusis non-zero.
Scripts can throw exceptions. Exceptions should be used for confirmed errorswhere an action has failed. Exceptions thrown by a script can be caught in ascript. Uncaught exceptions cause a script to terminate execution and returnwith a non-zero status. Exceptions are always written to the stderr location,unless they are caught by a script and handled.
In interactive XDC script mode, stderr messages are shown as separate lineswithout the js> command prompt. In the GUI debugger, stderr messages areshown in the JavaScript Console window.
To throw an exception, scripts use the "throw" keyword. This example throwsan exception if the defaultHeapInstance property of the xdc.runtime.Memorymodule is null.
if (xdc.runtime.Memory.defaultHeapInstance = NULL) { throw new Error("A default heap is required!");}
To catch an exception, a script can use a “try-catch” block. The syntax forsuch a block is as follows:
try { /* something that might throw an exception */}catch (e) { /* e is the error object thrown */}
For example, the following statements attempt to load a JavaScript file. If thefile does not exist, an exception is thrown. When the exception is caught, thescript continues executing. If this script did not catch the exception, the scriptwould terminate execution when the exception occurred.
try { fileName = prog_name + ".cfg"; xdc.includeFile(fileName);}catch (e) { print(e + "\nNo " + fileName + " file.");}

XDC Script Methods
XDC Configuration 5-15
5.4 XDC Script Methods
The XDC script environment provides a number of utility methods availableto any script. The following sections describe these methods and point tofurther documentation.
5.4.1 The print() Method
The print() method is an extension to JavaScript that sends the result of theexpression passed to the method to the stdout location. Within the Rhinoenvironment, output from the print() statement is displayed in the JavaScriptConsole window.
In this example, if any array of objects has been assigned to obj, thesestatements print a list of the objects in the array.
for (var i in obj) { print("obj." + i + " = " + obj[i]) }
5.4.2 Methods from Java Packages
For security reasons, JavaScript does not provide file services. In a webbrowser, the lack of file services prevents most forms of file access on yourcomputer. In XDC scripts, access to Java methods is provided through theRhino JavaScript interpreter via LiveConnect. The implementation providesunrestricted use of any Java package including, for example, the java.iopackage.
Calls to Java’s java.io package from a script look just like JavaScript functioncalls. Only the function called is written in Java. For example, thesestatements return the path to a file if it exists:
var file = new java.io.File(fileName);if (file.exists()) { return (file.getPath());}
For documentation of the java.io package, see version 1.3.1 of the Java 2SDK documentation at http://java.sun.com/j2se/1.3/docs. In particular, seethe java.io page at http://java.sun.com/j2se/1.3/docs/api/java/io/package-summary.html.

XDC Script Methods
5-16
5.4.3 Methods and Properties from the xdc Package
The xdc package itself provides a number of methods for use in XDC scripts.This section lists these methods.
xdc.csd() returns the directory of the script file that is currently beingloaded. There is always exactly one script file loading. This file is notnecessarily the same as the file containing the function currentlyexecuting. During the load of a script, the script can refer to its locationand possibly load/read/write files relative to this location. When a functiondefined by the script runs, the directory of the currently loading script maynot be the directory of the script where the function is defined.
xdc.exec(command, attrs, status). Executes an arbitrary shellcommand and optionally puts output into a file. Both stderr and stdout arecombined into a single output stream. Returns the command’s exit status.
"command" is the command string to execute.
"attrs" specifies an optional set of attributes used to control theenvironment of the command:
attrs.envs may be an array of environment variable settings.
attrs.cwd may be the command's current working directory.
attrs.outName may be the name of the output file to create. If thefile exists, output is appended to the end of the file.
attrs.filter may be a regular expression to filter command output.
"status" is an optional output parameter. If it is non-NULL, thefollowing fields are set:
status.output is a string containing all output from the command.
status.exitStatus is the exit status of the command.
xdc.findFile(filename). Finds the file specified by filename. This methodsearches for filename according to the following algorithm. It returns thepath to the file. The path returned may be absolute or relative. If the filecannot be found in these directories, NULL is returned.
a) If filename is an absolute path or begins with "./", xdc.findFile()returns filename if it exists. Otherwise xdc.findFile() returns NULL.
b) If filename is a relative path that does not start with "./": the followingdirectories are searched in order:
i) the current script directory (see xdc.csd())
ii) the directories specified by the XDCPATH
filename is a string specifying a file to locate.
XDC Script Methods
XDC Configuration 5-17
xdc.getPackageBase(package_name). Returns the absolute path tothe specified package's base directory. This method returns the full pathstring to the package. If the package cannot be found, this method throwsan exception.
package_name is a '.' separated package name. For example,xdc.runtime.
xdc.getPackageRepository(package_name). Returns the absolutepath to the specified package's repository directory. This method returnsthe full path string to the repository. If the repository cannot be found, thismethod throws an exception.
package_name is a '.' separated package name. For example,xdc.runtime.
xdc.includeFile(). An XDC script can load another script file using thexdc.includeFile() method. For example, this command includes thegeneric.cfg file
xdc.includeFile("generic.cfg");
This method normally searches the package path (XDCPATH) for the filespecified. However, if you specify a path to the file beginning with "./",XDC looks for the file relative to the current script’s location. For example:
xdc.includeFile("././project/includes/file.cfg");
Directory paths specified in JavaScript statements can use either "\\" or"/" as a directory separator. (Directory paths on the xs command line mustuse "/".)
If you do not specify a file extension, this function looks for the specifiedfile with an extension of .cfg.
When a script file is loaded, any statements that are outside any functionare executed immediately. The functions defined in the loaded script areavailable to be called by the script that loaded the file.
xdc.loadPackage(package_name). Loads the specified package andreturns a package object. This method finds a package's schema file(package/<package_name>.xds), loads it, initializes packageBase andpackageRepository, and calls the package's initialization function. If thepackage cannot be found, this method throws an exception.
package_name is a '.' separated package name. For example,xdc.runtime.

XDC Script Methods
5-18
xdc.module(module_name). Loads the specified module for use in ascript.
The only difference between the xdc.useModule() and xdc.module()methods is that useModule() sets the returned module object's $used flagto a non-zero value. During configuration, only modules that have $usedset to non-zero are linked into the final application. So, it is possible to geta module's object and use it's meta-only methods via xdc.module()without the module's target methods becoming part of the application.
xdc.useModule(module_name). Enables a module contained in apackage for use in the script.
module_name is a '.' separated module name. For example,xdc.runtime.System.

A-1
Appendix A
Target Compiler Options
This appendix lists the compiler options used by default for the varioustargets you can select.
A.1 Compiler Options . . . . . . . . . . . . . . . . . . . . . . . . . . . . . . . . . . . . . . . . A–2
Topic Page

Compiler Options
A-2
A.1 Compiler Options
The target you specify when you use configuro determines the compileroptions added to the compiler command line. The available targets havethe following default compiler options:
Target Compiler Options and Notes
ti.targets.arm.Arm7 "-me -mv4 --abi=ti_arm9_abi”
ti.targets.arm.Arm7_big_endian "-mv4 --abi=ti_arm9_abi”
ti.targets.arm.Arm9 "-me -mv5e --abi=ti_arm9_abi”Uses little endian
ti.targets.arm.Arm9t "-me -mt -mv5e --abi=ti_arm9_abi”Uses little endian
ti.targets.C28 "-v28 -mo”
ti.targets.C28_large "-v28 -DLARGE_MODEL=1 -ml”
ti.targets.C55 ““
ti.targets.C55_huge "--memory_model=huge”
ti.targets.C55_large "-ml”
ti.targets.C62 ““
ti.targets.C62_big_endian "-me”
ti.targets.C64 "-mv6400”
ti.targets.C64_big_endian "-me -mv6400”
ti.targets.C64P "-mv64p”
ti.targets.C64P_big_endian "-me -mv64p”
ti.targets.C67 "-mv6700”

Compiler Options
Target Compiler Options A-3
1) Sequences of the form "$(...)" refer to properties of the target:
n $(rootDir) is the value of the target's rootDir property. That is, it isthe installation directory of the compiler as specified by the user.
n $(GCCTARG) is the GSSTARG property of a GNU target. Thatis, it is the output from running "gcc -dumpmachine".
n $(GCCVERS) is the GCCVERS property of a GNU target. Thatis, it is the output from running "gcc -dumpversion".
ti.targets.C67_big_endian "-me -mv6700”
ti.targets.C67P "-mv67p”
ti.targets.C67P_big_endian "-me -mv67p”
ti.targets.MSP430 "-vmsp”
gnu.targets.Linux86 (See Note 1) "-nostdinc -B$(rootDir)/lib/gcc-lib/$(GCCTARG)/$(GCCVERS)/”Native Linux target using GCC compiler
gnu.targets.Mingw (See Note 1) "-nostdinc -B$(rootDir)/lib/gcc-lib/$(GCCTARG)/$(GCCVERS)/”Native Windows target using Mingw GCC compiler
gnu.targets.MVArm9 ““Embedded Linux target using MontaVista GCC compiler
gnu.targets.Sparc (See Note 1) "-nostdinc -B$(rootDir)/lib/gcc-lib/$(GCCTARG)/$(GCCVERS)/”Native Solaris target using GCC compiler
gnu.targets.UCArm9 ““ARM target with uClibc binary compatibility and GCC compiler for Linux
microsoft.targets.Net32 "-nologo -c”Microsoft .Net 32-bit native target using Microsoft VC++ 8
microsoft.targets.VC98 "-W3 -Zp1 -DWIN32 -D_DLL -D_AFXDLL -DEXPORT=”Microsoft Windows 32-bit target using Visual C/C++ 6.x compiler
microsoft.targets.Win32 "-W3 -Zp1 -DWIN32 -D_DLL -D_AFXDLL -DEXPORT=”Microsoft Windows 32-bit target using Visual C/C++ 6, 7, or 8 compiler
Target Compiler Options and Notes

A-4

Index-1
This is a draft version printed from file: xdcugix.fm on 7/31/07
Index
Ccatch keyword 5-14catching exceptions 5-14
Ddata types 5-2debugging
GUI debugger 5-9design-time configuration 5-2directory path 5-17Document Object Model (DOM) 5-3documentation, other 5-4dot (.) notation 5-13dynamic objects 5-2
EECMA-262 5-3error handling 5-14exceptions 5-14
catching 5-14throwing 5-14
exit keyword 5-8exit status 5-14exiting from tconf 5-8
Ffile services 5-3, 5-15
GGUI debugger 5-9
command line 5-9
Iinteractive tconf
command line 5-8
JJava 5-3
documentation 5-4Rhino written in 5-9
JavaScriptdocumentation 5-4language issues 5-13misconceptions 5-3overview 5-2Rhino interpreter 5-9
LLiveConnect 5-15loosely-typed language 5-2
Nnames
variables 5-3
Oobject-orientation 5-13
Ppath
separators 5-17pointers 5-3print() method 5-15
Rhino GUI 5-9
Index-2
Index
properties 5-13
Qquit command 5-8
Rreserved keywords 5-8Rhino 5-9
Sstdout location 5-15
Tthrow keyword 5-14throwing exceptions 5-14try keyword 5-14
Vvariable names 5-3variable types 5-2