xerox c2404 manual
TRANSCRIPT
8/2/2019 Xerox c2404 Manual
http://slidepdf.com/reader/full/xerox-c2404-manual 1/20
WorkCentre® C2424 Copier-Printer
Copyright © 2005 Xerox Corporation. All Rights Reserved.
1-1
This chapter includes:
■ "System Tour" on page 1-2
■ "The Control Panel" on page 1-7
■ "Managing Your System" on page 1-12
■ "System Settings" on page 1-14
Features
8/2/2019 Xerox c2404 Manual
http://slidepdf.com/reader/full/xerox-c2404-manual 2/20
System Tour
WorkCentre® C2424 Copier-Printer
1-2
System Tour
This section includes:
■ "System Features" on page 1-2
■ "Front View" on page 1-3
■ "Side View" on page 1-3
■ "Back View" on page 1-4
■ "Open View" on page 1-4
■ "System Options and Accessories" on page 1-5
■ "Printer and Scanner Drivers" on page 1-5
■ "Additional Resources" on page 1-6
System Features
The WorkCentre C2424 Copier-Printer embodies many features to meet your office needs:
■ Great performance and superior print quality
■ 24 pages per minute (ppm) with consistent, vibrant, artifact-free color prints and
copies
■ 6 second first page out color prints
■ 256 MB of RAM standard; optional up to 1 GB of RAM
■ Job pipelining
■ Fast and easy copying and scanning
■ Duplex automatic document feeder for 1- and 2-sided originals
■ First page out color copies under 15 seconds, with subsequent copies at printer speed
■ Preset copy adjustments for bound originals, enlargements/reductions, and 4x4 posters
■ Scan resolutions up to 600 dpi■ Flexible paper handling
■ Tray 1: 100-sheet capacity
■ Tray 2: 525-sheet capacity
■ Tray 3: optional 525-sheet capacity
■ Tray 4: optional 525-sheet capacity
■ Accommodates a wide range of media types and custom size paper
■ Wide variety of productivity features
■ High quality color
■ Easy to replace ink sticks
■ PhaserSMART online troubleshooting
■ CentreWare IS provides an embedded web server to help manage, configure, and
troubleshoot the system from your computer.
■ Usage Analysis Tool provides cost tracking that logs each job and the cost for each
page.
■ PrintingScout provides on-screen notification and guidance if the system needs help.
■ MaiLinX email notifies a specific person when supplies or maintenance are needed.
■ MaiLinX allows printing to your network system from anywhere you have email.
8/2/2019 Xerox c2404 Manual
http://slidepdf.com/reader/full/xerox-c2404-manual 3/20
System Tour
WorkCentre® C2424 Copier-Printer
1-3
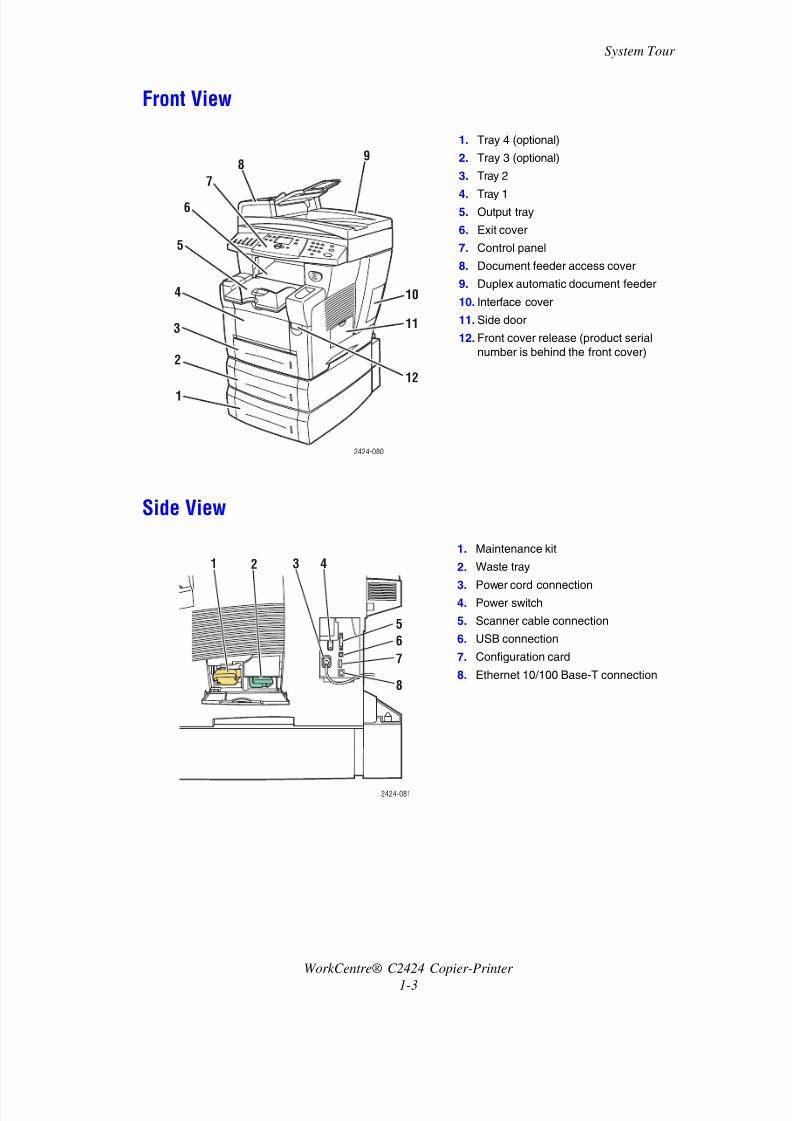
Front View
Side View
1. Tray 4 (optional)
2. Tray 3 (optional)
3. Tray 2
4. Tray 15. Output tray
6. Exit cover
7. Control panel
8. Document feeder access cover
9. Duplex automatic document feeder
10. Interface cover
11. Side door
12. Front cover release (product serial
number is behind the front cover)
1. Maintenance kit
2. Waste tray
3. Power cord connection4. Power switch
5. Scanner cable connection
6. USB connection
7. Configuration card
8. Ethernet 10/100 Base-T connection
2424-080
1
2
3
4
5
6
9
10
11
12
7
8
2424-081
5
6
7
8
1 2 3 4
8/2/2019 Xerox c2404 Manual
http://slidepdf.com/reader/full/xerox-c2404-manual 4/20
System Tour
WorkCentre® C2424 Copier-Printer
1-4
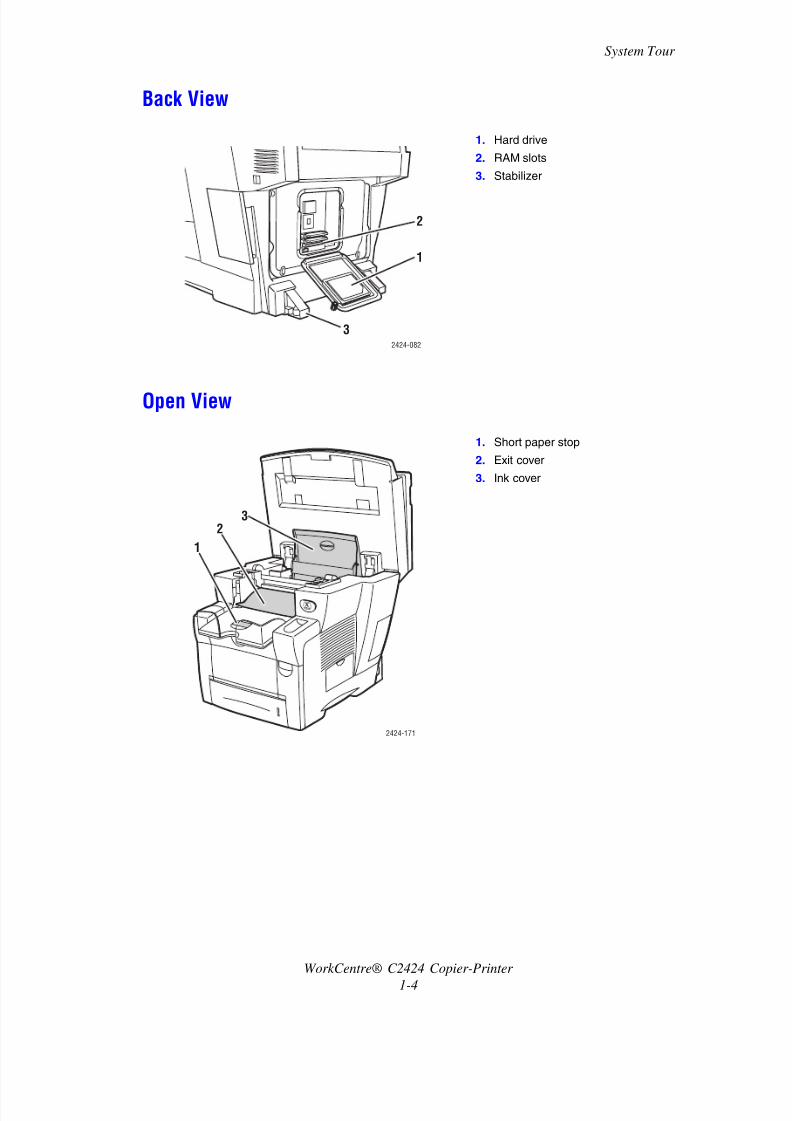
Back View
Open View
1. Hard drive
2. RAM slots
3. Stabilizer
1. Short paper stop
2. Exit cover
3. Ink cover
2424-082
2
1
3
2424-171
23
1
8/2/2019 Xerox c2404 Manual
http://slidepdf.com/reader/full/xerox-c2404-manual 5/20
System Tour
WorkCentre® C2424 Copier-Printer
1-5
System Options and Accessories
Options
■ Two RAM slots, supporting 128, 256, and 512 MB memory cards (maximum 1 GB)
■
Two 525-Sheet Feeders
Accessory
■ System Cart
For more information on options and accessories, go to www.xerox.com/office/c2424supplies .
Printer and Scanner Drivers
In order to access the full features of your system, install the printer and scanner drivers from
the WorkCentre C2424 Software CD-ROM or the driver web site at:
www.xerox.com/office/drivers.
Printer drivers enable your computer and printer to communicate and provide access to your
printer features. Xerox makes driver installation easy with its Walk-Up Technology. For more
information about printer drivers, see the video at www.xerox.com/office/drivers.
For more information about using the printer driver to access special features, see the Printing
chapter of this guide.
Scanner drivers enable you to:
■ Scan images directly to your personal computer
■ Acquire scanned images directly into an application
For more information about installing and using the scanner driver, see the Scanning chapterof this guide.
8/2/2019 Xerox c2404 Manual
http://slidepdf.com/reader/full/xerox-c2404-manual 6/20
System Tour
WorkCentre® C2424 Copier-Printer
1-6
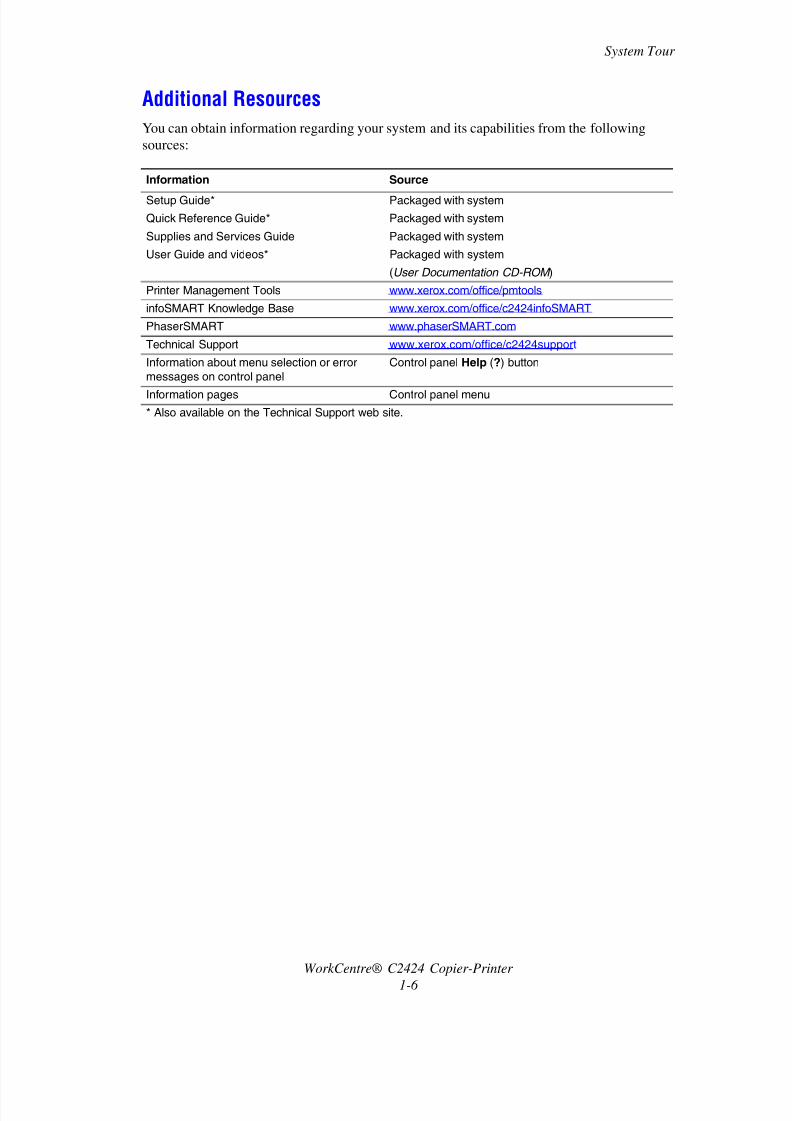
Additional Resources
You can obtain information regarding your system and its capabilities from the following
sources:
Information Source
Setup Guide*
Quick Reference Guide*
Supplies and Services Guide
Packaged with system
Packaged with system
Packaged with system
User Guide and videos* Packaged with system
(User Documentation CD-ROM )
Printer Management Tools www.xerox.com/office/pmtools
infoSMART Knowledge Base www.xerox.com/office/c2424infoSMART
PhaserSMART www.phaserSMART.com
Technical Support www.xerox.com/office/c2424support
Information about menu selection or error
messages on control panel
Control panel Help (?) button
Information pages Control panel menu
* Also available on the Technical Support web site.
8/2/2019 Xerox c2404 Manual
http://slidepdf.com/reader/full/xerox-c2404-manual 7/20
The Control Panel
WorkCentre® C2424 Copier-Printer
1-7
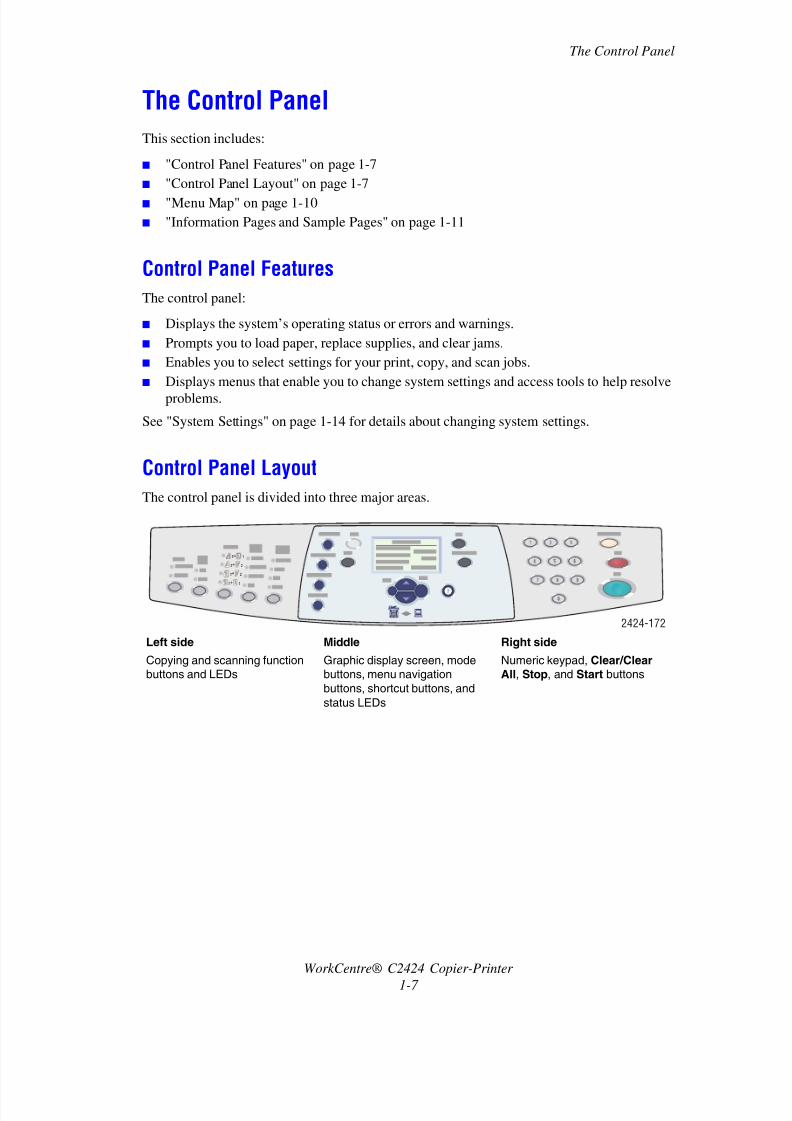
The Control Panel
This section includes:
■ "Control Panel Features" on page 1-7
■ "Control Panel Layout" on page 1-7
■ "Menu Map" on page 1-10
■ "Information Pages and Sample Pages" on page 1-11
Control Panel Features
The control panel:
■ Displays the system’s operating status or errors and warnings.
■ Prompts you to load paper, replace supplies, and clear jams.
■ Enables you to select settings for your print, copy, and scan jobs.
■ Displays menus that enable you to change system settings and access tools to help resolve
problems.
See "System Settings" on page 1-14 for details about changing system settings.
Control Panel Layout
The control panel is divided into three major areas.
Left side
Copying and scanning function
buttons and LEDs
Middle
Graphic display screen, mode
buttons, menu navigation
buttons, shortcut buttons, and
status LEDs
Right side
Numeric keypad, Clear/Clear
All, Stop, and Start buttons
2 1
1 1
22
1 2
2424-172
8/2/2019 Xerox c2404 Manual
http://slidepdf.com/reader/full/xerox-c2404-manual 8/20
The Control Panel
WorkCentre® C2424 Copier-Printer
1-8
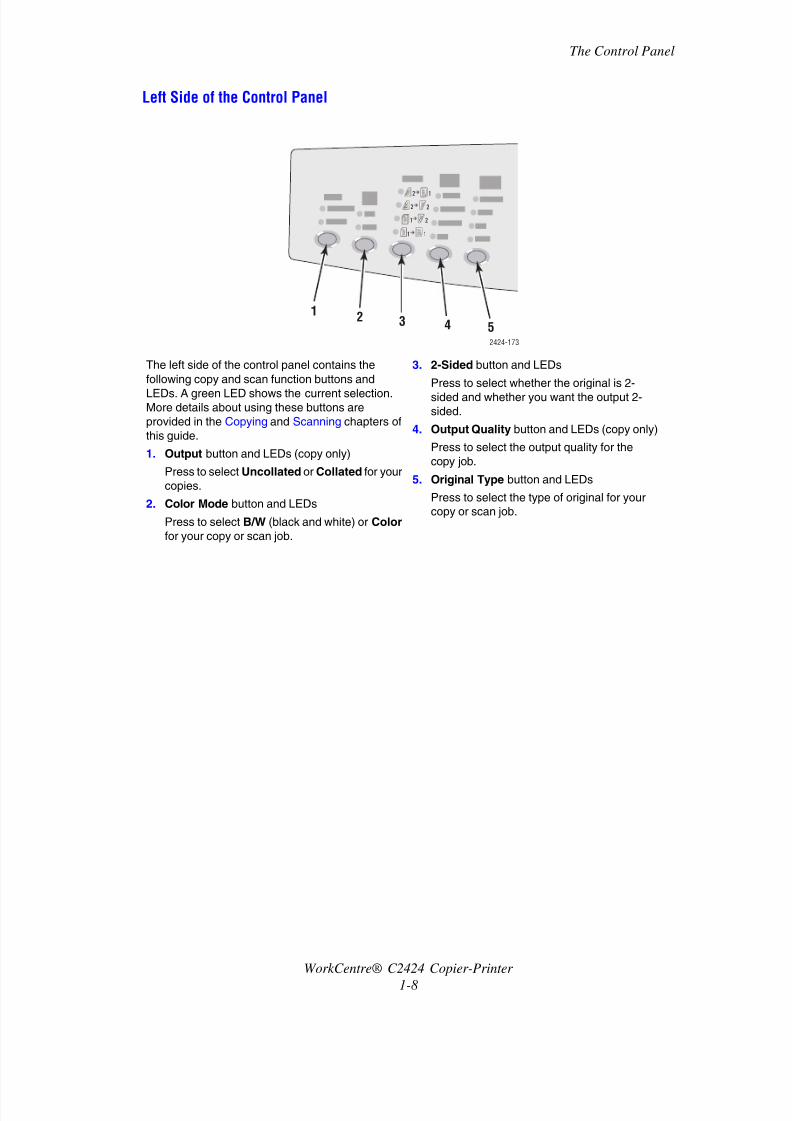
Left Side of the Control Panel
The left side of the control panel contains the
following copy and scan function buttons and
LEDs. A green LED shows the current selection.More details about using these buttons are
provided in the Copying and Scanning chapters of
this guide.
1. Output button and LEDs (copy only)
Press to select Uncollated or Collated for your
copies.
2. Color Mode button and LEDs
Press to select B/W (black and white) or Color
for your copy or scan job.
3. 2-Sided button and LEDs
Press to select whether the original is 2-
sided and whether you want the output 2-sided.
4. Output Quality button and LEDs (copy only)
Press to select the output quality for the
copy job.
5. Original Type button and LEDs
Press to select the type of original for your
copy or scan job.
2 1
1 1
22
1 2
2424-173
1 2 3 4 5

8/2/2019 Xerox c2404 Manual
http://slidepdf.com/reader/full/xerox-c2404-manual 9/20
The Control Panel
WorkCentre® C2424 Copier-Printer
1-9
Middle of the Control Panel
1. Original Size button
Press to jump to Original Size option on the
menu.
2. Lighten/Darken button
Press to jump to the Lighten/Darken option on
the menu.
3. Reduce/Enlarge button
Press to jump to Reduce/Enlarge option on
the menu.
4. Paper Supply button
Press to jump to the Paper Supply option on
the menu.
5. Copy button
Press to display the Copy menu on the graphic
display.6. Scan button
Press to display the Scan menu on the graphic
display.
7. Graphic display shows status messages and
menus.
8. Up Arrow button
Scrolls upward.
9. Enter button
Accepts the setting selected.
10. Status Indicator LED:Blinking green = System is busy or in
Standby or PowerSaver mode
Steady green = Ready
11. Down Arrow button
Scrolls downward.
12. Status Indicator LED:
Blinking red = Error condition, stops job
Yellow = Warning, continues job
13. Back button
Returns to the previous menu item.
14. Print button
Press to display the Print menu on the
graphic display.
15. System Setup button
Press to display the System Setup menu on
the graphic display.
16. Help (?) button
Press to display a help message explaining
the menu or message shown on the graphic
display.
2424-174
1
2
6 8
11 10
9
3
4
5 7
1213
14
15
16
8/2/2019 Xerox c2404 Manual
http://slidepdf.com/reader/full/xerox-c2404-manual 10/20
The Control Panel
WorkCentre® C2424 Copier-Printer
1-10
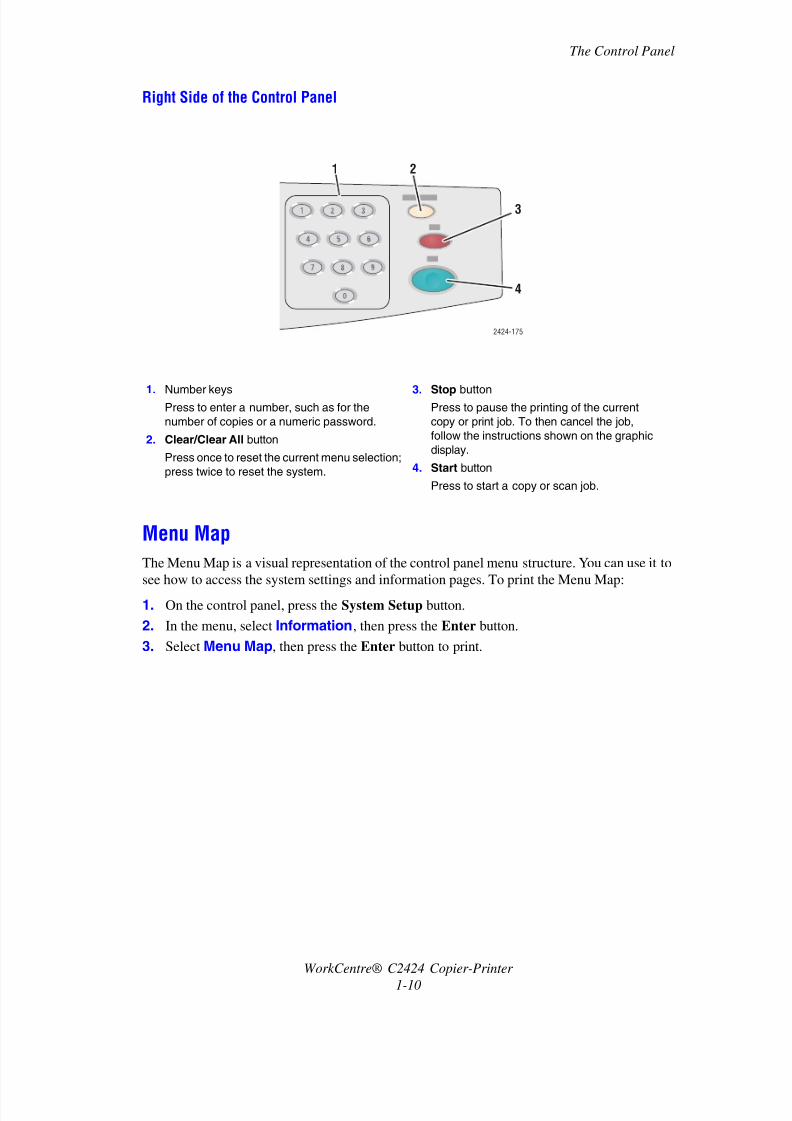
Right Side of the Control Panel
Menu Map
The Menu Map is a visual representation of the control panel menu structure. You can use it to
see how to access the system settings and information pages. To print the Menu Map:
1. On the control panel, press the System Setup button.
2. In the menu, select Information, then press the Enter button.
3. Select Menu Map, then press the Enter button to print.
1. Number keysPress to enter a number, such as for the
number of copies or a numeric password.
2. Clear/Clear All button
Press once to reset the current menu selection;
press twice to reset the system.
3. Stop buttonPress to pause the printing of the current
copy or print job. To then cancel the job,
follow the instructions shown on the graphic
display.
4. Start button
Press to start a copy or scan job.
2424-175
1
4
3
2
8/2/2019 Xerox c2404 Manual
http://slidepdf.com/reader/full/xerox-c2404-manual 11/20
The Control Panel
WorkCentre® C2424 Copier-Printer
1-11
Information Pages and Sample Pages
Your system comes with a set of information and sample pages to help you obtain the best
results from your system. You access these pages from the control panel. Print the Menu Map
to see where these information pages are located in the control panel menu structure.
For example, to print the “Configuration Page”, which shows current information about your
system, do the following:
1. On the control panel, press the System Setup button.
2. In the menu, select Information, then press the Enter button.
3. In the menu, select Information Pages, then press the Enter button.
4. In the menu, select Configuration Page, then press the Enter button to print.
Note
You can also print the “Configuration Page” from CentreWare IS and from the printer
driver.
Color Sampler Pages
The printing function of the system uses color corrections to translate color from your
computer to the system. To view the CMYK or RGB colors printed by the system, print the
color sampler pages:
1. On the control panel, press the System Setup button.
2. In the menu, select Information, then press the Enter button.
3. Select Sample Pages, then press the Enter button.
4. Select either CMYK Sampler Pages or RGB Sampler Pages, then press the
Enter button to print.
Note
Color samples print based on your system PostScript settings for print quality and color
correction. For information about adjusting these settings, see the Printing chapter of this
guide.
This print icon appears before the titles of information pages that can beprinted. When the information page is highlighted on the control panel, press
the Enter button to print that page.
8/2/2019 Xerox c2404 Manual
http://slidepdf.com/reader/full/xerox-c2404-manual 12/20
Managing Your System
WorkCentre® C2424 Copier-Printer
1-12
Managing Your System
When the system is connected to your computer over a network, there are a number of
resources available to help you manage the system.
This section includes:
■ "System’s IP Address" on page 1-12
■ "CentreWare Internet Services (IS)" on page 1-12
■ "PhaserSMART" on page 1-13
■ "PrintingScout" on page 1-13
System’s IP Address
You need your system’s IP address to view the status of your system and change system
settings through CentreWare Internet Services. To see your system’s IP address:
1. On the control panel, press the System Setup button.
2. In the menu, select Information, then press the Enter button.
3. Select System Identification, then press the Enter button.
4. Scroll down to locate the IP Address.
CentreWare Internet Services (IS)
CentreWare IS is a tool that you can use on your computer to manage tasks on networked
printers and multifunction products. CentreWare IS uses TCP/IP and a web browser to
communicate directly with an embedded web server in the printer or system. With
CentreWare IS you can:
■ Configure and manage multi-vendor printers and multifunction products.
■ Access remote diagnostics and troubleshooting information for problems.
■ Monitor printer and system status.
■ Monitor supply status.
■ Link to software updates and Technical Support.
Launching CentreWare IS
To launch CentreWare IS:
1. Launch your web browser.
2. Enter your system’s IP address in the browser’s Address field (http://xxx.xxx.xxx.xxx).
3. For detailed information about the information on the CentreWare IS screen, click the
Help button on the upper-right of the CentreWare IS screen.
For more information about CentreWare IS, see the Networking chapter of this guide.
8/2/2019 Xerox c2404 Manual
http://slidepdf.com/reader/full/xerox-c2404-manual 13/20
Managing Your System
WorkCentre® C2424 Copier-Printer
1-13
PhaserSMART
PhaserSMART Technical Support is an automated, Internet-based support system. Use your
default web browser to send diagnostic information from your system to our web site for
analysis. PhaserSMART Technical Support examines the information, diagnoses the problem,
and proposes a solution. If the problem is not resolved with the solution, PhaserSMART
Technical Support assists you in opening a Service Request with Xerox Customer Support.
To access PhaserSMART Technical Support:
1. Open your browser and go to www.phaserSMART.com.
2. Enter your system’s IP address in the browser window.
3. Follow the instructions on the screen.
PrintingScout
PrintingScout is a tool that is installed with your Windows printer driver. It automatically
checks the printer status when you send a print job. If the printer is unable to print your job,
PrintingScout automatically displays a message on your computer screen to let you know that
the printer needs attention. The message also explains how to fix the problem.
Note
PrintingScout is available from the Windows printer driver for printer connected to the
network via TCP/IP.
8/2/2019 Xerox c2404 Manual
http://slidepdf.com/reader/full/xerox-c2404-manual 14/20
System Settings
WorkCentre® C2424 Copier-Printer
1-14
System Settings
This section includes:
■ "Controlling the Printing of the Startup Page" on page 1-14
■ "Changing the Power Saver Timeout" on page 1-15
■ "Changing Intelligent Ready Mode" on page 1-16
■ "Locking the Control Panel Menus" on page 1-17
■ "Changing the Load Paper Timeout" on page 1-18
■ "Adjusting Control Panel Brightness" on page 1-19
■ "Adjusting Control Panel Contrast" on page 1-19
■ "Setting the Control Panel Language" on page 1-19
■ "Setting the System Date and Time" on page 1-20
Note
You can print the Menu Map to see the path through the menus to make other selections;
see "Menu Map" on page 1-10. You can also press the Help (?) button at any time to get
more information about menu selections.
Controlling the Printing of the Startup Page
The system automatically produces a “Startup Page” each time the system is turned on or
reset. You can turn off the automatic printing of the “Startup Page” and later print it from the
information pages menu.
To turn on/off the “Startup Page”, use either:
■ The control panel
■
CentreWare IS
Using the Control Panel
To turn on/off automatic printing of the “Startup Page”:
1. On the control panel, press the System Setup button.
2. In the menu, select General Setup, then press the Enter button.
3. Select System Controls, then press the Enter button.
4. Select Startup Page, then press the Enter button.
5. Select On or Off, then press the Enter button.
8/2/2019 Xerox c2404 Manual
http://slidepdf.com/reader/full/xerox-c2404-manual 15/20
System Settings
WorkCentre® C2424 Copier-Printer
1-15
Using CentreWare IS
To turn on/off the automatic printing of the “Startup Page”:
1. Launch your web browser.
2. Enter your system’s IP address in the browser’s Address field (http://xxx.xxx.xxx.xxx).
3. Select Properties.
4. Click the General folder on the left sidebar, then click Printer Defaults.
5. Under User Preferences, select Off or On from the Startup Page drop-down list to
change the setting.
6. Click Save Changes at the bottom of the page.
Printing the Startup Page
To print the “Startup Page”:
1. On the control panel, press the System Setup button.
2. In the menu, select Information, then press the Enter button.
3. Select Information Pages, then press the Enter button.
4. Select Startup Page, then press the Enter button to print.
Note
You can also print the Startup Page from the Troubleshooting tab of the Windows printer
driver.
Changing the Power Saver Timeout
To save energy, the system enters a Power Saver, low-energy consumption mode after a pre-
defined period of time since its last activity. In this mode, most electrical systems are shut
down. When a print job is sent to the system, the system enters Warmup Mode. You can also
warm up the system by pressing the Enter button on the control panel.
Note
When the system enters Power Saver mode, you will hear the printhead moving. This is
part of the normal system operation.
If you find that the system is going into Power Saver mode too often and you do not want to
wait while the system warms up, increase the length of time before the system goes into Power
Saver mode.
To change the Power Saver timeout value, use either:
■ The control panel
■ CentreWare IS
Using the Control Panel
1. On the control panel, press the System Setup button.
2. In the menu, select General Setup, then press the Enter button.
8/2/2019 Xerox c2404 Manual
http://slidepdf.com/reader/full/xerox-c2404-manual 16/20
System Settings
WorkCentre® C2424 Copier-Printer
1-16
3. Select System Controls, then press the Enter button.
4. Select Power Saver Timeout, then press the Enter button.
5. Press the Down Arrow or Up Arrow button to scroll to a selected Power Saver timeout
value. Select a larger value if you want to extend the length of time before the system goes
into Power Saver mode.
6. Press the Enter button.
Using CentreWare IS
1. Launch your web browser.
2. Enter your system’s IP address in the browser’s Address field (http://xxx.xxx.xxx.xxx).
3. Select Properties.
4. Click the General folder on the left sidebar, then click Warmup.
5. Select a value from the Power Saver Timeout drop-down list to change the setting.
6. Click Save Changes at the bottom of the page.
Changing Intelligent Ready Mode
Intelligent Ready mode is an automated system that:
■ Monitors the system’s usage.
■ Warms up the system when you are most likely to need it based on past usage patterns.
To turn on/off Intelligent Ready mode, use either:
■ The control panel
■ CenterWare IS
Using the Control Panel
To turn Intelligent Ready mode on/off:
1. On the control panel, press the System Setup button.
2. In the menu, select General Setup, then press the Enter button.
3. Select System Controls, then press the Enter button.
4. Select Intelligent Ready.
5. Select On or Off, then press the Enter button.
8/2/2019 Xerox c2404 Manual
http://slidepdf.com/reader/full/xerox-c2404-manual 17/20
System Settings
WorkCentre® C2424 Copier-Printer
1-17
Using CentreWare IS
To select Intelligent Ready mode or to schedule warmup/standby settings:
1. Launch your web browser.
2. Enter your system’s IP address in the browser’s Address field (http://xxx.xxx.xxx.xxx).
3. Click Properties.
4. Click the General folder on the left sidebar, then click Warmup.
5. Click the Warmup Mode drop-down list and select Intelligent Ready, Scheduled, or Job
Activated.
6. If you select Scheduled in Step 5, make selections for each day’s warmup setting and
standby setting.
7. Click Save Changes at the bottom of the screen.
Note
Although the control panel selections only allow you to turn Intelligent Ready Mode on or
off, CentreWare IS allows you to specify particular system Warmup Modes and settings.
Locking the Control Panel Menus
Lock the control panel menus to prevent others from changing settings in the system setup
menus. To lock or unlock the system setup menus, use CentreWare IS.
1. Launch your web browser.
2. Enter your system’s IP address in the browser’s Address field (http://xxx.xxx.xxx.xxx).
3. Click Properties.
4. Open the General folder on the left sidebar, then click Printer Defaults.
5. Click the Control Panel Menus drop-down list, then select On or Off.
■ Select On to have all menus available from the control panel.
■ Select Off to prevent access to system setup menus at the control panel.
6. Click Save Changes at the bottom of the page.
8/2/2019 Xerox c2404 Manual
http://slidepdf.com/reader/full/xerox-c2404-manual 18/20
System Settings
WorkCentre® C2424 Copier-Printer
1-18
Changing the Load Paper Timeout
When your print job is formatted for a type or size of paper that is not loaded in the system, the
control panel displays a message requesting you to load the appropriate paper. The Load Paper
Timeout controls the amount of time the system waits before printing on another type or size
of paper.
To change the load paper timeout, use either:
■ The control panel
■ CentreWare IS
Using the Control Panel
To change the load paper timeout:
1. On the control panel, press the System Setup button.
2. In the menu, select Job Defaults Setup, then press the Enter button.
3. Select Print Defaults Setup, then press the Enter button.
4. Select Paper Handling Setup, then press the Enter button.
5. Select Load Paper Timeout, then press the Enter button.
6. Scroll to the desired timeout value. The values (None, 1, 3, 5, or 10 minutes, 1 hour or
24 hours) indicate the length of time you want the printer to wait for you to load paper
before printing. If you select a value of None, the printer does not wait for paper to be
inserted and immediately picks paper from the default tray.
7. Press the Enter button to save the change.
Using CentreWare IS
To change the load paper timeout:1. Launch your web browser.
2. Enter your system’s IP address in the browser’s Address field (http://xxx.xxx.xxx.xxx).
3. Click Properties.
4. Click the General folder on the left sidebar, then click Printer Defaults.
5. Scroll to Timeout Settings, then select a value from the Load Paper Timeout drop-down
list. The values (None, 1, 3, 5, or 10 minutes, 1 or 24 hours) indicate the length of time you
want the system to wait for you to load paper before printing. If you select a value of
None, the system does not wait for paper to be inserted and immediately picks paper from
the default tray.
6. Click Save Changes at the bottom of the screen.
8/2/2019 Xerox c2404 Manual
http://slidepdf.com/reader/full/xerox-c2404-manual 19/20
System Settings
WorkCentre® C2424 Copier-Printer
1-19
Adjusting Control Panel Brightness
To adjust the brightness of the control panel’s background lighting:
1. On the control panel, press the System Setup button.
2. In the menu, select General Setup, then press the Enter button.
3. Select Control Panel Setup, then press the Enter button.4. Select Control Panel Brightness, then press the Enter button.
5. Press the Down Arrow or Up Arrow button or use the keypad to increase or decrease the
control panel brightness value. The brightness values range from 0 (no background light)
to 10 (brightest background light).
6. Press the Enter button to save your change.
Adjusting Control Panel Contrast
To adjust the contrast between the text and the background to make the control panel text more
readable:
1. On the control panel, press the System Setup button.
2. In the menu, select General Setup, then press the Enter button.
3. Select Control Panel Setup, then press the Enter button.
4. Select Control Panel Contrast, then press the Enter button.
5. Press the Down Arrow or Up Arrow button or use the keypad to increase or decrease the
control panel contrast value. The contrast values range from 1 (least contrast) to 10
(highest contrast).
6. Press the Enter button to save your change.
Setting the Control Panel LanguageTo select the default control panel language, use either:
■ The control panel
■ CentreWare IS
Using the Control Panel
To select the default control panel language:
1. On the control panel, press the System Setup button.
2. In the menu, select General Setup, then press the Enter button.3. Select Control Panel Setup, then press the Enter button.
4. Select Control Panel Language, then press the Enter button.
5. Select the desired language, then press the Enter button.
8/2/2019 Xerox c2404 Manual
http://slidepdf.com/reader/full/xerox-c2404-manual 20/20
System Settings
Using CentreWare IS
To select the default control panel language:
1. Launch your web browser.
2. Enter your system’s IP address in the browser’s Address field (http://xxx.xxx.xxx.xxx).
3. Click Properties.
4. Click the General folder on the left sidebar, then click Printer Defaults.
5. In the User Preferences box, select the language from the Set Control Panel Language
drop-down list.
6. Click Save Changes at the bottom of the screen.
Setting the System Date and Time
The system creates file names for scanned images using the current date and time. To change
the system date and time, use either:
■
The control panel■ CentreWare IS
Using the Control Panel
To change the system date and time:
1. On the control panel, press the System Setup button.
2. In the menu, select General Setup, then press the Enter button.
3. Select System Controls, then press the Enter button.
4. Select Date and Time, then press the Enter button. The system displays the current
settings for the Year, Month, Day, Hour, Minute, and Second.
5. To change one of the date/time settings, select the appropriate setting, press the Enter
button, press the Up Arrow or Down Arrow button or use the keypad to enter a value,
then press the Enter button.
Using CentreWare IS
To change the system date and time:
1. Launch your web browser.
2. Enter your system’s IP address in the browser’s Address field (http://xxx.xxx.xxx.xxx).
3. Click Properties.
4. Click the General folder on the left sidebar, then click Date and Time. The windowdisplays the system’s current date and time.
5. To change the date or time, select the a value from the New Day or New Time drop-down
boxes.
6. Click Save Changes at the bottom of the screen.
Note
For more information about scanned image files, see the Scanning chapter of this guide.