xerox document centre dc tips · xerox document centre printer drivers in microsoft windows...
TRANSCRIPT
dc02cc0299Document Centre Technical Support Operations
Upgrading Document CPrinter Drivers in a WiEnvironmentPurposeThis document provides recommended procedures to perform oXerox Document Centre printer drivers in Microsoft Windows opCurrently, Xerox does not recommend use of the NT PCL Standdocument does not contain upgrade or change procedures for t
The document is divided into the sections described below.
! "Preparing to Upgrade or Change Printer Drivers." This secand procedures to help you determine prerequisites to the uprocess.
! "Upgrading Drivers." This section contains tables and procecurrent driver with a new version.
! "Changing Drivers' Printer Description Language." This secprocedures to change the printer description language (PDL
IMPORTANT: Information identified in the "Preparing toPrinter Drivers" section later in this document and enterlocated at the end of this document, is vital to determinilanguage change procedure appropriate for you. Read the operation you are performing before you carry out aany questions, call your Customer Support Center.
Conventions Used in this Document! Successive selections in a menu path appear in square bra
colons, for example: Select [File:Open].
! Any verbatim element of an application, such as, button namselections, and dialog box names, appear in bold type, for e
! Buttons are clicked. Menu items or other elements of an apexample: Select [Start:Run], when prompted click OK.
Xerox Document Centre
DC Tips� fodc02cc0299
September 4, 2002
This document appliesto these Xeroxproducts:
x DC 555/545/535 ST
x DC 490/480/470/460 ST
x DC 440/432/425/420 ST
x DC 340/332 ST
x DC 265/255/240 ST/LP
x DC 230/220 ST/LP
DCCS 50
r the user
Page 1
entrendows
perations related toerating systems.ard printer driver. This
his printer driver.
tion contains informationpgrade or change
dures to replace your
tion contains tables and) of a printer driver.
Upgrade or Changeed on the worksheetng the upgrade orthe sections applicable to procedure. If you have
ckets, separated by
es, field names, menuxample: Click Continue.
plication are selected, for
dc02cc0299Page 2 Document Centre Technical Support Operations
Preparing to Upgrade or Change Printer DriversDetermining the upgrade or change procedure appropriate for you is not an intuitiveprocess. This document is written and organized for use with the accompanyingworksheet. To complete the upgrade or change process successfully, proceed throughthis document sequentially and use the worksheet when indicated.
Types of Driver InstallationsYou can install drivers in Windows operating systems using one of these configurations.It is important to the upgrade or change process that you know how your driver isinstalled.
! Client-Direct-to-Printer. The client prints directly to the printer either using a parallelprinter cable or a network connection without a server.
! Client/Server. The printer driver resides on a server and automatically transfers to theclient when the shared printer is installed on the workstation.
In a Client/Server driver installation, an upgrade or PDL change is easier when the clientand server have the same version of the Windows operating system. Because of the wayWindows saves and stores drivers, a layer of complexity is added when the client andserver share printers and have different versions of the Windows operating system. Theupgrade and PDL change procedures found later in this document contain instructionsbased on procedures in the Microsoft Knowledge Base.
Driver Upgrade or PDL Change PrerequisitesBefore you upgrade or change the PDL of a printer driver, print the worksheet at the endof this document to record the following information:
! On your worksheet, record the version of the operating system described in thescenario below that applies to you:
− If you are using Windows NT or 2000 on the server or workstation where theupgrade or PDL change is to take place, enter one of these operating systemsfor the first prerequisite on your worksheet. Most likely you know this information.If not, double-click the My Computer icon on the systems' desktop. Select[Help:About] to display the About Windows dialog box that lists the currentWindows version.
− If you are changing the operating system of the printer driver, enter the operatingsystem to which you are changing as the first prerequisite on your worksheet. Forexample, the appropriate worksheet entry for changing from CenterWare 5.x NTEnhanced driver to a Windows 2000 CentreWare 5.3 driver is Windows 2000.
− If you are upgrading or changing clients using Windows 9x, enter Windows 9x forthe first prerequisite on your worksheet.
! The operating system, version number, and PDL of your current printer driver.
− If you use Windows 9x (95/98/ME), your driver is for the Windows 9x operatingsystem (see the table in "The Printer Driver's Operating System"). Record thisinformation on your worksheet, then follow the procedure in the section"Determining Printer Driver Information," to determine driver version number andPDL.
− If you use Windows NT or Windows 2000, follow the procedure(s) in the section"Determining Printer Driver Information," to determine driver operating system,version number, and PDL. Record the information on your worksheet when youperform the procedure(s).
! The version of CentreWare that includes your current printer driver. After you findyour printer driver version number, locate it in the table in the "CentreWare VersionGuide" section, to determine your version of CentreWare. Record it on yourworksheet.
dc02cc0299Document Centre Technical Support Operations Page 3
! The type of installation (Client-Direct-to-Printer or Client/Server described above)used to install the driver you are upgrading. Indicate the type of installation on yourworksheet. If you are upgrading or changing a 9x driver in a client/server installation,enter the operating system of the server next to the Client/Server check box.
The Printer Driver's Operating SystemIn some cases, the operating system of the server or workstation where the upgrade orchange takes place determines the operating system of the printer driver. Refer to thefollowing table:
Operating System ofServer/Workstation WhereUpgrade/Change Occurs
Potential Printer Driver(s)
Windows 95, Windows 98, orWindows Millennium Edition
Windows 95, Windows 98, or WindowsMillennium Edition
Windows NT 4.0 Windows NT 4.0 Standard
Windows NT 4.0 Enhanced
Windows 2000 Windows NT 4.0 Standard
Windows NT 4.0 Enhanced
Windows 2000
Windows XP Windows NT 4.0 Enhanced
Windows 2000
Determining Printer Driver InformationUse the following procedure(s) to determine your driver's version number, PDL, andoperating system. Use the table in the section "CentreWare Version Guide" (later in thisdocument), to identify the CentreWare version to which your driver is associated.
1. Select [Start:Settings:Printers].
2. Right-click the Document Centre printer object associated with the printer driver youwish to upgrade or change and select Properties.
3. Look for the About tab.
a. Only Windows 9x and Windows NT Enhanced drivers have an About tab. If anAbout tab is available, select it and continue with this procedure.
b. If you do not have an About tab, you have either a Windows NT Standard or2000 driver. Skip to the next section "NT Standard and Windows 2000 Drivers,"and follow the procedure to determine the driver version number and PDL.
4. Locate the driver version number listed beneath the CentreWare logo.

dc02cc0299Page 4 Document Centre Technical Support Operations
Note the printer driver version number, operating system, and PDL. Record thisinformation on your worksheet using the following format: [Win 9x/NT] [PDL] [versionnumber].
For example, record the printer driver listed on the About tab graphic as:NT PS 2.03.00
5. If you have a Windows NT driver, mark the Enhanced box on your worksheet.
6. In the table in the "CentreWare Version Guide" section, locate your driver version andcorresponding CentreWare version in which it is included. For example, the DC420/425/432/440 driver NT PS 2.03.00 is included in CentreWare 5.2SP1. Recordthe CentreWare version number on your worksheet.
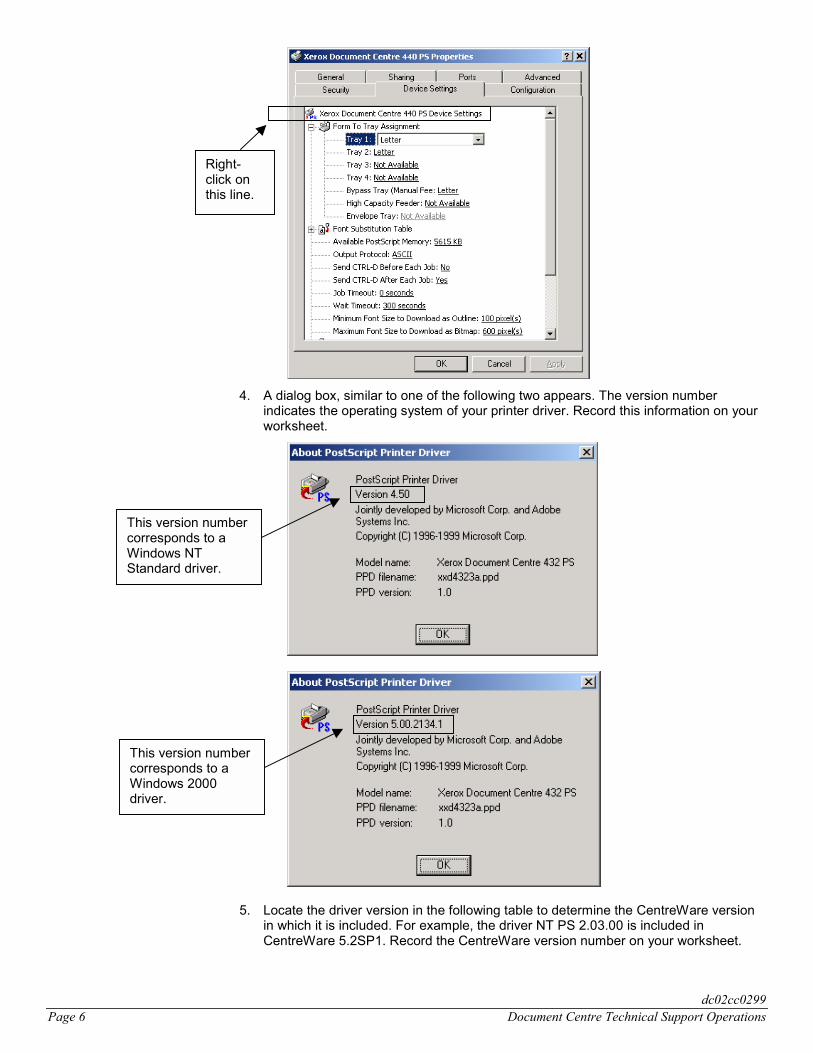
NT Standard and Windows 2000 Printer Drivers1. Select the Configuration tab. The driver version appears in the lower right-hand
corner. Record this information on your worksheet.
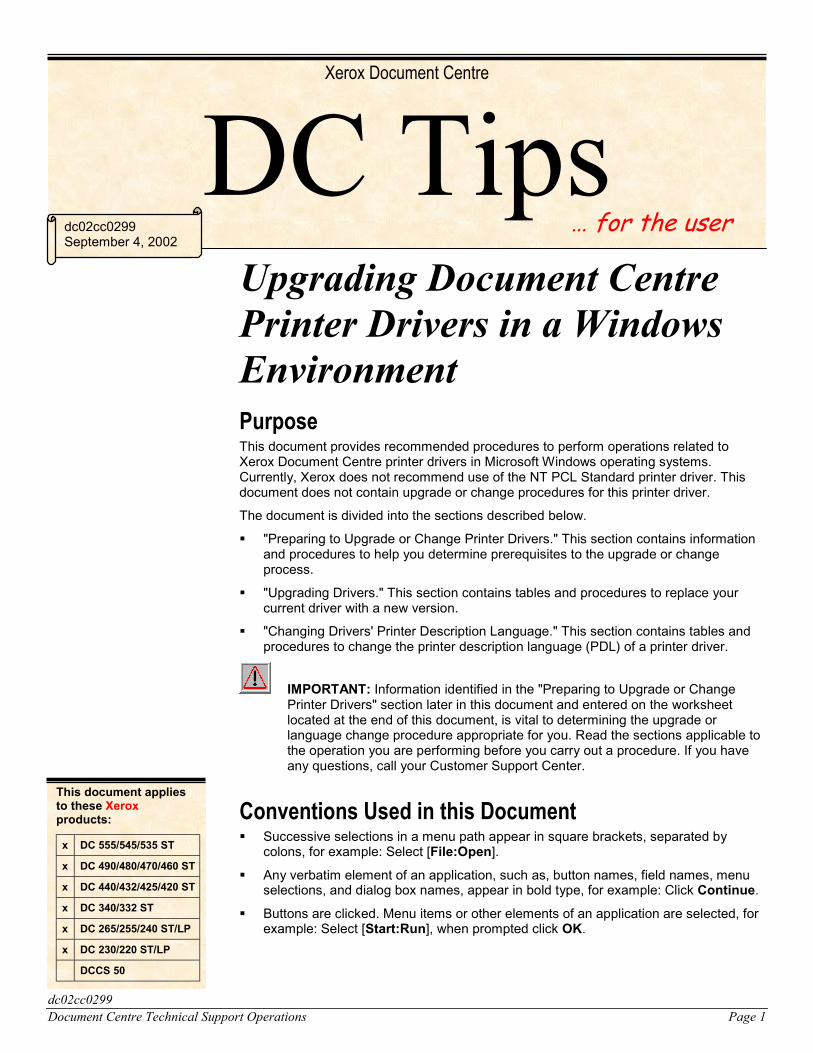
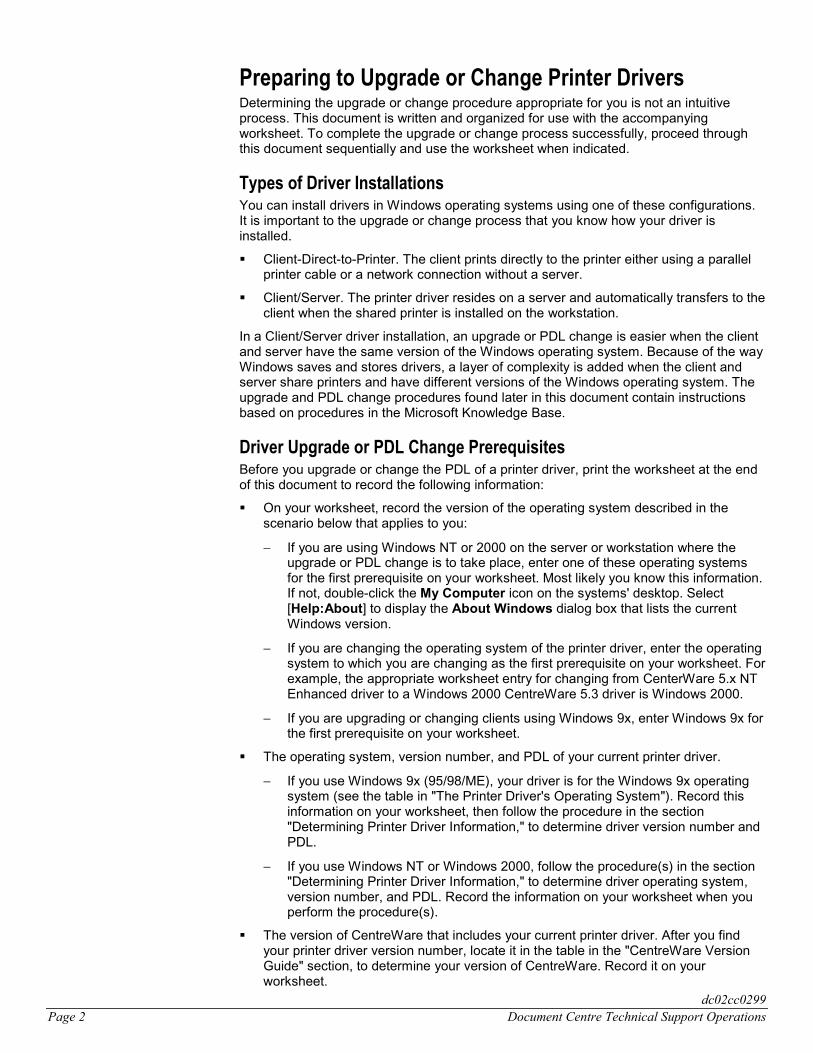
2. Click on the Device Settings tab. The tab appears similar to the one below. The firstline contains Xerox Document Center [model number][PDL] Device Settings. Ifthe PDL is PostScript, PS is included. If the PDL is blank, the driver is PCL. Recordthis information on your worksheet.
The printer driverversion indicated bythis About tab is2.03.00.The printer driver'soperating system isWindows NT.
PDL indicator
The printer driverversion indicated onthis Configuration tabis 1.3.11.0.
dc02cc0299Document Centre Technical Support Operations Page 5
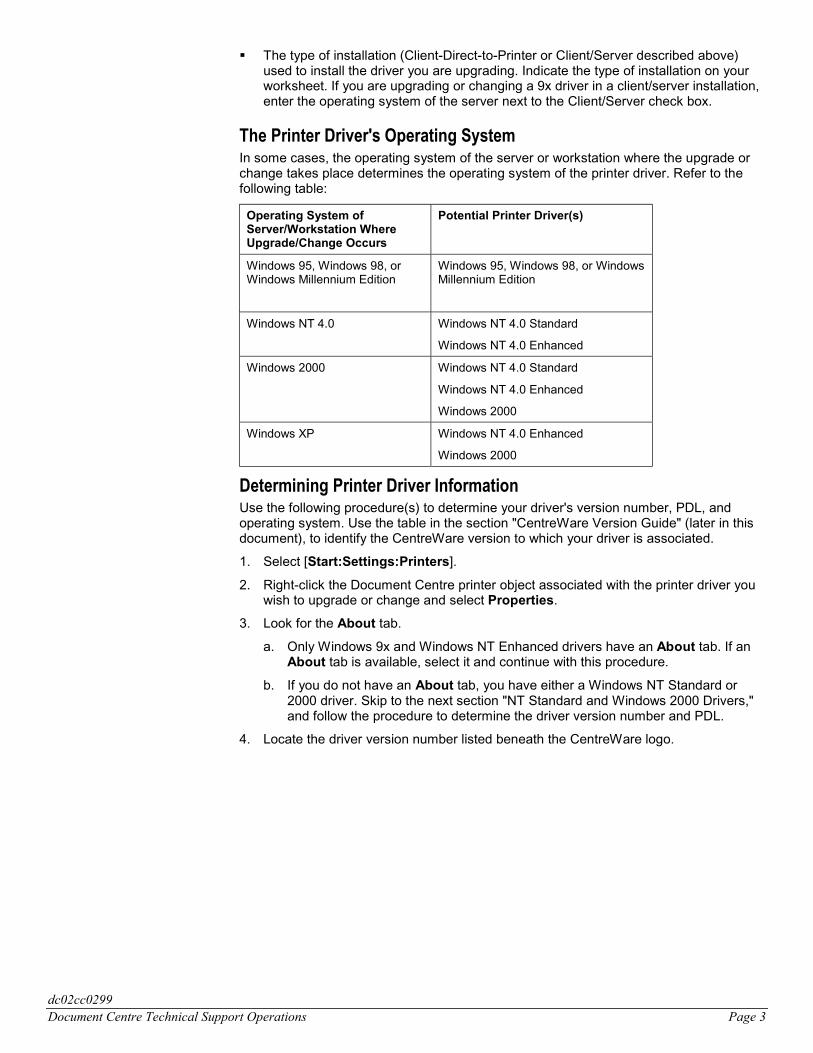
Note: Currently, Xerox does not recommend use of the NT PCL Standard printerdriver. This document does not contain upgrade or change procedures for this printerdriver.
3. Perform one of the following:
a. If the Device Settings tab does not contain the About [PDL] Printer Driverbutton, continue with step 3b. If it does, click About [PDL] Printer Driver andcontinue with step 4.
b. Right-click on the first line.
c. Select About.
This line indicates thatthe driver PDL isPostScript.
This line indicates thatthe driver PDL is PCL.
dc02cc0299Page 6 Document Centre Technical Support Operations
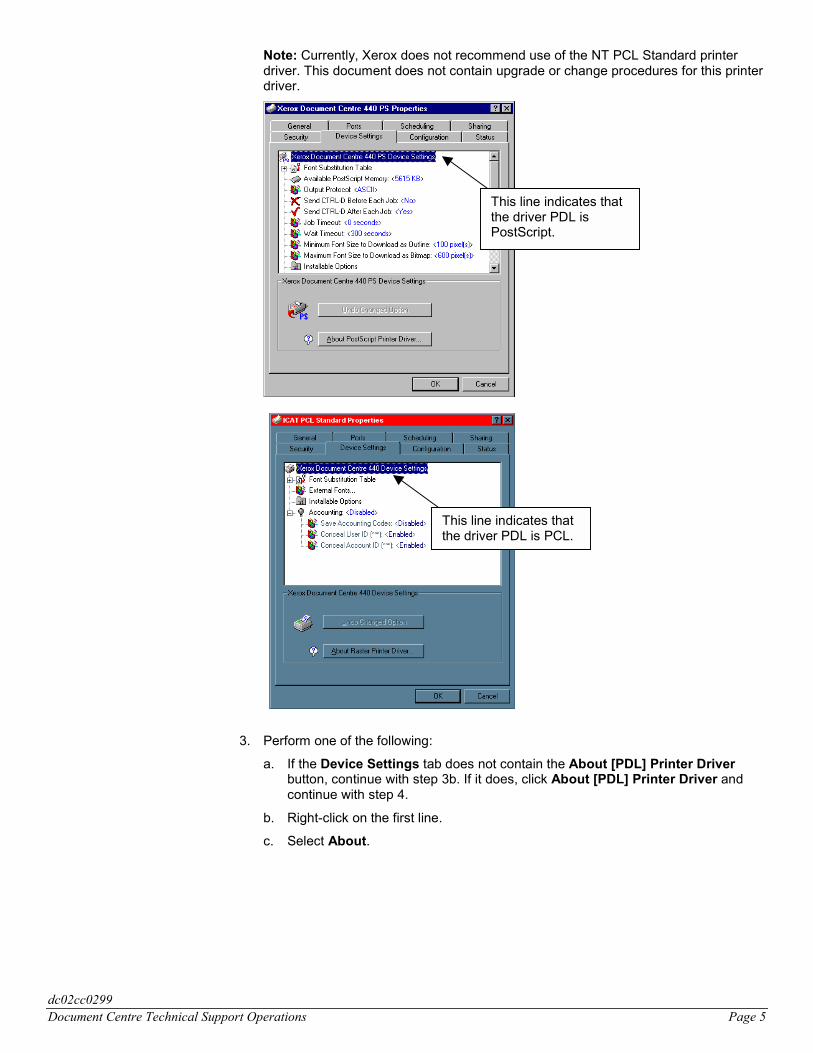
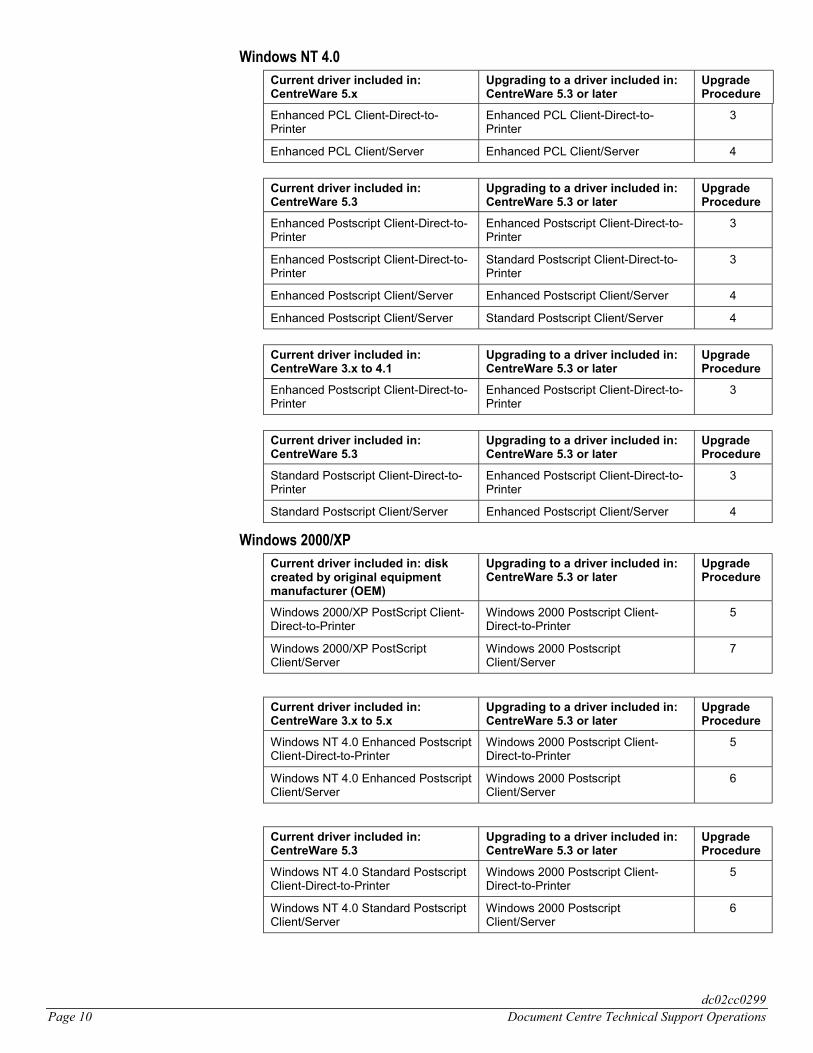
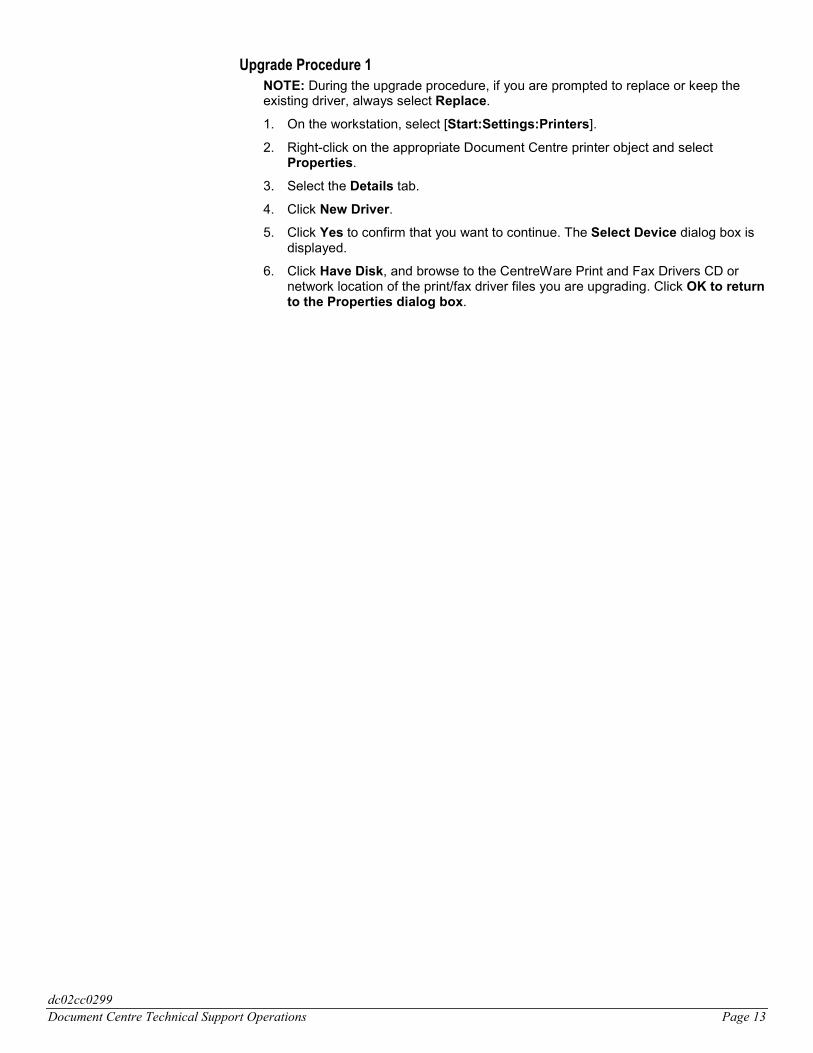
4. A dialog box, similar to one of the following two appears. The version numberindicates the operating system of your printer driver. Record this information on yourworksheet.
5. Locate the driver version in the following table to determine the CentreWare versionin which it is included. For example, the driver NT PS 2.03.00 is included inCentreWare 5.2SP1. Record the CentreWare version number on your worksheet.
Right-click onthis line.
This version numbercorresponds to aWindows NTStandard driver.
This version numbercorresponds to aWindows 2000driver.

dc02cc0299Document Centre Technical Support Operations Page 7
CentreWare Version GuideDue to printer driver updates, some versions of CentreWare contain more than oneprinter driver version. To determine which version of CentreWare includes your printerdriver, compare the version numbers of the driver you are using from one CentreWarerelease to the next. If your driver version falls between the versions listed, it is included inthe older version of CentreWare. Refer to the table for an example.
NOTE: CentreWare 3.0 contains the Windows 9x PostScript printer driver version listed and allthose between the Windows 9x PostScript printer driver version listed for CentreWare 3.1. That is,CentreWare 3.0 could include the driver versions: Win 9x PS 1.00.12, Win 9x PS 1.00.13, Win 9xPS 1.00.14, and Win 9x PS 1.00.15. This information applies to any driver listed in the table.
DC220/230/332/340
DC240/255/265
DC420/425/432/440
DC45x/46x/47x/48x/49x
DC535/545/555
CentreWare
3.0
Win 9x PS 1.00.12
Win 9x PCL 1.00.13
NT PS 1.00.14
NT PCL N/A
2000 N/A
N/A N/A N/A N/A
CentreWare
3.1
Win 9x PS 1.00.16
Win 9x PCL 1.00.13
NT PS 1.00.17
NT PCL N/A
2000 N/A
N/A N/A N/A N/A
CentreWare3.2
Win 9x PS 1.00.16
Win 9x PCL 1.00.17
NT PS 1.02.00
NT PCL N/A
Win 2000 N/A
N/A N/A N/A N/A
CentreWare4.1
Win 9x PS 1.00.16
Win 9x PCL 1.01.00
NT PS 1.06.00
NT PCL N/A
2000 N/A
Win 9x PS 1.00.06
Win 9x PCL 1.00.10
NT PS 1.00.14
NT PCL N/A
2000 N/A
N/A N/A N/A
CentreWare4.1SP1
Win 9x PS 2.00.22
Win 9x PCL 2.00.01
NT PS 2.00.06
NT PCL N/A
2000 N/A
Win 9x PS 1.02.02
Win 9x PCL 1.02.03
NT PS 1.00.19
NT PCL N/A
2000 N/A
N/A N�A N/A
CentreWare4.1SP2
Win 9x PS 2.02.01
Win 9x PCL 2.02.03
NT PS 2.00.09
NT PCL N/A
2000 N/A
Win 9x PS 1.02.02
Win 9x PCL 1.02.03
NT PS 1.02.05
NT PCL N/A
2000 N/A
N/A N/A N/A
CentreWare5.1
Win 9x PS 2.02.07
Win 9x PCL 2.03.14
NT PS 2.00.26
NT PCL 1.00.18
2000 N/A
Win 9x PS 2.00.09
Win 9x PCL 2.00.15
NT PS 2.00.19
NT PCL 1.01.19
2000 N/A
N/A N/A N/A
CentreWare5.2
Win 9x PS 2.20.13
Win 9x PCL 3.00.18
NT PS 2.02.15
NT PCL 1.01.15
2000PS/PCL 1.1.3.0
Win 9x PS 2.20.13
Win 9x PCL 3.00.17
NT PS 2.02.05
NT PCL 1.02.17
2000 PS/PCL 1.1.3.0
Win 9x PS 2.20.13
Win 9x PCL 3.00.18
NT PS 2.02.15
NT PCL 1.01.15
2000 PS/PCL 1.1.3.0
Win 9x PS 2.20.13
Win 9x PCL 3.00.17
NT PS 2.02.05
NT PCL 1.02.17
2000 PS/PCL 1.1.3.0
N/A

dc02cc0299Page 8 Document Centre Technical Support Operations
DC220/230/332/340
DC240/255/265
DC420/425/432/440
DC45x/46x/47x/48x/49x
DC535/545/555
CentreWare5.2SP1
Win 9x PS 2.20.14
Win 9x PCL 3.00.18
NT PS 2.03.00
NT PCL 1.02.00
2000 PS/PCL 1.1.5.6
Win 9x PS 2.20.13
Win 9x PCL 3.00.17
NT PS 2.02.11
NT PCL 1.03.01
2000 PS/PCL 1.1.5.6
Win 9x PS 2.20.14
Win 9x PCL 3.00.18
NT PS 2.03.00
NT PCL 1.02.00
2000 PS/PCL 1.1.5.6
Win 9x PS 2.20.13
Win 9x PCL 3.00.17
NT PS 2.02.11
NT PCL 1.03.01
2000 PS/PCL 1.1.5.6
N/A
CentreWare5.3
N/A N/A Win 9x PS 2.30.11
Win 9x PCL 3.01.07
NT Enhanced PS2.04.08
NT Enhanced PCL1.02.35
NT Standard PS1.3.11.0
2000 PS 1.3.11.0
Win 9x PS 2.30.11
Win 9x PCL 3.01.07
NT Enhanced PS2.04.09
NT Enhanced PCL1.03.33
NT Standard PS1.3.11.0
2000 PS 1.3.11.0
N/A
CentreWare5.3 sp1
N/A N/A Win 9x PS 2.30.11
Win 9x PCL 3.01.07
NT Enhanced PS2.04.08
NT Enhanced PCL2.00.05
NT Standard PS/PCL1.3.12.2
2000 PS/PCL1.3.12.2
Win 9x PS 2.31.21
Win 9x PCL 3.02.03
NT Enhanced PS2.05.15
NT Enhanced PCL2.00.13
NT Standard PS/PCL2.1.3.2
2000 PS/PCL 2.1.3.2
N/A
CentreWare5.4
N/A N/A N/A N/A Win 9x PS/USB3.40.16
Win 9x PCL5e/USB5.00.11
Win 9x PCL6/USB5.40.23
NT/2000/XPEnhanced PS 1.00.16
NT/2000/XPEnhanced PCL65.40.25
NT/2000/XPEnhanced PCL5e1.00.11
NT/2000/XP StandardPCL5e 3.52.0.0
NT/2000/XP StandardPS 3.52.0.0

dc02cc0299Document Centre Technical Support Operations Page 9
Upgrading DriversUse the information in this section to upgrade your printer driver. If you are changing thePDL, go to the section "Changing Drivers' Printer Description Language," later in thisdocument.
NOTE: If you are changing the operating system of the printer driver, ensure that yourefer to the appropriate sub-section. For example, the appropriate table for changingfrom CenterWare 5.x NT Enhanced driver to a Windows 2000 CentreWare 5.3 driveris located in the Windows 2000 subsection.
Upgrade ScenariosUse the tables in this section to identify an upgrade procedure based on the prerequisiteinformation recorded on your worksheet. Follow these steps to determine which tablecontains information appropriate for you:
1. Locate the sub-section below that corresponds to the current operating system of theclient or server on which the driver upgrade is to occur. (See worksheet.)
2. In that sub-section, locate the table with headings that contain the versions ofCentreWare described below:
! First column heading: references the version of CentreWare that includes thedriver you are currently using on your workstation or server. (See worksheet.)
! Second column heading: references the version of CentreWare that includes thedriver to which you are upgrading.
3. Locate the row in the table you identify in step 2, that contains the followinginformation:
! First column: the PDL and type of installation of the driver currently installed onthe workstation or server. (See worksheet.)
! Second column: the PDL and type of installation of the driver to which you areupgrading.
NOTE: The tables uses the following printer driver descriptions:
− Enhanced. Refers to drivers Xerox previously described as Customized.
− Standard. Refers to drivers built using a Microsoft-based softwaredevelopment kit (SDK).
! Third column: the upgrade procedure number.
4. Record the upgrade procedure number in the appropriate place on your worksheet.
5. To upgrade your printer driver, follow the procedure in the "Upgrade Procedures"section that corresponds to the number you recorded on your worksheet.
NOTE: Currently, Xerox does not recommend use of the NT PCL Standard printer driver.This document does not contain upgrade or change procedures for this printer driver.
Windows 9.xCurrent driver included in:CentreWare 3.x to 5.x
Upgrading to a driver included in:CentreWare 5.3 or later
UpgradeProcedure
PostScript Client-Direct-to-Printer PostScript Client-Direct-to-Printer 1
PostScript Client/Server PostScript Client/Server 2
PCL Client-Direct-to-Printer PCL Client-Direct-to-Printer 1
PCL Client/Server PCL Client/Server 2
dc02cc0299Page 10 Document Centre Technical Support Operations
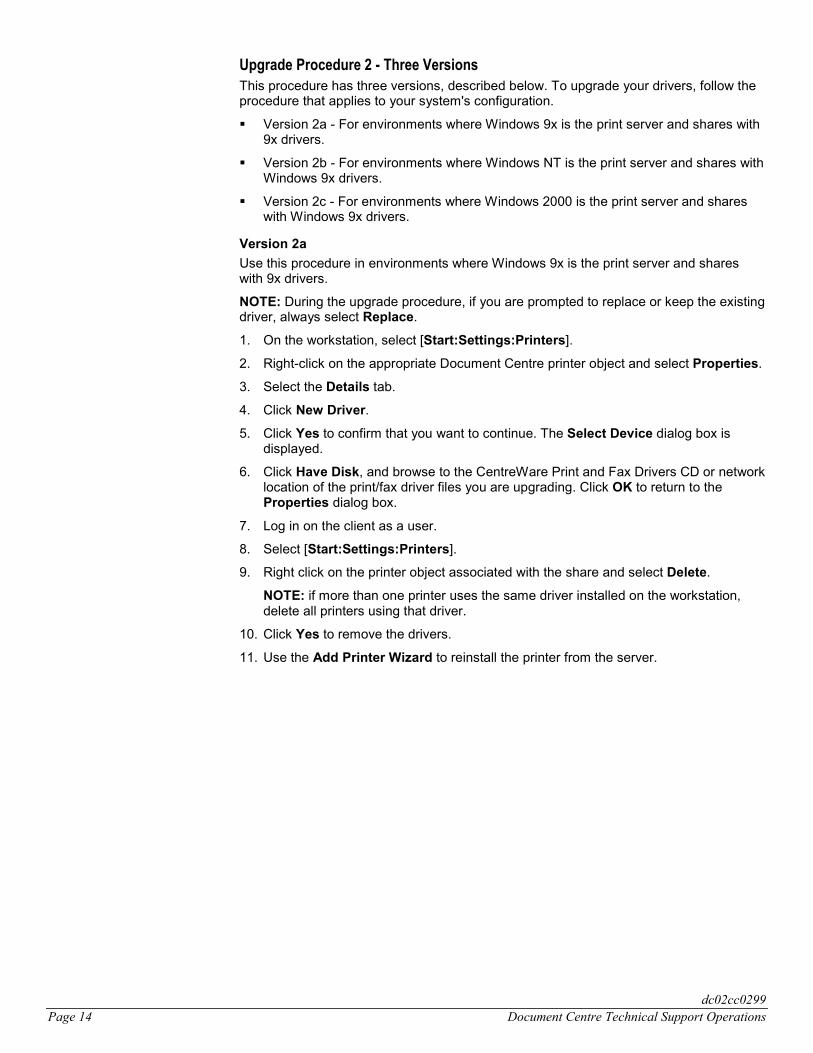
Windows NT 4.0Current driver included in:CentreWare 5.x
Upgrading to a driver included in:CentreWare 5.3 or later
UpgradeProcedure
Enhanced PCL Client-Direct-to-Printer
Enhanced PCL Client-Direct-to-Printer
3
Enhanced PCL Client/Server Enhanced PCL Client/Server 4
Current driver included in:CentreWare 5.3
Upgrading to a driver included in:CentreWare 5.3 or later
UpgradeProcedure
Enhanced Postscript Client-Direct-to-Printer
Enhanced Postscript Client-Direct-to-Printer
3
Enhanced Postscript Client-Direct-to-Printer
Standard Postscript Client-Direct-to-Printer
3
Enhanced Postscript Client/Server Enhanced Postscript Client/Server 4
Enhanced Postscript Client/Server Standard Postscript Client/Server 4
Current driver included in:CentreWare 3.x to 4.1
Upgrading to a driver included in:CentreWare 5.3 or later
UpgradeProcedure
Enhanced Postscript Client-Direct-to-Printer
Enhanced Postscript Client-Direct-to-Printer
3
Current driver included in:CentreWare 5.3
Upgrading to a driver included in:CentreWare 5.3 or later
UpgradeProcedure
Standard Postscript Client-Direct-to-Printer
Enhanced Postscript Client-Direct-to-Printer
3
Standard Postscript Client/Server Enhanced Postscript Client/Server 4
Windows 2000/XPCurrent driver included in: diskcreated by original equipmentmanufacturer (OEM)
Upgrading to a driver included in:CentreWare 5.3 or later
UpgradeProcedure
Windows 2000/XP PostScript Client-Direct-to-Printer
Windows 2000 Postscript Client-Direct-to-Printer
5
Windows 2000/XP PostScriptClient/Server
Windows 2000 PostscriptClient/Server
7
Current driver included in:CentreWare 3.x to 5.x
Upgrading to a driver included in:CentreWare 5.3 or later
UpgradeProcedure
Windows NT 4.0 Enhanced PostscriptClient-Direct-to-Printer
Windows 2000 Postscript Client-Direct-to-Printer
5
Windows NT 4.0 Enhanced PostscriptClient/Server
Windows 2000 PostscriptClient/Server
6
Current driver included in:CentreWare 5.3
Upgrading to a driver included in:CentreWare 5.3 or later
UpgradeProcedure
Windows NT 4.0 Standard PostscriptClient-Direct-to-Printer
Windows 2000 Postscript Client-Direct-to-Printer
5
Windows NT 4.0 Standard PostscriptClient/Server
Windows 2000 PostscriptClient/Server
6

dc02cc0299Document Centre Technical Support Operations Page 11
Current driver included in:CentreWare 5.x
Upgrading to a driver included in:CentreWare 5.3 or later
UpgradeProcedure
Windows 2000 Postscript Client-Direct-to-Printer
Windows 2000 Postscript Client-Direct-to-Printer
5
Windows 2000 PostscriptClient/Server
Windows 2000 PostscriptClient/Server
7
Windows 2000 Postscript Client-Direct-to-Printer
Windows NT 4.0 Postscript Client-Direct-to-Printer
5
Windows 2000 PostscriptClient/Server
Windows NT 4.0 PostscriptClient/Server
6
Current driver included in:CentreWare 5.x
Upgrading to a driver included in:CentreWare 5.3 or later
UpgradeProcedure
Enhanced PCL Client-Direct-to-Printer
Enhanced PCL Client-Direct-to-Printer
5
Enhanced PCL Client/Server Enhanced PCL Client/Server 6
Current driver included in:CentreWare 3.x to 5.x
Upgrading to a driver included in:CentreWare 5.3 or later
UpgradeProcedure
Windows NT 4.0 Enhanced PostscriptClient-Direct-to-Printer
Windows NT 4.0 Enhanced PostscriptClient-Direct-to-Printer
3
Windows NT 4.0 Enhanced PostscriptClient-Direct-to-Printer
Windows NT 4.0 Standard PostscriptClient-Direct-to-Printer
3
Windows NT 4.0 Enhanced PostscriptClient/Server
Windows NT 4.0 Enhanced PostscriptClient/Server
4
Windows NT 4.0 Enhanced PostscriptClient/Server
Windows NT 4.0 Standard PostscriptClient/Server
4
Current driver included in:CentreWare 5.3
Upgrading to a driver included in:CentreWare 5.3 or later
UpgradeProcedure
Windows NT 4.0 Standard PostscriptClient-Direct-to-Printer
Windows NT 4.0 Enhanced PostscriptClient-Direct-to-Printer
3
Windows NT 4.0 Standard PostscriptClient/Server
Windows NT 4.0 Enhanced PostscriptClient/Server
4
Upgrade Procedures Page Location TableUpgrade Procedure 1 page 13
Upgrade Procedure 2 pages 14-16
Upgrade Procedure 3 page 17
Upgrade Procedure 4 pages 18-19
Upgrade Procedure 5 page 20
Upgrade Procedure 6 page 21
Upgrade Procedure 7 pages 22-23

dc02cc0299Page 12 Document Centre Technical Support Operations
Upgrade ProceduresThis section contains the upgrade procedures that correspond to the tables in the"Upgrade Scenarios" section. These are the recommended upgrade procedures for theDocument Centre printer drivers. Follow all of the steps for the upgrade procedureindicated to ensure you complete the upgrade successfully.
CAUTION: Some of the upgrade procedures contain information about editingthe registry. Make sure to back up your registry before you edit it. If you arerunning Windows NT or Windows 2000, you should also update your EmergencyRepair Disk (ERD). Finally, make sure you understand how to restore the backupif a problem occurs. For more information, review the help topic "Restoring theRegistry," in Regedit.exe or the help topic "Restoring a Registry Key," inRegedt32.exe.
Using Registry Editor incorrectly can cause serious problems that may requireyou to reinstall your operating system. Xerox cannot guarantee that problemsresulting from the incorrect use of Registry Editor can be resolved. Use RegistryEditor at your own risk. For information about how to edit the registry, view thehelp topic "Changing Keys and Values" in Registry Editor (Regedit.exe), or thehelp topics "Add and Delete Information in the Registry" and "Edit Registry Data"in Regedt32.exe.
dc02cc0299Document Centre Technical Support Operations Page 13
Upgrade Procedure 1NOTE: During the upgrade procedure, if you are prompted to replace or keep theexisting driver, always select Replace.
1. On the workstation, select [Start:Settings:Printers].
2. Right-click on the appropriate Document Centre printer object and selectProperties.
3. Select the Details tab.
4. Click New Driver.
5. Click Yes to confirm that you want to continue. The Select Device dialog box isdisplayed.
6. Click Have Disk, and browse to the CentreWare Print and Fax Drivers CD ornetwork location of the print/fax driver files you are upgrading. Click OK to returnto the Properties dialog box.
dc02cc0299Page 14 Document Centre Technical Support Operations
Upgrade Procedure 2 - Three VersionsThis procedure has three versions, described below. To upgrade your drivers, follow theprocedure that applies to your system's configuration.
! Version 2a - For environments where Windows 9x is the print server and shares with9x drivers.
! Version 2b - For environments where Windows NT is the print server and shares withWindows 9x drivers.
! Version 2c - For environments where Windows 2000 is the print server and shareswith Windows 9x drivers.
Version 2a
Use this procedure in environments where Windows 9x is the print server and shareswith 9x drivers.
NOTE: During the upgrade procedure, if you are prompted to replace or keep the existingdriver, always select Replace.
1. On the workstation, select [Start:Settings:Printers].
2. Right-click on the appropriate Document Centre printer object and select Properties.
3. Select the Details tab.
4. Click New Driver.
5. Click Yes to confirm that you want to continue. The Select Device dialog box isdisplayed.
6. Click Have Disk, and browse to the CentreWare Print and Fax Drivers CD or networklocation of the print/fax driver files you are upgrading. Click OK to return to theProperties dialog box.
7. Log in on the client as a user.
8. Select [Start:Settings:Printers].
9. Right click on the printer object associated with the share and select Delete.
NOTE: if more than one printer uses the same driver installed on the workstation,delete all printers using that driver.
10. Click Yes to remove the drivers.
11. Use the Add Printer Wizard to reinstall the printer from the server.

dc02cc0299Document Centre Technical Support Operations Page 15
Version 2b
Use this procedure in environments where Windows NT is the print server and shareswith 9x drivers.
This procedure includes removal and reinstallation of printer drivers on a Windows NTprinter share. This information was obtained from Microsoft Knowledgebase ArticleQ162258 and can be found athttp://support.microsoft.com/support/kb/articles/Q162/2/58.aspRefer to the article for additional information.
CAUTION: This procedure instructs you to edit the registry. Make sure to backup your registry before you edit it. If you are running Windows NT or Windows2000, you should also update your Emergency Repair Disk (ERD). Finally, makesure you understand how to restore the backup if a problem occurs. For moreinformation, review the help topic "Restoring the Registry," in Regedit.exe or thehelp topic "Restoring a Registry Key," in Regedt32.exe.
Using Registry Editor incorrectly can cause serious problems that may requireyou to reinstall your operating system. Xerox cannot guarantee that problemsresulting from the incorrect use of Registry Editor can be solved. Use RegistryEditor at your own risk. For information about how to edit the registry, view thehelp topic "Changing Keys and Values" in Registry Editor (Regedit.exe), or thehelp topics "Add and Delete Information in the Registry" and "Edit Registry Data"in Regedt32.exe.
1. Log on to the server as an administrator.
2. Select [Start:Control Panel] and double-click the Services icon.
3. Select the Spooler service and click Stop. Click Yes when prompted.
4. Start the Registry Editor (Regedt32.exe) and select the following subkey:
HKEY_LOCAL_MACHINE\SYSTEM
\CurrentControlSet
\Control
\Environments
\Win40
\Drivers
\Version-0
\<Printer driver>
<Printer driver> refers to the key for the Document Centre Windows 9x printerdriver you wish to upgrade. For example: Xerox DC 220/230/332/340/ PS 2.
5. Delete the printer driver key(s) you wish to upgrade and close the registry editor.
6. Delete the Windows 9x shared driver files that correspond to the driver key youdelete in step 5. You can find these files in the following directories:
%SystemRoot%\System32\Spool\Drivers\Win40\
%SystemRoot%\System32\Spool\Drivers\Win40\0
NOTE: The notation %SystemRoot% refers to the location of the operating systemfiles, for example, c:\Winnt
7. Select [Start:Control Panel], open the Services icon, select the Spooler serviceand click Start.
8. Reboot the server to let the changes take effect.
9. Select [Start:Settings:Printers].
10. Right-click on the Document Centre printer object and select Sharing.
dc02cc0299Page 16 Document Centre Technical Support Operations
11. Re-install the shared printer drivers, using the new versions.
12. Log in on the client as a user.
13. Select [Start:Settings:Printers].
14. Right click on the printer object associated with the share and select Delete.
NOTE: if more than one printer uses the same driver installed on the workstation,delete all printers using that driver.
15. Click Yes to remove the drivers.
16. Use the Add Printer Wizard to reinstall the printer from the server.
Version 2c
Use this procedure in environments where Windows 2000 is the print server and shareswith 9x drivers.
This information is derived from the Microsoft Windows 2000 Help system. Refer to it foradditional information.
During the upgrade procedure, if you are prompted to replace or keep the existing driver,always select Replace.
1. On the server, select [Start:Settings:Printers]. In the Printers window, select[File:Server Properties].
2. On the Drivers tab, select the 9x driver(s) you want to update in the Installed printerdrivers list, and click Update.
3. Click Yes. The driver files are copied for all the installed environments and versions.The system might prompt you for the path to the drivers.
4. Log in on the client as a user.
5. Select [Start:Settings:Printers].
6. Right click on the printer object associated with the share and select Delete.
NOTE: if more than one printer uses the same driver installed on the workstation,delete all printers using that driver.
7. Click Yes to remove the drivers.
8. Use the Add Printer Wizard to reinstall the printer from the server.
dc02cc0299Document Centre Technical Support Operations Page 17
Upgrade Procedure 3NOTE: During the upgrade procedure, if you are prompted to replace or keep the existingdriver, always select Replace.
1. Log on to your workstation as an administrator and close all applications (forexample, email or virus protection).
2. Select [Start:Settings:Printers].
3. Right-click on the Document Centre printer object and select Delete.
4. Click Yes to confirm that you want to delete the printer.
5. Reboot the workstation.
6. Access the Printers folder again and double-click Add Printer to start the AddPrinter Wizard.
7. When the dialog box to indicate how the printer is attached to your computer isdisplayed, select either Local printer or Network printer.
8. At the prompt to install the printer driver on your local machine, click Have Disk.Browse to the location of your printer driver files and select the correct .INF file. ClickOK. Follow the instructions provided by the Add Printer Driver Wizard to completethe installation.
9. Click Finish. The printer driver upgrade is now complete.
dc02cc0299Page 18 Document Centre Technical Support Operations
Upgrade Procedure 4 - Two VersionsNOTE: After you use a version of this upgrade procedure be aware of the following:
An issue exists with the Windows NT Enhanced PCL printer driver where theprocess spoolss.exe consumes all available resources of the host machine (PCLSPIN). This only occurs when all the following conditions are met:
! A Windows NT Enhanced PCL printer driver is loaded on a Windows 2000server.
! This Windows NT Enhanced PCL printer driver is shared out to NT clientswhere a user(s) has Administrator rights on the Windows 2000 server ordomain.
! Remote administration of the printer object or access to the printerproperties, document defaults, or printer settings of the NT Enhanced PCLdriver loaded on the Windows 2000 server is attempted from an NT clientwhere the user has administrator rights on the Windows 2000 server ordomain. This can occur either by accessing the printer object in the printersfolder or through the print dialogue box of an application.
Both CPU utilization and memory resources will rise and continue to climb untilthey are exhausted.
To avoid this scenario, users with Administrator rights to a Windows 2000 printserver or domain must administer the printer object for the Windows NTEnhanced PCL printer driver printer driver from either a Windows 2000 client orfrom the server itself.
This procedure has two versions, described below. Follow the procedure mostappropriate to you.
! Version 4a - If you must maintain the same printer driver name use this procedure(requires a reboot).
! Version 4b - Use this procedure to assign a new name to the print object (no rebootrequired).
NOTE: During the upgrade procedure, if you are prompted to replace or keep the existingdriver, always select Replace.
Version 4a
Use this procedure if you must maintain the same printer driver name (requires a reboot).
1. Log on to the server as an administrator and close all applications (for example,email or virus protection).
2. Select [Start:Settings:Printers].
3. Right-click on the Document Centre printer object and select Delete.
4. Click Yes to confirm that you want to delete the printer.
5. Reboot the server.
6. Access the Printers folder again and double-click Add Printer to start the AddPrinter Wizard.
7. When the dialog box to indicate how the printer is attached to your computer isdisplayed, select either Local printer or Network printer.
8. At the prompt to install the printer driver on your local machine, click Have Disk.Browse to the location of your printer driver files and select the correct .INF file. ClickOK. Follow the instructions provided by the Add Printer Driver Wizard to completethe installation.
9. Click Finish.
10. Log in on the client as a user.
dc02cc0299Document Centre Technical Support Operations Page 19
11. Select [Start:Settings:Printers].
12. Wait for all disk activity to cease, then reboot the workstation to complete theinstallation of the new printer drivers from the server.
13. Repeat steps 10 through 12 for each client you need to upgrade.
NOTE: If configuration or default settings set for the driver on the server do not transfer tothe client, use one of these methods to force the transfer:
! Print a test page from the server.
! Toggle one of the driver configuration settings on the server and close the dialog box.
Version 4b
Use this procedure to assign a new name to the print object (no reboot required).
NOTE: During the upgrade procedure, if you are prompted to replace or keep the existingdriver, always select Replace.
1. Log on to the server as an administrator and close all applications (for example,email or virus protection).
2. Select [Start:Settings:Printers].
3. Select the Document Centre printer object to upgrade.
4. Record the Document Centre printer object�s name.
5. Right-click on the Document Centre printer object and select Delete.
6. Click Yes to confirm that you want to delete the printer.
7. Access the Printers folder again and open Add Printer.
8. On the screen to indicate how the printer is attached to your computer, select eitherLocal printer or Network printer.
9. At the prompt to install the printer driver on your local machine, select Have Disk.Browse to the location of your printer driver files and select the correct .INF file. ClickOK. Follow the instructions provided by the Add Printer Driver Wizard.
10. At the prompt to enter the name of the printer, enter a name different from the oneyou recorded in step 4.
11. Continue with the Add Printer Driver Wizard until you click Finish.
If your client(s) use Windows NT or 2000, continue with the procedure below. Otherwise,the upgrade is complete.
12. Log in on the client as a user.
13. Select [Start:Settings:Printers].
14. Right-click on the old Document Centre printer object and select Delete.
15. Reinstall the new shared printer object on the workstation using the new share name.
NOTE: If configuration or default settings set for the driver on the server do not transfer tothe client, use one of these methods to force the transfer:
! Print a test page from the server.
! Toggle one of the driver configuration settings on the server and close the dialog box.
dc02cc0299Page 20 Document Centre Technical Support Operations
Upgrade Procedure 51. For each Document Centre driver to receive an upgrade, delete the printer object
associated with that driver:
a. Log on to the server or workstation as an administrator and close all applications.
b. Select [Start:Settings:Printers].
c. Right-click on the Document Centre printer object and select Delete.
d. Click Yes to confirm you want to delete the printer.
2. Reboot the server/workstation.
3. Reinstall the deleted printers:
a. Access the Printers folder again and open Add Printer.
b. Select the type of network, either Local printer or Network printer.
c. At the prompt to install the printer driver on your local machine, select HaveDisk. Browse to the location of your printer driver files and select the correct .INFfile. Click OK. Follow the instructions provided by the Add Printer Driver Wizardto complete the installation.
d. Specify if you want the Document Centre to be your default printer. Click Next.
e. Indicate if you want to print a test page. Click Next.
f. Click Finish. The printer driver upgrade is now complete.
g. If the Microsoft Digital Signature dialog appears, click Yes to continue.
4. Ensure all of the options of the printers you installed are configured in the printerproperties.
dc02cc0299Document Centre Technical Support Operations Page 21
Upgrade Procedure 6NOTE: After you use this upgrade procedure be aware of the following:
An issue exists with the Windows NT Enhanced PCL printer driver where theprocess spoolss.exe consumes all available resources of the host machine (PCLSPIN). This only occurs when all the following conditions are met:
! A Windows NT Enhanced PCL printer driver is loaded on a Windows 2000server.
! This Windows NT Enhanced PCL printer driver is shared out to NT clientswhere a user(s) has Administrator rights on the Windows 2000 server ordomain.
! Remote administration of the printer object or access to the printerproperties, document defaults, or printer settings of the NT Enhanced PCLdriver loaded on the Windows 2000 server is attempted from an NT clientwhere the user has administrator rights on the Windows 2000 server ordomain. This can occur either by accessing the printer object in the printersfolder or through the print dialogue box of an application.
Both CPU utilization and memory resources will rise and continue to climb untilthey are exhausted.
To avoid this scenario, users with administrator rights to a Windows 2000 printserver or domain must administer the printer object for the Windows NTEnhanced PCL printer driver from either a Windows 2000 client or from theserver itself.
1. For each Document Centre driver to receive an upgrade, delete the printer objectassociated with that driver:
a. Log on to the server or workstation as an administrator and close all applications(for example, email or virus protection).
b. Select [Start:Settings:Printers].
c. Right-click on the Document Centre printer object and select Delete.
d. Click Yes to confirm you want to delete the printer.
2. Reboot the server/workstation.
3. Reinstall the deleted printers:
a. Access the Printers folder again and open Add Printer.
b. Select the type of network, either My Computer or Network printer server.
c. At the prompt to install the printer driver on your local machine, select HaveDisk. Browse to the location of your printer driver files and select the correct .INFfile. Click OK. Follow the instructions provided by the Add Printer Driver Wizardto complete the installation.
d. Specify if you want the Document Centre to be your default printer. Click Next.
e. Indicate if you want to print a test page. Click Next.
f. Click Finish. The printer driver upgrade is now complete.
g. If the Microsoft Digital Signature dialog appears, click Yes to continue.
4. Ensure all printer options you installed are configured in the printer properties.
5. Log in on the client as a user.
6. Select [Start:Settings:Printers].
7. Wait for all disk activity to cease, then reboot the workstation to complete theinstallation of the new printer drivers from the server.
8. Repeat steps 5 through 7 for each client you need to upgrade.
dc02cc0299Page 22 Document Centre Technical Support Operations
Upgrade Procedure 7NOTE:After you use this upgrade procedure be aware of the following:
An issue exists with the Windows NT Enhanced PCL printer driver where theprocess spoolss.exe consumes all available resources of the host machine (PCLSPIN). This only occurs when all the following conditions are met:
! A Windows NT Enhanced PCL printer driver is loaded on a Windows 2000server.
! This Windows NT Enhanced PCL printer driver is shared out to NT clientswhere a user(s) has Administrator rights on the Windows 2000 server ordomain.
! Remote administration of the printer object or access to the printer properties,document defaults, or printer settings of the NT Enhanced PCL driver loadedon the Windows 2000 server is attempted from an NT client where the userhas administrator rights on the Windows 2000 server or domain. This canoccur either by accessing the printer object in the printers folder or through theprint dialogue box of an application.
Both CPU utilization and memory resources will rise and continue to climb untilthey are exhausted.
To avoid this scenario, users with Administrator rights to a Windows 2000 printserver or domain must administer the printer object for the Windows NT EnhancedPCL printer driver from either a Windows 2000 client or from the server itself.
1. Log into the server as an administrator.
2. Delete the printer object that uses the driver your are updating (delete only one ifmore then one printer is using the same driver).
a. Select [Start:Settings:Printers].
b. Right-click on the Document Centre printer object and select Delete.
c. Click Yes to confirm you want to delete the printer.
3. Select [File:Server Properties].
4. Select the Drivers tab.
5. Select the driver you wish to upgrade from the list, then click Remove.
6. Click OK to close the Server Properties dialog box.
7. Select [Start:Find:Files and Folders].
8. In the Named field, type OEM*.INF.
9. In the Containing Text field type one of the following:
a. for the Document Centre 420, 425, 432, or 440 enter Xerox DC 420/432/440.
b. for the Document Centre 460, 470, 480, 490 enter Xerox DC 45x/46x/47x/48x.
c. for the Document Centre 220, 230, 332, or 340 enter Xerox DC 220/230 orXerox DC 220/230/332/340.
d. for the Document Centre 240, 255, or 265 enter Xerox DC 240/255/265.
10. In the Look in field select Browse... from the list.
11. In the Browse for Folder dialog, browse to %Systemroot%/Inf (usually located atC:\Winnt\inf) and choose OK.
12. Click Find to start the search.
13. Select the returned result, press the delete key, and click Yes to confirm the deletion.
14. Re-install the printer using the new driver and re-associate the shared drivers.
a. Access the Printers folder again and open Add Printer.
dc02cc0299Document Centre Technical Support Operations Page 23
b. Select the type of network, either Local or Network printer.
c. At the prompt to install the printer driver on your local machine, select HaveDisk. Browse to the location of your printer driver files and select the correct .INFfile. Click OK. Follow the instructions provided by the Add Printer Driver Wizardto complete the installation.
d. Specify if you want the Document Centre to be your default printer. Click Next.
e. Indicate if you want to print a test page. Click Next.
f. Click Finish. The printer driver upgrade is now complete.
g. If the Microsoft Digital Signature dialog appears, click Yes to continue.
15. Ensure all of the options of the printers you installed are configured in the printerproperties.
16. Log in on the client as a user.
17. Select [Start:Settings:Printers].
18. Wait for all disk activity to cease, then reboot the workstation to complete theinstallation of the new printer drivers from the server.
19. Repeat steps 16 through 18 for each client you need to upgrade.
dc02cc0299Page 24 Document Centre Technical Support Operations
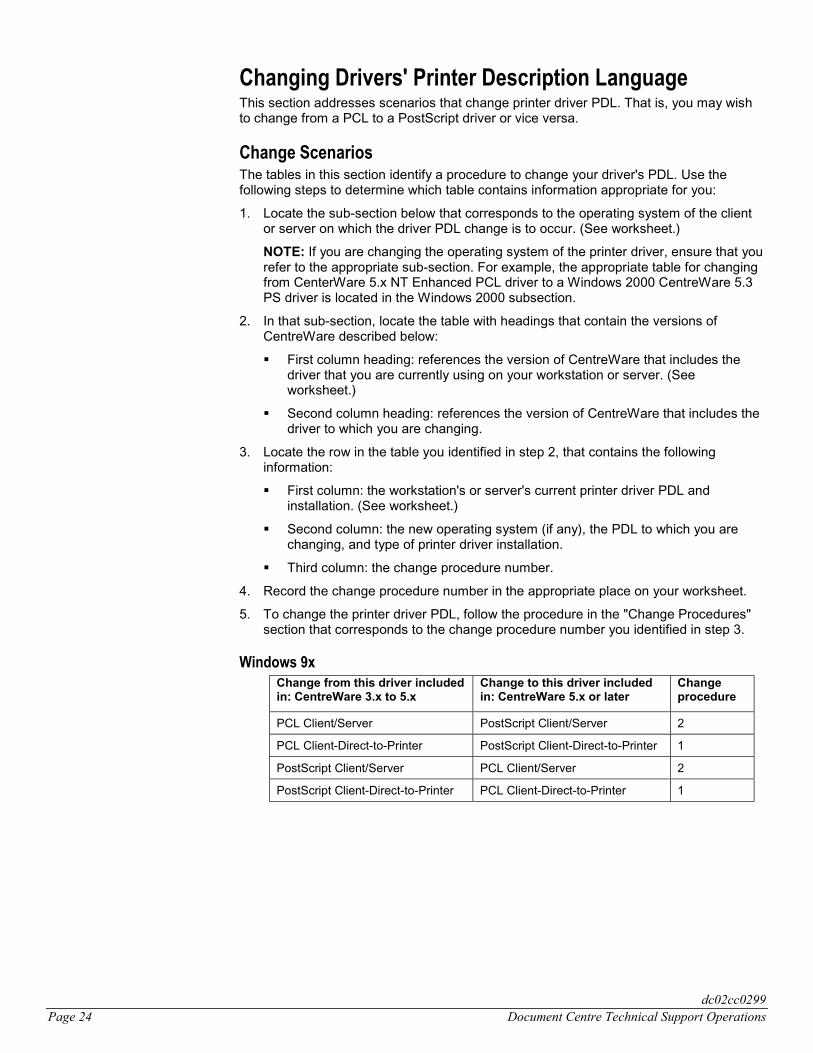
Changing Drivers' Printer Description LanguageThis section addresses scenarios that change printer driver PDL. That is, you may wishto change from a PCL to a PostScript driver or vice versa.
Change ScenariosThe tables in this section identify a procedure to change your driver's PDL. Use thefollowing steps to determine which table contains information appropriate for you:
1. Locate the sub-section below that corresponds to the operating system of the clientor server on which the driver PDL change is to occur. (See worksheet.)
NOTE: If you are changing the operating system of the printer driver, ensure that yourefer to the appropriate sub-section. For example, the appropriate table for changingfrom CenterWare 5.x NT Enhanced PCL driver to a Windows 2000 CentreWare 5.3PS driver is located in the Windows 2000 subsection.
2. In that sub-section, locate the table with headings that contain the versions ofCentreWare described below:
! First column heading: references the version of CentreWare that includes thedriver that you are currently using on your workstation or server. (Seeworksheet.)
! Second column heading: references the version of CentreWare that includes thedriver to which you are changing.
3. Locate the row in the table you identified in step 2, that contains the followinginformation:
! First column: the workstation's or server's current printer driver PDL andinstallation. (See worksheet.)
! Second column: the new operating system (if any), the PDL to which you arechanging, and type of printer driver installation.
! Third column: the change procedure number.
4. Record the change procedure number in the appropriate place on your worksheet.
5. To change the printer driver PDL, follow the procedure in the "Change Procedures"section that corresponds to the change procedure number you identified in step 3.
Windows 9xChange from this driver includedin: CentreWare 3.x to 5.x
Change to this driver includedin: CentreWare 5.x or later
Changeprocedure
PCL Client/Server PostScript Client/Server 2
PCL Client-Direct-to-Printer PostScript Client-Direct-to-Printer 1
PostScript Client/Server PCL Client/Server 2
PostScript Client-Direct-to-Printer PCL Client-Direct-to-Printer 1

dc02cc0299Document Centre Technical Support Operations Page 25
Windows NT 4.0Change from this driver includedin: CentreWare 5.x
Change to this driver includedin: CentreWare 5.3 or later
Changeprocedure
Enhanced PCL Client-Direct-to-Printer
Enhanced Postscript Client-Direct-to-Printer
3
Enhanced PCL Client/Server Enhanced Postscript Client/Server 4
Enhanced PCL Client-Direct-to-Printer
Standard Postscript Client-Direct-to-Printer
3
Enhanced PCL Client-Direct-to-Printer
Enhanced Postscript Client-Direct-to-Printer
3
Enhanced PCL Client/Server Standard Postscript Client/Server 4
Enhanced PCL Client/Server Enhanced Postscript Client/Server 4
Change from this driver includedin: CentreWare 3.x to 5.x
Change to this driver includedin: CentreWare 5.3 or later
Changeprocedure
Enhanced Postscript Client-Direct-to-Printer
Enhanced PCL Client-Direct-to-Printer
3
Enhanced Postscript Client/Server Enhanced PCL Client/Server 4
Change from this driver includedin: CentreWare 5.3
Change to this driver includedin: CentreWare 5.3 or later
Changeprocedure
Standard Postscript Client-Direct-to-Printer
Enhanced PCL Client-Direct-to-Printer
3
Standard Postscript Client/Server Enhanced PCL Client/Server 4
Windows 2000Change from this driver includedin: CentreWare 5.x
Change to this driver includedin: CentreWare 5.3 or later
Changeprocedure
Windows NT 4.0 Enhanced PCLClient-Direct-to-Printer
Windows NT 4.0 EnhancedPostscript Client-Direct-to-Printer
3
Windows NT 4.0 Enhanced PCLClient-Direct-to-Printer
Windows NT 4.0 StandardPostscript Client-Direct-to-Printer
3
Windows NT 4.0 Enhanced PCLClient-Direct-to-Printer
Windows NT 4.0 EnhancedPostscript Client-Direct-to-Printer
3
Windows NT 4.0 Enhanced PCLClient/Server
Windows NT 4.0 EnhancedPostscript Client/Server
4
Windows NT 4.0 Enhanced PCLClient/Server
Windows NT 4.0 EnhancedPostscript Client/Server
4
Windows NT 4.0 Enhanced PCLClient/Server
Windows NT 4.0 StandardPostscript Client/Server
4
Windows NT 4.0 Enhanced PCLClient/Server
Windows 2000 PostscriptClient/Server
4
Windows NT 4.0 Enhanced PCLClient-Direct-to-Printer
Windows 2000 Postscript Client-Direct-to-Printer
3
Change from this driver includedin: CentreWare 5.3
Change to this driver includedin: CentreWare 5.3 or later
Changeprocedure
Windows NT 4.0 StandardPostscript Client-Direct-to-Printer
Windows NT 4.0 Enhanced PCLClient-Direct-to-Printer
3
Windows NT 4.0 StandardPostscript Client/Server
Windows NT 4.0 Enhanced PCLClient/Server
4

dc02cc0299Page 26 Document Centre Technical Support Operations
Change from this driver includedin: CentreWare 3.x to 5.x
Change to this driver includedin: CentreWare 5.3 or later
Changeprocedure
Windows NT 4.0 EnhancedPostscript Client-Direct-to-Printer
Windows NT 4.0 Enhanced PCLClient-Direct-to-Printer
3
Windows NT 4.0 EnhancedPostscript Client-Direct-to-Printer
Windows NT 4.0 Enhanced PCLClient-Direct-to-Printer
3
Windows NT 4.0 EnhancedPostscript Client/Server
Windows NT 4.0 Enhanced PCLClient/Server
4
Windows NT 4.0 EnhancedPostscript Client/Server
Windows NT 4.0 Enhanced PCLClient/Server
4
Change Procedures Page Location TableChange Procedure 1 page 27
Change Procedure 2 pages 28-29
Change Procedure 3 page 30
Change Procedure 4 page 31
Change ProceduresBelow are the change procedures that correspond to the tables in the " Changing Drivers'Printer Description Language" section. These are the recommended procedures forchanging the Document Centre printer driver PDLs. Follow all of the steps in the changeprocedure you identified on the worksheet, to ensure you complete the changesuccessfully.
dc02cc0299Document Centre Technical Support Operations Page 27
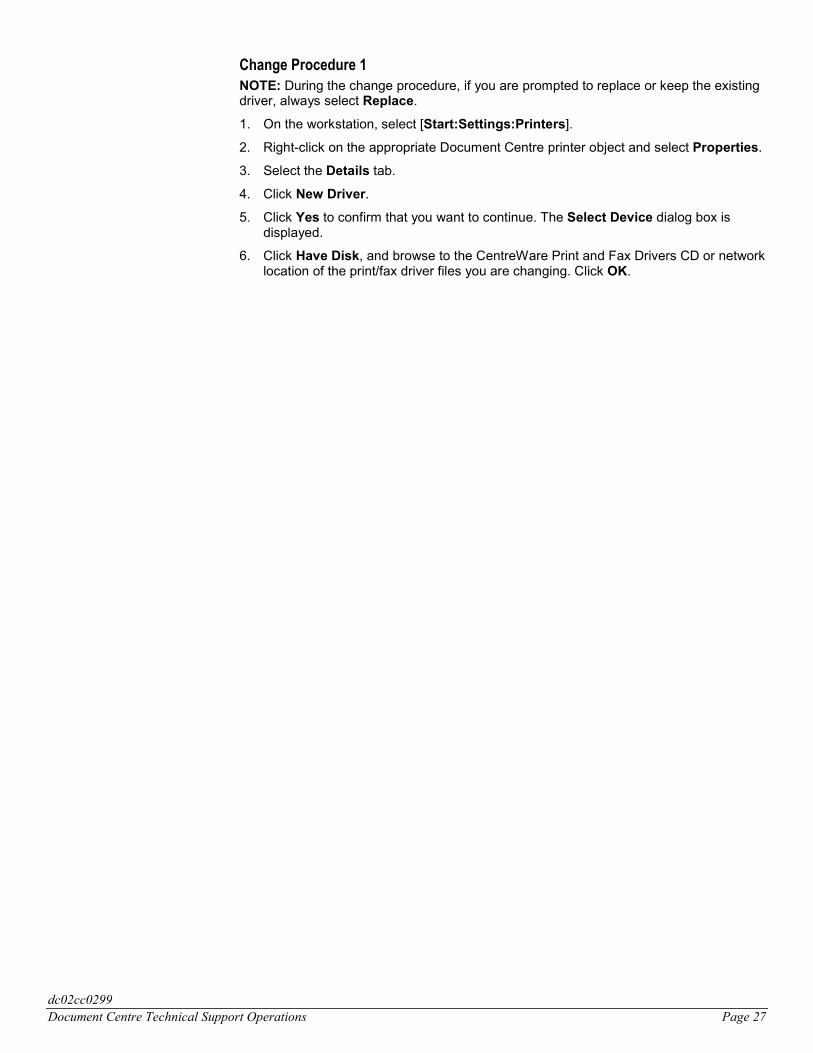
Change Procedure 1NOTE: During the change procedure, if you are prompted to replace or keep the existingdriver, always select Replace.
1. On the workstation, select [Start:Settings:Printers].
2. Right-click on the appropriate Document Centre printer object and select Properties.
3. Select the Details tab.
4. Click New Driver.
5. Click Yes to confirm that you want to continue. The Select Device dialog box isdisplayed.
6. Click Have Disk, and browse to the CentreWare Print and Fax Drivers CD or networklocation of the print/fax driver files you are changing. Click OK.

dc02cc0299Page 28 Document Centre Technical Support Operations
Change Procedure 2 - Three VersionsThis procedure has three versions, described below. To change your drivers, follow theprocedure that applies to your system's configuration.
Version 2a - For environments with Windows 9x servers sharing 9x drivers.
Version 2b - For environments with Windows NT 4.0 servers sharing 9x drivers.
Version 2c - For environments with Windows 2000 servers sharing 9x drivers. You mustdelete the entire printer share from the server and workstation(s), then reinstall it usingthe same driver PDL for both the print server and the printer share.
Version 2a
Use this procedure in environments with Windows 9x servers sharing 9x drivers.
NOTE: During the change procedure, if you are prompted to replace or keep the existingdriver, always select Replace.
1. On the workstation, select [Start:Settings:Printers].
2. Right-click on the appropriate Document Centre printer object and select Properties.
3. Select the Details tab.
4. Click New Driver.
5. Click Yes to confirm that you want to continue. The Select Device dialog box isdisplayed.
6. Click Have Disk, and browse to the CentreWare Print and Fax Drivers CD or networklocation of the print/fax driver files you are changing. Click OK.
7. Log on to a client workstation as a user (non-administrator).
8. Select [Start:Settings:Printers].
9. Wait for all disk activity to cease, then reboot the workstation to complete theinstallation of the new printer drivers from the server.
10. Repeat steps 7 through 9 for each client you need to upgrade.
Version 2b
Use this procedure in environments with Windows NT 4.0 servers sharing 9x driver. .
1. On the server, select [Start:Settings:Printers].
2. Right-click on the appropriate printer object and select Properties.
3. On the General tab, click New Driver.
4. Click Yes to confirm that you want to change the print/fax driver and access the AddPrinter Wizard.
5. Click Have Disk, and browse to the CentreWare Print and Fax Drivers CD or networklocation of the print and fax driver files you are changing. Click OK.
6. Verify the path and click OK.
7. Select Yes or No to identify the Document Centre as your default printer. Click Next.
8. Indicate if you want to print a test page. Click Next.
9. Click Finish. The new print/fax driver is installed.
10. Log on to a client workstation as a user (non-administrator).
11. Select [Start:Settings:Printers].
12. Wait for all disk activity to cease, then reboot the workstation to complete theinstallation of the new printer drivers from the server.
13. Repeat steps 10 through 12 for each client you need to upgrade.
dc02cc0299Document Centre Technical Support Operations Page 29
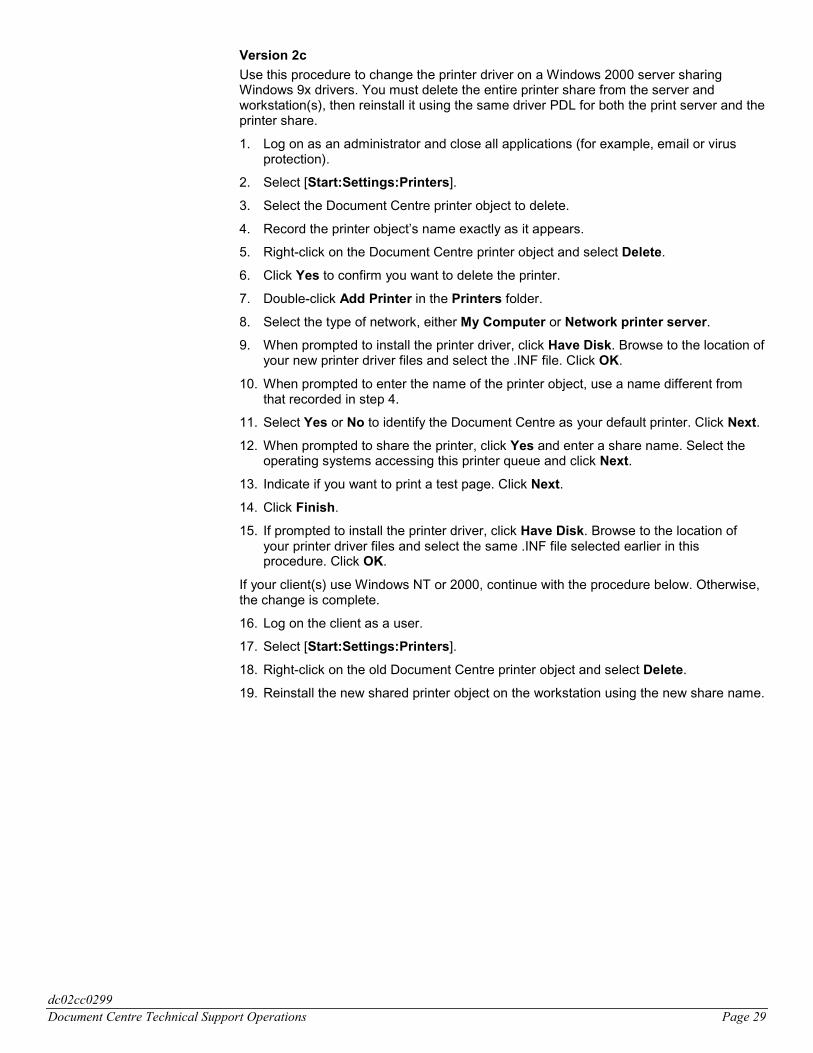
Version 2c
Use this procedure to change the printer driver on a Windows 2000 server sharingWindows 9x drivers. You must delete the entire printer share from the server andworkstation(s), then reinstall it using the same driver PDL for both the print server and theprinter share.
1. Log on as an administrator and close all applications (for example, email or virusprotection).
2. Select [Start:Settings:Printers].
3. Select the Document Centre printer object to delete.
4. Record the printer object�s name exactly as it appears.
5. Right-click on the Document Centre printer object and select Delete.
6. Click Yes to confirm you want to delete the printer.
7. Double-click Add Printer in the Printers folder.
8. Select the type of network, either My Computer or Network printer server.
9. When prompted to install the printer driver, click Have Disk. Browse to the location ofyour new printer driver files and select the .INF file. Click OK.
10. When prompted to enter the name of the printer object, use a name different fromthat recorded in step 4.
11. Select Yes or No to identify the Document Centre as your default printer. Click Next.
12. When prompted to share the printer, click Yes and enter a share name. Select theoperating systems accessing this printer queue and click Next.
13. Indicate if you want to print a test page. Click Next.
14. Click Finish.
15. If prompted to install the printer driver, click Have Disk. Browse to the location ofyour printer driver files and select the same .INF file selected earlier in thisprocedure. Click OK.
If your client(s) use Windows NT or 2000, continue with the procedure below. Otherwise,the change is complete.
16. Log on the client as a user.
17. Select [Start:Settings:Printers].
18. Right-click on the old Document Centre printer object and select Delete.
19. Reinstall the new shared printer object on the workstation using the new share name.
dc02cc0299Page 30 Document Centre Technical Support Operations
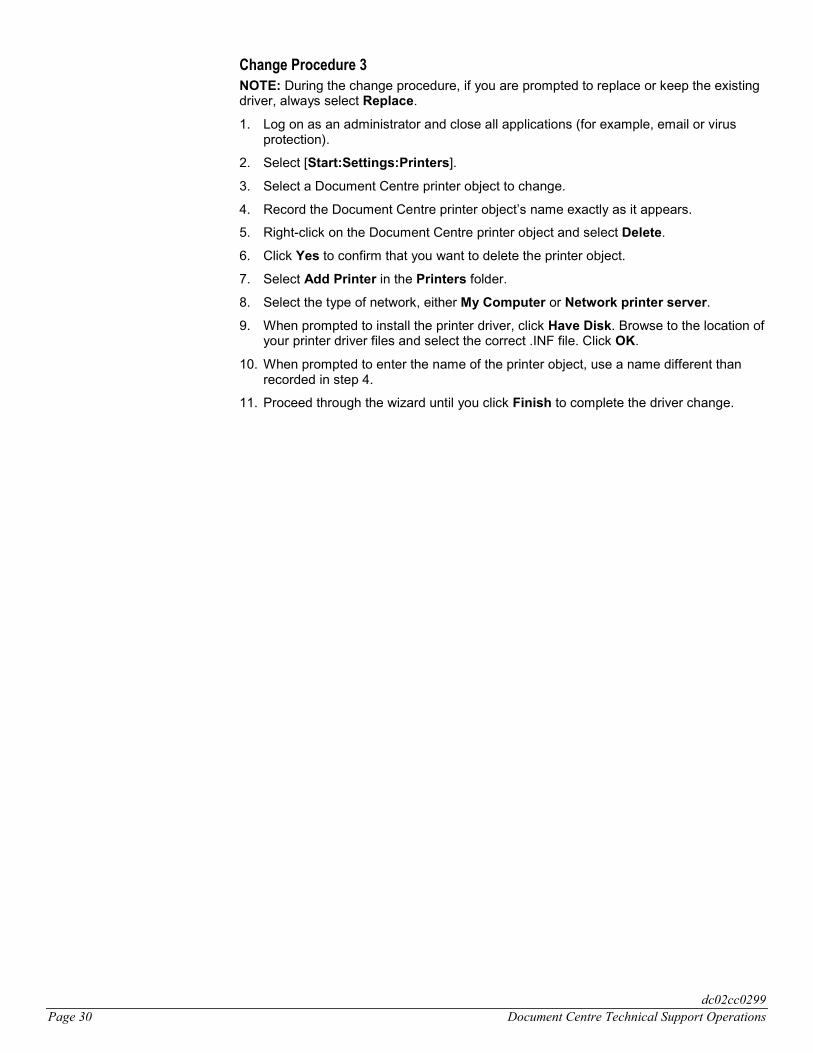
Change Procedure 3NOTE: During the change procedure, if you are prompted to replace or keep the existingdriver, always select Replace.
1. Log on as an administrator and close all applications (for example, email or virusprotection).
2. Select [Start:Settings:Printers].
3. Select a Document Centre printer object to change.
4. Record the Document Centre printer object�s name exactly as it appears.
5. Right-click on the Document Centre printer object and select Delete.
6. Click Yes to confirm that you want to delete the printer object.
7. Select Add Printer in the Printers folder.
8. Select the type of network, either My Computer or Network printer server.
9. When prompted to install the printer driver, click Have Disk. Browse to the location ofyour printer driver files and select the correct .INF file. Click OK.
10. When prompted to enter the name of the printer object, use a name different thanrecorded in step 4.
11. Proceed through the wizard until you click Finish to complete the driver change.

dc02cc0299Document Centre Technical Support Operations Page 31
Change Procedure 4NOTE: After you use a version of this upgrade procedure be aware of the following:
An issue exists with the Windows NT Enhanced PCL printer driver where theprocess spoolss.exe consumes all available resources of the host machine (PCLSPIN). This only occurs when all the following conditions are met:
! A Windows NT Enhanced PCL printer driver is loaded on a Windows 2000server.
! This Windows NT Enhanced PCL printer driver is shared out to NT clientswhere a user(s) has Administrator rights on the Windows 2000 server ordomain.
! Remote administration of the printer object or accessing the printerproperties, document defaults or printer settings of the NT Enhanced PCLdriver loaded on the Windows 2000 server is attempted from an NT clientwhere the user has administrator rights on the Windows 2000 server ordomain. This can occur either by accessing the printer object in the printersfolder or through the print dialogue box of an application.
Both CPU utilization and memory resources will rise and continue to climb untilthey are exhausted.
To avoid this scenario, users with Administrator rights to a Windows 2000 printserver or domain must administer the printer object for the Windows NTEnhanced PCL printer driver printer driver from either a Windows 2000 client orfrom the server itself.
NOTE: During the change procedure, if you are prompted to replace or keep the existingdriver, always select Replace.
1. Log on as an administrator and close all applications (for example, email or virusprotection).
2. Select [Start:Settings:Printers].
3. Select a Document Centre printer object to change.
4. Record the Document Centre print object�s name exactly as it appears.
5. Right-click on the Document Centre printer object and select Delete.
6. Click Yes to confirm that you want to delete the printer.
7. Select Add Printer in the Printers folder.
8. Select the type of network, either My Computer or Network printer server.
9. When prompted to install the printer driver, click Have Disk. Browse to the location ofyour printer driver files and select the correct .INF file. Click OK.
10. If prompted to enter the name of the printer object, use a name different than the onerecorded in step 4.
11. Proceed through the wizard until you click Finish to complete the driver change.
12. Log on the client as a user.
13. Select [Start:Settings:Printers].
14. Right-click on the old Document Centre printer object and select Delete.
15. Reinstall the new shared printer object on the workstation using the new sharedprinter name.
dc02cc0299Page 32 Document Centre Technical Support Operations
Additional InformationXerox Document Centre Technical Support Organization welcomes feedback on all DCTips documentation - send feedback via e-mail to:[email protected].
Other DC Tips are available at the following URL:http://www.xerox.com/DocumentCentreFamily/Tips.
XEROX ®, The Document Company ®, the digital X ®, and all Xerox product names are trademarks of XEROXCORPORATION. Other trademarks belong to their respective owners.
Copyright © XEROX CORPORATION 2002. All Rights Reserved.

WorksheetUse this worksheet to record important information about your print driverupgrade or PDL change.
Prequisites
1. Server or Client Operating System: __________________
2. Current Print Driver:
Operating PDL VersionSystem
❏ Standard ❏ Enhanced
3. CentreWare Version thatIncludes Current Driver: _________________________
4. Type of DriverInstallation: ❏ Client-Direct-to Printer
❏ Client/Server
Procedure
❏ Upgrade No. ______
❏ Change No. ______