xi commerce & science information technology practical …€¦ · commerce & science...
TRANSCRIPT

1
XI
Commerce & Science
Information technology
Practical No. 1
Identification of Computer components & understanding Lab set up
1) Computer
A computer is a programmable machine designed to sequentially and
automatically carry out a sequence of arithmetic or logical operation.
The basic components of a computer are –
Input Unit
This unit contains devices with the help of which we enter data into
computer. This unit makes link between user and computer. The input
devices translate the information into the form understandable by computer.
CPU (Central Processing Unit)
2
CPU is considered as the brain of the computer. CPU performs all types of
data processing operations. It stores data, intermediate results and
instructions (program). It controls the operation of all parts of computer.
CPU itself has following three components
1) ALU(Arithmetic Logic Unit)
2) Memory Unit
3) Control Unit
Output Unit
Output unit consists of devices with the help of which we get the
information from computer. This unit is a link between computer and users.
Output devices translate the computer's output into the form understandable
by users.
2) Components of computer
Computer system consists of hardware and software. A combination of
hardware and software forms a usable computing system.
.Computer hardware (usually simply called hardware when
a computing context is implicit) is the collection of physical elements that
constitutes a computer system.
Computer Software is any set of machine-readable instructions that directs
a computer's processor to perform specific operations.
Computer hardware
a. Mother board

3
A motherboard (sometimes alternatively known as
the mainboard, system board, planar board or logic board) is the
main printed circuit board (PCB) found in computers and other expandable
systems. It holds many of the crucial electronic components of the system,
such as the central processing unit (CPU) and memory, and provides
connectors for other peripherals.
b. RAM
RAM (Random Access Memory) is a form of computer data storage. A
random-access memory device allows data items to be read and written in
approximately the same amount of time regardless of the order in which
data items are accessed.
c. Cables
4
A cable comprises two or more wires running side by side and bonded,
twisted, or braided together to form a single assembly, the ends of which
can be connected to two devices, enabling the transfer of signals from one
device to the other.
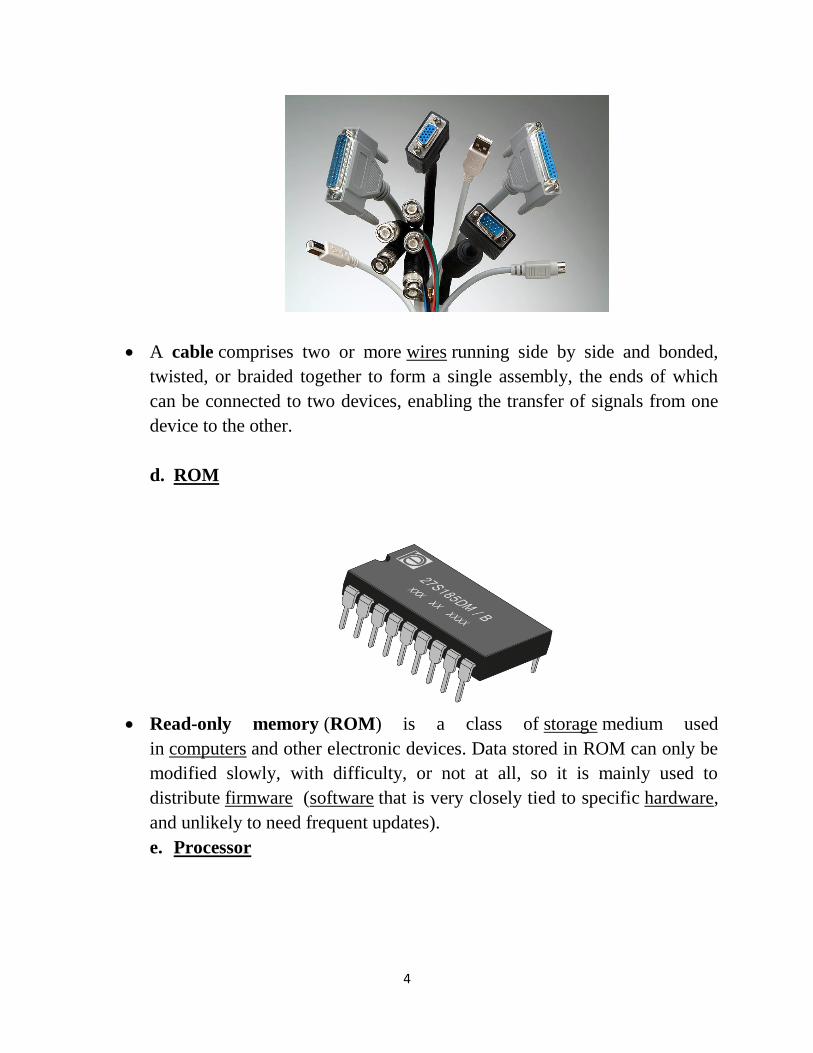
d. ROM
Read-only memory (ROM) is a class of storage medium used
in computers and other electronic devices. Data stored in ROM can only be
modified slowly, with difficulty, or not at all, so it is mainly used to
distribute firmware (software that is very closely tied to specific hardware,
and unlikely to need frequent updates).
e. Processor

5
A processor is the logic circuitry that responds to and processes the
basic instructions that drives a computer.
The term processor has generally replaced the term central processing unit
(CPU). The processor in a personal computer or embedded in small devices
is often called a microprocessor.
Computer software – Software is often divided into two categories
1) System Software – System Software has direct control and access to
your computer hardware, and memory locations.
2) Application Software – Application Software runs under System
Software, and are made to do a specific task, which have indirect
access to the hardware.

6
Practical No. 2
Exercise on Microsoft Windows, Start Menus and Accessories
Microsoft Windows
Microsoft Windows (or simply Windows) is a meta family
of graphical operating systems developed, marketed, and sold by Microsoft.
Windows is a personal computer operating system that, together with some
commonly used business applications such as Microsoft Word and Excel, has
become a "standard" for individual users in most corporations as well as in most
homes.
It consists of several families of operating systems.
The Desktop Environment

7
The desktop environment is made up of several parts including:
Desktop Icons
The Task Bar
The Clock
The Start Button
The Start Button
The start button is located on the lower left hand corner of your screen – on the
taskbar.
It’s used to access all of the programs on the computer so you can ―start‖ them.

8
Microsoft Paint
Microsoft Paint allows you to produce your own pictures or edit existing ones.
To run Microsoft Paint independently:
i. Open the Windows Start menu, select Programs then Accessories and finally
Paint
ii. [Maximize] the window so that the Paint window fills the screen Your
screen should now appear as below:
The white area on the screen is your painting canvas, below this is a palette of
28 colors, while to the left is a toolbox.
Menus
Four of the Paint menus - File, Edit, View and Help—are common to almost all
Windows programs. Some of the commands available, though, are specific to
this program.
Menus that are special to Windows Paint are Image and Colors.

9
The toolbox
All the little grey boxes down the left are called the tools and together they
make the toolbox.
Under the toolbox is a small area where you see different options according to
which tool you're using.
Paste Options

10
In this picture, with the selection tool active, you have a choice between paste
opaque and paste transparent (selected, as you can tell by the dark
background).
When you have white as your background color—the color selected by the
right mouse button—and have chosen paste transparent, anything you select
from a picture with a white background can be pasted without a rectangle of
white surrounding it.
Practical No. 3
MS-Word 2007
Introduction –
Microsoft (MS) Word 2007 is one of the most popular and important programs
in the Microsoft Office package which is used to create, edit and print
professional looking documents like letters, papers, reports, memos,
newsletters, booklets and manuals.

11
The Microsoft Office Button
In the upper-left corner of the Word 2007 window is the Microsoft Office
button. When you click the button, a menu appears. We can use the menu to
create a new file, open an existing file, save a file, and perform many other
tasks.
The Quick Access Toolbar
Next to the Microsoft Office button is the Quick Access toolbar. The Quick
Access toolbar provides you with access to commands you frequently use. By
default Save, Undo, and Redo appear on the Quick Access toolbar.

12
The Ribbon
We use commands to tell Microsoft Word what to do. In Microsoft Word 2007,
we use the Ribbon to issue commands. The Ribbon is located near the top of the
screen, below the Quick Access toolbar. At the top of the Ribbon are several
tabs; clicking a tab displays several related command groups.
Within each group are related command buttons. We click buttons to issue
commands or to access menus and dialog boxes. We may also find a dialog box
launcher in the bottom-right corner of a group. Clicking the dialog box launcher
gives you access to additional commands via a dialog box.
The Text Area
We type our document in the text area. The blinking vertical line in the upper-
left corner of the text area is the cursor. It marks the insertion point. As you
type, our text displays at the cursor location. The horizontal line next to the
cursor marks the end of the document.

13
The Ruler
The ruler is found below the Ribbon.
We can use the ruler to change the format of your document quickly. If our
ruler is not visible, follow the steps listed here:
1. Click the View tab to choose it.
14
2. Click the check box next to Ruler in the Show/Hide group. The ruler appears
below the Ribbon.
The Vertical and Horizontal and Vertical Scroll Bars
The vertical and horizontal scroll bars enable us to move up, down, and across
your window simply by dragging the icon located on the scroll bar.
The vertical scroll bar is located along the right side of the screen. The
horizontal scroll bar is located just above the status bar.
To move up and down your document, click and drag the vertical scroll bar up
and down.
To move back and forth across your document, click and drag the horizontal
scroll bar back and forth. You won't see a horizontal scroll bar if the width of
your document fits on your screen.
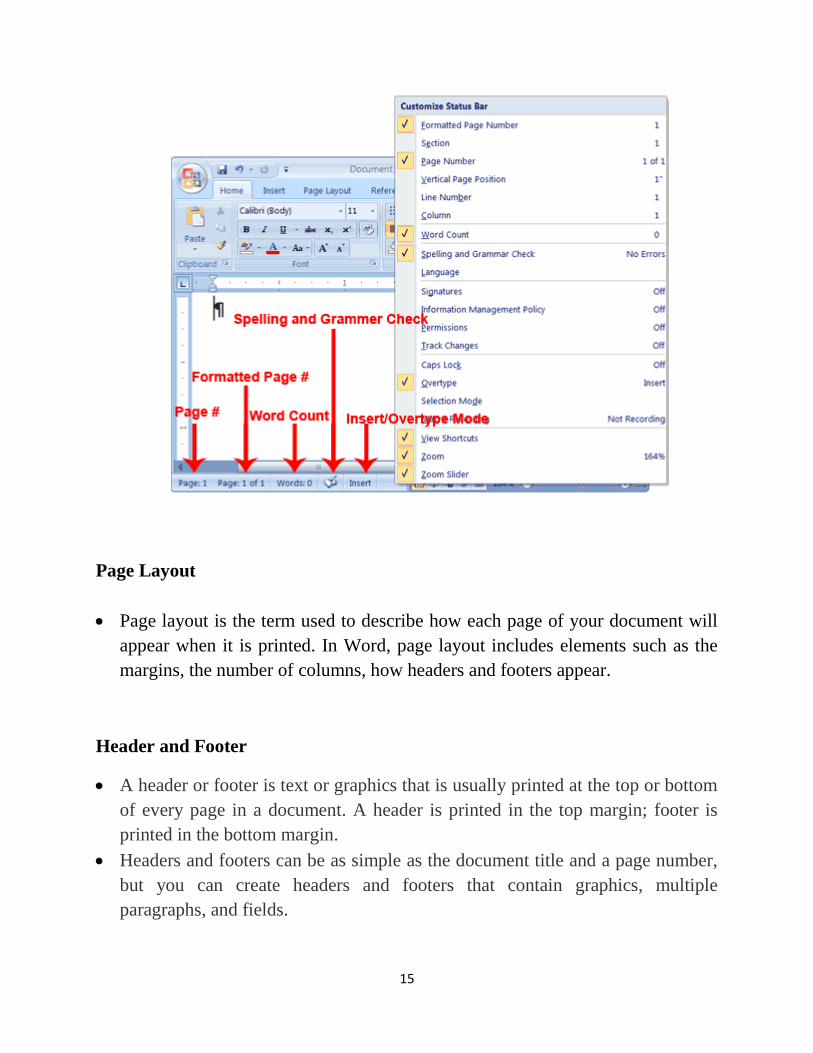
The Status Bar
The Status bar appears at the very bottom of your window and provides such
information as the current page and the number of words in your document.
We can change what displays on the Status bar by right-clicking on the Status
bar and selecting the options you want from the Customize Status Bar menu.
We click a menu item to select it.
We click it again to deselect it. A check mark next to an item means it is
selected.
15
Page Layout
Page layout is the term used to describe how each page of your document will
appear when it is printed. In Word, page layout includes elements such as the
margins, the number of columns, how headers and footers appear.
Header and Footer
A header or footer is text or graphics that is usually printed at the top or bottom
of every page in a document. A header is printed in the top margin; footer is
printed in the bottom margin.
Headers and footers can be as simple as the document title and a page number,
but you can create headers and footers that contain graphics, multiple
paragraphs, and fields.
16
Practical No. 4
Mail Merge
Introduction –
It is used to send a document to many customers on his different address and
also use to create labels from entities in a data source.
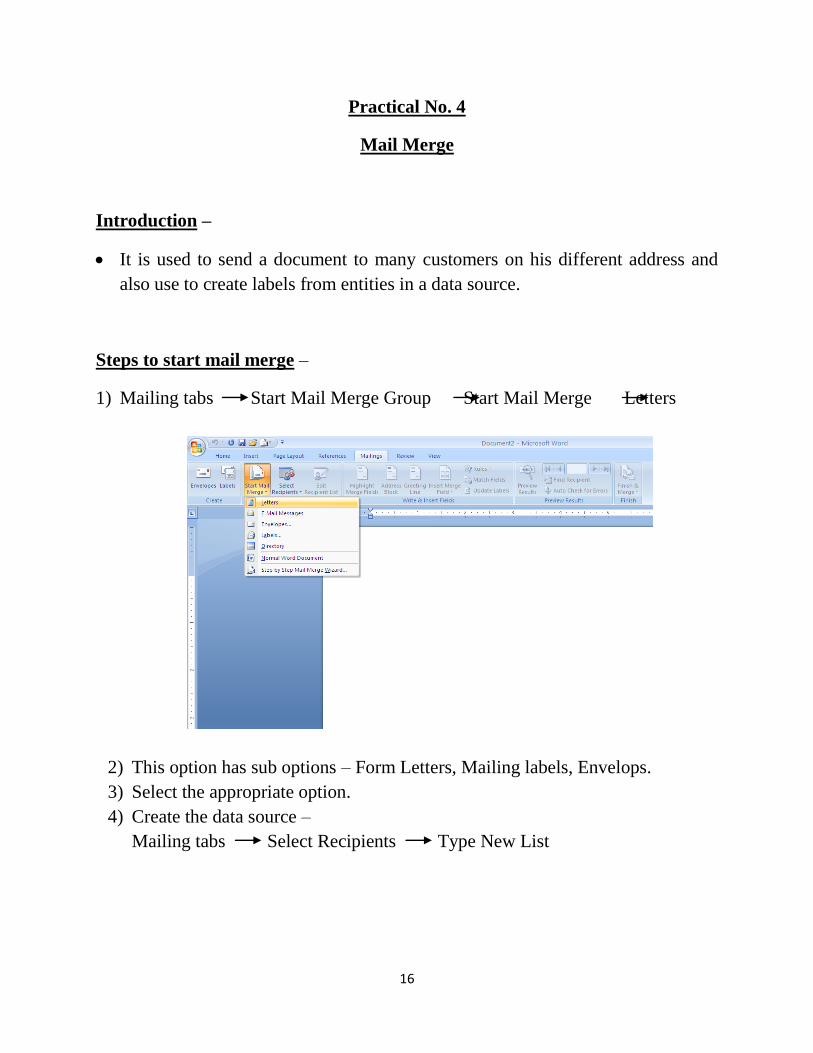
Steps to start mail merge –
1) Mailing tabs Start Mail Merge Group Start Mail Merge Letters
2) This option has sub options – Form Letters, Mailing labels, Envelops.
3) Select the appropriate option.
4) Create the data source –
Mailing tabs Select Recipients Type New List

17
Then click OK and Save it.

18
5) Choose Insert merge field option.
6) Type the content of letter.
7) Click on preview result.
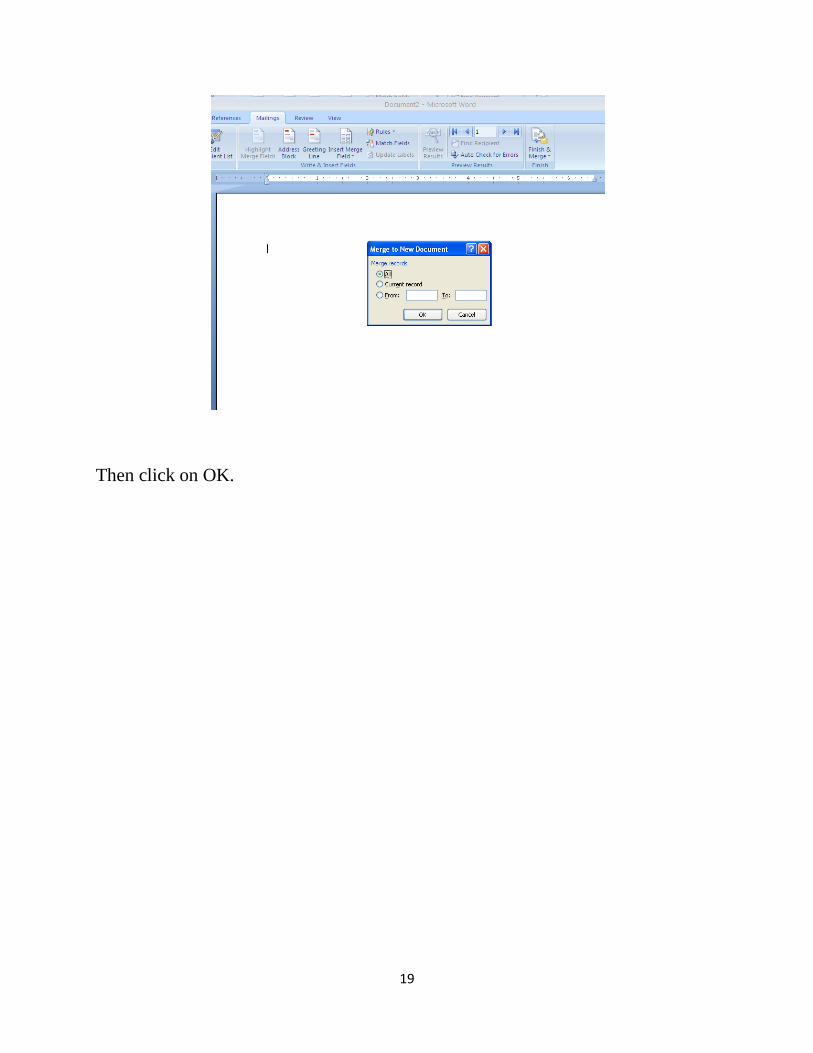
8) Click on Finish & Merge –
Mailing tabs Finish & Merge Edit Individual Documents
19
Then click on OK.
20
Practical no. 5
Create a table using ms-excel for calculate net earnings
(using maths functions)
Question:
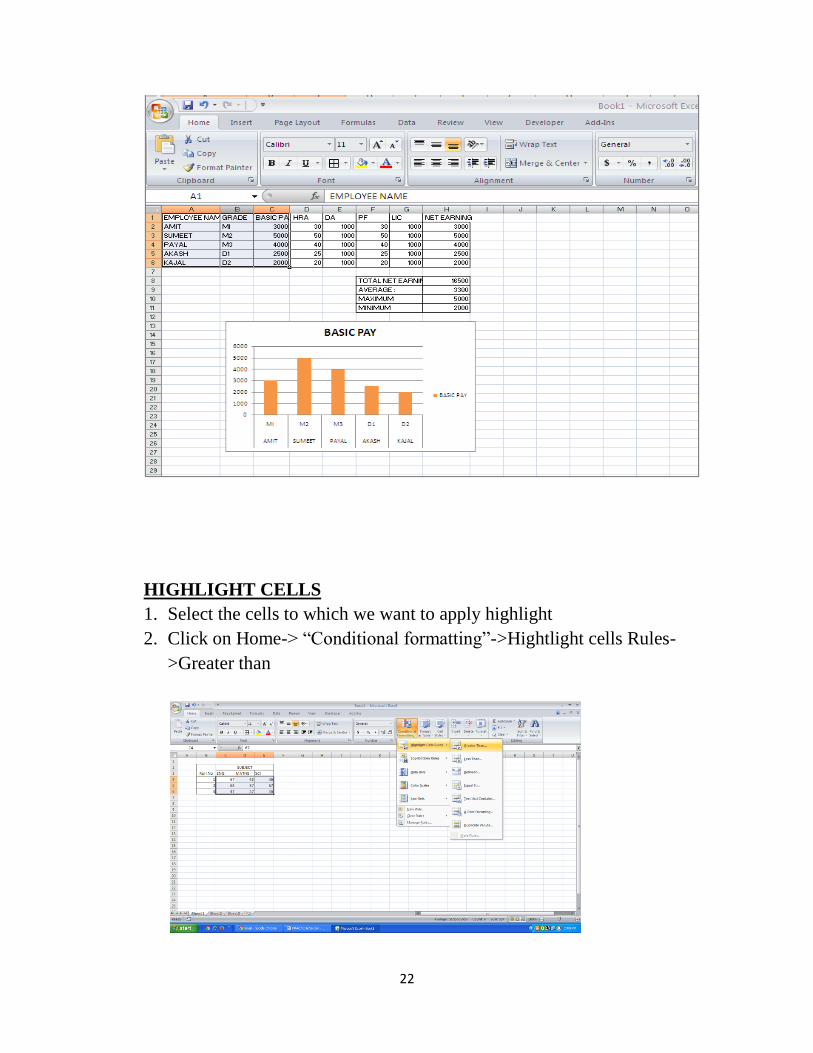
Create table with Employee name, grade and basic pay.
Add 5 additional Columns HRA, DA, PF, LIC and Net Earnings.
Calculate HRA(10% of BASIC),DA(additional 1000/-), PF(10% of
BASIC),LIC(AMOUNT 1000/- as compulsory saving towards LIC).
Calculate Total Net earnings.
Find Sum, Average, maximum and minimum of net earnings.
Solution:
Excel:
Excel is a spreadsheet program. A spreadsheet is a grid of rows and columns that
helps organize, summarize, and calculate data.
Ribbon:
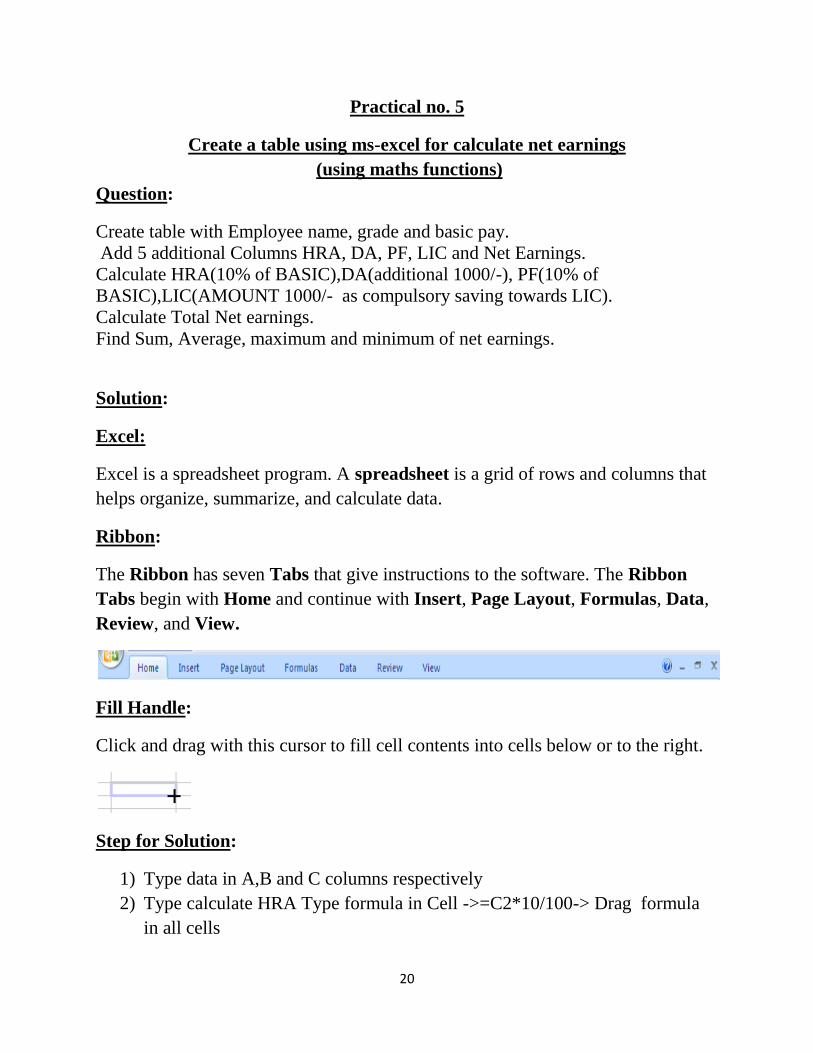
The Ribbon has seven Tabs that give instructions to the software. The Ribbon
Tabs begin with Home and continue with Insert, Page Layout, Formulas, Data,
Review, and View.
Fill Handle:
Click and drag with this cursor to fill cell contents into cells below or to the right.
Step for Solution:
1) Type data in A,B and C columns respectively
2) Type calculate HRA Type formula in Cell ->=C2*10/100-> Drag formula
in all cells

21
3) Add 1000 in DA column.
4) TO calculate PF type formula in cell->=C2*10/100->formula in all cells
5) Add 1000 in LIC column.
6) To calculate Net Earnings-> =(C2+D2+E2)-(F2+G2)
7) Calculate total net earnings->=sum(cell range)
8) Calculate total net earnings->=sum(cell range)
9) Calculate average earning->=Avg (cell range)
10) Calculate maximum earnings->=max(cell range)
11) Calculate minimum earnings->=min(cell range)
12) Save the worksheet as emp.xlsx
Output:
Create chart by selecting appropriate data :
Click on Insert -> Column chart
22
HIGHLIGHT CELLS
1. Select the cells to which we want to apply highlight
2. Click on Home-> ―Conditional formatting‖->Hightlight cells Rules-
>Greater than
0
1000
2000
3000
4000
5000
6000
MI M2 M3 D1 D2
AMIT SUMEET PAYAL AKASH KAJAL
BASIC PAY
BASIC PAY
23
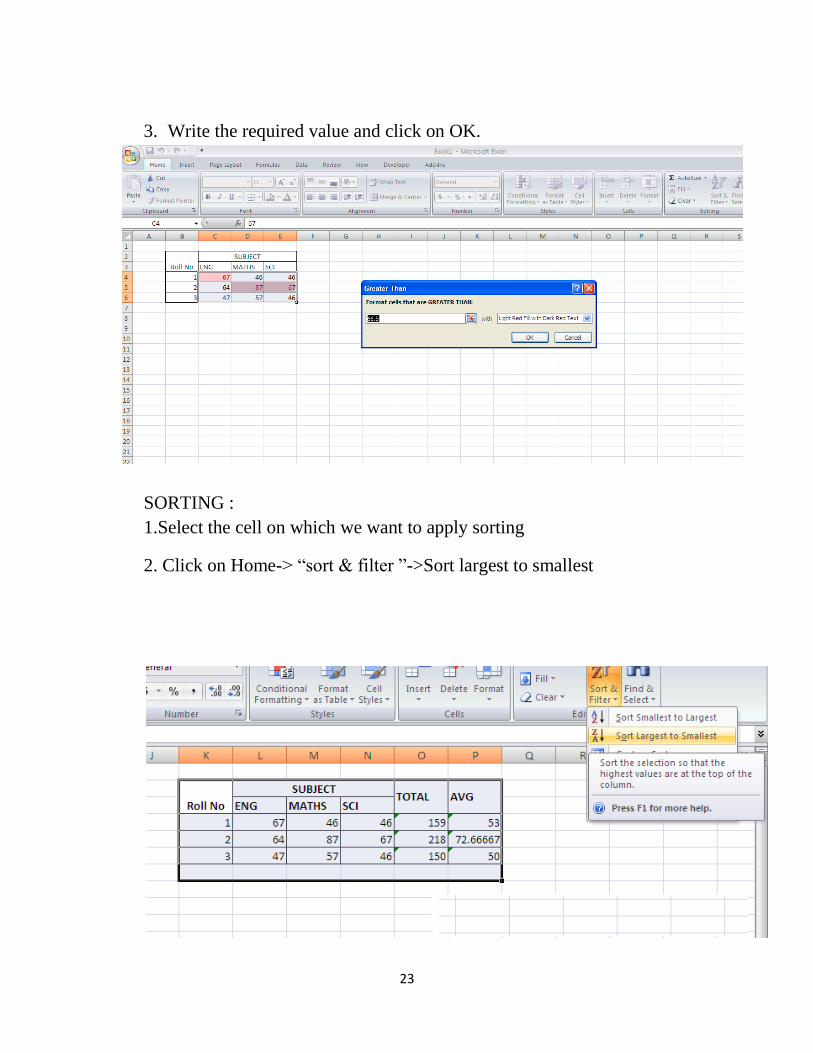
3. Write the required value and click on OK.
SORTING :
1.Select the cell on which we want to apply sorting
2. Click on Home-> ―sort & filter ‖->Sort largest to smallest
24
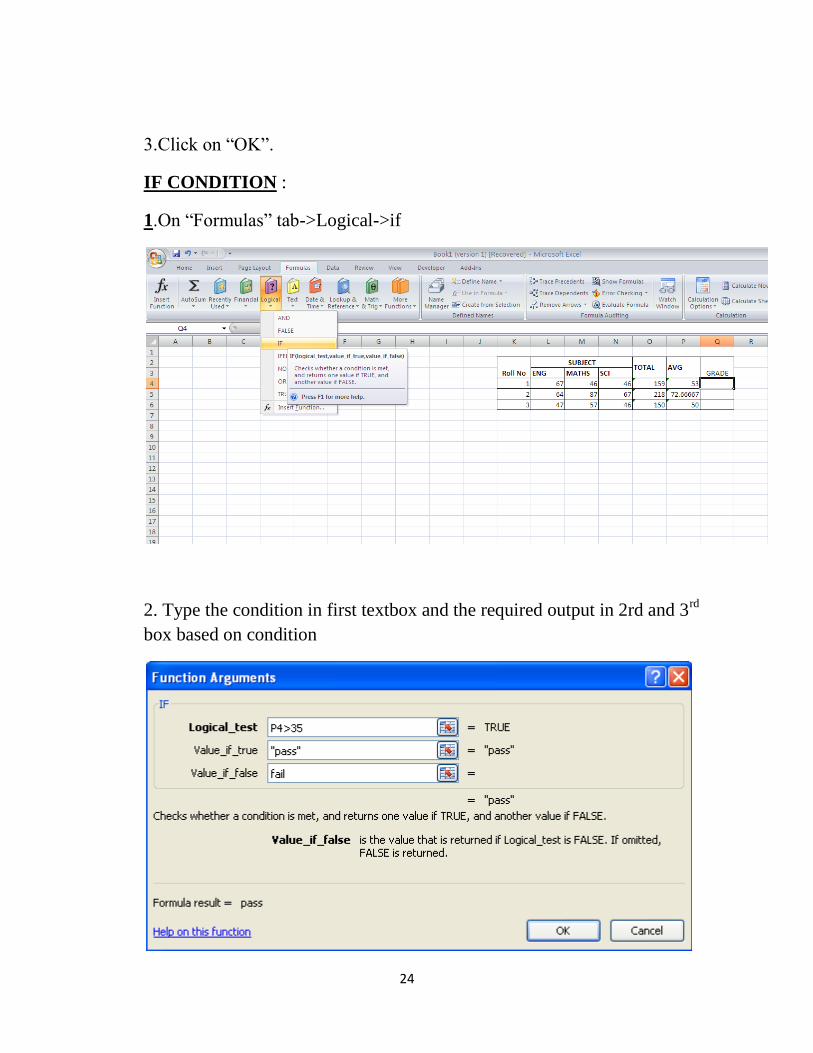
3.Click on ―OK‖.
IF CONDITION :
1.On ―Formulas‖ tab->Logical->if
2. Type the condition in first textbox and the required output in 2rd and 3rd
box based on condition
25
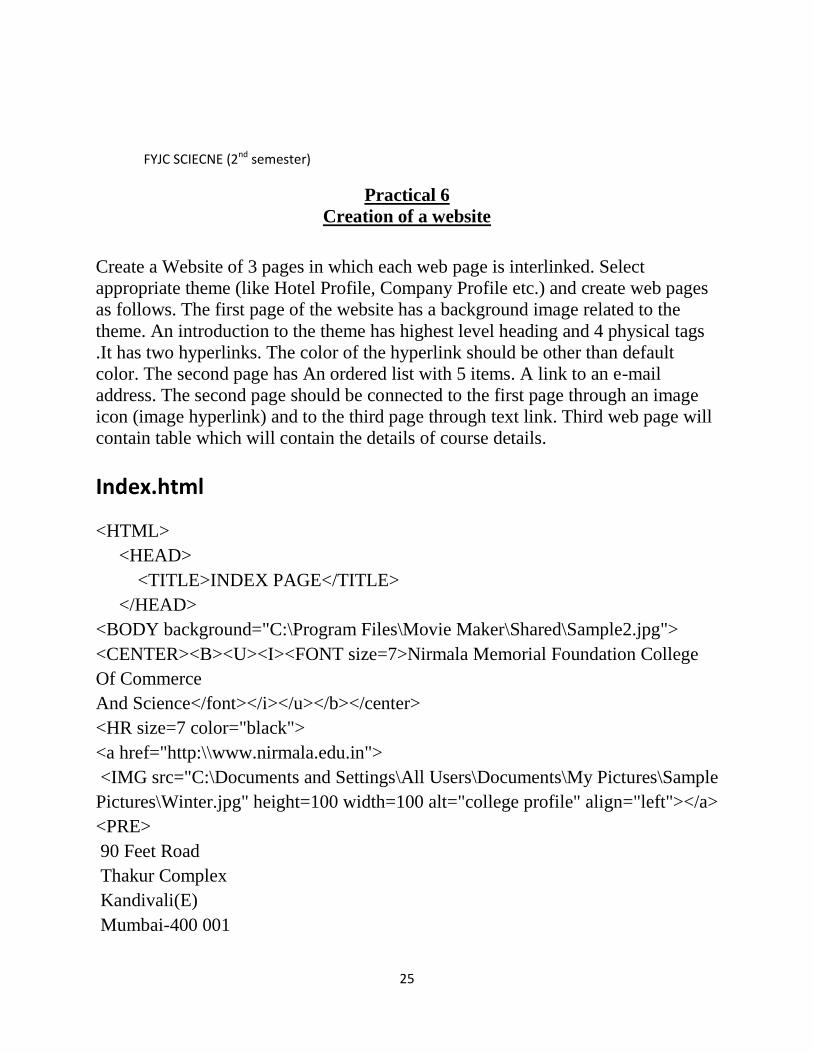
FYJC SCIECNE (2nd semester)
Practical 6
Creation of a website
Create a Website of 3 pages in which each web page is interlinked. Select
appropriate theme (like Hotel Profile, Company Profile etc.) and create web pages
as follows. The first page of the website has a background image related to the
theme. An introduction to the theme has highest level heading and 4 physical tags
.It has two hyperlinks. The color of the hyperlink should be other than default
color. The second page has An ordered list with 5 items. A link to an e-mail
address. The second page should be connected to the first page through an image
icon (image hyperlink) and to the third page through text link. Third web page will
contain table which will contain the details of course details.
Index.html
<HTML>
<HEAD>
<TITLE>INDEX PAGE</TITLE>
</HEAD>
<BODY background="C:\Program Files\Movie Maker\Shared\Sample2.jpg">
<CENTER><B><U><I><FONT size=7>Nirmala Memorial Foundation College
Of Commerce
And Science</font></i></u></b></center>
<HR size=7 color="black">
<a href="http:\\www.nirmala.edu.in">
<IMG src="C:\Documents and Settings\All Users\Documents\My Pictures\Sample
Pictures\Winter.jpg" height=100 width=100 alt="college profile" align="left"></a>
<PRE>
90 Feet Road
Thakur Complex
Kandivali(E)
Mumbai-400 001

26
</PRE>
<HR size=7 color="black">
<P ALIGN="RIGHT">
<a href="page2.html">Goto page2</a><br>
<a href="page3.html">Goto page3</a></p>
</body>
</html>
Output:
Page2.html
<html>
<head><title>Order list</title></head>
<body bgcolor=‖pink‖>
<h1>Courses</h1>
<ol>
<li>FYJC sci</li>

27
<li> SYJC sci </li>
<li> FYJC com </li>
<li>SYJC com</li>
</li>
</ol>
<p align=‖right‖><a href=‖page3.html‖>page3</p></a>
</body>
</html>
Output:
Page3. Html
<!-- Program to create a web site-->
<HTML>
<HEAD>
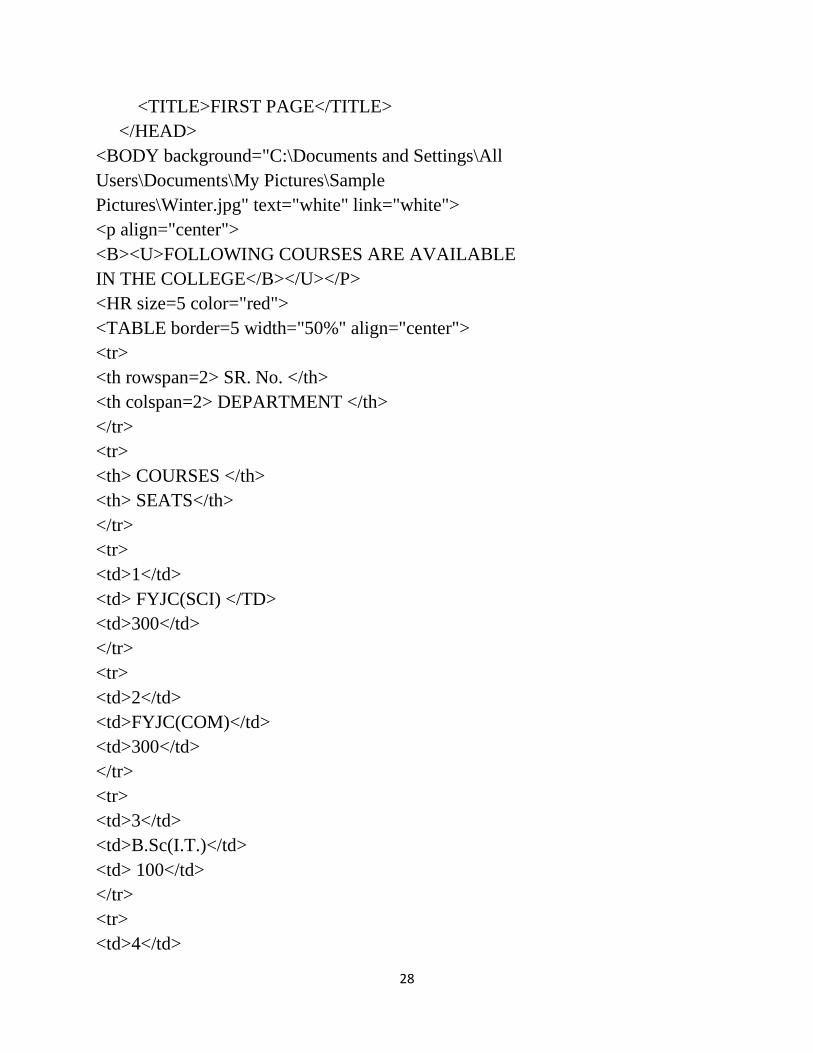
28
<TITLE>FIRST PAGE</TITLE>
</HEAD>
<BODY background="C:\Documents and Settings\All
Users\Documents\My Pictures\Sample
Pictures\Winter.jpg" text="white" link="white">
<p align="center">
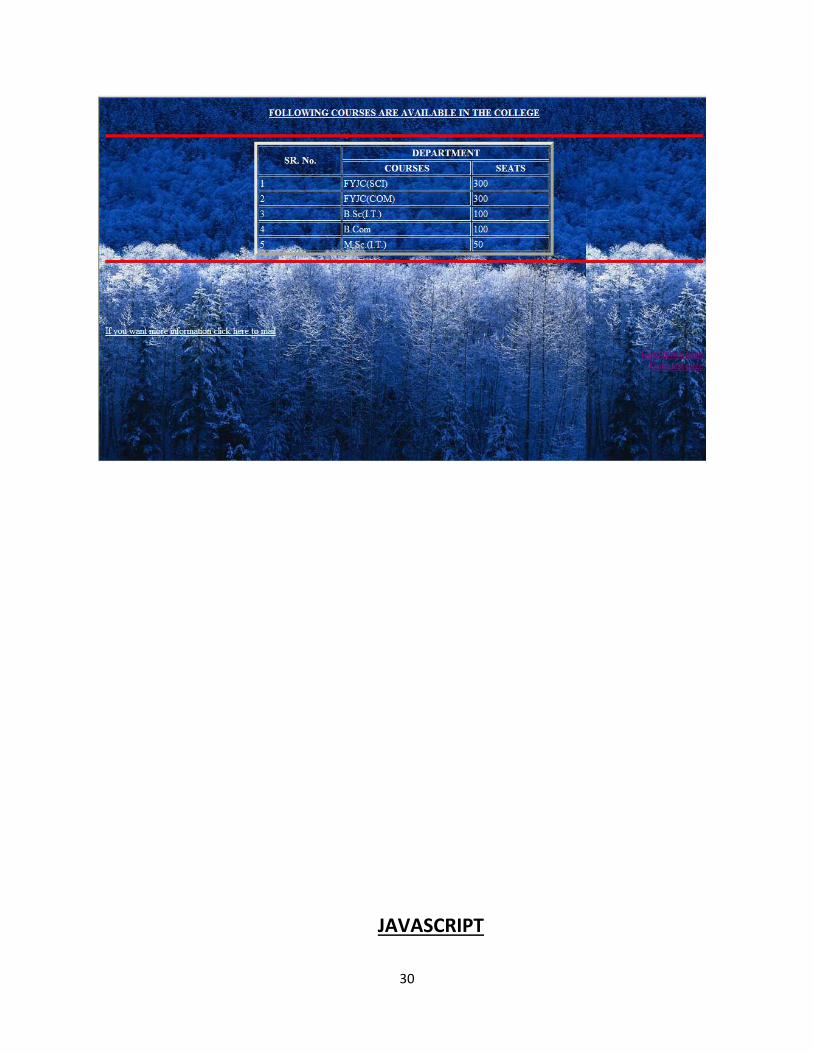
<B><U>FOLLOWING COURSES ARE AVAILABLE
IN THE COLLEGE</B></U></P>
<HR size=5 color="red">
<TABLE border=5 width="50%" align="center">
<tr>
<th rowspan=2> SR. No. </th>
<th colspan=2> DEPARTMENT </th>
</tr>
<tr>
<th> COURSES </th>
<th> SEATS</th>
</tr>
<tr>
<td>1</td>
<td> FYJC(SCI) </TD>
<td>300</td>
</tr>
<tr>
<td>2</td>
<td>FYJC(COM)</td>
<td>300</td>
</tr>
<tr>
<td>3</td>
<td>B.Sc(I.T.)</td>
<td> 100</td>
</tr>
<tr>
<td>4</td>

29
<td>B.Com</td>
<td>100</td>
</tr>
<tr>
<td>5</td>
<td>M.Sc.(I.T.)</td>
<td>50</td>
</tr>
</table>
<hr size=5 color="red">
<br><br><br><br><br>
<p>
<a href="mailto:[email protected]">
If you want more information click here to mail
</a></p>
<p align="right">
<a href="index.html">Goto Index page</a>
<br>
<a href="page3.html">Goto last page</a><br>
</p>
</body>
</html>
Output:
30
JAVASCRIPT
31
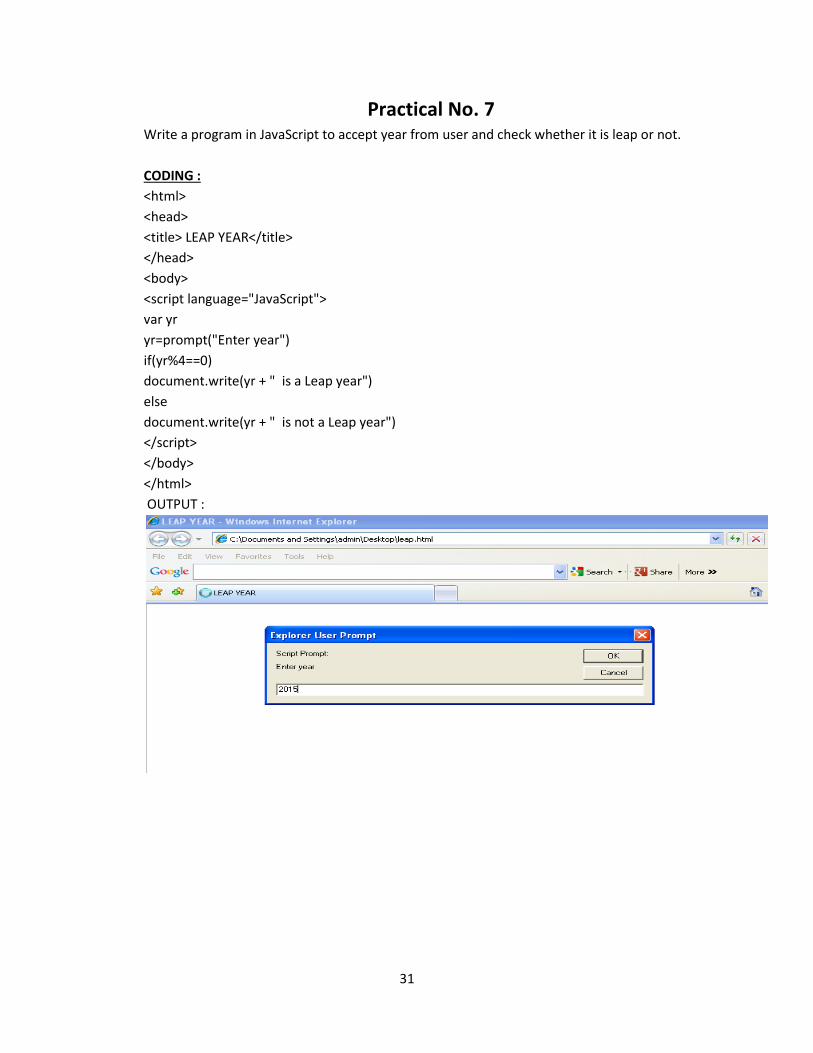
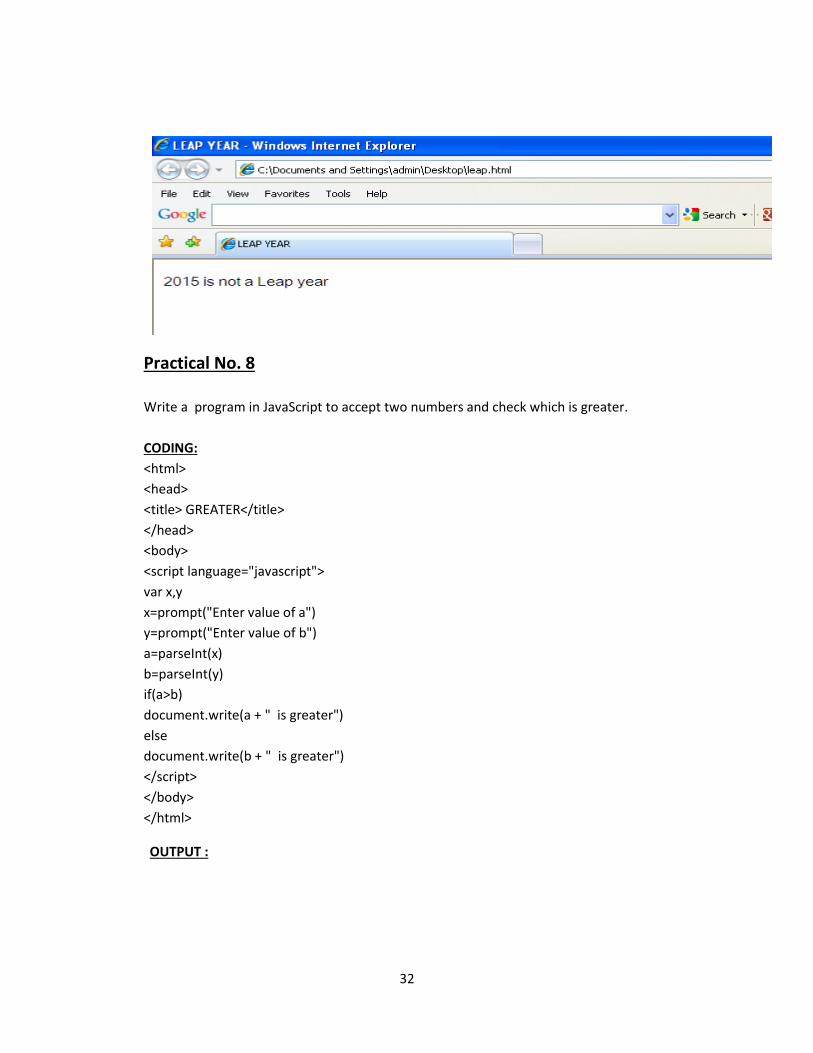
Practical No. 7 Write a program in JavaScript to accept year from user and check whether it is leap or not.
CODING :
<html>
<head>
<title> LEAP YEAR</title>
</head>
<body>
<script language="JavaScript">
var yr
yr=prompt("Enter year")
if(yr%4==0)
document.write(yr + " is a Leap year")
else
document.write(yr + " is not a Leap year")
</script>
</body>
</html>
OUTPUT :
32
Practical No. 8
Write a program in JavaScript to accept two numbers and check which is greater.
CODING:
<html>
<head>
<title> GREATER</title>
</head>
<body>
<script language="javascript">
var x,y
x=prompt("Enter value of a")
y=prompt("Enter value of b")
a=parseInt(x)
b=parseInt(y)
if(a>b)
document.write(a + " is greater")
else
document.write(b + " is greater")
</script>
</body>
</html>
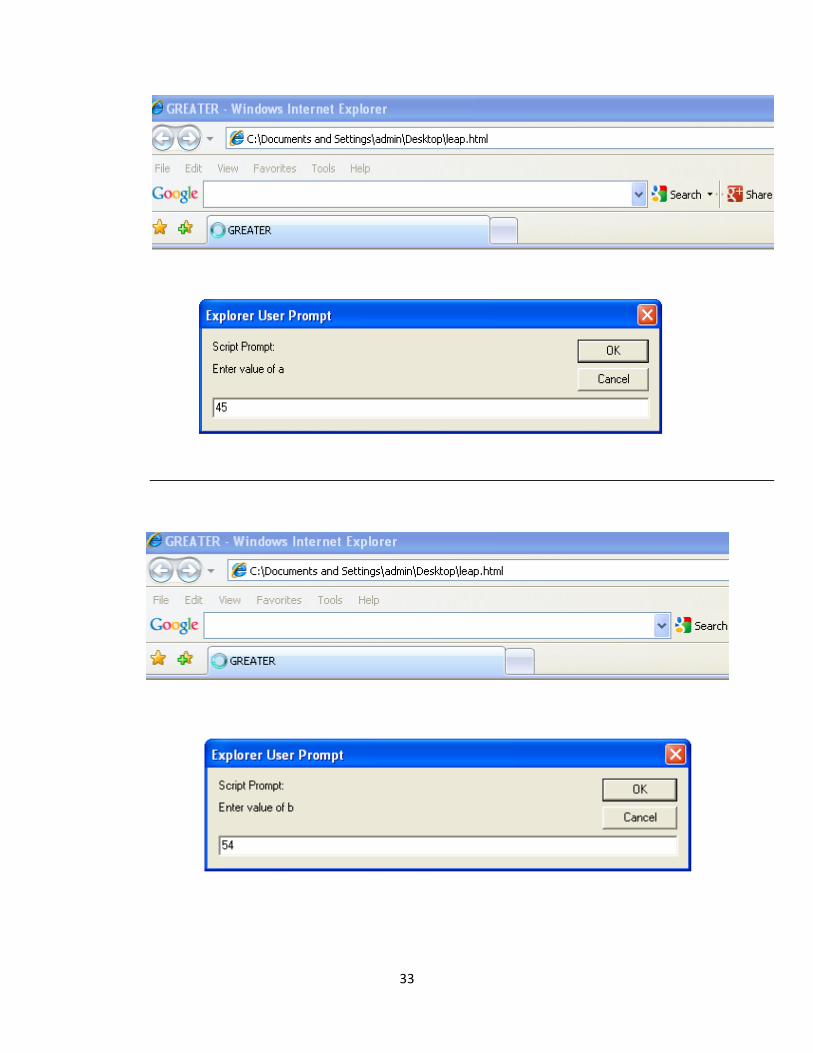
OUTPUT :
33

34

35
Practical No. 9
Write a program in javascript for swapping two numbers.
CODING :
<html>
<head>
<title> SWAP</title>
</head>
<body>
<script language="javascript">
var x=10,y=15
document.write("Before swapping :<br>")
document.write(" Value of x : " +x+"<br>")
document.write(" Value of y : " +y+"<br>")
t=x
x=y
y=t
document.write("After swapping :\n")
document.write(" Value of x : " +x+"<br>")
document.write(" Value of y : " +y+"<br>")
</script>
</body>
</html>
OUTPUT :

36
Practical No. 10
Write a program in JavaScript to display table of 5.
<html>
<head>
<title> Table</title>
</head>
<body>
<script language="javascript">
var x=5
for(i=1;i<=10;i++)
{
document.write(x + " x " + i + " = " + x*i +"<br>")
}
</script>
</body>
</html>

37