xl2 analyzer - eco-rental solutions · using your analyzer with your pc ... thermo scientific niton...
TRANSCRIPT
Thermo Fisher Scientific Niton Analyzers
XL2 AnalyzerVersion 8.0.1
User’s Guide (Abridged)Refer to NITON XL2 Resource Guide for complete information
Revision A March 2012


© 2010 Thermo Fisher Scientific Inc. All rights reserved.

Thermo Fisher Scientific Inc. provides this document to its customers with a product purchase to use in the product operation. This document is copyright protected and any reproduction of the whole or any part of this document is strictly prohibited, except with the written authorization of Thermo Fisher Scientific Inc.
The contents of this document are subject to change without notice. All technical information in this document is for reference purposes only. System configurations and specifications in this document supersede all previous information received by the purchaser.
Thermo Fisher Scientific Inc. makes no representations that this document is complete, accurate or error-free and assumes no responsibility and will not be liable for any errors, omissions, damage or loss that might result from any use of this document, even if the information in the document is followed properly.
This document is not part of any sales contract between Thermo Fisher Scientific Inc. and a purchaser. This document shall in no way govern or modify any Terms and Conditions of Sale, which Terms and Conditions of Sale shall govern all conflicting information between the two documents.
Release history:
For Research Use Only. Not for use in diagnostic procedures.
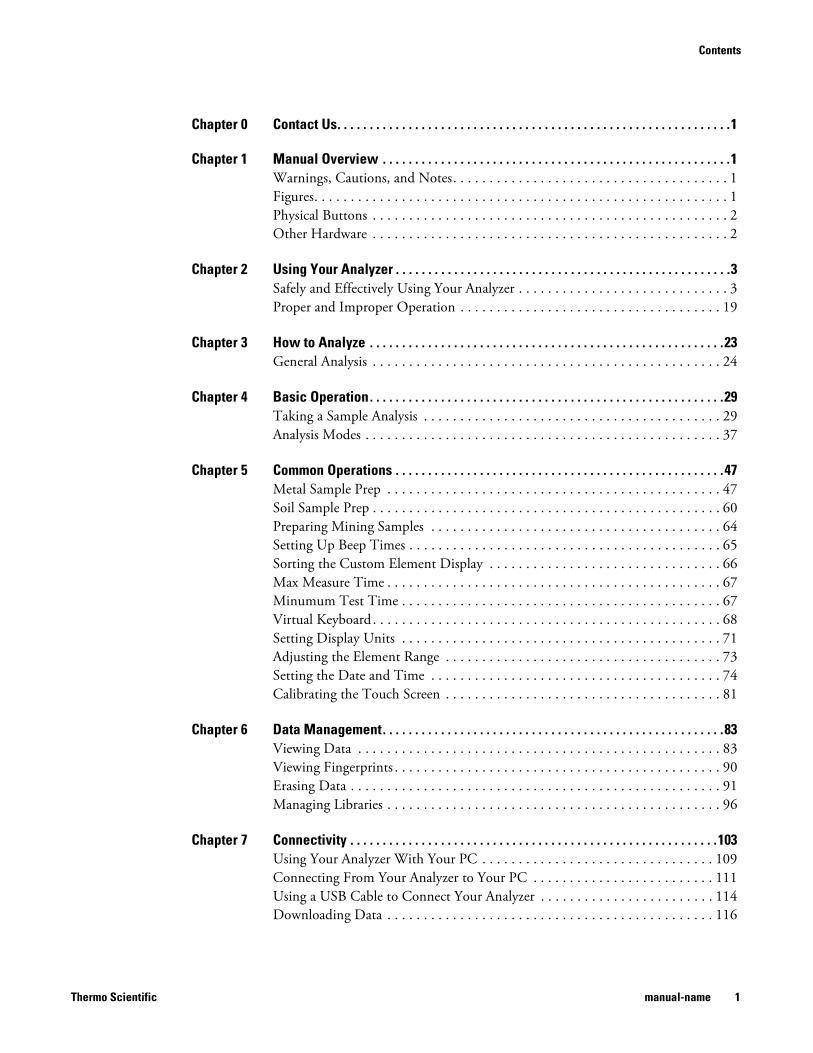
Contents
Chapter 0 Contact Us. . . . . . . . . . . . . . . . . . . . . . . . . . . . . . . . . . . . . . . . . . . . . . . . . . . . . . . . . . . . .1
Chapter 1 Manual Overview . . . . . . . . . . . . . . . . . . . . . . . . . . . . . . . . . . . . . . . . . . . . . . . . . . . . . .1
Warnings, Cautions, and Notes. . . . . . . . . . . . . . . . . . . . . . . . . . . . . . . . . . . . . . 1
Figures. . . . . . . . . . . . . . . . . . . . . . . . . . . . . . . . . . . . . . . . . . . . . . . . . . . . . . . . . 1
Physical Buttons . . . . . . . . . . . . . . . . . . . . . . . . . . . . . . . . . . . . . . . . . . . . . . . . . 2
Other Hardware . . . . . . . . . . . . . . . . . . . . . . . . . . . . . . . . . . . . . . . . . . . . . . . . . 2
Chapter 2 Using Your Analyzer . . . . . . . . . . . . . . . . . . . . . . . . . . . . . . . . . . . . . . . . . . . . . . . . . . . .3
Safely and Effectively Using Your Analyzer . . . . . . . . . . . . . . . . . . . . . . . . . . . . . 3
Proper and Improper Operation . . . . . . . . . . . . . . . . . . . . . . . . . . . . . . . . . . . . 19
Chapter 3 How to Analyze . . . . . . . . . . . . . . . . . . . . . . . . . . . . . . . . . . . . . . . . . . . . . . . . . . . . . . .23
General Analysis . . . . . . . . . . . . . . . . . . . . . . . . . . . . . . . . . . . . . . . . . . . . . . . . 24
Chapter 4 Basic Operation. . . . . . . . . . . . . . . . . . . . . . . . . . . . . . . . . . . . . . . . . . . . . . . . . . . . . . .29
Taking a Sample Analysis . . . . . . . . . . . . . . . . . . . . . . . . . . . . . . . . . . . . . . . . . 29
Analysis Modes . . . . . . . . . . . . . . . . . . . . . . . . . . . . . . . . . . . . . . . . . . . . . . . . . 37
Chapter 5 Common Operations . . . . . . . . . . . . . . . . . . . . . . . . . . . . . . . . . . . . . . . . . . . . . . . . . . .47
Metal Sample Prep . . . . . . . . . . . . . . . . . . . . . . . . . . . . . . . . . . . . . . . . . . . . . . 47
Soil Sample Prep . . . . . . . . . . . . . . . . . . . . . . . . . . . . . . . . . . . . . . . . . . . . . . . . 60
Preparing Mining Samples . . . . . . . . . . . . . . . . . . . . . . . . . . . . . . . . . . . . . . . . 64
Setting Up Beep Times . . . . . . . . . . . . . . . . . . . . . . . . . . . . . . . . . . . . . . . . . . . 65
Sorting the Custom Element Display . . . . . . . . . . . . . . . . . . . . . . . . . . . . . . . . 66
Max Measure Time . . . . . . . . . . . . . . . . . . . . . . . . . . . . . . . . . . . . . . . . . . . . . . 67
Minumum Test Time . . . . . . . . . . . . . . . . . . . . . . . . . . . . . . . . . . . . . . . . . . . . 67
Virtual Keyboard . . . . . . . . . . . . . . . . . . . . . . . . . . . . . . . . . . . . . . . . . . . . . . . . 68
Setting Display Units . . . . . . . . . . . . . . . . . . . . . . . . . . . . . . . . . . . . . . . . . . . . 71
Adjusting the Element Range . . . . . . . . . . . . . . . . . . . . . . . . . . . . . . . . . . . . . . 73
Setting the Date and Time . . . . . . . . . . . . . . . . . . . . . . . . . . . . . . . . . . . . . . . . 74
Calibrating the Touch Screen . . . . . . . . . . . . . . . . . . . . . . . . . . . . . . . . . . . . . . 81
Chapter 6 Data Management. . . . . . . . . . . . . . . . . . . . . . . . . . . . . . . . . . . . . . . . . . . . . . . . . . . . .83
Viewing Data . . . . . . . . . . . . . . . . . . . . . . . . . . . . . . . . . . . . . . . . . . . . . . . . . . 83
Viewing Fingerprints . . . . . . . . . . . . . . . . . . . . . . . . . . . . . . . . . . . . . . . . . . . . . 90
Erasing Data . . . . . . . . . . . . . . . . . . . . . . . . . . . . . . . . . . . . . . . . . . . . . . . . . . . 91
Managing Libraries . . . . . . . . . . . . . . . . . . . . . . . . . . . . . . . . . . . . . . . . . . . . . . 96
Chapter 7 Connectivity . . . . . . . . . . . . . . . . . . . . . . . . . . . . . . . . . . . . . . . . . . . . . . . . . . . . . . . . .103
Using Your Analyzer With Your PC . . . . . . . . . . . . . . . . . . . . . . . . . . . . . . . . 109
Connecting From Your Analyzer to Your PC . . . . . . . . . . . . . . . . . . . . . . . . . 111
Using a USB Cable to Connect Your Analyzer . . . . . . . . . . . . . . . . . . . . . . . . 114
Downloading Data . . . . . . . . . . . . . . . . . . . . . . . . . . . . . . . . . . . . . . . . . . . . . 116
Thermo Scientific manual-name 1

Contents
Chapter 7 Controlling Your Analyzer From Your PC . . . . . . . . . . . . . . . . . . . . . . . . . . . . . . . .125
Chapter 8 Learning More, Service, and Support . . . . . . . . . . . . . . . . . . . . . . . . . . . . . . . . . . .129
Replacing the Measurement Window . . . . . . . . . . . . . . . . . . . . . . . . . . . . . . . 129
Tips and Troubleshooting . . . . . . . . . . . . . . . . . . . . . . . . . . . . . . . . . . . . . . . . 132
Storing and Transporting Your Niton XL2 Analyzer . . . . . . . . . . . . . . . . . . . . 139
Chapter 8 Advanced Settings . . . . . . . . . . . . . . . . . . . . . . . . . . . . . . . . . . . . . . . . . . . . . . . . . . .143
Tools Menu Options. . . . . . . . . . . . . . . . . . . . . . . . . . . . . . . . . . . . . . . . . . . . 149
NDF Files: User Data Structuring . . . . . . . . . . . . . . . . . . . . . . . . . . . . . . . . . . 169
Safety Settings . . . . . . . . . . . . . . . . . . . . . . . . . . . . . . . . . . . . . . . . . . . . . . . . . 181
Camera . . . . . . . . . . . . . . . . . . . . . . . . . . . . . . . . . . . . . . . . . . . . . . . . . . . . . . 188
Chapter 8 Service . . . . . . . . . . . . . . . . . . . . . . . . . . . . . . . . . . . . . . . . . . . . . . . . . . . . . . . . . . . . .191
Warranty . . . . . . . . . . . . . . . . . . . . . . . . . . . . . . . . . . . . . . . . . . . . . . . . . . . . . 191
2 manual-name Thermo Scientific

Americas
niton@thermo
om
ofisher.com
Contact Us
Europe Asia
fisher.com [email protected]
NitonAsia.Support@therm
1

0 Contact Us
2 Niton XL2 Analyzer User’s Guide Thermo Scientific

1 Manual OverviewWarnings, Cautions, and Notes
Manual Overview
Warnings, Cautions, and Notes
Warnings
Warnings are extremely important recommendations, violating which may result in either
injury to yourself or others, or damage to your analyzer and/or data. Warnings will always be
identified as Warnings in the text, and will always be visually presented as follows:
WARNING This is a Warning.
Example Warning:WARNING Tampering with the 5,500 ppm (Lead high) lead-in-soil standard may cause
exposure to lead dust. Keep all standards out of reach of children.
Cautions
Cautions are important recommendations. Cautions will always be identified as Cautions in
the text, and will always be visually presented as follows:
CAUTION This is a Caution.
Example Caution:CAUTION Never tamper with Test Standards. They should not be used unless they are
completely intact
Notes
Notes are informational asides which may help you with your analyses. Notes will always be
identified as Notes in the text, and will always be visually presented as follows:
Note This is a Note.
Example Note:Note For defensible Quality Control, keep a record of the time and precision of every
calibration
Figures
Figures are illustrations used to show what something looks like. Figures will always be
labelled and identified as Figures directly below the Figure itself, and will always be visually
presented as follows:
Thermo Scientific Niton XL2 Analyzer User’s Guide 1

1 Manual OverviewPhysical Buttons
Figure 1. This is a Figure
Physical Buttons
Physical Buttons are actual buttons on the analyzer which must be pushed to activate their
function. Physical Buttons will always be identified as Buttons in the text, and will always be
visually presented as follows:
This is a Physical Button.
Example Physical Buttons:
On/Off/Escape Button, Clear/Enter Button, Interlock Button, and Trigger Button.
Other Hardware
Other Hardware refers to any physical part of the analyzer which performs a necessary
function. Other Hardware will always be visually presented as follows:
This is an example of Other Hardware.
Example Other Hardware:
Battery, Touch Screen Display, Measurement Window, and USB Cable
2 Niton XL2 Analyzer User’s Guide Thermo Scientific

Using Your Analyzer
This section discusses the basics of using your analyzer, no matter the
specific type of analysis you wish to perform. First we go over analyzer
safety, particularly radiation safety. Using an X-ray based analyzer safely
is very important, and not difficult, provided you read, understand, and
follow these guidelines. Secondly, we outline the startup procedure we
recommend for daily use to ensure that your analyzer is performing
properly and at its most efficient level.
Safely and Effectively Using Your AnalyzerCAUTION Niton analyzers are not intrinsically safe analyzers. All
pertinent Hot Work procedures should be followed in areas of concern.
WARNING Always treat radiation with respect. Do not hold your
analyzer near the measurement window during testing. Never point your
analyzer at yourself or anyone else when the shutter is open.
Radiation and General Safety
This section covers topics related to radiation safety and general safety
when using a Thermo Scientific Niton XL2 analyzer. At a minimum all
operators of the analyzer should be familiar with the instructions
provided in this chapter in order to handle the analyzer in a safe manner.
In addition to reading the information presented on the following pages,
Thermo Fisher Scientific recommends that instrument users participate
in a radiation safety and operational training class.
Radiation Protection Basics
The Niton Model XL2 analyzer contains an x-ray tube which emits
radiation only when the user turns the x-ray tube on. When the x-ray
tube is on and the shutter is open, as during a measurement, the analyzer
emits a directed radiation beam - see Figures 1-1 and 1-2. Reasonable
effort should be made to maintain exposures to radiation as far below
dose limits as is practical. This is known as the ALARA (As Low as
Reasonably Achievable) principle. For any given source of radiation,
three factors will help minimize your radiation exposure: Time,
Distance, and Shielding.
3
2 Using Your AnalyzerSafely and Effectively Using Your Analyzer
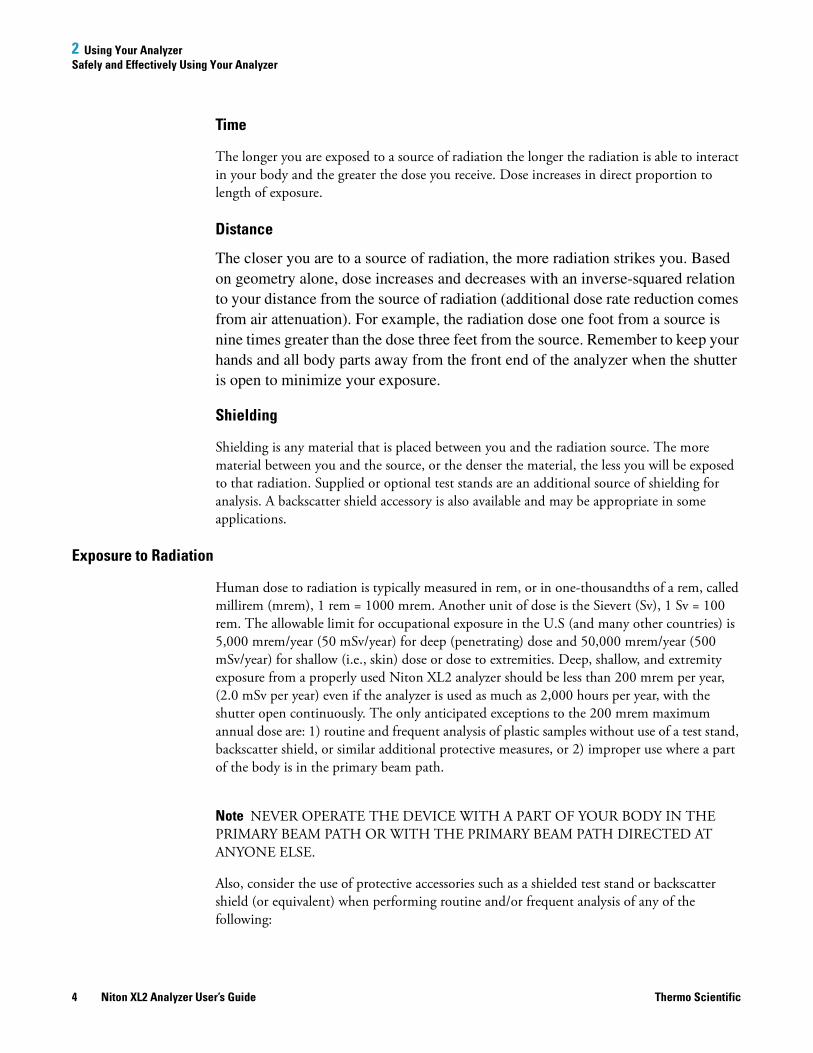
Time
The longer you are exposed to a source of radiation the longer the radiation is able to interact
in your body and the greater the dose you receive. Dose increases in direct proportion to
length of exposure.
Distance
The closer you are to a source of radiation, the more radiation strikes you. Based
on geometry alone, dose increases and decreases with an inverse-squared relation
to your distance from the source of radiation (additional dose rate reduction comes
from air attenuation). For example, the radiation dose one foot from a source is
nine times greater than the dose three feet from the source. Remember to keep your
hands and all body parts away from the front end of the analyzer when the shutter
is open to minimize your exposure.
Shielding
Shielding is any material that is placed between you and the radiation source. The more
material between you and the source, or the denser the material, the less you will be exposed
to that radiation. Supplied or optional test stands are an additional source of shielding for
analysis. A backscatter shield accessory is also available and may be appropriate in some
applications.
Exposure to Radiation
Human dose to radiation is typically measured in rem, or in one-thousandths of a rem, called
millirem (mrem), 1 rem = 1000 mrem. Another unit of dose is the Sievert (Sv), 1 Sv = 100
rem. The allowable limit for occupational exposure in the U.S (and many other countries) is
5,000 mrem/year (50 mSv/year) for deep (penetrating) dose and 50,000 mrem/year (500
mSv/year) for shallow (i.e., skin) dose or dose to extremities. Deep, shallow, and extremity
exposure from a properly used Niton XL2 analyzer should be less than 200 mrem per year,
(2.0 mSv per year) even if the analyzer is used as much as 2,000 hours per year, with the
shutter open continuously. The only anticipated exceptions to the 200 mrem maximum
annual dose are: 1) routine and frequent analysis of plastic samples without use of a test stand,
backscatter shield, or similar additional protective measures, or 2) improper use where a part
of the body is in the primary beam path.
Note NEVER OPERATE THE DEVICE WITH A PART OF YOUR BODY IN THE
PRIMARY BEAM PATH OR WITH THE PRIMARY BEAM PATH DIRECTED AT
ANYONE ELSE.
Also, consider the use of protective accessories such as a shielded test stand or backscatter
shield (or equivalent) when performing routine and/or frequent analysis of any of the
following:
4 Niton XL2 Analyzer User’s Guide Thermo Scientific

2 Using Your AnalyzerSafely and Effectively Using Your Analyzer
• light materials (such as plastic, wood, or similarly low density/low atomic mass
samples)
• thin samples (such as foils, circuit boards, and wires)
• samples that are smaller than the analysis window.
Shown in Table 1 are the typical background radiation doses received by the average member
of the public. The radiation dose limits for radiation workers in the US are also shown in
Table 2.
Thermo Scientific Niton XL2 Analyzer User’s Guide 5
2 Using Your AnalyzerSafely and Effectively Using Your Analyzer
Table 1. Typical Radiation Doses Received (Source: NCRP 1987)
Category Dose in mrem Dose in mSv
Average total dose in US (annual) 360 3.6
Average worker exposure (annual) 210 2.1
Average exposure for an underground
miner
400 4.0
Exposure for airline crew (1,000 hours at
35,000 ft)
500 5.0
Additional from living in Denver at 5300’
(annual)
25 .25
Additional from 4 pCi/l radon in home 1,000 10.0
Typical Chest X-Ray 6 0.06
Typical Head or Neck X-Ray 20 0.2
Typical pelvis/hip x-ray 65 0.65
Typical lumbar spine x-ray 30 0.3
Typical Upper G.I. x-ray 245 2.45
Typical Barium enema x-ray 405 4.05
Typical CAT scan 110 1.10
Table 2. Annual Occupational Dose Limits for Radiation Workers (Source: Code of Federal Regulations Title 10, Part 20)
Category Dose in mrem Dose in mSv
Whole Body 5000 50
Pregnant Worker (during gestation
period)
500 5
Eye Dose Equivalent 15,000 150
Shallow dose equivalent to the skin or
any extremity or organ
50,000 500
Maximum allowable dose for the general
public (annual)
100 1.0
For a Minor 500 5.0
6 Niton XL2 Analyzer User’s Guide Thermo Scientific

2 Using Your AnalyzerSafely and Effectively Using Your Analyzer
Monitoring your radiation exposure
Individuals can be monitored for the radiation dose they receive by use of radiation dosimetry
devices (dosimeters). Monitoring dose using a dosimeter can be a way of identifying improper
use and at the same time demonstrating proper use. In some locations, dosimetry is required
by regulations and in others it is optional. It is normally required when the user could
reasonably be expected to receive in excess of 10% of the annual dose limit. Thermo Fisher
Scientific recommends that you determine and obey the local regulatory requirements
concerning radiation monitoring of occupational workers.
Two common types of dosimeters are whole-body badges and ring badges. Whole body
badges are often attached to the user’s torso (e.g., clipped to the collar, shirt pocket, or waist as
appropriate). A ring badge is worn on the finger as a measure of maximum extremity dose.
When worn, the specific location of the dosimeter should be that part of the body that is
expected to receive the highest dose. This location will depend on how the analyzer is used
and so it may not be the same for all users. Dosimetry services are offered by many companies.
Two companies offering dosimetry services in the USA and much of the world are:
Note Wearing a dosimeter badge does not protect you against radiation exposure. A
dosimeter badge only measures your exposure (at the dosimeter location).
Pregnancy and Radiation Exposure
International guidance documents (e.g., ICRP Publication 60 and NCRP Publication 116*)
recommend that the radiation dose to the embryo/fetus of a pregnant woman should not
exceed a total of 500 mrem (10% of normal radiation worker limit) during the gestation
period. While this dose limit exceeds the dose limit to a trained operator, pregnant workers
may want to take special precautions to reduce their exposure to radiation. For more
information see the U.S. NRC Regulatory Guide 8.13 "Instruction Concerning Prenatal
Radiation Exposure" which can be found on the resource CD.
* The International Commission on Radiological Protection, ICRP, is an independent
Registered Charity, established to advance for the public benefit the science of radiological
protection, in particular by providing recommendations and guidance on all aspects of
protection against ionizing radiation.
Company Global Dosimetry Solutions Landauer, Inc.
Address 2652 McGaw Avenue 2 Science Road
City and State Irvine, CA 92614 Glenwood, IL 60425-9979
Website www.dosimetry.com www.landauerinc.com
Phone Number (800) 251-3331 (800) 323-8830
Thermo Scientific Niton XL2 Analyzer User’s Guide 7
2 Using Your AnalyzerSafely and Effectively Using Your Analyzer
* The National Council on Radiation Protection and Measurements (NCRP) was chartered
by the U.S. Congress in 1964 as the National Council on Radiation Protection and
Measurements.
How to Use the Niton XL2 Analyzer Safely
The Niton XL2 analyzer is designed to be safe to operate provided that it is used in
accordance with manufacturer's instructions. Under conditions of normal use, monitored
operators seldom receive a measurable dose and have not been known to receive in excess of
10% of the annual occupational dose limits (a criteria that would require monitoring under
regulation in the U.S.). In addition to proper use of the analyzer, it is recommended that you
follow these precautions to ensure your safety and the safety of those around you.
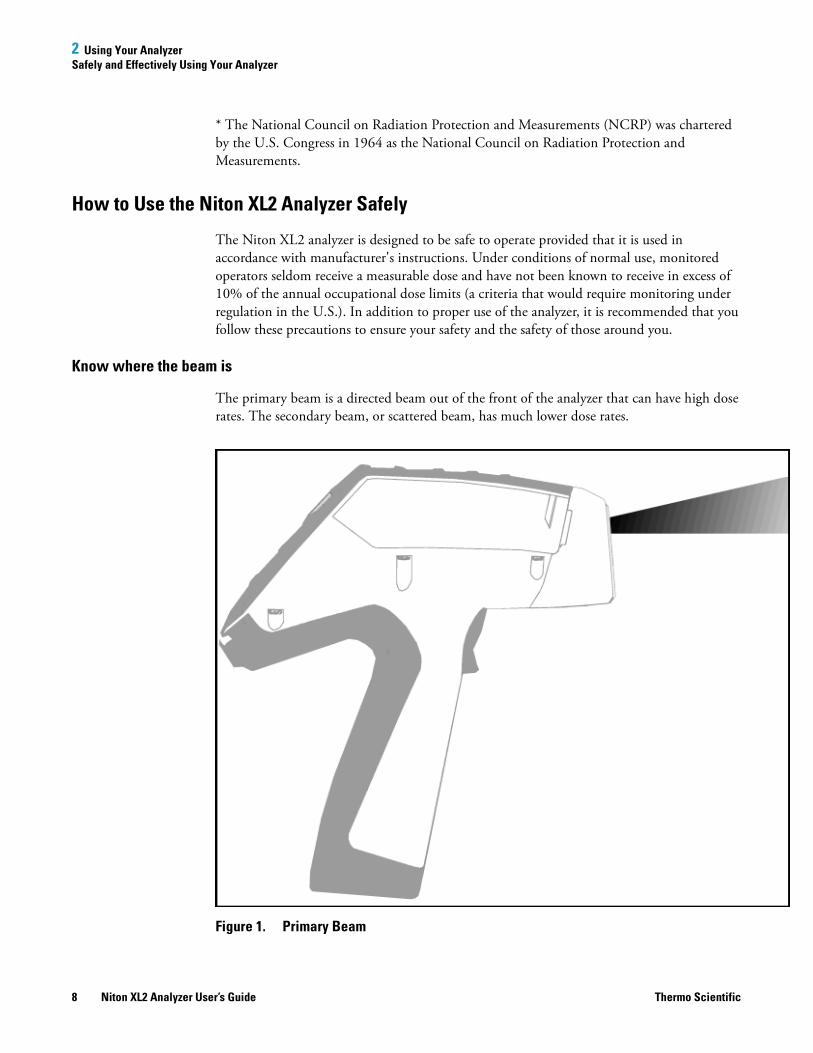
Know where the beam is
The primary beam is a directed beam out of the front of the analyzer that can have high dose
rates. The secondary beam, or scattered beam, has much lower dose rates.
Figure 1. Primary Beam
8 Niton XL2 Analyzer User’s Guide Thermo Scientific

2 Using Your AnalyzerSafely and Effectively Using Your Analyzer
Figure 2. Secondary (Scattered) Beam
The Shutter-Open Indicator Lights
When the lights are flashing, the primary beam is on, and radiation is being emitted from the
front of the analyzer.
Figure 3. The X-ray Beam Indicator Lights
Thermo Scientific Niton XL2 Analyzer User’s Guide 9

2 Using Your AnalyzerSafely and Effectively Using Your Analyzer
Handle and Use with Respect
Avoid holding the front of the analyzer when the x-ray tube is energized and the shutter is
open. Never point the instrument at yourself or anyone else when the shutter is open and the
x-ray tube is energized. Never look into the path of the primary beam.
Follow a Radiation Protection Program
Your organization should establish, document, and follow a Radiation Protection Program.
An example of such a program can be found on the resource CD (provided with the
instrument).
Take Proper Care of your Niton XL2
Keeping your analyzer maintained in good condition will help minimize the risk of accidental
exposure. Mechanical malfunction of the shutter can be avoided by maintaining the
measurement window, as described in the User Guide. This prevents foreign objects from
entering your analyzer
Avoid Over-Exposures
Direct contact with the window could result in overexposures in the times indicated inTable 3
below.
Extremity is defined by the NRC as the hand, elbow, arm below the elbow, foot, knee, or leg
below the knee. Whole Body is defined by the NRC as the head, trunk (including male
gonads), arms above the elbow, or legs above the knee.
Safe Handling of Samples
As mentioned many times in this chapter, never place any part of your body in the path of the
x-ray beam. There is always a safe way to handle samples whether they are small, irregularly
shaped, or of low density. Never look into the path of the primary beam.
Table 3. Potential Exposure Limit Times
Location of Dose Limit Time to Reach Limit
Deep Dose /
Whole Body
5 rem (50 mSv) 2.1 minutes
Shallow Dose /
Extremities
50 rem (500 mSv) 0.95 minutes
Member of Public
(i.e. untrained
operator)
0.1 to 5 rem (1 to 50 mSv) 2.5 to 9.5 seconds
10 Niton XL2 Analyzer User’s Guide Thermo Scientific

2 Using Your AnalyzerSafely and Effectively Using Your Analyzer
Small Samples
A small sample would be any sample that is smaller than the measurement window. Small
samples present a unique risk because they don’t block the entire beam path. The difficulty
with placing small samples down on a work surface to analyze them is that you may get
readings from the work surface that interfere with analytical results. A test stand is an effective
way of analyzing small samples accurately and safely. Never hold samples during analysis or
look into the path of the primary beam.
Irregularly Shaped Samples
Irregularly shaped samples may not allow the proximity button to be depressed, or they may
not entirely cover the primary beam and cause additional scattering. A back scatter shield is a
safe way of reducing your radiation exposure while effectively analyzing an irregularly shaped
sample.
Light Materials (such as plastics).
X-rays are attenuated more by denser and higher atomic mass materials, and less through
lighter materials such as plastic. This causes higher dose rates in the scattered radiation. If you
are frequently handling low density samples, you should consider the use of test stands,
backscatter shields, or the equivalent.
Thermo Scientific Niton XL2 Analyzer User’s Guide 11
2 Using Your AnalyzerSafely and Effectively Using Your Analyzer
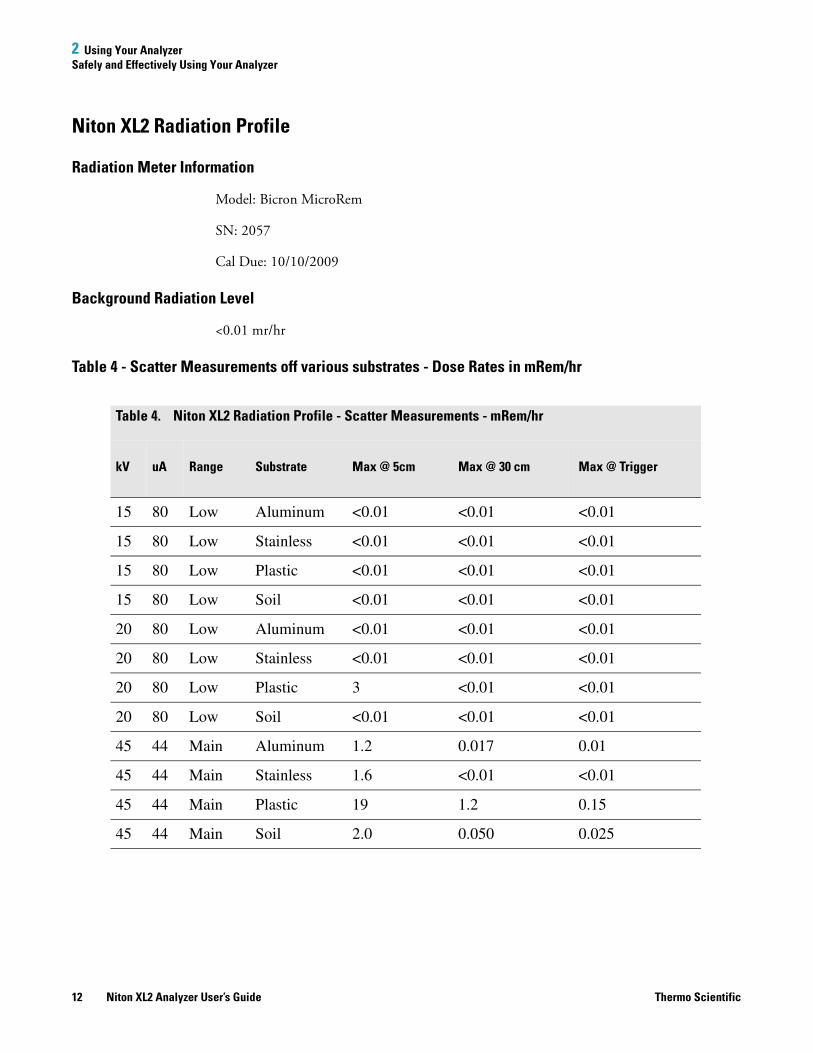
Niton XL2 Radiation Profile
Radiation Meter Information
Model: Bicron MicroRem
SN: 2057
Cal Due: 10/10/2009
Background Radiation Level
<0.01 mr/hr
Table 4 - Scatter Measurements off various substrates - Dose Rates in mRem/hr
Table 4. Niton XL2 Radiation Profile - Scatter Measurements - mRem/hr
kV uA Range Substrate Max @ 5cm Max @ 30 cm Max @ Trigger
15 80 Low Aluminum <0.01 <0.01 <0.01
15 80 Low Stainless <0.01 <0.01 <0.01
15 80 Low Plastic <0.01 <0.01 <0.01
15 80 Low Soil <0.01 <0.01 <0.01
20 80 Low Aluminum <0.01 <0.01 <0.01
20 80 Low Stainless <0.01 <0.01 <0.01
20 80 Low Plastic 3 <0.01 <0.01
20 80 Low Soil <0.01 <0.01 <0.01
45 44 Main Aluminum 1.2 0.017 0.01
45 44 Main Stainless 1.6 <0.01 <0.01
45 44 Main Plastic 19 1.2 0.15
45 44 Main Soil 2.0 0.050 0.025
12 Niton XL2 Analyzer User’s Guide Thermo Scientific

2 Using Your AnalyzerSafely and Effectively Using Your Analyzer
Table 5 - Scatter Measurements off various substrates - Dose Rates in µSv/hr
Notes:
Scatter measurements were taken at a radius of 5 or 30 cm around the nose of the analyzer
with the highest scatter dose rate being recorded.
Table 5. Niton XL2 Radiation Profile - Scatter Measurements - µSv/hr
kV uA Range Substrate Max @ 5cm Max @ 30 cm Max @ Trigger
15 80 Low Aluminum <0.1 <0.1 <0.1
15 80 Low Stainless <0.1 <0.1 <0.1
15 80 Low Plastic <0.1 <0.1 <0.1
15 80 Low Soil <0.1 <0.1 <0.1
20 80 Low Aluminum <0.1 <0.1 <0.1
20 80 Low Stainless <0.1 <0.1 <0.1
20 80 Low Plastic 30 <0.1 <0.1
20 80 Low Soil <0.1 <0.1 <0.1
45 44 Main Aluminum 12 0.17 0.1
45 44 Main Stainless 16 <0.1 <0.1
45 44 Main Plastic 190 12 1.5
45 44 Main Soil 20 0.50 0.25
Thermo Scientific Niton XL2 Analyzer User’s Guide 13

2 Using Your AnalyzerSafely and Effectively Using Your Analyzer
Table 6 - In Beam Measurements - Dose Rates in Rem/hr
Table 7 - In Beam Measurements - Dose Rates in mSv/hr
Notes:
In beam dose rates were measured using optically stimulated luminescent (OSL) dosimeters.
Reported results are based on measurement results that have been reduced to 2 significant
digits by rounding up. For example, a measurement result of 1441 would be reported as
1500.
Table 6. Niton XL2 Radiation Profile - In Beam Measurements - Rem/hr
kV uA Range Contact Deep Contact Shallow 5cm Deep 30cm Deep
15 80 Low 7.9 230 2.1 0.088
20 80 Low 41 690 19 0.90
45 44 Main 45 150 7.4 0.70
Table 7. Niton XL2 Radiation Profile - In Beam Measurements - mSv/hr
kV uA Range Contact Deep Contact Shallow 5cm Deep 30cm Deep
15 80 Low 79 2300 21 0.88
20 80 Low 410 6900 190 9.0
45 44 Main 450 1500 74 7.0
14 Niton XL2 Analyzer User’s Guide Thermo Scientific

2 Using Your AnalyzerSafely and Effectively Using Your Analyzer
Niton XL2 GOLDD Radiation Profile
Table 8 - Niton XL2 GOLDD Radiation profile- Scatter measurements - mRem/hr
Table 9 - Niton XL2 GOLDD Radiation Profile - Scatter Measurements - µSv/hr
Notes:
Scatter measurements were taken at a radius of 5 or 30 cm around the nose of the analyzer
with the highest scatter dose rate being recorded.
Table 8. Niton XL2 GOLDD Radiation Profile - Scatter Measurements - mRem/hr
kV uA Range Substrate Max @ 5cm Max @ 30 cm Max @ Trigger
8 100 Light Plastic <0.01 <0.01 <0.01
8 100 Light Stainless <0.01 <0.01 <0.01
8 100 Light Soil <0.01 <0.01 <0.01
45 44.4 Main Aluminum 0.5 <0.01 <0.01
45 44.4 Main Stainless 0.01 <0.01 <0.01
45 44.4 Main Plastic 5.0 0.4 0.8
45 44.4 Main Soil 0.9 <0.01 <0.01
Table 9. Niton XL2 GOLDD Radiation Profile - Scatter Measurements - µSv/hr
kV uA Range Substrate Max @ 5cm Max @ 30 cm Max @ Trigger
8 100 Light Plastic <0.1 <0.1 <0.1
8 100 Light Stainless <0.1 <0.1 <0.1
8 100 Light Soil <0.1 <0.1 <0.1
45 44.4 Main Aluminum 5.0 <0.1 <0.1
45 44.4 Main Stainless 0.1 <0.1 <0.1
45 44.4 Main Plastic 50 4.0 8.0
45 44.4 Main Soil 9.0 <0.1 <0.1
Thermo Scientific Niton XL2 Analyzer User’s Guide 15

2 Using Your AnalyzerSafely and Effectively Using Your Analyzer
Table 10 - Niton XL2 GOLDD Radiation Profile - In Beam Measurements - Rem/hr
Table 11 - Niton XL2 GOLDD Radiation Profile - In Beam Measurements - mSv/hr
Notes:
In beam dose rates were measured using optically stimulated luminescent (OSL) dosimeters.
Reported results are based on measurement results that have been reduced to 2 significant
digits by rounding up. For example, a measurement result of 1441 would be reported as
1500.
Table 10. Niton XL2 GOLDD Radiation Profile - In Beam Measurements - Rem/hr
kV uA Range Contact Deep Contact Shallow 5cm Deep 30 cm Deep
8 100 Light 0.01 980 0.002 <0.001
45 44.4 Main 39 130 8.1 0.51
Table 11. Niton XL2 GOLDD Radiation Profile - In Beam Measurements - mSv/hr
kV uA Range Contact Deep Contact Shallow 5cm Deep 30 cm Deep
8 100 Light 0.1 9800 0.02 <0.01
45 44.4 Main 390 1300 81 5.1
16 Niton XL2 Analyzer User’s Guide Thermo Scientific

2 Using Your AnalyzerSafely and Effectively Using Your Analyzer
Figure 4. Primary and Secondary Dose Locations (Not to Scale)
Thermo Scientific Niton XL2 Analyzer User’s Guide 17

2 Using Your AnalyzerSafely and Effectively Using Your Analyzer
Primary Radiation
Primary radiation is radiation that is produced by the analyzer and emitted out through the
kapton measurement window. Individuals should never place any part of their body in the
primary beam path when the x-ray tube is on. There should always be a sample in contact
with the measurement window when the x-ray tube is on. The sample will absorb most of the
primary-beam radiation unless it is smaller than the instrument's measurement window or of
low atomic mass, low density, and/or very thin. Caution should be taken when analyzing
samples that are small, thin, and/or low in atomic mass or density as they may allow much
more of the primary beam to escape. In-beam primary radiation dose rates for the Niton XL2
are listed in Table 6 andTable 7 - or Table 10 and Table 11 for the Niton XL2 GOLDD - and
their location identified relative to the analyzer in Figure 4 as Dose Point C.
Secondary Radiation
Under conditions of normal and proper use, individuals can be exposed to secondary (or
"scattered") radiation. Secondary radiation is low-level radiation that emanates from the
sample being analyzed as a result of primary beam radiation scattering in the sample or
primary beam radiation inducing fluorescent x-rays in the sample. Dose points A, A’ and B in
Figure 4 are examples of where you can encounter secondary radiation. The magnitude of this
secondary radiation is sample dependent. Higher atomic mass and density samples such as
steel will emit the lowest levels as they absorb most primary and secondary radiations. Lower
atomic mass and density samples such as aluminum, wood, and especially plastic, will produce
higher levels of secondary radiation. Secondary radiation dose rates for the Niton XL2 are
listed in Table 4 and Table 5 - or Table 8 and Table 9 for the Niton XL2 GOLDD - for a few
common sample types over a wide range of densities.
The operator is reminded that one should never hold samples during analysis, doing so will
result in higher than necessary exposure to secondary radiation and could expose the operator
directly to the much higher primary-beam dose rates.
Deep and Shallow Dose
You will find in Table 6, Table 7, Table 10, and Table 11 that shallow dose rates are listed for
some dose points. All dose rates listed in these four Tables are deep dose unless they are
specifically identified as shallow dose. Deep dose is dose from penetrating radiation that is
delivered to both skin and underlying tissues and organs and is the type most commonly
referred to when describing external radiation hazards. Occupational deep dose is limited to a
maximum of 5 rem (50 mSv) per year in the United States and most countries internationally.
Deep dose is measured at 1.0 cm below the skin surface.
18 Niton XL2 Analyzer User’s Guide Thermo Scientific
2 Using Your AnalyzerProper and Improper Operation
Shallow dose is often referred to as "skin dose" because it is a result of low penetrating
radiation that only interacts with the skin. Shallow dose is limited to a maximum of 50 rem
(500 mSv) per year in the United States and most countries internationally. Shallow dose is
listed for primary in-beam dose points only because the low penetrating radiation that causes
shallow dose is nearly all absorbed by a sample and does not produce any significant secondary
radiation. Shallow dose is measured at a point 0.007 cm below the surface.
Proper and Improper Operation
Storage and Transportation
Storage
Regulations in nearly all locations will require that you store your analyzer locked in a secured
area to prevent access, use, and/or removal by unauthorized individuals. Storage requirements
will vary by location, particularly with regard to storage at temporary job sites or away from
your primary storage location such as hotels and motels and in vehicles. You should contact
your local Radiation Control Authority to identify the specific storage requirements in your
jurisdiction.
Transportation
There are no X-ray tube specific US Department of Transportation (DOT) or International
Air Transport Association (IATA) radiation regulations regarding shipping the Niton XL2
analyzer. It is recommended that you ship the analyzer in its carrying case and an over-pack to
protect the sensitive measuring equipment inside the analyzer. Do NOT ship the analyzer
with the battery pack connected to the analyzer.
Lost or Stolen InstrumentNote THIS PAGE CONTAINS EMERGENCY CONTACT INFORMATION THAT
SHOULD BE AVAILABLE TO THE OPERATOR AT ALL TIMES.
If the Niton XL2 analyzer is lost or stolen, notify your Radiation Safety Officer (RSO) or the
equivalent responsible individual at your company or institution immediately. Your
company's RSO, as well as other important emergency contacts, are listed below. Your
company RSO may need to notify the x-ray tube regulatory authority and the local police. It
is also recommended that a notification is made to Thermo Fisher Scientific.
Damaged Instrument
Minor Damage
If the instrument is intact but there is indication of an unsafe condition such as a cracked case,
a shutter mechanism failure, or the lights remain flashing after a measurement is terminated,
follow these steps:
Thermo Scientific Niton XL2 Analyzer User’s Guide 19

2 Using Your AnalyzerProper and Improper Operation
1. Stop using the instrument
2. Remove the battery. The x-ray tube can not produce radiation when the battery is
disconnected. The instrument is now safe to handle.
3. Place the instrument securely in the holster.
4. Place the instrument in the carrying case that came with the instrument.
5. Notify your Radiation Safety Officer (RSO) or the equivalent responsible individual at
your company or institution immediately.
6. You or your RSO should call Thermo Fisher Scientific at one of their contact numbers
listed below for additional instructions and guidance.
Major Damage
If the instrument is severely damaged:
1. Perform the same steps as described above for minor damage. There will be no radiation
hazard as long as the battery is removed from the instrument.
2. Place all components in a plastic bag and contact Thermo Fisher Scientific.
20 Niton XL2 Analyzer User’s Guide Thermo Scientific
2 Using Your AnalyzerProper and Improper Operation
Emergency Response Information
Please Complete the Following Emergency Response Information and Keep with the Analyzer
at All Times
NITON ANALYZER EMERGENCY CONTACT INFORMATION
The Company RSO is:______________________________________
RSO Telephone Number:____________________________________
Regulatory Agency Emergency Number:________________________
Local Fire Department:______________________________________
Local or State Police Department:_____________________________
Thermo Fisher Scientific's Niton Analyzer Contact Numbers
Main Number (USA): (800) 875-1578
Additional Radiation Emergency #'s: (978) 790-8269 or (617) 901-3125
Outside the USA - Local Niton Service Center:___________________
Europe
Niton Analyzers Europe
Munich, Germany
Phone: +49 89 3681 380
Fax: +49 89 3681 3830
Email: [email protected]
Asia
Niton Analyzers Asia
Hong Kong
Phone: +852 2869-6669
Fax: +852 2869-6665
Email: [email protected]
Thermo Scientific Niton XL2 Analyzer User’s Guide 21

2 Using Your AnalyzerProper and Improper Operation
Registration and Licensing
As a user of a Niton XL2 analyzer, you may be required to register or obtain a license with
your local radiation control authority. In the US, if you intend to do work with your analyzer
in states other than your own, you may be required to register there as well. See the Safety and
Compliance Web Hub for much more information.
Regarding Safety Devices for the Open Beam Configuration:
In the US, you may be required to file for an exemption, "variance letter", with your state if
there is a requirement for a safety device that would prevent entry of an extremity into the
primary beam. If you need assistance with the exemption letter, you may contact the radiation
safety group.
Registration and Licensing FAQ
See the “Registration and Licensing FAQ” on page 433
22 Niton XL2 Analyzer User’s Guide Thermo Scientific

3 How to Analyze
How to Analyze
To analyze samples, from the main menu select sample type, and then click on the appropriate
Mode icon. Once in the Selection Screen you have a number of sub-modes to select from.
depending on how your instrument is calibrated. See the Example Path below.
Thermo Scientific Niton XL2 Analyzer User’s Guide 23

3 How to AnalyzeGeneral Analysis
Figure 5. The Metals Analysis Menu Path (Example)
Element Ranges and Lists
From the Element Range Screen, select the Element List Button to display the Element List
for the Range you want to use. This list shows the elements that the Range is best designed to
detect. See Adjusting the Element Range for details.
Figure 6. The Element Range Screen
General Analysis
Note Each user should read the Thermo Scientific Niton XL2 User’s Guide carefully before
initiating measurements with the system. Users are strongly urged to attend the Thermo
Scientific Niton XRF Analyzer Radiation Safety and Operations Training courses offered
regularly, or the web-based trainings. For more information, visit www.thermo.com/niton.
PREPARATORY TASKS
Attach a charged battery to the analyzer and turn it on. Follow the screen instructions and
“Log On” as the operator using either the default password or a custom one as designated by
the user in an NDU file.
Wait five (5) minutes before using the analyzer, allowing the instrument electronics to
stabilize.
24 Niton XL2 Analyzer User’s Guide Thermo Scientific
3 How to AnalyzeGeneral Analysis
Verify that the date is set properly for data tracking purposes.
From the Main Menu, select the System icon, then the Specs icon. The date will be displayed
for verification. If the date is incorrect, correct it prior to proceeding. This can be done by
“Closing” out of the Specs screen and selecting the Date & Time icon. Detailed information
on this procedure is available in Setting the Date and Time.
(Optional) Connect the analyzer to a computer via the included serial cable, USB cable, or
Bluetooth™ wireless module. (Consult “Using Your Analyzer With Your PC” on page 109for
details, if necessary.)
During analysis and detector calibrations, it is important to ensure that the analyzer is not
exposed to strong electromagnetic fields, including those produced by computer monitors,
hard drives, cellular telephones, walkie talkies, etc. Keep a minimum two (2) feet (0.7 meters)
distance between the analyzer and electronic devices.
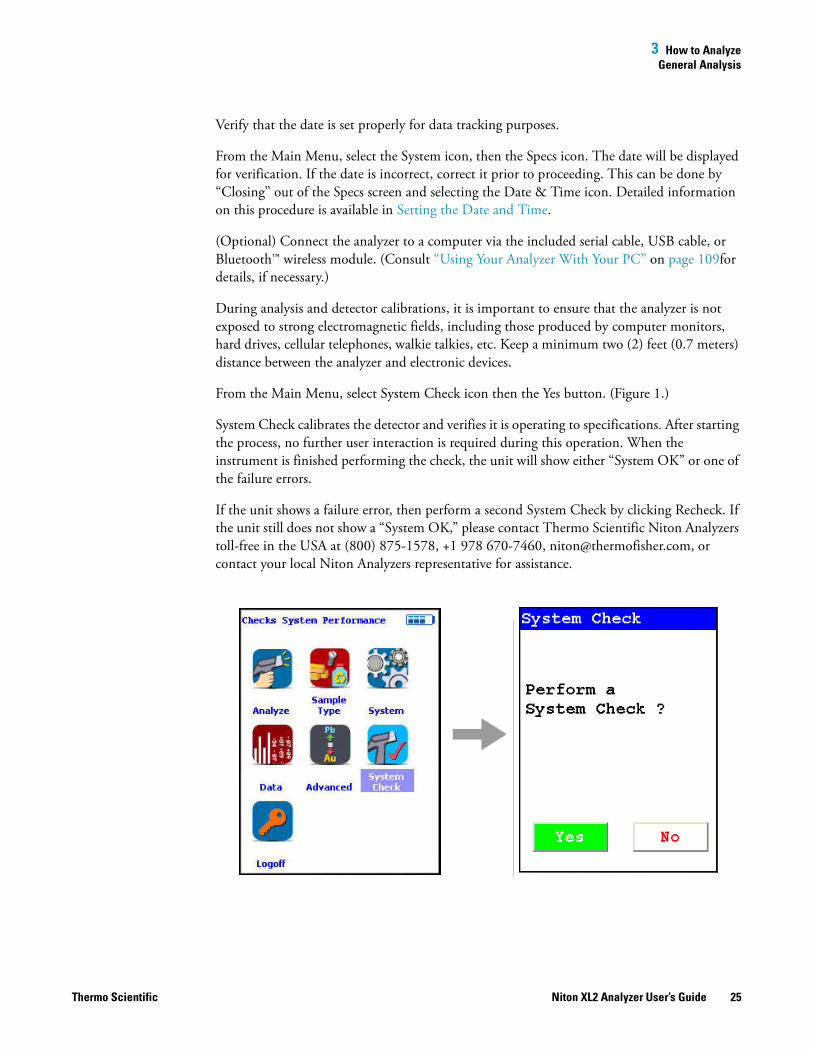
From the Main Menu, select System Check icon then the Yes button. (Figure 1.)
System Check calibrates the detector and verifies it is operating to specifications. After starting
the process, no further user interaction is required during this operation. When the
instrument is finished performing the check, the unit will show either “System OK” or one of
the failure errors.
If the unit shows a failure error, then perform a second System Check by clicking Recheck. If
the unit still does not show a “System OK,” please contact Thermo Scientific Niton Analyzers
toll-free in the USA at (800) 875-1578, +1 978 670-7460, [email protected], or
contact your local Niton Analyzers representative for assistance.
Thermo Scientific Niton XL2 Analyzer User’s Guide 25
3 How to AnalyzeGeneral Analysis
Figure 7. System Check Menu Path
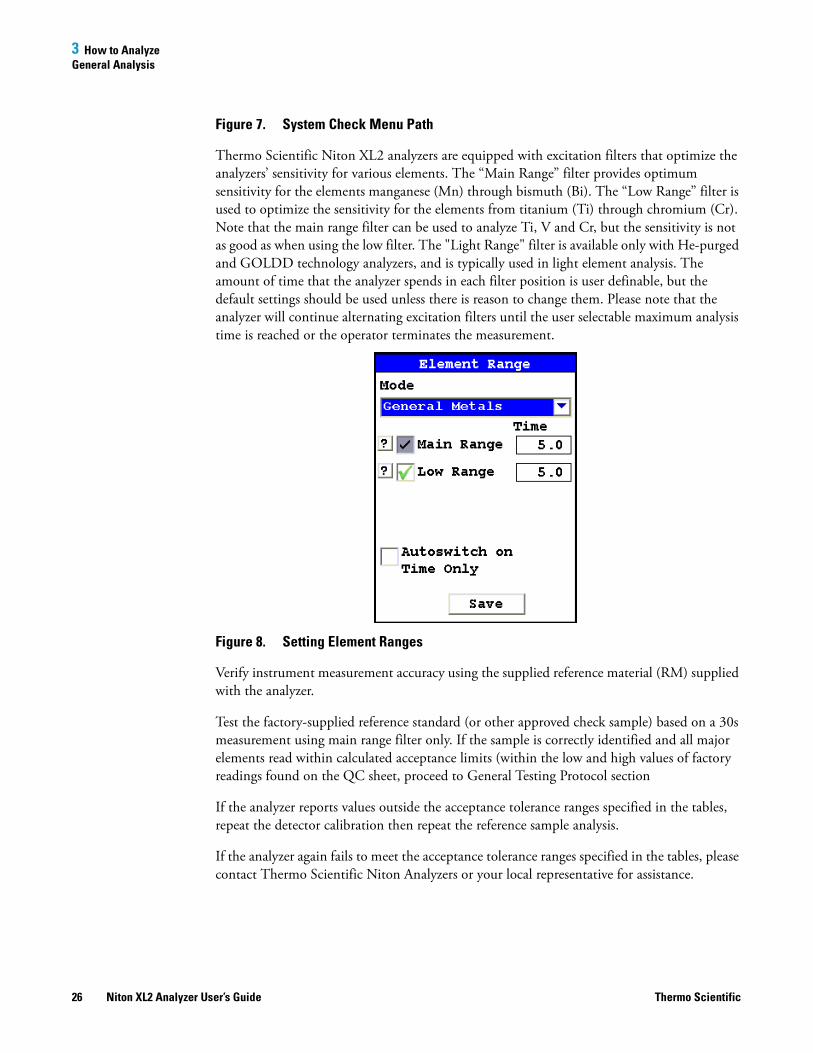
Thermo Scientific Niton XL2 analyzers are equipped with excitation filters that optimize the
analyzers’ sensitivity for various elements. The “Main Range” filter provides optimum
sensitivity for the elements manganese (Mn) through bismuth (Bi). The “Low Range” filter is
used to optimize the sensitivity for the elements from titanium (Ti) through chromium (Cr).
Note that the main range filter can be used to analyze Ti, V and Cr, but the sensitivity is not
as good as when using the low filter. The "Light Range" filter is available only with He-purged
and GOLDD technology analyzers, and is typically used in light element analysis. The
amount of time that the analyzer spends in each filter position is user definable, but the
default settings should be used unless there is reason to change them. Please note that the
analyzer will continue alternating excitation filters until the user selectable maximum analysis
time is reached or the operator terminates the measurement.
Figure 8. Setting Element Ranges
Verify instrument measurement accuracy using the supplied reference material (RM) supplied
with the analyzer.
Test the factory-supplied reference standard (or other approved check sample) based on a 30s
measurement using main range filter only. If the sample is correctly identified and all major
elements read within calculated acceptance limits (within the low and high values of factory
readings found on the QC sheet, proceed to General Testing Protocol section
If the analyzer reports values outside the acceptance tolerance ranges specified in the tables,
repeat the detector calibration then repeat the reference sample analysis.
If the analyzer again fails to meet the acceptance tolerance ranges specified in the tables, please
contact Thermo Scientific Niton Analyzers or your local representative for assistance.
26 Niton XL2 Analyzer User’s Guide Thermo Scientific

3 How to AnalyzeGeneral Analysis
GENERAL TESTING PROTOCOL
Good surface preparation is essential for obtaining accurate test results. All non- representative
material (e.g., paint, coating, scale) must be removed prior to testing. An approximately
2-inch-square section of surface should be cleaned down to the material to be analyzed. See
the Resource Guide for information on Sample Preparation.
The analyzer will often display a correct alloy identification and/or accurate chemistry result
before the specified time interval. If the accuracy meets the user’s requirements, it is not
necessary to measure for the full time.
Longer measurements might be necessary if low concentrations of elements must be
determined.
INSTRUMENT QC
Measure the supplied reference calibration check sample AT LEAST once a shift. If correct,
continue work. If incorrect, redo System Check and re-take the past 2 hours of results.
UNDERSIZED OR NON-CONTACT SAMPLES
(Samples that do not make contact with or that do not fully cover the measurement aperture)
For samples that do not fully cover the measurement aperture, increase the testing time by
increasing the time in inverse proportion to the decrease in percentage of aperture covered.
For example: a rod only covers ½ of the aperture, so increase the measurement time by two
(e.g., from 10 to 20 seconds per filter for alloy chemistry).
The best procedure to measure undersized samples is to use the Thermo Scientific Niton
portable test stand (optional), which is shielded to prevent radiation exposure to the operator.
An undersized sample may alternately be measured while lying on another material. Results
may be affected by the signal coming from the underlying material itself. Use only pure
aluminum, pure plastic, or clean wood and employ the Disable Al feature. Use the Tools
Menu, then select Disable Al, and check the underlying surface itself to be sure no metals are
present. Be sure to use the Tools Menu and select Enable Al before testing aluminum alloys.
Thermo Scientific Niton XL2 Analyzer User’s Guide 27

3 How to AnalyzeGeneral Analysis
28 Niton XL2 Analyzer User’s Guide Thermo Scientific
4 Basic OperationTaking a Sample Analysis
Basic Operation
Taking a Sample Analysis
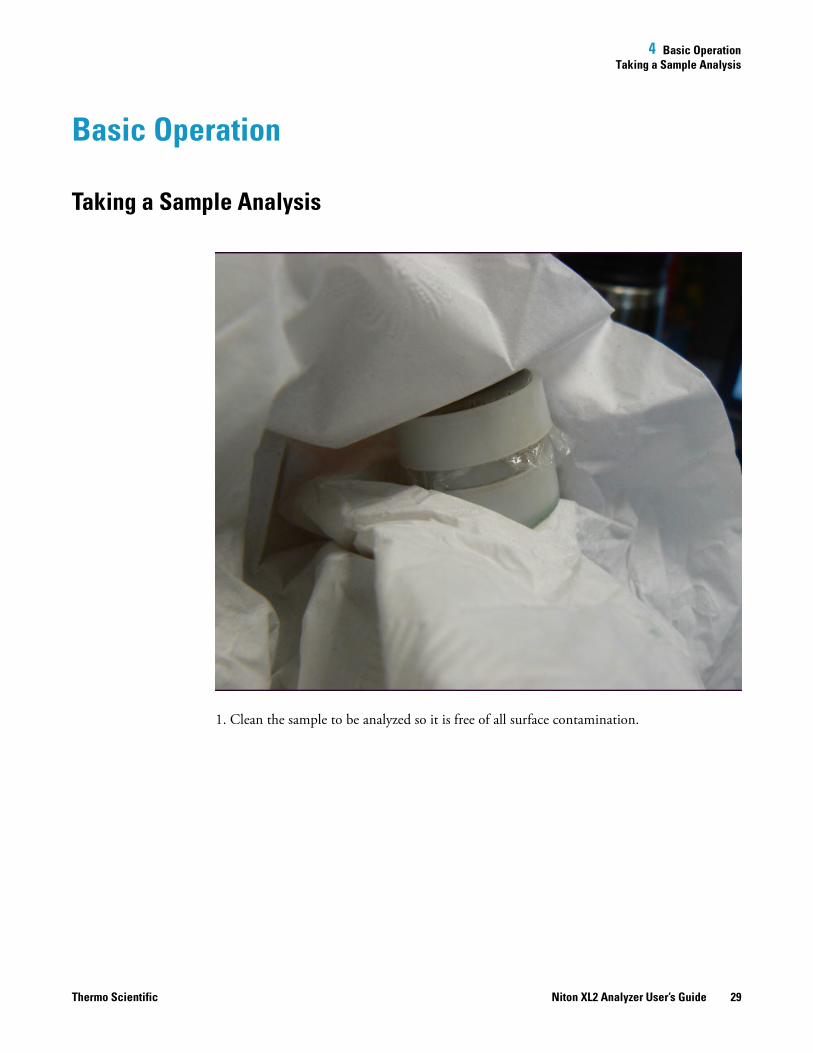
1. Clean the sample to be analyzed so it is free of all surface contamination.
Thermo Scientific Niton XL2 Analyzer User’s Guide 29
4 Basic OperationTaking a Sample Analysis
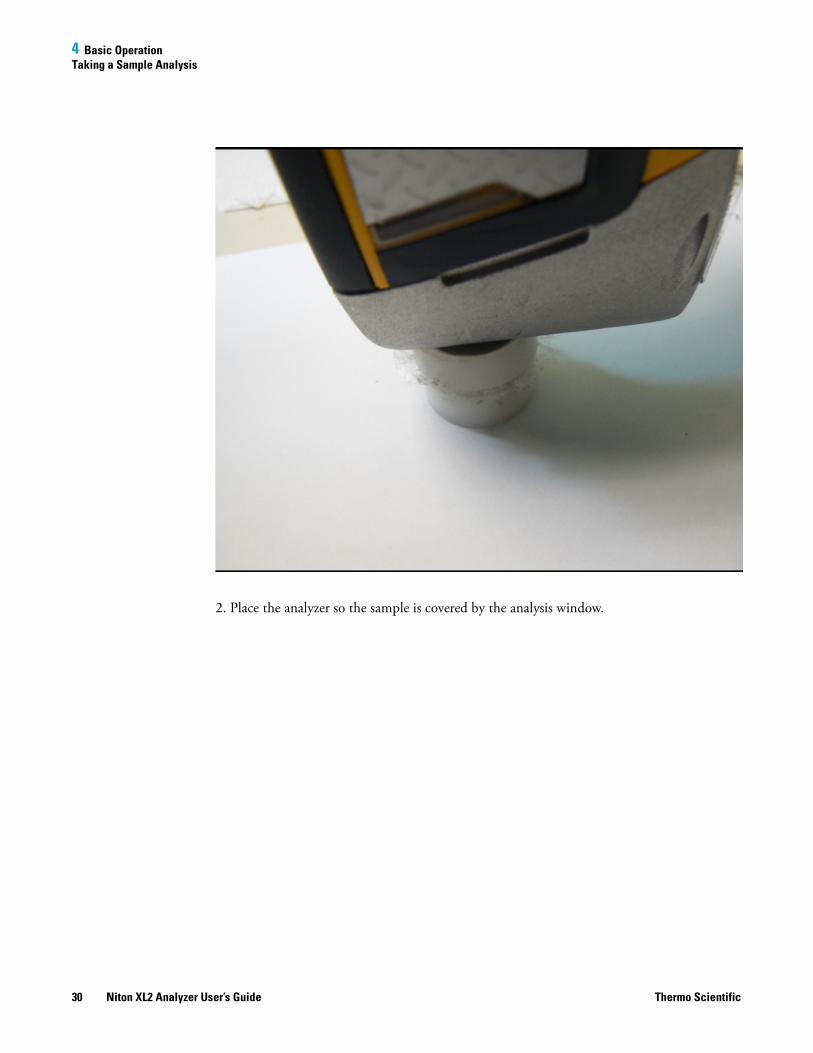
2. Place the analyzer so the sample is covered by the analysis window.
30 Niton XL2 Analyzer User’s Guide Thermo Scientific
4 Basic OperationTaking a Sample Analysis
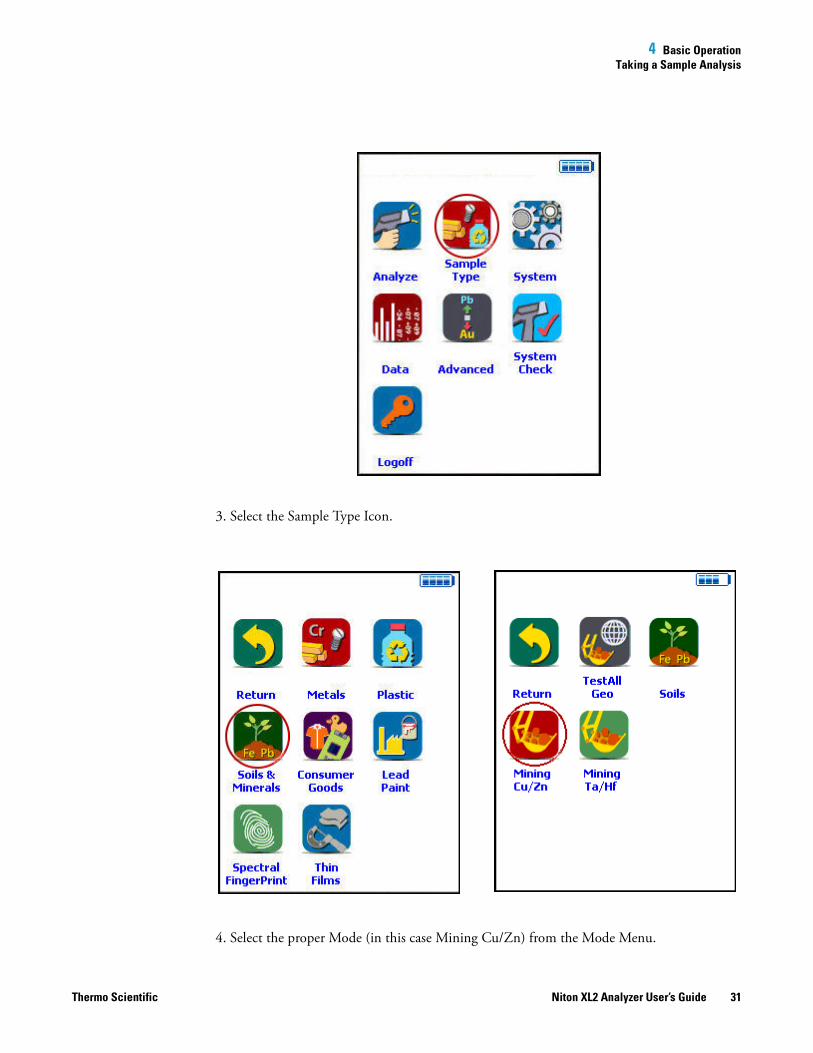
3. Select the Sample Type Icon.
4. Select the proper Mode (in this case Mining Cu/Zn) from the Mode Menu.
Thermo Scientific Niton XL2 Analyzer User’s Guide 31

4 Basic OperationTaking a Sample Analysis
Note See “Analysis Modes” on page 37. for more information on the Modes available.
5. Select the Analyze Icon.
32 Niton XL2 Analyzer User’s Guide Thermo Scientific

4 Basic OperationTaking a Sample Analysis
5a. Select Data Entryif you wish todo any data entry.
Thermo Scientific Niton XL2 Analyzer User’s Guide 33
4 Basic OperationTaking a Sample Analysis
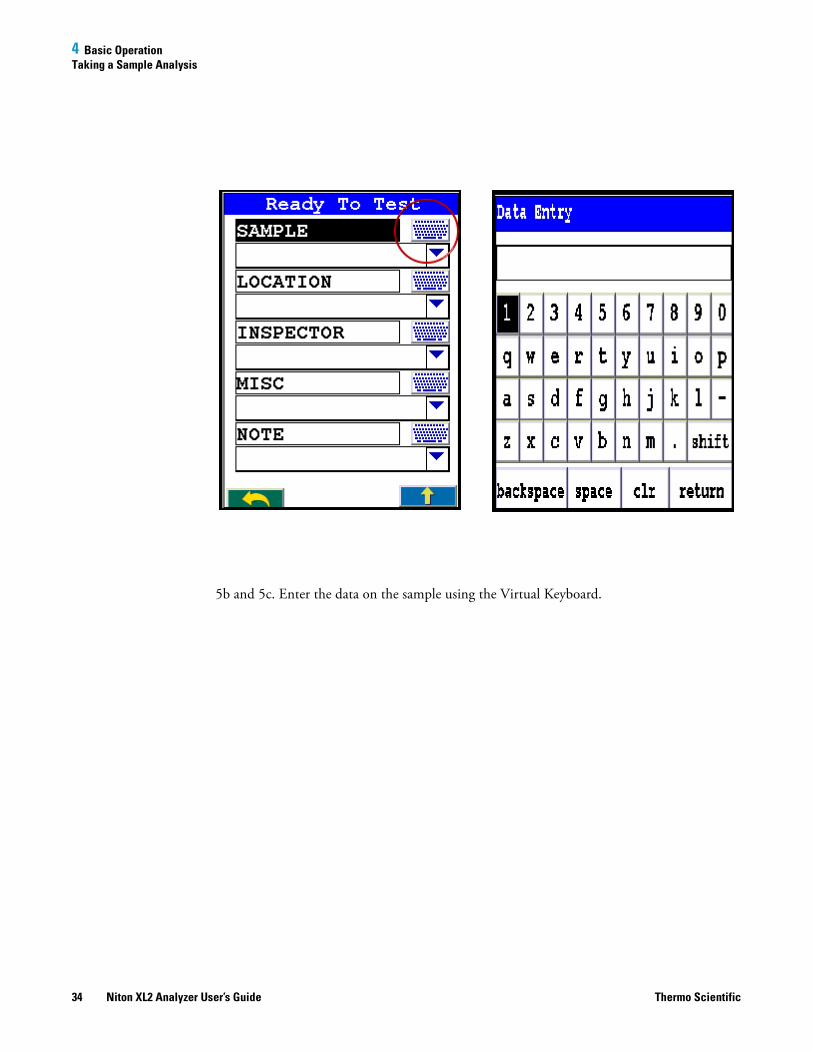
5b and 5c. Enter the data on the sample using the Virtual Keyboard.
34 Niton XL2 Analyzer User’s Guide Thermo Scientific

4 Basic OperationTaking a Sample Analysis
6. Initiate a Reading by pressing the trigger.
7. When the sample has been sufficiently analyzed, release the trigger.
Thermo Scientific Niton XL2 Analyzer User’s Guide 35

4 Basic OperationTaking a Sample Analysis
8. View the composition returned.
36 Niton XL2 Analyzer User’s Guide Thermo Scientific

4 Basic OperationAnalysis Modes
9. Remove the sample.
Analysis Modes
Your analyzer has several Analysis Modes. Which Analysis Mode you should use depends on
the nature of the sample you are attempting to analyze.
General Metals Mode
Use this mode to analyze samples entirely composed of metal alloys. This mode will attempt
to return an Alloy Grade Identification by matching the analyzed composition of the sample
with the nominal composition of alloys in the analyzer's Alloy Grade Library. It will also
return an elemental composition of the alloy as analyzed. Alloy Composition is output by
default in terms of percent of composition by weight.
See “Using General Metals Mode” on page 39.
Thermo Scientific Niton XL2 Analyzer User’s Guide 37

4 Basic OperationAnalysis Modes
Electronic Metals Mode
Use this mode to analyze electronic component samples - circuit boards, chips, etc. This mode
will attempt to return an Alloy Grade Identification by matching the analyzed composition of
the sample with the nominal composition of electronic alloys in the analyzer's Alloy Grade
Library. It will also return an elemental composition of the electronic alloy as analyzed.
Electronic Metal Composition is output by default in terms of percent of composition by
weight.
See “Using Electronic Metals Mode” on page 40.
Precious Metals Mode
Use this mode to analyze samples composed primarily of precious metals. This mode will
attempt to return an Alloy Grade Identification by matching the analyzed composition of the
sample with the nominal composition of alloys in the analyzer's Precious Alloy Grade Library.
It will also return an elemental composition of the precious metal sample as analyzed. Precious
Alloy Composition is output by default in terms of parts per million.
See “Using Precious Metals Mode” on page 40.
Plastics Mode
Use this mode to analyze samples composed primarily of plastic. This mode will return an
elemental composition of the plastic sample as analyzed. Plastic Composition is output by
default in terms of parts per million.
See “Using Plastics Mode” on page 42.
Soils Mode
Use this mode to analyze samples composed primarily of soil and rock. This mode will return
an elemental composition of the soil sample as analyzed. Soil Composition is output by
default in terms of parts per million.
See “Using Soils Mode” on page 42.
Mining Cu/Zn Mode
Use this mode to analyze samples composed of potential metal ore - rock containing high
proportions of metal - and containing Cu and/or Zn. This mode will return an elemental
composition of the ore sample as analyzed. Ore Composition is output by default in terms of
percent of composition by weight.
See “Using Mining Cu/Zn Mode” on page 43.
38 Niton XL2 Analyzer User’s Guide Thermo Scientific
4 Basic OperationAnalysis Modes
Mining Ta/Hf Mode
Use this mode to analyze samples composed of potential metal ore - rock containing high
proportions of metal - and containing Ta and/or Hf. This mode will return an elemental
composition of the ore sample as analyzed. Ore Composition is output by default in terms of
percent of composition by weight.
See “Using Mining Ta/Hf Mode” on page 44.
TestAll Mode
Use this mode to analyze samples composed of unknown and/or mixed composition, such as
toys and consumer products. This mode will attempt to return a general Material
Identification by comparing the analysis with other general types of materials. It will select the
proper sub-mode for analysis and return an elemental composition of the sample as analyzed.
Material Elemental Composition is output by default in terms of parts per million.
See “Using TestAll Mode” on page 44.
TestAll Geo Mode
Use this mode to analyze powder, mineral, and ore samples without first determining whether
the samples would best be analyzed with Mining or Soil Mode. This mode uses both the
Compton Normalization calibration (Soil) and the Fundamental Parameters calibration
(Mining) to determine whether the soil calibration is acceptable or whether the total metal
content is too high for Compton mode. It will then return an elemental composition of the
sample as analyzed. If the sample can be analyzed via soil mode, then the analyzer will display
results from both Soil and Mining Modes in one unified list. If both calibrations contain the
same element, then the mode that has the lower detection limit will be displayed. Material
Elemental Composition is output by default in terms of both parts per million (mg/kg) and
percent of composition by weight, with 0.10% being the cutoff point.
Note Due to the nature of this mode, your analyzer will only use factory calibrations. User
modified Cal Factors will not be available.
See “Using TestAll Geo Mode” on page 44.
Using General Metals Mode
1. Clean the sample to be analyzed so it is free of all surface contamination, grinding the
surface if appropriate.
2. Place the analyzer so that the sample covers the analysis window.
3. Select the Mode icon.
Thermo Scientific Niton XL2 Analyzer User’s Guide 39
4 Basic OperationAnalysis Modes
a. Select General Metals from the Mode Menu.
4. Select the Analyze icon.
a. Select the Data Button if you wish to do any data entry.
b. Enter the data on the sample using the Virtual Keyboard.
5. Initiate the analysis.
6. When the sample has been sufficiently analyzed, stop the analysis.
7. View the composition returned.
8. Remove the sample.
Using Electronic Metals Mode
1. Clean the sample to be analyzed so it is free of all surface contamination.
2. Place the analyzer so that the sample covers the analysis window.
3. Select the Mode icon.
a. Select Electronic Metals from the Mode Menu.
4. Select the Analyze icon.
a. Select the Data Button if you wish to do any data entry.
b. Enter the data on the sample using the Virtual Keyboard.
5. Initiate the analysis.
6. When the sample has been sufficiently analyzed, stop the analysis.
7. View the composition returned.
8. Remove the sample.
Using Precious Metals Mode
1. Clean the sample to be analyzed so it is free of all surface contamination.
2. Place the analyzer so that the sample covers the analysis window.
3. Select the Mode icon.
a. Select Precious Metals from the Mode Menu.
4. Select the Analyze icon.
40 Niton XL2 Analyzer User’s Guide Thermo Scientific

4 Basic OperationAnalysis Modes
a. Select the Data Button if you wish to do any data entry.
b. Enter the data on the sample using the Virtual Keyboard.
5. Initiate the analysis.
6. When the sample has been sufficiently analyzed, stop the analysis.
7. View the composition returned.
8. Remove the sample.
Thermo Scientific Niton XL2 Analyzer User’s Guide 41

4 Basic OperationAnalysis Modes
Using Plastics Mode
1. Clean the sample to be analyzed so it is free of all surface contamination.
2. Place the analyzer so that the sample covers the analysis window.
3. Select the Mode icon.
a. Select Plastics from the Mode Menu.
4. Select the Analyze icon.
a. Select the Data Button if you wish to do any data entry.
b. Enter the data on the sample using the Virtual Keyboard.
5. Initiate the analysis.
6. When the sample has been sufficiently analyzed, stop the analysis.
7. View the composition returned.
8. Remove the sample.
Using Soils Mode
1. Pack the sample into a Sample Cup.
a. Clean the sample to be analyzed so it is free of all surface contamination.
2. Place the analyzer so that the sample covers the analysis window.
3. Select the Mode icon.
a. Select Soils from the Mode Menu.
4. Select the Analyze icon.
a. Select the Data Button if you wish to do any data entry.
b. Enter the data on the sample using the Virtual Keyboard.
5. Initiate the analysis.
6. When the sample has been sufficiently analyzed, stop the analysis.
7. View the composition returned.
8. Remove the sample.
42 Niton XL2 Analyzer User’s Guide Thermo Scientific
4 Basic OperationAnalysis Modes
Using Mining Cu/Zn Mode
1. Clean the sample to be analyzed so it is free of all surface contamination.
2. Place the analyzer so that the sample covers the analysis window.
3. Select the Mode icon.
a. Select Mining Cu/Zn from the Mode Menu.
4. Select the Analyze icon.
a. Select the Data Button if you wish to do any data entry.
b. Enter the data on the sample using the Virtual Keyboard.
5. Initiate the analysis.
6. When the sample has been sufficiently analyzed, stop the analysis.
7. View the composition returned.
8. Remove the sample.
Thermo Scientific Niton XL2 Analyzer User’s Guide 43
4 Basic OperationAnalysis Modes
Using Mining Ta/Hf Mode
1. Clean the sample to be analyzed so it is free of all surface contamination.
2. Place the analyzer so that the sample covers the analysis window.
3. Select the Mode icon.
a. Select Mining Ta/Hf from the Mode Menu.
4. Select the Analyze icon.
a. Select the Data Button if you wish to do any data entry.
b. Enter the data on the sample using the Virtual Keyboard.
5. Initiate the analysis.
6. When the sample has been sufficiently analyzed, stop the analysis.
7. View the composition returned.
8. Remove the sample.
Using TestAll Mode
1. Clean the sample to be analyzed so it is free of all surface contamination.
2. Place the analyzer so that the sample covers the analysis window.
3. Select the Mode icon.
a. Select TestAll from the Mode Menu.
4. Select the Analyze icon.
a. Select the Data Button if you wish to do any data entry.
b. Enter the data on the sample using the Virtual Keyboard.
5. Initiate the analysis.
6. When the sample has been sufficiently analyzed, stop the analysis.
7. View the composition returned.
8. Remove the sample.
Using TestAll Geo Mode
1. Clean the sample to be analyzed so it is free of all surface contamination.
44 Niton XL2 Analyzer User’s Guide Thermo Scientific

4 Basic OperationAnalysis Modes
2. Place the analyzer so that the sample covers the analysis window.
3. Select the Mode icon.
a. Select TestAll Geo from the Mode Menu.
4. Select the Analyze icon.
a. Select the Data Button if you wish to do any data entry.
b. Enter the data on the sample using the Virtual Keyboard.
5. Initiate the analysis.
6. When the sample has been sufficiently analyzed, stop the analysis.
7. View the composition returned.
8. Remove the sample.
Thermo Scientific Niton XL2 Analyzer User’s Guide 45

4 Basic OperationAnalysis Modes
46 Niton XL2 Analyzer User’s Guide Thermo Scientific
5 Common OperationsMetal Sample Prep
Common Operations
Metal Sample Prep
Up until recently, sample preparation was not a big worry for XRF metals analysis, as the
LOD of the analyzer was seldom low enough for any but the most heavy contamination to be
intrusive; but recent developments such as He-purged analysis have brought analysis to a level
where even light surface contamination can skew an analysis.
You should always prepare your samples before analysis, especially when using He-purged
analysis, as these analyzers will see even trace amounts of contaminants. Oils from fingerprints
and other body contact, lint, oxidation materials, and abrasive materials used in cleaning can
all skew readings if not removed. Sample preparation is simple and not time consuming, and
usually well worth the effort.
The following is a list of problems that need correction before testing:
• Oxidation or Rust may produce an increase or decrease in one or more element test
values unless we remove the rust or oxidation and expose the raw metal.
• Paint may contain several elements which need to be tested at lower levels within
metal alloys (Ti & Zn in white paint, Fe in red paint, Cr in green paint).
• Oil, grease or lubricates may contain high levels of the following elements: lithium,
aluminum, barium, strontium, molybdenum or calcium.
Plated surfaces may have high levels of the following elements: zinc, chromium, nickel, or
copper.
CAUTION Anything on the metal surface will become part of your test results!
Sample Analysis Preparation
You need to clear the surface of your samples of any paint, plating, or any oxidation such as
rust or verdigris before analysis. In order to accomplish this, you need the following:
• Isopropyl alcohol - not rubbing alcohol, which contains oils.
• Lint-free paper.
• Diamond paper - P/N 179-1202- cut into 1 inch/2.5 cm squares. Never re-use this
paper, as it may transfer contaminants to the surface of the sample from previous
cleanings. Depending on the state of the sample, several squares may be needed per
sample.
Thermo Scientific Niton XL2 Analyzer User’s Guide 47

5 Common OperationsMetal Sample Prep
• A Sample Grinder for removing deeper surface contamination. Choice of grinding
wheel media also may be important, depending on what you are testing for. Never
re-use grinding media, as contaminants can be transferred from sample to sample on
the media itself.
For light contamination on hard metal reference standards, remove the oxidation by
scrubbing the dry sample lightly with the diamond paper square, using the fingers to maintain
pressure. If the diamond paper begins to load up with material, discard it and use a fresh
square. When the oxidation is removed, wipe the sample with lint-free paper soaked with
isopropyl alcohol to remove any oils or dust. Let the sample dry before attempting analysis.
For soft metal reference standards, wipe the sample with lint-free paper soaked with isopropyl
alcohol, then remove the oxidation by scrubbing the wet sample lightly with the diamond
paper square, using the fingers to maintain pressure. If the diamond paper begins to load up
with material, discard it and use a fresh square. When the oxidation is removed, wipe the
sample again with lint-free paper soaked with isopropyl alcohol to remove any oils or dust. Let
the sample dry before attempting analysis.
Oils, lint and dust can be removed by wiping the sample with lint-free paper soaked with
isopropyl alcohol. Let the sample dry before attempting analysis.
Surface Oxidation
With the exception of a limited number of metal types, most metal alloys form an oxide
covering on the surface when exposed to oxygen or air. This oxide covering is visible in carbon
and low alloy steel as a red colored substance called rust. Other metal alloys form oxidation
which is not always visible, but that does not mean that it is not present. If the test results for
low concentration elements are higher or lower than expected, remove the oxide coating by
grinding and retest. Follow proper safety procedures when changing discs or grinding
materials.
During a recent case study the effects of sample preparation became apparent. A customer
asked for low detection limits of nickel, chromium and copper in carbon steel pipe. The
reported chemistry of the purchased material is listed on the first line in the chart below. The
test results of a hand held Niton XL2t 900S GOLDD instrument appears in the second line
of the chart. The results from a test on the unground surface appear in the bottom line of the
chart. Note the values for nickel and copper in this carbon steel alloy in the chart below. The
oxidation on the surface of this pipe was not visibly egregious. We need to always be wary of
the presence of even low levels of oxidation and their possible effects on analytic accuracy.
Table 1. Comparative test results with and without grinding
Sample % Mn % Ni % Cr % Mo % Cu
Reported Chemistry 0.650 0.090 0.070 0.030 0.040
48 Niton XL2 Analyzer User’s Guide Thermo Scientific

5 Common OperationsMetal Sample Prep
Painted Surfaces
Paint is a mixture of several items that are combined into a liquid which is applied to the
surface of materials such as metal. Once applied this liquid dries with time and adheres to the
surface of metal. Paint is used to protect or decorate the metal item. Paint can also be used to
identify or mark the metal during the manufacturing process.
Components of paint are divided into classifications of pigments, binders, solvents, additives
and fillers. The inorganic elements in pigments will contribute to increases in displayed values
for those elements if paint on the metal surface is not removed prior to testing. Be especially
careful of the presence of heavy elements, which can also act to shield x-rays from lighter
elements in the metal sample.
The following is a list of some of the most common components of paint:
White Paint
• Antimony (Sb)
• Lead (Pb)
• Titanium (Ti)
• Zinc (Zn)
• Cobalt (Co)
Red Paint
• Iron (Fe)
• Lead (Pb)
• Green Paint
• Chromium (Cr)
An experiment was conducted to determine the effect and severity of surface problems on
XRF results. Results from analyses of a 1541 alloy steel sample are shown below, before and
after surface grinding. The sample had painted markings, of light to medium thickness, on
the surface, as well as light rust. Note the change in titanium, zinc and cobalt levels after
surface grinding.
Test Results with Ground Surface 0.67 0.089 0.070 0.033 0.039
Test Results with Unground Sur-
face
0.61 0.178 0.081 0.033 0.514
Table 1. Comparative test results with and without grinding
Thermo Scientific Niton XL2 Analyzer User’s Guide 49

5 Common OperationsMetal Sample Prep
Oil, Grease & Cutting Oils
Oil and grease contain a number of elements combined into a viscous substance and applied
to moving parts in order to reduce friction. Grease coatings can remain on component
surfaces after it has been removed from service. Grease can also be applied to a metal's surface
by accidental contact with other materials coated in heavy grease. Metals can also be coated in
oil as a result of cutting and machining processes in manufacturing.
Grease and oil may contain the following elements:
• Aluminum (Al)
• Zinc (Zn)
• Molybdenum (Mo)
• Sodium (Na)
• Calcium (Ca)
An experiment was performed to show how grease on metal surfaces affects XRF results. A
carbon steel sample was cleaned and ground as a control surface for the experiment. XRF tests
were performed on the control surface, and again after light and heavier layers of automotive
wheel bearing grease were applied to the surface of the steel sample. Results are shown below.
Note the elevated levels of molybdenum, cobalt and zinc from the grease.
If a sample's surface contains lubricants or cutting oil, use a solvent and a clean towel or rag to
remove them before analysis. You may then need to grind the surface to insure good results.
Clean first, grind second, test last.
Table 2. Prepped and unprepped painted metal analysis
Sample Mn Ni Cr Mo Ti Zn Co
Ground Surface 1.49 0.04 0.03 0.004 0.011 0.0001 0.03
Unground Surface 1.34 0.01 0.04 0.011 2.507 1.751 0.21
Table 3. Clean and greased sample metal analysis
Sample Mn Ni Cr Mo Cu Co Zn
Clean Surface 1.18 0.001 0.041 0.004 0.001 0.001 0.019
Light Grease 1.07 0.001 0.001 0.067 0.033 0.322 0.416
Heavy Grease 0.96 0.001 0.001 0.500 0.062 1.760 3.430
50 Niton XL2 Analyzer User’s Guide Thermo Scientific

5 Common OperationsMetal Sample Prep
Remember to follow safe techniques for handling and disposing of solvents and cleaning rags
Anodized, Plated and Galvanized Surfaces
Anodizing is the process of polarizing the metal surface into a passive state which protects it
against corrosion. This process is most often applied to aluminum alloys.
Galvanized steel is one of the most common of the coated surfaces. In this process, steel is
passed through a molten bath of a zinc alloy. Zinc reacts with the steel metal to form a
bonding layer on the steel surface. The zinc layer does not separate from the steel and forms a
protective layer that protects the steel from oxidation.
Galvanized layers are relatively thick compared to other plating elements and methods. When
grinding to remove the zinc coating, you will find increased zinc values even when you can see
the steel surface. Grind a little further and zinc values will disappear. Zinc clings to the surface
of the sanding disc, so you will need to frequently change discs.
Electroplating is another common practice of applying a coating which not only protects the
surface from oxidation, but also improves the base material's wear resistance, lubricity and
improves the overall aesthetics of the product. The electroplated coating is generally thinner
and more evenly applied than galvanizing. Electroplating has a wide range of elements and in
some situations there may be two or more different coatings on the same part.
The following is a partial list of elements that are used to plate the surface of base metals:
Ni, Cr, Cadmium (Cd), Tin (Sn), Zn, Al
Cordless Right Angle Drill
This style of drill is recommended for most surface preparation in the field because it gives the
operator the greatest amount of control, and thus safety, when grinding samples. When
moving a sanding disc on a conventional drill over a sample, forces tend to produce
movement the operator may find difficult to control. Control and stability are important in
grinding from effectiveness and safety perspectives.
A cordless right angle drill similar to the one pictured below is recommended for light to
medium surface removal. For materials with heavy oxidation such as carbon and low alloy
steel, an angle grinder, explained in the next section, is recommended. A kit with the drill,
batteries and charging units, can be purchased from ThermoFisher, or companies such as
DeWalt, Hitachi, Makita, Milwaukee or Ryobi.
Thermo Scientific Niton XL2 Analyzer User’s Guide 51

5 Common OperationsMetal Sample Prep
Figure 1. Example of Right Angle Drill
A disc holder is needed with the drill to hold the sanding disc. (In the US, we recommend a
3.0 inch disc holder. It has a 0.25 inch shank to insert into the chuck of the drill.) If sanding
discs are ordered from a local supplier, attention should be paid to the method of attaching
the sanding disc to the disc holder. There are three types of connections: metal snap-on,
plastic twist and plastic snap-on.
52 Niton XL2 Analyzer User’s Guide Thermo Scientific
5 Common OperationsMetal Sample Prep
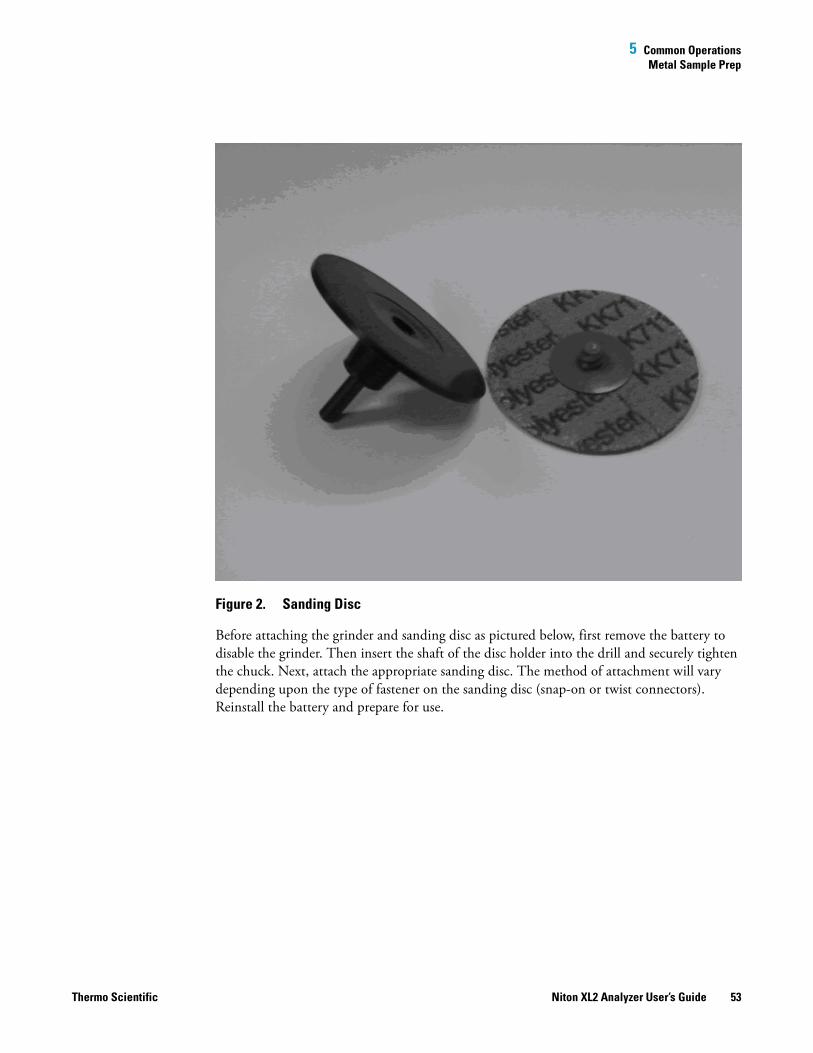
Figure 2. Sanding Disc
Before attaching the grinder and sanding disc as pictured below, first remove the battery to
disable the grinder. Then insert the shaft of the disc holder into the drill and securely tighten
the chuck. Next, attach the appropriate sanding disc. The method of attachment will vary
depending upon the type of fastener on the sanding disc (snap-on or twist connectors).
Reinstall the battery and prepare for use.
Thermo Scientific Niton XL2 Analyzer User’s Guide 53

5 Common OperationsMetal Sample Prep
Figure 3. Attaching the Sanding Disc 1
Figure 4. Attaching the Sanding Disc 2
54 Niton XL2 Analyzer User’s Guide Thermo Scientific
5 Common OperationsMetal Sample Prep
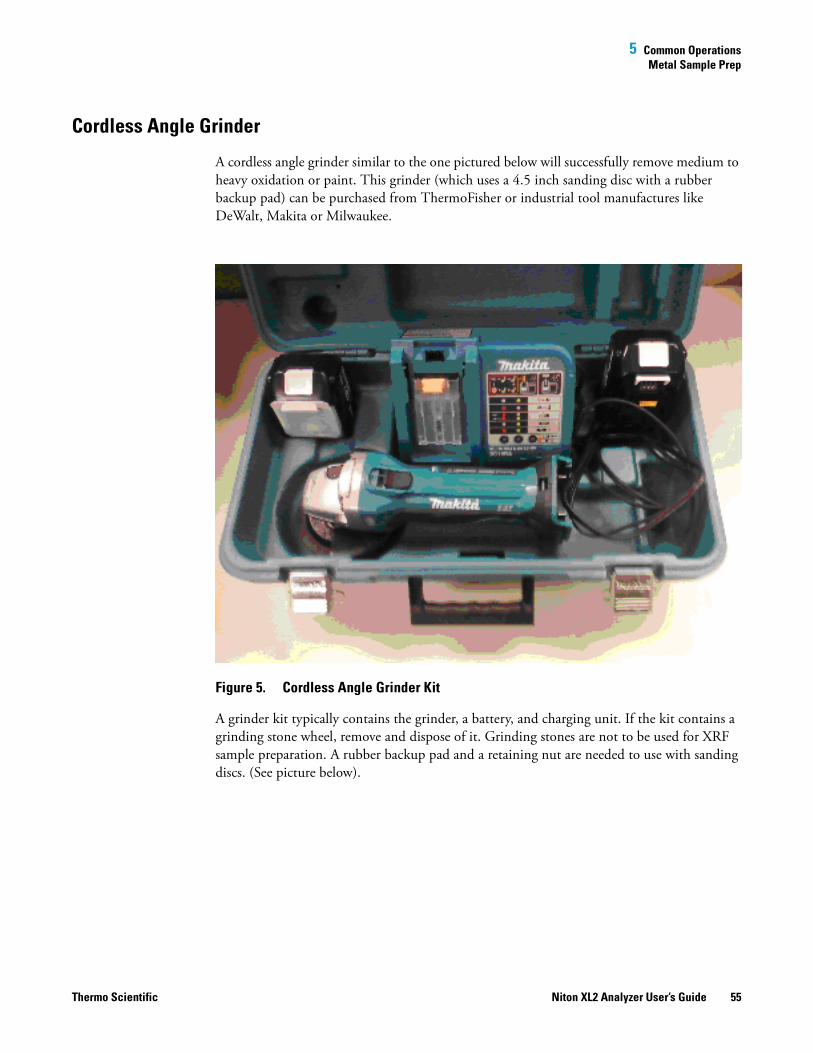
Cordless Angle Grinder
A cordless angle grinder similar to the one pictured below will successfully remove medium to
heavy oxidation or paint. This grinder (which uses a 4.5 inch sanding disc with a rubber
backup pad) can be purchased from ThermoFisher or industrial tool manufactures like
DeWalt, Makita or Milwaukee.
Figure 5. Cordless Angle Grinder Kit
A grinder kit typically contains the grinder, a battery, and charging unit. If the kit contains a
grinding stone wheel, remove and dispose of it. Grinding stones are not to be used for XRF
sample preparation. A rubber backup pad and a retaining nut are needed to use with sanding
discs. (See picture below).
Thermo Scientific Niton XL2 Analyzer User’s Guide 55

5 Common OperationsMetal Sample Prep
Figure 6. Rubber Backing Pad and Nut
In the US, sanding discs are 4.5 inch diameter and can be purchased in various grit sizes of 36
to 120. The surface abrasive can be one of the following materials: aluminum oxide, silicon
carbide or zirconia alumina. The selection of sanding discs is covered in the next section.
56 Niton XL2 Analyzer User’s Guide Thermo Scientific

5 Common OperationsMetal Sample Prep
Figure 7. Assembling the Grinder
Remove the battery before assembling the grinder, backup pad and sanding disc. Start by
installing the backup pad onto the drive shaft of the grinder, or, with some backup pads. You
will need to screw it onto the threaded shaft.
Next place the sanding disc over the drive shaft onto the backup pad. Hold the locking button
on the reverse side of the grinder while tightening the retaining nut into the hole of the
sanding disc.
Once the backup pad, sanding disc and locking nut are secured, reinstall the battery. The
grinder is now ready for use.
Sanding Discs
It has been well tested and determined that samples can be easily contaminated by the abrasive
material contained in and on a sanding disc. An example would be the increase in aluminum
content of carbon steel after grinding the sample with a new aluminum oxide sanding disc.
Aluminum from the aluminum oxide disc imbeds itself in the surface of the steel sample and
an XRF would show an unusually high aluminum concentration.
Thermo Scientific Niton XL2 Analyzer User’s Guide 57
5 Common OperationsMetal Sample Prep
Aluminum oxide is the most common abrasive surface used today. For most applications it
will be safe to use aluminum oxide discs. But if test results for aluminum in any metal alloy are
significantly higher than expected, switch to another type of abrasive disc. Also, when
grinding aluminum, aluminum oxide discs tend to trap aluminum from the metal surface into
the disc surface. Once this happens, the disc looses its efficiency and cross contaminates the
next sample.
Silicon Carbide
Silicon carbide discs are a good alternative for aluminum oxide and the cost of a disc is only
slightly higher than aluminum oxide. This adhesive type is best for grinding aluminum,
copper and other soft metals.
Zirconia Alumina
Zirconia alumina discs are more expensive than aluminum oxide or silicon carbide but they
last much longer and so may be the best investment. Few metal alloys have low additive levels
of zirconium, so it is one of the safest abrasive types for general use.
One exception is the Aluminum alloy Al 7050 which is a near twin to alloy Al 7075 except for
the ~0.1% Zr in 7050. Therefore, if 7075 is ground with Zr grinding paper it may be
erroneously identified as Al 7050 due to the Zr transferred from the grinding disk to the
surface of the Al 7075. s
Diamond Sanding Paper
Do not use diamond sanding paper for surface preparation in the field. Even after extensive
and aggressive sanding with diamond paper, a metal surface will not be prepared properly.
Diamond sanding paper is only recommended for removal of very light oxide coatings on flat
surfaces such as analytical reference standards.
• Nickel, cobalt, and steel alloys should be ground using 36, 40, 50 or 60 grit discs.
The selection of a grit size of 100 or la
• inum, copper alloys, and other softer metals should be ground using 60 or 80 grit
discs.
• Grinding stones are not recommended because they will absorb surface material and
transfer them onto the next surface ground.
Safety Rules
When using a grinder, follow these safety rules:
• When changing sanding discs, always remove the grinder battery to prevent
accidental activation of the grinder.
• Allow the grinder to stop spinning before placing it on a flat surface.
58 Niton XL2 Analyzer User’s Guide Thermo Scientific
5 Common OperationsMetal Sample Prep
• Replace any damaged or torn sanding discs immediately.
• Always wear impact eye protection to prevent eye damage from flying debris.
• Place small samples or standards in a clamping device when grinding to prevent
accidental contact between the spinning disc and your hand.
• Use proper techniques and safety precautions when grinding beryllium, beryllium
copper, lead, or titanium alloys.
• Always follow the safety instructions outlined by the grinder's manufacture as
mentioned in the instruction manual..
Thermo Scientific Niton XL2 Analyzer User’s Guide 59

5 Common OperationsSoil Sample Prep
Soil Sample Prep
Examine the site for differences in surface characteristics before sampling. Valid results depend
on a sufficient and appropriate selection of sites to sample. Incorrect sample collection may
give rise to misleading or meaningless results, regardless of the analysis method. Delineate
sections with different characteristics and treat them as different areas. It may be desirable to
subdivide larger areas even if they have the same characteristics to ensure a thorough
examination. Make certain to label each bag thoroughly. Common information included on
each bag includes the person and/or the company who collected the sample, the location and
area where the sample was taken, and the date the sample was collected.
Prepared sample analysis is the most accurate method for determining the concentration of
elements in a bulk medium using the instrument. Sample preparation will minimize the
effects of moisture, large particle size, variations in particle size and sample non-homogeneity.
Note More sample preparation (drying, milling and sifting) will yield greater accuracy. The
drier, finer, and more homogeneous the particles, the better the measurements.
Preparing Bulk Soil Samples
We recommends establishing a specific sample protocol. Following this protocol for preparing
and testing samples is vital for achieving a level of accuracy comparable with laboratory
results. The equipment you need to prepare samples is included in your kit. Among these are
a mortar and pestle, several different sized metal sieves, and cups to hold the samples
.
CAUTION All test equipment must be kept clean to prevent contaminationof samples.
Cleaning Your Equipment:
The mortar, pestle, and grinding mill may be cleaned with dry paper towels. You can also
clean the mortar, pestle, and the mill’s container with water, but be sure each is absolutely dry
before using them on another sample. The mortar and pestle may be cleaned by grinding
clean, dry sand in the mortar. Use the short bristle brushes (included in your Soil Testing Kit)
to clean the sieves. If you have an electric soil grinder in your kit, when the soil grinder blades
wear out, unbolt the worn blades and replace them. Call the Thermo Sales Department at
1-800-875-1578 for replacement blades.
Note Using the soil grinder may artificially increase the amount of Fe in soil samples.
60 Niton XL2 Analyzer User’s Guide Thermo Scientific
5 Common OperationsSoil Sample Prep
Sample Preparation
Prior to analysis, the material should be dry and well homogenized. Ideally, the entire sample
should be dried to constant weight, sifted to remove gravel and debris, and ground or milled
to a fine powder. Dry the sample if it is moist and cohesive. The sample can be dried in any of
several ways. Choose one of the following:
• Oven dry the sample for approximately 2 hours at 150° C, until the sample reaches a
constant weight. Note: Oven drying is inappropriate when volatile compounds may
be present in the sample. For example, lead present as tetraethyl lead would be driven
off by the heat of drying. Some forms of mercury and arsenic are volatile. Air drying
will preserve more of these volatile substances.
• Air dry the sample overnight at room temperature in a shallow pan.
• Stir gently and warm the sample in a pan over a hot plate or burner.
Coning and Quartering
You may need to divide your sample at various times during preparation. Coning and
quartering is a method for dividing the sample into homogenous quarters.
• Pour the dry material slowly and carefully onto a flat sheet or pan, forming a
symmetrical cone. Divide the cone into equal piles using a flat thin-bladed tool, such
as a knife or ruler. Divide these in half again.
• Now you have four samples, each one-quarter the size of the original and each more
homogenous than the original.
• Grind the sample to break up dirt clods and/or paint chips.
WARNING Grinding and sifting dried samples produces dust. Even clean soil contains silica,
which may be hazardous when airborne. Prepare all samples in a ventilated area; wear a mask,
gloves, and an apron; and spread a drop cloth.
Sift using the #10 (2mm) mesh and separate out the larger pieces (stones, organic matter,
metallic objects, etc. Examine the larger particles by eye but do not include in the sample.
Grind the sample again so its particles will be finer and more homogenous. Use mortar and
pestle, or an electrically powered grinding mill. Sift at least 10 grams of the sample through
#60 (250 ?m) and #120 (125 ?m) mesh. Re-grind the un-passed material until the entire
fraction is able to pass. Mix the resulting sample.
Placing the Sample in an XRF Sample CupNote The sample container should be a sample cup of a type that can be filled from the rear;
that is, the side opposite the window (e.g. Thermo NITON Part Number 187-466). Thermo
recommends using a 1/4 mil Polypropylene film (e.g. Thermo NITON Part Number
187-461). A supply of cups and films are included.
Thermo Scientific Niton XL2 Analyzer User’s Guide 61
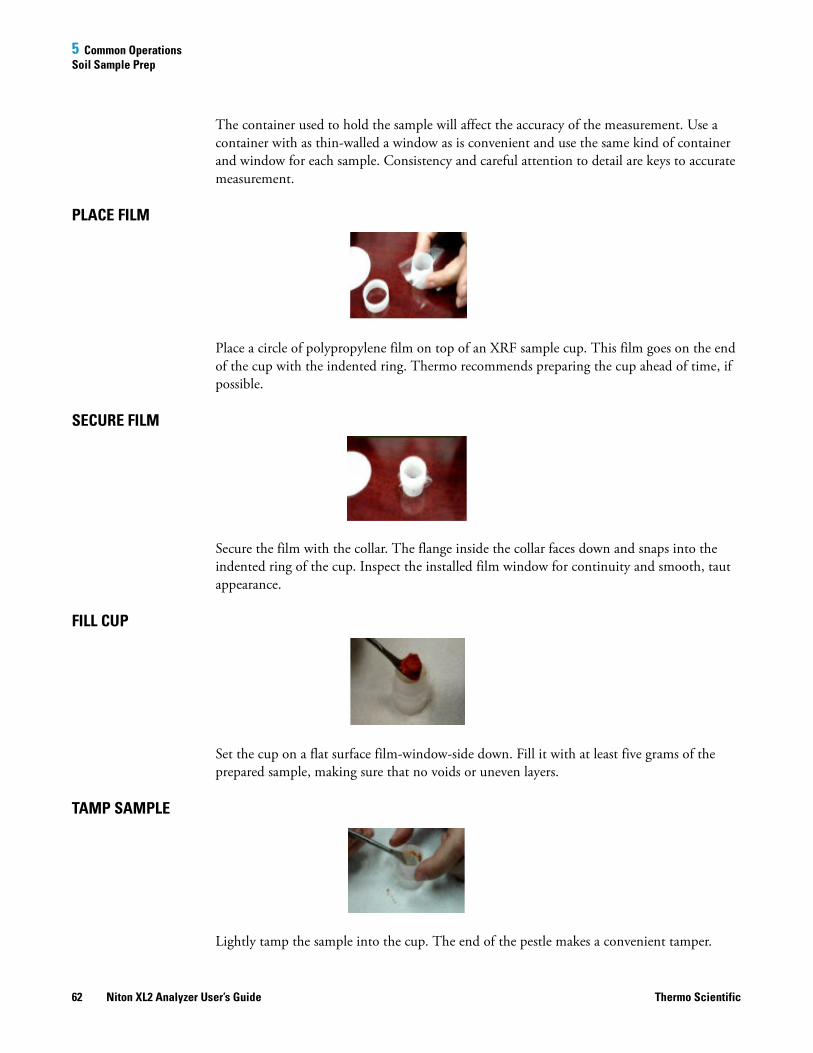
5 Common OperationsSoil Sample Prep
The container used to hold the sample will affect the accuracy of the measurement. Use a
container with as thin-walled a window as is convenient and use the same kind of container
and window for each sample. Consistency and careful attention to detail are keys to accurate
measurement.
PLACE FILM
Place a circle of polypropylene film on top of an XRF sample cup. This film goes on the end
of the cup with the indented ring. Thermo recommends preparing the cup ahead of time, if
possible.
SECURE FILM
Secure the film with the collar. The flange inside the collar faces down and snaps into the
indented ring of the cup. Inspect the installed film window for continuity and smooth, taut
appearance.
FILL CUP
Set the cup on a flat surface film-window-side down. Fill it with at least five grams of the
prepared sample, making sure that no voids or uneven layers.
TAMP SAMPLE
Lightly tamp the sample into the cup. The end of the pestle makes a convenient tamper.
62 Niton XL2 Analyzer User’s Guide Thermo Scientific

5 Common OperationsSoil Sample Prep
PLACE FILTER
Place a filter-paper disk on the sample after tamping it.
STUFF CUP
Fill the rest of the cup with polyester fiber stuffing to prevent sample movement. Use
aquarium filter or pillow filling as stuffing. A small supply of stuffing comes with your bulk
sample kit.
CAP CUP
Place a cap on your cup.
LABEL CUP
Place a label on teh cup. Using a pen with indelible ink, write identifying information on the
cup. Keep a record of the sample designation, the site and location, the date of the sample,
and any other relevant comments.
Cup is ready for testing.
Thermo Scientific Niton XL2 Analyzer User’s Guide 63

5 Common OperationsPreparing Mining Samples
Preparing Liquids and Sludge
Liquids
Fill an XRF sample cup with the liquid to be tested (do not pad the sample with cotton). The
cup must be full so it is best if some liquid is allowed to overflow when the cap is put on.
Sludge
Sludge can be placed directly into an XRF cup for screening. This is considered in-situ testing
because no attempt has been made to prepare the sample. For more accuracy, the sludge can
be dried, sieved, and ground. Prepare in an XRF sample cup and test the same way you would
with a soil sample. For risk analysis, it is advisable to use a 60-mesh sieve to isolate and test
only fine particles.
Preparing Mining Samples
Examine the site for differences in surface characteristics before sampling. Valid results depend
on a sufficient and appropriate selection of sites to sample. Incorrect sample collection may
give rise to misleading or meaningless results, regardless of the analysis method. Delineate
sections with different characteristics and treat them as different areas. It may be desirable to
subdivide larger areas even if they have the same characteristics to ensure a thorough
examination. Make certain to label each bag thoroughly. Common information included on
each bag includes the person and/or the company who collected the sample, the location and
area where the sample was taken, and the date the sample was collected.
Prepared sample analysis is the most accurate method for determining the concentration of
elements in a bulk medium using the instrument. Sample preparation will minimize the
effects of moisture, large particle size, variations in particle size and sample non-homogeneity.
Note More sample preparation (drying, milling and sifting) will yield greater accuracy. The
drier, finer, and more homogeneous the particles, the better the measurements.
Specimen Preparation - Fused Glass Disk
The samples need to be predried for 2-6 hours in 105°C depending on the moisture content.
1. Grind the dried samples to ~200mesh (74 ?m).
2. Calcination (Ashing) the sample
a. About 4-6 g of dry pulverized sample is calcinated in an alumina or platinum crucible in a
muffle furnace at 1000°C for 1 hour.
b. The sample is cooled in a dedicator and loss on ignition (LOD) is calculated from weight
difference before and after Calcination.
64 Niton XL2 Analyzer User’s Guide Thermo Scientific

5 Common OperationsSetting Up Beep Times
3. Weight 1.0g of calcinated sample into fusion crucible add 5.0 g of lithium tetraborate and
0.3 lithium fluoride, and 10-20 mg lithium bromide as a nonstick agent.
4. Fuse in a fluxer for at least 4 min in the flame.
5. The resulting disk is released from the mold, cooled, then presented to the spectrometer.
Specimen Preparation - Pressed Powder Briquette Preparation
1. Thoroughly remix the sample in its jar by rotating in a figure-eight motion with two hands
2. Weight 7.0g of sample into weighting boat by taking several separate gram-size portions
then fine grind sample using a swing mill.
3. Add 2 small drops of propylene glycol on the top of the powder sample in the mill as a
grinding aid, grind 4min at 1000rpm to obtain 10 ?m particle size.
4. Add 0.5g binder to the sample and continue grinding for 30sec more.
5. Brush the finely grounded samples into 31 mm aluminum sample cap and press at
50,000psi for 1 min.
CAUTION All test equipment must be kept clean to prevent contamination of samples.
Setting Up Beep Times
Selecting the Measurement Parameters icon allows you to set up Beep Times, enabling
changes to the beep settings for various modes. This option allows you to change the beep
settings for different modes independently. Select Mode you want to change, then the
Measurement Parameters icon to set up your preferred beep times.
First Beep
This option allows you to change the seconds of delay before the First Beep. Select the screen
button labeled with the number of seconds of delay for the First Beep. The Beep One Time
editor will open. Clear the current number of seconds with the "C" button, then select the E
button to enter the information.
Second Beep
This option allows you to change the seconds of delay before the Second Beep. Select the
screen button labeled with the number of seconds of delay for the Second Beep. The Beep
Two Time editor will open. Clear the current number of seconds with the "C" button, then
select the E button to enter the information.
Thermo Scientific Niton XL2 Analyzer User’s Guide 65

5 Common OperationsSorting the Custom Element Display
Third Beep
This option allows you to change the seconds of delay before the Third Beep. Select the screen
button labeled with the number of seconds of delay for the Third Beep. The Beep Three Time
editor will open. Clear the current number of seconds with the "C" button, then select the E
button to enter the information.
Beep on Grade Match
Selecting this option will enable a special beep when the reading chemistry matches an alloy
grade, and put a check mark in the box. Selecting the box again will remove the check mark
and turn the beep off
Sorting the Custom Element Display
Select the Custom Element Display icon to configure sorting criteria used for analysis display.
Select the mode you wish to change, then selecting the Custom Element Display icon opens
up the Custom Element Display Screen.
On the left of the display are elements, each with its currently selected display option beside it
to the right. The element list is ranked by importance, with the most important element on
top, and each one lower down of less importance than the one above it.
By selecting an element and using the arrow buttons to the right of the list, you can change its
ranking. Use the Up Button to move an element one rank closer to the top with each click.
Use the Dn Arrow Button to move an element one rank closer to the bottom with each click.
Display Options
The Display Options Drop Down Menu allows you to change the display status of any
element to one of three states:
• Normal - The standard state. Element displays only when the elemental value is
greater than the limit of detection.
• Always - Always display the results for this element. Use this state for elements critical
to all of your analyses.
• Never - Never display the results for this element. Use this state for elements which
are unimportant to your work. This makes your instrument display less complex.
Select the element you want to change, then select the menu option corresponding to your
choice of display status. The currently selected element is displayed in white on black.
Select the Save Button to save your current status as the new default. Select the Reset button
to reset the settings to the previously saved state. Select the Close button to exit the screen
without saving.
66 Niton XL2 Analyzer User’s Guide Thermo Scientific

5 Common OperationsMax Measure Time
Report Settings
Under Electronics Metals, Plastics, and Test All Modes, A field called Report Settings is
available. Selecting the triangle next to the Report Settings Field will open a pop up menu
allowing you to choose between the three Report Settings Modes. Select the mode you wish to
edit.
Changing the settings for one analysis mode will not affect the settings for other modes, and
the configurations can be saved independently.
RoHS Option
When the RoHS Option is selected, clicking on the Pass and Fail values works as it does in
any other Mode.
Detection Option
When the Detection Option is selected, Selecting the Pass/Fail field for that element acts as an
On/Off Toggle, which will switch Pass/Fail mode between On and Off for the selected
element. Selecting it again will reverse the toggle.
Consumer Products Option
When the Consumer Products Option is selected, clicking on the Pass and Fail values works
as it does in any other Mode. In addition, the total of Cl+Br is also calculated and used for
Pass/Fail Testing.
Max Measure Time
Under the Method Setup -> Measurement Parameters option is a field called Max Measure
Time. Here you can set up the maximum time your analyzer will continue to analyze the
sample. Select the Max Measure Time field, and a Virtual Numeric Keypad will pop up,
allowing you to input a new Maximum Measurement Time in seconds. The default Max
Measure Time is set to 300 seconds.
Minumum Test Time
Under the Method Setup -> Consumer Goods option is a field called Minimum Test Time.
Here you can set up the minimum time your analyzer will continue to analyze the sample
when using the Detection Option only. Select the Minimum Test Time field, and a Virtual
Numeric Keypad will pop up, allowing you to input a new Minimum Test Time in seconds.
The default Minimum Test Time is set to 60 seconds.
Thermo Scientific Niton XL2 Analyzer User’s Guide 67
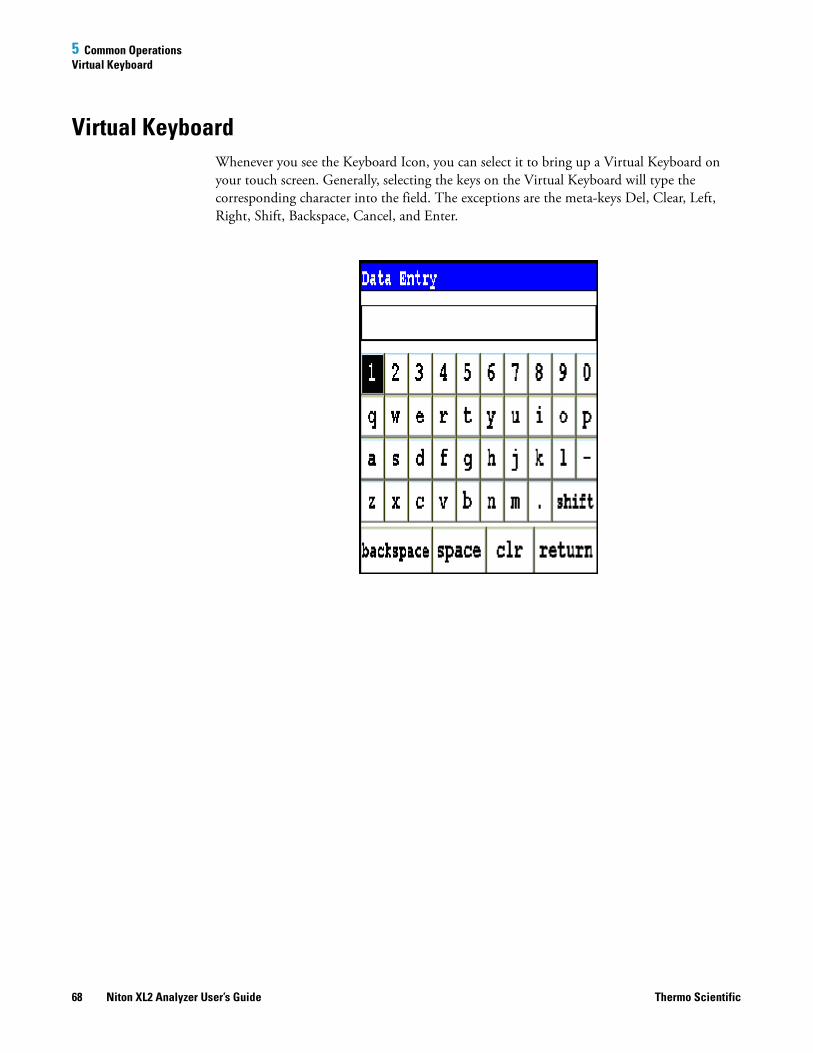
5 Common OperationsVirtual Keyboard
Virtual Keyboard
Whenever you see the Keyboard Icon, you can select it to bring up a Virtual Keyboard on
your touch screen. Generally, selecting the keys on the Virtual Keyboard will type the
corresponding character into the field. The exceptions are the meta-keys Del, Clear, Left,
Right, Shift, Backspace, Cancel, and Enter.
68 Niton XL2 Analyzer User’s Guide Thermo Scientific

5 Common OperationsVirtual Keyboard
Figure 8. Virtual Keyboard
Figure 9. Shifted Virtual Keyboard
Del
Del is the Delete Key. Selecting this key will delete the character to the left of the cursor.
Clear
Clear is the Clear Key. Selecting this key will clear all characters from the field.
Left
Left is the Left Cursor Key. Selecting this key will move the cursor one space to the left.
Right
Right is the Right Cursor Key. Selecting this key will move the cursor one space to the right.
Shift
Shift is the Shift Key. Selecting this key will bring up the alternate, shifted keyboard. See
Figure 1-1B. Selecting the Shift Key on the shifted keyboard will bring up the normal
keyboard. See Figure 1-1A.
Thermo Scientific Niton XL2 Analyzer User’s Guide 69

5 Common OperationsVirtual Keyboard
Backspace
Backspace is the Backspace Key. Selecting this key will delete the character to the right of the
cursor.
Cancel
Cancel is the Cancel Key. Selecting this key will return you to the normal screen without
inputting your changes into the field.
Enter
Enter is the Enter Key. Selecting this key will return you to the normal screen, replacing the
former contents of the field with the changes you have made.
70 Niton XL2 Analyzer User’s Guide Thermo Scientific
5 Common OperationsSetting Display Units
Setting Display Units
Select the Display Units radio buttons on the Set Display Units page to choose between ppm
(parts per million) and percentage (hundredths of whole) displays when taking readings, and
to change the Sigma value you want for the reading.
In the Display Units area, you can select between Percent composition and Parts per Million
as the units displayed in a measurement, and you can change this setting independently for
any mode. You can also change the Sigma for each of these modes independently. When you
have changed the display units to the appropriate values, select the Close button to save these
settings for use.
Changing Precision (Sigma Value)
Sigma is the symbol used for Standard Deviation, a measure of how much a set of numbers
deviates from the mean. For example, each of the three data sets {0, 0, 14, and 14}, {0, 6, 8,
and 14} and {6, 6, 8, 8} has a mean of 7. Their standard deviations are 7, 5, and 1,
respectively. The third set has a much smaller standard deviation than the other two because
its values are all close to 7. In a loose sense, the standard deviation tells us how far from the
mean the data points tend to be. The number of standard deviations between the process
mean and the nearest specification limit is given in sigmas. As process standard deviation goes
up, or the mean of the process moves away from the center of the tolerance, the sigma number
goes down, because fewer standard deviations will then fit between the mean and the nearest
specification limit.
Confidence Intervals
Confidence intervals assume that the data are from an approximately normally distributed
population - generally, sums of many independent, identically distributed random variables
tend towards the normal distribution as a limit. Using this assumption, about 68 % of the
values must be within 1 standard deviation of the mean, about 95 % of the values must be
within two standard deviations, about 99.7 % must lie within 3 standard deviations, and
about 99.99% of the values must lie within 4 standard deviations.
The greater the sigma value of the test, the more confident you can be that the sample is as it
appears, but the more difficult and time consuming the testing must be to verify this. That's
why it's important to use the most appropriate sigma value for the test. By adjusting the sigma
value for each type of test, you can optimize the process for your needs.
Thermo Scientific Niton XL2 Analyzer User’s Guide 71

5 Common OperationsSetting Display Units
Adjusting the Sigma Values
The sigma values are listed in the column headed with the Greek letter "sigma". The default
value is 2 sigma. You can change this value by selecting the down arrow next to the value,
which opens up a drop-down menu from which you can select the desired sigma value by
clicking on it.
Figure 10. Selecting the Sigma Value
When you have changed the sigma values to the appropriate number, select the Close button
to save these settings for use.
72 Niton XL2 Analyzer User’s Guide Thermo Scientific
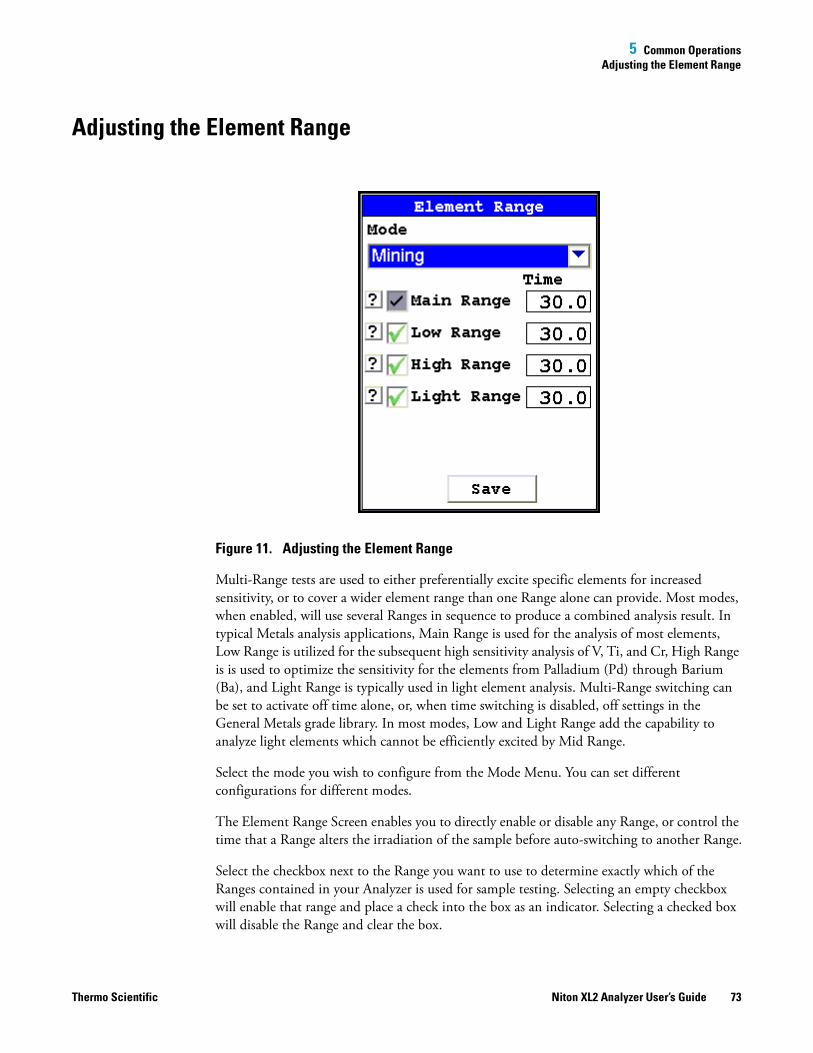
5 Common OperationsAdjusting the Element Range
Adjusting the Element Range
Figure 11. Adjusting the Element Range
Multi-Range tests are used to either preferentially excite specific elements for increased
sensitivity, or to cover a wider element range than one Range alone can provide. Most modes,
when enabled, will use several Ranges in sequence to produce a combined analysis result. In
typical Metals analysis applications, Main Range is used for the analysis of most elements,
Low Range is utilized for the subsequent high sensitivity analysis of V, Ti, and Cr, High Range
is is used to optimize the sensitivity for the elements from Palladium (Pd) through Barium
(Ba), and Light Range is typically used in light element analysis. Multi-Range switching can
be set to activate off time alone, or, when time switching is disabled, off settings in the
General Metals grade library. In most modes, Low and Light Range add the capability to
analyze light elements which cannot be efficiently excited by Mid Range.
Select the mode you wish to configure from the Mode Menu. You can set different
configurations for different modes.
The Element Range Screen enables you to directly enable or disable any Range, or control the
time that a Range alters the irradiation of the sample before auto-switching to another Range.
Select the checkbox next to the Range you want to use to determine exactly which of the
Ranges contained in your Analyzer is used for sample testing. Selecting an empty checkbox
will enable that range and place a check into the box as an indicator. Selecting a checked box
will disable the Range and clear the box.
Thermo Scientific Niton XL2 Analyzer User’s Guide 73

5 Common OperationsSetting the Date and Time
In typical metals analysis applications, Main Range is used for the analysis of most elements.
You cannot deselect the Main Range in metals analysis.
Low Range is utilized for the subsequent high sensitivity analysis of V, Ti, and Cr.
Select the Element List Button - labeled with a question mark - to display the Element List for
that Range. This list shows the elements that the Range is best designed to detect.
Select the Range Time field for the intended range to change the switch time for that range.
The Range Time Editor will appear. This enables you to set the number of seconds each
enabled range is allotted before auto-switching will occur when needed during sample testing.
Your analyzer will auto-switch from one range to another when the testing time for that range
is greater than or equal to the time you have chosen, and the identified alloy is flagged as
needing the switch in the Niton Alloy Library.
Select the C button to clear the current time, then from the virtual numeric key pad, select
each digit you want to input, then select the E button to enter.
Setting the Date and Time
Figure 12. Setting the Date and Time
From the System Menu, select the Date & Time icon from the System Screen to set the date
and time as needed for different time zones, daylight savings time, or any other reason. The
date and time are factory preset prior to shipping. The clock is a 24 hour clock, so add 12 to
PM hours - i.e. 1:13 PM would be 13:13.
74 Niton XL2 Analyzer User’s Guide Thermo Scientific

5 Common OperationsSetting the Date and Time
Figure 13. The Date & Time Screen
When the Date & Time button is selected, the Date & Time Screen comes up on your
analyzer’s LCD Screen. You may change the Month, Year, Date, Hour, and Minute on your
analyzer.
Thermo Scientific Niton XL2 Analyzer User’s Guide 75

5 Common OperationsSetting the Date and Time
Changing the Month
To change the month, select the downward pointing triangle button next to the month
displayed. A drop down menu will appear, listing the months of the year in order of
appearance.
Figure 14. Month Drop Down Menu
Select the month you want from the drop down menu, using the vertical slider button to
display hidden months. The display will change to show the month you selected.
76 Niton XL2 Analyzer User’s Guide Thermo Scientific

5 Common OperationsSetting the Date and Time
Changing the Year
To change the year, select the downward pointing triangle button next to the year displayed. A
drop down menu will appear, listing the years in order of appearance.
Figure 15. Changing the Year
Select the year you want from the drop down menu, using the vertical slider button to display
hidden years. The display will change to show the year you selected.
Thermo Scientific Niton XL2 Analyzer User’s Guide 77

5 Common OperationsSetting the Date and Time
Changing the Date
To change the date, select the date you want from the Date Selection Screen. The date you
selected will be highlighted in red, while the old date will be shown in red numbers.
Figure 16. Selecting the Date
78 Niton XL2 Analyzer User’s Guide Thermo Scientific

5 Common OperationsSetting the Date and Time
Changing the Hour and Minute
To change the hour, select the hour numbers. The hour numbers will be highlighted in gray.
Then select the Upwards Pointing Chevron Button to increment (increase) the hour, or the
Downward Pointing Chevron Button to decrement (decrease) the hour.
Figure 17. Changing the Hour
To change the minute, select the minute numbers. The minute numbers will be highlighted in
gray. Then select the Upwards Pointing Chevron Button to increment (increase) the minute,
or the Downward Pointing Chevron Button to decrement (decrease) the minute.
Thermo Scientific Niton XL2 Analyzer User’s Guide 79
5 Common OperationsSetting the Date and Time
Figure 18. Changing the Minute
Saving Your Changes
To save your changes, select the "Save" screen Button. The display will return to the previous
screen and the Date and Time will be saved.
Exiting Without Saving
To exit the screen without saving changes, select the "Cancel" Screen Button. The display will
return to the previous screen and the Date and Time will not be saved.
80 Niton XL2 Analyzer User’s Guide Thermo Scientific

5 Common OperationsCalibrating the Touch Screen
Calibrating the Touch Screen
Figure 19. Initiating Touch Screen Calibration
Select the Calibrate Touch Screen button from the System Screen to re-calibrate the analyzer's
touch screen display. This procedure establishes the display boundaries for the touch screen
interface.
1. Select the Touch Screen icon.
2. The display will show a message asking you to confirm whether or not you want to
calibrate your Touch Screen. Select the Yes button.
3. The display will show the message: "Calibrate Touch Screen". There will be a small cross in
the upper left-hand corner of the display.
4. Tap on this cross with the stylus, and the cross will disappear and reappear in the upper
right-hand corner of the screen.
5. Tap on the cross again, and it will reappear in the lower right-hand corner of the screen.
6. Tap on the cross again and it will reappear in the lower left-hand corner of the screen.
7. Tap on the cross once more, and you will be presented with a Confirmation Screen.
8. Select the Yes Button to confirm that the parameters are good. Select the No Button to start
the process again.
Thermo Scientific Niton XL2 Analyzer User’s Guide 81

5 Common OperationsCalibrating the Touch Screen
9. Once you have confirmed the parameters, the System Menu will be displayed. The screen is
now calibrated.
Figure 20. Touch Screen Calibration Crosses
The Touch Screen can be calibrated - and the system operated - with a USB mouse plugged
into the USB ports in the rear of teh analyzer.
82 Niton XL2 Analyzer User’s Guide Thermo Scientific
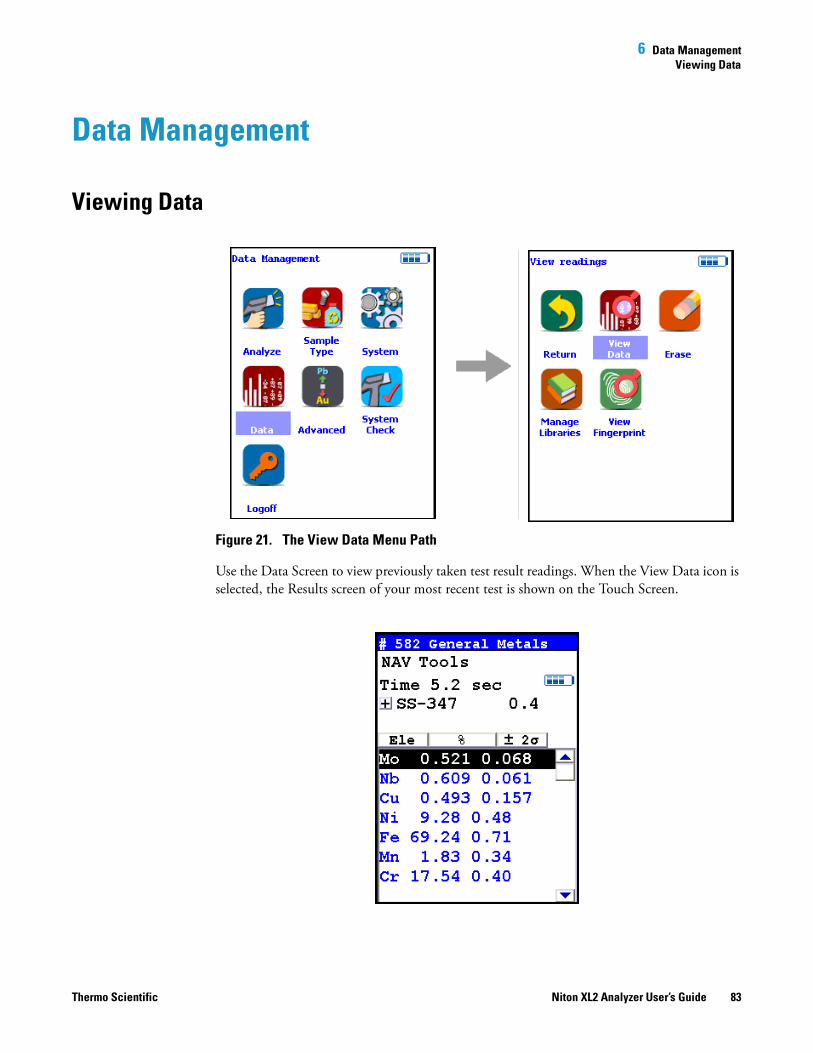
6 Data ManagementViewing Data
Data Management
Viewing Data
Figure 21. The View Data Menu Path
Use the Data Screen to view previously taken test result readings. When the View Data icon is
selected, the Results screen of your most recent test is shown on the Touch Screen.
Thermo Scientific Niton XL2 Analyzer User’s Guide 83
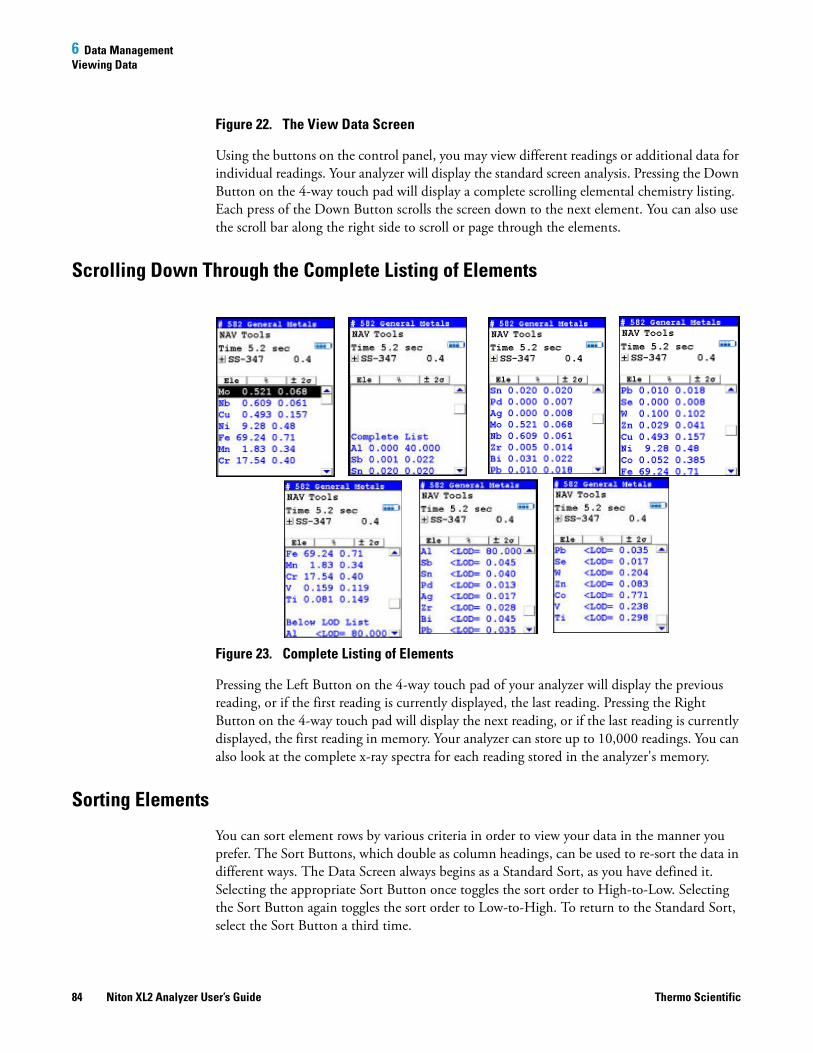
6 Data ManagementViewing Data
Figure 22. The View Data Screen
Using the buttons on the control panel, you may view different readings or additional data for
individual readings. Your analyzer will display the standard screen analysis. Pressing the Down
Button on the 4-way touch pad will display a complete scrolling elemental chemistry listing.
Each press of the Down Button scrolls the screen down to the next element. You can also use
the scroll bar along the right side to scroll or page through the elements.
Scrolling Down Through the Complete Listing of Elements
Figure 23. Complete Listing of Elements
Pressing the Left Button on the 4-way touch pad of your analyzer will display the previous
reading, or if the first reading is currently displayed, the last reading. Pressing the Right
Button on the 4-way touch pad will display the next reading, or if the last reading is currently
displayed, the first reading in memory. Your analyzer can store up to 10,000 readings. You can
also look at the complete x-ray spectra for each reading stored in the analyzer's memory.
Sorting Elements
You can sort element rows by various criteria in order to view your data in the manner you
prefer. The Sort Buttons, which double as column headings, can be used to re-sort the data in
different ways. The Data Screen always begins as a Standard Sort, as you have defined it.
Selecting the appropriate Sort Button once toggles the sort order to High-to-Low. Selecting
the Sort Button again toggles the sort order to Low-to-High. To return to the Standard Sort,
select the Sort Button a third time.
84 Niton XL2 Analyzer User’s Guide Thermo Scientific
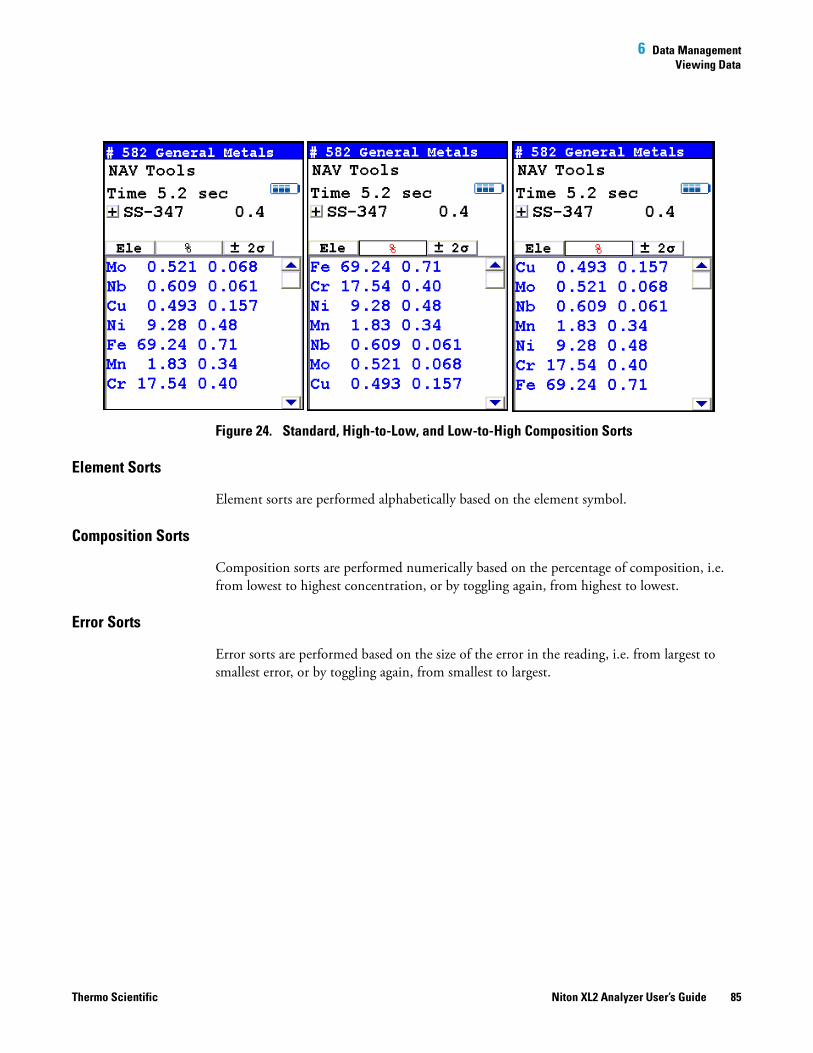
6 Data ManagementViewing Data
Figure 24. Standard, High-to-Low, and Low-to-High Composition Sorts
Element Sorts
Element sorts are performed alphabetically based on the element symbol.
Composition Sorts
Composition sorts are performed numerically based on the percentage of composition, i.e.
from lowest to highest concentration, or by toggling again, from highest to lowest.
Error Sorts
Error sorts are performed based on the size of the error in the reading, i.e. from largest to
smallest error, or by toggling again, from smallest to largest.
Thermo Scientific Niton XL2 Analyzer User’s Guide 85
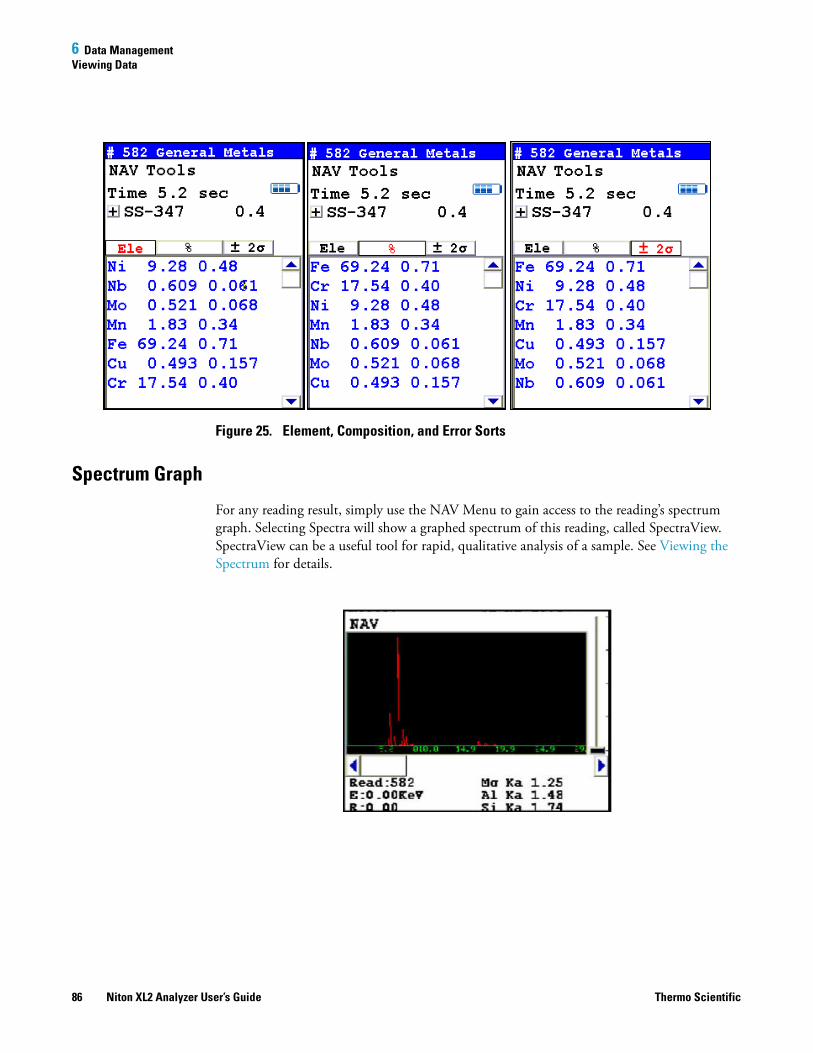
6 Data ManagementViewing Data
Figure 25. Element, Composition, and Error Sorts
Spectrum Graph
For any reading result, simply use the NAV Menu to gain access to the reading’s spectrum
graph. Selecting Spectra will show a graphed spectrum of this reading, called SpectraView.
SpectraView can be a useful tool for rapid, qualitative analysis of a sample. See Viewing the
Spectrum for details.
86 Niton XL2 Analyzer User’s Guide Thermo Scientific
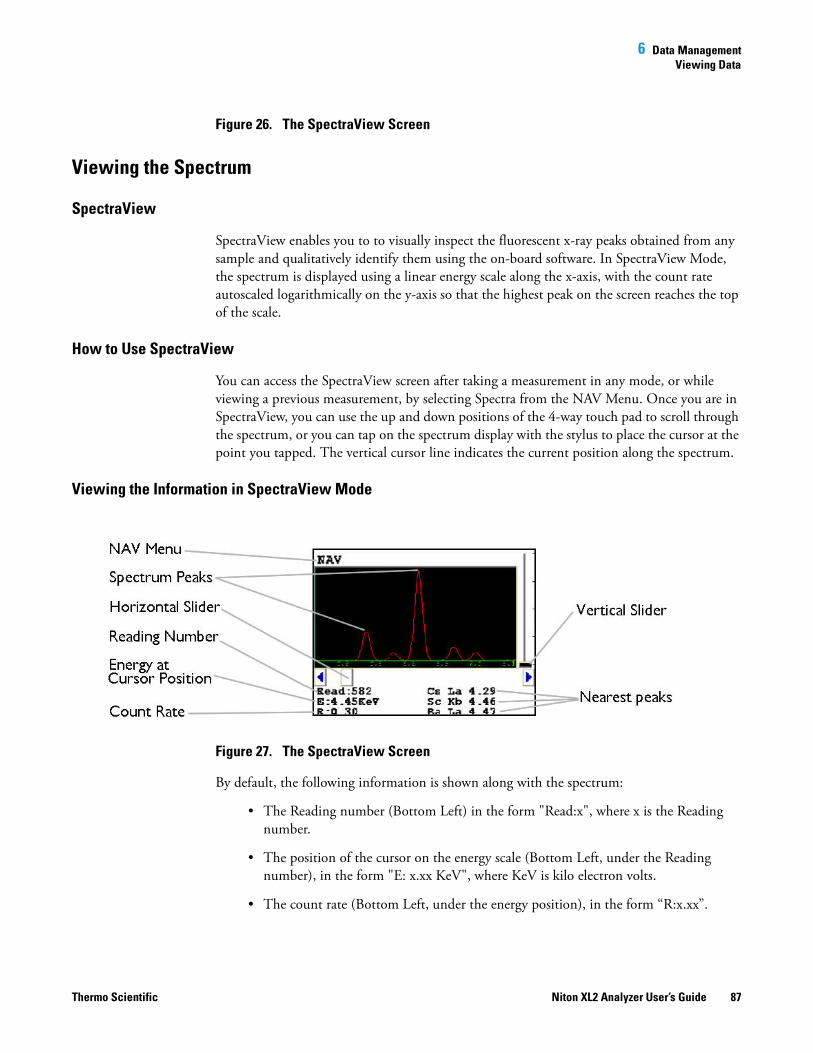
6 Data ManagementViewing Data
Figure 26. The SpectraView Screen
Viewing the Spectrum
SpectraView
SpectraView enables you to to visually inspect the fluorescent x-ray peaks obtained from any
sample and qualitatively identify them using the on-board software. In SpectraView Mode,
the spectrum is displayed using a linear energy scale along the x-axis, with the count rate
autoscaled logarithmically on the y-axis so that the highest peak on the screen reaches the top
of the scale.
How to Use SpectraView
You can access the SpectraView screen after taking a measurement in any mode, or while
viewing a previous measurement, by selecting Spectra from the NAV Menu. Once you are in
SpectraView, you can use the up and down positions of the 4-way touch pad to scroll through
the spectrum, or you can tap on the spectrum display with the stylus to place the cursor at the
point you tapped. The vertical cursor line indicates the current position along the spectrum.
Viewing the Information in SpectraView Mode
Figure 27. The SpectraView Screen
By default, the following information is shown along with the spectrum:
• The Reading number (Bottom Left) in the form "Read:x", where x is the Reading
number.
• The position of the cursor on the energy scale (Bottom Left, under the Reading
number), in the form "E: x.xx KeV", where KeV is kilo electron volts.
• The count rate (Bottom Left, under the energy position), in the form “R:x.xx”.
Thermo Scientific Niton XL2 Analyzer User’s Guide 87

6 Data ManagementViewing Data
• Ka, Kb, La, Lb, and/or Lg peaks of the three elements closest to where your cursor is
positioned on the energy scale (Bottom Right). This information is written with the
element symbol first, followed by either Ka (K shell alpha peak), Kb (K shell beta
peak), La (L shell alpha peak), La (L shell beta peak), or Lg (L shell gamma peak). An
example would be "Al Ka 1.48." To determine if a given element is present, look at
the count rate at that cursor position.
Note SpectraView cannot be used to determine exact element percentages in a sample.
Fitting the Spectrum
By using the touch screen, you can select parts of the displayed spectrum and zoom in. Touch
and hold the stylus to the screen immediately before the area of the spectrum you wish to
enhance, then - still holding the stylus to the screen - sweep it across the area of the spectrum
you wish to see closer, lifting the stylus from the screen when you pass the end of the area of
interest. The screen will display vertical lines to either side of the area of interest, delineating
the boundaries of the area.
Figure 28. Delineating the Area of Interest
Select the FIT button in the upper right hand corner of the Spectrum to fit the area of interest
to the display area.
88 Niton XL2 Analyzer User’s Guide Thermo Scientific

6 Data ManagementViewing Data
Figure 29. Area of Interest Fit to the Display
The view of the spectrum will change to show only the area of interest.
Multiple Ranges
SpectraView can display any individual spectra, including those obtained from multiple
Ranges (filters) if you are using more than one Range. Use the NAV Menu to select which
spectrum to view.
The Spectra1 choice will display the spectrum produced by the first Range.
The Spectra2 choice will display the spectrum produced by the second Range.
SpectraView Navigation
Use the left button on the 4-way touch pad to expand the spectrum, centered on the position
of the cursor.
Use the right button on the 4-way touch pad to contract the spectrum, centered on the
position of the cursor.
Thermo Scientific Niton XL2 Analyzer User’s Guide 89

6 Data ManagementViewing Fingerprints
Viewing Fingerprints
Figure 30. The View Fingerprints Menu Path
Select the View Fingerprints icon to view data saved as reference sample Fingerprints in Teach
Fingerprint Mode. When the View Fingerprints icon is selected, the Results Screen of your
most recent Teach Fingerprint is shown on the Touch Screen display.
90 Niton XL2 Analyzer User’s Guide Thermo Scientific
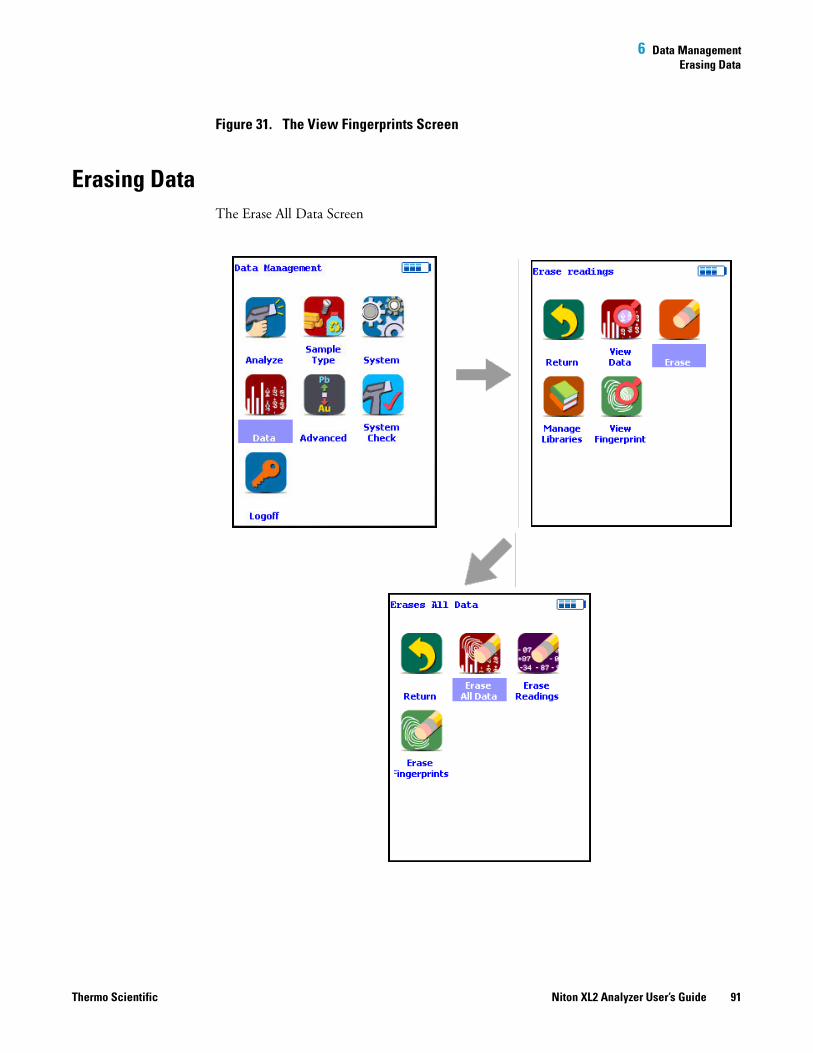
6 Data ManagementErasing Data
Figure 31. The View Fingerprints Screen
Erasing Data
The Erase All Data Screen
Thermo Scientific Niton XL2 Analyzer User’s Guide 91
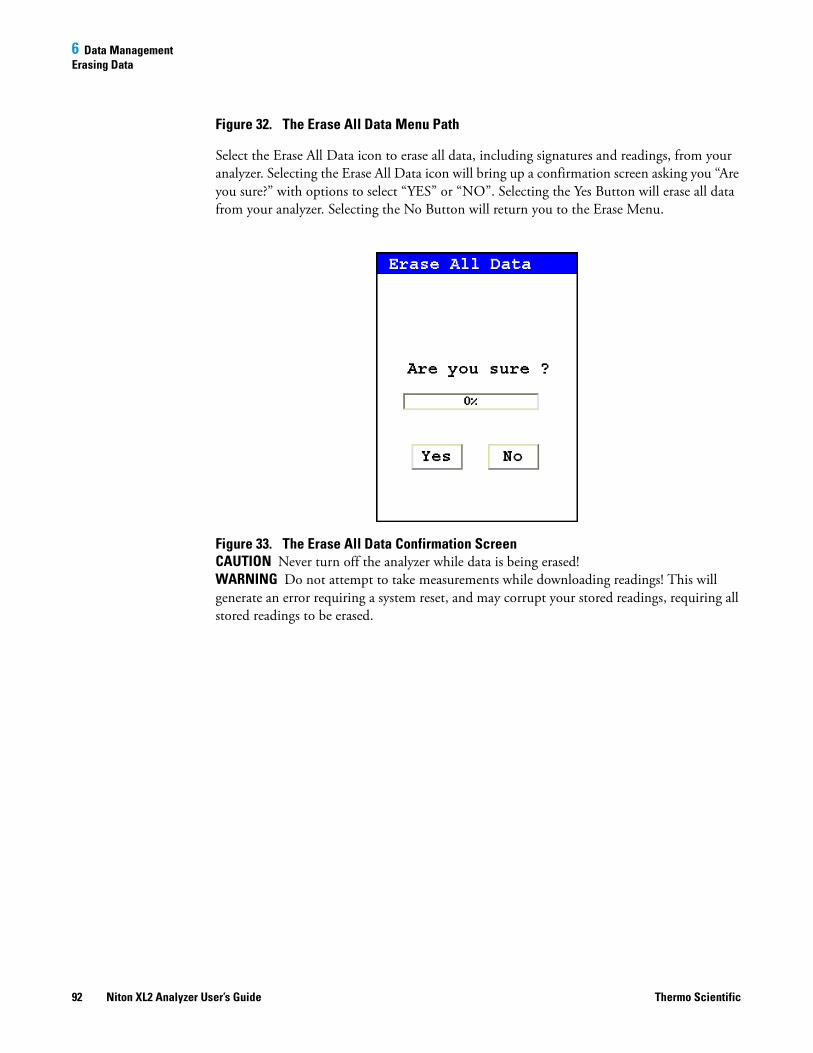
6 Data ManagementErasing Data
Figure 32. The Erase All Data Menu Path
Select the Erase All Data icon to erase all data, including signatures and readings, from your
analyzer. Selecting the Erase All Data icon will bring up a confirmation screen asking you “Are
you sure?” with options to select “YES” or “NO”. Selecting the Yes Button will erase all data
from your analyzer. Selecting the No Button will return you to the Erase Menu.
Figure 33. The Erase All Data Confirmation ScreenCAUTION Never turn off the analyzer while data is being erased!
WARNING Do not attempt to take measurements while downloading readings! This will
generate an error requiring a system reset, and may corrupt your stored readings, requiring all
stored readings to be erased.
92 Niton XL2 Analyzer User’s Guide Thermo Scientific

6 Data ManagementErasing Data
The Erase Readings Screen
Figure 34. The Erase Readings Menu Path
Select the Erase Readings icon to erase all accumulated test readings from your analyzer.
Selecting the Erase Readings icon will bring up a confirmation screen asking you “Are you
sure?” with options to select “YES” or “NO”. Selecting the Yes Button will erase all test
reading data from your analyzer. Selecting the No Button will return you to the Erase Menu.
Thermo Scientific Niton XL2 Analyzer User’s Guide 93

6 Data ManagementErasing Data
Figure 35. The Erase Readings Confirmation Screen
Note - We recommend that you download all your readings into an NDT file for recording
purposes before erasing all data.
94 Niton XL2 Analyzer User’s Guide Thermo Scientific

6 Data ManagementErasing Data
The Erase Fingerprints Screen
Figure 36. The Erase Fingerprints Menu Path
Select the Erase Fingerprints icon to erase all accumulated alloy fingerprints from your
analyzer. Selecting the Erase Fingerprints icon will bring up a confirmation screen asking you
“Are you sure?” with options to select “YES” or “NO”. Selecting the Yes Button will erase all
fingerprint data from your analyzer. Selecting the No Button will return you to the Erase
Menu.
Thermo Scientific Niton XL2 Analyzer User’s Guide 95
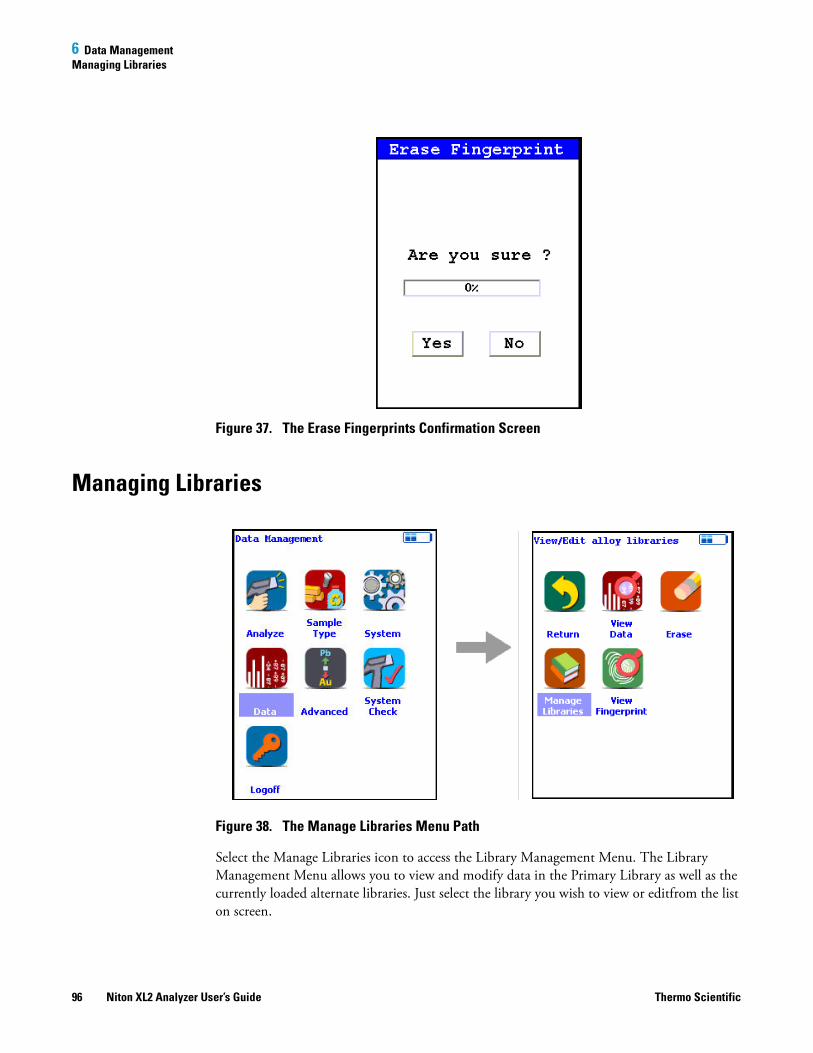
6 Data ManagementManaging Libraries
Figure 37. The Erase Fingerprints Confirmation Screen
Managing Libraries
Figure 38. The Manage Libraries Menu Path
Select the Manage Libraries icon to access the Library Management Menu. The Library
Management Menu allows you to view and modify data in the Primary Library as well as the
currently loaded alternate libraries. Just select the library you wish to view or editfrom the list
on screen.
96 Niton XL2 Analyzer User’s Guide Thermo Scientific

6 Data ManagementManaging Libraries
Figure 39. Viewing the Libraries
The entries in the Grade Library serve as a reference for chemistry based analysis. The library
entries allow the analyzer to work properly “out of the box” without needing time-consuming
pre-analysis.
Figure 40. The Library Editor
Thermo Scientific Niton XL2 Analyzer User’s Guide 97

6 Data ManagementManaging Libraries
Using the Library Editor
The Library Editor enables you to edit any library to conform to your specifications.
Alloy Name Button
Selecting the Alloy Name Button sorts the alloy list alphanumerically.
(Name in List)
Selecting the actual name of the alloy - i.e. “Fe/CS” - will bring up the Element Specification
Screen.
Add Button
Selecting the Add Button will add a new alloy to the Library. First the Alloy Name Editor will
appear, enabling you to enter the name of the new alloy.
Figure 41. The Alloy Name Editor
The Alloy Name Editor is a standard Virtual Keyboard. Use it as you would any Virtual
Keyboard. Hitting the return key enters the name into the alloy list. Select the name of the
new alloy to bring up the Element Specification Screen and enter the specification of the alloy.
Del Button
Selecting the Del Button will delete the currently selected alloy. First a confirmation screen
appears.
98 Niton XL2 Analyzer User’s Guide Thermo Scientific
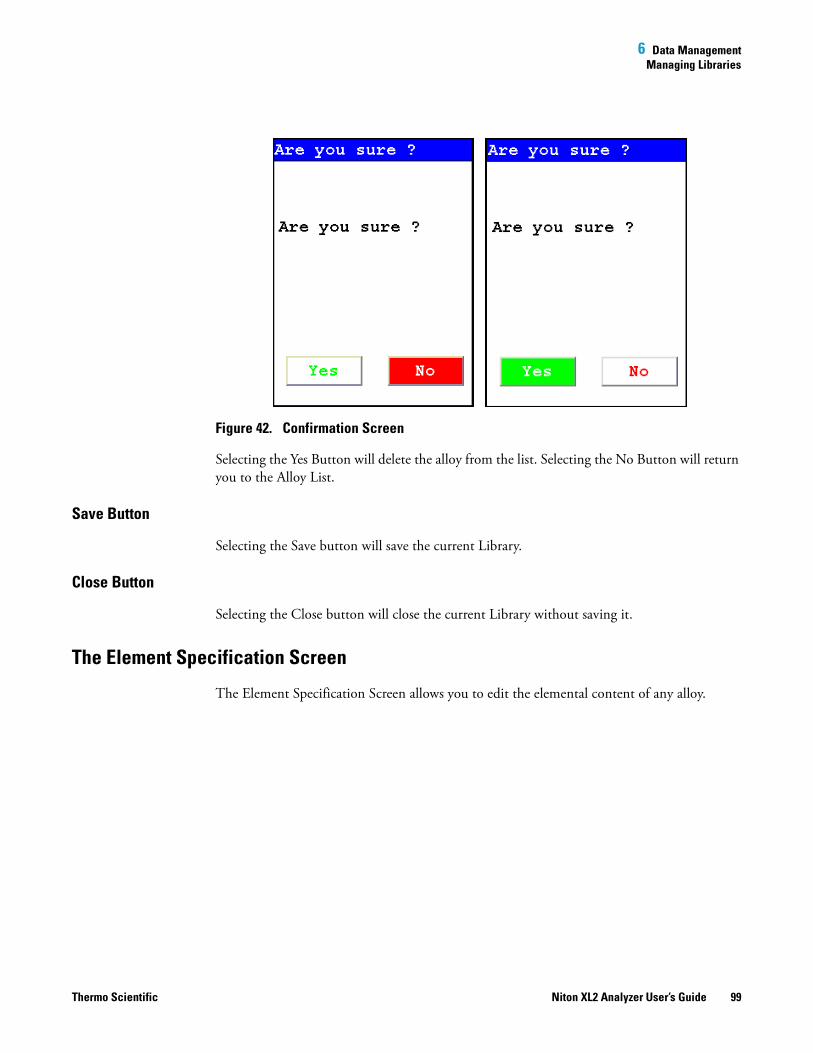
6 Data ManagementManaging Libraries
Figure 42. Confirmation Screen
Selecting the Yes Button will delete the alloy from the list. Selecting the No Button will return
you to the Alloy List.
Save Button
Selecting the Save button will save the current Library.
Close Button
Selecting the Close button will close the current Library without saving it.
The Element Specification Screen
The Element Specification Screen allows you to edit the elemental content of any alloy.
Thermo Scientific Niton XL2 Analyzer User’s Guide 99

6 Data ManagementManaging Libraries
Figure 43. The Element Specification Screen
Library Name
This is the name of the library you are editing. Make sure you are editing the correct library
before proceeding further.
Alloy Name
This is the name of the alloy you are editing. Make sure you are editing the correct alloy
before proceeding further.
Element to be Edited
This is the element you need to edit for this alloy.
Minimum Percentage
This is the lowest amount of the element in question you want to be in the alloy. If the
element in the analyzed sample is any lower, the sample will not be recognized as this alloy.
Selecting the element minimum will open the Minimum Editor.
100 Niton XL2 Analyzer User’s Guide Thermo Scientific

6 Data ManagementManaging Libraries
Figure 44. The Minimum Editor
This is a standard Virtual Numerical Keypad. The C Button will clear the current display, The
< Button will backspace one space, and the E Button will enter this number as the minimum.
After selecting the E Button, you will be returned to the Element Specification Screen.
Maximum Percentage
This is the highest amount of the element in question you want to be in the alloy. If the
element in the analyzed sample is any higher, the sample will not be recognized as this alloy.
Selecting the element maximum will open the Maximum Editor.
Thermo Scientific Niton XL2 Analyzer User’s Guide 101

6 Data ManagementManaging Libraries
Figure 45. The Maximum Editor
This is a standard Virtual Numerical Keypad. The C Button will clear the current display, The
< Button will backspace one space, and the E Button will enter this number as the minimum.
After selecting the E Button, you will be returned to the Element Specification Screen.
OK Button
Selecting the OK button will save the edited library.
Cancel Button
Selecting the Cancel button will exit the Element Specification Screen for this alloy, returning
you to the Library Editor.
102 Niton XL2 Analyzer User’s Guide Thermo Scientific

7 Connectivity
Connectivity
This section discusses how to connect your computer and your analyzer, for data transfer and
integration, translation to other formats, data storage and security, as well as controlling your
analyzer remotely through your computer. Connection can be achieved via USB, serial,
and/or Bluetooth wireless means. Your analyzer comes with software which facilitates these
uses, and works together with your analyzer to increase your productivity and efficiency.
Installing the Windows 7 USB Driver
1. Insert the NDT CD and close out any dialogue box that pops up. The driver is located on
this disk.
Thermo Scientific Niton XL2 Analyzer User’s Guide 103
7 Connectivity
2. Click on “Control Panel” and locate the “Device Manager”. If it is not available directly
under “Control Panel”, look under “System and Security” then “System”.
104 Niton XL2 Analyzer User’s Guide Thermo Scientific

7 Connectivity
3. Open “Device Manager”
4. Plug in instrument using the USB cable provided
5. Message will appear “Device Driver Software Not Successfully Installed”
6. In “Device Manager”, “Unknown Device” will appear under “Other Devices”
7. Right click on “Unknown Devices”; select “Update Driver Software”
Thermo Scientific Niton XL2 Analyzer User’s Guide 105
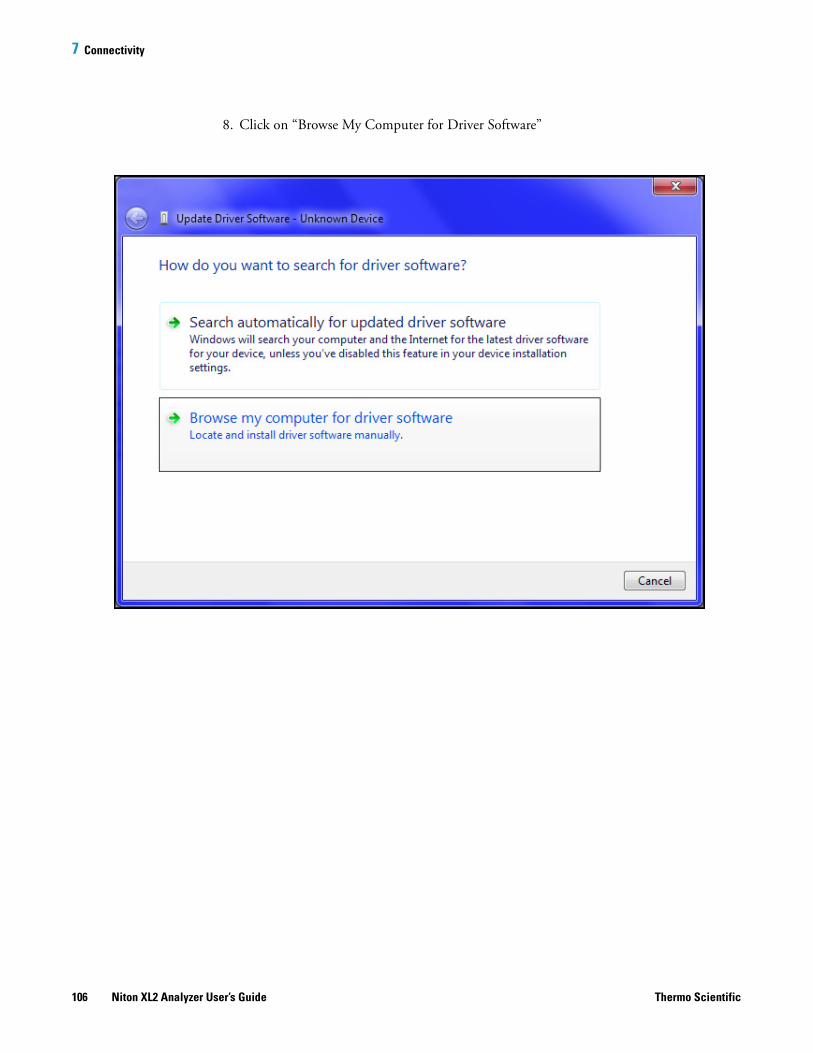
7 Connectivity
8. Click on “Browse My Computer for Driver Software”
106 Niton XL2 Analyzer User’s Guide Thermo Scientific

7 Connectivity
9. Click “Browse” button; select CD drive or the location of the driver if you are not
installing from the NDT CD (recommended).
10. Click “OK”
11. Click “Next”
Thermo Scientific Niton XL2 Analyzer User’s Guide 107
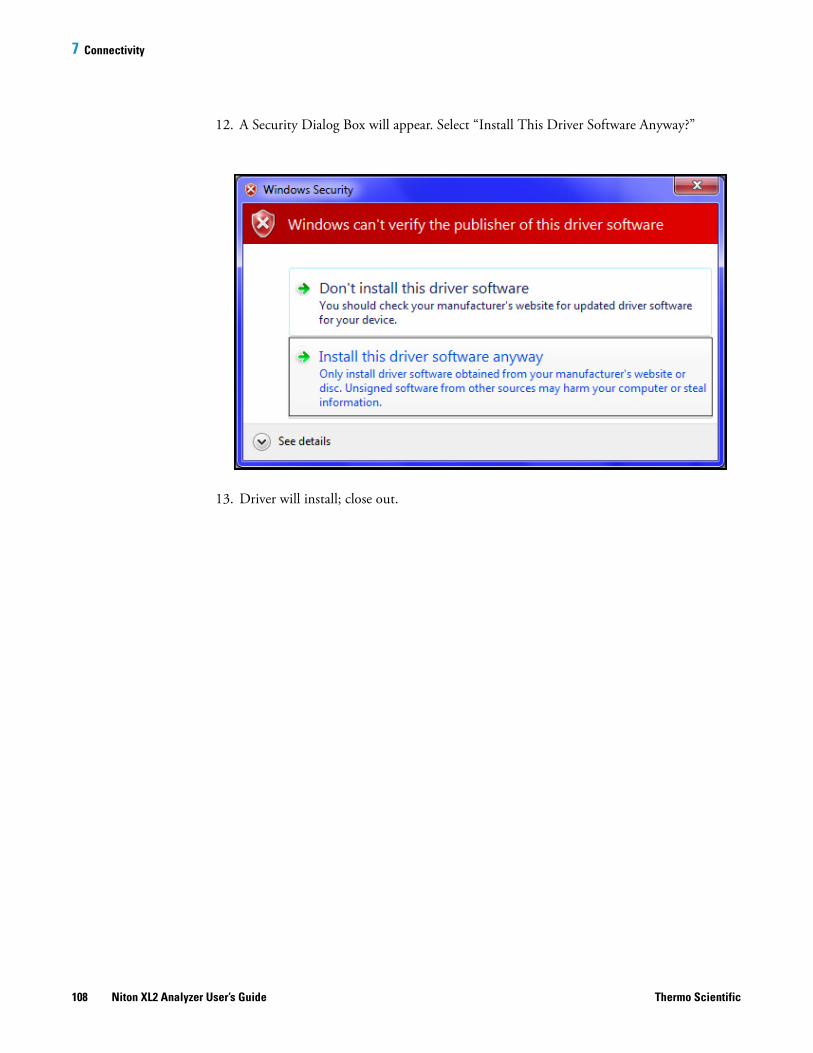
7 Connectivity
12. A Security Dialog Box will appear. Select “Install This Driver Software Anyway?”
13. Driver will install; close out.
108 Niton XL2 Analyzer User’s Guide Thermo Scientific
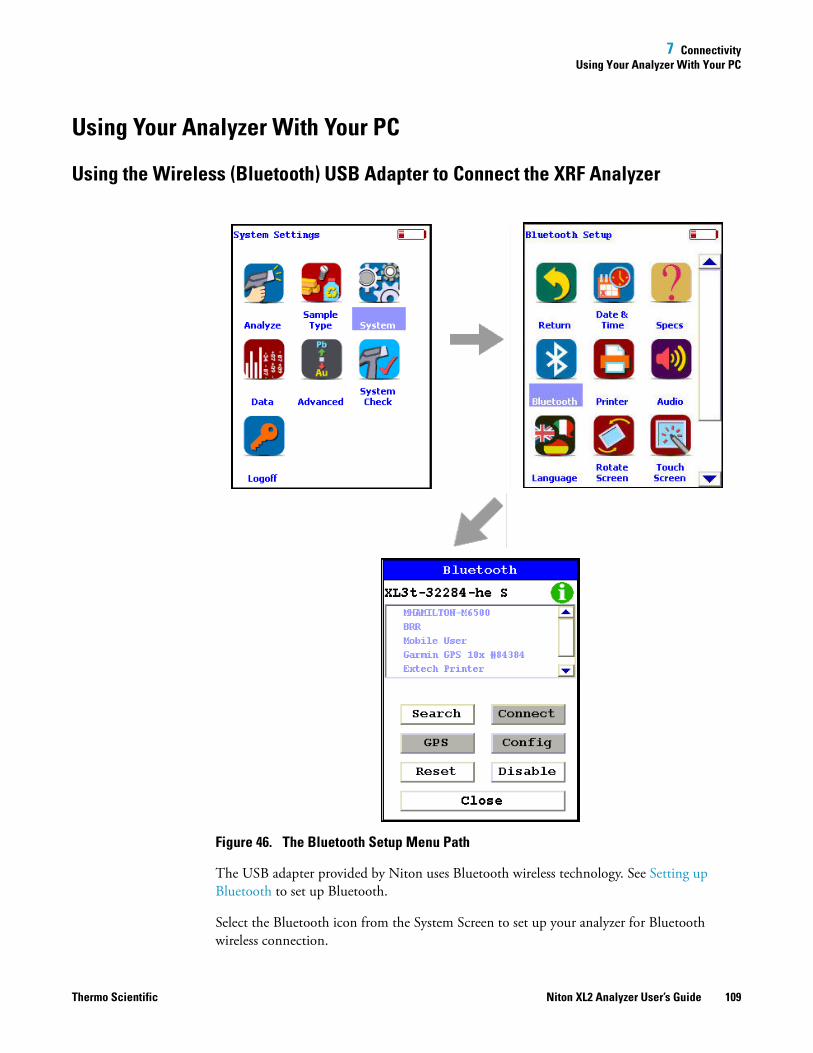
7 ConnectivityUsing Your Analyzer With Your PC
Using Your Analyzer With Your PC
Using the Wireless (Bluetooth) USB Adapter to Connect the XRF Analyzer
Figure 46. The Bluetooth Setup Menu Path
The USB adapter provided by Niton uses Bluetooth wireless technology. See Setting up
Bluetooth to set up Bluetooth.
Select the Bluetooth icon from the System Screen to set up your analyzer for Bluetooth
wireless connection.
Thermo Scientific Niton XL2 Analyzer User’s Guide 109

7 ConnectivityUsing Your Analyzer With Your PC
i Icon
Figure 47. BT Information Screen
Selecting the i Icon in the top right of the Bluetooth Setup Screen will open the Bluetooth
Information Screen. The Bluetooth Information Screen will supply the current name as well
as the MAC address of your analyzer
Search Button
Selecting the Search Button will initiate a search for currently available Bluetooth devices in
the area.
110 Niton XL2 Analyzer User’s Guide Thermo Scientific

7 ConnectivityConnecting From Your Analyzer to Your PC
Figure 48. Bluetooth Searching
After the search, your analyzer will report which Bluetooth devices it has found in the main
window of the screen.
You can connect your PC and analyzer two different ways, from the analyzer to the PC, and
from the PC to the analyzer.
Connecting From Your Analyzer to Your PC
After searching, select the PC you would like to connect to from the main window of the
screen.
Select the Connect Button. Your analyzer's screen will show connection progress.
Figure 49. Connecting Via Bluetooth
Open the program you are attempting to connect to. Here we are connected to NDTr,
running the analyzer remotely over COM 5
Thermo Scientific Niton XL2 Analyzer User’s Guide 111

7 ConnectivityConnecting From Your Analyzer to Your PC
Figure 50. Connecting Via Bluetooth
Connect Button
Select a located Bluetooth device from the Search List, then select the Connect Button to
connect to that device.
GPS Button
Select the GPS Button to download GPS data from a connected GPS Device.
112 Niton XL2 Analyzer User’s Guide Thermo Scientific

7 ConnectivityConnecting From Your Analyzer to Your PC
Figure 51. Bluetooth GPS Data Screen
Reset Button
Selecting the Reset Button initiates a Bluetooth reset.
Config Button
Thermo Scientific Niton XL2 Analyzer User’s Guide 113
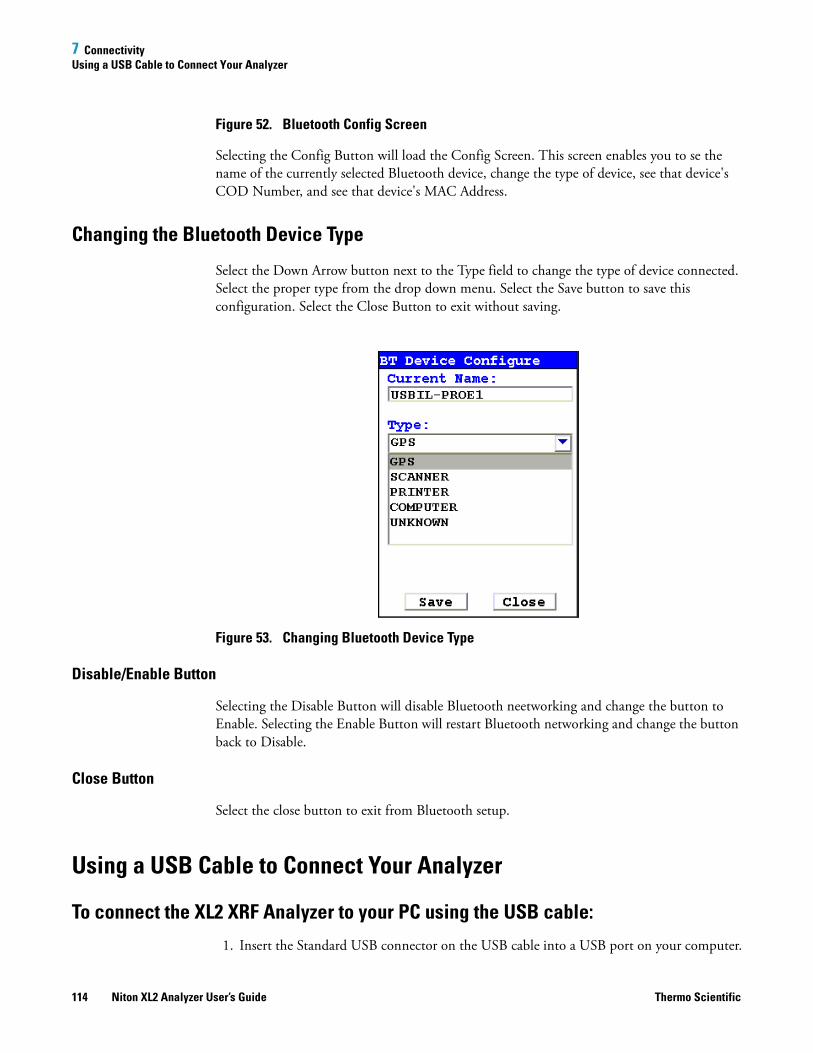
7 ConnectivityUsing a USB Cable to Connect Your Analyzer
Figure 52. Bluetooth Config Screen
Selecting the Config Button will load the Config Screen. This screen enables you to se the
name of the currently selected Bluetooth device, change the type of device, see that device's
COD Number, and see that device's MAC Address.
Changing the Bluetooth Device Type
Select the Down Arrow button next to the Type field to change the type of device connected.
Select the proper type from the drop down menu. Select the Save button to save this
configuration. Select the Close Button to exit without saving.
Figure 53. Changing Bluetooth Device Type
Disable/Enable Button
Selecting the Disable Button will disable Bluetooth neetworking and change the button to
Enable. Selecting the Enable Button will restart Bluetooth networking and change the button
back to Disable.
Close Button
Select the close button to exit from Bluetooth setup.
Using a USB Cable to Connect Your Analyzer
To connect the XL2 XRF Analyzer to your PC using the USB cable:
1. Insert the Standard USB connector on the USB cable into a USB port on your computer.
114 Niton XL2 Analyzer User’s Guide Thermo Scientific

7 ConnectivityUsing a USB Cable to Connect Your Analyzer
Figure 54. Standard USB Connector
2. Open the Port Cover on the XRF Analyzer.
3. Turn on the analyzer and insert the mini USB connector on the USB cable into the USB
port in the handle of the XRF Analyzer.
4. Upon initial installation, insert the NDT disk located behind the foam in your case.
Follow the prompts and install the USB driver located on the disk.
Figure 55. Mini USB Connector
Thermo Scientific Niton XL2 Analyzer User’s Guide 115

7 ConnectivityDownloading Data
Downloading Data
Standard Download
To download data you have collected offline:
1. Make sure that the XRF Analyzer is connected to your computer. See “Using Your
Analyzer With Your PC” on page 109for more information.
2. Turn on the XRF Analyzer. See the manual for the XRF Analyzer for more information.
Note Wait at least 30 seconds after turning on the XRF Analyzer to begin downloading files.
The System Start screens do not allow downloading.
3. Start Niton Data Transfer.
4. Click the Download button. The Download dialog box will open.
Figure 56. The Download Button
5. In the Download dialog box, Select the Test button to test the serial connection to the
Analyzer.
116 Niton XL2 Analyzer User’s Guide Thermo Scientific

7 ConnectivityDownloading Data
Figure 57. The Test Button
6. You should get a pop-up window informing you that the connection tested successfully. If
the test fails, there is a problem with your serial port setup.
Figure 58. Connection Success Window
7. In the Download dialog box, click the Connect button.
Figure 59. The Connect Button
8. Click the Query Readings button. This will return a list of all current readings on your
analyzer. The list appears in the large white box in the Download dialog box.
Thermo Scientific Niton XL2 Analyzer User’s Guide 117
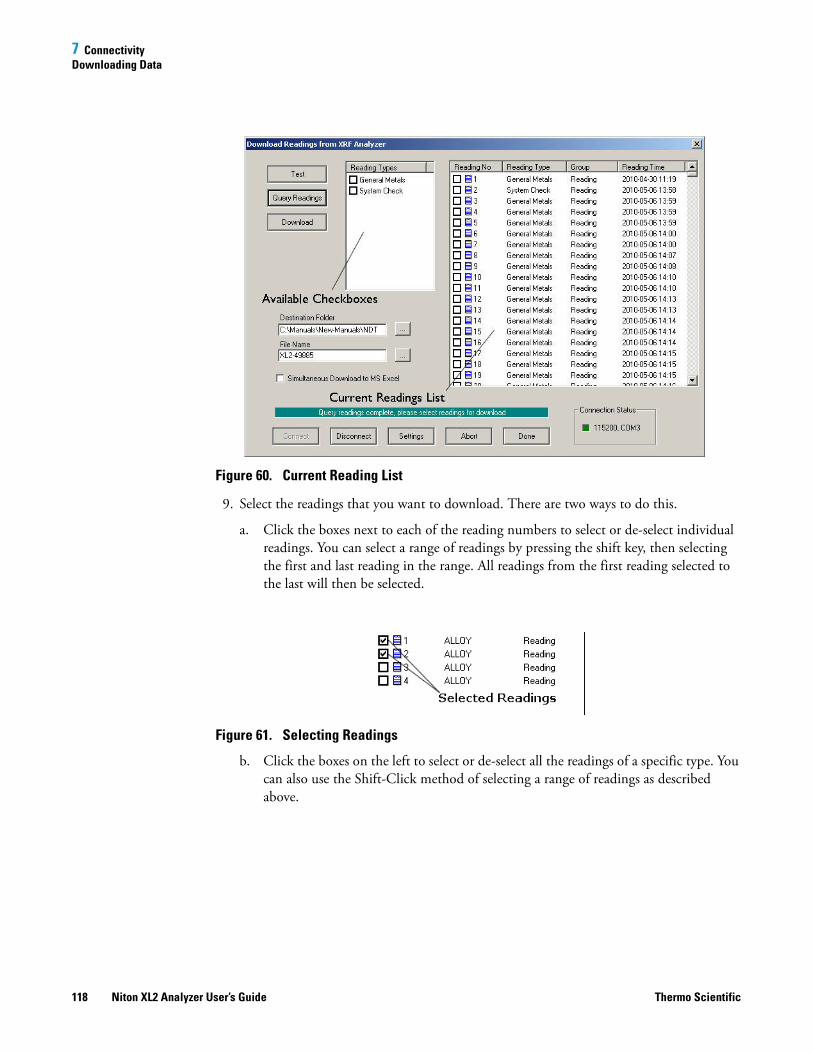
7 ConnectivityDownloading Data
Figure 60. Current Reading List
9. Select the readings that you want to download. There are two ways to do this.
a. Click the boxes next to each of the reading numbers to select or de-select individual
readings. You can select a range of readings by pressing the shift key, then selecting
the first and last reading in the range. All readings from the first reading selected to
the last will then be selected.
Figure 61. Selecting Readings
b. Click the boxes on the left to select or de-select all the readings of a specific type. You
can also use the Shift-Click method of selecting a range of readings as described
above.
118 Niton XL2 Analyzer User’s Guide Thermo Scientific

7 ConnectivityDownloading Data
Figure 62. Using Check Boxes
10. The download generates a data file containing the selected readings. To save the file for
later use:
c. Enter the path for the file in the Destination Folder field. You can use the ... button
to browse.
Figure 63. The Browse Button
d. Enter a name for the file in the File Name field.
CAUTION Some characters are not allowed in the file name. Characters such as the "#" sign
will cause an error. Niton recommends using only alphanumeric characters "-", "_" and the
space character when naming a file.
e. Click the Download button.
Thermo Scientific Niton XL2 Analyzer User’s Guide 119

7 ConnectivityDownloading Data
Figure 64. The Download Button
When the progress bar shows that all the readings are downloaded, click the Done button.
120 Niton XL2 Analyzer User’s Guide Thermo Scientific

7 ConnectivityDownloading Data
Figure 65. The Progress Bar
You should now see the readings you selected for download displayed, one reading per
horizontal line. The data has been saved to the folder and filename you indicated prior to
downloading. If an error message has appeared, see the following section.
You can also automatically save reports in .csv format for importing into Excel or other
programs.Simultaneous Save as CSV File
Table 4: Error Messages while Downloading
Error Message Action
Couldn't open \\.\COM7 Error
Code: 2
Select another COM port.
The port \\.\COM2 is in use Select another COM port.
Please Open the Port Click the Connect button.
Hardware Not Responding
or
Hardware Not Ready
Turn on the XRF Analyzer.
If you are using a serial cable, check that the cable is
inserted snugly.
If you are using a serial cable, select the other COM
port.
If you are using the wireless USB adapter, connect the
serial port. See the "Installing and Using Bluetooth"
manual for complete instructions on setting up the
Bluetooth adapter to work with your analyzer.
Check that the spare battery is fully charged.
The Serial Port connection failed:
RFCOMM connection failed
Check that the battery is fully charged.
WARNING: 38400 baud rate not
supported.
This indicates a potential problem. Test the serial port.
If there is a problem connecting, switch baud rate on
both the analyzer and the NDT software to 115200.
Incorrect Data in reading # XXX.
Reading will be skipped.
Error code:
BOUNDARY_ERROR1.
This indicates a version mismatch between your
instrument code and the NDT code running on your
computer. Use a version of NDT that matches the
ver?sion number of the software on your analyzer.
Incorrect Data in reading # XXX.
Reading will be skipped.
Error code:
BOUNDARY_ERROR2.
This indicates a version mismatch between your
instrument code and the NDT code running on your
computer. Use a version of NDT that matches the
ver?sion number of the software on your analyzer.
Thermo Scientific Niton XL2 Analyzer User’s Guide 121

7 ConnectivityDownloading Data
Note When using the wireless USB adapter, if the serial port repeatedly disconnects, check
that the battery is fully charged.
Live Download (Automatic Save)
If desired, your Niton XL2 analyzer has the capability to download and store each reading to
the PC in real time to a file of your choice. To enable this feature, you must do the following:
• Your Niton analyzer must be turned on and connected to the PC. See Using Your Analyzer
With Your PC.
• The NDTr program module must be running and connected to your analyzer. See
Operating Your Analyzer Remotely.
• The Download icon in the NDTr toolbar must be selected.
Figure 66. Live Download Icon
The file created is in a format readable by the NDT program module, has an extension of
.ndt, and looks identical to a file of manually downloaded readings - see Standard Download.
It can also create a simultaneous .CSV file. Simultaneous Save as CSV File .
Please note the following:
1. When the instrument is unplugged, selecting the Download icon does nothing.
Incorrect Data in reading # XXX.
Reading will be skipped.
Error code:
BOUNDARY_ERROR3.
This indicates a version mismatch between your
instrument code and the NDT code running on your
computer. Use a version of NDT that matches the
ver?sion number of the software on your analyzer.
WARNING: 115200 baud rate not
supported.
This indicates a potential problem. Test the serial port.
If there is a problem connecting, switch baud rate on
both the analyzer and the NDT software to 38400.
SH4 Successfully Communicating
Result: SUCCESS
This indicates a normal connection.
Table 4: Error Messages while Downloading
122 Niton XL2 Analyzer User’s Guide Thermo Scientific

7 ConnectivityDownloading Data
2. When you disconnect, then reconnect, your analyzer, Download appends future readings
to same file.
3. Live Download does not overwrite any previous readings in the file. If you want to do
this, you must first explicitly erase the file before initiating Live Download.
4. Live Download does not retroactively add any readings taken while your analyzer was
disconnected.
Changing the Filename for Live Download
Once you have selected the Download icon, a dialog box appears as shown below:
Figure 67. File Dialog Box
You can change the destination file or folder by clicking in the appropriate text box and typing
in the new file name, or by clicking on the browse button (...) to the right of the text box and
selecting a different pre-existing filename. To implement these changes, click the OK button.
Your instrument serial number is associated with the file. If a different instrument is
connected and Live Download is started, a message will appear saying that the connected
instrument and file instrument do not match, and Live Download will not start. Saving the
session as a new file will alleviate this issue
Simultaneous Save as CSV File
By clicking on the checkbox box labeled "Save the readings to CSV file as well" you can
enable simultaneously saving the data as a standard CSV (Comma Separated Value) file for
use with other programs.
Thermo Scientific Niton XL2 Analyzer User’s Guide 123

7 ConnectivityDownloading Data
124 Niton XL2 Analyzer User’s Guide Thermo Scientific
7 Controlling Your Analyzer From Your PC
Controlling Your Analyzer From Your PC
The NDTr program allows you to completely control your Niton analyzer remotely, from
your computer. It works over serial or USB connection over the supplied connector, or
Bluetooth wireless communication. See Using Your Analyzer With Your PC for details on
how to connect your Analyzer and PC.
The NDTr Toolbar
The NDTr Toolbar is a string of icons along the top of the NDTr window. It looks like this:
Figure 68. The NDTr Toolbar
Start Measurement
Clicking this icon will initiate a measurement in whatever mode the analyzer is in currently.
Stop Measurement
Clicking this icon will halt any ongoing measurement on the analyzer.
Configure Connection Settings
Clicking this icon will allow you to change your configuration settings.
Connect
Clicking this icon will attempt to establish a connection between your computer and your
analyzer.
Thermo Scientific Niton XL2 Analyzer User’s Guide 125

7 Controlling Your Analyzer From Your PC
Disconnect
Clicking this icon will disconnect your computer from your analyzer.
Live Download
See Live Download from NDTr
Configure Connection Settings
Clicking on the Configure Connection Settings icon allows you to change the Com Port for
connecting your computer to your analyzer. Once you click on the icon, a settings dialog box
will appear.
Figure 69. Connection Settings Dialog Box
Selecting the Com Port
Selecting the down arrow in the "Connect Using" field will display the various Com Ports on
the computer that the analyzer can connect through.
Figure 70. Selecting the Com Port
Select the proper com port from the list, then select the OK Button.
126 Niton XL2 Analyzer User’s Guide Thermo Scientific

7 Controlling Your Analyzer From Your PC
Operating Your Analyzer Remotely
NDTr version 7 and above will automatically select the proper virtual interface for you,
whether you have a Thermo Scientific Niton XL2 or XL3. The virtual interface operates
exactly as the analyzer would. Selecting the buttons, icons and menus with your mouse works
exactly as if you were selecting them with your finger or stylus on the real analyzer.
Figure 71. Niton XL2 Virtual Interface
Live Download from NDTr
Once you have connected to your analyzer using NDTr, click on the Download icon on the
NDTr toolbar. When you click the Download icon, a Download dialog box will appear.
Thermo Scientific Niton XL2 Analyzer User’s Guide 127

7 Controlling Your Analyzer From Your PC
Figure 72. File Dialog Box
Dest Folder
This field shows the last used save folder, defaulting to the folder where NDT is installed.
... (Browse Folders) Button
Selecting this button enables you to select a different folder for saving the file. This will
change the Dest Folder Field.
Selected File
This shows the filename the reading will be saved to unless you change it.
... (Browse Files) Button
Selecting this button enables you to select a different file name by browsing the file listing.
The file extension “.ndt” will be appended to the name - i.e. File name “file” will be saved as
“file.ndt” and the file will be in the NDT format.
Save the Reading to CSV File as Well Checkbox
Selecting this checkbox enables you to create a second autosave file with CSV format for
importing into spreadsheets such as Excel. This file will have the same name as the NDT file
above, but with the file extension “.csv” instead - i.e. “test.ndt” will be saved as “test.csv” as
well. The checkbox is selected when there is a check in it, and deselected when it is empty.
Always Show this Dialog Box when the File button is Pressed Checkbox
Selecting this checkbox will enable you to change the filename whenever you want.
Deselecting this checkbox will save the file under the same name in the same folder every
time. The checkbox is selected when there is a check in it, and deselected when it is empty.
128 Niton XL2 Analyzer User’s Guide Thermo Scientific
Learning More, Service, and Support
This section of the Resource guide is about getting the most out of your
analyzer. We cover troubleshooting your analyzer by using the Specs
screen. We also cover advanced topics like setting thresholds, using the
Tools menu, correcting for light elements in the sample composition,
setting up pass/fail analysis, changing safety and start/stop parameters,
and many other special situations you may need. We have also included
a number of documents for reference, so you can learn more about XRF
analysis if you are so inclined.
Replacing the Measurement WindowWARNING Before you begin, remove the battery from your analyzer!
• Remove the two screws holding the Measurement Window Bracket to the nose of your analyzer.
Figure 1. Removing the Window Bracket Screws
• Remove the Measurement Window Bracket from the analyzer, and turn it over, exposing the back with seal and Measurement Window.
• Remove the old Measurement Window from the bracket.
• Clean the Window area thoroughly, using a clean, guaranteed lint-free cloth and isopropyl alcohol.
129

8 Learning More, Service, and SupportReplacing the Measurement Window
Figure 2. Removing the Old Window
• Measurement Windows come in two types - Prolene (P.N 187-1454) for 900 Series analyzers, and Polypropylene (P/N 187-1555) for all other analyzers.
.
Figure 3. Polyethylene Window P/N 187-1555
.
130 Niton XL2 Analyzer User’s Guide Thermo Scientific

8 Learning More, Service, and SupportReplacing the Measurement Window
Figure 4. Prolene Window PN 187-1454
• When the bracket is clean, remove the backing from the Measurement Window. Place the window on the Bracket gently. Make sure the opaque portions of the window do not intrude over the large measurement hole in the Bracket.
Figure 5. Removing the Backing from Prolene Window (Left) and Applying Window to Bracket (Right)
CAUTION Do not use fingers to press window into place! Use a smooth, hard surface such as back of tweezers.
Figure 6. Measurement Window Replaced
• Replace Window Bracket on the front of your analyzer, then insert screws.
Thermo Scientific Niton XL2 Analyzer User’s Guide 131
8 Learning More, Service, and SupportTips and Troubleshooting
Tips and Troubleshooting
The Specs Screen
Figure 7. The Specs Screen Menu Path
Select the Specs icon from the System Menu to display the analyzer's specifications. These
specifications include your analyzer's serial number, software and firmware versions, and
other data. Press the Close Screen Button to return to the previous menu. Press the ">-"
Screen Button to go to the Diagnostic Menu, and press the "<-" Screen Button to return
to the Specifications Screen.
132 Niton XL2 Analyzer User’s Guide Thermo Scientific
8 Learning More, Service, and SupportTips and Troubleshooting
Figure 8. The Specifications Screen
On the Specs Screen, standard information on the state of your analyzer is shown for your
reference. This information should be reported to Service if there is a problem.
Specs Information
The following is the information supplied on the Specs Screen:
Instrument Specific Serial Number
This is located in the left part of the blue band at the top of the screen.
Model Number
This is located in the right part of the blue band at the top of the screen.
Date And Time
This is the current Date and Time. This is particularly important for date stamping.
SW Version
This is the currently loaded software version, which should be reported to Service if there
is any problem.
Thermo Scientific Niton XL2 Analyzer User’s Guide 133

8 Learning More, Service, and SupportTips and Troubleshooting
FPGA
This is the currently loaded FPGA software version, which should be reported to Service
if there is any problem. FPGA versions are always a four digit number. Any other number
of digits may be a sign of a problem in the FPGA code.
Factory QC
This is the date that the machine was QCed at the factory.
Energy Cal
This line notes the last time a System Check was performed.
Battery
This line gives the proportional charge remaining to the battery.
System Check Reminder
Select the OFF Screen Button after "System Check Reminder" to set a reminder to
calibrate your analyzer. Selecting the button will open the Cal. Reminder Editor. Select
the number of days you want between reminders with the numeric keys. Of the other
screen buttons, C = Clear All, E = Enter, and OFF shuts off the Reminder Function.
Selecting the E button will enter the current value as the reminder interval and return to
the Specs Screen.
Figure 9. Cal Reminder Editor Screen
134 Niton XL2 Analyzer User’s Guide Thermo Scientific

8 Learning More, Service, and SupportTips and Troubleshooting
Diagnostics
Select the "->" Screen Button to load the Diagnostics Screen. The Diagnostics Screen
shows Detector Temperature, Bias, Cooler Voltage, SubBias, Energy Scale, and
Temperature in C and F scales.
The Diagnostics Screen can be of great utility in assuring proper operation of your
analyzer.
Figure 10. The Diagnostics Screen
The proper ranges of operational values on the Diagnostics Screen follow.
Det Temp:
Detector Temperature should be within this range:
- 25 + or - 5 degrees
Bias:
Bias should be within this range:
175 + or - 10
VCool:
VCool will vary with the ambient temperature.
Thermo Scientific Niton XL2 Analyzer User’s Guide 135
8 Learning More, Service, and SupportTips and Troubleshooting
SubBias:
SubBias should be within this range:
-11 + or - 3
Escale:
Escale should be within this range:
6.6 through 9.0
Preamp:
Preamp value should only be noted, and reported to Service if there is a problem.
136 Niton XL2 Analyzer User’s Guide Thermo Scientific
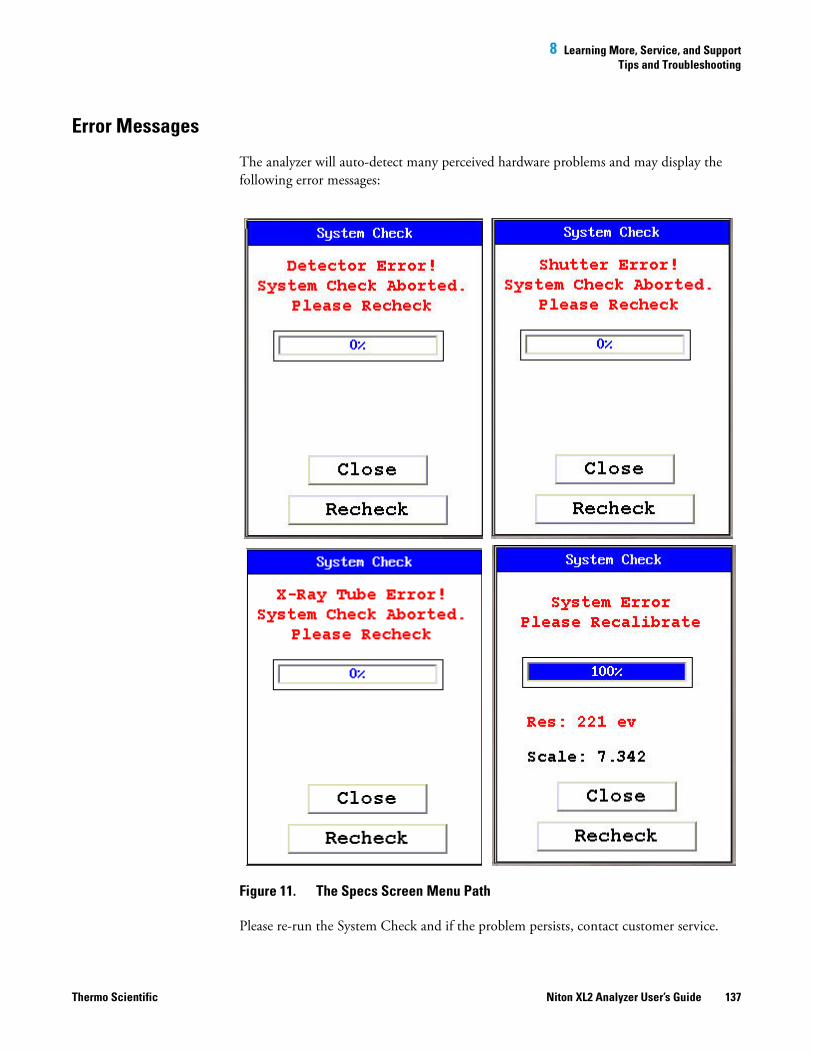
8 Learning More, Service, and SupportTips and Troubleshooting
Error Messages
The analyzer will auto-detect many perceived hardware problems and may display the
following error messages:
Figure 11. The Specs Screen Menu Path
Please re-run the System Check and if the problem persists, contact customer service.
Thermo Scientific Niton XL2 Analyzer User’s Guide 137

8 Learning More, Service, and SupportTips and Troubleshooting
Registration and Licensing FAQ
As a user of a Niton XL2 analyzer, you may be required to register or obtain a license with
your local radiation control authority. In the US, if you intend to do work with your
analyzer in states other than your own, you may be required to register there as well.
Below is a list of commonly asked questions that come up when filling out registration
forms.
FAQ
Q: What is the max mA, max kVp, and max power?
A: Maximum mA is 0.1 mA
Maximum kVp is 45 kVp
Maximum power: 2 watts
Q: What is the accelerator voltage or MeV?
A: This should be filled out as not applicable N/A as it does not apply to Niton XL2
analyzers.
Q: What is the radioisotope?
A: There are no radioactive isotopes in Niton XL2 analyzers.
Q: What category is the Niton XL2?
A: States differ greatly in their categories; the following is a list of common categories:
• X-Ray Fluorescence
• Analytical or Analytical XRF
• Open Beam or Open Beam Analytical
• Portable Gauge or Portable XRF
• Industrial Analytical or Non-Destructive Testing
When selecting the category make sure that you don't select medical or radiographic.
Q: How many tubes are in the Niton XL2?
138 Niton XL2 Analyzer User’s Guide Thermo Scientific

8 Learning More, Service, and SupportStoring and Transporting Your Niton XL2 Analyzer
A: One.
Q: What is the analyzer serial number?
A: The serial number is a 5 digit number located on the yellow sticker on the underside of
your analyzer.
Q: What is the tube serial number?
A: The serial number of the tube can be found on the Calibration Certificate.
Q: What is the type of X-Ray Processing?
A: None. Niton XL2 analyzers do not use film.
Q: How often do I need to perform leak tests on the Niton XL2?
A: Never. Leak tests are only required for analyzers with radioactive isotopes. Niton XL2
analyzers do not have radioactive isotopes.
Storing and Transporting Your Niton XL2 Analyzer
All Niton Analyzers are transported in waterproof, drop-resistant, fully padded carrying
cases with padlocks. In most countries, Niton XRF analyzers may be transported by car or
plane or shipped as an ordinary package. For most courier services, no special labels are
required on the outside of the Niton analyzer case or on additional packaging.
Thermo Scientific Niton XL2 Analyzer User’s Guide 139

8 Learning More, Service, and SupportStoring and Transporting Your Niton XL2 Analyzer
Figure 12. The Niton Carrying Case
All padlocks are shipped with a default combination of “0-0-0”. If you change this
combination, please inform Thermo of the new combination if you return the unit for
service.
To change the combination:
1. Dial the default combination to open the lock, and pull out the shackle.
2. Rotate the shackle 180 degrees and push it down as far as it can go.
3. While holding the shackle down, rotate it 90 degrees back in either direction and
release shackle.
4. Change the dial settings to the desired combination, record the combination, and
without disturbing the dials, rotate the shackle back 90 degrees to the position it had
in step 2.
5. Pull shackle out and rotate it 180 degrees and secure it. Your lock now has its own
secret combination.
CAUTION Always transport the unit in its padded carrying case, and store the Niton
Analyzer in its case whenever it is not being used.
140 Niton XL2 Analyzer User’s Guide Thermo Scientific

8 Learning More, Service, and SupportStoring and Transporting Your Niton XL2 Analyzer
CAUTION In most cases, no notification is required if transporting within state
boundaries. This may not be the case when entering federal properties.
CAUTION Within the United States, always keep a copy of the US DOT compliance
statement in your Niton analyzer case at all times. A copy is included with your analyzer.
CAUTION Always follow all pertinent local and national regulations and guidelines,
wherever your analyzer is transported or used.
CAUTION Always obtain a Return Authorization (RA) number from Thermo Fisher
Scientific’s Service Department in the United States, toll free, at (800) 875-1578, or
outside the United States, at +1-978-670-7460 before returning your analyzer to the
Service Department or to your local Authorized Niton Analyzers Service Center.
CAUTION If you return your Niton analyzer without the carrying case, you will void your
warranty in its entirety. You will be billed for a replacement case plus any repairs resulting
from improper shipping.
CAUTION CAUTION Always remove the battery pack when transporting or storing
your analyzer.
Thermo Scientific Niton XL2 Analyzer User’s Guide 141

8 Learning More, Service, and SupportStoring and Transporting Your Niton XL2 Analyzer
142 Niton XL2 Analyzer User’s Guide Thermo Scientific

Advanced Settings
Adjusting the Element Range
Figure 1. The Range Menu Path (Main)
Multi-Range tests are used to either preferentially excite specific
elements for increased sensitivity, or to cover a wider element range than
one Range alone can provide. Most modes, when enabled, will use two
Ranges in sequence to produce a combined analysis result. In typical
143
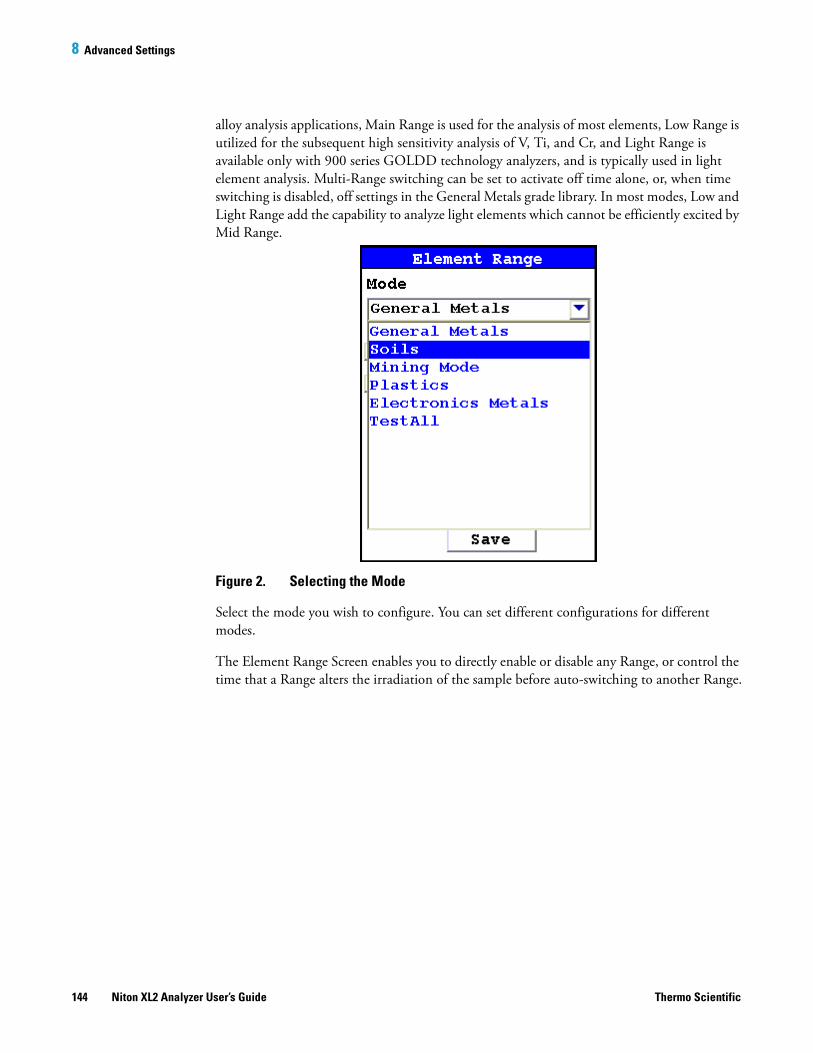
8 Advanced Settings
alloy analysis applications, Main Range is used for the analysis of most elements, Low Range is
utilized for the subsequent high sensitivity analysis of V, Ti, and Cr, and Light Range is
available only with 900 series GOLDD technology analyzers, and is typically used in light
element analysis. Multi-Range switching can be set to activate off time alone, or, when time
switching is disabled, off settings in the General Metals grade library. In most modes, Low and
Light Range add the capability to analyze light elements which cannot be efficiently excited by
Mid Range.
Figure 2. Selecting the Mode
Select the mode you wish to configure. You can set different configurations for different
modes.
The Element Range Screen enables you to directly enable or disable any Range, or control the
time that a Range alters the irradiation of the sample before auto-switching to another Range.
144 Niton XL2 Analyzer User’s Guide Thermo Scientific
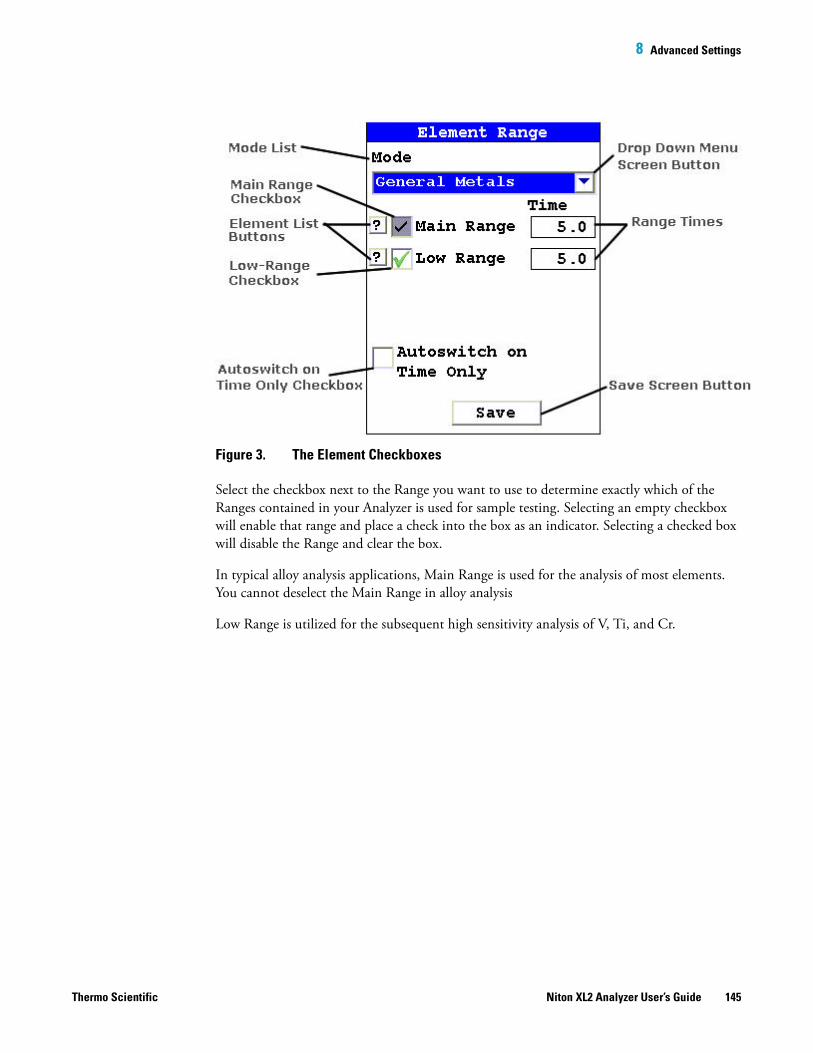
8 Advanced Settings
Figure 3. The Element Checkboxes
Select the checkbox next to the Range you want to use to determine exactly which of the
Ranges contained in your Analyzer is used for sample testing. Selecting an empty checkbox
will enable that range and place a check into the box as an indicator. Selecting a checked box
will disable the Range and clear the box.
In typical alloy analysis applications, Main Range is used for the analysis of most elements.
You cannot deselect the Main Range in alloy analysis
Low Range is utilized for the subsequent high sensitivity analysis of V, Ti, and Cr.
Thermo Scientific Niton XL2 Analyzer User’s Guide 145

8 Advanced Settings
Figure 4. The Range Element Lists
Select the Element List Button to display the Element List for that Range. This list shows the
elements that the Range is best designed to detect.
146 Niton XL2 Analyzer User’s Guide Thermo Scientific

8 Advanced Settings
Figure 5. The Range Time Fields
Select the Range Time field for the intended range to change the switch time for that range.
The Range Time Editor will appear. This enables you to set the number of seconds each
enabled range is allotted before auto-switching will occur when needed during sample testing.
Your analyzer will auto-switch from one range to another when the testing time for that range
is greater than or equal to the time you have chosen, and the identified alloy is flagged as
needing the switch in the Niton Alloy Library.
Thermo Scientific Niton XL2 Analyzer User’s Guide 147

8 Advanced Settings
Figure 6. The Range Time Editor
Select the C button to clear the current time, then from the virtual numeric key pad, select
each digit you want to input, then select the E button to enter.
148 Niton XL2 Analyzer User’s Guide Thermo Scientific
8 Advanced SettingsTools Menu Options
Tools Menu Options
The following options can be performed from the Tools Menu. Options which are only on
the main Tools Menu are listed as (Main). Those which can be found only on the alternate
Tools Menu are listed as (Alt).
Avg Forward
Enables you to average different readings together from this analysis forward. Select the Avg
Forward button to initiate future sample averaging. Avg Forward will set up an automatic
personal averaging protocol to be followed until your analyzer is shut down, or this feature is
disabled. To begin, select the number of readings you want to average from the virtual
numeric keypad. Your analyzer will calculate an average reading after that number of tests, and
continue this pattern until stopped. For example, if you select 3 on the virtual keypad, the
analyzer will automatically calculate, average, and store a reading for every three tests you take,
storing the individual readings along the way.
The range number is selected using a virtual numeric keypad on your analyzer similar to the
keypad used for login. Select the digits in the range number from the keypad, then select the E
button to enter the number. The C button will clear all, and the “<“ button will clear the last
digit entered. The average will automatically be displayed.
Thermo Scientific Niton XL2 Analyzer User’s Guide 149
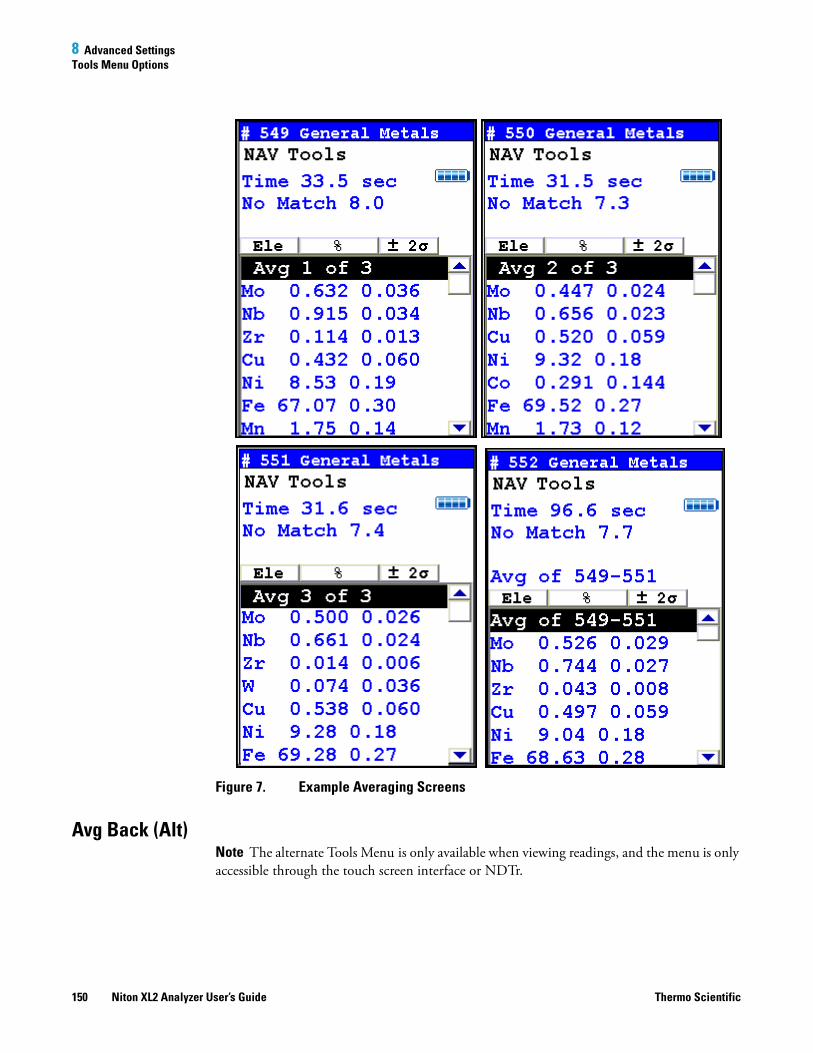
8 Advanced SettingsTools Menu Options
Figure 7. Example Averaging Screens
Avg Back (Alt)Note The alternate Tools Menu is only available when viewing readings, and the menu is only
accessible through the touch screen interface or NDTr.
150 Niton XL2 Analyzer User’s Guide Thermo Scientific
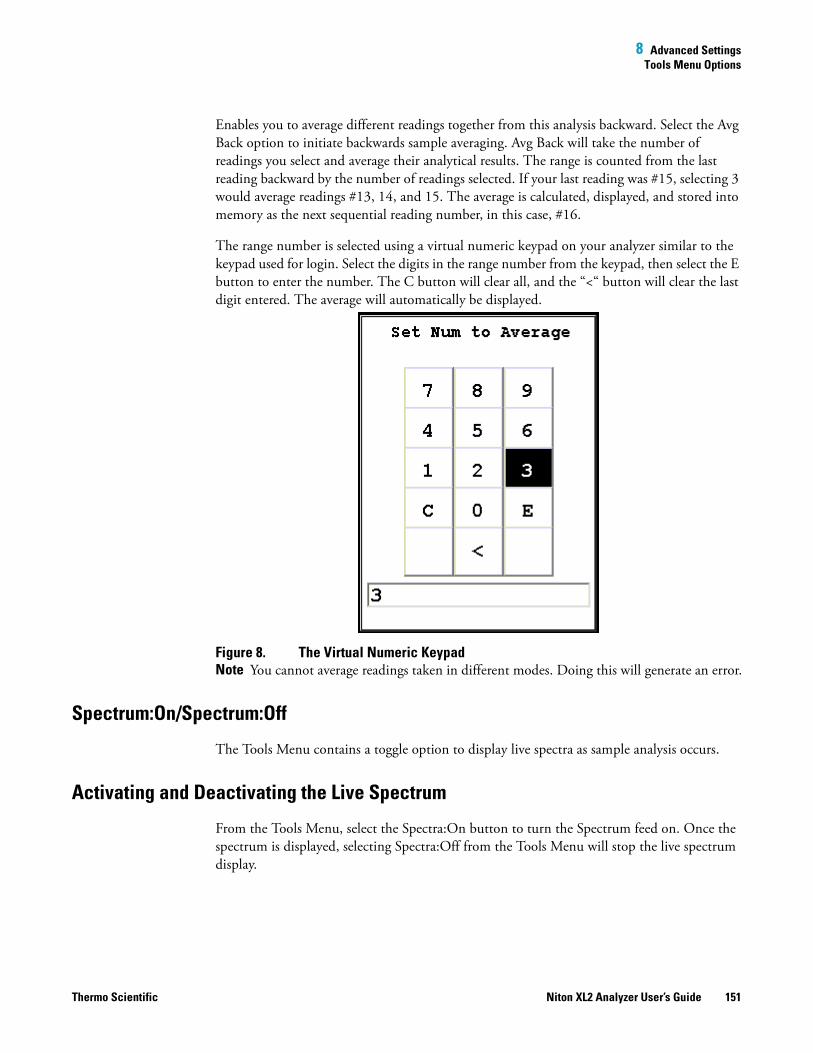
8 Advanced SettingsTools Menu Options
Enables you to average different readings together from this analysis backward. Select the Avg
Back option to initiate backwards sample averaging. Avg Back will take the number of
readings you select and average their analytical results. The range is counted from the last
reading backward by the number of readings selected. If your last reading was #15, selecting 3
would average readings #13, 14, and 15. The average is calculated, displayed, and stored into
memory as the next sequential reading number, in this case, #16.
The range number is selected using a virtual numeric keypad on your analyzer similar to the
keypad used for login. Select the digits in the range number from the keypad, then select the E
button to enter the number. The C button will clear all, and the “<“ button will clear the last
digit entered. The average will automatically be displayed.
Figure 8. The Virtual Numeric KeypadNote You cannot average readings taken in different modes. Doing this will generate an error.
Spectrum:On/Spectrum:Off
The Tools Menu contains a toggle option to display live spectra as sample analysis occurs.
Activating and Deactivating the Live Spectrum
From the Tools Menu, select the Spectra:On button to turn the Spectrum feed on. Once the
spectrum is displayed, selecting Spectra:Off from the Tools Menu will stop the live spectrum
display.
Thermo Scientific Niton XL2 Analyzer User’s Guide 151

8 Advanced SettingsTools Menu Options
Figure 9. Example Analysis Screen Showing Live Spectrum
Print (Alt)
Select the Print option from the Tools Menu to print the current analysis screen to any
attached portable printer. If you do not have a portable printer attached to your analyzer,
nothing will happen.
Set Pass/Fail
You can set up your analyzer to sort on a pass/fail basis. Pass/Fail uses the chemistry of a
user-generated list of alloys in the library as a basis for comparison. If the sample analysis is
entirely within the specifications for one of these alloys, a PASS result is given, otherwise a
FAIL result is returned. To turn on Pass/Fail, select the Tools Menu and select Set Pass/Fail
from the menu. The Pass/Fail Setup Screen will come up.
152 Niton XL2 Analyzer User’s Guide Thermo Scientific

8 Advanced SettingsTools Menu Options
Figure 10. Set Pass/Fail Screen
Add/Remove (Toggle)
Select alloys from the Available list and then the Add Button to move the alloy to the Selected
List. Select alloys from the Selected list and then the Remove Button to remove the alloys
from the Selected List.
Save
Select the Save Button to save these criteria.
Close
Select the Close Button to exit without saving.
Pass
Select the Pass Single button to initiate Pass Mode. Use Pass Mode when you have a desirable
match. If the alloy being analyzed matches one of the alloys in the selected list, the alloy will
Pass the analysis.
Fail
Select the Fail button to initiate Fail Mode. Use Fail Single Mode when you have an
undesirable match. If the alloy being analyzed matches one of the alloys in the selected list, the
alloy will Fail the analysis.
Thermo Scientific Niton XL2 Analyzer User’s Guide 153

8 Advanced SettingsTools Menu Options
Setting the Reference Alloys for Pass or Fail
Before you use Pass or Fail mode, you need to set the Reference Alloys. Select the alooy or
alloys from the slide down menu on the Pass Fail Setup Screen, then select the Add button.
Figure 11. . The Pass Fail Setup Screen
Searching for Reference Alloys
Select the Search button to search the library for the alloy you want as your Reference Alloy.
Figure 12. Using the Search Function
154 Niton XL2 Analyzer User’s Guide Thermo Scientific

8 Advanced SettingsTools Menu Options
Type the name of your reference alloy into the Virtual Keyboard, and the left column will
display any matches. Select the match you want and the Add button to make it your reference
alloy.
Figure 13. Search Results
UHow Pass/Fail Mode Works
Pass/Fail Mode compares the chemistry to that of the alloy(s) selected, using the cutoff you
selected. When the sample analysis reaches a match with the chemistry of any one of the alloys
on the Selected list, a PASS or FAIL notice is generated as appropriate.
Figure 14. Metals Pass and Fail Screens
Thermo Scientific Niton XL2 Analyzer User’s Guide 155
8 Advanced SettingsTools Menu Options
Switch Library (Main)
Selecting the Switch Library button from the Tools Menu will swap the currently loaded
library with the other library on the analyzer. Selecting Switch Library again will switch them
back.
Enable/Disable Al
Normally, the collective amount of unquantifiable light elements in alloy analysis - the
"balance" - is assumed to be aluminum and labeled as such in the analysis. Selecting the
Disable Al button from the Tools Menu will delete this "aluminum" from the analysis results,
showing only the quantified elements. Selecting the Enable Al button, the default state, will
label this "balance" as "aluminum".
Thickness Correction
Plastics, and polymers in general, unlike metals or soil, are very weak absorbers of X rays. This
is because polymers are composed mainly of very light elements such as carbon and hydrogen.
While just half a millimeter of steel will completely stop 23.1 keV energy X rays of cadmium,
for example, it takes at least 10mm of plasticized PVC and as much as 100mm of
polyethylene (PE) to do so. Fortunately, polymers that may contain cadmium (Cd), lead (Pb)
and other restricted elements would also contain considerable quantity of elements such as
antimony (Sb), bromine (Br), titanium (Ti), etc. Their presence results in much stronger
absorption of X rays which means that, instead of 100mm, it takes only about 15mm of
compounded PE to achieve saturation thickness for these X rays. If the thickness of analyzed
polymer sample is less than 5mm for PVC or less than about 9mm for a “typical” PE, the
measured intensity of X rays will be a function of both analyte concentration and sample
thickness. This is why measurements performed on thin samples (less than saturation
thickness) need to be corrected for thickness.
How to apply Thickness Correction.
In order for the instrument to apply thickness correction to the measured concentration
results, the user must be using the Thickness Correction screen and enter the thickness of the
analyzed plastic object expressed in [mm] before the measurement is initiated. The thickness
may be entered with precision to the second decimal place, although in practice only one
decimal place is sufficient for effective correction.
156 Niton XL2 Analyzer User’s Guide Thermo Scientific
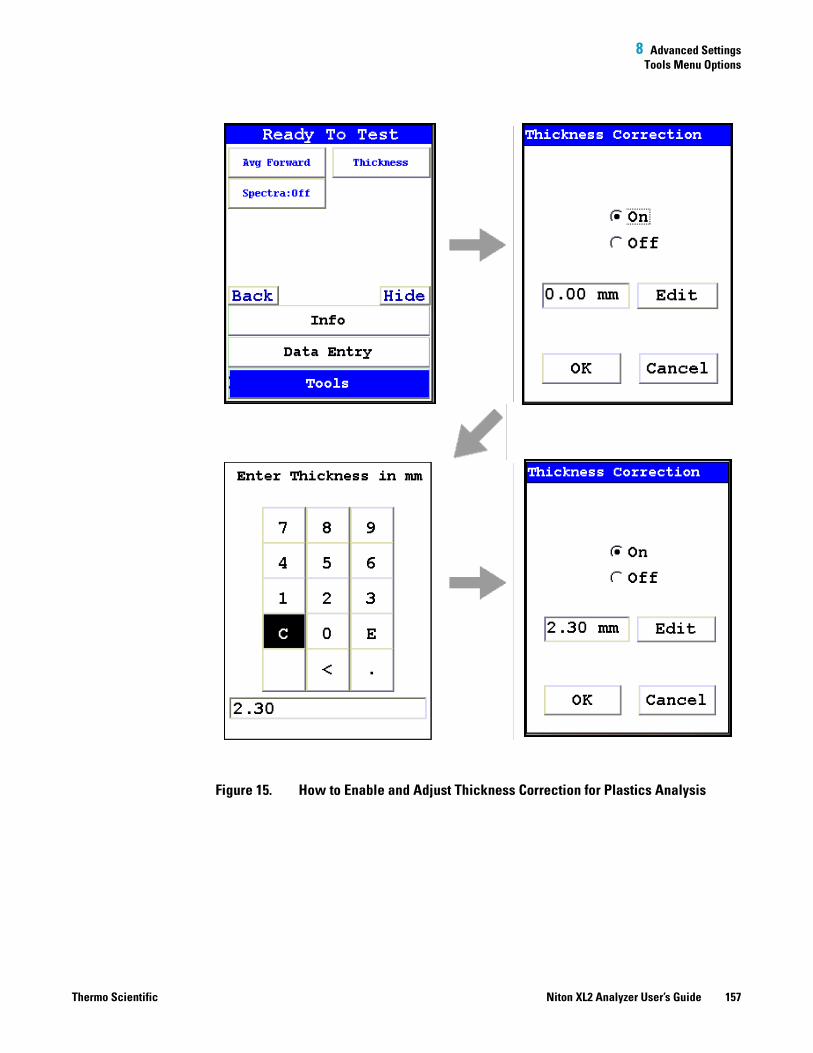
8 Advanced SettingsTools Menu Options
Figure 15. How to Enable and Adjust Thickness Correction for Plastics Analysis
Thermo Scientific Niton XL2 Analyzer User’s Guide 157

8 Advanced SettingsTools Menu Options
When to use Thickness Correction
Thickness Correction should only be used during the analysis of plastic (polymer) objects. It
has been experimentally verified that the correction algorithm will yield satisfactory results,
for a 60 second minimum testing time, for samples as thin as 0.3mm. Nevertheless, the
recommended range of use of the correction is from 1mm upwards. It is imperative that this
correction is not used for thin films such as single foils and plastic membranes; analysis of thin
films is performed using the Thin Sample Mode. (Contact Contact Thermo Scientific or your
local Niton Analyzers representative for information on this testing mode.)
Whenever possible, one should analyze as thick a sample as available. For example, if the
analyzed object is a piece of heatshrink tubing with wall thickness of 0.3mm, the best way to
analyze it is to obtain several pieces of the tubing (four for example) and stack them like a flat
sandwich, with the thickness correction set to 1.2mm. Doing so makes for faster and more
precise analyses. While it would be possible to analyze just a single layer of the tubing with
correction at 0.3 mm, by stacking several layers we reduce the relative error of measurement
(by a factor approximately equal to the square root of the number of layers). Conversely, when
analyzing thinner samples, we need to extend the measurement time fourfold (by the number
of layers) in order to maintain the same relative error of measurement. We can see how
quickly measurement time would escalate to impractical levels for thinner samples.
Examples: The most frequent instances in which thickness correction would be called for are
analyses of plastic sheeting or plastic insulation on wires and/or cables and heat shrink tubing.
Flat plastic sheeting or plastic enclosures pose no problems. We can either analyze an object
“as is”, or stack several layers of it before analysis. Plastic insulation such as that on wiring or
cables requires a little more sophisticated approach. First, the wire must be removed so that
only insulation is analyzed. Then, the insulation should be flattened for analysis, and a
thickness correction should be applied that is equal to double the wall thickness. Alternatively,
if the insulation is stiff, it should be cut lengthwise into strands which are placed on the
indtrument for analysis. The applied thickness correction should be equal to the wall
thickness of the sleeve. Both operations are shown in Figure 37 and Figure 38.
Figure 16. Wire Insulation Cut Into Strands
158 Niton XL2 Analyzer User’s Guide Thermo Scientific
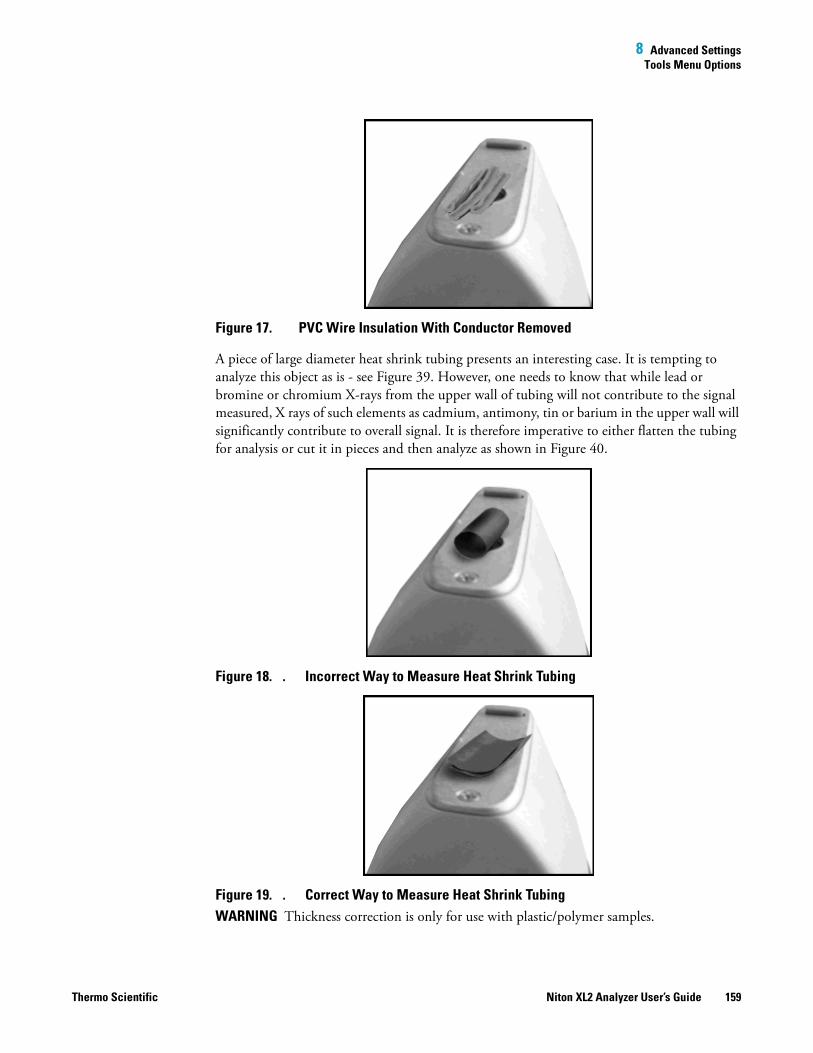
8 Advanced SettingsTools Menu Options
Figure 17. PVC Wire Insulation With Conductor Removed
A piece of large diameter heat shrink tubing presents an interesting case. It is tempting to
analyze this object as is - see Figure 39. However, one needs to know that while lead or
bromine or chromium X-rays from the upper wall of tubing will not contribute to the signal
measured, X rays of such elements as cadmium, antimony, tin or barium in the upper wall will
significantly contribute to overall signal. It is therefore imperative to either flatten the tubing
for analysis or cut it in pieces and then analyze as shown in Figure 40.
Figure 18. . Incorrect Way to Measure Heat Shrink Tubing
Figure 19. . Correct Way to Measure Heat Shrink Tubing
WARNING Thickness correction is only for use with plastic/polymer samples.
Thermo Scientific Niton XL2 Analyzer User’s Guide 159
8 Advanced SettingsTools Menu Options
Enable/Disable Paint
Selecting the Enable Paint option from the Tools Menu will enable the Painted Products
mode and toggle the option to Disable Paint. Selecting the Disable Paint option will disable
Painted Products mode and toggle the option to Enable Paint.
Action Level
Selecting the Action Level option from the Tools Menu will anable you to change the action
level used for qualitative testing.
Print Data
Selecting the Print Data option from the Tools Menu will print the currently displayed data to
the optional attached printer. See Setting Up the Printer for details.
Coatings Method
Metals are sometimes coated with various materials. If you wish to analyze the coating, select
the Coatings Method.
160 Niton XL2 Analyzer User’s Guide Thermo Scientific
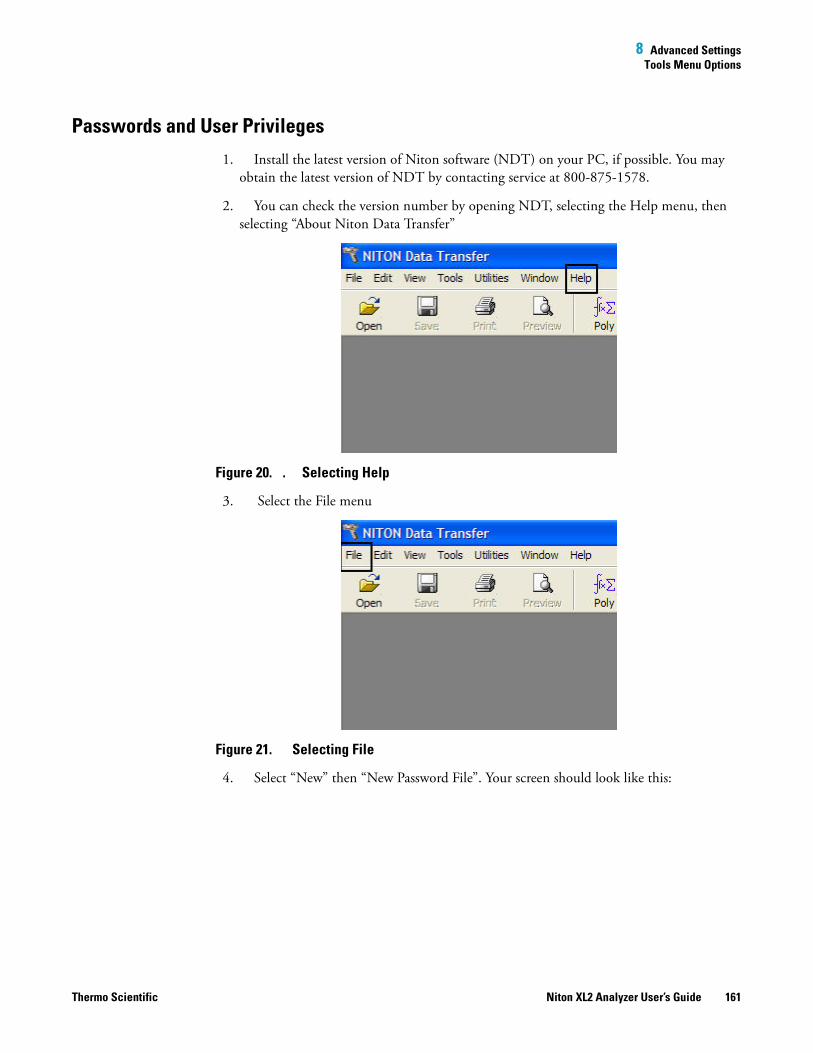
8 Advanced SettingsTools Menu Options
Passwords and User Privileges
1. Install the latest version of Niton software (NDT) on your PC, if possible. You may
obtain the latest version of NDT by contacting service at 800-875-1578.
2. You can check the version number by opening NDT, selecting the Help menu, then
selecting “About Niton Data Transfer”
Figure 20. . Selecting Help
3. Select the File menu
Figure 21. Selecting File
4. Select “New” then “New Password File”. Your screen should look like this:
Thermo Scientific Niton XL2 Analyzer User’s Guide 161

8 Advanced SettingsTools Menu Options
Figure 22. Creating the Security Key
5. Create a unique security key, then select the OK Button
Figure 23. Security Key
6. Your screen should look like this:
162 Niton XL2 Analyzer User’s Guide Thermo Scientific
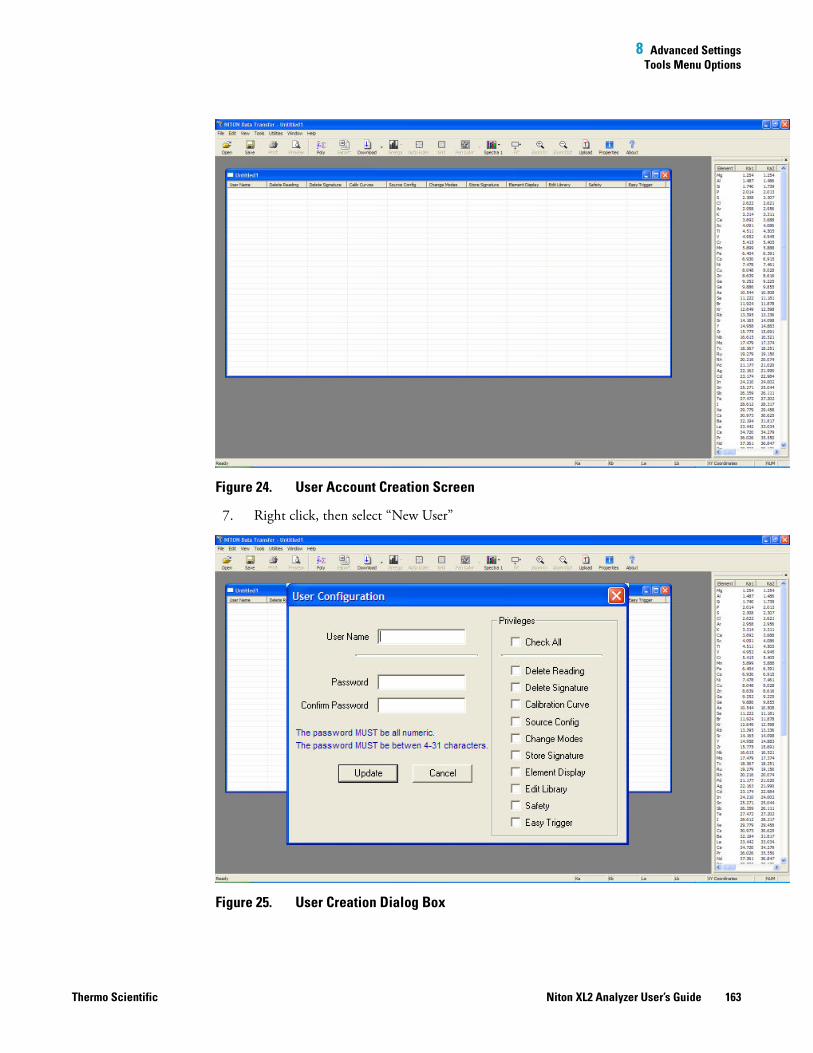
8 Advanced SettingsTools Menu Options
Figure 24. User Account Creation Screen
7. Right click, then select “New User”
Figure 25. User Creation Dialog Box
Thermo Scientific Niton XL2 Analyzer User’s Guide 163

8 Advanced SettingsTools Menu Options
8. Enter a user name and password, then select the privileges assigned to this user.
Selecting the Check All check box will result in enabling all features.
Figure 26. . Creating a User
WARNING it is recommended that only users at the highest level have access to the “Safety”
feature. This should be unchecked for all other operators.
164 Niton XL2 Analyzer User’s Guide Thermo Scientific

8 Advanced SettingsTools Menu Options
Figure 27. Unchecking Safety
9. Select the Update Button
Figure 28. User is Created
a. You are now ready to upload your password file to the analyzer.
Thermo Scientific Niton XL2 Analyzer User’s Guide 165

8 Advanced SettingsTools Menu Options
10. Be sure the analyzer is switched on; connect the analyzer using USB or serial
connection.
11. Select the Upload icon.
Figure 29. Selecting Upload
12. Your screen should look like this:
166 Niton XL2 Analyzer User’s Guide Thermo Scientific

8 Advanced SettingsTools Menu Options
Figure 30. Selecting Upload
13. Select the Settings Button and choose the comm port that your analyzer is connect to.
14. Select the Connect Button, then the Upload Button.
15. Upon completion, you will receive a “File Upload Successfully Completed” message.
16. Click the OK Button; save your password file at this time by selecting the File icon
then “Save As.
Thermo Scientific Niton XL2 Analyzer User’s Guide 167

8 Advanced SettingsTools Menu Options
Figure 31. Successful Installation Message
17. Restart your analyzer; your password file should be successfully installed.
168 Niton XL2 Analyzer User’s Guide Thermo Scientific

8 Advanced SettingsNDF Files: User Data Structuring
NDF Files: User Data Structuring
Creating New User-Defined Fields
You can create your own data entry fields for your Niton analyzer customized to your own
needs and usage. These fields are saved in a special format called an NDF (Niton Data File)
file. To create a new NDF file, select the File menu, then select New, then select New NDF
File.
Figure 32. Creating a New NDF File
This will create a new window in which you can create your own fields, and specify their
structure and parameters. The new window will appear with a single box, called “Untitled.”
Thermo Scientific Niton XL2 Analyzer User’s Guide 169
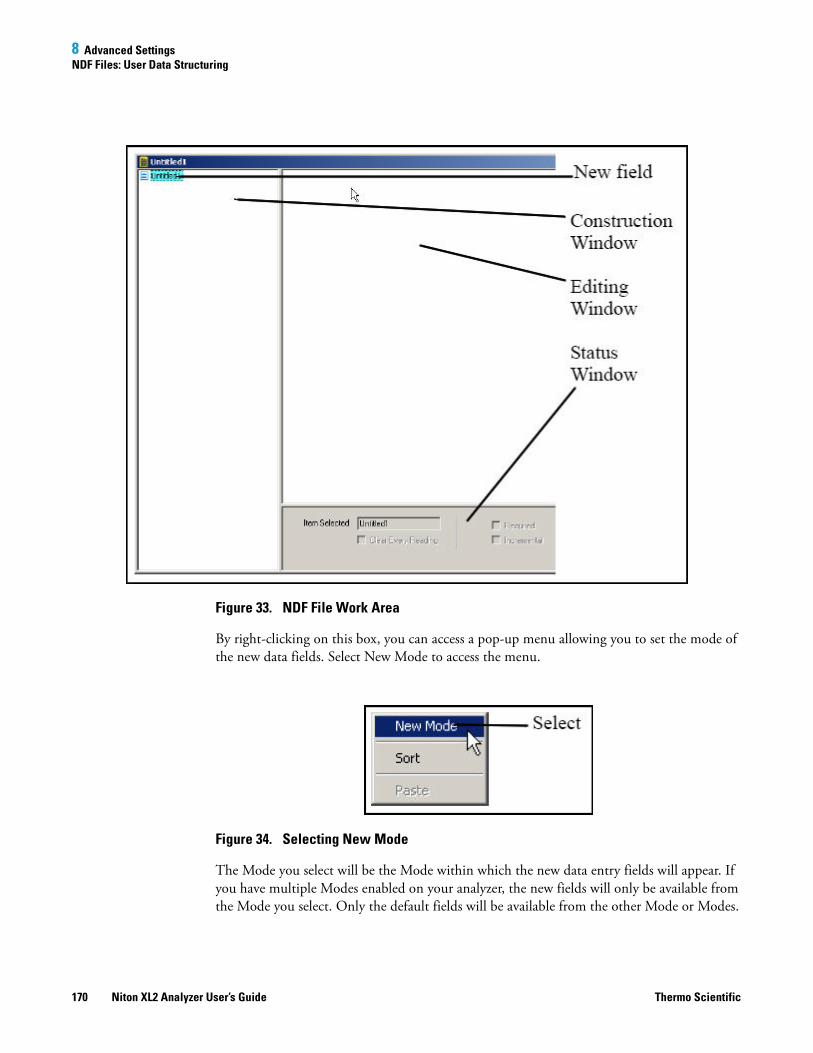
8 Advanced SettingsNDF Files: User Data Structuring
Figure 33. NDF File Work Area
By right-clicking on this box, you can access a pop-up menu allowing you to set the mode of
the new data fields. Select New Mode to access the menu.
Figure 34. Selecting New Mode
The Mode you select will be the Mode within which the new data entry fields will appear. If
you have multiple Modes enabled on your analyzer, the new fields will only be available from
the Mode you select. Only the default fields will be available from the other Mode or Modes.
170 Niton XL2 Analyzer User’s Guide Thermo Scientific

8 Advanced SettingsNDF Files: User Data Structuring
Figure 35. Selecting Mode
When you select the Mode for the new data fields, the Construction Window will change to
look like this:
Figure 36. Working within a Mode
The “M” indicates the mode you have chosen - in this case Alloy Mode. Right click on the
Mode name to access a pop-up menu.
Thermo Scientific Niton XL2 Analyzer User’s Guide 171
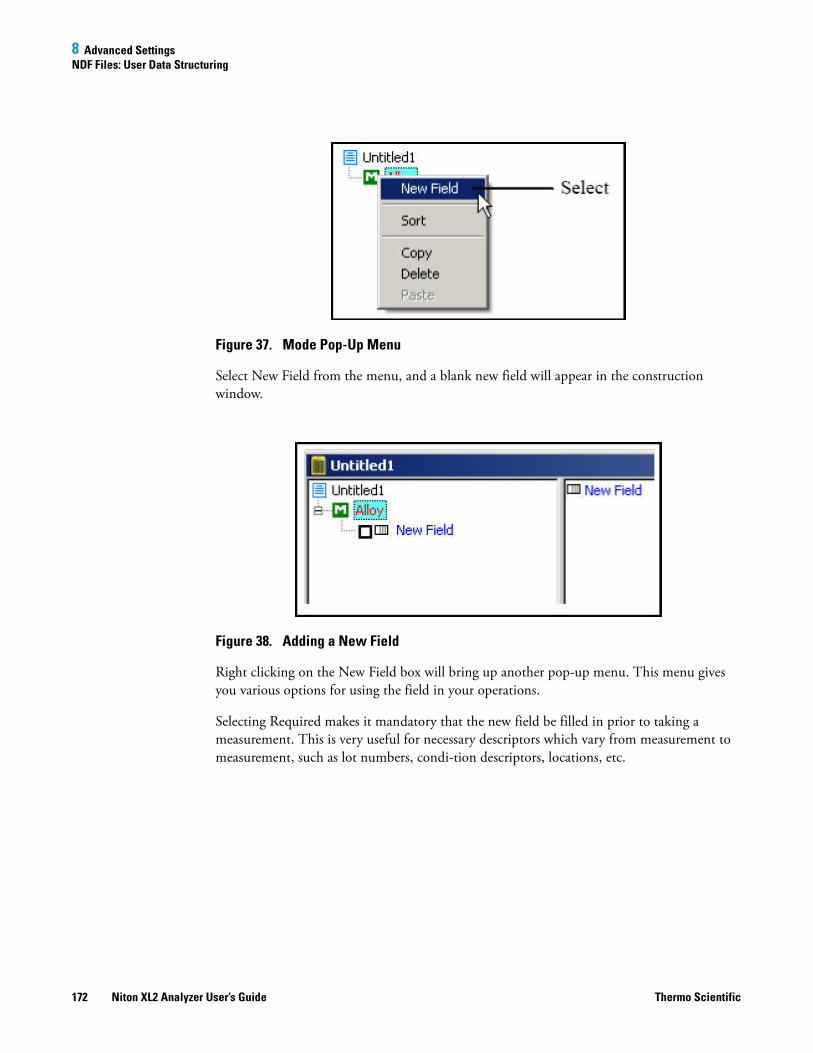
8 Advanced SettingsNDF Files: User Data Structuring
Figure 37. Mode Pop-Up Menu
Select New Field from the menu, and a blank new field will appear in the construction
window.
Figure 38. Adding a New Field
Right clicking on the New Field box will bring up another pop-up menu. This menu gives
you various options for using the field in your operations.
Selecting Required makes it mandatory that the new field be filled in prior to taking a
measurement. This is very useful for necessary descriptors which vary from measurement to
measurement, such as lot numbers, condition descriptors, locations, etc.
172 Niton XL2 Analyzer User’s Guide Thermo Scientific

8 Advanced SettingsNDF Files: User Data Structuring
Figure 39. Making Fields Required
Selecting the Incremental option sets up a field which increments the field descriptor by one
for each measurement taken. This option is handy for measuring several items with identical
descriptors, such as samples within a single lot, or several instances of the same part number,
because it appends the incremental number to the descriptor.
For example: P/N 455A2-1, P/N 455A2-2, P/N 455A2-3.
Another Example: Impeller-1, Impeller-2, Impeller-3.
Thermo Scientific Niton XL2 Analyzer User’s Guide 173

8 Advanced SettingsNDF Files: User Data Structuring
Figure 40. Making Fields Incremental
Selecting Clear Every Reading will toggle between two states. By default, the field will fill with
the data which was input during the last reading. By selecting Clear Every Reading, you tell
the instrument to clear the data from the field for each new reading, insuring that the person
taking the reading must input new data each time. This is very useful for times when the data
descriptor is expected to vary widely between readings.
Figure 41. Clearing Data for New Readings
The state of each of these options can be seen in the Field Status Window at the bottom of the
Construction Window. All options in effect for the field selected are checked.
Figure 42. Field Status Window - Default
This shows a field with no options in effect, the default configuration. This is a field that will
present the previous reading’s data for this field - which may be changed by the user - without
incrementing it, but does not require the user to input any data if there is none already there
from a previous reading.
174 Niton XL2 Analyzer User’s Guide Thermo Scientific

8 Advanced SettingsNDF Files: User Data Structuring
Figure 43. Field Status Window - Options Enabled
This shows a field with both Required and Clear Every Reading options in effect. This
presents a field that is cleared for each reading, and must be filled in by the user before a
reading is taken.
Selecting Edit from the pop-up menu allows you to edit the name of the field in the Editing
Window to the right of the Construction Window.
Figure 44. Editing the Field Name
Selecting the box to the left of the field toggles the Required option on or off.
Thermo Scientific Niton XL2 Analyzer User’s Guide 175

8 Advanced SettingsNDF Files: User Data Structuring
Figure 45. Toggling the Required Option
Selecting Copy from the pop-up window allows you to copy the currently selected field.
176 Niton XL2 Analyzer User’s Guide Thermo Scientific

8 Advanced SettingsNDF Files: User Data Structuring
Figure 46. Copying the Current Field
Once you copy a field, the Paste option can be selected to paste the copied field into the
Construction Window.
Figure 47. Pasting a Copied Field
Selecting the New Entry option from the pop-up menu allows you to define a choice for the
user for this field.
Thermo Scientific Niton XL2 Analyzer User’s Guide 177

8 Advanced SettingsNDF Files: User Data Structuring
Figure 48. Creating a New Entry
This is a New Entry in the Construction Window.
Figure 49. New Entry in the Construction Window
The “E” is for “Entry.” You can edit the entry once it is created, the same way as you edit the
field name. Right click on the entry name, and choose Edit from the pop-up menu.
Figure 50. Editing the New Entry
You can sort your entries by name, alphanumerically, by right clicking on the field and
selecting “Sort” from the pop-up menu.
178 Niton XL2 Analyzer User’s Guide Thermo Scientific
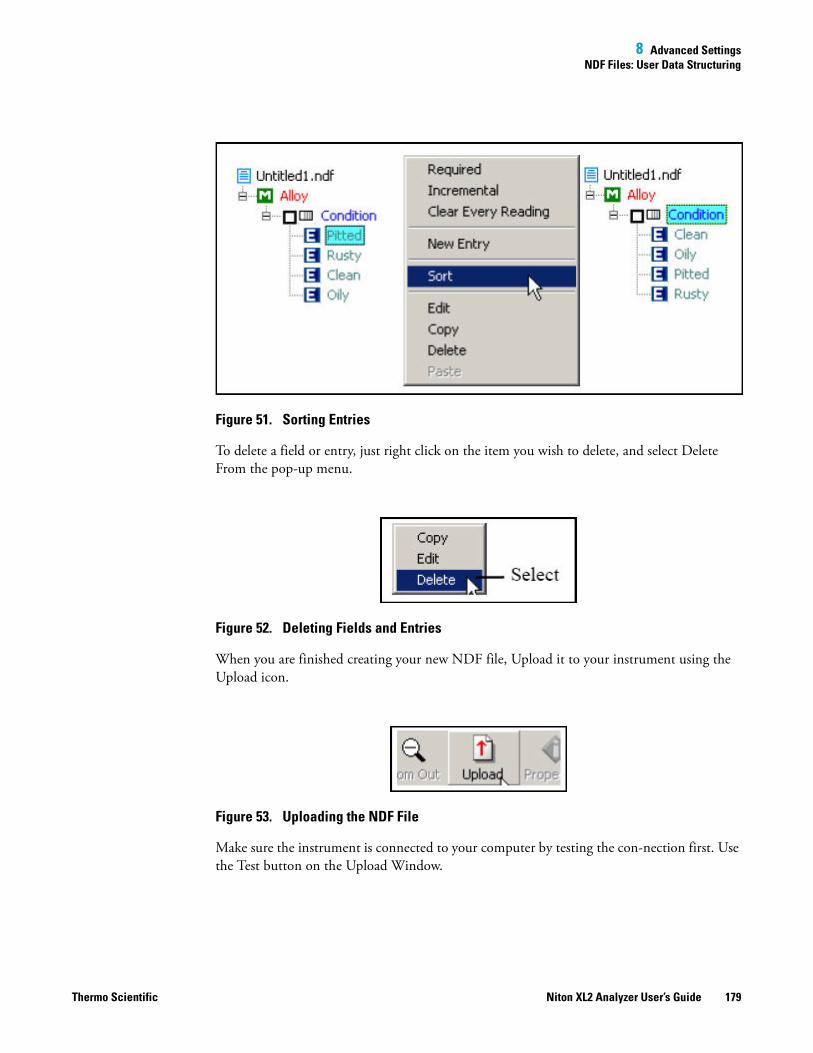
8 Advanced SettingsNDF Files: User Data Structuring
Figure 51. Sorting Entries
To delete a field or entry, just right click on the item you wish to delete, and select Delete
From the pop-up menu.
Figure 52. Deleting Fields and Entries
When you are finished creating your new NDF file, Upload it to your instrument using the
Upload icon.
Figure 53. Uploading the NDF File
Make sure the instrument is connected to your computer by testing the connection first. Use
the Test button on the Upload Window.
Thermo Scientific Niton XL2 Analyzer User’s Guide 179

8 Advanced SettingsNDF Files: User Data Structuring
Figure 54. Testing the Upload Connection
180 Niton XL2 Analyzer User’s Guide Thermo Scientific

8 Advanced SettingsSafety Settings
Safety Settings
Access to the Safety Settings Screen is blocked unless the user logging in has explicitly been
granted Safety access. The default login of 1234 does not have Safety access. See Passwords
and User Privileges.
Figure 55. . Safety Settings Menu Path
Thermo Scientific Niton XL2 Analyzer User’s Guide 181
8 Advanced SettingsSafety Settings
The Safety Settings Screen enables you to change the Method of Operation for your
analyzer. Each checkbox on the screen enables or disables the safety device named for purposes
of the preconditions for operation. For example, checking the Proximity Button Required
checkbox sets the engagement of the Proximity Sensor as a precondition for operation. Checking the Proximity Button Required checkbox and the Interlock Button Required
checkbox sets the engagement of both the Proximity Button and the Interlock Button as preconditions for operation.
Safety settings always override start-stop settings. If your safety setting requires the use of the
Proximity Button, you cannot set start-stop settings which ignore the Proximity Button. For
example, the Easy Trigger start-stop setting must have the Backscatter safety setting enabled.
While using Easy Trigger, you cannot disable Backscatter.
WARNING The backscatter sensor is enabled by default and acts as a recommended safety
feature for most applications. Some sample types, however, cannot be analyzed when this
feature is enabled. Samples that present very little mass to the analysis window, such as certain
thin films, thin layers of plastic, and very thin wires, may not be of sufficient mass to allow the
analysis to continue while backscatter is enabled. One should disable the backscatter feature
only when necessary to analyze such low mass samples, and re-enable the feature when
finished with these sample types. These samples also provide very little absorption of the
primary x-ray beam so it is typically most appropriate to analyze these samples in a test stand
when possible.
182 Niton XL2 Analyzer User’s Guide Thermo Scientific

8 Advanced SettingsSafety Settings
Start/Stop Setup
Figure 56. The Start/Stop Settings Menu Path
The Start/Stop Setting Screen enables you to change the preconditions for operation at a
lower level than the Safety level. See Safety Settings for more information. Start/Stop settings
cannot contradict Safety settings. If your safety setting requires the use of the Proximity
Button, you cannot set start-stop settings which ignore the Proximity Button. For example,
the Easy Trigger start-stop setting must have the Backscatter safety setting enabled. While
using Easy Trigger, you cannot disable Backscatter.
Thermo Scientific Niton XL2 Analyzer User’s Guide 183

8 Advanced SettingsSafety Settings
The Start/Stop parameter options are Proximity Start, Remote Trigger, and Easy Trigger.
There is also a field to set the maximum time for sample analysis before the analysis stops.
Proximity Start
Select the Proximity Start checkbox to use the Proximity Start parameters. Using Proximity
Start, once the reading has been started, release of the Proximity Button will immediately stop
the analysis. You cannot use Proximity Start with Easy Trigger.
Remote Trigger
Select the Remote Trigger checkbox to use the Remote Trigger parameters. Remote Tigger is
used with the Extend-a-Pole accessory to control the analysis. With the Extend-a-Pole's input
cable connected to the analyzer's Remote Trigger port, you can initiate and stop analysis
remotely from the Extend-a-Pole's handle trigger. You can use Remote Trigger with either
Proximity Start or with Easy Trigger.
Easy Trigger
Select the Easy Trigger checkbox to use the Easy Trigger parameters. Easy Trigger uses a single
press and release of the trigger to initiate analysis, and a second press to stop analysis. Selecting
Easy Trigger will immediately disable Proximity Start.
Max Time Field
Figure 57. The Max Test Time Editor
184 Niton XL2 Analyzer User’s Guide Thermo Scientific
8 Advanced SettingsSafety Settings
Select the Max Time field to change the maximum analysis time parameter. Selecting the Max
Time Field brings up a Virtual Numeric Keypad. To input the maximum number of seconds
before automatic shutoff, select the C button to clear the current time, then from the Virtual
Numeric Keypad, select each digit you want to input, then select the E button to enter. Of the
non-numeric screen buttons, C = Clear All, E = Enter, and ">" will backspace over the current
value. Selecting the E button will enter the current value as the Max Time, and return to the
Start/Stop Settings Screen.
Save Button
Selecting the Save Button will save your current settings.
Thermo Scientific Niton XL2 Analyzer User’s Guide 185

8 Advanced SettingsSafety Settings
Methods of Operation CAUTION After being powered on, your Niton Analyzer will perform an internal
re-calibration before an analysis is initiated. It is recommended that you let your analyzer
warm up for ten minutes after start up, before testing is begun.
There are six different methods of operation for taking a sample measurement, and your
analyzer will be configured to use one of those methods for alloy samples, depending on the
regulatory requirements of your locality. These methods are:
• Trigger-Only method. With the Trigger-Only method, you only need to place the
measurement window flush with the sample to be analyzed and pull the trigger for sample
analysis to be initiated.
• Trigger-and-Proximity-Sensor method. With the Trigger-and-Proximity-Sensor method,
you must place the measurement window against the sample to be analyzed to engage the
proximity sensor on the front of the analyzer, then pull the trigger for sample analysis to
be initiated.
• Momentary-Trigger-Touch-and-Proximity-Sensor method. With the
Momentary-Trigger-Touch-and-Proximity-Sensor method, you must place the
measurement window against the surface to be analyzed to engage the proximity sensor
on the front of the analyzer, then pull the trigger. The trigger may be released and the
reading will continue until you release the proximity button, or other criteria (such as
Max Time) are reached.
• Trigger-and-Interlock method. With the Trigger-and-Interlock method, you need to
place the measurement window close to the sample to be analyzed, press and keep
pressing the interlock button at the rear of the analyzer with your free hand, then pull the
trigger for sample analysis to be initiated.
• Trigger-Interlock-and-Proximity-Sensor method. With the
Trigger-Interlock-and-Proximity-Sensor method, you must place the measurement
window against the sample to be analyzed to engage the proximity sensor on the front of
the analyzer, press and keep pressing the interlock button at the rear of the analyzer with
your free hand, then pull the trigger for sample analysis to be initiated.
• Easy Trigger method. With the Easy trigger method, you need only place the
measurement window against the sample area and pull the trigger once to initiate a
sample analysis. Your analyzer will continuously sample the backscatter, using a complex
internal algorithm, to determine if the measurement window is against a sample or
pointing to the empty air. If it finds that there is no sample directly against the
measurement window, the analyzer will stop directing radiation through the window as
soon as this determination is made.
The analyzer is constantly checking the backscatter characteristics to determine if a sample is
against the measurement window, whether or not the Easy Trigger method is being used, and
will shut off any radiation directed through the window if it determines that there is no
sample present.
186 Niton XL2 Analyzer User’s Guide Thermo Scientific

8 Advanced SettingsSafety Settings
With any of these methods, analysis will stop if any one of the preconditions are violated. For
example, with the Trigger-Interlock-and-Proximity-Sensor method, if the trigger or the
Proximity Sensor or the Interlock is released, the reading will stop immediately, and the X-ray
tube will shut down.
After your analyzer is calibrated, initiate a sample reading using the appropriate method. If
you attempt to initiate a sample reading using a different method, the analyzer will inform
you that one or more of the preconditions need to be met in order for sample analysis to
begin.
Note The LED lights will blink whenever the x-ray tube is on.
WARNING The nose should not be touched during sample testing and calibration. If an ESD
event occurs during measurement, the instrument may terminate the testing in progress and
automatically reset to LogOn screen. Any test data collected prior to reset will be lost and the
testing may have to be repeated.
WARNING The preconditions for operation must be continued for the duration of the
reading. If the preconditions are violated, the x-ray tube will turn off, the calibration shutter
will close, and the measurement will end. The LED lights will stop blinking when the measurement is ended. The flashing of the LED lights is not synchronized to minimize
power consumption.
To end the test, simply release the trigger mechanism, or any other applicable preconditions.
Thermo Scientific Niton XL2 Analyzer User’s Guide 187

8 Advanced SettingsCamera
Camera
The Camera feature is only usable with properly configured analyzers, and the Small Spot
feature is only available on Small Spot analyzers.
If your analyzer is equipped with an internal video camera, you can turn that camera on and
off, and turn the saving of images with the readings on and off through an interface. When
the camera is on, the image will show in the Ready to Test screen, as in Figure 123. If the
camera is off, saving of images will also be off. If the camera is on and the image saving
function is also on, the images will automatically be saved with the reading. Saving images will
curtail the maximum number of readings stored.
How to Use the Camera
When a Camera equipped analyzer is in the Ready to Test screen, the video feed appears live
on the analyzer’s touch screen. This is the image that can be saved with the sample analysis.
When you take a measurement, if you choose to do so, the bitmap image will be saved on the
analyzer along with the analysis results. The interface is accessible through the System menu,
as in Figure 120.
188 Niton XL2 Analyzer User’s Guide Thermo Scientific

8 Advanced SettingsCamera
Thermo Scientific Niton XL2 Analyzer User’s Guide 189

8 Advanced SettingsCamera
Figure 58. The Camera Menu Path
Figure 59. Setting Up the Camera View and Image Saving
Selecting the empty checkbox next to Enable Camera will turn the internal camera on,
displaying the camera view in the Ready to Test screen. Selecting the checkbox again turns the
camera off. Enable Camera is enabled by default.
Selecting the empty checkbox next to Save Image will enable image saving with the analysis.
Selecting the checkbox again will disable automatic saving of image data. Save Image is
enabled by default.
Stored camera images from previous measurements can be viewed on the analyzer.
190 Niton XL2 Analyzer User’s Guide Thermo Scientific
Service
See “Contact Us” on page 1 to find your nearest Service facility.
Warranty
Warranty statement
Seller warrants that the Products will operate or perform substantially in
conformance with Seller's published specifications and be free from
defects in material and workmanship, when subjected to normal, proper
and intended usage by properly trained personnel, for the period of time
set forth in the product documentation, published specifications or
package inserts. If a period of time is not specified in Seller’s product
documentation, published specifications or package inserts, the warranty
period shall be one (1) year (unless otherwise agreed upon at time of
purchase) from the date of shipment to Buyer in the country of
purchase. Any part replaced on an instrument, covered by the original
factory warranty, will be warranted for the remainder of the instrument's
factory warranty. Seller agrees during the Warranty Period, to repair or
replace, at Seller's option, defective Products so as to cause the same to
operate in substantial conformance with said published specifications;
provided that Buyer shall (a) promptly notify Seller in writing upon the
discovery of any defect, which notice shall include the product model
and serial number (if applicable) and details of the warranty claim; and
(b) after Seller’s review, Seller will provide Buyer with service data and/or
a Return Material Authorization (“RMA”), which may include
biohazard or other Radiation safety decontamination procedures and
other product-specific handling instructions, then, if applicable, Buyer
may return the defective Products to Seller with all costs prepaid by
Buyer. Replacement parts may be new or refurbished, at the election of
Seller, the warranty of these parts expire with the instrument warranty.
All replaced parts shall become the property of Seller. Shipment to
Buyer of repaired or replacement Products shall be made in accordance
with the Delivery provisions of the Seller’s Terms and Conditions of
Sale. Accessories and Consumables are expressly excluded from this
warranty (see list A for details).
Notwithstanding the foregoing, Products supplied by Seller that are
obtained by Seller from an original manufacturer or third party supplier
are not warranted by Seller, but Seller agrees to assign to Buyer any
warranty rights in such Product that Seller may have from the original
manufacturer or third party supplier, to the extent such assignment is
allowed by such original manufacturer or third party supplier.
191
8 ServiceWarranty
In no event shall Seller have any obligation to make repairs, replacements or corrections
required, in whole or in part, as the result of (i) normal wear and tear, (ii) accident, disaster or
event of force majeure, (iii) misuse, fault or negligence of or by Buyer, (iv) use of the Products
in a manner for which they were not designed, (v) causes external to the Products such as, but
not limited to, power failure or electrical power surges, (vi) improper storage and handling of
the Products, (vii) use of the Products in combination with equipment or software not
supplied by Seller, (viii) Moderately heavy or excessive impact against any object, including
but not limited to floors, walls, furniture, sample or other objects. A shock sensor is fitted
inside of the instrumentation; warranty is void if this shock sensor is activated, (ix) Excessive
water, moisture or condensing humidity that breaches the instrument seals, (X) Excessive or
extreme ambient or direct temperature or (vi) Heavy vibrations directly to the instrument for
extended periods of time. If Seller determines that Products for which Buyer has requested
warranty services are not covered by the warranty hereunder, Buyer shall pay or reimburse
Seller for all costs of investigating and responding to such request at Seller's then prevailing
time and materials rates. If Seller provides repair services or replacement parts that are not
covered by this warranty, Buyer shall pay Seller therefore at Seller's then prevailing time and
materials rates.
ANY INSTALLATION, MAINTENANCE, REPAIR, SERVICE, RELOCATION OR
ALTERATION TO OR OF, OR OTHER TAMPERING WITH, THE PRODUCTS
PERFORMED BY ANY PERSON OR ENTITY OTHER THAN SELLER WITHOUT
SELLER'S PRIOR WRITTEN APPROVAL, OR ANY USE OF REPLACEMENT PARTS
NOT SUPPLIED BY SELLER, SHALL IMMEDIATELY VOID AND CANCEL ALL
WARRANTIES WITH RESPECT TO THE AFFECTED PRODUCTS.
THE OBLIGATIONS CREATED BY THIS WARRANTY STATEMENT TO REPAIR
OR REPLACE A DEFECTIVE PRODUCT SHALL BE THE SOLE REMEDY OF
BUYER IN THE EVENT OF A DEFECTIVE PRODUCT. EXCEPT AS EXPRESSLY
PROVIDED IN THIS WARRANTY STATEMENT, SELLER DISCLAIMS ALL OTHER
WARRANTIES, WHETHER EXPRESS OR IMPLIED, ORAL OR WRITTEN, WITH
RESPECT TO THE PRODUCTS AND INCLUDING WITHOUT LIMITATION ALL
IMPLIED WARRANTIES OF MERCHANTABILITY OR FITNESS FOR ANY
PARTICULAR PURPOSE. SELLER DOES NOT WARRANT THAT THE PRODUCTS
ARE ERROR-FREE OR WILL ACCOMPLISH ANY PARTICULAR RESULT.
Accessories, Spares and Consumables - exclusions
(List A)
Specific warranties of some common accessories:
• Battery Charger and batteries - 12 months
• Instrument accessories - 12 months
• Consumable - no warranty
192 Niton XL2 Analyzer User’s Guide Thermo Scientific

8 ServiceWarranty
• Soil Grinder - no warranty
• Single-stage or two stage helium tank regulator - 12 months
• Test stands, extend-a-poles and docking stations – 12 months
• Parts or spares sold, installed or supplied outside of the product warranty period and not
listed above – 12 months
Thermo Scientific Niton XL2 Analyzer User’s Guide 193

8 ServiceWarranty
194 Niton XL2 Analyzer User’s Guide Thermo Scientific