xmatters on-demand for servicenow incident management€¦ · chapter1:introduction 1 1.1summary 1...
TRANSCRIPT

xMatters On-DemandFOR SERVICENOW IT SERVICE MANAGEMENT SUITE

This manual provides information about xMatters. Every effort has been made to make it as complete and accurate as possible;however, the information it contains is subject to change without notice and does not represent a commitment on the part ofxMatters. No part of this document may be reproduced by any means without the prior written consent of xMatters.
Monday, April 13, 2015
Copyright © 1994-2015. All rights reserved.
xMatters™, xMatters®, xMatters® Java Client, xMatters mobile access, xMatters® integration agent, xMatters lite, xMattersworkgroup, xMatters enterprise, xMatters service provider, xMatters On-Demand, and xMatters® Notification Server aretrademarks of xMatters, inc.
All other products and brand names are trademarks of their respective companies.
Contacting xMatters
You can visit the xMatters Web site at: http:///www.xmatters.com
From this site, you can obtain information about the company, products, support, and other helpful tips. You can also visit theCustomer Support Site from the main web page. In this protected area, you will find current product releases, patches, releasenotes, a product knowledge base, trouble ticket submission areas and other tools provided by xMatters, inc.
Corporate Headquarters
12647 Alcosta Blvd, Suite 425San Ramon, CA 94583Telephone: 925.226.0300Facsimile: 925-226-0310
Client Assistance:
International: +1 925.226.0300 and press 2US/CAN Toll Free: +1 877.XMATTRS (962.8877)EMEA: +44 (0) 20 3427 6333Australia/APJ Support: +61-2-8038-5048 opt 2
Customer Support Site: http://support.xmatters.com
This integration was designed and tested on an unmodified version of ServiceNow IT Service Management Suite, and thisdocument describes how to configure xMatters to integrate with the default installation. If you have customized or altered yourinstance of ServiceNow, this integration may need to be modified for your deployment. Please note that these integrationchanges are not part of the services offered by xMatters Technical Support, but can be performed through xMatters’sProfessional Services department. For more information, contact your xMatters Sales representative.
Proprietary and Confidential © 2015 xMatters, inc

i
Table of Contents
Chapter 1: Introduction 1
1.1 Summary 1
1.1.1 About xMatters On-Demand 1
1.1.2 Benefits 3
1.1.3 Information Workflow 3
1.1.4 Integration Architecture 4
1.2 System Requirements 4
1.3 Conventions and Terminology 4
1.3.1 Conventions 5
1.3.2 Terminology 5
Chapter 2: Installation and Configuration 6
2.1 Installing the integration 6
2.2 Configuring ServiceNow 6
2.2.1 Completing the xMatters Configuration forms 6
2.2.2 Configuring Synchronizations 13
2.2.3 Configuring integration users 19
2.3 Seeding users and groups into xMatters 20
2.3.1 Enabling the Batch Load feature 20
2.3.2 Initial Data Load 20
2.4 Configuring xMatters 21
2.4.1 Importing the relevance engine and forms 21
2.4.2 Set form permissions 21
2.4.3 Deploying forms 22
2.4.4 Adding the web service user 22
2.4.5 Configuring Subscriptions 23
Chapter 3: Integration Validation 27
3.1 Validating User and Group Synchronization 27
3.1.1 Synchronizing users 27
3.1.2 Synchronizing groups and group membership 28
3.2 Triggering a notification 30
3.2.1 Engage with xMatters 32
3.3 Responding to a notification 33
3.4 Viewing response results 35
Chapter 4: Optimizing and Extending the Integration 37
xMatters On-Demand for ServiceNow IT Service Management Suite
ii
4.1 Disabling synchronization 37
4.2 Response choices 37

Chapter 1: Introduction
1
Chapter 1: IntroductionWelcome to xMatters On-Demand for ServiceNow IT Service Management Suite. This document describes how toset up and use the xMatters On-Demand for ServiceNow IT Service Management Suite software integration. Theintended audience for this document is experienced consultants, system administrators and other technical readers.
1.1 SummaryTo protect your business from catastrophe, and to have confidence that your organization will stay running,growing, and thriving even when the surrounding environment has been disrupted, you need a strategy for effectivecommunication and decision-making in times of crisis. If your organization is ever threatened, you will needimmediate, ongoing, targeted communication to all of the people who are affected – from employees to customers,vendors, partners, and neighbors.
xMatters On-Demand revolutionizes the way you manage and contain a crisis, giving you visibility into criticalareas of the organization and enabling precise, targeted communications to everyone involved.
With the help of xMatters, your business will remain available, compliant, and effective, no matter what.
1.1.1 About xMatters On-DemandxMatters On-Demand enables mass personalization: the ability to deliver personalized information, instructions,requests and procedures to everyone – employees, teams, customers, and partners – automatically and withinseconds. Each individual receives only what matters to them, and nothing that doesn’t. Mass personalization is notonly cost-effective, but also makes business run faster and smarter. Most importantly, it ensures that people get theinformation they need to make timely, informed decisions throughout a crisis.
Because of our flexible delivery system, people can receive notifications via voice, SMS, or email. An easy-to-understand dashboard allows you to view and create simple or complex groups and escalations as well aspermission-based scenarios. xMatters On-Demand allows you to audit and health check your notification processwith comprehensive status update messages, real-time reporting and message scheduling for broadcasting updates.
For risk professionalsWith xMatters On-Demand you can guarantee that if your organization is ever threatened, everyone affected will benotified at once. xMatters On-Demand allows you to communicate swiftly and accurately, letting people know whatis happening, how it affects them, and what actions they should take.
For IT professionalsCompanies invest significant resources into their IT infrastructure. But because of the complexity of IT operations,many continue to miss critical SLAs or are not able to deliver on their customer’s expectations. xMatters On-Demand enables you to eliminate unnecessary noise by blocking notifications, information and options that don’tmatter and instead send only what matters to the individuals who both want and need it. xMatters On-Demandconnects the people, enterprise applications and business processes that you already have in place, coordinatingnotification, information, choices and actions to speed desired out comes – without replacing your existinginvestments.
One platform, unlimited applicationLeading organizations use xMatters as their primary communication platform. Airports, national security agencies,enterprise IT departments, armed forces, municipalities, hospitals, corporate communications, risk and finance,customer relationship management and other application areas take advantage of xMatters. This fully hosted service

xMatters On-Demand for ServiceNow IT Service Management Suite
2
is perfect for emergency notifications and one time message blasts. xMatters On-Demand provides an easy answer todirecting the right message to the right person on any device and in any language, including:
l Internal IT organizations – incident, change and problem managementl Emergency notification – notify, locate, collaborate and respondl Product recalls – automate the removal of contaminated productsl Automated information – reduce the cost of customer communicationl Message services – provide messages to thousandsl Health and hospital – enable staff and patient notificationsl Government – accelerate command center communications
Why xMatters?xMatters has over 900 clients around the world. Our clients include federal agencies and departments, transportationauthorities, financial services firms, telecommunications and energy firms, hospitals and education facilities.
Our clients select xMatters over traditional mass notification alternatives because of our unique ability to provide apersonalized experience to the recipient of each message. In times of crisis, sending the same message to thousandsof people may contribute to confusion and actually slow the response. Mass personalization allows you to treat eachperson as an individual, receiving information, including location or skills specific to them, with tailoredinstructions and actions at the moment that matters.
Capacity and throughputxMatters On-Demand expands based on specific use cases and the capacity requirements of our clients. Eachinstance is capable of placing thousands of calls in minutes.
Our system is in use at several locations around the world including IBM Global Services and Navisite, our hostingpartner. We maintain three instances in North America, and one in Europe.
xMatters On-Demand was designed to provide scale and redundancy at each layer including:
l Web applicationl Transaction processingl Application hostingl Message auditing (real time and historic)l Database resiliencyl Geographically disbursed message deliveryl Highly available and automatic failoverl Message queuing and load balancing
Our commitmentWe commit to providing the service with 99% uptime. This commitment ensures that when you need to deliverpersonalized messages, xMatters On-Demand is available.
Our 99% availability measurement excludes regularly scheduled maintenance windows which are published 30 daysbefore they occur. Last year the xMatters On-Demand service achieved 100% uptime. This statistic is published onour website for viewing at any time.
We also commit that we will deliver your messages on time, every time. xMatters On-Demand uses sophisticatedmessage queuing and routing to ensure delivery via a global pool of providers including AT&T, Sprint, T-Mobileand Vodafone.

Chapter 1: Introduction
3
Over the past three years, xMatters has received positive results from Ernst & Young and IBM Global Servicesaudits for our software, development methods and service. We conduct over 10,000 automated functional andperformance tests to ensure issues are proactively caught and repaired.
For your protectionTo ensure system and data, the xMatters service is not accessible physically or electronically by unauthorizedpersonnel. Each data center uses state of the art biometric physical security controls, cards and access as well asbackground checks on all personnel. The system access has 24x7x365 protection using security guards and onsitetechnical staff.
The service is also protected using complex data security techniques and technologies including strong passwords,role based permissioning, 128 SSL encryption, PCI compliant data security and data privacy policies which complywith HIPAA, Gramm-Leach-Bliley and Basel II.
Easier on youxMatters client service teams based in the United States, Canada, and the United Kingdom have experience withover 800 clients and are trained to assist you. We provide help getting started, call-in support, message initiation,service monitoring and general client assistance services.
You can expect a high level of service from xMatters. We believe your use and satisfaction is our responsibility. Wewill assist with loading and synchronizing your data, delivering training to your users, providing online video andtutorials, and personal assistance when you need it.
1.1.2 BenefitsWith the xMatters integration, the appropriate technician can be notified directly via voice, email, pager, or otherdevice. Information about the failure will be presented to the event resolver and decisions can be made in real-time.
Once a response is selected on the recipient’s remote device, xMatters will update the ServiceNow incident in real-time. The benefit is that this process is immediate – significantly faster than the time required for staff to notice thefailures or malfunctions, determine who is on call, and manually notify the right person. In addition, the ability totake simple actions on the event from any device gives the event resolver a quick way to deal with many issues andcommunicate to other team members the current state of the event.
During the process, every notification, response, and action is logged in xMatters. In addition, xMattersautomatically annotates the original ServiceNow incident with status information.
The xMatters product features a self-service web user interface to allow accurate assignment of responsible personnelfor each job. xMatters also includes a Subscription feature that allows both managed and self-subscription toServiceNow events.
1.1.3 Information WorkflowThe following diagram illustrates a standard incident workflow in a management system, and how information fromthe management system is passed into xMatters On-Demand:

xMatters On-Demand for ServiceNow IT Service Management Suite
4
1.1.4 Integration ArchitectureThe software components in this integration include:
l ServiceNow IT Service Management Suitel xMatters On-Demand
Communication workflowServiceNow uses the Outbound REST Message Web Services to send JSON HTTP posts to the xMatters relevanceengine. These posts contain callbacks (webhooks) that allow xMatters to send status, deliveryStatus and responsesback to ServiceNow using the xMattersRESTProcessor. This public processor takes the callback details via the“guest” user account and processes them to determine what to update in ServiceNow.
1.2 System RequirementsThe following products must be installed and operating correctly prior to integration:
xMatters:
l xMatters On-Demand 5.5.63 (or later)
ServiceNow:
l ServiceNow IT Service Management Suite Fuji
Note: For more information about these components and their versions, contact your xMatters On-Demandenablement representative.
1.3 Conventions and TerminologyThis section describes how styles are used in the document, and provides a list of definitions.

Chapter 1: Introduction
5
1.3.1 ConventionsSome instructions appear in the following format: MENU > OPTION; for example, File > Open means click theFile menu, and then click the Open menu option.
Words in bold typically reference text that appears on the screen. Words in monospace font represent the following:
l text that must be typed into the computerl directory and file namesl code samples
Directory pathsExcept where explicitly stated, the directory paths in this document are listed in Windows format. Unix users mustsubstitute the given paths with the Unix equivalents.
1.3.2 TerminologyThe following terms are used through the xMatters documentation.
Term Meaning
Event An event refers to any situation or item of interest detected by the management system, andwhich requires attention. Event is also used to refer to the incident or situation as itprogresses through the xMatters system, from injection to notification to resolution. Eachevent must generate at least one alert or notification.
Event can also be a generic term used to refer to an incident, change request, message, orother specific item within the management system. Whenever possible, these situations arereferred to using the management system's preferred terminology, but can also collectivelybe called events.
Management system A management system is any sort of monitoring or managing software that watches forevents, and with which xMatters can combine; i.e., a synonym for ServiceNow.
Device The medium through which a recipient is contacted by xMatters; i.e., email, pager, phone,BlackBerry, etc.
User In xMatters, people who can receive notifications are called "users". Each person in thexMatters system is defined by a set of user details, including ID number, user name, loginpassword, and so on.
Group Groups are used to collect and organize users and devices into notification schedules. For acomplete explanation of groups in xMatters, see the xMatters user guide.
Documentation terminology

Chapter 2: Installation and Configuration
6
Chapter 2: Installation and ConfigurationThis chapter provides information about how to configure xMatters, ServiceNow, and the integration components.
2.1 Installing the integrationTo install the integration, download the xMatters On-Demand from the ServiceNow app store, and you're ready toproceed.
2.2 Configuring ServiceNowConfiguring ServiceNow to combine with xMatters requires that you specify the assignment, synchronization, webservices, and other settings on the xMatters Configuration forms, as explained in the following sections. You shouldalso run a batch load user and group to seed your users and groups into xMatters.
Note that only users with the ServiceNow "admin" role can modify the xMatters components within the ServiceNowinterface.
2.2.1 Completing the xMatters Configuration formsConfiguring ServiceNow to work with xMatters requires the completion of the configuration forms inServiceNow: the Incident Properties form, the Engage With xMatters form, and the Data Sync form.
Configuring Incident NotificationsTo set the default behaviors and IP addresses the system will use to communicate, you must complete the IncidentProperties form.
To complete the form:
1. In ServiceNow, click the Type filter text field, and then type xMatters.2. In the Integration - xMatters section of the returned search results, under the Configuration heading, click
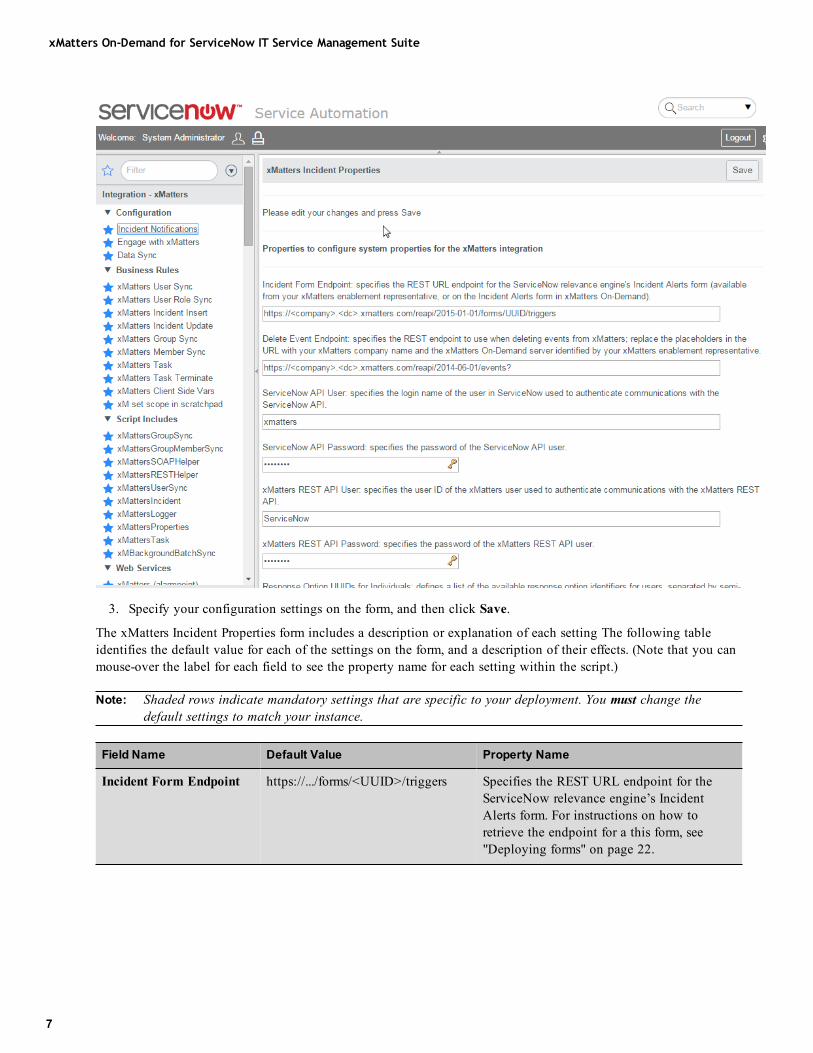
Incident Notifications.l ServiceNow displays the xMatters Incident Properties form.
xMatters On-Demand for ServiceNow IT Service Management Suite
7
3. Specify your configuration settings on the form, and then click Save.
The xMatters Incident Properties form includes a description or explanation of each setting The following tableidentifies the default value for each of the settings on the form, and a description of their effects. (Note that you canmouse-over the label for each field to see the property name for each setting within the script.)
Note: Shaded rows indicate mandatory settings that are specific to your deployment. You must change thedefault settings to match your instance.
Field Name Default Value Property Name
Incident Form Endpoint https://.../forms/<UUID>/triggers Specifies the REST URL endpoint for theServiceNow relevance engine’s IncidentAlerts form. For instructions on how toretrieve the endpoint for a this form, see"Deploying forms" on page 22.

Chapter 2: Installation and Configuration
8
Field Name Default Value Property Name
Delete Event Endpoint https://.../reapi/2014-06-01/events? Specifies the URL to use as theREST endpoint for deleting events fromxMatters. For more information about thesyntax required for this setting, see"Configuring REST endpoints" on page 9.
ServiceNow API User xmatters Specifies the login name of the ServiceNowuser used to authenticate communicationswith the ServiceNow API. For details on howto add this user, see "Configuring integrationusers" on page 19.
ServiceNow APIPassword
xmatters Specifies the password for the ServiceNowAPI User.
xMatters REST API User ServiceNow The User ID of the xMatters user used toauthenticate communications with thexMatters REST API and relevance engine.Note that this user must have the ability toperform GET, PUT, and POST REST webservices, and have permissions to act on therelevance engines.
xMatters REST APIPassword
ServiceNow The password of the xMatters REST APIUser.
Response Option UUIDsfor Individuals
Defines a list of the available response optionidentifiers for users, separated by semi-colons.In a default deployment, this should containthe UUIDs for Accept, Resolve, and Ignore.For information on how to access a UUID inxMatters, see "Determining identifiers" onpage 10.
Response Option UUIDsfor Group Assignment
Defines a list of the available response optionidentifiers for groups, separated by semi-colons. In a default deployment, this shouldcontain the UUIDs for Assign to me, Resolve,and Ignore. For information on how to accessa UUID in xMatters, see "Determiningidentifiers" on page 10.
Notify Current User false When selected, indicates that the current userwill be notified if they are the assignee forthe created or updated incident.
Priority 1,2 Determines which incidents should be sent toxMatters, entered as a comma-separated list.

xMatters On-Demand for ServiceNow IT Service Management Suite
9
Field Name Default Value Property Name
xMatters Language Suffix en Specifies the default language within theevent that incident properties are sent towithin xMatters. The suffix is added toproperty names such as number, and isrequired for specific functions. For example,the following property is marked with thelanguage suffix for English:number#en INC0010003
The suffix must match the "number#xx".fieldto perform the delete events functionality.
xMatters Event StatusUpdates
false If selected, incident work log entries will becreated for each of the xMatters event statusupdates.
xMatters Event DeliveryStatus Updates
false If selected, incident work log entries will becreated for each of the xMatters eventdelivery status updates.
Logging Level INFO Defines the logging level for the xMatterslogger; valid values are: DEBUG, INFO,WARN, ERROR.
Configuring REST endpointsThe xMatters configuration forms in ServiceNow require that you supply URL endpoints for theREST API communications. There are two types of endpoint required:
l Relevance engine form endpoints: the Incident Alerts, Engage With xMatters, and Conference Bridge formseach have a separate endpoint that allows the REST API to target that form. For instructions on how toretrieve the endpoint for a specific form, see "Deploying forms" on page 22.
l REST API endpoints: some fields on the form ask you to modify the default entry to match your specificdeployment; specifically, the Delete Events Endpoint and the Synchronization Endpoint. For more informationon how to configure these endpoint, see below.
For each REST API endpoint on the xMatters system configuration form, replace the placeholders in the defaultsetting with the appropriate values for your deployment. For example, the default value for the Delete EventEndpoint field is:https://<company>.<deployment>.xmatters.com/reapi/2014-06-01/events?
Replace the placeholders as follows:
l <company>: The name of your company in xMatters On-Demandl <deployment>: The server identifier of your xMatters On-Demand deployment.
Your configured group form endpoint should resemble the following:https://mycompany.na1.xmatters.com/reapi/2014-06-01/events?

Chapter 2: Installation and Configuration
10
Determining identifiersSome configuration fields require a UUID, or Universal Unique Identifier, for a specific component or property in arelevance engine. You can retrieve these identifiers in the xMatters user interface. The following instructions explainhow to get the identifier for a specific response choice, but the process is the same for any identifier you want todetermine.
To retrieve the identifier for a response choice:
1. In xMatters, open the ServiceNow relevance engine.2. On the Incident Alerts form, click Edit > Responses.3. On the Accept response, click the API icon.
l xMatters displays the Response Identifier dialog box:
Configuring Task PropertiesTo configure the xMatters user interface elements and conference bridge settings in ServiceNow, you must completethe Engage With xMatters (Task Properties) form.
To complete the form:
1. In ServiceNow, click the Type filter text field, and then type xMatters.2. In the Integration - xMatters section of the returned search results, under the Configuration heading, click
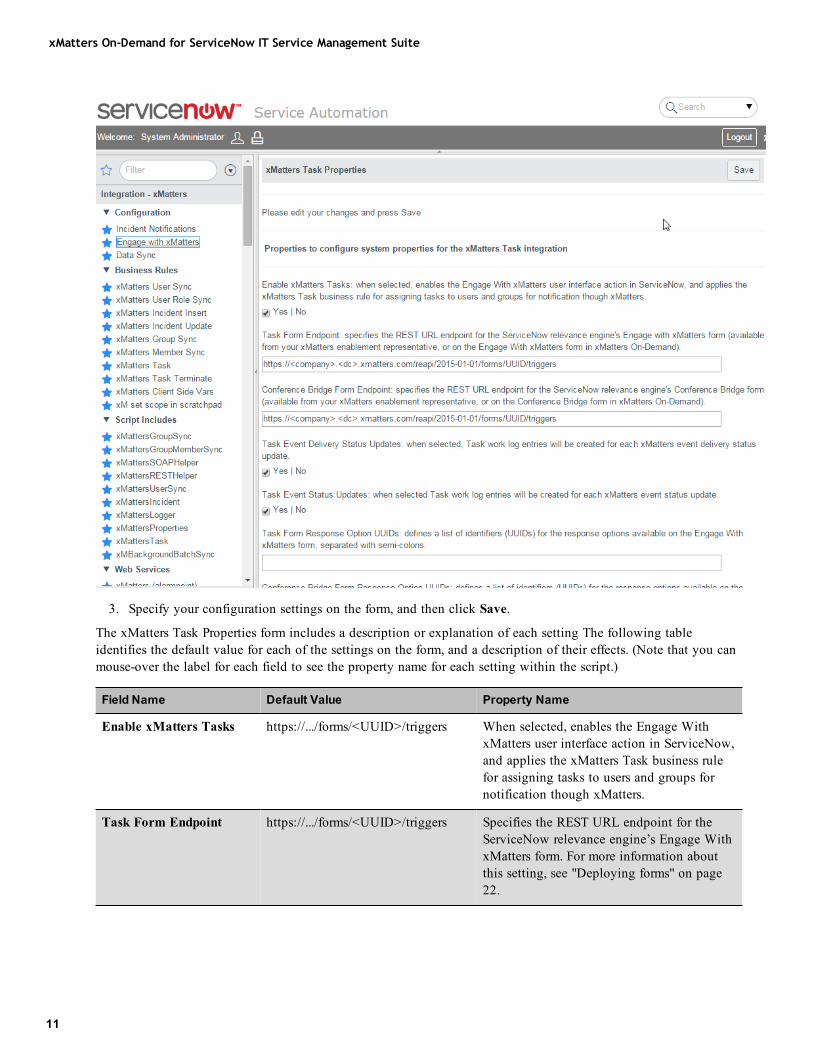
Engage with xMatters.l ServiceNow displays the xMatters Task Properties form.
xMatters On-Demand for ServiceNow IT Service Management Suite
11
3. Specify your configuration settings on the form, and then click Save.
The xMatters Task Properties form includes a description or explanation of each setting The following tableidentifies the default value for each of the settings on the form, and a description of their effects. (Note that you canmouse-over the label for each field to see the property name for each setting within the script.)
Field Name Default Value Property Name
Enable xMatters Tasks https://.../forms/<UUID>/triggers When selected, enables the Engage WithxMatters user interface action in ServiceNow,and applies the xMatters Task business rulefor assigning tasks to users and groups fornotification though xMatters.
Task Form Endpoint https://.../forms/<UUID>/triggers Specifies the REST URL endpoint for theServiceNow relevance engine’s Engage WithxMatters form. For more information aboutthis setting, see "Deploying forms" on page22.
Chapter 2: Installation and Configuration
12
Field Name Default Value Property Name
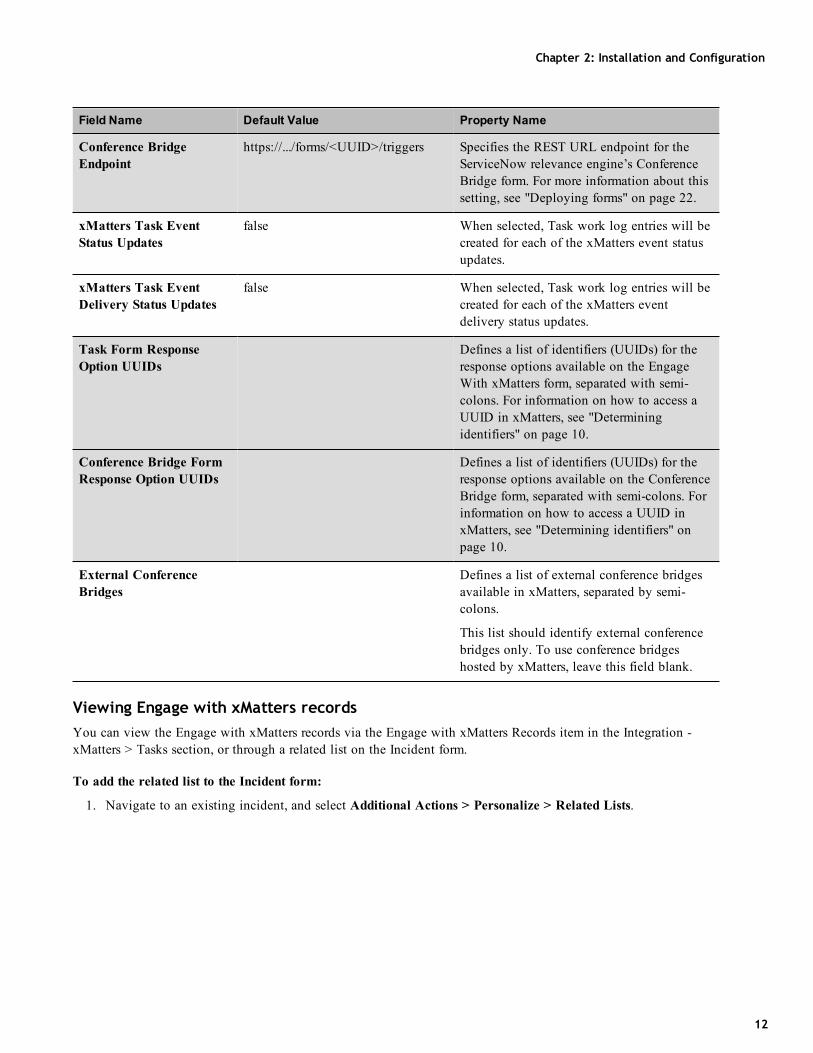
Conference BridgeEndpoint
https://.../forms/<UUID>/triggers Specifies the REST URL endpoint for theServiceNow relevance engine’s ConferenceBridge form. For more information about thissetting, see "Deploying forms" on page 22.
xMatters Task EventStatus Updates
false When selected, Task work log entries will becreated for each of the xMatters event statusupdates.
xMatters Task EventDelivery Status Updates
false When selected, Task work log entries will becreated for each of the xMatters eventdelivery status updates.
Task Form ResponseOption UUIDs
Defines a list of identifiers (UUIDs) for theresponse options available on the EngageWith xMatters form, separated with semi-colons. For information on how to access aUUID in xMatters, see "Determiningidentifiers" on page 10.
Conference Bridge FormResponse Option UUIDs
Defines a list of identifiers (UUIDs) for theresponse options available on the ConferenceBridge form, separated with semi-colons. Forinformation on how to access a UUID inxMatters, see "Determining identifiers" onpage 10.
External ConferenceBridges
Defines a list of external conference bridgesavailable in xMatters, separated by semi-colons.
This list should identify external conferencebridges only. To use conference bridgeshosted by xMatters, leave this field blank.
Viewing Engage with xMatters recordsYou can view the Engage with xMatters records via the Engage with xMatters Records item in the Integration -xMatters > Tasks section, or through a related list on the Incident form.
To add the related list to the Incident form:
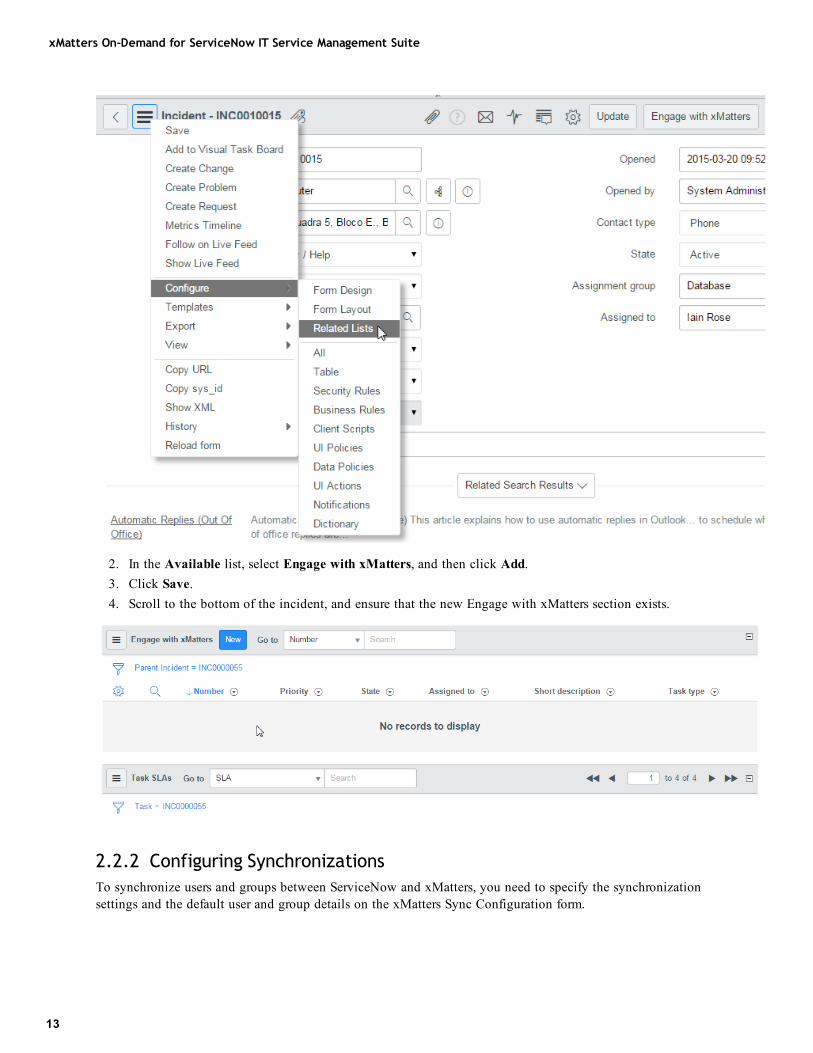
1. Navigate to an existing incident, and select Additional Actions > Personalize > Related Lists.
xMatters On-Demand for ServiceNow IT Service Management Suite
13
2. In the Available list, select Engage with xMatters, and then click Add.3. Click Save.4. Scroll to the bottom of the incident, and ensure that the new Engage with xMatters section exists.
2.2.2 Configuring SynchronizationsTo synchronize users and groups between ServiceNow and xMatters, you need to specify the synchronizationsettings and the default user and group details on the xMatters Sync Configuration form.

Chapter 2: Installation and Configuration
14
To complete the xMatters configuration form:
1. In ServiceNow, click the Type filter text field, and then type xMatters.2. In the Integration - xMatters section of the returned search results, under the Configuration heading, click Data
Sync.l ServiceNow displays the xMatters Sync Properties form for the user and group synchronization settings.
3. Specify your configuration settings on the form, and then click Save.
The xMatters Sync Configuration form includes a description of how each setting affects the synchronizationprocess. The following table identifies the default value for each of the settings on the form, and a description oftheir effects. (Note that you can mouse-over the label for each field to see the property name for each setting withinthe script.)
If you are not certain of the value required for any of the fields, contact your xMatters On-Demand enablementrepresentative.
Note: Shaded rows indicate mandatory settings that are specific to your deployment. You must change thedefault settings to match your instance.

xMatters On-Demand for ServiceNow IT Service Management Suite
15
Field Name Default Value Description
SynchronizationEndpoint
https://localhost:8888/api/services/AlarmPointWebService
Specifies the URL to use as the SOAP Endpoint forthe xMatters web service calls for User and Groupsynchronization. Replace localhost:8888 with the hostand port used to access the xMatters web server.
Note: Your xMatters On-Demand enablementrepresentative will provide this value to you.
Company xmatters_company Specifies the name of the xMatters Company forwhich this integration is being configured.
Web Services User APWSU Specifies the User ID of the xMatters web servicesuser. This name is used to authenticate web servicecalls in xMatters.
Web Services Password password Specifies the password used by the web services userto authenticate web services calls in xMatters.
Dynamic Sync true Determines whether the user, group membership, orgroups should be dynamically synchronized withxMatters when they are changed in ServiceNow.
Seed Only - Users Disabled When selected, indicates that users should only becreated if they do not already exist in xMatters;modifying or removing existing users in ServiceNowwill not affect users already in xMatters. When thisoption is NOT selected, updates and deletions toUsers in ServiceNow will be synchronized toxMatters.
Externally OwnedUsers
Disabled Determines whether synchronized users can beremoved from within xMatters. If selected, asynchronized user can only be removed from xMattersby removing the user in ServiceNow.
Exclude Users Enabled When selected, excludes all users identified in theUsers Exclude/Include List when synchronizing usersinto xMatters. If this option is NOT selected, and theUser Exclude/Include List is populated, then onlythose users in the list are synchronized into xMatters.

Chapter 2: Installation and Configuration
16
Field Name Default Value Description
Users Exclude/IncludeList
admin Specifies a list of xMatters User IDs, separated bysemi-colons (;), that identifies the users to exclude orinclude when synchronizing users with xMatters. Thislist is used in conjunction with the Exclude Userscheck box. If this list is populated, and the ExcludeUsers check box is selected, then the listed users willbe excluded from the synchronization. If this list ispopulated and the Exclude Users check box is NOTselected, then ONLY those users included in this listwill be synchronized with xMatters.
Web Login Type NATIVE Specifies the type of web login to use forsynchronized users; valid values are NATIVE orLDAP.
Language English Specifies the default Language to assign for allsynchronized users.
Priority Threshold LOW Specifies the default Priority Threshold setting forsynchronized devices; possible values are LOW,MEDIUM, and HIGH.
Email Device Work Email Specifies the device name to use for synchronizedusers' email devices. Note that this value must matchan existing device name in xMatters, or thesynchronization may not work.
Email Provider SMTP Email Specifies the default user service provider for user'semail devices.
Phone Device Work Phone Specifies the device name to use for synchronizedusers' voice phone devices. Note that this value mustmatch an exiting device name in xMatters, or thesynchronization may not work.
Mobile Phone Device Mobile Phone Specifies the device name to use for synchronizedusers' mobile phone devices. Note that this value mustmatch an exiting device name in xMatters, or thesynchronization may not work.
Phone Provider Phone Engine Specifies the default user service provider for users'voice phone devices.
Phone Expression (\d{3})(\d{7})(\d*)$ Specifies the regular expression used to parse a phonenumber. The default regular expression is the standardformat for North American numbers in a ten-digitformat (area code plus seven-digit phone number),followed by an extension.
xMatters On-Demand for ServiceNow IT Service Management Suite
17
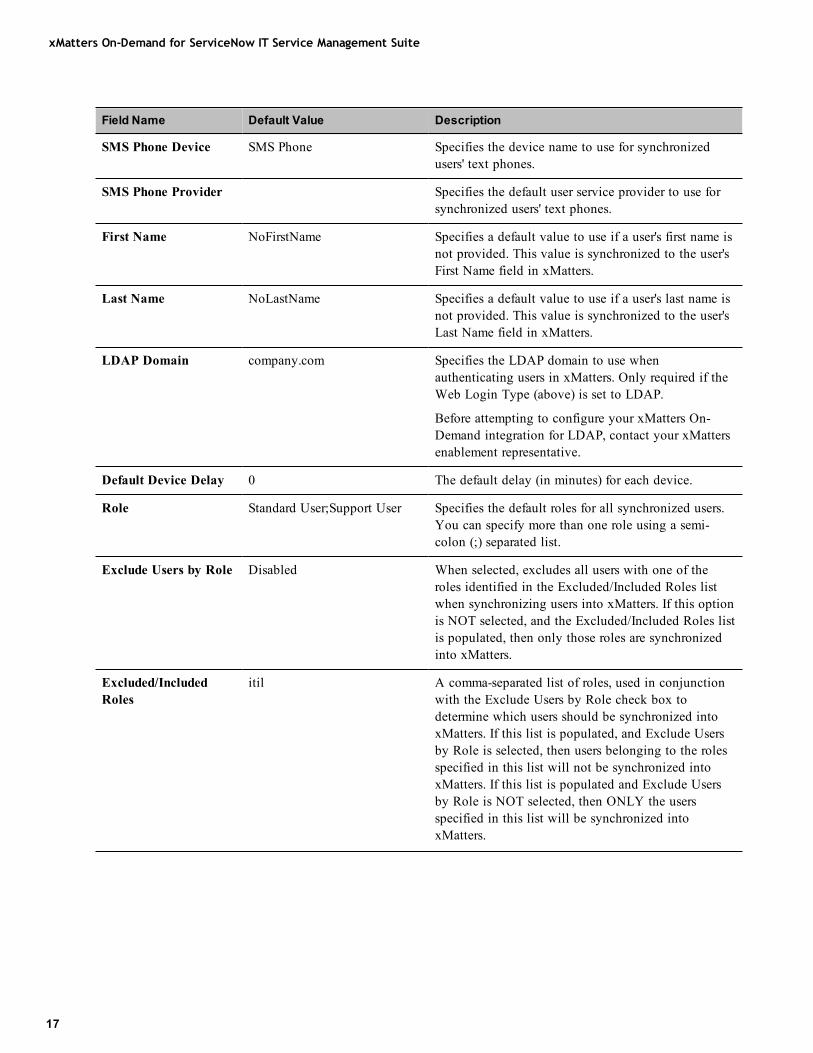
Field Name Default Value Description
SMS Phone Device SMS Phone Specifies the device name to use for synchronizedusers' text phones.
SMS Phone Provider Specifies the default user service provider to use forsynchronized users' text phones.
First Name NoFirstName Specifies a default value to use if a user's first name isnot provided. This value is synchronized to the user'sFirst Name field in xMatters.
Last Name NoLastName Specifies a default value to use if a user's last name isnot provided. This value is synchronized to the user'sLast Name field in xMatters.
LDAP Domain company.com Specifies the LDAP domain to use whenauthenticating users in xMatters. Only required if theWeb Login Type (above) is set to LDAP.
Before attempting to configure your xMatters On-Demand integration for LDAP, contact your xMattersenablement representative.
Default Device Delay 0 The default delay (in minutes) for each device.
Role Standard User;Support User Specifies the default roles for all synchronized users.You can specify more than one role using a semi-colon (;) separated list.
Exclude Users by Role Disabled When selected, excludes all users with one of theroles identified in the Excluded/Included Roles listwhen synchronizing users into xMatters. If this optionis NOT selected, and the Excluded/Included Roles listis populated, then only those roles are synchronizedinto xMatters.
Excluded/IncludedRoles
itil A comma-separated list of roles, used in conjunctionwith the Exclude Users by Role check box todetermine which users should be synchronized intoxMatters. If this list is populated, and Exclude Usersby Role is selected, then users belonging to the rolesspecified in this list will not be synchronized intoxMatters. If this list is populated and Exclude Usersby Role is NOT selected, then ONLY the usersspecified in this list will be synchronized intoxMatters.
Chapter 2: Installation and Configuration
18
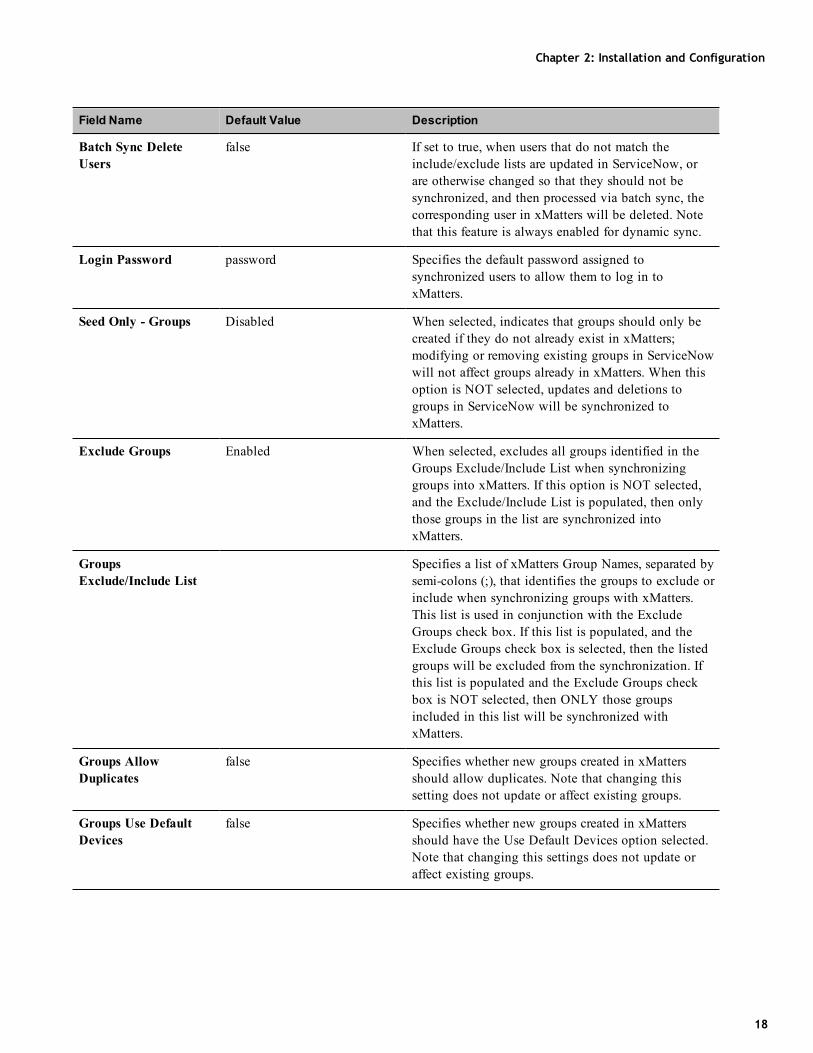
Field Name Default Value Description
Batch Sync DeleteUsers
false If set to true, when users that do not match theinclude/exclude lists are updated in ServiceNow, orare otherwise changed so that they should not besynchronized, and then processed via batch sync, thecorresponding user in xMatters will be deleted. Notethat this feature is always enabled for dynamic sync.
Login Password password Specifies the default password assigned tosynchronized users to allow them to log in toxMatters.
Seed Only - Groups Disabled When selected, indicates that groups should only becreated if they do not already exist in xMatters;modifying or removing existing groups in ServiceNowwill not affect groups already in xMatters. When thisoption is NOT selected, updates and deletions togroups in ServiceNow will be synchronized toxMatters.
Exclude Groups Enabled When selected, excludes all groups identified in theGroups Exclude/Include List when synchronizinggroups into xMatters. If this option is NOT selected,and the Exclude/Include List is populated, then onlythose groups in the list are synchronized intoxMatters.
GroupsExclude/Include List
Specifies a list of xMatters Group Names, separated bysemi-colons (;), that identifies the groups to exclude orinclude when synchronizing groups with xMatters.This list is used in conjunction with the ExcludeGroups check box. If this list is populated, and theExclude Groups check box is selected, then the listedgroups will be excluded from the synchronization. Ifthis list is populated and the Exclude Groups checkbox is NOT selected, then ONLY those groupsincluded in this list will be synchronized withxMatters.
Groups AllowDuplicates
false Specifies whether new groups created in xMattersshould allow duplicates. Note that changing thissetting does not update or affect existing groups.
Groups Use DefaultDevices
false Specifies whether new groups created in xMattersshould have the Use Default Devices option selected.Note that changing this settings does not update oraffect existing groups.

xMatters On-Demand for ServiceNow IT Service Management Suite
19
Field Name Default Value Description
Externally OwnedGroups
Disabled Specifies whether synchronized groups can beremoved from within xMatters. If selected, asynchronized group can only be removed fromxMatters by removing the group in ServiceNow.
Batch Sync DeleteGroups
false If set to true, when groups that do not match theinclude/exclude lists are updated in ServiceNow, orare otherwise changed so that they should not besynchronized, and then processed via batch sync, thecorresponding Group in xMatters will be deleted.
Default Site Default Site Specifies the site to which you want to assign groupsand users.
Supervisor admin Specifies the default supervisor for the synchronizedusers and groups.
Time Zone US/Pacific Specifies the default time zone for synchronized usersand groups.
Excluding users or groups from synchronizationYou can use the Exclude/Include Lists to specify the users and groups you do not want to synchronize withxMatters, or to limit the synchronization to a select number of users or groups. The following table explains therelationship between the Exclude/Include List and the Exclude check box.
Exclude/Include List Exclude Check Box Result
Empty Enabled All users/groups in ServiceNow are synchronized automaticallywith xMatters.
Populated Enabled The users/groups identified in the list are excluded from thesynchronization process; all other users and groups aresynchronized.
Empty Disabled No users/groups are synchronized. Note that thesynchronization calls will still be displayed in the system logs,but no information will be sent.
Populated Disabled Only those users/groups identified in the list are synchronizedwith xMatters; all other users/groups are excluded.
You can also disable the synchronization feature completely, and prevent the calls from being included in thesystem logs, as described in "Disabling synchronization" on page 37.
2.2.3 Configuring integration usersThis integration needs an authenticated user to handle REST web service callbacks from xMatters to ServiceNow.

Chapter 2: Installation and Configuration
20
To create a user:
1. In ServiceNow, click the Type filter text field.2. Type users.3. In the Organization Management section of the returned search results, click Users.
l ServiceNow displays a list of users.4. Click New to display the new user page.5. Populate the User ID, First Name, Last Name, and Password fields with the appropriate information.
l The User ID value should match the "ServiceNow API User" on the xMatters System configurationpage.
6. For added security, check the "Web service access only".l Note: You do not need to add any roles to this user.
2.3 Seeding users and groups into xMattersOnce you have established the configuration settings for your integration, you can use the Batch Load User andGroup feature in ServiceNow to seed xMatters with your users and groups.
2.3.1 Enabling the Batch Load featureBy default, the Batch Load User and Group feature is disabled when the integration is installed. This is to preventadministrators from inadvertently running the synchronization before they are ready to do so. The synchronizationmodule must be enabled by an administrator before it can be used.
Note that the Batch Load User and Group is a resource-intense process that can significantly affect serverperformance while running. This feature processes every user and group in your ServiceNow instance to determinewhether they should be synchronized to xMatters. All other ServiceNow requests will be held while the batch loadis being processed. It is recommended that you run the batch load process only when the integration is initiallyinstalled, and only during non-peak server times to minimize the server strain and processing time required tocomplete the synchronization.
To enable Batch Load User and Group:
1. In ServiceNow, right-click the Integration - xMatters title in the menu list, and then click Edit Application.2. On the Application page, in the Modules section, click the Batch Load User and Group link.3. On the Module details page, select the Active check box, and then click Update.4. On the Application page, click Update.5. Refresh the menu list to see the synchronization link.
2.3.2 Initial Data LoadThe batch data load processes all users, groups, and group members in ServiceNow and attempts to update them inxMatters. If the user or group does not exist in xMatters, it is added; if the user or group already exists in xMatters,it will be updated. A user or group that exists in xMatters but not in ServiceNow is not modified by the batchprocess; updates to these items are handled by the user and group synchronization process based on individualchanges only after the initial data load is complete.

xMatters On-Demand for ServiceNow IT Service Management Suite
21
To set up the scheduled job:
1. In the Type filter text field, type xMatters.2. In the returned search results, click Batch Load User and Group.
l ServiceNow starts the initial data load process immediately; note that it may take some time tocomplete. When the process is finished, it will display the output log.
2.4 Configuring xMattersThe following sections explain how to configure xMatters On-Demand to communicate with ServiceNow.
2.4.1 Importing the relevance engine and formsThe integration package includes a .zip file that was created using the xMatters "Export Relevance Engine" feature;this greatly simplifies the xMatters configuration process by enabling you to create the integration's requiredrelevance engine and forms in a single step.
To import the integration relevance engine package:
1. Log in to xMatters as a company supervisor, and click the Developer tab.2. On the Manage Relevance Engines page, click Import Engine.3. On the Import Relevance Engine File page, click Choose File, and then locate the ServiceNow.zip file
extracted from the integration archive.4. Click Open, and then click Import Engine.
xMatters imports the relevance engine file and displays the new ServiceNow relevance engine in the list:
Note that once you have completed the remaining configuration steps, you will need to return to this page, andensure that the relevance engine (and its underlying forms) is enabled by clicking the Engine Disabled button tochange the engine's status.
2.4.2 Set form permissionsAfter you have imported the relevance engine and forms, you must set the permissions on each form to identify whocan initiate and manage scenarios based on each form.
To set the form permissions:
1. In xMatters, on the Manage Relevance Engines page, in the ServiceNow relevance engine section, click theEdit drop-down list, and then select Forms.
2. On the Incident Alerts form, click the Not Deployed drop-down list, and then select Permissions.3. On the Form Permissions page, ensure that the appropriate user accounts can initiate the form and scenarios.
l This must include the xMatters Rest API User specified on the xMatters Incident Notifications form inServiceNow.
4. Click Save Changes to add the users and return to the forms.

Chapter 2: Installation and Configuration
22
5. Repeat the above steps for the Engage with xMatters and Conference Bridge relevance engine forms.6. Click Save Changes.
2.4.3 Deploying formsAfter you have imported the relevance engine and set the permissions, you must deploy the form as a web service toallow the creation of events from ServiceNow.
To deploy a form as a web service:
1. On the ServiceNow relevance engine page, in the Incident Alerts form area, click the Not Deployed drop-down list, and then select Create Event Web Service.
l xMatters deploys the form as a web service, and updates the icon and label for the drop-down list.2. To retrieve the web service endpoint for this form, click the Web Service Only drop-down list, and then select
Access Web Service URL:
3. In the Access Web Service URL dialog box, copy the supplied URL and paste it into the Incident FormEndpoint field on the Incident Properties configuration form in ServiceNow.
4. Repeat the above steps for the Engage with xMatters and Conference Bridge forms, and paste the suppliedURL into the Task Form Endpoint and Conference Bridge Form Endpoint fields respectively on the TaskProperties configuration form.
2.4.4 Adding the web service userThis integration requires a web service user for the data synchronization process to function. Note that this not thesame user as the REST API user used to create events.

xMatters On-Demand for ServiceNow IT Service Management Suite
23
To set up a web service user:
1. In xMatters, click the Users tab, and then click Add Web Service User.2. Enter the following information into the form:
l User ID: APWSUl Description: xMatters Web Service Userl Password: type the user’s password (default is password)l Verify Password: retype the password to verify it.
3. Set this user to have access to the following web services:l Add Coveragel Add Devicel Add Groupl Add Teaml Add Userl Delete Groupl Delete Teaml Delete Userl Delete Devicel Find Devicesl Find Personsl Query Groupl Query Incidentl Query Userl Update Coveragel Update Devicel Update Groupl Update Teaml Update User
4. Click Save.
Note: To ensure that you do not compromise your security, do not use the default password on productionsystems.
2.4.5 Configuring SubscriptionsYou can use the Subscriptions feature in xMatters to subscribe to ServiceNow incidents that match specific criteria.For example, you could configure a subscription that would send an informational notification to a specific usereach time an event entered the system that was of "Critical" Priority. These notifications, and their responses, do notaffect the normal progression of an event through the system.
To allow users to subscribe to specific criteria on injected events, you must configure a subscription using thefollowing steps:
l Define a subscription forml Create a subscription

Chapter 2: Installation and Configuration
24
Defining a subscription formThe subscription form allows you to control who can create subscriptions, how recipients can respond tosubscription notifications, and which of the available properties on the relevance engine form can be used to create asubscription. You must create a subscription form before you can create subscriptions.
Note: Before creating a subscription form, ensure that you have enabled the ServiceNow relevance engine. See"Importing the relevance engine and forms" on page 21.
To create a form:
1. On the Developer tab, in the Relevance Engine Builder menu, click Manage Relevance Engines.2. In the ServiceNow relevance engine, click Edit > Forms.3. In the group form, click Edit > Subscription Forms.4. Click Create Subscription Form.5. In the Name field, type a name for the subscription form, such as "ServiceNow-Group".6. Type a brief description in the Description field to help identify the subscription form7. Click Create Subscription Form.
l The Design Subscription Form dialog box appears:

xMatters On-Demand for ServiceNow IT Service Management Suite
25
8. Select the One Way check box.9. Drag and drop the properties to which you want to subscribe from the Form Properties list on the right to the
Properties area on the form.10. In the Roles that can subscribe area, specify the roles to which you want to provide permission to create
subscriptions.l Note that only those roles that have the required permissions to view and use this page will be able tocreate subscriptions; adding a role to a subscription form does not grant all users with that role theability to create subscriptions.
11. In the Devices area, select the devices or device types on which you want users to be able to receivesubscription notifications.
12. Click Save Changes.
Creating a subscriptionYou can now subscribe to ServiceNow events that match specific criteria. For example, you could configure asubscription that would send an informational notification to a specific user each time an incident was resolved inServiceNow (i.e., the state = "Resolved"). These notifications, and their responses, do not affect the normalprogression of an event through the system.
To create a subscription:
1. Click your name (user profile) in the upper-right corner of the page.2. In the Subscribed Alerts menu, click Subscriptions.3. To add a subscription, click on the "+" sign.
l The Add a Subscription dialog box appears.
4. Click a subscription form to create a subscription based on that form.5. On the Subscription Details page, specify a name for the subscription, provide a description (if desired), and
set the subscription criteria.l The following figure illustrates a sample Subscription Details page:

Chapter 2: Installation and Configuration
26
6. When you are satisfied with the criteria, click Save Changes to create the subscription.

Chapter 3: Integration Validation
27
Chapter 3: Integration ValidationThe following sections describe how to test the combination of xMatters On-Demand and ServiceNow fornotification delivery and response and synchronization configuration.
3.1 Validating User and Group SynchronizationThe following sections validate that communication from ServiceNow to xMatters for user and groupSynchronization is properly configured.
3.1.1 Synchronizing usersWhen you create, modify, or delete a user in ServiceNow, the system activates the xMatters User Sync business rule.The synchronization will create, update, or remove the user in xMatters, along with their email, business phone, andmobile phone device details.
Note: For user devices to be synchronized correctly, the service providers and device names must be configuredproperly within the xMatters Sync Configuration page.
To test the user synchronization:
1. In ServiceNow, in the Type filter text field, type user.2. In the returned search results, in the User Administration area, click Users.3. On the Users page, click New.4. Enter the details for the new user on the User page, including first name, last name, and an email address as
illustrated by the following figure:

xMatters On-Demand for ServiceNow IT Service Management Suite
28
Note: Specify an email address you can access; this User will be used to test the notification portion of theintegration in the following sections.
5. Click Submit.6. In the Users list, locate the user you just added and click their name.7. On the User page, in the Roles table, click Edit.8. On the Edit Members page, in the Collection list, select itil, and then click Add.
Note: The itil role must be assigned to users you want to be able to receive notifications from xMatters.
9. Click Save.l The user is now capable of receiving notifications.
When the user is created in ServiceNow, a matching user is added to xMatters using the properties specified on thexMatters System Configuration form, and the email address as an Email Device.
3.1.2 Synchronizing groups and group membershipWhen you create, modify, or delete a group in ServiceNow, the system activates the xMatters Group Sync businessrule. The synchronization will create, update, or remove the Group in xMatters.

Chapter 3: Integration Validation
29
To test the group synchronization:
1. In ServiceNow, in the Type filter text field, type group.2. In the returned search results, in the User Administration area, click Groups.3. On the Groups page, click New.4. Enter the details for a new group on the Group page, as illustrated by the following figure:
5. Click Submit.l When the group is created in ServiceNow, a matching group is automatically created in xMatters,containing a default 24x7 Coverage and an empty team named "Roster". You can now add users to thegroup in ServiceNow to test the group membership synchronization.
6. On the Groups page, click the name of the group you just created.7. On the Group page, in the Group members section, click Edit.8. On the Edit Members page, in the Collection list, select the names of the users you want to add to the group,
and then click Add.9. Click Save to add the users to the group.
The group in xMatters is now updated to include the members you added, on a default 24x7 Coverage, as illustratedby the following figure:

xMatters On-Demand for ServiceNow IT Service Management Suite
30
Note: For more information about how to work with groups, coverages, and teams, see the xMatters user guide.
3.2 Triggering a notificationTo test the notification portion of the integration, you can create an incident in ServiceNow, and assign it to theuser you created in the previous section.
To trigger a notification:
1. In ServiceNow, in the Type filter text field, type incident.2. In the Incident area, click Create New.3. On the Incident details page, enter the details of a test incident (with a Priority setting of "High" or "Critical")
into the form; for example:

Chapter 3: Integration Validation
31

xMatters On-Demand for ServiceNow IT Service Management Suite
32
4. In the Assigned to field, type the first name of the user you added in the previous section, and then click theirname in the list of users displayed below the field.
5. Click Submit to create the incident and trigger the notification.
3.2.1 Engage with xMattersTo test the Engage with xMatters portion of the integration, you can use the web user interface elements on anexisting incident.
To engage with xMatters:
1. In ServiceNow, in the Type filter text field, type incident.2. In the Incident area, click Open, and select an existing incident.3. On the Incident details page, click the Engage with xMatters button.
4. In the Engage with xMatters dialog box, select an appropriate Priority and State, and select a conferencebridge to add a conference to the notification:

Chapter 3: Integration Validation
33
5. Enter details about the message in the Message Subject and Message fields.6. Click the Add Recipients button, and use the filters and features in the Add Recipients dialog box to locate
and add the recipients you want to include.7. Click OK.8. Click Submit to send the notification.
3.3 Responding to a notificationThis section describes how to respond to a notification from xMatters. In the following example, the notification isreceived in an HTML email format, but the process is similar for all devices.

xMatters On-Demand for ServiceNow IT Service Management Suite
34
To respond to a notification:
1. When a notification arrives, open it to view its details:
2. To respond to the notification, click a response choice, and xMatters sends the response:
Note that the process is the same for Engage with xMatters notifications.
Responding to a conference bridge notificationWhen a user receives a conference bridge notifications, text is spoken to the user on their voice device, and they areprompted to press a button to indicate their response choice. For example, a user might hear the following:This is a manual conference bridge invite from ServiceNow regarding INC0000054.Message The SAP system is throwing database errors.Press 1 to join the conference, Press 2 to ignore and stop notifying.
If the user presses 1, they will be added to the conference bridge.

Chapter 3: Integration Validation
35
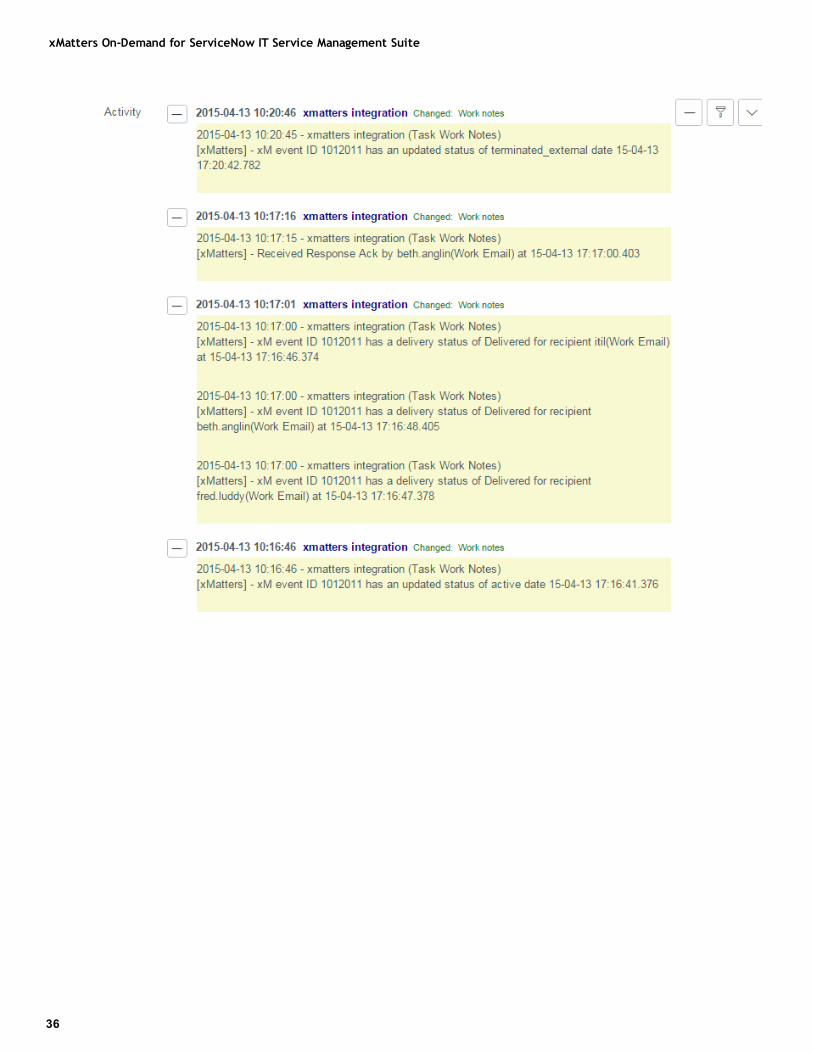
3.4 Viewing response resultsThe response is submitted to ServiceNow, which updates the Activity section of the incident details:
Viewing Engage with xMatters responsesWhen submitted to ServiceNow, responses to Engage with xMatters notifications are updated in the Activity sectionof the Engage with xMatters record:
xMatters On-Demand for ServiceNow IT Service Management Suite
36

Chapter 4: Optimizing and Extending the Integration
37
Chapter 4: Optimizing and Extending the IntegrationThis section describes some of the available methods you can use to optimize or extend the xMatters On-Demandfor ServiceNow IT Service Management Suite integration.
4.1 Disabling synchronizationYou can exclude specific groups and users from the synchronization process using the Exclude/Include Lists on thexMatters Sync Configuration form, but there may be some instances where you want to disable automaticsynchronization of all users and groups. For example, if you are adding test users or experimenting with groupescalations in ServiceNow, you might not want to synchronize the temporary or testing changes to xMatters. Inthese cases, you can use the following instructions to disable the synchronization feature.
Note that this will also prevent new users and groups from being automatically created in xMatters.
To disable User and Group Synchronization:
1. In ServiceNow, click the Type filter text field, and then type xMatters.2. In the Integration - xMatters section of the returned search results, click Business Rules - xMatters Group
Sync.l ServiceNowdisplays the xMatters Group Sync business rule form for the group synchronization.
3. Clear the Active check box, and then click Update.4. Repeat steps 2 and 3 for Business Rules - xMatters Member Sync and Business Rules - xMatters User Sync.
4.2 Response choicesThis integration allows recipients to respond to notifications with several default choices, some of which areinjected back to the management system, updating the original incident. Users notified on email Devices also havethe ability to respond with an extra annotation message which will be logged on the original incident.
The following is a list of the default response choices available with the integration and their associated actions onthe event and the incident.
Response xMatters Action ServiceNow Update Availability
Assign to me Assigns to user Sets user as assignee Only whentargeting a group
Accept Assigns to user Sets user as assignee Only whentargeting a user
Resolve Assigns to user Sets user as assignee and setsState to 'Resolved'
Always
Ignore Immediately escalates to the next user Always
Default response choices - Incident Alerts form

xMatters On-Demand for ServiceNow IT Service Management Suite
38
