yale university digitization shared practices – still
TRANSCRIPT

Digital Coffee Group Campus Digital Imaging Working Group Yale University Digitization Shared Practices – Still Images Version 1.0 August 2010; Version 1.0 Digital Coffee Group Shared Practices A Yale Campus Cultural Heritage Collaboration

2
Digital Imaging Shared Practices: Still Images
August 2010 Version 1.0 DIGITALCOFFEEMISSIONSTATEMENT................................................................................................................. 3PURPOSE.............................................................................................................................................................. 5 SCOPE................................................................................................................................................................. 5 REVISIONS.......................................................................................................................................................... 6 GENERALPRINCIPLES......................................................................................................................................... 6PROJECTPLANNING............................................................................................................................................. 6 DOCUMENTATION............................................................................................................................................. 6 COSTS................................................................................................................................................................. 7DIGITIZATIONTOOLBOX....................................................................................................................................... 7 HARDWARE........................................................................................................................................................ 7 SOFTWARE........................................................................................................................................................ 7 STORAGE........................................................................................................................................................ 7INFORMATIONALRESOURCES............................................................................................................................... 8FILENAMING.........................................................................................................................................................10METADATA........................................................................................................................................................... 10 OVERVIEW.......................................................................................................................................................... 10 TYPESOF............................................................................................................................................................ 11 YUAGSAMPLE.....................................................................................................................................................12 KEYWORDS........................................................................................................................................................ 13GUIDELINESFORCREATINGDIGITALIMAGES........................................................................................................ 14 DIGITALIMAGINGMETHODOLOGIES.................................................................................................................14 MASTERIMAGES................................................................................................................................................. 14 DERIVATIVEIMAGES........................................................................................................................................... 14 GUIDELINESBYSOURCETYPE............................................................................................................................. 15 TEXT..................................................................................................................................................................... 15 PHOTOGRAPHS.................................................................................................................................................... 15 GRAPHICMATERIALS........................................................................................................................................... 16 ARTWORK/3D.................................................................................................................................................... 17 MAPS................................................................................................................................................................... 17 FILM.................................................................................................................................................................... 18QUALITYCONTROLFORIMAGES............................................................................................................................18
TONALDYNAMICRANGE.....................................................................................................................................19 COLORMANAGEMENT........................................................................................................................................ 19 TARGETSANDCOLORBARS.................................................................................................................................20 QUALITYCONTROLWORKFLOW..........................................................................................................................20

3
DIGITAL COFFEE MISSION STATEMENT: The mission of the Yale Digital Coffee group is to establish core standards, develop resources, and provide guidance and support for Digital Imaging related technology, projects, and professionals on campus. The Digital Coffee group provides a forum for active learning and sharing about digital technologies, standards and the creative process. These results are achieved through common research, interaction, and dialogue within the imaging related communities of Yale. The Digital Coffee group organizes seminars, presentations and round table discussions to encourage education and participation, while building and maintaining its standards across campus. The primary focus is on issues and topics related to still photography. Website: http://www.yale.edu/digitalcoffee/ Founding Members: John ffrench – Yale University Art Gallery Chris Edwards – Beinecke Rare Book and Manuscript Library Melissa Fournier – Yale Center for British Art Representatives from Campus Institutions: Yale University Art Gallery Yale Center for British Art Beinecke Rare Book and Manuscript Library Photography and Design Services (formerly Media Services) DMCA (Digital Media Center for the Arts) Peabody Museum Yale Collection of Musical Instruments Goals GOAL 1. [Teaching and learning] Provide forum for campus units to share and collaborate procedures for digital capture and dissemination. GOAL 2. [Documentation] Ensure the preservation of the standards and documentation created by this group for future generations through active management. GOAL 3. [Staff and Governance] Work as a team in a collegial, professional, and productive environment. Implementation: Meeting Schedule: Core members meet monthly to discuss progress on projects, create common standards documents as well as plan for quarterly meetings Quarterly meetings with presentations or round table discussions. Planned Projects: Yale Standards for Digital Imaging guide/handbook Yale website for sharing standards in documentation

4
Digital Coffee Sponsored talks: JPG2000 – Pros and Cons Color Space, Color Profiling Rapid Imaging Workflow Best Practices in Fine Art Reproduction ODAI Presentation 3D Imaging Adobe CS5 Demo
5
Purpose
The purpose of this document is to offer guidance and to provide a range of digital imaging recommendations to institutions on campus that are planning for or are involved in digitization projects. These guidelines are not intended to be used as the de facto standard for digital imaging, but rather as a baseline guide for image capture, presentation, storage, and preservation. Inherent or unique characteristics of different source materials necessitate different approaches to digitization, and requirements for digital projects should be considered on a case-by-case basis (particularly for grant projects with specific requirements). The recommendations made in this document are purposely broad enough to apply to a variety of institutions and collections and attempt to synthesize different recommendations previously made for similar institutions or projects. This document addresses the more standard formats of text, photographs, maps, objects, and graphic materials and is written for institutions that have the equipment and expertise to digitize in-house. If you are planning to primarily digitize oversize materials, bound materials, or materials in non-standard formats and sizes, you may consider outsourcing these materials to imaging vendors referencing some of the standards we suggest here. These guidelines have been developed in order to: 1. Increase the interoperability and accessibility of digital collections across the academic and cultural heritage community at Yale through the use of widely accepted standards and formats 2. Ensure a consistent, high level of image quality across collections 3. Decrease the likelihood of re-digitizing in the future by promoting best practices for conversion of materials into digital format and the long-term preservation of these digital resources. Because technology and industry standards are constantly improving and changing, we view this as a continually evolving document. We welcome your comments and suggestions. Scope What is addressed in this document: Digitizing and file format recommendations for: Text, photographs, maps, 3D objects and graphic materials Suggested hardware configurations Software considerations Metadata and access standards Quality control, file naming, scanner and monitor calibration, targets and color bars,
storing images, and recording and verification of optical/removable media, such as CD or DVD-ROM.
What is not addressed in this document: Digitizing and file format recommendations for: Audio, Video/Moving Images, 3-D modelling, born-digital materials. (These are available through other sources) Prepress matters

6
Staffing Workflow issues Selection of collections for digitization Systems and network architecture Revisions The Digital Coffee Group will review and update the Digital Imaging Shared Practices document on an annual basis. Each new version will be given a new revision number, minor updates will receive a dot update (e.g. V1 for 2010, V2 for 2012 or V1.1 for minor updates) The Digital Coffee Group will act as the host for the workgroup’s efforts and all documents and related materials will be available through our website at www.yale.edu/digitalcoffee General Principles Creating (Converting or Capturing) Digital Image Files 1. Considerthenatureofthematerialtobedigitizedaswellastheenduseofthedigitizedresource;digitizethesourcematerialatthehighestappropriateresolutionbasedonthesefactors. 2. If resources and project objectives allow, create and store a master image file that can be used to produce derivative image files and serve a variety of current and future user needs; digitize at an appropriate level of quality to avoid recapture and re-handling of the originals in the future 3. Digitize an original or first generation (i.e., negative rather than print) of the source material to achieve the best quality image possible. 4. Use image file formats and compression techniques that conform to standards within the cultural heritage community, using components that are non-proprietary as much as possible. 5. Create meaningful metadata for image files or collections Storage and Preservation 1. Create backup copies of all files on a stable medium 2. Store media in an appropriate environment 3. Monitor and recopy data as necessary 4. Document a migration strategy for transferring data across generations of technology 5. Anticipate and plan for future technological developments Project Planning Successful projects should include careful planning before implementing a digitization initiative. This planning should consider how digitization fits into the institution’s overall strategic plan, technology plan, and project workflows. New digital practitioners or project teams are encouraged to join Digital Coffee and/or to contact existing Digital Coffee members for their expertise. Documentation Documentation of the choices your project has made can be a key factor in the long-term success of digitization efforts. Good documentation can offset the impact of staff turnover and allow future staff an ability to deal with digital collections created by their predecessors. Among the items to consider

7
documenting: Critical assumptions for decisions (funding, costs, staffing, available technology and skills, intellectual property concerns)
Local guidelines and benchmarks for image quality and resolution Resources that contributed to local practice guidelines Types of metadata captured (see Metadata below) File naming schemes Sustainability plans and procedures (storage, archiving, refreshing media, etc.) We encourage you to share these documents broadly across the University. The current Digital Coffee website contains working documents from several cultural organizations. Costs (and time) It is difficult to predict just how much a digital imaging project is actually going to cost, and little hard data on the cost, cost effectiveness, and costs over time of digital projects is readily available. Generally, capture and conversion of data often comprises only 1/3 of the total costs, while cataloging, description, and indexing comprises 2/3 of the total costs. Upfront and ongoing costs can be significant, and economic advantage may be better realized through collaborative initiatives or cooperative/regional digitization initiatives, where costs, resources, goals, and expertise can be shared. Initial investment in equipment, staff training, capture and conversion, handling, storing, and housing originals, producing derivative files, CD production, cataloging and building the image database system, and developing Web interfaces are all possible areas of cost for any digitization project. However, the costs of a project do not end after conversion. Some on-going costs that an institution must commit to include the costs of maintaining data and systems over time, including media migration costs and infrastructure costs as well as staff training costs. Digitization Toolbox Hardware Digitization/Capture Devices – SeeDigitizationMethodologiesDisplay The investment in a large display monitor will increase productivity of your project by providing more “screen real estate” to view and evaluate images. For institutions considering technical color calibration high quality monitors with standardized hardware and software calibration that are compatible with input devices (scanners, cameras, etc.) should be strongly considered. Each type, size, and quality of monitor can interpret and display colors and tonal values differently. Without careful and frequent color calibration projects should exercise caution when adjusting and manipulating images since you may be introducing color and tonal biases of your equipment into your images. Several institutions on campus are utilizing Eizo monitors, which are known for their color accuracy and ability to color profile. (http://www.eizo.com/global/). NEC and Apple Cinema displays are also in common use.

8
Software For color calibration software and targets from X-rite should be considered. (http://www.xrite.com/home.aspx) For calibration of scanners, also consider Silverfast. (http://www.silverfast.com/) Image editing software – Adobe PhotoShop is the defacto standard. (http://www.adobe.com/products/photoshop/compare/) Storage It is important to address the issue of archival storage for digital image files. Basic decisions include what kinds of files to archive, how to protect the archive from format obsolescence and media failure, as well as the choice of metadata scheme to facilitate searches. Storing multiple copies of image files on redundant hard drives is arguably the most convenient and least expensive solution to guard against data loss. Additional back-ups to CD-R or DVD-R media may be prudent. Note, however, that different brands and batches of CD-R and DVD-R media have different archival qualities. Use only media with high archival ratings; burn discs at lower speeds; do not use adhesive labels on discs; and write on discs only with non-solvent markers designed specifically for inscribing CDs and DVDs, writing only on the hub of the disc. A prudent practice is to maintain a complete copy of your photo archive off-site. However, be aware of one potential problem with any type of online copy: If there is corruption in your primary copy and you have your system set to automatically clone it to the backup, you may corrupt the backup. Server
• Rescue Repository or Digital Preservation Repository • Redundant server with tape backup
• Digital Asset Management System – with backup Physical
• CD/DVD duplicate copies stored in separate locations – media and files verified and migrated on a regular basis. • External Hard drives with duplicate copies stored in separate locations – media and files verified and migrated on a regular basis. This method is inherently risky due to the high rate of hard drive failure and should only be used as a short-term method of last resort or as a non primary storage method.
Informational Resources: Digital Coffee – (http://www.yale.edu/digitalcoffee) The mission of the Yale Digital Coffee group is to establish core standards, develop resources, and provide guidance and support for Digital Imaging related technology, projects, and professionals on campus. The primary focus is on issues and topics related to still photography.

9
dp Bestflow – (http://dpbestflow.org/) dpBestflow is a new guide to digital imaging technology and workflow from ASMP, a leading group in education for the professional photographer. ImageMuse – (http://www.imagemuse.org) ImageMuse is a group of museum imaging and publishing professionals, dedicated to defining guidelines for the creation and use of digital files for reproduction. MCN – Museum Computer Network (http://www.mcn.edu) MCN supports museum information professionals and the greater community by providing opportunities to explore and disseminate new technologies and best practices in the field. MCN hosts an annual conference, special interest groups, listserv, and a project registry. UPDIG – Universal Photographic Digital Imaging Guidelines (http://www.updig.org) The UPDIG Coalition is dedicated to promoting standards for photographic digital imaging. The UPDIG guidelines aim to clarify issues affecting accurate reproduction and management of digital images. These guidelines were created to establish photographic standards and practices for photographers, designers, printers, and image distributors. The guidelines cover Digital Asset Management, Color Profiling, Metadata, and Photography Workflow. Federal Agencies Digital Guidelines Initiative – (http://www.digitizationguidelines.gov/stillimages) This group is involved in a cooperative effort to develop common digitization guidelines for still image materials. An important and helpful aggregation of resources may be found here, including technical guidelines for digitizing cultural heritage materials (http://www.digitizationguidelines.gov/stillimages/documents/FADGITechnicalGuidelines-2010-06.pdf .) File Naming Conventions Systematic file naming is important for system compatibility, interoperability, and to demonstrate ownership of the digital asset. General practice indicates using a convention with an eight-character file name with a three-character extension to accommodate different systems; the characters are alpha-numeric, lowercase, and do not utilize spaces, tabs, or any characters reserved for system use (i.e. \ / ? * |, etc.). The first two or three characters can be an alphabetical unit-specific identification and the remaining characters a numeric digital object identifier. For example: am000421.tif (Art Museum, digital object number 421, TIFF). Other naming conventions, such as the protocols employed by the Yale University Art Gallery, may incorporate additional information into the filename. The YUAG naming convention, shared by the YCBA, is both human and machine readable, and includes institutional acronym, collection identifier, part designator and file extension, separated by a dash.

10
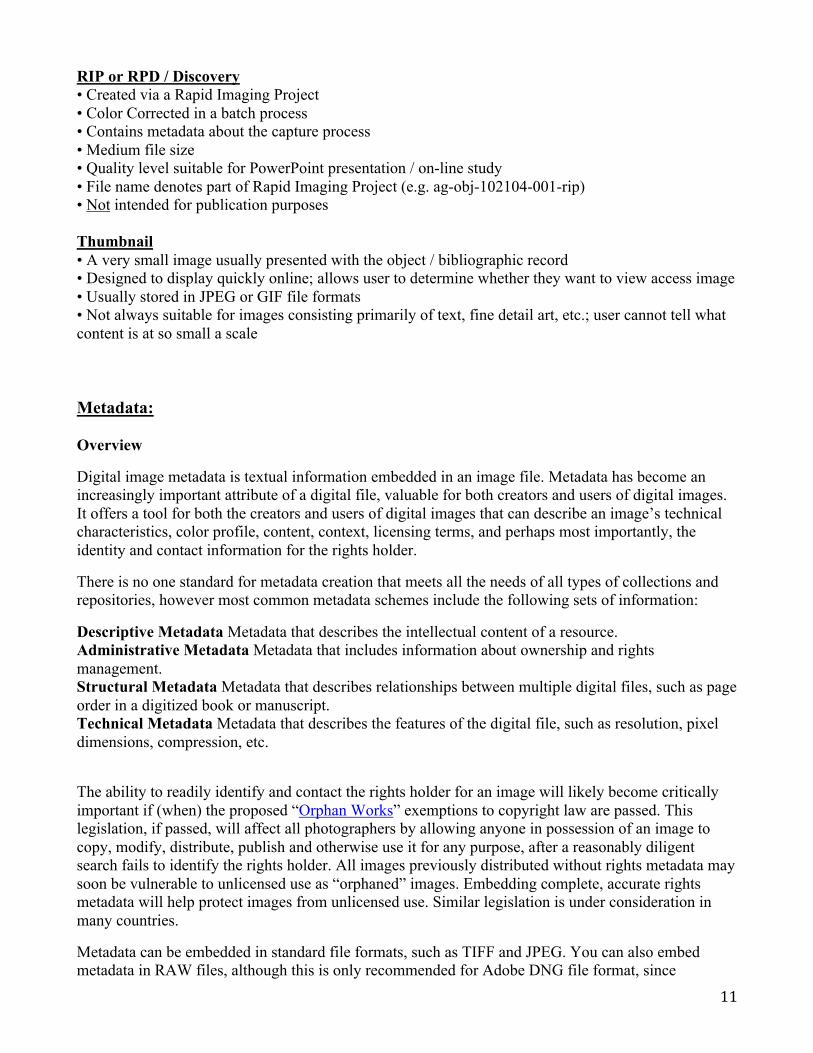
Sample: ag-obj-123456-001-bar.tif - the 6 digit number can increase if data records exceed 6 characters. ag=Art Gallery, obj=Objects Module of TMS, number series=Object I.D. from TMS, 001=rendition number (which will increase with each saved capture) Master images: (e.g. ag-obj-102104-001-mas) Color Corrected files (e.g. ag-obj-102104-001-bar) Cropped files; for public online systems: (e.g. ag-obj-102104-001-pub) Rapid Imaging Project File name denotes part of RIP (e.g. ag-obj-102104-001-rip) Master • Unedited capture from digital capture source • Uncompressed • High quality • Very large file size • Usually stored in the TIFF file format BAR (Formerly named CC) • Represents as closely as possible the information contained in the original artifact • Color Corrected against original object under controlled lighting conditions • Contains ICC color and/or grey-scale target/s • Can contain Paths for cropping and/or silhouetting object within file • Contains metadata about the capture process • Serves as long term source for derivative files • Can serve as surrogate for the original • High quality • Very large file size • Used for creating high quality print reproductions • Uncompressed. • Usually stored in the TIFF file format PUB (Formerly named PCC) • Identical representation of BAR file except cropped of color bars for public presentation Access • Cropped version of BAR image for general web/online database access • Generally fits within viewing area of average monitor • Reasonable file size for fast download; does not require a fast network connection • Acceptable quality for general research • Compressed for speed of access • Usually stored in JPEG file format
11
RIP or RPD / Discovery • Created via a Rapid Imaging Project • Color Corrected in a batch process • Contains metadata about the capture process • Medium file size • Quality level suitable for PowerPoint presentation / on-line study • File name denotes part of Rapid Imaging Project (e.g. ag-obj-102104-001-rip) • Not intended for publication purposes Thumbnail • A very small image usually presented with the object / bibliographic record • Designed to display quickly online; allows user to determine whether they want to view access image • Usually stored in JPEG or GIF file formats • Not always suitable for images consisting primarily of text, fine detail art, etc.; user cannot tell what content is at so small a scale Metadata: Overview
Digital image metadata is textual information embedded in an image file. Metadata has become an increasingly important attribute of a digital file, valuable for both creators and users of digital images. It offers a tool for both the creators and users of digital images that can describe an image’s technical characteristics, color profile, content, context, licensing terms, and perhaps most importantly, the identity and contact information for the rights holder.
There is no one standard for metadata creation that meets all the needs of all types of collections and repositories, however most common metadata schemes include the following sets of information:
Descriptive Metadata Metadata that describes the intellectual content of a resource. Administrative Metadata Metadata that includes information about ownership and rights management. Structural Metadata Metadata that describes relationships between multiple digital files, such as page order in a digitized book or manuscript. Technical Metadata Metadata that describes the features of the digital file, such as resolution, pixel dimensions, compression, etc.
The ability to readily identify and contact the rights holder for an image will likely become critically important if (when) the proposed “Orphan Works” exemptions to copyright law are passed. This legislation, if passed, will affect all photographers by allowing anyone in possession of an image to copy, modify, distribute, publish and otherwise use it for any purpose, after a reasonably diligent search fails to identify the rights holder. All images previously distributed without rights metadata may soon be vulnerable to unlicensed use as “orphaned” images. Embedding complete, accurate rights metadata will help protect images from unlicensed use. Similar legislation is under consideration in many countries.
Metadata can be embedded in standard file formats, such as TIFF and JPEG. You can also embed metadata in RAW files, although this is only recommended for Adobe DNG file format, since
12
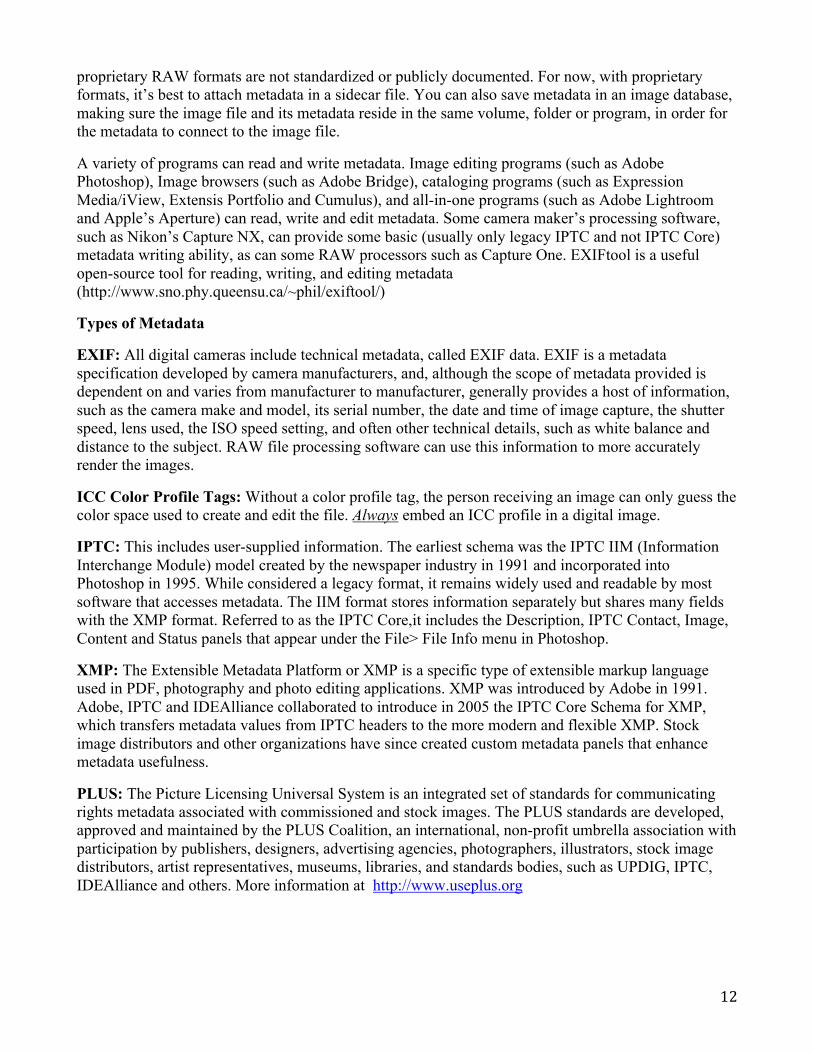
proprietary RAW formats are not standardized or publicly documented. For now, with proprietary formats, it’s best to attach metadata in a sidecar file. You can also save metadata in an image database, making sure the image file and its metadata reside in the same volume, folder or program, in order for the metadata to connect to the image file.
A variety of programs can read and write metadata. Image editing programs (such as Adobe Photoshop), Image browsers (such as Adobe Bridge), cataloging programs (such as Expression Media/iView, Extensis Portfolio and Cumulus), and all-in-one programs (such as Adobe Lightroom and Apple’s Aperture) can read, write and edit metadata. Some camera maker’s processing software, such as Nikon’s Capture NX, can provide some basic (usually only legacy IPTC and not IPTC Core) metadata writing ability, as can some RAW processors such as Capture One. EXIFtool is a useful open-source tool for reading, writing, and editing metadata (http://www.sno.phy.queensu.ca/~phil/exiftool/)
Types of Metadata
EXIF: All digital cameras include technical metadata, called EXIF data. EXIF is a metadata specification developed by camera manufacturers, and, although the scope of metadata provided is dependent on and varies from manufacturer to manufacturer, generally provides a host of information, such as the camera make and model, its serial number, the date and time of image capture, the shutter speed, lens used, the ISO speed setting, and often other technical details, such as white balance and distance to the subject. RAW file processing software can use this information to more accurately render the images.
ICC Color Profile Tags: Without a color profile tag, the person receiving an image can only guess the color space used to create and edit the file. Always embed an ICC profile in a digital image.
IPTC: This includes user-supplied information. The earliest schema was the IPTC IIM (Information Interchange Module) model created by the newspaper industry in 1991 and incorporated into Photoshop in 1995. While considered a legacy format, it remains widely used and readable by most software that accesses metadata. The IIM format stores information separately but shares many fields with the XMP format. Referred to as the IPTC Core,it includes the Description, IPTC Contact, Image, Content and Status panels that appear under the File> File Info menu in Photoshop.
XMP: The Extensible Metadata Platform or XMP is a specific type of extensible markup language used in PDF, photography and photo editing applications. XMP was introduced by Adobe in 1991. Adobe, IPTC and IDEAlliance collaborated to introduce in 2005 the IPTC Core Schema for XMP, which transfers metadata values from IPTC headers to the more modern and flexible XMP. Stock image distributors and other organizations have since created custom metadata panels that enhance metadata usefulness.
PLUS: The Picture Licensing Universal System is an integrated set of standards for communicating rights metadata associated with commissioned and stock images. The PLUS standards are developed, approved and maintained by the PLUS Coalition, an international, non-profit umbrella association with participation by publishers, designers, advertising agencies, photographers, illustrators, stock image distributors, artist representatives, museums, libraries, and standards bodies, such as UPDIG, IPTC, IDEAlliance and others. More information at http://www.useplus.org
13
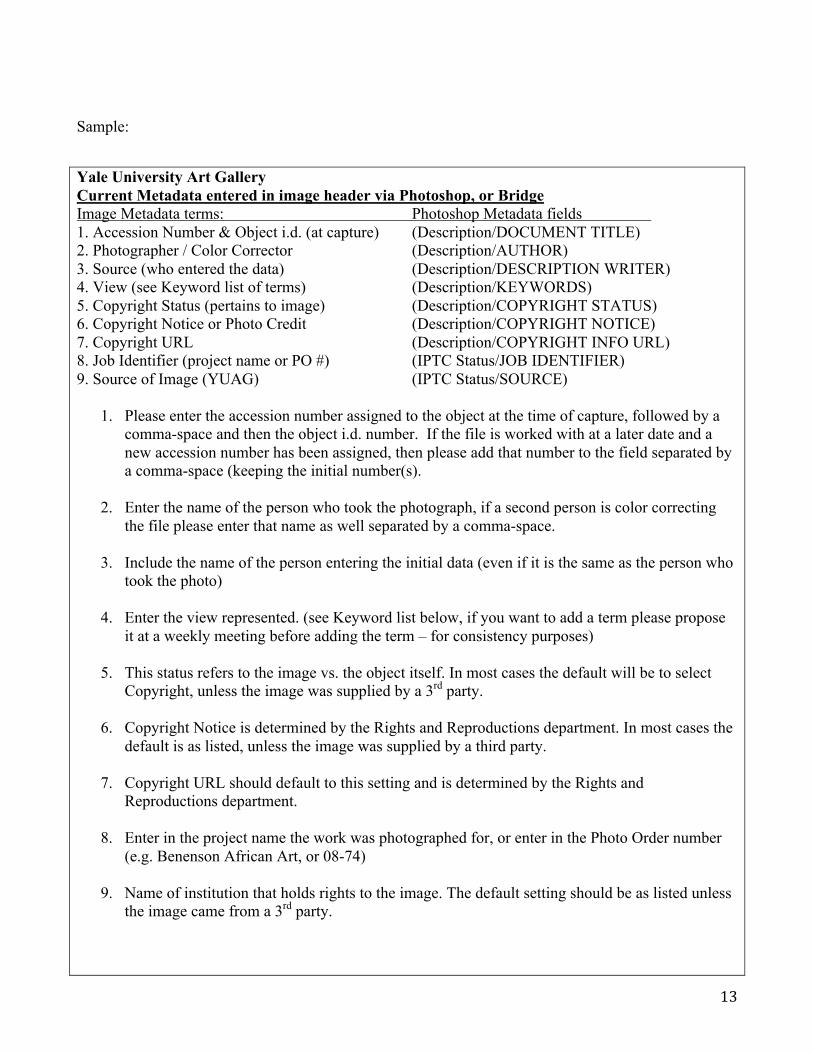
Sample:
Yale University Art Gallery Current Metadata entered in image header via Photoshop, or Bridge Image Metadata terms: Photoshop Metadata fields 1. Accession Number & Object i.d. (at capture) (Description/DOCUMENT TITLE) 2. Photographer / Color Corrector (Description/AUTHOR) 3. Source (who entered the data) (Description/DESCRIPTION WRITER) 4. View (see Keyword list of terms) (Description/KEYWORDS) 5. Copyright Status (pertains to image) (Description/COPYRIGHT STATUS) 6. Copyright Notice or Photo Credit (Description/COPYRIGHT NOTICE) 7. Copyright URL (Description/COPYRIGHT INFO URL) 8. Job Identifier (project name or PO #) (IPTC Status/JOB IDENTIFIER) 9. Source of Image (YUAG) (IPTC Status/SOURCE)
1. Please enter the accession number assigned to the object at the time of capture, followed by a comma-space and then the object i.d. number. If the file is worked with at a later date and a new accession number has been assigned, then please add that number to the field separated by a comma-space (keeping the initial number(s).
2. Enter the name of the person who took the photograph, if a second person is color correcting the file please enter that name as well separated by a comma-space.
3. Include the name of the person entering the initial data (even if it is the same as the person who took the photo)
4. Enter the view represented. (see Keyword list below, if you want to add a term please propose it at a weekly meeting before adding the term – for consistency purposes)
5. This status refers to the image vs. the object itself. In most cases the default will be to select Copyright, unless the image was supplied by a 3rd party.
6. Copyright Notice is determined by the Rights and Reproductions department. In most cases the default is as listed, unless the image was supplied by a third party.
7. Copyright URL should default to this setting and is determined by the Rights and Reproductions department.
8. Enter in the project name the work was photographed for, or enter in the Photo Order number (e.g. Benenson African Art, or 08-74)
9. Name of institution that holds rights to the image. The default setting should be as listed unless the image came from a 3rd party.
14
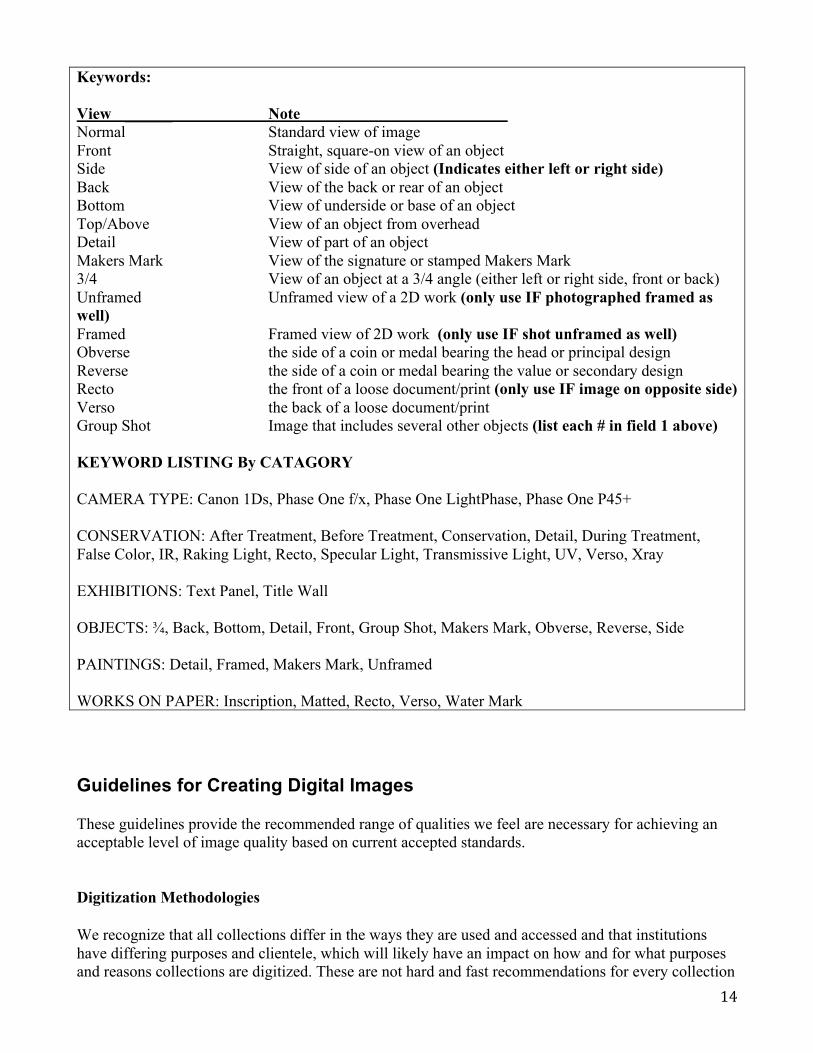
Keywords: View ______ Note Normal Standard view of image Front Straight, square-on view of an object Side View of side of an object (Indicates either left or right side) Back View of the back or rear of an object Bottom View of underside or base of an object Top/Above View of an object from overhead Detail View of part of an object Makers Mark View of the signature or stamped Makers Mark 3/4 View of an object at a 3/4 angle (either left or right side, front or back) Unframed Unframed view of a 2D work (only use IF photographed framed as well) Framed Framed view of 2D work (only use IF shot unframed as well) Obverse the side of a coin or medal bearing the head or principal design Reverse the side of a coin or medal bearing the value or secondary design Recto the front of a loose document/print (only use IF image on opposite side) Verso the back of a loose document/print Group Shot Image that includes several other objects (list each # in field 1 above) KEYWORD LISTING By CATAGORY CAMERA TYPE: Canon 1Ds, Phase One f/x, Phase One LightPhase, Phase One P45+ CONSERVATION: After Treatment, Before Treatment, Conservation, Detail, During Treatment, False Color, IR, Raking Light, Recto, Specular Light, Transmissive Light, UV, Verso, Xray EXHIBITIONS: Text Panel, Title Wall OBJECTS: ¾, Back, Bottom, Detail, Front, Group Shot, Makers Mark, Obverse, Reverse, Side PAINTINGS: Detail, Framed, Makers Mark, Unframed WORKS ON PAPER: Inscription, Matted, Recto, Verso, Water Mark
Guidelines for Creating Digital Images These guidelines provide the recommended range of qualities we feel are necessary for achieving an acceptable level of image quality based on current accepted standards. Digitization Methodologies We recognize that all collections differ in the ways they are used and accessed and that institutions have differing purposes and clientele, which will likely have an impact on how and for what purposes and reasons collections are digitized. These are not hard and fast recommendations for every collection

15
and every institution. As a rule, the key to quality digitization is not to produce the highest resolution possible but to digitize at a level that matches the informational content of the original and considers the end use(s.) Decisions regarding methods of digitization should be informed by the nature of the material to be digitized, the purpose for digitizing the original material, and the end use of the digitized material.
The quality and condition of the original material to be digitized will inform both the method for converting the original analog material to digital, as well as choices about the resolution at which to digitize. Is the material in stable or deteriorating condition? Is it being digitized for preservation, for access, for presentation, or for publication? Will it be viewed on a computer, on a large projection screen, as a quarter-page illustration in a newsprint magazine, a double-page spread in an art book, or a street banner several feet high? All these questions and answers are important in determining how material should or will be digitized.
Source Material and Equipment
Digitization may involve conversion from analog originals (such as a Steiglitz negative) or analog reproductions (a color transparency of a Picasso painting) or direct digital capture from original art, artifacts or scenery (a “born digital” photograph of a painting or artifact, or digital photographs of an exhibition or event, for instance.)
The format and condition of the material to be digitized, among other factors, will inform equipment choices. For instance, material that is 2D, stable, and of modest dimensions (whether an original work or an analog reproduction thereof) may be readily digitized on a consumer or graphics professional grade flatbed scanner. Advantages to flatbed scanning are equipment cost and environmental requirements (a controlled image may be produced in a relatively uncontrolled – eg non-photo-studio – environment); disadvantages include longer scan times and size limitations.
Cameras may be used to capture material that, for instance, is larger in format, is 3D, requires shorter exposure times, or may have more specific lighting requirements. Professional grade DSLR cameras may be selected for RIP projects or event documentation. Advantages of DSLR cameras include versatility and cost. However, for direct digital capture where the end use may involve publication, medium or large format cameras have become the norm. Large format cameras include scanbacks by manufacturers such as PhaseOne and Betterlight. Scanback cameras require a continuous lighting source. Advantages include large, uninterpolated files. Disadvantages include long exposure times and cost. Medium format cameras may be of the single or multishot variety; manufacturers include PhaseOne, Leaf, and Hasselblad. Single shot cameras produce interpolated files, while multishot cameras devote one or more shots to each color channel, producing a sharper, uninterpolated file. Strobe lighting may be used with both of these types of medium –format cameras. Advantages include shorter capture times, disadvantages include high cost.
Specialized equipment and other infrastructure
Camera setups may be vertical (camera on tripod photographing painting on easel), horizontal (camera mounted on copystand to photograph flat works) or specialized (two DSLRs mounted at angles over a book cradle.) Again, these setups will be determined largely by the safe handling requirements for the

16
type of material to be digitized. There is a great deal of specialized equipment for still digital imaging of 2D and 3D material that is not covered in this document.
Ideally, areas in which works are photographed should have daylight-balanced lighting available for viewing and softproofing, with neutral (black or neutral grey) surfaces and furnishings to prevent glare, reflection and color contamination as much as practicable. Other considerations include sufficient network access and speed for file transfer, and clean, conditioned power/adequate voltage and appropriate outlets for sensitive (for instance, scan backs) or high-draw (for instance, powerpacks for strobe lighting) equipment.
Resolution
Camera resolution is commonly expressed in megapixels, units of one million pixels. This number is derived by multiplying the pixel dimensions of the camera’s capture (and generally rounding up.) In selecting cameras, see also sensor size.
While digital image resolution is commonly given in pixels per inch (eg, 300 ppi) it is important to understand that, in the absence of the overall pixel dimensions of a digital image (eg 1500 pixels wide by 750 pixels high), the ppi of a digital image is meaningless. When speaking of the resolution of a digital image, bear in mind that a digital image has no absolute size (in inches) nor absolute resolution. Resolution can only be fully expressed by ppi in conjunction with the overall pixel dimensions of a digital image. Pixels per inch is a function of the image viewing environment. For instance, if an image of 1000 x 1000 pixels is set to display at 100 ppi, the size of the image when viewed at 100% will be 10 inches square. The same image may also be displayed at 1000 pixels per inch, in which case the size of the same image when viewed at 100% will be only 1 inch square.
General Approaches
Given that many original cultural materials are valuable, fragile, rare or otherwise vulnerable and/or of limited availability for digitization, the prevailing approach until recently has been the idea of “capture once, use many” – that the best practice should be to create the highest resolution and highest quality file overall that technology and budget can support, in the hope that the master file or any derivative thereof will be able to serve any and all future user needs, and that the original object will not need to be digitized again.
However, rapid imaging projects have steadily gained traction in the cultural heritage community over the past 2-3 years. The rapid imaging approach offers an inexpensive, flexible alternative to traditional high-resolution digitization. Using readily accessible high-end consumer imaging equipment, a RIP station can create medium resolution images suitable for “discovery,” for instance online research, web use, classroom use, or PowerPoint presentation. RIP files are generally produced quickly, utilizing automated batch editing processes with a minimum of individual attention to each file, and may not be suitable for print. Digitization projects may also bridge the gap between “capture once, use many” and RIP. For instance, a rapid workflow (auto focus, batch editing, matching color only to target values rather than soft-proofing image to the original object) may be used for capture on high end equipment.

17
Master Image File Good digital imaging projects produce a high-quality "master" or archival image and then derive multiple versions in smaller sizes or alternative formats for a variety of uses. There are compelling preservation, access, and economic reasons for creating an archival-quality digital master image: it provides an information-rich, unedited, research quality surrogate, and reduces the need for rescanning in the future. A high-quality master image will make the investment in the image capture process worthwhile. Since user expectations and technology change over time, a digital master must be available and rich enough to accommodate future needs and applications. The master image should be the highest quality you can afford; it should not be edited or processed for any specific output; and it should be uncompressed. Intensive quality control should be applied in creating master image files. Derivative Image Files Derivative files are created from the master digital image, and are used in place of it, usually for general Internet or network access. Derivative files typically include an access image, which is sized to fit within the screen of an average monitor or other delivery mechanism and a thumbnail image, which is small enough to load quickly and linked to the larger access image. With the proper image editing software it is not necessary to subject source materials to multiple scans as derivative files can be created from the high quality master images. Guidelines for Source Type For the following source types, recommendations are made for master, access and thumbnails. Be aware that access files should be made from an optimized master file. For more information on calculating resolution for print, see http://www.scantips.com/calc.html • Text — When scanning text documents, spatial resolutions should be based on the size of text found in the document and resolutions should be adjusted accordingly. Documents with smaller printed text may require higher resolutions and bit depths than documents that use large typefaces. Projects that will have Optical Character Recognition (OCR) applied, may wish to test pages at several resolutions to find the most satisfactory results. Images that produce the best results for OCR may not be pleasing to the eye and may require separate scans for OCR and human display. Projects with large amounts of textual materials, particularly hard-to-read materials such as manuscripts, should provide transcriptions of the materials in addition to the digital image. Access to textual material can be further enhanced through SGML/XML markup schemes such as the Text Encoding Initiative (TEI). As rekeying text can be cost prohibitive, projects considering transcriptions should investigate including Optical Character Recognition (OCR) software in their toolkit.
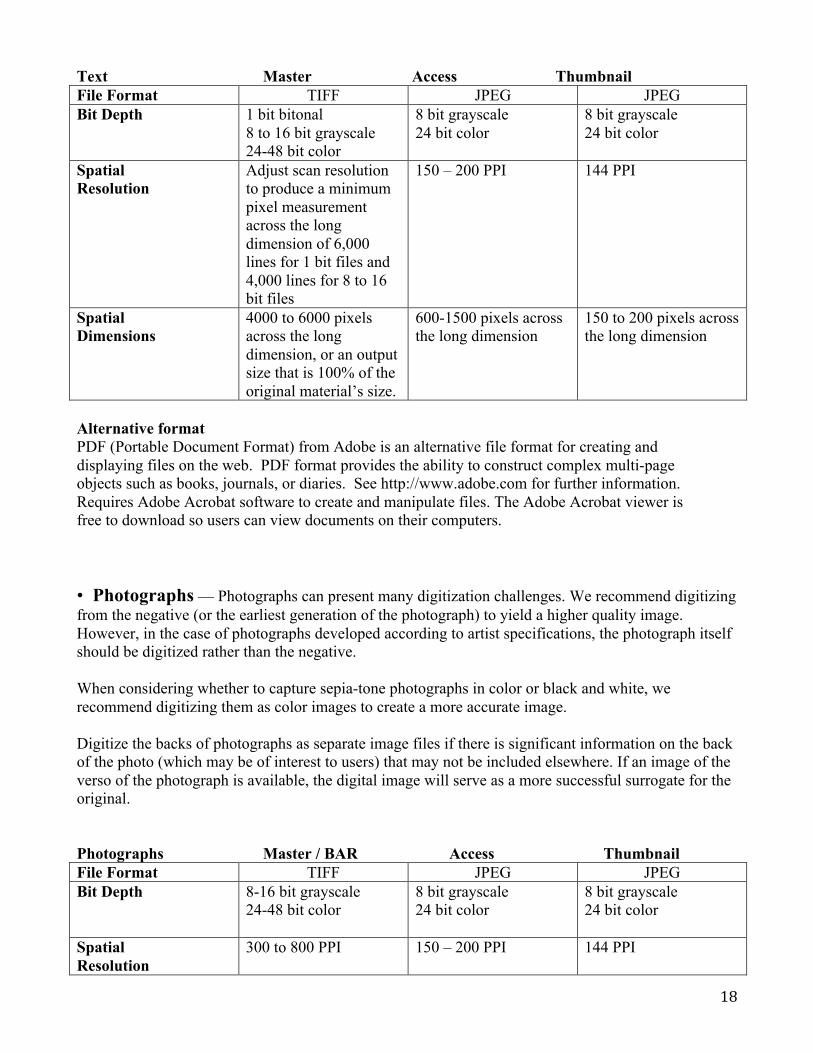
18
Text Master Access Thumbnail File Format TIFF JPEG JPEG Bit Depth 1 bit bitonal
8 to 16 bit grayscale 24-48 bit color
8 bit grayscale 24 bit color
8 bit grayscale 24 bit color
Spatial Resolution
Adjust scan resolution to produce a minimum pixel measurement across the long dimension of 6,000 lines for 1 bit files and 4,000 lines for 8 to 16 bit files
150 – 200 PPI 144 PPI
Spatial Dimensions
4000 to 6000 pixels across the long dimension, or an output size that is 100% of the original material’s size.
600-1500 pixels across the long dimension
150 to 200 pixels across the long dimension
Alternative format PDF (Portable Document Format) from Adobe is an alternative file format for creating and displaying files on the web. PDF format provides the ability to construct complex multi-page objects such as books, journals, or diaries. See http://www.adobe.com for further information. Requires Adobe Acrobat software to create and manipulate files. The Adobe Acrobat viewer is free to download so users can view documents on their computers. • Photographs — Photographs can present many digitization challenges. We recommend digitizing from the negative (or the earliest generation of the photograph) to yield a higher quality image. However, in the case of photographs developed according to artist specifications, the photograph itself should be digitized rather than the negative. When considering whether to capture sepia-tone photographs in color or black and white, we recommend digitizing them as color images to create a more accurate image. Digitize the backs of photographs as separate image files if there is significant information on the back of the photo (which may be of interest to users) that may not be included elsewhere. If an image of the verso of the photograph is available, the digital image will serve as a more successful surrogate for the original. Photographs Master / BAR Access Thumbnail File Format TIFF JPEG JPEG Bit Depth 8-16 bit grayscale
24-48 bit color 8 bit grayscale 24 bit color
8 bit grayscale 24 bit color
Spatial Resolution
300 to 800 PPI 150 – 200 PPI 144 PPI

19
Spatial Dimensions
4000 to 6000 pixels across the long dimension depending on size of original, or an output size that is 100% of the original material’s size, excluding mounts and borders
600-1500 pixels across the long dimension
150 to 200 pixels across the long dimension
• Graphics — Graphics include the various techniques used to reproduce words and images from originals such as engraving, lithography, line art, graphs, diagrams, illustrations, technical drawings and other visual representations. Nearly all graphics will be two-dimensional and should be scanned using the following guidelines. Graphics Master / BAR Access Thumbnail File Format TIFF JPEG JPEG Bit Depth 8-16 bit grayscale
24-48 bit color 8 bit grayscale 24 bit color
8 bit grayscale 24 bit color
Spatial Resolution
400 to 800 PPI 150 – 200 PPI 144 PPI
Spatial Dimensions
4000 to 8000 pixels across the long dimension, or an output size that is 100% of the original material’s size, excluding mounts and borders
600-1500 pixels across the long dimension
150 to 200 pixels across the long dimension
• Artwork/3-Dimensional Objects — For projects where the physical dimensions of the non-3D artwork matches the equipment available, the following standards can be used. If scanning photographic copies of objects and artifacts, see recommended requirements in the appropriate photo and film charts above. Artwork/3D objects Master / BAR Access Thumbnail File Format TIFF JPEG JPEG Bit Depth 48 bit color 24 bit color 24 bit color
Spatial Resolution
400 PPI-Device Maximum
300 PPI 144 PPI
Spatial Dimensions
100% of original with a minimum of 4000 pixels across the long dimension.
600-1500 pixels across the long dimension
150 to 200 pixels across the long dimension

20
• Maps — Scanning maps may involve items that vary widely in size, condition and amount of detail. Small maps may fit easily onto a flatbed scanner, while large plat maps may need to be scanned in sections using a large format scanner or captured by a camera. The size of the image can become a problem for storage, but also for viewing, serving over the web or processing. Smaller maps (less than 36 inches on the longest dimension) should be digitized at 600 PPI, 48-bit color or 16-bit grayscale if possible. For larger maps, 300-400 PPI may be more practical. If it becomes necessary to digitize a map in sections and stitch the image together in Photoshop, keep both the original images of the sections as well as the combined image. Maps Master / BAR Access Thumbnail File Format TIFF JPEG JPEG Bit Depth 8-16 bit grayscale
48 bit color 8 bit grayscale 24 bit color
8 bit grayscale 24 bit color
Spatial Resolution
400-600 PPI 300 to 400 PPI for larger maps
150 – 200 PPI 144 PPI
Spatial Dimensions
4000 to 8000 pixels across the long dimension, or an output size that is 100% of the original material’s size.
1500 pixels across the long dimension
150 to 200 pixels across the long dimension
Other considerations When scanning maps, spatial resolutions should be based on the size of smallest detail included in the map and resolutions should be adjusted accordingly. Documents with smaller details may require higher resolutions and bit depths than maps that use larger details and typefaces. • Film — For duplicates (negatives, slides, transparencies), match the original size. However, if original size is not known, the following recommendations are supplied: For a copy negative or transparency, scan at a resolution to achieve 4000 pixels across the long dimension. For duplicates, follow the scanning recommendations for the size that matches the actual physical dimensions of the duplicate. Master scans of camera originals may be captured and saved in RGB, particularly those negatives that contain color information as a result of staining, degradation or intentional colorcasts. Derivative files could later be reduced to grayscale in the scanning software or during post-processing editing. Film Master Access Thumbnail File Format TIFF JPEG JPEG Bit Depth 8-16 bit grayscale
24-48 bit color 8 bit grayscale 24 bit color
8 bit grayscale 24 bit color
21
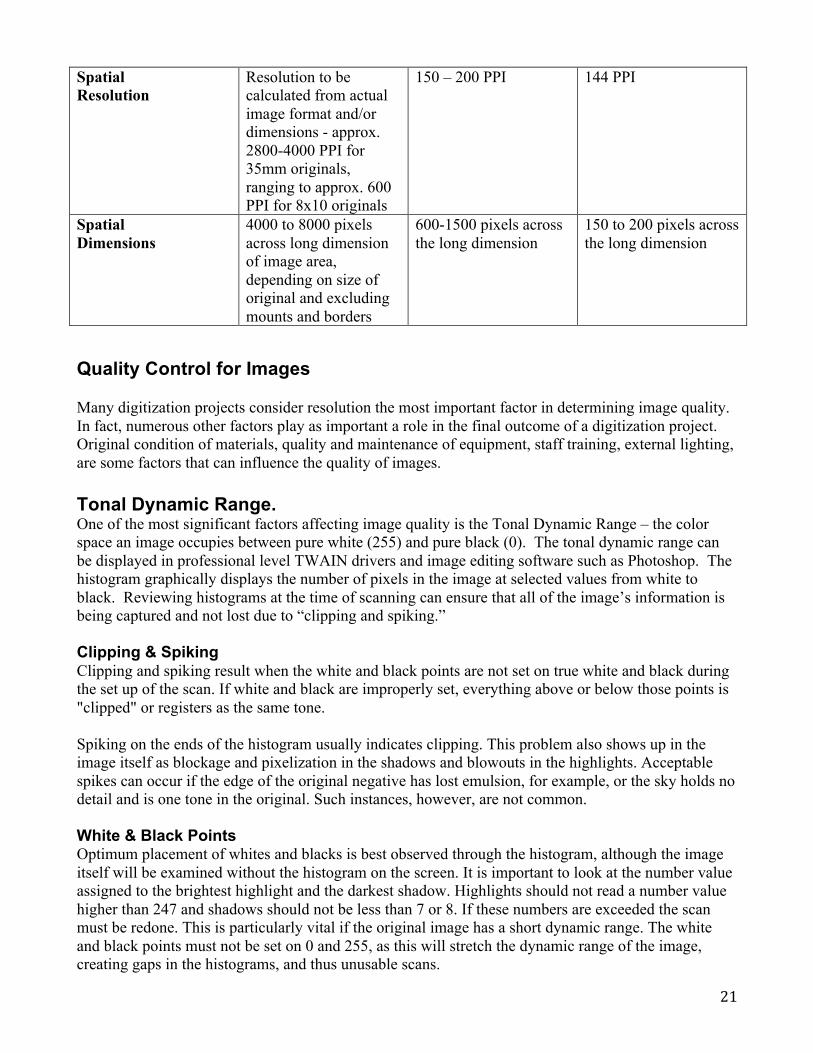
Spatial Resolution
Resolution to be calculated from actual image format and/or dimensions - approx. 2800-4000 PPI for 35mm originals, ranging to approx. 600 PPI for 8x10 originals
150 – 200 PPI 144 PPI
Spatial Dimensions
4000 to 8000 pixels across long dimension of image area, depending on size of original and excluding mounts and borders
600-1500 pixels across the long dimension
150 to 200 pixels across the long dimension
Quality Control for Images Many digitization projects consider resolution the most important factor in determining image quality. In fact, numerous other factors play as important a role in the final outcome of a digitization project. Original condition of materials, quality and maintenance of equipment, staff training, external lighting, are some factors that can influence the quality of images. Tonal Dynamic Range. One of the most significant factors affecting image quality is the Tonal Dynamic Range – the color space an image occupies between pure white (255) and pure black (0). The tonal dynamic range can be displayed in professional level TWAIN drivers and image editing software such as Photoshop. The histogram graphically displays the number of pixels in the image at selected values from white to black. Reviewing histograms at the time of scanning can ensure that all of the image’s information is being captured and not lost due to “clipping and spiking.” Clipping & Spiking Clipping and spiking result when the white and black points are not set on true white and black during the set up of the scan. If white and black are improperly set, everything above or below those points is "clipped" or registers as the same tone. Spiking on the ends of the histogram usually indicates clipping. This problem also shows up in the image itself as blockage and pixelization in the shadows and blowouts in the highlights. Acceptable spikes can occur if the edge of the original negative has lost emulsion, for example, or the sky holds no detail and is one tone in the original. Such instances, however, are not common. White & Black Points Optimum placement of whites and blacks is best observed through the histogram, although the image itself will be examined without the histogram on the screen. It is important to look at the number value assigned to the brightest highlight and the darkest shadow. Highlights should not read a number value higher than 247 and shadows should not be less than 7 or 8. If these numbers are exceeded the scan must be redone. This is particularly vital if the original image has a short dynamic range. The white and black points must not be set on 0 and 255, as this will stretch the dynamic range of the image, creating gaps in the histograms, and thus unusable scans.

22
These adjustments need to be made at the time of scanning since adjusting images after the fact in image editing software introduces interpolation of the dynamic range (guessing what the points are in the image) and frequently results in gaps in the histogram rather than continuous curves. Color Management Color management can be one of the most challenging and costly aspects of the digitization workflow. Each piece of hardware in the path from source to digital file can introduce biases of color and tone. The goal of color management systems is to accurately and predictably compensate for each of these biases across the entire system from scanner to print output or monitor display. Projects not undertaking color management should be aware that equipment will introduce color biases into any digitized materials. Attempting to make digitized materials “look good” on un-calibrated equipment may introduce these biases into the master images. Projects without a color management system should use available tools to perform basic monitor calibrations: Set to 24 millions of colors Set monitor Gamma at 2.2 (including Macintosh computers, that by default are set at 1.8 gamma) Color temperature at 6500° K Targets and Color Bars Targets and color bars are used to measure system resolution, tonal range and color fidelity. Including targets in a digitization workflow allows color management systems to create profiles for each device or for later adjustment in projects not implementing color management during scanning. Targets are a way of predicting image quality, and help ensure that the scanning system you are using is producing the best quality image it can and is operating at a consistent level of quality over time. Targets for prints and transparencies exist and targets appropriate for the materials being scanned should be used (paper, film, transparency, etc.). Targets usually contain patches of color, black and white, or shades of gray for verifying tone reproduction. Resolution targets allow projects to measure the level of detail a particular piece of equipment can capture. Resolution targets can be helpful in evaluating equipment before purchase or assessing the quality of output from a vendor. As equipment biases can shift over time best practice is to include targets on a regular basis throughout the course of the project. Some digitization projects are also scanning a color bar along with the original, to be included in the final digital image, to aid users in verifying accuracy in color reproduction. A few of the commonly available targets are: Kodak Q13 Color Separation Guide Greytag-Macbeth Color Checker IT8.7 (1/2) color output target (reflective/transmissive) IEEE Standard Facsimile Test Chart RIT Alphanumberic Resolution Test Object target USAF 1951 Resolution Target ISO Camera Resolution Chart
23
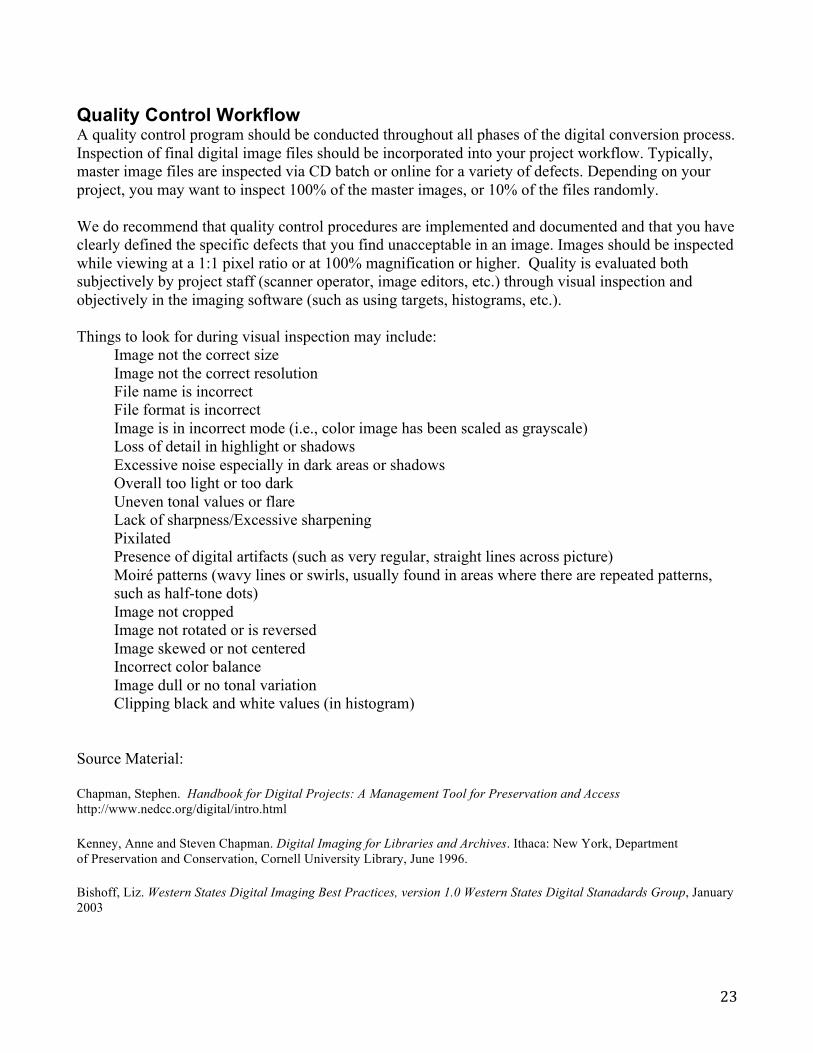
Quality Control Workflow A quality control program should be conducted throughout all phases of the digital conversion process. Inspection of final digital image files should be incorporated into your project workflow. Typically, master image files are inspected via CD batch or online for a variety of defects. Depending on your project, you may want to inspect 100% of the master images, or 10% of the files randomly. We do recommend that quality control procedures are implemented and documented and that you have clearly defined the specific defects that you find unacceptable in an image. Images should be inspected while viewing at a 1:1 pixel ratio or at 100% magnification or higher. Quality is evaluated both subjectively by project staff (scanner operator, image editors, etc.) through visual inspection and objectively in the imaging software (such as using targets, histograms, etc.). Things to look for during visual inspection may include: Image not the correct size Image not the correct resolution File name is incorrect File format is incorrect Image is in incorrect mode (i.e., color image has been scaled as grayscale) Loss of detail in highlight or shadows Excessive noise especially in dark areas or shadows Overall too light or too dark Uneven tonal values or flare Lack of sharpness/Excessive sharpening Pixilated Presence of digital artifacts (such as very regular, straight lines across picture)
Moiré patterns (wavy lines or swirls, usually found in areas where there are repeated patterns, such as half-tone dots)
Image not cropped Image not rotated or is reversed Image skewed or not centered Incorrect color balance Image dull or no tonal variation Clipping black and white values (in histogram) Source Material: Chapman, Stephen. Handbook for Digital Projects: A Management Tool for Preservation and Access http://www.nedcc.org/digital/intro.html Kenney, Anne and Steven Chapman. Digital Imaging for Libraries and Archives. Ithaca: New York, Department of Preservation and Conservation, Cornell University Library, June 1996. Bishoff, Liz. Western States Digital Imaging Best Practices, version 1.0 Western States Digital Stanadards Group, January 2003