yamaha - f e r m a t a · 2011. 6. 22. · introduction congratulations on purchasing the yamaha...
TRANSCRIPT

YAMAHA®
AUTHORIZEDPRODUCT MANUAL
R E V 7Professional Digital Reverberator

YAMAHAProfessional Digital ReverberatorRéverbérateur numérique professionnelDas Digital-Echohallgerät für den Profi
REV7Operating ManualMode d'emploiBedienungsanleitung
INTRODUCTION
Congratulations on purchasing the Yamaha REV7 Professional Digital Reverberator.You are now the owner of a state-of-the-art sound processing device that is bothextremely versatile and easy to operate.This refined stereo reverberator uses highly complex digital technology to createastonishingly authentic, warm, natural reverberation. A host of superb featuresmakes this unit a unique example of modern, sophisticated sound processing-fromYamaha.
*A wide variety of reverberation, echo, delay, and ambient effects.*Special Modulation effects include stereo phasing, flanging, chorus, and
tremolo.*Totally accurate and independent control of parameters.*The 30 factory preset effects may be edited to create up to 60 user programs,
which can be stored in the REV7’s memory, and instantly recalled at the touchof a button.
*Remote control unit permits remote selection of all presets and the mostcommonly used user programs.
*Effects may be selected from an external MIDI device (e.g., a DX7 synthesizer)enabling automatic selection of a specified reverberation effect for each voiceon the synthesizer.
*Full three-band parametric equalization allows adjustment of the sound of theREV7 to exactly match the acoustic properties of any environment.
This highly advanced unit offers superb performance in any situation where profes-sional quality reverberation is required: concerts, recording studios, and broadcast-ing, and will satisfy the highest demands of the contemporary musician and soundengineer. The REV7 Professional Digital Reverberator, designed according toYamaha’s philosophy of making up-to-the-minute advances in computer technologyavailable to you, the discerning user.The accompanying PROGRAM TABLE BOOKLET lists all the REV7’s presetprograms, and provides space for you to record the details of your own personallyprogrammed user programs.
1

CONTENTS
PRECAUTIONS. . . . . . . . . . . . . . . . . . . . . . . . . . . . . . . . . . . . . 3FRONT PANEL . . . . . . . . . . . . . . . . . . . . . . . . . . . . . . . . . . . . 4REAR PANEL . . . . . . . . . . . . . . . . . . . . . . . . . . . . . . . . . . . . . 5RC7 REMOTE CONTROL UNIT . . . . . . . . . . . . . . . . . . . . . . . . . 6QUICK OPERATING GUIDE. . . . . . . . . . . . . . . . . . . . . . . . . . . . 7BASIC OPERATIONS. . . . . . . . . . . . . . . . . . . . . . . . . . . . . . . . . 8RECALL . . . . . . . . . . . . . . . . . . . . . . . . . . . . . . . . . . . . . . . . . 9
DIRECT RECALL . . . . . . . . . . . . . . . . . . . . . . . . . . . . . . . . . 9NUMERIC KEY RECALL . . . . . . . . . . . . . . . . . . . . . . . . . . . 10+/- KEY RECALL. . . . . . . . . . . . . . . . . . . . . . . . . . . . . . . . 10REMOTE CONTROL RECALL . . . . . . . . . . . . . . . . . . . . . . . 10
EDIT&STORE . . . . . . . . . . . . . . . . . . . . . . . . . . . . . . . . . . . . 11EDITING PARAMETERS . . . . . . . . . . . . . . . . . . . . . . . . . . . 11STORING PROGRAMS . . . . . . . . . . . . . . . . . . . . . . . . . . . . . 11
EXPLANATION OF PARAMETERS . . . . . . . . . . . . . . . . . . . . . . 12REV TYPE . . . . . . . . . . . . . . . . . . . . . . . . . . . . . . . . . . . . . 12E/R1 AND E/R2 TYPE . . . . . . . . . . . . . . . . . . . . . . . . . . . . . 13DELAY TYPE . . . . . . . . . . . . . . . . . . . . . . . . . . . . . . . . . . . 14ECHO TYPE . . . . . . . . . . . . . . . . . . . . . . . . . . . . . . . . . . . . 14MOD TYPE . . . . . . . . . . . . . . . . . . . . . . . . . . . . . . . . . . . . . 15
DESCRIPTION OF PRESETS. . . . . . . . . . . . . . . . . . . . . . . . . . . 17MIDI SELECTION . . . . . . . . . . . . . . . . . . . . . . . . . . . . . . . . . . 19
MIDI MEMORY SETTING. . . . . . . . . . . . . . . . . . . . . . . . . . . . 19CHECKING MIDI MEMORY . . . . . . . . . . . . . . . . . . . . . . . . . 20CLEARING MIDI MEMORY . . . . . . . . . . . . . . . . . . . . . . . . . 20
APPLICATION EXAMPLES. . . . . . . . . . . . . . . . . . . . . . . . . . . . 21EARLY REFLECTION MODE CHART . . . . . . . . . . . . . . . . . . . . 22ROOM SIZE CHART . . . . . . . . . . . . . . . . . . . . . . . . . . . . . . . . 24USER PROGRAMMING TABLE. . . . . . . . . . . . . . . . . . . . . . . . . . 25BLOCK DIAGRAM . . . . . . . . . . . . . . . . . . . . . . . . . . . . . . . . . 26DIMENSIONS . . . . . . . . . . . . . . . . . . . . . . . . . . . . . . . . . . . . . 26SPECIFICATIONS . . . . . . . . . . . . . . . . . . . . . . . . . . . . . . . . . . 27MIDI IMPLEMENTATION CHART. . . . . . . . . . . . . . . . . . . . . . . 28MEMORY (ROM) CONTENTS AND CONTROLLABLEPARAMETERS . . . . . . . . . . . . . . . . . . . . . . . . . . . . . . . . . . . . 29
2

PRECAUTIONS NOTE: It is vital to read this section before using your REV7 Professional Digital Reverberator. This unit uses state-of-the-art
digital technology which, although constructed for years of trouble-free use, requires careful handling.
VOLTAGE RATINGSCheck that the AC supply in your area is appropriate foryour REV7.U.S./Canadian Model: 11 OV - 120V, 50/60Hz.General Model: 220V - 240V, 50/60Hz.
ENVIRONMENTAL TEMPERATURE Do not expose the REV7 to excessive heat. The operatingtemperature range of this unit is between 0 and 40 degreesCentigrade (32 ~ 104 degrees Fahrenheit).
EXTERNAL CLEANINGDO NOT clean the exterior of the REV7 with solventssuch as benzine or paint thinner. Dust, dirt, or finger-marks should simply be removed with a soft, dry cloth.Internal cleaning of the unit should only be done by aqualified technician.
BACKUP BATTERYTo ensure that User Programs are not lost when theREV7’s power is turned off, a built-in Lithium batteryacts as a backup. In normal use, this battery lasts 5 years,but it is advisable to change the battery before this timehas elapsed. Contact your local Yamaha dealer for details.NOTE: When you change the battery, the User Programs
may be lost. As a safeguard, you can note downthe parameters of your User Programs in theUSER PROGRAM TABLE accompanying thismanual. You can then reprogram the REV7 afterthe new battery is installed. The preset programsare permanent, and will not be affected by achange of battery.
XLR TYPE CONNECTORSThe XLR (Cannon) type Input and Output connectors arewired in the following configuration: Pin 1: GROUND.Pin 2: HOT. Pin 3: COLD. Ensure that all equipmentconnected to the REV7 matches this wiring.
FCC CERTIFICATION (USA)
This equipment generates and uses radio frequency Reorient the receiving antenna.energy and if not installed and used properly, that is, in Relocate the computer with respect to the receiver.strict accordance with the manufacturer’s instructions, Move the computer away from the receiver.may cause interference to radio and television reception. Plug the computer into a different outlet so thatIt has been type tested and found to comply with the computer and receiver are on different branch circuits.limits for a Class B computing device in accordance with If necessary, the user should consult the dealer or anthe specifications in Subpart J of Part 15 of FCC Rules, experienced radio/television technician for additionalwhich are designed to provide reasonable protection suggestions. The user may find the following bookletagainst such interference in a residential installation. prepared by the Federal Communications CommissionHowever, there is no guarantee that interference will not helpful:occur in a particular installation. If this equipment does “How to identify and Resolve Radio-TV interferencecause interference to radio or television reception, whichcan be determined by turning the equipment off and on,
Problems”.This booklet is available from the U.S. Government
the user is encouraged to try to correct the interference Printing Office, Washington, DC 20402, Stockby one or more of the following measures: No. 004-000-00345-4.
3

FRONT PANEL
POWER ON/OFF switchWhen the power is turned on, the last program and parameterselected will appear on the LCD.
MONO/STEREO switchThe REV7’s reverb signal is always output in stereo, whetherthe input signal is stereo or mono. If a mono signal isreceived at the Left input only, this switch, when set toMONO, sends the direct signal out of both outputs. With astereo input, this switch should be turned off. When switchedto MONO the MONO LED is illuminated. (See the BLOCKDIAGRAM)
INPUT LEVEL controlVaries the level of the input signal, over a range of +10 dB to-90 dB. At position “8” gives nominal gain of +4 dB.
EQ ON/OFF switchAllows you to switch the parametric EQ section ON or OFF,for instant comparison of equalized signal and original signal.When turned ON the EQ ON LED is illuminated.
EQUALIZER sectionA three-band semi-parametric equalizer that allows you toequalize the input signal prior to being processed into adigital reverb signal. The direct signal is NOT affected.Each of the three bands has a frequency control and a levelcontrol (+/-15 dB). The frequency ranges are as follows:
LO: 50Hz ~ 700HzMID: 0.35kHz ~ 5kHzHI: 2kHz ~ 20kHz
MIXING controlAllows you to balance the reverb signal with the direct signal.When turned completely to the left, only the direct signal isheard. When turned completely to the right, only the reverbsignal is heard.
DIRECT RECALL keysThese keys allow rapid and direct recall of the 30 presetprograms and the first 7 user programs, as explained in theDIRECT RECALL section.
PARAMETER SELECT and +/-keysAllows selection of up to 7 programmable parametersrelating to each of the preset programs, for editing andcreation of new programs. Pressing the +/- keys raises orlowers parameter values and other values (MIDI channelnumber, program number, etc.) by 1; holding down thesekeys permits continuous increase or decrease.
NUMERIC/EDITING keysFor numerically entering program numbers or parametervalues. Includes numbers 0 to 9 and decimal point. TheCLEAR key zeros the display. The ENTER key enters thenew value, when using the numeric keys for editing para-meters.
OUTPUT CONTROL keysThe MUTE key cancels the entire output. The OUT PHASEkey reverses the polarity of the right output of the reverbsignal. The BYPASS key cancels the reverb signal only, forimmediate comparison of direct signal/direct signal plusreverb.
MIDI CTRL keyPressing this key puts the REV7 into the MIDI ControlMode, allowing you to set the MIDI Channel on which MIDIsignals are received, and then program in pairs of voicenumbers and effects numbers so that effects may be automa-tically selected from a MIDI instrument, by pressing its VoiceSelect keys. Note that this key must be turned OFF beforeselection of programs can occur.

i MEMORY keysWhen using the numeric keys to select a program number,first press the MEMORY key. After selecting a memorynumber with the numeric keys, press the RECALL key torecall a program. The STORE key is used for storing editeddata when creating new programs, and for setting the REV7’sMIDI Memory.
EQ ON LEDIlluminates when the parametric EQ section is switched ON.
MONO LEDIlluminates when the MONO/STEREO switch is switched toMONO.
LCDA Liquid Crystal Display, indicating program names, para-meters and their values.
INPUT LEVEL LEDIndicates by an eight point LED the level of the input priorto processing, over a range of -30dB to 0dB.
MEMORY NUMBER LEDA two digit numeric LED (Light Emitting Diode) indicatingprogram numbers.
REAR PANEL
InputsThe REV7 can accept stereo or mono signals for processing.The inputs are balanced line 1/4” TRS (tip-ring-sleeve) jacks(which will also accept standard 1/4” mono phone jacks) andbalanced line XLR type connectors, rated at +4dBm nominallevel.When feeding a mono input to the LEFT input only, pressingthe MONO/STEREO switch on the front panel (the MONOLED will light) allows you to send the direct signal to bothoutputs. This places the direct signal in the center of thestereo reverberation. Do not press the MONO/STEREOswitch when using a stereo input.
OutputsThe REV7’s outputs are balanced TRS type phone jacks(also standard mono phone jacks) and balanced line XLRconnectors, rated at +4dBm, with a maximum output level of+18dBm. Note that a mono input signal can be processed tocreate a stereo reverberation output.
5
MIDI IN, MIDI THRU ConnectorsTo select effects programs from a MIDI device such as a DX7synthesizer, connect the MIDI output of the external deviceto the REV7’s MIDI IN terminal.The MIDI CTRL Switch should be turned ON only whilesetting the REV7’s MIDI Memory. For actual selection ofprograms by MIDI, it should be turned OFF. See the sectionentitled MIDI SELECTION for more details.The MIDI THRU connector on the rear panel allows you tosend on the MIDI control signal from the external MIDIdevice, in order to control a third MIDI device (which couldwell be a second REV7 unit, to provide independent controlof Early Reflections and Reverberation).
Remote Control UnitConnect the remote control unit to the terminal on the rearof the REV7, if you wish to select effects by remote control.

RC7 REMOTE CONTROL UNIT
DIRECT RECALL keys. These keys duplicate the functions of the corresponding keys on the front panel of the main unit. Theyallow rapid and direct recall of all 30 preset programs and the first 7 user programs, as explained in the REMOTE CONTROLRECALL section.
CONNECTIONSThe connections on the REV7 are simple and easy to make. Please be sure to read the PRECAUTIONS chapter prior to makingany connections.
6

QUICK OPERATING GUIDE
This provides an at-a-glance guide to the recall and editing functions of your REV7. For a full explanation of the functionsavailable on this advanced unit, please familiarize yourself with this entire manual.
PROGRAM RECALLThere are three ways to recall the REV7 programs (apartfrom REMOTE CONTROL).
A. DIRECT RECALL Keys. For presets 1 ~ 30, user pro-grams 31 ~ 37.
1. Presets 1 ~ 6. Press one of keys REV1 thru REV4,E/R1, E/R2.
2. Presets 7 ~ 30. Press the OTHERS key repeatedly untilthe desired program is called.
3. User Programs 31 ~ 37. Press the USER MEMORYkey, then one of keys 31 ~ 37.
B. NUMERIC KEYS. For all programs.
1. Press the MEMORY key.2. Select program number (1 ~ 90) with Numeric keys.3. Press the RECALL key.
C. +/-Keys. For all programs.
1. Press the MEMORY key.2. Use the +/- keys to increase or decrease the program
number (1 ~ 90).
7
PARAMETER CHANGE
1. Select a parameter by pressing the appropriate ParameterSelect key.
2. Alter the parameter value by using the Numeric keys or+/- keys.
3. Press the ENTER key (only necessary when Numeric keyshave been used).
PROGRAM STORE
1. Select the desired preset program.2. Change the parameters as desired.3. Press the MEMORY key.4. Select a program number (31 ~ 90) with the Numeric
keys.5. Press the STORE key.

BASIC OPERATIONS
First, a brief explanation of what happens when you use theREV7. (A look at the block diagram in this manual illustratesthis in visual form).When a signal is sent into the REV7 reverberator, it is firstEQ’d, then metered, then converted into a digital signal byan Analog/Digital converter. (NOTE: A stereo input is mixedto mono prior to being processed into a reverb signal. Thedirect signal, however, remains in stereo). The effect is thencreated within the Digital Signal Processor, the heart of theREV7. The processed digital signal is then converted backinto a stereo reverb signal by two Digital/Analog converters,which create slightly different left-channel and right-channelreverberation patterns. This is then mixed with the directsignal using the Mixing Control.Once you have connected your REV7 to your mixingconsole, synthesizer, or other external equipment, thefollowing operations should be carried out.
1. Switch power on. It is best to do this before switching onthe power of the amplifier or mixer to which the REV7’soutputs are connected, to avoid any clicks or bumps.
2. Press the MONO/STEREO switch for mono or stereoinput.
3. Send a nominal level signal into the REV7, and adjust theInput Level Control so that it peaks at just under zero onthe Input Level LED.
4. Set the Mixing Control to its half way point. This willallow you to hear an “average” mix of the reverb signaland the direct signal. Once you have selected an effect,you can then adjust the Mixing Control to your desiredbalance.
5. The output control switches should be as follows:MUTE: OFFOUT PHASE: OFF (this can be altered after selecting
an effect).MIDI CTRL: OFFBYPASS: OFF
The functions of these controls are explained in theFRONT PANEL section of this manual.
Start by setting the level controls of each band at the zero(central) position (the controls have an indent at thisposition). After selecting an effect, you can equalize thereverb signal to match the acoustic environment, or tocreate a special effect.The EQ IN/OUT switch should be ON when adjustingequalization.NOTE: If you add a large amount of EQ to your signal,
this may raise the level of the signal, and you canreduce it to peak at zero by adjusting the InputLevel Control.
You are now ready to select an effect on your REV7.
6. The REV7 has a sophisticated three-band parametricequalizer. The three bands have overlapping frequencyranges, so you can alter the frequency characteristics ofthe reverb sound (NOT the direct sound) in virtuallyany manner.
8

RECALL
This chapter explains in more detail the program selection operations covered in the QUICK OPERATING GUIDE.There are four ways of selecting (recalling) programs on the REV7: Direct Recall Selection, Numeric Key Selection, +/- KeySelection and Remote Control Selection. You can also select programs by an external MIDI device. See the section entitled MIDISELECTION.
DlRECT RECALL(Presets 1 ~ 30, User programs 31 ~ 37).The REV7’s software program allows you to directly recallall the presets, and the first seven user programs. In fact,instant one-button recall is provided for presets 1 through 6and user programs 31 through 37. This can be useful in situa-tions where you don’t have a lot of time on your hands-forexample, a live performance.
To directly recall presets, this is what you do:1. First ensure that the USER PROGRAM key is OFF (its
LED should not be illuminated).
2. The Direct Recall keys are printed with both a name and anumber. The names refer to the presets.Pressing keys REV1 thru 4 will instantly recall presets 1thru 4 respectively. The Memory LED will indicate thepreset number, and the LCD will show the name of thepreset and one of its parameters.
3. Pressing keys E/R1and E/R2 will recall presets 5 and 6.
4. Pressing the OTHERS key allows you to recall presets 7thru 30. When you press this key the Memory LED andLCD will indicate that the last preset selected by thisbutton has been recalled. Repeated pressings of this keywill increment the memory up to preset 30, then beginagain at 7.
To recall the first seven user programs:1. Press the USER MEMORY key. Its LED will light.
2. The Direct Recall keys are printed with both a name and anumber. The numbers refer to the User Program numbers.Pressing keys 31 thru 37 will instantly recall user program31 thru 37 respectively. The Memory LED will indicatethe program number, and the LCD will show the name ofthe program and one of its parameters. Note that in thiscase the OTHERS key calls only program number 37-it isnot a multi-action key as with the presets.
9

NUMERIC KEY RECALL(All programs)Selection of programs by the numeric keys is also rapid andefficient, and the advantage is that exactly the same opera-tion is required for all programs, both presets and userprograms.
1. Press the MEMORY key located to the right of thenumeric keys (its LED will light).
2. Use the numeric keys to select a number from 1 to 90(the number will flash on the Memory LED, and if youhave entered a wrong number, press the CLEAR key tozero the LED, then select another number).
3. Press the RECALL key. The Memory LED will stopflashing, and the selected program will be displayed on theLCD.
4. If you have selected a user program number (31 ~ 90)that does not contain any data, the Memory LED willcontinue flashing. Press the CLEAR key to zero the LED,then select another number, and press RECALL.
+/- KEY RECALL(All programs)The +/- keys enable you to “scroll” through all 90 programs,in either direction. This can be useful if, for example, youdon’t have your ROM Preset Chart or User Memory Charthandy, and you want to search for a particular program.
1. Press the MEMORY key (its LED will light).
2. Press the + key to “scroll through” the REV7’s memoryin an upward direction until you reach the desiredprogram. You can hold the key down for continuousscrolling, or press and release, to increase the programnumber by 1. The scrolling will stop when it reachesprogram number 90.
3. Press the - key to “scroll through” the REV7’s memoryin a downward direction until you reach the desiredprogram. You can hold the key down for continuousscrolling, or press and release, to decrease the programnumber by 1. The scrolling will stop when it reachesprogram number 1.
REMOTE CONTROL RECALL(Presets 1 ~ 30, User programs 31 ~ 37)The RC7 remote control unit exactly reproduces the func-tions of the Direct Recall keys marked REV1 thru 4, E/R1,E/R2, and OTHERS. The USER MEMORY key performs asimilar function to the front panel USER MEMORY key.Pressing this key switches the REV7 between presetprograms and user programs, indicated by the LED’s on theremote control unit. Of course, while the remote control unitis connected to the REV7, the front panel controls on themain unit may still be operated in the normal way. (Notethat the remote control’s LED’s will be activated by corres-ponding controls on the REV7’s front panel).The remote control unit is, therefore, a direct recall device,and may be used for recalling the 30 presets and the first 7user programs, as previously explained in the DIRECTRECALL section. So if you plan to use the remote controlunit, it’s advisable to store your most needed user programsin memory numbers 31 through 37.You’ll also need to set the Input Level, Parametric EQControls, Mixing Control and Output Controls to yourdesired setting, so that you don’t need to touch the frontpanel again during your performance or session.A simple way to use the Remote Control Unit as a bypassswitch is by selecting an appropriate effect-one where thelevel of the effect can be set at zero-and setting the relevantparameter levels to zero so that you create a new programthat does not in fact alter the input signal. For example,select preset 7 (DELAY L, R) and set the delay level to 0%.Store this edited program in a convenient memory number,say 31. Then, when you select program 31 with your RemoteControl Unit, any previous reverb effect will be cancelled andyou will hear only your direct signal.
NOTE: When scrolling continuously through the userprograms (numbers 31 ~ 90) scrolling will halt atany program number that does not contain anydata, and the Memory LED will flash at thatnumber. Continue scrolling by releasing the + or -key and pressing again.
10

EDIT & STORE
After recalling a preset from the REV7’s memory, you can instantly edit the parameters to create new effects. This editing is onlytemporary, however, unless you store the new data into the User Program Memory (numbers 31 thru 90). If you do not store thedata, the parameters of the preset will be initialized to their original values as soon as you recall another program.
EDITING PARAMETERS STORING PROGRAMS
1. Press any PARAMETER SELECT key. Note that certainpresets have fewer parameters than others, as indicated inthe MEMORY (ROM) CONTENTS CHART at the end ofthis manual. If you press a key that does not refer to aprogrammable parameter, the LCD will not change, andthe previous parameter will remain.
NOTE: The 1ST REF key is a double action key. Each timeyou press this key, it alternates between “1STDLY” and “1ST LEVEL” (as displayed on theLCD), allowing you to set the values of the delayand level of the first reflection.
2. Press numeric keys to type in the new value of the para-meter. The new value will flash on the LCD. If you makea mistake, press the CLEAR key to zero the LCD, andtype in new data.
3. Press ENTER to enter the new data. The LCD will stopflashing. If you have tried to enter a value that is higherthan the maximum possible value of the parameter, themaximum value will be automatically entered.You can also use the +/- keys to alter parameter values.Press once to increment or decrement the value, or holddown for rapid and continuous change.
NOTE: When using the +/- keys to change parametervalues, there is no need to press the ENTER key toenter the new value.
Having edited a parameter, you can now select anotherparameter and continue editing, or store the new data.
11
NOTE: Keep a record of your stored programs (on a copyof the USER PROGRAM CHART accompanyingthis manual) to avoid loosing important programswhen storing new data.
1. Having completed the editing process, press MEMORY.
2. Use the numeric keys to type in the number of the desti-nation of the new data (range: 31~90). This number willflash on the Memory LED. If you have typed in a wrongnumber, press CLEAR to zero the LED, and type inanother number.
3. Press STORE to store the edited data. The LED will stopflashing, indicating that storage has taken place.
NOTE: If you have tried to store data in the preset pro-grams (numbers 1 thru 30) the LED will continueflashing, as these programs are protected. PressCLEAR and type in a new number.
PERFORMANCE NOTE: The Direct Recall Keys and theremote control unit allow you to select only thefirst 7 User Programs. It is advisable, therefore, tostore the programs you use most frequently innumbers 31 thru 37.
You can move programs about within the User Programmemory simply by recalling the program you wish tomove, then carrying out the storage procedure. Note thatwhen you store a program, any program previously storedin that user program memory will be erased.
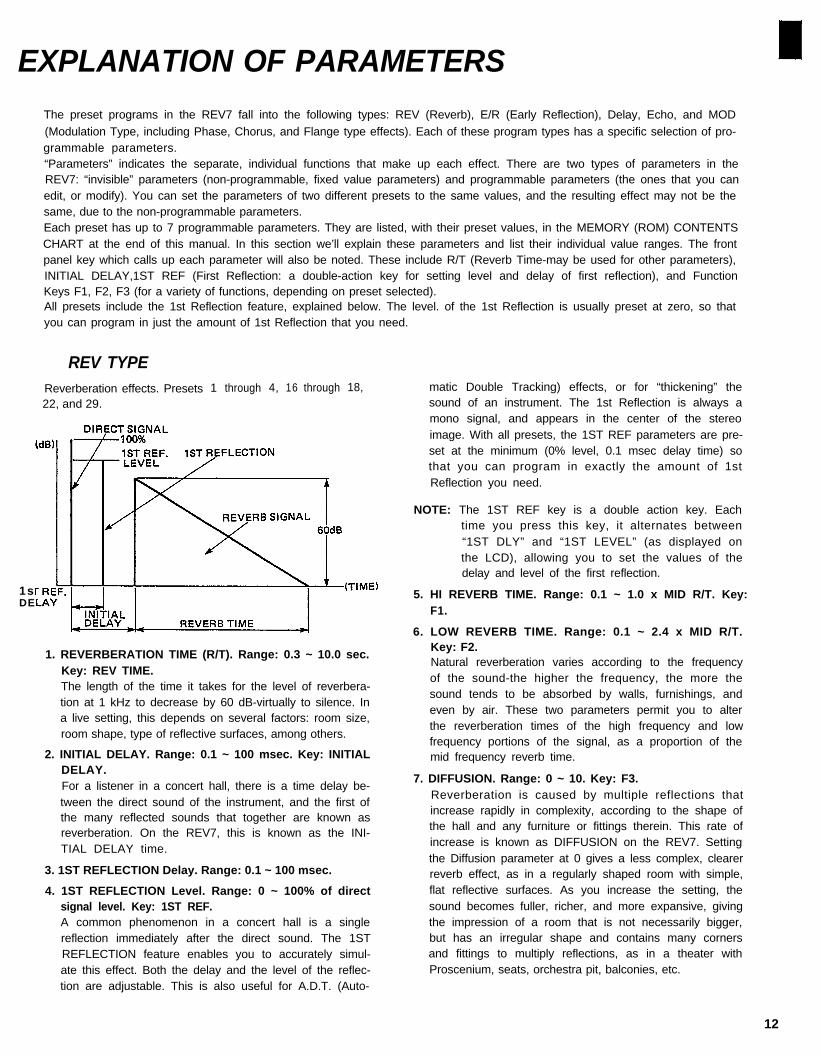
EXPLANATION OF PARAMETERSThe preset programs in the REV7 fall into the following types: REV (Reverb), E/R (Early Reflection), Delay, Echo, and MOD(Modulation Type, including Phase, Chorus, and Flange type effects). Each of these program types has a specific selection of pro-grammable parameters.“Parameters” indicates the separate, individual functions that make up each effect. There are two types of parameters in theREV7: “invisible” parameters (non-programmable, fixed value parameters) and programmable parameters (the ones that you canedit, or modify). You can set the parameters of two different presets to the same values, and the resulting effect may not be thesame, due to the non-programmable parameters.Each preset has up to 7 programmable parameters. They are listed, with their preset values, in the MEMORY (ROM) CONTENTSCHART at the end of this manual. In this section we’ll explain these parameters and list their individual value ranges. The frontpanel key which calls up each parameter will also be noted. These include R/T (Reverb Time-may be used for other parameters),INITIAL DELAY,1ST REF (First Reflection: a double-action key for setting level and delay of first reflection), and FunctionKeys F1, F2, F3 (for a variety of functions, depending on preset selected).All presets include the 1st Reflection feature, explained below. The level. of the 1st Reflection is usually preset at zero, so thatyou can program in just the amount of 1st Reflection that you need.
REV TYPEReverberation effects. Presets 1 through 4, 16 through 18,22, and 29.
1sDE
1. REVERBERATION TIME (R/T). Range: 0.3 ~ 10.0 sec.Key: REV TIME.The length of the time it takes for the level of reverbera-tion at 1 kHz to decrease by 60 dB-virtually to silence. Ina live setting, this depends on several factors: room size,room shape, type of reflective surfaces, among others.
2. INITIAL DELAY. Range: 0.1 ~ 100 msec. Key: INITIALDELAY.For a listener in a concert hall, there is a time delay be-tween the direct sound of the instrument, and the first ofthe many reflected sounds that together are known asreverberation. On the REV7, this is known as the INI-TIAL DELAY time.
3. 1ST REFLECTION Delay. Range: 0.1 ~ 100 msec.
4. 1ST REFLECTION Level. Range: 0 ~ 100% of directsignal level. Key: 1ST REF.A common phenomenon in a concert hall is a singlereflection immediately after the direct sound. The 1STREFLECTION feature enables you to accurately simul-ate this effect. Both the delay and the level of the reflec-tion are adjustable. This is also useful for A.D.T. (Auto-
matic Double Tracking) effects, or for “thickening” thesound of an instrument. The 1st Reflection is always amono signal, and appears in the center of the stereoimage. With all presets, the 1ST REF parameters are pre-set at the minimum (0% level, 0.1 msec delay time) sothat you can program in exactly the amount of 1stReflection you need.
NOTE: The 1ST REF key is a double action key. Eachtime you press this key, it alternates between“1ST DLY” and “1ST LEVEL” (as displayed onthe LCD), allowing you to set the values of thedelay and level of the first reflection.
5. HI REVERB TIME. Range: 0.1 ~ 1.0 x MID R/T. Key:F1.
6. LOW REVERB TIME. Range: 0.1 ~ 2.4 x MID R/T.Key: F2.Natural reverberation varies according to the frequencyof the sound-the higher the frequency, the more thesound tends to be absorbed by walls, furnishings, andeven by air. These two parameters permit you to alterthe reverberation times of the high frequency and lowfrequency portions of the signal, as a proportion of themid frequency reverb time.
7. DIFFUSION. Range: 0 ~ 10. Key: F3.Reverberation is caused by multiple reflections thatincrease rapidly in complexity, according to the shape ofthe hall and any furniture or fittings therein. This rate ofincrease is known as DIFFUSION on the REV7. Settingthe Diffusion parameter at 0 gives a less complex, clearerreverb effect, as in a regularly shaped room with simple,flat reflective surfaces. As you increase the setting, thesound becomes fuller, richer, and more expansive, givingthe impression of a room that is not necessarily bigger,but has an irregular shape and contains many cornersand fittings to multiply reflections, as in a theater withProscenium, seats, orchestra pit, balconies, etc.
12

E / R1 AND E / R2 TYPE
“Early Reflection” effects. Presets 5, 6, 19 through 21, 23through 28, and 30.
1. INITIAL DELAY. Range: 0.1 ~ 100 msec. Key: INITIALDELAY.The time delay between the direct sound of the instru-ment, and the first of the early reflections.
2. 1ST REFLECTION DELAY. Range: 0.1 ~ 100 msec.Key: 1ST REF.
3. 1ST REFLECTION LEVEL. Range: 0 ~ 100% of directsignal level. Key: 1ST REF.Same as for REV type presets.
4. LIVENESS. Range: 0 ~ 10. Key: REV TIME.Refers to the rate at which the reflected sounds fade. Setthis parameter at zero to simulate an acoustically “dead”room, with absorbent surfaces to “soak up” the reflectedsounds. As you increase the setting, the room appears tocontain more “live” surfaces, with the reflected soundsfading more slowly, as they reflect from wall to wall,until at the maximum setting the effect is of an intenselyreflective environment, containing many highly polishedsurfaces (tiles, glass, etc).
5. ROOM SIZE. Range: 0.1 ~ 10 x preset setting. Key: F2.In the REV7, the ROOM SIZE parameter indicates thetime gaps between the early reflections-directly propor-tional to the size of the room. The effect of this para-meter also depends on which early reflection Mode hasbeen selected. A Room Size Chart can be found later inthis manual.
13
6. DIFFUSION. Range: 0 ~ 10. Key: F3.Same as for REV type presets.
7. MODE. Range: 1~ 6. Key: F1.This is a rather special case. All “Early Reflection” presetsare switchable between 6 different Mode types. These are1: SMALL HALL (a typical grouping of early reflectionsthat would occur in a small performing environment), 2:LARGE HALL (a typical grouping of early reflectionsthat would occur in a large performing environment), 3:RANDOM (an irregular series of reflections that couldnot occur naturally), 4: REVERSE (a series of reflectionsthat increase in level, like the effect produced by playing a
recorded echo backwards), 5: PLATE (a typical groupingof early reflections that would occur in a plate echo unit)and 6: SPRING (a typical grouping of early reflectionsthat would occur in a spring reverberation unit). A slightlydifferent early reflection for the left and right outputscreates a natural stereo effect.
Although the name of each mode suggests a typical en-vironment or effect, note that only the first group ofreflections are generated, and they are not multiplied toproduce the sound you might expect. Also, each of theE/R type presets has “invisible” parameters that furtheraffect the sound, so the best course is to actually listen tothe presets and their different modes, to get the full effectof each mode and appreciate the enormous creativitythey provide.An Early Reflection Mode Chart can be found later in thismanual.
The REV7 produces 18 early reflections for each channel.It is possible to add a 1st reflection to these early reflec-tions, in the center of the stereo image.*For the REVERB type effects, 3 early reflections are
programmed for each channel.

ECHO TYPEDELAY TYPE
1. INITIAL DELAY. Range: 0.1 ~ 100 msec. Key: INITIALDELAY.Allows you to program in an additional delay time whichequally affects both output channels. This brings the totalpossible delay time up to 1 full second.
2. 1ST REFLECTION DELAY. Range: 0.1 ~ 100 msec.Key: 1ST REF.
3. 1ST REFLECTION LEVEL. Range: 0 ~ 100% of directsignal level. Key: 1ST REF.Same as for REV type presets.
4. LEFT CHANNEL DELAY TIME. Range: 0.1 ~ 900msec. Key: F1.
5. RIGHT CHANNEL DELAY TIME. Range: 0.1 ~ 900msec. Key: F2.Permits highly accurate independent setting of the left
and right delays. Note that the Initial Delay time is addedonto these delay times.
6. DELAY LEVEL. Range: 0 ~ 100% of direct signal level.Key: F3.Permits simultaneous setting of left and right delay level,as a proportion of direct signal level.
1. INITIAL DELAY. Range: 0.1 ~ 100 msec. Key: INITIALDELAY.Allows you to program in an additional delay time whichequally affects both output channels. The first echo willnot appear until this delay time and the echo delay timehave elapsed.
2. 1ST REFLECTION DELAY. Range: 0.1 ~ 100 msec.Key: 1ST REF.
3. 1ST REFLECTION LEVEL. Range: 0 ~ 100% of directsignal level. Key: 1ST REF.Same as for REV type presets.
4. LEFT CHANNEL DELAY TIME. Range: 0.1 ~ 450 msec.Key: F1.
5. RIGHT CHANNEL DELAY TIME. Range: 0.1 ~ 450msec. Key: F2.Permits highly accurate independent setting of the leftand right delays. After this delay time has elapsed (plusthe Initial Delay time) the first echo will appear. Sub-sequent echoes will appear at the same time interval, thenumber of echoes depending on how the Feedback Gainparameter is set.
6. FEEDBACK GAIN. Range: 0 ~ 99%. Key: REV TIME.This parameter permits adjustment of the number ofechoes that follow the direct signal, from zero to a vir-
tually infinite repeat at the maximum setting. The overalldecay time of the effect is proportional to the FeedbackGain setting.
7. HIGH DAMP. Range: 0 ~ 10. Key: F3.This effect is produced by inserting a low-pass filter in theREV7 feedback loop. This causes a gradual suppression ofthe high frequency content at each echo. Effectively, thismeans that the high frequency reverb time becomesshorter in relation to the midrange reverb time. A bright,unfiltered direct signal blended with a more muted echocan often create an authentic and pleasing acoustic effect.
14

MOD TYPE
“Modulation” effects. Presets 9 through 15. We’ll explain theprogrammable parameters for each preset of this type.
STEREO FLANGE
REVERB FLANGEIdentical to the STEREO FLANGE Preset, except for theFEEDBACK GAIN parameter, which is replaced by a RE-VERB TIME parameter, range 0.3 ~ 10 secs, called by pres-sing the REV TIME key. The feedback gain of this preset isfixed at 30%.
CHORUS A AND CHORUS B
1. INITIAL DELAY. Range: 0.1 ~ 100 msec. Key: INITIALDELAY.Allows you to program in an additional delay time. Theflanged signal will not appear until this delay time haselapsed.
2. 1ST REFLECTION DELAY. Range: 0.1 ~ 100 msec.Key: 1ST REF.
3. 1ST REFLECTION LEVEL. Range: 0 ~ 100% of directsignal level. Key: 1ST REF.Same as for REV type presets.
4. DELAY. Range: 0.1 ~ 100 msec. Key: F3.This sets the basic delay time of the flange effect. Thisdelay time is then modulated periodically by the LFO(a Low Frequency Oscillator, with adjustable frequency,built in to the REV7 specifically for varying delay timesperiodically in order to produce a variety of modulationeffects). This also sets the delay time between each repeat.
5. MODULATION DEPTH. Range: 0 ~ 100%. Key: F2.This sets the amount by which the LFO varies the delaytime. At the maximum setting, the delay time is varied by+/-4 msec.
6. MODULATION FREQUENCY. Range: 0.1 ~ 20 Hz.Key: F1.Sets the speed of the LFO, and hence the rate at whichthe delay time is modulated.
7. FEEDBACK GAIN. Range: 0 ~ 99%. Key: REV TIME.Sets the amount of flange signal which is fed back into thecircuit for further modulation. This controls the complex-ity of the effect, the number of repeats, and its overalldecay time.
1. INITIAL DELAY. Range: 0.1 ~ 100 msec. Key: INITIALDELAY.Allows you to program in an additional delay time. Thechorus signal will not appear until this delay time haselapsed.
2. 1ST REFLECTION DELAY. Range: 0.1 ~ 100 msec.Key: 1ST REF.
3. 1ST REFLECTION LEVEL. Range: 0 ~ 100% of directsignal level. Key: 1ST REF.Same as for REV type presets.
4. AMPLITUDE MODULATION DEPTH. Range: 0 ~ 100%.Key: F3.This sets the amount by which the LFO varies the ampli-tude (level) of the input signal.
5. DELAY MODULATION DEPTH. Range: 0 ~ 100%. Key:F2.This sets the amount by which the LFO varies the delaytime. At the maximum setting, the delay time is varied by+/- 4 msec.
6. MODULATION FREQUENCY. Range: 0.1 ~ 20 Hz.Key: F1.Sets the speed of the LFO, and hence the rate at whichthe delay time and amplitude are modulated.
15

STEREO PHASING TREMOLOThe programmable parameters for this preset are identical tothose for the Stereo Flange preset, omitting FEEDBACKGAIN and DELAY.
SYMPHONICThe programmable parameters for this preset are identical tothose for the Stereo Flange preset, omitting FEEDBACKGAIN and DELAY.
1. INITIAL DELAY. Range: 0.1 ~ 100 msec. Key: INITIALDELAY.Allows you to program in an additional delay time. Thephased signal will not appear until this delay time haselapsed.
2. 1ST REFLECTION DELAY. Range: 0.1 ~ 100 msec.Key: 1ST REF.
3. 1ST REFLECTION LEVEL. Range: 0 ~ 100% of directsignal level. Key: 1ST REF.Same as for REV type presets.
4. DELAY. Range: 0.1 ~ 8 msec. Key: F3.This sets the basic delay time of the phasing effect. The
delay time of the left and right channels remains fixed atthis setting, while the center signal’s delay time is modu-lated periodically by the LFO.
5. MODULATION DEPTH. Range: 0 ~ 100%. Key: F2.This sets the amount by which the LFO varies the delay time of the center signal. At the maximum setting, thedelay time is varied by +/- 4 msec.
6. MODULATION FREQUENCY. Range: 0.1 ~ 20 Hz.Key: F1.Sets the speed of the LFO, and hence the rate at whichthe center signal’s delay time is modulated.
16

DESCRIPTION OF PRESETS
This chapter aims to give a brief description of the presets,as a general introduction to the tremendous power and ver-satility of the REV7. The presets fall into several differenttypes, which are noted in the MEMORY (ROM) CONTENTSCHART at the end of this manual, and if you study theEXPLANATION OF PARAMETERS chapter, you’ll gain agreater understanding of these program types.Several presets are designed to add an acoustic richness tospecific instruments such as strings or electric bass, but bearin mind that they may be used for any application. Onceyou have become familiar with the REV7’s presets, you canexperiment with them and find any number of uses forevery preset.
1. LARGE HALLThe first of the REV7’s highly natural reverberationeffects, created by a multitude of delays (reflections) thatincrease in complexity, just as reflected sound does, in anatural setting. This gives an impressive stereo simulationof the acoustics of a large concert hall, eminently usablefor all applications. Can turn a dry drum machine into apowerhouse of percussive grandeur, or add lyrical spacious-ness to a soft acoustic guitar.
2. SMALL HALLA more “compact” version of the previous effect, withshorter reverb time and initial delay time, giving a stun-ningly realistic small hall or clubroom type reverb effect.
3. VOCAL PLATEParticularly suited for adding roundness and depth tovocals. This program reproduces exactly the effect of ahigh-quality plate echo device.
4. PERCUSSION PLATEA second echo plate program, with a slightly brightereffect, more suitable for adding crispness and ambience todrums and percussion instruments.
5. EARLY REFLECTION 1The Early Reflection presets have a carefully plottedgroup of reflections to create a specific effect. The E/R1type presets, of which this is the first, provide a subtleambient effect, that is ideal for adding a liveness androundness to the sound of any instrument. Similar to theacoustic effect of a “live” drum booth in a professionalrecording studio. As with all the Early Reflection presets,the “Mode” of this preset (the grouping of the early re-flections) can be switched to provide six effects: SMALLHALL, LARGE HALL, RANDOM, REVERSE, PLATE,and SPRING. The “Room Size” parameter varies the dis-tance between individual reflections, creating an accuratesimulation of a variety of performance environments.
6. EARLY REFLECTION 2The E/R2 type presets contain more reflections than theE/R1 type, and give a brighter, more “live” quality. Thispreset provides a tight, vibrant “kickback” that is meantto sound like an electronic effect rather than a naturalreverb.
7. DELAY L, RA crystal clear stereo digital delay effect, with left andright delays independently variable up to a full 900 mil-liseconds. You can even add a third delay by programmingin the “1st Reflection”, which is available on all presetprograms.
17
8. STEREO ECHO A “tape echo” type effect, but without any of the accom-panying noise or delay length limitations. Left and rightmultiple delays can be independently and precisely setfrom 0.1 to 450 milliseconds, and the “foldback gain”(number of repeats) can be set from 1 to virtually infiniterepeat, with no signal deterioration. You can also widelyvary the high frequency content of the echo signal.
9. STEREO FLANGE A The first of the Modulation type effects, this rich, stereoflanging effect is programmed for a fairly fast, “watery”effect, though of course the effect can be widely varied.You can also add a delay so that the flanged signal isheard after the direct signal (this applies to all the Modul-
ation presets). Flanging is great for keyboards that needsome “thickening”, and for those impressive “tube” or“aircraft” effects favored by many guitarists.With the Stereo Flange effect, the direct signal is delayedby a short delay time, which you can adjust. This delaytime is varied periodically with the built-in LFO (LowFrequency Oscillator) so that the delayed signal moves inrelation to the direct signal, producing the characteristicflanging effect. The stereo effect is created by splittingthe delayed signal into left and right signals, and increas-ing the left channel delay time while decreasing the rightchannel delay time, and vice versa. More pronouncedflanging is created by feeding the flange signal back onitself, producing a series of rapid repeats, each one ofwhich is modulated further.
10. REVERB FLANGE Combines the effect of the STEREO FLANGE presetwith a reverberation effect. The reverb time is widelyvariable. The feedback gain is not variable with thispreset.
11. CHORUS A The chorus program actually makes a single instrumentsuch as a violin sound like a well co-ordinated ensemble,with its slow “sweep”. The effect is rather like theslowly rotating baffle in a Leslie organ speaker. It’s acomplex effect, produced in the following manner.The input signal is split up into three signals, with theirphase set at 0 degrees, 120 degrees and 240 degrees.These signals are located center, left and right respective-ly in the stereo image, and delayed by 4 milliseconds.Each signal then has its delay time modulated (in thesame manner as the Stereo Flange preset) and its ampli-tude (level) modulated, by the LFO. In this way, a high-ly subtle, rich effect is generated from the simplestinput signal.
12. CHORUS B Produced in an identical manner to Chorus A, this pre-set has slightly different “invisible” parameters, creatinga modulation that has less “movement” than Chorus A.It provides the means to enrich and thicken the inputsignal, to generally add smoothness and depth to anysound.

13. STEREO PHASINGThis effect is variable from an almost imperceptible slow-moving phase shift, to a rapid pulsation. The effectis created as follows.The input signal is split up into right and left signals.The right channel is delayed very slightly in relation tothe left channel. A third signal, placed in the center ofthe stereo image, has its delay time modulated betweenzero and the right channel delay time setting, by theLFO. This means that the center signal will periodically“approach” and “meet” the left and right channelsalternately, causing phase changes as it does so. This is atotally controllable digital version of the original phasingmethod: playing back the same signal on two tape deckswhose minute fluctuations in speed caused phasechanges-a rather haphazard method. The timing differ-ences need to be very small, and on the REV7 can be setas low as 0.1 msec.
14. TREMOLOThe tremolo preset is adjustable from a slow once-every-ten-seconds roll to a twenty-times-a-second vibrato. It isproduced in virtually the same manner as the Choruspreset, with the amplitude modulation emphasized (for adeeper, more rapid modulation). Most conventionaltremolo effects use amplitude modulation and nothingmore. The other parameters of this preset add extrarichness and dimension, for a really modern, sophistic-ated sound.
15. SYMPHONICAnother effect based on the same modulation systemas the Chorus preset. This time, the delay time modula-tion is more rapid and deeper, giving the effect moremovement and more width, to create an expansive,spacious effect from any input signal.
16. SPRINGSpring reverb, featured in many low-price reverbera-tion devices, and often built into combo amplifiers ororgans, can add a pleasing, bright ambient quality tohigh register instruments (lead guitar, flute) as well asvocals.
17. ECHO ROOMThe authentic sound of the original echo device-theEcho Room, where the sound was transmitted from oneend of a specially reflective room, and picked at theother end by a mike. A long, rich reverb effect versatileenough for all instruments.
18. STRINGSThe first of several preset effects specifically designedfor use on named instruments, though of course theycan be used for any purpose. They all feature the six“modes” described in preset 5, above. For a stringorchestra, the most natural reverb is found in older,“medium” size concert halls, and this reverb typeprogram accurately simulates this environment.
19. ELECTRIC BASS AThis E/R1 type preset actually creates the fullnessand depth of a large reflex speaker cabinet of the typeused for amplifying a bass guitar. So with a “directinjection” bass guitar you can achieve a rich deep soundwithout the inherent problems caused by miking upspeaker cabinets. With this widely variable preset youcan simulate a variety of tube amplifiers and speakerenclosures.
20. ELECTRIC BASS BThis E/R2 type program is more “live” than the previouseffect, and can add briliance and “spice” to complex,funky bass riffs.
21. KICKSuperfast delays in this E/R1 type preset actively boostthe sound of a bass drum, adding a vivid, yet solid pre-sence, ideal for hard and heavy rock.
22. SNAREWith this reverb type preset, you can transform an ordi-nary snare drum into a classic “wall of sound” effectused in many rock recordings.
23. GATE REVERBA common studio effect on contemporary recordings isproduced by linking up various effects units-reverbera-tor, digital delay, noise gate, compressor-so that apowerful reverb is produced, which suddenly cuts off,instead of fading gradually. This E/R1 type programreproduces that effect, and is nothing short of astound-ing when used on drums, creating an enormous soundthat does not overhang and cloud up the overall soundof the band.
24. REVERSE GATEClosely related to the GATE REVERB preset, thisprogram actually gives the impression of a reverse reverbeffect. The reverb builds in intensity before cutting offsharply and dramatically.
25. PIANOThe impressive sound of a concert grand piano in anideal room setting can be created from virtually anypiano, by the judicious use of this E/R2 type effect.
26. ORGANWith this E/R1 type preset it is possible to give an elec-tronic organ the expansive, mellow sound of an old“tube” organ with its large wooden speaker cabinets.
27. BRASSAnother useful E/R1 type effect, the BRASS presetenables you to add punch and “sizzle” to brass instru-ments, retaining their brilliance while expanding theirharmonic qualities.
28.GUITARAn E/R2 type preset providing a mellow ambience thatwill delicately enhance the tone of any fine acousticguitar.
29. HANDCLAPSThis short, sharp reverberation type effect adds analmost metallic presence and fullness to handclaps,for a truly contemporary sound.
30. LIVE REFERENCEThis E/R2 type preset simulates a “standard” live atmos-phere. The effect is of a small, yet live, resonant room,elevating the tonal quality of any instrument or vocal toa brilliant, powerfully ambient timbre.
18

MIDI SELECTIONUsing a set up like the MIDI Performance System shown inthe APPLICATIONS chapter, it is possible to select any ef-fect in the REV7 memory simply by pressing a Voice Selectkey on a MIDI keyboard. This allows you to have a differentreverberation, echo, or other effect for each voice. This ishighly desirable, as a keyboard such as the Yamaha DX7Programmable Algorithm Synthesizer can create a virtuallyendless variety of voices-strings, clavinet, synth brass, per-cussion, banjo, etc., each of which requires a different typeof reverberation.
MIDI MEMORY SETTINGThe procedure for setting which effects are selected to gowith the voices on your MIDI keyboard is as follows:
1. Press the MIDI CTRL key. Its LED will light. The LCDwill show the following display:
NOTE: When in the MIDI Control mode, the only keys thatfunction on the REV7 are the ones used for settingthe MIDI Memory. All other keys will be ineffective,and reverb effects will not be available while in thismode.
2. You now have to set the MIDI Channel number. MIDIinformation can be received on channels 1 through 16, orthe REV7 can be set to OMNI, in which mode it willreceive information on all channels. (Note: A DX7 trans-mits on MIDI channel 1 automatically. You may be ableto set other keyboards to any channel). Enter the channelnumber by pressing the numeric keys (1 to 16, or 0 forOmni). The number you have selected will flash on theLCD. If you make a mistake, press the CLEAR key toclear the display, and enter the number again. Then pressENTER to enter the channel number you have selected.The channel number will stop flashing, and be displayedcontinuously on the LCD. You can also change the MIDIchannel number by using the +/- keys. In this case, thereis no need to press the ENTER key after the new numberappears.
3. Press the MEMORY key. The LCD display will now switch
to:
The next step is to enter the program number (voice num-ber) of the voice on your MIDI keyboard. This is done byusing the +/- keys on the REV7. The range available is 1to 128. Pressing a + or - key will increment or decrementthe program number; holding a key down will continuous-ly increase or decrease the voice number. This number willappear next to the “PGM” section on the LCD.
19
Use the numeric keys to input the number of the effect(MEM) you wish to use with the program you have select-ed. The range available is 1 to 90-this covers the 30 pre-sets and the 60 user programs. This number will flashnext to the “MEM” section on the LCD. NOTE: You canset the REV7 to the BYPASS mode (no reverb effect:direct signal output only) by setting the memory numberto zero.Remember that at any time you can clear the “MEM”
display by pressing the CLEAR key, and input anothernumber.Finally, press the STORE key to store the program num-
ber plus memory number into the REV7. The memorynumber will stop flashing, and be displayed continuouslyon the LCD.
4. You now have three options:(a) You can continue storing pairs of program/memory
numbers, by repeating operation 3.(b) You can change the MIDI channel receive number. Press
the MEMORY key, and the LCD will revert to the “RCVch” display, and you can repeat operation 2. NOTE:Pressing the MEMORY key alternates the REV7 betweenMIDI channel set and program/memory set, when theREV7 is in the MIDI Control mode.
(c) You can switch the REV7 out of the MIDI control mode,by simply pressing the MIDI CTRL key. Its LED will goout. You can now select effects from your MIDI key-board (or, of course, in the normal way, using the frontpanel keys or remote control unit). Connect the MIDIOUT of your keyboard to the MIDI IN of the REV7.Your keyboard should be set to transmit voice numberinformation. In the case of a Yamaha DX7 synthesizer,for example, it should be set to “SYSTEM INFO AVAIL-ABLE”. When you press a program select (voice select)key on your keyboard (provided, of course, you haveprogrammed this voice number into the REV7) theREV7 will switch automatically to the correspondingeffect, and this will be displayed on the LCD.

CHECKING MIDI MEMORYIt’s a good idea to keep a written record of your voice/effectsettings. However, you can easily check the REV’s MIDImemory without having to connect up your keyboard, in thefollowing manner:
1. Press the REV7’s MIDI CTRL key. Its LED will light.
2. Press the MEMORY key in order to call up the “PGM/MEM” display on the LCD.
3. You can now “scroll through” the REV7’s MIDI memory,by using the +/- keys. The PGM number will change, andif a program number has a corresponding memory num-ber, it will appear on the LCD, next to the “MEM” sec-tion. This will indicate the effect that has been selected togo with the voice indicated in the “PGM” section of theLCD.
4. To check the parameter values of this effect, look it up in
the MEMORY (ROM) CONTENTS or USER PROGRAMChart, as appropriate. Or you can check it on the REV7by pressing MIDI CTRL again, so that its LED goes out,and the REV7 is in its normal operating mode. Thenselect the effect in the usual way, and proceed to selectparameters.
CLEARING MIDI MEMORYNOTE: These clearing operations affect ONLY the voice-
plus-effect couplings stored in the REV7’s MIDImemory, NOT the presets or edited user programs.
1. Press the REV7’s MIDI CTRL key. Its LED will light.
2. Press the MEMORY key in order to call up the “PGM/MEM” display on the LCD.
3. To clear a single voice/effect memory. Press CLEARfollowed by STORE.
4. To clear the entire voice/effect memory. Press CLEARand ST0RE together.
5. You can now proceed to input further data into the MIDIMemory, as previously described, or return the REV7 toits normal operating mode by pressing the MIDI CTRLkey.
20

APPLICATION EXAMPLESThe extraordinarily broad versatility of the REV7 makes it the perfect reverberator for use in a wide range of applications-forsound reinforcement, recording, A/V production, theatrical productions, etc. The system diagram below shows three REV7 unitsbeing used in three completely different ways within a large concert sound reinforcement or recording system.
Main Reverb UnitOne REV7 is connected into the effect loop of the main system mixing console. In this case the mixing console provides a stereo effects loop:the left and right effects sends are fed to the corresponding REV7 stereo inputs, while the REV7 outputs are fed back to the correspondingeffects return inputs. The effects return level controls on the mixer are used to mix the appropriate amount of effect signal back into theprogram, so the REV7 is set up to output only the reverb signal (no direct signal). This permits application of any REV7 effect to the entirestereo program which is fed to the main house speakers or recording equipment.
Effects for a Specific SourceIn this system a separate mixer is used to mix the independent drum outputs from the RX11 Digital Rhythm Programmer, and add appropriateequalization to the individual drum sounds. A REV7 is patched into the drum mixer’s auxilliary send/return loop permitting the application ofeffects like Gate Reverb to the drum signal only. Since the REV7 is directly inserted into the mixing console’s main program buss, the desiredmixture of direct and effect sound must be set using the REV7 mixing control.
Keyboard Effects with MIDI Control
21
The third REV7 in this system is patched into the stereo effects loop of the keyboard mixer. The REV7 is programmed to select pre-determinedeffects when it receives specific “program change” data from a MIDI keyboard. That is, if the performer selects voice 5 on his keyboard, thecorresponding effect is automatically called on the REV7. For MIDI control, the MIDI OUT from a DX5 Digital Programmable AlgorithmSynthesizer is fed to the MIDI IN terminal of the REV7, and the MIDI THRU of the REV7 sends the same MIDI control signals on to a DX7Digital Programmable Algorithm Synthesizer. In this way, selecting a voice on the DX5 not only selects the corresponding effect on the REV7.but also the corresponding voice number on the DX7.

EARLY REFLECTION MODE CHARTThis chart shows the exact number and type of reflections created by the REV7 for each mode selected with E/R type programs.Room Size set at 1.0 and 4.0 for these graphs.
2222

23
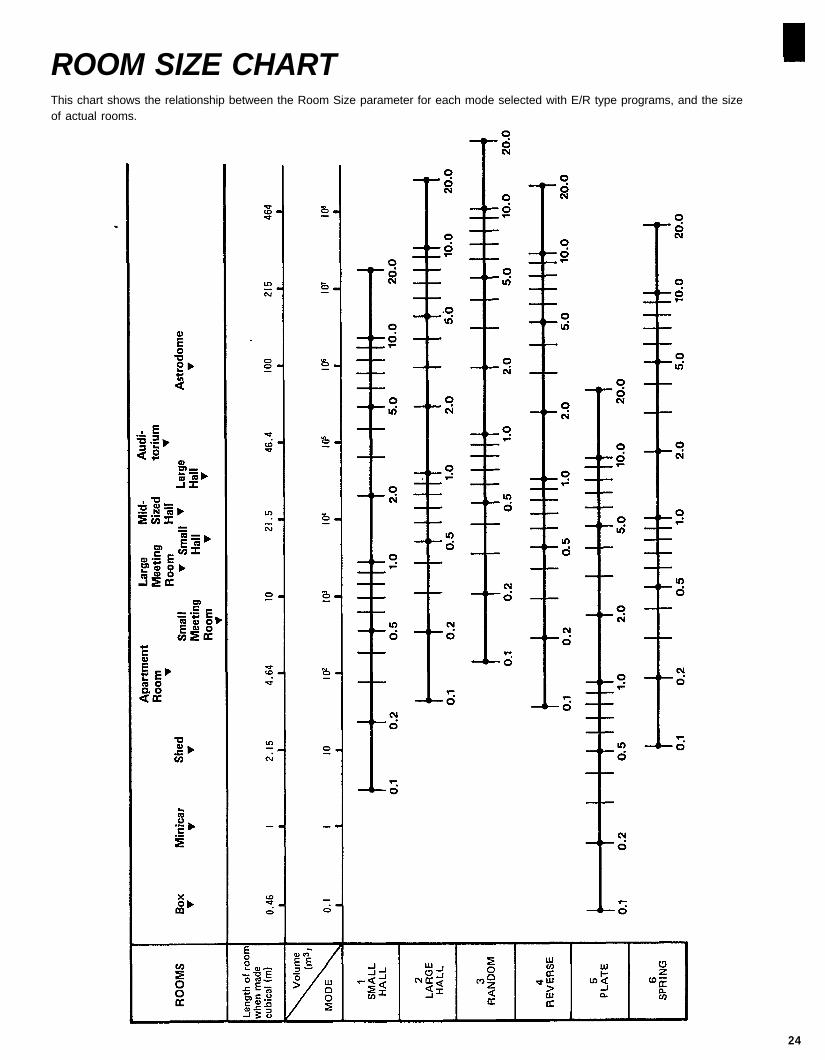
ROOM SIZE CHARTThis chart shows the relationship between the Room Size parameter for each mode selected with E/R type programs, and the sizeof actual rooms.
24

USER PROGRAMMlNG TABLE
This table is designed to help you create your own original effects programs, by editing preset programs. It lists all the programmable parameters(up to 7 can be programmed for each program). Enter the new parameters in this table, and once you’ve completed editing to get the effect youwant, you can enter the new parameter values in the “PROGRAM CHART” booklet. (You can make copies of this table for multiple use.)See the MEMORY (ROM) CONTENTS CHART for the parameters relating to each preset, and read the chapter entitled EXPLANATION OF PARA-METERS for further information.
25

BLOCK DIAGRAM
DIMENSIONS
26

MEMORY(ROM) CONTENTS AND CONTROLLABLE PARAMETERSThis chart lists all the programmable parameters of the REV7’s 30 presets. It includes the complete value ranges ofeach parameter, for quick reference when editing. The EXPLANATION OF PARAMETERS chapter should bestudied, for a full understanding of this chart.
The following abbreviations are used: REV TIME = REVERB TIME; HIGH = HIGH FREQUENCY REVERB TIME; LOW = LOW FREQUENCYREVERB TIME; Lch DELAY = LEFT CHANNEL DELAY TIME; Rch DELAY = RIGHT CHANNEL DELAY TIME; LEVEL = DELAY LEVEL; F.B. GAIN = FEEDBACK GAIN; HIGH = HIGH DUMP; MOD FREQ. = MODULATION FREQUENCY; MOD DEPTH = MODULATION DEPTH. 27
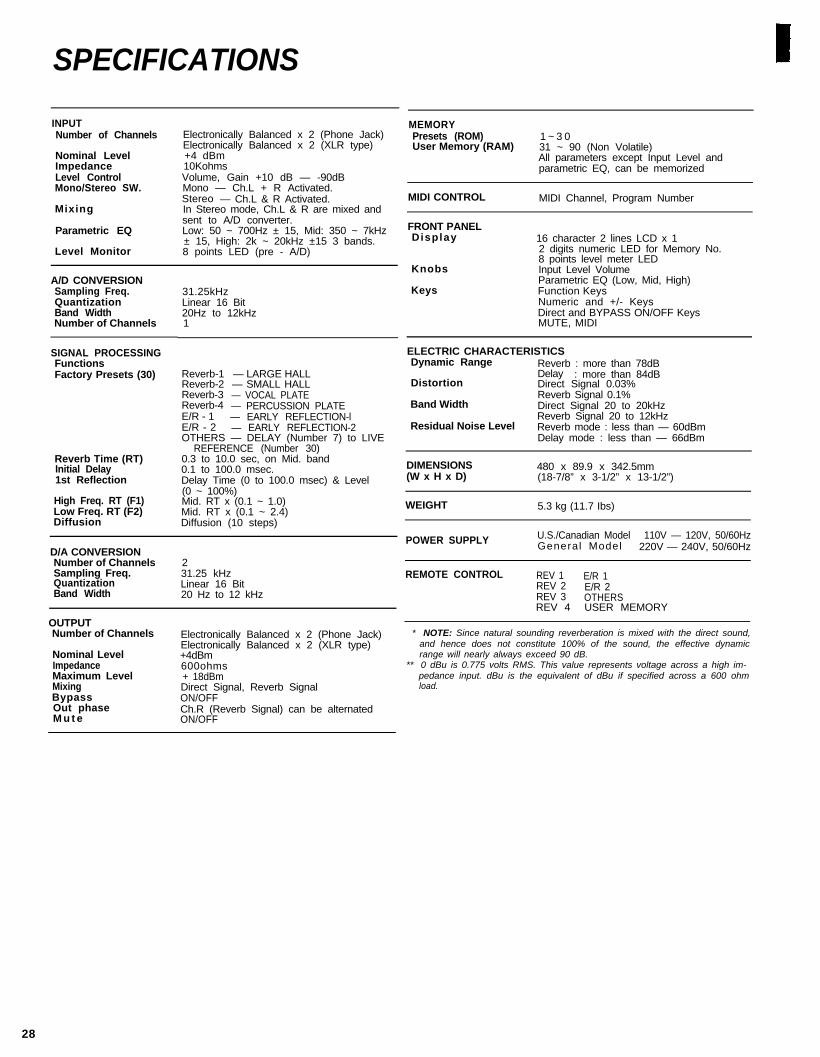
SPECIFICATIONS
INPUTNumber of Channels
Nominal LevelImpedanceLevel ControlMono/Stereo SW.
Mixing
Parametric EQ
Level Monitor
Electronically Balanced x 2 (Phone Jack)Electronically Balanced x 2 (XLR type)+4 dBm10KohmsVolume, Gain +10 dB — -90dBMono — Ch.L + R Activated.Stereo — Ch.L & R Activated.In Stereo mode, Ch.L & R are mixed andsent to A/D converter.Low: 50 ~ 700Hz ± 15, Mid: 350 ~ 7kHz± 15, High: 2k ~ 20kHz ±15 3 bands.8 points LED (pre - A/D)
A/D CONVERSIONSampling Freq.QuantizationBand WidthNumber of Channels
SIGNAL PROCESSINGFunctionsFactory Presets (30)
Reverb Time (RT)Initial Delay1st Reflection
REFERENCE (Number 30)0.3 to 10.0 sec, on Mid. band0.1 to 100.0 msec.Delay Time (0 to 100.0 msec) & Level(0 ~ 100%)
High Freq. RT (F1)Low Freq. RT (F2)
Mid. RT x (0.1 ~ 1.0)Mid. RT x (0.1 ~ 2.4)
Diffusion Diffusion (10 steps)
31.25kHzLinear 16 Bit20Hz to 12kHz1
Reverb-1 — LARGE HALLReverb-2 — SMALL HALLReverb-3 — VOCAL PLATEReverb-4 — PERCUSSION PLATEE/R - 1 — EARLY REFLECTION-lE/R - 2 — EARLY REFLECTION-2OTHERS — DELAY (Number 7) to LIVE
D/A CONVERSIONNumber of Channels 2Sampling Freq. 31.25 kHzQuantization Linear 16 BitBand Width 20 Hz to 12 kHz
OUTPUTNumber of Channels
Nominal LevelImpedance Maximum LevelMixing BypassOut phaseM u t e
Electronically Balanced x 2 (Phone Jack)Electronically Balanced x 2 (XLR type)
600ohms+ 18dBmDirect Signal, Reverb SignalON/OFFCh.R (Reverb Signal) can be alternatedON/OFF
MEMORYPresets (ROM)User Memory (RAM)
1 ~ 3 031 ~ 90 (Non Volatile)All parameters except Input Level andparametric EQ, can be memorized
MIDI CONTROL
FRONT PANELDisplay
Knobs
MIDI Channel, Program Number
16 character 2 lines LCD x 12 digits numeric LED for Memory No.8 points level meter LEDInput Level Volume
KeysParametric EQ (Low, Mid, High)Function KeysNumeric and +/- KeysDirect and BYPASS ON/OFF KeysMUTE, MIDI
ELECTRIC CHARACTERISTICSDynamic Range Reverb : more than 78dB
DistortionDelay : more than 84dBDirect Signal 0.03%
Band Width
Residual Noise Level
Reverb Signal 0.1%Direct Signal 20 to 20kHzReverb Signal 20 to 12kHzReverb mode : less than — 60dBmDelay mode : less than — 66dBm
DIMENSIONS 480 x 89.9 x 342.5mm(W x H x D) (18-7/8” x 3-1/2” x 13-1/2”)
WEIGHT 5.3 kg (11.7 Ibs)
POWER SUPPLY U.S./Canadian Model 110V — 120V, 50/60HzGeneral Model 220V — 240V, 50/60Hz
REMOTE CONTROL REV 1 E/R 1REV 2 E/R 2REV 3 OTHERSREV 4 USER MEMORY
* NOTE: Since natural sounding reverberation is mixed with the direct sound,and hence does not constitute 100% of the sound, the effective dynamicrange will nearly always exceed 90 dB.
** 0 dBu is 0.775 volts RMS. This value represents voltage across a high im-pedance input. dBu is the equivalent of dBu if specified across a 600 ohmload.
28
+4dBm

[ Digital Reverberator ] Date : 4/23, 1985Model REV7 MIDI Implementation Chart Version : 1.0
Function ...Recognized Remarks
memorized
memorized
1 - 1 61 - 1 6
Basic DefaultChannel Changed
DefaultMode Messages
AlteredOMNI OFF/OMNI ONxx
NoteNumber : True voice
xxxxxxxx
Note OFFAfter Key'sTouch Ch'sPitch Bender
ControlChange
O 0-127 *1ProgChange : True #System Exclusive xSystem : Song Pos
: Song SelCommon : Tune
xxxxxxxxx
System :ClockReal Time :CommandsAux :Local ON/OFF
:All Notes OFFMes- :Active Sensesages:Reset
selected.
Mode 1 : OMNI ON, POLY Mode 2 : OMNI ON, MONO o : YesMode 3 : OMNI OFF, POLY Mode 4 : OMNI OFF, MONO x : No29
Velocity Note ON
Notes *1 For program 1 - 128, memory #1 - #90 is
*1

SERVICEThe REV7 is supported by Yamaha's worldwide network of factory trained and qualified dealer service personnel. In the eventof a problem, contact your nearest Yamaha dealer.

Since 1887 YAMAHANIPPON GAKKI CO., LTD. HAMAMATSU, JAPAN
Japan

YAMAHA®
Yamaha Corporation of America6600 Orangethorpe Avenue, P.O. Box 6600, Buena Park, CA 90622-6600
REV7 OM
8/26/98 29553