yell - stanford university · youth engaged in leadership and learning (yell) was developed with...
TRANSCRIPT
Youth Engaged in Leadership and Learning
YELLA Handbook for Program Staff , Teachers, and Community Leaders
John W. Gardner Center for Youth and Th eir Communities 2nd Edition © 2007

From YELL ©2007 John W. Gardner Center
From YELL ©2007 John W. Gardner Center
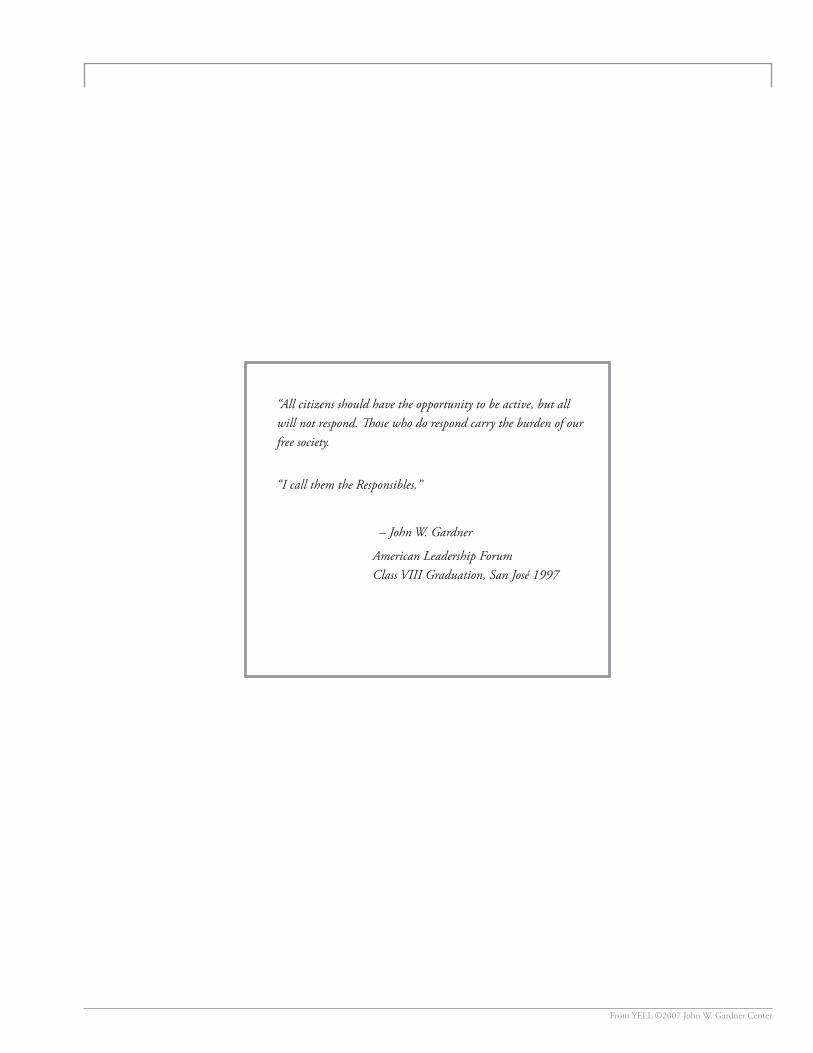
“All citizens should have the opportunity to be active, but all will not respond. Th ose who do respond carry the burden of our free society.
“I call them the Responsibles.”
– John W. Gardner
American Leadership Forum Class VIII Graduation, San José 1997
Youth Engaged in Leadership and Learning (YELL) was developed with the support and guidance of individuals and organizations
who partnered with the John W. Gardner Center for Youth and Their Communities (JGC) between 2000 and 2006. In particular, we
are grateful to our partners at the McClymonds Educational Complex in West Oakland and at Kennedy Middle School in Redwood
City, California. YELL would not exist without the young people, school, and community leaders who worked together with JGC to
increase youth voice and participation in decision making. The content of the YELL curriculum has been greatly enhanced by the
Americorps members and Stanford students who helped to document our work, provided ideas and activities for the curriculum,
and served as staff in the YELL program.
WE WOULD LIKE TO THANK THE FOLLOWING FOUNDATIONS FOR THEIR GENEROUS SUPPORT OF YELL:
Atlantic Philanthropies
Evelyn and Walter Haas Jr. Foundation
William and Flora Hewlett Foundation
David and Lucile Packard Foundation
San Francisco Foundation
Stuart Foundation
Surdna Foundation
Walton Family Foundation
Editors: Yolanda Anyon, Katrina Brink, Marie Crawford, María Fernández, Mary Hofstedt, Jerusha Osberg, and Karen Strobel
Youth Advisors: Anahí Aguilar, Jessie Burgueño, Rebecca Flores, Sandra Mendieta, and Vanessa Valencia
Field Testers: Yolanda Anyon, María Fernández, Mary Hofstedt, Arnulfo Medina, Jessie Molina, and Karen Strobel 2nd Edition
Project Managers: Mary Hofstedt and Katrina Brink
2nd Edition Production: Laura Ma (Administation), Mark Sloneker and Jodi McPhee (Design), and Ruth Schechter (Proofreading/Editing)
Photo Credits: Yolanda Anyon, Kali Cheung, Maria Fernandez, Mary Hofstedt, and others
©2007, 2001 The John W. Gardner Center for Youth and Their Communities
This version was released on December 1, 2007.
This document may be reproduced without oral or written permission for youth development or classroom use.
Permission must be obtained to reproduce this document in circumstances other than those described above.
Please send your requests to [email protected] or call 650-736-8495.
ACKNOWLEDGEMENTS
From YELL ©2007 John W. Gardner Center
YELL CURRICULUM CONTRIBUTORS
From YELL ©2007 John W. Gardner Center
The following people were active participants in the research, development, and writing of the YELL curriculum.
PROJECT DIRECTORS
Yolanda Anyon
María Fernández
Mary Hofstedt
Jocelyn Hughes
Arnulfo Medina
Jessie Molina
SENIOR RESEARCH ASSOCIATE
Karen Strobel
RESEARCH ASSISTANTS
Julianna Bunim
Becky Shea Burrow
Ernesto Colín
Jerusha Osberg Conner
Josh Corngold
Jennifer Crawford
Dabney Ingram
Ben Kirshner
Alyssa McLean
Natasha Marsh
Sandra Naughton
Ingrid Nelson
Daphne Ross
José Saldívar
Ingrid Seyer-Ochi
GRADUATE STUDENT CONTRIBUTORS
Jill Cheney
Jennifer Cohen
Meredith Honig
Ken Ikeda
Hanna Song
Lauren Stevenson
Greg Wright
Anne Zummo
UNDERGRADUATE STUDENT
STAFF AND INTERNS
Julie Afsahi
Elizabeth De Rham
Ben Eloy
Elisa Marie Overall
Amanda Posner
Natalie Tofano Ruiz
Sarah Schulman
Rachel Spitzer
Leah Sullivan
Jocelyn Sze
Judy Wang
AMERICORPS STAFF
Mary Boktor
Tannak Chan
Amie Cheung
Kali Cheung
Caroline Chumo
Michelle Coughlan
LaTonya Davis
Joycelyn Hughes
Eui Hwang
Tarik Kahsai
Natasha Marsh
Lindsay Poland
Damon Steele
Sunny Yu
YOUTH STAFF AND MENTORS
Anahí Aguilar
Patricia Akolo
Tashika Boston
Mirna Bresic
Jessie Burgueño
YOUTH STAFF AND MENTORS
(CONTINUED)
William Carter
Brittany Chambers
Tannak Chan
Toto Chittharath
Diego Contreras
Cynthia Cruz
Ruth Cruz
Ryan Czaple
Bianca De La Torre
Rebecca Flores
Brytteni Floyd-Mayo
Malcom Ford
Monica Foster
Jamaal Germaine
Lavana Gurley
Alex Hernández
Ashley Jones
Taylor Kemp
Travell McFay
Sandra Mendieta
Angela Nevárez
Francisco Pinto
Erika Ponce
Kianna Reed
Sopheak Sam
Charles Simms
Xenia Simms
Jenny Sokly
Jesse Torres
Clarence Thomas
Josh Tucker
Vanessa Valencia
We also acknowledge the more than 250 young people who shaped YELL as a project and approach to social change, the
community leaders who worked with youth to make change happen, the administrators and teachers who supported YELL as a
school-based strategy for positive youth engagement and systems reform, and the volunteers, friends, and myriad supporters of
all ages and levels of involvement. We extend a special thanks to the following people who helped make YELL an integral part
of their schools and communities: Edna Acri, Ken Klieman, Karin Kelley-Torregroza, Renée Matsunami, Anthony Mickens, Sandra
Portasio, Beth Ross, and Warren Sedar.
ABOUT JGC
From YELL ©2007 John W. Gardner Center
John W. Gardner Center for Youth and Th eir Communities at Stanford University
Youth Engaged in Leadership and Learning (YELL) was developed with the support and guidance of individuals and organizations
who partnered with the John W. Gardner Center for Youth and Their Communities (JGC) between 2000 and 2006.
JGC MISSION AND VISION
JGC partners with communities to research, develop, and disseminate effective practices and models for youth development and
community renewal. By bringing together community leaders and sharing new knowledge, we support the implementation of
quality programs for and with young people.
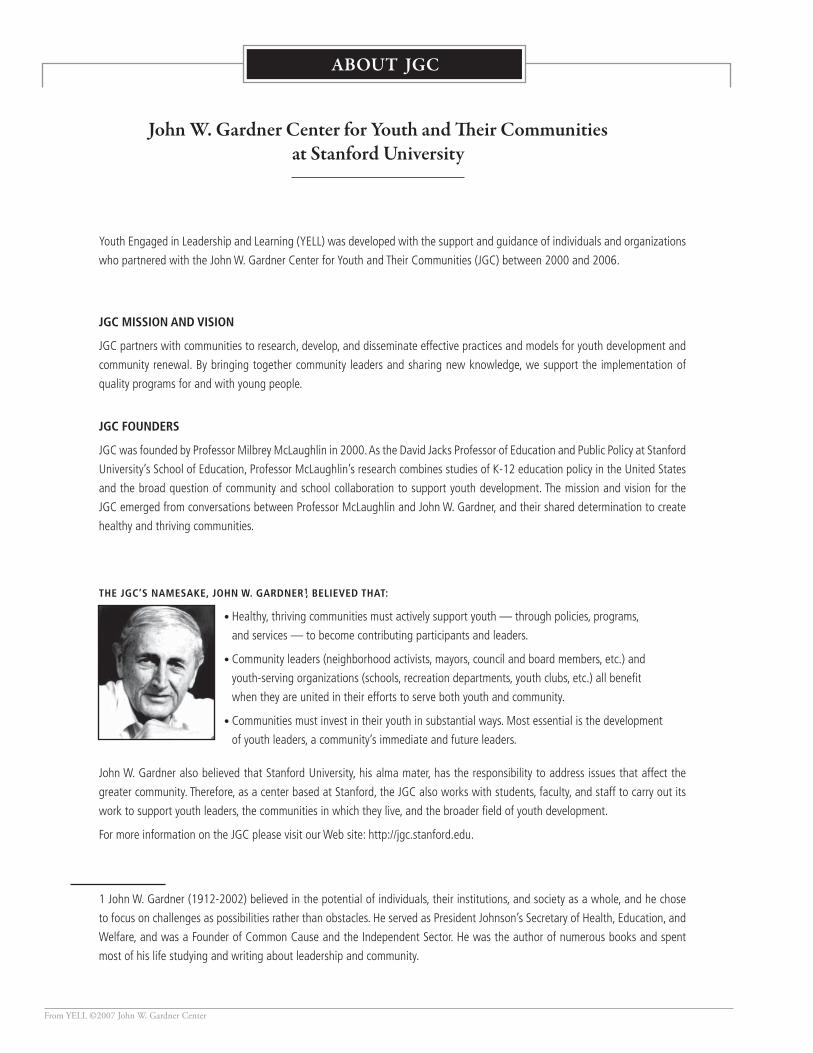
JGC FOUNDERS
JGC was founded by Professor Milbrey McLaughlin in 2000. As the David Jacks Professor of Education and Public Policy at Stanford
University’s School of Education, Professor McLaughlin’s research combines studies of K-12 education policy in the United States
and the broad question of community and school collaboration to support youth development. The mission and vision for the
JGC emerged from conversations between Professor McLaughlin and John W. Gardner, and their shared determination to create
healthy and thriving communities.
THE JGC’S NAMESAKE, JOHN W. GARDNER1, BELIEVED THAT:
• Healthy, thriving communities must actively support youth — through policies, programs,
and services — to become contributing participants and leaders.
• Community leaders (neighborhood activists, mayors, council and board members, etc.) and
youth-serving organizations (schools, recreation departments, youth clubs, etc.) all benefi t
when they are united in their efforts to serve both youth and community.
• Communities must invest in their youth in substantial ways. Most essential is the development
of youth leaders, a community’s immediate and future leaders.
John W. Gardner also believed that Stanford University, his alma mater, has the responsibility to address issues that affect the
greater community. Therefore, as a center based at Stanford, the JGC also works with students, faculty, and staff to carry out its
work to support youth leaders, the communities in which they live, and the broader fi eld of youth development.
For more information on the JGC please visit our Web site: http://jgc.stanford.edu.
1 John W. Gardner (1912-2002) believed in the potential of individuals, their institutions, and society as a whole, and he chose
to focus on challenges as possibilities rather than obstacles. He served as President Johnson’s Secretary of Health, Education, and
Welfare, and was a Founder of Common Cause and the Independent Sector. He was the author of numerous books and spent
most of his life studying and writing about leadership and community.
From YELL ©2007 John W. Gardner Center
TABLE OF CONTENTS
INTRODUCTION
Background of YELL ..............................................................................................................................................................xiv
A Note on Youth Leadership ...................................................................................................................................................xv
Youth Leadership in Action ....................................................................................................................................................xvi
The Guiding Framework and Applications of YELL .................................................................................................................xvii
Purpose of the YELL Curriculum ...........................................................................................................................................xviii
Overview of YELL Units ..........................................................................................................................................................xx
Facilitating YELL Sessions.......................................................................................................................................................xxi
GETTING STARTED: PLANNING AND IMPLEMENTING YELL
Starting a YELL Project or Program ..........................................................................................................................................2
Five Steps for Successful Recruitment ......................................................................................................................................3
Strategies for Retention ...........................................................................................................................................................6
Engaging Families, Teachers, and Community Members ............................................................................................................9
The Role of Adults in YELL: Facilitators, Mentors and Partners .................................................................................................10
Tips for Facilitating Successful Sessions ..................................................................................................................................12
Youth’s Advice to YELL Program and Project Leaders ..............................................................................................................13
YELL Session Strategies .........................................................................................................................................................14
YELL Outcomes and Indicators ..............................................................................................................................................18
Measurement Tips .................................................................................................................................................................19
Program Timeline and Planning Worksheet ............................................................................................................................20
Suggested Materials for YELL Sessions ...................................................................................................................................24
UNIT 1: COMMUNICATION
Unit 1 Table of Contents .......................................................................................................................................................32
ACTIVE LISTENING
Session 1: Introduction to Active Listening .............................................................................................................................34
Session 2: Active Listening in Group Decision Making ............................................................................................................36
Session 3: Active Listening in a Fish Bowl ...............................................................................................................................38
WORKING AS A TEAM
Session 4: Team Work ............................................................................................................................................................40
Session 5: Rights and Responsibilities ....................................................................................................................................42
Session 6: Establishing Consequences and Rewards ...............................................................................................................44
Session 7: Making Decisions ..................................................................................................................................................48
SPEAKING AND PRESENTING
Session 8: Speaking in Public and Making Presentations ........................................................................................................50
Session 9: Debate .................................................................................................................................................................52
Session 10: Debate and Compromise .....................................................................................................................................54
Session 11: Debate and Compromise Role Play ......................................................................................................................56
From YELL ©2007 John W. Gardner Center
TABLE OF CONTENTS
UNIT 1: COMMUNICATION CONTINUED
FACILITATION
Session 12: Introduction to Facilitation ..................................................................................................................................58
Session 13: Murder Mystery Mayhem ....................................................................................................................................62
Session 14: Facilitation Challenges and Solutions ...................................................................................................................64
Session 15: Exploring Situational Leadership ..........................................................................................................................66
Session 16: Facilitating Productive Meetings ..........................................................................................................................67
UNIT 1: MASTER COPIES FOR GROUP HANDOUTS AND FACILITATOR EXAMPLES ...............................................................68
UNIT 2: LEADERSHIP
Unit 2 Table of Contents ......................................................................................................................................................104
Session 1: Defi nitions of Leadership .....................................................................................................................................106
Session 2: Qualities of Leadership ........................................................................................................................................108
Session 3: Leadership in Community Context .......................................................................................................................110
Session 4: Styles of Leaders .................................................................................................................................................112
Session 5: Responsibilities of Leadership ..............................................................................................................................114
Session 6: Leadership Goals ................................................................................................................................................116
Session 7: Values and Identity ..............................................................................................................................................118
Session 8: Value Priorities ....................................................................................................................................................120
Session 9: Personal Asset Mapping ......................................................................................................................................122
Session 10: Youth as Leaders and Resources ........................................................................................................................123
Session 11: Youth-Adult Power in Organizations ..................................................................................................................124
Session 12: The Power of One ..............................................................................................................................................126
UNIT 2: MASTER COPIES FOR GROUP HANDOUTS AND FACILITATOR EXAMPLES ............................................................128
UNIT 3: RESEARCH AND ACTION
OVERVIEW: KEY STEPS TO THE INQUIRY PROCESS HANDOUT
Unit 3 Table of Contents ......................................................................................................................................................148
STEP 1: UNDERSTAND THE POWER OF RESEARCH
Session 1: Knowledge is Power ............................................................................................................................................152
STEP 2: IDENTIFY ISSUE AND ASSETS
Session 2: Community Webs and Maps ................................................................................................................................154
Session 3: The Ideal Neighborhood ......................................................................................................................................156
Session 4: Identify Issues and Assets ....................................................................................................................................158
Session 5: Pick a Topic .........................................................................................................................................................160
Session 6: Getting to the Root of the Problem ......................................................................................................................162
Session 7: Charity and Change ............................................................................................................................................164
STEP 3: DEVELOP THE RESEARCH QUESTIONS
Session 8: Decide on Your Research Questions .....................................................................................................................166
From YELL ©2007 John W. Gardner Center
TABLE OF CONTENTS
JGC
UNIT 3: RESEARCH AND ACTION CONTINUED
STEP 4: IDENTIFY POTENTIAL SOURCES OF INFORMATION
Session 9: Allies, Opponents, and Decision Makers................................................................................................................168
STEP 5: DECIDE ON RESEARCH METHODS AND DEVELOP RESEARCH TOOLS
Session 10: Research Round Robin ......................................................................................................................................170
Session 11: Choose your Research Methods .........................................................................................................................172
Session 12: Planning for Data Collection ..............................................................................................................................174
Session 13: How to Do a Good Interview .............................................................................................................................176
Session 14: Interview Protocol Development ........................................................................................................................178
Session 15: Focus Group Introduction ..................................................................................................................................180
Session 16: Focus Group Facilitation Practice ........................................................................................................................182
Session 17: Survey Basics and Protocol Development ...........................................................................................................184
STEP 6: COLLECT DATA – 2 SESSIONS
STEP 7: ORGANIZE AND ANALYZE DATA
Session 18: Organizing Interview Results .............................................................................................................................186
Session 19: Identify Interview Themes ..................................................................................................................................188
Session 20: Record and Analyze Survey Results ....................................................................................................................190
STEP 8: DECIDE ON RECOMMENDATIONS
Session 21: Recommendations ............................................................................................................................................192
Session 22: Goals and Audiences .........................................................................................................................................194
STEP 9: TAKE ACTION: ADVOCACY, ACTIVISM, AND EDUCATION
Session 23: Advocacy, Activism and Education: Round Robin ................................................................................................196
Session 24: Portraits and Skits: Advocate, Activist, and Educator ...........................................................................................200
Session 25: Messaging and Marketing .................................................................................................................................202
Session 26: Products and Presentation Tools: Round Robin ...................................................................................................204
STEP 10: CELEBRATE – 2 SESSIONS ...................................................................................................................................206
UNIT 3: MASTER COPIES FOR GROUP HANDOUTS AND FACILITATOR EXAMPLES .............................................................208
TABLE OF CONTENTS
From YELL ©2007 John W. Gardner Center
APPENDIXES
APPENDIX 1: SENIOR RESEARCH PROJECT ........................................................................................................................268
Appendix 1 provides a framework for adapting the YELL curriculum to support students in conducting research for class projects
or graduation requirements.
APPENDIX 2: ADDITIONAL YELL RESOURCES.................................................................................................................286
Appendix 2 includes the theoretical and research-based underpinnings of the YELL curriculum, along with information on potential
resources for supporting YELL development and sustainability. References to other youth development curricula, evaluation tools,
and academic publications are provided, along with links to John W. Gardner Center publications available on the JGC Web site.
APPENDIX 3: TEAM BUILDERS: ICE-BREAKERS, COMMUNITY BUILDERS AND ENERGIZERS ..............................................308
Appendix 3 includes a series of activities designed to engage youth, enliven sessions, and provide insight into particular concepts.
Each session agenda in the YELL curriculum includes a suggested activity from this appendix.
IN TRODUCTIONYouth Engaged in Leadership and Learning (YELL)
From YELL ©2007 John W. Gardner Center

NOTES
From YELL ©2007 John W. Gardner Center ★xiii

INTRODUCTION
From YELL ©2007 John W. Gardner Center★xiv
Background of YELL
“ Many of our best young people today wonder whether they have any place in this vast and complicated society of ours. Th ey feel anonymous and rootless and alienated. Th ey are oppressed by the impersonality of our institutions. In my judgment there isn’t any quicker cure for that ailment than evidence that their society needs them.”
~John W. Gardner, No Easy Victories
The YELL program, from which this curriculum is based, was developed by the John W. Gardner Center for Youth and Their Communties (JGC) in October 2000. That fi rst year, YELL included 15 middle school youth who conducted research to identify
community needs and strengths. The fi ndings were then used to leverage much-needed resources for the local school and
community. Through this process, youth learned about their communities and tapped into their own strengths and ideas to lead
a change effort. In addition, adult leaders came to solicit the perspectives of young people and apply those perspectives to local
policy.
Between 2000 and 2006, more than 350 youth participated in YELL programs in two JGC partner communities: Redwood
City and West Oakland. With the support and involvement of many community partners, YELL became a live model of prom-
ising youth development practices and youth leadership within these two communities.
Over the years, the original curriculum has been augmented with lessons from implementation, activities developed by youth
and adult partners, and JGC’s research on the program’s effective practices. With these improvements, this curriculum is now
designed for school, program, and community leaders to support authentic youth participation, promote effective policies and
practices to strengthen communities, and support young people’s personal growth.
Today YELL programs are run directly by community-based organizations and schools. In Redwood City, the Youth Development
Initiative (YDI) oversees YELL on two middle school campuses. In West Oakland, YELL is a high school elective class and after-
school program administered by the McClymond’s Educational Complex. JGC provides YELL curriculum and technical assistance,
and is currently testing new applications of YELL within its partner communities and beyond.
INTRODUCTION
From YELL ©2007 John W. Gardner Center
A Note on Youth Leadership
YOUTH LEADERSHIP takes many names and forms: youth voice, youth participation, youth civic engagement, youth decision
making, and youth empowerment, among others. While this curriculum is aimed at promoting and supporting youth as leaders,
it does not hold a single defi nition of leadership. Instead, this curriculum encourages youth and adults to look at leadership in
context and to fi nd value in different attitudes and defi nitions of leadership.
Six years of research on YELL has shown that a broader, more fl exible vision of leadership can play to different strengths,
improving the likelihood that youth will engage in the organization and in their communities in meaningful and authentic ways.
For young people, the more possibilities that seem open to them, the better their chances of fi nding an appropriate leadership
style of their own.
While this curriculum focuses on youth as leaders, it is ultimately about creating lasting social change. Leadership development
is not an end but a means to participation in and the creation of a more just and equitable society in which youth are valued
and have the opportunity to be productive and connected citizens who make meaningful contributions – now and throughout
their adult lives.
Tips from YELL Research Findings:
• Defi ne youth leadership broadly: Th ink about your own assumptions of what leadership looks like and introduce youth to a variety of leadership styles and models – real or historical.
• Create opportunities for involvement for and with youth that refl ect diverse forms of leadership and action.
• Remember that you– as an adult ally – are modeling leadership for the youth with whom you work.
• Refl ect constantly on being strategic in the lessons you want to model as well as remaining authentic and open to learning about leadership from them.
★xv
INTRODUCTION
From YELL ©2007 John W. Gardner Center★xvi
Youth Leadership in Action
At 13 years old, Amalia had faced the death of her mother and was living on the edges of poverty and gang involvement. She was
disinterested in school and had little academic or personal ambition.
Referred by a school staff member, Amalia joined a new after-school program – Youth Engaged in Leadership and Learning (YELL),
she was in eighth grade. Four years later, Amalia would describe YELL as “life changing: “ having provided her with leadership
skills, adult support, and learning experiences that allow her to share her perspectives on community issues, pursue her education,
help younger youth to make healthy decisions, and develop positive social relationships.
In YELL, Amalia learned social science research methods and applied what she learned to fi nd out about the needs of youth in her
community. The work that Amalia was presented to the City Council and the School Board. Their recommendations contributed to
the development of a family center at their school, the expansion of school-based services for youth, challenged agency leaders to
think about how to strengthen these same systems at other schools, and led the City Manager to include Amalia and other YELL
students in a series of community dialogues with more than 100 adults from different parts of the city.
Throughout high school, Amalia served as a mentor to new YELL participants – helping to facilitate YELL sessions, supporting
younger students in their community-based research, leading retreats, and advising staff on program design and expansion. Ama-
lia’s work with YELL improved the program for other youth and pushed staff to improve and expand their work.
In addition to her work with YELL, Amalia went on to volunteer as an elementary school reading tutor, to present work-
shops at national conferences, and to co-found “Latinas en Acción,”a support group for young Latinas. By the time
Amalia graduated from high school, she had received a prestigious leadership award, including a $5,000 college
scholarship honoring students with “extraordinary histories of selfl ess volunteer activism.” Amalia is now a full time student at
a nearby state college. “I’m proud of how much strength I have and how I keep moving forward with my dreams, especially my
education.”
Amalia is exceptional, yet her story is not the exception. Today, more than 200 young people in Amalia’s community have par-
ticipated in YELL, resulting in thousands of community members benefi ting from their leadership. A growing number of young
people like Amalia are partners and leaders in program and service evaluation and design, and are working with parents, teachers,
residents, and organizational and governmental leaders in unifi ed community renewal efforts.
“Th ere is a ladder of opportunities, and YELL is not the only way for youth to be involved. It is like [for me] YELL is the trunk of the tree and all these other programs and opportunities are the branches.”
~ Amalia, 2007
★xvii
INTRODUCTION
From YELL ©2007 John W. Gardner Center
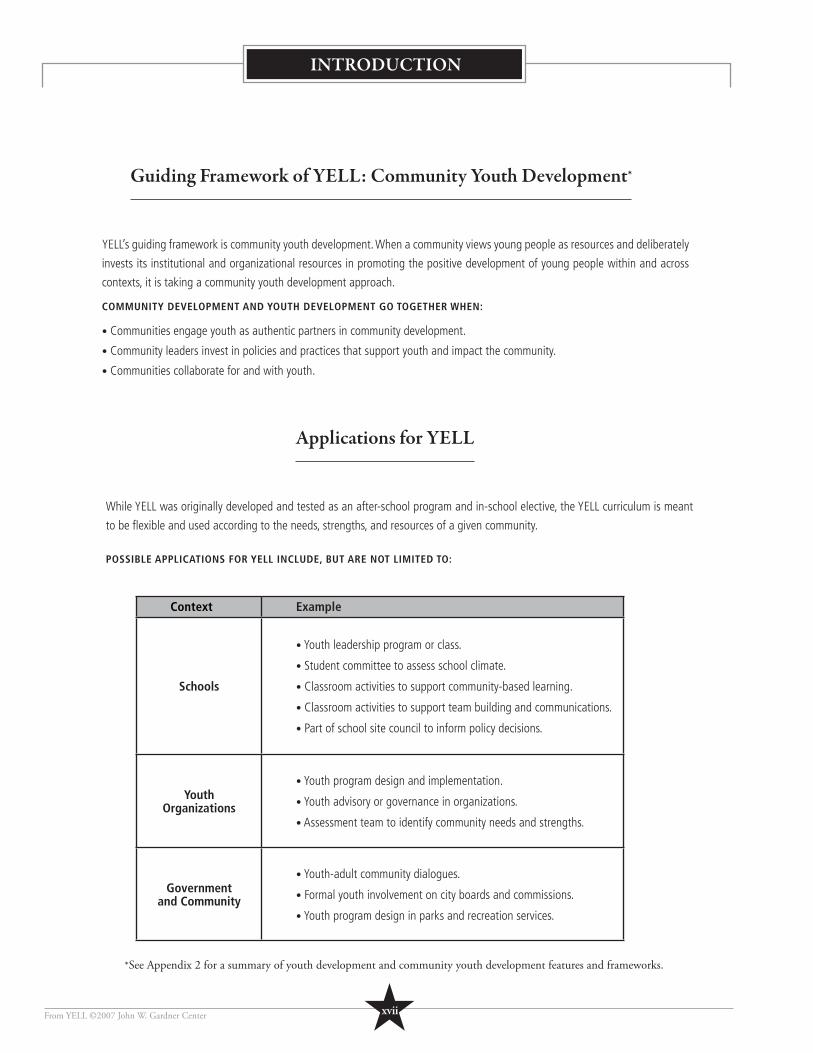
Guiding Framework of YELL: Community Youth Development*
YELL’s guiding framework is community youth development. When a community views young people as resources and deliberately
invests its institutional and organizational resources in promoting the positive development of young people within and across
contexts, it is taking a community youth development approach.
COMMUNITY DEVELOPMENT AND YOUTH DEVELOPMENT GO TOGETHER WHEN:
• Communities engage youth as authentic partners in community development.
• Community leaders invest in policies and practices that support youth and impact the community.
• Communities collaborate for and with youth.
Applications for YELL
While YELL was originally developed and tested as an after-school program and in-school elective, the YELL curriculum is meant
to be fl exible and used according to the needs, strengths, and resources of a given community.
POSSIBLE APPLICATIONS FOR YELL INCLUDE, BUT ARE NOT LIMITED TO:
Context Example
Schools
• Youth leadership program or class.
• Student committee to assess school climate.
• Classroom activities to support community-based learning.
• Classroom activities to support team building and communications.
• Part of school site council to inform policy decisions.
Youth Organizations
• Youth program design and implementation.
• Youth advisory or governance in organizations.
• Assessment team to identify community needs and strengths.
Governmentand Community
• Youth-adult community dialogues.
• Formal youth involvement on city boards and commissions.
• Youth program design in parks and recreation services.
*See Appendix 2 for a summary of youth development and community youth development features and frameworks.

INTRODUCTION
From YELL ©2007 John W. Gardner Center
Purpose of the YELL Curriculum
This curriculum supports young people and the adults who work with them to be what John W. Gardner called “responsibles.”
Being a responsible requires skills, knowledge, and a deepened understanding of oneself and the contexts in which one lives and
grows. The activities in this curriculum encourage skill and knowledge building around three areas, all common to diverse styles
of leadership:
1. COMMUNICATION AND INTERPERSONAL SKILLS
2. ANALYTIC AND CRITICAL REFLECTION
3. POSITIVE INVOLVEMENT IN SCHOOL AND COMMUNITY AFFAIRS
As a result of using this curriculum, you can expect youth to develop:
★ KNOWLEDGE OF LEADERSHIP, INCLUDING
• An understanding of their personal leadership style, strengths, and opportunities for personal growth.
• Knowledge of civic and social issues, and how they relate to community contexts.
• Knowledge of techniques and methods leaders can use to advance social change.
★ SKILLS THAT FACILITATE LEADERSHIP, INCLUDING
• Active listening.
• Public speaking and presenting.
• Debate and compromise.
• Decision making.
• Group facilitation.
• Ability to work with others collaboratively.
• Research techniques such as interviewing, survey development, and analysis.
• Self assessment and refl ection on practice.
★ ATTITUDES AND ORIENTATIONS OF LEADERSHIP, INCLUDING
• A sense of voice in their program, school, and community.
• A sense that they can accomplish things in their community.
• A sense that they matter and have potential.
• A sense of belonging in their program, school, and community.
• Commitment to understanding and developing their leadership skills.
★xviii
INTRODUCTION
From YELL ©2007 John W. Gardner Center
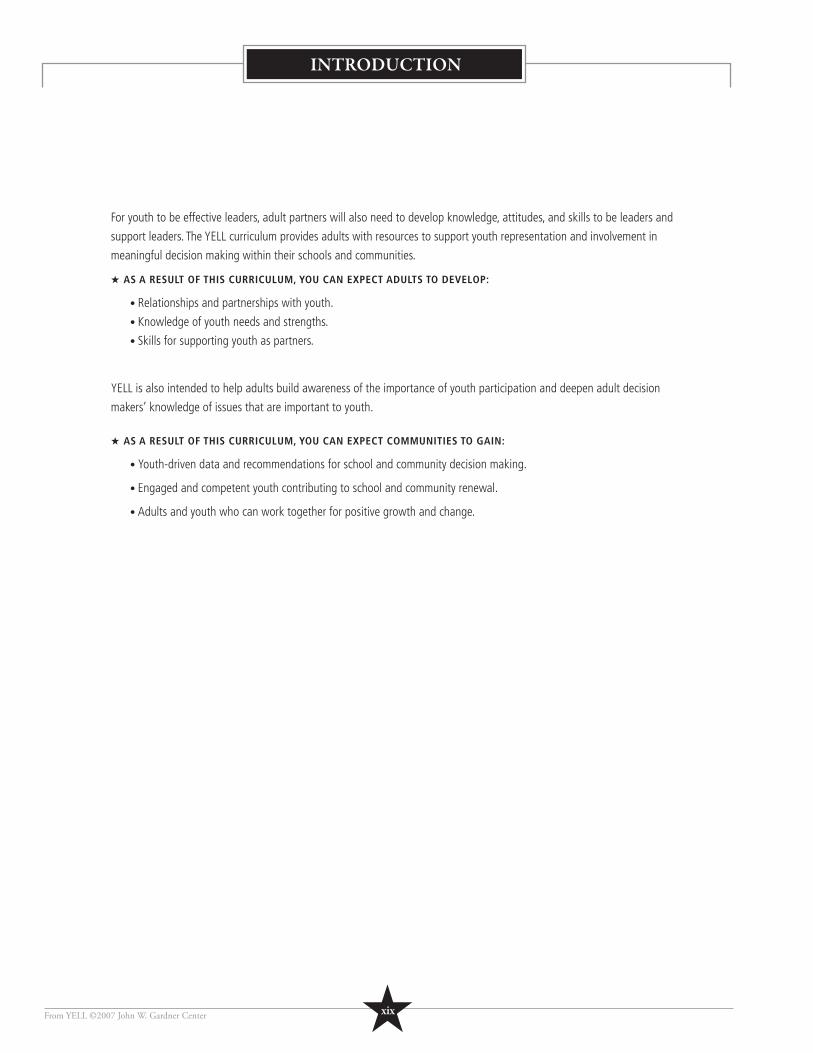
For youth to be effective leaders, adult partners will also need to develop knowledge, attitudes, and skills to be leaders and
support leaders. The YELL curriculum provides adults with resources to support youth representation and involvement in
meaningful decision making within their schools and communities.
★ AS A RESULT OF THIS CURRICULUM, YOU CAN EXPECT ADULTS TO DEVELOP:
• Relationships and partnerships with youth.
• Knowledge of youth needs and strengths.
• Skills for supporting youth as partners.
YELL is also intended to help adults build awareness of the importance of youth participation and deepen adult decision
makers’ knowledge of issues that are important to youth.
★ AS A RESULT OF THIS CURRICULUM, YOU CAN EXPECT COMMUNITIES TO GAIN:
• Youth-driven data and recommendations for school and community decision making.
• Engaged and competent youth contributing to school and community renewal.
• Adults and youth who can work together for positive growth and change.
★xix
INTRODUCTION
From YELL ©2007 John W. Gardner Center
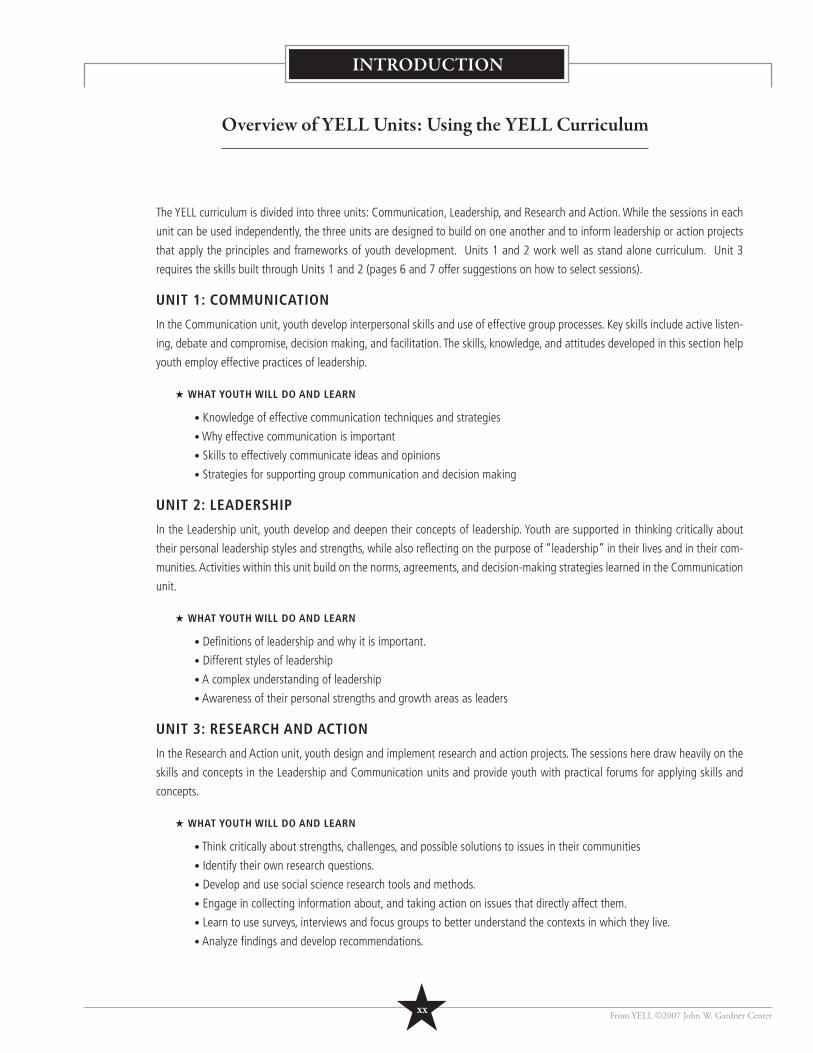
Overview of YELL Units: Using the YELL Curriculum
The YELL curriculum is divided into three units: Communication, Leadership, and Research and Action. While the sessions in each
unit can be used independently, the three units are designed to build on one another and to inform leadership or action projects
that apply the principles and frameworks of youth development. Units 1 and 2 work well as stand alone curriculum. Unit 3
requires the skills built through Units 1 and 2 (pages 6 and 7 offer suggestions on how to select sessions).
UNIT 1: COMMUNICATION
In the Communication unit, youth develop interpersonal skills and use of effective group processes. Key skills include active listen-
ing, debate and compromise, decision making, and facilitation. The skills, knowledge, and attitudes developed in this section help
youth employ effective practices of leadership.
★ WHAT YOUTH WILL DO AND LEARN
• Knowledge of effective communication techniques and strategies
• Why effective communication is important
• Skills to effectively communicate ideas and opinions
• Strategies for supporting group communication and decision making
UNIT 2: LEADERSHIP
In the Leadership unit, youth develop and deepen their concepts of leadership. Youth are supported in thinking critically about
their personal leadership styles and strengths, while also refl ecting on the purpose of “leadership” in their lives and in their com-
munities. Activities within this unit build on the norms, agreements, and decision-making strategies learned in the Communication
unit.
★ WHAT YOUTH WILL DO AND LEARN
• Defi nitions of leadership and why it is important.
• Different styles of leadership
• A complex understanding of leadership
• Awareness of their personal strengths and growth areas as leaders
UNIT 3: RESEARCH AND ACTION
In the Research and Action unit, youth design and implement research and action projects. The sessions here draw heavily on the
skills and concepts in the Leadership and Communication units and provide youth with practical forums for applying skills and
concepts.
★ WHAT YOUTH WILL DO AND LEARN
• Think critically about strengths, challenges, and possible solutions to issues in their communities
• Identify their own research questions.
• Develop and use social science research tools and methods.
• Engage in collecting information about, and taking action on issues that directly affect them.
• Learn to use surveys, interviews and focus groups to better understand the contexts in which they live.
• Analyze fi ndings and develop recommendations.
★xx
INTRODUCTION
From YELL ©2007 John W. Gardner Center ★xxi
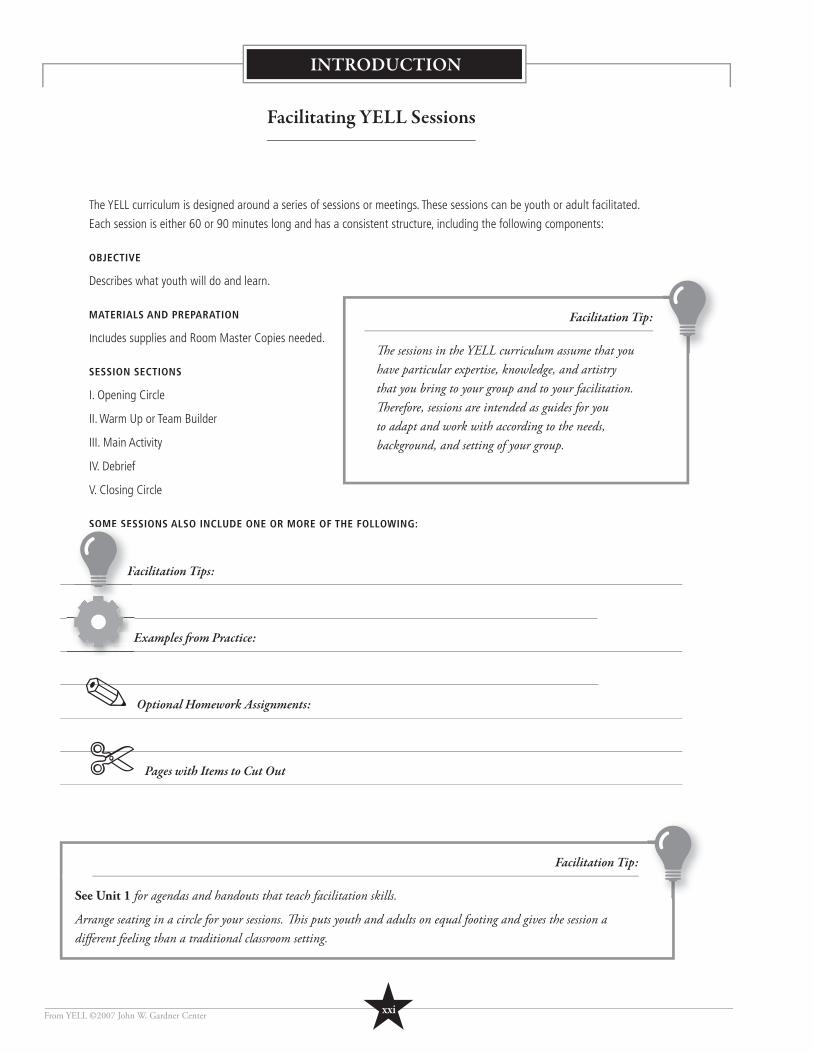
Facilitation Tip:
See Unit 1 for agendas and handouts that teach facilitation skills.
Arrange seating in a circle for your sessions. Th is puts youth and adults on equal footing and gives the session a diff erent feeling than a traditional classroom setting.
Facilitating YELL Sessions
The YELL curriculum is designed around a series of sessions or meetings. These sessions can be youth or adult facilitated.
Each session is either 60 or 90 minutes long and has a consistent structure, including the following components:
OBJECTIVE
Describes what youth will do and learn.
MATERIALS AND PREPARATION
Includes supplies and Room Master Copies needed.
SESSION SECTIONS
I. Opening Circle
II. Warm Up or Team Builder
III. Main Activity
IV. Debrief
V. Closing Circle
SOME SESSIONS ALSO INCLUDE ONE OR MORE OF THE FOLLOWING:
Facilitation Tips:
Examples fr om Practice:
✎ Optional Homework Assignments:
✄ Pages with Items to Cut Out
Facilitation Tip:
Th e sessions in the YELL curriculum assume that you have particular expertise, knowledge, and artistry that you bring to your group and to your facilitation. Th erefore, sessions are intended as guides for you to adapt and work with according to the needs, background, and setting of your group.
E
SOME SE
F
G ETTIN G STA RTEDPlanning and Implementing YELL
From YELL ©2007 John W. Gardner Center
“ Most of us have potentialities that have never been developed simply because the circumstances of our lives never called them forth. Exploration of the full range of our own potentialities is not something that we can safely leave to the chances of life. It is something to be pursued systematically, or at least avidly, to the end of our days.
“And by potentialities I mean not just skills but the full range of our capacities for sensing, wondering, learning, understanding, loving, and aspiring.”
~John W. Gardner, Self-Renewal

From YELL ©2007 John W. Gardner Center
NOTES
★1
PLANNING
From YELL ©2007 John W. Gardner Center
Starting a YELL Project or Program:What to Th ink about First
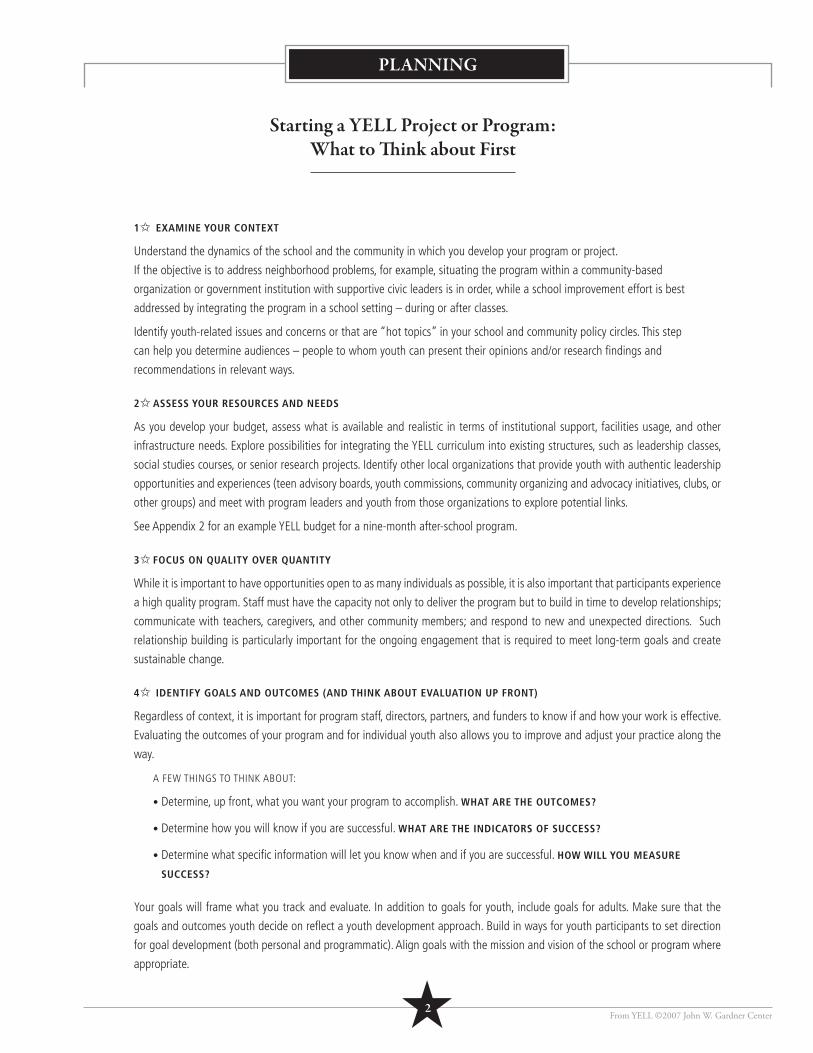
1✩ EXAMINE YOUR CONTEXT
Understand the dynamics of the school and the community in which you develop your program or project.
If the objective is to address neighborhood problems, for example, situating the program within a community-based
organization or government institution with supportive civic leaders is in order, while a school improvement effort is best
addressed by integrating the program in a school setting – during or after classes.
Identify youth-related issues and concerns or that are “hot topics” in your school and community policy circles. This step
can help you determine audiences – people to whom youth can present their opinions and/or research fi ndings and
recommendations in relevant ways.
2✩ ASSESS YOUR RESOURCES AND NEEDS
As you develop your budget, assess what is available and realistic in terms of institutional support, facilities usage, and other
infrastructure needs. Explore possibilities for integrating the YELL curriculum into existing structures, such as leadership classes,
social studies courses, or senior research projects. Identify other local organizations that provide youth with authentic leadership
opportunities and experiences (teen advisory boards, youth commissions, community organizing and advocacy initiatives, clubs, or
other groups) and meet with program leaders and youth from those organizations to explore potential links.
See Appendix 2 for an example YELL budget for a nine-month after-school program.
3✩ FOCUS ON QUALITY OVER QUANTITY
While it is important to have opportunities open to as many individuals as possible, it is also important that participants experience
a high quality program. Staff must have the capacity not only to deliver the program but to build in time to develop relationships;
communicate with teachers, caregivers, and other community members; and respond to new and unexpected directions. Such
relationship building is particularly important for the ongoing engagement that is required to meet long-term goals and create
sustainable change.
4✩ IDENTIFY GOALS AND OUTCOMES (AND THINK ABOUT EVALUATION UP FRONT)
Regardless of context, it is important for program staff, directors, partners, and funders to know if and how your work is effective.
Evaluating the outcomes of your program and for individual youth also allows you to improve and adjust your practice along the
way.
A FEW THINGS TO THINK ABOUT:
• Determine, up front, what you want your program to accomplish. WHAT ARE THE OUTCOMES?
• Determine how you will know if you are successful. WHAT ARE THE INDICATORS OF SUCCESS?
• Determine what specifi c information will let you know when and if you are successful. HOW WILL YOU MEASURE
SUCCESS?
Your goals will frame what you track and evaluate. In addition to goals for youth, include goals for adults. Make sure that the
goals and outcomes youth decide on refl ect a youth development approach. Build in ways for youth participants to set direction
for goal development (both personal and programmatic). Align goals with the mission and vision of the school or program where
appropriate.
★2
PLANNING
From YELL ©2007 John W. Gardner Center ★3
Five Steps for Successful Recruitment
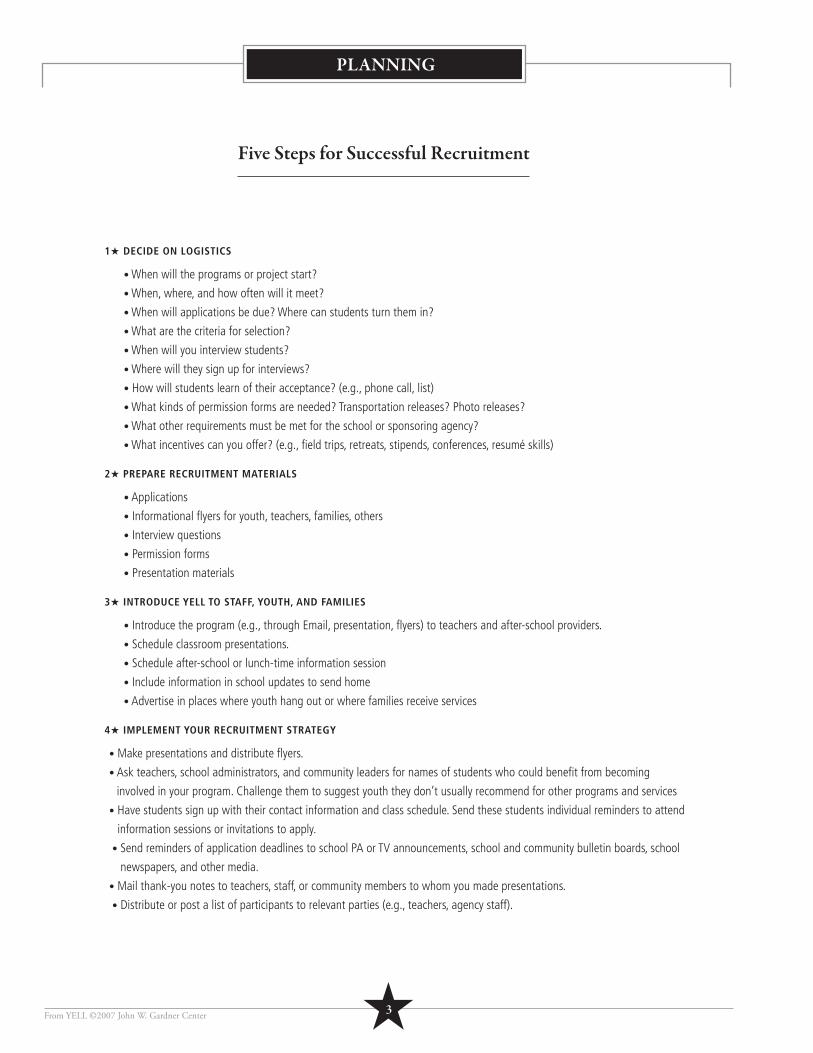
1★ DECIDE ON LOGISTICS
• When will the programs or project start?
• When, where, and how often will it meet?
• When will applications be due? Where can students turn them in?
• What are the criteria for selection?
• When will you interview students?
• Where will they sign up for interviews?
• How will students learn of their acceptance? (e.g., phone call, list)
• What kinds of permission forms are needed? Transportation releases? Photo releases?
• What other requirements must be met for the school or sponsoring agency?
• What incentives can you offer? (e.g., fi eld trips, retreats, stipends, conferences, resumé skills)
2★ PREPARE RECRUITMENT MATERIALS
• Applications
• Informational fl yers for youth, teachers, families, others
• Interview questions
• Permission forms
• Presentation materials
3★ INTRODUCE YELL TO STAFF, YOUTH, AND FAMILIES
• Introduce the program (e.g., through Email, presentation, fl yers) to teachers and after-school providers.
• Schedule classroom presentations.
• Schedule after-school or lunch-time information session
• Include information in school updates to send home
• Advertise in places where youth hang out or where families receive services
4★ IMPLEMENT YOUR RECRUITMENT STRATEGY
• Make presentations and distribute fl yers.
• Ask teachers, school administrators, and community leaders for names of students who could benefi t from becoming
involved in your program. Challenge them to suggest youth they don’t usually recommend for other programs and services
• Have students sign up with their contact information and class schedule. Send these students individual reminders to attend
information sessions or invitations to apply.
• Send reminders of application deadlines to school PA or TV announcements, school and community bulletin boards, school
newspapers, and other media.
• Mail thank-you notes to teachers, staff, or community members to whom you made presentations.
• Distribute or post a list of participants to relevant parties (e.g., teachers, agency staff).
★4
PLANNING
From YELL ©2007 John W. Gardner Center
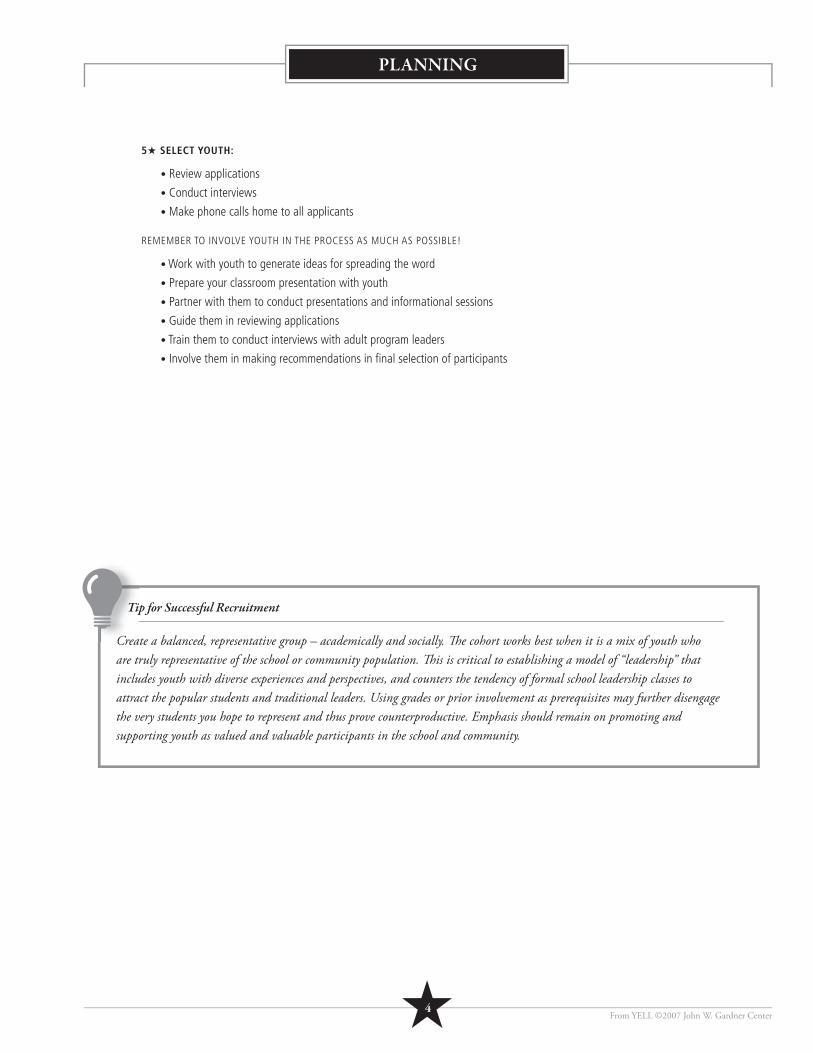
5★ SELECT YOUTH:
• Review applications
• Conduct interviews
• Make phone calls home to all applicants
REMEMBER TO INVOLVE YOUTH IN THE PROCESS AS MUCH AS POSSIBLE!
• Work with youth to generate ideas for spreading the word
• Prepare your classroom presentation with youth
• Partner with them to conduct presentations and informational sessions
• Guide them in reviewing applications
• Train them to conduct interviews with adult program leaders
• Involve them in making recommendations in fi nal selection of participants
Tip for Successful Recruitment
Create a balanced, representative group – academically and socially. Th e cohort works best when it is a mix of youth who are truly representative of the school or community population. Th is is critical to establishing a model of “leadership” that includes youth with diverse experiences and perspectives, and counters the tendency of formal school leadership classes to attract the popular students and traditional leaders. Using grades or prior involvement as prerequisites may further disengage the very students you hope to represent and thus prove counterproductive. Emphasis should remain on promoting and supporting youth as valued and valuable participants in the school and community.
Tip
Crea
★5
PLANNING
From YELL ©2007 John W. Gardner Center
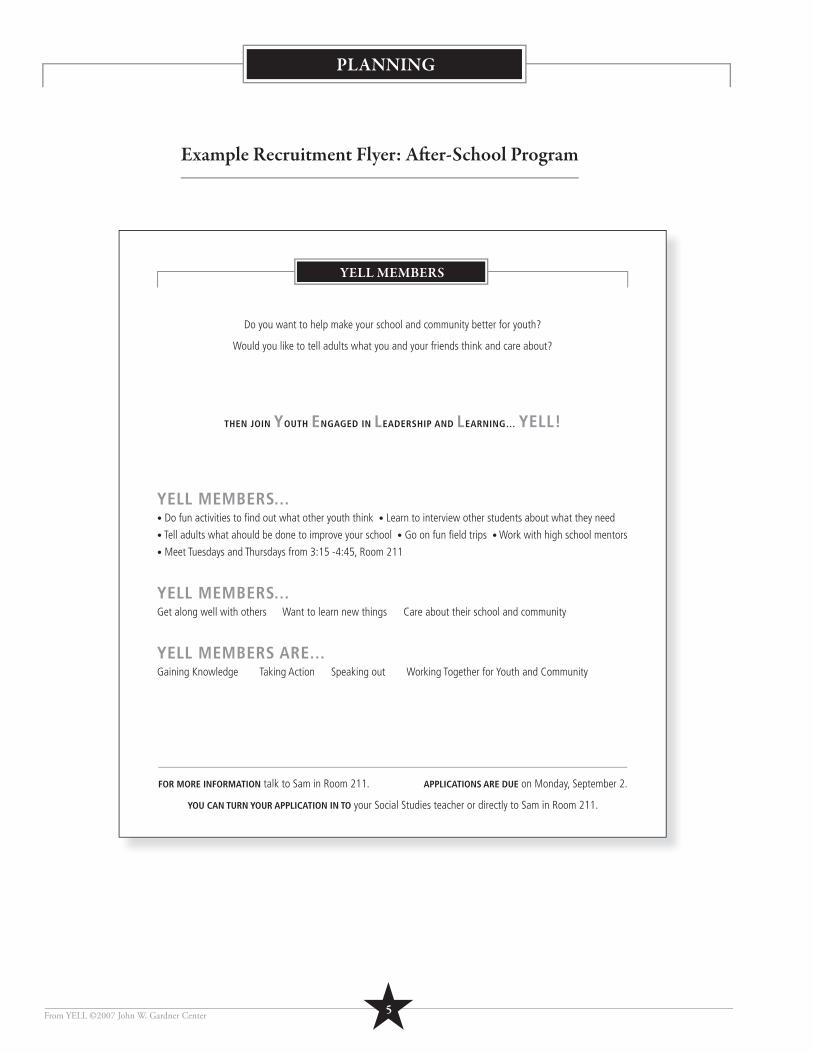
Example Recruitment Flyer: Aft er-School Program
YELL MEMBERS
Do you want to help make your school and community better for youth?
Would you like to tell adults what you and your friends think and care about?
THEN JOIN YOUTH ENGAGED IN LEADERSHIP AND LEARNING… YELL!
YELL MEMBERS...• Do fun activities to fi nd out what other youth think • Learn to interview other students about what they need
• Tell adults what ahould be done to improve your school • Go on fun fi eld trips • Work with high school mentors
• Meet Tuesdays and Thursdays from 3:15 -4:45, Room 211
YELL MEMBERS...Get along well with others Want to learn new things Care about their school and community
YELL MEMBERS ARE...Gaining Knowledge Taking Action Speaking out Working Together for Youth and Community
FOR MORE INFORMATION talk to Sam in Room 211. APPLICATIONS ARE DUE on Monday, September 2.
YOU CAN TURN YOUR APPLICATION IN TO your Social Studies teacher or directly to Sam in Room 211.
★6
PLANNING
From YELL ©2007 John W. Gardner Center
Strategies for Retention
Let young people know how they will benefi t from participating and highlight what they can contribute. Incentives like fi eld trips,
retreats, or a monthly stipend can let the youth know that you value their time and commitment. Try to involve youth who may not
be involved in other activities, and build a group that refl ects a diversity of interests, experiences, and backgrounds.
To become engaged and stay involved, youth need to feel the activities are accessible and relevant to their lives. They need to
know that they matter to the program and its staff, and that they have opportunities for growth and direct contribution. The
section below offers some suggestions for getting and keeping them engaged.
1. REMOVE BARRIERS TO PARTICIPATION
Make sure that youth have adequate access to transportation to and from meetings and that your program schedule does not
present any major confl icts with other school or community programs.
2. PROVIDE INCENTIVES
Incentives not only encourage and support participation but also build on the strengths and outcomes of the program. Community
building through retreats, fi eld trips, and interactive activities during sessions can be critical to members’ development of a shared
identity and sense of belonging. Below are some examples:
★ RECOGNITION
Given how diffi cult it can be for students to remember and follow through on certain responsibilities, it is important to
acknowledge them when they do. At the beginning of each meeting, recognize students who attended optional meetings,
turned in assignments on time, or improved their attendance.
★ FIELD TRIPS AND CONFERENCES
Field trips and Conferences can benefi t the YELL participants in many ways. They enrich participant learning, build
community, and keep participants engaged in the program. They can also serve as a valuable informal social opportunity
to engage with program staff as well as mentors and volunteers in a new setting outside of the program. The highlight
for many participants’ is attending regional youth conferences. Youth conferences are a great learning experience, a lot
of fun, and a good way to promote your work. In particular, youth conferences are an opportunity for participants to
feel connected to broader social movements and to meet other young people involved in community change efforts. This
connection can make them feel proud of their work and can make them more comfortable doing outreach.
★ RETREATS
These “getaways” provide opportunities to build community, create trust, move forward in the curriculum, and refl ect on
past work. It is important to incorporate ritual into these retreats, such as a regular location, series of activities, or roles for
older youth. While permission slips are legally and ethically mandatory, it is helpful to send home additional information
packets that provide greater detail about the location of the retreat and what students need to bring (toiletries, money,
food, and other items).
★7
PLANNING
From YELL ©2007 John W. Gardner Center
★ BIRTHDAYS
Youth appreciate when they are celebrated individually as well as in a group. It is important to be thoughtful in how you
celebrate birthdays respecting dietary or cultural observances. A common way to celebrate is to bring in a favorite treat on
each participant’s birthday and sing “Happy Birthday” at the beginning of session.
★ STIPENDS
Student stipends are a good way to reward participation, particularly for older youth who are eager to become more self-
reliant. This practice has also proven effective in low-income communities where youth employment is often scarce, family
fi nancial responsibilities are high, and opting for a paying job is a more attractive alternative to a program. Youth do not
need to report income to the Internal Revenue Service if the student earns less than $8,200 a year. (Since tax laws regularly
change, contact the IRS at 1-800-829-1040 for more information.)
3. INVOLVE YOUTH IN REAL DECISION MAKING AND EVALUATION
Nothing beats engaging youth like letting them know they matter and that their opinions are valued. Below are two examples:
★ HIRING OF NEW STAFF
Include youth in the hiring process when choosing new staff. Youth not only develop ownership of and accountability to the
program staffi ng decisions but also develop their knowledge of interviews, resumés, and hiring structures and practices. In
addition, youth perspectives can be highly instructive and relevant, improving the overall decision-making process.
We have seen that when young people are involved in the hiring of new staff (even in the case of a new program director),
they feel more invested in the success of the program (and the staff member) and continue to stay involved even with a
personnel turnover.
★ EVALUATION
When youth evaluate program staff and structures, the program and staff receive concrete tools for improving practice.
Youth also know that their perspectives matter and that they are heard. It is recommended that staff tabulate the evalua-
tion responses and share back with the youth, refl ecting on what they heard about their performance, what they are doing
well, and how they can improve.
Example fr om Practice:
At a YELL retreat for youth and new staff a few years ago, a group of returning youth came up with a role-play activity that they then facilitated for the full group. Rebecca Flores – one of the designers of the exercise – remembers this as one of her favorite YELL activities:“Youth had to act like adults, and adults had to act like the youth, to understand each other’s expectations. We’re always talking about “What do youth need?” or “How can we make it better?” I just wanted (the adults) to put themselves in our shoes, and we put ourselves in (the adults’) shoes, and then share out.”
ice:
★8
PLANNING
From YELL ©2007 John W. Gardner Center
4. OFFER MULTIPLE ROLES FOR INVOLVEMENT
YELL programs can provide a “ladder of opportunities” for youth who want to remain involved after their initial year of
participation. These roles are often overlapping and interconnected, but the important point is that they provide youth with a
clear sense of how responsibilities can grow and change. Three examples:
MENTORS OR YOUTH STAFF
Returning youth can assume the role of YELL mentor or Youth Staff. Mirroring adult program staff responsibilities by
facilitating discussions, offering insights based on their experiences in the program, and helping support the new
cohort. Mentors also help the program staff build a cohesive group culture in which leadership is distributed and
collective efforts take center stage. Youth are often proud to have adult-sounding titles of “mentor” or “staff.”
COMMUNITY AMBASSADORS
Youth can apprise program participants of other opportunities to become involved in effecting change, to represent youth
perspectives, or to cultivate leadership skills. They connect youth to local advisory boards, youth councils or commissions, or
other opportunities for meaningful community-based involvement.
YOUTH DEVELOPMENT TRAINERS
Youth who have become leaders in their own right can partner with program staff to plan, develop, and deliver training or
workshops to other educators and youth development program staff at local, regional, and national levels. The workshops
not only allow them to reinforce and articulate what they have learned but also provide an opportunity for them to share
their skills and knowledge with others.
Example fr om Practice:
Youth who have become leaders in their own right can partner with program staff to plan, develop, and deliver training or workshops to other educators and youth development program staff at local, regional, and national levels.
★9
IMPLEMENTING
From YELL ©2007 John W. Gardner Center
Engaging Families, Teachers, and Community Members
Communicating with others – including teachers, family members, guardians, and peers of the youth in your program – is
important. In general:
Seek input on the goals, outcomes and design of your program or project. Talk with a range of people and •
organizations, including youth, to highlight the importance of your program and to enlist their involvement.
Communicate with other adults about individual youth’s involvement, successes, and any emergent issues or challenges. •
If the program is in a school setting, provide a newsletter, quarterly updates, and fi nal products and reports to help staff stay •
informed and engaged.
If your program takes place after school or off school grounds, connect with teachers, as well as with other supportive adult •
allies such as homework center coordinators, counselors, or social service providers. Keeping different groups informed about
what youth in your program are doing can help facilitate links between YELL and school or agency activities or structures.
CONNECTING WITH CAREGIVERS: WHAT WORKS BEST?
• IT IS ALL ABOUT RELATIONSHIPS. Build caring and trusting relationships with caregivers. Learn caregivers’ names and which
family members your youth participants live and connect with regularly.
• EMBRACE A PHILOSOPHY OF PARTNERSHIP WITH FAMILIES. Differences in beliefs, language, and culture need not prevent
caregivers and educators from seeing their common goal – to support the positive development of their children. Communicate
to caregivers that you have their children’s best interests in mind and be clear about how youth benefi t from participating in
your program.
• LINK FAMILY AND COMMUNITY TO STUDENT LEARNING AND DEVELOPMENT. Inviting families to contribute their time,
interests, and knowledge to the program is a great way to connect to participants’ lives beyond the program or project, to inform the
community of your efforts, and to learn from family experiences and skills.
• MAKE CAREGIVER ACTIVITIES PART OF YOUR WORK PLAN. Caregiver engagement is necessary for retention, especially with
younger participants. If caregivers do not believe in your program, or feel it hinders their child’s progress in other areas, they
can prevent a young person from taking part. Schedule regular phone calls home (and make sure most of the calls are posi-
tive!), caregiver meetings, and evening events. Send individualized invitations to caregivers in their language. Email and fl yer
announcements are useful for teacher and community partner participation.
From YELL ©2007 John W. Gardner Center
IMPLEMENTING
Th e Role of Adults in YELL: Facilitators, Mentors, and Partners
Adults who implement this curriculum are allies who understand that youth bring relevant experience and expertise to the issues
and activities at hand. Adults in YELL therefore take on three roles: facilitators, mentors, and partners. As a facilitator, you guide
and support youth in ways that help to draw out their experience and expertise. As a mentor, you get to know participants on a
personal level, learn their goals, and coach them in developing the skills and attitudes needed to fulfi ll those goals. You also model
behaviors, approaches, and attitudes in every aspect of your work with youth. As a partner, you are invested in the outcomes for
youth and the program, and use your strengths and capacities.
Below are seven guidelines for these roles that also assure that YELL sessions provide a consistent, caring, and supportive
environment.
1. BE TRANSPARENT
• Do not assume anything when working with young people.
• Ask youth questions if you are in doubt.
• Create positive social norms and agreements that are understood by the whole group.
• Engage youth in playing a role in the design and direction of the program.
• Lay out the scope of youth’s decision-making role and what aspects are non-negotiable
(which does not mean those limits won’t be tested).
• Follow up on input and suggestions, and if it’s not feasible, explain why.
• Explain how assignments are relevant and build on what took place during session.
2. GET TO KNOW YOUTH PERSONALLY
• Set a culture of honesty and respect.
• Engage youth in activities to identify their personal goals and to refl ect on their progress throughout the year.
• Identify concrete ways for youth to build their skills and to challenge themselves in areas they have identifi ed for growth.
• Don’t assume that someone who doesn’t speak up readily is disengaged and that someone who constantly
speaks is doing well in all aspects of his or her life.
• Talk with youth’s family and friends.
3. CHECK IN REGULARLY
• Meet with each student individually at least once a semester, preferably after the fi rst marking period grades come out.
Topics can include:
- Personal information: How are you doing? Family? School? Friends?
- Member input: Likes and dislikes regarding the program.
- Support in the program: Support in the program staff can offer.
- Support outside the program: How can staff assist in other areas of your life?
(If you are a school-based program, talking about grades and engagement is critical.)
★10
From YELL ©2007 John W. Gardner Center
IMPLEMENTING
★11
4. SEND REMINDERS
• Present information in different ways (e.g., visual, in writing, or through an activity).
• Regular phone calls and cell phone text messages help students stay on track and attend sessions consistently.
• Emails are a useful tool for sending reminders for students who have access to computers.
5. ENLIST HELP FROM OTHERS
• Ask for the help of various adults to participate in the sessions on a regular basis.
• Contact your local university, volunteer group, businesses, and other potential mentors.
• Provide adults with a solid orientation to the program (engage youth in such orientation as well)
to clearly outline their role and explore skills they can contribute.
• Conduct background checks.
6. BE CONSISTENT
• Refer to group agreements on a regular basis to frame and remind youth of session norms and expectations.
• Respond to behaviors consistently. Youth will know that you treat them equitably, and that you are supporting
them in upholding the rules of engagement that they set at the beginning of the year.
• Outline consequences for failing to meet group agreements and establish rewards for students who go above and beyond
basic expectations. This will help you respond consistently to students’ mistakes and achievements.
7. BE RESPONSIVE TO YOUTH DIRECTION AND INPUT
• Adjust the curriculum according to the particular questions posed by the youth and the ideas they develop
and articulate during discussions.
• Get youth perspectives to develop a program that is responsive and fl exible to their unique strengths
and needs.
• Create opporunities for input with a clear understandings of how input will be used and considered.
• Don’t presume to know what the issues are or that you know what youth care about.
• Provide opportunities for youth to defi ne what’s important to them and play a role in addressing it.
• Be conscious of how your own background, education, and experiences have shaped about how you approach activities
and tasks or what issues are most important. Check your responses for personal biases.
Facilitation Tip:
Always begin a meeting by introducing yourself as a facilitator and explaining what that means. Example: “Hi, I will be your facilitator today. My job is to keep the group on track to achieve our goals. Th is is your meeting, and I want to help make it work for you.”
Fa
Alway
From YELL ©2007 John W. Gardner Center
Tips for Facilitating Successful Sessions
How sessions are run is as (if not more) important than the content. Below are some tips based on our work with YELL in two
communities. These tips can help you develop a safe and supportive structure and encourage a culture of belonging.
• Make the agenda visible so everyone is aware of the day’s plan.
• Post group agreements, consequences, and incentives, and hold youth to them.
• Ask the youth to read the agenda and group agreements aloud.
• Post pictures of youth and their artwork where you hold sessions.
• Set up chairs and couches in a circle so everyone is visible.
• Introduce new faces and give congratulatory “shout outs” when appropriate.
• Provide healthy snacks to keep energy up.
• Check in regularly to ensure the group is on the same page.
• Move: Keep the session dynamic (e.g., do outdoor ice breakers, shift from small groups to large groups).
• Refl ect on the session with allies and with participants. (What worked well? What might we change for future sessions?)
• Provide a “preview” of the next session so students come prepared.
• Keep the larger context in mind. (Was there a fi ght at school? A global event?) What happens outside greatly impacts what
happens in the session.
• Build in informal time for youth and staff to socialize outside of session (parties, breaks, retreats, conferences, or other group
outings or events).
• Celebrate individuals through birthdays or other celebrations.
• Call youth at home if they miss a session. Check in. Rememeber that some youth and caregivers have the experience that any
phone call from school means something is wrong. Call youth and caregivers to share positive things that you have seen or
noticed about the youth’s work or behavior.
IMPLEMENTING
Facilitation Tips: What to Avoid – Ideas shared directly fr om youth participants.
• Calling kids out or embarrassing them.• Ignoring or overlooking an agreement.• Negativity• Lecturing• Telling youth what you think they should do (Instead, ask a lot of questions).• Moving ahead with a plan that is not working.• Asking for youth input and then ignoring it.
See also Unit 1 (Facilitation Checklist - Master Copy 1.2b) for more suggestions.
Fa
•
★12
From YELL ©2007 John W. Gardner Center
IMPLEMENTING
Youth’s Advice to YELL Program and Project Leaders
These suggestions come from youth who participated in YELL between 2000 and 2006.
1. BE A FRIEND AND PARTNER
• Take the time to get to know youth on a personal level.
• Create a friendly environment so youth are not be intimidated to talk to you.
• Show youth that you are interested in what they say by asking questions and using other positive nonverbal cues like nodding
and acting on their ideas.
• Be patient.
• Tell youth what you (as an adult) are learning from them.
• Remember that respect goes both ways.
• Use props (acknowledge positive qualities and contributions).
• Share your authority and power.
• Be consistent in communicating the message that everyone is in this together.
“ Th e relationship between YELL participants and adult staff is not like parent-child or teacher-student.It is just the shared commitment you have for one another and pursuing the same thing despite your diff erent ages or beliefs.”
~ Former YELL participant, mentor and now college student
2. BE CLEAR
• Set personal boundaries: Speak your mind as an adult, and let youth know if you feel disrespected. You can use silence to let
youth know you don’t feel heard.
• Have youth create their own guidelines and post them. They will follow the guidelines better if they helped to create them.
• Find out what motivates youth to be involved, and remind them of their main motivation.
• Create specifi c roles and job descriptions for continuing youth and mentors.
• Have youth evaluate the staff and the program: ask “What can we do to change this or make it better?”
“If youth are bored or not paying attention, an energizer is good. But once you know them – if they are goofi ng around in order to get a break, don’t give in. Always put it clear: Th is is a place to have fun, but this is also a place to work.”
~ Former YELL participant, mentor and now college student
3. BE INCLUSIVE
• Write everyone’s ideas down – not just the ideas of certain people.
• Don’t have favorites.
• Give everyone opportunities to take on leadership roles.
• Don’t call people out just because they are quiet. It is important to fi nd out what they have to say – but be careful not to make
them feel “on the spot.” Start by pulling them out in small breakouts, not in front of the whole group.
AND OTHER YOUTH ADVICE TO PROGRAM LEADERS: “DON’T LEAVE.”
★13
From YELL ©2007 John W. Gardner Center
YELL Session Strategies
By “mixing it up” in sessions – youth are energized and able to interact with each other and explore the presented skills and
information in a variety of ways. Below are some of the strategies used in YELL session agendas:
LEARNING STRATEGIES:
Round Robin: Introduces youth to several types of information, provides an opportunity for hands-on learning.
• Create several “stations” or activities that students rotate through to build understanding and experience
of a concept or skill set.
Jigsaw: For sharing many pieces of information or breaking down a big topic.
• Hand out paper with written facts, statements, or questions – one paper per person. Give participants a certain
amount of time to pair up and share their information or to ask their question to another person in the group.
Once both partners have completed their statement or question, have them swap papers. Switch partners and
repeat several times.
Think-Pair-Share: To increase student engagement and to allow students to gather their thoughts before speaking. A think-pair-
share is helpful when you’re short on time but want to get different perspectives.
• Think: Have participants spend several moments thinking and writing on their own.
• Pair: Have participants pair up and share their thoughts.
Remind pairs of active listening techniques.
• Share: Have a sampling of individual volunteers from different groups share what they discussed in pairs.
Fish Bowl: For practicing active listening and encouraging deep focus on a particular topic.
• A fi sh bowl is a facilitated conversation or dialogue that takes place among a subset of people, while the rest of
the group listens without commenting or interrupting, even for questions. Good facilitaiton is very important to
maintain a safe and supportive structure. A fi sh bowl can also be a good tool for assuring that youth are listened
to in primarily adult settings.
Gallery Walks: Small group work can be displayed for everyone to see through an end-of-session “gallery.” Interactive gallery
walks can encourage participants to add ideas, notes, or answer questions on butcher paper or at stations.
Skits and Role Plays: Many people enjoy acting out scenarios that illustrate both “what to do” and “what not to do.” Use some
of the scenarios in this curriculum – or have participants come up with their own.
Game Shows: Game shows like Jeopardy and Who Wants to be a Millionaire provide a great model. Prizes like candy or snack
can work well.
IMPLEMENTING
Example fr om Practice:
Creating a place on the agenda for announcements can engage youth and give them a meaningful role in sessions. Sandra Mendieta – who participated in a YELL program from 8th through 12th grade – remembers this strategy being particularly useful when eighth graders were working on the design and creation of three murals. Th e students would present progress on artistic direction, district permission, and fundraising at the start of each session so that the rest of the group knew the status of the small-team eff orts.
E
★14
From YELL ©2007 John W. Gardner Center
IMPLEMENTING
REFLECTION STRATEGIES:
Around the World – Opening and Closing Circles: To set the tone at the start of a session or to connect participants to the
lesson of the session through personal refl ection.
• One at a time, each participant shares out one thought (or opinion or experience) on a given topic. For example,
as part of a session focused on responsibility, the facilitator would ask youth to share a time or event when they
had to be responsible. Note – every session in this curriculum suggests an opening statement, which can be
done as “Around the World.” A talking object (a stick, a pen, tape, anything really) can be used: Only the person
holding this object may speak!
Inter-Facing Circles: For active listening or “get to know you” exercises.
• Divide the group in half, and form two concentric circles – the inner one facing out, and the outer facing in so
that each person is looking at a partner. Give participants two minutes to talk about a topic with their partner,
then have the outside circle rotate one person to the right. Keep going until they complete a rotation or as
decided by the facilitator.
DECISION-MAKING STRATEGIES:
Fist to Five: A quick “rating” or voting system.
• In response to a statement, students will hold up one to fi ve fi ngers showing how strongly they feel about it.
Five is very strong, 1 is very weak.
Dot Voting: To rank items on a list or to shorten a long list.
• Decide on the number of votes or dots for each participant. A good method is to take the total
number of choices on a list and divide by three. Have participants use stickers (or markers) to place dots next to
the items they support on a list of items on butcher paper. Participants can place one dot on each of their top
choices or place two or more of their dots on their favorite item. Participants can place their votes at the same
time as others or wait until they see how others are voting.
★15
From YELL ©2007 John W. Gardner Center
BRAINSTORM STRATEGIES:
Whip: For when you have limited time and are trying to get a quick sense of the questions or comments in the group.
• Everyone who has a question or comment speaks in turn, and a list is written on the board or butcher paper.
This list can then be referred immediately or at another time.
Sticky Note Brainstorm: Useful strategy to help a group organize their collective thoughts and to get input from youth who
may be less vocal in a large group. It can also work as part of a think-pair-share and can be especially useful for those needing
visual cues.
• Hand out sticky notes to every participant and have them write three thoughts or answers related to a given
question or prompt. Have participants write one answer per sticky note. Then form pairs. Each pair must pick
(between them) their two most important sticky notes and pass those to the facilitator. The facilitator can group
or cluster the sticky notes by topic – asking the group to decide what categories to use to group the sticky notes.
It may take several rounds to fi nd the best categories to use.
• Sticky notes can also be used for anonymous voting. Participants can write their vote on a note, pass it to the
facilitator, and the facilitator can put up all the notes up so the the group can see the pattern.
ENERGIZING AND RE-FOCUSING STRATEGIES:
Popcorn: Stop what you are doing and have everyone move to a new seat (not directly next to where they are currently sitting).
Let participants know that “popcorn” can be called at any time by the facilitator or by a designated participant.
Community Builders, Ice Breakers, and Energizers. Have a backup energizer in mind every time you facilitate so that if the
group’s energy gets low, you have a way to wake participants up with a fun and relevant activity. See Appendix 2.
Affi rmations – “Shout Outs” and “Props:” Stop what you are doing and ask each youth to say something positive – or give
a “shout out” or “prop”– to the person standing next to them. Shout outs or props can refer to good things people do or say, or
to qualities they bring to the group. Alternatively, you can have the youth write out the props or shout outs on small pieces of
paper anonymously, then read them aloud to the group.
Snowball: Stop what you are doing and have each youth write down the answer to a silly question, or an idea for how to make
the session better. Instruct the students to then crumple up the piece of paper. Give them 30 seconds to throw the crumpled
papers around the room as a “snowball fi ght” (they cannot throw the snowballs directly at each other). After the time is up, have
each student fi nd a “snowball,” open it up, and read what is written to the group.
IMPLEMENTING
Example fr om practice:
Youth staff from West Oakland YELL created a trivia game for their orientation session to help new participants learn about the program and related expectations. Categories included program Responsibilities, Rewards, Goals, and “daily doubles” like the program director’s cell phone number. New participants were allowed to work in teams and look for answers in their orientation binders.
★16

From YELL ©2007 John W. Gardner Center
NOTES
★17
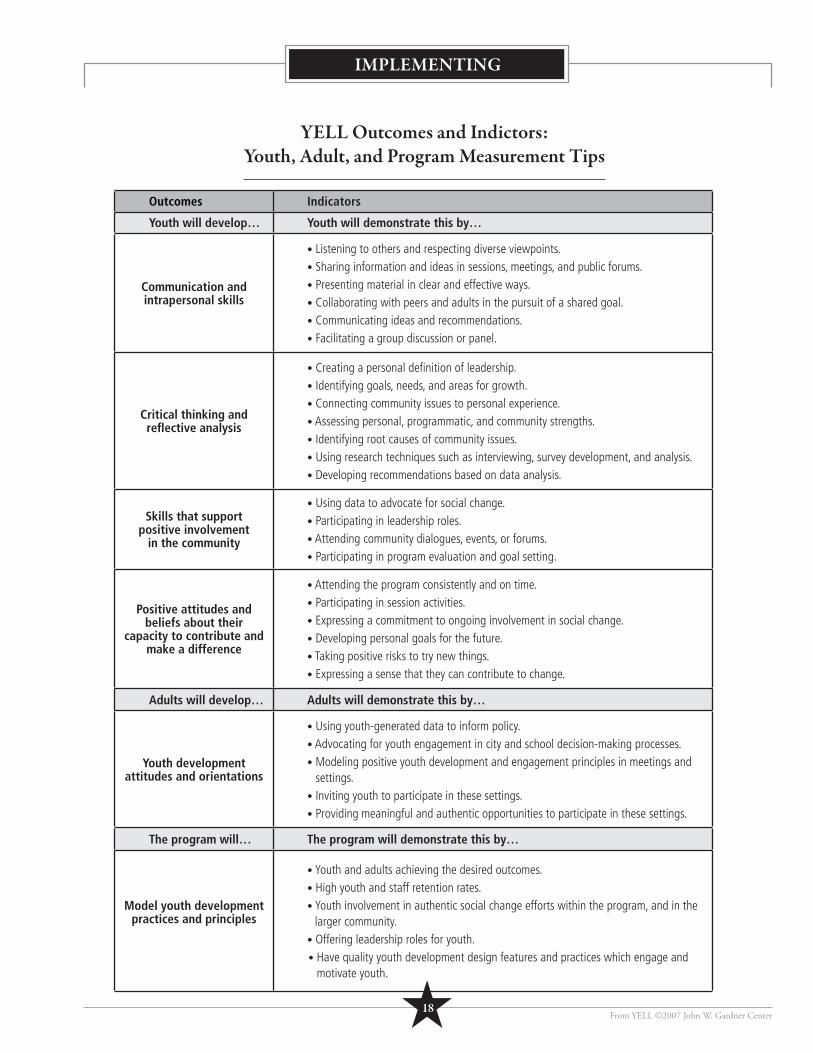
IMPLEMENTING
From YELL ©2007 John W. Gardner Center
Outcomes Indicators
Youth will develop… Youth will demonstrate this by…
Communication and intrapersonal skills
• Listening to others and respecting diverse viewpoints.• Sharing information and ideas in sessions, meetings, and public forums.• Presenting material in clear and effective ways.• Collaborating with peers and adults in the pursuit of a shared goal.• Communicating ideas and recommendations. • Facilitating a group discussion or panel.
Critical thinking and refl ective analysis
• Creating a personal defi nition of leadership.• Identifying goals, needs, and areas for growth.• Connecting community issues to personal experience. • Assessing personal, programmatic, and community strengths. • Identifying root causes of community issues. • Using research techniques such as interviewing, survey development, and analysis.• Developing recommendations based on data analysis.
Skills that support positive involvement
in the community
• Using data to advocate for social change.• Participating in leadership roles. • Attending community dialogues, events, or forums.• Participating in program evaluation and goal setting.
Positive attitudes and beliefs about their
capacity to contribute and make a difference
• Attending the program consistently and on time. • Participating in session activities. • Expressing a commitment to ongoing involvement in social change. • Developing personal goals for the future.• Taking positive risks to try new things. • Expressing a sense that they can contribute to change.
Adults will develop… Adults will demonstrate this by…
Youth development attitudes and orientations
• Using youth-generated data to inform policy.• Advocating for youth engagement in city and school decision-making processes.• Modeling positive youth development and engagement principles in meetings and
settings.• Inviting youth to participate in these settings.• Providing meaningful and authentic opportunities to participate in these settings.
The program will… The program will demonstrate this by…
Model youth development practices and principles
• Youth and adults achieving the desired outcomes.• High youth and staff retention rates.• Youth involvement in authentic social change efforts within the program, and in the
larger community.• Offering leadership roles for youth.• Have quality youth development design features and practices which engage and
motivate youth.
YELL Outcomes and Indictors:Youth, Adult, and Program Measurement Tips
★18
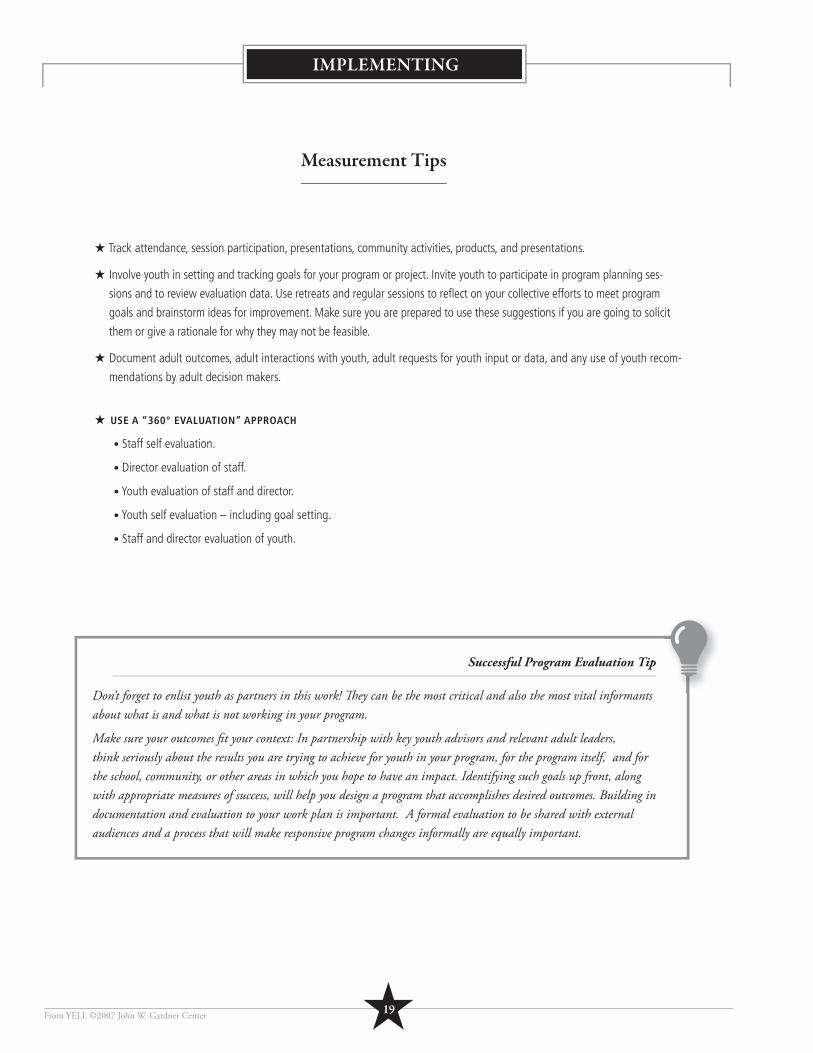
IMPLEMENTING
From YELL ©2007 John W. Gardner Center
Measurement Tips
★ Track attendance, session participation, presentations, community activities, products, and presentations.
★ Involve youth in setting and tracking goals for your program or project. Invite youth to participate in program planning ses-
sions and to review evaluation data. Use retreats and regular sessions to refl ect on your collective efforts to meet program
goals and brainstorm ideas for improvement. Make sure you are prepared to use these suggestions if you are going to solicit
them or give a rationale for why they may not be feasible.
★ Document adult outcomes, adult interactions with youth, adult requests for youth input or data, and any use of youth recom-
mendations by adult decision makers.
★ USE A “360° EVALUATION” APPROACH
• Staff self evaluation.
• Director evaluation of staff.
• Youth evaluation of staff and director.
• Youth self evaluation – including goal setting.
• Staff and director evaluation of youth.
★19
Successful Program Evaluation Tip
Don’t forget to enlist youth as partners in this work! Th ey can be the most critical and also the most vital informants about what is and what is not working in your program.
Make sure your outcomes fi t your context: In partnership with key youth advisors and relevant adult leaders, think seriously about the results you are trying to achieve for youth in your program, for the program itself, and for the school, community, or other areas in which you hope to have an impact. Identifying such goals up front, along with appropriate measures of success, will help you design a program that accomplishes desired outcomes. Building in documentation and evaluation to your work plan is important. A formal evaluation to be shared with external audiences and a process that will make responsive program changes informally are equally important.
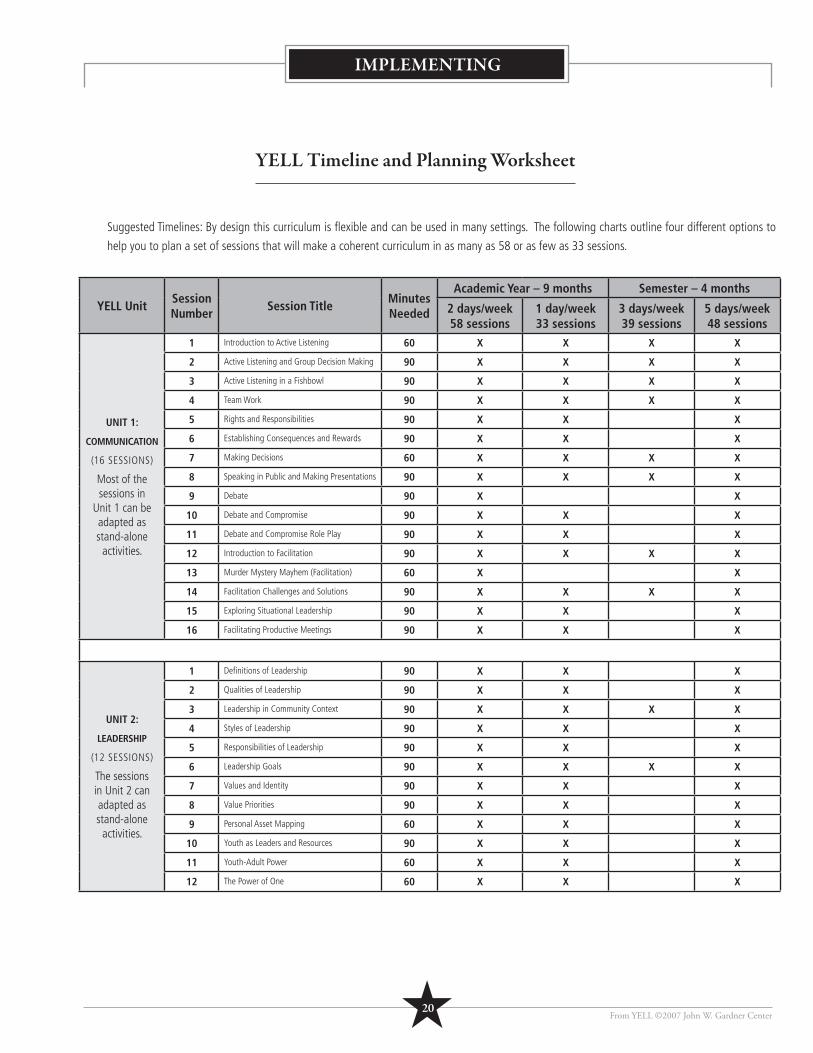
★20
IMPLEMENTING
From YELL ©2007 John W. Gardner Center
YELL Timeline and Planning Worksheet
YELL UnitSession Number
Session TitleMinutes Needed
Academic Year – 9 months Semester – 4 months
2 days/week58 sessions
1 day/week33 sessions
3 days/week39 sessions
5 days/week48 sessions
UNIT 1:
COMMUNICATION
(16 SESSIONS)
Most of the sessions in
Unit 1 can be adapted as stand-alone
activities.
1 Introduction to Active Listening 60 X X X X
2 Active Listening and Group Decision Making 90 X X X X
3 Active Listening in a Fishbowl 90 X X X X
4 Team Work 90 X X X X
5 Rights and Responsibilities 90 X X X
6 Establishing Consequences and Rewards 90 X X X
7 Making Decisions 60 X X X X
8 Speaking in Public and Making Presentations 90 X X X X
9 Debate 90 X X
10 Debate and Compromise 90 X X X
11 Debate and Compromise Role Play 90 X X X
12 Introduction to Facilitation 90 X X X X
13 Murder Mystery Mayhem (Facilitation) 60 X X
14 Facilitation Challenges and Solutions 90 X X X X
15 Exploring Situational Leadership 90 X X X
16 Facilitating Productive Meetings 90 X X X
UNIT 2:
LEADERSHIP
(12 SESSIONS)
The sessions in Unit 2 can adapted as stand-alone
activities.
1 Defi nitions of Leadership 90 X X X
2 Qualities of Leadership 90 X X X
3 Leadership in Community Context 90 X X X X
4 Styles of Leadership 90 X X X
5 Responsibilities of Leadership 90 X X X
6 Leadership Goals 90 X X X X
7 Values and Identity 90 X X X
8 Value Priorities 90 X X X
9 Personal Asset Mapping 60 X X X
10 Youth as Leaders and Resources 90 X X X
11 Youth-Adult Power 60 X X X
12 The Power of One 60 X X X
Suggested Timelines: By design this curriculum is fl exible and can be used in many settings. The following charts outline four different options to
help you to plan a set of sessions that will make a coherent curriculum in as many as 58 or as few as 33 sessions.
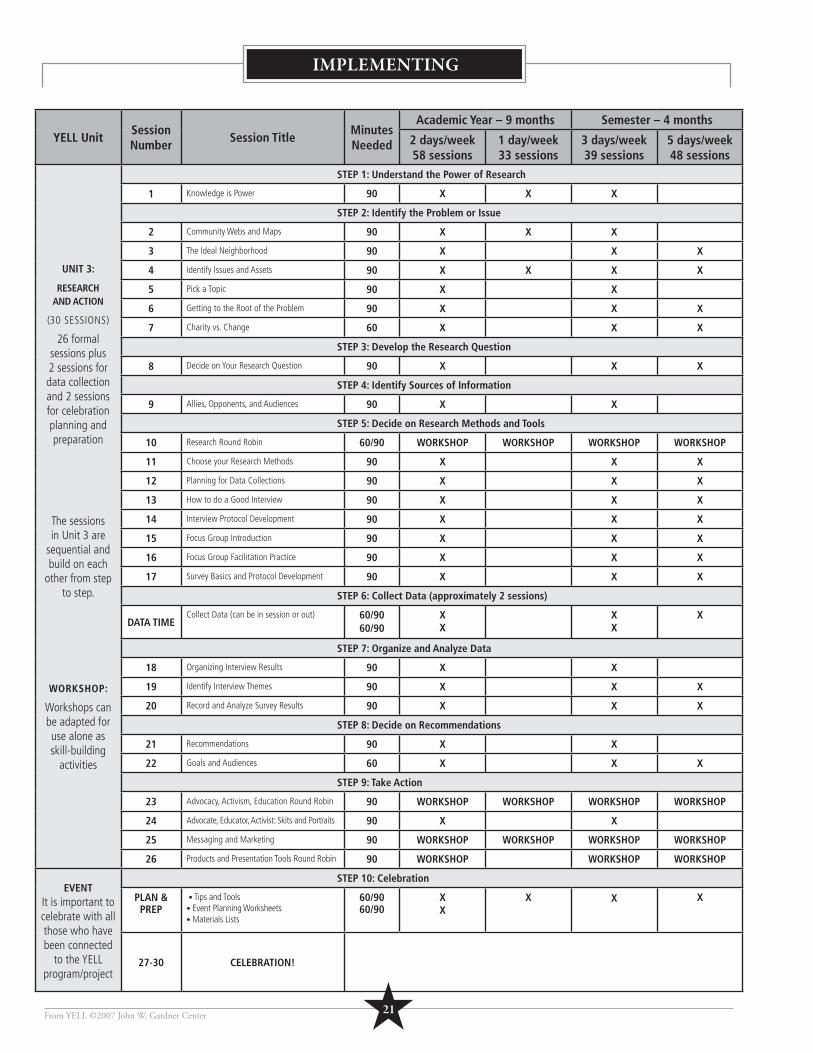
IMPLEMENTING
From YELL ©2007 John W. Gardner Center
YELL UnitSession Number
Session TitleMinutes Needed
Academic Year – 9 months Semester – 4 months
2 days/week58 sessions
1 day/week33 sessions
3 days/week39 sessions
5 days/week48 sessions
UNIT 3:
RESEARCH AND ACTION
(30 SESSIONS)
26 formal sessions plus 2 sessions for data collection and 2 sessions for celebration planning and preparation
The sessions in Unit 3 are
sequential and build on each
other from step to step.
WORKSHOP:
Workshops can be adapted for use alone as skill-building
activities
STEP 1: Understand the Power of Research
1 Knowledge is Power 90 X X X
STEP 2: Identify the Problem or Issue
2 Community Webs and Maps 90 X X X
3 The Ideal Neighborhood 90 X X X
4 Identify Issues and Assets 90 X X X X
5 Pick a Topic 90 X X
6 Getting to the Root of the Problem 90 X X X
7 Charity vs. Change 60 X X X
STEP 3: Develop the Research Question
8 Decide on Your Research Question 90 X X X
STEP 4: Identify Sources of Information
9 Allies, Opponents, and Audiences 90 X X
STEP 5: Decide on Research Methods and Tools
10 Research Round Robin 60/90 WORKSHOP WORKSHOP WORKSHOP WORKSHOP
11 Choose your Research Methods 90 X X X
12 Planning for Data Collections 90 X X X
13 How to do a Good Interview 90 X X X
14 Interview Protocol Development 90 X X X
15 Focus Group Introduction 90 X X X
16 Focus Group Facilitation Practice 90 X X X
17 Survey Basics and Protocol Development 90 X X X
STEP 6: Collect Data (approximately 2 sessions)
DATA TIMECollect Data (can be in session or out) 60/90
60/90XX
XX
X
STEP 7: Organize and Analyze Data
18 Organizing Interview Results 90 X X
19 Identify Interview Themes 90 X X X
20 Record and Analyze Survey Results 90 X X X
STEP 8: Decide on Recommendations
21 Recommendations 90 X X
22 Goals and Audiences 60 X X X
STEP 9: Take Action
23 Advocacy, Activism, Education Round Robin 90 WORKSHOP WORKSHOP WORKSHOP WORKSHOP
24 Advocate, Educator, Activist: Skits and Portraits 90 X X
25 Messaging and Marketing 90 WORKSHOP WORKSHOP WORKSHOP WORKSHOP
26 Products and Presentation Tools Round Robin 90 WORKSHOP WORKSHOP WORKSHOP
EVENTIt is important to celebrate with all those who have been connected
to the YELL program/project
STEP 10: Celebration
PLAN &PREP
• Tips and Tools• Event Planning Worksheets • Materials Lists
60/9060/90
XX
X X X
27-30 CELEBRATION!
★21
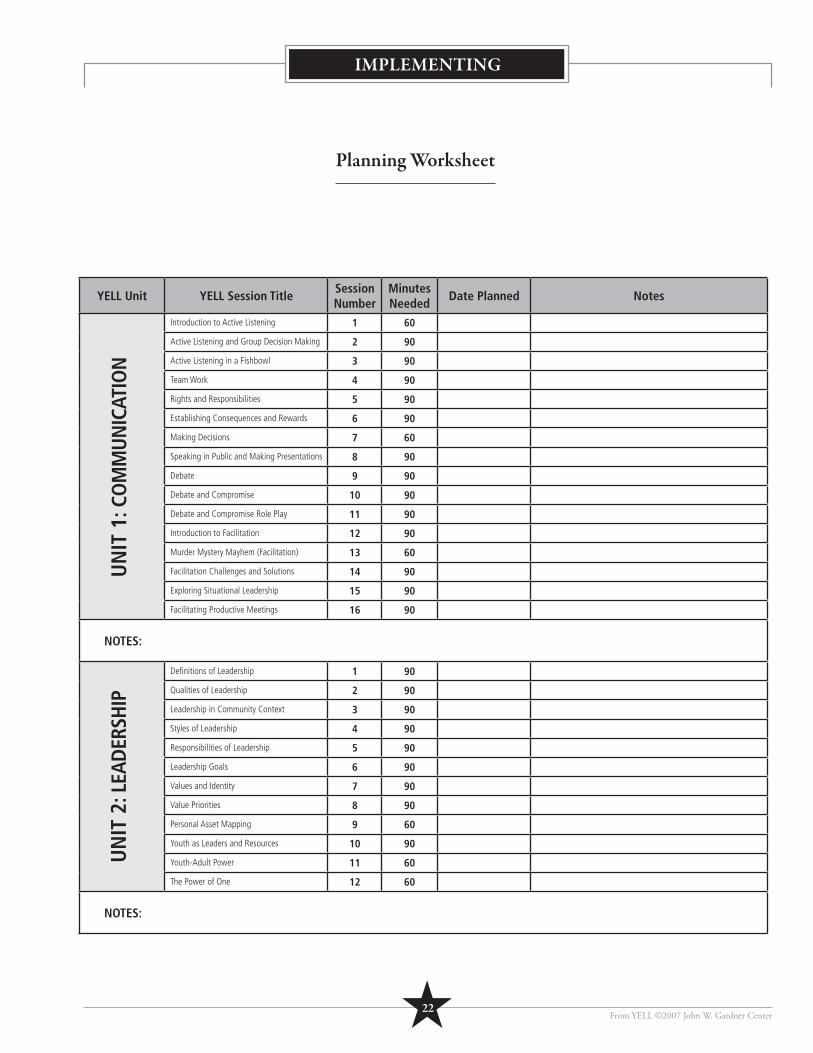
IMPLEMENTING
From YELL ©2007 John W. Gardner Center
Planning Worksheet
YELL Unit YELL Session TitleSession Number
Minutes Needed
Date Planned Notes
Introduction to Active Listening 1 60
Active Listening and Group Decision Making 2 90
Active Listening in a Fishbowl 3 90
Team Work 4 90
Rights and Responsibilities 5 90
Establishing Consequences and Rewards 6 90
Making Decisions 7 60
Speaking in Public and Making Presentations 8 90
Debate 9 90
Debate and Compromise 10 90
Debate and Compromise Role Play 11 90
Introduction to Facilitation 12 90
Murder Mystery Mayhem (Facilitation) 13 60
Facilitation Challenges and Solutions 14 90
Exploring Situational Leadership 15 90
Facilitating Productive Meetings 16 90
NOTES:
Defi nitions of Leadership 1 90
Qualities of Leadership 2 90
Leadership in Community Context 3 90
Styles of Leadership 4 90
Responsibilities of Leadership 5 90
Leadership Goals 6 90
Values and Identity 7 90
Value Priorities 8 90
Personal Asset Mapping 9 60
Youth as Leaders and Resources 10 90
Youth-Adult Power 11 60
The Power of One 12 60
NOTES:
UN
IT 1
: CO
MM
UNIC
ATIO
NU
NIT
2: L
EAD
ERSH
IP
★22
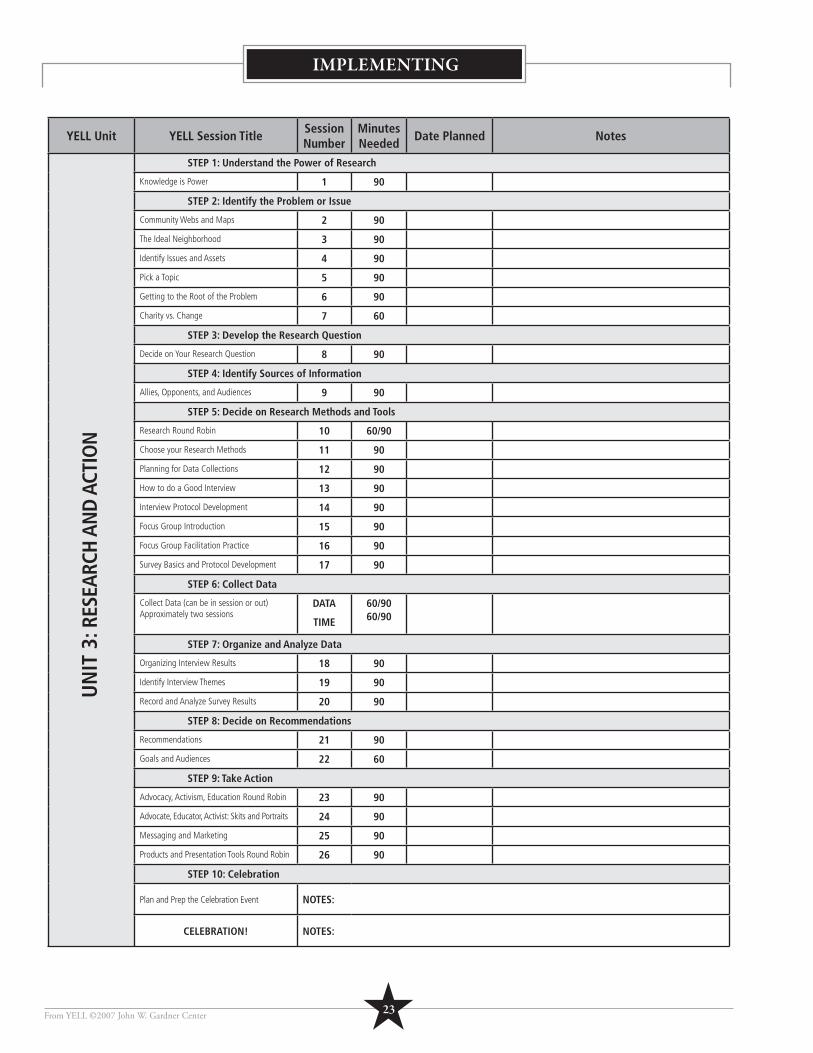
IMPLEMENTING
From YELL ©2007 John W. Gardner Center
YELL Unit YELL Session TitleSession Number
Minutes Needed
Date Planned Notes
STEP 1: Understand the Power of Research
Knowledge is Power 1 90
STEP 2: Identify the Problem or Issue
Community Webs and Maps 2 90
The Ideal Neighborhood 3 90
Identify Issues and Assets 4 90
Pick a Topic 5 90
Getting to the Root of the Problem 6 90
Charity vs. Change 7 60
STEP 3: Develop the Research Question
Decide on Your Research Question 8 90
STEP 4: Identify Sources of Information
Allies, Opponents, and Audiences 9 90
STEP 5: Decide on Research Methods and Tools
Research Round Robin 10 60/90
Choose your Research Methods 11 90
Planning for Data Collections 12 90
How to do a Good Interview 13 90
Interview Protocol Development 14 90
Focus Group Introduction 15 90
Focus Group Facilitation Practice 16 90
Survey Basics and Protocol Development 17 90
STEP 6: Collect Data
Collect Data (can be in session or out)Approximately two sessions
DATA
TIME
60/9060/90
STEP 7: Organize and Analyze Data
Organizing Interview Results 18 90
Identify Interview Themes 19 90
Record and Analyze Survey Results 20 90
STEP 8: Decide on Recommendations
Recommendations 21 90
Goals and Audiences 22 60
STEP 9: Take Action
Advocacy, Activism, Education Round Robin 23 90
Advocate, Educator, Activist: Skits and Portraits 24 90
Messaging and Marketing 25 90
Products and Presentation Tools Round Robin 26 90
STEP 10: Celebration
Plan and Prep the Celebration Event NOTES:
CELEBRATION! NOTES:
UN
IT 3
: RES
EARC
H AN
D A
CTIO
N
★23
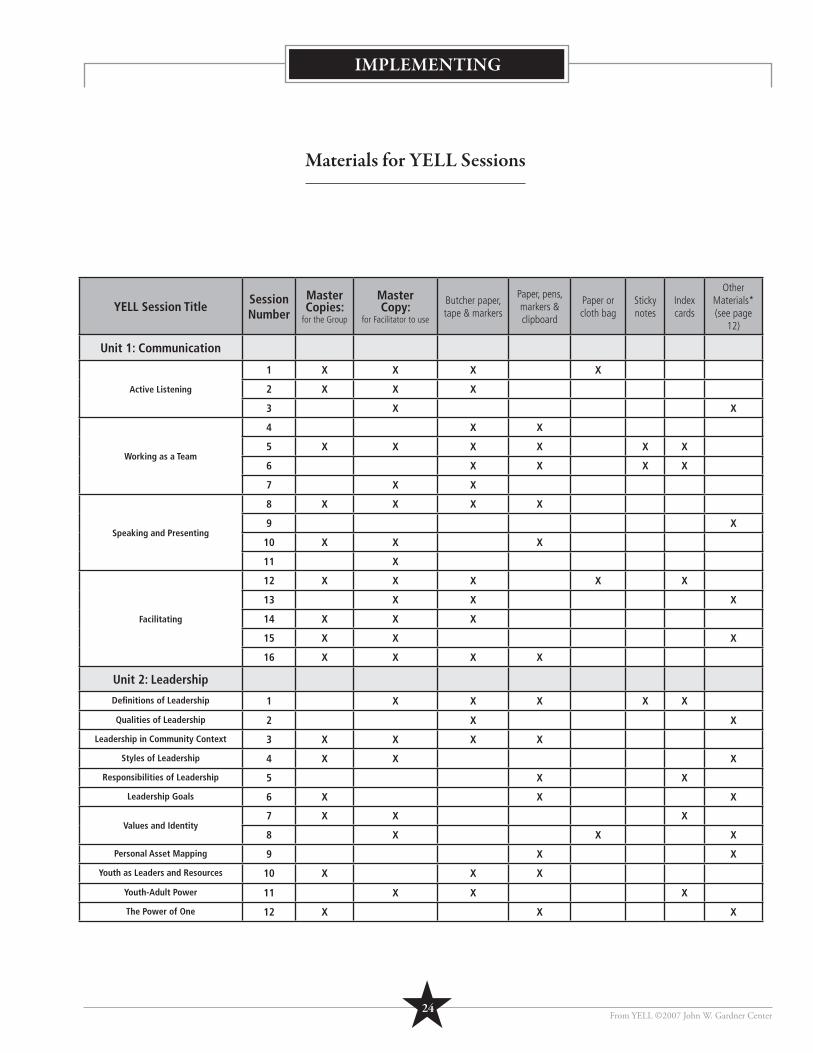
IMPLEMENTING
From YELL ©2007 John W. Gardner Center
Materials for YELL Sessions
YELL Session TitleSession Number
Master Copies:
for the Group
Master Copy:
for Facilitator to use
Butcher paper, tape & markers
Paper, pens, markers & clipboard
Paper or cloth bag
Sticky notes
Index cards
Other Materials*(see page
12)
Unit 1: Communication
Active Listening
1 X X X X
2 X X X
3 X X
Working as a Team
4 X X
5 X X X X X X
6 X X X X
7 X X
Speaking and Presenting
8 X X X X
9 X
10 X X X
11 X
Facilitating
12 X X X X X
13 X X X
14 X X X
15 X X X
16 X X X X
Unit 2: Leadership
Defi nitions of Leadership 1 X X X X X
Qualities of Leadership 2 X X
Leadership in Community Context 3 X X X X
Styles of Leadership 4 X X X
Responsibilities of Leadership 5 X X
Leadership Goals 6 X X X
Values and Identity7 X X X
8 X X X
Personal Asset Mapping 9 X X
Youth as Leaders and Resources 10 X X X
Youth-Adult Power 11 X X X
The Power of One 12 X X X
★24
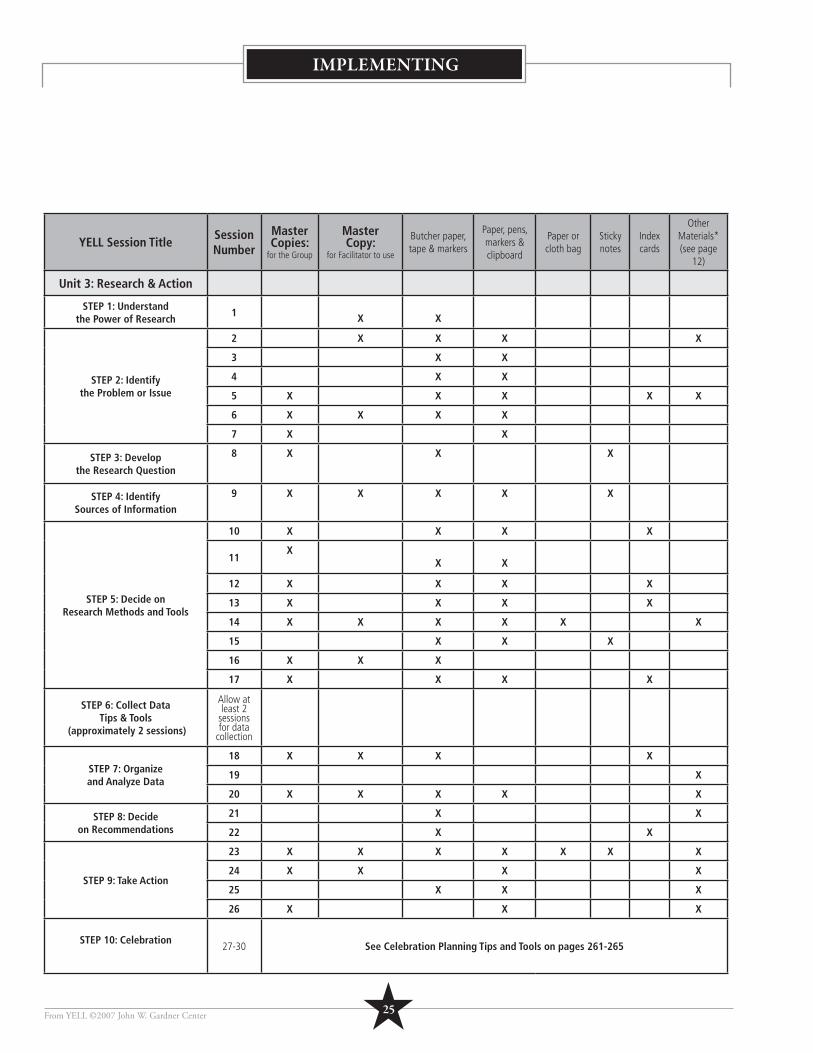
IMPLEMENTING
From YELL ©2007 John W. Gardner Center
YELL Session TitleSession Number
Master Copies:
for the Group
Master Copy:
for Facilitator to use
Butcher paper, tape & markers
Paper, pens, markers & clipboard
Paper or cloth bag
Sticky notes
Index cards
Other Materials*(see page
12)
Unit 3: Research & Action
STEP 1: Understand the Power of Research
1 X X
STEP 2: Identify the Problem or Issue
2 X X X X
3 X X
4 X X
5 X X X X X
6 X X X X
7 X X
STEP 3: Develop the Research Question
8 X X X
STEP 4: Identify Sources of Information
9 X X X X X
STEP 5: Decide on Research Methods and Tools
10 X X X X
11X
X X
12 X X X X
13 X X X X
14 X X X X X X
15 X X X
16 X X X
17 X X X X
STEP 6: Collect DataTips & Tools
(approximately 2 sessions)
Allow at least 2
sessions for data
collection
STEP 7: Organize and Analyze Data
18 X X X X
19 X
20 X X X X X
STEP 8: Decide on Recommendations
21 X X
22 X X
STEP 9: Take Action
23 X X X X X X X
24 X X X X
25 X X X
26 X X X
STEP 10: Celebration27-30 See Celebration Planning Tips and Tools on pages 261-265
★25

IMPLEMENTING
From YELL ©2007 John W. Gardner Center
Special Materials Needed
★26
Other Materials*Session Number
Materials Needed
Unit 1: Communication
Active Listening in a Fishbowl 3 blindfolds for half of the participants
Debate 9materials to make a peanut butter and jelly sandwhich optional: video clips from a presidential or other debate (programs with courtroom scenes work well too)
Murder Mystery Mahem (Facilitation) 13 optional: scary props and eerie music
Exploring Situational Leadership 15 optional: tarp, rope, or small platform
Unit 2: Leadership
Qualities of Leadership 2 art supplies for leader portraits (optional: magazines for collage)
Styles of Leadership 4 tape and newspaper (optional: chalk)
Leadership Goals 6 small, colorful candies and envelopes
Values and Identity 8 $200 in fake money for each participant (any denominations)
Personal Asset Mapping 9 11 x 14 paper
The Power of One 12 poker chips or tokens
Unit 3: Research & Action
Community Webs and Maps 2 map of your city or town, push pins, and string optional: disposable cameras
Pick a Topic 5 sticker dots or markers
Interview Protocol Development 14 optional: tape recorder for interviews
Identify Interview Themes 19 Rubber bands or clips for index cards and highlighters
Record and Analyze Survey Results 20 tape or chalkoptional: graph paper
Recomendations 21 sticker dots or markers
Advocacy, Activism, Education Round Robin
23 sticker dots or markers
Advocate, Educator, Activist: Skits and Portraits
24 11 x 14 paper
Messaging and Marketing25 collect and bring samples of logos, taglines, and slogans from corporations,
nonprofi ts, political campaigns, etc.
Products and Presentation Tools: Round Robin
26 two computers for the PowerPoint and video stations, CD player, and music for music station
STEP 10: Celebration See pages 261-265 for preparation tools and tips.

★27
NOTES
From YELL ©2007 John W. Gardner Center

From YELL ©2007 John W. Gardner Center
NOTES
★28

From YELL ©2007 John W. Gardner Center
NOTES
★29
30
Unit 1
C O M MUN I C AT I O N
From YELL ©2007 John W. Gardner Center
“It takes two to speak the truth: one to speak, and another to hear.”
~ Henry David Th oreau

NOTES
From YELL ©2007 John W. Gardner Center ★31
UNIT 1 Communication
TABLE OF CONTENTS
From YELL ©2007 John W. Gardner Center
ACTIVE LISTENING
Session 1: Introduction to Active Listening .............................................................................................................................34
Session 2: Active Listening in Group Decision Making ............................................................................................................36
Session 3: Active Listening in a Fish Bowl ..............................................................................................................................38
WORKING AS A TEAM
Session 4: Team Work ............................................................................................................................................................40
Session 5: Rights and Responsibilities ....................................................................................................................................42
Session 6: Establishing Consequences and Rewards ...............................................................................................................44
Session 7: Making Decisions ..................................................................................................................................................48
SPEAKING AND PRESENTING
Session 8: Speaking in Public and Making Presentations ........................................................................................................50
Session 9: Debate ..................................................................................................................................................................52
Session 10: Debate and Compromise .....................................................................................................................................54
Session 11: Debate & Compromise Role Play .........................................................................................................................56
FACILITATION
Session 12: Introduction to Facilitation ..................................................................................................................................58
Session 13: Murder Mystery Mayhem ....................................................................................................................................62
Session 14: Facilitation Challenges and Solutions ...................................................................................................................64
Session 15: Exploring Situational Leadership ..........................................................................................................................66
Session 16: Facilitating Productive Meetings ..........................................................................................................................67
UNIT 1: MASTER COPIES FOR GROUP HANDOUTS AND FACILITATOR EXAMPLES TABLE OF CONTENTS .............................68
★32
UNIT 1 Communication
Core Communication Skils
From YELL ©2007 John W. Gardner Center
CORE COMMUNICATION SKILLS DEVELOPED IN THIS UNIT:
• Active Listening: Active listening is a cornerstone of communication. It is a skill that helps youth deepen understanding of the experiences,
thoughts, and feelings of others. Active listening exercises provide youth with opportunities to feel heard and respected by peers and adults.
Starting with Active Listening helps to set positive social norms and provides a forum for relationship building early in the program or project.
• Speaking and Presenting: Sharing information clearly, so the listener understands and can respond, is a critical communication skill.
Speaking and presenting practice provides youth with opportunities to refl ect on and improve body language, content development, and to
develop different types of speaking and presentation tools.
• Working as a Team: Clear agreements, shared expectations and goals, and personal responsibility set the context for effective communication.
Exercises expose youth to processes and structures that help people work well together, establish trust and safety, and create shared ownership
of roles and expectations. Setting an agreement is also the foundation for any research or action project that youth may undertake.
• Facilitation: Facilitation is a skill that helps to ensure that everyone’s voice is heard, upholds norms and agreements, and moves the group’s
agenda forward so that shared goals and objectives are met. Facilitation puts together listening, speaking, refl ecting, and team process and
decision making. For staff new to facilitation, use this section for training and skill development prior to the beginning of the program. Facilitation
skills will also support youth in authentic youth-inclusive contexts, including youth-led focus groups, community forums, and group dialogues.
★33
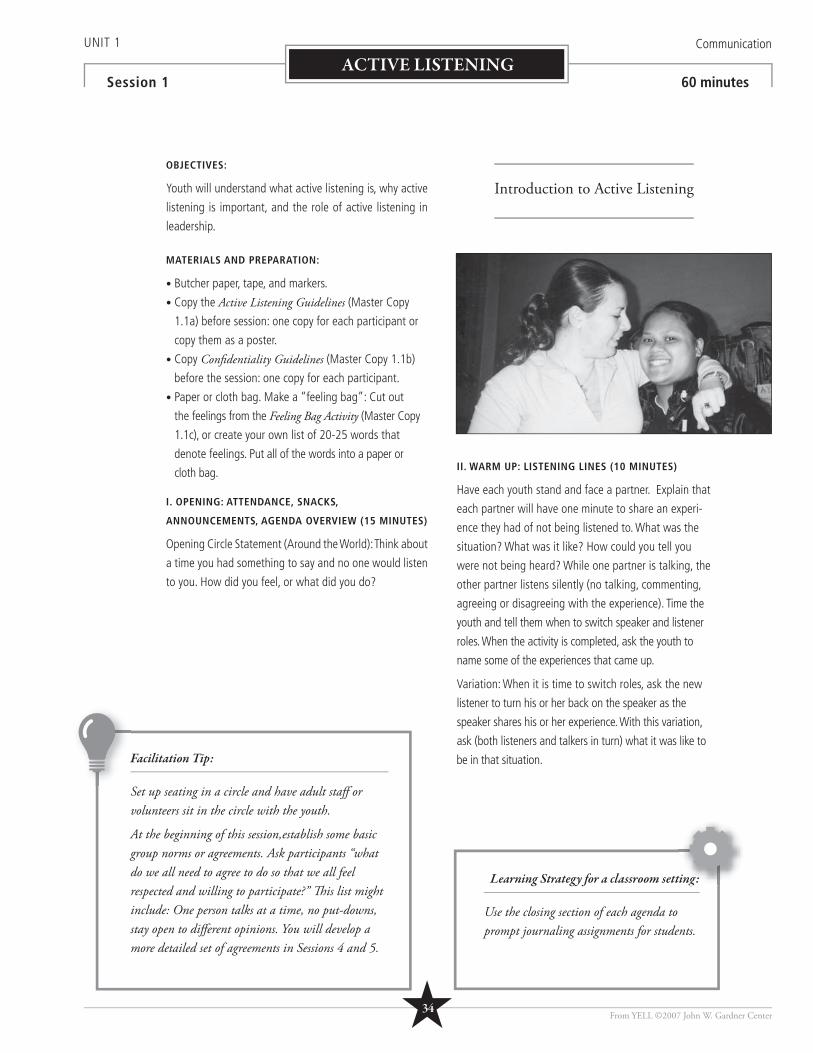
UNIT 1 Communication
Session 1 60 minutesACTIVE LISTENING
OBJECTIVES:
Youth will understand what active listening is, why active
listening is important, and the role of active listening in
leadership.
MATERIALS AND PREPARATION:
• Butcher paper, tape, and markers.
• Copy the Active Listening Guidelines (Master Copy
1.1a) before session: one copy for each participant or
copy them as a poster.
• Copy Confi dentiality Guidelines (Master Copy 1.1b)
before the session: one copy for each participant.
• Paper or cloth bag. Make a “feeling bag”: Cut out
the feelings from the Feeling Bag Activity (Master Copy
1.1c), or create your own list of 20-25 words that
denote feelings. Put all of the words into a paper or
cloth bag.
I. OPENING: ATTENDANCE, SNACKS,
ANNOUNCEMENTS, AGENDA OVERVIEW (15 MINUTES)
Opening Circle Statement (Around the World): Think about
a time you had something to say and no one would listen
to you. How did you feel, or what did you do?
II. WARM UP: LISTENING LINES (10 MINUTES)
Have each youth stand and face a partner. Explain that
each partner will have one minute to share an experi-
ence they had of not being listened to. What was the
situation? What was it like? How could you tell you
were not being heard? While one partner is talking, the
other partner listens silently (no talking, commenting,
agreeing or disagreeing with the experience). Time the
youth and tell them when to switch speaker and listener
roles. When the activity is completed, ask the youth to
name some of the experiences that came up.
Variation: When it is time to switch roles, ask the new
listener to turn his or her back on the speaker as the
speaker shares his or her experience. With this variation,
ask (both listeners and talkers in turn) what it was like to
be in that situation.Facilitation Tip:
Set up seating in a circle and have adult staff or volunteers sit in the circle with the youth.
At the beginning of this session,establish some basic group norms or agreements. Ask participants “what do we all need to agree to do so that we all feel respected and willing to participate?” Th is list might include: One person talks at a time, no put-downs, stay open to diff erent opinions. You will develop a more detailed set of agreements in Sessions 4 and 5.
Introduction to Active Listening
From YELL ©2007 John W. Gardner Center
Learning Strategy for a classroom setting:
Use the closing section of each agenda to prompt journaling assignments for students.
ting:
★34
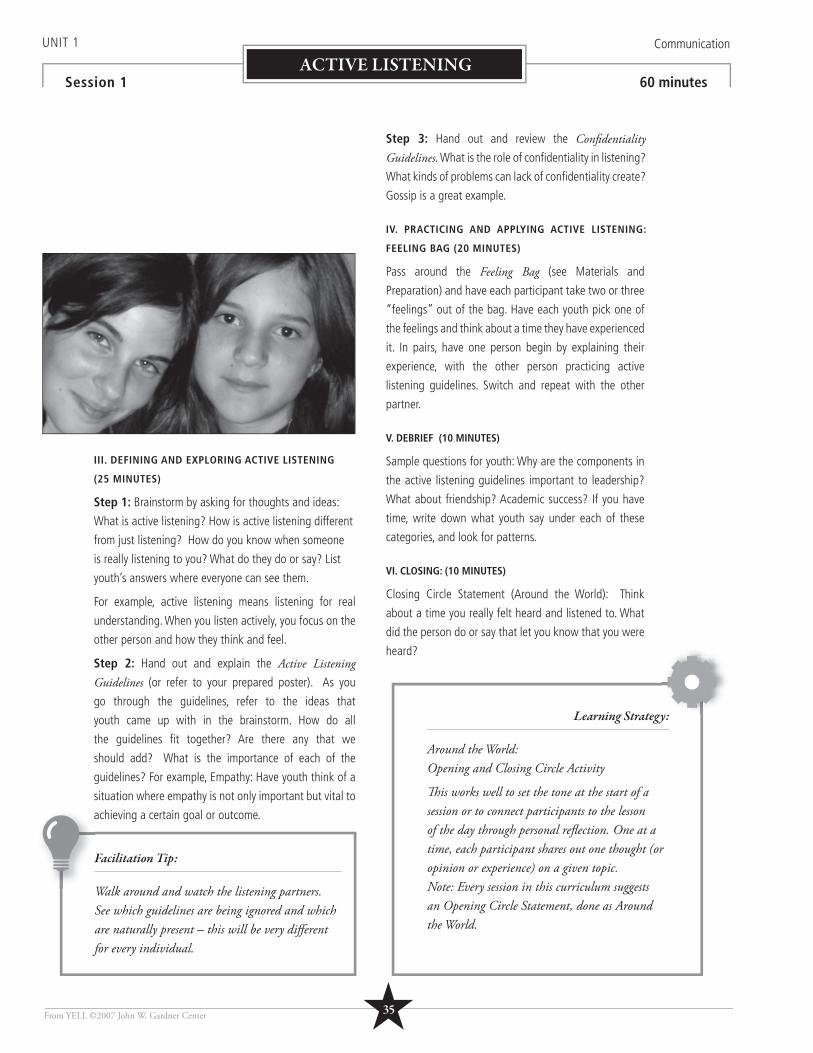
III. DEFINING AND EXPLORING ACTIVE LISTENING
(25 MINUTES)
Step 1: Brainstorm by asking for thoughts and ideas:
What is active listening? How is active listening different
from just listening? How do you know when someone
is really listening to you? What do they do or say? List
youth’s answers where everyone can see them.
For example, active listening means listening for real
understanding. When you listen actively, you focus on the
other person and how they think and feel.
Step 2: Hand out and explain the Active Listening Guidelines (or refer to your prepared poster). As you
go through the guidelines, refer to the ideas that
youth came up with in the brainstorm. How do all
the guidelines fi t together? Are there any that we
should add? What is the importance of each of the
guidelines? For example, Empathy: Have youth think of a
situation where empathy is not only important but vital to
achieving a certain goal or outcome.
Step 3: Hand out and review the Confi dentiality Guidelines. What is the role of confi dentiality in listening?
What kinds of problems can lack of confi dentiality create?
Gossip is a great example.
IV. PRACTICING AND APPLYING ACTIVE LISTENING:
FEELING BAG (20 MINUTES)
Pass around the Feeling Bag (see Materials and
Preparation) and have each participant take two or three
“feelings” out of the bag. Have each youth pick one of
the feelings and think about a time they have experienced
it. In pairs, have one person begin by explaining their
experience, with the other person practicing active
listening guidelines. Switch and repeat with the other
partner.
V. DEBRIEF (10 MINUTES)
Sample questions for youth: Why are the components in
the active listening guidelines important to leadership?
What about friendship? Academic success? If you have
time, write down what youth say under each of these
categories, and look for patterns.
VI. CLOSING: (10 MINUTES)
Closing Circle Statement (Around the World): Think
about a time you really felt heard and listened to. What
did the person do or say that let you know that you were
heard?
Learning Strategy:
Around the World: Opening and Closing Circle Activity
Th is works well to set the tone at the start of a session or to connect participants to the lesson of the day through personal refl ection. One at a time, each participant shares out one thought (or opinion or experience) on a given topic. Note: Every session in this curriculum suggests an Opening Circle Statement, done as Around the World.
UNIT 1 Communication
Session 1 60 minutesACTIVE LISTENING
From YELL ©2007 John W. Gardner Center
a
Facilitation Tip:
Walk around and watch the listening partners. See which guidelines are being ignored and which are naturally present – this will be very diff erent for every individual.
★35
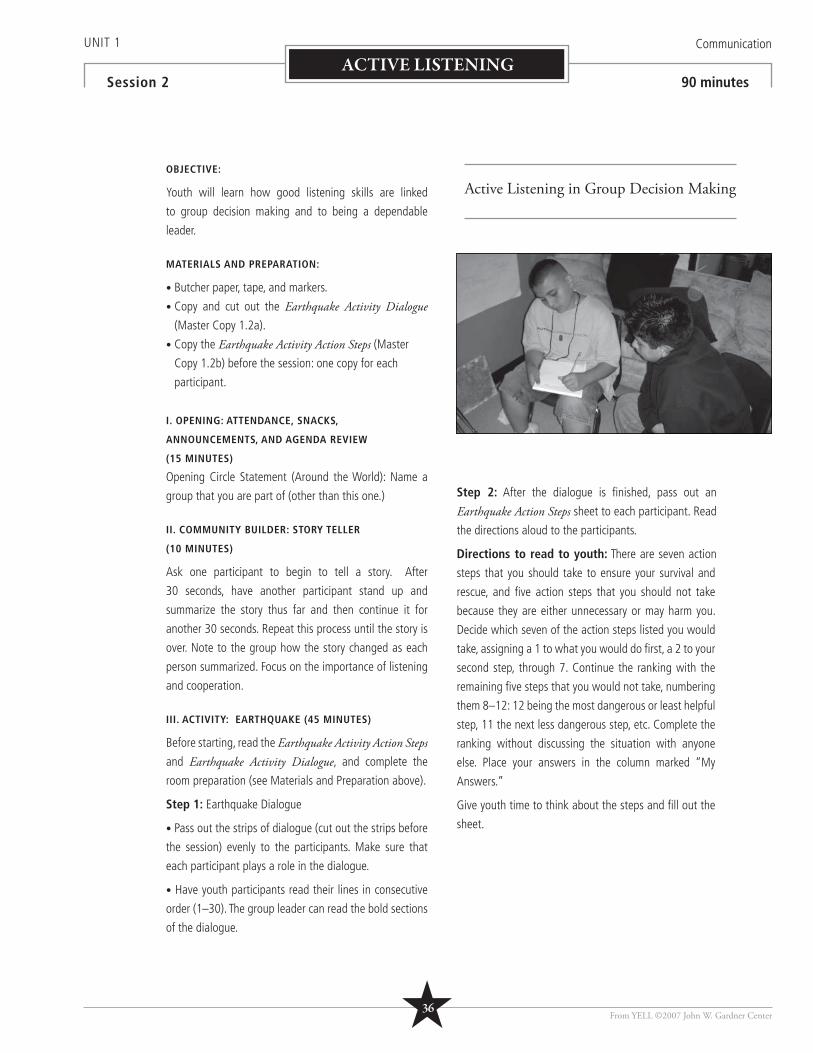
UNIT 1 Communication
Session 2 90 minutesACTIVE LISTENING
OBJECTIVE:
Youth will learn how good listening skills are linked
to group decision making and to being a dependable
leader.
MATERIALS AND PREPARATION:
• Butcher paper, tape, and markers.
• Copy and cut out the Earthquake Activity Dialogue (Master Copy 1.2a).
• Copy the Earthquake Activity Action Steps (Master
Copy 1.2b) before the session: one copy for each
participant.
I. OPENING: ATTENDANCE, SNACKS,
ANNOUNCEMENTS, AND AGENDA REVIEW
(15 MINUTES)
Opening Circle Statement (Around the World): Name a
group that you are part of (other than this one.)
II. COMMUNITY BUILDER: STORY TELLER
(10 MINUTES)
Ask one participant to begin to tell a story. After
30 seconds, have another participant stand up and
summarize the story thus far and then continue it for
another 30 seconds. Repeat this process until the story is
over. Note to the group how the story changed as each
person summarized. Focus on the importance of listening
and cooperation.
III. ACTIVITY: EARTHQUAKE (45 MINUTES)
Before starting, read the Earthquake Activity Action Steps and Earthquake Activity Dialogue, and complete the
room preparation (see Materials and Preparation above).
Step 1: Earthquake Dialogue
• Pass out the strips of dialogue (cut out the strips before
the session) evenly to the participants. Make sure that
each participant plays a role in the dialogue.
• Have youth participants read their lines in consecutive
order (1–30). The group leader can read the bold sections
of the dialogue.
Step 2: After the dialogue is fi nished, pass out an
Earthquake Action Steps sheet to each participant. Read
the directions aloud to the participants.
Directions to read to youth: There are seven action
steps that you should take to ensure your survival and
rescue, and fi ve action steps that you should not take
because they are either unnecessary or may harm you.
Decide which seven of the action steps listed you would
take, assigning a 1 to what you would do fi rst, a 2 to your
second step, through 7. Continue the ranking with the
remaining fi ve steps that you would not take, numbering
them 8–12: 12 being the most dangerous or least helpful
step, 11 the next less dangerous step, etc. Complete the
ranking without discussing the situation with anyone
else. Place your answers in the column marked “My
Answers.”
Give youth time to think about the steps and fi ll out the
sheet.
Active Listening in Group Decision Making
From YELL ©2007 John W. Gardner Center★36
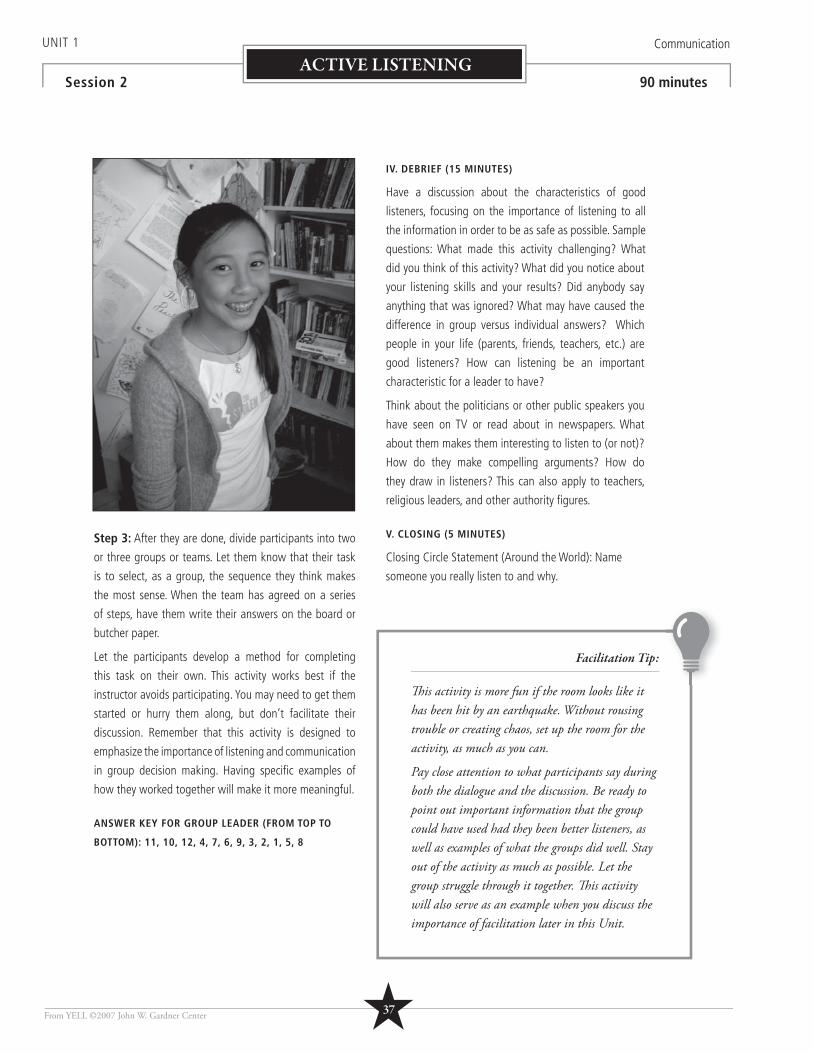
Facilitation Tip:
Th is activity is more fun if the room looks like it has been hit by an earthquake. Without rousing trouble or creating chaos, set up the room for the activity, as much as you can.
Pay close attention to what participants say during both the dialogue and the discussion. Be ready to point out important information that the group could have used had they been better listeners, as well as examples of what the groups did well. Stay out of the activity as much as possible. Let the group struggle through it together. Th is activity will also serve as an example when you discuss the importance of facilitation later in this Unit.
Step 3: After they are done, divide participants into two
or three groups or teams. Let them know that their task
is to select, as a group, the sequence they think makes
the most sense. When the team has agreed on a series
of steps, have them write their answers on the board or
butcher paper.
Let the participants develop a method for completing
this task on their own. This activity works best if the
instructor avoids participating. You may need to get them
started or hurry them along, but don’t facilitate their
discussion. Remember that this activity is designed to
emphasize the importance of listening and communication
in group decision making. Having specifi c examples of
how they worked together will make it more meaningful.
ANSWER KEY FOR GROUP LEADER (FROM TOP TO
BOTTOM): 11, 10, 12, 4, 7, 6, 9, 3, 2, 1, 5, 8
IV. DEBRIEF (15 MINUTES)
Have a discussion about the characteristics of good
listeners, focusing on the importance of listening to all
the information in order to be as safe as possible. Sample
questions: What made this activity challenging? What
did you think of this activity? What did you notice about
your listening skills and your results? Did anybody say
anything that was ignored? What may have caused the
difference in group versus individual answers? Which
people in your life (parents, friends, teachers, etc.) are
good listeners? How can listening be an important
characteristic for a leader to have?
Think about the politicians or other public speakers you
have seen on TV or read about in newspapers. What
about them makes them interesting to listen to (or not)?
How do they make compelling arguments? How do
they draw in listeners? This can also apply to teachers,
religious leaders, and other authority fi gures.
V. CLOSING (5 MINUTES)
Closing Circle Statement (Around the World): Name
someone you really listen to and why.
UNIT 1 Communication
Session 2 90 minutesACTIVE LISTENING
From YELL ©2007 John W. Gardner Center ★37
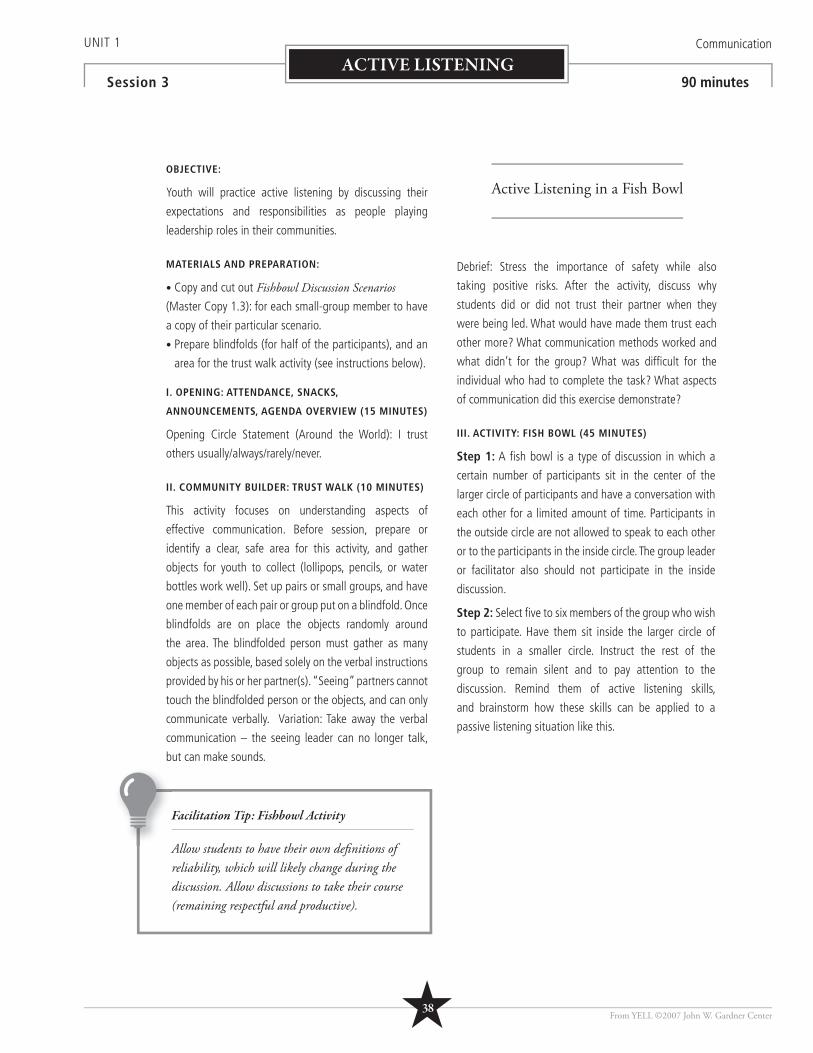
UNIT 1 Communication
Session 3 90 minutesACTIVE LISTENING
OBJECTIVE:
Youth will practice active listening by discussing their
expectations and responsibilities as people playing
leadership roles in their communities.
MATERIALS AND PREPARATION:
• Copy and cut out Fishbowl Discussion Scenarios(Master Copy 1.3): for each small-group member to have
a copy of their particular scenario.
• Prepare blindfolds (for half of the participants), and an
area for the trust walk activity (see instructions below).
I. OPENING: ATTENDANCE, SNACKS,
ANNOUNCEMENTS, AGENDA OVERVIEW (15 MINUTES)
Opening Circle Statement (Around the World): I trust
others usually/always/rarely/never.
II. COMMUNITY BUILDER: TRUST WALK (10 MINUTES)
This activity focuses on understanding aspects of
effective communication. Before session, prepare or
identify a clear, safe area for this activity, and gather
objects for youth to collect (lollipops, pencils, or water
bottles work well). Set up pairs or small groups, and have
one member of each pair or group put on a blindfold. Once
blindfolds are on place the objects randomly around
the area. The blindfolded person must gather as many
objects as possible, based solely on the verbal instructions
provided by his or her partner(s). “Seeing” partners cannot
touch the blindfolded person or the objects, and can only
communicate verbally. Variation: Take away the verbal
communication – the seeing leader can no longer talk,
but can make sounds.
Debrief: Stress the importance of safety while also
taking positive risks. After the activity, discuss why
students did or did not trust their partner when they
were being led. What would have made them trust each
other more? What communication methods worked and
what didn’t for the group? What was diffi cult for the
individual who had to complete the task? What aspects
of communication did this exercise demonstrate?
III. ACTIVITY: FISH BOWL (45 MINUTES)
Step 1: A fi sh bowl is a type of discussion in which a
certain number of participants sit in the center of the
larger circle of participants and have a conversation with
each other for a limited amount of time. Participants in
the outside circle are not allowed to speak to each other
or to the participants in the inside circle. The group leader
or facilitator also should not participate in the inside
discussion.
Step 2: Select fi ve to six members of the group who wish
to participate. Have them sit inside the larger circle of
students in a smaller circle. Instruct the rest of the
group to remain silent and to pay attention to the
discussion. Remind them of active listening skills,
and brainstorm how these skills can be applied to a
passive listening situation like this.
Facilitation Tip: Fishbowl Activity
Allow students to have their own defi nitions of reliability, which will likely change during the discussion. Allow discussions to take their course (remaining respectful and productive).
Active Listening in a Fish Bowl
From YELL ©2007 John W. Gardner Center★38
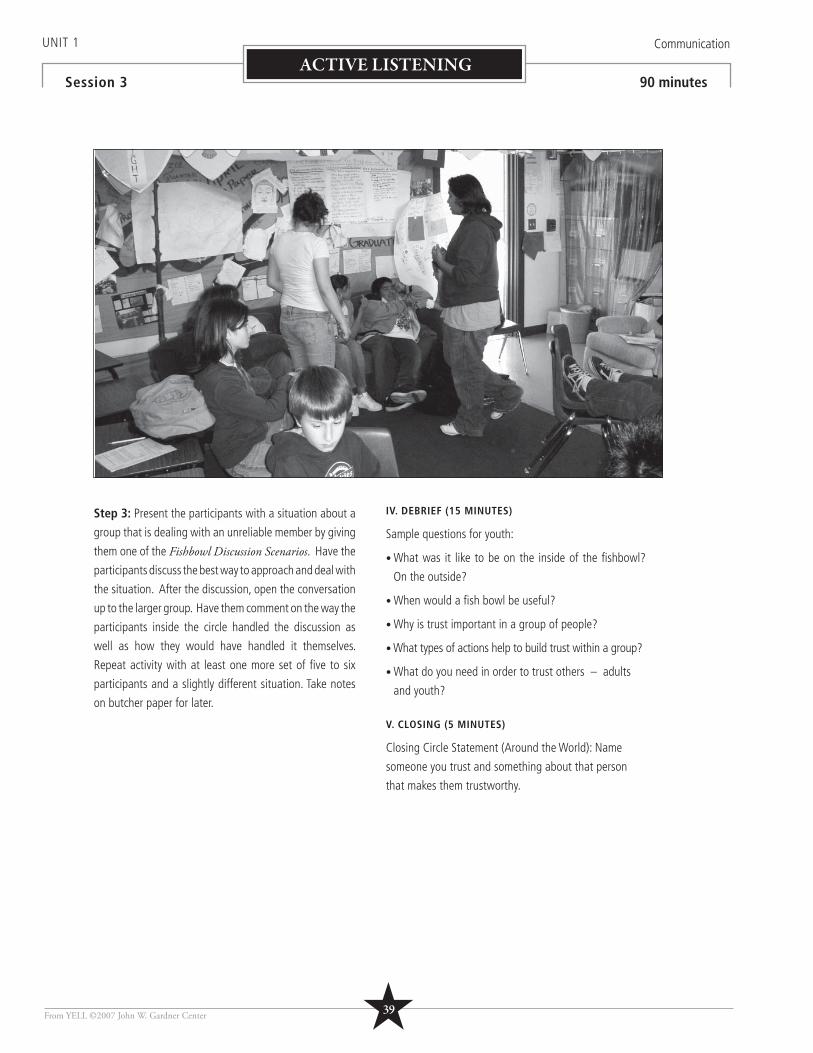
Step 3: Present the participants with a situation about a
group that is dealing with an unreliable member by giving
them one of the Fishbowl Discussion Scenarios. Have the
participants discuss the best way to approach and deal with
the situation. After the discussion, open the conversation
up to the larger group. Have them comment on the way the
participants inside the circle handled the discussion as
well as how they would have handled it themselves.
Repeat activity with at least one more set of fi ve to six
participants and a slightly different situation. Take notes
on butcher paper for later.
IV. DEBRIEF (15 MINUTES)
Sample questions for youth:
• What was it like to be on the inside of the fi shbowl?
On the outside?
• When would a fi sh bowl be useful?
• Why is trust important in a group of people?
• What types of actions help to build trust within a group?
• What do you need in order to trust others – adults
and youth?
V. CLOSING (5 MINUTES)
Closing Circle Statement (Around the World): Name
someone you trust and something about that person
that makes them trustworthy.
UNIT 1 Communication
Session 3 90 minutesACTIVE LISTENING
From YELL ©2007 John W. Gardner Center ★39
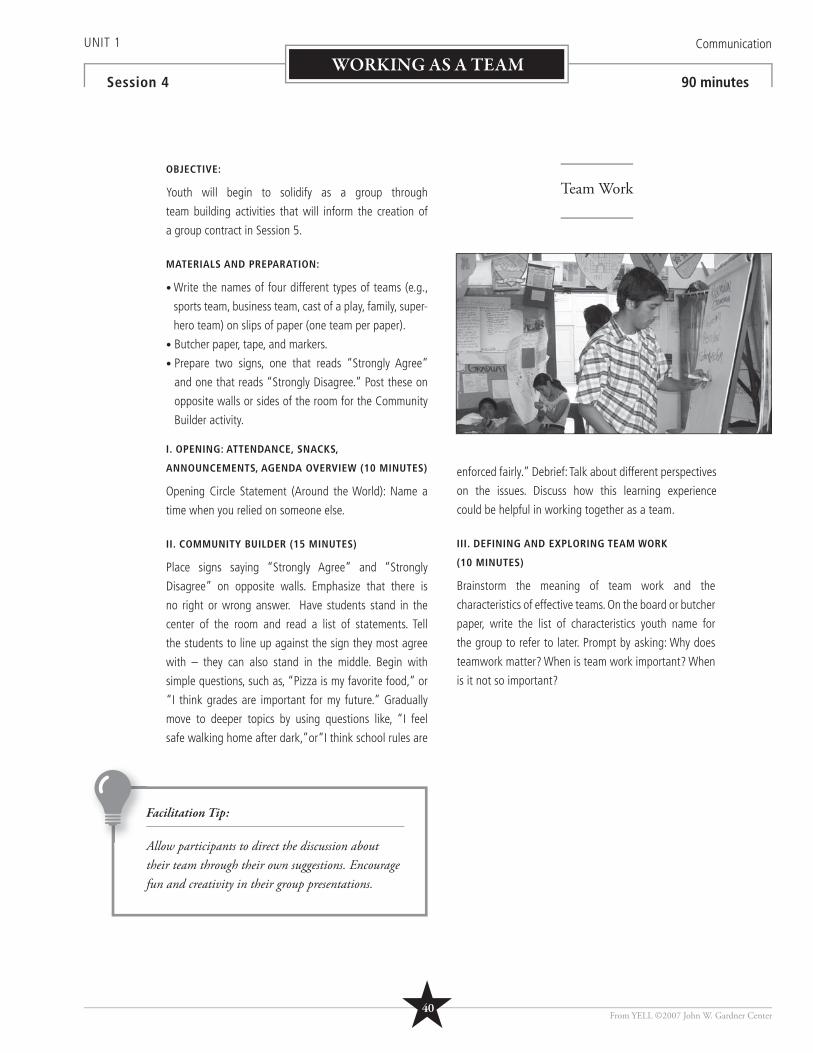
UNIT 1 Communication
Session 4 90 minutesWORKING AS A TEAM
OBJECTIVE:
Youth will begin to solidify as a group through
team building activities that will inform the creation of
a group contract in Session 5.
MATERIALS AND PREPARATION:
• Write the names of four different types of teams (e.g.,
sports team, business team, cast of a play, family, super-
hero team) on slips of paper (one team per paper).
• Butcher paper, tape, and markers.
• Prepare two signs, one that reads “Strongly Agree”
and one that reads “Strongly Disagree.” Post these on
opposite walls or sides of the room for the Community
Builder activity.
I. OPENING: ATTENDANCE, SNACKS,
ANNOUNCEMENTS, AGENDA OVERVIEW (10 MINUTES)
Opening Circle Statement (Around the World): Name a
time when you relied on someone else.
II. COMMUNITY BUILDER (15 MINUTES)
Place signs saying “Strongly Agree” and “Strongly
Disagree” on opposite walls. Emphasize that there is
no right or wrong answer. Have students stand in the
center of the room and read a list of statements. Tell
the students to line up against the sign they most agree
with – they can also stand in the middle. Begin with
simple questions, such as, “Pizza is my favorite food,” or
“I think grades are important for my future.” Gradually
move to deeper topics by using questions like, “I feel
safe walking home after dark,”or“I think school rules are
enforced fairly.” Debrief: Talk about different perspectives
on the issues. Discuss how this learning experience
could be helpful in working together as a team.
III. DEFINING AND EXPLORING TEAM WORK
(10 MINUTES)
Brainstorm the meaning of team work and the
characteristics of effective teams. On the board or butcher
paper, write the list of characteristics youth name for
the group to refer to later. Prompt by asking: Why does
teamwork matter? When is team work important? When
is it not so important?
Facilitation Tip:
Allow participants to direct the discussion about their team through their own suggestions. Encourage fun and creativity in their group presentations.
Team Work
From YELL ©2007 John W. Gardner Center★40
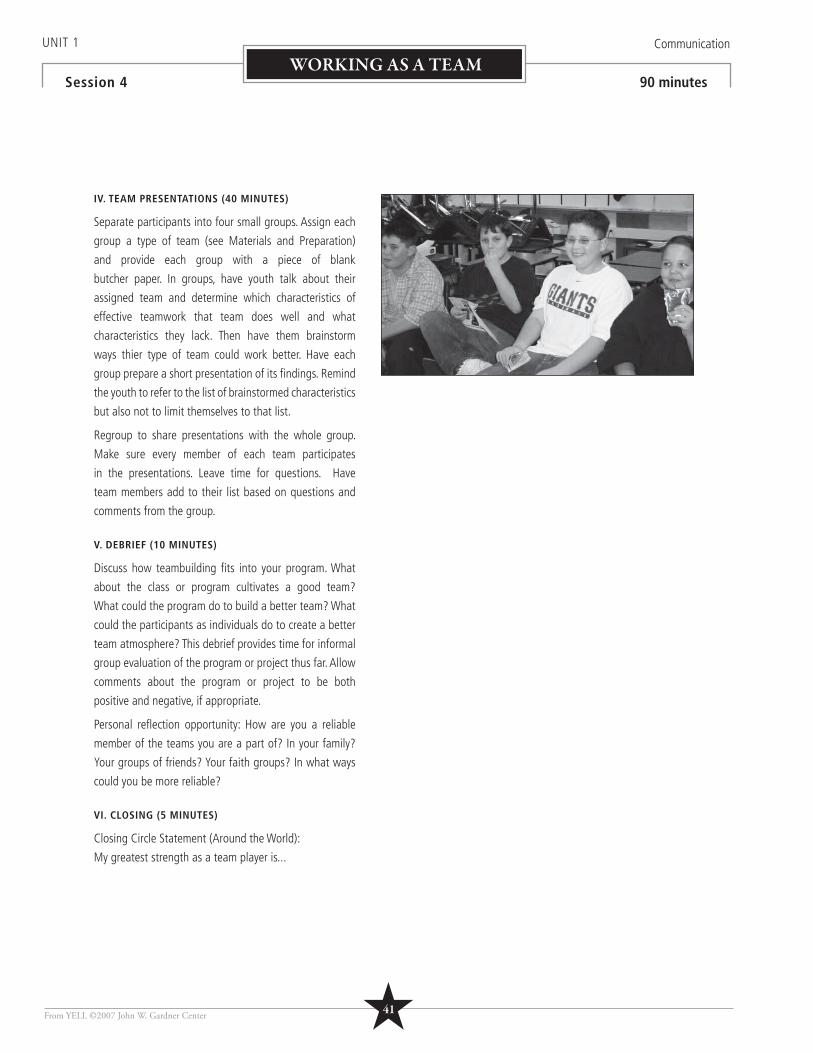
IV. TEAM PRESENTATIONS (40 MINUTES)
Separate participants into four small groups. Assign each
group a type of team (see Materials and Preparation)
and provide each group with a piece of blank
butcher paper. In groups, have youth talk about their
assigned team and determine which characteristics of
effective teamwork that team does well and what
characteristics they lack. Then have them brainstorm
ways thier type of team could work better. Have each
group prepare a short presentation of its fi ndings. Remind
the youth to refer to the list of brainstormed characteristics
but also not to limit themselves to that list.
Regroup to share presentations with the whole group.
Make sure every member of each team participates
in the presentations. Leave time for questions. Have
team members add to their list based on questions and
comments from the group.
V. DEBRIEF (10 MINUTES)
Discuss how teambuilding fi ts into your program. What
about the class or program cultivates a good team?
What could the program do to build a better team? What
could the participants as individuals do to create a better
team atmosphere? This debrief provides time for informal
group evaluation of the program or project thus far. Allow
comments about the program or project to be both
positive and negative, if appropriate.
Personal refl ection opportunity: How are you a reliable
member of the teams you are a part of? In your family?
Your groups of friends? Your faith groups? In what ways
could you be more reliable?
VI. CLOSING (5 MINUTES)
Closing Circle Statement (Around the World):
My greatest strength as a team player is...
UNIT 1 Communication
Session 4 90 minutesWORKING AS A TEAM
From YELL ©2007 John W. Gardner Center ★41
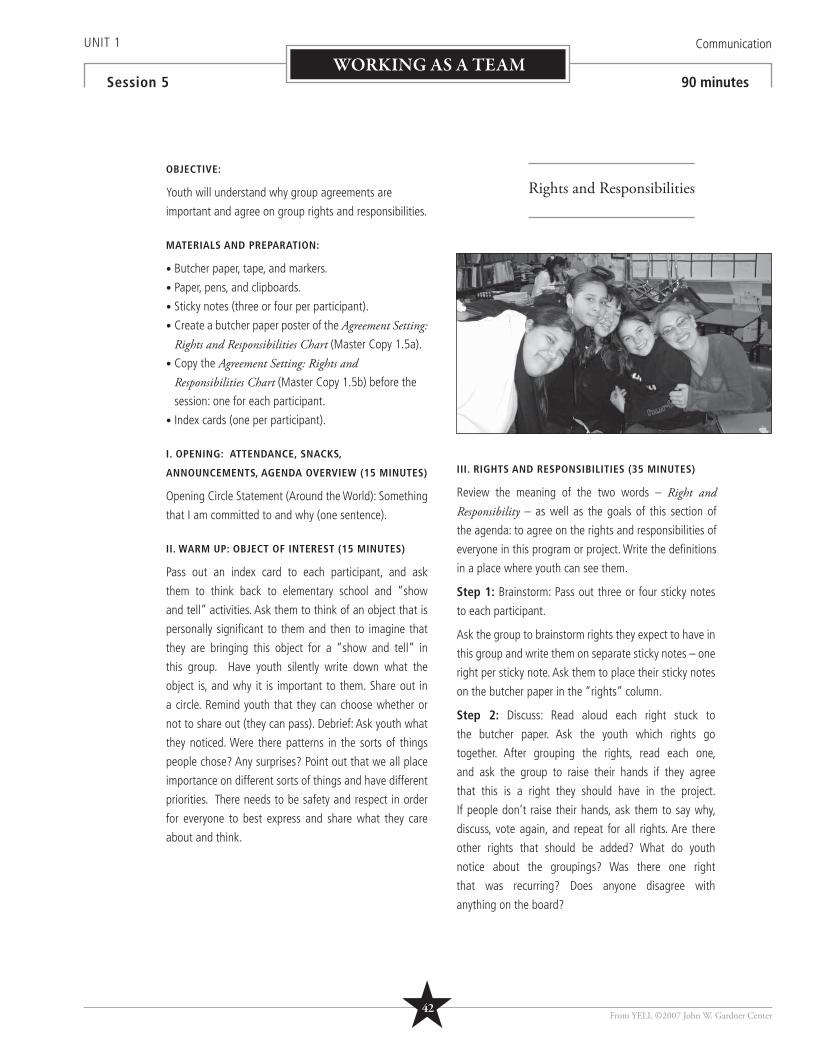
UNIT 1 Communication
Session 5 90 minutes
OBJECTIVE:
Youth will understand why group agreements are
important and agree on group rights and responsibilities.
MATERIALS AND PREPARATION:
• Butcher paper, tape, and markers.
• Paper, pens, and clipboards.
• Sticky notes (three or four per participant).
• Create a butcher paper poster of the Agreement Setting: Rights and Responsibilities Chart (Master Copy 1.5a).
• Copy the Agreement Setting: Rights and Responsibilities Chart (Master Copy 1.5b) before the
session: one for each participant.
• Index cards (one per participant).
I. OPENING: ATTENDANCE, SNACKS,
ANNOUNCEMENTS, AGENDA OVERVIEW (15 MINUTES)
Opening Circle Statement (Around the World): Something
that I am committed to and why (one sentence).
II. WARM UP: OBJECT OF INTEREST (15 MINUTES)
Pass out an index card to each participant, and ask
them to think back to elementary school and “show
and tell” activities. Ask them to think of an object that is
personally signifi cant to them and then to imagine that
they are bringing this object for a “show and tell” in
this group. Have youth silently write down what the
object is, and why it is important to them. Share out in
a circle. Remind youth that they can choose whether or
not to share out (they can pass). Debrief: Ask youth what
they noticed. Were there patterns in the sorts of things
people chose? Any surprises? Point out that we all place
importance on different sorts of things and have different
priorities. There needs to be safety and respect in order
for everyone to best express and share what they care
about and think.
III. RIGHTS AND RESPONSIBILITIES (35 MINUTES)
Review the meaning of the two words – Right and Responsibility – as well as the goals of this section of
the agenda: to agree on the rights and responsibilities of
everyone in this program or project. Write the defi nitions
in a place where youth can see them.
Step 1: Brainstorm: Pass out three or four sticky notes
to each participant.
Ask the group to brainstorm rights they expect to have in
this group and write them on separate sticky notes – one
right per sticky note. Ask them to place their sticky notes
on the butcher paper in the “rights” column.
Step 2: Discuss: Read aloud each right stuck to
the butcher paper. Ask the youth which rights go
together. After grouping the rights, read each one,
and ask the group to raise their hands if they agree
that this is a right they should have in the project.
If people don’t raise their hands, ask them to say why,
discuss, vote again, and repeat for all rights. Are there
other rights that should be added? What do youth
notice about the groupings? Was there one right
that was recurring? Does anyone disagree with
anything on the board?
Rights and Responsibilities
From YELL ©2007 John W. Gardner Center
WORKING AS A TEAM
★42
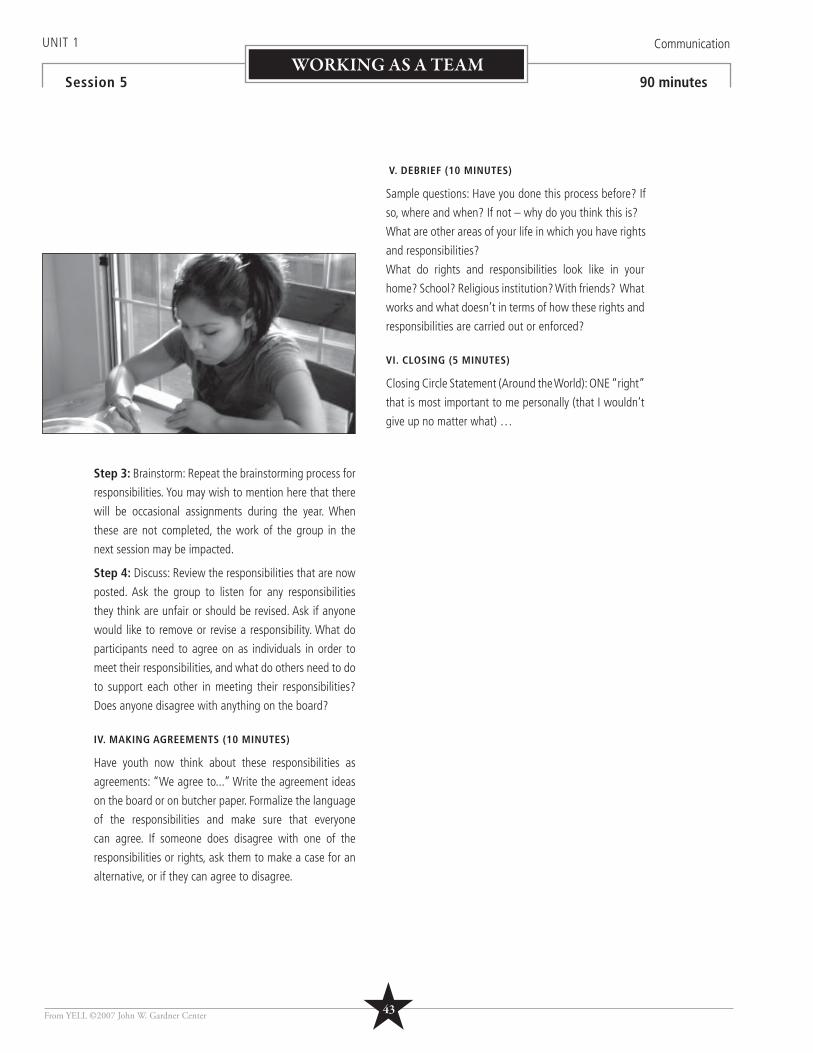
Step 3: Brainstorm: Repeat the brainstorming process for
responsibilities. You may wish to mention here that there
will be occasional assignments during the year. When
these are not completed, the work of the group in the
next session may be impacted.
Step 4: Discuss: Review the responsibilities that are now
posted. Ask the group to listen for any responsibilities
they think are unfair or should be revised. Ask if anyone
would like to remove or revise a responsibility. What do
participants need to agree on as individuals in order to
meet their responsibilities, and what do others need to do
to support each other in meeting their responsibilities?
Does anyone disagree with anything on the board?
IV. MAKING AGREEMENTS (10 MINUTES)
Have youth now think about these responsibilities as
agreements: “We agree to...” Write the agreement ideas
on the board or on butcher paper. Formalize the language
of the responsibilities and make sure that everyone
can agree. If someone does disagree with one of the
responsibilities or rights, ask them to make a case for an
alternative, or if they can agree to disagree.
V. DEBRIEF (10 MINUTES)
Sample questions: Have you done this process before? If
so, where and when? If not – why do you think this is?
What are other areas of your life in which you have rights
and responsibilities?
What do rights and responsibilities look like in your
home? School? Religious institution? With friends? What
works and what doesn’t in terms of how these rights and
responsibilities are carried out or enforced?
VI. CLOSING (5 MINUTES)
Closing Circle Statement (Around the World): ONE “right”
that is most important to me personally (that I wouldn’t
give up no matter what) …
UNIT 1 Communication
Session 5 90 minutes
From YELL ©2007 John W. Gardner Center
WORKING AS A TEAM
★43
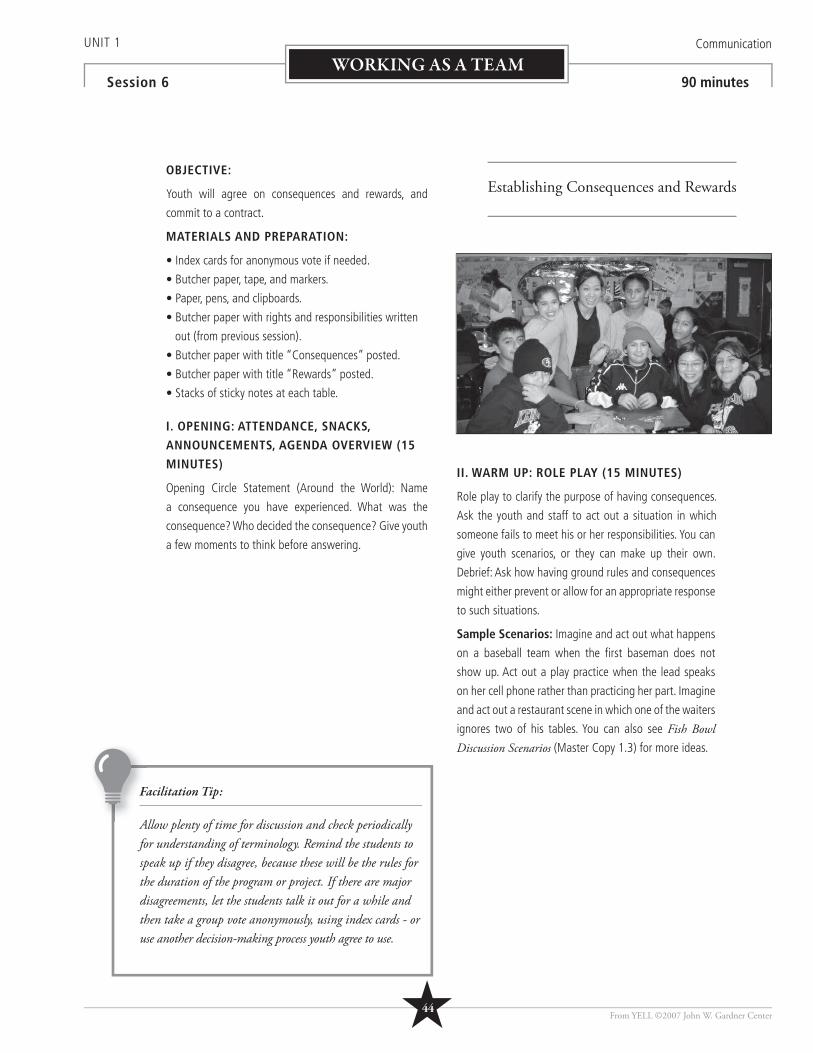
UNIT 1 Communication
Session 6 90 minutesWORKING AS A TEAM
OBJECTIVE:
Youth will agree on consequences and rewards, and
commit to a contract.
MATERIALS AND PREPARATION:
• Index cards for anonymous vote if needed.
• Butcher paper, tape, and markers.
• Paper, pens, and clipboards.
• Butcher paper with rights and responsibilities written
out (from previous session).
• Butcher paper with title “Consequences” posted.
• Butcher paper with title “Rewards” posted.
• Stacks of sticky notes at each table.
I. OPENING: ATTENDANCE, SNACKS,
ANNOUNCEMENTS, AGENDA OVERVIEW (15
MINUTES)
Opening Circle Statement (Around the World): Name
a consequence you have experienced. What was the
consequence? Who decided the consequence? Give youth
a few moments to think before answering.
II. WARM UP: ROLE PLAY (15 MINUTES)
Role play to clarify the purpose of having consequences.
Ask the youth and staff to act out a situation in which
someone fails to meet his or her responsibilities. You can
give youth scenarios, or they can make up their own.
Debrief: Ask how having ground rules and consequences
might either prevent or allow for an appropriate response
to such situations.
Sample Scenarios: Imagine and act out what happens
on a baseball team when the fi rst baseman does not
show up. Act out a play practice when the lead speaks
on her cell phone rather than practicing her part. Imagine
and act out a restaurant scene in which one of the waiters
ignores two of his tables. You can also see Fish Bowl Discussion Scenarios (Master Copy 1.3) for more ideas.
Facilitation Tip:
Allow plenty of time for discussion and check periodically for understanding of terminology. Remind the students to speak up if they disagree, because these will be the rules for the duration of the program or project. If there are major disagreements, let the students talk it out for a while and then take a group vote anonymously, using index cards - or use another decision-making process youth agree to use.
Establishing Consequences and Rewards
From YELL ©2007 John W. Gardner Center★44
III. DETERMINING CONSEQUENCES (15 MINUTES)
Step 1: Discuss the need of having a system that keeps
track of infractions or neglectful behavior. Emphasizing
such points as having clear rules and consequences will:
• Make it more likely that they will be applied consistently
and equally. Without a clear system, people could
unfairly get away with negative behavior that affects
the whole group and others might feel as though staff
members are playing favorites.
• Support the cohesiveness of the group. There is less
likelihood that you will resent your peers for negative
behavior if you know they are receiving consequences.
• Help the group meet its goals and hold its members
accountable if they are not doing what is best for the
group.
• Make sure that everyone has the agreed-upon rights.
Step 2: Using butcher paper to record responses, ask
the group if there should be an ultimate consequence,
or a “last straw” for participants in this group. If so, what
should it be? What kinds of behaviors could warrant
receiving the ultimate consequence?
Step 3: Ask if there should be a system of warnings that
leads up to that ultimate consequence. Decide on what
to call these: warnings, strikes, penalties? Ask how many
should be accumulated before the ultimate consequence
is reached. Determine the consequences that should
accompany a certain number of warnings (e.g., After the
fi rst warning, the program director will call your parents).
Step 4: Align consequences with responsibilities. Refer
the youth to the responsibilities that they came up with
last session. Determine how many “warnings” one should
get for violating each responsibility on the list. Ask if each
of the responsibilities is of equal importance, or if some
more important than others.
IV. RECOGNIZING REWARDS (20 MINUTES)
Step 1: Explain the purpose of having a reward system in
place to acknowledge people who demonstrate a great
commitment to the project, go out of their comfort zone,
or just do something excellently. Emphasize that you
don’t have a lot of money to work with, but you can do
things like erase warnings or give privileges like picking
their favorite snacks for an upcoming meeting.
Step 2: Ask each participant to come up with at least one
idea for a reward, write it on a sticky note, and post it on
the butcher paper. Read each sticky aloud. Discard those
that are impractical, explaining why. Then encourage the
youth to discuss how rewards will be determined. Pose
questions such as:
• Who should decide when a reward is deserved?
• How should the reward be selected for the
accomplishment? (Should the person rewarded get
to choose or should some rewards be matched with
certain efforts or accomplishments?)
• Are all these rewards of equal worth or are some better
than others?
• Are the rewards for individuals for groups, or some of
each?
Step 3: Formulate a policy based on their discussion and
decisions.
UNIT 1 Communication
Session 6 90 minutesWORKING AS A TEAM
From YELL ©2007 John W. Gardner Center
Facilitation Tip:
You may wish to introduce the concept of “props” or “shout outs” during this session, if you have not already done so.
“Shout outs” or “props” are public acknowledgements of the positive things people in the group do or say, or the qualities that they exhibit.
:
★45
UNIT 1 Communication
Session 6 90 minutesWORKING AS A TEAM
V. CREATING A VISITOR POLICY (15 MINUTES)
Step 1: Introduce the concept that throughout the year,
people, such as friends and family members are going to
be interested in meeting the participants and visiting the
sessions. Explain the purpose of having a visitor policy,
emphasizing that the main point is to ensure that the
visitor has a positive experience and does not negatively
affect the experience of the group.
Step 2: Brainstorm a visitor policy. Ask questions and
record responses on butcher paper:
• What do you think about having visitors coming to the
sessions? Why?
• What would you like to know about a potential visitor
before they come to a session?
• What would you like the visitor to know about the group
before coming to a session?
• How would you like the sessions to run if a visitor
is present? (Is there anything that should be done
differently?)
• What would you expect from visitors during the session?
What would their role be (e.g., observe, participate)?
Would you have any ground rules for them?
Step 3: Incorporate the visitor policy into your agreements.
VI. COMMITTING TO THE CONTRACT (10 MINUTES)
Introduce the idea of a contract to which you sign your
name to formalize your commitment to what you have
decided on as ground rules and consequences,. Encourage
youth to look at their participation as something that goes
beyond avoiding consequences or working for rewards,
something that refl ects their commitment to their peers,
their school, and their community.
VII. DEBRIEF (10 MINUTES)
Sample questions: Do you agree with the entire
agreement, or are there ideas that you would change?
What aspects of the agreement will be hardest for you to
follow? What have you learned about yourself in this
process? What have you learned about the group?
VIII. CLOSING (5 MINUTES)
Closing Circle Statement (Around the World): Name
a class or a group in which rules are respected and
well enforced.
Facilitation Tip:
Write the fi nalized version of the contract as diff erent components are settled. Keep it posted where youth can see it as a reminder.
Type up the agreement and have youth sign individual copies. Go through the contract item by item, asking for any changes or additions. Have the youth initial each item and sign the contract. Include two “witness” signatures.
From YELL ©2007 John W. Gardner Center★46

From YELL ©2007 John W. Gardner Center
NOTES
★47
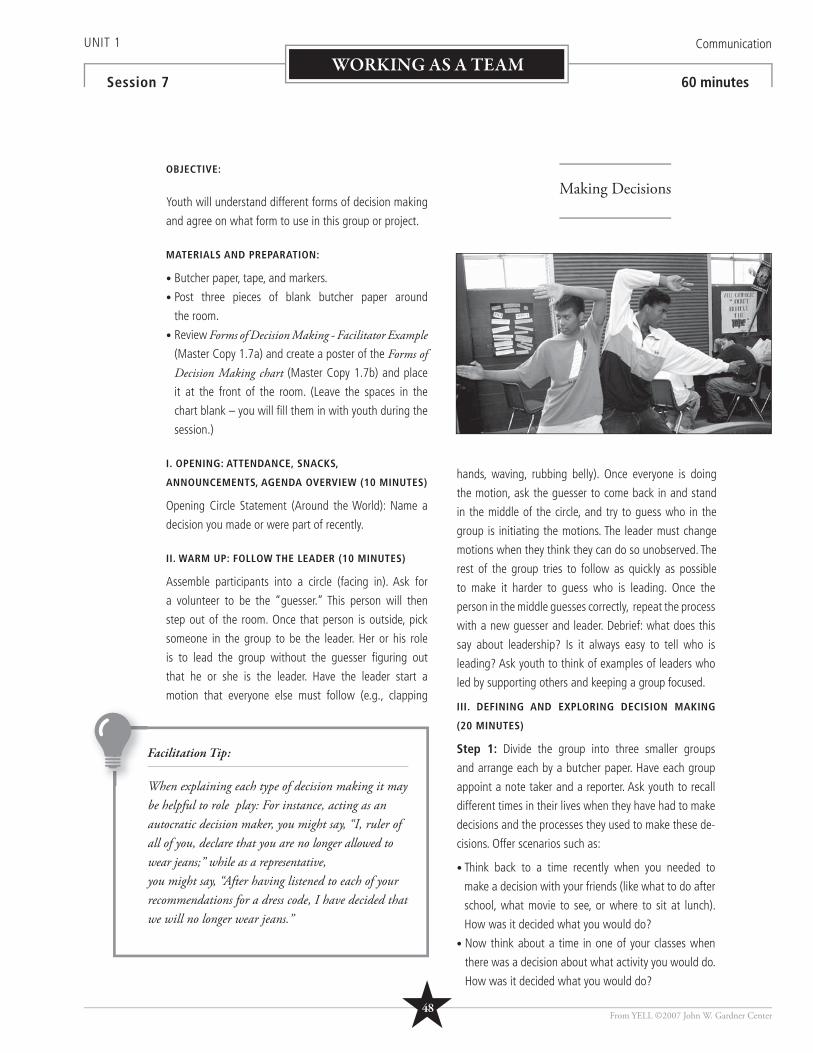
UNIT 1 Communication
Session 7 60 minutesWORKING AS A TEAM
OBJECTIVE:
Youth will understand different forms of decision making
and agree on what form to use in this group or project.
MATERIALS AND PREPARATION:
• Butcher paper, tape, and markers.
• Post three pieces of blank butcher paper around
the room.
• Review Forms of Decision Making - Facilitator Example (Master Copy 1.7a) and create a poster of the Forms of Decision Making chart (Master Copy 1.7b) and place
it at the front of the room. (Leave the spaces in the
chart blank – you will fi ll them in with youth during the
session.)
I. OPENING: ATTENDANCE, SNACKS,
ANNOUNCEMENTS, AGENDA OVERVIEW (10 MINUTES)
Opening Circle Statement (Around the World): Name a
decision you made or were part of recently.
II. WARM UP: FOLLOW THE LEADER (10 MINUTES)
Assemble participants into a circle (facing in). Ask for
a volunteer to be the “guesser.” This person will then
step out of the room. Once that person is outside, pick
someone in the group to be the leader. Her or his role
is to lead the group without the guesser fi guring out
that he or she is the leader. Have the leader start a
motion that everyone else must follow (e.g., clapping
hands, waving, rubbing belly). Once everyone is doing
the motion, ask the guesser to come back in and stand
in the middle of the circle, and try to guess who in the
group is initiating the motions. The leader must change
motions when they think they can do so unobserved. The
rest of the group tries to follow as quickly as possible
to make it harder to guess who is leading. Once the
person in the middle guesses correctly, repeat the process
with a new guesser and leader. Debrief: what does this
say about leadership? Is it always easy to tell who is
leading? Ask youth to think of examples of leaders who
led by supporting others and keeping a group focused.
III. DEFINING AND EXPLORING DECISION MAKING
(20 MINUTES)
Step 1: Divide the group into three smaller groups
and arrange each by a butcher paper. Have each group
appoint a note taker and a reporter. Ask youth to recall
different times in their lives when they have had to make
decisions and the processes they used to make these de-
cisions. Offer scenarios such as:
• Think back to a time recently when you needed to
make a decision with your friends (like what to do after
school, what movie to see, or where to sit at lunch).
How was it decided what you would do?
• Now think about a time in one of your classes when
there was a decision about what activity you would do.
How was it decided what you would do?
Facilitation Tip:
When explaining each type of decision making it may be helpful to role play: For instance, acting as an autocratic decision maker, you might say, “I, ruler of all of you, declare that you are no longer allowed to wear jeans;” while as a representative,you might say, “After having listened to each of your recommendations for a dress code, I have decided that we will no longer wear jeans.”
Making Decisions
From YELL ©2007 John W. Gardner Center★48
• When the city needs to decide whether or not to build a
new park, how is it decided what will happen?
• What about in your family: Who decides what you eat
for dinner or whether or not you go to church?
Step 2: In the full group, explain the general categories
of decisions:
• Autocratic: Made by one person
• Representative: Made by one person with input
from others
• Democratic: Made by group together, majority rules
• Consensus: Made by group together, all must come
to agreement
Discuss the pros and cons of each category, using the
Forms of Decision Making chart you have prepared. Fill
in youth’s answers and ideas.
Step 3: Back in their small groups, ask the youth to again
discuss the examples they came up with and decide which
category best fi ts with each of their examples. Then ask
them to identify the most common forms of decision mak-
ing they experience and to identify some ways they would
change the decision-making structures in their lives.
Step 4: Have a representative share out from each of
the groups.
IV. DEBRIEF AND DECIDE: WHAT WORKS FOR THIS
GROUP? (15 MINUTES)
Bring the entire group back together, explain the importance
of having a procedure for making decisions together, and
ask each group’s reporter to state which model they think
would be best for this group or program and why. Let the
group know that others who have used this curriculum
have found that democratic processes work best to ensure
a fair process where everyone’s voice is heard and decisions
are made in a timely way. Also, let the group know that
there may be some cases when the adults will need to
make decisions. For example: The adult leader may decide
to plan an activity or retreat that addresses a particular
issue or confl ict that they notice in the group. Review the
procedure that has merited the most support. Be certain
to ask if there are any objections, questions, or revisions
given their earlier discussions.
V. CLOSING (5 MINUTES)
Closing Circle Statement (Around the World): Share
something you noticed in or about the session today.
UNIT 1 Communication
Session 7 60 minutesWORKING AS A TEAM
From YELL ©2007 John W. Gardner Center ★49
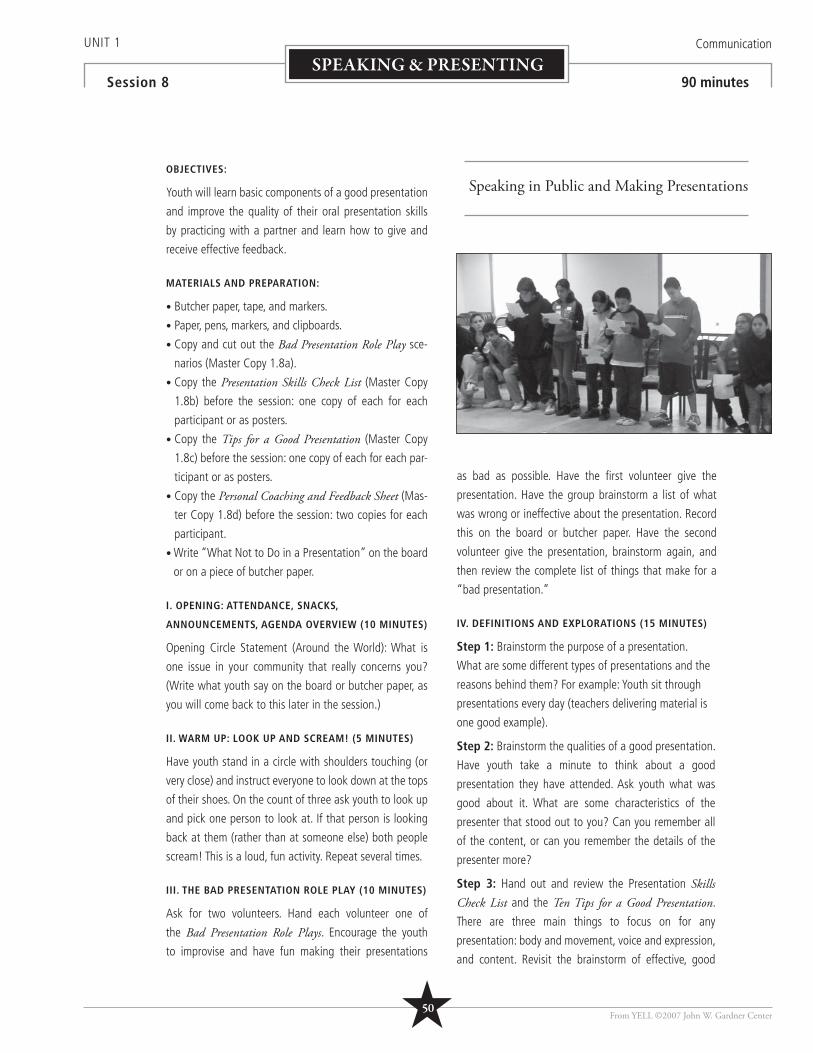
UNIT 1 Communication
Session 8 90 minutesSPEAKING & PRESENTING
OBJECTIVES:
Youth will learn basic components of a good presentation
and improve the quality of their oral presentation skills
by practicing with a partner and learn how to give and
receive effective feedback.
MATERIALS AND PREPARATION:
• Butcher paper, tape, and markers.
• Paper, pens, markers, and clipboards.
• Copy and cut out the Bad Presentation Role Play sce-
narios (Master Copy 1.8a).
• Copy the Presentation Skills Check List (Master Copy
1.8b) before the session: one copy of each for each
participant or as posters.
• Copy the Tips for a Good Presentation (Master Copy
1.8c) before the session: one copy of each for each par-
ticipant or as posters.
• Copy the Personal Coaching and Feedback Sheet (Mas-
ter Copy 1.8d) before the session: two copies for each
participant.
• Write “What Not to Do in a Presentation” on the board
or on a piece of butcher paper.
I. OPENING: ATTENDANCE, SNACKS,
ANNOUNCEMENTS, AGENDA OVERVIEW (10 MINUTES)
Opening Circle Statement (Around the World): What is
one issue in your community that really concerns you?
(Write what youth say on the board or butcher paper, as
you will come back to this later in the session.)
II. WARM UP: LOOK UP AND SCREAM! (5 MINUTES)
Have youth stand in a circle with shoulders touching (or
very close) and instruct everyone to look down at the tops
of their shoes. On the count of three ask youth to look up
and pick one person to look at. If that person is looking
back at them (rather than at someone else) both people
scream! This is a loud, fun activity. Repeat several times.
III. THE BAD PRESENTATION ROLE PLAY (10 MINUTES)
Ask for two volunteers. Hand each volunteer one of
the Bad Presentation Role Plays. Encourage the youth
to improvise and have fun making their presentations
as bad as possible. Have the fi rst volunteer give the
presentation. Have the group brainstorm a list of what
was wrong or ineffective about the presentation. Record
this on the board or butcher paper. Have the second
volunteer give the presentation, brainstorm again, and
then review the complete list of things that make for a
“bad presentation.”
IV. DEFINITIONS AND EXPLORATIONS (15 MINUTES)
Step 1: Brainstorm the purpose of a presentation.
What are some different types of presentations and the
reasons behind them? For example: Youth sit through
presentations every day (teachers delivering material is
one good example).
Step 2: Brainstorm the qualities of a good presentation.
Have youth take a minute to think about a good
presentation they have attended. Ask youth what was
good about it. What are some characteristics of the
presenter that stood out to you? Can you remember all
of the content, or can you remember the details of the
presenter more?
Step 3: Hand out and review the Presentation Skills Check List and the Ten Tips for a Good Presentation.
There are three main things to focus on for any
presentation: body and movement, voice and expression,
and content. Revisit the brainstorm of effective, good
Speaking in Public and Making Presentations
From YELL ©2007 John W. Gardner Center★50
presentations. Do most of the characteristics fall in line
with these handouts? Does anything on the handouts
surprise you?
V. GIVING AND RECEIVING FEEDBACK (10 MINUTES)
The purpose of feedback is to learn, be proactive, and
improve skills through refl ection on information shared
and received. There are ways to give feedback so people
hear what we are saying and can learn from it. Ask youth
for some quick examples of how they like to receive feed-
back – or not!
Explain the Personal Coaching and Feedback Sheet handout. Ask youth why it is important to end on a
positive. What is the difference between telling people
what they are doing wrong vs. telling them where you
see opportunities for growth? (Answers will vary: have
the presenter feel good about themselves, create a safe
and supportive environment, have an opportunity to
improve and grow, negatives without suggestions for
improvement can be harmful). Relate this back to
the bad presentation role plays. Have youth come up
with examples of the feedback process based on the
bad presentations.
VI. PRESENTATION PRACTICE, FEEDBACK PRACTICE
(30 MINUTES)
Hand out two Personal Coaching and Feedback Sheets to each youth. Have them put their name on one of the
forms. They will put their partner’s name on the other.
Think: Have each youth take fi ve minutes to brainstorm
some ideas for a presentation on an issue they
personally think is VITAL for their school or community
to address. Offer an outline for the presentation (e.g.,
Introduction, Issue, Some Possible Solutions, Thank
you and Closing Remarks.) Youth can think back to the
session’s opening Around the World question, and use
their answer or someone else’s. Remind youth to focus on
the objectives of a good presentation.
Pair: Pick partners, and have youth designate who will
go fi rst in giving their presentation to the partner. Have
one person start while the other is taking notes on the
feedback handout. After the fi rst presenter is done, take
a few minutes for youth to write notes on the feedback
forms. (Make sure that the presenter self-evaluates at this
time.) Switch roles and repeat the process.
Share: In their pairs, have youth give each other very
specifi c, detailed feedback. Have each youth identify
and write down what they most want to work on or
improve. If you have time, ask youth to take another fi ve
minutes to revisit their presentation outline and make
changes. Ask if anyone would like to present for the
entire group (take volunteers). Be sure to point out the
contraints of the limited preparation time. For example,
because this is a short practice, we can’t expect the
content to be fully developed.
Variations: Have every member of the group present
to the full class, and videotape the presentations. This
can be a great evaluation and refl ection tool, and a very
effective way to identify strengths, improvements, and
areas for growth. Be sure that the participant is ready
and wants to do this step, as it can be intimidating!
VII. DEBRIEF (5 MINUTES) What is hard about presenting?
What comes naturally? Were the guidelines and
feedback helpful? How can you continue to improve your
presentation skills?
VIII. CLOSING (5 MINUTES)
Closing Circle Statement (Around the World): Rank your
nervousness about public speaking on a scale of 1-5,
with 5 being extremely nervous, and 1 being not at all
nervous.
Learning Strategy:
Th ink-Pair-Share
Th is works well to increase student engagement and to allow students to gather their thoughts before speaking. Th ink: Participants spend several moments thinking and writing on their own. Pair: Participants pair up with one other person and share their thinking. Remind pairs of active listening techniques. Share: Volunteers share out what they discussed in pairs.
y:
UNIT 1 Communication
Session 8 90 minutesSPEAKING & PRESENTING
From YELL ©2007 John W. Gardner Center ★51
UNIT 1 Communication
Session 9 90 minutesSPEAKING & PRESENTING
OBJECTIVES:
Youth will learn the foundations of good communication
and practice expressing their opinions effectively.
MATERIALS AND PREPARATION:
• Peanut butter, jelly, bread, knife, spoon, and napkins.
• Optional: prepare a video clip of a presidential or other
debate (programs with courtroom scenes work well
too).
• Pick a topic for the Ridiculous Debate activity.
I. OPENING: ATTENDANCE, SNACKS,
ANNOUNCEMENTS, AGENDA OVERVIEW (15 MINUTES)
Opening Circle Statement (Around the World): Name a
rule or law that you feel strongly about – either “for” or
“against” (e.g., dress code, death penalty, curfew, voting
age).
II. COMMUNITY BUILDER: BUILDING A PEANUT
BUTTER AND JELLY SANDWICH (10 MINUTES)
Pretend to be an alien who doesn’t know how to make
a peanut butter and jelly sandwich. Have the participants
instruct the alien step by step on how to do so. Take
every suggestion as literally as possible (“put hand
on jar lid and twist”) to illustrate the importance of
being specifi c and thorough. Have a brief recap discussion
to clarify the points and allow students to express
frustration at not being able to communicate clearly with
the alien.
III. ACTIVITY: RIDICULOUS DEBATE (45 MINUTES)
Introduce debate as an important component of
leadership. Show video clip of a presidential or other
salient debate to illustrate everyday applications, if
possible. Clips from television programs with courtroom
scenes also work well.
Divide the group into two sides for a debate on a
ridiculous issue such as the importance of wearing
matching socks. Within those two groups, designate who
will formulate offensive arguments and who will come
up with defensive arguments. Give both sides 10-15
minutes to formulate their arguments and solidify their
“plans of attack.”
Have each group designate two spokespersons (two on
offense and two on defense). Conduct a mini-debate
about the issue, giving one team several minutes to pres-
ent their argument, and then the other team a minute for
rebuttal. After both teams have presented, allow some
time for back and forth. Allow things to get a bit out
of control to illustrate how debates can get out of hand
even if they are about nothing important.
Facilitation Tip:
Allow the building a sandwich activity to be fun and goofy. Don’t be afraid to make a mess.
In the debate debrief, stress the importance and relevance of debate in everyday life.
Debate
From YELL ©2007 John W. Gardner Center★52
IV. DEBRIEF (15 MINUTES)
Conduct a discussion about the debate experience
focusing on the importance of effective communication
during debate. How could the debaters have been more
effective? What were the strengths in the methods of
communication and expression?
V. CLOSING: (5 MINUTES)
Closing Circle Statement (Around the World): In what
ways is debate applicable to your daily life with family
and friends? How could debating skills make you a better
student? A better friend?
UNIT1 Communication
Session 9 90 minutesSPEAKING & PRESENTING
From YELL ©2007 John W. Gardner Center ★53
UNIT 1 Communication
Session 10 90 minutesSPEAKING & PRESENTING
OBJECTIVE:
Youth will understand the differences between debate
focused on winning and discussion focused on compromise
and understanding.
MATERIALS AND PREPARATION:
• Paper, pens, markers, and clipboards for Back to Back
Drawing activity.
• Copy the Wizard’s Wand: Th e Debate (Master Copy
1.10a) before the session: one copy for each partici-
pant.
• Copy the Wizard’s Wand Role Plays (Master Copy
1.10b). Cut out the roles for two groups.
I. OPENING: ATTENDANCE, SNACKS,
ANNOUNCEMENTS, AGENDA OVERVIEW (10 MINUTES)
Opening Circle Statement (Around the World): Tell the
group about a time when you have had to compromise.
II. COMMUNITY BUILDER: BACK TO BACK DRAWING
(15 MINUTES)
This activity highlights the importance of clear directions
and active listening.
Give each person two blank pieces of paper and a
marker or pen. Ask everyone to fi nd a partner and to sit
down back to back. Ask everyone to draw a picture on
one of the sheets of paper. After all youth have drawn
a picture (make sure they don’t let their partner see!),
have each pair designate one person as the drawer
and the other person as the instructor. Continuting to
sit back to back (and therefore unable to see the other
person’s sheet of paper), the instructor gives directions
to the drawer, with the goal of creating a copy of the
instructor’s picture. Directions must be given without
using the name of the object (For example, if the
instructor drew a big happy face, the directions might
include; “Draw a circle that takes up most of your paper.
In the center of the top left quadrant of the circle draw
another small circle.”) This exercise requires very clear
directions! Switch roles, so each person in the pair has
a chance to be the drawer and the instructor. Debrief:
Discuss the experience and compare the original drawings
with the instructed drawings. What was diffi cult about
this activity?
III. DEBATE (40 MINUTES)
Divide the participants into two teams. Read through the
Wizard’s Wand debate scenario with the participants.
You can either read aloud or provide both teams with
copies of the scenario, and team members can take turns
reading aloud.
Round 1: Pass out the Round One Role Play instructions
for each group. Give each group time to plan their
arguments. Emphasize that the goal of the activity is to
win the debate. After each group has prepared, facilitate
a debate between the two groups. Start the debate in
Facilitation Tip:
Don’t let the arguments get personal.
Opportunity for personal refl ection: Over the next week, ask youth to think about how they react to disagreements. Is their focus on compromise or winning?
Debate and Compromise
From YELL ©2007 John W. Gardner Center★54
a controlled fashion. Allow each group to take turns
speaking. However, let the debate get out of control.
When the debate has reached an obvious stalemate, stop
it and pass out the Round Two Role Play Instructions.
Round 2: Run the debate again, but this time focus on
reaching a compromise that makes both teams happy. Tell
groups to focus more on the other teams’ needs than their
own. Remind youth of the guidelines for active listening.
IV. DEBRIEF (15 MINUTES)
Sample questions for youth: Why do you think we •
did this activity?
What did you notice about the two discussions? •
How was the second different from the fi rst? •
What happened to your listening skills during the •
debate?
What happens during a debate? •
What is bad about debate? •
What is good? •
What makes discussion effective? •
At what point is debate appropriate? •
V. CLOSING (10 MINUTES)
Using what was learned from today’s activity, establish
group norms for discussions. Brainstorm and create a list
that can be posted and referred to during disagreements
in sessions. How should the group handle disagreements
and settle dispute? What can compromise teach us about
our discussions?
UNIT 1 Communication
Session 10 90 minutesSPEAKING & PRESENTING
From YELL ©2007 John W. Gardner Center ★55

UNIT 1 Communication
Session 11 90 minutesSPEAKING & PRESENTING
OBJECTIVE:
Youth will practice debate and compromise skills through
a mock City Council meeting.
MATERIALS AND PREPARATION:
• Copy the Mock City Council Proposal and Roles for
participants (Master Copy 1.11) and cut out the roles:
one for each participant or group.
I. OPENING: ATTENDANCE, SNACKS, ANNOUNCEMENTS,
AGENDA OVERVIEW (15 MINUTES)
Opening Circle Statement (Around the World): If you had
two minutes to talk to all of the people of your community
what subject would you talk about?
II. WARM UP: WHO ELSE? (10 MINUTES)
Begin by making a circle of chairs. There should be one
less chair than the total number of people playing. One
person starts by standing in the middle of the circle and
saying something about themselves and ending with
“Who else?” Example: “I love chocolate. Who else loves
chocolate?” All the group members who love chocolate
must get up and switch places without selecting the chairs
directly on either side of them. The person left without
a chair goes to the center of the circle and makes the
next statement. This game can be light hearted or serious,
depending on the content and the group.
III. MOCK CITY COUNCIL MEETING (45 MINUTES)
Step 1: Introduce the scenario to youth and pick roles.
A group of middle and high-school students are presenting
a proposal to their City Council on an issue that impacts
many local youth: bus passes. Ask for volunteers to play
the different roles (or have them draw from a hat).
• Youth presenters (2)
• Citizens against the proposal (4)
• Citizens for the proposal (4)
• City Council members (The rest of the group)
Have the Council sit together at one side of the room. The
role of the City Council is to listen to the proposal, hear
arguments for and against the proposal, ask questions,
and make a decision on the proposal.
Step 2: Youth presenters read the proposal.
Step 3: Citizens share opinions for and against the
proposal.
Step 4: Debate and Discussion
Open the City Council meeting for citizen debate. During
the debate, the City Council will make sure the following
questions are addressed:
• What are the benefi ts for students? (e.g., safety, time
saved, convenience)
• What are the benefi ts for families? (e.g., money saved,
time saved, peace of mind)
• What are the benefi ts for the community? (e.g., keeping
kids off the streets, decrease in graffi ti, decrease in
juvenile crime)
• What are some of the costs to the community? (Who
will pay for this? the bus company, the taxpayers in
cities, others?)
• Is this proposal fair? Should some people get free bus
passes and not others? schoolchildren, the elderly,
hardworking adults, others?)
• Do schoolchildren really need subsidized bus passes?
• Any other questions or issues you can think of?
Debate and Compromise Role Play
From YELL ©2007 John W. Gardner Center
Mock City Council was based on an actual Youth Bus Pass campaign that Kids First Oakland youth leaders and allies organized in 2001 securing free and aff ordable transportation for 25,000 low-income youth - www.kidsfi rstoakland.org
★56
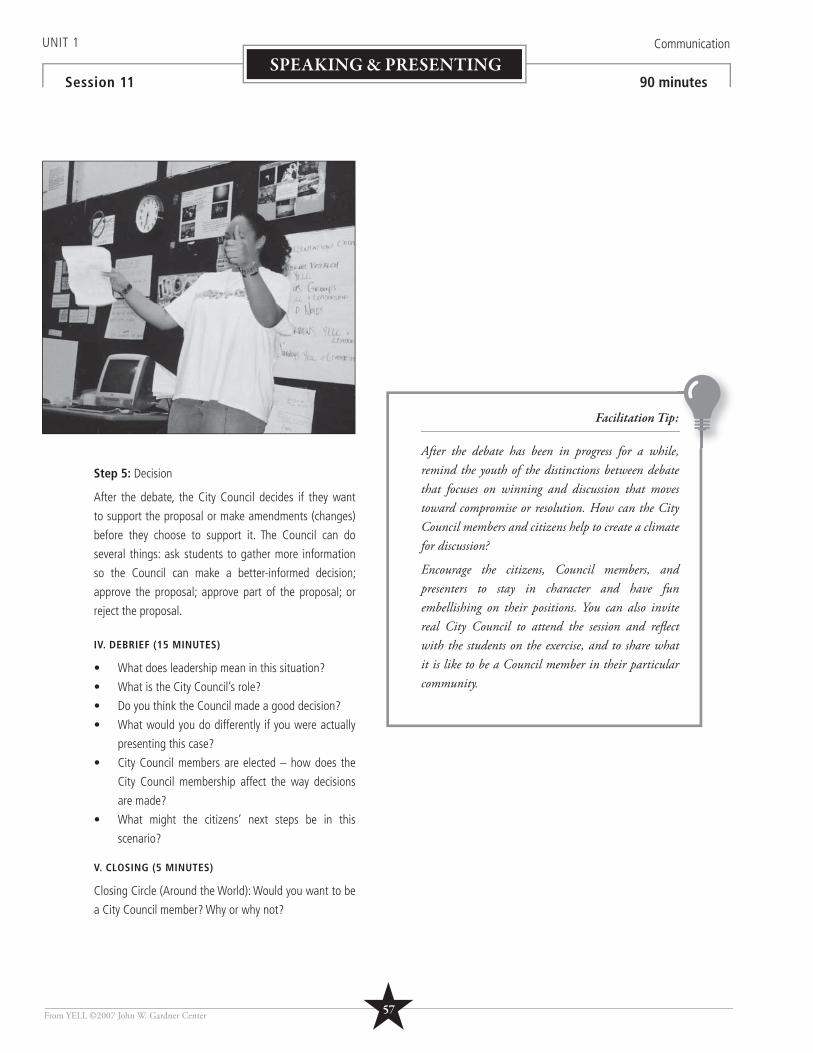
Step 5: Decision
After the debate, the City Council decides if they want
to support the proposal or make amendments (changes)
before they choose to support it. The Council can do
several things: ask students to gather more information
so the Council can make a better-informed decision;
approve the proposal; approve part of the proposal; or
reject the proposal.
IV. DEBRIEF (15 MINUTES)
What does leadership mean in this situation? •
What is the City Council’s role? •
Do you think the Council made a good decision?•
What would you do differently if you were actually •
presenting this case?
City Council members are elected – how does the •
City Council membership affect the way decisions
are made?
What might the citizens’ next steps be in this •
scenario?
V. CLOSING (5 MINUTES)
Closing Circle (Around the World): Would you want to be
a City Council member? Why or why not?
UNIT 1 Communication
Session 11 90 minutesSPEAKING & PRESENTING
From YELL ©2007 John W. Gardner Center
Facilitation Tip:
After the debate has been in progress for a while, remind the youth of the distinctions between debate that focuses on winning and discussion that moves toward compromise or resolution. How can the City Council members and citizens help to create a climate for discussion?
Encourage the citizens, Council members, and presenters to stay in character and have fun embellishing on their positions. You can also invite real City Council to attend the session and refl ect with the students on the exercise, and to share what it is like to be a Council member in their particular community.
:
★57
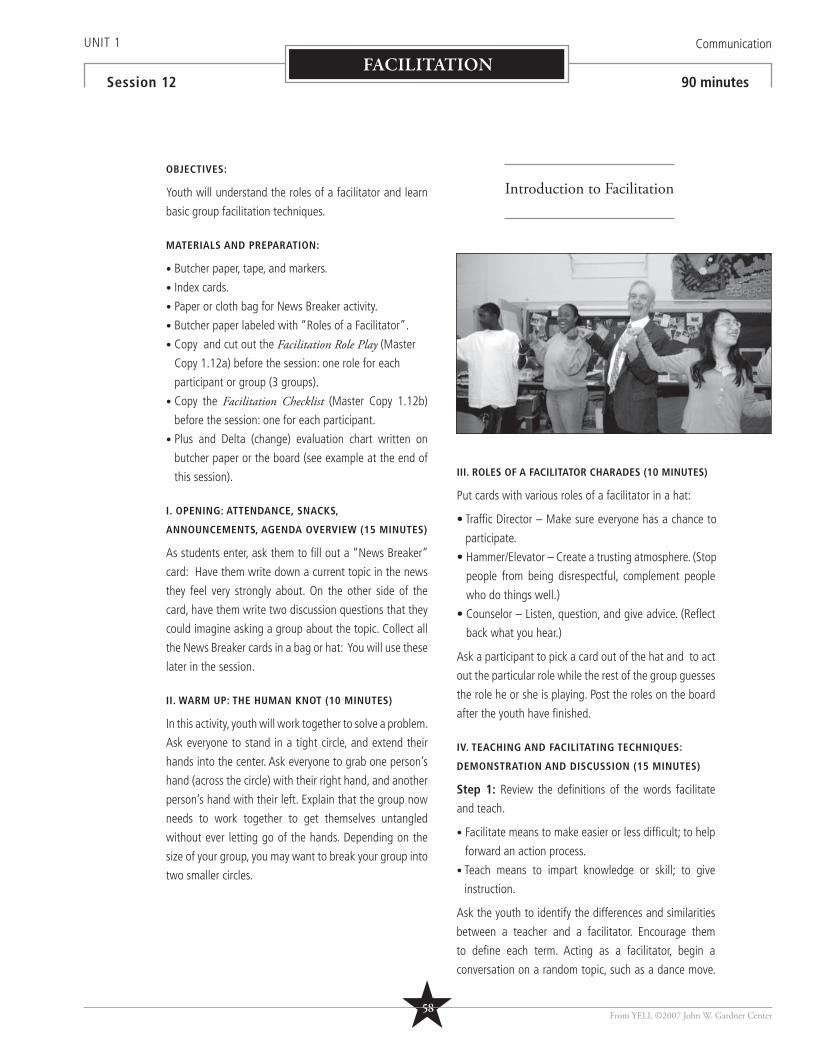
★58
UNIT 1 Communication
Session 12 90 minutesFACILITATION
OBJECTIVES:
Youth will understand the roles of a facilitator and learn
basic group facilitation techniques.
MATERIALS AND PREPARATION:
• Butcher paper, tape, and markers.
• Index cards.
• Paper or cloth bag for News Breaker activity.
• Butcher paper labeled with “Roles of a Facilitator”.
• Copy and cut out the Facilitation Role Play (Master
Copy 1.12a) before the session: one role for each
participant or group (3 groups).
• Copy the Facilitation Checklist (Master Copy 1.12b)
before the session: one for each participant.
• Plus and Delta (change) evaluation chart written on
butcher paper or the board (see example at the end of
this session).
I. OPENING: ATTENDANCE, SNACKS,
ANNOUNCEMENTS, AGENDA OVERVIEW (15 MINUTES)
As students enter, ask them to fi ll out a “News Breaker”
card: Have them write down a current topic in the news
they feel very strongly about. On the other side of the
card, have them write two discussion questions that they
could imagine asking a group about the topic. Collect all
the News Breaker cards in a bag or hat: You will use these
later in the session.
II. WARM UP: THE HUMAN KNOT (10 MINUTES)
In this activity, youth will work together to solve a problem.
Ask everyone to stand in a tight circle, and extend their
hands into the center. Ask everyone to grab one person’s
hand (across the circle) with their right hand, and another
person’s hand with their left. Explain that the group now
needs to work together to get themselves untangled
without ever letting go of the hands. Depending on the
size of your group, you may want to break your group into
two smaller circles.
III. ROLES OF A FACILITATOR CHARADES (10 MINUTES)
Put cards with various roles of a facilitator in a hat:
• Traffi c Director – Make sure everyone has a chance to
participate.
• Hammer/Elevator – Create a trusting atmosphere. (Stop
people from being disrespectful, complement people
who do things well.)
• Counselor – Listen, question, and give advice. (Refl ect
back what you hear.)
Ask a participant to pick a card out of the hat and to act
out the particular role while the rest of the group guesses
the role he or she is playing. Post the roles on the board
after the youth have fi nished.
IV. TEACHING AND FACILITATING TECHNIQUES:
DEMONSTRATION AND DISCUSSION (15 MINUTES)
Step 1: Review the defi nitions of the words facilitate
and teach.
• Facilitate means to make easier or less diffi cult; to help
forward an action process.
• Teach means to impart knowledge or skill; to give
instruction.
Ask the youth to identify the differences and similarities
between a teacher and a facilitator. Encourage them
to defi ne each term. Acting as a facilitator, begin a
conversation on a random topic, such as a dance move.
Introduction to Facilitation
From YELL ©2007 John W. Gardner Center
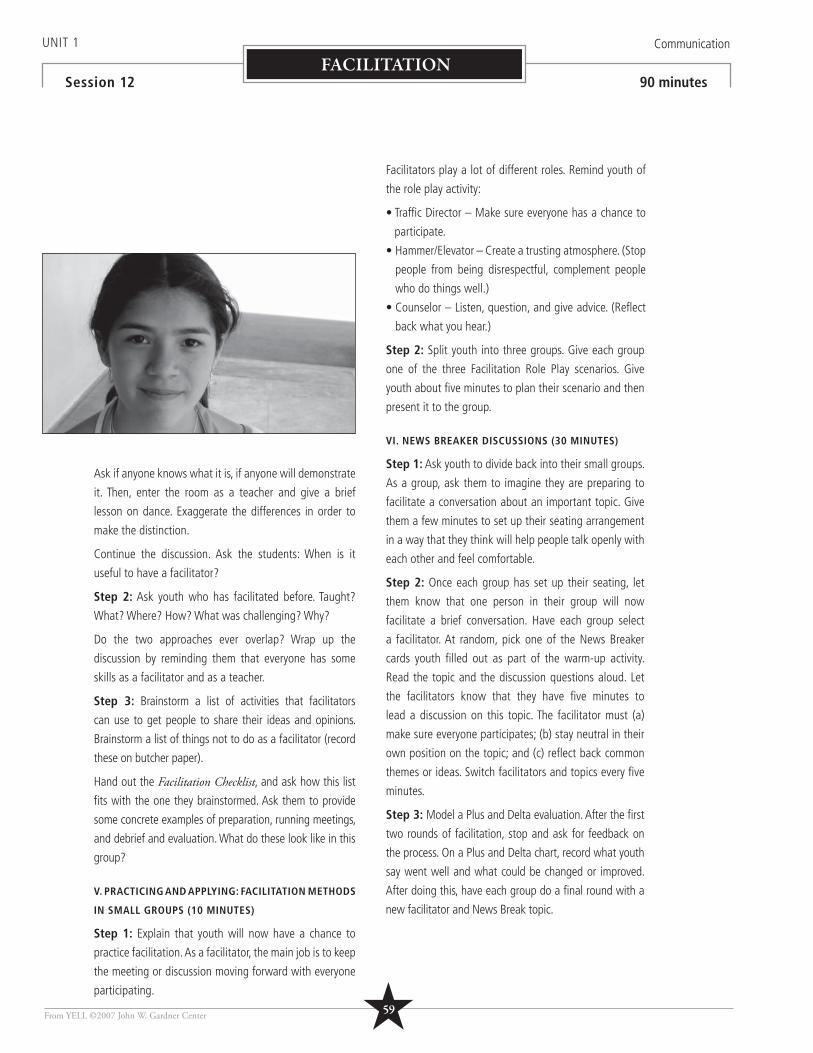
Ask if anyone knows what it is, if anyone will demonstrate
it. Then, enter the room as a teacher and give a brief
lesson on dance. Exaggerate the differences in order to
make the distinction.
Continue the discussion. Ask the students: When is it
useful to have a facilitator?
Step 2: Ask youth who has facilitated before. Taught?
What? Where? How? What was challenging? Why?
Do the two approaches ever overlap? Wrap up the
discussion by reminding them that everyone has some
skills as a facilitator and as a teacher.
Step 3: Brainstorm a list of activities that facilitators
can use to get people to share their ideas and opinions.
Brainstorm a list of things not to do as a facilitator (record
these on butcher paper).
Hand out the Facilitation Checklist, and ask how this list
fi ts with the one they brainstormed. Ask them to provide
some concrete examples of preparation, running meetings,
and debrief and evaluation. What do these look like in this
group?
V. PRACTICING AND APPLYING: FACILITATION METHODS
IN SMALL GROUPS (10 MINUTES)
Step 1: Explain that youth will now have a chance to
practice facilitation. As a facilitator, the main job is to keep
the meeting or discussion moving forward with everyone
participating.
Facilitators play a lot of different roles. Remind youth of
the role play activity:
• Traffi c Director – Make sure everyone has a chance to
participate.
• Hammer/Elevator – Create a trusting atmosphere. (Stop
people from being disrespectful, complement people
who do things well.)
• Counselor – Listen, question, and give advice. (Refl ect
back what you hear.)
Step 2: Split youth into three groups. Give each group
one of the three Facilitation Role Play scenarios. Give
youth about fi ve minutes to plan their scenario and then
present it to the group.
VI. NEWS BREAKER DISCUSSIONS (30 MINUTES)
Step 1: Ask youth to divide back into their small groups.
As a group, ask them to imagine they are preparing to
facilitate a conversation about an important topic. Give
them a few minutes to set up their seating arrangement
in a way that they think will help people talk openly with
each other and feel comfortable.
Step 2: Once each group has set up their seating, let
them know that one person in their group will now
facilitate a brief conversation. Have each group select
a facilitator. At random, pick one of the News Breaker
cards youth fi lled out as part of the warm-up activity.
Read the topic and the discussion questions aloud. Let
the facilitators know that they have fi ve minutes to
lead a discussion on this topic. The facilitator must (a)
make sure everyone participates; (b) stay neutral in their
own position on the topic; and (c) refl ect back common
themes or ideas. Switch facilitators and topics every fi ve
minutes.
Step 3: Model a Plus and Delta evaluation. After the fi rst
two rounds of facilitation, stop and ask for feedback on
the process. On a Plus and Delta chart, record what youth
say went well and what could be changed or improved.
After doing this, have each group do a fi nal round with a
new facilitator and News Break topic.
UNIT 1 Communication
Session 12 90 minutesFACILITATION
From YELL ©2007 John W. Gardner Center ★59

UNIT 1 Communication
Session 12 90 minutesFACILITATION
From YELL ©2007 John W. Gardner Center
VII. CLOSING: PLUS AND DELTA (10 MIN)
Let youth know that as the facilitator of this group, you want to
know what is going well and not so well in the program or project.
Ask them: What do you think is going well with the group? What
do you think could be better? Any specifi c ideas for how to improve
the program? Write their tips on butcher paper. Tell the students
that this sheet will be posted in the room at all times, and you
will work on incorporating changes that they suggest as much as
possible.
+ Δ WHAT WENT WELL (PLUS) THINGS TO CHANGE OR DO DIFFERENTLY (DELTA)______________________________________________________________________________________
★60

From YELL ©2007 John W. Gardner Center
NOTES
★61
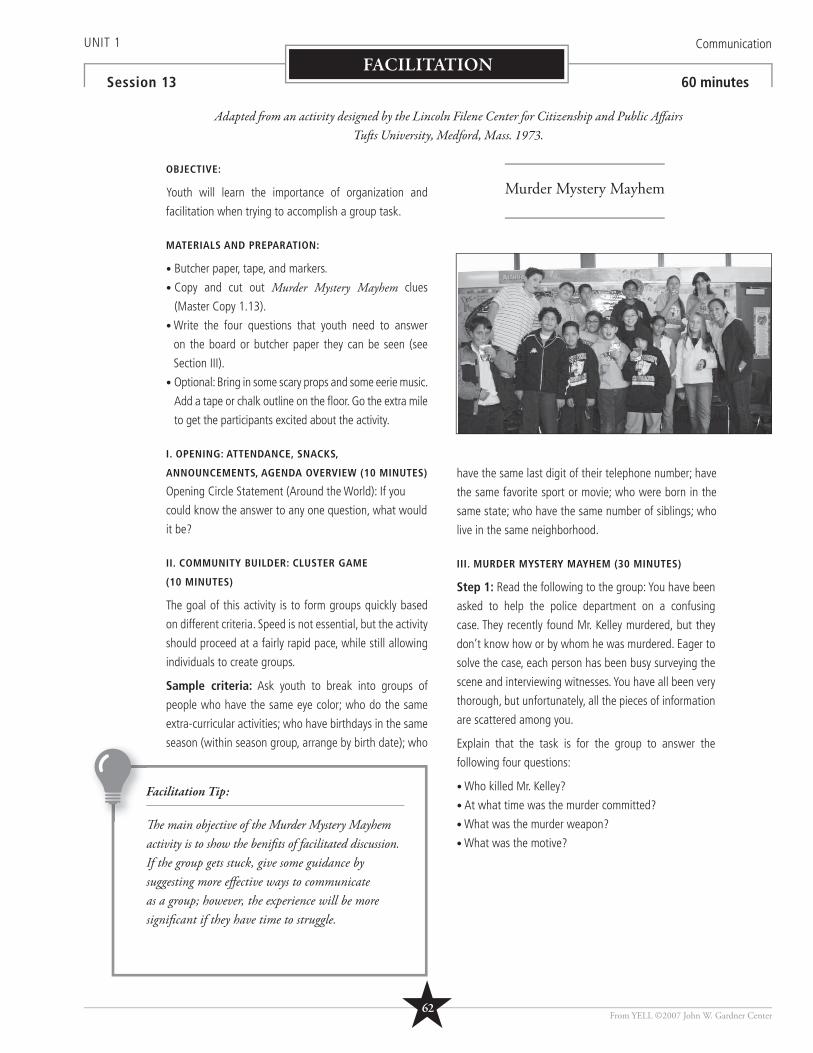
UNIT 1 Communication
Session 13 60 minutesFACILITATION
OBJECTIVE:
Youth will learn the importance of organization and
facilitation when trying to accomplish a group task.
MATERIALS AND PREPARATION:
• Butcher paper, tape, and markers.
• Copy and cut out Murder Mystery Mayhem clues
(Master Copy 1.13).
• Write the four questions that youth need to answer
on the board or butcher paper they can be seen (see
Section III).
• Optional: Bring in some scary props and some eerie music.
Add a tape or chalk outline on the fl oor. Go the extra mile
to get the participants excited about the activity.
I. OPENING: ATTENDANCE, SNACKS,
ANNOUNCEMENTS, AGENDA OVERVIEW (10 MINUTES)
Opening Circle Statement (Around the World): If you
could know the answer to any one question, what would
it be?
II. COMMUNITY BUILDER: CLUSTER GAME
(10 MINUTES)
The goal of this activity is to form groups quickly based
on different criteria. Speed is not essential, but the activity
should proceed at a fairly rapid pace, while still allowing
individuals to create groups.
Sample criteria: Ask youth to break into groups of
people who have the same eye color; who do the same
extra-curricular activities; who have birthdays in the same
season (within season group, arrange by birth date); who
have the same last digit of their telephone number; have
the same favorite sport or movie; who were born in the
same state; who have the same number of siblings; who
live in the same neighborhood.
III. MURDER MYSTERY MAYHEM (30 MINUTES)
Step 1: Read the following to the group: You have been
asked to help the police department on a confusing
case. They recently found Mr. Kelley murdered, but they
don’t know how or by whom he was murdered. Eager to
solve the case, each person has been busy surveying the
scene and interviewing witnesses. You have all been very
thorough, but unfortunately, all the pieces of information
are scattered among you.
Explain that the task is for the group to answer the
following four questions:
• Who killed Mr. Kelley?
• At what time was the murder committed?
• What was the murder weapon?
• What was the motive?
Facilitation Tip:
Th e main objective of the Murder Mystery Mayhem activity is to show the benifi ts of facilitated discussion. If the group gets stuck, give some guidance by suggesting more eff ective ways to communicate as a group; however, the experience will be more signifi cant if they have time to struggle.
Murder Mystery Mayhem
From YELL ©2007 John W. Gardner Center
Adapted fr om an activity designed by the Lincoln Filene Center for Citizenship and Public Aff airsTuft s University, Medford, Mass. 1973.
★62
Step 2: Explain that in order to complete this task, each
group member will get at least one clue. Participants can
share their information only by word of mouth. No one
is allowed to pass around their clues or read the clues of
other participants. Distribute the various clues evenly to
all participants. Remind them not to show one another
their clues. Then let them begin the activity.
Step 3: Discussion and debrief. When the group seems
to have some resolution, ask them to answer the four
questions. Then, use the following questions to discuss
the purpose of this activity:
Why do you think we did this activity? •
How was time lost getting organized? •
Was a leader needed? •
Did anyone assume this role? •
Did that work? •
Were all members involved in the task? •
Did anyone monopolize the discussion? •
How can we use this experience to improve future •
discussions?
IV. CLOSING: BENEFITS OF FACILITATION
(10 MINUTES)
Using what was learned from today’s activity, establish
group norms for facilitation and agenda setting.
What type of facilitation is needed? •
Does the group need a set facilitator? •
Who should set the agenda? •
When does it need to be set? •
Under what circumstances would we “throw out” •
or change the agenda?
Record these ideas on butcher paper.•
Answer:After receiving a superfi cial gunshot wound from Mr. Jones, Mr. Kelley went to Mr. Scott’s apartment where he was killed by Mr. Scott with a knife at 12:30 a.m. because Mr. Scott was in love with Mr. Kelley’s wife.
UNIT 1 Communication
Session 13 60 minutesFACILITATION
From YELL ©2007 John W. Gardner Center ★63
UNIT 1 Communication
Session 14 90 minutesFACILITATION
OBJECTIVE:
Youth will learn and practice strategies for addressing
challenges in group facilitation.
MATERIALS AND PREPARATION:
• Butcher paper, tape, and markers.
• Copy the Facilitation Challenges and Tips for Solutions (Master Copy 1.14a) before the session: one copy for
each participant.
• Copy A Process for Addressing Facilitation Challenges (Master Copy 1.14b) before the session: one copy for
each participant.
• Copy and cut out Facilitation Scenarios (Master Copy
1.14c) and Facilitation Scenario Roles (Master Copy
1.14d) and put the different roles in a hat or box for
youth to draw.
I. OPENING: ATTENDANCE, SNACKS,
ANNOUNCEMENTS, AGENDA OVERVIEW (15 MINUTES)
Opening Circle Statement (Around the World): Name
something that individuals or groups do that could
be challenging for a facilitator (e.g., side talking, text
messaging, talking all the time). Create a list on the board
or butcher paper as youth make suggestions.
II. WARM UP: SCRIBBLE DRAWING (10 MINUTES)
Give each person a piece of paper and marker and tell
them to scribble until you say to stop (about fi ve seconds).
Next, have them trade papers and have each participant
try to create a picture out of someone else’s scribble.
Debrief by discussing how each of them used their own
perspectives and creativity to create a positive change.
Stress the need for creative thinking and how something
that is initially nothing special (or a problem) can be
transformed into something interesting, useful, or even
beautiful.
III. FACILITATION CHALLENGES (60 MINUTES)
Step 1: Hand out and review the Facilitation Challenges and Tips for Solutions and A Process for Addressing Facilitation Challenges handouts. Go
through the challenges and ask youth for examples from
their experience. When have they seen (or personally
experienced) this challenge, and what did the group leader
do to address it? What are some positive strategies they
have seen? Not so positive? Which of these challenging
group behaviors do they personally exhibit? This question
can be used as a group refl ection: see if the group is
heavy in one or two particular challenge areas. Then
focus on these areas to support the group in working
together more effectively.
Facilitation Tip:
Enlist youth as “trainers”: Ask the person playing the challenging facilitator role to be as realistic as possible (not overly dramatic). Th is is a great way for the facilitator to get a sense of when their actions are eff ective.
Facilitation Challenges and Solutions
From YELL ©2007 John W. Gardner Center★64
Step 2: Explain that youth will now practice strategies for
addressing the challenges (staff should also participate).
Let youth know that different individuals will act as
facilitators, and others within the group will play certain
roles. After each role play the group will talk about what
worked best and what they could do better.
Step 3: Role play. Ask for a volunteer to be the fi rst
facilitator. Give this person a copy of the fi rst Facilitation Scenario and send them out of the room to review the
scenario and prepare. While the facilitator is out of
the room, have one to three people in the group draw
Facilitation Scenario Roles to play during the exercise.
They will act out these roles so the facilitator can practice.
Debrief: Stop the role play and ask for feedback and ideas
for solutions. Remember to use the “bracket technique”
of positive feedback: Start and end on a positive! Ask if
there are roles that group members can play to address
facilitation challenges. What are some things other group
members can do to support the facilitator?
Step 4: Repeat this process for the remaining scenarios.
If you have a large group, you can make up additional
scenarios so that more youth have an opportunity to
practice. You can also revisit the scenarios from Session
12 (see Master 1.12b) to provide an opportunity to
incorporate new skills and understandings.
IV. CLOSING (5 MINUTES)
Closing Circle Statement (Around the World): What is the
most diffi cult facilitation challenge for you to address?
Facilitation Tip:
In the role plays, help the facilitator recognize and address challenging behaviors. For example, if the facilitator is struggling, you can call “freeze” and ask the group for some strategies the facilitator could use. If your group has limited experience with facilitation, you may want to start with smaller groups (divide the group in half, for example), and one challenging role at a time.
UNIT 1 Communication
Session 14 90 minutesFACILITATION
From YELL ©2007 John W. Gardner Center ★65
UNIT 1 Communication
Session 15 90 minutesFACILITATION
OBJECTIVE:
Youth will identify and practice effective strategies for
addressing challenges in group facilitation and leadership.
MATERIALS AND PREPARATION:
• Optional: tarp, rope, or small platform for the Community
Builder.
• Copy Situational Leadership (Master Copy 1.15a) before
the session: one copy for each participant.
• Copy and cut out Situational Leadership Role Plays (Master Copy 1.15b).
I. OPENING: ATTENDANCE, SNACKS,
ANNOUNCEMENTS, AGENDA OVERVIEW
(10 MINUTES)
Opening Circle Statement (Around the World): What do
you want to work on (one goal for growth or change)?
II. COMMUNITY BUILDER: ALL ABOARD! (15 MINUTES)
This activity requires working together in close proximity
to solve a practical, physical problem. It emphasizes group
communication, cooperation, patience, and problem
solving strategies, as well as issues related to physical
self and physical proximity. Ask the whole group to try
to fi t inside a small area, which can be marked by a small
platform, a circle of rope, or a tarp. When the group
succeeds, decrease the area (e.g., change platforms, shrink
the circle, or fold the tarp) and challenge the group again.
How far can the group go? Cautions: Obviously people
are going to need to feel physically comfortable in order
to get close and be supportive of one another. Variation:
Tarp Flip Over. With a group standing on a tarp, challenge
them to turn the tarp over without anyone touching the
ground in the process.
III. SITUATIONAL LEADERSHIP ROLE PLAY
(60 MINUTES)
Step 1: Review the Situational Leadership handout.
Ask youth to come up with an example of each type of
leadership. Which style is most familiar to them? Are there
styles with which they are more or less comfortable?
What style do they see the most of in (a) classrooms,
(b) sports teams, (c) peer groups, or in other settings?
Step 2: Divide the group into fi ve small teams and
give each team one of the Situational Leadership Role Play scenarios. Ask teams to come up with a skit that
demonstrates the challenge outlined in the role play and
a solution for handling the challenge. Have observes
identify which leadership style – or combination of styles
– the solution involves.
Step 3: Debrief after each role play scenario. Ask for
additional solutions. Have any of them experienced this
sort of situation? What happened? What could have
been done differently? How are different leadership
styles used in this group or program? What styles do you
see at work in a typical session?
IV. CLOSING (5 MINUTES)
Closing Circle Statement (Around the World): Complete
the statement, “A leader is someone who...”
Exploring Situational Leadership
From YELL ©2007 John W. Gardner Center★66
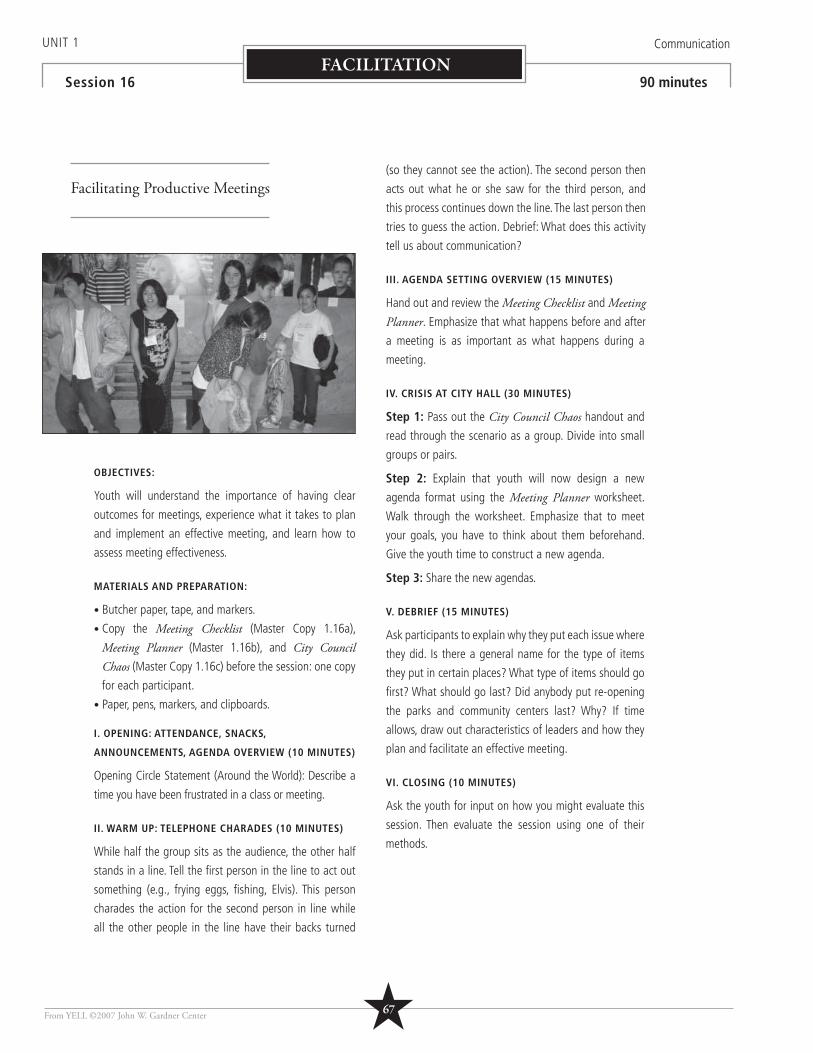
OBJECTIVES:
Youth will understand the importance of having clear
outcomes for meetings, experience what it takes to plan
and implement an effective meeting, and learn how to
assess meeting effectiveness.
MATERIALS AND PREPARATION:
• Butcher paper, tape, and markers.
• Copy the Meeting Checklist (Master Copy 1.16a),
Meeting Planner (Master 1.16b), and City Council Chaos (Master Copy 1.16c) before the session: one copy
for each participant.
• Paper, pens, markers, and clipboards.
I. OPENING: ATTENDANCE, SNACKS,
ANNOUNCEMENTS, AGENDA OVERVIEW (10 MINUTES)
Opening Circle Statement (Around the World): Describe a
time you have been frustrated in a class or meeting.
II. WARM UP: TELEPHONE CHARADES (10 MINUTES)
While half the group sits as the audience, the other half
stands in a line. Tell the fi rst person in the line to act out
something (e.g., frying eggs, fi shing, Elvis). This person
charades the action for the second person in line while
all the other people in the line have their backs turned
(so they cannot see the action). The second person then
acts out what he or she saw for the third person, and
this process continues down the line. The last person then
tries to guess the action. Debrief: What does this activity
tell us about communication?
III. AGENDA SETTING OVERVIEW (15 MINUTES)
Hand out and review the Meeting Checklist and Meeting Planner. Emphasize that what happens before and after
a meeting is as important as what happens during a
meeting.
IV. CRISIS AT CITY HALL (30 MINUTES)
Step 1: Pass out the City Council Chaos handout and
read through the scenario as a group. Divide into small
groups or pairs.
Step 2: Explain that youth will now design a new
agenda format using the Meeting Planner worksheet.
Walk through the worksheet. Emphasize that to meet
your goals, you have to think about them beforehand.
Give the youth time to construct a new agenda.
Step 3: Share the new agendas.
V. DEBRIEF (15 MINUTES)
Ask participants to explain why they put each issue where
they did. Is there a general name for the type of items
they put in certain places? What type of items should go
fi rst? What should go last? Did anybody put re-opening
the parks and community centers last? Why? If time
allows, draw out characteristics of leaders and how they
plan and facilitate an effective meeting.
VI. CLOSING (10 MINUTES)
Ask the youth for input on how you might evaluate this
session. Then evaluate the session using one of their
methods.
UNIT 1 Communication
Session 16 90 minutesFACILITATION
From YELL ©2007 John W. Gardner Center
Facilitating Productive Meetings
★67
From YELL ©2007 John W. Gardner Center
UNIT 1 Communication
TABLE OF CONTENTS
Unit 1 Master Copies
SESSION 1Active Listening Guidelines: Group Handout 1.1a.......................................................................................69Confi dentiality Guidelines: Group Handout 1.1b ........................................................................................70Feeling Bag: Facilitator Copy and Cut 1.1c .................................................................................................71
SESSION 2 Earthquake Activity Dialogue: Facilitator Copy and Cut 1.2a ..........................................................................72Earthquake Activity Action Steps: Group Handout 1.2b ..............................................................................74
SESSION 3 Fish Bowl Discussion Scenarios: Facilitator Copy and Cut 1.3 .....................................................................75
SESSION 4None
SESSION 5Agreement Setting: Rights and Responsibilities: Facilitator Example 1.5a ....................................................................76Agreement Setting: Rights and Responsibilities: Group Handout 1.5b ........................................................................77
SESSION 6Optional: Fish Bowl Discussion Scenarios: Facilitator Copy and Cut 1.3 (use again) .....................................75
SESSION 7Forms of Decision Making: Facilitator Example 1.7a ...................................................................................78Forms of Decision Making: Group Handout 1.7b ........................................................................................79
SESSION 8
Bad Presentation Role Play: Facilitator Copy and Cut 1.8a .........................................................................80Presentation Skills Check List: Group Handout 1.8b ...................................................................................81Ten Tips for a Good Presentation: Group Handout 1.8c ..............................................................................82Personal Coaching and Feedback: Group Handout 1.8d .............................................................................83
SESSION 9 None
SESSION 10 Wizard’s Wand: The Debate: Group Handout 1.10a ....................................................................................84Role Play: Debate and Compromise: Facilitator Copy and Cut 1.10b ......................................................85
SESSION 11 Mock City Council Proposal and Presentation Participant Roles: Facilitator Copy and Cut 1.11 ....................86
SESSION 12 Facilitation Role Play: Facilitator Copy and Cut 1.12a) ...............................................................................88Facilitation Checklist: Group Handout 1.12b...............................................................................................89
SESSION 13 Murder Mystery Mayhem: Facilitator Copy and Cut 1.13 ...........................................................................90
SESSION 14
Facilitation Challenges and Tips for Solutions: Group Handout 1.14a ..........................................................91A Process for Addressing Facilitation Challenges: Group Handout 1.14b .....................................................93Facilitation Scenarios: Facilitator Copy and Cut 1.14c .................................................................................94Facilitation Roles: Facilitator Copy and Cut 1.14d ......................................................................................95
SESSION 15Situational Leadership: Group Handout 1.15a ..........................................................................................96Role Plays: Situational Leadership: Facilitator Copy and Cut 1.15b ............................................................97
SESSION 16Meeting Check List: Group Handout 1.16a ................................................................................................98Meeting Planner: Group Handout 1.16b ...................................................................................................99City Council Chaos: Group Handout 1.16c................................................................................................100
★68
1.1a
Active Listening Guidelines
From YELL ©2007 John W. Gardner Center
• Empathize. Put yourself in the other person’s place to understand what that person is saying and how he or she feels.
• Be attentive. Make an effort to listen carefully. Don’t daydream or talk when someone else is talking.
• Show understanding and acceptance by nonverbal behaviors. • Tone of voice • Facial expressions • Gestures • Eye contact • Posture
• Refl ect back the person’s most important thoughts and feelings. Try to do this in your own words. Paraphrase or restate while being careful to say only what you heard.
• Do not interrupt, offer advice, or give suggestions. Do not bring up similar feelings and problems from your own experience. Leave out your personal emotions, disagreements, opinions, and other feedback (unless you are asked for it).
• Remain neutral. Don’t take sides.
• Ask open-ended questions. Ask for clarifi cation but be polite and respectful. For example, ask “Can you say more about that?” or “What did you mean when you said…?”
★69
Confi dentiality Guidelines
1.1b
WHEN SHOULD YOU SHARE PRIVATE INFORMATION?
If someone is or tells you they are…
• Being hurt by someone else. • Going to hurt someone else. • Going to hurt himself or herself.
IF THIS HAPPENS, PLEASE TALK TO YOUR PROGRAM COORDINATOR OR TEACHER IMMEDIATELY.
Adults working in schools and youth-serving organizations are required by law to report if they heard about
any of these three situations. They need to make sure the person is getting the help he or she needs to stay
healthy and safe.
From YELL ©2007 John W. Gardner Center
Adapted from a resource by Samira Soleimanpour, MPH ~ School-Based Health Center Student Research Project of the Institute for Health Policy Studies ~ University of California, San Francisco
“WHAT IS SAID HERE STAYS HERE.”
Confi dentiality means that anything you learn about another person must be kept private and not shared with others. If
confi dentiality is “broken” people can be hurt or embarrassed. You must not share an individual’s thoughts, feelings, or
experiences that they tell you or personal information you learn during your project.
WHAT INFORMATION MUST BE KEPT CONFIDENTIAL?
1. Information that your team members share with you. You may share personal information with your fellow team members.
You want your privacy to be respected and must respect the privacy of others as well.
• For example: You are doing an Active Listening exercise, and your partner shares
that she has been receiving counseling services through the school health center.
This is personal information that your partner felt comfortable sharing with you,
but it should not be shared with others.
2. Information you gather through your research. You might be collecting surveys or conducting interviews or focus groups for
your research topics. In these cases, rules of confi dentiality also apply.
• For example: Sometimes in focus group discussions or interviews, people will
share experiences they have had but do not want anyone to know that the
information came from them. It is important to keep what is shared in these
discussions confi dential and never share the identity of the person who gave
you this information. When reporting any results, you should always refer to
general terms, such as, “One female respondent said…”
★70
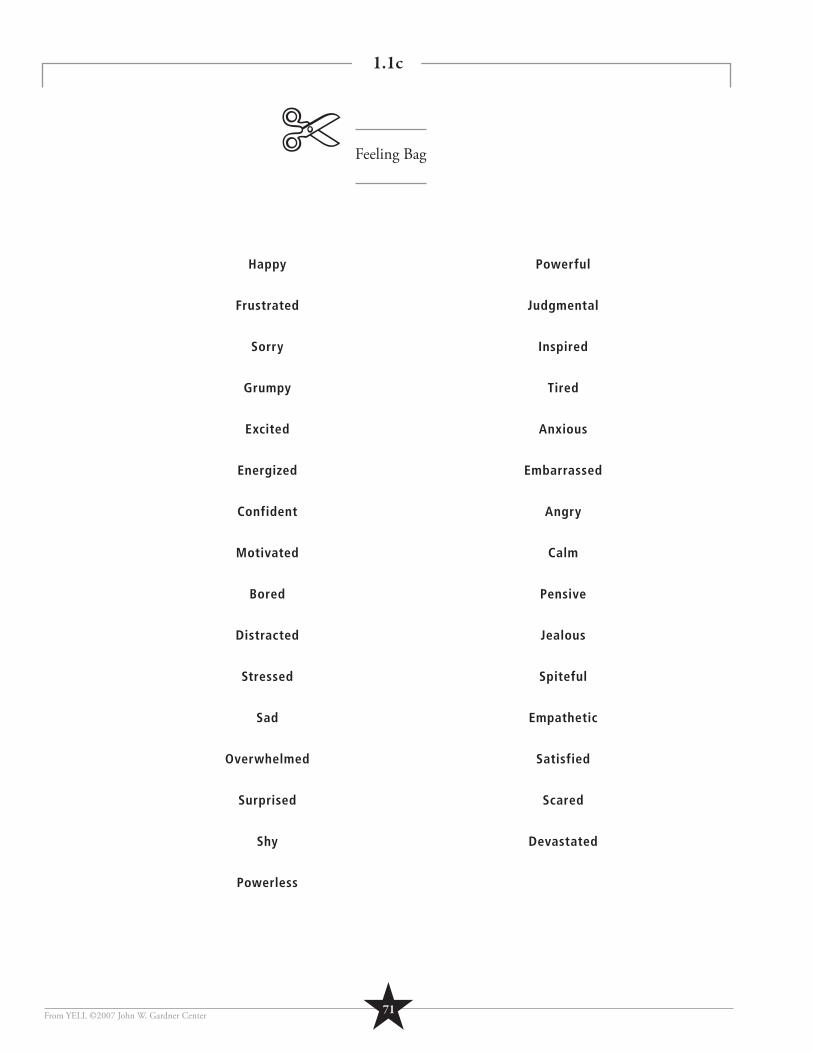
1.1c
Feeling Bag
From YELL ©2007 John W. Gardner Center
Happy
Frustrated
Sorry
Grumpy
Excited
Energized
Confident
Motivated
Bored
Distracted
Stressed
Sad
Overwhelmed
Surprised
Shy
Powerless
Powerful
Judgmental
Inspired
Tired
Anxious
Embarrassed
Angry
Calm
Pensive
Jealous
Spiteful
Empathetic
Satisfied
Scared
Devastated
✄
★71
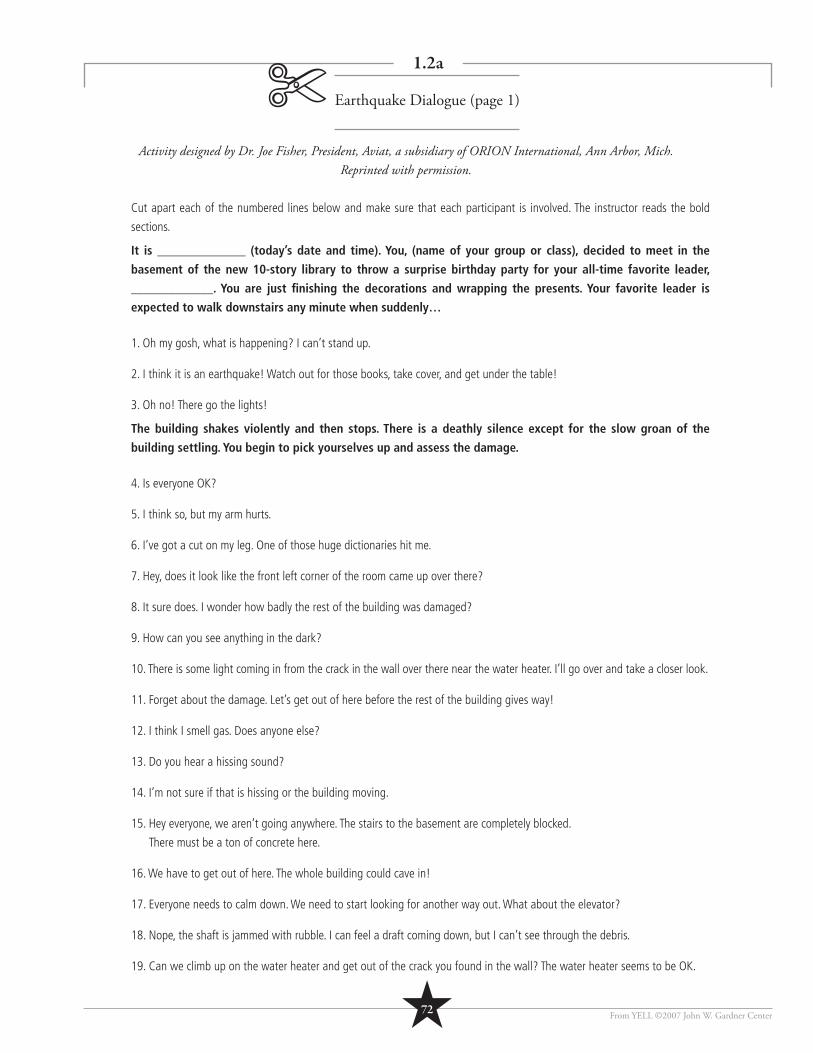
1.2a
From YELL ©2007 John W. Gardner Center
Activity designed by Dr. Joe Fisher, President, Aviat, a subsidiary of ORION International, Ann Arbor, Mich. Reprinted with permission.
Cut apart each of the numbered lines below and make sure that each participant is involved. The instructor reads the bold
sections.
It is ______________ (today’s date and time). You, (name of your group or class), decided to meet in the
basement of the new 10-story library to throw a surprise birthday party for your all-time favorite leader,
_____________. You are just fi nishing the decorations and wrapping the presents. Your favorite leader is
expected to walk downstairs any minute when suddenly…
1. Oh my gosh, what is happening? I can’t stand up.
2. I think it is an earthquake! Watch out for those books, take cover, and get under the table!
3. Oh no! There go the lights!
The building shakes violently and then stops. There is a deathly silence except for the slow groan of the
building settling. You begin to pick yourselves up and assess the damage.
4. Is everyone OK?
5. I think so, but my arm hurts.
6. I’ve got a cut on my leg. One of those huge dictionaries hit me.
7. Hey, does it look like the front left corner of the room came up over there?
8. It sure does. I wonder how badly the rest of the building was damaged?
9. How can you see anything in the dark?
10. There is some light coming in from the crack in the wall over there near the water heater. I’ll go over and take a closer look.
11. Forget about the damage. Let’s get out of here before the rest of the building gives way!
12. I think I smell gas. Does anyone else?
13. Do you hear a hissing sound?
14. I’m not sure if that is hissing or the building moving.
15. Hey everyone, we aren’t going anywhere. The stairs to the basement are completely blocked.
There must be a ton of concrete here.
16. We have to get out of here. The whole building could cave in!
17. Everyone needs to calm down. We need to start looking for another way out. What about the elevator?
18. Nope, the shaft is jammed with rubble. I can feel a draft coming down, but I can’t see through the debris.
19. Can we climb up on the water heater and get out of the crack you found in the wall? The water heater seems to be OK.
Earthquake Dialogue (page 1)✄
★72
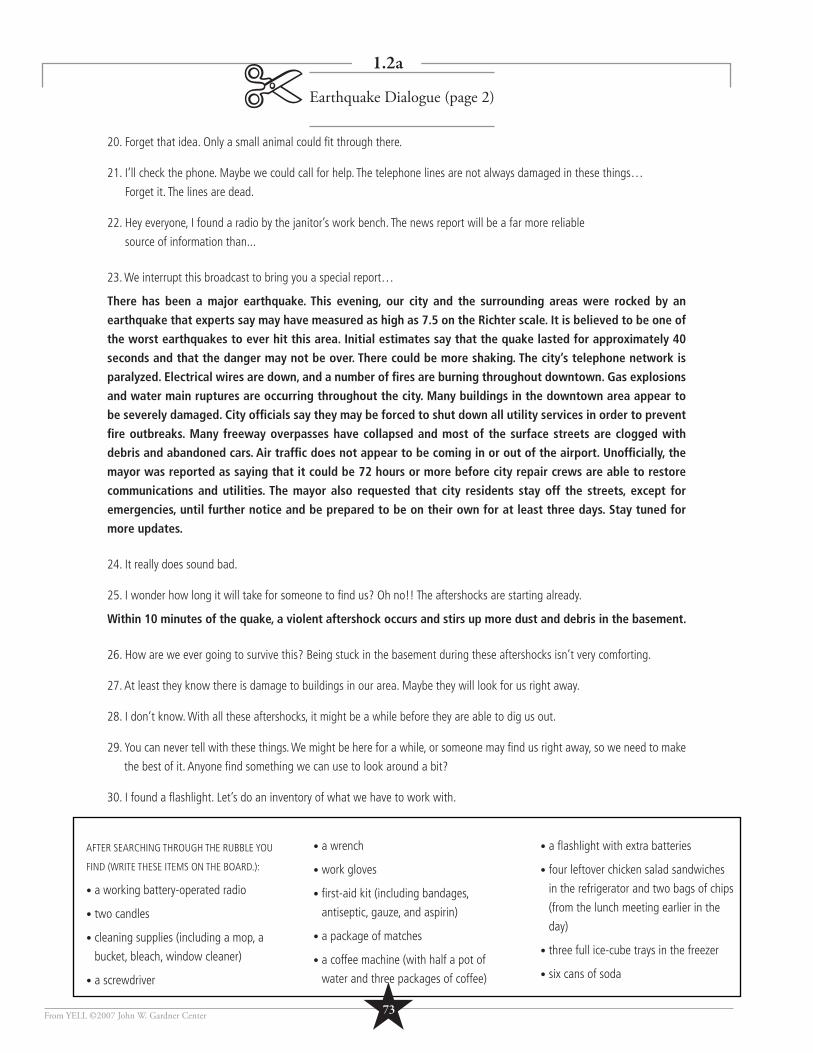
1.2a
Earthquake Dialogue (page 2)
From YELL ©2007 John W. Gardner Center
20. Forget that idea. Only a small animal could fi t through there.
21. I’ll check the phone. Maybe we could call for help. The telephone lines are not always damaged in these things…
Forget it. The lines are dead.
22. Hey everyone, I found a radio by the janitor’s work bench. The news report will be a far more reliable
source of information than...
23. We interrupt this broadcast to bring you a special report…
There has been a major earthquake. This evening, our city and the surrounding areas were rocked by an
earthquake that experts say may have measured as high as 7.5 on the Richter scale. It is believed to be one of
the worst earthquakes to ever hit this area. Initial estimates say that the quake lasted for approximately 40
seconds and that the danger may not be over. There could be more shaking. The city’s telephone network is
paralyzed. Electrical wires are down, and a number of fi res are burning throughout downtown. Gas explosions
and water main ruptures are occurring throughout the city. Many buildings in the downtown area appear to
be severely damaged. City offi cials say they may be forced to shut down all utility services in order to prevent
fi re outbreaks. Many freeway overpasses have collapsed and most of the surface streets are clogged with
debris and abandoned cars. Air traffi c does not appear to be coming in or out of the airport. Unoffi cially, the
mayor was reported as saying that it could be 72 hours or more before city repair crews are able to restore
communications and utilities. The mayor also requested that city residents stay off the streets, except for
emergencies, until further notice and be prepared to be on their own for at least three days. Stay tuned for
more updates.
24. It really does sound bad.
25. I wonder how long it will take for someone to fi nd us? Oh no!! The aftershocks are starting already.
Within 10 minutes of the quake, a violent aftershock occurs and stirs up more dust and debris in the basement.
26. How are we ever going to survive this? Being stuck in the basement during these aftershocks isn’t very comforting.
27. At least they know there is damage to buildings in our area. Maybe they will look for us right away.
28. I don’t know. With all these aftershocks, it might be a while before they are able to dig us out.
29. You can never tell with these things. We might be here for a while, or someone may fi nd us right away, so we need to make
the best of it. Anyone fi nd something we can use to look around a bit?
30. I found a fl ashlight. Let’s do an inventory of what we have to work with.
AFTER SEARCHING THROUGH THE RUBBLE YOU
FIND (WRITE THESE ITEMS ON THE BOARD.):
• a working battery-operated radio
• two candles
• cleaning supplies (including a mop, a
bucket, bleach, window cleaner)
• a screwdriver
• a wrench
• work gloves
• fi rst-aid kit (including bandages,
antiseptic, gauze, and aspirin)
• a package of matches
• a coffee machine (with half a pot of
water and three packages of coffee)
• a fl ashlight with extra batteries
• four leftover chicken salad sandwiches
in the refrigerator and two bags of chips
(from the lunch meeting earlier in the
day)
• three full ice-cube trays in the freezer
• six cans of soda
✄
★73
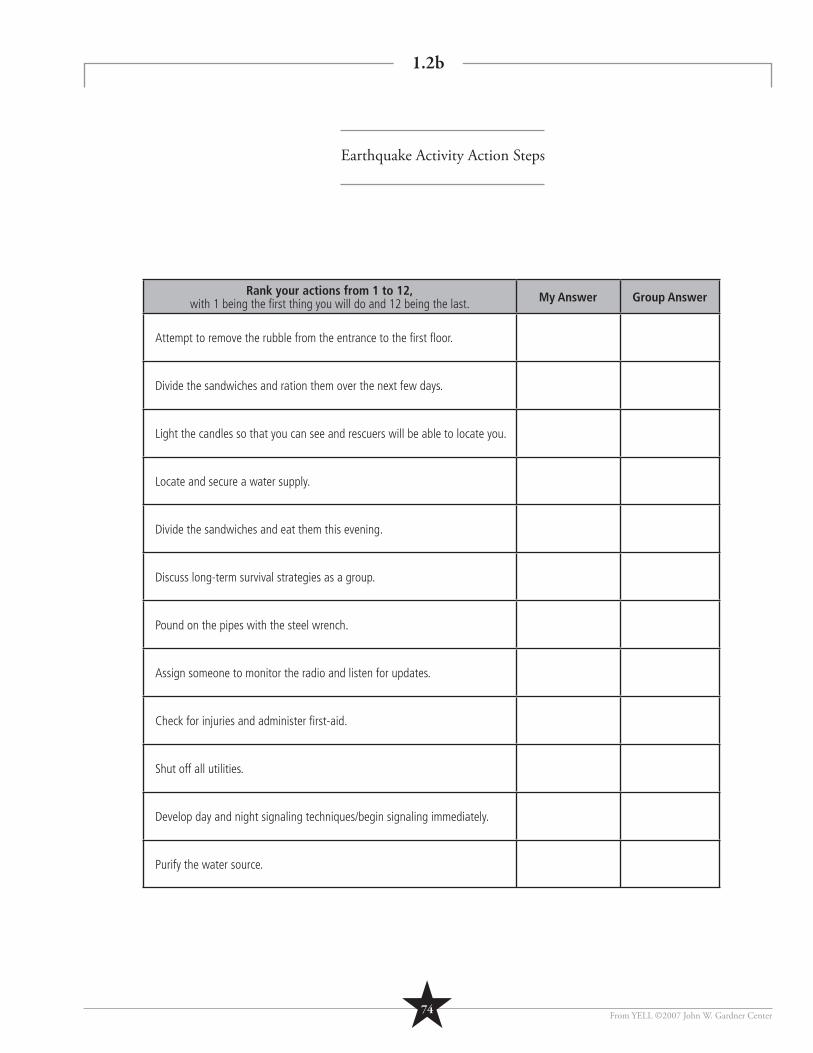
1.2b
Earthquake Activity Action Steps
From YELL ©2007 John W. Gardner Center
Rank your actions from 1 to 12, with 1 being the fi rst thing you will do and 12 being the last. My Answer Group Answer
Attempt to remove the rubble from the entrance to the fi rst fl oor.
Divide the sandwiches and ration them over the next few days.
Light the candles so that you can see and rescuers will be able to locate you.
Locate and secure a water supply.
Divide the sandwiches and eat them this evening.
Discuss long-term survival strategies as a group.
Pound on the pipes with the steel wrench.
Assign someone to monitor the radio and listen for updates.
Check for injuries and administer fi rst-aid.
Shut off all utilities.
Develop day and night signaling techniques/begin signaling immediately.
Purify the water source.
★74
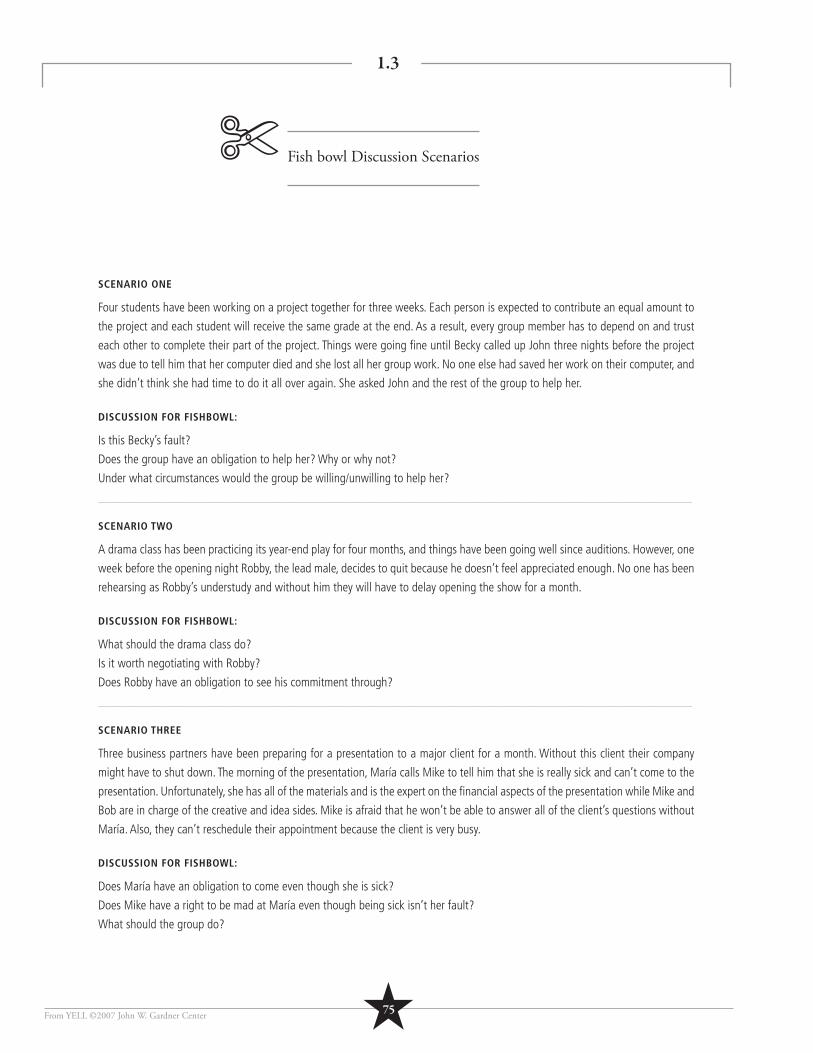
Fish bowl Discussion Scenarios
1.3
From YELL ©2007 John W. Gardner Center
SCENARIO ONE
Four students have been working on a project together for three weeks. Each person is expected to contribute an equal amount to
the project and each student will receive the same grade at the end. As a result, every group member has to depend on and trust
each other to complete their part of the project. Things were going fi ne until Becky called up John three nights before the project
was due to tell him that her computer died and she lost all her group work. No one else had saved her work on their computer, and
she didn’t think she had time to do it all over again. She asked John and the rest of the group to help her.
DISCUSSION FOR FISHBOWL:
Is this Becky’s fault?
Does the group have an obligation to help her? Why or why not?
Under what circumstances would the group be willing/unwilling to help her?
______________________________________________________________________________________________
SCENARIO TWO
A drama class has been practicing its year-end play for four months, and things have been going well since auditions. However, one
week before the opening night Robby, the lead male, decides to quit because he doesn’t feel appreciated enough. No one has been
rehearsing as Robby’s understudy and without him they will have to delay opening the show for a month.
DISCUSSION FOR FISHBOWL:
What should the drama class do?
Is it worth negotiating with Robby?
Does Robby have an obligation to see his commitment through?
______________________________________________________________________________________________
SCENARIO THREE
Three business partners have been preparing for a presentation to a major client for a month. Without this client their company
might have to shut down. The morning of the presentation, María calls Mike to tell him that she is really sick and can’t come to the
presentation. Unfortunately, she has all of the materials and is the expert on the fi nancial aspects of the presentation while Mike and
Bob are in charge of the creative and idea sides. Mike is afraid that he won’t be able to answer all of the client’s questions without
María. Also, they can’t reschedule their appointment because the client is very busy.
DISCUSSION FOR FISHBOWL:
Does María have an obligation to come even though she is sick?
Does Mike have a right to be mad at María even though being sick isn’t her fault?
What should the group do?
✄
★75
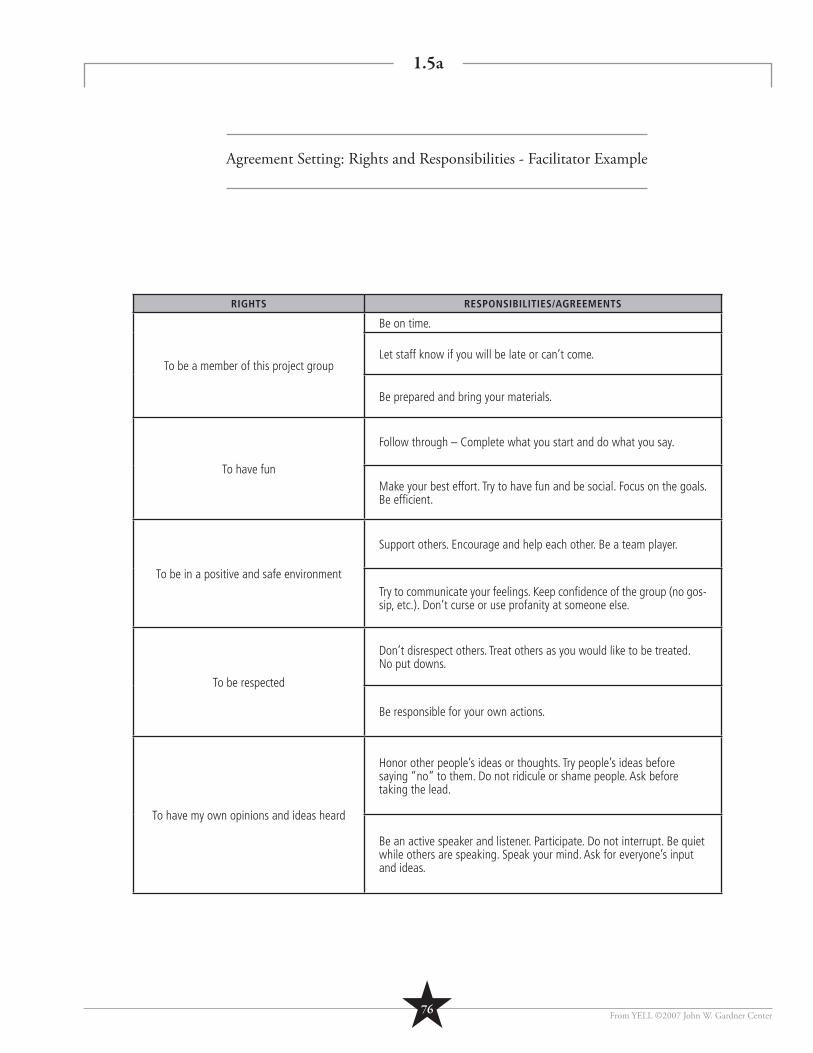
1.5a
Agreement Setting: Rights and Responsibilities - Facilitator Example
From YELL ©2007 John W. Gardner Center
RIGHTS RESPONSIBILITIES/AGREEMENTS
To be a member of this project group
Be on time.
Let staff know if you will be late or can’t come.
Be prepared and bring your materials.
To have fun
Follow through – Complete what you start and do what you say.
Make your best effort. Try to have fun and be social. Focus on the goals. Be effi cient.
To be in a positive and safe environment
Support others. Encourage and help each other. Be a team player.
Try to communicate your feelings. Keep confi dence of the group (no gos-sip, etc.). Don’t curse or use profanity at someone else.
To be respected
Don’t disrespect others. Treat others as you would like to be treated. No put downs.
Be responsible for your own actions.
To have my own opinions and ideas heard
Honor other people’s ideas or thoughts. Try people’s ideas before saying “no” to them. Do not ridicule or shame people. Ask before taking the lead.
Be an active speaker and listener. Participate. Do not interrupt. Be quiet while others are speaking. Speak your mind. Ask for everyone’s input and ideas.
★76
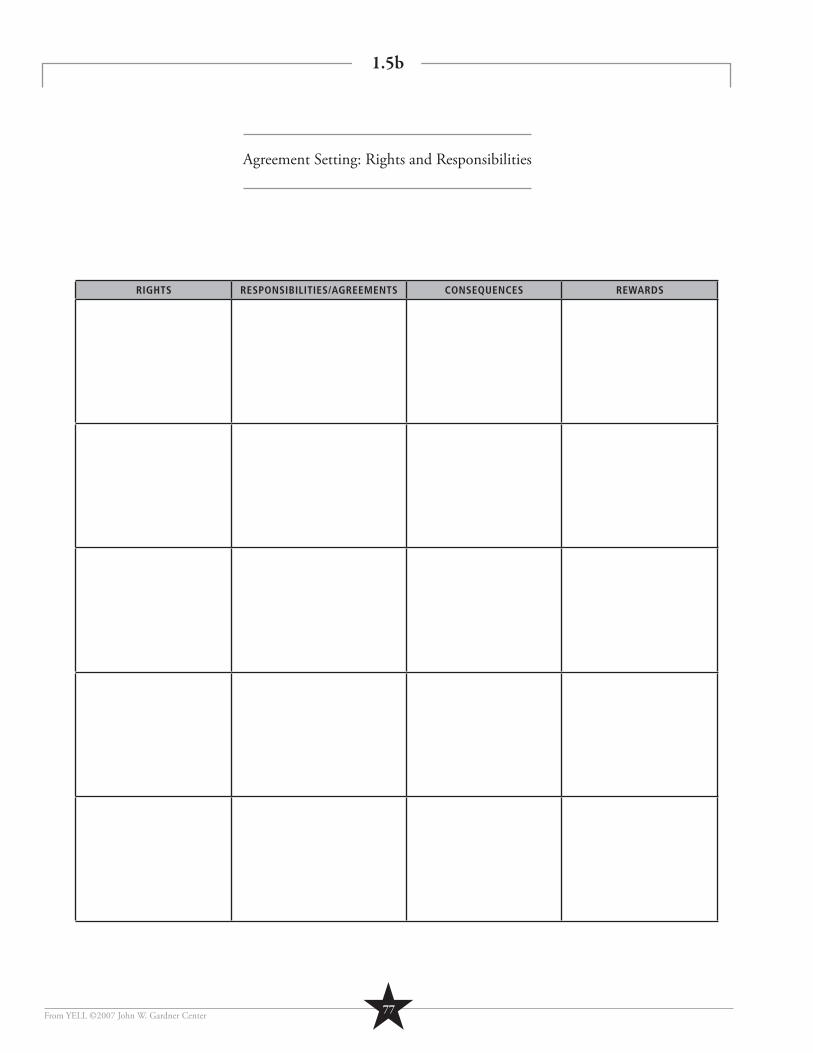
1.5b
From YELL ©2007 John W. Gardner Center
RIGHTS RESPONSIBILITIES/AGREEMENTS CONSEQUENCES REWARDS
Agreement Setting: Rights and Responsibilities
★77

1.7a
Forms of Decision Making - Example
From YELL ©2007 John W. Gardner Center
DECISION STYLE PROS CONS
Individual (Autocratic)
One person decides
Decisions are swift.
Requires no consultation.
Everyone knows who is responsiblefor the decision.
Might not be the best decision.
Might arise only from what the individual knows or is most comfortable with.
Action might not be agreeable to most or even any.
Most will not feel deeply committed to the decision unless they are deeply committed to the individual.
Representative
One person (or a small group)
receives advice from others
and makes decisions that
impact everyone.
Decisions are swift.
More ideas expand possibilities.
Those consulted might feel pressure from the decision maker(s).
Might not be the wisest decision.
Action might not be agreeable to most or even any.
Some points of view are not heard.
Most will not feel deeply committed to the decision unless they are deeply committed to the individual or group.
Majority (Democratic)
An issue is widely discussed,
but the majority rules the
decision-making process;
voting.
Can be used with small and large groups.
Most people are familiar and comfortable with this process.
Everyone has a voice initially, if they use it; many points of view are heard.
Individuals feel a sense of equality.
A win-or-lose mentality can develop.
There may be a lack of commitment by those who fought for a different position.
Issues become personal, based on who has supported whom, rather than who believes in what.
People tend to look at traditional alternatives when using traditional methods.
Consensus
An issue is widely discussed
and everyone agrees that the
decision is acceptable.
More opinions and perspectives are aired.
Individuals feel a sense of equality.
Promotes synthesis of ideas.
Elicits broader commitment.
Can prompt further education about a topic.
Can take a lot of time.
Requires members to be mature about carrying out ideas that didn’t rank fi rst on their list.
Progress can be blocked by one person.
Diffi cult in large groups.
When new members join they must learn to trust the group and the process.
★78

1.7b
Forms of Decision Making
From YELL ©2007 John W. Gardner Center
DECISION STYLE PROS CONS EXAMPLE
Individual (Autocrat)
One person decides.
Representative
One person (or a small group
of people) receives advice from
others and makes decisions
that impact everyone.
Majority (Democratic)
An issue is widely discussed, but
the majority rules the decision-
making process; voting.
Consensus
An issue is widely discussed
and everyone agrees that deci-
sion is acceptable.
★79
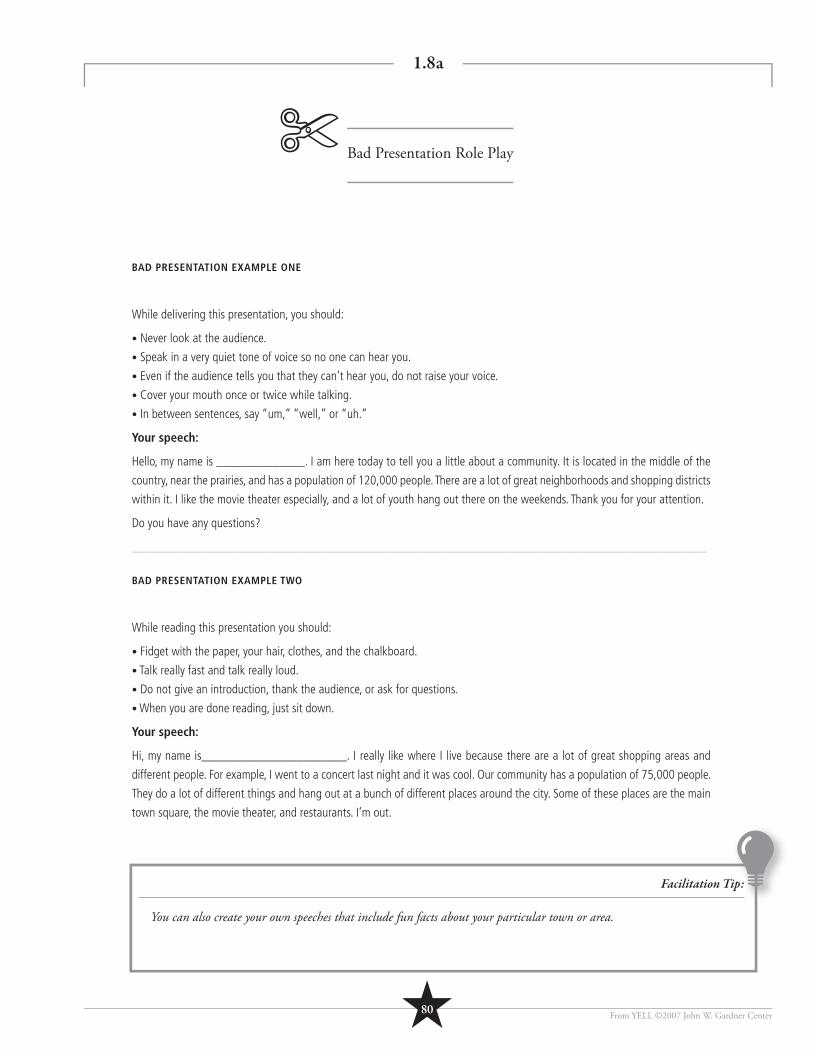
1.8a
Bad Presentation Role Play
From YELL ©2007 John W. Gardner Center
BAD PRESENTATION EXAMPLE ONE
While delivering this presentation, you should:
• Never look at the audience.
• Speak in a very quiet tone of voice so no one can hear you.
• Even if the audience tells you that they can’t hear you, do not raise your voice.
• Cover your mouth once or twice while talking.
• In between sentences, say “um,” “well,” or “uh.”
Your speech:
Hello, my name is ______________. I am here today to tell you a little about a community. It is located in the middle of the
country, near the prairies, and has a population of 120,000 people. There are a lot of great neighborhoods and shopping districts
within it. I like the movie theater especially, and a lot of youth hang out there on the weekends. Thank you for your attention.
Do you have any questions?
___________________________________________________________________________________________
BAD PRESENTATION EXAMPLE TWO
While reading this presentation you should:
• Fidget with the paper, your hair, clothes, and the chalkboard.
• Talk really fast and talk really loud.
• Do not give an introduction, thank the audience, or ask for questions.
• When you are done reading, just sit down.
Your speech:
Hi, my name is_______________________. I really like where I live because there are a lot of great shopping areas and
different people. For example, I went to a concert last night and it was cool. Our community has a population of 75,000 people.
They do a lot of different things and hang out at a bunch of different places around the city. Some of these places are the main
town square, the movie theater, and restaurants. I’m out.
✄
Facilitation Tip:
You can also create your own speeches that include fun facts about your particular town or area.
★80
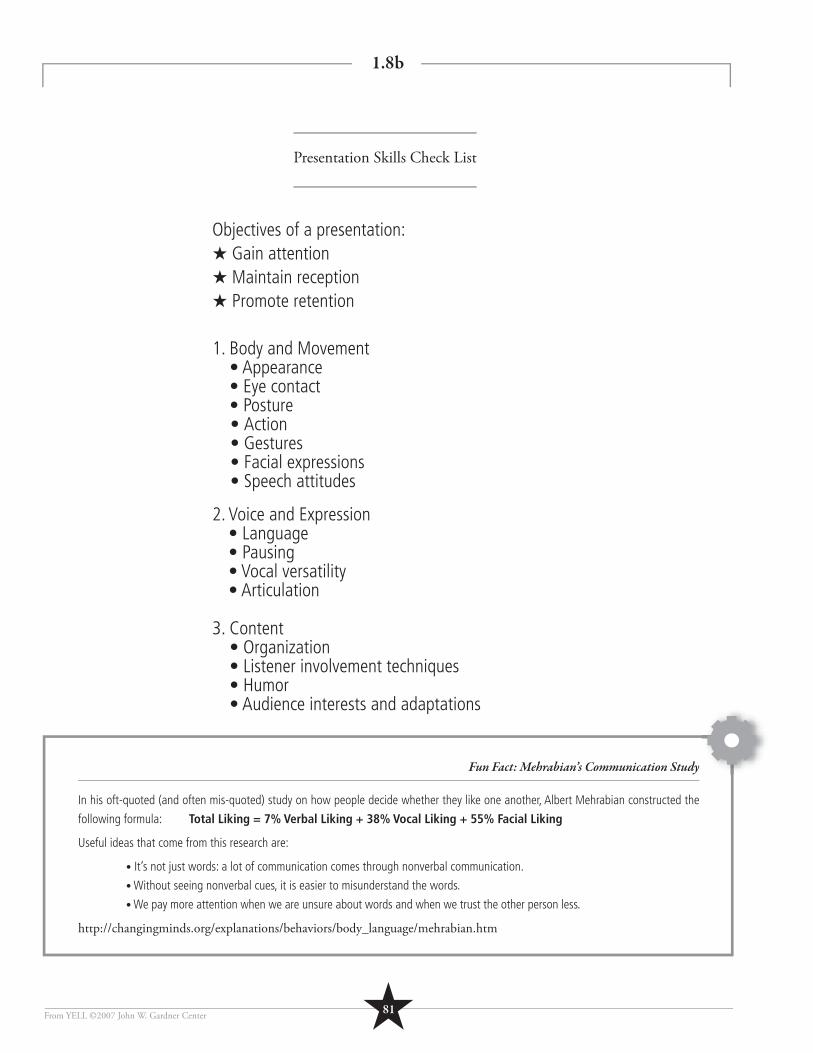
Presentation Skills Check List
1.8b
From YELL ©2007 John W. Gardner Center
Objectives of a presentation: ★ Gain attention ★ Maintain reception★ Promote retention
1. Body and Movement • Appearance • Eye contact • Posture
• Action • Gestures • Facial expressions • Speech attitudes
2. Voice and Expression • Language • Pausing • Vocal versatility • Articulation
3. Content • Organization• Listener involvement techniques• Humor • Audience interests and adaptations
Fun Fact: Mehrabian’s Communication Study
In his oft-quoted (and often mis-quoted) study on how people decide whether they like one another, Albert Mehrabian constructed the
following formula: Total Liking = 7% Verbal Liking + 38% Vocal Liking + 55% Facial Liking
Useful ideas that come from this research are:
• It’s not just words: a lot of communication comes through nonverbal communication.
• Without seeing nonverbal cues, it is easier to misunderstand the words.
• We pay more attention when we are unsure about words and when we trust the other person less.
http://changingminds.org/explanations/behaviors/body_language/mehrabian.htm
★81
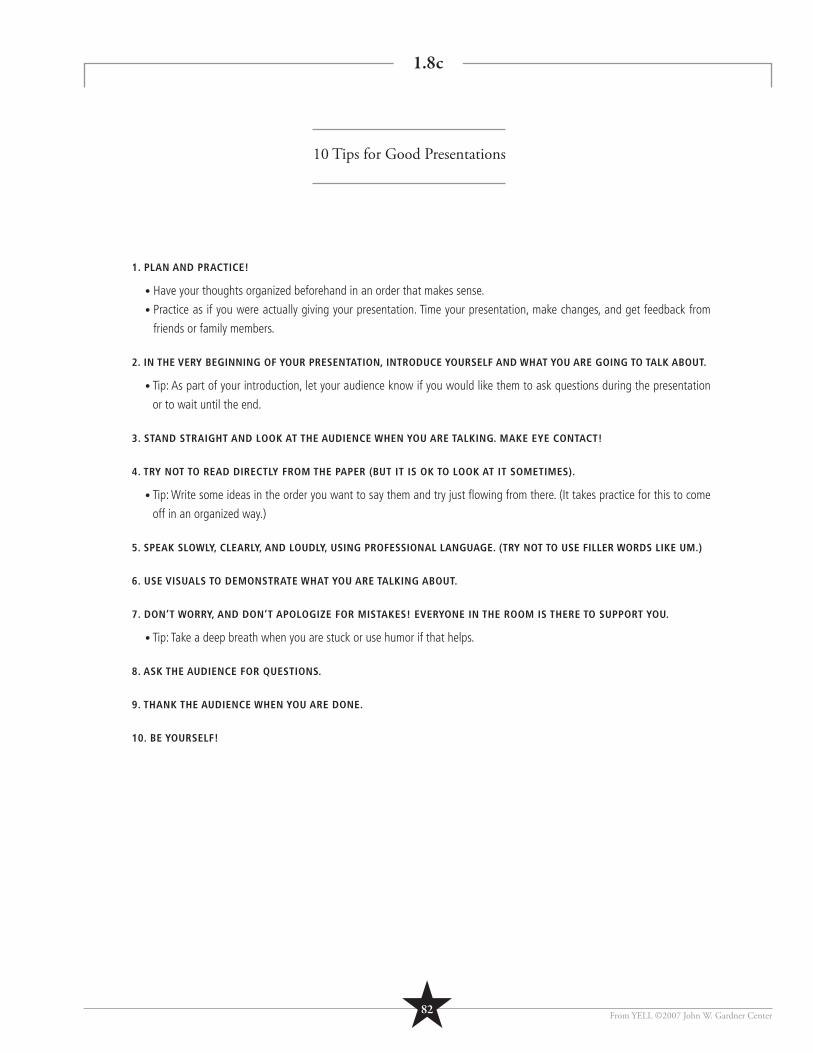
1.8c
10 Tips for Good Presentations
From YELL ©2007 John W. Gardner Center
1. PLAN AND PRACTICE!
• Have your thoughts organized beforehand in an order that makes sense.
• Practice as if you were actually giving your presentation. Time your presentation, make changes, and get feedback from
friends or family members.
2. IN THE VERY BEGINNING OF YOUR PRESENTATION, INTRODUCE YOURSELF AND WHAT YOU ARE GOING TO TALK ABOUT.
• Tip: As part of your introduction, let your audience know if you would like them to ask questions during the presentation
or to wait until the end.
3. STAND STRAIGHT AND LOOK AT THE AUDIENCE WHEN YOU ARE TALKING. MAKE EYE CONTACT!
4. TRY NOT TO READ DIRECTLY FROM THE PAPER (BUT IT IS OK TO LOOK AT IT SOMETIMES).
• Tip: Write some ideas in the order you want to say them and try just fl owing from there. (It takes practice for this to come
off in an organized way.)
5. SPEAK SLOWLY, CLEARLY, AND LOUDLY, USING PROFESSIONAL LANGUAGE. (TRY NOT TO USE FILLER WORDS LIKE UM.)
6. USE VISUALS TO DEMONSTRATE WHAT YOU ARE TALKING ABOUT.
7. DON’T WORRY, AND DON’T APOLOGIZE FOR MISTAKES! EVERYONE IN THE ROOM IS THERE TO SUPPORT YOU.
• Tip: Take a deep breath when you are stuck or use humor if that helps.
8. ASK THE AUDIENCE FOR QUESTIONS.
9. THANK THE AUDIENCE WHEN YOU ARE DONE.
10. BE YOURSELF!
★82
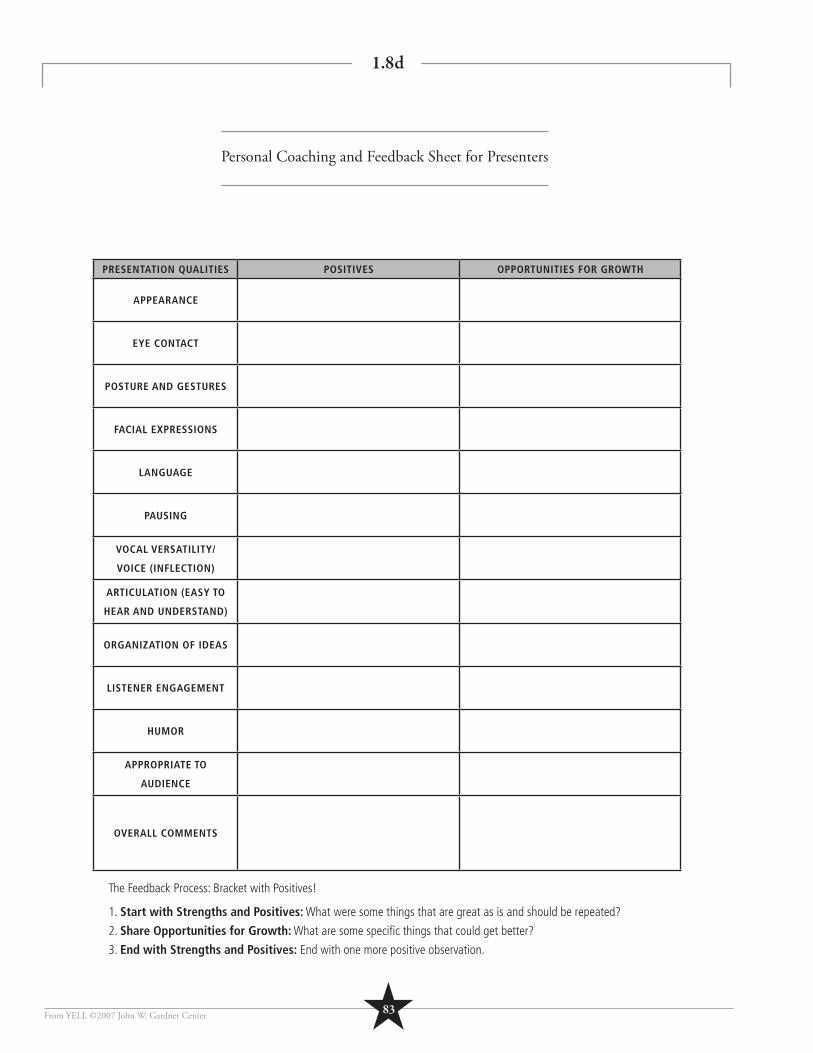
Personal Coaching and Feedback Sheet for Presenters
1.8d
From YELL ©2007 John W. Gardner Center
PRESENTATION QUALITIES POSITIVES OPPORTUNITIES FOR GROWTH
APPEARANCE
EYE CONTACT
POSTURE AND GESTURES
FACIAL EXPRESSIONS
LANGUAGE
PAUSING
VOCAL VERSATILITY/
VOICE (INFLECTION)
ARTICULATION (EASY TO
HEAR AND UNDERSTAND)
ORGANIZATION OF IDEAS
LISTENER ENGAGEMENT
HUMOR
APPROPRIATE TO
AUDIENCE
OVERALL COMMENTS
The Feedback Process: Bracket with Positives!
1. Start with Strengths and Positives: What were some things that are great as is and should be repeated?
2. Share Opportunities for Growth: What are some specifi c things that could get better?
3. End with Strengths and Positives: End with one more positive observation.
★83
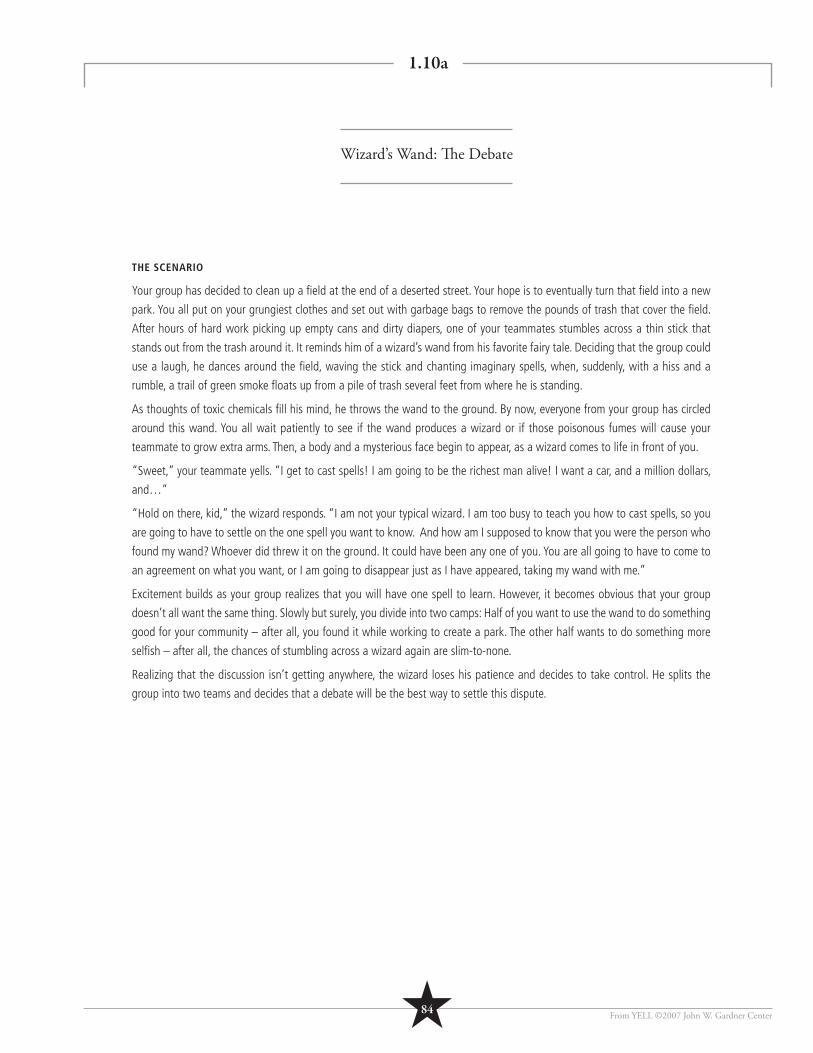
Wizard’s Wand: Th e Debate
1.10a
From YELL ©2007 John W. Gardner Center
THE SCENARIO
Your group has decided to clean up a fi eld at the end of a deserted street. Your hope is to eventually turn that fi eld into a new
park. You all put on your grungiest clothes and set out with garbage bags to remove the pounds of trash that cover the fi eld.
After hours of hard work picking up empty cans and dirty diapers, one of your teammates stumbles across a thin stick that
stands out from the trash around it. It reminds him of a wizard’s wand from his favorite fairy tale. Deciding that the group could
use a laugh, he dances around the fi eld, waving the stick and chanting imaginary spells, when, suddenly, with a hiss and a
rumble, a trail of green smoke fl oats up from a pile of trash several feet from where he is standing.
As thoughts of toxic chemicals fi ll his mind, he throws the wand to the ground. By now, everyone from your group has circled
around this wand. You all wait patiently to see if the wand produces a wizard or if those poisonous fumes will cause your
teammate to grow extra arms. Then, a body and a mysterious face begin to appear, as a wizard comes to life in front of you.
“Sweet,” your teammate yells. “I get to cast spells! I am going to be the richest man alive! I want a car, and a million dollars,
and…”
“Hold on there, kid,” the wizard responds. “I am not your typical wizard. I am too busy to teach you how to cast spells, so you
are going to have to settle on the one spell you want to know. And how am I supposed to know that you were the person who
found my wand? Whoever did threw it on the ground. It could have been any one of you. You are all going to have to come to
an agreement on what you want, or I am going to disappear just as I have appeared, taking my wand with me.”
Excitement builds as your group realizes that you will have one spell to learn. However, it becomes obvious that your group
doesn’t all want the same thing. Slowly but surely, you divide into two camps: Half of you want to use the wand to do something
good for your community – after all, you found it while working to create a park. The other half wants to do something more
selfi sh – after all, the chances of stumbling across a wizard again are slim-to-none.
Realizing that the discussion isn’t getting anywhere, the wizard loses his patience and decides to take control. He splits the
group into two teams and decides that a debate will be the best way to settle this dispute.
★84
Wizard’s Wand Role Play
1.10b
From YELL ©2007 John W. Gardner Center
ROUND ONE ROLE PLAY
Group One: Your group believes fi rmly that you need to cast a spell to do something good for the community. You believe that
casting a spell for anything that personally benefi ts you is against the values you have been taught in this program and that defi ne
who you are. Your goal is to come up with a spell that will meet your needs and then to come up with arguments to support your
wish. You want desperately to win this debate. Do not let the other team win, so also think of what they might say to argue for their
viewpoint, and come up with arguments against them. Do not back down!
______________________________________________________________________________________________
Group Two: Your group believes fi rmly that you need to cast a spell to do something good for yourselves. You believe that using
this spell to improve the community is impossible and a waste of the perfect opportunity to make your own life better. Your goal is
to come up with a spell that will meet your needs and then to come up with arguments to support it. You want desperately to win
this debate. Do not let the other team win, so also think of what they might say to argue for their viewpoint, and come up with
arguments against them. Do not back down!
______________________________________________________________________________________________
ROUND TWO ROLE PLAY
Group One: Your group still believes that you should cast a spell to do something good for the community; however, you also
think it would be nice if that wish benefi ted you in some way. Your goal this time is to come up with a compromise that will make
both groups happy. Rather than focusing only on your own needs, focus on making sure that the other group is happy with the
decision.
______________________________________________________________________________________________
Group Two: Your group still believes that you should cast a spell to do something good for yourselves; however, you also think it
would be nice if that wish benefi ted your community in some way. Your goal this time is to come up with a compromise that will
make both groups happy. Rather than focusing only on your own needs, focus on making sure that the other group is happy with
the decision.
✄
★85
1.11
Mock City Council Proposal and Participant Roles (page 1)
★86 From YELL ©2007 John W. Gardner Center
Youth Presenter 1: Many youth in our community must commute to school from the other side of town. There are no public
school buses, so youth must use city buses and pay for their own bus passes. When families cannot afford bus passes, youth end
up walking or biking to school on unsafe roadways without bike lanes and occasionally must pass through unsafe neighbor-
hoods. This is particularly problematic for middle school students, who are too young to drive and too young to work and earn
their own money for bus passes.
___________________________________________________________________________________________
Youth Presenter 2: We want the city to provide 20 free bus passes per month to middle school students for the next year and
10 free bus passes per month to high school students. We are asking the City Council to support this proposal. From here, we
will ask the bus company to match the city’s support by donating additional bus passes for middle school youth.
Bus passes would be awarded to students who have to travel more than 1 mile to school, have a good attendance record,
and have economic need. This proposal would also allow these students the opportunity to use their bus pass around the city,
making our community more accessible to youth.
CITIZENS “FOR” THE PROPOSAL___________________________________________________________________
Name: Anisha, age13. You are an 8th grader who lives in the community, has two smaller brothers; both of your parents
work, your mom does not drive, and your dad works from 7am to 4pm. Your parents can barely pay their rent every month, and
they have to buy you a bus pass to go to school. Sometimes you have to walk because your parents are gathering the money
to buy a bus pass.
Your position: You are for the proposal. You would like to see this project start because it would help your family out.
___________________________________________________________________________________________
Name: Jennifer, age 33. You are a single parent who has to buy passes for two children (6th and 7th grades). You live in an
apartment building that is not close to any of the youth activity centers in town, and you rarely have time to take your kids out
anywhere because you work full time. Some months you are not able to purchase the bus passes until mid-way through the
month because money is scarce.
Your position: You are in favor of the proposal. Bus passes are important for getting kids to school and to get across town to
other positive activities (like movies with their friends).
___________________________________________________________________________________________
Name: José, age 31. You have been a middle school teacher for 10 years and have seen students walking home as late as
5:30pm when you go home. You have also had students miss class because they don’t feel like walking to school and can’t
afford a bus pass.
Your position: You are in favor of the proposal. This would be a great project that could help students get to and from school
and out to have fun once in a while. It could also provide incentives (like good grades) for students to earn the bus passes.
✄CITY COUNCIL MEMBERS’ QUESTIONS:
• Do these schoolchildren really need subsidized bus passes?
• What are the benefi ts for students (safety, time)?
• What are the benefi ts for the community (keeping kids off
the streets, decrease in graffi ti or juvenile crime)?
• What are the benefi ts for families (money saved, time
saved, peace of mind)?
• What are some of the costs for the community? Who will
pay for this (the bus company, the taxpayers in, others)?
• Is this proposal fair? Should some people get free
bus passes and not others (schoolchildren, elderly, or
hardworking adults)?
• Any other questions you can think of.
1.11
From YELL ©2007 John W. Gardner Center
Name: Patricia, age 13. You are an 8th grader whose parents have enough money to pay for bus passes. You believe that every
good student should have an equal chance of winning the bus passes, (even though parents could afford the bus passes, they could
use that money for something else). This could be a good way to show appreciation to the good students.
Your position: You are for the proposal, but you also think that the bus passes should be awarded to all good students who ride
the bus to school – regardless of economic need.
CITIZENS “AGAINST” THE PROPOSAL__________________________________________________________________
Name: Juan Carlos, age 45. You are running for City Council in the upcoming election and are the vice president of a
manufacturing company. You have been selected as a representative of your neighborhood (a part of town that is primarily middle
and upper-middle income) to speak against this proposal.
Your position: You are opposed to the proposal. “This proposal would exclude our children from getting these bus passes for the
most part (they don’t have economic need). Also, we have been trying to get some sort of bus program for our elderly residents for
years, and this could get in the way of that. In addition, kids do not need to be out late unsupervised or roaming across town in the
evenings. If you did do something like this, it should only be a special pass to get to and from school.”
___________________________________________________________________________________________
Name: Jack, Age 68. You are a retired juvenile parole offi cer, a resident of the community, and don’t have any children or
grandchildren.
Your position: Against the proposal. “I already have to pay taxes to educate everyone else’s children. I don’t want my money to
go toward encouraging kids to go out by themselves on buses and staying out late to make trouble. If the city decides to pay for
this, it would be expensive and other programs might get cut and we know that when programs get cut they usually impact us
retired persons.”
___________________________________________________________________________________________
Name: Yuki, age 28. You grew up in the community and work for the county offi ce of education. You don’t think that this
proposal should be a priority right now – the community and schools have other needs that are much more important.
Your position: You are against the proposal. “Priorities!! I agree that this would be a good idea if we were in a position
economically to do this, but we are not. We need to focus on other issues that are more important right now. We need to make sure
that we have enough textbooks, enough qualifi ed teachers, supplies for teachers, and money for the arts (band, music, art). Besides,
the proposal is vague. What does “good” attendance mean? How will you defi ne “economic need?” What about grade point
average? This proposal is not well planned out yet.”
___________________________________________________________________________________________
Name: Andrea, age 46. You live in the community and work as a lawyer. You are worried about liability issues.
Your position: Against the proposal. “What about legal liability? Is the City Council going to be responsible for those kids if
something happens to them while they are out having more fun? We need to focus on priorities, and if we are trying to help youth,
there are better ways of doing so.”
Mock City Council Proposal and Participant Roles (page 2)✄
★87
Facilitation Role Play
1.12a
From YELL ©2007 John W. Gardner Center
Scenario One: Traffi c Director – Make sure everyone has a chance to participate
The facilitator is trying to lead a discussion about a controversial issue (select the issue). Two people are always dominating the
conversation. Demonstrate how the facilitator can make sure that everyone has a chance to participate.
___________________________________________________________________________________________
Scenario Two: Hammer/Elevator – Create a safe and trusting atmosphere
The facilitator is trying to lead a debrief. Two of the students in the group are mad at each other from something that happened
at school earlier. When one student gives her perspective on what happened, the other student makes a rude comment. Dem-
onstrate how the facilitator can respond to the situation to create a safe environment for everyone.
___________________________________________________________________________________________
Scenario Three: Counselor – Listen and question
The facilitator is trying to get feedback about how to make the after-school clubs better. Participants are giving short answers
that aren’t very helpful. Demonstrate how the facilitator can get the students to talk more about what they are thinking.
✄
★88
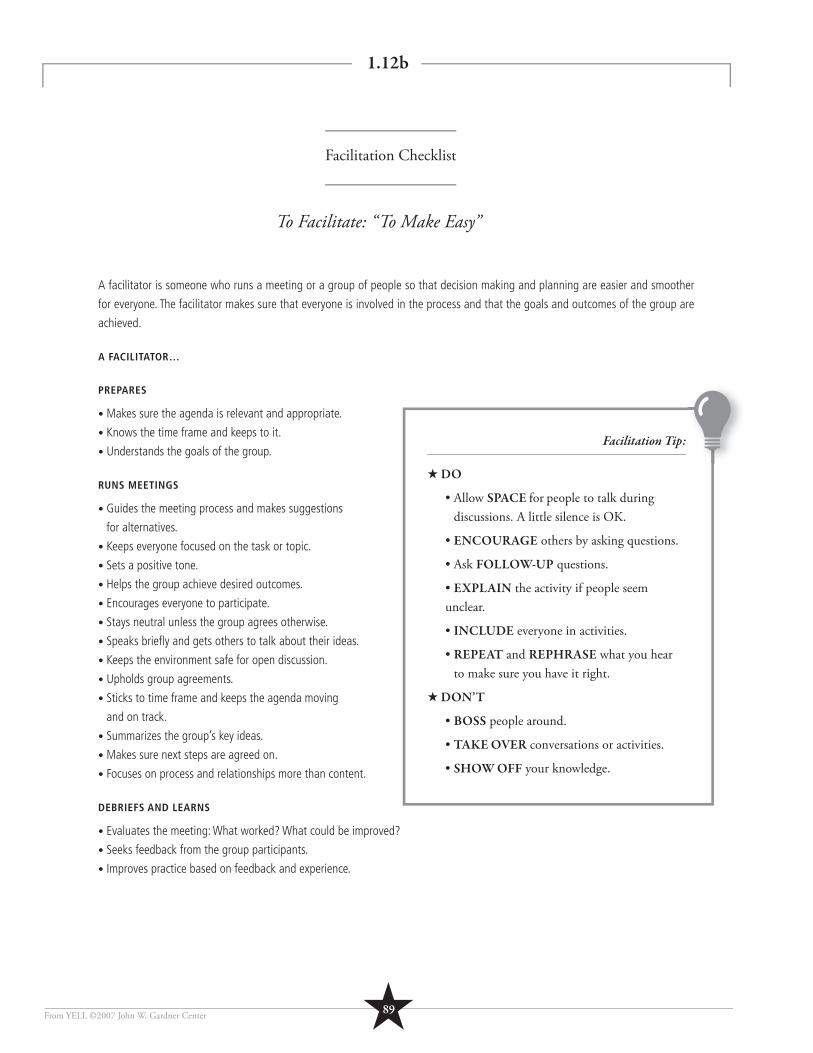
Facilitation Checklist
1.12b
From YELL ©2007 John W. Gardner Center
A facilitator is someone who runs a meeting or a group of people so that decision making and planning are easier and smoother
for everyone. The facilitator makes sure that everyone is involved in the process and that the goals and outcomes of the group are
achieved.
A FACILITATOR…
PREPARES
• Makes sure the agenda is relevant and appropriate.
• Knows the time frame and keeps to it.
• Understands the goals of the group.
RUNS MEETINGS
• Guides the meeting process and makes suggestions
for alternatives.
• Keeps everyone focused on the task or topic.
• Sets a positive tone.
• Helps the group achieve desired outcomes.
• Encourages everyone to participate.
• Stays neutral unless the group agrees otherwise.
• Speaks briefl y and gets others to talk about their ideas.
• Keeps the environment safe for open discussion.
• Upholds group agreements.
• Sticks to time frame and keeps the agenda moving
and on track.
• Summarizes the group’s key ideas.
• Makes sure next steps are agreed on.
• Focuses on process and relationships more than content.
DEBRIEFS AND LEARNS
• Evaluates the meeting: What worked? What could be improved?
• Seeks feedback from the group participants.
• Improves practice based on feedback and experience.
To Facilitate: “To Make Easy”
Facilitation Tip:
★ DO
• Allow SPACE for people to talk during discussions. A little silence is OK.
• ENCOURAGE others by asking questions.
• Ask FOLLOW-UP questions.
• EXPLAIN the activity if people seem unclear.
• INCLUDE everyone in activities.
• REPEAT and REPHRASE what you hear to make sure you have it right.
★ DON’T
• BOSS people around.
• TAKE OVER conversations or activities.
• SHOW OFF your knowledge.
★89
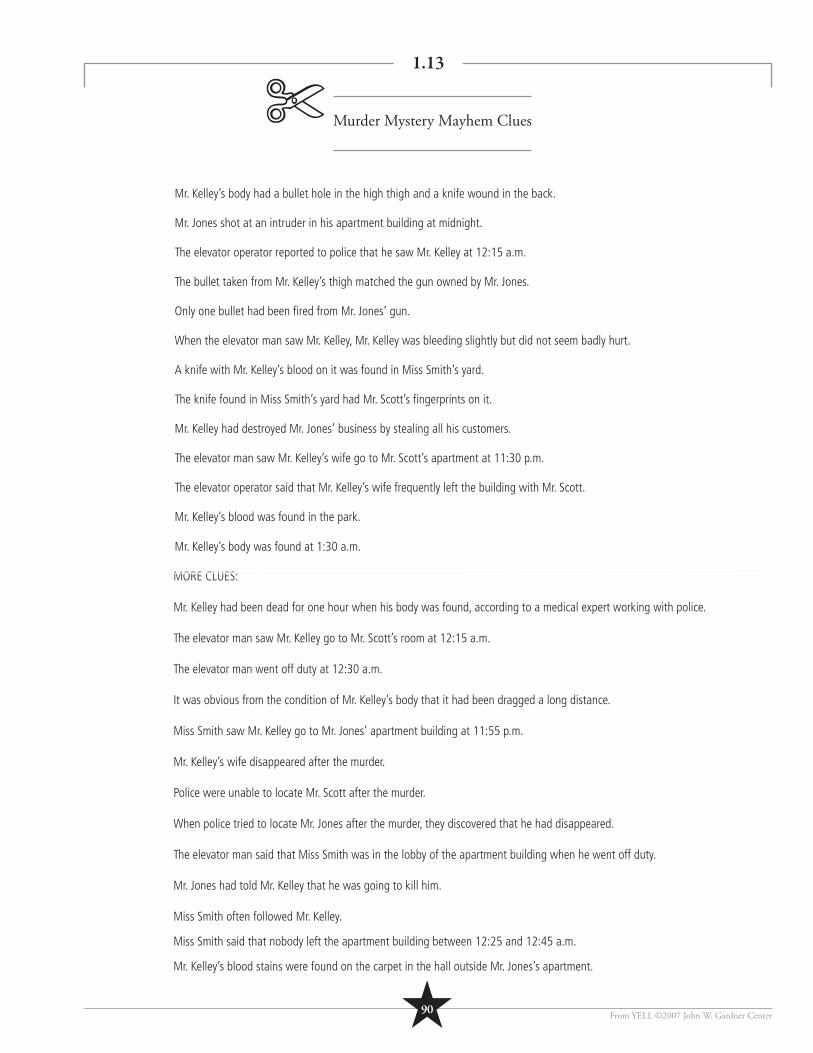
Murder Mystery Mayhem Clues
1.13
From YELL ©2007 John W. Gardner Center
Mr. Kelley’s body had a bullet hole in the high thigh and a knife wound in the back.
Mr. Jones shot at an intruder in his apartment building at midnight.
The elevator operator reported to police that he saw Mr. Kelley at 12:15 a.m.
The bullet taken from Mr. Kelley’s thigh matched the gun owned by Mr. Jones.
Only one bullet had been fi red from Mr. Jones’ gun.
When the elevator man saw Mr. Kelley, Mr. Kelley was bleeding slightly but did not seem badly hurt.
A knife with Mr. Kelley’s blood on it was found in Miss Smith’s yard.
The knife found in Miss Smith’s yard had Mr. Scott’s fi ngerprints on it.
Mr. Kelley had destroyed Mr. Jones’ business by stealing all his customers.
The elevator man saw Mr. Kelley’s wife go to Mr. Scott’s apartment at 11:30 p.m.
The elevator operator said that Mr. Kelley’s wife frequently left the building with Mr. Scott.
Mr. Kelley’s blood was found in the park.
Mr. Kelley’s body was found at 1:30 a.m.
MORE CLUES:
Mr. Kelley had been dead for one hour when his body was found, according to a medical expert working with police.
The elevator man saw Mr. Kelley go to Mr. Scott’s room at 12:15 a.m.
The elevator man went off duty at 12:30 a.m.
It was obvious from the condition of Mr. Kelley’s body that it had been dragged a long distance.
Miss Smith saw Mr. Kelley go to Mr. Jones’ apartment building at 11:55 p.m.
Mr. Kelley’s wife disappeared after the murder.
Police were unable to locate Mr. Scott after the murder.
When police tried to locate Mr. Jones after the murder, they discovered that he had disappeared.
The elevator man said that Miss Smith was in the lobby of the apartment building when he went off duty.
Mr. Jones had told Mr. Kelley that he was going to kill him.
Miss Smith often followed Mr. Kelley.
Miss Smith said that nobody left the apartment building between 12:25 and 12:45 a.m.
Mr. Kelley’s blood stains were found on the carpet in the hall outside Mr. Jones’s apartment.
✄
★90
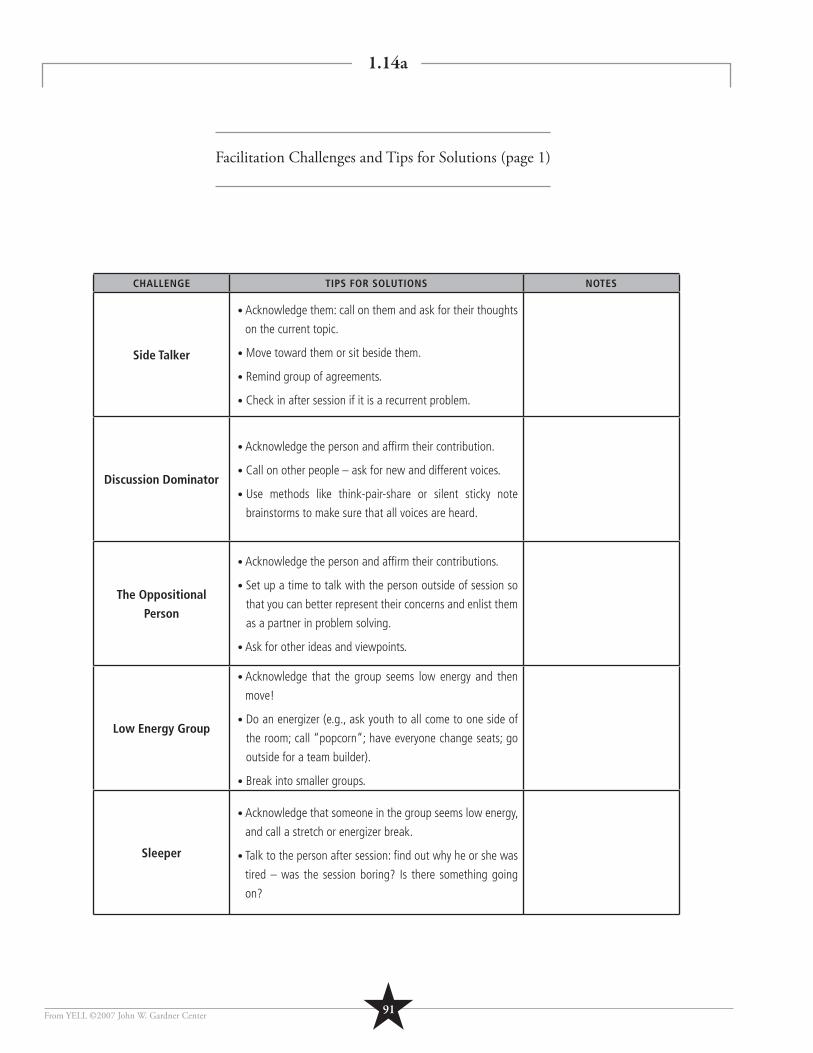
Facilitation Challenges and Tips for Solutions (page 1)
1.14a
From YELL ©2007 John W. Gardner Center
CHALLENGE TIPS FOR SOLUTIONS NOTES
Side Talker
• Acknowledge them: call on them and ask for their thoughts
on the current topic.
• Move toward them or sit beside them.
• Remind group of agreements.
• Check in after session if it is a recurrent problem.
Discussion Dominator
• Acknowledge the person and affi rm their contribution.
• Call on other people – ask for new and different voices.
• Use methods like think-pair-share or silent sticky note
brainstorms to make sure that all voices are heard.
The Oppositional
Person
• Acknowledge the person and affi rm their contributions.
• Set up a time to talk with the person outside of session so
that you can better represent their concerns and enlist them
as a partner in problem solving.
• Ask for other ideas and viewpoints.
Low Energy Group
• Acknowledge that the group seems low energy and then
move!
• Do an energizer (e.g., ask youth to all come to one side of
the room; call “popcorn”; have everyone change seats; go
outside for a team builder).
• Break into smaller groups.
Sleeper
• Acknowledge that someone in the group seems low energy,
and call a stretch or energizer break.
• Talk to the person after session: fi nd out why he or she was
tired – was the session boring? Is there something going
on?
★91

From YELL ©2007 John W. Gardner Center
CHALLENGE TIPS FOR SOLUTIONS NOTES
Unclear or
Hard to Understand
• Repeat back what you think you heard and ask for
affi rmation or clarifi cation.
• Ask questions to make sure you understand.
• Ask if anyone in the group can rephrase.
Complainer
• Check in with the group – what could make this more
interesting? Is something else going on that people want
or need to address?
• Put concerns in the “parking lot” – a section of the board
or piece of butcher paper where you write questions that
don’t fi t with the current agenda – and fi nd a way to
address with the individual.
Know-it-All
• Acknowledge the person and their contribution.
• Call on other people – ask for new and different voices.
• Use methods like think-pair-share or silent sticky note
brainstorms.
Joker
• Appreciate the person for providing a sense of fun for the
group; note the importance of humor.
• Let the person know that there will be a break and time
after session to hang out and be playful, but that right now
we need to focus on the agenda.
• If possible, turn the joke into a serious example or refer-
ence that highlights the agenda’s purpose.
“Out of Left Field”
Comments and
Questions
• Use a “parking lot” – a section of the board or piece of
butcher paper where you write questions that don’t fi t with
the current agenda. This lets youth know that you have
heard them and keeps the group focused at the same time.
• Use elements of the questions to make a point or as an
example that re-focuses the group on the purpose of the
conversation.
Add from your own
experience
Facilitation Challenges and Tips for Solutions (page 2)
1.14a
★92
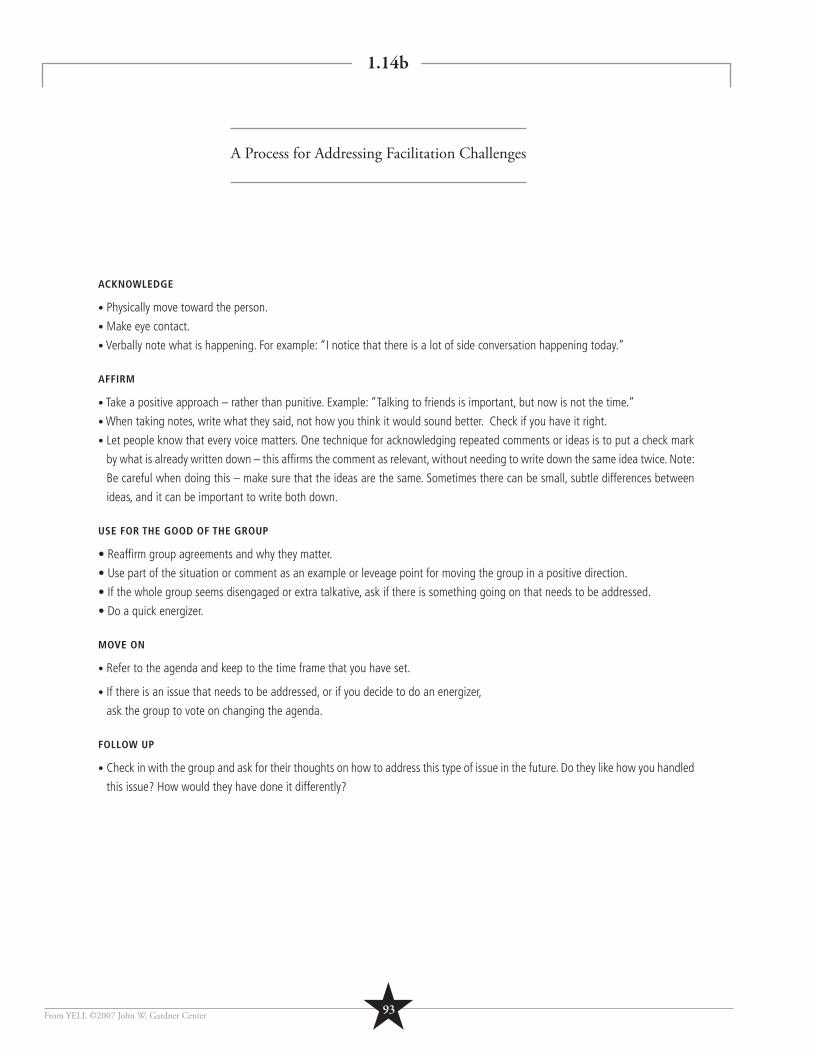
A Process for Addressing Facilitation Challenges
1.14b
From YELL ©2007 John W. Gardner Center
ACKNOWLEDGE
• Physically move toward the person.
• Make eye contact.
• Verbally note what is happening. For example: “I notice that there is a lot of side conversation happening today.”
AFFIRM
• Take a positive approach – rather than punitive. Example: “Talking to friends is important, but now is not the time.”
• When taking notes, write what they said, not how you think it would sound better. Check if you have it right.
• Let people know that every voice matters. One technique for acknowledging repeated comments or ideas is to put a check mark
by what is already written down – this affi rms the comment as relevant, without needing to write down the same idea twice. Note:
Be careful when doing this – make sure that the ideas are the same. Sometimes there can be small, subtle differences between
ideas, and it can be important to write both down.
USE FOR THE GOOD OF THE GROUP
• Reaffi rm group agreements and why they matter.
• Use part of the situation or comment as an example or leveage point for moving the group in a positive direction.
• If the whole group seems disengaged or extra talkative, ask if there is something going on that needs to be addressed.
• Do a quick energizer.
MOVE ON
• Refer to the agenda and keep to the time frame that you have set.
• If there is an issue that needs to be addressed, or if you decide to do an energizer,
ask the group to vote on changing the agenda.
FOLLOW UP
• Check in with the group and ask for their thoughts on how to address this type of issue in the future. Do they like how you handled
this issue? How would they have done it differently?
★93
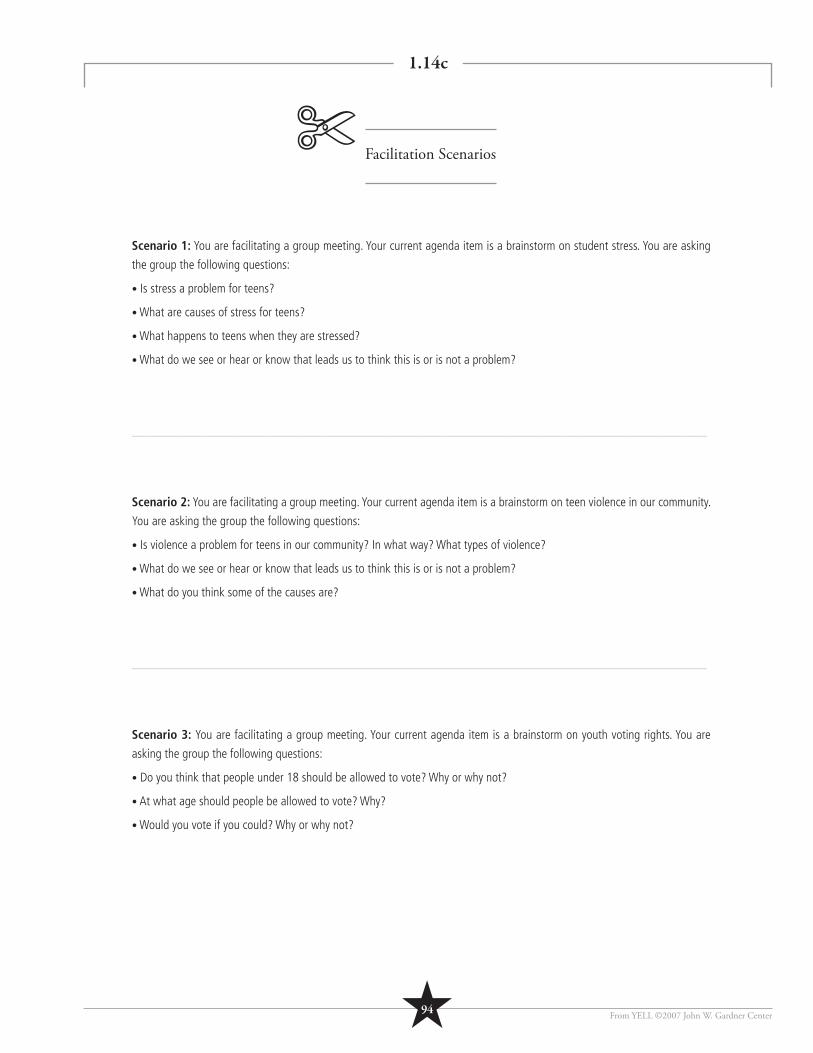
Facilitation Scenarios
1.14c
From YELL ©2007 John W. Gardner Center
Scenario 1: You are facilitating a group meeting. Your current agenda item is a brainstorm on student stress. You are asking
the group the following questions:
• Is stress a problem for teens?
• What are causes of stress for teens?
• What happens to teens when they are stressed?
• What do we see or hear or know that leads us to think this is or is not a problem?
___________________________________________________________________________________________
Scenario 2: You are facilitating a group meeting. Your current agenda item is a brainstorm on teen violence in our community.
You are asking the group the following questions:
• Is violence a problem for teens in our community? In what way? What types of violence?
• What do we see or hear or know that leads us to think this is or is not a problem?
• What do you think some of the causes are?
___________________________________________________________________________________________
Scenario 3: You are facilitating a group meeting. Your current agenda item is a brainstorm on youth voting rights. You are
asking the group the following questions:
• Do you think that people under 18 should be allowed to vote? Why or why not?
• At what age should people be allowed to vote? Why?
• Would you vote if you could? Why or why not?
✄
★94
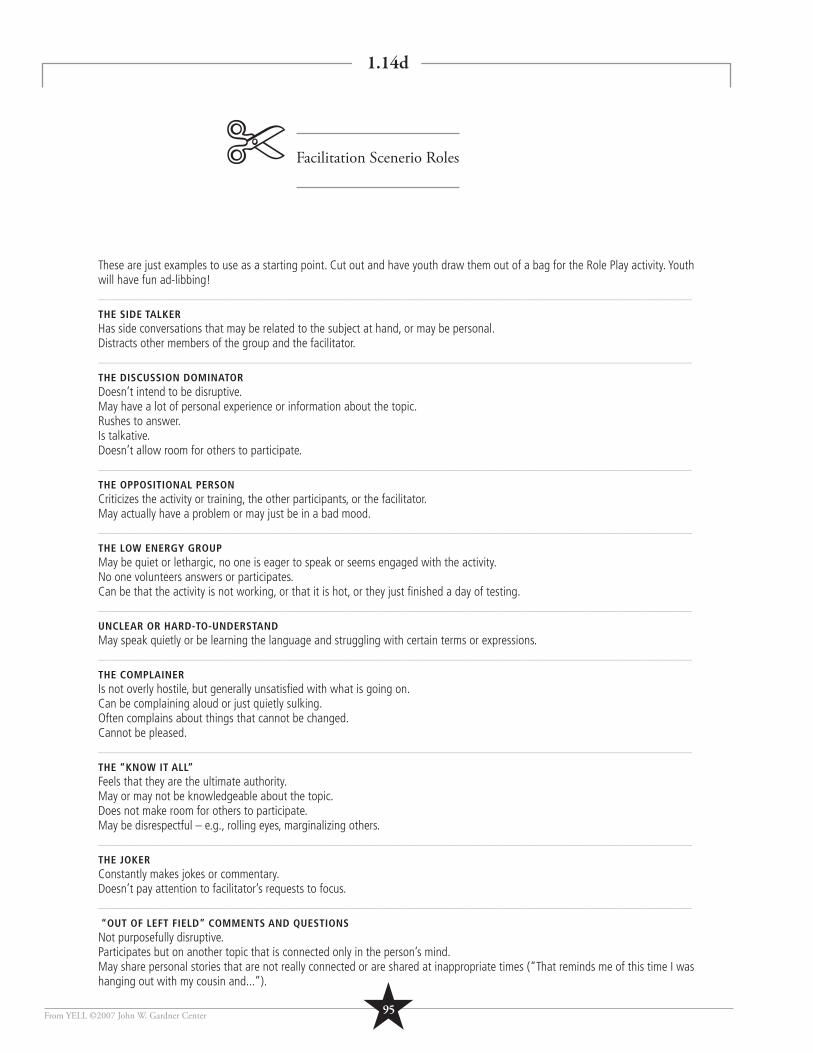
1.14d
Facilitation Scenerio Roles
From YELL ©2007 John W. Gardner Center
These are just examples to use as a starting point. Cut out and have youth draw them out of a bag for the Role Play activity. Youth will have fun ad-libbing! ______________________________________________________________________________________________
THE SIDE TALKERHas side conversations that may be related to the subject at hand, or may be personal.Distracts other members of the group and the facilitator.______________________________________________________________________________________________
THE DISCUSSION DOMINATORDoesn’t intend to be disruptive.May have a lot of personal experience or information about the topic.Rushes to answer. Is talkative.Doesn’t allow room for others to participate.______________________________________________________________________________________________
THE OPPOSITIONAL PERSONCriticizes the activity or training, the other participants, or the facilitator.May actually have a problem or may just be in a bad mood.______________________________________________________________________________________________
THE LOW ENERGY GROUPMay be quiet or lethargic, no one is eager to speak or seems engaged with the activity.No one volunteers answers or participates.Can be that the activity is not working, or that it is hot, or they just fi nished a day of testing.______________________________________________________________________________________________
UNCLEAR OR HARD-TO-UNDERSTANDMay speak quietly or be learning the language and struggling with certain terms or expressions.______________________________________________________________________________________________
THE COMPLAINERIs not overly hostile, but generally unsatisfi ed with what is going on.Can be complaining aloud or just quietly sulking.Often complains about things that cannot be changed.Cannot be pleased.______________________________________________________________________________________________
THE “KNOW IT ALL”Feels that they are the ultimate authority.May or may not be knowledgeable about the topic.Does not make room for others to participate.May be disrespectful – e.g., rolling eyes, marginalizing others.______________________________________________________________________________________________
THE JOKERConstantly makes jokes or commentary.Doesn’t pay attention to facilitator’s requests to focus.______________________________________________________________________________________________
“OUT OF LEFT FIELD” COMMENTS AND QUESTIONSNot purposefully disruptive.Participates but on another topic that is connected only in the person’s mind.May share personal stories that are not really connected or are shared at inappropriate times (“That reminds me of this time I was hanging out with my cousin and...”).
✄
★95
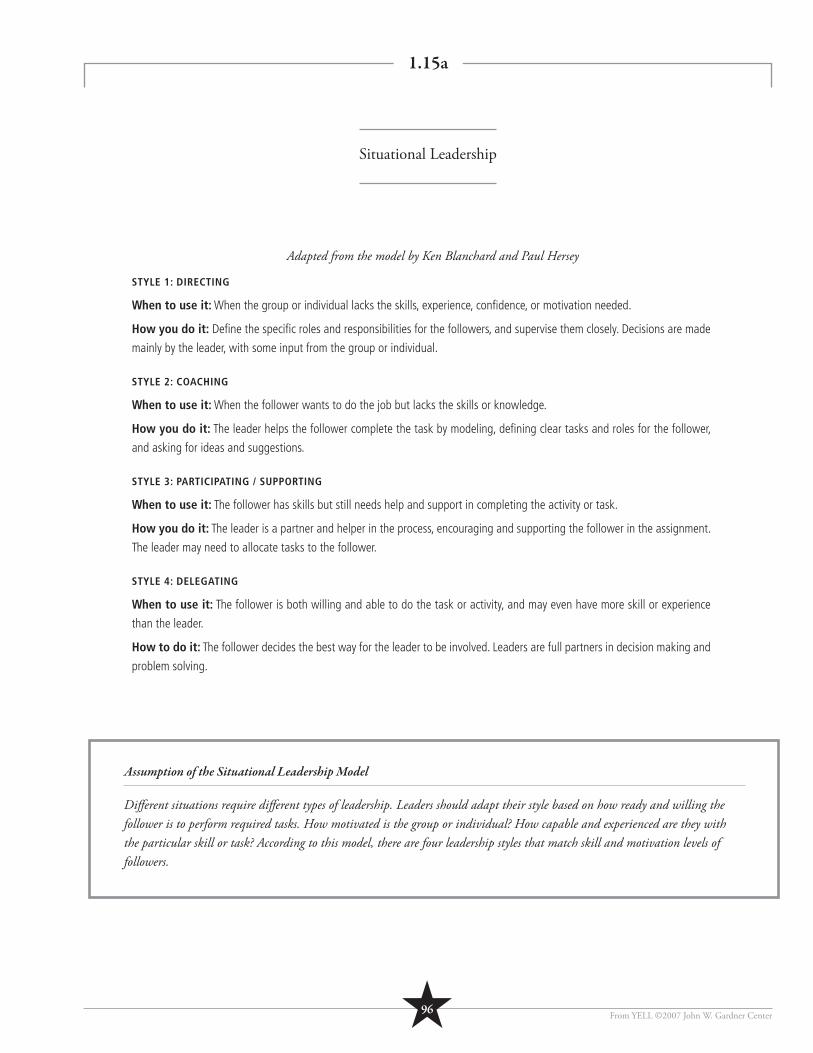
Situational Leadership
1.15a
From YELL ©2007 John W. Gardner Center
STYLE 1: DIRECTING
When to use it: When the group or individual lacks the skills, experience, confi dence, or motivation needed.
How you do it: Defi ne the specifi c roles and responsibilities for the followers, and supervise them closely. Decisions are made
mainly by the leader, with some input from the group or individual.
STYLE 2: COACHING
When to use it: When the follower wants to do the job but lacks the skills or knowledge.
How you do it: The leader helps the follower complete the task by modeling, defi ning clear tasks and roles for the follower,
and asking for ideas and suggestions.
STYLE 3: PARTICIPATING / SUPPORTING
When to use it: The follower has skills but still needs help and support in completing the activity or task.
How you do it: The leader is a partner and helper in the process, encouraging and supporting the follower in the assignment.
The leader may need to allocate tasks to the follower.
STYLE 4: DELEGATING
When to use it: The follower is both willing and able to do the task or activity, and may even have more skill or experience
than the leader.
How to do it: The follower decides the best way for the leader to be involved. Leaders are full partners in decision making and
problem solving.
Adapted from the model by Ken Blanchard and Paul Hersey
Assumption of the Situational Leadership Model
Diff erent situations require diff erent types of leadership. Leaders should adapt their style based on how ready and willing the follower is to perform required tasks. How motivated is the group or individual? How capable and experienced are they with the particular skill or task? According to this model, there are four leadership styles that match skill and motivation levels of followers.
★96
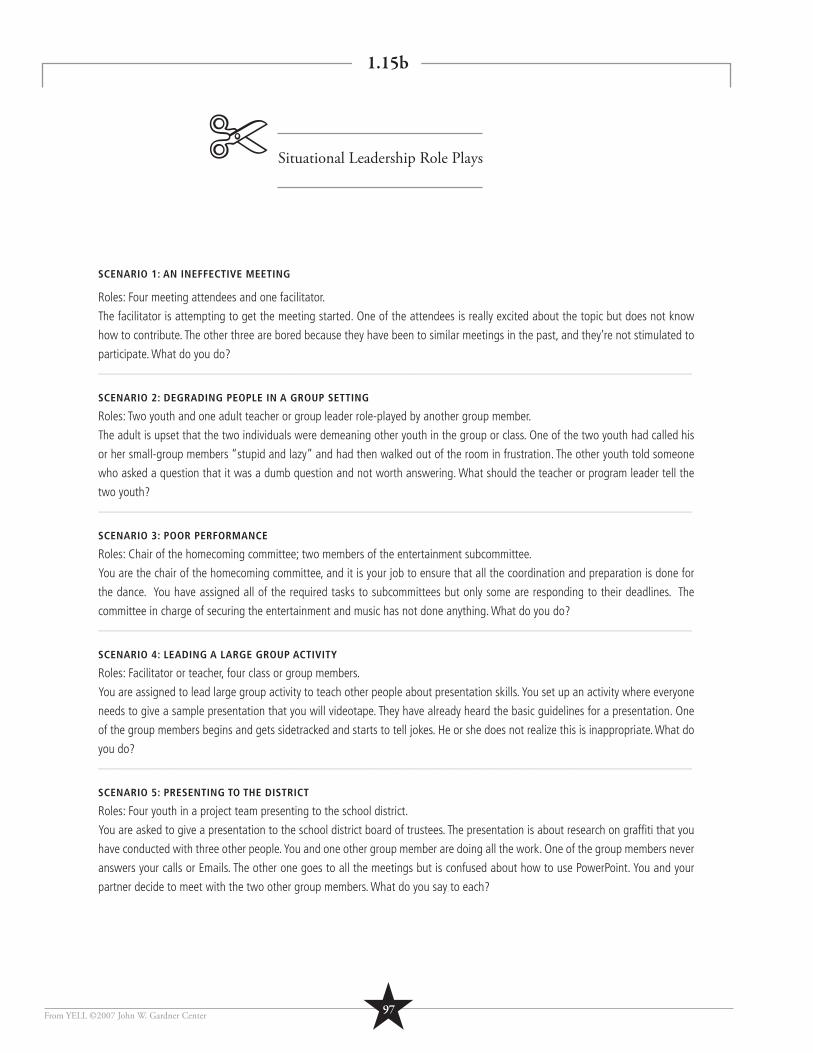
Situational Leadership Role Plays
1.15b
From YELL ©2007 John W. Gardner Center
SCENARIO 1: AN INEFFECTIVE MEETING
Roles: Four meeting attendees and one facilitator.
The facilitator is attempting to get the meeting started. One of the attendees is really excited about the topic but does not know
how to contribute. The other three are bored because they have been to similar meetings in the past, and they’re not stimulated to
participate. What do you do? ______________________________________________________________________________________________
SCENARIO 2: DEGRADING PEOPLE IN A GROUP SETTING
Roles: Two youth and one adult teacher or group leader role-played by another group member.
The adult is upset that the two individuals were demeaning other youth in the group or class. One of the two youth had called his
or her small-group members “stupid and lazy” and had then walked out of the room in frustration. The other youth told someone
who asked a question that it was a dumb question and not worth answering. What should the teacher or program leader tell the
two youth? ______________________________________________________________________________________________
SCENARIO 3: POOR PERFORMANCE
Roles: Chair of the homecoming committee; two members of the entertainment subcommittee.
You are the chair of the homecoming committee, and it is your job to ensure that all the coordination and preparation is done for
the dance. You have assigned all of the required tasks to subcommittees but only some are responding to their deadlines. The
committee in charge of securing the entertainment and music has not done anything. What do you do? ______________________________________________________________________________________________
SCENARIO 4: LEADING A LARGE GROUP ACTIVITY
Roles: Facilitator or teacher, four class or group members.
You are assigned to lead large group activity to teach other people about presentation skills. You set up an activity where everyone
needs to give a sample presentation that you will videotape. They have already heard the basic guidelines for a presentation. One
of the group members begins and gets sidetracked and starts to tell jokes. He or she does not realize this is inappropriate. What do
you do? ______________________________________________________________________________________________
SCENARIO 5: PRESENTING TO THE DISTRICT
Roles: Four youth in a project team presenting to the school district.
You are asked to give a presentation to the school district board of trustees. The presentation is about research on graffi ti that you
have conducted with three other people. You and one other group member are doing all the work. One of the group members never
answers your calls or Emails. The other one goes to all the meetings but is confused about how to use PowerPoint. You and your
partner decide to meet with the two other group members. What do you say to each?
✄
★97
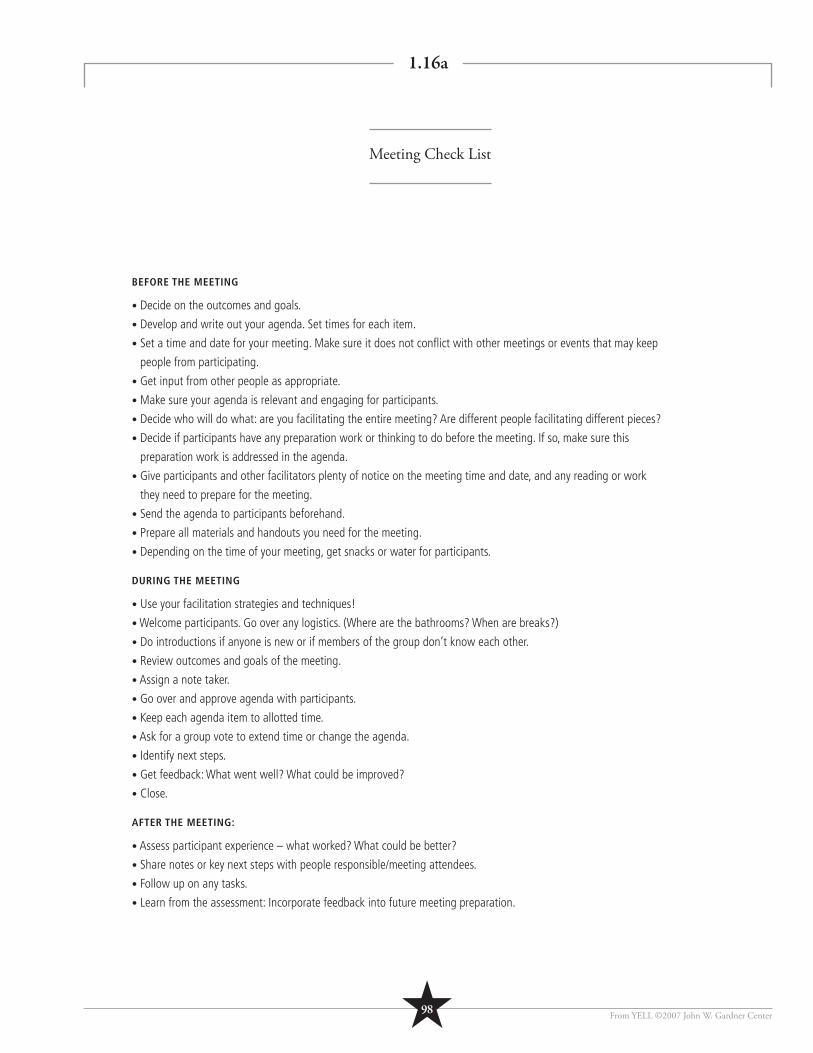
Meeting Check List
1.16a
From YELL ©2007 John W. Gardner Center
BEFORE THE MEETING
• Decide on the outcomes and goals.
• Develop and write out your agenda. Set times for each item.
• Set a time and date for your meeting. Make sure it does not confl ict with other meetings or events that may keep
people from participating.
• Get input from other people as appropriate.
• Make sure your agenda is relevant and engaging for participants.
• Decide who will do what: are you facilitating the entire meeting? Are different people facilitating different pieces?
• Decide if participants have any preparation work or thinking to do before the meeting. If so, make sure this
preparation work is addressed in the agenda.
• Give participants and other facilitators plenty of notice on the meeting time and date, and any reading or work
they need to prepare for the meeting.
• Send the agenda to participants beforehand.
• Prepare all materials and handouts you need for the meeting.
• Depending on the time of your meeting, get snacks or water for participants.
DURING THE MEETING
• Use your facilitation strategies and techniques!
• Welcome participants. Go over any logistics. (Where are the bathrooms? When are breaks?)
• Do introductions if anyone is new or if members of the group don’t know each other.
• Review outcomes and goals of the meeting.
• Assign a note taker.
• Go over and approve agenda with participants.
• Keep each agenda item to allotted time.
• Ask for a group vote to extend time or change the agenda.
• Identify next steps.
• Get feedback: What went well? What could be improved?
• Close.
AFTER THE MEETING:
• Assess participant experience – what worked? What could be better?
• Share notes or key next steps with people responsible/meeting attendees.
• Follow up on any tasks.
• Learn from the assessment: Incorporate feedback into future meeting preparation.
★98

1.16b
Meeting Planner
From YELL ©2007 John W. Gardner Center
Title of Meeting:__________________________________________________________________________________
Date:___________________________________________ Time/Length:_____________________________________
_
Location of Meeting:_______________________________________________________________________________
Who will be invited?____________________________________________________ # of Participants: ______________
Outcomes: What is the purpose of this meeting? What will participants know or be able to do as a result of this meeting? What
decisions will be made?
1.
2.
Materials and Preparation: What do you need for this meeting – handouts, markers, butcher paper, etc?
Agenda:
I. Welcome
Facilitator:_______________________________________________________ time:___________________________
1. Review logistics/announcements
2. Review meeting outcomes
3. Approve agenda
II. Activity or Presentation
Facilitator:_______________________________________________________ time:___________________________
1. Introduction
2. Body
3. Practice/application
4. Conclusion
III. Discussion/Debrief
Facilitator:_______________________________________________________ time:___________________________
1. Guiding questions or discussion items
IV. Decision Making/Next Steps
Facilitator:_______________________________________________________ time:___________________________
V. Closing/Evaluation:
How will you know if you met your outcomes? What type of feedback do you want to get from participants?
★99

1.16c
City Council Chaos
From YELL ©2007 John W. Gardner Center
SCENARIO:
Mayor Natalie Leader is in big trouble. Since she took over as mayor of Fair City, the city has fallen apart. In an attempt to
increase community involvement in town government, Mayor Leader promised to tackle one controversial issue per City Council
meeting. She hoped that she could increase attendance to City Council meetings by starting each meeting with an open discus-
sion on some hot topic and then by following the discussion with a preview of next week’s topic. Unfortunately, her plan worked
too well.
Apparently Fair City is fi lled with frustrated citizens. The City Council meetings had to move to the high school gymnasium just
to give everybody a seat. Meeting times have been extended from two to seven hours, but Mayor Leader and her City Council
have yet to make a single decision. As a result, many of the smaller but important business items have been ignored, causing
major disasters across the city. The City Council hasn’t had a chance to approve the pay raise for the workers at the city zoo,
so they are on strike, and monkeys and giraffes are running wild in the streets. To make matters worse, they haven’t approved
the necessary repairs for the traffi c lights, so the sound of screeching tires, horns, and shouts from angry drivers has fi lled the
city. Finally, the last Mayor, after losing the election, decided to close parks and community centers until further notice. For this
reason, the annual bake sale is taking place in the street tomorrow and there is much concern about what will happen with the
out-of-control traffi c and the wild animals.
The City Council is in agreement about how to fi x these problems, but the Mayor’s current agenda doesn’t leave time for them to
vote through these issues, and, although these issues are becoming hot topics, the Mayor’s schedule of opening issues is already
set. Mayor Natalie Leader needs your help. She wants to keep her promise to discuss these issues, but she needs to address
other issues, too. How can the mayor create a more effi cient agenda?
ASSIGNMENT
Write an agenda for the mayor in an order that makes the most sense. Be able to explain your order.
Include the following issues:
• This Week’s Hot Topic
• Next Week’s Hot Topic
• Pay Raise for City Zoo Workers
• Repairing the Traffi c Lights
• Reopen the Parks and Community Centers
• Announcements
★100

101From YELL ©2007 John W. Gardner Center
NOTES
From YELL ©2007 John W. Gardner Center ★101
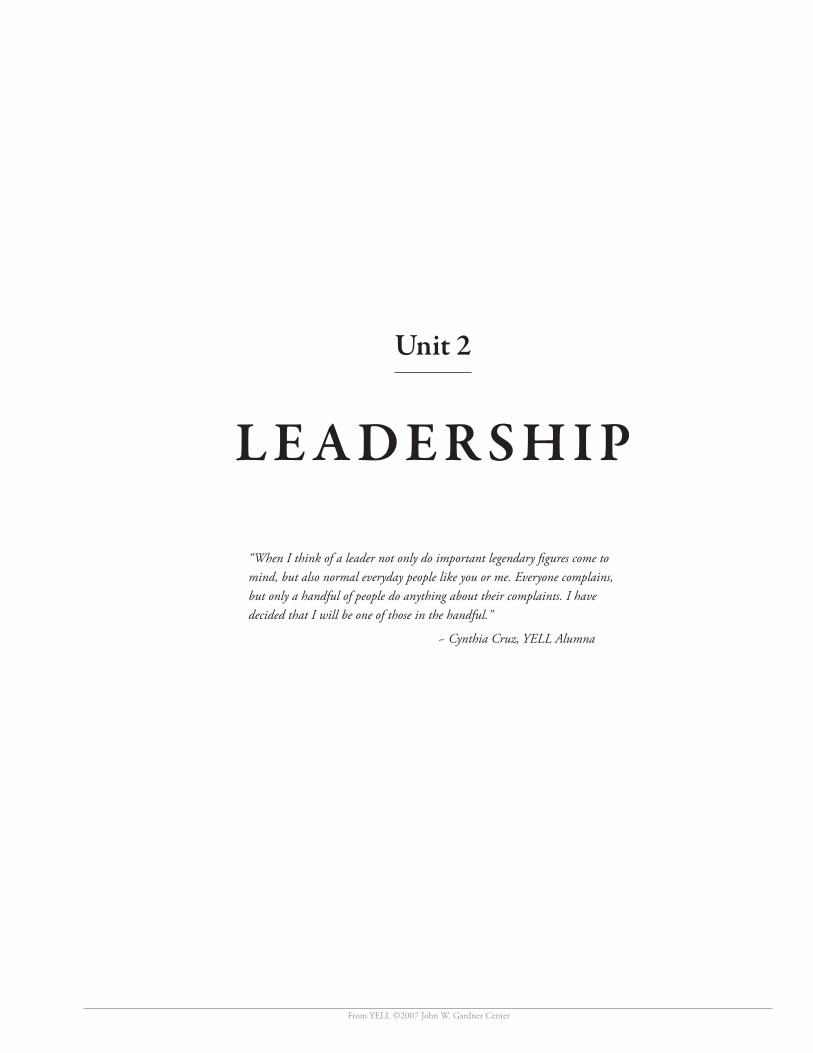
102
Unit 2
L E A D E R S H I P
From YELL ©2007 John W. Gardner Center
“When I think of a leader not only do important legendary fi gures come to mind, but also normal everyday people like you or me. Everyone complains, but only a handful of people do anything about their complaints. I have decided that I will be one of those in the handful.”
~ Cynthia Cruz, YELL Alumna

From YELL ©2007 John W. Gardner Center
NOTES
★103
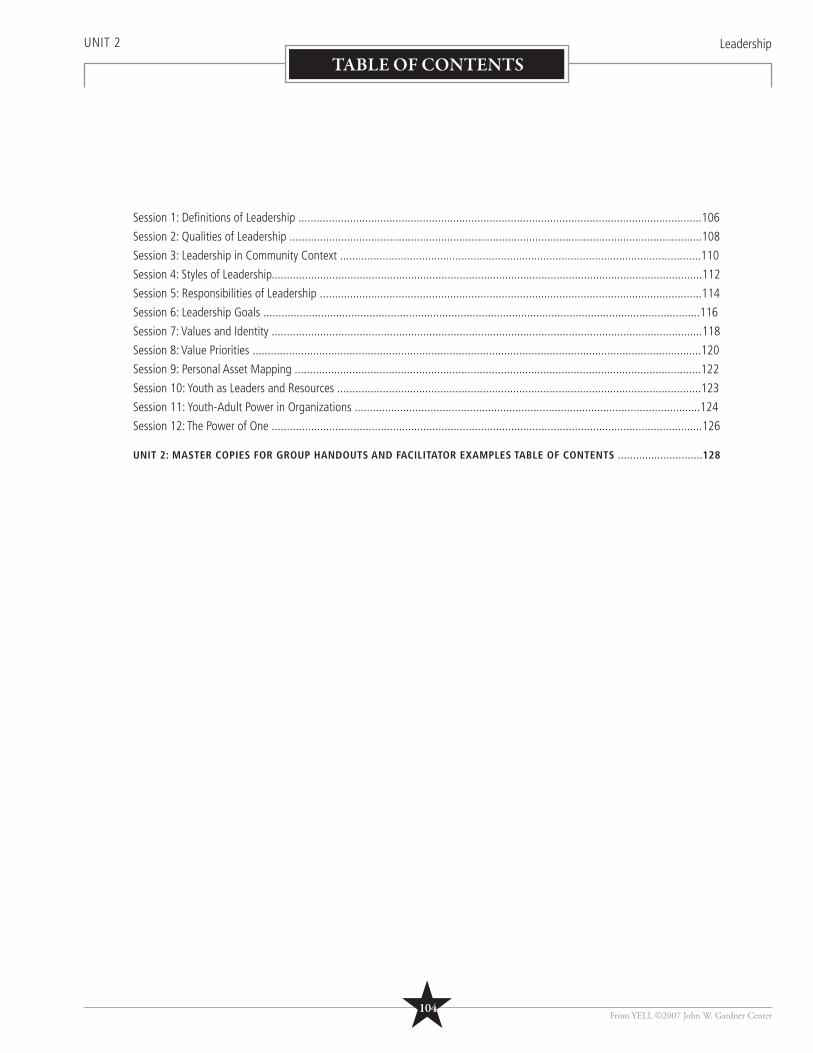
From YELL ©2007 John W. Gardner Center
UNIT 2 Leadership
TABLE OF CONTENTS
Session 1: Defi nitions of Leadership .....................................................................................................................................106
Session 2: Qualities of Leadership ........................................................................................................................................108
Session 3: Leadership in Community Context .......................................................................................................................110
Session 4: Styles of Leadership..............................................................................................................................................112
Session 5: Responsibilities of Leadership ..............................................................................................................................114
Session 6: Leadership Goals ................................................................................................................................................116
Session 7: Values and Identity ..............................................................................................................................................118
Session 8: Value Priorities ....................................................................................................................................................120
Session 9: Personal Asset Mapping ......................................................................................................................................122
Session 10: Youth as Leaders and Resources ........................................................................................................................123
Session 11: Youth-Adult Power in Organizations ..................................................................................................................124
Session 12: The Power of One ..............................................................................................................................................126
UNIT 2: MASTER COPIES FOR GROUP HANDOUTS AND FACILITATOR EXAMPLES TABLE OF CONTENTS ............................128
★104
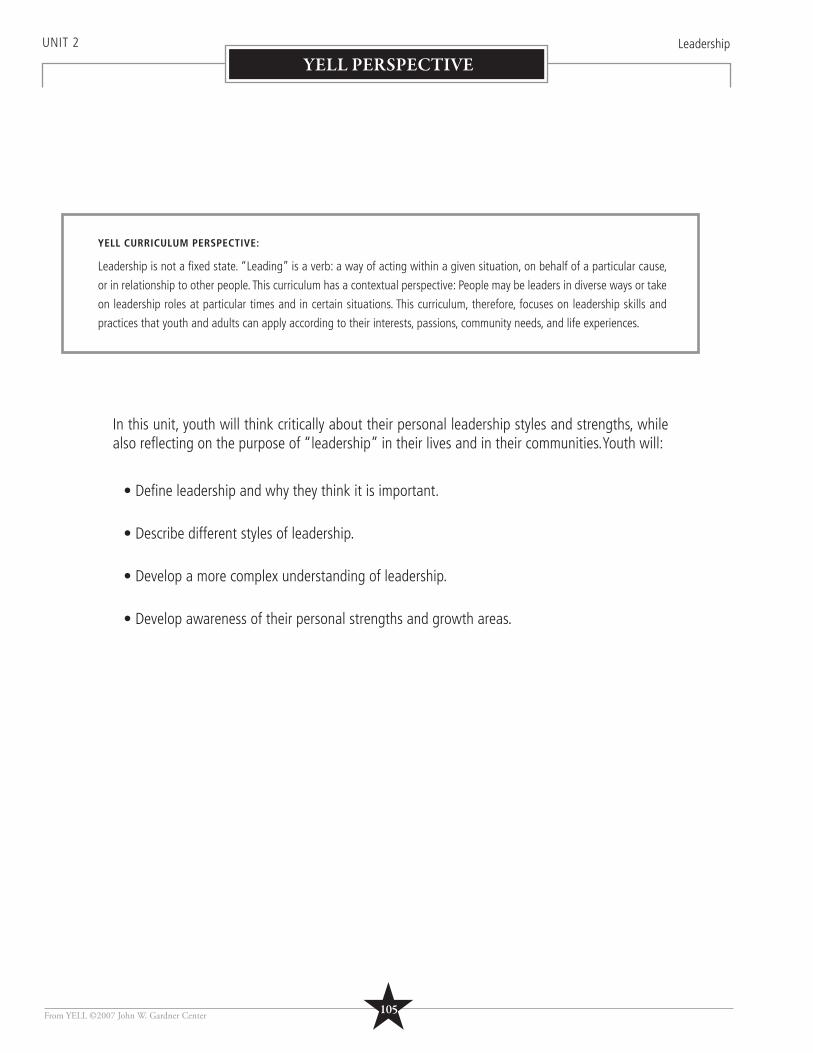
From YELL ©2007 John W. Gardner Center
UNIT 2 Leadership
YELL PERSPECTIVE
YELL CURRICULUM PERSPECTIVE:
Leadership is not a fi xed state. “Leading” is a verb: a way of acting within a given situation, on behalf of a particular cause,
or in relationship to other people. This curriculum has a contextual perspective: People may be leaders in diverse ways or take
on leadership roles at particular times and in certain situations. This curriculum, therefore, focuses on leadership skills and
practices that youth and adults can apply according to their interests, passions, community needs, and life experiences.
In this unit, youth will think critically about their personal leadership styles and strengths, while also refl ecting on the purpose of “leadership” in their lives and in their communities.Youth will:
• Defi ne leadership and why they think it is important.
• Describe different styles of leadership.
• Develop a more complex understanding of leadership.
• Develop awareness of their personal strengths and growth areas.
★105
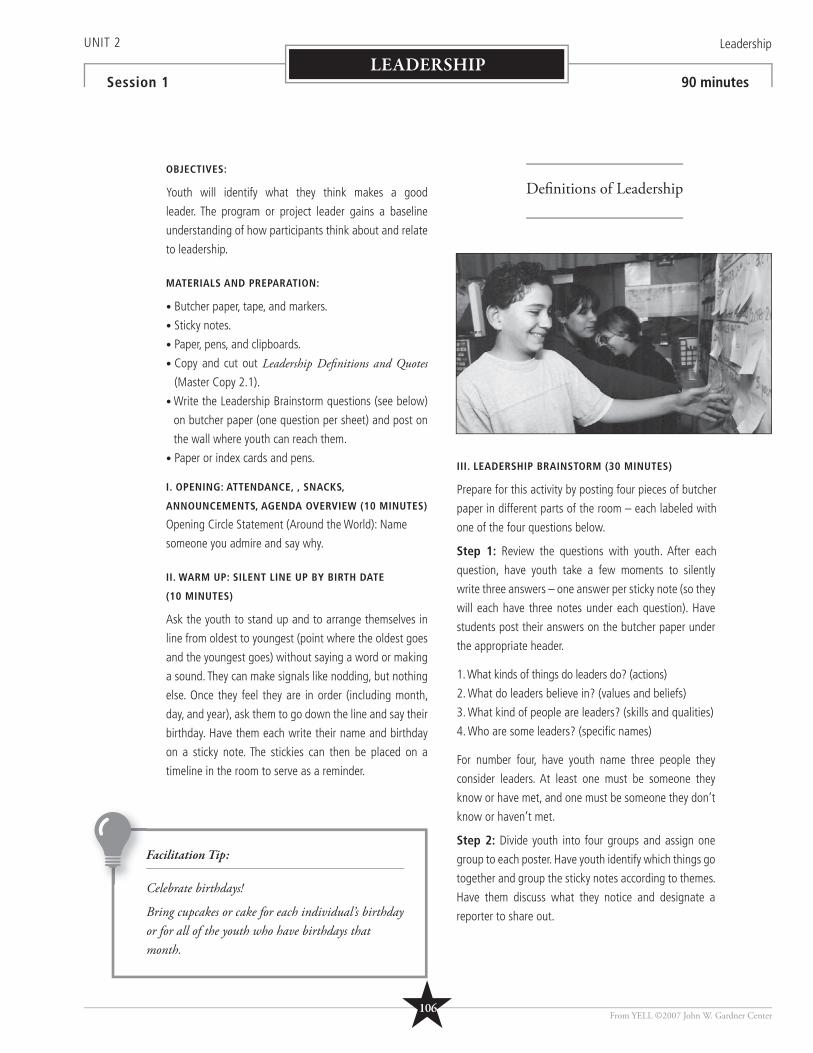
UNIT 2 Leadership
Session 1 90 minutesLEADERSHIP
OBJECTIVES:
Youth will identify what they think makes a good
leader. The program or project leader gains a baseline
understanding of how participants think about and relate
to leadership.
MATERIALS AND PREPARATION:
• Butcher paper, tape, and markers.
• Sticky notes.
• Paper, pens, and clipboards.
• Copy and cut out Leadership Defi nitions and Quotes (Master Copy 2.1).
• Write the Leadership Brainstorm questions (see below)
on butcher paper (one question per sheet) and post on
the wall where youth can reach them.
• Paper or index cards and pens.
I. OPENING: ATTENDANCE, , SNACKS,
ANNOUNCEMENTS, AGENDA OVERVIEW (10 MINUTES)
Opening Circle Statement (Around the World): Name
someone you admire and say why.
II. WARM UP: SILENT LINE UP BY BIRTH DATE
(10 MINUTES)
Ask the youth to stand up and to arrange themselves in
line from oldest to youngest (point where the oldest goes
and the youngest goes) without saying a word or making
a sound. They can make signals like nodding, but nothing
else. Once they feel they are in order (including month,
day, and year), ask them to go down the line and say their
birthday. Have them each write their name and birthday
on a sticky note. The stickies can then be placed on a
timeline in the room to serve as a reminder.
III. LEADERSHIP BRAINSTORM (30 MINUTES)
Prepare for this activity by posting four pieces of butcher
paper in different parts of the room – each labeled with
one of the four questions below.
Step 1: Review the questions with youth. After each
question, have youth take a few moments to silently
write three answers – one answer per sticky note (so they
will each have three notes under each question). Have
students post their answers on the butcher paper under
the appropriate header.
1. What kinds of things do leaders do? (actions)
2. What do leaders believe in? (values and beliefs)
3. What kind of people are leaders? (skills and qualities)
4. Who are some leaders? (specifi c names)
For number four, have youth name three people they
consider leaders. At least one must be someone they
know or have met, and one must be someone they don’t
know or haven’t met.
Step 2: Divide youth into four groups and assign one
group to each poster. Have youth identify which things go
together and group the sticky notes according to themes.
Have them discuss what they notice and designate a
reporter to share out.
Facilitation Tip:
Celebrate birthdays!
Bring cupcakes or cake for each individual’s birthday or for all of the youth who have birthdays that month.
Defi nitions of Leadership
From YELL ©2007 John W. Gardner Center★106
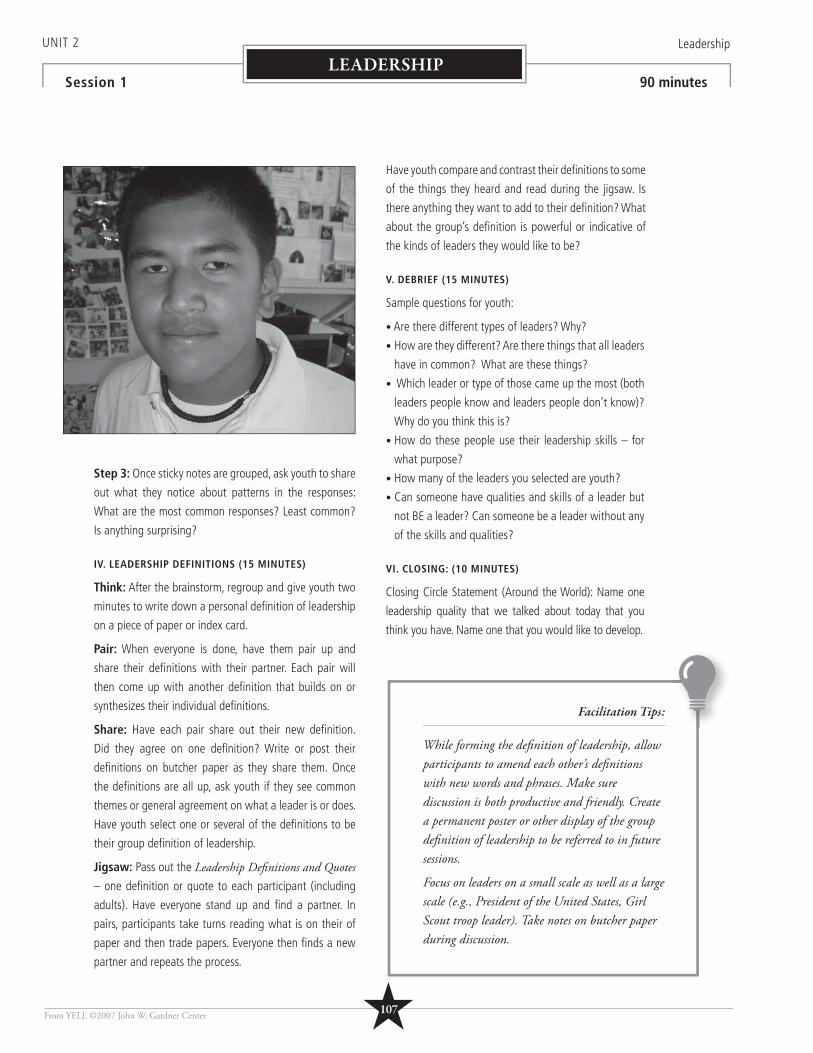
Step 3: Once sticky notes are grouped, ask youth to share
out what they notice about patterns in the responses:
What are the most common responses? Least common?
Is anything surprising?
IV. LEADERSHIP DEFINITIONS (15 MINUTES)
Think: After the brainstorm, regroup and give youth two
minutes to write down a personal defi nition of leadership
on a piece of paper or index card.
Pair: When everyone is done, have them pair up and
share their defi nitions with their partner. Each pair will
then come up with another defi nition that builds on or
synthesizes their individual defi nitions.
Share: Have each pair share out their new defi nition.
Did they agree on one defi nition? Write or post their
defi nitions on butcher paper as they share them. Once
the defi nitions are all up, ask youth if they see common
themes or general agreement on what a leader is or does.
Have youth select one or several of the defi nitions to be
their group defi nition of leadership.
Jigsaw: Pass out the Leadership Defi nitions and Quotes – one defi nition or quote to each participant (including
adults). Have everyone stand up and fi nd a partner. In
pairs, participants take turns reading what is on their of
paper and then trade papers. Everyone then fi nds a new
partner and repeats the process.
Have youth compare and contrast their defi nitions to some
of the things they heard and read during the jigsaw. Is
there anything they want to add to their defi nition? What
about the group’s defi nition is powerful or indicative of
the kinds of leaders they would like to be?
V. DEBRIEF (15 MINUTES)
Sample questions for youth:
• Are there different types of leaders? Why?
• How are they different? Are there things that all leaders
have in common? What are these things?
• Which leader or type of those came up the most (both
leaders people know and leaders people don’t know)?
Why do you think this is?
• How do these people use their leadership skills – for
what purpose?
• How many of the leaders you selected are youth?
• Can someone have qualities and skills of a leader but
not BE a leader? Can someone be a leader without any
of the skills and qualities?
VI. CLOSING: (10 MINUTES)
Closing Circle Statement (Around the World): Name one
leadership quality that we talked about today that you
think you have. Name one that you would like to develop.
Facilitation Tips:
While forming the defi nition of leadership, allow participants to amend each other’s defi nitions with new words and phrases. Make sure discussion is both productive and friendly. Create a permanent poster or other display of the group defi nition of leadership to be referred to in future sessions.
Focus on leaders on a small scale as well as a large scale (e.g., President of the United States, Girl Scout troop leader). Take notes on butcher paper during discussion.
UNIT 2 Leadership
Session 1 90 minutesLEADERSHIP
From YELL ©2007 John W. Gardner Center ★107
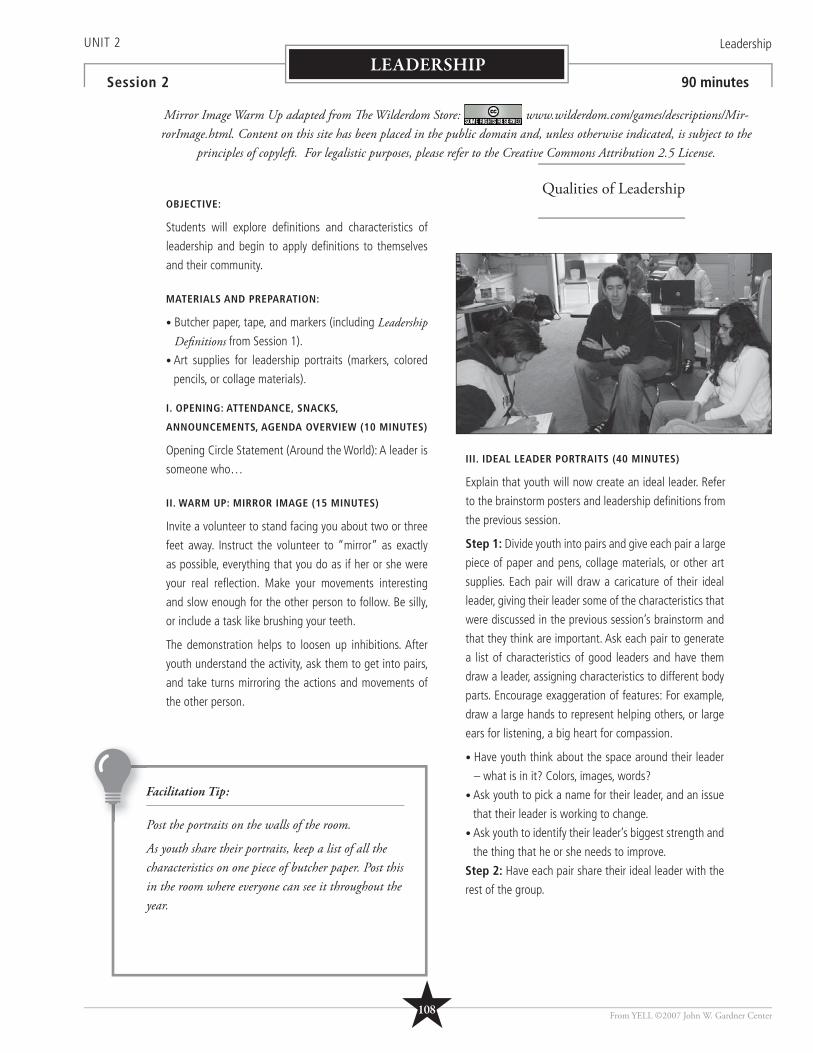
UNIT 2 Leadership
Session 2 90 minutesLEADERSHIP
III. IDEAL LEADER PORTRAITS (40 MINUTES)
Explain that youth will now create an ideal leader. Refer
to the brainstorm posters and leadership defi nitions from
the previous session.
Step 1: Divide youth into pairs and give each pair a large
piece of paper and pens, collage materials, or other art
supplies. Each pair will draw a caricature of their ideal
leader, giving their leader some of the characteristics that
were discussed in the previous session’s brainstorm and
that they think are important. Ask each pair to generate
a list of characteristics of good leaders and have them
draw a leader, assigning characteristics to different body
parts. Encourage exaggeration of features: For example,
draw a large hands to represent helping others, or large
ears for listening, a big heart for compassion.
• Have youth think about the space around their leader
– what is in it? Colors, images, words?
• Ask youth to pick a name for their leader, and an issue
that their leader is working to change.
• Ask youth to identify their leader’s biggest strength and
the thing that he or she needs to improve.
Step 2: Have each pair share their ideal leader with the
rest of the group.
Facilitation Tip:
Post the portraits on the walls of the room.
As youth share their portraits, keep a list of all the characteristics on one piece of butcher paper. Post this in the room where everyone can see it throughout the year.
Qualities of Leadership
From YELL ©2007 John W. Gardner Center
OBJECTIVE:
Students will explore defi nitions and characteristics of
leadership and begin to apply defi nitions to themselves
and their community.
MATERIALS AND PREPARATION:
• Butcher paper, tape, and markers (including Leadership Defi nitions from Session 1).
• Art supplies for leadership portraits (markers, colored
pencils, or collage materials).
I. OPENING: ATTENDANCE, SNACKS,
ANNOUNCEMENTS, AGENDA OVERVIEW (10 MINUTES)
Opening Circle Statement (Around the World): A leader is
someone who…
II. WARM UP: MIRROR IMAGE (15 MINUTES)
Invite a volunteer to stand facing you about two or three
feet away. Instruct the volunteer to “mirror” as exactly
as possible, everything that you do as if her or she were
your real refl ection. Make your movements interesting
and slow enough for the other person to follow. Be silly,
or include a task like brushing your teeth.
The demonstration helps to loosen up inhibitions. After
youth understand the activity, ask them to get into pairs,
and take turns mirroring the actions and movements of
the other person.
Mirror Image Warm Up adapted from Th e Wilderdom Store: www.wilderdom.com/games/descriptions/Mir-rorImage.html. Content on this site has been placed in the public domain and, unless otherwise indicated, is subject to the
principles of copyleft. For legalistic purposes, please refer to the Creative Commons Attribution 2.5 License.
★108
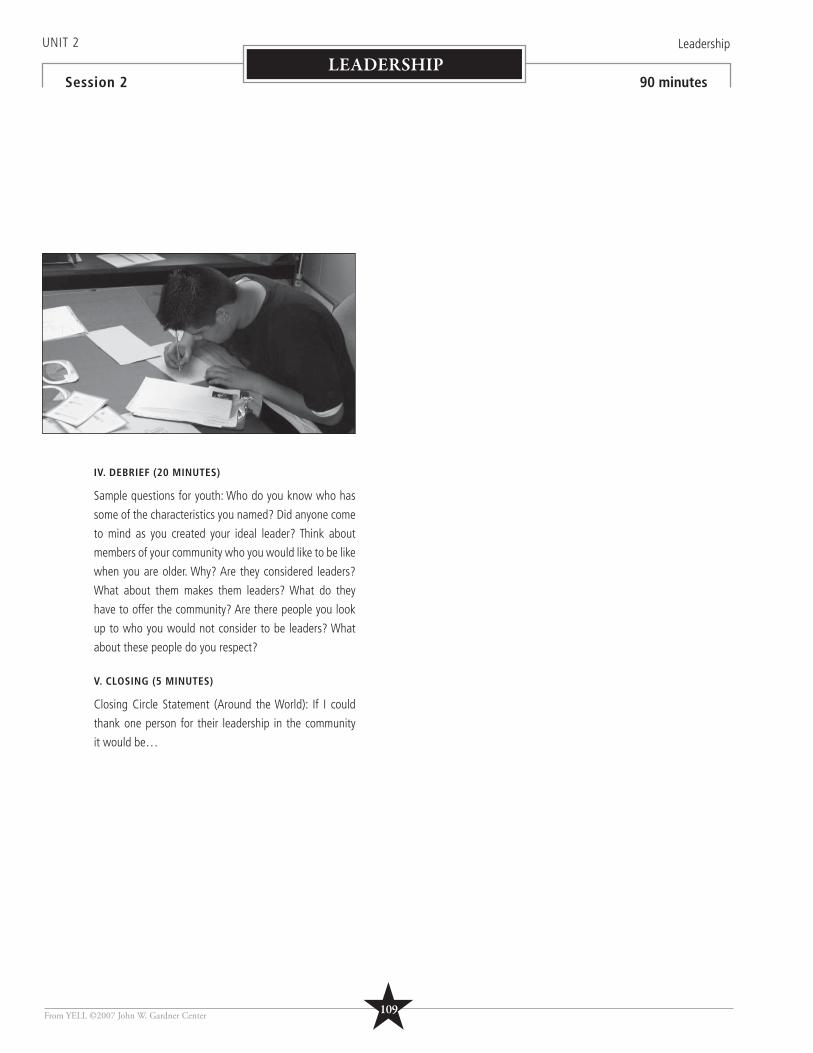
IV. DEBRIEF (20 MINUTES)
Sample questions for youth: Who do you know who has
some of the characteristics you named? Did anyone come
to mind as you created your ideal leader? Think about
members of your community who you would like to be like
when you are older. Why? Are they considered leaders?
What about them makes them leaders? What do they
have to offer the community? Are there people you look
up to who you would not consider to be leaders? What
about these people do you respect?
V. CLOSING (5 MINUTES)
Closing Circle Statement (Around the World): If I could
thank one person for their leadership in the community
it would be…
UNIT 2 Leadership
Session 2 90 minutesLEADERSHIP
From YELL ©2007 John W. Gardner Center ★109
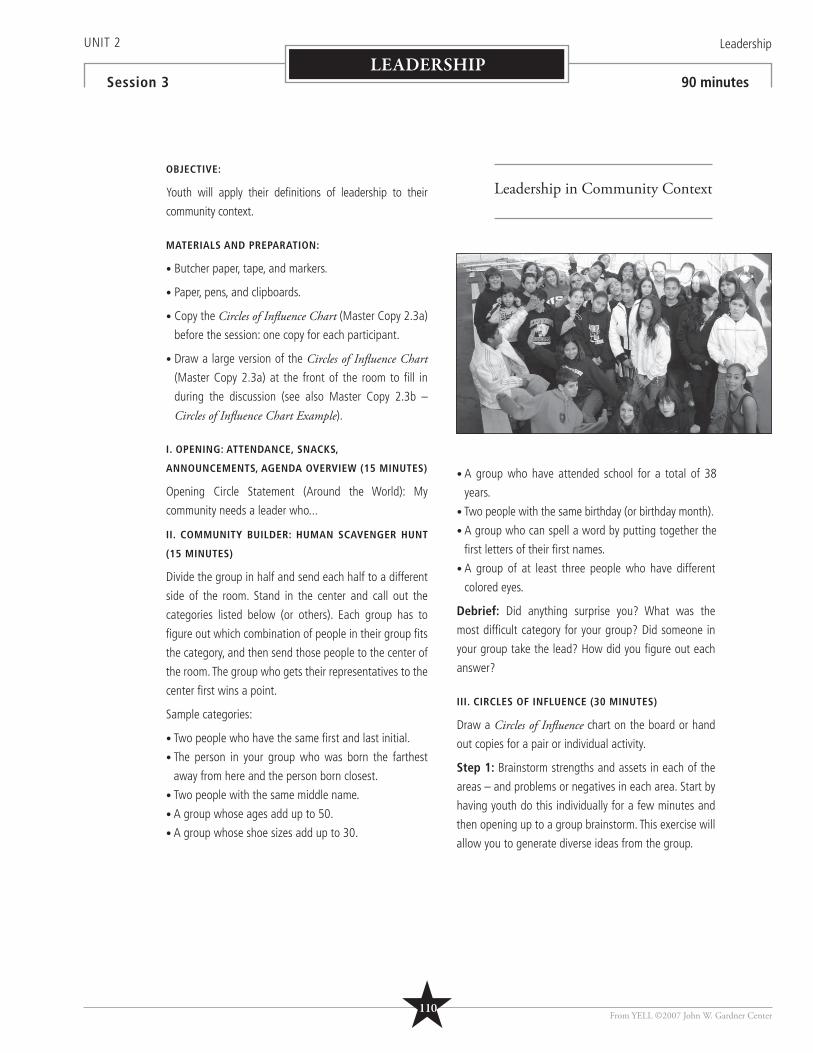
★110
UNIT 2 Leadership
Session 3 90 minutesLEADERSHIP
OBJECTIVE:
Youth will apply their defi nitions of leadership to their
community context.
MATERIALS AND PREPARATION:
• Butcher paper, tape, and markers.
• Paper, pens, and clipboards.
• Copy the Circles of Infl uence Chart (Master Copy 2.3a)
before the session: one copy for each participant.
• Draw a large version of the Circles of Infl uence Chart (Master Copy 2.3a) at the front of the room to fi ll in
during the discussion (see also Master Copy 2.3b –
Circles of Infl uence Chart Example).
I. OPENING: ATTENDANCE, SNACKS,
ANNOUNCEMENTS, AGENDA OVERVIEW (15 MINUTES)
Opening Circle Statement (Around the World): My
community needs a leader who...
II. COMMUNITY BUILDER: HUMAN SCAVENGER HUNT
(15 MINUTES)
Divide the group in half and send each half to a different
side of the room. Stand in the center and call out the
categories listed below (or others). Each group has to
fi gure out which combination of people in their group fi ts
the category, and then send those people to the center of
the room. The group who gets their representatives to the
center fi rst wins a point.
Sample categories:
• Two people who have the same fi rst and last initial.
• The person in your group who was born the farthest
away from here and the person born closest.
• Two people with the same middle name.
• A group whose ages add up to 50.
• A group whose shoe sizes add up to 30.
• A group who have attended school for a total of 38
years.
• Two people with the same birthday (or birthday month).
• A group who can spell a word by putting together the
fi rst letters of their fi rst names.
• A group of at least three people who have different
colored eyes.
Debrief: Did anything surprise you? What was the
most diffi cult category for your group? Did someone in
your group take the lead? How did you fi gure out each
answer?
III. CIRCLES OF INFLUENCE (30 MINUTES)
Draw a Circles of Infl uence chart on the board or hand
out copies for a pair or individual activity.
Step 1: Brainstorm strengths and assets in each of the
areas – and problems or negatives in each area. Start by
having youth do this individually for a few minutes and
then opening up to a group brainstorm. This exercise will
allow you to generate diverse ideas from the group.
Leadership in Community Context
From YELL ©2007 John W. Gardner Center
Step 2: Once youth have fi lled up the circles with their
and ideas of strengths and issues, ask them to think back
to the discussion of the different types of leaders in their
community (see previous session). What do people do,
what do they say, how do they act that contributes to
the positives or the negatives that are listed? How do
individuals and groups make these positive things or
negative things possible? Name specifi c leaders in the
different domains, along with the actions those leaders
are taking. Youth will see that there is a lot of overlap and
that actions in one domain can impact what happens in
other domains.
IV. DEBRIEF (15 MINUTES)
Sample questions:
How do actions within one domain impact the others? •
Have youth think of examples.
Where do youth have the most infl uence? Where •
could youth have more infl uence?
Are certain domains harder to infl uence than others?•
Where does your group or the people in your group •
fall? What are your strongest areas of infl uence?
V. CLOSING (15 MINUTES)
Closing Circle Statement (Around the World): If I had a
magic wand and could instantly change one thing in my
life it would be…
★111
UNIT 2 Leadership
Session 3 90 minutesLEADERSHIP
From YELL ©2007 John W. Gardner Center
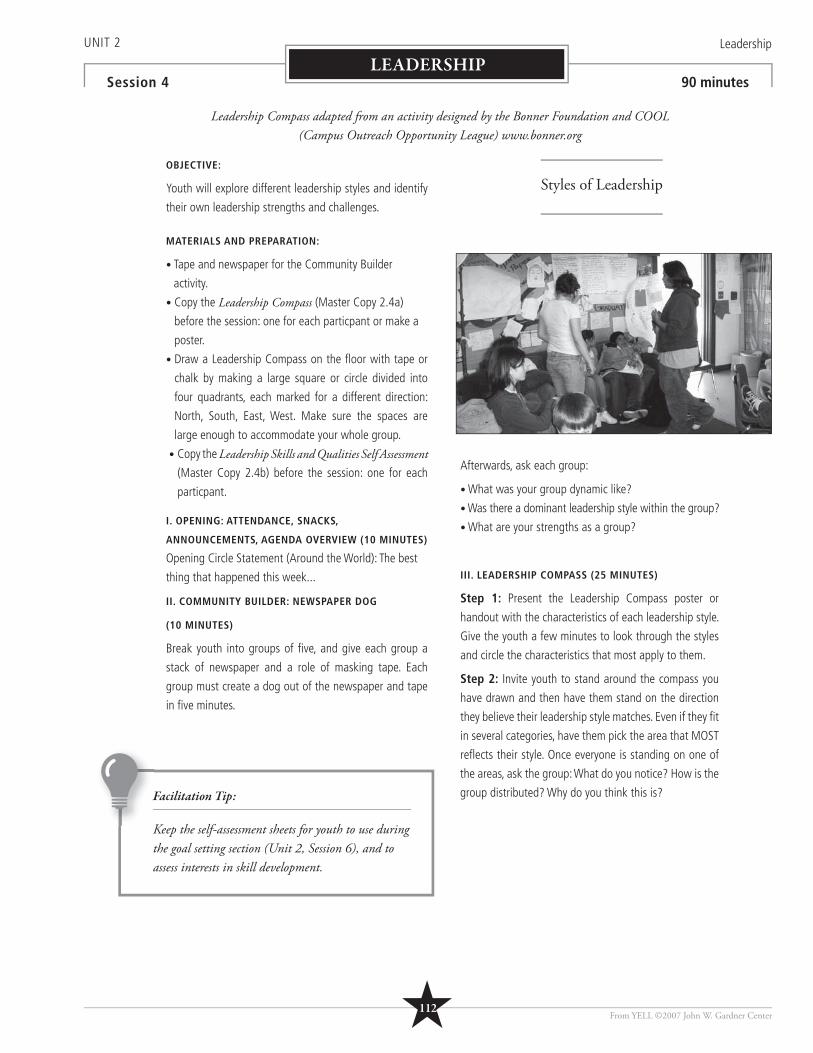
★112
UNIT 2 Leadership
Session 4 90 minutesLEADERSHIP
OBJECTIVE:
Youth will explore different leadership styles and identify
their own leadership strengths and challenges.
MATERIALS AND PREPARATION:
• Tape and newspaper for the Community Builder
activity.
• Copy the Leadership Compass (Master Copy 2.4a)
before the session: one for each particpant or make a
poster.
• Draw a Leadership Compass on the fl oor with tape or
chalk by making a large square or circle divided into
four quadrants, each marked for a different direction:
North, South, East, West. Make sure the spaces are
large enough to accommodate your whole group.
• Copy the Leadership Skills and Qualities Self Assessment (Master Copy 2.4b) before the session: one for each
particpant.
I. OPENING: ATTENDANCE, SNACKS,
ANNOUNCEMENTS, AGENDA OVERVIEW (10 MINUTES)
Opening Circle Statement (Around the World): The best
thing that happened this week...
II. COMMUNITY BUILDER: NEWSPAPER DOG
(10 MINUTES)
Break youth into groups of fi ve, and give each group a
stack of newspaper and a role of masking tape. Each
group must create a dog out of the newspaper and tape
in fi ve minutes.
Afterwards, ask each group:
• What was your group dynamic like?
• Was there a dominant leadership style within the group?
• What are your strengths as a group?
III. LEADERSHIP COMPASS (25 MINUTES)
Step 1: Present the Leadership Compass poster or
handout with the characteristics of each leadership style.
Give the youth a few minutes to look through the styles
and circle the characteristics that most apply to them.
Step 2: Invite youth to stand around the compass you
have drawn and then have them stand on the direction
they believe their leadership style matches. Even if they fi t
in several categories, have them pick the area that MOST
refl ects their style. Once everyone is standing on one of
the areas, ask the group: What do you notice? How is the
group distributed? Why do you think this is? Facilitation Tip:
Keep the self-assessment sheets for youth to use during the goal setting section (Unit 2, Session 6), and to assess interests in skill development.
Styles of Leadership
From YELL ©2007 John W. Gardner Center
Leadership Compass adapted from an activity designed by the Bonner Foundation and COOL (Campus Outreach Opportunity League) www.bonner.org
Step 3: Give each group a piece of paper and pens,
and have them move to an area where they can work
comfortably. Within each leadership style group, have
them discuss and write down answers to the following
questions:
• What are the strengths of your leadership style?
• What are the challenges of your leadership style?
• What would be your group’s motto?
Step 4: Have youth prepare a brief presentation, sharing
the strengths, challenges, and motto of their style.
When groups present (inside if you have been doing
the activity outdoors), write or post the strengths and
challenges each group describes.
IV. DEBRIEF (20 MINUTES)
Sample questions:
• After everyone has fi nished sharing, ask how their styles
complement each other.
• Ask the group to look at the challenges of one style and
ask how the strengths of another style compensate in
a group context.
• Does the group need all of the styles? Why or why not?
• Did anything surprise you about yourself or the group?
What did you notice?
• How much of leadership style do you think is our
personality, and how much can be learned? Why do
you believe this?
V. LEADERSHIP SKILLS AND QUALITIES:
SELF ASSESSMENT (20 MINUTES)
This exercise can be done in session or as homework.
Hand out the Leadership Skills and Qualities Self Assessment sheet. Go over the categories as a group and
then in silence have youth identify their strengths and
areas for growth. Have youth turn in these sheets.
VI. CLOSING (5 MINUTES)
Closing Circle Statement (Around the World): Name one
word that best describes your leadership style.
★113
UNIT 2 Leadership
Session 4 90 minutesLEADERSHIP
From YELL ©2007 John W. Gardner Center
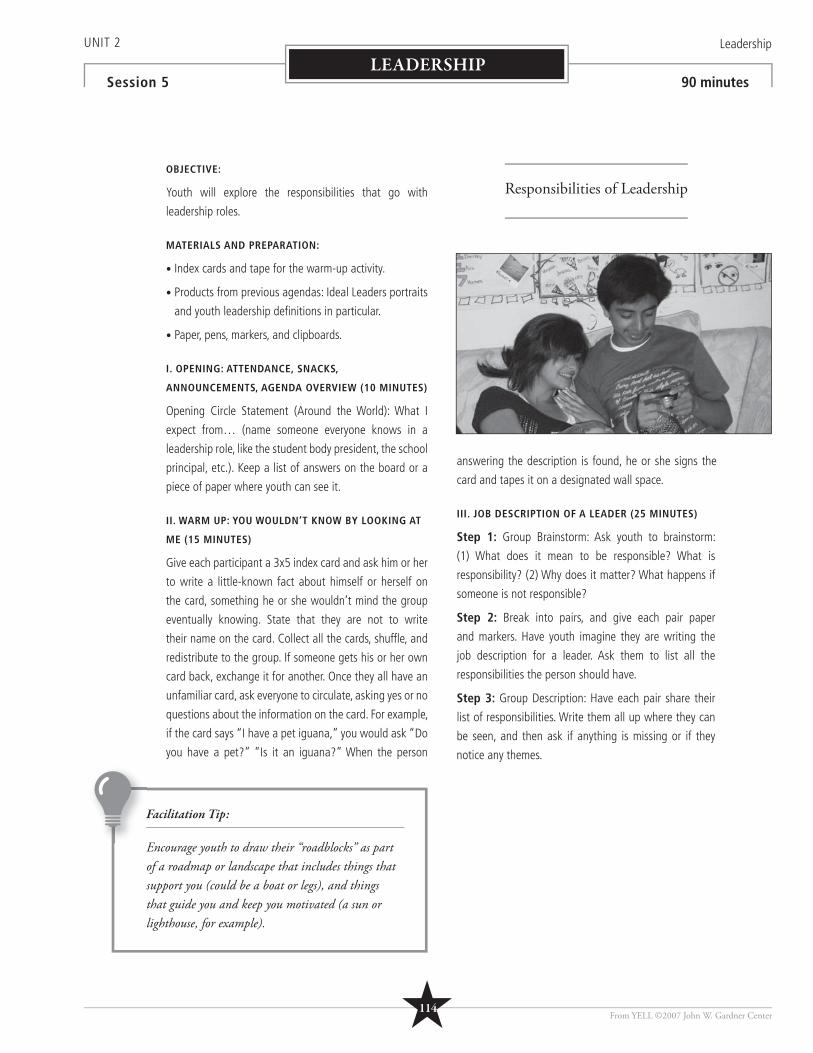
★114
UNIT 2 Leadership
Session 5 90 minutesLEADERSHIP
OBJECTIVE:
Youth will explore the responsibilities that go with
leadership roles.
MATERIALS AND PREPARATION:
• Index cards and tape for the warm-up activity.
• Products from previous agendas: Ideal Leaders portraits
and youth leadership defi nitions in particular.
• Paper, pens, markers, and clipboards.
I. OPENING: ATTENDANCE, SNACKS,
ANNOUNCEMENTS, AGENDA OVERVIEW (10 MINUTES)
Opening Circle Statement (Around the World): What I
expect from… (name someone everyone knows in a
leadership role, like the student body president, the school
principal, etc.). Keep a list of answers on the board or a
piece of paper where youth can see it.
II. WARM UP: YOU WOULDN’T KNOW BY LOOKING AT
ME (15 MINUTES)
Give each participant a 3x5 index card and ask him or her
to write a little-known fact about himself or herself on
the card, something he or she wouldn’t mind the group
eventually knowing. State that they are not to write
their name on the card. Collect all the cards, shuffl e, and
redistribute to the group. If someone gets his or her own
card back, exchange it for another. Once they all have an
unfamiliar card, ask everyone to circulate, asking yes or no
questions about the information on the card. For example,
if the card says “I have a pet iguana,” you would ask “Do
you have a pet?” “Is it an iguana?” When the person
answering the description is found, he or she signs the
card and tapes it on a designated wall space.
III. JOB DESCRIPTION OF A LEADER (25 MINUTES)
Step 1: Group Brainstorm: Ask youth to brainstorm:
(1) What does it mean to be responsible? What is
responsibility? (2) Why does it matter? What happens if
someone is not responsible?
Step 2: Break into pairs, and give each pair paper
and markers. Have youth imagine they are writing the
job description for a leader. Ask them to list all the
responsibilities the person should have.
Step 3: Group Description: Have each pair share their
list of responsibilities. Write them all up where they can
be seen, and then ask if anything is missing or if they
notice any themes.
Facilitation Tip:
Encourage youth to draw their “roadblocks” as part of a roadmap or landscape that includes things that support you (could be a boat or legs), and things that guide you and keep you motivated (a sun or lighthouse, for example).
Responsibilities of Leadership
From YELL ©2007 John W. Gardner Center
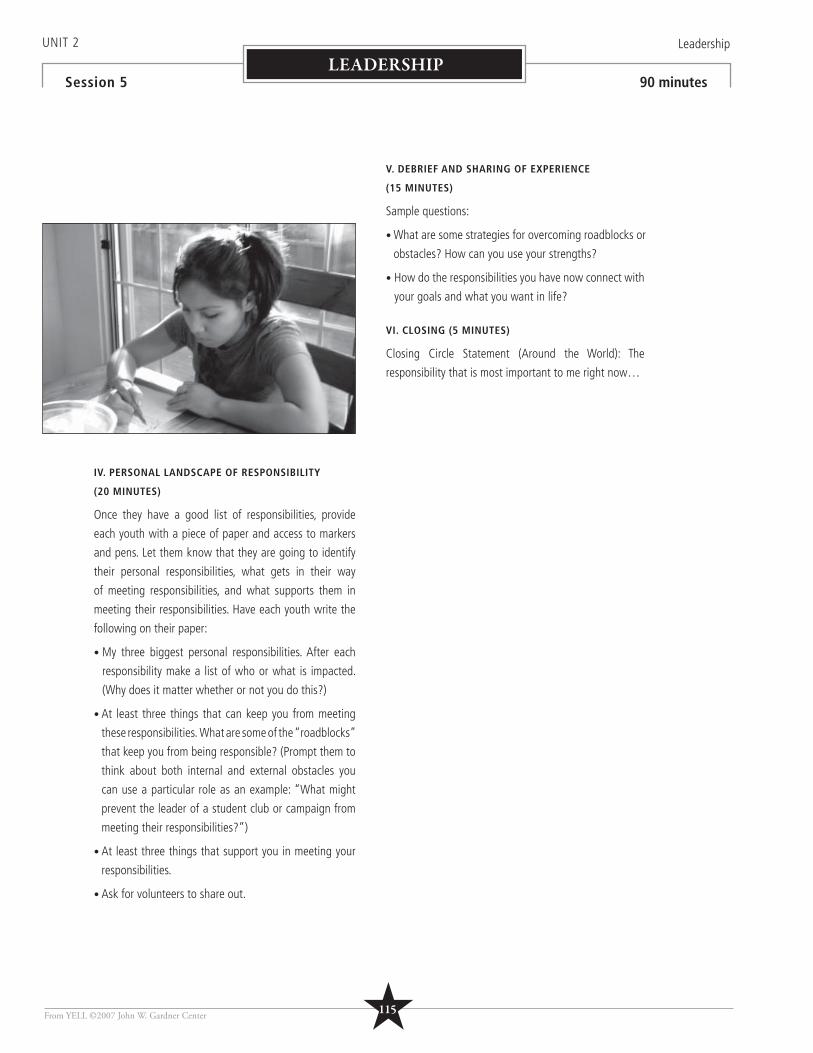
IV. PERSONAL LANDSCAPE OF RESPONSIBILITY
(20 MINUTES)
Once they have a good list of responsibilities, provide
each youth with a piece of paper and access to markers
and pens. Let them know that they are going to identify
their personal responsibilities, what gets in their way
of meeting responsibilities, and what supports them in
meeting their responsibilities. Have each youth write the
following on their paper:
• My three biggest personal responsibilities. After each
responsibility make a list of who or what is impacted.
(Why does it matter whether or not you do this?)
• At least three things that can keep you from meeting
these responsibilities. What are some of the “roadblocks”
that keep you from being responsible? (Prompt them to
think about both internal and external obstacles you
can use a particular role as an example: “What might
prevent the leader of a student club or campaign from
meeting their responsibilities?”)
• At least three things that support you in meeting your
responsibilities.
• Ask for volunteers to share out.
V. DEBRIEF AND SHARING OF EXPERIENCE
(15 MINUTES)
Sample questions:
• What are some strategies for overcoming roadblocks or
obstacles? How can you use your strengths?
• How do the responsibilities you have now connect with
your goals and what you want in life?
VI. CLOSING (5 MINUTES)
Closing Circle Statement (Around the World): The
responsibility that is most important to me right now…
★115
UNIT 2 Leadership
Session 5 90 minutesLEADERSHIP
From YELL ©2007 John W. Gardner Center
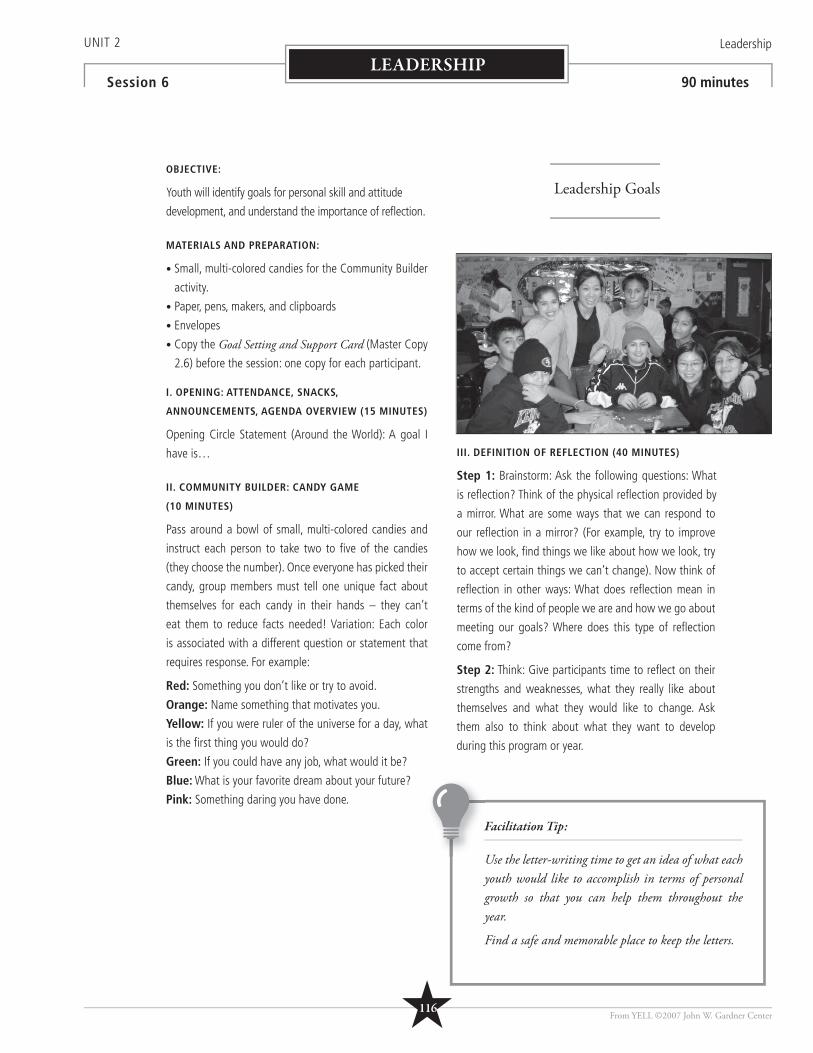
★116
UNIT 2 Leadership
Session 6 90 minutesLEADERSHIP
OBJECTIVE:
Youth will identify goals for personal skill and attitude
development, and understand the importance of refl ection.
MATERIALS AND PREPARATION:
• Small, multi-colored candies for the Community Builder
activity.
• Paper, pens, makers, and clipboards
• Envelopes
• Copy the Goal Setting and Support Card (Master Copy
2.6) before the session: one copy for each participant.
I. OPENING: ATTENDANCE, SNACKS,
ANNOUNCEMENTS, AGENDA OVERVIEW (15 MINUTES)
Opening Circle Statement (Around the World): A goal I
have is…
II. COMMUNITY BUILDER: CANDY GAME
(10 MINUTES)
Pass around a bowl of small, multi-colored candies and
instruct each person to take two to fi ve of the candies
(they choose the number). Once everyone has picked their
candy, group members must tell one unique fact about
themselves for each candy in their hands – they can’t
eat them to reduce facts needed! Variation: Each color
is associated with a different question or statement that
requires response. For example:
Red: Something you don’t like or try to avoid.
Orange: Name something that motivates you.
Yellow: If you were ruler of the universe for a day, what
is the fi rst thing you would do?
Green: If you could have any job, what would it be?
Blue: What is your favorite dream about your future?
Pink: Something daring you have done.
III. DEFINITION OF REFLECTION (40 MINUTES)
Step 1: Brainstorm: Ask the following questions: What
is refl ection? Think of the physical refl ection provided by
a mirror. What are some ways that we can respond to
our refl ection in a mirror? (For example, try to improve
how we look, fi nd things we like about how we look, try
to accept certain things we can’t change). Now think of
refl ection in other ways: What does refl ection mean in
terms of the kind of people we are and how we go about
meeting our goals? Where does this type of refl ection
come from?
Step 2: Think: Give participants time to refl ect on their
strengths and weaknesses, what they really like about
themselves and what they would like to change. Ask
them also to think about what they want to develop
during this program or year.
Facilitation Tip:
Use the letter-writing time to get an idea of what each youth would like to accomplish in terms of personal growth so that you can help them throughout the year.
Find a safe and memorable place to keep the letters.
Leadership Goals
From YELL ©2007 John W. Gardner Center
Step 3: Write: Ask youth to write a letter to the person
they hope to be at the end of this program or year. Suggest
these ideas as they write the letters:
• What do you want that person to be like?
• How do you think you will get there?
• What strengths do you have that will help you reach
your goal?
• What weakness do you want to work on?
• What experiences do you hope to have?
• What do you need from adult staff/teachers in order to
meet your goals?
Ask the participants to take their time and be thoughtful.
Ask them to think about all of the concepts that they have
discussed so far. Let them know that they will not need to
share the letter with others.
When they are done, seal the letters in envelopes and
save them for the end of the year.
DO NOT TELL PARTICIPANTS THAT THEY WILL BE
GETTING THE LETTERS BACK. DON’T LOSE THEM.
IV. GOAL CARDS (20 MINUTES)
Have youth focus on one main goal that is really important
for them to meet this year. Hand out the Goal Setting and Support Card sheets and have each youth fi ll it out.
Once everyone is done, have them circulate through the
group and get “signatures of support” from the others
who they think can and will support them in meeting
their objective.
V. CLOSING (5 MINUTES)
Closing Circle Statement (Around the World): Have each
youth stand up and state his or her goal.
Example fr om Practice:
In the Middle School YELL program, each youth had a laminated YELL ID card that included their picture, goal, and a group picture on the back. Each youth decorated their own card before it was laminated.
e:
★117
UNIT 2 Leadership
Session 6 90 minutesLEADERSHIP
From YELL ©2007 John W. Gardner Center
★118
UNIT 2 Leadership
Session 7 90 minutesLEADERSHIP
OBJECTIVES:
Participants will understand how personal values affect
leadership. They also will learn why it is important for
groups to encourage diversity rather than suppress it.
MATERIALS AND PREPARATION:
• Index cards.
• Prepare categories on the People Bingo template and
then copy enough People Bingo Cards (Master Copy
2.7a and 2.7b) for each participant.
• Prepare the room for Crossing the Line by clearing a
space big enough for the entire group to stand and
move around. In the middle of the space, draw or tape
a line for participants to cross.
• Copy the Crossing the Line Statements (Master
Copy 2.7c) for a reference or make your own list of
statements.
• Review Active Listening Guidelines (Master Copy 1.1a)
and Confi dentiality Guidelines (Master Copy 1.1b)
from Unit 1.
I. OPENING: ATTENDANCE, SNACKS,
ANNOUNCEMENTS, AGENDA OVERVIEW (10 MINUTES)
Opening Circle Statement (Around the World): Name one
word you would use to describe yourself when meeting
someone for the fi rst time.
II. COMMUNITY BUILDER: PEOPLE BINGO
(10 MINUTES)
This activity is designed to help youth get to know each other
and to demonstrate the diversity within the group. Pass out
People Bingo Cards and a pen to each participant. Give them
time to fi ll up their cards. The person to fi ll up his or her card
fi rst wins. To encourage participation rather than competition,
consider altering the goal: Try Instead to see how quickly the
entire group can fi ll their cards.
III. CROSSING THE LINE (45 MINUTES)
Crossing the Line allows youth to think about their values,
backgrounds, and experiences. Although the participants may
appear to come from similar situations, it is likely that the
group is comprised of much diversity. This activity will involve
naming and personalizing some of this diversity (along with
some similarities!). Make sure to review the Confi dentiality Guidelines before starting this activity.
Step 1: Explain the group rules and expectations.
1. No one is required to cross the line – or to participate
at all. However, ask those participants to refl ect on what
makes it diffi cult to cross the line or on why they do not want
to participate – this will also refl ect values!
2. Participants must use respectful listening and communication
skills. They should remain silent throughout the activity,
and nonverbal signals like giggling and eye rolling are not
permitted. Make sure everyone agrees to the rules before you
do the activity.
3. Finally, it is important to respect the dignity of each person
involved in the activity. All that is shared must remain
confi dential, and no one should feel or offer any judgment.
Step 2: Have youth fi nd a partner, and then have all partners
sit facing each other in a circle format (one circle inside the
other, so that the people inside the circle face their partners
in the outside circle). This is an active listening exercise: If
necessary, remind youth of the Active Listening Guidelines. Let
youth know that they will each have one minute to share their
Facilitation Tip: Crossing the Line
Make sure there is an established level of trust and comfort in your group before doing this activity.
Th is can be an emotional activity. Don’t rush through it. Allow plenty of time to discuss. If you are worried about time, cut the community builder short.
If you have extra time, let the participants digest what they have experienced by journaling or drawing.
Values and Identity
From YELL ©2007 John W. Gardner Center
Identity Cards Activity adapted from an activity by Maria Kelly, Academic Dean at the Saint Paul Conservatory for Performing Arts
response to a question, then they will have one minute to
listen to their partner’s response. At the end of the fi rst
round, the people in the outer circle will all move one
space and face a new partner. Repeat. At the end of the
questions, ask youth to share some of the things they
heard that surprised them or made them think. Suggested
questions:
• What is your defi nition of values?
• Where did you learn your values?
• Who taught them to you?
• What specifi c values do you hold?
Explain to the group that values play a signifi cant role
in shaping someone’s style of leadership. To understand
leadership, people must also understand their values and
how those values shape their actions. To understand the
group, members must understand the diverse participants
of which it is composed.
Step 3: Crossing the Line
Ask the participants to gather on one side of the room
or line and face toward its center. Explain that you will
call out specifi c categories, labels, and descriptions, and
ask that all of those to whom this applies walk to the
other side of the room or line. Start with an example like,
“Anyone who wears glasses, cross the line.” Participants
who wear glasses, if they feel comfortable, cross the
line and turn to face the participants on the other side.
Ask participants on both sides to take the time to think
about what it means to be on each side. Be slow and
deliberate with the activity, and allow enough time for
youth to get in touch with their thoughts and feelings.
Then ask those participants to return to the original side,
and continue with a new statement (see Crossing the Line Statements).Step 4: Debrief
Use sample questions below to guide the discussion after
participants have completed the activity. You can do this
debrief as a full group, or if you have other leaders or
volunteers, in several small groups.
• What feelings or thoughts did you have as you
participated? What was it like when there were very few
of you on one side of the line?
• What does this activity have to do with leadership? What did you learn
through this activity that will make you a better person or leader? A
better follower or partner in leadership?
• How did the movement of others infl uence you?
• Did you fi nd yourself making judgments of others?
• What did you learn through this activity that can make our environment
more welcoming?
• What does this activity have to do with values?
• Are there times in life when values are ignored? What is the result
when values are ignored? Do values matter? Why?
IV. IDENTITY CARDS (20 MINUTES)
Step 1: Give each participant fi ve index cards.
Step 2: Ask everyone to think of fi ve words that defi ne who they
are. These words should link with groups with which the participants
identify. As an example, you can say that you could put “facilitator”
on your card because you facilitate this group. Religion, race, ethnicity,
hobbies, last names also work well for this activity. The key is to focus
on membership rather than characteristics. When participants have
fi nished writing their fi ve words on their fi ve cards, ask them to stand
in a circle. Ask the participants to look at their cards and decide which
card they are willing to give up. Ask them to place the card in the
center of the circle, but remind them that by putting the card there
they no longer identify with that group. Repeat the process slowly and
thoughtfully until all participants are left with only one card that defi nes
them. Then go around the room and share what that card says.
Step 3: Debrief with the following questions: How did it feel to give up
cards? Did it get easier or harder as you got to your last two? What is
the point of this activity? What does it tell you about the group? Have
any of you ever been in a situation where you had to “give up your
card” or suppress part of who you are? How does that feel? What can
our group do to make sure that no one has to suppress part of their
identity? What can we do outside of this group to help with this issue?
What does this have to do with leadership?
V. CLOSING (5 MINUTES)
Closing Circle Statement (Around the World): One thing you do to ex-
press your identity in positive ways…
UNIT 2 Leadership
Session 7 90 minutesLEADERSHIP
From YELL ©2007 John W. Gardner Center ★119
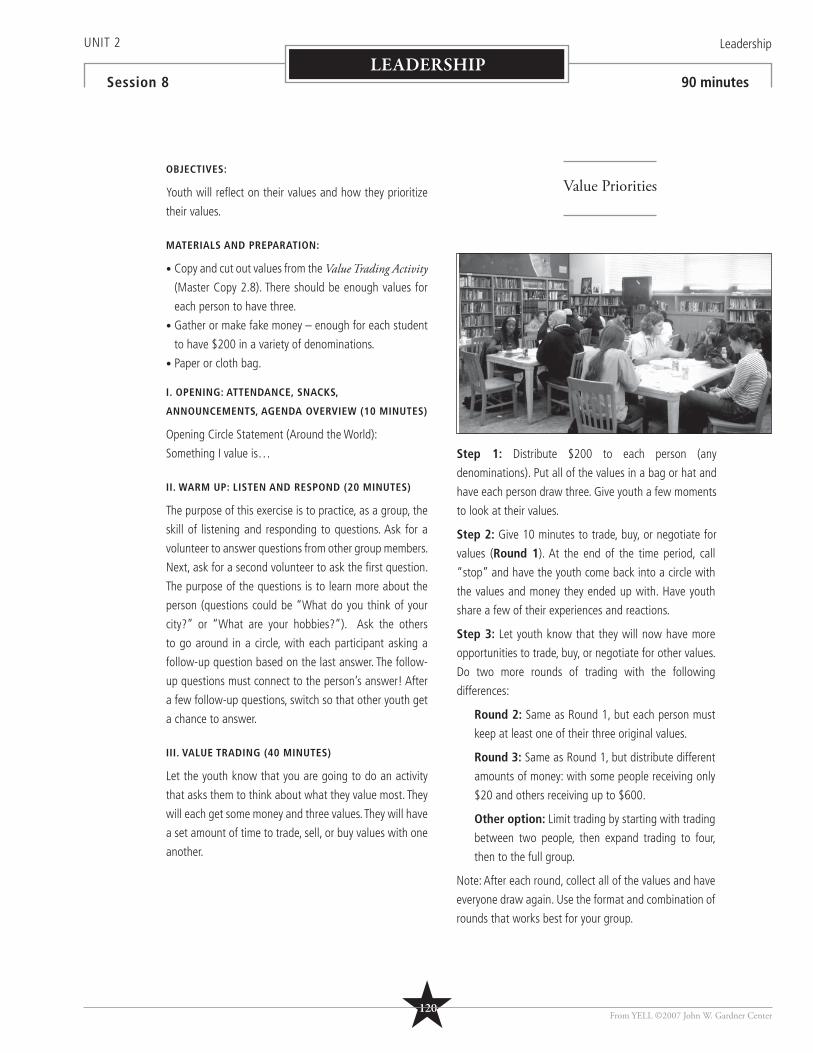
★120
UNIT 2 Leadership
Session 8 90 minutesLEADERSHIP
OBJECTIVES:
Youth will refl ect on their values and how they prioritize
their values.
MATERIALS AND PREPARATION:
• Copy and cut out values from the Value Trading Activity (Master Copy 2.8). There should be enough values for
each person to have three.
• Gather or make fake money – enough for each student
to have $200 in a variety of denominations.
• Paper or cloth bag.
I. OPENING: ATTENDANCE, SNACKS,
ANNOUNCEMENTS, AGENDA OVERVIEW (10 MINUTES)
Opening Circle Statement (Around the World):
Something I value is…
II. WARM UP: LISTEN AND RESPOND (20 MINUTES)
The purpose of this exercise is to practice, as a group, the
skill of listening and responding to questions. Ask for a
volunteer to answer questions from other group members.
Next, ask for a second volunteer to ask the fi rst question.
The purpose of the questions is to learn more about the
person (questions could be “What do you think of your
city?” or “What are your hobbies?”). Ask the others
to go around in a circle, with each participant asking a
follow-up question based on the last answer. The follow-
up questions must connect to the person’s answer! After
a few follow-up questions, switch so that other youth get
a chance to answer.
III. VALUE TRADING (40 MINUTES)
Let the youth know that you are going to do an activity
that asks them to think about what they value most. They
will each get some money and three values. They will have
a set amount of time to trade, sell, or buy values with one
another.
Step 1: Distribute $200 to each person (any
denominations). Put all of the values in a bag or hat and
have each person draw three. Give youth a few moments
to look at their values.
Step 2: Give 10 minutes to trade, buy, or negotiate for
values (Round 1). At the end of the time period, call
“stop” and have the youth come back into a circle with
the values and money they ended up with. Have youth
share a few of their experiences and reactions.
Step 3: Let youth know that they will now have more
opportunities to trade, buy, or negotiate for other values.
Do two more rounds of trading with the following
differences:
Round 2: Same as Round 1, but each person must
keep at least one of their three original values.
Round 3: Same as Round 1, but distribute different
amounts of money: with some people receiving only
$20 and others receiving up to $600.
Other option: Limit trading by starting with trading
between two people, then expand trading to four,
then to the full group.
Note: After each round, collect all of the values and have
everyone draw again. Use the format and combination of
rounds that works best for your group.
Value Priorities
From YELL ©2007 John W. Gardner Center
IV. DEBRIEF (15 MINUTES)
Sample questions for youth: What did you notice about
yourself and others? What were the things that were
most coveted? Least? Why do you think this is? Did you
have a strategy or goal in this activity? What does this say
about how our values infl uence how we act?
V. CLOSING (5 MINUTES)
Closing Circle Statement (Around the World): A value I
have that I want to pay more attention to is…
★121
UNIT 2 Leadership
Session 8 90 minutesLEADERSHIP
From YELL ©2007 John W. Gardner Center
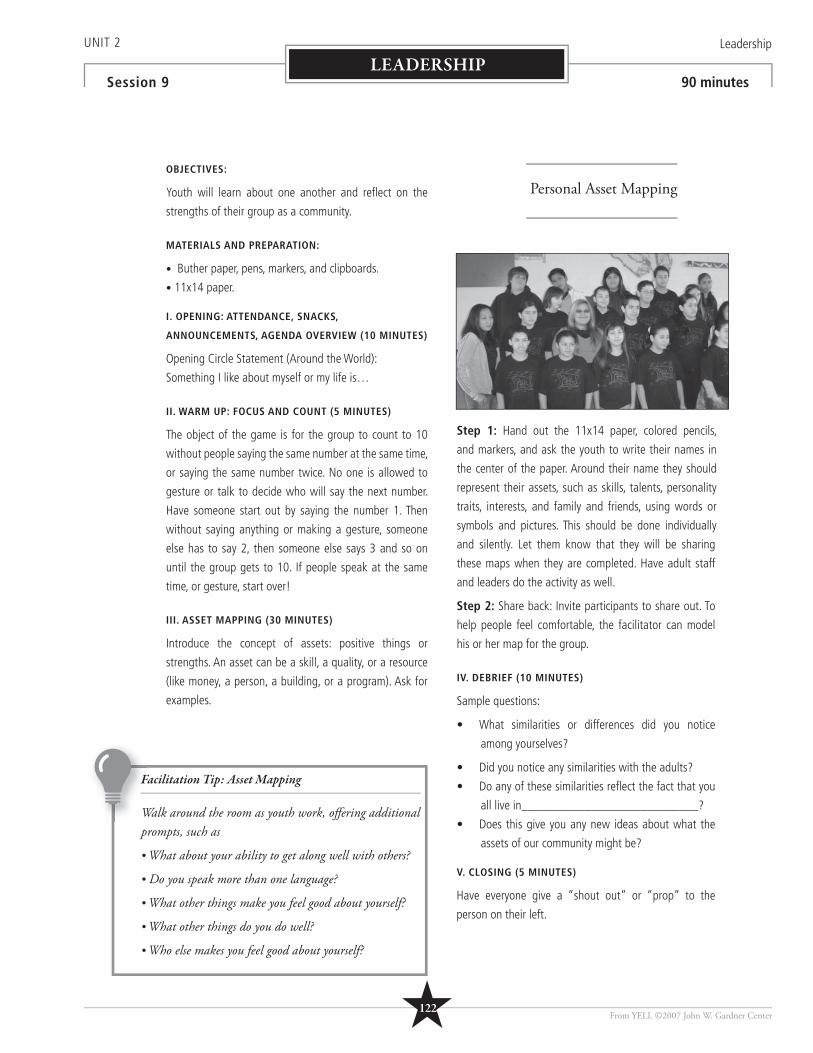
UNIT 2 Leadership
Session 9 90 minutesLEADERSHIP
OBJECTIVES:
Youth will learn about one another and refl ect on the
strengths of their group as a community.
MATERIALS AND PREPARATION:
• Buther paper, pens, markers, and clipboards.
• 11x14 paper.
I. OPENING: ATTENDANCE, SNACKS,
ANNOUNCEMENTS, AGENDA OVERVIEW (10 MINUTES)
Opening Circle Statement (Around the World):
Something I like about myself or my life is…
II. WARM UP: FOCUS AND COUNT (5 MINUTES)
The object of the game is for the group to count to 10
without people saying the same number at the same time,
or saying the same number twice. No one is allowed to
gesture or talk to decide who will say the next number.
Have someone start out by saying the number 1. Then
without saying anything or making a gesture, someone
else has to say 2, then someone else says 3 and so on
until the group gets to 10. If people speak at the same
time, or gesture, start over!
III. ASSET MAPPING (30 MINUTES)
Introduce the concept of assets: positive things or
strengths. An asset can be a skill, a quality, or a resource
(like money, a person, a building, or a program). Ask for
examples.
Step 1: Hand out the 11x14 paper, colored pencils,
and markers, and ask the youth to write their names in
the center of the paper. Around their name they should
represent their assets, such as skills, talents, personality
traits, interests, and family and friends, using words or
symbols and pictures. This should be done individually
and silently. Let them know that they will be sharing
these maps when they are completed. Have adult staff
and leaders do the activity as well.
Step 2: Share back: Invite participants to share out. To
help people feel comfortable, the facilitator can model
his or her map for the group.
IV. DEBRIEF (10 MINUTES)
Sample questions:
What similarities or differences did you notice •
among yourselves?
Did you notice any similarities with the adults?•
Do any of these similarities refl ect the fact that you •
all live in____________________________?
Does this give you any new ideas about what the •
assets of our community might be?
V. CLOSING (5 MINUTES)
Have everyone give a “shout out” or “prop” to the
person on their left.
Facilitation Tip: Asset Mapping
Walk around the room as youth work, off ering additional prompts, such as
• What about your ability to get along well with others?
• Do you speak more than one language?
• What other things make you feel good about yourself?
• What other things do you do well?
• Who else makes you feel good about yourself?
Personal Asset Mapping
From YELL ©2007 John W. Gardner Center★122
OBJECTIVES:
Youth and staff will examine a “youth as resource” perspective and think about youth and adult relationships in organizations and communities.
MATERIALS AND PREPARATION:
• Butcher paper, tape, and markers.• Paper, pens, and clipboards. • Write the numbers one through 10, each on a piece of
paper, and hang up as a continuum placed along a wall.• Copy the Youth as Objects, Recipients, Resources
handout (Master Copy 2.10) before the session: one for each participant.
I. OPENING: ATTENDANCE, SNACKS,
ANNOUNCEMENTS, AGENDA OVERVIEW
(10 MINUTES)
Opening Circle Statement (Around the World): Think of someone your age that you feel has a lot of power. In what settings or circumstances does this person have power?
II. WARM UP: PICK YOUR NUMBER (15 MINUTES)
Along the wall or on the fl oor, place the numbers one to 10 with enough room for several people to stand at each number. Tell participants they should stand next to the number that represents where they think the statement falls on the continuum of youth inclusion: one represents youth being completely excluded, and 10 represents youth being fully encouraged and welcomed.
Ask the participants the following questions: To what extent are young people involved in the planning, operations, and evaluation of programs and organizations that exist to promote their well being (in other words, how much infl uence do youth have) at the:
• National level? • Community level?• State level? • School level?• In this program or group?After everyone is standing at one of the numbers, ask a few participants what made them choose that number and why. Make sure that participants understand that there is no right or wrong answer – it is their opinion of what exists. Ask participants how they would like it to be, ideally.
III. ROLE PLAY (20 MINUTES)
Step 1: Divide into small groups and ask youth to do the following: (1) Brainstorm a list of situations in which youth tend to feel powerless, and come up with some specifi c examples from their experience. (2) Prepare a skit to demonstrate a situation where a young person feels powerless simply because he or she is young. Each role play should be two to three minutes long. Suggest that the groups use real-life experiences for inspiration, and encourage them to use a clear situation with clear characters.
Step 2: Bring groups back together, have each group present their list of examples, and then perform its role play. After every group has presented, ask: What similarities were there among the skits? What themes about youth experiences can be identifi ed from the skits?
IV. YOUTH AS OBJECTS, RECIPIENTS, RESOURCES (40 MINUTES)
Step 1: Distribute the Youth as Objects, Recipients, Resources handout. Ask if there are any questions about these three styles of youth participation. Ask youth to identify how the styles are different and to name an example or two for each area.
Step 2: Break participants into small groups and assign each group an area – objects, recipients, or resources. They have 10 minutes to work together. Give each group one piece of butcher paper and markers, and ask them to write examples from their lives of their assigned style. Ask each group to discuss the following:
• What kinds of organizations and systems operate in this fashion?
• What are some of the feelings youth might have in this style?
• What are some of the behaviors for youth and adults in this
style?
Step 3: Have groups share back the themes of their brainstorm.
Let youth know that next session they will identify what types of
structures they want to have in this group or program.
V. CLOSING: (5 MINUTES)
Closing Circle Statement (Around the World): Name a time when
you have felt respected and powerful.
★123
UNIT 2 Leadership
Session 10 90 minutesLEADERSHIP
From YELL ©2007 John W. Gardner Center
Youth as Leaders and Resources
Facilitation Tip:
Youth as Objects, Recipients, Resources should be done with both the youth and adult members of the organization.
en
Adapted from “Th e Spectrum of Adult Attitudes Toward Young People,” Th e Technology of Prevention Workbook, William A. Lofquist, Associates for Youth Development Inc., 1989, pages 47-50.
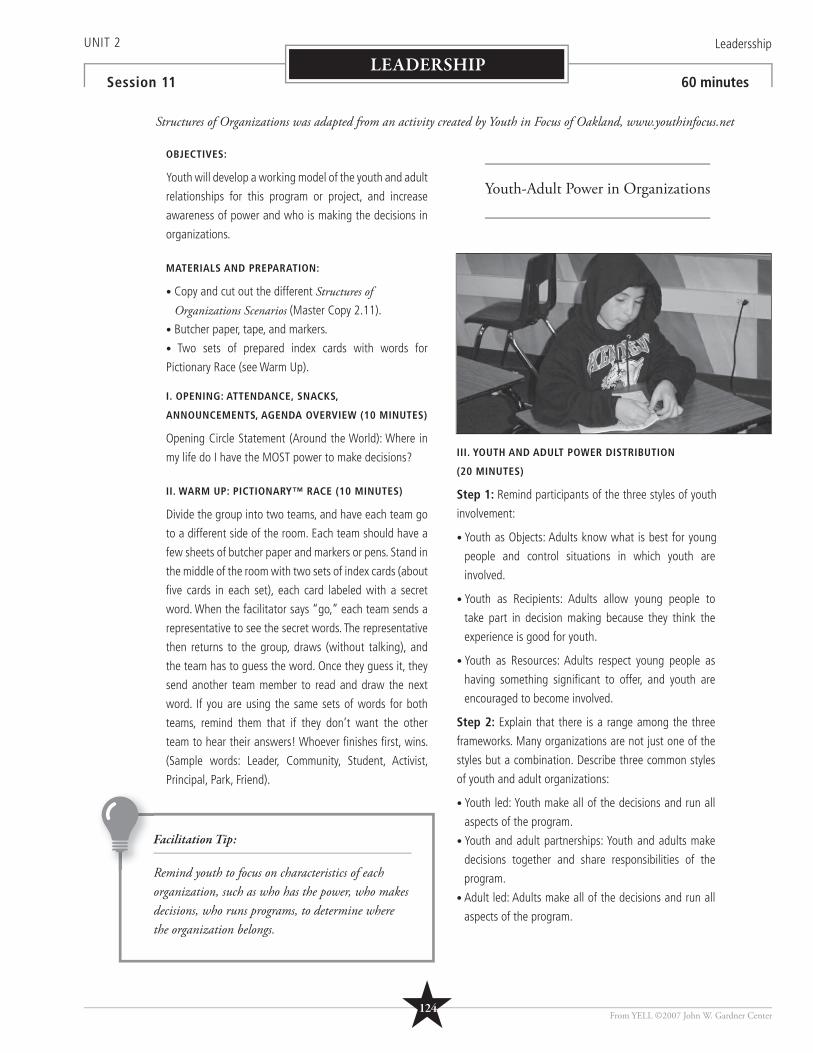
UNIT 2 Leadersship
Session 11 60 minutesLEADERSHIP
OBJECTIVES:
Youth will develop a working model of the youth and adult
relationships for this program or project, and increase
awareness of power and who is making the decisions in
organizations.
MATERIALS AND PREPARATION:
• Copy and cut out the different Structures of Organizations Scenarios (Master Copy 2.11).
• Butcher paper, tape, and markers.
• Two sets of prepared index cards with words for
Pictionary Race (see Warm Up).
I. OPENING: ATTENDANCE, SNACKS,
ANNOUNCEMENTS, AGENDA OVERVIEW (10 MINUTES)
Opening Circle Statement (Around the World): Where in
my life do I have the MOST power to make decisions?
II. WARM UP: PICTIONARY™ RACE (10 MINUTES)
Divide the group into two teams, and have each team go
to a different side of the room. Each team should have a
few sheets of butcher paper and markers or pens. Stand in
the middle of the room with two sets of index cards (about
fi ve cards in each set), each card labeled with a secret
word. When the facilitator says “go,” each team sends a
representative to see the secret words. The representative
then returns to the group, draws (without talking), and
the team has to guess the word. Once they guess it, they
send another team member to read and draw the next
word. If you are using the same sets of words for both
teams, remind them that if they don’t want the other
team to hear their answers! Whoever fi nishes fi rst, wins.
(Sample words: Leader, Community, Student, Activist,
Principal, Park, Friend).
III. YOUTH AND ADULT POWER DISTRIBUTION
(20 MINUTES)
Step 1: Remind participants of the three styles of youth
involvement:
• Youth as Objects: Adults know what is best for young
people and control situations in which youth are
involved.
• Youth as Recipients: Adults allow young people to
take part in decision making because they think the
experience is good for youth.
• Youth as Resources: Adults respect young people as
having something signifi cant to offer, and youth are
encouraged to become involved.
Step 2: Explain that there is a range among the three
frameworks. Many organizations are not just one of the
styles but a combination. Describe three common styles
of youth and adult organizations:
• Youth led: Youth make all of the decisions and run all
aspects of the program.
• Youth and adult partnerships: Youth and adults make
decisions together and share responsibilities of the
program.
• Adult led: Adults make all of the decisions and run all
aspects of the program.
Youth-Adult Power in Organizations
From YELL ©2007 John W. Gardner Center★124
Facilitation Tip:
Remind youth to focus on characteristics of each organization, such as who has the power, who makes decisions, who runs programs, to determine where the organization belongs.
Structures of Organizations was adapted from an activity created by Youth in Focus of Oakland, www.youthinfocus.net
Facilitation Tip:
If you do this activity with a group of more than 10 participants, you may want to have two or three sets of the Structures of Organizations paper slips. Before the slips are handed out, divide the group into two or three smaller teams. Have each team line up separately, and then have discussion as one large group.
Step 3: Hand out fi ve slips of paper with the example
organizations from the Structures of Organizations: Scenarios and have youth read the slips out loud. Tell
participants that they will be forming a line, with the
program that is most youth led on the right and the
program that is least youth led on the left. Have students
without slips help others line up. Once participants have
begun forming their line, encourage them to double check
with the person to the left and right to make sure they
are where they think that they should be. After everyone
has lined up, ask them to go down the line and read the
slips of paper.
IV. DEBRIEF (15 MINUTES)
Ask the following questions:
• Why did you line up in that order? At what point does it
turn into a youth-led program? Youth-adult partnership?
Adult-led?
• Which organizational structure do you like best or think
would work the best for this group? Why?
• In what ways does this group currently match this
structure of organization? In what ways is it different?
V. CLOSING (5 MINUTES)
Closing Circle Statement (Around the World): I would like
to see more youth involved in…
Example fr om Practice:
Before engaging in this activity, high school students in West Oakland felt that YELL should be strictly youth-led, which meant young people should be in charge of all aspects of the program. However, after completing the power distribution line-up, the participants realized that support from adults actually enhances young people’s ability to lead and make decisions. Given the demands of school, extracurricular activities, and family, it was not feasible for youth to be responsible for all of the grant-writing, hiring and daily management of the program. In the end, the students decided that a program was still youth-led if youth participants make most decisions, lead most activities, and support hiring and grant-writing activities but adult allies provide guidance and administrative support.
e:
★125
UNIT 2 Leadership
Session 11 60 minutesLEADERSHIP
From YELL ©2007 John W. Gardner Center

★126
UNIT 2 Leadership
Session 12 60 minutesLEADERSHIP
“Th e cynic says, ‘One man can’t do anything.’ I say, ‘Only one man can do anything.’” ~John W. Gardner
OBJECTIVE:
Youth will understand the power of individuals - including
themselves – to create change.
MATERIALS AND PREPARATION:
• Paper, pens, markers, and clipboards for the Community
Builder.
• Copy Th e Star Th rower story (Master Copy 2.12) before
the session: one for each participant.
• Poker chips or tokens.
I. OPENING: ATTENDANCE, SNACKS,
ANNOUNCEMENTS, AGENDA OVERVIEW (10 MINUTES)
Opening Circle Statement (Around the World): A hero is
someone who…
II. COMMUNITY BUILDER: DO YOU LOOK LIKE A
SUPERHERO? (15 MINUTES)
Have each participant draw a “community superhero”
suit that a hero would wear. What objects would a
superhero in your community need in his or her toolbelt?
What image would a hero present? Does your hero stand
out in a crowd with bright colors, or does your hero look
like someone in your school, your neighborhood, your
religious community? Have each participant explain to
the group the reasons behind each detail of his or her
drawing.
III. THE POWER OF ONE (15 MINUTES)
Step 1: Have a volunteer (or several) read Th e Star Th rower out loud.
Step 2: Discuss as a group the role of the individual in
creating change. Sample questions:
• What do you think about this story? Did you like it or
not? Why?
• What are the messages in this story? What do you think
about the messages?
• Why do you think the author chose to call the old man
wise?
• Why do you think the author made the star thrower
young?
• What does it mean to make a difference?
• How signifi cant does your action have to be?
IV. DEBRIEF (10 MINUTES)
• How is this sort of thing happening in our lives and in
our community? Who are the starfi sh throwers that we
know? What types of things do they do?
• How do I contribute to others and their lives? What are
some of the small things I do?
• How does the “power of one” apply to a group of
people like this one?
V. CLOSING (10 MINUTES)
Give one poker chip to each particpant. Write the year
and the program name on the chip. Before handing out
the poker chips, talk to the participants about how all
of the people who make a difference take chances and
risks to make change. Pass out the poker chips, and ask
the youth to keep them some place where they can
constantly be reminded that they can make a difference,
even in small ways.
Th e Power of One
From YELL ©2007 John W. Gardner Center

★127From YELL ©2007 John W. Gardner Center
NOTES

★128From YELL ©2007 John W. Gardner Center
UNIT 2 Leadership
TABLE OF CONTENTS
Unit 2 Masters Copies
SESSION 1 Leadership Defi nitions and Quotes: Group Handout 2.1..........................129
SESSION 2 None
SESSION 3 Circle of Infl uence Chart: Group Handout 2.3a........................................132Circle of Infl uence Chart: Facilitator Example 2.3b..................................133
SESSION 4 Leadership Compass: Group Handout 2.4a.............................................134Leadership Skills and Qualities Self-Assessment: Group Handout 2.4b.....135
SESSION 5 None
SESSION 6 Goal Setting and Support Card: Group Handout 2.6................................136
SESSION 7
People Bingo: Facilitator Example 2.7a...................................................137People Bingo: Group Handout 2.7b........................................................138Crossing the Line Sample Statements: Facilitator Example 2.7c................139Active Listening Guidelines: Group Handout 1.1a (use again)...................69Confi dentiality Guidelines: Group Handout 1.1b (use again).....................70
SESSION 8 Values Trading Activity: Facilitator Copy and Cut 2.8................................140
SESSION 9 None
SESSION 10 Youth as Objects, Recipients, Resources: Group Handout 2.10.................141
SESSION 11 Structures of Organizations Scenarios: Facilitator Copy and Cut 2.11.......142
SESSION 12 The Star Thrower: Group Handout 2.12...................................................143
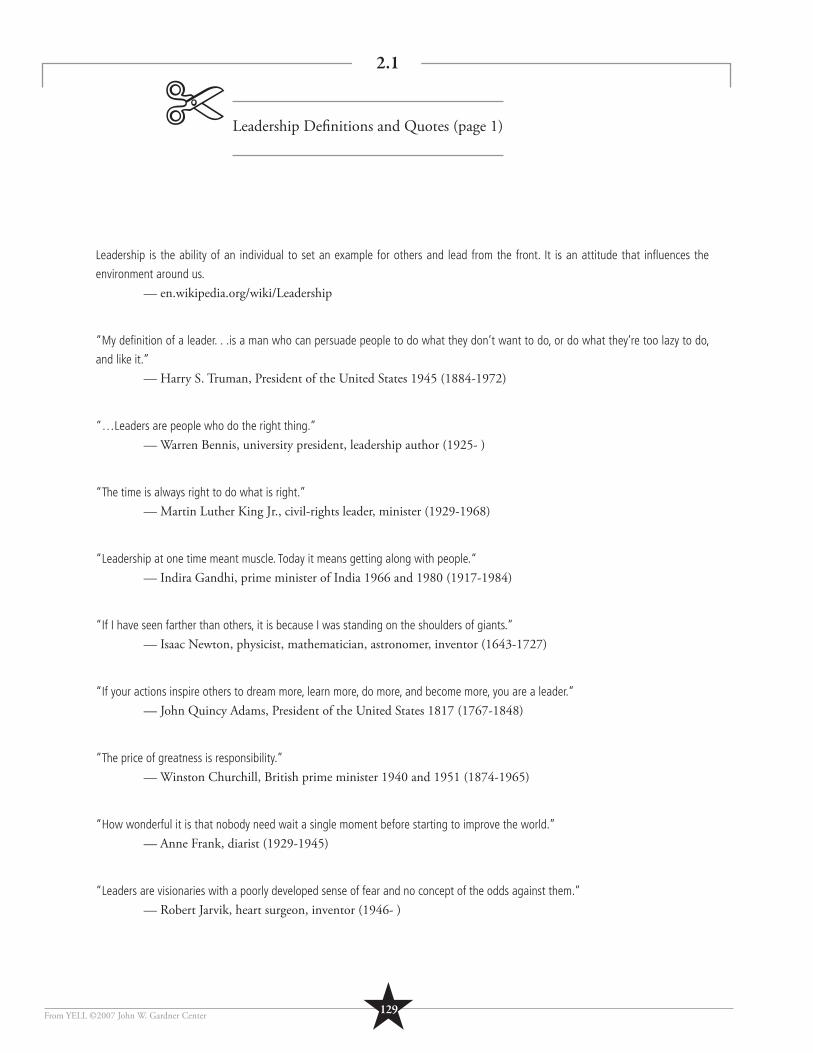
2.1
★129From YELL ©2007 John W. Gardner Center
Leadership is the ability of an individual to set an example for others and lead from the front. It is an attitude that infl uences the
environment around us.
— en.wikipedia.org/wiki/Leadership
“My defi nition of a leader. . .is a man who can persuade people to do what they don’t want to do, or do what they’re too lazy to do,
and like it.”
— Harry S. Truman, President of the United States 1945 (1884-1972)
“…Leaders are people who do the right thing.”
— Warren Bennis, university president, leadership author (1925- )
“The time is always right to do what is right.”
— Martin Luther King Jr., civil-rights leader, minister (1929-1968)
“Leadership at one time meant muscle. Today it means getting along with people.“
— Indira Gandhi, prime minister of India 1966 and 1980 (1917-1984)
“If I have seen farther than others, it is because I was standing on the shoulders of giants.”
— Isaac Newton, physicist, mathematician, astronomer, inventor (1643-1727)
“If your actions inspire others to dream more, learn more, do more, and become more, you are a leader.”
— John Quincy Adams, President of the United States 1817 (1767-1848)
“The price of greatness is responsibility.”
— Winston Churchill, British prime minister 1940 and 1951 (1874-1965)
“How wonderful it is that nobody need wait a single moment before starting to improve the world.”
— Anne Frank, diarist (1929-1945)
“Leaders are visionaries with a poorly developed sense of fear and no concept of the odds against them.”
— Robert Jarvik, heart surgeon, inventor (1946- )
Leadership Defi nitions and Quotes (page 1)✄

2.1
From YELL ©2007 John W. Gardner Center★130
Leadership Defi nitions and Quotes (page 2)
“The function of leadership is to produce more leaders, not more followers.”
— Ralph Nader, activist lawyer, consumer advocate (1934- )
“All of the great leaders have had one characteristic in common: it was the willingness to confront unequivocally the major anxiety of
their people in their time. This, and not much else, is the essence of leadership.”
— John Kenneth Galbraith, U.S. economist (1908-2006)
“Leadership is infl uence – nothing more, nothing less.”
— John C Maxwell, American pastor, author, leadership expert (1947- )
“Leadership is a function of knowing yourself, having a vision that is well communicated, building trust among colleagues, and taking
effective action to realize your own leadership potential.”
— Warren Bennis, university president, writer on leadership (1925- )
“My grandfather once told me that there were two kinds of people: those who do the work and those who take the credit. He told me
to try to be in the fi rst group. There is much less competition.”
— Indira Gandhi, prime minister of India 1966 and 1980 (1917-1984)
“Leaders can express the values that hold the society together.”
— John W. Gardner, Secretary of Health, Education, and Welfare 1965 (1912-2002)
“A leader is best when people barely know he exists. When his work is done, his aim fulfi lled, they will say: We did it ourselves.”
— Lao Tzu, Chinese Philosopher, founder of Taoism (600-531 BC)
“The prime function of a leader is to keep hope alive.”
— John W. Gardner, Secretary of Health, Education, and Welfare 1965 (1912-2002)
“Whoever is providing leadership needs to be as fresh and thoughtful and refl ective as possible to make the very best fi ght.”
— Faye Wattleton, fi rst African American president of Planned Parenthood 1978 (1943- )
“…Leadership is the capacity to translate vision into reality.”
— Warren Bennis, university president, writer on leadership (1925- )
“It is not enough to teach our young people to be successful...so they can realize their ambitions, so they can earn good livings, so they can
accumulate the material things that this society bestows. Those are worthwhile goals. But it is not enough to progress as individuals while our
friends and neighbors are left behind.”
— César Chávez, labor leader and civil rights activist (1927-1993)
✄
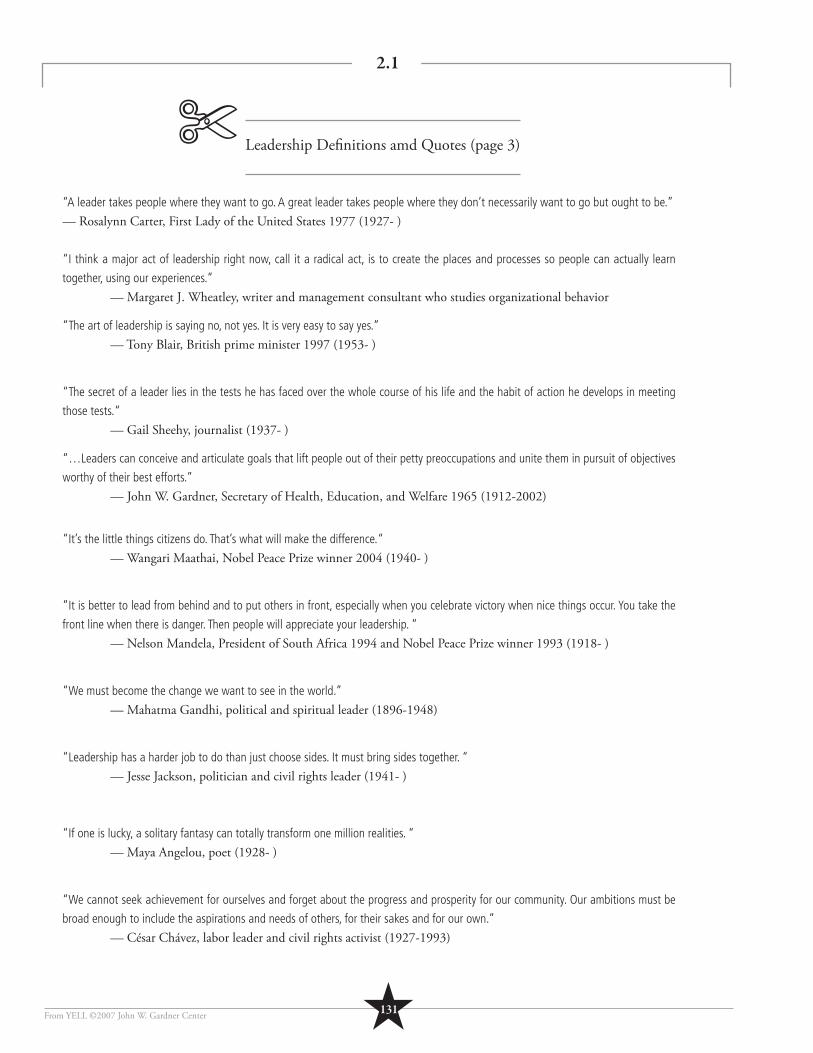
2.1
★131From YELL ©2007 John W. Gardner Center
“A leader takes people where they want to go. A great leader takes people where they don’t necessarily want to go but ought to be.” — Rosalynn Carter, First Lady of the United States 1977 (1927- )
“I think a major act of leadership right now, call it a radical act, is to create the places and processes so people can actually learn
together, using our experiences.”
— Margaret J. Wheatley, writer and management consultant who studies organizational behavior
“The art of leadership is saying no, not yes. It is very easy to say yes.”
— Tony Blair, British prime minister 1997 (1953- )
“The secret of a leader lies in the tests he has faced over the whole course of his life and the habit of action he develops in meeting
those tests.“
— Gail Sheehy, journalist (1937- )
“…Leaders can conceive and articulate goals that lift people out of their petty preoccupations and unite them in pursuit of objectives
worthy of their best efforts.”
— John W. Gardner, Secretary of Health, Education, and Welfare 1965 (1912-2002)
“It’s the little things citizens do. That’s what will make the difference.“
— Wangari Maathai, Nobel Peace Prize winner 2004 (1940- )
“It is better to lead from behind and to put others in front, especially when you celebrate victory when nice things occur. You take the
front line when there is danger. Then people will appreciate your leadership. “
— Nelson Mandela, President of South Africa 1994 and Nobel Peace Prize winner 1993 (1918- )
“We must become the change we want to see in the world.”
— Mahatma Gandhi, political and spiritual leader (1896-1948)
“Leadership has a harder job to do than just choose sides. It must bring sides together. “
— Jesse Jackson, politician and civil rights leader (1941- )
“If one is lucky, a solitary fantasy can totally transform one million realities. “
— Maya Angelou, poet (1928- )
“We cannot seek achievement for ourselves and forget about the progress and prosperity for our community. Our ambitions must be
broad enough to include the aspirations and needs of others, for their sakes and for our own.”
— César Chávez, labor leader and civil rights activist (1927-1993)
Leadership Defi nitions amd Quotes (page 3)✄
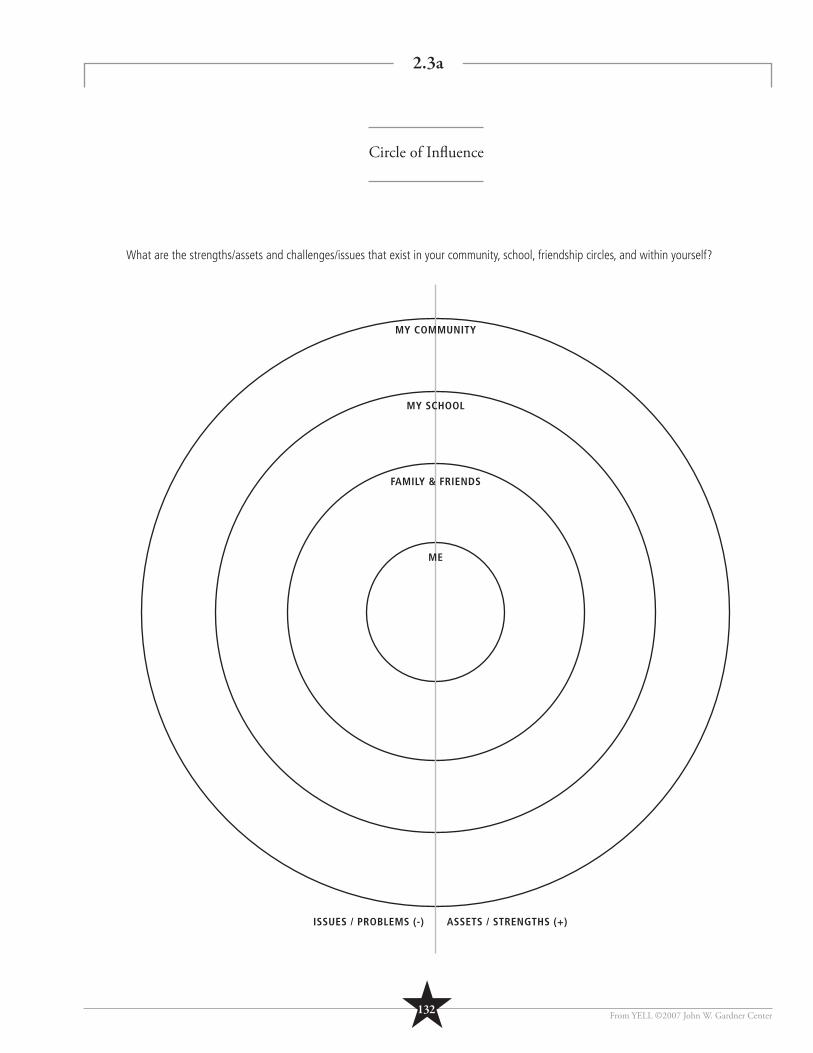
Circle of Infl uence
2.3a
From YELL ©2007 John W. Gardner Center★132
What are the strengths/assets and challenges/issues that exist in your community, school, friendship circles, and within yourself?
ME
FAMILY & FRIENDS
MY SCHOOL
MY COMMUNITY
ISSUES / PROBLEMS (-) ASSETS / STRENGTHS (+)
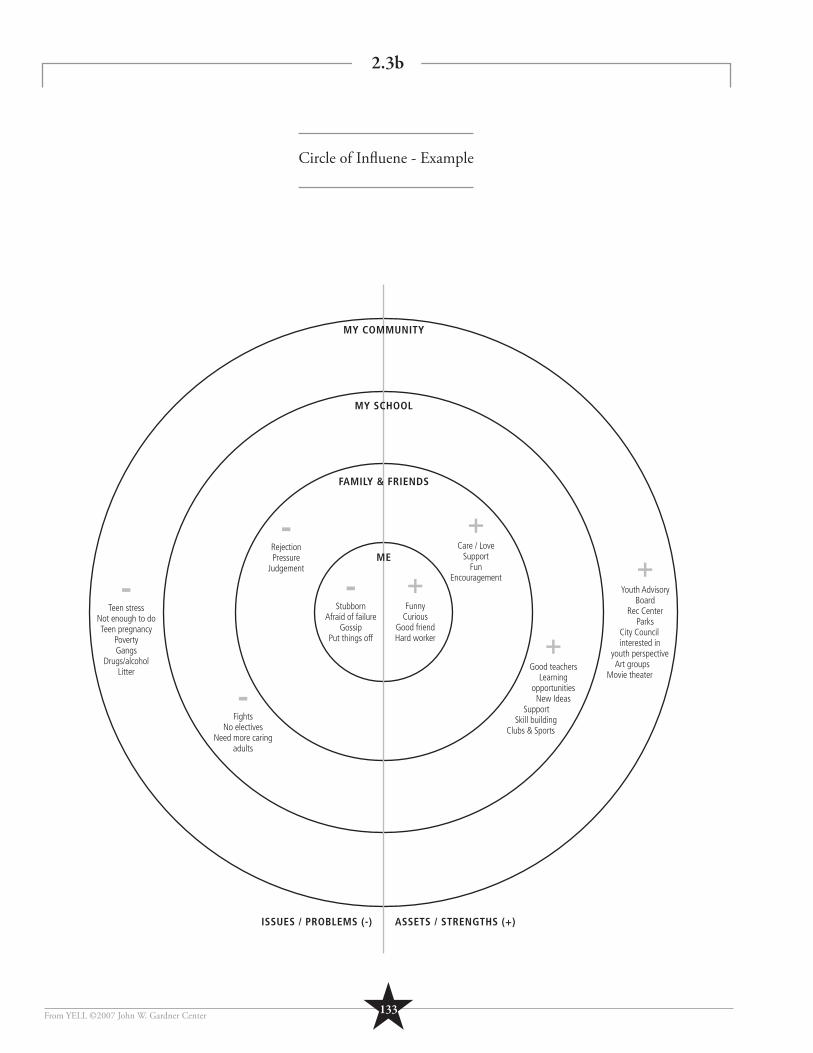
Circle of Infl uene - Example
2.3b
★133From YELL ©2007 John W. Gardner Center
ME
FAMILY & FRIENDS
MY SCHOOL
MY COMMUNITY
ISSUES / PROBLEMS (-) ASSETS / STRENGTHS (+)
-Teen stress
Not enough to doTeen pregnancy
PovertyGangs
Drugs/alcoholLitter
-Fights
No electivesNeed more caring
adults
-RejectionPressure
Judgement
-Stubborn
Afraid of failureGossip
Put things off
+Funny
CuriousGood friendHard worker
+Care / Love
SupportFun
Encouragement
+Good teachers
LearningopportunitiesNew Ideas
Support Skill buildingClubs & Sports
+Youth Advisory
BoardRec Center
Parks City Council interested in youth perspective Art groups Movie theater
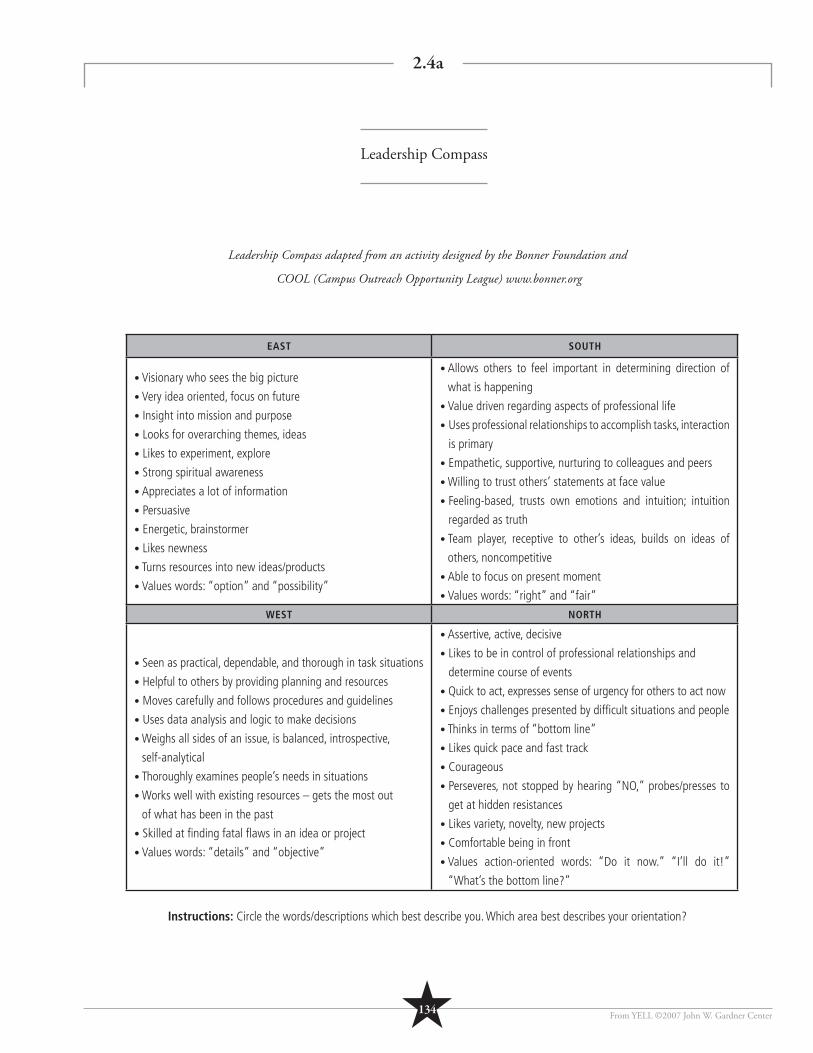
2.4a
Leadership Compass
★134 From YELL ©2007 John W. Gardner Center
Leadership Compass adapted from an activity designed by the Bonner Foundation and
COOL (Campus Outreach Opportunity League) www.bonner.org
EAST SOUTH
• Visionary who sees the big picture
• Very idea oriented, focus on future
• Insight into mission and purpose
• Looks for overarching themes, ideas
• Likes to experiment, explore
• Strong spiritual awareness
• Appreciates a lot of information
• Persuasive
• Energetic, brainstormer
• Likes newness
• Turns resources into new ideas/products
• Values words: “option” and “possibility”
• Allows others to feel important in determining direction of
what is happening
• Value driven regarding aspects of professional life
• Uses professional relationships to accomplish tasks, interaction
is primary
• Empathetic, supportive, nurturing to colleagues and peers
• Willing to trust others’ statements at face value
• Feeling-based, trusts own emotions and intuition; intuition
regarded as truth
• Team player, receptive to other’s ideas, builds on ideas of
others, noncompetitive
• Able to focus on present moment
• Values words: “right” and “fair”
WEST NORTH
• Seen as practical, dependable, and thorough in task situations
• Helpful to others by providing planning and resources
• Moves carefully and follows procedures and guidelines
• Uses data analysis and logic to make decisions
• Weighs all sides of an issue, is balanced, introspective,
self-analytical
• Thoroughly examines people’s needs in situations
• Works well with existing resources – gets the most out
of what has been in the past
• Skilled at fi nding fatal fl aws in an idea or project
• Values words: “details” and “objective”
• Assertive, active, decisive
• Likes to be in control of professional relationships and
determine course of events
• Quick to act, expresses sense of urgency for others to act now
• Enjoys challenges presented by diffi cult situations and people
• Thinks in terms of “bottom line”
• Likes quick pace and fast track
• Courageous
• Perseveres, not stopped by hearing “NO,” probes/presses to
get at hidden resistances
• Likes variety, novelty, new projects
• Comfortable being in front
• Values action-oriented words: “Do it now.” “I’ll do it!”
“What’s the bottom line?”
Instructions: Circle the words/descriptions which best describe you. Which area best describes your orientation?
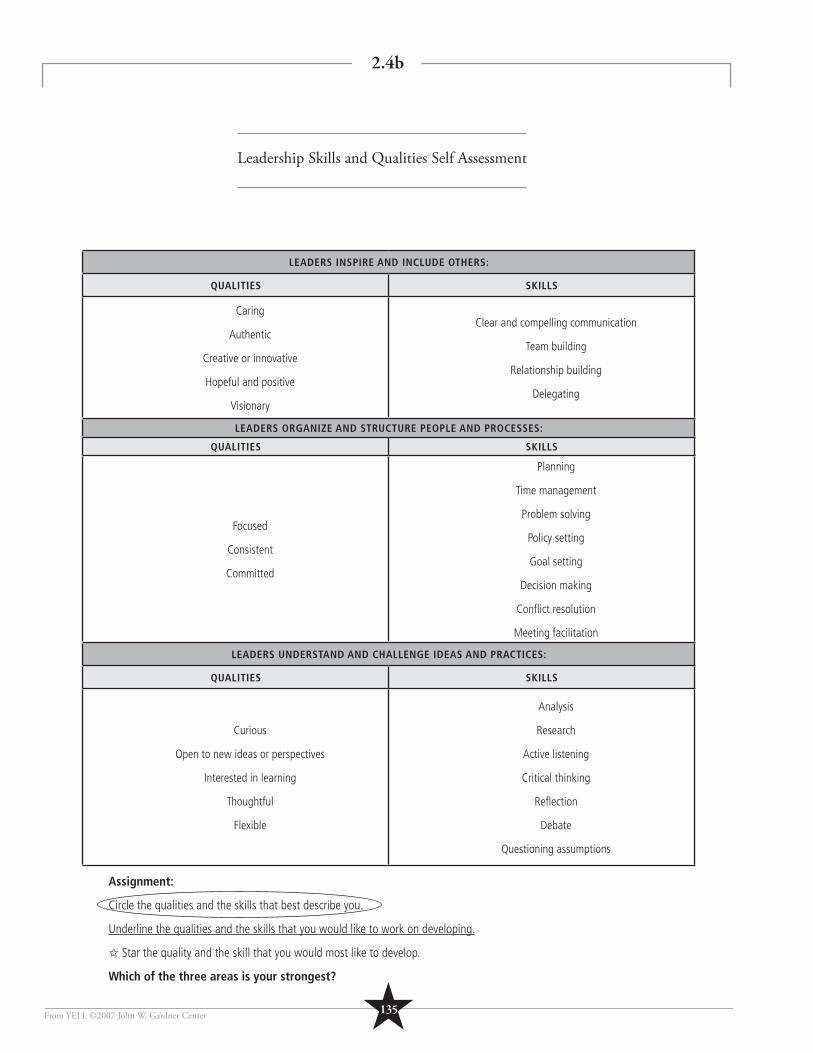
2.4b
Leadership Skills and Qualities Self Assessment
From YELL ©2007 John W. Gardner Center
LEADERS INSPIRE AND INCLUDE OTHERS:
QUALITIES SKILLS
Caring
Authentic
Creative or innovative
Hopeful and positive
Visionary
Clear and compelling communication
Team building
Relationship building
Delegating
LEADERS ORGANIZE AND STRUCTURE PEOPLE AND PROCESSES:
QUALITIES SKILLS
Focused
Consistent
Committed
Planning
Time management
Problem solving
Policy setting
Goal setting
Decision making
Confl ict resolution
Meeting facilitation
LEADERS UNDERSTAND AND CHALLENGE IDEAS AND PRACTICES:
QUALITIES SKILLS
Curious
Open to new ideas or perspectives
Interested in learning
Thoughtful
Flexible
Analysis
Research
Active listening
Critical thinking
Refl ection
Debate
Questioning assumptions
Assignment:
Circle the qualities and the skills that best describe you.
Underline the qualities and the skills that you would like to work on developing.
✩ Star the quality and the skill that you would most like to develop.
Which of the three areas is your strongest?
★135
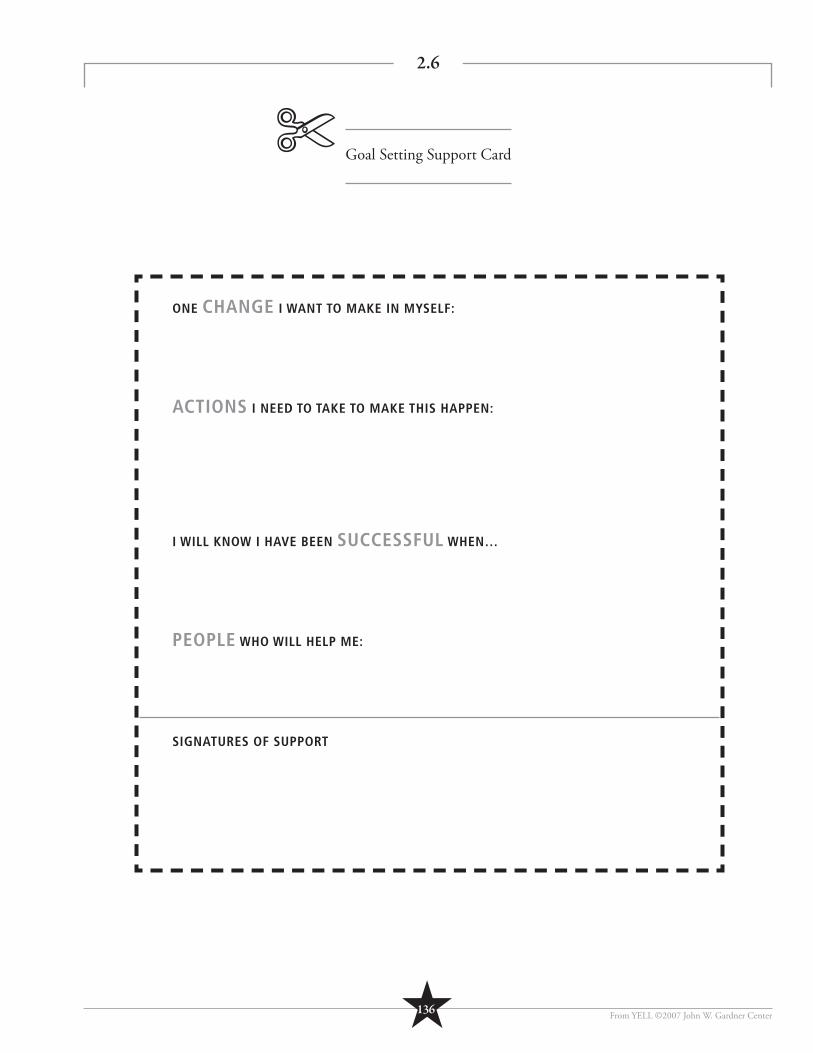
2.6
Goal Setting Support Card
From YELL ©2007 John W. Gardner Center
ONE CHANGE I WANT TO MAKE IN MYSELF:
ACTIONS I NEED TO TAKE TO MAKE THIS HAPPEN:
I WILL KNOW I HAVE BEEN SUCCESSFUL WHEN…
PEOPLE WHO WILL HELP ME:
SIGNATURES OF SUPPORT
✄
★136
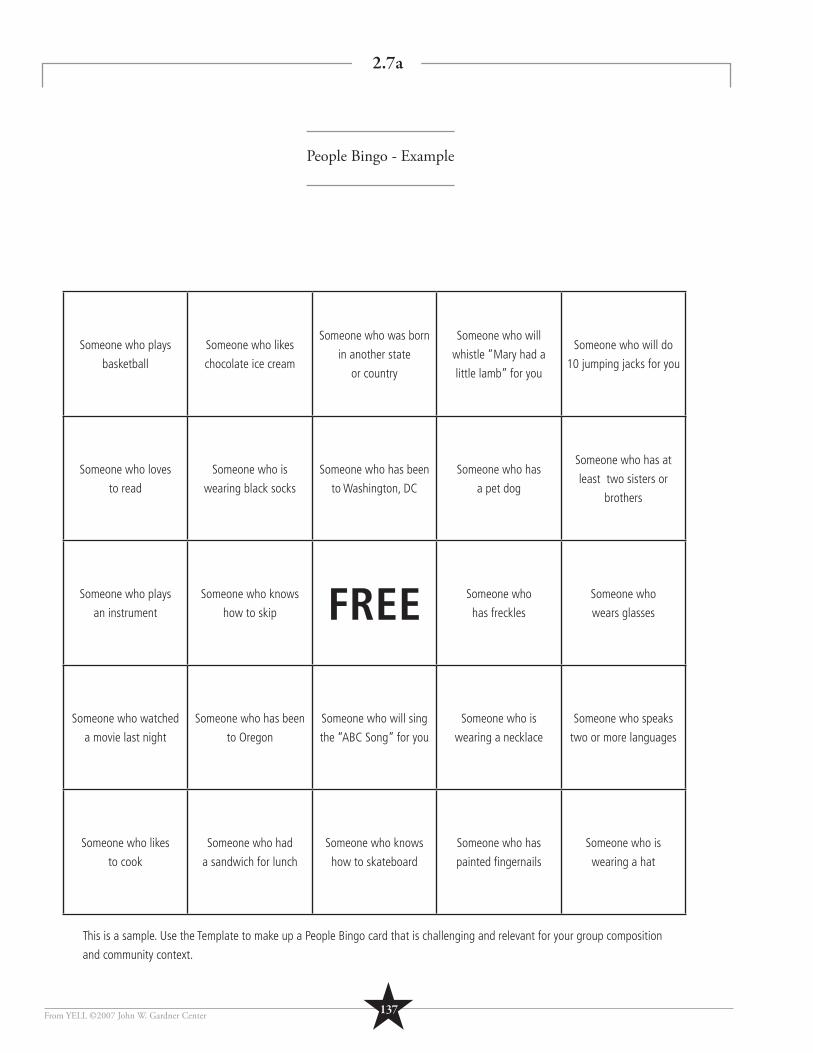
2.7a
People Bingo - Example
From YELL ©2007 John W. Gardner Center
Someone who plays
basketball
Someone who likes
chocolate ice cream
Someone who was born
in another state
or country
Someone who will
whistle “Mary had a
little lamb” for you
Someone who will do
10 jumping jacks for you
Someone who loves
to read
Someone who is
wearing black socks
Someone who has been
to Washington, DC
Someone who has
a pet dog
Someone who has at
least two sisters or
brothers
Someone who plays
an instrument
Someone who knows
how to skip FREE Someone who
has freckles
Someone who
wears glasses
Someone who watched
a movie last night
Someone who has been
to Oregon
Someone who will sing
the “ABC Song” for you
Someone who is
wearing a necklace
Someone who speaks
two or more languages
Someone who likes
to cook
Someone who had
a sandwich for lunch
Someone who knows
how to skateboard
Someone who has
painted fi ngernails
Someone who is
wearing a hat
This is a sample. Use the Template to make up a People Bingo card that is challenging and relevant for your group composition
and community context.
★137
People Bingo
2.7b
From YELL ©2007 John W. Gardner Center
FREE
★138

Crossing the Line Statements
2.7c
From YELL ©2007 John W. Gardner Center
Important: Have all youth read and agree to the Confi dentiality Guidelines prior to starting this activity (see Master 1.1b on page 70).
BEFORE STARTING THE ACTIVITY, PLEASE SELECT STATEMENTS CAREFULLY.
Add or subtract from the list according to the nature of your group, using statements that are relevant and appropriate for your
process. The statements below are recommended for most groups: Anyone who (fi ll in from below) cross the line.
• was born in this state• was born in another county• is female • prefers day to night • has never fl own • is a person of color • is proud of their heritage• feels that he or she knows very little about his or her cultural heritage • is the oldest in the family • is the youngest in the family • is an only child • considers him or herself a Democrat/Republican/Socialist • does not connect with any one political party• considers him or herself religious• is atheist or agnostic • is proud to live in their neighborhood or community• feels stressed by school• feels stressed by home life • helps take care of other family members (siblings, etc.)
THESE STATEMENTS ARE RECOMMENDED FOR ESTABLISHED GROUPS WITH ONGOING ADULT SUPPORT. ANYONE WHO…
• has been in love and been hurt • would describe his or her family as blue collar or working class • would describe his or her family as middle class • would describe his or her family as upper class • sometimes has low self confi dence • sometimes feels lonely • has ever been in a fi ght to prove he or she was tough • has earned all A’s in a semester • has earned all A’s and B’s • grades are usually lower than B’s • is adopted • parents or caregivers have divorced • has had one or more of their parents pass away • believes it is OK for someone to have a date of the same gender at a social event • has a family member who is gay, lesbian, bisexual, or transgender • is choosing to abstain from sex until marriage • has experienced the effects of alcoholism in their family • has experienced the effects of drug addiction in their family • has a friend or relative who has been sexually assaulted or abused • has not yet crossed the line
★139
★
Value Trading Activity
2.8
140 From YELL ©2007 John W. Gardner Center
Perfect health until age 100
United States Senate Seat
$500 winning lottery ticket
A fulfi lling relationship
Peace of mind
A satisfying career
A supportive, happy family
A summer house wherever you want
Time to travel every year
Car of your dreams
Ability to write a book that could infl uence generations
Loyal friends
On the cover of your favorite magazine
Fun every day
A cure for cancer
Healthy children
Financial independence
House of your dreams
Trip into history
Popularity
Famous muralist
A four-year college scholarship
Freedom
Ability to make people feel safe and comfortable
Cure for AIDS
Ability to be invisible
True love
Big, happy family
Ability to fl y
Opportunity to speak directly to the President and Congress
Unlimited spending at my favorite mall
Fluent in eight languages of your choice
Trip into the future
Great talent in music or art
Perfect S.A.T. score
Reputation as kind and generous
Known by all as trustworthy and honest
A college degree, with honors
Contentment
A Nobel Peace Prize
✄
Youth as Objects, Recipients, Resources
2.10
★141From YELL ©2007 John W. Gardner Center
YOUNG PEOPLE VIEWED AS OBJECTS
• Adults know what is best for young people and control situations in which they allow them to be involved.
• Adults feel that young people have little to contribute and may work to keep young people in relatively powerless positions.
• Youth are not included in the design of the program or opportunity.
• Adults believe that the responsibility of the young person is to take advantage of the program or opportunity
designed by the adult.
YOUNG PEOPLE VIEWED AS RECIPIENTS
• Adults allow young people to be valued in the design of the opportunity but the primary emphasis of this adult attitude is on
how the young person will benefi t from participation, not on what the young person has to offer to the design process.
• Adults are still well in control of the conditions under which the young person participates.
• Adults allow youth participation because of the value of the experience to the young person.
• Adults want to prepare young people for the future as responsible decision makers.
YOUNG PEOPLE VIEWED AS RESOURCES
• Adults view young people as resources and respect the contribution young people can make to planning,
operation, and evaluation.
• Leadership and decision-making roles involved can be shared by adults and young people.
• Both young people and adults may need to learn skills and attitudes necessary for shared decision making.
• Youth and adults both have strengths to contribute.
Structures of Organizations: Scenerios
2.11
★142 From YELL ©2007 John W. Gardner Center
In this project, youth staff serve as project directors and are on the board of directors or leadership team. They are responsible for
everything. They are in charge of creating the project’s vision, setting goals, raising money for program costs, planning the year,
creating lesson plans, organizing activities or events, facilitating meetings, hiring and training all new employees or members,
supervising new employees, and reporting back to the sponsoring organization or funder. There are no adult employees except
at the sponsoring organization.
__________________________________________________________________________________________
In this project, youth create the mission of the project, set goals, plan for the year, create lesson plans, run meetings, organize
activities or events, and hire, train, and mentor new youth members on their own. Adults are responsible for raising money for
program costs, reporting back, and hiring any adult staff to help with fundraising or research.
__________________________________________________________________________________________
In this project, the board of advisors for the project, or leadership team, is made up of both youth staff and adult staff. Both
adults and youth get to vote on decisions. This board makes the major decisions and planning for the project, like the goals
for the year or the research topic. They also evaluate how the program is going. Youth staff supervise and mentor new youth
members, who can make smaller decisions. Youth staff are in charge of small projects and have to report back to the leadership
team. With the support of youth staff, adults create daily activities to meet decided goals, raise money and report back. Adult
staff supervise and mentor youth staff.
__________________________________________________________________________________________
In this project, there is an advisory board of youth staff, but youth can’t vote, just give advice. Adult staff make all of the fi nal
decisions. With the advice of the youth staff, adult staff create the vision, set goals, raise money, and hire or fi re employees.
Adults run all of the after-school meetings and work with youth to organize activities or events. Adult staff tell youth what do
and how to do it.
__________________________________________________________________________________________
In this project, there is an advisory board of youth staff and adult staff, but only youth staff can vote. This leadership team makes
all of the major decisions for the project and evaluates whether the project is meeting its goals. Youth staff facilitates after-
school meetings with the support of adults. Adults support Youth Staff in making lesson plans and planning activities, giving
youth choices about what to do and how. Adults make suggestions and give constructive feedback instead of telling youth what
to do, and the youth make the fi nal decisions.
Structures of Organizations was adapted from an activity created by Youth in Focus of Oakland, www.youthinfocus.net
✄
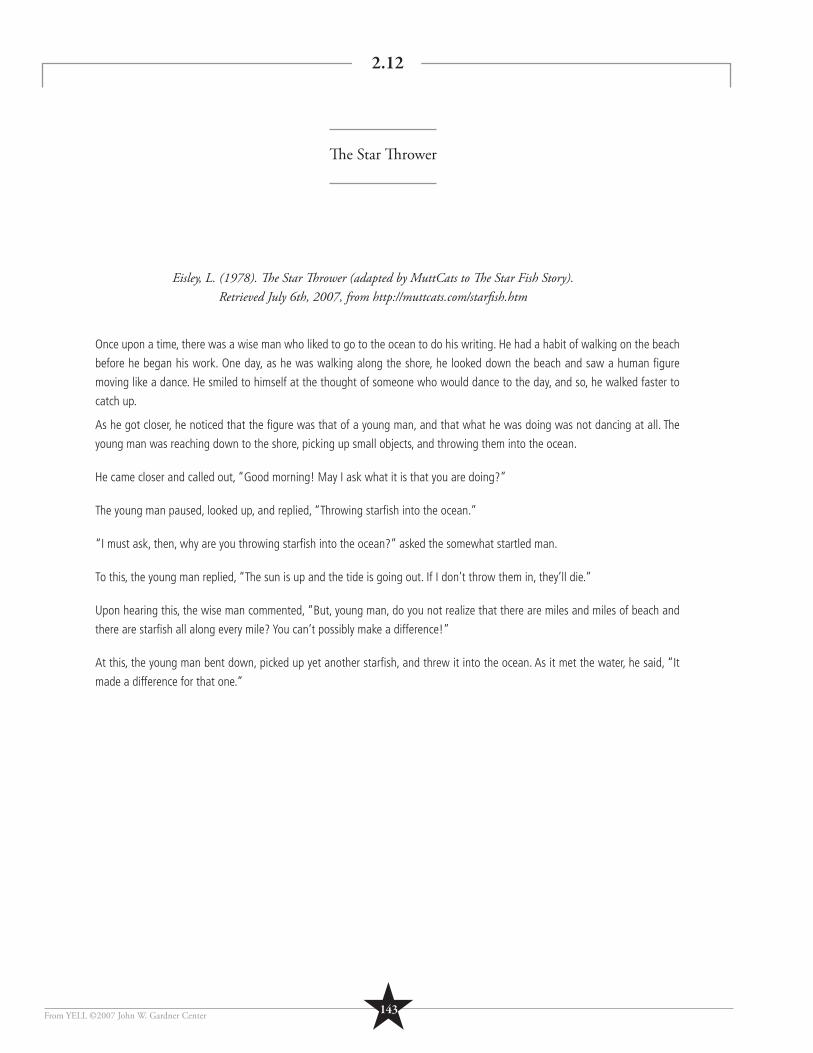
Th e Star Th rower
2.12
★143From YELL ©2007 John W. Gardner Center
Eisley, L. (1978). Th e Star Th rower (adapted by MuttCats to Th e Star Fish Story). Retrieved July 6th, 2007, from http://muttcats.com/starfi sh.htm
Once upon a time, there was a wise man who liked to go to the ocean to do his writing. He had a habit of walking on the beach
before he began his work. One day, as he was walking along the shore, he looked down the beach and saw a human fi gure
moving like a dance. He smiled to himself at the thought of someone who would dance to the day, and so, he walked faster to
catch up.
As he got closer, he noticed that the fi gure was that of a young man, and that what he was doing was not dancing at all. The
young man was reaching down to the shore, picking up small objects, and throwing them into the ocean.
He came closer and called out, “Good morning! May I ask what it is that you are doing?”
The young man paused, looked up, and replied, “Throwing starfi sh into the ocean.”
“I must ask, then, why are you throwing starfi sh into the ocean?” asked the somewhat startled man.
To this, the young man replied, “The sun is up and the tide is going out. If I don’t throw them in, they’ll die.”
Upon hearing this, the wise man commented, “But, young man, do you not realize that there are miles and miles of beach and
there are starfi sh all along every mile? You can’t possibly make a difference!”
At this, the young man bent down, picked up yet another starfi sh, and threw it into the ocean. As it met the water, he said, “It
made a difference for that one.”

From YELL ©2007 John W. Gardner Center★144
NOTES
From YELL ©2007 John W. Gardner Center

★145From YELL ©2007 John W. Gardner Center
NOTES
Unit 3
R E S E A R C H A N D AC T I O N
From YELL ©2007 John W. Gardner Center
“One of the most diffi cult problems we face is to make it possible for young people to participate in the great tasks of their time.”
~ John W. Gardner, Self Renewal
“Part of what YELL is about is going out there and researching and exposing all that you fi nd - there will always be an issue that people want to gather around and address.”
~ Anahi Aguilar, YELL participant and mentor 2001-2006

★147
UNIT 3 Research and Action
From YELL ©2007 John W. Gardner Center
Notes

From YELL ©2007 John W. Gardner Center
UNIT 3 Research and Action
TABLE OF CONTENTS
OVERVIEW: KEY STEPS TO THE INQUIRY PROCESS HANDOUT.................................................................................... 149
STEP 1: UNDERSTAND THE POWER OF RESEARCH
Session 1: Knowledge is Power ...........................................................................................................................................152
STEP 2: IDENTIFY THE PROBLEM OR ISSUE
Session 2: Community Webs and Maps ................................................................................................................................154
Session 3: The Ideal Neighborhood ......................................................................................................................................156
Session 4: Identify Issues and Assets ....................................................................................................................................158
Session 5: Pick a Topic .........................................................................................................................................................160
Session 6: Getting to the Root of the Problem ......................................................................................................................162
Session 7: Charity and Change ............................................................................................................................................164
STEP 3: DEVELOP THE RESEARCH QUESTION(S)
Session 8: Decide on Your Research Questions .....................................................................................................................166
STEP 4: IDENTIFY POTENTIAL SOURCES OF INFORMATION
Session 9: Allies, Opponents, and Decision Makers................................................................................................................168
STEP 5: DECIDE ON RESEARCH METHODS AND DEVELOP RESEARCH TOOLS
Session 10: Research Round Robin ......................................................................................................................................170
Session 11: Choose your Research Methods .........................................................................................................................172
Session 12: Planning for Data Collection ..............................................................................................................................174
Session 13: How to Do a Good Interview .............................................................................................................................176
Session 14: Interview Protocol Development ........................................................................................................................178
Session 15: Focus Group Introduction ..................................................................................................................................180
Session 16: Focus Group Facilitation Practice ........................................................................................................................182
Session 17: Survey Basics and Protocol Development ...........................................................................................................184
STEP 6: COLLECT DATA 2 Sessions
STEP 7: ORGANIZE AND ANALYZE DATA
Session 18: Organizing Interview Results .............................................................................................................................186
Session 19: Identify Interview Themes ..................................................................................................................................188
Session 20: Analyze Survey Results ......................................................................................................................................190
STEP 8: DECIDE ON RECOMMENDATIONS
Session 21: Recommendations ............................................................................................................................................192
Session 22: Goals and Audiences ........................................................................................................................................194
STEP 9: TAKE ACTION: ADVOCACY, ACTIVISM, AND EDUCATION
Session 23: Advocacy, Activism, and Education: Round Robin ...............................................................................................196
Session 24: Portraits and Skits: Advocate, Activist, and Educator ...........................................................................................200
Session 25: Messaging and Marketing .................................................................................................................................202
Session 26: Products and Presentation Tools: Round Robin ...................................................................................................204
STEP 10: CELEBRATE 2 Sessions ......................................................................................................................................206
UNIT 3: MASTER COPIES FOR GROUP HANDOUTS AND FACILITATOR EXAMPLES TABLE OF CONTENTS............................208
★148
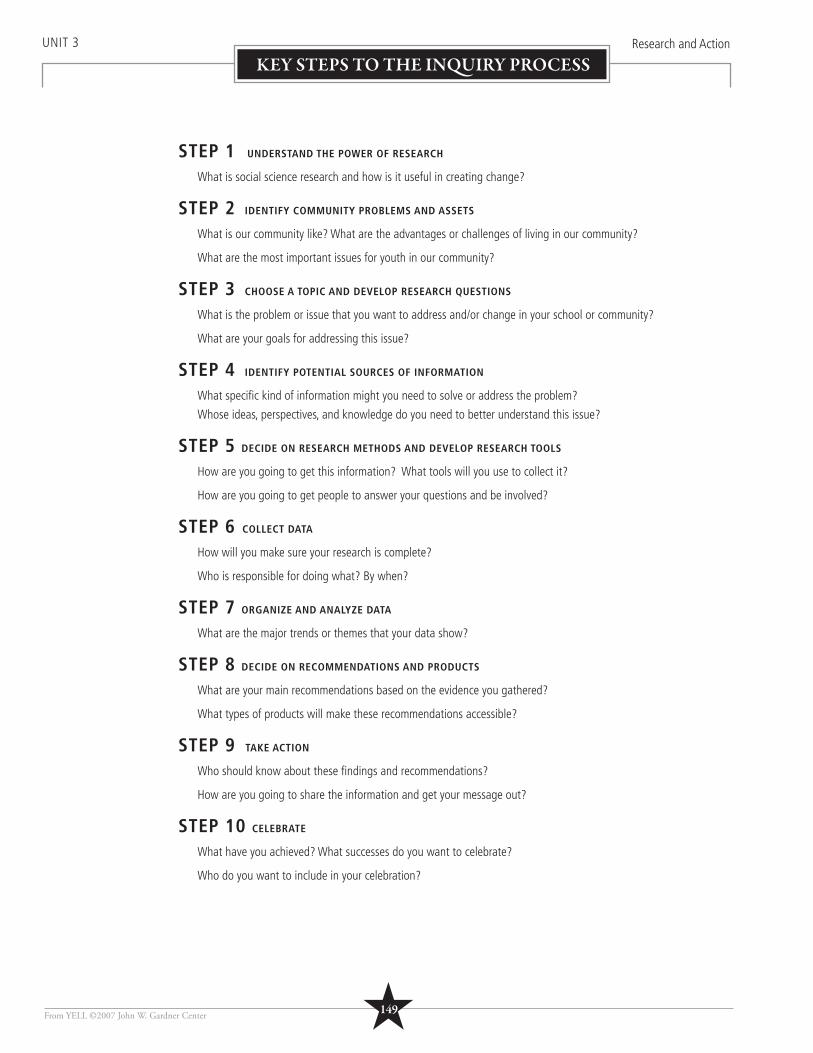
UNIT 3 Research and Action
From YELL ©2007 John W. Gardner Center
KEY STEPS TO THE INQUIRY PROCESS
STEP 1 UNDERSTAND THE POWER OF RESEARCH
What is social science research and how is it useful in creating change?
STEP 2 IDENTIFY COMMUNITY PROBLEMS AND ASSETS
What is our community like? What are the advantages or challenges of living in our community?
What are the most important issues for youth in our community?
STEP 3 CHOOSE A TOPIC AND DEVELOP RESEARCH QUESTIONS
What is the problem or issue that you want to address and/or change in your school or community?
What are your goals for addressing this issue?
STEP 4 IDENTIFY POTENTIAL SOURCES OF INFORMATION
What specifi c kind of information might you need to solve or address the problem?
Whose ideas, perspectives, and knowledge do you need to better understand this issue?
STEP 5 DECIDE ON RESEARCH METHODS AND DEVELOP RESEARCH TOOLS
How are you going to get this information? What tools will you use to collect it?
How are you going to get people to answer your questions and be involved?
STEP 6 COLLECT DATA
How will you make sure your research is complete?
Who is responsible for doing what? By when?
STEP 7 ORGANIZE AND ANALYZE DATA
What are the major trends or themes that your data show?
STEP 8 DECIDE ON RECOMMENDATIONS AND PRODUCTS
What are your main recommendations based on the evidence you gathered?
What types of products will make these recommendations accessible?
STEP 9 TAKE ACTION
Who should know about these fi ndings and recommendations?
How are you going to share the information and get your message out?
STEP 10 CELEBRATE
What have you achieved? What successes do you want to celebrate?
Who do you want to include in your celebration?
★149
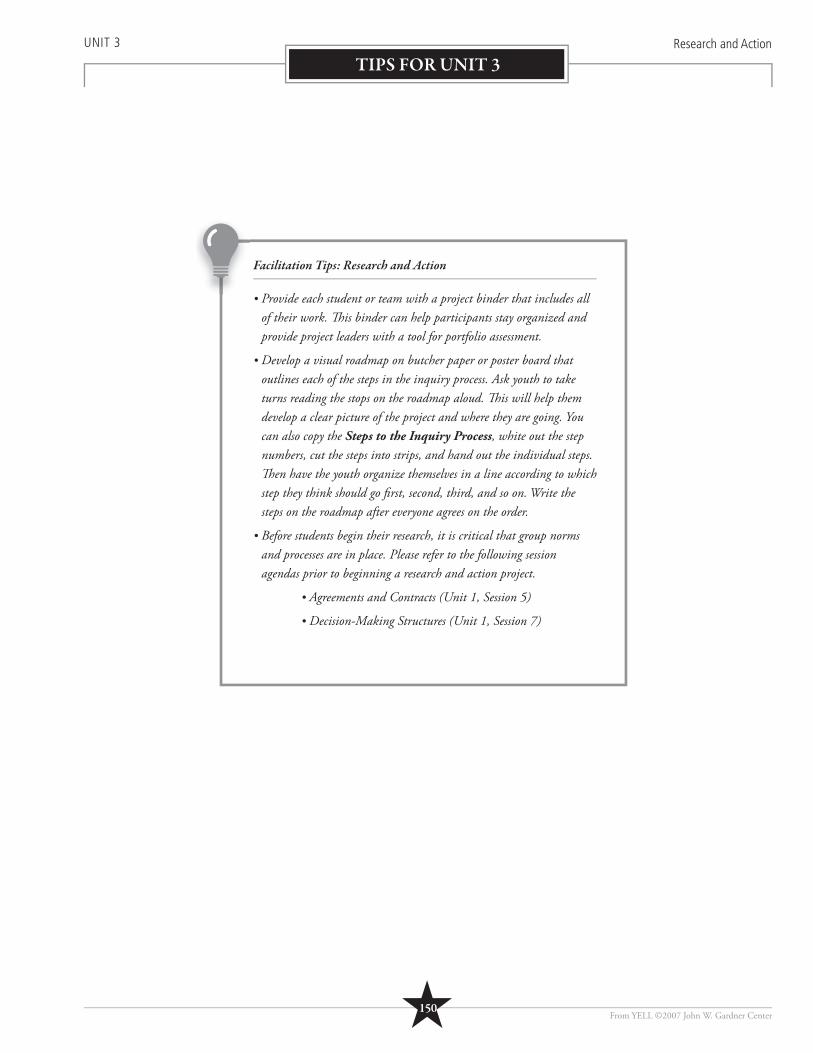
UNIT 3 Research and Action
TIPS FOR UNIT 3
From YELL ©2007 John W. Gardner Center
Facilitation Tips: Research and Action
• Provide each student or team with a project binder that includes all of their work. Th is binder can help participants stay organized and provide project leaders with a tool for portfolio assessment.
• Develop a visual roadmap on butcher paper or poster board that outlines each of the steps in the inquiry process. Ask youth to take turns reading the stops on the roadmap aloud. Th is will help them develop a clear picture of the project and where they are going. You can also copy the Steps to the Inquiry Process, white out the step numbers, cut the steps into strips, and hand out the individual steps. Th en have the youth organize themselves in a line according to which step they think should go fi rst, second, third, and so on. Write the steps on the roadmap after everyone agrees on the order.
• Before students begin their research, it is critical that group norms and processes are in place. Please refer to the following session agendas prior to beginning a research and action project.
• Agreements and Contracts (Unit 1, Session 5)
• Decision-Making Structures (Unit 1, Session 7)
★150

From YELL ©2007 John W. Gardner Center
NOTES
★151
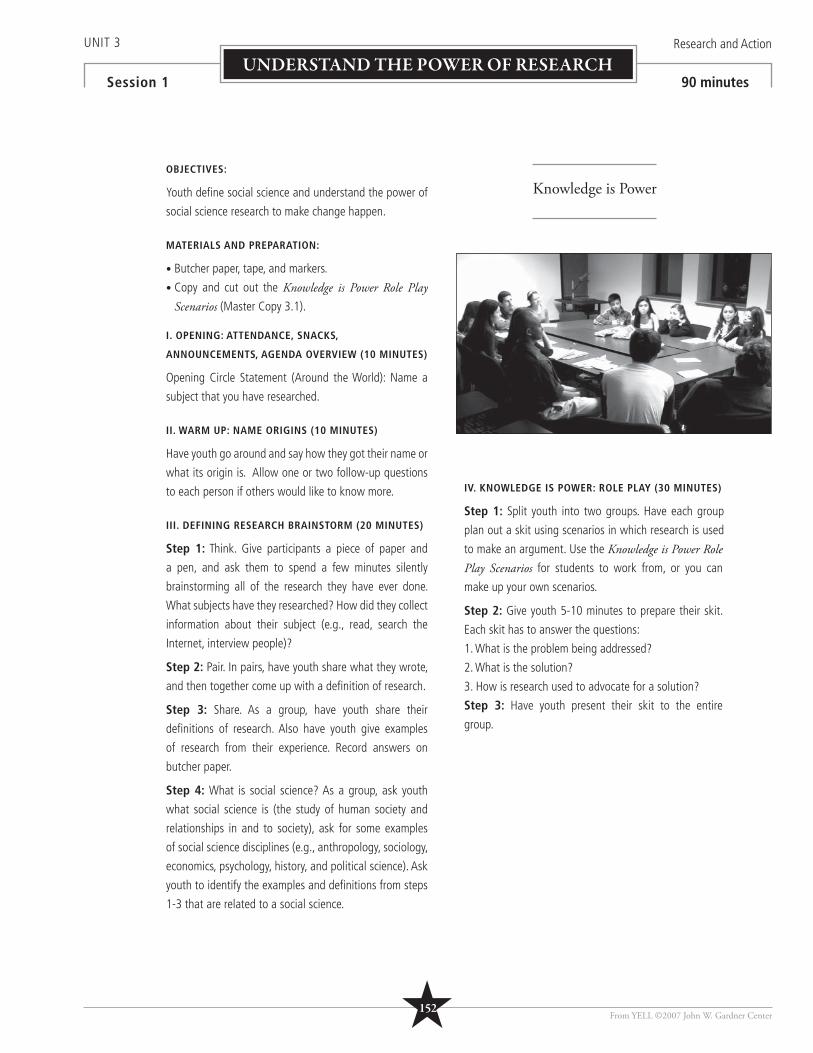
UNIT 3 Research and Action
Session 1 90 minutesUNDERSTAND THE POWER OF RESEARCH
OBJECTIVES:
Youth defi ne social science and understand the power of
social science research to make change happen.
MATERIALS AND PREPARATION:
• Butcher paper, tape, and markers.
• Copy and cut out the Knowledge is Power Role Play Scenarios (Master Copy 3.1).
I. OPENING: ATTENDANCE, SNACKS,
ANNOUNCEMENTS, AGENDA OVERVIEW (10 MINUTES)
Opening Circle Statement (Around the World): Name a
subject that you have researched.
II. WARM UP: NAME ORIGINS (10 MINUTES)
Have youth go around and say how they got their name or
what its origin is. Allow one or two follow-up questions
to each person if others would like to know more.
III. DEFINING RESEARCH BRAINSTORM (20 MINUTES)
Step 1: Think. Give participants a piece of paper and
a pen, and ask them to spend a few minutes silently
brainstorming all of the research they have ever done.
What subjects have they researched? How did they collect
information about their subject (e.g., read, search the
Internet, interview people)?
Step 2: Pair. In pairs, have youth share what they wrote,
and then together come up with a defi nition of research.
Step 3: Share. As a group, have youth share their
defi nitions of research. Also have youth give examples
of research from their experience. Record answers on
butcher paper.
Step 4: What is social science? As a group, ask youth
what social science is (the study of human society and
relationships in and to society), ask for some examples
of social science disciplines (e.g., anthropology, sociology,
economics, psychology, history, and political science). Ask
youth to identify the examples and defi nitions from steps
1-3 that are related to a social science.
IV. KNOWLEDGE IS POWER: ROLE PLAY (30 MINUTES)
Step 1: Split youth into two groups. Have each group
plan out a skit using scenarios in which research is used
to make an argument. Use the Knowledge is Power Role Play Scenarios for students to work from, or you can
make up your own scenarios.
Step 2: Give youth 5-10 minutes to prepare their skit.
Each skit has to answer the questions:
1. What is the problem being addressed?
2. What is the solution?
3. How is research used to advocate for a solution?
Step 3: Have youth present their skit to the entire
group.
Knowledge is Power
From YELL ©2007 John W. Gardner Center★152
V. DEBRIEF (10 MINUTES)
Sample questions:
• Why do you think these groups used research in their
campaigns for changing their community (e.g., helped
them prove their point; made them better advocates.)?
• What kind of research was best for making a solid
argument (e.g., video evidence, surveys, statistics,
interviews)? Why?
VI. CLOSING (10 MINUTES)
Do the take-home assignment as a brainstorm or close
with an Around the World statement.
UNIT 3 Research and Action
Session 1 90 minutes
From YELL ©2007 John W. Gardner Center
Optional Take-Home Assignment
Instructions:
• Write down three issues or problems that impact you and other youth in your community.
• After each issue or problem, write down at least one thing that a person or group could do to solve, improve, or raise awareness of that issue or problem. Briefl y explain how this would help.
• Bring your ideas to the next session!
UNDERSTAND THE POWER OF RESEARCH
✎
★153

UNIT 3 Research and Action
Session 2 90 minutes
OBJECTIVES:
Youth will defi ne what community means to them and
understand the interdependency of the people and
places within their community. Youth will begin to map
the resources and needs they see in their community and
identify the diverse perspectives that group members
bring to the community.
MATERIALS AND PREPARATION:
• Butcher paper, tape, and markers.
• Paper, pens, and clipboards.
• Prior to session, refer to the Community Web example
(Master Copy 3.2a).
• Map of your city or town (hand drawn or large wall
map).
• Push pins and string.
• Optional: Neighborhood Mapping Assignment (Master
Copy 3.2b).
I. OPENING: ATTENDANCE, SNACKS,
ANNOUNCEMENTS, AGENDA OVERVIEW (10 MINUTES)
Opening Circle Statement (Around the World): What one
word would you use to describe your neighborhood? If
you have time, hand out pens and index cards so that
youth can write their word before sharing out. This will
allow more variety in answers.
II. WARM UP: MAPPING YOUR HOME (15 MINUTES)
Using a large map of your city or town, mark your school
or program location with a large push pin. Ask youth to
come up one at a time and put a pin where they live and
then connect a piece of colored string from their home
to the meeting place. After everyone is done, ask youth if
they see a pattern. Hint: Label the pins with their names
so they can know which pin is theirs in relation to the
others in the group.
III. COMMUNITY WEB (15 MINUTES)
Step 1: Think, Pair, Share. Ask each youth to consider
their defi nition of community. They should think (or write)
for at least one minute. Then divide participants into pairs
to discuss their defi nitions, compare ideas, and create a
defi nition of community that incorporates both sets of
ideas. Have each pair share their defi nition with the full
group. Have one of the youth or adult leaders write the
defi nitions on chart paper or the board. In the center of
the defi nitions, write the word “community.”
Step 2: On the butcher paper or board, draw one large
circle around both the word “community” and the youth’s
defi nitions. Ask participants to name specifi c places and
people that make up a community and write these on
the perimeter of the circle. Connect these to the center
circle, making a web. See the Community Web example
for category ideas.
IV. CREATE A MAP (40 MINUTES)
Step 1: Create small groups of three to four people.
Preferably, youth should be divided according to their
neighborhoods, the places with which they most identify,
or where they spend the most time. You can also have
youth do this as an individual activity or take-home task.
Step 2: Ask youth to draw a picture of their community
according to the criteria below:
• What are the boundaries of your neighborhood – where
does it begin and end? What markers tell you when you
are entering or leaving this neighborhood?
• Draw this area to the best of your memory. Add in
streets, particular houses, stores, businesses, parks,
restaurants, landscapes, and other physical features.
Facilitation Tip:
Th is session youth will explore the benefi ts and challenges of living in their community and think critically about causes of important issues that impact them. Th is process positions youth to select a topic for research.
If you assigned the take-home task in the previous session, have participants share their thinking from the assignment during the debrief section. Write all of the student ideas on easel paper or the board.
Community Webs and Maps
From YELL ©2007 John W. Gardner Center
IDENTIFY ISSUES AND ASSETS
★154
• Include areas that offer resources or are of interest
to youth (positive and negative). Where do they hang
out?
• On or near your map, list four adjectives that describe
this area.
Step 3: Have each group share their map with the larger
group. Note differences and similarities between the
maps and the neighborhoods. Ask what youth think might
account for the differences and similarities in what the
different groups included.
Step 4: As a group, create a Community Web of
your community, based on the small group maps, and
think about what might have been omitted. Discuss
how the Community Web shows the connectedness
of the community. Demonstrate how a problem in a
neighborhood could affect many other people and
places in the community. Discuss how communities are
interdependent on the people and places within them.
V. DEBRIEF: CONNECTING TO ISSUES AND SOLUTIONS
(10 MINUTES)
Sample questions:
• What kinds of positive resources are there for youth in
your community?
• Do you think youth use these resources or go to these
places? Why or why not?
• Have you used these resources? Do you know who has?
• What do youth need that doesn’t currently exist?
• What happens when there is a problem within the
community? Who does it affect?
• What about when something positive happens?
• Who is responsible for making change?
VI. CLOSING (5 MINUTES)
Closing Circle Statement (Around the World): If I could
change any one thing about my neighborhood…
Example fr om Practice:
Some YELL participants had diffi culty remembering specifi c street names and the details of entire sections of their neighborhoods.
Th eir experience of their community was defi ned less by conventional boundaries like streets and more by patterns of movement and particular structures that have local signifi cance (like the subway station or the corner store). We learned that it helps to encourage youth to draw what is important to them, not what is usually on a map.
e:
UNIT 3 Research and Action
Session 2 90 minutes
From YELL ©2007 John W. Gardner Center
IDENTIFY ISSUES AND ASSETS
Optional Take-Home Assignment: Neighborhood Mapping
Give each youth the Neighborhood Mapping activity handout (Master Copy 3.2b) and ask them to complete the assignment by the next session. If possible, provide each youth with a labeled, disposable camera to use for this assignment.
In the next session, build in time to debrief the activity and have youth do a group collage.
Ask the youth to get in groups with others who live in their neighborhood. Use magazine pictures and any photos that the youth took of their neighborhoods to create collages on poster board. (Th ese can be used as display boards during presentations.)
Have youth discuss the following for each collage:
• Where were the pictures taken? (What neighborhood?)
• If there are people in the photographs, how are they related to the youth researcher? (Are they friends, family, or perhaps just random people?)
• What grabs your attention? What is the most interesting thing to you about the photographs or the collage?
• What did you LEARN from looking at this collage? What would someone who has never been to this area see based on the collage?
✎
★155
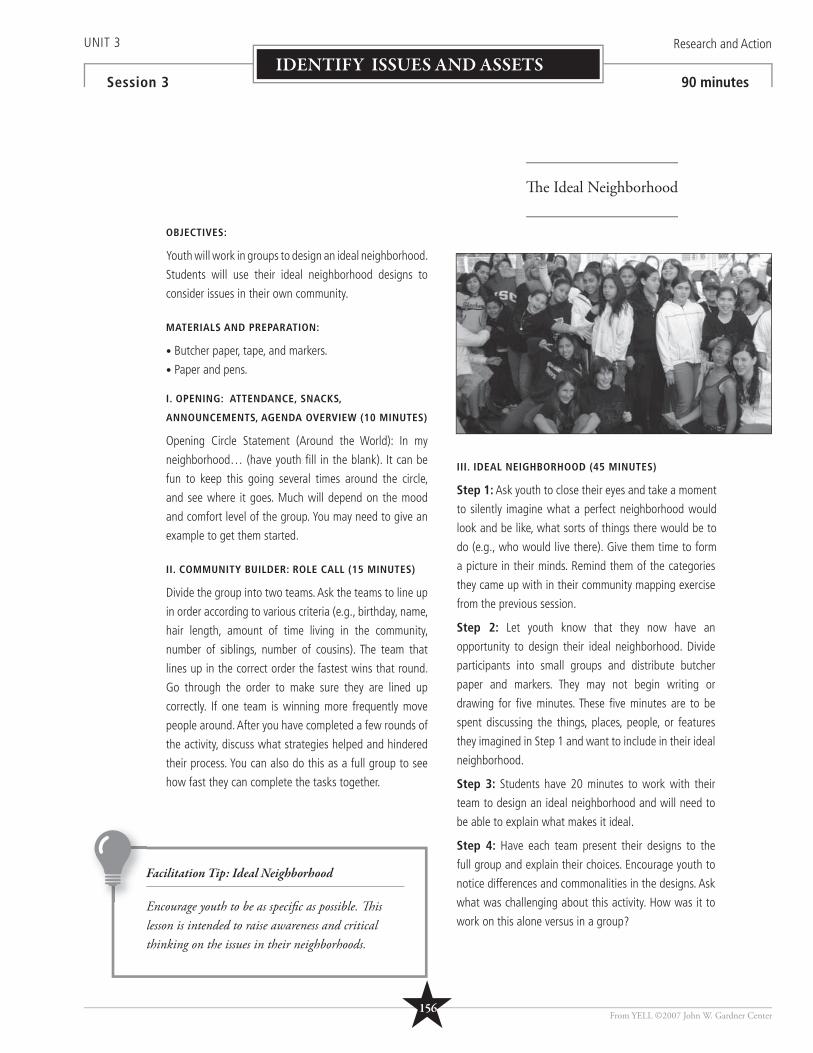
UNIT 3 Research and Action
Session 3 90 minutes
OBJECTIVES:
Youth will work in groups to design an ideal neighborhood.
Students will use their ideal neighborhood designs to
consider issues in their own community.
MATERIALS AND PREPARATION:
• Butcher paper, tape, and markers.
• Paper and pens.
I. OPENING: ATTENDANCE, SNACKS,
ANNOUNCEMENTS, AGENDA OVERVIEW (10 MINUTES)
Opening Circle Statement (Around the World): In my
neighborhood… (have youth fi ll in the blank). It can be
fun to keep this going several times around the circle,
and see where it goes. Much will depend on the mood
and comfort level of the group. You may need to give an
example to get them started.
II. COMMUNITY BUILDER: ROLE CALL (15 MINUTES)
Divide the group into two teams. Ask the teams to line up
in order according to various criteria (e.g., birthday, name,
hair length, amount of time living in the community,
number of siblings, number of cousins). The team that
lines up in the correct order the fastest wins that round.
Go through the order to make sure they are lined up
correctly. If one team is winning more frequently move
people around. After you have completed a few rounds of
the activity, discuss what strategies helped and hindered
their process. You can also do this as a full group to see
how fast they can complete the tasks together.
III. IDEAL NEIGHBORHOOD (45 MINUTES)
Step 1: Ask youth to close their eyes and take a moment
to silently imagine what a perfect neighborhood would
look and be like, what sorts of things there would be to
do (e.g., who would live there). Give them time to form
a picture in their minds. Remind them of the categories
they came up with in their community mapping exercise
from the previous session.
Step 2: Let youth know that they now have an
opportunity to design their ideal neighborhood. Divide
participants into small groups and distribute butcher
paper and markers. They may not begin writing or
drawing for fi ve minutes. These fi ve minutes are to be
spent discussing the things, places, people, or features
they imagined in Step 1 and want to include in their ideal
neighborhood.
Step 3: Students have 20 minutes to work with their
team to design an ideal neighborhood and will need to
be able to explain what makes it ideal.
Step 4: Have each team present their designs to the
full group and explain their choices. Encourage youth to
notice differences and commonalities in the designs. Ask
what was challenging about this activity. How was it to
work on this alone versus in a group?
Facilitation Tip: Ideal Neighborhood
Encourage youth to be as specifi c as possible. Th is lesson is intended to raise awareness and critical thinking on the issues in their neighborhoods.
Th e Ideal Neighborhood
From YELL ©2007 John W. Gardner Center
IDENTIFY ISSUES AND ASSETS
★156

IV. DEBRIEF AND DISCUSSION (10 MINUTES)
Once all groups have presented, raise questions about
differences between these neighborhoods and the ones
they actually live in. What differences exist? What makes
one more ideal than another?
• What is the difference between a good neighborhood
and a bad one? How would you feel living in each of
these places? Why?
• What could happen that would cause problems in these
ideal communities? Poor economy? No jobs? Violence?
If this neighborhood is ideal, why might these problems
arise?
• What could we do to transform a “bad” neighborhood
into a “good” one? How easy or diffi cult do you think
this would be?
V. CLOSING (10 MINUTES)
Closing Circle Statement (Around the World): If you could
make ONE aspect of your neighborhood more like your
ideal one, what would you choose? What would you do?
UNIT 3 Research and Action
Session 3 90 minutes
From YELL ©2007 John W. Gardner Center
IDENTIFY ISSUES AND ASSETS
★157
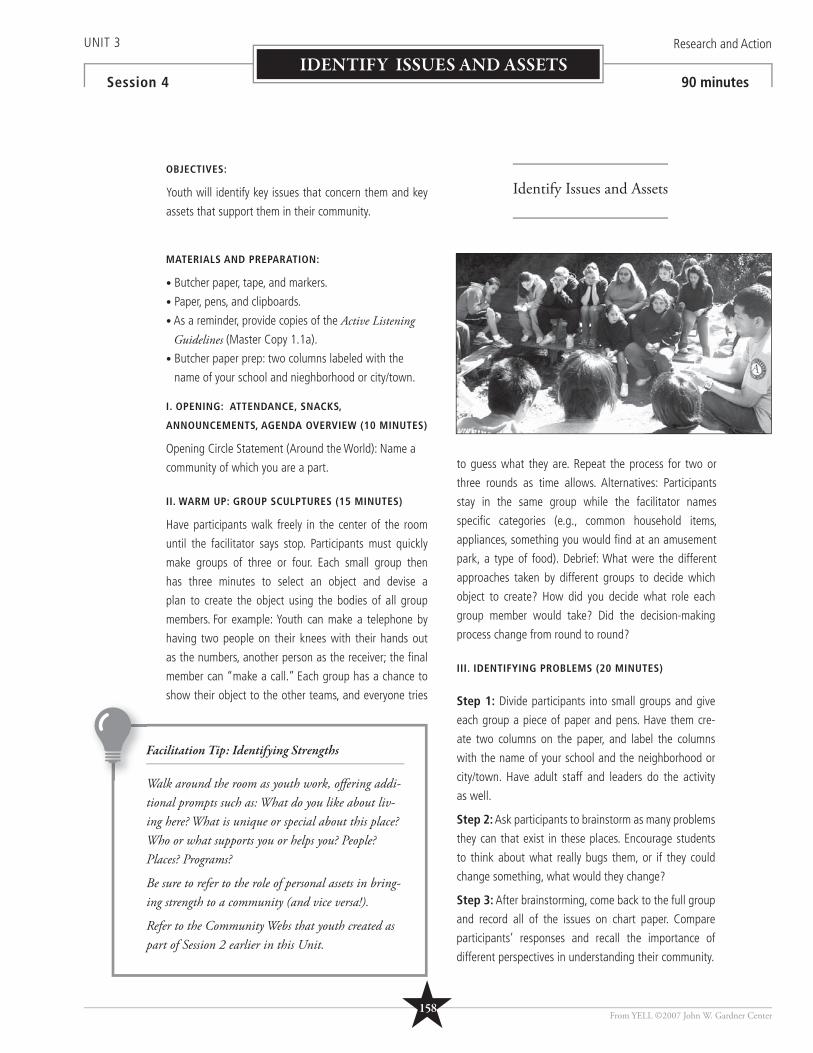
UNIT 3 Research and Action
Session 4 90 minutes
OBJECTIVES:
Youth will identify key issues that concern them and key
assets that support them in their community.
MATERIALS AND PREPARATION:
• Butcher paper, tape, and markers.
• Paper, pens, and clipboards.
• As a reminder, provide copies of the Active Listening Guidelines (Master Copy 1.1a).
• Butcher paper prep: two columns labeled with the
name of your school and nieghborhood or city/town.
I. OPENING: ATTENDANCE, SNACKS,
ANNOUNCEMENTS, AGENDA OVERVIEW (10 MINUTES)
Opening Circle Statement (Around the World): Name a
community of which you are a part.
II. WARM UP: GROUP SCULPTURES (15 MINUTES)
Have participants walk freely in the center of the room
until the facilitator says stop. Participants must quickly
make groups of three or four. Each small group then
has three minutes to select an object and devise a
plan to create the object using the bodies of all group
members. For example: Youth can make a telephone by
having two people on their knees with their hands out
as the numbers, another person as the receiver; the fi nal
member can “make a call.” Each group has a chance to
show their object to the other teams, and everyone tries
to guess what they are. Repeat the process for two or
three rounds as time allows. Alternatives: Participants
stay in the same group while the facilitator names
specifi c categories (e.g., common household items,
appliances, something you would fi nd at an amusement
park, a type of food). Debrief: What were the different
approaches taken by different groups to decide which
object to create? How did you decide what role each
group member would take? Did the decision-making
process change from round to round?
III. IDENTIFYING PROBLEMS (20 MINUTES)
Step 1: Divide participants into small groups and give
each group a piece of paper and pens. Have them cre-
ate two columns on the paper, and label the columns
with the name of your school and the neighborhood or
city/town. Have adult staff and leaders do the activity
as well.
Step 2: Ask participants to brainstorm as many problems
they can that exist in these places. Encourage students
to think about what really bugs them, or if they could
change something, what would they change?
Step 3: After brainstorming, come back to the full group
and record all of the issues on chart paper. Compare
participants’ responses and recall the importance of
different perspectives in understanding their community.
Facilitation Tip: Identifying Strengths
Walk around the room as youth work, off ering addi-tional prompts such as: What do you like about liv-ing here? What is unique or special about this place? Who or what supports you or helps you? People? Places? Programs?
Be sure to refer to the role of personal assets in bring-ing strength to a community (and vice versa!).
Refer to the Community Webs that youth created as part of Session 2 earlier in this Unit.
Identify Issues and Assets
From YELL ©2007 John W. Gardner Center
IDENTIFY ISSUES AND ASSETS
★158
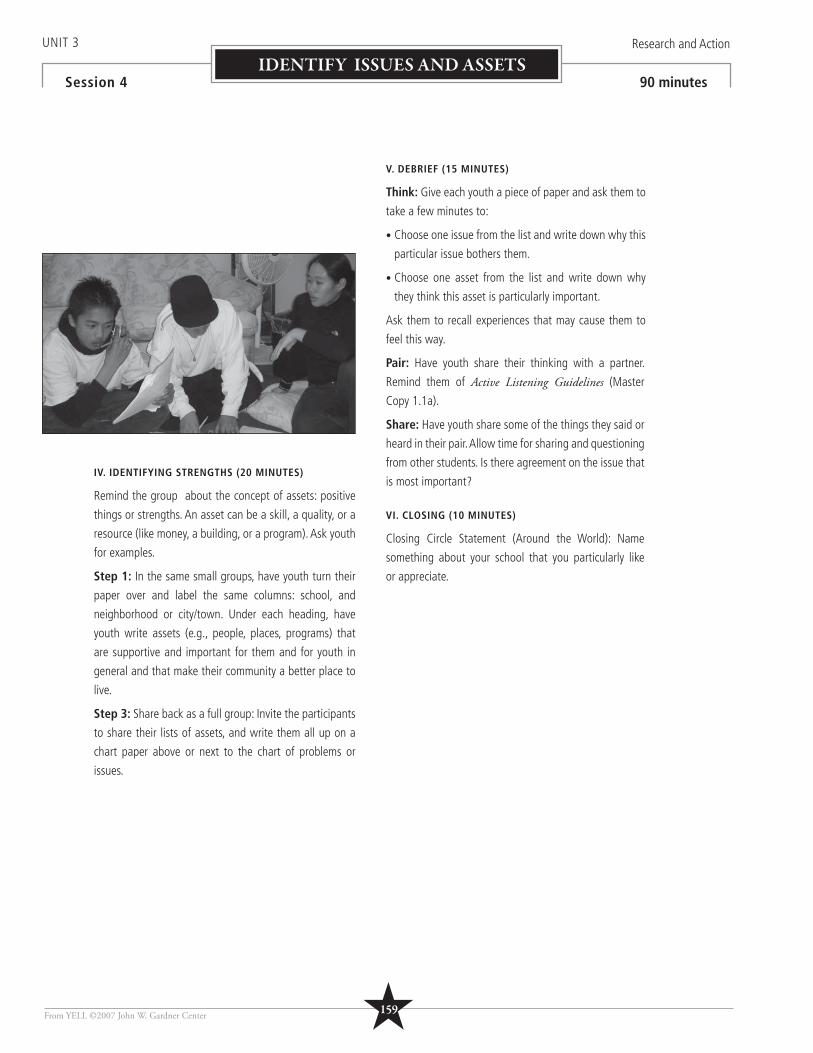
IV. IDENTIFYING STRENGTHS (20 MINUTES)
Remind the group about the concept of assets: positive
things or strengths. An asset can be a skill, a quality, or a
resource (like money, a building, or a program). Ask youth
for examples.
Step 1: In the same small groups, have youth turn their
paper over and label the same columns: school, and
neighborhood or city/town. Under each heading, have
youth write assets (e.g., people, places, programs) that
are supportive and important for them and for youth in
general and that make their community a better place to
live.
Step 3: Share back as a full group: Invite the participants
to share their lists of assets, and write them all up on a
chart paper above or next to the chart of problems or
issues.
V. DEBRIEF (15 MINUTES)
Think: Give each youth a piece of paper and ask them to
take a few minutes to:
• Choose one issue from the list and write down why this
particular issue bothers them.
• Choose one asset from the list and write down why
they think this asset is particularly important.
Ask them to recall experiences that may cause them to
feel this way.
Pair: Have youth share their thinking with a partner.
Remind them of Active Listening Guidelines (Master
Copy 1.1a).
Share: Have youth share some of the things they said or
heard in their pair. Allow time for sharing and questioning
from other students. Is there agreement on the issue that
is most important?
VI. CLOSING (10 MINUTES)
Closing Circle Statement (Around the World): Name
something about your school that you particularly like
or appreciate.
UNIT 3 Research and Action
Session 4 90 minutes
From YELL ©2007 John W. Gardner Center
IDENTIFY ISSUES AND ASSETS
★159
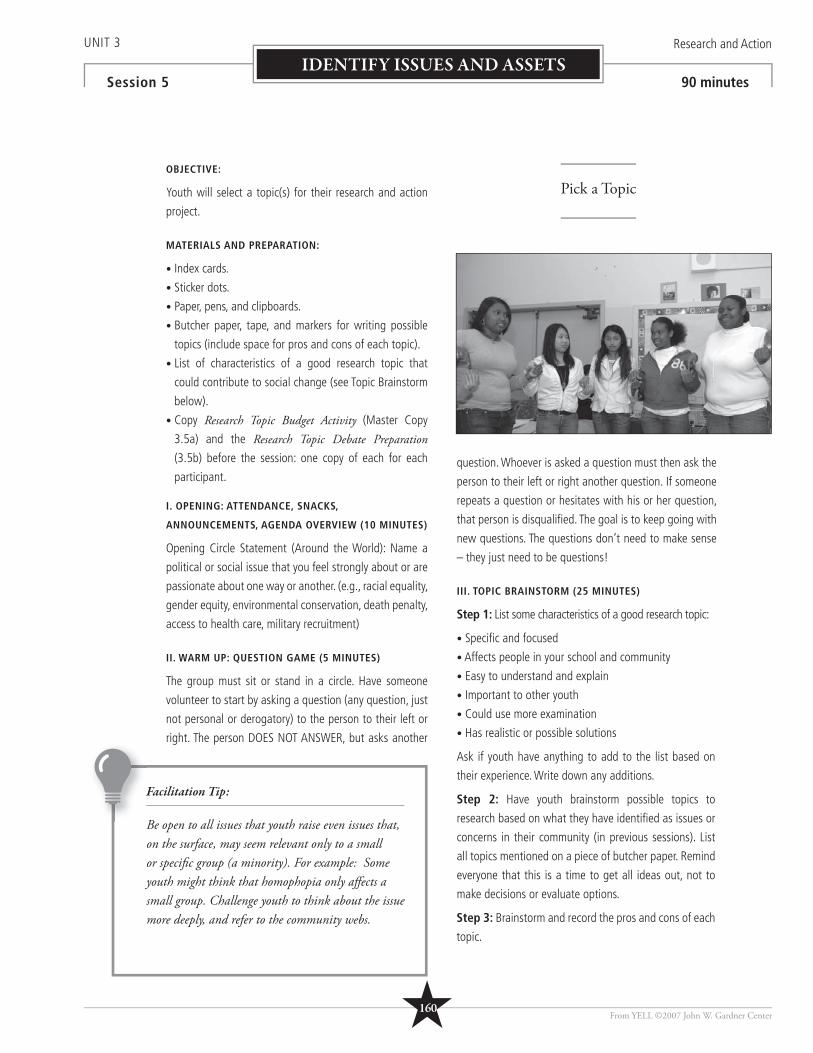
UNIT 3 Research and Action
Session 5 90 minutes
OBJECTIVE:
Youth will select a topic(s) for their research and action
project.
MATERIALS AND PREPARATION:
• Index cards.
• Sticker dots.
• Paper, pens, and clipboards.
• Butcher paper, tape, and markers for writing possible
topics (include space for pros and cons of each topic).
• List of characteristics of a good research topic that
could contribute to social change (see Topic Brainstorm
below).
• Copy Research Topic Budget Activity (Master Copy
3.5a) and the Research Topic Debate Preparation
(3.5b) before the session: one copy of each for each
participant.
I. OPENING: ATTENDANCE, SNACKS,
ANNOUNCEMENTS, AGENDA OVERVIEW (10 MINUTES)
Opening Circle Statement (Around the World): Name a
political or social issue that you feel strongly about or are
passionate about one way or another. (e.g., racial equality,
gender equity, environmental conservation, death penalty,
access to health care, military recruitment)
II. WARM UP: QUESTION GAME (5 MINUTES)
The group must sit or stand in a circle. Have someone
volunteer to start by asking a question (any question, just
not personal or derogatory) to the person to their left or
right. The person DOES NOT ANSWER, but asks another
question. Whoever is asked a question must then ask the
person to their left or right another question. If someone
repeats a question or hesitates with his or her question,
that person is disqualifi ed. The goal is to keep going with
new questions. The questions don’t need to make sense
– they just need to be questions!
III. TOPIC BRAINSTORM (25 MINUTES)
Step 1: List some characteristics of a good research topic:
• Specifi c and focused
• Affects people in your school and community
• Easy to understand and explain
• Important to other youth
• Could use more examination
• Has realistic or possible solutions
Ask if youth have anything to add to the list based on
their experience. Write down any additions.
Step 2: Have youth brainstorm possible topics to
research based on what they have identifi ed as issues or
concerns in their community (in previous sessions). List
all topics mentioned on a piece of butcher paper. Remind
everyone that this is a time to get all ideas out, not to
make decisions or evaluate options.
Step 3: Brainstorm and record the pros and cons of each
topic.
Facilitation Tip:
Be open to all issues that youth raise even issues that, on the surface, may seem relevant only to a small or specifi c group (a minority). For example: Some youth might think that homophopia only aff ects a small group. Challenge youth to think about the issue more deeply, and refer to the community webs.
Pick a Topic
From YELL ©2007 John W. Gardner Center
IDENTIFY ISSUES AND ASSETS
★160
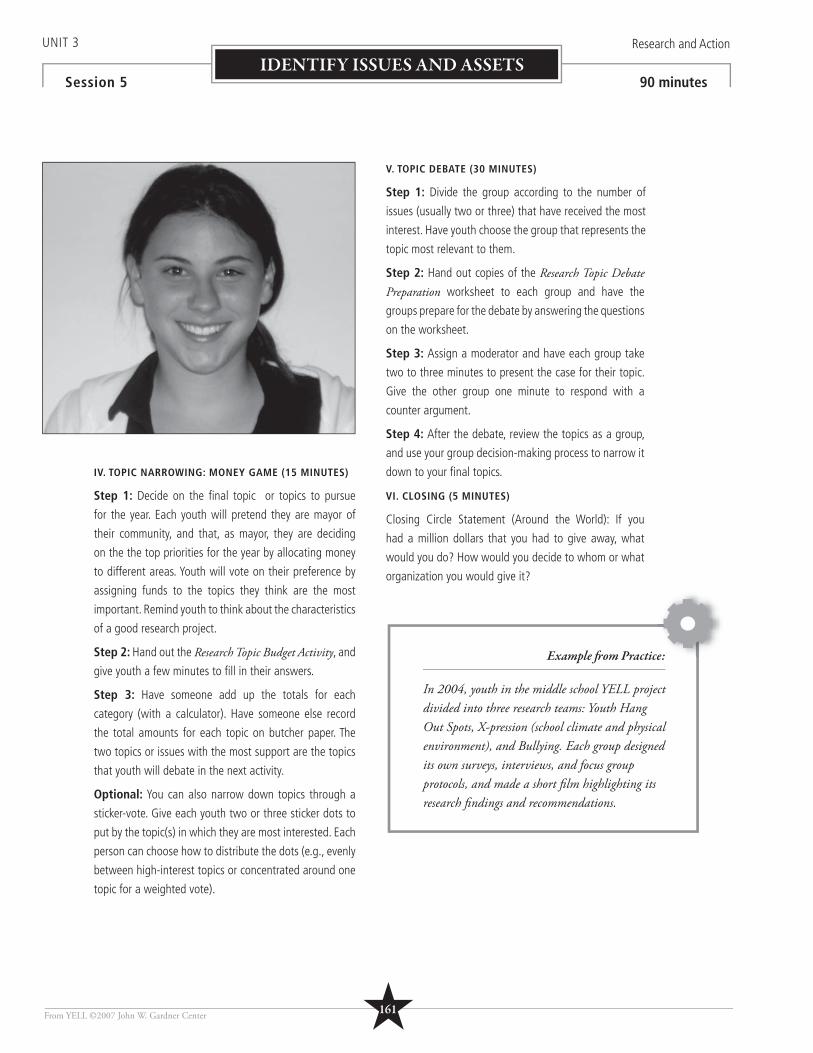
IV. TOPIC NARROWING: MONEY GAME (15 MINUTES)
Step 1: Decide on the fi nal topic or topics to pursue
for the year. Each youth will pretend they are mayor of
their community, and that, as mayor, they are deciding
on the the top priorities for the year by allocating money
to different areas. Youth will vote on their preference by
assigning funds to the topics they think are the most
important. Remind youth to think about the characteristics
of a good research project.
Step 2: Hand out the Research Topic Budget Activity, and
give youth a few minutes to fi ll in their answers.
Step 3: Have someone add up the totals for each
category (with a calculator). Have someone else record
the total amounts for each topic on butcher paper. The
two topics or issues with the most support are the topics
that youth will debate in the next activity.
Optional: You can also narrow down topics through a
sticker-vote. Give each youth two or three sticker dots to
put by the topic(s) in which they are most interested. Each
person can choose how to distribute the dots (e.g., evenly
between high-interest topics or concentrated around one
topic for a weighted vote).
V. TOPIC DEBATE (30 MINUTES)
Step 1: Divide the group according to the number of
issues (usually two or three) that have received the most
interest. Have youth choose the group that represents the
topic most relevant to them.
Step 2: Hand out copies of the Research Topic Debate Preparation worksheet to each group and have the
groups prepare for the debate by answering the questions
on the worksheet.
Step 3: Assign a moderator and have each group take
two to three minutes to present the case for their topic.
Give the other group one minute to respond with a
counter argument.
Step 4: After the debate, review the topics as a group,
and use your group decision-making process to narrow it
down to your fi nal topics.
VI. CLOSING (5 MINUTES)
Closing Circle Statement (Around the World): If you
had a million dollars that you had to give away, what
would you do? How would you decide to whom or what
organization you would give it?
Example fr om Practice:
In 2004, youth in the middle school YELL project divided into three research teams: Youth Hang Out Spots, X-pression (school climate and physical environment), and Bullying. Each group designed its own surveys, interviews, and focus group protocols, and made a short fi lm highlighting its research fi ndings and recommendations.
e:
UNIT 3 Research and Action
Session 5 90 minutes
From YELL ©2007 John W. Gardner Center
IDENTIFY ISSUES AND ASSETS
★161
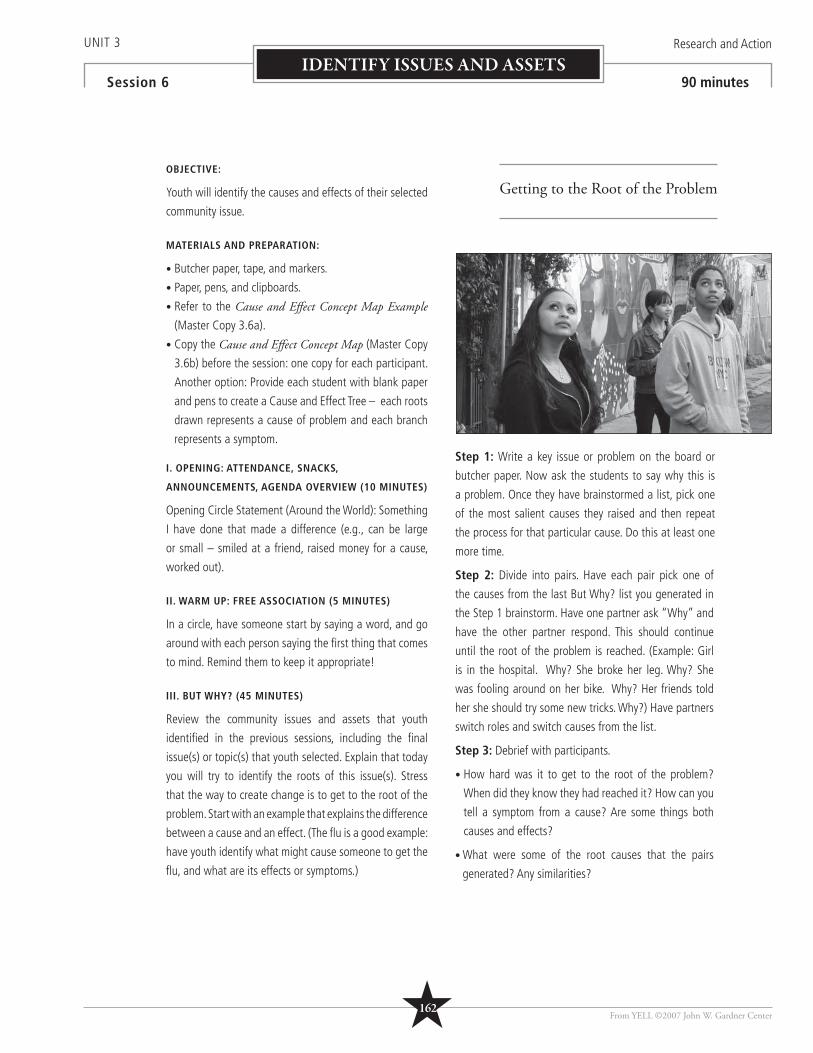
UNIT 3 Research and Action
Session 6 90 minutes
OBJECTIVE:
Youth will identify the causes and effects of their selected
community issue.
MATERIALS AND PREPARATION:
• Butcher paper, tape, and markers.
• Paper, pens, and clipboards.
• Refer to the Cause and Eff ect Concept Map Example (Master Copy 3.6a).
• Copy the Cause and Eff ect Concept Map (Master Copy
3.6b) before the session: one copy for each participant.
Another option: Provide each student with blank paper
and pens to create a Cause and Effect Tree – each roots
drawn represents a cause of problem and each branch
represents a symptom.
I. OPENING: ATTENDANCE, SNACKS,
ANNOUNCEMENTS, AGENDA OVERVIEW (10 MINUTES)
Opening Circle Statement (Around the World): Something
I have done that made a difference (e.g., can be large
or small – smiled at a friend, raised money for a cause,
worked out).
II. WARM UP: FREE ASSOCIATION (5 MINUTES)
In a circle, have someone start by saying a word, and go
around with each person saying the fi rst thing that comes
to mind. Remind them to keep it appropriate!
III. BUT WHY? (45 MINUTES)
Review the community issues and assets that youth
identifi ed in the previous sessions, including the fi nal
issue(s) or topic(s) that youth selected. Explain that today
you will try to identify the roots of this issue(s). Stress
that the way to create change is to get to the root of the
problem. Start with an example that explains the difference
between a cause and an effect. (The fl u is a good example:
have youth identify what might cause someone to get the
fl u, and what are its effects or symptoms.)
Step 1: Write a key issue or problem on the board or
butcher paper. Now ask the students to say why this is
a problem. Once they have brainstormed a list, pick one
of the most salient causes they raised and then repeat
the process for that particular cause. Do this at least one
more time.
Step 2: Divide into pairs. Have each pair pick one of
the causes from the last But Why? list you generated in
the Step 1 brainstorm. Have one partner ask “Why” and
have the other partner respond. This should continue
until the root of the problem is reached. (Example: Girl
is in the hospital. Why? She broke her leg. Why? She
was fooling around on her bike. Why? Her friends told
her she should try some new tricks. Why?) Have partners
switch roles and switch causes from the list.
Step 3: Debrief with participants.
• How hard was it to get to the root of the problem?
When did they know they had reached it? How can you
tell a symptom from a cause? Are some things both
causes and effects?
• What were some of the root causes that the pairs
generated? Any similarities?
Getting to the Root of the Problem
From YELL ©2007 John W. Gardner Center
IDENTIFY ISSUES AND ASSETS
★162
IV. ACTIVITY: CONCEPT MAPPING (20 MINUTES)
As a group, use answers from the But Why? activity, and
lead the participants through a Causes and Effect Concept
Map (or Tree). You can do this as an individual activity or
as a full group. Questions as you proceed could include:
Why do you think that? Tell me more. Can you give an
example?
• Encourage all responses, even if there is disagreement.
Different perspectives are important.
V. CLOSING (10 MINUTES)
Closing Circle Statement (Around the World): What did
you learn from this activity?
Another Approach: Roots and Branches
On a large piece of paper, draw a tree with many roots and branches. Explain that the branches are the symptoms of the problem, and the roots are the causes of the problem. For example: For the issue of alcohol abuse, the branches could be bad grades, skipping school, violence, failed relationships, accidents, and falling down. Th e roots could be depression, stress, insecurity, and easy access. If you opt to use this model, encourage “sub-roots,” or smaller roots that feed into the larger roots. For example, a sub-root of depression could be genetics, or a sub-root of easy access to alcohol could be lack of enforcement of laws against selling to minors.
UNIT 3 Research and Action
Session 6 90 minutes
From YELL ©2007 John W. Gardner Center
IDENTIFY ISSUES AND ASSETS
★163
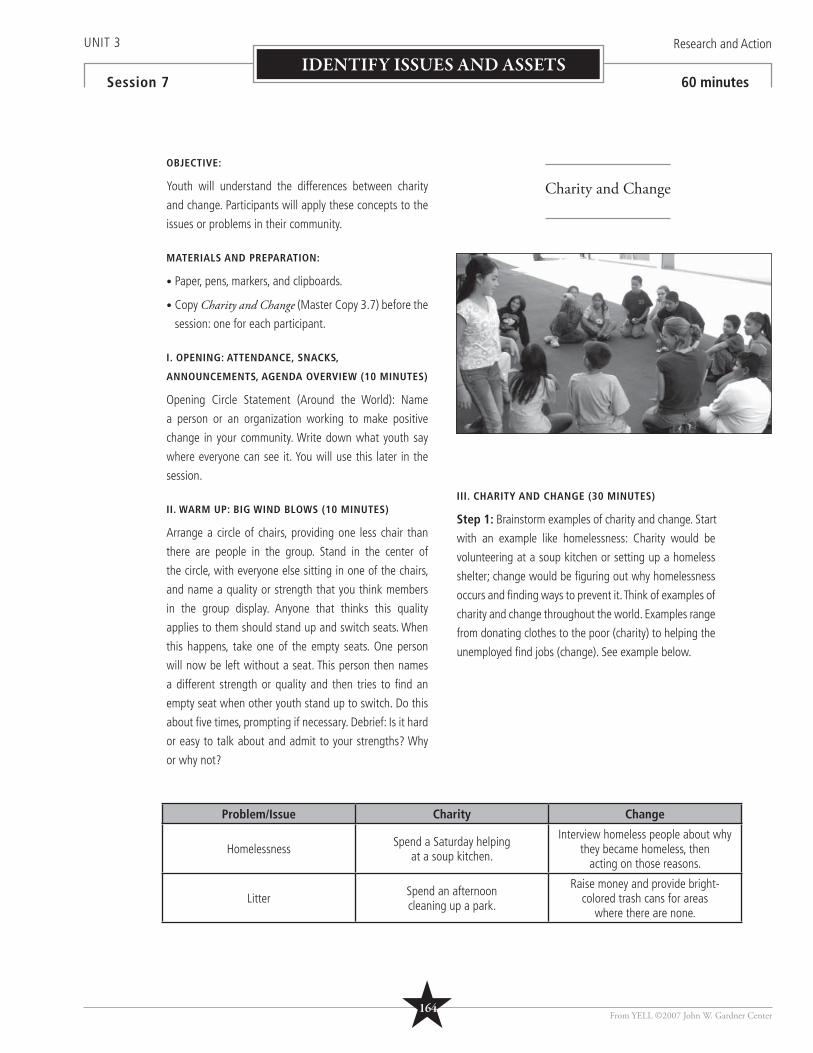
UNIT 3 Research and Action
Session 7 60 minutes
OBJECTIVE:
Youth will understand the differences between charity
and change. Participants will apply these concepts to the
issues or problems in their community.
MATERIALS AND PREPARATION:
• Paper, pens, markers, and clipboards.
• Copy Charity and Change (Master Copy 3.7) before the
session: one for each participant.
I. OPENING: ATTENDANCE, SNACKS,
ANNOUNCEMENTS, AGENDA OVERVIEW (10 MINUTES)
Opening Circle Statement (Around the World): Name
a person or an organization working to make positive
change in your community. Write down what youth say
where everyone can see it. You will use this later in the
session.
II. WARM UP: BIG WIND BLOWS (10 MINUTES)
Arrange a circle of chairs, providing one less chair than
there are people in the group. Stand in the center of
the circle, with everyone else sitting in one of the chairs,
and name a quality or strength that you think members
in the group display. Anyone that thinks this quality
applies to them should stand up and switch seats. When
this happens, take one of the empty seats. One person
will now be left without a seat. This person then names
a different strength or quality and then tries to fi nd an
empty seat when other youth stand up to switch. Do this
about fi ve times, prompting if necessary. Debrief: Is it hard
or easy to talk about and admit to your strengths? Why
or why not?
III. CHARITY AND CHANGE (30 MINUTES)
Step 1: Brainstorm examples of charity and change. Start
with an example like homelessness: Charity would be
volunteering at a soup kitchen or setting up a homeless
shelter; change would be fi guring out why homelessness
occurs and fi nding ways to prevent it. Think of examples of
charity and change throughout the world. Examples range
from donating clothes to the poor (charity) to helping the
unemployed fi nd jobs (change). See example below.
Charity and Change
From YELL ©2007 John W. Gardner Center
IDENTIFY ISSUES AND ASSETS
Problem/Issue Charity Change
Homelessness Spend a Saturday helping at a soup kitchen.
Interview homeless people about why they became homeless, then
acting on those reasons.
Litter Spend an afternoon cleaning up a park.
Raise money and provide bright- colored trash cans for areas
where there are none.
★164
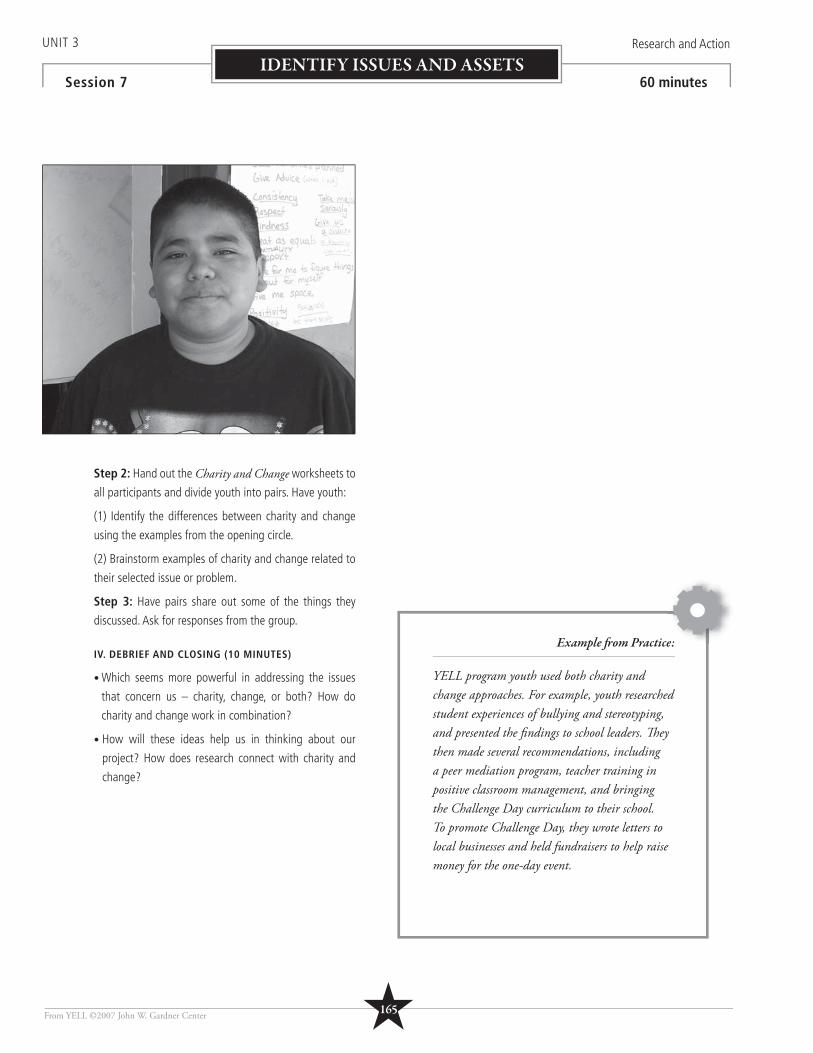
Step 2: Hand out the Charity and Change worksheets to
all participants and divide youth into pairs. Have youth:
(1) Identify the differences between charity and change
using the examples from the opening circle.
(2) Brainstorm examples of charity and change related to
their selected issue or problem.
Step 3: Have pairs share out some of the things they
discussed. Ask for responses from the group.
IV. DEBRIEF AND CLOSING (10 MINUTES)
• Which seems more powerful in addressing the issues
that concern us – charity, change, or both? How do
charity and change work in combination?
• How will these ideas help us in thinking about our
project? How does research connect with charity and
change?
UNIT 3 Research and Action
Session 7 60 minutes
From YELL ©2007 John W. Gardner Center
IDENTIFY ISSUES AND ASSETS
Example fr om Practice:
YELL program youth used both charity and change approaches. For example, youth researched student experiences of bullying and stereotyping, and presented the fi ndings to school leaders. Th ey then made several recommendations, including a peer mediation program, teacher training in positive classroom management, and bringing the Challenge Day curriculum to their school. To promote Challenge Day, they wrote letters to local businesses and held fundraisers to help raise money for the one-day event.
e:
★165
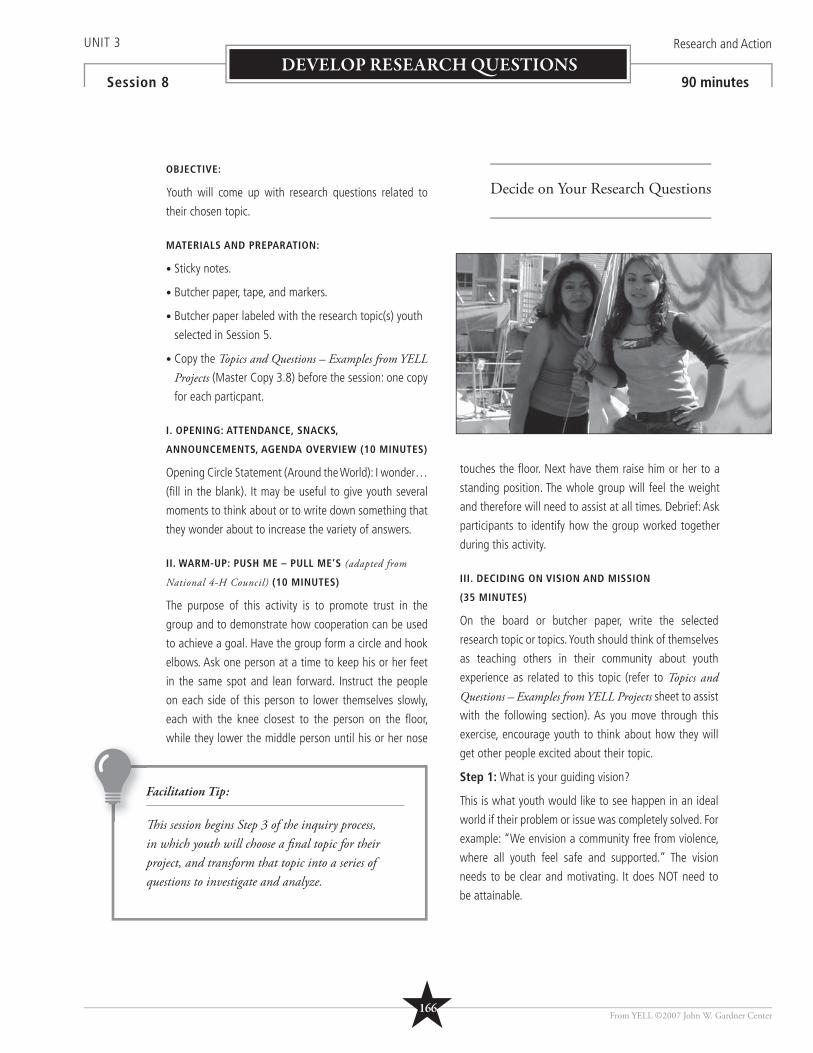
UNIT 3 Research and Action
Session 8 90 minutes
OBJECTIVE:
Youth will come up with research questions related to
their chosen topic.
MATERIALS AND PREPARATION:
• Sticky notes.
• Butcher paper, tape, and markers.
• Butcher paper labeled with the research topic(s) youth
selected in Session 5.
• Copy the Topics and Questions – Examples from YELL Projects (Master Copy 3.8) before the session: one copy
for each particpant.
I. OPENING: ATTENDANCE, SNACKS,
ANNOUNCEMENTS, AGENDA OVERVIEW (10 MINUTES)
Opening Circle Statement (Around the World): I wonder…
(fi ll in the blank). It may be useful to give youth several
moments to think about or to write down something that
they wonder about to increase the variety of answers.
II. WARM-UP: PUSH ME – PULL ME’S (adapted from
National 4-H Council) (10 MINUTES)
The purpose of this activity is to promote trust in the
group and to demonstrate how cooperation can be used
to achieve a goal. Have the group form a circle and hook
elbows. Ask one person at a time to keep his or her feet
in the same spot and lean forward. Instruct the people
on each side of this person to lower themselves slowly,
each with the knee closest to the person on the fl oor,
while they lower the middle person until his or her nose
touches the fl oor. Next have them raise him or her to a
standing position. The whole group will feel the weight
and therefore will need to assist at all times. Debrief: Ask
participants to identify how the group worked together
during this activity.
III. DECIDING ON VISION AND MISSION
(35 MINUTES)
On the board or butcher paper, write the selected
research topic or topics. Youth should think of themselves
as teaching others in their community about youth
experience as related to this topic (refer to Topics and Questions – Examples from YELL Projects sheet to assist
with the following section). As you move through this
exercise, encourage youth to think about how they will
get other people excited about their topic.
Step 1: What is your guiding vision?
This is what youth would like to see happen in an ideal
world if their problem or issue was completely solved. For
example: “We envision a community free from violence,
where all youth feel safe and supported.” The vision
needs to be clear and motivating. It does NOT need to
be attainable.
Facilitation Tip:
Th is session begins Step 3 of the inquiry process, in which youth will choose a fi nal topic for their project, and transform that topic into a series of questions to investigate and analyze.
Decide on Your Research Questions
From YELL ©2007 John W. Gardner Center
DEVELOP RESEARCH QUESTIONS
★166

Step 2: What is your mission?
The mission is what you will actually attempt to do or
make happen. For example: “Our mission is to increase
understanding of youth’s perspectives on violence
and youth’s experiences of violence in our school and
community, and show adult decision makers that young
people can be part of making a positive difference for the
whole community.”
Step 3: What are your specifi c goals?
Start with a brainstorm: have youth imagine that they
have fi nished collecting all their information and are ready
to share what they found. What type of impact do they
expect? What type of change do they want their fi ndings
to make? What do they want to be able to share? Have
youth agree to at least two goals. Make sure the goals are
realistic based on the time frame available. For example:
“Our goals are:
(1) To share research fi ndings and recommendations with
decision makers in our school and community.
(2) To develop action steps for putting our
recommendations into practice.”
IV. DECIDING ON RESEARCH QUESTIONS (25 MINUTES)
Let youth know that now they will come up with questions
to help them meet their goals.
Step 1: Work through at least one example of research
questions on the board by using Topics and Questions – Examples from YELL Projects or an example of your own.
Ask the youth to add at least one research question to
the example.
Step 2: Divide youth into groups of two or three. Give each
small group three sticky notes. Each group is responsible
for coming up with at least three questions they think will
help them better understand their topic. Have youth write
one question per sticky note. After they have completed
their questions, have them number their questions from
one to three, with one being the most important, and three
being least important.
Step 3: Come back together as a group and have
each group pass up the question they think is the most
important. Post all of these #1 questions on a whiteboard
of piece of butcher paper. Once all of the #1 questions
are up, ask if anyone has any duplicates, and if so to pass
them up for the facilitator to group accordingly. Then,
have youth pass up any non-duplicate #2 questions,
and repeat the process until all questions are up on the
board or paper. As much as possible, group the questions
according to common themes. After the questions are
grouped, have youth state the key overarching question
that covers each grouped set of questions. Write these
overarching questions on a separate sheet of butcher
paper. If there are more than three question categories,
have youth prioritize the three most important by whatever
decision-making process is best for your group.
Step 4: Write the fi nal topic, vision, mission, goals, and
main questions on butcher paper and post in a prominent
place.
V. CLOSING (10 MINUTES)
Closing Circle Statement (Around the World): If you could
know the answer to any question in the world, what
would it be?
UNIT 3 Research and Action
Session 8 90 minutes
From YELL ©2007 John W. Gardner Center
DEVELOP RESEARCH QUESTIONS
★167
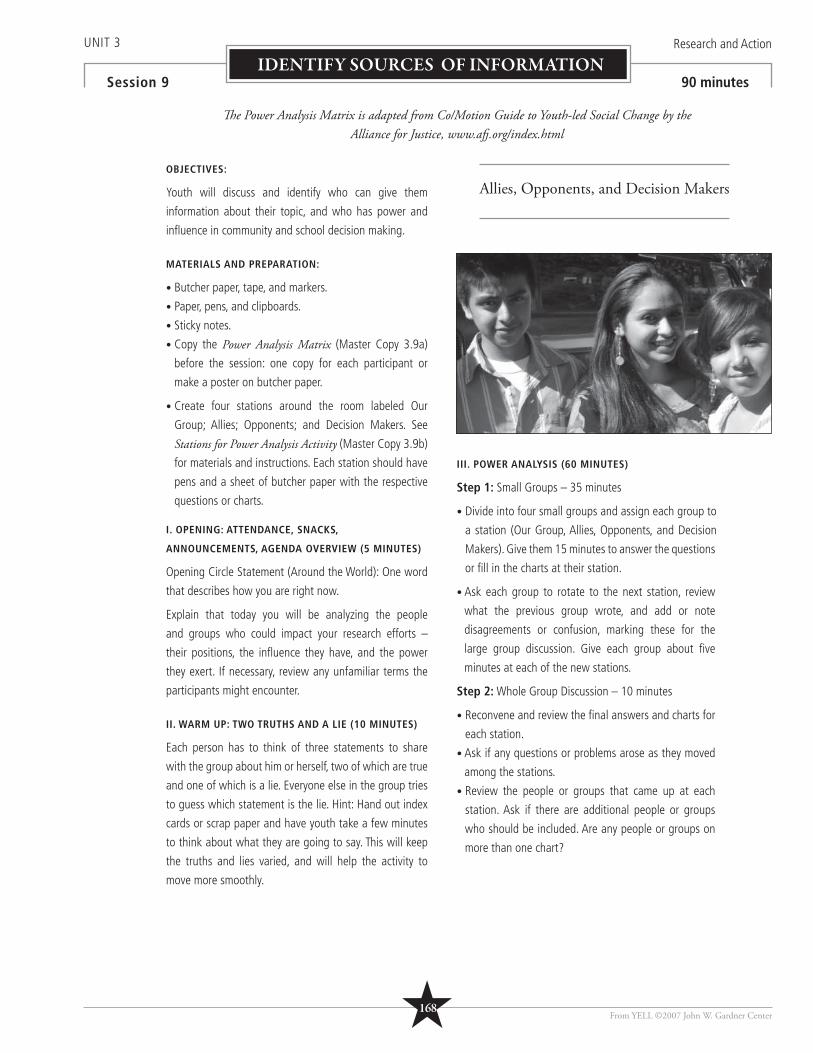
UNIT 3 Research and Action
Session 9 90 minutes
OBJECTIVES:
Youth will discuss and identify who can give them
information about their topic, and who has power and
infl uence in community and school decision making.
MATERIALS AND PREPARATION:
• Butcher paper, tape, and markers.
• Paper, pens, and clipboards.
• Sticky notes.
• Copy the Power Analysis Matrix (Master Copy 3.9a)
before the session: one copy for each participant or
make a poster on butcher paper.
• Create four stations around the room labeled Our
Group; Allies; Opponents; and Decision Makers. See
Stations for Power Analysis Activity (Master Copy 3.9b)
for materials and instructions. Each station should have
pens and a sheet of butcher paper with the respective
questions or charts.
I. OPENING: ATTENDANCE, SNACKS,
ANNOUNCEMENTS, AGENDA OVERVIEW (5 MINUTES)
Opening Circle Statement (Around the World): One word
that describes how you are right now.
Explain that today you will be analyzing the people
and groups who could impact your research efforts –
their positions, the infl uence they have, and the power
they exert. If necessary, review any unfamiliar terms the
participants might encounter.
II. WARM UP: TWO TRUTHS AND A LIE (10 MINUTES)
Each person has to think of three statements to share
with the group about him or herself, two of which are true
and one of which is a lie. Everyone else in the group tries
to guess which statement is the lie. Hint: Hand out index
cards or scrap paper and have youth take a few minutes
to think about what they are going to say. This will keep
the truths and lies varied, and will help the activity to
move more smoothly.
III. POWER ANALYSIS (60 MINUTES)
Step 1: Small Groups – 35 minutes
• Divide into four small groups and assign each group to
a station (Our Group, Allies, Opponents, and Decision
Makers). Give them 15 minutes to answer the questions
or fi ll in the charts at their station.
• Ask each group to rotate to the next station, review
what the previous group wrote, and add or note
disagreements or confusion, marking these for the
large group discussion. Give each group about fi ve
minutes at each of the new stations.
Step 2: Whole Group Discussion – 10 minutes
• Reconvene and review the fi nal answers and charts for
each station.
• Ask if any questions or problems arose as they moved
among the stations.
• Review the people or groups that came up at each
station. Ask if there are additional people or groups
who should be included. Are any people or groups on
more than one chart?
Allies, Opponents, and Decision Makers
From YELL ©2007 John W. Gardner Center
IDENTIFY SOURCES OF INFORMATION
Th e Power Analysis Matrix is adapted from Co/Motion Guide to Youth-led Social Change by the Alliance for Justice, www.afj .org/index.html
★168
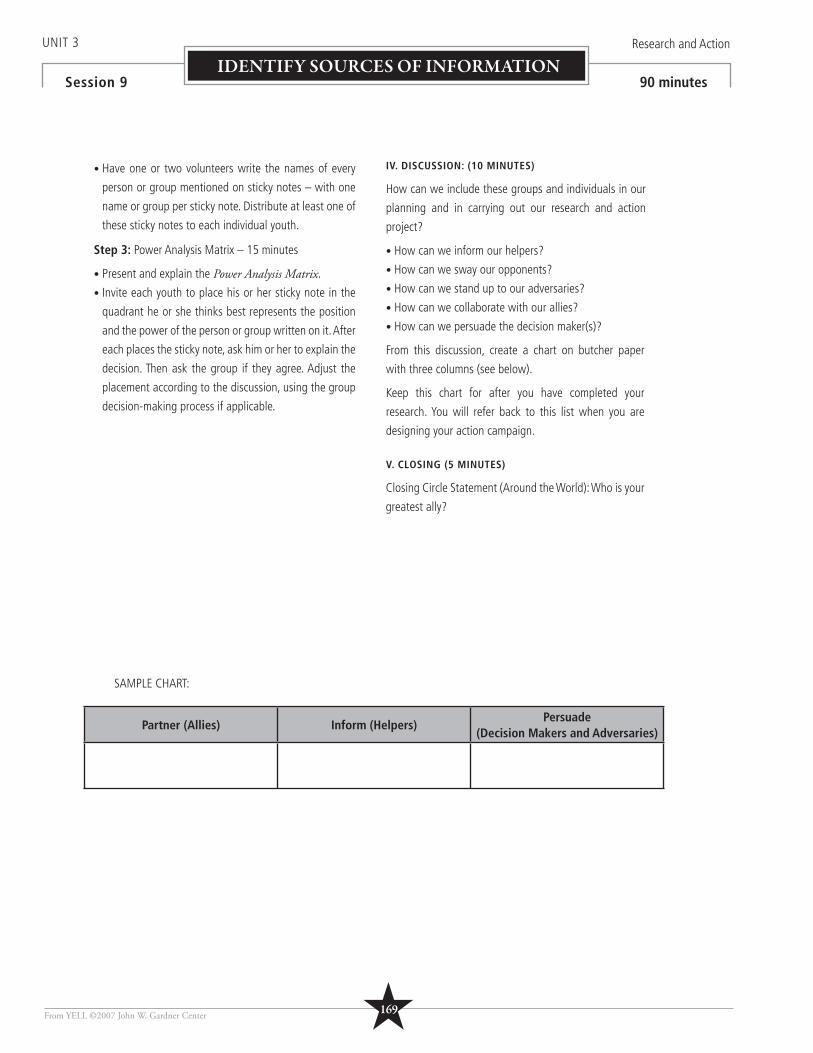
• Have one or two volunteers write the names of every
person or group mentioned on sticky notes – with one
name or group per sticky note. Distribute at least one of
these sticky notes to each individual youth.
Step 3: Power Analysis Matrix – 15 minutes
• Present and explain the Power Analysis Matrix.
• Invite each youth to place his or her sticky note in the
quadrant he or she thinks best represents the position
and the power of the person or group written on it. After
each places the sticky note, ask him or her to explain the
decision. Then ask the group if they agree. Adjust the
placement according to the discussion, using the group
decision-making process if applicable.
IV. DISCUSSION: (10 MINUTES)
How can we include these groups and individuals in our
planning and in carrying out our research and action
project?
• How can we inform our helpers?
• How can we sway our opponents?
• How can we stand up to our adversaries?
• How can we collaborate with our allies?
• How can we persuade the decision maker(s)?
From this discussion, create a chart on butcher paper
with three columns (see below).
Keep this chart for after you have completed your
research. You will refer back to this list when you are
designing your action campaign.
V. CLOSING (5 MINUTES)
Closing Circle Statement (Around the World): Who is your
greatest ally?
UNIT 3 Research and Action
Session 9 90 minutes
From YELL ©2007 John W. Gardner Center
IDENTIFY SOURCES OF INFORMATION
Partner (Allies) Inform (Helpers)Persuade
(Decision Makers and Adversaries)
SAMPLE CHART:
★169
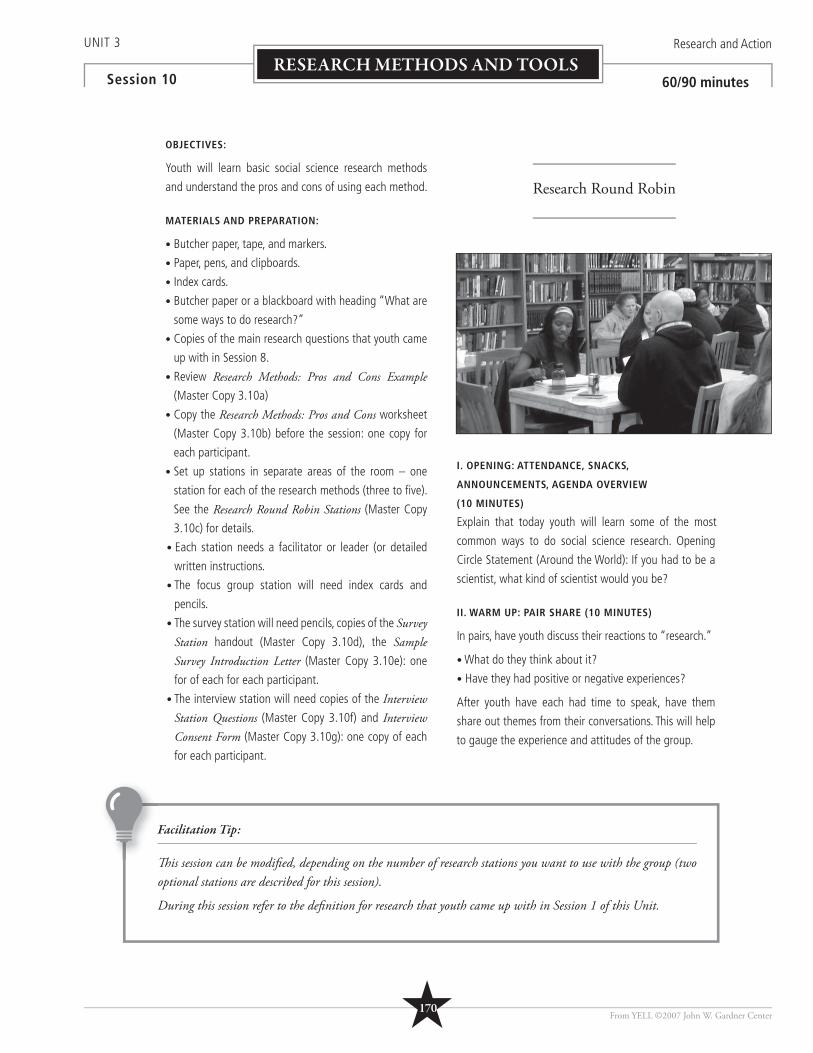
UNIT 3 Research and Action
Session 10 60/90 minutes
OBJECTIVES:
Youth will learn basic social science research methods
and understand the pros and cons of using each method.
MATERIALS AND PREPARATION:
• Butcher paper, tape, and markers.
• Paper, pens, and clipboards.
• Index cards.
• Butcher paper or a blackboard with heading “What are
some ways to do research?”
• Copies of the main research questions that youth came
up with in Session 8.
• Review Research Methods: Pros and Cons Example (Master Copy 3.10a)
• Copy the Research Methods: Pros and Cons worksheet
(Master Copy 3.10b) before the session: one copy for
each participant.
• Set up stations in separate areas of the room – one
station for each of the research methods (three to fi ve).
See the Research Round Robin Stations (Master Copy
3.10c) for details.
• Each station needs a facilitator or leader (or detailed
written instructions.
• The focus group station will need index cards and
pencils.
• The survey station will need pencils, copies of the Survey Station handout (Master Copy 3.10d), the Sample Survey Introduction Letter (Master Copy 3.10e): one
for of each for each participant.
• The interview station will need copies of the Interview Station Questions (Master Copy 3.10f) and Interview Consent Form (Master Copy 3.10g): one copy of each
for each participant.
I. OPENING: ATTENDANCE, SNACKS,
ANNOUNCEMENTS, AGENDA OVERVIEW
(10 MINUTES)
Explain that today youth will learn some of the most
common ways to do social science research. Opening
Circle Statement (Around the World): If you had to be a
scientist, what kind of scientist would you be?
II. WARM UP: PAIR SHARE (10 MINUTES)
In pairs, have youth discuss their reactions to “research.”
• What do they think about it?
• Have they had positive or negative experiences?
After youth have each had time to speak, have them
share out themes from their conversations. This will help
to gauge the experience and attitudes of the group.
Facilitation Tip:
Th is session can be modifi ed, depending on the number of research stations you want to use with the group (two optional stations are described for this session).
During this session refer to the defi nition for research that youth came up with in Session 1 of this Unit.
Research Round Robin
From YELL ©2007 John W. Gardner Center
RESEARCH METHODS AND TOOLS
★170

III. BRAINSTORM RESEARCH METHODS (5 MINUTES)
Ask the students to brainstorm different research
methods:
• How can you get information about an issue?
• How can you fi nd out what other people think and
experience?
• How do politicians or major companies fi nd out about
people’s opinions or interests?
Record answers on butcher paper or the board.
IV. RESEARCH METHODS ROUND ROBIN (30/60 MINUTES)
Explain that youth will now experiment with some of the
most common ways to do research or collect data. Youth
will rotate from station to station, spending 10 minutes at
each station (modify as necessary) trying out the research
method and then thinking about the pros and cons of
that method.
• Give each student a Research Methods: Pros and Cons worksheet to fi ll out at each station.
• Divide youth into three to fi ve groups and send each
group to a station.
V. DEBRIEF/CLOSING (5 MINUTES)
After all students have gone to all three (or more) stations,
bring the group back together and ask “What research
methods did you like best and why?”
UNIT 3 Research and Action
Session 10 60/90 minutes
From YELL ©2007 John W. Gardner Center
RESEARCH METHODS AND TOOLS
★171
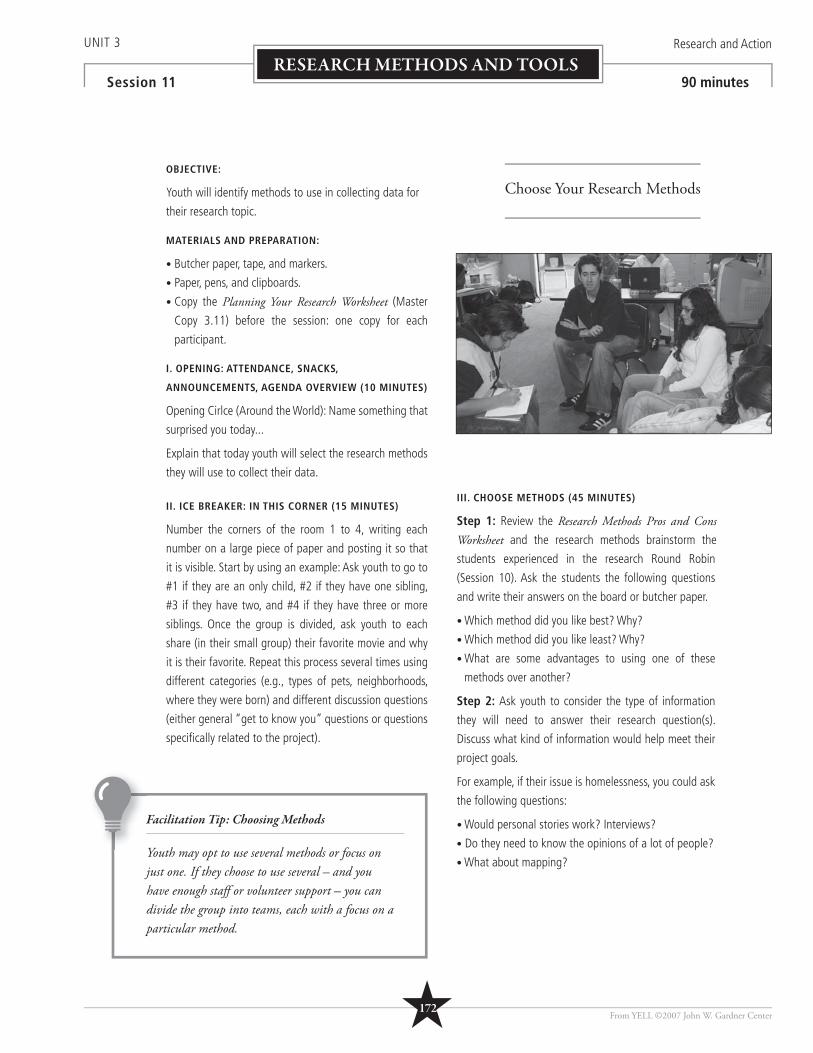
UNIT 3 Research and Action
Session 11 90 minutes
OBJECTIVE:
Youth will identify methods to use in collecting data for
their research topic.
MATERIALS AND PREPARATION:
• Butcher paper, tape, and markers.
• Paper, pens, and clipboards.
• Copy the Planning Your Research Worksheet (Master
Copy 3.11) before the session: one copy for each
participant.
I. OPENING: ATTENDANCE, SNACKS,
ANNOUNCEMENTS, AGENDA OVERVIEW (10 MINUTES)
Opening Cirlce (Around the World): Name something that
surprised you today...
Explain that today youth will select the research methods
they will use to collect their data.
II. ICE BREAKER: IN THIS CORNER (15 MINUTES)
Number the corners of the room 1 to 4, writing each
number on a large piece of paper and posting it so that
it is visible. Start by using an example: Ask youth to go to
#1 if they are an only child, #2 if they have one sibling,
#3 if they have two, and #4 if they have three or more
siblings. Once the group is divided, ask youth to each
share (in their small group) their favorite movie and why
it is their favorite. Repeat this process several times using
different categories (e.g., types of pets, neighborhoods,
where they were born) and different discussion questions
(either general “get to know you” questions or questions
specifi cally related to the project).
III. CHOOSE METHODS (45 MINUTES)
Step 1: Review the Research Methods Pros and Cons Worksheet and the research methods brainstorm the
students experienced in the research Round Robin
(Session 10). Ask the students the following questions
and write their answers on the board or butcher paper.
• Which method did you like best? Why?
• Which method did you like least? Why?
• What are some advantages to using one of these
methods over another?
Step 2: Ask youth to consider the type of information
they will need to answer their research question(s).
Discuss what kind of information would help meet their
project goals.
For example, if their issue is homelessness, you could ask
the following questions:
• Would personal stories work? Interviews?
• Do they need to know the opinions of a lot of people?
• What about mapping?
Facilitation Tip: Choosing Methods
Youth may opt to use several methods or focus on just one. If they choose to use several – and you have enough staff or volunteer support – you can divide the group into teams, each with a focus on a particular method.
Choose Your Research Methods
From YELL ©2007 John W. Gardner Center
RESEARCH METHODS AND TOOLS
★172
Step 3: Choose Your Research Methods
• Divide youth into three or four small groups.
• Hand out the Planning Your Research worksheet.
• Give youth 5-10 minutes to work on the questions.
• Have youth share their answers with the full group and
record what they say on the board or butcher paper.
• Have them discuss until they reach agreement on the
methods best suited to their project (usually two or
three methods), and the goals for data collection. Use
sticky-dot voting if there is disagreement
IV. DETERMINE DATA COLLECTION STRUCTURE
(10 MINUTES)
Group Brainstorm: How can we structure our group to
best collect all of our data?
Examples of Methods of Data Collection:
• Pick one method. For example, survey the entire
student body.
• Divide into teams on each method. While everyone will
learn the methods together, particular teams can be
responsible for the key administration of protocols and
analysis.
• Divide into teams around several topics. For example,
you could have one team researching youth violence
and another researching after-school programs – each
group using the methods they choose.
• Discuss the benefi ts and limitations of each strategy to
come to an agreement.
V. CLOSING (10 MINUTES)
Closing Circle Statement (Around the World): Have youth
name their favorite ice cream fl avor.
UNIT 3 Research and Action
Session 11 90 minutes
From YELL ©2007 John W. Gardner Center
RESEARCH METHODS AND TOOLS
Facilitation Tip:
Th is is a good time to refer back to group agreements, and your group’s model of youth-adult partnership (see Unit 1, Sessions 5-6).
★173

UNIT 3 Research and Action
Session 12 90 minutes
OBJECTIVES:
Youth and adult staff will create a timeline for their
research and action project.
MATERIALS AND PREPARATION:
• Butcher paper, tape, and markers.
• Paper, pens, markers, and clipboards.
• Index cards.
• Copy the Project Timeline Example (Master Copy
3.12a) and Project Timeline worksheet (Master Copy
3.12b) before the session: one copy of each for each
participant.
• Make a poster listing the group’s vision, mission, and
project goals, and put up where it can be seen easily.
• Have available youth’s completed Research Methods (Master Copy 3.10f) worksheets from Session 10.
• Create a LARGE CALENDAR (big enough for students to
see and refer to easily) of the months left in the project.
You can do this by writing the names of the months
along a horizontal continuum with space to write tasks
under each month or as an actual calendar grid. Make
sure to note any vacations or breaks so that youth
incorporate these when planning their timeline.
I. OPENING: ATTENDANCE, SNACKS,
ANNOUNCEMENTS, AGENDA OVERVIEW (10 MINUTES)
Opening Circle Statement (Around the World): Name
something you could teach others about (e.g., music, Web
design, art, history, football, animals, fashion, origami,
cooking).
II. WARM UP: RANDOM SPEECHES (10 MINUTES)
Provide each youth with an index card and pencil or pen.
Have them write three things on the card: (1) A type of job
people do, (2) A common household item, and (3) The name
of a popular band. Then have everyone pass their card to
the person on their left. Each person must stand up and
tell a very brief story (two sentences or less!) starting with
“Yesterday, the strangest thing happened…”, including
the three things on their card.
III. AGREE ON STEPS TO TAKE (40 MINUTES)
Step 1: Remind youth of the mission and goals of their
project, and that all of this work is helping to fulfi ll that
mission and meet those goals. Review the completed
Research Methods worksheets to remind youth of the
methods that they have agreed to use for their research.
Step 2: Divide youth into three groups and assign each
group a section of the planning timeline (Methods, People,
or Products). Give each group a piece of butcher paper
and a Project Timeline Example. Ask them to write their
chart on the butcher paper. For now, they should focus on
tasks and the dates, and to leave the People Responsible
section blank.
GROUP 1: METHODS
Have youth make a list of deliverables and deadlines that
will help complete their research. Be sure to address the
following questions:
• How many interviews, surveys, or focus groups do you
plan to do?
• When will you have your questions ready? A draft?
Final copy?
• When will you start and complete your data analysis?
Facilitation Tip: Timeline
Start from your completion dates and work backward!
If you have a youth and adult partnership structure, both should decide together on tasks and due dates, and play active roles in the work.
To model the power of youth and adult partnership in change eff orts, YELL groups can align project timelines with the scheduled meetings of school administrators or city leaders and present research and recommendations.
Planning for Data Collection
From YELL ©2007 John W. Gardner Center
RESEARCH METHODS AND TOOLS
★174
GROUP 2: PEOPLE
Have youth list the individuals and groups that they
need to inform and enlist along the way, and decide the
following:
• Who needs to know about your research plan? Whose
permission do you need to carry out your research?
Whose support and involvement could help you get
things done?
• What groups or individuals have the greatest impact
or infl uence? How do we get them involved (or get
involved with them)?
• With whom will you share your fi nal recommendations
and fi ndings? When?
GROUP 3: PRODUCTS AND PRESENTATIONS
Ask this group to think about the products that would
best communicate fi ndings and recommendations. Make
sure the following questions are addressed:
• How will you share your fi ndings and recommendations?
• What products will you create? How long will it take to
make each product?
• Who are the audiences for the products?
Step 3: Bring everyone back together and ask each small
group to share their main tasks and assigned completion
dates. As the groups present, ask everyone for feedback:
• Is this timeframe realistic?
• Are there any tasks we may have overlooked?
As the group comes to agreement on each task, write
the tasks on the LARGE CALENDAR where everyone
can see them. Once all of the tasks have been written in
chronological order, ask the group again if this timeline
seems realistic and if anything has been overlooked.
UNIT 3 Research and Action
Session 12 90 minutes
From YELL ©2007 John W. Gardner Center
RESEARCH METHODS AND TOOLS
Facilitation Tip:
After this session, write the tasks and names into the blank Project Timeline and make copies for all participants.
IV. WHO IS RESPONSIBLE? (20 MINUTES)
Together, participants need to decide who is accountable
to the others for getting the listed tasks completed. How
you do this depends on the structure of your group.
Examples:
If you have teams assigned by method, have youth •
work in their teams to fi gure out their areas of
responsibility and leads for each. Remind them that
the skills they need will be developed through the
actual creation of products and protocols for their
project. However, several tasks will also take extra
commitment outside of session time. Be sure to ask
the group if there are areas where they want adults
to take the lead.
Either in team groups or as individuals, have youth •
write their name on three sticky notes and place
those sticky notes under three things they would
like to work on and be responsible for. You may
need to add sticky notes depending on the number
of tasks and number of youth. After all of the spaces
are fi lled, reassess the timeline and the commitment
it will take to fulfi ll it.
Finally, Ask if anyone seems over-committed in their
responsibilities, and if all of the tasks still seem doable
and realistic.
Once agreement is reached, have youth remove the sticky
notes and place their signatures under the tasks to which
they have committed.
V. CLOSING (10 MINUTES)
Closing Circle Statement (Around the World): Name
something you are responsible for outside of this group.
Facilitation Tip:
If your group did Session 9: Allies, Opponents, and Decision Makers, refer Group 2 participants to the materials from this session and remind them of the allies and opponents that they have already identifi ed.
and
Fac
★175
UNIT 3 Research and Action
Session 13 90 minutes
OBJECTIVE:
Youth will learn how to do an effective interview and gain
self-confi dence as interviewers.
MATERIALS AND PREPARATION:
• Butcher paper, tape, and markers.
• Paper, pens, and clipboards.
• Index cards.
• Copy the Steps to a Good Interview (Master Copy
3.13a) and Designing Open-Ended Questions (Master
Copy 3.13b) before the session: one copy of each for
each youth.
I. OPENING: ATTENDANCE, SNACKS,
ANNOUNCEMENTS, AGENDA OVERVIEW (10 MINUTES)
Explain that the goal of today’s workshop is to learn how
to conduct a good interview.
Opening Circle Statement (Around the World): Someone I
would like to interview and learn more about... (It can be
anyone – famous or not, living or not.)
II. WARM UP: LISTEN AND RESPOND (5 MINUTES)
The purpose of this exercise is for youth to practice, as a
group, the skill of listening and responding to questions.
Pick a volunteer to be “interviewed” by the group, and
pick another volunteer to ask an initial question (It could
be “What do you think of your city?” or “What are your
hobbies?”). After the fi rst question has been answered,
go around in a circle asking follow-up questions based on
the responses of the person being interviewed. Because
they don’t have a script, this exercise requires them to
listen and respond to what was said. Remind youth to
keep questions respectful.
III. INTERVIEW EXPERIENCE BRAINSTORM
(10 MINUTES)
Ask youth about their experience with interviews. What
have they seen? Done? Have they ever interviewed
someone else? Been interviewed?
• On a piece of butcher paper or the board, list the different
types of interviews youth mention: Entertainment (talk
shows), employment, information (news, radio), and
others.
• Ask youth to name, from their experience, qualities of
good interviews and qualities of bad interviews. Ask for
specifi c examples, and write down the comments on
the board or butcher paper.
IV. BAD INTERVIEW – GOOD INTERVIEW
(20 MINUTES)
Step 1: Ask for a youth volunteer. Interview the person
using pre-written questions of your choice. Purposely do
not do a good job (e.g., don’t make eye contact, forget
questions, check your cell phone for text messages, start
telling a story about yourself, ask to borrow a pen, don’t
listen to what is said, ask leading questions, give your
opinion, use poor body language).
Ask youth, what was wrong with this interview? Did you
get good information? Why not? How did the interviewee
feel?
Step 2: Brainstorm tips for conducting a good interview.
What would have made the bad interview good? What
are some principles of a good interview? Discuss and
record. Examples include:
• Make eye contact.
• Show the person you are listening by repeating what
they say.
• Ask follow-up questions (probes) to better understand
what they are saying.
• Reference the warm-up activity here – the importance
of showing the person that you are listening and are
interested in what they have to say.
• Keep your questions open-ended so answers need to
be more than “yes” or “no.”
• Introduce yourself and the purpose of the interview.
• Ask for permission.
Step 3: Hand out the Steps to a Good Interview. Ask
youth for questions and any additions based on the
brainstorm.
How to Do a Good Interview
From YELL ©2007 John W. Gardner Center
RESEARCH METHODS AND TOOLS
★176
V. OPEN-ENDED AND NON-LEADING QUESTIONS
(15 MINUTES)
Step 1: Explain that one of the most important goals in
an interview is to be open-minded and to really hear what
the person has to say. Open-ended questions allow people
to talk in detail about their own perspectives. If you can
answer yes or no, it is not an open-ended question.
Step 2: Explain that sometimes questions are leading.
When a question is leading, it puts ideas and opinions
into the question in a way that makes it hard for a person
to share their own thoughts. If the answer to the questions
below is yes, then the question is leading:
• Does this question assume a certain opinion?
• Does it direct someone to a particular answer?
As a group, evaluate the following questions (or other
questions that you or the youth make up). Decide whether
or not each question is leading or closed ended, and then
revise the leading and closed-ended questions.
• Don’t you think that youth in our community are
stereotyped a lot?
• It seems like the media is to blame, don’t you think?
• The news always focuses on the bad stuff happening in our
community. I think if they showed more positive stories,
the stereotypes would change. Don’t you think so?
• How would you describe your neighborhood?
• Don't you think that school is a waste of time?
Step 3: Hand out the Designing Open-Ended and Non-Leading Questions worksheet. Students should revise
each leading question to make it both non-leading and
open-ended. Ask for volunteers to share a couple of
examples.
VI. PEER INTERVIEWS (15 MINUTES)
The purpose of this activity is to practice interview skills.
Step 1: As a group, brainstorm what questions youth want to
ask to fi nd out more about each other (could also be related to
their research topic, a current event, or something happening
in the school). Make sure the questions are open-ended and
non leading! Write these questions on the board or a piece
of paper where everyone can see them. Remind youth of
the Listen and Respond activity you did at the beginning of
this session. Encourage youth to ask probing or follow-up
questions based on what they hear from the person they are
interviewing.
Step 2: Break into pairs and have youth take turns
interviewing each other (three minutes for each interview)
using the questions created by the group.
Step 3: Have each youth share their partner’s name and
one thing they learned (no more than one minute each for
reporting back). As a group, discuss: How was it interviewing?
(Communicate the idea that they already have lots of
experience and skills.)
VII. DEBRIEF AND CLOSING (15 MINUTES)
To summarize the key points from the session, ask for two
volunteers to start an interview in front of the group. Let the
group know that if they see an opportunity for a probing or
follow-up question, they can shout “freeze!” and take the
place of the interviewer. Every few minutes, switch out the
person being interviewed at random. As the facilitator, you
can call “freeze” at any time to point out something positive,
ask the group questions about how the interview is going, or
ask for suggestions on how to improve the process.
Closing Circle Statement (Around the World): One thing I
noticed today…
Example fr om Practice:
Former YELL participant Sandra Mendieta says that learning how to ask questions and learning the diff erence between open-ended and leading questions, helped her to be a better student in high school and in college.
Exa
UNIT 3 Research and Action
Session 13 90 minutes
From YELL ©2007 John W. Gardner Center
RESEARCH METHODS AND TOOLS
Optional Take-Home Assignment:
• Create four interview questions related to the research topic. • Use these questions to interview a sibling, parent, or relative. • What worked and what questions could be improved? • Bring the revised questions to the next session.
✎
★177
UNIT 3 Research and Action
Session 14 90 minutes
OBJECTIVES:
Youth will create interview questions for their research
project and interview each other for the purpose of
practicing, testing, and revising their protocol.
MATERIALS AND PREPARATION:
• Butcher paper, tape, and markers.
• Paper, pens, and clipboards.
• Paper or cloth bag.
• List of any previously brainstormed interview questions.
• Copy the Interview Protocol Components (Master Copy
3.14a), the blank Interview Protocol Design (3.14b),
and the Interview Note Taking Sheet (Master Copy
3.14c) before the session: one copy of each for each
participant.
• Write silly interview subjects on scraps of paper for youth
to use in the What is a Protocol? activity.
• Review Steps to a Good Interview (Master Copy 3.13a).
• Optional: tape recorders with batteries, cassette tapes.
• Optional: copies of Helpful Hints for Successful Recording
(Master Copy 3.14d).
I. OPENING: ATTENDANCE, SNACKS,
ANNOUNCEMENTS, AGENDA OVERVIEW (5 MINUTES)
Opening statement (Around the World): What is the most
signifi cant event of our time and why? (Give youth a few
minutes to think about this and even to write down their
answer.)
II. WARM UP: COMMONALITIES (5 MINUTES)
Ask youth to pair up with someone they do not know
very well. Ask them to make a list of things they have in
common (e.g., neighborhood, personality trait, experience,
ability). After a few minutes, go around the room and
ask pairs to share with the group their most surprising
commonality.
III. DECIDE ON INTERVIEW SUBJECTS (10 MINUTES)
Explain that the point of doing interviews is to get information
that will help youth learn more about their research topic.
That means youth need to talk to people about what they
have identifi ed as the root causes.
Brainstorm: Who will we interview? Record the answers.
• Who is impacted by your issue or topic?
• Who could help you better understand your issue?
Ask the students if all people would be asked the same
questions.
• Should there be different protocols for different people or
groups of people?
• Does one group take priority over another?
Ask the students if it is important to ask about a person’s
background (e.g., age, race, gender).
• In what situations would it help to know about the
background of the people you are interviewing?
IV. WHAT IS A PROTOCOL? (10 MINUTES)
Step 1: Brainstorm: If you were interviewing someone, where
would you start? What types of questions would you ask?
What do you think would get you the most information?
Step 2: Hand out and review the Interview Protocol Components. Ask for more examples for each question
category. Highlight the importance of using the same set
and order of basic questions to get consistent data.
Step 3: Divide into pairs and give each pair a blank interview
protocol worksheet. Have each pair draw a random topic
from a hat or come up with one of their own. You can make
the topics silly and fun. Based on the topic drawn, have pairs
come up with questions.
Step 4: As a group, go over the questions that each pair
came up with, and ask the group to listen carefully. Make
sure the questions fi t with the category and look for leading
questions.
Interview Protocol Development
From YELL ©2007 John W. Gardner Center
RESEARCH METHODS AND TOOLS
Facilitation Tip:
Refer to the root causes identifi ed in Sessions 6 and 7 to help youth think carefully about who is impacted and has insight into their topic.
Look back at your work on Allies, Opponents, and Decision Makers from Session 9 to help youth think about their interview subjects.
★178
V. DRAFT INTERVIEW QUESTIONS (25 MINUTES)
Step 1: In new pairs, have youth create interview questions
for their research project. If youth decided that several different
sets of questions are needed for different audiences, assign an
equal number of pairs to each audience. Remind the students
to write open-ended questions. Use another blank Interview Protocol Design worksheet to support students in structuring
their interview questions.
Step 2: Create a draft interview protocol: As a group, have
youth share their questions under each category. Ask for
additions or revisions. Agree on the interview protocol(s).
Explain that after practicing this protocol, youth may see
changes they need to make.
VI. PEER INTERVIEW PRACTICE AND QUESTION REVISION
(30 MINUTES)
Inform participants that they will now practice by interviewing
each other using the questions they just agreed to. Encourage
them to think about what it means to be a good listener
when they are conducting the interviews. Before starting,
review the Steps to a Good Interview handout. Highlight the
importance of getting consent – either as a written form or as
a statement on audio tape.
Step 1: Split the group into pairs (different partners than
before). Ask the youth to take turns interviewing each other
using the questions on which they’ve agreed. Have youth take
DETAILED notes on what the other person says in their interview
(see the Interview Note Taking sheet for an example). Discuss
UNIT 3 Research and Action
Session 14
From YELL ©2007 John W. Gardner Center
Facilitation Tip:
• It is important to record the gender and ethnicity of the people interviewed. Always do this at the end of an interview or survey so that it is clear this is just demographic information rather than information used to judge. For example, youth may have expressed interest in knowing how diff erent groups in the community think, or where diff erent groups hang out and spend their time. Knowing the gender and ethnicity will help with this information.
• If they are fl uent in a language other than English, youth should feel comfortable interviewing peers in a language they have in common.
• Remind youth that the interview protocol is just to get the conversation started. It is important to add follow-up questions like, “Can you tell me more about that?” From time to time, repeat back to show understanding (“It sounds like you’re saying… do I have that right?”).
• Having good questions is more important than having lots of questions!
• It is important to have a clear and consistent format for taking detailed notes during interviews. Th is will help with coding and analysis.
RESEARCH METHODS AND TOOLS90 minutes
the importance of taking clear notes in a
consistent format.
Step 3: As a whole group, have a discussion
about the interview process. How comfortable
did youth feel conducting the interview? Did
they get the answers they had hoped? How
can the group improve the questions? Make
sure there is agreement on any changes made
to the protocol.
VII. CLOSING (5 MINUTES)
Have each youth give a prop (e.g., compliments,
praise, thanks for their work today) to the
person on their right.
Optional Take-Home Assignment: ✎
• Interview at least one person who is not part of your YELL group or class using your fi nalized questions.
• Ask probing questions and follow ups.• Take detailed notes on what the person says, or use a tape recorder. • Immediately after the interview write down the following: - What went well? Not so well? - Did I have enough follow-up questions? What could I have done
or said to get more information? - Do any of the questions need to be changed or improved? - What was the most interesting or surprising thing that the person
said? Bring your notes and your post-interview refl ections to the next session.
★179
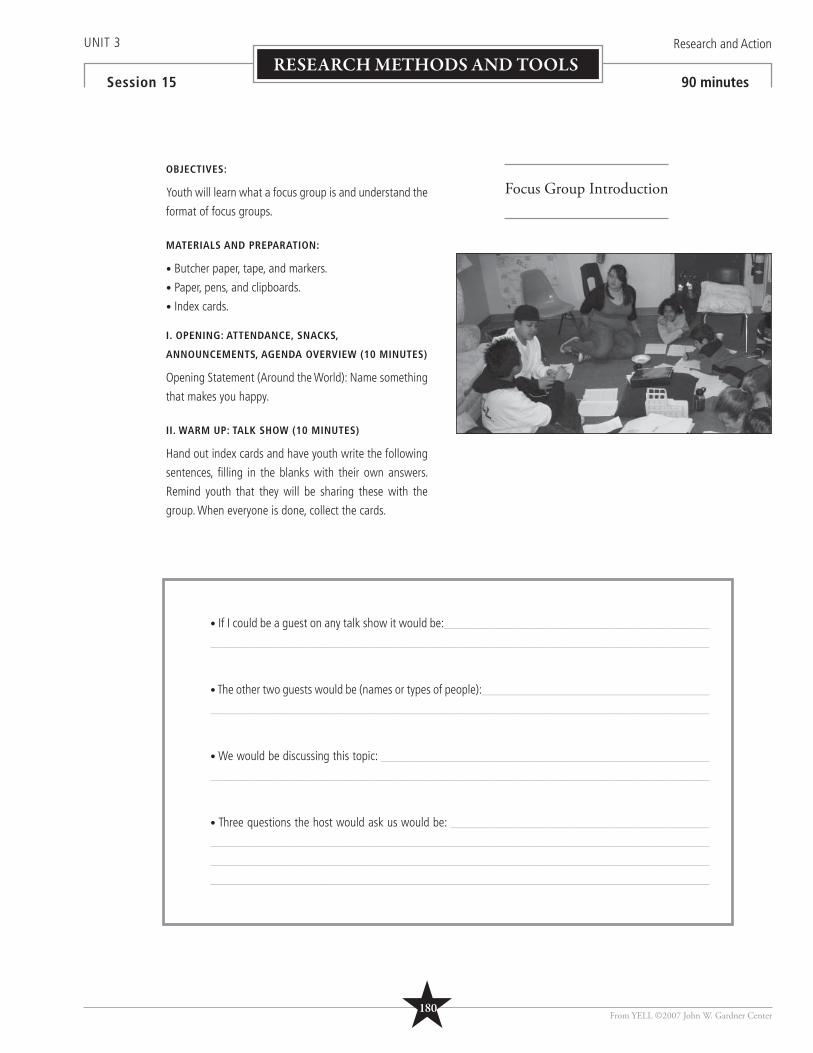
UNIT 3 Research and Action
Session 15 90 minutes
OBJECTIVES:
Youth will learn what a focus group is and understand the
format of focus groups.
MATERIALS AND PREPARATION:
• Butcher paper, tape, and markers.
• Paper, pens, and clipboards.
• Index cards.
I. OPENING: ATTENDANCE, SNACKS,
ANNOUNCEMENTS, AGENDA OVERVIEW (10 MINUTES)
Opening Statement (Around the World): Name something
that makes you happy.
II. WARM UP: TALK SHOW (10 MINUTES)
Hand out index cards and have youth write the following
sentences, fi lling in the blanks with their own answers.
Remind youth that they will be sharing these with the
group. When everyone is done, collect the cards.
Focus Group Introduction
From YELL ©2007 John W. Gardner Center
RESEARCH METHODS AND TOOLS
• If I could be a guest on any talk show it would be:__________________________________________
_______________________________________________________________________________
• The other two guests would be (names or types of people):____________________________________
_______________________________________________________________________________
• We would be discussing this topic: ____________________________________________________
_______________________________________________________________________________
• Three questions the host would ask us would be: _________________________________________
_______________________________________________________________________________
_______________________________________________________________________________
_______________________________________________________________________________
★180
III. TALK SHOW PRESENTATIONS (60 MINUTES)
Explain that a focus group is just like a talk show but in
private: It is a group discussion that is focused around
one topic. The purpose is to record people’s opinions,
something like a group interview.
Step 1: Break the students into three small groups and
give each group several index cards from the warm-up
activity. Ask each group to pick one card and select a host
of their talk show. The host will ask the questions on the
topic and facilitate the talk show. It is the host’s job to
get people talking about the issue on the card. Encourage
youth to take on different personalities, characters, or
political views. Give groups 10-15 minutes to plan and
practice their talk show.
Step 2: Have each group present their talk show. Each
presentation should be no more than fi ve minutes. After
each group presents, ask the “audience” the following
questions:
• What were some of the opinions of the people on the
talk show?
• Were there any issues that people seemed to agree
upon?
• What did the host do or say to get people to talk and
share their opinions?
• Ask youth to identify any great follow-up questions or
leading questions.
• What were some of the diffi culties a focus group leader
might encounter?
IV. CLOSING (10 MINUTES)
Closing Circle Statement (Around the World): On a scale
of 1 to 5 – with 1 being least and 5 being most – how
would you rate your interest in leading a focus group?
Why? What population or audience would you be
interested in talking to the most?
UNIT 3 Research and Action
Session 15 90 minutes
From YELL ©2007 John W. Gardner Center
RESEARCH METHODS AND TOOLS
★181

UNIT 3 Research and Action
Session 16 90 minutes
OBJECTIVE:
Youth will learn strategies for running a successful focus
group and agree on a focus group protocol.
MATERIALS AND PREPARATION:
• Butcher paper, tape, and markers.
• Copy Focus Group Facilitator Roles and Responsibilities (Master Copy 3.16a), Tools for Focus Group Facilitators (Master Copy 3.16b) and Check List for Focus Group Facilitators (Master Copy 3.16c) before the session: one
copy for each participant.
• Three main responsibilities of a facilitator written up on
the board or butcher paper (see III below).
• Copies of Interview Protocol Design worksheet (Master
Copy 3.14b) developed in Session 14.
• Copy and cut out the Facilitation Scenarios (Master
Copy 1.14c).
I. OPENING: ATTENDANCE, SNACKS,
ANNOUNCEMENTS, AGENDA OVERVIEW (5 MINUTES)
Remind students of their talk show presentations from
the previous session and what they discussed about focus
groups. In this session, they will practice facilitating a
focus group with the interview questions they developed
for their research project.
II. WARM UP: SILENT LINE UP BY TV HOURS
(10 MINUTES)
Ask youth to stand up and silently arrange themselves in
a line according to the number of hours of TV they watch
each week – from fewest number of hours of TV watched
to most (point to where the most and the fewest go).
They can make signals and nod, but nothing else. Once
they are lined up, have them go down the line and say
how many hours they watch. Debrief: Ask the people who
watch the most TV, what do we know about the people
who watch the least TV? Then ask the people who watch
the least what they know about the people who watch
the most. Have them generate as many ideas as they
can. Then ask the group, “What do we know about the
people in the middle?” After the group has named all of
their assumptions about each of the groups based on the
amount of TV watched per week, ask “What do we really
know about anyone based on the amount of TV they
watch?” Can we really know anything about someone
for sure based on the amount of TV they watch? What
else would you need to know? This is a great opportunity
to talk about how the mind likes to categorize and make
meaning, even when all of the facts are not present,
and about how we make assumptions about people
and things based on limited information. Tie this to the
importance of evidence and inquiry!
III. FOCUS GROUP FACILITATION (25 MINUTES)
Explain that, like the host of a talk show, a focus group
facilitator has a particular role. This person asks questions
to get people talking and keeps the conversation going.
This process of keeping everything in order and guiding
the conversation is called facilitating. To facilitate means
to make easier or less diffi cult, to help move forward. A
facilitator is responsible for three main things:
1. Making sure everyone has a chance to participate.
2. Creating a safe and trusting atmosphere.
3. Listening and asking questions.
Step 1: As a group, brainstorm strategies for recruiting
focus group participants and facilitating a focus group.
What are some activities or strategies that a facilitator
could use to get people to share their ideas and opinions?
Think about a talk show host: how does he or she get
people to talk and express themselves? (Record these.)
Focus Group Facilitation
From YELL ©2007 John W. Gardner Center
RESEARCH METHODS AND TOOLS
★182
Facilitation Tip:
If you have not already done so, this is a great point to introduce a facilitation workshop for youth: See Unit 1, Sessions 12 and 14 for some ideas.
If you decide to run a focus group, you will need to recruit
at least six to 10 people for an hour-long conversation.
What are some ideas you have for getting people to
participate in your focus group? (Record these.)
You either audio-tape or video-tape a focus group to
record what everyone says. What are some ideas for how
you could organize the main ideas from a focus group
when you listen or watch your tape? (Record these)
Step 2: Hand out the Tools for Focus Group Facilitators and Check List for Focus Group Facilitators. Review the
sheets with the youth and have them add ideas from the
brainstorm.
IV. FOCUS GROUP ROLE PLAY AND PROTOCOL
DEVELOPMENT (40 MINUTES)
Step 1: Divide youth into three groups, and give each
group a copy of the interview protocol they developed
for their research project in Session 14. Have each group
assign a facilitator.
Step 2: Give groups 10 minutes to plan and practice a
scenario where the facilitator is doing a good job with
at least one of the three main responsibilities: listening,
creating a trusting atmosphere, or making sure everyone
has a chance to participate. Give youth about 10 minutes to
plan their scenario and then three- fi ve minutes to present
it to the group. Make sure they are using the questions from
their interview protocol in the planning and role play.
Step 3: After each group presents, ask for feedback from
everyone. What did the facilitator do well? (Remember to
bracket constructive criticism with positives!). Revisit the
interview protocol with the youth and ask if they would
revise any of the questions for a focus group. Which
questions work the best? Which ones would you revise?
Anything that would be interesting to add?
V. CLOSING (10 MINUTES)
Outline next steps for planning and implementing your
focus group. You can also assign this as a small-team
take-home task.
UNIT 3 Research and Action
Session 16 90 minutes
From YELL ©2007 John W. Gardner Center
RESEARCH METHODS AND TOOLS
★183
UNIT 3 Research and Action
Session 17 90 minutes
OBJECTIVES:
Youth will learn how to create a survey and develop a
draft survey protocol.
MATERIALS AND PREPARATION:
• Butcher paper, tape, and markers.
• Paper, pens, and clipboards.
• Index cards.
• Copy Types of Survey Questions (Master Copy 3.17a)
before the session: one copy for each participant.
• Copy Survey Protocol Worksheet (Master Copy 3.17b)
before the session: at least two copies for each
participant.
• Copy Survey Tips for School Settings (Master Copy 3.17c)
before the session: one copy for each participant.
• On a piece of butcher paper, write the four categories
of survey questions with room under each category to
record sample questions.
I. OPENING: ATTENDANCE, SNACKS,
ANNOUNCEMENTS, AGENDA OVERVIEW (10 MINUTES)
Opening Statement (Around the World): What was the
best gift you’ve ever received? Why?
II. WARM UP: STAND UP IF (10 MINUTES)
Ask students to stand up if they have ever:
• Been upset with a family member.
• Wanted to buy something they couldn’t afford.
• Voted in a political election.
Ask youth to sit down after each question. Point out that
what you are doing is surveying the group. When students
stood up in answer to a question, they basically took a
survey, using their bodies instead of writing their answers
down on a piece of paper. Ask youth for some “stand up
if…” examples related to the research topic(s) (e.g., stand
up if you feel physically safe at school, emotionally safe
at school, if you feel respected by adults). Explain that
a survey is just another way to gather information using
questions. Ask if anyone has another way of explaining
what a survey is or does.
III. CREATE A SURVEY (55 MINUTES)
Step 1: Ask each person to write down two or three
general questions that they could ask someone about
their research topic (on index cards or paper). After youth
have had a few minutes to write on their own, have them
share out. List all the questions on butcher paper or the
board.
Step 2: Pass out the Types of Survey Questions handout
and review each question type:
• Yes or No
• Scale
• Multiple choice
• Open-ended
Step 3: Pass out the blank Survey Protocol Worksheet. Divide youth into pairs. Have each pair use a blank survey
form to come up with survey questions in at least three of
the survey question categories. They can use or revise the
brainstormed questions or make up new questions.
Step 4: Using their newly created survey questions, have
youth move about the room and fi nd fi ve different people
to take their survey. Encourage students to ask each
other questions and give feedback if a survey question is
confusing. Have youth return to their pair and revise their
questions according to the feedback they received, and
then add at least one survey question to each category.
Survey Basics and Protocol Development
From YELL ©2007 John W. Gardner Center
RESEARCH METHODS AND TOOLS
★184
Facilitation Tip:
• If you plan to give your surveys to diff erent categories of people, you may want to adjust the questions for diff erent audiences, just like you did with your interviews. Collect background information at the end of the survey so you can compare how diff erent groups of people think (e.g., age, ethnicity, neighborhood, school).
• See Survey Tips for School Settings for thinking about surveys up front (Master Copy 1.17c).
• It is OK to have the same question asked a little diff erently in two diff erent places on the survey – this can actually affi rm that the person’s answers are serious. (If the person answers the questions the same, you know that they were paying attention and answering honestly; if the answers are diff erent – perhaps the person was fi lling in answers randomly).
• After this session, an adult or youth volunteer can type all the questions into one survey, deleting or consolidating any duplicates. Th is way a draft of the survey can be brought to the next session for fi nal revisions.
IV. DEBRIEF AND FINALIZE SURVEY QUESTIONS
(10 MINUTES)
Have one pair at a time read out their questions (by
category) to the group. Have volunteers write the
questions on butcher paper. (If possible, have four pieces,
one for each type of question.) As you go around the
room, have people add questions that have not yet been
stated by another pair. After everyone has had a turn, ask
if there are any additions.
V. CLOSING (5 MINUTES)
Closing Circle Statement (Around the World): Something I
noticed today in this session…
UNIT 3 Research and Action
Session 17 90 minutes
From YELL ©2007 John W. Gardner Center
RESEARCH METHODS AND TOOLS
Schedule 2 sessions here for youth to collect data!
★185
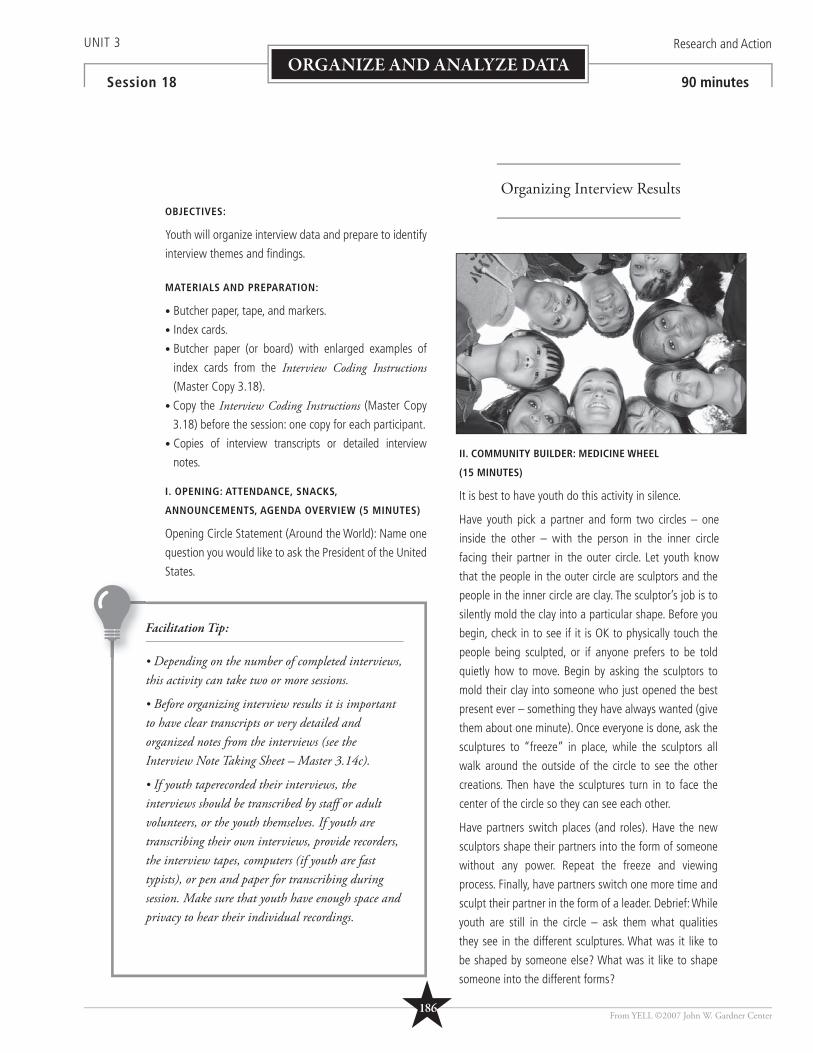
UNIT 3 Research and Action
Session 18 90 minutes
OBJECTIVES:
Youth will organize interview data and prepare to identify
interview themes and fi ndings.
MATERIALS AND PREPARATION:
• Butcher paper, tape, and markers.
• Index cards.
• Butcher paper (or board) with enlarged examples of
index cards from the Interview Coding Instructions (Master Copy 3.18).
• Copy the Interview Coding Instructions (Master Copy
3.18) before the session: one copy for each participant.
• Copies of interview transcripts or detailed interview
notes.
I. OPENING: ATTENDANCE, SNACKS,
ANNOUNCEMENTS, AGENDA OVERVIEW (5 MINUTES)
Opening Circle Statement (Around the World): Name one
question you would like to ask the President of the United
States.
II. COMMUNITY BUILDER: MEDICINE WHEEL
(15 MINUTES)
It is best to have youth do this activity in silence.
Have youth pick a partner and form two circles – one
inside the other – with the person in the inner circle
facing their partner in the outer circle. Let youth know
that the people in the outer circle are sculptors and the
people in the inner circle are clay. The sculptor’s job is to
silently mold the clay into a particular shape. Before you
begin, check in to see if it is OK to physically touch the
people being sculpted, or if anyone prefers to be told
quietly how to move. Begin by asking the sculptors to
mold their clay into someone who just opened the best
present ever – something they have always wanted (give
them about one minute). Once everyone is done, ask the
sculptures to “freeze” in place, while the sculptors all
walk around the outside of the circle to see the other
creations. Then have the sculptures turn in to face the
center of the circle so they can see each other.
Have partners switch places (and roles). Have the new
sculptors shape their partners into the form of someone
without any power. Repeat the freeze and viewing
process. Finally, have partners switch one more time and
sculpt their partner in the form of a leader. Debrief: While
youth are still in the circle – ask them what qualities
they see in the different sculptures. What was it like to
be shaped by someone else? What was it like to shape
someone into the different forms?
Facilitation Tip:
• Depending on the number of completed interviews, this activity can take two or more sessions.
• Before organizing interview results it is important to have clear transcripts or very detailed and organized notes from the interviews (see the Interview Note Taking Sheet – Master 3.14c).
• If youth taperecorded their interviews, the interviews should be transcribed by staff or adult volunteers, or the youth themselves. If youth are transcribing their own interviews, provide recorders, the interview tapes, computers (if youth are fast typists), or pen and paper for transcribing during session. Make sure that youth have enough space and privacy to hear their individual recordings.
Organizing Interview Results
From YELL ©2007 John W. Gardner Center
ORGANIZE AND ANALYZE DATA
★186
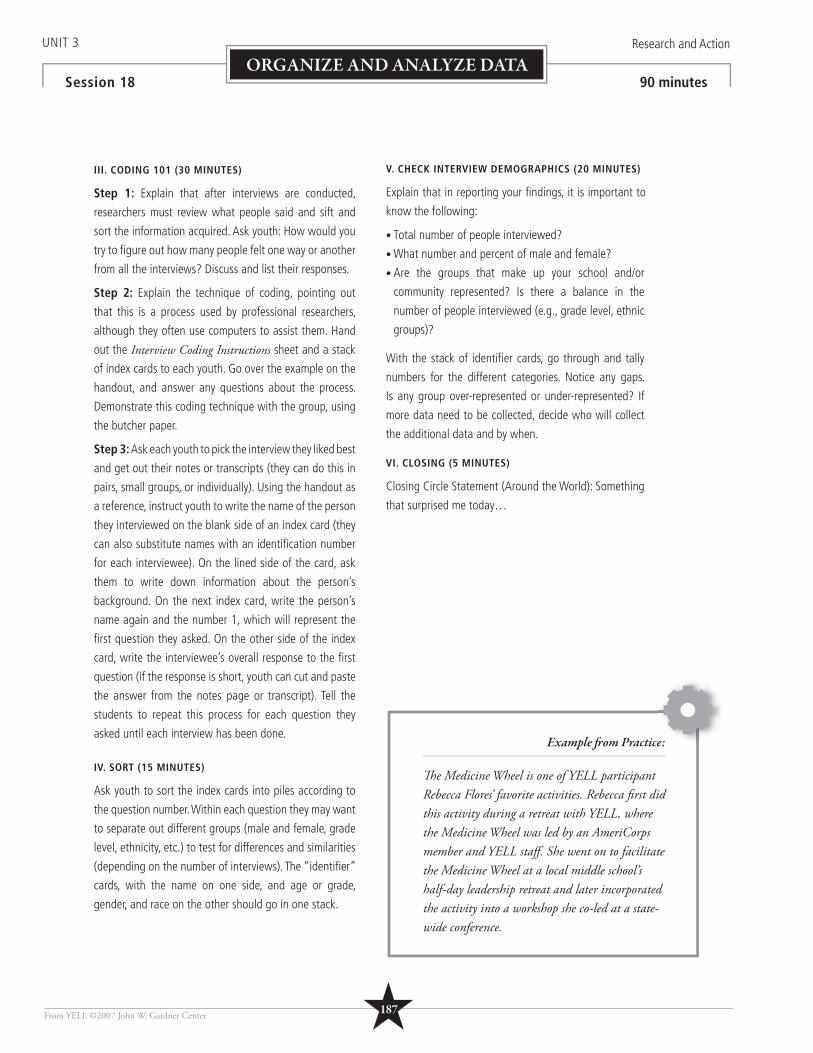
III. CODING 101 (30 MINUTES)
Step 1: Explain that after interviews are conducted,
researchers must review what people said and sift and
sort the information acquired. Ask youth: How would you
try to fi gure out how many people felt one way or another
from all the interviews? Discuss and list their responses.
Step 2: Explain the technique of coding, pointing out
that this is a process used by professional researchers,
although they often use computers to assist them. Hand
out the Interview Coding Instructions sheet and a stack
of index cards to each youth. Go over the example on the
handout, and answer any questions about the process.
Demonstrate this coding technique with the group, using
the butcher paper.
Step 3: Ask each youth to pick the interview they liked best
and get out their notes or transcripts (they can do this in
pairs, small groups, or individually). Using the handout as
a reference, instruct youth to write the name of the person
they interviewed on the blank side of an index card (they
can also substitute names with an identifi cation number
for each interviewee). On the lined side of the card, ask
them to write down information about the person’s
background. On the next index card, write the person’s
name again and the number 1, which will represent the
fi rst question they asked. On the other side of the index
card, write the interviewee’s overall response to the fi rst
question (if the response is short, youth can cut and paste
the answer from the notes page or transcript). Tell the
students to repeat this process for each question they
asked until each interview has been done.
IV. SORT (15 MINUTES)
Ask youth to sort the index cards into piles according to
the question number. Within each question they may want
to separate out different groups (male and female, grade
level, ethnicity, etc.) to test for differences and similarities
(depending on the number of interviews). The “identifi er”
cards, with the name on one side, and age or grade,
gender, and race on the other should go in one stack.
V. CHECK INTERVIEW DEMOGRAPHICS (20 MINUTES)
Explain that in reporting your fi ndings, it is important to
know the following:
• Total number of people interviewed?
• What number and percent of male and female?
• Are the groups that make up your school and/or
community represented? Is there a balance in the
number of people interviewed (e.g., grade level, ethnic
groups)?
With the stack of identifi er cards, go through and tally
numbers for the different categories. Notice any gaps.
Is any group over-represented or under-represented? If
more data need to be collected, decide who will collect
the additional data and by when.
VI. CLOSING (5 MINUTES)
Closing Circle Statement (Around the World): Something
that surprised me today…
Example fr om Practice:
Th e Medicine Wheel is one of YELL participant Rebecca Flores’ favorite activities. Rebecca fi rst did this activity during a retreat with YELL, where the Medicine Wheel was led by an AmeriCorps member and YELL staff . She went on to facilitate the Medicine Wheel at a local middle school’s half-day leadership retreat and later incorporated the activity into a workshop she co-led at a state-wide conference.
e:
UNIT 3 Research and Action
Session 18 90 minutes
From YELL ©2007 John W. Gardner Center
ORGANIZE AND ANALYZE DATA
★187
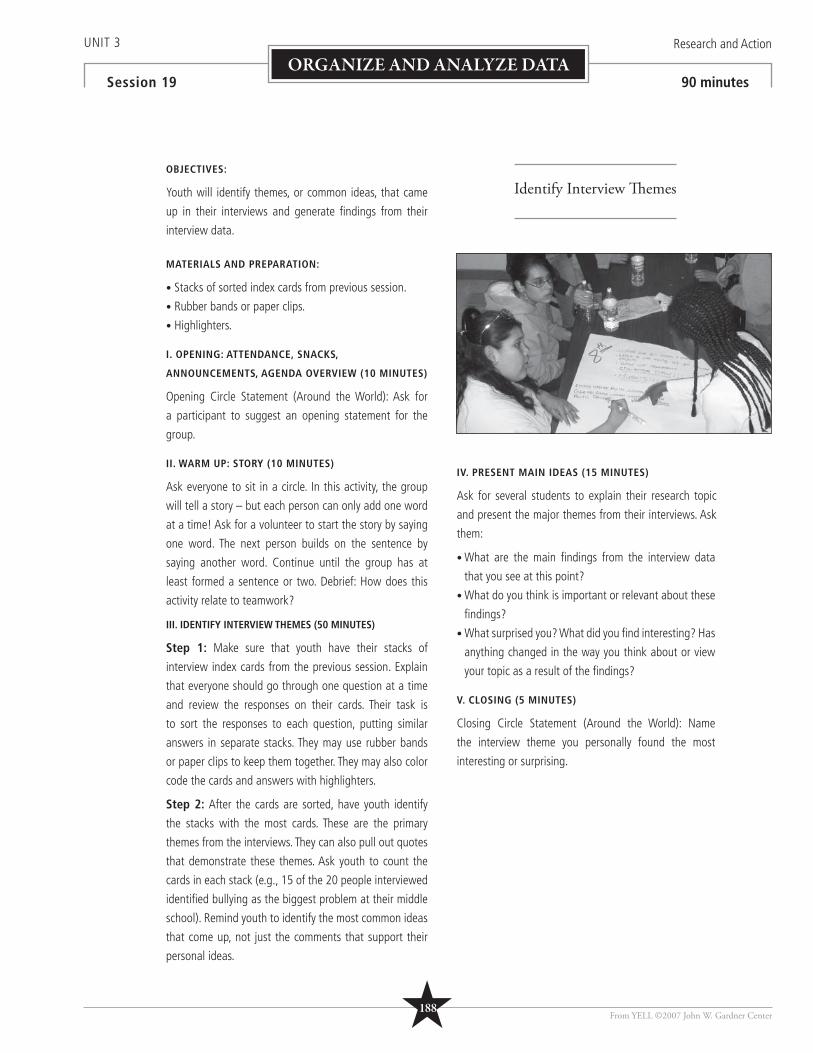
UNIT 3 Research and Action
Session 19 90 minutes
OBJECTIVES:
Youth will identify themes, or common ideas, that came
up in their interviews and generate fi ndings from their
interview data.
MATERIALS AND PREPARATION:
• Stacks of sorted index cards from previous session.
• Rubber bands or paper clips.
• Highlighters.
I. OPENING: ATTENDANCE, SNACKS,
ANNOUNCEMENTS, AGENDA OVERVIEW (10 MINUTES)
Opening Circle Statement (Around the World): Ask for
a participant to suggest an opening statement for the
group.
II. WARM UP: STORY (10 MINUTES)
Ask everyone to sit in a circle. In this activity, the group
will tell a story – but each person can only add one word
at a time! Ask for a volunteer to start the story by saying
one word. The next person builds on the sentence by
saying another word. Continue until the group has at
least formed a sentence or two. Debrief: How does this
activity relate to teamwork?
III. IDENTIFY INTERVIEW THEMES (50 MINUTES)
Step 1: Make sure that youth have their stacks of
interview index cards from the previous session. Explain
that everyone should go through one question at a time
and review the responses on their cards. Their task is
to sort the responses to each question, putting similar
answers in separate stacks. They may use rubber bands
or paper clips to keep them together. They may also color
code the cards and answers with highlighters.
Step 2: After the cards are sorted, have youth identify
the stacks with the most cards. These are the primary
themes from the interviews. They can also pull out quotes
that demonstrate these themes. Ask youth to count the
cards in each stack (e.g., 15 of the 20 people interviewed
identifi ed bullying as the biggest problem at their middle
school). Remind youth to identify the most common ideas
that come up, not just the comments that support their
personal ideas.
IV. PRESENT MAIN IDEAS (15 MINUTES)
Ask for several students to explain their research topic
and present the major themes from their interviews. Ask
them:
• What are the main fi ndings from the interview data
that you see at this point?
• What do you think is important or relevant about these
fi ndings?
• What surprised you? What did you fi nd interesting? Has
anything changed in the way you think about or view
your topic as a result of the fi ndings?
V. CLOSING (5 MINUTES)
Closing Circle Statement (Around the World): Name
the interview theme you personally found the most
interesting or surprising.
Identify Interview Th emes
From YELL ©2007 John W. Gardner Center
ORGANIZE AND ANALYZE DATA
★188

From YELL ©2007 John W. Gardner Center
NOTES
★189
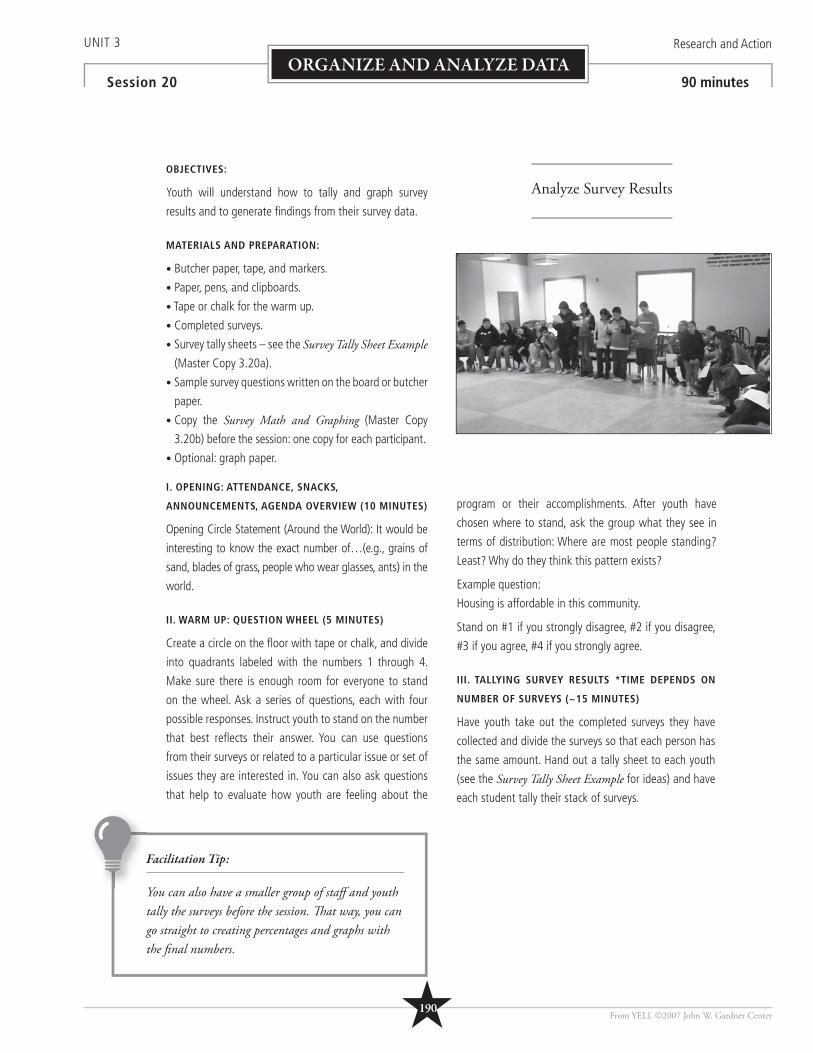
UNIT 3 Research and Action
Session 20 90 minutes
OBJECTIVES:
Youth will understand how to tally and graph survey
results and to generate fi ndings from their survey data.
MATERIALS AND PREPARATION:
• Butcher paper, tape, and markers.
• Paper, pens, and clipboards.
• Tape or chalk for the warm up.
• Completed surveys.
• Survey tally sheets – see the Survey Tally Sheet Example (Master Copy 3.20a).
• Sample survey questions written on the board or butcher
paper.
• Copy the Survey Math and Graphing (Master Copy
3.20b) before the session: one copy for each participant.
• Optional: graph paper.
I. OPENING: ATTENDANCE, SNACKS,
ANNOUNCEMENTS, AGENDA OVERVIEW (10 MINUTES)
Opening Circle Statement (Around the World): It would be
interesting to know the exact number of…(e.g., grains of
sand, blades of grass, people who wear glasses, ants) in the
world.
II. WARM UP: QUESTION WHEEL (5 MINUTES)
Create a circle on the fl oor with tape or chalk, and divide
into quadrants labeled with the numbers 1 through 4.
Make sure there is enough room for everyone to stand
on the wheel. Ask a series of questions, each with four
possible responses. Instruct youth to stand on the number
that best refl ects their answer. You can use questions
from their surveys or related to a particular issue or set of
issues they are interested in. You can also ask questions
that help to evaluate how youth are feeling about the
program or their accomplishments. After youth have
chosen where to stand, ask the group what they see in
terms of distribution: Where are most people standing?
Least? Why do they think this pattern exists?
Example question:
Housing is affordable in this community.
Stand on #1 if you strongly disagree, #2 if you disagree,
#3 if you agree, #4 if you strongly agree.
III. TALLYING SURVEY RESULTS *TIME DEPENDS ON
NUMBER OF SURVEYS (~15 MINUTES)
Have youth take out the completed surveys they have
collected and divide the surveys so that each person has
the same amount. Hand out a tally sheet to each youth
(see the Survey Tally Sheet Example for ideas) and have
each student tally their stack of surveys.
Facilitation Tip:
You can also have a smaller group of staff and youth tally the surveys before the session. Th at way, you can go straight to creating percentages and graphs with the fi nal numbers.
Analyze Survey Results
From YELL ©2007 John W. Gardner Center
ORGANIZE AND ANALYZE DATA
★190
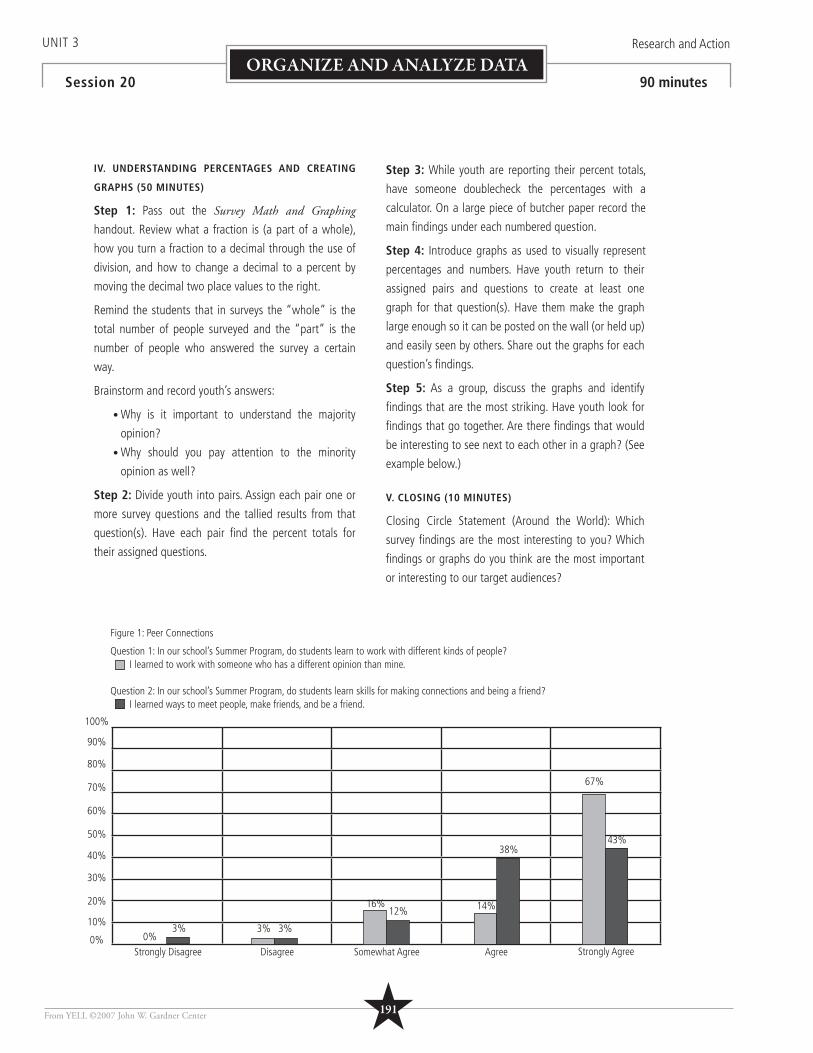
IV. UNDERSTANDING PERCENTAGES AND CREATING
GRAPHS (50 MINUTES)
Step 1: Pass out the Survey Math and Graphing
handout. Review what a fraction is (a part of a whole),
how you turn a fraction to a decimal through the use of
division, and how to change a decimal to a percent by
moving the decimal two place values to the right.
Remind the students that in surveys the “whole” is the
total number of people surveyed and the “part” is the
number of people who answered the survey a certain
way.
Brainstorm and record youth’s answers:
• Why is it important to understand the majority
opinion?
• Why should you pay attention to the minority
opinion as well?
Step 2: Divide youth into pairs. Assign each pair one or
more survey questions and the tallied results from that
question(s). Have each pair fi nd the percent totals for
their assigned questions.
Step 3: While youth are reporting their percent totals,
have someone doublecheck the percentages with a
calculator. On a large piece of butcher paper record the
main fi ndings under each numbered question.
Step 4: Introduce graphs as used to visually represent
percentages and numbers. Have youth return to their
assigned pairs and questions to create at least one
graph for that question(s). Have them make the graph
large enough so it can be posted on the wall (or held up)
and easily seen by others. Share out the graphs for each
question’s fi ndings.
Step 5: As a group, discuss the graphs and identify
fi ndings that are the most striking. Have youth look for
fi ndings that go together. Are there fi ndings that would
be interesting to see next to each other in a graph? (See
example below.)
V. CLOSING (10 MINUTES)
Closing Circle Statement (Around the World): Which
survey fi ndings are the most interesting to you? Which
fi ndings or graphs do you think are the most important
or interesting to our target audiences?
UNIT 3 Research and Action
Session 20 90 minutes
From YELL ©2007 John W. Gardner Center
ORGANIZE AND ANALYZE DATA
100%
90%
80%
70%
60%
50%
40%
30%
20%
10%
0%Strongly Disagree Disagree Somewhat Agree Agree Strongly Agree
Figure 1: Peer Connections
Question 1: In our school’s Summer Program, do students learn to work with different kinds of people? I learned to work with someone who has a different opinion than mine.
Question 2: In our school’s Summer Program, do students learn skills for making connections and being a friend? I learned ways to meet people, make friends, and be a friend.
3%0%
3% 3%
12%16%
38%
14%
43%
67%
★191
UNIT 3 Research and Action
Session 21 90 minutes
OBJECTIVES:
Youth will turn their data analysis and fi ndings into
recommendations and prioritize their top recommendations.
MATERIALS AND PREPARATION:
• Butcher paper, tape, and markers.
• Post the youth’s mission and vision statements on
butcher paper (if not already posted in the room).
• Write the key fi ndings from the research analysis on
pieces of butcher paper, making sure there is plenty of
room for youth to write under each fi nding. (If there are
lots of fi ndings, group them into at least three stations
in the room. The grouping of fi ndings can be done by
staff or by youth as part of this or another session.)
• Sticker dots.
I. OPENING: ATTENDANCE, SNACKS,
ANNOUNCEMENTS, AGENDA OVERVIEW (10 MINUTES)
Opening Circle (Around the World): Have each youth
name one of the fi ndings from their data analysis or name
something that surprised them in their research.
II. WARM UP: FROM SWIMMING TO FLYING
(10 MINUTES)
The goal of this game is to become a bird. All participants
start as fi sh and should “swim” around the room. When
a fi sh fi nds another fi sh they stop and play rock/paper/
scissors. The winner becomes a frog and jumps away. The
fi sh swims away looking for another fi sh to play with. A
frog must fi nd another frog to play rock/paper/scissors
with. The winner of a game between two frogs becomes
a bird and fl ies around watching the rest of the games.
When there is only one fi sh, one frog, and a group of
birds the game is over. Debrief: What did you think of the
game? Is playing a game where most will win more or
less fun than a game with one winner? How is this type
of game different?
III. IDENTIFY RECOMMENDATIONS (40 MINUTES)
Step 1: Brainstorm the meaning and purpose of a
recommendation. A recommendation is a specifi c solution
or action that outlines how change will happen. Example
youth recommendations:
• “We recommend that the administration include
a youth research and leadership class as part of the
school curriculum.”
• “We recommend that the administration and Climate
Committee of our school re-instate the peer mediation
program.”
• “We recommend that the city provide free bus passes
to low-income students.”
• “We recommend that the school district implement
teacher training in positive discipline methods.”
In particular, discuss the power of a recommendation
that is based on data. Ask youth: What is the difference
between a recommendation based on opinion and a
recommendation based on data? Imagine the above
statements starting with “based on our research” vs.
“we believe.” What makes for a stronger argument?
Recommendations
From YELL ©2007 John W. Gardner Center
DECIDE ON RECOMMENDATIONS
★192
Step 2: Revisit your topic, vision, and mission. Ask the
group: Who remembers our vision and mission? Based on
the research and analysis we have done so far, what new
or more specifi c information have we learned about our
topic? How has our view of our topic changed (or been
confi rmed)?
Step 3: Station Rotation. Ask youth to count off by the
number of fi ndings or fi nding stations you have created
(see Materials and Preparation above) and then assign
each number to a particular station. Hint: Instead of
counting off, you can sort youth into groups by date of
birth (January through April, May through August, and
September through December).
At each station ask youth to read through the
fi ndings together and then brainstorm and write their
recommendations based on the fi ndings listed. After fi ve
minutes, have youth rotate to a different station and repeat
the process. If youth agree with what the previous group
listed, they should put a check next to that statement or
recommendation. Encourage youth to discuss their ideas
with their groupmates. End the rotation when youth are
back at their original station. Have each group share out
the key recommendations at their station and summarize
how the fi ndings support those recommendations. Cross
off any duplicate recommendations (make sure they are
exactly the same).
Step 4: Vote and Prioritize. Hand out three sticker
dots to each person. Give youth a few minutes to vote
by placing a sticker by the three recommendations on
which they most want to focus. Ask youth to consider
the following: Is the recommendation specifi c enough?
Do you think it is realistic? Youth can also put all three
stickers at one recommendation. After the voting, list
the top recommendations on a separate piece of paper.
Allow people to advocate for recommendations with
fewer dots: Are there compelling reasons to re-examine
one of the recommendations that received fewer votes?
IV. CLARIFY RECOMMENDATIONS (20 MINUTES)
As a group (or in several small groups if there are several
recommendations), ask youth to consider the following
questions:
• What is our evidence for this recommendation?
• What could make this recommendation stronger
(research ideas for future groups or perhaps more
research is one of the recommendations)?
• Who has the power to act or support us in acting to
make this recommendation a reality?
V. CLOSING (10 MINUTES)
Closing Circle Statement (Around the World): I think that
the most important recommendation is…
UNIT 3 Research and Action
Session 21 90 minutes
From YELL ©2007 John W. Gardner Center
DECIDE ON RECOMMENDATIONS
★193
UNIT 3 Research and Action
Session 22 60 minutes
OBJECTIVE:
Youth will identify target audiences for their fi ndings and
recommendations.
MATERIALS AND PREPARATION:
• Index cards for warm up.
• Butcher paper, tape, and markers.
I. OPENING: ATTENDANCE, SNACKS,
ANNOUNCEMENTS, AGENDA OVERVIEW (5 MINUTES)
Opening Circle (Around the World): I get nervous when I
have to talk to…
II. WARM UP: WACKY SPEECH (20 MINUTES)
In a circle, have each youth write down something they
expect from adults, then pass their paper or index card
to the person on their left. Below what is already written
on the paper they have received, have youth write their
favorite animal, and again pass the paper to the left.
Next, have youth write what they would wish for if they
had one wish. Pass the paper one more time. Now each
youth should have a piece of paper with three things
on it. One at a time, have youth create an argument or
“case” from the statements on their card or paper. The
argument must meet two criteria: It must be expressed
with real concern or passion, and if must ask the group
to do or think about something specifi c that includes all
three items. Encourage youth to be as creative and silly as
possible. Their argument does not need to make sense!
For example: I want respect for wombats who are working
for world peace! Therefore I am askin all of you to sign
my petition!
III. SMALL GROUPS: GOAL AND AUDIENCE
IDENTIFICATION (25 MINUTES)
Divide youth into small groups. Give each group a piece
of butcher paper listing the recommendations developed
in the previous session. Explain that each group will
share back their responses after working together to
answer the following questions:
1. What are your goals for each recommendation? What
do you want to happen or be different as a result?
2. If this recommendation is acted on, will it lead to the
fulfi llment of your mission and vision? How?
3. Who needs to be involved and on board for these
changes to happen? These are the audiences for your
recommendations and fi ndings.
Ask the youth to record their answers and nominate
someone to report to the other groups.
Invite each group to report back on its identifi ed goals
and audiences. Write the answers. Facilitation Tip:
Look back at Session 9 and the ideas youth generated about Allies, Opponents, and Decision Makers.
Goals and Audiences
From YELL ©2007 John W. Gardner Center
DECIDE ON RECOMMENDATIONS
★194
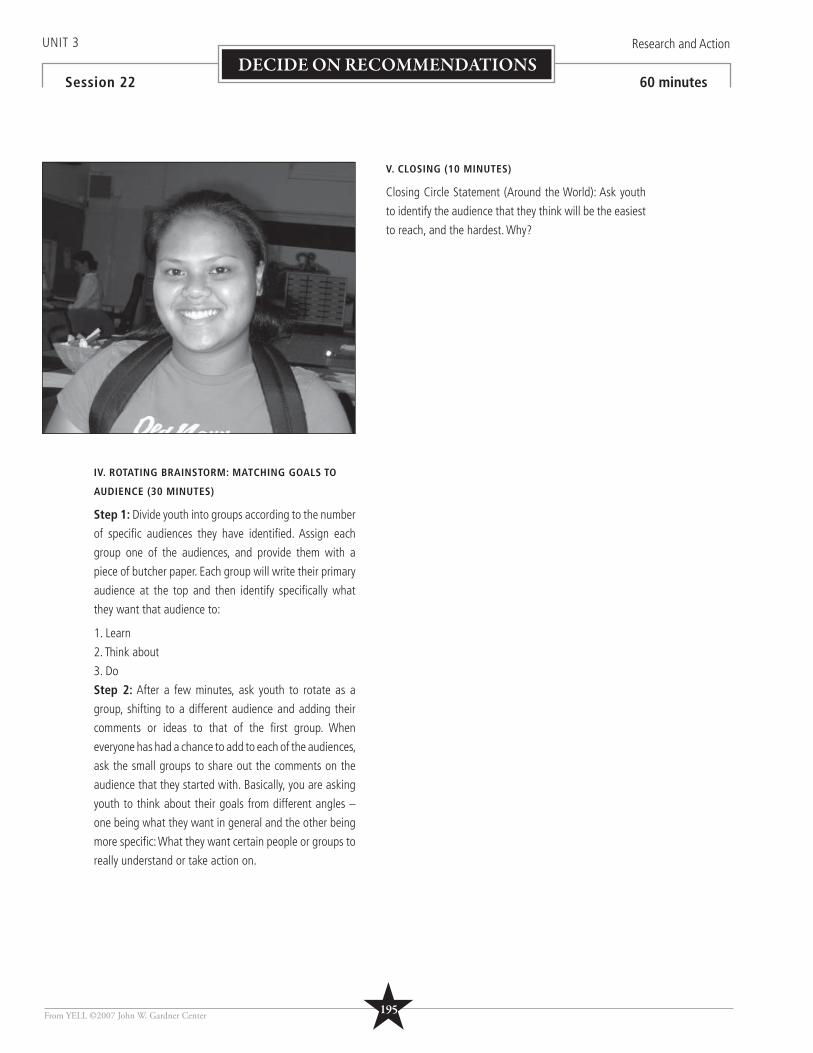
IV. ROTATING BRAINSTORM: MATCHING GOALS TO
AUDIENCE (30 MINUTES)
Step 1: Divide youth into groups according to the number
of specifi c audiences they have identifi ed. Assign each
group one of the audiences, and provide them with a
piece of butcher paper. Each group will write their primary
audience at the top and then identify specifi cally what
they want that audience to:
1. Learn
2. Think about
3. Do
Step 2: After a few minutes, ask youth to rotate as a
group, shifting to a different audience and adding their
comments or ideas to that of the fi rst group. When
everyone has had a chance to add to each of the audiences,
ask the small groups to share out the comments on the
audience that they started with. Basically, you are asking
youth to think about their goals from different angles –
one being what they want in general and the other being
more specifi c: What they want certain people or groups to
really understand or take action on.
V. CLOSING (10 MINUTES)
Closing Circle Statement (Around the World): Ask youth
to identify the audience that they think will be the easiest
to reach, and the hardest. Why?
UNIT 3 Research and Action
Session 22 60 minutes
From YELL ©2007 John W. Gardner Center
DECIDE ON RECOMMENDATIONS
★195
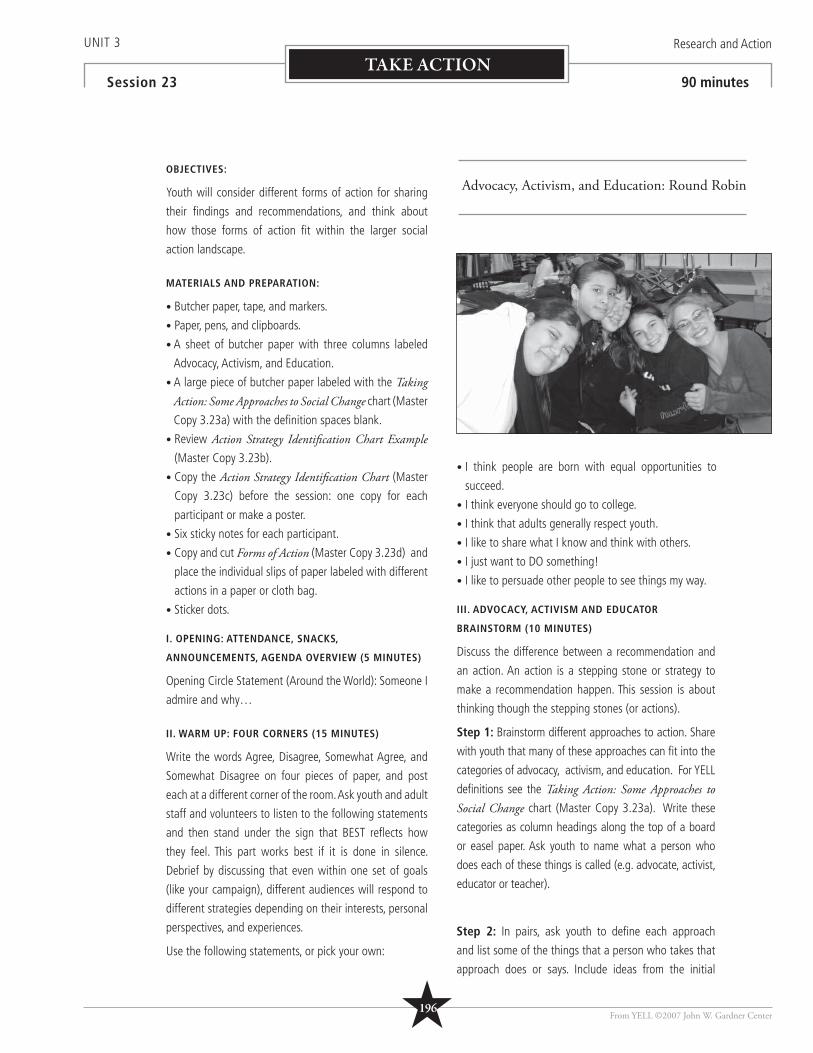
UNIT 3 Research and Action
Session 23 90 minutesTAKE ACTION
OBJECTIVES:
Youth will consider different forms of action for sharing
their fi ndings and recommendations, and think about
how those forms of action fi t within the larger social
action landscape.
MATERIALS AND PREPARATION:
• Butcher paper, tape, and markers.
• Paper, pens, and clipboards.
• A sheet of butcher paper with three columns labeled
Advocacy, Activism, and Education.
• A large piece of butcher paper labeled with the Taking Action: Some Approaches to Social Change chart (Master
Copy 3.23a) with the defi nition spaces blank.
• Review Action Strategy Identifi cation Chart Example (Master Copy 3.23b).
• Copy the Action Strategy Identifi cation Chart (Master
Copy 3.23c) before the session: one copy for each
participant or make a poster.
• Six sticky notes for each participant.
• Copy and cut Forms of Action (Master Copy 3.23d) and
place the individual slips of paper labeled with different
actions in a paper or cloth bag.
• Sticker dots.
I. OPENING: ATTENDANCE, SNACKS,
ANNOUNCEMENTS, AGENDA OVERVIEW (5 MINUTES)
Opening Circle Statement (Around the World): Someone I
admire and why…
II. WARM UP: FOUR CORNERS (15 MINUTES)
Write the words Agree, Disagree, Somewhat Agree, and
Somewhat Disagree on four pieces of paper, and post
each at a different corner of the room. Ask youth and adult
staff and volunteers to listen to the following statements
and then stand under the sign that BEST refl ects how
they feel. This part works best if it is done in silence.
Debrief by discussing that even within one set of goals
(like your campaign), different audiences will respond to
different strategies depending on their interests, personal
perspectives, and experiences.
Use the following statements, or pick your own:
• I think people are born with equal opportunities to
succeed.
• I think everyone should go to college.
• I think that adults generally respect youth.
• I like to share what I know and think with others.
• I just want to DO something!
• I like to persuade other people to see things my way.
III. ADVOCACY, ACTIVISM AND EDUCATOR
BRAINSTORM (10 MINUTES)
Discuss the difference between a recommendation and
an action. An action is a stepping stone or strategy to
make a recommendation happen. This session is about
thinking though the stepping stones (or actions).
Step 1: Brainstorm different approaches to action. Share
with youth that many of these approaches can fi t into the
categories of advocacy, activism, and education. For YELL
defi nitions see the Taking Action: Some Approaches to Social Change chart (Master Copy 3.23a). Write these
categories as column headings along the top of a board
or easel paper. Ask youth to name what a person who
does each of these things is called (e.g. advocate, activist,
educator or teacher).
Step 2: In pairs, ask youth to defi ne each approach
and list some of the things that a person who takes that
approach does or says. Include ideas from the initial
Advocacy, Activism, and Education: Round Robin
From YELL ©2007 John W. Gardner Center★196
brainstorm of approaches to action. Have them write
down their responses on sticky notes or index cards, and
tape or post them under the appropriate category. Make
sure youth have plenty of time to write before posting
begins, as this will encourage a wider variety of answers.
Step 3: Review the sticky notes and group them
according to theme. Based on the brainstorm, develop a
fi nal defi nition for each of the words.
IV. SMALL GROUPS: THINKING ABOUT STRATEGIES
(30 MINUTES)
Step 1: Divide youth into two or three groups. Give each
group an Action Strategy Identifi cation Chart, either on
butcher paper or as individual handouts. Ask the members
of each group to take turns picking an action strategy
out of the bag or box you prepared before session (see
Materials and Preparation). Explain that once they pick an
action, they should return to their group, read the slip of
paper, and then lead a discussion on that action. Sample
discussion structure:
• Determine whether the action is primarily education,
activism, or advocacy.
• Think of an example from their experience, current
events, or history.
• Consider the advantages and challenges of using this
action.
• Discuss how appropriate, feasible, and effective they
believe this action is for their particular campaign.
Example fr om Practice:
As a college sophomore, Elisa Marie Overall facilitated a cohort of youth who were interested in how their school’s physical appearance refl ected the student population. Th e group polled fellow students on school cleanliness and appearance, visited other campuses, interviewed staff and administrators, and took fi eld trips to look at murals in school and community settings. Next they advocated for better bathroom facilities and created three student-vetted murals at their school. Four years later, one of the youth from this group shared the following: “I remember Elisa Marie saying that people shape their environment and that the environment shapes people, too. Trips to see other schools or to see the San Francisco murals helped us understand that.”
ice:
UNIT 3 Research and Action
Session 23 90 minutesTAKE ACTION
From YELL ©2007 John W. Gardner Center
Approach Advocacy Activism Education Other
What is it?
Person Advocate Activist Educator Other
What do they do or say?
Example:
★197
Step 2: When all of the papers have been drawn and
their charts are fairly full, ask each group to take a few
moments to rank the actions and agree on some actions
they think would work best for their project.
Step 3: Have each group appoint a presenter to share
back the highlights of their discussion and their conclusions
with the other group(s). Ask the spokespeople to present
their charts and explain their rankings and agreements.
Check to make sure everyone understands each type of
action.
V. CHOOSE ACTIONS (25 MINUTES)
After everyone has shared out, give each youth three or
four sticker dots (depending on the number of actions
you think would be reasonable to plan and execute). Ask
them to place their dots next to the action or actions they
think would be most effective.
Tally the results and record the top three to fi ve on the left
side of a clean sheet of butcher paper. Ask the youth to
write their names next to the action they would most like
to be involved in planning for the remainder of the year.
Check to make sure the workload is evenly distributed for
each action. If not, discuss how to equalize imbalances.
VI. CLOSING (5 MINUTES)
Closing Circle Statement (Around the World): Which do
you most identify with and why – activist, advocate,
educator?
From YELL ©2007 John W. Gardner Center
Examples of Youth in Action:Advocates, Activists, and Educators
Clara is a young woman in her late teens who works on environmental justice campaigns. She organizes protests (activism), talks to groups of middle and high school students about environmental and social justice issues (education), and works with others to create and screen fi lm documentaries highlighting environmental injustices (advocacy).
***
After her initial year of participation in YELL, Marsha continued as a mentor for the program. She explained that she sees herself as a teacher (educator), someone who can share her own experiences with younger students, off ering them guidance as well as support. As a sophomore in high school, Marsha facilitates after-school research and advocacy sessions, and teaches a summer class for sixth graders on communications and team building.
***
Michael is a high school student who has always loved art. When he found that he could not take an art class in high school because of district cutbacks that only allowed for a part-time art teacher, he decided to take action. First he went to diff erent classrooms and talked to students about the budget cuts (education). Th en he created a petition demanding more art classes signed by almost 80 percent of the students(activism). He took this petition to his school site council and asked it to fund a full-time art teacher at his school (advocacy). Michael also informed the media and publicized the issue (advocacy). Th e school decided to make the art teacher full time.
UNIT 3 Research and Action
Session 23 90 minutesTAKE ACTION
★198

From YELL ©2007 John W. Gardner Center
NOTES
★199
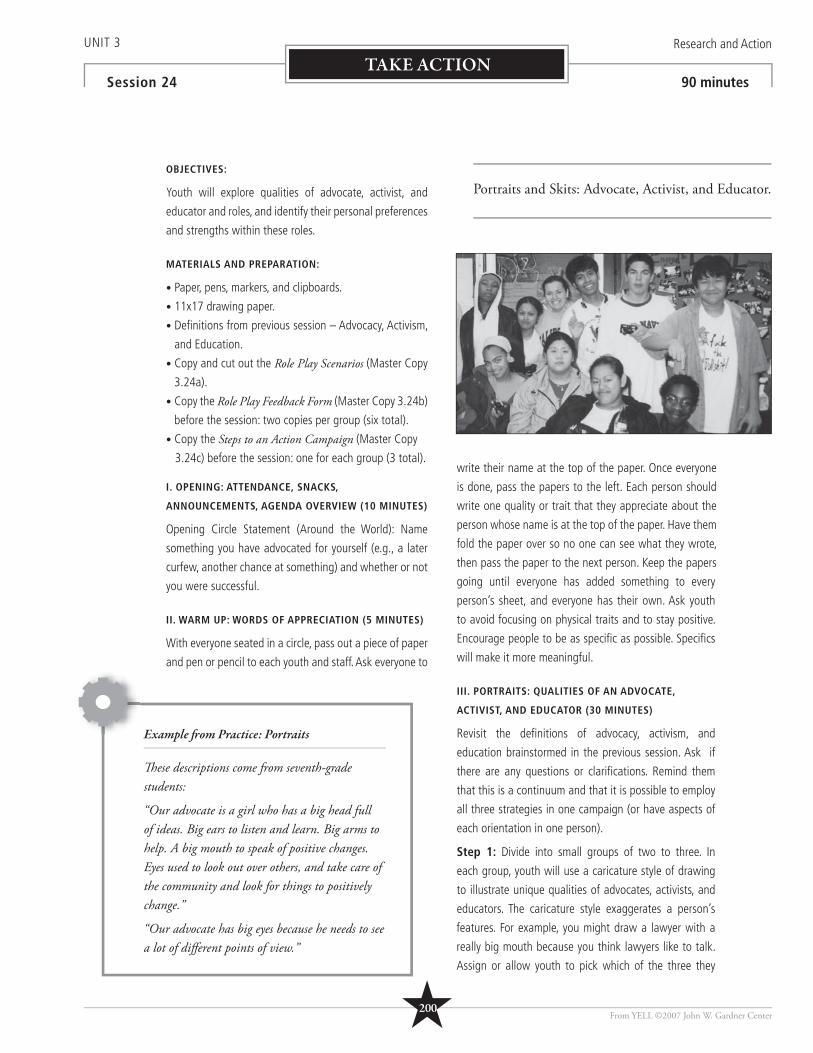
UNIT 3 Research and Action
Session 24 90 minutes
OBJECTIVES:
Youth will explore qualities of advocate, activist, and
educator and roles, and identify their personal preferences
and strengths within these roles.
MATERIALS AND PREPARATION:
• Paper, pens, markers, and clipboards.
• 11x17 drawing paper.
• Defi nitions from previous session – Advocacy, Activism,
and Education.
• Copy and cut out the Role Play Scenarios (Master Copy
3.24a).
• Copy the Role Play Feedback Form (Master Copy 3.24b)
before the session: two copies per group (six total).
• Copy the Steps to an Action Campaign (Master Copy
3.24c) before the session: one for each group (3 total).
I. OPENING: ATTENDANCE, SNACKS,
ANNOUNCEMENTS, AGENDA OVERVIEW (10 MINUTES)
Opening Circle Statement (Around the World): Name
something you have advocated for yourself (e.g., a later
curfew, another chance at something) and whether or not
you were successful.
II. WARM UP: WORDS OF APPRECIATION (5 MINUTES)
With everyone seated in a circle, pass out a piece of paper
and pen or pencil to each youth and staff. Ask everyone to
write their name at the top of the paper. Once everyone
is done, pass the papers to the left. Each person should
write one quality or trait that they appreciate about the
person whose name is at the top of the paper. Have them
fold the paper over so no one can see what they wrote,
then pass the paper to the next person. Keep the papers
going until everyone has added something to every
person’s sheet, and everyone has their own. Ask youth
to avoid focusing on physical traits and to stay positive.
Encourage people to be as specifi c as possible. Specifi cs
will make it more meaningful.
III. PORTRAITS: QUALITIES OF AN ADVOCATE,
ACTIVIST, AND EDUCATOR (30 MINUTES)
Revisit the defi nitions of advocacy, activism, and
education brainstormed in the previous session. Ask if
there are any questions or clarifi cations. Remind them
that this is a continuum and that it is possible to employ
all three strategies in one campaign (or have aspects of
each orientation in one person).
Step 1: Divide into small groups of two to three. In
each group, youth will use a caricature style of drawing
to illustrate unique qualities of advocates, activists, and
educators. The caricature style exaggerates a person’s
features. For example, you might draw a lawyer with a
really big mouth because you think lawyers like to talk.
Assign or allow youth to pick which of the three they
Portraits and Skits: Advocate, Activist, and Educator.
From YELL ©2007 John W. Gardner Center
Example fr om Practice: Portraits
Th ese descriptions come from seventh-grade students:
“Our advocate is a girl who has a big head full of ideas. Big ears to listen and learn. Big arms to help. A big mouth to speak of positive changes. Eyes used to look out over others, and take care of the community and look for things to positively change.”
“Our advocate has big eyes because he needs to see a lot of diff erent points of view.”
TAKE ACTION
★200
Facilitation Tip:
• Remind youth to focus on the strengths of their team and their community to make change happen.
• Refer to Unit 1, Session 8 for tips and activities to build presentation and speaking skills.
• Th is is a great time to assess how youth are feeling about themselves, the group, and the program.
want to do (advocate, activist, educator). Encourage them
to be as specifi c as possible.
Step 2: Have youth share their portraits with the group.
Post the portraits in the room.
IV. ROLE PLAY: JUST ACT (30 MINUTES)
Step 1: Divide youth into three groups, and give each
group one of the three Role Play Scenarios. Youth will
create a skit according to the parameters of their assigned
scenario. Give each group a Steps to an Action Campaign
handout to use as a checklist as they plan.
Step 2: Reassemble the full group and pass out two
feedback forms per group. Explain that after each skit,
your group will have a few minutes to fi ll in the feedback
form together and then share that feedback. Note: Remind
youth to bracket negative feedback with positives.
V. DEBRIEF AND SELF-ASSESSMENT (10 MINUTES)
Sample questions: What are the most essential and
important qualities of a successful action strategy of any
kind? Individual qualities? Team qualities?
Where is our group strong and where do we need
improvement?
VI. CLOSING (5 MINUTES)
Closing Circle Statement (Around the World): Something
you like about yourself and something you would like to
work on.
UNIT 3 Research and Action
Session 24 90 minutes
From YELL ©2007 John W. Gardner Center
TAKE ACTION
★201
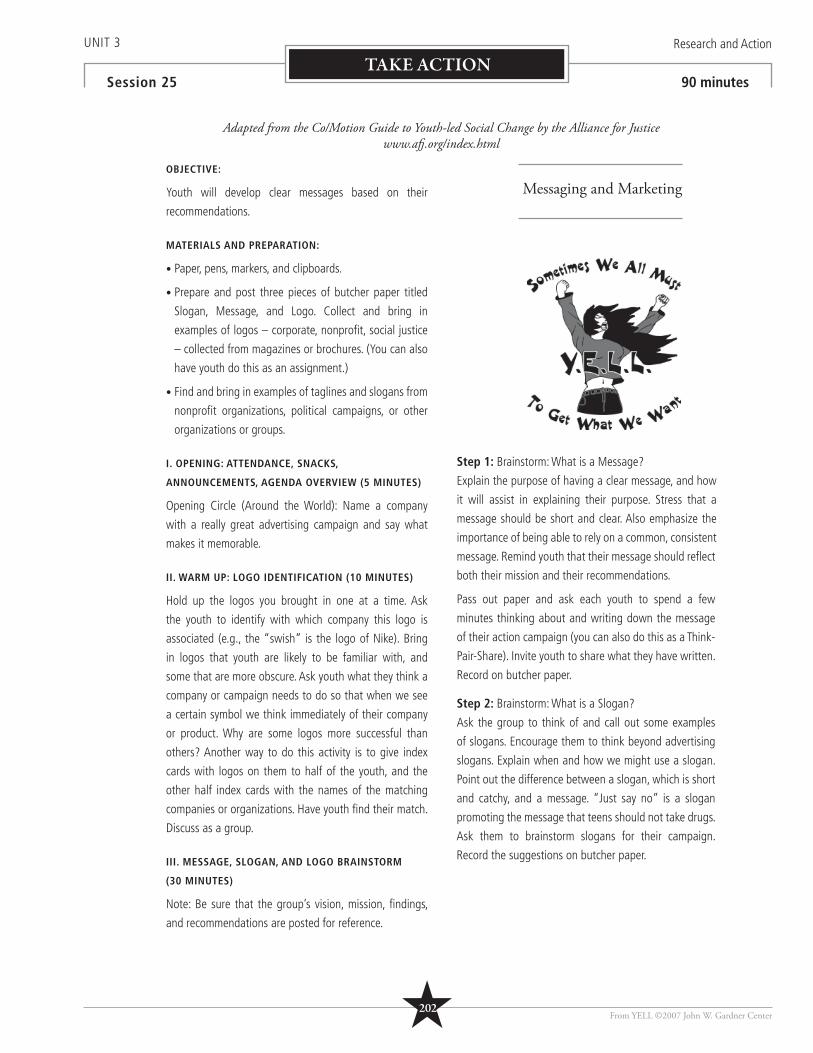
UNIT 3 Research and Action
Session 25 90 minutes
OBJECTIVE:
Youth will develop clear messages based on their
recommendations.
MATERIALS AND PREPARATION:
• Paper, pens, markers, and clipboards.
• Prepare and post three pieces of butcher paper titled
Slogan, Message, and Logo. Collect and bring in
examples of logos – corporate, nonprofi t, social justice
– collected from magazines or brochures. (You can also
have youth do this as an assignment.)
• Find and bring in examples of taglines and slogans from
nonprofi t organizations, political campaigns, or other
organizations or groups.
I. OPENING: ATTENDANCE, SNACKS,
ANNOUNCEMENTS, AGENDA OVERVIEW (5 MINUTES)
Opening Circle (Around the World): Name a company
with a really great advertising campaign and say what
makes it memorable.
II. WARM UP: LOGO IDENTIFICATION (10 MINUTES)
Hold up the logos you brought in one at a time. Ask
the youth to identify with which company this logo is
associated (e.g., the “swish” is the logo of Nike). Bring
in logos that youth are likely to be familiar with, and
some that are more obscure. Ask youth what they think a
company or campaign needs to do so that when we see
a certain symbol we think immediately of their company
or product. Why are some logos more successful than
others? Another way to do this activity is to give index
cards with logos on them to half of the youth, and the
other half index cards with the names of the matching
companies or organizations. Have youth fi nd their match.
Discuss as a group.
III. MESSAGE, SLOGAN, AND LOGO BRAINSTORM
(30 MINUTES)
Note: Be sure that the group’s vision, mission, fi ndings,
and recommendations are posted for reference.
Step 1: Brainstorm: What is a Message?
Explain the purpose of having a clear message, and how
it will assist in explaining their purpose. Stress that a
message should be short and clear. Also emphasize the
importance of being able to rely on a common, consistent
message. Remind youth that their message should refl ect
both their mission and their recommendations.
Pass out paper and ask each youth to spend a few
minutes thinking about and writing down the message
of their action campaign (you can also do this as a Think-
Pair-Share). Invite youth to share what they have written.
Record on butcher paper.
Step 2: Brainstorm: What is a Slogan?
Ask the group to think of and call out some examples
of slogans. Encourage them to think beyond advertising
slogans. Explain when and how we might use a slogan.
Point out the difference between a slogan, which is short
and catchy, and a message. “Just say no” is a slogan
promoting the message that teens should not take drugs.
Ask them to brainstorm slogans for their campaign.
Record the suggestions on butcher paper.
From YELL ©2007 John W. Gardner Center
TAKE ACTION
Messaging and Marketing
Adapted from the Co/Motion Guide to Youth-led Social Change by the Alliance for Justice www.afj .org/index.html
★202
Step 3: Brainstorm: What is a Logo?
Remind youth of the Warm Up activity. Explain how a logo
can help attract attention to a campaign and help people
remember its cause. Pass out another sheet of paper to each
youth. Ask them to spend a couple of minutes designing,
describing, or sketching a logo for their campaign.
IV. SMALL GROUPS: DEVELOPING A MESSAGE, SLOGAN,
AND LOGO (20 MINUTES)
Invite the youth to go to one of the three stations: message,
slogan, or logo according to what they are most passionate
about or interested in. Try to strike an even balance among
the groups. Give each group a goal:
• The message group should use the message brainstorm
answers and any of the written responses to craft a
message. Is there one consistent message that comes
through? What is it? Is there a message that transcends all
of the audiences they are targeting?
• The slogan group should use the butcher paper brainstorm
to consider the merits of the various suggestions. They can
develop arguments for their preference and present these
arguments to the whole group.
• The logo group should examine the strengths of the
submissions and suggestions. They can either develop an
argument in favor of their favorite or design a new logo
and present it to the entire group.
UNIT 3 Research and Action
Session 25 90 minutes
From YELL ©2007 John W. Gardner Center
TAKE ACTION
V. WHOLE GROUP: DECIDING ON A MESSAGE, SLOGAN,
AND LOGO (20 MINUTES)
Reconvene and ask each group to share its work and ideas.
Decide on a fi nal message, slogan, and logo, using the
agreed upon decision-making process. Also have the group
suggest ideas for using or integrating some of the messages,
slogans, or visuals that weren’t selected.
VI. CLOSING (5 MINUTES)
Closing Circle Statement (Around the World): The most
challenging thing about developing a slogan and logo is…
Facilitation Tip:
Have youth use their message and slogan to create a T-shirt for group members.
★203
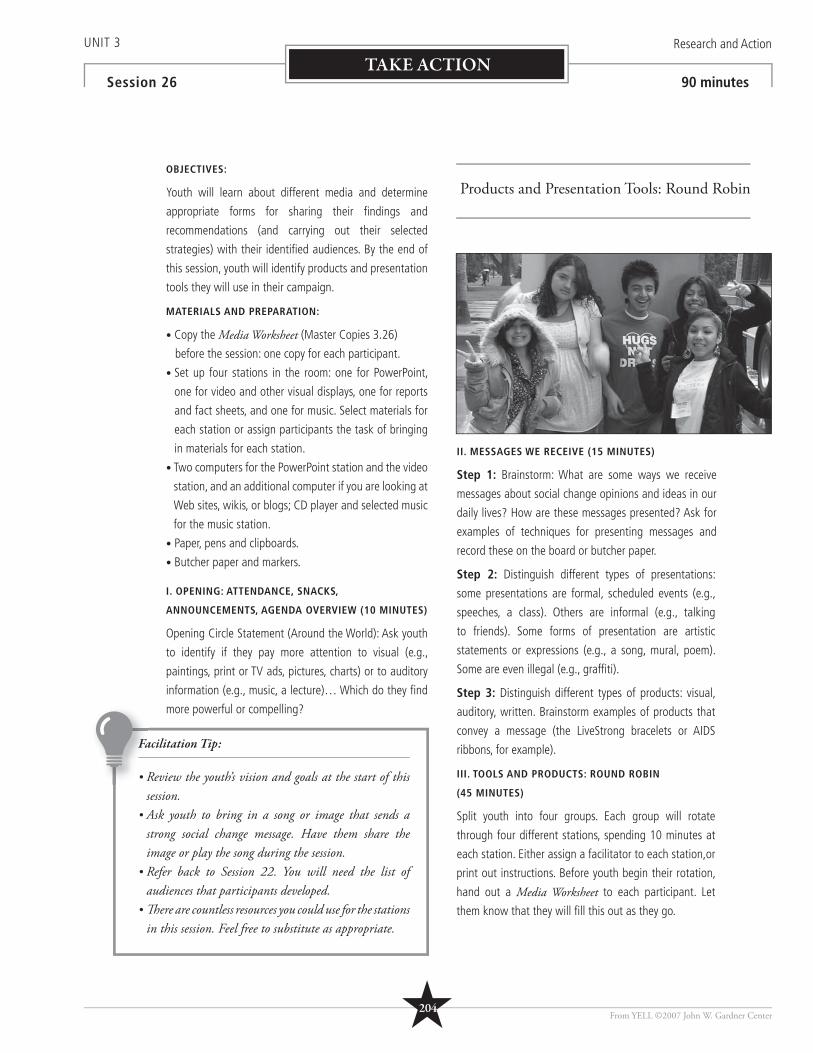
UNIT 3 Research and Action
Session 26 90 minutes
OBJECTIVES:
Youth will learn about different media and determine
appropriate forms for sharing their fi ndings and
recommendations (and carrying out their selected
strategies) with their identifi ed audiences. By the end of
this session, youth will identify products and presentation
tools they will use in their campaign.
MATERIALS AND PREPARATION:
• Copy the Media Worksheet (Master Copies 3.26)
before the session: one copy for each participant.
• Set up four stations in the room: one for PowerPoint,
one for video and other visual displays, one for reports
and fact sheets, and one for music. Select materials for
each station or assign participants the task of bringing
in materials for each station.
• Two computers for the PowerPoint station and the video
station, and an additional computer if you are looking at
Web sites, wikis, or blogs; CD player and selected music
for the music station.
• Paper, pens and clipboards.
• Butcher paper and markers.
I. OPENING: ATTENDANCE, SNACKS,
ANNOUNCEMENTS, AGENDA OVERVIEW (10 MINUTES)
Opening Circle Statement (Around the World): Ask youth
to identify if they pay more attention to visual (e.g.,
paintings, print or TV ads, pictures, charts) or to auditory
information (e.g., music, a lecture)… Which do they fi nd
more powerful or compelling?
II. MESSAGES WE RECEIVE (15 MINUTES)
Step 1: Brainstorm: What are some ways we receive
messages about social change opinions and ideas in our
daily lives? How are these messages presented? Ask for
examples of techniques for presenting messages and
record these on the board or butcher paper.
Step 2: Distinguish different types of presentations:
some presentations are formal, scheduled events (e.g.,
speeches, a class). Others are informal (e.g., talking
to friends). Some forms of presentation are artistic
statements or expressions (e.g., a song, mural, poem).
Some are even illegal (e.g., graffi ti).
Step 3: Distinguish different types of products: visual,
auditory, written. Brainstorm examples of products that
convey a message (the LiveStrong bracelets or AIDS
ribbons, for example).
III. TOOLS AND PRODUCTS: ROUND ROBIN
(45 MINUTES)
Split youth into four groups. Each group will rotate
through four different stations, spending 10 minutes at
each station. Either assign a facilitator to each station,or
print out instructions. Before youth begin their rotation,
hand out a Media Worksheet to each participant. Let
them know that they will fi ll this out as they go.
Facilitation Tip:
• Review the youth’s vision and goals at the start of this session.
• Ask youth to bring in a song or image that sends a strong social change message. Have them share the image or play the song during the session.
• Refer back to Session 22. You will need the list of audiences that participants developed.
• Th ere are countless resources you could use for the stations in this session. Feel free to substitute as appropriate.
Products and Presentation Tools: Round Robin
From YELL ©2007 John W. Gardner Center
TAKE ACTION
★204
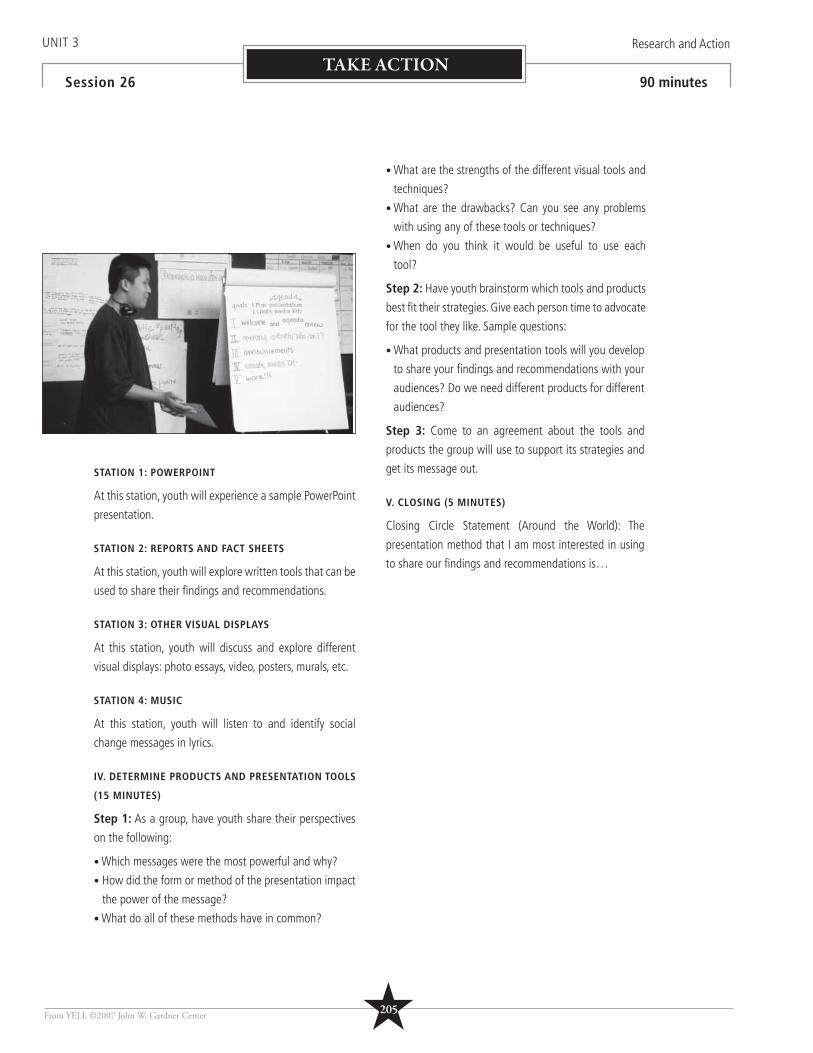
STATION 1: POWERPOINT
At this station, youth will experience a sample PowerPoint
presentation.
STATION 2: REPORTS AND FACT SHEETS
At this station, youth will explore written tools that can be
used to share their fi ndings and recommendations.
STATION 3: OTHER VISUAL DISPLAYS
At this station, youth will discuss and explore different
visual displays: photo essays, video, posters, murals, etc.
STATION 4: MUSIC
At this station, youth will listen to and identify social
change messages in lyrics.
IV. DETERMINE PRODUCTS AND PRESENTATION TOOLS
(15 MINUTES)
Step 1: As a group, have youth share their perspectives
on the following:
• Which messages were the most powerful and why?
• How did the form or method of the presentation impact
the power of the message?
• What do all of these methods have in common?
• What are the strengths of the different visual tools and
techniques?
• What are the drawbacks? Can you see any problems
with using any of these tools or techniques?
• When do you think it would be useful to use each
tool?
Step 2: Have youth brainstorm which tools and products
best fi t their strategies. Give each person time to advocate
for the tool they like. Sample questions:
• What products and presentation tools will you develop
to share your fi ndings and recommendations with your
audiences? Do we need different products for different
audiences?
Step 3: Come to an agreement about the tools and
products the group will use to support its strategies and
get its message out.
V. CLOSING (5 MINUTES)
Closing Circle Statement (Around the World): The
presentation method that I am most interested in using
to share our fi ndings and recommendations is…
UNIT 3 Research and Action
Session 26 90 minutes
From YELL ©2007 John W. Gardner Center
TAKE ACTION
★205
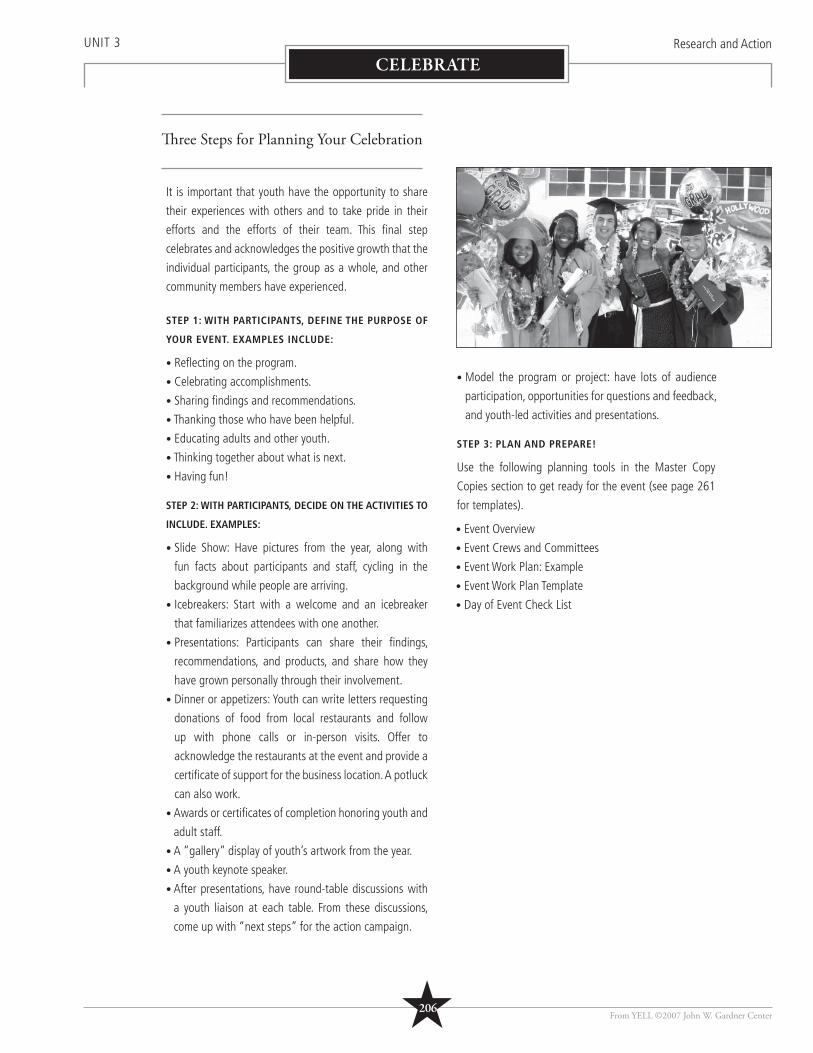
UNIT 3 Research and Action
CELEBRATE
It is important that youth have the opportunity to share
their experiences with others and to take pride in their
efforts and the efforts of their team. This fi nal step
celebrates and acknowledges the positive growth that the
individual participants, the group as a whole, and other
community members have experienced.
STEP 1: WITH PARTICIPANTS, DEFINE THE PURPOSE OF
YOUR EVENT. EXAMPLES INCLUDE:
• Refl ecting on the program.
• Celebrating accomplishments.
• Sharing fi ndings and recommendations.
• Thanking those who have been helpful.
• Educating adults and other youth.
• Thinking together about what is next.
• Having fun!
STEP 2: WITH PARTICIPANTS, DECIDE ON THE ACTIVITIES TO
INCLUDE. EXAMPLES:
• Slide Show: Have pictures from the year, along with
fun facts about participants and staff, cycling in the
background while people are arriving.
• Icebreakers: Start with a welcome and an icebreaker
that familiarizes attendees with one another.
• Presentations: Participants can share their fi ndings,
recommendations, and products, and share how they
have grown personally through their involvement.
• Dinner or appetizers: Youth can write letters requesting
donations of food from local restaurants and follow
up with phone calls or in-person visits. Offer to
acknowledge the restaurants at the event and provide a
certifi cate of support for the business location. A potluck
can also work.
• Awards or certifi cates of completion honoring youth and
adult staff.
• A “gallery” display of youth’s artwork from the year.
• A youth keynote speaker.
• After presentations, have round-table discussions with
a youth liaison at each table. From these discussions,
come up with “next steps” for the action campaign.
• Model the program or project: have lots of audience
participation, opportunities for questions and feedback,
and youth-led activities and presentations.
STEP 3: PLAN AND PREPARE!
Use the following planning tools in the Master Copy
Copies section to get ready for the event (see page 261
for templates).
• Event Overview
• Event Crews and Committees
• Event Work Plan: Example
• Event Work Plan Template
• Day of Event Check List
From YELL ©2007 John W. Gardner Center
Th ree Steps for Planning Your Celebration
★206
EXAMPLE:
TONIGHT’S YELL PROGRAM
6:30 BUFFET DINNER AND YELL GALLERY
6:45 OFFICIAL WELCOME AND ACTIVITY
7:00 SLIDE SHOW AND OVERVIEW OF PROJECT
7:15 RESEARCH PRESENTATIONS
7:45 ROUND TABLE DISCUSSIONS: FINDINGS AND RECOMMENDATIONS
8:10 SPOKEN WORD BY REBECCA ANYON
8:15 KEYNOTE SPEAKER: ANAHÍ CASILLAS
YELL MENTOR, FRIDA KAHLO HIGH SCHOOL SENIOR
8:20 PRESENTATION OF CERTIFICATES AND AWARDS
8:30 RAFFLE AND CLOSING
MUSIC AND SLIDE SHOW
UNIT 3 Research and Action
CELEBRATE
From YELL ©2007 John W. Gardner Center
Event Planning Tips:
• Set the date of the party early and send Save the Date notices to everyone you hope will attend.
• Send printed invitations to parents, teachers, community members, and all the people who were helpful. Include personal notes by staff or youth and a clear date for RSVPs.
• Send e-mail reminders as you get close to the day of the event.
• Pick a central, community-based location that is easily accessible.
• Provide appropriate translation of both written materials and spoken presentations.
• Invite local media for a pre-event press conference.
• See Unit 2, Session 6. Remember to give participants the letters they wrote as part of this session. Use those letters as a prompt for personal refl ection.
• Take time to relax and celebrate as a group before the guests arrive.
• Talk about next steps. Give participants a chance to brainstorm topics for next year. Keep the excitement building.
E
★207
SESSION 1 Knowledge is Power Role Play 1, 2 and Additional Role Play Scenarios: Facilitator Copy and Cut 3.1.....................................205
SESSION 2Community Web: Facilitator Example 3.2a............................................................................................................................212Optional: Neighborhood Mapping Assignment: Group Handout 3.2b....................................................................................213
SESSION 4 Active Listening Guidelines: Group Handout 1.1a (use again).................................................................................................69
SESSION 5Research Topic Budget: Group Handout 3.5a........................................................................................................................214Research Topic Debate Preparation: Group Handout 3.5b.....................................................................................................215
SESSION 6Cause and Effect Concept Map: Facilitator Example 3.6a......................................................................................................216Cause and Effect Concept Map: Group Handout 3.6b...........................................................................................................217
SESSION 7 Charity and Change Worksheet: Group Handout 3.7.............................................................................................................218
SESSION 8 Topic and Questions: Samples from YELL Projects: Group Handout 3.8..................................................................................219
SESSION 9Power Analysis Matrix: Group Handout 3.9a........................................................................................................................220Stations for Power Analysis Activity: Group Handout 3.9b.....................................................................................................221
SESSION 10
Research Methods Pros and Cons Worksheet: Facilitator Example 3.10a...............................................................................225Research Methods Pros and Cons Worksheet: Group Handout 3.10b....................................................................................226Research Round Robin Stations: Facilitator Example 3.10c....................................................................................................227Survey Station: Group Handout 3.10d..................................................................................................................................230Survey Introduction Letters: Group Handout 3.10e................................................................................................................231Interview Station Questions: Facilitator Copy and Cut 3.10f .................................................................................................232Interview Consent Form: Group Handout 3.10g...................................................................................................................233
SESSION 11 Planning Your Research: Group Handout 3.11......................................................................................................................234
SESSION 12
Project Timeline Example: Facilitator Example 3.12a.............................................................................................................235Project Timeline Worksheet: Group Handout 3.12b...............................................................................................................236Research Methods Pros and Cons Worksheet: Group Handout 3.10f (use again fi lled in by youth).........................................232
SESSION 13Steps to a Good Interview: Group Handout 3.13a................................................................................................................237Designing Open Ended and Non Leading Questions: Group Handout 3.13b..........................................................................238
SESSION 14
Interview Protocol Components: Group Handout 3.14a.......................................................................................................239Interview Protocol Design: Group Handout 3.14b................................................................................................................240Interview Note Taking Sheet: Group Handout 3.15c.............................................................................................................241Helpful Hints for Successful Tape Recording: Group Handout 3.14d......................................................................................242Steps to a Good Interview: Group Handout 3.13a (use again)...............................................................................................237
SESSION 16
Focus Group Facilitator Roles and Responsibilities: Group Handout 3.16a.............................................................................243Tools for Focus Group Facilitators: Group Handout 3.16b.....................................................................................................244Checklist for Group Facilitators: Group Handout 3.16c.........................................................................................................245Facilitation Scenarios: Facilitator Copy and Cut 1.14c (use again)...........................................................................................94Interview Protocol Design Worksheet: Group Handout 3.14b (fi lled in by youth in Session 14)............................................240
SESSION 17
Types of Survey Questions: Group Handout 3.17a ..............................................................................................................246Survey Protocol Worksheet: Group Handout 3.17b..............................................................................................................247Tips for Surveying in School Settings: Group Handout 3.17c................................................................................................248
SESSION 18 Interview Coding Instructions and Examples: Group Handout 3.18a...................................................................................249
SESSION 20Survey Tally Sheet: Group Handout 3.20a...........................................................................................................................250Survey Math and Graphing: Grou p Handout 3.20b............................................................................................................251
SESSION 23
Taking Action: Some Approaches to Social Change: Facilitatior Example 3.23a....................................................................253Action Strategy Identifi cation Chart Example: Facilitator Example 3.23b..............................................................................254Action Strategy Identifi cation Chart: Group Handout 3.23c.................................................................................................255Sample Forms of Action: Facilitator Copy and Cut 3.23d.....................................................................................................256
SESSION 24
Role Play Scenarios: Facilitator Copy and Cut 3.24a............................................................................................................257Role Play Feedback Form: Group Handout 3.24b................................................................................................................258 Step to an Action Campaign: Group Handout.....................................................................................................................259
SESSION 26 Media Brainstorm Worksheet: Group Handout 3.26............................................................................................................260
2 SESSIONS Celebration Planning Tips and Tools....................................................................................................................................261
From YELL ©2007 John W. Gardner Center
UNIT 3 Research and Action
TABLE OF CONTENTS
Unit 3 Master Copies
★208
Knowledge is Power Role Play 1
From YELL ©2007 John W. Gardner Center
SCENARIO 1: THE POUGHKEEPSIE HIGH SURVEY
“The whole thing started out with this one little survey that we never thought would be anything” Ms. McKinney, 17, said. “The
way our school runs, sometimes you might think students wouldn’t care as much as they did.”
In spring 2003 the government class at Poughkeepsie High in New York did an unheard-of thing: It released a poll to the student
body asking what everyone wanted to see changed in the school’s budget.
At the Board of Education meeting, six students of the government class formally presented their report, full of charts, graphs,
and suggestions. Some wished for programs, like driver’s education, they had been absent from Poughkeepsie High’s budget for
years and seemed worth reconsidering, board members said. Others, like paying students to do school maintenance or pressing
troublemakers into janitorial service as a form of detention, were illegal.
At least fi ve board members took it upon themselves to congratulate the students and promised to take the survey results into
consideration. The students also discovered that even the superintendent of the school district had wanted to have student
opinion and was very pleased and surprised at how seriously the students took it.
Potential characters: High school students, board of education members, school superintendent.
Your skit must answer the following questions:
• What is the problem the government class is addressing?
• What is its solution?
• How did students use research to advocate for (argue for) their solution?
Skit (5 minutes)
3.1
★209
From YELL ©2007 John W. Gardner Center
SCENARIO 2: EAST LOS ANGELES YOUTH ORGANIZERS
Joshua, a student from Garfi eld High, in East Los Angeles, describes conditions at his school: “Most of our classes have 40
students in them. You have to sit way in the back with no tables, and some students have to stand up because there’s no room.
It’s very stressful. Tiles are falling off the ceilings, and lunch is in a little area where you can’t really sit down. Usually, only one or
two bathrooms are open for 4,800 students, and they’re in horrible condition.”
Another East LA high school student describes her experience: “My friends in the lower [non-college-prep] classes have
unaccredited teachers, while we have accredited ones. We have college counselors come into the classroom but only the military
recruiters come into theirs. College counselors should be available throughout the school, not only to a small percentage of
students! I don’t want to see my friends stay behind or drop out of school, join the military, or work as low-wage labor.”
Joshua and students from different high schools in East LA formed InnerCity Struggle to organize change in their schools.
InnerCity Struggle merged with another youth organization, called United Students. First students had to come up with hard
research to prove that the problems existed, so they put together a survey for their fellow students. Then they held a student-led
meeting with the principal to share their results. They won the principal’s support.
It worked! “The school superintendent allocated $20 million into improving school conditions. We’ve had a lot of interviews on
the radio and with the LA Times. We’re so young, but we’ve done so much, and it feels good.”
Potential characters: Youth organizers, adult facilitators, school principal, school superintendent, the media.
Your skit must answer the following questions:
• What is the problem InnerCity Struggle is addressing?
• What is the solution?
• How did they use research to advocate for their solution?
Skit (5 minutes)
For more information on InnerCity Struggle you can visit their website here: http://innercitystruggle.org/
3.1
Knowledge is Power Role Play 2
★210
Knowledge is Power: Additional Role Play Scenarios
From YELL ©2007 John W. Gardner Center
NEWSCAST SCENARIO
• Channel 9 is covering a protest against police brutality that community members are holding in front of the
police chief’s offi ce. The protestors claim it is a serious problem in their neighborhood.
• There are several people at the protest who claim they have experienced police brutality and are willing to
be interviewed by Channel 9.
• The protestors have brought several videotapes of police brutality in West City to the news station.
_______________________________________________________________________________
TRIAL – ATTORNEY AND EXPERT WITNESS
• Big City fi les a class action suit against Yeasty Yeast Factory on behalf of West City youth with asthma. (West
City is a low-income neighborhood in Big City.) They want to shut Yeasty Yeast Factory down because of the
pollution and bad smell it creates.
• An expert witness on environmental health is at the trial. He knows that:
- The yeast factory is ranked the second worst toxic air polluter in Big City.
- Rates of asthma in West City are twice as high as the rest of Big City County and three times higher
than the rest of the state.
- A young person with a bad case of asthma who lives near Yeasty Yeast is also at the trial. He or she
believes the asthma is a result of the fumes from the factory.
_______________________________________________________________________________
PUBLIC POLICY – GOVERNOR GIVING A SPEECH
• Public Advocates (a nonprofi t research group) releases a poll of more than 100,000 people that says that 75
percent of Californians are unhappy with the public education system.
• The same Californians who reported being unhappy said that they would prefer the California budget give
more money to schools than to prisons.
• In response to this information, the Governor is holding a press conference about a new law he is making
to address their concerns.
3.1
✄
★211
From YELL ©2007 John W. Gardner Center
MY COMMUNITY
BUSINESSES
• Fast food
• Auto body shops
• Shopping mall
• Grocery stores
FAM
ILIES
• Pare
nts/sib
lings
• Exte
nded
family
• Fam
ily/clo
se fam
ily frie
nds
PEER
GR
OU
PS
• Fr
iend
s
• Cl
assm
ates
• N
eigh
bors
ENVIR
ONMEN
T
• Park
s• P
ublic
spac
es
• Plac
es to
hang
out
ORGANIZATIONS
• Neighborhood associations
• Juvenile justice
• Nonprofi t groups
• Health services
POLICY-SETTING GROUPS
• School Board
• City Council
SCH
OO
LS
• Preschool
• Elementary
• Middle • High
• College • Alternative
TEAMS / CLUBS
• Soccer
• Boy’s & Girl’s clubs
• Teen recreation
• Drama club
3.2a
Community Web - Example
★212
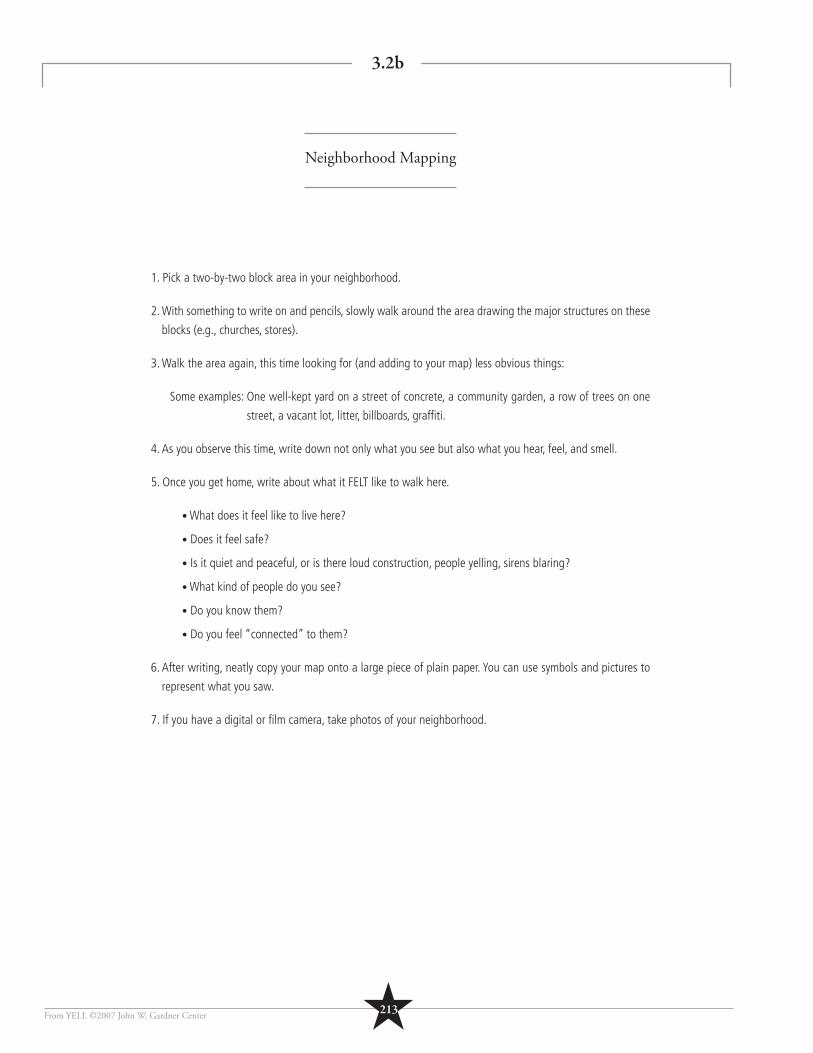
Neighborhood Mapping
From YELL ©2007 John W. Gardner Center
1. Pick a two-by-two block area in your neighborhood.
2. With something to write on and pencils, slowly walk around the area drawing the major structures on these
blocks (e.g., churches, stores).
3. Walk the area again, this time looking for (and adding to your map) less obvious things:
Some examples: One well-kept yard on a street of concrete, a community garden, a row of trees on one
street, a vacant lot, litter, billboards, graffi ti.
4. As you observe this time, write down not only what you see but also what you hear, feel, and smell.
5. Once you get home, write about what it FELT like to walk here.
• What does it feel like to live here?
• Does it feel safe?
• Is it quiet and peaceful, or is there loud construction, people yelling, sirens blaring?
• What kind of people do you see?
• Do you know them?
• Do you feel “connected” to them?
6. After writing, neatly copy your map onto a large piece of plain paper. You can use symbols and pictures to
represent what you saw.
7. If you have a digital or fi lm camera, take photos of your neighborhood.
3.2b
★213
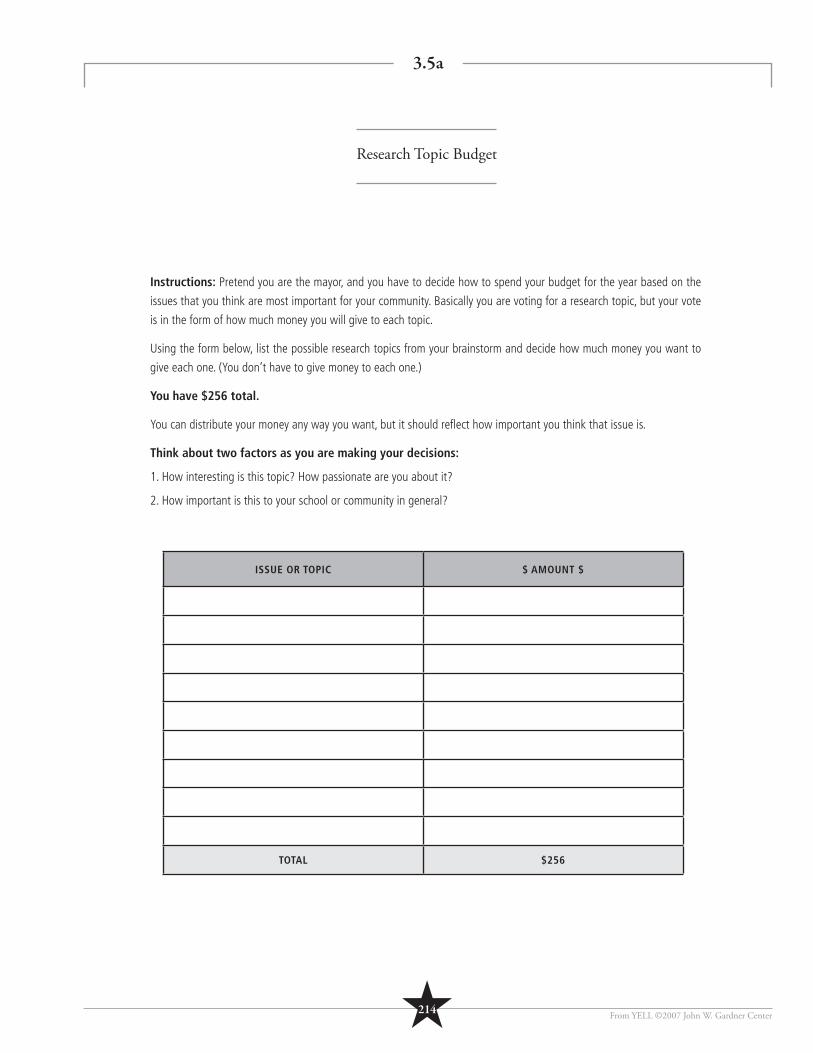
From YELL ©2007 John W. Gardner Center
Instructions: Pretend you are the mayor, and you have to decide how to spend your budget for the year based on the
issues that you think are most important for your community. Basically you are voting for a research topic, but your vote
is in the form of how much money you will give to each topic.
Using the form below, list the possible research topics from your brainstorm and decide how much money you want to
give each one. (You don’t have to give money to each one.)
You have $256 total.
You can distribute your money any way you want, but it should refl ect how important you think that issue is.
Think about two factors as you are making your decisions:
1. How interesting is this topic? How passionate are you about it?
2. How important is this to your school or community in general?
ISSUE OR TOPIC $ AMOUNT $
TOTAL $256
3.5a
Research Topic Budget
★214
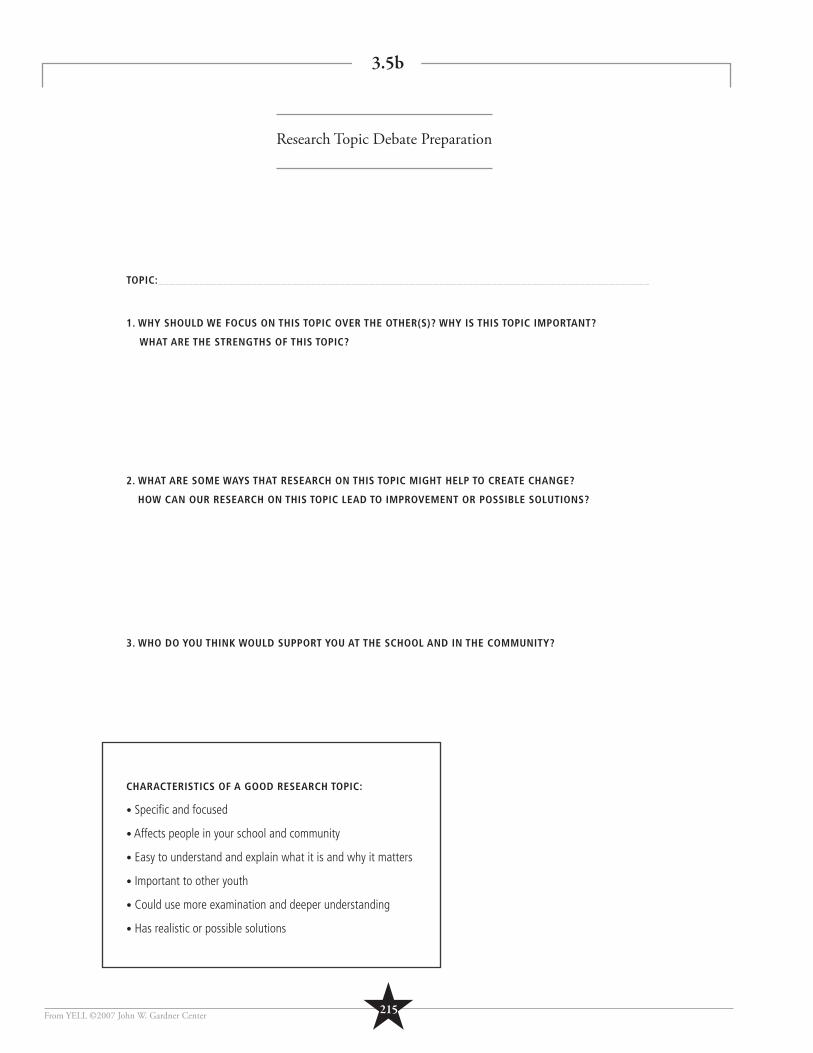
From YELL ©2007 John W. Gardner Center
TOPIC:____________________________________________________________________________________
1. WHY SHOULD WE FOCUS ON THIS TOPIC OVER THE OTHER(S)? WHY IS THIS TOPIC IMPORTANT?
WHAT ARE THE STRENGTHS OF THIS TOPIC?
2. WHAT ARE SOME WAYS THAT RESEARCH ON THIS TOPIC MIGHT HELP TO CREATE CHANGE?
HOW CAN OUR RESEARCH ON THIS TOPIC LEAD TO IMPROVEMENT OR POSSIBLE SOLUTIONS?
3. WHO DO YOU THINK WOULD SUPPORT YOU AT THE SCHOOL AND IN THE COMMUNITY?
CHARACTERISTICS OF A GOOD RESEARCH TOPIC:
• Specifi c and focused
• Affects people in your school and community
• Easy to understand and explain what it is and why it matters
• Important to other youth
• Could use more examination and deeper understanding
• Has realistic or possible solutions
3.5b
Research Topic Debate Preparation
★215
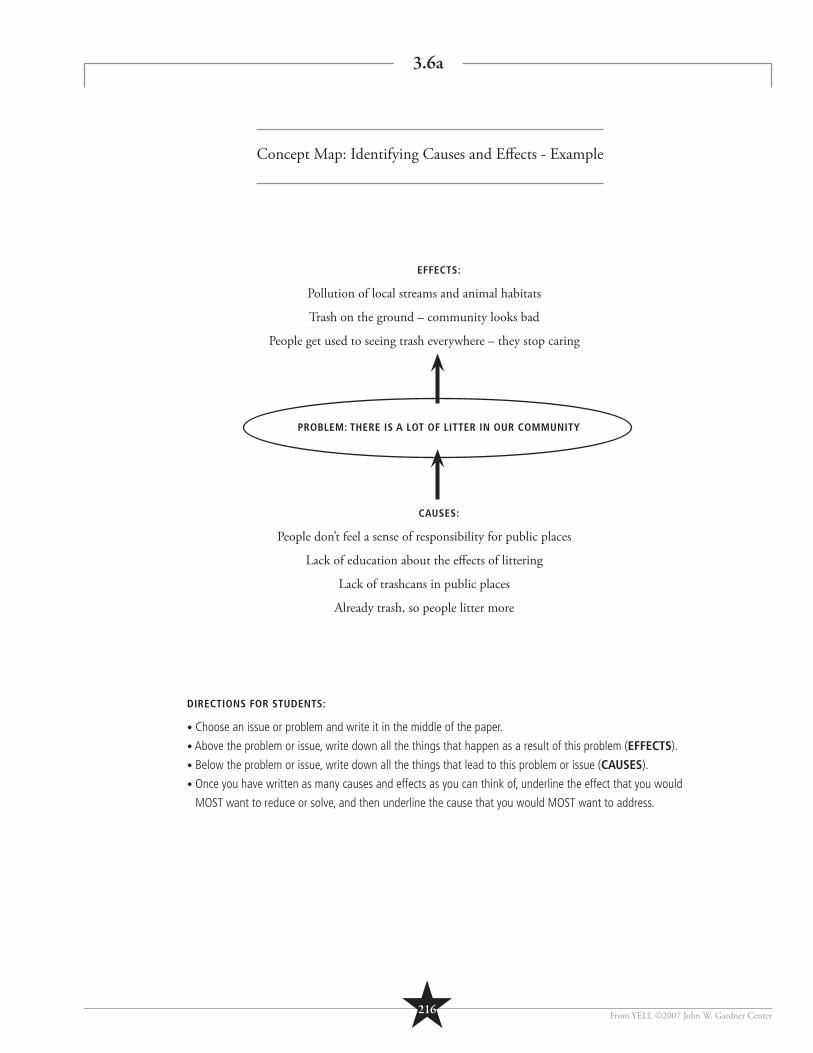
From YELL ©2007 John W. Gardner Center
EFFECTS:
Pollution of local streams and animal habitats
Trash on the ground – community looks bad
People get used to seeing trash everywhere – they stop caring
PROBLEM: THERE IS A LOT OF LITTER IN OUR COMMUNITY
CAUSES:
People don’t feel a sense of responsibility for public places
Lack of education about the eff ects of littering
Lack of trashcans in public places
Already trash, so people litter more
DIRECTIONS FOR STUDENTS:
• Choose an issue or problem and write it in the middle of the paper.
• Above the problem or issue, write down all the things that happen as a result of this problem (EFFECTS).
• Below the problem or issue, write down all the things that lead to this problem or issue (CAUSES).
• Once you have written as many causes and effects as you can think of, underline the effect that you would
MOST want to reduce or solve, and then underline the cause that you would MOST want to address.
3.6a
Concept Map: Identifying Causes and Eff ects - Example
★216
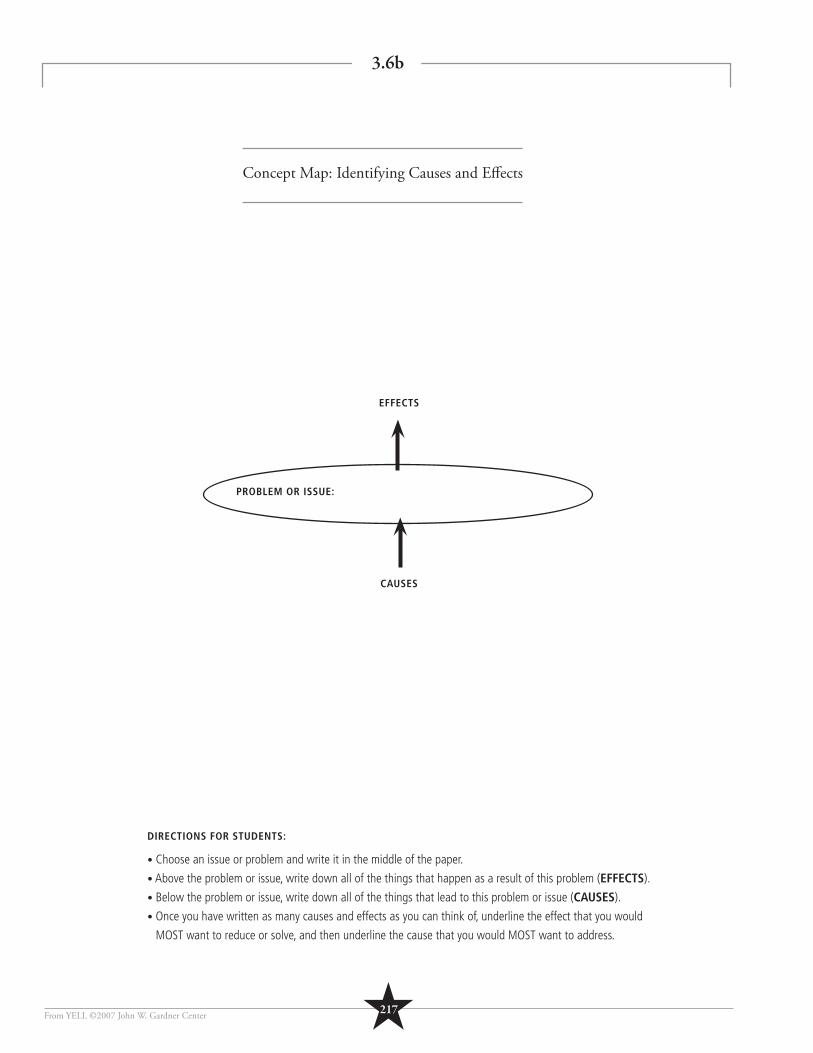
From YELL ©2007 John W. Gardner Center
EFFECTS
CAUSES
DIRECTIONS FOR STUDENTS:
• Choose an issue or problem and write it in the middle of the paper.
• Above the problem or issue, write down all of the things that happen as a result of this problem (EFFECTS).
• Below the problem or issue, write down all of the things that lead to this problem or issue (CAUSES).
• Once you have written as many causes and effects as you can think of, underline the effect that you would
MOST want to reduce or solve, and then underline the cause that you would MOST want to address.
3.6b
Concept Map: Identifying Causes and Eff ects
★217
PROBLEM OR ISSUE:
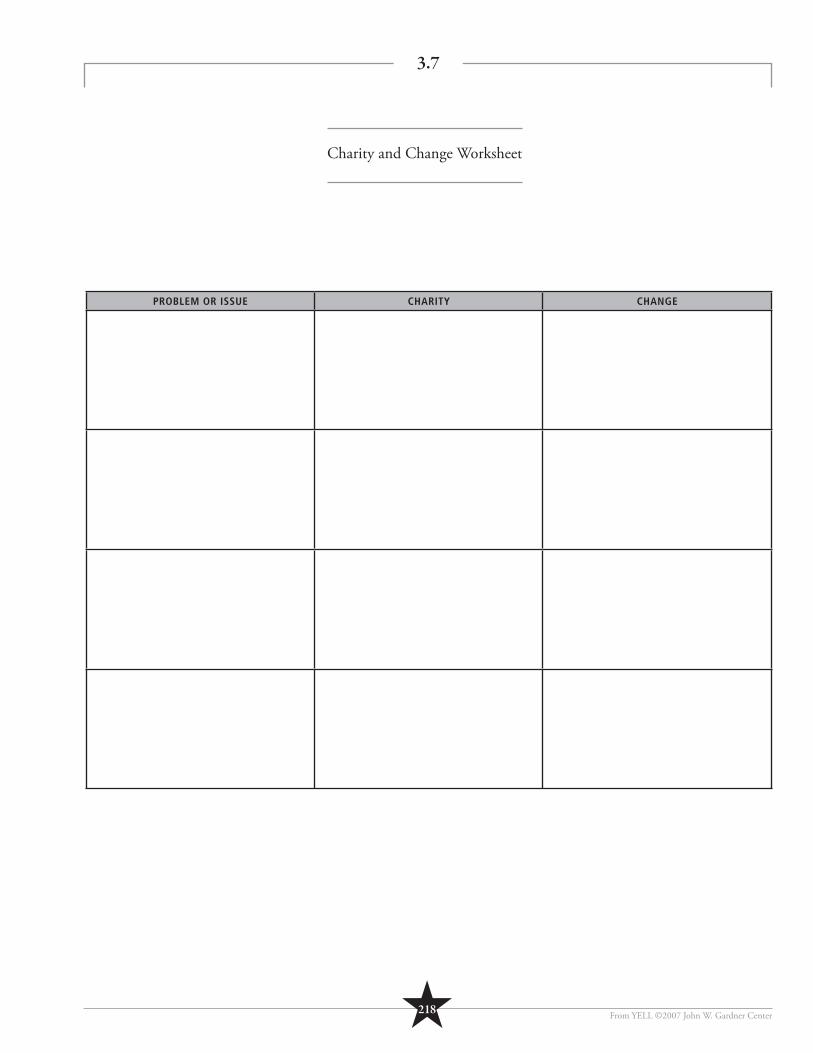
From YELL ©2007 John W. Gardner Center
PROBLEM OR ISSUE CHARITY CHANGE
3.7
Charity and Change Worksheet
★218
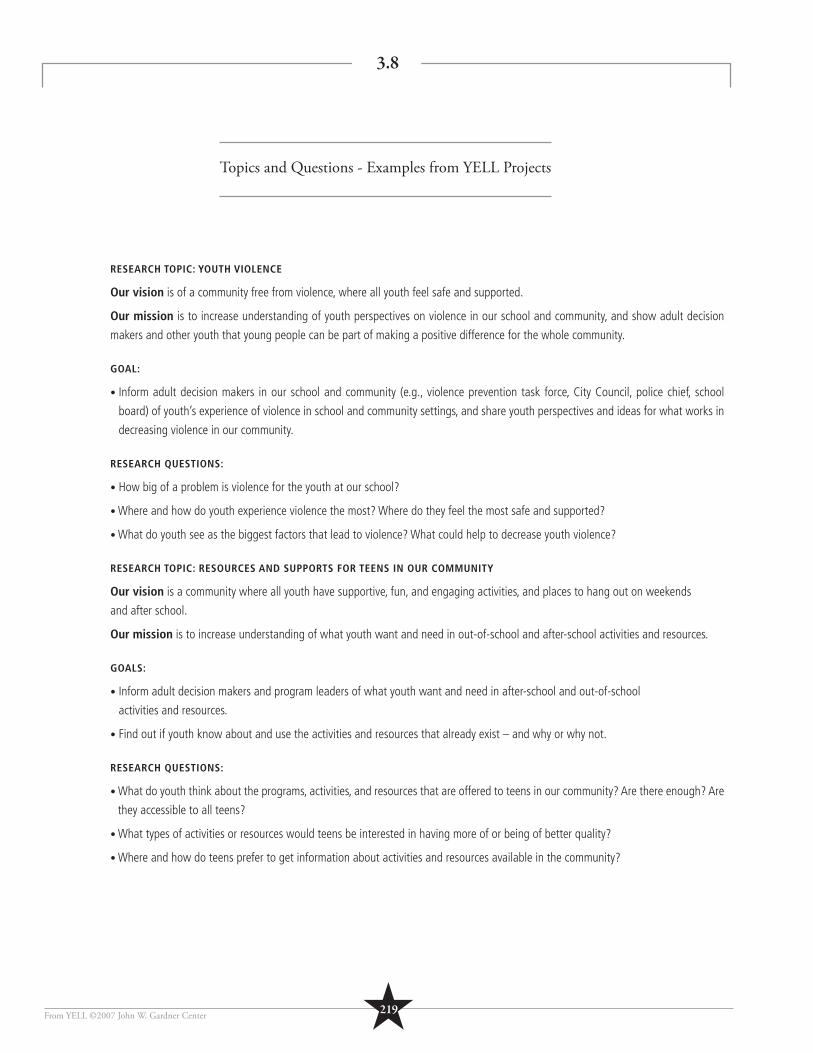
From YELL ©2007 John W. Gardner Center
RESEARCH TOPIC: YOUTH VIOLENCE
Our vision is of a community free from violence, where all youth feel safe and supported.
Our mission is to increase understanding of youth perspectives on violence in our school and community, and show adult decision
makers and other youth that young people can be part of making a positive difference for the whole community.
GOAL:
• Inform adult decision makers in our school and community (e.g., violence prevention task force, City Council, police chief, school
board) of youth’s experience of violence in school and community settings, and share youth perspectives and ideas for what works in
decreasing violence in our community.
RESEARCH QUESTIONS:
• How big of a problem is violence for the youth at our school?
• Where and how do youth experience violence the most? Where do they feel the most safe and supported?
• What do youth see as the biggest factors that lead to violence? What could help to decrease youth violence?
RESEARCH TOPIC: RESOURCES AND SUPPORTS FOR TEENS IN OUR COMMUNITY
Our vision is a community where all youth have supportive, fun, and engaging activities, and places to hang out on weekends
and after school.
Our mission is to increase understanding of what youth want and need in out-of-school and after-school activities and resources.
GOALS:
• Inform adult decision makers and program leaders of what youth want and need in after-school and out-of-school
activities and resources.
• Find out if youth know about and use the activities and resources that already exist – and why or why not.
RESEARCH QUESTIONS:
• What do youth think about the programs, activities, and resources that are offered to teens in our community? Are there enough? Are
they accessible to all teens?
• What types of activities or resources would teens be interested in having more of or being of better quality?
• Where and how do teens prefer to get information about activities and resources available in the community?
3.8
Topics and Questions - Examples from YELL Projects
★219
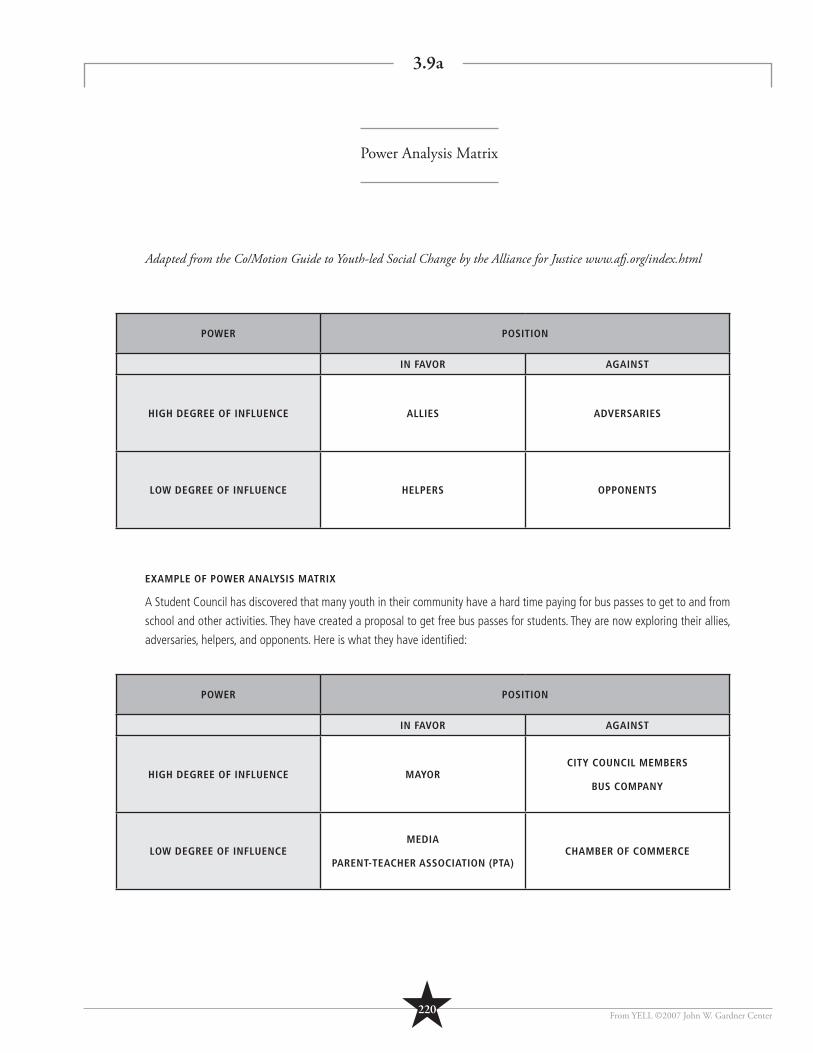
From YELL ©2007 John W. Gardner Center
POWER POSITION
IN FAVOR AGAINST
HIGH DEGREE OF INFLUENCE ALLIES ADVERSARIES
LOW DEGREE OF INFLUENCE HELPERS OPPONENTS
Adapted from the Co/Motion Guide to Youth-led Social Change by the Alliance for Justice www.afj .org/index.html
POWER POSITION
IN FAVOR AGAINST
HIGH DEGREE OF INFLUENCE MAYORCITY COUNCIL MEMBERS
BUS COMPANY
LOW DEGREE OF INFLUENCEMEDIA
PARENT-TEACHER ASSOCIATION (PTA)CHAMBER OF COMMERCE
EXAMPLE OF POWER ANALYSIS MATRIX
A Student Council has discovered that many youth in their community have a hard time paying for bus passes to get to and from
school and other activities. They have created a proposal to get free bus passes for students. They are now exploring their allies,
adversaries, helpers, and opponents. Here is what they have identifi ed:
3.9a
Power Analysis Matrix
★220

From YELL ©2007 John W. Gardner Center
STATION 1: OUR GROUP
1. What is the issue we are working on (our research topic)?
2. What is the cause(s) of the problem or issue?
3. What is our long-term goal or solution to the problem?
4. What do we hope to do or change as a result of our work?
3.9b
Station for Power Analysis Activity
★221
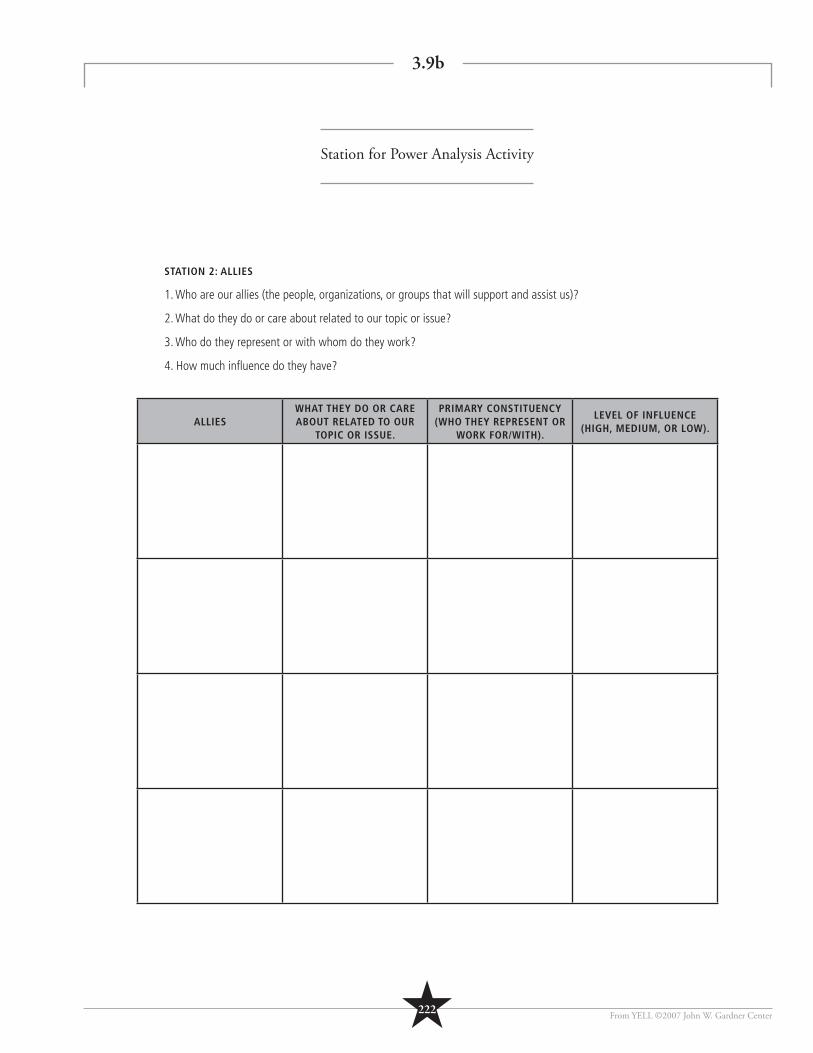
From YELL ©2007 John W. Gardner Center
STATION 2: ALLIES
1. Who are our allies (the people, organizations, or groups that will support and assist us)?
2. What do they do or care about related to our topic or issue?
3. Who do they represent or with whom do they work?
4. How much infl uence do they have?
ALLIESWHAT THEY DO OR CARE ABOUT RELATED TO OUR
TOPIC OR ISSUE.
PRIMARY CONSTITUENCY (WHO THEY REPRESENT OR
WORK FOR/WITH).
LEVEL OF INFLUENCE (HIGH, MEDIUM, OR LOW).
3.9b
Station for Power Analysis Activity
★222
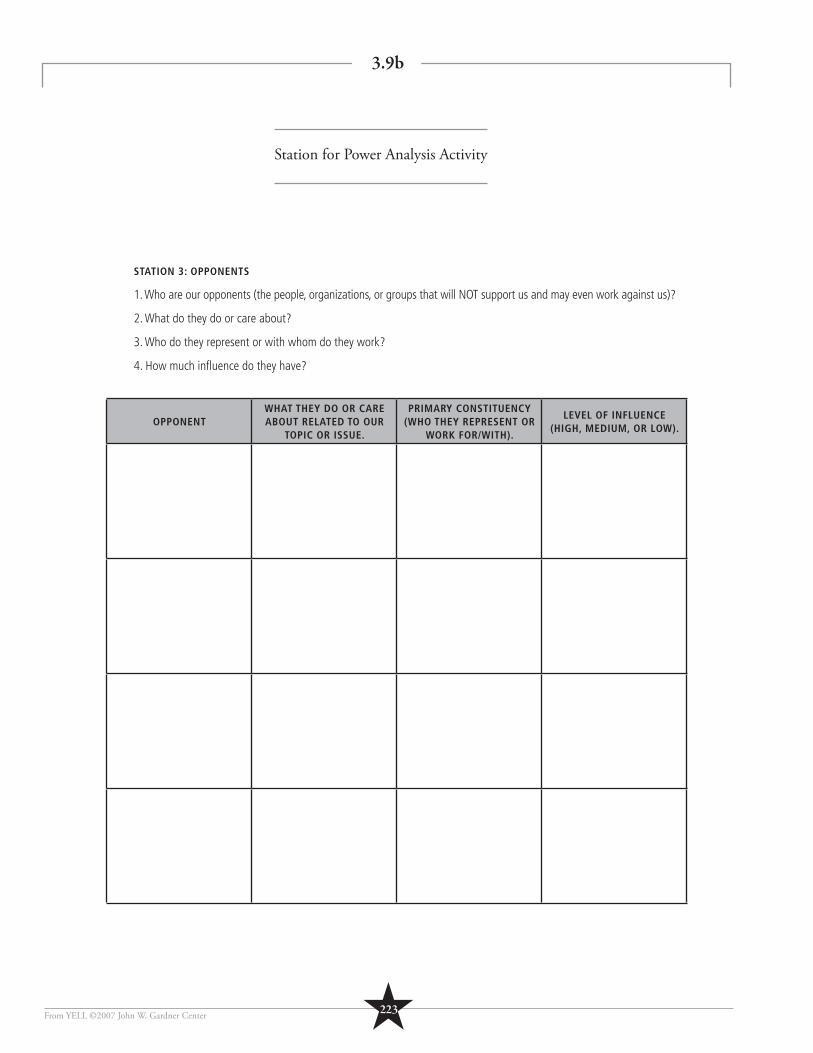
From YELL ©2007 John W. Gardner Center
STATION 3: OPPONENTS
1. Who are our opponents (the people, organizations, or groups that will NOT support us and may even work against us)?
2. What do they do or care about?
3. Who do they represent or with whom do they work?
4. How much infl uence do they have?
OPPONENTWHAT THEY DO OR CARE ABOUT RELATED TO OUR
TOPIC OR ISSUE.
PRIMARY CONSTITUENCY (WHO THEY REPRESENT OR
WORK FOR/WITH).
LEVEL OF INFLUENCE (HIGH, MEDIUM, OR LOW).
3.9b
Station for Power Analysis Activity
★223
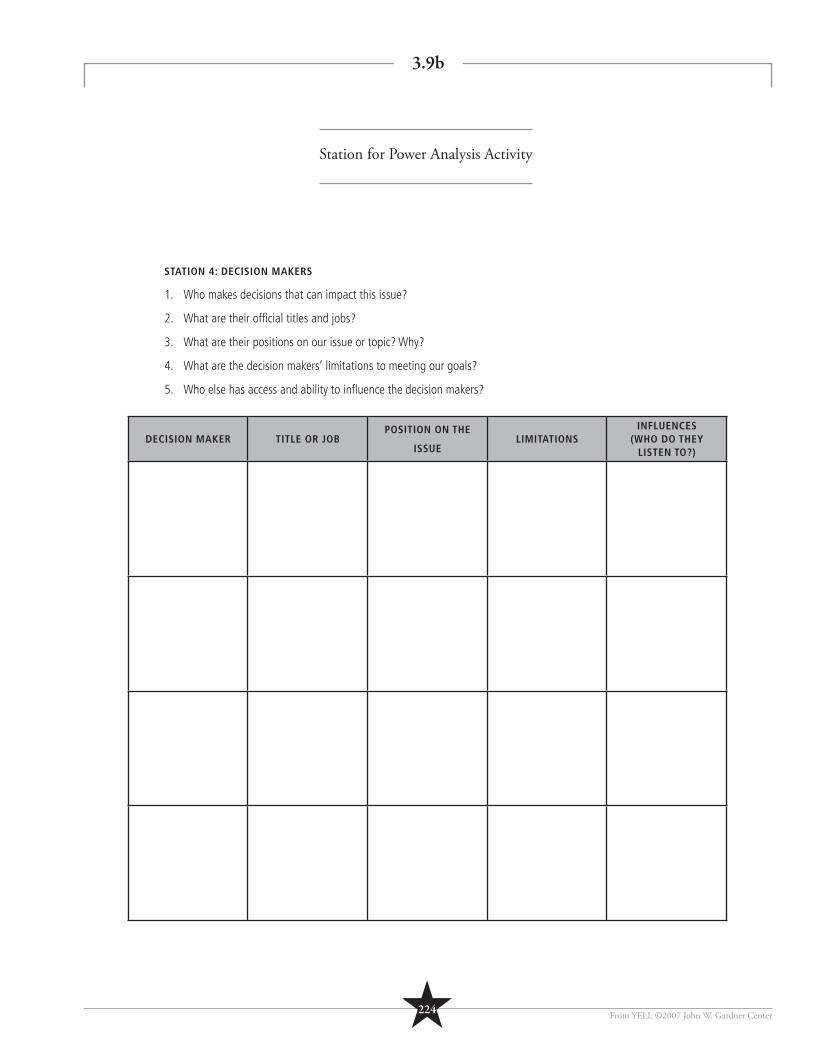
From YELL ©2007 John W. Gardner Center
STATION 4: DECISION MAKERS
1. Who makes decisions that can impact this issue?
2. What are their offi cial titles and jobs?
3. What are their positions on our issue or topic? Why?
4. What are the decision makers’ limitations to meeting our goals?
5. Who else has access and ability to infl uence the decision makers?
DECISION MAKER TITLE OR JOBPOSITION ON THE
ISSUELIMITATIONS
INFLUENCES (WHO DO THEY
LISTEN TO?)
3.9b
Station for Power Analysis Activity
★224
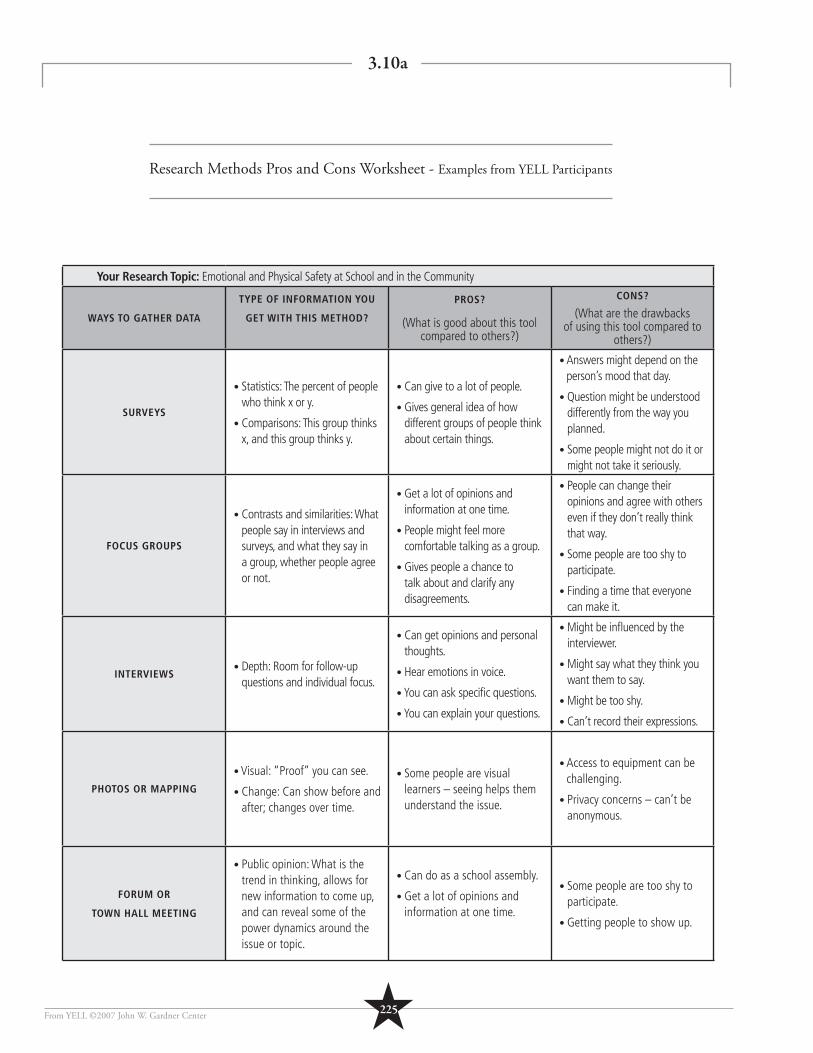
From YELL ©2007 John W. Gardner Center
Your Research Topic: Emotional and Physical Safety at School and in the Community
WAYS TO GATHER DATA
TYPE OF INFORMATION YOU
GET WITH THIS METHOD?
PROS?
(What is good about this tool compared to others?)
CONS?
(What are the drawbacks of using this tool compared to
others?)
SURVEYS
• Statistics: The percent of people who think x or y.
• Comparisons: This group thinks x, and this group thinks y.
• Can give to a lot of people.
• Gives general idea of how different groups of people think about certain things.
• Answers might depend on the person’s mood that day.
• Question might be understood differently from the way you planned.
• Some people might not do it or might not take it seriously.
FOCUS GROUPS
• Contrasts and similarities: What people say in interviews and surveys, and what they say in a group, whether people agree or not.
• Get a lot of opinions and information at one time.
• People might feel more comfortable talking as a group.
• Gives people a chance to talk about and clarify any disagreements.
• People can change their opinions and agree with others even if they don’t really think that way.
• Some people are too shy to participate.
• Finding a time that everyone can make it.
INTERVIEWS• Depth: Room for follow-up
questions and individual focus.
• Can get opinions and personal thoughts.
• Hear emotions in voice.
• You can ask specifi c questions.
• You can explain your questions.
• Might be infl uenced by the interviewer.
• Might say what they think you want them to say.
• Might be too shy.
• Can’t record their expressions.
PHOTOS OR MAPPING
• Visual: “Proof” you can see.
• Change: Can show before and after; changes over time.
• Some people are visual learners – seeing helps them understand the issue.
• Access to equipment can be challenging.
• Privacy concerns – can’t be anonymous.
FORUM OR
TOWN HALL MEETING
• Public opinion: What is the trend in thinking, allows for new information to come up, and can reveal some of the power dynamics around the issue or topic.
• Can do as a school assembly.
• Get a lot of opinions and information at one time.
• Some people are too shy to participate.
• Getting people to show up.
3.10a
Research Methods Pros and Cons Worksheet - Examples from YELL Participants
★225
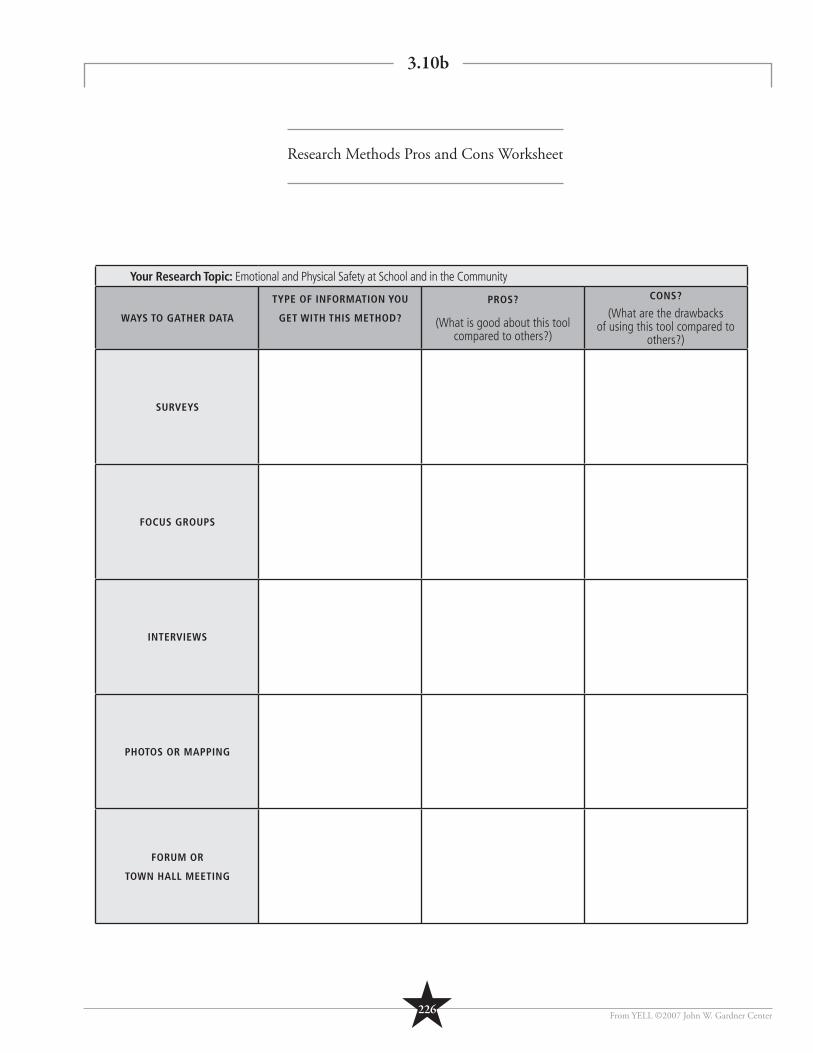
From YELL ©2007 John W. Gardner Center
Your Research Topic: Emotional and Physical Safety at School and in the Community
WAYS TO GATHER DATA
TYPE OF INFORMATION YOU
GET WITH THIS METHOD?
PROS?
(What is good about this tool compared to others?)
CONS?
(What are the drawbacks of using this tool compared to
others?)
SURVEYS
FOCUS GROUPS
INTERVIEWS
PHOTOS OR MAPPING
FORUM OR
TOWN HALL MEETING
3.10b
Research Methods Pros and Cons Worksheet
★226
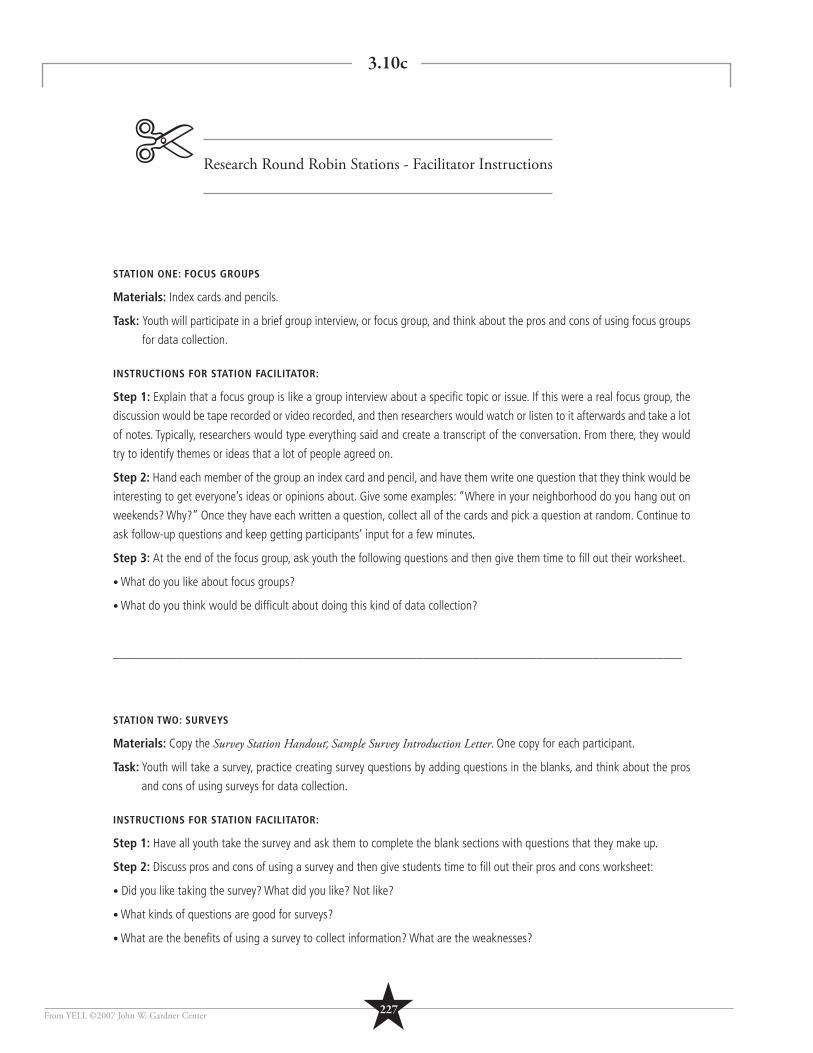
From YELL ©2007 John W. Gardner Center
STATION ONE: FOCUS GROUPS
Materials: Index cards and pencils.
Task: Youth will participate in a brief group interview, or focus group, and think about the pros and cons of using focus groups
for data collection.
INSTRUCTIONS FOR STATION FACILITATOR:
Step 1: Explain that a focus group is like a group interview about a specifi c topic or issue. If this were a real focus group, the
discussion would be tape recorded or video recorded, and then researchers would watch or listen to it afterwards and take a lot
of notes. Typically, researchers would type everything said and create a transcript of the conversation. From there, they would
try to identify themes or ideas that a lot of people agreed on.
Step 2: Hand each member of the group an index card and pencil, and have them write one question that they think would be
interesting to get everyone’s ideas or opinions about. Give some examples: “Where in your neighborhood do you hang out on
weekends? Why?” Once they have each written a question, collect all of the cards and pick a question at random. Continue to
ask follow-up questions and keep getting participants’ input for a few minutes.
Step 3: At the end of the focus group, ask youth the following questions and then give them time to fi ll out their worksheet.
• What do you like about focus groups?
• What do you think would be diffi cult about doing this kind of data collection?
__________________________________________________________________________________________
STATION TWO: SURVEYS
Materials: Copy the Survey Station Handout; Sample Survey Introduction Letter. One copy for each participant.
Task: Youth will take a survey, practice creating survey questions by adding questions in the blanks, and think about the pros
and cons of using surveys for data collection.
INSTRUCTIONS FOR STATION FACILITATOR:
Step 1: Have all youth take the survey and ask them to complete the blank sections with questions that they make up.
Step 2: Discuss pros and cons of using a survey and then give students time to fi ll out their pros and cons worksheet:
• Did you like taking the survey? What did you like? Not like?
• What kinds of questions are good for surveys?
• What are the benefi ts of using a survey to collect information? What are the weaknesses?
3.10c
Research Round Robin Stations - Facilitator Instructions✄
★227
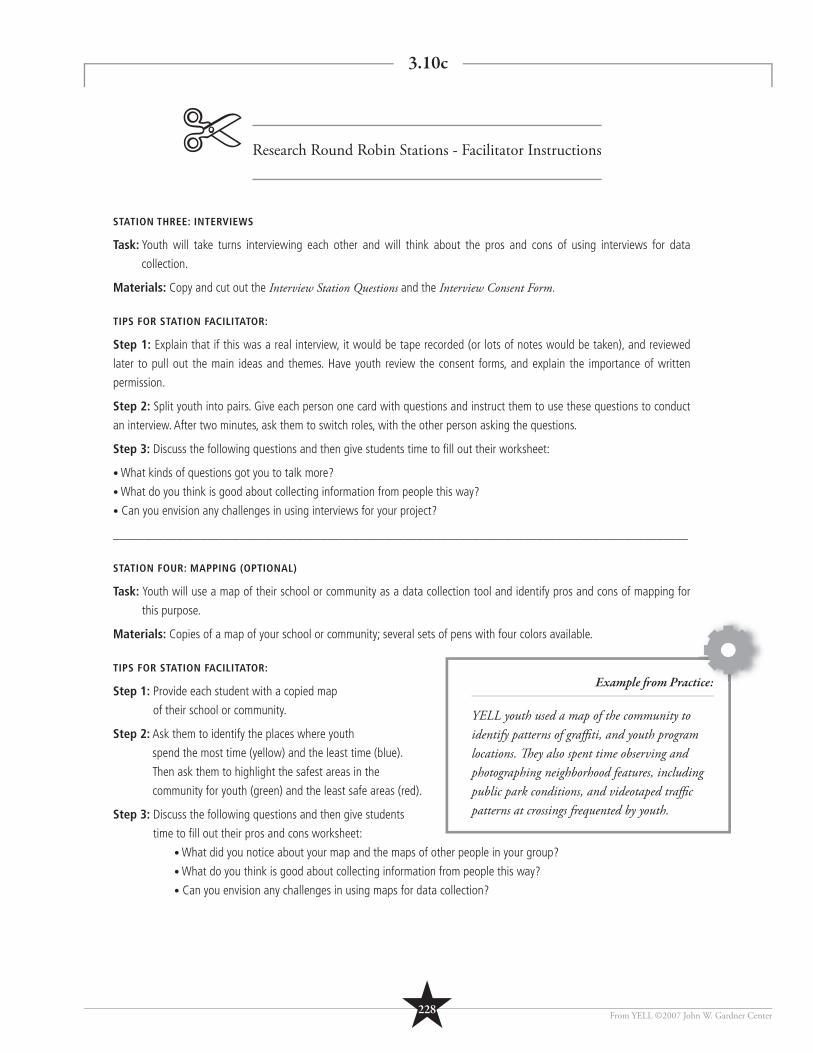
From YELL ©2007 John W. Gardner Center
STATION THREE: INTERVIEWS
Task: Youth will take turns interviewing each other and will think about the pros and cons of using interviews for data
collection.
Materials: Copy and cut out the Interview Station Questions and the Interview Consent Form.
TIPS FOR STATION FACILITATOR:
Step 1: Explain that if this was a real interview, it would be tape recorded (or lots of notes would be taken), and reviewed
later to pull out the main ideas and themes. Have youth review the consent forms, and explain the importance of written
permission.
Step 2: Split youth into pairs. Give each person one card with questions and instruct them to use these questions to conduct
an interview. After two minutes, ask them to switch roles, with the other person asking the questions.
Step 3: Discuss the following questions and then give students time to fi ll out their worksheet:
• What kinds of questions got you to talk more?
• What do you think is good about collecting information from people this way?
• Can you envision any challenges in using interviews for your project?
___________________________________________________________________________________________
STATION FOUR: MAPPING (OPTIONAL)
Task: Youth will use a map of their school or community as a data collection tool and identify pros and cons of mapping for
this purpose.
Materials: Copies of a map of your school or community; several sets of pens with four colors available.
TIPS FOR STATION FACILITATOR:
Step 1: Provide each student with a copied map
of their school or community.
Step 2: Ask them to identify the places where youth
spend the most time (yellow) and the least time (blue).
Then ask them to highlight the safest areas in the
community for youth (green) and the least safe areas (red).
Step 3: Discuss the following questions and then give students
time to fi ll out their pros and cons worksheet:
• What did you notice about your map and the maps of other people in your group?
• What do you think is good about collecting information from people this way?
• Can you envision any challenges in using maps for data collection?
Example fr om Practice:
YELL youth used a map of the community to identify patterns of graffi ti, and youth program locations. Th ey also spent time observing and photographing neighborhood features, including public park conditions, and videotaped traffi c patterns at crossings frequented by youth.
ice:
3.10c
✄ Research Round Robin Stations - Facilitator Instructions
★228
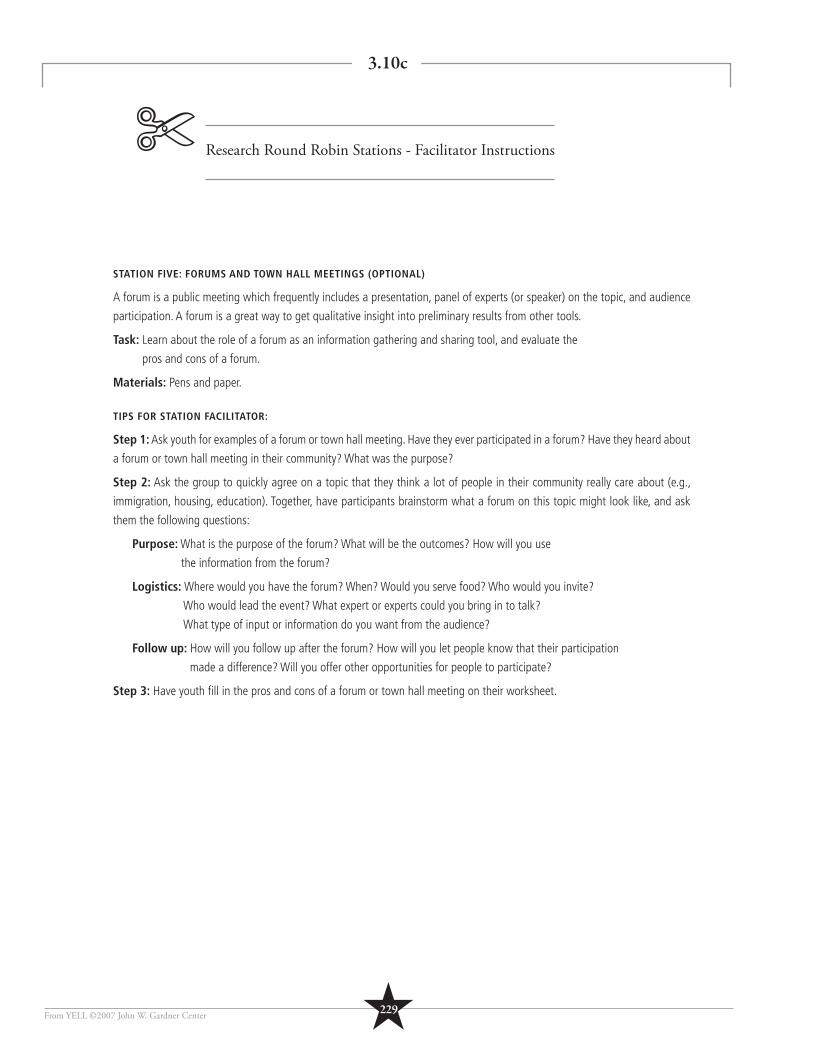
From YELL ©2007 John W. Gardner Center
STATION FIVE: FORUMS AND TOWN HALL MEETINGS (OPTIONAL)
A forum is a public meeting which frequently includes a presentation, panel of experts (or speaker) on the topic, and audience
participation. A forum is a great way to get qualitative insight into preliminary results from other tools.
Task: Learn about the role of a forum as an information gathering and sharing tool, and evaluate the
pros and cons of a forum.
Materials: Pens and paper.
TIPS FOR STATION FACILITATOR:
Step 1: Ask youth for examples of a forum or town hall meeting. Have they ever participated in a forum? Have they heard about
a forum or town hall meeting in their community? What was the purpose?
Step 2: Ask the group to quickly agree on a topic that they think a lot of people in their community really care about (e.g.,
immigration, housing, education). Together, have participants brainstorm what a forum on this topic might look like, and ask
them the following questions:
Purpose: What is the purpose of the forum? What will be the outcomes? How will you use
the information from the forum?
Logistics: Where would you have the forum? When? Would you serve food? Who would you invite?
Who would lead the event? What expert or experts could you bring in to talk?
What type of input or information do you want from the audience?
Follow up : How will you follow up after the forum? How will you let people know that their participation
made a difference? Will you offer other opportunities for people to participate?
Step 3: Have youth fi ll in the pros and cons of a forum or town hall meeting on their worksheet.
3.10c
Research Round Robin Stations - Facilitator Instructions✄
★229
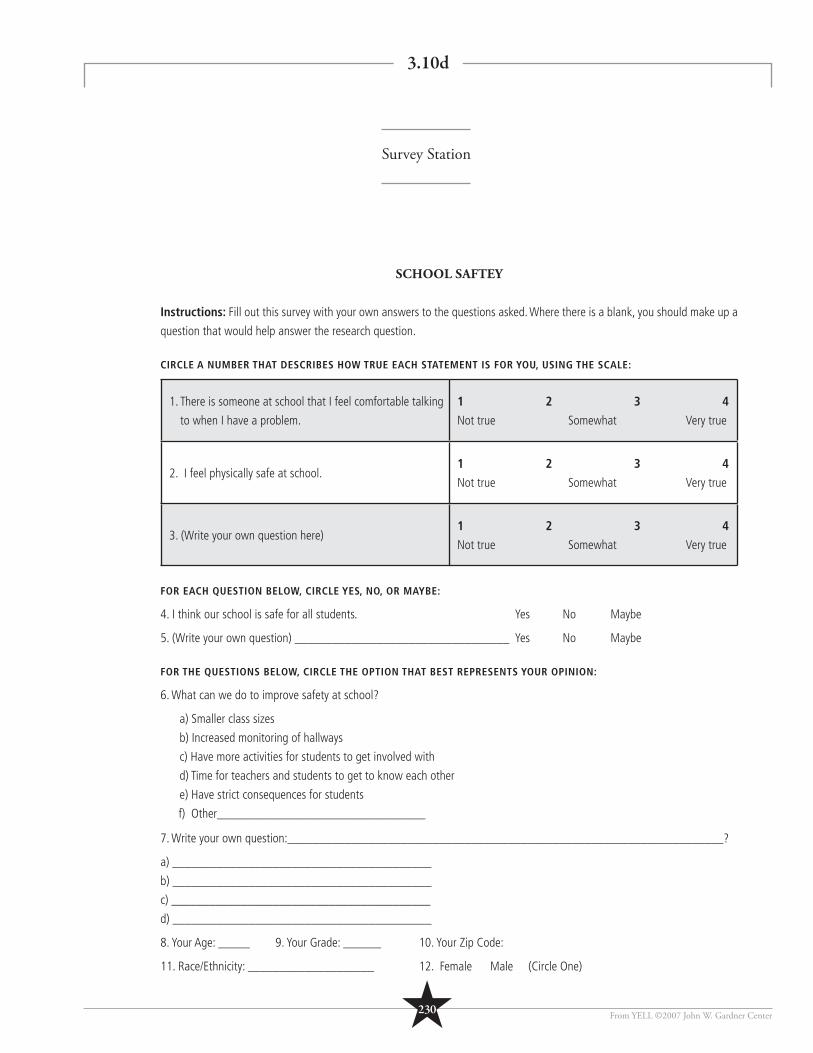
From YELL ©2007 John W. Gardner Center
SCHOOL SAFTEY
Instructions: Fill out this survey with your own answers to the questions asked. Where there is a blank, you should make up a
question that would help answer the research question.
CIRCLE A NUMBER THAT DESCRIBES HOW TRUE EACH STATEMENT IS FOR YOU, USING THE SCALE:
1. There is someone at school that I feel comfortable talking
to when I have a problem.
1 2 3 4
Not true Somewhat Very true
2. I feel physically safe at school. 1 2 3 4
Not true Somewhat Very true
3. (Write your own question here)1 2 3 4
Not true Somewhat Very true
FOR EACH QUESTION BELOW, CIRCLE YES, NO, OR MAYBE:
4. I think our school is safe for all students. Yes No Maybe
5. (Write your own question) __________________________________ Yes No Maybe
FOR THE QUESTIONS BELOW, CIRCLE THE OPTION THAT BEST REPRESENTS YOUR OPINION:
6. What can we do to improve safety at school?
a) Smaller class sizes
b) Increased monitoring of hallways
c) Have more activities for students to get involved with
d) Time for teachers and students to get to know each other
e) Have strict consequences for students
f) Other_________________________________
7. Write your own question:_____________________________________________________________________?
a) _________________________________________
b) _________________________________________
c) _________________________________________
d) _________________________________________
8. Your Age: _____ 9. Your Grade: ______ 10. Your Zip Code:
11. Race/Ethnicity: ____________________ 12. Female Male (Circle One)
3.10d
Survey Station
★230
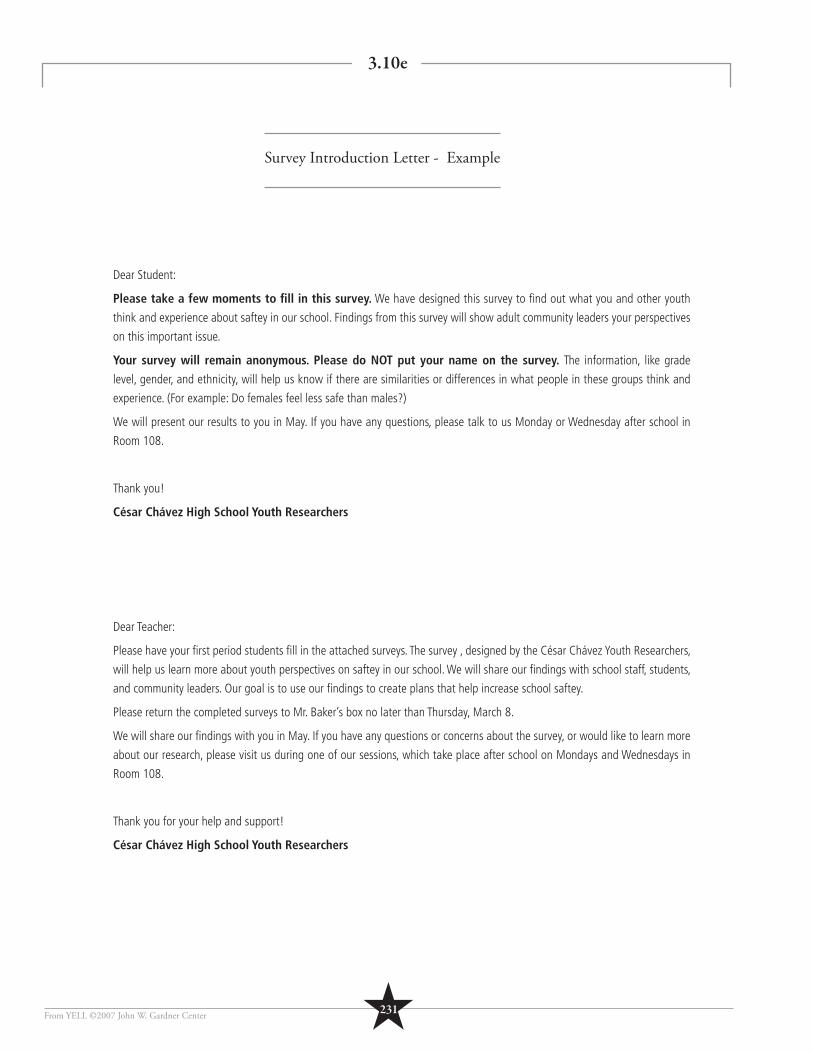
From YELL ©2007 John W. Gardner Center
Dear Student:
Please take a few moments to fi ll in this survey. We have designed this survey to fi nd out what you and other youth
think and experience about saftey in our school. Findings from this survey will show adult community leaders your perspectives
on this important issue.
Your survey will remain anonymous. Please do NOT put your name on the survey. The information, like grade
level, gender, and ethnicity, will help us know if there are similarities or differences in what people in these groups think and
experience. (For example: Do females feel less safe than males?)
We will present our results to you in May. If you have any questions, please talk to us Monday or Wednesday after school in
Room 108.
Thank you!
César Chávez High School Youth Researchers
Dear Teacher:
Please have your fi rst period students fi ll in the attached surveys. The survey , designed by the César Chávez Youth Researchers,
will help us learn more about youth perspectives on saftey in our school. We will share our fi ndings with school staff, students,
and community leaders. Our goal is to use our fi ndings to create plans that help increase school saftey.
Please return the completed surveys to Mr. Baker’s box no later than Thursday, March 8.
We will share our fi ndings with you in May. If you have any questions or concerns about the survey, or would like to learn more
about our research, please visit us during one of our sessions, which take place after school on Mondays and Wednesdays in
Room 108.
Thank you for your help and support!
César Chávez High School Youth Researchers
3.10e
Survey Introduction Letter - Example
★231
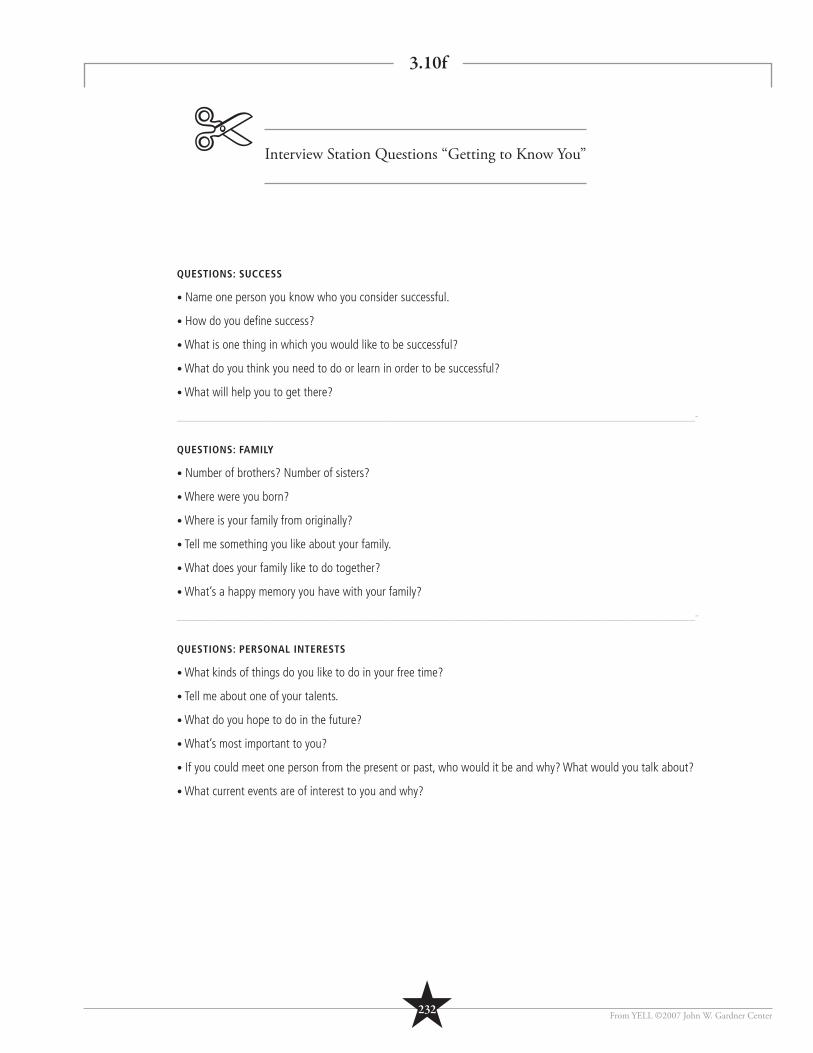
From YELL ©2007 John W. Gardner Center
QUESTIONS: SUCCESS
• Name one person you know who you consider successful.
• How do you defi ne success?
• What is one thing in which you would like to be successful?
• What do you think you need to do or learn in order to be successful?
• What will help you to get there?
__________________________________________________________________________________-
QUESTIONS: FAMILY
• Number of brothers? Number of sisters?
• Where were you born?
• Where is your family from originally?
• Tell me something you like about your family.
• What does your family like to do together?
• What’s a happy memory you have with your family?
__________________________________________________________________________________-
QUESTIONS: PERSONAL INTERESTS
• What kinds of things do you like to do in your free time?
• Tell me about one of your talents.
• What do you hope to do in the future?
• What’s most important to you?
• If you could meet one person from the present or past, who would it be and why? What would you talk about?
• What current events are of interest to you and why?
3.10f
Interview Station Questions “Getting to Know You”✄
★232
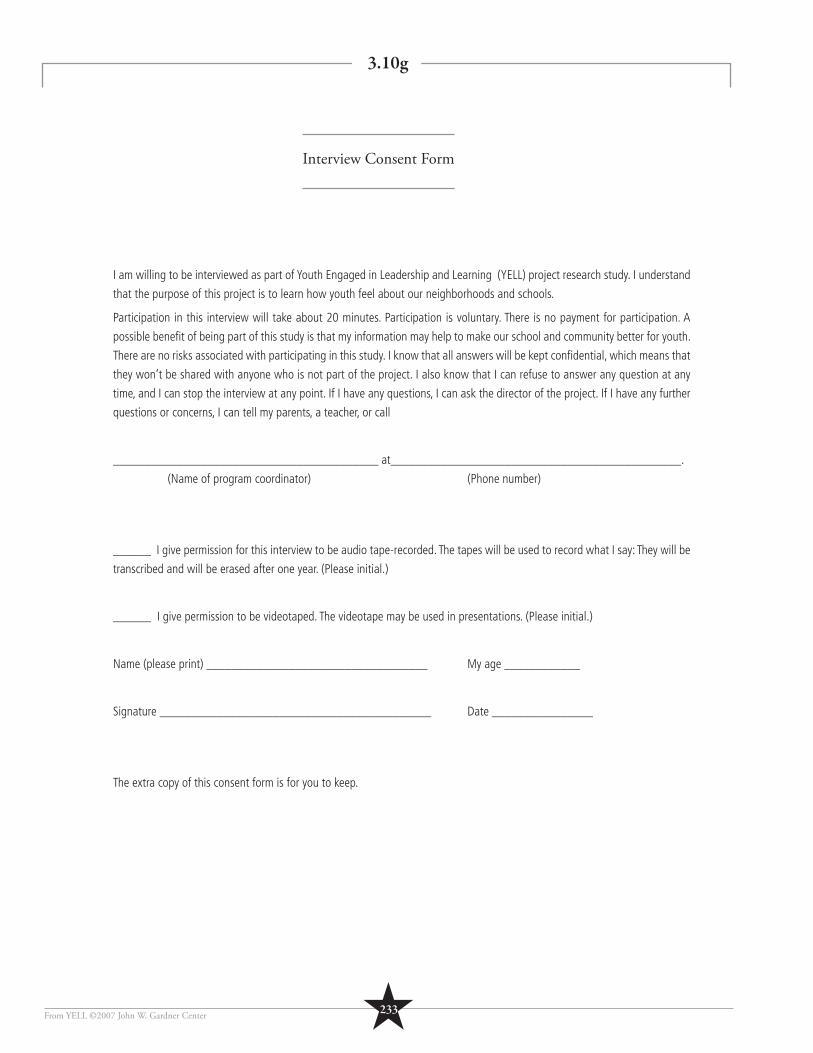
From YELL ©2007 John W. Gardner Center
I am willing to be interviewed as part of Youth Engaged in Leadership and Learning (YELL) project research study. I understand
that the purpose of this project is to learn how youth feel about our neighborhoods and schools.
Participation in this interview will take about 20 minutes. Participation is voluntary. There is no payment for participation. A
possible benefi t of being part of this study is that my information may help to make our school and community better for youth.
There are no risks associated with participating in this study. I know that all answers will be kept confi dential, which means that
they won’t be shared with anyone who is not part of the project. I also know that I can refuse to answer any question at any
time, and I can stop the interview at any point. If I have any questions, I can ask the director of the project. If I have any further
questions or concerns, I can tell my parents, a teacher, or call
__________________________________________ at______________________________________________.
(Name of program coordinator) (Phone number)
______ I give permission for this interview to be audio tape-recorded. The tapes will be used to record what I say: They will be
transcribed and will be erased after one year. (Please initial.)
______ I give permission to be videotaped. The videotape may be used in presentations. (Please initial.)
Name (please print) ___________________________________ My age ___________ _
Signature ___________________________________________ Date ________________
The extra copy of this consent form is for you to keep.
3.10g
Interview Consent Form
★233
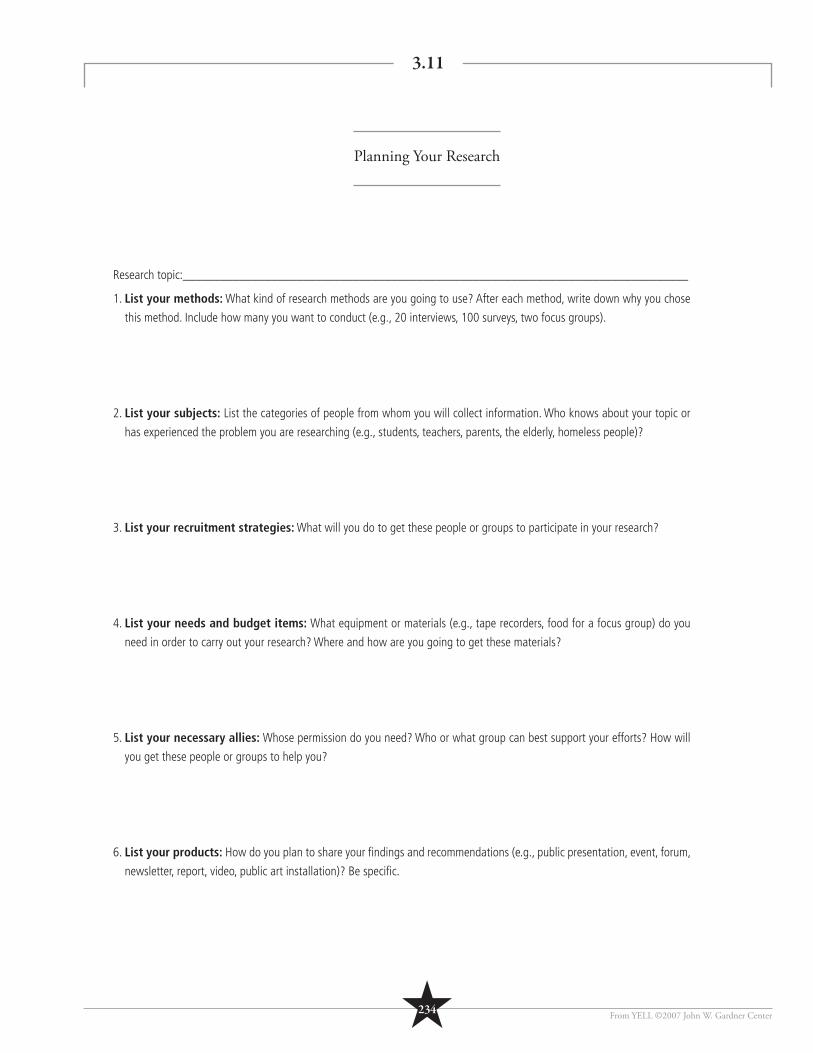
From YELL ©2007 John W. Gardner Center
Research topic:________________________________________________________________________________
1. List your methods: What kind of research methods are you going to use? After each method, write down why you chose
this method. Include how many you want to conduct (e.g., 20 interviews, 100 surveys, two focus groups).
2. List your subjects: List the categories of people from whom you will collect information. Who knows about your topic or
has experienced the problem you are researching (e.g., students, teachers, parents, the elderly, homeless people)?
3. List your recruitment strategies: What will you do to get these people or groups to participate in your research?
4. List your needs and budget items: What equipment or materials (e.g., tape recorders, food for a focus group) do you
need in order to carry out your research? Where and how are you going to get these materials?
5. List your necessary allies: Whose permission do you need? Who or what group can best support your efforts? How will
you get these people or groups to help you?
6. List your products: How do you plan to share your fi ndings and recommendations (e.g., public presentation, event, forum,
newsletter, report, video, public art installation)? Be specifi c.
3.11
Planning Your Research
★234

From YELL ©2007 John W. Gardner Center
TOPIC PROGRAMS AND ACTIVITIES FOR YOUTH IN AFTER-SCHOOL HOURS
Vision and MissionOur vision is a community where all youth have access to supportive, fun, and engaging activities in out-of-school hours. Our mission is to increase understanding of what youth want and need in out-of-school and after-school activities and resources.
Project Goals• Inform adult decision makers and program leaders of what youth want and need in after-school and out-
of-school activities and resources.• Find out if youth know about and use the activities and resources that already exist – and why or why not.
Main Questions
• What do youth think about the programs, activities, and resources that are offered to teens in our com-munity? Are there enough? Are they accessible to all teens?
• What activities or resources would youth like to have more of or of better quality? • Where and how do teens prefer to get information about activities and resources available?
WHAT BY WHEN PEOPLE RESPONSIBLE DETAILS/DESCRIPTION
Meet with school principal January 20 Project staff leader, Jesse, Loretta
Inform her of the work we are doing and get on agenda for the February all-school staff meeting
Ask if she will help to encourage teachers to participate and get involved
Ask if there is anything that she is curious about or interested in (related to our topic)
Create survey March 1 Whole YELL group (in session) Come up with questions for a two-page survey and revise in sessions
Create interview protocol March 4 Whole YELL group (in session) Come up with interview questions and revise in session
Pilot survey March 10 Survey team (Ali lead)10 students during lunch – (provide pizza) – get feedback and see how long it takes to complete
Pilot and revise interview questions March 10 Whole group (Jesse lead)
In session and with at least two people each outside of session – revise questions
Meet with District Superin-tendent March 15
Project staff leader, Jesse, Loretta (leads), all welcome
Let him know what our group is doing and why we think it is important. Ask who he thinks would be interested in learning more and how our fi nd-ings might be useful to the district.
Administer surveys March 20 Survey team (Zac lead)
Survey administered to 350 students
Teachers administer the survey fi rst period
Schedule student assembly and get prinicipal approval to be on staff agenda
Complete interviews March 20 Interview team (Anahi lead)Interview at least 35 7th- and 8th-grade students
During lunch and after school – weekends can interview friends.
Tabulate answers and analyze April 5
Survey team (Sandra lead in session)
Create graphs and outline with key fi ndings
Transcribe interviews April 5 Interview team (Becky lead)In sessions, with adult support (or take detailed/organized notes during interviews)
Code answers and analyze April 7 Interview team (in session) In sessions and one extra after-school work session
Final report May 24 Whole group – sections assigned Include process, fi ndings, and recommendations – send to stakeholders
Student forum May 26 Facilitator TBD – Whole team Student assembly – get approval and schedule with administration by March 22
School staff presentation June 3 Speakers TBD – whole team Agenda item in regular staff meeting – get principal approval by March 22
City Parks and Recreation TBD TBDSend a letter to director and assistant directors of youth programs by March 22 – requesting a time/date for meeting
Plan next steps June 5 Team TBD Bring together a focus group of key stake holders to decide on next steps
3.12a
Project Timeline - Example
★235
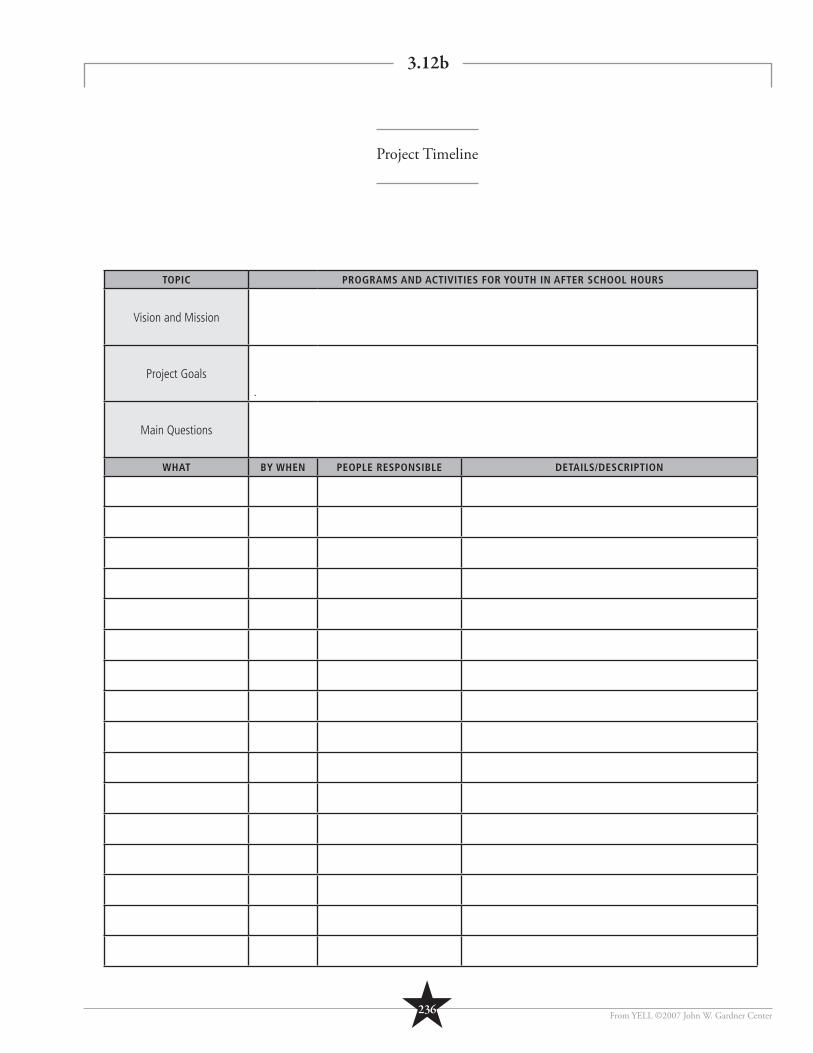
From YELL ©2007 John W. Gardner Center
TOPIC PROGRAMS AND ACTIVITIES FOR YOUTH IN AFTER SCHOOL HOURS
Vision and Mission
Project Goals.
Main Questions
WHAT BY WHEN PEOPLE RESPONSIBLE DETAILS/DESCRIPTION
3.12b
Project Timeline
★236
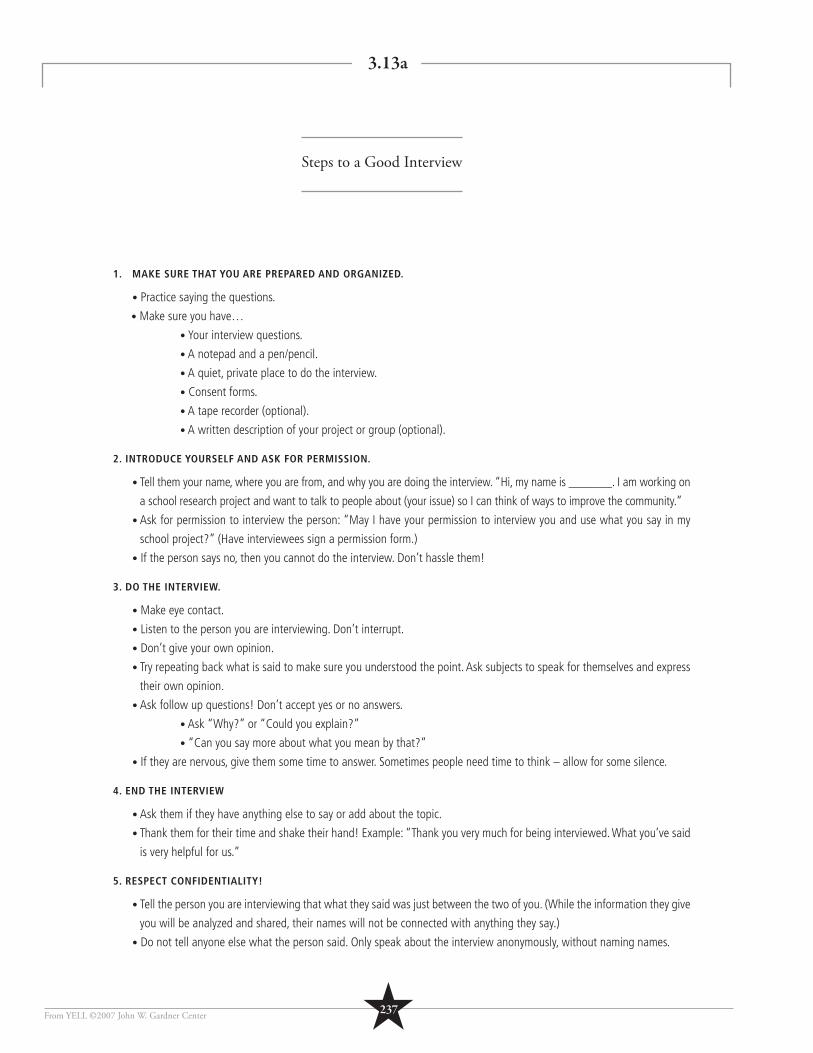
From YELL ©2007 John W. Gardner Center
1. MAKE SURE THAT YOU ARE PREPARED AND ORGANIZED.
• Practice saying the questions.
• Make sure you have…
• Your interview questions.
• A notepad and a pen/pencil.
• A quiet, private place to do the interview.
• Consent forms.
• A tape recorder (optional).
• A written description of your project or group (optional).
2. INTRODUCE YOURSELF AND ASK FOR PERMISSION.
• Tell them your name, where you are from, and why you are doing the interview. “Hi, my name is _______. I am working on
a school research project and want to talk to people about (your issue) so I can think of ways to improve the community.”
• Ask for permission to interview the person: “May I have your permission to interview you and use what you say in my
school project?” (Have interviewees sign a permission form.)
• If the person says no, then you cannot do the interview. Don’t hassle them!
3. DO THE INTERVIEW.
• Make eye contact.
• Listen to the person you are interviewing. Don’t interrupt.
• Don’t give your own opinion.
• Try repeating back what is said to make sure you understood the point. Ask subjects to speak for themselves and express
their own opinion.
• Ask follow up questions! Don’t accept yes or no answers.
• Ask “Why?” or “Could you explain?”
• “Can you say more about what you mean by that?”
• If they are nervous, give them some time to answer. Sometimes people need time to think – allow for some silence.
4. END THE INTERVIEW
• Ask them if they have anything else to say or add about the topic.
• Thank them for their time and shake their hand! Example: “Thank you very much for being interviewed. What you’ve said
is very helpful for us.”
5. RESPECT CONFIDENTIALITY!
• Tell the person you are interviewing that what they said was just between the two of you. (While the information they give
you will be analyzed and shared, their names will not be connected with anything they say.)
• Do not tell anyone else what the person said. Only speak about the interview anonymously, without naming names.
3.13a
Steps to a Good Interview
★237
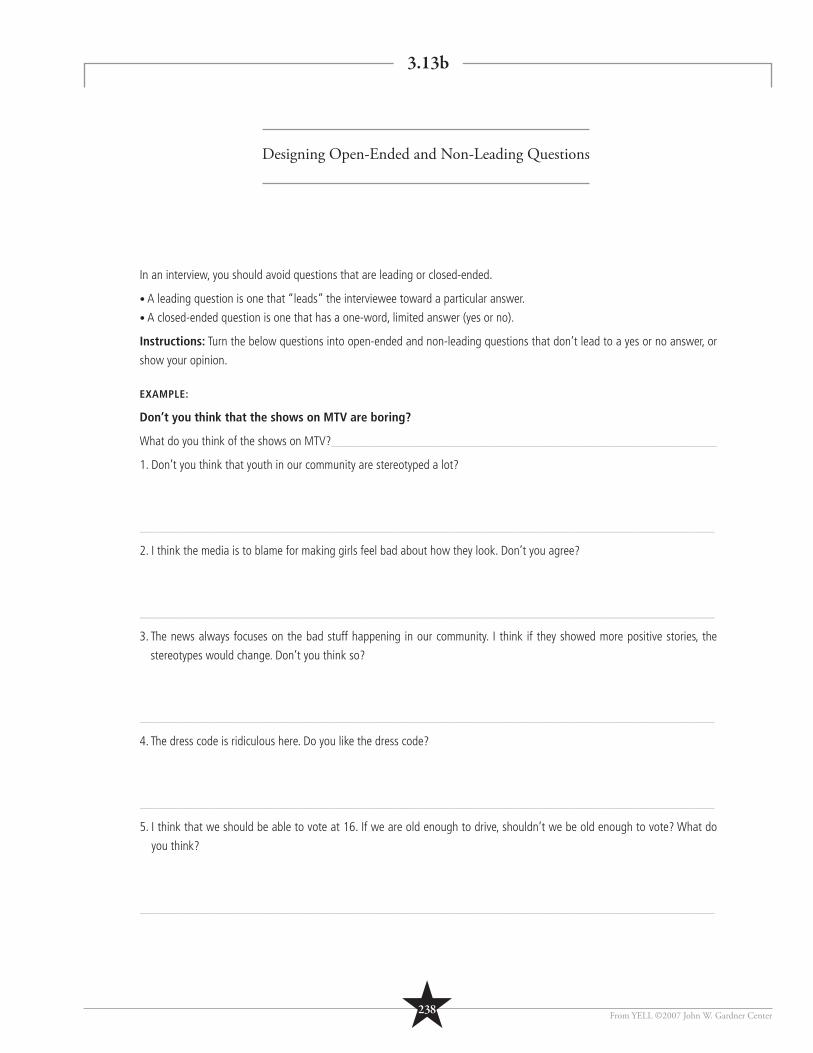
★238 From YELL ©2007 John W. Gardner Center
In an interview, you should avoid questions that are leading or closed-ended.
• A leading question is one that “leads” the interviewee toward a particular answer.
• A closed-ended question is one that has a one-word, limited answer (yes or no).
Instructions: Turn the below questions into open-ended and non-leading questions that don’t lead to a yes or no answer, or
show your opinion.
EXAMPLE:
Don’t you think that the shows on MTV are boring?
What do you think of the shows on MTV?_____________________________________________________________
1. Don’t you think that youth in our community are stereotyped a lot?
___________________________________________________________________________________________
2. I think the media is to blame for making girls feel bad about how they look. Don’t you agree?
___________________________________________________________________________________________
3. The news always focuses on the bad stuff happening in our community. I think if they showed more positive stories, the
stereotypes would change. Don’t you think so?
___________________________________________________________________________________________
4. The dress code is ridiculous here. Do you like the dress code?
___________________________________________________________________________________________
5. I think that we should be able to vote at 16. If we are old enough to drive, shouldn’t we be old enough to vote? What do
you think?
___________________________________________________________________________________________
3.13b
Designing Open-Ended and Non-Leading Questions
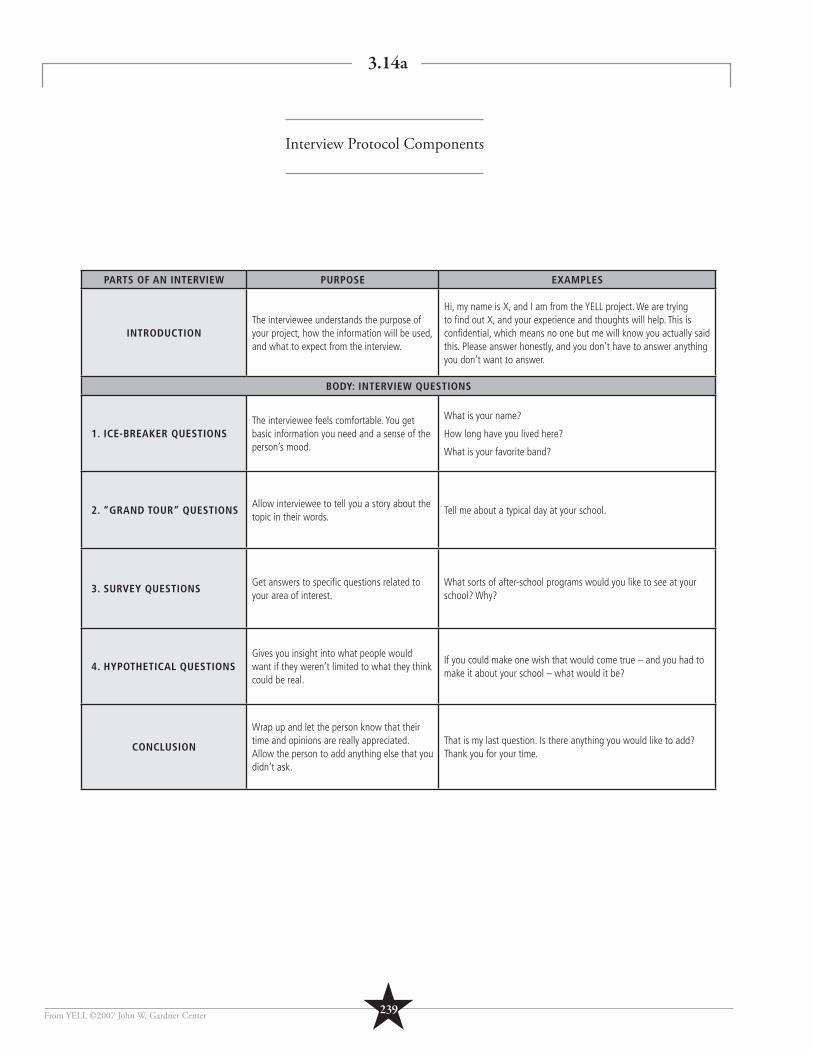
From YELL ©2007 John W. Gardner Center ★239
PARTS OF AN INTERVIEW PURPOSE EXAMPLES
INTRODUCTIONThe interviewee understands the purpose of your project, how the information will be used, and what to expect from the interview.
Hi, my name is X, and I am from the YELL project. We are trying to fi nd out X, and your experience and thoughts will help. This is confi dential, which means no one but me will know you actually said this. Please answer honestly, and you don’t have to answer anything you don’t want to answer.
BODY: INTERVIEW QUESTIONS
1. ICE-BREAKER QUESTIONSThe interviewee feels comfortable. You get basic information you need and a sense of the person’s mood.
What is your name?
How long have you lived here?
What is your favorite band?
2. “GRAND TOUR” QUESTIONSAllow interviewee to tell you a story about the topic in their words.
Tell me about a typical day at your school.
3. SURVEY QUESTIONSGet answers to specifi c questions related to your area of interest.
What sorts of after-school programs would you like to see at your school? Why?
4. HYPOTHETICAL QUESTIONSGives you insight into what people would want if they weren’t limited to what they think could be real.
If you could make one wish that would come true – and you had to make it about your school – what would it be?
CONCLUSION
Wrap up and let the person know that their time and opinions are really appreciated. Allow the person to add anything else that you didn’t ask.
That is my last question. Is there anything you would like to add? Thank you for your time.
3.14a
Interview Protocol Components
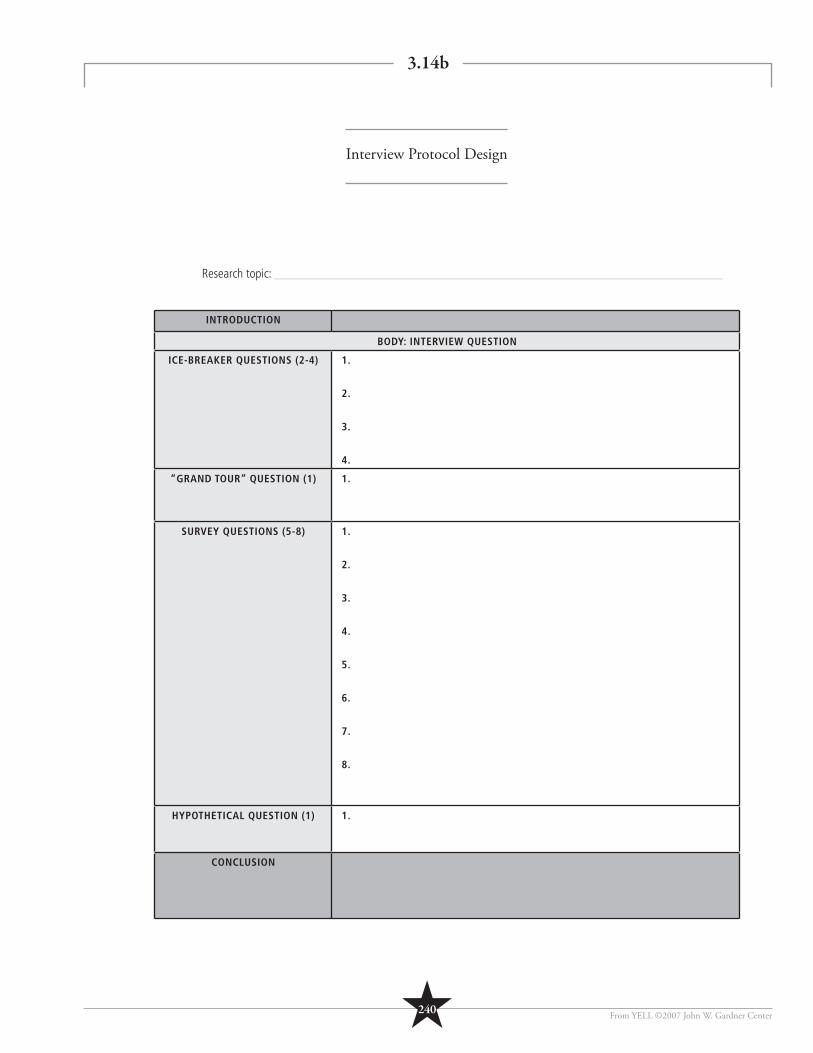
From YELL ©2007 John W. Gardner Center★240
INTRODUCTION
BODY: INTERVIEW QUESTION
ICE-BREAKER QUESTIONS (2-4) 1.
2.
3.
4.
“GRAND TOUR” QUESTION (1) 1.
SURVEY QUESTIONS (5-8) 1.
2.
3.
4.
5.
6.
7.
8.
HYPOTHETICAL QUESTION (1) 1.
CONCLUSION
Research topic: _______________________________________________________________________
3.14b
Interview Protocol Design
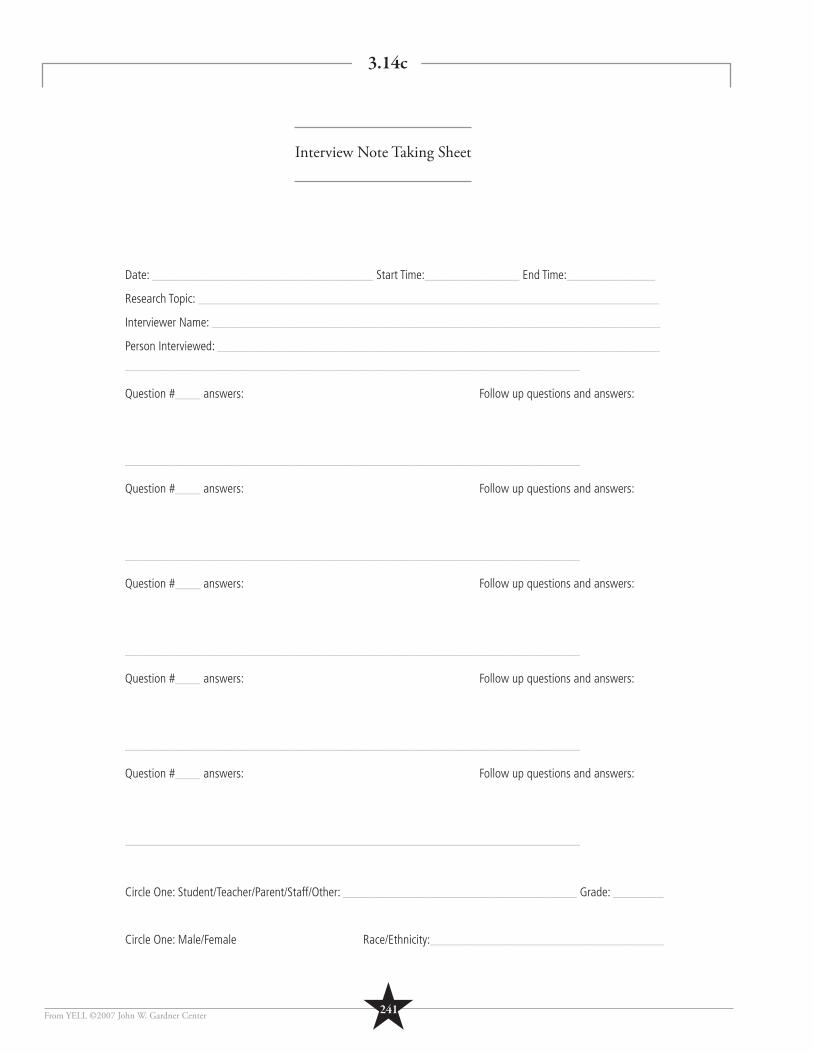
★241From YELL ©2007 John W. Gardner Center
Date: ___________________________________ Start Time:_______________ End Time:______________
Research Topic: _________________________________________________________________________
Interviewer Name: _______________________________________________________________________
Person Interviewed: ______________________________________________________________________
––––––––––––––––––––––––––––––––––––––––––––––––––––––––––––––––––––––––
Question #____ answers: Follow up questions and answers:
––––––––––––––––––––––––––––––––––––––––––––––––––––––––––––––––––––––––
Question #____ answers: Follow up questions and answers:
––––––––––––––––––––––––––––––––––––––––––––––––––––––––––––––––––––––––
Question #____ answers: Follow up questions and answers:
––––––––––––––––––––––––––––––––––––––––––––––––––––––––––––––––––––––––
Question #____ answers: Follow up questions and answers:
––––––––––––––––––––––––––––––––––––––––––––––––––––––––––––––––––––––––
Question #____ answers: Follow up questions and answers:
––––––––––––––––––––––––––––––––––––––––––––––––––––––––––––––––––––––––
Circle One: Student/Teacher/Parent/Staff/Other: _____________________________________ Grade: ________
Circle One: Male/Female Race/Ethnicity:_____________________________________
3.14c
Interview Note Taking Sheet
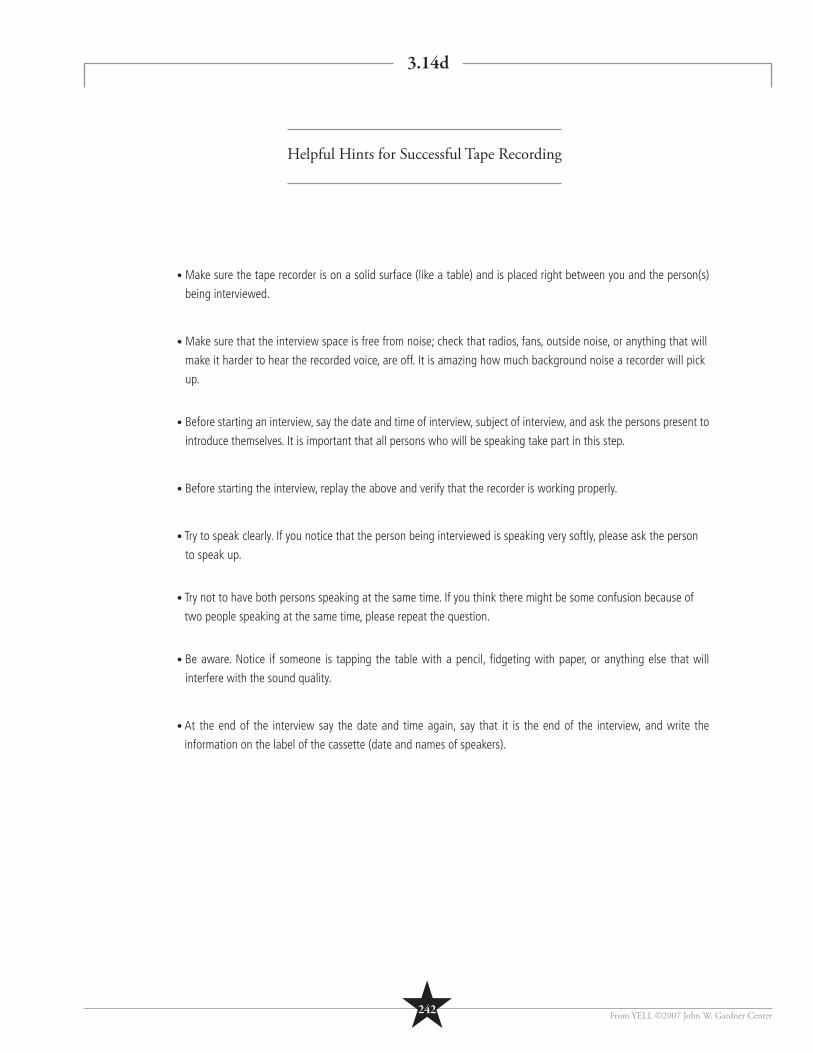
From YELL ©2007 John W. Gardner Center★242
• Make sure the tape recorder is on a solid surface (like a table) and is placed right between you and the person(s)
being interviewed.
• Make sure that the interview space is free from noise; check that radios, fans, outside noise, or anything that will
make it harder to hear the recorded voice, are off. It is amazing how much background noise a recorder will pick
up.
• Before starting an interview, say the date and time of interview, subject of interview, and ask the persons present to
introduce themselves. It is important that all persons who will be speaking take part in this step.
• Before starting the interview, replay the above and verify that the recorder is working properly.
• Try to speak clearly. If you notice that the person being interviewed is speaking very softly, please ask the person
to speak up.
• Try not to have both persons speaking at the same time. If you think there might be some confusion because of
two people speaking at the same time, please repeat the question.
• Be aware. Notice if someone is tapping the table with a pencil, fi dgeting with paper, or anything else that will
interfere with the sound quality.
• At the end of the interview say the date and time again, say that it is the end of the interview, and write the
information on the label of the cassette (date and names of speakers).
3.14d
Helpful Hints for Successful Tape Recording

★243From YELL ©2007 John W. Gardner Center
• Set group agreements up front.
• Keep the discussion moving and on topic.
• Ensure that participants feel safe and respected.
• Encourage people to have different ideas.
• Make sure every participant has an opportunity to speak and to listen.
• Include a co-facilitator who takes notes, manages the audiotape, and helps with focus group
logistics.
• Stay neutral! Avoid reinforcing one point of view over another.
• Help people expand on their comments by asking follow-up questions like,
“Can you give an example of what you mean?” or “Can you say more about that?”
• Use body language that shows you are interested in what people are saying.
• Allow participants time to write down their responses so it gives them time to think.
• Set up a group dynamic. If people are talking too much to you and not to the group,
tell them you are going to leave the room for a few minutes to let them talk about
a particular issue and when you return you want to know what they came up with together.
• Allow for silence. Pause before changing topics or asking follow-up questions.
This is the time that people who are hesitating may jump into the discussion.
3.16a
Focus Group Facilitator Roles and Responsibilities
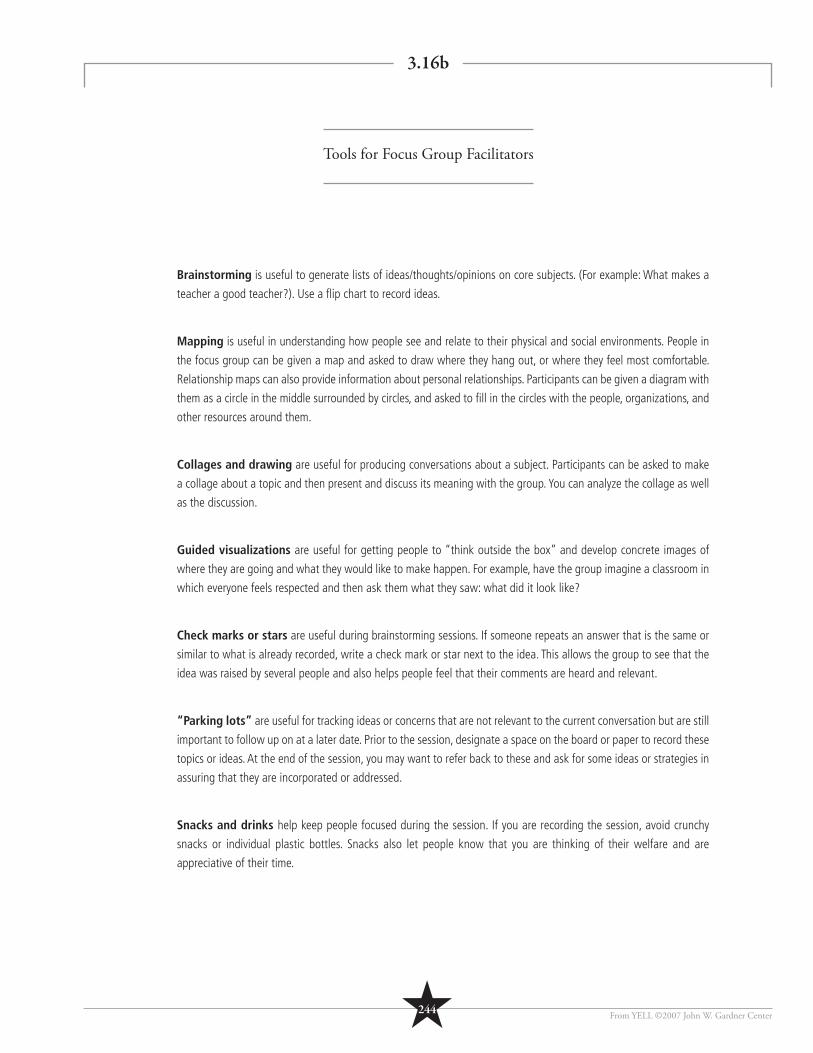
From YELL ©2007 John W. Gardner Center★244
Brainstorming is useful to generate lists of ideas/thoughts/opinions on core subjects. (For example: What makes a
teacher a good teacher?). Use a fl ip chart to record ideas.
Mapping is useful in understanding how people see and relate to their physical and social environments. People in
the focus group can be given a map and asked to draw where they hang out, or where they feel most comfortable.
Relationship maps can also provide information about personal relationships. Participants can be given a diagram with
them as a circle in the middle surrounded by circles, and asked to fi ll in the circles with the people, organizations, and
other resources around them.
Collages and drawing are useful for producing conversations about a subject. Participants can be asked to make
a collage about a topic and then present and discuss its meaning with the group. You can analyze the collage as well
as the discussion.
Guided visualizations are useful for getting people to “think outside the box” and develop concrete images of
where they are going and what they would like to make happen. For example, have the group imagine a classroom in
which everyone feels respected and then ask them what they saw: what did it look like?
Check marks or stars are useful during brainstorming sessions. If someone repeats an answer that is the same or
similar to what is already recorded, write a check mark or star next to the idea. This allows the group to see that the
idea was raised by several people and also helps people feel that their comments are heard and relevant.
“Parking lots” are useful for tracking ideas or concerns that are not relevant to the current conversation but are still
important to follow up on at a later date. Prior to the session, designate a space on the board or paper to record these
topics or ideas. At the end of the session, you may want to refer back to these and ask for some ideas or strategies in
assuring that they are incorporated or addressed.
Snacks and drinks help keep people focused during the session. If you are recording the session, avoid crunchy
snacks or individual plastic bottles. Snacks also let people know that you are thinking of their welfare and are
appreciative of their time.
3.16b
Tools for Focus Group Facilitators
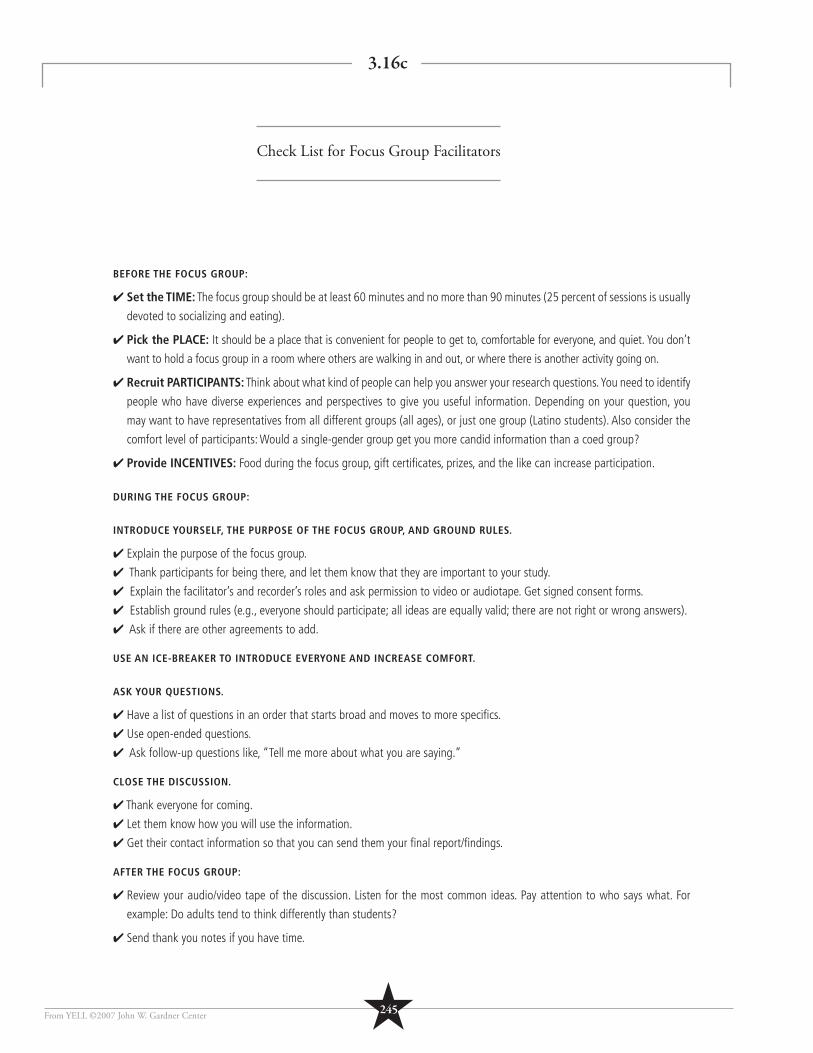
★245From YELL ©2007 John W. Gardner Center
BEFORE THE FOCUS GROUP:
✔ Set the TIME: The focus group should be at least 60 minutes and no more than 90 minutes (25 percent of sessions is usually
devoted to socializing and eating).
✔ Pick the PLACE: It should be a place that is convenient for people to get to, comfortable for everyone, and quiet. You don’t
want to hold a focus group in a room where others are walking in and out, or where there is another activity going on.
✔ Recruit PARTICIPANTS: Think about what kind of people can help you answer your research questions. You need to identify
people who have diverse experiences and perspectives to give you useful information. Depending on your question, you
may want to have representatives from all different groups (all ages), or just one group (Latino students). Also consider the
comfort level of participants: Would a single-gender group get you more candid information than a coed group?
✔ Provide INCENTIVES: Food during the focus group, gift certifi cates, prizes, and the like can increase participation.
DURING THE FOCUS GROUP:
INTRODUCE YOURSELF, THE PURPOSE OF THE FOCUS GROUP, AND GROUND RULES.
✔ Explain the purpose of the focus group.
✔ Thank participants for being there, and let them know that they are important to your study.
✔ Explain the facilitator’s and recorder’s roles and ask permission to video or audiotape. Get signed consent forms.
✔ Establish ground rules (e.g., everyone should participate; all ideas are equally valid; there are not right or wrong answers).
✔ Ask if there are other agreements to add.
USE AN ICE-BREAKER TO INTRODUCE EVERYONE AND INCREASE COMFORT.
ASK YOUR QUESTIONS.
✔ Have a list of questions in an order that starts broad and moves to more specifi cs.
✔ Use open-ended questions.
✔ Ask follow-up questions like, “Tell me more about what you are saying.”
CLOSE THE DISCUSSION.
✔ Thank everyone for coming.
✔ Let them know how you will use the information.
✔ Get their contact information so that you can send them your fi nal report/fi ndings.
AFTER THE FOCUS GROUP:
✔ Review your audio/video tape of the discussion. Listen for the most common ideas. Pay attention to who says what. For
example: Do adults tend to think differently than students?
✔ Send thank you notes if you have time.
3.16c
Check List for Focus Group Facilitators
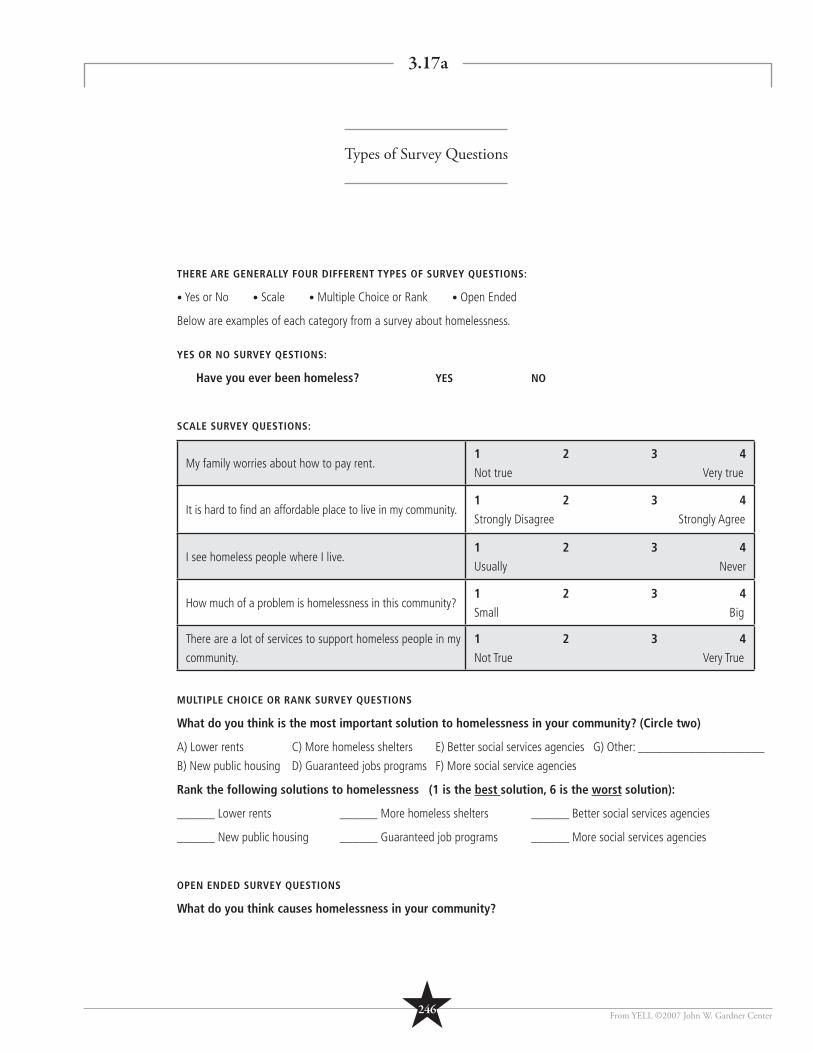
From YELL ©2007 John W. Gardner Center★246
THERE ARE GENERALLY FOUR DIFFERENT TYPES OF SURVEY QUESTIONS:
• Yes or No • Scale • Multiple Choice or Rank • Open Ended
Below are examples of each category from a survey about homelessness.
YES OR NO SURVEY QESTIONS:
Have you ever been homeless? YES NO
SCALE SURVEY QUESTIONS:
My family worries about how to pay rent.1 2 3 4
Not true Very true
It is hard to fi nd an affordable place to live in my community.1 2 3 4
Strongly Disagree Strongly Agree
I see homeless people where I live.1 2 3 4
Usually Never
How much of a problem is homelessness in this community?1 2 3 4
Small Big
There are a lot of services to support homeless people in my
community.
1 2 3 4
Not True Very True
MULTIPLE CHOICE OR RANK SURVEY QUESTIONS
What do you think is the most important solution to homelessness in your community? (Circle two)
A) Lower rents C) More homeless shelters E) Better social services agencies G) Other: ____________________
B) New public housing D) Guaranteed jobs programs F) More social service agencies
Rank the following solutions to homelessness (1 is the best solution, 6 is the worst solution):
______ Lower rents ______ More homeless shelters ______ Better social services agencies
______ New public housing ______ Guaranteed job programs ______ More social services agencies
OPEN ENDED SURVEY QUESTIONS
What do you think causes homelessness in your community?
3.17a
Types of Survey Questions
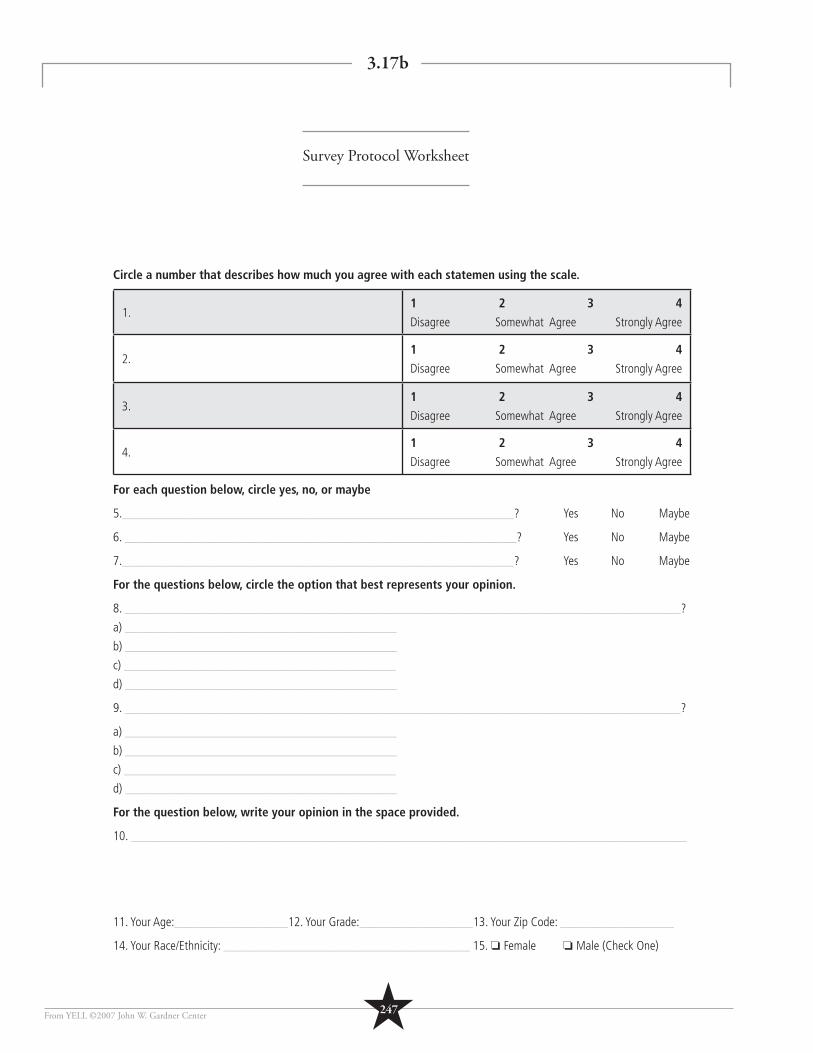
★247From YELL ©2007 John W. Gardner Center
Circle a number that describes how much you agree with each statemen using the scale.
1.1 2 3 4
Disagree Somewhat Agree Strongly Agree
2.1 2 3 4
Disagree Somewhat Agree Strongly Agree
3.1 2 3 4
Disagree Somewhat Agree Strongly Agree
4.1 2 3 4
Disagree Somewhat Agree Strongly Agree
For each question below, circle yes, no, or maybe
5.______________________________________________________________? Yes No Maybe
6. ______________________________________________________________? Yes No Maybe
7.______________________________________________________________? Yes No Maybe
For the questions below, circle the option that best represents your opinion.
8. ________________________________________________________________________________________?
a) ___________________________________________
b) ___________________________________________
c) ___________________________________________
d) ___________________________________________
9. ________________________________________________________________________________________?
a) ___________________________________________
b) ___________________________________________
c) ___________________________________________
d) ___________________________________________
For the question below, write your opinion in the space provided.
10. ________________________________________________________________________________________
11. Your Age:__________________12. Your Grade:__________________13. Your Zip Code: __________________
14. Your Race/Ethnicity: _______________________________________ 15. ❏ Female ❏ Male (Check One)
3.17b
Survey Protocol Worksheet
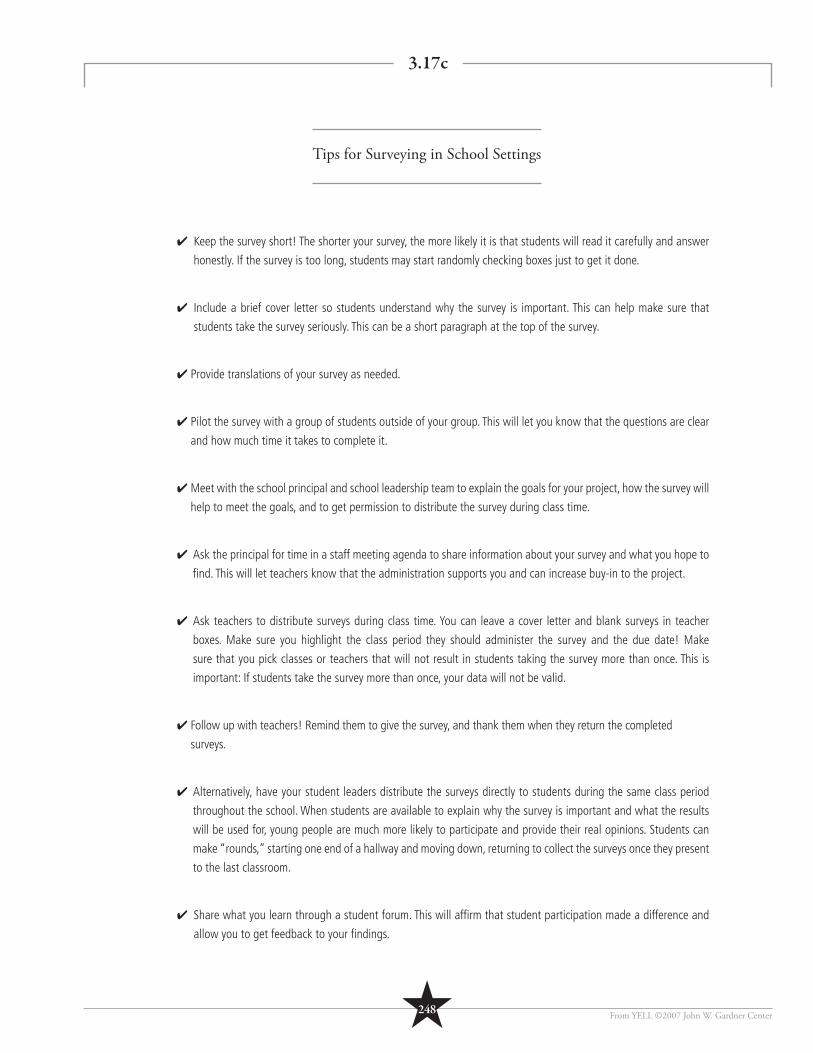
From YELL ©2007 John W. Gardner Center
✔ Keep the survey short! The shorter your survey, the more likely it is that students will read it carefully and answer
honestly. If the survey is too long, students may start randomly checking boxes just to get it done.
✔ Include a brief cover letter so students understand why the survey is important. This can help make sure that
students take the survey seriously. This can be a short paragraph at the top of the survey.
✔ Provide translations of your survey as needed.
✔ Pilot the survey with a group of students outside of your group. This will let you know that the questions are clear
and how much time it takes to complete it.
✔ Meet with the school principal and school leadership team to explain the goals for your project, how the survey will
help to meet the goals, and to get permission to distribute the survey during class time.
✔ Ask the principal for time in a staff meeting agenda to share information about your survey and what you hope to
fi nd. This will let teachers know that the administration supports you and can increase buy-in to the project.
✔ Ask teachers to distribute surveys during class time. You can leave a cover letter and blank surveys in teacher
boxes. Make sure you highlight the class period they should administer the survey and the due date! Make
sure that you pick classes or teachers that will not result in students taking the survey more than once. This is
important: If students take the survey more than once, your data will not be valid.
✔ Follow up with teachers! Remind them to give the survey, and thank them when they return the completed
surveys.
✔ Alternatively, have your student leaders distribute the surveys directly to students during the same class period
throughout the school. When students are available to explain why the survey is important and what the results
will be used for, young people are much more likely to participate and provide their real opinions. Students can
make “rounds,” starting one end of a hallway and moving down, returning to collect the surveys once they present
to the last classroom.
✔ Share what you learn through a student forum. This will affi rm that student participation made a difference and
allow you to get feedback to your fi ndings.
3.17c
Tips for Surveying in School Settings
★248
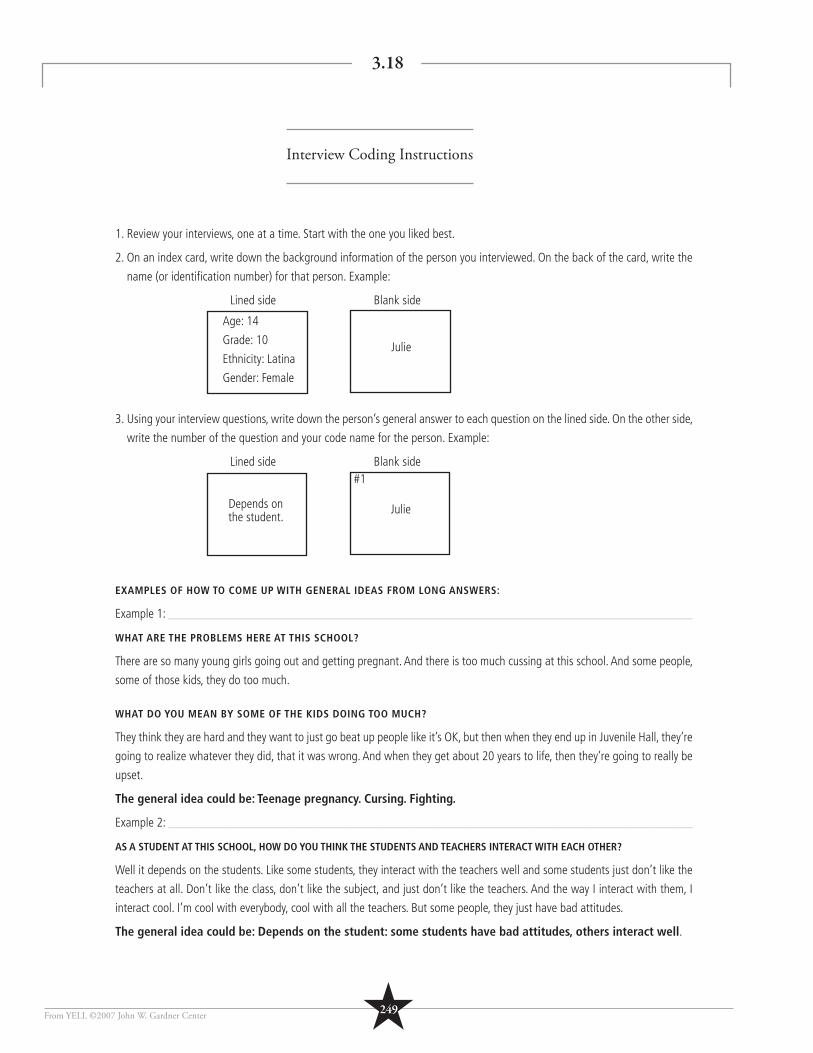
From YELL ©2007 John W. Gardner Center
1. Review your interviews, one at a time. Start with the one you liked best.
2. On an index card, write down the background information of the person you interviewed. On the back of the card, write the
name (or identifi cation number) for that person. Example:
Lined side Blank side
3. Using your interview questions, write down the person’s general answer to each question on the lined side. On the other side,
write the number of the question and your code name for the person. Example:
Lined side Blank side
EXAMPLES OF HOW TO COME UP WITH GENERAL IDEAS FROM LONG ANSWERS:
Example 1: ___________________________________________________________________________________
WHAT ARE THE PROBLEMS HERE AT THIS SCHOOL?
There are so many young girls going out and getting pregnant. And there is too much cussing at this school. And some people,
some of those kids, they do too much.
WHAT DO YOU MEAN BY SOME OF THE KIDS DOING TOO MUCH?
They think they are hard and they want to just go beat up people like it’s OK, but then when they end up in Juvenile Hall, they’re
going to realize whatever they did, that it was wrong. And when they get about 20 years to life, then they’re going to really be
upset.
The general idea could be: Teenage pregnancy. Cursing. Fighting.
Example 2: ___________________________________________________________________________________
AS A STUDENT AT THIS SCHOOL, HOW DO YOU THINK THE STUDENTS AND TEACHERS INTERACT WITH EACH OTHER?
Well it depends on the students. Like some students, they interact with the teachers well and some students just don’t like the
teachers at all. Don’t like the class, don’t like the subject, and just don’t like the teachers. And the way I interact with them, I
interact cool. I’m cool with everybody, cool with all the teachers. But some people, they just have bad attitudes.
The general idea could be: Depends on the student: some students have bad attitudes, others interact well.
Age: 14
Grade: 10
Ethnicity: Latina
Gender: Female
Julie
Julie
#1
Depends on the student.
3.18
Interview Coding Instructions
★249
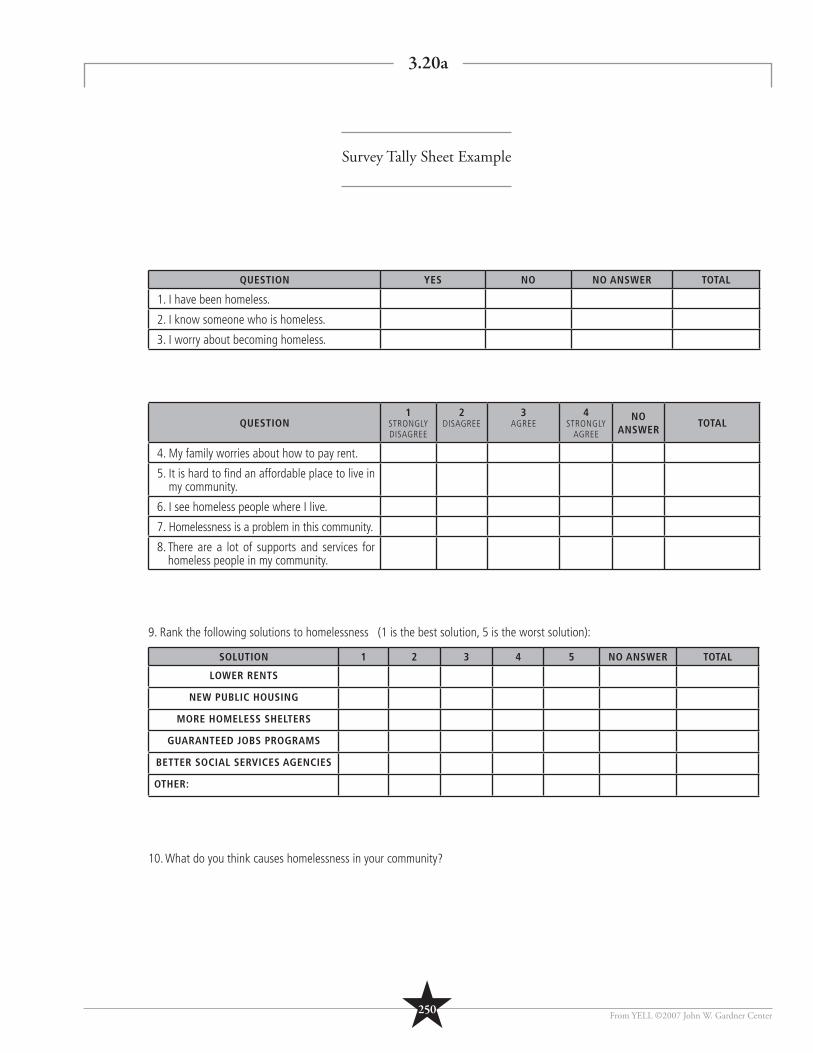
From YELL ©2007 John W. Gardner Center
QUESTION YES NO NO ANSWER TOTAL
1. I have been homeless.
2. I know someone who is homeless.
3. I worry about becoming homeless.
QUESTION1
STRONGLY DISAGREE
2DISAGREE
3AGREE
4STRONGLY
AGREE
NOANSWER
TOTAL
4. My family worries about how to pay rent.
5. It is hard to fi nd an affordable place to live in my community.
6. I see homeless people where I live.
7. Homelessness is a problem in this community.
8. There are a lot of supports and services for homeless people in my community.
9. Rank the following solutions to homelessness (1 is the best solution, 5 is the worst solution):
SOLUTION 1 2 3 4 5 NO ANSWER TOTAL
LOWER RENTS
NEW PUBLIC HOUSING
MORE HOMELESS SHELTERS
GUARANTEED JOBS PROGRAMS
BETTER SOCIAL SERVICES AGENCIES
OTHER:
10. What do you think causes homelessness in your community?
3.20a
Survey Tally Sheet Example
★250
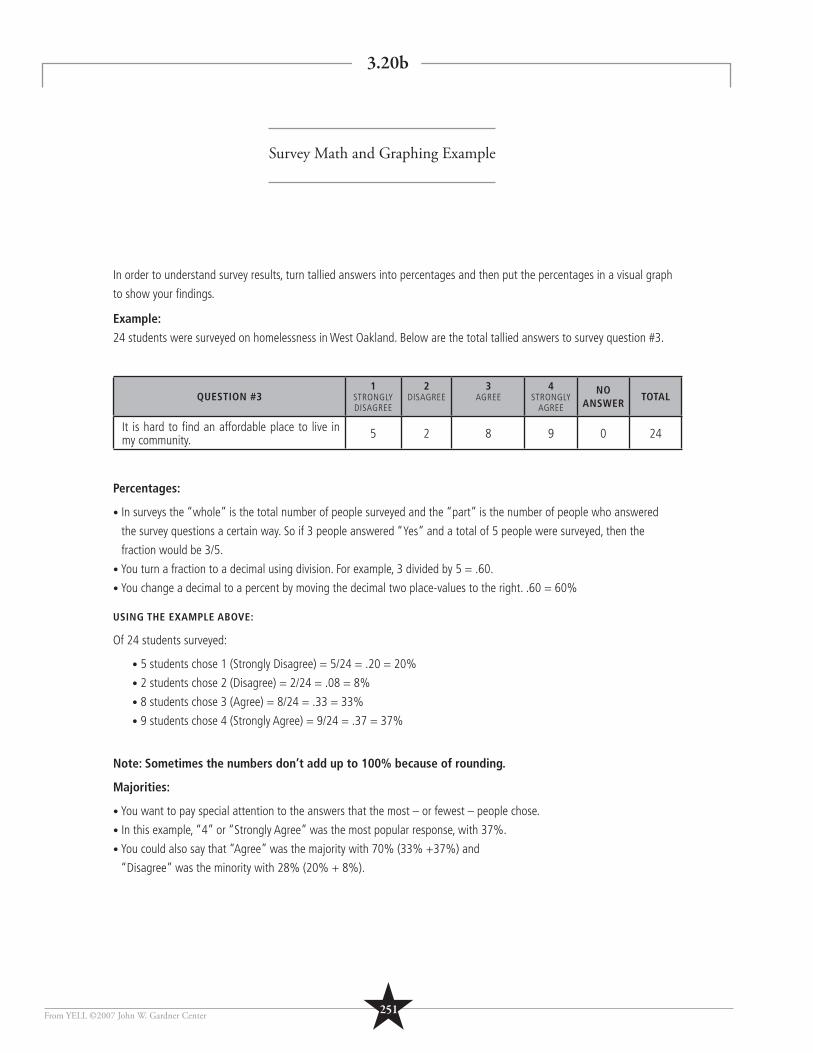
From YELL ©2007 John W. Gardner Center
In order to understand survey results, turn tallied answers into percentages and then put the percentages in a visual graph
to show your fi ndings.
Example:
24 students were surveyed on homelessness in West Oakland. Below are the total tallied answers to survey question #3.
QUESTION #31
STRONGLY DISAGREE
2DISAGREE
3AGREE
4STRONGLY
AGREE
NOANSWER
TOTAL
It is hard to fi nd an affordable place to live in my community. 5 2 8 9 0 24
Percentages:
• In surveys the “whole” is the total number of people surveyed and the “part” is the number of people who answered
the survey questions a certain way. So if 3 people answered “Yes” and a total of 5 people were surveyed, then the
fraction would be 3/5.
• You turn a fraction to a decimal using division. For example, 3 divided by 5 = .60.
• You change a decimal to a percent by moving the decimal two place-values to the right. .60 = 60%
USING THE EXAMPLE ABOVE:
Of 24 students surveyed:
• 5 students chose 1 (Strongly Disagree) = 5/24 = .20 = 20%
• 2 students chose 2 (Disagree) = 2/24 = .08 = 8%
• 8 students chose 3 (Agree) = 8/24 = .33 = 33%
• 9 students chose 4 (Strongly Agree) = 9/24 = .37 = 37%
Note: Sometimes the numbers don’t add up to 100% because of rounding.
Majorities:
• You want to pay special attention to the answers that the most – or fewest – people chose.
• In this example, “4” or “Strongly Agree” was the most popular response, with 37%.
• You could also say that “Agree” was the majority with 70% (33% +37%) and
“Disagree” was the minority with 28% (20% + 8%).
3.20b
Survey Math and Graphing Example
★251
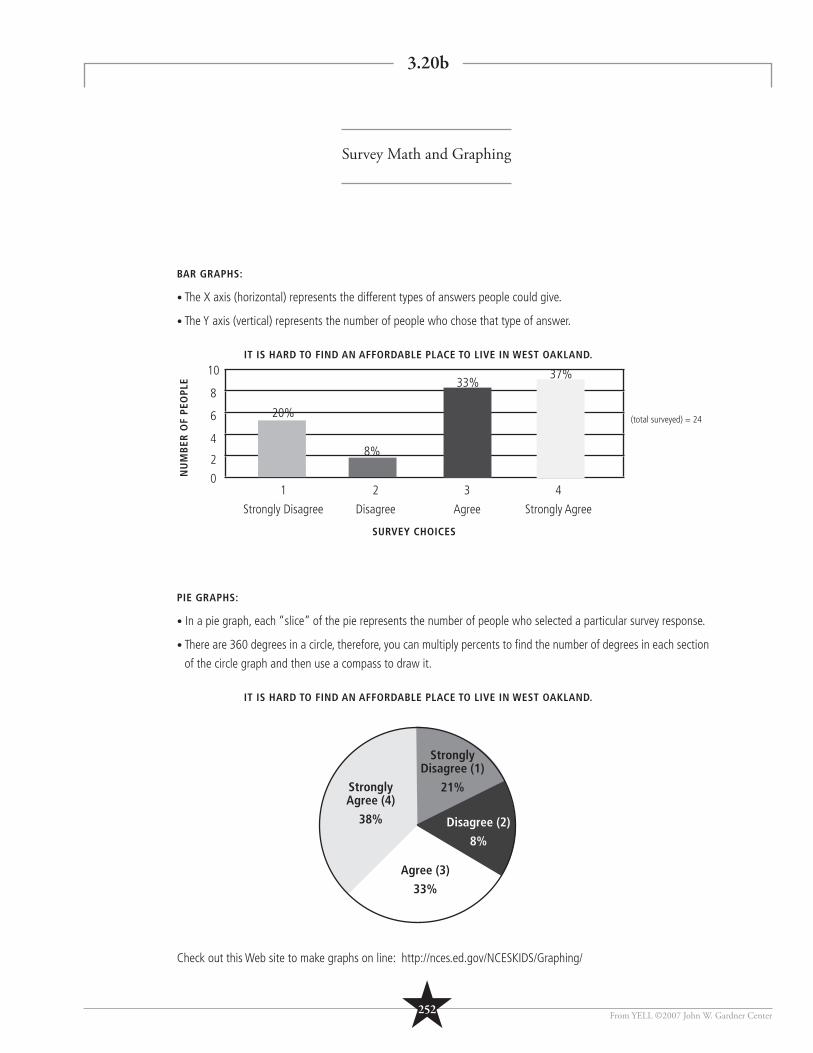
From YELL ©2007 John W. Gardner Center
BAR GRAPHS:
• The X axis (horizontal) represents the different types of answers people could give.
• The Y axis (vertical) represents the number of people who chose that type of answer.
IT IS HARD TO FIND AN AFFORDABLE PLACE TO LIVE IN WEST OAKLAND.
PIE GRAPHS:
• In a pie graph, each “slice” of the pie represents the number of people who selected a particular survey response.
• There are 360 degrees in a circle, therefore, you can multiply percents to fi nd the number of degrees in each section
of the circle graph and then use a compass to draw it.
IT IS HARD TO FIND AN AFFORDABLE PLACE TO LIVE IN WEST OAKLAND.
Check out this Web site to make graphs on line: http://nces.ed.gov/NCESKIDS/Graphing/
(total surveyed) = 24
10
8
6
4
2
01
Strongly Disagree
2
Disagree
3
Agree
4
Strongly Agree
NU
MB
ER O
F PE
OPL
E
SURVEY CHOICES
20%
8%
33%37%
Strongly Agree (4)
38%
Strongly Disagree (1)
21%
Agree (3)
33%
Disagree (2)
8%
3.20b
Survey Math and Graphing
★252
From YELL ©2007 John W. Gardner Center
Depending on audience and the nature of your topic, you will select different approaches – or combinations of ap-
proaches – for sharing your fi ndings and recommendations.
A Continuum: While your plan can fall squarely into just one of these approaches, usually all three work together in
some combination. By using these approaches in tandem, you can strengthen and broaden your impact.
ACTION TYPE MEANS... PERSON... IS SOMEONE WHO...
ADVOCACY
Arguing on behalf of a • particular issue, idea, or person
Standing up for • something you believe in
ADVOCATE
Stands up for people•
Speaks out and gets their • voice heard
Meets with people in power • and asks for specifi c things
EDUCATION
Building understanding • and knowledge
Sharing information and • ideas
Sharing fi ndings from • research
EDUCATOR
Teaches•
Supports others•
Mentors or empowers others•
ACTIVISM
Taking action or getting • involved as a means of achieving a goal for change
ACTIVIST
Acts! •
Fights for what they believe in•
Protests and demonstrates•
Gets people excited and • involved
3.23a
Taking Action: Some Approaches to Social Change
★253
From YELL ©2007 John W. Gardner Center
ACTION TYPE OF STRATEGY ADVANTAGES CHALLENGESUSE AND PRIORITY FOR THIS PROJECT
Distribute
fl yers with
facts about
your topic
Education
Example: Place pamphlets
about an topic that you
care about in the student
center.
Shares the facts •
and lets people
read them
according to
interest
Gets topic to a lot •
of different people
Cost for production •
(copying and paper) •
People might not read •
them
High priority – could
also do a column in
the bilingual parent
newsletter
Protest at
City Hall
Activism
Example: Organize a rally
for a policy that is up for
a vote.
Shows decision •
makers and the
public that we are
serious and that
we care about this
issue
Media could come•
Transportation•
Getting enough people •
there to make a real
impact
Attracting media •
attention
Maybe later – in the
next phase – right
now we need to build
interest and momentum
in our work
Produce a
video and
hold viewings
Advocacy
Example: Show a
documentary on a topic
that you care about.
Can publicize and •
have event at the
school auditorium
– get a wide
audience
Have footage of •
interviews, etc.
Time to produce•
Production equipment •
Limited footage•
Medium priority – this
would get youth’s
attention, but we
would need someone
with strong skills and
commitment
3.23b
Action Strategy Identifi cation Chart - Example
★254
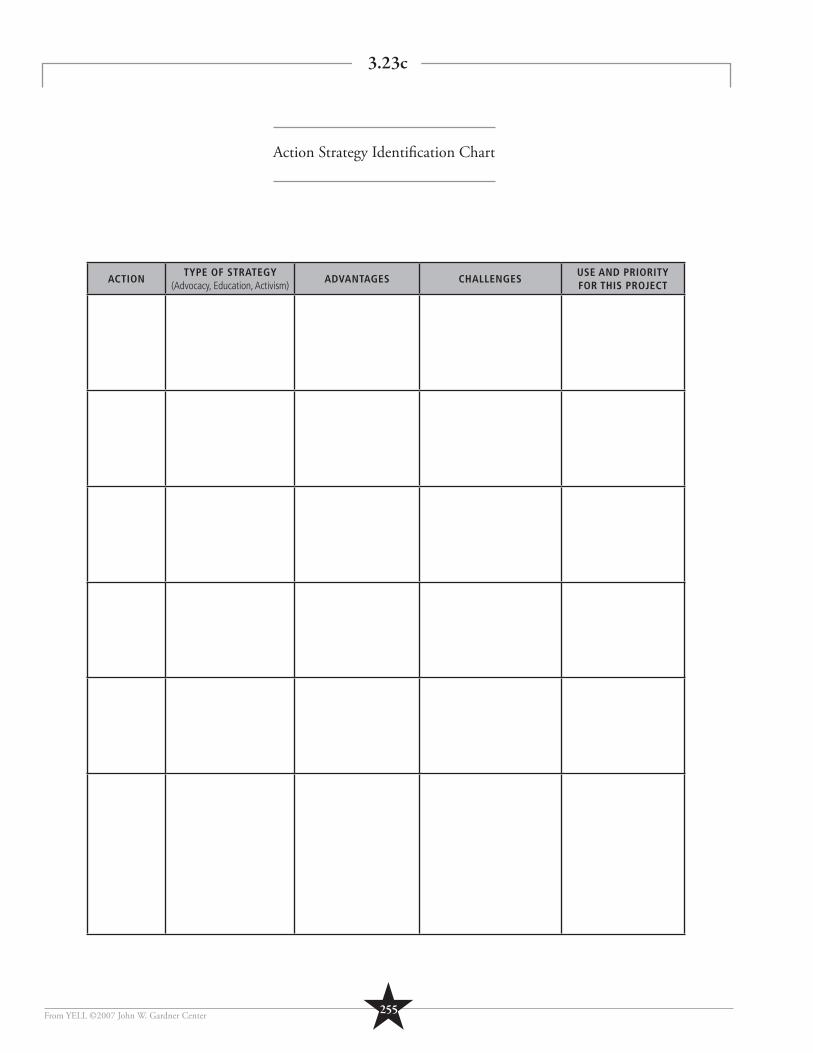
From YELL ©2007 John W. Gardner Center
ACTIONTYPE OF STRATEGY
(Advocacy, Education, Activism)ADVANTAGES CHALLENGES
USE AND PRIORITY FOR THIS PROJECT
3.23c
Action Strategy Identifi cation Chart
★255
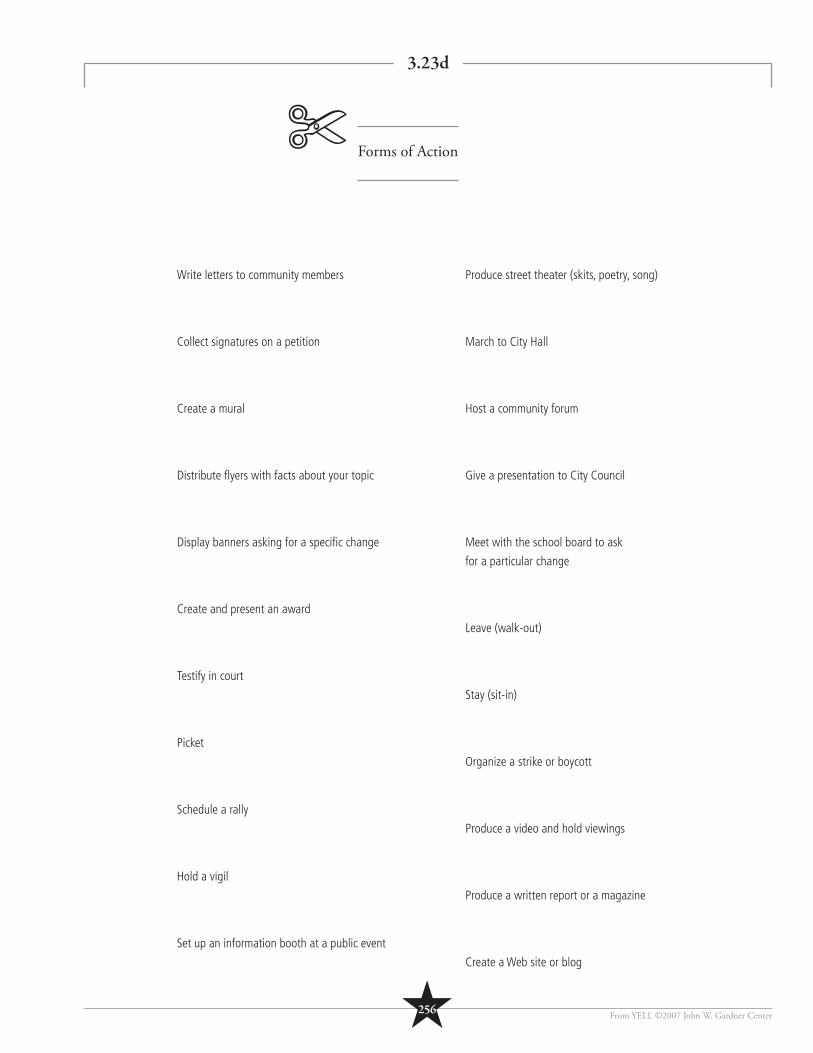
From YELL ©2007 John W. Gardner Center
Write letters to community members
Collect signatures on a petition
Create a mural
Distribute fl yers with facts about your topic
Display banners asking for a specifi c change
Create and present an award
Testify in court
Picket
Schedule a rally
Hold a vigil
Set up an information booth at a public event
Produce street theater (skits, poetry, song)
March to City Hall
Host a community forum
Give a presentation to City Council
Meet with the school board to ask
for a particular change
Leave (walk-out)
Stay (sit-in)
Organize a strike or boycott
Produce a video and hold viewings
Produce a written report or a magazine
Create a Web site or blog
3.23d
Forms of Action✄
★256
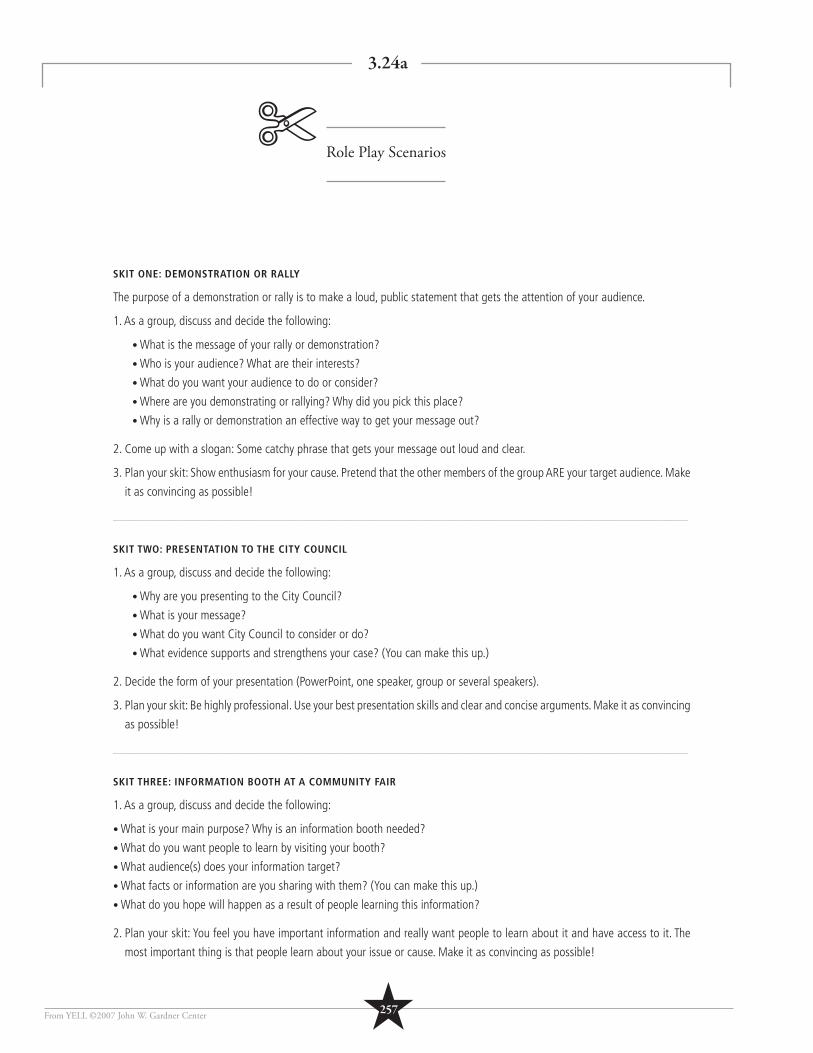
From YELL ©2007 John W. Gardner Center
SKIT ONE: DEMONSTRATION OR RALLY
The purpose of a demonstration or rally is to make a loud, public statement that gets the attention of your audience.
1. As a group, discuss and decide the following:
• What is the message of your rally or demonstration?
• Who is your audience? What are their interests?
• What do you want your audience to do or consider?
• Where are you demonstrating or rallying? Why did you pick this place?
• Why is a rally or demonstration an effective way to get your message out?
2. Come up with a slogan: Some catchy phrase that gets your message out loud and clear.
3. Plan your skit: Show enthusiasm for your cause. Pretend that the other members of the group ARE your target audience. Make
it as convincing as possible!
___________________________________________________________________________________________
SKIT TWO: PRESENTATION TO THE CITY COUNCIL
1. As a group, discuss and decide the following:
• Why are you presenting to the City Council?
• What is your message?
• What do you want City Council to consider or do?
• What evidence supports and strengthens your case? (You can make this up.)
2. Decide the form of your presentation (PowerPoint, one speaker, group or several speakers).
3. Plan your skit: Be highly professional. Use your best presentation skills and clear and concise arguments. Make it as convincing
as possible!
___________________________________________________________________________________________
SKIT THREE: INFORMATION BOOTH AT A COMMUNITY FAIR
1. As a group, discuss and decide the following:
• What is your main purpose? Why is an information booth needed?
• What do you want people to learn by visiting your booth?
• What audience(s) does your information target?
• What facts or information are you sharing with them? (You can make this up.)
• What do you hope will happen as a result of people learning this information?
2. Plan your skit: You feel you have important information and really want people to learn about it and have access to it. The
most important thing is that people learn about your issue or cause. Make it as convincing as possible!
3.24a
Role Play Scenarios✄
★257
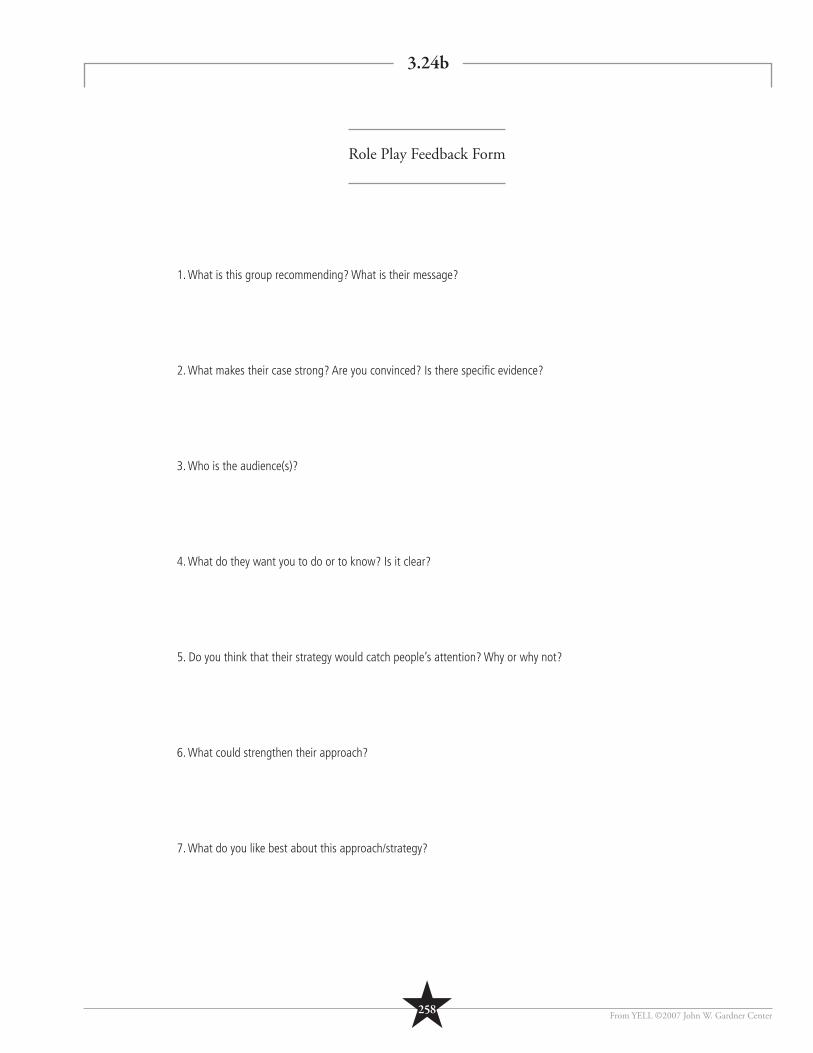
From YELL ©2007 John W. Gardner Center
1. What is this group recommending? What is their message?
2. What makes their case strong? Are you convinced? Is there specifi c evidence?
3. Who is the audience(s)?
4. What do they want you to do or to know? Is it clear?
5. Do you think that their strategy would catch people’s attention? Why or why not?
6. What could strengthen their approach?
7. What do you like best about this approach/strategy?
3.24b
Role Play Feedback Form
★258
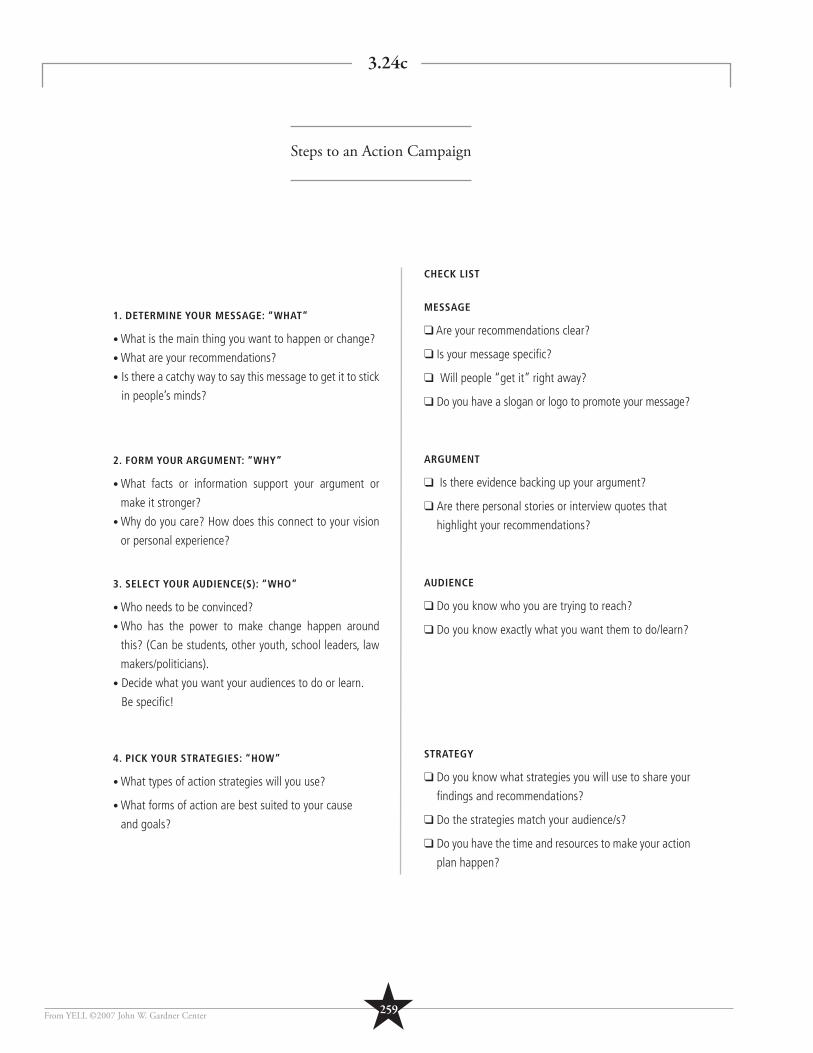
From YELL ©2007 John W. Gardner Center
1. DETERMINE YOUR MESSAGE: “WHAT”
• What is the main thing you want to happen or change?
• What are your recommendations?
• Is there a catchy way to say this message to get it to stick
in people’s minds?
2. FORM YOUR ARGUMENT: “WHY”
• What facts or information support your argument or
make it stronger?
• Why do you care? How does this connect to your vision
or personal experience?
3. SELECT YOUR AUDIENCE(S): “WHO”
• Who needs to be convinced?
• Who has the power to make change happen around
this? (Can be students, other youth, school leaders, law
makers/politicians).
• Decide what you want your audiences to do or learn.
Be specifi c!
4. PICK YOUR STRATEGIES: “HOW”
• What types of action strategies will you use?
• What forms of action are best suited to your cause
and goals?
CHECK LIST
MESSAGE
❑ Are your recommendations clear?
❑ Is your message specifi c?
❑ Will people “get it” right away?
❑ Do you have a slogan or logo to promote your message?
ARGUMENT
❑ Is there evidence backing up your argument?
❑ Are there personal stories or interview quotes that
highlight your recommendations?
AUDIENCE
❑ Do you know who you are trying to reach?
❑ Do you know exactly what you want them to do/learn?
STRATEGY
❑ Do you know what strategies you will use to share your
fi ndings and recommendations?
❑ Do the strategies match your audience/s?
❑ Do you have the time and resources to make your action
plan happen?
3.24c
Steps to an Action Campaign
★259
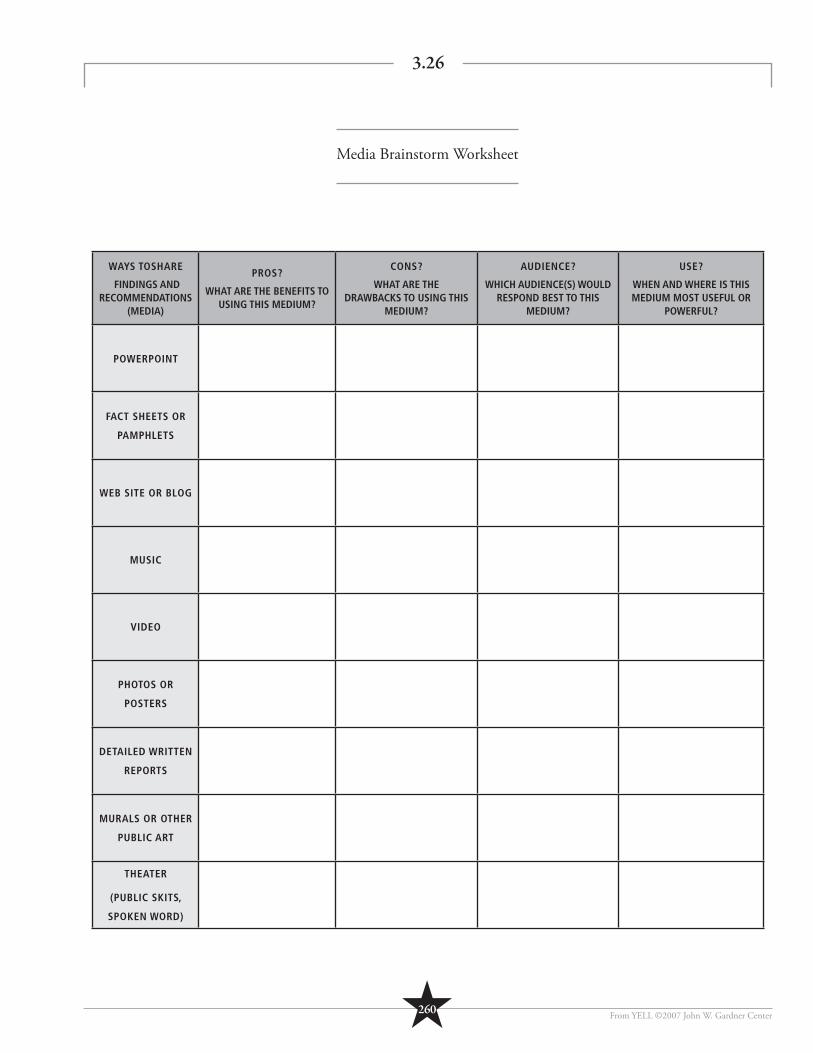
From YELL ©2007 John W. Gardner Center
WAYS TOSHARE
FINDINGS AND RECOMMENDATIONS
(MEDIA)
PROS?
WHAT ARE THE BENEFITS TO USING THIS MEDIUM?
CONS?
WHAT ARE THE DRAWBACKS TO USING THIS
MEDIUM?
AUDIENCE?
WHICH AUDIENCE(S) WOULD RESPOND BEST TO THIS
MEDIUM?
USE?
WHEN AND WHERE IS THIS MEDIUM MOST USEFUL OR
POWERFUL?
POWERPOINT
FACT SHEETS OR
PAMPHLETS
WEB SITE OR BLOG
MUSIC
VIDEO
PHOTOS OR
POSTERS
DETAILED WRITTEN
REPORTS
MURALS OR OTHER
PUBLIC ART
THEATER
(PUBLIC SKITS,
SPOKEN WORD)
3.26
Media Brainstorm Worksheet
★260
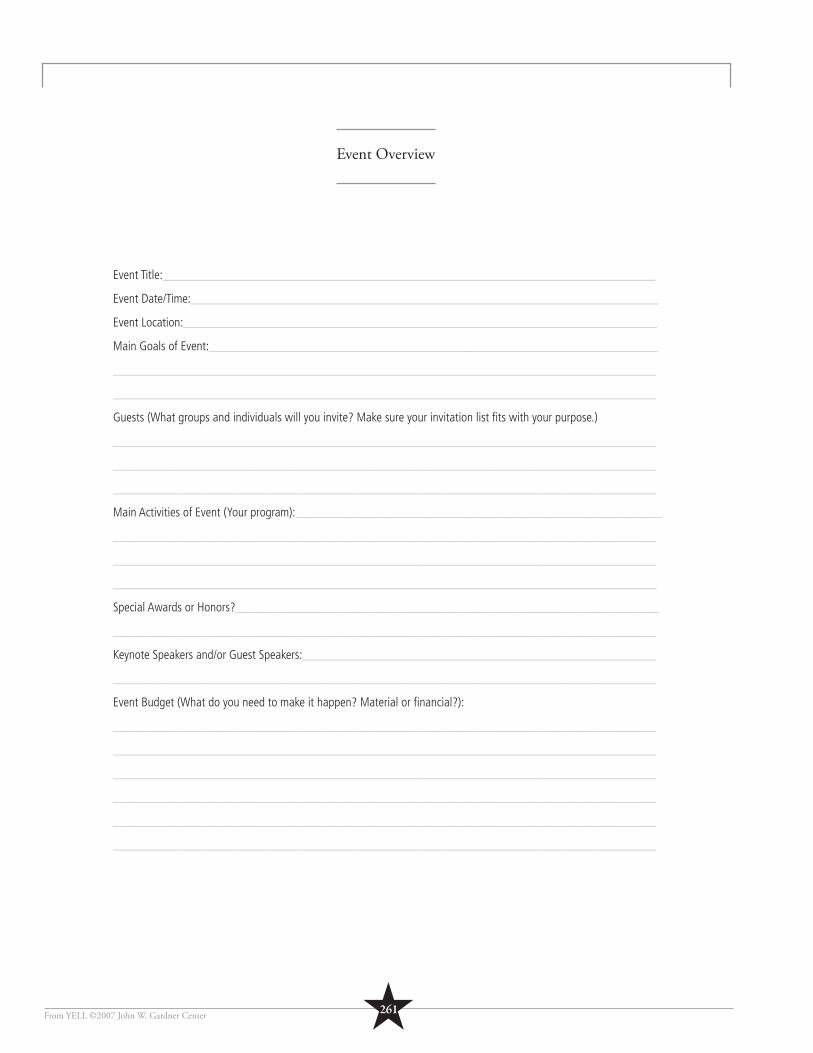
From YELL ©2007 John W. Gardner Center
Event Overview
Event Title:______________________________________________________________________________
Event Date/Time:__________________________________________________________________________
Event Location:___________________________________________________________________________
Main Goals of Event:_______________________________________________________________________
______________________________________________________________________________________
______________________________________________________________________________________
Guests (What groups and individuals will you invite? Make sure your invitation list fi ts with your purpose.)
______________________________________________________________________________________
______________________________________________________________________________________
______________________________________________________________________________________
Main Activities of Event (Your program):__________________________________________________________
______________________________________________________________________________________
______________________________________________________________________________________
______________________________________________________________________________________
Special Awards or Honors?___________________________________________________________________
______________________________________________________________________________________
Keynote Speakers and/or Guest Speakers:________________________________________________________
______________________________________________________________________________________
Event Budget (What do you need to make it happen? Material or fi nancial?):
______________________________________________________________________________________
______________________________________________________________________________________
______________________________________________________________________________________
______________________________________________________________________________________
______________________________________________________________________________________
______________________________________________________________________________________
★261
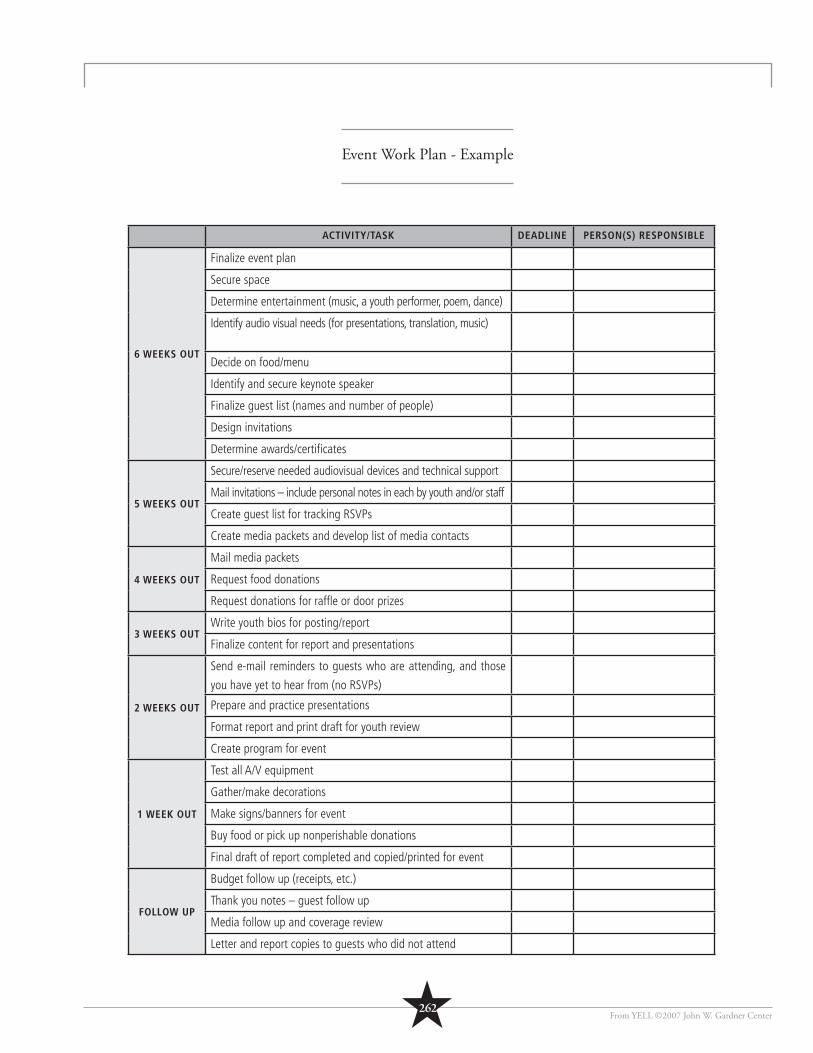
From YELL ©2007 John W. Gardner Center
Event Work Plan - Example
ACTIVITY/TASK DEADLINE PERSON(S) RESPONSIBLE
6 WEEKS OUT
Finalize event plan
Secure space
Determine entertainment (music, a youth performer, poem, dance)
Identify audio visual needs (for presentations, translation, music)
Decide on food/menu
Identify and secure keynote speaker
Finalize guest list (names and number of people)
Design invitations
Determine awards/certifi cates
5 WEEKS OUT
Secure/reserve needed audiovisual devices and technical support
Mail invitations – include personal notes in each by youth and/or staff
Create guest list for tracking RSVPs
Create media packets and develop list of media contacts
4 WEEKS OUT
Mail media packets
Request food donations
Request donations for raffl e or door prizes
3 WEEKS OUTWrite youth bios for posting/report
Finalize content for report and presentations
2 WEEKS OUT
Send e-mail reminders to guests who are attending, and those
you have yet to hear from (no RSVPs)
Prepare and practice presentations
Format report and print draft for youth review
Create program for event
1 WEEK OUT
Test all A/V equipment
Gather/make decorations
Make signs/banners for event
Buy food or pick up nonperishable donations
Final draft of report completed and copied/printed for event
FOLLOW UP
Budget follow up (receipts, etc.)
Thank you notes – guest follow up
Media follow up and coverage review
Letter and report copies to guests who did not attend
★262
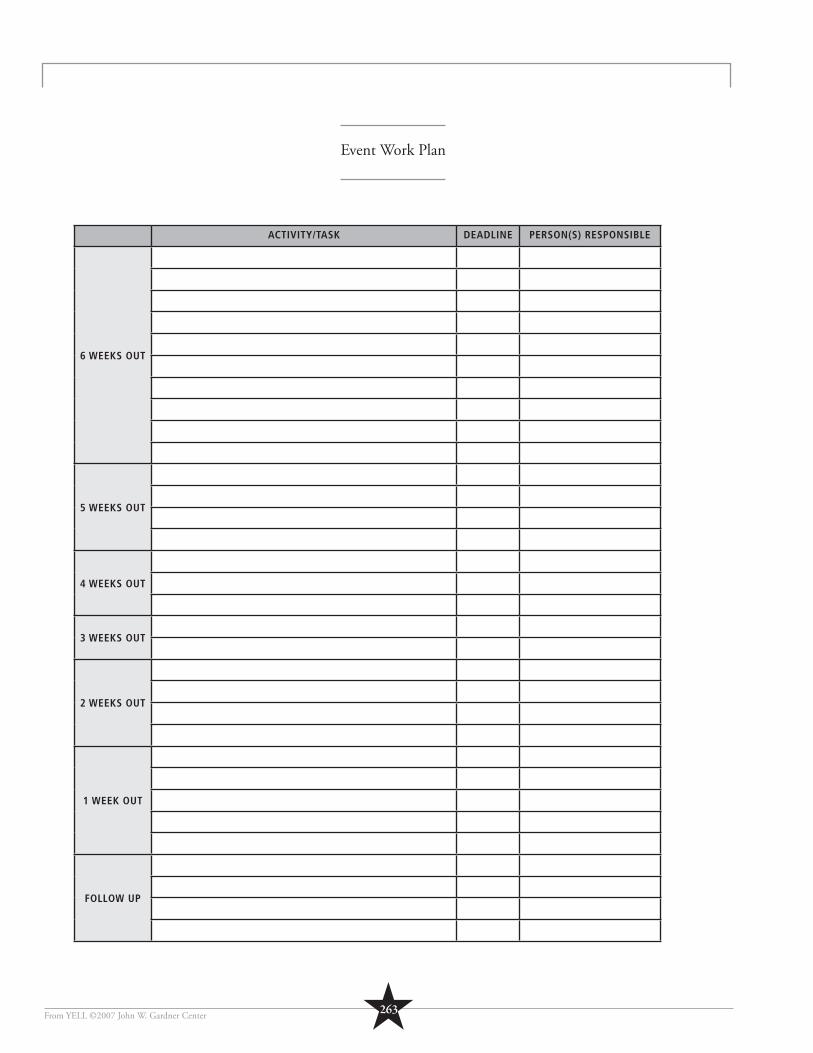
From YELL ©2007 John W. Gardner Center
Event Work Plan
ACTIVITY/TASK DEADLINE PERSON(S) RESPONSIBLE
6 WEEKS OUT
5 WEEKS OUT
4 WEEKS OUT
3 WEEKS OUT
2 WEEKS OUT
1 WEEK OUT
FOLLOW UP
★263
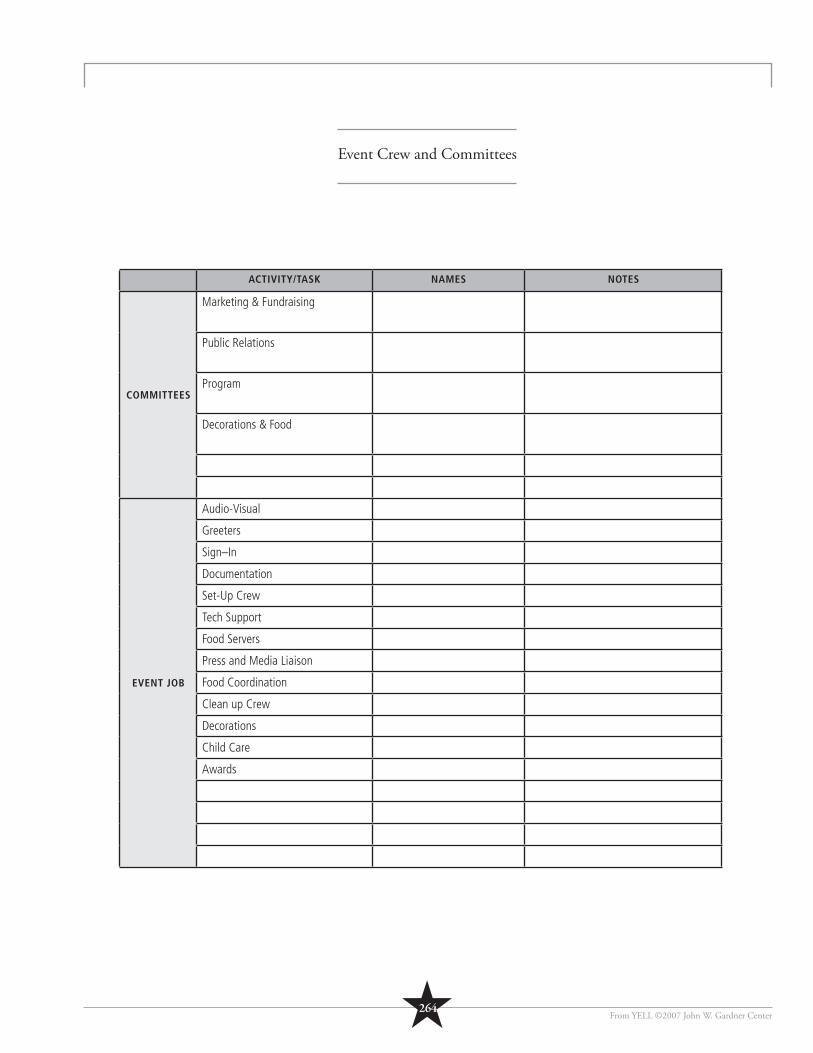
From YELL ©2007 John W. Gardner Center
Event Crew and Committees
ACTIVITY/TASK NAMES NOTES
COMMITTEES
Marketing & Fundraising
Public Relations
Program
Decorations & Food
EVENT JOB
Audio-Visual
Greeters
Sign–In
Documentation
Set-Up Crew
Tech Support
Food Servers
Press and Media Liaison
Food Coordination
Clean up Crew
Decorations
Child Care
Awards
★264
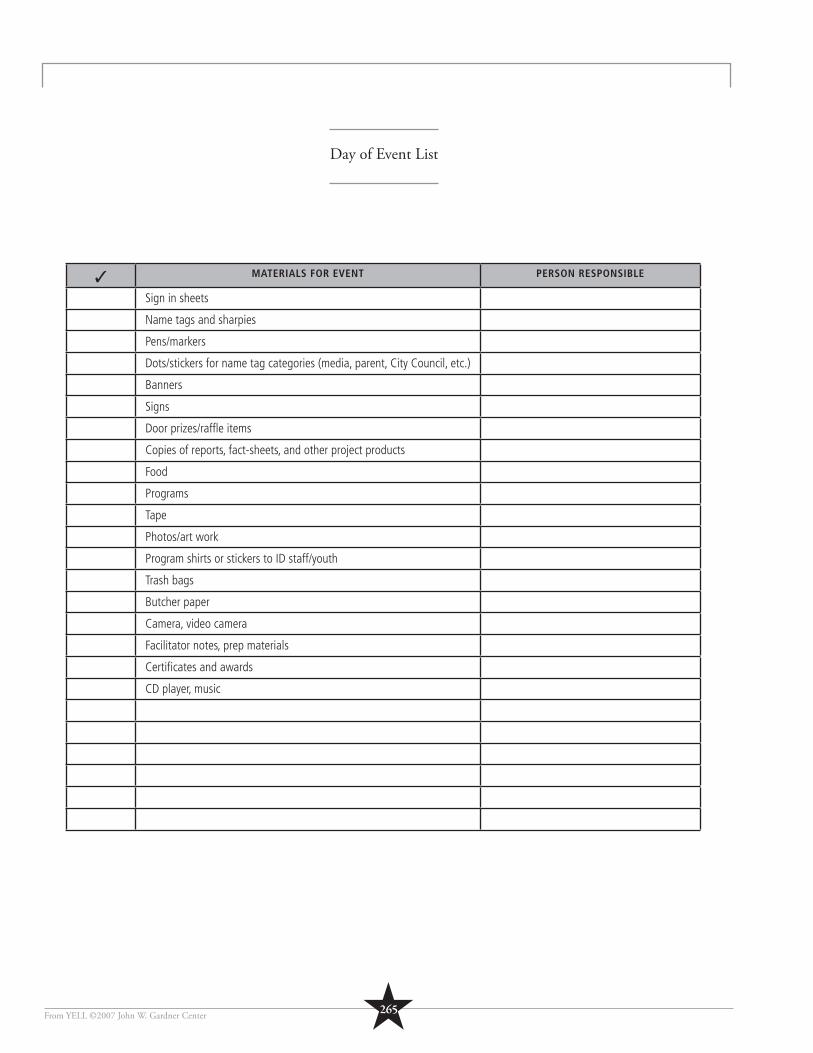
★265From YELL ©2007 John W. Gardner Center
Day of Event List
✓ MATERIALS FOR EVENT PERSON RESPONSIBLE
Sign in sheets
Name tags and sharpies
Pens/markers
Dots/stickers for name tag categories (media, parent, City Council, etc.)
Banners
Signs
Door prizes/raffl e items
Copies of reports, fact-sheets, and other project products
Food
Programs
Tape
Photos/art work
Program shirts or stickers to ID staff/youth
Trash bags
Butcher paper
Camera, video camera
Facilitator notes, prep materials
Certifi cates and awards
CD player, music

From YELL ©2007 John W. Gardner Center
NOTES
From YELL ©2007 John W. Gardner Center★266

From YELL ©2007 John W. Gardner Center
NOTES
★267
From YELL ©2007 John W. Gardner Center
Appendix 1
Y E L L A S A S E N I O R R E S E A R C H P R O J E C T
★268
From YELL ©2007 John W. Gardner Center
YELL APPENDIX 1 Senior Research Project
Applying the YELL curriculum as a senior research project provides students with the opportunity to explore
an area of personal interest and to demonstrate skills and knowledge gained during their high school years.
Typically a senior research project is a major undertaking that must be successfully completed as part of a
student’s graduation requirements.
This appendix frames YELL Unit 3 as an individual project. While originally developed for seniors in one
high school in West Oakland, this appendix can be adapted as a classroom project for either high school
or middle school students. What is presented here is meant to serve as a sample or launch point for work
that fi ts with the goals and needs of your particular school.
PROJECT REQUIREMENTS
✔ Work Records
✔ Community Connection
✔ Academic Paper with Cross-Curricular Connections
✔ Final Product
✔ Presentation
MAIN STEPS TO A SENIOR RESEARCH PROJECT
✔ Select a Topic and Develop a Research Question
✔ Create a Research Plan
✔ Develop Research Tools and Collect Information
✔ Analyze Information and Write a Paper
✔ Present Findings
★269
From YELL ©2007 John W. Gardner Center
YELL APPENDIX 1 Senior Research Project
Senior Research Project Support Structure
Senior Research Project Cohort (SRPC): The SRPC supports seniors with organizing their time, developing their
skills, writing their report, and planning their fi nal presentation. Depending on the number of seniors and faculty at
your school, each faculty member should be assigned a group of fi ve seniors. Each SRPC meets every month, with
faculty providing structure and support for seniors in planning and completing their projects. Each student is assigned
to a SPRC by the beginning of the spring semester of their senior year. Specifi cally, the SRPC structure provides
students with the following:
• Peer Resources: Within each SRPC, students work together to understand and implement the steps and
requirements of the project and address any problems that arise. Youth can use the structure for peer reviews
of work, topic identifi cation brainstorms and other feedback formats.
• Faculty Advisors: Students work under the guidance of faculty members who serve as Senior Research
Project Cohort guides and advisors. Faculty are assigned a core group of students for one-on-one advising and
support.
• Parent/Guardian Acknowledgement: Students are required to get a parent or guardian signature for each
step of their project. This encourages communication about the project and provides a system for keeping
parents or guardians informed of the project requirements.
Working with the support of their SRPC, and under the supervision of faculty, students will develop and complete
substantial projects. Although various forms of assistance will be made available, the primary initiative for completion
of the project lies with the student. Selection of a project topic will be the responsibility of each student, based on
such factors as interest, knowledge, and career goals. Topics must be submitted to the student’s faculty advisor for
approval. Students may choose to include service in their project to meet a service learning graduation requirement.
Parents and caregivers are encouraged to discuss project topics with their children and to be supportive during the
year as the project develops.
SENIOR RESEARCH PROJECT OVERVIEW
★270
From YELL ©2007 John W. Gardner Center
YELL APPENDIX 1 Senior Research Project
Letter from the Principal - Example
Dear Parents and Guardians of Seniors:
Graduation requirements for members of this year’s class include a senior research project. The senior research project gives
each senior the opportunity to demonstrate her or his years of educational experience in thinking, reading, writing, speaking,
accessing information, self-discipline, problem solving, and organization. These skills will be showcased in a fi ve-part process
consisting of the following requirements:
• Work Records: A collection of all the written material that results from the project, including a process journal, reading list,
annotated bibliography, notes of research, response forms, and letters generated as part of project work.
• Community Connection: Research (interviews, surveys, or focus groups) with community members.
• Academic Paper with Cross-Curricular Connections: A 10–15 page paper that demonstrates use of skills and knowledge
from several areas of study.
• Final Product: A service, performance, activity, object, or work of art created by the student as a result of the exploration of
a chosen topic.
• Presentation of Learning: Final presentation to a panel of evaluators composed of parents, students, teachers, and
community members.
For successful completion of the senior research project, your student cannot rely solely on what she or he already knows,
but must demonstrate an aspect of new learning and growth. A successful senior research project experience involves your
support and teacher support as well as student initiative and self-discipline. Each student has been informed of the deadlines
and requirements of the project. Please review the planning packet and become an active participant in this exciting learning
experience with your student.
We are looking forward to working with our students through this process and to the end of the school year when we will see
the wonderful array of projects they create. If you have any questions, please call.
Sincerely,
The Principal
★271
From YELL ©2007 John W. Gardner Center
YELL APPENDIX 1 Senior Research Project
Steps to a Senior Research Project
1. PICK A TOPIC AND DEVELOP A RESEARCH QUESTION
Topic selection can be based on your interest, knowledge, and career goals. Topics must be submitted to the faculty
leaders of the Senior Research Project Cohort for approval. You may choose to include service in your project in order
to meet service-learning graduation requirements.
What is the community-based issue or topic that you want to address? What is your primary question?
2. CREATE A RESEARCH PLAN
Create a timeline and work plan for your senior research project.
When is each part of the project due? What do you need to accomplish by when to stay on track?
3. DEVELOP RESEARCH TOOLS AND GATHER INFORMATION
Explore the history, politics, and root causes of the issue you want to address. Use newspaper articles, books,
government reports, journal articles, and the Internet. Learn to use surveys, interviews, and focus groups to better
understand the surrounding community.
Who is impacted or involved in the problem you are addressing? What is the best way (interviews, surveys, focus
groups) to get information from these people?
4. ANALYZE INFORMATION AND WRITE A PAPER
This is your opportunity to write about your fi ndings and share what you learned about your topic.
What did you learn? What are the major trends or themes that come out of what people have said?
5. PRESENT FINDINGS
Present your ideas and share your work with people who could use your information to make change in your
community.
Who should know about your topic and what you learned? How will you share this information with those people?
Invite these people to your presentation and put up fl yers or posters about your fi nal presentation.
★272

From YELL ©2007 John W. Gardner Center
YELL APPENDIX 1 Senior Research Project
Senior Research Project Planning Packet Contents
PARENT OR GUARDIAN ACKNOWLEDGEMENT OF SENIOR RESEARCH PROJECT PLANNING PACKET CONTENTS
I have read and discussed the senior research project planning packet with the student below. We understand that the senior
research project is required for graduation from high school and that work on a successful senior research project begins in the
very beginning of the spring semester and keeps to the timeline.
______________________________ ______________________________ ________________
Parent or Care Giver Name (please print) Student Name (please print) Date
______________________________ ______________________________
Parent Signature Student Signature
______________________________
Daytime Telephone Number
★273
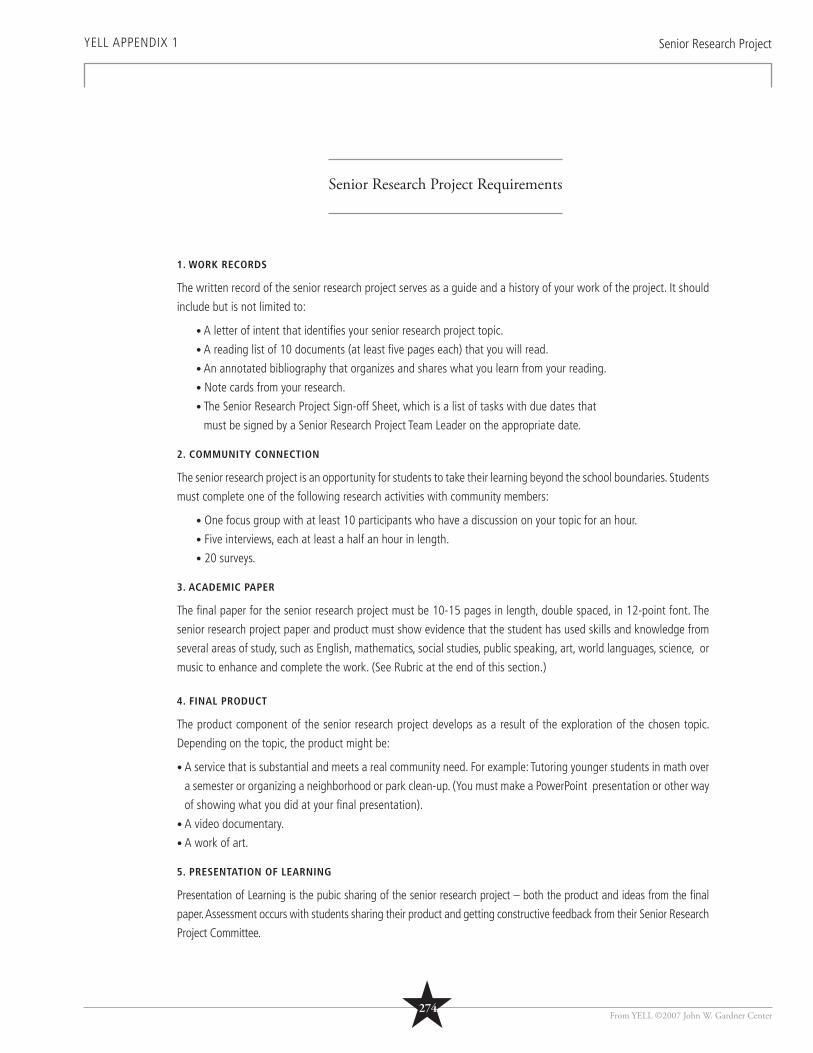
From YELL ©2007 John W. Gardner Center
YELL APPENDIX 1 Senior Research Project
Senior Research Project Requirements
1. WORK RECORDS
The written record of the senior research project serves as a guide and a history of your work of the project. It should
include but is not limited to:
• A letter of intent that identifi es your senior research project topic.
• A reading list of 10 documents (at least fi ve pages each) that you will read.
• An annotated bibliography that organizes and shares what you learn from your reading.
• Note cards from your research.
• The Senior Research Project Sign-off Sheet, which is a list of tasks with due dates that
must be signed by a Senior Research Project Team Leader on the appropriate date.
2. COMMUNITY CONNECTION
The senior research project is an opportunity for students to take their learning beyond the school boundaries. Students
must complete one of the following research activities with community members:
• One focus group with at least 10 participants who have a discussion on your topic for an hour.
• Five interviews, each at least a half an hour in length.
• 20 surveys.
3. ACADEMIC PAPER
The fi nal paper for the senior research project must be 10-15 pages in length, double spaced, in 12-point font. The
senior research project paper and product must show evidence that the student has used skills and knowledge from
several areas of study, such as English, mathematics, social studies, public speaking, art, world languages, science, or
music to enhance and complete the work. (See Rubric at the end of this section.)
4. FINAL PRODUCT
The product component of the senior research project develops as a result of the exploration of the chosen topic.
Depending on the topic, the product might be:
• A service that is substantial and meets a real community need. For example: Tutoring younger students in math over
a semester or organizing a neighborhood or park clean-up. (You must make a PowerPoint presentation or other way
of showing what you did at your fi nal presentation).
• A video documentary.
• A work of art.
5. PRESENTATION OF LEARNING
Presentation of Learning is the pubic sharing of the senior research project – both the product and ideas from the fi nal
paper. Assessment occurs with students sharing their product and getting constructive feedback from their Senior Research
Project Committee.
★274
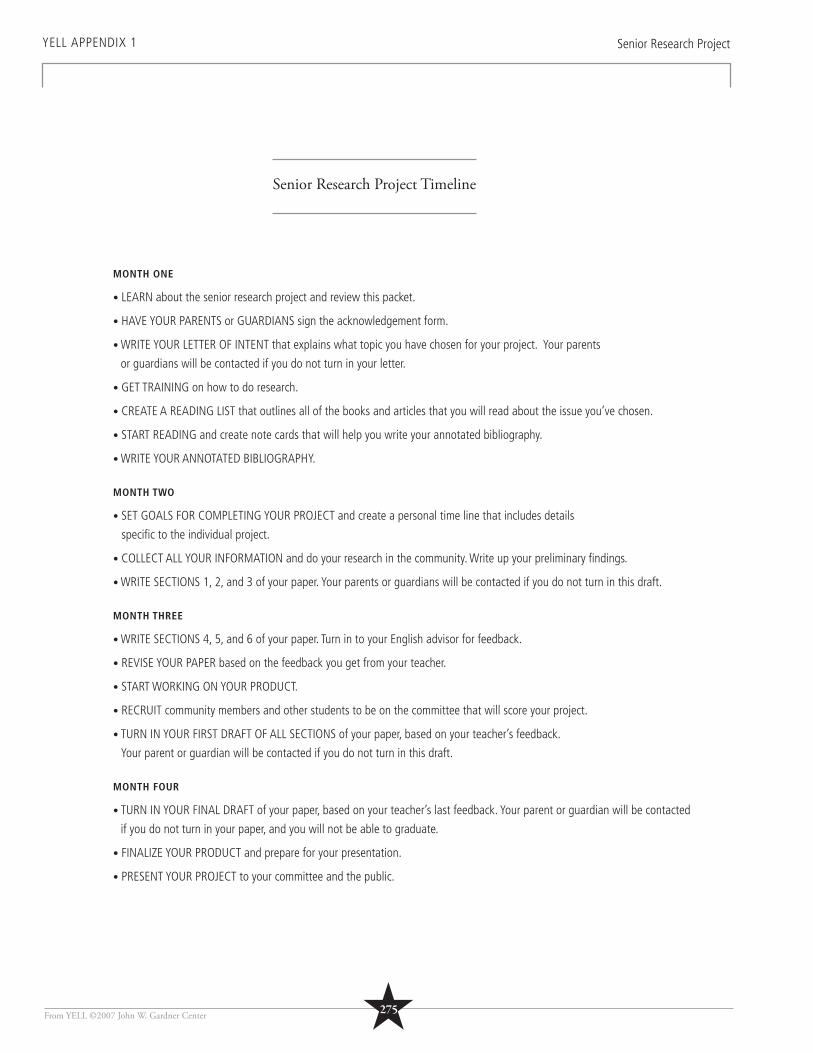
From YELL ©2007 John W. Gardner Center
YELL APPENDIX 1 Senior Research Project
Senior Research Project Timeline
MONTH ONE
• LEARN about the senior research project and review this packet.
• HAVE YOUR PARENTS or GUARDIANS sign the acknowledgement form.
• WRITE YOUR LETTER OF INTENT that explains what topic you have chosen for your project. Your parents
or guardians will be contacted if you do not turn in your letter.
• GET TRAINING on how to do research.
• CREATE A READING LIST that outlines all of the books and articles that you will read about the issue you’ve chosen.
• START READING and create note cards that will help you write your annotated bibliography.
• WRITE YOUR ANNOTATED BIBLIOGRAPHY.
MONTH TWO
• SET GOALS FOR COMPLETING YOUR PROJECT and create a personal time line that includes details
specifi c to the individual project.
• COLLECT ALL YOUR INFORMATION and do your research in the community. Write up your preliminary fi ndings.
• WRITE SECTIONS 1, 2, and 3 of your paper. Your parents or guardians will be contacted if you do not turn in this draft.
MONTH THREE
• WRITE SECTIONS 4, 5, and 6 of your paper. Turn in to your English advisor for feedback.
• REVISE YOUR PAPER based on the feedback you get from your teacher.
• START WORKING ON YOUR PRODUCT.
• RECRUIT community members and other students to be on the committee that will score your project.
• TURN IN YOUR FIRST DRAFT OF ALL SECTIONS of your paper, based on your teacher’s feedback.
Your parent or guardian will be contacted if you do not turn in this draft.
MONTH FOUR
• TURN IN YOUR FINAL DRAFT of your paper, based on your teacher’s last feedback. Your parent or guardian will be contacted
if you do not turn in your paper, and you will not be able to graduate.
• FINALIZE YOUR PRODUCT and prepare for your presentation.
• PRESENT YOUR PROJECT to your committee and the public.
★275
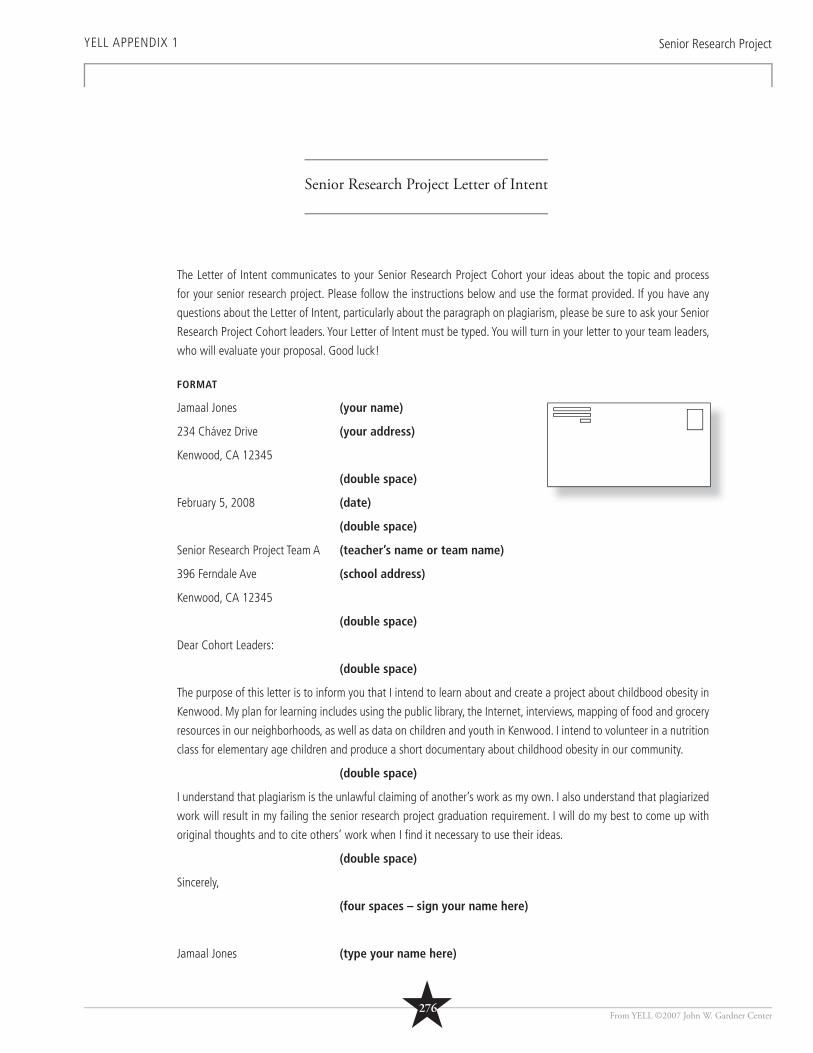
From YELL ©2007 John W. Gardner Center
YELL APPENDIX 1 Senior Research Project
Senior Research Project Letter of Intent
The Letter of Intent communicates to your Senior Research Project Cohort your ideas about the topic and process
for your senior research project. Please follow the instructions below and use the format provided. If you have any
questions about the Letter of Intent, particularly about the paragraph on plagiarism, please be sure to ask your Senior
Research Project Cohort leaders. Your Letter of Intent must be typed. You will turn in your letter to your team leaders,
who will evaluate your proposal. Good luck!
FORMAT
Jamaal Jones (your name)
234 Chávez Drive (your address)
Kenwood, CA 12345
(double space)
February 5, 2008 (date)
(double space)
Senior Research Project Team A (teacher’s name or team name)
396 Ferndale Ave (school address)
Kenwood, CA 12345
(double space)
Dear Cohort Leaders:
(double space)
The purpose of this letter is to inform you that I intend to learn about and create a project about childbood obesity in
Kenwood. My plan for learning includes using the public library, the Internet, interviews, mapping of food and grocery
resources in our neighborhoods, as well as data on children and youth in Kenwood. I intend to volunteer in a nutrition
class for elementary age children and produce a short documentary about childhood obesity in our community.
(double space)
I understand that plagiarism is the unlawful claiming of another’s work as my own. I also understand that plagiarized
work will result in my failing the senior research project graduation requirement. I will do my best to come up with
original thoughts and to cite others’ work when I fi nd it necessary to use their ideas.
(double space)
Sincerely,
(four spaces – sign your name here)
Jamaal Jones (type your name here)
★276
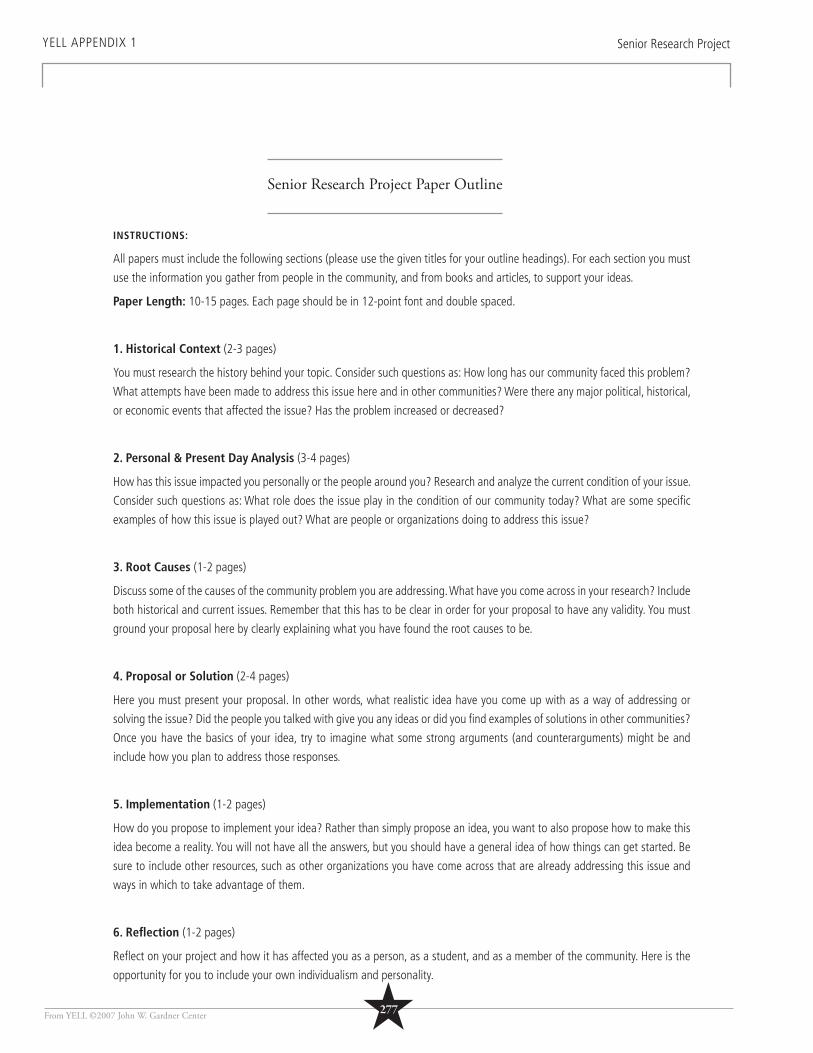
From YELL ©2007 John W. Gardner Center
YELL APPENDIX 1 Senior Research Project
Senior Research Project Paper Outline
INSTRUCTIONS:
All papers must include the following sections (please use the given titles for your outline headings). For each section you must
use the information you gather from people in the community, and from books and articles, to support your ideas.
Paper Length: 10-15 pages. Each page should be in 12-point font and double spaced.
1. Historical Context (2-3 pages)
You must research the history behind your topic. Consider such questions as: How long has our community faced this problem?
What attempts have been made to address this issue here and in other communities? Were there any major political, historical,
or economic events that affected the issue? Has the problem increased or decreased?
2. Personal & Present Day Analysis (3-4 pages)
How has this issue impacted you personally or the people around you? Research and analyze the current condition of your issue.
Consider such questions as: What role does the issue play in the condition of our community today? What are some specifi c
examples of how this issue is played out? What are people or organizations doing to address this issue?
3. Root Causes (1-2 pages)
Discuss some of the causes of the community problem you are addressing. What have you come across in your research? Include
both historical and current issues. Remember that this has to be clear in order for your proposal to have any validity. You must
ground your proposal here by clearly explaining what you have found the root causes to be.
4. Proposal or Solution (2-4 pages)
Here you must present your proposal. In other words, what realistic idea have you come up with as a way of addressing or
solving the issue? Did the people you talked with give you any ideas or did you fi nd examples of solutions in other communities?
Once you have the basics of your idea, try to imagine what some strong arguments (and counterarguments) might be and
include how you plan to address those responses.
5. Implementation (1-2 pages)
How do you propose to implement your idea? Rather than simply propose an idea, you want to also propose how to make this
idea become a reality. You will not have all the answers, but you should have a general idea of how things can get started. Be
sure to include other resources, such as other organizations you have come across that are already addressing this issue and
ways in which to take advantage of them.
6. Refl ection (1-2 pages)
Refl ect on your project and how it has affected you as a person, as a student, and as a member of the community. Here is the
opportunity for you to include your own individualism and personality.
★277
From YELL ©2007 John W. Gardner Center
YELL APPENDIX 1 Senior Research Project
How to Write a Reading List
DEFINITION:
A reading list compiles at least 10 documents (e.g., books, articles, Web sites), each at least fi ve pages long, that you
are going to use as sources for your senior paper. Eventually it will be your annotated bibliography at the end of your
paper!
PURPOSE:
A reading list will help you focus on fi nding the material you need to help you write your fi nal paper. The reading list
will show your senior advisor that you have started working and will give your advisor a chance to point you toward
better resources when appropriate.
REQUIREMENTS:
A reading list looks just like a bibliography. You must list at least 10 documents that you will read as research for your
fi nal paper. Your advisor may have their own style that they prefer you use, and there are a number of examples with
the popular styles (such as APA or MLA) online at www.docstyles.com. These documents will provide you with the
information you need to write each section of your fi nal paper.
SAMPLE READING LIST:
Dworkin, J.B., Larson R., & Hansen D. (2003) Adolescents’ accounts of growth experiences in youth activities. Journal
of Youth and Adolescence. 32: 17-26
Greenberg, M.T., Weissberg, R.P., O’Brien M.U., Zins, J.E., Fredericks L., Resnik, H., & Elias, M.J. (2003) Enhancing
school-based prevention and youth development through coordinated social, emotional, and academic learning.
American Psychologist. 58: 466-474.
Larson, R. (2000). Towards a psychology of positive youth development. American Psychologist. 55: 170-183.
McLaughlin, M. (2000). Community counts: how youth organizations matter for youth development. Washington, DC:
Public Education Network.
Roth, J.L. & Brooks-Gunn, J. (2003). Youth development programs: risk, prevention and policy. Journal of Adolescent
Health. 32:170-182.
Werner, E. (2005). Resilience and recovery: fi ndings from the Kauai longitudinal study. Focal Point: Research, Policy
and Practice in Children’s Mental Health. 19: 11-14.
★278
From YELL ©2007 John W. Gardner Center
YELL APPENDIX 1 Senior Research Project
How to Write an Annotated Bibliography
DEFINITION:
An annotated bibliography is an organized list of your research sources (e.g., books, newspapers, magazines, Web pages) each
of which is followed by a brief note or “annotation.”
PURPOSE:
An annotated bibliography helps you organize your research and keep track of the main ideas you fi nd.
REQUIREMENTS:
Your annotated bibliography must include at least fi ve sources (e.g., articles, books) that you have used in your research.
How does an annotated bibliography look? You write and arrange the bibliographic entries just as you would any other
bibliography. They are usually arranged alphabetically by the fi rst word, which is typically the author’s last name. The short note,
or annotation, then immediately follows the bibliographic information.
Each annotation consists of:
• A description of the content and focus of the book or article.
• Analysis of any conclusions the author(s) made.
• Your reaction to the document and its usefulness.
Sample Annotation (an annotated bibliography is a page of entities like this):
London, Herbert. “Five Myths of the Television Age.” Television Quarterly 10 (1) Spring 1982: 81-89.
Herbert London, the dean of journalism at New York University and author of several books and articles, explains how television
contradicts fi ve commonly believed ideas. He uses specifi c examples of events seen on television, such as the assassination of
John Kennedy, to illustrate his points. His examples have been selected to contradict such truisms as: “Seeing is believing;” “A
picture is worth a thousand words;” and “Satisfaction is its own reward.” London uses logical arguments to support his ideas
which are his personal opinion. He doesn’t refer to any previous works on the topic.
★279
From YELL ©2007 John W. Gardner Center
YELL APPENDIX 1 Senior Research Project
Annotated Bibliography Work Sheet
1. ARTICLE NAME: __________________________________________________________________________
What was the main point of the article?
What is something new you learned from the article?
Do you agree or disagree with what people said in the article? Why or why not?
2.ARTICLE NAME: ____________________________________________________________________________
What was the main point of the article?
What is something new you learned from the article?
Do you agree or disagree with what people said in the article? Why or why not?
3. ARTICLE NAME: ___________________________________________________________________________
What was the main point of the article?
What is something new you learned from the article?
Do you agree or disagree with what people said in the article? Why or why not?
4. ARTICLE NAME: ___________________________________________________________________________
What was the main point of the article?
What is something new you learned from the article?
Do you agree or disagree with what people said in the article? Why or why not?
★280
From YELL ©2007 John W. Gardner Center
YELL APPENDIX 1 Senior Research Project
Senior Research Project Sign-Off Form
This form is to be kept with the senior research project planning packet and presented to a Senior Research Project Cohort
leader for sign-off on the appropriate dates. The completed form is a part of the fi nal senior research project presentation.
TASK DATE SIGN-OFF
1. Attendance at Senior Research Project Cohort Meeting
2. Return of Signed Parent/Guardian Letter
3. Submission of Letter of Intent
4. Attendance at Senior Research Project Cohort Meeting
5. Submission of Reading List
6. Submission of Annotated Bibliography
7. Attendance at Senior Research Project Cohort Meeting
8. Submission of First Three Sections of Paper
9. Attendance at Senior Research Project Cohort Meeting
10. Submission of Last Three Sections of Paper
11. Submission of First Draft of Paper
12. Attendance at Senior Research Project Cohort Meeting
13. Submission of Final Draft of Paper
14. Final Presentation of Product and Paper
★281
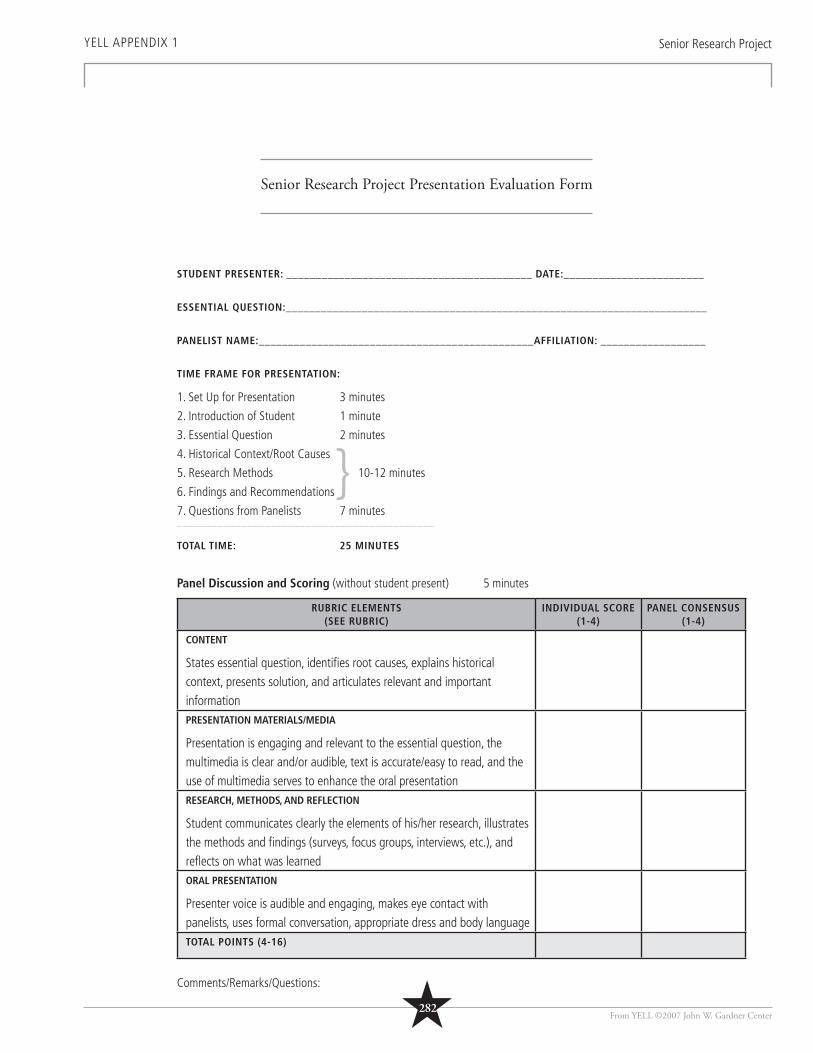
From YELL ©2007 John W. Gardner Center
YELL APPENDIX 1 Senior Research Project
Senior Research Project Presentation Evaluation Form
STUDENT PRESENTER: __________________________________________ DATE:________________________
ESSENTIAL QUESTION:________________________________________________________________________
PANELIST NAME:_______________________________________________AFFILIATION: __________________
TIME FRAME FOR PRESENTATION:
1. Set Up for Presentation 3 minutes
2. Introduction of Student 1 minute
3. Essential Question 2 minutes
4. Historical Context/Root Causes
5. Research Methods 10-12 minutes
6. Findings and Recommendations
7. Questions from Panelists 7 minutes____________________________________________
TOTAL TIME: 25 MINUTES
Panel Discussion and Scoring (without student present) 5 minutes
RUBRIC ELEMENTS (SEE RUBRIC)
INDIVIDUAL SCORE (1-4)
PANEL CONSENSUS (1-4)
CONTENT
States essential question, identifi es root causes, explains historical context, presents solution, and articulates relevant and important informationPRESENTATION MATERIALS/MEDIA
Presentation is engaging and relevant to the essential question, the multimedia is clear and/or audible, text is accurate/easy to read, and the use of multimedia serves to enhance the oral presentationRESEARCH, METHODS, AND REFLECTION
Student communicates clearly the elements of his/her research, illustrates the methods and fi ndings (surveys, focus groups, interviews, etc.), and refl ects on what was learnedORAL PRESENTATION
Presenter voice is audible and engaging, makes eye contact with panelists, uses formal conversation, appropriate dress and body language TOTAL POINTS (4-16)
Comments/Remarks/Questions:
}
★282
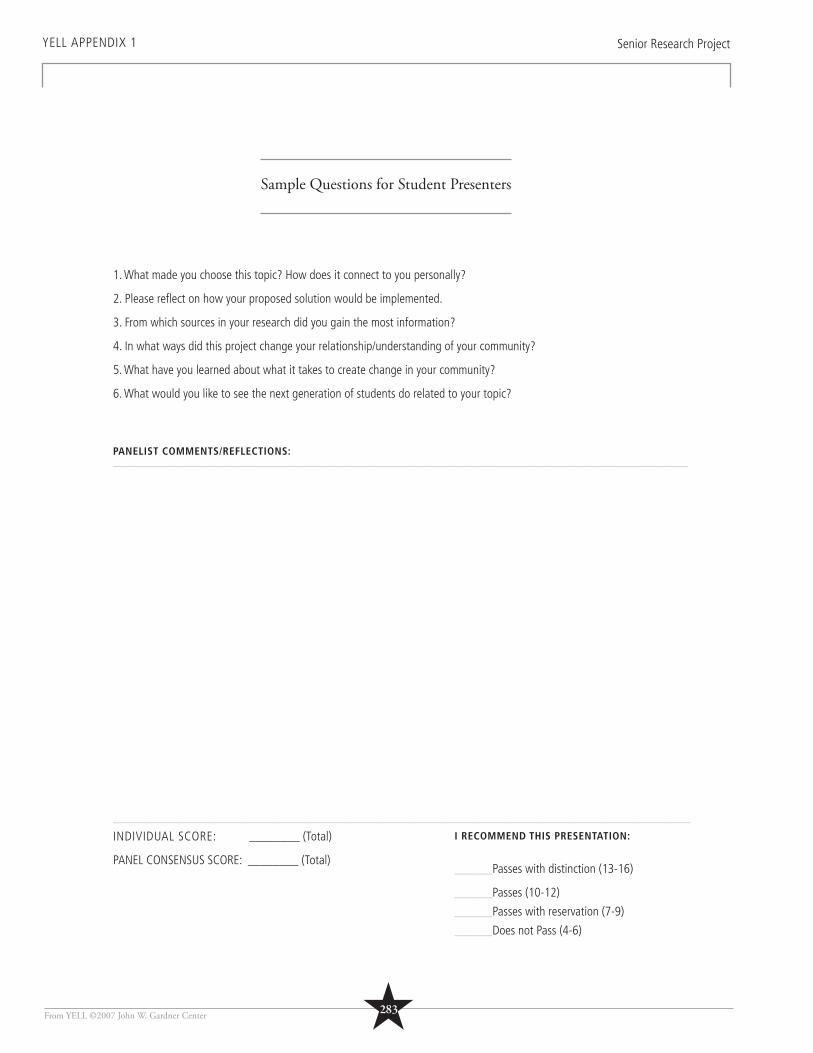
From YELL ©2007 John W. Gardner Center
YELL APPENDIX 1 Senior Research Project
Sample Questions for Student Presenters
1. What made you choose this topic? How does it connect to you personally?
2. Please refl ect on how your proposed solution would be implemented.
3. From which sources in your research did you gain the most information?
4. In what ways did this project change your relationship/understanding of your community?
5. What have you learned about what it takes to create change in your community?
6. What would you like to see the next generation of students do related to your topic?
PANELIST COMMENTS/REFLECTIONS:___________________________________________________________________________________________
__________________________________________________________________________________________
INDIVIDUAL SCORE: ________ (Total)
PANEL CONSENSUS SCORE: ________ (Total)
★283
I RECOMMEND THIS PRESENTATION:
______Passes with distinction (13-16)
______Passes (10-12)
______Passes with reservation (7-9)
______Does not Pass (4-6)
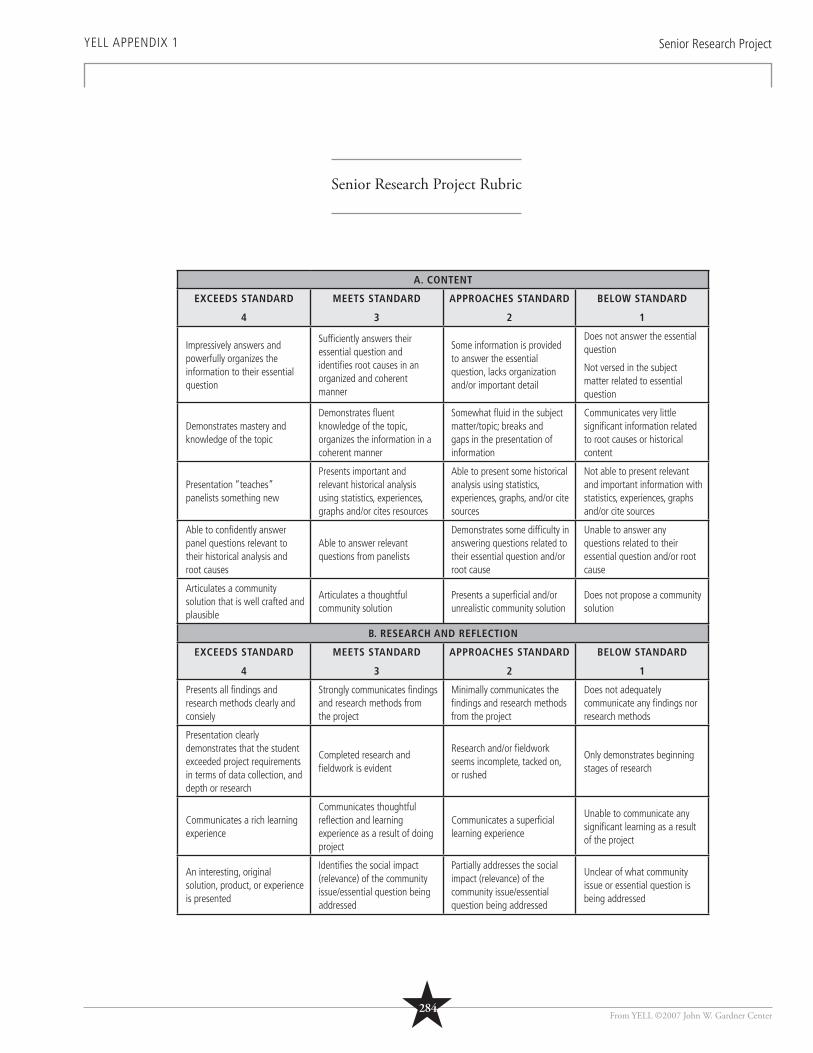
From YELL ©2007 John W. Gardner Center
YELL APPENDIX 1 Senior Research Project
Senior Research Project Rubric
A. CONTENT
EXCEEDS STANDARD
4
MEETS STANDARD
3
APPROACHES STANDARD
2
BELOW STANDARD
1
Impressively answers and powerfully organizes the information to their essential question
Suffi ciently answers their essential question and identifi es root causes in an organized and coherent manner
Some information is provided to answer the essential question, lacks organization and/or important detail
Does not answer the essential question
Not versed in the subject matter related to essential question
Demonstrates mastery and knowledge of the topic
Demonstrates fl uent knowledge of the topic, organizes the information in a coherent manner
Somewhat fl uid in the subject matter/topic; breaks and gaps in the presentation of information
Communicates very little signifi cant information related to root causes or historical content
Presentation “teaches” panelists something new
Presents important and relevant historical analysis using statistics, experiences, graphs and/or cites resources
Able to present some historical analysis using statistics, experiences, graphs, and/or cite sources
Not able to present relevant and important information with statistics, experiences, graphs and/or cite sources
Able to confi dently answer panel questions relevant to their historical analysis and root causes
Able to answer relevant questions from panelists
Demonstrates some diffi culty in answering questions related to their essential question and/or root cause
Unable to answer any questions related to their essential question and/or root cause
Articulates a community solution that is well crafted and plausible
Articulates a thoughtful community solution
Presents a superfi cial and/or unrealistic community solution
Does not propose a community solution
B. RESEARCH AND REFLECTION
EXCEEDS STANDARD
4
MEETS STANDARD
3
APPROACHES STANDARD
2
BELOW STANDARD
1
Presents all fi ndings and research methods clearly and consiely
Strongly communicates fi ndings and research methods from the project
Minimally communicates the fi ndings and research methods from the project
Does not adequately communicate any fi ndings nor research methods
Presentation clearly demonstrates that the student exceeded project requirements in terms of data collection, and depth or research
Completed research and fi eldwork is evident
Research and/or fi eldwork seems incomplete, tacked on, or rushed
Only demonstrates beginning stages of research
Communicates a rich learning experience
Communicates thoughtful refl ection and learning experience as a result of doing project
Communicates a superfi cial learning experience
Unable to communicate any signifi cant learning as a result of the project
An interesting, original solution, product, or experience is presented
Identifi es the social impact (relevance) of the community issue/essential question being addressed
Partially addresses the social impact (relevance) of the community issue/essential question being addressed
Unclear of what community issue or essential question is being addressed
★284
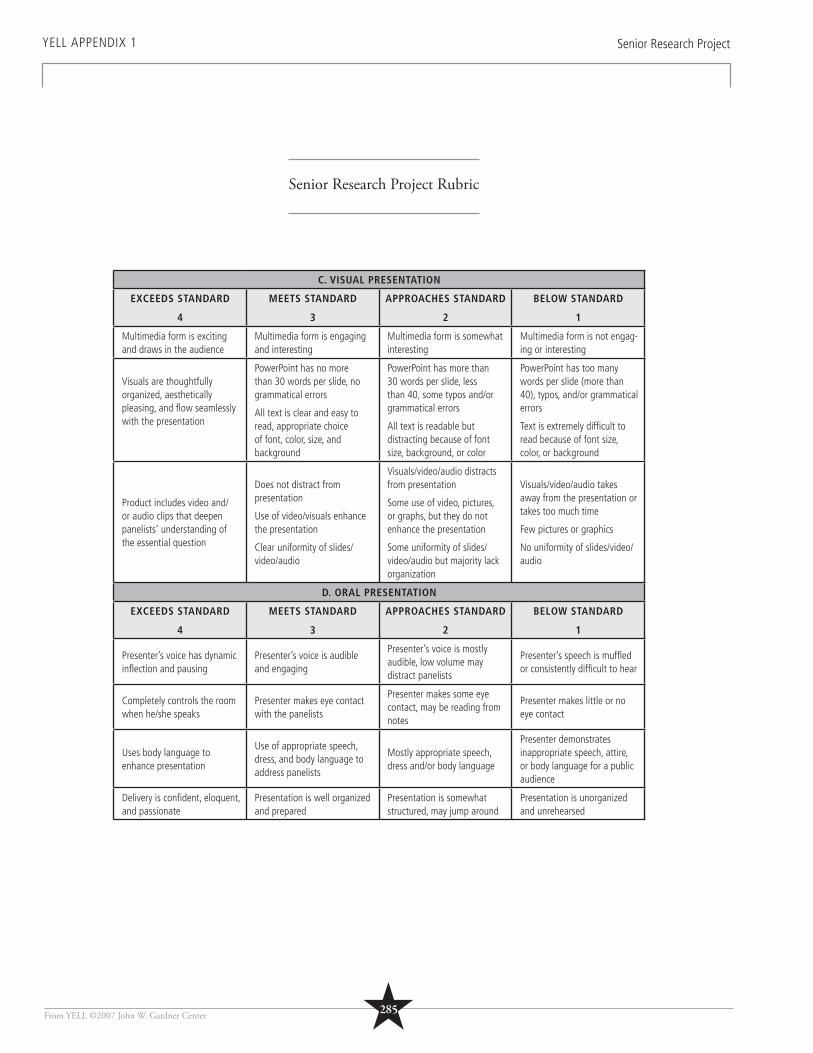
From YELL ©2007 John W. Gardner Center
YELL APPENDIX 1 Senior Research Project
Senior Research Project Rubric
C. VISUAL PRESENTATION
EXCEEDS STANDARD
4
MEETS STANDARD
3
APPROACHES STANDARD
2
BELOW STANDARD
1
Multimedia form is exciting and draws in the audience
Multimedia form is engaging and interesting
Multimedia form is somewhat interesting
Multimedia form is not engag-ing or interesting
Visuals are thoughtfully organized, aesthetically pleasing, and fl ow seamlessly with the presentation
PowerPoint has no more than 30 words per slide, no grammatical errors
All text is clear and easy to read, appropriate choice of font, color, size, and background
PowerPoint has more than 30 words per slide, less than 40, some typos and/or grammatical errors
All text is readable but distracting because of font size, background, or color
PowerPoint has too many words per slide (more than 40), typos, and/or grammatical errors
Text is extremely diffi cult to read because of font size, color, or background
Product includes video and/or audio clips that deepen panelists’ understanding of the essential question
Does not distract from presentation
Use of video/visuals enhance the presentation
Clear uniformity of slides/video/audio
Visuals/video/audio distracts from presentation
Some use of video, pictures, or graphs, but they do not enhance the presentation
Some uniformity of slides/video/audio but majority lack organization
Visuals/video/audio takes away from the presentation or takes too much time
Few pictures or graphics
No uniformity of slides/video/audio
D. ORAL PRESENTATION
EXCEEDS STANDARD
4
MEETS STANDARD
3
APPROACHES STANDARD
2
BELOW STANDARD
1
Presenter’s voice has dynamic infl ection and pausing
Presenter’s voice is audible and engaging
Presenter’s voice is mostly audible, low volume may distract panelists
Presenter’s speech is muffl ed or consistently diffi cult to hear
Completely controls the room when he/she speaks
Presenter makes eye contact with the panelists
Presenter makes some eye contact, may be reading from notes
Presenter makes little or no eye contact
Uses body language to enhance presentation
Use of appropriate speech, dress, and body language to address panelists
Mostly appropriate speech, dress and/or body language
Presenter demonstrates inappropriate speech, attire, or body language for a public audience
Delivery is confi dent, eloquent, and passionate
Presentation is well organized and prepared
Presentation is somewhat structured, may jump around
Presentation is unorganized and unrehearsed
★285
From YELL ©2007 John W. Gardner Center
YELL APPENDIX 2 Additional YELL Resources
Appendix 2
A D D IT I O NA L
Y E L L R E S O UR C E S
★286

From YELL ©2007 John W. Gardner Center
YELL APPENDIX 2 Additional YELL Resources
Notes
★287
From YELL ©2007 John W. Gardner Center
YELL APPENDIX 2 Additional YELL Resources
What is Youth Development?
Youth Development is an area of scholarship and practice devoted to understanding and supporting the developmental
process between adolescence and adulthood. A youth development approach sets positive outcomes for young people and
provides information on how best to support young people’s growth and transitions into healthy, stable adults.
There is consensus among researchers, teachers, parents, and community members that young people need to develop certain
assets. According to the National Research Council and the Institute of Medicine’s 2002 report “Community Programs to
Promote Youth Development,”1 positive youth development requires healthy growth in and across the following areas:
Physical Development – Good health habits and risk management skills.•
Intellectual Development – Knowledge of essential life and vocational skills, school success, critical thinking, reasoning and •
decision-making skills, ability to navigate through multiple cultural contexts.
Psychological and Emotional Development – Good mental health, positive self-regard, social identity, coping and confl ict •
resolution skills; “planfulness,” autonomy, pro-social values, strong moral character.
Social Development – Connectedness, sense of social place/integration, attachment to conventional institutions, ability to •
navigate in multiple contexts, civic engagement.
Success from a Youth Development Perspective:
The Community Network for Youth Development2 defi nes success as what we want young people to be able to do as they enter
early adulthood. There are three broad categories of what, at a minimum, we hope all young people will attain:
Economic Self-Suffi ciency• means that all youth should expect as adults to be able to support themselves and their
families, and to have some resources beyond basic survival needs. They should have decent jobs and the education or
access to education to improve or change jobs.
Healthy Family and Social Relationships• means that young people should grow up to be physically and mentally
healthy, be supportive parents if they have children, and have positive family and friendship networks.
Contributing to Community • can take many forms, but we hope that young people will look to do more than be
taxpayers and law-abiders – to contribute at a level where they add to their community, however they defi ne the term.
1 The most comprehensive report of its kind that evaluates and integrates the current research related to community programs for youth: Eccles, J. and J.A. Gootman, Eds. (2002). Community programs to promote youth development. Washington, DC: National Academy Press. www.nap.edu/openbook.php?isbn=0309072751 http://www.nap.edu/openbook.php?isbn=0309072751
2 CNYD. (2001).Youth Development Guide: Engaging young people in after-school programming. Community Network for Youth Development, San Francisco: www.cnyd.org/trainingtools/index.php.
★288
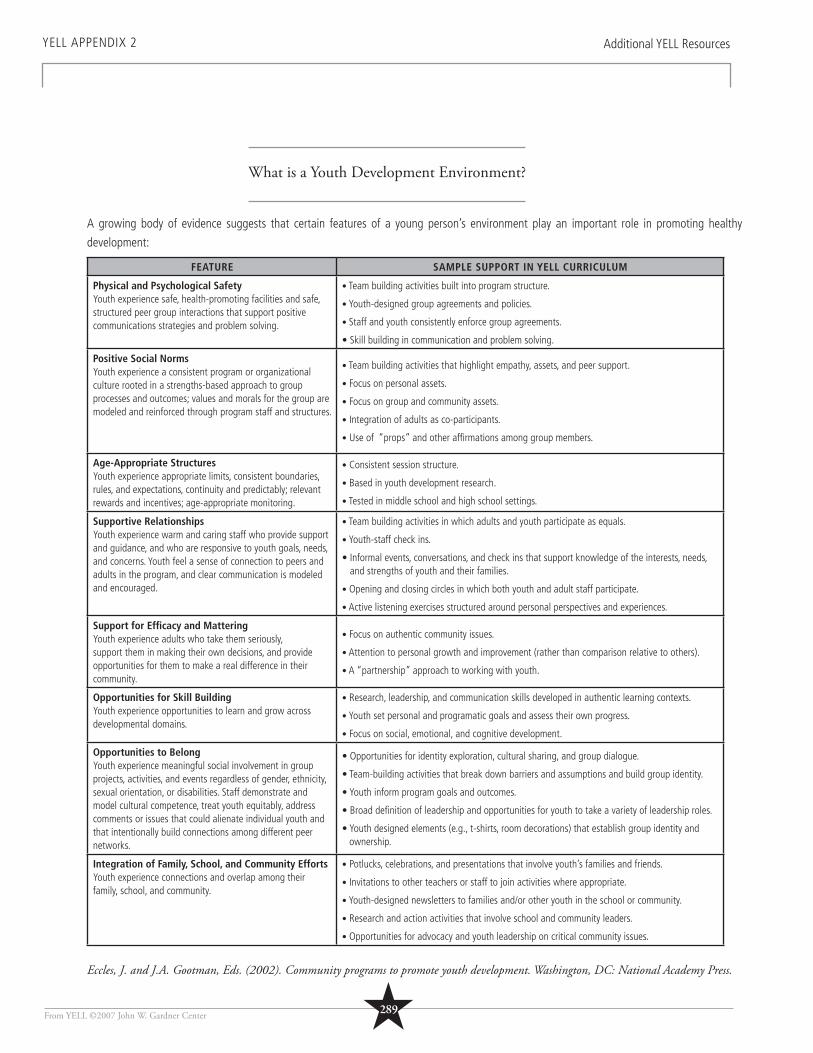
From YELL ©2007 John W. Gardner Center
YELL APPENDIX 2 Additional YELL Resources
What is a Youth Development Environment?
A growing body of evidence suggests that certain features of a young person’s environment play an important role in promoting healthy
development:
FEATURE SAMPLE SUPPORT IN YELL CURRICULUM
Physical and Psychological SafetyYouth experience safe, health-promoting facilities and safe, structured peer group interactions that support positive communications strategies and problem solving.
• Team building activities built into program structure.
• Youth-designed group agreements and policies.
• Staff and youth consistently enforce group agreements.
• Skill building in communication and problem solving.
Positive Social NormsYouth experience a consistent program or organizational culture rooted in a strengths-based approach to group processes and outcomes; values and morals for the group are modeled and reinforced through program staff and structures.
• Team building activities that highlight empathy, assets, and peer support.
• Focus on personal assets.
• Focus on group and community assets.
• Integration of adults as co-participants.
• Use of “props” and other affi rmations among group members.
Age-Appropriate StructuresYouth experience appropriate limits, consistent boundaries, rules, and expectations, continuity and predictably; relevant rewards and incentives; age-appropriate monitoring.
• Consistent session structure.
• Based in youth development research.
• Tested in middle school and high school settings.
Supportive RelationshipsYouth experience warm and caring staff who provide support and guidance, and who are responsive to youth goals, needs, and concerns. Youth feel a sense of connection to peers and adults in the program, and clear communication is modeled and encouraged.
• Team building activities in which adults and youth participate as equals.
• Youth-staff check ins.
• Informal events, conversations, and check ins that support knowledge of the interests, needs, and strengths of youth and their families.
• Opening and closing circles in which both youth and adult staff participate.
• Active listening exercises structured around personal perspectives and experiences.
Support for Effi cacy and MatteringYouth experience adults who take them seriously, support them in making their own decisions, and provide opportunities for them to make a real difference in their community.
• Focus on authentic community issues.
• Attention to personal growth and improvement (rather than comparison relative to others).
• A “partnership” approach to working with youth.
Opportunities for Skill BuildingYouth experience opportunities to learn and grow across developmental domains.
• Research, leadership, and communication skills developed in authentic learning contexts.
• Youth set personal and programatic goals and assess their own progress.
• Focus on social, emotional, and cognitive development.
Opportunities to BelongYouth experience meaningful social involvement in group projects, activities, and events regardless of gender, ethnicity, sexual orientation, or disabilities. Staff demonstrate and model cultural competence, treat youth equitably, address comments or issues that could alienate individual youth and that intentionally build connections among different peer networks.
• Opportunities for identity exploration, cultural sharing, and group dialogue.
• Team-building activities that break down barriers and assumptions and build group identity.
• Youth inform program goals and outcomes.
• Broad defi nition of leadership and opportunities for youth to take a variety of leadership roles.
• Youth designed elements (e.g., t-shirts, room decorations) that establish group identity and ownership.
Integration of Family, School, and Community EffortsYouth experience connections and overlap among their family, school, and community.
• Potlucks, celebrations, and presentations that involve youth’s families and friends.
• Invitations to other teachers or staff to join activities where appropriate.
• Youth-designed newsletters to families and/or other youth in the school or community.
• Research and action activities that involve school and community leaders.
• Opportunities for advocacy and youth leadership on critical community issues.
Eccles, J. and J.A. Gootman, Eds. (2002). Community programs to promote youth development. Washington, DC: National Academy Press.
★289
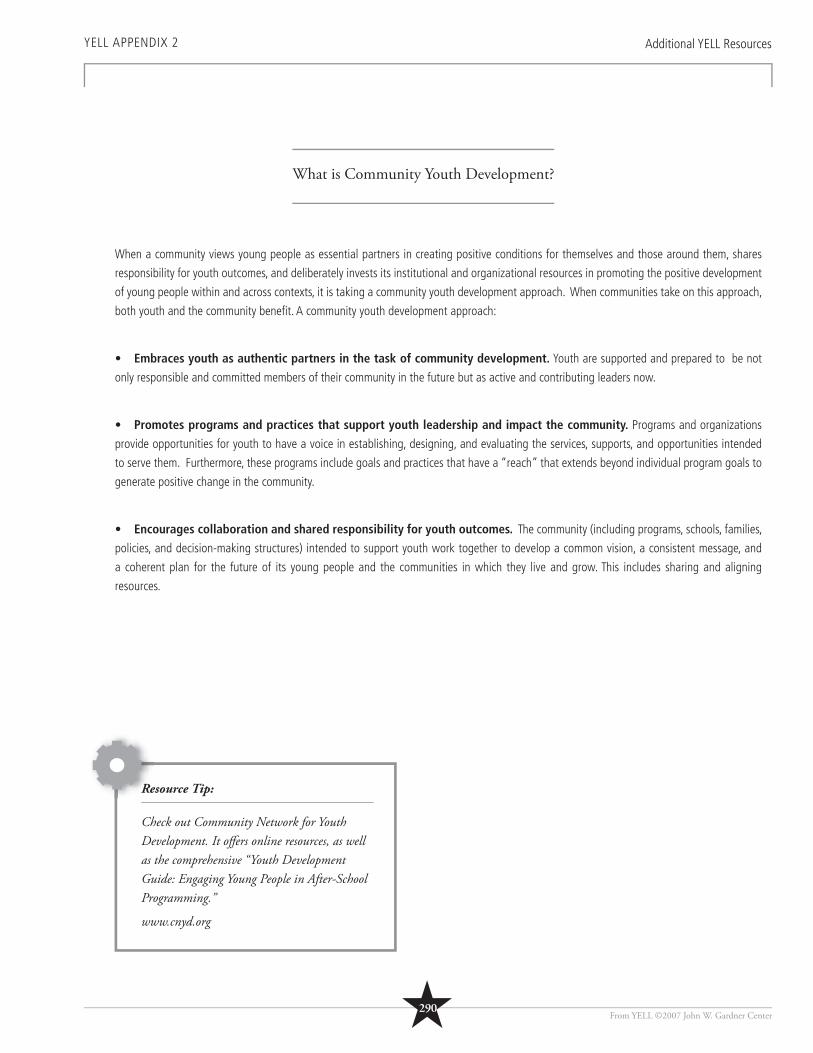
From YELL ©2007 John W. Gardner Center
YELL APPENDIX 2 Additional YELL Resources
What is Community Youth Development?
Resource Tip:
Check out Community Network for Youth Development. It off ers online resources, as well as the comprehensive “Youth Development Guide: Engaging Young People in After-School Programming.”
www.cnyd.org
When a community views young people as essential partners in creating positive conditions for themselves and those around them, shares
responsibility for youth outcomes, and deliberately invests its institutional and organizational resources in promoting the positive development
of young people within and across contexts, it is taking a community youth development approach. When communities take on this approach,
both youth and the community benefi t. A community youth development approach:
• Embraces youth as authentic partners in the task of community development. Youth are supported and prepared to be not
only responsible and committed members of their community in the future but as active and contributing leaders now.
• Promotes programs and practices that support youth leadership and impact the community. Programs and organizations
provide opportunities for youth to have a voice in establishing, designing, and evaluating the services, supports, and opportunities intended
to serve them. Furthermore, these programs include goals and practices that have a “reach” that extends beyond individual program goals to
generate positive change in the community.
• Encourages collaboration and shared responsibility for youth outcomes. The community (including programs, schools, families,
policies, and decision-making structures) intended to support youth work together to develop a common vision, a consistent message, and
a coherent plan for the future of its young people and the communities in which they live and grow. This includes sharing and aligning
resources.
Re
★290
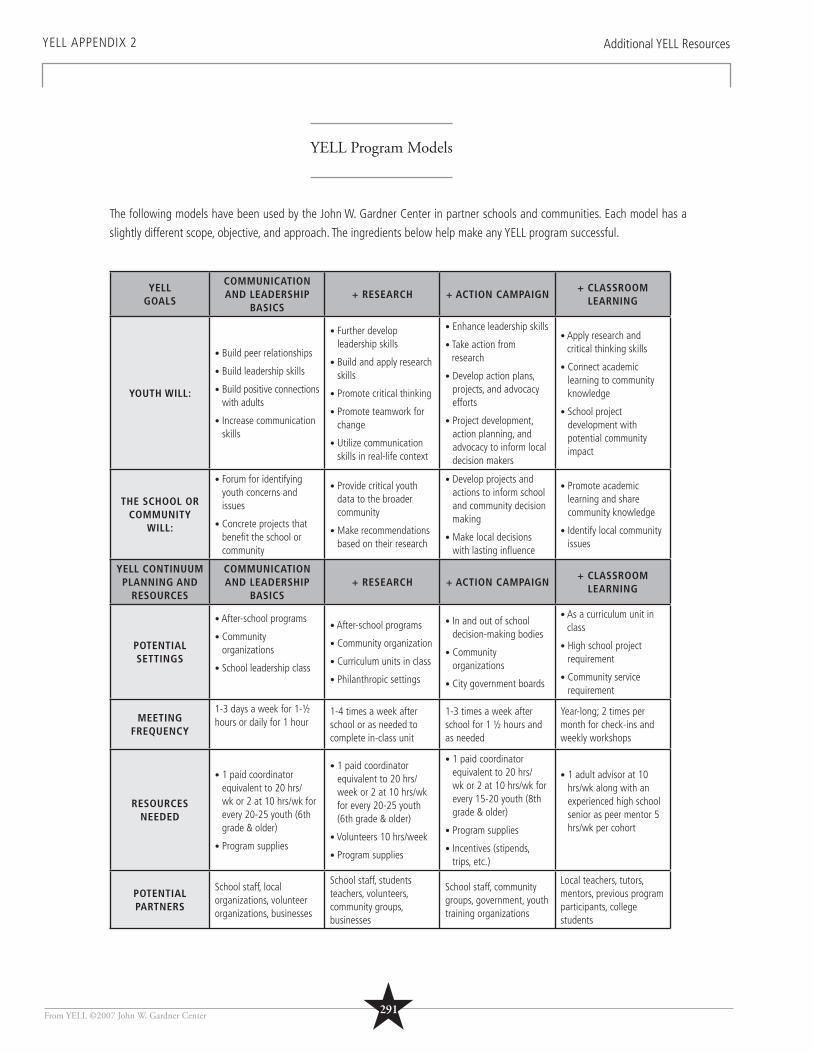
From YELL ©2007 John W. Gardner Center
YELL APPENDIX 2 Additional YELL Resources
★291
YELL Program Models
The following models have been used by the John W. Gardner Center in partner schools and communities. Each model has a
slightly different scope, objective, and approach. The ingredients below help make any YELL program successful.
YELLGOALS
COMMUNICATION AND LEADERSHIP
BASICS+ RESEARCH + ACTION CAMPAIGN
+ CLASSROOM LEARNING
YOUTH WILL:
• Build peer relationships
• Build leadership skills
• Build positive connections with adults
• Increase communication skills
• Further develop leadership skills
• Build and apply research skills
• Promote critical thinking
• Promote teamwork for change
• Utilize communication skills in real-life context
• Enhance leadership skills
• Take action from research
• Develop action plans, projects, and advocacy efforts
• Project development, action planning, and advocacy to inform local decision makers
• Apply research and critical thinking skills
• Connect academic learning to community knowledge
• School project development with potential community impact
THE SCHOOL OR COMMUNITY
WILL:
• Forum for identifying youth concerns and issues
• Concrete projects that benefi t the school or community
• Provide critical youth data to the broader community
• Make recommendations based on their research
• Develop projects and actions to inform school and community decision making
• Make local decisions with lasting infl uence
• Promote academic learning and share community knowledge
• Identify local community issues
YELL CONTINUUMPLANNING AND
RESOURCES
COMMUNICATION AND LEADERSHIP
BASICS+ RESEARCH + ACTION CAMPAIGN
+ CLASSROOM LEARNING
POTENTIAL SETTINGS
• After-school programs
• Community organizations
• School leadership class
• After-school programs
• Community organization
• Curriculum units in class
• Philanthropic settings
• In and out of school decision-making bodies
• Community organizations
• City government boards
• As a curriculum unit in class
• High school project requirement
• Community service requirement
MEETING FREQUENCY
1-3 days a week for 1-½ hours or daily for 1 hour
1-4 times a week after school or as needed to complete in-class unit
1-3 times a week after school for 1 ½ hours and as needed
Year-long; 2 times per month for check-ins and weekly workshops
RESOURCES NEEDED
• 1 paid coordinator equivalent to 20 hrs/wk or 2 at 10 hrs/wk for every 20-25 youth (6th grade & older)
• Program supplies
• 1 paid coordinator equivalent to 20 hrs/week or 2 at 10 hrs/wk for every 20-25 youth (6th grade & older)
• Volunteers 10 hrs/week
• Program supplies
• 1 paid coordinator equivalent to 20 hrs/wk or 2 at 10 hrs/wk for every 15-20 youth (8th grade & older)
• Program supplies
• Incentives (stipends, trips, etc.)
• 1 adult advisor at 10 hrs/wk along with an experienced high school senior as peer mentor 5 hrs/wk per cohort
POTENTIAL PARTNERS
School staff, local organizations, volunteer organizations, businesses
School staff, students teachers, volunteers, community groups, businesses
School staff, community groups, government, youth training organizations
Local teachers, tutors, mentors, previous program participants, college students
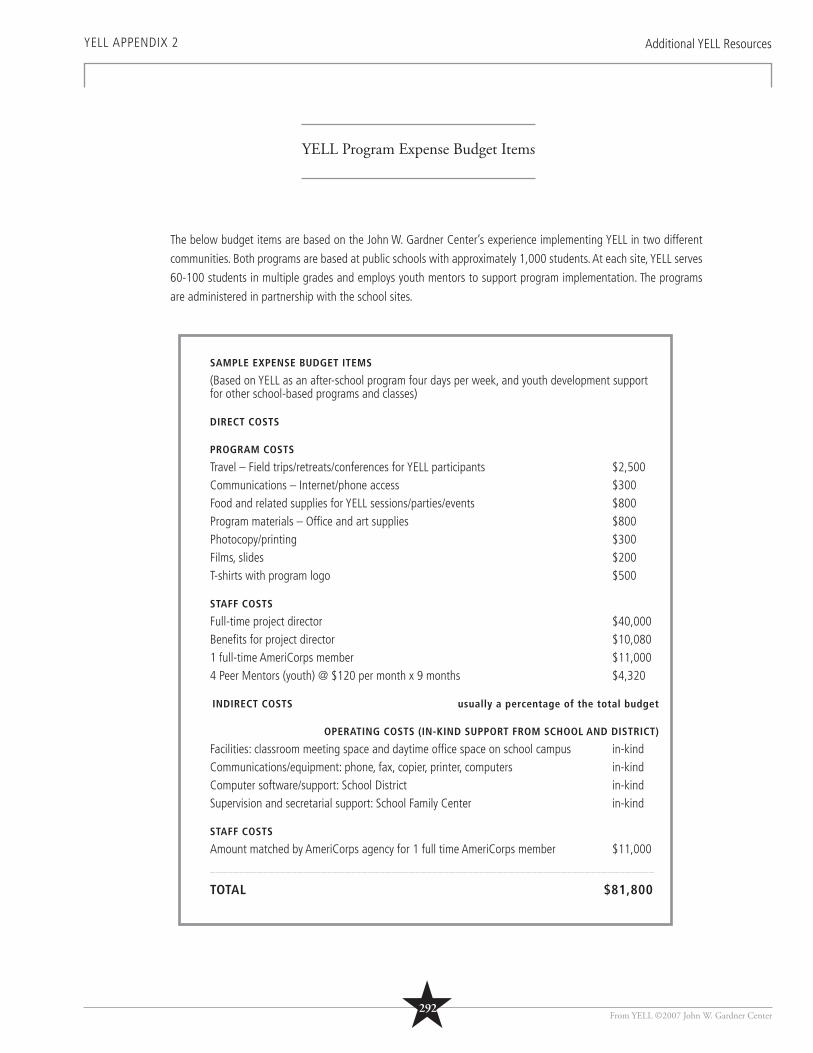
From YELL ©2007 John W. Gardner Center
YELL APPENDIX 2 Additional YELL Resources
YELL Program Expense Budget Items
The below budget items are based on the John W. Gardner Center’s experience implementing YELL in two different
communities. Both programs are based at public schools with approximately 1,000 students. At each site, YELL serves
60-100 students in multiple grades and employs youth mentors to support program implementation. The programs
are administered in partnership with the school sites.
SAMPLE EXPENSE BUDGET ITEMS
(Based on YELL as an after-school program four days per week, and youth development support for other school-based programs and classes)
DIRECT COSTS
PROGRAM COSTS
Travel – Field trips/retreats/conferences for YELL participants $2,500Communications – Internet/phone access $300Food and related supplies for YELL sessions/parties/events $800Program materials – Offi ce and art supplies $800Photocopy/printing $300Films, slides $200T-shirts with program logo $500
STAFF COSTS
Full-time project director $40,000Benefi ts for project director $10,0801 full-time AmeriCorps member $11,0004 Peer Mentors (youth) @ $120 per month x 9 months $4,320
INDIRECT COSTS usually a percentage of the total budget
OPERATING COSTS (IN-KIND SUPPORT FROM SCHOOL AND DISTRICT)
Facilities: classroom meeting space and daytime offi ce space on school campus in-kindCommunications/equipment: phone, fax, copier, printer, computers in-kindComputer software/support: School District in-kindSupervision and secretarial support: School Family Center in-kind
STAFF COSTS
Amount matched by AmeriCorps agency for 1 full time AmeriCorps member $11,000____________________________________________________________________________
TOTAL $81,800
★292
From YELL ©2007 John W. Gardner Center
YELL APPENDIX 2 Additional YELL Resources
★293
YELL as a Sustainable Program: Sources of Support
Project Support is vital to the success and continuity of the project. Not only is fi nancial support needed, but
humanpower and in-kind resources are required as well.
KNOW YOUR RESOURCES – START WITH A LIST
Awareness of what resources you have and what resources you need is important. Also, remember there will always
be surprise expenses along the way, so be realistic and round up on estimates of costs and time, NOT down.
Questions to start your list (you can also use the sample budget as a starting point):
• What do I need to support me personally – who or where can I go with questions or concerns?
• Where will YELL meet? Does the current space meet the needs of the program?
• What do I need for materials? Where can I get these materials?
• Who are already supporters of the program in my community?
• Who doesn’t currently know about the program that might support it?
SOURCES OF SUPPORT FOR YOUR PROGRAM OR PROJECT
• IN-KIND SUPPORT FROM SCHOOLS
Most schools will be able to offer some in-kind support. In-kind support could be anything on your list that already exists
at the school that can be used for the YELL program (such as a classroom that is designated for the program, access to
copy machines, access to a school library, or release time for a teacher or facilitator to plan for YELL). Finding allies and
resources within the schools that youth attend is an important part of creating a sustainable program.
• FINANCIAL SUPPORT FROM SCHOOLS
Some schools do have some form of funding to support youth programs. Often the funds for youth programs have been
set aside for a specifi c use (e.g., violence prevention, health education). It can take considerable effort to uncover which
funds could be utilized to support YELL, but if you can fi nd the right supporters in an individual school’s administration,
then you are more likely to learn about opportunities for fi nancial support for your work.
• SUPPORT FROM CAREGIVERS
In addition to encouraging support for the youth in the program, learn more about what caregivers might want to
contribute to the program. Donating time and resources often is a good way to help caregivers feel connected and
supportive of the program. Clear communication about what support you would like and how you would like to use
it should be emphasized.
From YELL ©2007 John W. Gardner Center
YELL APPENDIX 2 Additional YELL Resources
• SUPPORT FROM THE COMMUNITY
Many communities have community-based organizations and/or public facilities (e.g. park and recreation departments) to serve
the youth in the communities in which you are working. Collaboration with others can benefi t all youth in the community. Be
aware that collaboration with other groups can be VERY time consuming. Be strategic about what kinds of conversations, which
organizations you approach, and the organizations with which you are open to collaborating. Remember that unlikely allies can
sometimes become the strongest allies.
Through collaboration with other organizations you may be able to:
• Secure additional in-kind support.
• Learn more about fi nancial resources available in your community and access them.
• Create sustainable support networks for you and YELL youth.
• WORKING WITH AMERICORPS MEMBERS AND VOLUNTEERS
Previous YELL facilitators have worked closely with AmeriCorps members and other volunteers. Recruiting, supporting, and
fi nding meaningful ways to involve others can enhance your program but can also be resource intensive.
For more information you may want to contact:
• Your school’s Parent Teacher Association (PTA)
• A local United Way Offi ce
• A local AmeriCorps branch or the National Offi ce:
1201 New York Avenue, NW
Washington, DC 20525
Tel.: 202-606-5000
TTY: 202-606-3472
E-mail: [email protected]
A FEW NOTES ABOUT AMERICORPS FROM ITS WEB SITE:
• What is AmeriCorps?: AmeriCorps is a network of local, state, and national service programs that connects more than
70,000 Americans each year in intensive service to meet our country’s critical needs in education, public safety, health, and the
environment.
• What would AmeriCorps provide?: AmeriCorps provides grants only to organizations, not to individuals. Grantees use the
funding to support AmeriCorps members for intensive service in their community. AmeriCorps grants partially cover the expense
of operating an AmeriCorps program and do not cover general organizational expenses. A cash and in-kind match is required.
• How do I fi nd AmeriCorps programs in my own community? Visit the State Profi les on the AmeriCorps Web site.
Grantees are listed by city and organization name. To fi nd the appropriate corporation contact for your state, download the PDF
labeled “National Service Contacts in my State.”
Web site: www.americorps.org/for_organizations/overview/index.asp
★294

From YELL ©2007 John W. Gardner Center
YELL APPENDIX 2 Additional YELL Resources
★295
• FINANCIAL SUPPORT FROM DONATIONS AND FOUNDATIONS
Though in-kind support can help most programs get a great start, it will be important to think long term about how to support
and improve YELL in your community year after year. There are many ways to structure the funding of YELL. The more connected
participants and community members are to the program, the easier it will be to fi nd the fi nancial resources needed to support
the program. However, fundraising can be a very complex and resource-intensive process, so think carefully before you decide
on what strategies you are going to use.
DONATIONS FROM COMMUNITY MEMBERS
Individual donations can add up quickly and can be spent fl exibly, and donors often continue to contribute year after year. If you
do choose to fundraise from individual community members, fi nd out what fundraising events you could combine your efforts with
and what types of events have been successful in your community in the past. Think carefully about engaging youth in fundraising
as it can take up time and energy that could be better spent on other activities.
GRANTS FROM FOUNDATIONS
Community, family, and corporate foundations are another possible source of fi nancial support for YELL. Foundations vary
widely in the size of the grants they offer, in the level of intensity of the application process, and the length of time a funder
will support a particular program. Think carefully about which foundations have giving patterns that align with your program’s
needs. Deciding which foundations to apply to and going through the application process can be very time consuming. However,
developing lasting relationships with foundations can be a critical step in sustaining efforts that benefi t youth and their
communities. In addition, to work with a foundation you must be prepared to articulate the reasons it should support YELL and
align those reasons with the foundation’s criteria for funding programs.
DEPENDING ON YOUR COMMUNITY YOU MAY WANT TO SEEK OUT:
• Corporate giving programs and local businesses that want to contribute to local youth. Corporations often
match the gifts of employees and give funds in the neighborhoods where their employees live and work.
• Community foundations that focus on youth in your county. Community foundations often fund locally with
support from local donors.
• Family foundations that support youth. Family foundations vary widely in their funding priorities. Often family
foundation’s funding programs are focused on a particular way of supporting youth (e.g., education, youth
development, college access).

From YELL ©2007 John W. Gardner Center
YELL APPENDIX 2 Additional YELL Resources
• SUPPORT FROM JOHN W. GARDNER CENTER – STANFORD UNIVERSITY
The John W. Gardner Center supports YELL sites with technical assistance and by continuing to study the short- and
long-term effects of YELL. Please contact the John W. Gardner Center if you would like to request technical assistance
or to learn more about its current work with the YELL program.
CONTACT FOR THE JOHN W. GARDNER CENTER AT STANFORD UNIVERSITY:
John W. Gardner Center for Youth and Their Communities
Stanford University School of Education
505 Lasuen Mall
Stanford, CA 94305-3083
E-MAIL: [email protected]
PHONE: 650-723-1137
WEB SITE: http://jgc.stanford.edu
Facilitation Tip:
When speaking with potential partners, be sure to mention that the YELL curriculum was developed at Stanford University and that it is based on years of research and practice.
★296

★297From YELL ©2007 John W. Gardner Center
NOTES
From YELL ©2007 John W. Gardner Center ★297
From YELL ©2007 John W. Gardner Center
YELL APPENDIX 2 Additional YELL Resources
Resources and Tools
REPORTS, ARTICLES, AND FRAMEWORKS
Community Programs to Promote Youth Development
This report from the National Research Council offers authoritative fi ndings and guidance to practitioners, policymakers,
and researchers on the role of youth development programs in promoting the healthy development and well being of
young people. It lays out the key features of youth programs that contribute to young people’s successful transition
from adolescence to adulthood. (An executive summary of the report can be downloaded from the National Academy
Press at www.nap.edu. The complete report can be read or ordered at: www.nap.edu/books/030907275/html.)
Community Counts: How youth organizations matter for youth development
Based on a dozen years of conversations with youth in challenging urban and rural settings, this publication describes
what motivates youth to participate in community-based organizations. This study offers a better understanding of what
effective youth-based organizations look like, what youth gain by participating in them, and what communities can do
to cultivate and sustain more effective programs for youth. (A free copy of this publication may be downloaded from
the Public Education Network at http://publiceducation.org/pdf/Publications/support_services/communitycounts.pdf
Hard copies may also be obtained from the John W. Gardner Center for Youth and Their Communities.)
The Community Action Framework for Youth Development
This article by Michelle Gambone and James P. Connell provides a comprehensive description of promoting youth
development within a community action framework and highlights the necessary interconnectedness of youth
development and community development. (This article can be found in Volume 11(2) April 2004 issue of the
Prevention Research or online at www.TPRonline.org.)
Community Youth Development: A framework for action
Written by Della Hughes and Susan Curnan, this article provides a comprehensive defi nition and framework for
community youth development and outlines how community development is crucial to the positive development of
young people and the power young people have to contribute to strengthen their communities. (This article can be
found online at www.cydjournal.org/2000Winter/hughes.html.)
A Vehicle for Reform, Toward Collaboration: Youth development, youth programs, and school reform
This synthesis from the Center for Youth Development and Policy Research provides different strategic approaches to
youth development and school reform. (To order, call 202-884-8266 - $5.00 prepaid.)
First Things First’s Approach to Improving Instruction
This article from the Institute for Research and Reform in Education describes how youth development practices can
be applied to a major school reform effort, particularly to support instruction. It also provides specifi c examples of
practices which create an engaging learning environment for young people. This article will be of particular interest
to those working in school settings or anyone interested in the link between youth development and learning.
(This article may be downloaded from the Institute for Research and Reform in Education at www.irre.org/pdf_fi les/
TLMonographwRef.pdf.)
★298
From YELL ©2007 John W. Gardner Center
YELL APPENDIX 2 Additional YELL Resources
Resources and Tools
Students as Allies in Improving Their Schools: A report on work in progress
This report from What Kids Can Do Inc. presents fi ndings of youth researchers investigating two central questions: What if
teachers and students became steady allies rather than frequent adversaries? What would it take for students to become
stakeholders not just in their own success but also in that of their teachers and schools? (A free copy of this report and related
materials can be downloaded at www.whatkidscando.org/publications/pdfs/saa_fi nalreport.pdf.)
Turning the Corner: From risk to resiliency
This publication from the California Healthy Start Field Offi ce describes the importance of creating environments that nurture
individual resiliency. Thirteen articles offer information on peer programs, collaboration as a catalyst for creative problem
solving, multiculturalism, protective factors in prevention, the role of school restructuring in prevention, how schools convey
high expectations to their students, mentoring, collaboration to foster children’s resiliency, research on resiliency, and the
integration of resiliency into communities. (This publication can be downloaded at http://hsfo.ucdavis.edu/download/Turning_
the_Corner.pdf.)
Moving Youth Participation into the Classroom: Students as allies
Student voices describe the key ways that teachers can make their classrooms safe for meaningful participation. (This article
from New Directions for Youth Development can be ordered from Jossey-Bass at www.josseybass.com/WileyCDA/WileyTitle/
productCD-0787963399,descCDtableOfContents.html.)
Does Youth Participation in Out-of-School Time Activities Make a Difference?
This article by the Harvard Family Research Project integrates fi ndings from academic research and program evaluation to
provide a comprehensive look at the relationship between participation in out-of-school-time activities and positive youth
outcomes, and point to new directions for out-of-school-time research and evaluation. (To download a copy of this article, go
to www.gse.harvard.edu/hfrp/eval/issue21/theory.html.)
Shared Features of High-performing After-school Programs: A follow-up to the TASC evaluation
This Southwest Educational Development Laboratory study examined high-performing after-school projects funded by the After-
School Corporation to determine characteristics shared by these projects. Key fi ndings of shared programming, staffi ng, and
support system characteristics found across the 10 projects are outlined here. (To download a copy of this publication, go to
www.sedl.org/pubs/catalog/items/fam107.html.)
TOOL KITS AND GUIDES
Adults as Allies
This booklet from What Kids Can Do Inc., is designed for adults who hope to strengthen their work with young people and
be allies to youth in their quest to effect social change. Its purpose is to increase awareness, pose questions, and increase
intergenerational interaction. (A free copy of this publication can be downloaded from the W.K. Kellogg Foundation at www.
wkkf.org/pubs/YouthED/Pub564.pdf.)
★299
From YELL ©2007 John W. Gardner Center
YELL APPENDIX 2 Additional YELL Resources
Resources and Tools
Helping Teens Stop Violence: A practical guide for counselors, educators, and parents
This guide provides model anti-bias workshops for teachers, counselors, clergy, or parents who work with young
people. It includes antiviolence role-playing techniques, strategies for families and youth dealing with violence, and
tools for youth leaders working toward social change. (To order a copy, call 1-800-266-5592.)
Learning and Leading: A tool kit for youth development and civic activism
This research-based tool kit from the Innovation Center for Commmunity and Youth Development provides practical
training activities and tools on civic activism as a strategy for developing personal, community, and organizational
leadership. It includes promising practices, vignettes, and training materials. (For more information, visit the Innovation
Center for Community and Youth Development at www.theinnovationcenter.org/r_ydev_civeng.asp.)
Meaningful Student Involvement: Guide to inclusive school change (Sound Out)
This short booklet by Sound Out delineates theory, basis, practice, and examples of youth voice in action in schools.
The accompanying Web site provides various evaluation tools. (A free copy of this publication and other related
materials can be downloaded at www.soundout.org.)
Safe, Supportive, and Successful Schools Step by Step
A guide from the Institute for Research and Reform in Education on how to integrate student support, school reform,
and safe schools principles. (Ordering information can be found at http://store.cambiumlearning.com.)
Student Involvement Handbook
This handbook, by the California State Parent Teacher Association (PTA), presents a plan of action for school offi cials
and PTA members who are serious about student action. It provides a range of information, from a rationale for why
students should be involved to numerous examples of actions participants can undertake to promote projects that
benefi t and excite both student and adults. (This publication can be downloaded in both English and Spanish from:
ww.capta.org/sections/membership/student-involvement-full.cfm.)
Training Materials on Important Out-of-School Time Issues
Developed by the National Institute on Out-of-School Time, this training guide offers straightforward, user-friendly
information on important out-of-school time topics. The materials are presented in a “train-the-trainer” format with
handouts designed to be used by participants as they conduct training for program staff and volunteers. (To download
a copy of the manual, go to http://www.niost.org/publications/papers.html.)
Working With Young People as Partners: A guide for school-linked services sites
This manual was developed in collaboration with middle school students by the California Healthy Start Field Offi ce
as a guide for school leaders to support students as partners in effectively coordinating school-linked services. The
manual includes ideas and activities developed by students themselves. (This publication can be ordered at http://hsfo.
ucdavis.edu/clearinghouse/catalog/hitlist.lasso.)
★300

From YELL ©2007 John W. Gardner Center
YELL APPENDIX 2 Additional YELL Resources
Resources and Tools
Youth-Adult Partnerships: A training manual
This manual by the Innovation Center for Community and Youth Development provides activities and resources that guide
trainers and practitioners through the process of engaging youth and adults to create community change. The manual explores
the foundations of effective youth-adult partnerships and includes nuts and bolts skill development activities. (This publication
can be ordered from the Innovation Center for Community and Youth Development at www.theinnovationcenter.org/r_ya_
partners.asp.)
Youth Development Guide: Engaging Young People in After-school Programming
This guide from the Community Network for Youth Development provides specifi c and practical advice on strengthening
individual staff practices and organizational policies in after-school programs to support learning and young people’s healthy
development. Each chapter offers descriptions of core youth development practices and exercises and tools to use with staff
members on site. (To download a free copy of the guide, go to www.cnyd.org/trainingtools/media/YDGuide.pdf.)
Youth On Board: Why and How to Involve Young People in Organizational Decision-making
This booklet is a useful tool for the busy staff person or board chair who wants to fi nd out about involving young people in
decision-making. It features an overview of Youth on Board’s 14-point system for successfully involving youth in decision-making
and addresses why organizations would want to include young people in their decision-making processes. (This publication and
related materials can be ordered from at www.youthonboard.org/publications.htm.)
EVALUATION TOOLS AND RESOURCES
Measuring Youth Program Quality: A Guide to Assessment Tools
This report from the Forum for Youth Investment provides users with information to guide their decision making on what tools
and systems they can use to assess and improve the quality of their programs. (A copy of the report can be found at www.
forumfyi.org/Files//Measuring_Youth_Program_Quality.pdf.)
Say Y.E.S. to Youth: Youth Engagement Strategies
This resource packet includes sections to assess your team’s readiness to involve young people in decision making, selecting
young people for key positions, support, maintaining engagement over time, and evaluating your efforts. (To download this
packet, go to http://downloads.cas.psu.edu/4h/yesbookweb.pdf.)
A Self-Study Guide for Managers and Staff of Primary Support Programs for Young People
This self-study guide is intended to help primary support organizations in meaningful involvement of their participants. It
provides key tools and indicators for assessing the level of quality in youth programming. (This publication can be downloaded
from the Chapin Hall Center for Children Web site at www.chapinhall.org.)
Indicators of Quality Youth Development Programs (Edna McConnell Clark Foundation)
This chart is based on an assessment approach developed and used by the Foundation, shows the characteristics of three levels
of program effectiveness—from apparent at the low end of the spectrum to proven at the high end. (To download this chart,
go to www.emcf.org/evaluation/process/programquality.htm).
★301
From YELL ©2007 John W. Gardner Center
YELL APPENDIX 2 Additional YELL Resources
Resources and Tools
ORGANIZATIONS AND LINKS
Afterschool Alliance www.afterschoolalliance.org
The Afterschool Alliance is dedicated to raising awareness of the importance of after-school programs and advocating
for quality, affordable programs for all children.
Afterschool.gov www.afterschool.gov
Connection to federal resources that support children and youth during out-of-school hours.
America’s Promise www.americaspromise.org
America’s Promise is a collaborative network that builds upon the collective power of communities and partners to
help fulfi ll the Five Promises (caring adults, safe places, healthy start, marketable skills, and opportunities to serve) for
every young person in America.
Center for Cooperative Research and Extension Services for Schools (CRESS Center) http://education.ucdavis.edu/cress/
The CRESS Center at University of California, Davis, assists university faculty, education extension specialists, graduate
students and K-12 educators in cooperatively designing and conducting educational research, curriculum, and
professional development projects.
Center for Community Partnerships www.upenn.edu/ccp/index.php
The University of Pennsylvania’s Center for Community Partnership’s is designed to create and strengthen local,
national, and international networks of higher education institutions committed to engagement with their local
communities.
Chapin Hall Center for Children www.chapinhall.org
The University of Chicago’s research and development center focuses on policies, practices, and programs affecting
children and the families and communities in which they live. Many new publications and abstracts are available free
of charge on Chapin Hall’s Web site.
Children Now www.childrennow.org
Children Now uses approaches that include nonpartisan policy positions to bring about change in government,
business, and communities; communications strategies that inform, educate, and engage; analysis and research,
including the voices of children and families; partnerships with community organizations, parents, advocates, business,
and government; and leadership in motivating those with infl uence and power to act on behalf of children.
Children’s Aid Society www.childrensaidsociety.org
The Society’s mission is to ensure the physical and emotional well being of children and families, and to provide each
child with the support and opportunities needed to become a happy, healthy and productive adult.
Coalition for Community Schools www.communityschools.org
The Coalition brings together local, state and national organizations that represent individuals and groups engaged
in creating and sustaining community schools.
★302
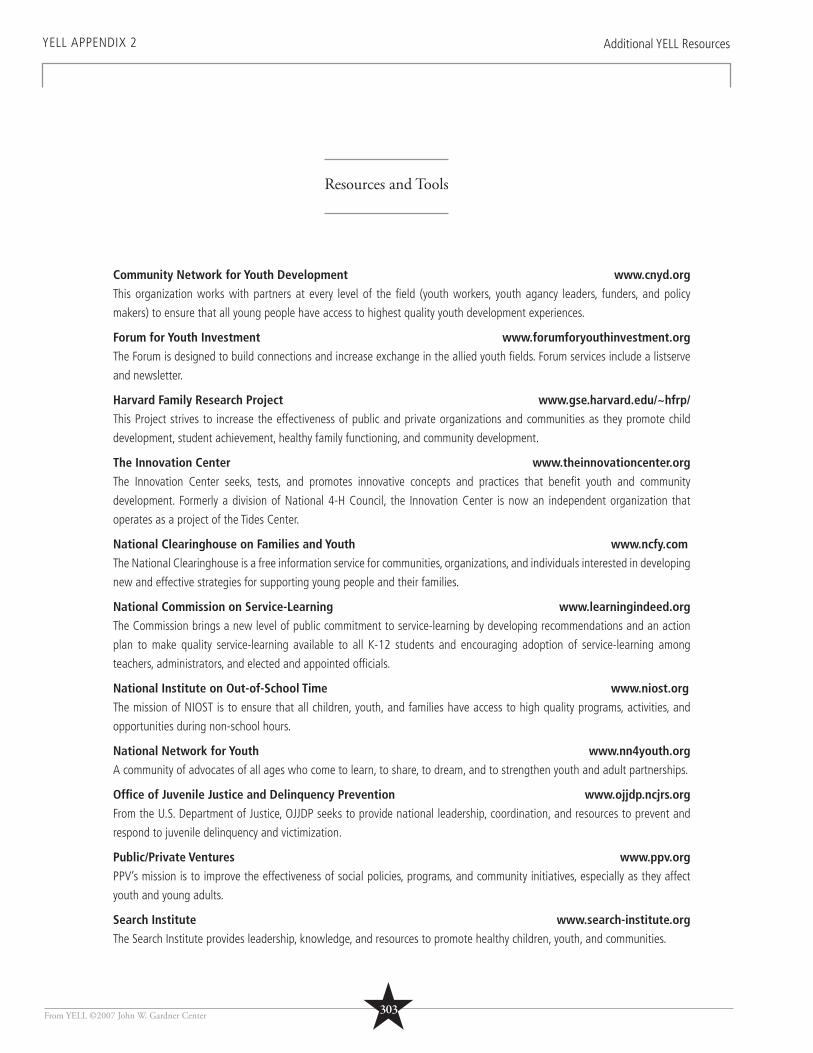
From YELL ©2007 John W. Gardner Center
YELL APPENDIX 2 Additional YELL Resources
Resources and Tools
Community Network for Youth Development www.cnyd.org
This organization works with partners at every level of the fi eld (youth workers, youth agancy leaders, funders, and policy
makers) to ensure that all young people have access to highest quality youth development experiences.
Forum for Youth Investment www.forumforyouthinvestment.org
The Forum is designed to build connections and increase exchange in the allied youth fi elds. Forum services include a listserve
and newsletter.
Harvard Family Research Project www.gse.harvard.edu/~hfrp/
This Project strives to increase the effectiveness of public and private organizations and communities as they promote child
development, student achievement, healthy family functioning, and community development.
The Innovation Center www.theinnovationcenter.org
The Innovation Center seeks, tests, and promotes innovative concepts and practices that benefi t youth and community
development. Formerly a division of National 4-H Council, the Innovation Center is now an independent organization that
operates as a project of the Tides Center.
National Clearinghouse on Families and Youth www.ncfy.com
The National Clearinghouse is a free information service for communities, organizations, and individuals interested in developing
new and effective strategies for supporting young people and their families.
National Commission on Service-Learning www.learningindeed.org
The Commission brings a new level of public commitment to service-learning by developing recommendations and an action
plan to make quality service-learning available to all K-12 students and encouraging adoption of service-learning among
teachers, administrators, and elected and appointed offi cials.
National Institute on Out-of-School Time www.niost.org
The mission of NIOST is to ensure that all children, youth, and families have access to high quality programs, activities, and
opportunities during non-school hours.
National Network for Youth www.nn4youth.org
A community of advocates of all ages who come to learn, to share, to dream, and to strengthen youth and adult partnerships.
Offi ce of Juvenile Justice and Delinquency Prevention www.ojjdp.ncjrs.org
From the U.S. Department of Justice, OJJDP seeks to provide national leadership, coordination, and resources to prevent and
respond to juvenile delinquency and victimization.
Public/Private Ventures www.ppv.org
PPV’s mission is to improve the effectiveness of social policies, programs, and community initiatives, especially as they affect
youth and young adults.
Search Institute www.search-institute.org
The Search Institute provides leadership, knowledge, and resources to promote healthy children, youth, and communities.
★303
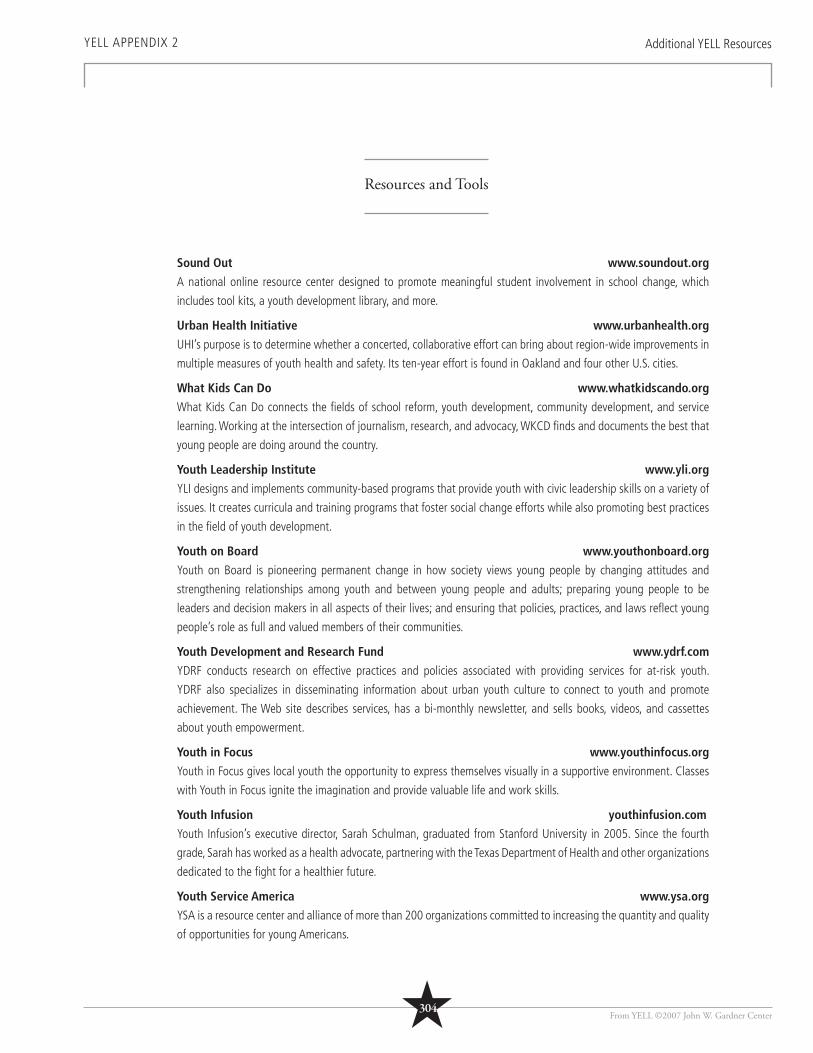
Sound Out www.soundout.org
A national online resource center designed to promote meaningful student involvement in school change, which
includes tool kits, a youth development library, and more.
Urban Health Initiative www.urbanhealth.org
UHI’s purpose is to determine whether a concerted, collaborative effort can bring about region-wide improvements in
multiple measures of youth health and safety. Its ten-year effort is found in Oakland and four other U.S. cities.
What Kids Can Do www.whatkidscando.org
What Kids Can Do connects the fi elds of school reform, youth development, community development, and service
learning. Working at the intersection of journalism, research, and advocacy, WKCD fi nds and documents the best that
young people are doing around the country.
Youth Leadership Institute www.yli.org
YLI designs and implements community-based programs that provide youth with civic leadership skills on a variety of
issues. It creates curricula and training programs that foster social change efforts while also promoting best practices
in the fi eld of youth development.
Youth on Board www.youthonboard.org
Youth on Board is pioneering permanent change in how society views young people by changing attitudes and
strengthening relationships among youth and between young people and adults; preparing young people to be
leaders and decision makers in all aspects of their lives; and ensuring that policies, practices, and laws refl ect young
people’s role as full and valued members of their communities.
Youth Development and Research Fund www.ydrf.com
YDRF conducts research on effective practices and policies associated with providing services for at-risk youth.
YDRF also specializes in disseminating information about urban youth culture to connect to youth and promote
achievement. The Web site describes services, has a bi-monthly newsletter, and sells books, videos, and cassettes
about youth empowerment.
Youth in Focus www.youthinfocus.org
Youth in Focus gives local youth the opportunity to express themselves visually in a supportive environment. Classes
with Youth in Focus ignite the imagination and provide valuable life and work skills.
Youth Infusion youthinfusion.com
Youth Infusion’s executive director, Sarah Schulman, graduated from Stanford University in 2005. Since the fourth
grade, Sarah has worked as a health advocate, partnering with the Texas Department of Health and other organizations
dedicated to the fi ght for a healthier future.
Youth Service America www.ysa.org
YSA is a resource center and alliance of more than 200 organizations committed to increasing the quantity and quality
of opportunities for young Americans.
From YELL ©2007 John W. Gardner Center
YELL APPENDIX 2 Additional YELL Resources
Resources and Tools
★304
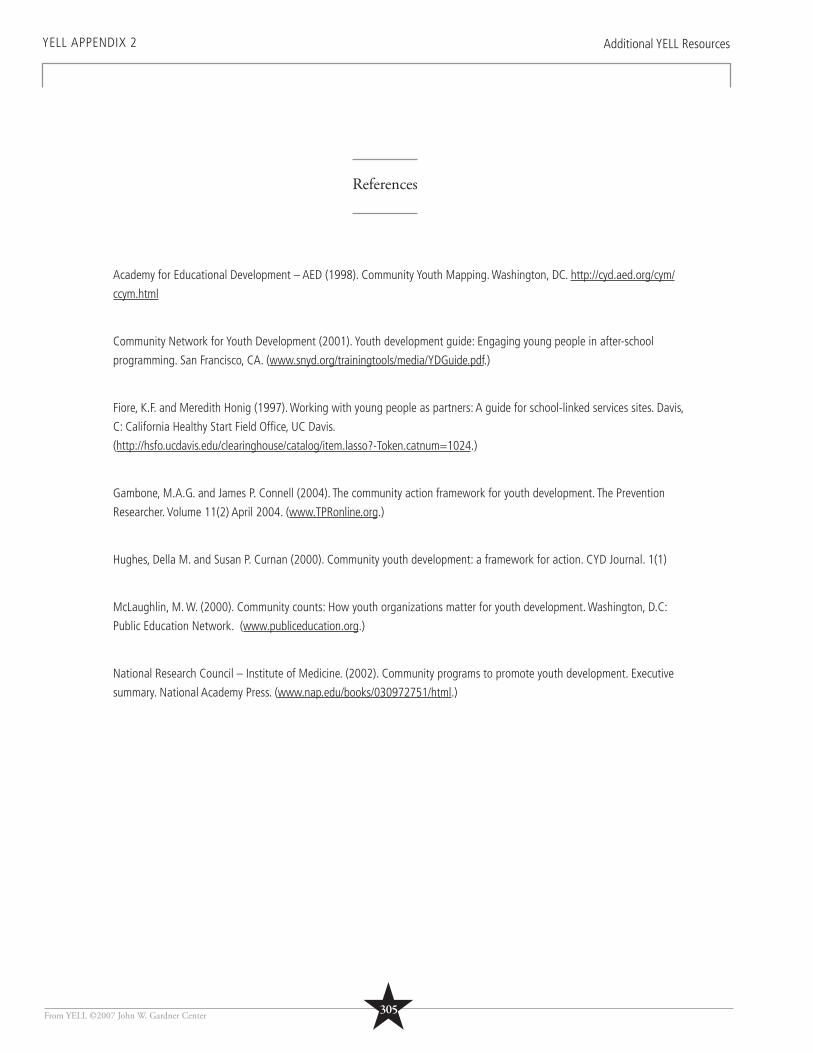
From YELL ©2007 John W. Gardner Center
YELL APPENDIX 2 Additional YELL Resources
References
Academy for Educational Development – AED (1998). Community Youth Mapping. Washington, DC. http://cyd.aed.org/cym/
ccym.html
Community Network for Youth Development (2001). Youth development guide: Engaging young people in after-school
programming. San Francisco, CA. (www.snyd.org/trainingtools/media/YDGuide.pdf.)
Fiore, K.F. and Meredith Honig (1997). Working with young people as partners: A guide for school-linked services sites. Davis,
C: California Healthy Start Field Offi ce, UC Davis.
(http://hsfo.ucdavis.edu/clearinghouse/catalog/item.lasso?-Token.catnum=1024.)
Gambone, M.A.G. and James P. Connell (2004). The community action framework for youth development. The Prevention
Researcher. Volume 11(2) April 2004. (www.TPRonline.org.)
Hughes, Della M. and Susan P. Curnan (2000). Community youth development: a framework for action. CYD Journal. 1(1)
McLaughlin, M. W. (2000). Community counts: How youth organizations matter for youth development. Washington, D.C:
Public Education Network. (www.publiceducation.org.)
National Research Council – Institute of Medicine. (2002). Community programs to promote youth development. Executive
summary. National Academy Press. (www.nap.edu/books/030972751/html.)
★305
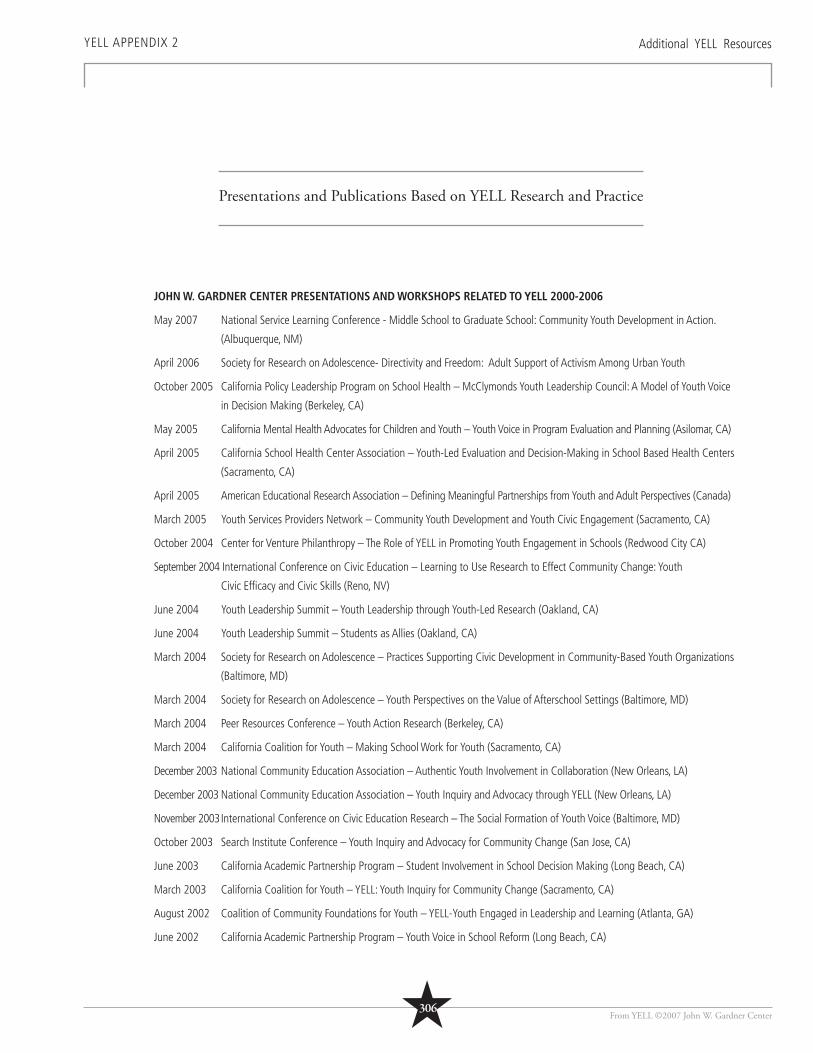
From YELL ©2007 John W. Gardner Center
Presentations and Publications Based on YELL Research and Practice
YELL APPENDIX 2 Additional YELL Resources
★306
JOHN W. GARDNER CENTER PRESENTATIONS AND WORKSHOPS RELATED TO YELL 2000-2006
May 2007 National Service Learning Conference - Middle School to Graduate School: Community Youth Development in Action.
(Albuquerque, NM)
April 2006 Society for Research on Adolescence- Directivity and Freedom: Adult Support of Activism Among Urban Youth
October 2005 California Policy Leadership Program on School Health – McClymonds Youth Leadership Council: A Model of Youth Voice
in Decision Making (Berkeley, CA)
May 2005 California Mental Health Advocates for Children and Youth – Youth Voice in Program Evaluation and Planning (Asilomar, CA)
April 2005 California School Health Center Association – Youth-Led Evaluation and Decision-Making in School Based Health Centers
(Sacramento, CA)
April 2005 American Educational Research Association – Defi ning Meaningful Partnerships from Youth and Adult Perspectives (Canada)
March 2005 Youth Services Providers Network – Community Youth Development and Youth Civic Engagement (Sacramento, CA)
October 2004 Center for Venture Philanthropy – The Role of YELL in Promoting Youth Engagement in Schools (Redwood City CA)
September 2004 International Conference on Civic Education – Learning to Use Research to Effect Community Change: Youth
Civic Effi cacy and Civic Skills (Reno, NV)
June 2004 Youth Leadership Summit – Youth Leadership through Youth-Led Research (Oakland, CA)
June 2004 Youth Leadership Summit – Students as Allies (Oakland, CA)
March 2004 Society for Research on Adolescence – Practices Supporting Civic Development in Community-Based Youth Organizations
(Baltimore, MD)
March 2004 Society for Research on Adolescence – Youth Perspectives on the Value of Afterschool Settings (Baltimore, MD)
March 2004 Peer Resources Conference – Youth Action Research (Berkeley, CA)
March 2004 California Coalition for Youth – Making School Work for Youth (Sacramento, CA)
December 2003 National Community Education Association – Authentic Youth Involvement in Collaboration (New Orleans, LA)
December 2003 National Community Education Association – Youth Inquiry and Advocacy through YELL (New Orleans, LA)
November 2003 International Conference on Civic Education Research – The Social Formation of Youth Voice (Baltimore, MD)
October 2003 Search Institute Conference – Youth Inquiry and Advocacy for Community Change (San Jose, CA)
June 2003 California Academic Partnership Program – Student Involvement in School Decision Making (Long Beach, CA)
March 2003 California Coalition for Youth – YELL: Youth Inquiry for Community Change (Sacramento, CA)
August 2002 Coalition of Community Foundations for Youth – YELL-Youth Engaged in Leadership and Learning (Atlanta, GA)
June 2002 California Academic Partnership Program – Youth Voice in School Reform (Long Beach, CA)
From YELL ©2007 John W. Gardner Center ★307
June 2002 Youth Leadership Institute – Youth-Led Evaluation (San Francisco, CA)
April 2002 American Educational Research Association - Youth Community Engagement: A Sociocultural Study of Participatory Action
Research (New Orleans, LA)
April 2002 Society for Research on Adolescence - Civic Involvement Among Urban Youth: A Qualitative Study of Pathways Towards
Critical Engagement (New Orleans, LA)
April 2002 Society for Research on Adolescence – Choosing Indicators of Civic Engagement: The Infl uence of Social Justice Beliefs Versus Volunteer
Service (New Orleans, LA)
February 2002 Center for Popular Education and Participatory Research – Youth-Driven Research to Inform School and Community Change (University
of California, Berkeley)
YELL RELATED PUBLICATIONS
Summer 2007 Strobel, K., and Nelson, I. Model for Fostering Youth Leadership: The Youth Engaged in Leadership and Learning Program. Youth
Developments, John W. Gardner Center, Stanford, CA.
Winter 2007 Strobel, K., and Nelson, I. Understanding Youth Leadership Development: An examination of the Youth Engaged in Leadership and
Learning Program (YELL). Research Brief, John W. Gardner Center, Stanford, CA.
Winter 2007 Hofstedt, Mary. Building Bridges: A Summer Program for Middle School Students Highlights a Community School in Action. Brief, John
W. Gardner Center, Stanford, CA.
Spring 2007 Osberg-Conner, J.H. & Strobel, K. R. (2007). Leadership Development: An Examination of Individual and Programmatic Growth. Journal
of Adolescent Research, 22(3), 275-297.
Summer 2006 Kirshner, B. The Social Formation of Leadership in a Youth Activism Group. published in the proceedings of the International Conference
of the Learning Sciences.
Winter 2006 Strobel, K., Osberg, J., and McLaughlin, M. Participation in Social Change: Shifting Adolescents’ Developmental Pathways. In Gingwright, S.,
Noguera, P., and Cammarota, J. (Eds). Beyond Resistance: Youth Activism and Community Change: New Democratic Possibilities
for Policy and Practice for America’s Youth (pp. 197-214). New York, NY: Taylor & Francis.
Spring 2005 Kirshner, B., O’Donoghue, J., and McLaughlin, M. “Youth Adult Research Collaborations: Bringing youth voice to the research process”
In Larson, R., Eccles, J., and Mahoney, J. (Eds). Organized Activities as Contexts of Development: Extracurricular activities, after-school
and community programs (pp. 131-156). Mahwah, NJ: Erlbaum.
Winter 2004 Penuel, W. R., Gray, J.H., and Kim, D. Integrating Technology into Community Youth Research. Brief, John W. Gardner Center and SRI
International, CA
Spring 2003 Kirshner, B., Strobel K., and Fernández M. Critical Civic Engagement Among Urban Youth. PENN GSE Perspectives on Urban Education,
2 (1).
Winter 2003 Anyon, Y. and Naughton, S. Youth Empowerment: The Contributions and Challenges of Youth-Led Research in a High-Poverty, Urban
Community. Brief, John W. Gardner Center, Stanford, CA.
Winter 2003 O’ Donoghue, J.L. Youth Civic Engagement Annotated Bibliography. John W. Gardner Center, Stanford, CA.
Fall 2002 Fernández, M.A. Creating Community Change: Tensions in Community Youth Research. Brief, John W. Gardner Center, Stanford, CA.
Fall 2001 YELL: A Handbook for Supporting Community Youth Researchers (fi rst edition). John W. Gardner Center, Stanford, CA.
Annually Youth Engaged in Leadership and Learning (YELL) Annual Report produced by youth and adult staff from the YELL Programs in Redwood
City and West Oakland.
YELL APPENDIX 2 Additional YELL Resources
From YELL ©2007 John W. Gardner Center
YELL APPENDIX 3 Team Builders
Appendix 3
T E A M BUI L D E R SGetting to Know Each Other Activities
Team Building and Trust Activities
Basic Energizers
Props and Validation Exercises
★308
From YELL ©2007 John W. Gardner Center
YELL APPENDIX 3 Team Builderss
Getting to Know Each Other
ADJECTIVE NAME GAME (10-15 MINUTES)
In a circle go around and say an adjective that describes you and starts with the fi rst letter of your name (e.g., Happy Hanna).
The next person begins by saying everyone’s adjective and name and then adds his or her name and adjective (e.g., Happy
Hanna, Jolly Jill, Mysterious María).
SILENT NAME GAME (10 MINUTES)
Ask all the youth to go around and say their names aloud. Then tell them that they are no longer allowed to talk. Ask them
to line up in alphabetical order according to their fi rst name. Starting at the front of the line, individuals say their name to
determine if the order is correct.
SILENT LINE UP BY BIRTH DATE (10 MINUTES)
Ask the youth to stand up and to arrange themselves in line from oldest to youngest (point where the oldest goes and the
youngest goes) without saying a word or making a sound. They can make signals, like nodding, but nothing else. Once they feel
they are in order from youngest to oldest (including month, day, and year), ask them to go down the line and say their birthday.
Have them each write their name and birthday on a sticky note. The sticky notes can then be placed on a timeline in the room
to serve as a reminder.
NAME ORIGINS (10 MINUTES)
Ask all the youth to go around and say how they got their name or what its origin is. Allow one or two follow-up questions to
each person if others would like to know a little more.
NAME GAME TOSS (15 MINUTES)
Person one says their name, then someone else’s name and throws the ball to that person. That person now has to say person
one’s name, his or her name, and the name of someone else and throw the ball to them. That person says everyone’s name that
came before them, then his or her name until everyone has gotten the ball. You have to throw it to someone who hasn’t had
the ball yet, so pay attention!
Every time someone messes up, go back to the beginning using the same order. After successfully completing the circle, have the
group do the sequence backwards. You can also add additional balls and have a couple of sequences going at the same time.
MOVEMENT NAME GAME (10-15 MINUTES)
Ask each person to think of a movement for him or herself. Ask one youth to say his or her name and do the movement. The
next person will do that person’s movement and say their name and then do one him or herself. Keep going until everyone has
had a turn.
BALLOON NAME GAME (10-15 MINUTES)
Stand in a circle and toss a balloon in the air and call someone’s name. That person must catch the balloon – or hit it up – before
it touches the ground. That person calls out another person’s name as soon as the balloon is back up in the air.
★309

From YELL ©2007 John W. Gardner Center
YELL APPENDIX 3 Team Builders
Going Deeper
COMMONALITIES (5 MINUTES)
Ask youth to get into pairs with someone they do not know very well. Ask them to make a list of things they have in
common (e.g., neighborhood, personality trait, experience), ability. After a few minutes, go around the room, and ask
them to share with the group their most surprising commonality.
STAND UP IF (5-10 MINUTES)
Ask participants to “Please stand up if you…” (select categories that are interesting or important for that session).
You can also ask for volunteers to say a quality about themselves, something they like, or a goal they have, for
example, and then everyone who also has that similarity will stand up. This is a good activity to start off a presentation:
It can help youth get to know their audience.
BIG WIND BLOWS (10 MINUTES)
Begin by making a circle of chairs. There should be one less chair than the total number of people playing. One person
starts by standing in the middle of the circle and saying something about themselves, ending with “Who else?”
Example: “I love chocolate, who else loves chocolate?” All the group members who love chocolate must get up and
switch places without selecting the chairs directly on either side of them. The person who is left without a chair goes
to the center of the circle and picks the next statement. This game can be light hearted or serious, depending on the
content and the group.
TWO TRUTHS AND A LIE (10 MINUTES)
Each person has to think of three statements to share with the group about him or herself, two of which are true and
one of which is a lie. Everyone else in the group tries to guess which statement is the lie after each person shares the
three statements. Hint: Hand out index cards or scrap paper and have youth take a few minutes before beginning the
activity to think about what they are going to say. This will keep the truths and lies varied and will help the activity
to move more smoothly.
★310
From YELL ©2007 John W. Gardner Center
YELL APPENDIX 3 Team Builders
Going Deeper
THIS CORNER (15 MINUTES)
Number the corners of the room 1-4, writing each number on a large piece of paper so that it is visible. Let youth know that
they are to stand by the number that best fi ts them. Start by using an example: Ask youth to go to #1 if they are an only child,
#2 if they have one sibling, #3 if they have two, and #4 if they have three or more siblings. Repeat this process several times
using different categories (e.g., types of pets, neighborhoods, where they were born). Depending on the group, you can also
have the students discuss topics in their categories (either general “get to know you” questions, or questions specifi cally related
to the project).
YOU WOULDN’T KNOW BY LOOKING AT ME (15 MINUTES)
Give each participant a 3x5 index card and ask them write a little-known fact about him or herself on the card, something he or
she wouldn’t mind the group knowing. State that they are not to write their name on the card. Collect all the cards, shuffl e, and
redistribute to the group. If someone gets his or her own card back, exchange it for another. Once they all have an unfamiliar
card, ask them to circulate, asking one another yes or no questions about the information on the card. For example, if the card
says “I have a pet iguana,” they could ask “Do you have a pet? Is it an iguana?” When the person answering the description is
found, he or she signs the card and tapes it on a designated wall space. Once all cards are up read them aloud.
CANDY GAME (10 MINUTES)
Pass around a bowl of small multi-colored candies, and instruct each person to take two to fi ve (they choose the number). Once
everyone has picked their candy, youth must tell one unique fact about themselves for each candy in their hands – they can’t
eat them to reduce facts needed! Variation: each color has a different question or statement that the person needs to respond
to. For example:
Red: Something you don’t like or try to avoid.
Orange: Name something that motivates you.
Yellow: If you were ruler of the universe for a day, what is the fi rst thing you would do?
Green: If you could have any job, what would it be?
Blue: What is a dream you have about your future?
Pink: Something daring that you have done.
★311
From YELL ©2007 John W. Gardner Center
YELL APPENDIX 3 Team Builders
Going Deeper
CLUSTER GAME (10 MINUTES)
The goal of this activity is to form groups quickly based on similarities. Direct youth members to form smaller groups
based on criteria you give them. Speed is not essential, but the activity should proceed at a fairly rapid pace, while still
allowing individuals to create groups and introduce themselves each time.
Sample Criteria:
People who have the same...
• eye color.
• shirt color.
• Extra-curricular activities.
• birthdays in the same season (within season group, arrange by birth date).
• favorite sport or movie.
• last digit of your telephone number.
• state where they were born.
• neighborhood where they live.
Find someone who...
• had the same breakfast as you.
• has the same shoe size (or has the same size hand).
• has a different religious belief.
• you haven’t met yet.
• has the same favorite season.
• has been to a place you would like to visit.
Line up according to:
• Number of siblings.
• Introversion/extraversion.
• How tired/alert you feel.
Variation: Role Call
Divide the group into two teams. Ask the teams to line up according to various criteria (birthday, name, hair length,
amount of time living in the community, number of siblings, number of cousins, etc). The team that lines up in the
correct order the fastest wins that round. Go through the order to make sure they are correct. If one team is winning
more frequently than the other, mix up the teams. After you have completed a few rounds of the activity, discuss what
strategies helped and hindered their organization process. You can also do this as a full group and time them to see
how fast they can complete the tasks.
This activity great to do when your group is working on research analysis since they can notice clusters or “trends”
within their group.
★312
From YELL ©2007 John W. Gardner Center
YELL APPENDIX 3 Team Builders
Going Deeper
HUMAN SCAVENGER HUNT (15 MINUTES)
Divide the group in half and send each half to a different side of the room. The facilitator stands in the center and calls out the
categories listed below (or others). Each group has to fi gure out which combination of people in their group fi ts the category,and
then send those people to the center of the room. The group who gets their representatives to the center fi rst wins a point.
Sample Categories:
• Two people who have the same fi rst and last initial.
• The person who was born the farthest away from here and the person born closest.
• Two people with the same middle name.
• A group whose ages add up to 50.
• A group whose shoe sizes add up to 30.
• A group who have attended school for a total of 38 years.
• Two people with the same birthday (or birthday month).
• A group of people who can spell a word by putting together the fi rst letters of their fi rst names.
• A group of at least three people who all have different colored eyes.
Debrief: Did anything surprise you? What was the most diffi cult category for your group? Did someone in your group take the
lead? How did you fi gure out each answer?
LISTEN AND RESPOND (5 MINUTES)
The purpose of this exercise is for youth to practice, as a group, the skill of listening and responding to questions. Pick a
volunteer to be “interviewed” by the group, and pick another volunteer to ask an initial question (e.g., “What do you think of
your city?” or “What are your hobbies?”). After the fi rst question has been asked and answered, have other youth go around in
a circle asking follow-up questions based on the responses of the person being interviewed. Because they don’t have a script,
this exercise requires participants to listen and respond to what was said. Remind youth to keep questions respectful.
LISTENING LINES (10 MINUTES)
Have each youth silently stand and face a partner. Each partner will have one to two minutes to share an experience of not
being listened to. What was the situation? What was it like? How could you tell you were not being heard? While one partner
is talking, the other partner is to be silent. Time the youth and tell them when to switch speaker and listener roles. When the
activity is complete, ask the youth to name some of the experiences they have had of not being listened to and some of the
issues that came up.
Variation: When it is time to switch roles, ask the new listener to remain with their back turned as the speaker shares his or her
experience. With this variation, ask youth (both listeners and talkers in turn) what it was like to be in that situation.
★313
From YELL ©2007 John W. Gardner Center
YELL APPENDIX 3 Team Builders
Going Deeper
NAME THAT TUNE/FIND YOUR OTHER HALF
Each person receives an index card with either the title of a well-known song printed on it or the name of its
associated artist. The task is to create pairs based on aligning the song with its respective artist. Once the pairs have
been made, introductions are done and each individual gives a specifi c fact about themselves. This can be continued
for multiple iterations with new index cards. Other possible pair combinations:
• Book title and author.
• Movie title with actors/actresses.
• Countries with leaders.
• Cities with professional sports teams.
Variation: You can also do this with duos (e.g., Mickey and Minnie, Bonnie and Clyde). In this case, participants have
their character taped to their back and must ask yes or no questions to their peers to fi nd out who they are. Once they
know who they are, they can fi nd their other half.
TAKING A STAND (ADAPTED FROM INNOVATION CENTER FOR COMMUNITY AND YOUTH DEVELOPMENT) (15 MINUTES)
Place signs saying Strongly Agree and Strongly Disagree on opposite walls. Emphasize that there is no right or wrong
answer. Have students stand in the center of the room. Read a list of statements and tell the students to line up
against the sign they most agree with – they can also remain in the middle. Begin with simple questions, such as,
“Pizza is my favorite food” or “I think grades are important for my future.” Gradually move to deeper topics by using
questions like, “I feel safe walking home after dark” or “There’s a problem with gangs in our community.”
Debrief: Talk about different perspectives on the issues. Discuss how this learning experience could be helpful in
working together as a team.
BACK-TO-BACK DRAWING (15 MINUTES)
This activity highlights the importance of clear directions and active listening.
Give each person two blank pieces of paper and a marker or pen. Ask everyone to fi nd a partner and sit down back to
back. Ask everyone to draw a picture on one of the sheets of paper. After all youth have drawn a picture (make sure
they don’t let their partner see!), have each pair designate one person as the artist and the other person as the “art
director.” Sitting back to back (and therefore unable to see the other person’s sheet of paper), the artist must follow
the art director’s verbal directions and try to successfully draw the same picture as their partner. This requires very
good directions! Switch roles, so each person in the pair has a chance to be the artist and the art director.
Debrief: Discuss their experiences and compare the original drawings with the instructed drawings. What was
diffi cult about this activity?
★314
From YELL ©2007 John W. Gardner Center
YELL APPENDIX 3 Team Builders
Going Deeper
LIFE LINE (ADAPTED FROM NATIONAL 4H COUNCIL) (30 MINUTES)
The pupose of this activity is to share life events; to build trust and empathy; to gain understanding into the events in our life
that were beyond our control and how we coped; and to gain insight into those which were within our control and how we
problem solved.
Materials: Paper (one sheet for each participant); colored pencils or pen.
Ask participants to draw a horizontal line across the paper, with their birth date at one end and today’s date at the other. Instruct
them to mark signifi cant life events along the line, to write a brief description of each, and to note their age at the time (e.g., 3
years/mumps; 4 years/brother born). After each life line is complete, have them write beside each event whether it was within
their control or not (N=No Control, C=Control). Take turns sharing life lines. If appropriate, probe to fi nd out how they coped or
resolved problems. Point out similarities. If grief is a central theme, discuss what this was like for them.
LABELS (ADAPTED FROM THE NATIONAL CONFERENCE) (30 MINUTES)
The purpose of this activity is to examine the phenomenon of using labels for ourselves and for others and to consider the
meanings labels can acquire in particular cultural contexts.
Materials: Create worksheets with the heading “I am…” that contain several labels categorized in groups such as gender/
sex; height; eye color; hair color; religion; school clique; ethnicity and race. You will also need sticky notes and butcher paper
sheet titled The Label Junkyard.
Distribute the worksheets and ask participants to circle the labels that apply to them personally. Ask them to use the sticky note
to write down one label they never wish to hear used about them again. Have them post their sticky notes on the labeled The
Label Junkyard. Discuss the worksheet and the Junkyard, using such questions as:
• How do you feel about labels?
• What is the advantage of being a person with your labels? What are the disadvantages?
• Why do you think we use labels?
• What harm can be done by labeling?
Read the labels in the Junkyard and then use the YELL decision-making process to decide what to do with this sheet. Options may include
posting it in the room, deciding on a consequence for each time someone uses a label, or giving everyone a turn to tear it up.
GONE FISHING (10 MINUTES)
Prepare for this activity by drawing a fi sh on each of three sheets of paper. Draw one fi sh big, one fi sh small, and one fi sh a
medium size. Have the participants stand in two lines facing one another, with enough space between the two lines for you to
walk comfortably between them. Tell participants that this will be a silent exercise until the end. Arrange the fi sh drawings so
that you can walk down the center of the two groups showing one line of participants the biggest fi sh and the other side the
smallest fi sh (you can tape the papers back to back – but make sure that the lines don’t show through). Then walk back down
the center of the two lines with the medium size fi sh drawing so that both sides can see. Tell the group that on the count of
three they are going to shout out a description of the second fi sh they saw. Refl ection: What does this exercise show about
perception of what you see?
★315
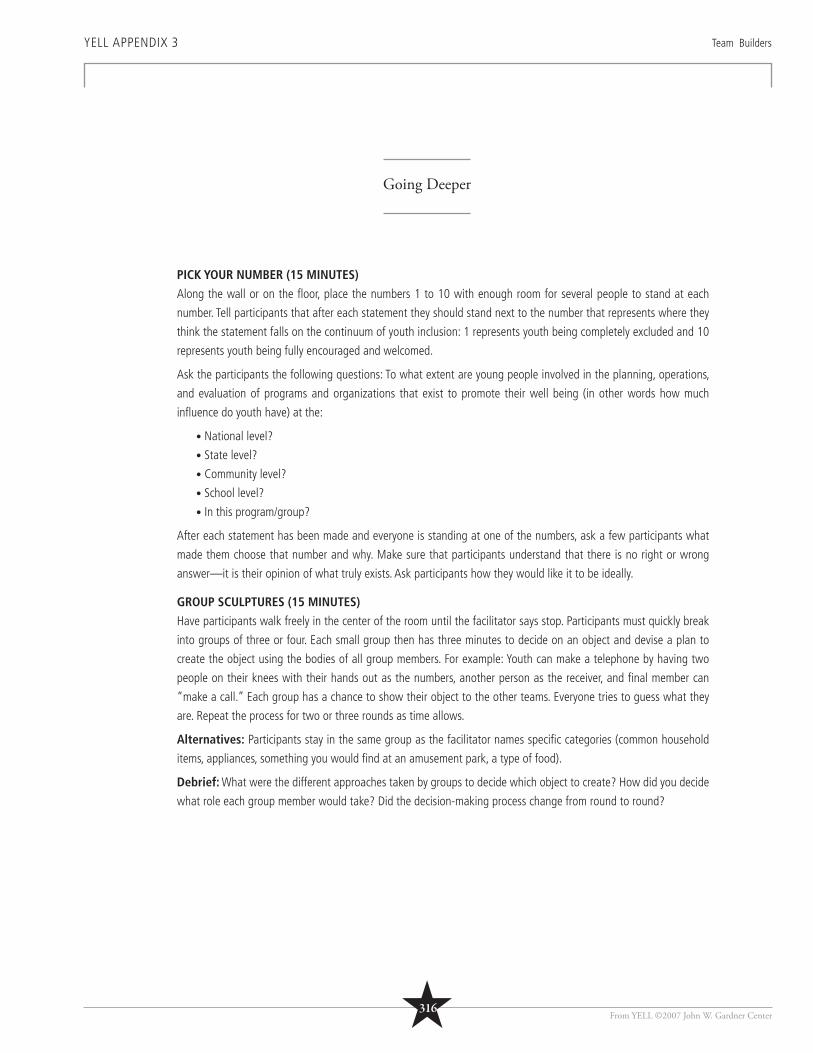
From YELL ©2007 John W. Gardner Center
YELL APPENDIX 3 Team Builders
Going Deeper
PICK YOUR NUMBER (15 MINUTES)
Along the wall or on the fl oor, place the numbers 1 to 10 with enough room for several people to stand at each
number. Tell participants that after each statement they should stand next to the number that represents where they
think the statement falls on the continuum of youth inclusion: 1 represents youth being completely excluded and 10
represents youth being fully encouraged and welcomed.
Ask the participants the following questions: To what extent are young people involved in the planning, operations,
and evaluation of programs and organizations that exist to promote their well being (in other words how much
infl uence do youth have) at the:
• National level?
• State level?
• Community level?
• School level?
• In this program/group?
After each statement has been made and everyone is standing at one of the numbers, ask a few participants what
made them choose that number and why. Make sure that participants understand that there is no right or wrong
answer—it is their opinion of what truly exists. Ask participants how they would like it to be ideally.
GROUP SCULPTURES (15 MINUTES)
Have participants walk freely in the center of the room until the facilitator says stop. Participants must quickly break
into groups of three or four. Each small group then has three minutes to decide on an object and devise a plan to
create the object using the bodies of all group members. For example: Youth can make a telephone by having two
people on their knees with their hands out as the numbers, another person as the receiver, and fi nal member can
“make a call.” Each group has a chance to show their object to the other teams. Everyone tries to guess what they
are. Repeat the process for two or three rounds as time allows.
Alternatives: Participants stay in the same group as the facilitator names specifi c categories (common household
items, appliances, something you would fi nd at an amusement park, a type of food).
Debrief: What were the different approaches taken by groups to decide which object to create? How did you decide
what role each group member would take? Did the decision-making process change from round to round?
★316
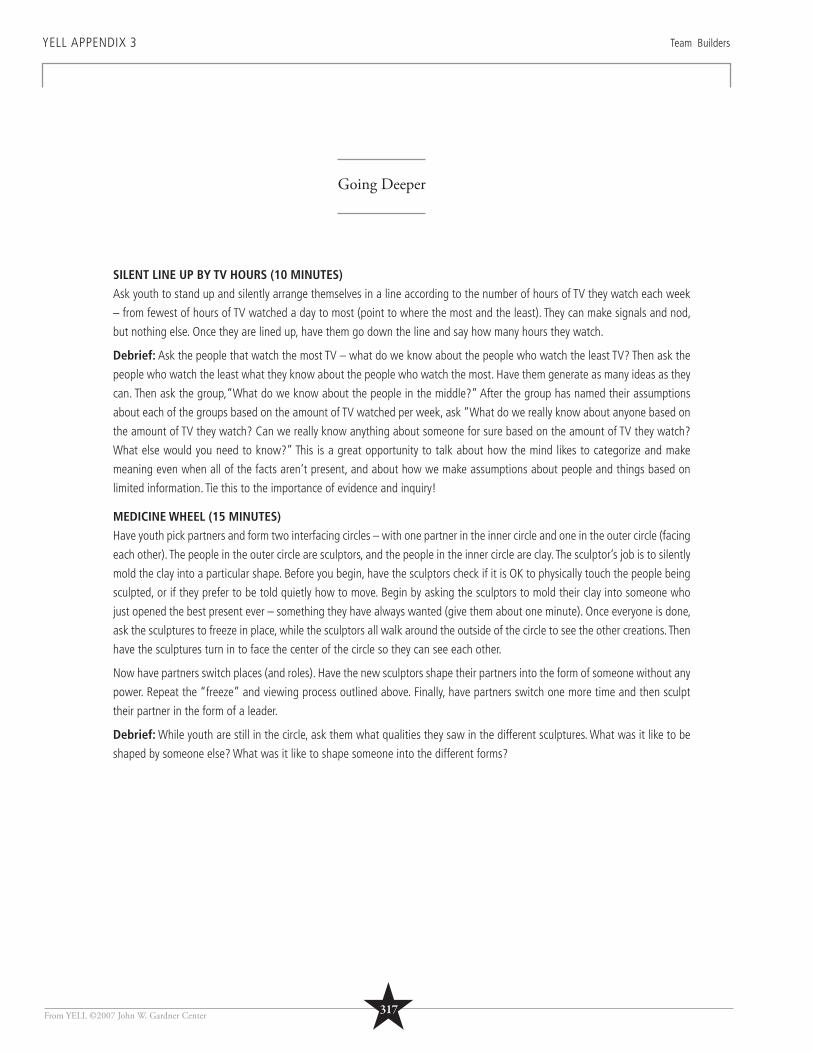
From YELL ©2007 John W. Gardner Center
YELL APPENDIX 3 Team Builders
Going Deeper
SILENT LINE UP BY TV HOURS (10 MINUTES)
Ask youth to stand up and silently arrange themselves in a line according to the number of hours of TV they watch each week
– from fewest of hours of TV watched a day to most (point to where the most and the least). They can make signals and nod,
but nothing else. Once they are lined up, have them go down the line and say how many hours they watch.
Debrief: Ask the people that watch the most TV – what do we know about the people who watch the least TV? Then ask the
people who watch the least what they know about the people who watch the most. Have them generate as many ideas as they
can. Then ask the group,“What do we know about the people in the middle?” After the group has named their assumptions
about each of the groups based on the amount of TV watched per week, ask “What do we really know about anyone based on
the amount of TV they watch? Can we really know anything about someone for sure based on the amount of TV they watch?
What else would you need to know?” This is a great opportunity to talk about how the mind likes to categorize and make
meaning even when all of the facts aren’t present, and about how we make assumptions about people and things based on
limited information. Tie this to the importance of evidence and inquiry!
MEDICINE WHEEL (15 MINUTES)
Have youth pick partners and form two interfacing circles – with one partner in the inner circle and one in the outer circle (facing
each other). The people in the outer circle are sculptors, and the people in the inner circle are clay. The sculptor’s job is to silently
mold the clay into a particular shape. Before you begin, have the sculptors check if it is OK to physically touch the people being
sculpted, or if they prefer to be told quietly how to move. Begin by asking the sculptors to mold their clay into someone who
just opened the best present ever – something they have always wanted (give them about one minute). Once everyone is done,
ask the sculptures to freeze in place, while the sculptors all walk around the outside of the circle to see the other creations. Then
have the sculptures turn in to face the center of the circle so they can see each other.
Now have partners switch places (and roles). Have the new sculptors shape their partners into the form of someone without any
power. Repeat the “freeze” and viewing process outlined above. Finally, have partners switch one more time and then sculpt
their partner in the form of a leader.
Debrief: While youth are still in the circle, ask them what qualities they saw in the different sculptures. What was it like to be
shaped by someone else? What was it like to shape someone into the different forms?
★317
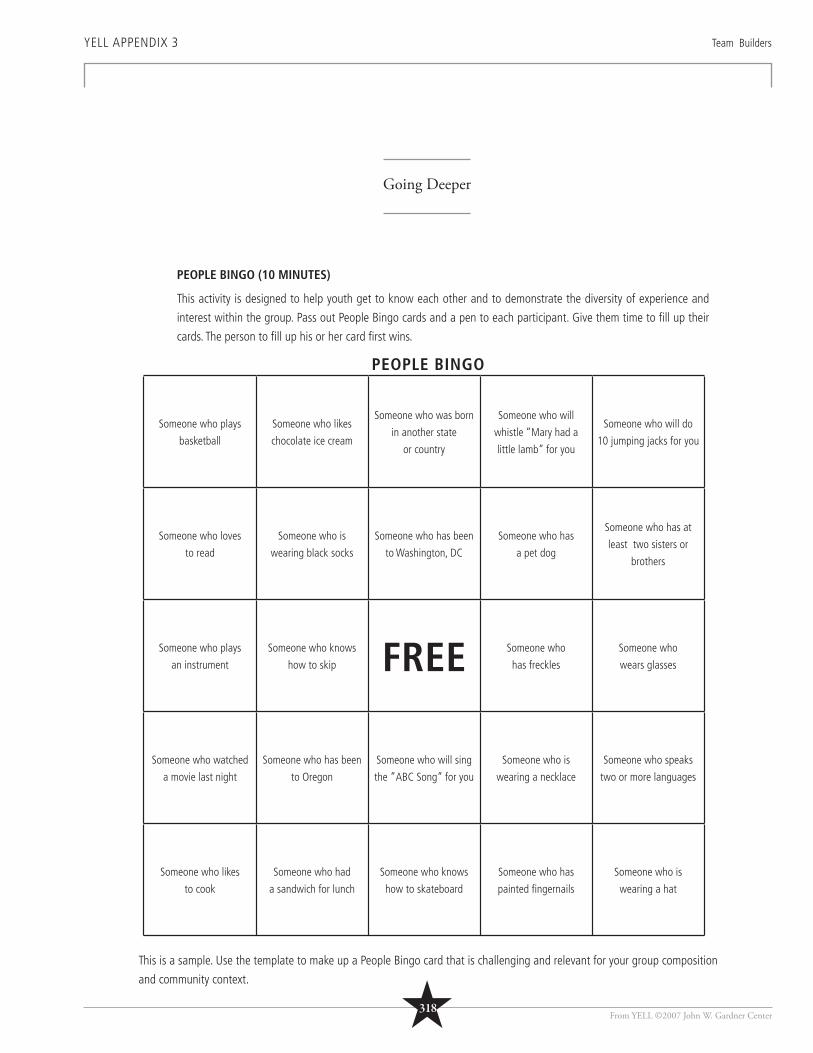
From YELL ©2007 John W. Gardner Center
Someone who plays
basketball
Someone who likes
chocolate ice cream
Someone who was born
in another state
or country
Someone who will
whistle “Mary had a
little lamb” for you
Someone who will do
10 jumping jacks for you
Someone who loves
to read
Someone who is
wearing black socks
Someone who has been
to Washington, DC
Someone who has
a pet dog
Someone who has at
least two sisters or
brothers
Someone who plays
an instrument
Someone who knows
how to skip FREE Someone who
has freckles
Someone who
wears glasses
Someone who watched
a movie last night
Someone who has been
to Oregon
Someone who will sing
the ”ABC Song” for you
Someone who is
wearing a necklace
Someone who speaks
two or more languages
Someone who likes
to cook
Someone who had
a sandwich for lunch
Someone who knows
how to skateboard
Someone who has
painted fi ngernails
Someone who is
wearing a hat
PEOPLE BINGO
This is a sample. Use the template to make up a People Bingo card that is challenging and relevant for your group composition
and community context.
YELL APPENDIX 3 Team Builders
Going Deeper
PEOPLE BINGO (10 MINUTES)
This activity is designed to help youth get to know each other and to demonstrate the diversity of experience and
interest within the group. Pass out People Bingo cards and a pen to each participant. Give them time to fi ll up their
cards. The person to fi ll up his or her card fi rst wins.
★318
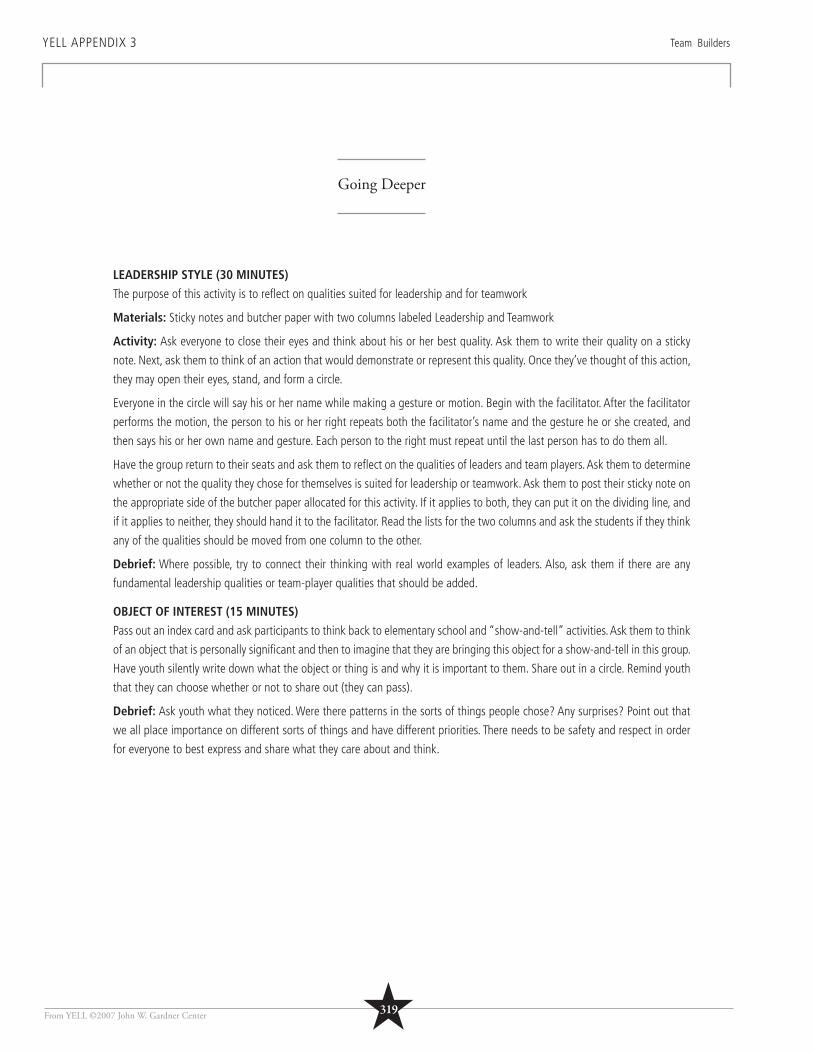
From YELL ©2007 John W. Gardner Center
YELL APPENDIX 3 Team Builders
Going Deeper
LEADERSHIP STYLE (30 MINUTES)
The purpose of this activity is to refl ect on qualities suited for leadership and for teamwork
Materials: Sticky notes and butcher paper with two columns labeled Leadership and Teamwork
Activity: Ask everyone to close their eyes and think about his or her best quality. Ask them to write their quality on a sticky
note. Next, ask them to think of an action that would demonstrate or represent this quality. Once they’ve thought of this action,
they may open their eyes, stand, and form a circle.
Everyone in the circle will say his or her name while making a gesture or motion. Begin with the facilitator. After the facilitator
performs the motion, the person to his or her right repeats both the facilitator’s name and the gesture he or she created, and
then says his or her own name and gesture. Each person to the right must repeat until the last person has to do them all.
Have the group return to their seats and ask them to refl ect on the qualities of leaders and team players. Ask them to determine
whether or not the quality they chose for themselves is suited for leadership or teamwork. Ask them to post their sticky note on
the appropriate side of the butcher paper allocated for this activity. If it applies to both, they can put it on the dividing line, and
if it applies to neither, they should hand it to the facilitator. Read the lists for the two columns and ask the students if they think
any of the qualities should be moved from one column to the other.
Debrief: Where possible, try to connect their thinking with real world examples of leaders. Also, ask them if there are any
fundamental leadership qualities or team-player qualities that should be added.
OBJECT OF INTEREST (15 MINUTES)
Pass out an index card and ask participants to think back to elementary school and “show-and-tell” activities. Ask them to think
of an object that is personally signifi cant and then to imagine that they are bringing this object for a show-and-tell in this group.
Have youth silently write down what the object or thing is and why it is important to them. Share out in a circle. Remind youth
that they can choose whether or not to share out (they can pass).
Debrief: Ask youth what they noticed. Were there patterns in the sorts of things people chose? Any surprises? Point out that
we all place importance on different sorts of things and have different priorities. There needs to be safety and respect in order
for everyone to best express and share what they care about and think.
★319
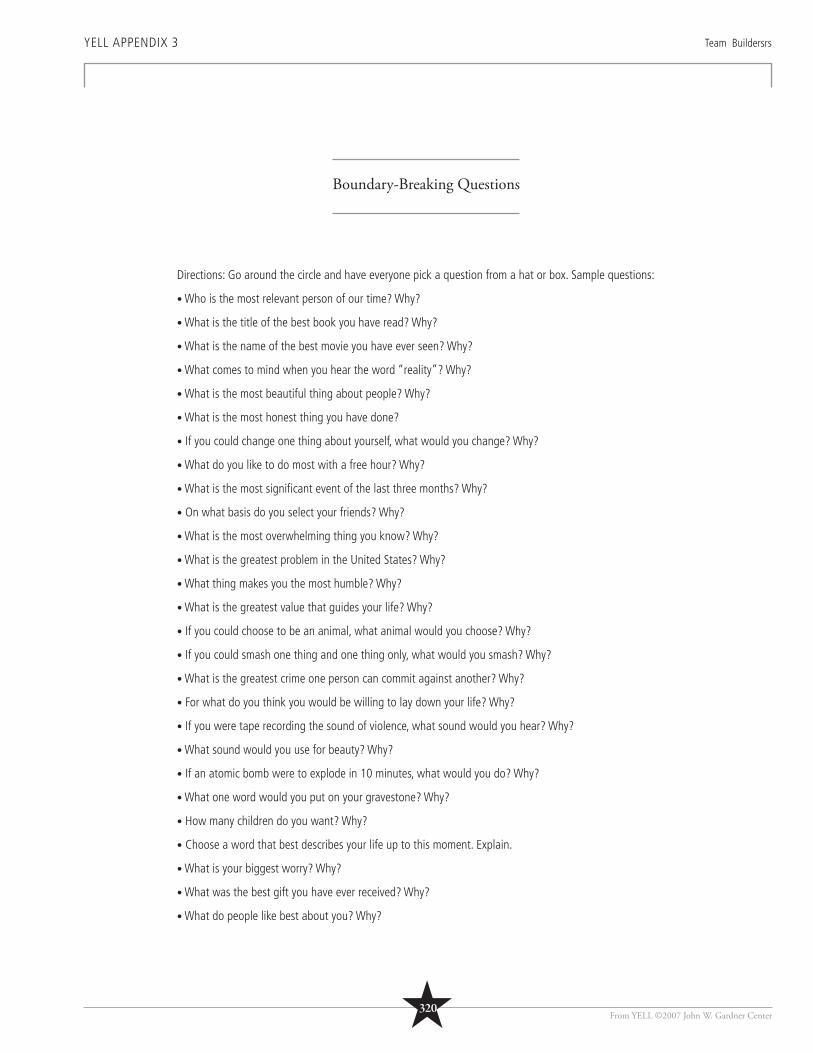
From YELL ©2007 John W. Gardner Center
YELL APPENDIX 3 Team Buildersrs
Boundary-Breaking Questions
Directions: Go around the circle and have everyone pick a question from a hat or box. Sample questions:
• Who is the most relevant person of our time? Why?
• What is the title of the best book you have read? Why?
• What is the name of the best movie you have ever seen? Why?
• What comes to mind when you hear the word “reality”? Why?
• What is the most beautiful thing about people? Why?
• What is the most honest thing you have done?
• If you could change one thing about yourself, what would you change? Why?
• What do you like to do most with a free hour? Why?
• What is the most signifi cant event of the last three months? Why?
• On what basis do you select your friends? Why?
• What is the most overwhelming thing you know? Why?
• What is the greatest problem in the United States? Why?
• What thing makes you the most humble? Why?
• What is the greatest value that guides your life? Why?
• If you could choose to be an animal, what animal would you choose? Why?
• If you could smash one thing and one thing only, what would you smash? Why?
• What is the greatest crime one person can commit against another? Why?
• For what do you think you would be willing to lay down your life? Why?
• If you were tape recording the sound of violence, what sound would you hear? Why?
• What sound would you use for beauty? Why?
• If an atomic bomb were to explode in 10 minutes, what would you do? Why?
• What one word would you put on your gravestone? Why?
• How many children do you want? Why?
• Choose a word that best describes your life up to this moment. Explain.
• What is your biggest worry? Why?
• What was the best gift you have ever received? Why?
• What do people like best about you? Why?
★320
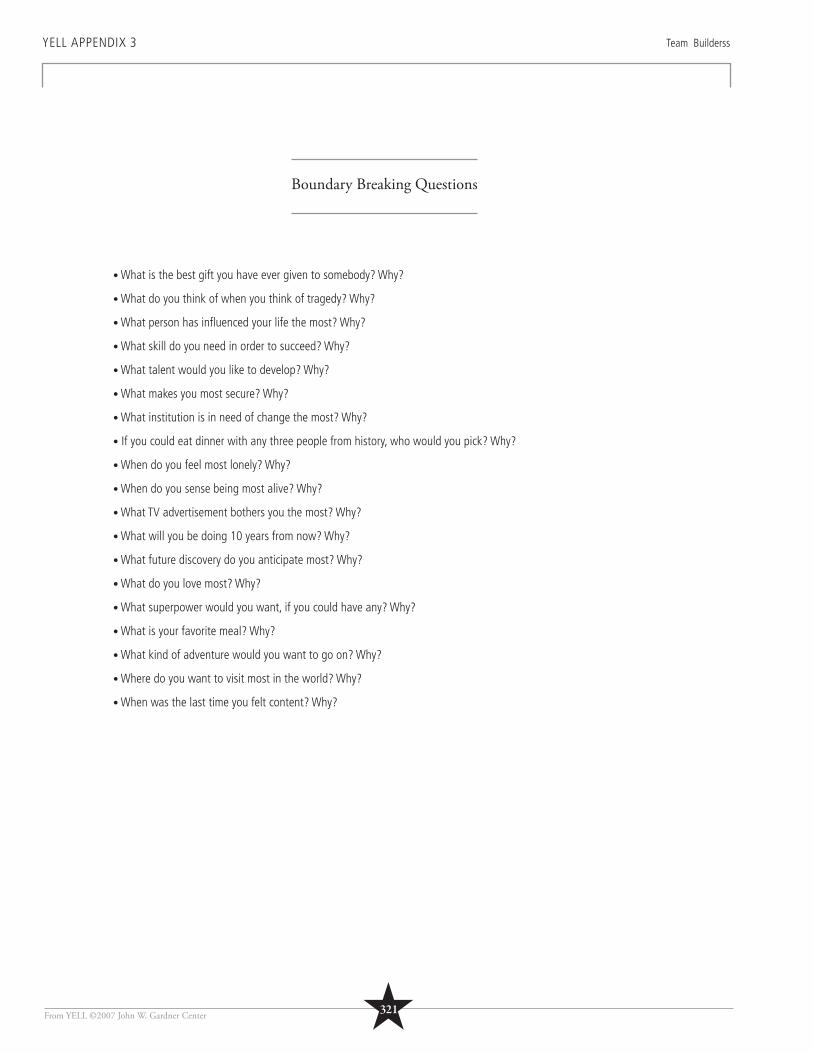
From YELL ©2007 John W. Gardner Center
YELL APPENDIX 3 Team Builderss
Boundary Breaking Questions
• What is the best gift you have ever given to somebody? Why?
• What do you think of when you think of tragedy? Why?
• What person has infl uenced your life the most? Why?
• What skill do you need in order to succeed? Why?
• What talent would you like to develop? Why?
• What makes you most secure? Why?
• What institution is in need of change the most? Why?
• If you could eat dinner with any three people from history, who would you pick? Why?
• When do you feel most lonely? Why?
• When do you sense being most alive? Why?
• What TV advertisement bothers you the most? Why?
• What will you be doing 10 years from now? Why?
• What future discovery do you anticipate most? Why?
• What do you love most? Why?
• What superpower would you want, if you could have any? Why?
• What is your favorite meal? Why?
• What kind of adventure would you want to go on? Why?
• Where do you want to visit most in the world? Why?
• When was the last time you felt content? Why?
★321
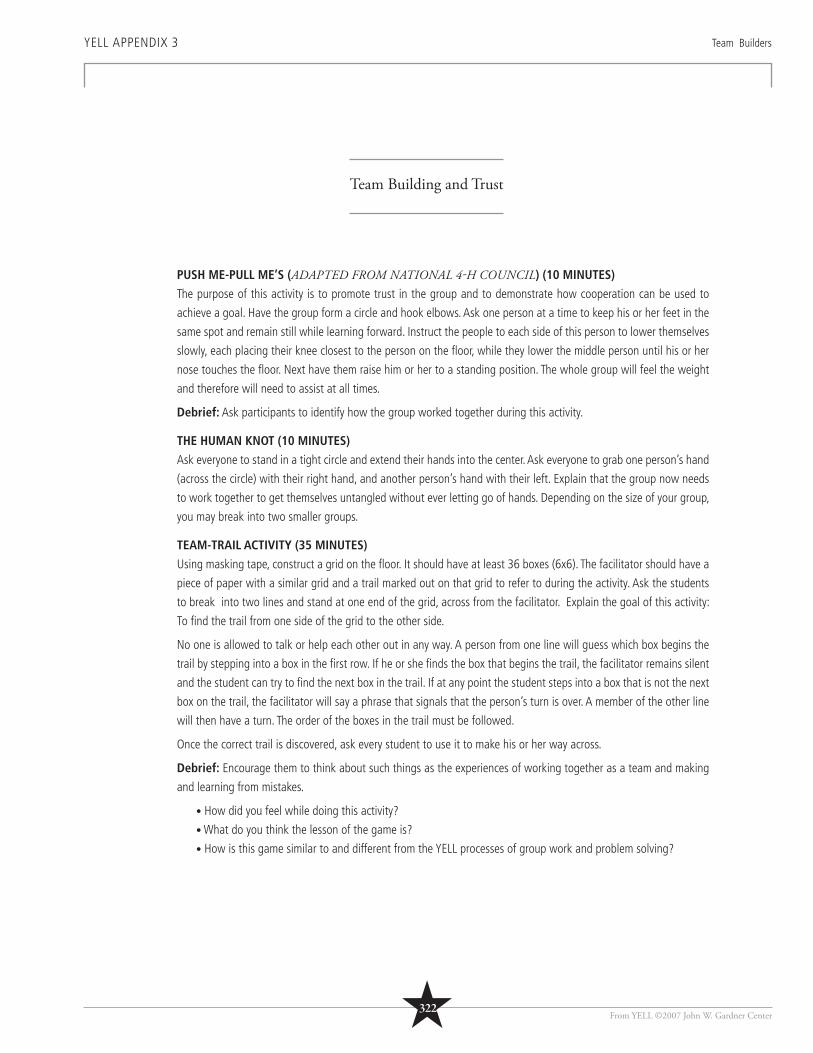
From YELL ©2007 John W. Gardner Center
YELL APPENDIX 3 Team Builders
Team Building and Trust
PUSH ME-PULL ME’S (ADAPTED FROM NATIONAL 4H COUNCIL) (10 MINUTES)
The purpose of this activity is to promote trust in the group and to demonstrate how cooperation can be used to
achieve a goal. Have the group form a circle and hook elbows. Ask one person at a time to keep his or her feet in the
same spot and remain still while learning forward. Instruct the people to each side of this person to lower themselves
slowly, each placing their knee closest to the person on the fl oor, while they lower the middle person until his or her
nose touches the fl oor. Next have them raise him or her to a standing position. The whole group will feel the weight
and therefore will need to assist at all times.
Debrief: Ask participants to identify how the group worked together during this activity.
THE HUMAN KNOT (10 MINUTES)
Ask everyone to stand in a tight circle and extend their hands into the center. Ask everyone to grab one person’s hand
(across the circle) with their right hand, and another person’s hand with their left. Explain that the group now needs
to work together to get themselves untangled without ever letting go of hands. Depending on the size of your group,
you may break into two smaller groups.
TEAM-TRAIL ACTIVITY (35 MINUTES)
Using masking tape, construct a grid on the fl oor. It should have at least 36 boxes (6x6). The facilitator should have a
piece of paper with a similar grid and a trail marked out on that grid to refer to during the activity. Ask the students
to break into two lines and stand at one end of the grid, across from the facilitator. Explain the goal of this activity:
To fi nd the trail from one side of the grid to the other side.
No one is allowed to talk or help each other out in any way. A person from one line will guess which box begins the
trail by stepping into a box in the fi rst row. If he or she fi nds the box that begins the trail, the facilitator remains silent
and the student can try to fi nd the next box in the trail. If at any point the student steps into a box that is not the next
box on the trail, the facilitator will say a phrase that signals that the person’s turn is over. A member of the other line
will then have a turn. The order of the boxes in the trail must be followed.
Once the correct trail is discovered, ask every student to use it to make his or her way across.
Debrief: Encourage them to think about such things as the experiences of working together as a team and making
and learning from mistakes.
• How did you feel while doing this activity?
• What do you think the lesson of the game is?
• How is this game similar to and different from the YELL processes of group work and problem solving?
★322
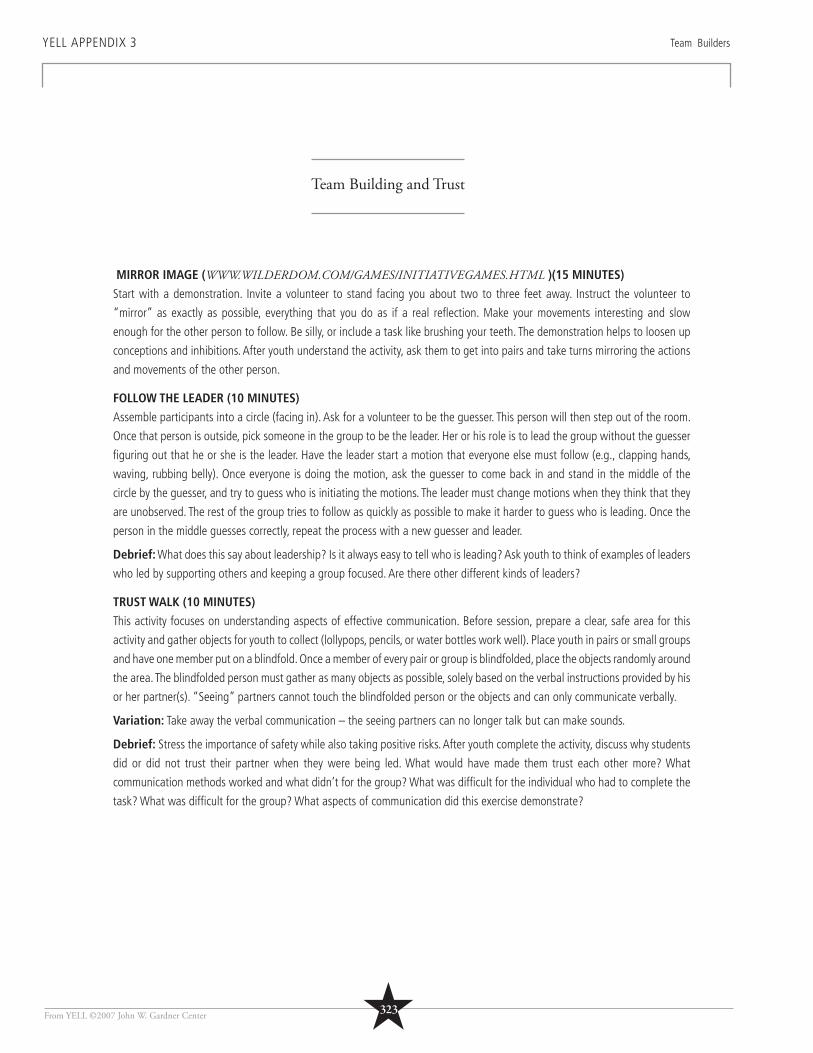
From YELL ©2007 John W. Gardner Center
YELL APPENDIX 3 Team Builders
Team Building and Trust
MIRROR IMAGE (WWW.WILDERDOM.COM/GAMES/INITIATIVEGAMES.HTML )(15 MINUTES)
Start with a demonstration. Invite a volunteer to stand facing you about two to three feet away. Instruct the volunteer to
“mirror” as exactly as possible, everything that you do as if a real refl ection. Make your movements interesting and slow
enough for the other person to follow. Be silly, or include a task like brushing your teeth. The demonstration helps to loosen up
conceptions and inhibitions. After youth understand the activity, ask them to get into pairs and take turns mirroring the actions
and movements of the other person.
FOLLOW THE LEADER (10 MINUTES)
Assemble participants into a circle (facing in). Ask for a volunteer to be the guesser. This person will then step out of the room.
Once that person is outside, pick someone in the group to be the leader. Her or his role is to lead the group without the guesser
fi guring out that he or she is the leader. Have the leader start a motion that everyone else must follow (e.g., clapping hands,
waving, rubbing belly). Once everyone is doing the motion, ask the guesser to come back in and stand in the middle of the
circle by the guesser, and try to guess who is initiating the motions. The leader must change motions when they think that they
are unobserved. The rest of the group tries to follow as quickly as possible to make it harder to guess who is leading. Once the
person in the middle guesses correctly, repeat the process with a new guesser and leader.
Debrief: What does this say about leadership? Is it always easy to tell who is leading? Ask youth to think of examples of leaders
who led by supporting others and keeping a group focused. Are there other different kinds of leaders?
TRUST WALK (10 MINUTES)
This activity focuses on understanding aspects of effective communication. Before session, prepare a clear, safe area for this
activity and gather objects for youth to collect (lollypops, pencils, or water bottles work well). Place youth in pairs or small groups
and have one member put on a blindfold. Once a member of every pair or group is blindfolded, place the objects randomly around
the area. The blindfolded person must gather as many objects as possible, solely based on the verbal instructions provided by his
or her partner(s). “Seeing” partners cannot touch the blindfolded person or the objects and can only communicate verbally.
Variation: Take away the verbal communication – the seeing partners can no longer talk but can make sounds.
Debrief: Stress the importance of safety while also taking positive risks. After youth complete the activity, discuss why students
did or did not trust their partner when they were being led. What would have made them trust each other more? What
communication methods worked and what didn’t for the group? What was diffi cult for the individual who had to complete the
task? What was diffi cult for the group? What aspects of communication did this exercise demonstrate?
★323
324From YELL ©2007 John W. Gardner Center
YELL APPENDIX 3 Team Builders
Team Building and Trust
SCRIBBLE DRAWING (10 MINUTES)
Give participants a piece of paper and marker and tell them to scribble until you say to stop (about 5-10 seconds).
Next, have them trade papers and try to create a picture out of someone else’s scribble. Debrief by discussing how
each one of them used their own perspectives and creativity to create a positive change. Stress the need for creative
thinking and how something that is initially nothing special (or a problem) can be transformed into something
interesting, useful, or even beautiful.
THE HIGHEST TOWER (30 MINUTES)
Materials:
• Several sheets of newspaper
• Sheets of 8x11 paper
• Paperclips
• Masking tape
• Envelope
• Pieces of cardboard
Suggestions: The ground rules that the youth generate at the end of this activity can be used as a starting-off point
for a discussion of rules, rights, and responsibilities.
Activity: One facilitator at each table will explain the instructions.
Hand out materials. These need to be exactly the same for all teams.
Instruct each group to try to build the highest standing tower using only the materials available. The tower must stand
on its own. Allot fi ve minutes to plan (they can touch the materials only to explain their ideas) and 10 minutes to
construct. When they are done, measure the towers to see who won.
Debrief: Within each small group, have a short discussion about how they made decisions and worked together.
Record the ground rules they develop on sticky notes. Some questions to spark discussion:
• How do you think we worked together as a team?
• What helped us work well together?
• Did anyone assume a leadership role?
• What could we have done better?
★324
From YELL ©2007 John W. Gardner Center
YELL APPENDIX 3 Team Builders
Team Building and Trust
ISLAND PARADISE? (1-2 HOURS)
*At least 16 people
Materials: Clay and paper and pens.
Divide into groups of about eight, creating at least two but preferably three or more groups. Give each group a football size
lump of potter clay with the task of creating an island that all would inhabit. Proceed through the exercise as follows:
The fi rst part of the exercise will be done silently. In this portion, each member of the group will silently construct their idea of
the island on paper, complete with geographical features and shelter for themselves. Allow about 10 minutes.
Have the group members talk amongst themselves and determine a concept for a community island. Elements to discuss
include how their island will operate, such as health care, education, commerce, defense, food production, transportation, and
governing structure. Though all of these cannot be modeled in clay, discussion can still occur and be facilitated by advisors.
Allow about 40 minutes.
Once group islands have been established, then inform the groups that other islands exist (the other groups) and that if they
want, they can interact with them. The groups have to fi gure out how interactions will occur – attack, commerce, trade rules?
Allow about 20 minutes.
Debrief: Facilitate an assessment of the activity and issues that arose. Allow up to 20 minutes or as much time as is available/
or eeded. Topics to direct conversation include:
1. Leadership – did someone take charge in each group?
2. Decision making – did any systematic decision-making process occur? Was it effective?
3. Communication – what methods were used within groups and between groups?
4. Planning – what was good planning and what was not?
5. Morality and Integrity – did these issues arise? If so, how and what was the outcome?
6. Culture – did islands create their own culture? If so, what was it? When allowed to
interact with other islands, did an island’s original culture change? If so, how?
Facilitation Tip:
• A fl at surface is helpful to construct the islands, such as large sheets of paper or a board.
• Clay can be messy, so having aprons or some way to clean up after the activity is useful.
• If available, a sandbox or beach would also create a good setting to do the exercise.
★325
326From YELL ©2007 John W. Gardner Center
YELL APPENDIX 3 Team Builders
Team Building and Trust
WIDGET ASSEMBLY (1 HOUR)
The goal of this activity is to appreciate the challenges of articulating one’s vision and goals to others. A widget
assembly line is used to convey this idea.
Materials: A large roll of craft paper and an additional empty roll. On a medium-sized table, set up the roll of craft
paper on one end and affi x the end of the paper to the empty roll on the other end. Affi x in such a way that the paper
can be rolled from the full roll to the empty one. This will become the assembly line. A collection of assorted LEGOs is
needed as the building components for the assembly line along with small containers at the various assembly station
points.
Divide into groups of fi ve to seven people. Prior to briefi ng the group on the activity, have one person designated as
the leader or manager. This person will receive the actual briefi ng from the facilitator regarding the specifi cs of the
activity and what widget the assembly line must make. This is the only person who is aware of the entire scope of the
task. Ideally, he or she does not see the layout of the assembly line, but does receive an explicit schematic and a list
of the component LEGOs available. This individual is provided with a sample of the widget to make and must organize
the group and convey to them what needs to be accomplished. A box at the end of the assembly line and a partition
would be useful so that the leader/manager can see only the end product and make adjustments from there. They
cannot go onto the assembly line and show the rest of the group how they want the fi nal product to look; they can
only affect change verbally. Once the leader/manager has given instructions to the group, the facilitator will turn on
the assembly line by beginning to roll the paper from the full roll to the empty roll.
The widgets need to be complicated, and details of organization and sequencing should be left to whomever is
designated as the leader/manager. A number of aspects will need to be considered, which can drive discussion at the
end of the activity. Given the fi nal product, the manager must decide how it should be constructed on the assembly
line and inform the builders what components are needed, along with other organization issues. Have multiple
widgets available for construction so that all members in the group have an opportunity to be the leader/manager.
Time the task to see how long it takes the group to successfully complete a widget or to make a specifi ed number of
correct widgets.
Depending on site capabilities, another way of doing this activity is to have the assembly line and builders in one
room and the leader/manager able to view the proceeding through a window. Based on observation, the manager
can then relay messages to the group on how to fi x any issues. This may be an easier task for the group to start with
and then proceed to the format where the leader/manager is completely blind to the assembly line. This can depict
the evolution of trust and confi dence that the leader/manager has in the group as they begin to understand his/her
way of conveying information.
Many adaptations and extensions are possible with this activity, so be creative as the group begins to master the
basics of working together and effectively conveying their widget vision.
Debrief: Ensure that time is left at the end so the group can discuss what worked and what didn’t regarding how
the leader/manager conveyed information. Also have them refl ect on whether the task became easier after several
iterations and why this may or may not be so.
★326
From YELL ©2007 John W. Gardner Center
YELL APPENDIX 3 Team Builders
Team Building and Trust
ALL ABOARD! (15 MINUTES)
This activity requires working together in close physical proximity to solve a practical problem. It tends to emphasize group
communication, cooperation, patience, and problem-solving strategy, as well as issues related to physical self and physical
proximity.
Basic method: Ask the whole group to try to fi t inside a small area which can be marked by a tarp, a small platforms, or a
circle of rope, or a blanket.
When the group succeeds, decrease the area (e.g., changing platforms, shrinking the circle, or folding the tarp) and challenge
the group again. How far can the group go?
Cautions: Obviously people are going to need to feel physically comfortable in order to get physically close and be supportive
of one another. Make sure people are warmed up and preferably have removed excessive jewelry, watches, and other loose
objects.
Variation: Tarp Flip Over: With a group standing on a tarp, challenge them to turn the tarp over without anyone touching the
ground in the process.
NEWSPAPER DOG (10 MINUTES)
Break youth into groups of fi ve, and give each group a stack of newspaper and a roll of masking tape. Each group must create
a dog out of the newspaper and tape in fi ve minutes. Afterwards, ask each group:
• What was your group dynamic like?
• Was there a dominant leadership style within the group?
• What are your strengths as a group?
• What does each of you bring or contribute to the group?
DO YOU LOOK LIKE A SUPERHERO? (15 MINUTES)
Have each participant draw a “community superhero” suit that a hero would wear. What objects would a superhero in your
community need in his or her tool belt? What image would a hero present? Does your hero stand out in a crowd with bright
colors or does your hero look like someone in your school, your neighborhood, your religious community? Have each participant
explain to the group the reasons behind each detail of his or her drawing.
★327
328From YELL ©2007 John W. Gardner Center
YELL APPENDIX 3 Team Builders
Team Building and Trust
QUESTION WHEEL (5 MINUTES)
Create a circle on the fl oor with tape or chalk, and divide into quadrants labeled with the numbers 1 through 4. Make
sure there is enough room for everyone to stand on the wheel. Ask a series of questions, each with four possible
responses. Instruct youth to stand on the number that best fi ts with their answer. You can also ask questions that
help to evaluate how youth are feeling about the program or their accomplishments. After they have chosen where
to stand, ask the group what they see in terms of distribution: Where are most people standing? Least? Why do they
think this pattern exists?
Example Question: It is hard to fi nd an affordable place to live in this community.
Stand on #1 if you strongly disagree, #2 if you disagree, #3 if you agree, #4 if you strongly agree.
FOUR CORNERS (15 MINUTES)
Write the words Agree, Disagree, Somewhat Agree, and Somewhat Disagree on four pieces of paper and post each
at a different corner of the room. Ask youth and adult staff and volunteers to listen to the following statements and
stand under the sign that best refl ects how they feel. Debrief by discussing that different people respond to differently
depending on their interests, personal perspectives, and experiences.
Use the following statements, or pick your own:
• I think people are born with equal opportunities to succeed.
• I think everyone should go to college.
• I think that adults generally respect youth.
• I like to share what I know and think with others.
• I like taking action!
• I like to try to persuade other people to see things my way.
SWIMMING TO FLYING (10 MINUTES)
The goal of the game is to become a bird. All participants start as fi sh and should “swim” around the room. When a
fi sh fi nds another fi sh they stop and play rock/paper/scissors once. The winner becomes a frog and jumps away. The
fi sh swims away looking for another fi sh to play with. A frog must fi nd another frog to play rock/paper/scissors with.
The winner of a game between two frogs becomes a bird and fl ies around watching the rest of the games. When there
is only one fi sh, one frog, and a group of birds the game is over.
Debrief: What did you think of the game? Is playing a game where most will win more fun or less fun than a game
with one winner? How is this type of game different?
★328
From YELL ©2007 John W. Gardner Center
YELL APPENDIX 3 Team Builders
Team Building and Trust
WACKY SPEECH (20 MINUTES)
In a circle, have each youth write down something they expect from adults, then pass their paper or index card to the person
on their left. Below what is already written on the paper they have received, have youth write their favorite animal or song, and
again, pass the paper to the left. Next, have youth write what they would wish for if they had one wish. Pass the paper one more
time. Now each youth should have a piece of paper with three things on it. One at a time, have youth create an argument or
“case” from the statements on their card or paper. The argument must meet two criteria: It must be expressed with real concern
or passion, and it must ask for the group to do or think about something specifi c that includes all three items. Encourage youth
to be as creative and silly as possible. Their argument does not need to make sense!
★329
330From YELL ©2007 John W. Gardner Center
YELL APPENDIX 3 Team Builders
Basic Energizers
LOOK UP AND SCREAM! (5 MINUTES)
Have youth stand in a close circle and instruct everyone to look down at their shoes. On the count of three ask youth
to look up and pick one person to look at. If that person is looking back at them (rather than at someone else), both
people scream! This is a loud, fun activity.
QUESTION GAME (5 MINUTES)
The group must sit or stand in a circle. The fi rst person can ask a question (any question, just not personal or
derogatory) to the person to their left or right. The person DOES NOT ANSWER, but asks another question. Whoever is
asked a question must then ask the person to their left or right another question. If you repeat a question or hesitate,
you are disqualifi ed. The goal is to keep going with new questions!
FOCUS AND COUNT (10 MINUTES)
The facilitator starts out by saying the number 1. Then without saying anything or making a gesture, someone else
has to say 2, then someone else says 3 and so on until 10. The object of the game is to count to 10 without people
saying the same number at the same time. Also, you can’t say a number two times in a row. Select someone to start
with the number 1 and begin.
TELEPHONE CHARADES (10 MINUTES)
While half the group sits as the audience, the other half stands in a line. The fi rst person in the line is to act out
something (e.g., frying eggs, fi shing, Elvis). This person charades the action for the second person in line while all
the other people in the line have their backs turned (so they cannot see the action). The second person then acts out
what he or she saw for the third person, and this process continues down the line. The last person then tries to guess
what the action is.
Debrief: What does this activity tell us about communication?
STORY (10 MINUTES)
Ask everyone to sit in a circle. In this activity, the group will tell a story – but each person can only add one word at
a time! Ask for a volunteer to start the story by saying one word. The next person has to continue building on the
sentence by saying another word. Continue until the group has formed at least a sentence or two.
Debrief: How does this activity relate to teamwork?
STORY TELLER (10 MINUTES)
Ask one participant to begin to tell a story. After 30 seconds have, have another participant stand up and summarize
the story thus far and then continue it for another 30 seconds. Repeat this process until the story is over.
Debrief: Focus on the importance of listening and cooperation. How the story changed as each person
summarized?
★330
From YELL ©2007 John W. Gardner Center
YELL APPENDIX 3 Team Builders
Basic Energizers
BIPPITY BIPPITY BOP (10-15 MINUTES)
Everyone sits or stands in a circle. Ask for a volunteer to stand in the middle of the circle. That person spins madly as they count
up to 10. When they get to 10, they stop and point to someone in the circle. That person then sticks their arm out in front of
their face and dangles it like an elephant truck. The people on either side of the person have to make the ears of the elephant
with their arms. While this is going on, the person in the circle has to say Bippity Bippity and by the time they say Bop, all three
elephant parts must be in place. The person who did not fi nish their part of the elephant in time trades places with the person
in the center and the game continues. Ties are decided by someone from the circle.
PICTIONARY RACE (10 MINUTES)
Divide the group into two teams and have each team go to a different part of the room. Each team should have a few sheets
of butcher paper to draw on. Have someone stand in the middle of the room with a set of cards, each with a secret word that
the teams will have to guess. When the facilitator says go, each team will send a representative to see the secret word. The
representative then returns to the group, draws (without talking), and the team has to guess the word. Once they guess it, they
send another team member to read and draw the next word. If you are using the same sets of words for both teams, remind the
teams to be quiet if they don’t want the other team to hear their answers! Whoever fi nishes fi rst wins. (Sample words: Leader,
Community, Student, Activist, Principal, Park, Friend.)
LOOP-DE-LOOP (10 MINUTES)
Have the youth stand in a circle and hold hands. Start one hula hoop (or innertube, long loop of rope) hanging over one pair of
joined hands. Each person in the circle must pass the hoop/loop over him/herself and on to the next person – WITHOUT letting
go of hands. This activity could be timed or done with two or three hoops/loops going at the same time in different directions.
BUILDING A PEANUT BUTTER AND JELLY SANDWICH (10 MINUTES)
Pretend to be an alien who doesn’t know how to make a peanut butter and jelly sandwich. Have the participants instruct the
alien step by step on how to do so. Take every suggestion as literally as possible (“put hand on jar lid and twist”) to illustrate the
importance of being specifi c and thorough. Have a brief recap discussion to clarify the points and to allow students to express
frustration at not being able to communicate with the alien.
FREE ASSOCIATION (5 MINUTES)
In a circle, have someone start by saying a word and go around with each person saying the fi rst thing that comes to their mind
(remind them to keep it appropriate!).
★331
From YELL ©2007 John W. Gardner Center
YELL APPENDIX 3 Team Builders
Props and Validations
PROPS
“Props” can refer to good things people do or say, or to qualities they bring to the group.
After the fi rst couple of sessions, give participants a sheet of sticker labels, and have them write a prop for each person
in the group. After everyone has written a prop for everyone, have youth put the stickers on each other. At the end of
the session, give students a piece of paper for all their props so they can keep them.
Another option is a “props bags” – brown paper lunch bags that youth decorate with their names. Keep these bags
in the room, next to a stack of paper and pens. Encourage youth to share props by writing down the positive qualities
or actions of others and placing those notes in the bags. Make sure everyone writes at least one prop for every person
in the group (so that no one ends up with an empty bag and youth have to fi nd the good and positives in everyone),
and make sure to include staff and adult leaders! Youth can choose to sign their props or make them anonymous.
SWEET THANKS
Pass out fi ve (or any number) candies to everyone in the group. Set a time limit of about 30 minutes for everyone to
pass out their candies to each other, one candy for every validation. If someone has already gotten fi ve candies, they
must sit down until everyone else gets fi ve.
THANKS AND APOLOGIES
Go around the circle and have each person give thanks to the group and/or apologies. This is a great process to
use when there have been some confl icts that have been resolved, and you want to give youth the opportunity to
acknowledge personal regret or gratitude in the group setting.
WORDS OF APPRECIATION
With everyone seated in a circle, pass out a piece of paper and pen or pencil to each youth and staff. Ask everyone
to write their name at the top of the paper. Once everyone is done, pass the papers to the left. Each person should
write one quality or trait that they appreciate about the person whose name is at the top of the paper. Once they have
written something, pass the paper to the next person. Keep the papers going until everyone has added something to
every person’s sheet, and everyone has their own. Ask youth to avoid focusing on physical traits and to stay positive.
Encourage people to be as specifi c as possible. Specifi cs will make it more meaningful.
Note:
Many communities have Ropes Courses and other team-building resources. Activities like Trust Falls and Lifts are also powerful experiences for groups and individuals. Th ese activities must have high supervision and staff training or experience.
N
★332

From YELL ©2007 John W. Gardner Center
NOTES
★333
From YELL ©2007 John W. Gardner Center
List of Reference Materials
INTRODUCTION AND GETTING STARTED REFERENCE MATERIALS
• First Quote in introduction: John W. Gardner, American Leadership Forum
graduation speech, San Jose 1997.
• A Note on Youth Leadership Quote: Gardner, J. W. (1968). No Easy Victories. New York: Harper & Row.
• Getting Started Introduction Quote: Gardner, J. W. (1964). Self Renewal (pp 11). New York: Harper & Row.
UNIT 1 REFERENCE MATERIALS
• Session 1: Confi dentiality Guidelines – Master 1.1b -– Adapted from a resource by Samira Soleimanpour, MPH.
School Based-Health Center Student Research Project of the Institute for Health Policy Studies. University of
California, San Francisco.
• Session 2: Earthquake Activity and Master Copy 1.2a and 1.2b Designed by Dr. Joe Fisher, President, Aviat, a
subsidiary of ORION International, Ann Arbor, Michigan.
• Session 8: Master Copy 1.8b Fun Fact
http://changingminds.org/explanations/behaviors/body_language/mehrabian.htm.
• Session 11: Mock City Council based on an actual Youth Bus Pass campaign that Kids First Oakland youth
leaders and allies organized in 2001 securing free and affordable transportation for 25,000 low-income youth
www.kidsfi rstoakland.org.
• Session 13: Murder Mystery Mayhem adapted from an activity designed by the Lincoln Filene Center for
Citizenship and Public Affairs, Tufts University, Medford, MA. 1973.
• Session 15: Situational Leadership adapted from the Model by Ken Blanchard and Paul Hersey.
UNIT 2 REFERENCE MATERIALS
• Session 2: Warm up: Mirror Image adapted from The Wilderdom Store: www.wilderdom.com/games/descriptions/
MirrorImage.html. Content on this site has been placed in the public domain and, unless otherwise indicated, is
subject to the principles of copyleft. For legalistic purposes, please refer to the Creative Commons Attribution 2.5
License.
• Session 4: Leadership Compass adapted from an activity designed by the Bonner Foundation and COOL (Campus
Outreach Opportunity League) www.bonner.org/
• Session 7: Identity Cards Activity adapted from an activity by Maria Kelly, academic dean at the Saint Paul
Conservatory for Performing Arts
• Session 10: Adapted from “The Spectrum of Adult Attitudes toward Young People,” The Technology of Prevention
Workbook, William A. Lofquist, Associates for Youth Development Inc., 1989, pages 47-50.
★334
From YELL ©2007 John W. Gardner Center
List of Reference Materials
• Session 11: Structures of Organizations was adapted from an activity created by Youth in Focus of Oakland, www.
youthinfocus.net.
• Session 12: Eisley, L. (1978). The Star Thrower (adapted by MuttCats to The Star Fish Story). Retrieved July 6th, 2007, from
http://muttcats.com/starfi sh.htm.
UNIT 3 REFERENCE MATERIALS
• Unit 3 Introduction Quote: Gardner, J. W. (1964). Self Renewal. New York: Harper & Row.
• Session 1: Knowledge is Power role plays from www.whatkidscando.org
• Session 9: Adapted from The Co/Motion Guide to Youth-led Social Change by the Alliance for Justice
www.afj.org/index.html
• Session 25: Adapted from the Co/Motion Guide to Youth-led Social Change by the Alliance for Justice
www.afj.org/index.html
APPENDIX 2 REFERENCE MATERIALS
• Defi nitions – What is Youth Development and What is a Youth Development Environment:
• CNYD. (2001).Youth Development Guide: Engaging young people in after school programming. Community Network for
Youth Development, San Francisco: www.cnyd.org/trainingtools/index.php.
• Eccles, J.S. 92002). Community programs to promote youth development. Washington, DC: National Academy Press.
★335