you play - we tune!
TRANSCRIPT


You play - we tune!TronicalTune
PACKAGE CONTENT
6 x ROBOHEAD
1 x CONTACTING PCB
1 x LiPo BATTERY
1 x CHARGER INCL. WALL-PLUG
7 x LOCK NUT & RING WASHER
1 x WRENCH

GETTING STARTED INSERT BATTERY . . . . . . . . . . . . . . . . . . . . . . . . . . . . . . . . . . . . . . . . . . . . . . . . . . . . . . . . . . . . . . . . . . . . . . . . . . . . . . . . . . . . . . . . . . . . . . . . . . . . . . 6 CHARGE BATTERY . . . . . . . . . . . . . . . . . . . . . . . . . . . . . . . . . . . . . . . . . . . . . . . . . . . . . . . . . . . . . . . . . . . . . . . . . . . . . . . . . . . . . . . . . . . . . . . . . . . . . 8 REPLACE BATTERY . . . . . . . . . . . . . . . . . . . . . . . . . . . . . . . . . . . . . . . . . . . . . . . . . . . . . . . . . . . . . . . . . . . . . . . . . . . . . . . . . . . . . . . . . . . . . . . . . . . . 9 INSTALL THE SYSTEM ON THE GUITAR . . . . . . . . . . . . . . . . . . . . . . . . . . . . . . . . . . . . . . . . . . . . . . . . . . . . . . . . . . . . . . . . . . . . . . . . . 10 STRING GUITAR . . . . . . . . . . . . . . . . . . . . . . . . . . . . . . . . . . . . . . . . . . . . . . . . . . . . . . . . . . . . . . . . . . . . . . . . . . . . . . . . . . . . . . . . . . . . . . . . . . . . . . 12 TREBLE STRINGS . . . . . . . . . . . . . . . . . . . . . . . . . . . . . . . . . . . . . . . . . . . . . . . . . . . . . . . . . . . . . . . . . . . . . . . . . . . . . . . . . . . . . . . . . . . . . . 14 BASS STRINGS . . . . . . . . . . . . . . . . . . . . . . . . . . . . . . . . . . . . . . . . . . . . . . . . . . . . . . . . . . . . . . . . . . . . . . . . . . . . . . . . . . . . . . . . . . . . . . . . . 16
BASIC FUNCTIONS OVERVIEW . . . . . . . . . . . . . . . . . . . . . . . . . . . . . . . . . . . . . . . . . . . . . . . . . . . . . . . . . . . . . . . . . . . . . . . . . . . . . . . . . . . . . . . . . . . . . . . . . . . . . . . . . . . . 18 DEFAULT TUNINGS . . . . . . . . . . . . . . . . . . . . . . . . . . . . . . . . . . . . . . . . . . . . . . . . . . . . . . . . . . . . . . . . . . . . . . . . . . . . . . . . . . . . . . . . . . . . . . . . . . 20 LOW TUNINGS . . . . . . . . . . . . . . . . . . . . . . . . . . . . . . . . . . . . . . . . . . . . . . . . . . . . . . . . . . . . . . . . . . . . . . . . . . . . . . . . . . . . . . . . . . . . . . . . . . . . . . . 22
ADVANCED FUNCTIONS OVERVIEW . . . . . . . . . . . . . . . . . . . . . . . . . . . . . . . . . . . . . . . . . . . . . . . . . . . . . . . . . . . . . . . . . . . . . . . . . . . . . . . . . . . . . . . . . . . . . . . . . . . . . . . . . . . . 24 TUNING FUNCTIONS STRING UP/DOWN . . . . . . . . . . . . . . . . . . . . . . . . . . . . . . . . . . . . . . . . . . . . . . . . . . . . . . . . . . . . . . . . . . . . . . . . . . . . . . . . . . . . . . . . . . . . . 27 CUSTOM TUNING . . . . . . . . . . . . . . . . . . . . . . . . . . . . . . . . . . . . . . . . . . . . . . . . . . . . . . . . . . . . . . . . . . . . . . . . . . . . . . . . . . . . . . . . . . . . . . 27 REFERENCE TUNING . . . . . . . . . . . . . . . . . . . . . . . . . . . . . . . . . . . . . . . . . . . . . . . . . . . . . . . . . . . . . . . . . . . . . . . . . . . . . . . . . . . . . . . . . . 28 FIRMWARE VERSION . . . . . . . . . . . . . . . . . . . . . . . . . . . . . . . . . . . . . . . . . . . . . . . . . . . . . . . . . . . . . . . . . . . . . . . . . . . . . . . . . . . . . . . . . 28 BATTERY LEVEL . . . . . . . . . . . . . . . . . . . . . . . . . . . . . . . . . . . . . . . . . . . . . . . . . . . . . . . . . . . . . . . . . . . . . . . . . . . . . . . . . . . . . . . . . . . . . . . . 29 TUNING OFFSET TEMP./ GLOBAL . . . . . . . . . . . . . . . . . . . . . . . . . . . . . . . . . . . . . . . . . . . . . . . . . . . . . . . . . . . . . . . . . . . . . . . . . . . 29
RESET FUNCTION . . . . . . . . . . . . . . . . . . . . . . . . . . . . . . . . . . . . . . . . . . . . . . . . . . . . . . . . . . . . . . . . . . . . . . . . . . . . . . . . . . . . . . . . . . . . . . . . . . 30 HARDWARE FUNCTIONS CALIBRATION MODE . . . . . . . . . . . . . . . . . . . . . . . . . . . . . . . . . . . . . . . . . . . . . . . . . . . . . . . . . . . . . . . . . . . . . . . . . . . . . . . . . . . . . . . . . . 33 ACCURACY . . . . . . . . . . . . . . . . . . . . . . . . . . . . . . . . . . . . . . . . . . . . . . . . . . . . . . . . . . . . . . . . . . . . . . . . . . . . . . . . . . . . . . . . . . . . . . . . . . . . . . 35 ROBOHEAD DELAY . . . . . . . . . . . . . . . . . . . . . . . . . . . . . . . . . . . . . . . . . . . . . . . . . . . . . . . . . . . . . . . . . . . . . . . . . . . . . . . . . . . . . . . . . . . . 35 ROBOHEAD SPEED . . . . . . . . . . . . . . . . . . . . . . . . . . . . . . . . . . . . . . . . . . . . . . . . . . . . . . . . . . . . . . . . . . . . . . . . . . . . . . . . . . . . . . . . . . . . 35 INTERFERENCE FILTER . . . . . . . . . . . . . . . . . . . . . . . . . . . . . . . . . . . . . . . . . . . . . . . . . . . . . . . . . . . . . . . . . . . . . . . . . . . . . . . . . . . . . . . 35
SOFTWARE FUNCTIONS GAIN . . . . . . . . . . . . . . . . . . . . . . . . . . . . . . . . . . . . . . . . . . . . . . . . . . . . . . . . . . . . . . . . . . . . . . . . . . . . . . . . . . . . . . . . . . . . . . . . . . . . . . . . . . . . . . 37 GUITAR TYPE . . . . . . . . . . . . . . . . . . . . . . . . . . . . . . . . . . . . . . . . . . . . . . . . . . . . . . . . . . . . . . . . . . . . . . . . . . . . . . . . . . . . . . . . . . . . . . . . . . . 37 PITCH WINDOW . . . . . . . . . . . . . . . . . . . . . . . . . . . . . . . . . . . . . . . . . . . . . . . . . . . . . . . . . . . . . . . . . . . . . . . . . . . . . . . . . . . . . . . . . . . . . . . . 37 ACTIVATE LOW TUNINGS. . . . . . . . . . . . . . . . . . . . . . . . . . . . . . . . . . . . . . . . . . . . . . . . . . . . . . . . . . . . . . . . . . . . . . . . . . . . . . . . . . . . . 39 TUNING OFFSET MODE . . . . . . . . . . . . . . . . . . . . . . . . . . . . . . . . . . . . . . . . . . . . . . . . . . . . . . . . . . . . . . . . . . . . . . . . . . . . . . . . . . . . . . . 39
PER-STRING PITCH CORRECTION . . . . . . . . . . . . . . . . . . . . . . . . . . . . . . . . . . . . . . . . . . . . . . . . . . . . . . . . . . . . . . . . . . . . . . . . . . . . . . 40
UNBLOCK BANKS FOR CUSTOM TUNINGS . . . . . . . . . . . . . . . . . . . . . . . . . . . . . . . . . . . . . . . . . . . . . . . . . . . . . . . . . . . . . . . . . . . . 42
CAPO MODE . . . . . . . . . . . . . . . . . . . . . . . . . . . . . . . . . . . . . . . . . . . . . . . . . . . . . . . . . . . . . . . . . . . . . . . . . . . . . . . . . . . . . . . . . . . . . . . . . . . . . . . . . . 44
LEGAL INFORMATION . . . . . . . . . . . . . . . . . . . . . . . . . . . . . . . . . . . . . . . . . . . . . . . . . . . . . . . . . . . . . . . . . . . . . . . . . . . . . . . . . . . . . . . . . . . . . . . 46
TronicalTuneIndex
4 5
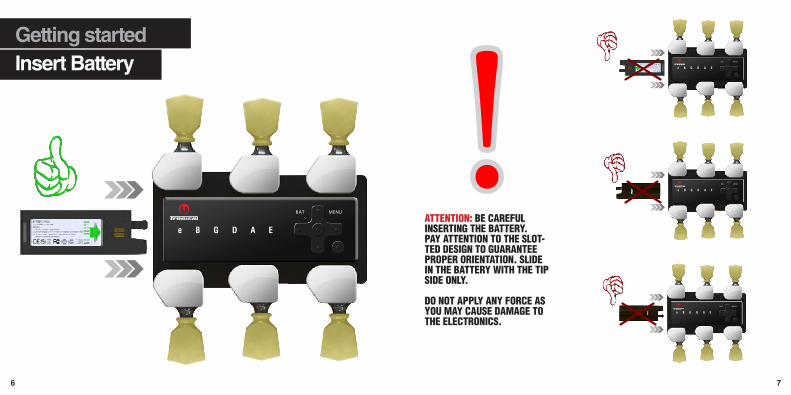
Getting startedInsert Battery
BAT
e B G D A E
MENU
BAT
e B G D A E
MENU
BAT
e B G D A E
MENU
BAT
e B G D A E
MENU
ATTENTION: BE CAREFUL INSERTING THE BATTERY. PAY ATTENTION TO THE SLOT-TED DESIGN TO GUARANTEE PROPER ORIENTATION. SLIDE IN THE BATTERY WITH THE TIP SIDE ONLY.
DO NOT APPLY ANY FORCE AS YOU MAY CAUSE DAMAGE TO THE ELECTRONICS.
!6 7
Battery is CHARGING Battery is CHARGED
Getting startedCharging Battery
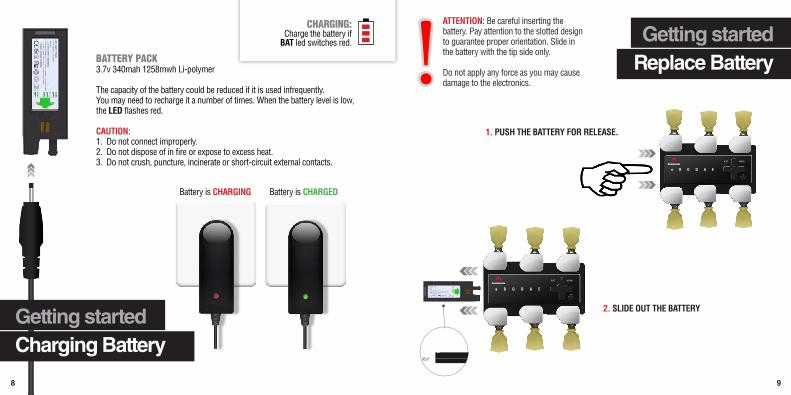
BATTERY PACK3.7v 340mah 1258mwh Li-polymer
The capacity of the battery could be reduced if it is used infrequently. You may need to recharge it a number of times. When the battery level is low, the LED flashes red.
CAUTION:1. Do not connect improperly.2. Do not dispose of in fire or expose to excess heat.3. Do not crush, puncture, incinerate or short-circuit external contacts.
CHARGING:Charge the battery if
BAT led switches red. Getting startedReplace Battery
ATTENTION: Be careful inserting the battery. Pay attention to the slotted design to guarantee proper orientation. Slide in the battery with the tip side only.
Do not apply any force as you may cause damage to the electronics.
BAT
e B G D A E
MENU
!
BAT
e B G D A E
MENU
1. PUSH THE BATTERY FOR RELEASE.
2. SLIDE OUT THE BATTERY
8 9

Getting started Install the system on the guitar
NOTE: do not use any tools on the Lock Nut and do not over tighten. Instead use a 1 CENT COIN to tighten the locknut, otherwise you may damage the gear wheels by applying too much force.
Use only supplied wrench or torque wrench to tighten the Hex Nuts (the recommended torque for the Hex Nuts of the RoboHeads is 1.5 Nm - 1.65 Nm (13.27 in.lbs - 14.6 in-lbs))
It is recommended to use a contact cleaning liquid (such as ethyl alcohol) before installing the RoboHeads to the contacting PCB. Ensure that all contacts have a good connection before tightening the Hex Nuts entirely.
Use caution when inserting the battery. Pay attention to the slotted design to guarantee proper orientation!
At first remove all original tuners from the headstock.
Place the contacting PCB onto the backside of the headstock. Make sure that the Tronical logo appears the right way up.
Make sure that all PCB drill holes line up with the headstock’s tuner holes. Insert the RoboHeads through the Tuner holes.
Apply the Washers and mount the Hex Nuts.
Use the wrench that comes with the set to tighten the Hex Nuts of the RoboHeads.
The recommended torque for the Hex Nuts of the RoboHeads is 1.5 nm - 1.65 nm (13.27 in.lbs - 14.6 in-lbs)
Now TronicalTune is ready for string up.
1 2
3
5
4
6
10 11

LOCK NUTThe Lock Nut holds the string.
STRING RECESSThe string recess guides the string.
STRING SHAFTThe string shaft winds the string.
HEX NUTUse the wrench that comes with the set to tighten the Hex Nut.
Getting started String your guitar
NOTE: do not use any tools on the Lock Nut and do not over tighten. Instead use a 1 CENT COIN to tighten the locknut, otherwise you may damage the ROBOHEAD by applying too much force.
Use only supplied wrench or torque wrench to tighten the Hex Nuts (the recommended torque for the Hex Nuts of the RoboHeads is 1.5 Nm - 1.65 Nm (13.27 in.lbs - 14.6 in-lbs))
13

Getting started String up your guitar (bass strings)
Tighten the Lock Nut with a small coin easily by hand.
NOTE: Do not use any tool to fix the Lock Nut and DO NOT OVER TIGHTEN! Use a 1 CENT COIN to tighten the Lock Nut, otherwise you may damage the RoboHeads!
Recommended max. torque is 1.0 Nm (8.85 in-lbs)
Cut the end of the string close to the string shaft. Done!
Take off the Lock Nut and make sure that the recess is at 90 degrees to longitudinal direction of the neck.
You can turn the key manually or use the string-up mode.
Wind the string around the string shaft under the recess and bring it up through the recess.
Hold the string tight and apply the Lock Nut. Wind up the string CLOCKWISE around the string shaft once above the recess.
1
2 3
4
5 6
NOTE: TronicalTune systems Type C (six-in-a-row tuner headstocks) do work with “bass” RoboHeads only.
14 15

Getting started String up your guitar (treble strings)
Tighten the Lock Nut with a small coin easily by hand.
NOTE: Do not use any tool to fix the Lock Nut and DO NOT OVER TIGHTEN! Use a 1 CENT COIN to tighten the Lock Nut, otherwise you may damage the RoboHead!
Recommended max. torque is 1.0 Nm (8.85 in-lbs)
Cut the end of the string close to the string shaft. Done!
Take off the Lock Nut and make sure that the recess is at 90 degrees to longitudinal direction of the neck.
You can turn the key manually or use the string-up mode.
Wind the string around the string shaft under the recess and bring it up through the recess.
Hold the string tight and apply the Lock Nut. Wind the string around the shaft once above the recess.
NOTE: To ensure that the 1st (e) and 2nd (B) string are securely locked, we recommend to perform TWO WINDINGS around the string shaft before tightening the Lock Nut.
1
2 3
4
5 6
16 17
Basic Functions: Start Here
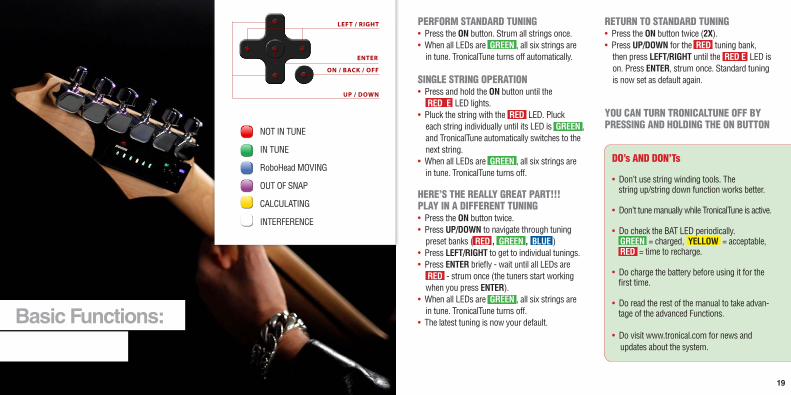
PERFORM STANDARD TUNING• Press the ON button. Strum all strings once. • When all LEDs are GREEN , all six strings are in tune. TronicalTune turns off automatically.
SINGLE STRING OPERATION• Press and hold the ON button until the RED E LED lights.• Pluck the string with the RED LED. Pluck each string individually until its LED is GREEN , and TronicalTune automatically switches to the next string.• When all LEDs are GREEN , all six strings are in tune. TronicalTune turns off.
HERE’S THE REALLY GREAT PART!!! PLAY IN A DIFFERENT TUNING• Press the ON button twice.• Press UP/DOWN to navigate through tuning preset banks ( RED , GREEN , BLUE )• Press LEFT/RIGHT to get to individual tunings. • Press ENTER briefly - wait until all LEDs are RED - strum once (the tuners start working when you press ENTER).• When all LEDs are GREEN , all six strings are in tune. TronicalTune turns off.• The latest tuning is now your default.
RETURN TO STANDARD TUNING• Press the ON button twice (2X).• Press UP/DOWN for the RED tuning bank, then press LEFT/RIGHT until the RED E LED is on. Press ENTER, strum once. Standard tuning is now set as default again.
YOU CAN TURN TRONICALTUNE OFF BY PRESSING AND HOLDING THE ON BUTTON
DO’s AND DON’Ts
• Don’t use string winding tools. The string up/string down function works better.
• Don’t tune manually while TronicalTune is active.
• Do check the BAT LED periodically. GREEN = charged, YELLOW = acceptable, RED = time to recharge.
• Do charge the battery before using it for the first time.
• Do read the rest of the manual to take advan- tage of the advanced Functions.
• Do visit www.tronical.com for news and updates about the system.
NOT IN TUNE
IN TUNE
RoboHead MOVING
OUT OF SNAP
CALCULATING
INTERFERENCE
ON / BACK / OFF
ENTER
LEFT / RIGHT
UP / DOWN
19

Main Tuning Preset Bank Default Tunings
RED MAIN TUNING PRESET BANK LED STRING E A D G B eE Standard E A D G B EA DADGAD D A D G A DD Whole step D G C F A DG Drop D D A D G B EB E flat Eb Ab Db Gb Bb Eb
e Double drop D D A D G B D
GREEN MAIN TUNING PRESET BANK LED STRING E A D G B eE Open E E B E G# B EA Open A E A E A C# ED Open D D A D F# A DG Open G D G D G B DB Dobro G B D G B De All 4ths E A D G C F
BLUE MAIN TUNING PRESET BANK LED STRING E A D G B eE A D G B e
The BLUE USER TUNING PRESET BANK defaults to standard tuning (E, A, D, G, B, e). Use the chart to note your custom tuning names and tunings.
21

Low Tuning Preset Bank Default Tunings
WHITE (Low Tuning Preset Banks) LED STRING E A D G B eE C tuning C F A# D# G CA Low C C G D G A DD C sharp C# F# B E G# C#
G B tuning B E A D F# BB Dropped C C G C F A De Dropped B B F# B E G# C#
YELLOW (Low Tuning Preset Banks) LED STRING E A D G B eE Open C C G C G C EA Open C6 C A C G C ED Open B B F# B F# B D#
G Double drop C# C# G# C# F# A# C#
B Double drop C C G C F A Ce Double drop B B F# B E G# B
MAGENTA USER TUNING PRESET BANKLED STRING E A D G B eE A D G B e
The MAGENTA USER TUNING PRESET BANK defaults to standard C tuning (C, F, A#, D#, G, C). Use the chart to note your custom tuning names and tunings.
23
Overview: how to choose, access, and edit advanced functions
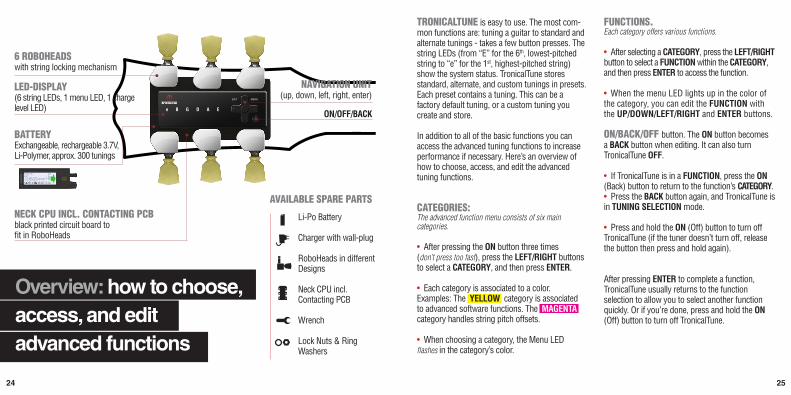
6 ROBOHEADS with string locking mechanism
BAT
e B G D A E
MENU
LED-DISPLAY (6 string LEDs, 1 menu LED, 1 charge level LED)
BATTERY Exchangeable, rechargeable 3.7V, Li-Polymer, approx. 300 tunings
NAVIGATION UNIT(up, down, left, right, enter)
Li-Po Battery Charger with wall-plug RoboHeads in different Designs Neck CPU incl. Contacting PCB
Wrench
Lock Nuts & Ring Washers
ON/OFF/BACK
NECK CPU INCL. CONTACTING PCB black printed circuit board to fit in RoboHeads
TRONICALTUNE is easy to use. The most com-mon functions are: tuning a guitar to standard and alternate tunings - takes a few button presses. The string LEDs (from “E” for the 6th, lowest-pitched string to “e” for the 1st, highest-pitched string) show the system status. TronicalTune stores standard, alternate, and custom tunings in presets. Each preset contains a tuning. This can be a factory default tuning, or a custom tuning you create and store.
In addition to all of the basic functions you can access the advanced tuning functions to increase performance if necessary. Here’s an overview of how to choose, access, and edit the advanced tuning functions.
CATEGORIES: The advanced function menu consists of six main categories.
• After pressing the ON button three times (don’t press too fast), press the LEFT/RIGHT buttons to select a CATEGORY, and then press ENTER.
• Each category is associated to a color. Examples: The YELLOW category is associated to advanced software functions. The MAGENTA category handles string pitch offsets.
• When choosing a category, the Menu LED flashes in the category’s color.
FUNCTIONS. Each category offers various functions.
• After selecting a CATEGORY, press the LEFT/RIGHT button to select a FUNCTION within the CATEGORY, and then press ENTER to access the function.
• When the menu LED lights up in the color of the category, you can edit the FUNCTION with the UP/DOWN/LEFT/RIGHT and ENTER buttons.
ON/BACK/OFF button. The ON button becomes a BACK button when editing. It can also turn TronicalTune OFF.
• If TronicalTune is in a FUNCTION, press the ON (Back) button to return to the function’s CATEGORY. • Press the BACK button again, and TronicalTune is in TUNING SELECTION mode.
• Press and hold the ON (Off) button to turn off TronicalTune (if the tuner doesn’t turn off, release the button then press and hold again).
After pressing ENTER to complete a function, TronicalTune usually returns to the function selection to allow you to select another function quickly. Or if you’re done, press and hold the ON (Off) button to turn off TronicalTune.
AVAILABLE SPARE PARTS
24 25

Tuning Functions White Category
E STRING UP/DOWN. Wind or unwind strings automatically
• When TronicalTune is switched off, press ON three times. Then press ENTER twice.• The LED for the string to wind or unwind flashes RED . The LEFT/RIGHT buttons select a string.• Press and hold DOWN to wind down, UP to wind up.
NOTE: During String Up/Down, Single-String Tun-ing Mode (tunes each string individually) is active. When approaching the correct pitch during string wind up, release the Up button and pluck the string. A flashing YELLOW string LED indicates that the string is close to the pitch defined by the last completed tuning. TronicalTune takes over, tunes the string to correct pitch and moves automatically to the next string. (Pluck the string until the LED switches to GREEN .)
A CUSTOM TUNINGCreate a custom tuning and store it as a user tuning preset in the blue tuning preset bank.
• When TronicalTune is switched off, tune your guitar to a custom tuning.• Press ON three times. Press ENTER. • Press the LEFT/RIGHT button to select the WHITE A LED, then press ENTER.• When a string flashes RED , pluck it.
(HINT: Mute a string after its´ string LED turns green to speed up the process.) • When a string LED flashes BLUE , use the LEFT/RIGHT buttons to select a preset slot from the BLUE bank. Press ENTER = stores the tuning in the selected preset slot.
A CUSTOM TUNING WITH “PITCH ASSISTANCE” MODECreate a custom tuning and store it as a pitch-corrected user preset in the blue tuning preset bank.
Enabling PITCH ASSISTANCE MODE before saving a custom tuning automatically pitch-corrects notes that are within 40 cents of correct pitch.
• When TronicalTune is switched off tune your guitar to a custom tuning manually.
• Press ON three times. Press ENTER.
• Press the LEFT/RIGHT button to select the WHITE A LED, then press and hold ENTER for more than 3 seconds to engage Pitch Assistance.
• When a string flashes RED , pluck it. (HINT: Mute a string after its string LED turns green to speed up the process.)
• When a string LED flashes BLUE , use the LEFT/RIGHT button to select a preset from the BLUE bank. Press ENTER = stores pitch-corrected tuning in the selected preset slot.
1. ENTER CATEGORYPress ON three times. Press ENTER.
2. SELECT SUBCATEGORYUse LEFT/RIGHT buttons to select a subcategory ( E-e ). Press ENTER.
BAT
e B G D A
MENU
ELEFT / RIGHT
ENTER
SWITCH BETWEEN STRINGS
BAT
e B G D A
MENU
E
ENTER
ON /BACK
E A D G B E
String Up/DownCustom Tuning ModeReference TuningFirmware VersionBattery LevelGlobal Tuning Offset
26 27
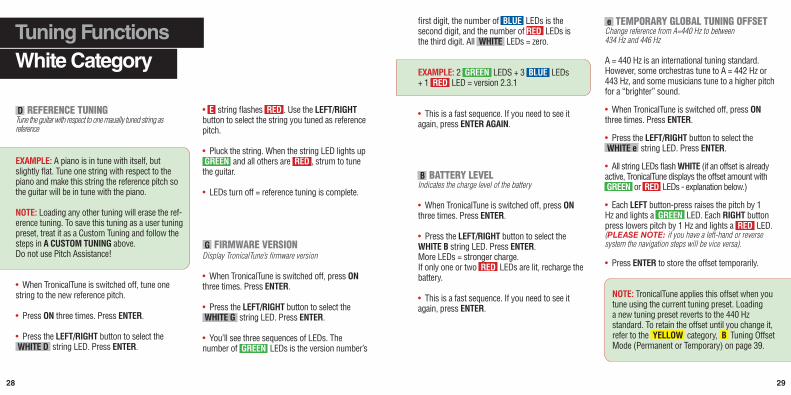
D REFERENCE TUNINGTune the guitar with respect to one maually tuned string as reference
EXAMPLE: A piano is in tune with itself, but slightly flat. Tune one string with respect to the piano and make this string the reference pitch so the guitar will be in tune with the piano.
NOTE: Loading any other tuning will erase the ref-erence tuning. To save this tuning as a user tuning preset, treat it as a Custom Tuning and follow the steps in A CUSTOM TUNING above. Do not use Pitch Assistance!
• When TronicalTune is switched off, tune one string to the new reference pitch.
• Press ON three times. Press ENTER.
• Press the LEFT/RIGHT button to select the WHITE D string LED. Press ENTER.
• E string flashes RED . Use the LEFT/RIGHT button to select the string you tuned as reference pitch.
• Pluck the string. When the string LED lights up GREEN and all others are RED , strum to tune the guitar.
• LEDs turn off = reference tuning is complete.
G FIRMWARE VERSIONDisplay TronicalTune’s firmware version
• When TronicalTune is switched off, press ON three times. Press ENTER.
• Press the LEFT/RIGHT button to select the WHITE G string LED. Press ENTER.
• You’ll see three sequences of LEDs. The number of GREEN LEDs is the version number’s
Tuning Functions White Category
first digit, the number of BLUE LEDs is the second digit, and the number of RED LEDs is the third digit. All WHITE LEDs = zero.
EXAMPLE: 2 GREEN LEDS + 3 BLUE LEDs + 1 RED LED = version 2.3.1
• This is a fast sequence. If you need to see it again, press ENTER AGAIN.
B BATTERY LEVELIndicates the charge level of the battery
• When TronicalTune is switched off, press ON three times. Press ENTER.
• Press the LEFT/RIGHT button to select the WHITE B string LED. Press ENTER. More LEDs = stronger charge. If only one or two RED LEDs are lit, recharge the battery.
• This is a fast sequence. If you need to see it again, press ENTER.
e TEMPORARY GLOBAL TUNING OFFSETChange reference from A=440 Hz to between 434 Hz and 446 Hz
A = 440 Hz is an international tuning standard. However, some orchestras tune to A = 442 Hz or 443 Hz, and some musicians tune to a higher pitch for a “brighter” sound.
• When TronicalTune is switched off, press ON three times. Press ENTER.
• Press the LEFT/RIGHT button to select the WHITE e string LED. Press ENTER.
• All string LEDs flash WHITE (if an offset is already active, TronicalTune displays the offset amount with GREEN or RED LEDs - explanation below.)
• Each LEFT button-press raises the pitch by 1 Hz and lights a GREEN LED. Each RIGHT button press lowers pitch by 1 Hz and lights a RED LED. (PLEASE NOTE: if you have a left-hand or reverse system the navigation steps will be vice versa).
• Press ENTER to store the offset temporarily.
NOTE: TronicalTune applies this offset when you tune using the current tuning preset. Loading a new tuning preset reverts to the 440 Hz standard. To retain the offset until you change it, refer to the YELLOW category, B Tuning Offset Mode (Permanent or Temporary) on page 39.
28 29
Reset Function Red Category
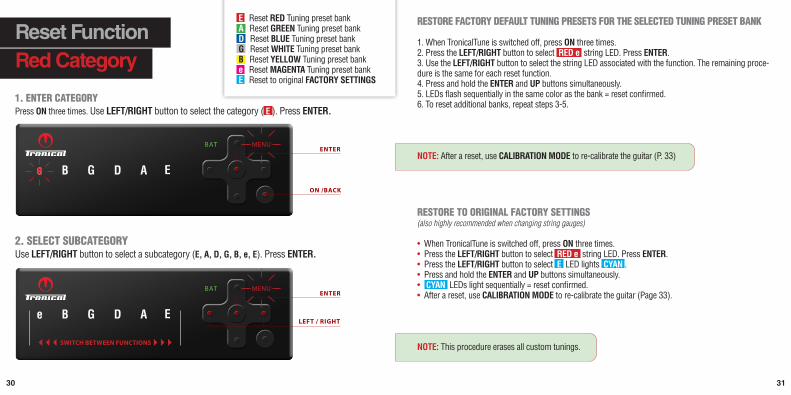
RESTORE FACTORY DEFAULT TUNING PRESETS FOR THE SELECTED TUNING PRESET BANK
1. When TronicalTune is switched off, press ON three times.2. Press the LEFT/RIGHT button to select RED e string LED. Press ENTER.3. Use the LEFT/RIGHT button to select the string LED associated with the function. The remaining proce-dure is the same for each reset function.4. Press and hold the ENTER and UP buttons simultaneously.5. LEDs flash sequentially in the same color as the bank = reset confirmed.6. To reset additional banks, repeat steps 3-5.
NOTE: After a reset, use CALIBRATION MODE to re-calibrate the guitar (P. 33)
RESTORE TO ORIGINAL FACTORY SETTINGS (also highly recommended when changing string gauges)
• When TronicalTune is switched off, press ON three times.• Press the LEFT/RIGHT button to select RED e string LED. Press ENTER.• Press the LEFT/RIGHT button to select E LED lights CYAN .• Press and hold the ENTER and UP buttons simultaneously.• CYAN LEDs light sequentially = reset confirmed.• After a reset, use CALIBRATION MODE to re-calibrate the guitar (Page 33).
NOTE: This procedure erases all custom tunings.
E Reset RED Tuning preset bank A Reset GREEN Tuning preset bank D Reset BLUE Tuning preset bank G Reset WHITE Tuning preset bank B Reset YELLOW Tuning preset bank e Reset MAGENTA Tuning preset bank E Reset to original FACTORY SETTINGS
1. ENTER CATEGORYPress ON three times. Use LEFT/RIGHT button to select the category ( E ). Press ENTER.
2. SELECT SUBCATEGORYUse LEFT/RIGHT button to select a subcategory (E, A, D, G, B, e, E). Press ENTER.
BAT
e B G D A
MENU
ELEFT / RIGHT
ENTER
SWITCH BETWEEN FUNCTIONS
BAT
e B G D A
MENU
E
ENTER
ON /BACK
e
30 31

Advanced Hardware Functions Cyan Category
E CALIBRATION MODEBefore calibration tune the guitar to standard pitch! (red tuning bank E LED).
1. When TronicalTune is switched off, press the ON button.
2. Strum the open strings once.
3. When all LEDs are GREEN , all six strings are tuned. TronicalTune turns off automatically (if any LEDs are not green, pluck those strings individ-ually).
NOTE: You must calibrate TronicalTune:- after installing the TronicalTune for the first time- if you change your strings’ gauge, type, or brand- if you perform a master system reset or firmware update- if you are facing issues like erratic ROBOHEAD movements, strings not tuning properly, etc.
CALIBRATION:1. Press ON three times. Press the LEFT/RIGHT button to select CYAN A .
2. Press ENTER twice. The string LEDs blink RED .
3. Strum all strings once. All lights should shine GREEN briefly then turn off. If the LEDs continue to flash RED , mute all strings and then strum again.
4. Once the strings have turned off from being GREEN , or show a combination of BLUE and RED LEDs, mute all strings. Then all string LEDs blink RED .
5. Repeat steps 3 and 4 until the LEDs light SEQUENTIALLY and one string LED is lit.
1. ENTER CATEGORYPress ON three times. Use LEFT/RIGHT button to select CYAN category ( A ). Press ENTER.
2. SELECT SUBCATEGORYUse LEFT/RIGHT button to select a subcategory ( E-B ). Press ENTER.
E
A
D
G
B
Calibration Mode
Accuracy Level
RoboHead Delay
RoboHead Speed
Interference Level
CATEGORY FUNCTIONS
BAT
e B G D A
MENU
E
ENTER
ON /BACK
A
BAT
e B G D A
MENU
ELEFT / RIGHT
LEFT / RIGHT
ENTER
SWITCH BETWEEN FUNCTIONS
32 33

A ACCURACYBalance tuning accuracy vs. speed
1. When TronicalTune is switched off, press ON three times. Press the LEFT/RIGHT button to select CYAN A . Press ENTER.
2. Again, press the LEFT/RIGHT button to select CYAN A . Press ENTER.
3. The LEFT/RIGHT button selects the accuracy. More lit LEDs = higher accuracy/tuning takes a little longer. Fewer lit LEDs = accuracy is a little lower/faster tuning speed.
4. Press ENTER = accuracy setting stored.
D ROBOHEAD DELAYSet a delay before the ROBOHEADS start turning after initiating a function
1. When TronicalTune is switched off, press ON three times. Press the LEFT/RIGHT button to select CYAN A . Press ENTER.
2. Press the LEFT/RIGHT button to select the CYAN D LED. Press ENTER.
3. The LEFT/RIGHT button selects the delay. Each unlit LED increases the delay by 0.5 seconds.
4. Press ENTER = delay setting stored.
G ROBOHEAD SPEEDSlow down the ROBOHEAD speed to accommodate guitars whose neck relief or neck stability degrades tuning accuracy.
1. When Tronicaltune is switched off, press ON three times. Press the LEFT/RIGHT button to select CYAN A . Press ENTER. 2. Press the LEFT/RIGHT button to select the CYAN G . Press ENTER.3. Use the LEFT/RIGHT button to select the speed. Each unlit LED decreases the speed.4. Press ENTER = speed setting stored.
B INTERFERENCE FILTERReduce the interference among the strings if a wrong ROBOHEAD is turning instead of the one that you are plucking the string for.
1. When TronicalTune is switched off, press ON three times. Press the LEFT/RIGHT button to select CYAN A . Press ENTER. 2. Press the LEFT/RIGHT button to select the CYAN B LED. Press ENTER.3. Use the LEFT/RIGHT button to select the degree of filtering. Each unlit LED increases the filtering degree to reduce interference.4. Press ENTER = interference filter setting stored.
NOTE: Raising this setting to six lit LEDs may increase performance but increases also the vulnerability of the e and B strings to incorrect tuning, even if TronicalTune indicates they are in tune. If this occurs, lower the Interference Filter setting to three or four lit LEDs.
Advanced Hardware Functions Cyan Category
35

Advanced Software Functions Yellow Category
E GAINIncrease gain if string LEDs don’t turn yellow when first plucked; decrease gain in environments with high ambient noise. The default is recommended.
1. When TronicalTune is switched off, press ON three times. Press the LEFT/RIGHT button to select YELLOW D .
2. Press ENTER twice. The LEFT/RIGHT button selects the gain amount. More lit LEDs = higher gain/increased system sensitivity.
3. Press ENTER = gain setting stored.
NOTE: The calibration process (page 33) opti-mizes gain. We strongly recommend keeping the default gain setting. However when you are tuning in loud environments, decreasing the gain temporarily and/or tuning in Single-String Tuning mode can improve performance.
A GUITAR TYPESet up TronicalTune for electric or acoustic guitar
1. When TronicalTune is switched off, press ON three times. Press the LEFT/RIGHT button to select YELLOW D .2. Press ENTER. Press the LEFT/RIGHT button to select the YELLOW A string LED. Press ENTER.3. The LEFT/RIGHT button selects E for electric, A E for acoustic, or D A E for short scale guitars.4. Press ENTER = guitar type setting stored.
D PITCH WINDOWIf you try to use Multi-String Tuning mode but a string is considerably out of tune, TronicalTune switches to Single-String Tuning mode automatically. This function sets how far off-pitch a string must be before TronicalTune switches to Single-String Tuning mode.
1. When TronicalTune is switched off, press ON three times. 2. Press the LEFT/RIGHT button to select YELLOW D . Press ENTER.3. Press the LEFT/RIGHT button to select YELLOW D . Press ENTER. 4. The LEFT/RIGHT button selects the pitch window.
1 lit LED = 150 cents2 lit LEDs = 100 cents3 lit LEDs = 75 cents4 lit LEDs = 50 cents5 lit LEDs = 35 centsall LEDs lit = 25 cents
1. ENTER CATEGORYPress ON three times. Use LEFT/RIGHT button to select YELLOW category( D ). Press ENTER.
2. SELECT SUBCATEGORYUse LEFT/RIGHT button to select a subcategory ( E-B ). Press ENTER.
BAT
e B G D A
MENU
E
ENTER
ON /BACK
LEFT / RIGHTD
E A D G B
CATEGORY FUNCTIONS
GainGuitar TypePitch WindowLow TuningsTuning Offset
BAT
e B G D A
MENU
ELEFT / RIGHT
ENTER
SWITCH BETWEEN FUNCTIONS
36 37

5. Press ENTER = pitch window setting stored. G ACTIVATE LOW TUNINGS AND/OR ADDI-TIONAL USER TUNING PRESET BANKSUnblocks three additional tuning preset banks (White, Yellow, and Magenta).
This function activates three additional tuning preset banks. The WHITE and YELLOW banks default to write-protected presets for music with low tunings (heavier gauge strings are necessary for low tunings). The MAGENTA bank, like the BLUE bank, defaults to be write-enabled for storing user tuning presets.
However, you can also convert any of these tuning preset banks to store presets. See Block/Unblock Banks for Custom Tunings ( BLUE category) on page 42 for details.
1. When TronicalTune is switched off, press ON three times. Press the LEFT/RIGHT button to select YELLOW D .
2. Press ENTER. Press the LEFT/RIGHT button to select the YELLOW G LED. Press ENTER.
3. Use LEFT/RIGHT button to activate low tunings and additional preset banks ( e B G LEDs flash GREEN ) or to deactivate low tunings and addition-al preset banks ( D A E LEDs flash RED ).
4. Press ENTER = low tuning/additional banks settings stored.
B TUNING OFFSET MODE (Permanent or Temporary)
The Global Tuning Offset ( WHITE CATEGORY ) is temporary and applies only until loading a new tuning preset. This function retains offset when changing tuning presets.
1. When TronicalTune is switched off, press ON three times. Press the LEFT/RIGHT button to select YELLOW D .
2. Press ENTER. Press the LEFT/RIGHT button to select the YELLOW B LED. Press ENTER.
3. The LEFT/RIGHT button selects the permanent tuning offset ( e B G LEDs flash GREEN ) or the temporary tuning offset ( D A E LEDs flash RED ).
4. Press ENTER = tuning offset mode setting stored.
Advanced Software Functions Yellow Category
39

Per-String Pitch Offset Magenta Category
Apply an offset to any string with individual pitch up/down to ±12 cents (a cent is 1/100th of a semitone)
NOTE: Pitch Offset applies to the last completed tuning. Please choose, select and tune to a tuning preset before applying the per-string pitch offset. Pitch offset will remain applied to this tuning until you change its pitch offset, reset the bank or reset the system.
1. When TronicalTune is switched off, press ON three times. Press the LEFT/RIGHT button to select MAGENTA G . Press ENTER.
2. The LEFT/RIGHT button choose the MAGENTA LED for the string you want to offset. Press ENTER.
3. Press the LEFT/RIGHT button to change the string’s pitch offset:
• If no previous offset exists, all string LEDs flash WHITE . Each LEFT button press lights a GREEN LED and offsets the pitch by +1 cent (up to +6 cents). Continuing to press the LEFT button lights YELLOW LEDs. Each lit YELLOW LED offsets the pitch by another +1 cent (+7 to +12 cents maximum).
• Each RIGHT button press lights a RED LED and offsets the pitch by -1 cent (up to -6 cents). Continuing to press the RIGHT button lights MAGENTA LEDs. Each lit MAGENTA LED offsets the pitch by another -1 cent (-7 to -12 cents maximum).
• If an offset already exists, TronicalTune displays the offset amount as described above. In this case RIGHT or LEFT button presses continue on from the existing offset. Example: If 12 MAGENTA LEDs are lit to indicate -12 cents of offset, pressing the LEFT button will turn off successive MAGENTA LEDs, then turn off successive RED LEDs, then start lighting GREEN LEDs.
4. Press ENTER. To offset additional strings, repeat steps 2- 4. Otherwise, press and hold the ON/BACK/OFF button to turn off TronicalTune.
PLEASE NOTE: if you have a left-hand or reverse system the navigation step 3 will be vice versa.
1. ENTER CATEGORYPress ON three times. Use LEFT/RIGHT button to select MAGENTA category ( G ). Press ENTER.
2. SELECT SUBCATEGORYUse LEFT/RIGHT button to select a subcategory ( E-e ). Press ENTER.
BAT
e B G D A
MENU
ELEFT / RIGHT
ENTER
SWITCH BETWEEN FUNCTIONS
BAT
e B G D A
MENU
E
ENTER
ON /BACK
LEFT / RIGHTG
40 41
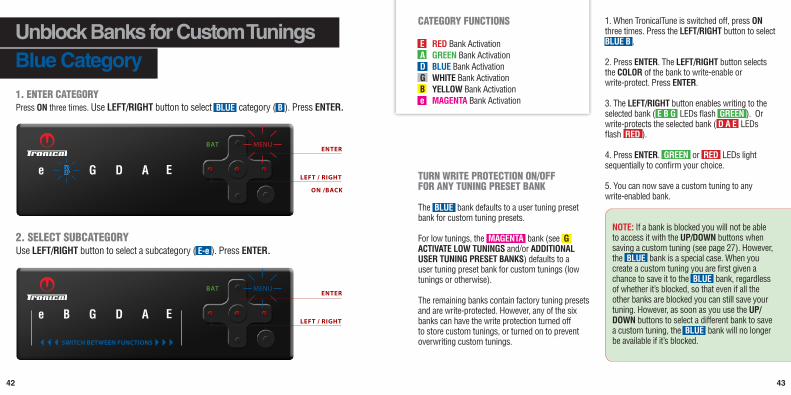
Unblock Banks for Custom Tunings Blue Category
TURN WRITE PROTECTION ON/OFF FOR ANY TUNING PRESET BANK
The BLUE bank defaults to a user tuning preset bank for custom tuning presets.
For low tunings, the MAGENTA bank (see G ACTIVATE LOW TUNINGS and/or ADDITIONAL USER TUNING PRESET BANKS) defaults to a user tuning preset bank for custom tunings (low tunings or otherwise).
The remaining banks contain factory tuning presets and are write-protected. However, any of the six banks can have the write protection turned off to store custom tunings, or turned on to prevent overwriting custom tunings.
1. When TronicalTune is switched off, press ON three times. Press the LEFT/RIGHT button to select BLUE B .
2. Press ENTER. The LEFT/RIGHT button selects the COLOR of the bank to write-enable or write-protect. Press ENTER.
3. The LEFT/RIGHT button enables writing to the selected bank ( E B G LEDs flash GREEN ). Or write-protects the selected bank ( D A E LEDs flash RED ).
4. Press ENTER. GREEN or RED LEDs light sequentially to confirm your choice.
5. You can now save a custom tuning to any write-enabled bank.
NOTE: If a bank is blocked you will not be able to access it with the UP/DOWN buttons when saving a custom tuning (see page 27). However, the BLUE bank is a special case. When you create a custom tuning you are first given a chance to save it to the BLUE bank, regardless of whether it’s blocked, so that even if all the other banks are blocked you can still save your tuning. However, as soon as you use the UP/DOWN buttons to select a different bank to save a custom tuning, the BLUE bank will no longer be available if it’s blocked.
2. SELECT SUBCATEGORYUse LEFT/RIGHT button to select a subcategory ( E-e ). Press ENTER.
E A D G B e
CATEGORY FUNCTIONS
RED Bank ActivationGREEN Bank ActivationBLUE Bank ActivationWHITE Bank ActivationYELLOW Bank ActivationMAGENTA Bank Activation
1. ENTER CATEGORYPress ON three times. Use LEFT/RIGHT button to select BLUE category ( B ). Press ENTER.
BAT
e B G D A
MENU
ELEFT / RIGHT
ENTER
SWITCH BETWEEN FUNCTIONS
BAT
e B G D A
MENU
E
ENTER
ON /BACK
LEFT / RIGHTB
42 43

Capo Mode
Adding a capo often requires retuning a guitar. TronicalTune can detect a capo in the range of the 1st to 6th fret, then tune while taking the capo position into account. Yes, this is amazing.
ENTER CAPO MODE
1. Capo Mode applies to the last completed tuning. Select and tune to a tuning preset before entering Capo Mode.
2. Once TronicalTune has turned off attach your capo on the 1st to 6th fret.
3. Press ON twice. Press and hold the LEFT button. GREEN LEDs light sequentially = capo mode is active.
4. Press ENTER and strum to tune your guitar. TronicalTune briefly indicates capo detection; the number of lit YELLOW LEDs indicates the capo’s location. Example: Two lit YELLOW LEDs = capo is at second fret. Then tuning proceeds as usual.
NOTE: Whenever you tune in capo mode TronicalTune first indicates capo location by the number of lit YELLOW LEDs.
5. If any string LEDs aren’t GREEN , pluck those strings. TronicalTune turns off automatically once tuning is complete.
EXIT CAPO MODE: TWO OPTIONS
• Remove the capo. Next time you tune, as soon as you strum TronicalTune will detect that there is no capo, RED LEDs will flash sequentially to turn off Capo Mode, and TronicalTune will confirm that there is no capo by flashing shortly all BLUE LEDs. Continue with tuning.
• If you don’t want to re-tune after removing the capo, make sure TronicalTune is off and follow steps 3 and 4 above. RED LEDs will light sequen-tially instead of GREEN ones to indicate that Capo Mode is no longer active. Press and hold ON to turn off TronicalTune. Remove the capo.
BAT
e B G D A
MENU
ELEFT / RIGHT
ENTER
ON /BACK
45

GUIDELINES FOR SAFETY AND EFFICIENT USE
Read this information before using TronicalTune.
PRODUCT CARE:
DO NOT expose your product to liquid or moisture or to humidity.
DO NOT expose your product to extreme high or low temperatures.
DO NOT expose your product to lit candles, cigarettes, or cigars, or to open flames etc.
DO NOT drop, throw or try to bend the product as rough treatment could damage it.
DO NOT attempt to disassemble your product. The product does not contain consumer serviceable or replaceable components. Only Tronical GmbH should perform service. If you will not be using the product for a while, store it in a place that is dry, free from damp, dust and extreme temperatures.
DISPOSAL OF OLD ELECTRICAL & ELECTRONIC EQUIPMENT:
This symbol on the product indicates that the product shall not be treated as household waste. Instead it shall be handed over to the applicable collection point for the recycling of
electrical and electronic equipment. By ensuring this product is disposed of correctly, you will help to prevent potential negative consequences for the environment and human health. Recycling will help to conserve natural resources. For more detailed information about recycling of this product, please contact your local city office, your household waste disposal service or the shop where you purchased the product.
POWER SUPPLY
Connect the AC power adapter only to designat-ed power sources as marked on the product. To reduce risk of damage to electric cord remove it from the outlet by holding onto the AC adapter rather than the cord.
To reduce risk of electric shock unplug the unit from any power source before attempting to clean it.
The AC power adapter must not be used outdoors or in damp areas. DANGER - Never alter the ACcord or plug. If the plug will not fit into the outlet or has a proper outlet installed by a qualified electri-cian contact your reseller. Improper connection can result in risk of electric shock.
CHILDREN:
DO NOT allow children to play with Tronical Tune since it contains small parts that could be detached by improper handling and create a choking hazard.
BATTERY INFORMATION:
A rechargeable battery has long service life if treated properly. A new battery or one that has not been used for a long period of time could have re-duced capacity the first few times it is used. Do not expose the battery to extreme temperatures, never above +55° C (+131° F). For maximum battery capacity use the battery in room temperature. If the battery is used in low temperatures, the battery capacity will be reduced. The battery can only be charged in temperatures between +10°C (+50° F) and +45° C (+113° F).
RECYCLING THE BATTERY:
The battery in your Tronical Tune must be disposed of properly and should never be placed in municipal waste.
Legal Information
BATTERY CAUTION:
1. DO NOT CONNECT IMPROPERLY.2. DO NOT DISPOSE OF IN FIRE OR EXPOSE TO HEAT.3. DO NOT CRUSH, PUNCTURE, INCINERATE OR SHORT CIRCUIT EXTERNAL CONTACTS.
46 47

Tronical Components GmbH • Heselstuecken 18 • 22453 Hamburg • [email protected] • www.tronical.com
© Copyright 2014 Tronical-Components GmbH All rights reserved.