your first windows mobile application - vargr.com · visual studio 2008 allows you to build windows...
TRANSCRIPT

Your First Windows Mobile Application
General

Contents
Your First Windows Mobile Application..........................................................................................1 General ....................................................................................................................................1 Chapter 1. Tutorial Overview and Design Patterns ......................................................................3
Tutorial Overview ..................................................................................................................3 Design Patterns .....................................................................................................................4
Chapter 2. Creating Your Project ................................................................................................5 Visual Studio 2008 + Windows Mobile 6 SDK...........................................................................5 Application Bootstrapping .....................................................................................................6
Chapter 3. Adding a View Controller. .........................................................................................7 Adding a View Controller Class ...............................................................................................7 Adding a View Controller Property .........................................................................................7 Creating the View Controller Instance.....................................................................................7 Setting up the View ...............................................................................................................7 Housekeeping .......................................................................................................................7 Implementation Source Listing ...............................................................................................7
Chapter 4. Adding a Nib File ......................................................................................................8 Interface Builder ...................................................................................................................8 Create the Nib File.................................................................................................................8 Configuring File’s Owner ........................................................................................................8 Connecting the View Outlet ...................................................................................................8 Loading the Nib File ...............................................................................................................8
Chapter 5. Configuring the View ................................................................................................9 Adding the User Interface Elements .......................................................................................9 The View Controller Interface Declaration ............................................................................12 Making Connections ............................................................................................................12 Chapter 6. Implementing the View Controller .......................................................................13 The Properties.....................................................................................................................13 The changeGreeting: Method...............................................................................................13 The Text Field’s Delegate .....................................................................................................13
Chapter 7. Troubleshooting .....................................................................................................14 Compiling and Running ........................................................................................................14 Installing on a Device ...........................................................................................................14 End Product ........................................................................................................................15
Chapter 8. What Next? ............................................................................................................16 The User Interface ...............................................................................................................16 Creating User Interface Elements Programmatically ..............................................................16
Conclusion..............................................................................................................................17

Chapter 1. Tutorial Overview and Design Patterns
Tutorial Overview
In this tutorial, we will create an application equivalent to the “Hello World” application as described in Apple’s “Your First iPhone Application” tutorial, using .Net Compact Framework 3.5 and Visual Studio 2008.
This is the application to be duplicated. It consists of a text entry field, a text display area and a
single button. The user types in their name and presses the “Hello” button, causing the text to change to Hello followed by the name the user typed in.

Design Patterns
The MacOS X system, of which the iPhone OS is a subset, is based on the Model-View -Controller
design pattern. The .Net system, however, is based on a container-object-event model where UI elements are objects that are held in a container and which expose events that are subscribed to and fired when needed.
As a result of this simpler architecture, there is no need for an entire layer abstracting the object
from the consumer of the object, although one can add it if desired. As a result, a lot of steps in the Apple tutorial just don’t apply to development in .Net, and really aren’t replaced by anything.
The other important difference is that Visual Studio does a lot of the work for you by generating
most of the code, so you can focus on the application logic, rather than on hooking everything up.
Chapter 2. Creating Your Project
Visual Studio 2008 + Windows Mobile 6 SDK
Visual Studio 2008 allows you to build Windows Mobile applications and general Windows
applications both for .Net and native. It also supports a wide range of languages including C++, C#, J# (Java) and Visual Basic.
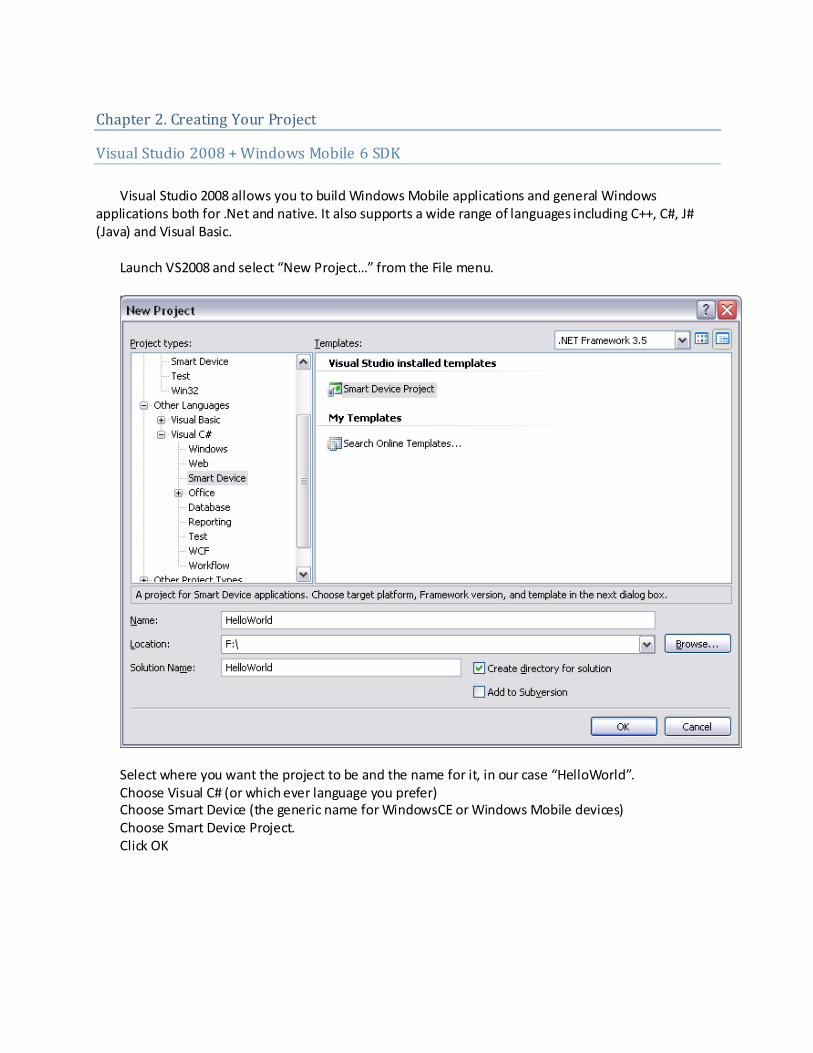
Launch VS2008 and select “New Project…” from the File menu.
Select where you want the project to be and the name for it, in our case “HelloWorld”. Choose Visual C# (or which ever language you prefer) Choose Smart Device (the generic name for WindowsCE or Windows Mobile devices) Choose Smart Device Project. Click OK

One more step.
Choose “Windows Mobile 6 Professional SDK” for Target platform. Choose “.Net Compact Framework Version 3.5” for .Net Compact Framework version. Choose “Device Application” for Template. Click OK. Visual Studio should now generate a complete SmartDevice framework and open up a window with
a blank application with a title bar and a menu.
Application Bootstrapping
Does not apply.

Chapter 3. Adding a View Controller.
Does not apply.
Adding a View Controller Class
Does not apply.
Adding a View Controller Property
Does not apply.
Creating the View Controller Instance
Does not apply.
Setting up the View
Does not apply.
Housekeeping
Does not apply.
Implementation Source Listing
None.

Chapter 4. Adding a Nib File
Does not apply.
Interface Builder
Does not apply.
Create the Nib File
Does not apply.
Configuring File’s Owner
Does not apply.
Connecting the View Outlet
Does not apply.
Loading the Nib File
Does not apply.

Chapter 5. Configuring the View
The .Net architecture isn’t Model-Controller-View in design, but can be done that way. In general,
the approach is Containers instead of views, and objects that respond to events. Since in general we have to have some kind of UI, we get a base form generated for us as a starting point.
Adding the User Interface Elements
Remove Menu (since we’re not using it) and switch to Toolbox

1. Select the form and change the following:
a. WindowState to Maximized (gets rid of the title bar) 2. Add a TextBox and change the following settings:
a. Name to txtName b. Text to “You”
3. Add a Label and change the following settings: a. Name to lblName b. Text to “Hello You” c. TextAlign to TopCenter
4. Add a Button and change the following settings: a. Name to btnHello b. Text to “Hello!”
Select all three controls and use Align Centers to center the controls.

You should now see something like this:

The View Controller Interface Declaration
Does not apply.
Making Connections
Double click on the button. This will open up the code for the form object and insert the routine
“btnHello_Click,” which will be called in response to a user clicking on the button. Enter the line ”lblName.Text = "Hello " + txtName.Text;” in the body of this routine.
You’re done. Really. One line of code.

Chapter 6. Implementing the View Controller
Does not apply.
The Properties
Does not apply.
The changeGreeting: Method
Does not apply.
The Text Field’s Delegate
Does not apply.

Chapter 7. Troubleshooting
Oddly, the Apple tutorial never actually suggests compiling and running your new application.
Compiling and Running
Hit F5 to run. This will also compile the application. If you made any errors typing in the one line of code, you’ll see it in the Errors pane.
Installing on a Device
Select the configuration you want to test on and click OK.
If you select one of the choices which refer to an emulator, the emulator will be started with that
configuration and your application will be deployed along with all necessary support files (such as .Net 3.5 Compact Framework) and it will be launched.
If you select one of the choicse which refer to an actual device (such as “Windows Mobile 6
Professional Device”), the device must be connected. The application and support files will be deployed to your Windows Mobile device.

End Product
And voila. Your application running in emulation. Type “World” into the text box and click on “Hello”
and it should look like this:

Chapter 8. What Next?
The User Interface
You can both use the stock controls or easily create new controls via the UserControl item. You can
use existing controls and bind them together into a user control, add specialized logic and once compile, they become part of your library of controls.
Each control has an array of properties that you can preset in the designer, or programmatically at
run time. As well, each control has events which are fired to let your object do specific tasks. In many cases, functionality is immediate upon connecting UI elements together.
Creating User Interface Elements Programmatically
In this tutorial, the user elements were dragged and dropped onto a form, but you may wish to add
new elements at design time. This is very easy. Every UI element is also a .Net object and so can be instanced on demand.
Let’s add a new TextBox to the form. First, double-click on the form to create a Form_Load event
handler, or use the Event panel and double click on Load which will bring you to the form Load event handler generated for you. Enter the following code:
private void Form1_Load(object sender, EventArgs e)
{
TextBox txtField = new TextBox();
txtField.Bounds = new Rectangle(20, 68, 280, 31);
txtField.TextAlign = HorizontalAlignment.Center;
txtField.Name = "txtAnotherField";
this.Controls.Add(txtField); // adds the control to the form
}
That’s basically it.

Conclusion
In each version of XCode, the development of a MacOS X or iPhone app gets simpler, but in my
opinion, and I hope I’ve shown here, in fact – the development of .Net applications with Visual Studio is still significantly simpler, especially for UI oriented applications.
If Apple improved XCode to handle more of the code generation and management, I believe it could
easily become almost as simple, although there are other obstacles which, to me, limit the ease of use of the XCode development system.