zenworks 7 desktop management troubleshooting guide - novell
TRANSCRIPT

Novell®
novdocx (en) 16 April 2010
AUTHORIZED DOCUMENTATION
ZENworks 7 Desktop Management Troubleshooting Guide
www.novell.com
ZENworks®
Desktop Management
7 SP1 IR4/IR4a/IR4bSeptember 16, 2010
Troubleshooting Guide
novdocx (en) 16 April 2010
Legal Notices
Novell, Inc. makes no representations or warranties with respect to the contents or use of this documentation, and specifically disclaims any express or implied warranties of merchantability or fitness for any particular purpose. Further, Novell, Inc. reserves the right to revise this publication and to make changes to its content, at any time, without obligation to notify any person or entity of such revisions or changes.
Further, Novell, Inc. makes no representations or warranties with respect to any software, and specifically disclaims any express or implied warranties of merchantability or fitness for any particular purpose. Further, Novell, Inc. reserves the right to make changes to any and all parts of Novell software, at any time, without any obligation to notify any person or entity of such changes.
Any products or technical information provided under this Agreement may be subject to U.S. export controls and the trade laws of other countries. You agree to comply with all export control regulations and to obtain any required licenses or classification to export, re-export, or import deliverables. You agree not to export or re-export to entities on the current U.S. export exclusion lists or to any embargoed or terrorist countries as specified in the U.S. export laws. You agree to not use deliverables for prohibited nuclear, missile, or chemical biological weaponry end uses. Please refer to www.novell.com/info/exports/ for more information on exporting Novell software. Novell assumes no responsibility for your failure to obtain any necessary export approvals.
Copyright © 2010 Novell, Inc. All rights reserved. No part of this publication may be reproduced, photocopied, stored on a retrieval system, or transmitted without the express written consent of the publisher.
Novell, Inc. has intellectual property rights relating to technology embodied in the product that is described in this document. In particular, and without limitation, these intellectual property rights may include one or more of the U.S. patents listed at http://www.novell.com/company/legal/patents/ and one or more additional patents or pending patent applications in the U.S. and in other countries.
Novell, Inc.404 Wyman Street, Suite 500Waltham, MA 02451U.S.A.www.novell.com
Online Documentation: To access the online documentation for this and other Novell products, and to get updates, see www.novell.com/documentation.

novdocx (en) 16 April 2010
Novell Trademarks
For a list of Novell trademarks, see Novell Trademark and Service Mark List (http://www.novell.com/company/legal/trademarks/tmlist.html) at http://www.novell.com/company/legal/trademarks/tmlist.html.
Third-Party Materials
All third-party trademarks are the property of their respective owners.

4 ZENw
novdocx (en) 16 April 2010
orks 7 Desktop Management Troubleshooting Guide
Contents
novdocx (en) 16 April 2010
About This Guide 9Part I Troubleshooting Remote Management 11
1 Remote Management Error Messages 131.1 Remote Management Errors on Windows Workstations . . . . . . . . . . . . . . . . . . . . . . . . . . . . . 131.2 Desktop4.exe Error Messages. . . . . . . . . . . . . . . . . . . . . . . . . . . . . . . . . . . . . . . . . . . . . . . . . 17
2 Remote Management Troubleshooting Strategies 192.1 General Troubleshooting . . . . . . . . . . . . . . . . . . . . . . . . . . . . . . . . . . . . . . . . . . . . . . . . . . . . . 192.2 Troubleshooting Remote Management Installation . . . . . . . . . . . . . . . . . . . . . . . . . . . . . . . . . 202.3 Troubleshooting Remote Control . . . . . . . . . . . . . . . . . . . . . . . . . . . . . . . . . . . . . . . . . . . . . . . 202.4 Troubleshooting the File Transfer Protocol . . . . . . . . . . . . . . . . . . . . . . . . . . . . . . . . . . . . . . . 222.5 Troubleshooting the Wake-On-LAN Service . . . . . . . . . . . . . . . . . . . . . . . . . . . . . . . . . . . . . . 23
Part II Troubleshooting Novell Application Launcher 25
3 Novell Application Launcher Error Messages 27
4 Novell Application Launcher Troubleshooting Strategies 29
Part III Troubleshooting Workstation Inventory 31
5 Error Messages 335.1 Service Manager Error Messages . . . . . . . . . . . . . . . . . . . . . . . . . . . . . . . . . . . . . . . . . . . . . . 335.2 Scanner Error Messages . . . . . . . . . . . . . . . . . . . . . . . . . . . . . . . . . . . . . . . . . . . . . . . . . . . . . 415.3 Sender and Receiver Error Messages . . . . . . . . . . . . . . . . . . . . . . . . . . . . . . . . . . . . . . . . . . . 575.4 TCP Receiver Error Messages . . . . . . . . . . . . . . . . . . . . . . . . . . . . . . . . . . . . . . . . . . . . . . . . 695.5 Storer Error Messages . . . . . . . . . . . . . . . . . . . . . . . . . . . . . . . . . . . . . . . . . . . . . . . . . . . . . . . 775.6 AlterDBSpaces Tool (Organizing the Database Spaces) Error Messages . . . . . . . . . . . . . . . 815.7 Inventory Policy Error Messages . . . . . . . . . . . . . . . . . . . . . . . . . . . . . . . . . . . . . . . . . . . . . . . 835.8 Custom Scan Editor Error Messages. . . . . . . . . . . . . . . . . . . . . . . . . . . . . . . . . . . . . . . . . . . . 915.9 Configure DB Error Messages . . . . . . . . . . . . . . . . . . . . . . . . . . . . . . . . . . . . . . . . . . . . . . . . . 935.10 Inventory Report Error Messages . . . . . . . . . . . . . . . . . . . . . . . . . . . . . . . . . . . . . . . . . . . . . . 945.11 Custom Attribute Editor Error Messages . . . . . . . . . . . . . . . . . . . . . . . . . . . . . . . . . . . . . . . . . 965.12 Data Export Error Messages . . . . . . . . . . . . . . . . . . . . . . . . . . . . . . . . . . . . . . . . . . . . . . . . . . 965.13 Inventory Summary Error Messages . . . . . . . . . . . . . . . . . . . . . . . . . . . . . . . . . . . . . . . . . . . 1105.14 Desktop4.exe Error Messages. . . . . . . . . . . . . . . . . . . . . . . . . . . . . . . . . . . . . . . . . . . . . . . . 1125.15 Upgrade Service Error Messages . . . . . . . . . . . . . . . . . . . . . . . . . . . . . . . . . . . . . . . . . . . . . 1145.16 Inventory Query Error Messages . . . . . . . . . . . . . . . . . . . . . . . . . . . . . . . . . . . . . . . . . . . . . . 1165.17 Inventory Sync Service Error Messages . . . . . . . . . . . . . . . . . . . . . . . . . . . . . . . . . . . . . . . . 1185.18 Roll-Up Scheduler Error Messages . . . . . . . . . . . . . . . . . . . . . . . . . . . . . . . . . . . . . . . . . . . . 1195.19 Selector Error Messages . . . . . . . . . . . . . . . . . . . . . . . . . . . . . . . . . . . . . . . . . . . . . . . . . . . . 121
Contents 5
6 ZENw
novdocx (en) 16 April 2010
5.20 Inventory Removal Service Error Messages . . . . . . . . . . . . . . . . . . . . . . . . . . . . . . . . . . . . . 1215.21 Dictionary Provider Error Messages. . . . . . . . . . . . . . . . . . . . . . . . . . . . . . . . . . . . . . . . . . . . 1245.22 Dictionary Consumer Error Messages . . . . . . . . . . . . . . . . . . . . . . . . . . . . . . . . . . . . . . . . . . 124
6 Troubleshooting Strategies 1316.1 Troubleshooting Workstation Inventory Installation . . . . . . . . . . . . . . . . . . . . . . . . . . . . . . . . 1316.2 Troubleshooting the Inventory Service Manager . . . . . . . . . . . . . . . . . . . . . . . . . . . . . . . . . . 1326.3 Troubleshooting .Str and .Zip File Transfer . . . . . . . . . . . . . . . . . . . . . . . . . . . . . . . . . . . . . . 1336.4 Troubleshooting the Inventory Scanner or Inventory Agent . . . . . . . . . . . . . . . . . . . . . . . . . . 1346.5 Troubleshooting the Inventory Policy . . . . . . . . . . . . . . . . . . . . . . . . . . . . . . . . . . . . . . . . . . . 1356.6 Troubleshooting the Database Backup . . . . . . . . . . . . . . . . . . . . . . . . . . . . . . . . . . . . . . . . . 1356.7 Troubleshooting the Data Export . . . . . . . . . . . . . . . . . . . . . . . . . . . . . . . . . . . . . . . . . . . . . . 1366.8 Troubleshooting the Inventory Summary . . . . . . . . . . . . . . . . . . . . . . . . . . . . . . . . . . . . . . . . 1366.9 Troubleshooting the Inventory Reports . . . . . . . . . . . . . . . . . . . . . . . . . . . . . . . . . . . . . . . . . 1376.10 Troubleshooting the Inventory Query. . . . . . . . . . . . . . . . . . . . . . . . . . . . . . . . . . . . . . . . . . . 1386.11 Troubleshooting the Storer. . . . . . . . . . . . . . . . . . . . . . . . . . . . . . . . . . . . . . . . . . . . . . . . . . . 1386.12 Troubleshooting the Upgrade Service's Inventory Database Migration . . . . . . . . . . . . . . . . . 1426.13 Troubleshooting the Inventory Sync Service . . . . . . . . . . . . . . . . . . . . . . . . . . . . . . . . . . . . . 1436.14 Troubleshooting the Inventory Installation on Linux. . . . . . . . . . . . . . . . . . . . . . . . . . . . . . . . 144
7 Troubleshooting Workstation and Server Imaging 147
8 Troubleshooting Automatic Workstation Import and Removal 149
Part IV Troubleshooting ZENworks Agent 151
9 Troubleshooting ZENworks Agent Error Messages 153
10 Troubleshooting ZENworks Agent Issues 155
Part V Enabling Debug Logging in ZENworks 7 157
11 Enabling Debug Logging for the ZENworks Desktop Management Installation 15911.1 Editing the Registry to Enable Server Installation Debug Logging. . . . . . . . . . . . . . . . . . . . . 15911.2 Editing Group Policies to Enable Agent Installation Debug Logging . . . . . . . . . . . . . . . . . . . 159
12 Enabling Debug Logging for the ZENworks Middle Tier Server 16112.1 Editing the Registry to Enable NetWare Middle Tier Server Debug Logging. . . . . . . . . . . . . 16112.2 Editing the Registry to Enable Windows Middle Tier Server Debug Logging. . . . . . . . . . . . . 16112.3 Editing the Registry to Enable Agent to Middle Tier Communication Debug Logging . . . . . . 162
13 Enabling Debug Logging for Automatic Workstation Import and Removal 16313.1 Editing the Registry to Enable Agent Import Debug Logging . . . . . . . . . . . . . . . . . . . . . . . . 16313.2 Editing the Configuration File to Enable NetWare Import Server Debug Logging . . . . . . . . . 16313.3 Editing the Registry to Enable Windows Import Server Debug Logging . . . . . . . . . . . . . . . . 164
orks 7 Desktop Management Troubleshooting Guide
novdocx (en) 16 April 2010
14 Enabling Debug Logging for Desktop Management Policies 16514.1 Editing the Registry to Enable Policy Debug Logging . . . . . . . . . . . . . . . . . . . . . . . . . . . . . . 165
15 Enabling Debug Logging for the Novell Application Launcher 169
16 Enabling Debug Logging for ZENworks Desktop Management Imaging and Preboot Services 17316.1 Using the Command Line to Enable NetWare Imaging Server Debug Logging . . . . . . . . . . 17316.2 Using the Command Line to Enable Windows Imaging Server Debug Logging . . . . . . . . . . 17316.3 Using the Command Line to Enable Workstation IMG Debug Logging . . . . . . . . . . . . . . . . . 17416.4 Editing the Registry to Enable ZISWIN Debug Logging. . . . . . . . . . . . . . . . . . . . . . . . . . . . . 17416.5 Editing the Registry to Enable Windows Preboot Services Debug Logging. . . . . . . . . . . . . . 17416.6 Using the Command Line to Enable NetWare Preboot Services Debug Logging . . . . . . . . . 175
16.6.1 Adding a Startup Switch to Zenpxe.nlm to Enable Preboot Services Debug Logging . . . . . . . . . . . . . . . . . . . . . . . . . . . . . . . . . . . . . . . . . . . . . . . . . . . . . . . . . . 175
16.6.2 Editing SYS:SYSTEM\DTS.INI to Enable Transaction Server Debug Logging . . . . 175
17 Enabling Debug Logging for ZENworks Remote Management 17717.1 Retrieving Target Workstation Debug Logging . . . . . . . . . . . . . . . . . . . . . . . . . . . . . . . . . . . 17717.2 Retrieving Console Workstation Debug Logging . . . . . . . . . . . . . . . . . . . . . . . . . . . . . . . . . . 17717.3 Editing the Registry to Enable Remote Management Policy Debug Logging . . . . . . . . . . . . 177
18 Enabling Debug Logging for Workstation Inventory 17918.1 Retrieving Inventory Scanner Debug Logging . . . . . . . . . . . . . . . . . . . . . . . . . . . . . . . . . . . . 179
18.1.1 Using the Default Log . . . . . . . . . . . . . . . . . . . . . . . . . . . . . . . . . . . . . . . . . . . . . . . 17918.1.2 Using the Workstation Scan History in ConsoleOne . . . . . . . . . . . . . . . . . . . . . . . . 179
18.2 Editing the Registry to Enable Inventory Policy Debug Logging . . . . . . . . . . . . . . . . . . . . . . 17918.3 Retrieving Inventory Service Default Logging . . . . . . . . . . . . . . . . . . . . . . . . . . . . . . . . . . . . 18018.4 Editing the Properties File to Enable Inventory Service Debug Logging . . . . . . . . . . . . . . . . 18018.5 Retrieve Inventory Database Migration Debug Logging . . . . . . . . . . . . . . . . . . . . . . . . . . . . 18018.6 Enabling eDirectory Debug Logging Reports for the Workstation Inventory Service. . . . . . . 181
19 Enabling Debug Logging for ConsoleOne Administration 18319.1 Editing the Registry to Enable ZENworks Tools Debug Logging . . . . . . . . . . . . . . . . . . . . . . 183
A Documentation Updates 185A.1 May 20, 2010 . . . . . . . . . . . . . . . . . . . . . . . . . . . . . . . . . . . . . . . . . . . . . . . . . . . . . . . . . . . . 185
A.1.1 Enabling Debug Logging in ZENworks 7 . . . . . . . . . . . . . . . . . . . . . . . . . . . . . . . . . 185A.2 November 18, 2009 . . . . . . . . . . . . . . . . . . . . . . . . . . . . . . . . . . . . . . . . . . . . . . . . . . . . . . . . 186
A.2.1 Troubleshooting ZENworks Agent . . . . . . . . . . . . . . . . . . . . . . . . . . . . . . . . . . . . . . 186A.3 September 18, 2009 . . . . . . . . . . . . . . . . . . . . . . . . . . . . . . . . . . . . . . . . . . . . . . . . . . . . . . . 186
A.3.1 Troubleshooting Novell Application Launcher . . . . . . . . . . . . . . . . . . . . . . . . . . . . . 186A.4 July 30, 2009 (Support Pack 1 Interim Release 4a). . . . . . . . . . . . . . . . . . . . . . . . . . . . . . . . 186
A.4.1 Troubleshooting Automatic Workstation Import and Removal . . . . . . . . . . . . . . . . 186A.4.2 Troubleshooting ZENworks Agent . . . . . . . . . . . . . . . . . . . . . . . . . . . . . . . . . . . . . . 187A.4.3 Troubleshooting Novell Application Launcher . . . . . . . . . . . . . . . . . . . . . . . . . . . . . 187
A.5 June 17, 2009 (Support Pack 1 Interim Release 4) . . . . . . . . . . . . . . . . . . . . . . . . . . . . . . . . 187A.5.1 Troubleshooting Workstation and Server Imaging . . . . . . . . . . . . . . . . . . . . . . . . . 187
Contents 7
8 ZENw
novdocx (en) 16 April 2010
A.6 December 10, 2008 . . . . . . . . . . . . . . . . . . . . . . . . . . . . . . . . . . . . . . . . . . . . . . . . . . . . . . . . 187A.6.1 Troubleshooting Novell Application Launcher . . . . . . . . . . . . . . . . . . . . . . . . . . . . 187A.6.2 Enabling Debug Logging in ZENworks 7 . . . . . . . . . . . . . . . . . . . . . . . . . . . . . . . . 188
A.7 April 29, 2008 (Interim Release 3a) . . . . . . . . . . . . . . . . . . . . . . . . . . . . . . . . . . . . . . . . . . . . 188A.7.1 Novell Application Launcher Error Messages . . . . . . . . . . . . . . . . . . . . . . . . . . . . . 188
A.8 July 14, 2006 (Support Pack 1) . . . . . . . . . . . . . . . . . . . . . . . . . . . . . . . . . . . . . . . . . . . . . . . 188A.8.1 Remote Management Troubleshooting Strategies . . . . . . . . . . . . . . . . . . . . . . . . . 188
A.9 January 31, 2006 . . . . . . . . . . . . . . . . . . . . . . . . . . . . . . . . . . . . . . . . . . . . . . . . . . . . . . . . . . 188A.9.1 Workstation Inventory . . . . . . . . . . . . . . . . . . . . . . . . . . . . . . . . . . . . . . . . . . . . . . . 188
A.10 December 23, 2005 . . . . . . . . . . . . . . . . . . . . . . . . . . . . . . . . . . . . . . . . . . . . . . . . . . . . . . . . 189A.10.1 Workstation Inventory . . . . . . . . . . . . . . . . . . . . . . . . . . . . . . . . . . . . . . . . . . . . . . . 189
A.11 December 9, 2005 . . . . . . . . . . . . . . . . . . . . . . . . . . . . . . . . . . . . . . . . . . . . . . . . . . . . . . . . . 189
orks 7 Desktop Management Troubleshooting Guide
novdocx (en) 16 April 2010
About This Guide
This guide includes troubleshooting strategies that you can use and error messages that might be displayed for problems that could occur as you use the Remote Management and Workstation Inventory components of Novell® ZENworks® 7 Desktop Management in your production environment.
As administrators gain experience using ZENworks Desktop Management, some unusual or previously untested implementation scenarios and undocumented product limitations will surface. We will gather this feedback from Novell customers and add it to this guide as it becomes practical to do so.
The information in this guide is organized into the following parts:
Part I, “Troubleshooting Remote Management,” on page 11Part II, “Troubleshooting Novell Application Launcher,” on page 25Part III, “Troubleshooting Workstation Inventory,” on page 31Chapter 7, “Troubleshooting Workstation and Server Imaging,” on page 147Part V, “Enabling Debug Logging in ZENworks 7,” on page 157Appendix A, “Documentation Updates,” on page 185
If you are reading this guide as a printed documentation customer, we recommend that you visit the Novell Support Knowledgebase (http://support.novell.com/search/kb_index.jsp) for the most current troubleshooting information.
Audience
This guide is intended for system administrators installing ZENworks 7 Desktop Management software.
Feedback
We want to hear your comments and suggestions about this manual and the other documentation included with this product. Please use the User Comment feature at the bottom of each page of the online documentation, or go to http://www.novell.com/documentation/feedback/ (http://www.novell.com/documentation/feedback/feedback/data/hc7znq4j.html) and enter your comments there.
Documentation Updates
For the most recent version of the Novell ZENworks 7 Desktop Management Troubleshooting Guide for Remote Management and Workstation Inventory, visit the Novell ZENworks 7 documentation Web site (http://www.novell.com/documentation/zenworks7).
About This Guide 9
10 ZENw
novdocx (en) 16 April 2010
Additional Documentation
ZENworks 7 Desktop Management is supported with other documentation (in both PDF and HTML formats) that you can use to learn about and implement the product:
Novell ZENworks 7 Desktop Management Installation GuideNovell ZENworks 7 Desktop Management Administration Guide
In addition, the other capabilities included in the ZENworks 7 suite have extensive documentation for your use. For a full list of this documentation, see the ZENworks 7 page at the Novell ZENworks 7 Web site (http://www.novell.com/documentation/zenworks7).
Documentation Conventions
In Novell documentation, a greater-than symbol (>) is used to separate actions within a step and items in a cross-reference path.
A trademark symbol (®, TM, etc.) denotes a Novell trademark. An asterisk (*) denotes a third-party trademark.
When a single pathname can be written with a backslash for some platforms or a forward slash for other platforms, the pathname is presented with a backslash. Users of platforms that require a forward slash, such as Linux* or UNIX*, should use forward slashes as required by your software.
orks 7 Desktop Management Troubleshooting Guide
Inovdocx (en) 16 A
pril 2010
ITroubleshooting Remote Management
If the Remote Management component of Novell® ZENworks® 7 Desktop Management displays an error message, you can look it up in the Error Messages section. If a problem is not accompanied by an error message, or if specific instructions for an error message are not available, you can try more general troubleshooting strategies to resolve the problem.
Chapter 1, “Remote Management Error Messages,” on page 13Chapter 2, “Remote Management Troubleshooting Strategies,” on page 19
Troubleshooting Remote Management 11

12 ZENw
novdocx (en) 16 April 2010
orks 7 Desktop Management Troubleshooting Guide
1novdocx (en) 16 A
pril 2010
1Remote Management Error Messages
The following sections contain detailed explanations of the error messages you might encounter using the Remote Management component of Novell® ZENworks® 7 Desktop Management:
Section 1.1, “Remote Management Errors on Windows Workstations,” on page 13Section 1.2, “Desktop4.exe Error Messages,” on page 17
NOTE: The information in this section also applies to ZENworks 7 Desktop Management with Support Pack 1.
1.1 Remote Management Errors on Windows Workstations
“1456: The Remote Management Agent is unable to read information from the eDirectory server. Verify that the workstation object is valid and the Middle Tier Server is up and running” on page 13“1461: The Agent failed to verify the address information. If working across NAT, the option for connections across NAT should be enabled in the property pages” on page 14“1463: The Agent failed to verify the port information. If working across NAT, the option for connections across NAT should be enabled in the property pages” on page 14“1481: Unable to obtain the DN of the remote operator logged in to eDirectory” on page 14“1487: You are attempting to launch the operation from an obsolete or invalid workstation object. Verify that the workstation object is valid” on page 15“1759: The selected user has not logged in to any workstation” on page 15“1801: This mode of authentication is currently unavailable on the target machine” on page 16“1802: This operation is currently unavailable on the target machine” on page 16“1805: This operation is currently being performed on the target machine and will not be available” on page 16“1858: The connection with the Remote Management Agent has timed out” on page 16“1899: The connection with the Remote Management Agent 192.168.0.52 is terminated” on page 17“1900: Unable to connect to the Remote Management Agent. Ensure that the Agent is running on the target machine and is compatible with this Remote Management Console” on page 17
1456: The Remote Management Agent is unable to read information from the eDirectory server. Verify that the workstation object is valid and the Middle Tier Server is up and running
Source: ZENworks Desktop Management; Remote Management Console
Severity: Critical
Remote Management Error Messages 13
14 ZENw
novdocx (en) 16 April 2010
Possible Cause: The workstation is not authenticated to Novell eDirectoryTM.
Action: Contact Novell Support (http://www.novell.com/support).
Possible Cause: The Middle Tier server might be down or configured incorrectly. A Middle Tier Server is required if the managed workstation does not have the Novell ClientTM installed.
Action: Contact your system administrator to configure the Middle Tier Server correctly.
Possible Cause: Service Location Protocol (SLP) is not configured correctly for your network. This is required if the managed workstation requires the Novell Client.
Action: Contact your system administrator to configure SLP correctly.
Possible Cause: The error occurs because C:\Program Files\Novell\ZENworks is no longer a part of the PATH variable on the workstation.
Action: Add C:\Program Files\Novell\.ZENworks directory to the PATH.
1461: The Agent failed to verify the address information. If working across NAT, the option for connections across NAT should be enabled in the property pages
Source: ZENworks Desktop Management; Remote Management Console
Severity: Informational
Possible Cause: The Remote Control policy prohibits accepting connections from a Remote Management Console located across NAT.
Action: Enable the Accept Connections across NAT option in the relevant Remote Control policy.
1463: The Agent failed to verify the port information. If working across NAT, the option for connections across NAT should be enabled in the property pages
Source: ZENworks Desktop Management; Remote Management Console
Severity: Informational
Possible Cause: The Remote Control policy prohibits accepting connections from a Remote Management Console located across NAT.
Action: Enable the Accept Connections across NAT option in the relevant Remote Control policy.
1481: Unable to obtain the DN of the remote operator logged in to eDirectory
Source: ZENworks Desktop Management; Remote Management Console
Severity: Informational
Possible Cause: A new user has logged into the eDirectory tree after Novell ConsoleOne® was started.
Action: Refresh ConsoleOne.
orks 7 Desktop Management Troubleshooting Guide
novdocx (en) 16 April 2010
1487: You are attempting to launch the operation from an obsolete or invalid workstation object. Verify that the workstation object is valid
Source: ZENworks Desktop Management; Remote Management Console
Severity: Informational
Possible Cause: The managed workstation has been imported as a different workstation object in the tree and the object from where you are attempting to launch the remote operation is invalid.
Action: Launch the Remote Management operation from the correct workstation object corresponding to the managed workstation.
1759: The selected user has not logged in to any workstation
Source: ZENworks Desktop Management; Remote Management snap-in
Severity: Informational
Possible Cause: The eDirectory server was restarted after the user logged in to the eDirectory tree.
Action: The user on the managed workstation needs to log in to eDirectory.
Possible Cause: The preferred protocol in the Novell Client properties from where the user logged in is IPXTM.
Action: Do the following:
1 Ensure that the preferred protocol is IP by right-clicking the Novell Client, then click NetWare Connections.
2 To change the preferred protocol, select Novell Client > Properties > IP Protocol. If the preferred protocol is IPX, disable IPX from the Protocols List in NetWare Connections.
3 Log in to the eDirectory tree again.
Action: Install the following eDirectory patch builds:
For eDirectory 8.6
Patch: eDirectory 8.6.2 SP1 for all platformsTID # 2962444File: edir862sp1.exeRelease: 20 June 2002
For eDirectory 8.5
Patch: eDirectory update for all platformsTID # 2962755File: edir8527.exeRelease: 19 June 2002
For eDirectory 8.0
Patch: NDS® 8.x update for NetWare® 5.1 ver 8.80dTID # 2962807
Remote Management Error Messages 15
16 ZENw
novdocx (en) 16 April 2010
File: ds880_a.exeRelease: 12 June 2002
IMPORTANT: Prior to installing a patch, you should read the ZENworks 7 Desktop Management Readme (http://www.novell.com/documentation/zenworks7) file for specific information.
1801: This mode of authentication is currently unavailable on the target machine
Source: ZENworks Desktop Management; Remote Management Console
Severity: Informational
Possible Cause: The password-based authentication mode has been disabled in the relevant Remote Control policy.
Action: Enable Password-Based Remote Management in the relevant Remote Control policy.
Possible Cause: The managed workstation might not have been imported in eDirectory. This is required to perform Remote Management operation via directory-based authentication.
Action: Import the workstation to the eDirectory tree.
1802: This operation is currently unavailable on the target machine
Source: ZENworks Desktop Management; Remote Management Console
Severity: Informational
Possible Cause: The Remote Management operation that you want to perform has been disabled in the relevant Remote Control policy.
Action: Enable the Remote Management operation in the relevant Remote Control policy.
1805: This operation is currently being performed on the target machine and will not be available
Source: ZENworks Desktop Management; Remote Management Console
Severity: Informational
Action: Try the Remote Management operation after the existing session terminates.
1858: The connection with the Remote Management Agent has timed out
Source: ZENworks Desktop Management; Remote Management Console
Severity: Informational
Possible Cause: The Remote Management console is unable to contact the Remote Management Agent on the managed workstation. If the managed workstation has Windows* XP SP2 installed on it, the firewall bundled with Windows XP SP 2 might have blocked access to the Remote Management port, which is 1761 by default.
Action: Contact your network administrator.
orks 7 Desktop Management Troubleshooting Guide
novdocx (en) 16 April 2010
1899: The connection with the Remote Management Agent 192.168.0.52 is terminated
Source: ZENworks Desktop Management; Remote Management Console
Severity: Informational
Possible Cause: The Remote Management operation was terminated by the user on the managed workstation.
Possible Cause: The Remote Management service was stopped.
Possible Cause: The managed workstation was restarted.
Action: Ensure that the Remote Management service is up and running on the managed workstation.
1900: Unable to connect to the Remote Management Agent. Ensure that the Agent is running on the target machine and is compatible with this Remote Management Console
Source: ZENworks Desktop Management; Remote Management console
Severity: Informational
Possible Cause: The Remote Management Console is unable to contact the Remote Management Agent on the managed workstation. If the managed workstation has Windows XP SP2 installed on it, the firewall bundled with Windows XP SP 2 might have blocked access to the Remote Management port, which is 1761 by default.
Action: Contact your network administrator.
Possible Cause: The network connection is down.
Action: Ensure that the network connection is up.
1.2 Desktop4.exe Error MessagesThe following sections contain detailed explanations of the error messages you might encounter using the Remote Management desktop4.exe:
“Unable to get the IP address of managed workstation from Novell eDirectory” on page 17“The specified operation, server_name, is not supported” on page 18“Permission is denied to perform the Remote Management operation on the managed workstation” on page 18“Unable to start the Remote Control or the Remote View operation” on page 18
Unable to get the IP address of managed workstation from Novell eDirectory
Source: ZENworks Desktop Management; Desktop4.exe
Severity: Critical
Possible Cause: The Remote Management console is unable to reach eDirectory or eDirectory is not synchronized.
Action: Run DSREPAIR.
Remote Management Error Messages 17
18 ZENw
novdocx (en) 16 April 2010
Possible Cause: Unable to find the workstation object in eDirectory.
Action: Use ConsoleOne to check whether the workstation object is present in eDirectory
Possible Cause: The workstation was not imported correctly into eDirectory.
Action: Import a workstation into eDirectory and retry.
The specified operation, server_name, is not supported
Source: ZENworks Desktop Management; Desktop4.exe
Severity: Informational
Possible Cause: The operation you have specified is not a supported operation of Remote Management.
Action: You can perform only the following Remote Management operations:
Remote ControlFile TransferRemote ViewRemote ExecuteDiagnosticsRemote Wake Up
Permission is denied to perform the Remote Management operation on the managed workstation
Source: ZENworks Desktop Management; Desktop4.exe
Severity: Critical
Possible Cause: You do not have sufficient rights to perform the specified operation.
Action: Ensure that you have sufficient rights to perform the specified operation on the workstation you are trying to remotely control. If the problem persists, contact your system administrator.
Unable to start the Remote Control or the Remote View operation
Source: ZENworks Desktop Management; Desktop4.exe
Severity: Critical
Possible Cause: Rcconsole.exe is not present in the ConsoleOne_installation_directory\bin\zen\rclaunch.
Action: Reinstall Remote Management ConsoleOne snap-ins.
orks 7 Desktop Management Troubleshooting Guide
2novdocx (en) 16 A
pril 2010
2Remote Management Troubleshooting Strategies
The following sections provide solutions to problems you might encounter when using the Remote Management component of Novell® ZENworks® 7 Desktop Management:
Section 2.1, “General Troubleshooting,” on page 19Section 2.2, “Troubleshooting Remote Management Installation,” on page 20Section 2.3, “Troubleshooting Remote Control,” on page 20Section 2.4, “Troubleshooting the File Transfer Protocol,” on page 22Section 2.5, “Troubleshooting the Wake-On-LAN Service,” on page 23
2.1 General TroubleshootingUse the following information to help you troubleshoot problems of a general nature in ZENworks 7 Desktop Management Remote Management:
“From a user object, I am unable to view the IP address of a machine with the Novell Client installed” on page 19
From a user object, I am unable to view the IP address of a machine with the Novell Client installed
Source: ZENworks Desktop Management; Remote Management snap-in
Possible Cause: The Novell eDirectoryTM server was restarted after the user logged in to the eDirectory tree.
Action: The user on the managed workstation needs to log in to eDirectory.
Possible Cause: The preferred protocol in the Novell ClientTM properties from where the user logged in is listed as IPXTM instead of IP.
Action: Do the following:
1 Ensure that the preferred protocol is IP by right-clicking the Novell Client, then click NetWare Connections.
2 To change the preferred protocol, select Novell Client > Properties > IP Protocol. If the preferred protocol is IPX, disable IPX from the Protocols List in the NetWare connections.
3 Log in to the eDirectory tree again.
Action: Install the following eDirectory patch builds:
IMPORTANT: Prior to installing a patch, you should read the ZENworks 7 Desktop Management Readme (http://www.novell.com/documentation/zenworks7) file for specific information.
For eDirectory 8.6
Remote Management Troubleshooting Strategies 19
20 ZENw
novdocx (en) 16 April 2010
Patch: eDirectory 8.6.2 SP1 for all platformsTID # 2962444File: edir862sp1.exeRelease: 20 June 2002
For eDirectory 8.5
Patch: eDirectory update for all platformsTID # 2962755File: edir8527.exeRelease: 19 June 2002
For eDirectory 8.0
Patch: NDS® 8.x update for NetWare® 5.1 ver 8.80dTID # 2962807File: ds880_a.exeRelease: 12 June 2002
2.2 Troubleshooting Remote Management Installation
“Installation of the Remote Management snap-ins fails” on page 20
Installation of the Remote Management snap-ins fails
Source: ZENworks Desktop Management; Remote Management snap-in install
Possible Cause: Some files on the machine where you are installing the snap-ins might be in use.
Action: Do the following:
1 Ensure that no remote session has started using the snap-ins on the machine where you want to install the Remote Management snap-ins.
2 Retry installing the Remote Management snap-ins.
2.3 Troubleshooting Remote Control“Unable to see the video file (*.mpg) running on the managed workstation during the Remote Management session” on page 21“The Remote Control or the Remote View session is slow” on page 21“The graphics are distorted” on page 22“The 3D cursor on the managed workstation renders a block-shaped cursor with reverse colors during Remote Control” on page 22“ConsoleOne snap-ins cause Remote Control to ZENworks for Desktops 3.x with SP3 workstations to fail” on page 22
orks 7 Desktop Management Troubleshooting Guide
novdocx (en) 16 April 2010
Unable to see the video file (*.mpg) running on the managed workstation during the Remote Management session
Source: ZENworks Desktop Management; Remote Management; Remote Control Console
Action: If the video file is running on the Windows Media Player 6.4:
1 In the Windows Media Player window, click View > Option.2 Click the Playback tab.3 Set the Hardware Acceleration to None.4 Click Apply, then click OK.
If the video file is running on Windows Media Player 7 or 8:
1 In the Windows Media Player window, click Tools > Options.2 Click the Performance tab > the Advanced button.3 Deselect Use Overlays.4 Click OK.
If the video file is running on RealPlayer:
1 In the RealPlayer window, click View > Preferences.2 Click the Performance tab.3 Deselect the Use Optimized Video Display check box.4 Click OK.
Action: If the problem persists, disable hardware acceleration on the managed workstation.
On a Windows 2000/XP managed workstation:
1 In the Control Panel, double-click Display.2 Click the Settings tab > the Advanced button.3 Click the Troubleshooting tab.4 Set Hardware Acceleration to None.5 Click OK.
The Remote Control or the Remote View session is slow
Source: ZENworks Desktop Management; Remote Management; Remote Control Console
Possible Cause: The Remote Management optimization driver is not enabled on the managed workstation.
Action: Disable hardware acceleration on the managed workstation.
NOTE: The optimization status can be viewed in the Information dialog box invoked from the Remote Management icon in the notification area.
Action: Install the Mirror Driver on the managed workstation.
Remote Management Troubleshooting Strategies 21
22 ZENw
novdocx (en) 16 April 2010
Action: If you have already installed the Mirror Driver, contact Novell Support (http://www.novell.com/support).
The graphics are distorted
Source: ZENworks Desktop Management; Remote Management Agent
Explanation: There is a problem with the NVIDIA* driver installed on the managed workstation.
Action: Download and install the latest display driver for NVIDIA from the Dell* Web site (http://www.dell.com).
The 3D cursor on the managed workstation renders a block-shaped cursor with reverse colors during Remote Control
Source: ZENworks Desktop Management; Remote Management Agent
Action: Set the cursor shape as a non-3D cursor on your managed workstation.
ConsoleOne snap-ins cause Remote Control to ZENworks for Desktops 3.x with SP3 workstations to fail
Source: ZENworks Desktop Management; Remote Management ConsoleOne snap-in.
Explanation: ZENworks Server Management and ZENworks Desktop Management have different sets of snap-ins. Because Server Management supports launching of Remote Management only from the Server object, it does not contain the snap-ins to launch Remote Management from the Workstation object. When ZENworks 7 Server Management snap-ins are installed over ZENworks for Desktops 3.x snap-ins, the snap-in required to launch Remote Management from the Workstation object cannot load ndsaccess.dll, which is replaced during Server Management installation. For this reason, the Remote Management launch fails.
Action: Update the existing snap-ins to ZENworks 7 Desktop Management with Support Pack 1.
2.4 Troubleshooting the File Transfer Protocol“After successfully uploading a directory from a local machine to a remote machine using the FTP session, I'm unable to open any other directory on the remote machine from FTP” on page 22“Unable to access ConsoleOne during an FTP session” on page 23
After successfully uploading a directory from a local machine to a remote machine using the FTP session, I'm unable to open any other directory on the remote machine from FTP
Source: ZENworks Desktop Management; Remote Management; File Transfer
Explanation: You can only upload a non-protected folder between the local and the remote machine. The folder you transferred is a protected folder. Because of this, the folder on the remote machine is empty, the File Transfer session is disabled, and you are unable to open any folders on the remotely managed workstation.
orks 7 Desktop Management Troubleshooting Guide
novdocx (en) 16 April 2010
Action: Do the following:
1 Delete the folder from the remote machine.2 Disable the security settings on the protected folder.3 Upload it to the remote machine again.
Unable to access ConsoleOne during an FTP session
Source: ZENworks Desktop Management; Remote Management; File Transfer
Explanation: You cannot use Novell ConsoleOne® during an FTP session if you have invoked the FTP session from ConsoleOne.
Action: Use desktop4.exe to transfer large files. For more information, see Starting Remote Management Operations Without Using ConsoleOne in the Novell ZENworks 7 Desktop Management Administration Guide.
2.5 Troubleshooting the Wake-On-LAN Service“If eDirectory and the Wake-On-LAN service are installed on the same Windows server, the Wake-on-LAN service does not start appropriately after server reboot” on page 23
If eDirectory and the Wake-On-LAN service are installed on the same Windows server, the Wake-on-LAN service does not start appropriately after server reboot
Source: ZENworks Desktop Management; Remote Management; Wake-On-LAN Service
Possible Cause: The eDirectory service might not have been initialized before the Wake-On-LAN service started.
Action: Restart the Wake-On-LAN service after the server reboot.
Action: Append the following line to the zenworks_installation_directory\zenworks\remmgmt\server\properties\dserror.properties file:
*ALL*=1
The Wake-On-LAN service attempts to connect to eDirectory for a few minutes and will not exit.
Remote Management Troubleshooting Strategies 23

24 ZENw
novdocx (en) 16 April 2010
orks 7 Desktop Management Troubleshooting Guide
IInovdocx (en) 16 A
pril 2010
IITroubleshooting Novell Application Launcher
If the Novell Application Launcher component of Novell® ZENworks® 7 Desktop Management displays an error message, you can look it up in the Error Messages section. If a problem is not accompanied by an error message, or if specific instructions for an error message are not available, you can try more general troubleshooting strategies to resolve the problem.
Chapter 3, “Novell Application Launcher Error Messages,” on page 27Chapter 4, “Novell Application Launcher Troubleshooting Strategies,” on page 29
Troubleshooting Novell Application Launcher 25

26 ZENw
novdocx (en) 16 April 2010
orks 7 Desktop Management Troubleshooting Guide
3novdocx (en) 16 A
pril 2010
3Novell Application Launcher Error Messages
The following section explains the scenarios that you might encounter using the Novell Application Launcher component of Novell® ZENworks® 7 Desktop Management:
“Novell Application fails to launch when the device boots” on page 27“Retry connecting to Middle Tier Server might take considerable amount of time” on page 27
Novell Application fails to launch when the device boots
Source: ZENworks Desktop Management; Novell Application Launcher.
Description: A NAL Application shortcut present in the Windows Startup folder fails to launch when the device boots even if the Application Window or Application Explorer shortcut is added to the Windows Startup folder.
Action: Perform the following steps to delay the launch of the NAL application:
1. Open the Registry Editor.2. Go to
HKEY_CURRENT_USER\SOFTWARE\Novell\ZENworks\NALExplorer.
3. Create a DWORD called DelayExec and set the value of this entry to the required time delay in seconds.
Retry connecting to Middle Tier Server might take considerable amount of time
Source: ZENworks Desktop Management; Novell Application Launcher.
Description: If the authorization to the Middle Tier Server fails during the first attempt, then the login screen might be displayed after some considerable amount of time because the time interval between two retry attempts is 15 seconds by default.
Action: Before connecting to the Middle Tier Server, reduce the time interval between the retry attempts as follows :
1. Open the Registry Editor.2. Go to HKEY_LOCAL_MACHINE\Software\Novell\LgnXTier\.3. Create a DWORD called PassiveModeLoginRetryInterval and set the
desired value.
Novell Application Launcher Error Messages 27

28 ZENw
novdocx (en) 16 April 2010
orks 7 Desktop Management Troubleshooting Guide
4novdocx (en) 16 A
pril 2010
4Novell Application Launcher Troubleshooting Strategies
The following section explains the scenarios that you might encounter using the Novell Application Launcher component of Novell® ZENworks® 7 Desktop Management:
“Novell Application Launcher constantly refreshes on the device that is connected to the network using a Virtual Private Network connection” on page 29“On refreshing the Novell Application Launcher on a device that is not connected to the internet, the device takes some time to respond” on page 29“The job that is assigned to a workstation through BITS fails to resume after a system reboot” on page 30
Novell Application Launcher constantly refreshes on the device that is connected to the network using a Virtual Private Network connection
Source: ZENworks Desktop Management; Novell Application Launcher.
Possible Cause: ICMP ping protocol is disabled on the Virtual Private Network (VPN) connection.
Action: Do the following:
1 In ConsoleOne®, right-click the User object, then click Properties.2 Click the ZENworks tab, then click Launcher Configuration to display the
Launcher Configuration page.3 Click Add. In the Launcher Configuration dialog box, select Configure
remote access detection method.4 Set the value to either User will always be local, User will always be
remote, or Prompt because Auto detect using max interface speed fails to function on networks on which ICMP ping is disabled.
On refreshing the Novell Application Launcher on a device that is not connected to the internet, the device takes some time to respond
Source: ZENworks Desktop Management; Novell Application Launcher.
Explanantion: When the Novell Application Launcher is refreshed on a device that is not connected to the internet, the CPU utilization of the device becomes very high and the device takes some time to respond.This is because the Update Root Certificates component on the device is turned on and the device is unable to connect to the Windows* Update server on the Internet. The Update Root Certificates component automatically updates trusted root-certificate authorities from the Microsoft* Update server at regular intervals.
Novell Application Launcher Troubleshooting Strategies 29
30 ZENw
novdocx (en) 16 April 2010
Action: Do one of the following:
Connect the device to the internet Disable the update of Root certificates. For more information on disabling the Update Root Certificates component, see Microsoft Support Site (http://support.microsoft.com/kb/317541).
The job that is assigned to a workstation through BITS fails to resume after a system reboot
Source: ZENworks Desktop Management; Novell Application Launcher.
Explanantion: If a job is assigned to a workstation through BITS and the workstation reboots during the execution of the job, the job might fail to resume after the system reboots. If you want the job to resume after the sytem reboot, then ensure to set the startup type of BITS service to manual when you assign the job to the workstation.
Action: Set the startup type of BITS service to manual:
1 Run services.msc to open the Services window.2 Right-click Background Intelligent Transfer Service and click Properties.3 Set the Startup type option to Manual.4 Click OK.
orks 7 Desktop Management Troubleshooting Guide
IIInovdocx (en) 16 A
pril 2010
IIITroubleshooting Workstation Inventory
If the Workstation Inventory component of Novell® ZENworks® 7 Desktop Management displays an error message, you can look it up in the Error Messages section. If a problem is not accompanied by an error message, or if specific instructions for an error message are not available, you can try more general troubleshooting strategies to resolve the problem.
Chapter 5, “Error Messages,” on page 33Chapter 6, “Troubleshooting Strategies,” on page 131
Troubleshooting Workstation Inventory 31

32 ZENw
novdocx (en) 16 April 2010
orks 7 Desktop Management Troubleshooting Guide
5novdocx (en) 16 A
pril 2010
5Error Messages
The following sections contain detailed explanations of the error messages you might encounter in the Workstation Inventory component of Novell® ZENworks® 7 Desktop Management:
“Service Manager Error Messages” on page 33“Scanner Error Messages” on page 41“Sender and Receiver Error Messages” on page 57“TCP Receiver Error Messages” on page 69“Storer Error Messages” on page 77“AlterDBSpaces Tool (Organizing the Database Spaces) Error Messages” on page 81“Inventory Policy Error Messages” on page 83“Custom Scan Editor Error Messages” on page 91“Configure DB Error Messages” on page 93“Inventory Report Error Messages” on page 94“Custom Attribute Editor Error Messages” on page 96“Data Export Error Messages” on page 96“Inventory Summary Error Messages” on page 110“Desktop4.exe Error Messages” on page 112“Upgrade Service Error Messages” on page 114“Inventory Query Error Messages” on page 116“Inventory Sync Service Error Messages” on page 118“Roll-Up Scheduler Error Messages” on page 119“Selector Error Messages” on page 121“Inventory Removal Service Error Messages” on page 121“Dictionary Provider Error Messages” on page 124“Dictionary Consumer Error Messages” on page 124
5.1 Service Manager Error Messages“602: Unable to start the ZENworks Inventory service” on page 34“603: Unable to read the Inventory Service Object in Novell eDirectory” on page 34“604: Unable to read the role of the server” on page 35“605: Unable to identify the NCP server corresponding to the Inventory Service Object in Novell eDirectory” on page 36“606: Unable to read the NCP Server object corresponding to the Inventory Server” on page 36“607: Unable to proceed because of a Novell eDirectory error” on page 36“608: Invalid Scan file path” on page 37“609: The Roll-Up policy is not configured” on page 37
Error Messages 33
34 ZENw
novdocx (en) 16 April 2010
“610: The Database Location policy is not configured” on page 38“615: The schedule is not set in the Roll-Up policy” on page 38“616: The schedule in the Roll-Up policy is corrupted” on page 38“622: Unable to get information from the database” on page 38“627: Database version not supported” on page 39“629: An error occurred while reading the configuration file. Reinstall the Inventory server component” on page 39“630: The scan data cannot be rolled up from a Novell ZENworks 7 Inventory server to an Inventory server with older versions of ZENworks for Desktops or ZENworks for Servers installed. You must upgrade the older version of the Inventory server to ZENworks 7” on page 40“631: The database object has not been configured properly in Novell eDirectory. Reconfigure the database object” on page 40“632: Invalid dictionary directory path” on page 40
602: Unable to start the ZENworks Inventory service
Source: ZENworks Desktop Management; Workstation Inventory; Inventory Service Manager
Severity: Critical
Possible Cause: The Inventory Service is unable to bind to the port specified in the Inventory_server_installation_directory\zenworks\inv\server\wminv\properties\config.properties file.
Possible Cause: Another application is binding to the same port number.
Action: Do the following:
1 Modify the port number in the Inventory_server_installation_directory\zenworks\inv\server\wminv\properties\config.properties file. For more information, see “Understanding the Server Configuration Service” in “Workstation Inventory” in the Novell ZENworks 7 Desktop Management Administration Guide.
2 Restart the Inventory services. For more information, see “Starting and Stopping the Inventory Service” in “Workstation Inventory” in the Novell ZENworks 7 Desktop Management Administration Guide.
Possible Cause: The Inventory server is already loaded.
Action: In this case, this message is informational.
603: Unable to read the Inventory Service Object in Novell eDirectory
Source: ZENworks Desktop Management; Workstation Inventory; Inventory Service Manager
Severity: Critical
Possible Cause: Novell eDirectoryTM failed to start.
orks 7 Desktop Management Troubleshooting Guide
novdocx (en) 16 April 2010
Action: Ensure that the Novell eDirectory service starts properly, then restart the Inventory service. To troubleshoot the problems related to eDirectory, see the Novell eDirectory 8.7.3 (http://www.novell.com/documentation/edir873/index.html) or eDirectory 8.8 (http://www.novell.com/documentation/edir88/index.html) documentation Web sites.
Possible Cause: The tree name or the DN of the Inventory server is invalid in the Inventory_server_installation_directory\zenworks\inv\server\wminv\properties\config.properties file.
Action: Ensure that the entries in the Inventory_server_installation_directory\zenworks\inv\server\wminv\properties\config.properties file are correct. For more information, see “Understanding the Server Configuration Service” in “Workstation Inventory” in the Novell ZENworks 7 Desktop Management Administration Guide.
Possible Cause: The Service Manager is unable to authenticate to eDirectory as the Inventory Service object
Action: Ensure that the Inventory Service object corresponding to the Inventory server is present.
Action: Do the following:
1 Run the DSRepair service. For more information, see the Novell eDirectory documentation Web site (http://www.novell.com/documentation/lg/ndsedir86/index.html).
2 Restart the Inventory services. For more information, see “Starting and Stopping the Inventory Service” in “Workstation Inventory” in the Novell ZENworks 7 Desktop Management Administration Guide.
604: Unable to read the role of the server
Source: ZENworks Desktop Management; Workstation Inventory; Inventory Service Manager
Severity: Critical
Explanation: The role of the Inventory server is configured in the Inventory Service object property page. This error occurs if the Service Manager is unable to read the role of the Inventory Service object.
Possible Cause: The tree name or the DN of the Inventory server is invalid in the Inventory_server_installation_directory\zenworks\inv\server\wminv\properties\config.properties file.
Action: Ensure that the entries in the Inventory_server_installation_directory\zenworks\inv\server\wminv\properties\config.properties file are correct. For more information, see “Understanding the Server Configuration Service” in “Workstation Inventory” in the Novell ZENworks 7 Desktop Management Administration Guide.
Possible Cause: The Service Manager is unable to authenticate to eDirectory as the Inventory Service object.
Error Messages 35
36 ZENw
novdocx (en) 16 April 2010
Action: Ensure that the Inventory Service object corresponding to the Inventory server is present.
Action: In Novell ConsoleOne®, configure the server settings in the Inventory Service object property page for the Inventory server. For more information, see “Configuring the Inventory Service Object ” in “Workstation Inventory” in the Novell ZENworks 7 Desktop Management Administration Guide.
Action: Do the following:
1 Run the DSRepair service. For more information, see the Novell eDirectory documentation Web site (http://www.novell.com/documentation/lg/ndsedir86/index.html).
2 Restart the Inventory services. For more information, see “Starting and Stopping the Inventory Service” in “Workstation Inventory” in the Novell ZENworks 7 Desktop Management Administration Guide.
605: Unable to identify the NCP server corresponding to the Inventory Service Object in Novell eDirectory
Source: ZENworks Desktop Management; Workstation Inventory; Inventory Service Manager
Severity: Critical
Possible Cause: The attribute in the Inventory Service object for Inventory_server_name is not zenInvHostServer.
Action: Verify if the Inventory_server_name for the zenInvHostServer attribute is set correctly in the Inventory Service object. If the problem persists, reinstall Workstation Inventory. For more information, see “Reinstalling Workstation Inventory” in “Uninstall/Reinstall” in the Novell ZENworks 7 Desktop Management Installation Guide.
606: Unable to read the NCP Server object corresponding to the Inventory Server
Source: ZENworks Desktop Management; Workstation Inventory; Inventory Service Manager
Severity: Critical
Explanation: The NCP Server object should be a trustee of the Inventory Service object in eDirectory. During installation, the NCP Server object is granted trustee rights.
Possible Cause: The Service Manager is unable to read the NCP Server object corresponding to the Inventory server.
Action: Ensure that the NCP Server object is a trustee of the Inventory Service object in eDirectory.
607: Unable to proceed because of a Novell eDirectory error
Source: ZENworks Desktop Management; Workstation Inventory; Inventory Service Manager
Severity: Critical
Possible Cause: eDirectory failed to start.
orks 7 Desktop Management Troubleshooting Guide
novdocx (en) 16 April 2010
Action: Ensure that the eDirectory service starts properly, then restart the Inventory service. To troubleshoot the problems related to eDirectory, see the Novell eDirectory 8.7.3 (http://www.novell.com/documentation/edir873/index.html) or eDirectory 8.8 (http://www.novell.com/documentation/edir88/index.html) documentation Web sites.
Action: Do the following:
1 Run the DSRepair service. For more information, see the Novell eDirectory 8.7.3 (http://www.novell.com/documentation/edir873/index.html) or eDirectory 8.8 (http://www.novell.com/documentation/edir88/index.html) documentation Web sites.
2 Restart the Inventory services. For more information, see “Starting and Stopping the Inventory Service” in “Workstation Inventory” in the Novell ZENworks 7 Desktop Management Administration Guide.
Action: If the problem persists, contact Novell Support (http://www.novell.com/support).
608: Invalid Scan file path
Source: ZENworks Desktop Management; Workstation Inventory; Inventory Service Manager
Severity: Critical
Explanation: The scandir directory file path is configured during the installation or in the Inventory Service object property page.
Possible Cause: The scandir directory is not configured.
Action: In ConsoleOne, configure the scandir directory settings in the Inventory Service object. For more information, see “Configuring the Inventory Service Object ” in “Workstation Inventory” in the Novell ZENworks 7 Desktop Management Administration Guide.
609: The Roll-Up policy is not configured
Source: ZENworks Desktop Management; Workstation Inventory; Inventory Service Manager
Severity: Critical
Explanation: In an inventory roll-up deployment, the scan data rolls up from the lower-level Inventory servers to the next higher-level Inventory servers. To configure the Inventory roll-up settings, the next-level roll-up Inventory server for each lower-level Inventory server should be specified in the Roll-Up policy
Possible Cause: The Roll-Up policy is not configured or the policy is not configured correctly for the lower-level Inventory server.
Action: Ensure that the Roll-Up policy is properly configured. For more information, see “Configuring the Roll-Up Policy” in “Workstation Inventory” in the Novell ZENworks 7 Desktop Management Administration Guide.
Error Messages 37

38 ZENw
novdocx (en) 16 April 2010
610: The Database Location policy is not configured
Source: ZENworks Desktop Management; Workstation Inventory; Inventory Service Manager
Severity: Critical
Explanation: The Database Location policy identifies the DN for locating the ZENworks Database object. The policy must be associated to the container under which an Inventory Service object resides.
Possible Cause: The Database Location policy is not configured or the policy is not configured correctly for the Inventory server with database attached.
Action: Ensure that the Database Location Policy is properly configured. For more information, see “Configuring the Database Location Policy” in “Workstation Inventory” in the Novell ZENworks 7 Desktop Management Administration Guide.
615: The schedule is not set in the Roll-Up policy
Source: ZENworks Desktop Management; Workstation Inventory; Inventory Service Manager
Severity: Critical
Explanation: The schedule for the roll-up of scan data is not configured properly in the Roll-Up policy.
Action: Set the schedule for roll-up in the Roll-Up policy. For more information, see “Configuring the Roll-Up Policy” in “Workstation Inventory” in the Novell ZENworks 7 Desktop Management Administration Guide.
616: The schedule in the Roll-Up policy is corrupted
Source: ZENworks Desktop Management; Workstation Inventory; Inventory Service Manager
Severity: Critical
Possible Cause: The Service Manager is unable to authenticate to the Inventory Service object.
Possible Cause: The Service Manager is unable to read the schedule for roll-up.
Possible Cause: The Roll-Up Scheduler information in eDirectory is corrupted.
Action: Reset the schedule for roll-up in the Roll-Up policy. For more information, see “Configuring the Roll-Up Policy” in “Workstation Inventory” in the Novell ZENworks 7 Desktop Management Administration Guide.
622: Unable to get information from the database
Source: ZENworks Desktop Management; Workstation Inventory; Service Manager
Severity: Critical
Explanation: The Service Manager exits if the database cannot be contacted.
Possible Cause: The network is down.
Action: Ensure that the network is up and the network connections are active.
orks 7 Desktop Management Troubleshooting Guide

novdocx (en) 16 April 2010
Possible Cause: The database is not up and running.
Action: Bring up the database.
Possible Cause: The database engine is not the correct version
Action: Reinstall the Inventory database. For more information, see “Reinstalling Workstation Inventory” in “Uninstall/Reinstall” in the Novell ZENworks 7 Desktop Management Installation Guide.
Possible Cause: On a Novell NetWare® Inventory server with the Native File Access pack installed, one or more volumes are exposed as CIFS shares. If the NetWare server does not have a DNS name configured, the CIFS service is given a NetBIOS name. During installation, the database object snap-in assigns the NetBIOS name as the host name.
This error occurs if the Inventory service on the NetWare server fails to resolve the NetBIOS name to an IP address.
Action: Choose an IP address in the database object instead of the NetBIOS name in the database object property page. For more information, see “Setting Up the Inventory Database” in “Workstation Inventory” in the Novell ZENworks 7 Desktop Management Administration Guide.
627: Database version not supported
Source: ZENworks Desktop Management; Workstation Inventory; Service Manager
Severity: Critical
Action: Do the following:
1 Ensure that you have installed the recommended database version. For more information about the recommended database version, see “Preparation” in the Novell ZENworks 7 Desktop Management Installation Guide.
2 If the problem persists, reinstall the Inventory database. For more information, see “Reinstalling Workstation Inventory” in “Uninstall/Reinstall” in the Novell ZENworks 7 Desktop Management Installation Guide.
629: An error occurred while reading the configuration file. Reinstall the Inventory server component
Source: ZENworks Desktop Management; Workstation Inventory; Service Manager
Severity: Critical
Explanation: The config.properties and directory.properties files do not exist in the inventory_server_installation_directory\zenworks\inv\server\wminv\properties directory.
Action: Reinstall the Inventory server component. For more information, see “Reinstalling Workstation Inventory” in “Uninstall/Reinstall” in the Novell ZENworks 7 Desktop Management Installation Guide.
Error Messages 39
40 ZENw
novdocx (en) 16 April 2010
630: The scan data cannot be rolled up from a Novell ZENworks 7 Inventory server to an Inventory server with older versions of ZENworks for Desktops or ZENworks for Servers installed. You must upgrade the older version of the Inventory server to ZENworks 7
Source: ZENworks Desktop Management; Workstation Inventory; Service Manager
Severity: Critical
Possible Cause: A ZENworks 7 Inventory server is configured to roll up to a ZENworks for Servers 3.x or ZENworks for Desktops 4.x Inventory server in the ZENworks 7 Inventory server's Roll-Up policy.
Action: Do one of the following:
In the Roll-Up policy, change the DN of the Inventory Service object of next-level server to a ZENworks 7 Inventory server. For more information, see “Configuring the Roll-Up Policy” in “Workstation Inventory” in the Novell ZENworks 7 Desktop Management Administration Guide.Upgrade the ZENworks for Servers 3.x or ZENworks for Desktops 4.x Inventory server to ZENworks 7 Server Management or ZENworks 7 Desktop Management respectively. For more information on upgrading a ZENworks for Servers 3.x Inventory server to ZENworks 7 Server Management, see “Server Inventory” in “Upgrade” in the Novell ZENworks 7 Server Management Installation Guide. For more information on upgrading a ZENworks for Desktops 4.x Inventory server to ZENworks 7 Desktop Management, see “Upgrade”in the Novell ZENworks 7 Desktop Management Installation Guide.
631: The database object has not been configured properly in Novell eDirectory. Reconfigure the database object
Source: ZENworks Desktop Management; Workstation Inventory; Service Manager
Severity: Critical
Possible Cause: Some attributes of the Inventory database object have not been configured.
Action: Reconfigure the database object and provide values for all attributes. For more information, see “Setting Up the Inventory Database” in “Workstation Inventory” in the Novell ZENworks 7 Desktop Management Administration Guide.
632: Invalid dictionary directory path
Source: ZENworks Desktop Management; Workstation Inventory; Service Manager
Severity: Critical
Possible Cause: An error occurred during the installation of the ZENworks 7 Inventory server.
orks 7 Desktop Management Troubleshooting Guide

novdocx (en) 16 April 2010
Action: Do the following:
1 If you encounter any errors during the ZENworks 7 Inventory server installation, try to resolve them. For more information, see “Installation Error Messages”in the Novell ZENworks 7 Desktop Management Installation Guide.
2 If the problem persists, reinstall the Inventory server component. For more information, see “Reinstalling Workstation Inventory” in “Uninstall/Reinstall” in the Novell ZENworks 7 Desktop Management Installation Guide.
5.2 Scanner Error Messages“001: Unable to create ZENworks directory in Windows_installation_drive” on page 43“002: Unable to register to the DMI Service Layer” on page 43“003: Insufficient memory. Close some applications” on page 43“004: ZENworks directory created in Windows_installation_drive” on page 44“006: Unable to free allocated system memory. Close some applications” on page 44“007: Insufficient memory to run the Scanner. Close some applications” on page 44“008: Unable to scan software using Microsoft Installer (MSI)” on page 44“009: Software scan done using Microsoft Installer (MSI)” on page 44“010: Unable to create the History file (hist.ini) in the Windows_installation_drive/ZENWORKS directory” on page 45“011: Unable to read the History file. The Scanner will re-create this file and scan the workstation completely” on page 45“012: Unable to create the .str file” on page 45“013: Microsoft Installer is not installed” on page 45“014: The history file is corrupted. The Scanner will overwrite the existing file and scan the workstation completely” on page 46“015: Unable to update the numeric value in the registry on the workstation” on page 46“016: Unable to create the key in the registry” on page 46“017: Unable to update the string value in the registry” on page 46“018: Unable to find the MAC address of the workstation” on page 47“019: Unable to get the local time on the workstation” on page 47“020: The Custom Scan file is corrupted” on page 47“022: Unable to write to the .str file” on page 47“023: Unable to close the .str file” on page 47“024: Initiated scan successfully” on page 48“026: Unable to find the workstation DN name or the tree name in Novell eDirectory. Reinstall the ZENworks Agent and register the workstation properly” on page 48“027: Unable to read the sequence number from the Workstation object” on page 48“028: Unable to read the scandir directory location from the Inventory policy” on page 49
Error Messages 41
42 ZENw
novdocx (en) 16 April 2010
“033: The Software scanning option is not enabled in the Inventory policy. Enable the Software Scanning option in the policy” on page 49“035: Unable to find the Inventory policy. Associate the Workstation object with an Inventory policy” on page 49“042: Unable to launch the Inventory Scanner” on page 49“043: Unable to read the Software Rules file” on page 50“044: The Software Rules file is corrupted” on page 50“046: Unable to load the ZENworks Library, zenpol32.dll. Ensure that zenpol32.dll exists on workstation. If the file is not found, reinstall the ZENworks Agent” on page 50“047: Unable to read the ZENworks Library, zenpol32.dll. Ensure that zenpol32.dll exists on workstation. If the file is not found, reinstall the ZENworks Agent” on page 50“048: Unable to initialize WMI” on page 51“049: Unable to initialize COM” on page 51“050: Unable to initialize COM Security” on page 51“051: Could not create Wbem Locator Interface. Maybe WMI is not installed” on page 51“052: Could not connect to WMI server” on page 51“055: Cimmaps.ini is corrupted or does not exist. Reinstall the Workstation Inventory” on page 51“056: The custom hardware scan attributes are either not configured or are not configured properly in the Workstation Inventory policy” on page 52“057: custom.ini does not exist on the local workstation” on page 52“058: Unable to parse the custom.ini file completely” on page 52“060: Unknown connection type” on page 52“062: This Novell eDirectory object is not a workstation object. Ensure that the workstation has been registered properly” on page 53“063: Transfer of the str file from the Workstation to the Inventory server failed” on page 53“064: The scanner path is not found in the registry. Reinstall the ZENworks agent” on page 53“065: Unable to create filename file on the local workstation. Ensure that the file has Write rights” on page 53“072: Custom.ini (Line: line_number): Invalid CIM class Inventory_class_name” on page 54“074: Custom.ini (Line: line_number): The specified regular attribute name for the CIM class Inventory_class_name is invalid” on page 54“075: Custom.ini (Line: line_number): The regular attribute name for the CIM class Inventory_class_name has been specified more than once” on page 54“076: Custom.ini (Line: line_number): The number of the regular attribute names and the number of the regular attribute values are not equal for CIM class Inventory_class_name. Each regular attribute name must have a corresponding regular attribute value” on page 54“079: Custom.ini (Line: line_number): The custom attribute name or the custom attribute value has not been specified for the CIM class Inventory_class_name” on page 55“080: Custom.ini (Line: line_number): The specified custom attribute name for the CIM class Inventory_class_name is invalid” on page 55
orks 7 Desktop Management Troubleshooting Guide
novdocx (en) 16 April 2010
“081: Custom.ini (Line: line_number): The custom attribute name for the CIM class Inventory_class_name has been specified more than once” on page 55“082: Custom.ini (Line: line_number): The custom attribute name and its corresponding value have not been specified for the CIM class Inventory_class_name” on page 55“083: Custom.ini (Line: line_number): The query for the CIM class Inventory_class_name is incomplete” on page 55“084: Custom.ini (Line: line_number): The End section is missing for the CIM class Inventory_class_name. Add the End section” on page 56“085: Custom.ini (Line: line_number): The Start section is missing for the CIM class Inventory_class_name. Add the Start section” on page 56“086: Custom.ini (Line: line_number): The number of characters of the custom attribute value for the custom attribute custom_attribute_name exceeds 512” on page 56“087: Custom.ini (Line: line_number): The query is invalid because the format is not correct” on page 56“088: Custom.ini (Line: line_number): The data type of one or more regular attribute values mismatch with the expected data type” on page 57“093: Inventory Scanning is disabled” on page 57
001: Unable to create ZENworks directory in Windows_installation_drive
Source: ZENworks Desktop Management; Workstation Inventory; Scanner
Severity: Critical
Explanation: When scanning the inventoried workstations, the Scanner places the scan log files and other files in Windows_installation_directory/zenworks.
The Scanner creates the directory if it does not exist.
Possible Cause: The Windows_installation_directory might not have the rights to create directories.
Action: Ensure that the Windows_installation_directory has Create rights.
002: Unable to register to the DMI Service Layer
Source: ZENworks Desktop Management; Workstation Inventory; Scanner
Severity: Informational
Explanation: If the inventoried workstation is instrumented for DMI scanning, the Scanner collects the scan data from the Service Provider within the Service Layer. If the DMI Service Layer was not present on the inventoried workstation at the time of scanning, the Scanner probes the inventoried workstation.
Action: Install DMI.
003: Insufficient memory. Close some applications
Source: ZENworks Desktop Management; Workstation Inventory; Scanner
Severity: Critical
Possible Cause: The workstation has insufficient memory.
Error Messages 43
44 ZENw
novdocx (en) 16 April 2010
Action: Close some applications so that system memory is available for the Scanner.
004: ZENworks directory created in Windows_installation_drive
Source: ZENworks Desktop Management; Workstation Inventory; Scanner
Severity: Informational
Explanation: When scanning the inventoried workstations, the Scanner places the scan log files and other files in the Windows_installation_directory/zenworks.
006: Unable to free allocated system memory. Close some applications
Source: ZENworks Desktop Management; Workstation Inventory; Scanner
Severity: Critical
Explanation: The Scanner cannot free the allocated system heap memory. This error occurs if some memory areas are corrupted.
Action: Close some applications so that system memory is available for the Scanner.
007: Insufficient memory to run the Scanner. Close some applications
Source: ZENworks Desktop Management; Workstation Inventory; Scanner
Severity: Critical
Possible Cause: Insufficient memory to run the Scanner on the inventoried workstation.
Action: Close some applications and run the Scanner from the Scheduler.
008: Unable to scan software using Microsoft Installer (MSI)
Source: ZENworks Desktop Management; Workstation Inventory; Scanner
Severity: Informational
Explanation: The Scanner uses the MSI layer to collect software information on the inventoried workstations. If the MSI layer was not present on the inventoried workstation at the time of scanning, the Scanner probes the inventoried workstation.
Possible Cause: The MSI layer is not installed or is not functional.
Action: Ensure that MSI support is installed and functional.
009: Software scan done using Microsoft Installer (MSI)
Source: ZENworks Desktop Management; Workstation Inventory; Scanner
Severity: Informational
Explanation: The Scanner uses the MSI layer to collect software information on the inventoried workstations. If the MSI layer was not present on the inventoried workstation at the time of scanning, the Scanner probes the inventoried workstation.
orks 7 Desktop Management Troubleshooting Guide
novdocx (en) 16 April 2010
010: Unable to create the History file (hist.ini) in the Windows_installation_drive/ZENWORKS directory
Source: ZENworks Desktop Management; Workstation Inventory; Scanner
Severity: Warning
Possible Cause: There is no free disk space on the inventoried workstation.
Action: Ensure that there is free disk space on the inventoried workstation.
Possible Cause: The hist.ini file in the zenworks directory on the inventoried workstation has only Read rights.
Action: Ensure that hist.ini also has Write rights.
011: Unable to read the History file. The Scanner will re-create this file and scan the workstation completely
Source: ZENworks Desktop Management; Workstation Inventory; Scanner
Severity: Warning
Explanation: The Scanner creates a history file (hist.ini) in the Windows_installation_directory/zenworks on the inventoried workstation. If the file is corrupted, the Scanner re-creates the file and enforces a full scan on the inventoried workstation.
Action: Perform a full scan.
1 In ConsoleOne, right-click the workstation object, then click Properties.2 Click the ZENworks Inventory tab, then the Workstation Scan
Configuration suboption.3 Select Start Full Scan.4 Click Apply, then click Close.
012: Unable to create the .str file
Source: ZENworks Desktop Management; Workstation Inventory; Scanner
Severity: Critical
Possible Cause: The disk on the inventoried workstation is full.
Action: Ensure that there is free disk space on the inventoried workstation.
013: Microsoft Installer is not installed
Source: ZENworks Desktop Management; Workstation Inventory; Scanner
Severity: Warning
Explanation: The Scanner uses the MSI layer to collect software information on the inventoried workstations. If the MSI layer was not present on the inventoried workstation at the time of scanning, the Scanner probes the inventoried workstation.
Error Messages 45
46 ZENw
novdocx (en) 16 April 2010
014: The history file is corrupted. The Scanner will overwrite the existing file and scan the workstation completely
Source: ZENworks Desktop Management; Workstation Inventory; Scanner
Severity: Warning
Explanation: The Scanner creates a history file (hist.ini) in the Windows_installation_directory/zenworks directory. If the file is corrupted, the Scanner re-creates the file and scans the inventoried workstation completely.
015: Unable to update the numeric value in the registry on the workstation
Source: ZENworks Desktop Management; Workstation Inventory; Scanner
Severity: Warning
Explanation: The Scanner creates the Novell\Workstation Manager key in the registry.
Possible Cause: The key is missing.
Action: Ensure that the Novell\Workstation Manager key exists in the registry.
Possible Cause: The value in the key is invalid.
Action: Re-register the inventoried workstation. For more information, see “Workstation Registration Files” in “Automatic Workstation Import and Removal” in the Novell ZENworks 7 Desktop Management Administration Guide.
016: Unable to create the key in the registry
Source: ZENworks Desktop Management; Workstation Inventory; Scanner
Severity: Warning
Explanation: The Scanner creates the Novell\Workstation Manager key in the registry.
Possible Cause: The key is missing in the registry.
Action: Ensure that the Novell\Workstation Manager key exists in the registry.
Action: Re-register the workstation. For more information, see “Workstation Registration Files” in “Automatic Workstation Import and Removal” in the Novell ZENworks 7 Desktop Management Administration Guide.
017: Unable to update the string value in the registry
Source: ZENworks Desktop Management; Workstation Inventory; Scanner
Severity: Warning
Explanation: The Scanner creates the Novell\Workstation Manager key in the registry.
Possible Cause: The key is missing.
Action: Ensure that the Novell\Workstation Manager key exists in the registry.
Possible Cause: The value in the key is invalid.
orks 7 Desktop Management Troubleshooting Guide
novdocx (en) 16 April 2010
Action: Re-register the workstation. For more information, see “Workstation Registration Files” in “Automatic Workstation Import and Removal” in the Novell ZENworks 7 Desktop Management Administration Guide.
018: Unable to find the MAC address of the workstation
Source: ZENworks Desktop Management; Workstation Inventory; Scanner
Severity: Critical
Possible Cause: The network card on the inventoried workstation is not Ethernet, token ring, or FDDI.
Action: Ensure that the inventoried workstation has an Ethernet, token ring, or FDDI network card installed.
019: Unable to get the local time on the workstation
Source: ZENworks Desktop Management; Workstation Inventory; Scanner
Severity: Critical
Action: Contact Novell Support (http://www.novell.com/support).
020: The Custom Scan file is corrupted
Source: ZENworks Desktop Management; Workstation Inventory; Scanner
Severity: Informational
Explanation: The attribute for the Custom Scan file in eDirectory contains invalid data.
IMPORTANT: This error can occur if a ZENworks for Desktops 4.x inventoried workstation sends inventory data to a ZENworks 7 Desktop Management Inventory server.
Action: In ConsoleOne, run the Custom Scan Editor. The editor validates the Custom Scan file. For more information, see the ZENworks for Desktops 4.0.1 documentation Web site (http://www.novell.com/documentation/zdpr/index.html).
If the problem persists, contact Novell Support (http://www.novell.com/support).
022: Unable to write to the .str file
Source: ZENworks Desktop Management; Workstation Inventory; Scanner
Severity: Critical
Action: Contact Novell Support (http://www.novell.com/support).
023: Unable to close the .str file
Source: ZENworks Desktop Management; Workstation Inventory; Scanner
Severity: Warning
Possible Cause: The system memory on the inventoried workstation is corrupted.
Error Messages 47

48 ZENw
novdocx (en) 16 April 2010
Action: Schedule the scan again.
024: Initiated scan successfully
Source: ZENworks Desktop Management; Workstation Inventory; Scanner
Severity: Informational
Explanation: This message is displayed when the Scanner has been launched successfully on the inventoried workstation even if the Enable Scan of Workstation option is not selected on the Inventory Service object property page, this message is displayed.
If you disable scanning of inventoried workstations (that is, if you deselect the Enable Scan workstation property on the Inventory Service Object property page), the status logs for the Scanner do not display any status, indicating that the scan is disabled. However, the Status logs still display a message indicating that the scan process was initiated successfully.
026: Unable to find the workstation DN name or the tree name in Novell eDirectory. Reinstall the ZENworks Agent and register the workstation properly
Source: ZENworks Desktop Management; Workstation Inventory; Scanner
Severity: Critical
Possible Cause: The inventoried workstation is not registered.
Action: Ensure that the inventoried workstation is properly registered as a Workstation object in eDirectory. To do this, click the Workstation Manager icon in the notification area at the bottom of the desktop on the inventoried workstation, then click Display NDS Information. The Workstation object and the Workstation tree should display the DN name and the tree name.
027: Unable to read the sequence number from the Workstation object
Source: ZENworks Desktop Management; Workstation Inventory; Scanner
Severity: Warning
Possible Cause: The scan details have been deleted from eDirectory. Also, the inventoried workstation details are deleted from eDirectory and re-created.
Action: Make sure that the Selector is loaded on the server so the Selector can process .str files.
Action: Ensure that the Inventory database contains the scan information. This ensures that the Selector has processed the .str file and created the sequence number in the Workstation object. To check whether scan information is present:
1 In ConsoleOne, click a container.2 Click Tools, then click Configure DB.3 Select a ZENworks Database object, then click OK.4 View the scan information, right-click the inventoried workstation from
ConsoleOne, click Actions, then click Inventory.
orks 7 Desktop Management Troubleshooting Guide
novdocx (en) 16 April 2010
Action: If the problem persists, contact Novell Support (http://www.novell.com/support).
028: Unable to read the scandir directory location from the Inventory policy
Source: ZENworks Desktop Management; Workstation Inventory; Scanner
Severity: Critical
Explanation: The Scanner collects the scan data in the .str file. The .str file for the inventoried workstation is stored in the scandir directory. The scandir directory path is specified during the installation or in the Inventory Service object property page.
This error occurs if the scandir directory location is not properly configured in the Inventory Service object property page.
Action: Ensure that the scandir directory path is properly configured in the Inventory Service object. For more information, see “Configuring the Inventory Service Object ” in “Workstation Inventory” in the Novell ZENworks 7 Desktop Management Administration Guide.
033: The Software scanning option is not enabled in the Inventory policy. Enable the Software Scanning option in the policy
Source: ZENworks Desktop Management; Workstation Inventory; Scanner
Severity: Warning
Explanation: By default, the Scanner does not collect the software information of the inventoried workstation. If you want the software inventory, you must select the Enable the Software Scan option in the Workstation Inventory policy.
Action: Select the Enable the Software Scan option in the Workstation Inventory policy. For more information, see “Configuring the Workstation Inventory Policy” in “Workstation Inventory” in the Novell ZENworks 7 Desktop Management Administration Guide.
035: Unable to find the Inventory policy. Associate the Workstation object with an Inventory policy
Source: ZENworks Desktop Management; Workstation Inventory; Scanner
Severity: Critical
Possible Cause: The Inventory policy associated with the Workstation object does not exist.
Action: Associate the workstation object with an Inventory policy. For more information, see “Configuring the Workstation Inventory Policy” in “Workstation Inventory” in the Novell ZENworks 7 Desktop Management Administration Guide.
042: Unable to launch the Inventory Scanner
Source: ZENworks Desktop Management; Workstation Inventory; Scanner
Severity: Critical
Action: Contact Novell Support (http://www.novell.com/support).
Error Messages 49
50 ZENw
novdocx (en) 16 April 2010
043: Unable to read the Software Rules file
Source: ZENworks Desktop Management; Workstation Inventory; Scanner
Severity: Informational
Possible Cause: The Software Rules are not configured in the Workstation Inventory policy.
IMPORTANT: This error can occur if a ZENworks for Desktops 4.x inventoried workstation sends inventory data to a ZENworks 7 Desktop Management Inventory server.
Action: Ensure that the Software Rules are configured in the Workstation Inventory policy. For more information, see the ZENworks for Desktops 4.0.1 documentation Web site (http://www.novell.com/documentation/zdpr/index.html).
044: The Software Rules file is corrupted
Source: ZENworks Desktop Management; Workstation Inventory; Scanner
Severity: Warning
Explanation: An error occurred while reading the Software Rules attribute in eDirectory.
IMPORTANT: This error can occur if a ZENworks for Desktops 4.x inventoried workstation sends inventory data to a ZENworks 7 Desktop Management Inventory server.
Action: Reconfigure the Software Rules in the Workstation Inventory policy. For more information, see the ZENworks for Desktops 4.0.1 documentation Web site (http://www.novell.com/documentation/zdpr/index.html).
046: Unable to load the ZENworks Library, zenpol32.dll. Ensure that zenpol32.dll exists on workstation. If the file is not found, reinstall the ZENworks Agent
Source: ZENworks Desktop Management; Workstation Inventory; Scanner
Severity: Critical
Possible Cause: The file is corrupted or does not exist in the ZENworks installation directory.
Action: Reinstall the ZENworks 7 Desktop Management Agent. For more information, see “Reinstalling Workstation Inventory” in “Uninstall/Reinstall” in the Novell ZENworks 7 Desktop Management Installation Guide.
047: Unable to read the ZENworks Library, zenpol32.dll. Ensure that zenpol32.dll exists on workstation. If the file is not found, reinstall the ZENworks Agent
Source: ZENworks Desktop Management; Workstation Inventory; Scanner
Severity: Critical
Possible Cause: The file is corrupted or does not exist in the ZENworks installation directory.
Action: Reinstall the ZENworks 7 Desktop Management Agent. For more information, see “Reinstalling Workstation Inventory” in “Uninstall/Reinstall” in the Novell ZENworks 7 Desktop Management Installation Guide.
orks 7 Desktop Management Troubleshooting Guide
novdocx (en) 16 April 2010
048: Unable to initialize WMI
Source: ZENworks Desktop Management; Workstation Inventory; Scanner
Severity: Informational
Possible Cause: Microsoft* Windows Management Instrumentation (WMI) is not installed on the inventoried workstation.
Action: Install WMI again on the inventoried workstation.
049: Unable to initialize COM
Source: ZENworks Desktop Management; Workstation Inventory; Scanner
Severity: Informational
Possible Cause: An internal occur has occurred.
Action: Install WMI again on the inventoried workstation.
If the problem persists, contact Novell Support (http://www.novell.com/support).
050: Unable to initialize COM Security
Source: ZENworks Desktop Management; Workstation Inventory; Scanner
Severity: Informational
Possible Cause: An internal occur has occurred.
Action: Install WMI again on the inventoried workstation.
If the problem persists, contact Novell Support (http://www.novell.com/support).
051: Could not create Wbem Locator Interface. Maybe WMI is not installed
Source: ZENworks Desktop Management; Workstation Inventory; Scanner
Severity: Informational
Possible Cause: WMI is not installed on the inventoried workstation.
Action: Install WMI on the inventoried workstation.
052: Could not connect to WMI server
Source: ZENworks Desktop Management; Workstation Inventory; Scanner
Severity: Informational
Possible Cause: WMI is not installed on the inventoried workstation.
Action: Install WMI on the inventoried workstation.
055: Cimmaps.ini is corrupted or does not exist. Reinstall the Workstation Inventory
Source: ZENworks Desktop Management; Workstation Inventory; Scanner
Severity: Informational
Error Messages 51
52 ZENw
novdocx (en) 16 April 2010
Explanation: The ZENworks Agent install copies the cimmaps.ini file to the inventoried workstation.
This error occurs if the file is corrupted or does not exist.
Action: Reinstall the ZENworks 7 Desktop Management Agent. For more information, see “Reinstalling Workstation Inventory” in “Uninstall/Reinstall” in the Novell ZENworks 7 Desktop Management Installation Guide.
056: The custom hardware scan attributes are either not configured or are not configured properly in the Workstation Inventory policy
Source: ZENworks Desktop Management; Workstation Inventory; Scanner
Severity: Informational
Action: Configure the Custom Scan attributes. For more information, see the ZENworks for Desktops 4.0.1 documentation Web site (http://www.novell.com/documentation/zdpr/index.html).
IMPORTANT: This error can occur if a ZENworks for Desktops 4.x inventoried workstation sends inventory data to a ZENworks 7 Desktop Management Inventory server in your inventory tree.
057: custom.ini does not exist on the local workstation
Source: ZENworks Desktop Management; Workstation Inventory; Scanner
Severity: Informational
Possible Cause: The custom.ini file is not found in the Windows_installation_directory\zenworks directory.
Action: Configure custom.ini and save it in the Windows_installation_directory\zenworks directory of the inventoried workstation. For more information, see “Configuring the Workstation Inventory Policy” in “Workstation Inventory” in the Novell ZENworks 7 Desktop Management Administration Guide.
058: Unable to parse the custom.ini file completely
Source: ZENworks Desktop Management; Workstation Inventory; Scanner
Severity: Informational
Possible Cause: The custom.ini file is not configured properly.
Action: Configure custom.ini properly. For more information, see “Configuring the Workstation Inventory Policy” in “Workstation Inventory” in the Novell ZENworks 7 Desktop Management Administration Guide.
060: Unknown connection type
Source: ZENworks Desktop Management; Workstation Inventory; Scanner
Severity: Critical
orks 7 Desktop Management Troubleshooting Guide
novdocx (en) 16 April 2010
Possible Cause: The inventoried workstation cannot contact eDirectory using the Novell ClientTM or Desktop Management Middle Tier server.
Action: Ensure that the inventoried workstation is connected to the network.
062: This Novell eDirectory object is not a workstation object. Ensure that the workstation has been registered properly
Source: ZENworks Desktop Management; Workstation Inventory; Scanner
Severity: Critical
Action: Delete the workstation object in the eDirectory and re-register the workstation. For more information about registering the workstation again, see “Workstation Registration Files” in “Automatic Workstation Import and Removal” in the Novell ZENworks 7 Desktop Management Administration Guide.
063: Transfer of the str file from the Workstation to the Inventory server failed
Source: ZENworks Desktop Management; Workstation Inventory; Scanner
Severity: Critical
Explanation: The Workstation Inventory server installation creates the scandir directory on the Inventory server and assigns appropriate rights to the directory. This error occurs if the Scanner is unable to copy the .str file in the scandir directory.
Possible Cause: The Scanner does not have proper rights to the scandir path.
Action: Ensure that the Workstation Inventory server installation program has created the scandir directory and appropriate rights have been assigned to this directory.
064: The scanner path is not found in the registry. Reinstall the ZENworks agent
Source: ZENworks Desktop Management; Workstation Inventory; Scanner
Severity: Critical
Possible Cause: The ZENworks 7 Desktop Management Agent installation program failed to create a registry key, which has the Scanner path under novell/workstation manager/invscanner registry key.
Action: Reinstall the ZENworks 7 Desktop Management Agent. For more information, see “Reinstalling Workstation Inventory” in “Uninstall/Reinstall” in the Novell ZENworks 7 Desktop Management Installation Guide.
065: Unable to create filename file on the local workstation. Ensure that the file has Write rights
Source: ZENworks Desktop Management; Workstation Inventory; Scanner
Severity: Critical
Explanation: The Scanner is unable to create the file in the Windows_installation_directory/zenworks directory on the inventoried workstation.
Possible Cause: The file already exists with Read rights.
Error Messages 53
54 ZENw
novdocx (en) 16 April 2010
Action: If the file already exists on the inventoried workstation, ensure that it also has Write rights.
072: Custom.ini (Line: line_number): Invalid CIM class Inventory_class_name
Source: ZENworks Desktop Management; Workstation Inventory; Scanner
Severity: Informational
Explanation: An invalid Inventory class name has been specified in the custom.ini file in the line line_number.
Action: Ensure that the Inventory class name specified in the custom.ini file is valid. For more information, see “Customizing the Hardware Inventory Information To Be Scanned” in “Workstation Inventory” in the Novell ZENworks 7 Desktop Management Administration Guide.
074: Custom.ini (Line: line_number): The specified regular attribute name for the CIM class Inventory_class_name is invalid
Source: ZENworks Desktop Management; Workstation Inventory; Scanner
Severity: Informational
Explanation: An invalid regular attribute name has been specified in the custom.ini file in the line line_number.
Action: Ensure that the regular attribute name specified in the custom.ini file is valid. For more information, see “Customizing the Hardware Inventory Information To Be Scanned” in “Workstation Inventory” in the Novell ZENworks 7 Desktop Management Administration Guide.
075: Custom.ini (Line: line_number): The regular attribute name for the CIM class Inventory_class_name has been specified more than once
Source: ZENworks Desktop Management; Workstation Inventory; Scanner
Severity: Informational
Action: Ensure that the regular attribute name has been specified only once in the custom.ini file. For more information, see “Customizing the Hardware Inventory Information To Be Scanned” in “Workstation Inventory” in the Novell ZENworks 7 Desktop Management Administration Guide.
076: Custom.ini (Line: line_number): The number of the regular attribute names and the number of the regular attribute values are not equal for CIM class Inventory_class_name. Each regular attribute name must have a corresponding regular attribute value
Source: ZENworks Desktop Management; Workstation Inventory; Scanner
Severity: Informational
Action: Ensure that each regular attribute name has a corresponding value in the custom.ini file. For more information, see “Customizing the Hardware Inventory Information To Be Scanned” in “Workstation Inventory” in the Novell ZENworks 7 Desktop Management Administration Guide.
orks 7 Desktop Management Troubleshooting Guide

novdocx (en) 16 April 2010
079: Custom.ini (Line: line_number): The custom attribute name or the custom attribute value has not been specified for the CIM class Inventory_class_name
Source: ZENworks Desktop Management; Workstation Inventory; Scanner
Severity: Informational
Action: Ensure that each regular attribute name in the custom.ini file has a corresponding value and vice versa. For more information, see “Customizing the Hardware Inventory Information To Be Scanned” in “Workstation Inventory” in the Novell ZENworks 7 Desktop Management Administration Guide.
080: Custom.ini (Line: line_number): The specified custom attribute name for the CIM class Inventory_class_name is invalid
Source: ZENworks Desktop Management; Workstation Inventory; Scanner
Severity: Informational
Action: Configure the custom attribute in the Custom Hardware Scan editor using ConsoleOne. For more information, see “Customizing the Hardware Inventory Information To Be Scanned” in “Workstation Inventory” in the Novell ZENworks 7 Desktop Management Administration Guide.
081: Custom.ini (Line: line_number): The custom attribute name for the CIM class Inventory_class_name has been specified more than once
Source: ZENworks Desktop Management; Workstation Inventory; Scanner
Severity: Informational
Action: Ensure that the custom attribute name has been specified only once in the custom.ini file. For more information, see “Customizing the Hardware Inventory Information To Be Scanned” in “Workstation Inventory” in the Novell ZENworks 7 Desktop Management Administration Guide.
082: Custom.ini (Line: line_number): The custom attribute name and its corresponding value have not been specified for the CIM class Inventory_class_name
Source: ZENworks Desktop Management; Workstation Inventory; Scanner
Severity: Informational
Action: Ensure that you have specified at least one custom attribute name and its corresponding value in the custom.ini file. For more information, see “Customizing the Hardware Inventory Information To Be Scanned” in “Workstation Inventory” in the Novell ZENworks 7 Desktop Management Administration Guide.
083: Custom.ini (Line: line_number): The query for the CIM class Inventory_class_name is incomplete
Source: ZENworks Desktop Management; Workstation Inventory; Scanner
Severity: Informational
Error Messages 55
56 ZENw
novdocx (en) 16 April 2010
Possible Cause: The custom attributes and their corresponding values have not been configured properly for the Inventory class Inventory_class_name at the line line_number.
Action: Ensure that you have specified at least one custom attribute name and its corresponding value for each Inventory class in the custom.ini file. For more information, see “Customizing the Hardware Inventory Information To Be Scanned” in “Workstation Inventory” in the Novell ZENworks 7 Desktop Management Administration Guide.
084: Custom.ini (Line: line_number): The End section is missing for the CIM class Inventory_class_name. Add the End section
Source: ZENworks Desktop Management; Workstation Inventory; Scanner
Severity: Informational
Action: At the specified line in the custom.ini file, add the line [END_CIM_OBJECT] to end the section. For more information, see “Customizing the Hardware Inventory Information To Be Scanned” in “Workstation Inventory” in the Novell ZENworks 7 Desktop Management Administration Guide.
085: Custom.ini (Line: line_number): The Start section is missing for the CIM class Inventory_class_name. Add the Start section
Source: ZENworks Desktop Management; Workstation Inventory; Scanner
Severity: Informational
Action: At the specified line in the custom.ini file, add the line [START_CIM_OBJECT] to start the section. For more information, see “Customizing the Hardware Inventory Information To Be Scanned” in “Workstation Inventory” in the Novell ZENworks 7 Desktop Management Administration Guide.
086: Custom.ini (Line: line_number): The number of characters of the custom attribute value for the custom attribute custom_attribute_name exceeds 512
Source: ZENworks Desktop Management; Workstation Inventory; Scanner
Severity: Informational
Action: Ensure that the custom attribute value does not have more than 512 characters. For more information, see “Customizing the Hardware Inventory Information To Be Scanned” in “Workstation Inventory” in the Novell ZENworks 7 Desktop Management Administration Guide.
087: Custom.ini (Line: line_number): The query is invalid because the format is not correct
Source: ZENworks Desktop Management; Workstation Inventory; Scanner
Severity: Informational
Action: Configure the custom.ini file properly. For more information, see “Customizing the Hardware Inventory Information To Be Scanned” in “Workstation Inventory” in the Novell ZENworks 7 Desktop Management Administration Guide.
orks 7 Desktop Management Troubleshooting Guide

novdocx (en) 16 April 2010
088: Custom.ini (Line: line_number): The data type of one or more regular attribute values mismatch with the expected data type
Source: ZENworks Desktop Management; Workstation Inventory; Scanner
Severity: Informational
Action: Configure the custom.ini file properly. For more information, see “Customizing the Hardware Inventory Information To Be Scanned” in “Workstation Inventory” in the Novell ZENworks 7 Desktop Management Administration Guide.
093: Inventory Scanning is disabled
Source: ZENworks Desktop Management; Workstation Inventory; Scanner
Severity: Informational
Possible Cause: The Enable Scan of Machines option is not selected in the Inventory Service object's property page.
Action: To start the Inventory scanning, select the Enable Scan of Machines option in the Inventory Service object's property page. For more information, see “Configuring the Inventory Service Object ” in “Workstation Inventory” in the Novell ZENworks 7 Desktop Management Administration Guide.
5.3 Sender and Receiver Error Messages“301: Unable to create the Property file filename” on page 58“302: Unable to read the Property file filename” on page 59“303: Unable to unzip the file zip_filename” on page 59“304: Unable to open the file path_name/filename” on page 59“306: zip_filename is corrupted, probably during transmission” on page 60“307: Unable to create the .zip file filename” on page 60“308: Compression failure. filename.str is not compressed to a .zip file” on page 60“309: Input-output failure. filename.str is not compressed to a .zip file” on page 61“310: Input-output failure. Unable to close the file filename” on page 61“311: Could not extract Cascading attributes because sanity check failed” on page 61“317: Unable to copy the file filename from the entpushdir directory to the dbdir directory” on page 62“320: Unable to reach the Receiver receiver_host_address” on page 62“324: Directory directory_name does not exist” on page 63“327: Sender establishes connection with Receiver after a previous attempt to connect failed” on page 63“328: Unable to read Security Directory from sender.properties” on page 63“329: The Receiver service on the server server_name is currently down” on page 64“330: Unable to contact the receiver on the server server_name” on page 64“332: An internal error occurred while getting the zeninvRollupTime” on page 64
Error Messages 57
58 ZENw
novdocx (en) 16 April 2010
“333: Invalid URL for the CascadeBaseTime service” on page 64“334: An internal error occurred while starting the CascadeBaseTimeServer” on page 64“335: Socket Input-Output error occurred while getting the zeninvRollupTime” on page 65“338: An internal error occurred while transferring the zip file to the Receiver running on the server server_name” on page 65“339: Invalid URL for the Inventory File Service on the server server_name” on page 65“340: The Receiver on server server_name is currently busy with other requests” on page 66“341: Input-Output error occurred at the Receiver running on server server_name while receiving the zip file” on page 66“342: Socket Input-Output error occurred while transferring the zip file to the Receiver running on server server_name” on page 66“343: Unable to obtain a lock on the target file” on page 67“344: An internal error occurred while starting the Inventory File Service” on page 67“345: The target directory on the server server_name, where the zip file is to be copied is invalid” on page 67“346: The target directory on the server server_name, where the zip file is to be copied, does not have the required permission” on page 67“347: Internal error while connecting to the Receiver on server server_name” on page 67“348: An internal error occurred. Unable to start Receiver Service” on page 68“349: Unable to change stored status for the file filename” on page 68“350: File filename in dbdir is locked” on page 68“351: Error in Sender on the server server_name. Invalid firewall proxy address” on page 69“352: Error in Sender on the server server_name. Invalid firewall proxy port” on page 69“354: Unable to write the Inventory Service DN to the property file” on page 69“355: Unable to write the server name to the property file” on page 69
301: Unable to create the Property file filename
Source: ZENworks Desktop Management; Workstation Inventory; Sender
Severity: Critical
Explanation: For each roll-up scheduled by the Sender, the .str files from the entmergedir directory are placed in the entpushdir directory and compressed to a .zip file. The .zip file is again compressed with a .prp file into a .zip file. The .prp file contains information about the .zip file.
This error occurs if the Sender fails to create the .prp file.
Possible Cause: The disk on the Inventory server is full.
Action: Ensure that there is free disk space on the Inventory server.
Possible Cause: The entpushdir directory is not found on the Inventory server.
Action: Ensure that the entpushdir directory exists on the Inventory server.
Possible Cause: There is no write access for the entpushdir directory.
Action: Ensure that the directory has write permission.
orks 7 Desktop Management Troubleshooting Guide

novdocx (en) 16 April 2010
302: Unable to read the Property file filename
Source: ZENworks Desktop Management; Workstation Inventory; Sender and Receiver
Severity: Critical
Explanation: The Property file contains the roll-up information of the .zip file. For each roll-up scheduled by the Sender, the .str files from the entmergedir directory are placed in entpushdir directory and compressed to a .zip file. The .zip file is again compressed with a .prp file into a .zip file.
The Sender and the Receiver read the property file in the .zip file to verify if the compressed file is in .zip format and if the .zip file is an Inventory .zip file. The inventory components also read the file to get the roll-up information of the .zip file.
This error occurs if the Sender or the Receiver is unable to read the .prp file.
Possible Cause: The entpushdir directory is not found on the Inventory server.
Action: Ensure that the entpushdir directory exists on the Inventory server.
Possible Cause: There is no Read access for the files in the entpushdir directory.
Action: Ensure that the files have Read access.
Action: If the source of the problem is the Receiver component, restart the Receiver from the Service Manager. For more information, see “Understanding the Inventory Service Manager” in “Workstation Inventory” in the Novell ZENworks 7 Desktop Management Administration Guide.
If the source of the problem is the Sender component, you do not need to restart the Sender because the roll-up time scheduled in the Roll-Up policy triggers the Sender.
303: Unable to unzip the file zip_filename
Source: ZENworks Desktop Management; Workstation Inventory; Receiver
Severity: Critical
Explanation: The Receiver internally decompresses the .zip file. If it fails to do so, it retries. If it does not succeed, the Receiver goes down.
Possible Cause: The disk on the Inventory server is full.
Action: Ensure that there is free disk space on the server.
Action: Restart the Receiver from the Service Manager. For more information, see “Understanding the Inventory Service Manager” in “Workstation Inventory” in the Novell ZENworks 7 Desktop Management Administration Guide.
304: Unable to open the file path_name/filename
Source: ZENworks Desktop Management; Workstation Inventory; Receiver
Severity: Critical
Error Messages 59

60 ZENw
novdocx (en) 16 April 2010
Explanation: This error occurs when the Receiver is processing the .zip file. The Receiver internally decompresses the .zip file. If it fails to do so, it retries. If it does not succeed, the Receiver goes down.
Possible Cause: The disk on the Inventory server is full.
Action: Ensure that there is free disk space on the server.
Action: Restart the Receiver from the Service Manager. For more information, see “Understanding the Inventory Service Manager” in “Workstation Inventory” in the Novell ZENworks 7 Desktop Management Administration Guide.
306: zip_filename is corrupted, probably during transmission
Source: ZENworks Desktop Management; Workstation Inventory; Receiver
Severity: Critical
Explanation: The Receiver internally decompresses the .zip file. If it fails to do so, it retries. If it does not succeed, the Receiver goes down.
Possible Cause: The disk on the Inventory server is full.
Action: Ensure that there is free disk space on the server.
Action: Restart the Receiver from the Service Manager. For more information, see “Understanding the Inventory Service Manager” in “Workstation Inventory” in the Novell ZENworks 7 Desktop Management Administration Guide.
307: Unable to create the .zip file filename
Source: ZENworks Desktop Management; Workstation Inventory; Sender
Severity: Critical
Explanation: The Sender creates a .zip file of all .str files. The .zip file is again compressed with a .prp file into a .zip file.
This error occurs if the Sender fails to create the .zip file.
Possible Cause: The disk on the Inventory server is full.
Action: Ensure that there is free disk space on the server.
Possible Cause: The directory containing the .str files does not exist.
Action: Ensure that the directory exists on the Inventory server.
Possible Cause: There is no Read and Write access to the files in the directory.
Action: Ensure that the directory has Read and Write access for the files in the directory.
308: Compression failure. filename.str is not compressed to a .zip file
Source: ZENworks Desktop Management; Workstation Inventory; Sender
Severity: Critical
Explanation: The Sender compresses the .str files in the entpushdir directory of the server as a .zip file and also creates a Property file.
orks 7 Desktop Management Troubleshooting Guide
novdocx (en) 16 April 2010
Possible Cause: There is an internal problem with the Java* utility for creating a .zip file of the .str files.
Action: If the problem persists, contact Novell Support (http://www.novell.com/support).
309: Input-output failure. filename.str is not compressed to a .zip file
Source: ZENworks Desktop Management; Workstation Inventory; Sender
Severity: Critical
Explanation: The Sender compresses the .str files in the entpushdir directory of the Inventory server as a .zip file and also creates a Property file.
Possible Cause: The directory that contains the files does not exist.
Action: Ensure that the directory exists on the Inventory server.
Possible Cause: There is no Read and Write access to the files in the directory.
Action: Ensure that the directory has Read and Write access for the files in the directory.
Possible Cause: The disk on the Inventory server is full.
Action: Ensure that there is free disk space on the Inventory server.
310: Input-output failure. Unable to close the file filename
Source: ZENworks Desktop Management; Workstation Inventory; Sender and Receiver
Severity: Warning
Explanation: This error occurs when the inventory component closes the intermediate files after processing them.
Possible Cause: The input-output buffers are not closed.
Action: If the source of the problem is the Receiver component, restart the Receiver from the Service Manager. For more information, see “Understanding the Inventory Service Manager” in “Workstation Inventory” in the Novell ZENworks 7 Desktop Management Administration Guide.
If the source of the problem is the Sender component, you do not need to restart the Sender because the roll-up time scheduled in the Roll-Up policy triggers the Sender.
311: Could not extract Cascading attributes because sanity check failed
Source: ZENworks Desktop Management; Workstation Inventory; Sender
Severity: Critical
Explanation: The error occurs if the Sender is unable to write to the roll-up log.
Action: Contact Novell Support (http://www.novell.com/support).
Error Messages 61
62 ZENw
novdocx (en) 16 April 2010
317: Unable to copy the file filename from the entpushdir directory to the dbdir directory
Source: ZENworks Desktop Management; Workstation Inventory; Receiver
Severity: Critical
Explanation: The Receiver on the Inventory server that has the database attached to it copies the files from the entpushdir to the dbdir directory after the .zip file is received from the lower-level Inventory server.
Possible Cause: The disk on the Inventory server is full.
Action: Ensure that there is free disk space on the Inventory server.
Possible Cause: The directory that contains the files does not exist.
Action: Ensure that the directory exists on the Inventory server.
Possible Cause: There is no Write access to the files in the directory.
Action: Ensure that the directory has Write access for the files in the directory.
Action: If the source of the problem is the Receiver component, restart the Receiver from the Service Manager. For more information, see “Understanding the Inventory Service Manager” in “Workstation Inventory” in the Novell ZENworks 7 Desktop Management Administration Guide.
If the source of the problem is the Sender component, you do not need to restart the Sender because the roll-up time scheduled in the Roll-Up policy triggers the Sender.
320: Unable to reach the Receiver receiver_host_address
Source: ZENworks Desktop Management; Workstation Inventory; Sender
Severity: Critical
Explanation: This error occurs when the Sender cannot establish the connection with the Receiver.
Possible Cause: The Receiver address in the eDirectory is not correct.
Action: Specify a valid address for the Receiver in the Roll-Up policy. For more information, see “Configuring the Roll-Up Policy” in “Workstation Inventory” in the Novell ZENworks 7 Desktop Management Administration Guide.
Possible Cause: The Receiver is down.
Action: Restart the Receiver. If the problem persists, restart the ZENworks 7 Desktop Management components.
Possible Cause: The address is not properly configured in eDirectory.
Action: Verify the Receiver address in eDirectory with the address of the Receiver that the Sender is establishing the connection with.
Possible Cause: The network is down.
Action: Ensure that the network is up and running and the network connections are active.
orks 7 Desktop Management Troubleshooting Guide
novdocx (en) 16 April 2010
324: Directory directory_name does not exist
Source: ZENworks Desktop Management; Workstation Inventory; Sender and Receiver
Severity: Critical
Explanation: The Inventory component accesses the files in the directory for processing the scan information.
Action: Ensure that the directory exists on the Inventory server.
Action: If the source of the problem is the Receiver component, restart the Receiver from the Service Manager. For more information, see “Understanding the Inventory Service Manager” in “Workstation Inventory” in the Novell ZENworks 7 Desktop Management Administration Guide.
If the source of the problem is the Sender component, you do not need to restart the Sender because the roll-up time scheduled in the Roll-Up policy triggers the Sender.
327: Sender establishes connection with Receiver after a previous attempt to connect failed
Source: ZENworks Desktop Management; Workstation Inventory; Sender
Severity: Informational
Explanation: When the Sender is unable to connect with the Receiver, it logs an error message with the cause for the failure in the error log. After the Sender successfully establishes a connection with the Receiver, the status is logged in the error log.
328: Unable to read Security Directory from sender.properties
Source: ZENworks Desktop Management; Workstation Inventory; Sender
Severity: Critical
Explanation: The Sender failed to read the SECURITYDIR value from the Inventory_server_installation_directory\zenworks\inv\server\wminv\properties\sender.properties file.
Possible Cause: The sender.properties file is corrupt.
Action: Reinstall the Inventory server. For more information, see “Reinstalling Workstation Inventory” in “Uninstall/Reinstall” in the Novell ZENworks 7 Desktop Management Installation Guide.
Possible Cause: The securitydir entry is missing from sender.properties.
Action: Add the following entry to sender.properties:
security_directory=sys:\\public\\zenworks\\wminv\\properties
NOTE: If the entry already exists, delete it, save the file, and add it again.
Error Messages 63

64 ZENw
novdocx (en) 16 April 2010
329: The Receiver service on the server server_name is currently down
Source: ZENworks Desktop Management; Workstation Inventory; Sender
Severity: Critical
Explanation: The Sender cannot roll up the scan information because the Receiver on the next-level Inventory server is down. The Sender retries connecting to the Receiver for approximately 23 hours before it discontinues trying.
Action: On the next-level Inventory server, start the Receiver from the Service Manager. For more information, see “Understanding the Inventory Service Manager” in “Workstation Inventory” in the Novell ZENworks 7 Desktop Management Administration Guide.
Action: If the Sender fails to connect to the Receiver even after the retries, contact Novell Support (http://www.novell.com/support)
330: Unable to contact the receiver on the server server_name
Source: ZENworks Desktop Management; Workstation Inventory; Sender
Severity: Critical
Explanation: The Sender failed to contact the Receiver on the next-level Inventory server. The Sender retries connecting to the Receiver for approximately 23 hours before it discontinues trying.
Action: On the next-level Inventory server, restart the Receiver from the Service Manager. For more information, see “Understanding the Inventory Service Manager” in “Workstation Inventory” in the Novell ZENworks 7 Desktop Management Administration Guide.
Action: If the Sender fails to connect to the Receiver even after the retries, contact Novell Support (http://www.novell.com/support).
332: An internal error occurred while getting the zeninvRollupTime
Source: ZENworks Desktop Management; Workstation Inventory; Sender
Severity: Critical
Explanation: An internal error occurred while getting the zeninvRollupTime.
Action: Contact Novell Support (http://www.novell.com/support).
333: Invalid URL for the CascadeBaseTime service
Source: ZENworks Desktop Management; Workstation Inventory; Sender
Severity: Critical
Explanation: An internal error occurred while getting the CascadeBaseTime.
Action: Contact Novell Support (http://www.novell.com/support).
334: An internal error occurred while starting the CascadeBaseTimeServer
Source: ZENworks Desktop Management; Workstation Inventory; Receiver
Severity: Critical
orks 7 Desktop Management Troubleshooting Guide
novdocx (en) 16 April 2010
Explanation: An internal error occurred while starting the CascadeBaseTimeServer.
Action: Contact Novell Support (http://www.novell.com/support).
335: Socket Input-Output error occurred while getting the zeninvRollupTime
Source: ZENworks Desktop Management; Workstation Inventory; Sender
Severity: Critical
Explanation: An internal error occurred while getting the zeninvRollupTime. The Sender retries connecting to the Receiver for approximately 23 hours before it discontinues trying.
Possible Cause: The next-level Inventory server is not up and running.
Action: Ensure that the next-level Inventory serve is up and running.
Possible Cause: The next-level Inventory server is not reachable.
Action: Ensure that the next-level Inventory server is reachable.
Possible Cause: The ZENworks Web Server is not running on the next-level Inventory server.
Action: Ensure that the ZENworks Web Server and the Inventory services are running on the next-level Inventory server.
Possible Cause: This problem might occur on a NetWare Inventory server with Native File Access Pack installed. This NetWare server has one or more volumes exposed as CIFS shares and does not have a DNS name configured.
If the NetWare server does not have a DNS name configured, the CIFS service is given a NetBIOS name, and the Roll-up policy assigns the NetBIOS name as the host name.
This error occurs if the Sender on the NetWare server fails to resolve the NetBIOS name to an IP address.
Action: Choose an IP address instead of the NetBIOS name in the Roll-up policy. For more information, see “Configuring the Roll-Up Policy” in “Workstation Inventory” in the Novell ZENworks 7 Desktop Management Administration Guide.
Action: If the problem persists, contact Novell Support (http://www.novell.com/support)
338: An internal error occurred while transferring the zip file to the Receiver running on the server server_name
Source: ZENworks Desktop Management; Workstation Inventory; Sender
Severity: Critical
Explanation: An internal error occurred while transferring the .zip file to the Receiver running on the next level Inventory server.
Action: Contact Novell Support (http://www.novell.com/support).
339: Invalid URL for the Inventory File Service on the server server_name
Source: ZENworks Desktop Management; Workstation Inventory; Sender
Error Messages 65
66 ZENw
novdocx (en) 16 April 2010
Severity: Critical
Explanation: An internal error occurred while transferring the .zip file to the Receiver running on the next-level Inventory server. The Sender retries connecting to the Receiver for approximately 23 hours before it discontinues trying.
Action: If the Sender fails to connect to the Receiver even after the retries, contact Novell Support (http://www.novell.com/support).
340: The Receiver on server server_name is currently busy with other requests
Source: ZENworks Desktop Management; Workstation Inventory; Sender
Severity: Critical
Explanation: The Receiver on the next-level Inventory server is currently busy with other requests. The Sender retries connecting to the Receiver for approximately 23 hours before it discontinues trying.
Action: If the Sender fails to connect to the Receiver even after the retries, contact Novell Support (http://www.novell.com/support).
341: Input-Output error occurred at the Receiver running on server server_name while receiving the zip file
Source: ZENworks Desktop Management; Workstation Inventory; Sender
Severity: Critical
Explanation: An input-output error occurred at the Receiver running on the next-level Inventory server while receiving the .zip file. The Sender retries connecting to the Receiver for approximately 23 hours before it discontinues trying.
Action: If the Sender fails to connect to the Receiver even after the retries, contact Novell Support (http://www.novell.com/support).
342: Socket Input-Output error occurred while transferring the zip file to the Receiver running on server server_name
Source: ZENworks Desktop Management; Workstation Inventory; Sender
Severity: Critical
Explanation: A socket input-output error occurred at the Receiver running on the next-level Inventory server while receiving the .zip file. The Sender retries connecting to the Receiver for approximately 23 hours before it discontinues trying.
Possible Cause: The next-level Inventory server is not up and running.
Action: Ensure that the next-level Inventory server is up and running.
Possible Cause: The next-level Inventory server is not reachable.
Action: Ensure that the next-level Inventory server is reachable.
Possible Cause: The ZEN Web Server is not running on the next-level Inventory server.
Action: Ensure that the ZEN Web Server and the Inventory services are running on the next-level Inventory server.
orks 7 Desktop Management Troubleshooting Guide
novdocx (en) 16 April 2010
Possible Cause: This problem might occur on a NetWare Inventory server with Native File Access Pack installed. This NetWare server has one or more volumes exposed as CIFS shares and does not have a DNS name configured.
If the NetWare server does not have a DNS name configured, the CIFS service is given a NetBIOS name, and the Roll-up policy assigns the NetBIOS name as the host name.
This error occurs if the Sender on the NetWare server fails to resolve the NetBIOS name to an IP address.
Action: Choose an IP address instead of the NetBIOS name in the Roll-up policy. For more information, see “Configuring the Roll-Up Policy” in “Workstation Inventory” in the Novell ZENworks 7 Desktop Management Administration Guide.
Action: If the problem persists, contact Novell Support (http://www.novell.com/support)
343: Unable to obtain a lock on the target file
Source: ZENworks Desktop Management; Workstation Inventory; Sender
Severity: Critical
Action: Contact Novell Support (http://www.novell.com/support).
344: An internal error occurred while starting the Inventory File Service
Source: ZENworks Desktop Management; Workstation Inventory; Receiver
Severity: Critical
Action: Contact Novell Support (http://www.novell.com/support).
345: The target directory on the server server_name, where the zip file is to be copied is invalid
Source: ZENworks Desktop Management; Workstation Inventory; Receiver
Severity: Critical
Action: Restart the Receiver from the Service Manager. For more information, see “Understanding the Inventory Service Manager” in “Workstation Inventory” in the Novell ZENworks 7 Desktop Management Administration Guide.
346: The target directory on the server server_name, where the zip file is to be copied, does not have the required permission
Source: ZENworks Desktop Management; Workstation Inventory; Receiver
Severity: Critical
Action: Contact Novell Support (http://www.novell.com/support).
347: Internal error while connecting to the Receiver on server server_name
Source: ZENworks Desktop Management; Workstation Inventory; Sender
Severity: Critical
Error Messages 67
68 ZENw
novdocx (en) 16 April 2010
Action: Contact Novell Support (http://www.novell.com/support).
348: An internal error occurred. Unable to start Receiver Service
Source: ZENworks Desktop Management; Workstation Inventory; Receiver
Severity: Critical
Action: Restart the Receiver from the Service Manager. For more information, see “Understanding the Inventory Service Manager” in “Workstation Inventory” in the Novell ZENworks 7 Desktop Management Administration Guide.
Action: If the problem persists, contact Novell Support (http://www.novell.com/support).
349: Unable to change stored status for the file filename
Source: ZENworks Desktop Management; Workstation Inventory; Receiver
Severity: Critical
Explanation: The Receiver modifies the stored status for the .zip file. If there is a failure while doing this, the Receiver retries. If it does not succeed, the Receiver Service goes down.
Possible Cause: The disk on the Inventory server is full.
Action: Ensure that there is free disk space on the server.
Action: Restart the Receiver from the Service Manager.
Action: If the problem persists, contact Novell Support (http://www.novell.com/support).
350: File filename in dbdir is locked
Source: ZENworks Desktop Management; Workstation Inventory; Receiver
Severity: Critical
Explanation: The Receiver processes the .zip file received from the lower-level Inventory servers and copies the file to dbdir. This error occurs if the Storer has locked the file and the Receiver is not able to access this file even after retrying. The Receiver service exits on getting this error.
Action: Do the following:
1 Stop the Storer from the Service Manager. For more information, see “Understanding the Inventory Service Manager” in “Workstation Inventory” in the Novell ZENworks 7 Desktop Management Administration Guide.
2 Restart the Receiver and the Sender from the Service Manager. For more information, see “Understanding the Inventory Service Manager” in “Workstation Inventory” in the Novell ZENworks 7 Desktop Management Administration Guide.
3 Start the Storer. For more information, see “Starting and Stopping the Inventory Service” in “Workstation Inventory” in the Novell ZENworks 7 Desktop Management Administration Guide.
orks 7 Desktop Management Troubleshooting Guide
novdocx (en) 16 April 2010
351: Error in Sender on the server server_name. Invalid firewall proxy address
Source: ZENworks Desktop Management; Workstation Inventory; Sender
Severity: Critical
Action: Ensure that the proxy address in the Roll-Up policy is correct. For more information, see “Configuring the Roll-Up Policy” in “Workstation Inventory” in the Novell ZENworks 7 Desktop Management Administration Guide.
352: Error in Sender on the server server_name. Invalid firewall proxy port
Source: ZENworks Desktop Management; Workstation Inventory; Sender
Severity: Critical
Action: Ensure that the proxy port in the Roll-Up policy is correct. For more information, see “Configuring the Roll-Up Policy” in “Workstation Inventory” in the Novell ZENworks 7 Desktop Management Administration Guide.
354: Unable to write the Inventory Service DN to the property file
Source: ZENworks Desktop Management; Workstation Inventory; Sender and Receiver
Severity: Critical
Possible Cause: The Sender or the Receiver fails to get the Inventory Service object DN.
Action: Contact Novell Support (http://www.novell.com/support).
355: Unable to write the server name to the property file
Source: ZENworks Desktop Management; Workstation Inventory; Sender and Receiver
Severity: Critical
Possible Cause: The Sender or the Receiver fails to get the Inventory server name.
Action: Contact Novell Support (http://www.novell.com/support).
5.4 TCP Receiver Error Messages“251: The Upgrade Service has failed” on page 70“304: Unable to open the file filename” on page 70“310: Input-output failure. Unable to close the file filename” on page 71“312: Network connection lost or closed while writing the data to the network. Verify the network connections” on page 71“313: Network connection lost or closed while reading the data from the network. Verify the network connections” on page 71“315: Unable to accept connection from the Sender” on page 71“316: Unexpected data read from the network by the Sender/Receiver. Verify the network connections” on page 71“319: Unable to send the file filename from the Sender to the Receiver” on page 72
Error Messages 69
70 ZENw
novdocx (en) 16 April 2010
“322: Input-output error while closing the buffers” on page 72“324: Directory directory_name does not exist” on page 72“325: The Receiver could not bind to accept connections from the Sender at Time in Milliseconds value” on page 72“2651: Could not extract Property values because sanity check failed on ZIP_filename” on page 73“2652: Invalid zip file name ZIP_filename” on page 73“2653: ZIP_filename could not be unzipped into the directory directory_filename” on page 73“2654: Error converting Property file old_filename to new_filename” on page 73“2655: Unable to unzip the file ZIP_filename” on page 74“2656: Unable to close the file ZIP_filename” on page 74“2657: Invalid number of Property files found: number_of_property_files” on page 74“2658: An internal error occurred while trying to convert .str files” on page 74“2659: Error converting .str files in directory_name” on page 75“2660: Unable to find .str files in directory_name for compression” on page 75“2661: Unable to delete file filename in directory directory_name” on page 75“2662: Unable to move file filename to directory directory_name” on page 75“2663: Fatal error: ZIP file processing exceeded retry” on page 76“2664: Unable to create directory directory_name” on page 76“2665: Unable to find files with extension file_extension in directory_name” on page 76“2666: Unable to obtain lock on filename with component_name” on page 77
251: The Upgrade Service has failed
Source: ZENworks Desktop Management; Workstation Inventory; TCP Receiver
Severity: Critical
Explanation: The Upgrade service copies the ZENworks for Desktops 4.x residual files to specific directories and updates zeninvComponentStaus, the Inventory Service object's attribute. The residual files are then converted to the ZENworks 7 Desktop Management format by the TCP Receiver.
Possible Cause: The Upgrade service has not completed copying the residual files.
Action: Restart the Inventory service. For more information, see “Starting and Stopping the Inventory Service” in “Workstation Inventory” in the Novell ZENworks 7 Desktop Management Administration Guide.
304: Unable to open the file filename
Source: ZENworks Desktop Management; Workstation Inventory; TCP Receiver
Severity: Critical
Possible Cause: The disk on the Inventory server is full.
Action: Ensure that there is free disk space on the server
Possible Cause: The directory that contains the file does not exist.
orks 7 Desktop Management Troubleshooting Guide
novdocx (en) 16 April 2010
Action: Ensure that the directory that contains the file exists on the server.
Possible Cause: There is no Read and Write access to the file in the directory.
Action: Ensure that the file has Read and Write access.
Action: Restart the TCP Receiver from the Service Manager. For more information, see “Understanding the Inventory Service Manager” in “Workstation Inventory” in the Novell ZENworks 7 Desktop Management Administration Guide.
310: Input-output failure. Unable to close the file filename
Source: ZENworks Desktop Management; Workstation Inventory; TCP Receiver
Severity: Warning
Explanation: This error occurs when the TCP Receiver tries to close the file while processing it.
Possible Cause: The input-output buffers are not closed.
Action: Restart the TCP Receiver from the Service Manager. For more information, see “Understanding the Inventory Service Manager” in “Workstation Inventory” in the Novell ZENworks 7 Desktop Management Administration Guide.
312: Network connection lost or closed while writing the data to the network. Verify the network connections
Source: ZENworks Desktop Management; Workstation Inventory; TCP Receiver
Severity: Warning
Action: Ensure that the network is up and running.
313: Network connection lost or closed while reading the data from the network. Verify the network connections
Source: ZENworks Desktop Management; Workstation Inventory; TCP Receiver
Severity: Warning
Action: Ensure that the network is up and running.
315: Unable to accept connection from the Sender
Source: ZENworks Desktop Management; Workstation Inventory; TCP Receiver
Severity: Warning
Possible Cause: The socket has not been created properly.
Action: Ensure that the network is up and running.
316: Unexpected data read from the network by the Sender/Receiver. Verify the network connections
Source: ZENworks Desktop Management; Workstation Inventory; TCP Receiver
Severity: Warning
Error Messages 71
72 ZENw
novdocx (en) 16 April 2010
Possible Cause: The network connection was lost or closed while the TCP Receiver is reading the data from the network.
Action: Ensure that the network is up and running.
319: Unable to send the file filename from the Sender to the Receiver
Source: ZENworks Desktop Management; Workstation Inventory; TCP Receiver
Severity: Critical
Explanation: This error occurs when the .zip file cannot be sent from the ZENworks for Desktops 4.x Sender to the TCP Receiver on the network.
Possible Cause: The network connection was lost or closed while the TCP Receiver was reading the data from the network.
Action: Ensure that the network is up and running.
Possible Cause: The disk on the Inventory server is full.
Action: Ensure that there is free disk space on the server.
Action: Restart the TCP Receiver from the Service Manager. For more information, see “Understanding the Inventory Service Manager” in “Workstation Inventory” in the Novell ZENworks 7 Desktop Management Administration Guide.
322: Input-output error while closing the buffers
Source: ZENworks Desktop Management; Workstation Inventory; TCP Receiver
Severity: Warning
Possible Cause: The input-output buffers are not closed properly.
Action: Restart the TCP Receiver from the Service Manager. For more information, see “Understanding the Inventory Service Manager” in “Workstation Inventory” in the Novell ZENworks 7 Desktop Management Administration Guide.
324: Directory directory_name does not exist
Source: ZENworks Desktop Management; Workstation Inventory; TCP Receiver
Severity: Critical
Explanation: The TCP Receiver accesses the files in the directory for processing the scan information.
Action: Ensure that the directory exists on the Inventory server.
Action: Restart the TCP Receiver from the Service Manager. For more information, see “Understanding the Inventory Service Manager” in “Workstation Inventory” in the Novell ZENworks 7 Desktop Management Administration Guide.
325: The Receiver could not bind to accept connections from the Sender at Time in Milliseconds value
Source: ZENworks Desktop Management; Workstation Inventory; TCP Receiver
orks 7 Desktop Management Troubleshooting Guide
novdocx (en) 16 April 2010
Severity: Critical
Possible Cause: The default port numbers (between 1025 and 65432) are not available.
Action: Ensure that there are free port numbers in the range 1025 and 65432. If the port numbers are used by other applications, close the applications to free up the ports.
2651: Could not extract Property values because sanity check failed on ZIP_filename
Source: ZENworks Desktop Management; Workstation Inventory; TCP Receiver
Severity: Informational
Explanation: The TCP Receiver processes the .zip files that are remaining after a ZENworks for Desktops 4.0.1 server has been upgraded to ZENworks 7 Desktop Management.
This error occurs if a .zip file is invalid. The TCP Receiver continues processing the remaining .zip files.
Action: None.
2652: Invalid zip file name ZIP_filename
Source: ZENworks Desktop Management; Workstation Inventory; TCP Receiver
Severity: Informational
Explanation: The TCP Receiver processes the .zip files that are remaining after a ZENworks for Desktops 4.0.1 server has been upgraded to ZENworks 7 Desktop Management.
This error occurs if the name of the .zip file is invalid. The TCP Receiver continues processing the remaining .zip files.
Action: None.
2653: ZIP_filename could not be unzipped into the directory directory_filename
Source: ZENworks Desktop Management; Workstation Inventory; TCP Receiver
Severity: Critical
Possible Cause: The disk on the Inventory server is full.
Action: Ensure that there is free disk space on the server.
Possible Cause: The directory that contains the file does not exist.
Action: Ensure that the directory that contains the file exists on the server.
Possible Cause: There is no Read and Write access to the file in the directory.
Action: Ensure that the file has Read and Write access.
2654: Error converting Property file old_filename to new_filename
Source: ZENworks Desktop Management; Workstation Inventory; TCP Receiver
Severity: Informational
Error Messages 73
74 ZENw
novdocx (en) 16 April 2010
Explanation: The TCP Receiver processes the .zip files that are remaining after a ZENworks for Desktops 4.x server has been upgraded to ZENworks 7 Desktop Management.
Possible Cause: The property file is not in a valid ZENworks for Desktops 4.x format. The TCP Receiver continues processing the remaining .zip files.
Action: None.
2655: Unable to unzip the file ZIP_filename
Source: ZENworks Desktop Management; Workstation Inventory; TCP Receiver
Severity: Critical
Possible Cause: The .zip file is corrupted.
Action: Restart the TCP Receiver from the Service Manager. For more information, see “Understanding the Inventory Service Manager” in “Workstation Inventory” in the Novell ZENworks 7 Desktop Management Administration Guide.
2656: Unable to close the file ZIP_filename
Source: ZENworks Desktop Management; Workstation Inventory; TCP Receiver
Severity: Critical
Action: Restart the TCP Receiver from the Service Manager. For more information, see “Understanding the Inventory Service Manager” in “Workstation Inventory” in the Novell ZENworks 7 Desktop Management Administration Guide.
2657: Invalid number of Property files found: number_of_property_files
Source: ZENworks Desktop Management; Workstation Inventory; TCP Receiver
Severity: Informational
Possible Cause: There are some property files of the previous TCP Receiver execution in the directory or there is more than one property file present in the .zip file. The TCP Receiver continues processing the remaining files.
Action: None.
2658: An internal error occurred while trying to convert .str files
Source: ZENworks Desktop Management; Workstation Inventory; TCP Receiver
Severity: Critical
Action: Restart the TCP Receiver from the Service Manager. For more information, see “Understanding the Inventory Service Manager” in “Workstation Inventory” in the Novell ZENworks 7 Desktop Management Administration Guide.
Action: If the problem persists, contact Novell Support (http://www.novell.com/support).
orks 7 Desktop Management Troubleshooting Guide
novdocx (en) 16 April 2010
2659: Error converting .str files in directory_name
Source: ZENworks Desktop Management; Workstation Inventory; TCP Receiver
Severity: Informational
Possible Cause: The .str files are not in a valid ZENworks 7 Desktop Management format.
Action: Restart the TCP Receiver from the Service Manager. For more information, see “Understanding the Inventory Service Manager” in “Workstation Inventory” in the Novell ZENworks 7 Desktop Management Administration Guide.
2660: Unable to find .str files in directory_name for compression
Source: ZENworks Desktop Management; Workstation Inventory; TCP Receiver
Severity: Critical
Explanation: To form a ZENworks 7 Desktop Management .zip file, str files in the directory are collected and compressed.
Possible Cause: There are no .str files for compression.
Action: Restart the TCP Receiver from the Service Manager. For more information, see “Understanding the Inventory Service Manager” in “Workstation Inventory” in the Novell ZENworks 7 Desktop Management Administration Guide.
Action: If the problem persists, contact Novell Support (http://www.novell.com/support).
2661: Unable to delete file filename in directory directory_name
Source: ZENworks Desktop Management; Workstation Inventory; TCP Receiver
Severity: Critical
Explanation: The ZENworks for Desktops 4.x .zip files are converted to ZENworks 7 Desktop Management format and moved to the appropriate directory for processing by ZENworks 7.
Possible Cause: The ZENworks for Desktops 4.x .zip file was not deleted from the directory.
Action: Restart the TCP Receiver from the Service Manager. For more information, see “Understanding the Inventory Service Manager” in “Workstation Inventory” in the Novell ZENworks 7 Desktop Management Administration Guide.
2662: Unable to move file filename to directory directory_name
Source: ZENworks Desktop Management; Workstation Inventory; TCP Receiver
Severity: Critical
Explanation: The ZENworks for Desktops 4.x .zip files are converted to ZENworks 7 Desktop Management format and moved to the appropriate directory for processing by ZENworks 7.
Possible Cause: The ZENworks for Desktops 4.x .zip file was not deleted from the directory.
Error Messages 75

76 ZENw
novdocx (en) 16 April 2010
Possible Cause: The disk on the Inventory server is full.
Action: Ensure that there is free disk space on the server.
Possible Cause: The file is locked by some other application.
Action: Restart the TCP Receiver from the Service Manager. For more information, see “Understanding the Inventory Service Manager” in “Workstation Inventory” in the Novell ZENworks 7 Desktop Management Administration Guide.
2663: Fatal error: ZIP file processing exceeded retry
Source: ZENworks Desktop Management; Workstation Inventory; TCP Receiver
Severity: Critical
Explanation: The ZENworks for Desktops 4.x .zip files are converted to ZENworks 7 Desktop Management format. During the processing, other Inventory components such as the Storer and the ZENworks 7 Receiver try to obtain a handle on the .zip file for further processing.
Possible Cause: The lock on the .zip file has not been released.
Action: Restart the Inventory service. For more information, see “Starting and Stopping the Inventory Service” in “Workstation Inventory” in the Novell ZENworks 7 Desktop Management Administration Guide.
2664: Unable to create directory directory_name
Source: ZENworks Desktop Management; Workstation Inventory; TCP Receiver
Severity: Critical
Explanation: The ZENworks for Desktops 4.x .zip files are converted into ZENworks 7 Desktop Management .zip files and are transferred to the appropriate directory for processing by ZENworks 7 Desktop Management components.
Possible Cause: The appropriate directory is not found on the Inventory server.
Action: Ensure that the directory exists on the Inventory server.
Action: Restart the TCP Receiver from the Service Manager. For more information, see “Understanding the Inventory Service Manager” in “Workstation Inventory” in the Novell ZENworks 7 Desktop Management Administration Guide.
2665: Unable to find files with extension file_extension in directory_name
Source: ZENworks Desktop Management; Workstation Inventory; TCP Receiver
Severity: Critical
Explanation: Files such as .str and .zip are converted from ZENworks for Desktops 4.x to ZENworks 7 Desktop Management format.
Possible Cause: The files are not found in the appropriate directories.
orks 7 Desktop Management Troubleshooting Guide
novdocx (en) 16 April 2010
Action: Restart the TCP Receiver from the Service Manager. For more information, see “Understanding the Inventory Service Manager” in “Workstation Inventory” in the Novell ZENworks 7 Desktop Management Administration Guide.
Action: If the problem persists, contact Novell Support (http://www.novell.com/support).
2666: Unable to obtain lock on filename with component_name
Source: ZENworks Desktop Management; Workstation Inventory; TCP Receiver
Severity: Critical
Explanation: The ZENworks for Desktops 4.x .zip files are converted to ZENworks 7 Desktop Management format. During the processing, other Inventory components such as the Storer and the ZENworks 7 Desktop Management Receiver tries to obtain a handle on the .zip file for further processing.
Possible Cause: The handle on the .zip file is not found.
Action: Restart the Inventory service. For more information, see “Starting and Stopping the Inventory Service” in “Workstation Inventory” in the Novell ZENworks 7 Desktop Management Administration Guide.
5.5 Storer Error Messages“101: Invalid username or password” on page 77“102: Unable to load the database driver file” on page 78“104: Unable to connect to the database server” on page 78“105: Database connection failed” on page 78“107: This scanned file is corrupt. Unable to store in the database” on page 78“108: The Database is not initialized because it is being upgraded” on page 79“109: This scanned file is not in sequence with the previous one” on page 79“110: Data instance in the scanned file is not found” on page 79“141: Unable to read the mapping file. Map.ser is missing or corrupted” on page 79“142: Unable to read the association file. Association.ser is missing or corrupted” on page 80“143: The database directory (dbdir) does not exist” on page 80“151: Workstation is not found in the database” on page 80“152: Unable to store the rolled-up scan data” on page 81
101: Invalid username or password
Source: ZENworks Desktop Management; Workstation Inventory; Storer
Severity: Critical
Explanation: The username and password for the Inventory database are configured in the database object. The Storer logs in to the database with the specified username and password.
Error Messages 77
78 ZENw
novdocx (en) 16 April 2010
Possible Cause: The username and the password do not match the details in the Inventory database.
Action: Ensure that the username and password for the database object match the details in the Inventory database.
102: Unable to load the database driver file
Source: ZENworks Desktop Management; Workstation Inventory; Storer
Severity: Critical
Possible Cause: The driver files required by the Storer are missing or incompatible.
Action: Do the following:
If your Inventory database is running on Sybase* or Oracle*, re-install the Inventory server. For more information, see “Reinstalling Workstation Inventory” in “Uninstall/Reinstall” in the Novell ZENworks 7 Desktop Management Installation Guide.If your Inventory database is running on MS SQL, perform the steps described in the “Connecting the Inventory Server and ConsoleOne to the MS SQL 2000 or MS SQL 2005 Inventory Database” in “Workstation Inventory” in the Novell ZENworks 7 Desktop Management Administration Guide.
If the problem persists, contact Novell Support (http://www.novell.com/support).
104: Unable to connect to the database server
Source: ZENworks Desktop Management; Workstation Inventory; Storer
Severity: Critical
Possible Cause: The network is either down or the IP address is not reachable.
Action: Ensure that the database server is reachable with the specified IP address. Ping the server to check its connectivity.
Possible Cause: The Inventory database is down.
Action: Ensure that the Inventory database is up.
105: Database connection failed
Source: ZENworks Desktop Management; Workstation Inventory; Storer
Severity: Critical
Possible Cause: The Inventory database is not up and running.
Action: Ensure that the Inventory database is up. Wait until the database connection is successfully re-established.
107: This scanned file is corrupt. Unable to store in the database
Source: ZENworks Desktop Management; Workstation Inventory; Storer
Severity: Informational
orks 7 Desktop Management Troubleshooting Guide
novdocx (en) 16 April 2010
Explanation: The scan data file (.str) contains invalid data. The Storer will enforce a full scan on the inventoried workstations that are directly attached to the Inventory server. Additionally, a periodic full scan from the inventoried workstation will update the inventory database.
Action: If the problem persists, contact Novell Support (http://www.novell.com/support).
108: The Database is not initialized because it is being upgraded
Source: ZENworks Desktop Management; Workstation Inventory; Storer
Severity: Informational
Explanation: The database is not ready for use, so the Storer waits until the Upgrade Service upgrades an earlier version of ZENworks Inventory database to ZENworks 7 Desktop Management.
This message is displayed at the Inventory server until the database is upgraded.
Action: If the problem persists, contact Novell Support (http://www.novell.com/support)
109: This scanned file is not in sequence with the previous one
Source: ZENworks Desktop Management; Workstation Inventory; Storer
Severity: Informational
Explanation: The scan data file (.str) contains invalid data. The Storer will enforce a full scan on the inventoried workstations that are directly attached to the Inventory server. Additionally, a periodic full scan from the inventoried workstation will update the inventory database.
Action: If the problem persists, contact Novell Support (http://www.novell.com/support).
110: Data instance in the scanned file is not found
Source: ZENworks Desktop Management; Workstation Inventory; Storer
Severity: Informational
Explanation: The scan data file (.str) contains invalid data. The Storer will enforce a full scan on the inventoried workstations that are directly attached to the Inventory server. Additionally, a periodic full scan from the inventoried workstation will update the inventory database.
Action: If the problem persists, contact Novell Support (http://www.novell.com/support).
141: Unable to read the mapping file. Map.ser is missing or corrupted
Source: ZENworks Desktop Management; Workstation Inventory; Storer
Severity: Critical
Explanation: One of the data files that the Storer requires is missing or corrupted.
Error Messages 79

80 ZENw
novdocx (en) 16 April 2010
Action: Reinstall the Inventory server. For more information, see “Reinstalling Workstation Inventory” in “Uninstall/Reinstall” in the Novell ZENworks 7 Desktop Management Installation Guide.
142: Unable to read the association file. Association.ser is missing or corrupted
Source: ZENworks Desktop Management; Workstation Inventory; Storer
Severity: Critical
Explanation: One of the data files that the Storer requires is missing or corrupted.
Action: Reinstall the Inventory server. For more information, see “Reinstalling Workstation Inventory” in “Uninstall/Reinstall” in the Novell ZENworks 7 Desktop Management Installation Guide.
143: The database directory (dbdir) does not exist
Source: ZENworks Desktop Management; Workstation Inventory; Storer
Severity: Critical
Explanation: The Storer stores the scan data from the .str files located in the dbdir directory to the Inventory database. This error occurs if the dbdir directory does not exist on the Inventory server.
Action: Ensure that the directory path of the scandir directory specified in the Inventory Service object property page exists on the Inventory server. For more information on how to access the Inventory Service object, see “Configuring the Inventory Service Object ” in “Workstation Inventory” in the Novell ZENworks 7 Desktop Management Administration Guide.
Also, ensure that dbdir exists in the scandir directory.
151: Workstation is not found in the database
Source: ZENworks Desktop Management; Workstation Inventory; Storer
Severity: Warning
Explanation: The Storer enforces a full scan on the inventoried workstations that are directly attached to the Inventory server. Additionally, a periodic full scan from the inventoried workstation will update the inventory database.
Possible Cause: The scan data file (.str) contains invalid data or is corrupt and the workstation name field is part of the corrupted data.
Possible Cause: The .str files containing only the delta inventory data reach the Storer, but the inventoried workstation is not found in the Inventory database.
Action: If the Storer delays in enforcing a full scan on the inventoried workstations, you must manually enforce a full scan to speed up the process on the workstation object.
Enforce a full scan either on this workstation object or on all workstation objects that send the inventory data to this Inventory server.
To enforce a full scan on this workstation object:
1 In ConsoleOne, right-click the workstation object, then click Properties.
orks 7 Desktop Management Troubleshooting Guide
novdocx (en) 16 April 2010
2 Click the ZENworks Inventory tab, then click the Workstation Scan Configuration suboption.
3 Select Start Full Scan.4 Click Apply, then click Close.
To enforce a full scan on all workstation objects that send the inventory data to this Inventory server:
1 Enforce a full scan on the Inventory Service object. For more information, see “Configuring the Inventory Service Object ” in “Workstation Inventory” in the Novell ZENworks 7 Desktop Management Administration Guide.
152: Unable to store the rolled-up scan data
Source: ZENworks Desktop Management; Workstation Inventory; Storer
Severity: Warning
Possible Cause: The .zip file is corrupted.
Action: Manually trigger a full scan on the Inventory Service object of the Inventory server from where the .zip file originated.
If the problem persists, contact Novell Support (http://www.novell.com/support).
5.6 AlterDBSpaces Tool (Organizing the Database Spaces) Error Messages
“1001: Unable to connect to the Inventory database. Ensure that the database is up and running” on page 81“1002: Unable to connect to the Inventory database. Ensure that the database location policy is configured correctly” on page 82“1003: Database spaces adjusted correctly. Move the database files to the paths specified in alterdb.props and restart the database for the new settings to take effect” on page 82“1004: The value for COUNT in alterdb.props has not been assigned or the specified value is incorrect” on page 82“1005: Specified COUNT=0 in alterdb.props is incorrect” on page 83“1006: Unable to load alterdb.props. Ensure that the file exists and the CLASSPATH includes the directory containing alterdb.props” on page 83“1008: The database is in use by one or more inventory components. It is required to stop them and run AlterDBSpace service again” on page 83
1001: Unable to connect to the Inventory database. Ensure that the database is up and running
Source: ZENworks Desktop Management; Workstation Inventory; AlterDBSpace
Severity: Important
Explanation: The AlterDBSpace service is not able to connect to the Inventory database.
Error Messages 81
82 ZENw
novdocx (en) 16 April 2010
Possible Cause: The database is down.
Action: Ensure that the database is up and running.
Possible Cause: The database properties are incorrectly set.
Action: Ensure that the username, password, and the connection details of the database object are set correctly in the database object. For more information on configuring the database object, see “Configuring the Database Location Policy” in “Workstation Inventory” in the Novell ZENworks 7 Desktop Management Administration Guide.
1002: Unable to connect to the Inventory database. Ensure that the database location policy is configured correctly
Source: ZENworks Desktop Management; Workstation Inventory; AlterDBSpace
Severity: Important
Possible Cause: The Database Location policy is not properly configured.
Action: Set the Database Location policy to point to the Inventory database. For more information, see “Configuring the Database Location Policy” in “Workstation Inventory” in the Novell ZENworks 7 Desktop Management Administration Guide.
Possible Cause: The database object is not associated in the Database Location policy.
Action: Associate the Database Location policy to the correct database. For more information, see “Configuring the Database Location Policy” in “Workstation Inventory” in the Novell ZENworks 7 Desktop Management Administration Guide.
1003: Database spaces adjusted correctly. Move the database files to the paths specified in alterdb.props and restart the database for the new settings to take effect
Source: ZENworks Desktop Management; Workstation Inventory; AlterDBSpace
Severity: Informational
Action: Move the database files to the paths specified in alterdb.props and restart the database.
1004: The value for COUNT in alterdb.props has not been assigned or the specified value is incorrect
Source: ZENworks Desktop Management; Workstation Inventory; AlterDBSpace
Severity: Critical
Explanation: The COUNT parameter in Inventory_server\zenworks\inv\server\wminv\properties\alterdb.props specifies the total number of database space files. This parameter should be set to 11.
Possible Cause: The COUNT parameter is not assigned correctly.
Action: Ensure that the COUNT parameter in Inventory_server\zenworks\inv\server\wminv\properties\alterdb.props is set to 11.
orks 7 Desktop Management Troubleshooting Guide
novdocx (en) 16 April 2010
1005: Specified COUNT=0 in alterdb.props is incorrect
Source: ZENworks Desktop Management; Workstation Inventory; AlterDBSpace
Severity: Critical
Explanation: The COUNT parameter in Inventory_server\zenworks\inv\server\wminv\properties\alterdb.props specifies the total number of database space files. This parameter should be set to 11.
Possible Cause: The COUNT parameter is not assigned correctly.
Action: Ensure that the COUNT parameter in Inventory_server\zenworks\inv\server\wminv\properties\alterdb.props is set to 11.
1006: Unable to load alterdb.props. Ensure that the file exists and the CLASSPATH includes the directory containing alterdb.props
Source: ZENworks Desktop Management; Workstation Inventory; AlterDBSpace
Severity: Critical
Explanation: The property file for the AlterDBSpace tool (alterdb.props) does not exist in Inventory_server\zenworks\inv\server\wminv\properties.
Possible Cause: The file has been deleted or renamed.
Action: Manually create alterdb.props in Inventory_server\zenworks\inv\server\wminv\properties. For more information, see “Organizing the Sybase Database Spaces on NetWare, Windows, or Linux Servers (AlterDBSpace Tool)” in “Workstation Inventory” in the Novell ZENworks 7 Desktop Management Administration Guide.
1008: The database is in use by one or more inventory components. It is required to stop them and run AlterDBSpace service again
Source: ZENworks Desktop Management; Workstation Inventory; AlterDBSpace
Severity: Warning
Explanation: Before running the AlterDBSpace service, you must disconnect all the database connections, stop the Storer, and close all ConsoleOne sessions.
Possible Cause: The database is used by the Inventory components
Action: Stop the Storer service from the Service Manager and close all the ConsoleOne sessions before restarting the AlterDBSpace service.
5.7 Inventory Policy Error MessagesWorkstation Inventory Policy
“The Inventory Service Object does not exist in this tree. Choose an existing Inventory Service object” on page 84“The Inventory Service object does not provide Inventory role” on page 85
Error Messages 83
84 ZENw
novdocx (en) 16 April 2010
“An error occurred while importing the data from the file” on page 85“An error occurred while exporting the data to the file” on page 85“Unable to write to Novell eDirectory because the data in the file is corrupt” on page 85
Inventory Service object Property
“Unable to update the rights for the scandir directory” on page 86“Unable to change the server name for the Scan Directory path. Scan Directory path will not be modified” on page 86“Unable to update the NDS attributes for the Inventory Service object” on page 87“Specified directory path does not exist. Change the path or create the specified directory” on page 87“Inventory policies are associated to this Inventory Service object. Remove all the associated Inventory policies and retry” on page 88“Specified change of role is not allowed. Choose a valid role” on page 88“Unable to remove the existing shared directory. Log in as an administrator” on page 88“The specified Scan Directory path does not exist. Change the path or create the specified directory” on page 89“Insufficient rights. Scan Directory path is not modified” on page 89“Unable to read the existing shared directory. Scan Directory path is not modified. Log in as administrator” on page 89
Roll-Up Policy
“Inventory Service object does not exist. Specify an existing Inventory Service object” on page 89“Inventory Service object does not provide roll-up data” on page 90“You do not have rights to access this object” on page 90
The Inventory Service Object does not exist in this tree. Choose an existing Inventory Service object
Source: ZENworks Desktop Management; Workstation Inventory; Workstation Inventory Policy
Severity: Critical
Explanation: The ZENworks 7 Desktop Management program creates the Inventory Service object and copies the Inventory server components on the server. The Inventory Service object to be configured should be in the same tree as the policy.
Possible Cause: The configured Inventory Service object is invalid.
Action: Choose the DN of an existing Inventory Service object in the same eDirectory tree. If the problem persists, reinstall the Workstation Inventory component. For more information, see “Reinstalling Workstation Inventory” in “Uninstall/Reinstall” in the Novell ZENworks 7 Desktop Management Installation Guide.
orks 7 Desktop Management Troubleshooting Guide
novdocx (en) 16 April 2010
The Inventory Service object does not provide Inventory role
Source: ZENworks Desktop Management; Workstation Inventory; Workstation Inventory Policy
Severity: Critical
Explanation: The ZENworks 7 Desktop Management installation program creates the Inventory Service object and installs the Inventory server components on the server that you specify.
Possible Cause: The server you selected in the Inventory Service object is not a ZENworks 7 Desktop Management Inventory server.
Action: Ensure that the server specified in the Inventory Service object is a ZENworks 7 Desktop Management Inventory server. After the installation, in the Workstation Inventory policy, choose an Inventory Service object that provides an Inventory role. For more information, see “Configuring the Workstation Inventory Policy” in “Workstation Inventory” in the Novell ZENworks 7 Desktop Management Administration Guide.
If the problem persists, rerun the installation program to install the Inventory components on the server. For more information, see “Reinstalling Workstation Inventory” in “Uninstall/Reinstall” in the Novell ZENworks 7 Desktop Management Installation Guide.
An error occurred while importing the data from the file
Source: ZENworks Desktop Management; Workstation Inventory; Workstation Inventory Policy
Severity: Warning
Possible Cause: The file is in use or locked by some other application.
Action: Ensure that the file is not in use by any other application.
An error occurred while exporting the data to the file
Source: ZENworks Desktop Management; Workstation Inventory; Workstation Inventory Policy
Severity: Warning
Possible Cause: An input-output error occurred while writing to the file.
Action: Delete the file and retry the export operation with a different filename.
Possible Cause: In the query, the value of the following classes is set to NULL: Patch, Software, Software Group, Include File, and Exclude File. For example, Patch = NULL
Action: Set the attributes of the following classes to NULL instead of the classes: Patch, Software, Software Group, Include File, and Exclude File. For example, Patch.Name = NULL
Unable to write to Novell eDirectory because the data in the file is corrupt
Source: ZENworks Desktop Management; Workstation Inventory; Workstation Inventory Policy
Error Messages 85
86 ZENw
novdocx (en) 16 April 2010
Severity: Warning
Possible Cause: The data present in the Configuration Editor is not in the correct format.
Action: Ensure that the data in the Configuration Editor is in the specified format. For more information, see “Customizing the Hardware Inventory Information To Be Scanned” and “Customizing the Software Inventory Information To Be Scanned For ZENworks 7 Inventoried Workstations” in “Workstation Inventory” in the Novell ZENworks 7 Desktop Management Administration Guide.
The directory service provider used by ConsoleOne returned an unknown error. Retry the operation or contact a Novell support provider. An error occurred writing changes to NDS. Some data may not have been written
Source: ZENworks Desktop Management; Workstation Inventory; Workstation Inventory Policy
Explanation: The Workstation Inventory policy uses the Case Ignore List attribute to store the information related to custom attributes. It uses the ConsoleOne service provider to write this data into eDirectory.
Possible Cause: This error occurs if the size of the data exceeds 28 KB.
Action: Ensure that the data you enter for the custom attributes does not exceed 28 KB. To verify this, export the list of custom attributes that you have entered to a file and ensure that the file size does not exceed 28 KB.
Unable to update the rights for the scandir directory
Source: ZENworks Desktop Management; Workstation Inventory; Inventory Service Object
Severity: Critical
Explanation: The scan data files in the Scan directory (scandir) are processed by the Workstation Inventory components.
You can modify the volume or the directory of the scandir directory path in the Inventory Service object property page. This error occurs when you modify the location of the scandir directory on a NetWare server, and the rights for the scandir directory cannot be created.
Possible Cause: The network is down.
Action: Ensure that the network is up and the network connections are active.
Possible Cause: There is a problem in eDirectory.
Action: Log in with administrator rights and specify the directory again.
Unable to change the server name for the Scan Directory path. Scan Directory path will not be modified
Source: ZENworks Desktop Management; Workstation Inventory; Inventory Service Object
Severity: Critical
orks 7 Desktop Management Troubleshooting Guide
novdocx (en) 16 April 2010
Explanation: When you install ZENworks 7 Desktop Management, you specify the volume on the Inventory server for storing the scan data files. You can modify the volume or the directory of the scandir directory path in the Inventory Service object property page.
The scandir directory path is the location on the Inventory server that stores the scan data files. The format of the scan directory path is as follows:
server_name_\volume_of_the_server\zenworks\scandir
The specified server name in the Scan Directory Path cannot be changed.
Possible Cause: The specified Inventory server is not a roll-up server.
Action: In the Inventory Service object property page, click Browse to specify the path to an existing directory on a NetWare server. For more information, see “Configuring the Inventory Service Object ” in “Workstation Inventory” in the Novell ZENworks 7 Desktop Management Administration Guide.
Unable to update the NDS attributes for the Inventory Service object
Source: ZENworks Desktop Management; Workstation Inventory; Inventory Service Object
Severity: Critical
Explanation: The inventory settings for the Inventory server are stored in eDirectory. This error occurs if the attributes cannot be written to eDirectory.
Possible Cause: The network is down.
Action: Ensure that the network is up and the network connections are active.
Possible Cause: There might be a problem with eDirectory.
Action: Log in with administrator rights and configure the Inventory Service object property page again. For more information, see “Configuring the Inventory Service Object ” in “Workstation Inventory” in the Novell ZENworks 7 Desktop Management Administration Guide.
Specified directory path does not exist. Change the path or create the specified directory
Source: ZENworks Desktop Management; Workstation Inventory; Inventory Service Object
Severity: Warning
Explanation: When you install ZENworks 7 Desktop Management, you specify the volume on the Inventory server for storing the scan data files. You can modify the volume or the directory of the scandir directory path in the Inventory Service object property page.
The scandir directory path is the location on the Inventory server that stores the scan data files. The format of the Scan Directory Path is as follows:
server_name\volume_of_the_server\zenworks\scandir
Error Messages 87
88 ZENw
novdocx (en) 16 April 2010
Action: In the Inventory Service object property page, click Browse to specify the path to an existing directory on a NetWare server. For more information, see “Configuring the Inventory Service Object ” in “Workstation Inventory” in the Novell ZENworks 7 Desktop Management Administration Guide.
Inventory policies are associated to this Inventory Service object. Remove all the associated Inventory policies and retry
Source: ZENworks Desktop Management; Workstation Inventory; Inventory Service Object
Severity: Warning
Explanation: When you want to change the role of an Inventory Service object, you must perform certain tasks to support the new role of the Inventory server.
If there are inventoried workstations and Inventory policies attached to the Inventory server, you must remove the associated Inventory policies before you change the role of the server.
Action: Disassociate the Inventory policies.
1 In ConsoleOne, right-click the appropriate policy package.2 Click Properties, click Policy, then select the appropriate sub-option.3 Select the policy that you want to disassociate, then click Reset.4 Deselect the policy.5 Click Apply, then click Close.
Specified change of role is not allowed. Choose a valid role
Source: ZENworks Desktop Management; Workstation Inventory; Inventory Service Object
Severity: Warning
Action: Choose another role for the Inventory server. For more information, see “Changing the Role of the Inventory Server” in “Workstation Inventory” in the Novell ZENworks 7 Desktop Management Administration Guide.
Unable to remove the existing shared directory. Log in as an administrator
Source: ZENworks Desktop Management; Workstation Inventory; Inventory Service Object
Severity: Warning
Explanation: On a Windows Inventory server, the settings for the shared directory (scandir) can be modified only if you log in as an administrator or with administrator rights.
Action: Log in to the Windows Inventory server as an administrator.
orks 7 Desktop Management Troubleshooting Guide
novdocx (en) 16 April 2010
The specified Scan Directory path does not exist. Change the path or create the specified directory
Source: ZENworks Desktop Management; Workstation Inventory; Inventory Service Object
Severity: Critical
Explanation: When you install ZENworks 7 Desktop Management, you specify the volume on the Inventory server for storing the scan data files. You can modify the volume or the directory of the scandir directory path in the Inventory Service object property page.
The scandir directory path is the location on the Inventory server that stores the scan data files. The format of the Scan Directory Path is as follows:
server_ name\volume_of_the_server\directory
Action: In the Inventory Service object property page, click Browse to specify the path to an existing directory on a NetWare server. For more information, see “Configuring the Inventory Service Object ” in “Workstation Inventory” in the Novell ZENworks 7 Desktop Management Administration Guide.
Insufficient rights. Scan Directory path is not modified
Source: ZENworks Desktop Management; Workstation Inventory; Inventory Service Object
Severity: Critical
Explanation: On a Windows Inventory server, the setting for the shared directory (scandir) is modified only if you log in as an administrator or with administrator rights.
Action: Log in to the Windows Inventory server as an administrator.
Unable to read the existing shared directory. Scan Directory path is not modified. Log in as administrator
Source: ZENworks Desktop Management; Workstation Inventory; Inventory Service Object
Severity: Warning
Explanation: On a Windows Inventory server, the setting for the shared directory (scandir) can be modified only if you log in as an administrator or with administrator rights.
Action: Log in to the Windows Inventory server as an administrator.
Inventory Service object does not exist. Specify an existing Inventory Service object
Source: ZENworks Desktop Management; Workstation Inventory; Roll-Up Policy
Severity: Critical
Possible Cause: The specified DN does not exist.
Explanation: You must specify the DN of the Inventory server at the next level to move the scan data from the selected Inventory server. The Inventory server that you specify must be one of the following servers: Intermediate Server,
Error Messages 89
90 ZENw
novdocx (en) 16 April 2010
Intermediate Server with Database, Intermediate Server with Database and Inventoried Workstations, Intermediate Server with Inventoried Workstations, Root Server, or Root Server with Inventoried Workstations.
Possible Cause: The selected server in the Roll-Up policy is not one of the specified server types.
Action: Specify an existing Inventory Service object of the next-level Inventory server for roll-up of scan data. For more information, see “Configuring the Roll-Up Policy” in “Workstation Inventory” in the Novell ZENworks 7 Desktop Management Administration Guide.
Inventory Service object does not provide roll-up data
Source: ZENworks Desktop Management; Workstation Inventory; Roll-Up Policy
Severity: Critical
Possible Cause: The Inventory server is not configured as a roll-up server.
Explanation: You must specify the DN of the Inventory server at the next level to move the scan data from the selected server. The server that you specify must be one of the following servers: Intermediate Server, Intermediate Server with Database, Intermediate Server with Database and Inventoried Workstations, Intermediate Server with Inventoried Workstations, Root Server, or Root Server with Inventoried Workstations.
Possible Cause: The selected server in the Roll-Up policy is not one of the specified server types.
Action: Do the following:
1 In the Inventory Service object property page, configure the role of the selected server that supports roll-up. For more information, see “Configuring the Inventory Service Object ” in “Workstation Inventory” in the Novell ZENworks 7 Desktop Management Administration Guide.
2 In the Roll-Up policy, specify the DN of the roll-up server. For more information, see “Configuring the Roll-Up Policy” in “Workstation Inventory” in the Novell ZENworks 7 Desktop Management Administration Guide.
You do not have rights to access this object
Source: ZENworks Desktop Management; Workstation Inventory; Roll-up Policy
Severity: Critical
Explanation: You must specify the DN of the Inventory server at the next level to move the scan data from the selected server. The selected server can exist on a different eDirectory tree.
Possible Cause: Insufficient rights for reading the attributes of the next-level Inventory Service object.
Action: Log in as an administrator to the eDirectory tree that contains the next-level Inventory Service object.
orks 7 Desktop Management Troubleshooting Guide
novdocx (en) 16 April 2010
5.8 Custom Scan Editor Error Messages“Unable to import the Custom Scan file. This file is not a valid file for Custom Scan Editor” on page 91“Total number of application entries in the Custom Scan file is missing” on page 91“Total number of column entries in the Custom Scan file is missing” on page 92“The Custom Scan file is corrupted” on page 92“Unable to open the selected file” on page 92“Unable to export the data” on page 92“The Custom Scan Editor is unable to get the data from Novell eDirectory” on page 93“The Custom Scan Editor is unable to write the data to Novell eDirectory” on page 93
Unable to import the Custom Scan file. This file is not a valid file for Custom Scan Editor
Source: ZENworks Desktop Management; Workstation Inventory; Custom Scan Editor
Severity: Warning
Explanation: If you have a large number of software applications that you want to specify for software scanning, you can create a Custom Scan file and later import the file.
IMPORTANT: This error can occur if a ZENworks for Desktops 4.x inventoried workstation sends inventory data to a ZENworks 7 Desktop Management Inventory server.
Possible Cause: The entries in the file are not valid or the file is not a valid text file.
Action: Ensure that you specify a valid Custom Scan file. For more information, see the ZENworks for Desktops 4.0.1 documentation Web site (http://www.novell.com/documentation/zdpr/index.html).
Total number of application entries in the Custom Scan file is missing
Source: ZENworks Desktop Management; Workstation Inventory; Custom Scan Editor
Severity: Warning
Explanation: If you have a large number of software applications that you want to specify for software scanning, you can create a Custom Scan file and later import the file.
IMPORTANT: This error can occur if a ZENworks for Desktops 4.x inventoried workstation sends inventory data to a ZENworks 7 Desktop Management Inventory server.
Possible Cause: The total number of application entries in the file are not valid or the file is not a valid text file.
Action: Re-create a valid Custom Scan file. For more information, see the ZENworks for Desktops 4.0.1 documentation Web site (http://www.novell.com/documentation/zdpr/index.html).
Error Messages 91
92 ZENw
novdocx (en) 16 April 2010
Total number of column entries in the Custom Scan file is missing
Source: ZENworks Desktop Management; Workstation Inventory; Custom Scan Editor
Severity: Warning
Explanation: If you have a large number of software applications that you want to specify for software scanning, you can create a Custom Scan file and later import the file.
IMPORTANT: This error can occur if a ZENworks for Desktops 4.x inventoried workstation sends inventory data to a ZENworks 7 Desktop Management Inventory server.
Possible Cause: The total number of column entries in the file is not valid or the file is not a valid text file.
Action: Re-create a valid Custom Scan file. For more information, see the ZENworks for Desktops 4.0.1 documentation Web site (http://www.novell.com/documentation/zdpr/index.html).
The Custom Scan file is corrupted
Source: ZENworks Desktop Management; Workstation Inventory; Custom Scan Editor
Severity: Warning
Action: Re-create a valid Custom Scan file. For more information, see the ZENworks for Desktops 4.0.1 documentation Web site (http://www.novell.com/documentation/zdpr/index.html).
IMPORTANT: This error can occur if a ZENworks for Desktops 4.x inventoried workstation sends inventory data to a ZENworks 7 Desktop Management Inventory server.
Unable to open the selected file
Source: ZENworks Desktop Management; Workstation Inventory; Custom Scan Editor
Severity: Warning
Possible Cause: The file is in use or locked by some other application.
IMPORTANT: This error can occur if a ZENworks for Desktops 4.x inventoried workstation sends inventory data to a ZENworks 7 Desktop Management Inventory server.
Action: Ensure that the file is not in use by any other application.
Unable to export the data
Source: ZENworks Desktop Management; Workstation Inventory; Custom Scan Editor
Severity: Informational
Possible Cause: An input-output error occurred while writing to the file.
orks 7 Desktop Management Troubleshooting Guide
novdocx (en) 16 April 2010
IMPORTANT: This error can occur if a ZENworks for Desktops 4.x inventoried workstation sends inventory data to a ZENworks 7 Desktop Management Inventory server.
Action: If the file exists, delete the file and retry the export operation with a different filename.
The Custom Scan Editor is unable to get the data from Novell eDirectory
Source: ZENworks Desktop Management; Workstation Inventory; Custom Scan Editor
Severity: Warning
Explanation: The Custom Scan data is stored in eDirectory. The Custom Scan Editor program is unable to access the directory services.
IMPORTANT: This error can occur if a ZENworks for Desktops 4.x inventoried workstation sends inventory data to a ZENworks 7 Desktop Management Inventory server.
Action: Ensure that the time synchronization has been set within a radius of 2 seconds.
The Custom Scan Editor is unable to write the data to Novell eDirectory
Source: ZENworks Desktop Management; Workstation Inventory; Custom Scan Editor
Severity: Warning
Explanation: The Custom Scan data is stored in eDirectory. The Custom Scan Editor program is unable to access the directory services.
IMPORTANT: This error can occur if a ZENworks for Desktops 4.x inventoried workstation sends inventory data to a ZENworks 7 Desktop Management Inventory server.
Action: Ensure that the time synchronization has been set within a radius of 2 seconds.
5.9 Configure DB Error Messages“1022: Unable to connect to the Inventory database. Ensure that the Database object properties are set properly” on page 93“1023: Unable to connect to the Inventory Database. Check if the database is up and running” on page 94“Not able to save the configuration across sessions” on page 94
1022: Unable to connect to the Inventory database. Ensure that the Database object properties are set properly
Source: ZENworks Desktop Management; Workstation Inventory; Configure DB
Severity: Warning
Possible Cause: The Database object is not set properly in the properties page.
Error Messages 93
94 ZENw
novdocx (en) 16 April 2010
Action: Ensure that the Database object properties are set properly. In ConsoleOne, right-click the Database object, click Properties, then click ZENworks Database.
Also, ensure that the properties page contains the properties that are correct for your database configuration.
For more information, see “Configuring the Database Location Policy” in “Workstation Inventory” in the Novell ZENworks 7 Desktop Management Administration Guide.
1023: Unable to connect to the Inventory Database. Check if the database is up and running
Source: ZENworks Desktop Management; Workstation Inventory; Configure DB
Severity: Warning
Possible Cause: The Inventory database is not up and running.
Action: Ensure that the database server is up and the Inventory database on the database server is loaded.
Possible Cause: The network connection is down.
Action: Ensure that the network connection is up.
Possible Cause: If you configure the Inventory database for the first time when the DNS server is down, the Inventory database configuration fails. Subsequently, if you configure the database when the DNS server is up, the Inventory database configuration again fails because Java caches the DNS resolution entry.
Action: Restart ConsoleOne and configure the database. For more information, see “Configuring the Database Location Policy” in “Workstation Inventory” in the Novell ZENworks 7 Desktop Management Administration Guide.
Not able to save the configuration across sessions
Source: ZENworks Desktop Management; Workstation Inventory; Configure DB
Severity: Warning
Action: Ensure that you have the Write rights to the ConsoleOne directory.
5.10 Inventory Report Error Messages“Unable to log into the database. Ensure that the ODBC driver is installed properly” on page 94“ZENworks Reporting encountered an error because of Crystal Reports. For more information, see the ZENworks error message online documentation at http://www.novell.com/documentation” on page 95“Unable to connect to the database. Ensure that the database is up and running” on page 95
Unable to log into the database. Ensure that the ODBC driver is installed properly
Source: ZENworks Desktop Management; Workstation Inventory; Reporting
Severity: Critical
orks 7 Desktop Management Troubleshooting Guide
novdocx (en) 16 April 2010
Explanation: ZENworks Reports uses ODBC for connecting to the Sybase or Oracle inventory database. The ODBC client should be installed on the machine running ConsoleOne.
The error occurs if the specific ODBC client required to connect to the Sybase or Oracle inventory database is not installed.
Action: If your inventory database is running on Sybase or Oracle, you must install the recommended ODBC client on the machine. For more information, see “Installing the ODBC Drivers” in “Post-Installation” in the Novell ZENworks 7 Desktop Management Installation Guide.
Action: If your inventory database is running on MS SQL, ignore this message and continue by clicking the Run Selected Report button. If the problem persists, contact Novell Support (http://www.novell.com/support).
ZENworks Reporting encountered an error because of Crystal Reports. For more information, see the ZENworks error message online documentation at http://www.novell.com/documentation
Source: ZENworks Desktop Management; Workstation Inventory; Reporting
Severity: Critical
Possible Cause: ZENworks Reporting requires Microsoft Data Access Component (MDAC) version 2.6 or later. This error occurs if the recommended MDAC version is not installed on the machine running ConsoleOne.
Action: Install MDAC version 2.6 or later. You can download it from the Microsoft Web site (http://www.microsoft.com).
Possible Cause: The ZENworks database is not synchronized with the Inventory ConsoleOne snap-ins of ZENworks 7 Desktop Management.
Action: Install and use the Inventory ConsoleOne snap-ins of ZENworks 7 Desktop Management to view the data from the ZENworks database. For more information, see the Novell ZENworks 7 Desktop Management Installation Guide.
Unable to connect to the database. Ensure that the database is up and running
Source: ZENworks Desktop Management; Workstation Inventory; Reporting
Severity: Warning
Possible Cause: The Inventory database is not up and running.
Action: Ensure that the database server is up and the Inventory database on the database server is loaded.
Possible Cause: The network connection is down.
Action: Ensure that the network connection is up.
Possible Cause: Unable to start the Proxy database.
Action: Ensure that ports 2639 and 2640 are not used by any other application.
Error Messages 95
96 ZENw
novdocx (en) 16 April 2010
5.11 Custom Attribute Editor Error Messages“This attribute is a regular attribute” on page 96“This is a reserved name” on page 96“The attribute has an invalid format” on page 96
This attribute is a regular attribute
Source: ZENworks Desktop Management; Workstation Inventory; Custom Attribute Editor
Severity: Warning
Possible Cause: A regular attribute has been specified as a custom attribute.
Action: Specify a custom attribute. For the list of regular attributes, see “Customizing the Hardware Inventory Information To Be Scanned” in “Workstation Inventory” in the Novell ZENworks 7 Desktop Management Administration Guide.
This is a reserved name
Source: ZENworks Desktop Management; Workstation Inventory; Custom Attribute Editor
Severity: Warning
Possible Cause: A reserved name has been specified for the custom attribute value. The reserved names such as Class, RegularAttrs, RegularVals, and Action cannot be used as custom attributes.
Action: Do not specify reserved names such as Class, RegularAttrs, RegularVals, or Action for custom attributes. For more information, see “Customizing the Hardware Inventory Information To Be Scanned” in “Workstation Inventory” in the Novell ZENworks 7 Desktop Management Administration Guide.
The attribute has an invalid format
Source: ZENworks Desktop Management; Workstation Inventory; Custom Attribute Editor
Severity: Warning
Action: Ensure that the custom attribute does not have any special characters. The allowed characters for the custom attributes are a-z, A-Z, or 0-9. For more information, see “Customizing the Hardware Inventory Information To Be Scanned” in “Workstation Inventory” in the Novell ZENworks 7 Desktop Management Administration Guide.
5.12 Data Export Error Messages“1101: File filename is not found” on page 98“1102: An error occurred while reading from the file filename. Ensure that no other applications are using the .exp and .cfg files, and run the data export program” on page 98
orks 7 Desktop Management Troubleshooting Guide
novdocx (en) 16 April 2010
“1103: Attribute attribute_name does not exist in the Inventory database. Ensure that the .cfg file contains valid Inventory attributes” on page 99“1104: Class class_name is not found. Unable to connect to the Inventory database because the JDBC driver is not found” on page 99“1105: Unable to connect to the Inventory database using the URL url_name. SQL exception occurred sql_error_details” on page 99“1106: Unable to connect to the Inventory database” on page 100“1108: Unable to disconnect from the Inventory database” on page 101“1110: Filename is not a valid .exp file” on page 101“1111: Input-output error occurred while writing to the file filename” on page 101“1112: Input-output error occurred while closing the file filename” on page 102“1113: Input-output error occurred while opening the file filename in the Write mode” on page 102“1116: Parameters parameters_list are not set in the file filename” on page 102“1117: Unable to accept the DBUsername and DBPassword because of an input-output error” on page 103“1118: Specified database vendor_name is not supported in the .exp file. Ensure that the DBVendor=SYBASE, DBVendor=ORACLE or DBVENDOR=MSSQL” on page 103“1121: Cannot write to the file filename. If the file exists, verify the Write permissions” on page 104“1125: Unable to retrieve the information from the database. Database or network connections are down” on page 104“1127: Configured Inventory database is empty” on page 104“1130: The configured database is not a compatible database. You are trying to access the older version of the ZENworks database” on page 104“1135: Unable to read the debug.properties file. The trace file, dbexporttracer.txt, will not be created” on page 105“Unable to launch Data Export. Configure the database (Click Tools > Configure DB)” on page 105“Unable to launch Data Export because connection cannot be established to the database. Ensure that the properties of the Database Object are configured properly” on page 105“Data Export will not proceed. Ensure that the working directory (\consoleone\version_no\reporting) exists” on page 106“Configured database is empty. Data Export will not proceed because export operations cannot be done” on page 106“Error in constructing the Data Export Attributes Panel” on page 106“Error in invoking the Data Export Criteria dialog” on page 106“Specified Data Export configuration file does not exist” on page 107“Invalid configuration file will not be opened. You must create the configuration file again” on page 107“Configuration will not be saved because the file extension is invalid. Specify .exp as the file extension” on page 107
Error Messages 97
98 ZENw
novdocx (en) 16 April 2010
“Invalid file extension for .csv file. Specify .csv as the file extension” on page 107“Specify the .CSV file in to which the inventory data will be exported” on page 108“Error creating directory(s) for the .csv file. Data Export will use the default directory” on page 108“Filename configuration file will not be loaded because the file is for a different language locale. Ensure that you use the correct language locale file” on page 108“Error reading the configuration details from filename. Run the Data Export tool to create the configuration file again” on page 108“Error saving the configuration changes in filename. Ensure there is disk space or the directory has Write permissions” on page 109“Error in attempting to overwrite filename. Ensure the directory has Write permissions and delete the existing file” on page 109“Filename configuration file is not found” on page 109“Configured site names are not found in selected database. Resetting the criteria to include all databases” on page 109“Unable to proceed with Data Export because the connection to the database is lost. Exit from the Data Export. Run the Data Export tool again. Configure the database, if required” on page 109“Data Export will not proceed. Unable to identify the type of installation” on page 110“Overwriting will not permit the configuration to be opened from an older version of the Data Export tool” on page 110
1101: File filename is not found
Source: ZENworks Desktop Management; Workstation Inventory; Running the Data Export Tool using ConsoleOne
Severity: Critical
Explanation: The data export configuration files (.exp and .cfg) contain the data export settings for exporting the data from the Inventory database.
Possible Cause: The specified .exp filename or the specified path for the file is incorrect.
Action: Specify the correct name of the .exp filename and then run the Data Export tool again. For more information, see “Exporting the Inventory Information” in “Workstation Inventory” in the Novell ZENworks 7 Desktop Management Administration Guide.
Possible Cause: The .cfg file is not in the same directory as the .exp file.
Action: Ensure that the .exp file and the corresponding .cfg file are in the same directory. Run the Data Export tool again. For more information, see “Exporting the Inventory Information” in “Workstation Inventory” in the Novell ZENworks 7 Desktop Management Administration Guide.
1102: An error occurred while reading from the file filename. Ensure that no other applications are using the .exp and .cfg files, and run the data export program
Source: ZENworks Desktop Management; Workstation Inventory; Running the Data Export Tool using ConsoleOne
orks 7 Desktop Management Troubleshooting Guide
novdocx (en) 16 April 2010
Severity: Critical
Explanation: The data export configuration files (.exp and .cfg) contain the data export settings for exporting the data from the Inventory database. This error occurs when the data export tool is unable to read the .exp or the .cfg file.
Possible Cause: The files are locked by some other application or the input-output buffers are full.
Action: Ensure that no other application is using the .exp and .cfg files, and then run the Data Export tool again. For more information, see “Exporting the Inventory Information” in “Workstation Inventory” in the Novell ZENworks 7 Desktop Management Administration Guide.
1103: Attribute attribute_name does not exist in the Inventory database. Ensure that the .cfg file contains valid Inventory attributes
Source: ZENworks Desktop Management; Workstation Inventory; Running the Data Export Tool using ConsoleOne
Severity: Critical
Explanation: The data export .cfg file contains the Inventory attributes that you choose to export.
Possible Cause: The .cfg file contains an attribute that is not a valid Inventory attribute.
Possible Cause: An attribute in the .cfg file does not match the actual Inventory attributes.
Action: Run the Data Export tool. Ensure that the data configuration files (.cfg and .exp) are not corrupted or manually edited. For more information, see “Exporting the Inventory Information” in “Workstation Inventory” in the Novell ZENworks 7 Desktop Management Administration Guide.
If the problem persists, contact Novell Support (http://www.novell.com/support).
1104: Class class_name is not found. Unable to connect to the Inventory database because the JDBC driver is not found
Source: ZENworks Desktop Management; Workstation Inventory; Running the Data Export Tool using ConsoleOne
Severity: Critical
Explanation: Data Export uses JDBC* to connect to the Inventory database.
Possible Cause: The required JDBC driver is not present.
Action: Contact Novell Support (http://www.novell.com/support).
1105: Unable to connect to the Inventory database using the URL url_name. SQL exception occurred sql_error_details
Source: ZENworks Desktop Management; Workstation Inventory; Running the Data Export Tool using ConsoleOne
Severity: Critical
Possible Cause: The database is not running.
Error Messages 99
100 ZENw
novdocx (en) 16 April 2010
Action: Ensure that the database is up and running. Run the Data Export tool. For more information, see “Exporting the Inventory Information” in “Workstation Inventory” in the Novell ZENworks 7 Desktop Management Administration Guide.
Possible Cause: The network connections are down while connecting to the database.
Action: Ensure that network is up and running. Run the Data Export tool. For more information, see “Exporting the Inventory Information” in “Workstation Inventory” in the Novell ZENworks 7 Desktop Management Administration Guide.
Possible Cause: The IP address or the port number of the database in the .exp file is not correct.
Action: Ensure that the correct IP address and port number are specified in the .exp file.
Run the Data Export tool. Ensure that the IP address and port number details are specified in the .exp file. For more information, see “Exporting the Inventory Information” in “Workstation Inventory” in the Novell ZENworks 7 Desktop Management Administration Guide.
Possible Cause: The username or the password is not correct.
Action: Verify with the database administrator if the username and the password are valid. Run the Data Export tool. For more information, see “Exporting the Inventory Information” in “Workstation Inventory” in the Novell ZENworks 7 Desktop Management Administration Guide.
1106: Unable to connect to the Inventory database
Source: ZENworks Desktop Management; Workstation Inventory; Running the Data Export Tool using ConsoleOne
Severity: Critical
Possible Cause: The database is not running.
Action: Ensure that the database is up and running. Run the Data Export tool. Ensure that the IP address and port number details are specified in the .exp file. For more information, see “Exporting the Inventory Information” in “Workstation Inventory” in the Novell ZENworks 7 Desktop Management Administration Guide.
Possible Cause: The network connections are down while connecting to the database.
Action: Ensure that the network is up and running.
Possible Cause: The IP address or the port number of the database in the .exp file is not correct.
Action: Ensure that correct IP address and port number are specified in the .exp file.
Possible Cause: The username or the password is not correct.
Action: Verify with the database administrator if the username and the password are valid.
orks 7 Desktop Management Troubleshooting Guide
novdocx (en) 16 April 2010
1108: Unable to disconnect from the Inventory database
Source: ZENworks Desktop Management; Workstation Inventory; Running the Data Export Tool using ConsoleOne
Severity: Informational
Explanation: This error occurs when the data export is almost completed.
Possible Cause: The database or the network connections are not up and running.
Action: If the data export to the .csv file is not complete, ensure that the database is up and running. Run the Data Export tool again. For more information, see “Exporting the Inventory Information” in “Workstation Inventory” in the Novell ZENworks 7 Desktop Management Administration Guide.
1110: Filename is not a valid .exp file
Source: ZENworks Desktop Management; Workstation Inventory; Data Export Tool
Severity: Critical
Possible Cause: The .exp file should contain the following attributes:
DBVendor = dbvendor_nameDBUser = dbuser_nameDBPassword = db_passwordDBIPAddress = database_server_ip_addressDECfgFile = filename.cfgDBPort = port_numberThe attribute names are case sensitive. If any one of the preceding attributes are not present, the file is not a valid .exp file.
Action: Run the Data Export tool. Ensure that the data configuration files (.cfg and .exp) are not corrupted or manually edited. For more information, see “Exporting the Inventory Information” in “Workstation Inventory” in the Novell ZENworks 7 Desktop Management Administration Guide.
If the problem persists, contact Novell Support (http://www.novell.com/support).
1111: Input-output error occurred while writing to the file filename
Source: ZENworks Desktop Management; Workstation Inventory; Running the Data Export Tool using ConsoleOne
Severity: Critical
Possible Cause: Disk is full.
Action: Ensure that there is enough disk space. Run the Data Export tool again. For more information, see “Exporting the Inventory Information” in “Workstation Inventory” in the Novell ZENworks 7 Desktop Management Administration Guide.
Possible Cause: Some other application is trying to read from or write to the same file.
Error Messages 101
102 ZENw
novdocx (en) 16 April 2010
Action: Ensure that no other application is using the file. Run the Data Export tool again. For more information, see “Exporting the Inventory Information” in “Workstation Inventory” in the Novell ZENworks 7 Desktop Management Administration Guide.
1112: Input-output error occurred while closing the file filename
Source: ZENworks Desktop Management; Workstation Inventory; Running the Data Export Tool using ConsoleOne
Severity: Critical
Possible Cause: Disk is full.
Action: Ensure that there is enough disk space. Run the Data Export tool again. For more information, see “Exporting the Inventory Information” in “Workstation Inventory” in the Novell ZENworks 7 Desktop Management Administration Guide.
Possible Cause: Some other application is trying to read from or write to the same file.
Action: Ensure that no other application is using the file. Run the Data Export tool again. For more information, see “Exporting the Inventory Information” in “Workstation Inventory” in the Novell ZENworks 7 Desktop Management Administration Guide.
1113: Input-output error occurred while opening the file filename in the Write mode
Source: ZENworks Desktop Management; Workstation Inventory; Running the Data Export Tool using ConsoleOne
Severity: Critical
Possible Cause: No Write permission to the file.
Action: Ensure that the file has the write permission. Run the Data Export tool again. For more information, see “Exporting the Inventory Information” in “Workstation Inventory” in the Novell ZENworks 7 Desktop Management Administration Guide.
1116: Parameters parameters_list are not set in the file filename
Source: ZENworks Desktop Management; Workstation Inventory; Running the Data Export Tool using ConsoleOne
Severity: Critical
Possible Cause: In the .exp file, one or more of the following values for the attributes is missing:
Database vendor name (DBVendor=dbvendor_name)IP address of the server on which the database is running (DBIPAddress=database_server_ip_address)Port number of the database (DBPort=port_number)Name of the corresponding .cfg file (DECfgFile=filename)
orks 7 Desktop Management Troubleshooting Guide
novdocx (en) 16 April 2010
Explanation: The .exp file should contain the following attributes:
DBVendor = dbvendor_nameDBUser = dbuser_nameDBPassword = db_passwordDBIPAddress = database_server_ip_addressDECfgFile = filename.cfgDBPort = port_numberThe attribute names are case sensitive. If any one of the preceding attributes is not present, the file is not a valid .exp file.These values are required to connect to the database and to export the attributes in the corresponding .cfg file.
Action: Ensure that these values are assigned correctly. Run the Data Export tool. Ensure that the data configuration files (.cfg and .exp) are not corrupted or manually edited. For more information, see “Exporting the Inventory Information” in “Workstation Inventory” in the Novell ZENworks 7 Desktop Management Administration Guide.
1117: Unable to accept the DBUsername and DBPassword because of an input-output error
Source: ZENworks Desktop Management; Workstation Inventory; Running the Data Export Tool using ConsoleOne
Severity: Critical
Possible Cause: Unable to accept command line input.
Action: Run the Data Export tool. For more information, see “Exporting the Inventory Information” in “Workstation Inventory” in the Novell ZENworks 7 Desktop Management Administration Guide.
If the problem persists, contact Novell Support (http://www.novell.com/support).
1118: Specified database vendor_name is not supported in the .exp file. Ensure that the DBVendor=SYBASE, DBVendor=ORACLE or DBVENDOR=MSSQL
Source: ZENworks Desktop Management; Workstation Inventory; Running the Data Export Tool using ConsoleOne
Severity: Informational
Possible Cause: The database vendor, specified in the .exp file, should be SYBASE, ORACLE, or MS SQL.
Action: The Workstation Inventory supports Sybase, Oracle, and MS SQL databases. Ensure that the vendor field (DBVendor=) in the .exp file is SYBASE, ORACLE, or MSSQL. These values are case sensitive.
Error Messages 103
104 ZENw
novdocx (en) 16 April 2010
Run the Data Export tool. Ensure that the data configuration files (.cfg and .exp) are not corrupted or manually edited. For more information, see “Exporting the Inventory Information” in “Workstation Inventory” in the Novell ZENworks 7 Desktop Management Administration Guide.
1121: Cannot write to the file filename. If the file exists, verify the Write permissions
Source: ZENworks Desktop Management; Workstation Inventory; Running the Data Export Tool using ConsoleOne
Severity: Informational
Possible Cause: The file does not have the Write permission.
Action: Ensure that the file has the necessary rights or run the data export to specify a different CSV filename. For more information, see “Exporting the Inventory Information” in “Workstation Inventory” in the Novell ZENworks 7 Desktop Management Administration Guide.
1125: Unable to retrieve the information from the database. Database or network connections are down
Source: ZENworks Desktop Management; Workstation Inventory; Running the Data Export Tool using ConsoleOne
Severity: Critical
Action: Ensure that the database is running, and the network connectivity is working. Run the Data Export tool. For more information, see “Exporting the Inventory Information” in “Workstation Inventory” in the Novell ZENworks 7 Desktop Management Administration Guide.
1127: Configured Inventory database is empty
Source: ZENworks Desktop Management; Workstation Inventory; Running the Data Export Tool using ConsoleOne
Severity: Informational
Action: Ensure that the Workstation Inventory policy is properly configured for the inventoried workstations attached to this Inventory database. For more information, see “Configuring the Workstation Inventory Policy” in “Workstation Inventory” in the Novell ZENworks 7 Desktop Management Administration Guide.
Action: Ensure that the inventory scans are being sent to the configured Inventory server. For more information, see “Viewing the Status of the Last Scan in the Workstation Scan Log” in “Workstation Inventory” in the Novell ZENworks 7 Desktop Management Administration Guide.
Action: Ensure that the inventoried workstation is configured to send the inventory scans to the correct Inventory database.
1130: The configured database is not a compatible database. You are trying to access the older version of the ZENworks database
Source: ZENworks Desktop Management; Workstation Inventory; Running the Data Export Tool using ConsoleOne
orks 7 Desktop Management Troubleshooting Guide
novdocx (en) 16 April 2010
Severity: Informational
Possible Cause: You are trying to access a database that is older than ZENworks for Desktops 4.x or later.
Action: Ensure that the configured Inventory database is of ZENworks for Desktops 4.x or later.
1135: Unable to read the debug.properties file. The trace file, dbexporttracer.txt, will not be created
Source: ZENworks Desktop Management; Workstation Inventory; Running the Data Export Tool using ConsoleOne
Severity: Informational
Possible Cause: The debug.properties file is not found.
Action: Using a text editor, Manually create debug.properties with the following content in ConsoleOne_installation_directory\1.2\bin:
DBEXPORT_TRACE=ON
Possible Cause: The debug.properties file does not contain any data or does not contain the following entry:
DBEXPORT_TRACE=ON
Action: Ensure that ConsoleOne_installation_directory\1.2\bin\debug.properties contains the following entry:
DBEXPORT_TRACE=ON
Unable to launch Data Export. Configure the database (Click Tools > Configure DB)
Source: ZENworks Desktop Management; Workstation Inventory; Data Export Tool
Severity: Warning
Explanation: Before running the Data Export, you must configure the database. This message is displayed when the database is not configured.
Action: Configure the Inventory database, and then run the Data Export tool. For more information, see “Configuring the Inventory Database” in “Workstation Inventory” in the Novell ZENworks 7 Desktop Management Administration Guide.
Unable to launch Data Export because connection cannot be established to the database. Ensure that the properties of the Database Object are configured properly
Source: ZENworks Desktop Management; Workstation Inventory; Data Export Tool
Severity: Warning
Possible Cause: The database object is not set properly in the properties page.
Action: Ensure that the Database object properties are set properly.
In ConsoleOne, right-click the Database object, click Properties, then click ZENworks Database. Ensure that the properties page contains the properties that are correct for your database configuration. Also, ensure that the JDBC
Error Messages 105
106 ZENw
novdocx (en) 16 April 2010
Properties page is configured properly. For more information, see “Configuring the Database Location Policy” in “Workstation Inventory” in the Novell ZENworks 7 Desktop Management Administration Guide.
Data Export will not proceed. Ensure that the working directory (\consoleone\version_no\reporting) exists
Source: ZENworks Desktop Management; Workstation Inventory; Data Export Tool
Severity: Warning
Possible Cause: The working directory for the Data Export tool in \consoleone\version_no\reporting does not exist.
Action: Ensure that the directory exists. If it does not, create the directory structure.
Configured database is empty. Data Export will not proceed because export operations cannot be done
Source: ZENworks Desktop Management; Workstation Inventory; Data Export Tool
Severity: Informational
Explanation: The Data Export tool uses the Inventory database populated with the scan data of the workstations. This message is displayed when the database does not contain inventory information of the workstations.
Action: Ensure that the Inventory setup is properly configured, and that the workstations are scheduled for scanning. Verify from the status logs whether the scan data has been stored successfully in the Inventory database. For more information, see “Monitoring Workstation Inventory Using Status Logs” in “Workstation Inventory” in the Novell ZENworks 7 Desktop Management Administration Guide.
Error in constructing the Data Export Attributes Panel
Source: ZENworks Desktop Management; Workstation Inventory; Data Export Tool
Severity: Critical
Explanation: There is some internal error in invoking the Data Export window.
Action: Run the Data Export tool. For more information, see “Exporting the Inventory Information” in “Workstation Inventory” in the Novell ZENworks 7 Desktop Management Administration Guide.
If the problem persists, contact Novell Support (http://www.novell.com/support).
Error in invoking the Data Export Criteria dialog
Source: ZENworks Desktop Management; Workstation Inventory; Data Export Tool
Severity: Critical
Explanation: There is some internal error in invoking the Data Export window.
Action: Run the Data Export tool. For more information, see “Exporting the Inventory Information” in “Workstation Inventory” in the Novell ZENworks 7 Desktop Management Administration Guide.
orks 7 Desktop Management Troubleshooting Guide
novdocx (en) 16 April 2010
If the problem persists, contact Novell Support (http://www.novell.com/support).
Specified Data Export configuration file does not exist
Source: ZENworks Desktop Management; Workstation Inventory; Data Export Tool
Severity: Warning
Explanation: The Data Export tool allows you to load an existing configuration file (.exp). After you load the .exp file, you can modify the settings for data export and then export the data to a .csv file. This error occurs if the file you specify for opening a saved database query does not exist in the directory.
Action: Ensure that you specify an existing file.
Invalid configuration file will not be opened. You must create the configuration file again
Source: ZENworks Desktop Management; Workstation Inventory; Data Export Tool
Severity: Warning
Explanation: The Data Export tool allows you to load an existing configuration file (.exp). After you load the .exp file, you can modify the settings for data export and then export the data to a .csv file. This error occurs if there are problems with the file.
Action: Ensure that the .exp file exists and run the Data Export tool again. For more information, see “Exporting the Inventory Information” in “Workstation Inventory” in the Novell ZENworks 7 Desktop Management Administration Guide.
Configuration will not be saved because the file extension is invalid. Specify .exp as the file extension
Source: ZENworks Desktop Management; Workstation Inventory; Data Export Tool
Severity: Warning
Explanation: The Data Export tool allows you to save the settings that you selected to a data export configuration file (.exp). The settings that are stored are the inventory components you selected and the query formed for filtering the workstations. If you open an existing .exp file, the stored settings are loaded. This error occurs if you do not specify a valid .exp extension.
Action: Ensure that you specify a valid .exp extension.
Invalid file extension for .csv file. Specify .csv as the file extension
Source: ZENworks Desktop Management; Workstation Inventory; Data Export Tool
Severity: Warning
Explanation: The Data Export exports the inventory information of the workstations from the Inventory database to the specified comma-separated value (.csv) file. This error occurs if you do not specify .csv as the file extension.
Action: Ensure that the specified file extension is .csv.
Error Messages 107
108 ZENw
novdocx (en) 16 April 2010
Specify the .CSV file in to which the inventory data will be exported
Source: ZENworks Desktop Management; Workstation Inventory; Data Export Tool
Severity: Informational
Explanation: The Data Export exports the inventory information of the workstations from the Inventory database to the specified comma-separated value (.csv) file.
Error creating directory(s) for the .csv file. Data Export will use the default directory
Source: ZENworks Desktop Management; Workstation Inventory; Data Export Tool
Severity: Warning
Explanation: The Data Export exports the inventory information of the workstations from the Inventory database to the specified comma-separated value (.csv) file. This error occurs if the .csv file cannot be created in the specified directory. This tool creates the specified .csv file in the default directory consoleone\version_no\reporting\export.
Possible Cause: The disk on the machine is full.
Action: Ensure that there is disk space.
Possible Cause: There is no Write access for the directory.
Action: Ensure that the file has Write access in the specified directory.
Filename configuration file will not be loaded because the file is for a different language locale. Ensure that you use the correct language locale file
Source: ZENworks Desktop Management; Workstation Inventory; Data Export Tool
Severity: Warning
Explanation: The configuration file (.exp) contains the locale settings. The DELocaleLanguage parameter specifies the language in use.
Action: Ensure that you use a correct locale configuration file (.exp). For example, DELocalLanguage=US specifies the locale setting for the English language.
Error reading the configuration details from filename. Run the Data Export tool to create the configuration file again
Source: ZENworks Desktop Management; Workstation Inventory; Data Export Tool
Severity: Critical
Explanation: The configuration file (.exp) contains the data export settings. The settings that are stored are the inventory components you selected and the query formed for filtering the workstations. If you open an existing .exp file, the stored settings are loaded. This error occurs if the file is corrupted and the Data Export tool is unable to read the file.
Action: Run the Data Export tool. Save the data export settings in a configuration file (.exp) file. For more information, see “Exporting the Inventory Information” in “Workstation Inventory” in the Novell ZENworks 7 Desktop Management Administration Guide.
orks 7 Desktop Management Troubleshooting Guide
novdocx (en) 16 April 2010
Error saving the configuration changes in filename. Ensure there is disk space or the directory has Write permissions
Source: ZENworks Desktop Management; Workstation Inventory; Data Export Tool
Severity: Warning
Possible Cause: The disk on the machine is full.
Action: Ensure that there is disk space.
Possible Cause: There is no Write access for the directory.
Action: Ensure that the file has Write access in the specified directory.
Error in attempting to overwrite filename. Ensure the directory has Write permissions and delete the existing file
Source: ZENworks Desktop Management; Workstation Inventory; Data Export Tool
Severity: Warning
Possible Cause: There is no Write access for the directory.
Action: Ensure that the file has write access in the specified directory. Delete the existing file from the directory.
Filename configuration file is not found
Source: ZENworks Desktop Management; Workstation Inventory; Data Export Tool
Severity: Critical
Explanation: There is an internal error with the file or the file has been accidentally deleted.
Action: Run the Data Export tool. Save the data export settings in the configuration file. For more information, see “Exporting the Inventory Information” in “Workstation Inventory” in the Novell ZENworks 7 Desktop Management Administration Guide.
Configured site names are not found in selected database. Resetting the criteria to include all databases
Source: ZENworks Desktop Management; Workstation Inventory; Data Export Tool
Severity: Informational
Explanation: The site names that you have selected do not exist in the Inventory database. By default, this tool exports the data from all databases satisfying the filter conditions specified for the workstations.
Unable to proceed with Data Export because the connection to the database is lost. Exit from the Data Export. Run the Data Export tool again. Configure the database, if required
Source: ZENworks Desktop Management; Workstation Inventory; Data Export Tool
Severity: Critical
Explanation: An internal error has occurred.
Error Messages 109
110 ZENw
novdocx (en) 16 April 2010
Action: Exit from the Data Export tool. Run the Data Export tool again. For more information, see “Exporting the Inventory Information” in “Workstation Inventory” in the Novell ZENworks 7 Desktop Management Administration Guide.
Data Export will not proceed. Unable to identify the type of installation
Source: ZENworks Desktop Management; Workstation Inventory; Data Export Tool
Severity: Critical
Possible Cause: The content of the query.properties file, which is located in the ConsoleOne_installation_path/bin directory, is invalid.
Action: Do the following:
1 In the ConsoleOne_installation_path\bin\query.properties file, ensure that the value of the insver parameter is valid.
2 Modify the insver parameter in query.properties to contain any of the following values:
zfs: ConsoleOne will have only Server Management snap-in functionality
zfd (default): ConsoleOne will have only Desktop Management snap-in functionality
both: ConsoleOne will have both Server Management and Desktop Management snap-in functionality
3 Run the Data Export tool and save the data export settings in the configuration file. For more information, see “Exporting the Inventory Information” in “Workstation Inventory” in the Novell ZENworks 7 Desktop Management Administration Guide.
Overwriting will not permit the configuration to be opened from an older version of the Data Export tool
Source: ZENworks Desktop Management; Workstation Inventory; Data Export Tool
Severity: Informational
Possible Cause: The schema of the ZENworks for Desktops 4.x Inventory database is different from the schema of ZENworks 7 Inventory database. Consequently, it is necessary to make the query compatible with the ZENworks 7 Inventory database.
Action: Back up the existing query and the configuration files before overwriting them.
5.13 Inventory Summary Error Messages“Inventory is not present in the configured Inventory database” on page 111“Unable to connect to configured Inventory database” on page 111“Invalid database user name or password” on page 111
orks 7 Desktop Management Troubleshooting Guide
novdocx (en) 16 April 2010
“The configured database is not a compatible database. You are trying to access the older version of the ZENworks database” on page 112“Configured Inventory database is empty” on page 112
Inventory is not present in the configured Inventory database
Source: ZENworks Desktop Management; Workstation Inventory; Inventory Summary
Severity: Critical
Possible Cause: The scan data of the inventoried workstation is not stored.
Action: Ensure that the scanner on the inventoried workstation is configured to scan the workstation. For more information, see “Configuring the Workstation Inventory Policy” in “Workstation Inventory” in the Novell ZENworks 7 Desktop Management Administration Guide.
Action: Check the workstation scan log to make sure that the inventory scans are being sent to the configured Inventory server. For more information, see “Viewing the Status of the Last Scan in the Workstation Scan Log” in “Workstation Inventory” in the Novell ZENworks 7 Desktop Management Administration Guide.
Possible Cause: You have configured the inventoried workstation to send the scan to some other Inventory database.
Action: Verify that the Inventory database is configured to receive the scan of this inventoried workstation.
Unable to connect to configured Inventory database
Source: ZENworks Desktop Management; Workstation Inventory; Inventory Summary
Severity: Critical
Possible Cause: The Inventory database is down or not reachable.
Action: Ensure that the database server is reachable. Ping the server to check the connectivity of the server.
Possible Cause: The database object is not configured correctly in the eDirectory.
Action: Ensure that the properties of the database object are configured correctly. For more information, see “Setting Up the Inventory Database” in “Workstation Inventory” in the Novell ZENworks 7 Desktop Management Administration Guide.
Invalid database user name or password
Source: ZENworks Desktop Management; Workstation Inventory; Inventory Summary
Severity: Critical
Action: Ensure that the Database object property values for Database (Read Only) User Name and Password are correct.
Error Messages 111
112 ZENw
novdocx (en) 16 April 2010
The configured database is not a compatible database. You are trying to access the older version of the ZENworks database
Source: ZENworks Desktop Management; Workstation Inventory; Inventory Summary
Severity: Informational
Possible Cause: You are trying to access a database that is older than ZENworks for Desktops 4.x.
Action: Ensure that the configured Inventory database is ZENworks for Desktops 4.x or later.
Configured Inventory database is empty
Source: ZENworks Desktop Management; Workstation Inventory; Inventory Summary
Severity: Informational
Action: Ensure that the Workstation Inventory policy is properly configured for the inventoried workstations attached to this Inventory database. For more information, see “Configuring the Workstation Inventory Policy” in “Workstation Inventory” in the Novell ZENworks 7 Desktop Management Administration Guide.
Action: Ensure that the inventory scans are being sent to the configured Inventory server. For more information, see “Viewing the Status of the Last Scan in the Workstation Scan Log” in “Workstation Inventory” in the Novell ZENworks 7 Desktop Management Administration Guide.
Action: Ensure that the inventoried workstation is configured to send the inventory scans to the correct Inventory database.
5.14 Desktop4.exe Error Messages“The specified database type inventory_database_server_type is invalid. For more information, see the error message documentation” on page 112“The database username has not been specified in .ini_filename. For more information, see the error message documentation” on page 113“The database password has not been specified in .ini_filename. For more information, see the error message documentation” on page 113“The IP address of the database has not been specified in .ini_filename. For more information, see the error message documentation” on page 113“The database port number has not been specified in .ini_filename. For more information, see the error message documentation” on page 114“The product scope has not been specified .ini_filename. For more information, see the error message documentation” on page 114“The specified operation, Inventory_operation, is not supported” on page 114
The specified database type inventory_database_server_type is invalid. For more information, see the error message documentation
Source: ZENworks Desktop Management; Workstation Inventory; Desktop4.exe
orks 7 Desktop Management Troubleshooting Guide

novdocx (en) 16 April 2010
Severity: Critical
Explanation: The value of the -d parameter, which indicates the Inventory database server type, is invalid.
Action: Ensure that the value of the -d parameter is Sybase, Oracle, or MS SQL. For more information, see “Viewing Inventory Information Without Using ConsoleOne” in “Workstation Inventory” in the Novell ZENworks 7 Desktop Management Administration Guide.
The database username has not been specified in .ini_filename. For more information, see the error message documentation
Source: ZENworks Desktop Management; Workstation Inventory; Desktop4.exe
Severity: Critical
Explanation: The database username has not been specified in the .ini file or the value is invalid.
Action: Ensure that the username specified in the .ini file is a valid database user ID. For more information, see “Viewing Inventory Information Without Using ConsoleOne” in “Workstation Inventory” in the Novell ZENworks 7 Desktop Management Administration Guide.
The database password has not been specified in .ini_filename. For more information, see the error message documentation
Source: ZENworks Desktop Management; Workstation Inventory; Desktop4.exe
Severity: Critical
Explanation: The database password has not been specified in the .ini file or the value is invalid.
Action: Ensure that the password specified in the .ini file is a valid database password. For more information, see “Viewing Inventory Information Without Using ConsoleOne” in “Workstation Inventory” in the Novell ZENworks 7 Desktop Management Administration Guide.
The IP address of the database has not been specified in .ini_filename. For more information, see the error message documentation
Source: ZENworks Desktop Management; Workstation Inventory; Desktop4.exe
Severity: Critical
Explanation: The IP address of the server on which the Inventory database is running has not been specified in the .ini file or the value is invalid.
Action: In the .ini file, ensure that you have specified a valid IP address of the server on which the Inventory database is running. For more information, see “Viewing Inventory Information Without Using ConsoleOne” in “Workstation Inventory” in the Novell ZENworks 7 Desktop Management Administration Guide.
Error Messages 113

114 ZENw
novdocx (en) 16 April 2010
The database port number has not been specified in .ini_filename. For more information, see the error message documentation
Source: ZENworks Desktop Management; Workstation Inventory; Desktop4.exe
Severity: Critical
Explanation: The database port number has not been specified in the .ini file or the value is invalid.
Action: Ensure that the database port number specified in the .ini file is valid. For more information, see “Viewing Inventory Information Without Using ConsoleOne” in “Workstation Inventory” in the Novell ZENworks 7 Desktop Management Administration Guide.
The product scope has not been specified .ini_filename. For more information, see the error message documentation
Source: ZENworks Desktop Management; Workstation Inventory; Desktop4.exe
Severity: Critical
Explanation: The scope for querying the Inventory database has not been specified in the .ini file or the value is invalid.
Action: Ensure that the product scope specified in the .ini file is valid. If you have installed only ZENworks 7 Desktop Management, enter ZFD. If you have installed only ZENworks 7 Server Management, enter ZFS. If you have installed Desktop Management and Server Management in the same setup, enter BOTH. For more information, see “Viewing Inventory Information Without Using ConsoleOne” in “Workstation Inventory” in the Novell ZENworks 7 Desktop Management Administration Guide.
The specified operation, Inventory_operation, is not supported
Source: ZENworks Desktop Management; Workstation Inventory; Desktop4.exe
Severity: Critical
Explanation: The specified Inventory operation to be performed on the inventoried workstation is not supported by Desktop4.exe.
Action: Using Desktop4.exe, you can perform only Query and Inventory Summary. To perform a query, enter -c "Query". To perform an inventory summary, enter -c "Inventory". For more information, see “Viewing Inventory Information Without Using ConsoleOne” in “Workstation Inventory” in the Novell ZENworks 7 Desktop Management Administration Guide.
5.15 Upgrade Service Error Messages“1177: Unable to complete all the operations. The Upgrade Service is exiting with errors” on page 115“1178: An error occurred while performing the DBSchema migration” on page 115“1179: An error occurred while performing the DB Data migration” on page 115“1182: An error occurred while migrating the residue files” on page 115“The Upgrade Service is migrating the schema to ZENworks 6.5 SP1” on page 116
orks 7 Desktop Management Troubleshooting Guide
novdocx (en) 16 April 2010
1177: Unable to complete all the operations. The Upgrade Service is exiting with errors
Source: ZENworks Desktop Management; Workstation Inventory; Upgrade Service
Severity: Critical
Action: Restart the Inventory services. For more information, see “Starting and Stopping the Inventory Service” in “Workstation Inventory” in the Novell ZENworks 7 Desktop Management Administration Guide.
If the problem persists, contact Novell Support (http://www.novell.com/support).
1178: An error occurred while performing the DBSchema migration
Source: ZENworks Desktop Management; Workstation Inventory; Upgrade Service
Severity: Critical
Explanation: An error occurred while migrating the schema of an earlier version of the ZENworks Inventory database to ZENworks 7 Desktop Management.
Action: Restart the Inventory services. For more information, see “Starting and Stopping the Inventory Service” in “Workstation Inventory” in the Novell ZENworks 7 Desktop Management Administration Guide.
If the problem persists, contact Novell Support (http://www.novell.com/support).
1179: An error occurred while performing the DB Data migration
Source: ZENworks Desktop Management; Workstation Inventory; Upgrade Service
Severity: Critical
Explanation: An error occurred while migrating the data of the ZENworks for Desktops 4.x database to ZENworks 7.
Action: Restart the Inventory services. For more information, see “Starting and Stopping the Inventory Service” in “Workstation Inventory” in the Novell ZENworks 7 Desktop Management Administration Guide.
If the problem persists, contact Novell Support (http://www.novell.com/support).
1182: An error occurred while migrating the residue files
Source: ZENworks Desktop Management; Workstation Inventory; Upgrade Service
Severity: Critical
Explanation: An error occurred during migration of the existing residue files (ZENworks for Desktops 4.x .str) on the Inventory Server before the ZENworks 7 installation.
Action: Restart the Inventory services. For more information, see “Starting and Stopping the Inventory Service” in “Workstation Inventory” in the Novell ZENworks 7 Desktop Management Administration Guide.
Error Messages 115
116 ZENw
novdocx (en) 16 April 2010
If the problem persists, contact Novell Support (http://www.novell.com/support).
The Upgrade Service is migrating the schema to ZENworks 6.5 SP1
Source: ZENworks Desktop Management; Workstation Inventory; Upgrade Service
Severity: Informational
Explanation: The ZENworks 7 Desktop Management Product CD contains ZENworks 6.5 database. After you install this database, it is migrated to ZENworks 7 when you run the Inventory Service for the first time. During the migration, the following message is displayed:
The Upgrade Service is migrating the schema to ZENworks 6.5 SP1.
The message is displayed only the the first time when you run the Inventory service.
5.16 Inventory Query Error Messages“The attributes in the saved query are not compatible with the current version of the Inventory query. The attributes will not be converted and the saved query will not be loaded” on page 116“The query has been changed for compatibility with the current version. The datatype of the following attributes are converted: attribute list” on page 116“This query has been changed for compatibility with the current version. The following attributes have not been converted and will not be loaded: attributes list” on page 117“An error occurred while loading the saved query / Error opening the query file” on page 117“The data could not be found for this attribute” on page 117“Unable to process the query. Ensure that the database connection is up. For more information, see the error message documentation at http://www.novell.com/documentation” on page 117
The attributes in the saved query are not compatible with the current version of the Inventory query. The attributes will not be converted and the saved query will not be loaded
Source: ZENworks Desktop Management; Workstation Inventory; Inventory Query
Severity: Informational
Explanation: You are attempting to open a ZENworks for Desktops 4.x Inventory query using the latest version of ConsoleOne. The attempt to convert the query in ZENworks for Desktops 4.x failed because there was no equivalent query in ZENworks 7 Desktop Management. The attributes will not be loaded.
Action: You must use the ConsoleOne having ZENworks for Desktops 4.x Inventory snap-ins to open the ZENworks for Desktops 4.x Inventory query.
The query has been changed for compatibility with the current version. The datatype of the following attributes are converted: attribute list
Source: ZENworks Desktop Management; Workstation Inventory; Inventory Query
orks 7 Desktop Management Troubleshooting Guide

novdocx (en) 16 April 2010
Severity: Informational
Explanation: Datatypes of the attributes in ZENworks for Desktops 4.x Inventory query are converted to ZENworks 7 Desktop Management. For example, the string datatype of the attribute in ZENworks for Desktops 4.x is converted to an integer datatype in ZENworks 7 Desktop Management.
Action: The conversion does not impact the Inventory query. You can continue to use the Inventory query.
This query has been changed for compatibility with the current version. The following attributes have not been converted and will not be loaded: attributes list
Source: ZENworks Desktop Management; Workstation Inventory; Inventory Query
Severity: Informational
Explanation: No matching attributes were found for conversion in the ZENworks 7 Desktop Management.
Action: To view the original query, use the ConsoleOne having ZENworks for Desktops 4.x Inventory snap-ins. You can continue to use your current version of ConsoleOne, but the attributes will be lost.
An error occurred while loading the saved query / Error opening the query file
Source: ZENworks Desktop Management; Workstation Inventory; Inventory Query
Severity: Informational
Explanation: The file you are trying to load is a corrupt serialized file or the file is not serializable.
Action: Try re-creating your query. For more information, see “Viewing Inventory Information by Querying the Database” in “Workstation Inventory” in the Novell ZENworks 7 Desktop Management Administration Guide.
The data could not be found for this attribute
Source: ZENworks Desktop Management; Workstation Inventory; Inventory Query
Severity: Informational
Explanation: You are using the Equal To operator on an attribute that does not have an associated value in the Inventory database. The scanner failed to populate any value for the attribute in the Inventory database.
Unable to process the query. Ensure that the database connection is up. For more information, see the error message documentation at http://www.novell.com/documentation
Source: ZENworks Desktop Management; Workstation Inventory; Inventory Query
Severity: Critical
Explanation: An exception was thrown while executing the query.
Error Messages 117

118 ZENw
novdocx (en) 16 April 2010
Action: Do the following on the workstation running ConsoleOne:
1 In ConsoleOne_installation_directory\1.2\bin, create debug.properties with the following entries:QUERYUI_TRACE=ON
INVAPI_TRACE=ON
NOTE: If the debug.properties file already exists, ensure that the file contains the above entries.
2 Run ConsoleOne and invoke the query that had this error.3 Refer to the queryuitrace.log and invapitrace.log files in the
ConsoleOne_installation_directory\1.2\bin to troubleshoot the problem.
4 If the problem persists, contact Novell Support (http://www.novell.com/support) with the logs.
5.17 Inventory Sync Service Error Messages“The Inventory Sync Schedule is not configured” on page 118“The Inventory Sync Schedule is corrupted” on page 118“2554: An error occurred while authenticating as Inventory Sync Service” on page 119“2555: An error occurred while creating the Inventory Sync table” on page 119“2556: An error occurred while creating the .str file(s)” on page 119
The Inventory Sync Schedule is not configured
Source: ZENworks Desktop Management; Workstation Inventory; Inventory Sync Services
Severity: Informational
Possible Cause: The Inventory Sync Schedule attribute is not present in the Novell eDirectory or it is not configured.
Action: Configure the Inventory Sync Schedule again.
To configure the Inventory Sync Schedule:
1 In ConsoleOne, right-click the Inventory Service object, then click Properties.
2 Click the Inventory Service Object tab, then select the Inventory Service Sync Schedule sub-option.
3 Modify the settings for scheduling the Inventory Sync Service.4 Click Apply, then click Close.
The Inventory Sync Schedule is corrupted
Source: ZENworks Desktop Management; Workstation Inventory; Inventory Sync Services
Severity: Informational
orks 7 Desktop Management Troubleshooting Guide
novdocx (en) 16 April 2010
Possible Cause: The Inventory Sync Service is unable to create a schedule object from the data read from eDirectory.
Action: You must re-create the Inventory Sync Schedule.
2554: An error occurred while authenticating as Inventory Sync Service
Source: ZENworks Desktop Management; Workstation Inventory; Inventory Sync Service
Severity: Critical
Possible Cause: The Inventory Sync service is unable to authenticate to eDirectory as an Inventory Service object.
Action: Ensure that the Inventory Service object corresponding to the Inventory server is present.
Action: Do the following:
1 Run the DSREPAIR service. For more information, see the eDirectory 8.7.3 documentation Web site (http://www.novell.com/documentation/edir873/index.html) or the eDirectory 8.8 documentation Web site (http://www.novell.com/documentation/edir88/index.html).
2 Restart the Inventory services. For more information, see “Starting and Stopping the Inventory Service” in “Workstation Inventory” in the Novell ZENworks 7 Desktop Management Administration Guide.
2555: An error occurred while creating the Inventory Sync table
Source: ZENworks Desktop Management; Workstation Inventory; Inventory Sync Service
Severity: Critical
Possible Cause: This error occurs if the Inventory Sync service is unable to create an internal table for processing workstation DNS.
Action: Shut down the Inventory Sync service and restart the service.
2556: An error occurred while creating the .str file(s)
Source: ZENworks Desktop Management; Workstation Inventory; Inventory Sync Service
Severity: Critical
Possible Cause: This error occurs if the Inventory Sync service is unable to access the scandir directory to create the .str files.
Action: Ensure that the directory path of the scandir directory specified in the Inventory Service object property page exists on the Inventory server and is writable.
5.18 Roll-Up Scheduler Error Messages“501: Unable to start the Roll-Up Scheduler for the server” on page 120“502: Unable to refresh the Roll-Up Schedule for the server” on page 120
Error Messages 119
120 ZENw
novdocx (en) 16 April 2010
501: Unable to start the Roll-Up Scheduler for the server
Source: ZENworks Desktop Management; Workstation Inventory; Roll-Up Scheduler
Severity: Critical
Possible Cause: The attributes for the server's Scheduler policy in eDirectory are invalid.
Action: Do the following:
1 Stop the Inventory Services on the server. For more information, see “Starting and Stopping the Inventory Service” in “Workstation Inventory” in the Novell ZENworks 7 Desktop Management Administration Guide.
2 Delete the existing Roll-Up policy and create the policy again. For more information, see “Configuring the Roll-Up Policy” in “Workstation Inventory” in the Novell ZENworks 7 Desktop Management Administration Guide.
3 Start the Inventory Services on the server. For more information, see “Starting and Stopping the Inventory Service” in “Workstation Inventory” in the Novell ZENworks 7 Desktop Management Administration Guide.
If the problem persists, contact Novell Support (http://www.novell.com/support).
502: Unable to refresh the Roll-Up Schedule for the server
Source: ZENworks Desktop Management; Workstation Inventory; Roll-Up Scheduler
Severity: Critical
Explanation: The attributes for the server's Scheduler policy in eDirectory are invalid.
Action: Do the following:
1 Stop the Inventory Services on the server. For more information, see “Starting and Stopping the Inventory Service” in “Workstation Inventory” in the Novell ZENworks 7 Desktop Management Administration Guide.
2 Delete the existing Roll-Up policy and create the policy again. For more information, see “Configuring the Roll-Up Policy” in “Workstation Inventory” in the Novell ZENworks 7 Desktop Management Administration Guide.
3 Start the Inventory Services on the server. For more information, see “Starting and Stopping the Inventory Service” in “Workstation Inventory” in the Novell ZENworks 7 Desktop Management Administration Guide.
If the problem persists, contact Novell Support (http://www.novell.com/support).
orks 7 Desktop Management Troubleshooting Guide
novdocx (en) 16 April 2010
5.19 Selector Error Messages“401: Unable to access scanfilename. The file is either used by some other process or the file is corrupted” on page 121“405: The directories required for the selector to function are not present. Selector services are stopped” on page 121“407: Unable to read the configuration information. Selector exiting...” on page 121
401: Unable to access scanfilename. The file is either used by some other process or the file is corrupted
Source: ZENworks Desktop Management; Workstation Inventory; Selector
Severity: Critical
Possible Cause: The scan data file (.str) contains invalid data or another application is using this file.
Action: Contact Novell Support (http://www.novell.com/support).
405: The directories required for the selector to function are not present. Selector services are stopped
Source: ZENworks Desktop Management; Workstation Inventory; Selector
Severity: Critical
Possible Cause: The selector processes the scan files located in the scandir directory and moves these files to the dbdir and\or entmerge directory within the scandir directory. This error occurs if the scandir\dbdir\entmerge directory does not exist on the Inventory Server.
Action: Ensure that the directory path of the scandir directory specified in the Inventory Service Object property page exists on the inventory server. For more information, see “Configuring the Inventory Service Object ” in “Workstation Inventory” in the Novell ZENworks 7 Desktop Management Administration Guide.
Also, ensure that the dbdir\entmerge directory exists in the scandir directory.
407: Unable to read the configuration information. Selector exiting...
Source: ZENworks Desktop Management; Workstation Inventory; Selector
Severity: Critical
Possible Cause: The Selector was unable to read the attributes of the Inventory Service Object. For more information, see “Configuring the Inventory Service Object ” in “Workstation Inventory” in the Novell ZENworks 7 Desktop Management Administration Guide.
Action: Verify whether the Inventory Service Object exists and is configured correctly.
5.20 Inventory Removal Service Error Messages“2564: Unable to get the scan directory (scandir) path” on page 122
Error Messages 121
122 ZENw
novdocx (en) 16 April 2010
“2565: Unable to find or open inventoryremoval.properties file” on page 122“2566: Unable to read the property \“Filepath”\ in the inventoryremoval.properties file” on page 122“2567: Unable to find or open the inventoryremovallist.txt file” on page 123“2568: An error occurred while creating the delete .str files” on page 123“2569: An error occurred while processing the inventoryremovallist.txt file” on page 123
2564: Unable to get the scan directory (scandir) path
Source: ZENworks Desktop Management; Workstation Inventory; Inventory Removal Service
Severity: Critical
Possible Cause: This error occurs if the scandir path is not available on the Inventory server.
Action: Ensure that the directory path of the scandir directory specified in the Inventory Service object property page exists on the Inventory server. For more information, see “Configuring the Inventory Service Object ” in “Workstation Inventory” in the Novell ZENworks 7 Desktop Management Administration Guide.
2565: Unable to find or open inventoryremoval.properties file
Source: ZENworks Desktop Management; Workstation Inventory; Inventory Removal Service
Severity: Critical
Possible Cause: This error occurs if the inventoryremoval.properties file does not exist or is deleted in the install_path\inv\server\properties directory on the Inventory server.
Action: Run the ZENworks Desktop Management installation to copy the inventoryremoval.properties to the specified location. For more information, see “Uninstalling or Reinstalling Workstation Inventory” in “Uninstall/Reinstall” in the Novell ZENworks 7 Desktop Management Installation Guide.
2566: Unable to read the property \“Filepath”\ in the inventoryremoval.properties file
Source: ZENworks Desktop Management; Workstation Inventory; Inventory Removal Service
Severity: Critical
Possible Cause: This error occurs if the inventoryremoval.properties file does not contain the FilePath property.
Action: Run the ZENworks Desktop Management installation to copy the inventoryremoval.properties file to the install_path\inv\server\properties directory. For more information, see “Reinstalling Workstation Inventory” in “Uninstall/Reinstall” in the Novell ZENworks 7 Desktop Management Installation Guide.
orks 7 Desktop Management Troubleshooting Guide
novdocx (en) 16 April 2010
2567: Unable to find or open the inventoryremovallist.txt file
Source: ZENworks Desktop Management; Workstation Inventory; Inventory Removal Service
Severity: Critical
Possible Cause: The Inventory Removal service is unable to access the inventoryremovallist.txt file at the location specified by the FilePath property in the inventoryremoval.properties file.
Action: Configure the inventoryremovallist.txt file with the DN names of the inventoried workstations that need to be removed from the database. Copy this file to the location specified by the FilePath property in the inventoryremoval.properties file. For more information, see “Removing Redundant Inventoried Workstations from the Inventory Database” in “Workstation Inventory” in the Novell ZENworks 7 Desktop Management Administration Guide.
2568: An error occurred while creating the delete .str files
Source: ZENworks Desktop Management; Workstation Inventory; Inventory Removal Service
Severity: Critical
Possible Cause: The Inventory Removal service creates a delete .str file for each of the DN names listed in the inventoryremovallist.txt file. This error occurs if the Inventory Removal service is unable to create the delete .str file.
Possible Cause: The scandir directory does not exist or there is an error while writing to the file system
Action: Ensure that the directory path of the scandir directory specified in the Inventory Service object property page exists on the Inventory server and is writable. For more information, see “Configuring the Inventory Service Object ” in “Workstation Inventory” in the Novell ZENworks 7 Desktop Management Administration Guide.
2569: An error occurred while processing the inventoryremovallist.txt file
Source: ZENworks Desktop Management; Workstation Inventory; Inventory Removal Service
Severity: Critical
Possible Cause: The Inventory Removal service encountered errors while parsing the inventoryremovallist.txt file.
Action: Ensure that the inventoryremovallist.txt file is configured correctly. For more information, see “Removing Redundant Inventoried Workstations from the Inventory Database” in “Workstation Inventory” in the Novell ZENworks 7 Desktop Management Administration Guide.
Error Messages 123
124 ZENw
novdocx (en) 16 April 2010
5.21 Dictionary Provider Error Messages“2700: Unable to start the Dictionary Provider. The error is message_string” on page 124“2701: Unable to stop the Dictionary Provider. The error is message_string” on page 124
2700: Unable to start the Dictionary Provider. The error is message_string
Source: ZENworks Desktop Management; Workstation Inventory; Dictionary Provider
Severity: Critical
Action: Restart the Dictionary Provider from the Service Manager. For more information, see “Understanding the Inventory Service Manager” in “Workstation Inventory” in the Novell ZENworks 7 Desktop Management Administration Guide.
Action: If the problem persists, contact Novell Support (http://www.novell.com/support).
2701: Unable to stop the Dictionary Provider. The error is message_string
Source: ZENworks Desktop Management; Workstation Inventory; Dictionary Provider
Severity: Minor
Action: Manually stop the Dictionary Provider from the Service Manager. For more information, see “Understanding the Inventory Service Manager” in “Workstation Inventory” in the Novell ZENworks 7 Desktop Management Administration Guide.
5.22 Dictionary Consumer Error Messages“2751: Unable to start the Dictionary Consumer. The error is message_string” on page 125“2752: Unable to stop the Dictionary Consumer. The error is message_string” on page 125“2753: Unable to download the Dictionary. The file client error is message_string” on page 125“2755: Unable to authenticate as DN_of_Dictionary_Update_policy” on page 126“2756: Dictionary Consumer property file corrupted or missing” on page 126“2757: No schedule configured for dictionary updates” on page 126“2758: No roll-up policy found” on page 127“2759: Corrupted or incomplete update policy” on page 127“2760: No update policy found” on page 128“2761: Internal error message_string” on page 128“2762: Unable to decompress the dictionary ZIP file” on page 128“2763: Unable to create the temporary directory” on page 128“2766: Unable to merge dictionary files” on page 128“2767: Unable to copy dictionary files from the temporary directory to the dictionary directory” on page 129
orks 7 Desktop Management Troubleshooting Guide
novdocx (en) 16 April 2010
2751: Unable to start the Dictionary Consumer. The error is message_string
Source: ZENworks Desktop Management; Workstation Inventory; Dictionary Consumer
Severity: Critical
Action: Restart the Dictionary Consumer from the Service Manager. For more information, see “Understanding the Inventory Service Manager” in “Workstation Inventory” in the Novell ZENworks 7 Desktop Management Administration Guide.
Action: If the problem persists, contact Novell Support (http://www.novell.com/support).
2752: Unable to stop the Dictionary Consumer. The error is message_string
Source: ZENworks Desktop Management; Workstation Inventory; Dictionary Consumer
Severity: Minor
Action: Manually stop the Dictionary Consumer from the Service Manager. For more information, see “Understanding the Inventory Service Manager” in “Workstation Inventory” in the Novell ZENworks 7 Desktop Management Administration Guide.
2753: Unable to download the Dictionary. The file client error is message_string
Source: ZENworks Desktop Management; Workstation Inventory; Dictionary Consumer
Severity: Critical
Possible Cause: The Dictionary Consumer is unable to receive the dictionary updates because the Dictionary Provider is down.
Action: Manually start the Dictionary Provider from the Service Manager running on the Inventory server, which is specified in the Dictionary Update policy. For more information, see “Understanding the Inventory Service Manager” in “Workstation Inventory” in the Novell ZENworks 7 Desktop Management Administration Guide.
For more information on how to access the Dictionary Update policy, see “Configuring the Dictionary Update Policy” in “Workstation Inventory” in the Novell ZENworks 7 Desktop Management Administration Guide.
Action: If the problem persists, contact Novell Support (http://www.novell.com/support).
Possible Cause: The address of the Dictionary Provider is not properly configured in the Dictionary Update policy.
Action: Ensure that the address of the Dictionary Provider is same as the IP address or the DNS name of the Inventory server, which is configured in the Dictionary Update policy.
Error Messages 125

126 ZENw
novdocx (en) 16 April 2010
For more information on how to access the Dictionary Update policy, see “Configuring the Dictionary Update Policy” in “Workstation Inventory” in the Novell ZENworks 7 Desktop Management Administration Guide.
Possible Cause: The network is down.
Action: Ensure that the network is up and running and the network connections are active.
2755: Unable to authenticate as DN_of_Dictionary_Update_policy
Source: ZENworks Desktop Management; Workstation Inventory; Dictionary Consumer
Severity: Critical
Possible Cause: The Dictionary Update policy is not properly configured or is corrupted.
Action: Delete the existing Dictionary Update policy and re-create the policy. For more information on how to create and configure the Dictionary Update policy again, see “Configuring the Dictionary Update Policy” in “Workstation Inventory” in the Novell ZENworks 7 Desktop Management Administration Guide.
Possible Cause: An error occurred in eDirectory.
Action: Ensure that the eDirectory is in good health. For more information, see the Novell eDirectory 8.7.3 (http://www.novell.com/documentation/edir873/index.html) or eDirectory 8.8 (http://www.novell.com/documentation/edir88/index.html) documentation Web sites.
2756: Dictionary Consumer property file corrupted or missing
Source: ZENworks Desktop Management; Workstation Inventory; Dictionary Consumer
Severity: Critical
Possible Cause: An error occurred during the installation of the ZENworks 7 Inventory server.
Action: Do the following:
1 If you encounter any errors during the ZENworks 7 Inventory server installation, try to resolve them. For more information, see “Workstation Inventory Installation Errors” in “Installation Error Messages” in the Novell ZENworks 7 Desktop Management Installation Guide.
2 If the problem persists, reinstall the Inventory server component. For more information, see “Reinstalling Workstation Inventory” in “Uninstall/Reinstall” in the Novell ZENworks 7 Desktop Management Installation Guide.
2757: No schedule configured for dictionary updates
Source: ZENworks Desktop Management; Workstation Inventory; Dictionary Consumer
Severity: Critical
orks 7 Desktop Management Troubleshooting Guide
novdocx (en) 16 April 2010
Action: Configure the schedule for the Dictionary Update policy. For more information, see “Configuring the Dictionary Update Policy” in “Workstation Inventory” in the Novell ZENworks 7 Desktop Management Administration Guide.
2758: No roll-up policy found
Source: ZENworks Desktop Management; Workstation Inventory; Dictionary Consumer
Severity: Critical
Explanation: This error occurs when you select the “Use the Roll-Up Server as the Update Source” check box in the Dictionary Update policy but the Roll-Up policy has not been configured.
Action: Do the following:
1 Configure the Roll-Up policy. For more information, see “Configuring the Roll-Up Policy” in “Workstation Inventory” in the Novell ZENworks 7 Desktop Management Administration Guide.
2 Select the Use the Roll-Up Server as the Update Source check box in the Dictionary Update policy. For more information, see “Configuring the Dictionary Update Policy” in “Workstation Inventory” in the Novell ZENworks 7 Desktop Management Administration Guide.
IMPORTANT: Do not select this option for a Standalone Server or a Root Server. You must manually configure the remaining settings of the policy.
Action: In the Dictionary Update policy, deselect the Use the Roll-Up Server as the Update Source check box and configure the remaining settings. For more information, see “Configuring the Dictionary Update Policy” in “Workstation Inventory” in the Novell ZENworks 7 Desktop Management Administration Guide.
2759: Corrupted or incomplete update policy
Source: ZENworks Desktop Management; Workstation Inventory; Dictionary Consumer
Severity: Critical
Possible Cause: An error occurred in eDirectory.
Action: Ensure that eDirectory is in good health. For more information, see the Novell eDirectory 8.7.3 (http://www.novell.com/documentation/edir873/index.html) or eDirectory 8.8 (http://www.novell.com/documentation/edir88/index.html) documentation Web sites.
Possible Cause: The Dictionary Update policy is not configured properly.
Action: Ensure that the Dictionary Update policy is properly configured. For more information, see “Novell ZENworks 7 Desktop Management Administration Guide” in “Workstation Inventory” in the Novell ZENworks 7 Desktop Management Administration Guide.
Error Messages 127
128 ZENw
novdocx (en) 16 April 2010
2760: No update policy found
Source: ZENworks Desktop Management; Workstation Inventory; Dictionary Consumer
Severity: Informational or Critical
Action: If you want to manually update the software dictionary, ignore this message. For more information on how to manually update the dictionary, see “Setting Up Distribution of Dictionary” in “Workstation Inventory” in the Novell ZENworks 7 Desktop Management Administration Guide
Action: Create and configure the Dictionary Update policy. For more information, see “Configuring the Dictionary Update Policy” in “Workstation Inventory” in the Novell ZENworks 7 Desktop Management Administration Guide.
2761: Internal error message_string
Source: ZENworks Desktop Management; Workstation Inventory; Dictionary Consumer
Severity: Critical
Action: Contact Novell Support (http://www.novell.com/support).
2762: Unable to decompress the dictionary ZIP file
Source: ZENworks Desktop Management; Workstation Inventory; Dictionary Consumer
Severity: Critical
Possible Cause: The disk on the Inventory server is full.
Action: Ensure that there is enough free disk space on the Inventory server.
Possible Cause: The dictionary files are corrupted.
Action: Reinstall the Inventory server component on the server where the Dictionary Provider runs. For more information, see “Reinstalling Workstation Inventory” in “Uninstall/Reinstall” in the Novell ZENworks 7 Desktop Management Installation Guide.
2763: Unable to create the temporary directory
Source: ZENworks Desktop Management; Workstation Inventory; Dictionary Consumer
Severity: Critical
Possible Cause: The disk on the Inventory server is full.
Action: Ensure that there is enough free disk space on the Inventory server.
2766: Unable to merge dictionary files
Source: ZENworks Desktop Management; Workstation Inventory; Dictionary Consumer
Severity: Critical
orks 7 Desktop Management Troubleshooting Guide
novdocx (en) 16 April 2010
Explanation: The Dictionary Consumer merges the downloaded dictionary with the local dictionary, and stores the merged dictionary files in a temporary directory.
Possible Cause: The disk on the Inventory server is full.
Action: Ensure that there is enough free disk space on the Inventory server.
2767: Unable to copy dictionary files from the temporary directory to the dictionary directory
Source: ZENworks Desktop Management; Workstation Inventory; Dictionary Consumer
Severity: Critical
Explanation: The Dictionary Consumer merges the downloaded dictionary with the local dictionary, and stores the merged dictionary files in a temporary directory. Later the merged files are copied to the dictionary directory.
Possible Cause: The disk on the Inventory server is full.
Action: Ensure that there is enough free disk space on the Inventory server.
Error Messages 129

130 ZENw
novdocx (en) 16 April 2010
orks 7 Desktop Management Troubleshooting Guide
6novdocx (en) 16 A
pril 2010
6Troubleshooting Strategies
This following sections provide solutions to problems you might encounter when using the Workstation Inventory component of Novell® ZENworks® 7 Desktop Management:
“Troubleshooting Workstation Inventory Installation” on page 131“Troubleshooting the Inventory Service Manager” on page 132“Troubleshooting .Str and .Zip File Transfer” on page 133“Troubleshooting the Inventory Scanner or Inventory Agent” on page 134“Troubleshooting the Inventory Policy” on page 135“Troubleshooting the Database Backup” on page 135“Troubleshooting the Data Export” on page 136“Troubleshooting the Inventory Summary” on page 136“Troubleshooting the Inventory Reports” on page 137“Troubleshooting the Inventory Query” on page 138“Troubleshooting the Storer” on page 138“Troubleshooting the Upgrade Service's Inventory Database Migration” on page 142“Troubleshooting the Inventory Sync Service” on page 143“Troubleshooting the Inventory Installation on Linux” on page 144
6.1 Troubleshooting Workstation Inventory Installation
“Is the installation of Workstation Inventory successful?” on page 131“Double-byte characters are not supported in the SCANDIR path if the Novell Client is not installed on inventoried workstations” on page 132“The ZENworks 7 Desktop Management Inventory policies are not effective” on page 132
Is the installation of Workstation Inventory successful?
Source: ZENworks Desktop Management; Workstation Inventory; Installation
Action: During the Workstation Inventory installation, choose to view the log files.
After the installation, you can also check the log files in the ZENworks_installation_drive\novell\zfdtemp direcory to ensure that no errors are reported.
Action: Check to see if the Inventory Service object is created.
Action: Check to see if the Scan directory is created and shared on the Inventory server and has the required rights.
Troubleshooting Strategies 131
132 ZENw
novdocx (en) 16 April 2010
Double-byte characters are not supported in the SCANDIR path if the Novell Client is not installed on inventoried workstations
Source: ZENworks Desktop Management; Workstation Inventory; Installation
Explanation: If the Novell ClientTM is not installed on inventoried workstations, and if you use double-byte characters in the Inventory Service object's scan directory (scandir) path, the .str files are not transferred to the Inventory server.
By default, the scandir path is the installation path where the Inventory server-side components and the database are installed, unless you manually changed it after the ZENworks 7 Desktop Management installation by configuring the Inventory Service object.
The ZENworks 7 Desktop Management Inventory policies are not effective
Source: ZENworks Desktop Management; Workstation Inventory; Installation
Possible Cause: You accidentally deleted the Inventory Service object before reinstalling ZENworks 7 Workstation Inventory, or before installing ZENworks 7 Workstation Inventory over ZENworks for Desktops 4.x
Action: After installing or reinstalling ZENworks 7 Workstation Inventory, configure the ZENworks 7 Workstation Inventory policy with the new Inventory Service object created by the ZENworks 7 Installation program.
For more information on how to configure the Workstation Inventory policy, see “Configuring the Workstation Inventory Policy” in “Workstation Inventory” in the Novell ZENworks 7 Desktop Management Administration Guide.
6.2 Troubleshooting the Inventory Service Manager
“You are unable to access the database server across NAT” on page 132“Inventory Service Manager exits with -1 status” on page 133
You are unable to access the database server across NAT
Source: ZENworks Desktop Management; Workstation Inventory; Inventory Service Manager
Explanation: If you install the database server on a private network and the database object is configured with the private address, you cannot access this database from the public network (for example, through Novell ConsoleOne®).
Action: Configure the database object with the public address of the database server.
1 In ConsoleOne, right-click the database object, then click Properties.2 Click the ZENworks Database tab.3 In the Server IP address or DNS Name field, specify the public address of
the database server.4 Click Apply, then click Close.
orks 7 Desktop Management Troubleshooting Guide
novdocx (en) 16 April 2010
Inventory Service Manager exits with -1 status
Source: ZENworks Desktop Management; Workstation Inventory; Inventory Service Manager
Explanation: On the Inventory server, the “Unable to connect to the database. Retrying...” message is displayed and the Service Manager eventually exits. The Inventory Service Manager logs this error in the Inventory server's status log with error code 622.
Possible Cause: The Database server is down.
Action: Ensure that the Database server is up and running.
Possible Cause: This problem can also occur on a Novell NetWare® Inventory server with the Native File Access Pack installed. This NetWare server has one or more volumes of the server exposed as CIFS shares and does not have a DNS name configured.
If the NetWare server does not have a DNS name configured, the CIFS service is given a NetBIOS name, so during installation the database object assigns the NetBIOS name as the host name. This error occurs if the Inventory service on the NetWare server fails to resolve the NetBIOS name to an IP address.
Action: Choose an IP address instead of the NetBIOS name in the database object property page. For more information, see “Setting Up the Inventory Database” in “Workstation Inventory” in the Novell ZENworks 7 Desktop Management Administration Guide.
6.3 Troubleshooting .Str and .Zip File Transfer“The .str files have not been transferred” on page 133“The Sender is unable to transfer the .zip files to the Receiver” on page 134
The .str files have not been transferred
Source: ZENworks Desktop Management; Workstation Inventory; .Str and .Zip File Transfer
Action: Ensure that the ZENworks Web Server is up and running.
Action: If an error message is displayed, refer to “Sender and Receiver Error Messages” on page 57 to troubleshoot the error.
Action: If you have not configured the XML proxy, ensure that the value of Port1 in the Inventory_Agent_installation_directory\zws.properties file is same as the value of Port1 in the ZENworks_Web_Server_installation_directory\zws.properties file on the Inventory server.
Troubleshooting Strategies 133
134 ZENw
novdocx (en) 16 April 2010
If you have configured the XML proxy, ensure that the following conditions are met:
The XML proxy port number entered in the Workstation Inventory policy is the same as the value of Port2 in the XML_proxy_installation_directory\zws.properties.The value of Port1 in the XML_proxy_installation_directory\zws.properties file is the same as the value of Port1 in the ZENworks_Web_Server_installation_directory\zws.properties file on the next-level Inventory server.
The Sender is unable to transfer the .zip files to the Receiver
Source: ZENworks Desktop Management; Workstation Inventory; .Str and .Zip File Transfer
Action: Ensure that the Receiver is up and running.
Action: Ensure that the ZENworks Web Server is up and running.
Action: If an error message is displayed, refer to “Sender and Receiver Error Messages” on page 57 to troubleshoot the error.
Action: If you have not configured the XML proxy, ensure that the value of Port1 in the ZWS_installation_directory\zws.properties file on the lower-level Inventory server is same as the value of Port1 in the ZENworks_Web_Server_installation_directory\zws.properties file on the next-level Inventory server.
If you have configured the XML proxy, ensure that the following conditions are met:
The XML proxy port number entered in the Roll-Up policy is the same as the value of Port2 in the XML_proxy_installation_directory\zws.properties.The value of Port1 in the XML_proxy_installation_directory\zws.properties file is the same as the value of Port1 in the ZENworks_Web_Server_installation_directory\zws.properties file on the Inventory server.
6.4 Troubleshooting the Inventory Scanner or Inventory Agent
“Unable to scan Windows 9x workstations that are attached to a Windows server” on page 134
Unable to scan Windows 9x workstations that are attached to a Windows server
Source: ZENworks Desktop Management; Workstation Inventory; Inventory Scanner or Inventory Agent
orks 7 Desktop Management Troubleshooting Guide
novdocx (en) 16 April 2010
Action: If you have configured a Windows server as an Inventory server and if you have installed the Novell Client on a Windows 95/98 inventoried workstation that will send the scan data to the Windows server, you must do the following for the scanners to collect data:
If there are Novell eDirectoryTM users who are also Windows domain users, ensure that the users who are logged in are valid users of the Windows domain in the existing share created by ZENworks 7 Desktop Management.If there are users logged in to a different domain, ensure that the users are Trusted users of the domain in the existing SHARE directory created by ZENworks 7 Desktop Management.If there are eDirectory users who are not users of any Windows domain, ensure that the users are not logged in to eDirectory when you start the workstation. However, these users can log in to eDirectory later.If there are users who do not log in to any Windows domain, or in to eDirectory, but log in to their local workstations with a username and password, ensure that their user names and passwords are also a part of the Windows domain.
6.5 Troubleshooting the Inventory Policy“Unable to update the swrules.ini file for ZENworks for Desktops 4.x inventoried workstations using ZENworks 7 ConsoleOne snap-ins” on page 135
Unable to update the swrules.ini file for ZENworks for Desktops 4.x inventoried workstations using ZENworks 7 ConsoleOne snap-ins
Source: ZENworks Desktop Management; Workstation Inventory; Inventory Policy
Explanation: If you update the swrules.ini file for ZENworks for Desktops 4.x inventoried workstations using the ZENworks 7 ConsoleOne snap-ins, you might encounter the following error:
Unable to write to Novell eDirectory as the data in the file is corrupt.
Action: Use ZENworks for Desktops 4.x Inventory ConsoleOne snap-ins to update the ZENworks for Desktops 4.x swrules.ini. For more information, see the ZENworks 4.0.1 Administration Guide (http://www.novell.com/documentation/zdpr/index.html).
6.6 Troubleshooting the Database Backup“When you back up the Sybase Inventory database running on a NetWare server, the database backup displays a successful message even though the backup has failed” on page 135“You are unable to view the backup directory that you created” on page 136
When you back up the Sybase Inventory database running on a NetWare server, the database backup displays a successful message even though the backup has failed
Source: ZENworks Desktop Management; Workstation Inventory; Database Backup
Troubleshooting Strategies 135
136 ZENw
novdocx (en) 16 April 2010
Explanation: When you try to back up the Sybase Inventory database running on a NetWare server, the DB backup displays a successful message even though the backup has failed and creates a file with zero bytes in the database backup directory.
Possible Cause: There is not sufficient disk space in the database backup directory.
Action: Ensure that there is sufficient free disk space in the database backup directory.
You are unable to view the backup directory that you created
Source: ZENworks Desktop Management; Workstation Inventory; Database Backup
Possible Cause: The backup directory you created contains double-byte characters. When you create a backup directory name using double-byte characters, Sybase interprets the double-byte characters as a different name and creates a backup folder using the interpreted name. When you create a new backup, avoid using double-byte characters in the directory name.
Action: Rename the directory.
6.7 Troubleshooting the Data Export“When you invoke the Data Export tool on a Japanese inventoried machine, the enum values might be displayed in French” on page 136
When you invoke the Data Export tool on a Japanese inventoried machine, the enum values might be displayed in French
Source: ZENworks Desktop Management; Workstation Inventory; Data Export
Action: Before invoking the Data Export tool, you must run the AddEnums utility to add the non-English enum values. For more information about how to run the AddEnums utility, see “Adding Non-English Enumerated Values for Inventory Attributes into the Inventory Database” in “Workstation Inventory” in the Novell ZENworks 7 Desktop Management Administration Guide.
6.8 Troubleshooting the Inventory Summary“The Inventory Summary window does not display the Representative File Information data or displays the message “No Information Found” when you select the Representative File Information attribute” on page 136“When you invoke the Inventory Summary on a Japanese inventoried machine, the enum values might be displayed in French” on page 137
The Inventory Summary window does not display the Representative File Information data or displays the message “No Information Found” when you select the Representative File Information attribute
Source: ZENworks Desktop Management; Workstation Inventory; Inventory Summary
Action: Refresh the Inventory Summary window.
orks 7 Desktop Management Troubleshooting Guide
novdocx (en) 16 April 2010
When you invoke the Inventory Summary on a Japanese inventoried machine, the enum values might be displayed in French
Source: ZENworks Desktop Management; Workstation Inventory; Inventory Summary
Action: Before invoking the Inventory Summary, you must run the AddEnums utility to add the non-English enum values. For more information about how to run the AddEnums utility, see “Adding Non-English Enumerated Values for Inventory Attributes into the Inventory Database” in “Workstation Inventory” in the Novell ZENworks 7 Desktop Management Administration Guide.
6.9 Troubleshooting the Inventory Reports“When you export an Inventory report to PDF, the location to save the file is not requested” on page 137“You are unable to export Inventory Reports to PDF if the Inventory data is stored in a MS SQL Database” on page 137“When you invoke the Inventory Reports on a Japanese inventoried machine, the enum values might be displayed in French” on page 137
When you export an Inventory report to PDF, the location to save the file is not requested
Source: ZENworks Desktop Management; Workstation Inventory; Inventory Report
Possible Cause: When you run an Inventory report, exportmoduller.dll and crtslv.dll are automatically registered on the machine.
This error occurs if the registration of these DLLs is corrupted.
Action: Before generating Inventory reports, do the following on the machine where you run the Inventory report:
1 Open the Registry Editor.2 Delete HKEY_CLASSES_ROOT\ExportModeller.EMAdornments.
You are unable to export Inventory Reports to PDF if the Inventory data is stored in a MS SQL Database
Source: ZENworks Desktop Management; Workstation Inventory; Inventory Report
Possible Cause: You are trying to export Inventory reports using ConsoleOne that has been copied to the machine and not installed.
Action: Invoke ConsoleOne from the machine where you have installed it and export the Inventory reports.
When you invoke the Inventory Reports on a Japanese inventoried machine, the enum values might be displayed in French
Source: ZENworks Desktop Management; Workstation Inventory; Inventory Report
Troubleshooting Strategies 137
138 ZENw
novdocx (en) 16 April 2010
Action: Before invoking an Inventory Report, you must run the AddEnums utility to add the non-English enum values. For more information about how to run the AddEnums utility, see “Adding Non-English Enumerated Values for Inventory Attributes into the Inventory Database” in “Workstation Inventory” in the Novell ZENworks 7 Desktop Management Administration Guide.
6.10 Troubleshooting the Inventory Query“When you invoke the Inventory Query on a Japanese inventoried machine, the enum values might be displayed in French” on page 138
When you invoke the Inventory Query on a Japanese inventoried machine, the enum values might be displayed in French
Source: ZENworks Desktop Management; Workstation Inventory; Inventory Query
Action: Before invoking the Inventory Query, you must run the AddEnums utility to add the non-English enum values. For more information about how to run the AddEnums utility, see “Adding Non-English Enumerated Values for Inventory Attributes into the Inventory Database” in “Workstation Inventory” in the Novell ZENworks 7 Desktop Management Administration Guide.
6.11 Troubleshooting the Storer“The .str files are not being stored in the Inventory database” on page 138“The Storer running on a Windows Inventory server randomly stops updating the workstation scan data in the Inventory database” on page 139“The CPU utilization of the Inventory server is 100% when the Storer is active” on page 139“How do I back up the .str file?” on page 140“How do I change to another Inventory database after the scan data has been stored in the Inventory database?” on page 141“The Storer takes too much time to store the .str files” on page 141“The Inventory Storer is unable to store the str files having non-ASCII characters into the Sybase or Oracle Inventory database” on page 141
The .str files are not being stored in the Inventory database
Source: ZENworks Desktop Management; Workstation Inventory; Storer
Action: Manually enforce a full scan on the workstation object:
1 In ConsoleOne, right-click the workstation object, then click Properties.2 Click the ZENworks Inventory tab, then click the Workstation Scan
Configuration suboption.3 Select Start Full Scan.4 Click Apply, then click Close.
orks 7 Desktop Management Troubleshooting Guide

novdocx (en) 16 April 2010
Action: If the problem persists:
1 Edit the Inventory_server_installation_path\zenworks\inv\server\wminv\properties\tracerfilter.properties file to set the Debug level to DEBUG5 or ALL.
2 Edit the Inventory_server_installation_path\zenworks\inv\server\wminv\properties\storerdebug.properties file to set the value of trace= true andstrfiledelete= path_where_you_want_to_back_up_.str_files.
3 Manually enforce a full scan on the workstation object:3a In ConsoleOne, right-click the workstation object, then click
Properties.3b Click the ZENworks Inventory tab, then click the Workstation Scan
Configuration suboption.3c Select Start Full Scan.3d Click Apply, then click Close.
If the problem persists, send the tracer and the backed-up .str files to Novell Support (http://www.novell.com/support).
The Storer running on a Windows Inventory server randomly stops updating the workstation scan data in the Inventory database
Source: ZENworks Desktop Management; Workstation Inventory; Storer
Explanation: The Storer running on a Windows Inventory server randomly stops updating the workstation scan data in the Inventory database. The Inventory server screen displays a message such as “Logout Exception: [Root exception is com.novell.service.jncp.ClientException: ccode = 34921 (0x8869)] com.novell.java.security.LogoutException: Logout failed.”
Also, the directory contains .str and .zip files that need to be processed.
Possible Cause: The Storer encounters errors while updating the inventoried workstation scan data in eDirectory. Consequently, the Selector and the Storer stops processing .str files.
Action: Restart the Inventory services. For more information, see “Starting and Stopping the Inventory Service” in “Workstation Inventory” in the Novell ZENworks 7 Desktop Management Administration Guide.
The CPU utilization of the Inventory server is 100% when the Storer is active
Source: ZENworks Desktop Management; Workstation Inventory; Storer
Explanation: The CPU utilization of the Inventory server might be 100% when the Storer is storing the scan data (typically, full scans) into the Inventory database.
This error occurs if the memory of the Inventory server is low, or one or more high CPU-utilization applications are running on the Inventory server.
Ignore this problem if you can run any other application on the server. If you cannot run any other application at normal speed, try the actions below.
Troubleshooting Strategies 139
140 ZENw
novdocx (en) 16 April 2010
Action: Dedicate a server to host the Inventory database.
Action: Do the following:
1 Stop the Storer by entering stopser storer at the server console prompt.
2 Configure the following Storer parameters in the Inventory_server_installation_path\zenworks\inv\server\wminv\properties\storerdebug.properties file to slow down the processing of .str files:
fileyield: Specify a value greater than or equal to 300 but less than 600
parseyield: Specify a value greater than or equal to 100 but less than 500
wsdelyield: Specify a value greater than or equal to 100 but less than 500
3 Start the Storer by entering startser storer at the server console prompt.
If the problem persists, send a copy of storerdebug.properties to Novell Support (http://www.novell.com/support).
Action: If your Inventory database runs on Sybase, you can improve the Storer performance by also running the Sybindex utility. For more information on how to run Sybindex, see “Sybase in the NetWare, Windows, or Linux Environment” in “Workstation Inventory” in the Novell ZENworks 7 Desktop Management Administration Guide.
How do I back up the .str file?
Source: ZENworks Desktop Management; Workstation Inventory; Storer
Action: Do the following:
1 Stop the Storer by entering stopser storer at the server console prompt
2 Edit the Inventory_server_installation_path\zenworks\inv\server\wminv\ properties\storerdebug.properties file to set the value of strfiledelete=path__where_you_want_to_back_up_.str_file.
IMPORTANT: If your Inventory server is a Windows server, ensure that the path is separated by double slash (\\). For example, c:\\windows\\temp.Ensure that the backup directory already exists on the Inventory server before editing the storerdebug.properties file.
3 Start the Storer by entering startser storer at the server console prompt.
orks 7 Desktop Management Troubleshooting Guide
novdocx (en) 16 April 2010
How do I change to another Inventory database after the scan data has been stored in the Inventory database?
Source: ZENworks Desktop Management; Workstation Inventory; Storer
Explanation: After the scan data has been stored, you might want to change your existing Inventory database to a different database. For example, you could change the existing Sybase Inventory database to an Oracle Inventory database.
Action: Do the following:
1 Stop the Inventory service of the Inventory server connected to the existing database that you want to change. For more information, see “Starting and Stopping the Inventory Service” in “Workstation Inventory” in the Novell ZENworks 7 Desktop Management Administration Guide.
2 Set up the desired Inventory database. For more information, see “Setting Up the Inventory Database” in “Workstation Inventory” in the Novell ZENworks 7 Desktop Management Administration Guide.
3 Ensure that the Inventory server is attached to the new Inventory database. For more information, see “Configuring the Database Location Policy” in “Workstation Inventory” in the Novell ZENworks 7 Desktop Management Administration Guide.
4 Select the Start Full Scan option in the Inventory Service object's property page of the Inventory server that is directly connected to this database and also in the lower-level Inventory servers that roll up scan data to this Inventory server.
5 Start the Inventory services of the Inventory server to which the new Inventory database is attached to. For more information, see “Starting and Stopping the Inventory Service” in “Workstation Inventory” in the Novell ZENworks 7 Desktop Management Administration Guide.
The Storer takes too much time to store the .str files
Source: ZENworks Desktop Management; Workstation Inventory; Storer
Action: You must tune the performance of the Inventory database. For more information, see “Database Parameter Tuning Tips” in “Workstation Inventory” in the Novell ZENworks 7 Desktop Management Administration Guide.
Action: If your Inventory database runs on Sybase, you can improve the performance the Storer performance by running the Sybindex utility. For more information on how to run Sybindex, see “Sybase in the NetWare, Windows, or Linux Environment” in “Workstation Inventory” in the Novell ZENworks 7 Desktop Management Administration Guide.
The Inventory Storer is unable to store the str files having non-ASCII characters into the Sybase or Oracle Inventory database
Source: ZENworks Desktop Management; Workstation Inventory; Storer
Troubleshooting Strategies 141

142 ZENw
novdocx (en) 16 April 2010
Explanation: The Inventory Storer freezes while storing the str files having non-ASCII characters such as Japanese and Chinese into the Sybase or Oracle 9i Inventory database.
Possible Cause: The length of few entries such as Product Name and Description in the str file exceeds the corresponding database column length.
Action: If your Inventory database is running on Sybase:
1 Stop the Inventory service. For more information, see “Starting and Stopping the Inventory Service” in “Workstation Inventory” in the Novell ZENworks 7 Desktop Management Administration Guide.
2 Edit zenworks\inv\server\wminv\properties\storerdebug.properties to set the value of jconn2 to True.
3 Start the Inventory service. For more information, see “Starting and Stopping the Inventory Service” in “Workstation Inventory” in the Novell ZENworks 7 Desktop Management Administration Guide.
Title: If your Inventory database is running on Oracle 9i
1 Stop the Inventory service. For more information, see “Starting and Stopping the Inventory Service” in “Workstation Inventory” in the Novell ZENworks 7 Desktop Management Administration Guide.
2 Stop the Inventory database.3 Add the following parameter in
Database server Drive:\zenworks\inventory\oracle\ database\init.ora :NLS_LENGTH_SEMANTICS=CHAR
4 Start the Inventory database.5 Start sqlplus or isqlplus, and connect to the inventory database as
mw_dba.6 At the sqlplus prompt, run the length_semantics.sql script that is
located in zenworks\inv\server\wminv\properties\sql.zip.
7 Start the Inventory service. For more information, see “Starting and Stopping the Inventory Service” in “Workstation Inventory” in the Novell ZENworks 7 Desktop Management Administration Guide.
6.12 Troubleshooting the Upgrade Service's Inventory Database Migration
“The Upgrade Service displays database-related errors or exceptions and abnormally terminates” on page 143“The Upgrade Service takes too much time to migrate the Inventory database” on page 143“How do I know whether the Upgrade Service is progressing during the Inventory database migration phase?” on page 143
orks 7 Desktop Management Troubleshooting Guide
novdocx (en) 16 April 2010
The Upgrade Service displays database-related errors or exceptions and abnormally terminates
Source: ZENworks Desktop Management; Workstation Inventory; Upgrade Service's Inventory Database Migration
Action: Send the inventory traces located in the Inventory_server_installation_path\zenworks\inv\server\wminv\logs\zenworksinvservice directory and the migration traces located in the Inventory_server_installation_path\zenworks\inv\server\wminv\logs\migrationlogs directory to Novell Support (http://www.novell.com/support).
The Upgrade Service takes too much time to migrate the Inventory database
Source: ZENworks Desktop Management; Workstation Inventory; Upgrade Service's Inventory Database Migration
Action: Do the following:
1 Ensure that all the connections to the database are closed.2 Restart the Inventory database and ensure that the database is not
accessed from any applications.3 Restart the Inventory services. For more information, see “Starting and
Stopping the Inventory Service” in “Workstation Inventory” in the Novell ZENworks 7 Desktop Management Administration Guide.
How do I know whether the Upgrade Service is progressing during the Inventory database migration phase?
Source: ZENworks Desktop Management; Workstation Inventory; Upgrade Service's Inventory Database Migration
Action: You will see progress indication as percentage of completion and the time taken as x% (y) on the server console, where x indicates the percentage amount and y indicates the time elapsed in seconds.
The progress indicator starts from 0% for both schema and data migration. After the data migration, the progress indicator shows the time to complete the operation.
6.13 Troubleshooting the Inventory Sync Service“The Inventory Sync Service deletes the workstation objects from the Inventory database even though they exist in Novell eDirectory” on page 143
The Inventory Sync Service deletes the workstation objects from the Inventory database even though they exist in Novell eDirectory
Source: ZENworks Desktop Management; Workstation Inventory; Inventory Sync Service
Possible Cause: The Inventory Service object does not have the Browse Entry rights, and the Read and Compare Attribute rights to the workstation objects.
Troubleshooting Strategies 143
144 ZENw
novdocx (en) 16 April 2010
Explanation: The Inventory Sync service authenticates as the Inventory Service Object to eDirectory to search for the workstations. The ZENworks Workstation Inventory installation grants the Inventory Service object Browse Entry rights, and Read and Compare Attribute rights to the root of the tree, and also to all workstations in the tree. It also ensures that the Inventory Sync service can search for all the workstations.
However, if you have defined the Inheritance Rights Filters that prevent the rights from flowing down to the workstation objects, the Inventory Sync service cannot find the workstation objects. Consequently, the Inventory Sync service assumes that the workstation objects are removed from eDirectory, and removes the workstations from the inventory database.
Action: Grant the Inventory Service Object Browse Entry rights, and the Read and Compare Attribute rights to the containers containing the workstation objects.
6.14 Troubleshooting the Inventory Installation on Linux
“The Windows inventoried workstation displays a message that the .str files are successfully transferred to the Linux Inventory server, but the .str files are not found on the Linux Inventory server” on page 144“On a Linux Inventory server, the Inventory service abruptly terminates if it is started manually” on page 145
The Windows inventoried workstation displays a message that the .str files are successfully transferred to the Linux Inventory server, but the .str files are not found on the Linux Inventory server
Source: ZENworks Desktop Management; Workstation Inventory; Inventory Installation on Linux
Possible Cause: Samba is not up and running on the Linux Inventory server.
Action: Do the following:
1 Check if Samba is up and running by entering the following commands at the Linux Inventory server prompt:/etc/init.d/smb status
/etc/init.d/nmb status
2 If any of the services are not running, start the service by entering the following command at the Linux Inventory server prompt:/etc/init.d/service_name start
Action: If the Inventory server is running on SLES, ensure that the NetBIOS name is unique, that it is different from the server name, and that it contains a maximum of 15 characters.
Action: If the Inventory server is running on OES Linux, ensure that the server's DNS name is same as the server name.
Possible Cause: The Samba version installed on the Inventory server is not the version recommended by ZENworks 7 Desktop Management.
orks 7 Desktop Management Troubleshooting Guide
novdocx (en) 16 April 2010
Action: Ensure that the Samba version running on the Inventory server is 3.0.9-2.6.
On a Linux Inventory server, the Inventory service abruptly terminates if it is started manually
Source: ZENworks Desktop Management; Workstation Inventory; Inventory Installation on Linux
Possible Cause: The ZWS service is running using the /etc/init.d/novell-zfs status.
Action: Restart the ZWS service using /etc/init.d/novell-zfs start.
Possible Cause: If the Linux Inventory server is a Standalone server with Sybase database, the Sybase database might be running using the /etc/init.d/novell-zdm-sybase status.
Action: Restart the Sybase database using /etc/init.d/novell-zdm-sybase start.
Troubleshooting Strategies 145

146 ZENw
novdocx (en) 16 April 2010
orks 7 Desktop Management Troubleshooting Guide
7novdocx (en) 16 A
pril 2010
7Troubleshooting Workstation and Server Imaging
This section lists the error message displayed by the Workstation and Server Imaging component of Novell® ZENworks® 7 Desktop Management.
“/opt/novell/eDirectory/bin/ndstrace: error while loading shared libraries” on page 147
/opt/novell/eDirectory/bin/ndstrace: error while loading shared libraries
Severity: Error
Possible Cause: On a SLES10 SP2 64 bit device that has eDirectory 8.8 SP3 64 bit installed, you might be doing one of the following:
Upgrading to ZENworks 7 Desktop Management Interim Release 4Running the following Imaging service script: /etc/init.d/novell-zmgserv
Action: Do one of the following before upgrading to Interim Release 4 or running the Imaging service script:
Run . /opt/novell/eDirectory/bin/ndspath Open the /etc/profile file using a text editor and add the following line: . /opt/novell/eDirectory/bin/ndspath
Troubleshooting Workstation and Server Imaging 147

148 ZENw
novdocx (en) 16 April 2010
orks 7 Desktop Management Troubleshooting Guide
8novdocx (en) 16 A
pril 2010
8Troubleshooting Automatic Workstation Import and Removal
The following section provides solutions to the problems you might encounter when using the Automatic Workstation Import and Removal component of Novell® ZENworks® 7 Desktop Management:
“Unable to import workstations to a ZENworks Desktop Management server that is running on an Open Enterprise Server (OES) 2.0 cluster” on page 149
Unable to import workstations to a ZENworks Desktop Management server that is running on an Open Enterprise Server (OES) 2.0 cluster
Severity: Critical.
Possible Cause: The Server Package policies are not properly associated with the shared resource object in Novell ConsoleOne®.
Action: Perform the following steps to add the Server Package to the associated policy packages of the shared resource object:
1. In ConsoleOne, right-click the object, then click Properties.2. Click ZENworks > Associated Policy Packages.3. Click Add. 4. Select the Server Package.5. Click OK.
Troubleshooting Automatic Workstation Import and Removal 149

150 ZENw
novdocx (en) 16 April 2010
orks 7 Desktop Management Troubleshooting Guide
IVnovdocx (en) 16 A
pril 2010
IVTroubleshooting ZENworks Agent
If the workstation where the ZENworks® Agent is installed displays an error message, you can look it up in the Error Messages section. If a problem is not accompanied by an error message, or if specific instructions for an error message are not available, you can try more general troubleshooting strategies to resolve the problem.
Chapter 9, “Troubleshooting ZENworks Agent Error Messages,” on page 153Chapter 10, “Troubleshooting ZENworks Agent Issues,” on page 155
Troubleshooting ZENworks Agent 151

152 ZENw
novdocx (en) 16 April 2010
orks 7 Desktop Management Troubleshooting Guide
9novdocx (en) 16 A
pril 2010
9Troubleshooting ZENworks Agent Error Messages
The following section provides solutions to the errors you might encounter on the workstations where the ZENworks Agent is installed:
“Change Password Failed” on page 153
Change Password Failed
Severity: Error
Explanation: If an eDirectory user authenticates to a server through an OES 2 SP2 or SLES 10 SP3 middle tier server and chooses to change the eDirectory password, the following error is displayed on the workstation even if the password is successfully changed:
Change Password Failed
For more information on changing the password, see “Using the ZENworks Agent Control Panel Applet To Modify Agent Settings”.
Action: Ignore the error message.
Troubleshooting ZENworks Agent Error Messages 153

154 ZENw
novdocx (en) 16 April 2010
orks 7 Desktop Management Troubleshooting Guide
10novdocx (en) 16 A
pril 2010
10Troubleshooting ZENworks Agent Issues
The following section provides solutions to problems you might encounter on the workstations where the ZENworks® Agent is installed:
“An eDirectory user is prompted to enter user credentials twice to log in to a workstation” on page 155
An eDirectory user is prompted to enter user credentials twice to log in to a workstation
Severity: Error
Explanation: An eDirectoryTM user whose password has expired is prompted to enter credentials twice to log in to a workstation that has both Novell® SecureLogin and the ZENworks Desktop Management Agent installed if the user chooses to change the password when prompted by ZENworks.
Action: Do one of the following:
Do not change the password when prompted to change by ZENworks.Perform the following steps to prevent ZENworks from prompting you to change the password:
1. Open the Registry Editor.2. Go to HKLM\Software\Novell\LgnXTier.3. Create a DWORD called DisablePasswordChangeDlg, and set the
value to a non-zero integer.
Troubleshooting ZENworks Agent Issues 155

156 ZENw
novdocx (en) 16 April 2010
orks 7 Desktop Management Troubleshooting Guide
Vnovdocx (en) 16 A
pril 2010
VEnabling Debug Logging in ZENworks 7
Debug logs are usually text files that contain information about processes occuring in various Novell® ZENworks® Desktop Management components. These log files are either enabled by default and are always available, or they are enabled when the component is installed or when the component processes are running.
These log files can help you understand the chronological flow of events occurring as the process runs. A knowledge of such events can help you to narrow possible causes for issues that might occur as you use ZENworks Desktop Management.
This section of the Novell ZENworks 7 Troubleshooting Guide includes the following information:
Chapter 11, “Enabling Debug Logging for the ZENworks Desktop Management Installation,” on page 159Chapter 12, “Enabling Debug Logging for the ZENworks Middle Tier Server,” on page 161Chapter 13, “Enabling Debug Logging for Automatic Workstation Import and Removal,” on page 163Chapter 14, “Enabling Debug Logging for Desktop Management Policies,” on page 165Chapter 15, “Enabling Debug Logging for the Novell Application Launcher,” on page 169Chapter 16, “Enabling Debug Logging for ZENworks Desktop Management Imaging and Preboot Services,” on page 173Chapter 17, “Enabling Debug Logging for ZENworks Remote Management,” on page 177Chapter 18, “Enabling Debug Logging for Workstation Inventory,” on page 179Chapter 19, “Enabling Debug Logging for ConsoleOne Administration,” on page 183
Enabling Debug Logging in ZENworks 7 157

158 ZENw
novdocx (en) 16 April 2010
orks 7 Desktop Management Troubleshooting Guide
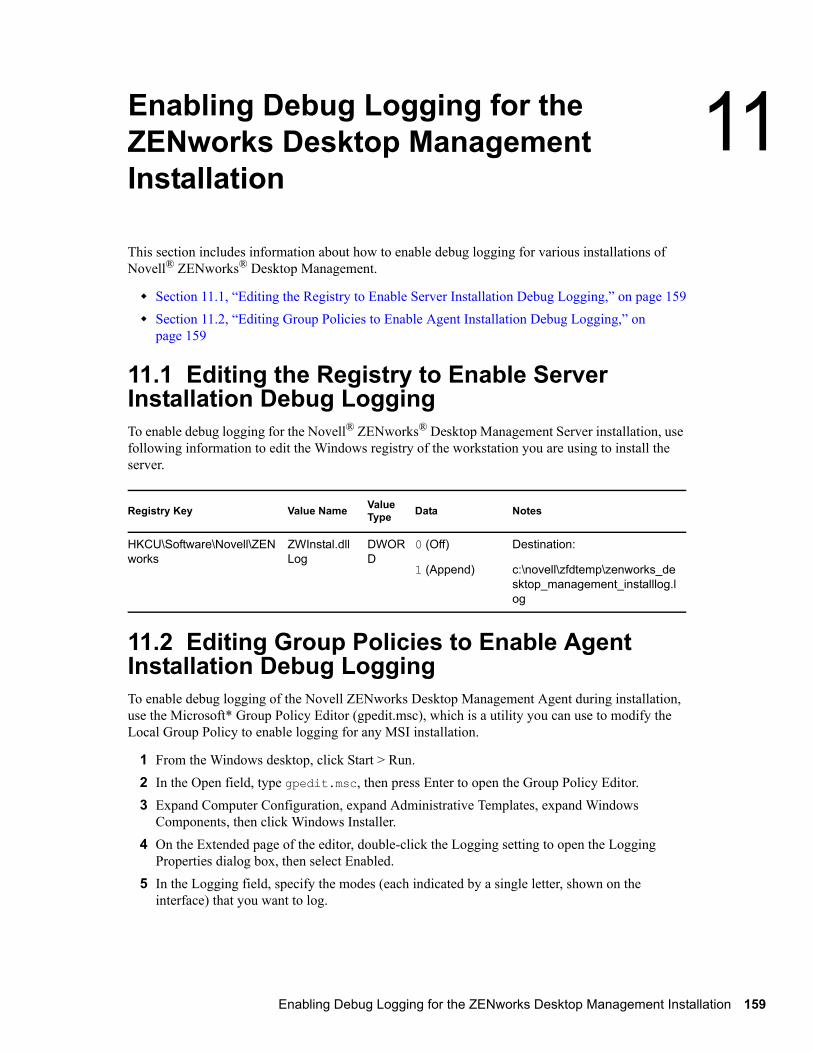
11novdocx (en) 16 A
pril 2010
11Enabling Debug Logging for the ZENworks Desktop Management Installation
This section includes information about how to enable debug logging for various installations of Novell® ZENworks® Desktop Management.
Section 11.1, “Editing the Registry to Enable Server Installation Debug Logging,” on page 159Section 11.2, “Editing Group Policies to Enable Agent Installation Debug Logging,” on page 159
11.1 Editing the Registry to Enable Server Installation Debug LoggingTo enable debug logging for the Novell® ZENworks® Desktop Management Server installation, use following information to edit the Windows registry of the workstation you are using to install the server.
11.2 Editing Group Policies to Enable Agent Installation Debug LoggingTo enable debug logging of the Novell ZENworks Desktop Management Agent during installation, use the Microsoft* Group Policy Editor (gpedit.msc), which is a utility you can use to modify the Local Group Policy to enable logging for any MSI installation.
1 From the Windows desktop, click Start > Run.2 In the Open field, type gpedit.msc, then press Enter to open the Group Policy Editor.3 Expand Computer Configuration, expand Administrative Templates, expand Windows
Components, then click Windows Installer.4 On the Extended page of the editor, double-click the Logging setting to open the Logging
Properties dialog box, then select Enabled.5 In the Logging field, specify the modes (each indicated by a single letter, shown on the
interface) that you want to log.
Registry Key Value Name Value Type Data Notes
HKCU\Software\Novell\ZENworks
ZWInstal.dll Log
DWORD
0 (Off)
1 (Append)
Destination:
c:\novell\zfdtemp\zenworks_desktop_management_installlog.log
Enabling Debug Logging for the ZENworks Desktop Management Installation 159
160 ZENw
novdocx (en) 16 April 2010
We recommend that you specify all available modes.The log file (msixxxxx.log, where xxxxx represents randomly-generated alphanumeric characters) appears in the \temp folder of the calling user (that is, %TEMP% for the logged-in user).
For more information on using the Group Policy Editor, see Article 314852 (http://support.microsoft.com/default.aspx?scid=kb;en-us;314852) in the Microsoft Knowledge Base.
For more information about Windows Installer logging for all Windows operating systems, see Article 223300 (http://support.microsoft.com/default.aspx?scid=kb;en-us;223300) in the Microsoft Knowledge Base.
orks 7 Desktop Management Troubleshooting Guide
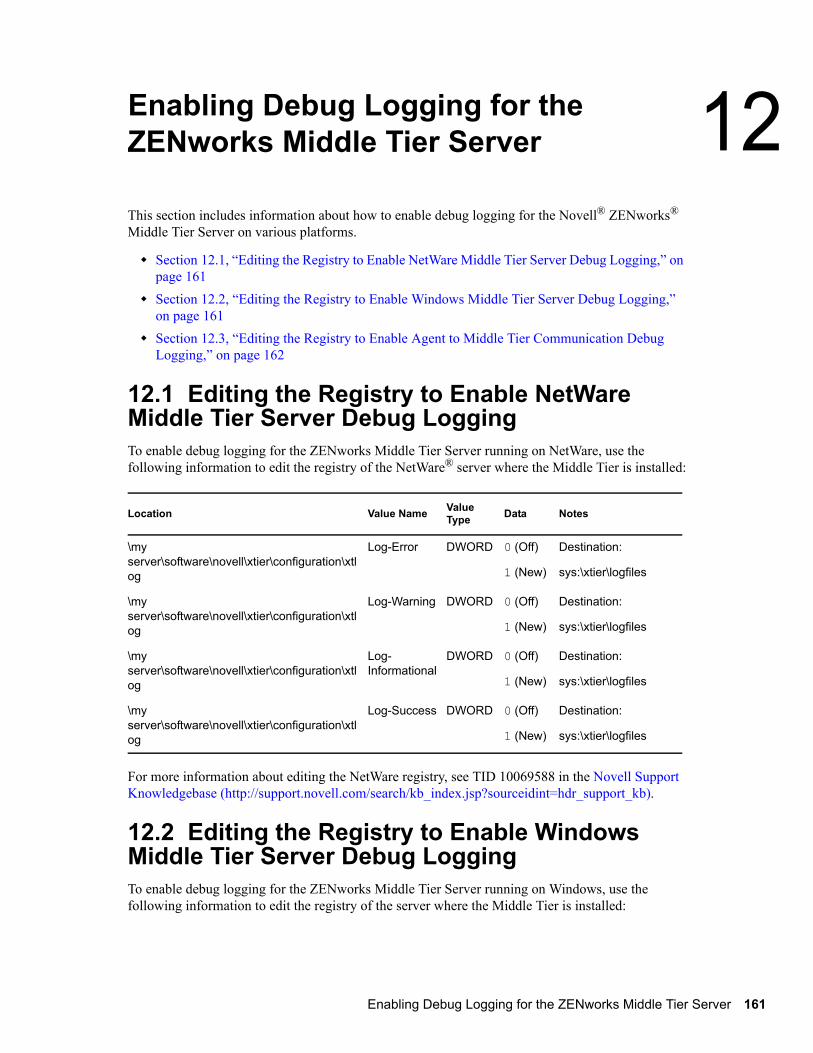
12novdocx (en) 16 A
pril 2010
12Enabling Debug Logging for the ZENworks Middle Tier Server
This section includes information about how to enable debug logging for the Novell® ZENworks® Middle Tier Server on various platforms.
Section 12.1, “Editing the Registry to Enable NetWare Middle Tier Server Debug Logging,” on page 161Section 12.2, “Editing the Registry to Enable Windows Middle Tier Server Debug Logging,” on page 161Section 12.3, “Editing the Registry to Enable Agent to Middle Tier Communication Debug Logging,” on page 162
12.1 Editing the Registry to Enable NetWare Middle Tier Server Debug LoggingTo enable debug logging for the ZENworks Middle Tier Server running on NetWare, use the following information to edit the registry of the NetWare® server where the Middle Tier is installed:
For more information about editing the NetWare registry, see TID 10069588 in the Novell Support Knowledgebase (http://support.novell.com/search/kb_index.jsp?sourceidint=hdr_support_kb).
12.2 Editing the Registry to Enable Windows Middle Tier Server Debug LoggingTo enable debug logging for the ZENworks Middle Tier Server running on Windows, use the following information to edit the registry of the server where the Middle Tier is installed:
Location Value Name Value Type Data Notes
\my server\software\novell\xtier\configuration\xtlog
Log-Error DWORD 0 (Off)
1 (New)
Destination:
sys:\xtier\logfiles
\my server\software\novell\xtier\configuration\xtlog
Log-Warning DWORD 0 (Off)
1 (New)
Destination:
sys:\xtier\logfiles
\my server\software\novell\xtier\configuration\xtlog
Log-Informational
DWORD 0 (Off)
1 (New)
Destination:
sys:\xtier\logfiles
\my server\software\novell\xtier\configuration\xtlog
Log-Success DWORD 0 (Off)
1 (New)
Destination:
sys:\xtier\logfiles
Enabling Debug Logging for the ZENworks Middle Tier Server 161
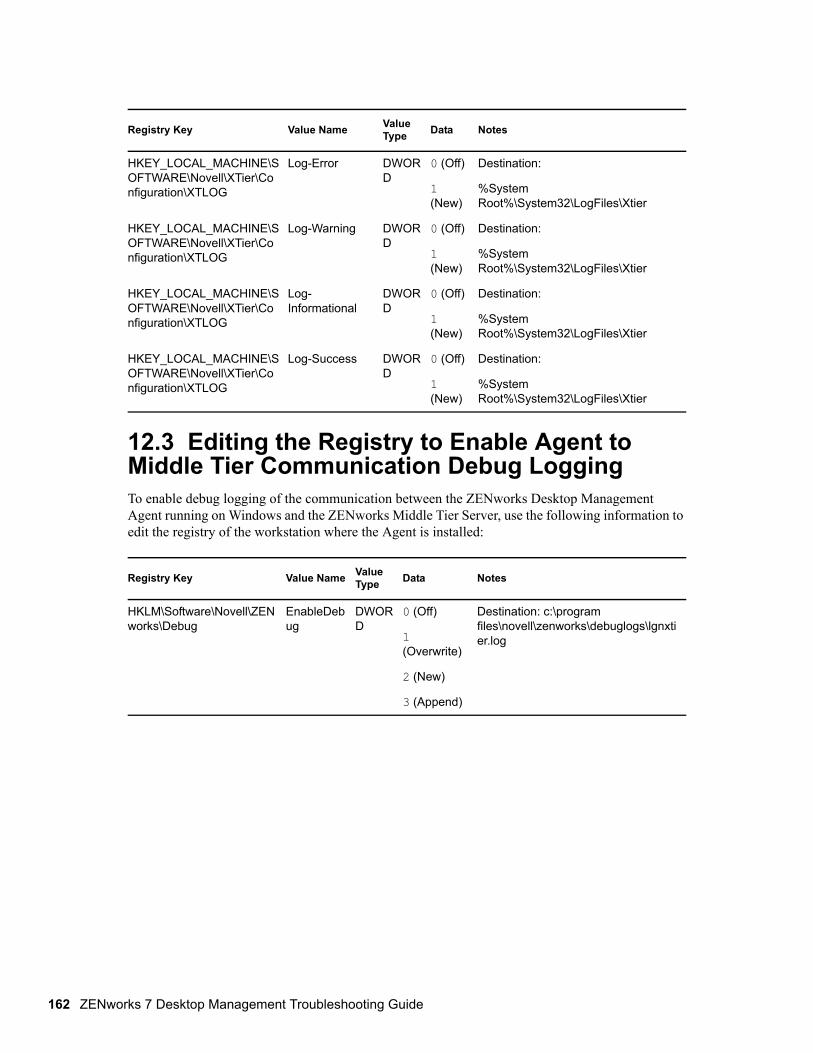
162 ZENw
novdocx (en) 16 April 2010
12.3 Editing the Registry to Enable Agent to Middle Tier Communication Debug LoggingTo enable debug logging of the communication between the ZENworks Desktop Management Agent running on Windows and the ZENworks Middle Tier Server, use the following information to edit the registry of the workstation where the Agent is installed:
Registry Key Value Name Value Type Data Notes
HKEY_LOCAL_MACHINE\SOFTWARE\Novell\XTier\Configuration\XTLOG
Log-Error DWORD
0 (Off)
1 (New)
Destination:
%System Root%\System32\LogFiles\Xtier
HKEY_LOCAL_MACHINE\SOFTWARE\Novell\XTier\Configuration\XTLOG
Log-Warning DWORD
0 (Off)
1 (New)
Destination:
%System Root%\System32\LogFiles\Xtier
HKEY_LOCAL_MACHINE\SOFTWARE\Novell\XTier\Configuration\XTLOG
Log-Informational
DWORD
0 (Off)
1 (New)
Destination:
%System Root%\System32\LogFiles\Xtier
HKEY_LOCAL_MACHINE\SOFTWARE\Novell\XTier\Configuration\XTLOG
Log-Success DWORD
0 (Off)
1 (New)
Destination:
%System Root%\System32\LogFiles\Xtier
Registry Key Value Name Value Type Data Notes
HKLM\Software\Novell\ZENworks\Debug
EnableDebug
DWORD
0 (Off)
1 (Overwrite)
2 (New)
3 (Append)
Destination: c:\program files\novell\zenworks\debuglogs\lgnxtier.log
orks 7 Desktop Management Troubleshooting Guide
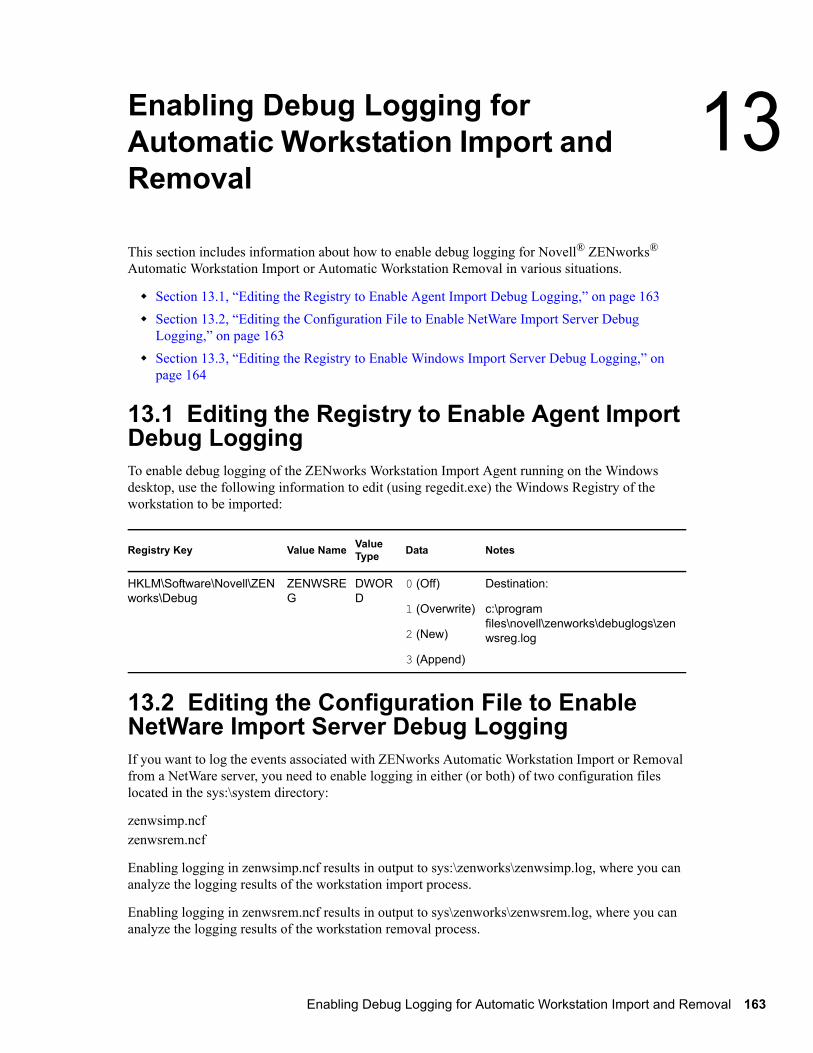
13novdocx (en) 16 A
pril 2010
13Enabling Debug Logging for Automatic Workstation Import and Removal
This section includes information about how to enable debug logging for Novell® ZENworks® Automatic Workstation Import or Automatic Workstation Removal in various situations.
Section 13.1, “Editing the Registry to Enable Agent Import Debug Logging,” on page 163Section 13.2, “Editing the Configuration File to Enable NetWare Import Server Debug Logging,” on page 163Section 13.3, “Editing the Registry to Enable Windows Import Server Debug Logging,” on page 164
13.1 Editing the Registry to Enable Agent Import Debug Logging To enable debug logging of the ZENworks Workstation Import Agent running on the Windows desktop, use the following information to edit (using regedit.exe) the Windows Registry of the workstation to be imported:
13.2 Editing the Configuration File to Enable NetWare Import Server Debug LoggingIf you want to log the events associated with ZENworks Automatic Workstation Import or Removal from a NetWare server, you need to enable logging in either (or both) of two configuration files located in the sys:\system directory:
zenwsimp.ncfzenwsrem.ncf
Enabling logging in zenwsimp.ncf results in output to sys:\zenworks\zenwsimp.log, where you can analyze the logging results of the workstation import process.
Enabling logging in zenwsrem.ncf results in output to sys\zenworks\zenwsrem.log, where you can analyze the logging results of the workstation removal process.
Registry Key Value Name Value Type Data Notes
HKLM\Software\Novell\ZENworks\Debug
ZENWSREG
DWORD
0 (Off)
1 (Overwrite)
2 (New)
3 (Append)
Destination:
c:\program files\novell\zenworks\debuglogs\zenwsreg.log
Enabling Debug Logging for Automatic Workstation Import and Removal 163
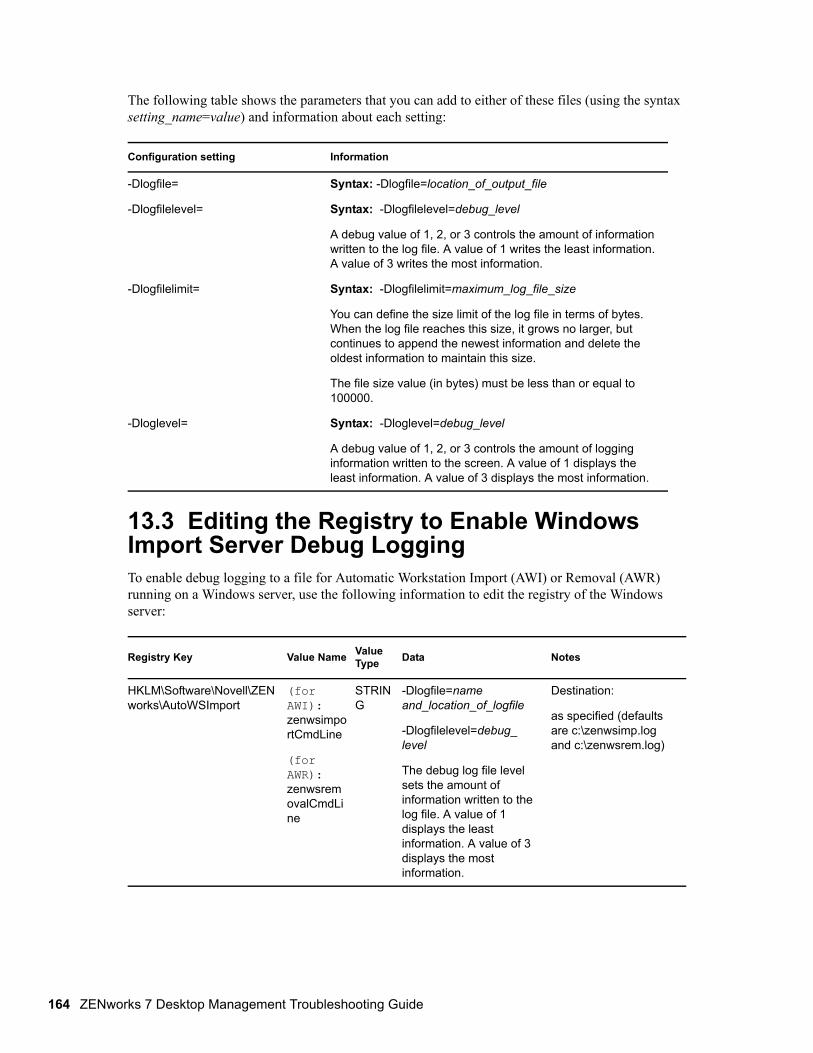
164 ZENw
novdocx (en) 16 April 2010
The following table shows the parameters that you can add to either of these files (using the syntax setting_name=value) and information about each setting:
13.3 Editing the Registry to Enable Windows Import Server Debug LoggingTo enable debug logging to a file for Automatic Workstation Import (AWI) or Removal (AWR) running on a Windows server, use the following information to edit the registry of the Windows server:
Configuration setting Information
-Dlogfile= Syntax: -Dlogfile=location_of_output_file
-Dlogfilelevel= Syntax: -Dlogfilelevel=debug_level
A debug value of 1, 2, or 3 controls the amount of information written to the log file. A value of 1 writes the least information. A value of 3 writes the most information.
-Dlogfilelimit= Syntax: -Dlogfilelimit=maximum_log_file_size
You can define the size limit of the log file in terms of bytes. When the log file reaches this size, it grows no larger, but continues to append the newest information and delete the oldest information to maintain this size.
The file size value (in bytes) must be less than or equal to 100000.
-Dloglevel= Syntax: -Dloglevel=debug_level
A debug value of 1, 2, or 3 controls the amount of logging information written to the screen. A value of 1 displays the least information. A value of 3 displays the most information.
Registry Key Value Name Value Type Data Notes
HKLM\Software\Novell\ZENworks\AutoWSImport
(for AWI): zenwsimportCmdLine
(for AWR): zenwsremovalCmdLine
STRING
-Dlogfile=name and_location_of_logfile
-Dlogfilelevel=debug_ level
The debug log file level sets the amount of information written to the log file. A value of 1 displays the least information. A value of 3 displays the most information.
Destination:
as specified (defaults are c:\zenwsimp.log and c:\zenwsrem.log)
orks 7 Desktop Management Troubleshooting Guide
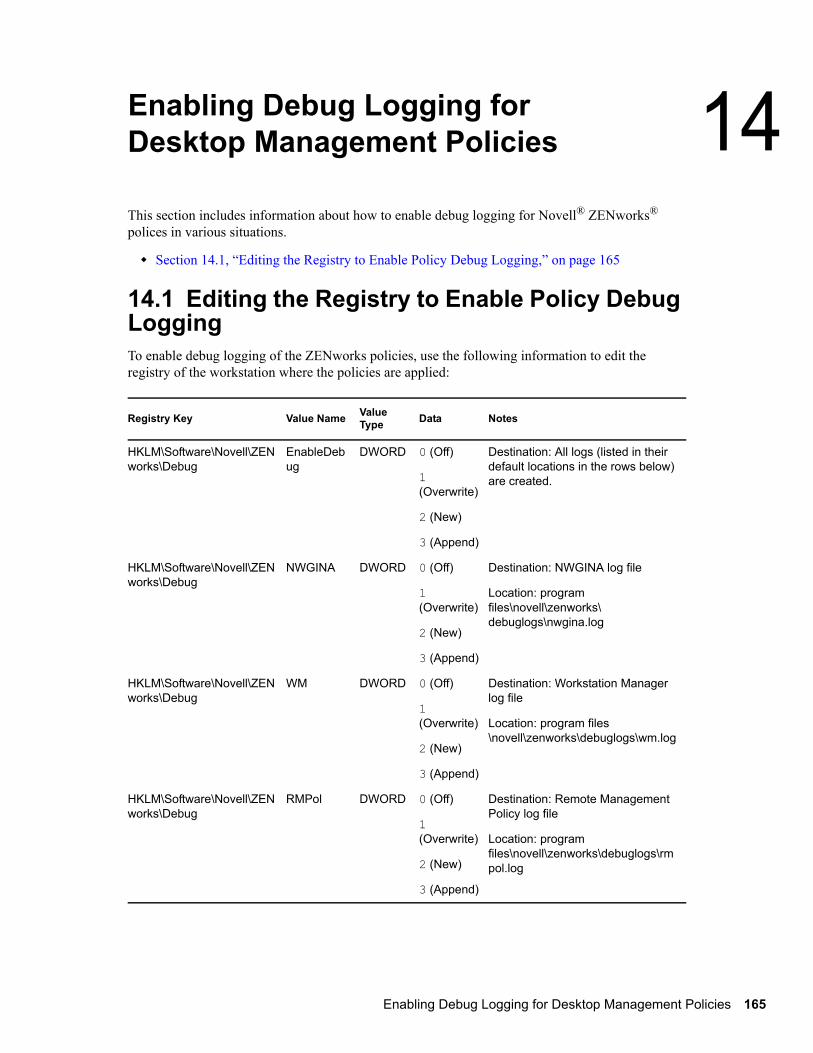
14novdocx (en) 16 A
pril 2010
14Enabling Debug Logging for Desktop Management Policies
This section includes information about how to enable debug logging for Novell® ZENworks® polices in various situations.
Section 14.1, “Editing the Registry to Enable Policy Debug Logging,” on page 165
14.1 Editing the Registry to Enable Policy Debug LoggingTo enable debug logging of the ZENworks policies, use the following information to edit the registry of the workstation where the policies are applied:
Registry Key Value Name Value Type Data Notes
HKLM\Software\Novell\ZENworks\Debug
EnableDebug
DWORD 0 (Off)
1 (Overwrite)
2 (New)
3 (Append)
Destination: All logs (listed in their default locations in the rows below) are created.
HKLM\Software\Novell\ZENworks\Debug
NWGINA DWORD 0 (Off)
1 (Overwrite)
2 (New)
3 (Append)
Destination: NWGINA log file
Location: program files\novell\zenworks\ debuglogs\nwgina.log
HKLM\Software\Novell\ZENworks\Debug
WM DWORD 0 (Off)
1 (Overwrite)
2 (New)
3 (Append)
Destination: Workstation Manager log file
Location: program files \novell\zenworks\debuglogs\wm.log
HKLM\Software\Novell\ZENworks\Debug
RMPol DWORD 0 (Off)
1 (Overwrite)
2 (New)
3 (Append)
Destination: Remote Management Policy log file
Location: program files\novell\zenworks\debuglogs\rmpol.log
Enabling Debug Logging for Desktop Management Policies 165

166 ZENw
novdocx (en) 16 April 2010
HKLM\Software\Novell\ZENworks\Debug
InvPol DWORD 0 (Off)
1 (Overwrite)
2 (New)
3 (Append)
Destination: Inventory Policy log file
Location: program files\novell\zenworks\debuglogs\invpol.log
HKLM\Software\Novell\ZENworks\Debug
WMGrpPol DWORD 0 (Off)
1 (Overwrite)
2 (New)
3 (Append)
Destination: Group Policies log file
Location: program files\novell\zenworks\debuglogs\wmgrppol.log
HKLM\Software\Novell\ZENworks\Debug
WMGrpPolUser
DWORD 0 (Off)
1 (Overwrite)
2 (New)
3 (Append)
Destination: User Group Policies log file
Location: program files\novell\zenworks\debuglogs\wmgrppoluserpol.log
HKLM\Software\Novell\ZENworks\Debug
WMGrpPolWks
DWORD 0 (Off)
1 (Overwrite)
2 (New)
3 (Append)
Destination: Workstation Group Policies log file
Location: program files\novell\zenworks\debuglogs\wmgrppolwks.log
HKLM\Software\Novell\ZENworks\Debug
WMiPrint DWORD 0 (Off)
1 (Overwrite)
2 (New)
3 (Append)
Destination: iPrint Policy log file
Location: program files\novell\zenworks\debuglogs\wmiprint.log
HKLM\Software\Novell\ZENworks\Debug
WMPM DWORD 0 (Off)
1 (Overwrite)
2 (New)
3 (Append)
Destination: Desktop Preferences log file
Location: program files\novell\zenworks\debuglogs\wmpm.log
HKLM\Software\Novell\ZENworks\Debug
WMPolHlp DWORD 0 (Off)
1 (Overwrite)
2 (New)
3 (Append)
Destination: Extensible Policies log file
Location: program files\novell\zenworks\debuglogs\wmpolhlp.log
Registry Key Value Name Value Type Data Notes
orks 7 Desktop Management Troubleshooting Guide
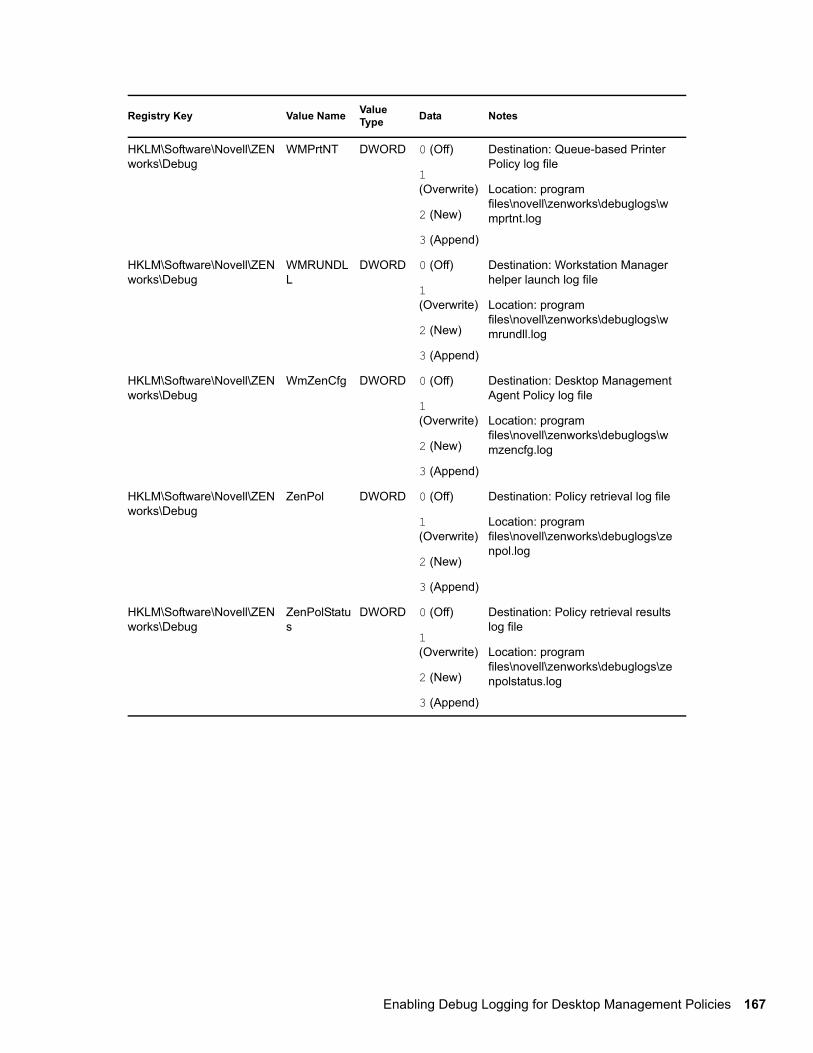
novdocx (en) 16 April 2010
HKLM\Software\Novell\ZENworks\Debug
WMPrtNT DWORD 0 (Off)
1 (Overwrite)
2 (New)
3 (Append)
Destination: Queue-based Printer Policy log file
Location: program files\novell\zenworks\debuglogs\wmprtnt.log
HKLM\Software\Novell\ZENworks\Debug
WMRUNDLL
DWORD 0 (Off)
1 (Overwrite)
2 (New)
3 (Append)
Destination: Workstation Manager helper launch log file
Location: program files\novell\zenworks\debuglogs\wmrundll.log
HKLM\Software\Novell\ZENworks\Debug
WmZenCfg DWORD 0 (Off)
1 (Overwrite)
2 (New)
3 (Append)
Destination: Desktop Management Agent Policy log file
Location: program files\novell\zenworks\debuglogs\wmzencfg.log
HKLM\Software\Novell\ZENworks\Debug
ZenPol DWORD 0 (Off)
1 (Overwrite)
2 (New)
3 (Append)
Destination: Policy retrieval log file
Location: program files\novell\zenworks\debuglogs\zenpol.log
HKLM\Software\Novell\ZENworks\Debug
ZenPolStatus
DWORD 0 (Off)
1 (Overwrite)
2 (New)
3 (Append)
Destination: Policy retrieval results log file
Location: program files\novell\zenworks\debuglogs\zenpolstatus.log
Registry Key Value Name Value Type Data Notes
Enabling Debug Logging for Desktop Management Policies 167

168 ZENw
novdocx (en) 16 April 2010
orks 7 Desktop Management Troubleshooting Guide
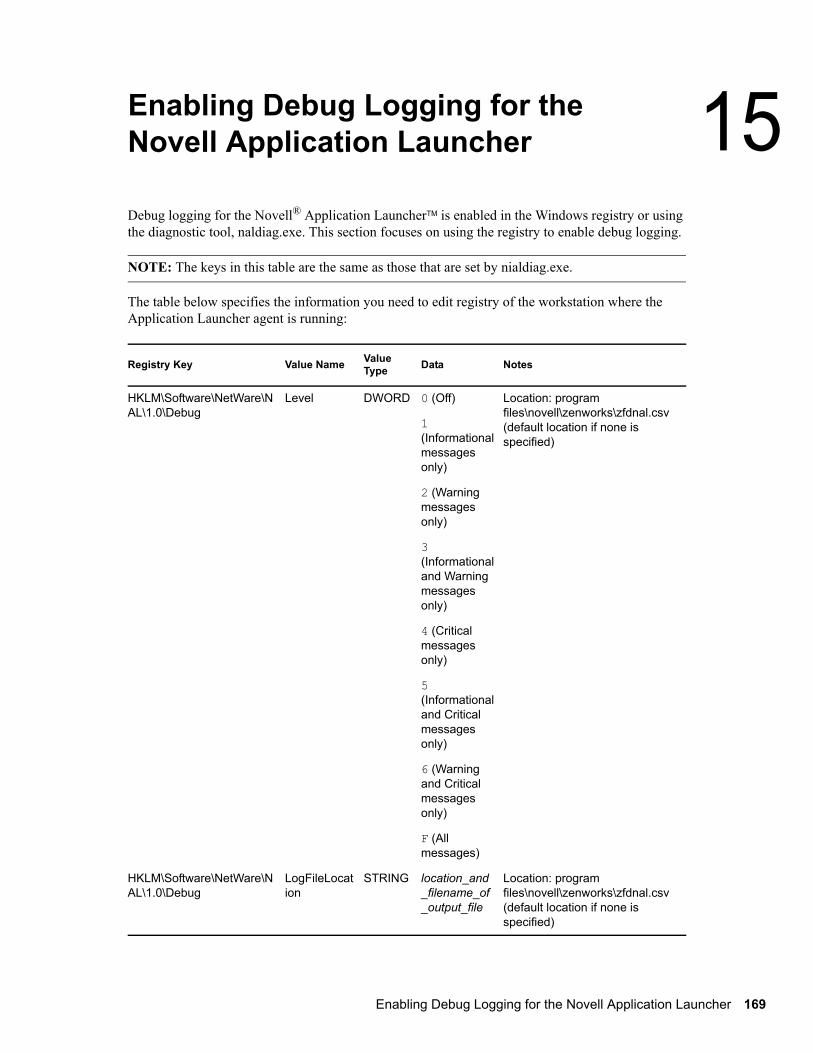
15novdocx (en) 16 A
pril 2010
15Enabling Debug Logging for the Novell Application Launcher
Debug logging for the Novell® Application LauncherTM is enabled in the Windows registry or using the diagnostic tool, naldiag.exe. This section focuses on using the registry to enable debug logging.
NOTE: The keys in this table are the same as those that are set by nialdiag.exe.
The table below specifies the information you need to edit registry of the workstation where the Application Launcher agent is running:
Registry Key Value Name Value Type Data Notes
HKLM\Software\NetWare\NAL\1.0\Debug
Level DWORD 0 (Off)
1 (Informational messages only)
2 (Warning messages only)
3 (Informational and Warning messages only)
4 (Critical messages only)
5 (Informational and Critical messages only)
6 (Warning and Critical messages only)
F (All messages)
Location: program files\novell\zenworks\zfdnal.csv (default location if none is specified)
HKLM\Software\NetWare\NAL\1.0\Debug
LogFileLocation
STRING location_and_filename_of_output_file
Location: program files\novell\zenworks\zfdnal.csv (default location if none is specified)
Enabling Debug Logging for the Novell Application Launcher 169
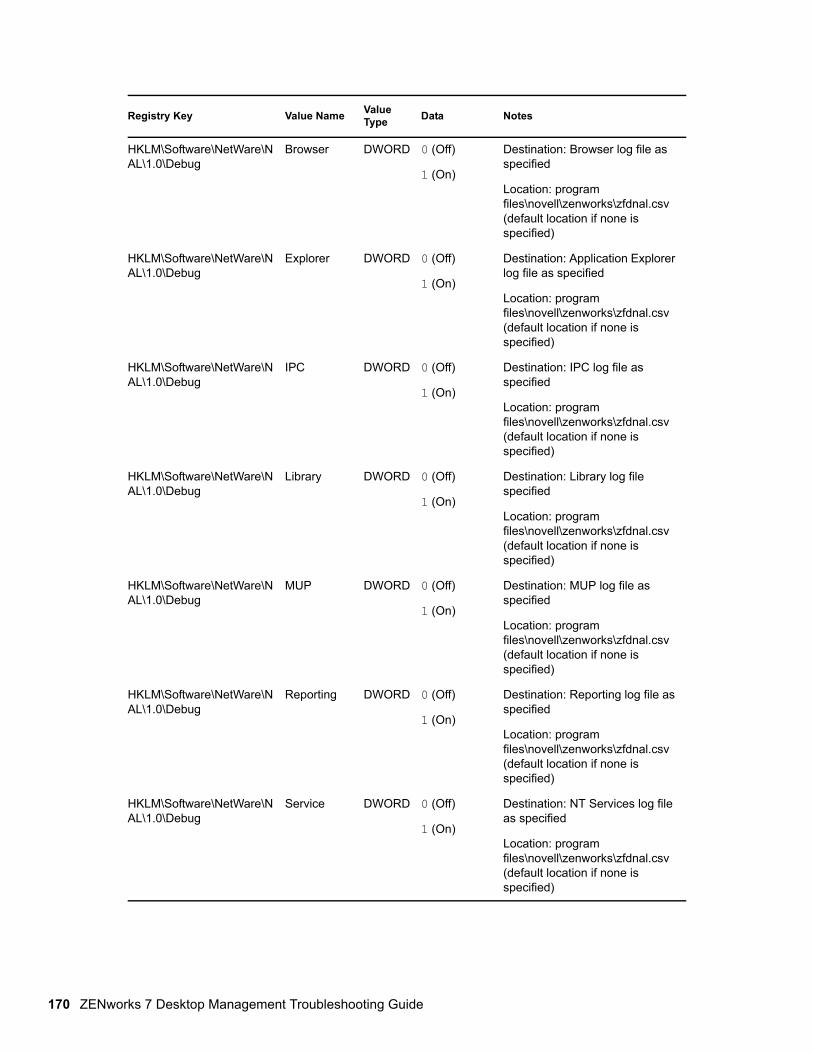
170 ZENw
novdocx (en) 16 April 2010
HKLM\Software\NetWare\NAL\1.0\Debug
Browser DWORD 0 (Off)
1 (On)
Destination: Browser log file as specified
Location: program files\novell\zenworks\zfdnal.csv (default location if none is specified)
HKLM\Software\NetWare\NAL\1.0\Debug
Explorer DWORD 0 (Off)
1 (On)
Destination: Application Explorer log file as specified
Location: program files\novell\zenworks\zfdnal.csv (default location if none is specified)
HKLM\Software\NetWare\NAL\1.0\Debug
IPC DWORD 0 (Off)
1 (On)
Destination: IPC log file as specified
Location: program files\novell\zenworks\zfdnal.csv (default location if none is specified)
HKLM\Software\NetWare\NAL\1.0\Debug
Library DWORD 0 (Off)
1 (On)
Destination: Library log file specified
Location: program files\novell\zenworks\zfdnal.csv (default location if none is specified)
HKLM\Software\NetWare\NAL\1.0\Debug
MUP DWORD 0 (Off)
1 (On)
Destination: MUP log file as specified
Location: program files\novell\zenworks\zfdnal.csv (default location if none is specified)
HKLM\Software\NetWare\NAL\1.0\Debug
Reporting DWORD 0 (Off)
1 (On)
Destination: Reporting log file as specified
Location: program files\novell\zenworks\zfdnal.csv (default location if none is specified)
HKLM\Software\NetWare\NAL\1.0\Debug
Service DWORD 0 (Off)
1 (On)
Destination: NT Services log file as specified
Location: program files\novell\zenworks\zfdnal.csv (default location if none is specified)
Registry Key Value Name Value Type Data Notes
orks 7 Desktop Management Troubleshooting Guide
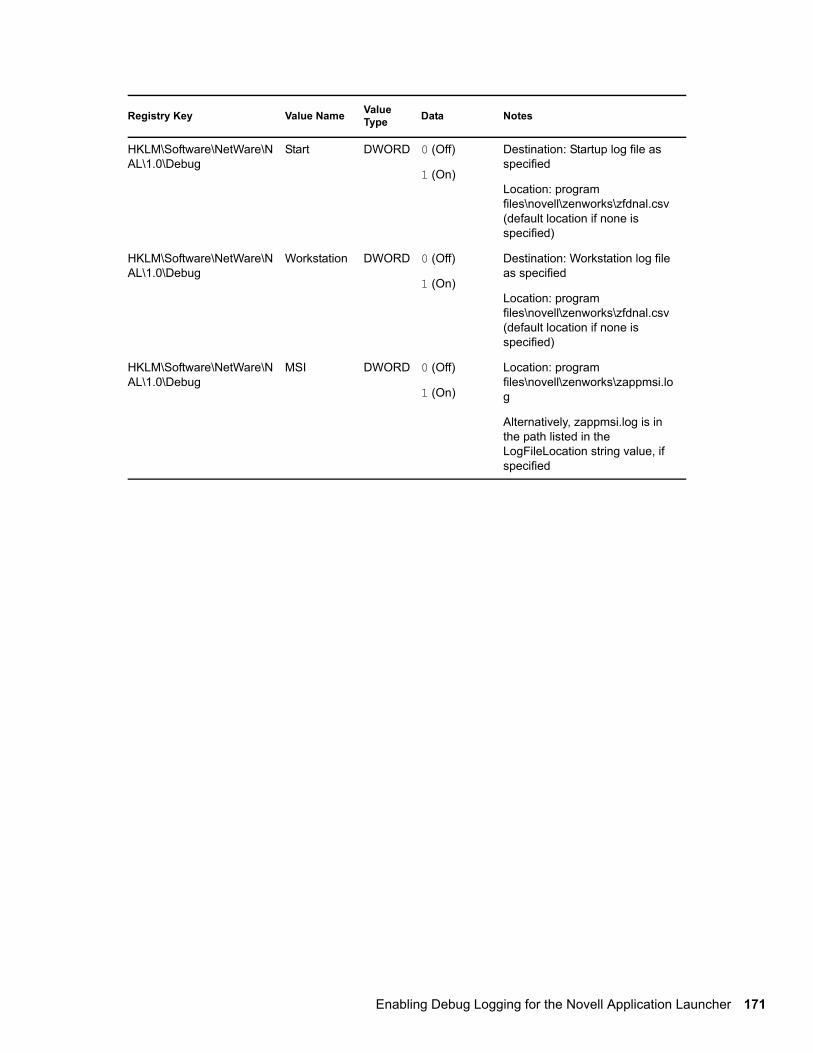
novdocx (en) 16 April 2010
HKLM\Software\NetWare\NAL\1.0\Debug
Start DWORD 0 (Off)
1 (On)
Destination: Startup log file as specified
Location: program files\novell\zenworks\zfdnal.csv (default location if none is specified)
HKLM\Software\NetWare\NAL\1.0\Debug
Workstation DWORD 0 (Off)
1 (On)
Destination: Workstation log file as specified
Location: program files\novell\zenworks\zfdnal.csv (default location if none is specified)
HKLM\Software\NetWare\NAL\1.0\Debug
MSI DWORD 0 (Off)
1 (On)
Location: program files\novell\zenworks\zappmsi.log
Alternatively, zappmsi.log is in the path listed in the LogFileLocation string value, if specified
Registry Key Value Name Value Type Data Notes
Enabling Debug Logging for the Novell Application Launcher 171

172 ZENw
novdocx (en) 16 April 2010
orks 7 Desktop Management Troubleshooting Guide
16novdocx (en) 16 A
pril 2010
16Enabling Debug Logging for ZENworks Desktop Management Imaging and Preboot Services
This section includes information about how to enable debug logging for Novell® ZENworks® 7 Workstation Imaging and ZENworks Preboot Services in various situations.
Section 16.1, “Using the Command Line to Enable NetWare Imaging Server Debug Logging,” on page 173Section 16.2, “Using the Command Line to Enable Windows Imaging Server Debug Logging,” on page 173Section 16.3, “Using the Command Line to Enable Workstation IMG Debug Logging,” on page 174Section 16.4, “Editing the Registry to Enable ZISWIN Debug Logging,” on page 174Section 16.5, “Editing the Registry to Enable Windows Preboot Services Debug Logging,” on page 174Section 16.6, “Using the Command Line to Enable NetWare Preboot Services Debug Logging,” on page 175
16.1 Using the Command Line to Enable NetWare Imaging Server Debug Logging Use the following steps to enable debug logging on the Desktop Management Server installed on NetWare® where you have included the Workstation Imaging component:
1 At the system console of the NetWare server where you have installed Workstation imaging, unload imgserv.nlm.
2 Enable debug logging by entering the following command at the system console:imgserv -debug
The debug log is written to sys:\zenworks\zimgdbg.log.
16.2 Using the Command Line to Enable Windows Imaging Server Debug LoggingUse the following steps to enable debug logging on the Desktop Management Server installed on Windows and where you have also installed the ZENworks Workstation Imaging component and Novell eDirectoryTM:
1 At the eDirectory Services system console, stop imgserv.dlm.2 Start imgserv.dlm with the -debug startup parameter.
The debug log is written to c:\zimgdbg.log.
Enabling Debug Logging for ZENworks Desktop Management Imaging and Preboot Services 173

174 ZENw
novdocx (en) 16 April 2010
16.3 Using the Command Line to Enable Workstation IMG Debug LoggingYou can use the command line at the Linux bash prompt to enable debug logging at the workstation you are imaging. Enter the following command at the bash prompt before you restore the image:
ZENIMGLOG=A
A debug log (imglog) is created in the current directory.
16.4 Editing the Registry to Enable ZISWIN Debug LoggingIf you want to enable debug logging for the Desktop Management Imaging Agent on Windows, you can edit the registry or use the ziswin.exe diagnostic tool.
The table below specifies the information you need in order to use regedit.exe to edit the registry of the workstation where the Imaging Agent is running:
16.5 Editing the Registry to Enable Windows Preboot Services Debug LoggingIf you want to enable debug logging for the ZENworks Preboot Services (PXE) server installed on Windows, you can edit the registry.
The table below specifies the information you need in order to use regedit.exe to edit the registry of the PXE server:
Registry Key Value Name Value Type Data Notes
HKLM\Software\Novell\ZENworks
ZISWin History Filename
STRING location_and_filename_of_output_file
Destination: Ziswin history file as specified
Location: c:\ziswin.hst (default location if none is specified)
HKLM\Software\Novell\ZENworks
ZISWin Log STRING 0 (Off)
1 (Overwrite)
2 (New)
Destination: Ziswin log as specified
HKLM\Software\Novell\ZENworks
ZISWin History Log Entries
DWORD maximum_number_of_entries
Destination: Ziswin history log file with specified number of entries (default value is 100 of not otherwise specified)
orks 7 Desktop Management Troubleshooting Guide
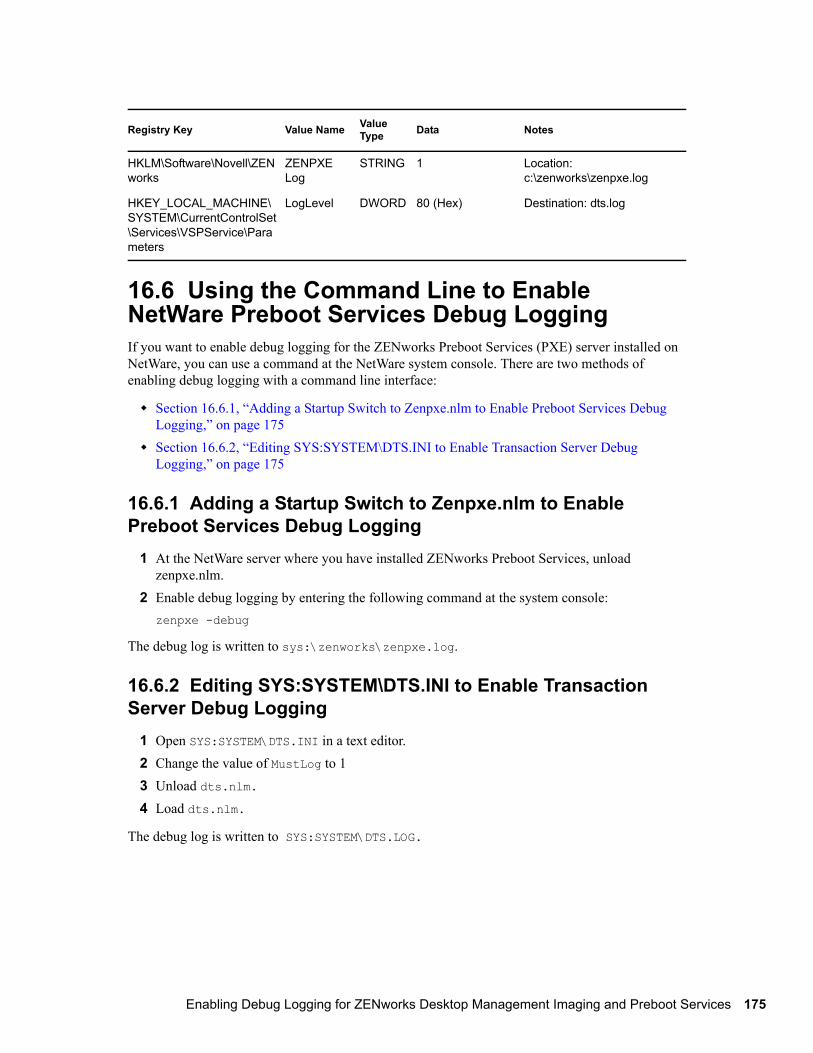
novdocx (en) 16 April 2010
16.6 Using the Command Line to Enable NetWare Preboot Services Debug LoggingIf you want to enable debug logging for the ZENworks Preboot Services (PXE) server installed on NetWare, you can use a command at the NetWare system console. There are two methods of enabling debug logging with a command line interface:
Section 16.6.1, “Adding a Startup Switch to Zenpxe.nlm to Enable Preboot Services Debug Logging,” on page 175Section 16.6.2, “Editing SYS:SYSTEM\DTS.INI to Enable Transaction Server Debug Logging,” on page 175
16.6.1 Adding a Startup Switch to Zenpxe.nlm to Enable Preboot Services Debug Logging
1 At the NetWare server where you have installed ZENworks Preboot Services, unload zenpxe.nlm.
2 Enable debug logging by entering the following command at the system console:zenpxe -debug
The debug log is written to sys:\zenworks\zenpxe.log.
16.6.2 Editing SYS:SYSTEM\DTS.INI to Enable Transaction Server Debug Logging
1 Open SYS:SYSTEM\DTS.INI in a text editor.2 Change the value of MustLog to 13 Unload dts.nlm.4 Load dts.nlm.
The debug log is written to SYS:SYSTEM\DTS.LOG.
Registry Key Value Name Value Type Data Notes
HKLM\Software\Novell\ZENworks
ZENPXE Log
STRING 1 Location: c:\zenworks\zenpxe.log
HKEY_LOCAL_MACHINE\SYSTEM\CurrentControlSet\Services\VSPService\Parameters
LogLevel DWORD 80 (Hex) Destination: dts.log
Enabling Debug Logging for ZENworks Desktop Management Imaging and Preboot Services 175

176 ZENw
novdocx (en) 16 April 2010
orks 7 Desktop Management Troubleshooting Guide

17novdocx (en) 16 A
pril 2010
17Enabling Debug Logging for ZENworks Remote Management
This section includes information about how to enable debug logging for Novell® ZENworks® 7 Remote Management in various situations.
Section 17.1, “Retrieving Target Workstation Debug Logging,” on page 177Section 17.2, “Retrieving Console Workstation Debug Logging,” on page 177Section 17.3, “Editing the Registry to Enable Remote Management Policy Debug Logging,” on page 177
17.1 Retrieving Target Workstation Debug LoggingDebug logging is enabled by default at the workstation you are remotely managing. The debug log file (rmerrorlog*.txt (where * is 0/1/2 and so on)), is saved in program files\novell\zenworks\remote management\rmagent.
17.2 Retrieving Console Workstation Debug LoggingDebug logging is enabled by default at the NetWare® system console. The debug log file (rmerrorlog0.txt), is saved in consoleone_directory\1.2\bin\zen\rclaunch.
17.3 Editing the Registry to Enable Remote Management Policy Debug LoggingIf you want to enable debug logging of the Remote Management policy on the ZENworks Desktop Management Server, you can edit the Windows registry on that server.
The table below specifies the information you need in order to use regedit.exe to edit the registry of the Remote Management server:
Registry Key Value Name Value Type Data Notes
HKLM\Software\Novell\ZENworks\Debug
RMpol DWORD 0 (Off)
1 (Overwrite)
2 (New)
3 (Append)
Location: program files\novell\zenworks\debuglogs\rmpol.log
Enabling Debug Logging for ZENworks Remote Management 177

178 ZENw
novdocx (en) 16 April 2010
orks 7 Desktop Management Troubleshooting Guide
18novdocx (en) 16 A
pril 2010
18Enabling Debug Logging for Workstation Inventory
This section includes information about how to enable debug logging for Novell® ZENworks® 7 Workstation Inventory in various situations.
Section 18.1, “Retrieving Inventory Scanner Debug Logging,” on page 179Section 18.2, “Editing the Registry to Enable Inventory Policy Debug Logging,” on page 179Section 18.3, “Retrieving Inventory Service Default Logging,” on page 180Section 18.4, “Editing the Properties File to Enable Inventory Service Debug Logging,” on page 180Section 18.5, “Retrieve Inventory Database Migration Debug Logging,” on page 180Section 18.6, “Enabling eDirectory Debug Logging Reports for the Workstation Inventory Service,” on page 181
18.1 Retrieving Inventory Scanner Debug LoggingThis section contains the following information regarding debug logging for the inventory scanner:
Section 18.1.1, “Using the Default Log,” on page 179Section 18.1.2, “Using the Workstation Scan History in ConsoleOne,” on page 179
18.1.1 Using the Default LogDebug logging for the inventory scanner on the agent workstation is enabled by default. The debug log file, zenerrors.log, is saved in %systemdrive%\zenworks.
18.1.2 Using the Workstation Scan History in ConsoleOneDebug logging in Novell eDirectoryTM for the inventory scanner is enabled by default in the ConsoleOne® management tool in the form of a Workstation Scan History.
To see the history, open ConsoleOne, right-click the Workstation object, click Properties, click ZENworks Inventory, then click Scan Status.
18.2 Editing the Registry to Enable Inventory Policy Debug LoggingIf you want to enable debug logging of the Workstation Inventory policy on the ZENworks Desktop Management Server, you can edit the Windows registry on that server.
The table below specifies the information you need in order to use regedit.exe to edit the registry of the Desktop Management Server where the inventory component is installed:
Enabling Debug Logging for Workstation Inventory 179
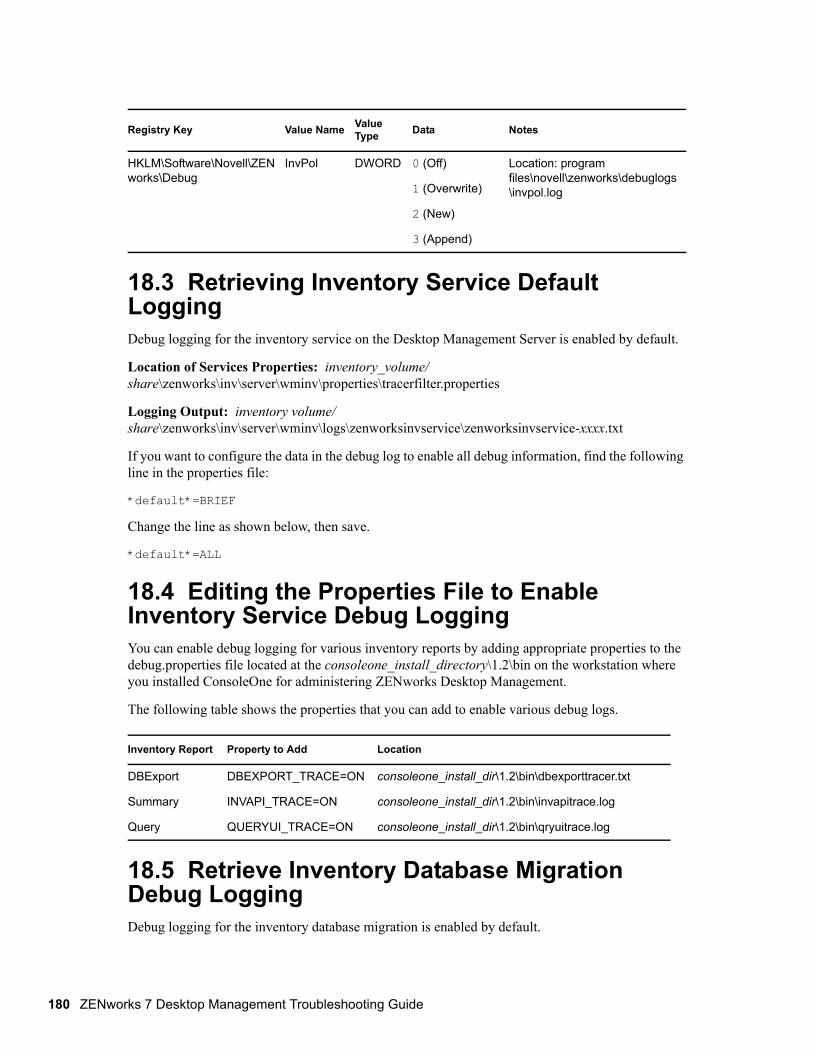
180 ZENw
novdocx (en) 16 April 2010
18.3 Retrieving Inventory Service Default LoggingDebug logging for the inventory service on the Desktop Management Server is enabled by default.
Location of Services Properties: inventory_volume/share\zenworks\inv\server\wminv\properties\tracerfilter.properties
Logging Output: inventory volume/share\zenworks\inv\server\wminv\logs\zenworksinvservice\zenworksinvservice-xxxx.txt
If you want to configure the data in the debug log to enable all debug information, find the following line in the properties file:
*default*=BRIEF
Change the line as shown below, then save.
*default*=ALL
18.4 Editing the Properties File to Enable Inventory Service Debug LoggingYou can enable debug logging for various inventory reports by adding appropriate properties to the debug.properties file located at the consoleone_install_directory\1.2\bin on the workstation where you installed ConsoleOne for administering ZENworks Desktop Management.
The following table shows the properties that you can add to enable various debug logs.
18.5 Retrieve Inventory Database Migration Debug LoggingDebug logging for the inventory database migration is enabled by default.
Registry Key Value Name Value Type Data Notes
HKLM\Software\Novell\ZENworks\Debug
InvPol DWORD 0 (Off)
1 (Overwrite)
2 (New)
3 (Append)
Location: program files\novell\zenworks\debuglogs\invpol.log
Inventory Report Property to Add Location
DBExport DBEXPORT_TRACE=ON consoleone_install_dir\1.2\bin\dbexporttracer.txt
Summary INVAPI_TRACE=ON consoleone_install_dir\1.2\bin\invapitrace.log
Query QUERYUI_TRACE=ON consoleone_install_dir\1.2\bin\qryuitrace.log
orks 7 Desktop Management Troubleshooting Guide
novdocx (en) 16 April 2010
Location of Log File: inventory_volume/share\zenworks\inv\server\wminv\logs\migrationlogs
Logging Output: timestamp_migrate.log
18.6 Enabling eDirectory Debug Logging Reports for the Workstation Inventory ServiceDebug logging for the inventory service in Novell eDirectory is enabled by default in the ConsoleOne management tool in the form of status reports.
To see these reports, open ConsoleOne, right-click the Inventory Service object, then click Status Report.
A Server Status report and a Rollup Status report are available.
Enabling Debug Logging for Workstation Inventory 181

182 ZENw
novdocx (en) 16 April 2010
orks 7 Desktop Management Troubleshooting Guide
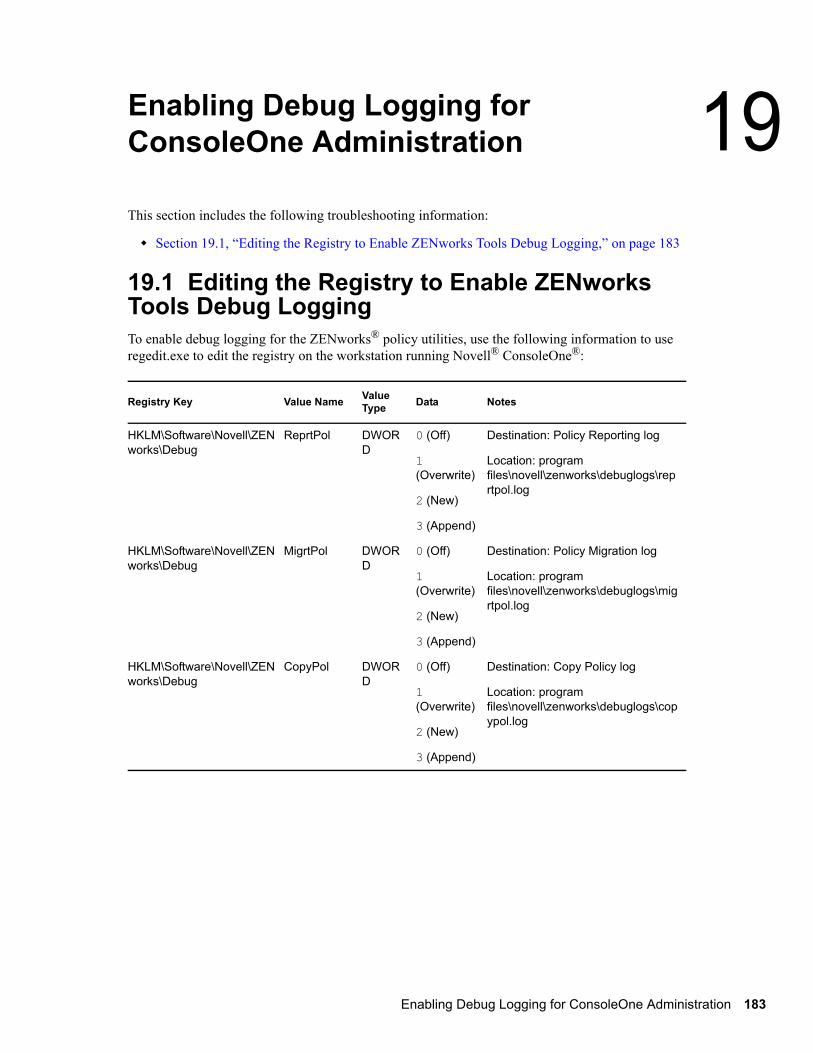
19novdocx (en) 16 A
pril 2010
19Enabling Debug Logging for ConsoleOne Administration
This section includes the following troubleshooting information:
Section 19.1, “Editing the Registry to Enable ZENworks Tools Debug Logging,” on page 183
19.1 Editing the Registry to Enable ZENworks Tools Debug LoggingTo enable debug logging for the ZENworks® policy utilities, use the following information to use regedit.exe to edit the registry on the workstation running Novell® ConsoleOne®:
Registry Key Value Name Value Type Data Notes
HKLM\Software\Novell\ZENworks\Debug
ReprtPol DWORD
0 (Off)
1 (Overwrite)
2 (New)
3 (Append)
Destination: Policy Reporting log
Location: program files\novell\zenworks\debuglogs\reprtpol.log
HKLM\Software\Novell\ZENworks\Debug
MigrtPol DWORD
0 (Off)
1 (Overwrite)
2 (New)
3 (Append)
Destination: Policy Migration log
Location: program files\novell\zenworks\debuglogs\migrtpol.log
HKLM\Software\Novell\ZENworks\Debug
CopyPol DWORD
0 (Off)
1 (Overwrite)
2 (New)
3 (Append)
Destination: Copy Policy log
Location: program files\novell\zenworks\debuglogs\copypol.log
Enabling Debug Logging for ConsoleOne Administration 183

184 ZENw
novdocx (en) 16 April 2010
orks 7 Desktop Management Troubleshooting Guide
Anovdocx (en) 16 A
pril 2010
ADocumentation Updates
This section contains information on documentation content changes that have been made in the Troubleshooting Guide after the initial release of Novell® ZENworks® 7 Desktop Management. The information helps you to keep current on updates to the documentation.
All changes that are noted in this section were also made in the documentation. The documentation is provided on the Web in two formats: HTML and PDF. The HTML and PDF documentation are both kept up-to-date with the documentation changes listed in this section.
The documentation update information is grouped according to the date the changes were published. Within a dated section, the changes are alphabetically listed by the names of the main table of contents sections for ZENworks 7 Desktop Management.
If you need to know whether a copy of the PDF documentation you are using is the most recent, the PDF document contains the date it was published on the front title page or in the Legal Notices section immediately following the title page.
The documentation was updated on the following dates:
Section A.1, “May 20, 2010,” on page 185Section A.2, “November 18, 2009,” on page 186Section A.3, “September 18, 2009,” on page 186Section A.4, “July 30, 2009 (Support Pack 1 Interim Release 4a),” on page 186Section A.5, “June 17, 2009 (Support Pack 1 Interim Release 4),” on page 187Section A.6, “December 10, 2008,” on page 187Section A.7, “April 29, 2008 (Interim Release 3a),” on page 188Section A.8, “July 14, 2006 (Support Pack 1),” on page 188Section A.9, “January 31, 2006,” on page 188Section A.10, “December 23, 2005,” on page 189Section A.11, “December 9, 2005,” on page 189
A.1 May 20, 2010 Updates were made to the following section:
Section A.1.1, “Enabling Debug Logging in ZENworks 7,” on page 185
A.1.1 Enabling Debug Logging in ZENworks 7
Location Change
Section 16.6.2, “Editing SYS:SYSTEM\DTS.INI to Enable Transaction Server Debug Logging,” on page 175
Edited the section
Documentation Updates 185
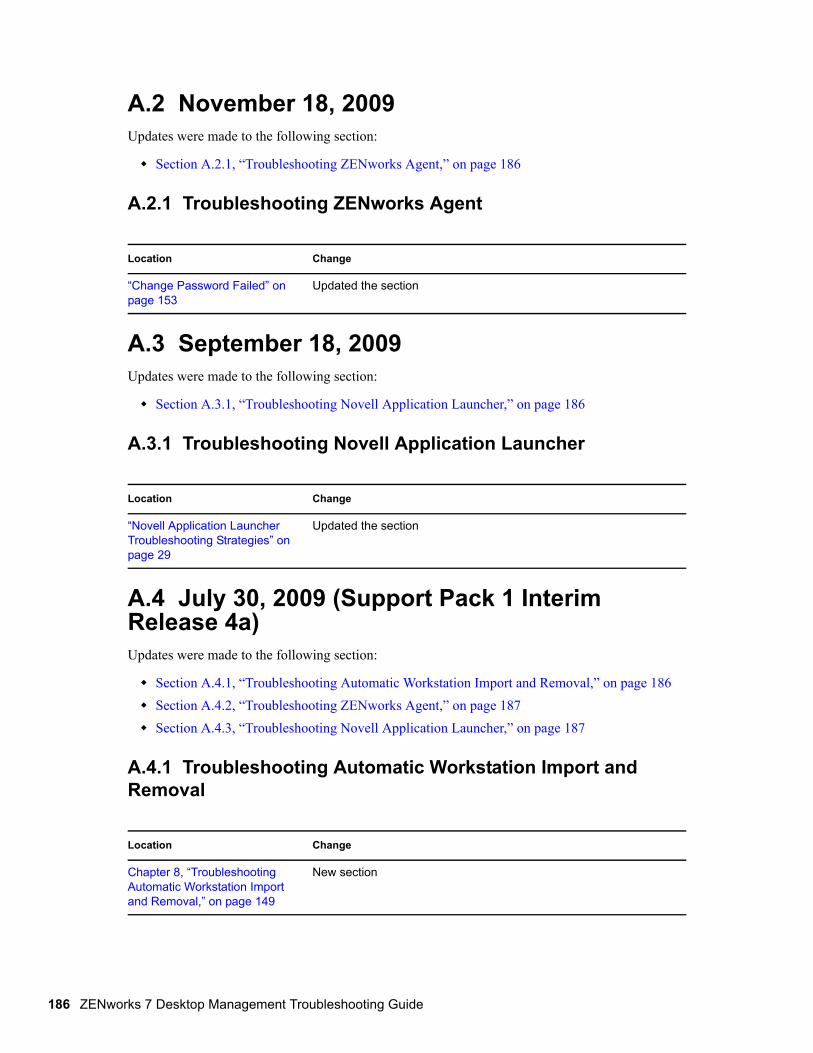
186 ZENw
novdocx (en) 16 April 2010
A.2 November 18, 2009 Updates were made to the following section:
Section A.2.1, “Troubleshooting ZENworks Agent,” on page 186
A.2.1 Troubleshooting ZENworks Agent
A.3 September 18, 2009 Updates were made to the following section:
Section A.3.1, “Troubleshooting Novell Application Launcher,” on page 186
A.3.1 Troubleshooting Novell Application Launcher
A.4 July 30, 2009 (Support Pack 1 Interim Release 4a)Updates were made to the following section:
Section A.4.1, “Troubleshooting Automatic Workstation Import and Removal,” on page 186Section A.4.2, “Troubleshooting ZENworks Agent,” on page 187Section A.4.3, “Troubleshooting Novell Application Launcher,” on page 187
A.4.1 Troubleshooting Automatic Workstation Import and Removal
Location Change
“Change Password Failed” on page 153
Updated the section
Location Change
“Novell Application Launcher Troubleshooting Strategies” on page 29
Updated the section
Location Change
Chapter 8, “Troubleshooting Automatic Workstation Import and Removal,” on page 149
New section
orks 7 Desktop Management Troubleshooting Guide
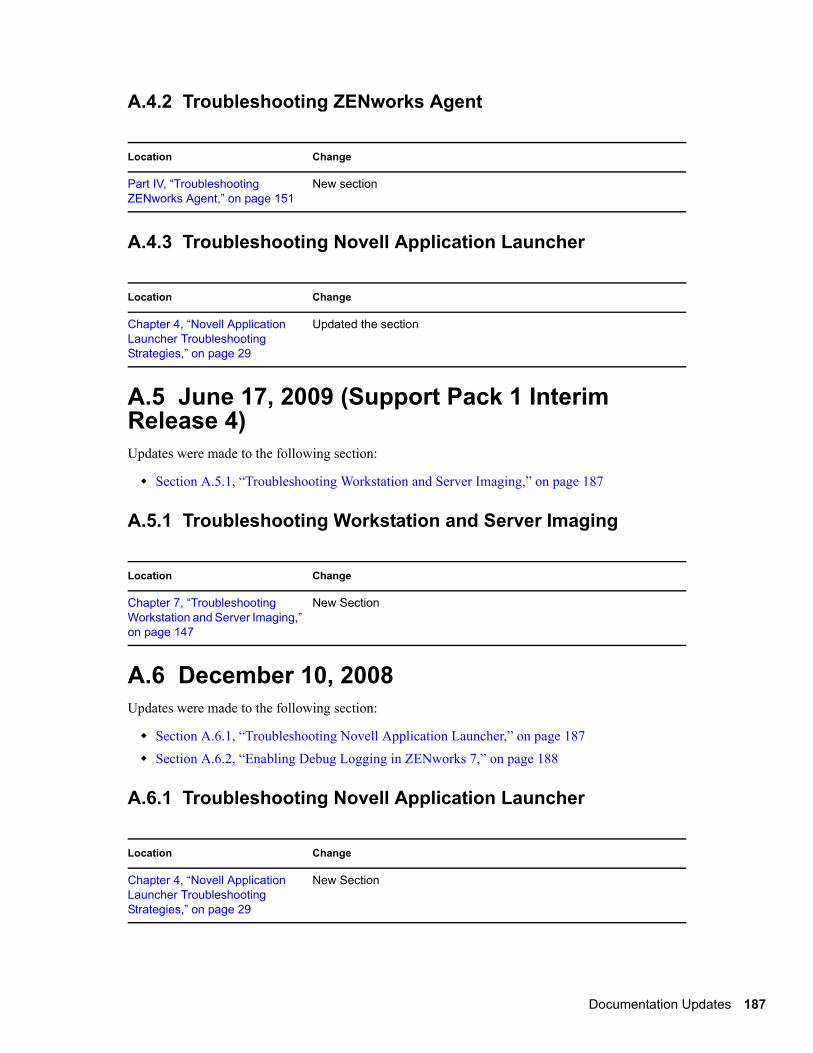
novdocx (en) 16 April 2010
A.4.2 Troubleshooting ZENworks Agent
A.4.3 Troubleshooting Novell Application Launcher
A.5 June 17, 2009 (Support Pack 1 Interim Release 4)Updates were made to the following section:
Section A.5.1, “Troubleshooting Workstation and Server Imaging,” on page 187
A.5.1 Troubleshooting Workstation and Server Imaging
A.6 December 10, 2008 Updates were made to the following section:
Section A.6.1, “Troubleshooting Novell Application Launcher,” on page 187Section A.6.2, “Enabling Debug Logging in ZENworks 7,” on page 188
A.6.1 Troubleshooting Novell Application Launcher
Location Change
Part IV, “Troubleshooting ZENworks Agent,” on page 151
New section
Location Change
Chapter 4, “Novell Application Launcher Troubleshooting Strategies,” on page 29
Updated the section
Location Change
Chapter 7, “Troubleshooting Workstation and Server Imaging,” on page 147
New Section
Location Change
Chapter 4, “Novell Application Launcher Troubleshooting Strategies,” on page 29
New Section
Documentation Updates 187
188 ZENw
novdocx (en) 16 April 2010
A.6.2 Enabling Debug Logging in ZENworks 7
A.7 April 29, 2008 (Interim Release 3a)Added the following section:
Section A.7.1, “Novell Application Launcher Error Messages,” on page 188
A.7.1 Novell Application Launcher Error Messages
A.8 July 14, 2006 (Support Pack 1)Updates were made to the following section:
Section A.8.1, “Remote Management Troubleshooting Strategies,” on page 188
A.8.1 Remote Management Troubleshooting StrategiesThe following changes were made in this section:
A.9 January 31, 2006Updates were made to the following section:
Section A.9.1, “Workstation Inventory,” on page 188
A.9.1 Workstation InventoryThe following changes were made in this section:
Location Change
Part V, “Enabling Debug Logging in ZENworks 7,” on page 157
New Section
Location Change
Chapter 3, “Novell Application Launcher Error Messages,” on page 27
New Section
Location Change
“ConsoleOne snap-ins cause Remote Control to ZENworks for Desktops 3.x with SP3 workstations to fail” on page 22
New section.
orks 7 Desktop Management Troubleshooting Guide
novdocx (en) 16 April 2010
A.10 December 23, 2005Updates were made to the following section:
Section A.10.1, “Workstation Inventory,” on page 189
A.10.1 Workstation InventoryThe following changes are made in this section:
A.11 December 9, 2005Page design of the entire guide was reformatted to comply with revised Novell documentation standards.
Location Change
Section 5.15, “Upgrade Service Error Messages,” on page 114.
Newly added the following error message:
“The Upgrade Service is migrating the schema to ZENworks 6.5 SP1” on page 116
Location Change
“Troubleshooting the Storer” on page 138.
Newly added the following troubleshooting scenario:
“The Inventory Storer is unable to store the str files having non-ASCII characters into the Sybase or Oracle Inventory database” on page 141
Documentation Updates 189

190 ZENw
novdocx (en) 16 April 2010
orks 7 Desktop Management Troubleshooting Guide