zig & zag quilt -...
TRANSCRIPT

1
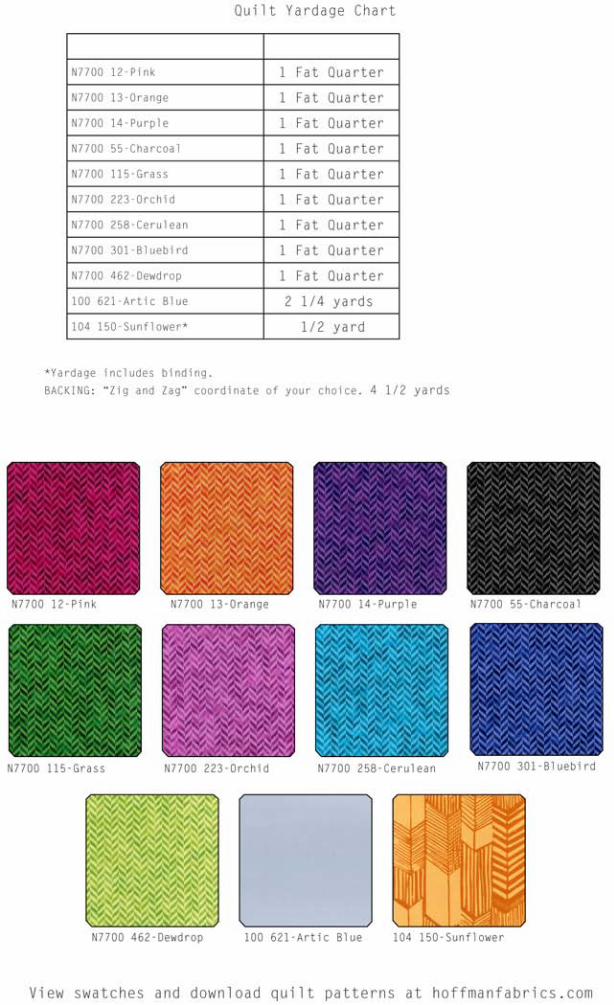
Zig & Zag Quilt
Finished size 52 by 69 inches
Quilt design and instructions by Linda Ambrosini, featuring fabrics from the
Zig & Zag collection by Hoffman CA Fabrics
¼ inch seam allowances used. Read through the instructions before cutting.
This quilt uses Hoffman’s Zig and Zag blenders in an overall Zig and Zag
quilt design, so if you are not feeling like walking a direct path come zig –
zag with us. Be sure to follow the pressing directions given and you will
have no issues connecting your points perfectly!! As a sewing note, there
are many biases in this quilt, just like all diamond quilts. Spray starch or any
sizing product is highly recommended as it helps to limit the fabric from
stretching along the bias.
Fabric Cutting:
From each of your fat quarters the cutting is done parallel to the salvage
edge for two reasons; first, the zig – zag design of the quilt is replicated
better within the fabric by cutting in this direction and secondly, it is a
more economical use of fabric. Cut six – 3 inch strips parallel to the
salvage.
Solid grey background
Cut 12 - 1 ½ inch by WOF strips, sub cut the strip in half to approx. 1 ½ by
22 inches. These are used in your pieced blocks
Cut 9 - 6 ½ by WOF strips. Sub cut each strip as follows. Fold the strip in half
salvage to salvage. Place the salvage edges on the
left side of your cutting mat. The cutting starts from the
salvage edges. Cut away the salvages with a
perpendicular cut. Now we will be using the 60 degree
line on your ruler to create the diamond shapes. Most
6“ by 24“ rulers have this angle marking.
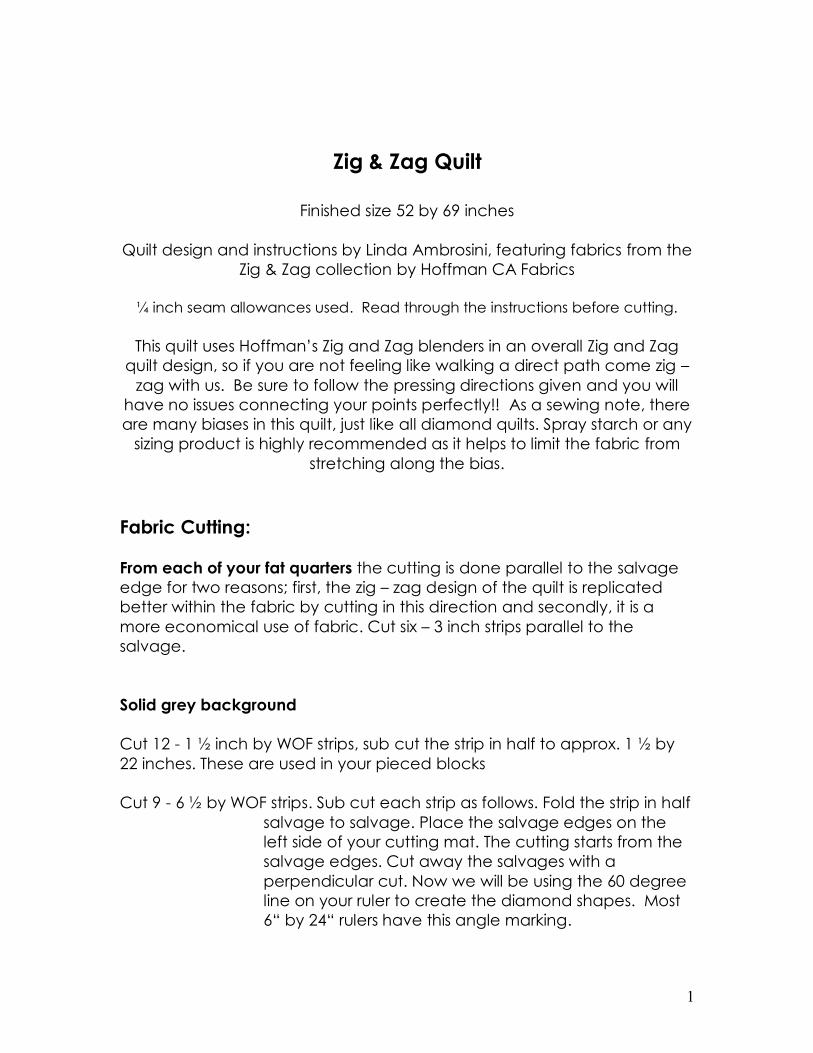
2
Each WOF strip will give us 2 – small end pieces, 4 – large diamonds and 1
– large end piece. Align this 60 degree marking along
the long top edge of the fabric strip with the majority of
the ruler lying on top of the fabric. Leave ¾ inch of
fabric extended beyond the left hand side of the ruler.
Cut along the left hand side of the ruler. You will have
cut your 2 – small end pieces as well as establishing
your 60 degree cut for the diamonds. (Reference Photo
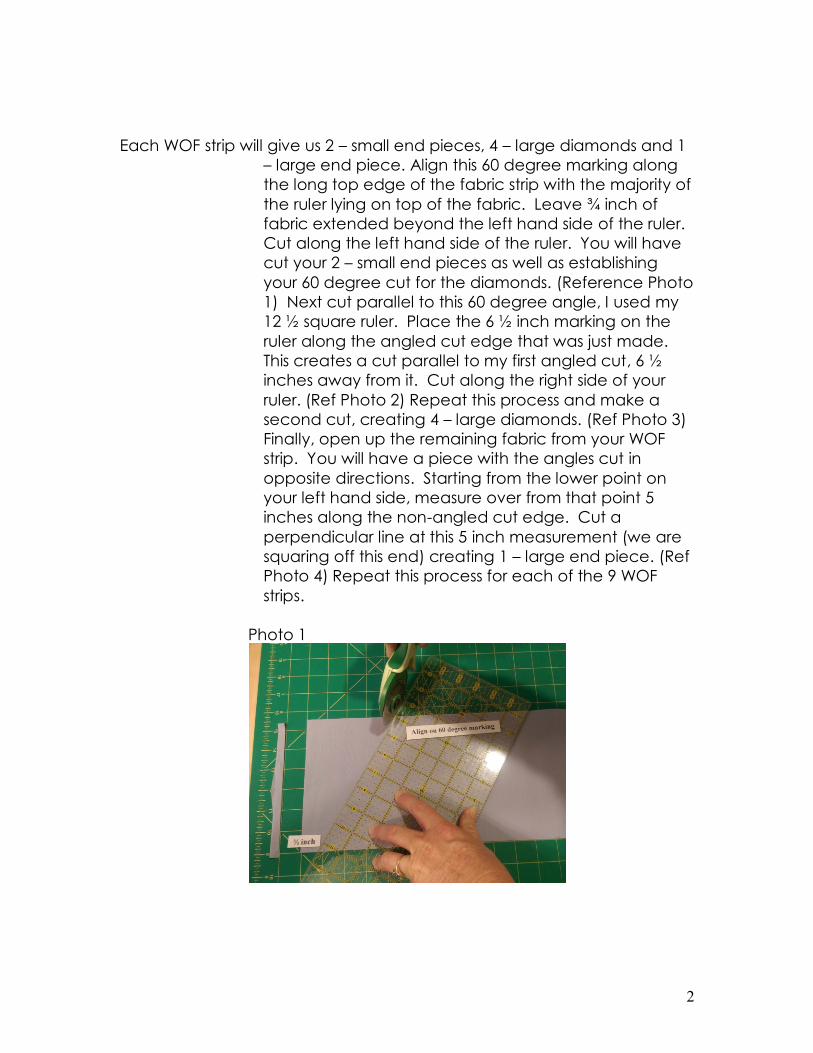
1) Next cut parallel to this 60 degree angle, I used my
12 ½ square ruler. Place the 6 ½ inch marking on the
ruler along the angled cut edge that was just made.
This creates a cut parallel to my first angled cut, 6 ½
inches away from it. Cut along the right side of your
ruler. (Ref Photo 2) Repeat this process and make a
second cut, creating 4 – large diamonds. (Ref Photo 3)
Finally, open up the remaining fabric from your WOF
strip. You will have a piece with the angles cut in
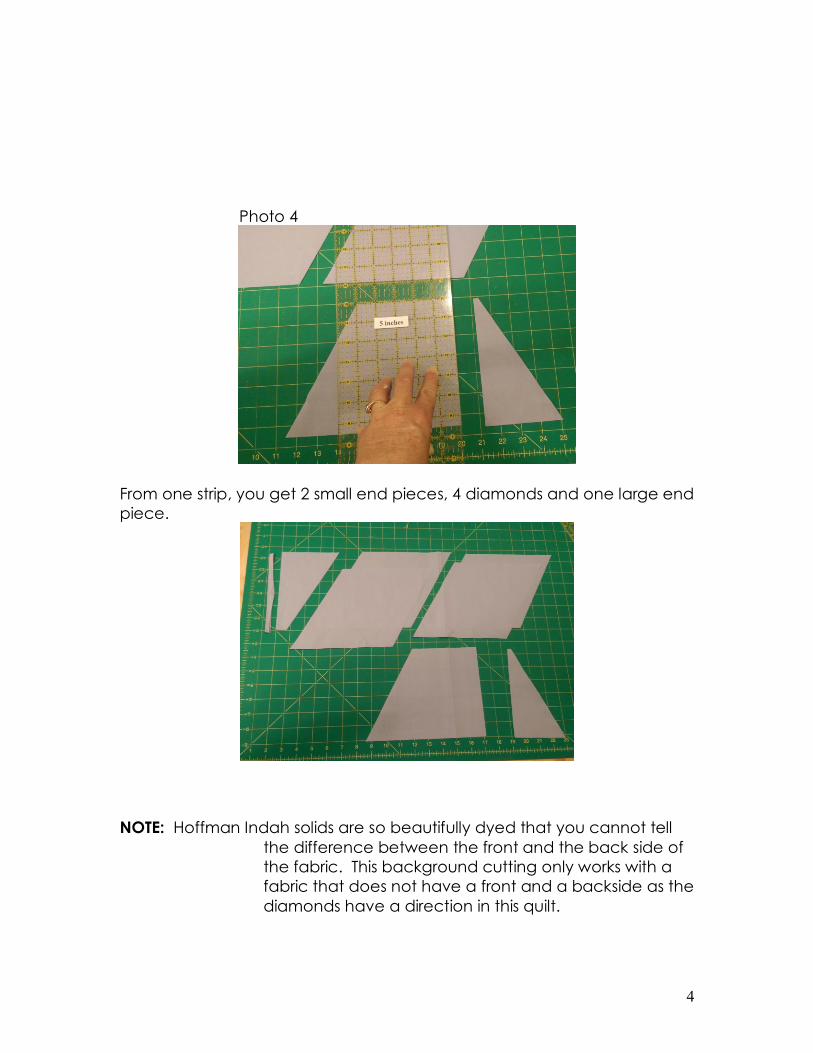
opposite directions. Starting from the lower point on
your left hand side, measure over from that point 5
inches along the non-angled cut edge. Cut a
perpendicular line at this 5 inch measurement (we are
squaring off this end) creating 1 – large end piece. (Ref
Photo 4) Repeat this process for each of the 9 WOF
strips.
Photo 1
3
Photo 2
Photo 3
4
Photo 4
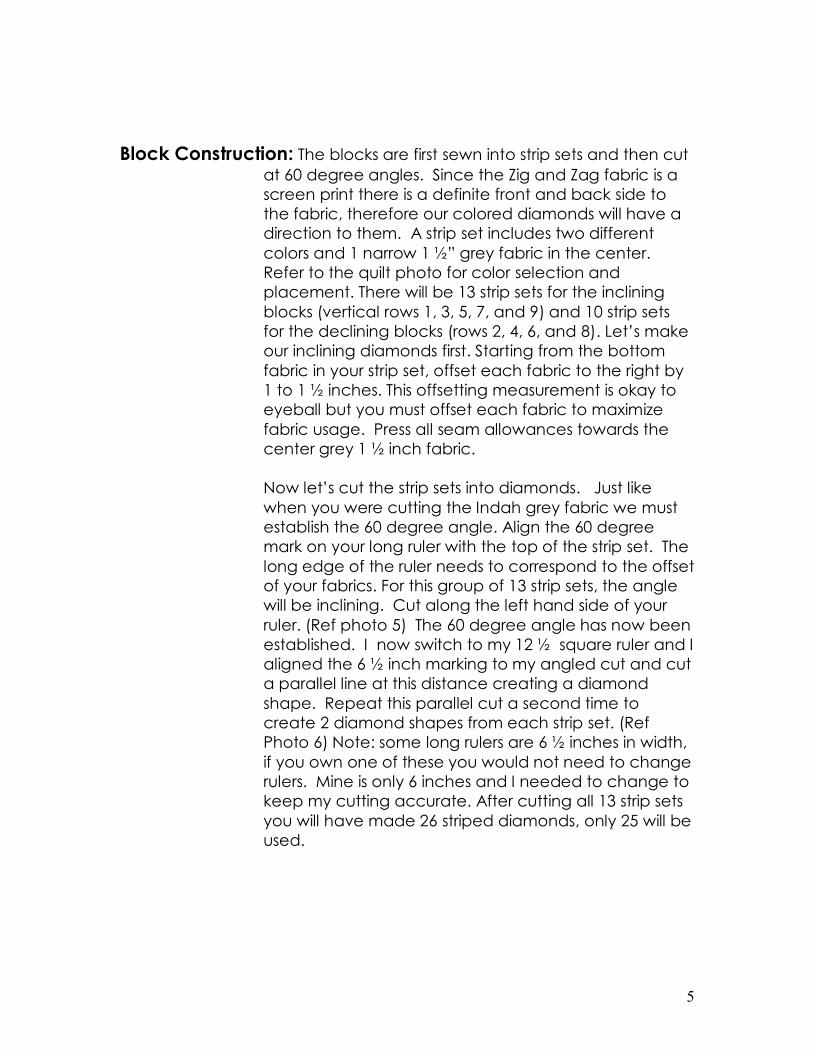
From one strip, you get 2 small end pieces, 4 diamonds and one large end
piece.
NOTE: Hoffman Indah solids are so beautifully dyed that you cannot tell
the difference between the front and the back side of
the fabric. This background cutting only works with a
fabric that does not have a front and a backside as the
diamonds have a direction in this quilt.
5
Block Construction: The blocks are first sewn into strip sets and then cut
at 60 degree angles. Since the Zig and Zag fabric is a
screen print there is a definite front and back side to
the fabric, therefore our colored diamonds will have a
direction to them. A strip set includes two different
colors and 1 narrow 1 ½” grey fabric in the center.
Refer to the quilt photo for color selection and
placement. There will be 13 strip sets for the inclining
blocks (vertical rows 1, 3, 5, 7, and 9) and 10 strip sets
for the declining blocks (rows 2, 4, 6, and 8). Let’s make
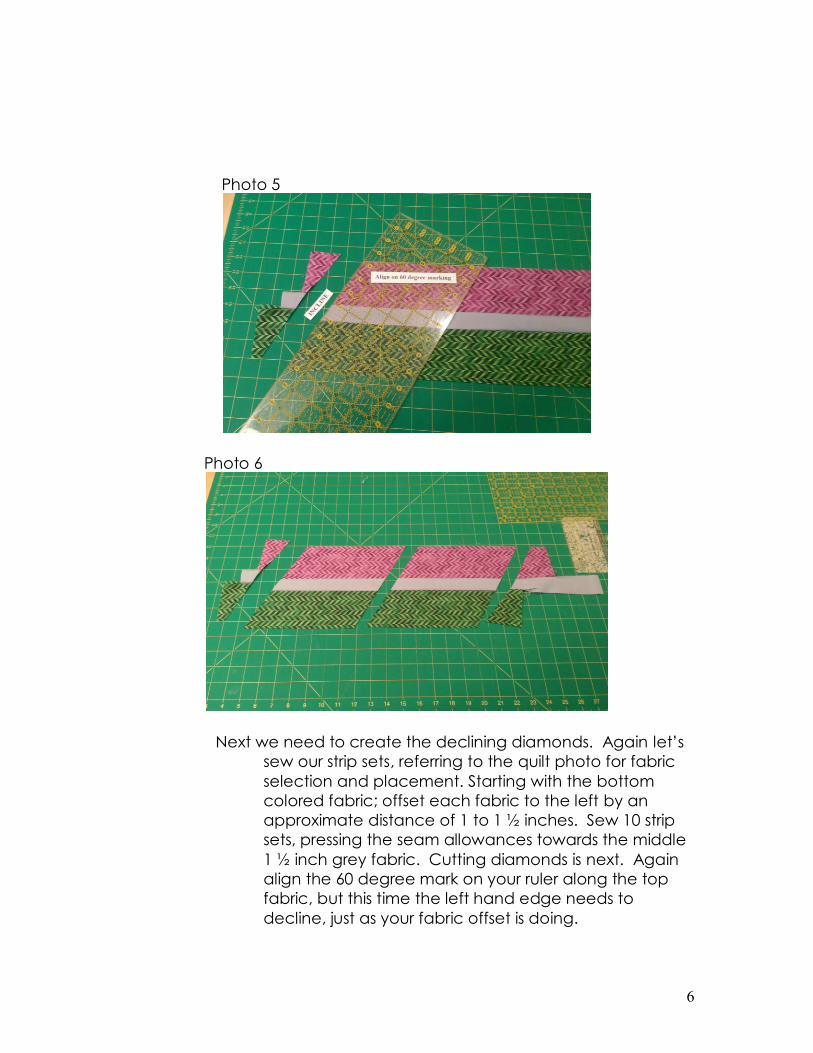
our inclining diamonds first. Starting from the bottom
fabric in your strip set, offset each fabric to the right by
1 to 1 ½ inches. This offsetting measurement is okay to
eyeball but you must offset each fabric to maximize
fabric usage. Press all seam allowances towards the
center grey 1 ½ inch fabric.
Now let’s cut the strip sets into diamonds. Just like
when you were cutting the Indah grey fabric we must
establish the 60 degree angle. Align the 60 degree
mark on your long ruler with the top of the strip set. The
long edge of the ruler needs to correspond to the offset
of your fabrics. For this group of 13 strip sets, the angle
will be inclining. Cut along the left hand side of your
ruler. (Ref photo 5) The 60 degree angle has now been
established. I now switch to my 12 ½ square ruler and I
aligned the 6 ½ inch marking to my angled cut and cut
a parallel line at this distance creating a diamond
shape. Repeat this parallel cut a second time to
create 2 diamond shapes from each strip set. (Ref
Photo 6) Note: some long rulers are 6 ½ inches in width,
if you own one of these you would not need to change
rulers. Mine is only 6 inches and I needed to change to
keep my cutting accurate. After cutting all 13 strip sets
you will have made 26 striped diamonds, only 25 will be
used.
6
Photo 5
Photo 6
Next we need to create the declining diamonds. Again let’s
sew our strip sets, referring to the quilt photo for fabric
selection and placement. Starting with the bottom
colored fabric; offset each fabric to the left by an
approximate distance of 1 to 1 ½ inches. Sew 10 strip
sets, pressing the seam allowances towards the middle
1 ½ inch grey fabric. Cutting diamonds is next. Again
align the 60 degree mark on your ruler along the top
fabric, but this time the left hand edge needs to
decline, just as your fabric offset is doing.
7
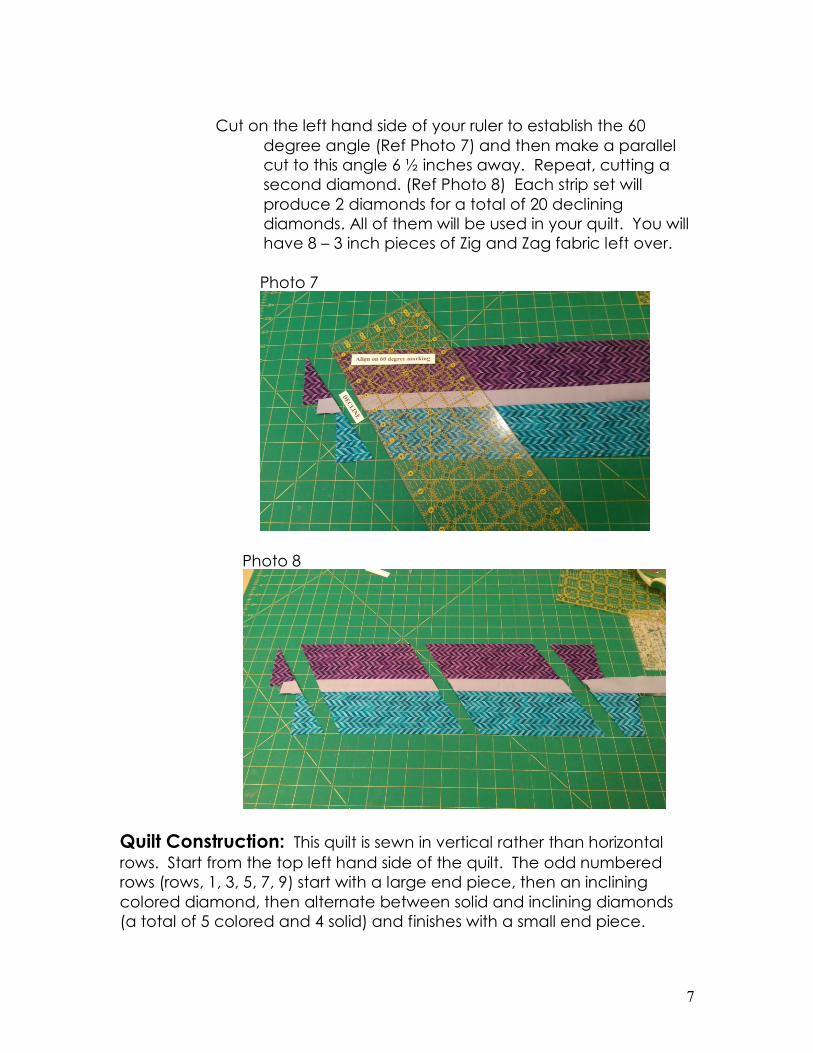
Cut on the left hand side of your ruler to establish the 60
degree angle (Ref Photo 7) and then make a parallel
cut to this angle 6 ½ inches away. Repeat, cutting a
second diamond. (Ref Photo 8) Each strip set will
produce 2 diamonds for a total of 20 declining
diamonds. All of them will be used in your quilt. You will
have 8 – 3 inch pieces of Zig and Zag fabric left over.
Photo 7
Photo 8
Quilt Construction: This quilt is sewn in vertical rather than horizontal
rows. Start from the top left hand side of the quilt. The odd numbered
rows (rows, 1, 3, 5, 7, 9) start with a large end piece, then an inclining
colored diamond, then alternate between solid and inclining diamonds
(a total of 5 colored and 4 solid) and finishes with a small end piece.
8
Remember, when sewing angled blocks together you do not match up
the end points of the blocks, but where the seam allowances meet. Press
all seam allowances between the blocks towards the colored fabric. The
even numbered rows start with a small end piece, then alternate
between declining and solid diamonds (a total of 5 colored and 4 solid)
and finish with a large end piece. Again, press all block seam allowances
toward the colored fabric.
While sewing the rows together, the seam allowances of every other Zig
and Zag fabric will nest together if you followed the pressing
instructions. These are the only points to match and with the
correct pressing will do so beautifully. Ease any fabric between
these points as some stretching does occur when bias edges are
involved. All the end pieces, both the small and the large, were
cut slightly longer than is needed. This was done so you would have
enough fabric to square-up your quilt. This squaring-up can be
done as a quilt top or after your quilting is completed. I really like
my blocks to end with a point against my binding and this “fudge
factor” allows this to happen.
Quilt bind and enjoy.