zippers - college of agriculture, food and environment › agcomm › pubs › fcs2 › fcs2842 ›...
TRANSCRIPT

Styles and TypesThere are basically three types of zippers: con-
ventional, separating, and invisible. Conventional and invisible zippers are closed at one end and are generally sewn into a seam. Separating zippers are open at both ends and are used in a seam line where they are required to open completely. All zippers are made with a chain of either metal or plastic teeth OR a synthetic continuous coil. Nylon and polyester coil zippers are lightweight and suited to a variety of fabrics.
This factsheet will cover sewing instructions for the lapped, centered, invisible, exposed, and mock fly front zipper applications. Illustrations are for garment applications; however, most can be adapted for accessories and home décor items.
Always choose the most appropriate zipper for the finished item based on the design of the item, the fabric type, and fabric weight. Be sure to se-lect a zipper that is long enough for the location to prevent strain when getting in and out of the gar-ment or item. If the desired length is not available, choose a longer zipper and shorten it. Instructions for shortening a zipper are included in this factsheet (Figure 3 on page 3.)
FCS2-842
ZippersMarjorie M. Baker, Family and Consumer Sciences
Z ippers are used as closures on garments, accessories, and home décor items. They are extremely secure and, if applied correctly, they can look very professional. If not applied
correctly, they can give a garment or other items a “homemade” look.
Conventional – One end of the zipper is open; designed for an open placket application; comes in lengths of 4 to 108 inches; a 7- to 9- inch zipper is recommended for pants and skirts.
Separating – Both ends of the zipper are open; used on jackets, coats, and blouses; comes in lengths of 10 to 36 inches; custom lengths also available.
Invisible – One end of the zipper is open; special sewing machine foot is available for easy application, but conventional zipper foot may be used; teeth are hidden when zipped; only the tab is visible; lengths available from 7 to 30 inches.
If zippers are not applied correctly, they can give a garment or other item
a “ homemade” look.

�
StandardsA well-constructed zipper placket (opening
where the zipper is placed) should:– Have matching seam lines when zipper crosses
a seam.– Have matching fabric design, if needed, such as
with stripes and plaids.– Be properly prepared (seam finish applied) and
pressed prior to zipper insertion.– Be sized to the zipper length.– Be the same length on both sides (Figure 1).
Right Wrong
Figure 1
A well-applied zipper should:– Be flat when closed and neat in appearance (lies
smooth without stretching or puckering the fabric).– Have smooth, even stitches evenly spaced from
the placket edge. – Be stitched across the bottom opening 1/8 inch
beyond zipper stop.– Have thread ends secured and hidden in folds of
fabric so they will not get caught in the zipper teeth.
– Be of a weight compatible to the fabric (light with light, heavy with heavy).
– Have a 3/8-inch area at the top of a neckline zipper for a fastener (hanging snap or hook-and-eye).
– Be suited in terms of weight, size, and length to the garment design, fabric used, and opening location on the garment; color should match or coordinate with fabric.
– Be concealed beneath the edge of the placket overlap from top to bottom.
PreparationAlways preshrink the zipper before applying it
to the garment. Make sure the zipper slides up and down easily. Check carefully that teeth are correctly aligned. Purchasing a good-quality zipper is impor-tant to the life of a garment.
HintsBefore applying a zipper, think about these options: Staystitch opening, if not on straight of grain. Apply appropriate seam finish to seam allow-
ance before inserting zipper. Stitch from the bottom to the top of the zipper
opening to keep fabric on grain. Close zipper when pressing, laundering, or dry
cleaning to protect teeth. Rub metal zipper teeth with soap, if they do
not zip easily. Use a lapped zipper application unless the gar-
ment design demands a centered application. A lapped zipper requires only one row of per-fect stitching, and the zipper teeth are less likely to show (sometimes difficult to match zipper to fabric color).
When pinning or hand basting a zipper, work from the top down.
Carefully match seams and garment designs, such as with plaids and stripes.
Insert zipper while garment pieces are flat, if possible.
Hand finishing (pricked or picked) a zipper adds a custom touch. Some fabrics almost always require hand finishing.
Add an underlap so you do not catch your skin, shirt, or lingerie when closing the zipper. You can use grosgrain ribbon or fabric that is the same width as the zipper tape. Stitch it to the seam on the underlap side of the zipper, and tack it on the opposite side at the bottom to hold it in place. (Figure �)
Fabric Underlap
Figure 2
3
Use a zipper foot to assist in stitching close to the zipper’s teeth.
Stabilize stretchy fabric with a lightweight, nonwoven interfacing in the seam allowance.
Use basting tape to hold zipper in place for stitching.
Use transparent tape or hand basting to pro-vide guidelines for a machine topstitching.
Have a minimum 5/8-inch seam allowance for zipper placket. Add to pattern to create a 1-inch seam for easier application.
Press placket seams well before and through-out the application.
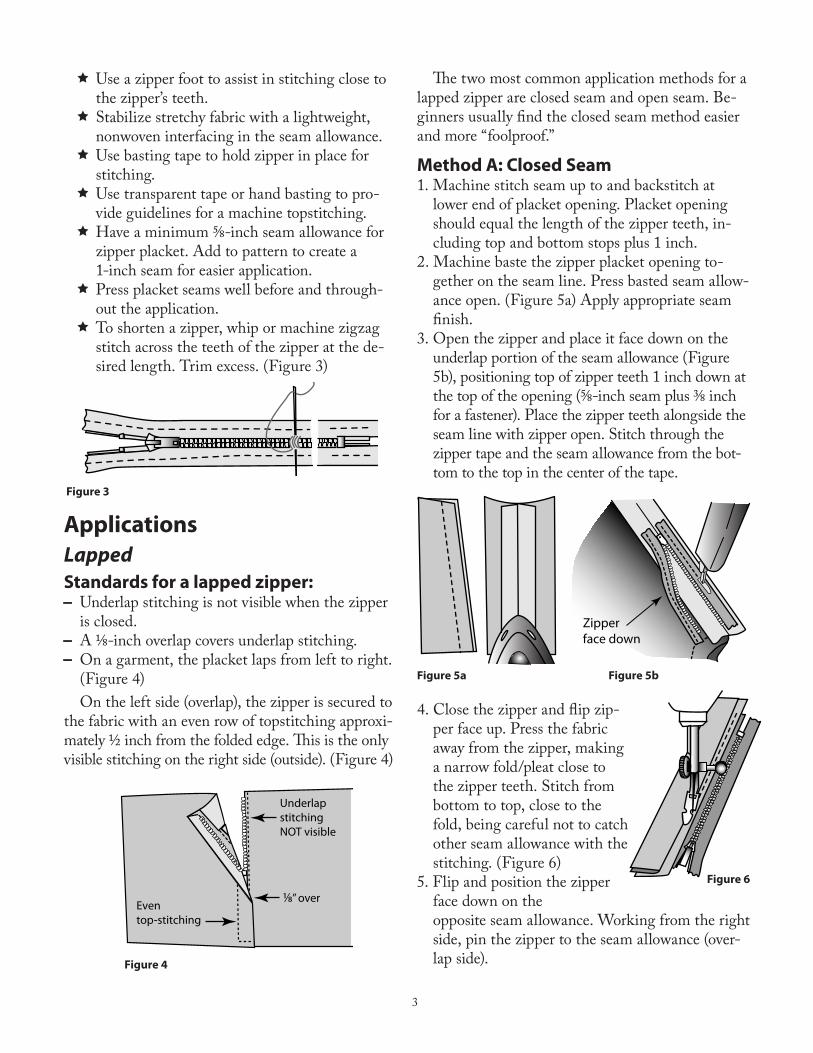
To shorten a zipper, whip or machine zigzag stitch across the teeth of the zipper at the de-sired length. Trim excess. (Figure 3)
Figure 3
ApplicationsLappedStandards for a lapped zipper:– Underlap stitching is not visible when the zipper
is closed.– A 1/8-inch overlap covers underlap stitching.– On a garment, the placket laps from left to right.
(Figure 4)On the left side (overlap), the zipper is secured to
the fabric with an even row of topstitching approxi-mately ½ inch from the folded edge. This is the only visible stitching on the right side (outside). (Figure 4)
Even top-stitching
Underlap stitching NOT visible
⁄” over
The two most common application methods for a lapped zipper are closed seam and open seam. Be-ginners usually find the closed seam method easier and more “foolproof.”
Method A: Closed Seam1. Machine stitch seam up to and backstitch at
lower end of placket opening. Placket opening should equal the length of the zipper teeth, in-cluding top and bottom stops plus 1 inch.
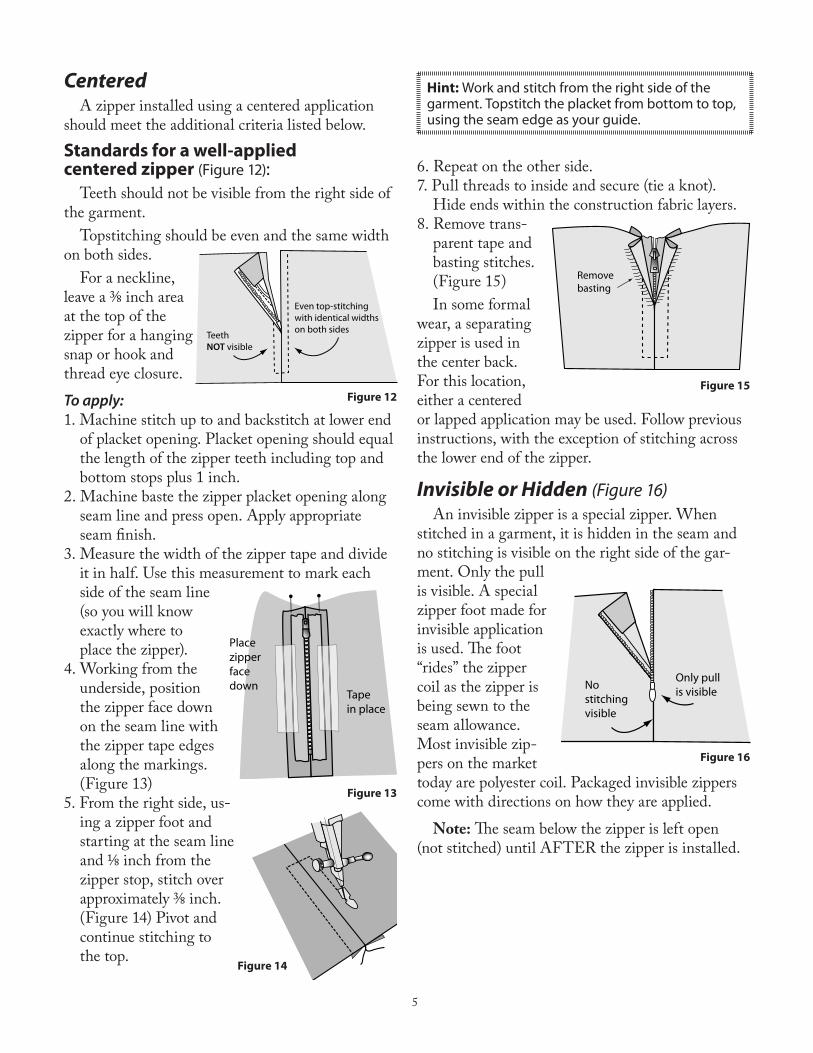
�. Machine baste the zipper placket opening to-gether on the seam line. Press basted seam allow-ance open. (Figure 5a) Apply appropriate seam finish.
3. Open the zipper and place it face down on the underlap portion of the seam allowance (Figure 5b), positioning top of zipper teeth 1 inch down at the top of the opening (5/8-inch seam plus 3/8 inch for a fastener). Place the zipper teeth alongside the seam line with zipper open. Stitch through the zipper tape and the seam allowance from the bot-tom to the top in the center of the tape.
Figure 5a Figure 5b
4. Close the zipper and flip zip-per face up. Press the fabric away from the zipper, making a narrow fold/pleat close to the zipper teeth. Stitch from bottom to top, close to the fold, being careful not to catch other seam allowance with the stitching. (Figure 6)
5. Flip and position the zipper face down on the opposite seam allowance. Working from the right side, pin the zipper to the seam allowance (over-lap side).
Zipper face down
Figure 6
Figure 4

4
Hint: Use basting tape or hand basting to mark stitching line. Topstitch the placket approximately ½ inch from the basted seam.
6. Working from the right side, stitch across the bottom of zipper beginning at the seam line. Pivot at the cor-ner with the needle in the fabric, and stitch up alongside zipper. (Figure 7)
7. Remove machine basting and press.
Method B: Open Seam1. Prepare placket opening: a. Machine stitch seam up to and backstitch at
lower end of placket opening. Placket opening should equal the length of the zipper teeth including top and bottom stops plus 1 inch.
b. Press seam allowances open both above and below the marking to the full seam’s width. Apply appropriate seam finish.
c. On the left seam allowance (the underlap), re-press seam allowance back 1/8 inch less than the full seam allowance width, using first crease line as a guide. This should extend be-hind the placket opening slightly. (Figure 8)
�. Place the fabric close to the zipper teeth. Pin or hand baste the zipper to the underlap. If you use pins, place them parallel to the zipper; positioning top of zipper teeth 1 inch down at the top of the neckline opening (5/8-inch seam plus 3/8-inch for a fastener). (Figure 9)
3. On the underlap side, begin stitching about ½ inch below the zipper opening at the bottom using a zipper foot. Position the zipper foot so you stitch close to the fold. If you have pin basted, remove the pins as you come to them.
4. With the zipper closed, position the overlap. The edge of the overlap will be 1/8 inch over the zipper teeth in line with original seam line. (Figure 10) Place pins parallel to the zipper (pins hold zipper more securely than hand basting). Place a few pins perpendicular to the zip-per on the overlap or hand baste.
5. Stitch from the bottom to the top by starting at the seam line. Insert the needle at the seam line. Stitch across bottom, pivot with the needle in fabric, and stitch to about 1½ inches from the top. (Figure 11)
6. Leave the needle in the fabric, raise the zipper foot, and unzip the zipper. Lower the zipper foot and carefully hold in posi-tion to complete stitching.
7. At the seam line at the bottom, pull the threads to the inside and tie a knot. Cut excess. Press.
}1"
Figure 11
Figure 9
Full seam allowance width
1⁄8” Less than seam allowance width
�⁄�”
Figure 10
Figure 7
Figure 8
5
Centered A zipper installed using a centered application
should meet the additional criteria listed below.Standards for a well-applied centered zipper (Figure 12):
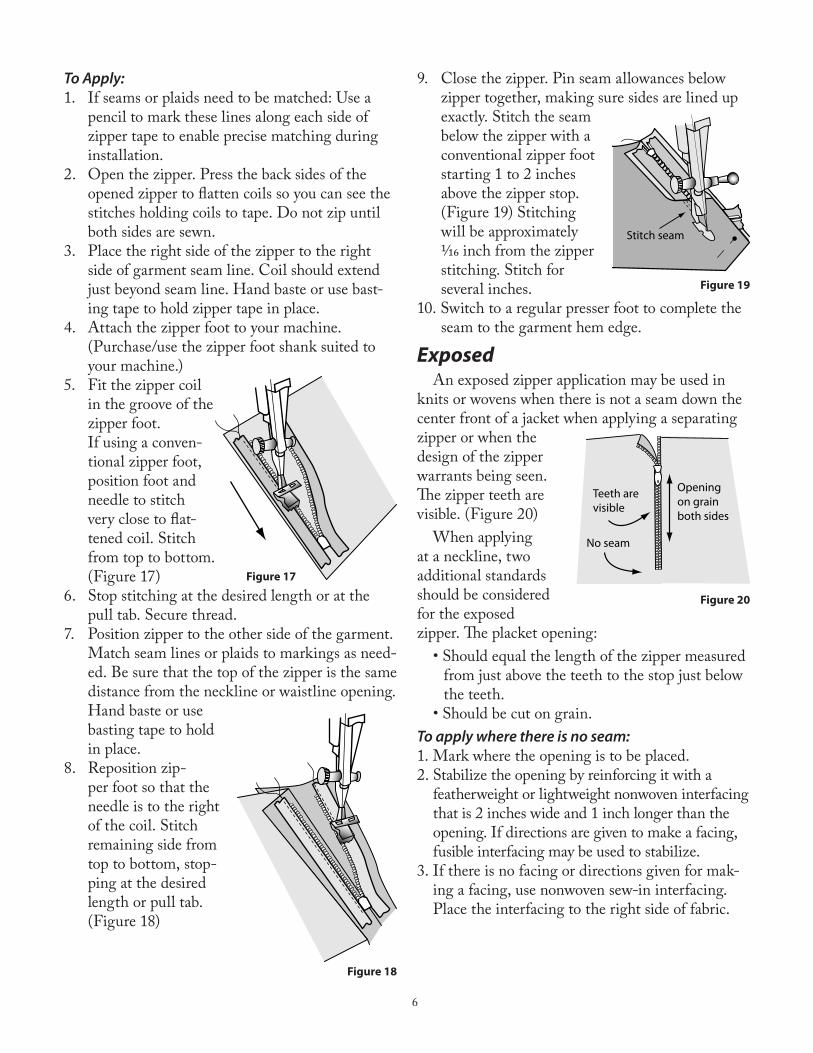
Teeth should not be visible from the right side of the garment.
Topstitching should be even and the same width on both sides.
For a neckline, leave a 3/8 inch area at the top of the zipper for a hanging snap or hook and thread eye closure.To apply:1. Machine stitch up to and backstitch at lower end
of placket opening. Placket opening should equal the length of the zipper teeth including top and bottom stops plus 1 inch.
�. Machine baste the zipper placket opening along seam line and press open. Apply appropriate seam finish.
3. Measure the width of the zipper tape and divide it in half. Use this measurement to mark each side of the seam line (so you will know exactly where to place the zipper).
4. Working from the underside, position the zipper face down on the seam line with the zipper tape edges along the markings. (Figure 13)
5. From the right side, us-ing a zipper foot and starting at the seam line and 1/8 inch from the zipper stop, stitch over approximately 3/8 inch. (Figure 14) Pivot and continue stitching to the top.
Hint: Work and stitch from the right side of the garment. Topstitch the placket from bottom to top, using the seam edge as your guide.
6. Repeat on the other side.7. Pull threads to inside and secure (tie a knot).
Hide ends within the construction fabric layers.8. Remove trans-
parent tape and basting stitches. (Figure 15)In some formal
wear, a separating zipper is used in the center back. For this location, either a centered or lapped application may be used. Follow previous instructions, with the exception of stitching across the lower end of the zipper.
Invisible or Hidden (Figure 16)An invisible zipper is a special zipper. When
stitched in a garment, it is hidden in the seam and no stitching is visible on the right side of the gar-ment. Only the pull is visible. A special zipper foot made for invisible application is used. The foot “rides” the zipper coil as the zipper is being sewn to the seam allowance. Most invisible zip-pers on the market today are polyester coil. Packaged invisible zippers come with directions on how they are applied.
Note: The seam below the zipper is left open (not stitched) until AFTER the zipper is installed.
Place zipper face down
Tape in place
Figure 14
Remove basting
Figure 15
Figure 13
Teeth NOT visible
Even top-stitching with identical widths on both sides
Figure 12
No stitching visible
Only pull is visible
Figure 16
6
To Apply:1. If seams or plaids need to be matched: Use a
pencil to mark these lines along each side of zipper tape to enable precise matching during installation.
�. Open the zipper. Press the back sides of the opened zipper to flatten coils so you can see the stitches holding coils to tape. Do not zip until both sides are sewn.
3. Place the right side of the zipper to the right side of garment seam line. Coil should extend just beyond seam line. Hand baste or use bast-ing tape to hold zipper tape in place.
4. Attach the zipper foot to your machine. (Purchase/use the zipper foot shank suited to your machine.)
5. Fit the zipper coil in the groove of the zipper foot. If using a conven-tional zipper foot, position foot and needle to stitch very close to flat-tened coil. Stitch from top to bottom. (Figure 17)
6. Stop stitching at the desired length or at the pull tab. Secure thread.
7. Position zipper to the other side of the garment. Match seam lines or plaids to markings as need-ed. Be sure that the top of the zipper is the same distance from the neckline or waistline opening. Hand baste or use basting tape to hold in place.
8. Reposition zip-per foot so that the needle is to the right of the coil. Stitch remaining side from top to bottom, stop-ping at the desired length or pull tab. (Figure 18)
9. Close the zipper. Pin seam allowances below zipper together, making sure sides are lined up exactly. Stitch the seam below the zipper with a conventional zipper foot starting 1 to � inches above the zipper stop. (Figure 19) Stitching will be approximately 1/16 inch from the zipper stitching. Stitch for several inches.
10. Switch to a regular presser foot to complete the seam to the garment hem edge.
ExposedAn exposed zipper application may be used in
knits or wovens when there is not a seam down the center front of a jacket when applying a separating zipper or when the design of the zipper warrants being seen. The zipper teeth are visible. (Figure �0)
When applying at a neckline, two additional standards should be considered for the exposed zipper. The placket opening: • Should equal the length of the zipper measured
from just above the teeth to the stop just below the teeth.
• Should be cut on grain.To apply where there is no seam:1. Mark where the opening is to be placed.�. Stabilize the opening by reinforcing it with a
featherweight or lightweight nonwoven interfacing that is � inches wide and 1 inch longer than the opening. If directions are given to make a facing, fusible interfacing may be used to stabilize.
3. If there is no facing or directions given for mak-ing a facing, use nonwoven sew-in interfacing. Place the interfacing to the right side of fabric.
Figure 17
Figure 18
Stitch seam
Figure 19
Teeth are visible
Opening on grain both sides
No seam
Figure 20

7
3. Machine stitch close to zip-per teeth. (Figure �5) If pattern includes a facing, trim back to the center front line and apply to the zipper opening.
4. Press facing/seam allowance to back of opening. Top-stitch ¼ inch away from fold along each side of zipper. (Figure �6)
The above application can be adapted for use in fashion accessories such as purses and fabric lug-gage. Be sure to select a zipper that is color coor-dinated. Select a heavy duty plastic zipper that is longer than the opening and shorten if needed.
Fly FrontThe fly front zipper is frequently used on “sporty,”
casual, or utilitarian garments such as pants and oc-casionally skirts. (Figure �7)
Note: On menswear, the placket will lap from left to right. On women’s wear, the placket may lap in either direction.
Follow the directions given by the pattern guide.
4. Stitch around the opening (on grain) the same width as the zipper teeth when it is inserted. Start at the bottom of opening and stitch across bottom, pivot, and stitch up one side. Repeat for other side of opening. Care-fully cut between parallel stitching lines and diago-nally to the cor-ners. (Figure �1)
5. Turn to the inside along the stitching lines and press.
6. Position zipper behind opening. Use basting tape to hold in place to the interfacing.
7. Fold outer garment piece back to expose seam. (Figure ��) On the inside, stitch across the tri-angle at the bottom, pivot, and stitch up side just inside previous stitching.
8. Repeat for other side of zipper. (Figure �3)
Exposed Separating ZipperTo apply in a center front opening, keep the
following in mind:1. If the pattern is not designed for an exposed
zipper, an adjustment needs to be made: Trim pattern off along center front line.
�. Unzip zipper, separating the two pieces. Lay each side face down on its respective front piece, right sides together, with edge of tape even with cut edge of each garment front. Baste in place. (Figure �4)
Figure 24
1"
2"Figure 21
Figure 22 Figure 23
Figure 25
Figure 26
Usesconventionalzipper
Figure 27
Mock Fly FrontA standard zipper opening can easily be converted
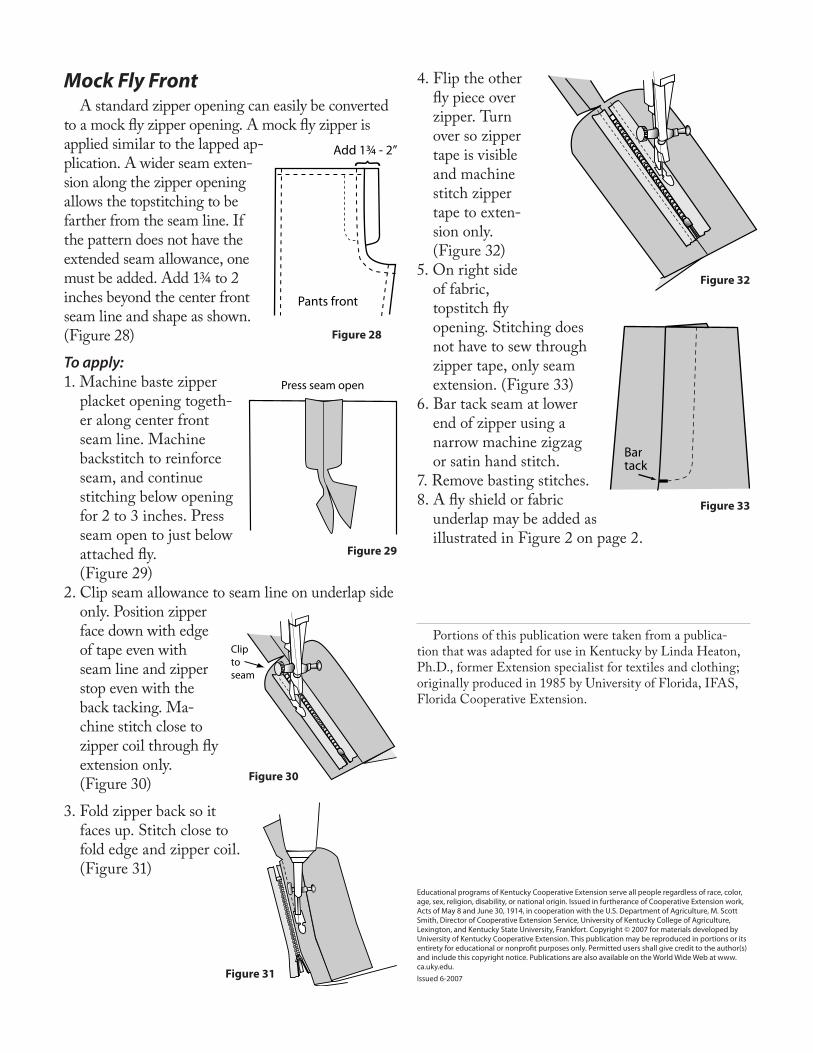
to a mock fly zipper opening. A mock fly zipper is applied similar to the lapped ap-plication. A wider seam exten-sion along the zipper opening allows the topstitching to be farther from the seam line. If the pattern does not have the extended seam allowance, one must be added. Add 1¾ to � inches beyond the center front seam line and shape as shown. (Figure �8)To apply:1. Machine baste zipper
placket opening togeth-er along center front seam line. Machine backstitch to reinforce seam, and continue stitching below opening for � to 3 inches. Press seam open to just below attached fly. (Figure �9)
�. Clip seam allowance to seam line on underlap side only. Position zipper face down with edge of tape even with seam line and zipper stop even with the back tacking. Ma-chine stitch close to zipper coil through fly extension only. (Figure 30)
3. Fold zipper back so it faces up. Stitch close to fold edge and zipper coil. (Figure 31)
4. Flip the other fly piece over zipper. Turn over so zipper tape is visible and machine stitch zipper tape to exten-sion only. (Figure 3�)
5. On right side of fabric, topstitch fly opening. Stitching does not have to sew through zipper tape, only seam extension. (Figure 33)
6. Bar tack seam at lower end of zipper using a narrow machine zigzag or satin hand stitch.
7. Remove basting stitches.8. A fly shield or fabric
underlap may be added as illustrated in Figure � on page �.
Portions of this publication were taken from a publica-tion that was adapted for use in Kentucky by Linda Heaton, Ph.D., former Extension specialist for textiles and clothing; originally produced in 1985 by University of Florida, IFAS, Florida Cooperative Extension.
Figure 28
Educational programs of Kentucky Cooperative Extension serve all people regardless of race, color, age, sex, religion, disability, or national origin. Issued in furtherance of Cooperative Extension work, Acts of May 8 and June 30, 1914, in cooperation with the U.S. Department of Agriculture, M. Scott Smith, Director of Cooperative Extension Service, University of Kentucky College of Agriculture, Lexington, and Kentucky State University, Frankfort. Copyright © 2007 for materials developed by University of Kentucky Cooperative Extension. This publication may be reproduced in portions or its entirety for educational or nonprofit purposes only. Permitted users shall give credit to the author(s) and include this copyright notice. Publications are also available on the World Wide Web at www.ca.uky.edu.Issued 6-2007
�Add 1¾ - 2”
Pants front
Press seam open
Clip toseam
Figure 30
Figure 31
Bartack
Figure 32
Figure 33
Figure 29