zodiac: your partner in pool care · zodiac: your partner in pool care ... diagnosis: the salt...
TRANSCRIPT

ZODIAC: YOUR PARTNER IN POOL CARE
Renowned worldwide for the quality and reliability of our products in the swimming pool industry, Zodiac is proud to be the market leader here in South Africa too. With our Clearwater Technology, expertise and experience, Zodiac brings you the reassurance of top quality equipment in terms of design and performance. A real guarantee of efficiency and peace of mind!
ZODIAC: SUCCESS THROUGH INNOVATION
One of the keys to Zodiac’s success is its continuous presence on the cutting edge of innovation and technology. This enables Zodiac to offer products that are efficient, safe, and compliant with the strictest standards and certification requirements. Numerous patents are the result of R&D programmes focusing on quality and performance.
ZODIAC: PEACE OF MIND
Zodiac strives to offer consumers superior quality products and service excellence. With dedicated staff throughout South Africa, you can be certain of premium after-sales service. Should you require assistance on your Zodiac product, need to locate a dealer near you or just wish to find out more information, log onto our website or call our customer help line.
• Please read this information before installation.• Always read all labels and the operation manual before installing your unit. • Please retain your manual as it contains your warranty information.
PRIVATE BAG X127HALFWAY HOUSE 1685
CUSTOMER CARE HELPLINE0860 ZODIAC
(0860 963 422) www.zodiac.co.za
WELCOME TO ZODIAC
CHLORINATOR WARRANTY
Your Clearwater Ei Salt Chlorinator has been manufactured with the greatest of care and from the best available materials.
The Chlorinator, excluding the electrodes, is covered by a manufacturing defects warranty for a period of 36 months. Parts will be replaced or repaired at the discretion of the manufacturer. The warranty period begins on the date of manufacture as encoded on the product, unless proof of purchase is supplied.
This warranty will be voided if parts other than ZODIAC approved parts are used for repairs.
PRO RATA CELL ELECTRODE WARRANTY
The Electrodes are covered by a 12 month unconditional warranty, plus a further 24 month pro rata warranty, whereby the manufacturer will contribute to the cost of a replacement cell electrode on a sliding scale, based on the age of the unit, which will be determined by the date encoded on the product, unless proof of purchase is provided.
Thank you for choosing ZODIAC. We wish you many happy years of enjoyment in your “Clearwater” pool.
Don’t forget to complete purchase details on the last page of this manual and return your Reply Paid Warranty Card to ZODIAC Pool Care South Africa (Pty) Ltd.
Note: This product is designed and manufactured for domestic/residential use only. Use on commercial or non residential pools voids all warranties. NB. Parts damaged by power surges or lightning are not considered as warranty.
Note: If the moulded plug is removed from this product and it is “hard wired”, this operation should be performed by a qualified electrician. Failing to do so will result in the warranty being voided.
WARRANTY
RECORD YOUR ZODIAC SALT WATER CHLORINATOR PURCHASE DETAILS HERE:
Clearwater Ei Salt Chlorinator
Date of purchase:
Purchased from:
Suburb:
Province:
Postal code:
Clearwater Ei Salt Chlorinator Serial No:
Please quote this number when you contact us
KEEP YOUR OWNER’S MANUAL FOR YOUR RECORDS
RECORD OF PURCHASE DETAILS
INDEX
SAFETY 1
GENERAL WARNINGS 2
ELECTRICAL HAZARD 3
CONTENTS OF THE CARTON 4
CLEARWATER TECHNOLOGY 5
YOUR COMPLETE FILTRATION SYSTEM 6
INSTALLATION 7
CONTROL PANEL 12
SETTING THE CLOCK 13
SETTING THE TIMERS 14
CLEARING THE TIMERS, SETTING THE LANGUAGE PREFERENCE 15
MANUAL OPERATION, USING AN EXTERNAL TIMER 16
SETTING THE OUTPUT LEVEL 17
24 HOUR SAFETY TIMEOUT 18
BACKUP BATTERY 19
CLEANING THE CELL 20
Inspecting and cleaning the electrodeIn zones where the water is hard (high TH) the Ei electrode may have to be cleaned.
To clean the Ei electrode:1. Turn off the Ei Chlorinator, then the filtering system, close the cut-off valves and remove the cell cap. Remove the cell cable.
2. Unscrew the locking ring and remove the electrode from the saddle clamp (pay attention to the small translucent vertical valve). The ring is crimped, making it easier to remove by hand (or using the supplied tightening tool).If a scale deposit is present, place the electrode upside down and pour some cleaning solution into it.
3. If you do not want to use a commercial cleaning solution you can make your own by carefully mixing one (1) part of hydrochloric acid with nine (9) parts of water ( Warning: always pour the acid into the water, never the opposite!). A stronger solution will reduce the electrode’s life span.
4. Leave the cleaning solution to dissolve the scale deposit for about fifteen minutes. Dispose of the solution in an approved local waste collection centre; never pour it into the rainwater drain or into the sewers.
5. Rinse the electrode in clean water and replace it in the cell body, taking note of the alignment marks.
6. Replace the locking ring, reconnect the cell cable and put the cap back into place. Turn the filtering system on, then the Ei chlorinator.
7. Confirm chlorine production and operating settings on the Ei command box. The clock settings are saved automatically.
21
SAFETY
120
At Zodiac, we take safety seriously. The Clearwater Ei unit is designed with many built in safety features but you should always exercise caution when using electrical appliances and follow the instructions closely. Failure to do so could result in permanent injury, electrocution or drowning.
Important things to consider!
Before you begin installation please turn the filtration equipment off and close off all your valves to prevent water from escaping when drilling into the pipe.
Ensure you have a suitable place on the plumbing return line for your Clearwater Ei cell, as the cell must be installed in an upright position.
WARNING!The installation and use of your Clearwater Ei Salt Chlorinator
must comply with the instructions and recommendations presented in this manual. For additional information please contact your pool professional.
PLEASE NOTE: Your Clearwater Ei unit has been designed to be suitable for DIY installation, however should you prefer to have it installed by a professional please contact our customer care team on 0860 963 422 and they will provide you with details of your closest approve installer.
CLEANING THE CELL
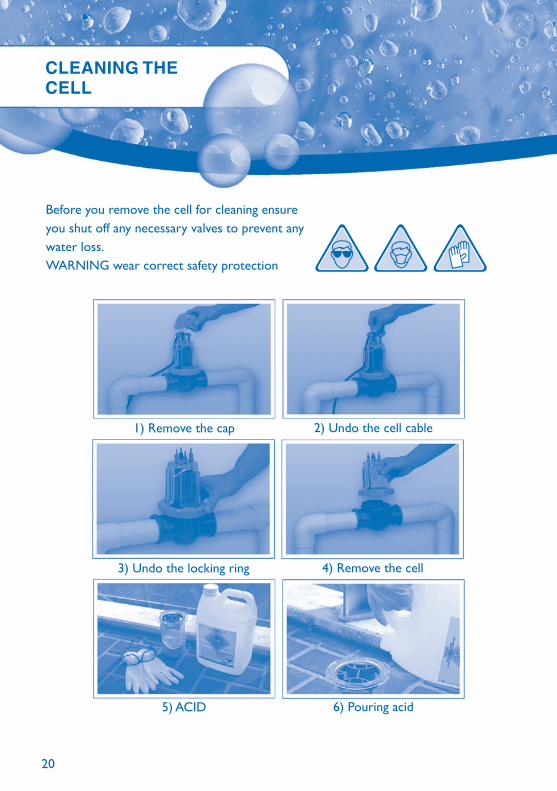
Before you remove the cell for cleaning ensure you shut off any necessary valves to prevent any water loss. WARNING wear correct safety protection
1) Remove the cap 2) Undo the cell cable
3) Undo the locking ring 4) Remove the cell
5) ACID 6) Pouring acid
CHILD SAFETY Children should not be allowed to operate or perform maintenance .................. on this product. No one, particularly children, should sit, step, lean, or climb on any of your pool’s operational system. In the interest of child safety, all components of a pool’s operational system should be located at least 3 metres away from the pool.
WARNINGSClearwater Ei Salt Chlorinators are designed for domestic swimming pool use only. Contrary use could affect performance and void the warranty. Operating a salt chlorinator without water flowing through the cell may cause a build up of flammable gases, resulting in fire or explosion.
SERVICE TO ZODIAC EQUIPMENT SHOULD ONLY BE CARRIED OUT BY A QUALIFIED POOL PROFESSIONAL.THE USE OF EYE PROTECTION IS RECOMMENDED WHEN WORKING WITH POOL CHEMICALS.
Keep equipment out of reach of children.A damaged supply cord should only be replaced by the manufacturer, service agent or electrician.When installing and using this electrical equipment, always follow basic safety precautions.Before performing installation, disconnect all power.Free available chlorine in your pool should be maintained between 1 and 3 ppm (parts per million) at all times.
GENERAL WARNINGS
2 19
BACKUP BATTERY
The Clearwater Ei unit is fitted with a long life rechargeable battery. This battery should last in excess of 500 hours without the mains being connected. The battery will retain ALL settings in the event of a power failure.In addition the Microprocessor in the unit will retain some settings permanently, in the event of the battery going flat or being replaced:
Operating hours Cell hours Controller setting
ERRORS / WARNINGS
NO FLOWDiagnosis: Insufficient water flow in the cell. This could mean the circulation pump has ceased to function, or the filter needs cleaning. The chlorine output will be turned off at this time.
CHECK SALTDiagnosis: The salt concentration in the pool is insufficient and/or the water temerature is too low. (The orange salt indicator light is on). Always maintain a salt level of 4000 ppm. If you don’t know what your salt level is or how to test it, consult your local pool care professional.
OUTPUT FAULTDiagnosis: There could be a problem with the power supply. Turn power off at the power point and consult your local pool care professional.
ELECTRICAL HAZARD
To avoid accidental contact with lawn mowers and hedge ....................trimmers, power cords should remain within sight and above ground at all times.The Clearwater Ei Power pack must not come into contact with pool water and should be installed at least 3 metres from the inside wall of your swimming pool.Should a lack of water flow be detected, the unit’s electronic flow switch is designed to turn off the system. Interfering with the electronic flow switch could result in personal injury and/or damage to the cell.One pump per electrical socket only (no ancillary equipment should be connected to the same outlet).This appliance is not intended for use by persons (including children) with reduced physical, sensory or mental capabilities, or lack of experience and knowledge, unless they have been given supervision or instruction concerning use of the appliance by a person responsible for their safety.Children should be supervised to ensure that they do not play with the appliance.The installation of the chlorinator should be carried out by a qualified pool professional. Please contact our customer care helpline on 0860 963422 for your nearest pool professional.
318
24 HOUR SAFETYTIMEOUT
To prevent the possibility of hazardous over-chlorination, the Clearwater Ei unit has a built-in safety shutdown. If the Clearwater Ei salt chlorinator is manually turned ON (with no timers set), and left on, chlorine generation will automatically turn OFF after 24 hours. The Clearwater Ei salt chlorinator can be turned ON as normal after this time.
NOTE: If using the Clearwater Ei unit with an external timer – the 24 hour timer is reset whenever power is cut to the Clearwater Ei unit.
CHLORINATOR REVERSAL
The Clearwater Ei salt chlorinator has a reverse polarity cell. This means that every 5 hours the cell will switch its polarity to help prevent any build up of calcium on the cell plates. This is sometimes referred to as self cleaning. During the transition between changing its polarity there is a 5 minute wait time when the cell will not produce any chlorine. Don’t be alarmed, once it has changed polarity it will continue producing chlorine.
‘** CLEANING **’ will be displayed on the screen during the 5 minute ‘WAIT’ period. (The output level indicator will remain as set during the CLEANING period).
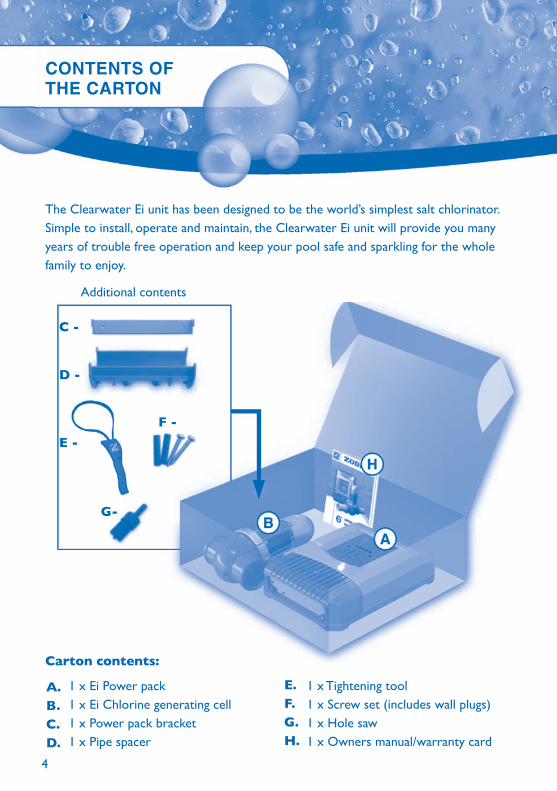
The Clearwater Ei unit has been designed to be the world’s simplest salt chlorinator. Simple to install, operate and maintain, the Clearwater Ei unit will provide you many years of trouble free operation and keep your pool safe and sparkling for the whole family to enjoy.
1 x Ei Power pack1 x Ei Chlorine generating cell1 x Power pack bracket1 x Pipe spacer
1 x Tightening tool1 x Screw set (includes wall plugs)1 x Hole saw1 x Owners manual/warranty card
C -
D -
E -
A.B.C.D.
Carton contents:
E.F.G.H.
Additional contents
CONTENTS OFTHE CARTON
4
F -
G-
17
SETTING THE OUTPUT LEVEL
Turn the chlorinator ‘ON’ by pressing the button.
Press the Output button to reach the desired output level. One amber level is
the minimum setting (20%) and the output can be adjusted in increments of 20%
up to 100%.
If the ‘Output’ button is pressed beyond 100%, the output level setting will drop to 20%.
1)
2)
3)
NOTE: If your output is set at 20% (one light) the Clearwater Ei unit will run for 2mins every 10mins, 40% (2 lights) it will run for 4mins every 10mins and so on.
When setting the chlorine output level you must consider the size of the pool, the amount of use the pool will be receiving and how hot the weather is. All these factors weigh greatly on the level of output needed. Simply adjust the output level needed using the following steps.
On/Off
Safety Alert: if using a pool cover of any kind always reduce your chlorine output to a minimum. High levels of chlorine in your pool will corrode or damage some equipment such as ladders, pool cleaners etc.
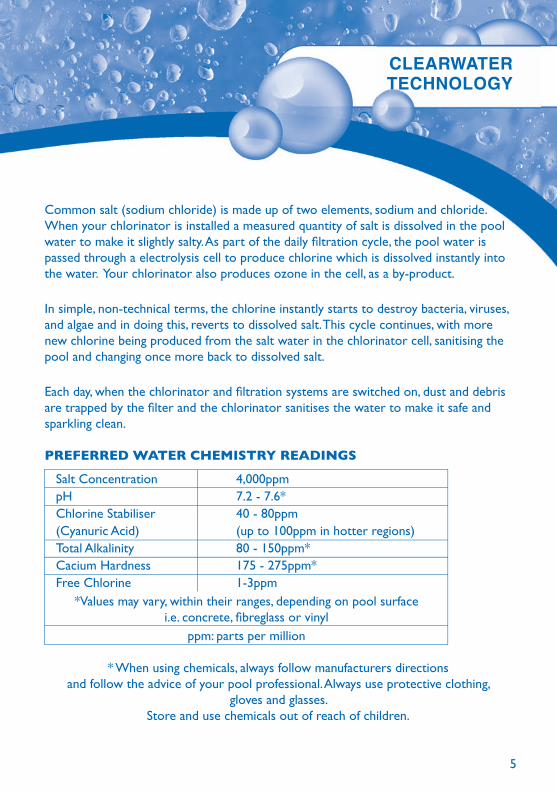
Common salt (sodium chloride) is made up of two elements, sodium and chloride.When your chlorinator is installed a measured quantity of salt is dissolved in the pool water to make it slightly salty. As part of the daily filtration cycle, the pool water is passed through a electrolysis cell to produce chlorine which is dissolved instantly into the water. Your chlorinator also produces ozone in the cell, as a by-product.
In simple, non-technical terms, the chlorine instantly starts to destroy bacteria, viruses, and algae and in doing this, reverts to dissolved salt. This cycle continues, with more new chlorine being produced from the salt water in the chlorinator cell, sanitising the pool and changing once more back to dissolved salt.
Each day, when the chlorinator and filtration systems are switched on, dust and debris are trapped by the filter and the chlorinator sanitises the water to make it safe and sparkling clean.
PREFERRED WATER CHEMISTRY READINGS
Salt Concentration 4,000ppmpH 7.2 - 7.6*Chlorine Stabiliser 40 - 80ppm(Cyanuric Acid) (up to 100ppm in hotter regions)Total Alkalinity 80 - 150ppm*Cacium Hardness 175 - 275ppm*Free Chlorine 1-3ppm
* When using chemicals, always follow manufacturers directions and follow the advice of your pool professional. Always use protective clothing,
gloves and glasses.Store and use chemicals out of reach of children.
*Values may vary, within their ranges, depending on pool surfacei.e. concrete, fibreglass or vinyl
ppm: parts per million
CLEARWATERTECHNOLOGY
16
In addition to running off a timer, the Clearwater Ei unit can also be operated
manually by pressing the button. The Clearwater Ei unit will run until the next
‘OFF’ time is reached, then will operate from the timers.
NOTE: If the Clearwater Ei unit is manually turned on and no ‘OFF’ time is set, the Clearwater Ei unit will run for a maximum of 30 hours continuously, then turn ‘OFF’ to prevent over chlorination.
On/Off
USING AN EXTERNAL TIMER
1)
2)
3)
In some cases it may be desirable to connect the Clearwater Ei unit to an external time switch. In this case, the chlorine output must turn on whenever power is supplied to the power pack. To set the Clearwater Ei unit up to run this mode, NO TIMERS should be set.
Clear any timers that are set, refer to page 15. (A small ’T’ symbol will be visible in the top right corner of the screen if a timer is set).
Turn the chlorine output on and set to the desired output level. (See ‘SETTING THE OUTPUT LEVEL’).
Set the external timer to the desired setting.
MANUAL OPERATION
5

The Clearwater Ei cell should be the last piece of equipment on the plumbing line back to the pool.
YOUR COMPLETEFILTRATION SYSTEM
Your new Clearwater Ei system
Your filtration system should look like this, once the Clearwater Ei unit is installed.
6
CLEARING THE TIMERS
1)
2)
3)
4)
From the main operating screen, press the button.
Wait for message to clear.
Press the button, ‘TIMERS CLEARED’ will appear on the screen.
Press the Button to return to the main operating screen.
Timer
Output
Clock
Switch on the Clearwater Ei unit.
Wait for the start up sequence to finish (± 5 seconds).
Press the key for about 5 seconds and the current language will be
displayed on the screen.
To change the language keep pressing the key until the desired language is
displayed on the LCD screen. Release the key to set the language.
1)
2)
3)
4)
SETTING THE LANGUAGE PREFERENCE
Hours
Hours
15
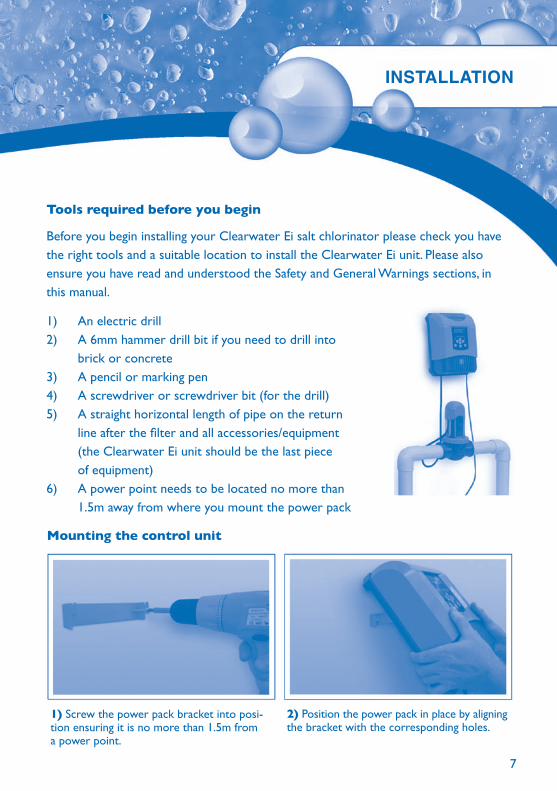
Tools required before you begin
Before you begin installing your Clearwater Ei salt chlorinator please check you have the right tools and a suitable location to install the Clearwater Ei unit. Please also ensure you have read and understood the Safety and General Warnings sections, in this manual.
An electric drill A 6mm hammer drill bit if you need to drill into brick or concreteA pencil or marking penA screwdriver or screwdriver bit (for the drill)A straight horizontal length of pipe on the return line after the filter and all accessories/equipment (the Clearwater Ei unit should be the last piece of equipment)A power point needs to be located no more than 1.5m away from where you mount the power pack
1)2)
3)4)5)
6)
1) Screw the power pack bracket into posi-tion ensuring it is no more than 1.5m from a power point.
2) Position the power pack in place by aligning the bracket with the corresponding holes.
Mounting the control unit
INSTALLATION
7
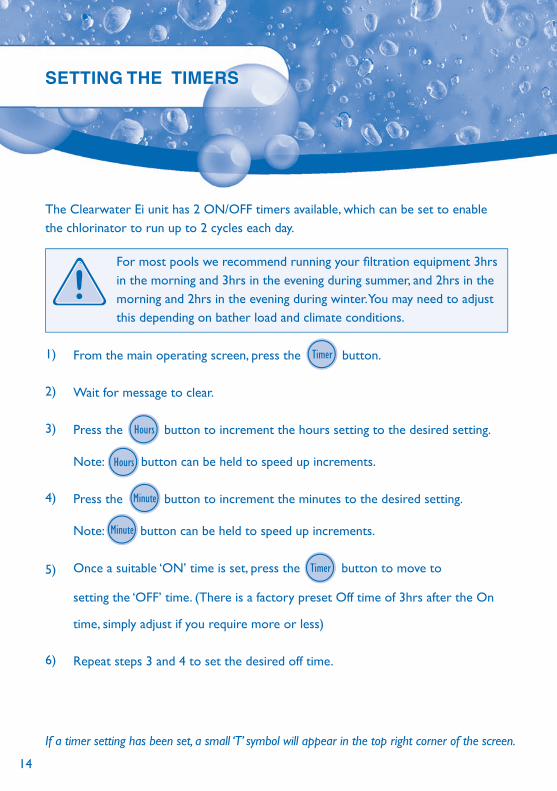
If a timer setting has been set, a small ‘T’ symbol will appear in the top right corner of the screen.
The Clearwater Ei unit has 2 ON/OFF timers available, which can be set to enable the chlorinator to run up to 2 cycles each day.
From the main operating screen, press the button.
Wait for message to clear.
Press the button to increment the hours setting to the desired setting.
Note: button can be held to speed up increments.
Press the button to increment the minutes to the desired setting.
Note: button can be held to speed up increments.
Once a suitable ‘ON’ time is set, press the button to move to
setting the ‘OFF’ time. (There is a factory preset Off time of 3hrs after the On
time, simply adjust if you require more or less)
Repeat steps 3 and 4 to set the desired off time.
1)
2)
3)
4)
5)
6)
For most pools we recommend running your filtration equipment 3hrs in the morning and 3hrs in the evening during summer, and 2hrs in the morning and 2hrs in the evening during winter. You may need to adjust this depending on bather load and climate conditions.
Timer
Hours
Hours
Minute
Minute
Timer
SETTING THE TIMERS
14
Less than1.5m
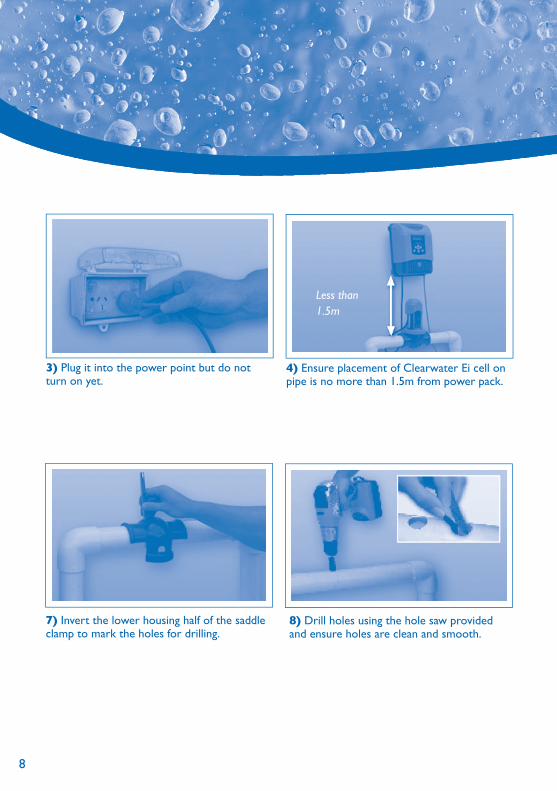
3) Plug it into the power point but do not turn on yet.
4) Ensure placement of Clearwater Ei cell on pipe is no more than 1.5m from power pack.
8
SETTING THE CLOCK
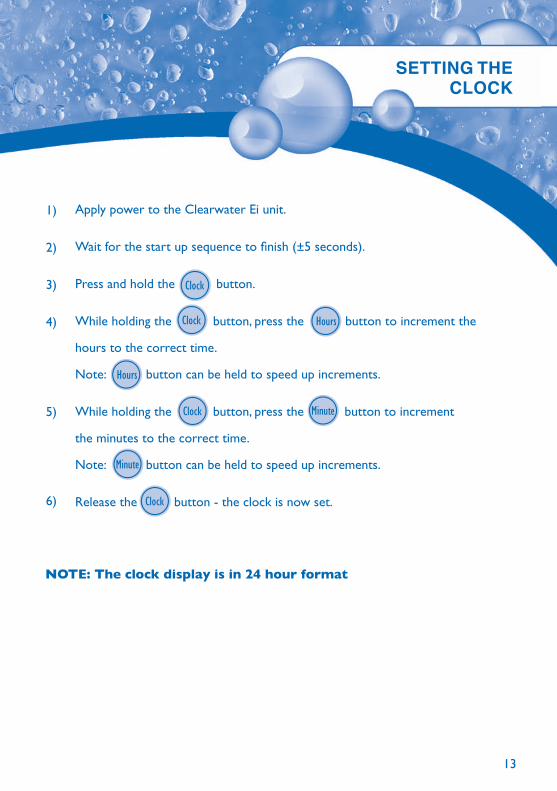
Apply power to the Clearwater Ei unit.
Wait for the start up sequence to finish (±5 seconds).
Press and hold the button.
While holding the button, press the button to increment the
hours to the correct time.
Note: button can be held to speed up increments.
While holding the button, press the button to increment
the minutes to the correct time.
Note: button can be held to speed up increments.
Release the button - the clock is now set.
1)
2)
3)
4)
5)
6)
NOTE: The clock display is in 24 hour format
Clock
Clock Hours
Hours
Clock Minute
Minute
Clock
7) Invert the lower housing half of the saddle clamp to mark the holes for drilling.
8) Drill holes using the hole saw provided and ensure holes are clean and smooth.
13
12 9
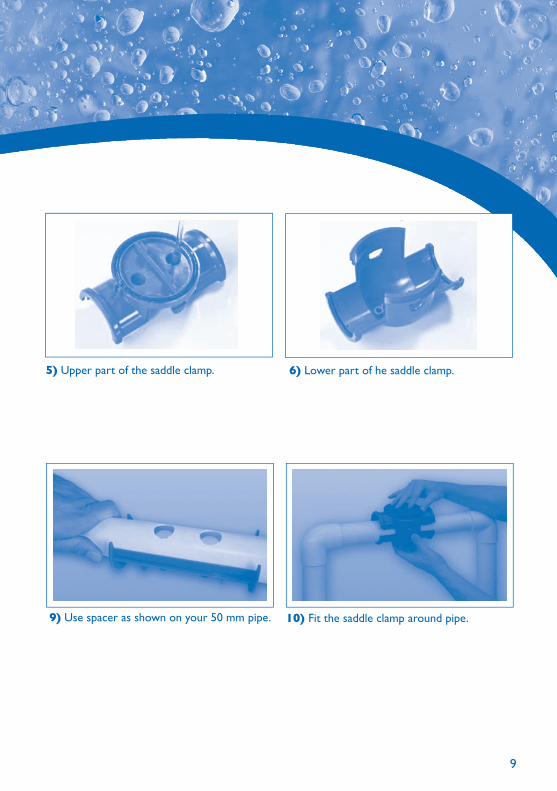
5) Upper part of the saddle clamp. 6) Lower part of he saddle clamp.
10) Fit the saddle clamp around pipe.9) Use spacer as shown on your 50 mm pipe.
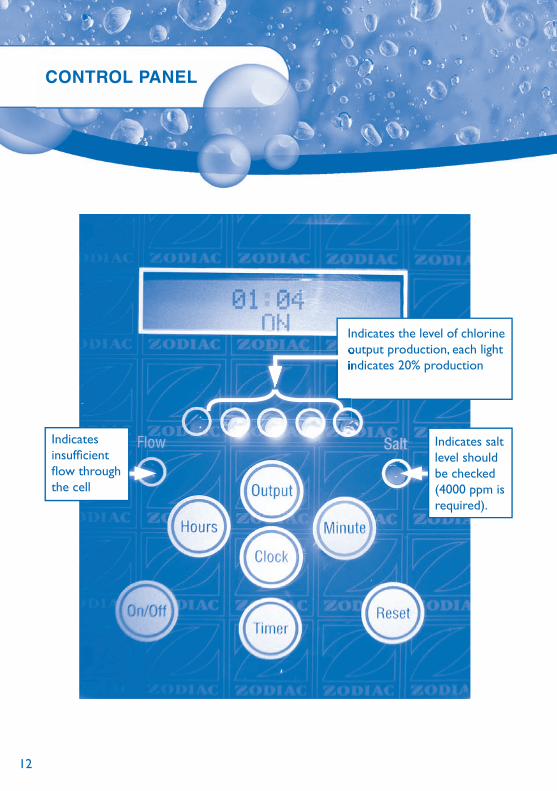
CONTROL PANEL
Indicates the level of chlorine output production, each light indicates 20% production
Indicates insufficient flow through the cell
Indicates salt level should be checked (4000 ppm is required).
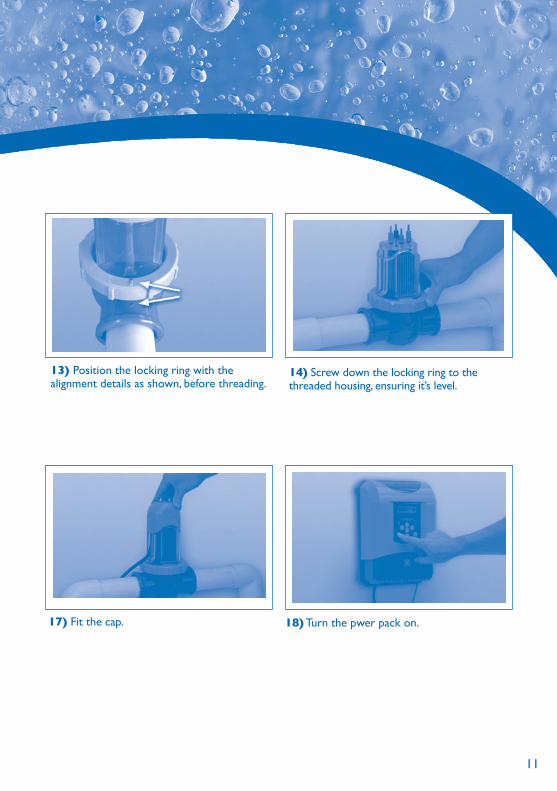
13) Position the locking ring with the alignment details as shown, before threading.
14) Screw down the locking ring to the threaded housing, ensuring it’s level.
10
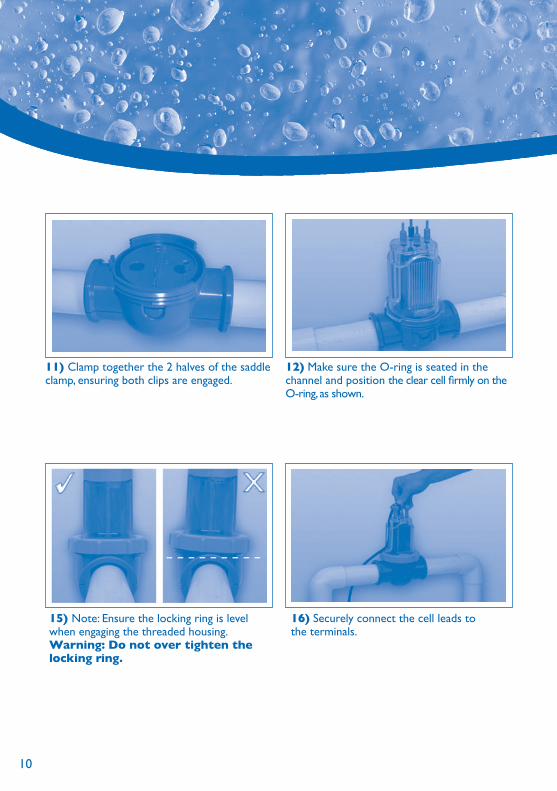
12) Make sure the O-ring is seated in the channel and position the clear cell firmly on the O-ring, as shown.
11) Clamp together the 2 halves of the saddle clamp, ensuring both clips are engaged.
15) Note: Ensure the locking ring is level when engaging the threaded housing. Warning: Do not over tighten the locking ring.
16) Securely connect the cell leads to the terminals.
11
17) Fit the cap. 18) Turn the pwer pack on.
13) Position the locking ring with the alignment details as shown, before threading.
14) Screw down the locking ring to the threaded housing, ensuring it’s level.
10
12) Make sure the O-ring is seated in the channel and position the clear cell firmly on the O-ring, as shown.
11) Clamp together the 2 halves of the saddle clamp, ensuring both clips are engaged.
15) Note: Ensure the locking ring is level when engaging the threaded housing. Warning: Do not over tighten the locking ring.
16) Securely connect the cell leads to the terminals.
11
17) Fit the cap. 18) Turn the pwer pack on.
12 9
5) Upper part of the saddle clamp. 6) Lower part of he saddle clamp.
10) Fit the saddle clamp around pipe.9) Use spacer as shown on your 50 mm pipe.
CONTROL PANEL
Indicates the level of chlorine output production, each light indicates 20% productionoutput production, each light output production, each light indicates 20% productionindicates 20% production
Indicates insufficient flow through the cell
Indicates salt level should be checked (4000 ppm is required).
Less than1.5m
3) Plug it into the power point but do not turn on yet.
4) Ensure placement of Clearwater Ei cell on pipe is no more than 1.5m from power pack.
8
SETTING THE CLOCK
Apply power to the Clearwater Ei unit.
Wait for the start up sequence to finish (±5 seconds).
Press and hold the button.
While holding the button, press the button to increment the
hours to the correct time.
Note: button can be held to speed up increments.
While holding the button, press the button to increment
the minutes to the correct time.
Note: button can be held to speed up increments.
Release the button - the clock is now set.
1)
2)
3)
4)
5)
6)
NOTE: The clock display is in 24 hour format
Clock
Clock Hours
Hours
Clock Minute
Minute
Clock
7) Invert the lower housing half of the saddle clamp to mark the holes for drilling.
8) Drill holes using the hole saw provided and ensure holes are clean and smooth.
13
Tools required before you begin
Before you begin installing your Clearwater Ei salt chlorinator please check you have the right tools and a suitable location to install the Clearwater Ei unit. Please also ensure you have read and understood the Safety and General Warnings sections, in this manual.
An electric drill A 6mm hammer drill bit if you need to drill into brick or concreteA pencil or marking penA screwdriver or screwdriver bit (for the drill)A straight horizontal length of pipe on the return line after the filter and all accessories/equipment (the Clearwater Ei unit should be the last piece of equipment)A power point needs to be located no more than 1.5m away from where you mount the power pack
1)2)
3)4)5)
6)
1) Screw the power pack bracket into posi-tion ensuring it is no more than 1.5m from a power point.
2) Position the power pack in place by aligning the bracket with the corresponding holes.
Mounting the control unit
INSTALLATION
7
If a timer setting has been set, a small ‘T’ symbol will appear in the top right corner of the screen.
The Clearwater Ei unit has 2 ON/OFF timers available, which can be set to enable the chlorinator to run up to 2 cycles each day.
From the main operating screen, press the button.
Wait for message to clear.
Press the button to increment the hours setting to the desired setting.
Note: button can be held to speed up increments.
Press the button to increment the minutes to the desired setting.
Note: button can be held to speed up increments.
Once a suitable ‘ON’ time is set, press the button to move to
setting the ‘OFF’ time. (There is a factory preset Off time of 3hrs after the On
time, simply adjust if you require more or less)
Repeat steps 3 and 4 to set the desired off time.
1)
2)
3)
4)
5)
6)
For most pools we recommend running your filtration equipment 3hrs in the morning and 3hrs in the evening during summer, and 2hrs in the morning and 2hrs in the evening during winter. You may need to adjust this depending on bather load and climate conditions.
Timer
Hours
Hours
Minute
Minute
Timer
SETTING THE TIMERS
14
The Clearwater Ei cell should be the last piece of equipment on the plumbing line back to the pool.
YOUR COMPLETEFILTRATION SYSTEM
Your new Clearwater Ei system
Your filtration system should look like this, once the Clearwater Ei unit is installed.
6
CLEARING THE TIMERS
1)
2)
3)
4)
From the main operating screen, press the button.
Wait for message to clear.
Press the button, ‘TIMERS CLEARED’ will appear on the screen.
Press the Button to return to the main operating screen.
Timer
Output
Clock
Switch on the Clearwater Ei unit.
Wait for the start up sequence to finish (± 5 seconds).
Press the key for about 5 seconds and the current language will be
displayed on the screen.
To change the language keep pressing the key until the desired language is
displayed on the LCD screen. Release the key to set the language.
1)
2)
3)
4)
SETTING THE LANGUAGE PREFERENCE
Hours
Hours
15
Common salt (sodium chloride) is made up of two elements, sodium and chloride.When your chlorinator is installed a measured quantity of salt is dissolved in the pool water to make it slightly salty. As part of the daily filtration cycle, the pool water is passed through a electrolysis cell to produce chlorine which is dissolved instantly into the water. Your chlorinator also produces ozone in the cell, as a by-product.
In simple, non-technical terms, the chlorine instantly starts to destroy bacteria, viruses, and algae and in doing this, reverts to dissolved salt. This cycle continues, with more new chlorine being produced from the salt water in the chlorinator cell, sanitising the pool and changing once more back to dissolved salt.
Each day, when the chlorinator and filtration systems are switched on, dust and debris are trapped by the filter and the chlorinator sanitises the water to make it safe and sparkling clean.
PREFERRED WATER CHEMISTRY READINGS
Salt Concentration 4,000ppmpH 7.2 - 7.6*Chlorine Stabiliser 40 - 80ppm(Cyanuric Acid) (up to 100ppm in hotter regions)Total Alkalinity 80 - 150ppm*Cacium Hardness 175 - 275ppm*Free Chlorine 1-3ppm
* When using chemicals, always follow manufacturers directions and follow the advice of your pool professional. Always use protective clothing,
gloves and glasses.Store and use chemicals out of reach of children.
*Values may vary, within their ranges, depending on pool surfacei.e. concrete, fibreglass or vinyl
ppm: parts per million
CLEARWATERTECHNOLOGY
16
In addition to running off a timer, the Clearwater Ei unit can also be operated
manually by pressing the button. The Clearwater Ei unit will run until the next
‘OFF’ time is reached, then will operate from the timers.
NOTE: If the Clearwater Ei unit is manually turned on and no ‘OFF’ time is set, the Clearwater Ei unit will run for a maximum of 30 hours continuously, then turn ‘OFF’ to prevent over chlorination.
On/Off
USING AN EXTERNAL TIMER
1)
2)
3)
In some cases it may be desirable to connect the Clearwater Ei unit to an external time switch. In this case, the chlorine output must turn on whenever power is supplied to the power pack. To set the Clearwater Ei unit up to run this mode, NO TIMERS should be set.
Clear any timers that are set, refer to page 15. (A small ’T’ symbol will be visible in the top right corner of the screen if a timer is set).
Turn the chlorine output on and set to the desired output level. (See ‘SETTING THE OUTPUT LEVEL’).
Set the external timer to the desired setting.
MANUAL OPERATION
5
The Clearwater Ei unit has been designed to be the world’s simplest salt chlorinator. Simple to install, operate and maintain, the Clearwater Ei unit will provide you many years of trouble free operation and keep your pool safe and sparkling for the whole family to enjoy.
1 x Ei Power pack1 x Ei Chlorine generating cell1 x Power pack bracket1 x Pipe spacer
1 x Tightening tool1 x Screw set (includes wall plugs)1 x Hole saw1 x Owners manual/warranty card
C -
D -
E -
A.B.C.D.
Carton contents:
E.F.G.H.
Additional contents
CONTENTS OFTHE CARTON
4
F -
G-
17
SETTING THE OUTPUT LEVEL
Turn the chlorinator ‘ON’ by pressing the button.
Press the Output button to reach the desired output level. One amber level is
the minimum setting (20%) and the output can be adjusted in increments of 20%
up to 100%.
If the ‘Output’ button is pressed beyond 100%, the output level setting will drop to 20%.
1)
2)
3)
NOTE: If your output is set at 20% (one light) the Clearwater Ei unit will run for 2mins every 10mins, 40% (2 lights) it will run for 4mins every 10mins and so on.
When setting the chlorine output level you must consider the size of the pool, the amount of use the pool will be receiving and how hot the weather is. All these factors weigh greatly on the level of output needed. Simply adjust the output level needed using the following steps.
On/Off
Safety Alert: if using a pool cover of any kind always reduce your chlorine output to a minimum. High levels of chlorine in your pool will corrode or damage some equipment such as ladders, pool cleaners etc.
ELECTRICAL HAZARD
To avoid accidental contact with lawn mowers and hedge ....................trimmers, power cords should remain within sight and above ground at all times.The Clearwater Ei Power pack must not come into contact with pool water and should be installed at least 3 metres from the inside wall of your swimming pool.Should a lack of water flow be detected, the unit’s electronic flow switch is designed to turn off the system. Interfering with the electronic flow switch could result in personal injury and/or damage to the cell.One pump per electrical socket only (no ancillary equipment should be connected to the same outlet).This appliance is not intended for use by persons (including children) with reduced physical, sensory or mental capabilities, or lack of experience and knowledge, unless they have been given supervision or instruction concerning use of the appliance by a person responsible for their safety.Children should be supervised to ensure that they do not play with the appliance.The installation of the chlorinator should be carried out by a qualified pool professional. Please contact our customer care helpline on 0860 963422 for your nearest pool professional.
318
24 HOUR SAFETYTIMEOUT
To prevent the possibility of hazardous over-chlorination, the Clearwater Ei unit has a built-in safety shutdown. If the Clearwater Ei salt chlorinator is manually turned ON (with no timers set), and left on, chlorine generation will automatically turn OFF after 24 hours. The Clearwater Ei salt chlorinator can be turned ON as normal after this time.
NOTE: If using the Clearwater Ei unit with an external timer – the 24 hour timer is reset whenever power is cut to the Clearwater Ei unit.
CHLORINATOR REVERSAL
The Clearwater Ei salt chlorinator has a reverse polarity cell. This means that every 5 hours the cell will switch its polarity to help prevent any build up of calcium on the cell plates. This is sometimes referred to as self cleaning. During the transition between changing its polarity there is a 5 minute wait time when the cell will not produce any chlorine. Don’t be alarmed, once it has changed polarity it will continue producing chlorine.
‘** CLEANING **’ will be displayed on the screen during the 5 minute ‘WAIT’ period. (The output level indicator will remain as set during the CLEANING period).
CHILD SAFETY Children should not be allowed to operate or perform maintenance .................. on this product. No one, particularly children, should sit, step, lean, or climb on any of your pool’s operational system. In the interest of child safety, all components of a pool’s operational system should be located at least 3 metres away from the pool.
WARNINGSClearwater Ei Salt Chlorinators are designed for domestic swimming pool use only. Contrary use could affect performance and void the warranty. Operating a salt chlorinator without water flowing through the cell may cause a build up of flammable gases, resulting in fire or explosion.
SERVICE TO ZODIAC EQUIPMENT SHOULD ONLY BE CARRIED OUT BY A QUALIFIED POOL PROFESSIONAL.THE USE OF EYE PROTECTION IS RECOMMENDED WHEN WORKING WITH POOL CHEMICALS.
Keep equipment out of reach of children.A damaged supply cord should only be replaced by the manufacturer, service agent or electrician.When installing and using this electrical equipment, always follow basic safety precautions.Before performing installation, disconnect all power.Free available chlorine in your pool should be maintained between 1 and 3 ppm (parts per million) at all times.
GENERAL WARNINGS
2 19
BACKUP BATTERY
The Clearwater Ei unit is fitted with a long life rechargeable battery. This battery should last in excess of 500 hours without the mains being connected. The battery will retain ALL settings in the event of a power failure.In addition the Microprocessor in the unit will retain some settings permanently, in the event of the battery going flat or being replaced:
Operating hours Cell hours Controller setting
ERRORS / WARNINGS
NO FLOWDiagnosis: Insufficient water flow in the cell. This could mean the circulation pump has ceased to function, or the filter needs cleaning. The chlorine output will be turned off at this time.
CHECK SALTDiagnosis: The salt concentration in the pool is insufficient and/or the water temerature is too low. (The orange salt indicator light is on). Always maintain a salt level of 4000 ppm. If you don’t know what your salt level is or how to test it, consult your local pool care professional.
OUTPUT FAULTDiagnosis: There could be a problem with the power supply. Turn power off at the power point and consult your local pool care professional.
SAFETY
120
At Zodiac, we take safety seriously. The Clearwater Ei unit is designed with many built in safety features but you should always exercise caution when using electrical appliances and follow the instructions closely. Failure to do so could result in permanent injury, electrocution or drowning.
Important things to consider!
Before you begin installation please turn the filtration equipment off and close off all your valves to prevent water from escaping when drilling into the pipe.
Ensure you have a suitable place on the plumbing return line for your Clearwater Ei cell, as the cell must be installed in an upright position.
WARNING!The installation and use of your Clearwater Ei Salt Chlorinator
must comply with the instructions and recommendations presented in this manual. For additional information please contact your pool professional.
PLEASE NOTE: Your Clearwater Ei unit has been designed to be suitable for DIY installation, however should you prefer to have it installed by a professional please contact our customer care team on 0860 963 422 and they will provide you with details of your closest approve installer.
CLEANING THE CELL
Before you remove the cell for cleaning ensure you shut off any necessary valves to prevent any water loss. WARNING wear correct safety protection
1) Remove the cap 2) Undo the cell cable
3) Undo the locking ring 4) Remove the cell
5) ACID 6) Pouring acid
INDEX
SAFETY 1
GENERAL WARNINGS 2
ELECTRICAL HAZARD 3
CONTENTS OF THE CARTON 4
CLEARWATER TECHNOLOGY 5
YOUR COMPLETE FILTRATION SYSTEM 6
INSTALLATION 7
CONTROL PANEL 12
SETTING THE CLOCK 13
SETTING THE TIMERS 14
CLEARING THE TIMERS, SETTING THE LANGUAGE PREFERENCE 15
MANUAL OPERATION, USING AN EXTERNAL TIMER 16
SETTING THE OUTPUT LEVEL 17
24 HOUR SAFETY TIMEOUT 18
BACKUP BATTERY 19
CLEANING THE CELL 20
Inspecting and cleaning the electrodeIn zones where the water is hard (high TH) the Ei electrode may have to be cleaned.
To clean the Ei electrode:1. Turn off the Ei Chlorinator, then the filtering system, close the cut-off valves and remove the cell cap. Remove the cell cable.
2. Unscrew the locking ring and remove the electrode from the saddle clamp (pay attention to the small translucent vertical valve). The ring is crimped, making it easier to remove by hand (or using the supplied tightening tool).If a scale deposit is present, place the electrode upside down and pour some cleaning solution into it.
3. If you do not want to use a commercial cleaning solution you can make your own by carefully mixing one (1) part of hydrochloric acid with nine (9) parts of water ( Warning: always pour the acid into the water, never the opposite!). A stronger solution will reduce the electrode’s life span.
4. Leave the cleaning solution to dissolve the scale deposit for about fifteen minutes. Dispose of the solution in an approved local waste collection centre; never pour it into the rainwater drain or into the sewers.
5. Rinse the electrode in clean water and replace it in the cell body, taking note of the alignment marks.
6. Replace the locking ring, reconnect the cell cable and put the cap back into place. Turn the filtering system on, then the Ei chlorinator.
7. Confirm chlorine production and operating settings on the Ei command box. The clock settings are saved automatically.
21
CHLORINATOR WARRANTY
Your Clearwater Ei Salt Chlorinator has been manufactured with the greatest of care and from the best available materials.
The Chlorinator, excluding the electrodes, is covered by a manufacturing defects warranty for a period of 36 months. Parts will be replaced or repaired at the discretion of the manufacturer. The warranty period begins on the date of manufacture as encoded on the product, unless proof of purchase is supplied.
This warranty will be voided if parts other than ZODIAC approved parts are used for repairs.
PRO RATA CELL ELECTRODE WARRANTY
The Electrodes are covered by a 12 month unconditional warranty, plus a further 24 month pro rata warranty, whereby the manufacturer will contribute to the cost of a replacement cell electrode on a sliding scale, based on the age of the unit, which will be determined by the date encoded on the product, unless proof of purchase is provided.
Thank you for choosing ZODIAC. We wish you many happy years of enjoyment in your “Clearwater” pool.
Don’t forget to complete purchase details on the last page of this manual and return your Reply Paid Warranty Card to ZODIAC Pool Care South Africa (Pty) Ltd.
Note: This product is designed and manufactured for domestic/residential use only. Use on commercial or non residential pools voids all warranties. NB. Parts damaged by power surges or lightning are not considered as warranty.
Note: If the moulded plug is removed from this product and it is “hard wired”, this operation should be performed by a qualified electrician. Failing to do so will result in the warranty being voided.
WARRANTY
RECORD YOUR ZODIAC SALT WATER CHLORINATOR PURCHASE DETAILS HERE:
Clearwater Ei Salt Chlorinator
Date of purchase:
Purchased from:
Suburb:
Province:
Postal code:
Clearwater Ei Salt Chlorinator Serial No:
Please quote this number when you contact us
KEEP YOUR OWNER’S MANUAL FOR YOUR RECORDS
RECORD OF PURCHASE DETAILS