· technique and approach by tom aungst glossary of percussion strokes below are the basic strokes...
TRANSCRIPT

Music for All Summer Symposium presented by Yamaha www.musicforall.org
Student National Percussion Symposium MaterialsMaterials appear in alphabetical order by clinician last name


Technique and ApproachBy Tom Aungst
Glossary of Percussion StrokesBelow are the basic strokes we use to unify our sound and detail the music. The touchand feel of each stroke may vary according to the musical intent. Besides these basicstrokes, other types of strokes will be taught to achieve the integrity and style of themusic.
1. Legato Stroke or Rebound Stroke: A stroke that starts at any height, plays,and then returns to its original height. It has a constant flow or motion, never stopping orstarting. It is the natural REBOUND of the stick.
2. Staccato Stroke or Down Stroke: A stroke that starts high, plays, and isstopped close to the drum. Basically, you are controlling the stick from rebounding up.This stroke is usually used on accents.
3. Tap: This is usually a 3 - inch or sometimes a 6 - inch legato stroke. Taps areusually the notes that are in-between the accents.
4. Up Stroke: A stroke that starts low, plays, and quickly lifts upward to a particularheight. An example would be grace notes from alternating flams.
DynamicsThese dynamic levels and heights are used to unify the sound and look of the ensemble.Like the percussion strokes described above, the dynamic levels are used to achieve thecomposer’s musical intent and is a major part of how the percussion ensemble maintainsthe integrity of the music.
pp pianissimo = less than an 1”1/2 off the drum head p piano = 1”1/2 off the drum head mp mezzo-piano = 3” off the drum head mf mezzo-forte = 6” off the drum head f forte = 9” off the drum head ff fortissimo = 12” off the drum head(Note: Anything above fortissimo will be defined as the musicdictates.)
Also, the intensity of the stroke for each dynamic level or height may change dependingon what is needed to achieve the musical intent of a particular pattern or musical phrase.For example, a group of forte accents may need to sound less intense because:
2

1. the tempo is too fast;2. an individual or the ensemble is out of balance;3. a certain touch is needed to achieve a better FEEL;4. it is affecting the quality of sound.
All these concepts will be considered as the music is being taught.
Playing Areas or ZonesIn addition to using dynamic levels and different strokes to achieve the musical intent,different playing areas or zones on the drum head can also be used to:
1. balance and blend the total ensemble;2. create different timbres and colors;3. achieve the appropriate touch and or feel.
THE 3 BASIC ZONES are center, ½ way between center and rim, and theedge.
Mechanics of PlayingWhen talking about the technical skills needed to perform at a high level, the mechanicsof playing must be taught and more importantly, must constantly be developed. Bydeveloping these skills, you will upgrade the performer’s ability and, at the same time,enhance the overall sound of the ensemble. Through repetition and proper coaching thesetechniques used to play a particular stroke, control a sticking pattern, or just be able toplay more “stuff” at certain tempos, are very important for the performers to learn inorder to achieve demanding material at the highest level. These are the basic componentson both hands that should be developed.
1. Fulcrum: This is the point where the stick should be held with the most pressure. a. RIGHT HAND = between the bottom part of the thumb and the side of index finger on the 2nd knuckle groove. b. LEFT HAND(for traditional grip only) = inside the crease between the thumb and index finger, making sure it is down at the bottom part of the thumb. It is very important to keep the fulcrum intact at all times to ensure control.
2. Fingers: The back fingers on your right hand should be relaxed naturally aroundthe stick. For the left hand, if playing traditional grip, the stick should be placed on thefirst knuckle of the ring finger. Like the right hand, the other fingers should be relaxedand curved in a natural fashion. Also, it is very important to develop your fingersthrough various exercises. Developing the use of your fingers will upgrade your qualityof sound and the control needed to play advanced material.
3. Wrist and Forearm: The wrist and forearm should work hand in hand toachieve a natural relaxed approach to playing. When both are rotating together it should
3

feel like you are DRIBBLING A BASKETBALL. By turning your wrist and using someforearm motion, you will be able to expand the range of your technical and musical skills.
Exercises
Purpose - To become great at playing any musical instrument you have to be willingto advance your technical skills. Learning how to play advanced percussion music with-out learning the techniques needed to play that music will not help you perform at thehighest level. THE BASICS, as most people call them, are very important to the successof the individual player as well as the total ensemble. We need to strengthen ourselvesindividually and, at the same time, work together in harmony.
The exercises in this book are used to help the players advance technically and musicallyand learn how to work together to achieve a great ensemble sound. Some of theseexercises are camp or audition exercises, used to teach a basic concept or evaluate theplayers skills. Once the show is learned and the drill is taught, more exercises will bewritten and taught by rote, focusing on a particular rudiment, pattern or musical phrasewritten in the drum book. By the end of the season we may have 15 different exerciseswhich will be repeated over and over each day. These exercises are called SHOWEXERCISES. Usually short in length, they are used to clean the musical book. For now,let’s focus on the exercises in this book.
By developing the techniques above and working these exercises the players will:
1. be better prepared physically to perform the demanding responsibilities of the music and drill;
2. learn how to work together to achieve a unified ensemble sound3. increase the quality of their playing;4. expand their rudimental vocabulary and upgrade their musicianship;
5. learn advanced rehearsal techniques; 6. strengthen their muscles (chops); 7. increase their endurance to play for longer periods of time.
Ways to Practice the Exercises – Here are a few tips for practicingindividually or as an ensemble.
1. Use a metronome! 2. When starting to learn an exercise, remember to start with a slower tempo. Be very
methodical and detailed. Follow all dynamics and check to make sure you areusing the correct technique.
4

3. Vary the way you play an exercise, use different tempos and dynamics. Also, if itis a “One Hander” exercise, play the entire exercise with just the right or left hand.This will help strengthen your playing chops and endurance.
4. The bass drummers should always learn the snare parts for all exercises, even if there is a split part for the basses to play. We want all of the players to developtheir hands equally.
5. When tenor players are learning these exercises, make sure they work on playingtheir part on one drum first. By playing on one drum they can focus on techniqueand not worry about what drum they need to play next.
6. Many of these exercises are long and are meant to be so. We want the players todevelop their chops and endurance and feel as if they a playing a longer piece ofmusic. The best way to develop a playing concept is to break down an idea intosmaller segments. Example: When working the “Swinging Double Triple”exercise start by working on the first four bars, trying to master the stroke andmechanics. Then add the next four bars, again working on the technique of the lefthand. Continue adding on segments to the exercise until you have reached letter A.You may just want to work the beginning to A and use that as an exercise.Remember, you will not get better by just playing these exercises, you need towork on the technique and approach that is used to play them.
7. Also, when you get comfortable playing a particular exercise make sure you addyour feet. This is as important as learning the proper technique.
5

MarchingCymbals
RLff
ff
S. D.
Cym.
R B
4
S. D.
Cym.
L B
7
Composer Tom Aungst
Unison Single Beats #1
orch.
c/c

Snare Drum
MarchingTenor Drums
MarchingBass Drum
MarchingBass Drum
MarchingCymbals
R
ff mpLff
A
R
ff mpLff
Rff
L R L
Rff
L R L
ff mp ff
S. D.
T. D.
B. D.
B. D.
Cym.
mp Rff
B7
mp Rff
R L R
mp ff
S. D.
T. D.
B. D.
B. D.
Cym.
Lff
Rmp ff
L Rff
10
Lff
Rmp ff
L ff
R
R R
mp
Composer Tom AungstSplit Single Beats #2
4
5
ORCH. C/C Z TAP ORCH. C/C
3
3
33
33
3
3
3
3
33 3 3
33
Z TAP ORCH.
3
3
33
33
3
3
33
33
33
3
3
33
33
33
3
3
3 3
3
33
3
3
33
3
33 3 3
33 3 3
3
33
3
3
3
ORCH. SLIDE CHOKE C/C

rrf
rl
rl
rl
rl
lr
rl
lr
rl
lr
rl
lr
rlmp
rl
rl
rl
rl
lr
rl
lr
rl
lr
rl
lr
rlf
lr r
llr
rl
lr
rl
lr
rl
lr
rlmp
rl
rl
lr
rl
lr
rl
lr
rl
lr
rlf
rl
rl
lr
rl
lr
rl
lr
rl
lrmp
rl
rr
rr
rr
rf
l r l r l r l r l r r l r rmp
l r l r l r l r l r r l r
A
rf
l r l r l r l r l l r l l rmp
l r l r l r l r l l r l l rf
l r l r l r l r r l r r l
rmp
l r l r l r l r r l r r l rf
l r l r l r l l r l l r l rmp
l r l r l r l l r l l r l
rf
l r l r l r l r r r r r l r r l r r l r l r r l r r l r l r l r l l l l l l r l l
B
r l r l r l r l r l r l r l r l r r r l r l l l r l r r l l r r l l
l l r l r l l l r r l r l r l r
Unison
Composer
Tom Aungst
TIMING THING #3
Technique Tips
follow all dynamics as written.
When playing this exercise start by playing the entire exercise at one volume level to master approach, then
Follow LEGATO STROKE technique throughout
8

Snare Drum
MarchingTenor Drums
MarchingBass Drum
MarchingCymbals
Rff
L R L R L R L R L R L simile
Rff
L R L R L R L R L R L simile
Rff
L R L R L R L R L R L simile
ff
S. D.
T. D.
B. D.
Cym.
Rff
L R L R L R L R L R L R L R L R L R L R L R L R L R L R L R L R L R L
4
Rff
L R L R L R L R L R L R L R L R L R L R L R L R L R L R L R L R L R L
Rff
L R L R L R L R L R L R L R L R L R L R L R L R L R L R L R L R L R L
mf
S. D.
T. D.
B. D.
Cym.
R L R L R L R L R L R L R L R L R L R L R L R L R L R L R L R L R L R L R L R L R L R L R L R L
A8
R L R L R L R L R L R L R L R L R L R L R L R L R L R L R L R L R L R L R L R L R L R L R L R L
R L R R L R R L R R L R R L R R L R R L R L R L R L R L R R R R L R L R R R
f
3 3 3 3
3 3 3 3 3 3 3 3
Triplet Hand to Hand A.T. #5
Composer Tom Aungst
3 3 3 3 3 3 3 3 3 3 3 3
3 3 3 3 3 3 3 3 3 3 3 3
ORCH
3 3
3
3 3 3 3 3
3 3
3 3
3 3 3 3 3 3 3 3 3 3 3 3
3 3 3 3 3 3 3 3 3 3 3 3
TAPS3 33 3 3 3
3
3
3
3 3
3
3
3 3 3
3
3
3 3
3 3
3 3 3 3 3 3 3 3 3 3 3 3 3 3 3 3
3
3
3
33 3
33 3 3
3
3 3 3
ORCH

S. D.
T. D.
B. D.
Cym.
simile R R R L R L R R R L R L R L L L R L R L L L R L
B12
simile R R R L R L R R R L R L R L L L R L R L L L R L
simile Rmp
L R L R L R L Rff
Rmp
R R L L L R L R R L R
S. D.
T. D.
B. D.
Cym.
R R R L L L R R R L L L R R L L R R L L R R L L R R R L R L R L L L R L R L R R R L
C16
R R R L L L R R R L L L R R L L R R L L R R L L R R R L R L R L L L R L R L R R R L
Rmp
L R R L R R L R R L R R L R L R L R L R L R L R R R L R R Lff
R R L R L
mf
S. D.
T. D.
B. D.
Cym.
R R R L L L R L L L R R R L R R R L R R R L L L R R R L L L R R L L R R L L R R L L
20
R R R L L L R L L L R R R L R R R L R R R L L L R R R L L L R R L L R R L L R R L L
R L R R L R R L R L R L R L R L L L L R
3 3 3 3 3 3 3 3 3 3 3 3 3 3 3 3
3 3 3 3 3 3 3 3 3 3 3 3 3 3 3 3
33
3 3
3
33 3 3 3 3 3 3 3
C/C
C/C ORCH
3 3 3 3 3 3 3 3 3 3
3
3 3 3
3 3 3 3 3 3 3 3 3 3 3 3 3 3
3
33
33 3
3
3 33
3 3
TAPS
33 3
3 3
3 3
3 3
3 3 3 3 3 3 3 3
3 3 3 3 3 3 3 3 3 3 3 3 3 3
3
3 3
3 3 3 3
33
3 3
3
ORCH C/C
3 3
2

Snare Drums
Tenor Drums
Bass Drums
MarchingCymbals
Rff
R R R R R R R R R L R L L L
Rff
R R R R R R R R R L R L L L
Rff
R L R L L R L R R L R R L R L R L R R L R L L R L R R L R R L R L R L R R L R L L R L R R L R R L R L R L
mf
SD
Quads
BD's
Cym.
L L L L L L L R L R R R R R R R R L R L L L L L L L L R L R R R R R R R L R
L L L L L L L R L R R R R R R R R L R L L L L L L L L R L R R R R R R R L R
R R L R L L R L R R L R R L R L R L R R L R L L R L R R L R R L R L R L L R L R L L R L R R L R R L R L R L R L R R L R R L R R L R
SD
Quads
BD's
Cym.
L L L L L L L R L R R R R R R R L R L L L L L L L R L R R R L R L L L R L R R R L R L L L R L R R L L R R L L R R L L R R L L R R L L R R L L R
L L L L L L L R L R R R R R R R L R L L L L L L L R L R R R L R L L L R L R R R L R L L L R L R R L L R R L L R R L L R R L L R R L L R R L L R
R L R R L R R L R R L R R L R R L R R L R R L R R L R R L R R L R R L R R R L R L R R L R L R R L R LR R L R L R R L R L L R R L R L L R
feel each bar as a 4/4
ComposerTom Aungst
Swinging Double Beat #6
slide choke
orch.
13
Rff
L R L R L R L R R L L R R L L R L R L R L R L Rmp
R L L R R L L
R L R R L R L L R L R R L R L L Rff
L R R L R L L R L R R L R L L
5
R L R R L R L L R L R R L R L L R R L R L L R L
9
R R L R L L R L R R L R L L R L R R L R L L R L R
12
Composer Tom Aungst
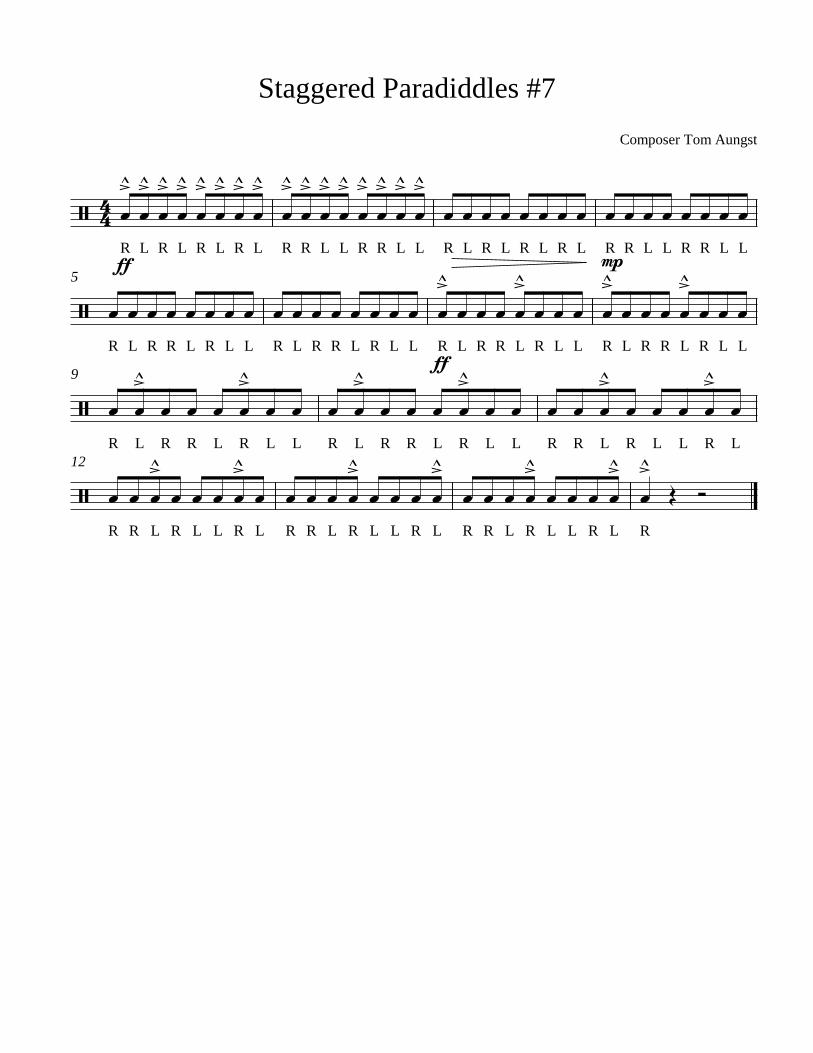
Staggered Paradiddles #7

Snare
Tenor
Bass
MarchingCymbals
R R R R R R R R R R R R R L R R L R L R R L R L R R L R L R R L R L R R L L L L L L
R R R R R R R R R R R R R L R R L R L R R L R L R R L R L R R L R L R R L L L L L L
R R R R R R R R R R R R R L R R L R L R R L R L R R L R L R R L R L R R L L L L L L
mp
S. D.
T. D.
B. D.
Cym.
L L L L L L L R L L R L R L L R L R L L R L R L L R L R L L R L R R L R L L R L R R L R L L
6
L L L L L L L R L L R L R L L R L R L L R L R L L R L R L L R L R R L R L L R L R R L R L L
L L L L L L L R L L R L R L L R L R L L R L R L L R L R L L R L R R L R L L R L R R L R L L
S. D.
T. D.
B. D.
Cym.
Rff
R R R R R R R R R R R R L R R L R L R R L R L R R L R L R R L R L R R L L L L L L
A10
Rff
R R R R R R R R R R R R L R R L R L R R L R L R R L R L R R L R L R R L L L L L L
Rff
R R R R R R R R R R R R L R R L R L R R L R L R R L R L R R L R L R R L L L L L L
ff
Paradiddle Jam #8
Composer Tom Aungst
TAP
Z
VERT.

S. D.
T. D.
B. D.
Cym.
L L L L L L L R L L R L R L L R L R L L R L R L L R L R L L R L R R L R L R R L R L L R L R L L
15
L L L L L L L R L L R L R L L R L R L L R L R L L R L R L L R L R R L R L R R L R L L R L R L L
L L L L L L L R L L R L R L L R L R L L R L R L L R L R L L R L R R L R L R R R L R R L R L R R
S. D.
T. D.
B. D.
Cym.
R L R R L R L R R L R L L R L R L L R L R R L R L L R L R R L R L L R L R R L L R R L L R R L L R R
B19
R L R R L R L R R L R L L R L R L L R L R R L R L L R L R R L R L L R L R R L L R R L L R R L L R R
R L R R L R L R R R L R R L L R L L R L R R L R L L R L R R L R L L R L L R
mf
S. D.
T. D.
B. D.
Cym.
L R L L R R L L R R L L R R L L R L R R L L R R L R L L R R L L R L R R L L R R L R L L R R L L
22
L R L L R R L L R R L L R R L L R L R R L L R R L R L L R R L L R L R R L L R R L R L L R R L L
R L L R R L L R R L L R
SLIDE CHOKE
2

S. D.
T. D.
B. D.
Cym.
R L R R L L R L R R L L R L R R L L R L R R L L R L R R L L R L R R L L R L R R L L R L R R L L
25
R L R R L L R L R R L L R L R R L L R L R R L L R L R R L L R L R R L L R L R R L L R L R R L L
R L R R L L R L R R L L R L R R L L R L R R L L R L R R L L R L R R L L R L R R L L R L R R L L
f
S. D.
T. D.
B. D.
Cym.
RR L R R L R L L R R L R L L R L R R L L RR L R R L R L L R R L R L L R L R R L L R L R R L R L R R L
C29
RR L R R L R L L R R L R L L R L R R L L RR L R R L R L L R R L R L L R L R R L L R L R R L R L R R L
RR L R R R L R R L L R L R R R L R R L L RR L R R R L R R L L R L R R R L R R L L R L R R L R L R R L
S. D.
T. D.
B. D.
Cym.
R L R R L R L R R L R L R L L R L R L L R L R L L R L R L L R L L R L L R L L R L L R L R R
D32
R L R R L R L R R L R L R L L R L R L L R L R L L R L R L L R L L R L L R L L R L L R L R R
R L R R L R L R R L R L L R R L R L
ORCH
3

S. D.
T. D.
B. D.
Cym.
L R R L R R L R R L R R L R L L R L L R L L R L L R L L Rff
L4
R R
36
L R R L R R L R R L R R L R L L R L L R L L R L L R L L Rff
L4
R R
R L L R R L R L Rmp
L R R L R R R L R L Rff
L R L
S. D.
T. D.
B. D.
Cym.
L R R L R R L R R L R R Lff
R L L R L R R L L R L R R L L R L R L R
38
L R R L R R L R R L R R Lff
R L L R L R R L L R L R R L L R L R L R
Rmp
L R R L R R R L R L Rff
L R L R L L R R L R L
C/C
4

Snare Drum
MarchingBass Drum
MarchingCymbals
Rff R R R R R R R R L R L R L R L R L L L L L L L L L R L R L R L R L R R R R R R R
R
ff
R R R R R R R R L R R L R R L R L L L L L L L L L R L L R L L R L R R R R R R R
ff
S. D.
B. D.
Cym.
R R R R R R R R L R R L R R L L L L L L L L L L L L L L L L R L L R L L R
6
R R R R R R R R R RR RR R RR RR R L L L L L L L L L L L L L L L L L L L L L L
S. D.
B. D.
Cym.
R L R L R L R R L L R R L R L R L R L L R R L L R L R L R L R L R L R L R R L R L L R L R R L R L R L R L R L L R R L L
11
R L R R L R RR LL RR R L R R L R L R L R L R L R L
S. D.
B. D.
Cym.
R L R L R L R R L L R R L R L R L R L R L R L R L L R L R R L R L L R L R RL
LR
RL
RL
LR
RL
LR
LR
RL
LR
RL
RL
16
R L R R L R RR LL RR R L R R L R L R L R L R L R L R
3 3 3 3 3 3 3
3 3 33 3
3 3 33
3
Composer Tom Aungst
Triple Flam Thing #9
3
3
3
3
3
3 3
33
3
3 3
33
3
3 3
chokes orch.
3
3
3 3 3
33
3
3 33
3
33
3
3 3
3
3
3
3
3
3
3 3
3
3 3 3
3
3 3
3
3
orch.
3 3 3
3
3 3 3 3 3 3 3 3
3 3
3 3 3 3 3
3
33
3
3
33
3
3
33
33
3
33
3
33
3
3
chokes
VARIATIONS FOR BARS 14 AND 16
FLAM PARADIDDLES
3 3 3
3
3 3 3 3
3 3
3 3 3
3
3 3
3
3
3
3
33
33
3
33
3
chokes
c/c

S. D.
B. D.
Cym.
R L R R L L L R L L R R R L R L R L R L R L R L RL
LR
RL
RL
LR
RL
LR
LR
RL
LR
RL
RL
RL
LR
RL
RL
LR
RL
LR
LR
RL
LR
RL
RL
22
S. D.
B. D.
Cym.
RL
RL
LR
RL
LR
LR
RL
LR
RL
RL
LR
RL
RL
LR
RL
RL
LR
RL
LR
LR
RL
LR
RL
RL
R L R R L R L R L L R L
29
FLAM PARADIDDLE DIDDLE
PATAFLAFLA
CHOO - CHOO
Drag CHOO-CHOO
3 3 3 3 3
3
3 3 3
3
3 3 3
3
3 3
# 9
SINGLE DRAG FLAM MILL
BOOK REPORTS
EXTENDED BOOK REPORT
3 3
3 3 3
3
3 3 3 3 3 3
2

Snare/Tenor
Bass
MarchingCymbals
Rff L R L R L R R L R R L R R L R L R L R L R L L R L L R L L R L R L R L R R L L R R L L R R L L
q = 184
Rff L R L R L R R L R R L R R L R L R L R L R L L R L L R L L R L R L R L R R L L R R L L R R L L
ff
S. D.
B. D.
Cym.
R L R L R L R R L L R R L L R R L L R L R L R L R L R L R L R R L L R R L L R R L L R R L L R R L L R R L L
7
R L R L R L R R L L R R L L R R L L R L R L R L R L R L R L R R L L R R L L R R L L R R L L R R L L R R L L
S. D.
B. D.
Cym.
R L R L R L Rmf
L R L R L R4
L R L R L R R L R R L R R L R L R L R L R L L R L L R L L R L R L R L
A13
R L R L R L Rmf
L R L R L R4
L R L R L R R L R R L R R L R L R L R L R L L R L L R L L R L R L R L
mp
S. D.
B. D.
Cym.
R R L L R R L L R R L L R L R L R L R R L L R R L L R R L L R L R L R L R L R L R L Rf4
L R L R L
B20
R R L L R R L L R R L L R L R L R L R R L L R R L L R R L L R L R L R L R L R L R L Rf4
L R L R L
f
Composer Tom Aungst
Roll Exercise #10
ORCH
Z
ORCH

S. D.
B. D.
Cym.
R L R R L R R L R L R L R L R L L R L L R L L R L R L R L R L L R R L L R R L L R L R L R L
C26
R L R R L R R L R L R L R L R L L R L L R L L R L R L R L R L L R R L L R R L L R L R L R L
S. D.
B. D.
Cym.
R L L R R L L R R L L R L R L R R LL L R R L L R R L R L R L L R R L L R R L L R L R L R L
32
R L L R R L L R R L L R L R L R L R L R R L R R R R R L R L R L
S. D.
B. D.
Cym.
R L R R L L R L R R L L R L L R R L R L L R R L L R R L L R R L L R R L L R R L Lf
37
R L R R L L R L R R L L R L L R R L R L L R R L L R R L L R R R Rff
VERT.
C/C
ORCH
2

Snare Drum
r l r l r l r r l l r r l l r l r r l r l l
S. D.
r r l r l l r l r l r r l l l r l l r r r l r l r l r l
7
S. D.
r r l r r l r r l r r l r l l r r l l r r r l r r l l r l l
13
S. D.
r l r r l r l l r l l r r r l r r l l l r r l r l l r l
19
S. D.
r l r r l r l l r r l r l l r l r r r l l r r r l l
25
S. D.
r l r r l r l l r l r r l r l l r l r r l r l l r l r r l r l l
31
S. D.
r l r l r l r l r l r l r l r l r lrl
rl
lr
rl
rl
lr
38
S. D.
r l l r l l r l l l r r r l r l r l r l r l r l r l r l r l
46
S. D.
r l r r l r l l r l r l r l r l r l r l r l r l r l
53
1. Flam Accent
2. Flam Tap
3. Flam Paradiddle
3 3
Rudiment Sheet #11
4. Single Flammed Mill
5. Flam Paradiddle Diddle
6. Pataflafla
7. Swiss Army Triplet
8. Inverted Flam Tap
9. Swiss-A-Diddle
6 65 5
10. Choo-Choo
11. Shirley Murphy
12. Shock-A-Diddle
6 6
13. Flamacue-Diddle
14. Diddle-Flafla
15. Egg Beaters
5 5
16. Drag Paradiddles
17. Tap Drag-A-Diddles
18. Drag Tap-A-Diddles
19. 5-A-Diddles
20. Cheeses
21. Flam Fives
22. Flam Drags
23. One Handed Flam Drags 3 3 3 3 3 3 3 3
24. Drag Pu-da-tas
25. Swiss Cheese Inverts
26. Cheese Chain
27. Chutra-Cheese
3 3 3 35 5
28. Book Reports
29. Double Flam Drag
30. Cheese Pataflafla
5 5

S. D.
r l r l r l r l r l l r r l l r r l r r l r
60
S. D.
r l r l r l r l r l r l r l r l r l
66
S. D.
r l r l l r l r l l r l r r l r l r r l r l r l r l r l
72
S. D.
r l r l r l r l r l r l r l r l r l r r l r l r l l r l
78
S. D.
r l r r r l r l l l r l r r r l r l l l
84
S. D.
r l r r l r l l r r l r l l r l
87
31. Flam Five Flafla
32. Cheese Inverts
33. Cheese Cha
3 3
#11
34. Hand to Hand Cheese Cha
35. Chut Cheese
36. Cheese Tap Cha
3 33 3
3 3
37. Grandmas
38. Inverted Grandmas
39. Dig-ga-dup-dat
40. Dap-dig-ga-up
41. Chap-dig-ga-up
42. Extended Book Report
43. Nut-Cha-Da
44. Drag Nut-Cha-Da
5 5
5 5
45. Drag Choo-Choo
46. Single Drag Flammed Mill
2

Snare Drum
MarchingTenor Drums
MarchingBass Drum
MarchingCymbals
R Rf
L L Lff
R R L R L Rmf
L R L R L R L R L R L R L R L R R Lf
R R L R L R L R L Rmf
L R L R L R L R L R L
q = 116 A
Lmf
R L R L R R L L R L R L R L R L R L R L R R L
Rmf
L R R R R R R L R R Rmf
L R R R R R
mf
S. D.
T. D.
B. D.
Cym.
Rf
L R R L R L L R R R R R R L R L R L R L R L R L R L R L L L R L R L R L R R L R L R L R Lf
R Lff
R L R L R L
B5
Lf
R L R L R L R L R L R R L R L R L R L R L R L L L R L R L R L R L R L R L L L R L R Lf
R Lff
R L R L R L
Rf
L R L R L L R R L Rf
L R Lmf
R R R R Rf
L R Lmf
R R R R R L R L R L R L
ff
S. D.
T. D.
B. D.
Cym.
Rf
R L Rff
Rmp
L L R L L R L R L R R R R R R R R R L R L Rf
L R L R Lff
R L R R L R L Rff
L L
C9
R L R L R L R L R L R R
mp
L R L R L R L R L R L R L R L R
f
L R L R L
ff
R L R R L R L Rff
L L
Rff
Lmp
R R L L R R L R R L R R L L R R L R Rf
L R L R Lff
R Rff
Lmp
R L R L L R L L Rff
L L
ff
one player RIM PINGS
3 3
"VEGAS STOMP"#12 Composer Tom Aungst
3
slide choke
3
3
orch. crash hi-hats orch. crash
STICK CLICK 16TH TO 1/2
TO C PINGS
CROSS
33
crash choke
orch. crash

S. D.
T. D.
B. D.
Cym.
R L R L R L R Rmp
R R Rff
L R L R L R L R L R R L R L R L Rmp
R R R R
fL R L R L R L R L
ffR L R L R R
ffL R L
mpR L R L R L R L R L R L
D E14
R L R L R L R R L L R R L R L R L R L R R L R L R L R Rf
L R L R L Rff
L R L R L R Lff
Rmp
L R R R R R R R R
R L R R L R R L R R L L R L RR R L Rf
mp
S. D.
T. D.
B. D.
Cym.
R L R L R L R L R L R L R L R L Rmf
L R L R L R L R L R L R L R L Rf
L R L R L R L R L R L R L R L Rff
R L R R L R R L R L
1.19
L R L R R R R R R R R Rmf
L R L R L R L R L R R L R L Rf
L R L R L R L R L R R L R L Rff
R L R R L R R L R L
R L R Rmf
L L R R L R Lf
L R R L R L Rff
L R RR L R R R L L
mf ff
S. D.
T. D.
B. D.
Cym.
Rmp
L R L R L Lf
R R Rff
L R L R L R L R L R R L R L Rfff
L R R L R L R
2.23
Rff
L R L R L R L R L R R L R L R fff L R R L R L R
Rmp
R R L L R Lf
R
ffL R L R R L R L R
ffL R L R R L R L
ff
3 3 3 3 3 3
6
#12
33
33
33
6
3
3
3
3 3 3
vert. crash crash choke
3 3
3
3
33
slide choke orch. crash crash choke
orch. crash
2

Snare
Tenors
Cymbals
Rff
L R L R f
q = 126 A
Rff
L R L R L R L Rf
L R L R L R L R R L R R L R L R L R R L L R R L
Rff
L R R L R L R L R Rff
L R L R L R L R L R L
mf
Perc.
Perc.
Perc.
Perc.
Rf
L R L R L R L R L
4
Rf
L R L R L R L R R L R R L R L R L R L R L R L R L R L R L R L R L R L Rff
r l r l
Rf
L R L R L R L R L R L r
mf
Perc.
Perc.
Perc.
Perc.
Rf
L R L R L R R L R L R L R L R L R L R L R L R L R L R L R L R L R L
R.
R
on
L
L.
R R L R L R L R
B8
Rf
L R L R L R R L L R L R L R L R L R L R L R L R L R L R L R R L L R R L
mf f R L R L R R R L R R R L
Composer Tom AungstBoom Boom #13
5 basses
rim clicks
hi-hat chokes
3 3
33 3
3
rim clicks
R. on front rim
3 3 3
rim shot front rim
33
3
ORCH. cr.ch

Perc.
Perc.
Perc.
Perc.
p
1/2
R L
to
R
c
L Rf
L L R L R L R L R R L R L R
(front
Rmp
L
Rim
R
)
L R L R L R L R L Rf
C12
R L R L R L R Rf
L R L R L R L R L R R L R L R L R L R L R L R
pRf
R L R R L R L R L Rf
Lmp
R R L R
f
Perc.
Perc.
Perc.
Perc.
Rmp
L R L R L R L R Rf
L R L L R L R L R L R L R R L R L L Rff
L R L R L R R L R L R L R L R L R
15
R L R L R L R L R R Rff
L R L R L R
R R L R Rf
L R L R Rff
Perc.
Perc.
Perc.
Perc.
Lff
Rmp
R R R L R L R L R L Rf
L R L R L R R L R L R R L R L R L R L R L R
D19
Rff
Lmp
R L L L L R L Rf
L R L R L R L R L R L L R R L R L R L R L
ff` mpRf
L R L R L R L R L R L
f
#13
ORCH. cr.ch
3 3
3 3 3
3
3
33
3
ORCH.
R. on L.
rim clicks
cr.ch ORCH.
2

Perc.
Perc.
Perc.
Perc.
R R R R R Lff
R L R R R L R L R
22
R R L L R R L R L R L R L R L Rff
L L R L R L R L R L R
R L R L R L R L R R
Perc.
Perc.
Perc.
Perc.
R R R R Rmp
R R R R L R L R L R L R
24
R R L L R R L R L R L R L R R L
R L R L R
#13
FRONT RIM
3 3
33
cr.ch
3

Snare Drum
MarchingTenor Drums
MarchingBass Drum
MarchingCymbals
Rff L R L R R L R R L R L Rf
R L R L R L L R L
q = 132 A
ff R L R L R Rf
L R L R L R L R L R L
Rff
L R L R L Rf
R L R L L R L
ff f
S. D.
T. D.
B. D.
Cym.
Rf
R L R L R L L R L R L R L R R L R L R R L R L R L R L R L R Rmp
L R R L L L R L
1. 2. B5
R L R L R R L R L R R L R L R L R L R L R R L R L R R L R R L R L R L R L
Rf
R L R L L R L R L R L R L R L R L R L L R mp
mp
S. D.
T. D.
B. D.
Cym.
R L R R L L L R L R L R R L L L R L Rf
L R L R R L R L R L L R R L R R L R L R L R L
9
R L R R L R L R L R R L R R L R L R L R L R R L L R L R R L L R L Rmp
L R R L L L R L
f mp
f mp
Composer Tom Aungst
Stick It#14
ORCH
RIM`
C/C` HI HAT CHOKES
RIM`
HI HAT CHOKES ORCH
HI HAT CHOKES

S. D.
T. D.
B. D.
Cym.
Rf
L R Rf
L R Rf
R L R R L R L R L R L R R L R R L R Rmp
L R L R L R
C13
R L R R L L L R L R L R R L L L R L Rf
L R L R L R L R Rmp
L R L R
Rf
L R L L R R mp
L R L R L R L
f mp
S. D.
T. D.
B. D.
Cym.
R L R L R Rf
L R L R L R R L R L R R L R L R R Lmp
Rff
L R L R L R L R L R L R
D17
R L R L R L R Rf
L R L R R L R L R R L R L R R Lmp
Rff
L R R L L L R L R L
R L R L R L R L Rf
L L R L R L R L R L R Lmp
RRff
LL R R L L L R
f ff
S. D.
T. D.
B. D.
Cym.
Rf
L R L R L R L R L R L R Rmf
L R L R L R L R L R L R L R L Rmp
L R L R L R L R Rp
R Rmp
L R L R R L L L R L R
E
RFf
L R R L L L R L R L RFmf
L R R L L L R L R L Rmp
L R L Rp
RRf
LL R R L L L R Rmf
L R L R L R L Rmp
L R L Rp
L R Rmp
R L R R R R
f mf mp
1/2 O I O I
#14
ORCH C/C
Z
O I O I TO 1/2
ORCH
TO 1/2 1/2
2

S. D.
T. D.
B. D.
Cym.
R L R L R L L L R L R Rmf
R L R R L L L R L R Rf
L R L R L R L R L R Lff
R
Rmp
L R L R L R L R L R L R Rmf
L R L R L R L R L R L R RFf
L R R L L Lff
R
R R L R R R R R R L R R R R RRf
LL R R L L Lff
R
mp mp f ff
S. D.
T. D.
B. D.
Cym.
Rmp
L R L R L Rff
L R L R L Rff
L R L R L R L R L R L Rmp
B B Bff
B B B L R L R
Rmp
L R L R L Rff
L R L R L Rff
L R L R L R L R L R L Rmp
Bff
B B B L R L R
Rmp
L R R L R Rff
L R R L R R L R R L R R L R R L R Rmp
Lff
R L R B
ff
#14
TAPS C/C
3
3
3 3
3 3
3 3 3 3
3
3
3
3
3 33
3
33
3
3
33
33
3 33
3
ORCH
C/C ORCH
3

Sna
re D
rum
A
Sna
re D
rum
B
Mar
chin
gT
enor
Dru
ms
A
Mar
chin
gT
enor
Dru
ms
B
Mar
chin
gB
ass
Dru
m A
Mar
chin
gB
ass
Dru
m B
Sur
do
Per
cuss
ion
R fR
R mp
LL
R fL
R mf
RR
RL f
RR
R mf
RR
RR
L fR
RR mf
RR
RL f
RR
R mf
RL
R mf
RR
RL f
RR
R mf
q =
150
AB
R mf
RL f
RR mf
RR
L fR
RR mf
RL f
RR mf
R mf
RL f
RR mf
R ffL
RR mpL
RL
RL
R ffL
R mpL
RR
LL
R mfL
RR
L fR
LL
R mf
LR
LR
LR
LR
RL
LR
L ff
mp R mp
RR
RR
RR
R
R mf
LR
L mp
LL
R mf
R mf
LR
LR
LR mf
LR
L mp
one
pers
on
RIG
HT
HA
ND
RIM
OR
SH
ELL
/LE
FT
HA
ND
1/2
WA
Yal
l in
PIN
GS
Ete
rna
l Fire
#15
Com
pose
r T
om
Aun
gst
RIG
HT
HA
ND
RIM
OR
SH
ELL
/LE
FT
HA
ND
1/2
WA
Yal
l in
so
lo
3
3
6
TA
MB
DJE
MB
E

S. D
.
S. D
.
T. D
.
T. D
.
B. D
.
B. D
.
Sur
do
Per
c.
RR
RR
L fR
RR mf
RR
RL f
RR
R mf
RL
R mf
RR
RL f
RR
R mf
C7
RR
L fR
RR mf
RL f
RR mf
R mf
RL f
RR mf
R ffL
RL
RL
RL
R fL
RL
mp
R ffL
RL
RL
RL
R fL
RL
RL
LR
LR f
LR
LR
LR
LR
LR
LR
RL
RL
RL
RL
RL
RL
RL
RL
R mpL
RR
LR
R ffL
LR
LR
LR
RR
RR
RR
R fL
RL
RL
Rmp
R ffL
LR
LR
LR
LL
R mf
R mf
LR
LR ff
LR
LR
LR mf
LR
L mp
PIN
GS
3
66
66
6
3
3
2

S. D
.
S. D
.
T. D
.
T. D
.
B. D
.
B. D
.
Sur
do
Per
c.
RR
RR
L fR
RR mf
RR
RL f
RR
R mf
RL
13
RR
L fR
RR mf
RL f
RR mf
RL
RR
LR
LL
RL
RL
RL
RR
LR
LR
LR
LR
LR
R fL mpR
LR
LR
LR
RL
LR mfR
LL
RR
LL
RR
LL
RR
LL
RL
RL
RL
RL
RL
RL
R fL
RL
RR
LL
R ffL
RL
R
RL
RL
RL
RL
RL
RL
RR
LR
LR
LR
`L
R mpL
RL
RL
RL
RR
LL
RR
LL
RL
RL
RL
RL
RL
RL
R fL
RL
RR
LL
R ffL
RL
R
LL
R mf
Rmf
LR
L
P
ING
S
33
33
33
33
3

S. D
.
S. D
.
T. D
.
T. D
.
B. D
.
B. D
.
Sur
do
Per
c.
R mf
RR
RL f
RR
R mf
RR
RR
L fR ff
LL
RL
RR
LL
RL
RR
LL
RL
R mp
LR
LR
LR
LR
LR
LR ff
LL
RR
LR
LR
RL
RL
RL
RL
RL
RL
RL
RL
DE
19
R mf
RL f
RR mf
RR
L fR ff
LL
RR
RR
RR
RL
R mp
RRR
RRR
RRR
RR
ffL
LR
RL
RL
RR
LR
LR
LR
LR
LR
RR
R ff`L
R mpR
LL
R ffL
R mfL
RL
RL
R fL
R mpL
RL
RL
RL
RL
RL
R ffL
LR
LR
RL
LR
LR
RL
LR
LRmp
LR
LR
LR
LR
LR
LRff
LL
RR
LR
LR
RL
RL
RL
RL
RL
RL
RL
RL
LR
LR
LR
LR
ffL
LR
LR
LR
LRR
LR
LL
RR
LR
LR
RL
RL
RL
RL
RL
RR
R
Rff
LR
RL
RR mpL
RL
RL
RL
Rff
LL
RL
LR
LL
R mp
LR
LR
LR
LR ff
LL
RR
LL
RL
RL
R
Rff
LR
RL
RR mpL
RL
RL
RL
Rff
LL
RL
LR
LL
R mp
LR
LR
LR
LR ff
LL
RR
LL
RL
RL
R
Rff
LR
L mp
LL
R ffR ff
LR
L mp
LL
R ffR
RL
LR
LR
LR
C
CR
ES
C. A
CC
EN
TS
ON
LY
33
33
33
C
33
3
33
CR
ES
C. A
CC
EN
TS
ON
LY
33
33
3
3
33
3
33
3
3
3
3
3
3
4

S. D
.
S. D
.
T. D
.
T. D
.
B. D
.
B. D
.
Sur
do
Per
c.
RL
RL
RL
RL
RR
RR
LR
LR fff
LR
Bmp
LR
LR
LR
LR
LR
LL
RL
RR
L
q. =
162
F25
RL
RL
RR
RR
LR
LR fff
LR
Bmp
RL
RL
RL
RL
RR
RR
LR
LR fff
LR
BRmp
LR
LR
RR
RL
RL
RR
RR
LR
LR fff
LR
B
RL
RL
R fff
LR
LR
Bmp
R ffL
RL
RR
LR
LR fff
LR
LR
Bmp
LL fff
RL
RL
R
mp
mp
3
3
1/2/
ON
E P
ER
SO
N
ALL
IN
Ete
rna
l Fire
#15
3
3
1/2
3
3
3
3
3
3
3
TA
MB
DJE
MB
E
5

S. D
.
S. D
.
T. D
.
T. D
.
B. D
.
B. D
.
Sur
do
Per
c.
RL
LR
LR
LR
LL
RL
RL
RL
LR
RL
LR
RL
LR
LR
LR
LR mf
LL
RRLL
RRR
LR
LR
LR
LR ff
RR
L ffR
LR
RL
LR
LR
LR
LR
LRR
LLR mp
LR
L
G33
RL
RL
RL
R ffL
RL
RL
RL
RL
RL
RR
RR
LR
L
RL
RL
RR
RR
LR
LR
RR
RL
RL
RR
RR ff
RR
L ffR
LR
RL
LR
LR
LR
RL
RL
RL
RL
R ffL
RL
RL
RL
RL
RL
RR
RR
LR
L
RL
RR
LR
RL
RL
RL
R ffL
RL
RL
RL
RR
LR
R ff`
RR
RR
LR
L
R mp
LR
LR
LR
LR ff
LR
LR
LR
LR ff
LR
LR
LR
L
ffmp
TO
C
PIN
GS
Ete
rna
l Fire
#15
T
O
S
TA
RT
WIT
H O
NE
TH
EN
AD
D IN
MO
RE
EA
CH
BA
R
6

S. D
.
S. D
.
T. D
.
T. D
.
B. D
.
B. D
.
Sur
do
Per
c.
RR ffR
RL ff
RL
RL
RR
LL
RL
RL mpRR
LR
LR
RL
LR
LR
LR ff
RR
LL mpRR
LLRR ff
LLRR
RLLL
LRR
LLR ff
RR
L ffR
LR
LR
RL
LR
LR
R mp
RR
H38
R ffL
RL
RL
RL
RL
RL
RR
RR
RR
R ffR
RR
RR
RR
RR
RR
R
RR ffR
RL ff
RL
RL
RL
RL
RR mp
RB
BB
ffR ff
RR
L ffR mpL
R ffL
RL
RL
R ffR
RL ff
RL
R mp
LR
L
R ffL
RL
RL
RL
RL
RL
Rmp
ffR ff
LR
LR
LR
RR
RL
RL
RL
R mp
LR
L
R ffL
RL
RL
RL
RR
LR
R mp
RR
ff
R ff`
RR
RR mp
RR
ff
R ffL
RL
RL
RL
R ffL
RL
R mp
LR
LR ff
LR
LR
LR
LR
LR
LR
LR
LR
LR
LR
LR
LR
LR
LR mp
LR
L
ffmp
ffmp
mp
PIN
G
7

S. D
.
S. D
.
T. D
.
T. D
.
B. D
.
B. D
.
Sur
do
Per
c.
R ffR
RR mp
LR mf
LR
LR
LR mp
LR
LR
LR mf
LR
LR
LR ff
RR
L ffR
LR ff
RR
L ffR
LR ff
RR
L ffR
RR
L ffR
LR
LR f
LR
LR
LR
LR
RL
LR
RL
LR
LR
LR
LR
RL
RR
L
IJ
44
R ffR
RR
RR
R mp
LR
LR
LR
RR
R ffL
RL
RL
RL
RL
RL
RL
RL
RL
RL
RL
RR
LR
LL
R
R ff R ff R ffL mp
RL
RL
RL
Rmp
LR
LR
LR
LR ff
LR
LR mp
LR
LR
LR ff
ffmp
mp
ffmp
ff
1/
2
TO
C
C
C
RE
SC
. ALL
LEF
T O
VE
R R
. ST
ICK
44
44
Ete
rna
l Fire
#15
1/2
2
22
2
8

S. D
.
S. D
.
T. D
.
T. D
.
B. D
.
B. D
.
Sur
do
Per
c.
RR
LR
RL
RR
LR
RL
R ffL
RR
LL
RR
LR f
LR
LR
LR
LR
LR
LR
L ffR
LR fff
LR
BR
L
KL
50
RRLL
RR
LR
LL
RL
RL
RL
RL ff
RL
R fff
LR
BR
L
R ffL
RR
LL
RR
LR f
LR
LR
LR ff
LR
LR
LR ff
LR
LR fff
LR
B
RR ffL
RL
R fff
LR
B
R ffL
RL
RR
RR
LR
LR
LL
L
L ffR
LR
RR ff
LmfR
LR
LR
LR
LR
LR
LR
L
ffff
mf
44
44
22
22
4
4
4
4
P
UT
DR
UM
ON
ITS
SID
E L
IKE
A S
OR
DO
DR
UM
9

S. D
.
S. D
.
T. D
.
T. D
.
B. D
.
B. D
.
Sur
do
Per
c.
R ffR
M57
R ffR
RL
ffR mp
LR ff
`LR
LR
RL
RL
LR
RL
RL
LR
LR
LR
LR
LR
LR
LR
LR
LR
LR
R ffL
RL ff
R mp
LR ff
`LR
LR
LR
LR
LR
LR
LR
LR
LR
LR
LR
LR
LR
LR
LR
LR
LR
R ffL
RL
RR
RL
R mp
RR
LR
LR ff
LR
L ffR mp
LR ff
`LR
LR
LR
LR
LR
LR
LR
LR
LR
LR
LR
LR
LR
LR
LR
LR
LR
R ffL
RL
RL
RL
RL
RL
RL
RL
RL
RL
RL
RL
RL
RL
RL
RL
RL
RL
RL
RL
RL mp
RL
RL
RL
R fL
RL
RL
RL
RL
RL
RL
RL
RL
RL
RL
RL
RL
RL
RL
RL
mp
fmp
10

S. D
.
S. D
.
T. D
.
T. D
.
B. D
.
B. D
.
Sur
do
Per
c.
R ffR
RL ff
R mp
LR ff
`L
RL
RR
LR
LL
RR
LR
LL
RL
RL
RL
RL
RL
RL
RL
RL
RL
R
N63
R ffL
RL
RL
RL
RL
RL
RL
RL
RL
RL
R ffR
RL ff
R mp
LR ff
`L
RL
RR
LR
LL
RR
LR
LL
RL
RL
RL
RL
RL
RL
RL
RL
RL
R
R ffL
RL ff
R mp
LR ff
`L
RL
RL
RL
RL
RL
RL
RL
RL
RL
RL
RL
RL
RL
RL
RL
RL
R
R ffL
RL ff
R mp
LR ff
`L
RL
RL
RL
RL
RL
RL
RL
RL
RL
RL
RL
RL
RL
RL
RL
RL
R
RL
RL
RL
RL
RL
RL
RL
RL
RL
RL
RL
RL
RL
RL
RL
RL
RL
RL
RL
RL
RL
RL
RL
RL
RL
RL
RL
RL
RL
RL
RL
RL
ff
11

S. D
.
S. D
.
T. D
.
T. D
.
B. D
.
B. D
.
Sur
do
Per
c.
RL mp
RL
RL
RR mf
LR
LR
LR
R fL
RL
RL
RR ff
LR
LB fff
O67
RL mp
RL
RL
RR mf
LR
LR
LR
R fL
RL
RL
RR ff
LR
LB fff
RL mp
RL
RL
RR mf
LR
LR
LR
R fL
RL
RL
RB ff
B fff
RL mp
RL
RL
RR mf
LR
LR
LR
R fL
RL
RL
RB ff
B fff
RL mp
RL
RL
RR mf
LR
LR
LR
R fL
RL
RL
RR ff
LR
LB fff
B
RL mp
RL
RL
RR mf
LR
LR
LR
R fL
RL
RL
RR ff
LR
LB fff
B
RL mp
RL
RL
RR mf
LR
LR
LR
R fL
RL
RL
RR ff
LR
LB fff
B
B
mp
mf
fff
fff
Ete
rna
l Fire
#15
12

Marching Bass Drum A
mpR L L R L
q = 150 A B
Rf
L R L R L R L R L R L R R L R L R L R L R L R L R L R L
8
Rmp
L R R L R Rff
L L R L R L R
10
Rff
L R R L R Rmp
L R L R L R L Rff
L L R L L R L L
C D12
Rmp
L R L R L R L Rff
L L R R L L R L R L R
E22
R L R L Rfff
L R L R B
25
q. = 162F30
6
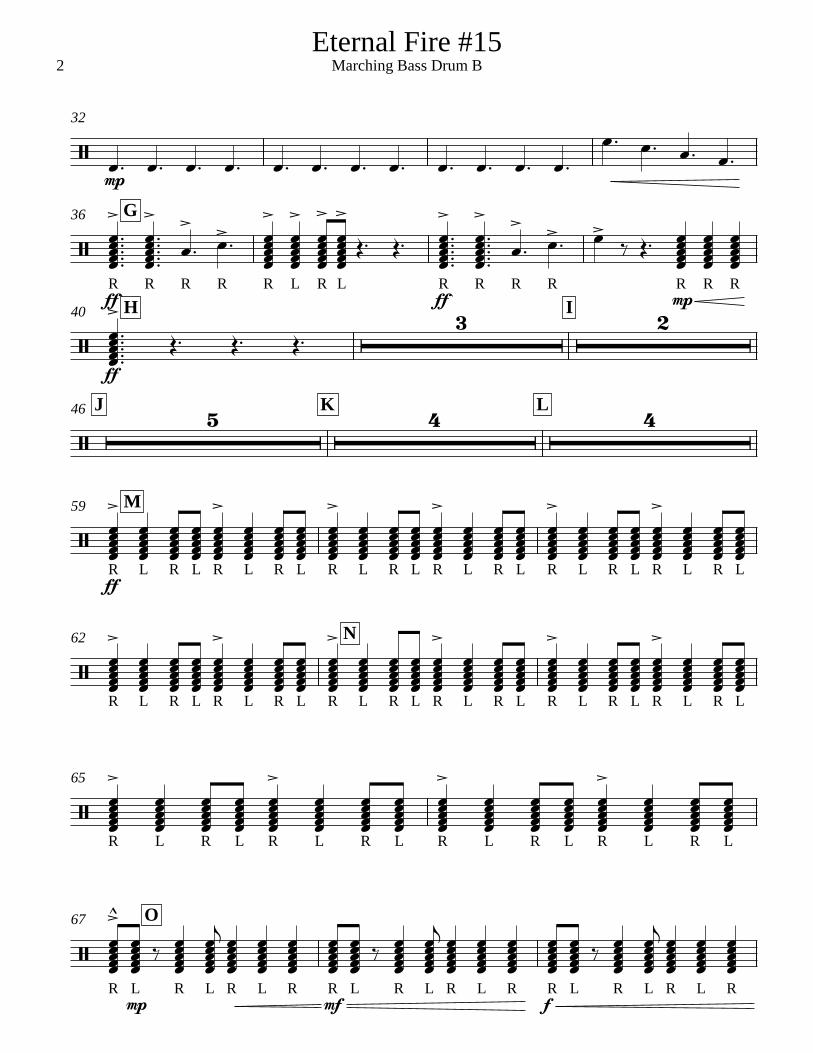
Eternal Fire #15
Composer Tom Aungst
3
6 6 6
6
3
3
3

mp R L R R L R R L R L R L
32
Rff
L R L R L R L R R L R Rff
L R L R L R L R R L R
G36
Rmp
R Rff
H39
I J K44
Rff
L R L R R R R L R L R L L L Rff
L R L R R R
L55
L Rmp
R R L R L Rff
L R Lff
Rmp
L Rff`
L R L
M58
R L R L R L R L R L R L R L R L R L R L R L R L R L R L R L R
60
Rff
L R Lff
Rmp
L Rff`
L R L R L R L R L R L R L R L R L R L R L R L R L R L
N63
Eternal Fire #15
PUT DRUM ON ITS SIDE LIKE A SORDO DRUM
Marching Bass Drum A2
R L R L R L R R Lmp
R L R L R Rmf
L R L R L R
O66
Rf
L R L R L R Rff
L R L Bfff
B
69
Eternal Fire #15
Marching Bass Drum A 3

Marching Bass Drum B
Rmp
R R R R R R R R R R R R R
q = 150 A B
Rf
L R L R L Rmp
Rff
L L R L R L R
8
Rff
L R R L R Rmp
L R L R L R L Rff
L L R L L R L L
C D12
Rmp
L R L R L R L Rff
L L R R L L R L R L R
E22
Rff
L R L R R L R L Rfff
L R L R B
25
q. = 162F30
Eternal Fire #15
Composer Tom Aungst
3
3
3
3
mp
32
Rff`
R R R R L R L Rff`
R R R Rmp
R R
G36
ff
H I40
J K L46
Rff
L R L R L R L R L R L R L R L R L R L R L R L
M59
R L R L R L R L R L R L R L R L R L R L R L R L
N62
R L R L R L R L R L R L R L R L
65
R Lmp
R L R L R Rmf
L R L R L R Rf
L R L R L R
O67
Eternal Fire #15
Marching Bass Drum B2

Rff
L R L Bfff
B
70
Eternal Fire #15
Marching Bass Drum B 3

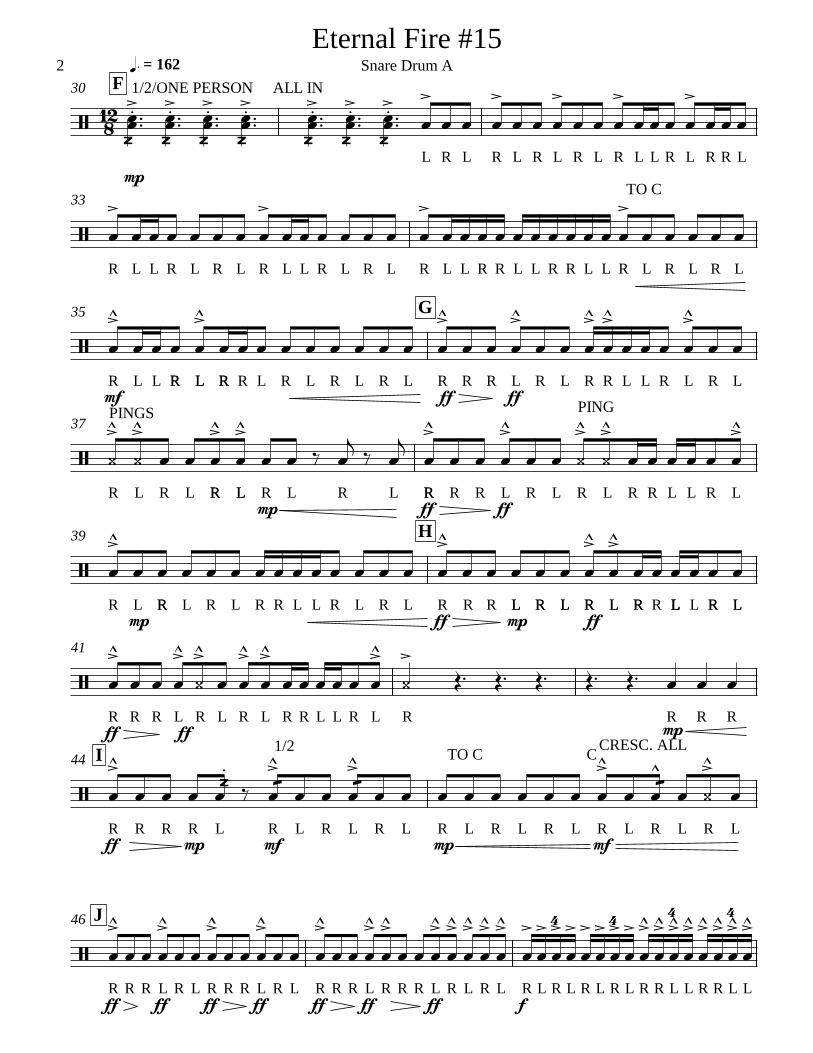
Snare Drum A
Rf
R Rmp
L L Rf
L Rmf
R R R Lf
R R Rmf
R R R R Lf
R R Rmf
R R R Lf
R R Rmf
q = 150A
R L Rmf
R R R Lf
R R Rmf
R R R R Lf
R R Rmf
R R R Lf
R R Rmf
B5
R L Rmf
R R R Lf
R R Rmf
R R R R Lf
R R Rmf
R R R Lf
R R Rmf
C11
R L Rmf
R R R Lf
R R Rmf
R R R R Lf
Rff
L L R L R R L L R L R R L L R L
D18
Rmp
L R L R L R L R L R L Rff
L L R R L R L R R L R L R L R L R L R L R L R L
E22
R L R L R L R L R R R R L R L Rfff
L R B
25
one person
RIGHT HAND RIM OR SHELL/LEFT HAND 1/2 WAYall in
Eternal Fire #15
Composer Tom Aungst
PINGS
PINGS
PINGS
C
CRESC. ACCENTS ONLY 3 3
3 3
3 3
3
3
mpL R L R L R L R L R L L R L R R L
q. = 162F30
R L L R L R L R L L R L R L R L L R R L L R R L L R L R L R L
33
Rmf
L L RR LL RR R L R L R L R L Rff
R R Lff
R L R R L L R L R L
G35
R L R L RR LL Rmp
L R L RRff
R R Lff
R L R L R R L L R L
37
R Lmp
RR L R L R R L L R L R L Rff
R R LLmp
RR LL RRff
LL RR R LLL L RR LL
H39
Rff
R R Lff
R L R L R R L L R L R Rmp
R R
41
Rff
R R Rmp
L Rmf
L R L R L Rmp
L R L R L Rmf
L R L R L
I44
Rff
R R Lff
R L Rff
R R Lff
R L Rff
R R Lff
R R R Lff
R L R L Rf
L R L R L R L R R L L R R L L
J46
1/2/ONE PERSON ALL IN
Eternal Fire #15
TO C
PINGS
PING
1/2 TO C C
CRESC. ALL
4 4
4 4
Snare Drum A2

R L R L R L R R L R R L R R L R R L R R L R R L
49
Rff
L R R L L R R L Rf
L R L R L R L R L R L R Lff
R L
K51
Rfff
L R B R L
L53
Rff
R Rff
R R Lff
Rmp
L Rff`
L R L
M N59
R R L R L L R R L R L L R L R L R L R L R L R L R L R L R L R
64
R Lmp
R L R L R Rmf
L R L R L R Rf
L R L R L R
O67
Rff
L R L Bfff
70
LEFT OVER R. STICK
Eternal Fire #15
4 4
44
Snare Drum A 3

Snare Drum B
Rmf
R Lf
R Rmf
R R Lf
R R Rmf
R Lf
R Rmf
q = 150 A
Rmf
R Lf
R Rmf
R R Lf
R R Rmf
R Lf
R Rmf
B6
Rmf
R Lf
R Rmf
R R Lf
R R Rmf
R Lf
R Rmf
C12
Rmf
R Lf
R Rmf
R R Lf
Rff
L L R R R R R R R L Rmp
R RR R RR R RR R Rff
L L
D19
R R L R L R R L R L R L R L R L R R R R L R L R R R
E23
R L R L Rfff
L R B
26
q. = 162F30
RIGHT HAND RIM OR SHELL/LEFT HAND 1/2 WAYall in
Eternal Fire #15
Composer Tom Aungst
C
3
33 3
3 3
3

mp R L R L R L
32
Rff
L R L R L R L R L R L R R R R L R L Rff
L R L R L R L R L R L
G36
R R R R R R Rff
R R R R R R R R R R R
H39
R Rff
R R R R R Rmp
L R L R L R R R
I42
Rff
L R L R L R L R L R L R L R L R L R L R L R R L R L L
J46
R RR LL R R L R L L R L R L R L R Lff
R L
K49
Rfff
L R B R L
L53
Rff
L R L R L R L R L R L R L R
M N59
1/2
TO
Eternal Fire #15
1/2
2 2 2 2
2 2 2 2
Snare Drum B2

L R L R L R Lmp
R L R L R Rmf
L R L R L R
O66
Rf
L R L R L R Rff
L R L Bfff
69
Eternal Fire #15
Snare Drum B 3

Marching Tenor Drums A
Rff
L R Rmp
L R L R L Rff
L Rmp
L R R L L Rmf
L R R Lf
R L L
q = 150 A
Rmf
L R L R L R L R R L L R Lff
B5
Rff
L R L R L R L Rf
L R L R L R R L R L L R L R L R L R
C12
R L R L R L R L R L R Rf
Lmp
R L R L R L R R L L Rmf
R L L R R L L
14
R R L L R R L L R L R L R L R L R L R L Rf
L R L R R L L Rff
L R L R
16
Rff`
L Rmp
R L L Rff
L Rmf
L R L R L Rf
L Rmp
L R L R L R L R L R L Rff
L L
D19
V.S.R L R R L L R L R R L L R L R
mpL R L R L R L R L R L R
ffL L
21
solo
Eternal Fire #15
Composer Tom Aungst
3
3
6
3 3
33
CRESC. ACCENTS ONLY
R R L R L R R L R L R L R L R L R L R L R L R L R L R L R L R R R R L R L Rfff
L R
E23
B Rmp
L R L R R R
q. = 162F27
R L R L R R R R L R L R R R R L R L R R R
33
Rff
R R Lff
R L R R L L R L R L R R L R L R L R L RRff
R R Lff
R L R L R L R L
G36
R Rmp
R B B Bff
Rff
R R Lff
Rmp
L Rff
L R L R L
H39
Rff
R R Lff
R L Rmp
L R L Rff
I43
Rff
L R R L L R R L Rf
L R L R L Rff
L R L R L Rff
L R L
J K46
Rfff
L R B
L53
3
3
33
3 3
3
3
Eternal Fire #15
44
4
4
Marching Tenor Drums A2

Rff
R R Lff
Rmp
L Rff`
L R L R R L R L L R R L R L L R L R L R L R L R L R L
M59
R L R L R L R Rff
R R Lff
Rmp
L Rff`
L R L R R L R L L R R L R L L
N62
R L R L R L R L R L R L R L R L R L R
65
R Lmp
R L R L R Rmf
L R L R L R Rf
L R L R L R
O67
Bff
Bfff
70
Eternal Fire #15
Marching Tenor Drums A 3

Marching Tenor Drums B
mp
q = 150 A B
Rff
L R L R L R L Rf
L R L R L R L R L R L R L R L R R L R L R L R` L
C12
Rmp
L R L R L R L R R L L R R L L R L R L R L R L R L R L Rf
L R L R R L L
15
Rff
L R L R L R L R L R L Rff
L L R L R L R L RR L R L L
D18
R R L R L R R L R L R L R L R L R R R R L R L R R R
E23
R L R L Rfff
L R B
26
q. = 162F30
Eternal Fire #15
Composer Tom Aungst
3 3
33
3
333
3 3
3

Rff
L R L R L R L R L R L R R R R L R L Rff
L R L R L R L R L R L
G36
Rmp ff
Rff
L R L R L R R R
H39
R L R L R L Rmp
L R L Rff
I43
RRff
L R L Rfff
L R B
J K46
Rff
L R Lff
Rmp
L Rff`
L R L
L M55
R L R L R L R L R L R L R L R L R L R L R L R L R L R L R L R
60
Rff
L R Lff
Rmp
L Rff`
L R L R L R L R L R L R L R L R L R L R L R L R L R L
N63
R L R L R L R R Lmp
R L R L R Rmf
L R L R L R
O66
Eternal Fire #15
Marching Tenor Drums B2

Rf
L R L R L R Bff
Bfff
69
Eternal Fire #15
Marching Tenor Drums B 3

Percussion
q = 150 A B C
mp
q. = 162D E F19
mp
32
ff mp
G35
ffmp
38
ff mp
H40
mp ff mpmp
I43
ff mp ff
J46
K51
TAMB
DJEMBE
Eternal Fire #15
Composer Tom Aungst
TAMB
DJEMBE

ff ff mf
L53
mp
56
f
M59
mp ff
N62
65
mp mf f
O67
ff fff
70
Eternal Fire #15
Percussion2

Surdo
Rmf
L R Lmp
L L Rmf
Rmf
L R L R L
q = 150 A
Rmf
L R Lmp
L L Rmf
Rmf
L R L Rff
L R L R L
B6
Rmf
L R Lmp
L L Rmf
Rmf
L R L
C12
Rff
L R Lmp
L L Rff
Rff
L R Lmp
L L Rff
D19
R R L L R L R L R L Lfff
R L
E23
R L R
q. = 162F27
Eternal Fire #15
Composer Tom Aungst
3
3
3
3

Rmp
L R L R L R L
33
Rff
L R L R L R L Rff
L R L R L R L Rff
L R L R L R L
G36
Rff
L R L Rmp
L R L Rff
L R L R L R L R L R L R L R L
H39
R L R L R L R L R L R L Rmp
L R L
42
Rff
Lmp
R L R L R L Rmp
L R L R L R L
I44
Rff
L R L Rmp
L R L R L Rff
J46
Lff
R L R R
K51
Rff
Lmf
R L R L R L R L R L R L R L R L R L R L R L
L55
R Lmp
R L R L R L Rf
L R L R L R L
M58
START WITH ONE THEN ADD IN MORE EACH BAR
Eternal Fire #15
Surdo2

R L R L R L R L R L R L R L R L R L R L R L R L
60
R L R L R L R L R L R L R L R L R L R L R L R L
N63
R L R L R L R L R Lmp
R L R L R Rmf
L R L R L R
O66
Rf
L R L R L R Rff
L R L B
fffB
B
69
Eternal Fire #15
Surdo 3

DEVELOPING YOUR INDOOR PROGRAMBy Tom Aungst
1. Setting up the culture a. Establish a work ethic b. Attitude c. Set up goals for now and the future
2. Ideas to upgrade your program a. Develop middle school program b. Private lessons c. Expanding Staff d. Parent involvement e. Using younger students f. Auditions g. Rudiment sheet
3. Starting the indoor season a. Technique program starts in the spring b. Use marching band to develop for indoor c. Indoor drives the program 4. Technique program and packet a. Developing and mastering skills b. Exercise packet (8's, hands together, accent tap, double beat, flams, paraddiddles, rolls) c. Developing mechanics of playing
5. Cleaning the book a. Starts from the beginning b. Set up the book as exercises c. Know your players, write to their abilities d. Don't be afraid to change
6. Setting up the program a. The first meeting(direction, reflect, ideas, and effects) b. Know groups strengths
7. Designing the show a. Concept drives the bus b. finding music to fit the concept c. What comes first d. Write with all elements in mind(visual, effects, etc.) e. Write as a tech and a designer

8. Orchestration a. Role of the Front ensemble b. Role of the Battery c. Clarity of intent d. How will it sound at the end e. Know what your players can handle(patterns, rudiments, etc.) f. Be creative with, who plays, dynamics, tempos, etc. g. Making the ensemble work through the idea of “less is more”

MUSIC FOR ALL SUMMER SYMPOSIUM – 2013 David Collier Materials Timpani Clinic Title Page
FUNdamental Performance Techniques for Timpani
Timpani Technique
Timpani Fundamentals
Fundamentals of Bass Drum
Fundamentals of Cymbals
Fundamentals of Accessory Percussion
Fundamentals of Triangle
Fundamentals of Tambourine
Accessory Techniques
Accessory Ensemble #1
Keyboard Percussion Technique – Scales
Arpeggios and Broken Chords
Keyboard Percussion Techniques – Double Vertical Strokes
Keyboard Percussion Techniques – 4-mallet permutations
Multiple Percussion Technique

FUNdamental
PERFORMANCE TECHNIQUES for
TIMPANI
Dr. David L. Collier Professor of Music
Director of Percussion Studies Illinois State University
Music for All Summer Symposium Ball State University
2013

FUNdamental Performance Techniques for Timpani Instrument Basics
Sizes and ranges
Set-‐ups • American • German Sit or stand?
Fundamental Techniques
Grips • German
This grip is similar to matched grip. It uses a hinge motion and is downward oriented.
• French This grip uses a rotational motion and is upward oriented. This
enables more follow-‐thru and a more resonant sound.
Legato Stroke Production • tossing motion with smooth follow through; a combination of wrist and
fingers • uses “mirroring” to develop consistent stroke • use towels to mute timpani in order to clearly hear evenness of sound Beating spot • 1”-‐3” from the edge of the bowl

Sticking procedures • If even number of notes, start with inside hand. • If odd number of notes, start with outside hand. • see worksheet Rolls • always single stroke rolls • roll slowly; only as fast as necessary to sustain the tone • roll slower on large timpano and/or a low pitch; roll faster on smaller
timpano and/or a higher pitch • When changing drums, lead with right hand when ascending and lead
with left hand when descending Muffling • place finger tips on the head in the beating spot • do not wipe the heads Staccato Stroke • produced with a snap motion from fingers. • minimal up-‐stroke or follow-‐through. The goal is a sound with a
pointed attack. Cross-‐sticking • use when executing rapid passages between multiple drums • see worksheet for examples Tuning • know ranges • sing basic intervals (M2, m2, P4, P5, M3, m3, scales) • Tuning steps sound the pitch sing the pitch lower pedal strike the timpano once and immediately gliss up to the pitch
Performance Preparations
Analyze the part How many pitches are there? Where do the pitches sound the best? Which timpani?
* I recommend placing pitches in the middle to upper register of the timpano.
How many timpani and which sizes do I need? What do the terms mean?

Determine mallet selection • Types of Mallets generals, staccato, ultra-‐staccato, cartwheel, wood • Base your mallet selection on Quality of Sound and Articulation • A softer mallet produces more tone and less articulation • A harder mallet produces more articulation and less tone. Determine tuning scheme Example Bb Eb F F Mark the part • Put in the tunings • Put in cues, number of bars of rests, mallet changes, etc
Study the composition Find a score
• Library, your director, online Find a recording
• Library, iTunes, emusic, CDs, online streaming LISTEN, LISTEN, LISTEN
Prepare/practice the part
Practice the selection with a metronome. • Begin slowly and work up to performance tempo. Play the part on a marimba or piano. • This will get the melodic structure in your ear. Record your part and play along with it. Practice with a recording of the complete work.
Play the performance Be prepared for the material to be rehearsed Have all music, mallets, mutes, pencil, stand towel, tuning fork, etc Resources Methods Saul Goodman—Modern Method for Timpani Mitchell Peters—Fundamental Method for Timpani Friese-‐Lepak—The Complete Timpani Method John Beck—Concepts for Timpani Raynor Carroll—Exercises, Etudes and Solos for Timpani Charles Dowd—The Well-‐Tempered Timpanist Fred Hinger—Technique for the Virtuoso Timpanist Gary Cook—Teaching Percussion

? c ..œ œ œ œR R R R
œ œ œ œL L L L
œœ œœ œœ œœB B B B
œœ œœ œœ œœB B B B
? .. ..5
œ œ œ œ œ œ œ œR R R R R R R R
œ œ œ œ œ œ œ œL L L L L L L L
œœ œœ œœ œœ œœ œœ œœ œœB B B B B B B B
œœ œœ œœ œœ œœ œœ œœ œœB B B B B B B B
? .. ..9
œ œ œ œR L R L
œ œ œ œR L R L
œ œ œ œ œ œ œR L R L R L R
œ œ œ œ œ œ œL R L R L R L
? .. ..13
œ œ œ œ œ œR L R R L R
œ œ œ œ œ œL R L L R L
œ œ œ œ œ œR L R L R L
œ œ œ œ œ œR L R L R L
? .. ..17
œ œ œ œ œ œ œ œ œ œ œ œR L R L R L R L R L R L
œ œ œ œ œ œ œ œ œ œ œ œR L R L R L R L R L R L
œ œ œ œ œ œ œ œ œ œ œ œR L R R L R L R L L R L
œ œ œ œ œ œ œ œ œ œ œ œR L R R L R L R L L R L
? .. ..21
œ œ œ œ œ œ œ œ œ ŒR L R L R L R L R
œ œ œ œ œ œ œ œ œ ŒL R L R L R L R L
œ œ œ œ œ œ œ œ œ ŒR L R L R
œ œ œ œ œ œ œ œ œ ŒL R L R L
? .. ..25
œ œ œ œ œ œ œ œ œ œ œ œ œR L R L R L R L R L R L R
œ œ œ œ œ œ œ œ œ œ œ œ œL R L R L R L R L R L R L
œ œ œ œ œ œ œ œ œ œ œ œ œR L R L R L R L R L R L R
œ œ œ œ œ œ œ œ œ œ œ œ œL R L R L R L R L R L R L
Timpani TechniqueDavid Collier
©2008, David L. Collier
Legato Strokes
Sticking Principals
Roll Development

? .. ..29
œ Œ œ ŒR l R l
œ Œ œ ŒR l R r
œ Œ œ ŒL r L r
œ Œ œ ŒL r L l
? .. ..33
œ ‰ œ ‰ œ ‰ œ ‰R r L l R r L l
œ ‰ œ ‰ œ ‰ œ ‰ œ œ Œ œ œ ŒR L B R L B
œ œ Œ œ œ ŒL R B L R B
?37
œ œ ‰ jœ œ
R L B L R
œ œ œ ‰ ‰Jœ œ
R L R l R L
œ ‰ œ ‰ œ ‰ œ ‰R r L l R r L l
œ œ ‰ œ œ œ œR L B L R R L
?41
œ ‰Jœ œ œ ‰ œ
R B R L R B L
œ œ Œ œ œ ŒR L B R L B
œ œ œ ‰ œ œ œR L R B L R L
œ œ œ œ ‰ jœ œ
R L R L B L R
? .. ..45
œœœœœœœœœœœœœœœœœœœœœœœœRRRRRRRRRLRLRLRL
œœœœœœœœœœœœœœœœœœœœœRRRRRRRRRLRLRLRLRLRLR
œœœœœœœœœœœœœœœœœœœœœœœœLLLLLLLLLRLRLRLR
œœœœœœœœœœœœœœœœœœœœœLLLLLLLLLRLRLRLRLRLRL
? .. ..49
æ œ ŒR R
æ œ ŒL L
˙æ
œ ŒR R
˙æ
œ ŒL L
? .. ..53
æ œ ŒR R
æ œ ŒL L
æ œ ŒR R
æ œ ŒL L
? .. ..57
Ͼ
œ œæ œR R L L
Ͼ
œ œæ œR R L L
œæ œ œæ œR R R R
œæ œ œæ œL L L L
!
2 Timpani Techique
Muffling Studies
Roll Studies

? c˙ ˙
31"
Ranges
˙ ˙29"
˙b ˙
26"
˙ ˙
23"
? œ œ œ œ œ œR L R L R L
Sticking Policies
œœœœœ œœœœœRLRLR LRLRL
‰ Jœ œ œjœ ‰ Œ
R L R L
≈⋲œœœœ ≈⋲œœœœ
LRLR LRLR
?Jœ ‰ ‰ Jœ ‰ ‰ Jœ ‰
Muffling‰ Jœ
jœ ‰ ‰ Jœ ‰jœ Jœ ‰ ‰
jœ ‰ Jœ ‰ Jœ œ œ ‰ Jœ ‰jœ œ œ Jœ‰Œ Ó
? wæRoll Techniques
œ Œ Ó wæ œ Œ Ó æ œ Œ æ œ Œ
?æ œ Œ ˙
æ œ Œ œæ œ œæ œ œæ œ œ
æ œ œ@œ œ@œ œ@œ œ@œ œ@ œ@ œ@œ@œ Œ
? .. .. ..œ œ œ œ œ œ œ œ œ œ œ œ œ œ œ œR L x R R L x R
Cross-Stickingœ œ œ œ œ œ œ œ œ œ œ œ œ œ œ œ
RL x R L RL x R L
? .. .. ..œ œ œ œ œ œ œ œ œ œ œ œ œ œ œ œRx L R L Rx L R L
œ œ œ œ œ œ œ œ œ œ œ œ œ œ œ œR L R L Rx L R L
Timpani Fundamentals
© David L. Collier, 1998

FUNDAMENTALS of BASS DRUM David L. Collier Director of Percussion Studies Illinois State University
For most of our early years in percussion, our goals have been to master snare drum, marimba, or drum set. The other instruments that we had to play in band often got no attention in our practice routine. At times this was because we could not practice them at home. In other cases it might have been because we thought it was unnecessary to work on instruments like Bass Drum, Cymbals, Tambourine and Triangle. As we grow as performers and become increasingly sensitive musicians, the artistry needed on these instruments becomes more apparent. Let's begin our study of Accessory Instruments with Concert Bass Drum. "But I don't like Bass Drum." "Mr./Ms Doe only put me on bass drum because he/she doesn't like me." "All I've got to do is hit it, right?" How many of you have had these thoughts? All of us have at one point or another, but Bass Drum is a fantastic instrument once you get involved with it. It is probably the most important instrument in the band because of the power it possesses to direct the entire ensemble. Everyone listens to the bass drum... and follows it. This means you have incredible power over the music--and you have an incredible responsibility. Bass Drum players must have impeccable time, must always watch the conductor, and must always listen to the ensemble. In addition, the percussionist on bass drum needs a large pallet of sound colors to use in various situations. How is this done? Through changes we make in technique, stroke, and where we strike the head. NAMES English Bass Drum German die Grosse Trommel French la grosse caisse Italian la grancassa, gran cassa BACKGROUND A new, large drum that was either carried or place on the floor with the heads in a vertical position was introduced to the musical courts of Europe with the appearance of Turkish Janissary music in the second half of the 18th century. The instrument was unique in that with the skin heads in a vertical position, the performer could play on both sides. At this time the drum was often played with a leather-covered wood beater on one side and a switch on the other. This instrument moved quickly into the orchestra in works such as Mozart's Abduction form the Seraglio and the Military Symphony of Haydn. In many works of the 19th century, bass drum and cymbals were often played together. Only in later works with the addition of more complicated rhythms and rolls were two distinct parts created as we have today. TECHNIQUES
• Basic grip is the same as French Grip on timpani • thumb is facing toward the ceiling; back of the hand is perpendicular to the floor

• grip firmly between the thumb and first fingers with the remaining fingers wrapped around the handle of the mallet
• grip should be firm but not tense.
• Basic stroke should be from the wrist and not from the arm • draw a backwards C or a bass clef sign in the air and contact the head at the bottom • this motion should have a moderate degree of snap to increase the velocity of the mallet • after striking the head, be sure to follow-thru away from the head (See Diagram 1)
WHERE TO STRIKE
• divide the head into three circles for our various types of playing. (See Diagram 2) • center circle (area 1) surrounds the node of the bass drum and is the point of least
vibration on the head and therefore produces the driest, most articulate sound. • use this area when you want a very short sound with excellent articulation. • the center is also where one should play the powerful "cannon shot" blows that are
sometimes called for. • second circle (area 2) is the area for most of our general-purpose sounds. • This portion of the head, which is about 4-6 inches off center, has a moderate amount of
resonance with just enough articulation for the majority of our strokes. • third circle is used primarily for rolls (area 3). This area which is very close to the rim
produces a light airy tone with very little articulation. • By using all three of these areas, the sensitive percussionist can produce an incredible
number of sounds on the Bass Drum.

Diagram 2 MALLET CHOICE
• For general playing, you will need a mallet with a moderately large head and with a fair amount of head weight.
• For extremely articulate passages, a pair of hard felt beaters (i.e. small marching bass drum mallets) will be useful.
• For rolls we will need a matched pair of mallets that have heads slightly smaller than our general-purpose mallet.
• A well-stocked percussionist will have a pair of general mallets, a pair of rolling mallets and a pair of hard mallets.
MUFFLING TECHNIQUES
• never put anything on the head or inside a concert bass drum • the most effective techniques for muffling involve the hands and knees • best method for muffling the bass drum is to use the non-playing hand on the playing
head. • gently place the fingers on your left hand near the rim of the bass drum while striking the
head with the right hand. • if a dryer sound is needed, move the left hand toward the center of the drum. • Increased control of the sound may be obtained by also using the knee • elevate the right knee on a small stool and gently press it into the playing head. This can
be used alone or with the hand muffling. This technique is very easy to use on any type of bass drum by performers of any size. It
also enables the player to easily see the music and the conductor. Practice, experimentation and keen listening will guide you in developing this technique.
MUSICALITY Another factor a performer must consider is the length of the notes. Often what we see printed is not exactly what the composer may have "intended". At times the note values we see are too short in relation to other wind parts, as if only the attack of the drum was written. I recommend a careful analysis of the score to compare the bass drum part with other wind parts. If everyone else has a half note and the bass drum has an eighth, perhaps we should allow the

drum to resonate for an entire half note before muffling. This aids in the phrasing and overall musicianship. Next time you get a bass drum part, listen to the rest of the ensemble and determine what the role of the bass drum is at every moment. Is it providing the ostinato pulse? Is it a low, rumbling effect? Is it a very rhythmic, syncopated solo? Is it the tremendous climax at the end? By deciding what your musical role is, you can decide what mallet to use, where to play, how to strike the drum and how to muffle. The combination of these aspects advances the art of bass drum performance into the realm of music and out of the pit of noise. Good luck!! PODIUM NOTES Directors: Most of what I have said above will happen if you reinforce it. You can create a musical percussion section by instructing them in the art of breathing, phrasing, and sound color. Point out how the bass drum punctuates the low brass syncopation. Have them listen to the French horn chord which they are supporting with that soft roll. Show them how they are the rhythmic backbone of the entire march. Often the printed music itself will not tell them what to play or how to play it. It only shows them where in time to play. Also, many poor playing habits can be passed down from other, older players. Start at the very beginning to instill solid pulse, accurate rhythm, and musical sensitivity in your percussionists. In addition to the correct technique, proper heads and tuning will radically affect the quality of the bass drum sound in your ensemble. The best sound possible for a Bass Drum is found with quality calfskin heads. Colleges and professionals should invest in this type of head. In most high school situations, I recommend the Remo FibreSkyn II™ or Renaissance™ heads for all concert Bass Drums. These heads are a synthetic imitation of calfskin. They have a warm, rich sound with very little "ring" yet are very durable and not effected by climate. When tuning a Concert Bass Drum, tune the playing side a minor 3rd higher than the resonating side. This will produce a greater number of overtones and avoid a sense of pitch in the drum. Tune the playing head tight enough that it produces a rich, low tone--one that is felt more than heard--which does not have a clear pitch. Do not place any muffling in the drum or on the heads. Carefully check that the same pitch is found at each tuning rod. If you have questions, just contact me.
© 2004, David L. Collier

FUNDAMENTALS of CYMBALS David L. Collier Director of Percussion Studies Illinois State University
In every band or orchestra, cymbals play a crucial role. They provide impact and color to all types of music. Good quality performance on both Suspended Cymbals and Crash Cymbals takes practice, inquisitiveness and sensitivity to master. Let’s start with the fundamentals that are crucial to our goal. NAMES English Suspended Cymbals German das Becken (hängend) French la cymbale (suspendue) Italian il piatto (sospeso) English Crash Cymbals (pair) German die Becken (paarweise) French les cymbales (à 2) Italian i piatti (a due); i cinelli BACKGROUND
Cymbals originated in Asia as small instruments almost like metal bowls with handles that were struck together. These were brought to Spain, southern Italy and the Mediterranean region by the Saracens in the Middle Ages. During the 17th century, large cymbals of cast or hammered alloys were used in Turkish Janissary music along with the bass drum. Cymbals were quickly adapted into opera and orchestral music as seen in such examples as Haydn’s Military Symphony, Mozart’s Abduction from the Seraglio and the 4th movement of Beethoven’s Ninth Symphony. SUSPENDED CYMBALS How to Mount
• mount the suspended cymbal on a high-quality stand that has a metal washer, felt washer and protective rubber/plastic sleeve
• use a cymbal strap and hang the cymbal from a gooseneck stand • be sure to position the cymbal flat and slightly above waist height
Choice of Instrument • if possible, have a minimum of 3 choices for your ensemble such as a 14”, 16” and 18” • there is no 1 ideal suspended cymbal • use personal drumset cymbals to increase selection possibilities • listen, experiment, strive for the perfect “color” and quality of sound
Choice of Implement
• best basic mallet is a medium cord mallet or a specialized suspended cymbal mallet • for other color choices explore these: stick, brush, metal scraper, coin, etc.

Proper Technique
• use a standard wrist stroke with a glancing blow to the cymbal • strike the cymbal near the edge for most notes; use shoulder and bell when specified
• for rolls, place mallets at 3 and 9 o’clock and use a slow, single stroke roll
• to dampen or stop the sound, use a) grab with free hand after striking in notated rest b) “feather out” the sound by slowly grasping cymbal with fingers c) for “secco” or very short sounds, rapidly grab cymbal immediately after striking
CRASH CYMBALS Choice of Instrument
• ideally one should have a minimum of 2 or 3 pair of varying sizes and weights • recommendations: 18” Viennese, 18” Germanics, 20” Germanics

Positioning and Setup
• establish a cymbal station that is not shared with other instruments • use cymbal cradle, padded table, etc to rest cymbals. • have all choices within easy reach • create “direct line of sight” with instrument, music and conductor • have trap stand/table for mallets/sticks close at hand
Proper Technique
• grasp cymbal straps without placing hands in loops • stand in relaxed posture in ready position with cymbals about 3/4 to 1” apart • hold cymbals in front of body at about 45˚ angle
• drop and thrust top cymbal into lower cymbal. • be sure that cymbals make contact off-center and not simultaneously • use gravity • vary type of contact for different colors • follow-thru and dampen when indicated
PRACTICE ETUDES With these cymbal techniques you can use any of the rhythmic exercises in your beginning snare method or rhythm studies book and start playing. Be sure to practice with various types of dynamics, tempo, types of contact, mallet choices and color choices. Remember: accuracy, consistency and quality of sound are always important!. Also, vary your muffling choices by deciding to stop the sound on all rests or not to stop the sound. With both suspended and crash cymbals, experiment with creating different colors. EXPERIMENT! Here are some simple exercises to begin with. Good luck and have a great time with the variety of sounds possible with cymbals!
© 2004, David L. Collier

FUNDAMENTALS of ACCESSORY PERCUSSION Triangle and Tambourine David L. Collier Two of the most common percussion accessory instruments used in band, orchestra, and percussion ensemble are the triangle and tambourine. Though the each instrument is not difficult to play, it takes practice, inquisitiveness and sensitivity to master. Let’s start with the fundamentals which are crucial to our goal. Holding the Triangle
• suspend the triangle from an insulated clip which has a loop of light-weight material • rest the tip of the clip on top of your middle finger and the back of the clip on your
thumb
Producing a Quality Sound • gently drop a triangle beater or steel rod into the triangle • strike the triangle on the side opposite the opening or on the bottom side • lift the beater away from the triangle in a smooth motion • striking the instrument in different locations and at different angles will produce a variety
of sounds Rolls on Triangle
• move the beater rapidly and steadily back and forth in the top or side corner • mount the triangle to a stand with a clip and use 2 identical beaters to play single-stroke
rolls Holding the Tambourine
• hold at the portion of the frame where there are no jingles • hold at a 45˚ angle with the head up to reduce the extra jingle noise
Producing a Quality Sound • for pp to mp sounds, play with the fingers on the rim of the tambourine • for mf to ff sounds, play with the bunched fingers or fist in the center of the head
For Playing Fast Passages
• For pp and mf dynamics, turn the tambourine upside down, rest it on your raised thigh and play with the fingers of both hands on the rim.
• For passages louder than mf, use the fist-knee technique. With the tambourine held in my left hand and the head facing downward, move the instrument between the fist of the right hand and the raised knee.
Rolls on Tambourine
• The shake roll, used in loud passages, is produced by rotating the tambourine with an elevated wrist.
• For very soft rolls a thumb roll, produced by gently pushing the thumb around the rim of the tambourine with just enough pressure that it “skips” along the head, is best.

As you can see, these fundamentals will involve some practice time but with diligence they can be mastered and will greatly improve your ensemble playing. Check out the exercises and etudes as a beginning for you triangle and tambourine studies. Remember: accuracy, consistency and quality of sound are always important! Good luck and have a great time with the variety of sounds possible with accessory percussion!
© 2004, David L. Collier

FUNDAMENTALS of TRIANGLE David L. Collier Director of Percussion Studies Illinois State University
One of the most common percussion accessory instruments used in band, orchestra, and percussion ensemble is the triangle. Dating back hundreds of years, today’s triangles are triangular-shaped rods of tempered steel capable of producing a large variety of sounds. Though the triangle is not difficult to play, it takes practice, inquisitiveness and sensitivity to master. Let’s start with the fundamentals which are crucial to our goal of Triangle Mastery.
First, we need to find a way to suspend the triangle so that it vibrates freely. This is done with an insulated clip which has a loop of lightweight material from which the triangle is hung. These clips may be purchased through your local music store or they may be constructed at home. If you make your own always use a strong, thin, lightweight material such as fishing line, thin nylon string, or fine speaker wire. Heavy materials like shoestrings will deaden the sound of the instrument.
The triangle is placed through the loop and the clip is held in the hand. Form a “C” shape with your hand and place the clip so that the tip of the clip rests on top of your middle finger and the back of the clip rests on your thumb. This allows you to hold the triangle up and you can control the length of the sound by touching the triangle with your 3rd and 4th fingers. Using a clip and holding the triangle at eye -level makes it easier to see your music, to see your director, and for the sound to get to the audience.
To get a quality sound from the triangle, it should be struck with a triangle beater or steel rod. The triangle is struck on the side opposite the opening or on the bottom side. A quality sound is easily produced by gently dropping the beater into the triangle and then lifting it away. By striking the instrument in different locations and at different angles, a variety of sounds can be produced. If the triangle is struck at an angle, a shimmering sound results; if struck with a perpendicular stroke, a bell-like tone occurs. Once you are able to produce these different sounds, you have to practice so that you can accurately play the particular sound you want at least 10 times in a row.
Different size beaters will also change the sound of the triangle. It is best to have a least 3 pairs of different size beaters. Again these can be bought or made you.
At times you may not be able to hold the triangle up and it will need to be clipped to a music stand. In this situation, be sure the music stand is high enough that you can see the conductor at all times. The techniques for playing are the same, however, it is now possible to use 2 identical triangle beaters to play more complicated rhythmic patterns. When playing with 2 triangle beaters, it is best to play on the bottom bar of the instrument or on opposite sides. If you find that the triangle “spins” when doing this, a second clip may be used so that the triangle will not move. This choice is a last option because it does reduce the sound of the instrument.

To play rolls on the triangle, the beater is moved rapidly and steadily back and forth in
the top or side corner. If the triangle is mounted to a stand with a clip, then you may use 2 identical beaters to play even single-stroke rolls on the instrument.
See, triangle technique is not that hard, but it does require some time and attention to details to be a master of these techniques. Check out the exercises and etudes as a beginning for you triangle studies. Remember: accuracy, consistency and quality of sound are always important!
The accompanying exercises and etudes were designed to be used on both triangle and tambourine. With each one, strive to achieve the same sound with each strike regardless of dynamics or tempo. Though speed is important, correct technique, quality of sound, accuracy and consistency must come first! Good luck and have a great time with the variety of sounds possible with accessory percussion!
© 2004, David L. Collier

FUNDAMENTALS of TAMBOURINE David L. Collier Director of Percussion Studies Illinois State University
Another of the common accessory instruments is tambourine. This round frame drum
with metal discs for jingles also has a long history but today it is found in two versions-- one with a head and one without a head. In most of the music we play in concert band and orchestra, a headed tambourine is used so let’s focus our attention on techniques for these instruments.
The tambourine is held in either hand at the portion of the frame where there are no jingles. Do not place a finger or thumb through the hole in the frame. This is used for mounting the tambourine on a cymbal stand. Though the tambourine may be held with the head up or down, I prefer to hold it at a 45˚ angle in my left hand with the head up. The 45˚ angle is important in producing a clear, articulate sound without the extra jingle noise that happens when the tambourine is held either horizontally or vertically.
As with triangle, a variety of quality sounds are possible from the tambourine by adjusting our technique. In all of the following techniques, my hand is the “mallet or stick” that I use to strike the tambourine. However, these techniques are limited to how fast I can play with one hand. The best way to develop and practice the fundamentals of tambourine is to approach the technique dynamically. For pp to mp I use just a few fingers and play lightly on the rim or halfway from the rim of the tambourine. For mf I use my bunched fingers in the center of the head. For f I use the knuckles of my hand and for ff I use my fist. By varying where I strike the instrument and what part of my hand I use, I can control both the dynamic and the quality of the sound.
If the part requires me to play fast rhythms that I cannot play with one hand (such as sixteenth notes), then I need two different techniques. For dynamics between pp and mf , I turn the tambourine upside down, rest it on my raised thigh and play with the fingers of both hands on the rim. I use my forearms to balance the tambourine on my thigh. For rapid passages that are louder than mf, I use the fist-knee technique. With the tambourine held in my left hand, the head facing downward, I move the instrument between the fist of my right hand and my raised knee. This technique, when mastered, will allow you to play passages which are both fast and loud. By using these techniques I am able to produce a very pure, high-quality tambourine sound. This is very important!! Even in fast passages, I won’t use snare drum sticks or mallets on the tambourine unless the composer specifically indicates in the part that I should.
The last components of tambourine fundamentals are rolls. Depending on the music, the percussionist must choose to use either a shake roll or a thumb roll. The shake roll is used in loud passages and is produced by rotating the tambourine with an elevated wrist. Stay relaxed and move with a steady motion. In most music, the roll will start with a tap and end with a tap.
For very soft, light and/or short rolls, a thumb roll is best. This technique is accomplished by gently pushing the thumb around the rim of the tambourine with just enough pressure that it “skips” along the head similar to a stone skipping on water. This technique takes

time and patience to master but it is great a great one to have in your “pallet of sounds.”
As you can see, tambourine fundamentals are a bit more involved than triangle but with some practice time and diligence they can be mastered and will greatly improve your ensemble playing. And they are a lot of fun. Again check out the exercises and etudes.
The accompanying exercises and etudes are designed to be used on both triangle and tambourine. With each one, strive to achieve the same sound with each strike regardless of dynamics or tempo. Though speed is important, correct technique, quality of sound, accuracy and consistency must come first! Good luck and have a great time with the variety of sounds possible with accessory percussion!
© 2004, David L. Collier

÷
÷
÷
?
c
c
c
c
.
.
.
.
.
.
.
.
Snare Drum
Triangle
Tambourine
Cymbals
Bass Drum
œ œ œ œ œ
œ Œ œ Œ
œ œ œ œ
Œ
œ
Œ
œ
˙ ˙
œ œ œ œ œ
œ Œ œ Œ
Œ œ œ œ
Œ
œ
Œ
œ
˙ ˙
œ œ œ œ œ
œ Œ œ Œ
œ Œ œ œ
Œ
œ
Œ
œ
˙ ˙
œ œ œ œ œ Œ
œ œ œ Œ
Œ œ œ Œ
œ œ œ
Œ
œ œ œŒ
÷
÷
÷
?
SD
Tri
Tamb
Cym
BD
5œ œ œ œ ‰ œ œ œ
5œ œ œ œ œ œ
5œ œ Œ œ œ Œ
5 Ó
˙
œ œ œ œ
œ œ ‰
J
œ œ œ œ
œ œ œ œ œ œ
œ œ œ œ œ œ
Ó
˙
œ œ œ œ
œ ‰
J
œ Œ œ œ
‰
J
œ œ œ œ Œ
œ œ ‰
J
œ œ œ œ
∑
œ‰J
œ œ‰J
œ
Œ œ œ œ œ œ
œ œ ‰
J
œ œ Œ
Œ œ œ Œ
˙
Ó
˙Ó
Accessory Ensemble # 1
David L. Collier
© 2005, David L. Collier

÷
÷
÷
?
SD
Tri
Tamb
Cym
BD
9œ œ Œ œ œ Œ
9œ œ œ œ
9‰ œ œ œ œ œ œ
9œ
Œ
œ
Œ
œ œ œ œ œ œ
œ œ œ œ œ œ
‰ œ ‰ œ ‰ œ ‰ œ
œ œ œ ‰ œ œ œ
œ œ œ
Œ
œ œ œŒ
œ œ ‰
J
œ œ œ œ
Œ œ œ œ Œ
‰ œ ‰ œ ‰ œ ‰ œ
Œ
œ
‰ j
œ œ
œ œ œ‰J
œ œ
‰ œ œ œ œ œ œ
œ œ œ œ œ œ œ
œ œ œ œ œ
Œ
œ œ œ
.
œ œ œ œ œ œ
.
÷
÷
÷
?
.
.
.
.
.
.
.
.
SD
Tri
Tamb
Cym
BD
13œ œ œ œ
13œ œ Œ œ œ Œ
13œ œ œ œ œ
13œ
Œ
œ
Œ
œ œ œ œ œ œ
‰ œ ‰ œ ‰ œ ‰ œ
œ œ œ œ œ œ
œ œ œ œ œ
œ œ œ
Œ
œ œ œŒ
Œ œ œ œ Œ
œ œ ‰
J
œ œ œ œ
œ œ œ œ œ
Œ
œ
‰ j
œ œ
œ œ œ‰J
œ œ
œ œ œ œ œ Œ
Œ œ œ Œ
œ œ œ œ œ Œ
œ œ œ
Œ
œ œ œŒ
Accessory Ensemble # 1

ã 44 .
.˙ ˙ ˙ ˙ Œ œ Œ œ Œ œ Œ œ
ã..
.
.
5
œ œ œ œ œ œ œ œ œ œ œ œ œ œ œ œ œ œ œ œ œ œ œ œ
ã..
.
.
9
œ œ œ œ œ œ œ œ œ œ œ œ œ œ œ œ œ œ œ œ œ œ œ œ
ã..
.
.
13
J
œ œ
J
œ
J
œ œ
J
œ
J
œ œ
J
œ
J
œ œ
J
œ ‰ œ œ œ ‰ œ œ œ ‰ œ œ œ ‰ œ œ œ
ã..
.
.
17
œ ‰J
œ œ ‰J
œ œ ‰J
œ œ ‰J
œ ‰ œ ‰ œ ‰ œ ‰ œ ‰ œ ‰ œ ‰ œ ‰ œ
ã..
.
...
.
.
21
œ œ œ œ œ œ œ œ œ œ œ œ œ œ œ œ œ œ œ œ œ œ œ œ œ œœ œœœ œœ œ œœ œœœ œœ œ œ œ œ œ œ œ œ œ œ
ã..
.
...
.
.
25
œ œ œ œ œ œ œ œ œ œ œ œ œ œ œ œ œ œ œ œ œ œ œ œ œ œ œ œ œ œ œ œ œ œ œ œ œ œ œ œ
ã..
.
...
.
.
29
œ œ œ œ œ œ œ œ œ œ œ œ œ œ œ œ œ œ œ œ œ œ ‰ œ œ œ œ ‰ œ œ œ œ ‰ œ œ ‰ œ œ œ œ
Accessory TechniquesDavid Collier
© 2008, David L. Collier
A B
C D
E F
16th Note Studies
Half, Quarter and Eighth Note Studies

ã..
.
...
33
‰ œ œ œ œ ‰ œ œ œ œ ‰ œ œ ‰ œ œ œ œ œ œ ≈ œ œ œ œ ≈ œ œ œ œ ≈ œ œ ≈ œ œ œ œ œ œ
ã..
.
...
.
.
37
≈ œ œ œ œ œ ≈ œ œ œ œ œ ≈ œ œ œ ≈ œ œ œ œ œ œ œ ≈ œ œ ≈ œ œ ≈ œ œ ≈ œ œ ≈ œ œ ≈ ≈ œ œ ≈ œ œ œ œ
ã..
.
...
.
.
41
.œ œ œ œ .œ œ œ œ .œ œ .œ œ œ œ œ œ ‰ .
R
œ œ œ ‰ .
R
œ œ œ ‰ .
R
œ ‰ .
R
œ œ œ œ œ
2 Accessory Techniques
G H
I J
K L

&c
œ œœœœœœœœœœœœ œ
œ œ
LR L
R
œ œœœœœœœœœœœ œ œ œœœœœœœœœœœœ œ
œ œ œ œœœœœœœœœœœ œ
&
5
œ œœ œ
œ œ œ œ œ œœ œ
œ œœ œ
RL
LR
œ œ œ œ œ œœ œ
œ œ œ œ œ œ œ œ œ
Œ Ó
&
8
œ œ œœ œ œ
œ œ œœ œ œ
3 3 3 3
RL
LR
œ œ œœ œ œ
œ œ œœ œ œ
3 3 3
3
œ œ œ œ œ œ œ œ œ œ œ œ
3 3 3
3
œ œ œ œ œ œ œ œ œ œ œ œ
3 3 3 3
œ
Œ Ó
&
13
œ œœœ œœœœœ
œœœœœœœ
RL
LR
œœœœœœœœœ
œœœœœœœ
œ œ œœ œœœ
œœœœœœœœ
œ
RL
LR
RL
LR
œœœœœœœ
œœœœœœœ œ
&
17
œ œœ œ œœ
œœœœœœœœ
œœ
RL
LR
RL
LR
œœœœœœ
œœœœœœœœ
œœ
LR
œ œ œ œœœœœ
œœœœœœœœ
LR
RL
LR
RL
œœœœœœœœ
œœœœ œ
&
21
œ œ œ œœœœœ
œœœœœœœœ
RL
LR
RL
LR
œœœœœœœœ
œœœœœœœœ
œ œœœ œœ
œœœœœœœœ
œœ
RL
LR
RL
LR
œœœœœœ
œœœœœœœœ
œœ œ
Œ Ó
&
26
œ œœ œœœœœ
œœœœœœœœ
RL
LR
RL
LR
œœœœœœœœ
œœœœœœœœ
œœœœœœœœ
œœœœœœœ œ
œœœœœœœ œ
œœœœœ œ
œ œ
RL
LR
RL
LR
&
30 œ œ œ œ œœœœ
œ œœœœœœœ
LR
RL
LR
RL
œœœœœœœœ
œœœœœœœœ
œœœœœœœœ
œœœœœœœœ
œœœœœœœœ
œœœœœœœœ œ
Œ Ó
Keyboard Percussion TechniqueScale Forms David Collier
©2006, David L. Collier
2 Octave Scales
Form I
Form II
Form III
Form IV
Form V
Form VI

& 43 .
. c
œœ
œœ
œœ
LR
RL
LR
RL
LR
RL
Major
œœ
œœ
œœ
LR
RL
LR
RL
LR
RL
œœ
œœ
œœ
LR
œœ
œœ
œœ
œ
Œ Œ
&c .
. bb
b 43
6
œœ
œœ
œœ
œœ
LR
RL
LR
RL
LR
RL
LR
RL
œœ
œœ
œœ
œœ
LR
RL
LR
RL
LR
RL
LR
RL
œœ
œœ
œœ
œœ
RL
LR
RL
LR
RL
LR
RL
LR
œœ
œœ
œœ
œœ
RL
LR
RL
LR
RL
LR
RL
LR
œ
Œ Ó
RL
&b
bb 4
3 .. c
11
œœ
œœ
œœ
Minor
*continue to use both sticking variations throughout
œœ
œœ
œœ
œœ
œœ
œœ
œœ
œœ
œœ
œ
Œ Œ
&b
bb c .
. nn
n
16
œœ
œœ
œœ
œœ
œœ
œœ
œœ
œœ œ
œœ
œœ
œœ
œ
œœ
œœ
œœ
œœ œ
Œ Ó
&..
21
œœ
œœb œ œ
œœ
Dominant 7th
œœ
œœb œ œ
œœ
œœ
œœb œ
œœ
œb œ œbœ
œœ œb
œœ
œ
Œ Ó
&..
26
œœ
œœb
œœ
œ œœ
œb œœ
œ œœ
œœ
œœ
œb œœ
œœ
œœ
œ œbœ
œ œœ
œ œbœ
œœ
œœ
œ œ
Œ Ó
&..
32
œœ
œœ œ œ
œœ
Major 7th
œœ
œœ œ œ
œœ
œœ
œœ œ
œœ
œ œœ
œœ œ
œœ
œ œ
Œ Ó
&.. b
bb
37
œœ
œœ
œœ
œ œœ
œ œœ
œ œœ
œœ
œœ
œ œœ
œœ
œœ
œ œœ
œ œœ
œ œœ
œœ
œœ
œ œ
Œ Ó
Arpeggios & Broken ChordsDavid Collier
©2008, David L. Collier

&b
bb
.
.
43
œœ
œœ œ œ
œœ
Minor m7th
œœ
œœ œ œ
œœ
œœ
œœ œ
œœ
œ œœ
œœ œ
œœ
œ œ
Œ Ó
&b
bb
.
.
48
œœ
œœ
œœ
œ œœ
œ œœ
œ œœ
œœ
œœ
œ œœ
œœ
œœ
œ œœ
œ œœ
œ œœ
œœ
œœ
œ œ
Œ Ó
2 Arpeggios & Broken Chords
Practice these exercises in all twelve keys at various tempi and dynamics. Utilize the entire range of the instrument. Play on all keyboard instruments.

&?44
44Marimba
œœœœœœœœœœœœœœœœ3 3 3 3 3 3 3 3 3 3 3 3 3 3 3 3
∑
∑œœœœœœœœœœœœœœœœ2 22 2 2222 222 2 22 22
œœœœœœœœœœœœœœœœ444 444 444 44 444 44
∑
∑
œœœœœœœœœœœœœœœœ1 1111 111 11 11 11 11
&?
5 œœœœœœœœœœœœœœœœ4 4 4 4 4 4 4 4 4 4 4 4 4 4 4 4
∑œœœœœœœœœœœœœœœœ3 3 3 3 3 3 3 3 3 3 3 3 3 3 3 3
∑
∑œœœœœœœœœœœœœœœœ2 2 2 2 2 2 2 2 2 2 2 2 2 2 2 2
∑
œœœœœœœœœœœœœœœœ1 1 1 1 1 1 1 1 1 1 1 1 1 1 1 1
&?
9 Œ œ œ œ œ Œ œ œ œ œ3 3 4 4 3 3 4 4
œ œ œ œ Œ œ œ œ œ Œ1 1 2 2 1 1 2 2
œ œ œ œ Œ œ œ œ œ Œ4 4 3 3 4 4 3 3
Œ œ œ œ œ Œ œ œ œ œ2 2 1 1 2 2 1 1
&?
11 ‰ œ œ ‰ œ œ ‰ œ œ ‰ œ œ3 3 4 4 3 3 4 4
œ œ ‰ œ œ ‰ œ œ ‰ œ œ ‰1 1 2 2 1 1 2 2
œ œ ‰ œ œ ‰ œ œ ‰ œ œ ‰4 4 3 3 4 4 3 3
‰ œ œ ‰ œ œ ‰ œ œ ‰ œ œ2 2 1 1 2 2 1 1
Keyboard Percussion Technique4-mallet permutations David Collier
© 2006, David L. Collier

&?
13
œ œ œœœ œ œ
œ1 2 3 4 1 2 3 4
∑
œ œ œ œœ œ œ œ
4 3 2 1 4 3 2 1
∑œ œ œ
œœ œ œ
œ1 3 2 4 1 3 2 4
∑
œ œ œ œœ œ œ œ
4 2 3 1 4 2 3 1
∑
&?
17
œ œœ œ œ œ
œ œ1 2 4 3 1 2 4 3
∑
œ œ œ œœ œ œ œ
4 3 1 2 4 3 1 2
∑
œ œ œœ œ œ œ
œ2 1 3 4 2 1 3 4
∑
œ œ œ œ œœ œ œ
3 4 2 1 3 4 2 1
∑
&?
21 œœ œ œ
œœ œ œ
4 1 2 3 4 1 2 3
∑œœ œ œ œ
œ œ œ1 4 2 3 1 4 2 3
∑œœ œ œ œ
œ œ œ1 4 3 2 1 4 3 2
∑
œœ œ œ
œœ œ œ
4 1 3 2 4 1 3 2
∑
&?
25 œ œ œ œ œœœ œ
3 4 1 2 3 4 1 2
∑
œ œœ œ œ œ
œ œ2 1 4 3 2 1 4 3
∑
œ œ œœ œ œ œ
œ3 2 1 4 3 2 1 4
∑
œ œ œ œ œ œœœ
2 3 4 1 2 3 4 1
∑
2 Keyboard Percussion Technique
1 2 3 4
5 6 7 8
9 10 11 12
13 14 15 16

&
?
44
4
4
.
.
.
.
.
.
.
.
Marimba
œ
œ
œ
œ
œ
œ
œ
œ
4/3 4/3
∑
œ
œ
œ
œ
œ
œ
œ
œ
∑
∑
œœ
œœ
œœ
œœ
2/1 2/1
∑
œœ
œœ
œœ
œœ
&
?
.
.
.
.
.
.
.
.
5
œ
œ
œ
œ
œ
œ
œ
œ
4/3
œ
œ
œ
œ
œ
œ
œ
œ
2/1
œ
œ
œ
œ
œ
œ
œ
œ
œ
œ
œ
œ
œ
œ
œ
œ
œ
œ
œ
œ
œ
œ
œ
œ
œœ
œœ
œœ
œœ
œ
œ
œ
œ
œ
œ
œ
œ
œœ
œœ
œœ
œœ
&
?
9
œœ
œœ
œœ
œœ
œœ
œœ
œœ
œœ
œœ
œœ
œœ
œœ
œœ
œœ
œœ
œœ
œœ
œœ
œœ
œœ
œœ
œœ
œœ
œœ
œœ
œœ
œœ
œœ
œœ
œœ
œœ
œœ
&
?
.
.
.
.
.
.
.
.
13
œ
œœœ
œ
œœœ
4/3 4/3 4/3 4/3
∑
œ
œœœ
œ
œœœ
∑
∑
œ
œœœ
œ
œœœ
2/1 2/1 2/1 2/1
∑
œ
œœœ
œ
œœœ
Keyboard Percussion TechniqueDouble Vertical Strokes
David Collier
© 2008, David L. Collier
Be sure to use a Piston Stroke. Practice slowly and accurately focusing on tone quality.
Use Piston Stroke. Pratice at different dynamics and tempos.
Continue this exercise using natural notes up and down from C to C. Also, pracitce moving up and down chromatically.

&
?
.
.
.
.
.
.
.
.
17
œ
œœœ
œ
œœœ
œœ
œœ
œœ
œœ
œ
œœœ
œ
œœœ
œœ
œœ
œœ
œœ
œ
œ
œ
œ
œ
œ
œ
œ
œœ
œœ
œœ
œœ
œ
œ
œ
œ
œ
œ
œ
œ
œœ
œœ
œœ
œœ
&
?
21
œ
œ
b œ
œ
œ
œ
œ
œ
œ
œ
b
b
œ
œ
œ
œ
œ
œ
œ
œ
b œ
œ
œ
œ
œ
œ
œ
œ
b
b
œ
œ
œ
œ
œ
œ
œ
œ#
œ
œ
œ
œ
œ
œ
œ
œ
œ
œ
œ
œ
œ
œ
œ
œ#
œ
œ
œ
œ
œ
œ
œ
œ
œ
œ
œ
œ
œ
œ
&
?
8
12
8
12
25œ
œ
b œ
œ
œ
œ
œ
œ
œ
œ
b
b
œ
œ
œ
œ
œ
œ
œ
œ
b œ
œ
œ
œ
œ
œ
œ
œ
b
b
œ
œ
œ
œ
œ
œ
œ
œ#
œ
œ
œ
œ
œ
œ
œ
œ
œ
œ
œ
œ
œ
œ
œ
œ#
œ
œ
œ
œ
œ
œ
œ
œ
œ
œ
œ
œ
œ
œ
&
?
812
8
12
.
.
.
.
.
.
.
.
29
‰
œ
œ‰
œ
œ‰
œ
œ‰
œ
œ
3 4 3 4 3 4 3 4
J
œ
œ ‰ ‰
J
œ
œ ‰ ‰
J
œ
œ ‰ ‰
J
œ
œ ‰ ‰
2/1 2/1 2/1 2/1
‰
œ
œ‰
œ
œ‰
œ
œ‰ j
œ
‰
J
œ
œ ‰ ‰
J
œ
œ ‰ ‰
J
œ
œ ‰ ‰
J
œ
œ ‰ ‰
&
?
.
.
.
.
.
.
.
.
31
Œj
œœ
Œj
œœ
Œj
œœ
Œj
œœ
4/3 4/3 4/3 4/3
œœ
‰ œœ
‰ œœ
‰ œœ
‰
1 2 1 2 1 2 1 2
Œj
œœ
Œj
œœ
Œj
œœ
Œj
œœ
œœ‰ œ
œ‰ œ
œ‰ œ
œ‰
2 Keyboard Percussion TechniqueDouble Vertical Strokes
Continue exercise up chromatically and then back down.

ã 44 .
.Tom Tomsœ œ œ
œ
R L R Lœ œ œ
œ
R L R Lœ œ œ
œ
R L R Lœ œ œ
œ
R L R L
ã..
.
.
5
œ œ œœ
L R L R
œ œ œ
œ
L R L R
œ œ œœ
L R L R
œ œ œ
œ
L R L R
ã..
.
.
9
œ œœ
œ
R L R L
œ œœ
œ
R L R L
œ œœ
œ
L R L R
œ œœ
œ
L R L R
ã..
13œœ œ
œ
œœ œ
œ
R L R L R L R Lœœ œ
œ
œœ œ
œ
L
œœ œ
œ
œœ œ
œ
L R L R L R L R
œœ œ
œ
œœ œ
œ
R
ã..
17œœœ œ
œœœ œ
R L R L R L R Lœœœ œ
œœœ œ
L
œœœ œ
œœœ œ
L R L R L R L R
œœœ œ
œœœ œ
ã..
21
œ œœœ
œ œœœ
L R L R L R L R
œ œœœ
œ œœœ
Rœ œ
œœ
œ œœœ
R L R L R L R Lœ œ
œœ
œ œœœ
L
ã..
.
.
25
œœœ
œœœ
œœ
L R R L R R L R
œœœ
œœœ
œœ
L R R L R R L Rœœœ
œœœ
œœ
R L L R L L R Lœœœ
œœœ
œœ
R L L R L L R L
Multiple Percussion TechniqueDavid Collier
© 2008, David L. Collier
Moving 8th notes

ã
29
œ œ œ œ œœ
œ œ
œ
œ œœ
R L R R L R R L R R L R
œ œ œ œ œœ
œ œ
œ
œ œœ
R
ã
31œ œ œ œ œ
œœ œ
œ
œ œœ
L R L L R L L R L L R Lœ œ œ œ œ
œœ œ
œ
œ œœ
L
ã
33
œœœ œ œ
œœ œ œ
œœ œ œ
œœ
L R L R R L R L L R L R R L R
œœœ œ œ
œœ œ œ
œœ œ œ
œœ
ã..
.
.
35y y y y y y y y
R R R R R R R R
Œ
œ
Œ
œ
L L
y y y y y y y y
Œ
œ
Œ
œ
L L
y y y y y y y y
‰
J
œœ
‰J
œœ
L L L L
y y y y y y y y
‰ J
œœ
‰J
œœ
L L L L
ã..
.
.
39
y y y y y y y y
L L L L L L L L
Œ
œ œ
Œ
œ œ
R R R R
y y y y y y y yŒ
œ œ
Œ
œœ
R R R R
y y y y y y y y‰
j
œœ
‰
j
œœ
R R R R
y y y y y y y y‰
œœœ
‰
œœœ
R R R R R R
2 Multiple Percussion Technique
Moving 16th notes
Hand Independence
Use these exercises with any group of instruments such as 3 toms,; 2 toms and 1 SD; 3 temple blocks; 3 cowbells. Be creative. For the Hand Independence, the repeated notes can be played on the rim of a drum, a hi hat, a cymbal, a cowbell, or a wood block. Again, use those instruments you have.
Be sure to use a variety of dynamics and tempos.

The 30-minute warm-up John Kilkenny George Mason University The Sewanee Summer Music Festival The following is a 30-minute warm-up that I use with all my students. It will get you through the following topics:
1. General warm-up, single strokes, down strokes and up strokes 2. Soft playing 3. Rolls
This is NOT meant to be a comprehensive exercise routine. In fact, that is not the point at all. The idea is to give you a guideline and offer the busy HS or college student a way to get through the standard warm-up routine, get your hands moving, or help you get back in shape after an extended break from snare drum playing. You should follow up this routine with regular practice of etudes, solo pieces and excerpts. However, if you need a place to start, or re-start, look no further! General Warm-up (10 minutes)
1. Start with single strokes, 8 bars of quarter notes in each hand. Metronome starts at 100, topping out at 180. FULL STROKES ONLY. All Right hand, all Left hand, then alternating. (5 minutes)
2. Then – crescendo/diminuendo in each hand, and alternating- starting at the same, slower tempo, and moving to 180 (5 minutes)
Soft playing (10 minutes) 1. Soft playing is all about developing endurance, avoiding tension, and being
relaxed. You have to “live” in the soft world for a while, in order for it to be comfortable. So….
2. Select your favorite beginning snare drum etudes, from Podemski, Whaley, Goldenberg, etc. Play them softly, very softly, for several minutes. Pick a comfortable tempo and STAY AT THAT TEMPO.
a. Focus on your breathing, grip, playing position and posture. b. Listen to the SOUND coming from our drum or pad – is it even, are your
hands matched? Rolls (10 minutes) You could easily spend 2-3 hours a day working on your roll, balancing hands, matching buzz length, dynamic control – so many aspects of your snare drum playing revolve around the ability to sustain.
1. Double strokes – 8 in each hand, focused on the SECOND note of the double – think about lifting out of the rebound (3 minutes)
2. Buzzes – 8 in each hand, thinking about balance from hand to hand, at various dynamics (3 minutes)
3. Hands together, at the same time, and alternating, at various dynamics (4 minutes) a. Again – focus on balance, evenness, sound, and relaxation.
Make sure you set aside time each day for snare drum, and change up the types of etudes
and solos you play – rudimental, extended techniques, concert etc…


Tambourine techniques John Kilkenny George Mason University The Sewanee Summer Music Festival List of techniques dynamics Single notes and rhythms First finger, unbraced with thumb ppp-‐p Middle finger, unbraced ppp-‐p
Middle finger, braced with thumbs p-‐mp First two fingers, braced with thumb mp/meno F Three fingers, braced with thumb mf-‐f Four fingers, braced with thumb mf-‐ff Flat fisted fingers f-‐ff
Fast Rhythms For loud, fast rhythms, I try to play as much as I can “up” and not play off my knee or turn the tambourine over. If the tempo is really moving, I will play “knee/fist”. Make sure you match your playing spots, from the shell to the knee For softer rhythms, you have some options
1. Off the knee a. Place the head of the tambourine on you knee, so that the head is
directly on you knee. b. Place your hands on the top of the head, and place with your index
fingers. Make sure you are plying directly on top of the jingles 2. On a table
a. Fold a bath towel or thick cloth lengthwise into a strip approximately 2 inches wider then the tambourines diameter and roll up from one end into a dense, tight wrap. You need to use a large enough towel to leave at least 12 inches left after you complete the roll, which should be at least 3-‐4 inches high. Place the tambourine with one edge resting on the roll and the other edge on the flat cloth on the table; leave the tambourine at an angle to dry up the rhythms. You can then rest the tambourine on the towel and play all of your soft, fast rhythms on this.
b. Rather then a table, use this same set up, but on a snare drum, which will allow you to adjust the height.
Practice rhythm patterns and dynamics 1. Much like cymbal playing, you can use early snare drum method books to
practice tambourine. 2. Pick a couple of etudes, learn them at “F”, and then again, “PP” so you can
practice both shake and friction rolls. 3. Dynamics control
a. Work on transitioning from knee/fist to all “up” b. Practice rhythm patterns knee/fist and “up”

Rolls 1. Thumb/friction rolls
a. Use rosin or bees was to help “catch” your finger on b. Move both your thumb/finger AND the tambourine
2. Shake rolls a. Must be able to execute with both hands, start and end roll with and
without struck note, holding the tambourine up in front or down the side.
b. Practice shake rolls slowly, with different rhythms, starting slowing. c. Move between 16th notes, 8th notes, triplets etc. All the while staying
relaxed and even. Excerpts for Tambourine Dvorak – Carnival Overture

Dvorak – Carnival Overture – second excerpt

Percussion Ensemble Repertoire, Programming for Student Development John Kilkenny George Mason University The Sewanee Summer Music Festival
What is “percussion ensemble” A percussion ensemble is a music ensemble made up entirely of percussion instruments. Typically, percussion ensemble is defined as the “chamber music expression for percussion”. While there is no fixed instrumentation for this ensemble, you may see the term “percussion orchestra” which typically refers to a larger group of percussionists performing conducted works.
When selecting rep for middle and high school ensembles, you must first answer a few critical questions:
1. Should you have a percussion ensemble at your school? a. YES – YOU SHOULD.
2. Why? a. Because it is the best way to teach your percussion students how to play b. If you have a strong ensemble program, your band section will play with
greater maturity sensitivity and ease c. You will offer your students a more diverse musical experience d. You will engage your parents and community e. You can explore a wider variety of musical offerings
3. But my kids/parents don’t want to, don’t think it will be fun, don’t like the
music, they don’t understand?.?.? a. Kids only know what we tell them – that is one reason is it fun to teach
middle and high school. If we present them with a high quality musical experience, that they can do together, for a shared goal, then they will want to be a part of it.
b. I have found that parents, in general, just want their kids to be doing something other then getting into trouble, and to be involved with their kids. You can create opportunity for parents to be involved
c. It is OUR job as musicians and educators to lead students, the parents and the community. Educate them, and offer them high quality musical experiences. Don’t follow, lead.
Ok – I want to do percussion ensemble, now what? Answer these questions:
1. What is the target audience? 2. Why am I starting an ensemble? What are the musical goals? Community
goals? Student goals? 3. Who will teach my ensemble?
a. If you are near a larger city, you will likely be able to find a professional percussionist looking for a teaching opportunity.
b. If not, there is likely a college near you that would have a grad student, or an advanced undergrad who can help you

4. Facilities and space? a. How much room do you have? b. Where will your ensemble rehearse c. What type of equipment do you have, and what will you need to get in
order to outfit a basic ensemble?
5. Where do I find the music? a. Start with Google. Google “percussion ensemble music”, or “middle
school percussion ensemble”. b. Find out what is happening in your community or in your state, there is
likely ONE person with an ensemble. Call them. c. Check out the local PAS (Percussive arts society) chapter. d. Youtube. e. The following composers are active in the percussion medium, particularly
music for early and mid level ensembles – this is NOT a representative list, just a small sampling to help start your search
i. James Campbell, Ralph Hicks, Nathan Daughtrey, John Beck, Chris Brooks, Jared Spears, Lynn Glassock, Tom Gauger, Christopher Deane, Anthony Cirone, Mark Ford, Blake Tyson.
f. Check out the following percussion websites, search for percussion ensemble music
i. Steve Weiss Music ii. C. Alan Music
iii. Row-loff productions iv. Bachovitch music v. Drop 6 productions
vi. Tap space vii. Meredith music
viii. Honeyrock ix. House Panther Press
g. Visit all the booths at the Midwest clinic and your local state conferences h. Check out the Leopard percussion series with Hal-Leonard. The
Louisville Leopards are an amazing group of young percussionists. http://www.louisvilleleopardpercussionists.com
i. Check out the Percussion Scholarship program. This is a program of the Chicago symphony and is directed by CSO percussionist Patricia Dash. http://cso.org/institute/youngmusicians/PercussionScholarship.aspx

6. What kind of music should I select? a. This is a totally subjective, based largely on the level of your students, the
reality of your time, space and equipment, and the experience of your instructor. The following questions will help you develop priorities for your ensemble
i. What do my kids need to know/play to become better players? ii. What will help them become better ensemble players? What will
help them have a better sense of shape, phrase, sound, tone etc… iii. What will they enjoy playing? iv. What will the parents what to hear? v. What will win at competition (I NEVER asked this question)…
7. Should I play Christmas music? Or a piece with buckets? Or Balloons? Or pieces where they bang on music stands? Or this great Justin Beeber tune transcribed for percussion ensemble?
a. I offer my answer this way – I love Ben and Jerry’s New York Super fudge Chunk ice cream. Once in a while, I have some. If I have too much, I get sick, after all, it is just milk, eggs, sugar, cream. But it sure is nice once in a while. Likewise, if I have nothing but really complex, hard to create, stressful-to-make dinners every day, I get tired too.
8. Where should we play? a. Holiday concerts, spring concerts, “stand alone performances”
i. I use to do a “benefit concert” every January, before festival/assessment time. Show off all of our percussion activities, feature student soloists, faculty soloists, and the ensemble. Invite other HS groups, Middle School groups. Make it a big deal, to give the kids and the parents a goal to work towards.
b. Middle school recruitment tours c. Partner with the local college ensemble for a shared program
i. I cannot think of any college ensemble that would turn down the chance to have a group of HS students at their school.
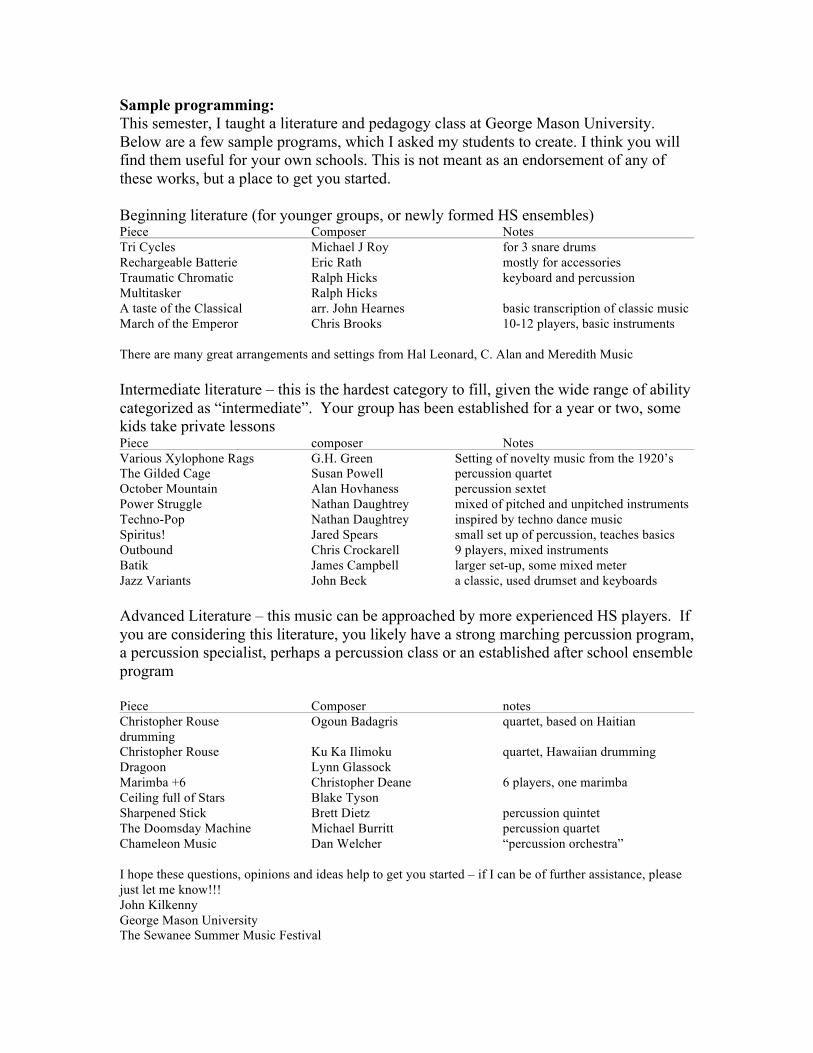
Sample programming: This semester, I taught a literature and pedagogy class at George Mason University. Below are a few sample programs, which I asked my students to create. I think you will find them useful for your own schools. This is not meant as an endorsement of any of these works, but a place to get you started. Beginning literature (for younger groups, or newly formed HS ensembles) Piece Composer Notes Tri Cycles Michael J Roy for 3 snare drums Rechargeable Batterie Eric Rath mostly for accessories Traumatic Chromatic Ralph Hicks keyboard and percussion Multitasker Ralph Hicks A taste of the Classical arr. John Hearnes basic transcription of classic music March of the Emperor Chris Brooks 10-12 players, basic instruments There are many great arrangements and settings from Hal Leonard, C. Alan and Meredith Music Intermediate literature – this is the hardest category to fill, given the wide range of ability categorized as “intermediate”. Your group has been established for a year or two, some kids take private lessons Piece composer Notes Various Xylophone Rags G.H. Green Setting of novelty music from the 1920’s The Gilded Cage Susan Powell percussion quartet October Mountain Alan Hovhaness percussion sextet Power Struggle Nathan Daughtrey mixed of pitched and unpitched instruments Techno-Pop Nathan Daughtrey inspired by techno dance music Spiritus! Jared Spears small set up of percussion, teaches basics Outbound Chris Crockarell 9 players, mixed instruments Batik James Campbell larger set-up, some mixed meter Jazz Variants John Beck a classic, used drumset and keyboards Advanced Literature – this music can be approached by more experienced HS players. If you are considering this literature, you likely have a strong marching percussion program, a percussion specialist, perhaps a percussion class or an established after school ensemble program Piece Composer notes Christopher Rouse Ogoun Badagris quartet, based on Haitian drumming Christopher Rouse Ku Ka Ilimoku quartet, Hawaiian drumming Dragoon Lynn Glassock Marimba +6 Christopher Deane 6 players, one marimba Ceiling full of Stars Blake Tyson Sharpened Stick Brett Dietz percussion quintet The Doomsday Machine Michael Burritt percussion quartet Chameleon Music Dan Welcher “percussion orchestra” I hope these questions, opinions and ideas help to get you started – if I can be of further assistance, please just let me know!!! John Kilkenny George Mason University The Sewanee Summer Music Festival


Cymbal Techniques John Kilkenny George Mason University The Sewanee Summer Music Festival
Cymbal playing is great fun when done correctly, but can be a major source of stress for students who are not familiar with some basic principals. The following are tips, suggestions and exercises that should help improve your playing, and give you a basic approach to the instrument. Some are my own, some I have “borrowed” from colleagues, and some come directly from my teachers and mentors. All are designed to help you get a great cymbal sound. Happy crashing Keywords/phrases I like to have a few, short phrases or keywords that I keep in mind when I crash. I can change the keywords depending on the style of music I am playing, or the Ensemble I’m working with. Below are a few ideas to get you started.
Point of contact, dark, follow through Sound, warm, open, rotation, impact, bright, clean, on point
The sound is the thing…. A terrific crash can be the highlight of a concert -‐ and a poorly executed crash and ruins a musical moment. Crash cymbal playing can be boiled down to three fundamental items:
1. Sound is effected by distance, size and shape of the rotation 2. Sound is effected by velocity (speed) you move into, and out of the crash 3. Sound if effected by what you do at the moment of impact
So – you should be thinking, always, about sound, and fit your mechanics to make the sound that you want. YOU control the cymbals, not the other way around.
So, how do you achieve a constant, quality sound????
HAND POSITION
1. Grip the straps so that only a small amount of your hand actually touches the cup/bell of the cymbal. Use high quality leather straps
2. Cymbals should be held perpendicular, not parallel to the ground, they are not hi hats.
3. Do not place your hands through the straps, but hold them like snare drum sticks
4. Your dominant hand should be on the bottom, working AGAINST gravity. Your weak hand is on top, working WITH GRAVITY.

Rotation 1. Think about the sound you are trying to create
a. What is the character of the music? Are you playing a march, or a transcription? Do you need the sound to sustain, or have a clean attack with little resonance?
2. Locate your “point of impact” a. The closer to the bell, the bigger the “flam” the closer to the edges, the
more likely you are to have an air pocket 3. Move your bottom cymbal up to meet the top cymbal, while at the same time
dropping the top cymbal down to meet the bottom. a. You should create a circular rotation
4. FOLLOW THROUGH – this is a big mistake many young players make, once you crash the cymbals together, you need to keep moving!! Follow through on the crash so that you complete the rotation, and return to your set position.
5. Muffle logically – if the band/orchestra is holding a note, you should as well, if they are cutting off, then follow them. LISTEN, and match your sound to the sound of the band/orchestra
Tips for practice
1. Practice one cymbal at a time a. Leaving the top hand still, holding the cymbal, rotate the bottom
cymbal up – focusing on the POINT OF CONTACT. Work to make this constant. Repeat the process, this time leaving the bottom cymbal still and rotating the top cymbal down. Watch the impact point, and the follow through2
2. Practice in front of a mirror – WATCH YOUR STANCE a. This a good idea for any percussion instrument, but particularly for
cymbal playing. Use the mirror to locate and watch your point of contact, observe your follow through, rotation etc…
b. Make sure you are standing with your feet shoulder length apart, with one foot slightly in front of another
3. Use early snare drum etudes for cymbal practice a. Any beginning snare drum book (Harr, Podemski, Ted Reed,
Goldenberg etc…) can be used as an etude book for cymbals. Play through early etudes, with a metronome
4. Don’t forget soft crashes!! a. More often then not, if you play an audition, you will be asked to play
soft crashes, make sure you work on that too.

Cymbal excerpts Rach, Piano Concerto #2

Using recording technology efficiently John Kilkenny, George Mason University, the Sewanee Summer Music Festival The use of recording technology as a tool for self -‐evaluation has been around for a many years. Now, however, virtually every student carries a recording studio around on their smartphone or tablet, with programs capable of vast recording capabilities. The ease of use, coupled with the high degree of comfort that most students have with this type of technology, make recording technology an even more powerful teaching tool. The following article offers some ideas and strategies that can be used by teachers in their private lessons as well as by students in their individual practice sessions. Use these ideas as a starting point; there are many variations of these basic concepts. It is my hope that you will use these suggestions to further your own performing and teaching activities and enhances the quality of your studio teaching Audition preparation and mock auditions. In this situation, you are using the recording device to replicate an audition or jury committee. While it is vital to play mock juries/auditions for real people, I have found over the years that I am able to get as focused to play for a recorder as I can for any live committee Try this:
a. Set the room up as close to a real audition space as possible. Try using the band or orchestra room at your local college, or any large, fairly resonant space. Clear the room as much as possible, leaving just a chair, music stand, and your recorder about 20 feet away.
b. Turn on the recorder and walk out of the room. You can even walk down to the end of the hall, or outside the building all together. Do whatever it takes to replicate the feeling you have right before a big performance**
c. When you reach the door, pause and make yourself mentally ready to audition**
d. Walk into the room, and play your mock audition to the recorder. Once you are done, walk out. Then, take a copy of your excerpts and listen back to your round, review not only the playing, but also the time between each excerpt, your breathing and the general pace of your mock run through. Be honest with yourself and listen carefully to what you hear. Repeat this process as many times as you can during your preparation.
2. Working on individual etudes or excerpts to improve time. Most teachers recommend that students record themselves. I think we need to take it a step further and really break down the process, give them something to listen to and a way of approaching the recording process so that it is both beneficial to their playing and does not contribute to their frustration.

Try this:
1. Turn on the recorder. 2. Turn on the metronome and allow the metronome to run for at least four
counts. 3. Turn the metronome off. 4. Count to yourself, in time to the metronome you just turned off, at least four
counts 5. Play the excerpt 6. One you finish, turn the metronome back on, in order to establish time once
again 7. Listen back and see what you did? Evaluate honestly
You can also record an entire run with the metronome on, and then a second run, after about ten minutes, with the metronome off. Use Garage band (or other music related software) to make click tracks of rhythmically challenging etudes. Record yourself with the click track, and without. Build a click track that stops counting time during rests, but starts at each instrumental entrance. This will force the student to count during a rests, and give them a frame a reference for entrances and ends of phrases. Teachers can do the same thing during lessons. Record the metronome, record your student playing, and turn the metronome off while they are playing, turning it back on just as they finish. Then listen back together. Repeat passages while recording, one time with the metronome on, and then, right after, with the metronome off. You will quickly learn your tendencies, and be able to efficiently repair rhythmic problems.
3. Using video recording devices to correct physical problems or bad habits Not only should you use audio recording, but also more and more I am turning to
my IPhone and IPad in lessons to video record students while they play – I do the same for my own practice sessions. Pay particular attention to nervous ticks, reactions to errors, or over exaggerated gestures that can be distracting to colleagues in an ensemble or audience members. While it is important to “look like the music” and not perform robotically, one must be careful not to over-‐do physical gestures or large body movements. These can end up being a distraction, and cost you dearly in an audition or jury. Of course, if you look like your miserable, this can reflect poorly as well, try to strike a balance.
You may also find technical problems reveal themselves in video recordings. As a percussionist, I am constantly looking at stick heights, travel rate from instrument to instrument and strike zones. Wind players can, literally, zoom in on finger placement, breathing, embouchure, etc.…and work to fix these problems before coming to a lesson. If you have tension or pain in certain parts of your body

when performing, focus the camera there and see if there is something you can adjust. Are you hunching your shoulders, bending forward, twisting your neck?
If you are preparing for a recital, video record a run through of your program,
from the moment you walk on stage, through transitions from piece to piece, to your bows. Each part of the process is important – I can personally attest to having been “called out” for poor stage presence as a young player. You would much prefer to have these bad habits fixed when you are a student, and not while trying to work in the professional arena.
One final suggestion, I have starting assigning students to bring recordings of etudes or excerpts to their lessons so that we can watch, listen and evaluate together. The idea is that they will get into the habit of recording their repertoire and critically listening to their own work, before bringing it to me for further review. They will also begin to build a “library” of recorded excerpts and solo pieces, which could come in handy at some point in the future. For younger students, it gives them a mid week goal which helps to keep them on task and hold them accountable for their lesson material.
These are just a few suggestions for studio teachers and students to use. There are many ways that modern recording technology can be used in lessons and practice. I would encourage you to be creative and take advantage of all the tools available to you. ** For those of you interested in learning more about audition skills, performance anxiety and techniques for combating both, I would highly recommend the writing and teaching of Don Green, author of several books, including Fight your Fear and Win, and Audition Success.

We all ask the same question each week – “did you practice this with a metronome.” Invariably, the student answers, in a meek, soft voice “yes?” But we know better…it was no more then one time through at tempo, with the metronome on the music stand or sitting on a chair nearby. How can we blame them – we give them an annoying little box that flashes a red light and beeps out an annoying pulse at their face, it is no wonder they don’t use it, or when they do, it is completely detached from their playing.
The purpose of this article is to provide some practical, real world strategies to more fully integrate metronome use into a student practice session. How can we get our students to more fully embrace the regular use of a metronome in practice?
Everything you practice should be practiced with a metronome. Your performance of low lyrical passages, as well as fast rhythmic music will benefit from regular metronome use. Often, I find students willing to use the metronome when they are trying to get something “faster” or “cleaner” but not when they are playing scales or something that is not, in their view “hard to play” Therefor….
1. Your metronome cannot be a passive participant in your practice session.
Simply tossing the metronome on the music stand, clicking “on” and leaving it at 120 (or 100, or 60) will not do you any good. In fact, it can actually be detrimental to overall student progress.
a. Try this, put the metronome in your pocket, attach ear buds, and put the click track in your ears. By placing the time directly into your mind, you can more fully internalize the pulse. Keep the volume down so you can still listen for tone quality and intonation.
2. Make sure you are using the metronome to subdivide the beat. Too often,
students will play quarter note to quarter note, rather then break down the beat so they can understand how the notes relate, to each other rhythmically. Take the time to subdivide. Start slowly, with the metronome on the smallest beat, typically 16th notes. Which leads me to my next point…
3. Use your metronome to practice slowly! Your metronome will allow you to
chart your progress and understand more fully where you start and where you need to go. Often, students (and some professionals) are in a hurry or impatient when they use a metronome. I have seen students (and professionals) say things like “I hate using this thing, let’s just try it once, and then we can turn it off” This is not useful. Your metronome should be a partner in your practice sessions, not just an occasional visitor. You should use it to practice slowly, with subdivision, each time you practice. Not only does slow practice with a metronome help to improve your time, it allows you to learn music more completely, in a relaxed, comfortable fashion, with little to no tension in the arms, neck or back.
Once you have settled on these basics, there are some additional, more advanced techniques that will aid in rhythmic training.

1. Set grove patterns, and take away the downbeat. For this, you will need a Dr. beat or other, similarly advanced device, which will allow you to change settings. Try this:
a. Set the “accent” to every downbeat, and turn off all other beats. You should now have a loud pulse on each downbeat, with nothing else. Add the eighth note and sixteenth note beat, while keeping the “accent” the same. You should now have sixteenth rest, and three sixteenth notes, with a strong downbeat on “one”. Now – try to play scales, in eighth notes, while you have the “groove” pattern going. Remember, you should have the metronome plugged in to ear buds, and those ear buds in your ear, with the grove pattern running, at a comfortable tempo. Have fun with this! I know it will be difficult at the beginning, but you’ll find yourself working harder to internalize the pulse, and feel the time, then you ever have before. Make up your own patterns and grooves as you become more comfortable.
b. If you are playing a passage of rapid 16th notes at say, MM=120, try putting the metronome on MM=60. This will force you to fill in the beat and make you less prone to pulsing each downbeat. You will find that this will also help you play more lyrically, and think about longer phrases.
c. Put your instrument down, but keep your metronome on! Clap, tap or
in some way vocalize the passage you are practicing. Do not solfeggio, simply “dutt”,“ta” or clap the rhythm. Getting away from your instrument, vocalizing the rhythm and focusing strictly on time will help you gain a better sense of your rhythmic tendencies. Just like instruments have tendencies when it comes to intonation, players have rhythmic tendencies. Some people rush at the ends of phrases, others drag in the middle of a long line. By getting away from the mechanics of your instruments, you can more clearly discover your tendencies, and fix the problem. I use this technique in my own playing, and with my students and ensembles, in has never failed me.
I hope these suggestions will help you, and your students, improve their time and general rhythmic pulse. I would suggest using these ideas as jumping off points for further rhythmic study. You may have the best sound, or the greatest intonation ever; you’re nothing without solid time.