1 pcs unlimited instructions (dragged)
TRANSCRIPT

2004-2006 Wrangler Unlimited 1 Piece Hardtop
Installation Instructions
PLEASE READ CAREFULLY BEFORE STARTING INSTALLATION
To safely lift and install this hardtop, you will need the assistance of at least one other person.
WARNINGThe top on this vehicle is designed only for additional
protection against the elements.Do not rely on the top to contain occupants within the
vehicle or to protect against intrusion of foreign objects, nor injury during an accident.
Make sure all brackets and screws are tight. Periodically check for tightness and retighten when necessary.
WEAR SEAT BELTS AT ALL TIMES
Parts included in the installation kit.
8 each ! Bolt 5/16 x 18 x 1 1/4
8 each! Nut 5/16 x 18
8 each! Washer 5/16
Instruction sheet

1. Unzip side windows and remove. 2. Unzip rear window and remove.
5. Pry open side connections with screwdriver. 6. Remove side connections to door frame.
3. Pull back bar to disengage and remove. 4. Pull down on corners and remove.
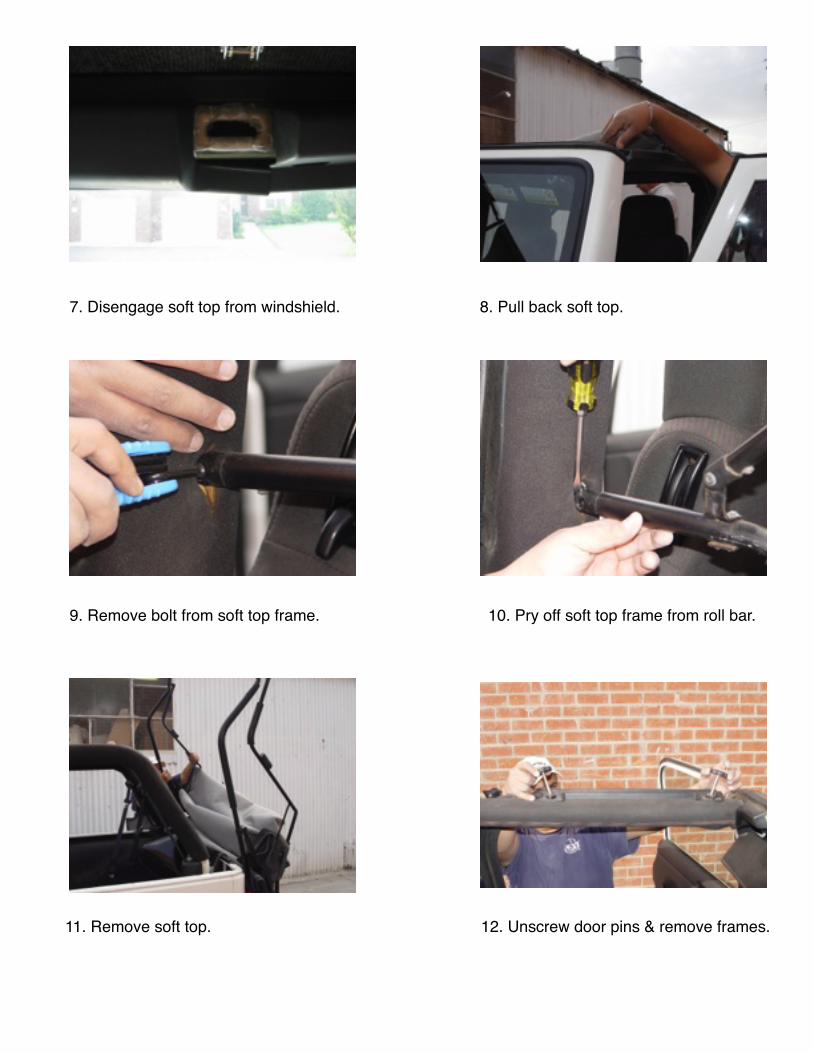
7. Disengage soft top from windshield. 8. Pull back soft top.
9. Remove bolt from soft top frame. 10. Pry off soft top frame from roll bar.
11. Remove soft top.!! ! 12. Unscrew door pins & remove frames.

! 13. Remove rear bar holders.! ! 14. See pre-installation instruction sheet.
15. Do not remove end seal. 16. Install hardtop on vehicle with at least 2 !! ! ! ! ! ! ! ! ! people.
17. Install 6 bolts with wash- ers using nut plates. 18. Adjust the cam locks to medium tension.
Your Done........Enjoy

Things to check
Before you tighten down the flange bolts make sure the top is centered on the windshield. Make sure the top is equal distance in both corners.
Sit in the front seat and look up at the windshield.Make sure the windshield stop is not hug up on the molding. It should look like this.
Check to make sure the clearance between the door and the top looks like this. Too close will pinch the door seal. Too much clearance will cause air leakage.

Things to Check
The door seals on this model are very weak. Consequently the mating surface on the door has to be smooth, so it will fit tight. Make sure you have a smooth surface. The tape has got to fit smoothly across the joint where the top meets the body. !

CJ 5 67 1/4 “
CJ 7 & YJ 75 1/8”
CJ 8 97 11/16”
TJ 75 1/8”
Unlimited 89 7/16”
Jeep Pre-Installation Instructions
1.! Place your tape on top ledge of !the windshield. 2.! Extent the tape to the rear of the body.
3.! Where the tape hits the body , it should read the !!! value in the chart below. Measure both sides. If it !! does, put the top on. If not, go to step 4.
4.! CJ 5 Loosen the bolts and ! !! wing nut. Adjust windshield !!! and tighten.
4.! CJ7 - CJ 8 - YJ!Loosen bolts !! using a T40 torx wrench. !! Go to step 5.
4.! TJ & Unlimited Using a T40 !! Torx wrench, loosen the bolt ! above the doors hinge. Go !! to step 5.
5.! Using a T50 tamper resistant Torx wrench or vise-! !! grips, loosen this bolt. On the CJ 7 & YJ’s it’s on the !! top of the roll bar. On the TJ & Unlimited it’s on the ! !! side of the roll bar. This will be a 2 person job. One !!! checks the measurement, the other person tightens !!! the bolt. Remember 75 1/8” on both sides. (Unlimited !! 89 7/16”). Once this is accomplished, tighten up the !!! bolt you loosened in step 4. Now you can put your top ! on. If the windshield is properly adjusted, the space !!! between the windshield and the door should be the !!! same on both sides.