15 first dates with assembly programming_
DESCRIPTION
b0nd @ (Assembly Programming for Hackers) (www.garage4hackers.com)TRANSCRIPT
15 FIRST DATES WITH
ASSEMBLY PROGRAMMING (Assembly Programming for Hackers)
b0nd @
(www.garage4hackers.com)

15 FIRST DATES WITH ASSEMBLY PROGRAMMING PAGE 2 OF 52
15 First Dates with Assembly Programming
10th March 2011 Ver. 0.1
Few words… This document is an attempt to provide some supplements to those who are new to assembly language
programming and finding it hard to start the venture of shell coding and/or exploitation techniques. Motive behind developing this document is:
1. To keep notes handy for authors own reference. 2. To provide a good supplement for beginners to play with registers, memory and our beloved stack
(before smashing it down ;).
3. To teach the basics of assembly programming which are required to learn Shell coding (yeah those weird \x series of characters), and developing Exploitation skills by presenting 15 easy to understand assembly programs.
An attempt has been made to introduce and code/collect some very basic programs in assembly language. With each program, the reader would find himself more comfortable playing with registers,
memory and stack (building blocks for Shell coding and Exploitation). Although all programs have been coded on Linux, but emphasize has been given on the basic concepts of
developing assembly programs instead of the platform. Most of the tutorials you would find for Win32 Assembly basically teach you coding assembly programs for Win32 GUI instead of revealing the background scene of the state of computer memory, registers and
stack. So here is an attempt to present the background process of “assembly programs” irrespective of the platform.
This document, by no means, is any reference guide or the author is pro in assembly. I reiterate, it‟s just an attempt to provide supplements to those who are learning assembly and find it hard to code assembly programs.
The readers might ask here and in fact they do; “Is it necessary to learn assembly for developing exploitation skill set?” The answer is: YES. This knowledge will help at almost every stage of exploitation,
right from the level at which user use the public shell codes trusting them the way there are promised to work. It could not be better justified than the arguments proposed by H. D. Moore under the section “Penetration Testing: Learn Assembly?” in metasploit blog. Have a look at that and surely you would be
convinced. The document is in version 0.1 only and I understand the vast scope of improvement in it. The next version
of it would cover things in more depth and breadth.
Thanks to: My wife (for being understanding and supporting all the time)
Greetz to: All my well wishers, friends and members @ www.garage4hackers.com (especially Eby, Punter, Vinnu, Fb1h2s, the_empty, Neo, Prashant)

15 FIRST DATES WITH ASSEMBLY PROGRAMMING PAGE 3 OF 52
TABLE OF CONTENT
1. Wake-Up Call............................................................................................................................. 4
2. Get Dressed-Up ......................................................................................................................... 8
Data Accessing Modes................................................................................................................ 8
Some examples ........................................................................................................................10
The Sexy Figure: The Structure of an Assembly Language Program.................................................12
Some flirting basics – Essential GDB basics to analyze the code – Essential for debugging .................15
3. Let‟s Start Dating .......................................................................................................................17
Date – 1: Know Your “Exit” Before You Say Hello ...........................................................................17
Date – 2: Hello With A Gentle Smile..........................................................................................19
Date – 3: Did Not Work? Let‟s Say Hello 10 Times .........................................................................21
Date – 4: Did Not Work? Let‟s Say H3!!0 10 Times in l337 Way – the sm4r7 way ...............................23
Date – 5: Hello Worked! Let‟s Exchange Some Beautiful Words .......................................................25
Date – 6: Picking the Best Feature – (Finding highest value in an integer array)..................................28
Date – 7: Be Sm4r7, Believe in TTMM (The Dutch Treat) – (Function call to add two numbers) ............30
Date – 8: Me Beer + She Vodka – (Compute the value of (a b + c d)) .........................................32
Date – 9: Time to Exaggerate Your Qualities - (Recursive program to find the factorial).......................35
Date – 10: Let Her Read Your Mind - (File Handling Copy data from one file to another) ..................38
Date – 12: Oops! CAT in Thoughts – (File Handling Implementing CAT Linux Command)................42
Date – 14: Plead 100 Times Now – (Print 1-100 on Console Using Shared Libraries) ..........................47
Date – 15: And Everything Smashed! What Else You Expected Moron?............................................49
Reference ....................................................................................................................................52

15 FIRST DATES WITH ASSEMBLY PROGRAMMING PAGE 4 OF 52
1. Wake-Up Call
The readers of this document would be broadly categorized into two categories per the prerequisites: 1. Those who understand the basics of assembly and are familiar with assembly instructions, memory
layout etc. 2. Those who are totally new to this subject.
For those who fall under category 2, it‟s strongly suggested to grab the video series “Assembly Primer for Hackers” by Vivek Ramachandran. He has done an awesome job by creating such a simple to understand video tutorials on assembly programming. There are 11 video, each of 10-30 minutes time duration. That
would give a kick start in understanding the basics of assembly programming language, the memory layout, registers and stack.
See the “Reference” section for the links to the awesome resources on the same subject. Those falling under the category 1 can start with the following as refreshing morning walk! Or directly jump
to the program examples section and shall refer to the introductory text when needed. Development Platform: Linux
Assembler: GAS (The GNU Assembler) Linker: ld Compiler: GCC
Debugger: GDB Operation on 32-bit registers on Intel architecture
Some one-liners to refresh your concepts: 1. GAS terminology: movl source, destination
addl S, D Add source to destination and store in destination subl S, D Subtract source from destination and store in destination
imull S, D Multiply source by the destination and store in destination idivl number Dividend has to be in register eax, “number” is the divisor,
quotient is then transferred to eax and the remainder to eds. The divisor
can be any register or memory location
2. Moving the values between registers:
movl %eax, %ebx Moving a double-word value (4 bytes) from the register eax into register ebx. The value in eax remains the same
movw %ax, %bx Moving a word value (2 bytes) from the register ax into register bx
movb %ah, %bh Moving a byte value (1 byte) from the register ah into register bh
The breakdown of a 32-bit register is as follows:
32 bit eax register
16 bit ax register
(Least significant half of register eax)
8 bit ah register (Most significant byte)
8 bit al register (Least significant byte)

15 FIRST DATES WITH ASSEMBLY PROGRAMMING PAGE 5 OF 52
Hence you can perform operations on either of the following:
The whole 32 bit register, as we did in the first mov statement by appending the character „l‟ (small L) and fetching 32-bit registers, or
The lower 16 bits of the register, as we did in the second mov statement by appending the character „w‟ (word) and fetching 16-bit registers, or
Either of the lowest 8-bits by addressing them as ah and al using movb (b ~ byte) instruction.
Please note that just for the sake of example the register “eax” has been taken. It could have
been ebx or ecx or edx. Word = 2 bytes
Dword = 4 bytes Short = 16 bit Int = 32 bit
The mov instruction is useful for transferring data along any of the following paths:
To a register from memory
To memory from a register
Between general registers
Immediate data to a register
Immediate data to a memory
The mov instruction cannot move from memory to memory. Memory-to-memory moves can be performed, however, by the string move instruction MOVSx series discussed later in the document.
3. Some Jump instructions:
cmpl %eax, %ebx
je Jump if the values under comparison are equal jg Jump if the 2
nd value is greater than the 1
st value
jge Jump if the 2nd
value is greater than equal to the 1st
value
jl Jump if the 2nd
value is less than the 1st
value jle Jump if the 2
nd value is less than equal to the 1
st value
jmp Unconditional jump
4. The difference between “call” and “jmp” is that “call” also pushes the return address onto the
stack so that the function can return from where it was been called, while the “jmp” does not. This would be clearer with the examples in the later part of the document.
5. A specific integer value is associated with each syscall; this value must be placed into the register eax. There are six registers that are used for the arguments that the system call takes. The first
argument goes in EBX, the second in ECX, then EDX, ESI, EDI, and finally EBP, if there are so many. If there are more than six arguments, EBX must contain the memory location where the list of argument is stored – but don‟t worry about this because it‟s unlikely that you‟ll use a
syscall with more than six arguments.
6. Moving Strings from one memory location to another (MOVSx series) movsb move a byte (8 bits)
movsw move a word (16 bits)

15 FIRST DATES WITH ASSEMBLY PROGRAMMING PAGE 6 OF 52
movsl move a double word (32 bits)
Source ESI points to memory location Destination EDI points to memory location
Interestingly, whenever any of the movsx series instruction is executed, the ESI and EDI are automatically incremented or decremented according to the Direction Flag (DF).
If DF (part of EFLAGS registers) is set i.e. has a value „1‟, ESI and EDI registers are decremented. If DF is cleared i.e. has a value „0‟, ESI and EDI registers are incremented.
We can set DF using the STD instruction and it can be cleared using the CLD instruction.
7. Moving Strings from memory location into registers (LODSx series)
lodsb load a byte from memory location into AL lodsw load a word from memory location into AX lodsl load a double word from memory location into EAX
The loading is always done into EAX register and the source string has to be pointed to by ESI.
The register ESI would be automatically incremented or decremented based on DF flag after the LODSx instruction executes.
8. Storing Strings from registers into memory location (STOSx series)
stosb store a byte from AL into memory location stosw store a word from AX into memory location stosl stores a double word from EAX into memory location
The storing is always done from EAX register and the EDI points to the destination memory.
The register EDI would be automatically incremented or decremented based on DF flat after the STOSx instruction executes.
9. Comparing Strings (CMPSx series to compare various strings) cmpsb compares a byte value
cmpsw compares a word value cmpsl compares a double word value
For comparison, the ESI should point to the source string and EDI should point to the destination string.
The register ESI and EDI would automatically incremented or decremented based on the DF flag after the CMPSx instruction executes. When CMPSx instruction executes, it subtracts the destination string from the source string and
appropriately sets the Zero Flag (ZF) in EFLAGS register. When the comparison matches, ZF is set to „0‟, else it is set to „1‟.
*Remember that when ZF or DF are „set‟, they have a numeral value of „1‟ and when they are „not set‟, they have a numeral value of „0‟.
CLD clear the DF (DF = 0). ESI and EDI would get incremented STD set the DF (DF = 1). ESI and EDI would get decremented
15 FIRST DATES WITH ASSEMBLY PROGRAMMING PAGE 7 OF 52
CMPSx When both of the strings are same, the subtraction of destination from source comes out to be „0‟ and ZF gets set i.e. it gets a value of „1‟
CMPSx When both the strings are different, ZF gets a value of „0‟ and is not set. (gdb) info registers would show only the „set‟ components of EFLAGS

15 FIRST DATES WITH ASSEMBLY PROGRAMMING PAGE 8 OF 52
2. Get Dressed-Up
This section covers Data Accessing Modes along with some examples, the skeleton of an assembly program, and the basics of GDB.
Data Accessing Modes
Data accessing modes or methods are different ways a processor can adopt to access data. This
section will deal with how those addressing modes are represented in assembly language instructions.
The general form of memory address references is following:
BaseAddress( %Offset, %Index, DataSize)
Perform the following calculation to calculate the address:
Final_address = BaseAddress + %Offset + (DataSize x %Index)
BaseAddress and DataSize must both be constants, while the other two, i.e. %Offset and %Index,
must be registers. If any of the pieces is left out, it is just substituted with zero in the equation.
All of the following discussed addressing modes except immediate addressing mode can be
represented in this fashion.
If you are new to this stuff, you might not be able to digest and understand it properly. So just go
through them once and do keep referring them while programming.
1. Immediate Addressing Mode
Instruction movl $10, %eax
It says; load the value 10 into the register eax. This mode is used to load direct values into registers or
memory location. Please pay attention to the $ sign. It‟s the $ sign which is making it “Immediate
Addressing Mode”. Without it, the instruction would instruct to load the „value‟ present at the memory
location 10 into eax rather than the number 10 itself and thus would make it “Direct Addressing Mode”
instead of “Immediate Addressing Mode”.
2. Direct Addressing Mode
Instruction movl ADDRESS, %eax
Hence, this is done by only using the BaseAddress portion, and rests of the fields have been
substituted with zero in the equation.
It says; load the value at the ADDRESS into the register eax. This terminology should be quite clear to
the readers acquainted with pointers in programming languages.
.section .data
IntValue:
.int 16
.section .text
.globl _start
_start:
movl IntValue, %eax
15 FIRST DATES WITH ASSEMBLY PROGRAMMING PAGE 9 OF 52
The above code will pass the value 16 into register eax. Please do not worry about the code if you are
not comfortable with it at the current moment. They would be clearer as you proceed with the
document.
Another example could be:
movl 1002, %eax.
It is Direct Addressing Mode considering 1002 as some memory address containing some value.
3. Indirect Addressing Mode
Instruction movl (%eax), %ebx
It says; eax is holding some address, and we want to move the value at that address into register ebx.
Hence, the “Indirect Addressing Mode” loads a value from the address indicated by a register.
A very nice example of this addressing mode is to obtain the top of the stack without popping out the
top value:
movl (%esp), %eax
4. Indexed Addressing Mode
Instruction movl BaseAddress(%Offset , %Index, DataSize), %DestinationRegister
.section .data
IntArray:
.long 1, 2, 3, 4, 5
.section .text
.globl _start
_start:
movl $0, %esi
movl $0, %edi
movl IntArray(%esi, %edi, 4), %eax
This will move the value “1” from the initialized array into the register eax.
Actually the above statement says, “Start at the beginning of IntArray as the %Offset is zero, and take
the first item number (because %Index is 0 and the counting of array starts from 0 itself).
Also remember that each number takes up four storage locations (because data type is „long‟ i.e. 4
bytes).”
If edi is incremented to 1 i.e. if the %Index holds numeral value 1, the last code statement would move
the number „2‟ from IntArray into eax.
5. Base Pointer Addressing Mode
Instruction movl 4(%eax), %ebx

15 FIRST DATES WITH ASSEMBLY PROGRAMMING PAGE 10 OF 52
Base-pointer addressing is similar to indirect addressing, except that it adds a constant value to the
address in the register.
movl (%esp), %eax Indirect addressing mode. It would copy the value on the top of the stack
into eax
movl 4(%esp), %eax Base pointer addressing mode to access the 2nd
top value on a stack
movl $9, 4(%edi) copy the value 9 in the memory pointed out by (edi + 4)
movl $9, -2(%edi) copy the value 9 in the memory pointed out by (edi – 2)
We would be using base pointer addressing mode very frequently while making programs in this
guide.
6. Register Addressing Mode
Instruction movl %eax, %ebx
Register mode simply moves data in or out of a register.
Some examples
Being said the above terminology; let us play moving some values in and out of memory/registers for practice.
Instead of taking examples one-by-one at this stage, let us pen down what generally arouses in mind of a
newbie programmer.
Before that, we need to declare some memory locations and keep in mind that while “moving” the data from
“source” to “destination” does not actually change the value at source. It is simply copied into the destination
contrary to the word “move”.
1. How to move a value 15 in register?
movl $15, %eax Immediate Addressing Mode
2. How to move a value 15 in the location?
movl $15, mem_location This would change the value in mem_location from 10 to 15
.section .data
mem_location:
.int 10
IntegerArray:
.int 10, 20, 30, 40, 50

15 FIRST DATES WITH ASSEMBLY PROGRAMMING PAGE 11 OF 52
3. How to move the value in the mem_location in a register and vice versa?
movl mem_location, %eax
movl %eax, mem_location
4. What if I need to copy the address of mem_location in a register? i.e. the value stored in the register
would be the addess of the mem_location
movl $mem_location, %eax Notice the prepended “$” dollar to memory location
print &mem_location = print /x $eax (Some GDB terminology you would come across later)
Similarly, movl $mem_location, another_location, will load the address of mem_location to
another_location.
5. What if I need to copy something from one register to another?
movl %eax, %ebx To move a 32 bit value
movw %ax, %bx To move a 16 bit value
movb %ah, %bh To move a 8 bit value.
Bottom line is that both, the source and destination, should be of same size.
6. How to access value in an array?
BaseAddress(Offset, Index, Data_Size)
Here the trap is, the “Offset” and “Index” needs to be mentioned in registers. “Data_Size” would be an
integer value and it‟s basically the size of the data type under operation.
Let us say you want to change the 4th variable of array to 44, following would be the instructions:
movl $0, %eax
movl $3, %ebx
movl $44, IntegerArray(%eax, %ebx, 4)
7. How to do indirectly (Indirect Addressing Mode)?
movl $mem_location, %eax move the address of label mem_location into register eax
movl (%eax), %ebx move the value at the address stored in register eax into register
ebx i.e. mov the value of label mem_location into register ebx
movl $35, (%eax) move the value 35 at the location pointed by the address stored
in register eax i.e. here in the current case, the current value of
label mem_location would be over written with integer value 35
15 FIRST DATES WITH ASSEMBLY PROGRAMMING PAGE 12 OF 52
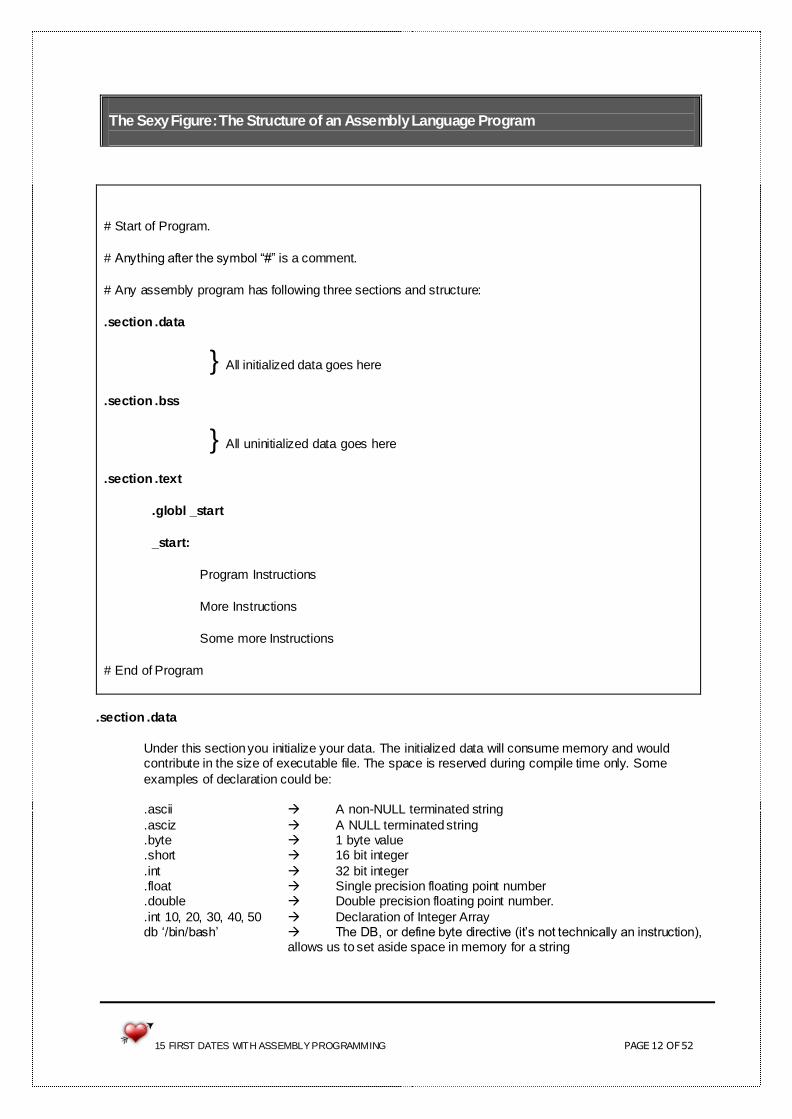
The Sexy Figure: The Structure of an Assembly Language Program
# Start of Program.
# Anything after the symbol “#” is a comment.
# Any assembly program has following three sections and structure:
.section .data
} All initialized data goes here
.section .bss
} All uninitialized data goes here
.section .text
.globl _start
_start:
Program Instructions
More Instructions
Some more Instructions
# End of Program
.section .data
Under this section you initialize your data. The initialized data will consume memory and would contribute in the size of executable file. The space is reserved during compile time only. Some
examples of declaration could be: .ascii A non-NULL terminated string
.asciz A NULL terminated string
.byte 1 byte value
.short 16 bit integer
.int 32 bit integer
.float Single precision floating point number
.double Double precision floating point number.
.int 10, 20, 30, 40, 50 Declaration of Integer Array db „/bin/bash‟ The DB, or define byte directive (it‟s not technically an instruction),
allows us to set aside space in memory for a string

15 FIRST DATES WITH ASSEMBLY PROGRAMMING PAGE 13 OF 52
.section .bss
All uninitialized data is stored here. Anything declared in this segment is created at run time. Hence, whatever you declare here is not going to occupy any space inside the executable. Only when the program is loaded into memory, the space actually will be created. Following could be the declaration
examples: .comm buffer, 1000 declares a „buffer‟ of 1000 bytes. „buffer‟ would be the Label_name
i.e. it would refer to the location that follows it. .comm declares common memory area
.lcomm declares local common memory area
This section can reserve storage, but it cannot initialize it. This section is primarily useful for buffers
because we do not need to initialize them anyway; we just need to reserve storage. .section .text
This section comprises of program instructions.
.globl _start _start:
This is somewhat like the “main()” function of „C‟ programming language, i.e. assembler
would hunt for it to be treated as the start of the program. We are free to include only that section of program which has some data or significance in our program. For
example, if we do not have any uninitialized data in our program, we can exclude the .bss section from our program without any harm.
The process layout map in memory looks like follow:
High Addresses (top of memory)
Stack
(Used for storing function
arguments and local variables) ↓ ↓
↓ Stack grows from high memory
towards low memory
Environment Variables
Command Line Variables
*envp
*argv
Argc
main() local variables
Unused Memory
Heap grows from low memory towards high memory
↑ ↑ ↑
HEAP (Dynamic Memory e.g. malloc())
.bss

15 FIRST DATES WITH ASSEMBLY PROGRAMMING PAGE 14 OF 52
(Uninitialized Data)
.data
(Initialized Data)
.text
(Program Code)
Low Address (bottom of memory)

15 FIRST DATES WITH ASSEMBLY PROGRAMMING PAGE 15 OF 52
Some flirting basics – Essential GDB basics to analyze the code – Essential for debugging
Learn your debugger well to debug the code efficiently. This section comprises of some
tricks/commands/short-cuts to use GDB efficiently. To cut it short, it ‟s a cheat sheet for GDB
1. If intending to open compiled „C‟ programs using GDB, you need to tell your compiler to compile
your code with symbolic debugging information included. E.g.
# gcc –g –o hello hello.c
# gcc –ggdb –o hello hello.c
# g++ -g –o hello hello.c
2. To run the program in GDB, do either of the following:
# gdb ./<binary> [Return Key] This will open up the binary in GDB
# gdb [Return Key] This will open up the debugger without loading any
program. On the gdb prompt, pass the command “file
<binary_name>” and that will cause the executable to be
loaded up:
(gdb) file <binary_name> [Return Key]
# gdb –tui ./<binary> [Return Key] For console-cum-GUI GDB
3. If arguments as well have to be passed to the program to be loaded into GDB, following options
can be opted:
# gdb <binary> --args arg1 arg2 arg3 …. argN [Return Key]
Or
# gdb <binary> [Return Key]
(gdb) run arg1 arg2 arg3 ….. argN
4. Hitting the „RETURN‟ at gdb prompt will repeat the last command entered.
5. Break Points
Use the “break” or “b” command at gdb prompt to specify a location which could be a function
name, a line number or a source file and line number.
Set Break Point
break main to set a break point at the function “main”
break 5 to set a break point at the code line number 5
break hello.c:5 to set a break point at code line number 5 of imported file hello
break *_start+1 include “nop” on the very next line of it to get a break point there
Check Break Point

15 FIRST DATES WITH ASSEMBLY PROGRAMMING PAGE 16 OF 52
info breakpoints, to list the current break points ( type „i b‟ without quotes for shortcut)
Clear Break Point
clear main to clear the break point set at particular function
delete <breakpoint number>
If the program has already been “run” but you forget to set breakpoints, hit CTRL-C and that
will stop the program where ever it happens to be and return you to the gdb prompt. At that
point, you can set up a proper breakpoint somewhere and „continue‟ to that break point.
6. „next‟, and „step‟ (s for shortcut) to proceed step by step after you have hit the breakpoint.
„continue‟ (c) to continue until next breakpoint or end of program.
One shortcut could be just hitting RETURN as it repeats the last command entered. This will
save you typing „next‟ or‟s‟ over and over again.
7. Following and the next point (8) are gdb commands which you would use very frequently while
debugging your program:
(gdb) list To list the source code of executable loaded
(gdb) disassemble <function_name> To dump the assembly code of function referred
(gdb) help <keyword> gdb help pages
(gdb) info registers To see the content and state of all registers
(gdb) info variables To see all variables and their respective addresses
8. Examine command
(gdb) print variable_name To see the value of a variable in decimal
(gdb) print /x variable_name To see the value of a variable in hex
(gdb) print /c variable_name To see the value of a variable in ASCII
(gdb) print &Label_name To see the address of Label_name
(gdb) print /x &Label_name To see the address of Lable_name in better format
(gdb) x/FMT &Label_name To see the value of variable (useful in case of integers)
(gdb) x/1s &Label_name To see the whole string in single-shot (useful in case of
strings)
(gdb) x/1s $register To see the whole string in single-shot located at the
address stored in register
(gdb) x/1s 0x080000 i.e address To see the whole string in single-shot at a particular
address
(gdb) print /c $eax To see the value in register in ASCII
(gdb) print /d $eax To see the value in register in Decimal
(gdb) print /x $eax To see the value in register in HEX
(gdb) x/FMT Address Address could be something like 0x08.. or „&Label_name‟
If there is no Label_name, take the address and fetch to examine command

15 FIRST DATES WITH ASSEMBLY PROGRAMMING PAGE 17 OF 52
3. Let’s Start Dating
This section is an attempt to produce 15 Assembly programs to help beginners learn Assembly programming.
Date – 1: Know Your “Exit” Before You Say Hello
Purpose To exit the program “cleanly” and pass the exit code to the Linux kernel
Input Nothing
Program Flow Call the “exit()” function and exit out of program
Check the return code at console
Output Nothing. Just check the exit code.
# Program to explain the way to exit() from a Linux Assembly Program
.section .data
.section .bss
.section .text .globl _start
_start: movl $1, %eax movl $0, %ebx
int $0x80
# End of program
Let‟s dissect the program
We have not initialized anything in .data or .bss section as we are only interested in exiting from the program successfully. Hence just for the sake of completeness they have been included; else they can
be dropped as well from the program code. The „C‟ programming terminology for exit is:
exit(integer-status) e.g. exit(0) or exit(1)
As a programmer, we generally pass the integer value „0‟ on success and integer value „1‟ on failure. So the program logic is, call the exit function and pass the relevant integer value to it as an exit integer-status.
Following are the steps we need to follow in Assembly language programs.
Load the system call for relevant function (i.e. call the exit function in current program)
Load it‟s parameters (i.e. pass the integer value to it)
Call Linux kernel interrupt to run the command (i.e. execute the exit function in current program)

15 FIRST DATES WITH ASSEMBLY PROGRAMMING PAGE 18 OF 52
The system call is always loaded into the register eax with the instruction:
movl $System_Call_Number, %eax
In the current case of exit, the System_Call_Number is „1‟, hence the instruction would be:
movl $1, %eax
The numbers of parameters required for the successful function call are fetched sequentially into ebx,
ecx, edx and so on. In the current case of exit, only one parameter is required which is either 0 (success status) or 1 (failure
status), hence just ebx needs to be loaded:
movl $0, %ebx
(In the example of read() or write() function call we will see how other parameters are loaded into registers)
Finally the control is handed over to Linux kernel by calling the interrupt int $0x80 to run the exit command.
int $0x80
So the following three instructions in assembly language are equivalent to the exit(0) function call in „C‟ programming language:
movl $1, %eax movl $0, %ebx int $0x80
For all such calls we need to follow the same pattern i.e. load the system call number into the register eax and start loading the required parameters into ebx, ecx, edx and so on. Finally call the Linux kernel interrupt with the instruction int $0x80 and run the desired command.
EAX System Call number EBX First argument
ECX Second argument EDX Third argument ESI Fourth argument
EDI Fifth argument For system calls which require more than 5 arguments, we go ahead and pass a pointer to structures
containing those arguments.
Execution
Name the program exit.s
Assemble the program $ as –gstabs –o exit.o exit.s Link the program $ ld –o exit exit.o Execute the program $ ./exit
Check the output $ echo $? You must get „0‟ at the console as output.
If any of the above commands report error(s), do spell check for the source code and commands. After correcting the source code, you have to re-run all the commands.
You must always re-assemble and re-link assembly programs after the source code file has been modified.

15 FIRST DATES WITH ASSEMBLY PROGRAMMING PAGE 19 OF 52
Play Ground
Pass a different parameter to exit system call and see the result with
echo $?
References
System Calls:
/usr/include/asm/unistd.h http://linux.die.net/man/2/syscalls
What we learnt?
The way to call “system calls” (exit in this case) with required number of parameters.
Let‟s visit and analyze the “Hello World” program now:
Date – 2: Hello With A Gentle Smile
Purpose To print “Hello World” on the console – Let‟s follow the programming trend.
Input Nothing
Program Flow
Initialize the string “Hello World\n”
Call the write() function to write the string on the console
Exit out of program
Output ”Hello World” string on console
# Program to print the string "Hello World" on console # Anything after the symbol “#” is a comment
.section .data
HelloWorld:
.ascii "Hello World\n"
.section .bss
.section .text
.globl _start
_start:
# Following is the call to write() function
movl $4, %eax movl $1, %ebx
movl $HelloWorld, %ecx movl $12, %edx int $0x80
# Following is the exit() process call
movl $1, %eax

15 FIRST DATES WITH ASSEMBLY PROGRAMMING PAGE 20 OF 52
movl $0, %ebx int $0x80
# End of program
Let‟s dissect the program
A string “Hello World\n” has been initialized in the .data section. This string would be accessible from anywhere in the program by its label name “HelloWorld”. So the HelloWorld label is like a pointer to the string following it.
The .ascii is used to define all ascii strings in assembly. The space acquired by the string “Hello World\n” i.e. 12 characters, would be a part of the size of
executable and would be assigned during compile time. Contrary to it, in .bss section we just declare the variables and the size they would need in future. They
are allocated memory at run time and hence do not add up to the size of executable. Let‟s analyze the first half of the .text section. Second half is the call to exit() syscall which we have
already discussed in previous example. In order to write something, be it on console or in a file, we need to call write() syscall:
write(int fd, const void *buf, size_t count) So by looking at the call to write() syscall, we know that in addition to system call number itself we need
to pass three more parameters to it. The system call number goes into eax register:
movl $4, %eax
The file descriptor (fd) goes into ebx. In case of console, the fd is „1‟. In case of writing data to some file, we need to pass the fd of that file.
movl $1, %ebx
Next is the buffer from where write syscall needs to read the data. Since the label HelloWorld is a pointer to our string, we shall pass the address of the label HelloWorld into the ecx register: movl $HelloWorld, %ecx
The last parameter for a successful write syscall is the number of bytes to be read from the buffer. In our case, the length of the string “Hello World\n” is 12 bytes. movl $12, %edx
Here ends the call to write syscall and loading of the required parameters. The last step is to call the Linux kernel interrupt to finish the job int $0x80
After printing out our string on console, the execution will proceed with the second half of the code and will exit gracefully.
Execution
Name the program HelloWorld.s Assemble the program $ as –gstabs –o HelloWorld.o HelloWorld.s Link the program $ ld –o HelloWorld HelloWorld.o
Execute the program $ ./HelloWorld

15 FIRST DATES WITH ASSEMBLY PROGRAMMING PAGE 21 OF 52
The string “Hello World” should get displayed at the console as output.
If any of the above commands report error(s), do spell check for the source code and commands. After correcting the source code, you have to re-run all
the commands. You must always re-assemble and re-link assembly programs after the source
code file has been modified.
Play Ground -
References
File descriptors in Linux: 0 Standard Input, STDIN
1 Standard Output, STDOUT 2 Standard Error, STDERR
The system call for write is 4. System Calls:
/usr/include/asm/unistd.h http://linux.die.net/man/2/syscalls
What we learnt? The way to call “system calls” (write in this case) with required parameters.
Date – 3: Did Not Work? Let‟s Say Hello 10 Times
Purpose To print “Hello World” 10 times on console using the concept of looping
Input Nothing
Program Flow
Initialize the string “Hello World”
Set the counter to the number of times string has to be printed
Get into a loop of printing the string counter number of times and decrement counter with every successful execution of loop
Exit out of program when counter becomes zero
Output ”Hello World” string printed ten times on console
# Program to print "Hello World" 10 times on console using “jmp” instruction and a counter
.section .data HelloWorld:
.ascii "Hello World"
.section .bss
.section .text .globl _start

15 FIRST DATES WITH ASSEMBLY PROGRAMMING PAGE 22 OF 52
_start: nop # It‟s just been added to overcome buggy gdb against break point
movl $10, %ecx
PrintHello:
cmpl $0, %ecx je ExitCall
pushl %ecx # Following 5 lines are to print the string on console once with each iteration
movl $4, %eax movl $1, %ebx
movl $HelloWorld, %ecx movl $12, %edx int $0x80
popl %ecx decl %ecx
jmp PrintHello
# Following is the exit() process call
ExitCall: movl $1, %eax
movl $0, %ebx int $0x80
# End of program
Let‟s dissect the program Couple of concepts to discuss here.
We have moved from the “flat” coding to some “segmentation”. Now we have a different body for “exit” instruction and a different body for the “PrintHello” loop. They are somewhat analogous to
functions in „C‟ language, but mind it that none of them is a function. We would see function declaration and usage in examples further down the document.
The program is not complex in any way. The register ecx has been initialized with the count 10, the desired number of times the string should get printed on console.
With every iteration of PrintHello section, the value in register ecx is compared with numeral „0‟ and is decremented by numeral „1‟ at the end of section. The iteration of section would last until the value of ecx is greater than 0.
The only thing which could bother a bit to a beginner is the “pushl” and “popl” instructions here. It is for the sake of protecting the value of ecx register. If you look carefully, our “write” code is using
ecx register to load the address of string every time “write” is getting called. At the same time we wish to use ecx as counter variable as well. Hence before it being modified by “write” call, we are saving its value by pushing on the stack and after it‟s been used by “write” call, we
are popping out its value back into ecx register.
Execution Name the program Hello10times.s
Assemble the program $ as –gstabs –o Hello10times.o Hello10times.s

15 FIRST DATES WITH ASSEMBLY PROGRAMMING PAGE 23 OF 52
Link the program $ ld –o Hello10times Hello10times.o Execute the program $ ./ Hello10times
The declared string would be printed out on console 10 times.
If any of the above commands report error(s), do spell check for the source code and commands. After correcting the source code, you have to re-run all the commands.
You must always re-assemble and re-link assembly programs after the source code file has been modified.
Play Ground
Open up the executable with GDB and analyze the complete program step by step setting up some break point.
References -
What we
learnt?
A bit of program code management by segregating code into different sections Basics of push and pop operations and the way to retain value of some variable/register.
Date – 4: Did Not Work? Let‟s Say H3!!0 10 Times in l337 Way – the sm4r7 way
Purpose To print “Hello World” 10 times on console using the concept of looping
Input Nothing
Program Flow
Initialize the string “Hello World”
Set the counter to the number of times string has to be printed
Get into a loop of printing the sting counter number of times and decrement counter with every successful execution of loop
Exit out of program when counter becomes zero
Output ”Hello World” string on console ten times
# Program to print "Hello World" 10 times on console using “loop” instruction and ecx counter
.section .data HelloWorld:
.ascii "Hello World"
.section .bss
.section .text .globl _start
_start: nop # It‟s just been added to overcome buggy gdb against break point

15 FIRST DATES WITH ASSEMBLY PROGRAMMING PAGE 24 OF 52
movl $10, %ecx
PrintHello: cmpl $0, %ecx je ExitCall
pushl %ecx # Following 5 lines are to print the string on console once
movl $4, %eax
movl $1, %ebx
movl $HelloWorld, %ecx
movl $12, %edx
int $0x80
popl %ecx
loop PrintHello
# Following is the exit() process call
ExitCall: movl $1, %eax movl $0, %ebx
int $0x80
# End of program
Let‟s dissect the program
The program does nothing different than the previous one; it just does in a different way. Here we have introduced a new instruction “loop”.
The instruction “loop” and the register %ecx work together. Whenever “loop” instruction is called, the value of ecx gets decremented by one automatically.
You can observe in our code that “dec l %ecx” instruction and “jmp PrintHello” have been removed, using which we coded our previous program.
Execution
Name the program l33t-h3llo.s Assemble the program $ as –gstabs –o l33t-h3llo.o l33t-h3llo.s
Link the program $ ld –o l33t-h3llo l33t-h3llo.o Execute the program $ ./ l33t-h3llo
The declared string would be printed out on console 10 times. If any of the above commands report error(s), do spell check for the source
code and commands. After correcting the source code, you have to re-run all the commands.
You must always re-assemble and re-link assembly programs after the source code file has been modified.

15 FIRST DATES WITH ASSEMBLY PROGRAMMING PAGE 25 OF 52
Play Ground
Open up the executable with GDB and analyze the complete program step
by step setting up some break point.
References -
What we learnt? Another way of “looping”.
Date – 5: Hello Worked! Let‟s Exchange Some Beautiful Words
Purpose This program copies a string from one memory location to another memory
location
Input Nothing
Program Flow
Initialize the string “Hello World”
Declare a memory location as destination
Copy string from source to destination
Exit out of program
Output The defined string gets copied to destination from source
# Program to copy the string "Hello World" from one memory location to another
.section .data
HelloWorld:
.ascii "Hello World"
.section .bss .lcomm Destination, 50
.section .text
.globl _start
_start: nop
movl $HelloWorld, %esi movl $Destination, %edi movl $11, %ecx
rep movsb
# Following is the exit() process call
movl $1, %eax movl $0, %ebx int $0x80
# End of program

15 FIRST DATES WITH ASSEMBLY PROGRAMMING PAGE 26 OF 52
Let‟s dissect the program
String‟s cannot simply be moved like integers.
In the .data section, the string “Hello World” has been initialized. Next, 50 bytes buffer has been declared in .bss section. This 50 byte would be allocated to it during run time and hence it would not contribute to the size of the executable (binary).
The string operations do not deal with mere location names, instead they deal with the registers “esi” and “edi” as well.
The source address has to be loaded into esi and destination address into edi. This has been achieved with the following codes: movl $HelloWorld, %esi movl $Destination, %edi
After that we have moved an integer value 11 into ecx, which you might have guessed correctly the number of characters in our string “Hello World”. Here, copying the number of characters in the register ecx has significance and any other register cannot be used. We need a counter to count 11
times and with every count we copy one byte from source to destination with the instruction movsb. rep movsb
movsb is an instruction to move just one byte at a time. Its family members, movsw will move 2 bytes
and movsl will move 4 bytes at a time. The instruction “rep” will repeat the instruction “movsb” ecx number of times, i.e., 11 in our case and
with every successful operation, the value of ecx would be decremented. So, the instruction “rep movsb” will execute 11 times and hence 11 bytes would be copied, 1 at a
time, copying the whole string from source to destination. Next follows the “exit” code to exit out of program cleanly.
In all of the above programs, we hard binded the string length value in edx register. It could be made generic with the following code:
helloworld: .ascii “hello world”
helloworld_end: .equ helloworld_len, helloworld_end – helloworld
movl $helloworld_len, %edx
The .equ notation is covered later in the document.
Execution
Name the program MoveString.s Assemble the program $ as –gstabs –o MoveString.o MoveString.s Link the program $ ld –o MoveString MoveString.o
Execute the program $ ./MoveString The defined string would be copied into the “Destination”
If any of the above commands report error(s), do spell check for the source

15 FIRST DATES WITH ASSEMBLY PROGRAMMING PAGE 27 OF 52
code and commands. After correcting the source code, you have to re-run all the commands.
You must always re-assemble and re-link assembly programs after the source code file has been modified.
Play Ground
Open up the executable with GDB and analyze the complete program step by step setting up some break point.
(gdb) x/1s &Destination would show the string stored at Destination Do also notice during the execution that the values of esi and edi will also
increment with every successful movsx operation. The amount of increment will depend whether we are copying one byte or two bytes and so on.
Actually ESI and EDI could either increment or decrement. The “direction flag” determines whether esi and edi would increment or decrement.
If Direction Flag is “clear”, they would increment. If Direction Flag is “set”, they would decrement.
We can clear the “Direction Flag” with the instruction “cld” and we can set the “Direction Flag” with the instruction “std”
In GDB, you can see whether the DF flag is “set” or “clear” by running the following command:
(gdb)info registers Notice the EFLAGS.
If you see “DF” in eflags, it means DF has been set and the value of ESI and EDI would decrement with each iteration of “rep”. In our case, since we wish ESI and EDI to increment to point to next memory location, DF has to be
cleared if set.
References -
What we learnt?
String operations are performed using esi and edi registers and the instructions used are:
movsb To move one byte of string movsw To move two bytes of string (one word) movsl To move four bytes of string (double word)
cld Clear the Direction Flag std Set the Direction Flag
15 FIRST DATES WITH ASSEMBLY PROGRAMMING PAGE 28 OF 52
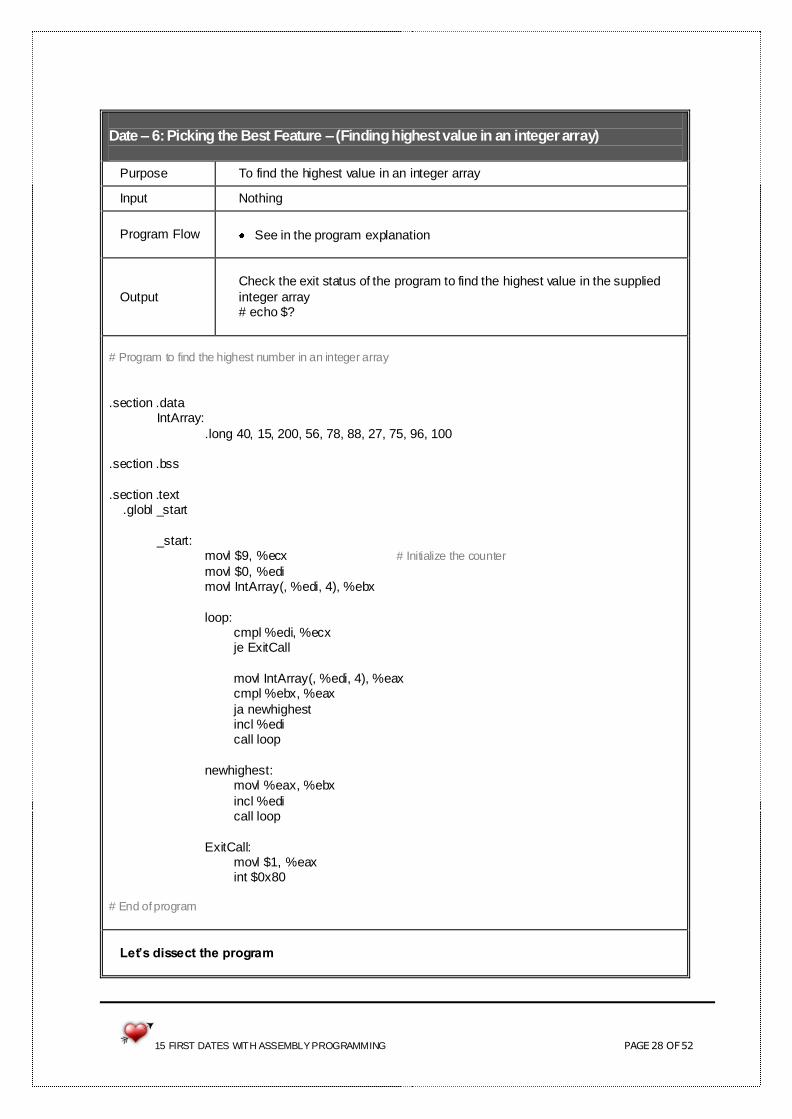
Date – 6: Picking the Best Feature – (Finding highest value in an integer array)
Purpose To find the highest value in an integer array
Input Nothing
Program Flow
See in the program explanation
Output
Check the exit status of the program to find the highest value in the supplied
integer array # echo $?
# Program to find the highest number in an integer array
.section .data IntArray:
.long 40, 15, 200, 56, 78, 88, 27, 75, 96, 100 .section .bss
.section .text .globl _start
_start: movl $9, %ecx # Initialize the counter
movl $0, %edi movl IntArray(, %edi, 4), %ebx
loop: cmpl %edi, %ecx je ExitCall
movl IntArray(, %edi, 4), %eax cmpl %ebx, %eax
ja newhighest incl %edi call loop
newhighest:
movl %eax, %ebx
incl %edi call loop
ExitCall: movl $1, %eax int $0x80
# End of program
Let‟s dissect the program
15 FIRST DATES WITH ASSEMBLY PROGRAMMING PAGE 29 OF 52
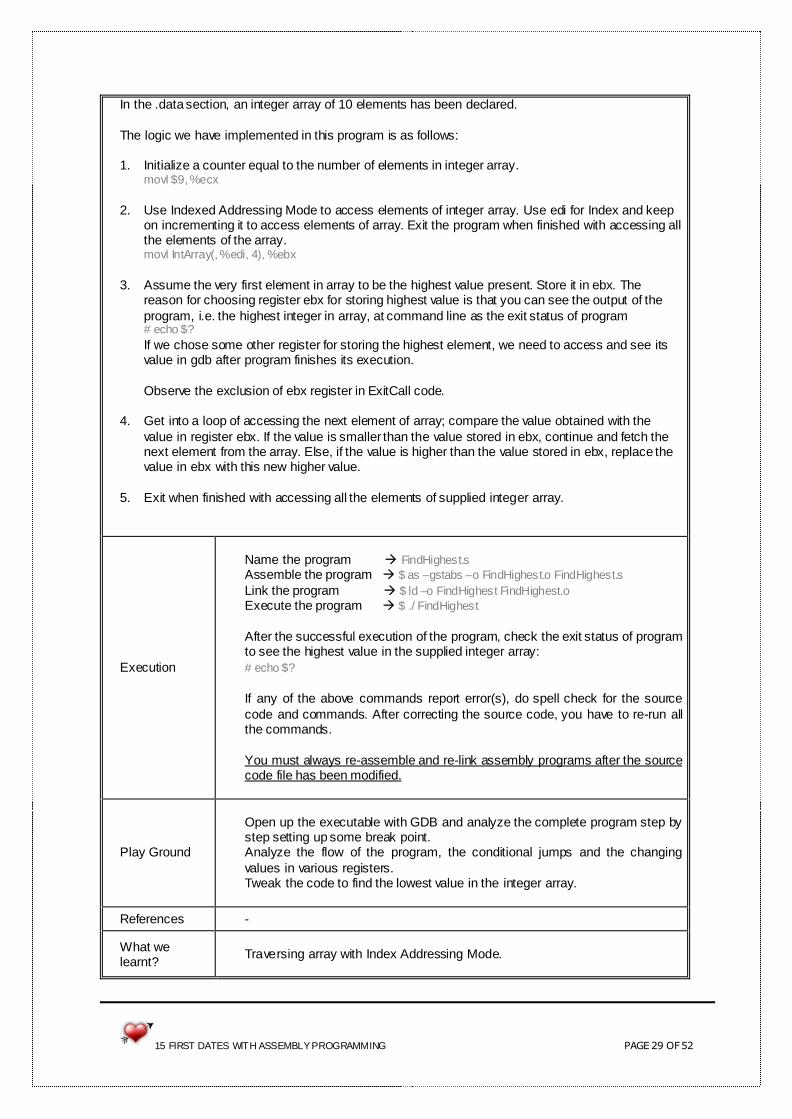
In the .data section, an integer array of 10 elements has been declared.
The logic we have implemented in this program is as follows: 1. Initialize a counter equal to the number of elements in integer array.
movl $9, %ecx
2. Use Indexed Addressing Mode to access elements of integer array. Use edi for Index and keep on incrementing it to access elements of array. Exit the program when finished with accessing all the elements of the array. movl IntArray(, %edi, 4), %ebx
3. Assume the very first element in array to be the highest value present. Store it in ebx. The
reason for choosing register ebx for storing highest value is that you can see the output of the
program, i.e. the highest integer in array, at command line as the exit status of program # echo $?
If we chose some other register for storing the highest element, we need to access and see its value in gdb after program finishes its execution.
Observe the exclusion of ebx register in ExitCall code.
4. Get into a loop of accessing the next element of array; compare the value obtained with the
value in register ebx. If the value is smaller than the value stored in ebx, continue and fetch the next element from the array. Else, if the value is higher than the value stored in ebx, replace the value in ebx with this new higher value.
5. Exit when finished with accessing all the elements of supplied integer array.
Execution
Name the program FindHighest.s Assemble the program $ as –gstabs –o FindHighest.o FindHighest.s
Link the program $ ld –o FindHighest FindHighest.o Execute the program $ ./ FindHighest
After the successful execution of the program, check the exit status of program to see the highest value in the supplied integer array:
# echo $?
If any of the above commands report error(s), do spell check for the source
code and commands. After correcting the source code, you have to re-run all the commands.
You must always re-assemble and re-link assembly programs after the source code file has been modified.
Play Ground
Open up the executable with GDB and analyze the complete program step by step setting up some break point. Analyze the flow of the program, the conditional jumps and the changing
values in various registers. Tweak the code to find the lowest value in the integer array.
References -
What we learnt?
Traversing array with Index Addressing Mode.

15 FIRST DATES WITH ASSEMBLY PROGRAMMING PAGE 30 OF 52
Date – 7: Be Sm4r7, Believe in TTMM (The Dutch Treat) – (Function call to add two numbers)
Purpose
To add two numbers by making a function call.
To analyze the stack closely during function call.
Input Pass two parameters to be added to function
Program Flow
Initialize two intergers
Pass interger values as parameters to function
Do addition in the function and return the sum
Exit out of program
Output The sum of added numbers
# Program explaining the way function call is made.
.section .data # initializing data Int_1: .long 27
Int_2: .long 13
.section .bss .section .text
.globl _start _start:
pushl Int_1 # push first integer pushl Int_2 # push second integer
call add_func # call function addl $8, %esp # move the stack pointer back
movl %eax, %ebx # pass the function return value into the exit status call Exit_call
# The input to the following function is two integer values whose sum has to be calculated.
.type add_func, @function add_func: pushl %ebp # setting up the stack
movl %esp, %ebp subl $8, %esp
movl 12(%ebp), %eax # load first integer value into eax movl 8(%ebp), %ebx # load second integer value into ebx
addl %ebx, %eax # eax hold the sum

15 FIRST DATES WITH ASSEMBLY PROGRAMMING PAGE 31 OF 52
movl %ebp, %esp # restore the stack pointer popl %ebp # restore the base pointer
ret # pop the return address in EIP Exit_call:
movl $1, %eax int $0x80 # End of program
Let‟s dissect the program
The .type directive tells the linker that „add_func‟ is a function. The next line that says „add_func:‟ gives the symbol add_func the storage location of the next instruction. That‟s how „call‟ knew where
to go when „call add_func‟ is executed.
Execution
Name the program addition.s
Assemble the program $ as –gstabs –o addition.o addition.s Link the program $ ld –o addition addition.o Execute the program $ ./addition
After the successful execution of the program, check the exit status of program to see the sum of the supplied integer values:
# echo $?
If any of the above commands report error(s), do spell check for the source
code and commands. After correcting the source code, you have to re-run all the commands.
You must always re-assemble and re-link assembly programs after the source code file has been modified.
Play Ground Try adding three integer values
References
Refer to page 55 and 56 of Programming from Ground Up for stack layout in
case of function calls
What we
learnt?
When a function is done executing, it does the following:
Returns the value in register %eax
Resets the stack to what it was before call to function
Control is returned back to where ever it was called from. The „ret‟ instruction does this by popping out the value of the top of the stack and
sets the instruction pointer EIP to that value.

15 FIRST DATES WITH ASSEMBLY PROGRAMMING PAGE 32 OF 52
Date – 8: Me Beer + She Vodka – (Compute the value of (a b + c d))
Purpose
Further analyze the function calls and stack layout.
To compute the value of (2 3 + 4 2)
Input -
Program Flow
See in the program explanation
Output The value of mathematical expression (2 3 + 4 2)
# Program explaining the way function call is made. # Program to do the following: # ( 2^3 + 4^2 )
.section .data # Initializing data Base_1: .long 2
Base_2: .long 4 Power_1:
.long 3 Power_2: .long 2
.section .bss
.section .text .globl _start
_start: nop pushl Power_1 # push power
pushl Base_1 # push base call raise_func # call function
addl $8, %esp # move the stack pointer back pushl %eax # save the returned value on stack for later use
pushl Power_2 # push power for next call to function pushl Base_2 # push base for next call to function
call raise_func # call function
addl $8, %esp # move the stack pointer back popl %ebx # pop out the value saved in stack earlier
addl %eax, %ebx # eax currently holds the return value of 2nd
function call

15 FIRST DATES WITH ASSEMBLY PROGRAMMING PAGE 33 OF 52
call Exit_call
# The input to the following function is “Base” and “Power”. It returns the value of base raise power in %eax register.
.type raise_func, @function raise_func:
pushl %ebp # Setting up the stack movl %esp, %ebp movl 12(%ebp), %ecx # Take “power” into ecx
movl 8(%ebp), %ebx # Take “base” into ebx
movl $1, %eax
power_loop: cmpl $0, %ecx je Return
imull %ebx, %eax
loop power_loop # The value of ecx decrements by „1‟ with every execution of „loop‟ instruction.
Return: movl %ebp, %esp
popl %ebp ret
Exit_call: movl $1, %eax int $0x80
Let‟s dissect the program
That‟s quite interesting program to learn some new stuff. Agenda is to find the result of mathematical expression (2 3 + 4 2).
Our program is designed the way to make a call to function „raise_func‟ twice. With each call it would return the result of „base power‟. In current case, during first call to function, the function will return the value of 2 3 and during second
call it will return the result of 4 2. Finally we would add up the return values to get the answer.
The point to notice here is the behavior of register %eax. Whenever a call is made to a function, the register eax is going to be altered for sure. Actually the return value of any function call by default goes into register eax.
Other registers might also get altered depending on the code. Hence it is advisable to save the values of registers during function calls if the old values of registers would be needed later.
You might have observed by now that inside the section „power_loop‟ we are keeping the result of multiplication in register eax. Hence during function return, the output of our „base power‟ would be in register eax.
After first call to function „raise_func‟, register eax is holding the return value which is in fact the result of 2 3. It‟s been pushed to stack to be popped later as eax is going to be altered soon with the next
call to „raise_func‟.

15 FIRST DATES WITH ASSEMBLY PROGRAMMING PAGE 34 OF 52
After the second call to „raise_func‟, eax is holding the result of 4 2 and we are popping out the earlier result of 2 3 from stack into ebx.
The summation of both would produce the desired result into register ebx.
One more point to note down: In order to see the result, we keep the answer as exit status of program in register ebx. Mind it, the maximum value for exit status cannot exceed 256.
Execution
Name the program raise_power.s Assemble the program $ as –gstabs –o raise_power.o raise_power.s Link the program $ ld –o raise_power raise_power.o
Execute the program $ ./raise_power The register %ebx will hold the final answer of summation.
If any of the above commands report error(s), do spell check for the source code and commands. After correcting the source code, you have to re-run all
the commands. You must always re-assemble and re-link assembly programs after the source
code file has been modified.
Play Ground
Create space for local variables and use them for temporary storage instead of
registers. In bigger programs there might not be enough registers left to store temporary values in, so practice offloading them into local variables. Open up gdb and analyze the program flow and values in stack and registers.
References -
What we learnt?
When a function is done executing, it does the following:
Returns the value in register %eax
Resets the stack to what it was before call to function
Control is returned back to where ever it was called from. The „ret‟
instruction does this by popping out the value of the top of the stack and sets the instruction pointer EIP to that value.
256 is the highest exit status value.

15 FIRST DATES WITH ASSEMBLY PROGRAMMING PAGE 35 OF 52
Date – 9: Time to Exaggerate Your Qualities - (Recursive program to find the factorial)
Purpose To compute the factorial of a number
Input -
Program Flow -
Output The factorial value of the supplied integer number
# Program to find the factorial of a number # Program to do the following: # factorial 4 : 4 * 3 * 2 * 1 = 24
.section .data # Initializing data Int1: .long 4
.section .bss
.section .text .globl _start _start:
nop pushl Int1 # push the number
call factorial # call function addl $4, %esp # move the stack pointer back
movl %eax, %ebx # take the returned factorial value in exit status register call exit_call
exit_call: movl $1, %eax
int $0x80 # The input to the following function is an integer value. It returns the factorial value of that number in %eax register.
.type factorial, @function factorial: pushl %ebp # Setting up the stack
movl %esp, %ebp movl 8(%ebp), %eax
cmpl $1, %eax jle end_factorial
decl %eax pushl %eax

15 FIRST DATES WITH ASSEMBLY PROGRAMMING PAGE 36 OF 52
call factorial
end_factorial: movl 8(%ebp), %ebx imull %ebx, %eax
movl %ebp, %esp popl %ebp ret
Let‟s dissect the program
The following would be the layout of stack once the execution of program enters the section „end_factorial‟ i.e. after the recursion of factorial function has already taken place:
Bottom of the Stack
4
RET (address of addl $4, %esp)
old ebp 0x00
3
RET
(address of end_factorial section)
old ebp
2
RET
(address of end_factorial section
old ebp
1
RET (address of end_factorial section
old ebp
Top of the Stack

15 FIRST DATES WITH ASSEMBLY PROGRAMMING PAGE 37 OF 52
By this point, register eax is holding an integer value 1.
Loaded with knowledge and experience from previous programs, the reader should be able to analyze the program flow in gdb well.
Again please note: The value in register ebx should not exceed 256 while making call to the exit function.
Execution
Name the program factorial.s Assemble the program $ as –gstabs –o factorial.o factorial.s
Link the program $ ld –o factorial factorial.o Execute the program $ ./factorial
The register %ebx will hold the final answer of factorial. If any of the above commands report error(s), do spell check for the source
code and commands. After correcting the source code, you have to re-run all the commands.
You must always re-assemble and re-link assembly programs after the source code file has been modified.
Play Ground
Open up gdb and analyze the program flow and values in stack and registers.
References -
What we
learnt?
When a function is done executing, it does the following: a) Returns the value in register %eax
b) Resets the stack to what it was before call to function c) Control is returned back to where ever it was called from. The „ret‟ instruction does this by popping out the value of the top of the stack and sets
the instruction pointer EIP to that value. 256 is the highest exit status value.

15 FIRST DATES WITH ASSEMBLY PROGRAMMING PAGE 38 OF 52
Date – 10: Let Her Read Your Mind - (File Handling Copy data from one file to another)
Purpose To copy data from one file into another file
Input The name of the files as command line arguments
Program Flow
Open first file in “read” mode
Open second file in “write” mode
Loop reading first file and writing it to second until the first file reaches EOF
Close the opened files
exit
Output A new copy of a file is created
# Program to copy the content of a file to another file, both passed as command line arguments
.section .data # Initializing constants .equ SYS_EXIT, 1 # They are linux system calls with fixed value
.equ SYS_READ, 3 .equ SYS_WRITE, 4
.equ SYS_OPEN, 5
.equ SYS_CLOSE, 6 . .equ SYS_CALL, 0x80
.equ O_RDONLY, 0
.equ O_WRONLY, 03101
.equ END_OF_FILE, 0 .section .bss
.equ BUFFER_SIZE, 500 # Reserving a space of 500 bytes to read data from file .lcomm BUFFER_DATA, BUFFER_SIZE
.section .text .equ SIZE_RESERVE, 8 # Reserve space on stack to hold file descriptors .equ FD_IN, -4 # File descriptor for first file to be opened in “read” mode
.equ FD_OUT, -8 # File descriptor for second file to be opened in “write” mode .equ ARGC, 0 # Number of arguments passed .equ ARGV_0, 4 # Program name
.equ ARGV_1, 8 # The first command line argument i.e. the first file
.equ ARGV_2, 12 # The second command line argument i.e. the second file
.globl _start _start: nop movl %esp, %ebp # Setting up the stack
subl $SIZE_RESERVE, %esp # Reserving space on stack for file descriptors Open_file:
Open_fd_in: # Opening first file in Read-Only mode movl $SYS_OPEN, %eax

15 FIRST DATES WITH ASSEMBLY PROGRAMMING PAGE 39 OF 52
movl ARGV_1(%ebp), %ebx movl $O_RDONLY, %ecx
movl $0666, %edx int $SYS_CALL
movl %eax, FD_IN(%ebp) # Saving file descriptor on stack as the register %eax would be overwritten soon
Open_fd_out:
movl $SYS_OPEN, %eax # Opening second file in Write mode
movl ARGV_2(%ebp), %ebx movl $O_WRONLY, %ecx movl $0666, %edx
int $SYS_CALL movl %eax, FD_OUT(%ebp) # Saving file descriptor on stack as the register %eax would be overwritten soon
Read_loop: # Reading data from the file been opened in RO mode
movl $SYS_READ, %eax movl FD_IN(%ebp), %ebx movl $BUFFER_DATA, %ecx
movl $BUFFER_SIZE, %edx int $SYS_CALL
cmpl $END_OF_FILE, %eax # Stop reading the file once EOF has reached jle End_loop
Write_File: # Writing the read data to second file
movl %eax, %edx # Size of buffer read is returned in %eax movl $SYS_WRITE, %eax movl FD_OUT(%ebp), %ebx
movl $BUFFER_DATA, %ecx int $SYS_CALL
jmp Read_loop End_loop:
movl $SYS_CLOSE, %eax # Clean up work. Closing first file. movl FD_IN(%ebp), %ebx int $SYS_CALL
movl $SYS_CLOSE, %eax # Closing second file movl FD_OUT(%ebp), %ebx
int $SYS_CALL
Exit_call: movl $SYS_EXIT, %eax movl $0, %ebx
int $0x80
Let‟s dissect the program

15 FIRST DATES WITH ASSEMBLY PROGRAMMING PAGE 40 OF 52
The first point need to be noted is the way command line arguments are placed on stack.
Let‟s say some xyz program has been executed as follows: # ./xyz file1.txt file2.txt file3.txt
The stack would look like: Top of the stack
argv_3 (third command line argument)
argv_2 (second command line argument)
argv_1 (first command line argument)
Program name
argc
(the number of arguments passed)
Bottom of the stack
Now the logic behind the program is: 1. Open the first file in RO mode 2. Open the second file in Write mode
3. Read data from opened file into buffer, 500 bytes at a time. If read 0 i.e. EOF, stop reading and go to step 6
4. Write the data found in buffer to second file
5. Go the step 3 6. Close the files when nothing more has to be read or write 7. Exit the program
The program has been started with the declaration of many constant values. This has been done to make the program more meaningful and to ease the amendment task.
The syntax for the same is: .equ String_name, value
All the needed system calls, buffer size, stack distance etc. have been declared as constants and throughout the program we just need to refer the values using string constants, making more sense
to the reader of the program. To open a file:
1. Pass the system call number in %eax 2. The address of the file name in %ebx 3. The mode (read/write) in %ecx (its 0 for read-only)
4. Permission value in %edx 5. Call the interrupt
With a successful “open” call, linux will return the file descriptor in %eax.
15 FIRST DATES WITH ASSEMBLY PROGRAMMING PAGE 41 OF 52
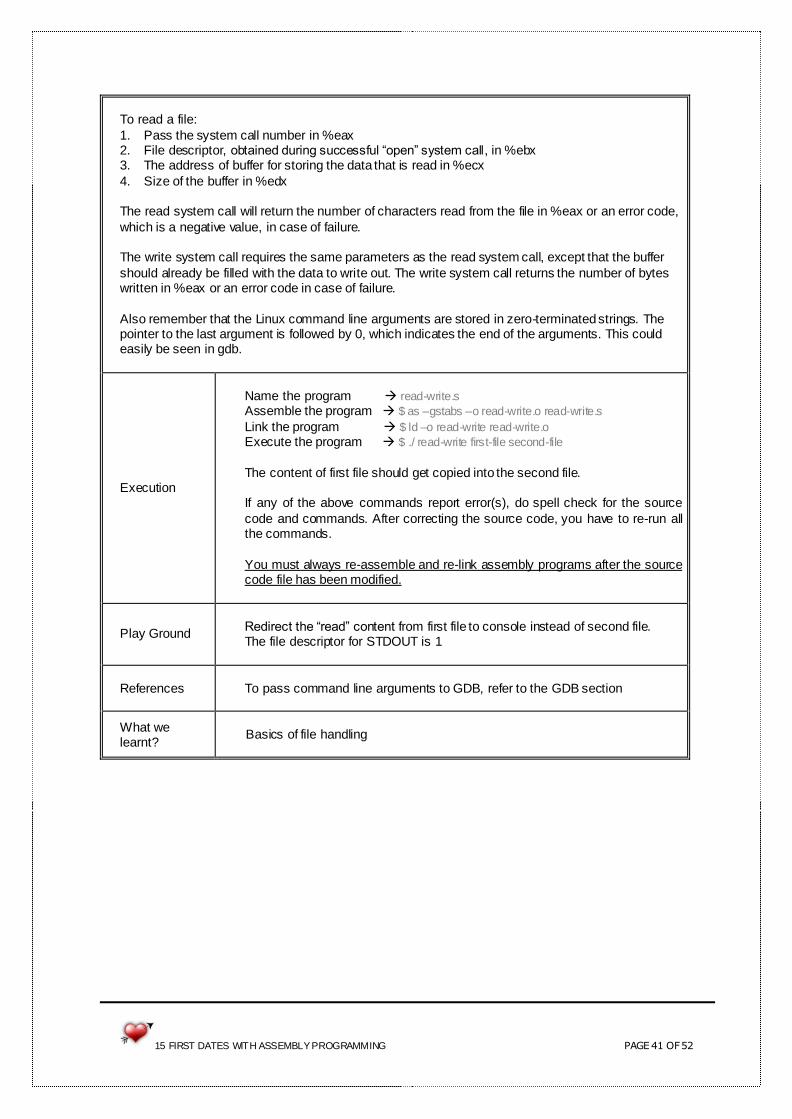
To read a file:
1. Pass the system call number in %eax 2. File descriptor, obtained during successful “open” system call, in %ebx 3. The address of buffer for storing the data that is read in %ecx
4. Size of the buffer in %edx
The read system call will return the number of characters read from the file in %eax or an error code,
which is a negative value, in case of failure. The write system call requires the same parameters as the read system call, except that the buffer
should already be filled with the data to write out. The write system call returns the number of bytes written in %eax or an error code in case of failure.
Also remember that the Linux command line arguments are stored in zero-terminated strings. The pointer to the last argument is followed by 0, which indicates the end of the arguments. This could easily be seen in gdb.
Execution
Name the program read-write.s Assemble the program $ as –gstabs –o read-write.o read-write.s
Link the program $ ld –o read-write read-write.o Execute the program $ ./ read-write first-file second-file
The content of first file should get copied into the second file. If any of the above commands report error(s), do spell check for the source
code and commands. After correcting the source code, you have to re-run all the commands.
You must always re-assemble and re-link assembly programs after the source code file has been modified.
Play Ground
Redirect the “read” content from first file to console instead of second file. The file descriptor for STDOUT is 1
References
To pass command line arguments to GDB, refer to the GDB section
What we learnt?
Basics of file handling

15 FIRST DATES WITH ASSEMBLY PROGRAMMING PAGE 42 OF 52
Date – 12: Oops! CAT in Thoughts – (File Handling Implementing CAT Linux Command)
Purpose To implement Linux „cat‟ command through assembly program
Input Name of the file as command line argument. If none specified, STDIN would be used for input
Program Flow
See in the program explanation
Output Implementation of CAT Linux command
# Program to implement Linux „cat‟ command through assembly program
# Implementation of Linux „cat‟ command through Assembly program
# Pass the name of the file/files as command line arguments. If nothing is mentioned, read from STDIN
# ./pgm file1.txt file2.txt
.section .data # Initializing constants .equ SYS_EXIT, 1 # They are linux system calls with fixed value
.equ SYS_READ, 3 .equ SYS_WRITE, 4 .equ SYS_OPEN, 5
.equ SYS_CLOSE, 6 .equ STDIN, 0 # This would be required in case of 0 arguments
.equ STDOUT, 1 .equ SYS_CALL, 0x80
.equ O_RDONLY, 0 .equ END_OF_FILE, 0
.equ NUM_OF_ARGUMENTS, 0 # To keep track of the arguments passed .section .bss
.equ BUFFER_SIZE, 500 .lcomm BUFFER_DATA, BUFFER_SIZE # Reserving a space of 500 bytes to read data from file
.section .text .equ SIZE_RESERVE, 4 # Reserve space on stack to hold file descriptor
.equ FD_IN, -8 # File descriptor for the file opened in “read” mode .equ ARGC, 0 # Number of arguments passed .equ ARGV_0, 4 # Program name
.equ ARGV_1, 8 # The first command line argument. In the program you would notice that we do not need to declare more constants in order to access other command line arguments.
.globl _start

15 FIRST DATES WITH ASSEMBLY PROGRAMMING PAGE 43 OF 52
_start: nop
movl %esp, %ebp # Setting up the stack movl (%esp), %ebx # Collect the number of arguments passed in register ebx decl %ebx # Decrement the value in order to check whether any command line argument i.e. files have been passed or not. If no, switch to STDIN to seek for some input, else proceed with the files been passed as command line arguments.
cmpl $NUM_OF_ARGUMENTS, %ebx
jle Read_STDIN # Seek STDIN for some input
jmp Open_Next_File # Else open the input files
Open_Next_File:
pushl %ebx # Keep track of number of arguments processed subl $SIZE_RESERVE, %esp # Reserving space on stack for file descriptor
Open_fd_in: # Opening file in Read-Only mode movl $SYS_OPEN, %eax movl ARGV_1(%ebp), %ebx
movl $O_RDONLY, %ecx movl $0666, %edx
int $SYS_CALL movl %eax, FD_IN(%ebp) # Saving file descriptor on stack as the register %eax would be overwritten soon
Read_loop: # Reading data from the file been opened in RO mode movl $SYS_READ, %eax movl FD_IN(%ebp), %ebx
movl $BUFFER_DATA, %ecx movl $BUFFER_SIZE, %edx
int $SYS_CALL cmpl $END_OF_FILE, %eax # Stop reading file once EOF has reached
jle End_loop Write_STDOUT: # Writing read data onto console
movl %eax, %edx # Size of buffer read is returned in %eax movl $SYS_WRITE, %eax movl $STDOUT, %ebx
movl $BUFFER_DATA, %ecx int $SYS_CALL
jmp Read_loop
End_loop: movl $SYS_CLOSE, %eax # Clean up work. Closing the file. movl FD_IN(%ebp), %ebx
int $SYS_CALL popl %eax # Popping out the fd value from stack to throw it away
popl %ebx # Retrieving older value of number of arguments passed

15 FIRST DATES WITH ASSEMBLY PROGRAMMING PAGE 44 OF 52
decl %ebx cmpl $NUM_OF_ARGUMENTS, %ebx # Checking for more arguments
jle Exit_call popl %eax # Pop up one more value from top of the stack so that the constant ARGV_1 always point to the next argument once program is done with previous argument
movl %esp, %ebp # Setting up the stack again to deal with next argument
jmp Open_Next_File
Exit_call: movl $SYS_EXIT, %eax movl $0, %ebx
int $0x80 Read_STDIN: # Seek STDIN for input i.e. keyboard
Read_Loop_STDIN: movl $SYS_READ, %eax movl $STDIN, %ebx
movl $BUFFER_DATA, %ecx movl $BUFFER_SIZE, %edx
int $SYS_CALL cmpl $END_OF_FILE, %eax # Press “ctrl + c” to exit the STDIN
jle End_Loop_STDIN Write_Loop_STDOUT: # Output on STDOUT i.e. console
movl %eax, %edx movl $SYS_WRITE, %eax movl $STDOUT, %ebx
movl $BUFFER_DATA, %ecx int $SYS_CALL
jmp Read_Loop_STDIN
End_Loop_STDIN: jmp Exit_call
Let‟s dissect the program The logic behind the program is:
1. First check whether any command line argument is passed or not. If passed, go to step 2 else go to step 8
2. If argument is there, open the file in RO mode
3. Read data from opened file into buffer, 500 bytes at a time. If read 0 i.e. EOF, stop reading and go to step 6
4. Write the data read into buffer to console
5. Go to step 3 6. Close the file when nothing more is there to read and look for next command line argument
passed
7. If next command line argument found, go to step 2. Else exit out of program 8. When no argument is passed, wait for input from keyboard. Echo the input on console
(STDOUT) once it‟s been received from keyboard.
9. Exit out of program when “ctrl + c” is pressed.

15 FIRST DATES WITH ASSEMBLY PROGRAMMING PAGE 45 OF 52
Now let‟s assume that 3 command line arguments have been passed:
./assembly_cat file1.txt file2.txt file3.txt The following would be the layout of stack once the execution of program begins.
The first column of table depicts the state of stack while dealing with file1.txt The second column of table depicts the state of stack while dealing with file2.txt
And the third column of table depicts the state of stack while dealing with file3.txt You would notice that with each successful completion of traversing a file, we are popping out one
argument from stack. This has been done to keep program generic to accept „n‟ number of arguments. This would help to reach the argument(file) every time from register ebp with our constant string value ARGV_1 (8)
Bottom of the Stack
Stack while reading 1
st file Stack while reading 2
nd file Stack while reading 3
rd file
argv_3
(3rd
command line argument)
argv_3
(3rd
command line argument)
argv_3
(3rd
command line argument)
Argv_2
(2nd
command line argument)
Argv_2
(2nd
command line argument)
Argv_2
(2nd
command line argument)
Argv_1
(1st command line argument)
Argv_1
(1st command line argument)
Argv_1
(1st command line argument)
Program name
Program name
ebx = 1
argc
(the number of arguments
passed)
ebx = 2
fd
(file descriptor)
ebx = 3
fd
(file descriptor)
fd
(file descriptor)
Top of the Stack
Loaded with knowledge and experience from previous programs, the reader should be able to analyze the program flow in gdb well.
Execution
Name the program assembly_cat.s Assemble the program $ as –gstabs –o assembly_cat.o assembly_cat.s
Link the program $ ld –o assembly_cat assembly_cat.o

15 FIRST DATES WITH ASSEMBLY PROGRAMMING PAGE 46 OF 52
Execute the program $ ./ assembly_cat
If command line argument has been passed, the content of it would get displayed on screen; else the program would sit and wait for some input from keyboard to be echoed back onto console.
If any of the above commands report error(s), do spell check for the source code and commands. After correcting the source code, you have to re-run all
the commands. You must always re-assemble and re-link assembly programs after the source
code file has been modified.
Play Ground Open up gdb and analyze the program flow and values in stack and registers.
References Refer the GDB cheat sheet to play around with the code while debugging
What we
learnt? Some more stack manipulation

15 FIRST DATES WITH ASSEMBLY PROGRAMMING PAGE 47 OF 52
Date – 14: Plead 100 Times Now – (Print 1-100 on Console Using Shared Libraries)
Purpose To print the series from 1 to 100 on console using shared libraries
Input -
Program Flow
See in the program explanation
Output A series from 1 to 100 would be printed out on console separated by newlines
# Print the numbers from 0 to 100 on console.
.section .data format_string: .asciz "%d\n"
.section .text .globl _start
_start: movl $0, %eax # Starting value
movl $100, %ebx # End value
loop: # push them on stack else would be overwritten during call to printf library function
pushl %eax pushl %ebx
# Display the current value i.e. value in register eax on console.
pushl %eax pushl $format_string call printf
addl $8, %esp popl %ebx
popl %eax # Check against the ending value.
cmpl %eax, %ebx je exit_call
# Increment the current value.
incl %eax jmp loop
exit_call: movl $1, %eax
movl $0, %ebx int $0x80

15 FIRST DATES WITH ASSEMBLY PROGRAMMING PAGE 48 OF 52
Let‟s dissect the program
All our earlier programs were statically-linked, as they contained all of the necessary functionality for the program that wasn‟t handled by the kernel.
The current program is dynamically-linked, which means that not all of the code needed to run the program is actually contained within the program file itself, but in external libraries.
The beginning and the end of the desired result has been initialized and pushed onto the stack. They are kept safe on stack because call to printf library function would return the result in register eax,
hence overwrite the previous value. Some other register can definitely be used to avoid push-pop actions.
The following function code is nothing but the „c‟ programming way of calling printf routine,
pushl %eax pushl $format_string call printf
addl $8, %esp where the arguments passed to printf are first pushed on to the stack in reverse order and then
following the number of %s or %d in the string the arguments are taken from the stack. The format_string is the first parameter to printf, and printf uses it to find out how many parameters it was given, and what kind they are.
In current case, format_string is “%d\n”. So the printf function knows that only one value has to be taken from the stack and the nature of value is int (interger).
The stack has been adjusted after every call to printf within loop.
Execution
Name the program printf_console.s Assemble the program $ as –gstabs –o printf_console.o printf_console.s
Link the program $ ld -dynamic-linker /lib/ld-linux.so.2 -o printf_console printf_console.o -lc
Execute the program $ ./printf_console
A series from 1 to 100 would be printed out on console separated by newlines. If any of the above commands report error(s), do spell check for the source
code and commands. After correcting the source code, you have to re-run all the commands.
You must always re-assemble and re-link assembly programs after the source code file has been modified.
Play Ground
Print “Hello World” using shared libraries
References -
What we learnt?
The way shared libraries can be used with the assembly codes
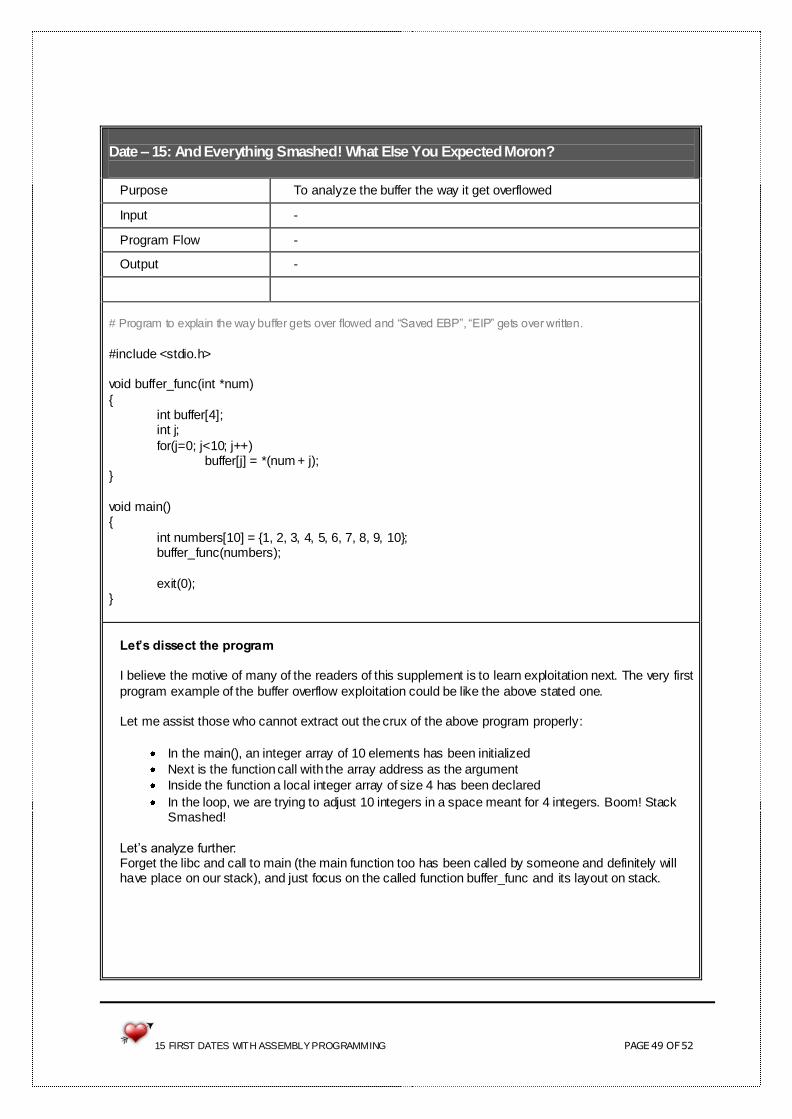
15 FIRST DATES WITH ASSEMBLY PROGRAMMING PAGE 49 OF 52
Date – 15: And Everything Smashed! What Else You Expected Moron?
Purpose To analyze the buffer the way it get overflowed
Input -
Program Flow -
Output -
# Program to explain the way buffer gets over flowed and “Saved EBP”, “EIP” gets over written.
#include <stdio.h> void buffer_func(int *num)
{ int buffer[4]; int j;
for(j=0; j<10; j++) buffer[j] = *(num + j); }
void main() {
int numbers[10] = {1, 2, 3, 4, 5, 6, 7, 8, 9, 10}; buffer_func(numbers);
exit(0); }
Let‟s dissect the program I believe the motive of many of the readers of this supplement is to learn exploitation next. The very first
program example of the buffer overflow exploitation could be like the above stated one. Let me assist those who cannot extract out the crux of the above program properly:
In the main(), an integer array of 10 elements has been initialized
Next is the function call with the array address as the argument
Inside the function a local integer array of size 4 has been declared
In the loop, we are trying to adjust 10 integers in a space meant for 4 integers. Boom! Stack Smashed!
Let‟s analyze further: Forget the libc and call to main (the main function too has been called by someone and definitely will have place on our stack), and just focus on the called function buffer_func and its layout on stack.

15 FIRST DATES WITH ASSEMBLY PROGRAMMING PAGE 50 OF 52
Bottom of the Stack
10
9
8
7
6
5
4
3
2
1
RET (EIP)
Saved EBP (push %ebp)
Space for int j
buffer [3]
buffer [2]
buffer [1]
buffer [0]
Top of the Stack
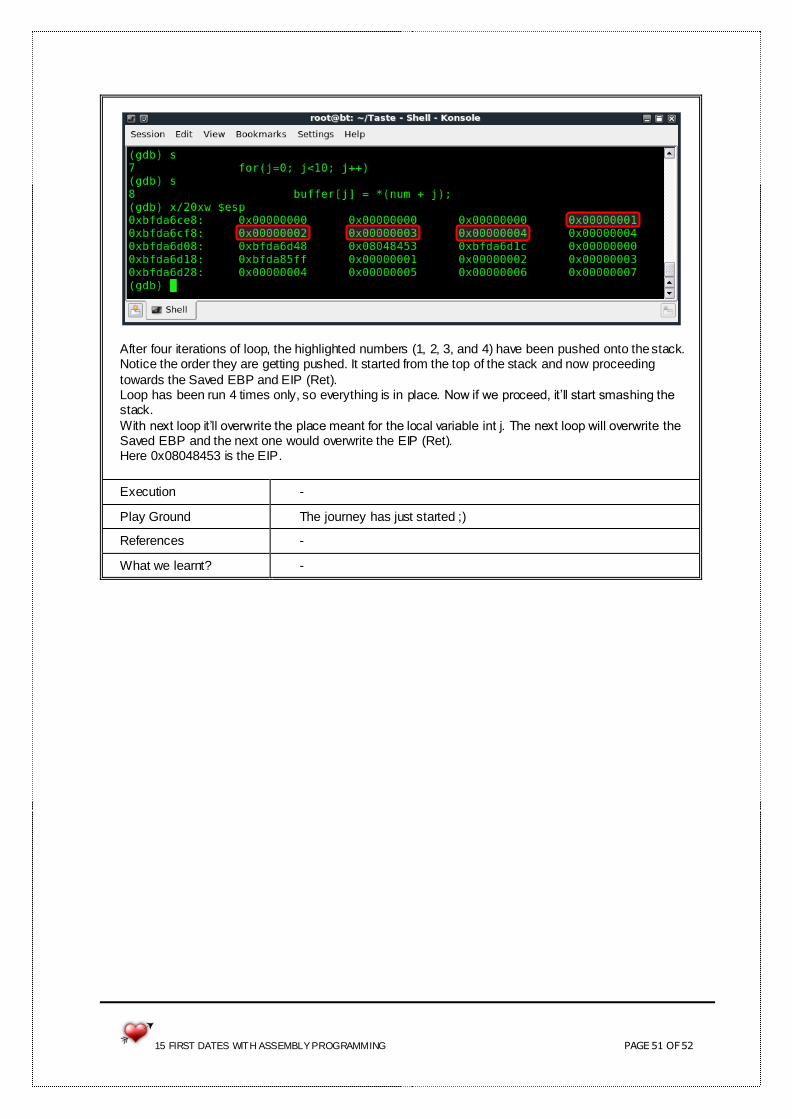
15 FIRST DATES WITH ASSEMBLY PROGRAMMING PAGE 51 OF 52
After four iterations of loop, the highlighted numbers (1, 2, 3, and 4) have been pushed onto the stack. Notice the order they are getting pushed. It started from the top of the stack and now proceeding
towards the Saved EBP and EIP (Ret). Loop has been run 4 times only, so everything is in place. Now if we proceed, it‟ll start smashing the stack.
With next loop it‟ll overwrite the place meant for the local variable int j. The next loop will overwrite the Saved EBP and the next one would overwrite the EIP (Ret). Here 0x08048453 is the EIP.
Execution -
Play Ground The journey has just started ;)
References -
What we learnt? -

15 FIRST DATES WITH ASSEMBLY PROGRAMMING PAGE 52 OF 52
Reference
1. Assembly Primer for Hackers Video Series – by Vivek Ramachandran
(http://www.securitytube.net) 2. Programming from the ground up – by Jonathan Bartlett 3. Beej‟s Quick Guide to GDB
4. Intel 80386 Reference Programmer's Manual (http://pdos.csail.mit.edu/6.828/2006/readings/i386/toc.htm)