2) grade 6 question techniques - home - declan plummer€¦ · · 2017-09-06identify whether the...
TRANSCRIPT

Grade 6 Techniques QUESTION 1 (A or B) A) Indicate ONE chord at each of the places marked * to accompany the following melody. You
may do so by (method 1) writing Roman Numerals or another other recognised method of notation between the staves as pictured below, OR (method 2) by writing notes on the staves which provide a proper harmonic structure; but use only ONE of these methods.
B) OR Complete the bass line and suitable figures as necessary at the places marked * in a passage. If you wish to use a 5-3 chord leave the space under the asterisk blank, but 5-3 chords must be shown as part of a cadential 6-4 or when chromatic alteration is required.
Working the Question: 1. Identify key implied by the key signature and the melody you’ve been given 2. Write out and label all the triads of the key, including their extended Roman numerals 3. Be aware that minor keys have two possible chords for each scale degree (except the tonic). 4. Hum the music in your head to get familiar with the melodic shape – use a comfortable tonic 5. Identify and mark the cadences, using the phrase structure of the piece. 6. Start at cadential points and work backwards! 7. Put diminished chords in first inversion to avoid diminished interval between outer voices. 8. Make sure there are no consecutive perfect 5ths or 8ves between the bass and the melody 9. Avoid consecutive root position chords a tone or semitone apart if the bass and melody move in
parallel motion: harmonic overtones imply consecutive perfect 5ths even if they’re not written! 10. You can modulate if you want, but it is not necessary at Grade 6 and there are no extra marks 11. Asterisks denote either a change of chord or a change in the position of the previous chord 12. A horizontal line following an asterisk means that the chord continues without any change 13. Don’t make it too difficult! Chords I, IV and V (and their first inversions) are your friends! If
you want to use other chords, be careful and try to adopt standard chord progressions:
‘Normal’ Progressions using Circle of Fifths(Major Keys)
iii viii V
IIV viio
Pre-Dominant Function Group
Dominant Function Group
‘Normal’ Progressions using Circle of Fifths(Minor Keys)
III VIiio V
iiv viio
Pre-Dominant Function Group
Dominant Function Group
VII
Relative Major
V inrelative major
QUESTION 2
Writing for four-part voices (SATB) or keyboard, realize this figured bass. Assume that all chords are 5-3 (root position) unless otherwise indicated.
Working the Question:
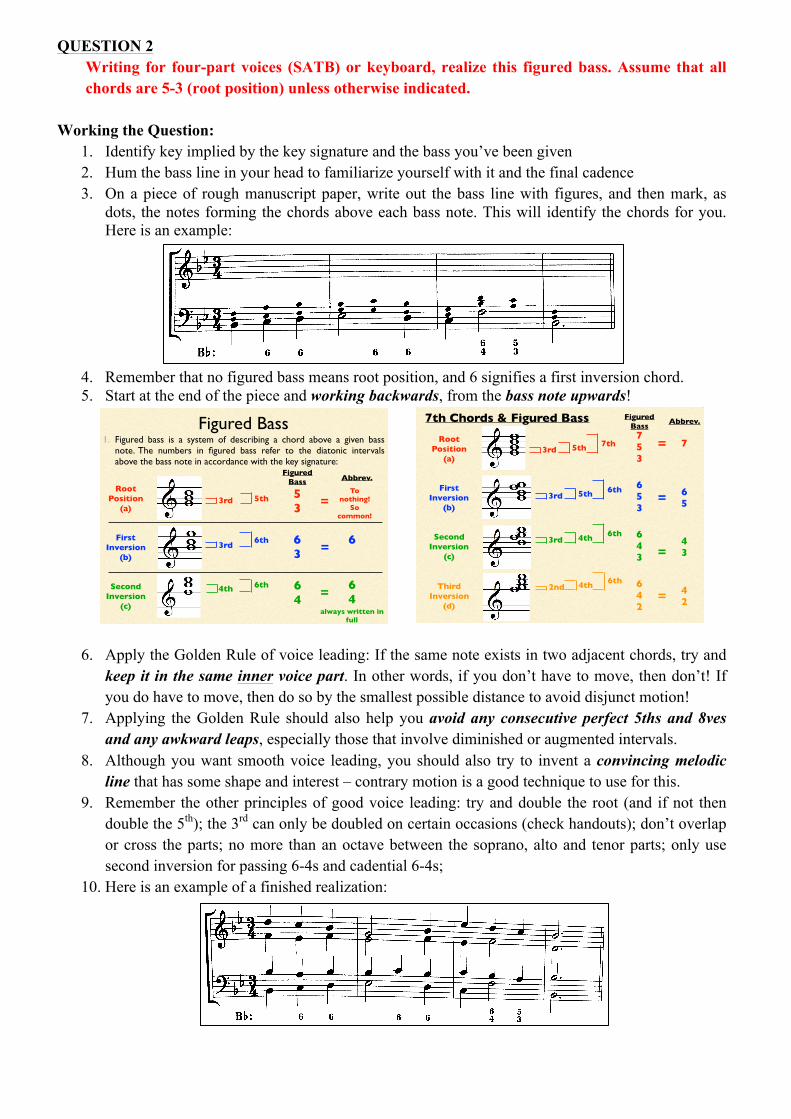
1. Identify key implied by the key signature and the bass you’ve been given 2. Hum the bass line in your head to familiarize yourself with it and the final cadence 3. On a piece of rough manuscript paper, write out the bass line with figures, and then mark, as
dots, the notes forming the chords above each bass note. This will identify the chords for you. Here is an example:
4. Remember that no figured bass means root position, and 6 signifies a first inversion chord. 5. Start at the end of the piece and working backwards, from the bass note upwards!
6. Apply the Golden Rule of voice leading: If the same note exists in two adjacent chords, try and
keep it in the same inner voice part. In other words, if you don’t have to move, then don’t! If you do have to move, then do so by the smallest possible distance to avoid disjunct motion!
7. Applying the Golden Rule should also help you avoid any consecutive perfect 5ths and 8ves and any awkward leaps, especially those that involve diminished or augmented intervals.
8. Although you want smooth voice leading, you should also try to invent a convincing melodic line that has some shape and interest – contrary motion is a good technique to use for this.
9. Remember the other principles of good voice leading: try and double the root (and if not then double the 5th); the 3rd can only be doubled on certain occasions (check handouts); don’t overlap or cross the parts; no more than an octave between the soprano, alto and tenor parts; only use second inversion for passing 6-4s and cadential 6-4s;
10. Here is an example of a finished realization:
Figured Bass1. Figured bass is a system of describing a chord above a given bass
note. The numbers in figured bass refer to the diatonic intervals above the bass note in accordance with the key signature:
Root Position
(a)
FirstInversion
(b)
SecondInversion
(c)
3rd 5th
3rd 6th
4th 6th
Figured Bass Abbrev.
53
63
64
To nothing!
So common!
64
always written in full
6
=
=
=
Root Position
(a)
FirstInversion
(b)
SecondInversion
(c)
ThirdInversion
(d)
3rd 5th 7th
Figured Bass Abbrev.
753
653
643
642
7=
3rd 5th 6th = 65
3rd 4th 6th
=43
2nd 4th 6th
= 42
7th Chords & Figured Bass

QUESTION 3 (A or B) A) Continue the opening to make the melody of between 8 and 20 bars in length. Write for the
instrument indicated and include any modulation as specified. Appropriate performance directions should also be added. – simple, tonal harmony and a stylistic melody (e.g. gigue)
B) OR Continue the opening for the instrument specified to make a complete piece of not less than 8 bars in length. You may make any modulation or modulations you wish, or none if you prefer. Add performance directions as appropriate. – freer, modern, modal/atonal, rhythmic
Working the Question A (Baroque, Classical, Romantic):
1. Identify key implied by the key signature, accidentals and significant melodic ideas. 2. Hum the melodic line in your head to establish its character and mood, noting the tempo, and any
dynamics, slurs/phrase marks, while imagining the sound of the stated instrument. 3. Consider the overall range of your melody (which should not be too narrow) and create a plan:
for example, introduce a fairly high climax point ¾ of the way through, giving the complete piece a good overall curving shape, building up to the climax and then down to the end.
4. Sketch the plan of the complete melody by putting in the bar lines, the given bars, the opening key and the desired modulation at the end.
5. Work out a proper harmonic foundation for the melody, which is extremely important! Your melody should normally suggest to the ear a proper musical progression of chords under it. a. Start from cadences and work backwards: imperfect cadence for the end of the first four-
bars; and perfect cadence for the modulation with a good pre-dominant b. To connect both phrases, you could use either the tonic or the submediant, depending if
opening given bars already suggested the tonic or not. Here is an example:
6. Use balanced phrase structure – the opening two bars should be answered by another two-bar phrase, while the last four bars could be 2 x two-bar phrases or 1 x four-bar phrase. Make sure that if the opening begins with an anacrusis that the following answer phrase does the same!
7. Melody notes approached or left by a leap should be derived from chords suggested by your harmonic structure, except for inessential notes such as appoggiaturas.
8. Melody notes approached or left by a step may be passing notes, neighbor (auxiliary) notes, or other non-harmony tones, and you should be familiar with the correct use for all of these!
9. Remember that wind instruments require the musician to breathe. Slower tempi allow wind players to breathe in between phrases; faster tempi may result in rests.
10. Use rhythm, pitch and interval patterns of the opening to help you develop your melodies. 11. Be familiar with modulation to the dominant, subdominant and relative major/minor. 12. Insert appropriate dynamics, articulation and tempo markings. Here is an example:

Working the Question B (20th century):
1. Your music should sound coherent. A piece of music in which the pitches and rhythms are chosen at random and put together in a totally unorganized way will have no intelligible shape. You must avoid this! So have a plan and show your working out, otherwise it is just noise!
2. Identify whether the music is tonal, modal or atonal – the music may not be tonal, because it lacks any suggestion of perfect cadences and the melody isn’t based on conventional chord progressions. But it still may have a ‘pitch centre’ (a note that is more prominent than the rest).
3. Take note of the instrument, style, tempo indications, dynamics, phrasing and articulation 4. Use rhythm, pitch and interval patterns of the opening to help you develop your melodies.
5. A greater range of note values (between x and s ), and pauses, silences and ties can be used. So music could lack strong or weak beats, or even bar lines or any sense of a time signature!
6. Some notes may sound more important than others because they are stressed, repeated, or are the highest or lowest points of a phrase, or are approached by leap. These are your pitch centres.
7. Your music should focus more on the colouristic devices, with considerable emphasis on the quality of sound, or timbre! So you must give detailed directions for dynamics, phrasing and articulation that are valid and have a purpose! Don’t insert just anything!
8. Remember! Variety is achieved by a simple modification of the initial material. Beginners often make the mistake of introducing too much variety into their music. Look for ways in which the opening material can be developed – don’t give a series of contrasting ideas that bear little relationship to each other or to the opening.