2005 volkswagen new technologies - datarunnerscontent.datarunners.net/content/ssp/801503.pdf · i...
TRANSCRIPT
Self-Study ProgramCourse Number 801503
2005 VolkswagenNew Technologies

Volkswagen of America, Inc. Volkswagen Academy Printed in U.S.A. Printed 09/2005 Course Number 801503
©2005 Volkswagen of America, Inc.
All rights reserved. All information contained in this manual is based on the latest information available at the time of printing and is subject to the copyright and other intellectual property rights of Volkswagen of America, Inc., its affiliated companies and its licensors. All rights are reserved to make changes at any time without notice. No part of this document may be reproduced, stored in a retrieval system, or transmitted in any form or by any means, electronic, mechanical, photocopying, recording or otherwise, nor may these materials be modified or reposted to other sites without the prior expressed written permission of the publisher.
All requests for permission to copy and redistribute information should be referred to Volkswagen of America, Inc.
Always check Technical Bulletins and the latest electronic repair information for information that may supersede any information included in this booklet.
Trademarks: All brand names and product names used in this manual are trade names, service marks, trademarks, or registered trademarks; and are the property of their respective owners.

i
Table of Contents
Important/Note!
New!
This Self-Study Program covers some systems of the 2006 Passat.
This Self-Study Program is not a Repair Manual. This information will not be updated.
For testing, adjustment and repair procedures, always refer to the latest electronic service information.
Introduction ................................................................................1New Technologies
Electric Parking Brake Overview ...............................................2Introduction, Electric Parking Brake Features
Electric Parking Brake Operation ...............................................4Electric Parking Brake Operation, Parking Brake Operation, Emergency Brake Operation, Using the Emergency Brake Feature, AUTO HOLD Operation, Hydraulic AUTO HOLD, AUTO HOLD Modes
Electric Parking Brake Components ........................................12Sensors, Actuators, Rear Wheel Brake Actuators, Parking Brake Unit, Toothed Belt Drive, Rear Wheel Brake Actuators, Clutch Position Sensor G476, Electric Parking Brake Button E538, AUTO HOLD Button E540, Indicator Lights, Electric Parking Brake Control Module J540
Electric Parking Brake Communication ..................................25Electric Parking Brake CAN-Bus
Electric Parking Brake Special Features ..................................27Automatic Brake Pad Clearance Adjustment, Brake Pad Replacement Mode
AFS Overview ...........................................................................29Components and Locations
AFS Moving Front Lights .........................................................32Moving Front Light Operation, Illuminated Areas, Operating Requirements
AFS Stationary Front Lights ....................................................34Stationary Front Light Operation, Operating Requirements
AFS Design ................................................................................36Adaptive Front Headlight Assembly, Moving Front Light Assembly, Stationary Front Light Assembly
AFS Service ...............................................................................41Fault Indicator
AFS Communication ................................................................42Sensors, Controlled Components, Control Module Network, CAN Communication
Knowledge Assessment ...........................................................48

ii
This page intentionally left blank

1
Introduction
New Technologies
This Self-Study Program focuses on new features found on the 2006 Passat.
These new features include:
• Electric Parking Brake
• Adaptive Front Lighting System

2
Electric Parking Brake Overview
AUTO HOLD Button E540Clutch Position Sensor
Rear Wheel Brake Actuators
Electric Parking Brake Control Module J540
ABS Control Module J104
Electric Parking Brake Button E538
S346_095
Introduction
This section provides detailed information on the electric parking brake. Topics covered include: system overview, components, operation, special features, CAN networking, and operational diagram.

3
Electric Parking Brake Overview
Electric Parking Brake Features
The electric parking brake offers many advantages over the mechanical hand parking brake. Significant advantages include:
• Greater interior design freedom The hand brake lever is replaced by a button. This allows greater freedom when designing the interior, the center console and the footwell area
• More customer features Through the use of electronic controls and CAN networking, the electric parking brake can integrate with the AUTO HOLD function
• Production advantages The elimination of the hand brake lever and hand brake cables allow simplification of the production and assembly process
• Self-diagnosis capability The electric parking brake system can be monitored constantly
Hand Parking Brake Electric Parking Brake
Setting Pull hand brake lever Press button
Releasing Release hand brake lever Apply brake pedal and press button
Stop and GoContinuous setting and releasing the parking brake or continuous operation of the foot brake
When AUTO HOLD is selected, the vehicle is automatically held at each stop.
A Comparison of a Hand Parking Brake and the Electric Parking Brake

4
Electric Parking Brake Operation
S346_088
Braking Starts
4.4 mph(7 km/hr) Vehicle at Standstill
Electric Braking
Hydraulic Braking
Electric Parking Brake Operation
The electric parking brake system provides the following modes of operation:
• Parking brake
• Emergency brake
• AUTO HOLD
Depending on vehicle speed when the brakes are applied, a distinction is made between static braking (vehicle speed less than 4.4 mph [7 km/hr] and dynamic braking (vehicle speed greater than 4.4 mph [7 km/hr]).
Static braking applies and releases the parking brake electrically.
Dynamic braking slows the vehicle via ABS/ESP, meaning the brakes are applied hydraulically.
The electric parking brake’s modes of operation are explained in greater detail on the following pages.

5
Electric Parking Brake Operation
S346_068
S346_064
S346_070
S346_066
Parking Brake Operation
The electric parking brake provides safe parking on grades of up to 30 percent. The electric parking brake is applied by pressing the Parking Brake button. The electric parking brake is released by pressing the brake pedal, holding it, then pressing the Parking Brake button.
Apply
The electric parking brake can be applied at any time even when the ignition is OFF.
When the parking brake is applied with the ignition ON, the indicator light in the electric parking brake button and the indicator light for the brake light both come ON.
If the electric parking brake is applied with the ignition OFF, both indicator lights come ON for 30 seconds and then go OFF.
Release
The electric parking brake can only be released with the ignition ON.
The electric parking brake releases when the brake pedal and the electric parking brake button are pressed at the same time.
If the brake pads and rotors cool after the vehicle sets for a while, the electric parking brake automatically tightens if necessary. This is a calculated function.

6
Electric Parking Brake Operation
E538 Electric Parking Brake ButtonJ104 ABS Control ModuleJ540 Electric Parking Brake Control Module V282 Left Parking Brake Motor V283 Right Parking Brake Motor
S346_090
J104
E538
V282 V283
J540 V<4.4 mph (7 km/hr)
Using the Electric Parking Brake
The Electric Parking Brake operates as follows:
1. The driver presses the Electric Parking Brake Button E538.
2. The Electric Parking Brake Control Module J540 communicates with the ABS Control Module J104 through the dedicated CAN-bus and determines that the vehicle speed is less than 4.4 mph (7 km/hr).
3. The Electric Parking Brake Control Module activates the two locking motors on the rear wheel brakes. The brake is applied automatically.
4. If the driver presses the electric parking brake button again while pressing the foot brake, the rear wheel parking brakes will release.

7
Electric Parking Brake Operation
Emergency Brake Operation
If the brake pedal fails or is blocked, the vehicle can be stopped using the emergency brake.
Apply
Pressing and holding the electric parking brake button causes a moving vehicle to be braked at a rate of approximately 6m/s2.
A warning sounds and the brake lights turn ON.
At a vehicle speed greater than 4.4 mph (7 km/hr), the emergency brake applies by increasing hydraulic brake pressure at all 4 wheels. Depending on the situation, the braking may be regulated by the ABS/ESP system to maintain vehicle stability.
If the button is pressed at a vehicle speed less than 4.4 mph (7 km/hr), the parking brake is applied.
Release
If the vehicle speed is greater than 4.4 mph (7 km/hr) after emergency braking has occurred, the brake releases when the electric parking brake button is released or the accelerator pedal is pressed.
If the vehicle has stopped, the parking brake will engage.
When the electric parking brake button is pressed, the engine goes to idle and related features such as cruise control, automatic cruise control or AUTO HOLD are turned off.
The emergency braking will function with the ignition OFF.

8
Electric Parking Brake Operation
E538 Electric Parking Brake ButtonJ104 ABS Control ModuleJ540 Electric Parking Brake Control Module V282 Left Parking Brake Motor V283 Right Parking Brake Motor
S346_092
J540
V282 V283
J540
J104
Using the Emergency Brake Feature
1. The driver presses and holds the Electric Parking Brake Button E538.
2. The Electric Parking Brake Control Module J540 communicates with the ABS Control Module J104 via the CAN-bus to determine if the vehicle speed is greater than 4.4 mph (7 km/hr).
3. If the vehicle speed is greater than 4.4 mph (7 km/hr), the ABS Control Module J104 activates the hydraulic pump, builds up brake pressure and applies the brakes to all four wheels.
4. If J538 is released or the accelerator pedal is pressed and J540 determines that the vehicle speed is still greater than 4.4 mph (7km/hr), the brakes are released.
If the vehicle has stopped, the parking brake will be engaged.
9
Electric Parking Brake Operation
S346_086
S346_082
AUTO HOLD Operation
AUTO HOLD assists the driver when the vehicle is standing still and in starting off events (forward or reverse travel).
Activation
AUTO HOLD activation can only occur if the:
• Driver-side door is closed
• Safety belt is buckled
• Engine is running
Whenever the vehicle is restarted, the AUTO HOLD feature must be reactivated by pressing the AUTO HOLD button.
To activate AUTO HOLD, press the AUTO HOLD button in the center console. The indicator light in the button lights showing that the AUTO HOLD system is active.
Deactivation
If any one of the Activation conditions change, the AUTO HOLD feature turns OFF.
To deactivate AUTO HOLD, press the AUTO HOLD button again. The indicator light in the button goes off showing that the AUTO HOLD system is inactive.
The AUTO HOLD function also includes the following assistance features:
Stop and Go Assistance
Less effort is required during stop-and-go driving because it is no longer necessary to use the brake pedal to hold the vehicle still.
10
Electric Parking Brake Operation
S346_084
S346_080
Start-off Assistance
When AUTO HOLD is activated, start-off assistance automatically holds the vehicle in a parked position on a grade until the accelerator pedal is pressed.
Automatic Parking Brake Application
When the vehicle is stopped with the AUTO HOLD feature activated, and the driver-side door is open, the safety belt is unbuckled or the ignition is OFF, the parking brake will automatically apply.
Hydraulic AUTO HOLD
When the AUTO HOLD feature is first activated, the vehicle is held in place hydraulically by the four wheel brakes.
When the driver applies the brakes by pressing the brake pedal, pressure is held by blocking the valves in the ABS unit. The driver is no longer required to press the brake pedal to hold the vehicle in place.
If the driver does not press the brake pedal and the vehicle starts to move after a detected stop, ESP is activated and brake pressure is applied by the ABS pump.
After the vehicle is held for three minutes, a switch from ESP hydraulic to the electric parking brake is made. The vehicle will move away seamlessly when the accelerator pedal is pressed.

11
Electric Parking Brake Operation
E540 AUTO HOLD Button J104 ABS Control ModuleJ540 Electric Parking Brake Control ModuleV282 Left Parking Brake Motor V283 Right Parking Brake Motor
S346_116
3 minutes
J104
E540
J540
V283V282
J104
E540
J540
V283V282
AUTO HOLD Modes
1. Initially AUTO HOLD prevents vehicle movement by hydraulically applying the four wheel brakes. This is set, monitored, and adjusted by the ABS Control Module J105 depending on the grade the vehicle is on.
2. After 3 minutes, the electric parking brake takes over. J104 communicates the torque required to hold the vehicle to the Electric Parking Brake Control Module J540.
3. J540 activates the left and right locking parking brake motors V282 and V283 on the rear wheel brakes. The brakes are now set electrically and the hydraulic brake pressure is reduced by J105.
12
Electric Parking Brake Components
Sensors Actuators
Clutch Position Sensor G476
Electric Parking Brake Button E538
AUTO HOLD Button E540
Left Parking Brake Motor V282
Right Parking Brake Motor V283Electric Parking Brake Control Module J540
ABS Control Module J104
Electric Parking Brake Indicator Lamp K213
Brake System Warning Lamp K118
Electric Park/Handbrake Malfunction Indicator Lamp K214
AUTO HOLD Indicator Lamp K237
S346_062

13
Electric Parking Brake Components
Rear Wheel Brake Actuators
The electric rear brake actuator is an integral part of the rear wheel brake caliper. The electric motor, the multistage gear and the spindle drive convert the “Activate Parking Brake” command into a specified force that applies the rear brakes.
Multistage Gear
Brake Caliper
Electric Motor (Locking Motor)
S346_041

14
Electric Parking Brake Components
Parking Brake Unit
Only slight movement of the brake piston is required to set the parking brake. The rotational motion of the electric motor is converted into a linear motion in three stages with an overall ratio of 1:150 (150 revolutions of the electric motor for each revolution of the spindle drive).
Spindle Drive
Brake Piston
Swash Plate Gear
Gear Housing
Brake Piston
Toothed Belt
Electric Motor
1st stage–toothed belt drive The first stage (ratio of 1:3) is from the electric motor to the swash plate gear input.
2nd stage–swash plate gear The second stage (ratio of 1:50) is produced by the swash plate gear.
3rd stage–spindle drive The spindle drive converts the rotational motion into linear motion.
S346_032
S346_034

15
Electric Parking Brake Components
Toothed Belt Drive
In the first stage (1:3), the toothed belt transmits power from the electric motor to the swash plate gear. The toothed belt drive consists of:
• A small gear attached to the electric motor
• A large gear attached to the swash plate
• A toothed belt that connects the small and large gears
The ratio is determined by the gear sizes.
Large Gear (Swash Plate Gear Input)
S346_040
S346_046
Small Gear (Electric Motor Output)
Toothed Belt
Large Gear (Swash Plate Gear Input)
Tab
Shaft
Driven Wheel
Tab
Swash Plate
Swash Plate Gear Assembly
The swash plate gear assembly provides the second stage ratio change (1:50) and consists of a large gear, the swash plate, and the driven wheel.
The swash plate is prevented from rotating in the housing by two tabs that allow only a rocking motion.

16
Electric Parking Brake Components
Spindle Drive
The spindle drive converts the rotational movement of the gears into a linear motion. The spindle is driven by the swash plate gear. The spindle’s direction of rotation determines the thrust nut direction of movement on the spindle drive.
The spindle assembly is self-locking. After the electric parking brake is set, the system remains locked even when the power is OFF.
The thrust nut slides inside the brake piston. Two flat areas on the inside of the brake system piston prevents rotation of the thrust nut.
Thrust Nut
Spindle
Brake Piston
Spindle Thread
Brake PistonSpindle
Thrust Nut
S346_036
S346_038
S346_044

17
Electric Parking Brake Components
Swash Plate Operation
The shaft is pressed into the driven wheel. The large gear with bearing turns freely on this shaft. The swash plate is attached to the hub of the large gear. This hub is bored at an angle and causes the rocking motion of the swash plate.
The driven wheel and swash plate are always engaged at the place where the large gear hub has the least thickness (A).
The swash plate has 51 gear teeth and the driven wheel has 50. Because of this, one tooth never fits exactly into a tooth space and one tooth of the swash plate is always engaging one tooth face of the driven wheel. This engagement forces the driven wheel to rotate slightly.
This moves the driven wheel one tooth width for each revolution of the large gear. Because the driven wheel has 50 teeth, the large gear rotates 50 times for each revolution of the driven wheel. The ratio is 1:50.
Engagement of the Teeth Swash Plate/Driven Wheel
Angular OffsetHub
Shaft
Driven Wheel Swash Plate
Tooth Face
S346_042
S346_114
A
Driven WheelSwash Plate
Large Gear
18
Electric Parking Brake Components
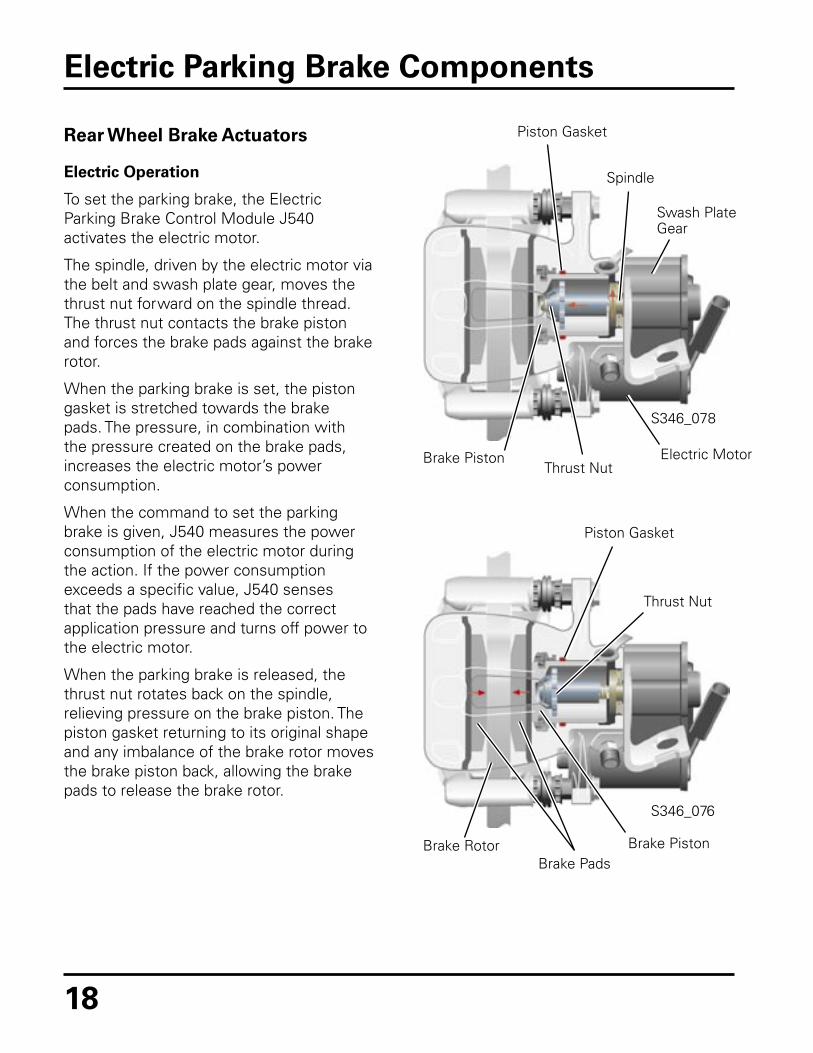
Rear Wheel Brake Actuators
Electric Operation
To set the parking brake, the Electric Parking Brake Control Module J540 activates the electric motor.
The spindle, driven by the electric motor via the belt and swash plate gear, moves the thrust nut forward on the spindle thread. The thrust nut contacts the brake piston and forces the brake pads against the brake rotor.
When the parking brake is set, the piston gasket is stretched towards the brake pads. The pressure, in combination with the pressure created on the brake pads, increases the electric motor’s power consumption.
When the command to set the parking brake is given, J540 measures the power consumption of the electric motor during the action. If the power consumption exceeds a specific value, J540 senses that the pads have reached the correct application pressure and turns off power to the electric motor.
When the parking brake is released, the thrust nut rotates back on the spindle, relieving pressure on the brake piston. The piston gasket returning to its original shape and any imbalance of the brake rotor moves the brake piston back, allowing the brake pads to release the brake rotor.
S346_076
S346_078
Piston Gasket
Spindle
Swash Plate Gear
Electric Motor
Thrust Nut
Brake Piston
Piston Gasket
Brake PistonBrake Pads
Brake Rotor
Thrust Nut

19
Electric Parking Brake Components
Hydraulic Operation
In an emergency braking event, pressing the button for the electric parking brake while the vehicle is moving causes the ABS Control Module J104 to activate, increasing hydraulic brake pressure and forcing the brake pads against the rotors.
Releasing the button ends the braking event. After the braking event has ended, the brake fluid pressure drops and brake pads release the brake rotors.
Holding the button until the vehicle stops applies the parking brake.
S346_074
S346_072
Piston Gasket
Brake Line Connection
Brake FluidBrake Piston
Piston Gasket
Brake Line Connection
Brake Piston
Brake PadsBrake Rotor

20
Electric Parking Brake Components
Clutch Position Sensor G476
The Clutch Position Sensor G476 is attached to the sensor cylinder. It detects when the clutch pedal is pressed.
The G476 signal is used for:
• Engine starting
• Turning off cruise control
• Briefly limiting fuel injection during shifting to prevent engine surge
• Calculating best AUTO HOLD release time
Clutch Pedal with Clutch Position Sensor
Construction
The sensor cylinder attaches to the pivot bracket with a bayonet connector and pushrod.
Pivot Bracket
Pushrod
Clutch Sensor Cylinder
Clutch Position Sensor
Piston with Permanent Magnet
Pedal Travel
S346_098
S346_097
21
Electric Parking Brake Components
Operation
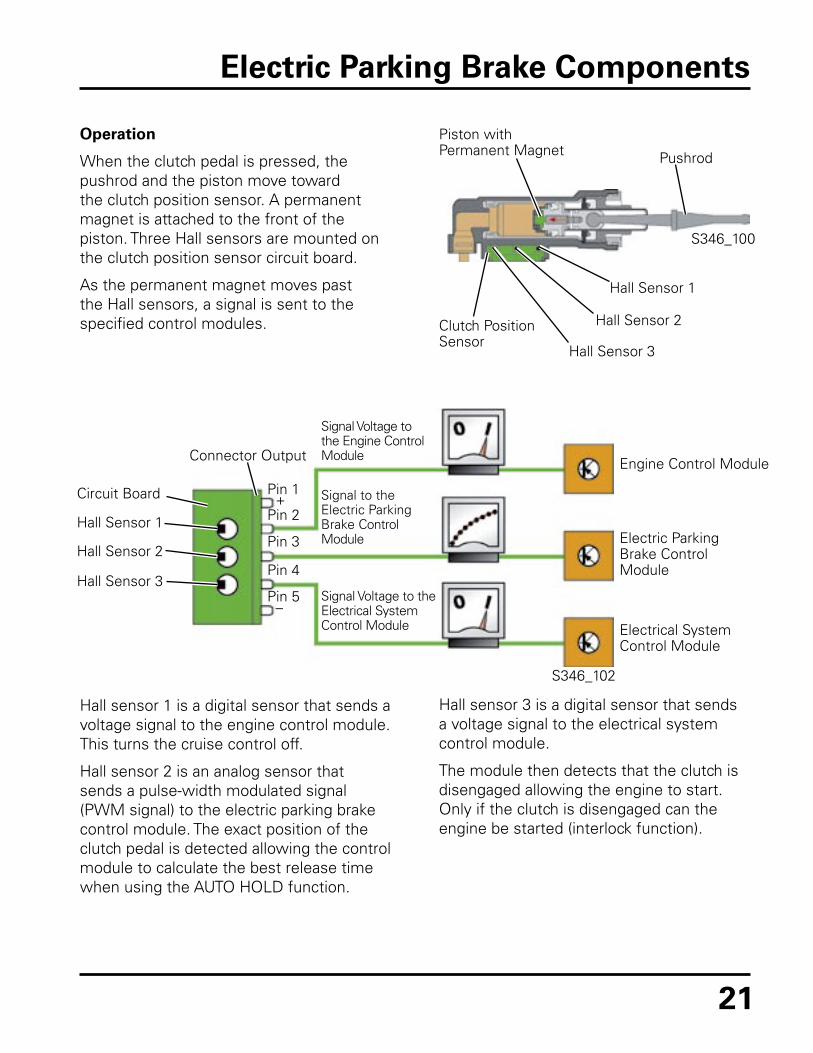
When the clutch pedal is pressed, the pushrod and the piston move toward the clutch position sensor. A permanent magnet is attached to the front of the piston. Three Hall sensors are mounted on the clutch position sensor circuit board.
As the permanent magnet moves past the Hall sensors, a signal is sent to the specified control modules.
Hall sensor 1 is a digital sensor that sends a voltage signal to the engine control module. This turns the cruise control off.
Hall sensor 2 is an analog sensor that sends a pulse-width modulated signal (PWM signal) to the electric parking brake control module. The exact position of the clutch pedal is detected allowing the control module to calculate the best release time when using the AUTO HOLD function.
Hall sensor 3 is a digital sensor that sends a voltage signal to the electrical system control module.
The module then detects that the clutch is disengaged allowing the engine to start. Only if the clutch is disengaged can the engine be started (interlock function).
Piston with Permanent Magnet Pushrod
Hall Sensor 1
Hall Sensor 2
Hall Sensor 3
Clutch Position Sensor
Connector Output
Circuit Board
Hall Sensor 1
Hall Sensor 2
Hall Sensor 3
Signal Voltage to the Engine Control Module
Signal to the Electric Parking Brake Control Module
Signal Voltage to the Electrical System Control Module
Engine Control Module
Electric Parking Brake Control Module
Electrical System Control Module
Pin 1
Pin 2
Pin 3
Pin 4
Pin 5
+
–
S346_100
S346_102
22
Electric Parking Brake Components
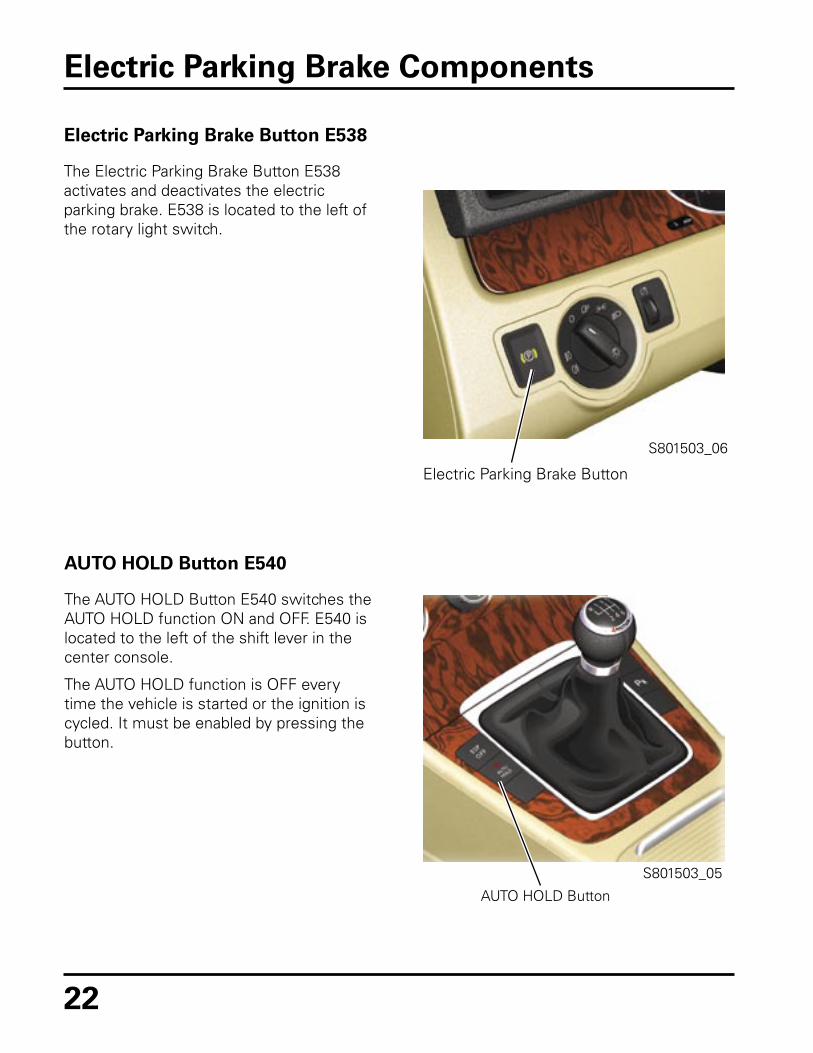
Electric Parking Brake Button E538
The Electric Parking Brake Button E538 activates and deactivates the electric parking brake. E538 is located to the left of the rotary light switch.
Electric Parking Brake Button
AUTO HOLD Button
AUTO HOLD Button E540
The AUTO HOLD Button E540 switches the AUTO HOLD function ON and OFF. E540 is located to the left of the shift lever in the center console.
The AUTO HOLD function is OFF every time the vehicle is started or the ignition is cycled. It must be enabled by pressing the button.
S801503_05
S801503_06
23
Electric Parking Brake Components
Indicator Lights
The Electric Parking Brake indicator lights are located in the Instrument Panel and the MFI.
S346_054
S346_056
S346_058
S346_060
AUTO HOLD Indicator Lamp K237
Electric Park/Handbrake Malfunction Indicator Lamp K214
Brake System Warning Lamp K118
Electric Parking Brake Indicator Lamp K213
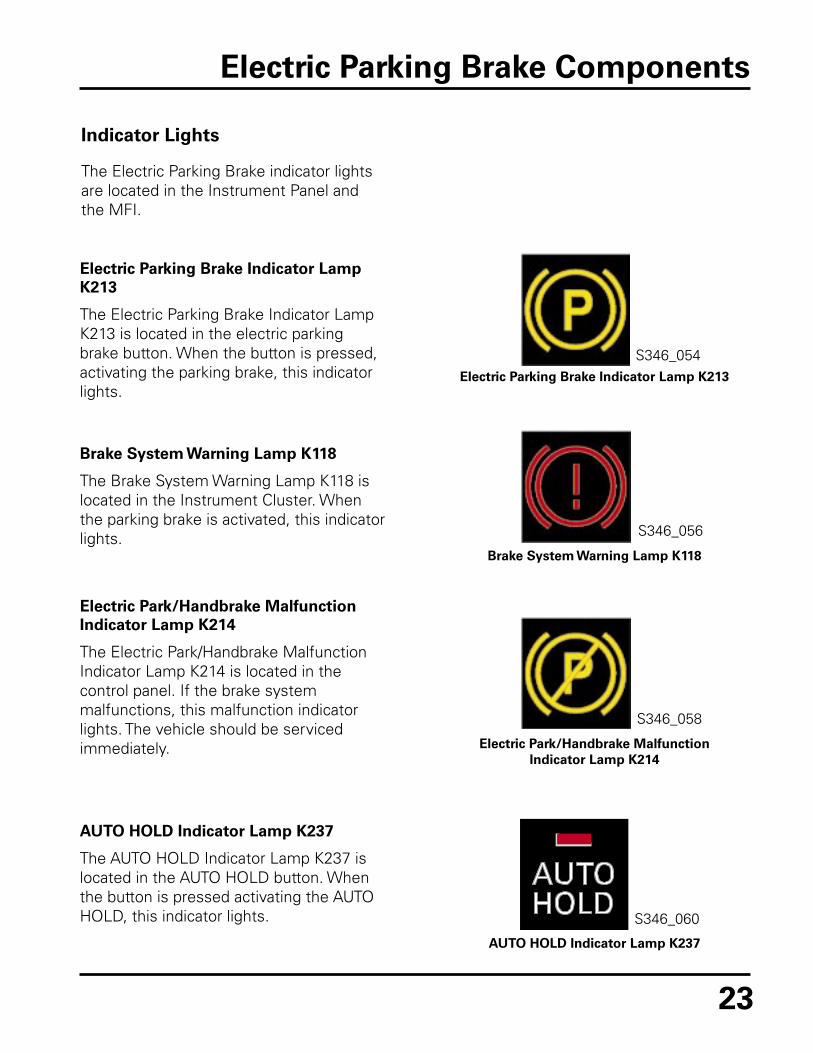
Electric Parking Brake Indicator Lamp K213
The Electric Parking Brake Indicator Lamp K213 is located in the electric parking brake button. When the button is pressed, activating the parking brake, this indicator lights.
Brake System Warning Lamp K118
The Brake System Warning Lamp K118 is located in the Instrument Cluster. When the parking brake is activated, this indicator lights.
Electric Park/Handbrake Malfunction Indicator Lamp K214
The Electric Park/Handbrake Malfunction Indicator Lamp K214 is located in the control panel. If the brake system malfunctions, this malfunction indicator lights. The vehicle should be serviced immediately.
AUTO HOLD Indicator Lamp K237
The AUTO HOLD Indicator Lamp K237 is located in the AUTO HOLD button. When the button is pressed activating the AUTO HOLD, this indicator lights.

24
Electric Parking Brake Components
Electric Parking Brake Control Module J540
The Electric Parking Brake Control Module J540 is located in the center console. All activation and diagnostic functions of the electric parking brake are controlled by J540.
J540 has two processors and is networked to the ABS Control Module J104 through a dedicated CAN-bus.
A sensor cluster in J540 includes the transverse acceleration sensor, the longitudinal acceleration sensor and the yaw rate sensor. Signals from the sensor cluster are analyzed for both electric parking brake and ESP control functions. The inclination angle is derived from the longitudinal acceleration sensor’s signal.
S346_048

25
Electric Parking Brake Communication
Control Units in the CAN-Bus for the Electric Parking Brake
J104 ABS Control ModuleJ533 Data Bus On Board Diagnostic Interface J540 Electric Parking Brake Control Module
J104
J533 J540
S346_118
Electric Parking Brake CAN-Bus
The Electric Parking Brake Control Module J540 is connected to the ABS Control Module J104 via a private CAN-bus.
The data transfer rate is 500 kbit/s. The data is transferred through the CAN high wire and the CAN low wire. To ensure reliable communication without conflict or interference, the CAN wires are twisted together.
The CAN-bus for the electric parking brake cannot transfer data over a single wire. If a failure occurs with either wire, no communication occurs.

26
Electric Parking Brake Communication
E538 Electric Parking Brake ButtonE540 AUTO HOLD ButtonG476 Clutch Position SensorH3 Warning Buzzer J104 ABS Control ModuleJ285 Instrument Cluster Control Module J519 Vehicle Electrical System Control Module J540 Electric Parking Brake Control ModuleK118 Brake System Warning LampK213 Electric Parking Brake Indicator LampK214 Electric Park/Handbrake Malfunction Indicator LampK237 AUTO HOLD Indicator LampS FuseV282 Left Parking Brake Motor V283 Right Parking Brake Motor
y to Engine Control Module J623
Key
Input Signal
Output Signal
Positive
Ground
CAN-Bus
H3 K214 K118
J519
J285
J104G476
J540
S S S
V282 V283 K213
S
E538 E540 K237
S346_110
Electric Parking Brake Control Circuit

27
Electric Parking Brake Special Features
At Rest Position of Thrust Nut
S346_108
Distance of the Thrust Nut Until the Brake Pad Contacts the Brake Rotor
Worn Brake Pad
Automatic Brake Pad Clearance Adjustment
The brake pad adjustment occurs periodically with the vehicle parked. If the electric parking brake has not been set within 620 miles (1,000 km), the clearance is adjusted automatically.
To perform the adjustment, the brake pad moves toward the brake rotor from its resting position.
The Electric Parking Brake Control Module J540 determines the distance traveled from the power consumption of the electric motor and adjusts to compensate for any brake wear.
The brake pad wear adjustment occurs with the vehicle parked, the ignition in the locked position and the parking brake not applied.
A customer may comment that their vehicle makes a strange noise. Ask them to set the parking brake and listen for the same noise. If it is the same noise, it’s normal.
28
Electric Parking Brake Special Features
Brake Pad Replacement Mode
The brake pads are replaced with the electric parking brake not activated. Using the VAS Scan Tool, the electric parking brake is completely released by moving the thrust nut on the spindle all the way back.
After the new brake pads have been installed, the electric parking brake is adjusted using the VAS Scan Tool. The new position of the new brake pads is learned automatically.
Please reference the current service information for brake pad replacement procedures.
Brake Piston
S346_106
Thrust Nut

29
AFS Overview
Volkswagen’s Adaptive Front Lighting System (AFS) consists of two independent lighting systems:
• Moving front lights
• Stationary front lights
The two lighting systems combine to provide improved nighttime visibility when cornering or turning.
This section provides an overview of the Adaptive Front Lighting System features and operation.
S801503_03

30
AFS Overview
Components and Locations
The following graphic shows the locations of the Adaptive Front Lighting System control modules and components. For the Passat, the Adaptive Front Lighting System (AFS) is available only as a package with High-Intensity Discharge Xenon Lamps.
Left Headlamp Power Output Stage J667
Right Headlamp Power Output Stage J668
Headlamp Range/Cornering Lamp Control Module J745

31
AFS Overview
Adaptive Lighting System features include:
• Moving low beam headlights that swivel horizontally at highway speeds, based on steering wheel position, to improve nighttime visibility around curves
• Stationary lights, located in the headlight, provide side lighting when turning at slower speeds
S335_009
Steering Angle Sensor G85, built into the steering column
Vehicle Electrical System Control Module J519, behind the fuse box
ABS Control Module J104, mounted in engine compartment
32
AFS Moving Front Lights
Moving Front Light Operation
The low beam headlight unit swivels horizontally, driven by an integrated electric motor.
Swivel Angle
The swivel angle on the inside curve headlight is approximately 15° and approximately 7.5° on the outside curve headlight.
Road Illumination
The different swivel angles provide the best possible illumination in curves because the headlight on the inside moves twice as far as the one on the outside of the curve.
The headlights do not swivel at speeds below 6 mph (10 km/hr). Above 6 mph (10 km/hr), the swivel angle depends on the sharpness of the curve. This complies with the regulations that prohibit both headlights from swiveling when the vehicle is not in motion.
S335_019
S335_012
15°
7.5°
7.5°
15°

33
AFS Moving Front Lights
Illuminated Areas
The moving front lights provide improved illumination on curves. The darker area shows illumination with a conventional low beam headlight. It illuminates area “A” of the road surface and a lot of the area off the road.
The lighter area shows the illumination on the same curve with the moving front lights in use. It illuminates more of the road surface as shown in area B.
Operating Requirements
Status ON Requirements OFF Conditions Adaptive Front Lights–Moving Front Lights set to low beams
- Terminal 15 ON
AND
- Low beam ON
AND
- Vehicle speed greater than 6 mph
AND
- Steering wheel turning gradually into a curve
AND
- Vehicle travelling forward
- No ON requirement met
S335_008
AB

34
AFS Stationary Front Lights
Stationary Front Light Operation
Stationary front lights provide improved visibility during nighttime turning at intersections. When activated, the stationary front lights, with integrated reflectors, illuminate the area to the right or left side of the vehicle depending on the position of the steering wheel.
The top graphic shows road illumination when turning with conventional low beam headlights. The bottom graphic shows the additional illumination provided by the stationary front lights.
The stationary front lights only work when the low beams are activated.
Stationary Front LightLow Beam
S335_014
S335_015
S335_023
Conventional Low Beam Lighting
Adaptive Stationary Low Beam Side Lighting

35
AFS Stationary Front Lights
Status ON Requirements OFF Conditions - Adaptive Front Lights– Stationary Front Lights set to low beams
- Terminal 15 ON
AND
- Low beam ON
AND
- Vehicle speed less than 31 mph
AND
- Steering wheel turning sharply in an intersection
- No ON requirement met
The Halogen bulbs in the stationary front light are activated, depending on conditions less than 31 mph (50 km/hr). They help the driver detect other road users or obstacles. The static cornering light is switched on and off by dimming.
Additional side illumination provides earlier visibility to the driver while turning at an intersection.
Operating Requirements
S335_028
Illuminated Area

36
AFS Design
Adaptive Front Headlight Assembly
Each Adaptive Front Headlight Assembly includes four bulbs:
• The Xenon bulb (for low beam, high beam, and moving front lights)
• The bulb for the stationary front light
• The turn signal bulb
• The parking light bulb
Left Parking Lamp M1 Left High Intensity Gas Discharge (HID) Lamp L13
Left Cornering Lamp L148
Left Front Turn Signal Lamp M5
S335_016
Left High Intensity Gas Discharge Lamp Control Module J343
Access to the Left Cornering Lamp L148

37
AFS Design
The power output modules for the left J667 and right J668 headlights are located on the bottom of the headlight modules.
Headlight Lens
Left High-Intensity Gas Discharge Lamp Control Module J343
S335_025
Left Headlamp Power Output Stage J667 (attached to the bottom of the headlight assembly)

38
AFS Design
Moving Front Light Assembly
The light module for the moving front lights is similar to a conventional Bi-Xenon module. The low and high beam light is located in the lamp module. The module is mounted on bearings in a swivel frame to allow horizontal movement.
The module is equipped with a control motor and sensor for controlled movement. The sensor recognizes and communicates the position of the assembly.
S335_018 S335_021
Left High Intensity Gas Discharge (HID) Lamp L13
Swivel Frame
Swivel Axis
Left High Intensity Gas Discharge (HID) Lamp L13
Left Swivel Module Position Sensor G474
Left Dynamic Cornering Light Motor V318

39
AFS Design
The gas discharge bulb is located in a holder at the back of the moving front light assembly. The gas discharge bulb can be accessed by opening the bulb holder door.
S335_022
Left High Intensity Gas Discharge (HID) Lamp L13

40
AFS Design
Stationary Front Light Assembly
The stationary front light projects light off a reflector located behind the turn signal to illuminate the side area at the front of the vehicle.
The bulb in the stationary front light is accessed through an opening in the headlight module housing.
S335_017
S335_026
41
AFS Service
Fault Indicator
The warning light in the instrument cluster flashes when the Adaptive Front Lighting System detects a fault in the system. The fault is stored in the fault memory of the Headlamp Range/Cornering Lamp Control Module J745.
If the low beam headlight fails on one side, the Adaptive Front Lighting System is disabled and low beam assemblies will no longer swivel during cornering. The stationary front lights are also disabled.
S335_024

42
AFS Communication
Sensors
J745 Headlamp Range/Cornering Lamp Control Module
J104 ABS Control Module
J533 Data Bus On Board Diagnostic Interface
Vehicles equipped with air leveling suspension provide information via the drivetrain CAN-bus. This information is then accessed by the Headlamp Range/Cornering Lamp Control Module J745. On vehicles without air suspension, J745 receives the information from the vehicle level sensors.
G76 Left Rear Level Control System Sensor G78 Left Front Level Control System Sensor
G475 Right Swivel Module Position Sensor (type depends on manufacturer)
G85 Steering Angle Sensor
G44 Right Rear ABS Wheel Speed Sensor G45 Right Front ABS Wheel Speed Sensor G46 Left Rear ABS Wheel Speed Sensor G47 Left Front ABS Wheel Speed Sensor
J285 Instrument Cluster Control Module
E1 Light Switch
F4 Back-Up Light Switch
G474 Left Swivel Module Position Sensor (type depends on manufacturer)

43
AFS Communication
Controlled Components
S801503_07
L148 Left Cornering Lamp
V48 Left Headlamp Beam Adjustment Motor
J667 Left Headlamp Power Output Stage
V318 Left Dynamic Cornering Light Motor
L149 Right Cornering Lamp
V49 Right Headlamp Beam Adjustment Motor
V319 Right Dynamic Cornering Light Motor J668 Right Headlamp Power Output Stage
J623 Engine Control Module
J527 Steering Column Electronic Systems Control Module
J519 Vehicle Electrical System Control Module
N395 Left Headlamp Reflector Adjustment Solenoid
N396 Right Headlamp Reflector Adjustment Solenoid
J343 Left High Intensity Gas Discharge Lamp Control Module
L13 Left High Intensity Gas Discharge (HID) Lamp
J344 Right High Intensity Gas Discharge Lamp Control Module
L14 Right High Intensity Gas Discharge (HID) Lamp
M5 Left Front Turn Signal Lamp
M7 Right Front Turn Signal Lamp
44
AFS Communication
N396 Right Headlamp Reflector Adjustment Solenoid
G76 Left Rear Level Control System Sensor G78 Left Front Level Control System Sensor G475 Right Swivel Module Position SensorJ344 Right High Intensity Gas Discharge
Lamp Control ModuleJ519 Vehicle Electrical System Control
ModuleJ667 Left Headlamp Power Output Stage J668 Right Headlamp Power Output Stage J745 Headlamp Range/Cornering Lamp
Control Module Power for the stationary front side lights is controlled by Power Output Modules J667 and J668. All other headlights are powered by the Vehicle Electrical System Control Module J519.
S801503_08
Key
Positive
Ground
Input Signal
CAN-Bus
V319 Right Dynamic Cornering Light Motor V49 Right Headlamp Beam Adjustment
MotorL14 Right High Intensity Gas Discharge (HID)
LampL149 Right Cornering Lamp M7 Right Front Turn Signal Lamp
Terminal15a
Terminal31
J519 J668
J667
J745
L149
L344
L14
M7
N396
G475 V319 V49 G78 G76
Right Side AFS Control Circuit

45
AFS Communication
Control Module Network
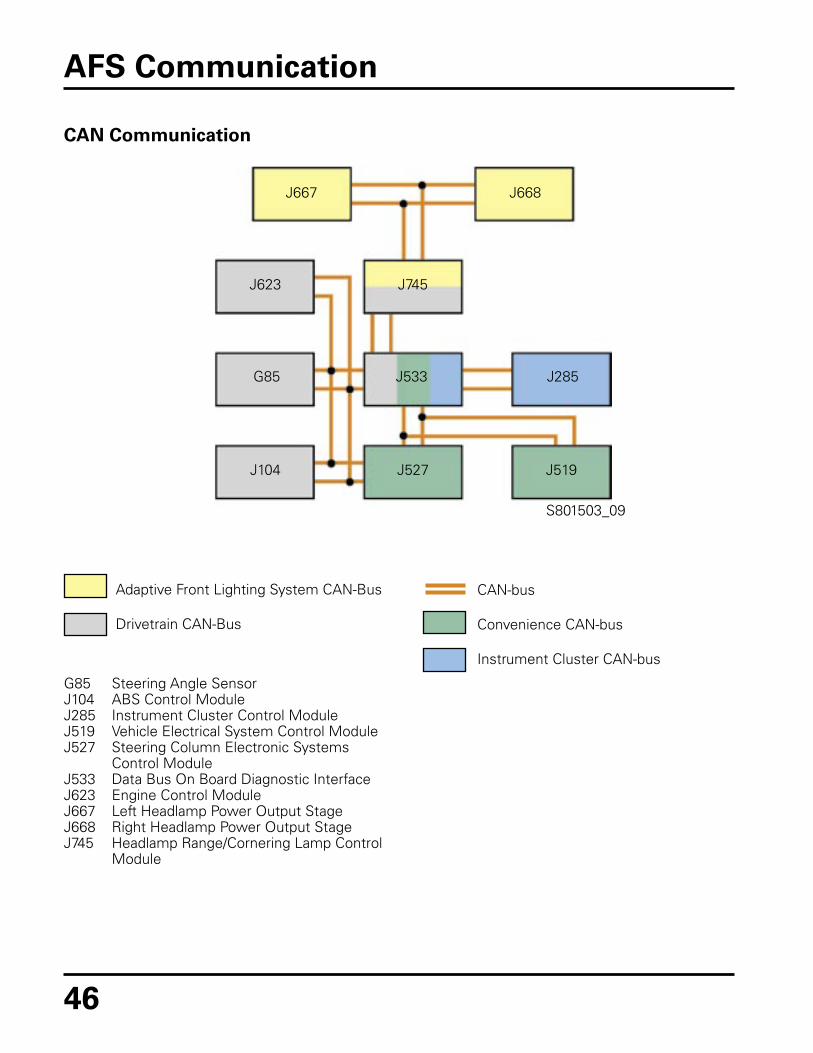
The control modules that control the Adaptive Front Lighting System functions and its CAN-bus network are shown on page 46. Data is exchanged between J745 and the power output modules in the left J667 and right J668 headlights via the 500 kBaud CAN-bus. This light CAN-bus is a separate CAN-bus and is not connected to the 500 kBaud Drivetrain CAN-bus. The Adaptive Front Lighting System CAN-bus also does not run via the Data Bus On Board Diagnostic Interface.
The following inputs are used by J431 to control adaptive front light functions:
• Steering wheel angle (Steering Angle Sensor G85)
• Steering wheel speed (Steering Angle Sensor G85)
• Wheel speed (ABS Control Module J104)
• Direction of travel (Vehicle Electrical System Control Module J519/Back-Up Light Switch F4)
• Yaw velocity (ABS Control Module J104)
• Low beam headlights (Vehicle Electrical System Control Module J519)
For additional information on the CAN-bus, please reference SSP 871503 “The 2006 Passat Electrical System Design and Function”.
46
AFS Communication
G85 Steering Angle Sensor J104 ABS Control Module J285 Instrument Cluster Control Module J519 Vehicle Electrical System Control ModuleJ527 Steering Column Electronic Systems
Control Module J533 Data Bus On Board Diagnostic Interface J623 Engine Control Module J667 Left Headlamp Power Output Stage J668 Right Headlamp Power Output Stage J745 Headlamp Range/Cornering Lamp Control
Module
CAN-bus
Convenience CAN-bus
Instrument Cluster CAN-bus
S801503_09
J667 J668
J745J623
G85
J104
J533
J527
J285
J519
Adaptive Front Lighting System CAN-Bus
Drivetrain CAN-Bus
CAN Communication

47
Knowledge Assessment

An on-line Knowledge Assessment (exam) is available for this Self-Study Program
You can find this Knowledge Assessment on your Certification Resource Center
at:
www.vwwebsource.com
From the vwwebsource.com homepage, do the following:
1. Click on the Certification tab 2. Click on “My Certification” tab 3. Click the Fulfill link next to this SSP 4. Click “Launch Assessment”
For assistance, please call:
Volkswagen Academy Concierge 1 – 877 – 791 – 4838
(8:00 a.m. to 8:00 p.m. EST) Or, E-Mail:


Volkswagen of America, Inc.3800 Hamlin RoadAuburn Hills, MI 48326Printed in U.S.A.September, 2005