2007 chevrolet silverado and gmc sierra and sierra … audio system ... index..... 91 2007 chevrolet...
TRANSCRIPT

Overview ........................................................ 3Overview .................................................. 4
Features and Controls ................................ 15Features and Controls ............................ 16
Navigation Audio System ............................ 57Navigation Audio System ........................ 58
Voice Recognition ....................................... 85Voice Recognition ................................... 86
Index ............................................................ 91
2007 Chevrolet Silverado and GMC Sierra and Sierra DenaliNavigation System M
1
GENERAL MOTORS, GM, the GM Emblem,CHEVROLET, the CHEVROLET Emblem, and thename SILVERADO, GMC, the GMC TruckEmblem, and the names SIERRA and SIERRADENALI are registered trademarks of GeneralMotors Corporation.
The information in this manual supplements theowner manual. This manual includes the latestinformation available at the time it was printed. Wereserve the right to make changes in the productafter that time without notice. For vehicles first soldin Canada, substitute the name General Motorsof Canada Limited for Chevrolet Motor Division orGMC whenever it appears in this manual.
Keep this manual with the owner manual in thevehicle, so it will be there if it is needed. If thevehicle is sold, leave this manual in the vehicle.
Canadian OwnersFor Canadian owners that would like to obtain aFrench language manual, see “Canadian Owners”in the Index of your vehicle’s owner manual.
Litho in U.S.A.Part No. 25793467 A First Printing ©2006 General Motors Corporation. All Rights Reserved.
2

Overview ......................................................... 4Navigation System Overview ......................... 4
Getting Started .............................................. 6Cleaning the Video Screen .......................... 14
Section 1 Overview
3

OverviewNavigation System Overview
Screen Shown with Map Disc Inserted
4

A. Map Disc DVD Slot. See “Installing the MapDVD” under Maps on page 18 for moreinformation.
B. FULL MAP Touch Screen Button. See “NAV”under “Hard Keys” under Using the NavigationSystem on page 16 for more information.
C. North Up/Heading Up Symbol. See Symbols onpage 21 for more information.
D. O(Power/Volume) Knob. See NavigationAudio System on page 58 for more information.
E. No GPS Symbol. See Symbols on page 21for more information.
F. NAV (Navigation) Key. See “Hard Keys” underUsing the Navigation System on page 16for more information.
G. Straight Line to Distance Symbol. See Symbolson page 21 for more information.
H. DEST (Destination) Key. See Destination onpage 27 for more information.
I. Map Scale. See “Map Scales” under Maps onpage 18 for more information.
J. RPT (Repeat) Key. See “Hard Keys” underUsing the Navigation System on page 16for more information.
K. FAV (Favorite) Key. See “Storing Radio StationPresets” under Navigation Audio System onpage 58 for more information.
L. V (Zoom In) Touch Screen Button. See “MapScales” under Maps on page 18 for moreinformation.
M. Mark Touch Screen Button. See “AddingDestinations to the Address Book” underDestination on page 27 for more information.
N. Source (AM, FM, XM, CD, etc.) TouchScreen Button. See Navigation Audio Systemon page 58 for more information.
O. CD/DVD Slot. See CD Player on page 68 andDVD Player on page 76 for more information.
P. Z(CD/DVD Video/Audio Eject) Key. SeeCD Player on page 68 and DVD Playeron page 76 for more information.
Q. Auxiliary Jack. See Auxiliary Devices onpage 84 for more information.
R. Clock Touch Screen Button. See ConfigureMenu on page 44 for more information.
S. f (Tune/Sound) knob. See Navigation AudioSystem on page 58 for more information.
5

T. AUDIO Key. See Navigation Audio System onpage 58 for more information.
U. MENU Key. See Configure Menu on page 44for more information.
V. ¨SEEK Key (Next). See Navigation AudioSystem on page 58 for more information.
W. U (Zoom Out) Touch Screen Button. See “MapScales” under Maps on page 18 for moreinformation.
X. ©SEEK Key (Previous). See Navigation AudioSystem on page 58 for more information.
Y. POI (Point of Interest) Touch Screen Button.See “Displaying Points of Interest (POI) on theMap Screen” under Symbols on page 21 formore information.
Getting StartedBefore you begin to operate the navigation system,read this manual thoroughly to become familiar withit and to understand how the system works.
DVD Map Disc noise, when entering the vehicleand turning the vehicle off, is normal systemoperation.
Keeping your mind on the drive is importantfor safe driving. See “Defensive Driving” inthe Index of your vehicle’s owner manual formore information. Get familiar with your vehicle’snavigation system so you can use it with lesseffort and take full advantage of its features. Yournavigation system includes not only navigation,but also audio functions. While your vehicleis parked:
• Familiarize yourself with all of itscontrols: hard keys on the faceplateand touch-sensitive screen buttons.
• Familiarize yourself with its operation.
• Set up your audio by presetting your favoritestations, setting the tone, and adjusting thespeakers. Then, when driving conditionspermit, you can tune to your favorite stationsusing the presets and steering wheelcontrols (if equipped).
• Set up the navigation features that can onlybe done before you begin driving, such asentering an address or a preset destination.
Entering a destination or alphanumeric textrequires many steps, so you can only performthese operations when the vehicle is in PARK (P).
6

You will notice that touch-sensitive screen buttonsleading to the alphanumeric keyboard aredimmed out while driving.
Other functions may also be locked out whiledriving and they too will appear grayed out on thescreen — but all functions are available whenparked. Some functions can be performed whiledriving, as long as you can do so without divertingtoo much of your attention from your driving.
{CAUTION:
This system provides you with a far greateraccess to audio stations and song listings.Giving extended attention to entertainmenttasks while driving can cause a crash andyou or others can be injured or killed.Always keep your eyes on the road andyour mind on the drive — avoid engagingin extended searching while driving.
{CAUTION:
Looking at the moving map on thenavigation screen frequently or for toolong while driving can cause a crash andyou or others can be injured or killed.Keep your eyes and mind on the road andavoid looking too long or too often at themoving map on the navigation screen.Use the voice guidance directionswhenever possible.
The navigation system allows you to do thefollowing:
• Plan a route with provided turn-by-turn routeand map guidance with voice prompts.
• Select a destination using various methodsand choices.
• Receive RDS broadcast announcements.
7

The information in the system may not always becomplete. Road conditions such as prohibitedturns, detours, and construction zones, changefrequently. It is important to consider whether youcan follow the directions given by the systemfor the current conditions.
Each time the vehicle is started and the navigationsystem is turned on, the Caution screen or theprevious active screen will appear dependenton system power off time. If the Caution screenappears, touch OK to load the map DVDinformation. If OK is not selected, all hardkeys except for NAV (navigation) and DEST(destination) can be accessed. Once the NAVor DEST hard keys are pressed, this Cautionscreen will appear and OK must be pressed toload the map DVD information from the map disc.
When getting started you may set the navigationsystem to your preference using various options.To do so, reference the following topics:
Language — English/MetricTo change the language of the navigation screens,see “Driver Information Center, DIC VehicleCustomization” in the Index of your vehicles ownermanual.
To change the navigation screens from English ormetric, see “Driver Information Center, DICOperation and Displays” in the Index of yourvehicles owner manual.
8

Storing Radio Station PresetsTo set preset radio stations, do the following:
1. Press theO(power) knob to turn thesystem on.
2. Press the AUDIO hard key and select thedesired band (AM, FM1, FM2, XM1, orXM2 (if equipped)).
3. Use the f (tune) knob or the SEEK arrows totune to the desired station.
4. Press and hold one of the five preset screenbuttons, at the bottom of the screen, until youhear a beep or see the station displayedon the selected preset button.
5. Repeat the steps for each preset.
See “Storing Radio Station Presets” underNavigation Audio System on page 58 for moreinformation.
Setting the TimeTo set the time, do the following:
1. Press the clock touch screen button located inthe upper right corner of the screen.
2. Press the Set screen button.
3. Press the Hours and Minutes − (minus) and+ (plus) signs to decrease and to increasethe time. See “Setting the Time” underConfigure Menu on page 44 for moreinformation.
Setting the Search Area, Entering anAddress and Point of Interest, andStoring Preset DestinationsBefore entering an Address, Point of Interest,Home, or Preset Destination, select theappropriate region that contains the finaldestination. Your vehicle must be in PARK (P)to perform this operation.
9

Setting the Search AreaTo set the search area, do the following:
1. If the radio is already on with a map discinserted, skip to Step 5.
2. Press theO(power) knob to turn thesystem on.
3. Insert the DVD map disc. See “Installing theMap DVD” under Maps on page 18 for moreinformation.
4. A caution may appear. Touch the OK screenbutton to proceed.
5. Press the DEST hard key.
6. Press the Change Search Area screen button.
7. Select the appropriate region numberedscreen button that contains your finaldestination.
8. Press the Back screen button to return to theDestination Entry menu. See Destination onpage 27 for more information.
Entering an AddressIf you are having trouble finding a city or a streetname, do the following:
• Input the street name first instead of the cityname, or vice versa.
• Input more characters or reduce the amountof characters to reduce or expand theavailable options.
To set a destination by entering a city name,do the following:
1. If the radio is already on with a map discinserted, skip to Step 5.
2. Press theO(power) knob to turn thesystem on.
3. Insert the DVD map disc. See “Installing theMap DVD” under Maps on page 18 for moreinformation.
4. A caution may appear. Touch the OK screenbutton to proceed.
5. Press the DEST hard key.
6. Press the 6 Address Entry screen button.
10

7. The City name category will automatically beselected for entry. Start entering the city name.If five or less names are available for theentered characters, a list will display. If morethan five are available, there will be ascreen button with a number in it, it representsthe number of available cities. Select thisbutton to view the list and select a city.
8. Once a city is selected the street namecategory will automatically be selectedfor entry. Start entering the street name.Do not enter directional information or streettype, and use the space symbol screen button(U) between street or city names. Forexample, the street name N. Royal Oak Rd.should be entered as royal U oak. Use thebackspace (q) screen button if an incorrectcharacter has been entered.If five or less names are available, a list willdisplay. If more than five are available,there will be a screen button with a number init, it represents the number of availablestreets. Select this button to view the list.
9. Select the street name with the correct prefixfrom the list (Dr., Ln., St., etc.).
10. Once a street has been selected, the numerickeyboard will display, allowing you to enterthe house number. The system will display thehouse number range that is available forthe street.
11. Select the Go screen button. A map screen,with the destination marked, will appear.
12. Select the route preference (Fastest, Shortest,or Other). The system will calculate andhighlight the route.
13. Select the Start Guidance screen button.You are now ready to start your route.
See “Address Entry” under Destination on page 27for more information.
11

Entering a Point of Interest (POI)To set a destination by entering a Point of Interest(POI), do the following:
1. If the radio is already on with a map discinserted, skip to Step 5.
2. Press theO(power) knob to turn thesystem on.
3. Insert the DVD map disc. See “Installing theMap DVD” under Maps on page 18 for moreinformation.
4. A caution may appear. Touch the OK screenbutton to proceed.
5. Press the DEST hard key.
6. Press the i Point of Interest screen button.
7. Enter the specific title of the POI in thePOI name space (i.e. Washington Monument).If five or less names are available, a list willdisplay. If more than five are available,there will be a screen button with a numberin it, it represents the number of availablePOIs. Select this button to view the list.
8. Select the Go screen button. A map screen,with the destination marked, will appear.
9. Select the route preference (Fastest, Shortest,or Other). The system will calculate andhighlight the route.
10. Select the Start Guidance screen button.You are now ready to start your route.
See “Point of Interest (POI)” under Destination onpage 27 for more information.
Storing Preset Destinations1. If the radio is already on with a map disc
inserted, skip to Step 5.
2. Press theO(power) knob to turn thesystem on.
3. Insert the DVD map disc. See “Installing theMap DVD” under Maps on page 18 for moreinformation.
4. A caution may appear. Touch the OK screenbutton to proceed.
5. Press the DEST hard key.
12

6. Enter a destination. See Destination onpage 27 for information on how to entera destination.
7. Press the Mark screen button from the mapscreen to add the current final destination asa preset destination.The address book screen will appear.
8. Select the Name screen button. Analpha-keyboard will display. Enter the name.
9. Press and hold one of the screen buttons atthe bottom of the screen until a pop-upconfirmation displays.The name will appear in that preset destinationscreen button and is now available to selectfrom the Destination Entry screen. See “UsingYour Stored Preset Destinations” next inthis section to select it as a destination.See “Adding or Changing Preset Destinations”under Destination on page 27 for moreinformation on how to add preset destinations.
Using Your Stored Preset DestinationsThese destinations are available for selectionwhile driving.
1. If the radio is already on with a map discinserted, skip to Step 5.
2. Press theO(power) knob to turn thesystem on.
3. Insert the DVD map disc. See “Installing theMap DVD” under Maps on page 18 for moreinformation.
4. A caution may appear. Touch the OK screenbutton to proceed.
5. Press the DEST hard key.
6. Select one of the available preset destinationscreen buttons. A map screen, with thedestination marked, will appear.
7. Select the route preference (Fastest, Shortest,or Other). The system will calculate andhighlight the route.
8. Select the Start Guidance screen button.You are now ready to start your route.
See “Preset Destination” under Destination onpage 27 for more information.
13

Canceling GuidanceGuidance will be canceled once you arrive at yourfinal destination. To cancel guidance prior toarrival at the final destination, do the following:
1. Press the DEST hard key.
2. Press the Cancel Guidance screen button.
Guidance VolumeTo adjust the volume of voice guidance prompts,do the following:
1. Press the MENU hard key to enter the menuoptions, then press the MENU key repeatedlyuntil Nav is selected or touch the Nav screenbutton.
2. Press the > Voice Prompt screen button.
3. Press the + (plus) or – (minus) screen buttonsto increase or to decrease the volume of thevoice prompts.
See “Voice Prompt ” under Configure Menu onpage 44 for more information.
Cleaning the Video ScreenWhen cleaning the video screen, use only a softclean cotton cloth dampened with clean water.
14

Features and Controls .................................. 16Using the Navigation System ....................... 16Maps ........................................................... 18Symbols ...................................................... 21Destination .................................................. 27Configure Menu ........................................... 44
Global Positioning System (GPS) ................ 52Vehicle Positioning ...................................... 53Problems with Route Guidance ................... 54If the System Needs Service ....................... 54Ordering Map DVDs .................................... 54Database Coverage Explanations ................ 55
Section 2 Features and Controls
15

Features and Controls
Using the Navigation SystemThis section presents basic information needed tooperate the navigation system.
Use the hard keys located on the navigationsystem along with the available touch-sensitivescreen buttons on the navigation screen to operatethe system. See Navigation System Overviewon page 4 for more information.
Once the vehicle is moving, various functions willbe disabled to reduce driver distractions.
Hard KeysThe following hard keys are located on thenavigation system:
O(Power/Volume): Press this knob to turn thesystem on and off. Turn the knob to increaseor decrease the volume to the audio system.
If your vehicle has the Rear Seat Entertainment(RSE) and Rear Seat Audio (RSA), press and holdthis knob for more than two seconds to turn offthe navigation system, the RSE, and RSA.
f (Tune/Speaker Adjustment): Press this knobto access the Sound screen to adjust bass,midrange, treble, and equalization or Digital SignalProcessing (DSP), if the vehicle has the Bose®
sound system. Turn the tune knob to go to the nextor previous radio station. See Navigation AudioSystem on page 58 for more information.
Z (CD/DVD Eject): Press the eject button toeject CDs or DVDs.
NAV (Navigation): Press this key to view yourvehicle’s current position on the map screen.Each press of this key will cycle through Full Mapand the tab that displays the current audiosource (AM, FM, CD, etc.). Full Map displays thescreen in full map view. Selecting the audiotab will split the screen between the map screenand the current audio source screen menu.See “Audio” under Navigation Audio System onpage 58 for more information.
DEST (Destination): Press this key to access theDestination Entry screen to plan a destination orto change the search area. See Destinationon page 27 for more information.
16

RPT (Navigation Repeat): Press this key torepeat the last voice guidance prompt.
FAV (Favorite): Press this key to access thepreset stations. See “Storing Radio StationPresets” under Navigation Audio System onpage 58 for more information.
AUDIO: Press this key to access the full Audioscreen to change AM, FM, XM™ SatelliteRadio Service (if equipped), CD, DVD(if equipped), and auxiliary input. See “Audio”under Navigation Audio System on page 58for more information.
MENU: Press this key to adjust features forsound, radio, navigation, and the display. SeeConfigure Menu on page 44 for more information.
¨SEEK / ©SEEK: Press the seek arrows toseek and scan radio stations, to seek trackson a CD, and to seek chapters on a DVD.See Navigation Audio System on page 58,CD Player on page 68, and DVD Player onpage 76 for more information.
Touch-Sensitive Screen ButtonsTouch-sensitive screen buttons are located on thescreen. When a screen button has been selected,a beep will sound. Screen buttons are highlightedwhen a feature is available.
Alpha-Numeric KeyboardLetters of the alphabet, symbols, punctuation, andnumbers, when available, will display on thenavigation screen as an alpha or numerickeyboard. The alpha keyboard will display whenthe system requires entry of a city or street name.
All characters are touch-sensitive screenbuttons. Touch a character to select it.
A-Y (Accent Alphabet): Select this screen buttonto select letters with accent symbols. This buttonmay toggle to A-Z.
A-Z (Alphabet): Select this screen button toselect letters from the alphabet. This button maytoggle to A-Y.
0-9 (Numbers): Select this screen button toselect numbers.
17

U (Space): Select the space screen button toenter a space between characters or the wordsof a name.
q (Backspace): Select the backspace screenbutton if an incorrect character has been selected.
To make name selections easier, the systemwill only highlight the characters that can followthe last one entered. For example, if a Z isentered, a T may not be available for selection.
If a name does not display after entry, it may needto be entered differently, the map DVD disc maynot contain that information, or the correctsearch area has not been selected. See DatabaseCoverage Explanations on page 55 for moreinformation or Destination on page 27 to changethe search area.
MapsThis section includes basic information needed toknow about the map database.
Regional MapsThe maps are stored on a DVD. The 48 contiguousUnited States and portions of Canada arecontained on one disc.
If a regional map does not contain a specific city,the map DVD may not contain the city or itmay have been misspelled when entered.
Refer to the Navigation System Map Disc manualto view a detailed explanation of map coverageand detailed city lists in each region. This manualwill be inside the map DVD case when thevehicle is delivered from the factory.
18

Installing the DVD Map DiscWhen a DVD Map Disc is installed, noise from thedisc may occur when entering the vehicle andturning the vehicle off, this is normal systemoperation.
When your vehicle is delivered from the factory,the dealer/retailer may have installed the mapDVD. If the map DVD was not installed, use thefollowing directions to load it:
Read the following steps completely beforeoperating this feature.
1. Turn the ignition on.
2. Press theO(power) knob to turn thenavigation system on.
3. Touch the OK screen button to agree to theCaution screen.
A. Map DVD Slot
4. Touch the Insert Map Disc screen button.The screen will tilt to access the mapDVD slot.
5. Load the map DVD partway into the slot.The system will pull it in.
6. Once the map DVD is loaded, touch theClose screen button. The screen will close.
19

Ejecting the DVD Map DiscWhen the DVD map disc is not loaded, you willnot be able to use the navigation portion ofthe system.
1. Press the MENU key to enter the Menuoptions, then press the MENU key repeatedlyuntil Nav is selected or touch the Nav screenbutton.
2. Touch the Map Database Information screenbutton.
3. Touch the Change screen button. The screenwill tilt, exposing the map DVD slot and themap DVD will eject. Pull the disc out.
4. Touch the Close screen button. The screenwill close.
Map AdjustmentsThe system allows you to adjust the scale ofview on the map. Also, as you drive, the mapwill scroll automatically based on the directionof travel.
Map Scales
V / U (Zoom In/Zoom Out): Touch the zoom inor out screen buttons or the scale on the bar tochange the level of map detail. The scale willappear on the screen once the zoom in or zoomout screen buttons are selected. The systemwill adjust the map accordingly. The scale of amap can range from 150 ft (45 m) to 250 mi(402 km). To change from English or metric, see“Driver Information Center, DIC Operation andDisplays” in the Index of your vehicle’s ownermanual.
Scrolling the Map
Touch anywhere on themap screen and thescroll symbol willappear. Use this featureto scroll across the map.
Move your finger in any direction on the mapscreen and the map will continue to scroll in thatdirection until you remove your finger.
20

If scrolling while your vehicle is in PARK (P),the system will scroll initially at a slower rate.It will increase if you continue touching themap screen.
If scrolling while your vehicle is in motion, youhave one scroll speed and a limited distance toscroll. You have to keep touching the map screento scroll for a longer distance.
If you have used the scroll feature to scroll themap and your vehicle icon becomes lost, press theNAV (Navigation) key to return to the currentvehicle location on the map.
You can use the scroll feature on the map toset a destination. See “Pick from Map” underDestination on page 27 for more information.
When scrolling on the map without a plannedroute, press the GO screen button to calculatethe route from your current position to thedestination mark.
SymbolsThe following symbols are the most commonsymbols that will appear on a map screen.
Your vehicle is shownas this symbol. Itindicates the currentposition and headingdirection of your vehicleon the map.
The destination symbolwill appear on the map,after a route hasbeen planned, markingyour final destination.
21

The waypoint symbolwill display on the mapafter a waypoint hasbeen added toyour route.
The waypoint symbol will be numbered fromone through three depending on how manyintermediate waypoints have been set.
The distance todestination symbolindicates the distance toyour final destination.
This symbol only appears when time is notavailable or when you are scrolling on the map.
The distance and timeto destination symbolindicates the distanceand the estimatedtime remaining to yourfinal destination orarrival time, dependingon the option selected.
The straight line todistance symbolindicates thestraight-line distance toyour destination.
This symbol will appear before you start driving onthe route or if you are on a road where navigationguidance cannot be given.
22

The north up symbolindicates the map withNorth Up, known asNorth Up mode.
While in North Up mode, the vehicle icon willfollow the north direction on the map regardlessof which direction the vehicle is traveling.Select this screen symbol to switch betweenNorth Up and Heading Up modes.
The heading up symbolindicates the map withthe vehicle traveldirection up, knownas Heading Up mode.
The shaded triangle indicates the North direction.While in Heading Up mode, the direction yourvehicle is traveling will always be at the top ofthe map screen. The vehicle icon will always
be headed in the direction your vehicle istraveling. Select this screen symbol to switchbetween Heading Up and North Up modes.
The No GPS symbolwill appear when yourvehicle is not receivinga Global PositioningSystem (GPS) satellitesignal.
See Global Positioning System (GPS) on page 52for more information.
Select the MARKscreen button tostore the locationon the screen inyour address book.
The system will automatically store the point in theaddress book. See “Adding Destinations to theAddress Book” under Destination on page 27 formore information.
23

Displaying Points of Interest (POI) on theMap Screen
Touch anywhere onthe map to display thePOI (Point of Interest)screen button.
Select the POI screen button to display ordelete POI icons from the map. Displaying POIicons on the map let you know where POIs(i.e. restaurants, gas stations, etc.) are located.This screen will appear after selecting thePOI screen button.
Select one of the POI categories to display or todelete POI icons from the map screen. Oncea category has been selected, the POI icon willdisplay at the top of the screen. Five categoriescan be selected to display on the map screen.When a category is selected those POI icons willdisplay on the map. Press the POI screenbutton again to add more POI icons.
More: Select this screen button to view morePOI categories.
24

POI Close to: Once a category has beenselected, select this screen button to display thelist of available POIs for the selected POIcategories. The list provides the POI icon, thename, the direction, and the distance to the POIfrom your vehicles current position. Use thescroll arrows to move up and down the list.Use the Sort by DIST. (distance), Icon, Name,and, on Route as desired.
Go: Press this screen button, next to the desiredPOI, to make this POI a destination or a waypoint.
Select a POI name to receive information aboutthe POI. From this screen you can select: Add toAddress Book, Go, or Map.
Add to Address Book: Press this screen buttonto add this POI to the address book. See “Nav”under Configure Menu on page 44 for informationon editing address book entries.
Go: Press this screen button to make this POI adestination or a waypoint.
Map: Press this screen button to display the mapshowing the location of the POI.
Show: Select this screen button to update themap screen and the list once a category hasbeen selected.
Show POI: Select ON to display the POI icons onthe map screen. Select OFF to remove the POIicons from the map screen.
List all Categories: Select this screen button tolist all POIs sorted alphabetically.
25

Clear: To delete a category, do one of thefollowing:
• To delete the last added POI category, selectthe Clear screen button.
• To delete a specific POI category:
1. Select the category.2. Select the subcategory.3. A pop-up confirmation will display. Select
the Delete screen button, the map screenwill display with that POI category deleted.
Clear All: Select this screen button to clear allselected POI categories. A pop-up confirmationwill display. Select the Delete screen button,the map screen will display with all POI categoriesdeleted.
Driving on a RouteWhen a destination has been routed and you aredriving on route, the map screen will automaticallydisplay the next maneuver.
This next maneuverpop-up will display thenext maneuver directionand how many milesor kilometers youare from it.
When you are approximately 1/2 mi. (.08 km) fromthe next maneuver, the screen will display thename and a detailed view of the next maneuver.
26

Auto RerouteWhen your destination is set and you are off theplanned route, the system will automatically plan anew route and begin to reroute. You will be ableto see the new route highlighted on the screen.
Traveling Across RegionsIf you plan to drive across many states, you mayhave to change the region selected to representthe area you are traveling to. To change theregion, do one of the following:
• Change the selected region in the search areawhen you get closer to your destination.See Destination on page 27.
• Change the selected region in the search areawhen entering your destination and routesettings. See Destination on page 27.For example, if you were traveling fromMichigan to Florida, change the regioncurrently selected in the search area to Florida.Enter a destination in Florida under theDestination Entry menu.
DestinationPress the DEST key to access the DestinationEntry screen. From this screen, you canselect from several options to plan a route byentering destination points.
27

Search AreaThe Destination Entry screen allows you to selectthe area included in the search for your destination.A map that divides the 48 contiguous United Statesand a part of Canada into 11 regions is displayed.
Before selecting a method of destination entry,review the search area map to make sure yourdestination is located in the highlighted region.
Touch the Change Search Area screen buttonto view the Search Area screen. Touch thenumbered screen button to the left of the searcharea map that corresponds with the numberedregion and to view a list of states included in theregion selected. The selected area will behighlighted on the map. Touch the down arrow toselect CAN (Canada). Touch the back screenbutton to return to the Destination Entry screenand to store the selected region.
To enter a destination, choose from one of thefollowing destination entry methods:
Address Entry
6 Address Entry: The address entry destinationmethod allows you to enter an address by providingthe system with a city name or a street name.
If you are having trouble finding a city or a streetname, do the following:
• Input the street name first instead of the cityname, or vice versa.
• Input more characters or reduce the amountof characters to reduce or expand theavailable options.
28

To enter a destination by entering the city namefirst, do the following:
1. Press the DEST hard key.
2. Select the 6 Address Entry screen button.
3. Select the City name button.
4. Enter the city name or touch the Last 5 Citiesscreen button.The Last 5 Cities screen will display a list ofthe last five city names that had been entered.Select a city from the list and it will appearin the City name area.
If using the alpha keyboard, finish entering thecity name. If five or less names are available,a list will display. If more than five areavailable, there will be a screen button with anumber in it, it represents the number ofavailable cities. Select this button to view thelist and select a city.
5. Once a city has been selected the Streetname category will automatically be selectedfor entry.Start entering the street name. If five orless names are available, a list will display.If more than five are available, there will bea screen button with a number in it, itrepresents the number of available streets.Select this button to view the list.
6. Select the street name with the correct prefix(Dr., Ln, St., etc.) from the list.
7. Once a street has been selected, the numerickeyboard will display, allowing you to enterthe house number. The system will display thehouse number range that is available forthe street.
29

8. Select the Go screen button. The map screen,with the destination marked, will display.
9. Select the route preference (Fastest, Shortest,or Other). The system will calculate andhighlight the route.
10. Select the Start Guidance screen button.You are now ready to start your route.See “Getting Started on Your Route” later inthis section for more information.
To enter a destination by entering the street namefirst, do the following:
1. Press the DEST hard key.
2. Select the 6 Address Entry screen button.
3. Select the Street screen button and startentering the street name.If five or less names are available, a list willdisplay. If more than five are available,there will be a screen button with a numberin it, it represents the number of availablestreets. Select this button to view the list.
4. Select the street name with the correct prefixfrom the list (Dr., Ln., St., etc.).
5. Once a street has been selected the Cityname category will automatically be selectedfor entry.If five or less cities are available for theselected street, the system will display the listof cities. If more than five cities are availablethe system will display the alpha keyboard.Start entering the city name. If five or lessnames are available, a list will display. If morethan five are available, there will be a screenbutton with a number in it, it represents thenumber of available cities. Select this button toview the list and select a city.
6. Once a city has been selected, the numerickeyboard will display, allowing you to enterthe house number. The system will display thehouse number range that is available forthe street.
30

7. Select the Go screen button. The map screen,with the destination marked, will display.
8. Select the route preference (Fastest, Shortest,or Other). The system will calculate andhighlight the route.
9. Select the Start Guidance screen button.You are now ready to start your route.See “Getting Started on Your Route” later inthis section for more information.
To enter a destination by entering a cross street,do the following:
1. Press the DEST hard key.
2. Select the 6 Address Entry screen button.
3. Select the Street screen button and startentering the street name.If five or less names are available, a list willdisplay. If more than five are available,there will be a screen button with a number init, it represents the number of availablestreets. Select this button to view the list.
4. Select the desired street name with thecorrect prefix from the list (Dr., Ln., St., etc.).
5. Once a street has been selected the CrossStreet screen button will become available.Select the Cross Street button and startentering the cross street name.If five or less names are available, a list willdisplay. If more than five are available, therewill be a screen button with a number in it,it represents the number of available crossstreets. Select this button to view the list.
6. Select the street name with the correct prefixfrom the list (Dr., Ln., St., etc.). An Informationscreen will automatically display.
7. Select the Go screen button. The map screen,with the destination marked, will display.
8. Select the route preference (Fastest, Shortest,or Other). The system will calculate andhighlight the route.
9. Select the Start Guidance screen button.You are now ready to start your route.See “Getting Started on Your Route” later inthis section for more information.
31
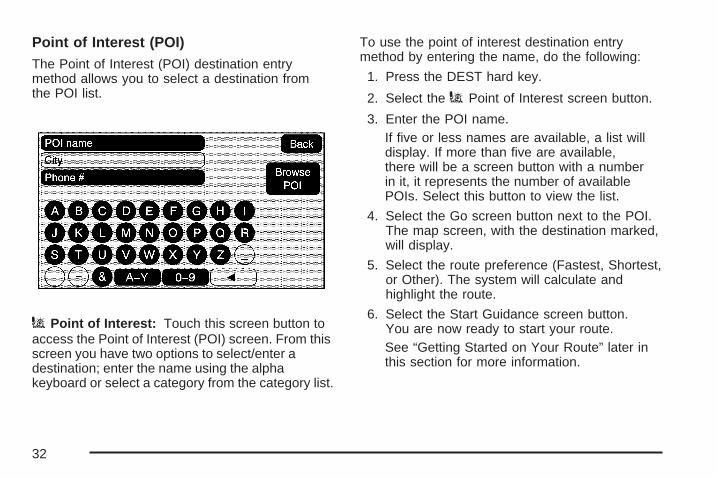
Point of Interest (POI)The Point of Interest (POI) destination entrymethod allows you to select a destination fromthe POI list.
i Point of Interest: Touch this screen button toaccess the Point of Interest (POI) screen. From thisscreen you have two options to select/enter adestination; enter the name using the alphakeyboard or select a category from the category list.
To use the point of interest destination entrymethod by entering the name, do the following:
1. Press the DEST hard key.
2. Select the i Point of Interest screen button.
3. Enter the POI name.If five or less names are available, a list willdisplay. If more than five are available,there will be a screen button with a numberin it, it represents the number of availablePOIs. Select this button to view the list.
4. Select the Go screen button next to the POI.The map screen, with the destination marked,will display.
5. Select the route preference (Fastest, Shortest,or Other). The system will calculate andhighlight the route.
6. Select the Start Guidance screen button.You are now ready to start your route.See “Getting Started on Your Route” later inthis section for more information.
32

To use the point of interest destination entrymethod by selecting a category, do the following:
1. Press the DEST hard key.
2. Select the i Point of Interest screen button.
3. Select the Browse POI screen button toview the list of POI categories.
4. Select a category, and then a sub-category.The system will display available POI namesin the selected sub-category or if the list istoo long the system will display the alphakeyboard.If the alpha keyboard is displayed, enter thePOI name until a list of available POIs appear.There is a screen button with a number init, it represents the number of available POIs.Select this button to view the list and selectthe POI.
5. Select the Go screen button next to the POI.The map screen, with the destination marked,will display.
6. Select the route preference (Fastest, Shortest,or Other). The system will calculate andhighlight the route.
7. Select the Start Guidance screen button.You are now ready to start your route.See “Getting Started on Your Route” later inthis section for more information.
33

Previous DestinationThe previous destination entry method allows youto select a destination from a list of previousdestination points.
7 Previous Destination: Touch this screenbutton to access the Previous Dest. screen.The system will store up to 100 points that havebeen previously entered. As new destinationsare entered, the system will automatically deletethe oldest destinations and add the newdestinations.
To use the previous destination entry method,do the following:
1. Press the DEST hard key.
2. Select the 7 Previous Destination screenbutton.
3. Select a previous destination from the list.Use the arrow to the right of the destinationto view the entire destination name asnecessary. Use the scroll arrows to the leftto scroll through the list.
4. Select the Go screen button next to thedestination. The map screen, with thedestination marked, will display.
5. Select the route preference (Fastest, Shortest,or Other). The system will calculate andhighlight the route.
6. Select the Start Guidance screen button.You are now ready to start your route.See “Getting Started on Your Route” later inthis section for more information.
34

Address BookThe address book entry method allows you toselect a destination by selecting an address thathas been stored in your address book.
* Address Book: Touch this screen button toaccess the Address Book screen. From this screenyou can select an address that already exists asthe destination.
To use the address book entry method, do thefollowing:
1. Press the DEST hard key.
2. Select the * Address Book screen button.
A list of your address book addresses willdisplay.
3. Select the Go screen button next to thedestination. The map screen, with thedestination marked, will display.
4. Select the route preference (Fastest, Shortest,or Other). The system will calculate andhighlight the route.
5. Select the Start Guidance screen button.You are now ready to start your route.See “Getting Started on Your Route” later inthis section for more information.See “Adding Destinations to the AddressBook” later in this section.
35

Pick from MapThis destination entry method allows you to selecta destination by scrolling on the map.
Pick from Map: Touch this screen button to enterthe pick from map destination entry method.
To use this destination entry method, do thefollowing:
1. Press the DEST hard key.
2. Select the Pick from Map screen button.A map screen will display with the scrollingsymbol.
3. Use the V / U (zoom in/out) screen buttonsand touch on the map to find the area thatyou would like to select as your destination.Pressing/holding and dragging your fingeron the map will activate fast scrolling.
4. Press/touch once on the area that you wouldlike to set as your destination.The map screen will display the addressinformation.
5. Select the Go screen button. The map screen,with the destination marked, will display.
6. Select the route preference (Fastest, Shortest,or Other). The system will calculate andhighlight the route.
7. Select the Start Guidance screen button.You are now ready to start your route.See “Getting Started on Your Route” later inthis section for more information.
36

Map CoordinatesThe coordinates destination entry method allowsyou to select a destination by entering latitude andlongitude coordinates.
Map Coordinates: Touch this screen button toaccess the Coordinates screen.
To use the coordinates destination entry method,do the following:
1. Press the DEST hard key.
2. Select the Pick from Map screen button.
3. Select the Map Coordinates screen button.
4. Touch N (north) or S (south) next to Lat.(latitude) to enter the direction of thelatitude coordinate. Enter the numeric portionof the latitude coordinate.
5. Touch E (east) or W (west) next to Long.(longitude) to enter the direction of thelongitude coordinate. Enter the numericportion of the longitude coordinate.
6. Once both coordinates are entered, select theOK screen button. The map screen, with thedestination marked, will display.
7. Select the route preference (Fastest, Shortest,or Other). The system will calculate andhighlight the route.
8. Select the Start Guidance screen button.You are now ready to start your route.See “Getting Started on Your Route” later inthis section for more information.
37

Preset DestinationThe preset destination entry method allows youto set a destination by selecting from one offive previously stored destinations. Besidesvoice tagged destinations, these are the onlydestinations available to set while the vehicle ismoving. If a destination is not set for one ofthe screen buttons, the button will be dimmed andnot available for use. See “Adding or ChangingPreset Destinations” later in this section forinformation on how to add a preset destination.
To use the preset destination entry method, do thefollowing:
1. Press the DEST hard key.
2. Select the desired preset destination screenbutton. The screen buttons are labeled withthe name that was selected for the destinationwhen it was stored. The map screen, withthe destination marked, will display.
3. Select the route preference (Fastest, Shortest,or Other). The system will calculate andhighlight the route.
4. Select the Start Guidance screen button.You are now ready to start your route.See “Getting Started on Your Route” later inthis section for more information.
38

Getting Started on Your RouteOnce you have entered a destination there areseveral functions that can be performed. Press theDEST hard key to access the Route screen.
Turn List
Turn List: Touch this screen button to view thelist of turn maneuvers for the entire route andto avoid turns on the route.
Q/R(Scroll Arrows): Touch the up and downarrow screen buttons to scroll through the listof maneuvers.
Avoid: Touch this screen button, next to theadjacent street name, to avoid the maneuver.
The map screen will display. Select the Fastest,Shortest, or Other screen buttons. Press the StartGuidance screen button. The route will re-calculatewithout the selected avoided street.
Avoid List: Select this screen button to cancel anavoided turn. The list of selected avoided turnswill display. Select the turn to cancel the turn frombeing avoided.
39

Route Preview: Select this screen button topreview the entire route in either direction.
t(Reverse Skip): Select this screen button togo back to the start point or previous waypoint.
q/r(Reverse Scroll): Select this screenbutton to scroll to the start point or previouswaypoint. This button will toggle between slowand fast speed.
j (Pause): Select this screen button to pausethe route preview, while in reverse or fastforward scroll.
r/[(Fast Forward Scroll): Select this screenbutton to scroll to the next waypoint or to thefinal destination. This button will toggle betweenslow and fast speed.
u(Fast Forward Skip): Select this screen buttonto go to the next waypoint or to the finaldestination.
Detour
Detour: Select this screen button from the Routescreen, then select to detour 1 mile, 3 miles, or5 miles (1 km, 3 km, or 5 km) around the currentroute. You may also select to detour the wholeroute if necessary. This option is only availablewhile you are driving on your current planned route.
Voice PromptSelect this screen button from the Route screen toturn voice prompts on or off and to change thevolume of voice prompts. See “Nav” underConfigure Menu on page 44 for more information.
40

Add Waypoint
Add Waypoint: Select this screen button fromthe Route screen. This feature allows you toadd up to three waypoints to the current route,between your start point and final destination.Once a waypoint has been added, the pointscan be edited or deleted.
To add a waypoint:
1. Press the DEST hard key.
2. Select the Add Waypoint screen button.This button will only appear if a route hasbeen calculated.
3. Using the desired method of entering adestination, enter the waypoint. See“Destination” previously for more information.
4. Select the route preference (Fastest, Shortest,or Other). The system will calculate andhighlight the route.
5. Select the Start Guidance screen button.You are now ready to start your route.
6. To add the second and third waypoints,press the DEST hard key, then select theAdd screen button, where you would like thenext waypoint to fall on the route.
7. Select the route preference (Fastest, Shortest,or Other). The system will calculate andhighlight the route.
8. Select the Start Guidance screen button.You are now ready to start your route.
41

To delete a waypoint from your current route:
1. Press the DEST hard key.
2. Select the Delete screen button for thedesired waypoint to delete.
3. The system will display a pop-up confirmationmessage. Choose Yes to delete the waypoint;touch No to cancel this operation.
4. Select the route preference (Fastest, Shortest,or Other). The system will calculate andhighlight the route.
5. Select the Start Guidance screen button.You are now ready to start your route.
Suspend GuidancePress this screen button, from the Route screen,to put the current route on hold.
Resume GuidancePress this screen button, from the Route screen,to resume guidance on the current route.
Cancel GuidancePress this screen button, from the Route screen,to cancel the current route.
Adding Destinations to theAddress BookThere are two ways to add a destination to theaddress book:
• To add the current final destination tothe address book, press the Mark screenbutton from the map screen. The systemwill automatically save the final destinationinformation in the address book.
• Press the Add to Address Book screen buttonwhen available on POI information screens,Destination Entry screens, or POI screens.The system will automatically save thisinformation in the address book.
See “Nav” under Configure Menu on page 44 forinformation on editing address book entries.
42
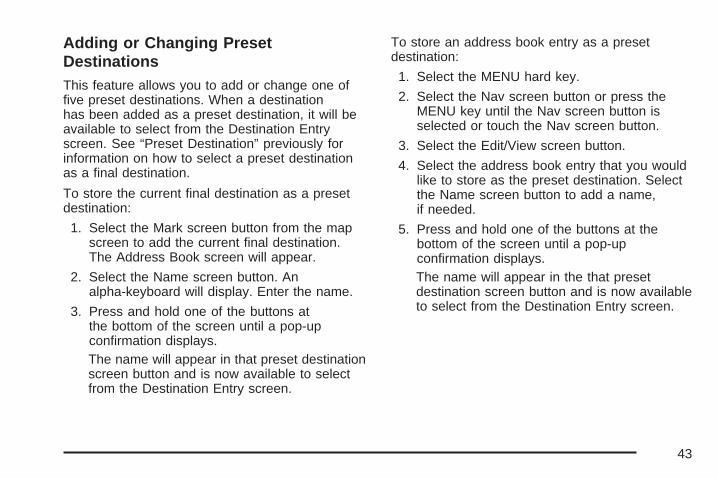
Adding or Changing PresetDestinationsThis feature allows you to add or change one offive preset destinations. When a destinationhas been added as a preset destination, it will beavailable to select from the Destination Entryscreen. See “Preset Destination” previously forinformation on how to select a preset destinationas a final destination.
To store the current final destination as a presetdestination:
1. Select the Mark screen button from the mapscreen to add the current final destination.The Address Book screen will appear.
2. Select the Name screen button. Analpha-keyboard will display. Enter the name.
3. Press and hold one of the buttons atthe bottom of the screen until a pop-upconfirmation displays.The name will appear in that preset destinationscreen button and is now available to selectfrom the Destination Entry screen.
To store an address book entry as a presetdestination:
1. Select the MENU hard key.
2. Select the Nav screen button or press theMENU key until the Nav screen button isselected or touch the Nav screen button.
3. Select the Edit/View screen button.
4. Select the address book entry that you wouldlike to store as the preset destination. Selectthe Name screen button to add a name,if needed.
5. Press and hold one of the buttons at thebottom of the screen until a pop-upconfirmation displays.The name will appear in the that presetdestination screen button and is now availableto select from the Destination Entry screen.
43

Configure Menu
Press the MENU hard key to adjust several ofyour system’s features and preferences. The lastselected menu screen will be the screen thatdisplays; Sound, Radio, Nav (navigation), Display,or Time.
SoundPress the MENU key to enter the Menu options,then press the MENU key repeatedly until Sound isselected or touch the Sound screen button tomake speaker and equalization or DSP (DigitalSignal Processing), if equipped with the Bose®
sound system, adjustments. See Navigation AudioSystem on page 58 for more information.
RadioPress the MENU key to enter the menu options,then press the MENU key repeatedly until Radio isselected or touch the Radio screen button tomake changes for radio information displayed,preset pages, XM™ categories, and AutomaticVolume Control or Bose® AudioPilot®, if yourvehicle has the Bose® sound system. SeeNavigation Audio System on page 58 for moreinformation.
44

Nav (Navigation)
Press the MENU key to enter the Menu options,then press the MENU key repeatedly until Nav isselected or touch the Nav screen button.
Voice Prompt
> Voice Prompt: Touch the Voice Promptscreen button to change the volume of the voiceprompts or to turn the voice prompts on and off.
Voice Prompt Volume: Touch the + (plus) or− (minus) screen buttons to increase or todecrease the volume of the voice prompts.
Turn voice turn instruction: Touch the ON orOFF screen buttons to turn voice instructionson and off while traveling on a planned route.
Route Preference
Touch the % Route Preference screen button tochange route options when the system calculatesa route.
Allow highway: This feature allows the system touse major roads when calculating a planned route.
Allow toll road: This feature allows the system touse toll roads when calculating a planned route.
Allow ferry: This feature allows the system to useferries when calculating a planned route.
Allow time and seasonal restricted road: Thisfeature allows the system to use time restricted andseasonal roads when calculating a planned route.
45

Edit Address Book — How to AddTo add an address to the address book, see“Adding Destinations to the Address Book” underDestination on page 27.
Edit Address Book — Edit/ViewTo edit the name of an address book:
1. Select the MENU hard key.
2. Select the NAV screen button.
3. Select the * Edit/View Address Book screenbutton.
4. Select the Address book entry. 5. Touch the Name screen button and use thealpha keyboard to edit or add the name.
6. Touch the OK screen button to save yourchanges.
To add or change the phone number of anaddress book entry:
1. Select the MENU hard key.
2. Select the NAV screen button.
3. Select the * Edit/View Address Book screenbutton.
4. Select the address book entry to change.
46

5. Touch the Phone # screen button and use thenumeric keyboard to enter or change thephone number.
6. Touch the OK screen button to save yourchanges.
To change the map icon of an address book entry:
1. Select the MENU hard key.
2. Select the NAV screen button.
3. Select the * Edit/View Address Book screenbutton.
4. Select the address book entry to change.
5. Select the Icon screen button.
6. Select an icon from the list.
To add a voice tag to an address book entry:
1. Select the MENU hard key.
2. Select the NAV screen button.
3. Select the * Edit/View Address Book screenbutton.
4. Select the Add Voice tag screen button.
5. The system will ask for you to state the name.You will have five seconds to state the name.The system will respond back with the name.
To delete an address book entry:
1. Select the MENU hard key.
2. Select the NAV screen button.
3. Select the * Edit/View Address Book screenbutton.
4. Select the address book entry to delete.
5. Press the Delete screen button to delete theaddress book entry.
To delete the entire address book:
1. Select the MENU hard key.
2. Select the NAV screen button.
3. Select the * Edit/View Address Book screenbutton.
4. Select the address book entry to delete.
5. Press and hold the Delete screen button untilthe delete all address book entries pop-upconfirmation displays. Select Yes to delete;select No to cancel the operation.
47
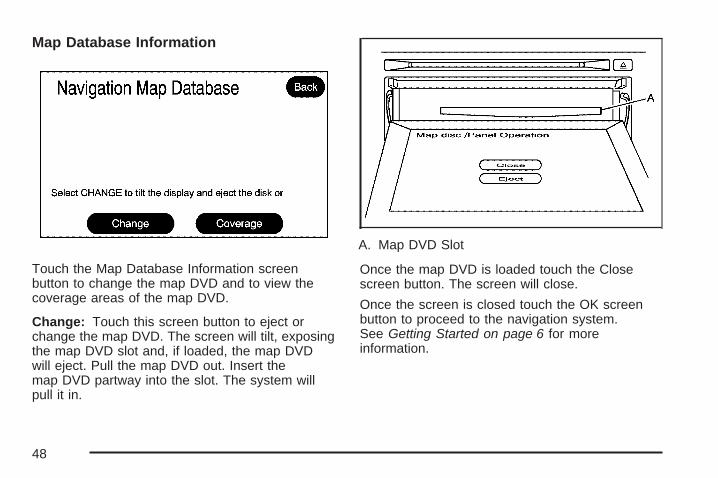
Map Database Information
Touch the Map Database Information screenbutton to change the map DVD and to view thecoverage areas of the map DVD.
Change: Touch this screen button to eject orchange the map DVD. The screen will tilt, exposingthe map DVD slot and, if loaded, the map DVDwill eject. Pull the map DVD out. Insert themap DVD partway into the slot. The system willpull it in.
A. Map DVD Slot
Once the map DVD is loaded touch the Closescreen button. The screen will close.
Once the screen is closed touch the OK screenbutton to proceed to the navigation system.See Getting Started on page 6 for moreinformation.
48

Coverage: Touch this screen button to view theareas covered by the map DVD.
Touch the up and down arrow screen buttons toview each region of the map DVD. The screen willdisplay the major cities for the selected region.
Low Fuel WarningTo turn the Low Fuel Warning on or off, do thefollowing:
1. Press the MENU key.
2. Press the Nav screen button.
3. Press the @ Low Fuel Warning ON or OFFscreen button. The active button will behighlighted.When on, a warning will appear on the displaywhen your vehicle’s fuel tank is low on fuel.The warning pop-up window will ask if youwould like to view gas station POIs on themap display. Once the gas station POIs aredisplayed you can automatically route to a gasstation by touching the gas station POI symbolon the screen and pressing the GO screenbutton.To remove the POIs from the screen, see thePOI information under Symbols on page 21for more information.See “Fuel” in the Index of your vehicle’sowner manual.
49

Off-Road ModeTo turn the Off-Road Mode on or off, do thefollowing:
1. Press the MENU key.
2. Press the Nav screen button.
3. Press the # Off-Road Mode ON or OFFscreen buttons. The active button will behighlighted.When the off-road mode is turned on, thenavigation system will show the path beingtraveled by the vehicle when not on a markedroad. This path will be a simulation sincethe map database coverage will not havethese roads on the DVD. This path willbe stored in the navigation system’s memory,see “Previous Destination” under Destinationon page 27 for more information.See “Off-Road Driving” in the Index of yourvehicle’s owner manual for more informationabout off-road driving.
Display
Press the MENU key to enter the menu options,then press the MENU key repeatedly until Displayis selected or touch the Display screen button.
Display OffTouch this screen button to turn the display off.Press any hard key to view the display.
50

Brightness/Contrast/Mode
Touch this screen button to change the brightness,contrast, and mode of the display.
] (Brightness): Touch the + (plus) or − (minus)screen buttons to increase or decrease thebrightness of the screen.
_ (Contrast): Touch the + (plus) or − (minus)screen buttons to increase or decrease thecontrast of the screen.
Auto (Automatic): Touch this screen button forthe system to automatically adjust the screenbackground depending on exterior lightingconditions.
Night: Touch this screen button and the systemwill make the screen background darken.
Day: Touch this screen button and the system willmake the screen background brighten.
Setting the TimePress the MENU key to enter the menu options,then press the MENU key repeatedly until the timeis selected or touch the time screen button, thenpress the Set screen button.
Hours: Press the − (minus) or + (plus) signs todecrease or increase the hours.
Minutes: Press the − (minus) or + (plus) signs todecrease or increase the minutes.
12/24 Format: Select the 12 screen button forstandard time; select the 24 screen buttonfor military time.
51

Global Positioning System (GPS)The navigation system determines the position ofyour vehicle by using satellite signals, variousvehicle signals, and map data.
At times, other interferences such as the satellitecondition, road configuration, the condition ofthe vehicle and/or other circumstances caninterfere with the navigation system’s ability todetermine the accurate position of the vehicle.
The GPS shows the current position of yourvehicle using signals sent by the GPS Satellitesof the United States Department of Defense.When your vehicle is not receiving signals fromthe satellites, a symbol will appear on themap screen. Refer to Symbols on page 21.
This system may not be available or interferencesmay occur if any of the following are true:
• Signals are obstructed by tall buildings,large trucks, or a tunnel.
• Objects are located on the rear shelf.
• Satellites are being repaired or improved.
• After-market glass tinting has been applied tothe vehicle’s rear windshield.
Notice: Do not apply after-market glass tintingto the vehicle’s windows. Glass tinting willinterfere with the system’s ability to receiveGPS signals and cause the system tomalfunction. You might have to replace thewindow to correct the problem. This would notbe covered by your warranty.
For more information if you are experiencing aproblem, see If the System Needs Serviceon page 54 and Problems with Route Guidanceon page 54.
52

Vehicle PositioningAt times, the position of the vehicle on the mapmay be inaccurate due to one or more of thefollowing reasons:
• The road system has changed.
• The vehicle is driving on slippery roadsurfaces such as in sand, gravel, and/or snow.
• The vehicle is traveling on winding roads.
• The vehicle is on a long straight road.
• The vehicle is approaching a tall building or alarge vehicle.
• The surface streets run parallel to a freeway.
• The vehicle has just been transferred by avehicle carrier or a ferry.
• The current position calibration is setincorrectly.
• The vehicle is traveling at high speed.
• The vehicle changes directions more thanonce, or when the vehicle is turning on aturn table in a parking lot.
• The vehicle is entering and/or exiting aparking lot, garage, or a lot with a roof.
• The GPS signal is not received.
• A roof carrier is installed on your vehicle.
• The vehicle is being driven with tire chains.
• The tires are replaced.
• The tire pressure for your tires is incorrect.
• The tires are worn.
• The first time the map DVD is inserted.
• The battery is disconnected for several days.
• The vehicle is driving in heavy traffic wheredriving is at low speeds, and the vehicle isstopped and started repeatedly.
If you experience problems with your system,see your dealer/retailer.
53

Problems with Route GuidanceInappropriate route guidance may occur under oneor more of the following conditions:
• You have not turned onto the road indicated.
• Route guidance may not be availablewhen using automatic rerouting for the nextright or left turn.
• The route may not be changed when usingautomatic rerouting.
• There is no route guidance when turning at anintersection.
• Plural names of places may be announcedoccasionally.
• It may take a long time to operate automaticrerouting during high-speed driving.
• Automatic rerouting may display a routereturning to the set waypoint if you are headingfor a destination without passing through aset waypoint.
• The route prohibits the entry of a vehicle dueto a regulation by time or season or anyother regulation which may be given.
• Some routes may not be searched.
• The route to the destination may not beshown if there are new roads, if roadshave recently changed, or if certain roads arenot listed on the map DVD. See OrderingMap DVDs on page 55.
To recalibrate the vehicle’s position on the map,see your dealer/retailer.
If the System Needs ServiceIf your system needs service and you havefollowed the steps listed here and still areexperiencing problems, see your dealer/retailerfor assistance.
54

Ordering Map DVDsThe map DVD in your vehicle is the most up-to-dateinformation available when your vehicle waspurchased. The map DVD is updated periodically,provided that the map information has changed.You will receive two free DVD map disc updateswith the purchase of your new vehicle. Updates arenecessary to make sure that your vehicle’snavigation system has the most accurateinformation available about streets/roads, points ofinterest, and business locations.
The updates are provided by the GM Nav DiscCenter at the first and second anniversary datesof your vehicle’s delivery date. About four tosix weeks before those anniversary dates, you willreceive a post card from the GM Nav Disc Centerreminding you that a free update is available.The center will request confirmation of your mailingaddress either by having you contact the toll-freenumber, 1-877-NAV-DISC (1-877-628-3472), or thecenter’s website, www.gmnavdisc.com. Afterverifying your address you should receive theupdated disc in about two weeks. After receivingthe updated disc, replace the old disc in thenavigation system. See “Installing the DVD Map
Disc” and “Ejecting the DVD Map Disc” under Mapson page 18. Dispose of the old disc to avoidconfusion about which disc is the most current.If you have any questions about the operation ofthe navigation system or the update process, callthe GM Nav Disc Center or go to the center’swebsite. If you need any future updates or areplacement disc, because the current disc is lost,damaged, or needs to be updated, call the GM NavDisc Center or order a new disc online. To order adisc, have your Vehicle Identification Number (VIN)available. This helps the center make sure youreceive the correct and most up to date DVD mapdisc for your vehicle. See “Vehicle IdentificationNumber (VIN)” in the Index of your vehicle’s ownermanual for more information.
Database Coverage ExplanationsCoverage areas vary with respect to the level ofmap detail available for any given area. Someareas will feature greater levels of detail thanothers. If this happens, it does not mean there is aproblem with the system. As the map DVD isupdated, more detail may become available forareas which previously had limited detail.See Ordering Map DVDs on page 55.
55

✍ NOTES
56

Navigation Audio System ............................. 58CD Player ................................................... 68
DVD Player ................................................. 76Auxiliary Devices ......................................... 84
Section 3 Navigation Audio System
57

Navigation Audio SystemNotice: Before adding any sound equipment toyour vehicle, such as an audio system, CDplayer, CB radio, mobile telephone, or two-wayradio, make sure that it can be added bychecking with your dealer/retailer. Also, checkfederal rules covering mobile radio andtelephone units. If sound equipment can beadded, it is very important to do it properly.Added sound equipment can interfere with theoperation of your vehicle’s engine, radio, orother systems, and even damage them. Yourvehicle’s systems can interfere with theoperation of sound equipment that hasbeen added.
Notice: The chime signals related to seatbelts, parking brake, and other functions ofyour vehicle operate through the navigationsystem. If that equipment is replaced oradditional equipment is added to your vehicle,the chimes may not work. Make sure thatreplacement or additional equipment iscompatible with your vehicle before installingit. See “Accessories and Modifications” inthe Index of your vehicle’s owner manual.
Playing the Radio
O (Power/Volume): Press this knob to turn theaudio system on and off. Turn the knob toincrease or to decrease the volume.
f (Tuning/Sound Knob): Turn this knob to go tothe next or previous frequency.
Press this knob to display the Sound menu. See“Sound Menu” later in this section.
AUDIO: Press this key to display the audioscreen. Press the key to switch between AM, FM,or XM, if equipped, DISC, or AUX (Auxiliary),or touch the screen button. See CD Playeron page 68, DVD Player on page 76, and AuxiliaryDevices on page 84 for more information.
58

Finding a Station
If viewing a map screen, touch the source screen(AM, FM, XM, CD, etc..) button. The displaywill split between the audio screen and the mapscreen. All station-changing functions can beperformed from this screen.
If you do not want to view a split screen or youare not on a map screen, press the AUDIOhard key.
AM/FM/XM: Touch the source (AM, FM, or XM,if equipped) screen button or press the AUDIO keyrepeatedly until the desired source is highlighted.
FM source shown, other sources similar
FM source shown, other sources similar
59

Category: Touch the screen button, located inthe middle of the screen, to receive a list of all ofthe selected band stations in the area. Use theup and down arrow screen buttons to scrollthe frequencies. Touch the desired frequency.
XM lists will also contain a category to selectand the stations or channels that pertain to thecategory. For XM, touch the left and right arrowscreen buttons to change categories. The stationinformation will appear on the display. See “RadioMenu” later in this section to add and remove XM
categories from the category list. When listening toXM stations, you will be able to select all of thecategories when using the right and left arrowscreen buttons on the main audio screen. Thecategories, when removed, will not be enabled toselect from the category list screen.
FM lists may also contain a category to selectif stations in your area support Radio DataSystems (RDS).
$ Refresh List: Touch this screen button torefresh the list of stations.
When viewing a map screen, the name of thestation or channel will appear on the display.
¨ SEEK / © SEEK: To seek stations, press theleft or right arrow keys to go to the next orprevious station and stay there.
To scan stations, press and hold either arrow formore than two seconds. The radio will go to astation, play for a few seconds, then go on to thenext station. To stop scanning, press eitherarrow again.
FM source shown, other sources similar
60

Storing Radio Station PresetsThis feature allows you to store up to 30 presetstations. You can mix AM, FM, and XM (ifequipped). To store presets, do the following:
1. Press theO (power) knob to turn thesystem on.
2. If viewing a map screen, touch the sourcescreen button, press the AUDIO key, orpress the FAV (favorite) key.
3. Select the band.
4. Seek, scan, or tune to the desired station, toselect the station.
5. Press and hold one of the preset screenbuttons for more than two seconds or untilyou hear a beep.
6. Repeat the steps for each preset.
Sound Menu
f (Sound Menu): Press this knob or press theMENU key to access the Sound menu to adjust thetreble, midrange, bass, fade, balance, andequalization or Digital Signal Processing (DSP).
Digital Signal Processing (DSP) shown,Equalization similar
61

Setting the Tone
TREBLE: Touch the plus (+) or minus (−) sign toincrease or decrease the treble. If a station isweak or noisy, decrease the treble.
MID (Midrange): Touch the plus (+) or minus (−)sign to increase or decrease the midrange.
BASS: Touch the plus (+) or minus (−) sign toincrease or decrease the bass.
Adjusting the Speakers
L/R (Left/Right) (Balance): To adjust the balancebetween the left and the right speakers, touchand hold the L or R screen buttons. To center thebalance and the fade, touch the center, wherethe two lines meet.
Front/Rear (Fade): To adjust the fade betweenthe front and the rear speakers, touch and holdthe Front or Rear screen buttons. To centerthe balance and the fade, touch the center,where the two lines meet.
Automatic EqualizationIf the system has automatic equalization, you canselect customized equalization settings designedfor Talk. Touch the Talk screen button to hearthe change in sound. The system will savethe setting for each source.
To not use the automatic equalization setting,press any of the screen buttons that will changethe treble, midrange, bass, balance, or fade.This will take the system out of the equalizationsetting so that you can create your own sound.
Digital Signal Processing (DSP)If the system has Digital Signal Processing (DSP),DSP is used to provide a choice of four differentlistening experiences. DSP can be used whilelistening to the audio system. The type ofDSP selected is displayed on the status line.
Select from the following DSP settings:
Normal: Select this screen button to adjust theaudio to be in normal mode. This provides the bestsound quality or all seating positions.
62
Surround (Centerpoint®): Select this screenbutton to turn on Bose Centerpoint® signalprocessing circuitry. Centerpoint® produces a fullvehicle surround sound listening experience from aCD, MP3/MWA, DVD, or XM stereo digital audiosource and delivers five independent audiochannels from the conventional two channel stereorecordings. This is not available for AM or FM.
Driver: Select this screen button to adjust theaudio to give the driver the best possible soundquality.
Rear: Select this screen button to adjust theaudio to give the rear seat occupants thebest possible sound quality.
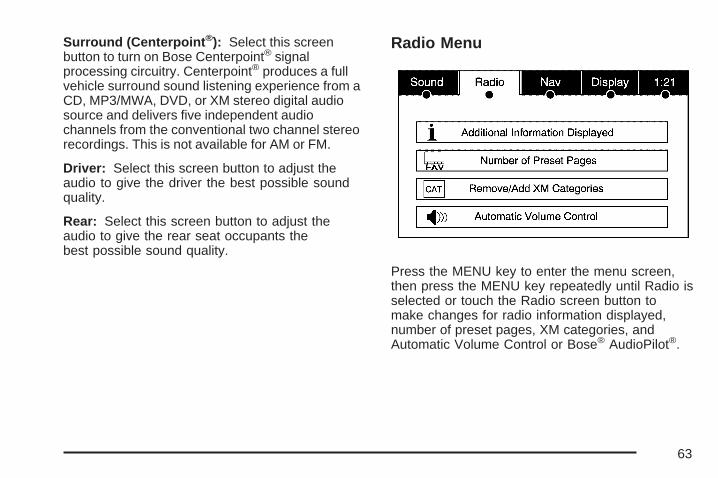
Radio Menu
Press the MENU key to enter the menu screen,then press the MENU key repeatedly until Radio isselected or touch the Radio screen button tomake changes for radio information displayed,number of preset pages, XM categories, andAutomatic Volume Control or Bose® AudioPilot®.
63

Additional Information Displayed
Touch the 4 Additional Information Displayedscreen button to turn station, channel, CD, andMP3 information on or off.
Touch the YES screen button to receiveinformation, when it is available, for thefollowing; FM: RDS category name andradio text, XM: Song Title and Artist Name,CD: CD text, MP3: tag information.
Touch the NO screen button to receive noinformation.
Number of Preset Pages
Touch the / Number of Preset Pages screenbutton to change the number of preset pages,1 through 6. Each preset page can containfive preset stations. Touch the desired numberedscreen button.
Remove/Add XM Categories
Touch the & Remove/Add XM Categories screenbutton to remove or add XM categories whenselecting XM categories from the categorylist screen. The list of XM categories will appearon the screen. Use the up and down arrow screen
buttons to scroll through the list. The categories toremove will be highlighted and the categories toadd will be dark in color. Touch the categorythat you would like to add or remove. Touch theRestore All Categories screen button to addall categories that have been removed.
Automatic Volume Control or BoseAudioPilot®
> Automatic Volume Control: With automaticvolume control, your audio system adjustsautomatically to make up for road and wind noiseas you drive.
To use Automatic Volume Control:1. Set the volume at the desired level.
2. Press the MENU key to enter the menuscreen, then press the MENU key repeatedlyuntil Radio is selected or touch the Radioscreen button
3. Press the > Automatic Volume Controlscreen button to access the SpeedCompensated Volume screen.
4. Touch the Low, Medium, or High screenbuttons. Each higher setting allows formore compensation at faster vehicle speeds.
64
Then, as you drive, automatic volume controlautomatically increases the volume, as necessary,to overcome noise at any speed. The volumelevel should always sound the same to you as youdrive. To turn automatic volume control off,touch the OFF screen button.
AudioPilot®: If the system has the Bose® soundsystem, Denali only, it includes Bose AudioPilot®
noise compensation technology.
To use AudioPilot®:
1. Press the MENU key to enter the menuscreen, then press the MENU key repeatedlyuntil Radio is selected or touch the Radioscreen button.
2. Press the > Automatic Volume Controlscreen button to access the AudioPilot® menu.
3. Press the ON screen button.
To turn it off, touch the OFF screen button. Whenon, AudioPilot® continuously adjusts the audiosystem equalization, to compensate forbackground noise, so that your music alwayssounds the same at the set volume level.
This feature is most effective at lower volumesettings where background noise can affect howwell you hear the music being played throughyour vehicle’s audio system. At higher volumesettings, where the music is much louder thanthe background noise, there may be little orno adjustments by AudioPilot®. For additionalinformation on AudioPilot®, please visitwww.bose.com.
Radio Data System (RDS)The audio system has a Radio Data System(RDS). RDS features are available for use onlyon FM stations that broadcast RDS information.With RDS, the radio can do the following:
• Seek to stations broadcasting the selectedtype of programming
• Receive announcements concerning local andnational emergencies
• Display messages from radio stations
65

This system relies on receiving specific informationfrom these stations and will only work when theinformation is available. In rare cases, a radiostation may broadcast incorrect information thatwill cause the radio features to work improperly.If this happens, contact the radio station.
The RDS system is always on. When information isbroadcast from the FM station you are listening to,the station name or call letters will be displayed onthe audio screen. RDS may provide a program type(PTY) for current programming and the name of theprogram being broadcasted.
XM™ Satellite Radio ServiceXM™ is a satellite radio service that is based inthe 48 contiguous United States and Canada.XM™ offers a large variety of coast-to-coastchannels including music, news, sports, talk,traffic/weather (U.S. subscribers), and children’sprogramming. XM™ provides digital qualityaudio and text information that includes thechannel name and number, song title, and artistname. A service fee is required in order to receivethe XM™ service. For more information, contactXM™; In the U.S. at www.xmradio.com orcall 1-800-852-XMXM (1-800-852-9696) or inCanada at www.xmradio.ca or call1-877-GET-XMSR (1-800-438-9677).
When XM™ is active, the channel name andnumber, song title, and artist will display onthe screen.
66

Radio Display Message Condition Action RequiredXM Updating Updating encryption code The encryption code in the receiver is being updated and no
action is required. This process should take no longer than30 seconds.
No XM signal Loss of signal The system is functioning correctly, but the vehicle is in alocation that is blocking the XM™ signal. When you moveinto an open area, the signal should return.
Loading XM Acquiring channel audio(after four second delay)
The audio system is acquiring and processing audio andtext data. No action is needed. This message shoulddisappear shortly.
Channel Off Air Channel not in service This channel is not currently in service. Tune in to anotherchannel.
Channel Unavail Channel no longeravailable
This previously assigned channel is no longer assigned.Tune to another station. If this station was one of thepresets, choose another station for that preset button.
No Artist Info Artist Name/Feature notavailable
No artist information is available at this time on this channel.The system is working properly.
No Title Info Song/Program Title notavailable
No song title information is available at this time on thischannel. The system is working properly.
No CAT Info Category Name notavailable
No category information is available at this time on thischannel. The system is working properly.
Not Found No channel available forthe chosen category
There are no channels available for the selected category.The system is working properly.
No Information No Text/Informationalmessage available
No text or informational messages are available at this timeon this channel. The system is working properly.
67

Radio Display Message Condition Action RequiredXM Theftlocked Theft lock active The XM™ receiver in the vehicle may have previously been
in another vehicle. For security purposes, XM™ receiverscannot be swapped between vehicles. If this message isreceived after having your vehicle serviced, check with yourGM dealer.
XM Radio ID Radio ID label (channel 0) If tuned to channel 0, this message will alternate with theXM™ Radio eight digit radio ID label. This label is neededto activate the service.
Unknown Radio ID not known(should only be ifhardware failure)
If this message is received when tuned to channel 0, theremay be a receiver fault. Consult with your GM dealer.
Check XM Receiver Hardware failure If this message does not clear within a short period of time,the receiver may have a fault. Consult with your GM dealer.
CD PlayerThe player can be used for CD and MP3. If yourvehicle has RSE, the player can be used forCD, MP3, DVD audio, and as a DVD video player.See DVD Player on page 76 for more informationabout DVD audio and video.
With the ignition on, insert a CD partway into theslot, label side up. The player will pull it in andthe CD should begin playing. While playing a CD,the navigation system is available. If you inserta CD with the system off and the ignition on, it willstart to play.
When you insert a CD, the CD tab will display.
If you turn off the ignition or radio with a CD in theplayer, it will stay in the player. When you turnon the ignition or radio, the CD will start playingwhere it stopped, if it was the last selectedaudio source.
As each new track starts to play, the track numberwill appear on the display.
68

The CD player can play the smaller 3 inch (8cm)single CDs with an adapter ring. Full-size CDsand the smaller CDs are loaded in the samemanner.
If playing a CD-R the sound quality may bereduced due to CD-R quality, the method ofrecording, the quality of the music that has beenrecorded, and the way the CD-R has beenhandled. There may be an increase in skipping,difficulty in finding tracks, and/or difficulty in loadingand ejecting. If these problems occur, check thebottom surface of the CD. If the surface of the CDis damaged, such as cracked, broken, orscratched, the CD will not play properly. If thesurface of the CD is soiled, see “Care ofYour CDs” in the Index of your vehicle’s ownermanual.
If there is no apparent damage, try a knowngood CD.
Notice: If a label is added to a CD, or morethan one CD is inserted into the slot at a time,or an attempt is made to play scratched ordamaged CDs, the CD player could bedamaged. While using the CD player, use onlyCDs in good condition without any label,load one CD at a time, and keep the CD playerand the loading slot free of foreign materials,liquids, and debris.
Do not add any label to a CD, it could get caughtin the CD player. If a CD is recorded on apersonal computer and a description label isneeded, try labeling the top of the recorded CDwith a soft marker instead.
If an error appears on the display, see “CDMessages” later in this section.
If viewing a map screen, touch the CD screenbutton. The display will split between the audioscreen and the map screen. If you do not want toview a split screen or you are not on a mapscreen, press the AUDIO key then press theAUDIO key until CD is selected or touch the CDscreen button.
69
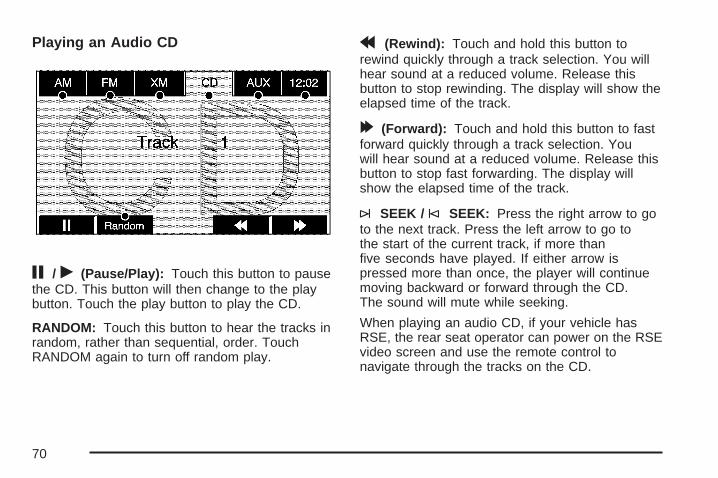
Playing an Audio CD
j / r (Pause/Play): Touch this button to pausethe CD. This button will then change to the playbutton. Touch the play button to play the CD.
RANDOM: Touch this button to hear the tracks inrandom, rather than sequential, order. TouchRANDOM again to turn off random play.
r (Rewind): Touch and hold this button torewind quickly through a track selection. You willhear sound at a reduced volume. Release thisbutton to stop rewinding. The display will show theelapsed time of the track.
[ (Forward): Touch and hold this button to fastforward quickly through a track selection. Youwill hear sound at a reduced volume. Release thisbutton to stop fast forwarding. The display willshow the elapsed time of the track.
¨ SEEK / © SEEK: Press the right arrow to goto the next track. Press the left arrow to go tothe start of the current track, if more thanfive seconds have played. If either arrow ispressed more than once, the player will continuemoving backward or forward through the CD.The sound will mute while seeking.
When playing an audio CD, if your vehicle hasRSE, the rear seat operator can power on the RSEvideo screen and use the remote control tonavigate through the tracks on the CD.
70

Using an MP3 CDMP3 FormatThere are guidelines that must be met, whencreating an MP3 disc. If the guidelines are not metwhen recording a CD-R(W), the CD may notplay. The guidelines are:
• Sampling rate: 16 kHz, 22.05 kHz, 24 kHz,32 kHz, and 44.1 kHz.
• Bit rates supported: 32, 40, 48, 56, 64, 80, 96,112, 128, 160, 192, 224, 256, and 320 kbps.
• ID3 tag information is displayed by the radio ifit is available. The radio supports ID3 taginformation v1.0 or v1.1. The radio will displaya filename, song name, artist name, albumname, and directory name.
• Maximum 32 characters, including spaces, ina file or folder name.
• Maximum number of folders is 253 with amaximum hierarchy of eight folders.
• Create a folder structure that makes it easyto find songs while driving. Organize songsby albums using one folder for each album.Each folder or album should contain 18 songsor less.
• It is recommended that there is a maximumof 192 files on a disc.
• The files can be recorded on a CD-R orCD-RW with a maximum capacity of 700MB.
• DVD with MP3 are not playable on thissystem.
Root DirectoryThe root directory will be treated as a folder. If theroot directory has compressed audio files, thedirectory will be displayed as ROOT. All filescontained directly under the root directory will beaccessed prior to any root directory folders.However, playlists (Px) will always be accessedbefore root folders or files.
Empty Directory or FolderIf a root directory or a folder exists somewherein the file structure that contains only folders/subfolders and no compressed files directlybeneath them, the player will advance to thenext folder in the file structure that containscompressed audio files and the empty folderwill not be displayed or numbered.
71

No FolderWhen the CD contains only compressed files,the files will be located under the root folder.The next and previous folder functions will haveno function on a CD that was recorded withoutfolders or playlists. When displaying the name ofthe folder the radio will display ROOT.
When the CD contains only playlists andcompressed audio files, but no folders, all files willbe located under the root folder. The left andright arrow buttons will search playlists (Px) firstand then go to the root folder. When the radiodisplays the name of the folder the radio willdisplay ROOT.
Order of PlayTracks will be played in the following order:
• Play will begin from the first track in the firstplaylist and will continue sequentially throughall tracks in each playlist. When the lasttrack of the last playlist has been played, playwill continue from the first track of the firstplaylist.
• If the CD does not contain any playlists, thenplay will begin from the first track under theroot directory. When all tracks from theroot directory have been played, play willcontinue from files according to their numericallisting. After playing the last track from thelast folder, play will begin again at thefirst track of the first folder or root directory.
When play enters a new folder, the display will notautomatically show the new folder name. Thenew track name will appear on the display.
File System and NamingThe song name that will display will be the songname that is contained in the ID3 tag. If thesong name is not present in the ID3 tag, then theradio will display the file name without theextension (such as .mp3) as the track name.
Track names longer than 32 characters orfour pages will be shortened. The display will notshow parts of words on the last page of textand the extension of the filename will not display.
72

Preprogrammed PlaylistsYou can access preprogrammed playlists whichwere created by WinAmp™, MusicMatch™,or Real Jukebox™ software, however, you will nothave editing capability. These playlists will betreated as special folders containing compressedaudio song files.
Playing an MP3With the ignition on, insert a CD partway into theslot, label side up. The player will pull it in.The system may take some time to read the MP3disc. While playing a CD, the navigation systemis available. If you insert a CD with the system offand the ignition on, it will start to play.
When you insert a CD, the CD tab will display.
If you turn off the ignition or radio with a CD in theplayer, it will stay in the player. When you turnon the ignition or radio, the CD will start playingwhere it stopped, if it was the last selectedaudio source.
As each new track starts to play, the track numberwill appear on the display.
If playing a CD-R the sound quality may bereduced due to CD-R quality, the method ofrecording, the quality of the music that has beenrecorded, and the way the CD-R has beenhandled. There may be an increase in skipping,difficulty in finding tracks, and/or difficulty in loadingand ejecting. If these problems occur, check thebottom surface of the CD. If the surface of the CDis damaged, such as cracked, broken, orscratched, the CD will not play properly. If thesurface of the CD is soiled, see “Care ofYour CDs” in the Index of your vehicle’s ownermanual.
73

If there is no apparent damage, try a knowngood CD.
Notice: If a label is added to a CD, or morethan one CD is inserted into the slot at a time,or an attempt is made to play scratched ordamaged CDs, the CD player could bedamaged. While using the CD player, use onlyCDs in good condition without any label,load one CD at a time, and keep the CD playerand the loading slot free of foreign materials,liquids, and debris.
Do not add any label to a CD, it could get caughtin the CD player. If a CD is recorded on apersonal computer and a description label isneeded, try labeling the top of the recorded CDwith a soft marker instead.
If an error appears on the display, see “CDMessages” later in this section.
If viewing a map screen, touch the CD screenbutton. The display will split between the audioscreen and the map screen. If you do not want toview a split screen or you are not on a mapscreen, press the AUDIO key, then press theAUDIO key until CD is selected or touch the CDscreen button.
j / r (Pause/Play): Touch this button to pausethe CD. This button will then change to the playbutton. Touch the play button to play the CD.
Random: Touch this screen button to hear thedisc played in random (tracks and folders)order. Touch the Random screen button to turnoff random play.
r (Rewind): Touch and hold this button torewind quickly through a track selection. You willhear sound at a reduced volume. Release thisbutton to stop rewinding. The display will show theelapsed time of the track.
74

[ (Forward): Touch and hold this button to fastforward quickly through a track selection. Youwill hear sound at a reduced volume. Release thisbutton to stop fast forwarding. The display willshow the elapsed time of the track.
qr (Folder): Select the left or right arrow to goto the previous or next folder on the disc.
Press the middle screen button, with the foldername, to sort the MP3 by folder and file name. Itmay take a few minutes for the system to sortthe MP3.
Sort By: Touch this screen button to organizethe MP3 to enable you to sort the MP3 by artist,album, and genre. It may take a few minutesfor the system to sort the MP3.
¨ SEEK / © SEEK: Press the right arrow to goto the next track. Press the left arrow to go to thestart of the current track, if more than five secondshave played. If either arrow is pressed more thanonce, the player will continue moving backwardor forward through the CD. The sound will mutewhile seeking.
When playing an MP3, if your vehicle has RSE,the rear seat operator can power on the RSE videoscreen and use the remote control to navigatethrough the MP3.
CD MessagesIf Disc Read Error appears on the display and/orthe CD comes out, it could be for one of thefollowing reasons:
• If a disc was inserted with an invalid orunknown format.
• If the map DVD disc was installed into the CDslot. See “Installing the Map DVD” underMaps on page 18 for more information.
• It is very hot. When the temperature returns tonormal, the CD should play.
• You are driving on a very rough road.When the road becomes smoother, theCD should play.
• The CD is dirty, scratched, wet, orupside down.
• The air is very humid. If so, wait about anhour and try again.
75

• There may have been a problem whileburning the CD.
• The label may be caught in the CD player.
If the CD is not playing correctly, for any otherreason, try a known good CD.
If any error occurs repeatedly or if an error cannotbe corrected, contact your dealer/retailer.
DVD PlayerThe player can be used for CD, MP3, DVD audio,and as a DVD video player.
With the ignition on, insert a DVD partway into thetop visible slot, label side up. The player willpull it in and the DVD should begin playing. Whileplaying a DVD, the navigation system isavailable. If you insert a DVD with the system offand the ignition on, it will start to play.
This feature will not operate on the navigationscreen unless the vehicle is in PARK (P).
The Rear Seat Entertainment (RSE) video screenwill start play of the DVD when a DVD hasbeen inserted into the navigation system. See“Rear Seat Entertainment System” in the Index ofyour vehicle’s owner manual for more information.
The DVD player is only compatible with DVDsof the appropriate region code that is printed onthe jacket of most DVDs.
The DVD slot is compatible with most audioCDs, CD-R, CD-RW, DVD-Video, DVD-Audio,DVD-R/RW, DVD+R/RW media along withMP3 and WMA “un-protected” formats.
If playing any compatible DVD-R the sound qualitymay be reduced due to disc quality, the method ofrecording, the quality of the video that has beenrecorded, and the way the disc has been handled.There may be an increase in skipping, difficulty infinding chapters, and/or difficulty in loading andejecting. If these problems occur, check the bottomsurface of the DVD. If the surface of the DVD isdamaged, such as cracked, broken, or scratched,the DVD will not play properly.
76

If there is no apparent damage, try a knowngood DVD.
Notice: If you add any label to a DVD, insertmore than one DVD into the slot at a time,or attempt to play scratched or damaged DVDs,you could damage the DVD player. Whenusing the DVD player, use only DVDs in goodcondition without any label, load one DVDat a time, and keep the DVD player andthe loading slot free of foreign materials,liquids, and debris.
Do not add any label to a DVD, it could get caughtin the DVD player. If a DVD is recorded on apersonal computer and a description labelis needed, try labeling the top of the recordedDVD with a soft marker instead.
If an error appears on the display, see “DVDMessages” later in this section.
Rear Seat Entertainment (RSE)If the Rear Seat Entertainment (RSE) videoscreen is playing a DVD movie and the ignition isturned to LOCK and then back to ACCESSORY,RUN, or START, the RSE screen will not turn backon automatically, but you will hear the audiofrom the movie. To view the movie on the RSEvideo screen:
• Press the remote controlO (power) button,then the r (play) button, which will continuethe movie from where it was stopped.
• Press the r (play) screen button on thenavigation DVD screen, which will continuethe movie from where it was stopped(this button may not be available).
• Eject and replace the DVD movie from thenavigation system, which will start themovie from the beginning.
77

Playing a DVDThere are three ways to play a DVD:
• Once a DVD is inserted, the system willautomatically start play of the DVD.
• If you are on a map screen, touch the DVDscreen button.
• Press the AUDIO hard key, then touch theDVD screen button.
When a DVD is loaded in the DVD player, the rearseat operator can power on the RSE videoscreen and use the remote control to navigatethrough the DVD.
O (Power/Volume): Press this knob to turn thesystem on and off. Turn the knob to increaseor decrease the volume of the audio system.
Press and hold this knob for more thantwo seconds to turn the navigation system,RSE, and RSA off.
DVD Menu OptionsOnce a DVD starts to play, the menu options willautomatically appear. To display the menuchoices while a DVD is playing in full screen,touch anywhere on the screen.
There are three pages of menu options. Press theright and left arrow screen buttons to use all ofthe menu screen buttons. Menu options areavailable when they are highlighted. Some menuoptions are only available when the DVD isnot playing.
78

Full: Press this screen button to remove all menuoptions from the display. Press anywhere onthe screen to display the menu options.
Cursor: Touch this button to access the cursormenu. The arrows and other cursor optionsallow you to navigate the DVD menu options. Thecursor menu options are only available if aDVD has a menu.
q, Q, r, R (Arrow Buttons): Use thesearrow buttons to move around the DVD menu.
Enter: Touch this button to select thehighlighted option.
Return: Touch this button to go back to theprevious DVD menu.
Back: Touch this button to go back to the mainDVD display screen.
Move: Touch this button to move the cursorbuttons back and forth from the bottom-right cornerto the top-left corner of the screen.
j / r (Pause/Play): Touch this button to pausethe DVD. This button will then change to the playbutton. Touch the play button to play the DVD.
Random: Touch this button to hear the tracks inrandom, rather than sequential, order. TouchRandom again to turn off random play. This buttonis not available for DVD video.
c (Stop): Touch this button to stop play of theDVD. Press the play button to continue playing theDVD from where the DVD was stopped. Press thisbutton twice to return to the beginning of the DVD.
r (Rewind): Touch and hold this button torewind through the scene, chapters, and titles.This button may not work when the DVD is playingthe copyright information or the previews.
[ (Forward): Touch and hold this button toadvance rapidly through the scene, chapters, andtitles. This button may not work when the DVD isplaying the copyright information or the previews.
Top Menu: Touch this button to display the firstmenu of the DVD. This button is not availableon all DVDs.
Menu: Touch this button to display the DVD menuof the current area of the DVD that is playing. Thisbutton is not available for DVD audio.
79

Search: Touch this button to display the titlesearch screen. The keyboard allows you to typein the title number of the title that you would liketo watch.
Setup: Touch this button to display the DVDSetup screen. This button is only available whenthe DVD is not playing. The DVD Setup screenallows you to change the brightness, contrast, andmode, change the viewing on the monitor, andto change the initial settings; language, parentallevel, and aspect.
! (Brightness): Touch the up or down screenarrows to increase or decrease the brightnessof the navigation screen.
_ (Contrast): Touch the up or down screenarrows to increase or decrease the contrast ofthe navigation screen.
Auto (Automatic): Touch this screen button forthe system to automatically adjust the navigationscreen background depending on exteriorlighting conditions.
Night: Touch this screen button and the systemwill make the navigation screen backgrounddarken.
Day: Touch this screen button and the system willmake the navigation screen background brighten.
Monitor: From the DVD Setup screen, touchthis button to adjust the viewing angle of the DVDon the navigation screen. This is not availableon all DVDs.
Touch the e button to close the screen in fromthe left and right sides.
Touch the J button to fill the screen on the leftand right sides.
Touch the d button to fill the screen on the topand bottom.
80

Initial Settings: From the DVD Setup screen,touch this button to change audio, subtitle,and menu languages, parental level, and to viewthe aspect of the DVD. The movie must bestopped to use this menu. These settings are notavailable on all DVDs.
Audio Language: Touch English, Francais, orEspanol to change the language that you arelistening to.
Subtitle Language: Touch English, Francais, orEspanol to change the language of the subtitles.
Menu Language: Touch English, Francais, orEspanol to change the language of the menus.
Parental Level: Touch this button to change therating level to only allow the play of DVDs witha certain rating. The rating selection is 1 through 8,with 1 being a G rating. If the 1 is selected, anyDVD with a rating above G will not be able tobe viewed without entering a password.
When the parental level screen is first entered akeyboard will appear on the display and a four-digitpassword will need to be created. Type in apassword that you will be able to remember. Oncethe password is created, you can then select arating level.
If you would like to change the rating level, pressthe Parental Level button, then press thePassword button. Type in the password and thenchange the rating level.
If the password has been forgotten, contact yourdealer.
This may not be available on all DVDs.
Aspect: Touch this button to change the aspectratio of the DVD. This may not be availableon all DVDs.
81

Audio: Press this button to display the audiostream number and to change the language heard.Repeatedly press this button to toggle throughthe available languages. This may not be availableon all DVDs. This button is not available whenthe DVD is stopped.
Subtitle: Touch this button to playback the videowith subtitles. Repeatedly press this button totoggle through the available languages. To turn thesubtitles off, press this button until Off is selected.This button is not available when the DVD isstopped. This may not be available on all DVDs.
Angle: Touch this button to adjust the viewingangle of the DVD. Repeatedly press this buttonto toggle through the angles. This button isnot available when the DVD is stopped. Thismay not be available on all DVDs.
q Page: Press this button to go to the previousscene. This button is not available when theDVD is stopped. This button is not available forDVD video.
Page r: Press this button to go to the nextscene. This button is not available when the DVD isstopped. This button is not available for DVD video.
¨ SEEK (Next Track/Chapter): Press thishard key to go to the next track or chapter. Thisbutton may not work when the DVD is playing thecopyright information or the previews.
© SEEK (Previous Track/Chapter): Press thishard key to return to the start of the currenttrack or chapter. Press this button again to go tothe previous track or chapter. This button maynot work when the DVD is playing the copyrightinformation or the previews.
82

DVD MessagesIf Disc Read Error appears on the display and/orthe DVD comes out, it could be for one of thefollowing reasons:
• If a disc was inserted with an invalid orunknown format.
• If the disc is not from a correct region.
• If the map DVD disc was installed into theDVD audio/video slot. See “Installing theMap DVD” under Maps on page 18 for moreinformation.
• It is very hot. When the temperature returns tonormal, the DVD should play.
• You are driving on a very rough road. Whenthe road becomes smoother, the DVDshould play.
• The DVD is dirty, scratched, wet, orupside down.
• The air is very humid. If so, wait about anhour and try again.
• There may have been a problem whileburning the DVD.
• The label may be caught in the DVD player.
If the DVD is not playing correctly, for anyother reason, try a known good DVD.
If any error occurs repeatedly or if an error cannotbe corrected, contact your dealer.
83
Auxiliary DevicesThe navigation system has an auxiliary input jacklocated in the upper right corner of the faceplate.This is not an audio output; do not plug theheadphone set into the front auxiliary input jack.You can however, connect an external audiodevice such as an iPod, laptop computer, MP3player, CD changer, or cassette tape player, etc. tothe auxiliary input jack for use as another sourcefor audio listening.
Drivers are encouraged to set up any auxiliarydevice while the vehicle is in PARK (P). See“Defensive Driving” in the Index of your vehiclesowner manual for more information on driverdistraction.
If your vehicle has rear audio/video input jacks,located in the rear of the center console, they canbe used as another source for audio/videolistening.
To use a portable audio player, connect a 3.5 mm(1/8 inch) cable to the auxiliary input jack. Whena device is connected, the system will detectand automatically begin playing audio from thedevice over the vehicle’s speakers.
If a device is connected and you are listening toanother source (FM, CD, MP3, etc.), press theAUDIO key then press the AUDIO key repeatedlyuntil AUX is selected or touch the AUX screenbutton. An auxiliary device must be connected forthe AUX screen button to appear as an option toselect or the vehicle must have rear auxiliary jacks.See “Rear Seat Entertainment System” in the Indexof your vehicle’s owner manual for more informationon the rear auxiliary jacks.
84

Voice Recognition ........................................ 86
Section 4 Voice Recognition
85

Voice RecognitionThe navigation system’s voice recognition allowsfor hands-free operation of the navigationsystem, audio system, and OnStar® features. TheDVD map disc must be installed in the navigationsystem for voice recognition to work. See“Installing the DVD Map Disc” under Maps onpage 18. Voice recognition can be used when theignition is on or when Retained AccessoryPower (RAP) is active. See “Retained AccessoryPower (RAP)” in the Index of your vehicle’sowner manual and for more information.
To use voice recognition, do the following:1. Push and hold the
talk symbol steeringwheel controluntil you hear abeep. The audiosystem, if on,will mute.
2. Clearly state one of the commands listed onthe following pages.
Helpful Hints for Stating Commands• When a multiple command is available, choose
the command that best works for you.
• Words that are in brackets are optional. Forexample, for the command Radio [band][select] FM, stating Radio FM or Radio selectFM are both valid commands.
• When the system recognizes the commandthe system will:
− either perform the function− ask you to confirm your choice by clearly
stating “yes or no”− issue an error message such as “System
does not recognize this command” ordirect you to “Please start speaking afterthe beep”
• If the system is not yet ready, the systemmay state “System is checking the disc.Please wait.”.
• To cancel a command or if the systemresponse does not match your verbalcommand, press and hold the talk symbolbutton. The system will reply, “Systemwill cancel the voice recognition”.
86

• If you experience difficulty with the systemrecognizing a command, try saying it moresoftly, and wait for a few seconds afterthe beep, or you may just try saying it again.
• Background noise may cause voicecommands to be misunderstood, includingairflow noise from wind.
• To use the voice recognition system, the mapDVD must be loaded.
This system is able to recognize commands inthree different languages. The system will onlyrecognize commands based on the languageselected from the Driver Information Center (DIC).See “Driver Information Center, DIC VehiclePersonalization” in the Index of your vehiclesowner manual.
Voice Recognition CommandsThe following list shows all of the voice commandsavailable for the navigation system with a briefdescription of each. The commands are listed withthe optional words in brackets. To use the voicecommands, refer to the instructions listedpreviously.
Voice Tag CommandsThe following are voice tag commands you canaccess by clearly stating the commands exactly asthey are written. You may have up to 40 voicetag entries for destinations.
Navigation go to [destination] (voice tag),navigation select [destination] (voice tag):These commands instruct the system to select adestination saved under the voice tag youhave stored.
If you are not currently driving on a route, thesystem will automatically create the voicetag destination as the final destination. If you arecurrently driving on a route, the system willautomatically create the voice tag destination as awaypoint. Up to three waypoints can be created.
Storing Voice TagsFrom the address book entry information page,press the Add Voice tag screen button. Thesystem will respond “Name Please?”.
Navigation Help
Navigation Help: This command instructs thesystem to assist with navigation commands.
87

Display CommandsUse the following display commands to set thedisplay mode.
Display [set] day [mode]: Use this command toset the display to daytime mode.
Display [set] night [mode]: Use this commandto set the display to night mode.
Display [set] auto [mode]: Use this command toset the display to automatic mode. The systemwill change between day and night modeautomatically.
System help: This command instructs the systemto assist with display commands.
Radio CommandsThe following are radio commands you canaccess by clearly stating the commands exactly asthey are written. The commands are onlyavailable when you are in one of the followingaudio modes, AM, FM, or XM™ (if equipped).
Radio: This command instructs the system to turnthe audio system on.
Radio [band] [select] AM, radio [band] [select]FM, radio [band] [select] XM, radio [band][select] satellite: These commands instructthe system to go to either the AM, FM, or XM(if equipped).
Radio [select] (frequency) AM, radio [select](frequency) FM: These commands instructthe system to go to a specific frequency oneither AM or FM.
Radio [select] (channel) XM, radio [select](channel) satellite: These commands instruct thesystem to go to a specific channel on the XM™band (if equipped). The channel must be avalid channel or the system will keep the radio atthe current station setting. The system willpause while searching for the channel.
Radio help: This command instructs the systemto assist with radio commands.
88

CD CommandsThe following are CD, MP3, and DVD commandsthat can be accessed by clearly stating thecommands exactly as they are written.
CD, DVD, Disc: Use this command to select aCD, DVD, or disc that is currently loaded.
CD, DVD, Disc, [select] track (one, two, three,etc.): This command instructs the system toselect a specific track number.
CD, DVD, Disc select next folder: Use thiscommand to select the next folder on the MP3 oraudio DVD.
CD, DVD, Disc select previous folder: Use thiscommand to select the previous folder on theMP3 or audio DVD.
CD help, DVD help, Disc help: This commandinstructs the system to assist with CD andDVD commands.
Auxiliary CommandsThe following auxiliary commands can beaccessed by clearly stating the commands exactlyas they are written. The commands are availablewhen the auxiliary source is available.
Aux, Auxiliary: Use this command to select theauxiliary device, when a device is connected.
OnStar® Command
OnStar: This command instructs the system toconnect to OnStar®. You will enter the OnStar®
voice recognition system. Refer to your OnStar®
manual for more information.
Voice Help
Voice help: This command will provide adescription of help commands that areavailable to use.
89

✍ NOTES
90

AAdding Destinations to the Address Book ...... 42Adding or Changing Preset Destinations ........ 43Alpha-Numeric Keyboard ............................... 17Audio System ................................................ 58Auto Reroute ................................................. 27
CCanadian Owners ........................................... 2Canceling Guidance ...................................... 14CD
Player ........................................................ 68CD Messages ............................................... 75CD Player ..................................................... 68Cleaning the Video Screen ............................ 14
DDatabase Coverage Explanations .................. 55Destination .................................................... 27Display .......................................................... 50Driving on a Route ........................................ 26DVD
Player ........................................................ 76DVD Menu Options ....................................... 78DVD Messages ............................................. 83DVD Player ................................................... 76
EEjecting the DVD Map Disc ........................... 20
91

FFinding a Station ........................................... 59
GGetting Started, Navigation .............................. 6Getting Started on Your Route ...................... 39Global Positioning System (GPS) .................. 52Guidance Volume .......................................... 14
HHard Keys ..................................................... 16
IInstalling the DVD Map Disc ......................... 19
LLanguage — English/Metric ............................. 8
MMap Adjustments ........................................... 20Map Scales ................................................... 20Maps ............................................................ 18
92

NNav (Navigation) ........................................... 45Navigation
Getting Started ............................................ 6System Overview ......................................... 4Using the System ...................................... 16
OOrdering
Map DVDs ................................................. 55Overview, Navigation System .......................... 4Owners, Canadian .......................................... 2
PPlaying a DVD .............................................. 78Playing the Radio .......................................... 58Problems with Route Guidance ..................... 54
RRadio ..................................................... 44, 58Radio Data System (RDS) ............................ 65Radio Menu .................................................. 63Rear Seat Entertainment (RSE) ..................... 77Regional Maps .............................................. 18
SScrolling the Map .......................................... 20Setting the Search Area, Entering an
Address and Point of Interest, and StoringPreset Destinations ...................................... 9
Setting the Time ....................................... 9, 51Sound ........................................................... 44Sound Menu ................................................. 61Storing Radio Station Presets .................. 9, 61Symbols ........................................................ 21System Needs Service, If .............................. 54
93

TTouch-Sensitive Screen Buttons .................... 17Traveling Across Regions .............................. 27
UUsing an MP3 CD ......................................... 71Using Your Stored Preset Destinations .......... 13
VVehicle Positioning ........................................ 53Video Screen, Cleaning ................................. 14Voice Recognition .......................................... 86Voice Recognition Commands ....................... 87
XXM™ Satellite Radio Service ........................ 66
94