285 scale paper buildings
TRANSCRIPT

7/28/2019 285 Scale Paper Buildings
http://slidepdf.com/reader/full/285-scale-paper-buildings 1/7
DUTCH STY IN BORKEL EN SCHAFT TIPS FOR MAKING THIS PAPER BUILDING
Finished sty
Print on heavy weight paper (125lb. or 200g/m2). Allow to dry.
Cut out the building parts with a sharp hobby knife. Use a
metal ruler to cut along straight lines.
Mark the folding lines on the blank sides of the building faces.Use the hobby knife to score the lines.
Fold building walls using your fingernail to make the folds
sharp. Make the corners square. Fit the building together to
see how it looks.
Cut the base out of cardboard or styrofoam. Glue the base afew millimeters from the bottom edge of the building. The small
gap between the base and the bottom of the walls will allow the building to sit in your terra in rather than on top of it.
Trace the shapes of the short sides of the building on styrofoamto make roof supports. Cut and trim to fit inside the walls. Check
how the roof fits and fold it accordingly. The roof should
overhang the building slightly, so glue the supports a fewmillimeters in from each end of the roof.
Fit the roof onto the building. If you want the roof
permanently attached, just glue it in place.
Attach chimneys and details as desired.
You may wish to spray a protective matte varnish on yourfinished building.
Paper building project by Patrick van Gompel GHQ, 28100 Woodside Road, Shorewood, MN 55331 U SA www.ghqmodels.com 1-800-BUY-1945

7/28/2019 285 Scale Paper Buildings
http://slidepdf.com/reader/full/285-scale-paper-buildings 2/7

7/28/2019 285 Scale Paper Buildings
http://slidepdf.com/reader/full/285-scale-paper-buildings 3/7
DUTCH ROWHOUSES IN EINDHOVENTIPS FOR MAKING THIS PAPER BUILDING
- Print on heavy weight paper (125lb. or 200g/m2). Allow to dry.
- Cut out the building parts with a sharp hobby knife.
Use a metal ruler to cut along straight lines.
- Mark the folding lines on the blank sides of the building faces.
Use the hobby knife to score the lines.
- Fold building walls using your fingernail to make the folds
sharp. Make the corners square. Fit the building together to seehow it looks.
- Cut the base out of cardboard or styrofoam. Glue the base a
few millimeters from the bottom edge of the building. The
small gap between the base and the bottom of the walls willallow the building to sit in your terrain rather than on top of it.
- Trace the shapes of the short sides of the building on styrofoam
to make roof supports. Cut and trim to fit inside the walls.
Check how the roof fits and fold it accordingly. The roof
should overhang the building slightly, so glue the supports afew millimeters in from each end of the roof.
- Fit the roof onto the building. If you want the roof permanently
attached, just glue it in place.
- Attach chimneys and details as desired.
- You may wish to spray a protective matte varnish on your
finished building.
Paper building project by Patrick van Gompel GHQ, 28100 Woodside Road, Shorewood, MN 55331 U SA www.ghqmodels.com 1-800-BUY-1945

7/28/2019 285 Scale Paper Buildings
http://slidepdf.com/reader/full/285-scale-paper-buildings 4/7

7/28/2019 285 Scale Paper Buildings
http://slidepdf.com/reader/full/285-scale-paper-buildings 5/7
TIPS FOR MAKING THIS PAPER BUILDING
- Print on heavy weight paper (125lb. or 200g/m2).
Allow to dry.
- Cut out the building parts with a sharp hobby knife.
Use a metal ruler to cut along straight lines.
- Mark the folding lines on the blank sides of the buildingfaces. Use the hobby knife to score the lines.
- Fold building walls using your fingernail to make the
folds sharp. Make the corners square. Fit the building
together to see how it looks.
- Cut the base out of cardboard or styrofoam. Glue the base
a few millimeters from the bottom edge of the building.
The small gap between the base and the bottom of thewalls will allow the building to sit in your terrain rather
than on top of it.
- Trace the shapes of the short sides of the building on
styrofoam to make roof supports. Cut and trim to fit inside
the walls. Check how the roof fits and fold it accordingly.The roof should overhang the building slightly, so glue the
supports a few millimeters in from each end of the roof.
- Fit the roof onto the building. If you want the roof
permanently attached, just glue it in place.
- Attach chimneys and details as desired.
- You may wish to spray a protective matte varnish onyour finished building.
Paper building project by Patrick van Gompel GHQ, 28100 Woodside Road, Shorewood, MN 55331 U SA www.ghqmodels.com 1-800-BUY-1945

7/28/2019 285 Scale Paper Buildings
http://slidepdf.com/reader/full/285-scale-paper-buildings 6/7
DUTCH ROWHOUSES IN VALKENSWAARD TIPS FOR MAKING THIS PAPER BUILDING
•Print on heavy weight paper (125lb. or 200g/m2). Allow to dry.
•Cut out the building parts with a sharp hobby knife. Use a metal ruler to cut
along straight lines.
•Mark the folding lines on the blank sides of the building faces. Use the hobby
knife to score the lines.
•Fold building walls using your fingernail to make the folds sharp. Make the
corners square. Fit the building together to see how it looks.
•Cut the base out of cardboard or styrofoam. Glue the base a few millimeters
from the bottom edge of the building. The small gap between the base and the bottom of the walls will allow the building to sit in your terrain rather than on
top of it.
•Cut slits in the roof to accomodate the gables. Fold the gables' sides and uppertabs back. Insert the side tabs into the roof slits and glue in place. Fold the
gables' roofs, check the fit and trim so they will sit flush on the main roof.
Glue in place.
•Trace the shapes of the short sides of the building on styrofoam to make roofsupports. Cut and trim to fit inside the walls. Check how the roof fits and fold
it accordingly. The roof should overhang the building slightly, so glue thesupports a few millimeters in from each end of the roof.
•Attach chimneys and details as desired.
•You may wish to spray a protective matte varnish on your finished building.
Paper building project by Patrick van Gompel GHQ, 28100 Woodside Road, Shorewood, MN 55331 U SA www.ghqmodels.com 1-800-BUY-1945
7/28/2019 285 Scale Paper Buildings
http://slidepdf.com/reader/full/285-scale-paper-buildings 7/7
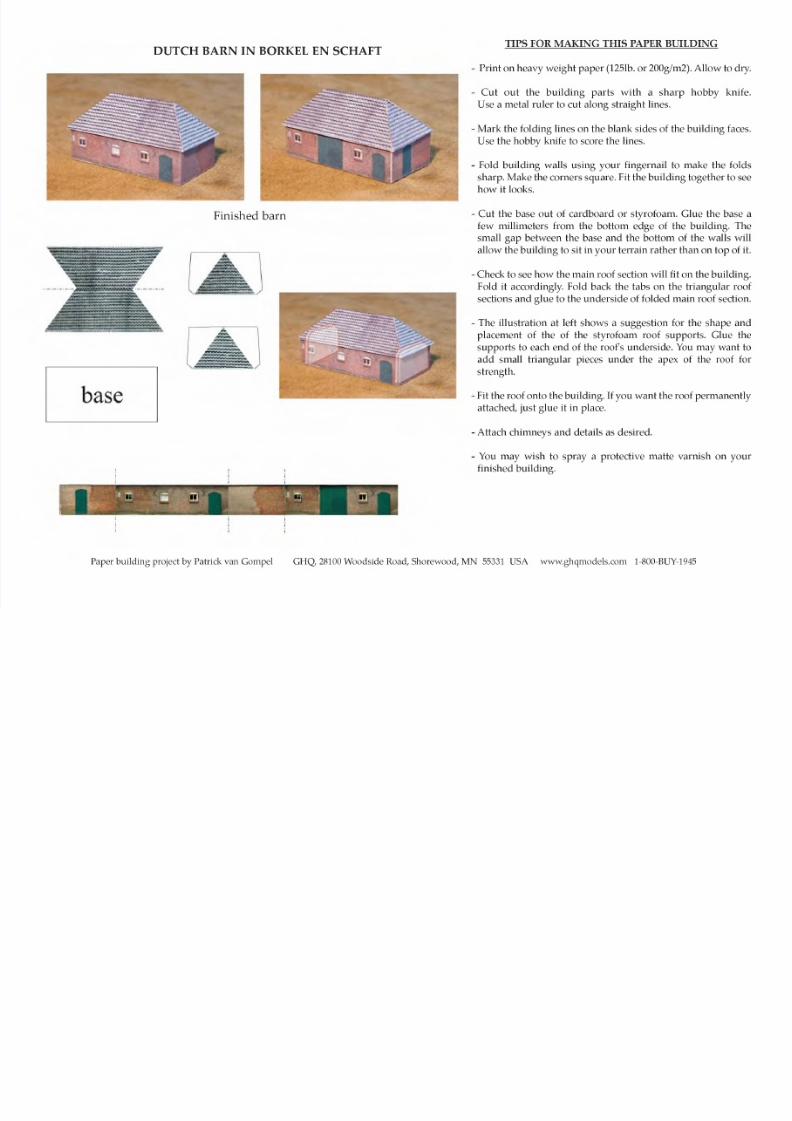
DUTCH BARN IN BORKEL EN SCHAFTTIPS FOR MAKING THIS PAPER BUILDING
Finished barn
Print on heavy weight paper (125lb. or 200g/m2). A llow to dry.
Cut out the building parts with a sharp hobby knife.
Use a metal ruler to cut along straight lines.
Mark the folding lines on the blank sides of the building faces.
Use the hobby knife to score the lines.
Fold building walls using your fingernail to make the folds
sharp. Make the corners square. Fit the building together to seehow it looks.
Cut the base out of cardboard or styrofoam. Glue the base afew millimeters from the bottom edge of the building. The
small gap between the base and the bottom of the walls willallow the building to sit in your terrain rather than on top of it.
Check to see how the main roof section will fit on the building.Fold it accordingly. Fold back the tabs on the triangular roofsections and glue to the underside of folded main roof section.
The illustration at left shows a suggestion for the shape and
placement of the of the styrofoam roof supports. Glue the
supports to each end of the roof's underside. You may want to
add small triangular pieces under the apex of the roof for
strength.
Fit the roof onto the building. If you want the roof permanently
attached, just glue it in place.
Attach chimneys and details as desired.
You may wish to spray a protective matte varnish on yourfinished building.
•'2 2 " 1 j j 2
Paper building project by Patrick van Gompel GHQ, 28100 Woodside Road, Shorewood, MN 55331 USA www.ghqmodels.com 1-800-BUY-1945