28mm medieval shop #1 b28-md-006 - blotz, mdf … around the building, gluing each frame into...
TRANSCRIPT
28mm Medieval Shop #1
B28-MD-006
Please read these instructions fully before starting construction.
PVA or equivalent glue will be required to stick sections together.
Sand paper can be used to gently clean any joints.
A sharp modelling knife will be required to remove sections from the sprue. Please use knives with due care and remember
to cut away from yourself at all times.
During the construction of this model, you may find it convenient to use pegs / elastic bands to hold pieces in place while
you allow glue to dry.
You may find it easier to paint portions of this model BEFORE construction – please see the end of the document for info
about this.
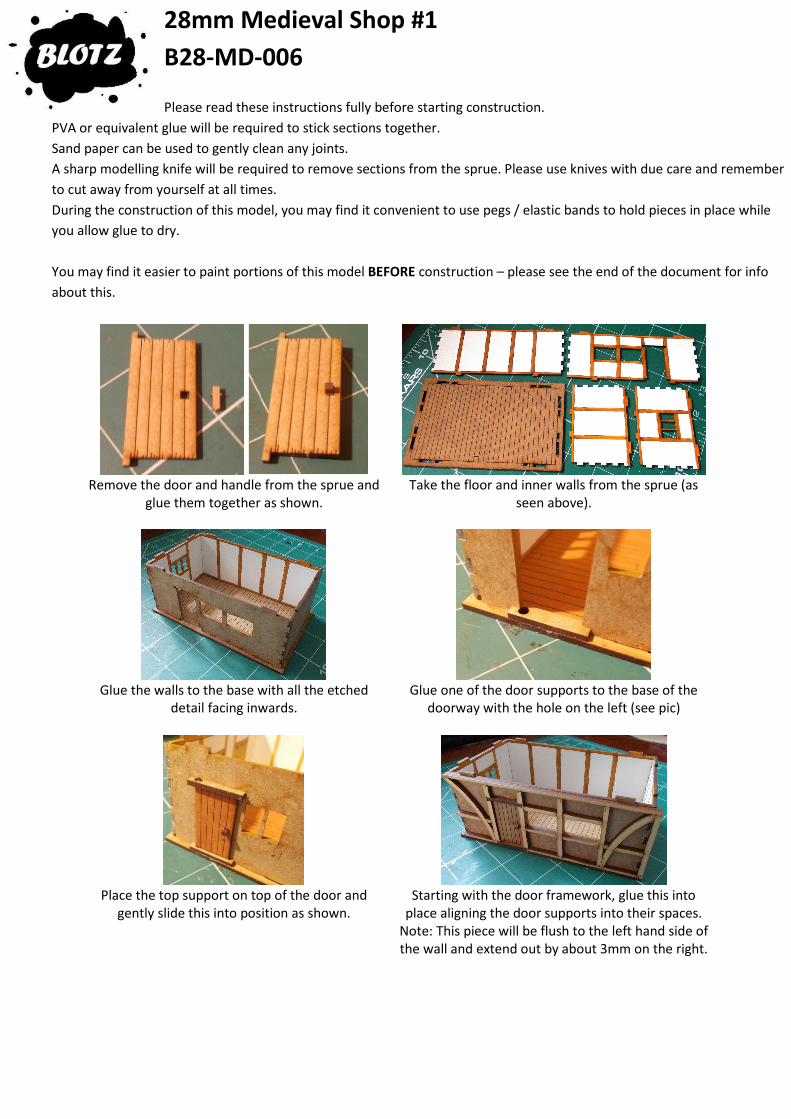
Remove the door and handle from the sprue and
glue them together as shown.
Take the floor and inner walls from the sprue (as
seen above).
Glue the walls to the base with all the etched
detail facing inwards.
Glue one of the door supports to the base of the
doorway with the hole on the left (see pic)
Place the top support on top of the door and
gently slide this into position as shown.
Starting with the door framework, glue this into
place aligning the door supports into their spaces.
Note: This piece will be flush to the left hand side of
the wall and extend out by about 3mm on the right.

Work around the building, gluing each frame into
position, making sure the spaces for the windows
align correctly.
Then take the insert sections from the sprue and
glue them into the spaces in the framework.
Note the insert pieces for each wall are in their
relative positions on the sprue.
Take the plinth and supports from the sprue.
Glue the plinth into place at the bottom of the
window space, then attach the four supports
underneath it (as seen above)
Note: There is an additional piece on the sprue which can be used as a signboard above the shop
windows if you so wish.
Roof
Take the roof pieces and end supports from the
sprue.
Glue the ends to the reverse side of one of the roof
pieces as shown
Then glue the other picee into place.
We suggest you now paint your roof (see painting
tips below)
The painted roof.

Glue the roof plate into position.
Glue the framework pieces into the gaps at the
ends of the roof.
Then add the insert pieces.
Take the chinmey pieces…
And glue them together a shown above.
Allow it to dry, then trim the bottom of the front
section so it is the same angle as the sides.
Glue into place on the roof.
The finished shop

Painting
It is much easier to paint sections of this building prior to assembly.
For the inner walls we removed these from the sprue and then sprayed them white with a standard car undercoat spray
paint.
Once dry we then painted over the etched woodwork with a pale brown colour.
The outer frames remained unpainted.
The insert panels were all left on the sprue and sprayed with a standard white car undercoat.
The lower part of the inserts can either be done as brick or stone:
• If brick, then after the white undercoat has dried, drybrush with a terracotta colour (standard DIY emulsion paint).
• If stone, then once the upper portions of the inserts have been added to the model, the lower portions were then
resprayed with a black car undercoat before being dry brushed with 2 different shades of grey (DIY emulsion paint)
The roof was partially assembled – roof pieces glued to the end sections before spraying the entire roof with a black car
undercoat spray.
If slate, then drybrush with a dark grey colour, before dry-brushing with a lighter grey (DIY emulsion).
If pantile, then drybrush with a chocolate brown colour before dry-brushing with a red colour (DIY emulsion)