3 4 5 · 3 4 5 2 q r g i en user manual es manual del usuario ... c flotador l mango lateral ... i...
TRANSCRIPT
www.philips.com/welcome
User manual
HD3103www.philips.com/welcome www.philips.com/welcome
Safety lea�et
HD3103
Warranty
HD3103
PescadoArroz
Aves
Vegetales
Carne de Cerdo
Porotos
Carne de vacuno
Apagado
PescadoArroz
Aves
Vegetales
Carne de Cerdo
Porotos
Carne de vacuno
Apagado
Temperatura Mantener presión/CalorTemperatura Mantener presión/
Calor
Pescado Arroz
Aves
Vegetales
Carne
de C
erdo
Porotos Carne
Ap
agad
o
Temperatura Mantener presión/Calor
Pescado Arroz
Aves
Vegetales
Carne
de C
erdo
Porotos Carne
Ap
agad
o
ba
cd
e
h
f
o
n
m
l
k
j
p
PescadoArroz
Aves
Vegetales
Carne de Cerdo
Porotos
Carne de vacuno
Apagado
Temperatura Mantener presión/Calor
1
3 4 5
2
q r
g
i
EN User manual ES Manual del usuario
HD2103
Register your product and get support at
www.philips.com/welcome
English
1 Your electric pressure cookerCongratulations on your purchase, and welcome to Philips!
To fully benefit from the support that Philips offers, register your product at www.philips.com/welcome.
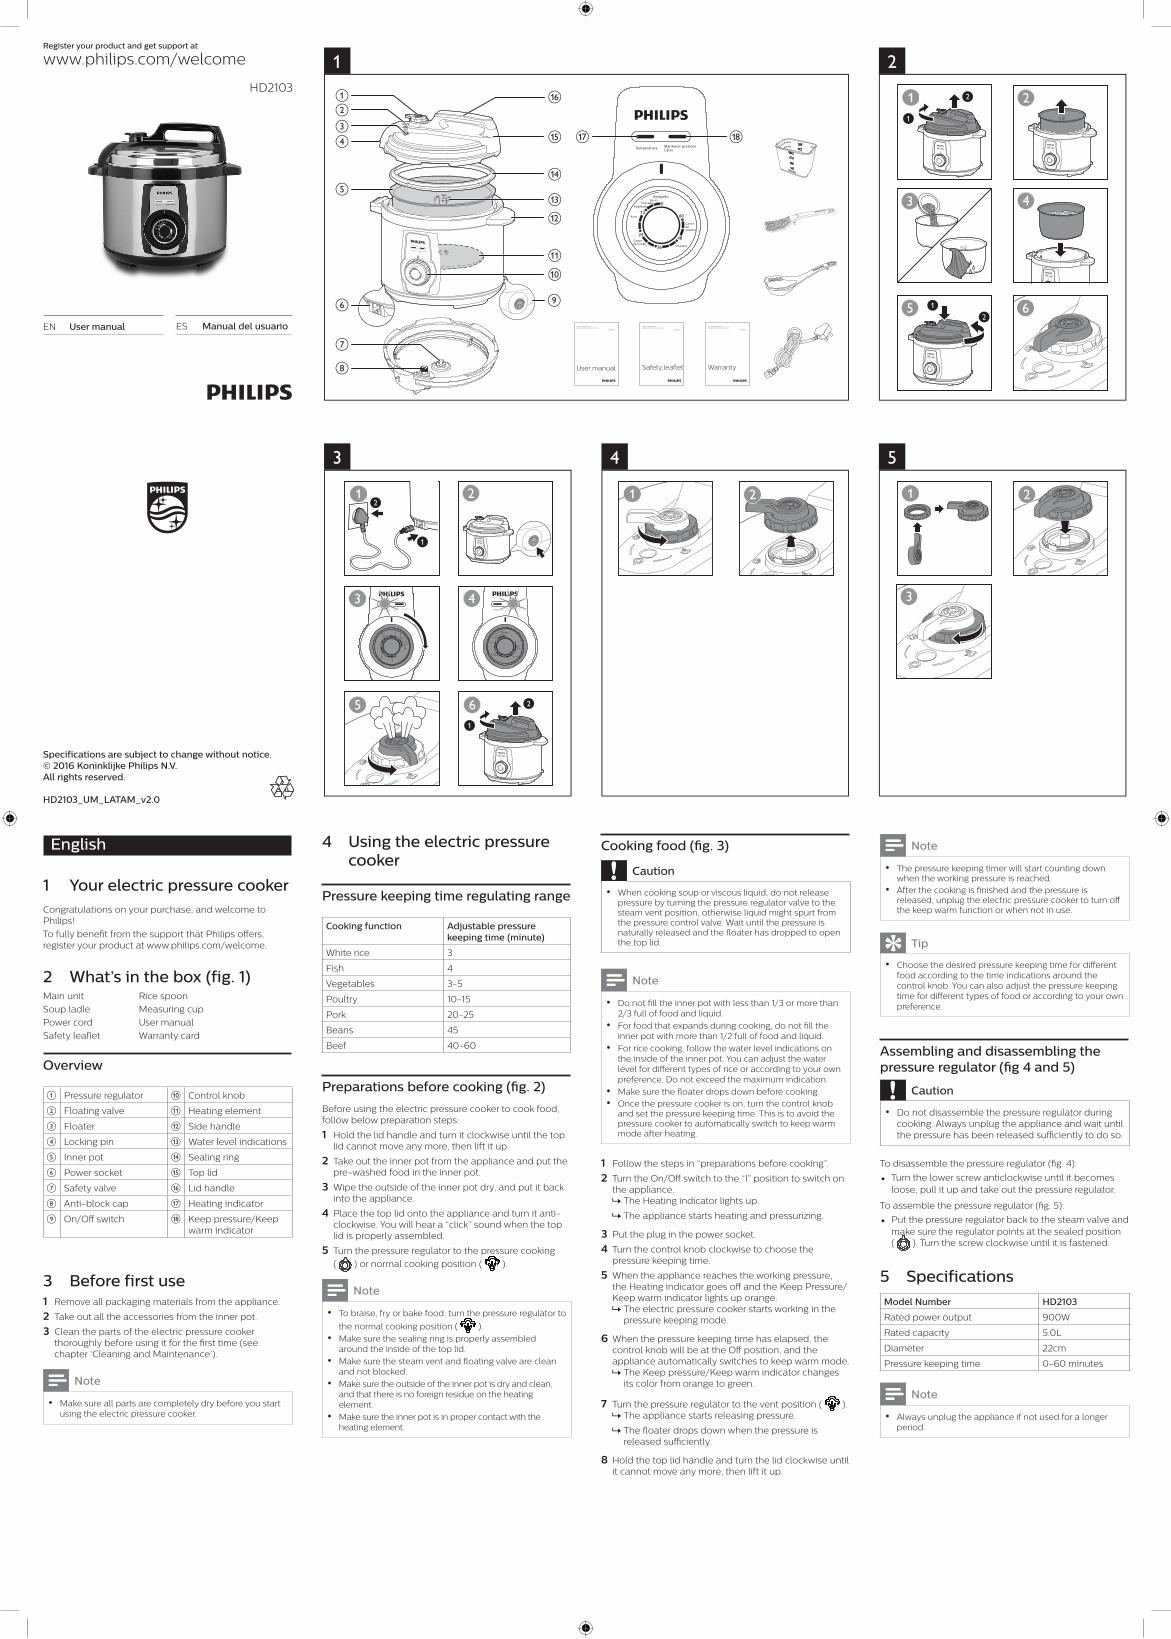
2 What’s in the box (fig. 1)Main unit Rice spoon
Soup ladle Measuring cup
Power cord User manual
Safety leaflet Warranty card
Overview
a Pressure regulator j Control knob
b Floating valve k Heating element
c Floater l Side handle
d Locking pin m Water level indications
e Inner pot n Sealing ring
f Power socket o Top lid
g Safety valve p Lid handle
h Anti-block cap q Heating indicator
i On/Off switch r Keep pressure/Keep warm indicator
3 Before first use1 Remove all packaging materials from the appliance.
2 Take out all the accessories from the inner pot.
3 Clean the parts of the electric pressure cooker thoroughly before using it for the first time (see chapter ‘Cleaning and Maintenance’).
Note
• Make sure all parts are completely dry before you start using the electric pressure cooker.
4 Using the electric pressure cooker
Pressure keeping time regulating range
Cooking function Adjustable pressure keeping time (minute)
White rice 3
Fish 4
Vegetables 3-5
Poultry 10-15
Pork 20-25
Beans 45
Beef 40-60
Preparations before cooking (fig. 2)
Before using the electric pressure cooker to cook food, follow below preparation steps:
1 Hold the lid handle and turn it clockwise until the top lid cannot move any more, then lift it up.
2 Take out the inner pot from the appliance and put the pre-washed food in the inner pot.
3 Wipe the outside of the inner pot dry, and put it back into the appliance.
4 Place the top lid onto the appliance and turn it anti-clockwise. You will hear a “click” sound when the top lid is properly assembled.
5 Turn the pressure regulator to the pressure cooking
( ) or normal cooking position ( ).
Note
• To braise, fry or bake food, turn the pressure regulator to
the normal cooking position ( ).• Make sure the sealing ring is properly assembled
around the inside of the top lid.
• Make sure the steam vent and floating valve are clean and not blocked.
• Make sure the outside of the inner pot is dry and clean, and that there is no foreign residue on the heating element.
• Make sure the inner pot is in proper contact with the heating element.
Cooking food (fig. 3)
Caution
• When cooking soup or viscous liquid, do not release pressure by turning the pressure regulator valve to the steam vent position, otherwise liquid might spurt from the pressure control valve. Wait until the pressure is naturally released and the floater has dropped to open the top lid.
Note
• Do not fill the inner pot with less than 1/3 or more than 2/3 full of food and liquid.
• For food that expands during cooking, do not fill the inner pot with more than 1/2 full of food and liquid.
• For rice cooking, follow the water level indications on the inside of the inner pot. You can adjust the water level for different types of rice or according to your own preference. Do not exceed the maximum indication.
• Make sure the floater drops down before cooking.• Once the pressure cooker is on, turn the control knob
and set the pressure keeping time. This is to avoid the pressure cooker to automatically switch to keep warm mode after heating.
1 Follow the steps in “preparations before cooking”.
2 Turn the On/Off switch to the “I” position to switch on the appliance. » The Heating indicator lights up.
» The appliance starts heating and pressurizing.
3 Put the plug in the power socket.
4 Turn the control knob clockwise to choose the pressure keeping time.
5 When the appliance reaches the working pressure, the Heating indicator goes off and the Keep Pressure/Keep warm indicator lights up orange. » The electric pressure cooker starts working in the pressure keeping mode.
6 When the pressure keeping time has elapsed, the control knob will be at the Off position, and the appliance automatically switches to keep warm mode. » The Keep pressure/Keep warm indicator changes its color from orange to green.
7 Turn the pressure regulator to the vent position ( ). » The appliance starts releasing pressure.
» The floater drops down when the pressure is released sufficiently.
8 Hold the top lid handle and turn the lid clockwise until it cannot move any more, then lift it up.
Note
• The pressure keeping timer will start counting down when the working pressure is reached.
• After the cooking is finished and the pressure is released, unplug the electric pressure cooker to turn off the keep warm function or when not in use.
Tip
• Choose the desired pressure keeping time for different food according to the time indications around the control knob. You can also adjust the pressure keeping time for different types of food or according to your own preference.
Assembling and disassembling the pressure regulator (fig 4 and 5)
Caution
• Do not disassemble the pressure regulator during cooking. Always unplug the appliance and wait until the pressure has been released sufficiently to do so.
To disassemble the pressure regulator (fig. 4):
• Turn the lower screw anticlockwise until it becomes loose, pull it up and take out the pressure regulator.
To assemble the pressure regulator (fig. 5):
• Put the pressure regulator back to the steam valve and make sure the regulator points at the sealed position ( ). Turn the screw clockwise until it is fastened.
5 Specifications
Model Number HD2103
Rated power output 900W
Rated capacity 5.0L
Diameter 22cm
Pressure keeping time 0-60 minutes
Note
• Always unplug the appliance if not used for a longer period.
Specifications are subject to change without notice.© 2016 Koninklijke Philips N.V.All rights reserved.
HD2103_UM_LATAM_v2.0

6 Cleaning and Maintenance
Note
• Unplug the appliance and wait until it has cooled down sufficiently before cleaning.
Interior
Inside of the outer lid and the main body:• Wipe with wrung out and damp cloth.• Make sure to remove all the food residues stuck to the
appliance.
Heating element:• Wipe with wrung out and damp cloth.
• Remove food residues with wrung out and damp cloth or toothpicks.
Sealing ring:• Soak in warm water and clean with sponge.
Exterior
Surface of the outer lid and outside of the main body:• Wipe with a cloth damped with soap water.• Only use soft and dry cloth to wipe the control knob.
• Make sure to remove all the food residues in the steam vent.
Pressure regulator and floating valve:• Disassemble the pressure control, soak it in warm
water, and clean with sponge.
• Remove food residues in the floating valve with toothpicks.
Accessories
Rice spoon, soup ladle, and inner pot:• Soak in hot water and clean with sponge.
7 RecyclingDo not throw away the appliance with normal household waste at the end of its life, but hand it in at an official collection point for recycling. By doing this, you can help to preserve the environment.
8 Guarantee and serviceIf you need service or information, or if you have a problem, visit the Philips website at www.philips.com or contact the Philips Customer Care Center in your country. You can find its phone number in the worldwide guarantee leaflet. If there is no Customer Care Center in your country, go to your local Philips dealer.
9 TroubleshootingIf your electric pressure cooker does not function properly or if the cooking quality is insufficient, consult the table below. If you are unable to solve the problem, contact a Philips service Center or the Consumer Care Center in your country.
Problem Possible cause and solution
I have difficulties closing the top lid.
The sealing ring is not well assembled. Make sure the sealing ring is well assembled around the inside of the top lid.
The floater blocks the locking pin. Push down the floater so that it does not block the locking pin.
I have difficulties opening the top lid after the pressure is released.
The floater has not dropped. Push the floater down.
The food is not cooked.
Make sure that there is no foreign residue on the heating element and the outside of the inner pot before switching on the appliance.
The heating element is damaged, or the inner pot is deformed. Take the appliance to your Philips dealer or a service center authorized by Philips.
Air or steam leaks from under the lid.
The sealing ring is not well assembled. Make sure the sealing ring is well assembled around the inside of the top lid.
There is food residue in the sealing ring. Make sure the sealing ring is clean.
The top lid is not properly closed. Make sure the top lid is properly closed.
The pressure level inside of the appliance is abnormal. In this case the safety valve will be releasing steam. Take the appliance to your Philips dealer or a service center authorized by Philips.
Air or steam leaks from the floating valve.
There is food residue in the rubber ring of the floater. Clean the rubber ring of the floater.
The rubber ring of the floater is broken. Replace the rubber ring.
The floater does not rise after the appliance starts pressurizing.
Make sure there is enough food and water in the inner pot.
The top lid or the pressure regulator has malfunction. Take the appliance to your Philips dealer or a service center authorized by Philips.
Español
1 Olla a presión eléctricaFelicitaciones por su compra y bienvenido a Philips.
Para aprovechar completamente la asistencia que ofrece Philips, registre su producto en www.philips.com/welcome.
2 Contenido de la caja (figura 1)
Unidad principal Cuchara para arroz
Cuchara para sopa Taza medidora
Cable de alimentación Manual del usuario
Folleto de seguridad Tarjeta de garantía
Descripción general
a Regulador de presión j Perilla de control
b Válvula flotante k Elemento de calefacción
c Flotador l Mango lateral
d Pasador de bloqueo m Indicaciones del nivel del agua
e Recipiente interior n Anillo de sellado
f Enchufe o Tapa superior
g Válvula de seguridad p Mango de la tapa
h Tapa antibloqueo q Indicador de calor
i Interruptor de encendido/apagado
r Indicador de conservación de calor/presión
3 Antes del primer uso1 Retire todos los materiales de embalaje del aparato.
2 Retire todos los accesorios del recipiente interior.
3 Limpie bien las piezas de la olla a presión eléctrica antes de utilizarla por primera vez (vea el capítulo “Limpieza y mantenimiento”).
Nota
• Asegúrese de que todas las piezas estén completamente secas antes de empezar a utilizar la olla a presión eléctrica.
4 Uso de la olla a presión eléctrica
Gama de regulación del tiempo de conservación de presión
Función de cocción Tiempo de conservación de presión ajustable (minutos)
Arroz 3
Pescado 4
Vegetales 3-5
Aves 10-15
Carne de Cerdo 20-25
Porotos 45
Carne de vacuno 40-60
Indicaciones antes de cocinar (figura 2)
Antes de utilizar la olla a presión eléctrica para cocinar alimentos, siga las indicaciones a continuación:
1 Sostenga el mango de la tapa y gírelo hacia la derecha hasta que la tapa no se pueda mover y luego levántela.
2 Saque el recipiente interior del aparato y coloque en él los alimentos lavados previamente.
3 Seque la parte exterior del recipiente interior y vuelva a ponerla en el aparato.
4 Coloque la tapa superior en el aparato y gírela hacia la izquierda. Escuchará un sonido de “clic” cuando la tapa superior esté instalada correctamente.
5 Gire el regulador de presión a la posición de cocción a
presión ( ) o cocción normal ( ).
Nota
• Para estofar, freír u hornear, gire el regulador de presión
a la posición de cocción normal ( ).• Asegúrese de que el anillo de sellado esté
correctamente ubicado alrededor del interior de la tapa superior.
• Asegúrese de que la salida de vapor y la válvula flotante estén limpias y no presenten obstrucciones.
• Asegúrese de que la parte externa del recipiente interior esté seca y limpia, y que no haya residuos en el elemento de calefacción.
• Asegúrese de que el recipiente interior entre en contacto correctamente con el elemento de calefacción.
Cocinar los alimentos (figura 3)
Precaución
• Cuando cocine sopa o líquidos viscosos, no libere presión girando la válvula reguladora de presión hacia la posición de salida de vapor, de lo contrario, es posible que salpique líquido desde la válvula de control de presión. Espere hasta que la presión se libere de manera natural y el flotador baje para abrir la tapa.
Nota
• No llene el recipiente interior con menos de 1/3 o más de 2/3 del total de los alimentos y los líquidos.
• Para los alimentos que se expanden durante la cocción, no llene el recipiente interior con más de 1/2 del total de los alimentos y los líquidos.
• Para cocer arroz, siga las indicaciones del nivel del agua en la parte interna del recipiente interior. Puede ajustar el nivel del agua para los diferentes tipos de arroz o según sus propias preferencias. No exceda el nivel máximo indicado.
• Asegúrese de que el flotador descienda antes de cocinar.
• Una vez que la olla a presión esté encendida, gire la perilla de control y establezca el tiempo de conservación de presión. Esto es para evitar que la olla a presión cambie automáticamente al modo de conservación del calor después del calentamiento.
1 Siga los pasos que se presentan en “Indicaciones antes de cocinar”.
2 Mueva el interruptor de encendido/apagado a la posición “I” para encender el artefacto. » El indicador de calentamiento se ilumina.
» El aparato comenzará a calentarse y a emitir presión.
3 Coloque el enchufe en la toma de corriente.
4 Gire la perilla de control hacia la derecha para seleccionar el tiempo de conservación de presión.
5 Cuando el aparato alcance la presión de trabajo, el indicador de calentamiento se apagará y el indicador de conservación de calor/presión se iluminará en naranja. » La olla a presión eléctrica comienza a trabajar en el modo de conservación de presión.
6 Cuando el tiempo de conservación de presión haya transcurrido, la perilla de control estará en la posición de apagado y el aparato cambiará automáticamente al modo de conservación del calor. » El indicador de conservación de calor/presión cambiará de color naranja a verde.
7 Gire el regulador de presión a la posición de salida
( ). » El aparato comenzará a liberar presión.
» El flotador desciende cuando se libera suficiente presión.
8 Sostenga el mango de la tapa superior y gire la tapa hacia la derecha hasta que no se pueda mover y luego levántela.
Nota
• El temporizador de conservación de presión comenzará la cuenta regresiva cuando se alcance la presión de trabajo.
• Después de que la cocción haya terminado y se haya liberado la presión, desenchufe la olla a presión eléctrica para desactivar la función de conservación de calor o cuando no esté en uso.
Sugerencia
• Seleccione el tiempo de conservación de presión deseado para los distintos tipos de alimentos según las indicaciones de tiempo alrededor de la perilla de control. También puede ajustar el tiempo de conservación de presión para los distintos tipos de comida o según sus propias preferencias.
Montaje y desmontaje del regulador de presión (figuras 4 y 5)
Precaución
• No desmonte el regulador de presión durante la cocción. Siempre desenchufe el aparato y espere hasta que se haya liberado suficiente presión para hacerlo.
Para desmontar el regulador de presión (figura 4):
• Gire el tornillo inferior a la izquierda hasta que se suelte, levántelo y saque el regulador de presión.
Para montar el regulador de presión (figura 5):
• Vuelva a colocar el regulador de presión en la válvula de vapor y asegúrese de que el regulador apunte a la posición cerrada ( ). Gire el tornillo hacia la derecha hasta que esté fijo.
5 Especificaciones
Número de modelo HD2103
Potencia de salida nominal 900 W
Capacidad nominal 5 L
Diámetro 22 cm
Tiempo de conservación de presión 0 a 60 minutos
Nota
• Siempre desenchufe el aparato si no lo va a utilizar durante un periodo prolongado.
6 Limpieza y mantenimiento
Nota
• Desenchufe el aparato y espere hasta que se haya enfriado lo suficiente antes de limpiarlo.
Interior
Dentro de la tapa exterior y el cuerpo principal:• Limpie con un paño húmedo y estrujado.
• Asegúrese de eliminar todos los restos de comida pegados al aparato.
Elemento de calefacción:• Limpie con un paño húmedo y estrujado.
• Elimine los restos de alimentos con un paño húmedo y estrujado o con mondadientes.
Anillo de sellado:• Remójelo en agua caliente y limpie con una esponja.
Exterior
Superficie de la tapa exterior y parte externa del cuerpo principal:• Limpie con un paño humedecido con agua y jabón.• Utilice solo un paño suave y seco para limpiar la
perilla de control.
• Asegúrese de eliminar todos los restos de comida de la salida del vapor.
Regulador de presión y válvula flotante:• Desmonte el control de presión, sumérjalo en agua
tibia y limpie con una esponja.
• Elimine los restos de alimentos de la válvula flotante con un mondadientes.
Accesorios
Cuchara para arroz, cuchara para sopa y recipiente interior:• Sumérjalos en agua caliente y limpie con una esponja.
7 ReciclajeNo tire el aparato junto con la basura normal del hogar al final de su vida útil; deposítelo en un punto de recogida oficial para su reciclado. De esta manera, ayudará a conservar el medio ambiente.
8 Garantía y servicioSi necesita servicio o información, o si tiene algún problema, visite el sitio web de Philips en www.philips.com o comuníquese con el centro de atención al cliente de Philips de su país. Puede encontrar el número de teléfono en el folleto de garantía mundial. Si no hay un centro de atención al cliente de Philips en su país, diríjase al distribuidor local de Philips.
9 Solución de problemasSi la olla a presión eléctrica no funciona correctamente o si la calidad de la cocción es insuficiente, consulte la siguiente tabla. Si no puede resolver el problema, comuníquese con el centro de servicios de Philips o con el centro de atención al cliente de su país.
Problema Posible causa y solución
Tengo dificultades para cerrar la tapa superior.
El anillo de sellado no está bien montado. Asegúrese de que el anillo de sellado esté bien montado en la parte interior de la tapa superior.
El flotador bloquea el pasador de bloqueo. Empuje hacia abajo el flotador para que no bloquee el pasador de bloqueo.
Tengo problemas para abrir la tapa superior después de que se libera la presión.
El flotador no ha descendido. Empuje el flotador hacia abajo.
La comida no está cocida.
Asegúrese de que no haya residuos en el elemento de calefacción y en la parte externa del recipiente interior antes de encender el aparato.
El elemento de calefacción está dañado o el recipiente interior está deformado. Lleve el aparato al distribuidor Philips o a un centro de servicio autorizado por Philips.
Fugas de aire o vapor por debajo de la tapa.
El anillo de sellado no está bien montado. Asegúrese de que el anillo de sellado esté bien montado en la parte interior de la tapa superior.
No hay restos de alimentos en el anillo de sellado. Asegúrese de que el anillo de sellado esté limpio.
La tapa superior no está cerrada correctamente. Asegúrese de que la tapa esté bien cerrada.
El nivel de presión al interior del artefacto es anormal. En este caso la válvula de seguridad liberará vapor. Lleve el artefacto a su distribuidor Philips o a un centro de servicio autorizado por Philips.
Fugas de aire o vapor desde la válvula flotante.
Hay restos de alimentos en el anillo de goma del flotador. Limpie el anillo de goma del flotador.
El anillo de goma del flotador está roto. Reemplace el anillo de goma.
El flotador no se eleva después de que el aparato empieza a emitir presión.
Asegúrese de que haya suficiente comida y agua en el recipiente interior.
La tapa superior o el regulador de presión presenta una falla. Lleve el aparato al distribuidor Philips o a un centro de servicio autorizado por Philips.