3d universe's unofficial flashforge creator x manual universe's unofficial flashforge...
TRANSCRIPT

is pleased to present:
The Unofficial FlashForge Creator X
Manual
Last updated on July 10, 2014

3D Universe Presents: The Unofficial FlashForge Creator X Manual
shop3duniverse.com Page 2 of 43 800-‐689-‐4344
Table of Contents A Note About FlashForge Support ........................................................................... 3 Important Safety Information ................................................................................. 4
General Safety Guidelines ................................................................................................................... 4 Please always check power setting before plug in .............................................................................. 4
Unboxing ................................................................................................................ 5 Package Contents ................................................................................................................................ 5 Unboxing ............................................................................................................................................. 5
Initial Hardware Setup ............................................................................................ 8 Mounting the Extruder Assembly ....................................................................................................... 8 Installing the Spool Holders and Filament Guide Tubes ..................................................................... 8
Leveling the Build Plate ......................................................................................... 10 Basic Leveling .................................................................................................................................... 10 Advanced Leveling ............................................................................................................................ 11
Software Installation and Usage ........................................................................... 12 A Note about Software Options ........................................................................................................ 12 Special Notes to Windows 8 users before Software Installation ...................................................... 12 Using Replicator G with the FlashForge Creator X ............................................................................ 13
Downloading and Installing Replicator G ................................................................................. 13 Importing an STL File and Generating Gcode ........................................................................... 14 Connecting the USB Cable & Setting the Extruder and Platform Temperatures ...................... 17 Loading and Unloading Filament .............................................................................................. 22 The First Print ........................................................................................................................... 26
Using Slic3r with the FlashForge Creator X ....................................................................................... 30 Installation and Initial Configuration ........................................................................................ 30 Custom G-‐Code (Single Material Prints) ................................................................................... 30 Custom G-‐Code (Dual Material Prints) ..................................................................................... 32 Converting from G-‐Code to .X3G Using GPX as a Slic3r Post-‐Processor ................................... 33
Using MakerWare with the FlashForge Creator X ............................................................................. 35 Using Simplify3D™ with the FlashForge Creator X ............................................................................ 36
Starting a Print .......................................................................................................................... 37 Troubleshooting ....................................................................................................................... 38
Upgrading to Sailfish Firmware ............................................................................. 40 Installing a Glass Build Plate ................................................................................. 41
Why Consider Printing on Glass? ...................................................................................................... 41 Installing a Thermal Glass Build Plate ............................................................................................... 41 Glass Surface Preparation for Various 3D Printing Materials ........................................................... 42

3D Universe Presents: The Unofficial FlashForge Creator X Manual
shop3duniverse.com Page 3 of 43 800-‐689-‐4344
A Note About FlashForge Support Please refer to the official FlashForge manual included with your Creator X (on the SD card) before contacting FlashForge support. The FlashForge support team will not provide support for anything not covered in their official manual. FlashForge only provides support for their hardware and the Replicator G software. For any questions related to other topics covered in this unofficial manual, 3D Universe customers are welcome to contact 3D Universe at [email protected] or 800-‐689-‐4344.

3D Universe Presents: The Unofficial FlashForge Creator X Manual
shop3duniverse.com Page 4 of 43 800-‐689-‐4344
Important Safety Information
General Safety Guidelines
Caution: The Creator X generates high temperatures and includes moving parts that can cause injury. Never reach inside The Creator X while it is in operation, and allow time for The Creator X to cool down after operation.
• The Creator X is very sensitive to static electricity, so make sure you contact a grounded object before operating the machine.
• Before repairing or making any alterations to the Creator X it is essential that the machine is turned off and the power cord is unplugged.
• The Creator X operates at very high temperatures; allow the nozzle, the extruded plastic and heating plate to cool before touching.
• Some plastic filaments may give off a little odor when heated, because of this, the machine should always be set up in a well-‐ventilated area.
• Do not wear gloves when operating or repairing, as entanglement may occur and cause injury.
• Do not leave the machine unattended when in operation.
Please always check power setting before plugging in!
FlashForge sets the power supply to 230V before leaving the factory. If voltage in your location is between 90V to 132V, please switch the power setting from 230V to 115V before you plug in. You will find the power source at the bottom of The Creator X. The following photos show the location of voltage selector switch:

3D Universe Presents: The Unofficial FlashForge Creator X Manual
shop3duniverse.com Page 5 of 43 800-‐689-‐4344
Unboxing
Package Contents
Along with your Creator X 3D printer, your package contains the following: In two long boxes on the top of the package, you will find:
• Power cable • USB A • 2 filament guide tubes • 2 spool holders
The accessory box on top of the machine includes:
• 2 extruder heads • SD card • Bolt, Hex wrench and screws kit
Under the build platform in the Creator X framework, there are:
• 2 spools of filament
Unboxing
The Creator X was carefully packed at the FlashForge factory. Please follow the un-‐boxing steps laid out below.
Handle the package and its contents with extra care; do not use any unnecessary force. Do not remove the thin yellow film from the heating plate. It is heat resistant tape that improves the adhesion of the extruded plastic to the plate. Do not remove the wrapping around the nozzle. It consists of a ceramic fiber fabric and heat-‐resistant tape, which helps to keep the nozzle at a constant temperature.
First, put the box on the floor in a clean and flat area. Remove the top two long boxes. Set them aside, and then pull out the cardboard packing that encloses the Creator X. Inside the two long boxes, you will find a power cable, USB A to B cable, 2 filament guide tubes, and 2 spool

3D Universe Presents: The Unofficial FlashForge Creator X Manual
shop3duniverse.com Page 6 of 43 800-‐689-‐4344
holders.
Now you can see the top of the printer, as well as some other boxes inside it. The large box with the black wire is the accessory box; this contains the extruder(s), SD card and other important components. Don't remove the accessory box or its contents yet. Note: Do not lift the box by the black cable! Doing so could damage it. Now take the Creator X out of the box using the two handles on the sides of the printer or by gripping the inner sides of the frame, as shown in the photo below. Gently lift and transfer the printer to your work surface. You will find the extruder in the protective packaging along with the black cable, carefully remove it and place it on your work surface.
Remove the cardboard packing material and take the accessory box from the printer. Set it aside for later. The build platform should now be visible. It is an aluminum plate covered in a thin polyamide film (Kapton tape). This is the surface that your objects will be printed on. Remember: Do not remove the film.

3D Universe Presents: The Unofficial FlashForge Creator X Manual
shop3duniverse.com Page 7 of 43 800-‐689-‐4344
The next step is to raise the build platform; there are two ways to do this: 1) Turn the large threaded rod behind the rotating platform, or 2) Grasp the printing platform with one hand on each side, raising it slowly and keeping it level. Stop once the platform is just shy of the bronze nozzle. Now you should be able to see underneath the build platform, you'll find the filament here; it’s easiest to remove the filament by setting aside the remaining packaging material. After that, cut off the ties between the X axis and front metal frame. You have now finished un-‐boxing! The next task is to set up the hardware.
3D Universe Presents: The Unofficial FlashForge Creator X Manual
shop3duniverse.com Page 8 of 43 800-‐689-‐4344
Initial Hardware Setup
Mounting the Extruder Assembly
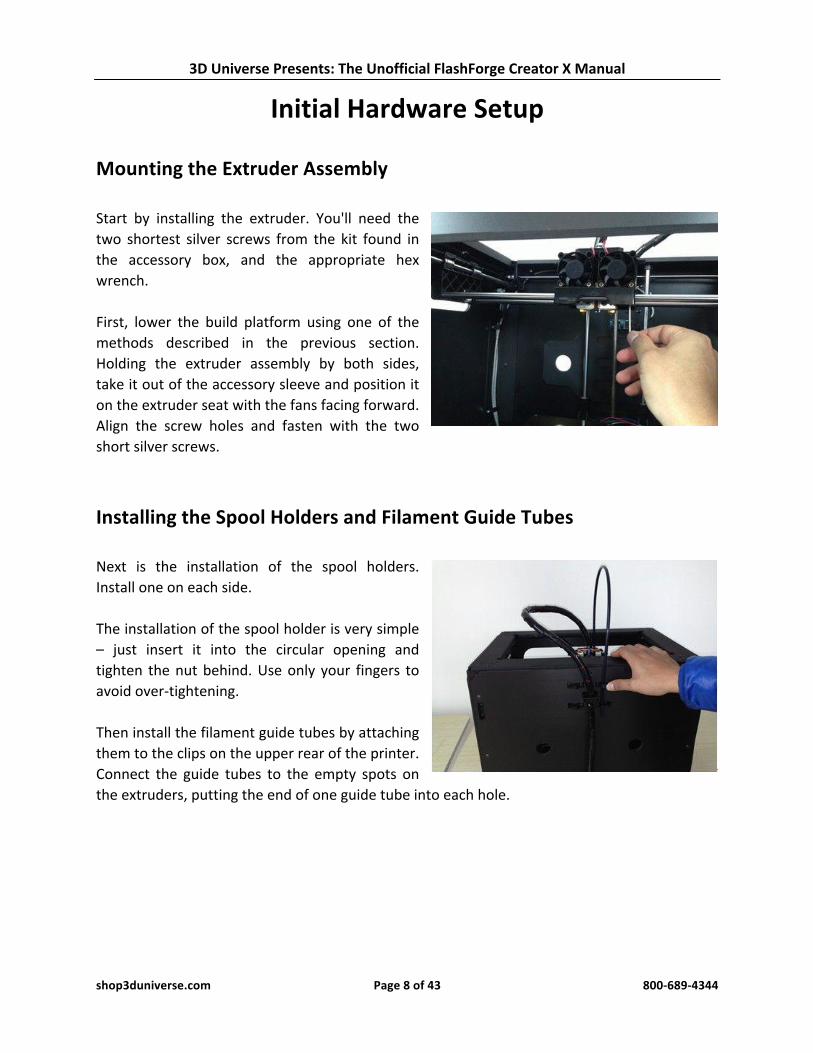
Start by installing the extruder. You'll need the two shortest silver screws from the kit found in the accessory box, and the appropriate hex wrench. First, lower the build platform using one of the methods described in the previous section. Holding the extruder assembly by both sides, take it out of the accessory sleeve and position it on the extruder seat with the fans facing forward. Align the screw holes and fasten with the two short silver screws.
Installing the Spool Holders and Filament Guide Tubes
Next is the installation of the spool holders. Install one on each side. The installation of the spool holder is very simple – just insert it into the circular opening and tighten the nut behind. Use only your fingers to avoid over-‐tightening. Then install the filament guide tubes by attaching them to the clips on the upper rear of the printer. Connect the guide tubes to the empty spots on the extruders, putting the end of one guide tube into each hole.
3D Universe Presents: The Unofficial FlashForge Creator X Manual
shop3duniverse.com Page 9 of 43 800-‐689-‐4344
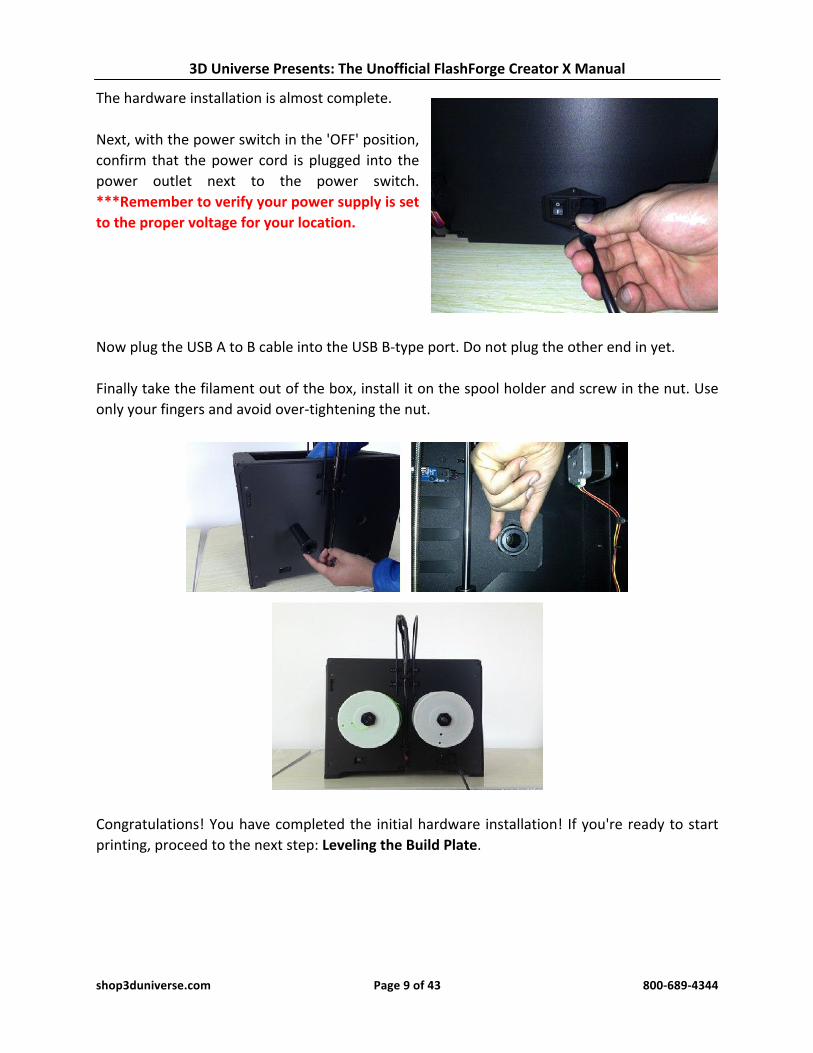
The hardware installation is almost complete. Next, with the power switch in the 'OFF' position, confirm that the power cord is plugged into the power outlet next to the power switch. ***Remember to verify your power supply is set to the proper voltage for your location. Now plug the USB A to B cable into the USB B-‐type port. Do not plug the other end in yet. Finally take the filament out of the box, install it on the spool holder and screw in the nut. Use only your fingers and avoid over-‐tightening the nut.
Congratulations! You have completed the initial hardware installation! If you're ready to start printing, proceed to the next step: Leveling the Build Plate.

3D Universe Presents: The Unofficial FlashForge Creator X Manual
shop3duniverse.com Page 10 of 43 800-‐689-‐4344
Leveling the Build Plate
Basic Leveling
First, make sure you’ve completed all the steps in the Unboxing and Initial Hardware Setup sections:
• The voltage selector on the power supply should be set properly (115V or 230V) • Your Dual Extruder Assembly should be bolted firmly in place • Your filament guide tubes should be connected • Your spools of filament should be mounted on the spool holders
Once all these have been completed, you can plug in your power supply, and then flip on the power switch on the back of your Creator X. Once the LCD display shows the main menu, go to Utilities-‐>Level Build Plate Pay close attention: leveling your platform is very important to print quality! Here’s the first screen: Actually, the Creator X has only three knobs on the bottom of the platform, just inside the plastic arms that hold it up. Your Creator X has been leveled perfectly before leaving the factory. However, it may become unleveled during shipping. Please do level the build plate again before starting a print. At each stage of the script, your Creator X will ask you to test the platform height by sliding a piece of paper between the platform and nozzle. Use a sheet of paper to test the platform height at each step of the process. If the sheet can move back and forth freely underneath the nozzle, your platform is too low; if it tears or leaves visible marks on the paper, your platform is too high; if it can slide around a little bit with some resistance, you’re ready to go.

3D Universe Presents: The Unofficial FlashForge Creator X Manual
shop3duniverse.com Page 11 of 43 800-‐689-‐4344
If your platform is too low, your prints might not stick to the surface. If it's too high, the nozzles could tear the Kapton tape on the platform surface. If you're having trouble, or if you just need to level your platform again, you can always get back to the leveling script in the menu by going to Utilities -‐> Level Build Plate.
Advanced Leveling
The basic leveling process is good for getting the bed level enough for most purposes. But if you still have issues with first layer adhesion, you may want to try the following more advanced leveling technique:
1. Download object #355893 from Thingiverse: http://www.thingiverse.com/thing:355893
2. Use your favorite slicing software to prepare this object to print, using 0.2mm layer height.
3. Start the print job.
4. While the print job is running, carefully make slight adjustments to each of the three
adjustment knobs until the extruded filament is the proper thickness all the way around the build plate.
a. When properly leveled, the filament should be flattened into the build plate,
such that the top of the filament has a flat, smooth surface (not rounded). b. If the filament is not flattened into the build plate, raise the build plate. c. If the filament is being pressed down too much, so that it does not extrude
evenly in places, or if you hear a clicking sound from the extruder, lower the build plate.
5. Repeat the print job as needed, clearing off the build plate each time, until you achieve
the desired results.

3D Universe Presents: The Unofficial FlashForge Creator X Manual
shop3duniverse.com Page 12 of 43 800-‐689-‐4344
Software Installation and Usage
A Note about Software Options
The FlashForge Creator X is based upon the original open source Makerbot design (the Makerbot Replicator 1 Dual). Therefore, it is compatible with all of the software (and firmware) designed for the Makerbot Replicator printers. This section covers Replicator G, an open source software application recommended by FlashForge. Please refer to the “Software Alternatives” section for other options. Choosing which software to use is primarily a matter of personal preference. At 3D Universe, we’ve done a great deal of testing with a variety of software options to determine the strengths and weaknesses of each. The following is a high-‐level summary of how some of these options compare, based upon our experience.
Special Notes to Windows 8 users before Software Installation
Windows 8 users, please make sure that you have disabled the Driver Signature Enforcement setting before installing the Replicator G software. Below is a video link showing you how to accomplish this: http://www.youtube.com/watch?v=NM1MN8QZhnk

3D Universe Presents: The Unofficial FlashForge Creator X Manual
shop3duniverse.com Page 13 of 43 800-‐689-‐4344
Using Replicator G with the FlashForge Creator X
Downloading and Installing Replicator G
ReplicatorG0040 is the software recommended by FlashForge for the Creator X. For additional software options, please refer to the remainder of this section. ReplicatorG0040 for Windows can also be found on the SD card included with your Creator X, in a folder called “Information of 3D printer”. Steps for installing and configuring your software:
1. Download and install the appropriate version of PyPy from http://pypy.org/download.html
2. Download and install the appropriate version of Replicator G suitable for your system
from http://replicat.org/download.
a. During the installation, if you receive a message saying that a Python interpreter was not found, ignore it and press Install to continue.
3. To run the Replicator G software, double click the shortcut on your desktop or in your
start menu.
4. Click File > Preferences, then click Select Python interpreter on the Advanced tab. A window will pop up, navigate to the PyPy installation directory and select pypy.exe and click ‘Open’.

3D Universe Presents: The Unofficial FlashForge Creator X Manual
shop3duniverse.com Page 14 of 43 800-‐689-‐4344
Click ‘Close’ on the Preferences menu and you are done!
Importing an STL File and Generating Gcode
The following gives an overview of how to import .STL files into the Replicator G software and then generate Gcode to print your creation. Click File > Open, then browse and select the .STL file that you would like to print, import the file by double-‐clicking. Then the drawing will appear on the Replicator G interface.
When the object is imported you may find that it is not on the virtual build platform or even on the screen. Using the function keys indicated by the red boxes, you can change the camera angle and reposition the object onto the center of the build platform. Once you've done this,

3D Universe Presents: The Unofficial FlashForge Creator X Manual
shop3duniverse.com Page 15 of 43 800-‐689-‐4344
the next step is to generate the Gcode; this is achieved by clicking on the button (Generate Gcode) at the bottom of the panel. Explanation of Gcode Settings: A new window will open up, giving you several options on how the Gcode will be generated:
• Slicing profile: Select Replicator slicing defaults for ABS printing, and select Replicator 2 slicing defaults for PLA printing.
• Use Right/Left extruder: This tells the printer which extruder to use for a dual-‐extruder printer. Either the left extruder or the right extruder can be selected.
• Support material: If your sample will have any hanging surfaces, it is recommended to have support. None means no support. Exterior means surface support. Full support means all support.
• Object infill: where 100% is a solid print, 0% is a hollow object. The recommended setting is 10-‐20%, this will save time and filament. Low infill also can reduce the corners lift up issue during ABS printing.
• Layer height: this controls the vertical resolution of the print. The recommended thickness is 0.20mm.
• Number of shells: this is the wall thickness; it’s usually set at 1 or 2.
• Feedrate: is the speed at which the filament is fed into the extruder. This usually set between 30 and 70. For ABS printing, 60 is recommended, for PLA printing, 100 is recommended.
• Travel feedrate: is the speed at which the printer head moves over the base, it’s usually set between 30 and 100. For ABS printing, 80 is recommended, for PLA printing, 120 is recommended
• Print temperature: is the temperature to which the nozzle is heated. This varies between filament types. For ABS, set it to 230. For PLA, set it to 190.

3D Universe Presents: The Unofficial FlashForge Creator X Manual
shop3duniverse.com Page 16 of 43 800-‐689-‐4344
Click Generate Gcode and a progress bar will appear:
The machine will now work properly when generating Gcode from Replicator G. Now we will start a preliminary test of the machine’s USB connection, and we will heat the platform and extruder in preparation for printing.

3D Universe Presents: The Unofficial FlashForge Creator X Manual
shop3duniverse.com Page 17 of 43 800-‐689-‐4344
Connecting the USB Cable & Setting the Extruder and Platform Temperatures
First, connect the machine and computer with the provided USB A to B cable.
The USB port on the machine is indicated by the red box in the above image. After connecting the cable, open the Replicator G software. We are now going to connect the computer and printer. Click Machine > Connection (serial port) > Rescan serial ports.

3D Universe Presents: The Unofficial FlashForge Creator X Manual
shop3duniverse.com Page 18 of 43 800-‐689-‐4344
If no new ports appear then the software driver has not been installed. To install the driver manually, right click 'My computer' and select properties. The basic system parameters appear. Then select Device Manager.
Locate the software driver shown in the red box, right click and select Update Driver
Click Browse… to find the location of ReplicatorG0040 on your system.

3D Universe Presents: The Unofficial FlashForge Creator X Manual
shop3duniverse.com Page 19 of 43 800-‐689-‐4344
Click FTDI USB Drivers in the driver folder before confirmation and click ‘OK’. The drivers will then be installed. The next step is to connect the printer. Rescan the serial ports and select the one that appears on your machine (on our test machine the port was COM10, but different computers vary).
3D Universe Presents: The Unofficial FlashForge Creator X Manual
shop3duniverse.com Page 20 of 43 800-‐689-‐4344
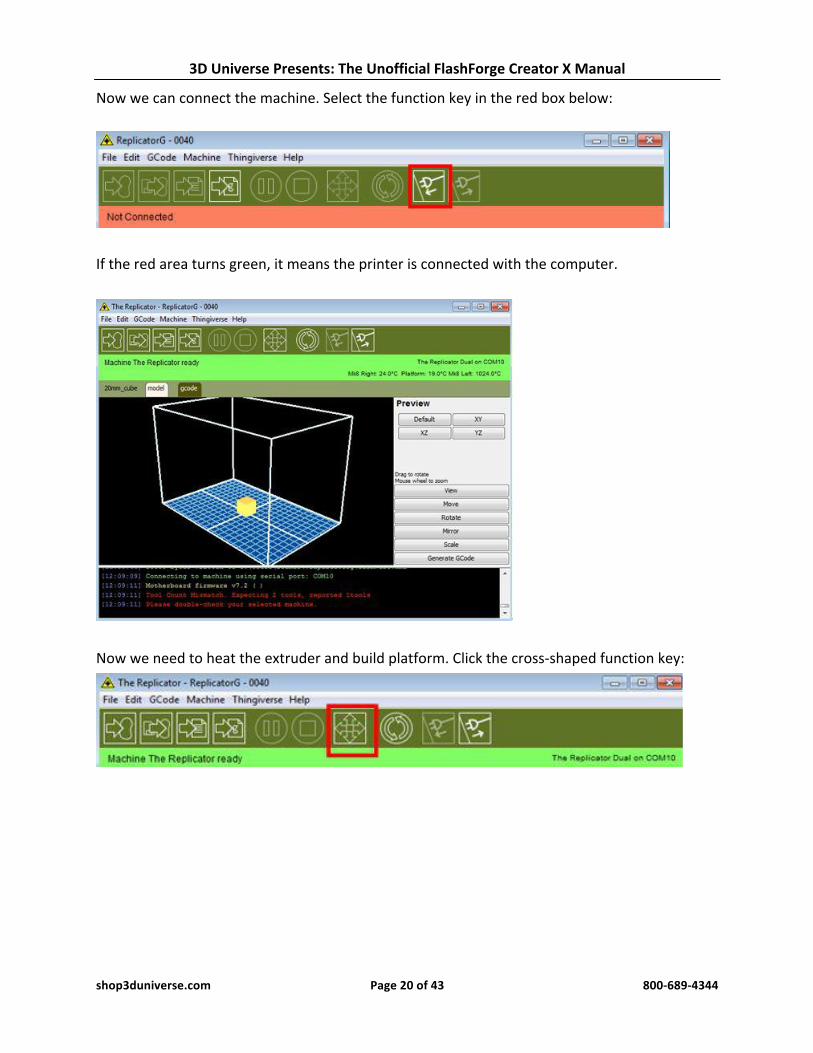
Now we can connect the machine. Select the function key in the red box below:
If the red area turns green, it means the printer is connected with the computer.
Now we need to heat the extruder and build platform. Click the cross-‐shaped function key:

3D Universe Presents: The Unofficial FlashForge Creator X Manual
shop3duniverse.com Page 21 of 43 800-‐689-‐4344
Input the following target values: 230 degrees for the extruder and 110 degrees for the heating platform. After entering the values, the platform will start to warm up. When the extruder temperature reaches 50 degrees, the cooling fan will activate and the current temperature value will display to the right as shown below.
3D Universe Presents: The Unofficial FlashForge Creator X Manual
shop3duniverse.com Page 22 of 43 800-‐689-‐4344
Loading and Unloading Filament
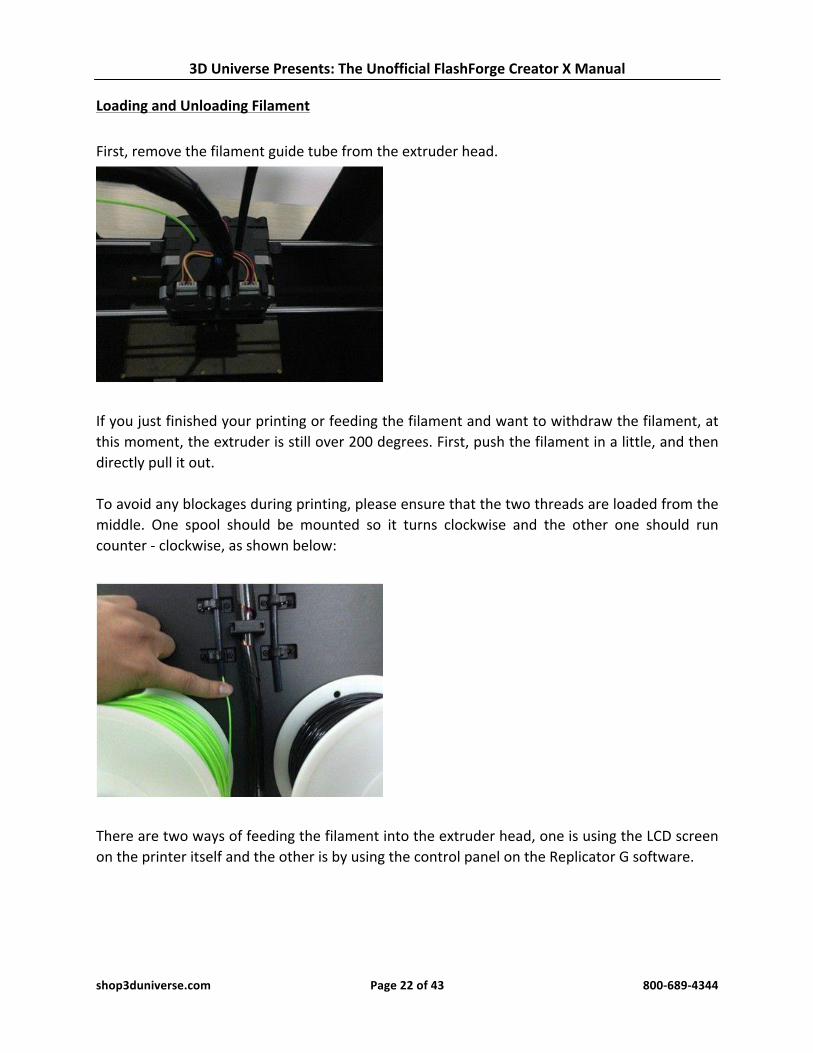
First, remove the filament guide tube from the extruder head.
If you just finished your printing or feeding the filament and want to withdraw the filament, at this moment, the extruder is still over 200 degrees. First, push the filament in a little, and then directly pull it out. To avoid any blockages during printing, please ensure that the two threads are loaded from the middle. One spool should be mounted so it turns clockwise and the other one should run counter -‐ clockwise, as shown below:
There are two ways of feeding the filament into the extruder head, one is using the LCD screen on the printer itself and the other is by using the control panel on the Replicator G software.
3D Universe Presents: The Unofficial FlashForge Creator X Manual
shop3duniverse.com Page 23 of 43 800-‐689-‐4344
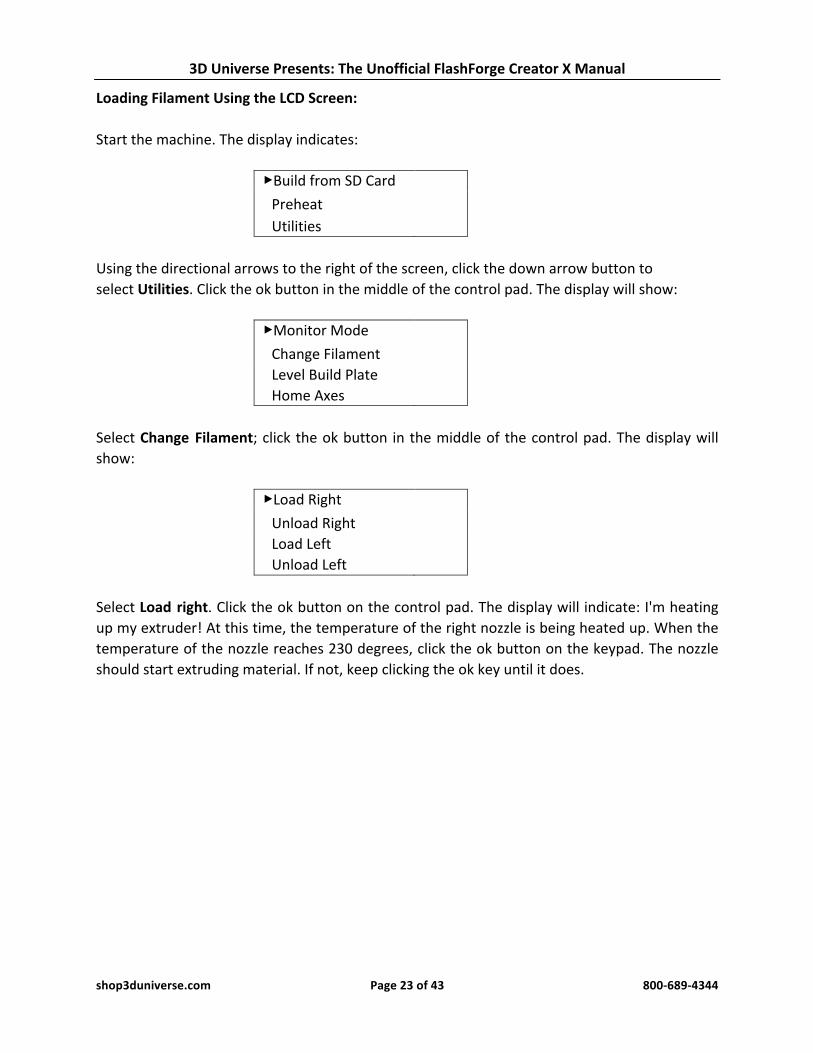
Loading Filament Using the LCD Screen: Start the machine. The display indicates:
▶Build from SD Card Preheat Utilities
Using the directional arrows to the right of the screen, click the down arrow button to select Utilities. Click the ok button in the middle of the control pad. The display will show:
▶Monitor Mode Change Filament Level Build Plate Home Axes
Select Change Filament; click the ok button in the middle of the control pad. The display will show:
▶Load Right Unload Right Load Left Unload Left
Select Load right. Click the ok button on the control pad. The display will indicate: I'm heating up my extruder! At this time, the temperature of the right nozzle is being heated up. When the temperature of the nozzle reaches 230 degrees, click the ok button on the keypad. The nozzle should start extruding material. If not, keep clicking the ok key until it does.
3D Universe Presents: The Unofficial FlashForge Creator X Manual
shop3duniverse.com Page 24 of 43 800-‐689-‐4344
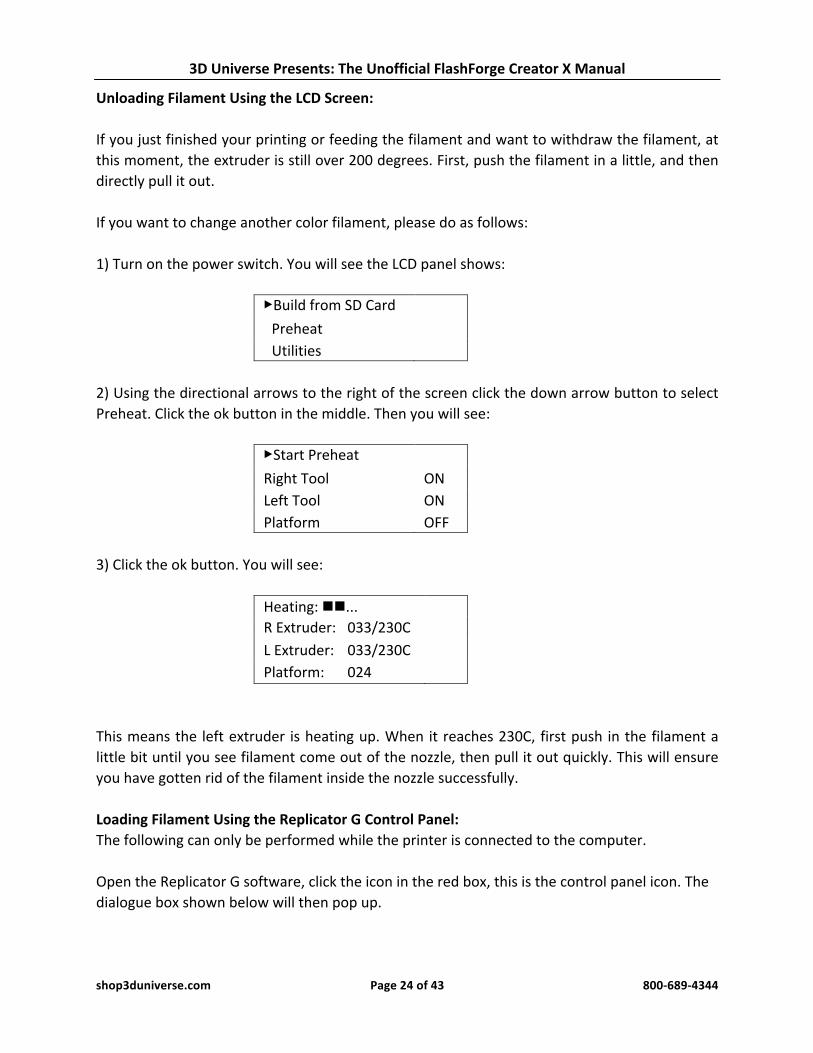
Unloading Filament Using the LCD Screen: If you just finished your printing or feeding the filament and want to withdraw the filament, at this moment, the extruder is still over 200 degrees. First, push the filament in a little, and then directly pull it out. If you want to change another color filament, please do as follows: 1) Turn on the power switch. You will see the LCD panel shows:
▶Build from SD Card Preheat Utilities
2) Using the directional arrows to the right of the screen click the down arrow button to select Preheat. Click the ok button in the middle. Then you will see:
▶Start Preheat Right Tool ON Left Tool ON Platform OFF
3) Click the ok button. You will see:
Heating: nn... R Extruder: 033/230C L Extruder: 033/230C Platform: 024
This means the left extruder is heating up. When it reaches 230C, first push in the filament a little bit until you see filament come out of the nozzle, then pull it out quickly. This will ensure you have gotten rid of the filament inside the nozzle successfully. Loading Filament Using the Replicator G Control Panel: The following can only be performed while the printer is connected to the computer. Open the Replicator G software, click the icon in the red box, this is the control panel icon. The dialogue box shown below will then pop up.
3D Universe Presents: The Unofficial FlashForge Creator X Manual
shop3duniverse.com Page 25 of 43 800-‐689-‐4344
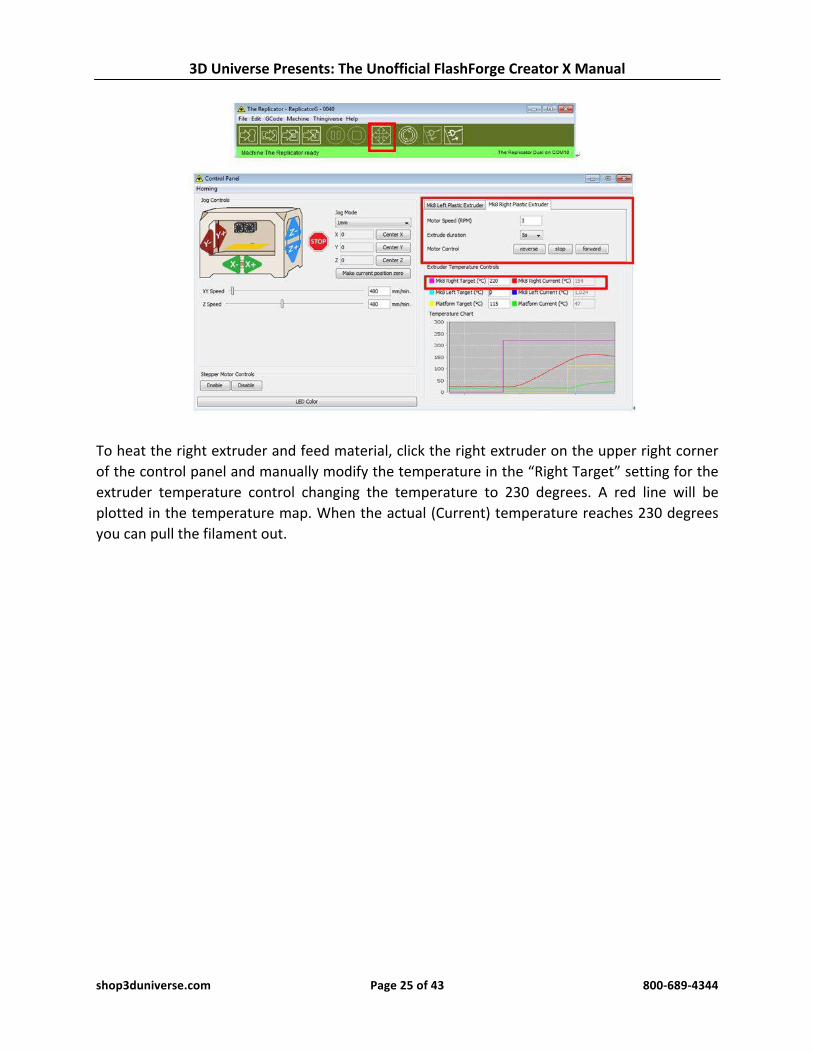
To heat the right extruder and feed material, click the right extruder on the upper right corner of the control panel and manually modify the temperature in the “Right Target” setting for the extruder temperature control changing the temperature to 230 degrees. A red line will be plotted in the temperature map. When the actual (Current) temperature reaches 230 degrees you can pull the filament out.

3D Universe Presents: The Unofficial FlashForge Creator X Manual
shop3duniverse.com Page 26 of 43 800-‐689-‐4344
The First Print
Single Extruder Print: Click File > Examples and then select 20mm_Calibration_Box.stl. The preview interface will then appear along with a virtual impression of the 20mm cube on the virtual printer bed. On the preview interface click Move > Centre and Put on platform so that the sample will be printed on the center of the build plate.
Next click Generate Gcode. A dialogue box will pop up. After inputting your chosen parameters, the Gcode will be generated.

3D Universe Presents: The Unofficial FlashForge Creator X Manual
shop3duniverse.com Page 27 of 43 800-‐689-‐4344
A loading bar will then appear showing the progress of the Gcode generation.
Once your Gcode is generated, click the left most button on the green bar near the top of the screen to start the print.
The Gcode has now been sent to the printer and the object will start printing shortly. Dual Extruder Print: To use the two-‐color printing that comes with the Replicator G software, select Gcode > Merge .STL for Dual Extrusion.
3D Universe Presents: The Unofficial FlashForge Creator X Manual
shop3duniverse.com Page 28 of 43 800-‐689-‐4344
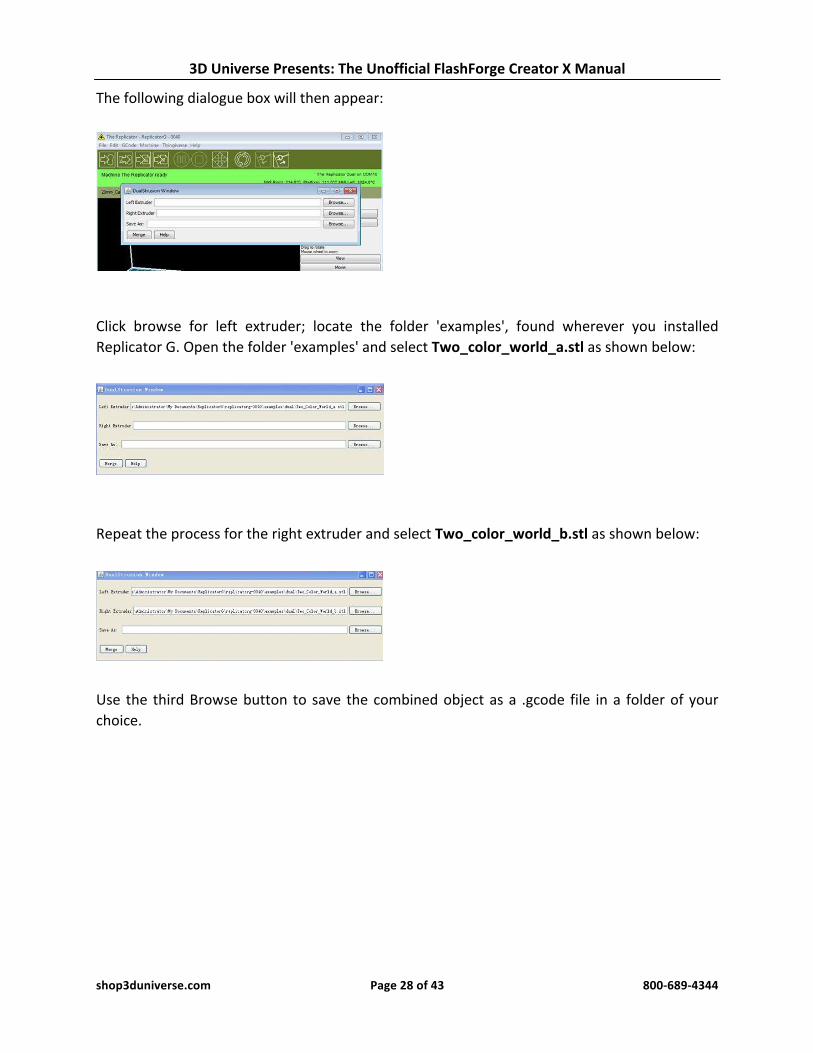
The following dialogue box will then appear:
Click browse for left extruder; locate the folder 'examples', found wherever you installed Replicator G. Open the folder 'examples' and select Two_color_world_a.stl as shown below:
Repeat the process for the right extruder and select Two_color_world_b.stl as shown below:
Use the third Browse button to save the combined object as a .gcode file in a folder of your choice.

3D Universe Presents: The Unofficial FlashForge Creator X Manual
shop3duniverse.com Page 29 of 43 800-‐689-‐4344
Now click Merge. Two windows will then pop up.
In both windows you need to remove the tick in front of the 'use raft/support' option. Make sure the rest of your settings are the same in both boxes, then click the Generate Gcode button in both windows. Once your Gcode is generated, click the left most button on the green bar near the top of the screen to start the print.
The Gcode has now been sent to the printer and the object will start printing shortly.

3D Universe Presents: The Unofficial FlashForge Creator X Manual
shop3duniverse.com Page 30 of 43 800-‐689-‐4344
Using Slic3r with the FlashForge Creator X
Installation and Initial Configuration
Download and install the latest version of Slic3r (http://slic3r.org/). Make sure you're in "Expert mode" (File, Preferences). Use the Configuration Wizard, or manually configure the printer settings. You're going to want at least two printer profiles -‐ one for single material prints and another for dual material prints. This is because we'll use different Start and End G-‐Code to handle the appropriate number of extruders. For "G-‐Code flavor", choose “Makerbot” if you are using the default firmware, or "Sailfish (Makerbot)" if you have upgraded to the Sailfish firmware. Set the print bed dimensions (X=228, Y=150). Set the number of extruders to 2.
Custom G-‐Code (Single Material Prints)
Under "Custom G-‐Code" in your single material printer profile, try using the following. Start G-‐Code:
T0; set primary extruder
M73 P0; enable show build progress
M109 S[first_layer_bed_temperature] T0; heat bed up to first layer temperature
M104 S[first_layer_temperature_0] T0; set nozzle heater to first layer temperature
M103; disable RPM
G21; set units to mm
G162 X Y F6000; home XY axes maximum
G161 Z F9000; home Z axis minimum
G92 Z0; set Z to 0
M132 X Y Z A B; Recall stored home offsets

3D Universe Presents: The Unofficial FlashForge Creator X Manual
shop3duniverse.com Page 31 of 43 800-‐689-‐4344
G90; set positioning to absolute
G1 Z30; move Z to waiting height
G1 X-‐95 Y-‐73 Z30 F14000; move to waiting position (front left corner of print bed)
G130 X0 Y0 A0 B0; set stepper motor vref to lower value while heating
M6 T0; wait for bed and extruder to heat up
G130 X127 Y127 A127 B127; set stepper motor vref to defaults
M108 T0 R3; set extruder speed
G92 E0; set E to 0
G90; use absolute coordinates
M320; acceleration enabled for all commands that follow
G1 Z[first_layer_height] F6000.000; move to first layer height
G1 X100 Y-‐73 F14000.000; move to front right corner of bed
G1 X-‐90 Y-‐73 E24 F2000.000; extrude a line of filament across the front edge of the bed
G4 P2000; wait for ooze to slow
G1 Z0 F6000.000; lower nozzle height to 0
G1 X-‐95; wipe nozzle
G1 Z[first_layer_height] F6000.000; set nozzle to first layer height
G1 F12000; ensure fast travel to first print move
G92 E0; set E to 0 again
M73 P0; reset build progress to 0
End G-‐Code:
M73 P100 ; end build progress
G162 X Y F2500; home X and Y axes
M18; disable all stepper motors
M109 S0 T0; set bed temperature to 0
M104 S0 T0; set extruder temperature to 0
M70 P5; Display "We <3 Making Things!" message
M72 P1; Play Ta-‐Da song

3D Universe Presents: The Unofficial FlashForge Creator X Manual
shop3duniverse.com Page 32 of 43 800-‐689-‐4344
Custom G-‐Code (Dual Material Prints)
Under "Custom G-‐Code" in your dual material printer profile, try using the following: Start G-‐Code:
T0; set primary extruder
M73 P0; enable show build progress
M109 S[first_layer_bed_temperature] T0 ; heat bed up to first layer temperature
M104 S[first_layer_temperature_0] T0 ; set 1st nozzle heater to first layer temperature
M104 S[first_layer_temperature_1] T1 ; set 2nd nozzle heater to first layer temperature
M103; disable RPM
G21; set units to mm
G162 X Y F9000; home XY axes maximum
G161 Z F6000; home Z axis minimum
G92 Z0; set Z to 0
M132 X Y Z A B; Recall stored home offsets
G90; set positioning to absolute
G1 Z30; move Z to waiting height
G1 X-‐95 Y-‐73 Z30 F12000.0; move to waiting position (front left corner of print bed)
G130 X0 Y0 A0 B0; set stepper motor vref to lower value while heating
M6 T0; wait for bed and extruder 1 to heat up
M6 T1; wait for extruder 2 to heat up
T0; change to primary extruder
G130 X127 Y127 A127 B127; set stepper motor vref to defaults
M108 T0 R3; set extruder speed
G92 E0; set E to 0
M320; acceleration enabled for all commands that follow
G1 Z[first_layer_height] F6000.000; move to first layer height
G1 X100 Y-‐73 F14000.000; move to front right corner of bed
G1 X-‐90 Y-‐73 E24 F2000.000; extrude a line of filament across the front edge of the bed using the 1st extruder
G92 E[retract_length]; set E to retraction length defined in printer settings
G4 P2000; wait for ooze to slow
G1 E0 F5400; excute reverse extrusion to retract by length defined in printer settings
G1 Z0 F6000.000; lower nozzle height to 0
G1 X-‐95; wipe purged noodle on edge of bed
G92 E0; set E to 0 for 1st extruder
T1; switch to 2nd extruder
G1 Z[first_layer_height] F6000.000; set nozzle to first layer height

3D Universe Presents: The Unofficial FlashForge Creator X Manual
shop3duniverse.com Page 33 of 43 800-‐689-‐4344
G1 X100 Y-‐71 F14000.000; move to front right corner of print bed
G1 X-‐90 Y-‐71 E24 F2000.000; extrude a line of filament across the front edge of the bed using the 2nd extuder
G4 P2000; wait for ooze to slow
G1 Z0 F6000.000; lower nozzle height to 0
G1 X-‐95; wipe purged noodle on edge of bed
G1 Z[first_layer_height] F6000.000; set nozzle to first layer height
G1 F14000; ensure fast travel to first print move
G92 E0; set E to 0 for 2nd extruder
M73 P0; reset build progress to 0
End G-‐Code:
M73 P100 ; end build progress
G162 X Y F2500; home X and Y axes
M109 S0 T0; set bed temperature to 0
M104 S0 T0; set 1st extruder temperature to 0
M104 S0 T1; set 2nd extruder temperature to 0
M18; disable all stepper motors
M70 P5; Display "We <3 Making Things!" message
M72 P1; Play Ta-‐Da song
And for Tool-‐Change G-‐Code:
T[next_extruder]
Converting from G-‐Code to .X3G Using GPX as a Slic3r Post-‐Processor
You can download the GPX utility from here (http://www.thingiverse.com/thing:81425). Place it in a directory of your choice. I found that if you just place the GPX executable into the "Post-‐processing scripts" field in Slic3r, it doesn't work the way I want it too because Slic3r doesn't let you pass command-‐line arguments to the script (for security reasons). To get around this, I created my own little Perl script to call GPX with the options I want. If you don't have a Perl interpreter installed, you can download one free of charge here (http://www.citrusperl.com/).
3D Universe Presents: The Unofficial FlashForge Creator X Manual
shop3duniverse.com Page 34 of 43 800-‐689-‐4344
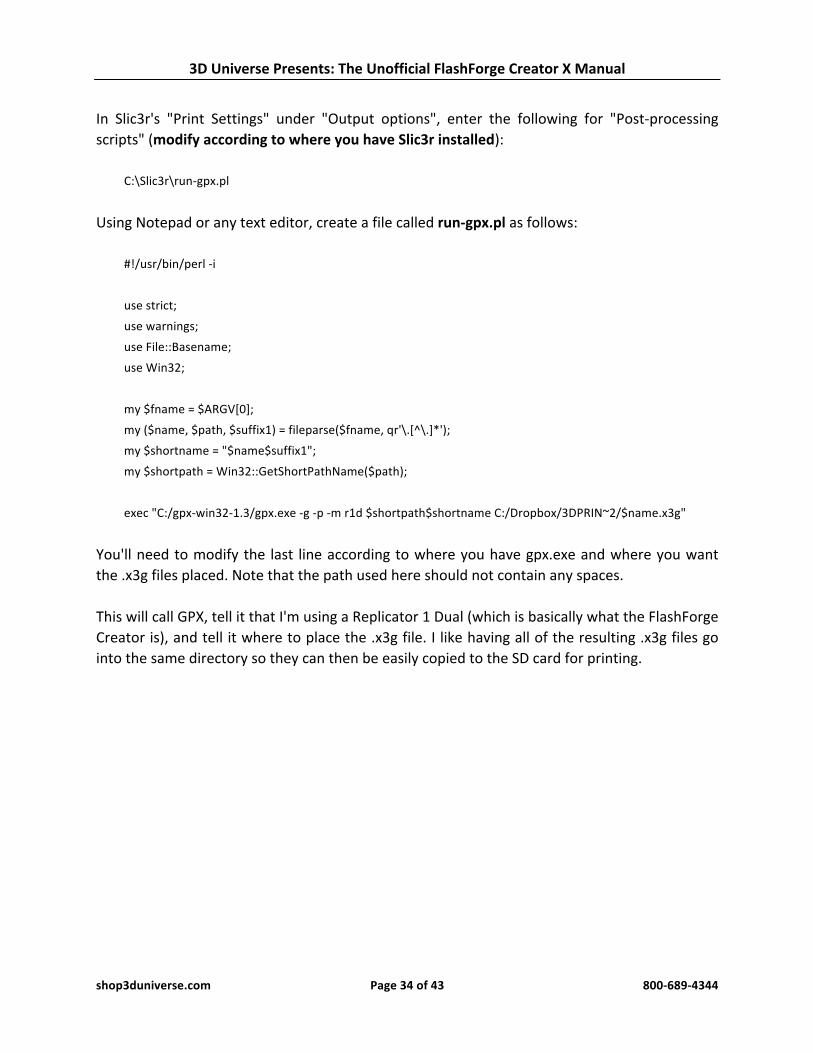
In Slic3r's "Print Settings" under "Output options", enter the following for "Post-‐processing scripts" (modify according to where you have Slic3r installed):
C:\Slic3r\run-‐gpx.pl
Using Notepad or any text editor, create a file called run-‐gpx.pl as follows:
#!/usr/bin/perl -‐i
use strict;
use warnings;
use File::Basename;
use Win32;
my $fname = $ARGV[0];
my ($name, $path, $suffix1) = fileparse($fname, qr'\.[^\.]*');
my $shortname = "$name$suffix1";
my $shortpath = Win32::GetShortPathName($path);
exec "C:/gpx-‐win32-‐1.3/gpx.exe -‐g -‐p -‐m r1d $shortpath$shortname C:/Dropbox/3DPRIN~2/$name.x3g"
You'll need to modify the last line according to where you have gpx.exe and where you want the .x3g files placed. Note that the path used here should not contain any spaces. This will call GPX, tell it that I'm using a Replicator 1 Dual (which is basically what the FlashForge Creator is), and tell it where to place the .x3g file. I like having all of the resulting .x3g files go into the same directory so they can then be easily copied to the SD card for printing.

3D Universe Presents: The Unofficial FlashForge Creator X Manual
shop3duniverse.com Page 35 of 43 800-‐689-‐4344
Using MakerWare with the FlashForge Creator X
The FlashForge Creator X is based upon the original open source Makerbot design (the Makerbot Replicator 1 Dual). Therefore, it is compatible with all of the software (and firmware) designed for the Makerbot printers. Makerbot offers their MakerWare software for free, which works nicely with the FlashForge Creator X. Compared to Replicator G, MakerWare is easier to use, has a nicer user interface, is more stable, and is significantly faster. Visit http://makerbot.com/makerware/, download the latest version of MakerWare for your operating system, and run the downloaded file to install. After installing, run the program. In the configuration wizard, choose “Replicator (Dual)” as the device type. This can also be configured by going to Devices -‐> Select type of device from the main menu.
Note: Makerware installs a service that runs in the background to communicate with the 3D printer. If you wish to use other software to interact with your 3D printer, you’ll need to first choose “Stop Background Service” from the “Services” menu in Makerware.

3D Universe Presents: The Unofficial FlashForge Creator X Manual
shop3duniverse.com Page 36 of 43 800-‐689-‐4344
Using Simplify3D™ with the FlashForge Creator X
The FlashForge uses the .x3g file format for printing. This is a binary file which contains all of the instructions the printer needs for it to print your part. Simplify3D software can be set up to output this file format directly thanks to its integrated Makerbot printer support. The resulting x3g file can then be printed in two ways. You can copy it to the machine’s SD card and use the built-‐in LCD menu or you can stream the file directly to your machine via a connected USB cable. The first step in setting up the software for your FlashForge is to open Simplify3D and go to Help > Configuration Assistant. When the assistant window pops up, just select the correct FlashForge Creator X profile for your printer under the drop down menu. You have now successfully configured Simplify3D to work with your FlashForge printer! If you would like to manually change the firmware settings, you can go to Tools > Firmware Configuration. From here you can change the firmware profile and the general communication settings. For the FlashForge, you should select the ‘Sailfish/Makerbot Firmware’ profile. This will allow the software to work with both the FlashForge firmware and the common Sailfish firmware upgrade (see the “Upgrading to Sailfish Firmware” section of this manual). In this same window, click on the X3G tab and select the correct machine profile (for the Creator X, choose “FlashForge Creator Dual”). You are now ready to set up your workflow. Import your STL file. Use the Add button (lower left of the main window) to add a new manufacturing process. Then click the Edit Process Settings button. Select one of the FlashForge printer profiles in the drop-‐down menu. Next, add the preconfigured FlashForge process or customize your own process settings. The software includes pre-‐configured profiles specifically for fast, medium and high quality prints. Note: If you are not familiar with the basic printer workflow, refer to the Simplify3D Quick Start Guide that can be accessed from within the software at Help > Quick Start Guide.

3D Universe Presents: The Unofficial FlashForge Creator X Manual
shop3duniverse.com Page 37 of 43 800-‐689-‐4344
Starting a Print
Once you are happy with your print settings in the FFF window, click “Prepare to print!” to advance to the Preview stage. An important point for your FlashForge is that when the “Prepare to print!” button is pressed, the software creates two files. One of these files is the binary x3g instructions that you will use for printing on the FlashForge (.x3g). The other file is the standard ASCII G-‐Code (.gcode) file that creates the preview visualization. We always advise that you examine the preview carefully to determine if your model appears the way you desire. Be sure to especially pay attention to the first layer, which can be examined using the “layer” checkbox and the layer sliders at the bottom of the preview window. If you are happy with the build sequence in the Preview, you have two options to begin printing.
1. Print using the SD card. Simply click on the SD card picture labeled “Save Toolpaths to Disk” button and the software will copy the .x3g and G-‐Code file to the FlashForgeʹ′s SD card. You can then insert the SD card back into your printer and use the built-‐in LCD menu to select the “Build from SD” option. Select the file you wish to print and start printing.
2. Print over a USB connection. When you plug the USB cable into your computer, the
software will automatically connect with the printer. A pop-‐up message will let you know when you are connected. To print, click on the “Begin Printing over USB” button. Your machine will start receiving commands and relaying information back to the computer. The software will alert you of the progress of the print through the same pop-‐up message in the bottom right corner. For example, if the printer is heating the extruders, a “Preheating Extruder” message will appear with a loading bar. When printing over USB the Preview Mode will turn into a live tracking tool. This tool will track the machine’s motions so that you are able to watch your print’s progress on your computer. If you wish to change the update interval you can set it on the left side under “Real-‐Time Updates”.
Congratulations! You are now ready to start 3D printing using the Simplify3D Software and your FlashForge Creator X 3D printer!
3D Universe Presents: The Unofficial FlashForge Creator X Manual
shop3duniverse.com Page 38 of 43 800-‐689-‐4344
Troubleshooting
If you run into problems during your first print, here are a few common troubleshooting tips you can try.
• Please make sure that the filename you choose when clicking the Prepare button is less than 30 characters. Note: You cannot simply rename the file to something shorter, you must export it a second time from the software using the shorter name.
• If you are using a Windows computer, please make sure that you have installed the necessary MakerBot Mightyboard drivers. If you have already installed MakerWare, Makerbot Desktop, or Replicator G, you do not need to worry about this.
• If you have MakerWare installed on your computer, please make sure that the Conveyor service is disabled before trying to connect to your printer using the Simplify3D Software. You can do this by opening MakerWare and going to Services > Stop Background Service.
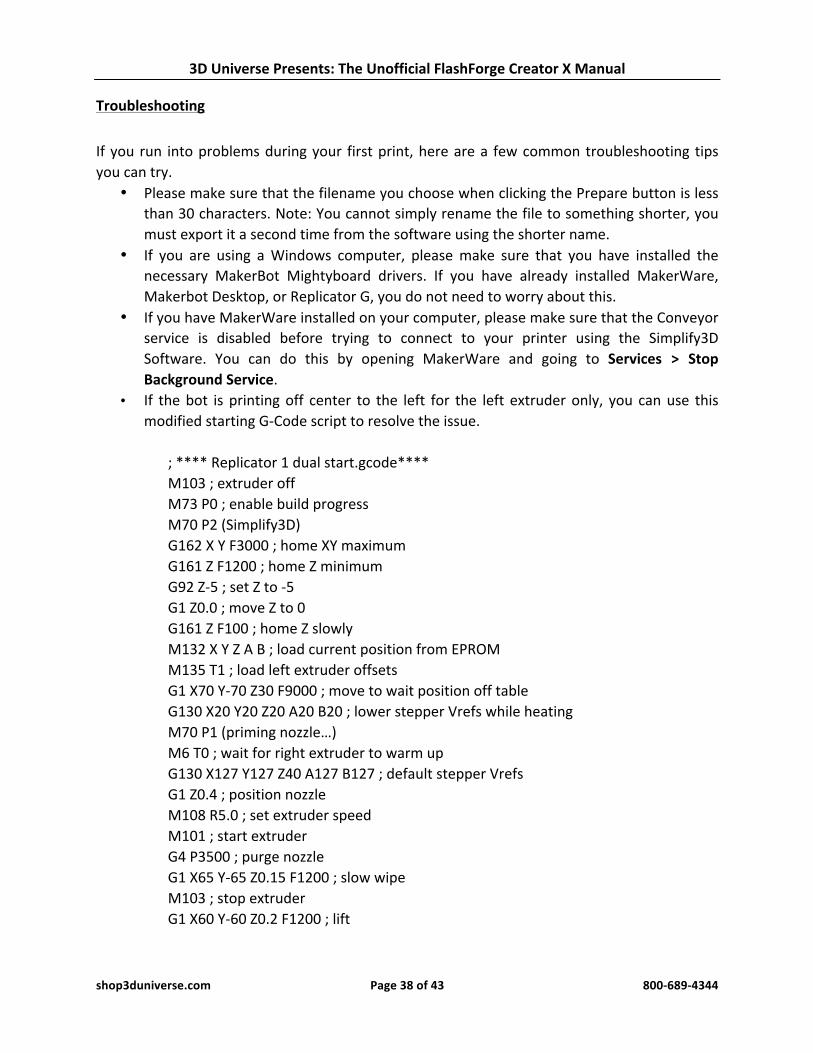
• If the bot is printing off center to the left for the left extruder only, you can use this modified starting G-‐Code script to resolve the issue.
; **** Replicator 1 dual start.gcode**** M103 ; extruder off M73 P0 ; enable build progress M70 P2 (Simplify3D) G162 X Y F3000 ; home XY maximum G161 Z F1200 ; home Z minimum G92 Z-‐5 ; set Z to -‐5 G1 Z0.0 ; move Z to 0 G161 Z F100 ; home Z slowly M132 X Y Z A B ; load current position from EPROM M135 T1 ; load left extruder offsets G1 X70 Y-‐70 Z30 F9000 ; move to wait position off table G130 X20 Y20 Z20 A20 B20 ; lower stepper Vrefs while heating M70 P1 (priming nozzle…) M6 T0 ; wait for right extruder to warm up G130 X127 Y127 Z40 A127 B127 ; default stepper Vrefs G1 Z0.4 ; position nozzle M108 R5.0 ; set extruder speed M101 ; start extruder G4 P3500 ; purge nozzle G1 X65 Y-‐65 Z0.15 F1200 ; slow wipe M103 ; stop extruder G1 X60 Y-‐60 Z0.2 F1200 ; lift

3D Universe Presents: The Unofficial FlashForge Creator X Manual
shop3duniverse.com Page 39 of 43 800-‐689-‐4344
M73 P1 ;@body (notify GPX body has started) ; **** end of start.gcode ****
3D Universe Presents: The Unofficial FlashForge Creator X Manual
shop3duniverse.com Page 40 of 43 800-‐689-‐4344
Upgrading to Sailfish Firmware The FlashForge Creator X is fully compatible with the popular Sailfish Firmware, created by Dan Newman. This firmware adds several significant features and improvements, including:
• Support for improved acceleration, which improves print speeds and reduces vibrations without sacrificing quality.
• Enables faster preheating by allowing the build plate and the extruders to heat up at the same time (this feature was included specifically for the FlashForge Creator and Creator X printers, which have a strong enough power supply to support this).
• Provides an improved bed leveling function. When the bed leveling option is selected, the build plate is raised and the stepper motors are disabled. This allows you to move the extruder manually to any position you wish, so you can check the leveling in several places more quickly without having to keep pressing the buttons on the control panel.
• Adds a “Pause @ Z Pos” option, which allows you to have the printer pause a print job automatically when it reaches a certain height (in millimeters).
• Adds an “Override Gcode Temps” option, which allows you to have the printer ignore any temperature settings in a .x3g file and instead use the current preheat settings for printing temperatures. This allows you to switch materials without having to re-‐generate your .x3g files.
If you are trying to upgrade to Sailfish, here are some tips and suggestions.
• Make sure you follow all the instructions specified on Makerbot’s Sailfish installation guide (http://www.makerbot.com/sailfish/install/). Also, don’t forget to complete Step 1 and 2 on the Sailfish setup guide (http://www.makerbot.com/sailfish/setup/). When you get to the ‘Installing the Sailfish Firmware’ portion of the guide and it asks for you to select the correct board, make sure to choose the FlashForge board.
• If the extruder is printing extremely far off to the left, make sure your home and extruder head offset is set correctly in the EEPROM. To do this, open up Replicator G and open up Onboard Preferences from the Machine menu.
• For the x home offset, you should have a value around 152mm. • For the y home offset, you should have a value around 75mm (for dual extruders)
or a value around 72mm (for single extruders). • For the extruder offsets, you should have a value of around 32mm or 33mm.
Alternatively you can have a value of 0mm and the firmware will automatically set it to the default value.
When you change the EEPROM settings, be sure to click on the ‘Commit’ button to save your changes. If you need to change all the settings back to default, press the ‘Reset Motherboard Completely’ button.

3D Universe Presents: The Unofficial FlashForge Creator X Manual
shop3duniverse.com Page 41 of 43 800-‐689-‐4344
Installing a Glass Build Plate
Why Consider Printing on Glass?
The FlashForge Creator X comes with a new and improved build plate, which is significantly thicker than the one used on the Creator (the previous model). This ensures the build plate will remain perfectly level and will not warp with temperature changes. When the Creator X arrives, it has a nice layer of Kapton tape installed on the build plate. Kapton tape is a popular surface for printing ABS, as the plastic adheres to it fairly well, yet is easy to remove. The challenge with Kapton tape is that it tears very easily. When that happens, you need to apply a new layer of Kapton tape, and doing so in a manner that yields a nice smooth surface without any air bubbles or imperfections can be a difficult task. Another downside of Kapton tape is, when you wish to print with other materials, you will need to change the print surface by adding glass, blue painter’s tape, or other materials, depending on what you’re printing with. As an alternative, you may consider adding a ¼” thick heat-‐resistant glass build plate on top of the standard build plate. The thermal glass build plate can be used to print on directly in a variety of materials, assuming you prepare it appropriately (see below). You can purchase a properly sized thermal glass build plate for your FlashForge Creator X here: http://shop3duniverse.com/collections/accessories/products/glass-‐build-‐plate
Installing a Thermal Glass Build Plate
Because adding a glass build plate will add another ¼” to the total build plate thickness, a “shim” needs to be installed so the printer will not lift the build plate as high. The required shim can be freely downloaded from Thingiverse (http://www.thingiverse.com/thing:289995) and 3D printed on your Creator X! You’ll want to print this before installing your glass build plate, of course. This part will be installed at the rear of the build plate, positioned such that it will come into

3D Universe Presents: The Unofficial FlashForge Creator X Manual
shop3duniverse.com Page 42 of 43 800-‐689-‐4344
contact with the Z-‐stop trigger when the bed is raised. These photos show the proper position:
Glass Surface Preparation for Various 3D Printing Materials
Here at 3D Universe, we have found that by applying the proper surface coating to the glass plate directly, there is no need to use Kapton tape. We attach the glass to the build plate using a thin strip of Kapton tape on each side (Kapton tape is heat resistant), and we use the following surface preparations:
• For ABS: ◦ The glass is coated with a thin layer of ABS juice (mixture of ABS and acetone) ◦ Heated bed temperature of 110C ◦ Clean the glass with a straight-‐edged razor tool
• For PLA: ◦ The glass is coated with Aqua Net Extra Super Hold hairspray ◦ Heated bed temperature of 60C ◦ Clean the glass with a damp cloth
• For Taulman Bridge Nylon: ◦ The glass is coated with a glue-‐stick (or liquid PVA glue) ◦ Heated bed temperature of 80C ◦ Clean the glass with a damp cloth, while the build plate is heated
This way, all you need to do is clean off the glass and you’re ready for the next print. Here at 3D Universe, we haven’t used Kapton tape since switching to this method. Warnings:
1) You need to be careful when working with acetone (keep children away, and using a

3D Universe Presents: The Unofficial FlashForge Creator X Manual
shop3duniverse.com Page 43 of 43 800-‐689-‐4344
respirator would be a good idea). 2) It can get a little messy when you scrape the dried ABS juice off the print bed. It cleans
off easily with a flat razor blade, but it creates very thin shavings that tend to get everywhere. We keep a portable vacuum nearby to clean these shavings out of the printer from time to time. Still, if you like keeping your 3D printer looking shiny and new, this might not be the best option for you.