4 manage and maintain the product
TRANSCRIPT

4 Manage and maintain the product
● Information pages
● HP Easy Printer Care
● Embedded Web server
● Use HP Web Jetadmin software
● Security features
● Manage supplies
● Clean the product
● Product updates
ENWW 69

Information pagesInformation pages provide details about the product and its current configuration.
1. Press the Menu button.
2. Press the down arrow to highlight the INFORMATION menu, and then press the OK button.
3. Press the down arrow to highlight the required information, and then press the OK button to print.
For more information about the available information pages, see Information menu on page 17.
70 Chapter 4 Manage and maintain the product ENWW

HP Easy Printer CareOpen the HP Easy Printer Care software
Use one of the following methods to open the HP Easy Printer Care software:
● On the Start menu, select Programs, select Hewlett-Packard, select HP Easy Printer Care, andthen click Start HP Easy Printer Care.
● In the Windows system tray (in the lower-right corner of the desktop), double-click the HP EasyPrinter Care icon.
● Double-click the desktop icon.
HP Easy Printer Care software sectionsHP Easy Printer Care software can provide information about multiple HP products that are on yournetwork as well as any products that are directly connected to your computer. Some of the items thatare in the following table might not be available for every product.
The Help button (?) in the upper-right corner of each page provides more detailed information about theoptions on that page.
Section Options
Device List tab
When you open the software, this is thefirst page that appears.
NOTE: To return to this page from anytab, click My HP Printers in the left sideof the window.
● Devices list: Shows the products that you can select.
NOTE: The product information appears either in list form or as icons,depending on the setting for the View as option.
● The information on this tab includes current alerts for the product.
● If you click a product in the list, the HP Easy Printer Care opens theOverview tab for that product.
Compatible Printers Provides a list of all the HP products that support HP Easy Printer Care software.
Find Other Printers window
Add more products to theMy HP Printers list
Click the Find Other Printers link in the Devices list to open the Find OtherPrinters window. The Find Other Printers window provides a utility that detectsother network printers so that you can add them to the My HP Printers list and thenmonitor those products from your computer.
Overview tab
Contains basic status information for theproduct
● Device Status section: This section shows product-identification informationand the product status. It indicates product-alert conditions, such as when aprint cartridge has reached is estimated end of life. After you correct a problemwith the product, click the refresh button in the upper-right corner of thewindow to update the status.
● Supplies Status section: Shows detailed supplies status, such as theestimated life remaining in the print cartridge and the status of the paper thatis loaded in each tray.
● Supplies Details link: Opens the supplies status page to view more detailedinformation about product supplies, ordering information, and recyclinginformation.
ENWW HP Easy Printer Care 71

Section Options
Support tab
Provides links to support information
● Device Status section: This section shows product-identification informationand the product status. It indicates product-alert conditions, such as a printcartridge that is at its estimated end of life. After you correct a problem with theproduct, click the refresh button in the upper-right corner of the window toupdate the status.
● Device Management section: Provides links to information about HP EasyPrinter Care, to advanced product settings, and to product usage reports.
● Troubleshooting and Help: Provides links to tools that you can use to resolveproblems, to online product support information, and to online HP experts.
Settings tab
Configure product settings, adjust print-quality settings, and find informationabout specific product features
NOTE: This tab is not available forsome products.
● About: Provides general information about this tab.
● General: Provides information about the product, such as the model number,serial number, and the settings for date and time, if they are available.
● Information Pages: Provides links to print the information pages that areavailable for the product.
● Capabilities: Provides information about product features, such as duplexing,the available memory, and the available printing personalities. Click Changeto adjust the settings.
● Print Quality: Provides information about print-quality settings. ClickChange to adjust the settings.
● Trays / Paper: Provides information about the trays and how they areconfigured. Click Change to adjust the settings.
● Restore Defaults: Provides a way to restore the product settings to the factorydefaults. Click Restore to restore the settings to the defaults.
HP Proactive Support
NOTE: This item is available from theOverview and Support tabs.
When enabled, HP Proactive Support routinely scans your printing system to identifypotential problems. Click the more info link to configure how frequently the scansoccur. This page also provides information about available updates for productsoftware, firmware, and HP printer drivers. You can accept or decline eachrecommended update.
Supplies Ordering button
Click the Supplies Ordering button onany tab to open the Supplies Orderingwindow, which provides access to onlinesupplies ordering.
NOTE: This item is available from theOverview and Support tabs.
● Ordering list: Shows the supplies that you can order for each product. To ordera certain item, click the Order check box for that item in the supplies list. Youcan sort the list by product, or by the supplies that need to be ordered thesoonest. The list contains supplies information for every product that is in theMy HP Printers list.
● Shop Online for Supplies button: Opens the HP SureSupply Web site in anew browser window. If you have checked the Order check box for any items,the information about those items can be transferred to the Web site, whereyou will receive information on options for purchasing your selected supplies.
● Print Shopping List button: Prints the information for the supplies that havethe Order check box selected.
72 Chapter 4 Manage and maintain the product ENWW

Section Options
Alert Settings link
NOTE: This item is available from theOverview and Support tabs.
Click Alert Settings to open the Alert Settings window, in which you can configurealerts for each product.
● Alerting is on or off: Activates or deactivates the alerts feature.
● Printer Alerts: Select the option to receive alerts for critical errors only, or forany error.
● Job Alerts: For products that support it, you can receive alerts for specific printjobs.
Color Access Control
NOTE: This item is available only forHP color products that support ColorAccess Control.
NOTE: This item is available from theOverview and Support tabs.
Use this feature to permit or restrict color printing.
ENWW HP Easy Printer Care 73
Embedded Web serverUse the embedded Web server to view product status, configure product network settings, and tomanage printing functions from your computer instead of from the product control panel. The followingare examples of what you can do using the embedded Web server:
NOTE: When the product is directly connected to a computer, use the HP Easy Printer Care to viewthe product status instead of the embedded Web server.
● View product status information.
● Determine the remaining life for all supplies and order new ones.
● View and change tray configurations.
● View and change the product control-panel menu configuration.
● View and print internal pages.
● Receive notification of product and supplies events.
● View and change network configuration.
To use the embedded Web server, you must have Microsoft Internet Explorer 5.01 or later or Netscape6.2 or later for Windows, Mac OS, and Linux (Netscape only). Netscape Navigator 4.7 is required forHP-UX 10 and HP-UX 11. The embedded Web server works when the product is connected to an IP-based network. The embedded Web server does not support IPX-based product connections. You donot have to have Internet access to open and use the embedded Web server.
When the product is connected to the network, the embedded Web server is automatically available.
NOTE: For complete information about using the embedded Web server, see the Embedded WebServer User Guide, which is on the CD that came with the product.
Open the embedded Web server by using a network connection1. In a supported Web browser on your computer, type the product IP address or host name in the
address/URL field. To find the IP address or host name, print a configuration page. See Informationpages on page 70.
NOTE: After you open the URL, you can bookmark it so that you can return to it quickly in thefuture.
2. The embedded Web server has the following tabs that contain settings and information about theproduct:
● Information tab
● Settings tab
● Networking tab
See Embedded Web server sections on page 75 for more information about each tab.
74 Chapter 4 Manage and maintain the product ENWW

Embedded Web server sections
Tab or section Options
Information tab
Provides product, status, andconfiguration information
● Device Status: Shows the product status and shows the estimated life remaining ofHP supplies. The page also shows the type and size of print paper set for each tray.To change the default settings, click Change Settings.
● Configuration Page: Shows the information found on the configuration page.
● Supplies Status: Shows the estimated life remaining of HP supplies. This page alsoprovides supplies part numbers. To order new supplies, click Shop for Supplies inthe Other Links area on the left side of the window.
● Event Log: Shows a list of all product events and errors. Use the hp instantsupport link (in the Other Links area on all embedded Web server pages) to connectto a set of dynamic Web pages that help you solve Event Log issues and otherproblems. These pages also show additional services available for the product.
● Usage Page: Shows a summary of the number of pages the product has printed,grouped by size, type, and paper print path.
● Diagnostics Page: Provides the time of the last calibration and the electro-photographic (EP) parameters that can be used to diagnose some print qualityproblems. For more information, contact HP Support. See Customer supporton page 514.
● Device Information: Shows the product network name, address, and modelinformation. To customize these entries, click Device Information on the Settingstab.
● Control Panel: Shows messages from the control panel, such as Ready or Sleepmode on.
● Color Usage Job Log: Shows the total pages printed, the number of pages printedin color, and the number of pages printed in black only.
● Print: Allows you to send print-ready jobs to the product.
Settings tab
Provides the ability to configure theproduct from your computer
● Configure Device: Allows you to configure product default settings. This pagecontains the traditional menus found on the control-panel display.
● Tray Sizes/Types: Shows the size and type of paper and print media allowed foreach input tray.
● E-mail Server: Network only. Used in conjunction with the Alerts page to set up e-mail alerts.
● Alerts: Network only. Allows you to set up to receive e-mail alerts for various productand supplies events.
● AutoSend: Allows you to configure the product to send automated e-mails regardingproduct configuration and supplies to specific e-mail addresses.
● Security: Allows you to set a password that must be entered to gain access to theSettings and Networking tabs as well as portions of the product's control panel andHP Jetdirect networking. Enable and disable certain features of the product.
● Edit Other Links: Allows you to add or customize a link to another Web site. Thislink is displayed in the Other Links area on all embedded Web server pages.
● Device Information: Allows you to name the product and assign an asset numberto it. Enter the name and e-mail address for the primary contact who will receiveinformation about the product.
ENWW Embedded Web server 75

Tab or section Options
● Language: Allows you to determine the language in which to display the embeddedWeb server information.
● Date & Time: Allows time synchronization with a network time server.
● Wake Time: Allows you to set or edit a wake time for the product to become ready.
● Restrict Color: Allows you to permit or restrict color printing. You can specifypermissions for individual users or for jobs that are sent from specific softwareprograms.
NOTE: The Settings tab can be password-protected. If this product is on a network,always consult with the system administrator before changing settings on this tab.
Networking tab
Provides the ability to changenetwork settings from yourcomputer
Network administrators can use this tab to control network-related settings for the productwhen it is connected to an IP-based network. This tab does not appear if the product isdirectly connected to a computer, or if the product is connected to a network using anythingother than an HP Jetdirect print server.
NOTE: The Networking tab can be password-protected.
Other Links
Contains links that connect you tothe Internet
● hp instant support: Connects you to the HP Web site to help you find solutions toproduct problems.
● Shop for Supplies: Connects to the HP SureSupply Web site, where you will receiveinformation on options for purchasing original HP supplies, such as print cartridgesand paper.
● Product Support: Connects to the support site for the product, from which you canfind help regarding various topics.
● Show Me How: Connects to information that demonstrates specific tasks for theproduct, such as clearing jams and printing on various types of paper.
NOTE: You must have Internet access in order to use any of these links. If you use adial-up connection and did not connect when you first opened the embedded Web server,you must connect before you can visit these Web sites. Connecting might require that youclose the embedded Web server and reopen it.
76 Chapter 4 Manage and maintain the product ENWW

Use HP Web Jetadmin softwareHP Web Jetadmin is a Web-based software solution for remotely installing, monitoring, andtroubleshooting network-connected peripherals. Management is proactive, allowing networkadministrators the ability to resolve issues before users are affected. Download this free, enhanced-management software at www.hp.com/go/webjetadmin.
Device plug-ins can be installed into HP Web Jetadmin to provide support for specific product features.The HP Web Jetadmin software can automatically notify you when new plug-ins are available. On theProduct Update page, follow the directions to automatically connect to the HP Web site and install thelatest device plug-ins for your product.
NOTE: Browsers must be Java™-enabled. Browsing from an Apple PC is not supported.
ENWW Use HP Web Jetadmin software 77
Security featuresSecure the embedded Web server
Assign a password for access to the embedded Web server so that unauthorized users cannot changethe product settings.
1. Open the embedded Web server. See Embedded Web server on page 74.
2. Click the Settings tab.
3. On the left side of the window, click the Security menu.
4. Click the Device Security Settings button.
5. In the Device Password area, type the password next to New Password, and type it again nextto Verify Password.
6. Click Apply. Make note of the password and store it in a safe place.
Secure Disk Erase (optional EIO hard drive)To protect deleted data from unauthorized access on the product hard drive, use the Secure Disk Erasefeature in the HP Web Jetadmin software. This feature can securely erase print jobs from the optionalhard drive.
Secure Disk Erase offers the following levels of disk security:
● Non-Secure Fast Erase. This is a simple file-table erase function. Access to the file is removed,but actual data is retained on the disk until it is overwritten by subsequent data-storage operations.This is the fastest mode. Non-Secure Fast Erase is the default erase mode.
● Secure Fast Erase. Access to the file is removed, and the data is overwritten with a fixed identicalcharacter pattern. This is slower than Non-Secure Fast Erase, but all data is overwritten. SecureFast Erase meets the U.S. Department of Defense 5220-22.M requirements for the clearing of diskmedia.
● Secure Sanitizing Erase. This level is similar to the Secure Fast Erase mode. In addition, data isrepetitively overwritten by using an algorithm that prevents any residual data persistence. Thismode will impact performance. Secure Sanitizing Erase meets the U.S. Department of Defense5220-22.M requirements for the sanitization of disk media.
Data affectedData affected (covered) by the Secure Disk Erase feature includes temporary files that are createdduring the print process, stored jobs, proof and hold jobs, disk-based fonts, disk-based macros (forms),address books, and HP and third-party applications.
NOTE: Stored jobs will be securely overwritten only when they have been deleted through theRETRIEVE JOB menu on the product after the appropriate erase mode has been set.
This feature will not impact data that is stored on flash-based product non-volatile RAM (NVRAM) thatis used to store default settings, page counts, and similar data. This feature does not affect data that isstored on a system RAM disk (if one is used). This feature does not impact data that is stored on theflash-based system boot RAM.
78 Chapter 4 Manage and maintain the product ENWW

Changing the Secure Disk Erase mode does not overwrite previous data on the disk, nor does itimmediately perform a full-disk sanitization. Changing the Secure Disk Erase mode changes how theproduct cleans up temporary data for jobs after the erase mode has been changed.
Additional InformationFor additional information about the HP Secure Disk Erase feature, see the HP support flyer or go towww.hp.com/go/webjetadmin.
Job storageTo securely print a private job, use the personal job option. The job can only be printed when the correctPIN is entered at the control panel.
To use the Personal Job option, the job-storage feature must be enabled.
When you select Personal Job, the print job is sent to the product, but is not printed until you requestthe job at the product control panel. Selecting Personal Job activates the PIN group box. If PIN toprint is selected, the print job can be printed only after you type the correct PIN at the control panel.After the job is printed, the job is immediately deleted from the product. This feature is useful when youare printing sensitive or confidential documents that you do not want to leave in an output bin afterprinting.
The Private Job/PIN coupling has a PIN restriction of four ASCII numeric characters (0 though 9). If youtype non-numeric characters, they are removed immediately. If you type more than four characters, thecharacters past the fourth are truncated. The text box temporarily accepts fewer than four digits in thestring, but when the text box loses focus, the zeroes pad the left end until the PIN contains exactly fourdigits. The default initialized value for the PIN is 0000 for Personal Job.
After it is released for printing, the private job is immediately deleted from the product. If more copiesare needed, you must reprint the job from the software program. If you send a second private job thathas the same user name and job name as an existing private job (and you have not released the originaljob for printing), the job overwrites the existing job, regardless of the PIN. Private jobs are deleted if youturn off the product.
HP Encrypted High Performance Hard DisksThis product supports an optional encrypted hard disk that you can install in the EIO accessory slot.This hard disk provides hardware-based encryption so you can securely store sensitive print, copy, andscan data without impacting product performance. This hard disk uses the latest Advanced EncryptionStandard (AES) and has versatile time-saving features and robust functionality.
For information about ordering these accessories see Part numbers on page 447.
Lock the control-panel menusTo prevent someone from changing the product configuration, you can lock the control-panel menus.This prevents unauthorized users from changing the configuration settings such as the SMTP server.
You can use HP Web Jetadmin to lock the control-panel menus on several products simultaneously.Browse to www.hp.com/go/webjetadmin to access white papers discussing security features, such ascontrol-panel lock, that allow you to secure the product against unwanted access.
1. Open the HP Web Jetadmin program.
2. Open the DEVICE MANAGEMENT folder in the drop-down list in the Navigation panel. Navigateto the DEVICE LISTS folder.
ENWW Security features 79

3. Select the product.
4. In the Device Tools drop-down list, select Configure.
5. Select Security from the Configuration Categories list.
6. Type a Device Password.
7. In the Control Panel Access section, select Maximum Lock. This prevents unauthorized usersfrom gaining access to configuration settings.
Lock the formatter cageThe formatter cage, on the back of the product, has a slot that you can use to attach a security cable.Locking the formatter cage prevents someone from removing valuable components from the formatter.
Figure 4-1 Slot for the security cable
80 Chapter 4 Manage and maintain the product ENWW

Manage suppliesUse genuine HP print cartridges for the best printing results.
Print-cartridge storageDo not remove the print cartridge from its package until you are ready to use it.
CAUTION: To prevent damage to the print cartridge, do not expose it to light for more than a fewminutes.
HP policy on non-HP print cartridgesHewlett-Packard Company cannot recommend the use of non-HP print cartridges, either new orremanufactured.
NOTE: Any damage caused by a non-HP print cartridge is not covered under the HP warranty andservice agreements.
To install a new HP print cartridge, see Change print cartridges on page 83. To recycle the usedcartridge, follow the instructions included with the new cartridge. For more information about recycling,see the product user guide.
HP fraud hotline and Web siteCall the HP fraud hotline (1-877-219-3183, toll-free in North America) or go to www.hp.com/go/anticounterfeit when you install an HP print cartridge and the control-panel message says the cartridgeis non-HP. HP will help determine if the cartridge is genuine and take steps to resolve the problem.
Your print cartridge might not be a genuine HP print cartridge if you notice the following:
● You are experiencing a high number of problems with the print cartridge.
● The cartridge does not look like it usually does (for example, the orange pull tab is missing, or thepackaging differs from HP packaging).
Replace suppliesYou can configure the product to stop when the supply level reaches its estimated end of life. However,the supply might still be able to produce acceptable print quality. To continue printing, either replace thesupply or reconfigure the printer by using the REPLACE SUPPLIES menu on the control panel. Formore information about ordering supplies, see Parts and diagrams on page 445. For more informationabout the REPLACE SUPPLIES menu, see System setup menu on page 25.
Supplies lifeFor information regarding specific product yield, see www.hp.com/go/learnaboutsupplies.
To order supplies, see Parts and diagrams on page 445.
Locate suppliesSupplies are identified by their labeling and their blue plastic handles.
ENWW Manage supplies 81

The following figure illustrates the location of each supply item.
Figure 4-2 Supply item locations
2
31
1 Toner collection unit
2 Print cartridges
3 Fuser
Supply replacement guidelinesTo facilitate the replacement of supplies, keep the following guidelines in mind when setting up theproduct.
● Allow sufficient space in the front and on the right side of the product for removing supplies.
● The product should be located on a flat, sturdy surface.
For instructions on installing supplies, see the label on each supply item or see www.hp.com/go/learnaboutsupplies.
82 Chapter 4 Manage and maintain the product ENWW
Change print cartridgesWhen a print cartridge approaches the end of its estimated useful life, the control panel displays amessage recommending that you order a replacement. The product can continue to print using thecurrent print cartridge until the control panel displays a message instructing you to replace the cartridge,unless you have selected the option to override the message by using the REPLACE SUPPLIES menu.For more information about the REPLACE SUPPLIES menu, see System setup menu on page 25.
The product uses four colors and has a different print cartridge for each color: black (K), magenta (M),cyan (C), and yellow (Y).
You can replace a print cartridge when the control panel displays a REPLACE <COLOR>CARTRIDGE message. The control panel display also indicates the color of the cartridge that hasreached the end of its estimated useful life (if a genuine HP cartridge is currently installed). Replacementinstructions are provided on the label on the print cartridge.
CAUTION: If toner gets on clothing, wipe it off with a dry cloth and wash the clothes in cold water. Hotwater sets toner into fabric.
NOTE: Attach the orange protective cover to the used print cartridge before returning to HP forrecycling. Additional information about recycling used print cartridges is on the print-cartridge box.
TIP: To see an animation of this procedure go to this Web site: www.hp.com/go/cljcp3525-replace-print-cartridges.
Replace print cartridges
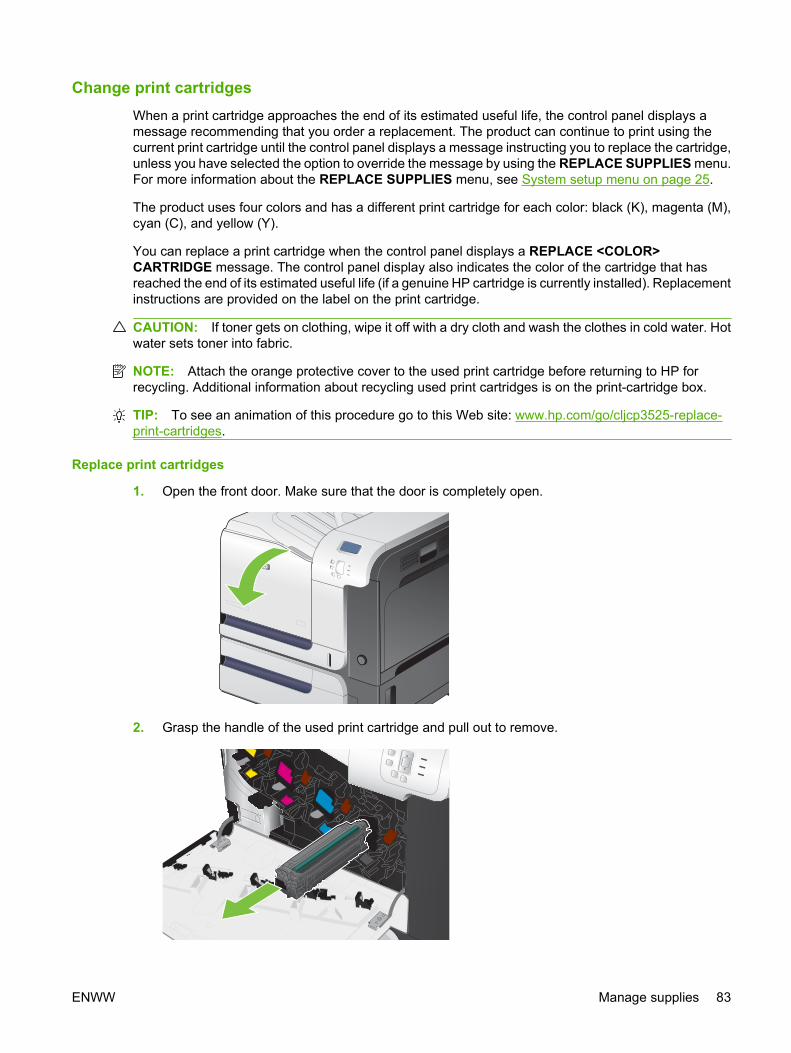
1. Open the front door. Make sure that the door is completely open.
2. Grasp the handle of the used print cartridge and pull out to remove.
ENWW Manage supplies 83

3. Store the used print cartridge in a protective bag. Information about recycling used print cartridgesis on the print-cartridge box.
4. Remove the new print cartridge from its protective bag.
NOTE: Be careful not to damage the memory tag on the print cartridge.
5. Grasp both sides of the print cartridge and distribute the toner by gently rocking the print cartridge.
84 Chapter 4 Manage and maintain the product ENWW

6. Remove the orange protective cover from the print cartridge.
CAUTION: Avoid prolonged exposure to light.
CAUTION: Do not touch the green roller. Doing so can damage the cartridge.
7. Align the print cartridge with its slot and insert the print cartridge until it clicks into place.
8. Close the front door.
ENWW Manage supplies 85

Change the toner collection unitReplace the toner collection unit when the control panel prompts you.
NOTE: The toner collection unit is designed for a single use. Do not attempt to empty the tonercollection unit and reuse it. Doing so could lead to toner being spilled inside the product, which couldresult in reduced print quality. After use, return the toner collection unit to HP’s Planet Partners programfor recycling.
TIP: To see an animation of this procedure go to this Web site: www.hp.com/go/cljcp3525-replace-toner-collection-unit.
Replace the toner collection unit
1. Open the front door. Make sure that the door is completely open.
2. Grasp the blue label at the top of the toner collection unit and remove it from the product.
86 Chapter 4 Manage and maintain the product ENWW

3. Place the attached blue cap over the blue opening at the top of the unit.
4. Remove the new toner collection unit from its packaging.
5. Insert the bottom of the new unit into the product first and then push the top of the unit until it clicksinto place.
ENWW Manage supplies 87

6. Close the front door.
NOTE: If the toner collection unit is not installed correctly, the front door does not closecompletely.
To recycle the used toner collection unit, follow the instructions included with the new toner collectionunit.
88 Chapter 4 Manage and maintain the product ENWW
Install memoryYou can install more memory for the product by adding a dual inline memory module (DIMM).
CAUTION: Static electricity can damage DIMMs. When handling DIMMs, either wear an antistaticwrist strap, or frequently touch the surface of the DIMM antistatic package and then touch bare metalon the product.
Install DDR2 memory DIMMs
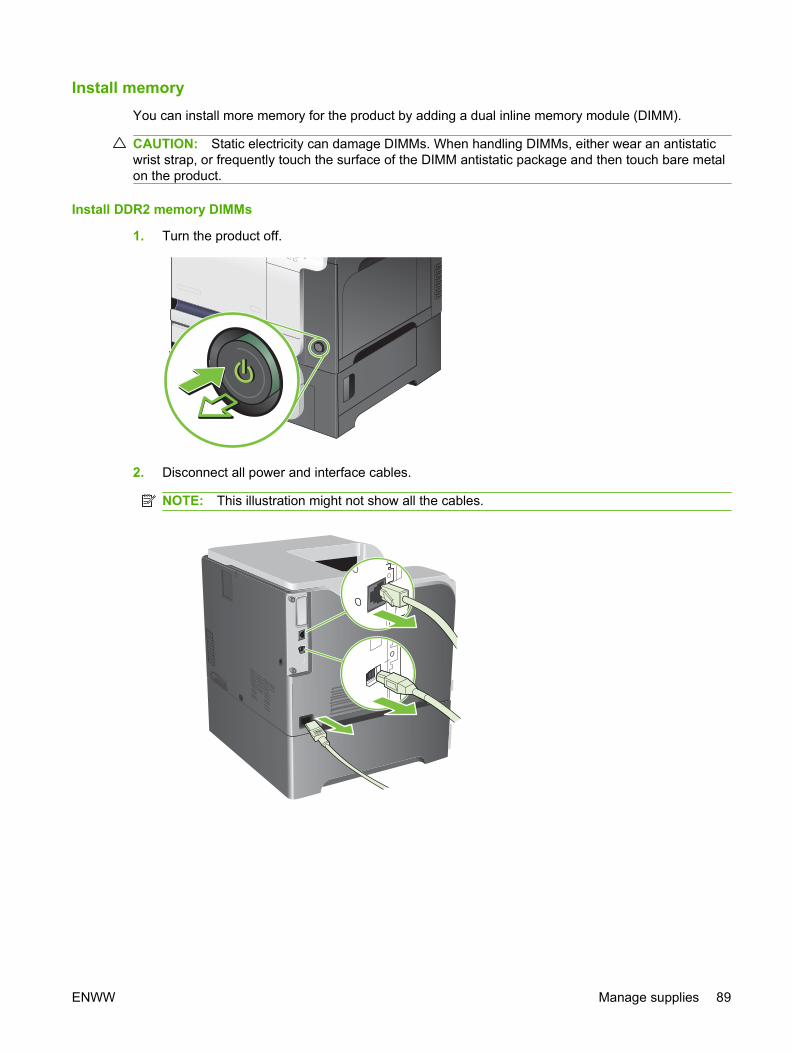
1. Turn the product off.
2. Disconnect all power and interface cables.
NOTE: This illustration might not show all the cables.
ENWW Manage supplies 89

3. Locate the thumb screws on the formatter board in the rear of the product.
4. Unscrew the thumb screws and then pull the formatter board from the product. Place the formatterboard on a clean, flat, grounded surface.
5. To replace a DIMM that is currently installed, spread the latches apart on each side of the DIMMslot, lift the DIMM up at an angle, and pull it out.
XOXOXO
XOXOXO
XOXOXOXOXOXO
XOXOXOXO
XO
XOXOXOXO
XO
XOXOXOXO
XO
XOXOXOXO
XO
XOXOXOXOXOXO
XOXOXOXOXO
XOXOXOXOXOXOXOXOXOXOXOXO
XOXOXOXOXOXO
XOXOXO
XOXOXOXOXOXO
XOXOXO
XOXOXO
XOXOXOXOXOXOXO
XOXOXO
XOXOXO
6. Remove the new DIMM from the antistatic package. Locate the alignment notch on the bottomedge of the DIMM.
90 Chapter 4 Manage and maintain the product ENWW

7. Holding the DIMM by the edges, align the notch on the DIMM with the bar in the DIMM slot at anangle and firmly press the DIMM into the slot until it is fully seated. When installed correctly, themetal contacts are not visible.
XOXOXO
XOXOXO
XOXOXOXOXOXO
XOXOXOXOXO
XOXOXOXOXO
XOXOXOXOXO
XOXOXOXOXO
XOXOXOXOXOXO
XOXOXOXOXO
XOXOXOXOXOXOXOXOXOXOXOXO
XOXOXO
XOXOXO
XOXOXO
XOXOXOXOXOXO
XOXOXO
XO
XO
XO
XOXOXOXOXOXOXO
XOXOXO
XOXOXO
8. Push down on the DIMM until both latches engage the DIMM.
XOXOXO
XOXOXO
XOXOXOXOXOXO
XOXOXOXOXOXO
XOXOXOXOXO
XOXOXOXOXOXOXOXOXOXOXOXO
XOXOXO
XOXOXO
XOXOXO
XOXOXOXOXOXO
XOXOXO
XO
XO
XO
XOXOXOXOXOXOXO
XOXOXO
XOXOXO
XIOXIOXIXO
OXIXO
XIOXIO
XIOXIOXIXO
OXIXO
XIOXIO
XIOXIOXIXO
OXIXO
XIOXIO
XIOXIOXIXO
OXIXO
XIOXIO
NOTE: If you have difficulty inserting the DIMM, make sure the notch on the bottom of the DIMMis aligned with the bar in the slot. If the DIMM still does not go in, make sure you are using thecorrect type of DIMM.
9. Align the formatter board in the tracks at the bottom of the slot, and then slide the board back intothe product.
NOTE: To prevent damage to the formatter board, ensure the formatter board is aligned in thetracks at the top and the bottom of the opening.
ENWW Manage supplies 91

10. Reconnect the power cable and interface cables, and turn the product on.
Enable memory for Windows
1. Windows XP, Windows Server 2003, and Windows Server 2008 (using the default Start menuview): Click Start, click Settings, and then click Printers and Faxes.
-or-
Windows XP, Windows Server 2003, and Windows Server 2008 (using the Classic Start menuview): Click Start, click Settings, and then click Printers.
-or-
Windows Vista: Click Start, click Control Panel, and then in the category for Hardware andSound click Printer.
2. Right-click the driver icon, and then select Properties.
3. Click the Device Settings tab.
4. Expand the area for Installable Options.
5. Select the total amount of memory installed in the product.
6. Next to Automatic Configuration, select Update Now.
7. Click OK.
Install an HP Jetdirect or EIO print server card or EIO hard disk
This product is equipped with an external I/O (EIO) slot. You can install an additional HP Jetdirect printserver card or external EIO hard drive in the available EIO slot.
92 Chapter 4 Manage and maintain the product ENWW

NOTE: This example shows installing an HP Jetdirect print server card.
1. Turn the product off.
2. Disconnect all power and interface cables.
3. Loosen and remove the two retaining screws holding the cover for the EIO slot, and then removethe cover. You will not need these screws and the cover again. They can be discarded.
ENWW Manage supplies 93

4. Firmly insert the HP Jetdirect print server card into the EIO slot.
5. Insert and tighten the retaining screws that came with the print server card.
6. Reconnect the power cable and remaining interface cables, and turn the product on.
7. Print a configuration page. An HP Jetdirect configuration page that contains network configurationand status information should also print.
94 Chapter 4 Manage and maintain the product ENWW

If it does not print, turn the product off, and then uninstall and reinstall the print server card to ensurethat it is completely seated in the slot.
8. Perform one of these steps:
● Choose the correct port. See the computer or operating system documentation forinstructions.
● Reinstall the software, choosing the network installation this time.
ENWW Manage supplies 95

Clean the productOver time, particles of toner and paper accumulate inside the product. This can cause print-qualityproblems during printing. Cleaning the product eliminates or reduces these problems.
Clean the paper path and print-cartridge areas every time that you change the print cartridge orwhenever print-quality problems occur. As much as possible, keep the product from dust and debris.
Clean the exteriorUse a soft, damp, lint-free cloth to wipe dust, smudges, and stains off of the exterior of the product.
Clean spilled tonerIf you get any toner on your clothes or hands, wash them in cold water. Hot water will set the toner intothe fabric.
Clean the fuserRun the product cleaning page to keep the fuser free of toner and paper particles that can sometimesaccumulate. Accumulation of toner and particles can cause specks to appear on the front or back sideof your print jobs.
HP recommends that you use the cleaning page when there is a print quality issue.
A CLEANING message appears on the product control panel display while the cleaning is taking place.
In order for the cleaning page to work correctly, print the page on copier-grade paper (not bond, heavy,or rough paper). A page will be printed when the task is complete. Discard the page.
96 Chapter 4 Manage and maintain the product ENWW

Product updatesThis product has remote firmware update (RFU) capability. Use this information to upgrade the productfirmware.
Determine the current firmware version1. Press the Menu button .
2. Press the down arrow to highlight the INFORMATION menu, and then press the OK button.
3. Press the down arrow to highlight the PRINT CONFIGURATION option, and then press theOK button to print.
The firmware datecode is listed on the Configuration page in the section called Device Information.The firmware datecode has this format: YYYYMMDD XX.XXX.X.
● The first string of numbers is the date, where YYYY represents the year, MM represents the month,and DD represents the date. For example, a firmware datecode that begins with 20061125represents November 25, 2006.
● The second string of numbers is the firmware version number, in decimal format.
Download new firmware from the HP Web siteTo find the most recent firmware upgrade for the product, go to www.hp.com/go/cljcp3525_firmware.This page provides instructions for downloading the new firmware version.
Transfer the new firmware to the productNOTE: The product can receive an .RFU file update when it is in a "ready" state.
The following conditions can affect the time required to transfer the file.
● The speed of the host computer that is sending the update.
● Any jobs that are ahead of the .RFU job in the queue are completed before the update is processed.
● If the process is interrupted before the firmware is downloaded, you must send the firmware fileagain.
● If power is lost during the firmware update, the update is interrupted and the message Resendupgrade appears (in English only) on the control-panel display. In this case, you must send theupgrade by using the USB port.
NOTE: The firmware update involves a change in the format of nonvolatile random-access memory(NVRAM). Any menu settings that are changed from the default settings might return to default settingsand must be changed again if you want settings that are different from the defaults.
Use the HP Easy Firmware Upgrade utility to update the firmwareThis product has flash-based memory, so you can use the .EXE file to upgrade the firmware. Downloadthis file from www.hp.com/go/cljcp3525_firmware.
ENWW Product updates 97
NOTE: To use this method, install the printer driver for this product on your computer and then connectthe product directly to your computer through a USB cable. Alternatively, have the customer downloadthe utility, so they can use it whether the product is directly connected to their PC or connected throughthe network.
Depending on the speed of your PC, the firmware upgrade process can be complete on the product,before the progress bar on the screen completes. Once the upgrade process has started, do not useyour PC for other activity until the process is complete.
1. Download the HP Easy Firmware Upgrade utility file to the desktop.
2. Click the HP Easy Firmware Upgrade utility file. A dialog box with the name of the printer opens.
3. Ensure the product to be upgraded is in a Ready state.
4. Select the product to upgrade. If the product is not listed, install a print driver for the product andmake sure you can print to the product using the printer driver before continuing.
5. Click the Send Firmware button. The progress bar moves to the right indicating information isbeing transferred.
NOTE: Do not turn off the product or the PC during this process, or the product may becomeunstable and unusable. Be aware that an upgrade may require more than ten minutes to complete.
6. On the PC, a smiling face icon displays in the HP Easy Firmware Upgrade utility dialog box upona successful firmware download.
NOTE: Depending on the speed of your PC, the firmware upgrade may complete before theprogress bar on the screen completes. When the upgrade process is complete, the product willreboot.
7. When the product is back online, print a configuration page to verify that the new firmware hasbeen installed.
Use FTP to upload the firmware through a browser1. Make sure the Internet browser you are using is configured for viewing folders from FTP sites.
These instructions are for Microsoft Internet Explorer.
a. Open the browser and click Tools, and then click Internet Options.
b. Click the Advanced tab.
c. Select the box labeled Enable folder view for FTP sites.
d. Click OK.
2. Print a configuration page and note the TCP/IP address.
3. Open a browser window.
4. In the address line of the browser, type ftp://<ADDRESS>, where <ADDRESS> is the addressof the product. For example, if the TCP/IP address is 192.168.0.90, type ftp://192.168.0.90.
5. Locate the downloaded .RFU file for the product.
6. Drag and drop the .RFU file onto the PORT icon in the browser window.
98 Chapter 4 Manage and maintain the product ENWW

NOTE: The product turns off and then on automatically to activate the update. When the updateprocess is complete, a Ready message displays on the product control panel.
Use FTP to upgrade the firmware on a network connection1. Take note of the IP address on the HP Jetdirect page. The HP Jetdirect page is the second page
that prints when you print the configuration page.
NOTE: Before upgrading the firmware, make sure that the product is not in Sleep mode. Alsomake sure that any error messages are cleared from the control-panel display.
2. Click Start, click Run, and then type cmd to open the command window.
3. Type: ftp <TCP/IP ADDRESS>. For example, if the TCP/IP address is 192.168.0.90, type ftp192.168.0.90.
4. Go to the folder where the firmware file is stored.
5. Press Enter on the keyboard.
6. When prompted for the user name, press Enter.
7. When prompted for the password, press Enter.
8. Type bin at the command prompt.
9. Press Enter. The message 200 Types set to I, Using binary mode to transfer files appears inthe command window.
10. Type put and then the file name. For example, if the file name is cljcp3525.rfu, type putcljcp3525.rfu.
11. The download process begins and the firmware is updated on the product. This can take severalminutes. Let the process finish without further interaction with the product or computer.
NOTE: The product automatically turns off and then on again after processing the upgrade.
12. At the command prompt, type: bye to exit the ftp command.
13. At the command prompt, type: exit to return to the Windows interface.
Use HP Web Jetadmin to upgrade the firmwareTo learn how to use HP Web Jetadmin to upgrade the product firmware, go to www.hp.com/go/webjetadmin
ENWW Product updates 99
Use Microsoft Windows commands to upgrade the firmwareTo update the firmware by using a network connection, follow these instructions.
1. Click Start, click Run, and then type cmd to open the command window.
2. Type the following: copy /B <FILENAME> \\<COMPUTERNAME>\<SHARENAME>, where<FILENAME> is the name of the .RFU file (including the path), <COMPUTERNAME> is the nameof the computer from which the product is being shared, and <SHARENAME> is the product sharename. For example: C:\>copy /b C:\cljcp3525.rfu \\YOUR_SERVER\YOUR_COMPUTER.
NOTE: If the file name or path includes a space, you must enclose the file name or path inquotation marks. For example, type: C:\>copy /b "C:\MY DOCUMENTS\cljcp3525.rfu" \\YOUR_SERVER\YOUR_COMPUTER.
3. Press Enter on the keyboard. The control panel shows a message that indicates the progress ofthe firmware upgrade. At the end of the upgrade process, the control panel shows the Readymessage. The message One File Copied appears on the computer screen.
Upgrade the HP Jetdirect firmwareThe HP Jetdirect network interface in the product has firmware that can be upgraded separately fromthe product firmware. This procedure requires that you install HP Web Jetadmin Version 8.x or later onyour computer. See Use HP Web Jetadmin software on page 77. Complete the following steps to updatethe HP Jetdirect firmware by using HP Web Jetadmin.
1. Open the HP Web Jetadmin program.
2. Open the Device Management folder in the drop-down list in the Navigation panel. Navigate tothe Device Lists folder.
3. Select the product that you want to update.
4. In the Device Tools drop-down list, select the Jetdirect Firmware Update option.
5. Under the Jetdirect Firmware Version heading the HP Jetdirect model number and currentfirmware version are listed. Make a note of these.
6. Go to http://www.hp.com/go/wja_firmware.
7. Scroll down to the list of HP Jetdirect model numbers and find the model number you wrote down.
8. Look at the current firmware version for the model, and see if it is later than the version you wrotedown. If it is, right-click on the firmware link, and follow the instructions on the Web page todownload the new firmware file. The file must be saved into the <drive>:\PROGRAM FILES\HP WEB JETADMIN\DOC\PLUGINS\HPWJA\FIRMWARE\JETDIRECT folder on the computerthat is running the HP Web Jetadmin software.
9. In HP Web Jetadmin, return to the main product list and select the digital sender again.
10. In the Device Tools drop-down list, select the Jetdirect Firmware Update option again.
11. On the HP Jetdirect firmware page, the new firmware version is listed under the JetdirectFirmware Available on HP Web Jetadmin heading. Click the Update Firmware Now button toupdate the Jetdirect firmware.
100 Chapter 4 Manage and maintain the product ENWW

NOTE: You can also use FTP or the HP Jetdirect Embedded Web Server to update the HP Jetdirectfirmware. For more information, go to http://www.hp.com/go/wja_firmware.
ENWW Product updates 101

102 Chapter 4 Manage and maintain the product ENWW